

Page 1

Owner’s manual
Manuel de l’utilisateur
Bedienungsanleitung
Manuale di istruzioni
Manual de instrucciones
Gebruiksaanwijzing
RA-1060
Stereo Integrated Amplifier
Amplificateur intégré stéréophonique
Stereo-Vollverstärker
L’Amplificatore di Controllo Stereo
Amplificador Integrado Estereofónico
Geïntegreerde Stereo Versterker
POWER
SPEAKERS
PHONES
A
B
OFF
A+B
STEREO INTEGRATED AMPLIFIER RA-1060
VOLUME RECORDING LISTENING
CONTOUR
OFF
H
L-1
LH
L-2
OFF
TUNER
TAPE 1 AUX 1
CD
AUX 2
TUNER CD
TAPE 1 AUX1
AUX 1
AUX2
AUX 2TAPE 2
Page 2

English 8
Français 13
Deutsch 18
Italiano 23
Español 28
Nederlands 34
Page 3

Cautions
Précautions d’utilisation
WARNING: There are no user serviceable parts inside. Refer
all servicing to qualified service personnel.
WARNING: To reduce the risk of fire or electric shock, do not
expose the unit to moisture or water. Do not allow foreign
objects to get into the enclosure. If the unit is exposed to moisture,
or a foreign object gets into the enclosure, immediately disconnect the power cord from the wall. Take the unit to a qualified
service person for inspection and necessary repairs.
Read all the instructions before connecting or operating the component.
Keep this manual so you can refer to these safety instructions.
Heed all warnings and safety information in these instructions and on the
product itself. Follow all operating instructions.
Clean the enclosure only with a dry cloth or a vacuum cleaner.
You must allow 10 cm or 4 inches of unobstructed clearance around the
unit. Do not place the unit on a bed, sofa, rug, or similar surface that could
block the ventilation openings. If the unit is placed in a bookcase or cabinet, there must be ventilation of the cabinet to allow proper cooling.
Keep the component away from radiators, heat registers, stoves, or any
other appliance that produces heat.
The unit must be connected to a power supply only of the type and voltage
specified on the rear panel. (USA: 115 V/60Hz, EC: 230V/50Hz)
Connect the component to the power outlet only with the supplied power
supply cable or an exact equivalent. Do not modify the supplied cable. Do
not defeat grounding and/or polarization provisions. The cable should be
connected to a 2-pin polarized wall outlet, matching the wide blade of the
plug to the wide slot of the receptacle. Do not use extension cords.
Do not route the power cord where it will be crushed, pinched, bent, exposed to heat, or damaged in any way. Pay particular attention to the power
cord at the plug and where it exits the back of the unit.
The power cord should be unplugged from the wall outlet if the unit is to be
left unused for a long period of time.
Immediately stop using the component and have it inspected and/or serviced by a qualified service agency if:
• The power supply cord or plug has been damaged.
• Objects have fallen or liquid has been spilled into the unit.
• The unit has been exposed to rain.
• The unit shows signs of improper operation
• The unit has been dropped or damaged in any way
L’éclair dans un triangle équilatéral indique la présence interne de tensions
électriques élevées susceptibles de présenter des risques graves d’électrocution.
ATTENTION: Pour réduire le risque d’électrocution, ne pas retirer
le capot. Il n’y a à l’intérieur aucune pièce susceptible d’être
modifiée par l’utilisateur. En cas de problème, adressez-vous
à un réparateur agréé.
Le point d’exclamation dans un triangle équilatéral indique
à l’utilisateur la présence de conseils et d’informations
importantes dans le manuel d’utilisation accompagnant
l’appareil. Leur lecture est impérative.
ATTENTION: Il n’y a à l’intérieur aucune pièce susceptible d’être
modifiée par l’utilisateur. Adressez-vous impérativement à une
personne qualifiée.
Prenez garde à ce qu’aucun objet ou liquide ne tombe à
l’intérieur de l’appareil par ses orifices de ventilation; Si
l’appareil est exposé à l’humidité ou si un objet tombe à
l’intérieur, couper immédiatement l’alimentation secteur de tous
les appareils. Débrancher l’appareil des autres maillons, et
adressez-vous immédiatement et uniquement à une personne
qualifiée et agréée.
Tous les conseils de sécurité et d’installation doivent être lus avant de faire
fonctionner l’appareil. Conservez soigneusement ce livret — Vous devez
pouvoir le consulter à nouveau pour de futures références.
Tous les conseils de sécurité doivent être soigneusement respectés. Suivez
les instructions. Respectez les procédures d’installation et de fonctionnement
indiquées dans ce manuel.
L’appareil doit être nettoyé uniquement avec un chiffon sec ou un aspirateur.
L’appareil doit être placé de telle manière que sa propre ventilation puisse
fonctionner, avec un espace minimum de 10 cm autour de lui. Par exemple,
il ne doit pas être posé sur un fauteuil, un canapé, une couverture ou tout
autre surface susceptible de boucher ses ouïes d’aération; ou placé dans
un meuble empêchant la bonne circulation d’air autour des orifices d’aération.
Cet appareil doit être placé loin de toute source de chaleur, tels que radiateurs,
chaudières, bouches de chaleur ou d’autres appareils (y compris amplificateurs
de puissance) produisant de la chaleur.
Cet appareil doit être branché sur une prise d’alimentation secteur, d’une
tension et d’un type conformes à ceux qui sont indiqués sur la face arrière
de l’appareil. En Europe, 230 V/50 Hz.
Brancher l’appareil uniquement grâce au cordon secteur fourni, ou à un
modèle équivalent. Ne pas tenter de modifier ou changer la prise. Notamment,
ne pas tenter de supprimer la prise de terre si celle-ci est présente. Ne pas
utiliser de cordon-rallonge. L’appareil doit être branché sur une prise murale
deux broches.
Prendre garde à ce que ce cordon d’alimentation ne soit pas pincé, écrasé
ou détérioré sur tout son trajet, à ce qu’il ne soit pas mis en contact avec
une source de chaleur. Vérifier soigneusement la bonne qualité des contacts, à l’arrière de l’appareil comme dans la prise murale.
Si l’appareil ne doit pas être utilisé pendant une longue période, la prise
secteur sera débranchée.
L’appareil doit être immédiatement éteint, débranché puis retourné au service après-vente agréé dans les cas suivants:
• Un objet est tombé, ou du liquide a coulé à l’intérieur de l’appareil.
• L’appareil a été exposé à la pluie.
• L’appareil ne fonctionne pas normalement, ou ses performances sont
anormalement limitées.
• L’appareil est tombé, ou le coffret est endommagé.
Placer l’appareil sur une surface plane, solide et rigide. Ne jamais
placer l’appareil sur une surface ou un support mobile pouvant basculer.
Page 4

Sicherheits- und Warnhinweise
Cautele
Bitte lesen Sie sich die Bedienungsanleitung vor Gebrauch des Gerätes genau
durch. Sie enthält wichtige Sicherheitsvorschriften, die unbedingt zu beachten
sind! Bewahren Sie die Bedienungsanleitung so auf, daß sie jederzeit
zugänglich ist.
WARNUNG: Außer den in der Bedienungsanleitung beschriebenen
Handgriffen sollten vom Bediener keine Arbeiten am Gerät
vorgenommen werden. Das Gerät ist ausschließlich von einem
qualifizierten Fachmann zu öffnen und zu reparieren.
WARNUNG: Dieses Gerät darf nur in trockenen Räumen betrieben
werden. Um die Gefahr von Feuer oder eines elektrischen Schlags
auszuschließen, dürfen keine Flüssigkeiten oder Fremdkörper
in das Gerät gelangen. Sollte dieser Fall trotzdem einmal eintreten,
trennen Sie das Gerät sofort vom Netz ab. Lassen Sie es von
einem Fachmann prüfen und die notwendigen Reparaturarbeiten
durchführen.
Befolgen Sie alle Warn- und Sicherheitshinweise in der Bedienungsanleitung
und auf dem Gerät.
Dieses Gerät sollte, wie andere Elektrogeräte auch, nicht unbeaufsichtigt
betrieben werden.
Ist das Gerät z.B. während des Transports über längere Zeit Kälte ausgesetzt
worden, so warten Sie mit der Inbetriebnahme, bis es sich auf Raumtemperatur
erwärmt hat und das Kondenswasser verdunstet ist.
Um das Gerät sollte ein Freiraum von 10 cm vorhanden sein. Stellen Sie es
daher weder auf ein Bett, Sofa, Teppich oder ähnliche Oberflächen. Ferner
sollte es nicht an einem Ort aufgestellt werden, an dem keine ausreichende
Luftzufuhr gegeben ist, zum Beispiel in einem engen Regalfach oder in einem
Einbauschrank.
Stellen Sie das Gerät nicht in die Nähe von Wärmequellen (Heizkörper,
Wärmespeicher, Öfen oder sonstige wärmeerzeugende Geräte).
Bevor Sie das Gerät in Betrieb nehmen, prüfen Sie, ob die Betriebsspannung
mit der örtlichen Netzspannung übereinstimmt. Die Betriebsspannung ist
an der Rückseite des Gerätes angegeben.
Schließen Sie das Gerät nur mit dem dazugehörigen zweipoligen Netzkabel
an die Wandsteckdose an. Modifizieren Sie das Netzkabel auf keinen Fall.
Versuchen Sie nicht, die Erdungs- und/oder Polarisationsvorschriften zu
umgehen. Das Netzkabel sollte an eine zweipolige Wandsteckdose
angeschlossen werden. Verwenden Sie keine Verlängerungskabel.
Netzkabel sind so zu verlegen, daß sie nicht beschädigt werden können (z.B.
durch Trittbelastung, Möbelstücke oder Erwärmung). Besondere Vorsicht ist
dabei an den Steckern, Ver teilern und den Anschlußstellen des Gerätes geboten.
Sollten Sie das Gerät für eine längere Zeit nicht in Betrieb nehmen, ziehen
Sie den Netzstecker aus der Steckdose.
Schalten Sie das Gerät sofort aus und ziehen Sie geschultes Fachpersonal
zu Rate, wenn:
• das Netzkabel oder der Stecker beschädigt sind,
• Gegenstände bzw. Flüssigkeit in das Gerät gelangt sind,
• das Gerät Regen ausgesetzt war,
• das Gerät nicht ordnungsgemäß funktioniert bzw. eine deutliche
Leistungsminderung aufweist,
• das Gerät hingefallen ist bzw. beschädigt wurde.
Ziehen Sie den Netzstecker aus der Steckdose, bevor Sie mit der Reinigung
des Gerätes beginnen. Reinigen Sie die Oberflächen des Gerätes nur mit
einem weichen, trockenen Tuch. Verwenden Sie keine scharfen Reinigungsoder Lösungsmittel. Vor der erneuten Inbetriebnahme des Gerätes ist
sicherzustellen, daß an den Anschlußstellen keine Kurzschlüsse bestehen
und alle Anschlüsse ordnungsgemäß sind.
Stellen Sie das Gerät waagerecht auf eine feste, ebene Unterlage. Es sollte
weder auf beweglichen Unterlagen noch Wagen oder fahrbaren Untergestellen
transportiert werden.
ATTENZIONE: rischio di scossa elettrica, non aprire.
AVVERTENZA: per ridurre il rischio di scossa, non togliete il
coperchio del cabinet. Non contiene parti utili per l'utente. Per
l'assistenza fate riferimento a personale qualificato.
SPIEGAZIONE DEI SIMBOLI GRAFICI:
Il fulmine inserito in un triangolo vi avverte della presenza di materiale non
isolato a "voltaggio elevato" all'interno del prodotto che può essere
abbastanza potente da costituire pericolo di folgorazione.
Il punto esclamativo entro un triangolo equilatero vi avverte della presenza
di istruzioni importanti per l'utilizzo e la manutenzione nel manuale che
accompagna l'apparecchiatura.
ATTENZIONE: Non vi sono parti interne riparabili dall’utilizzatore.
Per l’assistenza fate riferimento a personale qualificato.
ATTENZIONE: Per ridurre il rischio di incendio o di folgorazione,
non esporre all’umidità o all’acqua. Evitare che oggetti estranei
cadano all’interno del cabinet. Se l’apparecchio è stato esposto
all’umidità o un oggetto estraneo è caduto all’interno del cabinet,
staccare il cordone di alimentazione dalla presa di rete. Portare
l’apparecchio ad un centro di assistenza qualificato per i necessari
controlli e riparazioni.
Leggere attentamente tutte le istruzioni prima di collegare l’apparecchio
alla rete di alimentazione. Conservate questo manuale per ogni riferimento
futuro alle istruzioni di sicurezza.
Seguire attentamente tutte le avvertenze e le operazioni per il funzionamento.
Pulire l’unità solamente con un panno asciutto o con un piccolo aspirapolvere.
Lasciate uno spazio libero di 10cm intorno all’unità. L’apparecchiatura non
dovrebbe essere posta su un letto, divano, tappeto, o posti che possano
bloccare le aperture di ventilazione. Se l’apparecchio è posizionato in una
libreria o in un cabinet, fate in modo che ci sia abbastanza spazio attorno
all’unità per consentire un’adeguata ventilazione e raffreddamento.
L’unità dovrebbe essere posta lontano da fonti di calore come caloriferi,
termostati, stufe, o altri apparecchi che producano calore
L’apparecchiatura dovrebbe essere collegata solamente a una sorgente
elettrica del tipo descritto nelle istruzioni o indicato sul pannello posteriore
dell’apparecchiatura.
Collegate l’unità alla presa di alimentazione solo con il cavo a due poli
polarizzato che viene fornito o con un equivalente. Non cercate di eliminare
la massa o di manomettere le polarizzazioni. Il cavo dovrebbe essere collegato
ad un’uscita a muro polarizzata a due poli collegando la lamella piatta
della spina nella fessura più ampia. Non usate prolunghe
Non far passare il cavo di alimentazione dove potrebbe essere schiacciato,
pizzicato, piegato ad angoli acuti, esposto al calore o danneggiato in alcun
modo. Fate particolare attenzione al cavo di alimentazione all’altezza della
spina e nel punto in cui esce dalla parte posteriore dell’apparecchio.
Il cordone di alimentazione dovrebbe essere scollegato quando
l’apparecchiatura è inutilizzata per un periodo piuttosto lungo.
L’apparecchiatura dovrebbe essere subito disattivata e data a personale
qualificato quando:
• Il cavo di alimentazione o la spina sono stati danneggiati
• Oggetti sono caduti, o del liquido è stato versato nell’apparecchio
• L’apparecchiatura è stata esposta alla pioggia
• L’apparecchiatura non sembra funzionare in modo normale
• L’apparecchiatura è caduta, o è stata in qualche modo danneggiata
Posizionate l’unità su una superficie piana abbastanza resistente da sopportare
il suo peso. Non posizionatela su un carrello che potrebbe ribaltarsi.
Page 5

Precaución
Para reducir el riesgo de recibir una descarga eléctrica, no quitar la cubierta
superior. No hay componentes manipulables por el usuario en el interior del
aparato. Cualquier operación de mantenimiento debe ser llevada a cabo por
personal cualificado.
Este símbolo es para alertar al usuario sobre la presencia de tensiones
peligrosas no aisladas en el interior del aparato susceptibles de constituir un
riesgo de electrocución.
Este símbolo es para alertar al usuario sobre la presencia de instrucciones
importantes relacionadas con el funcionamiento y el mantenimiento (servicio)
tanto en este manual como en la literatura que acompaña al producto.
ADVERTENCIA: No hay componentes manipulables por el usuario
en el interior del aparato. Cualquier operación de mantenimiento
debe ser llevada a cabo por personal cualificado.
ADVERTENCIA: Para reducir el riesgo de que se produzca un
incendio o una descarga eléctrica, no exponga el RA-1060 al
agua o la humedad. No permita que ningún objeto extraño penetre
en el interior del aparato. Si el aparato está expuesto a la humedad
o algún objeto extraño penetra en su interior, desconecte
inmediatamente el cable de alimentación de la red eléctrica. En
caso de que fuera necesario, envíe el aparato a un especialista
cualificado para su inspección y posterior reparación.
Para reducir el riesgo de que se produzca un incendio o una descarga eléctrica,
no exponga el RA-1060 al agua o la humedad. No permita que ningún objeto
extraño penetre en el interior del aparato. Si el aparato está expuesto a la humedad
o algún objeto extraño penetra en su interior, desconecte inmediatamente el cable
de alimentación de la red eléctrica. En caso de que fuera necesario, envíe el
aparato a un especialista cualificado para su inspección y posterior reparación.
Lea todas las instrucciones del presente manual antes de conectar o hacer funcionar
el RA-1060. Conserve este manual cerca de usted para el caso de que necesite
revisar las instrucciones de seguridad que se indican a continuación.
Tenga siempre en mente las advertencias y la información relativa a seguridad
que figuran tanto en estas instrucciones como en el propio aparato. Siga al pie
de letra todas las instrucciones relacionadas con el funcionamiento del mismo.
Limpie el RA-1060 únicamente con una gamuza seca o un aspirador.
Mantenga siempre despejadas las ranuras destinadas a la ventilación del aparato.
Por ejemplo, no coloque nunca el RA-1060 en una cama, un sofá, una alfombra
o una superficie similar susceptible de bloquear las ranuras de ventilación. Si
el RA-1060 está ubicado en la estantería de una librería o un mueble, debe
haber suficiente espacio a su alrededor y ventilación en el mueble para permitir
una refrigeración adecuada.
Mantenga el RA-1060 alejado de radiadores, estufas, cocinas o de cualquier
otra instalación que produzca calor.
El RA-1060 debe ser conectado únicamente a una fuente de alimentación del
tipo y la tensión especificados en su panel posterior (115 V/60 Hz para EE.UU.
y 230 V/50 Hz para la Comunidad Europea).
Conecte el RA-1060 a una toma de corriente eléctrica únicamente a través
del cable de alimentación de dos clavijas polarizado suministrado de serie o
un equivalente exacto del mismo. No modifique de ningún modo dicho cable.
No intente desactivar los terminales destinados a la conexión a tierra o
polarización. El cable debería ser conectado a una toma de corriente eléctrica
de dos terminales que se adapten perfectamente a las clavijas del cable de
alimentación del RA-1060. No utilice ningún tipo de cable de extensión.
No coloque el cable de alimentación en lugares en que pueda ser aplastado,
pinchado, doblado en ángulos críticos, expuesto al calor o dañado de algún
modo. Preste particular atención al punto de unión entre el cable y la toma de
corriente y también a la ubicación de esta última en el panel posterior del aparato.
El cable de alimentación debería desconectarse de la red eléctrica cuando el
aparato no vaya a ser utilizado durante un largo período de tiempo (como
por ejemplo durante las vacaciones de verano).
Desconecte inmediatamente el RA-1060 y envíelo a un servicio técnico cualificado
para su inspección/reparación si:
• El cable de alimentación o alguna clavija del mismo ha sido dañado.
• Han caído objetos o se ha derramado líquido en el interior del aparato.
• El aparato ha sido expuesto a la lluvia.
• El aparato muestra signos de funcionamiento inadecuado.
• El aparato ha sido golpeado o dañado de algún modo.
Nederlands
WAARSCHUWING: Om het risico op elektrische schokken of brand te
vermijden: zorg dat het apparaat niet nat wordt. Verwijder de kast niet: er
bevinden zich in het apparaat geen bedieningsorganen. Indien nodig
waarschuw een bevoegd technicus!
EEN LAATSTE WAARSCHUWING: Om het risico op elektrische schokken
te voorkomen: laat het apparaat gesloten. Iedere reparatie dient door een
gekwalificeerde technicus verricht te worden.
Lees de gehele gebruiksaanwijzing. Voordat u met het apparaat gaat werken
is het van groot belang dat u weet hoe u ermee om moet gaan en dat zo
veilig mogelijk. Bewaar deze gebruiksaanwijzing op een plek, die u zich
na verloop van tijd nog weet te herinneren.
De waarschuwingen op het apparaat en in de gebruiksaanwijzing zijn
belangrijk, sla ze niet in de wind.
Als het apparaat vuil wordt, stof het dan af met een zachte droge doek, of
maak gebruik van een stofzuiger. Gebruik nooit een oplosmiddel van welke
soort dan ook.
Het apparaat moet dusdanig gebruikt worden, dat een behoorlijke koeling
niet in het gedrang komt. Voorbeeldjes: Gebruik het apparaat niet op: bed,
sofa, plaid of andere onregelmatige oppervlakken, waardoor de
ventilatiegaten geblokkeerd zouden kunnen worden. Ook het inbouwen
in een te kleine ruimte kan een voldoende koeling in de weg staan.
Het apparaat moet verre gehouden worden van warmtebronnen zoals:
radiatoren en kachels, maar ook versterkers.
Het apparaat mag alleen aangesloten worden op het voltage zoals
aangegeven op de achterkant, in dit geval 220 - 240 Volts 50 Hz.
Het apparaat dient alleen aangesloten te worden met de bijgeleverde netkabel,
of een soortgelijke.
Maatregelen dienen genomen te worden, die de aarding en polarisatie
van het apparaat niet te niet doen. Gebruik vooral geen verlengsnoeren.
De lichtnetkabel dient zo neergelegd te worden, dat er niet op getrapt kan
worden of geklemd kan worden door scherpe voorwerpen. Vooral de
aansluitpunten zijn belangrijk: de aansluiting in de wandcontactdoos en
daar waar de kabel het apparaat binnengaat.
Wanneer het apparaat voor langere tijd niet in gebruik is, dient de lichtnetkabel
uit het lichtnet verwijderd te zijn.
Het apparaat zal in service gegeven moeten worden wanneer één van de
volgende situaties zich voordoet:
• Wanneer het netsnoer en/of steker beschadigd zijn.
• Wanneer er toch voorwerpen/vloeistof in het apparaat terecht zijn
gekomen.
• Als het apparaat in de regen heeft gestaan.
• Als het apparaat niet normaal functioneert of een duidelijk afwijkend
gedrag vertoont..
• Wanneer het apparaat gevallen is en/of de kast beschadigd is.
Plaats het apparaat op een vaste, vlakke en stevige ondergrond. Plaats
hem niet op een verrijdbare wagen die gemakkelijk om kan vallen.
Page 6

RA-1060 Stereo Integrated Amplifier
6
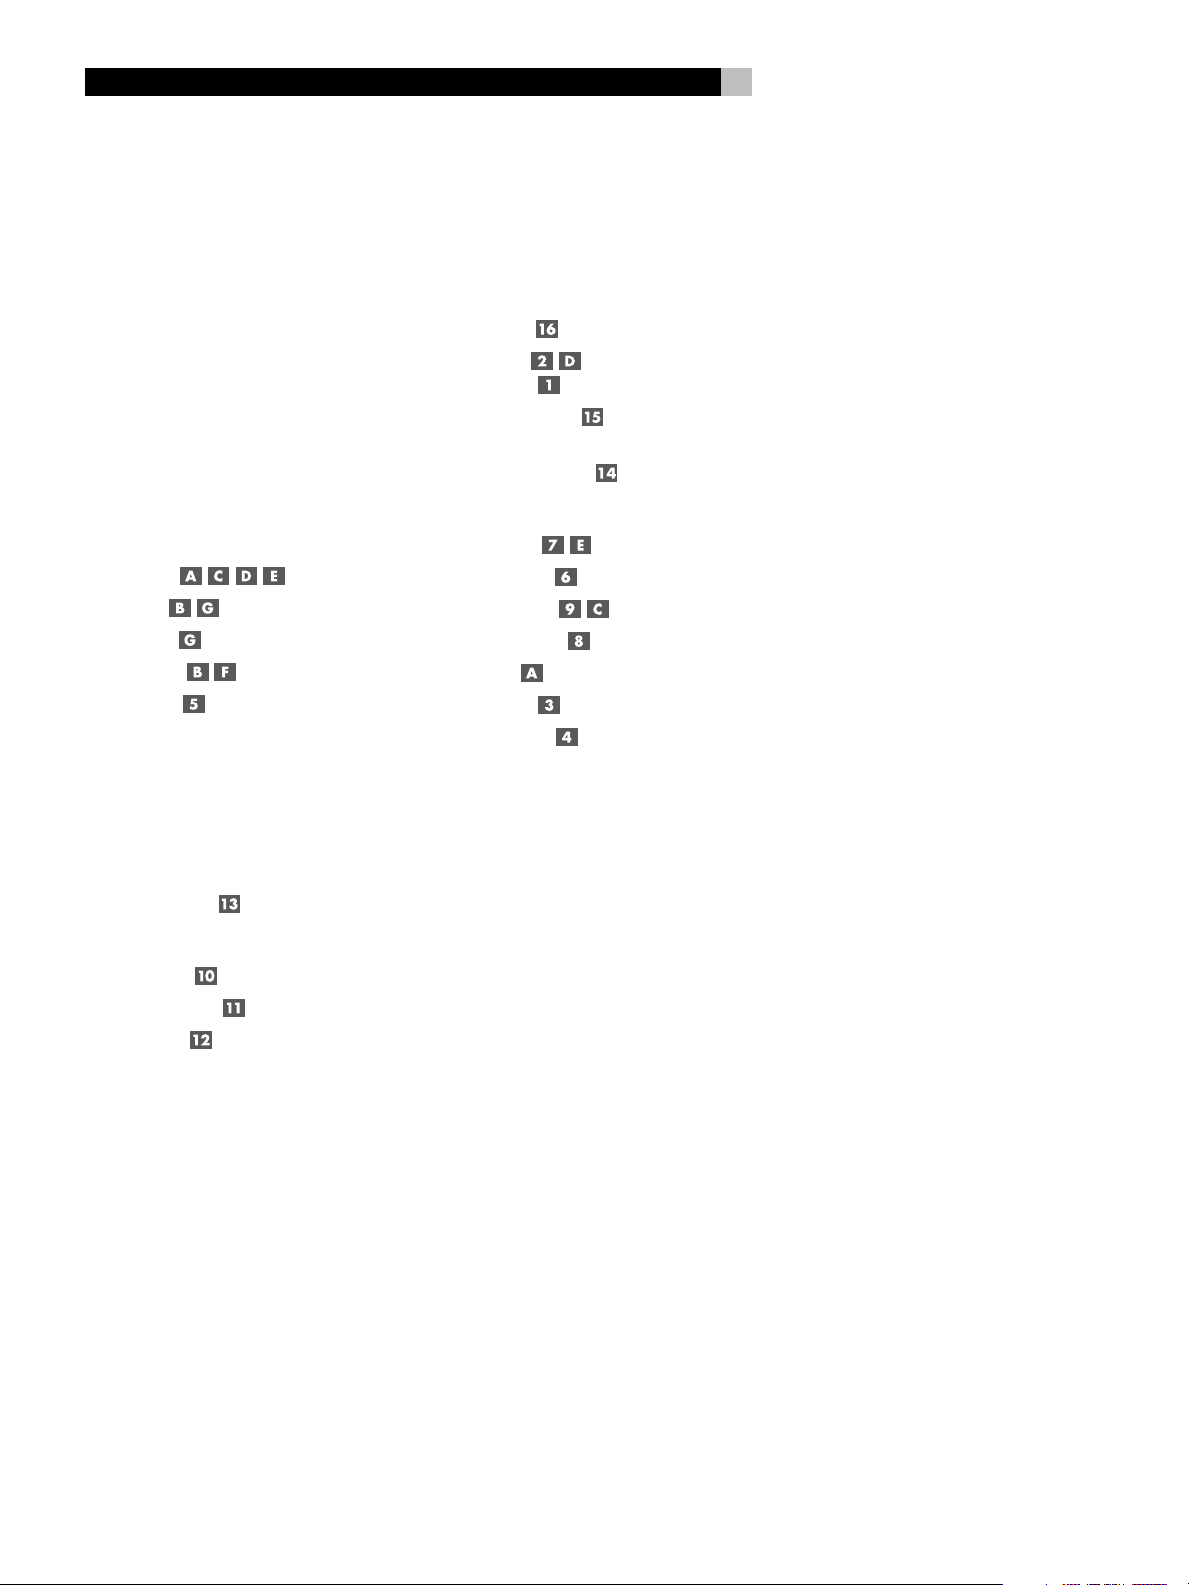
1: Controls and Connections • Commandes et branchements • Bedienelemente und Anschlüsse •
Controlli e collegamenti • Controles y Conexiones • De bedieningsorganen en aansluitpunten
POWER
CONTOUR
OFF
L-1
L-2HLH
A+B
A OR B – 4 OHMS PER SPEAKER
A AND B – 8 OHMS PER SPEAKER
TAPE 2 PRE OUT
IN OUTIN OUT
TAPE 1
SPEAKERS
A
OFF B
PHONES
1 53 4 6 8 97
2
WARNING:TO REDUCE THE RISK OF FIRE
OR ELECTRICAL SHOCK, DO NOT EXPOSE
THIS EQUIPMENT TO RAIN OR MOISTURE.
TUNERCD AUX 2AUX 1
STEREO INTEGRATED AMPLIFIER RA-1060
VOLUME
WARNING:
SHOCK HAZARD – DO NOT OPEN
AVIS: RISQUE DE CHOC ELECTRIQUE–NE PAS OUVRIR
LEFT
RIGHT
RIGHT LEFT
SPEAKER A
INTEGRATED AMPLIFIER
MODEL NO. RA-1060
RECORDING LISTENING
OFF
TUNER
TAPE 1 AUX 1
RA-1060
00POWER CONSUMPTION: 3 W
RIGHT LEFT
SPEAKER B
10 15 1611 12 13 14
CD
TAPE 1
TAPE 2
AUX 2
CDTUNER
12V TRIGGER
OUT
AUX 1
AUX 2
SWITCHED 200W MAX
BAND
POWER
VOLUME
TUNING
DISPLAY
TUNE
/PRESET
D
E
F
A
MUTE
123
456
7
B
PHONO
C
89
0
+10
PTY TA TP
CD TUNER
AUX 1 AUX 2 TAPE 1 TAPE 2
PLAY
STOP
G
RANDOMPAUSE
RR-AT92
Page 7

7
2: Connections • Branchements • Anschlußdiagramm • Collegamenti
Conexiones • De in- en uitgangsverbindingen
ROTEL RA-1060
WARNING:TO REDUCE THE RISK OF FIRE
OR ELECTRICAL SHOCK, DO NOT EXPOSE
THIS EQUIPMENT TO RAIN OR MOISTURE.
TUNERCD
AUX 2AUX 1
TAPE 1
A OR B – 4 OHMS PER SPEAKER
A AND B – 8 OHMS PER SPEAKER
TAPE 2 PRE OUT
IN OUTIN OUT
WARNING:
SHOCK HAZARD – DO NOT OPEN
AVIS: RISQUE DE CHOC ELECTRIQUE–NE PAS OUVRIR
LEFT
RIGHT
RIGHT LEFT
SPEAKER A
INTEGRATED AMPLIFIER
MODEL NO. RA-1060
TAPE • GRABADOR
RA-1060
00POWER CONSUMPTION: 3 W
RIGHT LEFT
SPEAKER B
CD
12V TRIGGER
OUT
SWITCHED 200W MAX
Page 8
RA-1060 Stereo Integrated Amplifier
8
Contents
Boxed numbers refer to RA-1060 illustration.
Boxed letters refer to RR-AT92 illustration.
1: Controls and Connections 6
2: Connections 7
About Rotel ...........................................8
Getting Started ......................................8
Unpacking 9
Placement 9
Cables 9
Remote Control ......................................9
Audio Controls 9
CD Functions 9
DVD Functions 9
Tuner Functions 9
Remote Sensor 9
Remote Control Batteries 9
Speaker Outputs ..................................10
Speaker Impedance 10
Speaker Wire 10
Polarity and Phasing 10
Speaker Connections 10
Signal Connections................................ 10
Line Level Inputs 10
Recorder Connections 10
Preamp Outputs 10
AC Power and Control ..........................10
AC Power Input 10
POWER Button
Power Indicator 11
Auxiliary Power Outlet
(North American version) 11
12V TRIGGER Connection 11
Audio Controls ..................................... 11
VOLUME Control 11
CONTOUR Selector 11
LISTENING Selector 11
RECORDING Selector 11
MUTE Button 11
PHONES Output 11
SPEAKERS Selector 12
Protection Circuit.................................. 12
Troubleshooting ....................................12
Power Indicator Is Not Lit 12
Fuse Replacement 12
No Sound 12
Specifications .......................................12
About Rotel
A family whose passionate interest in music
led them to manufacture high fidelity components of uncompromising quality founded Rotel
40 years ago. Through the years that passion
has remained undiminished and the family goal
of providing exceptional value for audiophiles
and music lovers regardless of their budget,
is shared by all Rotel employees.
The engineers work as a close team, listening to, and fine tuning each new product until
it reaches their exacting musical standards.
They are free to choose components from
around the world in order to make that product the best they can. You are likely to find
capacitors from the United Kingdom and
Germany, semi conductors from Japan or the
United States, while toroidal power transformers
are manufactured in Rotel’s own factory.
Rotel’s reputation for excellence has been
earned through hundreds of good reviews and
awards from the most respected reviewers in
the industry, who listen to music every day.
Their comments keep the company true to its
goal - the pursuit of equipment that is musical, reliable and affordable.
All of us at Rotel, thank you for buying this
product and hope it will bring you many years
of enjoyment.
Getting Started
Thank you for purchasing the Rotel RA-1060
Stereo Integrated Amplifier. When used in a
high-quality music audio system, it will provide
years of musical enjoyment.
The RA-1060 is a full featured, high performance component. All aspects of the design
have been optimized to retain the full dynamic
range and subtle nuances of your music. The
RA-1060 has a highly regulated power supply incorporating a Rotel custom-designed
toroidal power transformer and custom-made
slit foil capacitors. This low impedance power
supply has ample power reserves, which
enables the RA-1060 to easily reproduce the
most demanding audio signals. This type of
design is more expensive to manufacture, but
it is better for the music.
The printed circuit boards are designed with
Symmetrical Circuit Traces. This insures that
the precise timing of the music is maintained
Page 9

9
English
and faithfully recreated. The RA-1060 circuitry
uses metal film resistors and polystyrene or
polypropylene capacitors in important signal
paths. All aspects of this design have been
examined to ensure the most faithful music
reproduction.
In addition the RA-1060 has independent input signal selectors for listening and recording. They allow you to listen to one signal source
while recording another.
The main functions of the RA-1060 are easy
to install and use. If you have experience with
other stereo systems, you shouldn’t find anything perplexing. Simply plug in the associated components and enjoy.
Unpacking
Carefully remove the RA-1060, the remote
control, and accessories from the shipping
carton. Save the shipping carton and all enclosed packing material for future use. Shipping or moving the unit in anything other than
the original packing material may result in severe damage.
Keep the original sales receipt. It is your best
record of the date of purchase, which you will
need in the event warranty service is ever
required.
quality. Ask your authorized Rotel dealer for
advice about component furniture and proper
installation of audio components.
The RA-1060 is supplied with an RR-AT92
remote control and must be placed where the
infrared signal from the remote can reach the
front panel Remote Sensor.
Cables
Keep power cords, digital cables, and audio
cables away from each other. This will minimize the chance of the audio signal cables
picking up noise or interference from the power
cords or digital cables. Using high quality,
shielded cables will also help to prevent noise
or interference. If you have any questions see
your authorized Rotel dealer for advice about
the best cable to use with your system.
Remote Control
The RA-1060 includes an RR-AT92 remote control that operates many of the controls of the
RA-1060. In addition, the remote operates
basic features of some Rotel CD players, DVD
players, and AM/FM tuners.
Audio Controls
Tuner Functions
The BAND, TUNING, and additional tuning
feature buttons operate Rotel tuners, after the
TUNER button on the remote has been pressed.
By default, the RR-AT92 operates the Rotel
RT-955 tuner. Alternatively, the remote can be
reprogrammed to operate the RT-940AX tuner.
This programming only needs to be done once:
To program for the RT-940AX: press the
POWER button and the 2 button simultaneously.
To program for the RT-955: press the
POWER button and the 1 button simultaneously.
Remote Sensor
The remote sensor receives infrared signals
from the remote control. Do not cover or block
the sensor. It must be unobstructed or the remote control will not work properly.
The operation of the remote sensor can also
be affected if it is exposed to bright sunlight
or certain types of lighting (such as halogen
lights) that emit infrared light. In addition remote control functions may not work reliably
if the batteries in the RR-AT92 are weak.
NOTE
: To use the remote, aim it at the remote
sensor on the front panel of the RA-1060.
Placement
Like all audio components that handle low-level
signals, the RA-1060 can be affected by its
environment. Avoid placing the RA-1060 on
top of other components. Also avoid routing
audio signal cables near power cords. This
will minimize the chance it will pick up hum
or interference.
The RA-1060 generates heat as part of its normal operation. The heat sinks and ventilation
openings in the amplifier are designed to dissipate this heat. The ventilation slots in the top
cover must be open. There should be 10 cm
(4 inches) of clearance around the chassis,
and reasonable airflow through the installation location, to prevent the amplifier from
overheating.
Remember the weight of the amplifier when
you select an installation location. Make sure
that the shelf or cabinet can support it. We
recommend installing the RA-1060 in furniture
designed to house audio components. Such
furniture is designed to reduce or suppress
vibration which can adversely affect sound
The RR-AT92 duplicates the basic audio functions of the RA-1060 front panel. When a
function is available on both the front panel
and the remote, a number (see front panel
illustration) and a letter (see remote control
illustration) are shown in the instructions. For
example, to change the volume level, you can
either turn the control
or use the buttons
only one identifier appears, that control is available only on the front panel or the remote, but
not both.
on the front panel
on the remote. When
CD Functions
The PLAY, STOP, PAUSE, TRACK +/–, RANDOM buttons, and NUMERIC keys (0-10)
operate many Rotel CD players after the CD
button on the remote has been pressed.
DVD Functions
The PLAY, STOP, PAUSE, and TRACK +/–,
buttons operate Rotel DVD players, after the
AUX1 button on the remote has been pressed.
Remote Control Batteries
Two UM-4/AAA size batteries (supplied) must
be installed before the remote control can be
used. To install the batteries, remove the cover
on the back of the RR-AT92. Install the batteries as shown in the illustration in the battery
well. Test the control for proper operation, then
replace the cover. When the batteries become
weak the remote control won’t operate the
RA-1060 consistently. Installing fresh batteries
should eliminate the problem.
NOTE
: Remove the batteries from the remote
if it will not be used for a long period of time.
Do not leave run down batteries in the remote control; they can leak corrosive chemicals which will damage the unit.
Page 10

RA-1060 Stereo Integrated Amplifier
10
Speaker Outputs
See Figure 2
The RA-1060 has two sets of speaker outputs,
labeled SPEAKER A and SPEAKER B. The
speaker outputs are controlled by the switch
on the front panel.
Speaker Impedance
If only one set of speakers will be used at any
given time, the speakers may have an impedance as low as 4 ohms. If there are times when
both the A and B speakers will be used, all
the speakers should have an impedance of 8
ohms or more. Speaker impedance ratings are
less than precise. In practice, very few loudspeakers will present any problems for the
RA-1060. See your authorized Rotel dealer
if you have any questions.
Speaker Wire
Use insulated two-conductor stranded wire to
connect the RA-1060 to the speakers. The size
and quality of the wire can have an audible
effect on the performance of the system. Standard speaker wire will work, but can result
in lower output or diminished bass response,
particularly over longer distances. In general,
heavier wire will improve the sound. For best
performance, you may want to consider special high-quality speaker cables. Your authorized Rotel dealer can help in the selection of
cables for your system.
Polarity and Phasing
The polarity – the positive/negative orientation of the connections – for every speaker and
amplifier connection must be consistent so all
the speakers will be in phase. If the polarity
of one connection is reversed, bass output will
be very weak and stereo imaging degraded.
All wire is marked so you can identify the two
conductors. There may be ribs or a stripe on
the insulation of one conductor. The wire may
have clear insulation with different color conductors (copper and silver). There may be
polarity indications printed on the insulation.
Identify the positive and negative conductors
and be consistent with every speaker and
amplifier connection.
Speaker Connections
Turn off all the components in the system before connecting the speakers. The RA-1060
has color-coded speaker connectors on the
back panel. These connectors accept bare wire,
or connector lugs. (In non-EC markets, the connectors also accept dual banana plugs.)
Route the wire from the RA-1060 to the speakers. Give yourself enough slack so you can
move the components to allow access to the
speaker connectors. If you are using dual
banana plugs, connect them to the wires and
then plug into the backs of the binding posts.
The thumbscrews of the binding posts should
be screwed in all the way (clockwise).
If you are using terminal lugs, connect them
to the wires. If you are attaching bare wires
directly to the binding posts, separate the wire
conductors and strip the insulation from the
end of each conductor. Be careful not to cut
into the wire strands. Unscrew (turn counterclockwise) the binding post thumbscrews. Place
the connector lug or wire around the binding
post shaft. Turn the thumbscrews clockwise to
clamp the connector lug or wire firmly in place.
NOTE
: Be sure there are no loose wire strands
that could touch adjacent wires or connectors.
Signal Connections
The RA-1060 has line level inputs for source
components, connections for audio tape decks,
and preamp output connections to send signals to an external power amplifier.
NOTE
: To prevent loud, potentially damaging,
noises, make sure the system is turned off
when you make any signal connections.
Line Level Inputs
See Figure 2
The RA-1060 has four pair of conventional RCA
input connectors for line level components such
as CD players, video cassette recorders, tuners, Laser Disc players, or DVD players. These
inputs are labeled CD, TUNER, AUX 1, and
AUX 2.
The left and right channels are clearly labeled
and should be connected to the corresponding channels of the source component. The
left RCA connectors are white, the right con-
nectors are red. Use high quality RCA cables
for connecting input source components to the
RA-1060. Ask your authorized Rotel dealer
for advice about cables.
Recorder Connections
See Figure 2
Tape inputs and outputs can be connected to
any record/playback device that accepts standard line level analog input and output signals. Typically that will be a conventional tape
recorder. There are two sets of tape connections on the back panel, labelled TAPE 1 and
TAPE 2.
When connecting a recorder to the RA-1060,
the outputs of the recorder must be connected
to the tape inputs of the RA-1060. Similarly
the tape outputs of the RA-1060 must be connected to the inputs of the recorder. Be sure
to connect the left and right channels of each
device to the proper channels on the associated components. Use high quality connecting cables to prevent loss of sound quality.
NOTE
: The tape inputs can also be used for
standard playback-only source components,
omitting the output connections.
Preamp Outputs
The RA-1060 has a pair of preamp outputs
that can send a variable gain signal to an external power amp or signal processor. The
preamp outputs are standard RCA-type output connectors, compatible with the inputs of
most power amplifiers. Use high quality cables
and be sure to connect the left and right channel
outputs of the RA-1060 to the correct channels of the amplifier.
AC Power and Control
AC Power Input
Because of its relatively high power rating, the
RA-1060 can draw considerable current. Therefore, it should be plugged directly into a 2pin polarized wall outlet. Do not use an extension cord. A heavy duty multi-tap power
outlet strip may be used if it (and the wall outlet)
is rated to handle the current demanded by
the RA-1060 and all the other components
connected to it.
Page 11

11
English
Your RA-1060 is configured at the factory for
the proper AC line voltage in the country where
you purchased it (USA: 115 volts/60Hz AC
or CE: 230 volts/50 Hz AC ). The AC line
configuration is noted on a decal on the back
panel. Plug the supplied cord into the AC INPUT
receptacle on the back of the unit.
NOTE
: Should you move your RA-1060 to an-
other country, it is possible to reconfigure your
amplifier for use on a different line voltage.
Do not attempt to perform this conversion yourself. Opening the enclosure of the RA-1060
exposes you to dangerous voltages. Consult
a qualified service person or the Rotel factory service department for information.
If you are going to be away from home for
an extended period of time such as a monthlong vacation, it is a sensible precaution to
unplug your audio and video components while
you are away.
POWER Button
Power Indicator
Press the front panel POWER button, to turn
the RA-1060 on. The power indicator light is
illuminated when the RA-1060 is on. Press
POWER button again to turn the RA-1060 off.
Once the RA-1060 has been turned on with
the front panel button, it can be switched between normal operating mode and standby
mode with the POWER button on the RR-AT92
remote control.
Auxiliary Power Outlet
(North American version)
The RA-1060 has a switched outlet on the back
panel. Power is available from this outlet when
the RA-1060 is turned on. This outlet can provide up to 200 watts and is appropriate for
supplying power to signal sources, such as CD
players, tuners, or tape decks. It should not
be used for power amplifiers. Connecting components that will draw more than 200 watts
to these outputs could damage the RA-1060.
NOTE
: Do not connect a power amplifier to
the auxiliary power outlet on the RA-1060.
Power amplifiers often draw more power than
this outlet can provide.
12V TRIGGER Connection
Several Rotel amplifiers can be turned on and
off using a 12 volt signal, provided by the 12V
TRIGGER connection. When the RA-1060 is
activated, a 12 volt DC signal appears at this
connector and will turn on an amplifier. When
the RA-1060 is turned off, the trigger signal
is interrupted and the external amplifier will
be turned off.
Audio Controls
The following controls are used to operate the
RA-1060.
VOLUME Control
Turn the front panel VOLUME control clockwise to increase the volume, or counterclockwise to decrease the volume. Alternatively, press
the VOL buttons on the remote control to adjust the volume up or down
CONTOUR Selector
Instead of conventional tone controls, the
RA-1060 has a front-panel CONTOUR control which selects one of five available settings.
Each setting provides a fixed frequency contour as follows:
OFF: the tone contour circuits are bypassed
to ensure the purest possible sound.
L-1: moderate increase in bass frequencies
(typically +3dB @ 100Hz).
L-2: more increase in bass frequencies (typically +4dB @ 100Hz).
H: moderate increase in high frequencies
(+3dB @ 10kHz).
LH: combination of L-2 bass and H high frequency increases.
LISTENING Selector
The setting of the LISTENING selector controls
which of the input signals goes to the main
outputs and onto the power amplifier – or, more
simply, which source is heard. Turn the front
panel control to the source you want to hear,
or press the corresponding button on the
RR-AT92 remote.
RECORDING Selector
The RA-1060 can record from any input source
(except TAPE 2) to a recorder connected to
TAPE 1 or TAPE 2 outputs. To select an input
source for recording, turn the RECORDING
control on the front-panel to the desired source.
This selection is independent of the source
selected for listening. While recording, you
may still select a different source using the
LISTENING selector.
If you have a three-head recorder or a DAT
recorder that allows simultaneous read and
write operation, you can monitor your recording
by setting the LISTENING switch to the TAPE
1 or TAPE 2 position.
NOTE
: If you select TAPE 1 with the RECORD-
ING control, the recording signal will only
be available at the TAPE 2 recording outputs,
not the TAPE 1 outputs. To dub a tape, select
TAPE 1 and record to the tape deck connected
to the TAPE 2 outputs.
MUTE Button
To temporarily mute the sound of the system
press the MUTE button on the RR-AT92 remote.
Press the button again to return the sound
volume to the original level. The LED in the
volume control will flash when the unit is muted.
PHONES Output
The PHONES output allows you to connect
headphones for private listening. This output
accepts standard stereo phone (1/4”) plugs.
If your headphones have another type of plug,
such as a 1/8” mini-plug, you will need an
adapter plug. Contact your authorized Rotel
dealer, to get the correct adapter plug.
NOTE
: Plugging in headphones does not cut
off the signal to the speakers. If desired, use
the SPEAKERS selector to turn off the signal
to the speakers for private listening.
Page 12

RA-1060 Stereo Integrated Amplifier
12
SPEAKERS Selector
A four-position rotary switch on the front panel
determines which set of speakers, if any, is
active. Set the SPEAKER selector as follows:
OFF: No speakers will be heard. Use this
position when listening to headphones.
A: The speakers connected to the SPEAKER
A terminals will be heard.
B: The speakers connected to the SPEAKER
B terminals will be heard.
A+B: The speakers connected to both the
SPEAKER A and SPEAKER B terminals will be
heard.
Protection Circuit
A thermal protection circuit protects the amplifier against potential damage in the event
of extreme or faulty operating conditions. Unlike
many designs, the RA-1060’s protection circuit is independent of the audio signal and
has no impact on sonic performance. Instead,
the protection circuit monitors the temperature
of the output devices and shuts down the amplifier if temperatures exceed safe limits.
Fuse Replacement
If another electrical device works when plugged
into the power outlet, but the power indicator still will not light when the RA-1060 is
plugged into the wall outlet, it indicates that
the internal power fuse may have blown. If
you believe this has happened, contact your
authorized Rotel dealer to get the fuse replaced.
No Sound
Check the signal source to see if it is functioning properly. Make sure the cables from the
signal source to the RA-1060 inputs are connected properly. Be sure the LISTENING selector is set to the proper input. Be sure the
SPEAKERS selector is set to the proper position. Check the wiring between the RA-1060
and the speakers.
Specifications
Continuous Power Output
60 watts/channel (20-20 kHz, < 0.03%, 8 ohms)
Total Harmonic Distortion (20Hz-20kHz)
< 0.03% at rated power, 1/2 power, or 1 watt
Intermodulation Distortion
(60 Hz : 7 kHz, 4:1)
< 0.03% at rated power, 1/2 power or 1 watt
Frequency Response (all inputs)
10Hz-100kHz, +1, –3dB
Damping Factor (20-20,000 Hz, 8 ohms)
150
Input Sensitivity / Impedance
160 mV / 33 kOhms
Input Overload
5 V
Preamplifier Output / Impedance
1V / 470 ohms
Signal to Noise Ratio (IHF “A” weighted)
>95 dB
Power Requirements
USA: 115 Volts, 60 Hz
EC: 230 Volts, 50 Hz
Power Consumption
300 Watts
Dimensions (W x H x D)
430 x 92 x 355 mm
17 x 5
5/8 x 14 inches
Weight (net)
7.8 kg, 17.2 lbs.
Should a faulty condition arise, the amplifier
will stop playing. If this happens, turn the
amplifier off, let it cool down for several minutes, and attempt to identify and correct the
problem. When you turn the amplifier back
on, the protection circuit will automatically reset.
Troubleshooting
Most difficulties in audio systems are the result of incorrect connections, or improper control
settings. If you encounter problems, isolate the
area of the difficulty, check the control settings,
determine the cause of the fault and make the
necessary changes. If you are unable to get
sound from the RA-1060 refer to the suggestions for the following conditions:
Power Indicator Is Not Lit
The power indicator should be lit whenever
the RA-1060 is plugged into the wall power
outlet and the POWER switch is pushed in. If
it does not light, test the power outlet with another electrical device, such as a lamp. Be sure
the power outlet being used is not controlled
by a switch that has been turned off.
All specifications are accurate at the time of
printing.
Rotel reserves the right to make improvements
without notice.
Rotel and the Rotel HiFi logo are registered
trademarks of The Rotel Co, Ltd., Tokyo, Japan.
Page 13

13
Français
Sommaire
Les numéros cerclés correspondent aux illustrations
du RA-1060. Les numéros dans les carrés correspondant
à l’illustration de la télécommande RR-AT92.
1: Commandes et branchements 6
2: Branchements 7
Au sujet de Rotel..................................13
Pour démarrer......................................13
Déballage 14
Installation 14
Câbles 14
Télécommande...................................... 14
Commandes audio 14
Fonctions lecteur de CD 14
Fonctions lecteur de DVD 14
Fonctions tuner 14
Capteur infrarouge 14
Piles de la télécommande 14
Sorties enceintes acoustiques ................15
Impédance des enceintes 15
Section du câble d’enceintes 15
Polarité et mise en phase 15
Branchement des enceintes 15
Branchements des entrées .................... 15
Branchements niveau Ligne 15
Branchement d’un magnétophone 15
Sorties préampli 16
Alimentation secteur
et mise sous tension .............................16
Prise d’alimentation secteur 16
Touche de mise sous tension POWER
et indicateur Power 16
Prise de renvoi secteur
(version USA uniquement) 16
Sortie auxiliaire 12 V TRIGGER 16
Commandes audio.................................16
Contrôle de volume 16
Correcteur de tonalité CONTOUR 16
Sélecteur de la source en lecture
LISTENING 16
Sélecteur de la source en enregistrement
RECORDING 16
Touche Silence MUTE 16
Prise casque PHONES 17
Sélecteur d’enceintes acoustiques
SPEAKERS 17
Circuit de protection ............................. 17
Problèmes de fonctionnement ...............17
La diode Power ne s’allume pas 17
Remplacement du fusible 17
Pas de son 17
Spécifications .......................................17
Au sujet de Rotel
C’est une famille de passionnés de musique qui
a fondé Rotel, il y a quarante ans. Pendant toutes
ces années, leur passion ne s’est jamais
émoussée et tous les membres de la famille se
sont toujours battus pour fabriquer des appareils
présentant un exceptionnel rapport musicalitéprix, suivis en cela par tous les employés.
Les ingénieurs travaillent toujours en équipe
réduite, écoutant et peaufinant soigneusement
chaque appareil pour qu’il corresponde
parfaitement à leurs standards musicaux. Ils
sont libres de choisir n’importe quels
composants dans le monde entier, uniquement
en fonction de leur qualité. C’est ainsi que vous
trouvez dans les appareils Rotel des
condensateurs britanniques ou allemands, des
transistors japonais ou américains, tandis que
tous les transformateurs toriques sont
directement fabriqués dans une usine Rotel.
L’excellente réputation musicale des appareils
Rotel a été saluée par la plupart des magazines
spécialisés; ils ont reçu d’innombrables
récompenses, et sont choisis par de nombreux
journalistes critiques du monde entier, parmi
les plus célèbres, ceux qui écoutent de la musique
quotidiennement. Leurs commentaires restent
immuables: Rotel propose toujours des maillons
à la fois musicaux, fiables et abordables.
Mais plus que tout, Rotel vous remercie pour
l’achat de cet appareil, et souhaite qu’il vous
apporte de nombreuses heures de plaisir
musical.
Pour démarrer
Merci d’avoir acheté cet amplificateur stéréo
intégré Rotel RA-1060. Il a été spécialement
conçu pour vous fournir des heures et des
heures de plaisir musical en tant que cœur
d’une chaîne haute-fidélité de très haute qualité.
Le RA-1060 est un amplificateur intégré très
complet, de très hautes performances. Les
différents aspects de sa conception ont été
réalisés de manière à reproduire toute la
dynamique comme les plus subtiles nuances
de la musique. Le RA-1060 est entre autres
équipé d’une alimentation entièrement régulée,
utilisant un transformateur torique spécialement
fabriqué pour Rotel et des condensateurs «slitfoil» également uniques en leur genre. La faible
impédance de cette alimentation assure une
énorme réserve de puissance, capable de faire
Page 14

RA-1060 Amplificateur intégré stéréophonique
14
face aux exigences les plus élevées. Cette
conception est évidemment plus coûteuse, mais
elle est essentielle pour le respect de la musique.
Les circuits imprimés possèdent des pistes
parfaitement symétriques. Elles préservent ainsi
parfaitement l’intégrité «temporelle» de la
musique. Les composants utilisés sont par
exemple des résistances à film métallique et des
condensateurs au polystyrène ou polypropylène
sur tous les points critiques du trajet du signal.
Les plus infimes détails ont été analysés avec
soin, afin que rien ne vienne détruire
l’exceptionnelle musicalité de cet amplificateur.
De plus, le RA-1060 possède des sélecteurs de
source en lecture et en enregistrement séparés,
ce qui vous permet d’écouter une source pendant
que vous en enregistrez une autre.
Les principales fonctions du RA-1060 sont
faciles à comprendre et à utiliser. Elles ne
diffèrent en rien de celles d’une chaîne hautefidélité traditionnelle. Branchez simplement les
sources et écoutez!
Déballage
Déballez soigneusement le RA-1060, la
télécommande et les accessoires. Conservez
le carton d’emballage et tous ses composants.
Il constitue le meilleur moyen pour transporter
l’appareil dans le futur, sans risque de
détérioration.
Conservez soigneusement la facture d’achat.
Vous avez ainsi la preuve de la date d’achat,
qui vous sera utile dans le cas où il serait
nécessaire de faire jouer la garantie.
Installation
Comme tous les appareils traitant des signaux
de faible tension et intensité, le RA-1060 est
relativement sensible à son environnement
proche. Évitez de le poser sur l’amplificateur
de puissance, ce qui pourrait générer une
sensibilité aux interférences émises par ce
dernier. Pour les mêmes raisons, évitez de
l’installer près d’appareils intégrant des moteurs
électriques. Evitez enfin son exposition aux
rayons directs du soleil.
Nous vous recommandons d’installer le
RA-1060 dans un meuble spécialement destiné
aux appareils hi-fi. De tels meubles adaptés
réduisent ou suppriment également les
vibrations, ce qui améliore la qualité sonore
de tous les maillons de la chaîne. Pour de plus
amples renseignements sur ce type de meuble
et sur l’installation correcte des divers éléments
de la chaîne haute-fidélité, veuillez-vous
adresser à votre revendeur agréé Rotel.
Le RA-1060 est livré avec une télécommande
compacte et facile à utiliser, la RR-AT92. Afin
de profiter pleinement de ses avantages, le
RA-1060 doit être placé de telle manière que
con récepteur infrarouge soit en vue directe
de la télécommande en utilisation pratique.
Câbles
Pendant l’installation, prenez un soin particulier
aux trajets respectifs des câbles d’alimentation
secteur, câbles de modulation analogique et
câbles de signal numérique, afin d’éviter toute
interférence entre eux. N’utilisez que des câbles
de haute qualité, soigneusement blindés afin
d’éviter toute dégradation du signal entre les
maillons. Votre revendeur agréé Rotel est en
mesure de vous apporter toute l’information
nécessaire concernant le choix de câbles de
liaison de qualité.
Télécommande
Le RA-1060 est livré avec une télécommande
référence RR-AT92. Celle-ci vous permet de
commander la majeure partie des fonctions
du RA-1060 depuis votre place d’écoute
favorite. En plus, elle est capable de
commander les fonctions de base des lecteurs
de CD, lecteurs de DVD et tuners AM/FM Rotel.
Commandes audio
La RR-AT92 reproduit toutes les commandes
fondamentales de la façade du RA-1060.
Lorsque la même fonction est accessible à la
fois sur la face avant et sur la télécommande,
ceci est indiqué dans le manuel d’utilisation,
par un chiffre (face avant) et une lettre
(télécommande). Par exemple, pour modifier
le niveau sonore, vous pouvez soir tourner le
bouton de la face avant
touches
ou un chiffre apparaît uniquement, c’est que
la commande en question n’est accessible que
via la télécommande ou la face avant,
respectivement.
de la télécommande. Si une lettre
Fonctions lecteur de CD
Les touches repérées PLAY (lecture), STOP
(arrêt), PAUSE, TRACK +/– (plage suivante/
précédente), RANDOM (lecture en ordre
aléatoire) et les touches numériques (chiffres
, soit utiliser les
de 0 à 10) permettent de télécommander la
majeure partie des lecteurs de CD Rotel, après
avoir pressé la touche CD de la télécommande.
Fonctions lecteur de DVD
Les touches repérées PLAY (lecture), STOP
(arrêt), PAUSE, TRACK +/– (plage suivante/
précédente) permettent de télécommander les
lecteurs de DVD Rotel, après avoir pressé la
touche AUX1 de la télécommande.
Fonctions tuner
Les touches repérées BAND (gammes d’ondes),
TUNING (recherche) et d’autres fonctions
spécifiques permettent de télécommander les
tuners Rotel, après avoir pressé la touche
TUNER de la télécommande.
Par défaut, la RR-AT92 est réglée pour le tuner
Rotel RT-955. Mais elle peut aussi fonctionner
avec le tuner Rotel RT-940AX. Cette programmation n’est effectuée qu’une fois pour toutes:
Pour programmer l’utilisation avec le
RT-940AX: pressez la touche POWER et la
touche «2» en même temps.
Pour programmer l’utilisation avec le
RT-955: pressez la touche POWER et la touche
«1» en même temps.
Capteur infrarouge
Ce capteur reçoit les informations infrarouge
envoyées par la télécommande. Ne pas
masquer l’émetteur sur la télécommande, et
le récepteur sur l’appareil.
Son fonctionnement peut également être affecté
par la lumière trop brillante du soleil. Certains
types d’éclairages, comme les lampes à
halogène, peuvent émettre en partie une
lumière infrarouge qui peut interférer les codes
normaux de l’appareil. Enfin, les piles de la
télécommande doivent toujours être
suffisamment chargées.
NOTE
: Pour utiliser la télécommande, dirigez
sa face avant vers la façade du RA-1060.
Piles de la télécommande
Les deux piles fournies de type UM-4/AAA
doivent être installées pour le fonctionnement
de la télécommande. Le logement des piles
se trouve sous un couvercle, au dos de la
télécommande. Pressez doucement sur le
triangle gravé sur le couvercle et faites glisser
ce dernier pour dégager le logement. Installez
Page 15

15
Français
les piles en respectant bien leur polarité
(extrémités «+» et «–» repérées dans le
logement), puis remettez le couvercle en place.
Lorsque les piles seront déchargées, la
télécommande ne fonctionnera plus
correctement. Installez immédiatement des piles
neuves.
NOTE
: Ôtez les piles de la télécommande si
vous ne vous servez pas de celle-ci pendant
une longue période. Ne laissez pas des piles
usées dans la télécommande. Changez toutes
les piles en même temps. Une pile usée peut
dégager des produits corrosifs.
Sorties enceintes
acoustiques
Voir la figure 2
Le RA-1060 possède deux jeux de prises pour
deux paires d’enceintes acoustiques, l’un repéré
«SPEAKER A» et l’autre repéré «SPEAKER B».
Le choix de ces deux jeux de sorties est contrôlé
par le sélecteur d’enceintes acoustiques en face
avant.
Impédance des enceintes
Si une seule paire d’enceintes acoustiques est
branchée sur le RA-1060, ces enceintes peuvent
chacune avoir une impédance minimum de
4 ohms. Si deux paires sont branchées, à la
fois sur les prises A et B, chaque enceinte ne
doit pas présenter une impédance inférieure
à 8 ohms. L’impédance des enceintes est
souvent indiquée de manière relativement peu
précise. En pratique, seules quelques rares
modèles d’enceintes risquent de présenter des
problèmes pour le RA-1060. Consultez votre
revendeur agréé Rotel pour de plus amples
informations à ce sujet.
Section du câble d’enceintes
Utilisez du câble deux conducteurs isolé pour
relier le RA-1060 aux enceintes. La taille et
la qualité du câble peuvent avoir de l’influence
sur les performances musicales. Un câble
standard fonctionnera, mais il peut présenter
des limitations quant à la dynamique réellement
reproduite ou à la qualité du grave, surtout
sur de grandes longueurs. En général, un câble
de plus fort diamètre entraîne une amélioration
du son. Pour des performances optimales,
penchez-vous sur l’offre en terme de câbles
de très haute qualité. Votre revendeur agréé
Rotel est en mesure de vous renseigner
efficacement à ce sujet.
Polarité et mise en phase
La polarité – autrement dit l’orientation correcte
du «+» et du «–» – pour chaque branchement
entre le RA-1060 et les enceintes acoustiques
doit être respectée pour toutes les enceintes,
afin que celles-ci soient toutes en phase. Si la
phase d’une seule enceinte est inversée, il en
résultera un manque de grave sensible et une
dégradation importante de l’image stéréophonique. Tous les câbles sont repérés afin que
vous puissiez identifier clairement leurs deux
conducteurs. Soit les câbles sont différents (un
cuivré, un argenté), soit la gaine est de couleur
différente (filet de couleur), soit elle est gravée.
Assurez-vous que vous repérez bien le
conducteur repéré pour toutes les liaisons, et
que vous respectez parfaitement la phase sur
toutes les enceintes acoustiques, par rapport
à l’entrée.
Branchement des enceintes
Éteignez tous les appareils avant de brancher
les enceintes acoustiques. Le RA-1060 possède
des prises rouges et noires repérées qui
acceptent indifféremment du câble nu, des
cosses ou fourches spéciales, ou encore des
fiches banane (sauf en Europe, où les nouvelles
normes CE l’interdisent).
Tirez le câble depuis le RA-1060 vers les
enceintes acoustiques. Prévoyez suffisamment
de longueur pour qu’il ne subisse aucune
contrainte sur toute sa longueur et que vous
puissiez déplacer les éléments sans qu’il soit
tendu (accès aux prises de l’amplificateur).
Si vous utilisez des fourches, insérez-les à fond
dans le logement offert par les prises et serrez
fermement. Si vous utilisez du fil nu, dénudez
tous les câbles sur une longueur suffisante, et
torsadez les brins de chaque conducteur de
telle manière qu’aucun brin ne puisse venir
en contact avec un autre d’un autre conducteur
(court-circuit). Suivant la taille des torsades,
insérez-les dans les trous centraux des prises
ou entourez-le autour des axes de celles-ci (sens
des aiguilles d’une montre). Dans tous les cas,
serrez fermement à la main les bornes vissantes.
NOTE
: Vérifiez bien qu’il n’y ait aucun brin
qui vienne en contact avec des brins ou la
prise adjacente.
Branchements des entrées
Le RA-1060 possède des entrées pour le
branchement de sources niveau Ligne, les
entrées et sorties nécessaires au branchement
d’enregistreurs et des sorties préamplificateur
pour alimenter éventuellement un amplificateur
de puissance externe.
NOTE
: Pour éviter tout bruit parasite susceptible
d’endommager définitivement le système,
vérifiez que celui-ci est totalement éteint avant
de procéder au moindre branchement.
Branchements niveau Ligne
Voir la figure 2
Le RA-1060 est équipé de quatre paires de prises
d’entrée au standard traditionnel Cinch-RCA
pour le branchement de maillons niveau Ligne,
comme un lecteur de CD, un tuner, la partie
sonore d’un lecteur de DVD, d’un lecteur de
LaserDisc, d’un magnétophone, etc. Ces entrées
sont repérées CD, TUNER, AUX 1 et AUX 2.
Les canaux Gauche (Left) et Droit (Right) sont
clairement repérés et doivent être reliés aux
canaux correspondants des sources. Le canal
gauche est blanc, le canal droit rouge. N’utilisez
que des câbles blindés de très haute qualité.
Pour cela, demandez conseil à votre revendeur
agréé Rotel.
Branchement d’un
magnétophone
Voir la figure 2
Pour branche un enregistreur de type analogique
(cassette, magnétoscope, etc.), utilisez les prises
d’entrée et sortie correspondantes, acceptant
les signaux analogiques de niveau standard.
Il y a deux paires de prises d’entrée et sortie
pour cet usage, en face arrière, respectivement
repérées TAPE 1 et TAPE 2.
N’oubliez jamais que les prises IN reçoivent
le signal en provenance de l’enregistreur
(pour lecture d’une bande, sorties Out sur
l’enregistreur) tandis que les prises OUT envoient
le signal depuis le préamplificateur RA-1060
vers le magnétophone, pour enregistrement
(prises IN sur l’enregistreur). Comme pour les
autres entrées, respectez les canaux gauche
et droit et utilisez des câbles de haute qualité.
Page 16

RA-1060 Amplificateur intégré stéréophonique
16
NOTE
: Les prises d’entrée IN peuvent également
être utilisées comme entrées supplémentaires
pour sources de niveau Ligne, en n’utilisant
pas les prises OUT correspondantes.
Sorties préampli
Le RA-1060 possède une paire de prises de
sortie préamplificateur permettant d’envoyer un
signal à niveau réglé par le bouton de volume
vers un processeur ou un amplificateur de
puissance externe. Ce sont des prises type RCA,
compatibles avec la grande majorité des
amplificateurs du marché. N’utilisez que des
câbles de haute qualité pour brancher ces sorties
gauche et droite vers les canaux correspondants
de l’amplificateur de puissance externe.
Alimentation secteur et
mise sous tension
Prise d’alimentation secteur
Compte tenu de la puissance relativement
élevée qu’il peut délivrer, l’amplificateur
RA-1060 peut demander un courant très élevé
et ainsi être particulièrement exigeant vis-àvis de votre installation électrique. C’est
pourquoi nous vous conseillons très vivement
de ne le brancher que directement, dans une
prise murale munie de deux broches. N’utilisez
pas de câble rallonge. Une prise multiple pourra
éventuellement être utilisée, mais seulement si
elle possède la capacité en courant (ampères)
demandée par le RA-1060 et les autres
appareils branchés dessus.
Votre RA-1060 a été configuré en usine pour
la tension d’alimentation secteur du pays pour
lequel il est prévu (115 ou 230 volts, fréquence
50 ou 60 Hz). Cette valeur est indiquée sur
une étiquette, en face arrière.
NOTE
: si vous devez déménager dans un autre
pays, il est possible de modifier l’alimentation
du RA-1060. Ne tentez pas d’effectuer cette
transformation vous-même. Elle nécessite une
intervention interne présentant des risques
d’électrocution si certaines précautions ne sont
pas respectées Consultez directement un
revendeur agréé Rotel pour connaître la
procédure à suivre.
Si vous vous absentez pendant une longue
période (un mois ou plus), nous vous conseillons
de débrancher la prise murale d’alimentation.
Touche de mise sous tension
POWER
et
indicateur Power
Pressez la touche repérée POWER pour mettre
le RA-1060 en service. La diode corresponde
s’allume simultanément. Une seconde pression
sur cette même touche éteint le RA-1060.
L’interrupteur général étant pressé sur la face
avant du RA-1060, une pression sur la touche
«Standby» de la télécommande RR-AT92 place
l’amplificateur en mode de veille.
Prise de renvoi secteur
(version USA uniquement)
Dans sa version américaine, le RA-1060
possède une prise de renvoi secteur, couplée
à son interrupteur de mise sous tension, pour
y brancher une source. Celle-ci ne peut avoir
une consommation électrique maximum
supérieure à 200 watts. Les normes
européennes interdisent la présence d’une telle
prise de renvoi sur les versions européennes.
Sortie auxiliaire 12 V TRIGGER
Certains appareils audio sont mis automatiquement sous tension lorsqu’ils reçoivent une tension
de commande de 12 volts. Cette sortie repérée
12 V TRIGGER est prévue pour cet usage. Utilisez
un câble muni de la prise adéquate, jack
3,5 mm. La tension 12 V apparaît lors de la
mise sous tension du RA-1060, et n’est plus
présente lors de son extinction.
Commandes audio
Les commandes suivantes permettent d’utiliser
le RA-1060:
Contrôle de volume
Le bouton VOLUME permet d’augmenter ou
de diminuer le niveau sonore. La rotation dans
le sens des aiguilles d’une montre augmente
le volume, et la rotation dans le sens inverse
des aiguilles d’une montre le diminue. Vous
pouvez également utiliser les touches VOL de
la télécommande.
Correcteur de tonalité
CONTOUR
A la place des correcteurs de timbre
conventionnels, le RA-1060 vous propose une
commande CONTOUR dotée de cinq
positions. Chacune de ces positions correspond
à une correction de timbres volontairement fixe,
comme suit:
OFF: circuit de correction court-circuité, pour
assurer la plus grande pureté de son possible.
L-1: légère augmentation du grave
(typiquement +3dB @ 100Hz).
L-2: augmentation plus sensible du grave
(typiquement +4dB @ 100Hz).
H: légère augmentation de l’aigu (+3dB @
10kHz).
LH: combinaison des deux corrections L-2 et H.
Sélecteur de la source en
lecture LISTENING
Le sélecteur d’écoute LISTENING vous permet
de choisir la source que vous désirez écouter.
Tournez le bouton de la face avant, ou pressez
la touche correspondante sur la télécommande
RR-AT92.
Sélecteur de la source en
enregistrement RECORDING
Le RA-1060 peut enregistrer à partir de
n’importe quelle source (excepté TAPE 2), avec
un enregistreur branché sur les prises de sortie
TAPE 1 ou TAPE 2. Pour choisir la source à
enregistrer, tournez le sélecteur RECORDING
de la face avant sur la position désirée.
Cette sélection est indépendante de celle de
la source en lecture, ce qui fait que vous pouvez
enregistrer une source pendant que vous en
écoutez une autre (sélectionnée avec le bouton
LISTENING).
Si vous possédez un magnétophone trois têtes
ou DAT, vous pouvez écouter le résultat réel de
votre enregistrement en choisissant la position
TAPE 1 ou TAPE 2 sur le sélecteur LISTENING.
NOTE
: Si vous choisissez TAPE 1 comme signal
d’origine à enregistrer, il ne sera disponible
sur les sorties repérées TAPE 2 et pas sur les
sorties TAPE 1. Pour copier une bande,
sélectionnez TAPE 1 comme source (bande
d’origine en lecture) et TAPE 2 comme bande
d’enregistrement de la copie.
Touche Silence MUTE
Pour couper temporairement le son, pressez
la touche MUTE sur la télécommande RR-AT92.
Pressez de nouveau cette touche pour revenir
au niveau sonore préalablement choisi. La
Page 17

17
Français
diode du bouton de volume sur la face avant
de l’appareil clignote lorsque la touche MUTE
a été pressée et le son coupé.
Prise casque PHONES
Elle permet d’utiliser un casque équipé d’une
prise au format jack 6,35 mm. Des adaptateurs
existent pour les casques équipés d’une prise
différente (jack 3,5 mm, par exemple).
Contactez votre revendeur pour de plus amples
informations.
NOTE
: Le fait de brancher un casque ne coupe
pas le son dans les sorties enceintes
acoustiques. Pour couper celles-ci, utilisez la
position OFF du sélecteur d’enceintes
acoustiques SPEAKERS.
Sélecteur d’enceintes
acoustiques SPEAKERS
Un sélecteur rotatif à quatre positions, sur la
face avant, permet de choisir quelle(s) paire(s)
d’enceintes acoustiques est (sont) active(s), ou
non, de la manière suivante:
OFF: Aucune enceinte en fonctionnement.
Utilisez cette position lorsque vous désirez
n’écouter qu’au casque.
A: Les enceintes branchées sur les prises
SPEAKER A sont seules en fonctionnement réel.
B: Les enceintes branchées sur les prises
SPEAKER B sont seules en fonctionnement réel.
A + B: Les enceintes branchées à la fois sur
les prises SPEAKER A et SPEAKER B sont en
fonctionnement simultanément.
Lors de la nouvelle mise sous tension, le circuit
de protection sera automatiquement
réenclenché.
Problèmes de
fonctionnement
La majorité des problèmes dans une chaîne
haute-fidélité provient de mauvais branchements, ou de sélecteurs ou commandes mal
positionnés. En cas de difficulté, essayez de
cerner le problème (quelle source, quel
canal, etc.), vérifiez la position des différents
interrupteurs et sélecteurs et effectuez les
modifications nécessaires. Si aucun son ne sort
de votre RA-1060, vérifiez les points suivants:
La diode Power ne s’allume
pas
La diode POWER doit être allumée lorsque
le RA-1060 est relié au secteur. Vérifiez que
la prise murale est bien enfoncée, le bouton
Power pressé. Vérifiez que la prise est bien
alimentée, en branchant par exemple une
lampe d’éclairage à la place du RA-1060.
Remplacement du fusible
Si un autre appareil fonctionne parfaitement
dans la même prise secteur murale, le fusible
de protection interne du RA-1060 a peut-être
fondu. Veuillez dans ce cas contactez votre
revendeur agréé Rotel qui se chargera de le
vérifier et éventuellement de le changer.
Pas de son
Spécifications
Puissance de sortie continue
60 watts par canal
(20 Hz – 20 kHz, DHT < 0,03%, 8 ohms)
Distorsion harmonique totale
(20 – 20k Hz)
< 0,03 % à la puissance nominale, demi-puissance
ou 1 watt
Distorsion d’intermodulation totale
(60 Hz: 7 kHz, 4: 1)
< 0,03 % à la puissance nominale, demi-puissance
ou 1 watt
Réponse en fréquence (toutes entrées)
10Hz-100kHz, +1, –3dB
Facteur d’amortissement
(20 Hz – 20 kHz, 8 ohms)
150
Sensibilité/impédance d’entrée
160 mV/33 kilohms
Saturation en entrée
5 volts
Sensibilité préampli/impédance de sortie:
1 volt/470 ohms
Rapport signal/bruit (IHF pondéré A)
> 95 dB
Alimentation
USA: 115 volts, 60 Hz
Europe: 230 volts, 50 Hz
Consommation maximum
300 watts
Dimensions (L x H x P)
430 x 92 x 355 mm
Poids
7,8 kg
Toutes les spécifications sont certifiées exactes au
moment de l’impression.
Rotel se réserve le droit d’améliorer les performances sans préavis.
Rotel et le logo Rotel Hifi sont des marques
déposées de The Rotel Co, Ltd, Tokyo, Japon
Circuit de protection
Un circuit de protection thermique protège
l’amplificateur contre des conditions de
fonctionnement dépassant les possibilités
techniques de l’appareil. Contrairement à la
majorité des autres amplificateurs, ce circuit est
totalement indépendant du trajet du signal audio,
et n’a donc aucune influence négative sur la
qualité sonore. Ce circuit mesure en permanence
la température de fonctionnement des
composants en sortie, et coupe l’alimentation
si celle-ci dépasse une certaine valeur.
Si cela arrive, l’amplificateur s’arrête. Dans
ce cas-là, éteignez l’amplificateur, et laissez
refroidir pendant plusieurs minutes. Profitezen pour vérifier qu’il n’y a pas un problème
physique de fonctionnement (court-circuit, etc.).
Vérifiez que le RA-1060 est bien allumé et pas
seulement en position de veille Standby. La
diode VOLUME doit être allumée. Vérifiez la
présence réelle de signal à la source choisie
sur le sélecteur LISTENING. Vérifiez que tous
les branchements sont correctement effectués.
Vérifiez que la touche MUTE n’est pas
enclenchée. Vérifiez que l’amplificateur de
puissance est bien branché, allumé, et
fonctionne correctement. Vérifiez une fois
encore tous les câbles entre le RA-1060 et
l’amplificateur de puissance, puis entre celuici et les enceintes acoustiques.
Page 18

RA-1060 Stereo-Vollverstärker
18
Inhaltsverzeichnis
Die grau markierten Zahlen beziehen sich auf die
Abbildungen des RA-1060. Die grau markierten
Buchstaben beziehen sich auf die Abbildung der
RR-AT92.
1: Bedienelemente und Anschlüsse 6
2: Anschlußdiagramm 7
Die Firma Rotel ....................................18
Zu dieser Anleitung ..............................18
Auspacken 19
Aufstellung des Gerätes 19
Kabel 19
Fernbedienung......................................19
Audiofunktionen 19
CD-Funktionen 19
DVD-Funktionen 19
Tuner-Funktionen 19
Fernbedienungssensor 19
Einlegen der Batterien 20
Lautsprecherausgänge ..........................20
Auswahl der Lautsprecher 20
Auswahl der Lautsprecherkabel 20
Polarität und Phasenabgleich 20
Anschließen der Lautsprecher 20
Signalanschlüsse...................................20
Hochpegeleingänge 20
Tape-Anschlüsse 20
PRE OUT-Anschlüsse 21
Netzspannung und Bedienung................21
Netzeingang 21
POWER-Taste
Betriebsanzeige 21
Netzausgang
(nordamerikanische Version) 21
12V TRIGGER OUT 21
Bedienelemente und Tasten ...................21
Lautstärkeregelung 21
CONTOUR-Wahlschalter 21
LISTENING-Wahlschalter 21
RECORDING-Wahlschalter 21
MUTE-Taste 22
Kopfhörerbuchse (PHONES) 22
Lautsprecherwahlschalter (SPEAKERS) 22
Schutzschaltung.................................... 22
Bei Störungen ......................................22
Die Betriebsanzeige leuchtet nicht 22
Austauschen der Sicherung 22
Kein Ton 22
Technische Daten ..................................22
Die Firma Rotel
Die Firma Rotel wurde vor 40 Jahren von einer
Familie gegründet, deren Interesse an Musik
so groß war, daß sie beschloß, hochwertigste
HiFi-Produkte herzustellen und Musikliebhabern
ungeachtet ihres Geldbeutels einen
außergewöhnlichen Wert zukommen zu lassen.
Ein Ziel, das von allen Rotel-Angestellten verfolgt
wird.
Die Ingenieure arbeiten als Team eng
zusammen. Sie hören sich jedes Gerät an und
optimieren es klanglich, bis es den gewünschten
Musikstandards entspricht. Die eingesetzten
Bauteile stammen aus verschiedenen Ländern
und wurden ausgewählt, um das jeweilige
Produkt zu optimieren. So finden Sie in RotelGeräten Kondensatoren aus Großbritannien
und Deutschland, Halbleiter aus Japan oder
den USA und direkt bei Rotel gefertigte
Ringkerntransformatoren.
Rotels guter Ruf wird durch hunderte von
Testerfolgen von den angesehensten Testern der
Branche, die jeden Tag Musik hören,
untermauert. Die Ergebnisse beweisen, daß das
Unternehmen sein Ziel konsequent verfolgt hat,
mit Equipment hoher Musikalität und
Zuverlässigkeit bei gleichzeitig günstigen Preisen.
Zu dieser Anleitung
Wir danken Ihnen, daß Sie sich für den RotelStereo-Vollverstärker RA-1060 entschieden
haben. Dieses einzigartige Gerät kann optimal
in jedem hochwertigen Audiosystem eingesetzt
werden.
Der RA-1060 überzeugt durch höchste
Wiedergabequalität und ist mit einer Vielzahl
von Ausstattungsmerkmalen ausgestattet. Alle
Designaspekte sind darauf ausgelegt, den
kompletten Dynamikbereich und feinste
Nuancen Ihrer Musik wiederzugeben. Dieser
Vollverstärker überzeugt mit einem großzügig
dimensionierten Netzteil mit Rotel-Ringkerntransformator (custom-designed) und Slit-FoilSiebkondensatoren (custom-made). Dieses
niederohmige Netzteil hat extreme Leistungsreserven, die es dem Vollverstärker ermöglichen,
die anspruchsvollsten Musiksignale zu
reproduzieren. Zwar ist diese Konstruktion teurer
in der Herstellung, die Musikwiedergabe
profitiert jedoch deutlich davon.
Page 19

19
Deutsch
Die Signalwege des RA-1060 sind streng
symmetrisch gehalten, um Laufzeitunterschiede
in den Kanälen zu verhindern. In die Platine
sind Metallfilmwiderstände und Polystyrol- bzw.
Polypropylenkondensatoren integriert, durch die
die Signale klangtreuer übertragen werden. Alle
Aspekte dieser Konstruktion dienen nur dem Ziel
der originalgetreuen Wiedergabe von Musik.
Der RA-1060 ist einfach zu installieren und
zu bedienen. Sollten Sie bereits Erfahrung mit
der Installation anderer Stereo-Systeme haben,
dürften keinerlei Probleme auftreten. Schließen
Sie einfach die gewünschten Geräte an (siehe
Anschlußdiagramm am Anfang dieser
Bedienungsanleitung) und genießen Sie die
Musik.
Lesen Sie sich die Bedienungsanleitung bitte
vor der Inbetriebnahme genau durch. Neben
grundsätzlichen Installations- und Bedienungshinweisen (bitte beachten Sie auch die
Sicherheits- und Warnhinweise am Anfang der
Bedienungsanleitung) enthält sie allgemeine
Informationen, die Ihnen helfen werden, Ihr
System mit seiner maximalen Leistungsfähigkeit
zu betreiben. Bitte setzen Sie sich bei etwaigen
Fragen mit Ihrem autorisierten RotelFachhändler in Verbindung.
Auspacken
Bewahren Sie den Versandkarton und das
übrige Verpackungsmaterial des RA-1060 für
einen eventuellen späteren Einsatz auf. Der
Versand oder Transport des Vollverstärkers in
einer anderen als der Originalverpackung kann
zu erheblichen Beschädigungen des Gerätes
führen.
Schicken Sie die dem Vollverstärker beiliegende
Garantieanforderungskarte ausgefüllt an den
Rotel-Distributor in Ihrem Land. Bewahren Sie
bitte die Original-Kaufquittung auf. Sie belegt
am besten das Kaufdatum, das für Sie wichtig
wird, sobald Sie eine Garantieleistung in
Anspruch nehmen.
Aufstellung des Gerätes
Wie bei vielen anderen Audiokomponenten
auch, kann die Signalqualität des RA-1060
durch seine Umgebung beeinträchtigt werden.
Stellen Sie den RA-1060 nicht auf andere
Geräte. Vermeiden Sie es, Audiosignalkabel
in der Nähe der Netzkabel zu verlegen, um
so Störungen vorzubeugen.
Der RA-1060 erwärmt sich während des
Betriebes. Unter normalen Bedingungen kann
die entstehende Wärme über die Kühlrippen
und Ventilationsöffnungen des Verstärkers
abgeführt werden. Die Ventilationsöffnungen
an der Geräteoberseite dürfen nicht verdeckt
werden. Um das Gerät sollte ein Freiraum von
10 cm vorhanden sein. Achten Sie auf eine
ausreichende Luftzufuhr, um den Vollverstärker
vor Überhitzung zu schützen.
Wir empfehlen, ihn in HiFi-Mobiliar unterzubringen. HiFi-Mobiliar ist so ausgelegt, daß
Erschütterungen gedämpft bzw. unterdrückt
werden, die zu einer Verschlechterung der
Klangqualität führen können. Lassen Sie sich
von Ihrem autorisierten Rotel-Fachhändler in
bezug auf HiFi-Mobiliar und die optimale
Aufstellung von Audiokomponenten beraten.
Dem RA-1060 liegt die Fernbedienung RR-AT92
bei. Damit diese einwandfrei funktionieren kann,
sollten Sie den RA-1060 so aufstellen, daß der
Fernbedienungssensor nicht verdeckt wird.
Kabel
Achten Sie bitte darauf, daß Netz-, Digital- und
die normalen Audiosignalkabel separat
verlaufen. Dies minimiert die Wahrscheinlichkeit,
daß Netz- bzw. Digitalkabel die Signale der
Analogkabel stören. Wir empfehlen, hochwertige abgeschirmte Kabel zu verwenden.
Lassen Sie sich diesbezüglich von Ihrem
autorisierten Rotel-Fachhändler beraten.
Fernbedienung
Dem RA-1060 liegt die Fernbedienung RR-AT92
bei. Über diese Fernbedienung können
verschiedene Funktionen des RA-1060
gesteuert werden. Darüber hinaus kann die
RR-AT92 zur Fernbedienung einiger CD-Player,
DVD-Player und AM/FM-Tuner von Rotel
genutzt werden.
Audiofunktionen
Über die RR-AT92 können die grundlegenden
Audiofunktionen des RA-1060 aktiviert werden.
Können die Funktionen sowohl über die
Bedienelemente an der Gerätefront als auch
über die Fernbedienung gesteuert werden, so
sind diese in der Anleitung mit einer Ziffer (für
die Bedienelemente) und einem Buchstaben
(für die Fernbedienungstasten) gekennzeichnet.
Beispiel: Sie haben die Möglichkeit, den
Lautstärkepegel über den Lautstärkeregler
an der Gerätefront und die VOLUME-Tasten
auf der Fernbedienung zu verändern. Ist
nur eine Ziffer bzw. ein Buchstabe angegeben,
so steht die Funktion nur an der Gerätefront
oder nur auf der Fernbedienung zur Verfügung.
CD-Funktionen
Nach Drücken der CD-Taste auf der
Fernbedienung können Sie über die Tasten PLAY,
STOP, PAUSE, TRACK +/–, RANDOM und die
Zifferntasten (0-10) Funktionen verschiedener
Rotel-CD-Player steuern.
DVD-Funktionen
Nach Drücken der AUX 1-Taste auf der
Fernbedienung können Sie über die Tasten PLAY,
STOP, PAUSE und TRACK +/– Funktionen der
Rotel-DVD-Player steuern.
Tuner-Funktionen
Nach Drücken der TUNER-Taste auf der
Fernbedienung können Sie über BAND und
TUNING sowie zusätzliche Tuningtasten
Funktionen der Rotel-Tuner steuern.
Ab Werk ist die RR-AT92 so programmiert, daß
über sie der Rotel-Tuner RT-955 bedient werden
kann. Darüber hinaus können Sie die
Fernbedienung umprogrammieren, so daß Sie
den RT-940AX über die RR-AT92 steuern
können. Die Programmierung muß nur einmal
durchgeführt werden:
Programmierung für den RT-940AX:
Drücken Sie gleichzeitig die Tasten POWER
und 2.
Programmierung für den RT-955:
Drücken Sie gleichzeitig die Tasten POWER
und 1.
Fernbedienungssensor
Der Fernbedienungssensor empfängt die
Infrarotsignale der Fernbedienung. Verdecken
Sie den Sensor während des Betriebes nicht,
da die Fernbedienung dann nicht ordnungsgemäß funktionieren kann. Ferner kann die
Funktion der RR-AT92 durch helles Sonnenlicht
oder bestimmte Beleuchtungstypen, die
Infrarotlicht aussenden, sowie verbrauchte
Batterien beeinträchtigt werden.
HINWEIS
: Möchten Sie den RA-1060 über die
Fernbedienung steuern, so richten Sie die
RR-AT92 direkt auf den Fernbedienungssensor.
Page 20

RA-1060 Stereo-Vollverstärker
20
Einlegen der Batterien
Der Fernbedienung liegen zwei Batterien des
Typs UM-4/AAA bei. Diese müssen vor der
Inbetriebnahme in das Batteriefach eingelegt
werden. Entfernen Sie dazu die Abdeckung
an der Rückseite der RR-AT92. Legen Sie die
Batterien entsprechend der Kennzeichnung +
und – auf dem Batteriefachboden ein und
prüfen Sie, ob die Fernbedienung ordnungsgemäß funktioniert. Anschließend setzen Sie
die Abdeckung wieder auf die Fernbedienung.
Werden die Batterien schwach, ersetzen Sie
die verbrauchten durch neue Batterien.
HINWEIS
: Entfernen Sie die Batterien, wenn
die Fernbedienung über einen längeren
Zeitraum nicht benutzt wird. Lassen Sie keine
verbrauchten Batterien in der RR-AT92, da
diese auslaufen und die Fernbedienung
beschädigen können.
Lautsprecherausgänge
Siehe Abbildung 2
Der RA-1060 verfügt an der Rückseite über
mit „SPEAKER A“ und „SPEAKER B“
gekennzeichnete Lautsprecherausgänge. Über
den Lautsprecherwahlschalter (SPEAKERS) an
der Gerätefront kann eingestellt werden,
welche Lautsprecher spielen sollen.
Auswahl der Lautsprecher
Leistungsverluste und eine ungleichmäßige
Wiedergabe des Frequenzspektrums das
Ergebnis sein. Allgemein gilt, daß Kabel mit
größerem Querschnitt eine verbesserte
Wiedergabequalität gewährleisten. Für höchste
Wiedergabequalität sollten Sie die Benutzung
von speziellen, hochwertigen Lautsprecherkabeln erwägen. Ihr autorisierter RotelFachhändler wird Ihnen bei der Auswahl dieser
Lautsprecherkabel gerne weiterhelfen.
Polarität und Phasenabgleich
Die Polarität – die positive/negative
Ausrichtung der Anschlüsse – muß für jede
Lautsprecher-/Verstärkerverbindung
phasengleich sein. Wird die Polarität einer
Verbindung irrtümlicherweise umgekehrt, führt
dies zu einem unausgewogenen Klangbild
mit schwachen Bässen.
Die Kabel sind zur Identifizierung
gekennzeichnet. So kann die Isolationsschicht
eines Leiters gerippt oder ein Leiter mit einem
Streifen markiert sein. Das Kabel kann
verschiedenfarbige Leiter (Kupfer und Silber)
besitzen und von einer transparenten
Isolationsschicht umgeben sein. Bei anderen
Kabeln wird die Polaritätsangabe auf die
Isolationsschicht gedruckt. Unterscheiden Sie
zwischen positiven und negativen Leitern und
achten Sie beim Anschluß an Lautsprecher und
Verstärker auf die gleiche Polung.
Anschließen der Lautsprecher
Kabelenden, um ein Zerfasern zu vermeiden,
und stecken Sie das verdrillte Kabel hinter die
Schraubklemmen. Anschließend drehen Sie
die Klemmen im Uhrzeigersinn fest.
HINWEIS
: Achten Sie bitte darauf, daß die
blanken Kabelenden vollständig an den
Schraubklemmen untergebracht sind und
somit das Berühren benachbarter Drähte oder
Anschlüsse ausgeschlossen ist.
Signalanschlüsse
An der Rückseite des RA-1060 stehen
Hochpegeleingänge für die Quellen, TapeAnschlüsse sowie PRE OUT-Anschlüsse, über
die Signale zu einer externen Endstufe gesendet
werden können, zur Verfügung.
HINWEIS
: Beim Verkabeln und Anschließen
sollten alle Geräte abgeschaltet sein.
Hochpegeleingänge
Siehe Abbildung 2
Der RA-1060 verfügt über vier Paar CinchAnschlüsse, wie sie an jedem hochwertigen
Audiogerät zu finden sind. An diese mit CD,
TUNER, AUX 1 und AUX 2 gekennzeichneten
Eingänge können Hochpegelkomponenten wie
CD-Player, Video-Cassettenrecorder, Tuner,
LaserDisc-Player oder DVD-Player angeschlossen
werden.
Bei Einsatz von nur einem Lautsprecherpaar
reicht eine Lautsprecherimpedanz von 4 Ohm
aus. Möchten Sie jedoch Musik über zwei
Lautsprecherpaare (SPEAKER A und B) hören,
so sollten ausschließlich Lautsprecher mit einer
Impedanz von mindestens 8 Ohm eingesetzt
werden. Die Angaben bezüglich der Impedanz
von Lautsprechern sind oft ungenau. In der
Praxis gibt es jedoch nur bei sehr wenigen
Lautsprechern Probleme beim Betrieb mit dem
RA-1060. Wenden Sie sich bei Fragen bitte
an Ihren autorisierten Rotel-Fachhändler.
Auswahl der
Lautsprecherkabel
Verbinden Sie den RA-1060 und die
Lautsprecher über ein isoliertes, zweiadriges
Lautsprecherkabel. Aufbau und Qualität des
Kabels können hörbare Effekte auf die
Musikwiedergabe haben. Standard„Klingeldraht“ wird funktionieren, jedoch
können vor allem bei größeren Kabellängen
Schalten Sie zunächst alle zum System
gehörenden Geräte ab. An die Schraubklemmen des RA-1060 können blanke Drähte
oder Kabelschuhe angeschlossen werden.
Führen Sie das Kabel vom RA-1060 zu den
Lautsprechern. Lassen Sie sich genügend Raum,
damit Sie die Komponenten bewegen können
und so einen freien Zugang zu den
Lautsprechern sicherstellen.
Bei der Verwendung von Kabelschuhen
verbinden Sie diese mit den Kabeln, stecken
die Kabelschuhe hinten unter die
Schraubklemmen und drehen die Klemmen im
Uhrzeigersinn fest.
Sollten die Lautsprecherkabel direkt (ohne
Kabelschuhe) an die Schraubklemmen
angeschlossen werden, so entfernen Sie an
den Kabelenden ca. 15 mm der Isolation. Lösen
Sie die Klemmen durch Drehen gegen den
Uhrzeigersinn. Verdrillen Sie die blanken
Die linken und rechten Kanäle sind farbig
gekennzeichnet: die linken Cinch-Buchsen
weiß, die rechten Cinch-Buchsen rot. Verbinden
Sie diese mit den entsprechenden Kanälen der
Quellen. Wir empfehlen Ihnen, zum Anschluß
der Eingangsquellen an den RA-1060 qualitativ
hochwertige Cinch-Kabel zu verwenden.
Lassen Sie sich diesbezüglich von Ihrem
autorisierten Rotel-Fachhändler beraten.
Tape-Anschlüsse
Siehe Abbildung 2
Die Tape-Ein- und Ausgänge können an jedes
beliebige Aufnahme- und Wiedergabegerät
angeschlossen werden, das analoge HochpegelEin- und Ausgangssignale verarbeiten kann.
Normalerweise wird dies ein herkömmlicher
Cassettenrecorder sein. Die Tape-Anschlüsse sind
an der Rückseite mit TAPE 1 und TAPE 2
gekennzeichnet.
Page 21

21
Deutsch
Denken Sie beim Anschluß eines Recorders
an den RA-1060 daran, daß die Ausgänge
des Recorders mit den Tape-Eingängen am
RA-1060 verbunden werden müssen.
Dementsprechend sind die Tape-Ausgänge
des RA-1060 mit den Eingängen am
Recorder zu verbinden. Stellen Sie, wie bei
den anderen Quellen auch, sicher, daß die
linken und rechten Kanäle jedes Gerätes mit
den entsprechenden Kanälen der
angeschlossenen Komponenten verbunden
werden. Verwenden Sie hochwertige
Verbindungskabel, um eine optimale
Klangqualität zu gewährleisten.
HINWEIS
: An die Tape-Eingänge können auch
reine Wiedergabegeräte angeschlossen
werden. In diesem Fall bleiben die Ausgangsanschlüsse ungenutzt.
PRE OUT-Anschlüsse
An der Rückseite des RA-1060 befinden sich
Ausgangsanschlüsse, über die Signale zu einer
externen Endstufe oder zu einem Signalprozessor gesendet werden können. Bei den
PRE OUT-Ausgängen handelt es sich um CinchAnschlüsse, wie sie an jedem hochwertigen
Audiogerät zu finden sind. Verwenden Sie
qualitativ hochwertige Kabel und verbinden
Sie die Ausgänge des linken und rechten Kanals
am RA-1060 mit den entsprechenden Kanälen
an der Endstufe.
Netzspannung und
Bedienung
Netzeingang
Aufgrund der hohen Aufnahmeleistung benötigt
der RA-1060 erhebliche Strommengen. Daher
sollte er direkt an eine zweipolige
Wandsteckdose angeschlossen werden.
Verwenden Sie kein Verlängerungskabel. Eine
hochbelastbare Mehrfachsteckdose kann
eingesetzt werden, wenn diese (ebenso wie die
Wandsteckdose) ausreichende Strommengen
für die an sie angeschlossenen Komponenten
liefern kann.
HINWEIS
: Sollten Sie mit Ihrem RA-1060 in ein
anderes Land umziehen, kann die
Konfiguration des Vollverstärkers geändert
werden, so daß er mit einer anderen
Netzspannung betrieben werden kann.
Versuchen Sie auf keinen Fall, diese Änderung
selber vorzunehmen. Durch Öffnen des
Gehäuses setzen Sie sich gefährlichen
Spannungen aus. Ziehen Sie hierzu stets
qualifiziertes Servicepersonal zu Rate.
Sind Sie, wie z.B. bei einer mehrwöchigen
Urlaubsreise, für längere Zeit nicht zu Hause,
sollten Sie Ihren Vollverstärker (ebenso wie alle
anderen Audio- und Videokomponenten)
während Ihrer Abwesenheit vom Netz trennen.
POWER-Taste
Betriebsanzeige
Drücken Sie die POWER-Taste an der
Gerätefront, um den RA-1060 einzuschalten.
Die Betriebsanzeige beginnt zu leuchten. Durch
erneutes Drücken der POWER-Taste wird das
Gerät ausgeschaltet.
Ist der RA-1060 über die POWER-Taste an der
Gerätefront eingeschaltet worden, können Sie
über die POWER-Taste der Fernbedienung
RR-AT92 zwischen dem normalen
Betriebsmodus und dem Standby-Modus hin
und her schalten.
Netzausgang
(nordamerikanische Version)
In Abbildung 1 ist die nordamerikanische
Version des RA-1060 mit Netzausgang
dargestellt.
12V TRIGGER OUT
Einige Rotel-Verstärker können über ein 12-VoltTriggersignal ein- und abgeschaltet werden.
Der 12V TRIGGER OUT-Anschluß stellt dieses
12-Volt-Signal zur Verfügung. Ist der RA-1060
eingeschaltet, liegt an diesem Ausgang ein
12-Volt-Gleichspannungssignal und schaltet
einen angeschlossenen Verstärker ein. Wird
der RA-1060 ausgeschaltet, liegt kein
Triggersignal an. Der externe Verstärker schaltet
sich ab.
Lautstärkeregelung
Drehen Sie den Lautstärkeregler an der
Gerätefront nach rechts, um die Lautstärke zu
erhöhen. Durch Drehen des Reglers nach links
wird die Lautstärke reduziert. Ferner können
Sie die Lautstärke erhöhen, indem Sie die mit
gekennzeichnete VOLUME-Taste auf der
Fernbedienung drücken oder reduzieren, indem
Sie die mit
gekennzeichnete Taste drücken.
CONTOUR-Wahlschalter
Anstelle herkömmlicher Klangregler verfügt der
RA-1060 an der Gerätefront über einen
CONTOUR-Wahlschalter, über den die
folgenden fünf festen Frequenzeinstellungen
vorgenommen werden können:
OFF: Bei dieser Einstellung werden die
Tonsignale zur Gewährleistung eines optimalen
Klanges am Klangregelnetzwerk vorbeigeleitet.
L-1: Leichte Anhebung der tiefen Frequenzen
(in der Regel +3dB, 100 Hz).
L-2: Stärkere Anhebung der tiefen Frequenzen
(in der Regel +4dB, 100 Hz).
H: Leichte Anhebung der hohen Frequenzen
(in der Regel + 3dB, 10 kHz).
LH: Hierbei werden die Einstellungen L-2 und
H kombiniert.
LISTENING-Wahlschalter
Über den LISTENING-Wahlschalter können Sie
eine Eingangssignalquelle auswählen. Setzen
Sie den Wahlschalter an der Gerätefront auf
die Quelle, die Sie hören möchten, oder
drücken Sie die entsprechende Taste auf der
RR-AT92.
RECORDING-Wahlschalter
Über den RA-1060 können Aufnahmen von
jeder beliebigen Eingangsquelle (mit Ausnahme
von TAPE 2) auf einen an die Ausgänge TAPE
1 bzw. TAPE 2 angeschlossenen Recorder
überspielt werden. Möchten Sie eine
Eingangsquelle für Aufnahmezwecke
auswählen, drehen Sie den RECORDINGWahlschalter an der Gerätefront auf die
gewünschte Quelle.
Ihr RA-1060 wird von Rotel so konfiguriert, daß
er der in Ihrem Land üblichen Wechselspannung
(Europa: 230 Volt/50 Hz oder USA: 115 Volt/
60 Hz) entspricht. Die Konfiguration ist an der
Geräterückseite angegeben.
Bedienelemente und Tasten
Für den Betrieb des RA-1060 stehen die
folgenden Bedienelemente und Tasten zur
Verfügung:
Diese Einstellung ist unabhängig von der
Auswahl der Quelle, die Sie sich anhören
möchten. Sie können auch während der
Aufnahme über den LISTENING-Wahlschalter
eine andere Hörquelle auswählen.
Page 22

RA-1060 Stereo-Vollverstärker
22
Verwenden Sie ein Dreikopf-Cassettendeck
oder einen DAT-Recorder, mit dem „Lesen und
Schreiben“ gleichzeitig möglich ist, können Sie
sich die Aufnahme während des Überspielens
anhören. Dazu setzen Sie den LISTENINGWahlschalter in Position TAPE 1 oder in Position
TAPE 2.
HINWEIS
: Setzen Sie den RECORDING-
Wahlschalter in die TAPE 1-Position, steht das
Aufnahmesignal nur an den TAPE 2- und nicht
an den TAPE 1-Ausgängen zur Verfügung.
Wählen Sie daher zum Kopieren Position TAPE
1 und überspielen Sie die Aufnahme auf den
an die TAPE 2-Ausgänge angeschlossenen
Recorder.
MUTE-Taste
Über die MUTE-Taste auf der Fernbedienung
RR-AT92 ist es möglich, den Ton vorübergehend
stumm zu schalten. Bei Stummschaltung blinkt
die LED am Lautstärkeregler.
Kopfhörerbuchse (PHONES)
Über die Kopfhörerbuchse (PHONES) kann
ein Kopfhörer angeschlossen werden. Diese
Buchse ist auf die Verwendung von StandardStereo-Kopfhörersteckern ausgelegt. Sollte der
Stecker Ihres Kopfhörers nicht passen, fragen
Sie Ihren autorisierten Rotel-Fachhändler nach
einem geeigneten Adapter.
HINWEIS
: Bei Verwendung von Kopfhörern
liegen an den Ausgängen weiterhin Signale
an. Daher müssen Sie den Lautsprecherwahlschalter (SPEAKERS) in die OFF-Position
setzen, wenn Sie ausschließlich über
Kopfhörer Musik hören möchten.
Lautsprecherwahlschalter
(SPEAKERS)
Der Lautsprecherwahlschalter bietet vier
Einstellmöglichkeiten:
OFF: Sie hören keine Musik über die
Lautsprecher. Setzen Sie den Drehschalter in
diese Position, wenn Sie über Kopfhörer Musik
hören möchten.
A: Die Musik ist über die an die Schraubklemmen SPEAKER A angeschlossenen
Lautsprecher zu hören.
B: Die Musik ist über die an die Schraubklemmen SPEAKER B angeschlossenen
Lautsprecher zu hören.
A + B: Die Musik ist über die an die Schraubklemmen SPEAKER A und SPEAKER B
angeschlossenen Lautsprecher zu hören.
Schutzschaltung
Der RA-1060 verfügt über eine thermische
Schutzschaltung. Hierdurch wird der Verstärker
vor möglichen Schäden durch extreme oder
fehlerhafte Betriebsbedingungen geschützt. Im
Gegensatz zu vielen anderen Konstruktionen
ist die Schutzschaltung des RA-1060 unabhängig
vom Audiosignal und beeinflußt den Klang nicht.
Statt dessen überwacht sie die Temperatur an
den Leistungstransistoren und schaltet den
Vollverstärker ab, sobald bestimmte
Temperaturgrenzen überschritten werden.
Es ist unwahrscheinlich, daß es jemals zu einer
Überlastung kommt. Sollte dennoch eine
Störung auftreten, schaltet sich der Vollverstärker
ab. Drücken Sie die POWER-Taste an der
Gerätefront und lassen Sie das Gerät einige
Minuten abkühlen. Versuchen Sie, den Grund
für die Störung herauszufinden und zu
beheben. Beim erneuten Einschalten des
Vollverstärkers setzt sich die Schutzschaltung
automatisch zurück.
Bei Störungen
Viele Probleme beruhen auf Einstellungsfehlern
oder fehlerhaften Anschlüssen. Sollten
Störungen auftreten, grenzen Sie den Bereich
ein. Versuchen Sie, die Ursache für die Störung
herauszufinden. Prüfen Sie die Einstellung der
Bedienelemente und nehmen Sie
gegebenenfalls die erforderlichen Änderungen
vor. Läßt sich das Problem nicht beheben,
wenden Sie sich bitte an Ihren autorisierten
Rotel-Fachhändler.
Die Betriebsanzeige leuchtet
nicht
Bei ordnungsgemäßem Betrieb beginnt die
Betriebsanzeige zu leuchten, wenn der
RA-1060 an eine stromführende Wandsteckdose angeschlossen ist und die POWERTaste gedrückt wird. Leuchtet sie nicht, prüfen
Sie mit einem anderen elektrischen Verbraucher,
z.B. einer Lampe, ob die Steckdose tatsächlich
Strom führt. Prüfen Sie, ob der Strom nicht durch
einen dazwischengeschalteten Schalter
abgeschaltet worden ist.
Austauschen der Sicherung
Funktioniert ein anderes elektrisches Gerät an
einer Steckdose und der Vollverstärker nicht,
so kann dies ein Hinweis darauf sein, daß die
Grobsicherung im Gehäuseinnern durchgebrannt ist. Trennen Sie den Vollverstärker vom
Netz und lassen Sie die Sicherung von Ihrem
autorisierten Rotel-Fachhändler auswechseln.
Kein Ton
Prüfen Sie, ob die Signalquelle einwandfrei
funktioniert. Vergewissern Sie sich, daß die Kabel
von der Signalquelle zu den Eingängen des
RA-1060 ordnungsgemäß angeschlossen sind.
Stellen Sie sicher, daß der LISTENINGWahlschalter auf den richtigen Eingang und der
Lautsprecherwahlschalter in die richtige Position
gesetzt wurde. Prüfen Sie alle Verbindungen
zwischen dem RA-1060 und den Lautsprechern.
Technische Daten
Dauerausgangsleistung
(20 - 20.000 Hz, < 0,03 %, 8 Ohm)
60 Watt/Kanal
Gesamtklirrfaktor (20 - 20.000 Hz)
< 0,03 % bei Nennleistung,
halber Nennleistung oder 1 Watt
Intermodulationsverzerrung
(60 Hz:7 kHz, 4:1)
< 0,03 % bei Nennleistung,
halber Nennleistung oder 1 Watt
Frequenzgang (alle Eingänge)
10 - 100.000 Hz, +1dB, – 3dB
Dämpfungsfaktor (20 – 20.000 Hz, 8 Ohm)
150
Spannung/Impedanz (PRE OUT-Ausgänge)
1V/470 Ohm
Eingangsempfindlichkeit/-impedanz
160 mV/33 kOhm
Eingangsspannung
5 V
Geräuschspannungsabstand (IHF A)
> 95 dB
Spannungsversorgung
Europa: 230 Volt/50 Hz
USA: 115 Volt/60 Hz
Leistungsaufnahme
300 Watt
Abmessungen (B x H x T)
430 x 92 x 355 mm
Nettogewicht
7,8 kg
Diese Bedienungsanleitung entspricht dem
technischen Stand bei Drucklegung. Änderungen
in Technik und Ausstattung vorbehalten.
Rotel und das Rotel HiFi-Logo sind eingetragene
Warenzeichen von The Rotel Co., Ltd., Tokio,
Japan.
Page 23

23
Italiano
Indice
I numeri nei rettangoli fanno riferimento all’
illustrazione dell’RA-1060. Le lettere nei rettangoli
fanno riferimento all’illustrazione dell’RR-AT92.
1: Controlli e collegamenti 6
2: Collegamenti 7
Alcune Parole Sulla Rotel ......................23
Per Cominciare .....................................23
Sballaggio 24
Posizionamento 24
Cavi 24
Comando A Distanza.............................24
Controlli Audio 24
Funzioni del CD 24
Funzioni DVD 24
Funzioni del sintonizzatore 24
Sensore a distanza 24
Pile del comando a distanza 24
Uscite dei diffusori ...............................25
Impedenza dei diffusori 25
Cavi dei diffusori 25
Polarità e fase 25
Collegamento dei diffusori 25
Collegamenti di Segnale ........................25
Ingressi di livello di linea 25
Collegamenti Del Registratore 25
Uscite del preamplificatore 25
Collegamento Alla Rete e Controlli ........26
Ingresso in Corrente Alternata 26
Interruttore di accensione POWER
Spia di accensione 26
Uscite di alimentazione ausiliarie
(versione U.S.A) 26
Collegamento a scatto
TRIGGER 12V 26
Comandi Audio .....................................26
Controllo del volume 26
Selettore del livello dei toni (CONTOUR) 26
Selettore di ascolto 26
Selettore di registrazione 26
Pulsante MUTE 27
Uscita cuffia 27
Selettore dei diffusori 27
Circuito di Protezione ........................... 27
Ricerca dei Guasti.................................27
La Spia di Accensione Non Si Illumina 27
Sostituzione del Fusibile 27
Nessun Suono 27
Caratteristiche .....................................27
Alcune Parole Sulla Rotel
Una famiglia, la cui passione per la musica ha
spinto a realizzare componenti hi-fi di elevata
qualità, fondò la Rotel più di 40 anni fa.
Attraverso gli anni la passione è rimasta intatta
e l’obbiettivo di offrire prodotti eccezionali agli
audiofili e amanti della musica ad un costo non
elevato è condiviso da tutti alla Rotel.
Gli ingegneri lavorano come una squadra
affiatata, ascoltando e mettendo a punto ogni
nuovo prodotto finché non raggiunge
perfettamente i loro standard musicali. Sono
liberi di scegliere i componenti in qualsiasi parte
del mondo al fine di realizzare il prodotto nel
miglior modo possibile. Così potrete trovare
condensatori provenienti dall’Inghilterra e dalla
Germania, semiconduttori dal Giappone o
dagli Stati Uniti, mentre i trasformatori toroidali
sono prodotti proprio dalla Rotel.
La fama di eccellenza della Rotel è stata
guadagnata grazie a centinaia di ottime
recensioni e riconoscimenti conferiti dai più
autorevoli esperti del settore, che ascoltano
la musica ogni giorno. I loro commenti
confermano l’ obiettivo della società - La ricerca
di un apparecchio che sia musicale, affidabile
e conveniente.
Noi tutti alla Rotel vi ringraziamo per aver scelto
questo prodotto augurandovi molte ore di
piacevole intrattenimento musicale.
Per Cominciare
Grazie per aver acquistato il l’amplificatore
di controllo stereo Rotel RA-1060. Utilizzato
in un impianto hi-fi di alta qualità o in un sistema
home theater vi garantirà numerosi anni di
intrattenimento musicale.
L'RA 1060 è un amplificatore versatile di elevate prestazioni. Tutti gli aspetti del design
sono stati ottimizzati per conservare la piena
gamma dinamica e per restituirvi anche i minimi
dettagli della vostra musica. L’RA-1060 ha uno
stadio di alimentazione altamente regolato che
comprende un trasformatore specificamente
progettato dalla Rotel. Questa alimentazione
a bassa impedenza ha ampie riserve di
potenza che consentono all’RA-1060 di
riprodurre i segnali audio più complessi. Questo
tipo di progetto è più costoso da produrre ma
è migliore per la musica.
Page 24

RA-1060 L’Amplificatore di Controllo Stereo
24
Abbiamo progettato le schede dei circuiti
stampati (PCB) con Tracce a Circuito Simmetrico.
Ciò garantisce che il tempo esatto della musica
venga mantenuto e fedelmente riprodotto. Il
circuito dell’RA-1060 contiene resistenze a film
metallico e condensatori in polistirene o
polipropilene che vengono utilizzati in sezioni
importanti sul percorso del segnale. Tutti gli
aspetti di questo progetto sono stati studiati con
lo scopo finale della più fedele riproduzione
sonora.
L’istallazione dell’RA-1060 e il suo
funzionamento sono facili. Se avete già
esperienza con altri sistemi stereo, non dovreste
incontrare alcuna difficoltà. Collegate
semplicemente i componenti abbinati e
ascoltate la musica.
Leggete attentamente questo manuale. Oltre
alle istruzioni relative alle istruzioni di base e
al funzionamento fornisce interessanti
informazioni su diverse configurazioni di
sistema dell’RA-1060 come indicazioni generali
che vi aiuteranno a ottenere prestazioni ottimali
dal vostro impianto. Vi preghiamo di contattare
il vostro rivenditore autorizzato Rotel per
consigli o domande. Inoltre tutti noi alla Rotel
saremo ben lieti di rispondere alle vostre
domande e commenti.
Sballaggio
Togliete con attenzione l’RA-1060, il comando
a distanza e gli accessori dalla scatola di
consegna. Conservate l’imballaggio
dell’RA-1060 e tutto il materiale di imballaggio
interno per un uso futuro. Trasportare l’RA-1060
in un imballo non originale potrebbe
danneggiare il vostro preamplificatore.
Compilate e inviate la carta di registrazione
allegata all’RA-1060. Assicuratevi anche di
conservare la ricevuta della vendita originale.
E’ il vostro migliore documento per la data di
acquisto di cui avrete bisogno ogni volta sia
necessario il servizio di garanzia.
Posizionamento
Come tutti i componenti audio che utilizzano
segnali a basso livello, l’RA-1060 può essere
condizionato dal suo ambiente. Per ridurre al
minimo il surriscaldamento e le possibili
interferenze o disturbi, non appoggiate
l’RA-1060 sopra un amplificatore di potenza
o sopra qualsiasi altro apparecchio con un
ampio trasformatore di alimentazione. Per lo
stesso motivo mantenete l’RA-1060 lontano da
apparecchi che hanno dei motori. Non
collocatelo dove possa essere esposto alla
diretta luce del sole.
Vi raccomandiamo di installarlo in mobili
progettati per accogliere componenti audio.
I mobili appositi sono progettati per ridurre o
perfino eliminare le vibrazioni che possono
influenzare negativamente la qualità sonora.
Chiedete consiglio al vostro rivenditore
autorizzato Rotel hi-fi circa l’arredamento
dedicato e una corretta istallazione dei
componenti audio.
L’RA-1060 viene fornito insieme al comando
a distanza RR-AT92 e deve essere collocato
in un posto in cui il segnale a raggi infrarossi
dal comando a distanza possa raggiungere
il sensore a distanza del pannello anteriore.
Cavi
Fate attenzione a mantenere separati i cordoni
di alimentazione dai cavi di segnale digitali
e quelli di segnale audio normali. Questo
ridurrà la possibilità di un’interferenza e
disturbo. Se avete domande contattate il vostro
rivenditore autorizzato Rotel per un consiglio
sul migliore cavo per il vostro impianto.
Comando A Distanza
L’RA-1060 comprende un comando a
distanza RR-AT92 che attiva molti dei
comandi dell’RA-1060. Inoltre, il comando
a distanza attiva alcune caratteristiche
fondamentali di alcuni lettori CD Rotel, lettori
DVD e sintonizzatori AM/FM.
Controlli Audio
L’RR-AT92 duplica le funzioni audio di base
del pannello anteriore dell’RA-1060. Quando
una funzione è disponibile sul pannello
anteriore e sul comando a distanza, un numero
(controlli del pannello anteriore) e una lettera
(pulsanti del comando a distanza) vengono
mostrati nelle istruzioni. Per esempio, per
cambiare il livello del volume potete sia ruotare
il comando
utilizzare i pulsanti
Quando appare solo uno, quel comando è
disponibile solo o sul pannello anteriore o sul
comando a distanza, ma non su entrambi.
sul pannello anteriore sia
sul comando a distanza.
Funzioni del CD
I pulsanti PLAY,STOP, PAUSE, TRACK +/–,
RANDOM e i tasto NUMERICI (0-10)
controllano molti lettori CD Rotel dopo che il
pulsante CD è stato premuto sul comando a
distanza.
Funzioni DVD
I pulsanti PLAY, STOP, PAUSE e TRACK +/–
attivano i lettori DVD Rotel dopo che il tasto
AUX1 sul comando a distanza è stato premuto.
Funzioni del sintonizzatore
I pulsanti BAND, TUNING e altri tasti di
sintonizzazione attivano i sintonizzatori Rotel dopo che il tasto TUNER sul comando a
distanza è stato premuto.
Di fabbrica, l’RR-AT92 attiva il sintonizzatore
RT-955 della Rotel. Diversamente il comando
a distanza può venir riprogrammato per
attivare il sintonizzatore RT-940AX. Questa
programmazione è necessaria solamente una
volta.
Per programmare l’RT-940AX: premete
il tasto POWER e il pulsante 2 simultaneamente.
Per programmare l’RT-955: premete il
tasto POWER e il pulsante 1 simultaneamente.
Sensore a distanza
Il sensore a distanza riceve segnali infrarossi
dal comando a distanza. Non coprite o
bloccate il sensore. Deve essere libero altrimenti
il comando a distanza non funzionerà
correttamente.
Il funzionamento del sensore a distanza può
anche essere alterato se viene esposto alla luce
del sole o ad alcuni tipi di illuminazione (come
lampade alogene) che emettono luce a
infrarossi. Inoltre, le funzioni del comando a
distanza potrebbero non funzionare
adeguatamente se le batterie nell’RR-AT92
fossero scariche.
NOTA
: Per usare il comando a distanza
puntatelo al sensore a distanza sul pannello
anteriore dell’RA-1060.
Pile del comando a distanza
Due pile UM-4/AAA (fornite) devono essere
installate prima che il comando a distanza
possa essere utilizzato. Per installare le pile,
togliete il coperchio sul retro dell’RR-AT92.
Page 25

25
Italiano
Installate le pile come nell’illustrazione
nell’alloggiamento per le pila. Verificate che
il comando funzioni correttamente, poi
reinserite il coperchio. Quando le batterie si
scaricano il comando a distanza non
funzionerà costantemente. L’installazione di
pile nuove dovrebbe risolvere il problema.
NOTA
: Togliete le pile dal comando a distanza
se non verrà utilizzato per un certo periodo di
tempo. Non lasciate pile scariche nel comando
a distanza; potrebbero perdere e lasciare
materiale corrosivo che danneggerebbe
l’apparecchio.
Uscite dei diffusori
Vedi figura 2
L’RA-1060ha due coppie di uscite per diffusori,
indicate con SPEAKER A e SPEAKER B. Le uscite
del diffusore sono controllate dall’interruttore
sul pannello anteriore.
Impedenza dei diffusori
Se sola una coppia di diffusori verrà utilizzata
in un dato momento, i diffusori potrebbero
avere un’impedenza di solo 4 ohm. Se ci sono
momenti in cui i diffusori A e B vengono utilizzati
insieme, tutti i duffusori dovrebbero avere
un’impedenza di 8 ohm o più. I valori di
impedenza dei diffusori sono di granlunga
poco precisi. Di base, pochissimi diffusori
presenteranno dei problemi per l’RA-1060.
Se avete delle domande rivolgetevi al vostro
rivenditore autorizzato Rotel.
Cavi dei diffusori
Utilizzate cavi a due conduttori isolati per
collegare l’RA-1060 ai diffusori. Le dimensioni
e la qualità dei cavi possono avere effetti udibili
sulle performance del sistema. I cavi standard
vanno bene ma possono dare un’uscita più
bassa o una risposta limitata in gamma bassa,
in particolare se sono molto lunghi. In generale
cavi ben dimensionati miglioreranno la resa
sonora. Per ottenere le migliori prestazioni,
potete prendere in considerazioni cavi speciali
di alta qualità. Il vostro rivenditore Rotel vi potrà
aiutare nella scelta.
Polarità e fase
La polarità – l’orientamento positivo/negativo
dei collegamenti – per il collegamento di ogni
diffusore e amplificatore deve essere rispettata
affinché tutti i diffusori siano in fase. Se la
polarità di un collegamento è accidentalmente
invertita, il basso sarà debole e l’immagine
stereo scadente. Tutti i cavi sono segnati affinché
si possano identificare i due conduttori. Vi
possono essere scanalature o una striscia
sull’isolante di un conduttore. Il cavo può avere
un’isolante trasparente con conduttori di colori
diversi (rame e argento). Indicazioni sulla
polarità possono essere stampate sull’isolante.
Identificare i conduttori positivo e negativo e
che la polarità venga rispettata nei collegamenti
tra l’amplificatore e i diffusori.
Collegamento dei diffusori
Spegnete tutti i componenti del sistema prima
di collegare i diffusori. L’ RA-1060 ha connettori
colorati sul pannello posteriore . Questi
connettori accettano cavi spellati, forcelle. (Nei
mercati di paesi fuori dalla comunità Europea
accettano anche doppi connettori a banana).
Portare il cavo dall’RA-1060 ai diffusori.
Lasciatelo lento in modo da poter muovere i
componenti abbastanza da consentire
l’accesso ai connettori dei diffusori. Se utilizzate
i doppi connettori a banana, collegateli ai cavi
ed inseriteli nella parte posteriore dei connettori
dell’amplificatore. Gli anelli dei connettori
dovrebbero essere avvitati completamente (in
senso orario).
Se state utilizzando connettori a forcella,
collegateli ai cavi. Se state collegando cavi
spellati direttamente ai connettori, separate i
conduttori dei cavi e strappate indietro l’isolante
dall’estremità di ogni conduttore. Fate
attenzione a non tagliare l’intreccio dei fili.
Svitate (in senso antiorario) gli anelli dei
connettori. Posizionate la forcella attorno al
perno del connettore o inserite il filo avvolto
nel foro del perno. Avvitate gli anelli in senso
orario per serrare la forcella o il filo.
NOTA
: Assicuratevi che non vi siano fili sparsi
che potrebbero toccare i fili o i connettori
adiacenti
Collegamenti di Segnale
L’RA-1060 è provvisto di ingressi di livello di
linea per componenti di sorgente, collegamenti
per piastre di registrazione audio e
collegamenti d’uscita per inviare segnali a un
amplificatori di potenza esterno.
NOTA
: Per evitare disturbi forti e
potenzialmente pericolosi, assicuratevi che
l’impianto sia spento quando effettuate
qualsiasi collegamento di segnale.
Ingressi di livello di linea
vedi figura 2
L’RA-1060 è provvisto di quattro coppie di
connettori d’ingresso convenzionali RCA per
componenti di livello di linea come lettori CD,
registratori video, sintonizzatori, lettori per laser
Disc o lettori DVD. Questi ingressi sono
contrassegnati CD, TUNER e AUX 1 e AUX 2.
I canali destro e sinistro sono chiaramente
contrassegnati e dovrebbero essere collegati
ai canali corrispondenti del componente di
sorgente. I connettori sinistro RCA sono bianchi,
i connettori destro sono rossi. Usate cavi RCA
di alta qualità per collegare componenti di
sorgente d’ingresso all’RA-1060. Chiedete
consiglio al vostro rivenditore autorizzato Rotel.
Collegamenti Del Registratore
vedi figura 2
Gli ingressi e le uscite Tape possono essere
collegate a qualsiasi apparecchio di
registrazione/riproduzione che accetti segnali
standard di ingresso e di uscita di livello di linea
analogici. Generalmente si tratterà di un
registratore a cassetta convenzionale. Ci sono
due coppie di collegamenti tape sul pannello
posteriore, contrassegnati TAPE 1 e TAPE 2.
Quando collegate un registratore all’RA-1060
ricordate che le uscite del registratore devono
essere collegate agli ingressi tape
dell’RA-1060. Allo stesso modo le uscite tape
dell’RA-1060 devono essere collegate agli
ingressi del registratore. Come per altre
sorgenti assicuratevi di collegare i canali destro
e sinistro di ogni apparecchio al giusto canale
sui componenti in abbinamento. Utilizzate cavi
di collegamento di alta qualità per evitare una
perdita della qualità sonora.
NOTA
: Gli ingressi tape possono anche essere
utilizzati per componenti di sorgente solamente
–riproduzione standard, tralasciando i
collegamenti d’uscita.
Uscite del preamplificatore
L’RA-1060 è provvisto di una coppia di uscite
per il preamplificatore che possono inviare un
segnale di guadagno variabile a un
Page 26

RA-1060 L’Amplificatore di Controllo Stereo
26
amplificatore di potenza esterno e elaboratore
di segnale. Le uscite del preamplificatore sono
connettori d’uscita dei tipo RCA standard,
compatibili con gli ingressi della maggior parte
degli amplificatori di potenza. Utilizzate cavi
di alta qualità e assicuratevi di collegare le
uscite del canale destro e sinistro dell’RA-1060
ai canali corretti dell’amplificatore.
Collegamento Alla Rete e
Controlli
Ingresso in Corrente Alternata
A causa delle richieste di elevata potenza,
l’RA-1060 impiega una notevole quantità di
corrente. Pertanto l’RA-1060 sarebbe meglio
fosse collegato in genere direttamente a una
presa a muro polarizzata a due poli. Non usate
una prolunga . Una robusta ciabatta a prese
multiple può pilotare la corrente richiesta
dall’RA-1060 e dagli altri componenti collegati
ad essa.
Il vostro RA-1060 è già stato predisposto in
fabbrica per il voltaggio corretto per il paese
dove lo avete acquistato (o 115 volt o 230
volt con una frequenza di linea di o 50 Hz o
60 Hz). La configurazione di linea di corrente
alternata è indicata su un adesivo sul pannello
anteriore . Inserite il cordone fornito
nell’alloggiamento per l’ingresso in corrente
alternata sul retro dell’apparecchio.
NOTA
: Nel caso doveste trasportare il vostro
RA-1060 in un altro paese è possibile
riconfigurare l’amplificatore per un utilizzo
su una diversa linea di voltaggio. Non cercate
di provvedere a questa conversione da soli.
Aprire il cabinet dell’RA-1060 vi espone a
voltaggi pericolosi. Consultate personale di
servizio qualificato o il centro di servizio della
Rotel per informazioni.
Se vi assentate da casa per un lungo periodo,
come una vacanza di un mese, è consigliabile
staccare il vostro amplificatore dalla rete (così
come per gli altri componenti audio e video)
durante la vostra assenza.
Interruttore di accensione
POWER
Spia di accensione
Premete l’interruttore di accensione POWER
sul pannello anteriore per attivare l’RA-1060.
La spia di accensione si illumina quando
l’RA-1060 è acceso. Premendo nuovamente
l’interruttore l’RA-1060 si spegne.
Una volta che l’RA-1060 è stato attivato con il
pulsante sul pannello anteriore, può venire posto
alternativamente o in modalità di funzionamento
normale o in modalità standby con il pulsante
POWER sul comando a distanza RR-AT92.
Uscite di alimentazione
ausiliarie
L’RA-1060 è provvisto di un’uscita con
interruttore sul pannello posteriore.
L’alimentazione è disponibile da questa uscita
quando l’RA-1060 è acceso. Questa uscita
può fornire fino a un totale di 200 watt ed è
adatta a fornire alimentazione a sorgenti di
segnale come lettori CD, sintonizzatori, o
piastre di registrazione. Non dovrebbe essere
utilizzata per amplificatori di potenza.
Collegando componenti che richiedono più
di 200 watt a queste uscite potrebbe voler dire
danneggiare l’RA-1060.
NOTA
: Non collegate un amplificatore di
potenza alle uscite di alimentazione ausiliarie
sull’RA-1060. Gli amplificatori di potenza
spesso richiedono più alimentazione di
quanta queste uscite possano fornire.
(versione U.S.A)
Collegamento a scatto
TRIGGER 12V
Parecchi amplificatori Rotel possono essere
attivati e disattivati utilizzando un segnale trigger da 12 Questo collegamento fornisce un
segnale trigger da 12V. Quando l'RA 1060
è acceso, un segnale da 12V DC è presente
su questo connettore e potrà attivare un
amplificatore. Quando l'RA 1060 è spento,
il segnale trigger viene interrotto e
l'amplificatore esterno verrà disattivato.
Comandi Audio
I seguenti comandi sono utilizzati per operare
l’RA-1060.
Controllo del volume
Ruotate il comando del volume sul pannello
anteriore in senso orario per aumentare il
volume e in senso antiorario per diminuirlo.
Oppure premete i pulsanti VOL sul comando
a distanza per alzare o abbassare il volume.
Selettore del livello dei toni
(CONTOUR)
Anziché i soliti comandi di toni, l’RA-1060 è
provvisto di un comando CONTOUR sul
pannello anteriore che sceglie una delle cinque
regolazioni disponibili. Ogni regolazione offre
un contorno di frequenza prestabilito nel modo
seguente:
OFF: i circuiti di contorno del tono sono evitati
per garantire il suono più puro possibile.
L – 1: aumento moderato nella basse frequenze
(in genere +3 dB @ 100 Hz).
L – 2: maggiore aumento alle basse frequenze
(in genere +4 dB @ 100 Hz).
H: aumento moderato alle alte frequenze
(+3 dB @ 100 Hz).
LH: una combinazione di aumenti alle alte
frequenze H e alle basse L – 2.
Selettore di ascolto
La regolazione del selettore di ascolto controlla
quale dei segnali in ingresso è diretto alle uscite
principali e all’amplificatore di potenza – o,
più semplicemente, quale sorgente si stia
ascoltando. Ruotate il comando sul pannello
anteriore verso la sorgente che desiderate
ascoltare, oppure premete il pulsante
corrispondente sul comando a distanza RR-AT92.
Selettore di registrazione
L’RA-1060 può registrare da qualsiasi sorgente
d’ingresso (eccetto TAPE 2) a un registratore
collegato a uscite TAPE 1 o TAPE 2. Per
selezionare una sorgente d’ingresso per la
registrazione, ruotate il comando RECORDING sul pannello anteriore verso la sorgente
desiderata.
Page 27

27
Italiano
Questa selezione è indipendente dalla sorgente
scelta per l’ascolto. Mentre registrate potete
ancora scegliere una sorgente diversa usando
il selettore LISTENING.
Se avete un registratore a tre testine o un
registratore DAT che permette una operazione
di lettura e di scrittura simultanea, potete
monitorare la vostra registrazione regolando
l’interruttore di ascolto (LISTENING) in posizione
TAPE 1 o TAPE 2.
NOTA
: Se scegliete TAPE 1 con il comando
RECORDING, il segnale di registrazione sarà
presente solamente alle uscite di registrazione
TAPE 2, non alle uscite TAPE 1. Per doppiare
un nastro, scegliete TAPE 1 e registrate verso
la piastra di registrazione collegata alle uscite
TAPE 2.
Pulsante MUTE
Per porre temporaneamente in mute il sonoro
dell’impianto premete il pulsante MUTE sul
comando a distanza RR-AT92. Premete
nuovamente il pulsante per tornare al livello
originale. La spia del controllo del volume
lampeggerà quando l’apparecchio viene posto
in mute.
Uscita cuffia
L’uscita cuffia vi permette di collegare la cuffia
per un ascolto individuale. Questa uscita
accetta un jack per cuffia stereo standard. Se
la vostra cuffia ha un altro tipo di spina, come
una mini-jack da 1/8”, avrete bisogno di un
adattatore. Contattate il vostro rivenditore
autorizzato Rotel per acquistare l’adattatore
giusto.
NOTA
: l’inserimento di una cuffia non elimina
il segnale dalle uscite. nella maggior parte
dei casi dovreste disattivare l’amplificatore
di potenza quando ascoltate con la cuffia.
Selettore dei diffusori
Un interruttore circolare con quattro posizioni
sul pannello anteriore determina quale coppia
di diffusori fosse attiva. Regolate il selettore
dei diffusori nel seguente modo:
OFF: Non si udrà alcun diffusore. Utilizzate
questa posizione quando ascoltate la cuffia.
A: Si udranno i diffusori collegati al terminale
SPEAKER A.
B: Si udranno i diffusori collegati ai terminali
SPEAKER B.
A + B: Si udranno i diffusori collegati a entrambi
i terminali SPEAKER A e SPEAKER B.
Circuito di Protezione
Un circuito a protezione termica protegge
l’amplificatore da possibili danni nel caso di
condizioni di funzionamento estreme o errate.
A differenza di molti progetti, il circuito di
protezione dell’RA-1060 è indipendente dal
segnale audio e non ha alcun impatto sulla
resa sonora. Al contrario, il circuito di
protezione controlla la temperatura degli
apparecchi d’uscita e scollega l’amplificatore
se la temperatura supera i limiti di sicurezza.
Nel caso che una condizione di errore
insorgesse, l’amplificatore smetterebbe di
funzionare. Se ciò avvenisse, disattivate
l’amplificatore, lasciatelo raffreddare per alcuni
minuti e cercate d’identificare e correggere
il problema. Quando riattivate l’amplificatore,
il circuito di protezione si regolerà
automaticamente.
Ricerca dei Guasti
Nei sistemi audio molti problemi derivano da
collegamenti sbagliati o inadeguate regolazioni
dei controlli. Se vi si pone un problema, isolate l’area critica, verificate le regolazioni dei
controlli, determinate la causa del problema
e operate i necessari cambiamenti. Se non
siete in grado di far suonare l’RA-1060 fate
riferimento ai suggerimenti per le condizioni
che seguono:
La Spia di Accensione Non Si
Illumina
La spia di accensione dovrebbe essere accesa
ogni volta che l’RA-1060 è collegato alla presa
di alimentazione nel muro e viene premuto il
pulsante di accensione. Se non si accende
controllate la presa di alimentazione con
un’altro apparecchio elettrico, come una
lampada. Assicuratevi che la presa di
alimentazione in uso non sia controllata da
un interruttore che è stato disattivato.
Sostituzione del Fusibile
Se un altro apparecchio elettrico funziona una
volta collegato alla presa di alimentazione,
e la spia di accensione continua a non
illuminarsi, significa che potrebbe essersi
bruciato il fusibile di alimentazione interno.
Se ritenete che ciò sia successo, contattate il
vostro rivenditore Rotel per la sostituzione del
fusibile.
Nessun Suono
Controllate la sorgente di segnale per vedere
se funziona correttamente. Assicuratevi che i
cavi dalla sorgente di segnale agli ingressi
dell'RA 1060 siano collegati correttamente.
Controllate che il selettore LISTENING sia nella
giusta posizione. Controllate che il selettore
speaker sia nella giusta posizione. Controllate
infine il cablaggio tra l'RA 1060 e i diffusori.
Caratteristiche
Potenza di uscita continua
60 watt/canale (20-20kHz < 0.03%, 8 ohm)
Distorsione armonica totale
(20 hz – 20,000 hz)
< 0.003 % , 1/2 potenza, o 1 watt
Distorsione di intermodulazione
(60hz:7 khz, 4:1)
< 0.003 %, 1/2 potenza, o 1 watt
Risposta di frequenza (tutti gli ingressi)
10 Hz – 100kHz, +1, –3dB
Sensibilita’ d’ ingresso/impedenza
160mV / 33 kOhm 5 V
Sovraccarico d’ingresso
5V
Fattore di smorzamento
(20-20.000hz, 8 ohm)
150
Uscita/impedenza del preamplificatore
1 V / 470 ohm
Rapporto S/N, (IHF pesato A)
> 95 dB
Tensione di alimentazione
115 Volt, 60 Hz (USA)
230 Volt, 50 Hz (Versione Europea)
Assorbimento
300 Watt
Dimensioni (l x a x p)
430 x 92 x 355 mm
Peso
7.8 kg
Tutte le caratteristiche sono accurate al momento
della stampa.
Rotel si riserva il diritto di apportare
miglioramenti senza alcun preavviso
Rotel e il logo Rotel HIFI sono marchi registrati
della Rotel Co, Ltd., Tokyo, Giappone.
Page 28

RA-1060 Amplificador Integrado Estereofónico
28
Contenido
Los números encerrados en un recuadro hacen
referencia a una ilustración correspondiente al
RA-1060 mientras que las letras encerradas en un
recuadro hacen referencia a una ilustración
correspondiente al RR-AT92.
1: Controles y Conexiones 6
2: Conexiones 7
Acerca de Rotel ....................................28
Para Empezar.......................................28
Desembalaje 29
Colocación 29
Cables 29
Mando a Distancia ................................29
Controles de Audio 29
Funciones Correspondientes
al Reproductor de CD 29
Funciones Correspondientes
al Reproductor de DVD 29
Funciones Correspondientes
al Sintonizador 30
Sensor de Control Remoto 30
Pilas del Mando a Distancia 30
Salidas para la Conexión
de las Cajas Acústicas ...........................30
Impedancia de las Cajas Acústicas 30
Cable de Conexión a las Cajas Acústicas 30
Polaridad y Puesta en Fase 30
Conexión de las Cajas Acústicas 30
Conexión de las Fuentes ....................... 31
Entradas de Nivel de Línea 31
Conexiones para Componentes
de Grabación 31
Salidas Preamplificadas 31
Alimentación y Control.......................... 31
Toma de Corriente Eléctrica 31
Botón POWER e
Indicador Luminoso de Puesta en Marcha 32
Toma de Corriente Alterna Auxiliar
(sólo en la versión para América del Norte) 32
Conexión para SEÑAL DE DISPARO de 12 V 32
Controles de Audio ...............................32
Control VOLUME 32
Selector CONTOUR (“CONTORNO”) 32
Selector LISTENING (“ESCUCHA”) 32
Selector RECORDING (“GRABACION”) 32
Control MUTE (“SILENCIAMIENTO”) 32
Toma de AURICULARES 32
Selector SPEAKERS 32
Circuitería de Protección ....................... 33
Problemas y Posibles Soluciones ...........33
El Indicador Luminoso de Puesta en Marcha
No Se Activa 33
Sustitución del Fusible 33
No Hay Sonido 33
Características Técnicas ........................ 33
Acerca de Rotel
Rotel fue fundada hace 40 años por una familia
cuyo entusiasta interés por la música le condujo
a diseñar y construir componentes de Alta
Fidelidad sin ningún tipo de compromiso. Esta
pasión ha permanecido inalterada durante
todo este tiempo, hasta el punto de que el
objetivo de los fundadores de la compañía –
proporcionar productos de la máxima calidad
a melómanos y audiófilos independientemente
de cuales sean sus posibilidades económicas
– es compartido por todos sus empleados.
Los ingenieros de Rotel trabajan como un
equipo compacto, escuchando y llevando a
cabo el ajuste fino de cada nuevo producto
hasta que satisface de manera exacta los
estándares de calidad musical para los que
fue diseñado. Para lograrlo, disponen de la
máxima libertad para escoger los mejores
componentes allí donde se encuentren. Le
sorprenderá agradablemente encontrar
exquisitos condensadores procedentes del
Reino Unido y Alemania o semiconductores
de Japón o Estados Unidos, mientras que los
transformadores toroidales de potencia son
construidos en la propia factoría de Rotel.
Rotel se ha ganado a pulso, a través de a cientos
de artículos, bancos de pruebas y galardones
firmados por los críticos especializados más
respetados del mundo, una sólida reputación
por la excelencia de sus productos. Los
comentarios de estos profesionales que
escuchan música cada día hacen posible que
la compañía se reafirme en la validez de sus
objetivos: la puesta a punto de componentes
y equipos musicales, fiables y asequibles.
Le agradecemos que haya adquirido este
producto y esperamos que le permita disfrutar
de su música predilecta durante largos años.
Para Empezar
Gracias por adquirir el Amplificador Integrado
Estereofónico Rotel RA-1060. Utilizado en un
sistema de reproducción musical de alta
calidad, le permitirá disfrutar durante muchos
años de sus composiciones musicales favoritas.
El RA-1060 es un componente de audio de
altas prestaciones extremadamente completo.
Todos los aspectos de su diseño han sido
optimizados para preservar toda la gama
dinámica y todas las sutilezas de su música
Page 29

29
Español
predilecta. El RA-1060 incorpora una fuente
de alimentación altamente regulada que incluye
un transformador de alimentación toroidal y
condensadores de láminas finas diseñados y
construidos a medida siguiendo especificaciones
de Rotel. Esta fuente de alimentación de baja
impedancia posee una generosa reserva de
energía que permite al RA-1060 reproducir
fácilmente las más exigentes señales de audio.
Un diseño de este tipo resulta más caro de
fabricar pero es mejor para la música.
Las placas de circuito impreso (PCB) han sido
diseñadas con Pistas Circuitales Simétricas a
fin de asegurar el perfecto mantenimiento de
las relaciones temporales de la música y la más
fiel reproducción de las mismas. La circuitería
del RA-1060 utiliza resistencias de película
metálica y condensadores de poliestireno o
polipropileno en los puntos más críticos del
recorrido de la señal de audio. Todos los
aspectos de este diseño han sido examinados
al milímetro con el objetivo último de conseguir
una fiel reproducción de la música.
Además, el RA-1060 incluye selectores
independientes para grabación y escucha que
le permiten a usted escuchar una señal
procedente de una determinada fuente
mientras graba la procedente de otra.
Las funciones principales del RA-1060 son
fáciles de instalar y utilizar. Si usted ya está
experimentado en el manejo de componentes
de audio estereofónicos, en principio no
debería encontrar nada que le resultara
especialmente complicado durante la puesta
a punto inicial del mismo. Basta con que
conecte el resto de componentes de su equipo
y disfrute con su música preferida.
Desembalaje
Quite cuidadosamente del embalaje el
RA-1060, el mando a distancia y los accesorios.
Guarde el embalaje del RA-1060 y todo el
material en él contenido para un posible uso
futuro del mismo. El embalaje o transporte del
RA-1060 en condiciones diferentes de las
originales puede dañar seriamente el aparato.
Asegúrese de mantener en su poder la factura
de compra puesto que es la mejor manera de
que usted se acuerde de la fecha de compra,
un dato esencial en caso de que necesitara
asistencia técnica durante el período de
garantía.
Colocación
Al igual que todos los componentes de audio
que manejan señales de bajo nivel, el RA-1060
puede verse afectado por su entorno. Evite
colocar el RA-1060 encima de otros
componentes. Evite también colocar cables
que transporten señales de audio cerca de
los de alimentación ya que de este modo se
minimizará la posibilidad de que se capten
zumbidos o interferencias.
El RA-1060 genera calor durante su
funcionamiento normal. Tanto los disipadores
térmicos como las ranuras de ventilación de
su cubierta superior han sido diseñados para
evacuar este calor. Las ranuras de ventilación
de la cubierta superior deben permanecer
siempre despejadas. Debería haber unos 10
centímetros de espacio libre alrededor del
chasis y una razonable corriente de aire a lo
largo del lugar en que haya sido instalado el
amplificador para evitar el sobrecalentamiento
de este último.
Tenga igualmente en cuenta el peso del
amplificador cuando seleccione una ubicación
determinada para su instalación. Asegúrese
por tanto de que la estantería o mueble utilizado
pueda soportarlo. Le recomendamos que
instale el RA-1060 en muebles diseñados
específicamente para albergar componentes
de audio. Dichos muebles están concebidos
para reducir o suprimir vibraciones que pueden
afectar negativamente a la calidad del sonido.
Consulte a su distribuidor autorizado de
productos Rotel para que le aconseje acerca
de los muebles más adecuados para su equipo
y sobre la adecuada instalación en los mismos
de sus componentes de audio.
El RA-1060 se suministra de serie con un mando
a distancia RR-AT92. A fin de que aproveche
plenamente las comodidades que le ofrece
dicho mando, le recomendamos que coloque
el RA-1060 en lugares desde los que usted
pueda ver el Sensor de Control Remoto que
figura en su panel frontal.
Cables
Asegúrese de que los cables de alimentación,
digitales y de modulación de su equipo estén
alejados entre sí ya que de este modo se
minimizarán las posibilidades de que la señal
de audio se vea afectada por ruido o
interferencias procedentes de los cables digitales
o de alimentación. El uso exclusivo de cables
apantallados de alta calidad también contribuirá
a prevenir la entrada de ruido o interferencias
susceptibles de degradar la calidad sonora de
su equipo. Si tiene alguna pregunta que realizar
al respecto, le recomendamos que visite a su
distribuidor autorizado de productos Rotel para
que le aconseje los cables más adecuados para
su sistema.
Mando a Distancia
El RA-1060 se suministra de serie con un mando
a distancia RR-AT92 que gobierna la mayoría
de funciones del aparato. Además, también
está capacitado para gestionar funciones
básicas de algunos reproductores de CD,
reproductores de DVD y sintonizadores de
AM/FM de Rotel.
Controles de Audio
El RR-AT92 duplica las funciones básicas del
panel frontal del RA-1060. Cuando un mismo
control figure en el panel frontal del
amplificador y en el mando a distancia, se
indicarán los correspondientes códigos de
identificación en el presente manual de
instrucciones (números para el panel frontal
y letras para el mando a distancia). Por
ejemplo, para modificar el nivel de volumen
usted puede o bien girar el control
frontal o bien utilizar los botones
a distancia. Cuando sólo aparece un
identificador, significa que el correspondiente
control está disponible únicamente en el panel
frontal o en el mando a distancia pero no en
ambos.
Funciones Correspondientes al
Reproductor de CD
Los botones PLAY (REPRODUCCION), STOP
(PARADA), PAUSE (PAUSA), TRACK +/– (PISTA
+/–) y RANDOM (ALEATORIO) y las teclas
NUMERICAS (0-10) permiten gobernar muchos
reproductores de discos compactos de Rotel
una vez pulsado el botón CD del mando a
distancia.
Funciones Correspondientes al
Reproductor de DVD
Los botones PLAY (REPRODUCCION), STOP
(PARADA), PAUSE (PAUSA), TRACK +/– (PISTA
+/–) y RANDOM (ALEATORIO) gobiernan los
reproductores de DVD de Rotel una vez pulsado
el botón CD del mando a distancia.
del panel
del mando
Page 30

RA-1060 Amplificador Integrado Estereofónico
30
Funciones Correspondientes al
Sintonizador
Los botones BAND (BANDA), TUNING
(SINTONIA) y otros relacionados con la
sintonización de emisoras de radio gobiernan
los sintonizadores de Rotel una vez pulsado
el botón TUNER del mando a distancia.
Por defecto (es decir a menos que se especifique
lo contrario), el RR-AT92 controla el sintonizador
RT-955 de Rotel. De modo alternativo, el citado
mando a distancia puede ser reprogramado
para que controle el sintonizador Rotel
RT-940AX. Esta programación sólo necesita ser
realizada una vez:
Para programar el mando para que
controle el RT-940AX: pulse simultánea-
mente los botones POWER y 2.
Para programar el mando para que
controle el RT-955: pulse simultáneamente
los botones POWER y 1.
Sensor de Control Remoto
El Sensor de Control Remoto capta los rayos
infrarrojos procedentes del mando a distancia.
No lo cubra ni bloquee nunca ya que en caso
contrario no funcionará correctamente.
El funcionamiento del Sensor de Control Remoto
también puede verse afectado si es expuesto
a la luz solar directa o ciertos tipos de
iluminación artificial, como por ejemplo las
lámparas halógenas (que emiten una cierta
cantidad de luz infrarroja). Asimismo, es
posible que las funciones de control a distancia
no actúen de manera fiable si las pilas del
RR-AT92 están a punto a de agotarse.
NOTA
: Para utilizar el mando a distancia,
oriéntelo hacia el sensor de control remoto
del panel frontal del RA-1060.
Pilas del Mando a Distancia
Antes de utilizar el mando a distancia deben
colocarse dos pilas del tipo UM-4/AAA
(suministradas con el RA-1060). Para instalar
las pilas, quite en primer lugar la cubierta que
figura en la parte posterior del RR-AT92.
Coloque las pilas respetando las indicaciones
de polaridad que se ilustran en el propio
compartimento portabaterías. Verifique que
el mando a distancia funcione correctamente
y a continuación vuelva a colocar en su lugar
la tapa del compartimento portabaterías.
Cuando las pilas empiecen a agotarse, el
mando a distancia dejará de funcionar
correctamente. Bastará con que cambie las
pilas (todas) por otras nuevas para eliminar
el problema.
NOTA
: Quite las pilas del mando a distancia
si no piensa utilizarlo durante un largo
período de tiempo. No deje pilas agotadas
en el interior del mando a distancia ya que
podrían derramar productos químicos
corrosivos susceptibles de dañarlo.
Salidas para la Conexión
de las Cajas Acústicas
Ver Figura 2
El RA-1060 incorpora dos pares de salidas
para la conexión de cajas acústicas designados
por SPEAKER A y SPEAKER B. Dichas salidas
son controladas por el conmutador giratorio
SPEAKERS que figura en el panel frontal del
aparato.
Impedancia de las Cajas
Acústicas
Si sólo se va a utilizar una de las dos parejas
de cajas acústicas que pueden conectarse al
RA-1060, cada caja puede tener una
impedancia nominal de hasta 4 ohmios. Por
el contrario, si se van a utilizar simultáneamente
las parejas de cajas acústicas A y B, cada
caja debería tener una impedancia de 8
ohmios o más. Por lo general, la impedancia
de las cajas acústicas es un parámetro bastante
poco preciso, de modo que en la práctica muy
pocas cajas acústicas presentarán problemas
al RA-1060. Para cualquier duda o cuestión
que tenga al respecto, consulte con su
distribuidor autorizado de productos Rotel.
Cable de Conexión a las Cajas
Acústicas
Utilice un cable de dos conductores
perfectamente aislado para conectar el
RA-1060 a las cajas acústicas. El tamaño y
la calidad de dicho cable pueden tener un
efecto audible sobre las prestaciones de la
totalidad de su equipo. Un cable de conexión
de calidad estándar funcionará pero es posible
que provoque una disminución de la potencia
de salida o una atenuación de la respuesta
en graves, en particular si la longitud del mismo
es elevada. En general, un cable más
consistente mejorará la calidad del sonido.
Para conseguir unas prestaciones óptimas,
debería considerar la compra de cables de
alta calidad especialmente diseñados para
aplicaciones de audio. Su distribuidor
autorizado de productos Rotel puede ayudarle
a seleccionar los cables que vaya a utilizar
en su sistema.
Polaridad y Puesta en Fase
La polaridad, es decir la orientación positiva/
negativa de las conexiones correspondientes
a cada caja acústica y a la unión con el
amplificador deben ser coherentes, de modo
que todas las cajas acústicas del sistema estén
en fase. Si la polaridad de una conexión es
invertida por error, se producirá una fuerte
caída de la respuesta en graves, así como una
degradación perceptible de la imagen
estereofónica global. Todos los cables están
marcados de manera que usted pueda
identificar fácilmente los dos conductores.
Puede haber marcas o líneas impresas en el
revestimiento aislante de un conductor. El cable
también puede presentar un claro aislamiento
al incorporar conductores de distintos colores
(cobre y plata). También puede haber
indicaciones de polaridad impresas en el
revestimiento aislante. Identifique los
conductores positivos y negativos y sea
coherente con cada una de las conexiones
del amplificador y las cajas acústicas.
Conexión de las Cajas
Acústicas
Desconecte todos los componentes de su equipo
antes de llevar a cabo la conexión de las cajas
acústicas. El RA-1060 incorpora terminales de
conexión debidamente codificados (por colores)
en su panel posterior. Estos conectores aceptan
cable pelado, conectores de tipo horquilla o
conectores de tipo banana doble (excepto en
los países de la Comunidad Europea, donde
su uso no está permitido).
Lleve el cable desde el RA-1060 hasta las cajas
acústicas. Procure que el mismo posea la
suficiente longitud para que pueda accederse
sin ninguna restricción a los terminales de
conexión de aquéllas. Si usted está utilizando
conectores dobles de tipo banana, únalos
primero a los cables y a continuación insértelos
en la zona posterior de los terminales de
conexión. En cualquier caso, las tuercas de
fijación de dichos terminales deberían
bloquearse girándolas en sentido horario.
Page 31

31
Español
Si está utilizando conectores de tipo horquilla,
conéctelos en primer lugar a los cables. Si está
colocando directamente cable pelado en los
terminales de conexión a las cajas acústicas,
separe los cables correspondientes a cada
conductor y quite la parte superior del
revestimiento aislante. Asegúrese asimismo de
no cortar ninguno de los conductores
propiamente dichos. Libere (girándolas en
sentido contrario de las agujas del reloj) las
tuercas de fijación hexagonales y a
continuación coloque los conectores alrededor
de los terminales de conexión a las cajas
acústicas o el cable pelado en el orificio
transversal que hay en los mismos. Gire en
sentido horario las tuercas de fijación
hexagonales para sujetar firmemente en su
lugar el conector o el cable de conexión.
NOTA
: Asegúrese de que no haya restos de
cable que puedan tocar los cables o
conductores adyacentes.
Conexión de las Fuentes
El RA-1060 incorpora entradas de nivel de
línea equipadas con conectores RCA para la
conexión de fuentes y grabadores de audio,
así como salidas preamplificadas para enviar
señales a una etapa de potencia externa.
NOTA
: Para evitar la presencia de ruidos
susceptibles de ser apreciados tanto por usted
como por sus cajas acústicas, asegúrese de
que el sistema esté desconectado cuando
usted esté realizando cualquier tipo de
conexión de señal.
Entradas de Nivel de Línea
Ver Figura 2
El RA-1060 incorpora cuatro pares de
conectores de entrada convencionales (RCA)
para la conexión de componentes que manejan
señales de nivel de línea tales como
reproductores de discos compactos,
grabadores de videocasetes estereofónicos,
sintonizadores o reproductores de LaserDisc
y DVD. Estas entradas se designan por CD,
TUNER, AUX 1 y AUX 2.
Los canales Izquierdo (“Left”) y Derecho
(“Right”) están claramente identificados y
deberían ser conectados a los correspondientes
terminales de las fuentes utilizadas. Los
conectores RCA correspondientes al canal
Izquierdo son de color blanco, mientras que
los del canal Derecho son de color rojo. Utilice
cables de alta calidad equipados con
conectores RCA para la conexión de cualquier
fuente al RA-1060. Consulte a su distribuidor
autorizado de productos Rotel para que le
aconseje sobre los cables a utilizar.
Conexiones para Componentes
de Grabación
Ver Figura 2
Las entradas y salidas Tape pueden ser
conectadas a cualquier componente de
grabación/reproducción que acepte señales
de entrada y salida analógicas estándar de
nivel de línea, que por lo general suele ser
una platina a casetes convencional. En el panel
posterior del RA-1060 hay dos juegos de
conexiones para componentes de grabación
designados por TAPE 1 y TAPE 2.
Cuando conecte un componente de grabación
al RA-1060, recuerde que las salidas del
grabador deben conectarse a las entradas
tape del RA-1060. De modo similar, las salidas
tape del RA-1060 deben ser conectadas a las
entradas
con otras fuentes, asegúrese de conectar los
canales Izquierdo y Derecho correspondientes
a cada componente a los canales adecuados
de los componentes asociados. Utilice cables
de interconexión de alta calidad para evitar
pérdidas en la calidad de sonido.
NOTA
utilizarse para la conexión de fuentes
estándar omitiéndose las conexiones de
salida de señal (es decir las correspondientes
a grabación).
del grabador. Al igual que sucede
: Las entradas tape también pueden
Salidas Preamplificadas
El RA-1060 incluye una pareja de salidas
preamplificadas que pueden enviar una señal
de ganancia (nivel) variable a una etapa de
potencia o procesador de señal externo. Las
salidas preamplificadas utilizan conectores
RCA estándar compatibles con las entradas
de la inmensa mayoría de etapas de potencia
disponibles en el mercado. Utilice cables de
alta calidad y asegúrese de conectar las salidas
preamplificadas izquierda y derecha del
RA-1060 a las entradas correctas del
amplificador o procesador de señal.
Alimentación y Control
Toma de Corriente Eléctrica
Como consecuencia de su relativamente alta
potencia de salida, el RA-1060 puede drenar
una cantidad de corriente considerable de la
red eléctrica, por lo que debería ser conectado
directamente a una toma de corriente
polarizada de 2 clavijas. No utilice ningún
tipo de cable de extensión. Puede utilizarse
una base de enchufes de alta calidad siempre
y cuando esté (y también, por supuesto, la toma
de corriente ubicada en la pared de su casa)
preparada para manejar la corriente exigida
por el RA-1060 y todos los componentes
conectados a él.
Su RA-1060 está configurado en fábrica para
que trabaje con la tensión de red correcta que
corresponda al país en que haya sido
comprado (115 voltios de corriente alterna/
60 Hz para Estados Unidos y 230 voltios de
corriente alterna/50 Hz para La Comunidad
Europea). Dicha configuración está indicada
en un lugar visible del panel posterior del
aparato. Inserte el cable de red suministrado
de serie en el receptáculo AC INPUT situado
en el panel posterior del aparato.
NOTA
: En caso de que tuviese que desplazar
su RA-1060 a otro país, es posible
reconfigurarlo para que pueda trabajar con
tensiones de red diferentes de la establecida
en fábrica. No intente llevar a cabo esta
conversión por su cuenta. El acceso al interior
del RA-1060 le expone a tensiones
peligrosas. Para cualquier información al
respecto, le rogamos que contacte con
personal cualificado o llame al departamento
de asistencia técnica postventa de Rotel.
Si va a estar fuera de su casa durante un largo
período de tiempo -por ejemplo las vacaciones
de verano-, le recomendamos, como
precaución básica, que desconecte su
amplificador (así como el resto de componentes
de audio y vídeo de su equipo) de la red
eléctrica.
Page 32

RA-1060 Amplificador Integrado Estereofónico
32
Botón POWER e
Indicador Luminoso de Puesta
en Marcha
Pulse el botón POWER del panel frontal para
activar el RA-1060. El indicador luminoso
situado justo encima de dicho botón se activará
para confirmarlo. Pulse de nuevo el botón
POWER para desactivar el RA-1060.
Una vez que el RA-1060 se haya puesto en
marcha con el botón pertinente de su panel
frontal, puede ser situado entre los modos de
pleno funcionamiento y posición de espera
(“standby”) con el botón POWER del mando
a distancia RR-AT92
Toma de Corriente Alterna
Auxiliar
América del Norte)
El RA-1060 incorpora una toma de corriente
eléctrica conmutada en su panel posterior. Una
vez el aparato esté en marcha, podrá
disponerse de una señal eléctrica alterna (hasta
un total de 200 vatios de potencia) desde la
misma. Esta toma es adecuada para alimentar
cualquier fuente de señal, como por ejemplo
un reproductor de CD, un sintonizador o una
platina a casetes. La conexión a dicha toma
de componentes capaces de drenar una
potencia superior a 200 vatios podría dañar
el RA-1060.
(sólo en la versión para
Conexión para SEÑAL DE
DISPARO de 12 V
Varios amplificadores Rotel pueden ser activados
y desactivados utilizando una señal de disparo
de 12 voltios continuos suministrada por el
conector 12V TRIGGER. Cuando el RA-1060
es activado, en el mencionado conector aparece
una señal de 12 voltios continuos capaz de
poner en marcha un amplificador. Cuando el
RA-1060 es desactivado, la señal de disparo
es interrumpida.
Controles de Audio
Los controles que se describen a continuación
son utilizados para manejar el RA-1060.
Control VOLUME
Gire en sentido horario el control VOLUME
del panel frontal para aumentar el nivel de
volumen o en sentido antihorario para
reducirlo. De modo alternativo, pulse los
botones VOL del mando a distancia para
aumentar o disminuir el nivel de volumen.
Selector CONTOUR
(“CONTORNO”)
En vez de controles de tono convencionales,
el RA-1060 incorpora en su panel frontal un
control denominado CONTOUR que
selecciona uno de cinco ajustes disponibles.
Cada ajuste proporciona una curva de realce
en frecuencia predeterminado. Los ajustes
disponibles son:
OFF: los circuitos de contorno son evitados
para garantizar el sonido más puro posible.
L-1: realce moderado de la respuesta en
graves (+3 dB @ 100 Hz).
L-2: realce superior de la respuesta en graves
(+4 dB @ 100 Hz).
H: realce moderado de la respuesta en agudos
(+3 dB @ 10 kHz).
LH: combinación del realce de graves L-2 y
el realce de agudos H.
Selector LISTENING
(“ESCUCHA”)
El ajuste de este selector controla cual de las
señales de entrada es enviada a las salidas
principales y por tanto a la etapa de potencia
o, dicho de un modo más simple, cual es la
fuente que está siendo escuchada. Gire el control
del panel frontal hasta situarlo en la fuente que
desea utilizar o pulse el correspondiente botón
del mando a distancia RR-AT92.
Selector RECORDING
(“GRABACION”)
El RA-1060 puede grabar señales procedentes
de cualquier fuente de entrada (a excepción
de TAPE 2) a un componente de grabación
conectado a las salidas TAPE 1 o TAPE 2. Para
seleccionar una fuente con el fin de proceder
a su grabación, gire el control RECORDING
del panel frontal hasta que coincida con la
fuente deseada.
Esta selección es independiente de la fuente
seleccionada para ser escuchada. Mientras
esté grabando, usted tiene la opción de
seleccionar una fuente diferente para su
escucha utilizando el selector LISTENING.
Si dispone de una platina a casetes de tres
cabezales o una platina DAT que permita la
grabación y lectura simultáneas, podrá
monitorizar su grabación situando el
conmutador LISTENING en la posición TAPE
1 o TAPE 2.
NOTA
: Si selecciona TAPE 1 con el control
RECORDING, la señal a grabar estará
disponible únicamente en las salidas para
grabación TAPE 2 y no en las TAPE 1. Para
copiar una cinta, seleccione TAPE 1 y grabe
la señal pertinente en la platina conectada a
las salidas TAPE 2.
Control MUTE
(“SILENCIAMIENTO”)
Para silenciar temporalmente el sonido del
sistema, pulse el botón MUTE del mando a
distancia RR-AT92. Pulse de nuevo dicho botón
para que el nivel de volumen regrese a su valor
original. El indicador luminoso del control de
volumen parpadeará cada vez que el RA-1060
sea silenciado.
Toma de AURICULARES
La salida de AURICULARES (“PHONES”) le
permite conectar unos auriculares para
escuchar música en la intimidad. Esta salida
incluye una toma estereofónica estándar de
1/4”. Si sus auriculares incorporan un tipo
de clavija diferente, como por ejemplo una
de tipo “mini” de 1/8”, entonces necesitará
el adaptador correspondiente. Contacte con
su distribuidor autorizado de productos Rotel
para que le aconseje al respecto.
NOTA
: La conexión de los auriculares no
interrumpe el envío de señal a las salidas del
RA-1060. Si desea silenciar las cajas
acústicas para llevar a cabo una escucha en
la intimidad, utilice el selector SPEAKERS.
Selector SPEAKERS
Un conmutador giratorio de cuatro posiciones
situado en el panel frontal determina qué pareja
de cajas acústicas – en caso de que las hayaestá activa. Ajuste el selector SPEAKERS tal
como sigue:
OFF: No se oirá ninguna caja acústica. Utilice
esta posición cuando escuche música con
auriculares.
A: Se oirán las cajas acústicas conectadas
a los terminales SPEAKERS A.
Page 33

33
Español
B: Se oirán las cajas acústicas conectadas a
los terminales SPEAKERS B.
A+B: Se oirán simultáneamente las cajas
acústicas conectadas a los terminales
SPEAKERS A y SPEAKERS B.
Circuitería de Protección
Un circuito térmico de protección protege el
amplificador frente a posibles daños causados
por condiciones de funcionamiento extremas
o erróneas. Al contrario de lo que sucede en
muchos diseños de su clase, la circuitería de
protección del RA-1060 es completamente
independiente de la señal de audio y por tanto
no tiene ningún impacto en las prestaciones
musicales. De este modo, el circuito de
protección monitoriza la temperatura de los
dispositivos de salida y desconecta el
amplificador si la temperatura de funcionamiento
excede los límites de seguridad prefijados.
En el caso de que se detectara un
funcionamiento defectuoso de su RA-1060,
el aparato dejaría de funcionar. Si esto sucede,
desconecte completamente el amplificador,
déjelo enfriar durante varios minutos e intente
identificar y corregir el problema. Cuando
vuelva a poner de nuevo en marcha el aparato,
el circuito de protección se reinicializará
automáticamente y el indicador luminoso de
protección debería desactivarse.
Problemas y Posibles
Soluciones
El Indicador Luminoso de
Puesta en Marcha No Se Activa
El indicador luminoso de puesta en marcha
debería activarse en el momento de conectar
el RA-1060 a una toma de corriente eléctrica
y pulsar el botón POWER. En caso de que
no se active, compruebe dicha toma con otro
dispositivo eléctrico, como por ejemplo una
bombilla, y asegúrese de que el mismo no esté
controlado por un conmutador situado en su
posición Off.
Sustitución del Fusible
En el caso de que otro dispositivo eléctrico
conectado a la toma anterior funcione
correctamente y el indicador luminoso de
puesta en marcha del RA-1060 siga sin
activarse cuando este último esté conectado
a dicha toma, significa que es muy posible
que el fusible de protección interno del aparato
se haya fundido. Si usted cree que ha sucedido
esto, contacte con su distribuidor autorizado
de productos Rotel para que le proporcione
uno nuevo y se lo instale adecuadamente.
No Hay Sonido
Verifique la fuente de señal para asegurarse
de que esté funcionando correctamente.
Asegúrese de que los cables que van desde
la fuente de señal a las entradas del RA-1060
estén conectados adecuadamente. Asegúrese
de que el selector LISTENING coincida con
la entrada adecuada. Asegúrese de que el
selector SPEAKERS esté situado en la posición
correcta. Compruebe el cableado entre el
RA-1060 y las cajas acústicas.
Características Técnicas
Potencia Continua de Salida
60 vatios/canal sobre 8 ohmios
(20-20.000 Hz, THD <0’03%, 8 ohmios)
Distorsión Armónica Total (20-20.000 Hz)
<0’03% a la potencia nominal,
a la mitad de la misma o a 1 vatio
Distorsión por Intermodulación
(60 Hz:7 kHz, 4:1)
<0’03% a la potencia nominal,
a la mitad de la misma o a 1 vatio
Respuesta en Frecuencia
(todas las entradas)
10-100.000 Hz, +1 dB, –3 dB
Factor de Amortiguamiento
(20-20.000 Hz, 8 ohmios)
150
Sensibilidad/Impedancia de Entrada
160 mV/33 kohmios
Nivel de Entrada Máximo
5 V
Nivel/Impedancia de Salida del
Preamplificador
1 V/470 ohmios
Relación Señal/Ruido
(norma IHF/ponderación A)
mayor que 95 dB
Alimentación
Versión para EE.UU.: 115 voltios/60 Hz
Versión para Europa: 230 voltios/50 Hz
Consumo
300 vatios
Dimensiones (An x Al x P)
430x92x355 mm
Peso Neto
7’8 kg
Todas estas especificaciones son correctas en el
momento de la impresión del presente manual de
instrucciones. Rotel se reserva el derecho a
realizar modificaciones en las mismas sin previo
aviso.
Rotel y el logotipo Rotel HiFi son marcas
registradas de The Rotel Co. Ltd., Tokio, Japón.
La mayoría de dificultades que suelen
producirse en los sistemas de audio son el
resultado de conexiones realizadas
incorrectamente o ajustes inapropiados. En
caso de que usted se encuentre con algún
problema, aísle en primer lugar el área
afectada, compruebe los ajustes de control
realizados, determine la causa del fallo y haga
los cambios necesarios. Si se ve incapaz de
hacer funcionar de nuevo al RA-1060,
considere las sugerencias que le damos para
las siguientes condiciones:
Page 34

RA-1060 Geïntegreerde Stereo Versterker
34
Inhoud
De in vierkanten geplaatste cijfers verwijzen naar
de figuren van de RA-1060 en de in vierkanten
geplaatste letters naar die van de RR-AT92.
1: De bedieningsorganen en aansluitpunten 6
2: De in- en uitgangsverbindingen 7
Wij van Rotel .......................................34
Aan de slag met de RA-1060 ................34
Het uitpakken 35
Een plek voor de RA-1060 35
De bekabeling 35
De afstandsbediening ...........................35
De bedieningsorganen voor het geluid
35
De CD functies 35
De DVD functies 35
De tuner functies 35
Het afstandsbedieningsoog 35
Het inbrengen van de batterijen 36
De luidsprekeraansluitingen ..................36
Luidsprekerkeuze 36
Keuze van de luidsprekerkabel 36
Polariteit en fase 36
De luidsprekeraansluitingen 36
Het aansluiten van de ingangen ............36
De lijnniveau-ingangen 36
De verbindingen met
een opname apparaat 36
De voorversterker uitgangen 37
Het aansluiten op het lichtnet ...............37
De lichtaansluiting 37
De aan/uitschakelaar
met bijbehorende indicator 37
De extra lichtnetvoorzieningen op de
noordamerikaanse versie 37
De 12v. TRIGGER uitgang 37
De bedieningsorganen...........................37
De volumeregelaar
“VOLUME” 37
De klankkleurkeuzeschakelaar
“CONTOUR” 37
De ingangskeuzeschakelaar
“LISTENING” 37
De opname keuzeschakelaar
“RECORDING” 37
De stiltetoets “MUTE” 37
De hoofdtelefoonuitgang “PHONES” 37
De luidsprekerkeuzeschakelaar
“SPEAKERS” 38
Het beveiligingscircuit...........................38
Wat te doen bij problemen? ..................38
De lichtnet-indicator werkt niet 38
Het vervangen van de zekering 38
Hij geeft geen geluid 38
Technische gegevens .............................38
Wij van Rotel
Het is alweer meer dan 40 jaar geleden dat
een familie met een gepassioneerde
betrokkenheid bij muziek besloot om zelf
geluidsapparatuur van onberispelijke kwaliteit
te gaan vervaardigen onder de naam Rotel.
Door de loop der jaren heen is die passie
gebleven en het familiedoel om audiofielen
en muziekliefhebbers voor aantrekkelijke
prijzen topkwaliteit te bieden wordt door iedere
Rotelmedewerker gesteund.
De technici werken als een hecht team al
tweakend en luisterend totdat ieder nieuw
produkt dat muzikale niveau heeft bereikt dat
hun bij de aanvang voor ogen stond. Zij
worden volkomen vrijgelaten in hun keuze van
componenten, waar ze ook van de wereld
vandaan moeten komen. In Rotel apparatuur
kunt u condensatoren vinden uit Duitsland en
Engeland of half geleiders uit Amerika en
Japan, terwijl de ringkerntransformatoren in
eigen huis worden vervaardigd.
Onze goede reputatie werd gevestigd door
honderden waarderende testrapporten en vele
onderscheidingen die wij hebben mogen
ontvangen van mensen die uit professie dag
in dag uit naar muziek luisteren. Hun kritiek houdt
ons bij de les: het vervaardigen van muzikale,
betrouwbare en betaalbare apparatuur.
Door de aanschaf van dit produkt danken wij
u voor het in ons gestelde vertrouwen en
wensen wij u er veel en langdurig plezier mee.
Aan de slag met de
RA-1060
Wij danken u voor de aankoop van onze
RA-1060 versterker. Wij zijn ervan overtuigd,
dat de muziek d.m.v. deze RA-1060 ten gehore
gebracht, voor u een jarenlange bron van
plezier zal zijn.
De RA-1060 is een topkwaliteit versterker met
vele mogelijkheden. Hij is zo ontworpen dat
hij de volledige dynamiek en de meest subtiele
nuances van uw favoriete muziek met het
grootste gemak kan weergeven. Om dit
allemaal mogelijk te maken is de RA-1060
uitgerust met een nauwkeurig geregelde
voeding. Deze voeding is samengesteld uit een
speciaal voor Rotel ontworpen ringkerntransformator en z.g. “split-foil” condensatoren.
Zij zorgen voor de energie die nodig is om
Page 35

35
Nederlands
aan alle eisen van het muzieksignaal te kunnen
voldoen. Het is een kostbare manier van
versterkers maken, maar het is dan ook voor
een goede zaak:
De beide circuits op de printboards zijn
volkomen symmetrisch opgebouwd. Deze
symmetrie zorgt ervoor dat de integriteit van
het signaal gewaarborgd blijft. Bij ongelijke
signaalwegen krijgt u nl. een licht tijdsverschil
tussen het linker en rechter kanaal, met alle
vervelende gevolgen van dien. In de
signaalweg op de PCB’s gebruiken wij
uitsluitend metaalfilm-weerstanden en
polystyreen- of polypropyleen condensatoren,
want alle aspecten van dit ontwerp zijn maar
met één doel voor ogen gemaakt: de
natuurgetrouwe reproduktie van muziek.
Bij dit alles hebben wij nog wat leuke dingen
t.b.v. het bedieningsgemak toegevoegd. Zoals
een gescheiden schakeling voor luisteren en
opnemen. U kunt nu opnemen van de ene bron
terwijl u luistert naar de andere.
In zowel bediening als installatie is de RC-1060
een recht toe recht aan ontwerp. Heeft u
ervaring met andere apparatuur dan zal u dat
spoedig ontdekken. De plugjes aansluiten, de
steker in het stopcontact en genieten maar.
muziek.
Het uitpakken
Haal het apparaat voorzichtig uit de
verpakking. Vergeet de afstandsbediening en
andere accessoires niet. Bewaar als het even
kan de verpakking. Altijd handig bij een
eventuele verhuizing of wanneer het apparaat
opgestuurd moet worden voor reparatie, want
er is geen betere bescherming tijdens transport
dan zijn eigen doos.
Wanneer u van de ongelofelijk lange garantie
van 5 jaar wilt genieten moet u wel even uw
garantiebewijs invullen, door uw dealer laten
afstempelen, één deel opsturen naar de
importeur en uw deel goed bewaren bij de
nota van uw leverancier.
Een plek voor de RA-1060
De plaats voor het apparaat moet vlak zijn,
vrij van vocht, trillingen en hoge temperaturen.
Stel het apparaat niet bloot aan directe
zonnestralen en sluit het niet op in een niet
geventileerde ruimte.
De RA-1060 kan tijdens zijn werk redelijk warm
worden. De koelribben en de ventilatieopeningen zijn er echter voor om deze warmte
adequaat af te afvoeren. Die ventilatie-
openingen aan de bovenkant moeten vrij zijn
en de hele versterker moet een ruimte van
ongeveer 10cm. om zich heen hebben. Alleen
onder deze omstandigheden kan de koeling
goed zijn werk doen.
Wij raden u aan de RA-1060 te gebruiken
in een speciaal audiomeubel. Daarin kan hij
nooit
op zijn eigen plank staan. Zet hem
een eindversterker. Zodoende voorkomt u
oververhitting, brom en interactie met andere
componenten uit de hi-fi keten. Goede
audiomeubels zijn stevig gemaakt en
onderdrukken en verminderen daarmee valse
resonanties, aartsvijand nummer 1 in een
muziekinstallatie. U zou het niet zeggen maar
een meubel kan dus in goede en kwade zin
uw installatie danig beïnvloeden. Vraag uw
Rotel dealer om advies, hij weet er alles van!
De RA-1060 is uitgerust met een infrarood
afstandsbediening en de versterker moet dus
uit dien hoofde visueel bereikbaar zijn voor
de meegeleverde RR-AT92.
op
De bekabeling
Hou de lichtnet-, digitale- en analoge
signaalkabels uit elkaar. Dit vermindert de kans
dat het lichtnet of de digitale informatie invloed
kan uitoefenen op het analoge signaal. Ook
het gebruik van hoge kwaliteits
verbindingskabels voorkomt signaalvervuiling
van buitenaf. Als het goed is weet uw
onvolprezen Rotel leverancier hier alles van.
De afstandsbediening
Zoals boven al gemeld hebben wij bij de
RA-1060 de afstandsbediening RR-AT92
gedaan en deze bedient bijna alle functies
van deze versterker. Daarbij kan hij ook de
basisfuncties van vele Rotel cd- en dvd-spelers
en tuners bedienen.
De bedieningsorganen voor het
geluid
De RR-AT92 dupliceert hoofdzakelijk de
basisfuncties van de RA-1060 op de voorkant
van de versterker. Wanneer op beide
apparaten de functies aanwezig zijn worden
bij de uitleg zowel een nummer (zie de
betreffende versterkerfiguur) en een letter (zie
de betreffende afstandsbedieningsfiguur)
weergegeven. Voorbeeld: u kunt het volume
regelen middels zowel de volumeregelaar op
de versterker
als de betreffende toetsen
op de afstandsbediening. Is er slechts één
aanduiding dan betreft het een bedieningsfunctie die slechts op één van beide voorkomt.
De CD functies
De afspeel- (PLAY), stop- (STOP), pauze(PAUSE), nummerkeuze- (TRACK +/–), en de
hussel- (RANDOM) functie en de numerieke
toetsen (1-10) van vele Rotel cd-spelers worden
bediend wanneer de CD toets op de
afstandsbediening wordt gebruikt.
De DVD functies
De afspeel- (PLAY), stop- (STOP), pauze(PAUSE), nummerkeuze- (TRACK +/–), van de
Rotel dvd-spelers worden bediend wanneer
de AUX 1 toets op de afstandsbediening wordt
gebruikt.
De tuner functies
Nadat u de toets “TUNER” op de
afstandsbediening heeft ingedrukt komen de
toetsen “BAND”, “TUNING” en andere met
een Rotel tuner verband houdende toetsen tot
uw beschikking.
Van fabriekswege uit kunt u met de RR-AT92
de Rotel tuner RT-955 bedienen. U kunt de
afstandsbediening echter omprogrammeren
voor gebruik met de Rotel RT-940AX. Dit
omprogrammeren hoeft u slechts eenmaal te
doen:
Om hem om te programmeren voor
de RT-940AX: druk tegelijkertijd op de
toetsen “POWER” en “2”.
Om hem om te programmeren voor
de RT-955: druk tegelijkertijd op de toetsen
“POWER” en “1”.
Het afstandsbedieningsoog
Het oog op de voorkant van de versterker
ontvangt de commandosignalen van de
afstandsbediening. Zorg ervoor dat niets de
signalen in de weg staat anders kan de
afstandsbediening niet op de juiste wijze zijn
werk verrichten.
Direct zonlicht en/of beïnvloeding van
halogeenverlichting dient ook vermeden te
worden. Alhoewel de afstandsbediening
weinig energie gebruikt is regelmatige controle
van de batterijen een must voor het goed
functioneren van de afstandsbediening.
Page 36

RA-1060 Geïntegreerde Stereo Versterker
36
EXTRA INFORMATIE
juist te gebruiken, moet u hem richten op de
voorkant van de versterker.
: Om de afstandsbediening
Het inbrengen van de
batterijen
De meegeleverde AAA batterijen (minipenlights) moeten geïnstalleerd worden voordat
u de afstandsbediening kan gebruiken.
Daarvoor opent u het klepje achterop de
afstandsbediening. U brengt nu de batterijen
aan op de manier zoals op de
afstandsbediening staat aangegeven. Test nu
de RR-AT92 op juiste werking en sluit het
batterijcompartiment. Wanneer de batterijen
uitgeput raken zal de afstandsbediening de
RA-1060 niet meer altijd correct instrueren.
Verse batterijen is dan ons advies.
EXTRA INFORMATIE
voor een langere periode niet gebruikt,
adviseren wij u de batterijen te verwijderen.
Laat ook geen oude batterijen in de
afstandsbediening vanwege het gevaar van
lekken.
: Als u de afstandsbediening
De luidsprekeraansluitingen
Zie figuur 2
De RA-1060 heeft de mogelijkheid twee stel
luidsprekers aan te sluiten: een stel “A” en een
stel “B”. Met de luidsprekerkeuzeschakelaar
“SPEAKERS” (4) kunt u uw keuze aan de
versterker kenbaar maken.
Luidsprekerkeuze
Als u slechts één stel luidsprekers op de
RA-1060 wilt aansluiten mag de impedantie
van deze luidsprekers 4Ω zijn. Als u echter
twee stel luidsprekers op de RA-1060 wilt
aansluiten mag de impedantie van iedere
individuele luidspreker niet lager zijn dan 8Ω.
Hoewel de opgegeven impedantie van de
meeste luidsprekers verre van precies is, zal
de RA-1060 weinig problemen hebben met
de meeste luidsprekers. Heeft u twijfels
raadpleeg dan uw Rotel leverancier.
Keuze van de luidsprekerkabel
We kunnen het wel van de daken roepen:
onderschat niet het belang van een goede
luidsprekerverbinding. U kunt natuurlijk gewoon
draad gebruiken, maar dat is zonde van de
versterker die u zojuist heeft aangeschaft. Als
u er niet zoveel aandacht aan wilt schenken
koop dan in ieder geval kabel die zo dik
mogelijk is. Uw versterker is echter meer waard:
echte hoogwaardige luidsprekerkabel. Er zijn
vele soorten en kwaliteiten, raadpleeg uw
vakkundige Rotel leverancier, hij kan u van
de juiste informatie over dit zeer belangrijke
onderwerp voorzien.
Polariteit en fase
Zéér belangrijk: houdt u de fase in de
gaten? Goed luidsprekerkabel is gemerkt hetzij
met een tekst of met een kleur op een van de
draden. Zorg dat de rode uitgang van de
versterker ook met de rode of + van de
luidspreker wordt verbonden. Er gaat niets stuk
als u deze laatste handelingen verkeerd doet,
maar de muziek gaat zo beroerd klinken!
Mocht u toch nog twijfels hebben over de juiste
polariteit, dan hoeft u de draden van maar
één luidspreker te verwisselen. Hoe herkent
u de juiste polariteit? Zet de twee luidsprekers
met de fronten ongeveer 7,5cm. tegenover
elkaar. Speel een stukje muziek met veel lage
tonen (b.v. orgel). De verbinding met de meeste
lage tonen-reproductie is de juiste. Hoe komt
dat: bij aansluiting “in fase” versterken de
luidsprekers elkaar, maar “uit fase” heffen ze
elkaars geluid op.
De luidsprekeraansluitingen
Bij het aansluiten van de luidsprekers moeten
alle componenten uitstaan! Als u uw
luidsprekers zonder pluggen o.i.d. aansluit,
stript u dan ongeveer 1,5cm. van de
luidsprekerkabel en steek deze door de
aansluiting nadat u de knop van de uitgang
heeft losgedraaid en draai deze dan weer
(GOED) vast. Nogmaals: rood aan rood en
zwart aan zwart.
Zorg ervoor dat er geen losse draadjes
uitsteken, deze kunnen sluiting veroorzaken.
Gebruikt u de bekende vorkjes dan kunt u deze
bevestigen achter de losgedraaide
draaiknoppen. Draai ze weer goed, maar niet
overdreven vast. Herhaal deze handelingen
voor alle vier de draden. Gebruikt u tegen de
Europese regels toch luidsprekerpluggen dan
kunt u die direct in het middengat van de
aansluiting steken.
EXTRA INFORMATIE
u bij het monteren van de luidsprekerbekabeling geen sluiting maakt. Uw versterker
vindt sluiting heel vervelend.
: Controleer zorgvuldig of
Het aansluiten van de
ingangen
De RA-1060 heeft lijnniveau ingangen voor
de bronnen, aansluitingen voor opname
apparatuur en een
voorversterker uitgang voor het aansturen van
een externe eindversterker.
EXTRA INFORMATIE
komen: zet alle apparatuur uit wanneer u de
onderstaande verbindingen maakt.
De lijnniveau-ingangen
Zie figuur 2
De RA-1060 bezit vier stel conventionele
lijningangen voor cd-spelers, video recorders,
tuners laserdisc spelers of een dvd-speler. De
naamplaatjes zijn: CD, TUNER, AUX 1 en AUX
2. “LEFT” en “RIGHT” staan uiteraard voor links
en rechts, let u er wel op dat u dat, i.v.m. een
correct stereobeeld, juist aan sluit. Nogmaals
wij adviseren u kabels van een beter type te
gebruiken dan welke bij gemiddelde
apparatuur wordt bijgeleverd. Uw RA-1060
leverancier weet vast welk soort wij bedoelen.
De verbindingen met een
opname apparaat
Zie figuur 2
“TAPE 1” en “TAPE 2” zijn z.g. dubbelaansluitingen: twee voor opname en twee voor
weergave en werken op lijnniveau. Ze zijn
bedoeld voor het aansluiten van een
cassettedeck, ze kunnen natuurlijk voor alle
soorten opname/weergave apparatuur
gebruikt worden, zoals voor een hi-fi
videorecorder, een minidiscrecorder etc.
De “IN” aansluitingen zijn ingangen en
bedoeld voor de uitgangen (weergave) van
het apparaat. De “OUT” aansluitingen zijn
uitgangen en bedoeld voor de ingangen
(opname) van het apparaat. Ook hier staan
“LEFT” en “RIGHT” voor links en rechts, sluit
dat correct aan en nogmaals: gebruik goed
kabelmateriaal.
EXTRA INFORMATIE
uiteraard voor alle soorten lijnbronnen
gebruikt worden. Als de uitgangen maar niet
gebruikt worden.
: Om ongelukken te voor-
: De tape-ingangen kunnen
Page 37

37
Nederlands
De voorversterker uitgangen
De RA-1060 is uitgerust met een paar
geregelde voorversterkeruitgangen voor het
eventueel aansturen van een extra
eindversterker of een processor. Het zijn
gewone cinch aansluitingen, gewoonlijk
geschikt voor iedere eindversterker. We zeggen
het nog maar eens: gebruik hier ook goede
verbindingskabels. Ook hier: denk om links
(wit) en rechts (rood).
Het aansluiten op het
lichtnet
De lichtaansluiting
De RA-1060 gebruikt nogal wat energie,
daarom adviseren wij u het apparaat niet aan
te sluiten via een verlengsnoer, maar rechtstreeks
of via een hoogwaardig lichtnetfilter op het
lichtnet. Check even of de groep waarop u uw
hele installatie wilt aansluiten wel ruim genoeg
gezekerd is. Trek nooit de steker uit de
wandcontactdoos door aan het snoer te trekken.
Wanneer de RA-1060 eenmaal aangezet is
middels de toets “POWER” kan hij in z.g.
“STAND-BY” gezet worden middels de toets
“POWER” (D) op de afstandsbediening.
De extra lichtnetvoorzieningen
op de noordamerikaanse
versie
Zoals in de kop reeds aangeduid, is dit een
voorziening die alleen voorkomt op de noord
Amerikaanse versie van de RA-1060.
De 12v. TRIGGER uitgang
Er zijn een paar Rotel eindversterkers die
middels een 12 volts triggersignaal op afstand
aan/uit gezet kunnen worden. De aansluiting
“12V TRIGGER OUT” geeft dit signaal.
Wanneer u de RA-1060 aanzet komt het
signaal op deze aansluiting en brengt het de
betreffende eindversterkers tot leven. Zet u de
RA-1060 weer uit (STAND-BY) dan gaat ook
die eindversterker weer uit.
De bedieningsorganen
De ingangskeuzeschakelaar
“LISTENING”
Met de luisterkeuzeschakelaar “LISTENING”
kiest u de bron waarnaar u wenst te luisteren.
Deze schakelaar werkt volkomen onafhankelijk
van de “RECORDING” schakelaar. U kunt dus
tijdens het opnemen naar een andere bron
luisteren, dan waarvan u op dat moment een
opname maakt. Deze functie vindt u ook op
de afstandsbediening.
De opname keuzeschakelaar
“RECORDING”
Zet de opname keuzeschakelaar (“RECORDING”) op de bron waarvan u wenst op te
nemen. De stand van de volumeregelaar en
de toonregeling hebben geen invloed op de
opname.
Wanneer u van een opnameapparaat gebruikt
maakt met een driekoppen functie, bent u
instaat om tijdens het opnemen uw opname
te beluisteren de z.g. “naband” controle. U
doet dat door de luisterkeuzeschakelaar
(“LISTENING”) op het opnemende apparaat
te zetten b.v. “Tape 1”.
Dit apparaat is ontworpen om aangesloten te
worden op het lichtnet (220/230 Volts
wisselspanning). Sluit het nooit aan op een
lichtnet met een hoger voltage want dit kan
moeilijkheden veroorzaken. Heeft u twijfel over
het correcte voltage: het staat genoteerd op
de sticker op de achterkant van het apparaat.
EXTRA INFORMATIE
verhuizen naar een land met een ander
voltage, dan is de versterker op dat andere
voltage in te stellen. Doe deze operatie NIET
zelf, maar laat hem verrichten door uw Rotel
leverancier. Deze handelingen zijn voor een
niet ingewijde niet van gevaar ontbloot.
Als u van plan bent om langdurig van huis te
zijn, adviseren wij u uw gehele beeld en
geluidsinstallatie (dus ook de RA-1060) van
het lichtnet te ontkoppelen.
: Mocht u ooit moeten
De aan/uitschakelaar
met bijbehorende indicator
Met het indrukken van de “POWER” toets op
het front van de versterker, zet u het apparaat
aan, het lampje erboven brandt nu. Nog een
keer drukken zet het apparaat weer uit: het
lampje gaat weer uit.
De onderstaande toetsen en knoppen zijn om
de RA-1060 te bedienen.
De volumeregelaar
“VOLUME”
De “VOLUME” regelaar regelt het volume van
beide kanalen tegelijk: rechtsom vermeerderten linksom vermindert het niveau. De alternatieve
manier werkt via de afstandsbediening met de
“VOL” toetsen.
De klankkleurkeuzeschakelaar
“CONTOUR”
I.p.v. van conventionele toonregeling bezit de
RA-1060 een z.g. contourschakeling met 5
mogelijkheden. Iedere mogelijkheid biedt u
een gefixeerde toonregelstand t.w.:
OFF: de contourschakelaar is uitgeschakeld:
de versterker laat horen zoals hij is: PUUR!!
L-1: geeft een versterking in het lagetonengebied
(+ 3 dB bij 100 Hz.)
L-2: geeft nog meer versterking in het
lagetonengebied (+ 4 dB bij 100 Hz.)
H: geeft een versterking in het hogetonengebied
(+ 3 dB bij 10000 Hz.)
Wanneer u geen opnames maakt is het
raadzaam de opname keuzeschakelaar uit
(“OFF”) te zetten.
EXTRA INFORMATIE
apparaten op de RA-1060 heeft aangesloten
is het mogelijk de opname van de machine die
aangesloten is op “TAPE 1” over te schrijven
naar de machine die aangesloten is op “TAPE
2”. (niet andersom)
: Wanneer u twee opname-
De stiltetoets “MUTE”
U kunt middels de afstandsbediening de
versterker acuut het zwijgen opleggen door
op “MUTE” te drukken. Drukt u nogmaals op
deze toets dan herneemt de muziek zich weer
op het oude geluidsniveau. Tijdens het zwijgen
knippert het lampje in de volumeregelaar van
de versterker.
De hoofdtelefoonuitgang
“PHONES”
De “HEADPHONE” aansluiting is voor gebruik
van de RA-1060 met een hoofdtelefoon. Indien
uw hoofdtelefoon niet is voorzien van de juiste
plug, dan weet uw handelaar daar ongetwijfeld
raad mee.
LH: geeft een combinatie van standen L-2 en
H.
Page 38

RA-1060 Geïntegreerde Stereo Versterker
38
EXTRA INFORMATIE
: Wanneer u van de
hoofdtelefoon-uitgang gebruik maakt, wordt
het signaal naar de luidsprekeruitgangen niet
onderbroken. Wilt u de rest van het huis dus
in ruste houden, dan moet u uw luidsprekers
uitzetten met de luidsprekerkeuzeschakelaar
“SPEAKERS”.
De luidsprekerkeuzeschakelaar
“SPEAKERS”
Met deze vierstandenschakelaar kunt u kiezen
tussen de twee paar aangesloten luidsprekers.
OFF: Alle luidsprekers zijn uitgeschakeld.
Gebruik deze positie om naar de hoofdtelefoon
te luisteren.
A: De luidsprekers aangesloten op uitgangen
A zijn nu ingeschakeld.
B: De luidsprekers aangesloten op uitgangen
B zijn nu ingeschakeld.
A+B: Beide paren luidsprekers zijn nu
ingeschakeld.
Het beveiligingscircuit
De RA-1060 is uitgerust met een thermische
beveiliging, welke de versterker behoedt voor
schade veroorzaakt door foutief of extreem
gebruik. Niet zoals bij vele andere versterkers,
werkt dit beveiligingscircuit onafhankelijk van
het audiosignaal dus heeft het geen invloed
op de geluidsweergave. De beveiliging houdt
continu de temperatuur van de eind- trappen
in de gaten en schakelt de versterker uit
wanneer deze te heet wordt.
moet, probeer dan door elimineren er achter
te komen waar het probleem zit. Werkt dit ook
niet volgt u dan onderstaande suggesties:
De lichtnet-indicator werkt niet
De lichtnet-indicator gaat branden zodra de
RA-1060 wordt ingeschakeld middels aan/
uitschakelaar. Doet de indicator het niet,
controleer dan de lichnetaansluiitng waarop
de RA-1060 is aangesloten, met een ander
elektrisch apparaat, b.v. een schemerlamp.
Het vervangen van de zekering
Ontdekt u met de schemerlampproef dat er
wel degelijk spanning staat op het stopcontact
en de lichtnet-indicator doet het nog steeds niet,
dan kon de interne zekering van de RA-1060
wel eens ter ziele zijn. Laat uw handelaar dit
klusje voor u klaren.
Hij geeft geen geluid
De indicator brandt wel, maar u hoort nog
steeds niets. Controleer dan of de verbinding
tussen de bron en de RA-1060 wel o.k. is.
Controleer of de schakelaar “LISTENING” in
de juiste stand staat. Hoe is de kwaliteit van
de luidsprekerkabels? Na al deze controles
moet ‘ie het doen. Zo niet: u weet uw steun
en toeverlaat, uw Rotel leverancier, te vinden.
Technische gegevens
Continue uitgangsvermogen
(20-20.000 Hz. < 0,03% THD, 8
60 Watts per kanaal
Totale harmonische vervorming
(20-20.000 Hz.)
< 0,03% bij het opgegeven vermogen,
half vermogen en 1 watt
Intermodulatie vervorming
(60 Hz : 7 kHz., 4 : 1)
< 0,03% bij het opgegeven vermogen,
half vermogen en 1 watt
Frequentiebereik van alle ingangen
10Hz-100kHz, +1, –3dB
Dempingsfactor (20-20.000 Hz. aan 8
150
Ingangsimpedantie/gevoeligheid
160 mV/33 kΩ
Oversturingsgrens
5 V
Max. uitgangsspanning/impedantie
van voorversterker
1 V/470Ω
Signaal/ruisverhouding (IHF, A netwerk)
>95 dB
Lichtnetspanning
115V/60Hz (USA)
230V/50Hz (Europa)
Vermogensopname
300 Watts
Afmetingen (b x h x d)
430x92x355 mm
Netto gewicht
7,8 kg
Alle gegevens onder voorbehoud
Rotel houdt het recht om wijzigingen tussendoor
aan te brengen.
Rotel en het Rotellogo zijn gedeponeerde
handelsmerken.
ΩΩ
Ω)
ΩΩ
ΩΩ
Ω)
ΩΩ
Gebeurt dit, schakel dan de versterker uit, laat
hem gedurende enkele minuten afkoelen en
probeer er ondertussen achter te komen wat
de oorzaak van het probleem zou kunnen zijn
geweest. Wanneer u de versterker weer
aanzet, herstelt het beveiligingscircuit zichzelf.
Wat te doen bij problemen?
Als er al problemen zijn, zijn deze meestal te
wijten aan slechte verbindingen, slecht
verbindingsmateriaal of een verkeerde stand
van de knoppen/schakelaars.
Controleer bij niet functioneren of alle
schakelaars en knoppen in de juiste stand staan.
Functioneert het één en ander niet zoals het
Page 39

39
Page 40

The Rotel Co. Ltd.
10-10 Shinsen-Cho
Shibuya-Ku
Tokyo 150-0045
Japan
Phone: +81 3-5458-5325
Fax: +81 3-5458-5310
Rotel of America
54 Concord Street
North Reading, MA 01864-2699
USA
Phone: +1 978-664-3820
Fax: +1 978-664-4109
Rotel Europe
Meadow Road
Worthing, West Sussex BN11 2RX
England
Phone: +44 (0)1903 524 813
Fax: +44 (0)1903 524 831
Rotel Deutschland
Kleine Heide 12
D-33790 Halle/Westf.
Germany
Phone: +49 05201-87170
Fax: +49 05201-73370
www.rotel.com
082 OM-RA-1060 012901
English • Français • Deutsch • Italiano • Español • Nederlands
 Loading...