

Page 1
Rollei Prego 145
Hinweise zum Gebrauch
Instructions for use
1
Page 2
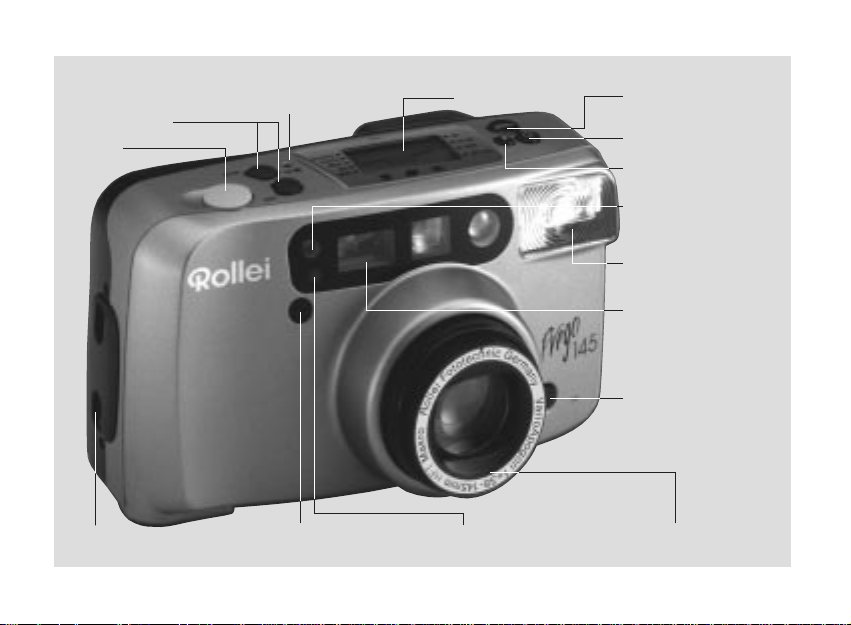
Teilebezeichnungen
Zoom-Taste
Zoom button
(TELE) + (WIDE)
Auslöser
Shutter button
Taste zur Rückspulung teilbelichteter Filme
Mid-roll rewinding button
LCD-Monitor
LCD panel
Funktionswähler
Function mode selection
Selbstauslösertaste
Self-timer mode selection
Blitztaste
Flash mode selection
Belichtungsmeßfenster
Exposure sensor
Blitzgerät
Flash
Sucherfenster
Finder window
Taste für
Unendlich-Einstellung
Infinite Landscape
mode button
Schlaufenhalterung
Strap holder
2
Empfänger für Fernauslösung
Remote control sensor
Selbstauslöserlampe
Self-timer lamp
Objektivabdeckung
Lens cap
Page 3
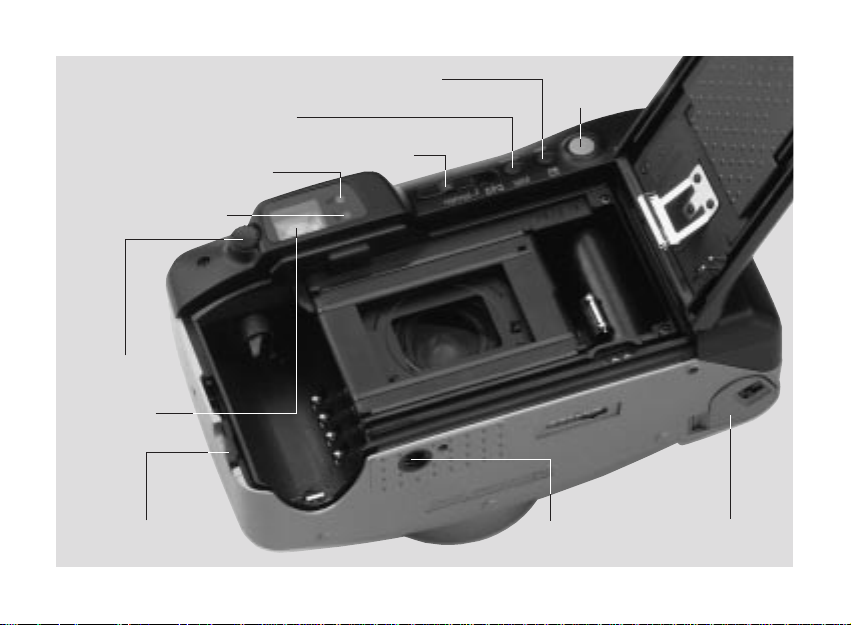
Taste zur Verringerung roter Augen und Gegenlichtkorrektur
Red eye reduction & and back light control
Taste für Schnappschuß-Einstellung
Snap button
Schärfenindikator (grüne LED)
Autofocus indicator (green LED)
Bereitschaftslampe (rote LED)
Flash indicator (red LED)
Dioptrien-Korrektur
Dioptre setting dial
Sucherokular
Viewfinder eyepiece
Panorama-Schalter
Panorama switch
Hauptschalter
ON/OFF button
Rückwand-Entriegelung
Back-cover release knob
Stativgewinde
Tripod socket
Batteriefachdeckel
Battery chamber cover
3
Page 4

INHALT
Bitte lesen Sie diese Anleitung vor Benutzung der
Kamera aufmerksam durch.
Besondere Hinweise ...................................................... 5
In folgenden Fällen bleibt der Auslöser gesperrt .......... 5
LCD-Monitor................................................................... 6
VORBEREITUNGEN
Einlegen der Batterien ................................................... 7
Wechseln der Batterien ................................................. 7
Batterieprüfung .............................................................. 7
Einlegen des Films......................................................... 8
Automatische Filmrückspulung ..................................... 9
Anbringen der Handschlaufe ...................................... 10
Anpassen der Okulareinstellung ................................. 10
Inbetriebnahme der Kamera........................................ 10
DER SUCHER
Bildfeldbegrenzungen ................................................. 11
Sucheranzeigen........................................................... 12
DIE AUFNAHME
Festlegen des Bildausschnitts ..................................... 13
Scharfstellung .............................................................. 14
Schärfenspeicherung .................................................. 14
Belichtung .................................................................... 15
Die richtige Kamerahaltung ......................................... 15
Datenrückwand............................................................ 16
4
ÜBERSICHT ÜBER DIE BETRIEBSARTEN
Betriebsarten ............................................................... 18
Basis-Blitzbetriebsarten ............................................... 19
Erweiterte Blitzbetriebsarten........................................ 20
Selbstauslöserbetriebsarten ........................................ 21
Normal ......................................................................... 22
Fuzzy............................................................................ 23
Step-Zoom ................................................................... 24
Intervallaufnahmen ...................................................... 25
Manuell gesteuerte Langzeitbelichtung (Bulb)............ 26
Porträt-Zoom ................................................................ 27
Reihenaufnahmen ........................................................ 28
Mehrfachbelichtungen................................................. 29
Automatisch gesteuerte Langzeitbelichtung
bei abgeschaltetem Blitz ............................................. 30
BLITZAUFNAHMEN
Blitzreichweiten ............................................................ 31
Aufhellblitz ................................................................... 32
Blitzen mit langen Verschlußzeiten
(Langzeitsynchronisation)............................................ 33
Vorblitz zur Verhinderung des „Rote-Augen-Effektes“ 34
Gegenlichtkorrektur ..................................................... 35
Belichtungskorrektur .................................................... 36
Schnappschußeinstellung ........................................... 37
Nahaufnahmen / Makroaufnahmen ............................. 38
Panorama-Aufnahmen ................................................. 38
Selbstauslöser / Fernauslöser...................................... 39
Fehlersuche ................................................................. 41
Technische Daten ........................................................ 42
Pflege und Aufbewahrung ........................................... 44
Page 5

Besondere Hinweise
• Die Kamera ist nur mit eingelegten Batterien funktionsfähig.
• Zum Betrieb sind zwei 3-V-Lithium-Batterie
(Typ CR-2) erforderlich.
• Beim Einschalten öffnet sich die Objektivabdeckung
automatisch.
• Die Objektivabdeckung darf nicht von Hand geöffnet
werden.
• Der Verschluß kann ausgelöst werden, obwohl kein
Film eingelegt ist! Wenn Sie nach einer langen
Aufnahmepause nicht sicher sind, ob ein Film eingelegt ist, vergewissern Sie sich durch einen Blick auf
das Filmkontrollfenster
In den folgenden Fällen bleibt der Auslöser gesperrt:
• Es sind keine Batterien eingelegt.
• Die Batterien sind erschöpft.
• Die Batterien sind falsch eingelegt.
• Die Kamera ist nicht eingeschaltet.
• Die Schärfe konnte nicht eingestellt werden.
• Eine der Zoomtasten wird betätigt.
• Der Blitz ist eingeschaltet, aber nicht blitzbereit .
• Der Film wird transportiert oder zurückgespult.
• Die Filmpatrone wurde nach der Rückspulung nicht
entnommen
Abbildungen
Alle Beispiel-Bilder finden Sie auf den Seiten 87-88.
Alle Abbildungen, welche die Handhabung der Kamera
demonstrieren, finden Sie auf der hinten eingeklappten
Umschlagseite.
5
Page 6
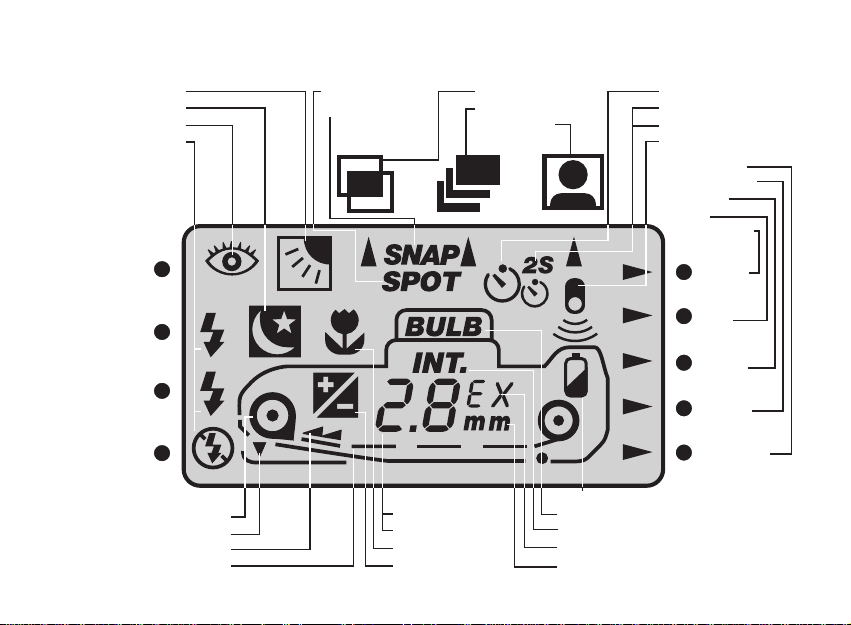
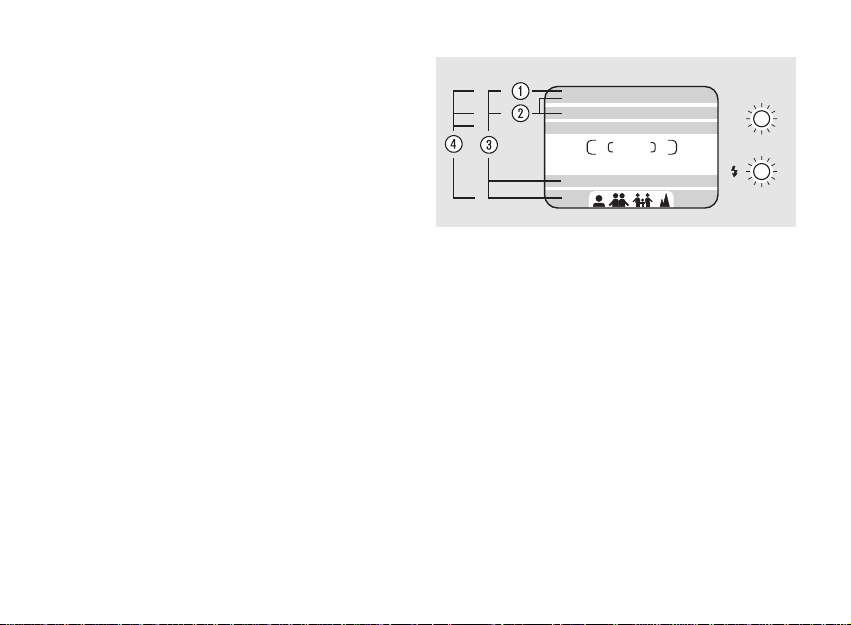
LCD-Monitor
Gegenlichtkorrektur
Langzeitsynchronisation
Verringerung roter Augen
Blitzfunktionen
Spot-Einstellung
Schnappschuß-Einst.
Mehrfachbelichtungen
Reihenaufnahmen
Porträtmodus
Selbstauslöser
Doppel-Selbstauslöser
Vorlaufzeit 2 s.
Fernauslöser
Normal-Modus
Fuzzy-Automatik
Step-Zoom
Intervall
Langzeitbelichtg.
6
red eye
auto
fill-in
off
Filmpatronenanzeige
offene Rückwand
Filmrückspulung
Filmlaufanzeige
Brennweite
Bildzähler
Nah-/Makro-Einst.
Gegenlichtkorrektur
bulb
int
step
fuzzy
normal
Batteriezustand
Langzeitbelichtungen
Intervallaufnahmen
Abk. für Aufn. u. Sek.
Einheit der Brennweite
Page 7

Einlegen der Batterien
1. Öffnen Sie den Batteriefachdeckel, indem Sie den
Schieber in Richtung Objektiv drücken (Abb.1)
2. Legen Sie die Batterien unter Beachtung der
Polungsmarken ein. Die Pluspole beider Batterien
müssen zum Batteriefachdeckel weisen. (Abb.2)
3. Schließen Sie den Batteriefachdeckel und achten Sie
darauf, daß er einrastet.
Wechseln der Batterien
1) Schalten Sie die Kamera aus.
2) Verfahren Sie, wie unter „Einlegen der Batterien“ beschrieben.
Anmerkungen
• Verwenden Sie ausschließlich Batterien vom Typ CR2
• Werden die Batterien bei eingelegtem Film entnommen und wieder eingesetzt, hat das keinen Einfluß auf
die Stellung des Films.
Batterieprüfung
Die Batterieleistung wird bei jedem
Einschalten der Kamera automatisch
geprüft. Gegebenenfalls erfolgt eine
Warnanzeige im LCD-Monitor.
• Keine Anzeige:
Gute Batterieleistung.
• Symbol zur Hälfte schwarz:
Batterieleistung reicht noch für einige Filme aus. Ersatzbatterien sollten bereitgehalten werden.
• Symbol blinkt:
Frische Batterien einsetzen.
Hinweis
• Bewahren Sie die Kamera bei niedrigen Außentemperaturen in einer Mantel- oder Jackentasche auf, um
die Batterien länger einsatzbereit zu halten.
• Halten Sie bei niedrigen Außentemperaturen Ersatzbatterien bereit, da die Batterieleistung bei niedrigen
Temperaturen nachläßt. Bei normalen Temperaturen
erholen sich die Batterien wieder.
7
Page 8
Bei falsch eingelegtem Film
Einlegen des Films
1. Öffnen Sie die Kamerarückwand gemäß Abb. 3, indem Sie den Entriegelungsknopf nach unten drücken.
2. Legen Sie die Filmpatrone in das Patronenfach. Der
Boden der Filmpatrone mit der Aussparung zeigt dabei nach oben. Wenden Sie keine Gewalt an.
3. Ziehen Sie den Filmanfang gemäß Abb. 4 zur Startmarke auf der rechten Kameraseite. Dabei darf der
Film keinen „Buckel“ bilden.
• Sollten Sie zuviel Film aus der Patrone gezogen haben, nehmen Sie die Patrone aus dem Patronenfach
und spulen Sie den Film vorsichtig zurück.
ACHTUNG: In diesem Fall ist es möglich, daß Lichteinfall den Teil des Films beeinträchtigt, auf den das
erste Bild belichtet wird. Machen Sie deshalb vorsichtshalber zwei Aufnahmen vom ersten Motiv.
8
4. Schließen Sie die Kamerarückwand. Achten Sie darauf, daß sie hörbar einrastet.
5. Der Film wird automatisch zur ersten Aufnahme vorgespult. Im LCD-Monitor erscheint die Filmlaufanzeige.
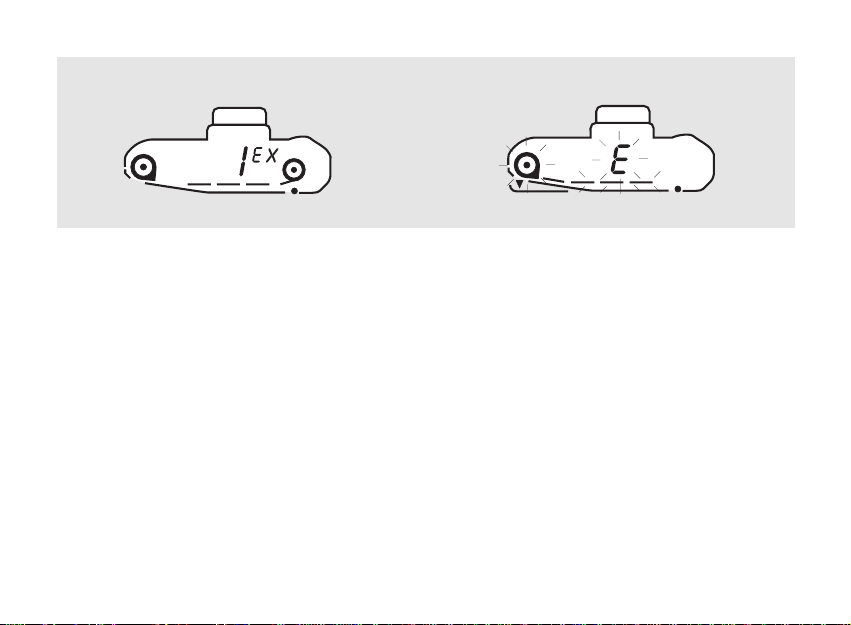
6. Wenn der Film vorgespult ist, wird im Bildzählwerk
des LCD-Monitors <1EX> angezeigt.
7. Wenn im LCD-Monitor die Anzeige <E> blinkt und
der Auslöser gesperrt bleibt, wurde der Film falsch
eingelegt. Öffnen Sie in diesem Fall die Rückwand
und legen Sie den Film erneut ein.
Anmerkungen
• Bei DX-codierten Filmen stellt die Kamera die Filmempfindlichkeit im Bereich von ISO 50 bis 3200 automatisch ein.
• Bei nicht-DX-codierten Filmen stellt die Kamera automatisch eine Filmempfindlichkeit von ISO 100/21° ein.
Page 9

• Sollten Sie tatsächlich einmal einen nicht-DX-codierten Film verwenden, der eine andere Empfindlichkeit
als ISO 100/21° aufweist, unterrichten Sie das Entwicklungslabor unbedingt davon. Oft kann der Unterschied zwischen tatsächlicher Empfindlichkeit und
eingestellter Empfindlichkeit im Labor ausgeglichen
werden.
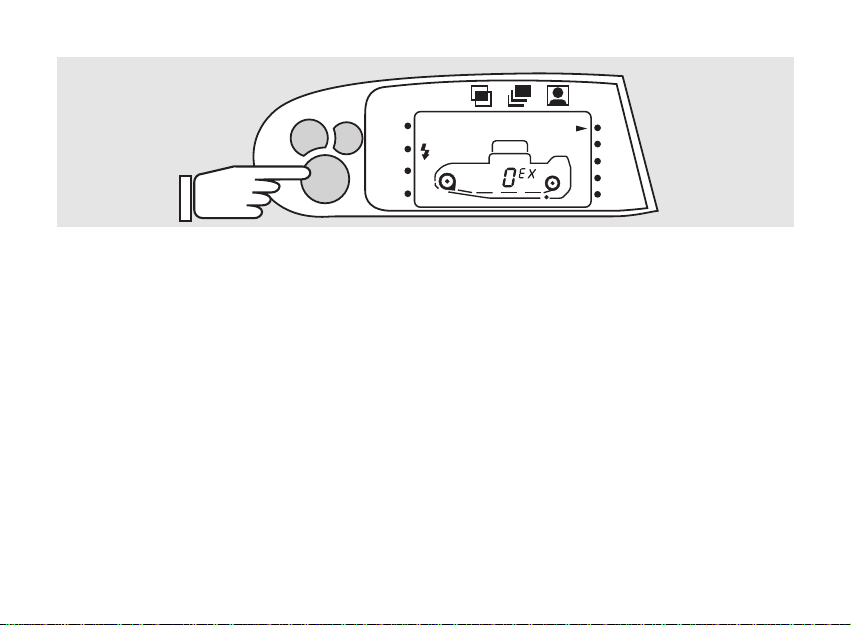
Automatische Filmrückspulung
1. Wenn das Filmende erreicht ist, wird die automatische
Filmrückspulung gestartet.
2. Im LCD-Monitor erscheint die Filmlaufanzeige und im
Bildzählwerk werden die Bildnummern von 36 bzw. 24
zurückgezählt.
3. Wenn der Film zurückgespult ist, blinken die Symbole
für die Filmpatrone und die Rückwand im LCD-Monitor.
4. Öffnen Sie die Kamerarückwand und entnehmen Sie
die Patrone.
5. Wenn Sie die Kamera ausschalten, während der Film
zurückläuft, wird die Rückspulung unterbrochen und
erst dann wieder aufgenommen, wenn Sie die Kamera
wieder einschalten.
Filmrückspulung manuell auslösen
1. Um einen teilbelichteten Film zurückzuspulen, drükken Sie die versenkte Taste (Abb. 8) mit einem spitzen Gegenstand, z.B. Kugelschreiber
Anmerkungen
• Sollte die Filmrückspulung unterbrochen werden, ehe
das Bildzählwerk im LCD-Monitor <0 EX> anzeigt,
legen Sie eine neue Batterie ein.
• Öffnen Sie auf keinen Fall die Rückwand, ehe Sie die
Batterie erneuert haben und die Rückspulung abgeschlossen ist.
Hinweis
Bevorzugen Sie einmal Filme mit einer Empfindlichkeit
von ISO 200/24° als Standardmaterial. Sie verringern
dadurch die Verwacklungsgefahr und erhöhen die
Blitzreichweite.
9
Page 10

Anbringen der Handschlaufe
Bringen Sie die Handschlaufe gemäß Abb. 5 an.
Anpassen der Okulareinstellung
1. Blicken Sie durch den Sucher und visieren Sie ein
Objekt in möglichst großer Entfernung an. Es muß im
Sucher scharf erscheinen.
2. Ist das nicht der Fall, können Sie das Sucherbild Ihrer
Sehschärfe anpassen. Halten Sie dazu die Kamera
am Auge und drehen Sie das Dioptrieneinstellrad
(Abb. 6), bis Sie das Objekt scharf sehen.
Anmerkung
Sollte sich das Dioptrieneinstellrad einmal versehentlich
verstellt haben und das Motiv unscharf im Sucher erscheinen, können Sie dennoch beruhigt auslösen. Die
Schärfe des Sucherbildes und die Schärfe des aufgenommenen Bildes haben nichts miteinander zu tun.
10
Inbetriebnahme der Kamera
1. Schalten Sie die Kamera durch einen Druck auf den
Hauptschalter ein (Abb. 7). Auf dem LCD-Monitor erscheinen ein Blitzsymbol in der Position AUTO und
ein Pfeil in der Position NORMAL. Die Objektivabdeckung öffnet sich.
2. Sie können die Kamera durch einen zweiten Druck auf
den Hauptschalter ausschalten. Tun Sie das nicht,
schaltet sich die Kamera drei Minuten nach der letzten Betätigung automatisch ab, um die Batterien zu
schonen. Beim Ausschalten schließt sich die Objektivabdeckung. Im LCD-Feld werden das Kamerasymbol,
das Symbol für den eingelegten Film und die Bildnummer weiterhin angezeigt.
Page 11
DER SUCHER
Bildfeldbegrenzungen
Bei den Bildfeldbegrenzungen handelt es sich um LCDFelder, die bei Bedarf aktiviert werden und bestimmte
Segmente des Suchers abdunkeln. Die Motivteile, die
von abgedunkelten Teilen des Suchers erfaßt werden,
sind auf dem Bild nicht zu sehen.
• Beachten Sie bei Vollformataufnahmen:
Ohne Bildfeldbegrenzungen reicht das Sucherbild bis
zum untersten Sucherbildrand.
Nah-Aufnahmen
Die obere Bildfeldbegrenzung (1) wird aktiviert.
Brennweite Entfernungsbereich
38 mm 0,80 m – 1,60 m
145 mm 1,60 m – 2,15 m
Makro-Aufnahmen
Die oberen Bildfeldbegrenzungen (2) werden aktiviert.
Brennweite Entfernungsbereich
38 mm 0,60 m – 0,80 m
145 mm 0,70 m – 1,60 m
AF
grün
rot
Panorama-Aufnahmen
Die beiden oberen Bildfeldbegrenzungen und die
beiden unteren Bildfeldbegrenzungen (3) werden aktiviert.
Panorama-Aufnahmen im Nahbereich
Die drei oberen Bildfeldbegrenzungen und eine untere
Bildfeldbegrenzung (4) werden aktiviert.
• Beachten Sie: Bei Panorama-Makroaufnahmen entspricht der nicht abgedunkelte Sucherausschnitt dem
Bildausschnitt auf dem Film.
Brennweite Entfernungsbereich
38 mm 0,60 m – 1,27 m
145 mm 0,70 m – 1,77 m
11
Page 12

Grüne LED: Schärfenindikator
• Die grüne LED leuchtet stetig, wenn die Schärfe eingestellt wurde. Das Motiv ist weiter als 0,6 m von der
Kamera entfernt.
• Die grüne LED blinkt langsam, wenn die Kamera automatisch auf Nah- oder Makroaufnahme umgeschaltet
hat. Das Motiv ist zwischen 1,25 m und 0,6 m von der
Kamera entfernt.
• Die grüne LED blinkt schnell, wenn das Motiv zu nah
an der Kamera ist (0,6 m oder weniger) und daher die
Schärfe nicht eingestellt werden kann. In diesem Fall
bleibt der Auslöser gesperrt.
Rote LED: Blitzbereitschaftsanzeige
• Die rote LED leuchtet nicht auf, wenn die Aufnahme
beim vorhandenen Umgebungslicht erfolgen kann.
• Die rote LED leuchtet stetig, wenn der Einsatz des
Blitzes erforderlich ist und der Blitz blitzbereit ist.
• Die rote LED blinkt schnell, wenn der Einsatz des Blitzes erforderlich ist, der Blitz aber noch nicht aufgeladen ist. In diesem Fall bleibt der Auslöser gesperrt,
bis der Blitz geladen ist.
• Die rote LED blinkt langsam bei ausgeschalteter Blitzautomatik (Seite 19) wenn beim vorhandenen
Umgebungslicht mit Verwacklungsunschärfen zu
rechnen ist. Stützen Sie in diesem Fall die Kamera auf
einer stabilen Unterlage ab oder verwenden Sie ein
Stativ.
12
LCD-Symbole im Sucher
Durch die Entfernungssymbole unten im Sucher wird
angezeigt, in welchem Entfernungsbereich sich das
Objekt befindet. Außerdem erfolgt hier eine Warnung,
wenn der Autofokus die Entfernung nicht einstellen
kann.
Entfernung 6,5 m – ∞
Entfernung 2,5 m – 6,5 m
Entfernung 1,6 m – 2,5 m
Entfernung 0,7 m – 1,6 m (Tele)
Entfernung 0,6 m – 1,6 m (Weitwinkel)
Das Symbol blinkt und der Auslöser
ist gesperrt
Entfernung unter 0,7 m (Tele)
Entfernung unter 0,6 m (Weitwinkel)
Die Symbole blinken.
Der Autofokus kann die Entfernung
nicht einstellen. Wird dennoch ausgelöst, ist die Aufnahme in einem bestimmten Bereich dennoch scharf!
Schärfenbereich 3,7 m – ∞ (Tele)
Schärfenbereich 2,8 m – ∞ (Weitwinkel)
Page 13

DIE AUFNAHME
Festlegen des Bildausschnitts
1. Legen Sie den Bildausschnitt fest, indem Sie die
Brennweite entsprechend einstellen.
2. Drücken Sie die Zoomtaste T, um eine längere Brennweite (einen engeren Bildausschnitt) zu erhalten.
3. Drücken Sie die Zoomtaste W, um eine kürzere Brennweite (einen größeren Bildausschnitt) zu erhalten.
4. Im LCD-Monitor wird die eingestellte Brennweite in
den Stufen 38 mm, 45 mm, 50 mm, 60 mm, 70 mm,
80 mm, 90 mm, 100 mm, 110 mm, 120 mm, 130 mm
und 145 mm angezeigt. Die Anzeige dient nur der Orientierung, da auch Zwischenwerte eingestellt werden
können.
Hinweis
• Versuchen Sie immer, den wichtigsten Teil des Motivs
formatfüllend ins Bild zu bekommen.
• Vermeiden Sie bei Weitwinkelaufnahmen einen großen, leeren Vordergrund. Oft genügt es, in die Knie zu
gehen und die Kamera leicht nach oben zu halten.
• Verwenden Sie die langen Brennweiten nicht nur, um
weit entfernte Motive aufzunehmen. Setzen Sie die
langen Brennweiten auch ein, um Details möglichst
groß ins Bild zu bekommen.
• Die Brennweiten um 90 mm sind besonders gut geeignet um Porträts aufzunehmen.
13
Page 14

Scharfstellung
1. Richten Sie das AF-Meßfeld auf den Teil des Motivs
aus, der auf jeden Fall scharf abgebildet werden soll.
Sollte sich dieser Teil des Motivs nicht in der Bildmitte
befinden, müssen Sie von der Schärfenspeicherung
Gebrauch machen (Seite 14).
2. Achten Sie auf die grüne und die rote LED neben dem
Sucherokular (Seite 11, Sucher)
Schärfenspeicherung
Soll sich das Hauptmotiv in der Bildmitte befinden, wird
es auf jeden Fall vom AF-Meßfeld erfaßt, das in der
Suchermitte angeordnet ist. In vielen Situationen ist es
jedoch angebracht, das Hauptmotiv deutlich außerhalb
der Bildmitte anzuordnen, um die Bildwirkung zu verbessern. In diesem Fall wird nicht mehr das Hauptmotiv vom
AF-Meßfeld erfaßt, sondern ein unwichtiger Teil des
Vorder- oder Hintergrunds. Die Scharfstellung erfolgt
dann auf den Vorder- oder Hintergrund, während das
Hauptmotiv unscharf abgebildet wird. Um das zu vermeiden, bedienen Sie sich der Schärfenspeicherung.
(Beispiele 1 – 3)
14
1. Visieren Sie mit dem AF-Meßfeld das Hauptmotiv an.
2. Drücken Sie den Auslöser bis zum ersten Druckpunkt.
Achten Sie darauf, den Auslöser noch nicht ganz
durchzudrücken, da sonst eine ungewollte Aufnahme
entsteht.
3. Die grüne LED leuchtet auf und zeigt an, daß die
Schärfe auf das Hauptmotiv eingestellt wurde.
4. Halten Sie Auslöser weiterhin bis zum ersten Druckpunkt gedrückt und schwenken Sie die Kamera, bis
der Bildausschnitt Ihren Vorstellungen entspricht.
5. Drücken Sie den Auslöser ganz durch, um die Aufnahme zu machen.
Anmerkung
• Gleichzeitig mit der Schärfe werden die Belichtungsdaten gespeichert.
• Um die Schärfenspeicherung aufzuheben, ohne eine
Aufnahme zu machen, lassen Sie den Auslöser einfach frei.
Page 15

Anmerkung zum Autofokus
• Das AF-Meßfeld der Kamera ist breit ausgelegt und
erfaßt dadurch einen großen Teil des Motivs. Die AFSteuerung ist so programmiert, daß sie die Schärfe
auf den jeweils nächstgelegenen Motivteil einstellt.
Achten Sie deshalb darauf, daß keine unwichtigen
Teile des Vordergrunds vom AF-Meßfeld erfaßt werden. Das gilt besonders bei Gruppen- oder Landschaftsbildern.
• Die Kamera kann die Schärfe auf Entfernungen von
0,6 m – bis unendlich (∞) einstellen (fokussieren). Aufnahmen von 0,6 m bis 1 m cm sind mit der Nah- oder
Makroeinstellung möglich (Seite 38).
• Die automatische Scharfstellung kann unter bestimmten Umständen schlecht oder gar nicht funktionieren.
Solche Umstände sind
- sehr heller Hintergrund
- Feuer
- Rauch, starker Dunst, Nebel
- sehr helle oder glänzende Flächen
- Motive hinter Glas
Belichtung
Die Kamera verfügt über einen eingebauten Belichtungsmesser. Von der Belichtungsautomatik werden
Verschlußzeit und Blende auf die ermittelte Helligkeit und
die Filmempfindlichkeit abgestimmt. Reicht das
Umgebungslicht nicht aus, um mit ganz offener Blende
und längster Verschlußzeit eine korrekte Belichtung
möglich zu machen, steht ein eingebauter Blitz zur
Verfügung, der automatisch oder manuell aktiviert, zur
Erzielung besonderer Effekte aber auch ganz abgeschaltet werden kann. Um Motive im Gegenlicht, kontrastreiche Motive sowie sehr helle oder sehr dunkle
Motive richtig belichtet ins Bild zu bekommen, bietet die
Kamera den Aufhellblitz (Seite 32), die Gegenlichtkorrektur (Seite 35) sowie die Belichtungskorrektur
(Seite 36).
Die richtige Kamerahaltung
Halten Sie die Kamera ruhig, um Verwacklungsunschärfen zu vermeiden. Das gilt besonders beim
Einsatz langer Brennweiten (Tele-Einstellung).
Bei Querformataufnahmen sollten beide Ellenbogen, bei
Hochformataufnahmen sollte ein Ellenbogen fest am
Körper anliegen. Achten Sie darauf, daß Objektiv, Blitz,
Belichtungsmeßfenster und AF-Meßfenster nicht von
Fingern, Haaren oder von der Handschlaufe verdeckt
werden. Bei Blitzaufnahmen im Hochformat sollte sich
das Blitzgerät oben befinden.
15
Page 16

mode select set
mode select set
96 10 21
mode select set
96 10 21
mode select set
96 10 21
Einbelichtungsanzeige
96 10 21
Jahr - Monat - Tag
21 12 20
Tag - Stunde - Minute
-- -- --
Keine Anzeige
Dateneinbelichtung (nur Modell mit Datenrückwand)
Drücken Sie die MODE-Taste. Bei jedem Druck schaltet die Betriebsart wie
abgebildet weiter.
Nach der Einbelichtung blinkt die Einbelichtungsanzeige in der Daten-LCD
zwei bis drei Sekunden lang.
Anmerkung
• Die versenkten Tasten sollten mit einem spitzen Gegenstand oder Fingernagel gedrückt werden.
Wählen Sie die gewünschte Schreibweise des Datums durch Druck auf
die Taste MODE.
Drücken Sie zur Korrektur die
SELECT-Taste, bis die gewünschte
Komponente blinkt.
10 21 96
Monat - Tag - Jahr
2110 96
Tag - Monat - Jahr
16
Stellen Sie Datum und Uhrzeit durch
Druck auf die SET-Taste ein.
• Bei anhaltendem Druck auf eine der Tasten laufen die Daten schnell durch.
• Die Korrektur wird beendet, sobald die Taste Mode gedrückt wird.
Page 17

Auswechseln der Datenbatterie
Wird die Datenanzeige schwach, muß die Datenbatterie
ausgewechselt werden.
1. Öffnen Sie das Fach der Datenbatterie gemäß Abb 9.
2. Entnehmen Sie die alte Batterie, und legen Sie eine
frische ein.
Deren Pluspol muß oben liegen.
3. Stellen Sie nach dem Batteriewechsel das Datum neu
ein.
• Batterietyp: Lithium-Knopfzelle 3 V (JS CR2025).
• Batterielebensdauer: ca. 3 Jahre.
Anmerkungen
• Vor einem hellen oder unruhigen Hintergrund kann
das Datum im Bild nur schwer lesbar sein.
• Die Datenrückwand ist für den Betrieb bei Temperaturen zwischen 50° C und -10° C bestimmt. Bei höheren
bzw. tieferen Temperaturen kann die Anzeige schwer
lesbar werden.
• Das Quartz-Date-Modell ist mit einem automatischen
Kalender ausgestattet, der bis zum Jahr 2019 programmiert ist. Er berücksichtigt kurze und lange Monate sowie Schaltjahre automatisch.
17
Page 18
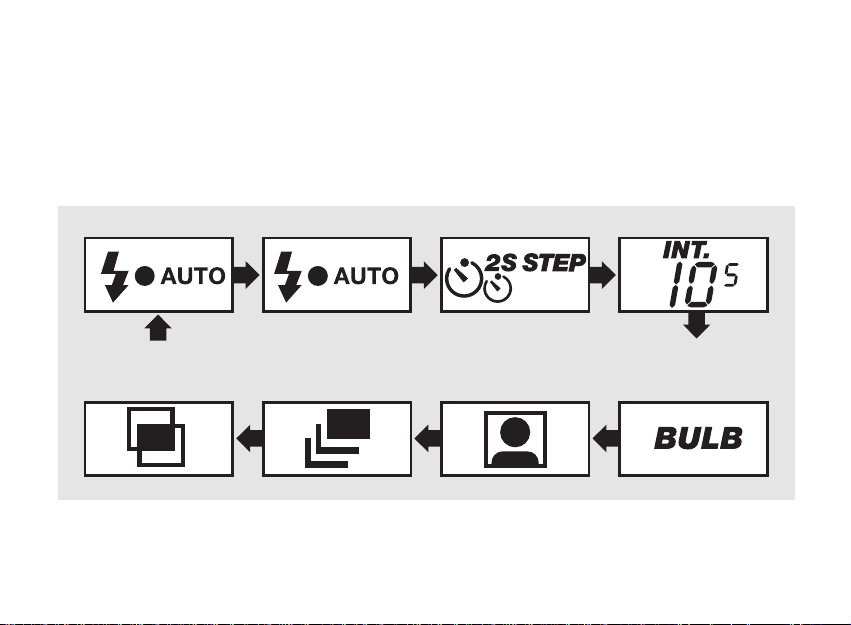
ÜBERSICHT ÜBER DIE BETRIEBSARTEN
Betriebsarten
Die gewünschte Betriebsart wird durch Druck auf den
Betriebsartenwähler MODE eingestellt. Ein Pfeil im LCDMonitor (gegebenenfalls kombiniert mit einem Symbol im
LCD-Monitor) zeigt die gewählte Betriebsart an.
Normalaufnahmen Fuzzy-Automatik
Mehrfachbelichtung
18
Reihenbilder
Step-Zoom Intervallaufnahme
Porträt-Zoom Langzeitbelichtung
Page 19
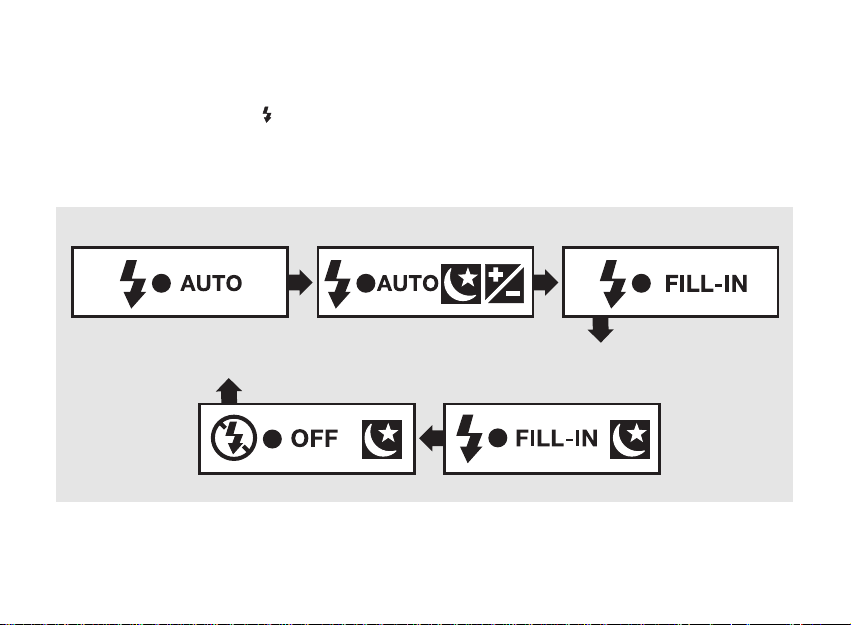
Basis-Blitzbetriebsarten
Die gewünschte Basis-Blitzbetriebsart wird durch Druck
auf den Blitzbetriebsartenwähler
im LCD-Monitor (gegebenenfalls kombiniert mit einem
Symbol im LCD-Monitor) zeigt die gewählte Betriebsart
an.
eingestellt. Ein Pfeil
AufhellblitzBelichtungskorrekturBlitzautomatik
LangzeitsynchronisationBlitz abgeschaltet
19
Page 20
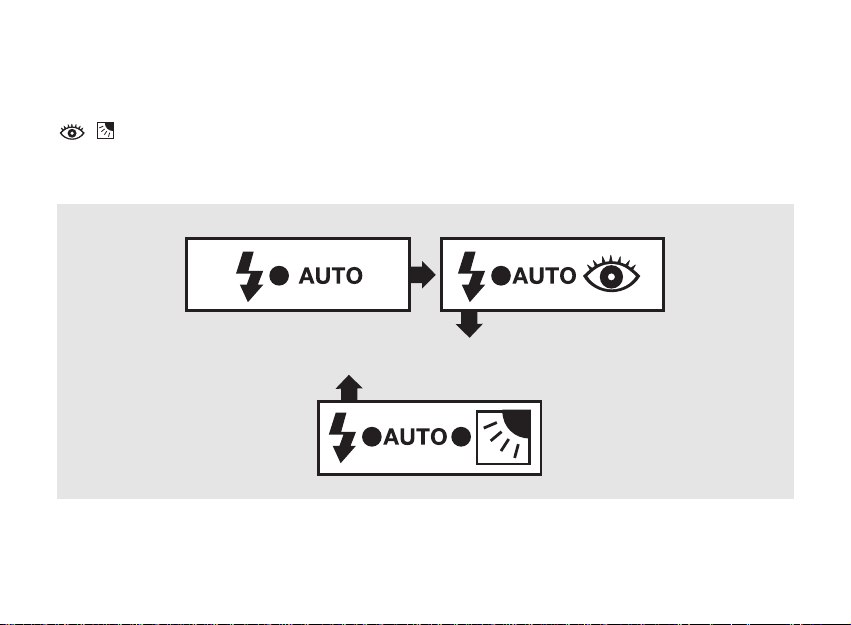
Erweiterte Blitzbetriebsarten
Die erweiterten Blitzbetriebsarten werden durch Druck
auf den Knopf für die erweiterten Blitzbetriebsarten
/ auf der Rückwand eingeschaltet und durch
Symbole im LCD-Monitor angezeigt.
Blitzautomatik
Gegenlichtkorrektur
20
Verringerung roter Augen
Page 21
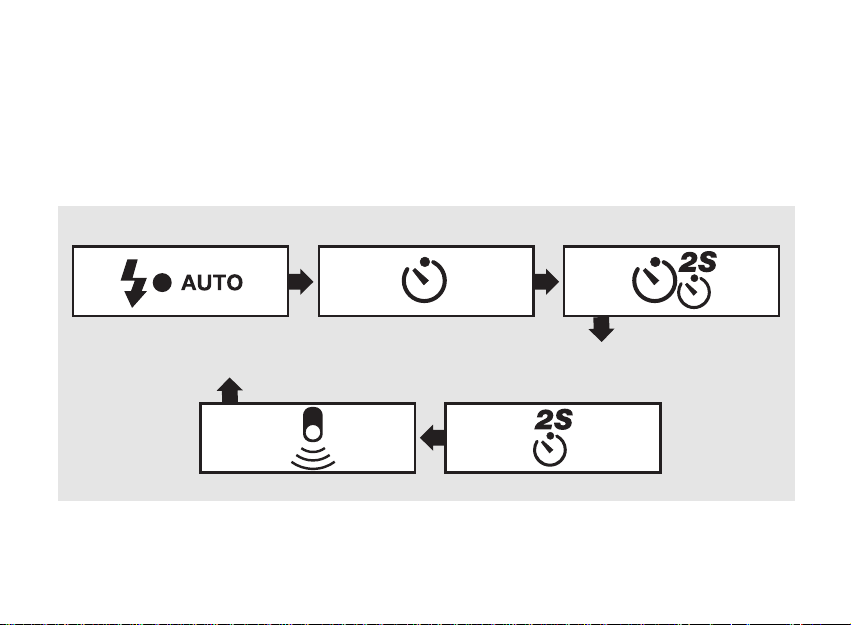
Selbstauslöserbetriebsarten
Die Selbstauslöserbetriebsarten werden mit der Selbstauslösertaste eingestellt und durch Symbole im LCDMonitor angezeigt.
Normalaufnahmen Selbstauslöser Doppel-Selbstauslöser
Anmerkung
• Der Fernauslöser ist als getrenntes Zubehör erhältlich.
Fragen Sie Ihren Händler.
Auslösung mit 2 s VorlaufzeitFernauslösung
21
Page 22

NORMAL
In der Betriebsart NORMAL steuert die Belichtungsautomatik Verschlußzeit und Blende. Das ist die Standardeinstellung, die für die meisten Motive geeignet ist.
1. Drücken Sie den Betriebsartenwähler MODE, bis der
Pfeil im LCD-Monitor auf NORMAL zeigt.
2. Verschlußzeit und Blende werden passend zur Filmempfindlichkeit und Umgebungshelligkeit eingestellt.
Anmerkung
Die Kamera bietet Verschlußzeiten von 1/3 bis 1/400 Sek.
22
Hinweis
• Bewegungsunschärfen werden durch eine Bewegung
des Motivs während der Belichtung hervorgerufen.
Sie können durch kurze Verschlußzeiten oder durch
den Einsatz des Blitzes verhindert werden.
• Verwacklungsunschärfen werden durch eine Bewegung der Kamera während der Belichtung hervorgerufen. Sie können durch kurze Verschlußzeiten, den
Einsatz des Blitzes oder durch Ruhigstellen der Kamera (solide Unterlage, Stativ) verhindert werden.
• Wenn mit Verwacklungs- oder Bewegungsunschärfen
zu rechnen ist, sollten Sie mit möglichst kurzen Brennweiten fotografieren. Hier bietet das Zoom große
Blendenöffnungen, die kurze Verschlußzeiten möglich
machen. Gegebenenfalls kann im Labor durch Ausschnittsvergrößerungen das Hauptmotiv besser ins
Bild gesetzt werden. (Ausschnittsvergrößerungen
sind allerdings teurer als Standardvergrößerungen!)
• Hochempfindliche Filme (ISO 400/27° oder höher)
verhelfen ebenfalls zu kurzen Verschlußzeiten.
Page 23
red eye
auto
fill-in
bulb
int
step
off
fuzzy
normal
FUZZY
In der Betriebsart FUZZY steuert die Belichtungsautomatik die Verschlußzeit und Blende und gegebenenfalls
auch die Objektivbrennweite, um Verwacklungsunschärfen zu vermeiden.
1. Drücken Sie den Betriebsartenwähler MODE, bis der
Pfeil im LCD-Monitor auf FUZZY zeigt.
2. Verschlußzeit und Blende werden passend zur Filmempfindlichkeit und Umgebungshelligkeit eingestellt.
3. Ergibt sich für ein Motiv außerhalb der Blitzreichweite
eine Verschlußzeit, die bei der eingestellten Brennweite zu Verwacklungsunschärfen führen kann, wird
die Brennweite verkürzt.
Anmerkung
• Je länger die Brennweite ist, desto kürzer muß die
Verschlußzeit sein, um Verwacklungen zu vermeiden.
23
Page 24
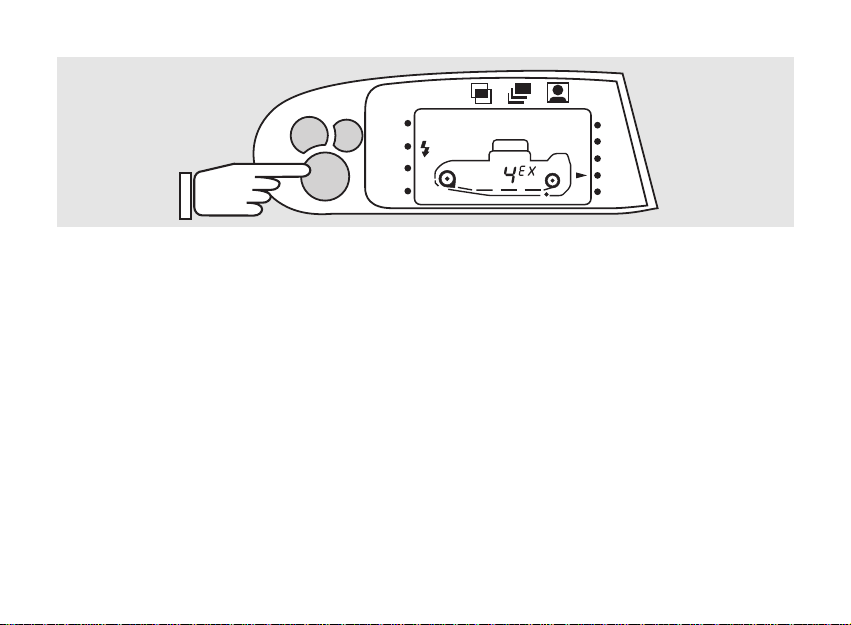
Aufnahme verkürzt wird. Wieviele Aufnahmen automatisch gemacht werden können, hängt von der gewählten
Anfangsbrennweite ab (Siehe Tabelle).
red eye
auto
fill-in
off
1. Drücken Sie den Betriebsartenwähler MODE, bis der
bulb
int
step
fuzzy
normal
Pfeil im LCD-Monitor auf STEP zeigt.
2. Der Selbstauslöser wird automatisch aktiviert.
3. Die erste Aufnahme erfolgt nach 10 Sekunden. Die
weiteren Aufnahmen erfolgen nach jeweils 5 Sekunden. Wenn für die Aufnahmen Blitzlicht erforderlich
ist, können die Aufnahmen erst erfolgen, wenn der
Blitz blitzbereit ist. Dadurch können die Pausen zwi-
STEP-ZOOM
In der Betriebsart STEP-ZOOM werden bis zu drei
Aufnahmen nacheinander mit verschiedenen Brennweiten gemacht, wobei die Brennweite von Aufnahme zu
schen den Aufnahmen länger ausfallen.
Anmerkung
• Es ist nicht nötig, den Auslöser gedrückt zu halten.
Anzahl d. Bilder 145 130 120 110 100 90 80 70 60 50 45 38mm
3 Ex ➀➁ ➂
3 Ex ➀➁➂
3 Ex ➀➁ ➂
3 Ex ➀➁➂
3 Ex ➀➁ ➂
3 Ex ➀➁➂
3 Ex ➀➁ ➂
3 Ex ➀➁➂
3 Ex ➀➁ ➂
3 Ex ➀➁➂
2 Ex ➀➁
1 Ex ➀
24
➀ erste Aufnahme ➁ zweite Aufnahme ➂ dritte Aufnahme
Page 25
red eye
auto
fill-in
bulb
int
step
off
fuzzy
normal
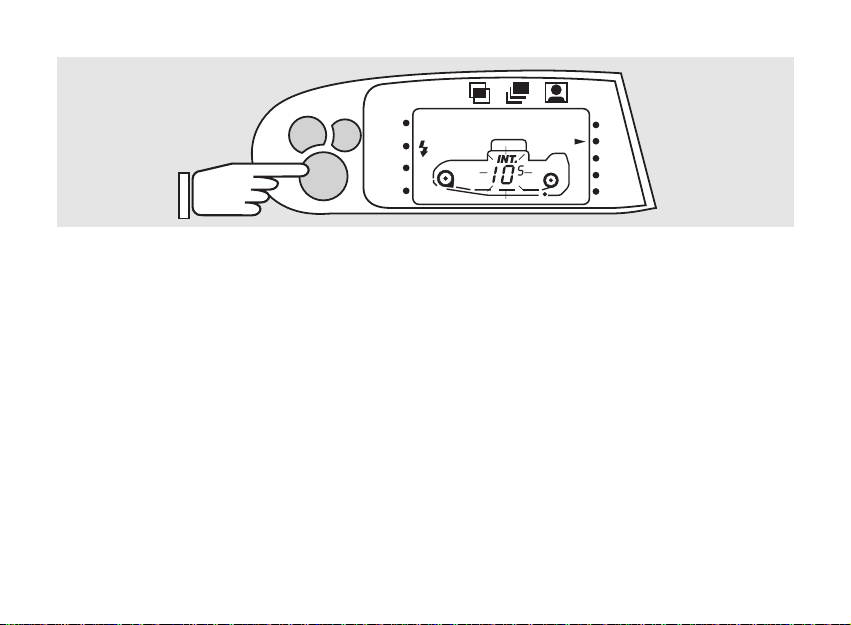
INTERVALLAUFNAHMEN
In dieser Betriebsart werden Aufnahmen in bestimmten
Abständen automatisch gemacht. (Beispiele 12 – 14)
1. Drücken Sie den Betriebsartenwähler MODE, bis der
Pfeil im LCD-Monitor auf INT zeigt.
2. Das Standardaufnahmeintervall von 10 Sekunden ist
eingestellt.
3. Um ein anderes Aufnahmeintervall einzustellen, halten Sie den Betriebsartenwähler MODE gedrückt und
betätigen Sie eine der beiden Zoomtasten. Das
Aufnahmeintervall wird im LCD-Monitor angezeigt.
Es stehen die Intervalle 10 Sek., 20 Sek., 30 Sek.,
40 Sek., 50 Sek. und 60 Sek. zur Wahl.
4. Die erste Aufnahme erfolgt beim ersten Druck auf
den Auslöser. Danach schaltet sich die Kamera ab
und aktiviert sich erst kurz vor der folgenden Aufnahme wieder.
5. Um die Intervallaufnahmen zu beenden, drücken Sie
den Betriebsartenwähler MODE oder den Hauptschalter.
6. Wenn Sie die Intervallaufnahmen nicht beenden, werden Sie bis zum Filmende durchgeführt.
Anmerkung
• Achten Sie bei Intervallaufnahmen darauf, daß die
Kamera auf einer soliden Unterlage oder einem Stativ
steht, damit der Bildausschnitt auf allen Bildern gleich
ist.
Hinweis
• Wenn Sie mit Diafilm fotografieren, können Sie Intervallaufnahmen bei der Vorführung nutzen, um einen
Zeitraffereffekt zu erzielen.
25
Page 26
red eye
auto
fill-in
bulb
int
step
off
fuzzy
normal
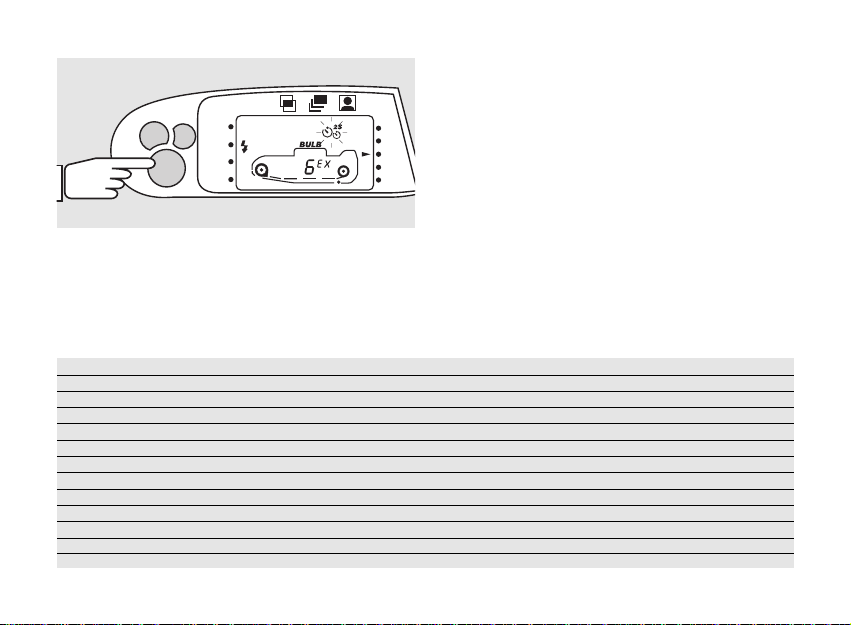
MANUELL GESTEUERTE LANGZEITBELICHTUNG
(BULB)
In dieser Betriebsart wird der Film belichtet, solange Sie
den Auslöser betätigen. Achten Sie darauf, daß das
Umgebungslicht sehr schwach ist, um Überbelichtungen zu vermeiden.
1. Drücken Sie den Betriebsartenwähler MODE, bis der
Pfeil im LCD-Monitor auf BULB zeigt.
2. Die Belichtungsdauer wird im LCD-Monitor angezeigt.
26
Anmerkung
• Achten Sie bei Langzeitbelichtungen darauf, daß die
Kamera auf einer soliden Unterlage oder einem Stativ
steht, um Verwacklungsunschärfen zu vermeiden.
Hinweis
• Nutzen Sie die Langzeitbelichtung für Aufnahmen von
Feuerwerken, Gewittern oder Lichtquellen, die sich
bewegen (Karussell, Autos). Je nach Belichtungszeit
werden die Lichtquellen als kürzere oder längere Linien im Bild erscheinen.
• Kombinieren Sie die Langzeit- mit einer Blitzbelichtung. Der Blitz sorgt für eine scharfe Abbildung, die
von einer verwischten, unscharfen Bewegung überlagert wird.
Page 27
red eye
auto
fill-in
bulb
int
step
off
fuzzy
normal
PORTRÄT-ZOOM
In der Betriebsart PORTRÄT-ZOOM steuert die Automatik Verschlußzeit und Blende. Außerdem wird die
Objektivbrennweite so gesteuert, daß ein bestimmter
Abbildungsmaßstab erzielt wird. (Beispiele 6 und 7)
1. Drücken Sie den Betriebsartenwähler MODE, bis der
Pfeil im LCD-Monitor auf das Porträtsymbol zeigt.
2. Verschlußzeit und Blende werden passend zur Filmempfindlichkeit und Umgebungshelligkeit eingestellt.
Die Objektivbrennweite wird bei Entfernungsänderungen immer so eingestellt, daß der Abbildungsmaßstab
gleich bleibt. Der Abbildungsmaßstab ist so abgestimmt, daß bei Querformataufnahmen von Personen
ein Halbfigur-Porträt entsteht.
Hinweis
• Auch wenn der Abbildungsmaßstab gleich bleibt, ändert sich durch die Veränderung des Standortes der
Bildeindruck (die Perspektive). Bei Aufnahmen mit
kurzer Brennweite aus geringer Entfernung wird viel
Hintergrund erfaßt. Das ist interessant, wenn die oder
der Porträtierte im passenden Umfeld gezeigt werden
soll. Bei Aufnahmen mit langer Brennweite aus großer
Entfernung wird wenig Hintergrund erfaßt. Das ist interessant, wenn das Augenmerk ganz und gar auf die
abgebildete Person gelenkt werden soll.
27
Page 28
red eye
auto
fill-in
bulb
int
step
off
fuzzy
normal
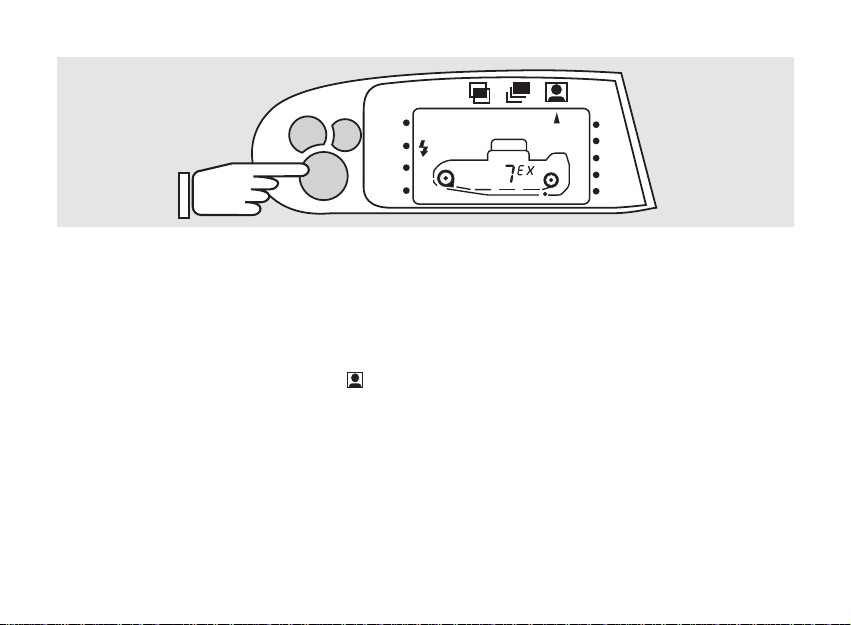
REIHENAUFNAHMEN
In dieser Betriebsart erfolgt eine Belichtung nach der
anderen, solange der Auslöser gedrückt gehalten wird.
(Beispiele 9 – 11)
1. Drücken Sie den Betriebsartenwähler MODE, bis der
Pfeil im LCD-Monitor auf das Symbol für Reihenaufnahmen zeigt .
2. Die maximale Bildfrequenz beträgt ein Bild/Sekunde.
Der Einsatz des Blitzgerätes verlängert die Pause zwischen den Aufnahmen.
28
Anmerkung
• Die Schärfe wird für jedes Bild neu eingestellt. Achten
Sie daher darauf, daß das Hauptmotiv immer vom AFMeßfeld erfaßt wird.
Page 29

red eye
auto
fill-in
bulb
int
step
off
fuzzy
normal
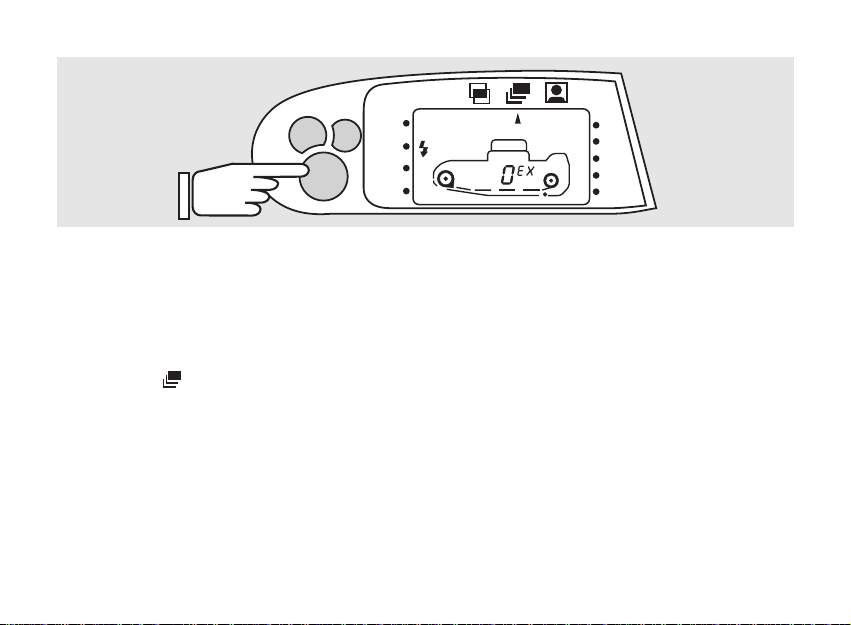
MEHRFACHBELICHTUNG
In dieser Betriebsart können zwei Aufnahmen auf ein
Filmstück gemacht werden. (Beispiel 8)
1. Drücken Sie den Betriebsartenwähler MODE, bis der
Pfeil im LCD-Monitor auf das Mehrfachbelichtungssymbol zeigt.
2. Nach der ersten Aufnahme blinkt im LCD-Monitor der
Pfeil, der auf das Mehrfachbelichtungssymbol zeigt.
3. Sie können nach der ersten Aufnahme die Kamera
abschalten. Die Betriebsart MEHRFACHBELICHTUNG bleibt erhalten. Nach der zweiten Aufnahme wird die Betriebsart gelöscht.
Anmerkung
• Wenn ein Filmstück zweimal belichtet wird, addieren
sich die Belichtungen. In der Regel wird die Doppelbelichtung zu hell ausfallen. Suchen Sie deshalb für
wenigstens eine Belichtung ein Motiv mit einem dunklen Hintergrund.
29
Page 30

red eye
auto
fill-in
bulb
int
step
off
fuzzy
normal
AUTOMATISCH GESTEUERTE LANGZEITBELICHTUNG BEI ABGESCHALTETEM BLITZ
Mit dieser Betriebsart wird das Umgebungslicht für
Aufnahmen in der Dämmerung oder schwach belichteten Innenräumen genutzt. Verschlußzeit und Blende
werden von der Automatik gesteuert.
1. Drücken Sie die Blitzbetriebsartentaste , bis im LCDMonitor das Blitz-Aus-Symbol neben OFF steht
und das Nachtsymbol zu sehen ist.
2. Wenn Verwacklungsgefahr besteht, blinkt die rote
LED langsam.
30
Anmerkung
• Im Gegensatz zu Langzeitbelichtung (BULB) wird die
Verschlußzeit von der Belichtungsautomatik gesteuert. Wenn eine längere Verschlußzeit nötig ist, als die
Automatik steuern kann, wird das Bild unterbelichtet!
• Bei schwachem Umgebungslicht wird die Verschlußzeit lang ausfallen. Achten Sie daher darauf, daß die
Kamera auf einer stabilen Unterlage oder einem Stativ
steht, um Verwacklungsunschärfen zu vermeiden.
Hinweis
• Setzen Sie diese Betriebsart ein, wenn das Hauptmotiv sehr groß oder sehr weit entfernt ist und vom Blitz
nicht ausgeleuchtet werden kann.
• Setzen Sie diese Betriebsart ein, wenn ein Blitz die
Lichtstimmung stören würde (Sonnenuntergang,
Glühlampenlicht).
Page 31

BLITZAUFNAHMEN
Mit dem eingebauten Blitz können je nach Blitzbetriebsart Aufnahmen bei unzureichender Beleuchtung gemacht, Schatten der Gegenlichtmotive aufgehellt oder
besondere Effekte erzielt werden.
Blitzreichweiten
bei Weitwinkel 38 mm bei Tele 145 mm
ISO 100/21° 6 m 3 m
ISO 200/24° 8,5 m 4,2 m
ISO 400/27° 12 m 6 m
Hinweis
• Wenn Sie mit einem hochempfindlichen Film
(ISO 400/27° oder mehr) arbeiten, sollten Sie darauf
achten, daß helle Motivteile (Gesichter, helle Kleidungsstücke) etwa 1,5 m von der Kamera entfernt
sind, um Überblitzen zu vermeiden. Durch das Überblitzen würde das entsprechende Motivteil zu hell und
mit wenig Durchzeichnung im Bild erscheinen.
• In sehr großen Räumen mit dunklen Möbeln und/oder
einer dunklen Holzdecke sowie im Freien sollten Sie
die maximale Blitzreichweite etwas geringer veranschlagen, als in der Tabelle oben angegeben.
31
Page 32

red eye
auto
fill-in
bulb
int
step
off
fuzzy
normal
AUFHELLBLITZ
Ist das Umgebungslicht so hell, daß der Blitz nicht
automatisch gezündet wird, kann er durch diese Betriebsart aktiviert werden. (Beispiel 21 und 22)
1. Drücken Sie die Blitzbetriebsartentaste, bis im LCDMonitor das Blitzsymbol neben FILL-IN steht.
32
Hinweis
• Nutzen Sie den Aufhellblitz, um vom Umgebungslicht
hervorgerufene Schatten im Hauptmotiv aufzuhellen.
• Nutzen Sie den Aufhellblitz, wenn Innenräume zwar
hell beleuchtet sind, durch das Licht aus Leuchtstoffröhren jedoch ein Farbstich zu befürchten ist. Die meisten Leuchtstoffröhren rufen einen grünlichen
Farbstich hervor.
Page 33

red eye
auto
fill-in
bulb
int
step
off
fuzzy
normal
BLITZEN MIT LANGEN VERSCHLUSSZEITEN
(LANGZEITSYNCHRONISATION)
Mit dieser Betriebsart lassen sich Aufnahmen in der
Dämmerung, in der Nacht oder in dunklen Innenräumen
mit einer Kombination aus Umgebungslicht und Blitzlicht
belichten. (Beispiel 15)
1. Drücken Sie die Blitzbetriebsartentaste , bis im
LCD-Monitor das Blitzsymbol neben FILL-IN steht
und das Nachtsymbol zu sehen ist.
2. Die rote LED leuchtet stetig, wenn der Blitz blitzbereit
ist.
3. Die rote LED blinkt schnell, wenn der Blitz geladen
wird.
4. Die rote LED blinkt langsam, um vor Verwacklungsgefahr zu warnen.
Anmerkung
• Für die Belichtung des Hintergrundes ergibt sich bei
geringem Umgebungslicht eine lange Verschlußzeit.
Achten Sie daher darauf, daß die Kamera auf einer
stabilen Unterlage oder einem Stativ steht, um
Verwacklungsunschärfen zu vermeiden.
Hinweis
• Setzen Sie diese Betriebsart ein, um ein Hauptmotiv
mit dem Blitz zu belichten, während Lichter im Hintergrund durch die Langzeitbelichtung belichtet werden.
Besonders interessant ist diese Kombination für Aufnahmen von Personen vor beleuchteten Sehenswürdigkeiten.
33
Page 34

red eye
auto
fill-in
bulb
int
step
off
fuzzy
normal
VORBLITZ zur Verringerung des
„Rote-Augen-Effekts“
Der „Rote-Augen-Effekt“ tritt auf, wenn Personen in
schwachem Umgebungslicht geblitzt werden. Dabei fällt
das Blitzlicht durch die weit geöffnete Pupille auf den
roten Augenhintergrund, der das Blitzlicht zur Kamera
zurück reflektiert. (Beispiele 16 und 17)
1. Drücken Sie die Knopf für die erweiterten Blitzbetriebsarten, bis im LCD-Monitor auf RED EYE
zeigt.
2. Durch den Vorblitz werden die Pupillen verkleinert, so
daß der „Rote-Augen-Effekt“ nicht oder nur schwach
in Erscheinung tritt.
34
Anmerkung
• Sagen Sie bei Gruppenaufnahmen, daß ein Vorblitz
gezündet wird. Dadurch vermeiden Sie, daß sich die
Personen nach dem Aufleuchten des Vorblitzes bewegen.
• Halten Sie die Kamera ruhig, bis der Hauptblitz gezündet wurde, damit der gewählte Bildausschnitt
nicht verändert wird.
Hinweis
• Sollten auf Vergrößerungen trotz des Vorblitzes rote
Augen zu sehen sein, können Sie sie mit einem dünnen, schwarzen Folienstift gut retuschieren.
Page 35

red eye
auto
fill-in
bulb
int
step
off
fuzzy
normal
GEGENLICHTKORREKTUR
Dunkle Motive vor hellem Hintergrund erhalten durch die
Gegenlichtkorrektur mehr Zeichnung, Strukturen im
eigentlichen Motiv sind besser zu erkennen.
1. Drücken Sie den Knopf für die erweiterten Blitzbetriebsarten, bis das Sonnensymbol
im LCD-Moni-
tor angezeigt wird.
2. Durch die Gegenlichtkorrektur fällt die Belichtung um
1,5 Belichtungsstufen reichlicher aus.
Anmerkung
• Die Belichtungskorrektur wird durch eine Verlängerung der Verschlußzeit erzielt. Achten Sie deshalb
besonders gut darauf, die Kamera ruhig zu halten
oder stellen Sie die Kamera auf eine stabile Unterlage
oder ein Stativ.
• Bei Aufnahmen in Richtung starker Lichtquellen
(Sonne, Scheinwerfer bei Sportveranstaltungen oder
Rockkonzerten) kann Streulicht zu einem kontrastarmen Bild führen. (Beispiele 4 und 5)
Hinweis
• Die Gegenlichtkorrektur sollte genutzt werden, wenn
ein Aufhellblitz (Seite 32) nicht möglich ist, weil sich
das Hauptmotiv außerhalb der Blitzreichweite befindet.
• Die Gegenlichtkorrektur empfiehlt sich, wenn durch
Aufhellblitz die Lichtstimmung zerstört würde.
• Die Gegenlichtkorrektur sollte nicht nur bei Aufnahmen gegen die Sonne oder den hellen Himmel eingesetzt werden. Sie verhilft auch im Schnee, am hellen
Sandstrand oder am Wasser, auf dem helle Lichtreflexe zu sehen sind, zu besseren Ergebnissen.
35
Page 36

BELICHTUNGSKORREKTUR
Die Belichtungskorrektur hilft bei hohem Kontrast zwischen Vordergrund sowie bei sehr hellen und sehr
dunklen Motiven zu richtig belichteten Bilder.
1. Drücken Sie die Blitzbetriebsartentaste
Monitor das Blitzsymbol und das Nachtsymbol
neben AUTO, sowie das Korrektursymbol zu sehen sind.
2. Halten Sie die Blitzbetriebsartentaste gedrückt, bis
das Korrektursymbol blinkt.
3. Betätigen Sie die Zoomtaste T, um eine Pluskorrektur
im Bereich von +0,5 bis +3 Belichtungsstufen in halben Stufen einzustellen.
4. Betätigen Sie die Zoomtaste W, um eine Minuskorrektur im Bereich von -0,5 bis -3 Belichtungsstufen
in halben Stufen einzustellen.
36
, bis im LCD-
Anmerkung
• Die Minuskorrektur führt zu einer knapperen Belichtung. Dadurch werden helle Motive vor einem dunklen
Hintergrund oder ganz helle Motive besser durchgezeichnet.
• Die Pluskorrektur führt zu einer reichlicheren Belichtung. Dadurch werden dunkle Motive vor einem hellen
Hintergrund oder ganz dunkle Motive besser durchgezeichnet.
Hinweis
• Belichtungskorrekturen sind nur sinnvoll, wenn Sie mit
Diafilm fotografieren. Bei der Vergrößerung vom Negativ werden Belichtungskorrekturen in der Regel von
der Korrekturautomatik des Printers ausgeglichen.
• Wenn Sie die Wirkung einer Korrektur nicht abschätzen können, machen Sie drei Aufnahmen mit Belichtungskorrekturen im Abstand von 0,5 Belichtungsstufen.
• Wenn Sie mit Diafilm arbeiten, können Sie die
Korrekturfaktoren nutzen, um die Farbigkeit des Bildes zu beeinflussen. Kräftige Farben (Herbstlaub,
Kinderspielzeug, Segel von Windsurfern, Heißluftballons vor blauem Himmel) werden noch satter,
wenn Sie eine Minuskorrektur von 0,5 Blendenstufen
wählen. Zarte Farben (Maiengrün, hell gekleidete Kinder, helle Blüten) werden noch lichter, wenn Sie eine
Pluskorrektur von 0,5 Blendenstufen einstellen.
Page 37

red eye
auto
fill-in
bulb
int
step
off
fuzzy
normal
SCHNAPPSCHUSSEINSTELLUNG
Mit der Schnappschußeinstellung sind schnelle Aufnahmen möglich, da nicht fokussiert werden muß.
1. Drücken Sie die SNAP/SPOT-Taste, bis im LCD-Monitor SNAP angezeigt wird.
2. Das Zoom wird fest auf 38 mm Brennweite eingestellt.
3. Blende und Entfernung werden so eingestellt, daß der
Bereich zwischen 1,3 m und 6 m scharf abgebildet
wird.
4. Der Filmtransport wird auf Reihenbild eingestellt.
Anmerkung
• Mehrfachbelichtungen und manuell gesteuerte Langzeitaufnahmen (BULB) Einstellung können mit der
Schnappschuß-Einstellung kombiniert werden.
Hinweis
• Nutzen Sie die Schnappschuß-Einstellung um unbemerkt Aufnahmen zu machen, ohne die Kamera ans
Auge zu nehmen.
• Nutzen Sie die Schnappschußeinstellung für Intervallaufnahmen, wenn die Möglichkeit besteht, daß sich
das Motiv in der Pause zwischen zwei Aufnahmen
aus dem AF-Meßfeld heraus bewegt.
37
Page 38

NAHAUFNAHMEN
Bei Aufnahmeabständen zwischen 0,7 m und 1,6 m (bei
Brennweite 38 mm) bzw. 0,73 m und 1,60 m (bei Brennweite 145 mm) schaltet die Kamera automatisch auf
Nahaufnahmen. Die grüne LED blinkt langsam und im
LCD-Monitor leuchtet das Nahaufnahmesymbol
stetig.
MACROAUFNAHMEN
Bei Aufnahmeabständen zwischen 0,6 m und 0,7 m (bei
Brennweite 38 mm) bzw. 0,7 m und 0,73 m (bei Brennweite 145 mm) schaltet die Kamera automatisch auf Makroaufnahmen. Die grüne LED blinkt langsam und im LCDMonitor blinkt das Nahaufnahmesymbol langsam.
Anmerkung
• Beachten Sie die Bildfeldbegrenzungen im Sucher. Denken Sie bei Vollformataufnahmen daran, daß der Sucher
den unteren Teil des Bildfeldes nicht in voller Breite zeigt.
• Je größer der Abbildungsmaßstab, desto größer ist
die Verwacklungsgefahr. Halten Sie die Kamera bei
Nah- und Makroaufnahmen besonders ruhig, stützen
Sie die Kamera auf einer soliden Unterlage ab oder
verwenden Sie ein Stativ.
• Bei Abständen unter 0,6 m sind Aufnahmen nicht
möglich. Die grüne LED blinkt schnell und der Auslöser ist gesperrt.
38
PANORAMA-AUFNAHMEN
Durch die Panorama-Einstellung werden Aufnahmen im
Format 13x36 mm möglich.
1. Schieben Sie den Panorama-Schiebeschalter nach
rechts.
2. Im Sucher wird das Bildfeld oben und unten abgedunkelt.
Anmerkung
• Fragen Sie Ihren Fotohändler oder bei der Filmannahmestelle, ob das Labor Vergrößerungen im
Panoramaformat machen kann.
• Weisen Sie bei der Filmabgabe darauf hin, daß der
Film Negative im Panoramaformat enthält.
• Vergrößerungen im Panoramaformat sind in der Regel
teurer als Vollformatvergrößerungen.
Hinweis
• Nutzen Sie die Panorama-Einstellung für Landschaftsaufnahmen oder Gruppenaufnahmen oder im Hochformat für Aufnahmen von Gebäuden oder Denkmälern.
• Stellen Sie eine lange Brennweite ein und machen Sie
mehrere Panoramaaufnahmen, die sich an den Rändern jeweils ein wenig überlappen. Kleben Sie die
Vergrößerungen entsprechend zusammen, um ein
Superpanoramabild zu erhalten.
Page 39

UNENDLICH-EINSTELLUNG
Diese Betriebsart ist für Aufnahmen entfernter Objekte
durch eine Glasscheibe bestimmt.
• Drücken Sie den Auslöser unter gleichzeitigem Druck
auf die mit ∞ markierte Taste.
• Die Funktion wird gelöscht, sobald Sie die UnendlichTaste freigeben.
Anmerkungen
• In Unendlich-Einstellung leuchtet die grüne LED beim
Druck auf den Auslöser nicht.
• Die Kamera schaltet den Blitz automatisch ab, um
Bedienungsfehler auszuschließen.
SELBSTAUSLÖSER
Mit Hilfe des Selbstauslösers ist es möglich, selbst ins
Bild zu kommen oder die Verwacklungsgefahr zu reduzieren. (Beispiel 18)
Selbstauslöser mit 10 Sekunden Verzögerung
1. Drücken Sie die Selbstauslösertaste, bis im LCD-Monitor das Selbstauslösersymbol
2. Betätigen Sie den Auslöser. Im LCD-Monitor beginnt
das Selbstauslösersymbol zu blinken. (Abb. 10)
3. Nach etwa 10 Sek. erfolgt die Aufnahme.
erscheint.
Selbstauslöser mit 2 Sekunden Verzögerung
1. Drücken Sie die Selbstauslösertaste, bis im LCD-Monitor das Selbstauslösersymbol erscheint.
2. Betätigen Sie den Auslöser. Im LCD-Monitor beginnt
das Selbstauslösersymbol zu blinken. (Abb. 10)
3. Nach etwa 2 Sek. erfolgt die Aufnahme.
Hinweis
• Nutzen Sie die kurze Verzögerung für Aufnahmen mit
Telebrennweiten und langen Verschlußzeiten oder für
Nahaufnahmen mit langen Verschlußzeiten. In beiden
Fällen können beim Auslösen Vibrationen entstehen
und für Verwacklungsunschärfen sorgen. Während
der Ablaufzeit des Selbstauslösers klingen die Vibrationen ab und die Verwacklungsunschärfen werden
vermieden.
39
Page 40

Doppel-Selbstauslöser
1. Drücken Sie die Selbstauslösertaste, bis im LCD-Monitor das Doppelselbstauslösersymbol
2. Betätigen Sie den Auslöser. Im LCD-Monitor beginnt
das Selbstauslösersymbol zu blinken. Nach etwa 10
Sek. erfolgt die erste Aufnahme, etwa 2 Sek. später
die zweite Aufnahme. (Beispiele 19 und 20)
Anmerkung
• Schärfe und Belichtungsdaten werden beim Druck
auf den Auslöser festgelegt. Achten Sie deshalb darauf, daß Sie beim Auslösen nicht vor der Kamera stehen.
• Stellen Sie die Kamera auf eine solide Unterlage oder
ein Stativ um zu gewährleisten, daß sich der Bildausschnitt zwischen Auslösen und Aufnahme nicht verändert.
• Bei Blitzaufnahmen kann die Verzögerung zwischen
Auslösen und Aufnahme länger ausfallen, da der Blitz
geladen werden muß.
Fernauslösung
Mit dem als Zubehör erhältlichen Fernauslöser kann die
Kamera drahtlos gesteuert werden (Abb. 11)
1. Zunächst schalten Sie mit der Selbstauslösertaste
(SELF) auf Fernauslösung.
40
erscheint.
2. Danach läßt sich mit der Zoom-Taste des Fernauslösers die Brennweite in derselben Weise verstellen wie an der Kamera. Jeder Druck auf die ZoomTaste führt zu einer Verstellung in den folgenden fünf
Stufen: 28, 45, 60, 75, 90 mm bzw. umgekehrt.
3. Die Belichtung erfolgt 2 s nach Betätigung des Fernauslösers, damit Sie zuvor eine geeignete Pose einnehmen können.
Anmerkungen
• Zur genauen Festlegung des Bildausschnittes empfiehlt es sich, die Brennweiteneinstellung zuvor an der
Kamera vorzunehmen..
• Der Fernauslöser wird von Ihrem Rollei Händler vertrieben.
• Der Fernauslöser kann am Tragriemen befestigt werden.
Batteriewechsel Fernauslöser
1. Öffnen Sie den Batteriefachdeckel, indem Sie ihn in
die abgebildete Richtung schieben. (Abb. 12)
2. Entnehmen Sie die alte Batterie, und legen Sie die
neue so ein, daß Ihr Pluspol (+) oben liegt.
3. Schließen Sie den Batteriefachdeckel, der hörbar einrastet.
• Verwenden Sie eine 3-V-Lithium-Batterie vom Typ JS
CR 2025.
Page 41

Fehlersuche
Prüfung Abhilfe Seite
Keine Belichtung bei Druck auf den Auslöser
Ist Objektivabdeckung voll geöffnet? Kamera kurz aus- und wieder einschalten 5, 9
Sind Batterien richtig eingelegt? Batterien richtig polen 7
Wurde Kamera lange nicht benutzt? Batterien wechseln 7
Bilder unscharf
Lag AF-Meßfeld bei Auslösung Lesen Sie den Abschnitt „Der Sucher“ 11, 12
auf Hauptobjekt?
Wurden AF-Fenster durch Finger Bei Aufnahme AF-Fenster stets freilassen 15
oder Haare verdeckt?
Bildausschnitt anders als im Sucher
Wurde korrekte Bildbegrenzung Lesen Sie den Abschnitt „Der Sucher“ 11, 12
verwendet? (z.B. bei Nahaufnahmen)
41
Page 42

Technische Daten
Kameratyp: Vollautomatische Kleinbild-Zentralverschlußkamera
Aufnahmematerial: DX-kodierter Kleinbildfilm; Normalformat 24 mm x 36 mm;
Panorama-Format 13 x 36 mm
Objektiv: Zoomobjektiv Rollei VarioApogon 1:3,7/38 mm - 1:10,98/145 mm elf Linsen in acht Gliedern
Verschluß: Elektronischer Programmverschluß mit Zeiten von 1/3 - 1/400 s und B (
1
/2 s - 60 s)
Scharfeinstellung: Aktives Infrarot-Autofokus-System mit Schärfenspeicher,
- Einstellbereich: 0,60 m – ∞
- Nahbereich: 0,7 m –1 m
- Macrobereich: 0,60 m – 0,73 m
Belichtungsregelung: Programmautomatik
- Arbeitsbereich (bei ISO 100/21°)
Weitwinkel (38 mm): LW 5,5 - 17,6
Tele (145 mm): LW 8,5 - 17,6
Sucher: Realbildsucher mit AF-Meßfeld
- Gesichtsfeld: 83 %
- Vergrößerung: 0,4fach - 1,52fach
- Dioptrienkorrektur
Filmempfindlichkeitseinstellung:
Mit DX-kodiertem Film automatisch von ISO 50/18° – 3200/36°
Filmeinfädelung: Einfädelautomatik bis zur ersten Aufnahme nach Schließen der Rückwand
Filmfunktionen:
Automatischer Filmtransport, automatische Rückspulung
(Rückspulung teilbelichteter Filme möglich)
Blitz: Eingebautes Elektronenblitzgerät mit Zoomreflektor
- AUTO: Automatische Blitzzuschaltung bei schwachem Licht
- FILL-IN: Aufhellblitzen bei Tageslicht und Langzeitsynchronisation
- OFF: Blitz für Available-Light-Aufnahmen abgeschaltet
- PRE-FLASH: Vorblitz zur Verringerung roter Augen
- Blitzreichweite (bei ISO 200/24°):
Weitwinkel (38 mm): 0,60 m - 8,5 m
Tele (145 mm): 0,73 m - 4,2 m
- Blitzfolgezeit: ca. 3 s.
42
Page 43

Besondere Merkmale
Über Blitztaste: - Verringerung roter Augen
- Gegenlichtkorrektur: + 1,5 LW
- Belichtungskorrektur: 0 bis +/- 3 LW (halbstufig)
- Aufhellblitz
- Blitzabschaltung
Über Funktionstaste: - Fuzzy-Automatik
- Portrait-Zoom
- Step-Zoom
- Reihenbilder
- Mehrfachbelichtungen
- Intervallaufnahmen
- Langzeitbelichtungen (B-Einstellung)
- Schnappschußeinstellung (Fixfocus)
- Unendlich-Einstellung
Selbstauslöser: - Einzel-/Doppel-Selbstauslöser
- Aufnahmen mit 2 s Vorlaufzeit
- Fernauslösung (mit Zubehör)
Aufnahmelampe: Vor der Belichtung leuchtet die Selbstauslöserlampe zur Kontrolle
für die fotografierten Personen
Automatische Abschaltung: Drei Minuten nach der letzten Betätigung schaltet die Kamera ab,
und die Objektivabdeckung schließt sich
Datenrückwand
(nur bei Modell mit - Automatischer Kalender und Quarzuhr
Datenrückwand) - Dateneinbelichtung
Spannungsquelle: Zwei Lithium-Batterien 3 V (CR-2)
Abmessungen (mm) 132 x 74 x 53
Gewicht (ohne Batterien) 332 g.
Änderungen im Sinne des technischen Fortschritts vorbehalten.
43
Page 44

Pflege und Aufbewahrung
• Säubern Sie die Kamera gegebenenfalls mit einem
weichen Tuch.
• Die Frontlinse des Objektivs sollte ausschließlich mit
Optik-Reinigungspapier und -flüssigkeit gesäubert
werden.
• Schützen Sie die Kamera vor Sand und Wasser.
• Bewahren Sie die Kamera an einem kühlen, trockenen
und staubfreien Ort auf. Lassen Sie sie niemals an
Orten zurück, an denen ein Hitzestau auftreten kann,
wie z.B. in einem geparkten Wagen. Setzen Sie sie
nicht unnötig dem direkten Sonnenlicht aus.
• Reinigen Sie das Kameragehäuse keinesfalls mit Al-
kohol oder einem chemischen Lösungsmittel.
• Die Kamera ist für den Betrieb bei Temperaturen zwi-
schen 50° C und -10° C konstruiert.
44
Wichtige Hinweise
• Übergeben Sie die Kamera bei Betriebsstörungen
Ihrem Händler oder dem Rollei Kundendienst. Unterlassen Sie jeden eigenen Eingriff in die Kamera! Diese
enthält einen Hochspannungskreis, der zur Gefahrenquelle werden kann.
• Schützen Sie die Kamera vor Schwingungen und Stößen. Eine heruntergefallene Kamera sollte vor der
Weiterbenutzung zur Überprüfung gegeben werden.
• Niedrige Temperaturen können das Funktionieren der
Kamera beeinträchtigen. Temperieren Sie Kamera
und Batterien bei Temperaturen unter 7° C bis unmittelbar vor den Aufnahmen.
• Vermeiden Sie den schnellen Wechsel aus der Kälte
in die Wärme, bei dem sich im Innern der Kamera
Feuchtigkeit niederschlagen kann.
• Vermeiden Sie wiederholtes Blitzen bei Temperaturen
über 40° C
• Entsorgen Sie erschöpfte Batterien über den Sondermüll, nicht über den Hausmüll.
Page 45

Rollei Prego 145
Instructions for use
45
Page 46

CONTENTS
Please read these instructions carefully before using the
camera.
Special instructions...................................................... 47
In the following cases the shutter release is locked. ... 47
LCD panel .................................................................... 48
PREPARATIONS
Inserting the batteries .................................................. 49
Changing the batteries ................................................ 49
Battery check ............................................................... 49
Loading the film ........................................................... 50
Automatic rewind ......................................................... 51
Attaching the wrist strap .............................................. 52
Adjusting the eyepiece ................................................ 52
Using the camera for the first time............................... 52
THE VIEWFINDER
Frame outlines ............................................................. 53
Viewfinder displays ...................................................... 54
TAKING A PICTURE
Framing ........................................................................ 55
Focus setting ............................................................... 56
Focus lock.................................................................... 56
Exposure ...................................................................... 57
Holding the camera ..................................................... 57
Databack ..................................................................... 58
46
OVERVIEW OF MODES
Modes .......................................................................... 60
Basic flash modes ....................................................... 61
Special flash modes .................................................... 62
Self-timer modes .......................................................... 63
Normal ......................................................................... 64
Fuzzy............................................................................ 65
Step zoom .................................................................... 66
Interval shooting .......................................................... 67
Manual time exposure (BuIb) ...................................... 68
Portrait zoom ................................................................ 69
Continuous shooting .................................................... 70
Multiple exposures....................................................... 71
Automatic time exposure with flash off ........................ 72
WORKING WITH FLASH
Flash ranges ................................................................ 73
Fill-in flash .................................................................... 74
Using flash with slow shutter speeds
(slow sync) ................................................................... 75
Using preflash to reduce red-eye ................................ 76
Backlight compensation .............................................. 77
Exposure compensation .............................................. 78
Snapshot mode............................................................ 79
Close-ups/macro shots ................................................ 80
Panorama shots ........................................................... 80
Self-timer/remote release ............................................. 81
Troubleshooting guide................................................. 83
Specifications .............................................................. 84
Looking after your camera ........................................... 85
Page 47

Special instructions
• The camera only works when the batteries are inserted.
• Two 3-V-lithium batteries (type CR-2) are required.
• The lens cover opens automatically when you switch
the camera on.
• Don’t try to open the lens cover without switching on
the camera.
• The shutter can be triggered even without any film
being loaded! If you haven’t used the camera for
some time, you may not be sure whether it has any
film. You can check this by looking in the film window.
In the following cases the shutter release is locked:
• No batteries.
• Batteries dead.
• Batteries incorrectly inserted.
• Camera not switched on-
• Focus could not be set-
• One of the zoom buttons is pressed.
• Flash switched on, but not “ready”.
• The film is being advanced or rewound.
• The film cartridge wasn’t removed after rewinding.
Figures
All the example pictures are on pages 87–88.
All the illustrations showing the handling of the camera
are on the back cover flap.
47
Page 48

Backlight compensation
Slow sync flash
Red-eye-reduction
Flash functions
Spot setting
Snapshot mode
Multiple exposures
Continuous shooting
Portrait mode
Self-timer
Double self-timer
2-second delay
Remote release
Normal
Fuzzy
Step
Interval
Time exp.
red eye
auto
bulb
int
step
fill-in
fuzzy
off
Film display
Back open
Rewind
Film
Focal length
Picture counter
Close-up/macro setting
Backlight compens.
48
Battery status
Multiple exposures
Interval shooting
Abbrev. for exposure & sec.
Focal length unit
normal
Page 49

Inserting the batteries
1. Open the battery compartment cover by pushing the
sliding part in the direction of the lens (Fig. 1)
2. Insert the batteries, making sure that the plus sign on
each battery points towards the battery compartment
cover (Fig. 2)
3. Close the cover so that it clicks into place.
Changing the batteries
1) Switch off the camera.
2) Change the battery as described in “Inserting the bat-
teries “.
Please note
• Only use CR2 batteries.
• If the batteries are taken out and put back when film is
loaded, this does not affect the position of the film.
Battery check
The battery power is checked automatically every time the camera is
switched on.
If the battery is low, you’ll see a
warning in the LCD panel.
• No display:
Battery power OK.
• Symbol half black:
Battery still OK for a few films.
Keep your spare batteries handy.
• Symbol flashes:
Insert new batteries
Note
• If you’re taking photographs outside in cold weather,
keep the camera in your coat or jacket pocket to preserve the battery life.
• Keep your spare batteries handy in cold weather
since batteries lose power at low temperatures . Batteries recover at normal temperatures.
49
Page 50

Display signaling film-loading-error
Loading the film
1. To open the camera back, press the release button
as shown in Fig. 3.
2. Insert the film cartridge in the film compartment. Don’t
use any force.
3. Pull out the leading edge of the film to the start mark
on the right side of the camera as shown in Fig. 4.
Keep the film flat.
• If you have pulled too much film from the cartridge,
remove the cartridge from the film compartment and
carefully wind back the film.
IMPORTANT:
Light may damage the part of the film on which the
first frame is exposed. As a precaution take two photographs of the first subject.
50
4. Close the camera back. Make sure you hear it click in
place.
5. The film is automatically advanced to the first frame.
The “film loaded” indication appears in the LCD panel.
6. Once the film has been advanced to the first frame,
<1EX> is displayed in the picture counter in the LCD
panel.
7. If < E > flashes in the LCD panel and the shutter release remains locked, that means the film was inserted incorrectly. Open the camera back and put the
film in again.
Observations
• With DX-coded films, the camera adjusts automatically to the correct film speed between ISO 50 and
3200.
• If the film is not DX-coded, the camera automatically
sets a film speed of ISO 100/21°.
Page 51

• If you use a non-DX-coded film with a different
speed from ISO 100/21°, tell the processing laboratory about this. Film processors can often compensate
for the difference between actual speed and set
speed.
Automatic rewind
1. After you take the last picture, the film rewinds automatically.
2. The “film loaded” indication appears in the LCD panel
and the exposure numbers are counted back from 36
or 24 in the picture counter.
3. Once the film is rewound, the symbols for the film
cartridge and the camera back flash in the LCD
panel.
4. Open the camera back and remove the film cartridge.
5. If you switch off the camera while the film is being rewound, rewinding stops and only starts again when
you switch the camera back on.
How to rewind a partly exposed film
1. If you want to rewind a partly exposed film, press the
film rewind button (Fig. 8) with the tip of a ball-point
pen or a similar pointed object. The film will then be
rewound automatically.
Observations
• If rewinding stops, before the <O EX> is shown in the
LCD panel, put in a new battery.
• Never open the back before replacing the battery and
rewinding is finished.
Practical tip
Using ISO 200/24° films as standard reduces the danger
of blurring and increases the flash range.
51
Page 52

Attaching the wrist strap
Attach the wrist strap as shown in Fig. 5.
Adjusting the eyepiece
1. Select an object as far away as possible. It must appear sharp in the viewfinder.
2. If it is blurred, adjust the viewfinder to suit your eyesight. Put the camera to your eye and turn the dioptre
setting dial (Fig. 6) until the object is sharp.
Note
If you inadvertently alter the dioptre and your subject
appears blurred, don’t worry - you can still go ahead
and take your picture. The sharpness of the viewfinder
image and the sharpness of the picture have nothing to
do with each other.
52
Using your camera for the first time
1. Press the ON/OFF button (Fig. 7). You’ll see a flash
symbol in the AUTO position and an arrow in the
NORMAL position in the LCD panel. The lens cover
opens.
2. Press the ON/OFF button again to switch the camera
off. If you don’t do this, the camera automatically
switches itself off three minutes after the last operation
to save your batteries. The lens cover closes as the
camera is switched off. The camera symbol, the “film
loaded” symbol and the picture number are displayed
in the LCD panel.
Page 53

THE VIEWFINDER
Frame outlines
The image area outlines correspond to parts of the LCD
panel which are activated when particular functions are
selected. Specific areas of the viewfinder are then
darkened. The parts of the subject which fall within the
darkened parts of the viewfinder image will not be
visible in your photograph.
• For full-frame shots please note the following: Without
the frame outlines, the viewfinder image extends to
the bottom of the image area in the viewfinder.
Close-up shots
The upper frame outline (1) is activated.
Focal length Focusing range
38 mm 0.80 m – 1,60 m
145 mm 1.60 m – 2,15 m
Macro shots
The upper frame outlines (2) are activated.
Focal length Focusing range
38 mm 0.60 m – 0,80 m
145 mm 0.70 m – 1,60 m
AF
grün
green
rot
red
Panorama shots
The two upper frame outlines and the two lower outlines
(3) are activated.
Panorama photos in the close-up range
The three upper frame outlines and a lower one bottom
outline (4) are activated.
• Please note: With panoramic macro shots, the nondarkened part of the viewfinder image shows the area
captured on film.
Focal length Focusing range
38 mm 0.60 m – 1.27 m
145 mm 0.70 m – 1.77 m
53
Page 54

Green LED: Focus indicator
• The green LED glows if the focus was set. The subject
is more than 0.6 m away from the camera.
• The green LED flashes slowly if the camera has automatically switched to close-up or macro mode. The
subject is between 1.25 m and 0.6 m from the camera
.
• The green LED flashes quickly if the subject is too
near the camera (0.6 or less) and focusing is impossible. In this case the shutter release locks.
Red LED: “Flash ready” indicator
• The red LED doesn’t come on if the exposure can be
made with the available light.
• The red LED glows if flash is needed and ready.
• The red LED flashes quickly if the flash is needed but
hasn’t been charged up. In this case the shutter release remains locked until the flash is charged.
• The red LED flashes slowly when auto flash is
switched off (page 19) if the pictures are likely to
come out blurred with the available light. Support the
camera on a firm base or use a tripod.
54
LCD symbols in the finder
The distance symbols in the lower part of the finder
show in which focusing range the subject is. A warning
is displayed if autofocusing is impossible.
Distance 6.5 m – ∞
Distance 2.5 m — 6.5 m
Distance 1.6 m – 2.5 m
Distance 0.7 m - 1.6 m (tele)
Distance 0.6 m - 1.6 m (wide-angle)
The symbol flashes and the shutter is
locked.
Distance less than 0.7 m (tele)
Distance less than 0.6 m (wide-angle)
The symbols flash.
Autofocusing is impossible. If the
shutter is released, some part of the
picture will be sharp nonetheless!
Focusing range 3.7 m – ∞ (tele)
Focusing range 2.8 m – ∞ (wide-angle)
Page 55

TAKING A PICTURE
Framing
1. Frame your subject by selecting a suitable focal
length.
2. Press zoom button T for a longer focal length (narrower angle).
3. Press zoom button W for a shorter focal length (wider
angle).
4. The selected focal length is displayed in the LCD
panel in steps of 38 mm, 45 mm, 50 mm, 60 mm, 70
mm, 80 mm, 90 mm, 100 mm, 110 mm, 120 mm, 130
mm and 145 m. The display is only for guidance,
since intermediate values can also be set.
Notes
• Always make sure that the most important part of the
subject takes up most of the frame.
• With wide-angle shots avoid a large, empty foreground. You can often do this by simply kneeling and
pointing the camera slightly upwards.
• Don’t use long focal lengths exclusively to photograph
distant subjects. Also use them to capture details as
large as possible.
• Focal lengths around 90 mm are particularly suitable
for taking portraiture.
55
Page 56

Focus setting
1 Align the AF area with the part of the subject which
you specifically want to have sharp. If this part of the
subject is not in the centre of the image, you need to
use focus lock (page 14).
2. Pay attention to the green and the red LED’s next to
the viewfinder eyepiece (page 11, Viewfinder).
Focus lock
If the part of your subject you want to emphasise is in the
centre of the frame, it is shown in the focus area in the
centre of the viewfinder. However, there are many situations where you can achieve the best effect by putting
your main feature outside the centre of the frame. In this
case, an unimportant part of the foreground or background will appear in the focus area. The focus will then
be set on the foreground or background, while the most
interesting part of the subject is shown blurred. To avoid
this, use the focus-lock facility. (Ex. 1 – 3)
56
1. Line up the main part of your subject in the focus
area.
2. Press the shutter release halfway. Make sure that you
don’t press it down fully or the shutter will be released.
3. The green LED comes on, showing that the camera
has focused on the selected area of interest.
4. Keeping the shutter release slightly pressed in, compose your picture.
5. Press the shutter release fully to release the shutter.
Notes:
• Focusing and exposure information are locked
simultaneonly.
• To clear focus lock without making an exposure, take
your finger off the shutter release button.
Page 57

Notes on the autofocus system
• The camera’s focus area is wide enough to cover a
large part of the subject. The AF control is programmed to focus on the nearest part of the subject.
Make sure that you don’t have insignificant parts of
the foreground in the focus area. This is particularly
important when you’re taking group or landscape pictures.
• The camera can focus at distances from 0.6 m to infinity. You can take photographs in the 0.6 cm -1 m
range with the close-up or macro setting (page 80).
• In certain circumstances, automatic focus will operate
inadequately or not at all.
Such circumstances are:
- Very bright background
- Fire
- Smoke, strong haze, fog
- Very bright or shiny areas
- Subjects behind glass
Exposure
The camera has a built-in exposure meter. Automatic
exposure control sets the shutter speed and aperture on
the basis of brightness and film speed. In some situations, the available light may not be enough to allow a
correct exposure with the aperture wide open, even
using the slowest shutter speed. You can use the builtin flash in auto or manual mode to create special effects,
or you can switch it off completely. To photograph
backlit subjects, contrasty subjects and very bright or
very dark subjects, the camera has fill-in flash (page
74), backlighting compensation (Page 77) and exposure
compensation (page 78).
Holding the camera
Keep the camera steady to avoid blurred pictures. This
is particularly important when using long focal lengths
(telephoto setting).
For shots in landscape format, both elbows should be
pressed firmly against your body; when taking pictures
in portrait format, keep one elbow pressed against your
body. Make sure that lens, flash, exposure metering
windows and AF windows are not covered by your
fingers or hair or by the wrist strap. When taking flash
shots in portrait format keep the flash at the top.
57
Page 58

mode select set
mode select set
96 10 21
mode select set
96 10 21
mode select set
96 10 21
Data display
96 10 21
Year - Month - Day
21 12 20
Day - hour - minute
-- -- --
No display
Date and time recording (data-back model only)
Press the MODE button. Every time you press the button the mode changes as
shown below.
The display in the data LCD flashes for two - three seconds.
Note:
• Operate the recessed buttons on the camera back with a pointed object or
your fingernail
Press the desired date format by
pressing the MODE button.
To alter the setting, press the SELECT button until the desired format
flashes.
10 21 96
Month - day - year
2110 96
Day - month - year
58
Set the date and time by pressing the
SET button.
• Keep one of the buttons pressed down to scroll through the dates quickly.
• Press the MODE button to terminate the setting.
Page 59

Replacing the data battery
If the data display is faint, replace the data battery.
1. Open the data battery compartment as shown in Fig. 9.
2. Remove the old battery and insert a new one, making
sure the plus sign is at the top.
3. After changing the battery set the date again.
• Battery type: 3V lithium button cell (JS CR2025).
• Battery life: Approx. 3 years.
Notes:
• The date is difficult to read in a photograph taken
against a bright or busy background.
• The databack is intended to be used at temperatures
between 50 °C and -10 °C. The display can become
difficult to read at higher or lower temperatures.
• The Quartz date model is fitted with an automatic calendar, which is programmed until the year 2019. It
automatically adjusts for short and long months and
leap years.
59
Page 60

OVERVIEW OF MODES
Modes
Select the mode by pressing the MODE button.
An arrow (possibly combined with a symbol) indicates
the selected mode.
Multiple exposure
60
Normal Fuzzy
Continuous shooting
Step zoom Interval shooting
Time exposure
Portrait zoom
Page 61

Basic flash modes
Select the basic flash mode by pressing mode button .
An arrow in the LCD panel (possibly combined with a
symbol) shows the selected mode.
Auto flash
tion
Fill flashExposure compensa-
Slow syncFlash off
61
Page 62

Special flash modes
Switch on the extended flash modes by pressing the
button for extended flash modes
the camera. The different modes are indicated by
symbols in the LCD panel.
/ on the back of
Auto flash
Backlighting compensation
62
Red-eye reduction
Page 63

Self-timer modes
Select the self-timer modes with the self-timer button.
The different modes are indicated by symbols in the LCD
panel.
Normal Self-timer Double self-timer
Note:
• The remote release is available as an accessory. Ask
your dealer.
Release with 2 sec. delay Remote release
63
Page 64

NORMAL
In NORMAL mode, automatic exposure controls shutter
speed and aperture. This default setting is suitable for
most subjects.
1. Keep pressing the MODE button until the arrow in the
LCD panel points to NORMAL.
2. Shutter speed and aperture are set according to the
film speed and ambient brightness.
Note:
The camera has shutter speeds between 1/3 and 1/400
sec.
64
Caution:
• If the subject moves during the exposure the picture
will be blurred. To prevent this, select a fast shutter
speed or use flash.
• Moving the camera during the exposure will also
cause the picture to come out blurred. You can prevent camera shake by selecting fast shutter speeds,
using flash or supporting the camera on a firm base
or tripod.
• If pictures are likely to turn out blurred because of
subject movement or camera shake, keep the focal
length as short as possible. The zoom lens here offers
large apertures which allow fast shutter speeds. If
necessary, the main area of interest can be enhanced at the processing laboratory by selective enlargement. (Selective enlargements are more expensive than standard enlargements!)
• High-speed films (ISO 400/27° or higher) also help
with fast shutter speeds.
Page 65

red eye
auto
fill-in
bulb
int
step
off
fuzzy
normal
FUZZY MODE
In FUZZY mode automatic exposure controls the shutter
speed and aperture. If necessary it also sets the focal
length to avoid blurred pictures due to camera shake.
1. Press the MODE button until the arrow in the LCD
panel points to FUZZY.
2. Shutter speed and aperture are set according to the
film speed and ambient brightness.
3. If the subject is outside the flash range and the shutter speed may result in blurred pictures with the set
focal length, the latter is shortened.
Note:
• The longer the focal length, the faster the shutter
speed must be to avoid blurred pictures due to camera shake.
65
Page 66

The initial focal length determines the number of automatic exposures (see table).
1. Press the MODE button until the arrow in the LCD
red eye
fill-in
bulb
auto
off
int
step
fuzzy
normal
panel points to STEP.
2. The self-timer is activated automatically.
3. The first exposure is made after 10 seconds. Further
exposures are made at five-second intervals. If flash
is required, the exposures can only be made if the
flash is “ready”. As a result intervals between shots
can be longer.
STEP-ZOOM
In STEP-ZOOM mode, up to three exposures with
different focal lengths are made in rapid succession.
Note:
• There is no need to keep the shutter release pressed
down.
The focal length is shortened from exposure to exposure.
No. of pictures 145 130 120 110 100 90 80 70 60 50 45 38mm
3 Ex ➀➁ ➂
3 Ex ➀➁➂
3 Ex ➀➁ ➂
3 Ex ➀➁➂
3 Ex ➀➁ ➂
3 Ex ➀➁➂
3 Ex ➀➁ ➂
3 Ex ➀➁➂
3 Ex ➀➁ ➂
3 Ex ➀➁➂
2 Ex ➀➁
1 Ex ➀
66
➀ First exposure ➁ Second exposure ➂ Third exposure
Page 67

red eye
auto
fill-in
bulb
int
step
off
fuzzy
normal
INTERVAL SHOOTING
In this mode the camera shoots automatically at specified intervals. (Ex. 12 – 14)
1. Press the MODE button until the arrow in the LCD
panel points to INT.
2. The default interval of 10 seconds is set.
3. To change the shooting interval, keep the MODE
button pressed down and press one of the two zoom
buttons. The interval is shown in the LCD panel. You
can select intervals of 10, 20, 30, 40, 50 and 60 seconds.
4. The first shot is taken the first time the release is
pressed. The camera then cuts out and comes back
on just before the next exposure.
5. To end interval shooting, press MODE or the ON/OFF
button.
6. If you don’t stop interval shooting, it carries on until
the end of the film.
Note:
• For interval shooting, put the camera on a solid base
or tripod to keep the same framing in all the pictures.
Hint:
• If you’re using slide film, interval shooting will let you
create a “fast-forward” effect in your slide show.
67
Page 68

red eye
auto
fill-in
bulb
int
step
off
fuzzy
normal
MANUALLY CONTROLLED TIME EXPOSURE
(BULB )
In this mode the film is exposed as long as you keep the
shutter release pressed down. Only use this feature
when the available light is fairly poor, otherwise you’ll
overexpose the film.
1. Press the MODE button until the arrow in the LCD
panel points to BULB.
2. The exposure time is shown in the LCD panel.
68
Note:
• For time exposures, always support the camera on a
firm base or a tripod.
Hint:
• Use time exposures for photographs of fireworks,
thunderstorms or illuminated moving subjects (e.g.
fair-ground rides, cars). These light sources will appear as shorter or longer lines in the picture depending on the exposure time.
• Combine time exposure with a flash exposure. Ghosting around the sharp flash contours may create an
attractive effect.
Page 69

red eye
auto
fill-in
bulb
int
step
off
fuzzy
normal
PORTRAIT ZOOM
In PORTRAIT ZOOM mode, “Auto” controls the shutter
speed and aperture. It also controls the focal length of
the lens so that the subject will always be the same size.
(Ex. 6 and 7)
1. Press MODE until the arrow in the LCD panel points
to the portrait symbol .
2. Shutter speed and aperture are set on the basis of the
film speed and the ambient brightness. The focal
length of the lens is always set so that the subject remains the same size even when the camera-to-subject distance is changed. Whith people shot in landscape mode the photo will always come out as a
half-length portrait.
Note
• Even though the picture stays the same size, the perspective will change as a result of altering the camera
viewpoint. If you take your photograph from a short
distance with a short focal length, you’ll find a lot of
the background is included. That’s useful if you want
to show the subject in suitable surroundings. If you
shoot from a greater distance with a longer focal
length, very little background will appear in the picture. That’s a good thing if you want your subject to
dominate the picture.
69
Page 70

red eye
auto
fill-in
bulb
int
step
off
fuzzy
normal
CONTINUOUS SHOOTING
In this mode, shots are taken in rapid succession as
long as the shutter release button is kept pressed down.
(Ex. 9 – 11)
1. Press the MODE button until the arrow in the LCD
panel points to the continuous shooting symbol .
2. The maximum shooting speed is one frame per second. The interval between shots will be longer if you
use flash.
70
Note:
• The focus is reset for each picture. Always keep the
centre of interest in the focus area.
Page 71

red eye
auto
fill-in
bulb
int
step
off
fuzzy
normal
MULTIPLE EXPOSURES
In multi-exposure mode you can make two or more
exposures in a single frame. (Ex. 8)
1. Press the MODE button until the arrow in the LCD
panel points to the multiple exposure symbol .
2. After the first exposure, the arrow in the LCD panel
pointing to the multiple exposure symbol flashes.
3. You can switch off the camera after the first exposure.
The MULTIPLE EXPOSURE mode is then stored. This
mode is cancelled after the second exposure. For
more than two exposures on one frame, select the
multi-exposure mode again before the second and all
following exposures.
Note:
• When two exposures are made on a single frame, the
amount of light reaching the film is increased accordingly. In general, the double exposure will turn out
too bright. It’s therefore a good idea to make at least
one of the exposures against a dark background.
71
Page 72

red eye
auto
fill-in
bulb
int
step
off
fuzzy
normal
AUTOMATIC TIME EXPOSURE
WITH THE FLASH OFF
Use this mode when you want to take photographs by
available light in the twilight or in poorly lit interiors.
Shutter speed and aperture are controlled automatically.
1. Press the flash button until the Flash Off symbol
is next to 0FF and the night symbol is displayed in
the LCD panel.
2. If there is a risk of blur, the red LED flashes slowly.
72
Notes:
• Unlike with time exposure (BULB), the shutter speed
is controlled by the automatic exposure control. If this
cannot provide a slow enough shutter speed, the picture will be underexposed!
• When there is not sufficient available light, a slower
shutter speed will be used. Steady the camera on an
improvised support or use a tripod to avoid camera
shake.
Hints:
• Use this mode if the main area of interest is very large
or very far away and cannot be illuminated by flash.
• Use this mode if a flash would disturb the mood of the
picture (e.g. when shooting a sunset or by lamp light).
Page 73

WORKING WITH FLASH
Use the integral flash to take pictures in poor light, to
relieve shadows around backlit subjects (with fill-in flash)
or to create special effects.
Flash ranges
With wide-angle 38 mm With tele 145 mm
ISO 100/21° 6 m 3 m
ISO 200/24° 8.5 m 4.2 m
ISO 400/27° 12 m 6 m
Notes:
• When using a high-speed film ( ISO 400/27° or faster
), keep bright areas of your subject (faces, bright
clothing) about 1.5 metres away from the camera,
otherwise the flash effect will be overdone and the
subject will appear too bright and won’t have enough
detail.
• In very large rooms with dark furniture and/or a dark
wooden ceiling and when shooting outdoors, go a
little under the values given in the above table when
calculating the maximum flash range.
73
Page 74

red eye
auto
fill-in
bulb
int
step
off
fuzzy
normal
FILL-IN FLASH
Select fill-in mode when the flash will be not fired automatically because there is enough ambient light.
(Ex. 21and 22)
1. Press the flash button until the flash symbol moves
to FILL-IN in the LCD panel.
74
Note
• Use fill-in flash to lighten shadows around your main
subject.
• Use fill-in flash when interiors are brightly illuminated
but fluorescent lighting may cause a colour cast. Most
fluorescent lighting causes a greenish colour cast.
Page 75

red eye
auto
fill-in
bulb
int
step
off
fuzzy
normal
USING FLASH WITH SLOW SHUTTER SPEEDS
(SLOW SYNC FLASH)
Use this mode to take photographs at twilight or night
time or in dimly lit interiors. Ambient light and flash are
combined. (Ex. 15)
1. Press the flash button until the flash symbol
moves to FILL-IN in the LCD panel and the night symbol is displayed.
2. The red LED glows when the flash is ready.
3. The red LED flashes quickly while the flash is charging.
4. The red LED flashes slowly to warn of camera shake.
Note:
• Set a slow shutter speed to record the background
when there is not enough ambient light. Steady the
camera on a firm support or use a tripod to avoid
camera shake.
Hint:
• In this mode, your foreground subject will be illuminated by flash light, with the background recorded by
time exposure. This combination is useful if you want
to take a photograph of somebody standing in front of
an illuminated tourist attraction.
75
Page 76

red eye
auto
fill-in
bulb
int
step
off
fuzzy
normal
USING PREFLASH TO REDUCE RED-EYE
Red-eye occurs when flash shots are taken of people in
inadequate ambient light. The light from the flash goes
straight into the subject’s eyes and bounces back into
the lens. The red colour is caused by the pigmentation
in the back of the eye. (Ex. 16 – 17)
1. Press the button for the extended flash modes until
RED EYE is indicated in the LCD panel.
2. The preflash makes the pupils contract so that “redeye” is reduced or avoided altogether.
76
Notes:
• When you’re taking a group shot, warn people that a
preflash will be fired so they don’t start to move about
after the preflash.
• Keep the camera steady until the main flash is fired
so your framing will not change.
• If people still come out with red eyes in your enlargements, try retouching the photograph with a suitable
black felt pen.
Page 77

red eye
auto
fill-in
bulb
int
step
off
fuzzy
normal
BACKLIGHT COMPENSATION
The best way to photograph dark subjects in front of a
bright background is to use backlight compensation.
This makes the detail in the subject stand out more
clearly.
1. Press the button for the extended flash modes until
the sun symbol
is displayed in the LCD panel.
2. This mode lets you increase exposure by 1.5 EV.
Notes:
• Backlight compensation involves slower shutter
speeds. This means you’ll need to keep the camera
steady or support it on a firm base or a tripod.
• When you’re shooting into strong light sources (sun,
floodlighting at sporting events or rock concerts),
stray light can result in a low-contrast picture.
(Ex. 4 and 5)
Hints:
• Use backlight compensation when fill-in flash won’t
do the job (page 74) because the main subject is outside the flash range.
• Backlight compensation is recommended if fill-in flash
would spoil the effect of the natural lighting.
• Don’t just use backlight compensation for pictures
taken against the sun or the bright sky. It is also a
great help when taking photographs in the snow, on a
bright sandy beach or on water where glare is a problem.
77
Page 78

Exposure compensation
Exposure compensation helps you obtain a correct
exposure in situations where there is a very pronounced
contrast between foreground and background or between very bright and very dark parts of the subject.
1. Press the flash button
the night symbol are displayed in the LCD panel
next to AUTO and the compensation symbol is
also displayed.
2. Keep the flash button pressed down until the compensation symbol flashes.
3. Press the zoom button T to enter a plus correction in
the range +0.5 to +3 EV in half EV steps.
4. Press the zoom button W to enter a minus correction
in the range -0.5 to -3 EV in half EV steps.
78
until the flash symbol and
Notes:
• A minus correction gives you less exposure. Bright
subjects in front of a dark background or very bright
subjects will show more detail.
• A plus correction provides a more generous exposure. Dark subjects in front of a bright background or
completely dark subjects will reveal more detail.
Hints:
• You only need to use exposure compensation when
shooting with slide film. When negatives are enlarged, exposure compensation is generally balanced
out automatically during processing.
• If you cannot estimate the effect of an exposure correction, take three shots 0.5 EV apart with exposure
compensation on.
• When you’re working with slide film, you can use the
correction factors to influence the colour of the picture. The saturation of vivid colours (autumn leaves,
children’s toys, sails of windsurfers, hot-air balloons
against a blue sky) can be further enhanced by selecting a 0.5-stop minus correction. Delicate colours
(spring foliage, children dressed in light colours,
blossoms) become even gentlier if you compensate
by + 0.5 f-stop.
Page 79

red eye
auto
fill-in
bulb
int
step
off
fuzzy
normal
SNAPSHOT MODE
Snapshot mode lets you shoot quickly, since there is no
need to focus each time.
1. Press the SNAP/SPOT button until SNAP is displayed
in the LCD panel.
2. The zoom lens is now locked at a focal length of
38 mm.
3. In this mode anything shot between 1.3 and 6 metres
away will be sharp.
4. Film transport is set to continuous shooting.
Note:
Multiple exposures and manual time exposures (BULB)
can be combined with the snapshot mode.
Hints:
• Use snapshot mode for candid shots without holding
the camera up to your eye.
• Use snapshot mode for interval shots if the subject is
likely to move out of the focus area between two
shots.
79
Page 80

CLOSE-UPS
When shooting from distances between 0.7 m and 1.6 m
(with a focal length of 38 mm) or 0.73 m and 1.60 m
(with a focal length of 145 mm) the camera automatically
switches to close-up mode. The green LED flashes
slowly and the close-up symbol
panel.
MACRO SHOTS
At distances between 0.6 m and 0.7 m (with a focal
length of 38 mm) or 0.7 m and 0.73 m (with a focal
length of 145 mm) the camera automatically switches to
macro mode. The green LED flashes slowly and the
close-up symbol flashes slowly in the LCD-panel.
• Note the frame outlines in the viewfinder. For fullframe shots, bear in mind that the viewfinder doesn’t
show the full width of the lower edge of the image
area.
• The larger the image, the greater the risk of blur.
Keep the camera steady when taking close-up and
macro shots. Support the camera on a firm base or
use a tripod.
• Exposures aren’t possible at distances of less than
0.6 m. The green LED flashes quickly and the shutter
locks.
80
appears in the LCD
PANORAMA SHOTS
Panorama mode lets you shoot in the 13x36 mm format.
1. Slide the panorama switch to the right.
2. LCD masks at the top and bottom of the viewfinder
image outline your frame area.
Notes:
• Ask your photographic dealer or developing agent
whether the laboratory will supply panorama prints.
• When you hand in the film, point out that it contains
panorama pictures.
• Panorama prints are usually more expensive than
standard prints.
Hints:
• Use the panorama setting for landscape shots or
group photos. Select portrait format for photographs
of buildings or monuments.
• Set a long focal length and take several panorama
shots, with slight lateral overlap. Then assemble the
prints into one super-panorama.
Page 81

INFINITY LOCK
This mode allows you to take photographs of distant
subjects through glass.
• Press the shutter release at the same time as pressing
the button marked ∞.
• The function is cancelled as soon as you release the
infinity button.
Notes:
• In infinity mode the green LED does not light up when
the shutter release is pressed.
• The camera switches the flash off automatically to
prevent it from being triggered inadvertently.
SELF-TIMER
The self-timer feature allows you to get into the picture or
to reduce camera shake. (Ex. 18)
Self-timer with 10-seconds delay
1. Press the self-timer button until the self-timer symbol
appears in the LCD panel.
2. Press the shutter release. The self-timer symbol
starts to flash in the LCD panel. (Fig. 10)
3. The shutter is released after about 10 seconds.
Self-timer with 2-second delay
1. Press the self-timer button until the self-timer symbol
appears in the LCD panel.
2. Press the shutter release. The self-timer symbol
starts to flash in the LCD panel. (Fig. 10)
3. The shutter is released after about 2 seconds.
Note
• Use the short delay for photos taken with tele focal
lengths and slow shutter speeds or for close-ups shot
with slow shutter speeds. In both cases vibrations can
occur when the shutter release is triggered, resulting
in blurred pictures. While the self-timer is in operation
the vibrations diminish and blurred pictures are
avoided.
81
Page 82

Two-shot self-timer
1. Press the self-timer button until the double self-timer
symbol
2. Press the shutter release. The self-timer symbol
starts to flash in the LCD panel. The first exposure is
made after about 10 seconds, with the second shot
following some 2 seconds later. (Ex. 19 and 20)
Notes:
• Focusing and exposure data are calculated when the
shutter release is pressed. Don’t stand in front of the
camera when you press the shutter release.
• Place the camera on a firm base or use a tripod. This
ensures that your framing won’t change after releasing the shutter.
• With flash shots, the delay between pressing the shutter release and the exposure can be longer since the
flash has to recycle.
Remote release
The optional remote release (Fig. 11) allows wireless
remote control of the camera.
1. First switch to remote release with the self-timer but-
ton (SELF).
82
appears in the LCD panel.
2. Set the focal length in the same way as on the camera, using the zoom lens button on the remote release. Every press of the zoom button moves the lens
up or down on step in the following range: 28, 45, 60,
75, 90 mm.
3. The exposure is made 2 seconds after you trigger the
remote release, giving you time to get into position.
Notes:
• To ensure accurate framing, it is preferable to set the
focal length on the camera beforehand.
• The remote release is available from your Rollei
dealer.
• The remote release unit can be attached to the strap.
Changing the remote release battery
1. Open the battery compartment cover by sliding it in
the direction indicated. (Fig. 12)
2. Remove the old battery and put in the new one with
the “+” at the top.
3. Close the battery compartment cover which should
click into place.
• Use a 3 V lithium battery (JS CR 2025).
Page 83

Troubleshooting guide
Problem & check Remedy Page
No exposure when shutter release pressed
Is lens cover fully open? Switch camera briefly off and on 47, 51
Are batteries inserted correctly? Put batteries right way round 49
Camera not used for a long time? Replace batteries 49
Blurred pictures
Was main subject in focus area Read the section on “The viewfinder” 53, 54
when you pressed the shutter release?
Were your fingers or hair Take care not to block autofocus window 57
covering the AF windows?
Picture different from viewfinder image
Did you use the correct frame outline Read the section on “The viewfinder” 53, 54
(e.g. for close-ups)?
83
Page 84

Specifications
Camera type: Fully automatic 35mm leaf-shutter camera
Film: DX-coded 35mm film; standard format 24 mm X 36 mm;
Lens: Zoom lens Rollei VarioApogon 38 mm f3.7 - 145 mm f/10.98;
Shutter: Electronic programmed shutter with speeds of 1/3 s — 1/400 and B (1/2 s — 60 s )
Focusing: Active infrared autofocus system with focus lock
Exposure control: Automatic control
Viewfinder: Real-image viewfinder with focus brackets
Film speed setting: With DX-coded film automatic from ISO 50/18° — 3200/36°
Film loading: Automatic advance to frame 1 when the camera back is closed
Film functions: Automatic film transport, automatic rewind (mid-roll rewinding also possible)
Flash: Built-in electronic flash with zoom reflector
84
Panorama format 13 mm x 36 mm
eleven elements in eight components
- Focusing range: 0.60 m — ∞
- Close-up range: 0.7 m — 1 m
- Macro range: 0.60 - 0.73 m
- Metering range (with ISO 100/21° film)
Wide angle (38 mm): 5.5 — 17.6 EV
Tele (145 mm): 8.5 — 17.6 EV
- Effective image area: 83%
- Magnification: 0.4x - 1.52x
- Eyesight adjustment
- AUTO: flash fires automatically in poor light
- FILL-IN: Fill-in flash for daylight and slow sync flash
- 0FF: Switch off the flash when you want to use the available light
- PRE-FLASH: Preflash for red-eye reduction
- Flash range (with ISO 200/24° film )
Wide angle (38 mm): 0.60 m — 8.5 m
Tele (145 mm): 0.73 m — 4.2 m
- Recycling time: approx. 3 seconds
Page 85

Special features
Via flash button: - Red-eye reduction
- Backlight compensation: + 1.5 EV
- Exposure compensation: 0 to +/-3 EV (half steps)
- Fill-in flash
- Flash off
Via function button: - Fuzzy zoom (intelligent exposure)
- Portrait zoom
- Step zoom
- Continuous shooting
- Multiple exposure
- Interval shooting
- Time exposures (B setting)
- Snapshot mode (fixed focus setting)
- Infinity mode
Self-timer: - Single-shot/two-shot self-timer
- Exposures with 2 sec. delay
- Remote release (optional accessory)
Exposure warning: The self-timer lamp shines just before the exposure so that the subject knows that
the picture is about to be taken.
Automatic cut-out: The camera cuts out and the lens cover closes if the camera is not operated for
three minutes.
Databack
(only on model with databack) - Automatic calendar and quartz clock
- Date recording
Power supply: Two lithium batteries 3 V ( CR — 2 )
Dimensions (mm): 132 X 74 X 53
Weight (without batteries): 332 g
Subject to change without notice.
85
Page 86

Taking care of your camera
• Clean the camera with a soft cloth.
• Only use lens cleaning paper and lens cleaning solu-
tion on the front lens.
• Protect the camera against sand and water.
• Keep the camera in a cool, dry and dust-free place.
Never leave it in a place where heat may cause
“sweating”, e.g. in a parked car. Keep the camera
out of direct sunlight as much as possible.
• Under no circumstances clean the camera body with
alcohol or a chemical solvent .
• The camera is designed to work at temperatures be-
tween 50 °C and -10 °C.
86
Important information
• If a fault occurs in your camera, take it to your dealer
or send it to the Rollei Customer Service Department.
No DIY repairs, please! The camera contains a highvoltage circuit that may cause injury if handled improperly.
• Protect the camera against vibrations and impact. If
the camera is dropped, have it thoroughly checked
before using it again.
• Low temperatures can impair the operation of the
camera. At temperatures below 7 °C, keep the camera and batteries warm until immediately before
shooting.
• Avoid abrupt changes of temperature, since condensation can seriously damage the interior of the camera.
• At temperatures above 40 °C avoid firing the flash
repeatedly at short intervalls.
• Dispose of used batteries in a special waste container
(where available). Never throw them out with your
household refuse.
Page 87

Beispiel 1 Example 1
Beispiel 2 Example 2
Beispiel 3 Example 3
Beispiel 4 Example 4
Beispiel 5 Example 5
87
Page 88

Beispiel 6 Example 6
Beispiel 7 Example 7
Beispiel 8 Example 8
Beispiel 10 Example 10Beispiel 9 Example 9
88
Beispiel 11 Example 11
Page 89

Beispiel 12 Example 12
Beispiel 13 Example 13
Beispiel 14 Example 14
Beispiel 16 Example 16Beispiel 15 Example 15
Beispiel 17 Example 17
89
Page 90

Beispiel 18 Example 18
90
Beispiel 19 Example 19
Beispiel 22 Example 22Beispiel 21 Example 21
Beispiel 20 Example 20
Page 91

Abb. 1 Fig. 1 Abb. 2 Fig. 2 Abb. 3 Fig. 3 Abb. 4 Fig. 4
Abb. 5 Fig. 5 Abb. 6 Fig. 6 Abb. 7 Fig. 7
Abb. 8 Fig. 8
Abb. 9 Fig. 9 Abb. 10 Fig. 10 Abb. 11 Fig. 11 Abb. 12 Fig. 12
91
 Loading...