

Page 1
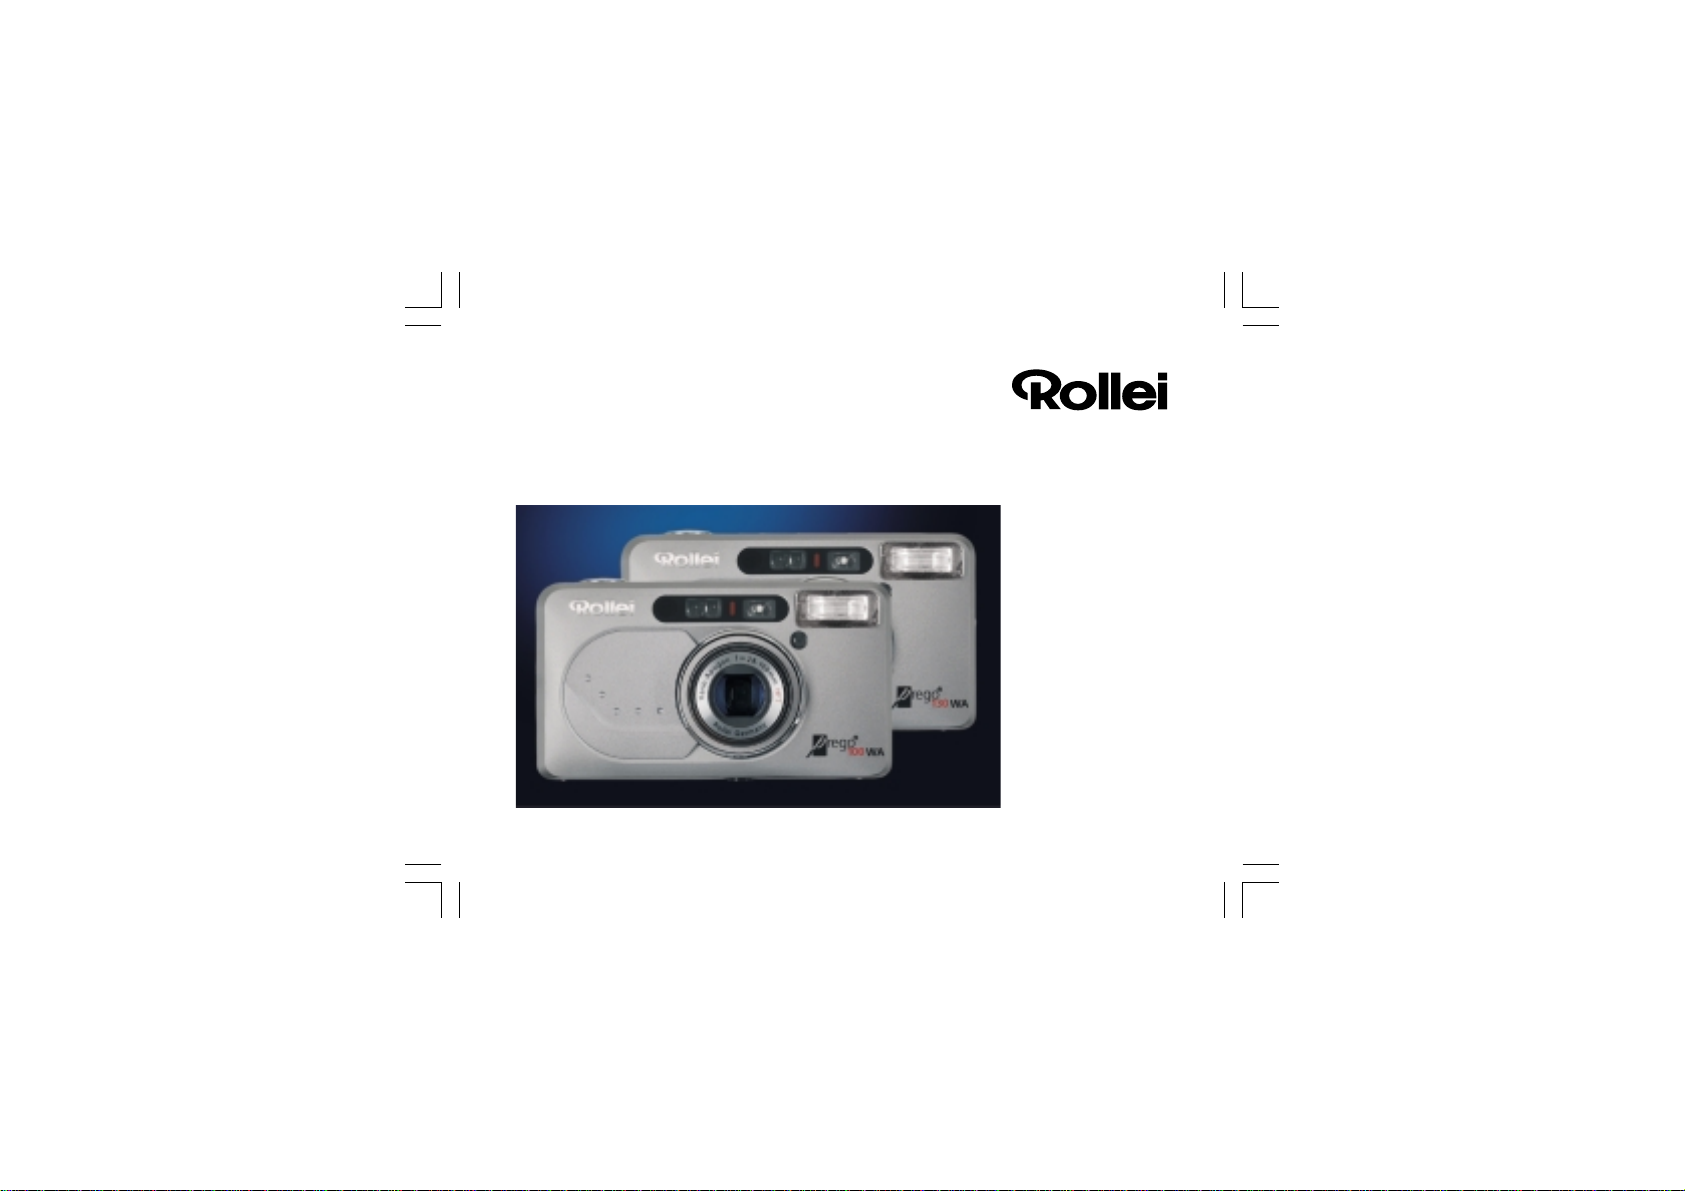
Rollei Prego 100 WA
Rollei Prego 130 WA
Instructions for use
Page 2

GENERAL
The camera
Do not take the camera apart yourself. It
›
contains high-voltage elements that can be
dangerous.
If you do, the warranty will cease to be valid.
If the housing becomes damaged, do not
›
touch any internal parts to avoid the risk of
an electric shock.
Should the camera get wet, remove the
›
battery for the same reason.
The battery
The camera will not work without a battery.
›
When you insert a battery, make sure it is the
›
right way round (check the poles).
Do not recharge the battery, or short-circuit
›
it, take it apart, throw it on the fire or expose
it to moisture. Keep it away from children
and animals and do not dispose of it in the
normal household refuse.
2
The camera will not take a picture if ...
there is no battery in the camera or the
›
battery is empty,
the lens cover is closed (camera is switched
›
off),
the film is being rewound,
›
the rewound film is still in the camera
›
the flash has not yet charged.
›
A microcomputer controls the camera electronically. In rare cases, strong electrical or
magnetic fields can lead to malfunctions. In
such circumstances, remove the battery for
2 – 3 minutes. When it has been replaced, the
camera should function normally.
Page 3

LIST OF CONTENTS
Police recommendation:
Take pictures of all valuables and catalogue
them, firstly to make life difficult for receivers of
stolen goods and secondly to save yourself
unnecessary annoyance.
Getting ready
Camera body
LCD panel
Finder / Autofocus LED
Inserting the battery
Battery status
Attaching the hand strap
Loading a film
Removing the film
Rewinding partly exposed films
Switching on / Zooming
›
›
›
›
›
›
10
›
11
›
11
›
12
›
Picture taking
Holding the camera
Taking a photograph
Focus lock
Menu control
Program system flash
Flash modes
Red-eye reduction
Fill-in flash
Flash off
Night flash
Self-timer
Remote control
Infinity (landscape)
4
Close-ups
6
Date imprinting
7
Setting the date and time
8
9
Miscellaneous
9
Camera care
Overcoming problems
Technical data
13
›
14
›
15
›
16
›
17
›
18
›
19
›
20
›
20
›
21
›
22
›
23
›
24
›
25
›
26
›
28
›
29
›
30
›
31
›
3
Page 4
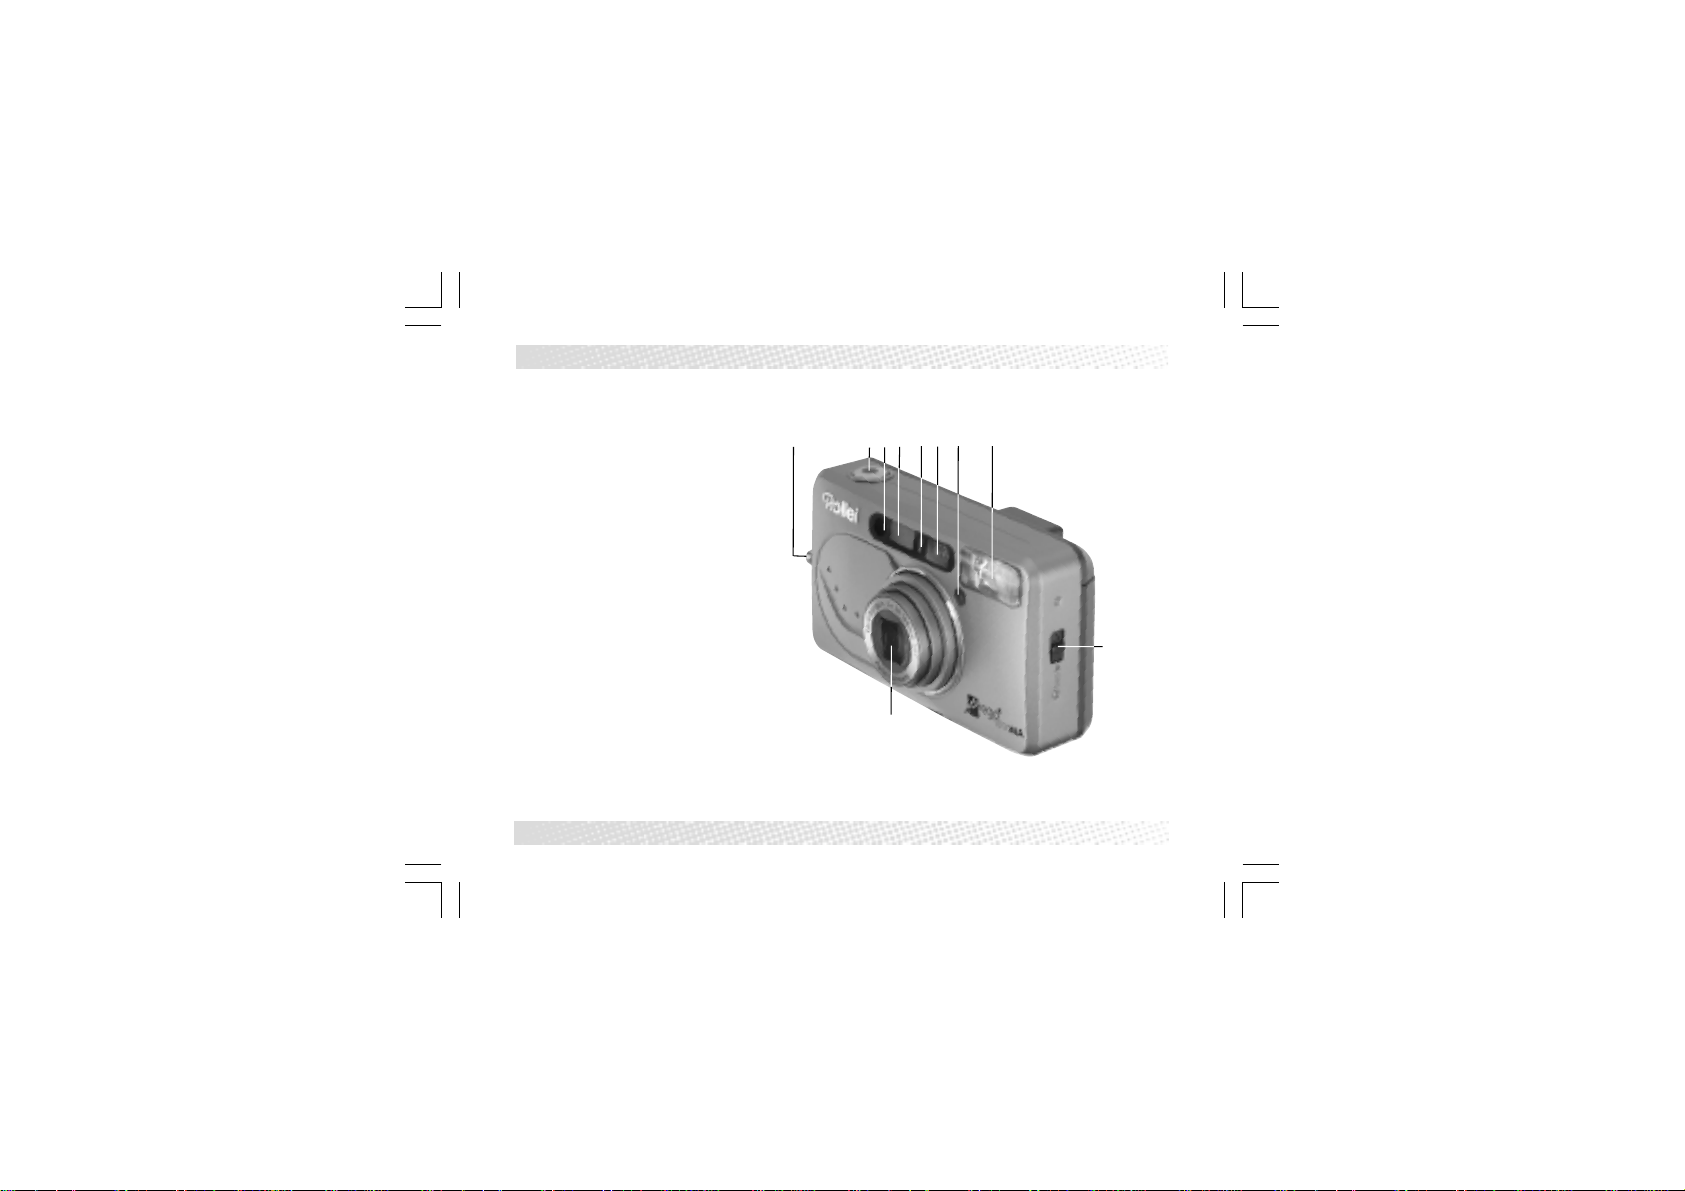
CAMERA BODY
1 Strap eyelet
2 Shutter-release button
3 IR remote shutter sensor
4 Autofocus window
5 Self-timer LED
6 Viewfinder window
7 Exposure sensor
8 Flash unit
9 Unlocking button for camera back
10 Lens, automatically retractable
4
2
3
4
5
6
8
1
7
9
10
Page 5

CAMERA BODY
11 Finder eyepiece
12 Green LED
(sharpness indicator)
13 Master switch ON/OFF
14 Zoom switch
15 Battery compartment
cover
16 Unlocking button for
battery compartment
17 Film window
18 Shift button
19 Mode button
20 Tripod socket
21 LCD monitor
22 Rewind button
23 Camera back
24* Eyesight correction
* Prego 130 WA only
24
23
22
11
12
13
14
15
16
17
19
18
2021
5
Page 6
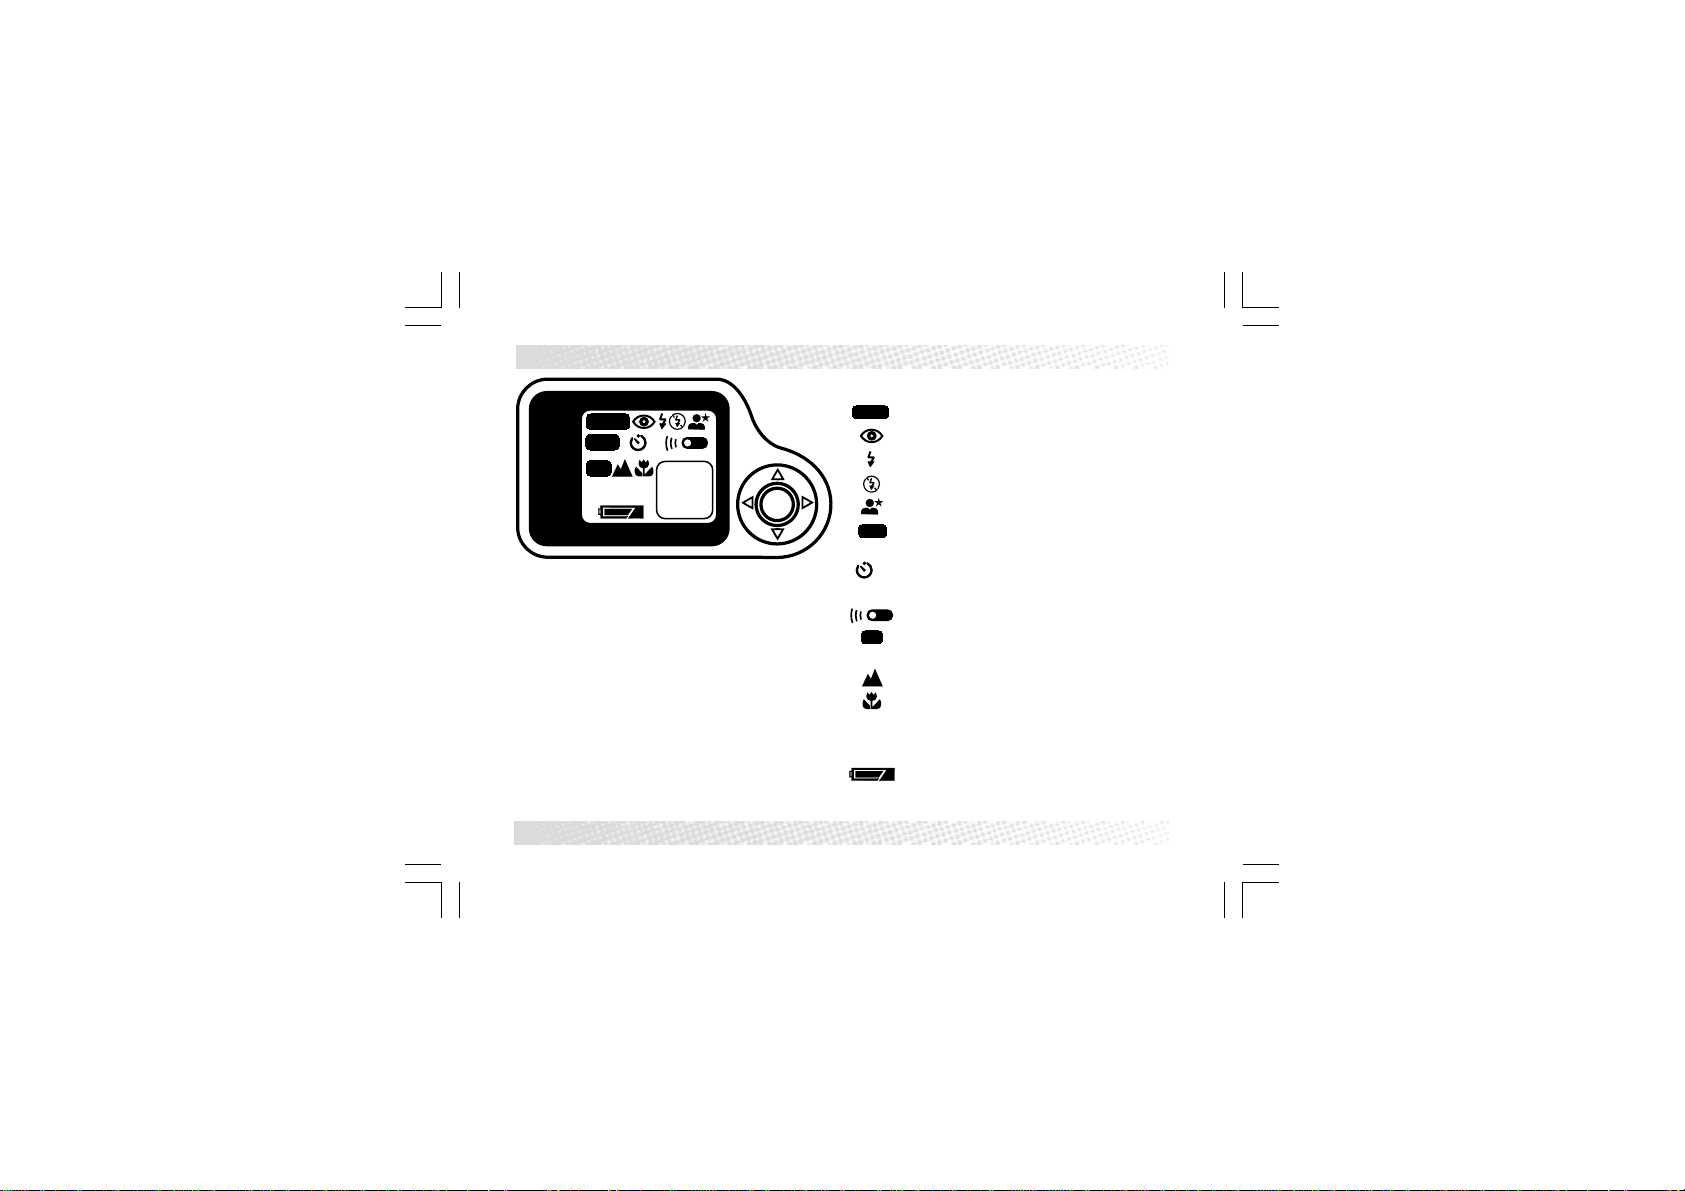
LCD PANEL
flash
self
mode
date
6
AUTO
OFF
AF
’88 88’:88
I
88
exp. no.
LCD panel
AUTO
OFF
I
AF
’88 88’:88
88
Autoflash
Auto red-eye reduction
Flash on
Flash off
Night portrait
Special modes switched off
(self-timer, remote release)
Self-timer
(up to 3 exposures in sequence)
Remote control mode
Special modes are switched off
(infinity, macro)
Infinity setting
Macro mode
Data imprinting
Frame counter
Battery status
Page 7
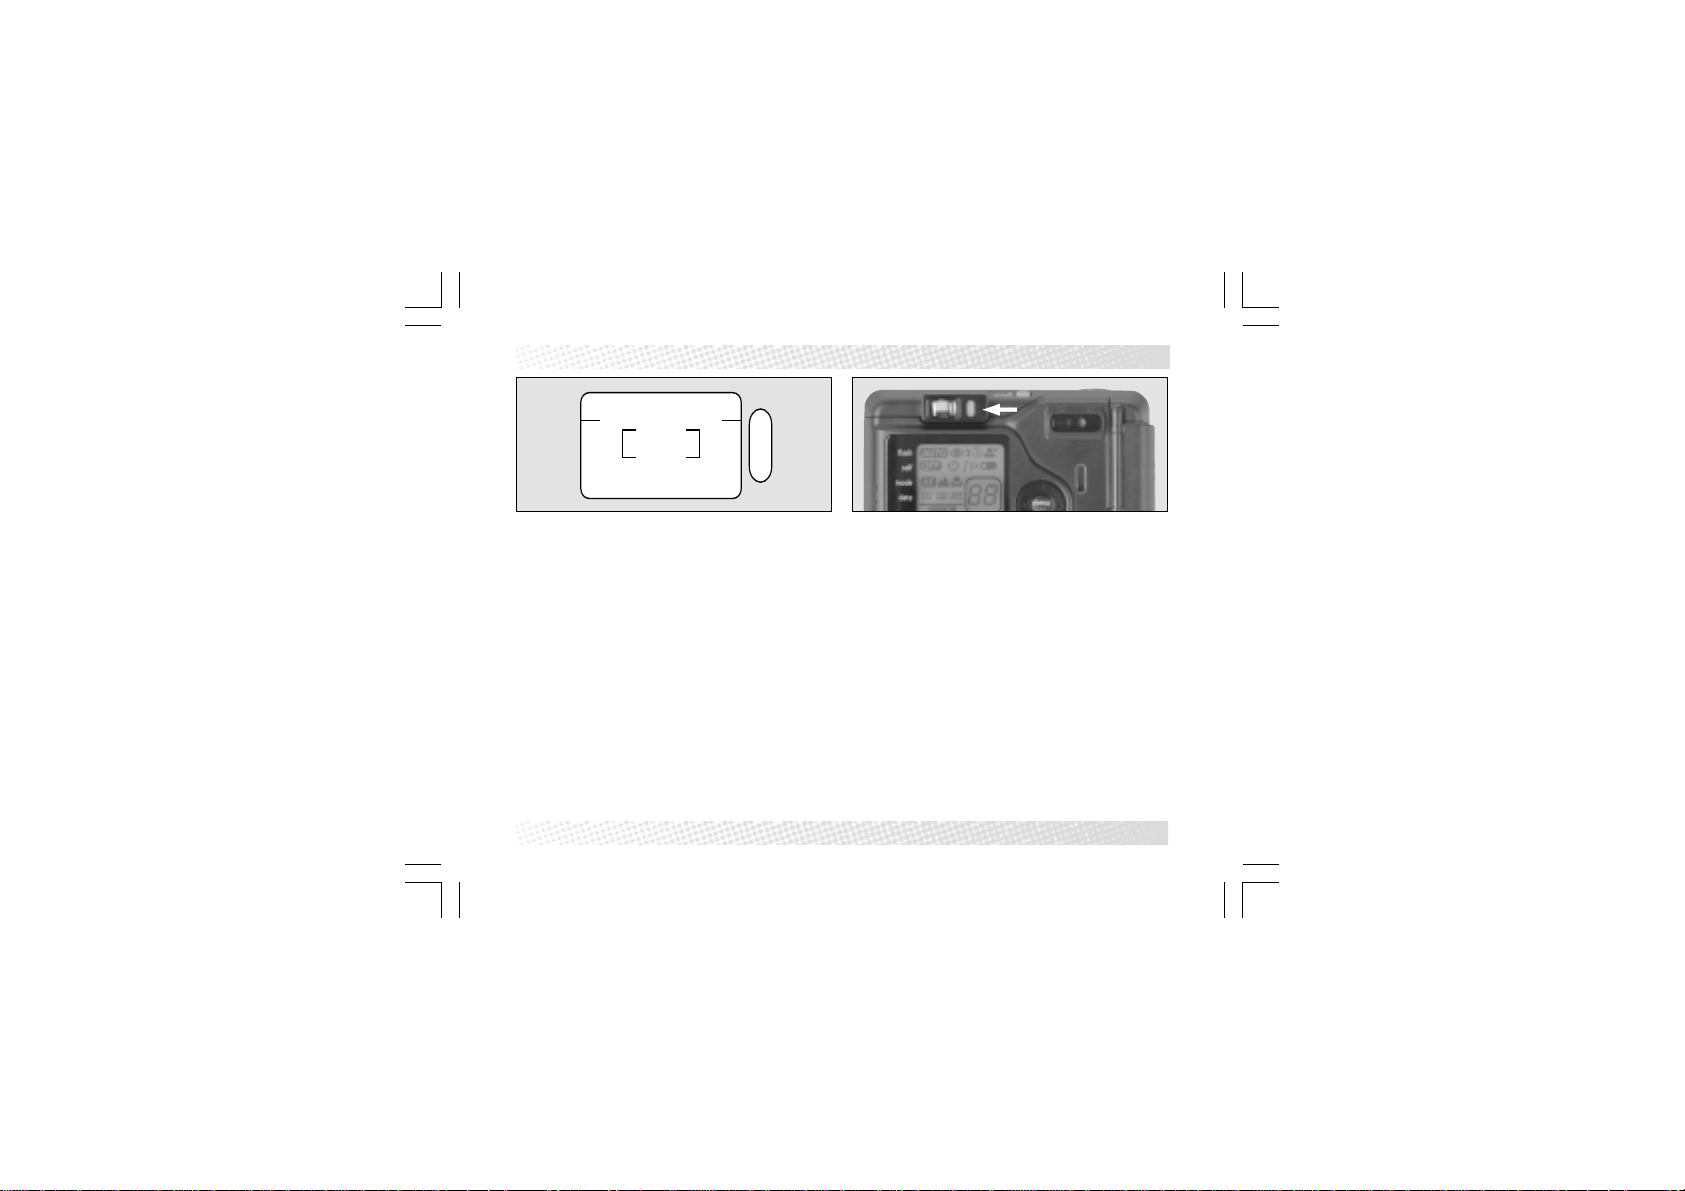
FINDER / AUTOFOCUS LED
3
2
4
1
Finder
The camera is equipped with a real-image
zoom finder.
1 Frame
2 AF metering area
3 Parallax marks for camera-to-subject dis-
tances below 1 m
4 Green LED (sharpness indicator)
Autofocus display
If you press the shutter release lightly, the
green LED will light up or flash.
If the LED lights up, the conditions are right
›
for taking a photo, the flash is ready.
If the LED flashes quickly, the subject is too
›
close (below 0.65 m with wide-angle and
telephoto).
If the LED flashes slowly,
›
the shutter speed is too slow, use a tri-
›
pod.
the camera cannot focus.
›
7
Page 8
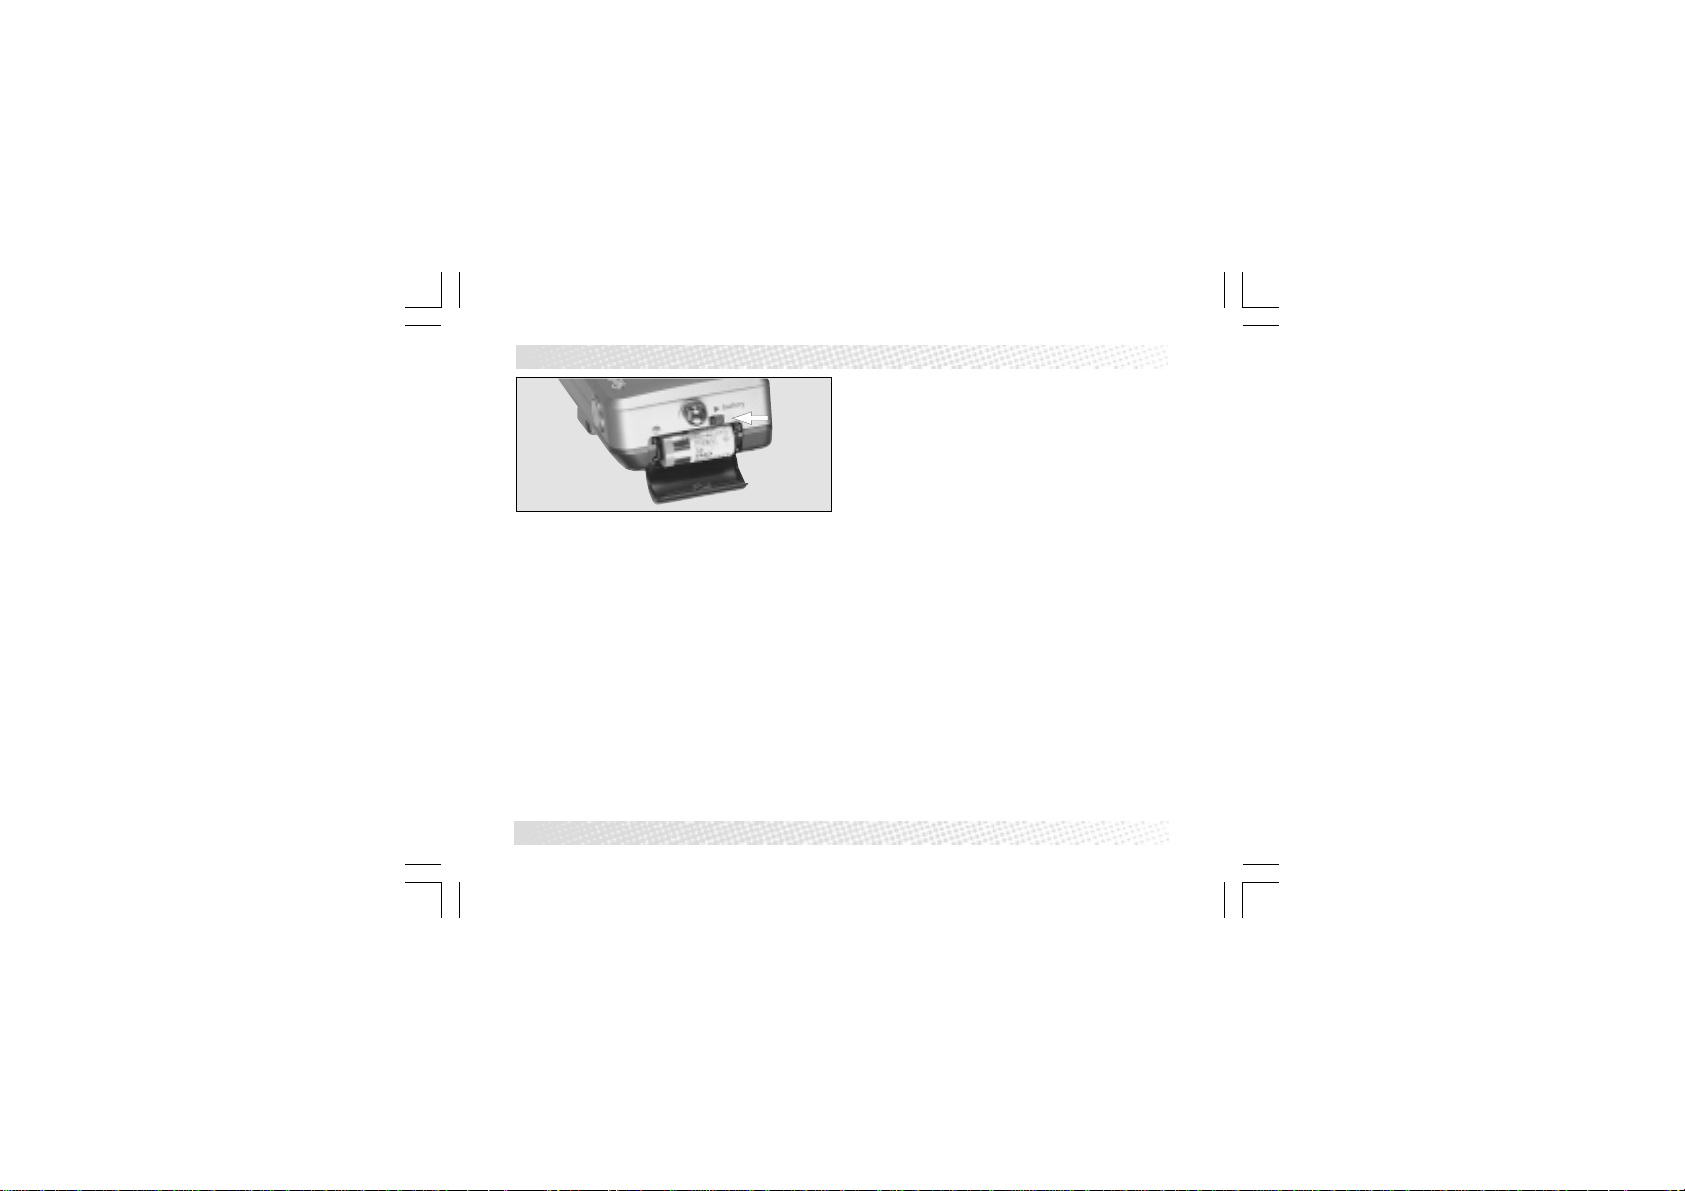
INSERTING THE BATTERY
Inserting the battery
The camera takes a 3 V lithium battery e.g. CR 2/
DL CR 2. A NiCad battery should not be used.
Unlock the battery compartment cover (15)
›
and open it.
Insert the battery with the poles the right way
›
round.
Close the cover and secure it in place.
›
Always switch off the camera before chang-
›
ing the battery.
Make sure the old battery is disposed of properly!
Note:
If you are not using the camera for several
weeks, take the battery out.
8
Important
The date shown in the display disappears 5
›
seconds after the battery has bee removed.
You will therefore have to reset the date
when you put in a new battery.
Should the battery run out while the film is
›
rewinding, insert a new battery and continue
the rewinding process by pressing on the
rewind button (22). When the rewinding procedure has finished, the frame counter will
show “E”.
Page 9
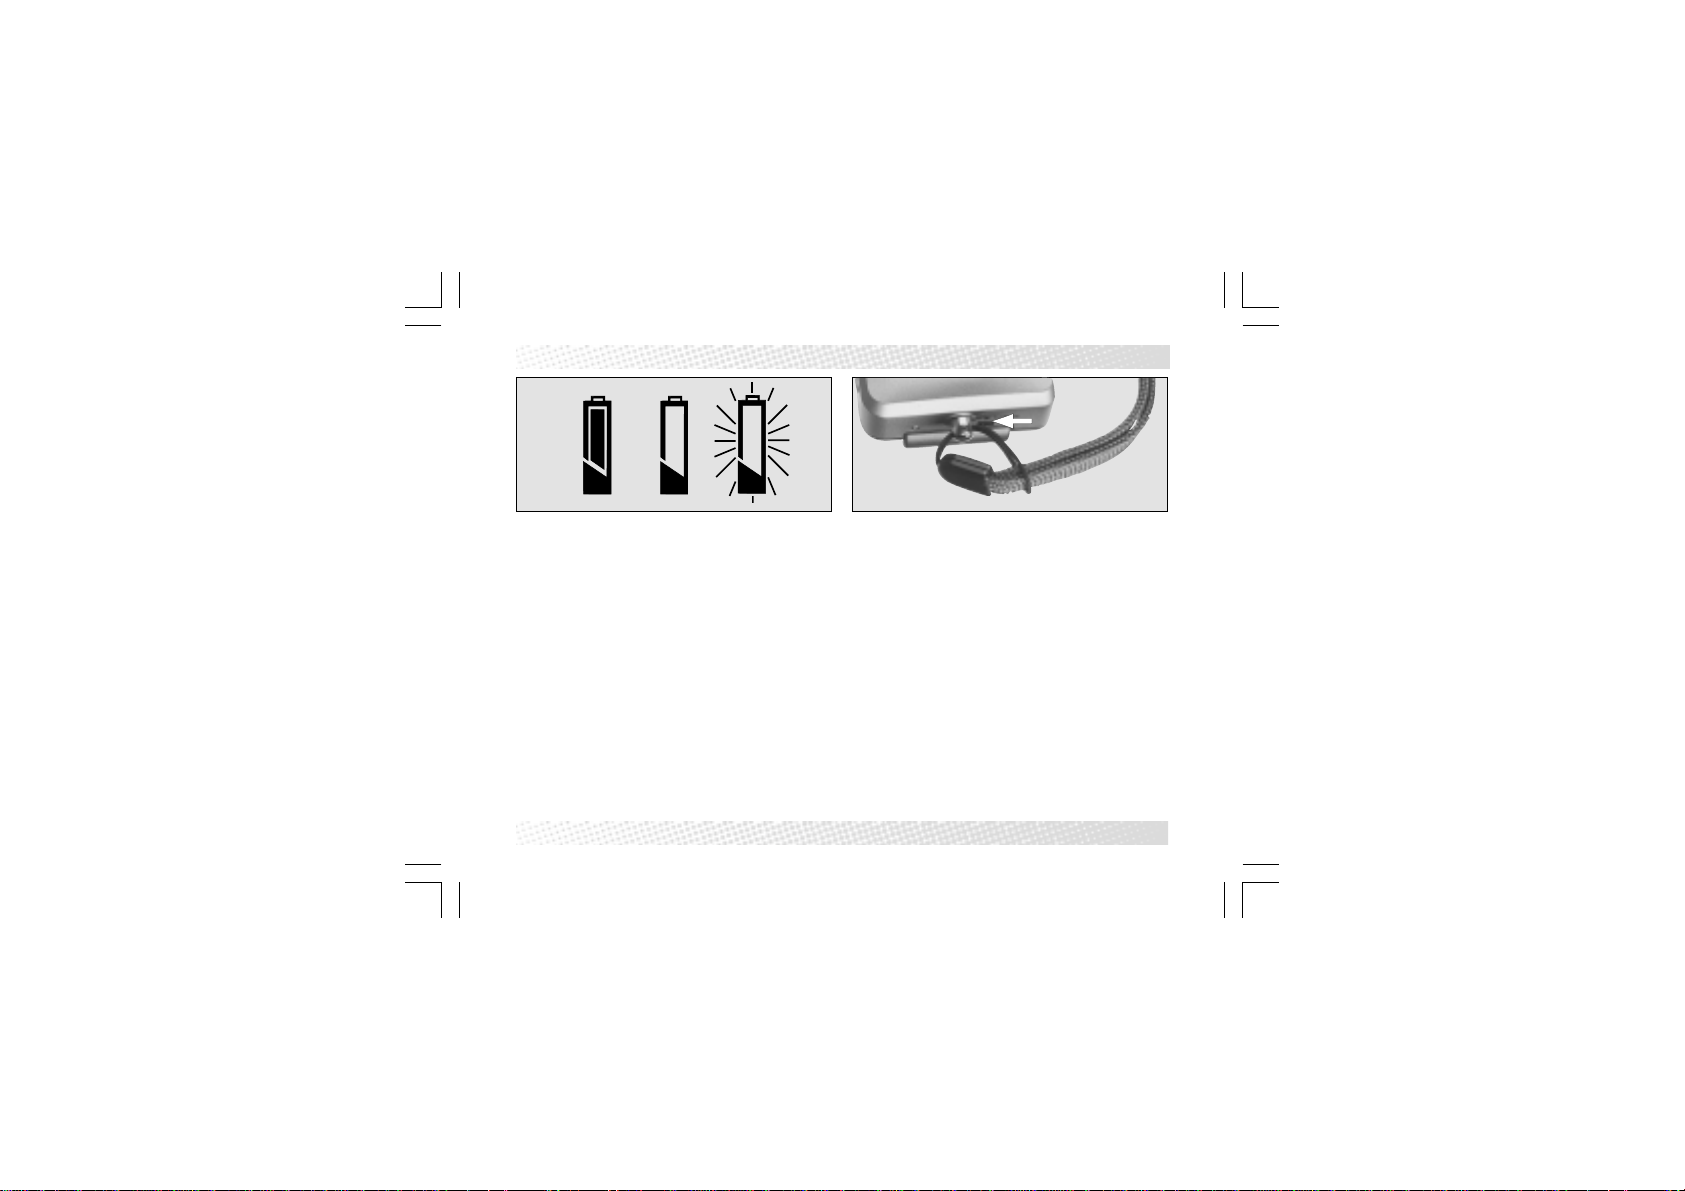
BATTERY STATUS
Battery status
Switch on the camera with the master switch
(13) and check the battery symbol on the LCD
monitor (21):
Full battery icon: battery is fully charged.
›
Low battery warning: battery should be re-
›
placed. When this symbol appears, there is
enough power left for about one more film.
If the battery symbol flashes, there is not
›
enough power left to operate the camera.
Replace the battery.
Note:
The available battery capacity decreases at
lower temperatures. In cold weather, it is advisable to keep a spare battery ready.
Attaching the hand strap
Pull the thin end of the hand strap through
›
the eyelet (1), then push the long end through
the loop and tighten.
9
Page 10
LOADING A FILM
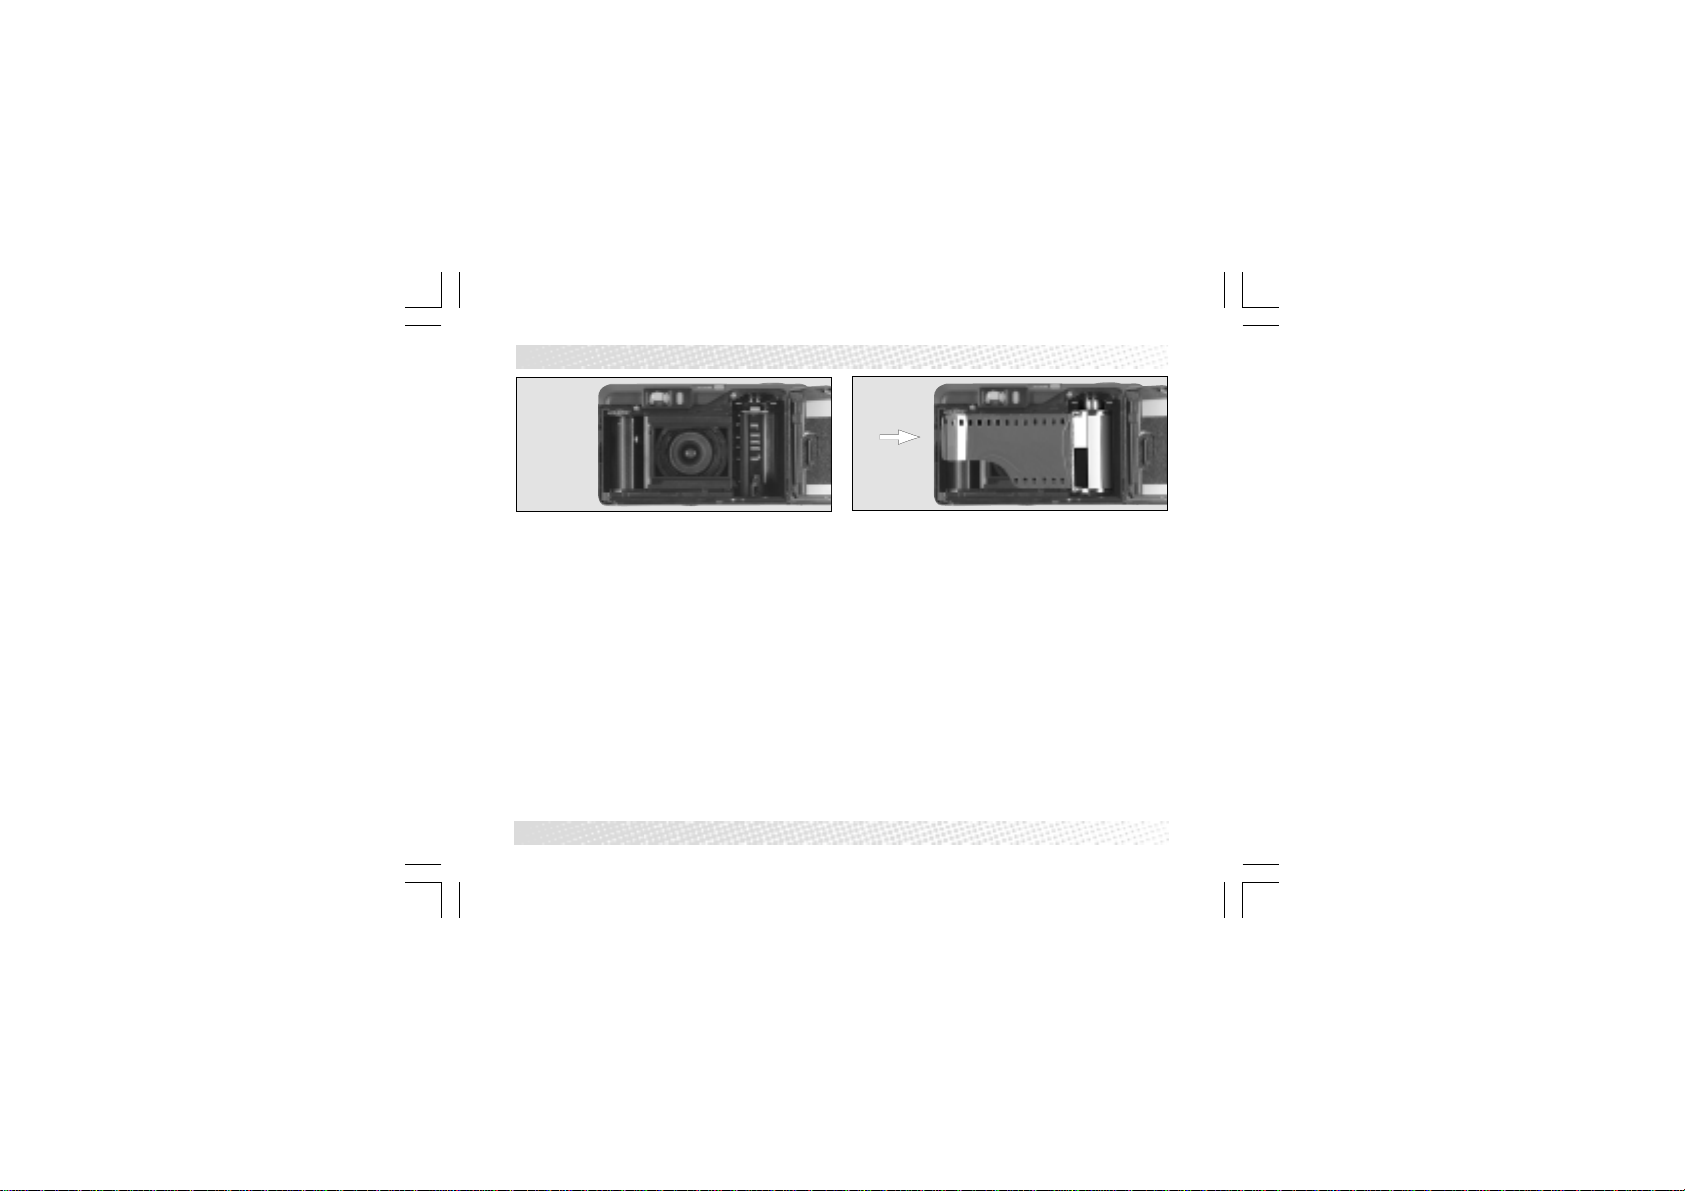
Loading a film
Open the back of the camera (23) using the
›
unlocking button (9).
Place the film in the film compartment, push
›
it in firmly and pull out the film until the
beginning of the film reaches the take-up
spool.
Make sure the film is lying flat on the film
›
guide.
Close the back again and the motor will
›
automatically advance the film to frame 1.
If the film has been correctly loaded, the
›
display will show frame 1.
If not, open the back again and repeat the
›
loading procedure as described above.
10
Note:
The camera is designed for DX-coded 35 mm
film. The film speed is set automatically within
the range ISO 50/18° to 3200/36°.
Never insert the film in direct sunlight.
Page 11

REMOVING THE FILM
Removing the film
At the end of the film, the film rewinds auto-
›
matically.
The rewinding process stops automatically
›
as soon as the film has been fully rewound in
the cartridge and the frame counter shows
“E” for “empty”. Only then should you open
the camera back to remove the film.
Please note that the last two frames of the
›
film may overlap if there are more than the
nominal number of exposures on the film.
Rewinding partly exposed films
To rewind a partly exposed film, activate the
›
rewind button (22) (e.g. with the tip of a ballpoint pen).
11
Page 12

SWITCHING ON / ZOOMING
Before shooting
Press master switch (13). The lens cover
›
opens, the camera switches itself on, the
LCD fills with data and the lens moves into
the ready position (WA, equivalent to 28
mm).
Prego 130 WA only:
Point the camera at the subject and use the
›
zoom lever (14) to move in closer.
Once you have framed your shot, rotate the
›
eyesight correction knob (24) until the picture
appears sharp (-1.5 – +1.5 dpt).
12
After shooting
After you have taken a shot or a series of
›
shots, press the master switch (13) to retract the lens and avoid taking exposures
unintentionally.
After seven minutes at the latest, the camera
›
will switch itself off and the lens will return to
its retracted position.
Page 13

HOLDING THE CAMERA
Holding the camera
Hold the camera firmly with both hands to
›
prevent any shake.
If possible, support your elbows against
›
your body.
Hold the camera close to your eye to have a
›
full view of the frame.
Press the shutter release slowly without any
›
jerking movements.
Caution:
Make sure your fingers, hair or indeed the
›
hand strap is not covering the lens, autofocus
window, exposure sensor window or the
flash.
When taking vertical format shots, hold the
›
camera so that the flash unit is at the top and
the direction of the light is as natural as
possible.
13
Page 14

TAKING A PHOTOGRAPH
Taking a photograph
Target your subject in the viewfinder (11).
›
Consult the data in the display.
›
Press the shutter release lightly. The LED will
›
light up continuously if the subject is in the
correct range between 0.65 m and ∞.
Autofocus frame
The autofocus frame corresponds to the camera’s autofocus metering area. When you compose your picture, aim the focus frame at the
subject.
14
Releasing the shutter
Press the shutter release (2).
›
When the shutter has been released, the film
›
automatically advances by one frame and
the frame counter in the display moves on to
the next frame to be exposed.
Page 15

FOCUS LOCK
1 2 33
Focus lock
The focus lock enables you to focus on a part
of the subject outside the centre of the frame.
Proceed as follows:
Aim the finder so that the autofocus meter-
›
ing area points at the main subject you want
to be in focus.
Press the shutter release (2) halfway down
›
to store the focus setting, and hold it there
(green LED (12) lights up or flashes).
With the stored focus setting, compose the
›
picture and press the shutter release right
down.
The automatic focus lock is cancelled as
›
soon as you let go of the shutter release.
15
Page 16

MENU CONTROL (MODE AND SHIFT BUTTON)
flash
self
mode
date
exp. no.
AUTO
flash
OFF
self
mode
AF
date
OFF
exp. no.
Selecting the mode level
Activate the master switch (13).
›
The display (21) lights up green.
›
When you activate the mode button (19), the
›
light in the display turns to red.
You can change from one level to another
›
using the shift button (18).
To do this, press the shift button up or down
›
in the direction of the arrow until the desired
level flashes.
The individual modes can be selected and
›
confirmed.
16
AUTO
OFF
AF
OFF
Selecting a mode
Activate the shift button to the left or right in
›
the direction of the arrows.
When you find the mode you want, confirm
›
it with the mode button.
The display lights up green.
›
The changes are entered in the memory.
›
Page 17

PROGRAM SYSTEM FLASH
Program system flash
The Rollei Prego 100 WA/Prego 130 WA features a new technology for compact cameras.
When you work with the flash, the camera
automatically takes into account the amount of
light, the brightness of the subject, the distance away and the focal length of the lens.
Conventional flash units in compact cameras
flash at full power regardless of how far away
the subject is. The flash unit in the Prego 100
WA /
Prego 130 WA carefully monitors the amount of
light emitted.
Examples:
Close-up photography
in low ambient light
With a normal flash exposure, the flash unit
emits all its power and the picture is overexposed. With the integrated system flash, however, the power output adapts to the particular
conditions (up to 12.5 %).
Portrait shots in very bright daylight
Under such conditions, portraits can show
very hard shadows around the nose or hair.
With a conventional fill-in flash, the flash unit
emits its full power.
With the system flash in the Prego 100 WA/
Prego 130 WA, only enough light is emitted to
tone down the hard shadow and produce a
naturally lit portrait.
17
Page 18

(LEVEL: “FLASH”) FLASH MODES / AUTOMATIC FLASH
Flash operation
When you press the mode button (19), the
display lights up and the individual symbols for
the flash modes appear in the “AUTO” menu
level.
Automatic flash
In this mode, the flash automatically comes
›
on in poor lighting conditions to ensure
›
correct exposure.
Touch the shutter release lightly as soon as
›
the green LED lights up and the camera is
ready to shoot.
Press the shutter release right down to take
›
the picture.
If the flash symbol in the display goes on and
›
off after the exposure, the flash unit is charging. Until the flash unit is ready, the shutter
Note:
Switching off the camera resets to automatic
mode apart from the “red-eye reduction” mode.
Film speed/Range
release is locked to prevent wrong exposures.
Flash exposures are synchronised at 1/45
›
sec with wide angle and at 1/70 sec with
telephoto. It is therefore important to hold
the camera steady when taking a picture.
Prego 100 WA:
ISO 100/21° 0.65 m – 2.9 m 0.65 m – 2.0 m
Prego 130 WA:
ISO 100/21° 0.65 m – 2.9 m 0.65 m – 1.8 m
18
AUTO
flash
self
mode
date
exp. no.
If you are taking flash exposures of people or
animals in poor light, switch to “red-eye
reduction”.
Wide angle Telephoto
Page 19

RED-EYE REDUCTION
flash
self
mode
date
exp. no.
Red-eye reduction
People photographed with flash under poor
light conditions often end up with red eyes.
To reduce this effect, the camera emits
›
several short preflashes before taking the
actual picture so that the pupils of the people in the photo become smaller.
To switch on the red-eye reduction mode,
›
briefly press the mode button and select the
relevant symbol with the shift button. Confirm by pressing the mode button again.
Note:
Red eyes are due to a reflection of the retina in
the eye. This effect can be reduced by increasing the distance between the flash unit and the
subject.
19
Page 20

flash
self
mode
date
exp. no.
FILL-IN FLASH / FLASH OFF
flash
self
mode
date
exp. no.
Fill-in flash
Bright daylight can produce deep shadow in
the foreground or create backlit situations. In
such cases, a fill-in flash can improve the
results.
To switch on the fill-in flash, briefly press the
›
mode button (19) and select the symbol for
fill-in flash with the shift button (18). Confirm
via the mode button. The longest shutter
speed in this mode is 1/4 sec, so that special
measures (tripod) may be necessary to avoid
camera wobble and blurred pictures.
Flash off
If flashlight might affect the natural mood of
›
your scene, switch the flash off by using the
mode and shift button to select the ‘flash off’
symbol.
This may well be useful not only for ‘available
›
light’ shots, but also where flash units are
not permitted – for example, in museums.
On the other hand, working without flash
›
may produce long shutter speeds that would
result in camera wobble with hand-held
shots.
A tripod should therefore be used where
›
possible.
20
Page 21

NIGHT FLASH
flash
self
mode
date
exp. no.
Night flash
This is a combination of flash and long shutter
speed. While the flash illuminates a person in
the foreground, the longer shutter speed accentuates the lower lighting in the background
and enhances the mood of the picture.
In this mode, the shutter speed may be as
›
long as 1 sec. To avoid any loss of sharpness due to camera wobble, it is advisable
to use a tripod.
To switch on this mode, select the night
›
flash symbol with the aid of the mode and
shift button.
21
Page 22

(LEVEL: “SELF”) SELF-TIMER
flash
self
mode
date
Self-timer
The self-timer can be combined with any of the
flash modes, including slow shutter synch.
Press the mode button and select the self-
›
timer symbol with the shift button.
Frame the shot.
›
Activate the self-timer by pressing the shut-
›
ter release. The camera takes the picture
after a delay of 10 sec.
During this time, the self-timer LED flashes
›
(5).
In the last 3 sec, the LED begins to flash
›
faster.
The focusing and exposure settings are
›
stored on pressing the shutter release.
22
I
2 x
exp. no.
To interrupt the delayed exposure, press the
›
mode button again or switch off the camera.
After the picture has been taken, the camera
›
returns to normal operation mode.
Note:
By pressing the shift button again, the selftimer mode can take up to 3 exposures one
after the other.
Page 23

REMOTE CONTROL
flash
self
mode
date
exp. no.
2
1
3
○○○○
3 x
Remote control
1 Protective cover
2 Release button
3 IR transmitter
Taking pictures with the remote control
Slide back the protective cover of the re-
›
mote control unit.
Press the mode and shift button until the
›
remote control symbol appears. Point the
remote control at the camera (if necessary,
stand the camera on a tripod) and press the
release button on the remote control.
The exposure is made after 2 sec. During
›
this time, the self-timer LED (5) lights up.
Note:
The protective cover is for attaching to the
hand strap.
The IR remote control has a range of approx. 5 m.
23
Page 24

(LEVEL “MODE”) INFINITY SETTING (LANDSCAPE)
flash
self
mode
date
exp. no.
1 x
In the “mode” level, the settings for infinity and
macro can be selected in addition to the normal autofocus mode (AF).
Infinity (landscape)
In this setting, the camera is focused at infinity.
It is ideal if your subject is a long way away or
if you want to photograph distant objects
through a window.
To switch this mode on, use the mode and
›
shift button to select the appropriate symbol
and confirm.
The flash mode is automatically switched
›
off.
24
Please note that poor light can lead to slow
›
shutter speeds with the possibility of blurring due to camera wobble. Use a tripod if
necessary.
After taking the shot, the camera automati-
›
cally erases this setting.
Page 25

CLOSE-UPS (MACRO)
flash
self
mode
date
exp. no.
Close-ups (macro)
The macro mode extends from 0.5 m to 1.0 m.
With the mode and shift button, select the
›
macro symbol in the display and confirm
with the mode button. The lens moves automatically into the macro position.
Frame the picture within the parallax marks
›
for the macro range.
The macro mode is automatically deacti-
›
vated after the shot has been taken.
If the distance to the subject is outside the
›
macro range, the green LED starts to flash
and the shutter release is locked.
Note:
With macro shots, the flash switches on automatically.
25
Page 26

DATE IMPRINTING
Automatic date imprint
The Prego 100 WA / Prego 130 WA is equipped
with a built-in quartz timer and a calendar
programmed up to December 31, 2032, so
that the date (and/or time) can be imprinted at
the bottom right-hand corner of the exposures.
26
Choice of imprinting format
Four different date formats are available. In
addition, the imprinting mode can be switched
off at any time.
The date must be reset after a battery change.
Page 27

DATE IMPRINTING
flash
self
mode
’88 88’:88
date
exp. no.
Date imprinting
Briefly press the mode button (19) and select
the “date” level with the shift button (18). The
display begins to flash. By pressing the shift
button to the left or right, you can select the
desired option and save it by pressing the
mode button.
• Year – Month – Day
’02 3 9
• Month – Day – Year
3 9 ’02
• Day – Month – Year
9 3 ’02
• Day – Hour – Minute
914:06
• none
OFF
27
Page 28

SETTING THE DATE AND TIME
Setting the date and time
You can select the way you want to write the
›
date and time via the shift button. The display flashes.
To make a correction, press the mode but-
›
ton until one of the figures begins to flash.
You can move from one figure to another via
›
the shift button, up/down.
Correct the selected values by pressing the
›
shift button, left/right.
When you have made all the changes, press
›
the mode button. The new notation appears
in the display.
28
Note:
• To run quickly through the figures, keep your
finger on the shift button, up/down.
• The correction procedure can be terminated
by pressing the mode button.
Page 29

CAMERA CARE
Camera care
Protect your camera from knocks and blows.
›
Loop the hand strap over your wrist to make
sure you do not drop it.
Protect the camera from damp and wet
›
conditions, constant sunshine and sand.
This is particularly important when the camera is open to change a film.
Keep the film pressure plate clean and oc-
›
casionally clean it off with a soft leather
cloth. Use a brush to clean the inside of the
camera.
A soft brush is also the best tool for cleaning
›
the lens. Fingerprints are best removed with
lens cleaning paper. If condensation forms
on a cold lens when it is taken indoors, wait
for a few minutes until the moisture evaporates by itself.
Take the battery out of the camera if you do
›
not use it for a prolonged period.
29
Page 30

OVERCOMING PROBLEMS
Problem Cause Remedy
Lens does not move out. Battery inserted wrong way round. Replace battery.
Film is not advanced Film leader too short. Pull out film leader until
to first frame. it reaches opposite end
Picture blurred. Autofocus frame was not Align main frame with main subject.
Picture overexposed. Film used was not DX-coded. Only use DX-coded film.
Picture underexposed Autoflash mode disabled. Activate autoflash mode.
and blurred. Flash reflector obstructed by finger.
Film is not fully rewound. Insufficient battery capacity. Replace battery.
No battery loaded. Check polarity marks.
Battery empty.
of film compartment.
aligned with main subject.
Highly shiny subject Recompose, if necessary lock
(water surface, focus on other subject
car paint or glass). at same distance.
Subject was behind glass.
Film used was not DX-coded. Only use DX-coded film.
30
Page 31

TECHNICAL DATA
Type: Fully automatic autofocus compact viewfinder
camera with auto exposure, between-the-lens shutter
and zoom lens
Film type: 35 mm film with DX code (exposure format:
24 x 36 mm)
Lens Prego 100 WA: 3.6x zoom lens 1:5.8 – 10.5 /
28 – 100 mm; 6 elements in 6 groups
Lens Prego 130 WA: 4.6x zoom lens 1:5.8 – 11.5 /
28 – 130 mm; 7 elements in 6 groups
Shutter: Electronic programmed shutter with speeds
from 1 s – 1/ 500 s
Focussing: Passive autofocus with AF lock
– Focusing range: 0.65 m – infinity
– Macro range: 0.5 m – 1.0 m
Film speed setting: ISO 50/ 18° – 3200 / 36°
according to DX code
Viewfinder: Real-image zoom finder with AF metering area
Magnification Prego 100 WA:
0.32x – 1.0 x
Magnification Prego 130 WA:
0.32x – 1.27 x
Flash: Integral electronic flash; recycle time approx.
8 s
Film transport: Automatic film advance and rewind;
rewind also possible before end of film.
Display: Large LCD monitor for all modes, e.g.:
– frame number
– auto flash
– fill-in flash
– flash off
– red-eye reduction
– slow shutter synch
– infinity
– macro
– self-timer
– remote control
– data imprinting
– battery status
Self-timer:
Exposure delay 10 s, up to 3 exposures in succession
Power economy:
Automatic switch-off after 5 minutes
Power supply: 1x 3 V lithium battery (CR 2)
Tripod thread: 1/4"
Dimensions (mm) Prego 100 WA:
W x H x D approx. 107 x 60 x 36
Dimensions (mm) Prego 130 WA:
W x H x D approx. 107 x 60 x 41.5
Weight Prego 100 WA: 175 g without battery
Weight Prego 130 WA: 180 g without battery
The manufacturer reserves the right to make technical
modifications.
31
Page 32

32
Rollei Fototechnic GmbH
P.O. Box 3245
D-38022 Braunschweig
www.rollei.de
Germany
80214.75.909
Prego 100 WA/
Prego 130 WA
GB • PA / RPM / 08-02
 Loading...