

Page 1
1
1. Rollei Multi Scanner PDF-S 340
2. USB-Cable
3. Negative Film Holder
4. Positive Slide Holder
5. 4 in 1 mount for photos and business cards(13x18cm, 10x15cm, 9x13cm and 9.1x5.5cm)
6. OCR CD
7. AC/DC adapter
8. Instruction manual
Dear customer,
Congratulations on purchasing a high-quality Rollei product. You have acquired a modern
Multi Scanner with excellent technical features and respective accessories, which is particularly
easy to operate. Please study this information in detail, observing safety instructions, in particular.
The scanner comes with a 2-year warranty. You will need the enclosed warranty card and your
sales receipt in the event of the Multi Scanner developing a fault. Keep these in a safe place
together with the instruction manual.
Please include the instruction manual when passing on the scanner to a third party.
Note:
• Only use the scanner for the intended purposes. Where the scanner has been used for
other purposes, resulting in damage, the warranty shall be invalidated. Injuries and
damage to the environment can also only be avoided if used correctly.
Main features
• Multi scanner with 5.1 megapixels image size
• High scanning quality of 1800 dpi and 2400 dpi (interpolated)
• Digitize slides, negatives and photos in a matter of seconds
• Automatic and manual exposure
• Automatic colour balance
• Power supply via USB cable
Contents of box
The box contains the following components:
Page 2

2
Contents
1 Introduction
1 Main features
1 Contents of box
2 Contents
4 1. Safety Instructions
6 2. Description of parts
7 3. Loading Slides
8 4. Loading Negatives
9 5. Inserting photos
10 6. General operations
10 6.1 Quick Start
11 6.2 Operation Guide
12 6.3 Capture
12 6.4 Capture: Mirror/Flip/(Hard Key)
13 6.5 Capture mode
13 6.6 Capture: Edit Menu
13 6.6.1 Live view Capture/Edit Menu
14 6.6.2 Capture: Save
14 6.6.3 Capture: Cancel
14 6.6.4 Capture: Home
14
6.7 Exit from Edit mode to go back to Capture mode(live view)
14 6.8 Memory full
15 6.9 Playback
15 6.9.1 Playback: Auto Slide Show
15 6.9.2 Playback: Edit menu
15 6.9.3 Playback: Slide show/Single picture/Edit mode
16 6.9.4 Playback: Rotate/Save
17 6.9.5 Playback: Exit
17 6.9.6 Playback: Delete
Page 3

3
17 6.9.7 Playback: Home
18 6.9.8 Playback: No File
18 6.10 Film Type
19 6.11 Effect
19 6.12 Crop proportion
20 6.13 Business Card Reader
20 6.13.1 Name Card Recognition
21 6.13.2 Edit Window
21 6.13.3 Manually Editing
22 6.13.4 Add a business card
22 6.13.5 Software Features
23 6.14 Resolution
23 6.15 Language
23 6.16 USB mode
24 7. Trouble shooting
24 8. Conformity
25 9. Technical Specifications
Page 4
4
Page 5
5
Page 6
6
1
2
3
4
5
7
6
8
9
10
11
12
13
14
15
16
17
18
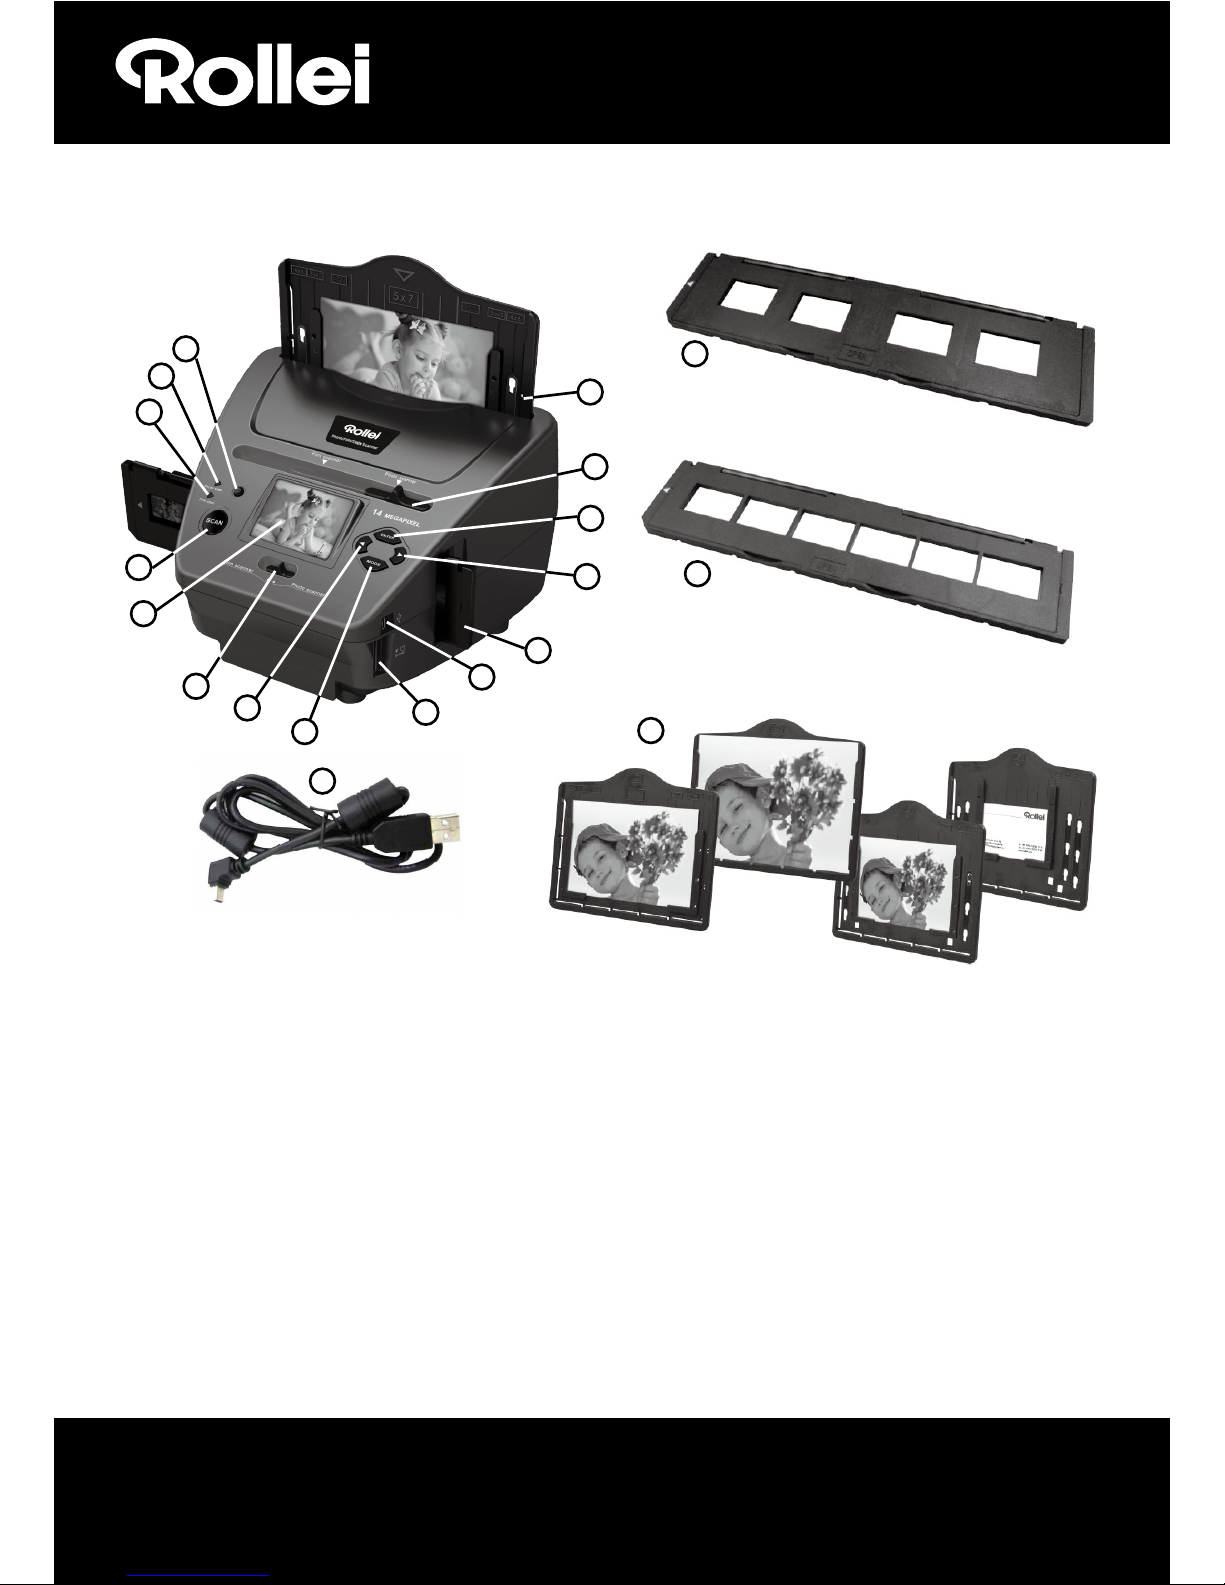
1. ON/OFF switch
2. Control LED photo scan mode
3. Control LED lm scan mode
4. SCAN button
5. TFT-LCD colour monitor
6. Switch for scan mode
7. Left button
8. ENTER button Negative film holder
9. SD-/SDHC and MMC memory card slot
10. Mini USB 2.0 connection
11. Slide hoder in insertion slot for slides
and negatives
2. Description of parts
19
12. Right button
13. MODE button
14. Slider for selecting scan template
15. Insertion slot for photo holder
16. Slide holder
17. Negative holder
18. 4 in 1 mount for photos and business cards
(13x18cm, 10x15cm, 9x13cm and 9.1x5.5cm)
19. USB Cable
Page 7
7
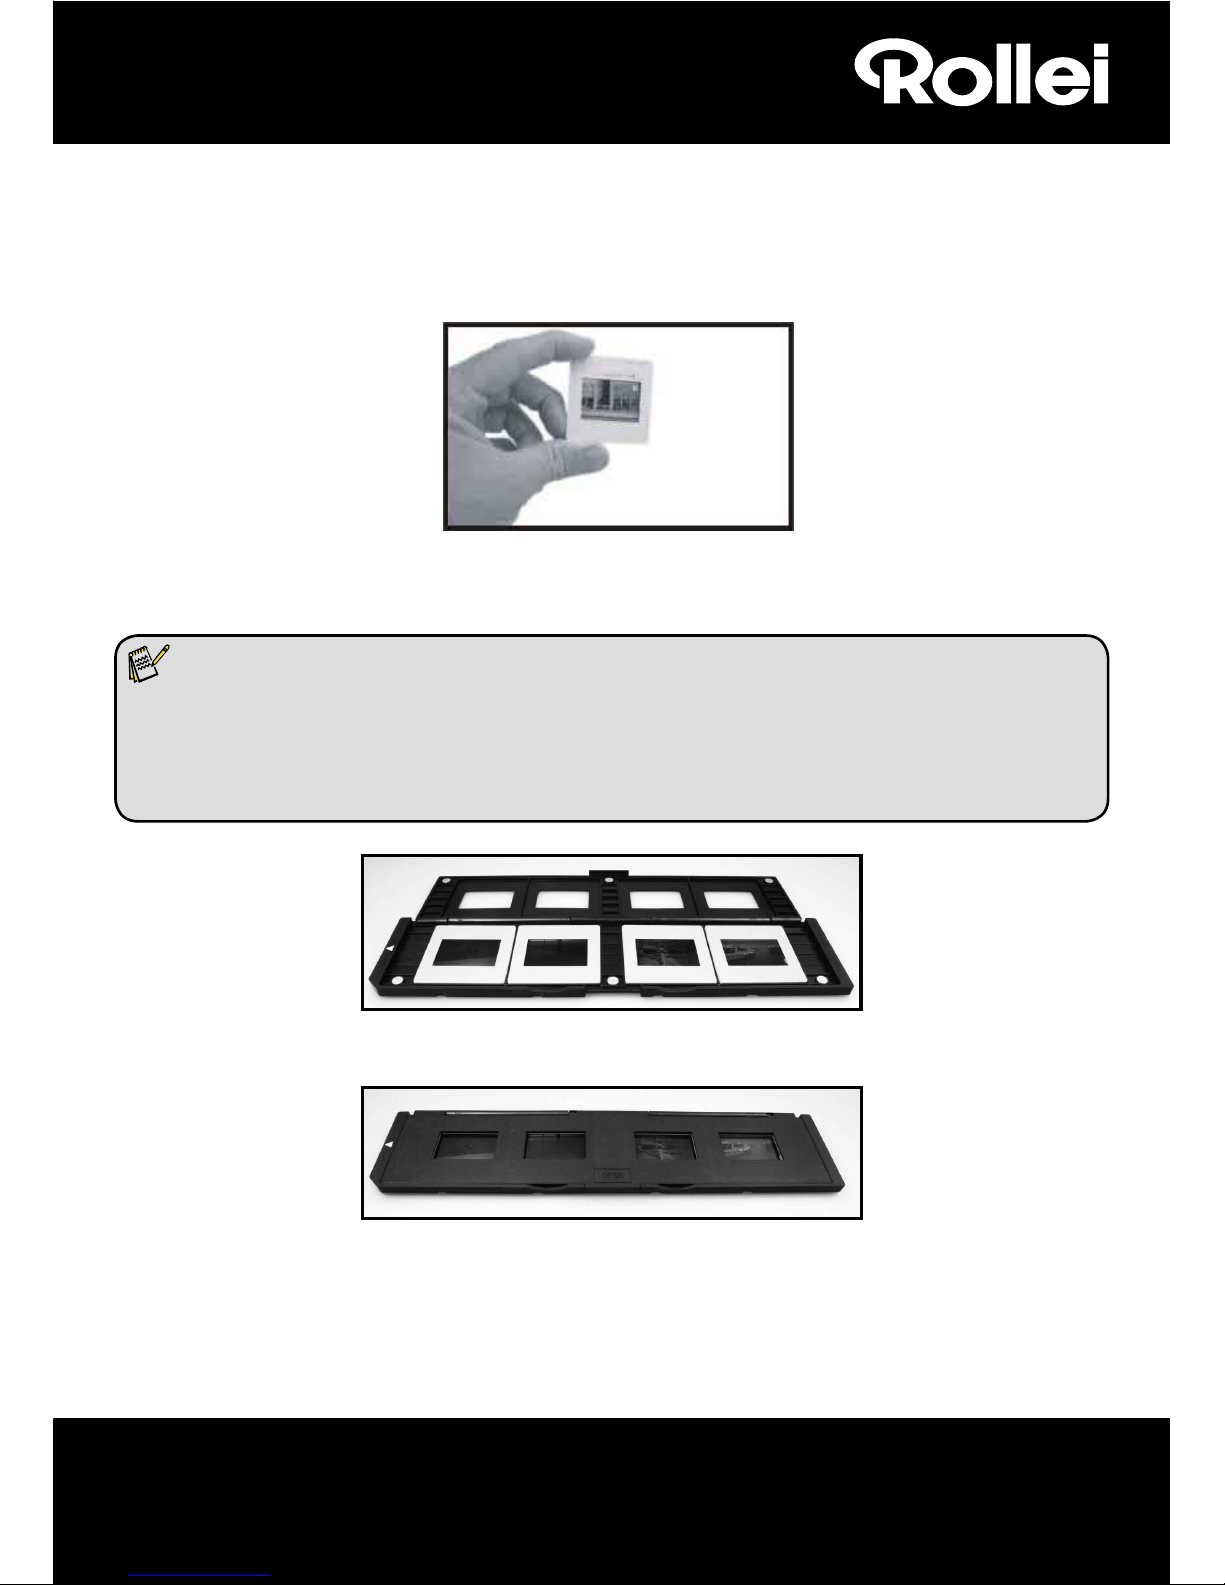
3. Loading Slides
Hold up the slide toward the light. Face the trademark side of the slide away from you. Look through
the slide and it should appear normally (not a mirror image).
Now turn the slide so the image is upside down while looking at the same side.
Open the slide holder at the marked spot on the top.
With the slide holder open, place the slide into recessed area in the holder- the slide should fit
perfectly.
Note:
Handle slides with care. Any dust scratches or ngerprints will show up on your saved images.
If possible use cotton gloves when handling slides. It is recommended to use compressed air
to remove any dust on the slides. This is not included with the lm & photo scanner but can be
purchased from an oce supply or electronics retailer.
Close the slide holder and press the edges so that it locks in place.
Hold it in the position as shown in the lm & photo scanner.
Insert the Slide Holder into the slot on the right side of the lm & photo scanner as shown.
Page 8
8
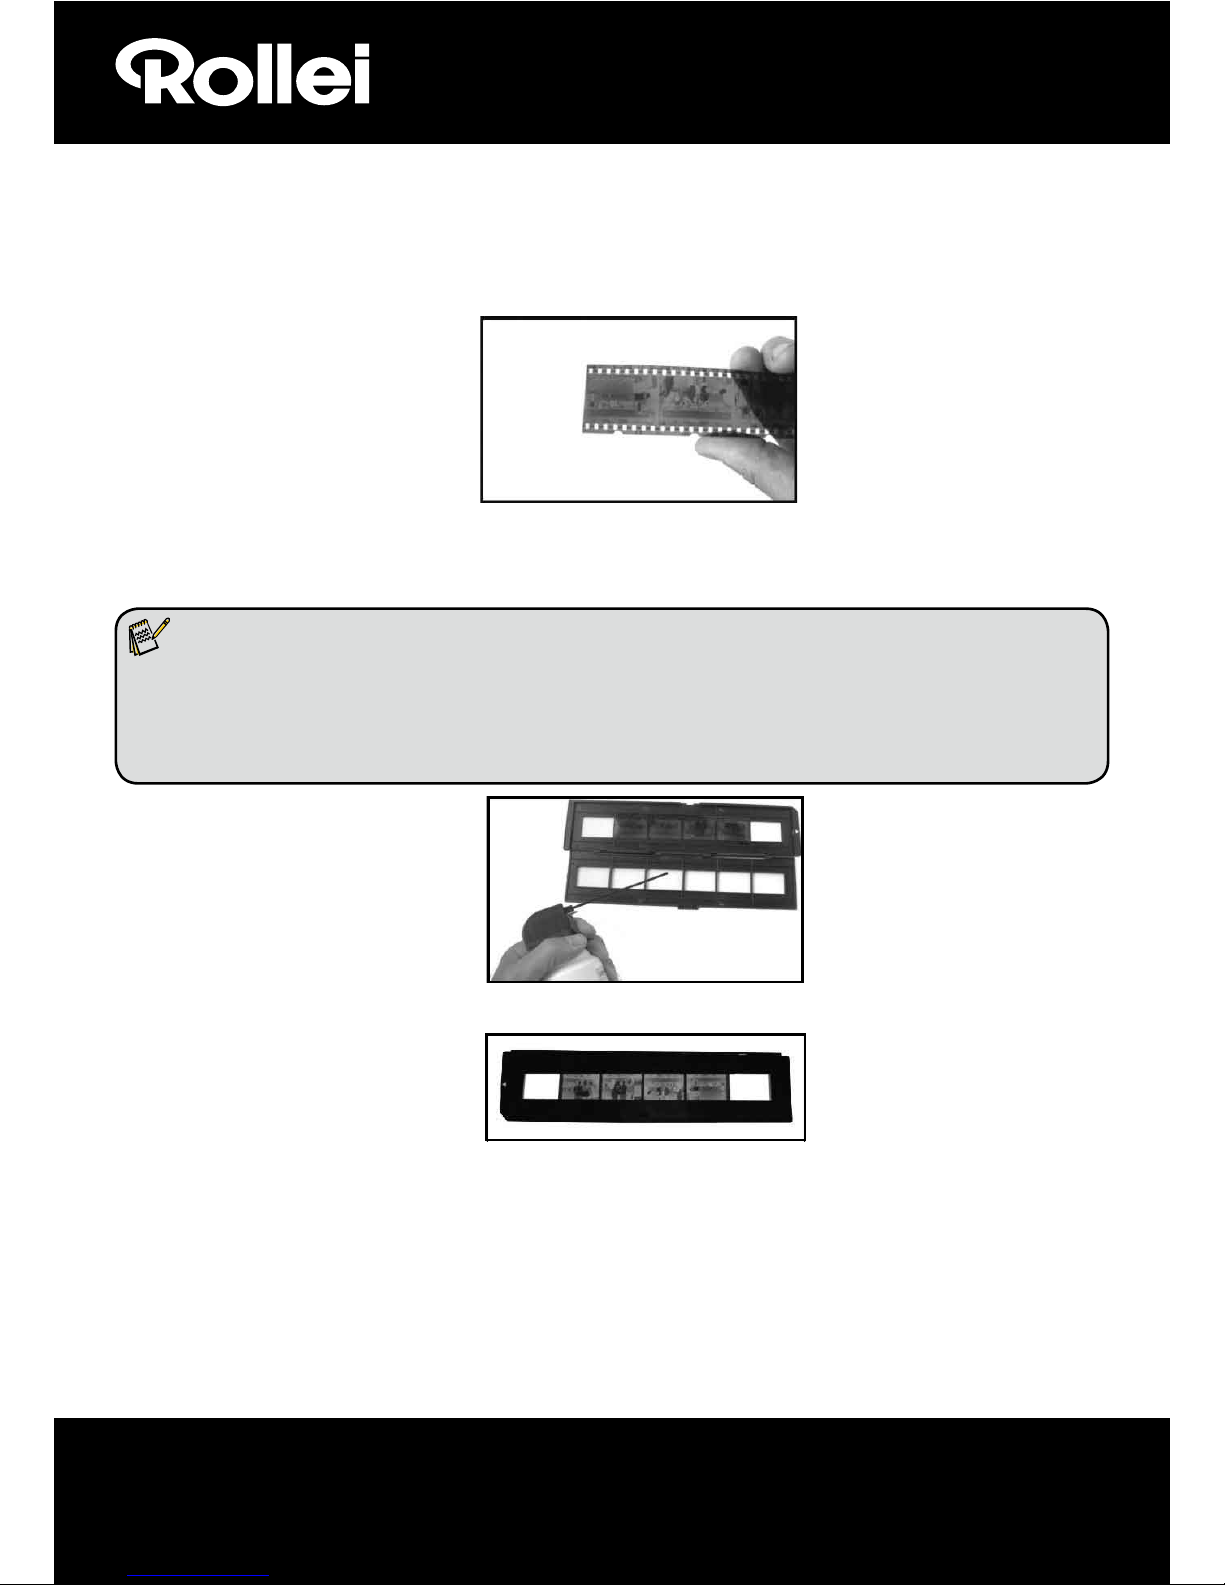
4. Loading Negatives
Hold up the negative toward the light. As you look through the negative you should be able to read
the small negative numbers normally (not a mirror image).
Now turn the negative so the image is upside down while looking at the same side.
Open the negative holder at the marked spot on the top.
With the negative holder open, place the negative into holder so the notches line up with the
notches on the holder.
Note:
Handle negatives with care. Any dust, scratches or ngerprints will show up on your saved
images. If possible use cotton gloves when handling negatives. It is recommended to use
compressed air to remove any dust on the negatives. This is not included with the lm &
photo scanner but can be purchased from an oce supply or electronics retailer.
Close the negative holder and press the edges so that it locks in place
Hold it in the position as shown in the lm & photo scanner.
Insert the negative holder into the slot on the right side of the lm & photo scanner as shown.
Film Holder: The design of the lm holder follows the ISO standard. In some cases the holes on the
lm will not match exactly to the alignment of the holder. This is caused by a nonstandard camera. In this case there will be a small black line on the edge of the frame
that can easily be cropped out using photo editing software.
ISO-- International Organization for Standardization
Page 9

9
Page 10

10
Push the slider above to the left (lm scanning)
1.Push the slider above to the right(photo scanning)
2.Please remove lm tray for photo scanning
6. General operations
Note:
Maybe there is some difference between the preview image and saved image, please
subject to the image that you saved in SD card.
6.1 Quick Start
Please insert the memory card into the device, and do not take out the memory card when the
device is operating, otherwise the device will be powered o automatically.
If you want to scan the lm, please push the two switches on the top of the device to the left
side. Otherwise if you want to scan the photos, please push the switches to the right side.
Put Slide/Negative onto the Slide/Negative Holder or insert photo into appropriately sized
photo tray (13x18cm, 10x15cm, 9x13cm )
Insert the Slide/Negative Holder into the slot on the right of the device or insert photo tray into
photo tray slot from the top of the device.
Apply the power to the lm & photo scanner by two ways:
(1) USB: Connect the lm & photo scanner to PC with USB cable
(2) 5V adapter: Connect the adapter to the device with USB cable
Press POWER button to turn on the lm & photo scanner.
NOTE:
When the Film scanner mode is selected, the Film scan indication LED is on.
When the Photo scanner mode is selected, the Photo scan indication LED is on.
Follow the menu on screen for scanning.
After you have nished scanning, take out the memory card.
Note:
The lm & photo scanner has a built-in memory for recording, when there is a memory card
inserted, it will take priority for saving data
Or read pictures from PC by USB mode
When capturing in either photo or lm modes, please remember to push both slide switches to
the correct placement.
A notication will appear on-screen as a reminder to carry out the following:
1. Photo: push both sliders to the right 2. Film: push both sliders to the left.
Page 11

11
6.2 Operation Guide
Home: Main menu
When the Film scanner mode is selected, the following main menu will appear:
When the Photo scanner mode is selected, the following main menu will appear:
Home/MODE: No memory card
If there is no memory card inserted into the device, a warning icon will be shown on screen when
entering the main menu
①
Language mode
②
USB mode
③
Capture mode
④
Playback mode
⑤
Film Type
⑥
Resolution
①
Language mode
②
USB mode
③
Capture mode
④
Playback mode
⑤
Eect: multicolor, B&W
⑥
Crop proportion:
(13x18cm, 10x15cm,
9x13cm , name card)
⑦
Resolution
① ② ③ ④ ⑤ ⑥
No memory card indicator
① ② ③ ④ ⑤ ⑥ ⑦
No card
Capture Resolution
Page 12

12
Mirror
6.3 Capture
or
After the welcome page, the above menu will appear. You can press LEFT/RIGHT button for desired
menu, and then press ENTER button to conrm the selection.
Adjust brightness and color of image
You can adjust brightness and color of image in capture mode.
When enter into capture mode, press ENTER button, following
picture will show on:
EV means brightness; R means red; G means green; B means
blue.
Press ENTER button to switch, press MIRROR/FLIP to adjust data
Press SCAN button back to image preview mode
6.4 Capture: Mirror/Flip(Hard Key)
If any image requires for Mirror or Flip before capture, press LEFT/RIGHT button for Mirror/Flip
function, the live view will be adjusted accordingly (This step is to correct an image incorrectly
placed the lm/photo either upside down or ip). Mirror and Flip function can only be used while in
the live view mode.
Press LEFT button to change image left to right
Capture Resolution Capture Crop
Page 13

13
Press RIGHT button to upside down image
6.5 Capture mode
Once entered capture mode, there will be an indicator on
the left top corner to indicate it is in live view mode.
You can also press ENTER button, then press LEFT/RIGHT
button to adjust EV value, press ENTER button again to
conrm and this will take you back to live view mode.
6.6 Capture: Edit Menu
①
Save: save captured image
②
Cancel: cancel any editing done with this image
③
Home: back to the main menu
6.6.1 Live view Capture/Edit menu
Once you press SCAN button in live
vi e w, the ed it me n u wil l app e ar.
When you press ENTER button, the
current image will be saved to internal
memory or memory card (when there
is a memory card inserted). The display
will return to live view again.
Flip
Live view indicator
Selected image
①
② ③
SCAN
ENTER
Page 14

14
Memory full indicator
6.6.2 Capture: Save
Once you press SCAN button, the preview (live view) image
will be selected and shown on the screen. This will take
between 1~2 second with 2 icons shown on the left side
of the screen. The SAVE icon will be highlighted for you to
conrm by pressing the ENTER button, after the above step,
the display will go back to live view mode (preview)
6.6.3 Capture: Cancel
Select the Cancel icon with LEFT/RIGHT button and press
ENTER button to cancel any editing with the selected image.
The display will return to live view mode i.e. (nothing will be
saved)
6.6.4 Capture: Home
Select the Home icon with LEFT/RIGHT button, then press
ENTER button or press MODE button on top of the device at
any time to return to main menu
6.7 Exit from Edit mode to go back to Capture mode (live view)
Once you press ENTER button for save or cancel option, the display will return to capture mode/live
view. Then you can move the lm holder to the next lm or change to another photo to capture.
6.8 Memory full
Once the images in internal memory or memory card is
full, a memory full icon will be shown on screen when you
press the SCAN button. You will then have to download
the images to a PC or replace another memory card for
continued capture.
Page 15

15
6.9 Playback
Pr es s L EF T/ RI G H T bu tt o n to g o to
theplayback mode, or access the main
menu by the pressing the Home icon/
MODE button at any time. Press the ENTER
button to conrm the selection.
6.9.1 Playback: Auto Slide Show
Once you enter playback mode (default to slide show), the
screen will automatically display all images stored in the
internal memory or memory card with 2 seconds interval
from the previously captured image. You can also stop the
slide show by pressing the ENTER button (Only the images
captured by the film & photo scanner are available in
playback mode)
6.9.2 Playback: Edit Menu
①
Rotate +90: captured image rotate +90 degrees
②
Rotate –90: captured image rotate –90 degrees
③
Delete: delete this picture stored in internal memory or memory card
④
Exit: return to Slide show mode
⑤
Save: save the modied image to internal memory or memory card
⑥
Home: return to main menu
6.9.3
Playback: Slide show Single picture Edit mode
User can interrupt (stop) slide show mode to stand alone playback mode (single picture playback)
by press ENTER button. (Pause slide show) Then user is able to scroll each picture by LEFT/RIGHT
or
① ④
② ⑤
③ ⑥
Exit
Page 16

16
button. Once user select the picture stored in internal memory or memory card which intended to
be modied, press ENTER button again to bring out the edit mode for modication.
Slide show mode Single picture mode Use LEFT/RIGHT Edit mode
button to scroll picture
If there is no memory card inserted or no image in internal memory, TFT will auto display 20 frames
stored in internal memory when enter playback mode, but they will not be edited anytime.
6.9.4 Playback: Rotate/Save
If user wants to rotate +90 degrees by ENTER button, the image will be rotated +90 degrees and
cursor will remain at Save. Press ENTER button again to save modied result and next picture will be
shown. For continuously rotate +90 degrees, move cursor to rotate again and press ENTER button.
(Same for Rotate –90 function)
ENTER ENTER
Exit
ENTER ENTER
ENTER
Exit
Rotate +90
Save
Page 17

17
6.9.5 Playback: Exit
Once user select Exit function in edit menu, the display will go back to slide show starting with the
current picture without any change
6.9.6 Playback: Delete
Select delete icon with LEFT/RIGHT button then press ENTER button, that will delete the present
selected picture and next picture will be shown. Cursor will remain at Exit icon. If user intend to
process continuously delete, just move cursor to delete icon again and press ENTER button to
conrm.
6.9.7 Playback: Home
Select Home icon with LEFT/RIGHT button, then press ENTER button or press ENTER button for 3
seconds during operation to back to main menu
ENTER
ENTER
ENTER
Exit
ExitDelete
Home
Capture
Page 18

18
6.9.8 Playback: No File
If there is no picture when enter playback mode, a No picture
symbol will show on screen
6.10 Film Type
When the Film scanner mode is selected, you can change the lm type by entering Film Type menu
or access the main menu at anytime by pressing the Home icon/MODE button. Press LEFT/RIGHT
button for Film Type and press ENTER button to conrm.
①
Negatives Film: select Negatives lm when the colour negative lm is in the holder
②
Slides: select Slides when the load slide is in the holder
③
B&W: select B&W when load B&W negative lm in holder
You can press LEFT/RIGHT button to select the lm type, then press the ENTER button to conrm
① ② ③
Film Negatives Film
ENTER
Playback
No File
Page 19

19
6.11 Eect
When the Photo scanner mode is selected, you can change colour eect by the Eect menu, or you
access through the main menu by pressing the Home icon/MODE button anytime. Press LEFT/RIGHT
button for Eect and press the ENTER button to conrm
①
Multicolour eect
②
B&W eect
You can press the LEFT/RIGHT button to select colour eect, and then press ENTER button to conrm
6.12 Crop proportion
When the Photo scanner mode is selected, you can change the crop proportion with the Crop menu
or access the main menu by the Home icon/MODE button during operation. Press LEFT/RIGHT
button for Crop and press ENTER button to conrm
①
5"x7" format (13x18cm)
②
4"x6" format (10x15cm)
③
3.5"x5" format (9x13cm)
④
Name card crop proportion
You can press LEFT/RIGHT button to select crop proportion, and then press ENTER button to conrm
① ②
① ② ③ ④
Crop
Effect
Color
Page 20

20
6.13 Business Card Reader
1. Insert the CD in the CD-ROM
2. A pop-up installation interface will appear after you put the CD in the CD-ROM
3. Install Business Card Reader.
NIMOCARD is a professional business
car d sc ann ing and ma nag e men t
s o f t w a r e . S u p p o r t e d b y t h e
appropriate hardware, Nimocard can
quickly capture a business card image,
convert it into text using its advanced
OCR engine, and then sort each line
of text into an appropriate category.
The user can also add or edit the card
information manually, or import/
export data from Microsoft Outlook,
Outlook Express, etc. To prevent data
loss caused by computer damage or a
hardware crash, Nimocard can backup
users’ data into a separate file, or
backup all the data onto the internet
server.
6.13.1 Name Card Recognition
Select “File” -> “open image”, you can choose a language, and then it will recognise the name card
automatically as below.
Page 21

21
When scanning is completed, you can
close the capture window or click on the
main window at the back to bring up
the preview window as show below.
6.13.2 Edit Window
Selected one of the name card listed
in the preview window and then click
on the "Edit" button on the left side,
the edit window will appear as the
following:
6.13.3 Manually Editing
The user can manually chan g e any
content listed on the left side of the
window, or simply right click on any of
the selected box on the card image and
then it will re-direct you to the right
sorting eld.
User can also rotate the image by click
on the "Rotate" button on the top. When
finished editing, click close to exit the
editing window.
Page 22

22
6.13.4 Add a business card
User can also create a new business card
by clicking on the "New" button on the
left side of the main window.
6.13.5 Software Features
1. Multi-language OS support
Nimocard uses unicode encoding standard and can be installed on various operating systems in
dierent languages.
2. OCR for multiple languages
Advanced OCR engine support multiple languages, such as English, Simplified Chinese, or
Traditional Chinese, etc.
3. Business card management
Nimocard allows users to quickly edit or sort their business card information. The user can also
import data from or export data to other windows applications, such as Window Outlook, Outlook
Express, or Excel, etc.
4. Quick Search
Nimocard allow users to search desired business card information using text search. Its quick
search speed can nd any card within a couple of seconds.
5. Business card printing
Nimocard provides a wide range of printing templates. Business card information can be easily
printed on a variety of labels or envelopes.
6. Data Backup
Nimocard provides various ways of data backup. The user can easily backup their data locally into
a le or backup their data on the internet server. With the internet backup service, the user can
access their data anywhere, anytime, on any internet device with web browsing capability.
Page 23

23
6.14 Resolution
Change the resolution by entering Resolution menu on the device or access the main menu by
Home icon/MODE button. Press LEFT/RIGHT button for Resolution and press ENTER button to
conrm
or
①
10M resolution
②
14M resolution
③
22M resolution
You can press LEFT/RIGHT button to select resolution, and then press ENTER button to conrm
6.15 Language
Change language denition with the language menu or access the main menu by the Home icon/
MODE button at anytime. Press LEFT/RIGHT button for language and press ENTER button to conrm.
or
You can press LEFT/RIGHT button to select language, and then press ENTER button to conrm
6.16 USB mode
After you have finished your capture, please take out the memory card from the film & photo
scanner to download the stored images from the memory card.
When the device is connected with USB cable to PC, you can also press MODE button to main menu,
then press LEFT/RIGHT button to select USB mode, then press ENTER button to conrm, the lm &
photo scanner will become a mass storage device and you can review or edit images on a PC.
① ② ③
Page 24

24
You can also press MODE button to back to main menu.
7. Trouble shooting
Question: There is an unwanted stripe appearing at the edge of the image.
Answer: If it is a slight stripe, move the slide holder gently to and fro in the device until the stripe
is no longer visible in the preview window.
If the stripe is still present, please contact our retailer.
Question: The device cannot connect to the computer.
Answer: Please check if the cable has already been connected to the USB port of the computer,
or connect the cable to another USB port. It is recommended that you connect it to the
motherboard directly via the USB port at the rear of the machine, and not to the front
panel.
Turn on the power button, enter USB mode, it acts as a mass storage device.
8. Conformity
The Manufacturer hereby declares that the CE marking was applied to the
Rollei PDF-S 340 in accordance with the basic requirements and other relevant
provisions of the following CE Directives:
2011/65/EC RoHs Directive
2004/108/EC Low Voltage Directive
1999/5/EG R&TTE Directive
2006/95/EEC LVD Directive
2009/125/EG EuP Directive
2002/96/EG WEEE Directive
The EC Declaration of Conformity can be requested from the address specied on the Warranty card.
Page 25

25
9. Technical Specications
Lens : 2G3P F/NO=3.98 f=5.22 Film Range:51.5mm
F/NO=3.4 f=5.12 Photo Range: 170mm
Sensor : 14 mega pixels CMOS sensor
LCD: 2.4 inch LTPS LCD Display
External memory: SD/MMC card
Exposure : Auto
Color balance : Auto
Scan high resolution : 22M interpolation resolution
Data conversion : 12 bits per color channel
Scan Method : Single pass
Light source : 7 x 2 white LED/Backlight (3 white LED)
LED light lifetime for on & o: 10000 times
Power : Po were d fr om US B/5V ada p ter
Interface: USB 2.0
Dimension: 220mm(L) x 208mm(W) x 147mm(H)
Weight: 845G
Language: English, German, Spanish, Portuguese, Italian, Greek, French, Dutch,
Polish, Czech, Hungarian, Swedish, Finnish, Danish, Norwegian
 Loading...