

Page 1
Rollei Nano 60
Rollei Nano 80
Hinweise zum Gebrauch
Instructions for use
Page 2

ALLGEMEINES
Zur Kamera
Kamera nicht selbst demontieren. Sie enthält Hoch-
»
spannungselemente, die gefährlich sein können.
Außerdem erlischt die Garantie.
Bei beschädigtem Gehäuse keine Innenteile berüh-
»
ren, um elektrischen Schlag zu vermeiden.
Falls die Kamera naß werden sollte, aus dem gleichen
»
Grund Batterie entnehmen.
Batteriehinweise
Die Kamera funktioniert nicht ohne Batterie.
»
Beim Einlegen auf richtige Batteriepolung achten.
»
Batterie nicht wiederaufladen,
»
kurzschließen oder demontieren,
nicht ins Feuer werfen,
keiner Feuchtigkeit aussetzen,
außer Reichweite von Kindern und Tieren halten.
nicht in den Hausmüll werfen.
2
Die Rollei Nano löst nicht aus, wenn…
keine Batterie eingelegt oder die Batterie leer ist,
›
der Objektivschieber geschlossen (Kamera ausge-
›
schaltet) ist,
gezoomt oder der Film zurückgespult wird,
›
der zurückgespulte Film noch in der Rollei Nano liegt,
›
der Blitz ist noch nicht aufgeladen ist,
›
das Filmfach offen ist,
›
kein Film eingelegt ist.
›
Ein Mikrocomputer steuert die Nano elektronisch. In seltenen Fällen kann es durch starke elektrische oder magnetische Felder zu Störungen kommen. In diesem Fall die
Batterie für 2 – 3 Minuten entnehmen. Nach erneutem
Einsetzen sollte eine eventuelle Störung behoben sein.
Page 3

INHALTSVERZEICHNIS
Wir wünschen Ihnen viel Erfolg beim Fotografieren mit der
Rollei Nano. Bitte lesen Sie diese Anleitung vor Gebrauch
sorgfältig durch, damit Sie die vielen Möglichkeiten Ihrer
Kamera optimal nutzen können.
Empfehlung aus dem Vorbeugungsprogramm der
Kriminalpolizei:
Wer seine Wertsachen dauerhaft kennzeichnet, fotografiert
und auflistet, verdirbt Hehlern den Absatz und erspart sich
unnötigen Ärger.
Vorbereitung
Bezeichnung der Teile
LCD-Monitor
APS-Funktionen
Sucher/Autofokus-LED
Batterie einlegen
Batteriekontrolle
Film einlegen
Film zurückspulen
Dioptrieneinstellung/Trageschlaufe anbringen
Kamera einschalten/zoomen
Fotografieren
Kamerahaltung
Fotografieren
Schärfespeicher
Datumsaufdruck
Titelaufdruck
Bildformate
4
›
6
Blitzfunktionen
›
7
Aufnahmefunktionen
›
Anti-Rotaugen-Licht
9
›
10
Tageslicht-Aufhellblitz
›
Langzeit-Synchronisation
11
›
12
Blitzabschaltung
›
13
Selbstauslöser
›
Unendlich-Einstellung
14
›
15
›
Sonstiges
Pflege und Aufbewahrung
16
Fehlersuche
›
17
›
Technische Daten
18
›
19
Kurz-Hinweise
›
21
›
22
›
23
›
24
›
25
›
26
›
27
›
28
›
29
›
30
›
31
›
32
›
32
›
34
›
3
Page 4
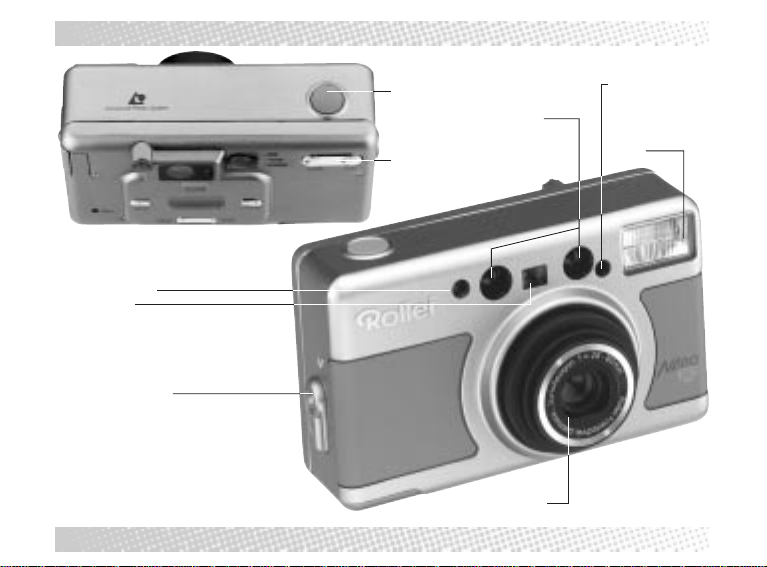
BEZEICHNUNG DER TEILE
Belichtungssensor
Sucherfenster
Filmfachentriegelung
4
Auslöser
Zoom-Tasten
(Tele/Wide)
Autofokusfenster
Objektiv
Selbstauslöser-/
Anti-Rotaugen-LED
Blitz
Page 5
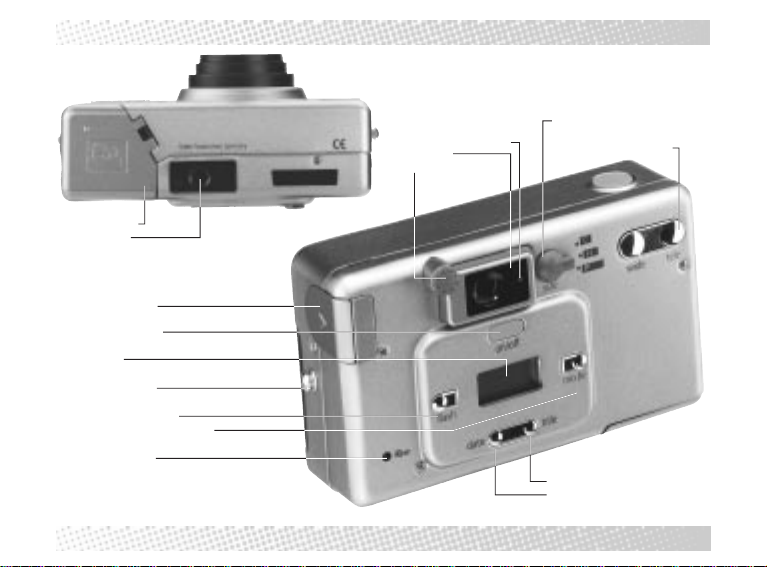
BEZEICHNUNG DER TEILE
Filmfachdeckel
Stativgewinde
Batteriefachdeckel
on/off Hauptschalter
LCD-Monitor
Trageschlaufenöse
flash Blitzfunktionstaste
mode Aufnahmefunktionstaste
Rückspulstarttaste
AutofokusKontroll-LED (grün)
Sucher
Dioptrienkorrektur
C/H/P-Hebel (Bildformat)
Zoom-Tasten (wide/tele)
title Titelwahltaste
date Datum/Zeit-Wahltaste
5
Page 6
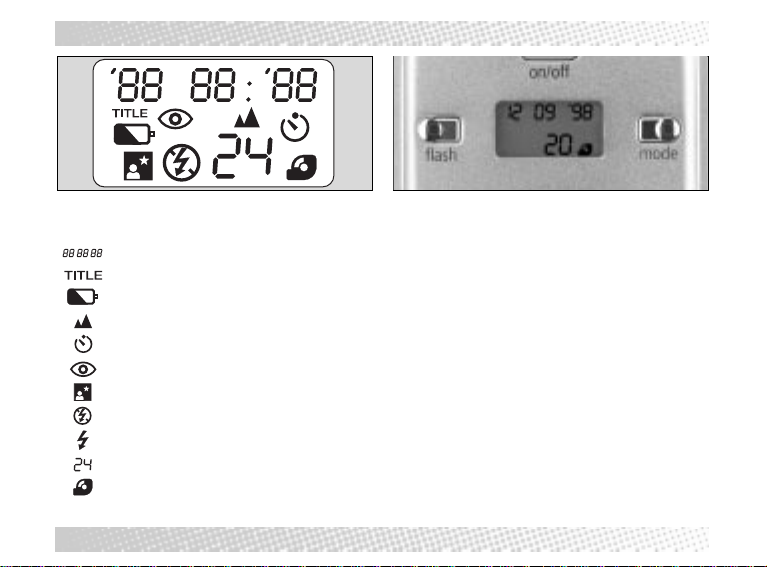
LCD-MONITOR
LCD-Monitor
Datum/Zeit/Titelnummer
Titelspeicheranzeige
Batteriekontrolle S. 11
Unendlich-Einstellung S. 30
Selbstauslöser S. 29
Anti-Rotaugen-Funktion S. 25
Langzeitsynchronisation S. 27
Blitzabschaltung S. 28
Aufhellblitzen S. 26
Bildzählwerk
Filmladesymbol
6
Bitte beachten
Bei ausgeschalteter Kamera zeigt das LC-Display Datum
und Bildzahl.
Page 7
APS-(ADVANCED PHOTO SYSTEM)-FUNKTIONEN
35mm-Film
APS-Film
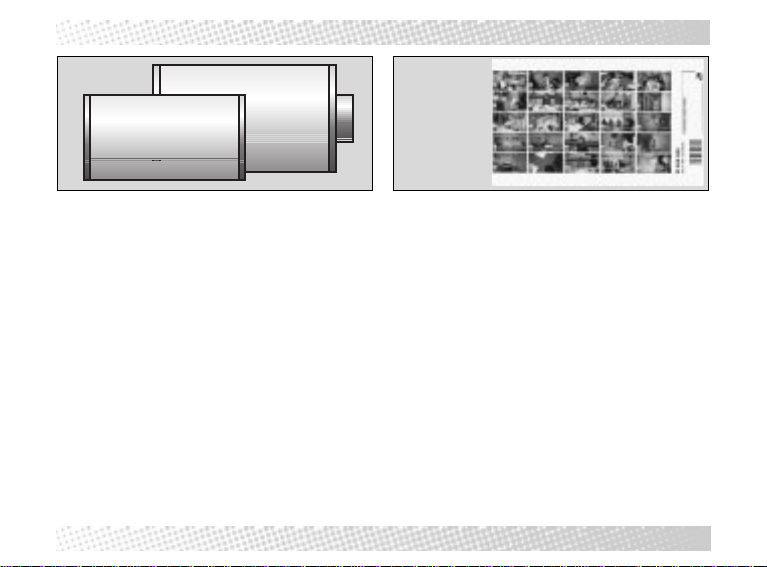
1. Neues Filmformat IX-240
Die Patrone ist kleiner als die des normalen 35mm-Films.
›
So ist der APS-Film vor und nach der Belichtung vollständig geschützt.
Das Filmeinlegen ist einfacher und sicherer.
›
Index-Print
C = classic
H = HDTV
P = Panorama
2. Index-Print
Mit dem entwickelten Film und den Vergrößerungen wird
ein Index-Print geliefert. Der Index-Print zeigt auf einem
Blatt alle Aufnahmen im Kleinformat mit Bildnummer und
gewähltem Format (C/H/P). Die Angabe der FilmIdentifikationsnummer garantiert die sichere Zuordnung
von Film und Index-Print.
7
Page 8

3. Informationsaustausch
(IX-Funktion)
Alle für eine typgerechte Verarbeitung des Films nötigen
Informationen sind (magnetisch oder optisch) gespeichert.
Die PQI (Print Quality Improvement)-Funktion ermöglicht
eine bestmögliche Qualität der Vergrößerungen. Bildformat
und Titel für den Rückseitenaufdruck können nachträglich
geändert werden
8
Bitte beachten
Fachgerechte Entwicklung garantieren Fotogeschäfte
›
mit dem APS-Symbol.
Page 9
SUCHER/AUTOFOKUS-LED
➀
➂
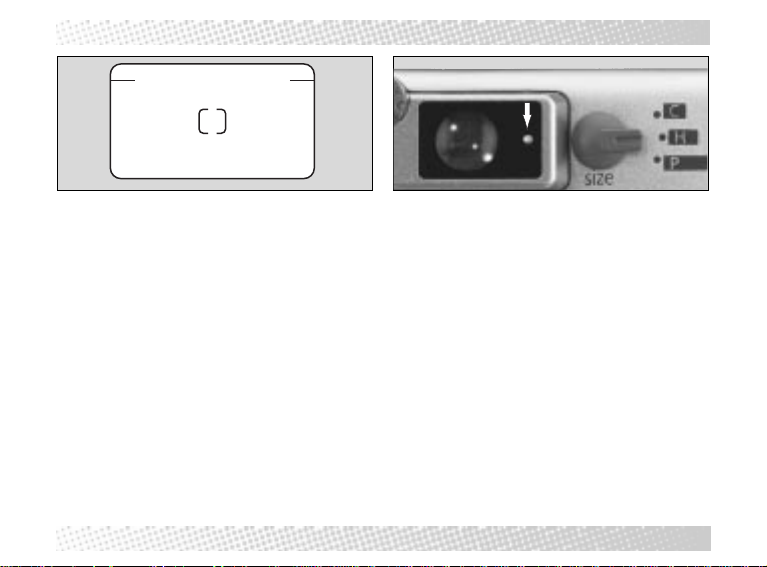
Sucher
➀ Bildfeldbegrenzung bei Nahaufnahme (70 cm)
➁ Bildfeldbegrenzung
➂ Autofokus-Meßfeld
➁
Autofokus-LED
Bei leichtem Andrücken des Auslösers leuchtet die
›
grüne Kontroll-LED auf.
LED leuchtet: Auslösen möglich
›
LED blinkt schnell: Motiv zu nahe (unter 70cm). Der
›
Auslöser blockiert.
LED blinkt langsam: Verwacklungsgefahr. Kamera auf-
›
legen oder Stativ verwenden.
9
Page 10
BATTERIE EINLEGEN
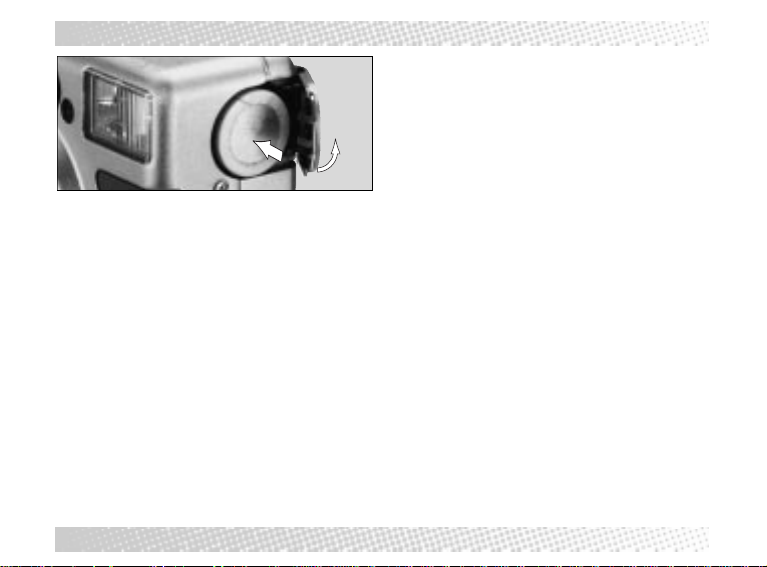
Batterie einlegen
Batteriefach wie abgebildet öffnen.
›
Neue Batterie richtig herum (Plus-Pol voran) einlegen.
›
Batteriefachdeckel schließen.
›
10
Bitte beachten
Nur eine Lithium-Batterie des Typs CR2 verwenden.
›
Nach 3 Minuten Nichtbenutzung schaltet die Rollei Nano
›
automatisch ab, um Energie zu sparen.
Bei längerem Nichtgebrauch der Kamera die Batterie
›
entnehmen.
Datumseinstellung nach einem Batteriewechsel über-
›
prüfen.
Page 11
BATTERIEKONTROLLE
Batteriekontrolle
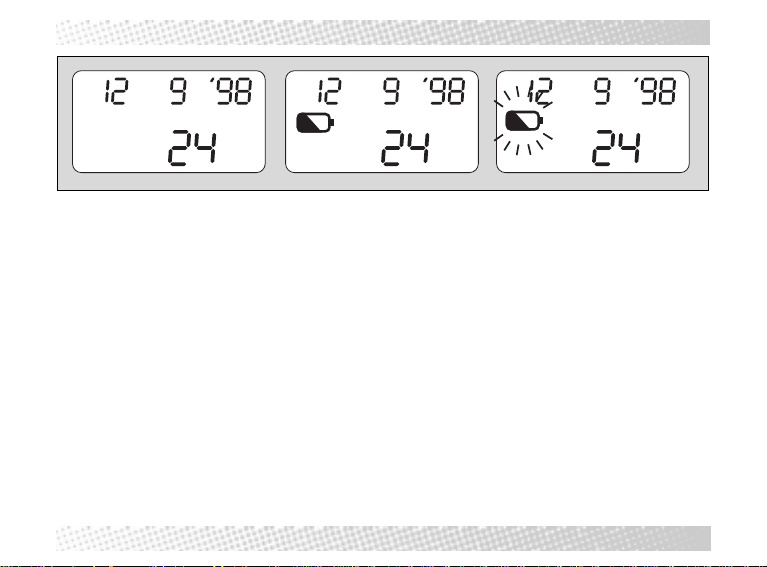
Das LCD-Symbol informiert über den Batteriezustand.
Kein Symbol – Batterie in Ordnung
›
Symbol erscheint – Batterie reicht noch für wenige Filme.
›
Ersatz-Batterie bereithalten.
Symbol blinkt – Batterie leer, Auslösen nicht mehr mög-
›
lich. Neue Batterie einsetzen.
Bitte beachten
Batterie nur bei ausgeschalteter Kamera wechseln.
›
Bei Kälte oder auf Reisen Ersatz-Batterie mitnehmen.
›
Bei niedrigen Temperaturen läßt die Batterieleistung
›
nach. Mit normaler Temperatur erreicht die Batterie
wieder ihre alte Leistung.
Batterie kann bei eingelegtem Film gewechselt werden.
›
11
Page 12
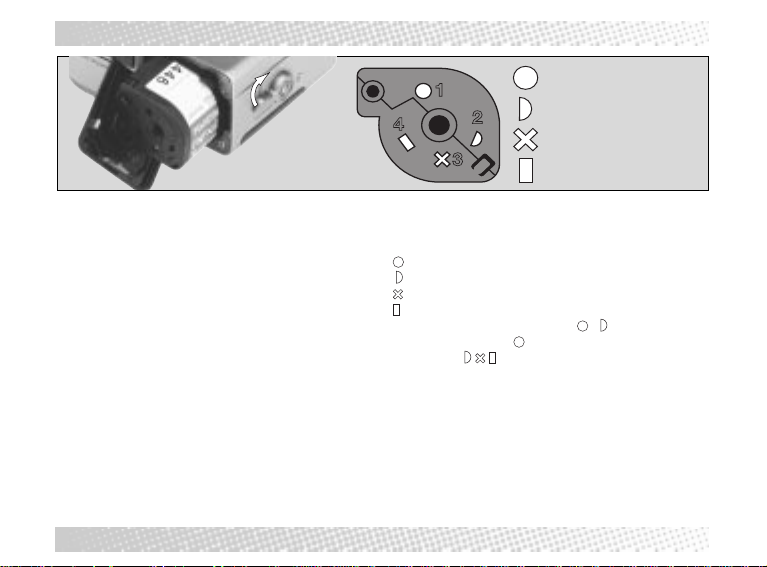
FILM EINLEGEN
unbelichtet
teilbelichtet
voll belichtet/nicht entwickelt
entwickelt
Film einlegen
1. Entriegelungshebel wie abgebildet betätigen, Deckel
aufklappen.
2. Filmpatrone in das Filmfach legen.
3. Deckel zudrücken, bis er mit einem Klicken einrastet.
Dann spult die Kamera den Film automatisch zum ersten
Bild vor.
4. Filmempfindlichkeit und Gesamtbildzahl werden im LCDisplay angezeigt. (Nach 2 s erscheint statt der Filmempfindlichkeit wieder das Datum.)
5. Wenn der Film nicht richtig transportiert wird, blinkt das
E-Symbol im LC-Display. In diesem Fall Einlegevorgang
wie beschrieben wiederholen.
12
Bitte beachten
Diese Kamera ist für APS-Filme (IX-240) geeignet.
›
Die Patrone zeigt den Filmstatus.
›
unbelichtet
teilbelichtet
voll belichtet/nicht entwickelt
entwickelt
Die Patrone muß das Symbol / zeigen (Nano 80).
›
oder das Symbol
(Symbole
Film nur mit Batterie in der Kamera einlegen.
›
Filmfach nur nach Zurückspulen des Films öffnen.
›
Filmfach nicht mit Gewalt schließen.
›
Die Kamera stellt die Filmempfindlichkeit automatisch
›
ein.
Beispiele für Filmempfindlichkeiten:
I-200(ISO 200)/I-400 (ISO 400)
Das Bildzählwerk zählt rückwärts und zeigt die Zahl der
›
verbleibenden Aufnahmen.
bei der Nano 60. Andere Filme
, , ) können nicht verwendet werden.
Page 13
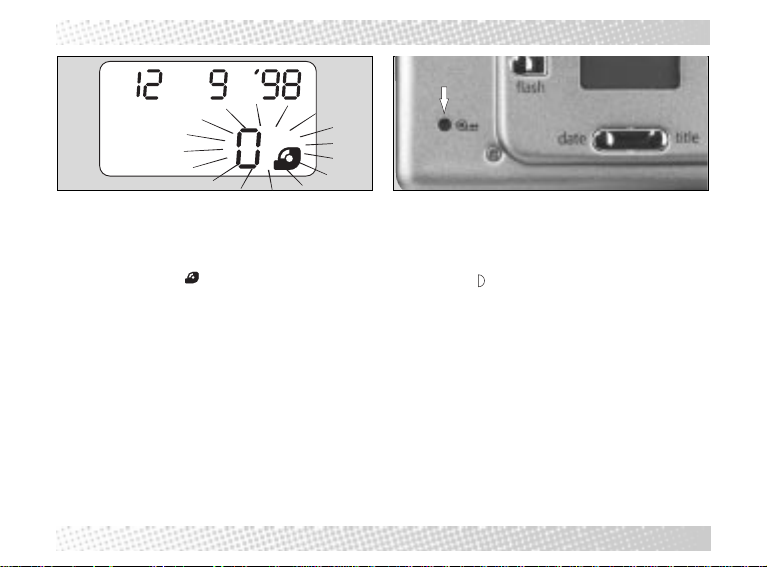
FILMZURÜCKSPULEN
Automatisches Zurückspulen
Der voll belichtete IX-Film wird automatisch zurück-
›
gespult.
Bei vollständig zurückgespultem Film zeigt das Bild-
›
zählwerk 0 und das
Filmfach öffnen
›
Film entnehmen
›
-Symbol blinkt.
Manueller Rückspulstart/MRC-Funktion
Teilbelichtete Filme können durch Drücken des manuel-
›
len Rückspulstartknopfes jederzeit zurückgespult werden. Die Filmpatrone zeigt anschließend das Symbol für
teilbelichtet
Zeitpunkt weiter belichtet werden. Der Film wird hierbei
auf das nächste unbelichtete Bild vortransportiert.
(MRC-Funktion, nur Nano 80)
Bitte beachten
Stoppt der Motor, bevor die 0 erscheint, neue Batterie
›
einlegen.
Rückwand nicht öffnen, bevor der Film mit neuer Batte-
›
rie vollständig zurückgespult worden ist.
. Dieser Film kann zu einem späteren
13
Page 14
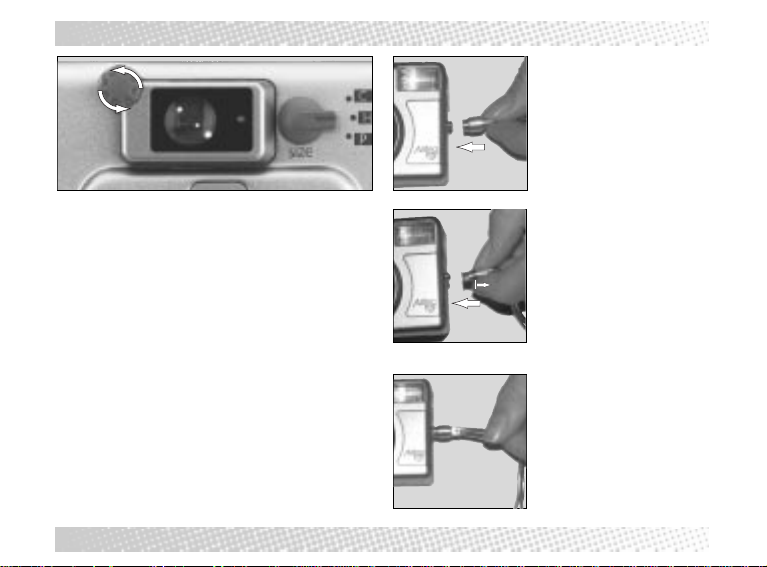
DIOPTRIENEINSTELLUNG TRAGESCHLAUFE ANBRINGEN
Dioptrieneinstellung
Objektiv auf tele stellen und an der Dioptrieneinstellung
›
drehen, bis das Bild scharf erscheint.
14
Trageschlaufe anbringen
Trageschlaufe wie
›
abgebildet befestigen.
Page 15
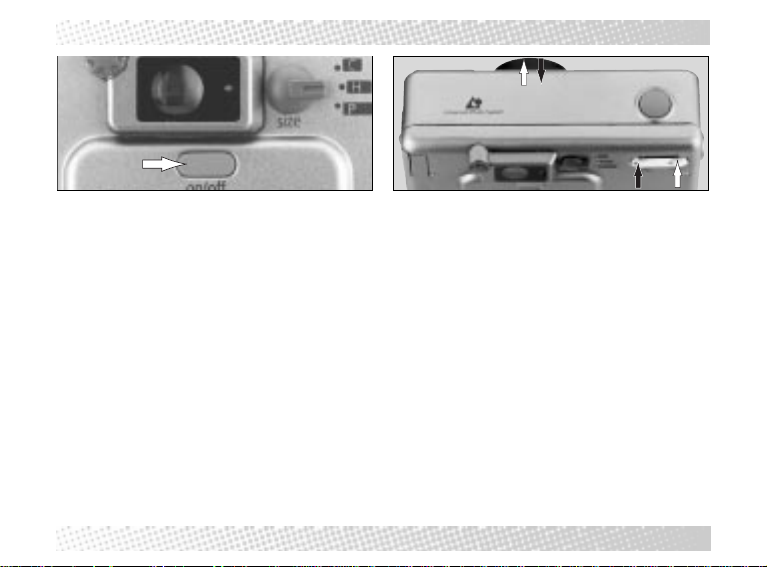
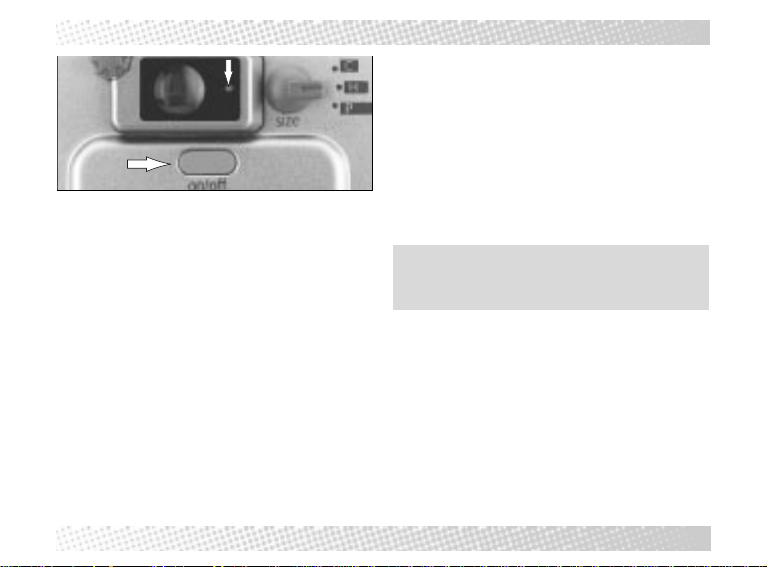
KAMERA EINSCHALTEN / ZOOMEN
TW
Kamera Einschalten / Zoomen
Hauptschalter drücken. Die Objektivabdeckung öffnet
›
sich, die LCD-Anzeigen erscheinen.
Motiv durch den Sucher anvisieren und mit der Zoom-
›
taste den gewünschten Bildausschnitt wählen.
Für größere Abbildung entfernter Motive oder Nahauf-
›
nahmen auf tele drücken, für Weitwinkelaufnahmen auf
wide (Weitwinkel).
Zum Ausschalten on/off erneut drücken.
›
Objektiv kehrt dann automatisch in Ruhestellung zurück,
›
die Lamellen schließen sich.
Wenn die Kamera länger als 3 Minuten nicht benutzt
›
wird, schaltet sie sich automatisch wieder aus.
Bitte beachten:
Erhält das Objektiv während des Zoomens einen Stoß
›
oder wird in seiner Bewegung behindert, erscheint E auf
dem LC-Display. In diesem Fall Kamera aus- und wieder
einschalten.
15
Page 16
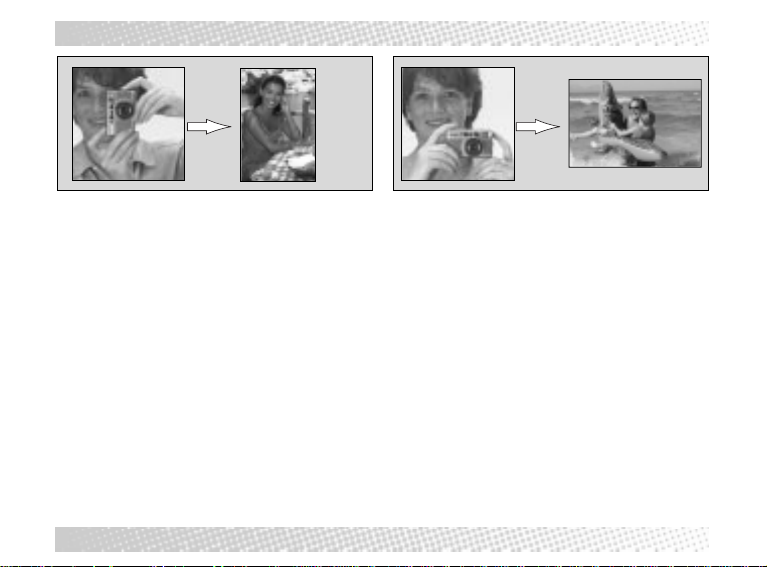
KAMERAHALTUNG
Kamerahaltung
Mit der Hand durch die Trageschlaufe greifen.
›
Kamera ruhig und fest mit beiden Händen halten, beson-
›
ders bei Tele, um nicht zu verwackeln.
Ellbogen möglichst am Körper abstützen.
›
Kamera nahe ans Auge halten, damit das ganze Bild zu
›
überblicken ist.
Langsam, nicht ruckartig den Auslöser drücken.
›
16
Bitte beachten
Objektiv, Autofokus- und Belichtungssensor-Fenster so-
›
wie den Blitz nicht durch Finger, herabhängende Haare
oder der Trageschlaufe verdecken.
Bei Hochformataufnahmen sollte der Blitz oben sein,
›
damit die Lichtrichtung möglichst natürlich wirkt.
Page 17
FOTOGRAFIEREN
Fotografieren
Motiv mit dem Autofokus-Meßfeld in der Mitte des
›
Sucherbildes anvisieren. (S. 9)
Den Auslöser leicht drücken. Wenn die grüne LED
›
aufleuchtet, ist die Entfernung eingestellt.
Zum Fotografieren den Auslöser ganz herunterdrücken.
›
Den Auslöser vorsichtig drücken, um nicht zu verwak-
›
keln.
Bei Entfernungen von weniger als 0,7 m bei Weitwinkel
›
(28mm) bzw. 0,75 m bei Tele (80mm) blinkt die grüne
AF-LED und der Auslöser ist blockiert.
Bei zu wenig Licht blitzt die Rollei Nano automatisch.
›
Blitzbereich für richtige Belichtung (ISO 200)
›
Weitwinkel Tele
(28mm) (60mm / 80mm)
0,7
–
5,0 m 0,75 – 2,2 m
Solange der Blitz noch aufgeladen wird, ist Auslösen
›
nicht möglich.
17
Page 18
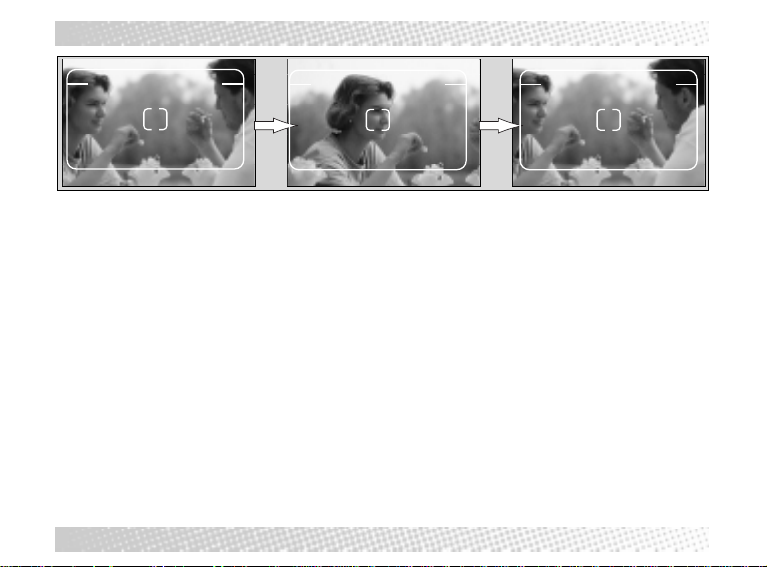
SCHÄRFESPEICHER
1
Schärfespeicher
Der Schärfespeicher hilft beim Scharfstellen auf Objekte
›
außerhalb der Bildmitte (1). Das funktioniert wie folgt:
1. AF-Meßfeld auf das Hauptmotiv richten. (2)
2. Auslöser leicht antippen (grüne LED leuchtet). Nicht zu
fest drücken, um unbeabsichtigtes Auslösen zu vermeiden.
3. Auslöser leicht gedrückt halten und gewünschten Bildausschnitt wählen. (3)
18
23
Kamera ruhig halten und dann Auslöser ganz herunter-
›
drücken.
Loslassen des Auslösers hebt die Schärfespeicherung
›
wieder auf.
Page 19
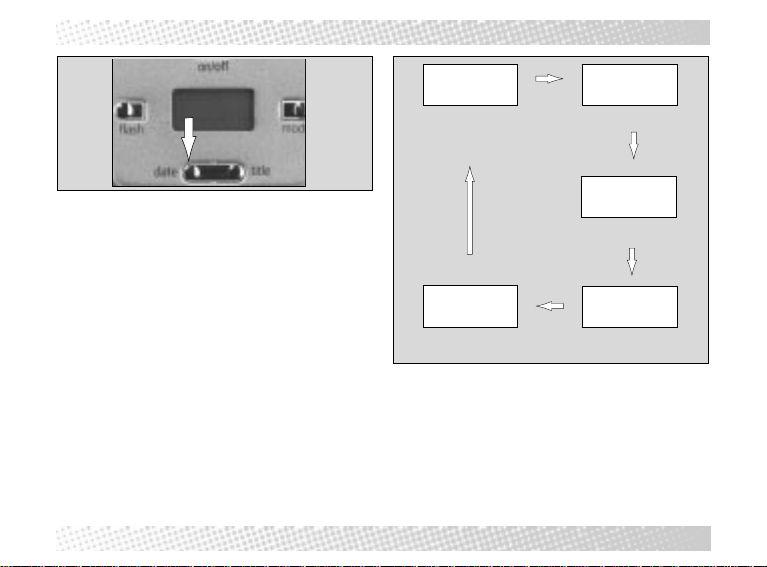
DATUMSAUFDRUCK
‘99320------
1. Einstellung des Datumformats
date-Taste drücken, um die einzelnen Formate aufzuru-
›
fen. (Reihenfolge siehe Abb.)
Anzeige 1: keine Einbelichtung
›
Anzeigen 2, 3, 4, 5: Das Datum wird in der gewählten
›
Reihenfolge auf Vorder- und Rückseite des Bildes gedruckt. (laborabhängig)
Keine
Einbelichtung
3 1 1 : 37
Tag - Stunde - Minute
Jahr - Monat - Tag
320 ‘99
Monat - Tag - Jahr
20 3 ‘ 99
Tag - Monat - Jahr
19
Page 20
DATUMS-/ZEITEINSTELLUNG
2 sec.
2. Datums-/Zeiteinstellung
date-Taste 2 s lang drücken, bis der erste Wert blinkt.
›
Zum Einstellen der Werte Zoom-Tasten drücken (tele
›
aufwärts, wide abwärts).
Erneutes Drücken der date-Taste bewirkt, daß der
›
nächste Wert aufgerufen wird und blinkt.
Nach Einstellung des letzten Wertes date-Taste drük-
›
ken. Anzeige hört auf zu blinken, die Einstellung ist
gespeichert.
Bitte beachten
Nach einem Batteriewechsel steht die Einbelichtung auf
›
-- -- -- (keine Einbelichtung). Einstellung bestätigen oder
nach Wunsch ändern.
00 steht für das Jahr 2000.
›
20
date
tele
date
tele
‘98320
‘99320
‘99320
‘99420
Page 21
TITELAUFDRUCK
Sprachcodes
und Titeltexte
En ENGLISCH
GE DEUTSCH
SP SPANISCH
Fr FRANZÖSISCH
JP JAPANISCH
GE -1 - ICH LIEBE DICH
GE -2 - DANKESCHÖN
GE -3 - HERZLICHE GLÜCKWÜNSCHE
GE -4 - FRÖHLICHE WEIHNACHTEN
GE -5 - FROHES NEUES JAHR
ICH LIEBE DICH
Titelaufdruck
Auf die Rückseite der Aufnahmen können verschiedene
Titel gedruckt werden.
1. Auswahl eines Titels
title-Taste einmal drücken. Die Titel-Sprache (links)
»
und -nummer (rechts) erscheinen im LC-Display.
Zum Ändern zuerst title-Taste 2 s lang drücken. Der
»
Sprachencode blinkt.
Dann mit Zoomtasten eine Sprache auswählen (Eng-
»
lisch, Französisch, Deutsch, Japanisch oder Spanisch)
title-Taste drücken, um Titelnummer zu wählen.
»
Dieser Titel wird beim Auslösen mit diesem Bild ge-
›
speichert.
Bitte beachten
Damit der gewählte Titel mit dem Bild zum Ausdruck
»
gespeichert wird, muß title im LC-Display aktiviert
sein.
Ein gespeicherter Titel kann mit entsprechendem
›
Nachbearbeitungsgerät (APS-Player für TV/Computer) verändert werden.
Die Titelspeicherung muß für jedes Bild neu aktiviert
»
werden, weil sie nach dem Auslösen automatisch
gelöscht wird. Eine aktivierte Titelspeicherung kann
vor der Aufnahme durch Drücken der date-Taste oder
Ausschalten der Kamera deaktiviert werden.
21
Page 22
BILDFORMATE
Bildformate
Gewünschtes APS-Bildformat mit dem C/H/P-Hebel
›
wählen.
Nachträgliche Änderungen des Bildformates sind im
›
Labor möglich.
22
C = classic (2:3)
H = HDTV (9:16)
P = Panorama (1:3)
Page 23

BLITZFUNKTIONEN
Blitzautomatik Rotaugen-
Blitzfunktionen
Mit der flash-Taste kann nach Bedarf eine der folgenden
Blitzfunktionen gewählt werden.
Blitzautomatik
›
Rotaugen-Reduzierung
›
Aufhellblitz
›
Langzeitsynchronisation
›
Blitz aus
›
Reduzierung
Aufhellblitz Langzeit-
Synchronisation
Blitz aus
23
Page 24

AUFNAHMEFUNKTIONEN
Normale Automatik Selbstauslöser Unendlich
Aufnahmefunktionen
Mit der mode-Taste kann nach Bedarf eine der folgenden Aufnahmefunktionen gewählt werden.
Normale Automatik
›
Selbstauslöser
›
Unendlich
›
24
Page 25

ANTI-ROTAUGEN-LICHT
1x
normale Blitzautomatik mit Rotaugen-Reduzierung
Anti-Rotaugen-Licht
Der Rotaugen-Effekt tritt vor allem bei geblitzten Portraitaufnahmen im Dunkeln auf.
Durch das Anti-Rotaugen-Licht wird der Rotaugen-
›
Effekt deutlich reduziert, weil das Licht ein Schließen der
Pupillen bewirkt, bevor die Aufnahme erfolgt.
flash-Taste 1x drücken, um diese Funktion zu aktivieren
›
Bitte beachten
Mit dieser Funktionen leuchtet die Anti-Rotaugen-LED
›
für 1 s auf.
Diese Funktion bleibt aktiv, bis eine andere gewählt wird.
›
25
Page 26

TAGESLICHT-AUFHELLBLITZ
2x
normale Blitzautomatik mit Aufhellblitz
Tageslicht-Aufhellblitz
Wenn das Hauptmotiv im Schatten liegt und die
›
Umgebungshelligkeit zu stark für die automatische Blitzzuschaltung ist, sorgt die FILL-IN-Funktion für eine Aufhellung der Schattenpartien und somit eine ausgewogene Belichtung.
flash-Taste 2x drücken, um diese Funktion zu aktivie-
›
ren.
26
Bitte beachten
Mit dieser Funktionen wird der Blitz unabhängig von
›
Motiv- und Hintergrundhelligkeit immer ausgelöst.
Page 27

LANGZEITSYNCHRONISATION
3x
normale Blitzautomatik mit Langzeit-Synchronisation
Langzeitsynchronisation
Blitzen mit Langzeit-Synchronisation läßt auch das Umge-
›
bungslicht zur Geltung kommen.
flash-Taste 3x drücken, um diese Funktion zu aktivie-
›
ren.
Bitte beachten
Kamera auf einer festen Unterlage abstützen oder ein
Stativ benutzen, um nicht zu verwackeln.
27
Page 28

BLITZABSCHALTUNG
4x
Blitzabschaltung
Zum Fotografieren mit dem vorhandenen Licht und
›
wenn Blitzen verboten oder störend ist, kann der Blitz
abgeschaltet werden.
flash-Taste 4x drücken, um diese Funktion zu aktivie-
›
ren.
28
Bitte beachten
Kamera auf einer festen Unterlage abstützen oder ein
Stativ benutzen, um nicht zu verwackeln.
Page 29

SELBSTAUSLÖSER
Selbstauslöser
mode-Taste 1x drücken, um diese Funktion zu aktivie-
›
ren.
Beim Auslösen sollte das AF-Meßfeld auf das Hauptmo-
›
tiv oder ein anderes Detail in gleicher Entfernung zielen.
Nach Drücken des Auslösers leuchtet die Selbstauslö-
›
ser-LED 7 s lang und blinkt dann die letzten 3 s vor der
Aufnahme.
Kamera auf einer festen Unterlage abstützen oder ein
›
Stativ benutzen, um nicht zu verwackeln.
1x
29
Page 30

UNENDLICH-EINSTELLUNG
2x
Unendlich-Einstellung
Die Unendlich-Einstellung eignet sich besonders, um
›
entfernte oder konturlose Motive wie Wolken, Feuer,
Rauch und durch Fensterscheiben oder Gitter zu fotografieren.
mode-Taste 2x drücken, um diese Funktion zu aktivie-
›
ren.
30
Bitte beachten
Der Blitz ist in diesem Fall abgeschaltet.
›
Kamera bei schlechten Lichtverhältnissen, besonders
›
mit Tele, auf einer festen Unterlage abstützen oder ein
Stativ benutzen, um nicht zu verwackeln.
Page 31

PFLEGE UND AUFBEWAHRUNG
Pflege und Aufbewahrung
Die Kamera wird am besten mit einem weichen, fussel-
›
freien Tuch gereinigt.
Keinen Alkohol oder andere chemische Lösungsmittel
›
verwenden.
Zum Reinigen des Objektivs Staub mit Pustepinsel
›
entfernen. Hartnäckige Verschmutzung nur mit Objektivreinigungspapier oder -tuch und spezieller Reinigungsflüssigkeit vorsichtig abwischen.
Die Kamera vor Sand, Staub und Wasser schützen.
›
Kamera vor Schlägen, Stößen und Vibrationen schüt-
›
zen. Nach Fall oder Schlag einwandfreie Funktion kontrollieren.
Frontlinse und Meßfenster sauber halten.
›
Kamera an einem trockenen, kühlen und staubfreien Ort
›
aufbewahren.
Kamera nicht in der Hitze liegenlassen, z.B. einem
›
geparkten Auto oder direktem Sonnenlicht.
Die Kamera funktioniert in einem Temperaturbereich von
›
-10°C – +50°C einwandfrei.
Beim längerem Fotografieren in der Kälte kann nachlas-
›
sende Batterieleistung die Funktion der Kamera beeinträchtigen. Kamera bzw. Reserve-Batterie möglichst
warm halten, z. B. in einer Tasche am Körper.
Bei einem Problem mit der Kamera an den Fotohändler
›
oder autorisierten Rollei-Service wenden.
31
Page 32

FEHLERSUCHE
Die Kamera löst nicht aus. Seite
Kamera eingeschaltet?
›
Wenn nicht, Hauptschalter drücken. 15
»
Batterie richtig eingelegt?
›
Batterieposition prüfen. 10
»
Kamera lange nicht benutzt?
›
Batterie wechseln. 10
»
Die Fotos sind unscharf.
Das Motiv mit dem AF-Meßfeld richtig anvisiert?
›
Den Abschnitt ”SUCHER” noch einmal lesen. 9
»
Autofokusfenster verdeckt?
›
Darauf achten, daß Finger, Haare oder Trageschlaufe
»
nicht davor hängen. 16
32
TECHNISCHE DATEN
Typ
vollautomatische APS-Zentralverschluß-Zoomkamera
Film
Typ: APS-Film IX-240
Einlegen: automatisch bis Bild 1
Transport: automatisch
Rückspulen: automatisch, manueller Start möglich
Bildformate
C (classic) 16,7 x 23,9 mm
H (HDTV) 16,7 x 30,2 mm
P (Panorama) 9,6 x 30,2 mm
Objektiv
4,0/28 – 8/60mm-Motor-Zoom, Nano 60
4,2/28 – 11/80mm-Motor-Zoom, Nano 80
Fokussierung
Spot-AF-System mit Fokusspeicher, ab 0,7 m
Belichtung
Programmautomatik,
Arbeitsbereich (ISO 100)
Verschluß
programmgesteuerter Zentralverschluß
Verschlußzeiten 1/400 – 1/3 s
(MRC-Funktion, Nano 80)
Page 33

Sucher
Realbild-Zoomsucher mit Autofokus Meßfeldmarkierung
Bildfeld: 80%
Vergrößerung: 0,4x – 0,92x
Blitz
integriert, Leitzahl 10,5
Blitzbereich (ISO 100-Film)
WIDE (28mm): ca. 0,7 – 5,0 m
TELE (60/80mm): 0,75 – 2,2 m
Blitzfolgezeit: ca.6 s
Blitzfunktionen
Anti-Rotaugen-Blitz,
Aufhellblitz,
Langzeitsynchro,
Blitz aus
Aufnahmefunktionen
Unendlich-Einstellung,
Selbstauslöser 10 s
Bildzählwerk
LC-Display, subtraktiv
Abschaltautomatik
nach 3 Minuten ohne Kamerabetätigung.
Stromquelle
1 x 3-Volt-Lithium-Batterie (CR2)
Abmessungen
98,4 x 59,2 x 35,5 mm (B X H X T)
Gewicht
ca. 170 g (mit Batterie)
Technische Änderungen vorbehalten.
»
Alle Angaben entsprechend Rollei-Standard-Tests.
»
33
Page 34

KURZ-HINWEISE
Taste Funktion LCD
Bildformat mit C/H/P-Hebel wählen
title Zum Ändern zuerst title-Taste 2 s lang drücken bis
1x flash Rotaugen-Reduzierung
2x flash Aufhellblitz
3x flash Langzeit-Synchronisation
4x flash Blitz abschalten
1x mode Selbstauslöser
2x mode Unendlich-Einstellung
34
Titelauswahl
Sprachencode blinkt. Mit Zoomtaste eine Sprache wählen.
title-Taste drücken, um Titelnummer zu wählen.
gegen rote Augen bei Portraits im Dunkeln
zur Schattenaufhellung bei Tageslicht
damit auch das vorhandene Licht
zur Geltung kommt
wenn Blitzen stört oder verboten ist
um 10 s verzögert auszulösen
zum Fotografieren konturloser Motive
(Wolken, Feuerwerk) oder durch Glas
Page 35

NOTIZEN
35
Page 36

NOTIZEN
36
Page 37

Rollei Nano 60
Rollei Nano 80
Instructions for use
37
Page 38

GENERAL
About the camera
Never dismantle the camera yourself. It contains high-
»
voltage elements which can be dangerous. This will also
invalidate your guarantee.
If the camera body is damaged, do not touch interior
»
components as there is a risk of electric shock.
If the camera gets wet, remove the battery for the same
»
reason.
Battery instructions
The camera will not operate without a battery.
»
When inserting the battery make sure the plus and minus
»
signs are the right way round.
Do not recharge, short-circuit or dismantle the battery
»
Do not throw the battery into the fire.
Do not expose the battery to moisture
Keep away from children and animals.
Do not dispose of batteries with the household refuse
38
The Rollei Nano will not take pictures when ...
no battery is inserted or the battery is flat.
›
the lens slide is closed (camera switched off).
›
the zoom is operating or the film is being rewound.
›
the rewound film is still in the Rollei Nano.
›
the flash is not yet charged.
›
the film chamber is open.
›
no film has been inserted.
›
A microprocessor controls the Nano electronically. In rare
cases strong electric or magnetic fields can cause
interference.
If this happens, remove the battery for 2 – 3 minutes. When
you put back the battery you should find that the interference
has stopped.
Page 39

TABLE OF CONTENTS
We wish you every success with your Rollei Nano. Please
read through these instructions carefully before using the
camera. This will help you to make the best use of the many
features on your new camera.
Recommendation from the police crime prevention
programme:
Put the fences out of business and save yourself unnecessary
trouble: permanently, mark, photograph and list your
valuables.
Preparation
Components
LCD-panel
APS functions
Viewfinder/autofocus LED
Inserting the battery
Battery monitoring
Loading the film
Rewinding the film
Diopter adjustment/Attaching the carrying loop
Switching on the camera/zooming
Taking pictures
Holding the camera
Taking pictures
Focus lock
Date imprinting
40
›
40
›
41
›
43
›
44
›
45
›
46
›
47
›
48
›
49
›
50
›
51
›
52
›
53
›
Title backprinting
Picture formats
Flash functions
Shooting functions
Anti-red-eye flash
Fill-in flash
Slow sync mode
Flash off
Self-timer
Infinity setting
Other information
Care and storage
Troubleshooting
Specification
Brief instructions
55
›
56
›
57
›
58
›
59
›
60
›
61
›
62
›
63
›
64
›
65
›
66
›
66
›
68
›
39
Page 40

COMPONENTS
Exposure sensor
Viewfinder window
Film chamber catch
40
Shutter release
Autofocus window
Zoom button
(wide/tele)
Lens
Anti-red-eye/
self-timer LED
Flash
Page 41

COMPONENTS
Film chamber cover
Tripod thread
Battery compartment cover
on/off Main switch
LCD-panel
Carrying loop eye
flash Flash function key
mode Shooting function key
Rewind start button
Autofocus
control LED(green)
Viewfinder
Diopter adjustment
C/H/P-lever (picture format)
Zoom button (wide/tele)
title Title selection button
date Date/time selection button
41
Page 42

LCD-PANEL
LCD-PANEL
Date/time/title number
Title memory display
Battery monitoring S. 11
Infinity setting S. 30
Self-timer S. 2 9
Anti-red-eye function S. 25
Slow sync mode S. 27
Flash off S. 28
Fill-in flash S. 26
Frame counter
Film loading symbol
42
Please note
The LCD display shows the date and frame number when
the camera is switched off.
Page 43

APS (ADVANCED PHOTO SYSTEM) FUNCTIONS
35mm film
APS film
1. New film format IX-240
The cartridge is smaller than that of the normal 35mm
›
film. So the APS film is completely protected before and
after exposure.
Film loading is simpler and safer.
›
Index-Print
C = Classic
H = High vision
P = Panorama
2. Index print
An index print is sent back with the processed film and the
enlargements. The index print is a single sheet containing all
the photos in 35 mm format with the frame number and the
chosen format (C/H/P). The printed film identification number
ensures reliable classification of film and index print.
43
Page 44

3. Information exchange function (IX function)
All the information needed to process the film is recorded
(magnetically or optically). The PQI (Print Quality
Improvement) function allows the best possible enlargements
to be made. The picture format and the title for backprinting
can subsequently be changed by the processing laboratory
or with an appropriate accessory.
44
Please note
Photo shops displaying the APS symbol guarantee
›
expert processing.
Page 45

VIEWFINDER/AUTOFOCUS LED
➀
➂
Viewfinder
➀ Image area outline with close-up (70 cm)
➁ Image area outline
➂ Autofocus metering field
➁
Autofocus LED
The green LED lights up when the shutter release is
›
pressed gently.
LED lit: shutter release possible
›
LED flashes quickly: Subject too close (under 70cm).
›
The shutter release is locked.
LED flashes slowly: Danger of blurred pictures. Support
›
camera or use a tripod.
45
Page 46

INSERTING THE BATTERY
Inserting the battery
Open the battery compartment as shown.
›
Insert the new battery correctly (plus terminal at front).
›
Close the battery compartment.
›
46
Please note
Only use a CR2 lithium battery.
›
The Rollei Nano switches off automatically after not
›
being used for 3 minutes to save power.
If the camera is not going to be used for longer periods,
›
take out the battery.
Check the date setting after a battery change.
›
Page 47

BATTERY MONITORING
Battery monitoring
The LCD symbol informs you of the battery status.
No symbol - battery working OK
›
Symbol appears - still enough battery for a few films.
›
Keep replacement battery handy.
Symbol flashes - battery flat, shutter release no longer
›
possible. Insert new battery.
Please note
Only change the battery when the camera is switched
›
off.
Take a spare battery with you in cold weather or on long
›
journeys.
The battery power drops in low temperatures. In normal
›
temperatures the battery regains its former power output.
The battery can be changed when the film is loaded.
›
47
Page 48

LOADING THE FILM
unexposed
partially exposed
fully exposed/unprocessed
processed
Loading the film
1. Push catch in the direction of the arrow, open cover.
2. Drop the film cartridge into the film chamber.
3. Press the cover until it clicks in place. The camera
automatically advances the film to the first frame.
4. The film speed and the total number of frames are shown
in the LCD display. (After 2 seconds the date is displayed
instead of the film speed)
5. If the film is not advanced properly, the E symbol flashes
in the LCD display. If this happens, re-load the film as
described.
48
Please note
This camera is suitable for APS films (IX-240)
›
The cartridge shows the film status.
›
unexposed
partially exposed
fully exposed/unprocessed
processed
The cartridge must show the / symbol (Nano 80) or
›
symbol (Nano 60) . The camera does not accept
the
other films (symbols
Only load the film when the battery is in the camera.
›
Only open the film chamber after rewinding the film.
›
Do not use force to close the film chamber.
›
The camera sets the film speed automatically.
›
Examples of film speeds
I-200(ISO 200)/I-400 (ISO 400)
The frame counter counts backwards and shows the
›
number of shots left.
, , ).
Page 49

REWINDING THE FILM
Auto rewind
The fully exposed IX film is rewound automatically.
›
When the film is completely rewound, the frame counter
›
shows 0 and the
Open the film chamber
›
Remove the film
›
symbol flashes.
Manual rewind start
Partially exposed films can be rewound mid-roll by
›
pressing the manual rewind button at any time. The film
cartridge subsequently shows the symbol for partially
exposed film. This film can be exposed further in a
camera with the MRC function (Nano 80).
Please note
If the motor stops before the 0 appears, insert a new
›
battery.
After inserting a new battery, do not open the camera
›
back until the film is fully rewound.
49
Page 50

DIOPTER ADJUSTMENT ATTACHING CARRYING LOOP
Diopter adjustment
Set the lens to tele and turn the diopter control until the
›
picture appears sharp.
50
Attaching carrying loop
Attach the carrying loop as
›
shown.
Page 51

SWITCHING ON THE CAMERA/ZOOMING
TW
Switching on the camera/zooming
Press the main switch. The lens cover opens, the LCD
›
displays light up.
If the camera is not used for more than 3 minutes it
›
automatically switches off again.
Point the viewfinder at the subject and select the desired
›
framing with the zoom button.
To magnify remote subjects or for close-ups press tele,
›
for wide-angle shots press wide.
To switch the camera off press on/off again.
›
The lens automatically returns to the off position, the lens
›
cover closes.
Please note:
If the zoom movement is hindered, E appears on the
›
LCD display. If this happens, switch the camera off and
on again.
51
Page 52

HOLDING THE CAMERA
Holding the camera
Put your hand through the loop to hold the camera
›
securely.
Hold the camera steadily and firmly with both hands,
›
especially when using tele so as not to avoid camera
shake.
Where possible rest your elbow against your body.
›
Hold the camera near your eye so that you can see the
›
whole picture.
Press the shutter release slowly, not abruptly.
›
52
Please note
Make sure you do not obscure the lens, the autofocus
›
and exposure sensor window or the flash with your
fingers, hair or the carrying loop.
When taking pictures in portrait format hold the camera
›
so that the flash is at the top. This makes sure that the
light direction is as natural as possible.
Page 53

TAKING PICTURES
Taking pictures
Make sure the subject is in the autofocus metering field
›
in the middle of the viewfinder image (S. 43)
Press the shutter release gently. When the green LED
›
lights up, the focus value is set.
Press the shutter release in completely to take the
›
photograph.
Press the shutter release carefully to avoid camera
›
shake.
With distances of less than 0.7 m for wide-angle (28mm)
›
or 0.75 m for tele (80mm), the green AF-LED flashes and
the shutter release is locked.
The Rollei Nano fires its flash automatically in poor
›
lighting conditions.
Flash range for correct exposure (ISO 200)
›
Wide-angle Tele
(28mm) (60/80mm)
0.7
–
5.0 m 0.75 – 2.2 m
While the flash is still charging, the shutter cannot be
›
released.
53
Page 54

FOCUS LOCK
1
Focus lock
The focus lock is an aid for focusing on objects outside
›
of the middle of the picture (1). It functions as follows:
1. Make sure the main subject is in the AF metering field. (2)
2. Gently press the shutter release (green LED lights up).
Do not press too hard to avoid unintentional release.
1. Keep the shutter release pressed gently and select the
desired framing.(3)
54
23
Keep the camera steady and then completely press
›
down the shutter release.
When you take your finger off the shutter release the
›
focus lock is cancelled.
Page 55

DATE IMPRINTING
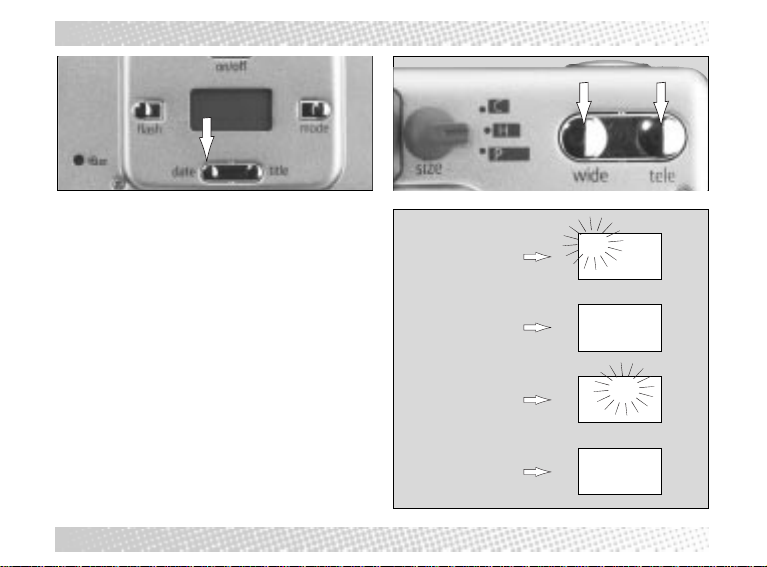
1. Setting the date format
Press the date button to call up the individual formats.
›
(For sequence see figure on right)
Display 1: no date imprinting
›
Displays 2, 3, 4, 5: The date is printed on the front and
›
back of the picture in the chosen sequence. (Depending
on the processing laboratory)
‘99320------
No imprinting Year - month - day
320 ‘99
Month - day - year
3 1 1 : 37
Day - hor - minute
20 3 ‘ 99
Day - month - year
55
Page 56

DATUMS-/ZEITEINSTELLUNG
2 sec.
2. Date/time setting
Press the date button for 2 seconds until the first value
›
flashes.
The following values are called up by pressing the button
›
further.
To set the values press the zoom buttons (tele up, wide
›
down)
After setting the last value, press the date button. The
›
display should flash until the setting is stored.
Please note
After a battery change the date imprinting display shows
›
-- -- -- (No date imprinting). Confirm the setting or
change it as required.
00 stands for the year 2000.
›
56
date
tele
date
tele
‘98320
‘99320
‘99320
‘99420
Page 57

PRINTING TITLES
Language codes
and title texts
En ENGLISCH
GE GERMAN
SP SPANISH
Fr FRENCH
JP JAPANESE
En -1 - I LOVE YOU
En -2 - THANK YOU
En -3 - SEASONS GREETINGS
En -4 - HAPPY BIRTHDAY
En -5 - CONGRATULATION
I LOVE YOU
Printing titles
Various titles can be printed on the back of pictures.
1. Selecting a title
Press the title button once. The title language (left) and
»
number (right) appear in the LCD display.
To change, first press the title button for 2 seconds. The
»
language code flashes.
Next select a language with the zoom buttons (English,
»
French, German, Japanese or Spanish)
Press title to select the title number.
»
This title is stored with this picture when shutter release
›
is pressed.
Please note
The chosen title is recorded with the picture for printing
»
when TITLE appears in the LCD display below the
language code.
A recorded title can be changed using suitable
›
photofinishing equipment (APS-player for TV/computer).
The title storage must be activated again for each
»
picture, because it is automatically erased after the
shutter release is pressed. The activated title storage is
deactivated before the shot by pressing the date button
or by switching off the camera.
57
Page 58

PICTURE FORMATS
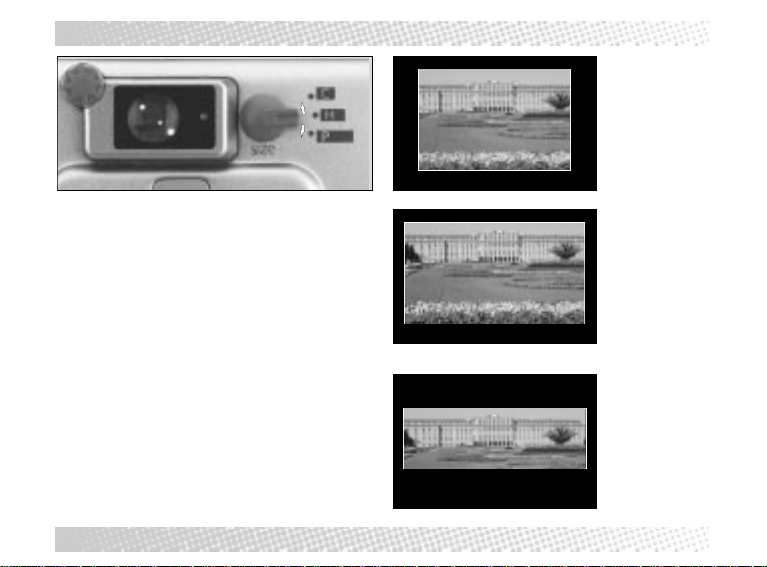
Picture formats
Choose the desired APS picture format with the C/H/P
›
lever.
Picture formats can be changed later at the processing
›
laboratory.
58
C = Classic (2:3)
H = High vision (9:16)
P = Panorama (1:3)
Page 59

FLASH FUNCTIONS
Auto flash Anti-red-eye flash Fill-in flash Slow sync mode Flash off
Flash functions
Using the flash button one of the following flash functions
can be selected as required.
Auto flash
›
Anti-red-eye flash
›
Fill-in flash
›
Slow sync mode
›
Flash off
›
59
Page 60

SHOOTING FUNCTIONS
Normal auto self-timer infinity
Shooting functions
Use the mode button to select one of the following shooting
functions:
Normal auto
›
self-timer
›
infinity
›
60
Page 61

ANTI-RED-EYE FLASH
1x
Normal auto flash Anti-red-eye-flash
Anti-red eye flash
The red-eye effect mainly occurs when flash portraits are
taken in the dark.
The anti-red-eye flash significantly reduces red-eye
›
because the flash causes the pupils to close before the
picture is taken.
Press the flash button once to activate this function.
›
Please note
With these functions the anti-red-eye LED lights up for 1
›
second.
This function remains active until another function is
›
selected.
61
Page 62

FILL-IN FLASH
2x
Normal auto flash with fill-in flash
Fill-in flash
If the main subject is in the shade and the ambient
›
brightness is too strong for the automatic flash to be
triggered, fill-in flash will brighten up the shadow areas,
thereby ensuring a balanced exposure.
Press the flash button twice to activate this function.
›
62
Please note
When these functions are selected, the flash is always
›
fired independently of subject and background
brightness.
Page 63

SLOW SYNC MODE
3x
Normal auto flash with slow sync mode
Slow sync mode
Using flash with the slow sync mode allows the available
›
light to be utilized as well.
Press the flash button 3 times to activate this function.
›
Please note
Support the camera on a firm base or use a tripod to
›
avoid camera shake.
63
Page 64

FLASH OFF
4x
Flash off
To take pictures with the available light and when flash
›
photographs are forbidden or disturbing to others, you
can switch the flash off.
Press the flash button 4 times to activate this function.
›
64
Please note
Support the camera on a firm base or use a tripod to
›
avoid camera shake.
Page 65

SELF-TIMER
Self-timer
Press the mode button once to activate this function.
›
When the shutter release, the main subject or another
›
detail at the same distance should be in the AF metering
field.
After the shutter release is pressed, the self-timer LED
›
lights up for 7 seconds and then flashes the last 3
seconds before the shot.
Support the camera on a firm base or use a tripod to
›
avoid camera shake.
1x
65
Page 66

INFINITY SETTING
2x
Infinity setting
The infinity setting is particularly suitable for shooting
›
remote or contourless subjects such as clouds, lights
and smoke and shooting through windows or railings.
Press the mode button twice to activate this function.
›
66
Please note
With this function the flash is off.
›
In the case of poor lighting conditions, especially with
›
tele, support the camera on a firm base or use a tripod
to avoid camera shake.
Page 67

CARE AND STORAGE OF THE CAMERA
Care and storage of the camera
It is best to clean the camera with a soft, fluff-free cloth.
›
Do not use alcohol or other chemical solvents.
›
When cleaning the lens remove dust with a soft brush.
›
Carefully wipe away stubborn dirt, using lens cleaning
›
paper or a cloth and special cleaning fluid.
Protect the camera against sand, dust and water.
›
Protect the camera against knocks and shaking. If the
›
camera is dropped or knocked, check that it works
properly.
Keep the front element and metering window clean.
›
Keep the camera in a dry, cool and dust-free place.
›
Do not leave the camera in heat, e.g. a parked car or
›
direct sunlight.
The camera functions without problems in a temperature
›
range from -10°C to +50°C.
When the camera is used for lengthy periods in cold
›
weather, reduced battery power can impair the operation
of the camera. Keep the camera and/or battery as warm
as possible, e.g. in a bag next to your body.
If you have a problem with the camera, contact your
›
photographic dealer or the authorized Rollei Service in
your country.
67
Page 68

TROUBLESHOOTING
The camera does not release page
Camera switched on?
›
If not, press ON/OFF button. 49
»
Is battery correctly inserted?
›
Check battery position. 44
»
Camera out of use for a long time?
›
Change battery. 44
»
The pictures are not sharp
How is the subject shown in the AF metering field?
›
Re-read the section on the ”viewfinder”. 43
»
Is the autofocus window being obscured?
›
Make sure that it is not blocked by your finger or hair or
»
by the carrying loop. 50
68
SPECIFICATION
Type
Fully-automatic APS leaf-shutter zoom camera film
Film
Typ: APS-Film IX-240
Picture formats
C (Classic) 16.7 x 23.9 mm
H (High vision) 16.7 x 30.2 mm
P (Panorama) 9.6 x 30.2 mm
Lens
28 – 60mm f/4.0 - 8 motor zoom, Nano 60
28 – 80mm f/4.2 - 11 motor zoom, Nano 80
Focussing
Spot-AF-System with focus lock from 0.7 m
Exposure
Programmed auto exposure, working range (ISO 100)
Shutter
Program-controlled leaf shutter
Shutter speeds 1/400 – 1/3 s
Automatic loading to frame ”1”
Automatic film transport
Rewind: automatic, manual start possible
(MRC-function, Nano 80)
Page 69

Viewfinder
Real image zoom viewfinder with autofocus metering field
marking
Image area: 80%
Magnification: 0.4x – 0.92x
Flash
integral, guide number 10.5 ,flash range (ISO 100-Film)
wide (28mm): app. 0.7 – 5.0 m
tele (80/60mm): 0.75 – 2.2 m
Flash interval: app. 6 s
Flash functions
Anti-red-eye flash, fill-in flash, slow sync mode, flash off
Shooting functions
Infinity setting , 10 s self-timer
Frame counter
LC-Display, counts backwards
Auto cut-out
after camera not being used for 3 minutes
Power supply
1 x 3-Volt lithium battery (CR2)
Dimensions
98.4 x 59.2 x 35.5 mm (B X H X T)
Weight
approx. 185 g (with battery)
Technical modifications reserved
»
All information in accordance with Rollei standard
tests.
69
Page 70

BRIEF INSTRUCTIONS
Taste Function LCD
Picture format with C/H/P lever
title
1x flash Red-eye reduction
2x flash Fill-in flash
3x flash Slow sync mode
4x flash Flash off
1x mode Self-timer
2x mode Infinity setting
70
Title selection
To change first, press title button for 2 seconds until the
language code flashes. Choose a language with the zoom button.
Press the title button to select a title number.
to reduce red-eye when shooting portraits in the dark
to fill in shadow areas in daylight
to use the available light as well
when flash is disturbing or prohibited
to release with 10 sec. delay
for taking pictures of contourless subjects
(clouds, fireworks) or through glass.
Page 71

NOTES
71
Page 72

Rollei Fototechnic GmbH
P.O Box 3245
D-38022 Braunschweig
http://www.rollei.de
Germany
80210.75.919 • Nano 60/80
D, GB • Pro Art, SZ
 Loading...