

Page 1
Owner‘s Manual
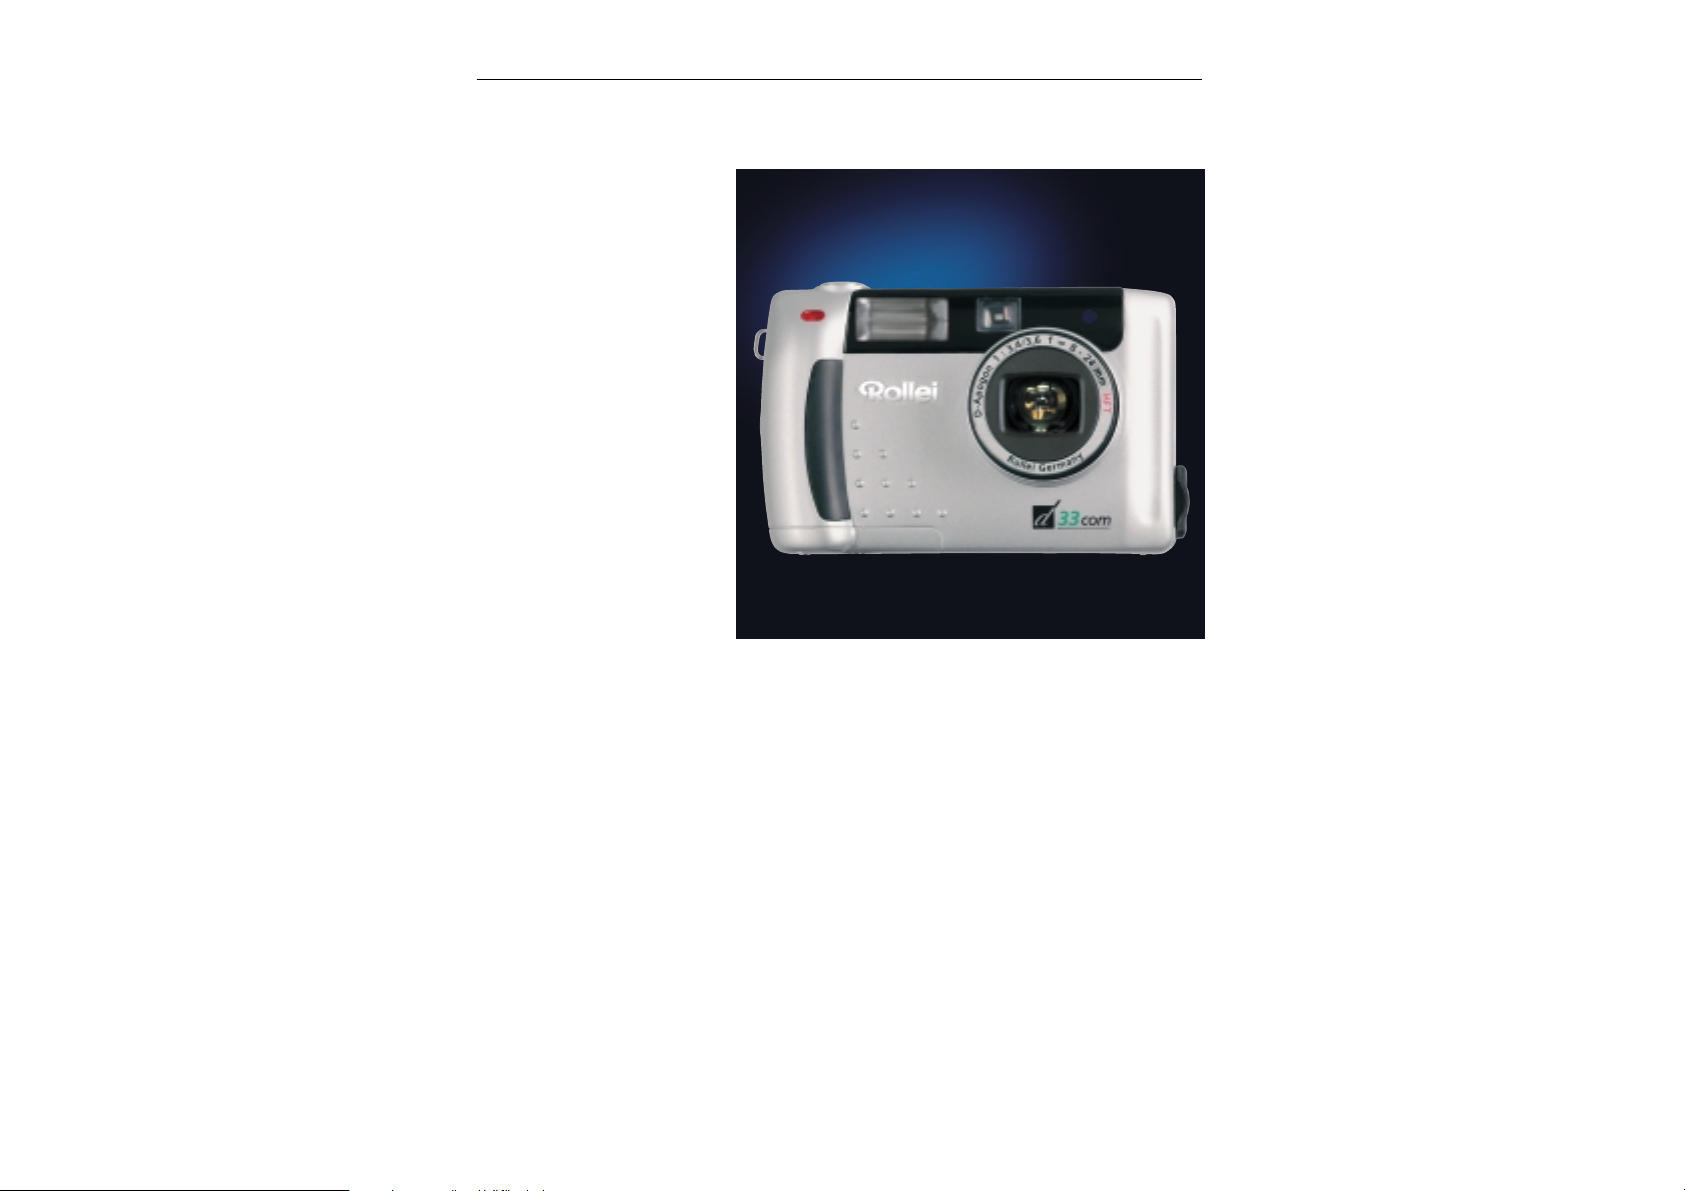
Rollei d33 com
3.31-megapixel digital camera (2048x1536 pixels)
3x zoom lens 8-24mm (38-114mm in 35mm terms),
Macro down to 0.08 m
Automatic flash unit with five modes
Automatic exposure control, single frames, continuous shooting and multishot
images
Various autofocus and exposure modes
Shutter speeds 2 – 1/500 s, apertures f/3.4-3.6 to f/15
1.8-inch TFT screen (220 x 280 pixels)
Type I CompactFlash‘ cards as storage medium
Professional image management with camera folders
Video Out for TV/beamer
Power supplied by four size AA alkaline or rechargeable NiCd or NiMH batteries
Optional external 6V DC power supply
USB image transfer to PC or Macintosh
Rollei Fototechnic GmbH, Salzdahlumer Strasse 196, D-38126 Braunschweig, Tel 0531-6800-0, Fax 0531-6800-243, eMail info@rollei.de
Page 2

Warnings
Before you start…
Caution !
Be sure to read all hints and warnings carefully. Improper use may cause batteries
to heat up or explode.
• Exclusively use the types of battery mentioned in this manual.
• Be sure to load the batteries with proper orientation of negative and positive poles.
• Do not expose batteries to fire or high temperatures.
• Never try to recharge, short-circuit or open ordinary batteries.
• Do not mix batteries of different make or age.
• Follow the usual rules for the use of batteries.
• Be particularly careful when using the camera near small children to avoid accidents.
• Always keep batteries and other small objects that might be swallowed out of reach of small
children. Immediately call a doctor if such an object has been swallowed.
• If you have dropped the camera or if it has received a severe blow that might have damaged its
interior components, immediately remove the batteries and do not use the camera any more.
• Do not use the camera if it emits smoke, smell or heat.
• Do not walk or run while looking at the TFT screen.
NEVER try to dismantle your camera! Contact with its electrical circuits may result in electric shock!
Please consult your dealer should the camera every need repairs.
The temperature of the camera will rise during prolonged use.
Take suitable care when using the camera or changing batteries or memory cards.
Everything complete?
Check the packing to see whether everything is complete. Should something be missing, please
contact your dealer or an authorized service center.
• Camera (1x)
• Size AA alkaline batteries (4x)
• Video cable (1x)
• Wrist strap (1x)
• Camera case (1x)
• USB cable (1x)
• Software on CD-ROM:
USB drivers for windows®98/Windows®98 Second Edition,
Windows 2000 Prof/Me
USB drivers for Mac OS 8.6/9/9.0.2/9.0.4
Owner‘s Manual (PDF) Windows®/Macintosh
Adobe PhotoDeluxe 4.0, Family Edition, CD-ROM for Windows®
Adobe PhotoDeluxe 2.0, CD-ROM for Macintosh
2
Rollei Fototechnic GmbH, Salzdahlumer Strasse 196, D-38126 Braunschweig, Tel 0531-6800-0, Fax 0531-6800-243, eMail info@rollei.de
• Printed documentation
Warranty card (1x)
3
Rollei Fototechnic GmbH, Salzdahlumer Strasse 196, D-38126 Braunschweig, Tel 0531-6800-0, Fax 0531-6800-243, eMail info@rollei.de
Page 3

Contents Contents
Proper and safe use ----------------------------------------------------------------------------------------------- 2
Before you start ---------------------------------------------------------------------------------------------------- 3
Contents
Names of parts and controls, camera front ------------------------------------------------------ 8
Names of parts and controls, camera back ------------------------------------------------------ 9
Terminals, bottom plate -----------------------------------------------------------------------------10
LCD monitor -------------------------------------------------------------------------------------------11
Viewfinder ---------------------------------------------------------------------------------------------12
Focus/flash-ready indicators ------------------------------------------------------------------------13
Brief instructions --------------------------------------------------------------------------------------14
Getting ready -----------------------------------------------------------------------------------------14
Shooting -----------------------------------------------------------------------------------------------14
Playback -----------------------------------------------------------------------------------------------16
Deleting images --------------------------------------------------------------------------------------17
Power supply
Loading the alkaline or rechargeable batteries -------------------------------------------------18
Checking battery power -----------------------------------------------------------------------------19
Automatic cutoff -------------------------------------------------------------------------------------19
Using the optional power-supply unit ----------------------------------------------------------- 20
Memory card
Inserting and removing the CF memory card ---------------------------------------------------21
Basic functions
The TFT screen in Camera mode ------------------------------------------------------------------ 22
Screen settings --------------------------------------------------------------------------------------- 23
Taking pictures
Focusing ---------------------------------------------------------------------------------------------- 24
Focus lock --------------------------------------------------------------------------------------------- 24
Special focusing situations ------------------------------------------------------------------------- 25
Digital zoom ------------------------------------------------------------------------------------------ 26
Shooting digital images----------------------------------------------------------------------------- 28
Autofocus photography ---------------------------------------------------------------------------- 29
Switching to spot autofocus ----------------------------------------------------------------------- 30
Switching from autofocus to manual focusing---------------------------------------------------31
Switching to macro autofocus -------------------------------------------------------------------- 32
Using the built-in flash unit ------------------------------------------------------------------------ 33
More details about flash photography ---------------------------------------------------------- 34
Using the different shooting modes ------------------------------------------------------------- 36
Automatic exposure control ----------------------------------------------------------------------- 38
Exposure compensation ---------------------------------------------------------------------------- 39
Selecting resolution / file size --------------------------------------------------------------------- 40
Selecting the compression level -------------------------------------------------------------------41
Selecting pixel sharpness -------------------------------------------------------------------------- 42
Selecting white balance----------------------------------------------------------------------------- 43
Resetting camera functions to default settings ----------------------------------------------- 44
Default camera settings ---------------------------------------------------------------------------- 44
Selecting screen brightness ------------------------------------------------------------------------ 46
Image playback
Displaying individual images ---------------------------------------------------------------------- 48
Displaying several images (Index Mode) -------------------------------------------------------- 49
Magnified playback --------------------------------------------------------------------------------- 50
Slide show ---------------------------------------------------------------------------------------------51
Playback via TV set or video beamer ------------------------------------------------------------ 52
Deleting images
Deleting images one by one ----------------------------------------------------------------------- 54
Deleting all the images on your memory card ------------------------------------------------- 55
Image printout
Preparing images for direct printout in DPOF format ----------------------------------------- 56
4
Rollei Fototechnic GmbH, Salzdahlumer Strasse 196, D-38126 Braunschweig, Tel 0531-6800-0, Fax 0531-6800-243, eMail info@rollei.de
5
Rollei Fototechnic GmbH, Salzdahlumer Strasse 196, D-38126 Braunschweig, Tel 0531-6800-0, Fax 0531-6800-243, eMail info@rollei.de
Page 4

Contents
Image management
Saving and managing images in folders -------------------------------------------------------- 58
Deleting folders from the memory card --------------------------------------------------------- 59
DCF standard for digital image storage --------------------------------------------------------- 60
Basic settings
Basic camera settings and functions-------------------------------------------------------------- 62
Default settings for Playback, Set and Transfer modes---------------------------------------- 64
PC linkup
Connecting the camera to PC --------------------------------------------------------------------- 66
Connecting the camera to Macintosh ----------------------------------------------------------- 67
Tips and tricks
How to handle batteries --------------------------------------------------------------------------- 69
Notes on the use of CompactFlash‘ cards ------------------------------------------------------ 70
Care of TFT screen ----------------------------------------------------------------------------------- 70
Taking care of your digital camera ----------------------------------------------------------------71
Cleaning your digital camera -----------------------------------------------------------------------71
Questions and service -------------------------------------------------------------------------------71
Troubleshooting ------------------------------------------------------------------------------------- 72
Specifications ----------------------------------------------------------------------------------------------------- 76
System requirements -------------------------------------------------------------------------------------------- 77
6
Rollei Fototechnic GmbH, Salzdahlumer Strasse 196, D-38126 Braunschweig, Tel 0531-6800-0, Fax 0531-6800-243, eMail info@rollei.de
7
Rollei Fototechnic GmbH, Salzdahlumer Strasse 196, D-38126 Braunschweig, Tel 0531-6800-0, Fax 0531-6800-243, eMail info@rollei.de
Page 5
Names of parts and controls Names of parts and controls
:
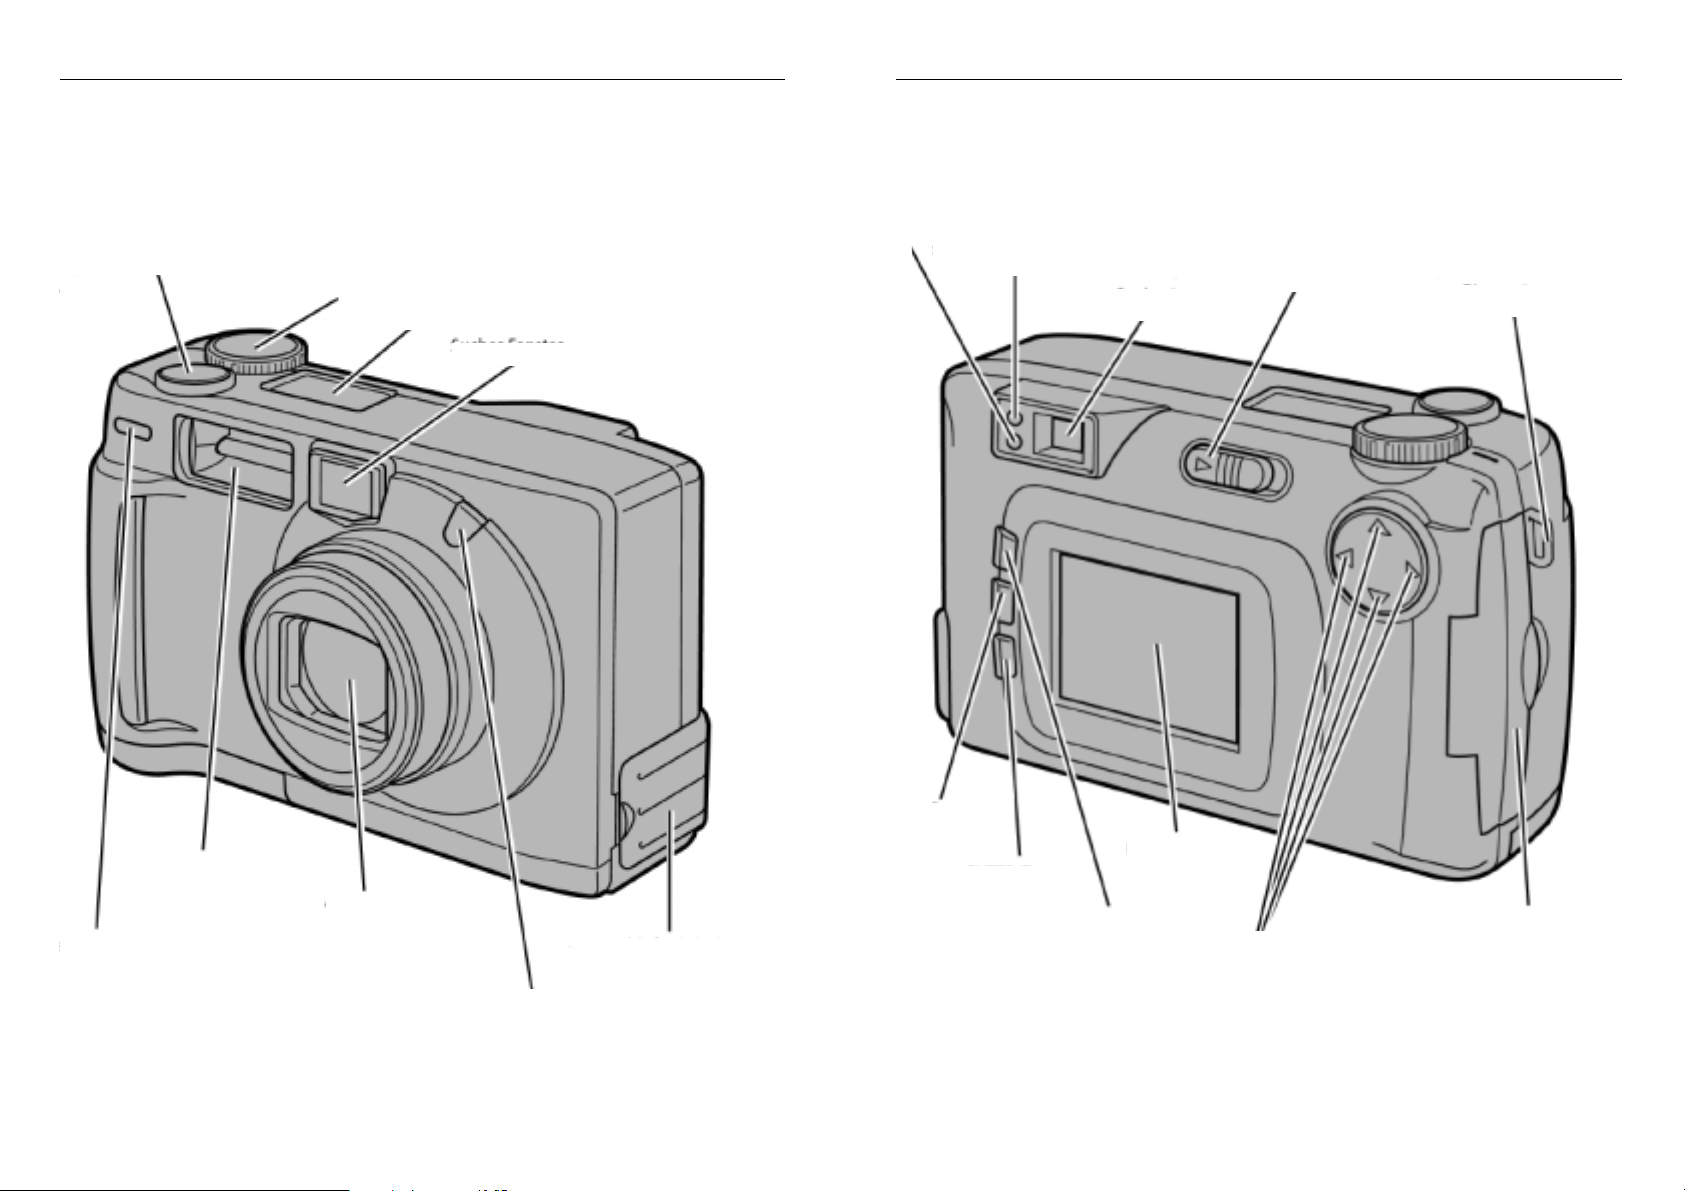
Camera front Camera back
Flash-ready indicator
Shutter release
Flash unit*
Self-timer indicator
Mode dial
Lens*
LCD monitor
Viewfinder window
Terminal cover
Focus indicator (green)
menue
button
enter
button
Display button
Viewfinder*
TFT screen*
Power switch
on/off
Four-way control
Strap lug
Card slot
Flash sensor*
* Do not touch!
8
Rollei Fototechnic GmbH, Salzdahlumer Strasse 196, D-38126 Braunschweig, Tel 0531-6800-0, Fax 0531-6800-243, eMail info@rollei.de
Note: The four-way control has a number of different functions: In the camera mode it controls zooming, helps you navigate
through the display of stored images and select camera functions. As a rule, the selection made in the different setting
menus is confirmed by depression of the Right arrow .
The enter button at the back of the camera is enabled only when the four-way control is needed, for example, for
selection in index displays.
9
Rollei Fototechnic GmbH, Salzdahlumer Strasse 196, D-38126 Braunschweig, Tel 0531-6800-0, Fax 0531-6800-243, eMail info@rollei.de
Page 6

Names of parts and controls Names of parts and controls
Camera terminals / bottom plate LCD monitor
Battery cover
Video OutPower-supply terminal USB terminal
Image size
Frame counter*/
No card
Flash mode
Battery status
Self-timer
Tripod socket
10
Rollei Fototechnic GmbH, Salzdahlumer Strasse 196, D-38126 Braunschweig, Tel 0531-6800-0, Fax 0531-6800-243, eMail info@rollei.de
* * The max. number of images is approximate.
The actual number is a function of JPEG compression.
11
Rollei Fototechnic GmbH, Salzdahlumer Strasse 196, D-38126 Braunschweig, Tel 0531-6800-0, Fax 0531-6800-243, eMail info@rollei.de
Page 7
Names of parts and controls Names of parts and controls
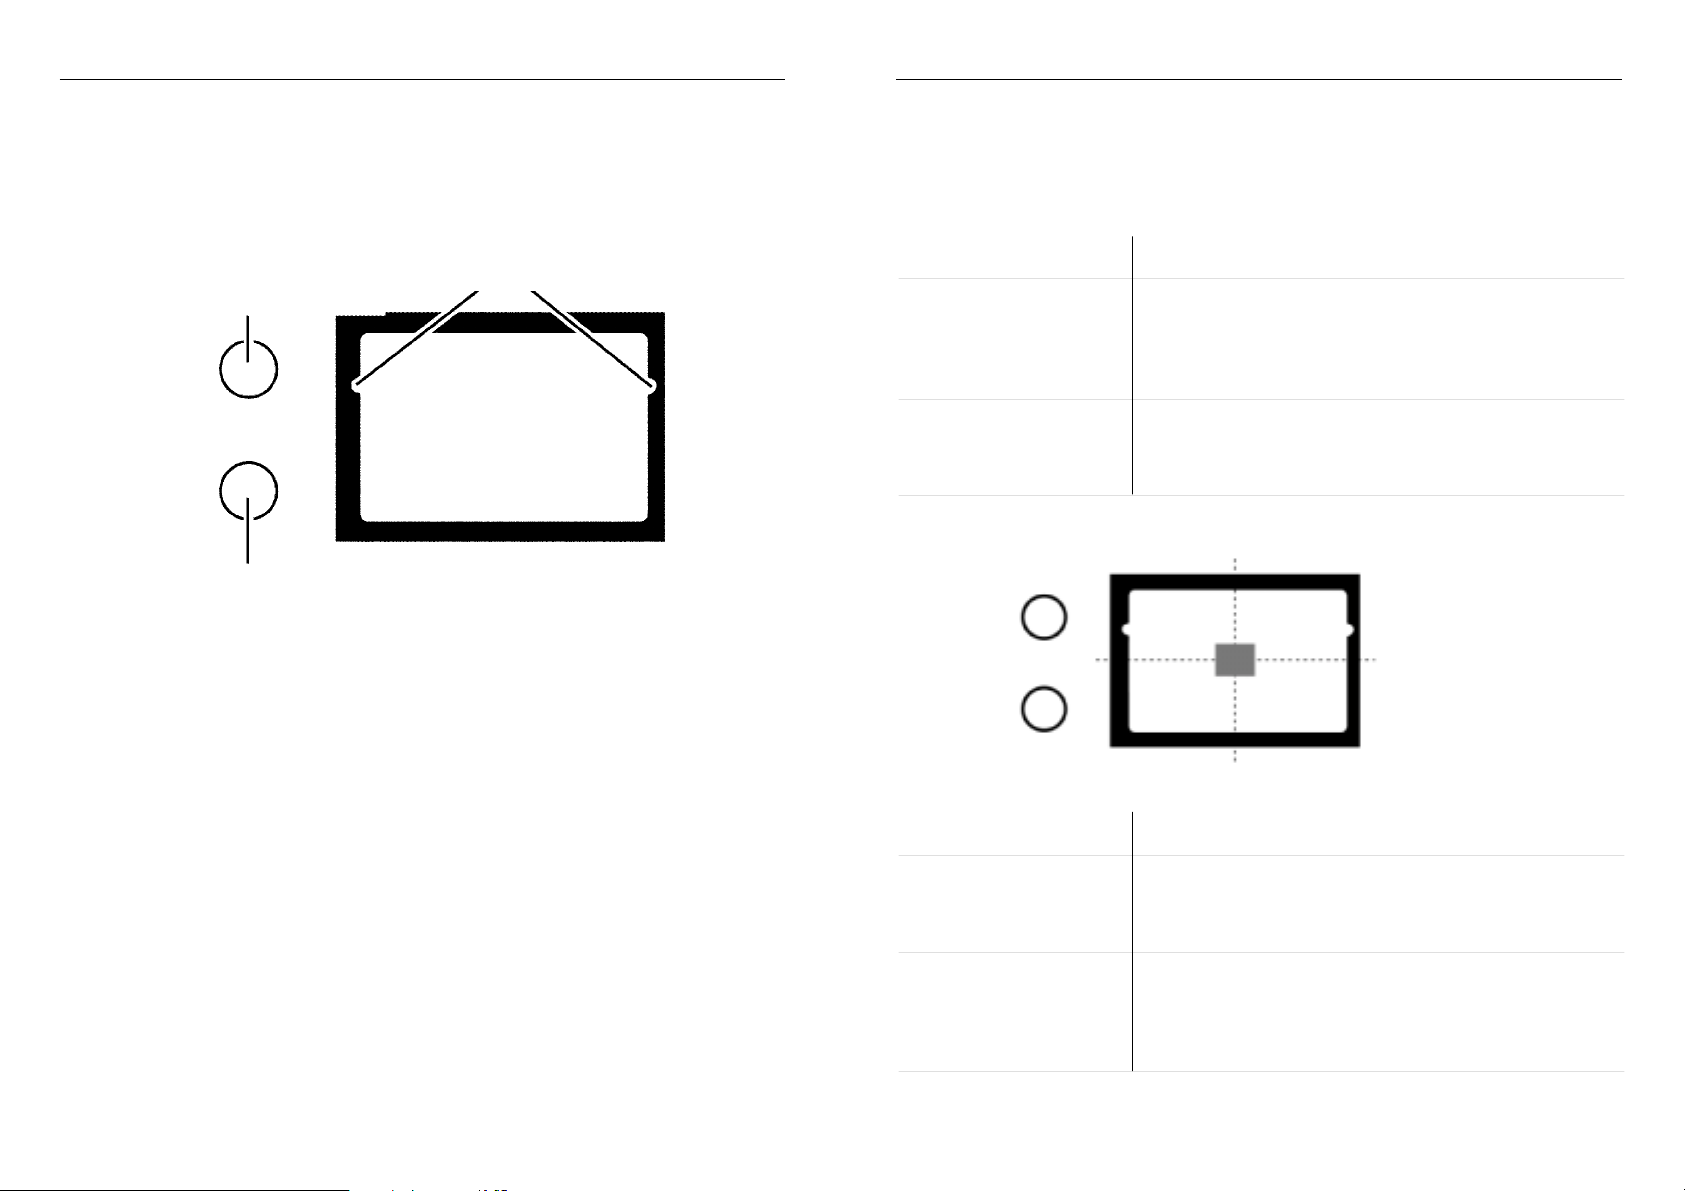
Viewfinder Focus/Flash-ready indicators
Flash indicator (orange)
Parallax marksFocus indicator (green)
Focus indicator (green)
Lights Subject in focus.
Blinks rapidly Focusing impossible.
(approx. 8x per second) (Insufficient contrast, subject too dark or too close.
In macro mode:
subject too far away.)
Blinks slowly Image being written to CompactFlash‘ card
(approx. 2x per second) or loaded from card.
Focus area
In autofocus mode, the
camera will focus on the
area marked gray.
Flash indicator (orange)
Lights Flash fully charged and ready to fire.
Parallax marks
At distances of less than 1 m, only the subject detail below these marks will be recorded.
It is therefore advisable to use the TFT screen for framing at short range.
12
Rollei Fototechnic GmbH, Salzdahlumer Strasse 196, D-38126 Braunschweig, Tel 0531-6800-0, Fax 0531-6800-243, eMail info@rollei.de
Blinks rapidly Flash being recycled,
(approx. 8x per second) shutter cannot be released.
Blinks slowly With flash switched off,
(approx. 2x per second) camera uses slow shutter speed
– risk of camera shake.
13
Rollei Fototechnic GmbH, Salzdahlumer Strasse 196, D-38126 Braunschweig, Tel 0531-6800-0, Fax 0531-6800-243, eMail info@rollei.de
Page 8
Brief instructions Brief instructions
This is how it works: This is how it looks:
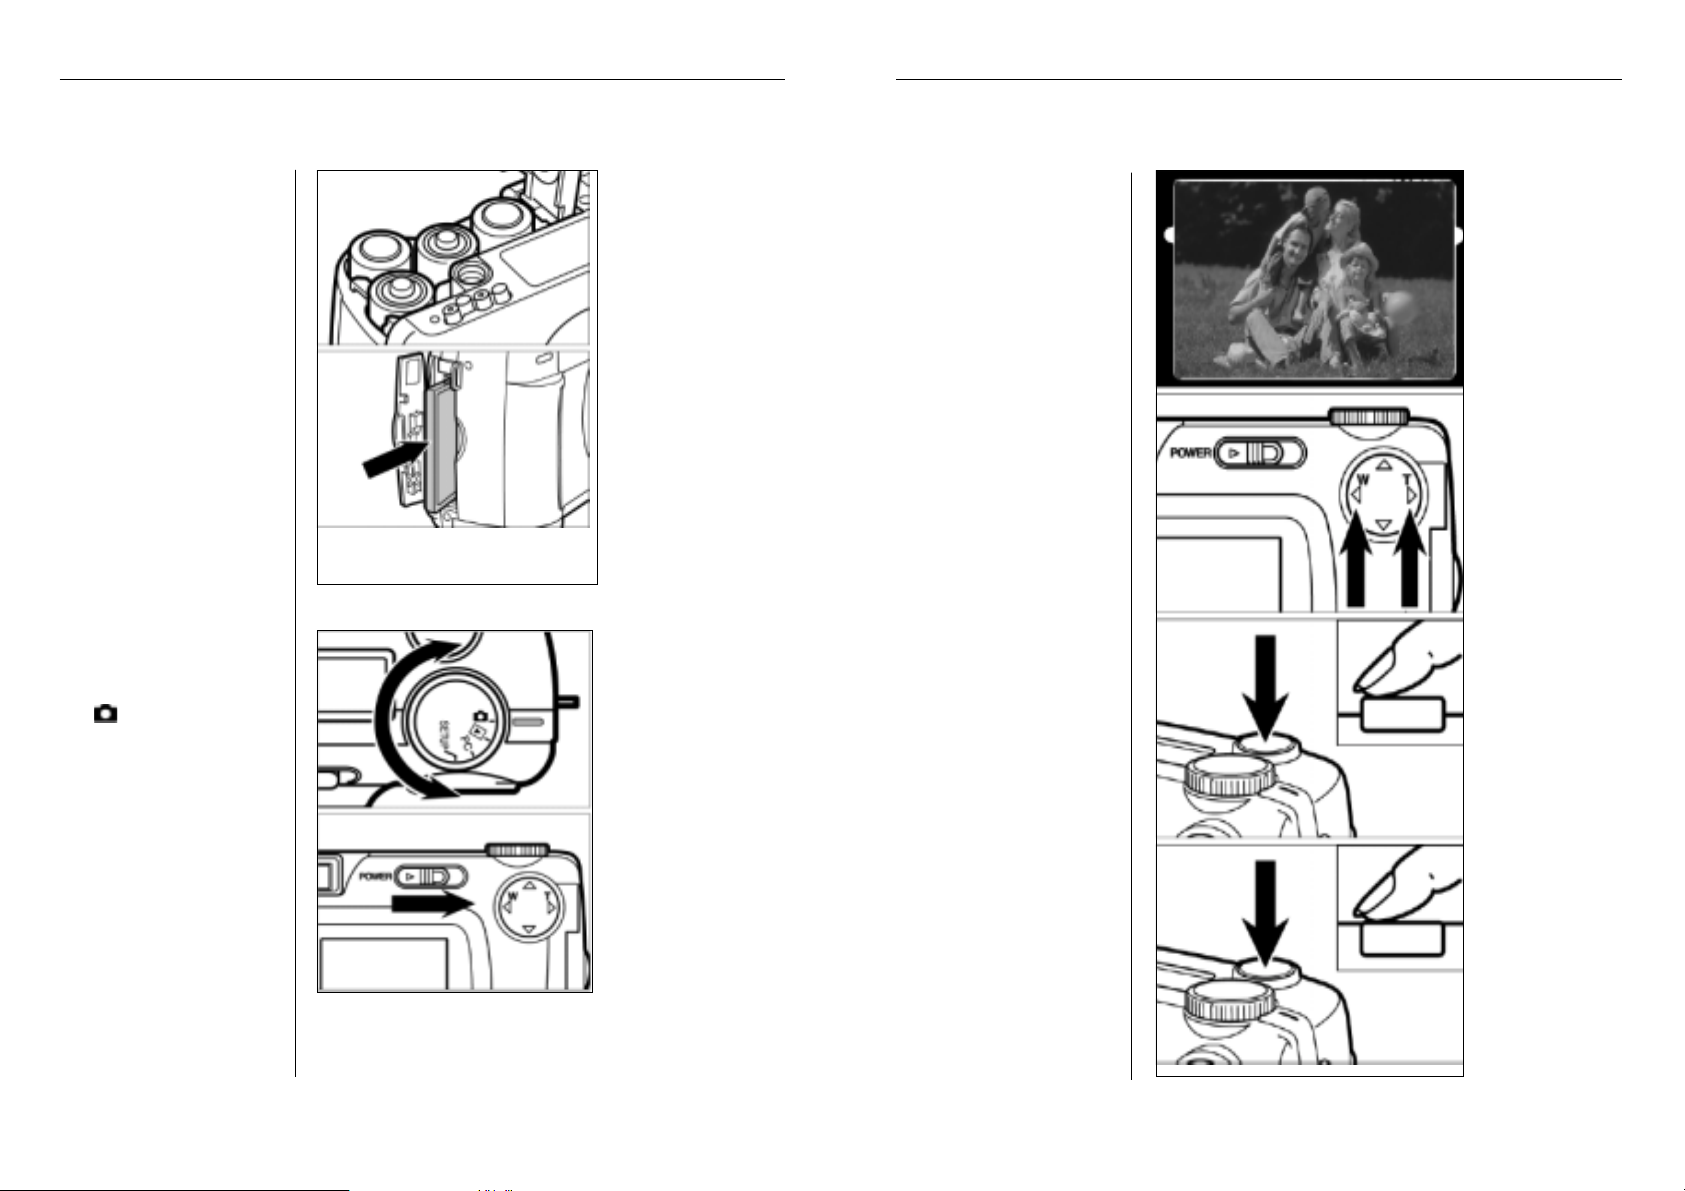
Load batteries
Insert memory card
Shoot
Turn mode dial to camera
icon
This is how it works: This is how it looks:
Frame your subject in the
viewfinder or on the TFT
screen
If necessary, zoom in or out
pressing the four-way
control:
Right wide-angle
Left telephoto
Press shutter release
halfway until the green
lamp beside the viewfinder
eyepiece lights green
Press power switch
on/off.
14
Rollei Fototechnic GmbH, Salzdahlumer Strasse 196, D-38126 Braunschweig, Tel 0531-6800-0, Fax 0531-6800-243, eMail info@rollei.de
Press shutter release fully
to take your picture
Please note: The shutter release
works in two stages; pressed
halfway, it activates the autofocus
system that needs a few fractions of
a second for focusing..
15
Rollei Fototechnic GmbH, Salzdahlumer Strasse 196, D-38126 Braunschweig, Tel 0531-6800-0, Fax 0531-6800-243, eMail info@rollei.de
Page 9

Brief instructions Brief instructions
This is how it works: This is how it looks:
Playing back images
Turn the mode dial to the
Playback icon
If the camera is still off, press
the power switch
Your last shot will be
displayed; using the
four-way control, you can
navigate between all the
pictures stored on your
memory card
This is how it works: This is how it looks:
Deleting images
Turn mode dial to Playback
icon
Press
1) menue button on
camera back;
2) Right-hand arrow of
four-way control on Delete
item of menu
3) Right-hand arrow of
four-way control once more
on Select Image item of
submenu
An overview of six images
will be displayed, the image
to be deleted being
highlighted
16
Rollei Fototechnic GmbH, Salzdahlumer Strasse 196, D-38126 Braunschweig, Tel 0531-6800-0, Fax 0531-6800-243, eMail info@rollei.de
4) Once more select this
image by pressing the DISP
on/off button until delete
icon (recycle bin) appears in
image
5) Finally, press enter
button and answer the
following dialog by
6) pressing the Down arrow
of the four-way control =
Yes
Rollei Fototechnic GmbH, Salzdahlumer Strasse 196, D-38126 Braunschweig, Tel 0531-6800-0, Fax 0531-6800-243, eMail info@rollei.de
7) Then press right-hand
arrow of four-way control
to delete the image.
17
Page 10
Power supplyPower supply
This is how it works: This is how it looks: This is what it‘s for:
Loading alkaline or
rechargeable batteries
:
The camera should preferably be used with highcapacity NiMH batteries.
Your camera uses four size
AA alkaline batteries of four
NiMH batteries or four
rechargeable batteries, type
After changing batteries,
check whether the built-in
clock is set to the correct
date and time.
NiCd.
If the camera is without
Should you use rechargeable
batteries, make sure that
these have been fully
charged in a suitable
power supply for over five
minutes, the clock may be
slow or it may reset. In this
case, set date and time.
charger.
Left without power supply
Always turn the camera off
before loading or exchanging batteries.
for a prolonged period, the
camera will „forget“
individual settings and reset
to default values.
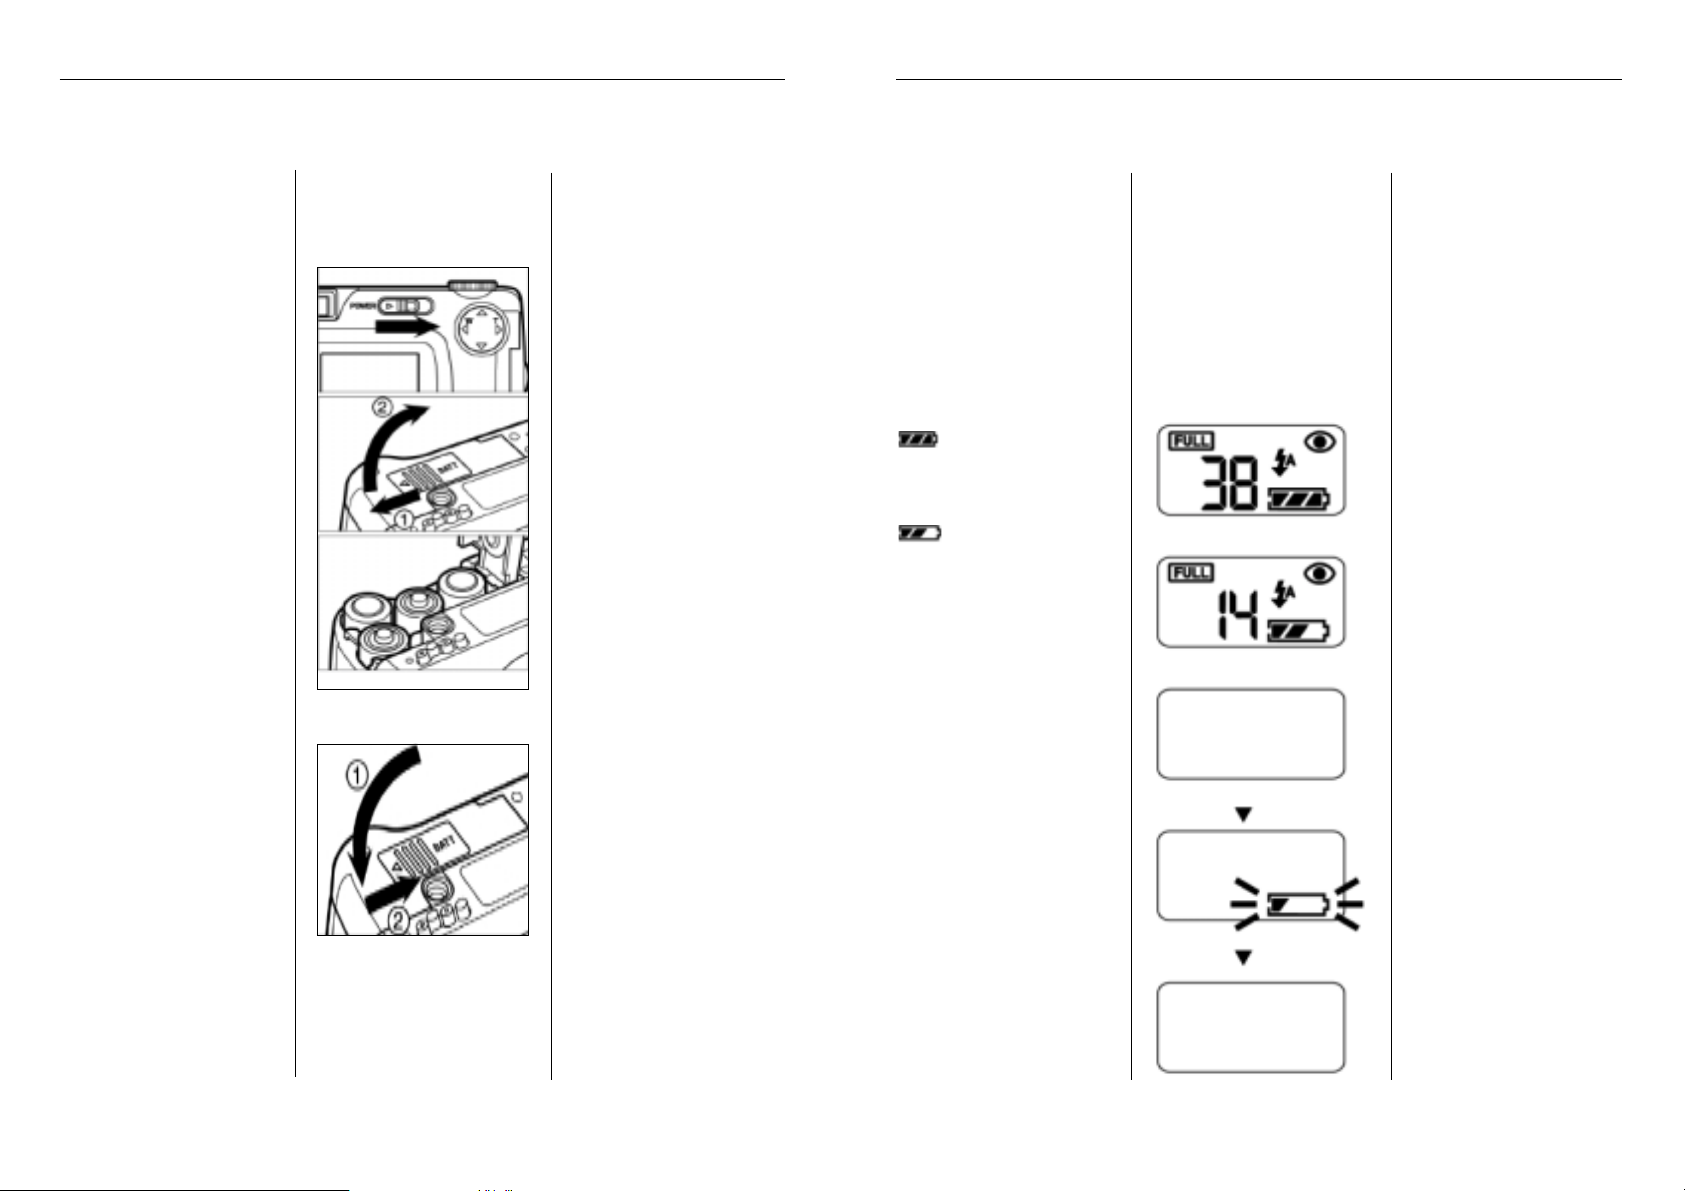
Open the battery compartment by pushing its cover in
the direction shown (1), then
However, the pictures stored
on your memory card will
not be lost.
open the flap (2).
Do not put the camera
Load the batteries in
accordance with the +/marks.
down with the battery
compartment open to
prevent damage to its cover.
Be careful when changing
batteries that may get hot in
use.
This is how it works: This is how it looks:
Checking battery power
With batteries loaded, the
camera will automatically
check their status and
display it on the LCD
monitor.
lit
Full power.
lit
Declining battery power, but
the camera is fully operational.
If the display disappears,
followed by the battery icon
blinking for five seconds and
disappearing once more,
battery power is insufficient
for camera operation.
Replace all batteries by fresh
ones, or use the optional
power-supply unit.
This is what it‘s for:
If the LCD monitor is blank,
replace all batteries and
make sure they are inserted
with their +/- poles properly
oriented.
If left unused for three
minutes, the camera will
automatically switch off to
save power. To resume
operation, press the power
switch.
If you wish, you may select
intervals of 1, 5, 10 or 30
minutes for automatic cutoff.
When the optional powersupply unit is used or when
the camera is connected to a
PC, the cutoff interval is
always 30 minutes and
cannot be varied.
18
Rollei Fototechnic GmbH, Salzdahlumer Strasse 196, D-38126 Braunschweig, Tel 0531-6800-0, Fax 0531-6800-243, eMail info@rollei.de
19
Rollei Fototechnic GmbH, Salzdahlumer Strasse 196, D-38126 Braunschweig, Tel 0531-6800-0, Fax 0531-6800-243, eMail info@rollei.de
Page 11
Power supply
Memory card
This is how it works: This is how it looks:
Using the optional
power-supply unit
The camera can be operated
on external power with the
aid of the optional powersupply unit. This is advisable
for prolonged shooting
sessions to save battery
power. The power-supply
unit is particularly helpful
when the camera is linked
up with a PC.
Before changing over from
battery power to AC or vice
versa, make sure that your
camera is turned off. Never
change the power supply
with the camera switched
on!
Connect the plug to the
power-supply terminal of
the camera.
Plug the power-supply unit
into a wall outlet.
This is what it‘s for:
Note that the power-supply
unit will not recharge any
batteries in the camera. To
charge these, use a
commercial charger.
Even with the power-supply
unit, the camera will
automatically cut off (for
safety reasons) after 30
minutes of non-use.
To reactivate the camera,
simply press the power
switch.
This is how it works: This is how it looks:
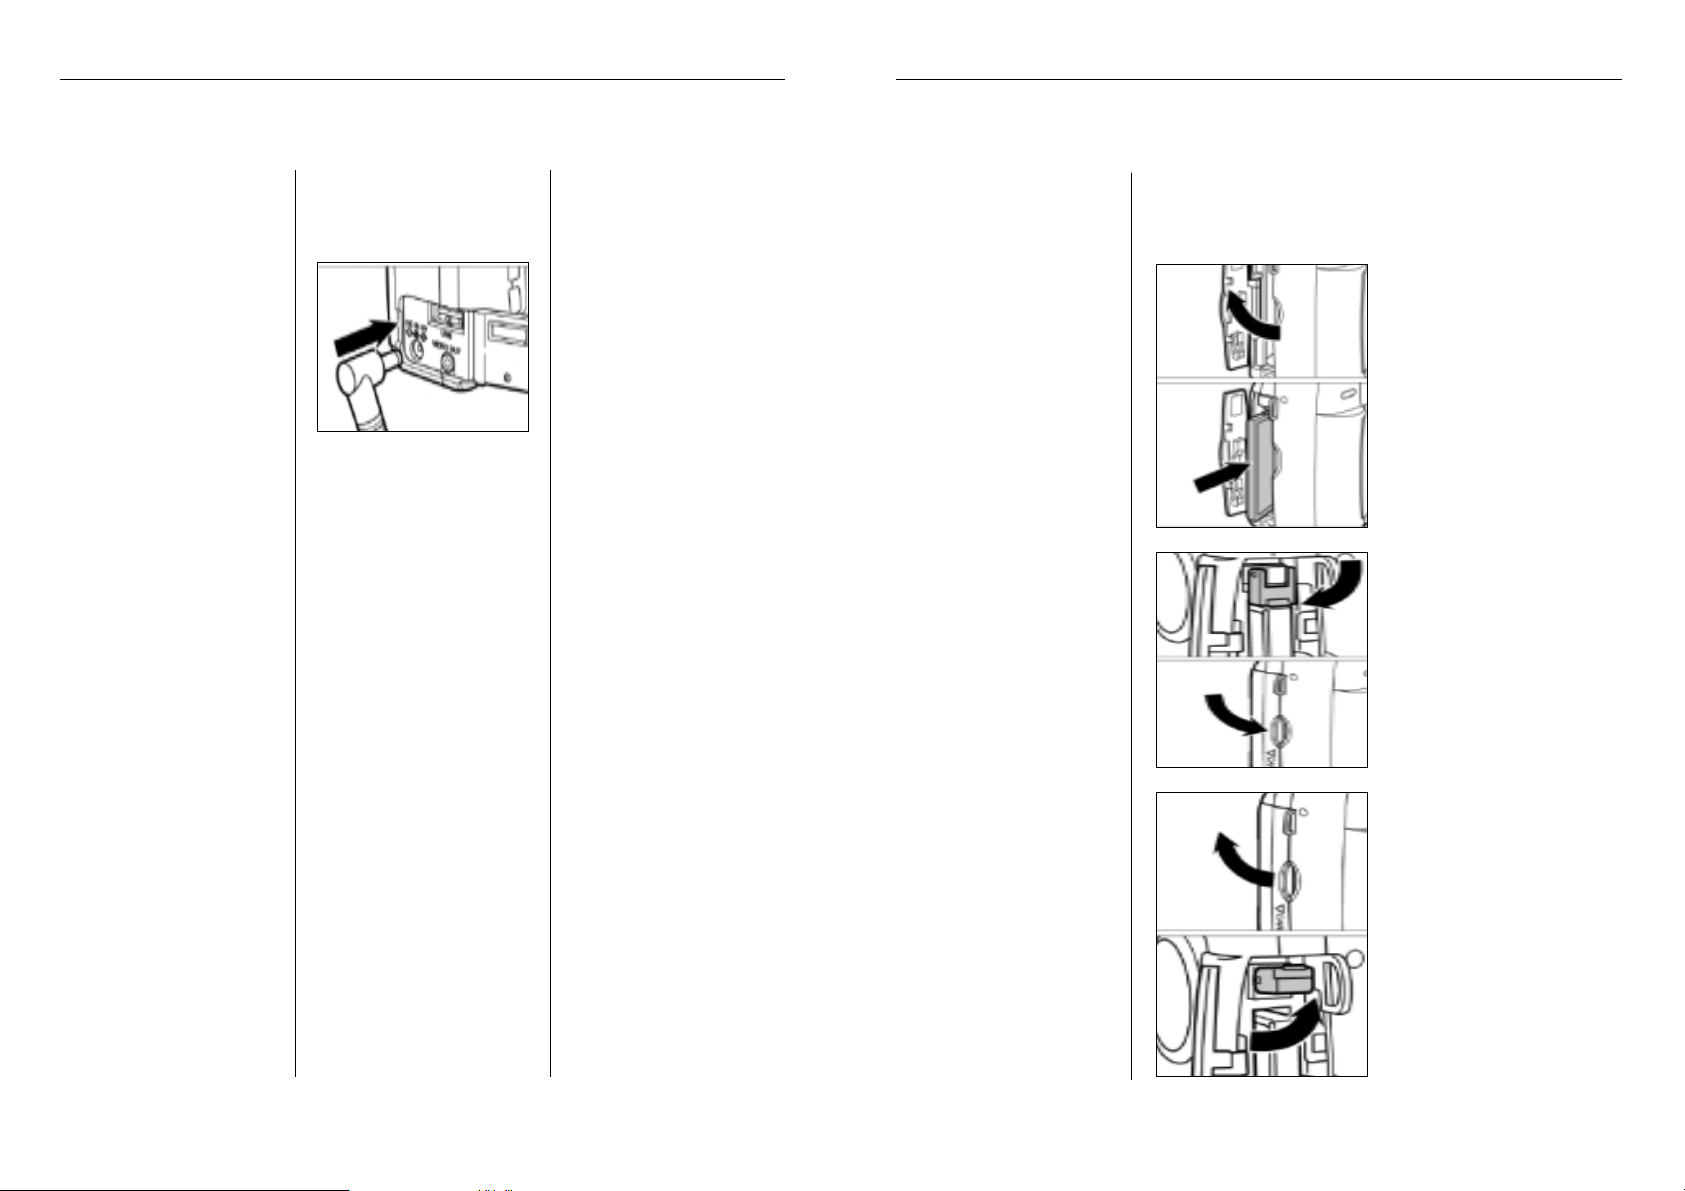
Using the CompactFlash
memory card
Always switch off your
camera before inserting
or changing a CompactFlash card! Otherwise, the data on the
card may be lost or the
card itself damaged.
Open the card slot as
shown.
Insert the CF card with its
contacts forward into the
camera.
Be sure not to tilt or jam the
card.
To avoid jamming, make
sure the card is inserted with
the proper end facing the
camera.
Never use force to avoid
damage to card and camera.
This is what it‘s for:
Note:
CF cards (type I) can be
inserted into the camera
only in one direction and
with the proper side up.
Before important events, it is
advisable to practice the
exchange of memory cards
at home.
The card slot of the camera
has a small hinged safety
and ejector lever. This holds
the card in place and –
when folded – serves to
eject it.
After properly inserting the
card, push it as far as it will
go. The safety lever will
move out and can be folded.
To remove the card, fold the
lever out and push to eject
the card slightly.
20
Rollei Fototechnic GmbH, Salzdahlumer Strasse 196, D-38126 Braunschweig, Tel 0531-6800-0, Fax 0531-6800-243, eMail info@rollei.de
21
Rollei Fototechnic GmbH, Salzdahlumer Strasse 196, D-38126 Braunschweig, Tel 0531-6800-0, Fax 0531-6800-243, eMail info@rollei.de
Page 12
Basic functions Basic functions
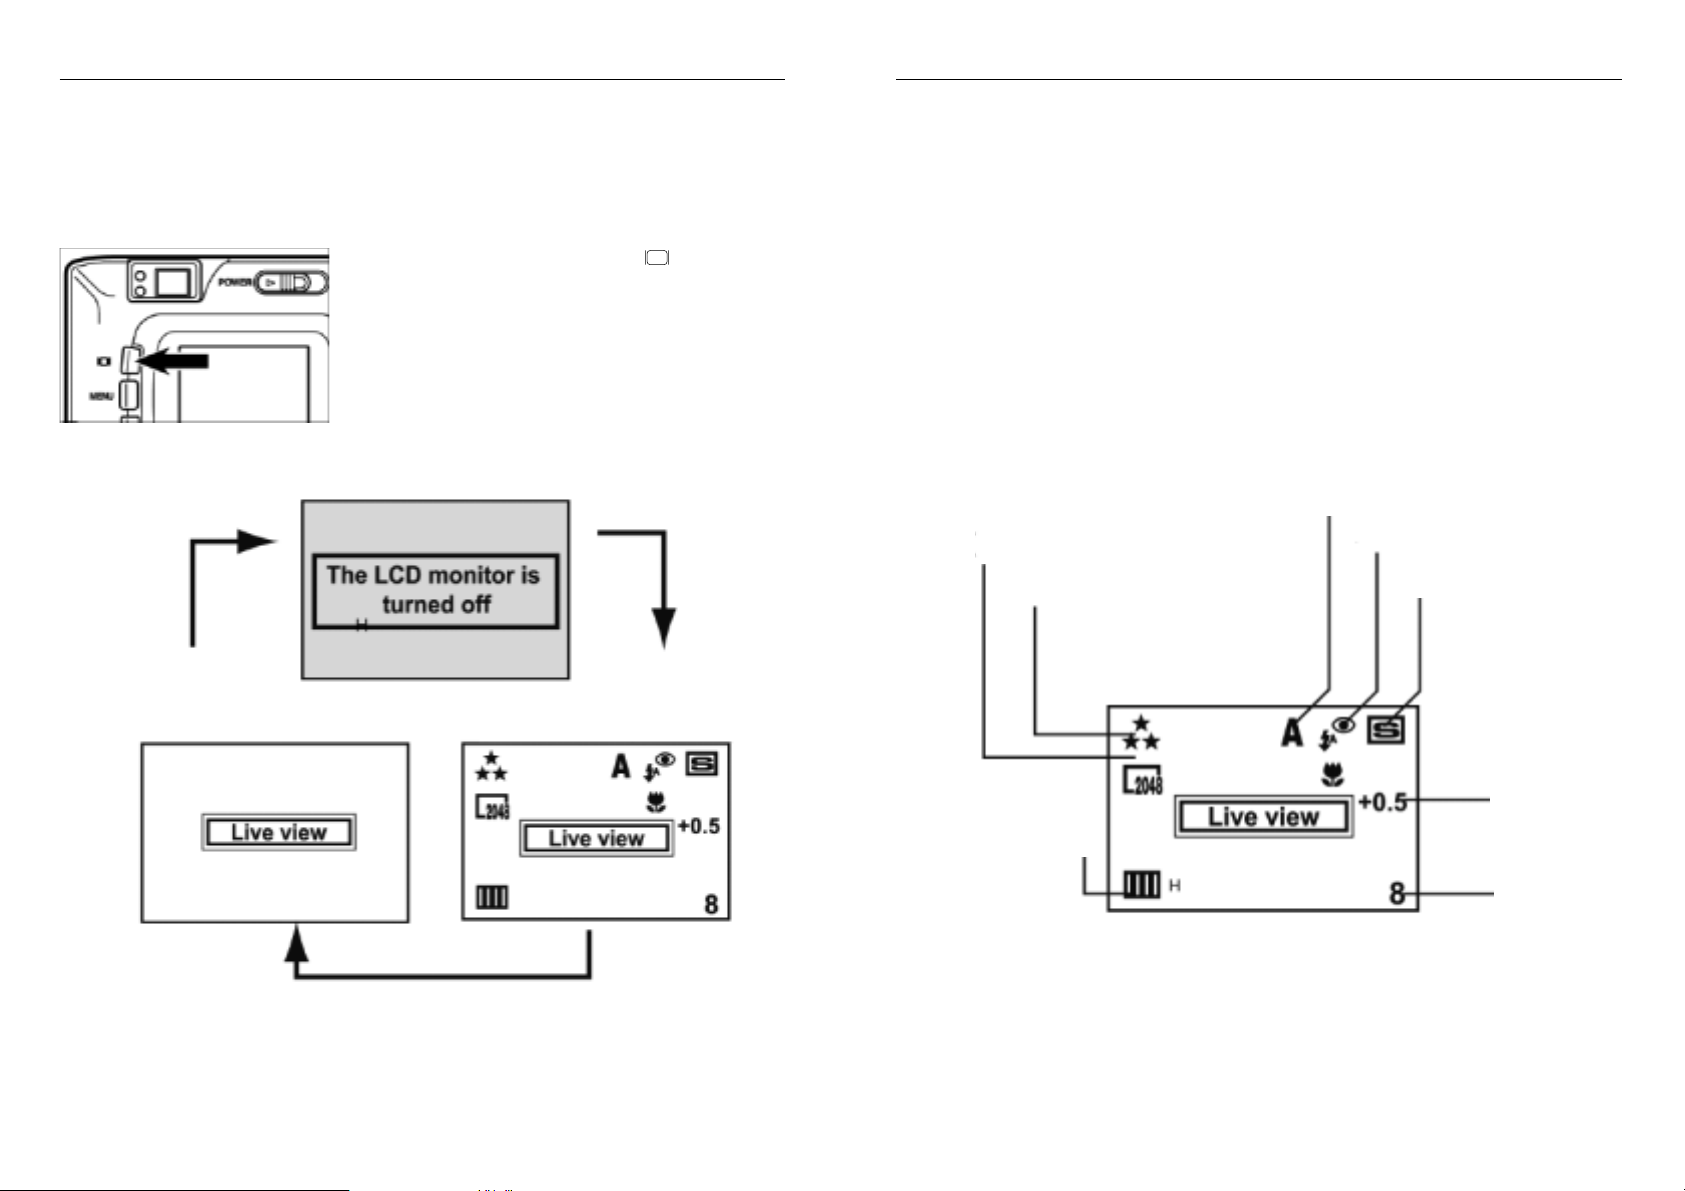
Screen settingsThe TFT screen in Camera mode
Each depression of the Display button will change
the screen display as follows.
TFT screen turned off
Live image
(Camera settings not shown)
Live image
(Camera settings displayed)
Image size (see page 40)
Image quality (see page 40)
Focusing mode
(see page 42)
White balance
(see page 43)
Flash mode (see page 33)
Drive-Modus (siehe Seite 36)
Exposure
compensation
(see page 39)
Frame
counter
22
Rollei Fototechnic GmbH, Salzdahlumer Strasse 196, D-38126 Braunschweig, Tel 0531-6800-0, Fax 0531-6800-243, eMail info@rollei.de
23
Rollei Fototechnic GmbH, Salzdahlumer Strasse 196, D-38126 Braunschweig, Tel 0531-6800-0, Fax 0531-6800-243, eMail info@rollei.de
Page 13

Taking pictures Mode dial set to Camera icon Mode dial set to Camera icon Taking pictures
This is how it works: This is how it looks: This is what it‘s for:
Focusing
Focus lock
As the shutter release is
pressed halfway, the camera
automatically focuses on
your subject. The green lamp
near the viewfinder eyepiece
signals the focus status.
If the lamp lights green
(after a few fractions of a
second), focus is set and you
may press the shutter
release to take your picture.
Should the green lamp blink,
check the following points:
The autofocus system is
center-weighted. If your
Did you try to focus on a
detail that is difficult to focus
on? (See page opposite.)
subject is off center, the
camera will focus on the
background. In this case, use
focus lock:
Is your subject less than the
minimum focusing distance
away (or over 40 cm in
Macro mode)?
Place your main subject in
the center of the TFT screen
and press the shutter release
halfway. Then recompose
without letting go of the
shutter release and finally
press the release fully to
take your picture.
This is how it works: This is how it looks: This is what it‘s for:
Special focusing
situations
The autofocus system is
Your subject is too dark.
center-weighted and uses
image contrast (the
difference between dark and
bright details) to detect
focus. This is why there are
some subjects that make
autofocusing impossible.
Your subject has insufficient
In this case either use focus
lock, focusing on a subject at
contrast, such as blue sky or
a white wall.
the same distance, or switch
to manual focusing.
Subjects located at different
distances overlap in the
focus area.
Your subject is too bright,
such as highly glossy car
paint or a shiny water
surface.
24
Rollei Fototechnic GmbH, Salzdahlumer Strasse 196, D-38126 Braunschweig, Tel 0531-6800-0, Fax 0531-6800-243, eMail info@rollei.de
25
Rollei Fototechnic GmbH, Salzdahlumer Strasse 196, D-38126 Braunschweig, Tel 0531-6800-0, Fax 0531-6800-243, eMail info@rollei.de
Page 14

Taking pictures Mode dial set to Camera icon
This is how it works: This is how it looks: This is what it‘s for:
Digital zoom
The camera has a digital
zoom which allows zooming
in on your subject beyond
the longest focal length of
the camera‘s zoom lens.
The digital zoom is operative
only with the TFT screen
switched on.
To turn on the digital zoom,
press the Right arrow of
the four-way control beyond
the maximum value for two
seconds.
Note: Use this feature only in
exceptional cases and for
pictures that require only
lesser resolution because the
camera will automatically
change over to 480x640pixel resolution.
2 sec
The digital zoom should not
be confounded with the
optical zoom, that is, a
variation of lens focal length.
Digital zooming may be
compared to selective
enlargement, which is why
digital-zoom pictures cannot
be enlarged or sharpened.
26
Rollei Fototechnic GmbH, Salzdahlumer Strasse 196, D-38126 Braunschweig, Tel 0531-6800-0, Fax 0531-6800-243, eMail info@rollei.de
27
Rollei Fototechnic GmbH, Salzdahlumer Strasse 196, D-38126 Braunschweig, Tel 0531-6800-0, Fax 0531-6800-243, eMail info@rollei.de
Page 15

Taking pictures Mode dial set to Camera icon Mode dial set to Camera icon Taking pictures
This is how it works: This is how it looks: This is what it‘s for:
Shooting digital images
Turn the mode dial to the
red camera icon
.
Always reset the camera
from other settings in the
Playback, transfer and set
menus to the camera icon,
so you‘ll always be ready to
shoot at a moment‘s notice.
Switch the camera on.
Look through the viewfinder
or switch the TFT screen on
by pressing the screen icon
The optical viewfinder is
ideal for candid shots and
for use in bright light.
on the camera back.
This is how it works: This is how it looks: This is what it‘s for:
Autofocus photography
The shutter release operates
in two stages: Half
depressed, the camera will
start automatic focusing.
Always wait for the green
light beside the viewfinder
to come on before pressing
the shutter release fully.
This always takes a second
or so (approx. 1.5 second for
a subject 3 m away).
The beep may be disabled
via the Set menu (accessible
with the mode dial).
Once the camera has
focused on your subject, a
green lamp will light beside
the viewfinder eyepiece
(focus indicator), and a short
beep will be heard.
If your main subject is
off-center, lock focus on the
most important detail by
keeping the shutter release
pressed halfway. Then
Only now should you press
the shutter release fully for
recompose with the release
held in this position.
exposure.
Press the shutter release
fully down.
Because of autofocusing, the
shutter release operates in
two stages. To take your
picture, always press it fully.
The camera will save your
picture to the memory card.
The camera takes a few
seconds to complete saving.
Only then is it ready for the
next shot.
28
Rollei Fototechnic GmbH, Salzdahlumer Strasse 196, D-38126 Braunschweig, Tel 0531-6800-0, Fax 0531-6800-243, eMail info@rollei.de
It is advisable to practice the
two-stage release of the
shutter.
For critical subjects you have
the additional option of
manual focusing as well as
the Macro mode.
29
Rollei Fototechnic GmbH, Salzdahlumer Strasse 196, D-38126 Braunschweig, Tel 0531-6800-0, Fax 0531-6800-243, eMail info@rollei.de
Page 16

Taking pictures Mode dial set to Camera icon Mode dial set to Camera icon Taking pictures
This is how it works: This is how it looks: This is what it‘s for:
Switching to spot
autofocus
While autofocusing is
normally center-weighted, it
may also be switched to
spot focusing.
Press the MENU button on
the camera back and use the
four-way control to select
Focusing. Then select Area,
Choose spot autofocusing if
you wish to focus precisely
on a specific part of your
subject.
As the camera is turned off,
it will reset to normal
(center-weighted) autofocusing.
followed by Spot.
This is how it works: This is how it looks: This is what it‘s for:
Switching from autofocus
to manual focusing
As an alternative to
autofocusing, you may also
focus manually.
Use the TFT screen of the
camera for manual focusing.
This cannot be turned off in
the manual focusing mode.
Press the MENU button on
the camera back and use the
four-way control to select
Manual focusing is possible
from infinity right down to
close-up.
Focusing. Then select Focus
and from there Manual.
Confirm your selection by
pressing the Right arrow
of the four-way control.
During manual focusing, the
green lamp beside the
viewfinder eyepiece – which
during autofocusing signals
that focus has been
To focus, press the four-way
control. Depression of the
achieved and the camera is
ready to shoot – is disabled.
Up arrow will shift focus
towards infinity, of the
Down arrow towards
close-up (down to 8 cm).
30
Rollei Fototechnic GmbH, Salzdahlumer Strasse 196, D-38126 Braunschweig, Tel 0531-6800-0, Fax 0531-6800-243, eMail info@rollei.de
31
Rollei Fototechnic GmbH, Salzdahlumer Strasse 196, D-38126 Braunschweig, Tel 0531-6800-0, Fax 0531-6800-243, eMail info@rollei.de
Page 17

Taking pictures Mode dial set to Camera icon Mode dial set to Camera icon Taking pictures
This is how it works: This is how it looks: This is what it‘s for:
Switching to macro
autofocus
For close-up shots, switch to
macro autofocus.
If at all possible, mount your
camera on a tripod for
close-up shots.
Press the MENU button on
the camera back and use the
four-way control to select
Focusing. Then select Focus
and from there Close-up.
Confirm your selection by
Close-up photography
makes sense only if you use
the TFT screen for framing.
This is why the TFT screen
cannot be switched off in
this mode.
pressing the Right arrow
of the four-way control.
The built-in flash is unsuit-
able for close-range
photography. It is therefore
automatically disabled in the
close-up mode.
Macro autofocusing is
possible over a range of
0.08 to 0.4 m.
Manual focusing is helpful in
close-range photography
because the macro mode
lets you focus all the way
down to 8 cm (object field
approx. 4x6 cm).
This is how it works: This is how it looks: This is what it‘s for:
Using the built-in flash
unit
Press the MENU button and
use the four-way control to
select Flash. Then select the
Mode subfunction.
The built-in flash unit has
five different modes that can
be selected with the
four-way control.
To select the desired mode,
press the Right arrow of
the control.
When the light is low, the
flash will then fire automatically.
Flash on.
Use this standard mode for
candid photography.
Shooting against the light,
this mode will help you fill in
deep foreground shadows (if
necessary, with reduced
output).
Flash off.
This is ideal for atmospheric
available-light shots in
situations where flash would
disturb the evocative mood
of the scene.
Flash on with red-eye
reduction.
The flash emits preflashes to
reduce the risk of red eye
caused by reflection from
the retina.
32
Rollei Fototechnic GmbH, Salzdahlumer Strasse 196, D-38126 Braunschweig, Tel 0531-6800-0, Fax 0531-6800-243, eMail info@rollei.de
Slow sync – Flash is
synchronized with a slow
shutter speed.
Rollei Fototechnic GmbH, Salzdahlumer Strasse 196, D-38126 Braunschweig, Tel 0531-6800-0, Fax 0531-6800-243, eMail info@rollei.de
Flash illuminates the
foreground, while a slow
shutter speed coaxes out
weak illumination in the
background.
33
Page 18

Taking pictures Mode dial set to Camera icon Mode dial set to Camera icon Taking pictures
This is how it works: This is how it looks: This is what it‘s for:
More details about flash
photography
The ready lamp beside the
viewfinder eyepiece lights
red as soon as the flash is
fully charged and ready to
fire.
While the flash is recycling –
for example when you take
several flash pictures in short
order – the red ready lamp
will blink. Releasing the
shutter is then impossible.
For prolonged shooting
sessions with flash (important events, etc.) always use
fresh or fully charged
batteries.
Turn off the TFT screen and
use the optical viewfinder if
you have to use flash while
the camera is warning of
low battery power (only two
bars remaining).
Experiment with the
different flash modes. More
often than not, availableThe built-in flash unit has a
range of approx. 0.4 to 3 m,
regardless of the focal
length set.
light shots of stationary
subjects are more evocative
than flash pictures. However,
the camera should be placed
on a sturdy support (tripod
or similar).(Stativ etc).
If subject contrast is high
Flash is disabled in the
Continuous and Macro
modes.
(for example with sunlight
incident at an angle), use the
flash to fill in shadows (Flash
On mode).
This is how it works: This is how it looks: This is what it‘s for:
More details about flash
photography
Flash output is controlled
automatically, but flash
exposure compensation is
possible.
In digital photography, the
high sensitivity of the CCD
sensor may result in
relatively bright flash
pictures.
Press the MENU button on
the camera back and use the
four-way control to select
the Flash mode. Then select
the Power subfunction
where you can choose
between the following
settings: +2.0, +1.5, +1.0,
+0.5, 0.0 (default), -0.5, -1.0,
-1.5 and –2.0. Confirm your
This is why you should
experiment with flash
exposure compensation –
described at left – as well as
with slow sync that brings
out weaker background
illumination in addition to
your flash-illuminated
foreground subject.
selection by pressing the
Right arrow of the
four-way control.
Be sure to experiment with
all available flash modes –
it‘s worth your while! Digital
photography is instan-
taneous: You will see your
picture right after you take
it. So you can repeat it at
Switching the camera off will
reset it to „Autoflash with
red-eye reduction“ and
default output.
will, if necessary. And your
pictures will surely benefit
from mastery of the
different flash modes.
34
Rollei Fototechnic GmbH, Salzdahlumer Strasse 196, D-38126 Braunschweig, Tel 0531-6800-0, Fax 0531-6800-243, eMail info@rollei.de
35
Rollei Fototechnic GmbH, Salzdahlumer Strasse 196, D-38126 Braunschweig, Tel 0531-6800-0, Fax 0531-6800-243, eMail info@rollei.de
Page 19

Taking pictures Mode dial set to Camera icon Mode dial set to Camera icon Taking pictures
This is how it works: This is how it looks: This is what it‘s for:
Using the different
shooting modes
Switching the camera on
sets it to single frames
(SingleShot). In addition,
there are the Continuous,
Multishot 16 and Self-timer
modes.
The Continuous mode is
ideal for shooting motion
sequences (sports / dance /
action), since it allows
photos to be taken continuously at intervals of just
a few seconds.
To select one of these
modes, press the MENU
button on the camera back
and use the four-way control
to select Drive Mode. Then
These picture series are
limited exclusively by the
capacity of the memory card
used.
use the four-way control to
select either Single,
Continuous, Multishot 16 or
Self-timer by pressing the
Right arrow .
This is why there should be
sufficient storage space
available for your picture
series. Alternatively, you may
reduce the image size
Flash is disabled in the
Continuous and Multishot 16
(number of pixels) and/or
image quality (compression).
modes.
Focusing is another point in
continuous photography
that deserves your attention.
The camera will focus the
first image of a series.
Should your subject leave
the area of sharp focus, you
might have to interrupt the
series to resume focusing.
This is how it works: This is how it looks: This is what it‘s for:
Using the different
shooting modes
In the Multishot 16 mode,
16 pictures will be taken at
intervals of approx. two
seconds. However, these will
all be combined in one
frame (multishot).
Flash is not available in this
Be sure to experiment with
this attractive feature. If your
subject moves during the
series or if you vary the
framing slightly, the result
will be particularly fascinating.
mode.
In the Self-timer mode, the
shutter will be released 10
seconds after depression of
the shutter release. The red
lamp on the camera front
will blink ever more rapidly,
reflecting the countdown. In
addition, a beep will be
When pressing the shutter
release, be sure not to stand
in front of the camera.
Instead, look through the
viewfinder. Otherwise, the
camera might focus on your
chest or some distance in
front of the actual subject.
heard. This can be disabled
via the Set menu and the
mode dial under Beep.
If your main subject is
off-center, use focus lock
with the shutter release
pressed halfway. See
Autofocus / Focusing.
36
Rollei Fototechnic GmbH, Salzdahlumer Strasse 196, D-38126 Braunschweig, Tel 0531-6800-0, Fax 0531-6800-243, eMail info@rollei.de
37
Rollei Fototechnic GmbH, Salzdahlumer Strasse 196, D-38126 Braunschweig, Tel 0531-6800-0, Fax 0531-6800-243, eMail info@rollei.de
Page 20

Taking pictures Mode dial set to Camera icon Mode dial set to Camera icon Taking pictures
This is how it works: This is how it looks: This is what it‘s for:
Automatic exposure
control
The camera automatically
controls the exposure of
your digital photos with an
equivalent sensitivity of ISO
100/21°.
To lock in exposure settings,
press and hold the shutter
release in its halfway
position. This allows pinpoint
exposure control in the case
of high subject contrast.
Programmed AE will
automatically select shutter
speeds from 2 s to 1/500 s
and apertures of f/3.4, f/4.8,
f/7.7 and f/15 (wide-angle)
as well as f/3.6, f/4.8, f/7.7
and f/15 (telephoto).
In its default setting, the
camera averages exposure
Press the MENU button on
the camera back and use the
four-way control to select
Exposure. In the Area
submenu you may select
Full, Central or Spot using
over the entire field.
However, for certain
subjects, such as portraits
against a bright background,
you may also switch to
center-weighted metering.
the four-way control
(pressing the Right arrow
).
Spot metering in turn is ideal
for precise metering of
important subject details.
A blinking red lamp beside
the viewfinder eyepiece
warns against camera shake
(when the flash is off) and
For pinpoint metering, use
AE lock with the shutter
release depressed halfway.
recommends use of a tripod.
This is how it works: This is how it looks: This is what it‘s for:
Exposure compensation
Automatic exposure can be
compensated over a range
of +2.0 to –2.0.
Experiment with exposure
compensation to optimize
your digital images. Slight
compensation (for example
Press the MENU button on
the camera back and use the
four-way control to select
the Exposure mode. In the
EV subprogram you then
can choose between the
following compensation
values: +2.0, +1.5, +1.0,
+0.5, -0.5, -1.0, -1.5 and
–2.0. Press the Right arrow
of the four-way control
to make your selection.
by +/- 0.5) may be useful,
above all if you wish to print
out your pictures directly, i.e.
without subsequent
manipulation by PC
image-processing software,
be it on your own printer or
through an Internet printing
service, since different
printers and printer software
interpret digital images
differently (and might print
your pictures too bright or
too dark).
Note: If you wish to avoid
flash in low light, a certain
amount of underexposure
may give you shake-free
images because the camera
will then use a faster shutter
speed. PC image-processing
software is capable of
correcting such under-
exposure.
38
Rollei Fototechnic GmbH, Salzdahlumer Strasse 196, D-38126 Braunschweig, Tel 0531-6800-0, Fax 0531-6800-243, eMail info@rollei.de
39
Rollei Fototechnic GmbH, Salzdahlumer Strasse 196, D-38126 Braunschweig, Tel 0531-6800-0, Fax 0531-6800-243, eMail info@rollei.de
Page 21

Taking pictures Mode dial set to Camera icon Mode dial set to Camera icon Taking pictures
This is how it works: This is how it looks: This is what it‘s for:
Selecting resolution / file
size
The camera has a 1/1.8-inch
CCD sensor with 3.15
megapixels (1536x2048)
and an aspect ratio of 4:3.
If you have sufficient storage
space (that is, a sufficient
number of or sufficiently
powerful memory cards),
always use the highest
The maximum resolution /
file size of 1536x2048 pixels
possible resolution
(1536x2048 pixels).
can be reduced to
768x1024 or 480x640
pixels.
Reduce the resolution
setting only if you are sure
you need only a smaller file
Press the MENU button on
the camera back and use the
four-way control to select
size (for example, for images
intended exclusively for the
Web).
the desired resolution under
Image Size of 1536x2048,
768x1024 or 480x640 by
pressing the Right arrow
of the control.
On the go, a reduction of file
size may help you out if you
are running out of storage
space. This will get you a
few additional pictures on
The resolution selected will
remain in effect, regardless
of whether or not the
camera is switched off.
your card (at reduced
quality). Try to buy addi-
tional high-capacity memory
cards or use other storage
media (mobile hard
480 x 640
disk/laptop) and make full
use of maximum resolution
768 x 1024
(1536x2048) and minimum
compression (Fine).
1536 x 2048
Resolutions /
file sizes available
This is how it works: This is how it looks: This is what it‘s for:
Selecting the compression level
The data provided by the
camera‘s CCD sensor can be
saved at three different
compression levels: Fine =
1:6, Standard = 1:12 and
Economy = 1:25.
In conjunction with the
different resolution settings,
variation of the compression
level allows very precise
tailoring of the desired
picture quality to your
specific requirements.
These compression levels are
available for each of the
three different resolutions
(1536x2048, 768x1024 and
480x640 pixels).
Optimum quality is obtained
by using the highest
resolution/largest file size
(1536x2048 pixels) with
Press the MENU button on
lowest compression (Fine).
the camera back and use the
four-way control to select
the desired compression
level under Quality: The
resulting file sizes are
approx. 1 MB* (Fine),
approx. 550 kB* (Standard)
and approx. 260 kB*
(Economy).
(*) File sizes for 1536x2048
pixel resolution.
Depending on the capacity
of your memory card, you
may have to make some
compromises – for example
away from home – in order
to capture a sufficient
number of pictures. It is
therefore advisable to add a
mobile, battery-powered
hard disk to your equipment
so that you can easily load
The compression level
down your pictures.
selected will remain in effect
even if the camera is
switched off.
40
Rollei Fototechnic GmbH, Salzdahlumer Strasse 196, D-38126 Braunschweig, Tel 0531-6800-0, Fax 0531-6800-243, eMail info@rollei.de
41
Rollei Fototechnic GmbH, Salzdahlumer Strasse 196, D-38126 Braunschweig, Tel 0531-6800-0, Fax 0531-6800-243, eMail info@rollei.de
Page 22

Taking pictures Mode dial set to Camera icon Mode dial set to Camera icon Taking pictures
This is how it works: This is how it looks: This is what it‘s for:
Selecting pixel sharpness
A special mode of the
camera allows the pixels
provided by the CCD sensor
to be saved with different
sharpness characteristics
In most cases it is advisable
to save the image data
unchanged, that is, neither
digitally sharpened nor
softened.
(digital sharpening).
This feature should,
however, not be confounded
with focusing of the lens.
Digital sharpening enhances
the visual impression of
sharpness by contour
sharpening through
numerical manipulation of
Press the MENU button on
the camera back and use the
four-way control to select
pixel characteristics (for
example, at the borders of
bright and dark details).
either Hard, Normal or Soft
under Image Sharpness.
Digital softening is ana-
logous
When the camera is
switched off, it will automatically reset to Normal =
unchanged saving of image
data.
However, since this overall
technique will often enhance
unwanted detail as well,
such as skin blemishes in
portraits, it is usually more
convenient to sharpen or
soften (very carefully) only
later, using suitable PC
image-processing software.
This is how it works: This is how it looks: This is what it‘s for:
Selecting white balance
With its automatic white
balance, the camera
automatically adjusts to the
color temperature of
available light sources.
Similar to a video camera, a
digital still camera also has
to adjust to the color
temperature of the prevailing light to render color
as naturally as possible.
To optimize your results and
make allowance for special
lighting conditions, you may
set the camera to special
Automatic white balance
will be entirely sufficient for
a large number of subjects.
light sources by pressing the
MENU button on the
camera back and selecting
White Balance.
Only in extreme lighting
situations – which you can
recognize from a pro-
nounced color cast in your
In addition to the default
Auto setting, the presets
Daylight, Light Bulb and
Fluorescent may be selected
pictures – should you make
test shots using the presets
for tungsten or fluorescent
light.
with the four-way control.
Try your hand and expeWhen the camera is
switched off, it will automatically reset to automatic
white balance.
Automatic white
balance
Daylight setting
riment!
Selectively used, these
modes can result in very
attractive special effects, for
example at parties, that
clearly distinguish them from
„ordinary“ photos by their
Tungsten setting
special color mood.
42
Rollei Fototechnic GmbH, Salzdahlumer Strasse 196, D-38126 Braunschweig, Tel 0531-6800-0, Fax 0531-6800-243, eMail info@rollei.de
Fluorescent-light
setting
43
Rollei Fototechnic GmbH, Salzdahlumer Strasse 196, D-38126 Braunschweig, Tel 0531-6800-0, Fax 0531-6800-243, eMail info@rollei.de
Page 23

Taking pictures Mode dial set to Camera icon Mode dial set to Camera icon Taking pictures
This is how it works: This is how it looks: This is what it‘s for:
Resetting camera
functions to default
settings
All shooting modes of the
camera can be reset to their
default values.
The camera offers a
multitude of settings for
shooting. However, since
only some of these are reset
Press the MENU button on
the camera back and use the
four-way control to select
Default and then Yes or No.
when the camera is
switched off, the Reset
mode is a convenient means
of defaulting all of them.
If you wish to reset the
camera to its defaults, select
Yes and press the Right
arrow of the control.
This reset within the Camera
menu (mode dial on top
plate set to red camera icon)
affects only the shooting
modes and is different from
the reset to default values of
the general camera modes
(Playback, Set and Transfer)
that can be selected via the
Set menu and the mode dial.
This is how it works: This is how it looks: This is what it‘s for:
Default camera settings
Upon reset, the shooting modes
default to the following settings:
Flash
Autoflash with red-eye reduction
Focus Mode
Autofocus
Focus Area
Center-weighted
Drive Mode
Single frames
Image size
Full format (1536x2048 pixels)
Quality
Medium compression
White Balance
Automatic
44
Rollei Fototechnic GmbH, Salzdahlumer Strasse 196, D-38126 Braunschweig, Tel 0531-6800-0, Fax 0531-6800-243, eMail info@rollei.de
Exposure EV
Zero exposure compensation
Exposure Area
Center-weighted metering
Sharpness
No sharpening
Camera TFT screen (LCD)
Screen brightness set to a medium 5
45
Rollei Fototechnic GmbH, Salzdahlumer Strasse 196, D-38126 Braunschweig, Tel 0531-6800-0, Fax 0531-6800-243, eMail info@rollei.de
Page 24

Taking pictures Mode dial set to Camera icon
This is how it works: This is how it looks: This is what it‘s for:
Selecting screen brightness
The brightness of the TFT
screen on the camera back
can be varied.
Press the MENU button on
the camera back and use the
four-way control to select
LCD and Brightness, where
values from 0 to 9 can be
set on a scale. Confirm by
pressing the Right arrow
of the control.
Your setting will remain
effective even when the
camera is switched off.
Screen brightness can also
be set in the Playback menu.
Screen dark – Camera
defective? Not necessarily.
Before turning the camera in
for repairs, check (preferably
in a dark room) whether
screen brightness might be
set to 1 or even 0. These
settings are equivalent to
extremely low screen
brightness, which in daylight
may give the impression that
the screen is dead.
46
Rollei Fototechnic GmbH, Salzdahlumer Strasse 196, D-38126 Braunschweig, Tel 0531-6800-0, Fax 0531-6800-243, eMail info@rollei.de
47
Rollei Fototechnic GmbH, Salzdahlumer Strasse 196, D-38126 Braunschweig, Tel 0531-6800-0, Fax 0531-6800-243, eMail info@rollei.de
Page 25

Image playback Mode dial set to Playback icon Mode dial set to Playback icon Image playback
This is how it works: This is how it looks: This is what it‘s for:
Displaying individual
images
Turn the mode dial to the
Playback icon.
.
The possibility of checking all
your pictures right after the
shot is one of the main
Switch the camera on.
advantages of digital
photography.
The TFT screen will automatically display your last
shot, including the frame
number, the shooting date
and time.
Immediately after pressing
the shutter release you can
see your picture, check
framing, exposure and focus
– and repeat the shot, if
Pressing the screen display
necessary.
button again will display
the entire image without
these data.
By the way: Your picture is
displayed on the screen
during saving, though very
To navigate through the
briefly.
pictures saved on your
memory card, press the Left
arrow of the four-way
control to go back, the Right
arrow to go forward.
This is how it works: This is how it looks: This is what it‘s for:
Displaying several images
(Index Mode)
If you press the screen
display button twice with
the mode dial set to
Playback , nine images
will be displayed in the Index
The Index mode is very
convenient, above all, with
high-capacity memory cards,
for a quick overview of the
images saved on the card.
mode.
With the DPOF mode of the
The display will start with
the first image on your card,
which will be highlighted in
color.
camera (see Image Printout),
a similar index can be
prepared, saved to memory
card and printed out on
printers compatible with this
Using the four-way control,
mode.
you can shift this frame to
select separate images. After
the first nine, another nine
images will be opened.
To open up the selected
image to full size, press the
ENTER button on the camera
back. Go back to Index view
pressing the screen display
button twice.
48
Rollei Fototechnic GmbH, Salzdahlumer Strasse 196, D-38126 Braunschweig, Tel 0531-6800-0, Fax 0531-6800-243, eMail info@rollei.de
49
Rollei Fototechnic GmbH, Salzdahlumer Strasse 196, D-38126 Braunschweig, Tel 0531-6800-0, Fax 0531-6800-243, eMail info@rollei.de
Page 26

Image playback Mode dial set to Playback icon
Mode dial set to Playback icon
Image playback
This is how it works: This is how it looks: This is what it‘s for:
Zoom-magnifier playback
Recorded images can also
be displayed at 2x magnification.
In Playback mode (with the
mode dial set to the
Playback icon), press the
MENU button, then select
Zoom using the four-way
control. If you now press the
The magnifier mode is ideal
for checking image detail
and focus.
In portraits or group shots, it
lets you check whether all of
the people in the picture
have their eyes open so that
you may repeat the shot, if
necessary.
Right arrow of the
control, the details of the
image will be displayed at
2x magnification. A
magnifier icon and „2.0x“
will also appear on the
Other subjects may be
checked for optimum focus.
If necessary, you can then
switch to manual focusing
and repeat the shot.
screen.
The image section displayed
can now be shifted in all
four directions with the aid
of the four-way control. (
)
To go back to standard
display, press the MENU
button.
This is how it works: This is how it looks: This is what it‘s for:
Slide show
The camera can display all
the pictures on your memory
card in the form of an
automatic slide show.
Your slide show will be
particularly impressive if you
show your pictures on a TV
screen (see Playback via TV
set).
In Playback mode (with the
mode dial set to the
Playback icon) press the
MENU button and use the
four-way control to select
Slide Show. Pressing the
Right arrow of the control
takes you to a submenu in
which you can start the slide
show selecting Start.
To do this, connect the video
cable supplied to the Video
Out terminal of your camera
(under the lateral rubber
cover) on the one hand and
the Video In terminal of your
TV set on the other. As soon
as the cable is in place, the
camera screen will be
switched off.
The screen time of the
pictures can be set via the
Time submenu to either 2, 3,
5 or 10 seconds.
To interrupt your show,
press the ENTER button, to
exit press the MENU button.
The picture last selected will
The order of the pictures
be displayed in full size.
shown can be selected via
the Direct submenu with the
options Forward, Backward
and Random.
50
Rollei Fototechnic GmbH, Salzdahlumer Strasse 196, D-38126 Braunschweig, Tel 0531-6800-0, Fax 0531-6800-243, eMail info@rollei.de
51
Rollei Fototechnic GmbH, Salzdahlumer Strasse 196, D-38126 Braunschweig, Tel 0531-6800-0, Fax 0531-6800-243, eMail info@rollei.de
Page 27

Image playback Mode dial set to Playback icon
This is how it works: This is what it‘s for:
You may view the
pictures captured with
your camera on a TV
screen. The camera has
a video output terminal via which it can
be connected to a TV
set using the video
cable. This terminal
can be switched to
either NTSC or PAL.
Playback via TV set or
video beamer
The pictures saved on your
memory card can be viewed
on a TV set or projected via
a video beamer.
To do this, connect the cable
supplied to the Video Out
terminal under the lateral
rubber cover of your camera
to the Video In terminal of
your TV set or beamer.
Caution: Be sure to make
the connection with both
the camera and the TV set or
beamer switched off!
Then switch on the
TV/beamer and the camera
set to Playback. The camera
screen is disabled in this
mode.
You may use any of the
playback modes of the
camera: single frames, zoom
magnifier and, above all,
slide show.
Dark TV screen? Check
whether the right video
input of your TV set is
activated. Many TV sets
have several video inputs.
Connecting your digital
camera to a TV set is a neat
way of viewing your pictures
quickly and hassle-free on a
large screen or showing
them to your friends.
You may have to turn up the
color of your TV set and
reduce brightness somewhat, since digital images
are optimized for viewing on
PC monitors. However, your
pictures are saved in true
color on your memory card.
If you have more than one
CF card, you may assemble
your own selection of
images on one card (via your
PC).
52
Rollei Fototechnic GmbH, Salzdahlumer Strasse 196, D-38126 Braunschweig, Tel 0531-6800-0, Fax 0531-6800-243, eMail info@rollei.de
53
Rollei Fototechnic GmbH, Salzdahlumer Strasse 196, D-38126 Braunschweig, Tel 0531-6800-0, Fax 0531-6800-243, eMail info@rollei.de
Page 28

Deleting images Mode dial set to Playback icon
Mode dial set to Playback icon
Deleting images
This is how it works: This is how it looks: This is what it‘s for:
Deleting images one by
one
The images stored on your
memory card can be
Please note that deleted
pictures are irreversibly lost.
selected via the camera
screen and deleted either
separately or all at once.
The different steps required
for deleting images are
summarized on page XX.
In Playback mode, press the
MENU button and use the
four-way control to select
Delete. Press the Right
If you use your camera only
occasionally, it is advisable
to copy this page and keep
it in your camera case.
arrow of the control to
access a submenu where
depression of the same
arrow under Select Image
lets you delete one of six
pictures displayed. The
image selected is highlighted
in color and has to be
confirmed by pressing the
screen display button. Then
select Yes in the dialog that
follows and confirm by
pressing the Right arrow
of the control.
This is how it works: This is how it looks: This is what it‘s for:
Deleting all the images
on your memory card
All the images stored on
your memory card can be
Please note that deleted
images are irreversibly lost.
deleted at once with a single
menu command.
Frequently used memory
cards should occasionally be
In Playback mode (with the
mode dial set to Playback
icon), press the MENU
reformatted (Format mode
accessible with the mode
dial set to Set).
button, then select Delete
using the four-way control.
This applies above all to
cards that have already been
Press the Right arrow of
the four-way control to
used in digital cameras of
other make.
access a submenu where
another depression of
under All Images will delete
all the pictures on your card.
In the submenu that follows,
confirm Yes by pressing
again.
54
Rollei Fototechnic GmbH, Salzdahlumer Strasse 196, D-38126 Braunschweig, Tel 0531-6800-0, Fax 0531-6800-243, eMail info@rollei.de
55
Rollei Fototechnic GmbH, Salzdahlumer Strasse 196, D-38126 Braunschweig, Tel 0531-6800-0, Fax 0531-6800-243, eMail info@rollei.de
Page 29

Image printout Mode dial set to Playback icon
This is how it works: This is how it looks: This is what it‘s for:
Preparing images for
direct printout in DPOF‘
format
Your camera is capable of
preparing images for direct
printout in DPOF‘ format
(Digital Print Order Format).
In Playback mode (mode dial
set to Playback icon), press
the MENU button and select
Print using the four-way
control. Then press the Right
arrow of the control to
access a submenu with the
items STD, Index and Cancel.
If you select STD, a set of
thumbnails is displayed for
selection with the four-way
control.
Preset the number of prints
desired for the image
selected by pressing the Up
arrow of the control. A
compatible printer will then
print the desired number of
copies from the card.
The DPOF‘ function lets you
select – right in the camera
and thus without connection
to a PC – individual images
for subsequent printout on
DPOF-compatible printers.
In addition, it is possible to
select the desired number of
prints. And finally, these
printers allow automatic
generation of an Index Print
showing all the images on
the card. (Select Index
subfunction in the Print
menu.)
With the Cancel subitem, all
orders for the DPOF‘ system,
including the Index Print, can
be canceled and deleted.
The camera supports Version
1.0 of the DPOF‘ system that
is being upgraded continually.
56
Rollei Fototechnic GmbH, Salzdahlumer Strasse 196, D-38126 Braunschweig, Tel 0531-6800-0, Fax 0531-6800-243, eMail info@rollei.de
57
Rollei Fototechnic GmbH, Salzdahlumer Strasse 196, D-38126 Braunschweig, Tel 0531-6800-0, Fax 0531-6800-243, eMail info@rollei.de
Page 30

Image management Mode dial set to Playback icon Mode dial set to Playback icon Image management
This is how it works: This is how it looks: This is what it‘s for:
Saving and managing
images in folders
The camera saves your
pictures on the memory card
in folders. In addition to the
folders generated automatically by the camera,
further folders can be
You don‘t normally need to
pay attention to folder
management, since the
required folders are
automatically generated for
each card.
created and named to
facilitate image management.
However, for special projects
or in the case of cards of
very high capacity, the use
In the Playback mode (mode
dial set to Playback icon),
press the MENU button and
use the four-way control to
select Folder. Press the Right
of differently named folders
does make sense for image
management – similar to
conditions in a personal
computer.
arrow of the control to
access a submenu with the
options New and Select.
New lets you generate and
name new folders. (Select
letters or numbers with the
As new folders are created,
the camera will save your
pictures to the folder last
generated, which is thus
active.
Up or Down arrow of
the control.)
If you have other (possibly
even empty) folders on your
Select lets you select the
folders available on your
card.
card and have changed
between these via Folder –
Select, you will first have to
go back to display of the
images in the „correct“
folder or search all the
folders.
This is how it works: This is how it looks: This is what it‘s for:
Deleting folders from the
memory card
With the exception of the
write-protected Default
folder, all folders on your
card can be deleted.
This delete function only
serves to delete folders
created either by the camera
or by you (in the camera).
Folders created on your card
In the Playback mode (mode
in a PC will not be displayed.
dial set to Playback icon),
press the MENU button and
select Delete using the
four-way control. Press the
Note regarding the use of
memory cards in different
digital camera systems:
Right arrow of the control
to access a submenu which,
among other things, lets you
choose Folder.
Since nearly all digital
camera systems and
manufacturers create their
own folders and folder
Again press the Right arrow
of the control to display
all the folders on your card
that can be deleted (with
the exception of the
write-protected Default
designations on the memory
cards, it is advisable to use a
PC CompactFlash card
reader for safe and precise
erasure of these „foreign“
folders.
folder)..
Once you are sure that these
memory cards do not
Caution: You will also
delete all the images
contained in these folders!
contain any useful pictures
any more, you should
reformat these cards using
the Set mode and Format
before using them in your
digital Rollei camera..
58
Rollei Fototechnic GmbH, Salzdahlumer Strasse 196, D-38126 Braunschweig, Tel 0531-6800-0, Fax 0531-6800-243, eMail info@rollei.de
59
Rollei Fototechnic GmbH, Salzdahlumer Strasse 196, D-38126 Braunschweig, Tel 0531-6800-0, Fax 0531-6800-243, eMail info@rollei.de
Page 31

Image management Mode dial set to Playback icon
Mode dial set to Playback icon Image management
This is how it works:
DCF standard for digital
image storage
The DCF standard (Design
rule for Camera File System)
has been adopted for
storing images in digital
cameras.
This worldwide standard
guarantees that:
• The pictures taken with
this camera cannot only be
displayed on the camera
screen, but also on other
digital cameras as well as
other multimedia equipment, such as video
beamers.
• The images can be printed
out on different printers.
• The memory cards can be
used interchangeably in
different cameras and
camera systems of different
makers.
• The digital images taken
with the camera can be
processed in a PC/Mac..
This is how it works: This is how it looks: This is what it‘s for:
Setting camera-screen
brightness
The brightness of the TFT
screen on the camera back
can be varied.
Screen dark – Camera
defective? Not necessarily.
Before turning the camera in
for repairs, check (preferably
Press the MENU button on
the camera back and use the
four-way control to select
LCD and Brightness, where
values from 0 to 9 can be
set on a scale. Confirm by
pressing the Right arrow
of the control.
in a dark room) whether
screen brightness might be
set to 1 or even 0. These
settings are equivalent to
extremely low screen
brightness, which in daylight
may give the impression that
the screen is dead.
Your setting will remain
effective even when the
camera is switched off.
Screen brightness can also
be set in the Camera mode
in the Camera menu.
60
Rollei Fototechnic GmbH, Salzdahlumer Strasse 196, D-38126 Braunschweig, Tel 0531-6800-0, Fax 0531-6800-243, eMail info@rollei.de
61
Rollei Fototechnic GmbH, Salzdahlumer Strasse 196, D-38126 Braunschweig, Tel 0531-6800-0, Fax 0531-6800-243, eMail info@rollei.de
Page 32

Basic settings Mode dial set to set icon Mode dial set to set icon Basic settings
This is how it works: This is how it looks: This is what it‘s for:
Basic camera settings and
functions
The basic camera settings
and functions are combined
in the Set menu (mode dial
set to Set icon).
Formatting will irreversibly
delete all your images on the
card! If you have more than
one card, check whether you
really have inserted the card
To select the different
you wish to format.
menus, turn the mode dial
and activate/confirm by
pressing the Right arrow
of the four-way control.
The shorter the interval, the
more power you will save.
Also, use the camera screen
only when you really need it.
It consumes more power
Formatting
than anything else.
This menu serves to format
memory cards. Caution:
Formatting will automatically delete all images
(even those in new folders)!
Power Save
Here you can set the interval
after which the camera will
automatically cut off to save
power.
The following settings are
available: 1 min, 3 min, 5
min, 10 min and 30 min.
When the camera is
connected to a PC or used
with the power-supply unit,
the interval is fixed at 30
min (default).
This is how it works: This is what it‘s for:
Basic camera settings and
functions
Date/Time
This is where you can set the
date and time. These will be
saved together will each
Always set date and time,
since these data are very
useful in filing and managing
your pictures.
image.
Beep
This menu lets you switch
the beeps on or off.
Here you can cancel the
beeps which in certain
situations might be found
Video Out
disturbing.
In the Video Out menu the
European video and TV
standard PAL is fixed.
Language
This menu allows the
selection of either German
or English for the camera
menus.
Default
The Default/Reset menu lets
you reset all Playback, Set
and Transfer functions to
default. (Note: The Camera
menu has its own reset
function.)
This is useful when you have
set several special functions
in the different submenus
and would like to cancel
them with a single com-
mand. The images saved on
the card will not be deleted
by resetting to default
values.
62
Rollei Fototechnic GmbH, Salzdahlumer Strasse 196, D-38126 Braunschweig, Tel 0531-6800-0, Fax 0531-6800-243, eMail info@rollei.de
63
Rollei Fototechnic GmbH, Salzdahlumer Strasse 196, D-38126 Braunschweig, Tel 0531-6800-0, Fax 0531-6800-243, eMail info@rollei.de
Page 33

Basic settings Mode dial set to set icon
This is how it works: This is how it looks: This is what it‘s for:
Default settings for
Playback, Set and
Transfer modes
In the Set menu, the following
defaults are reset in the Playback,
Set and Transfer modes:
In Playback menu:
Delete
Selected image: single frame
Slide Show Time
Screen time 5 seconds
Slide Show Direction
Forward playback
Print
STD (standard)
Folders
Numbering of folders 100SK330
LCD (camera screen)
5 – medium brightness
In Camera Set menu:
Power Save
Automatic cutoff after 3 minutes
Beep
On
In Transfer menu:
Storage: Transfer to PC On
64
Rollei Fototechnic GmbH, Salzdahlumer Strasse 196, D-38126 Braunschweig, Tel 0531-6800-0, Fax 0531-6800-243, eMail info@rollei.de
65
Rollei Fototechnic GmbH, Salzdahlumer Strasse 196, D-38126 Braunschweig, Tel 0531-6800-0, Fax 0531-6800-243, eMail info@rollei.de
Page 34

PC linkup Mode dial set to transfer icon Mode dial set to transfer icon PC linkup
This is how it works: This is how it looks:
Connecting the camera to
PC/Macintosh
Install driver software.
For Windows 98/Windows
98 SE/Windows 2000
Prof./Windows proceed in
the following way:
Insert software CD in your
computer drive.
Double-click on Setup icon
to start installation.
The Setup dialog box is
displayed. Please wait.
When the Welcome dialog
box appears, click [Next].
When the Software License
Agreement appears, please
read it carefully and take
your decision.
[Yes]: Agrees and takes you
to next screen.
[No]: Exit
When the Start Copying Files
box is displayed, select:
[Next]: Start installation.
[Back]: Back to preceding
dialog box.
[Cancel]: Exit
When the Setup Complete
box appears, click [Finish] to
finish installation.
This is how it works: This is how it looks:
The following steps apply to
both OS 8.6 and OS 9.
Select the driver for your
system.
Start installation with a
double click.
When the Welcome box
appears, click [Continue].
Start installation by clicking
on Install.
Read warning, then click on
[Continue].
If necessary, exit by clicking
on [Cancel].
Installation has been
successfully completed.
To initial the program
installed, restart your
computer (suggested), or
click on [Continue] if the
Twain driver is to be
activated right away.
[Back]: Back to preceding
dialog box.
Page 35

PC linkup Mode dial set to transfer icon
Tips and Tricks
Bilder aufnehmen
This is how it works:
Connecting the camera to
PC/Macintosh
For as long as the camera is
connected to your computer
or data are being exchanged
between camera and
computer, observe the
following warnings:
• Do not switch the camera
off!
• Do not pull the USB cable!
• Do not move the mode
dial!
• Do not insert or remove
your memory card!
Leaving these warnings
unheeded may damage your
camera or computer and
damage or destroy the data
on your memory card.
As long as the camera is
connected to your PC, it will
automatically switch off
after 30 minutes.
When linking up your
camera with a computer and
transferring data, the
batteries should have full
power. If the batteries have
only limited power, there is a
risk that the camera will cut
off during data transmission.
An error message will be
displayed, and the camera
and computer may malfunction. Also, the image
data on your memory card
might be damaged or
destroyed.
It is recommended always to
use fresh batteries or the
optional power-supply unit
when connecting the camera
to your computer.
A very safe and comfortable
means of transferring data is
the use of CompactFlash
card readers that are
connected to the USB
terminal or a PC or Macintosh.
This is how it works:
How to handle batteries
• Battery power drops at
low temperatures. When
shooting in a cold
environment, keep fresh
batteries ready, preferably
in a warm pocket inside
your clothing.
• The power of rechar-
geable NiMH batteries
drops more slowly, so that
these are therefore
preferable. Even after use
at low temperatures, they
will regain their normal
power as soon as they
have been restored to
normal temperature.
• Remove the batteries if
you are planning not to
use your camera for a
certain length of time.
Leaking batteries may
damage the battery
compartment.
• With alkaline batteries,
the battery-status
indicator may signal less
power than is actually
available. When you use
the camera, the icon
disappears.
• Caution! Batteries may get
hot during use and should
therefore be handled with
care when removing or
replacing them. Switch the
camera off and wait long
enough for the batteries to
cool down..
Ambient temperature and
operating conditions
• Your camera has been
designed for operation at
temperatures from 0°C to
40°C.
• Never keep your camera
in a place where it might
be exposed to very high
temperatures, for example
in the glove compartment
of a car.
• Do not expose your
camera to extreme
humidity.
• To avoid condensation,
keep your camera in a
light-tight plastic bag
before taking it from a
cold environment to a
warm room. Leave it to
adopt room temperature
before taking it out of the
bag.
68
Rollei Fototechnic GmbH, Salzdahlumer Strasse 196, D-38126 Braunschweig, Tel 0531-6800-0, Fax 0531-6800-243, eMail info@rollei.de
69
Rollei Fototechnic GmbH, Salzdahlumer Strasse 196, D-38126 Braunschweig, Tel 0531-6800-0, Fax 0531-6800-243, eMail info@rollei.de
Page 36

Tips and Tricks
Tips and Tricks
Notes on the use of
CompactFlash™ cards
In the following cases, data
may be lost or your memory
card may be damaged:
• If the card is used
improperly.
• Near electrostatic
discharges or electrical
fields.
• If the card is removed or
the power supply
interrupted while the
camera is accessing the
card (reading, deleting).
• If the card is left unused
over a prolonged period.
With time, the data stored
on a CompactFlash‘ card
get weaker. After
prolonged nonuse, the
data on the card may
therefore be impossible to
recover.
• Formatting your card will
irreversibly delete all the
data stored on it.
• The storage capacity of
CompactFlash‘ cards
diminishes with heavy use.
Should this be noticed,
buy a new card.
• Keep your memory card
away from electrical fields
and static charges.
• Do not bent the card, nor
expose it to heavy impact
.
• Do not touch the electrical
contacts with your fingers
or a metallic object.
• Protect the card from
humidity, heat and direct
sunlight.
• Keep the card away from
powerful magnets, such
as in loudspeakers.
• Keep the card in its case
when not using it.
Care of TFT screen
• The TFT screen of the
camera is a highly precise
component with a pixel
failure rate of less than
0.02%.
• Do not subject the surface
of the screen to any
pressure whatsoever, since
this might result in
permanent damage.
• At low temperatures, the
screen may temporarily
darken. However, it will go
back to normal as soon as
normal temperature is
restored.
• Should the screen surface
be dirty, first blow away
dust and sand, then use a
soft, dry and clean cloth.
• Should the screen flicker
permanently or fail to
work, it will have to be
replaced.
Taking care of your
digital camera
• Your camera is sensitive
to shock and should
therefore be handled with
care.
• Switch the camera off for
carrying, and remove the
batteries.
• Your camera is neither
splashwater-proof, nor
watertight.
• Inserting or removing
batteries or memory cards
with wet hands may result
in damage.
• Careless use of the
camera at the beach or
near water may damage
the camera.
• Do not expose the camera
to direct sunlight for
prolonged periods. Never
point the lens directly at
the sun, or the CCD sensor
might be damaged.
Cleaning your digital
camera
• To clean your camera and
lens, use a soft, clean and
dry cloth. First blow off
sand or dust. Do not try to
wipe it off right away,
since this might cause
scratches.
• To clean the lens surface,
first use a blower brush to
remove dust or sand, then
apply some lens cleaning
fluid to a clean cloth.
• Never use organic
solvents to clean your
camera.
• Avoid touching the lens as
much as possible.
Questions and service
• Before important events,
carefully check all
functions of the camera or
make test shots.
• Rollei will not be responsible for any damage
caused by malfunctioning
of the camera.
• If you have any questions
regarding your camera
and before sending it for
repairs, please ask your
dealer.
Page 37

Troubleshooting
Problem Ursache Lösung
Hilfe bei Störungen
Troubleshooting
If you have any trouble with your camera, try to solve the problem with the aid of the
following table. Should this be unsuccessful, please consult your dealer.
Problem Cause Remedy Page
Automatic focusing Are you trying to focus on a Use focus lock or focus 24
impossible (green subject that is unsuitable for manually.
focus lamp blinking AF?
rapidly – approx. 8x
per second) when
shutter release is
depressed halfway.
Are you trying to shoot Step back to maintain a 24
a subject that is less distance of, at least, 40 cm.
than 40 cm away or Use macro mode for
– in macro mode – subjects that are between
over 40 cm away? 8 cm and 40 cm away.
Shutter does not Is camera switched off? Turn control dial 32
release. to
on.
Is camera set to Record?
Does green focus lamp Your image is being saved 33
blink slowly on CF card. Wait until
(approx. twice per second) saving is completed and
and does “Recording” neither the focus
blink on LCD screen? lamp nor “Recording”
blink.
and switch camera
Problem Cause Remedy Page
release.
No live image
on screen.
CF card is full. Shutter does not
Is camera switched on? Turn control dial
Are batteries spent? Replace all four batte-
Have batteries been
inserted with wrong
polarity?
Is LCD screen
switched off?
Camera has turned off
automatically to save
power.
Delete images you donicht
not wish to keep or
load pictures down to
PC. Alternatively, insert
another CF card with
suffi cient free memory.
and switch
to
camera on.
ries or use the
AC adapter (sold separately).
Reload them with
proper polarity.
Press DISPLAY
button to switch it on.
Turn it on again.
54
32
18
18
22
19
Page 38

Troubleshooting
Troubleshooting
Problem Cause Remedy Page
Shutter does not
release.
Flash picture comes
out underexposed.
Is there a CF card in the
camera?
Green focus lamp blinks
slowly (about twice per
second), and PLAYBACK
blinks on screen.
Was your subject within
fl ash range?
If NO CARD appears on the
LCD screen and CF on the
data monitor, there is no CF
card loaded. Insert a card.
Camera is reading data
from CF card. Wait until it
has fi nished and the focus
lamp as well as PLAYBACK stop blinking.
Make sure your subject
is within range of the
built-in fl ash unit: 0.4 –
3 m.
21
24
34
Problem Cause Remedy Page
Zoom playback does not
work.
All images are over or
underexposed.
Lens moves out, but
data monitor remains
blank, and camera does
not work.
Image fi le damaged. Did you remove your CF
Was the picture taken with
digital zoom?
Did you use exposure
compensation?
Does the battery icon
blink?
card while it was accessed
by the camera?
Pictures taken with digital
zoom cannot be played back
in zoom mode.
Reset exposure compensation to zero.
(Display goes dead after
fi ve seconds.) If the
battery icon
the display will go dead
after fi ve seconds, while
the lens moves out.
Replace the batteries.
Never remove your CF
card while the green focus
lamp is blinking slowly
after exposure (about
twice per second).
blinks,
26
39
18
21
Camera does not work
properly.
Remove the batteries and replace them. If the camera
malfunctioned while it was powered by AC, pull the plug
from the camera and reinsert it. Then switch the camera
on again.
If the camera cannot be switched off, a defective CF card is
the likely cause. In this case, format your CF card externally
in a PC after loading down its data onto the computer.
Page 39

Specifications
System requirements
Camera
CCD: 1/1.8-inch CCD (4:3) with 3.15 megapixels (1536x2048), ISO 100/21°
Lens: 3x zoom lens 8-24mm f/3.4-3.6 (38-114mm in 35mm terms);
9 elements in 6 components, max. resolution 160 lp/mm,
focusing from 0.4 m – infinity, macro mode from 0.08 m
(object field 4x6 cm)
Shutter: 2 – 1/500 s; min. shooting interval 6 s, release lag 1.5 s
Exposure control: Programmed AE with center-weighted or spot metering
Camera TFT screen: 1.8-inch TFT color LCD with 220x220 pixels
Storage medium: Type I CompactFlash‘ card
Image files: 24-bit RGB, Exif 2.1 (DCF), DPOF-compatible
Shooting modes
Mode: Single frame, continuous shooting, 16-image multishot, self-timer
Self-timer: Delay approx. 10 s
Built-in flash unit
Recycling time: approx. 8 s for fill flash
Flash modes: Autoflash, fill flash, flash off, autoflash with red-eye reduction
(default setting), slow sync; flash disabled in macro mode
Interfaces
Video Out: Composite signal, PAL, H-resolution 220 lines
PC interface: USB terminal (Universal Serial Bus) for PC and Macintosh
Power sources
Batteries: Four size AA alkaline batteries or rechargeable NiCd or NiMH batteries
External power source: AC power-supply unit (DC terminal in camera)
Operating temperature: 0°C to 40°C, max. 85% rel. humidity (non-condensing)
Dimensions and weight
Dimensions (wxhxd): 116 x 73 x 62 mm (4.57 x 2.87 x 2.44 „) – without protruding parts
Weight: approx. 280 g (without batteries and CF card)
System requirements for Windows
• For USB Windows 98/98SE/2000Prof./Me
• 16MB RAM, preferably 32 MB
• 110 MB free disk space
• VGA color monitor
• CD-ROM drive
• 3.5“ diskette drive
• USB and Video Out terminals
System requirements for iMac, ibook, G3 blue & white series, G4 series
• Mac OS 8.6 / 9 / 9.0.2 – preferably 9.0.4
• 32MB RAM or higher
• 110 MB free disk space
• VGA color monitor
• CD-ROM drive
• USB and Video Out terminals
All data at time of going to print, subject to change without notice.
76
Rollei Fototechnic GmbH, Salzdahlumer Strasse 196, D-38126 Braunschweig, Tel 0531-6800-0, Fax 0531-6800-243, eMail info@rollei.de
All data at time of going to print, subject to change without notice.
77
Rollei Fototechnic GmbH, Salzdahlumer Strasse 196, D-38126 Braunschweig, Tel 0531-6800-0, Fax 0531-6800-243, eMail info@rollei.de
 Loading...