

Page 1
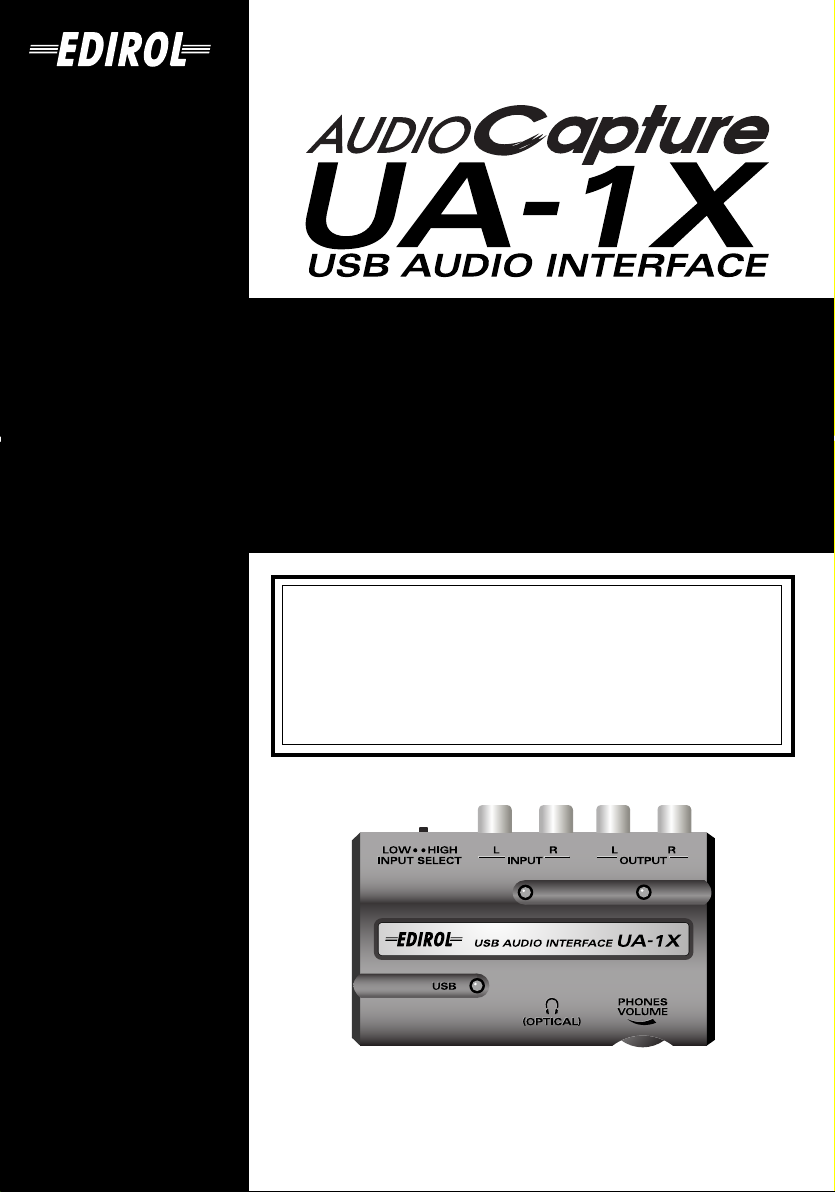
Owner’s Manual
Bedienungsanleitung
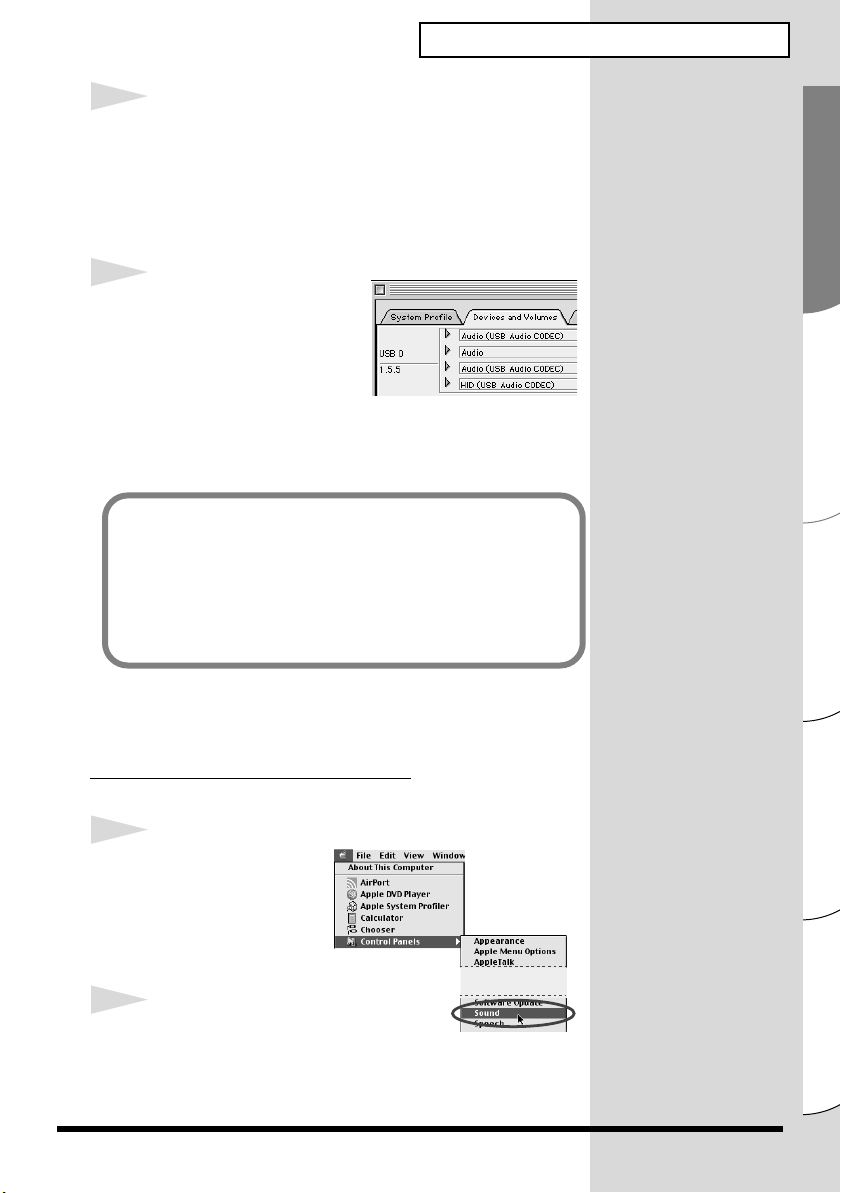
Mode d’emploi
Manuale d’uso
Manual del usuario
Before using this unit, carefully read the sections entitled: “USING
THE UNIT SAFELY” (p. 2–3) and “IMPORTANT NOTES” (p. 4).
These sections provide important information concerning the proper
operation of the unit. Additionally, in order to feel assured that you
have gained a good grasp of every feature provided by your new unit,
Getting Started should be read in its entirety. The manual should be
saved and kept on hand as a convenient reference.
Copyright © 2003 ROLAND CORPORATION
All rights reserved. No part of this publication may be reproduced in any
form without the written permission of ROLAND CORPORATION.
Page 2
Used for instructions intended to alert
the user to the risk of death or severe
injury should the unit be used
improperly.
Used for instructions intended to alert
the user to the risk of injury or material
damage should the unit be used
improperly.
* Material damage refers to damage or
other adverse effects caused with
respect to the home and all its
furnishings, as well to domestic
animals or pets.
001
• Before using this unit, make sure to
read the instructions below, and the
Owner’s Manual.
..................................................................................................
002a
• Do not open or perform any internal
modifications on the unit.
..................................................................................................
003
• Do not attempt to repair the unit, or
replace parts within it (except when
this manual provides specific instructions directing you to do so). Refer all
servicing to your retailer, the nearest
EDIROL/Roland Service Center, or an
authorized EDIROL/Roland
distributor, as listed on the “Information”
page.
..................................................................................................
004
• Never use or store the unit in places
that are:
• Subject to temperature extremes
(e.g., direct sunlight in an enclosed
vehicle, near a heating duct, on top
of heat-generating equipment); or are
• Damp (e.g., baths, washrooms, on wet
floors); or are
• Humid; or are
• Exposed to rain; or are
• Dusty; or are
• Subject to high levels of vibration.
..................................................................................................
The symbol alerts the user to important instructions
or warnings.The specific meaning of the symbol is
determined by the design contained within the
triangle. In the case of the symbol at left, it is used for
general cautions, warnings, or alerts to danger.
The symbol alerts the user to items that must never
be carried out (are forbidden). The specific thing that
must not be done is indicated by the design contained
within the circle. In the case of the symbol at left, it
means that the unit must never be disassembled.
The ● symbol alerts the user to things that must be
carried out. The specific thing that must be done is
indicated by the design contained within the circle. In
the case of the symbol at left, it means that the powercord plug must be unplugged from the outlet.
007
• Make sure you always have the unit
placed so it is level and sure to remain
stable. Never place it on stands that
could wobble, or on inclined surfaces.
..................................................................................................
010
• This unit, either alone or in combination with an amplifier and
headphones or speakers, may be
capable of producing sound levels that
could cause permanent hearing loss.
Do not operate for a long period of
time at a high volume level, or at a
level that is uncomfortable. If you
experience any hearing loss or ringing
in the ears, you should immediately
stop using the unit, and consult an
audiologist.
..................................................................................................
011
• Do not allow any objects (e.g.,
flammable material, coins, pins); or
liquids of any kind (water, soft drinks,
etc.) to penetrate the unit.
..................................................................................................
2
Page 3
012d
• Immediately turn the power off, and
request servicing by your retailer, the
nearest Roland Service Center, or an
authorized Roland distributor, as
listed on the “Information” page
when:
• If smoke or unusual odor occurs
• Objects have fallen into, or liquid
has been spilled onto the unit; or
• The unit has been exposed to rain
(or otherwise has become wet); or
• The unit does not appear to operate
normally or exhibits a marked
change in performance.
..................................................................................................
013
• In households with small children, an
adult should provide supervision until
the child is capable of following all the
rules essential for the safe operation
of the unit.
..................................................................................................
014
• Protect the unit from strong impact.
(Do not drop it!)
..................................................................................................
104
• Try to prevent cords and cables from
becoming entangled. Also, all cords
and cables should be placed so they
are out of the reach of children.
..................................................................................................
106
• Never climb on top of, nor place heavy
objects on the unit.
..................................................................................................
108c
• Disconnect all cords coming from
external devices before moving
the unit.
..................................................................................................
204
* Microsoft and Windows are registered
trademarks of Microsoft Corporation.
206e
* Screen shots in this documents are reprinted
with permission from Microsoft Corporation.
206j
* Windows® is known officially as:
“Microsoft® Windows® operating system.”
207
* Apple and Macintosh are registered
trademark of Apple Computer, Inc.
209
* MacOS is a trademark of Apple Computer,
Inc.
220
* All product names mentioned in this
document are trademarks or registered
trademarks of their respective owners.
3
Page 4

IMPORTANT NOTES
291a
In addition to the items listed under “USING THE UNIT SAFELY” on page 2–3, please read and observe
the following:
Power Supply
307
• Before connecting this unit to other devices, turn off the
power to all units. This will help prevent malfunctions and/
or damage to speakers or other devices.
Placement
351
• Using the unit near power amplifiers (or other equipment
containing large power transformers) may induce hum. To
alleviate the problem, change the orientation of this unit; or
move it farther away from the source of interference.
352a
• This device may interfere with radio and television reception.
Do not use this device in the vicinity of such receivers.
352b
• Noise may be produced if wireless communications devices,
such as cell phones, are operated in the vicinity of this unit.
Such noise could occur when receiving or initiating a call, or
while conversing. Should you experience such problems, you
should relocate such wireless devices so they are at a greater
distance from this unit, or switch them off.
354a
• Do not expose the unit to direct sunlight, place it near devices
that radiate heat, leave it inside an enclosed vehicle, or
otherwise subject it to temperature extremes. Excessive
heat can deform or discolor the unit.
355b
• When moved from one location to another where the temperature and/or humidity is very different, water droplets
(condensation) may form inside the unit. Damage or
malfunction may result if you attempt to use the unit in
this condition. Therefore, before using the unit, you must
allow it to stand for several hours, until the condensation has
completely evaporated.
Maintenance
401a
• For everyday cleaning wipe the unit with a soft, dry cloth or
one that has been slightly dampened with water. To remove
stubborn dirt, use a cloth impregnated with a mild, nonabrasive detergent. Afterwards, be sure to wipe the unit
thoroughly with a soft, dry cloth.
402
• Never use benzine, thinners, alcohol or solvents of any kind,
to avoid the possibility of discoloration and/or deformation.
Copyright
851
• Unauthorized recording, distribution, sale, lending, public
performance, broadcasting, or the like, in whole or in part, of
a work (musical composition, video, broadcast, public performance, or the like) whose copyright is held by a third party is
prohibited by law.
852a
• When exchanging audio signals through a digital connection
with an external instrument, this unit can perform recording
without being subject to the restrictions of the Serial Copy
Management System (SCMS). This is because the unit is
intended solely for musical production, and is designed
not to be subject to restrictions as long as it is used to record
works (such as your own compositions) that do not infringe
on the copyrights of others. (SCMS is a feature that prohibits
second-generation and later copying through a digital
connection. It is built into MD recorders and other consumer
digital-audio equipment as a copyright-protection feature.)
853
• Do not use this unit for purposes that could infringe on a
copyright held by a third party. We assume no responsibility
whatsoever with regard to any infringements of third-party
copyrights arising through your use of this unit.
Additional Precautions
552
• Unfortunately, it may be impossible to restore the contents of
data that was stored on a storage device (e.g., hard disk) once
it has been lost. Roland
Corporation assumes no liability concerning such
loss of data.
553
• Use a reasonable amount of care when using the unit’s
buttons, sliders, or other controls; and when using its jacks
and connectors. Rough handling can lead to malfunctions.
556
• When connecting / disconnecting all cables, grasp the
connector itself—never pull on the cable. This way you
will avoid causing shorts, or damage to the cable’s internal
elements.
558a
• To avoid disturbing your neighbors, try to keep the unit’s
volume at reasonable levels. You may prefer to use
headphones, so you do not need to be concerned about
those around you (especially when it is late at night).
559a
• When you need to transport the unit, package it in the box
(including padding) that it came in, if possible. Otherwise,
you will need to use equivalent packaging materials.
562
• Use a cable from Roland to make the connection. If using
some other make of connection cable, please note the
following precautions.
• Some connection cables contain resistors. Do not use
cables that incorporate resistors for connecting to this
unit. The use of such cables can cause the sound level to
be extremely low, or impossible to hear. For information
on cable specifications, contact the manufacturer of
the cable.
563
• Unauthorized duplication, reproduction, hiring, and lending
prohibited.
564
• Before you open the included CD-ROM, you must read the
“license agreement”. Opening the CD-ROM will be taken
to mean your acceptance of the license agreement.
986
• Although Roland has tested numerous configurations, and
has determined that on average, a computer system similar
to that described above will permit normal operation of the
UA-1X, Roland cannot guarantee that a given computer
can be used satisfactorily with the UA-1X based solely on the
fact that it meets the above requirements. This is because
there are too many other variables that may influence the
processing environment, including differences in motherboard design and the particular combination of other devices
involved.
4
Page 5

Contents
Features of the UA-1X............................................................................ 6
Check the Contents of the Package ..................................................... 7
Panel Descriptions ................................................................................. 8
Using the UA-1X ..................................................................................... 9
UA-1X Signal Flow Diagram..................................................................................... 9
Listening to Sound from Your Computer ............................................................. 10
Digitally Recording to MD ...................................................................................... 11
Recording from the AUX Input .............................................................................. 12
English
Connections and Driver Installation (Windows)................................ 13
Connections and Driver Installation (Macintosh).............................. 23
Deutsch
Anschlüsse und Treiberinstallation (Windows) ................................ 31
Anschlüsse und Treiberinstallation (Macintosh) .............................. 43
Français
Connexions et installation des pilotes (Windows)............................ 51
Connexions et installation des pilotes (Macintosh).......................... 63
Italiano
Collegamenti e installazione del driver (Windows)........................... 71
Collegamenti e installazione del driver (Macintosh)......................... 83
Español
Conexiones e instalación del controlador (Windows)...................... 91
Conexiones e instalación del controlador (Macintosh).................. 103
Troubleshooting ................................................................................. 111
Problems related to the USB driver...................................................................... 111
Problems when using the UA-1X......................................................................... 113
Deleting the USB Audio Device Driver (Windows) .......................................... 119
Specifications ..................................................................................... 120
5
Page 6
Features of the UA-1X
The UA-1X is a USB audio interface that can be connected to your computer via
a single USB cable, providing high-quality digital audio output.
Unbeatable Audio Quality
Digital output connectors are provided, and sampling frequencies of
32/44.1/48 kHz are supported for both digital output, allowing signals
to be transferred to or from CD, MD, or DAT with no loss in audio quality.
Analog input/output is provided by RCA phono jacks, allowing high-quality
recording and playback.
* Sampling frequency
When audio is recorded digitally, the level of the sound is measured at fixed
intervals, and those levels are converted into digital signals. The “sampling
frequency” is what determines this interval. Normally, a CD or MD uses
a sampling frequency of 44.1 kHz.
Simple Connection to Your Computer Via USB Cable
The UA-1X can be connected to your computer via a USB cable. It is bus-powered,
meaning that the power is supplied from your computer.
Since an AC adaptor is not necessary, the UA-1X is an ideal choice for use with
a notebook computer.
What is USB?
6
USB stands for Universal Serial Bus. It is a new interface used to connect various
peripheral devices to a computer.
USB allows more than one peripheral device to be connected via a single USB cable,
and also allows data to be transmitted more rapidly than conventional serial ports.
Peripherals can also be connected or disconnected with the power turned on, and
the computer will automatically recognize the peripheral that has been plugged in.
(Some peripherals may require settings or other operations to be performed.)
Page 7
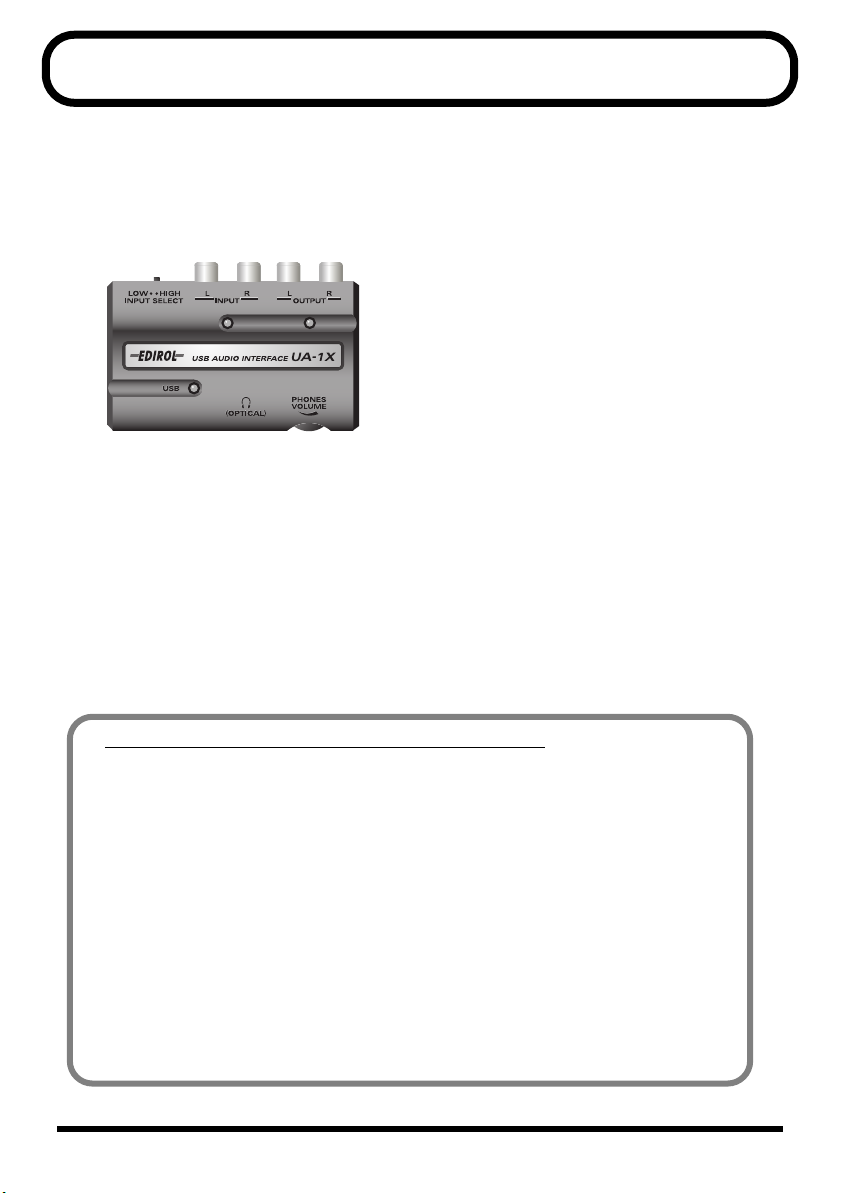
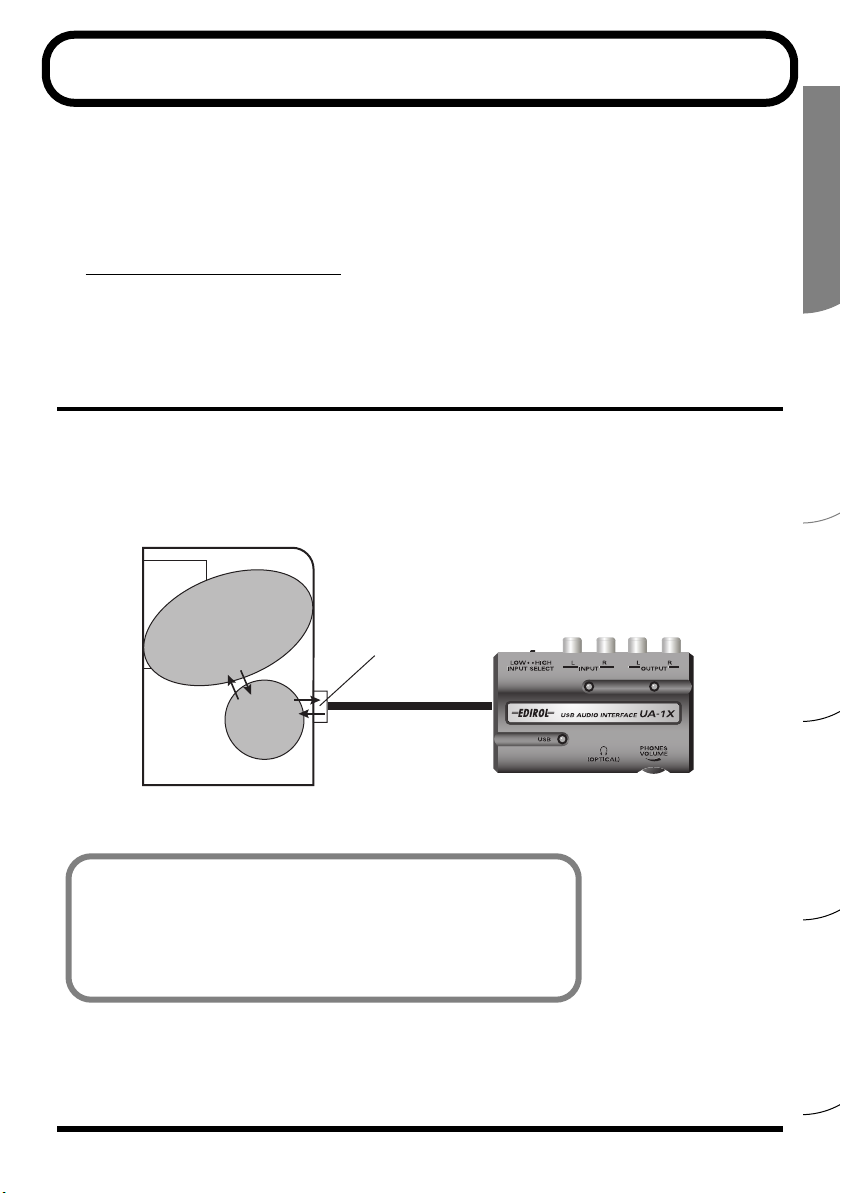
Check the Contents of the Package
The UA-1X includes the following items. When you open the package, first make
sure that all items are included. If any are missing, contact the dealer where you
purchased the UA-1X.
●
UA-1X
fig.01-01
●
Owner’s Manual
This is the document you are reading. Keep it at hand for reference when needed.
You will Need to Provide These Items Yourself
External amp, speakers, headphones, and mic are not included
External amp, speakers, or headphones necessary for listening to the sound output
via the UA-1X are not included. Nor is a mic included for inputting sound to the
UA-1X. You will need to provide these items yourself.
* As soon as you connect the UA-1X to your computer, sound will no longer be output from
the speakers of your computer. You will need to provide an external monitor system
or headphones.
Digital input/output cables for connecting the MD or DAT recorder are not
included
Although you can use an MD or DAT digital recorder to perform digital recording,
the cables for connecting the recorder to the UA-1X are not included. You will need
to provide these separately.
7
Page 8
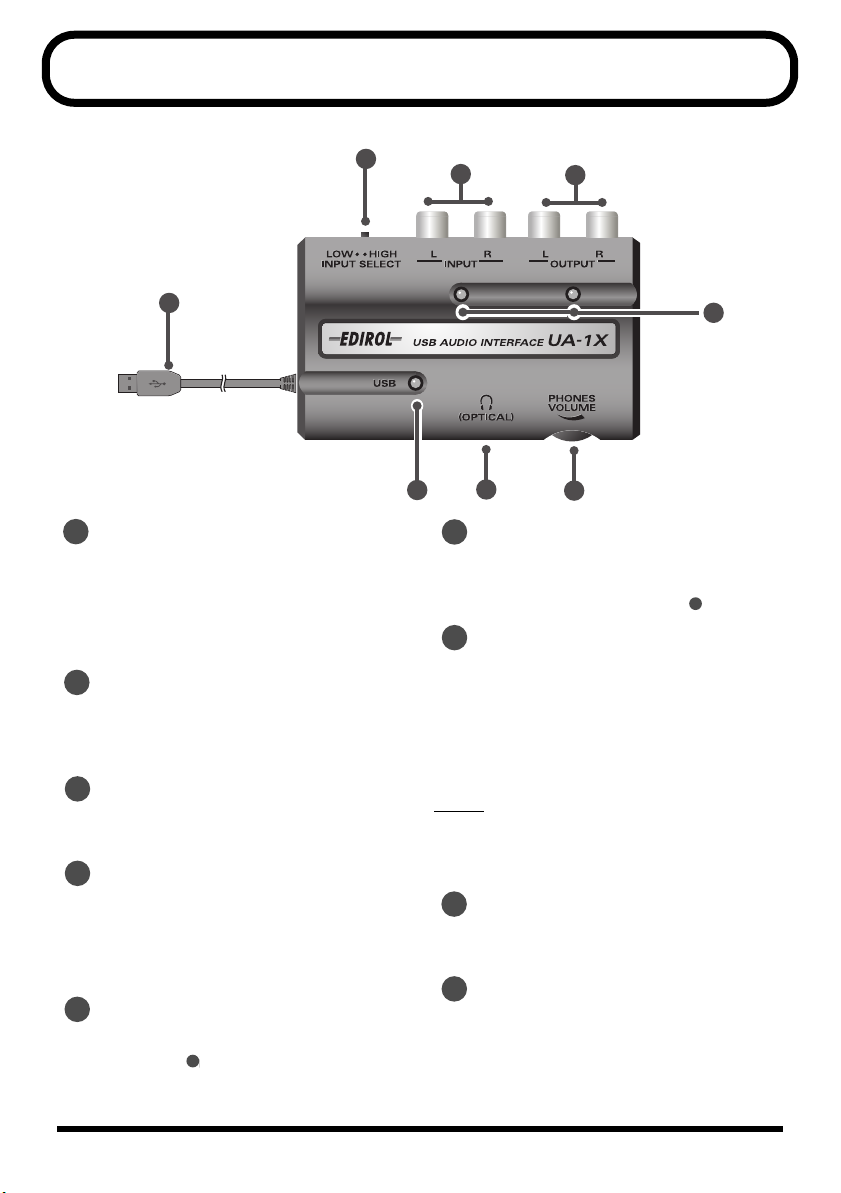
Panel Descriptions
fig.01-08_90
1
2
3
8
1
Input select switch
Set this switch appropriately for the device that
you connect to the input jacks. Normally, you will
leave this at the LOW setting. If the sound is
distorted because the signal level is high, set this
to HIGH.
2
Line input jacks
Make connections here when you want to input
audio signals from an audio device or MIDI
sound generator.
3
Line output jacks
Connect these to your audio equipment (AUX IN,
LINE IN), such as an AV amp or stereo system.
Output level indicator,
4
Input level indicator
The INPUT indicator will light when audio
is received through the line input jacks. The
OUTPUT indicator will light when audio is
output from the line output jacks.
5
Headphones volume
This adjusts the volume that is output from the
Headphone jack
Stereo set
(Cassette, record player)
UA-1X
Loop Connection
LINE OUT
INPUT
6
.
OUTPUT
LINE IN
You cannot adjust the volume of the signal that
is output from the digital output jack.
4
7
6
6
Headphone jack
5
A set of headphones can be connected here. Even
if headphones are connected, sound will still be
output from the
6
Digital output connector (optical)
Line output jacks
3
.
If you want to digitally output the audio signal
to a Dolby Digital decoding amp or to a digital
recorder such as an MD, use an optical cable
to make connections.
* The same jack serves as both the
headphone jack and digital output jack.
Optical
These are digital I/O jacks for connecting optical
cables. Digital I/O jacks for connecting coaxial
cables are labeled Coaxial.
7
USB indicator
This will light when the UA-1X is connected and
recognized to the computer.
8
USB cable
Connect this cable to the USB connector of your
computer.
8
Page 9
Using the UA-1X
This chapter explains the various ways the UA-1X can be connected, and introduces
some of its applications.
* To prevent malfunction and/or damage to speakers or other devices, always turn down the
volume, and turn off the power of all devices before disconnecting the USB cable.
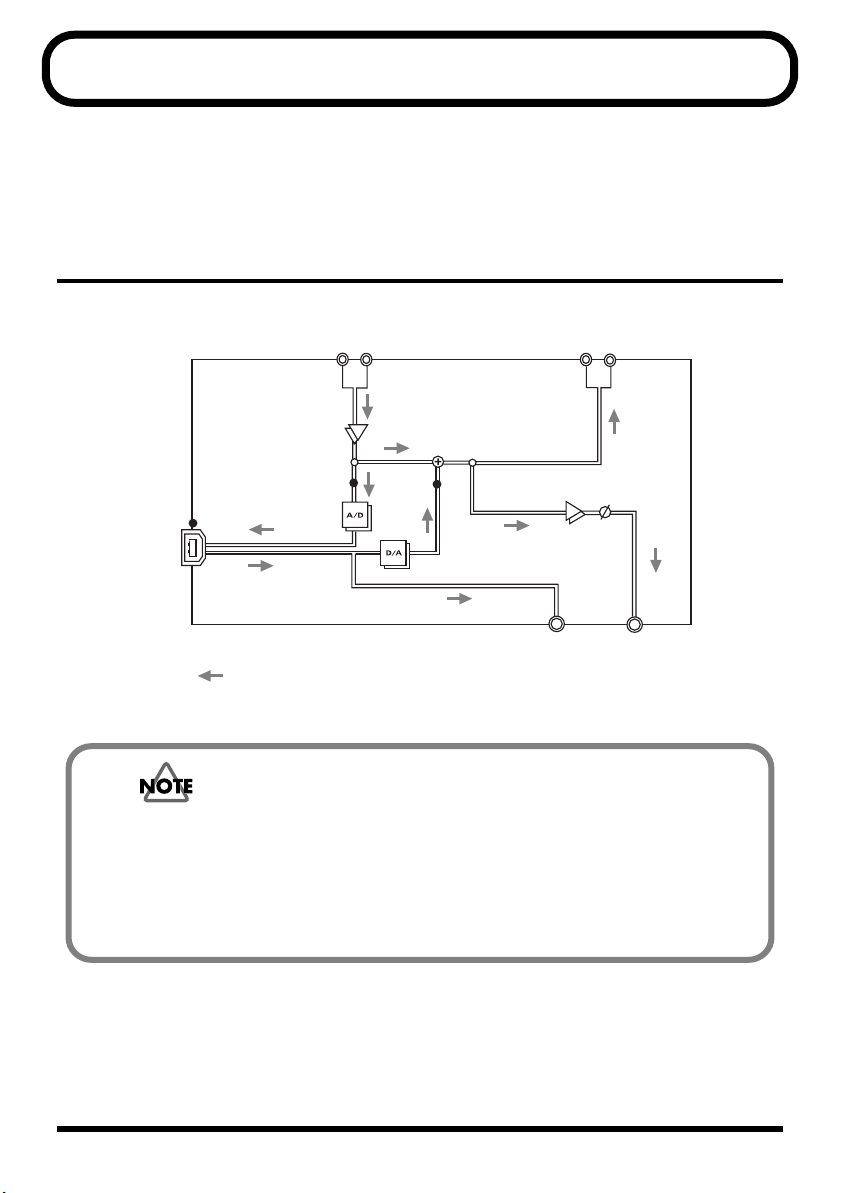
UA-1X Signal Flow Diagram
fig.diagram.e
AUDIO INPUT
RL
UA-1X
INPUT
SELECT
AUDIO OUTPUT
RL
OPTICAL
OUT
PHONES
VOLUME
PHONES
USB
LED
Signal flow
LED
LED
* The same jack serves as both the headphone jack and digital output jack.
As soon as you connect the UA-1X to your computer, sound will no longer
be output from the speakers of your computer.
• Connect an external monitor system or headphones to the UA-1X.
• If you want sound to be output from the speakers of your computer,
disconnect the UA-1X from your computer.
9
Page 10
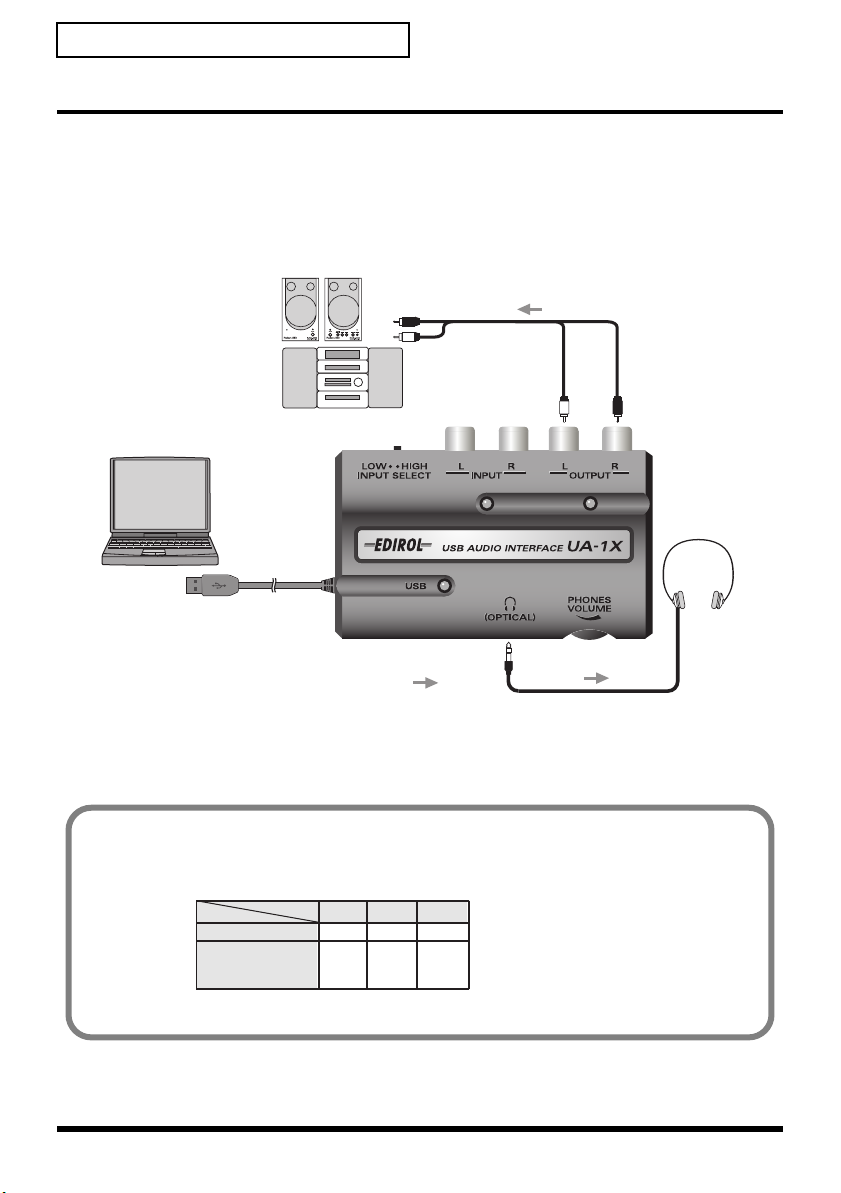
Using the UA-1X
Listening to Sound from Your Computer
As shown in the diagram, you can connect headphones or monitor speakers,
and monitor the playback sound from your application or the sound from the
instrument or audio device to which the UA-1X is connected.
fig.07-01
Stereo set,
Monitor speakers, etc.
Computer
USB
connector
External Input jacks
(LINE IN, AUX IN)
Signal flow
Audio Cable
OUTPUT
Stereo
Headphones
Signal flow
Set the desired sampling frequency for recording in the application being used for recording,
then proceed with recording. Available sampling frequencies vary depending on the operating
system used.
fig.table
OS
Mac OS 9/X ✕
Windows 98 SE/
Windows Me/
Windows 2000/XP
Frequency
32 kHz
❍❍❍
44.1kHz
48 kHz
❍✕
10
Page 11

Digitally Recording to MD
fig.07-02
Audio amplifier / MIDI Sound module
( Cassette, Record players)
Computer
USB
connector
Signal flow
External Input jacks
(LINE IN, AUX IN)
Audio Cable
OPTICAL
OUT
Optical
Digital
cable
DIGITAL INPUT
Using the UA-1X
OUTPUT
MD
11
Page 12
Using the UA-1X
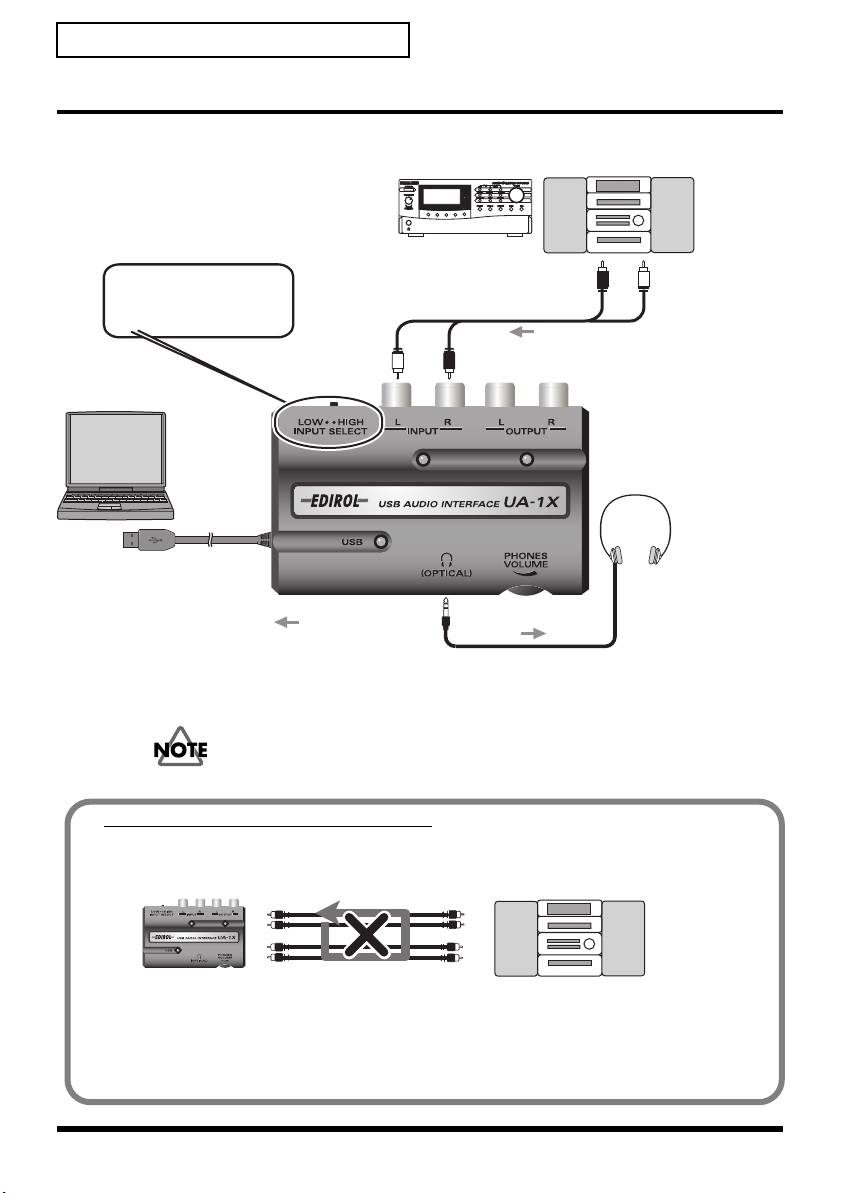
Recording from the AUX Input
fig.07-05
Audio amplifier / MIDI Sound module
( Cassette, Record players)
If the input signal level is high
(causing the sound to distort),
set this to "HIGH."
Computer
USB
connector
Signal flow
If the input signal level is high (causing the sound to distort), set INPUT SELECT
to “HIGH”.
If you are using a record player, use a player that has a built-in phono
equalizer. If your record player does not have a phono equalizer, output
the sound through a speaker system that has a phono equalizer.
Be Careful of Looped Connections
fig.loop
UA-1X
Loop Connection
INPUT
INPUT
LINE OUT
Audio Cable
Stereo set
(Cassette, record player)
Stereo
Headphones
External Output jacks
(LINE OUT)
12
OUTPUT
LINE IN
If you connect the UA-1X as shown in the above diagram with another device that
passes the input audio back to the output (e.g., a MD/DAT in recording mode), the
sound will loop between the UA-1X and the other device, causing oscillation and
producing an unexpected high volume. Be aware that such connections can cause
malfunctions or damage your speakers.
Page 13
Connections and Driver Installation (Windows)
* If you are a Macintosh user, refer to
(Macintosh)
(p. 23).
Before installing the driver
* The UA-1X cannot be used with Windows 95 or Windows NT.
* Exit all other applications of the Windows before you install the UA-1X driver.
* If you intend to connect the UA-1X and other USB devices to your computer and use them
simultaneously, disconnect all USB devices other than the UA-1X from the USB connector
before you install the driver. If a USB device other than the USB is left connected to your
computer when you install the driver, the driver may not be installed correctly.
In order to use the UA-1X, you must first install the USB Composite Device driver,
the USB Human Interface driver, and the USB Audio Device driver consecutively.
These drivers are included with Windows. If you are using Windows 98, this driver
is provided in the Microsoft Windows CD-ROM, so you will need to have the
Microsoft Windows CD-ROM ready.
(This is not necessary for Windows Me, 2000, or XP.)
What is a driver?
A driver is software that allows an application program running on your computer
to transfer data to and from the UA-1X when it is connected to your computer via
a USB cable.
The driver passes data from the application to the UA-1X, and passes data from the
UA-1X to the application.
fig.05-01.e
Connections and Driver Installation
Application
USB
Driver
Computer
USB
connector
USB cable
UA-1X
Español Italiano Français Deutsch English
13
Page 14

Connections and Driver Installation (Windows)
Making Connections and Installing the Driver
The installation procedure will differ depending on your
system. Please proceed to one of the following sections,
depending on the system you use.
• Windows XP/2000 users...................p. 14
• Windows Me users.............................p. 15
• Windows 98 users...............................p. 16
To prevent malfunction and/or damage to speakers or other
devices, always turn down the volume, and turn off the
power on all devices before disconnecting the USB cable.
It is not necessary to turn off the power of your computer.
Use a USB cable to connect the UA-1X to your computer
before turning on the power of your audio equipment.
■
Windows XP/2000 Users
1
With the UA-1X disconnected from your computer,
turn on your computer and start up Windows.
Disconnect all USB cables except for a USB keyboard and
USB mouse (if used).
14
2
Use a USB cable to connect the UA-1X to your
computer.
The UA-1X will be detected automatically, and the driver will
be installed.
3
After installing the driver, restart Windows.
Next, you need to make the driver settings.
→ Settings and Checking (p. 19)
If you are using Windows XP,
the installation has been
completed when the message
near the taskbar saying that
“Found New Hardware”
has disappeared.
This unit is equipped with
a protection circuit. A brief
interval (a few seconds) after
connecting a USB connector is
required before the unit will
operate normally.
Page 15
■
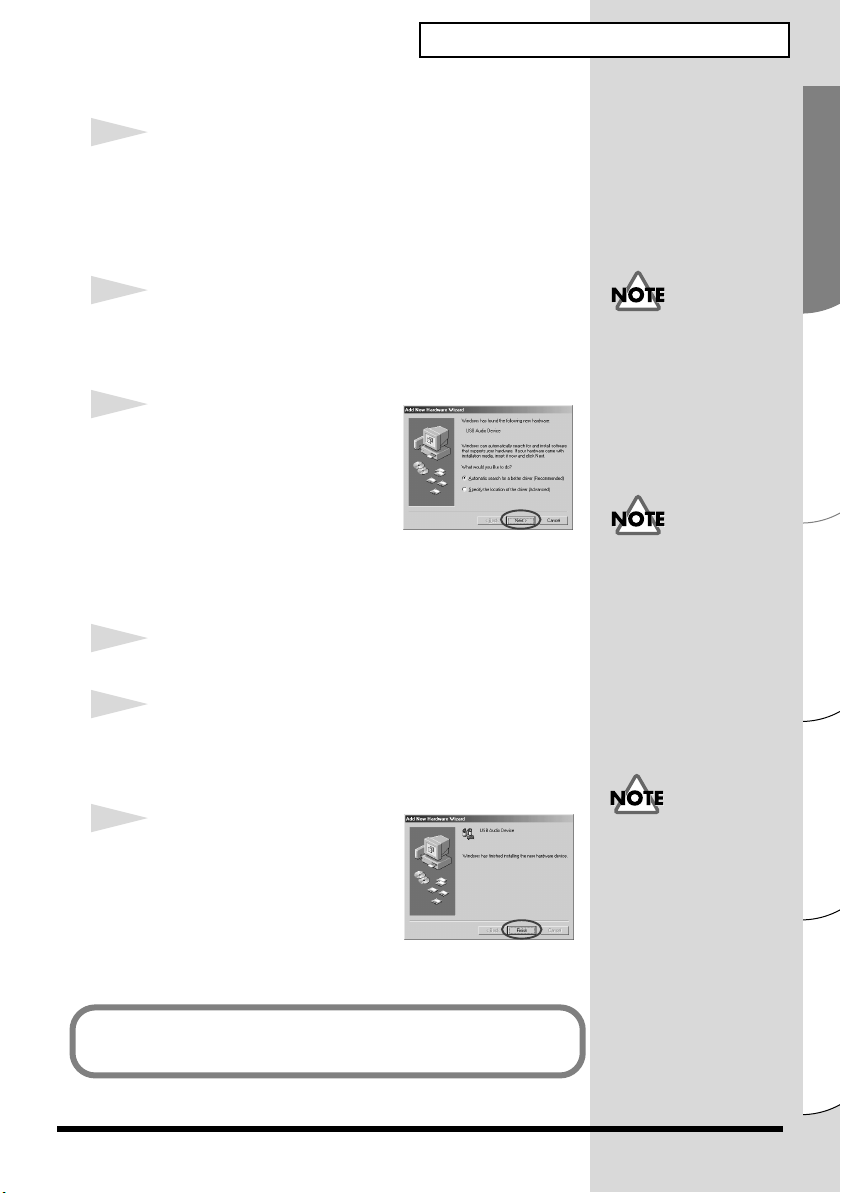
Windows Me Users
1
With the UA-1X disconnected from your computer,
turn on your computer and start up Windows.
Disconnect all USB cables except for a USB keyboard and
USB mouse (if used).
2
Use a USB cable to connect the UA-1X to your
computer.
fig.02-03.e
3
Windows will detect the
UA-1X, and the
Hardware Wizard”
will appear.
Make sure that
for a better driver (Recommended)
click
[Next]
.
“Add New
dialog box
Automatic search
Connections and Driver Installation (Windows)
is selected, and
This unit is equipped with
a protection circuit. A brief
interval (a few seconds) after
connecting a USB connector is
required before the unit will
operate normally.
Some time may be required
until this dialog box appears.
4
The search for the driver starts.
5
When the correct driver is found, driver installation
starts.
fig.02-04.e
6
When a dialog box informing
you that driver installation
has finished appears, click
[Finish]
Windows.
Next, you need to make the driver settings.
→ Settings and Checking (p. 19)
, and restart
Depending on your computing
setup, there may be a short
wait after the driver is
installed until the device
is recognized.
Español Italiano Français Deutsch English
15
Page 16
Connections and Driver Installation (Windows)
■
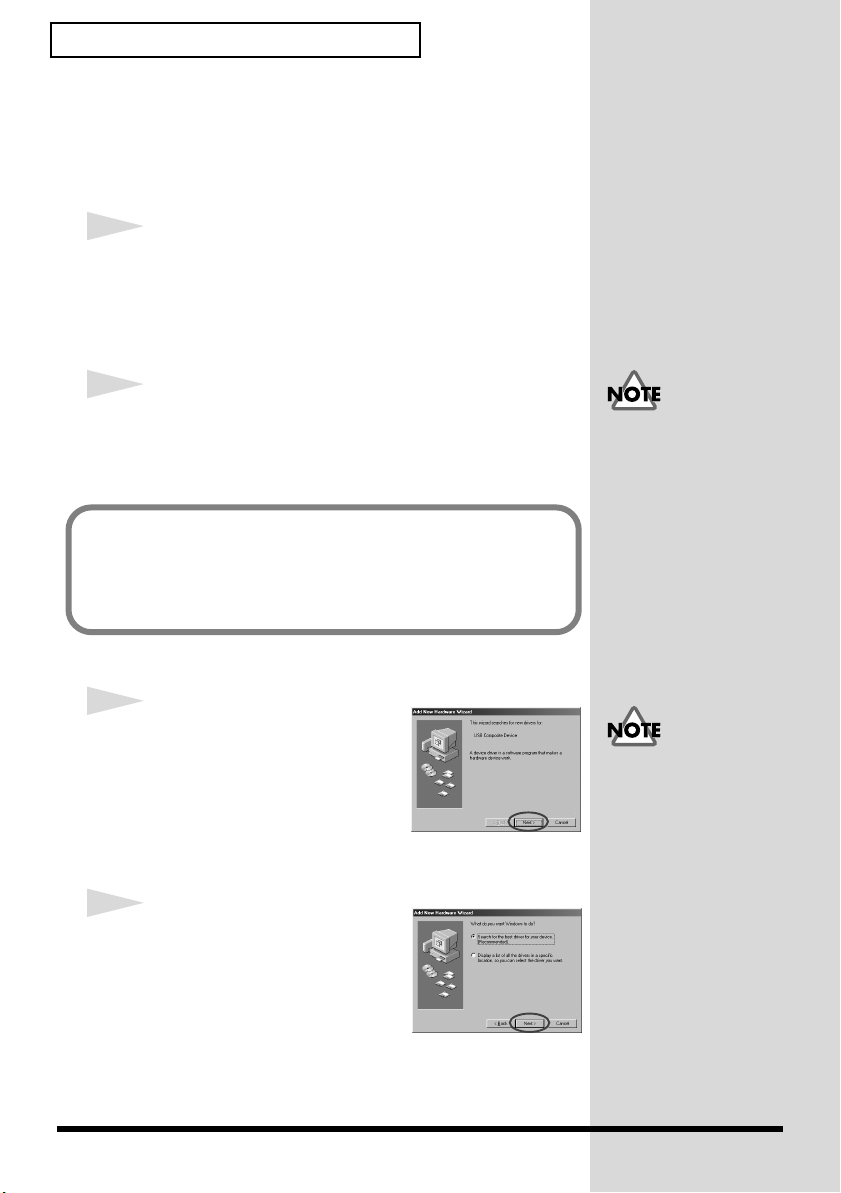
Windows 98 Users
Installation must be performed in the order of the
Composite Device driver, USB Human Interface Device
driver
, and then the
following procedure to perform the installation.
USB Audio Device driver
1
With the UA-1X disconnected from your computer,
turn on your computer and start up Windows.
Disconnect all USB cables except for a USB keyboard and
USB mouse (if used).
2
Insert the Microsoft Windows CD-ROM into your
CD-ROM drive, and use a USB cable to connect
the UA-1X to your computer.
Since some computers are sold with the contents of the
Microsoft Windows CD-ROM already in the hard disk, a
Microsoft Windows CD-ROM may not have been included.
If this is the case, you will be able to install the driver without
the Microsoft Windows CD-ROM
USB
. Use the
This unit is equipped with
a protection circuit. A brief
interval (a few seconds) after
connecting a USB connector
is required before the unit
will operate normally.
16
fig.02-05.e
3
A USB Composite Device will
be detected automatically, and
the
“Add New Hardware
Wizard”
Click
fig.02-06.e
dialog box will appear.
[Next]
.
4
When the display asks
do you want Windows to
do?”
, select
“Search for the
best driver for your device.
(Recommended)”
[Next]
.
If this dialog box does not
appear, refer to Problems
related to the USB driver
(p. 111)
“What
and click
Page 17
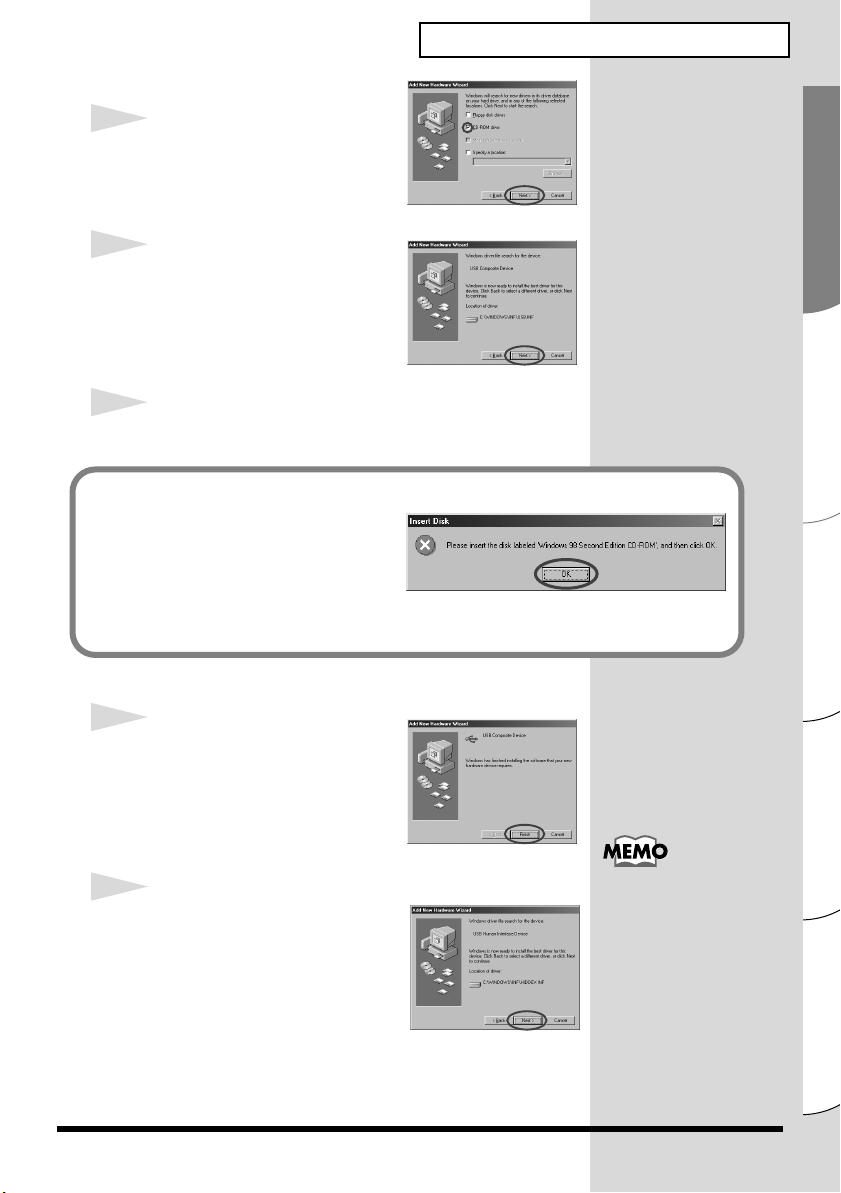
fig.02-07.e
5
Check
CD-ROM drive
click
[Next]
.
fig.02-08.e
6
Click
[Next]
.
* Depending on your system, the
Location of driver may differ from
the above illustration, but this is not
a problem.
7
Copying of the file (Driver) will begin.
fig.02-09.e
If the Windows CD-ROM is not
inserted in the CD-ROM drive,
a “Insert Disc” dialog box may
appear. If this occurs, insert the
Microsoft Windows CD-ROM
into the CD-ROM drive, and
click [OK].
fig.02-10.e
Connections and Driver Installation (Windows)
, and
8
When installation of the
Composite Device driver
finished, the following dialog
box will appear. Click
fig.02-11.e
9
Next, the
Interface Device
detected automatically, and the
“Add New Hardware Wizard”
dialog box will appear. Click
[Next]
installation in the same way
as in steps 4–7 (pp. 16–17).
USB Human
, and proceed with the
[Finish]
will be
USB
is
.
In step 6, the screen will
indicate “Windows driver file
search for the device: USB
Audio Device.”
Español Italiano Français Deutsch English
17
Page 18
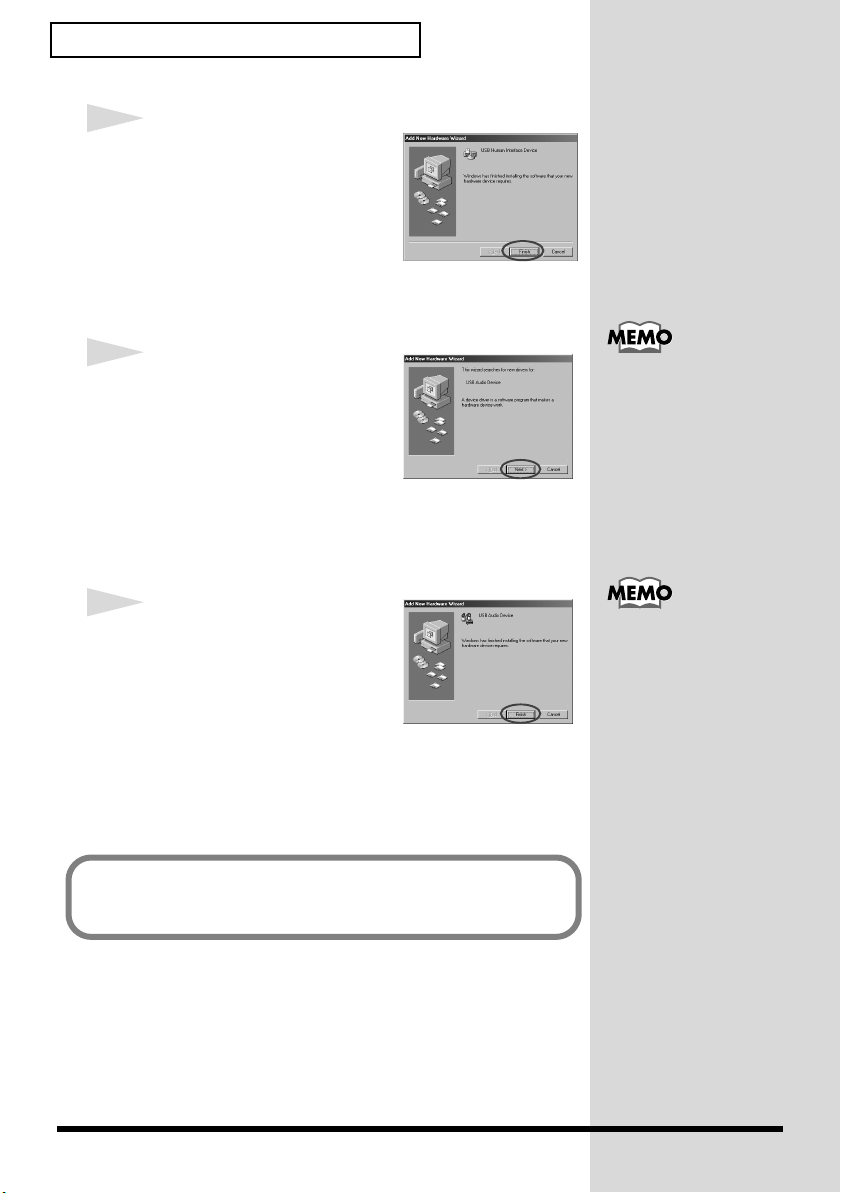
Connections and Driver Installation (Windows)
b
fig.02-12.e
10
When installation of the
Human Interface Device
driver
is finished, the
following dialog box will
appear. Click
fig.02-13.e
[Finish]
USB
.
11
Next, the
will be detected automatically,
and the
Wizard”
appear.
Click
way as in steps 4–7 (pp. 16– 17).
fig.02-14.e
USB Audio Device
“Add New Hardware
dialog box will
[Next]
, and proceed with the installation in the same
12
When installation of the
Audio Device driver
complete, a dialog box like the
one shown here will appear.
Click
[Finish]
This completes installation of the USB Composite Device
driver, the USB Human Interface Device driver, and the USB
Audio Device driver. Restart Windows.
Next, you need to make the driver settings.
→ Settings and Checking (p. 19)
.
USB
is
In step 6, the screen will
indicate “Windows driver file
search for the device: USB
Audio Device.”
Depending on your system,
the cursor may stay in the
hourglass shape for several
minutes after you click [OK],
ut you should simply keep
waiting.
18
Page 19
Connections and Driver Installation (Windows)
Settings and Checking
■
Specifying the Audio Input/Output Device
1
Click the Windows
Control Panel
then click
Control Panel
Start
button, and select
(In Windows XP, click the
.
.)
Start
2
Access
“Sound and Multimedia Properties”
(for Windows 98,
If using Windows XP/2000/Me:
In
Control Panel
icon to open the
dialog box.
* If the
Sound and Multimedia Properties
Windows XP:
In the
Control Panel
Devices
the
Windows Me:
In the left frame, click
Windows 98 users:
In
the
. Next, click
“Sound and Audio Devices Properties”
Control Panel
Multimedia Properties
“Multimedia Properties”
, double-click the
“Sounds and Multimedia Properties”
, click
Sounds and Audio Devices
View all Control Panel options.
, double-click the
Sounds and Multimedia
icon is not shown
Sounds, Speech, and Audio
dialog box.
Multimedia
dialog box.
icon to open
Settings -
button and
).
to access
3
Click the
Audio
tab.
4
As the
Preferred device
Preferred device
Audio CODEC
Click , and from the list that appears, click
CODEC
or
or
USB Audio Device
for
for
Sound recording
USB Audio Device
5
Click
[OK]
to complete the settings.
Sound playback
, select
.
USB Sudio
to select it.
and
USB
If you are using Windows XP,
set the Default device for
Sound playback and Default
device for Sound recording
to USB Audio CODEC.
If you are using Windows 98,
set the Preferred device for
Playback and Preferred
device for Recording to
USB Audio CODEC.
Depending on your system,
USB Audio Device will be
shown a number added, ex.
“USB Audio Device (1).”
19
Español Italiano Français Deutsch English
Page 20
Connections and Driver Installation (Windows)
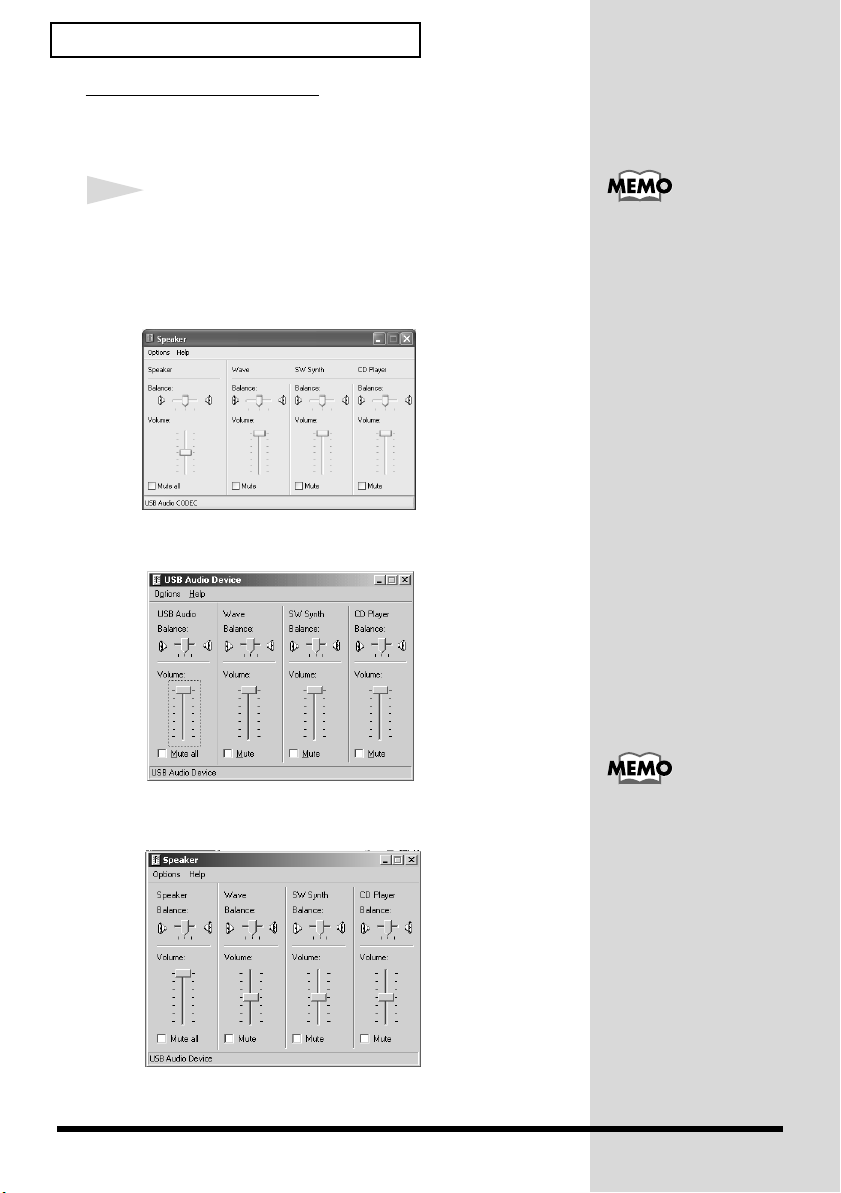
Volume Control Settings
The output volume of the UA-1X can be controlled by the
Windows Volume Control.
1
Click the Windows
(In Windows XP,
Entertainment – Volume Control
Windows XP users
fig.05-16ae_30
Windows Me users
fig.02-17.e.eps
Start
button, and select
All Programs
Programs
– Accessories –
)
to start it up.
If Volume Control is not
installed on your computer,
use Add/ Remove
Applications in the Control
Panel to install it. For details
on installation, refer to the
Windows owner’s manual
or Help.
Windows 2000 users/Windows 98 users
fig.02-18.e.eps
20
If you are using Windows
2000 and “CD Player” does
not appear, check the Digital
CD Playback item “Enable
digital CD audio for this
CD-ROM device.”
When using your
→
computer’s CD-ROM drive
to play an audio CD, or
when playing background
music for games with the
UA-1X (p. 22)
Page 21
Connections and Driver Installation (Windows)
b
j
j
2
You can raise or lower the slider to adjust the volume
of the UA-1X. The following items can be set.
USB Audio
(Speaker)
CD Player
Wave
SW Synth
*1 Depending on your Windows version, this may be displayed as
an “analog connector.”
*2 If the playback of the CD does not change when you adjust this
volume, change the WAVE volume.
Adjust the volume of the analog outputs
(line output and headphone output).
The digital output will not change (*1).
Adjust the “CD Music” volume for the
CD-ROM drive of your computer (*2).
Adjust the volume that is output from
the audio output device “USB Audio
Device.” The digital output and analog
output will change.
Adjust the volume of the software
synthesizer built into Windows.
By turning up the volume
control you can output the
sound from your computer
through the UA-1X at the
est audio quality.
If Mute is checked, or if the
slider is in the lowest position,
no sound will be output from
the UA-1X.
If the UA-1X is connected,
Windows will not output
sound from your computer's
speakers. Since the sound from
your computer will be output
from the UA-1X's headphone
ack or line output jacks rather
than from your computer's
speakers, you will need to
connect headphones or
monitor speakers to the
UA-1X. Alternatively, you
can connect the UA-1X's line
output jacks to the LINE input
acks of your computer.
Español Italiano Français Deutsch English
21
Page 22
Connections and Driver Installation (Windows)
When using your computer’s CD-ROM drive to play an audio CD, or when
playing background music for games with the UA-1X
Windows XP/2000 users:
1. Open the System Properties dialog box.
Select Start | Settings | Control Panel, and in the Control Panel, double-click
the System icon.
For Windows XP, select Start | Control Panel, and in the Control Panel,
double-click the System icon.
Alternatively, click Control Panel | Performance and Maintenance. Next,
click the System icon.
2. Open the Device Manager.
Click the Hardware tab, and click the Device Manager button.
3. Open the CD-ROM drive’s Properties.
In CD-ROM drive, double-click the CD-ROM drive that you are using. With
Windows XP, you should next click the Properties tab.
In Digital CD Playback, check the “Enable digital CD audio for this
CD-ROM device” item.
Windows Me users:
1. Open the System Properties dialog box.
Select Start | Settings | Control Panel, and in the Control Panel, double-click
the System icon.
2. Click the Device Manager tab.
3. Open the CD-ROM drive’s Properties.
Double-click the CD-ROM icon, and then double-click the CD-ROM drive that
you are using.
4. Click the Properties tab, and in Digital CD Playback, check the “Enable
digital CD audio for this CD-ROM device” item.
22
Windows 98 users:
1. Open the Multimedia Properties dialog box.
Select Start | Settings | Control Panel, and in Control Panel, double-click the
Multimedia icon.
2. Click the CD Music tab, and check the “Enable digital CD audio for this
CD-ROM device” item.
* Depending on your system, playback may still not be possible. For details, refer to
information provided by your computer’s manufacturer. If you are using a PC-card
(PCMCIA) type CD-ROM drive, playing back WAVE data from a CD-ROM or playing
an audio CD may cause interrupted sound, or possibly no sound at all.
Page 23
Connections and Driver Installation (Macintosh)
* If you are a Windows user, refer to
(p. 13).
When you start up your computer with the UA-1X connected, the computer may
become unstable. If this occurs, start up your computer before connecting the
UA-1X, and connect the UA-1X after start-up.
Before Installing the Driver
In order to use the UA-1X, you must first install a driver. UA-1X uses a driver
included with Mac OS. You do not need to use the CD-ROM that is included
with the UA-1X.
What is a Driver?
A driver is software that allows an application program running on your computer
to transfer data to and from the UA-1X when it is connected to your computer via
a USB cable.
The driver passes data from the application to the UA-1X, and passes data from
the UA-1X to the application.
fig.05-01.e
Application
USB
Driver
Connections and Driver Installation (Windows)
USB
connector
USB cable
Computer
The installation procedure will differ depending on your
system. Please proceed to one of the following sections,
depending on the system you use.
• Mac OS 9 users....................................p. 24
• Mac OS X users ...................................p. 28
UA-1X
Español Italiano Français Deutsch English
23
Page 24
Connections and Driver Installation (Macintosh)
Connections and Driver Installation (OS 9)
To prevent malfunction and/or damage to speakers or other
devices, always turn down the volume, and turn off the
power on all devices before disconnecting the USB cable. It is
not necessary to turn off the power of your computer. Use
a USB cable to connect the UA-1X to your computer before
turning on the power of your audio equipment.
1
With the UA-1X disconnected, start up the Macintosh.
Disconnect all USB cables except for a USB keyboard and USB
mouse (if used).
2
Exit all currently running software (applications).
If you are using virus checking or similar software, be sure
to exit it as well.
fig.03-02.e
3
After starting up Mac
OS, select
System Profiler
the
The
Profiler”
appear.
Apple
Apple
menu.
“Apple System
dialog box will
from
24
4
Click the
Devices and Volumes
5
Choose
menu.
Update all information
from the
6
Use a USB cable to connect the UA-1X to your
computer.
tab.
Commands
This unit is equipped with
a protection circuit. A brief
interval (a few seconds) after
connecting a USB connector is
required before the unit will
operate normally.
Page 25
7
Wait for approximately five seconds.
UA-1X uses a driver included with Mac OS.
While you are waiting, the screen display will not change,
but the UA-1X is being detected. Do not touch the mouse
or keyboard.
fig.03-04.e
8
In order to check that
detection has been
completed, once again
go to
Apple System
Profiler
Update all information
In the USB area, three audio devices will be displayed.
If these are displayed correctly, driver installation has
succeeded. In the File menu, click Quit to close “Apple
System Profiler.”
If they are not displayed correctly, disconnect the UA-1X,
wait for about ten seconds, and then repeat the procedure
from step 2.
, and select
from the
Commands
Connections and Driver Installation (Macintosh)
menu.
■
Settings and Checking
Adjusting the Sound Input/Output
fig.03-05.e
1
From the
menu, select
Control Panels Sound
Sound
Apple
to open the
dialog.
2
Click the
tab or
Settings
Speakers
Speaker
.
Español Italiano Français Deutsch English
25
Page 26

Connections and Driver Installation (Macintosh)
fig.03-06.e
3
Turn down the volume
on the UA-1X, and on
your audio equipment,
then click
fig.03-07.e
[Start Test]
.
4
Use the
bar to adjust the volume.
When you are finished,
click
Test sounds are output from
left to right, along with what
appears on the screen.
[Main Volume]
[Stop Test]
.
The contents of the display
will differ depending on your
operating system and data.
Depend on the your OS
version, there is no Main
Volume bar. In that case, use
the Volume bar in the Output
to adjust the volume.
26
fig.03-08.e
5
In the
Sound
click the
In
Choose a source for
sound input
USB audio
* Do not check
through output device.”
dialog box,
Input
tab.
, select
.
“Play sound
If USB audio is not displayed,
close the “Sound” dialog box,
and disconnect the UA-1X’s
USB cable from the Macintosh.
Perform the driver installation
once again.(p. 24)
Page 27
Connections and Driver Installation (Macintosh)
6
When you are finished making settings, close the
“Sound”
Select
Known issues: UA-1X
• While the audio application is recording or playing, do not connect/disconnect
the USB cable. Doing so may cause the application to freeze.
• You may hear sound hopping and/or noise when you record and play back at the
same time due to high load on the CPU. However, the noise should not be in the
recording itself. Such noise should only be found in the playback signal.
• The standard driver that comes with Mac OS is not ASIO compatible.
dialog box.
Quit
from the
File
menu.
27
Español Italiano Français Deutsch English
Page 28
Connections and Driver Installation (Macintosh)
Connections and Driver Installation (OS X)
* The
UA-1X
and
Mac OS 10.2
■
Make Connections and System Sound Input/Output Settings
are used for this explanation.
1
Use a USB cable to connect the UA-1X to your
Macintosh.
2
Open the
Sound
fig.macX-1
System Preference
.
dialog box and click
3
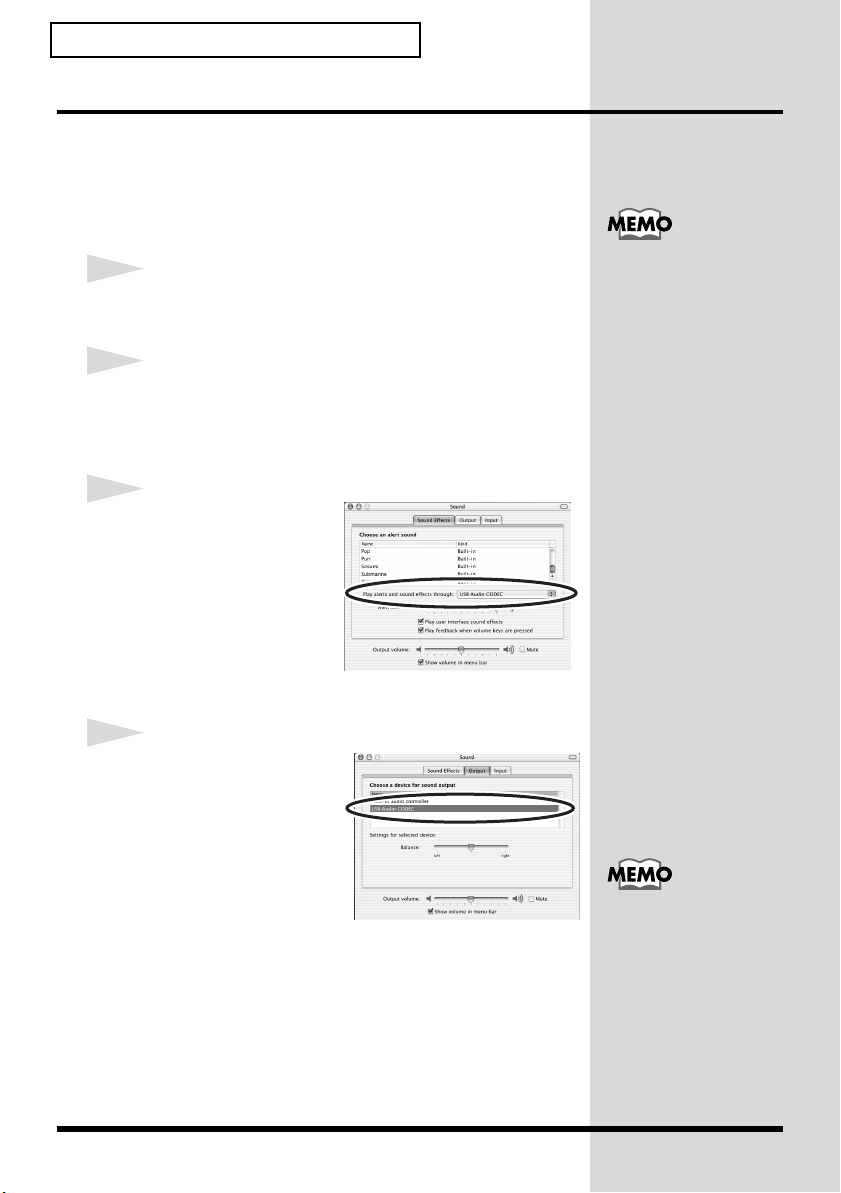
In the
Sound Effects
tab, click
and sound effects
through
USB Audio CODEC
as the playback device
for sound effects.
figmacX-2, macOSX-3.
Play alerts
and choose
4
Click the
and choose
Audio CODEC
device that will output
sound.
Output
USB
tab,
as the
You cannot use the UA-1X in
the Mac OS X Classic
environment.
28
If no sound is output from the
speaker (internal speaker) of
the Macintosh, choose Built-in
audio controller in the Output
tab.
Page 29
figmacX-2, macOSX-3.
5
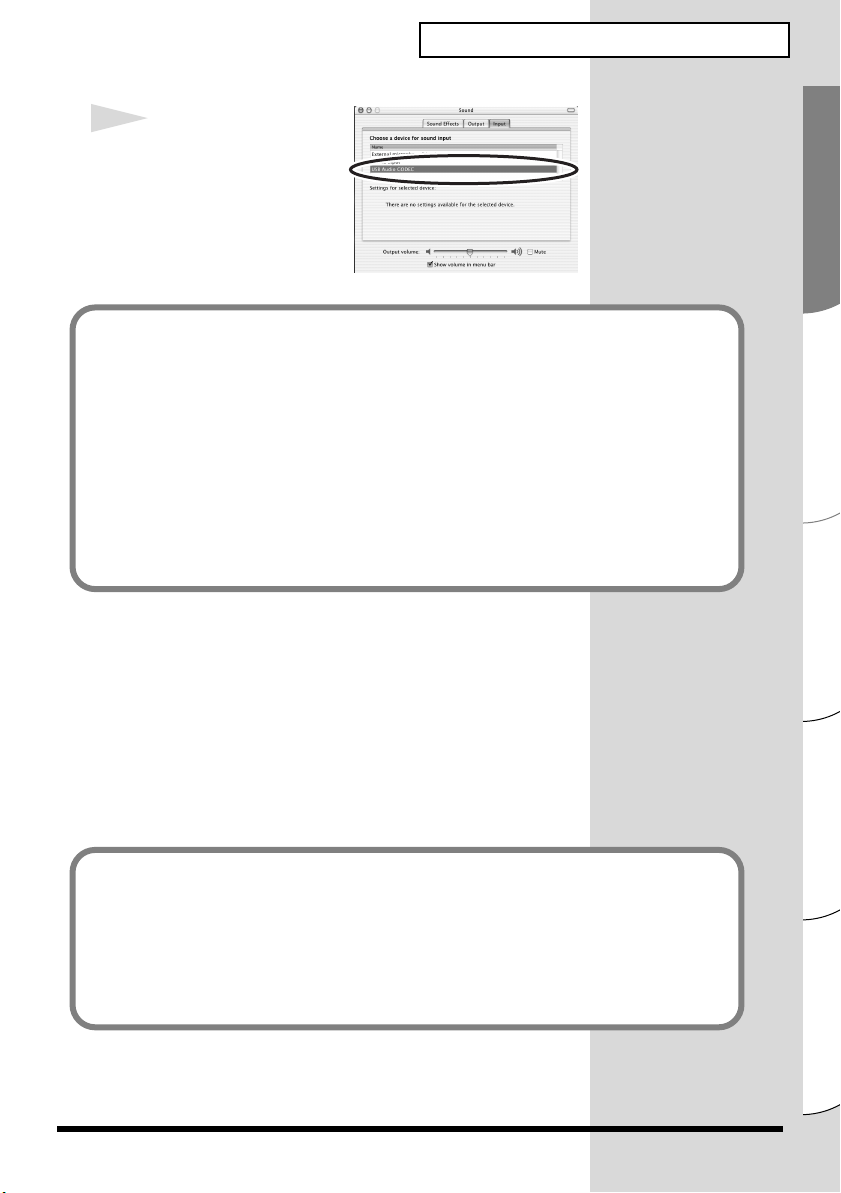
If the
Input
tab is
displayed, choose
Audio CODEC
device for inputting
sounds.
Known issues: UA-1X
Caution
Please check the following before you use your software.
• Use a USB cable to connect the UA-1X to your computer before you
start up your software.
• Do not disconnect the UA-1X's USB cable while your software is
running.
• Exit your software before you disconnect the UA-1X's USB cable.
• Turn off the Sleep settings of your Macintosh.
• The UA-1X will not operate in the Mac OS X Classic environment.
You can not use it if the Classic environment is running.
USB
as the
Connections and Driver Installation (Macintosh)
■
Audio Software Settings
Use a USB cable to connect the UA-1X to your computer
before you start up your software.
If your software allows you to make audio input/output
settings, choose
* For details, refer to the owner's manual of the software you
are using.
Known issues: UA-1X
• While the audio application is recording or playing, do not connect/disconnect
the USB cable. Doing so may cause the application to freeze.
• You may hear sound hopping and/or noise when you record and play back at the
same time due to high load on the CPU. However, the noise should not be in the
recording itself. Such noise should only be found in the playback signal.
• The standard driver that comes with Mac OS is not ASIO compatible.
USB Audio CODEC
.
Español Italiano Français Deutsch English
29
Page 30

MEMO
Page 31

Anschlüsse und Treiberinstallation (Windows)
* Wenn Sie ein Macintosh-Anwender sind, lesen Sie bitte
(Macintosh)
(S. 43).
Vor der Installation des Treibers
* Das UA-1X kann unter Windows 95 oder Windows NT nicht verwendet werden.
* Beenden Sie alle anderen Anwendungen unter Windows, bevor Sie den UA-1X-Treiber
installieren.
* Wenn Sie das UA-1X und andere USB-Geräte mit Ihrem Computer verbinden und
gleichzeitig verwenden möchten, trennen Sie alle USB-Geräte außer dem UA-1X vom
USB-Anschluss, bevor Sie den Treiber installieren. Wenn mit Ihrem Computer außer dem
UA-1X ein weiteres USB-Gerät verbunden ist, während Sie den Treiber installieren, wird
der Treiber eventuell nicht fehlerfrei installiert.
Bevor Sie das UA-1X benutzen können, müssen Sie zuerst nacheinander die Treiber
für das USB-Verbundgerät, die USB Human Interface und das USB-Audiogerät
installieren. Diese Treiber sind in Windows enthalten. Wenn Sie Windows 98
verwenden, befinden sich diese Treiber auf der Microsoft Windows CD-ROM,
Sie sollten daher die Microsoft Windows CD-ROM bereithalten.
(Dies ist nicht erforderlich für Windows Me, 2000 oder XP.)
Was ist ein Treiber?
Ein Treiber ist Software, die es einem Anwendungsprogramm auf Ihrem Computer
ermöglicht, Daten zum/vom UA-1X zu übertragen, wenn das Gerät an Ihren Computer
via USB-Kabel angeschlossen ist.
Der Treiber überträgt die Daten der Anwendung an das UA-1X sowie die Daten vom
UA-1X an die Anwendung.
fig.05-01.e
Anschlüsse und Treiberinstallation
Application
USB
Driver
Computer
USB
connector
USB cable
UA-1X
Español Italiano Français Deutsch English
31
Page 32

Anschlüsse und Treiberinstallation (Windows)
Anschlüsse und Treiberinstallation
Die Vorgehensweise bei der Installation hängt von Ihrem
System ab. Bitte lesen Sie abhängig von dem von Ihnen
verwendeten System in einem der folgenden Abschnitte
weiter.
• Windows XP/2000-Anwender.........S. 32
• Windows Me-Anwender...................S. 33
• Windows 98-Anwender.....................S. 34
Um Fehlfunktionen und/oder Schäden an Lautsprechern
oder anderen Geräten zu verhindern, reduzieren Sie stets
die Lautstärke und schalten alle Geräte ab, bevor Sie das
USB-Kabel ausstecken. Es ist nicht erforderlich, den
Computer auszuschalten. Verwenden Sie ein USB-Kabel,
um das UA-1X an Ihren Computer anzuschließen, bevor
Sie Ihre Audiogeräte einschalten.
■
Windows XP/2000-Anwender
1
Trennen Sie das UA-1X von Ihrem Computer, schalten
Sie Ihren Computer ein und starten Sie Windows.
Stecken Sie alle USB-Kabel außer der USB-Tastatur und
der USB Maus aus (falls vorhanden).
32
2
Schließen Sie das UA-1X an Ihren Computer mit
einem USB-Kabel an.
Das UA-1X wird vom Computer automatisch erkannt und
der Treiber wird installiert.
3
Starten sie Windows neu, nachdem Sie den Treiber
installiert haben.
Nun nehmen Sie die Einstellungen für den Treiber vor.
→ Einstellungen und Überprüfung (S. 38)
Wenn Sie Windows XP
verwenden, wurde die Installation fertiggestellt, sobald
eine Meldung in der TaskLeiste angezeigt wird, die Sie
darüber informiert, dass der
“Hardwareassistent” nicht
mehr aktiv ist.
Dieses Gerät ist mit einem
Schutzschaltkreis ausgestattet.
Nach dem Anschluss eines
USB-Steckers benötigt das
Gerät eine kurze Zeitspanne
(einige Sekunden), bis es den
normalen Betrieb aufnimmt.
Page 33

■
b
Windows Me-Anwender
1
Trennen Sie das UA-1X von Ihrem Computer,
schalten Sie Ihren Computer ein und starten
Sie Windows.
Stecken Sie alle USB-Kabel außer der USB-Tastatur und
der USB Maus aus (falls vorhanden).
2
Schließen Sie das UA-1X an Ihsren Computer mit
einem USB-Kabel an.
fig.02-03.e
3
Windows erkennt
anschließend das UA-1X und
das Dialogfeld
Assistent”
Stellen Sie sicher, dass
Automatisch nach geeigneten Treiber suchen
(empfohlen)
“Hardware-
wird angezeigt.
ausgewählt ist und klicken Sie auf
4
Die Suche nach dem Treiber beginnt.
Anschlüsse und Treiberinstallation (Windows)
Dieses Gerät ist mit einem
Schutzschaltkreis ausgestattet.
Nach dem Anschluss eines
USB-Steckers benötigt das
Gerät eine kurze Zeitspanne
(einige Sekunden), bis es den
normalen Betrieb aufnimmt.
[Next]
.
Es kann einige Zeit dauern,
is dieses Dialogfeld
erscheint.
5
Sobald der richtige Treiber gefunden wurde, beginnt
der Prozess der Treiberinstallation.
fig.02-04.e
6
Wenn ein Dialogfeld
erscheint, das Sie darüber
informiert, dass die
Treiberinstallation
abgeschlossen ist, klicken
Sie auf
[Finish]
(Beenden)
und starten Windows neu.
Nun nehmen Sie die Einstellungen für den Treiber vor.
→ Einstellungen und Überprüfung (S. 38)
Abhängig von Ihrer
Computerinstallation kann
es etwas dauern, bis das
Gerät erkannt wird, nachdem
der Treiber installiert wurde.
Español Italiano Français Deutsch English
33
Page 34

Anschlüsse und Treiberinstallation (Windows)
b
■
Windows 98-Anwender
Die Installation muss in der Reihenfolge
USB Human Interface Device
erfolgen. Gehen Sie bei der Installation wie anschließend
beschrieben vor.
1
Trennen Sie das UA-1X von Ihrem Computer, schalten
Sie Ihren Computer ein und starten Sie Windows.
Stecken Sie alle USB-Kabel außer der USB-Tastatur und
der USB Maus aus (falls vorhanden).
2
Legen Sie die Microsoft Windows CD-ROM in Ihr
CD-ROM-Laufwerk ein und verwenden Sie ein
USB-Kabel, um das UA-1X an Ihren Computer
anzuschließen.
Da bei einigen Computern bereits beim Kauf der Inhalt
der Microsoft Windows CD-ROM auf der Festplatte
gespeichert ist, befand sich die Microsoft Windows
CD-ROM eventuell nicht im Lieferumfang Ihres PCs.
Wenn das der Fall ist, kann die Installation des Treibers
auch ohne die Microsoft Windows CD-ROM erfolgen.
USB-Verbundgerät
und
USB-Audiogerät
,
Dieses Gerät ist mit einem
Schutzschaltkreis ausgestattet.
Nach dem Anschluss eines
USB-Steckers benötigt das
Gerät eine kurze Zeitspanne
(einige Sekunden), bis es den
normalen Betrieb aufnimmt.
fig.02-05.e
3
Das USB-Verbundgerät wird
automatisch erkannt und das
Dialogfeld
Assistent”
Klicken Sie auf
fig.02-06.e
“Hardware-
wird angezeigt.
[Next]
.
Wenn dieses Dialogfeld nicht
angezeigt wird, lesen Sie
itte Problems related to
the USB driver (S. 111).
4
Wenn die Anzeige fragt,
möchten Sie vorgehen?”
wählen Sie
“Nach dem besten
Treiber für das Gerät suchen.
(empfohlen)”
und klicken Sie
anschließend auf
34
[Next]
“Wie
,
(Weiter).
Page 35

fig.02-07.e
5
Wählen Sie
und klicken Sie auf
(Weiter).
fig.02-08.e
CD-ROM-Gerät
[Next]
6
Klicken Sie auf
* Abhängig von Ihrem System kann sich
die Position des Treibers von der
obigen Abbildung unterscheiden,
aber das ist kein Problem.
[Next]
.
7
Das Kopieren der Datei (Treiber) beginnt.
fig.02-09.e
Wenn die Microsoft Windows
CD-ROM nicht in das CD-ROMLaufwerk eingelegt wurde,
wird eventuell das Dialogfeld
“Diskette einlegen” angezeigt.
In diesem Fall legen Sie die
Microsoft Windows CD-ROM
in das CD-ROM-Laufwerk
ein und klicken auf [OK].
Anschlüsse und Treiberinstallation (Windows)
35
Español Italiano Français Deutsch English
Page 36

Anschlüsse und Treiberinstallation (Windows)
fig.02-10.e
8
Sobald die Installation des
Treibers
USB-Verbundgerät
beendet ist, wird folgendes
Dialogfeld angezeigt. Klicken
Sie auf
[Finish]
fig.02-11.e
.
9
Nun wird das
Interface-Gerät
erkannt, und das Dialogfeld
“Hardware-Assistent”
angezeigt. Klicken Sie auf
[Next]
(Weiter) und setzen
Sie die Installation wie in den
Schritten 4-7 beschrieben
fort (S. 34-35).
fig.02-12.e
USB Human
automatisch
wird
In Schritt 6 zeigt der
Bildschirm die Meldung
“Die Treiberdatei für
folgendes Gerät wird
gesucht: USB-Audiogerät.”
36
10
Sobald die Installation des
USB Human InterfaceTreibers
folgendes Dialogfeld
angezeigt. Klicken Sie
auf
beendet ist, wird
[Finish]
.
Page 37

fig.02-13.e
Anschlüsse und Treiberinstallation (Windows)
11
Nun wird das
Audiogerät
erkannt, und das Dialogfeld
“Hardware-Assistent”
wird angezeigt.
Klicken Sie auf
wie in den Schritten 4-7 beschrieben fort (S. 34-35).
fig.02-14.e
USB-
automatisch
[Next]
(Weiter) und setzen Sie die Installation
12
Sobald die Installation des
Treibers
beendet ist, wird ein
Dialogfeld ähnlich wie hier
angezeigt. Klicken Sie auf
[Finish]
Damit ist die Installation der Treiber USB-Verbundgerät,
USB Human Interface Device und USB-Audiogerät beendet.
Starten Sie Windows neu.
Nun nehmen Sie die Einstellungen für den Treiber vor.
→ Einstellungen und Überprüfung (S. 38)
USB-Audiogerät
.
In Schritt 6 zeigt der
Bildschirm die Meldung
“Die Treiberdatei für
folgendes Gerät wird
gesucht: USB-Audiogerät.”
Abhängig von Ihrem System
ist es möglich, dass der
Mauszeiger minutenlang
als Sanduhr angezeigt wird,
nachdem Sie auf [OK]
geklickt haben. Warten Sie
in diesem Fall, bis das System
nicht mehr ausgelastet ist.
37
Español Italiano Français Deutsch English
Page 38

Anschlüsse und Treiberinstallation (Windows)
Einstellungen und Überprüfung
■
Angabe des Audioeingabe/Ausgabegeräts
1
Klicken Sie auf die Windows-Schaltfläche
und wählen Sie
(In Windows XP klicken Sie auf die Schaltfläche
und anschließend auf
Einstellungen - Systemsteuerung
Systemsteuerung
Start
Start
.)
2
Öffnen Sie die
Multimedia”
für Multimedia”
Bei Verwendung von Windows XP/2000/Me:
Doppelklicken Sie in der
[Sounds und Multimedia]
“Eigenschaften für Sounds und Multimedia”
* Wenn das Dialogfeld
Multimedia
Windows XP:
Klicken Sie in der
und Audiogeräte
Audiogeräte
für Sound- und Audiogeräte”
Windows Me:
Klicken Sie auf
anzeigen
Windows 98-Anwender:
Doppelklicken Sie in der
[Multimedia]
Multimedia
“Eigenschaften von Sounds und
(für Windows 98,
“Eigenschaften
).
“Systemsteuerung
, um das Dialogfeld
Eigenschaften von Sounds und
nicht angezeigt wird
Systemsteuerung
. Nun klicken Sie auf
um auf das Dialogfeld
Alle Optionen der Systemsteuerung
im linken Rahmen.
Systemsteuerung
, um das Dialogfeld
zu öffnen.
auf
Sound und
“Eigenschaften
zuzugreifen.
Eigenschaften für
auf das Symbol
zu öffnen.
Sounds, Sprache
auf das Symbol
.
38
Page 39

3
Klicken Sie auf die Registerkarte
Audio
4
Wählen Sie als
und
Bevorzugtes Gerät
CODEC
Klicken Sie auf und klicken Sie in der angezeigten Liste
auf
USB Audio CODEC
Gerät auszuwählen.
Bevorzugtes Gerät
oder
USB-Audiogerät
für
für
Aufnahme USB Audio
.
oder
USB-Audiogerät
5
Klicken Sie auf
abzuschließen.
[OK]
, um die Konfiguration
Anschlüsse und Treiberinstallation (Windows)
.
Wiedergabe
, um dieses
Wenn Sie mit Windows XP
arbeiten, wählen Sie als
Standardgerät für die
Audiowiedergabe und als
Standardgerät für die
Audioaufnahme USB
Audio CODEC.
Wenn Sie mit Windows 98
arbeiten, wählen Sie als
Bevorzugtes Gerät für die
Wiedergabe und als
Bevorzugtes Gerät für die
Aufnahme USB Audio
CODEC.
Abhängig von Ihrem System
wird USB-Audiogerät mit
einer zusätzlichen Nummer
angezeigt, z.B. “USB-
Audiogerät (1).”
39
Español Italiano Français Deutsch English
Page 40

Anschlüsse und Treiberinstallation (Windows)
Einstellung der Lautstärkeregelung
Die Ausgabelautstärke des UA-1X kann mit der
Lautstärkeregelung von Windows gesteuert werden.
1
Klicken Sie auf die Windows
und wählen Sie
Programme
Lautstärkeregelung
Windows XP-Anwender
fig.05-16ae_30
Windows Me-Anwender
fig.02-17.e.eps
Programme
– Zubehör – Unterhaltungsmedien –
)
, um sie zu starten.
Start
-Schaltfläche
(Unter Windows XP
Alle
Wenn die Lautstärkeregelung auf Ihrem Computer
nicht installiert ist, verwenden
Sie das Symbol Software in
der Systemsteuerung, um
sie zu installieren. Um Details
zur Installation zu erhalten,
lesen Sie bitte das Benutzerhandbuch für Windows oder
rufen die Windows Hilfe auf.
Windows 2000-Anwender/Windows 98-Anwender
fig.02-18.e.eps
40
Wenn Sie mit Windows 2000
arbeiten und “CD Player”
nicht angezeigt wird,
aktivieren Sie die Option
Digitale CD-Wiedergabe in
“Digitale CD-Wiedergabe
für den CD-Player
aktivieren.”
Wenn Sie das CD-ROM-
→
Gerät Ihres Computer’s für
das Abspielen einer AudioCD verwenden oder wenn
Sie Hintergrundmusik für
Spiele mit dem UA-1X
abspielen (S. 42)
Page 41

2
b
Sie können den Regler nach oben oder nach unten
verschieben, um die Lautstärke des UA-1X anzupassen.
Folgende Optionen können eingestellt werden.
USB-Audio
(Lautsprecher)
CDWiedergabe
Wave
SW Synth
*1 Abhängig von Ihrer Windows-Version kann dies als
“Analoganschluss.” angezeigt werden.
*2 Wenn die Wiedergabe der CD durch die Anpassung der
Lautstärke nicht verändert wird, ändern Sie die
WAVE-Lautstärke.
Passt die Lautstärke der analogen
Ausgänge an (Line Output und
Kopfhörer-Ausgang). Die
Digitalausgabe wird hiermit nicht
verändert (*1).
Passt die “CD-Musik”-Lautstärke des
CD-ROM-Laufwerks Ihres Computers
an (*2).
Passt die Lautstärke an, die vom
Audio-Ausgabegerät “USB Audio
gerät” ausgegeben wird. Die
Digitalausgabe und die analoge
Ausgabe werden hiermit geändert.
Stellt die Lautstärke des Software
synthesizers ein, der in Windows
integriert ist.
Anschlüsse und Treiberinstallation (Windows)
Durch Verstellen der
Lautstärke können Sie den
Sound aus Ihrem Computer
über das UA-1X mit der
estmöglichen Audioqualität
wiedergeben.
Wenn "Ton aus" aktiviert ist
oder wenn der Schieberegler
ganz unten ist, wird aus dem
UA-1X kein Sound
ausgegeben.
Wenn das UA-1X
angeschlossen ist, gibt
Windows keinen Sound aus
den Lautsprechern Ihres
Computers aus. Da der Sound
von Ihrem Computer aus der
Kopfhörerbuchse des UA-1X
oder aus den Line-Ausgangsbuchsen anstelle aus den
Lautsprechern ausgegeben
wird, müssen Sie die
Kopfhörer oder Monitorlautsprecher mit dem UA-1X
verbinden. Alternativ können
Sie die Line-Ausgangsbuchsen des UA-1X mit den
LINE-Eingangsbuchsen Ihres
Computers verbinden.
Español Italiano Français Deutsch English
41
Page 42

Anschlüsse und Treiberinstallation (Windows)
Wenn Sie das CD-ROM-Gerät Ihres Computer’s für das Abspielen einer Audio-CD
verwenden oder wenn Sie Hintergrundmusik für Spiele mit dem UA-1X abspielen
Windows XP/2000-Anwender:
1. Öffnen Sie das Dialogfeld “Systemeigenschaften....”
Wählen Sie Start | Einstellungen | Systemsteuerung und doppelklicken Sie in der
Systemsteuerung auf das Symbol System.
Wählen Sie unter Windows XP Start | Systemsteuerung und doppelklicken Sie in
der Systemsteuerung auf das Symbol System.
Alternativ klicken Sie auf Systemsteuerung | Leistung und Wartung.
Anschließend klicken Sie auf das Symbol System.
2. Öffnen Sie den Geräte-Manager.
Klicken Sie auf die Registerkarte Hardware und anschließend auf Geräte-Manager.
3. Öffnen Sie die Eigenschaften des CD-ROM-Laufwerks. ’
Doppelklicken Sie unter dem Symbol CD-ROM-Laufwerke auf das CD-ROM-
Laufwerk, das Sie verwenden. Unter Windows XP sollten Sie nun auf die Registerkarte
Eigenschaften klicken.
Aktivieren Sie unter Digitale CD-Wiedergabe die Option “Digitale CD-Wiedergabe
für den CD-Player aktivieren.”
Windows Me-Anwender:
1. Öffnen Sie das Dialogfeld Systemeigenschaften.
Wählen Sie Start | Einstellungen | Systemsteuerung und doppelklicken Sie in der
Systemsteuerung auf das Symbol System.
2. Klicken Sie auf die Registerkarte Geräte-Manager.
3. Öffnen Sie die Eigenschaften des CD-ROM-Laufwerks. ’
Doppelklicken Sie auf das Symbol CD-ROM und doppelklicken Sie anschließend
auf das CD-ROM-Laufwerk, das Sie verwenden.
4. Klicken Sie auf das Register Eigenschaften und aktivieren Sie unter Digitale CD-
Wiedergabe die Option “Digitale CD-Wiedergabe für dieses Gerät aktivieren.”
Windows 98-Anwender:
1. Öffnen Sie das Dialogfeld Eigenschaften für Multimedia.
Wählen Sie Start | Einstellungen | Systemsteuerung und doppelklicken Sie in der
Systemsteuerung auf das Symbol Multimedia.
2. Klicken Sie auf das Register “Musik-CD” und aktivieren Sie die Option “Digitale
CD-Wiedergabe für dieses CD-Gerät aktivieren.”
* Es kann vorkommen, dass abhängig von Ihrem System die Wiedergabe trotzdem nicht möglich
ist. Einzelheiten hierzu finden Sie in den Informationen, die Ihr Computer-Hersteller anbietet. ’
Wenn Sie ein CD-ROM-Gerät vom Typ PC-Card (PCMCIA) verwenden, kann die Wiedergabe
von WAVE-Daten oder einer Audio-CD auf dem CD-ROM-Gerät dazu führen, dass der Sound
unterbrochen wird oder kein Sound erklingt.
42
Page 43

Anschlüsse und Treiberinstallation (Macintosh)
* Wenn Sie ein Windows-Anwender sind, lesen Sie bitte
(Windows)
Wenn Sie Ihren Computer mit angeschlossenem UA-1X starten, wird der Computer
eventuell instabil. Starten Sie den Computer in diesem Fall, bevor Sie das UA-1X
anschließen, und verbinden Sie das UA-1X mit dem Computer nach dem Hochfahren.
(S. 31).
Vor der Installation des Treibers
Bevor Sie das UA-1X verwenden können, müssen Sie einen Treiber installieren.
UA-1X benutzt einen Treiber, der im Mac OS enthalten ist. Die mit dem UA-1X
mitgelieferte CD-ROM ist für die Treiberinstallation nicht erforderlich.
Was ist ein Treiber?
Ein Treiber ist Software, die es einem Anwendungsprogramm auf Ihrem Computer
ermöglicht, Daten zum/vom UA-1X zu übertragen, wenn das Gerät an Ihren
Computer via USB-Kabel angeschlossen ist.
Der Treiber überträgt die Daten der Anwendung an das UA-1X sowie die Daten
vom UA-1X an die Anwendung.
fig.05-01.e
Application
USB
Driver
USB
connector
USB cable
Anschlüsse und Treiberinstallation
Computer
Die Vorgehensweise bei der Installation hängt von Ihrem System
ab. Bitte lesen Sie abhängig von dem von Ihnen verwendeten
System in einem der folgenden Abschnitte weiter.
• Mac OS 9-Anwender..........................S. 44
• Mac OS X-Anwender .........................S. 48
UA-1X
Español Italiano Français Deutsch English
43
Page 44

Anschlüsse und Treiberinstallation (Macintosh)
Anschlüsse und Treiberinstallation (OS 9)
Um Fehlfunktionen und/oder Schäden an Lautsprechern
oder anderen Geräten zu verhindern, reduzieren Sie stets
die Lautstärke und schalten alle Geräte ab, bevor Sie das
USB-Kabel ausstecken. Es ist nicht erforderlich, den
Computer auszuschalten. Verwenden Sie ein USB-Kabel,
um das UA-1X an Ihren Computer anzuschließen, bevor
Sie Ihre Audiogeräte einschalten.
1
Starten Sie den Macintosh, wobei das UA-1X
ausgesteckt ist.
Stecken Sie alle USB-Kabel außer der USB-Tastatur und
der USB-Maus aus (falls vorhanden).
2
Beenden Sie alle aktuell ausgeführten Programme
(Anwendungen).
Wenn Sie ein Virenschutzprogramm oder ähnliche Software
verwenden, müssen Sie diese ebenfalls beenden.
fig.03-02.e
3
Nachdem Sie Mac OS
gestartet haben, wählen
Sie
Apple System
Profiler
Daraufhin wird das
Dialogfeld
Profiler”
im Menü
“Apple System
angezeigt.
Apple
.
44
4
Klicken Sie auf die Registerkarte
Volumes
.
Devices and
5
Wählen Sie
Informationen aktualisieren) im Menü
Update all information
6
Schließen Sie das UA-1X an Ihren Computer mit
einem USB-Kabel an.
(alle
Commands
.
Dieses Gerät ist mit einem
Schutzschaltkreis ausgestattet.
Nach dem Anschluss eines
USB-Steckers benötigt das
Gerät eine kurze Zeitspanne
(einige Sekunden), bis es den
normalen Betrieb aufnimmt.
Page 45

7
Warten Sie ungefähr fünf Sekunden lang.
UA-1X benutzt einen Treiber, der im Mac OS enthalten ist.
Während Sie noch warten, verändert sich die
Bildschirmanzeige nicht, während das UA-1X vom
Computer erkannt wird. Arbeiten Sie währenddessen nicht
mit der Maus oder mit der Tastatur.
fig.03-04.e
8
Um zu prüfen, ob die
Erkennung abgeschlossen
ist, wechseln Sie erneut
in den
Apple System
Profiler
Update all information
Im Bereich USB werden drei Audiogeräte angezeigt.
Wenn diese Geräte angezeigt werden, war die
Treiberinstallation erfolgreich. Klicken Sie im Menü File
auf Quit, um den “Apple System Profiler” zu schließen.
Wenn diese Geräte nicht angezeigt werden, trennen Sie
das UA-1X vom Anschluss, warten ca. 10 Sekunden und
wiederholen alle Schritte ab Schritt 2.
und wählen
aus dem Menü
Anschlüsse und Treiberinstallation (Macintosh)
Commands
.
■
Einstellungen und Überprüfung
Anpassen der Soundeingabe/ausgabe
fig.03-05.e
1
Klicken Sie im Menü
Apple
auf die Option
Control Panels Sound
(Kontrollfelder –
Ton), um das Dialogfeld
Sound
(Ton) zu öffnen.
2
Klicken Sie auf die Registerkarten
(Lautsprecher) oder
(Lautsprechereinstellungen).
Speaker Settings
Speakers
45
Español Italiano Français Deutsch English
Page 46

Anschlüsse und Treiberinstallation (Macintosh)
J
fig.03-06.e
3
Reduzieren Sie die
Lautstärke des UA-1X
und Ihrer Audiogeräte
und klicken Sie
anschließend auf
[Start Test]
fig.03-07.e
.
4
Verwenden Sie die
Leiste
[Main Volume]
(Lautstärke), um die
Lautstärke anzupassen.
Wenn Sie fertig sind,
klicken Sie auf
Test]
(Test stoppen).
Testsounds werden von
links nach rechts - wie
die Bildschirmanzeige ausgegeben.
fig.03-08.e
[Stop
Der Inhalt der Anzeige
hängt vom installierten
Betriebssystem und von
den jeweiligen Daten ab.
e nach OS-Version ist
eventuell keine Leiste
[Main Volume] (Lautstärke)
vorhanden. Verwenden Sie
in diesem Fall die Leiste
[Volume] (Lautstärke) in
[Output] (Ausgang), um die
Lautstärke anzupassen.
5
Im Dialogfeld
(Ton) klicken Sie auf die
Registerkarte
(Eingang).
Anschließend wählen Sie in
Choose a source for sound
input:
(Wählen Sie ein Gerät
für die Tonausgabe) die
Option
* Aktivieren Sie nicht
(Ton über das Ausgabegerät abspielen).
46
Sound
Input
USB Audio
.
“[Play sound through output device]”
Wenn USB Audio nicht
angezeigt wird, schließen
Sie das Dialogfeld “Sound”
und trennen das USB-Kabel
des UA-1X vom Macintosh.’
Installieren Sie den Treiber
erneut.(S. 44)
Page 47

Anschlüsse und Treiberinstallation (Macintosh)
6
Nachdem Sie alle Einstellungen vorgenommen haben,
schließen Sie das Dialogfeld
Wählen Sie die Option
Bekannte Probleme: UA-1X
• Während die Audioanwendung aufnimmt oder Daten abspielt, schließen Sie
das USB-Kabel nicht an und trennen Sie es nicht vom Gerät. Dies kann dazu
führen, dass die Anwendung abstürzt.
• Sie hören eventuell Sound-Aussetzer und/oder Rauschen, wenn Sie
gleichzeitig Sound aufnehmen und wiedergeben. Dies ist durch die hohe
CPU-Auslastung bedingt. Das Rauschen sollte jedoch nicht in der Aufnahme
selbst auftreten. Derartiges Rauschen sollte nur im Wiedergabesignal
vorkommen.
• Der Standardtreiber, der mit Mac OS ausgeliefert wird, ist nicht
ASIO-kompatibel.
Quit
“Sound.”
im Menü
File
.
47
Español Italiano Français Deutsch English
Page 48

Anschlüsse und Treiberinstallation (Macintosh)
Anschlüsse und Treiberinstallation (OS X)
* Für diese Beschreibung werden das
verwendet.
■
Anschlüsse und Einstellungen für System
UA-1X
und
Mac OS 10.2
Sound Input/Output
1
Schließen Sie das UA-1X an Ihren Macintosh mit
einem USB-Kabel an.
2
Öffnen Sie das Dialogfeld
klicken Sie auf
fig.macX-1
Sound
System Preference
.
3
Klicken Sie im Register
Sound Effects
(Soundeffekte) auf
Play alerts and
sound effects
through
und Klangeffekte
spielen über) und
wählen Sie
für die Soundeffekte.
(Warntöne
USB Audio CODEC
als Wiedergabegerät
Das UA-1X funktioniert nicht
in der Mac OS X ClassicUmgebung.
und
48
Page 49

figmacX-2, macOSX-3.
4
Klicken Sie im Register
Output
auf die Option
USB Audio CODEC
,
um dieses Gerät für
die Ausgabe von
Sound auszuwählen.
figmacX-2, macOSX-3.
5
Wenn das Register
Input
angezeigt wird,
wählen Sie
Audio CODEC
Gerät für die Eingabe
von Sounds.
Bekannte Probleme: UA-1X
Vorsicht
Bitte prüfen Sie vor der Verwendung Ihres Programms
Folgendes.
USB
als
• Schließen Sie das UA-1X an Ihren Computer mit einem USB-Kabel an,
bevor Sie Ihr Programm starten.
• Während das Programm ausgeführt wird, sollten Sie das USB-Kabel
des UA-1X nicht vom Gerät trennen.
• Beenden Sie das Programm, bevor Sie das USB-Kabel des UA-1X
ausstecken.
• Deaktivieren Sie den Ruhezustand Ihres Macintosh.
• Das UA-1X funktioniert nicht in der Mac OS X Classic-Umgebung.
Sie können es nicht verwenden, wenn die Classic-Umgebung
ausgeführt wird.
Anschlüsse und Treiberinstallation (Macintosh)
Wenn aus dem Lautsprecher
(internen Sprecher) kein Sound
ausgegeben wird, wählen Sie
Built-in audio controller im
Register Output.
49
Español Italiano Français Deutsch English
Page 50

Anschlüsse und Treiberinstallation (Macintosh)
■
Audio-Softwareeinstellungen
Schließen Sie das UA-1X an Ihren Computer mit einem
USB-Kabel an, bevor Sie Ihr Programm starten.
Wenn in Ihrem Programm die Einstellungen für die
Audioeingabe/Ausgabe vorgenommen werden, wählen
Sie
USB Audio CODEC
* Einzelheiten hierzu finden Sie im Handbuch des Programms,
das Sie verwenden.
Bekannte Probleme: UA-1X
• Während die Audioanwendung aufnimmt oder Daten abspielt, schließen Sie
das USB-Kabel nicht an und trennen Sie es nicht vom Gerät. Dies kann dazu
führen, dass die Anwendung abstürzt.
• Sie hören eventuell Sound-Aussetzer und/oder Rauschen, wenn Sie
gleichzeitig Sound aufnehmen und wiedergeben. Dies ist durch die hohe
CPU-Auslastung bedingt. Das Rauschen sollte jedoch nicht in der Aufnahme
selbst auftreten. Derartiges Rauschen sollte nur im Wiedergabesignal
vorkommen.
• Der Standardtreiber, der mit Mac OS ausgeliefert wird, ist nicht
ASIO-kompatibel.
.
50
Page 51

Connexions et installation des pilotes (Windows)
* Si vous possédez un Macintosh, reportez-vous
(Macintosh)
(p. 63).
Avant d'installer le pilote
* L'UA-1X ne peut être utilisé avec Windows 95 ou Windows NT.
* Quittez toutes les applications Windows ouvertes avant d’installer le pilote de l’UA-1X.
* Si vous avez l’intention de raccorder l’UA-1X et d’autres appareils USB à votre ordinateur
et de les utiliser simultanément, débranchez tous les appareils USB autres que l’UA-1X
du connecteur USB avant d’installer le pilote. Si un appareil USB autre que l’USB reste
raccordé à l’ordinateur lorsque vous installez le pilote, celui-ci ne sera pas correctement
installé.
Pour utiliser l'UA-1X, vous devez d'abord installer dans l’ordre le pilote USB Composite,
puis le pilote USB Human Interface, et enfin le pilote USB Audio Device. Ces pilotes sont
inclus dans Windows. Si vous utilisez Windows 98, ce pilote est fourni sur le CD-ROM
de Microsoft Windows, dont vous aurez besoin pendant l'installation..
(Inutile pour Windows Me, 2000 ou XP.)
Qu'est-ce qu'un pilote ?
Un pilote est un logiciel qui permet à un programme s'exécutant sur votre ordinateur
de transférer des données de et vers un périphérique (comme l'UA-1X) lorsque celui-ci
est connecté à votre ordinateur à l'aide d'un câble USB.
Le pilote transmet les données de l'application à l'UA-1X et vice-versa.
fig.05-01.e
Connexions et installation des pilotes
Application
USB
Driver
Computer
USB
connector
USB cable
UA-1X
Español Italiano Français Deutsch English
51
Page 52

Connexions et installation des pilotes (Windows)
b
Etablissement des connexions et installation du pilote
La procédure d’installation dépend de votre système
d’exploitation. Veuillez lire la section qui vous concerne.
• Windows XP/2000 .............................p. 52
• Windows Me.......................................p. 53
• Windows 98.........................................p. 54
Afin d’éviter un mauvais fonctionnement et/ou
d’endommager les haut-parleurs et autres périphériques,
diminuez toujours le volume et mettez toujours les
périphériques hors tension avant de déconnecter le câble
USB. Il n'est pas nécessaire d'éteindre votre ordinateur.
Utilisez un câble USB pour connecter l'UA-1X à votre
ordinateur avant d'allumer votre équipement audio.
■
Utilisateurs de Windows XP/2000
1
L’UA-1X étant déconnecté, mettez votre ordinateur
sous tension ; Windows démarre.
Débranchez tous les câbles USB, à l’exception de ceux du
clavier et de la souris (le cas échéant).
2
Utilisez un câble USB pour connecter l'UA-1X à votre
ordinateur.
L’UA-1X est détecté automatiquement, le pilote est installé.
Si vous utilisez Windows XP,
l’installation est terminée
lorsque le message près de la
arre des tâches indiquant un
“Nouveau matériel détecté”
disparaît.
3
Après installation du pilote, redémarrez Windows.
Cet appareil est équipé d'un
circuit de protection. Lors de
Vous devez ensuite procéder à la configuration du pilote.
→ Configuration et contrôle (p. 58)
52
la connexion au port USB,
attendez quelques secondes
avant d'utiliser l'appareil.
Page 53

■
j
Utilisateurs de Windows Me
1
L’UA-1X étant déconnecté, mettez votre ordinateur
sous tension ; Windows démarre.
Débranchez tous les câbles USB, à l’exception de ceux du
clavier et de la souris (le cas échéant).
2
Utilisez un câble USB pour connecter l'UA-1X à votre
ordinateur.
fig.02-03.e
3
Windows détecte l’UA-1X,
puis la boîte de dialogue
“Assistant Ajout de
nouveau matériel”
Assurez-vous que l’option
Rechercher automatiquement un meilleur pilote
(recommandé)
s’affiche.
est sélectionnée, puis cliquez sur
Connexions et installation des pilotes (Windows)
Cet appareil est équipé
d'un circuit de protection.
Lors de la connexion au
port USB, attendez quelques
secondes avant d'utiliser
l'appareil.
Cette boîte de dialogue
[Suivant]
peut mettre un peu de
.
temps à s'afficher.
4
La recherche du pilote démarre.
5
Lorsque le bon pilote est trouvé, son installation
démarre.
fig.02-04.e
6
Lorsque la boîte de dialogue
vous informant que
l'installation du pilote est
terminée s'affiche, cliquez sur
[Terminer]
et redémarrez
Windows.
Vous devez ensuite procéder à la configuration du pilote.
→ Configuration et contrôle (p. 58)
Selon la configuration de
votre ordinateur, un court
délai peut intervenir après
l'installation du pilote
usqu'à la reconnaissance
du périphérique.
Español Italiano Français Deutsch English
53
Page 54

Connexions et installation des pilotes (Windows)
■
Windows 98
Les pilotes doivent être installés dans l’ordre suivant :
Composite Device driver, USB Human Interface Device
driver, USB Audio Device driver
pour effectuer l'installation.
1
L’UA-1X étant déconnecté, mettez votre ordinateur
sous tension ; Windows démarre.
Débranchez tous les câbles USB, à l’exception de ceux du
clavier et de la souris (le cas échéant).
2
Insérez le CD-ROM Microsoft Windows dans votre
lecteur de CD-ROM et utilisez un câble USB pour
connecter l' UA-1X à votre ordinateur.
Certains ordinateurs étant vendus avec le contenu du
CD-ROM de Microsoft Windows déjà copié sur le disque dur,
ce CD-ROM n’est pas forcément livré avec l’ordinateur.
Dans ce cas, vous pourrez installer le pilote sans recourir
au CD-ROM.
USB
. Procédez comme suit
Cet appareil est équipé d'un
circuit de protection. Lors de
la connexion au port USB,
attendez quelques secondes
avant d'utiliser l'appareil.
54
fig.02-05.e
3
Un périphérique USB
Composite est détecté
automatiquement et la boîte de
dialogue de l'
“Assistant Ajout
de nouveau matériel”
Cliquez sur
fig.02-06.e
[Suivant]
4
Lorsque l'ordinateur vous
demande
faire ?”
“Rechercher le meilleur pilote
pour votre périphérique.
(recommandé)”
sur
“Que voulez-vous
, sélectionnez
[Suivant]
.
s'affiche.
.
et cliquez
Si cette boîte de dialogue ne
s’affiche pas, reportez-vous à
la section Problems related
to the USB driver (p. 111)
Page 55

fig.02-07.e
5
Cochez
CD-ROM”
sur
fig.02-08.e
“Lecteur de
et cliquez
[Suivant]
.
6
Cliquez sur
* Selon votre système, l'emplacement du
pilote peut différer de celui de la figure
ci-dessus, mais ceci ne constitue pas
un problème.
[Suivant]
7
La copie du fichier (pilote) démarre.
fig.02-09.e
Si le CD-ROM Windows n'est
pas inséré dans le lecteur de
CD-ROM, la boîte de dialogue
“Insérer le disque” s’affiche.
Dans ce cas, insérez le CD-ROM
Microsoft Windows dans le
lecteur de CD-ROM et
cliquez sur [OK].
Connexions et installation des pilotes (Windows)
.
55
Español Italiano Français Deutsch English
Page 56

Connexions et installation des pilotes (Windows)
fig.02-10.e
8
Une fois l'installation du pilote
Périphérique USB
Composite
terminée, la boîte
de dialogue suivante s'affiche.
Cliquez sur
fig.02-11.e
[Terminer]
.
9
Ensuite, le
d'interface utilisateur USB
est détecté automatiquement
et la boîte de dialogue
“Assistant Ajout de nouveau
matériel”
[Suivant]
l’installation comme aux
étapes 4–7 (p. 54-55).
fig.02-12.e
Périphérique
s'affiche. Cliquez sur
, puis procédez à
10
Lorsque l'installation du pilote
USB Human Interface Device
est terminée, la boîte de
dialogue suivante s'affiche.
Cliquez sur
[Terminer]
.
A l'étape 6, l'écran affiche
le message : “Windows
recherche les fichiers du
pilote pour ce périphérique :
USB Audio Device.”
56
Page 57

fig.02-13.e
Connexions et installation des pilotes (Windows)
11
Ensuite,
sera détecté automatiquement
et la boîte de dialogue
“Assistant Ajout de nouveau
matériel”
Cliquez sur
aux étapes 4–7 (p. 54-55).
fig.02-14.e
USB Audio Device
s’affichera.
[Suivant]
, puis procédez à l’installation comme
12
Une fois terminée l’installation
du pilote
une boîte de dialogue similaire
à la suivante s’affiche. Cliquez
sur
L'installation des pilotes USB Composite Device, USB Human
Interface Device et USB Audio Device est terminée.
Redémarrez Windows.
Vous devez ensuite procéder à la configuration du pilote.
→ Configuration et contrôle (p. 58)
USB Audio Device
[Terminer]
.
,
A l'étape 6, l'écran affiche
le message : “Windows
recherche les fichiers du
pilote pour ce périphérique :
USB Audio Device.”
Selon votre système, le
pointeur peut conserver la
forme d’un sablier plusieurs
minutes après avoir cliqué sur
[OK]. Dans ce cas, patientez.
57
Español Italiano Français Deutsch English
Page 58

Connexions et installation des pilotes (Windows)
Configuration et contrôle
■
Spécification du périphérique d'entrée/ sortie audio
1
Cliquez sur le bouton
sélectionnez
configuration
Démarrer
Paramètres – Panneau de
.
, puis sur
[Démarrer]
(Sous Windows XP, cliquez sur le bouton
Panneau de configuration
de Windows, puis
2
Affichez
(pour Windows 98,
Avec Windows XP/Me :
Dans le
l'icône
“Propriétés de Sons et multimédia.”
* Si l’icône
Windows XP :
Dans le
Voix et Périphériques audio
et périphériques audio
“Propriétés de Son et Périphériques audio.”
Windows Me :
Dans le cadre de gauche, cliquez sur
options du Panneau de configuration.”
Windows 98 :
Dans le
sur l'icône
Propriétés de multimédia
“Sons et Propriétés multimédia”
“Propriétés multimédia”
Panneau de configuration
Sons et Multimédia
“Propriétés de Sons et Multimédia”
Panneau de configuration
pour afficher la boîte de dialogue
Panneau de configuration
Multimédia
pour ouvrir la boîte de dialogue
.
, cliquez deux fois sur
pour ouvrir la boîte de dialogue
, cliquez sur
. Cliquez ensuite sur
“Afficher toutes les
, cliquez deux fois
.)
).
n’apparaît pas
Sons,
Sons
58
Page 59

3
Cliquez sur l'onglet
Audio
Connexions et installation des pilotes (Windows)
.
4
Pour
Périphérique par défaut
Périphérique par défaut
sélectionnez
audio USB
Cliquez sur puis, dans la liste qui s’affiche, cliquez sur
CODEC audio USB
le sélectionner.
CODEC audio USB
.
ou
Périphérique audio USB
sous
sous
Enregistrement
ou
Lecture
Périphérique
5
Cliquez sur
[OK]
pour confirmer.
et
pour
Si vous utilisez Windows XP,
définissez le Périphérique
,
par défaut de Lecture et
Périphérique par défaut
de Enregistrement sur
CODEC audio USB.
Si vous utilisez Windows 98,
définissez le Périphérique
par défaut de Lecture et
Périphérique par défaut
de Enregistrement sur
CODEC audio USB.
Selon votre système,
Périphérique Audio USB
sera affiché avec un numéro,
par exemple : “Périphérique
audio USB (1).”
59
Español Italiano Français Deutsch English
Page 60

Connexions et installation des pilotes (Windows)
Réglages du contrôle du volume
Le volume de sortie de l'UA-1X peut être contrôlé par
l’utilitaire “Contrôle du volume” de Windows.
1
Cliquez sur le bouton
sélectionnez
les programmes
Contrôle du volume
Windows XP
fig.05-16ae_30
Windows Me
fig.02-17.e.eps
Programmes
Démarrer
(dans Windows XP,
– Accessoires – Divertissement –
)
pour le démarrer.
de Windows, puis
Tous
Si le Contrôle du volume
n'est pas installé sur votre
ordinateur, utilisez Ajout/
Suppression de
programmes dans le
Panneau de configuration
pour l'installer. Pour plus de
précisions sur l'installation,
reportez-vous au manuel
d’utilisation de Windows
ou à l'Aide Windows.
Windows 2000/Windows 98
fig.02-18.e.eps
60
Si vous utilisez Windows
2000 et que“Lecteur CD”
n'apparaît pas, cochez
l'option Lecture CD
numérique “Activer la
lecture numérique sur
ce lecteur de CD-ROM.”
Lorsque vous utilisez le
→
lecteur de CD-ROM de
votre ordinateur pour lire
un CD audio ou pour lire la
musique de fond des jeux
avec l’UA-1X : (p. 62)
Page 61

2
Vous pouvez monter ou baisser le curseur pour régler
le volume de l'UA-1X. Les options suivantes peuvent
être réglées.
Connexions et installation des pilotes (Windows)
En augmentant la commande
de volume, vous pouvez
obtenir le son de qualité
optimale à partir de votre
ordinateur via l'UA-1X.
USB Audio
(Speaker)
Règle le volume des sorties analogiques
(sortie ligne et sortie casque). Ce réglage
n'affecte pas les sorties numériques (*1).
CD Player
Règle le volume “CD Audio” du lecteur
de CD-ROM de votre ordinateur (*2).
Wave
Règle le volume de sortie du périphérique audio de sortie “Périphérique
audio USB.”
Les sorties numériques et analogiques
sont affectées.
SW Synth
Règle le volume du logiciel de
synthétisation intégré à Windows.
*1 Selon votre version de Windows, cet élément peut être nommé
“Connecteur analogique.”
*2 Si la lecture du CD n'est pas modifiée en réglant ce volume,
utilisez le volume WAVE.
Si Muet est coché, ou si le
curseur est au plus bas, aucun
son ne sortira de l'UA-1X.
Si l'UA-1X est connecté,
Windows n'émettra aucun son
en sortie des haut-parleurs de
votre ordinateur. Puisque le
son de votre ordinateur sortira
de la prise casque de l'UA-1X,
ou des prises de sortie de ligne
plutôt que depuis les hautarleurs de votre ordinateur,
vous devrez brancher un
casque ou des haut-parleurs à
l'UA-1X. Vous pouvez
également brancher les prises
de sortie de ligne de l'A-1X aux
prise d'entrée de LIGNE de
votre ordinateur.
61
Español Italiano Français Deutsch English
Page 62

Connexions et installation des pilotes (Windows)
Lorsque vous utilisez le lecteur de CD-ROM de votre ordinateur pour lire un
CD audio ou pour lire la musique de fond des jeux avec l’UA-1X :
Windows XP/2000/XP :
1. Ouvrez la boîte de dialogue Propriétés Système.
Sélectionnez Démarrer | Paramètres | Panneau de configuration et, dans
le Panneau de configuration, cliquez deux fois sur l’icône Système.
Pour Windows XP, sélectionnez Démarrer | Panneau de configuration puis,
dans le Panneau de configuration, cliquez deux fois sur l’icône Système.
Vous pouvez également cliquer sur Panneau de configuration |
Performances et Maintenance. Cliquez deux fois sur l’icône Système.
2. Ouvrez le Gestionnaire de périphériques.
Cliquez sur l’onglet Matériel, puis sur le bouton Gestionnaire de périphériques.
3. Ouvrez les Propriétés du lecteur de CD-ROM.
Cliquez deux fois sur le CD audio que vous utilisez. Avec Windows XP, vous
devez ensuite cliquer sur l’onglet Propriétés.
Dans Lecture CD numérique , activez l’option “Lecture numérique pour les
CD audio sur ce lecteur CD-ROM..”
Windows Me :
1. Ouvrez la boîte de dialogue Propriétés Système.
Sélectionnez Démarrer | Paramètres | Panneau de configuration et, dans
le Panneau de configuration, cliquez deux fois sur l’icône Système.
2. Cliquez sur l'onglet Gestionnaire de périphériques.
3. Ouvrez les Propriétés du lecteur de CD-ROM.
Cliquez deux fois sur l’icône CD audio, puis cliquez deux fois sur le lecteur
de CD-ROM que vous utilisez.
4. Cliquez sur l’onglet Propriétés puis, dans Lecture CD numérique, activez
l’option “Lecture numérique pour les CD audio sur ce lecteur CD-ROM.”
Windows 98 :
1. Ouvrez la boîte de dialogue Propriétés de Multimédia.
Sélectionnez Démarrer | Paramètres | Panneau de configuration et, dans
le Panneau de configuration, cliquez deux fois sur l’icône Multimédia.
2. Dans CD audio, activez l’option “Lecteur CD-ROM par défaut pour les
CD audio.”
* Selon votre système, des problèmes de lecture peuvent subsister. Pour plus de détails, reportez-
vous aux informations fournies par le constructeur de votre ordinateur. Si vous utilisez un
lecteur de CD-ROM de type PCMCIA, la lecture des données WAVE d’un CD-ROM ou
d'un CD audio sur ce lecteur peut interrompre le son ou le supprimer totalement.
62
Page 63

Connexions et installation des pilotes (Macintosh)
* Si vous possédez un PC sous Windows, reportez-vous
des pilotes (Windows)
Lorsque vous démarrez votre ordinateur avec l'UA-1X connecté, celui-ci peut devenir
instable. Si cela se produit, démarrez d'abord votre Macintosh, puis connectez l'UA-1X.
(p. 51).
Avant d'installer le pilote
Pour pouvoir utiliser l'UA-1X, vous devez d'abord installer un pilote. L'UA-1X
utilise un pilote inclus dans le système Mac OS. Vous n’avez pas besoin du CDROM livré avec l’UA-3D.
Qu'est-ce qu'un pilote ?
Un pilote est un logiciel qui permet à un programme s'exécutant sur votre ordinateur
de transférer des données de et vers un périphérique (comme l'UA-1X) lorsque celui-ci
est connecté à votre ordinateur à l'aide d'un câble USB.
Le pilote transmet les données de l'application à l'UA-1X et vice-versa.
fig.05-01.e
Application
USB
Driver
USB
connector
USB cable
Connexions et installation
Computer
La procédure d’installation dépend de votre système
d’exploitation. Veuillez lire la section qui vous concerne.
• Utilisateurs de Mac OS 9 ...................p. 64
• Utilisateurs de Mac OS X...................p. 68
UA-1X
Español Italiano Français Deutsch English
63
Page 64

Connexions et installation des pilotes (Macintosh)
Connexions et installation des pilotes (OS 9)
Afin d’éviter un mauvais fonctionnement et/ou
d’endommager les haut-parleurs et autres périphériques,
diminuez toujours le volume et mettez toujours les
périphériques hors tension avant de déconnecter le câble
USB. Il n'est pas nécessaire d'éteindre votre ordinateur.
Utilisez un câble USB pour connecter l'UA-1X à votre
ordinateur avant d'allumer votre équipement audio.
1
L’UA-1X étant éteint, mettez le Macintosh sous
tension.
Débranchez tous les câbles USB, à l’exception de ceux
du clavier et de la souris (le cas échéant).
2
Quittez tous les logiciels (applications) actifs.
Si vous utilisez un anti-virus, quittez-le également.
fig.03-02.e
3
Après avoir démarré
Mac OS, sélectionnez
Informations système
Apple
dans le menu
Apple
.
La boîte de dialogue
“Informations système
Apple”
s'affiche.
64
4
Cliquez sur l'onglet
Périphériques/Volumes
5
Choisissez
dans le menu
Mettre à jour toutes les informations
Commandes
.
6
Utilisez un câble USB pour connecter l'UA-1X à votre
ordinateur.
.
Cet appareil est équipé
d'un circuit de protection. Lors
de la connexion au port USB,
attendez quelques secondes
avant d'utiliser l'appareil.
Page 65

7
Attendez environ cinq secondes.
L'UA-1X utilise un pilote inclus dans le système Mac OS.
Pendant que vous patientez, l’affichage ne change pas,
mais l’UA-1X est bien en cours de détection. Ne touchez
ni à la souris, ni au clavier.
fig.03-04.e
8
Pour vérifier que la
détection est positive,
affichez à nouveau les
Informations système
Apple
et sélectionnez
Mettre à jour toutes les informations
Commandes
Dans la zone USB, trois appareils audio sont affichés.
Si l’affichage est correct, l’installation du pilote a réussi.
Dans le menu Fichier, cliquez sur Quitter pour fermer
“Informations système Apple .”
Si les appareils ne s’affichent pas correctement, débranchez
l’UA-1X, attendez environ dix secondes, puis répétez la
procédure à partir de l’étape 2.
.
Connexions et installation des pilotes (Macintosh)
du menu
■
Configuration et contrôle
Réglage de l’entrée et de la sortie du son
fig.03-05.e
1
Dans le menu
Apple
, sélectionnez
[Tableaux de bord]
pour ouvrir la boîte
de dialogue
Son
.
2
Cliquez sur l’onglet
Haut-parleurs
Réglage des haut-parleurs
ou
.
Español Italiano Français Deutsch English
65
Page 66

Connexions et installation des pilotes (Macintosh)
fig.03-06.e
3
Baissez le volume sur
l'UA-1X et sur votre
appareil audio, puis
cliquez sur
le test]
fig.03-07.e
[Démarrer
.
4
Utilisez la barre
principal]
le volume. Lorsque vous
avez terminé, cliquez
sur
[Arrêter le test]
Les sons de test sont entendus
de gauche à droite, en suivant
l’affichage.
[Volume
pour régler
.
L’affichage dépend de votre
système d’exploitation et de
vos données.
Avec certaines versions de
Mac OS, la barre Volume
principal n'existe pas.
Dans ce cas, utilisez la barre
Volume dans l'onglet
Sortie pour régler
le volume.
66
fig.03-08.e
5
Dans la boîte de dialogue
Son
, cliquez sur l’onglet
Entrée
.
Pour
Choisir un
périphérique d'entrée
audio
, sélectionnez
Audio USB
* Ne cochez pas
son par le périphérique
de sortie.”
.
“Lecture du
Si Audio USB ne s’affiche
pas, fermez la boîte de
dialogue “Son”, puis
débranchez le câble USB
de l’UA-1X du Macintosh.
Procédez à une nouvelle
installation du pilote (p. 64).
Page 67

Connexions et installation des pilotes (Macintosh)
6
Lorsque vous avez terminé la configuration, fermez
la boîte de dialogue
Dans le menu
Problèmes connus : UA-1X
• Lorsque l’applicaton audio est en cours d’enregistrement ou de lecture, veillez à
ne pas brancher, ni débrancher, le câble USB. Le logiciel risquerait de se bloquer.
• Il est possible que le son soit haché ou qu'il soit de mauvaise qualité si vous
enregistrez et lisez en même temps, en raison d'une charge trop importante
au niveau du processeur (CPU). Ce défaut ne devrait pas affecter le résultat
de l'enregistrement. Ce genre de problème ne devrait concerner que le signal
de lecture.
• Le pilote standard livré avec Mac OS n'est pas compatible ASIO.
Fichier
“Son.”
, sélectionnez
Quitter
.
67
Español Italiano Français Deutsch English
Page 68

Connexions et installation des pilotes (Macintosh)
Connexions et installation des pilotes (OS X)
*L’
UA-1X
et le
Mac OS 10.2
dans cette explication.
■
Effectuer les branchements et les réglages
ont été employés à titre d’exemple
système d’entrée/sortie du son
Vous ne pouvez pas utiliser
1
Utilisez un câble USB pour connecter l’UA-1X à votre
Macintosh.
l’UA-1X dans
l'environnement Mac OS X
Classique.
2
Ouvrez la boîte de dialogue
cliquez sur
fig.macX-1
Sound
.
System Preference
et
3
Dans l'onglet
Effects
Play alerts and
sound effects
through
sélectionnez
Audio CODEC
périphérique de lecture pour les effets sonores.
figmacX-2, macOSX-3.
Sound
, cliquez sur
et
USB
comme
68
4
Cliquez sur l'onglet
Output
USB Audio CODEC
comme périphérique
de sortie du son.
, et sélectionnez
Si aucun son n'est produit par
le haut-parleur
(haut-parleur interne) du
Macintosh, sélectionnez Built-
in audio controller à partir de
onglets Output.
Page 69

figmacX-2, macOSX-3.
5
Si l'onglet
s'affiche, sélectionnez
USB Audio CODEC
comme périphérique
d'entrée de sons.
Problèmes connus : UA-1X
Attention
Avant d'utiliser votre logiciel, veuillez vérifier les points
suivants :
Input
• Utilisez un câble USB pour brancher l'UA-1X à votre ordinateur avant
de lancer votre logiciel.
• Ne débranchez pas le câble USB de l'UA-1X lorsque votre logiciel est
en cours d'utilisation.
• Quittez votre logiciel avant de débrancher le câble USB de l'UA-1X.
• Désactivez la fonction de veille de votre Macintosh.
• L’UA-1X ne fonctionne pas avec l'environnement Mac OS X Classique.
Vous ne pouvez pas l'utiliser si l'environnement “Classique” est en
cours d'utilisation.
Connexions et installation des pilotes (Macintosh)
■
Réglages du logiciel audio
Utilisez un câble USB pour brancher l'UA-1X à votre
ordinateur avant de lancer votre logiciel.
Si votre logiciel vous permet d'effectuer des réglages
d'entrée/sortie audio, sélectionnez
* Pour plus de détails, reportez-vous au mode d'emploi du
logiciel utilisé.
Problèmes connus : UA-1X
• Lorsque l’applicaton audio est en cours d’enregistrement ou de lecture, veillez à
ne pas brancher, ni débrancher, le câble USB. Le logiciel risquerait de se bloquer.
• Il est possible que le son soit haché ou qu'il soit de mauvaise qualité si vous
enregistrez et lisez en même temps, en raison d'une charge trop importante
au niveau du processeur (CPU). Ce défaut ne devrait pas affecter le résultat
de l'enregistrement. Ce genre de problème ne devrait concerner que le signal
de lecture.
• Le pilote standard livré avec Mac OS n'est pas compatible ASIO.
USB Audio CODEC
.
Español Italiano Français Deutsch English
69
Page 70

MEMO
Page 71

Collegamenti e installazione del driver (Windows)
* Per gli utenti Macintosh, fare riferimento a
(Macintosh)
(pag. 83).
Prima di installare il driver
* Non è possibile utilizzare l’UA-1X con Windows 95 o Windows NT.
* Chiudere tutte le applicazioni eventualmente attive in Windows prima di installare il driver
UA-1X.
* Se si prevede di collegare l’UA-1X e altri dispositivi USB al computer e di utilizzarli
contemporaneamente, scollegare tutti i dispositivi USB, eccetto l’UA-1X, dal connettore
USB prima di installare il driver. Evitare di lasciare collegato il dispositivo USB quando
se ne installa il driver perché l’installazione potrebbe non essere corretta.
Per poter utilizzare l’UA-1X, è necessario installare prima il driver Periferica
composita USB e successivamente nell’ordine il driver USB Human Interface e il
driver Periferica audio USB. Questi driver sono forniti con Windows. Se si utilizza
Windows 98, questo driver si trova nel CD-ROM di Microsoft Windows, che sarà
quindi necessario avere pronto.
(Per Windows Me, 2000, o XP non è necessario)
Definizione di un driver
Un driver è un programma informatico che permette di eseguire un’applicazione
sul computer per trasferire i dati da e verso l’UA-1X quando l’apparecchio
è collegato al computer tramite un cavo USB.
Il driver trasmette i dati dall’applicazione all’UA-1X e viceversa.
fig.05-01.e
Collegamenti e installazione del driver
Application
USB
Driver
Computer
USB
connector
USB cable
UA-1X
Español Italiano Français Deutsch English
71
Page 72

Collegamenti e installazione del driver (Windows)
Collegamenti e installazione del driver
La procedura d’installazione dipenderà dal sistema
utilizzato. Passare ad una delle sezioni seguenti a seconda
del sistema utilizzato.
• Utenti Windows XP/2000 .................pag. 72
• Utenti Windows Me ..........................pag. 73
• Utenti Windows 98.............................pag. 74
Per evitare malfunzionamenti e/o danni ai diffusori o ad altri
dispositivi, abbassare sempre il volume e accertarsi che tutti
gli apparecchi non siano alimentati prima di scollegare il cavo
USB. Non è necessario spegnere il computer. Utilizzare
un cavo USB per collegare l’UA-1X al computer prima
di accendere gli apparecchi audio.
■
Utenti Windows XP/2000
1
Accendere il computer e avviare Windows senza
collegare l’UA-1X.
Scollegare tutti i cavi USB, ad eccezione della tastiera e del
mouse USB, se utilizzati.
72
2
Utilizzare un cavo USB per collegare l’UA-1X
al computer.
L’UA-1X verrà rilevato automaticamente e il driver verrà
installato.
3
Dopo aver installato il driver, riavviare Windows.
Successivamente sarà necessario configurare il driver.
→ Configurazione e verifica (pag. 78)
Se si utilizza Windows XP,
l’installazione risulterà
conclusa una volta che il
messaggio “Trovato nuovo
hardware” non è visualizzato.
Questo apparecchio
è provvisto di un circuito
di protezione. È necessario
aspettare qualche secondo
dopo aver inserito un
connettore USB prima che
l’apparecchio funzioni
normalmente.
Page 73

■
Utenti Windows Me
1
Accendere il computer e avviare Windows senza
collegare l’UA-1X.
Scollegare tutti i cavi USB, ad eccezione della tastiera e del
mouse USB, se utilizzati.
2
Utilizzare un cavo USB per collegare l’UA-1X
al computer.
fig.02-03.e
3
Windows rileva l’UA-1X
e appare la finestra di
dialogo
guidata nuovo hardware.”
Accertarsi che l’opzione
un driver adatto alla periferica
(scelta consigliata)
“Installazione
Collegamenti e installazione del driver (Windows)
Cerca
sia selezionata e fare clic su
[Avanti]
Questo apparecchio
è provvisto di un circuito
di protezione. È necessario
aspettare qualche secondo
dopo aver inserito un
connettore USB prima che
l’apparecchio funzioni
normalmente.
Questa finestra potrebbe
richiedere un certo tempo
.
prima di essere visualizzata.
4
Viene avviata la ricerca del driver.
5
Una volta che il driver corretto è stato trovato,
comincia l’installazione.
fig.02-04.e
6
Nella finestra indicante che
l’installazione del driver è
giunta al termine, fare clic su
[Fine]
e riavviare Windows.
Successivamente sarà necessario configurare il driver.
→ Configurazione e verifica (pag. 78)
A seconda della
configurazione informatica,
potrebbe passare un breve
intervallo di tempo tra
l’installazione e il
riconoscimento del driver.
Español Italiano Français Deutsch English
73
Page 74

Collegamenti e installazione del driver (Windows)
■
Utenti Windows 98
L’installazione dei driver deve rispettare la seguente
successione:
Human Interface
la procedura sotto indicata per eseguire l’installazione.
Periferica composita USB, Periferica USB
e infine
Periferica audio USB
1
Accendere il computer e avviare Windows senza
collegare l’UA-1X.
Scollegare tutti i cavi USB, ad eccezione della tastiera e del
mouse USB, se utilizzati.
2
Inserire il CD-ROM di Microsoft Windows nell’unità
corrispondente e utilizzare un cavo USB per collegare
l’UA-1X al computer.
Poiché alcuni computer sono venduti con il contenuto del
CD-ROM di Microsoft Windows già installato sul disco
rigido, il CD in questione potrebbe non essere stato fornito.
In questo caso il driver potrà essere installato senza il
CD-ROM di Microsoft Windows .
. Seguire
Questo apparecchio
è provvisto di un circuito
di protezione. È necessario
aspettare qualche secondo
dopo aver inserito un
connettore USB prima che
l’apparecchio funzioni
normalmente.
74
fig.02-05.e
3
Il dispositivo USB Composite
Device viene rilevato
automaticamente e appare
la finestra di dialogo
“Installazione guidata
Nuovo hardware.”
Fare clic su
fig.02-06.e
[Avanti]
4
Al messaggio
l’operazione da effettuare”
selezionare
driver per la periferica.
(scelta consigliata)”
e fare clic su
“Cerca il miglior
[Avanti]
.
“Scegliere
.
Se questa finestra non
appare, fare riferimento a
Problems related to the
USB driver (pag. 111).
,
Page 75

fig.02-07.e
5
Selezionare la casella
CD-ROM
[Avanti]
fig.02-08.e
e fare clic su
.
Unità
6
Fare clic su
*A seconda del sistema utilizzato, la
finestra Percorso del driver potrebbe
essere diversa da quella di seguito
illustrata, ma non è un problema.
[Avanti]
.
7
A questo punto comincerà la copia dei file.
fig.02-09.e
Se il CD-ROM di Microsoft
Windows non è presente
nell’unità CD-ROM, potrebbe
apparire la finestra di dialogo
“Inserire il disco.” In questo
caso, inserire il CD-ROM di
Microsoft Windows nell’unità
CD-ROM e fare clic su [OK].
Collegamenti e installazione del driver (Windows)
fig.02-10.e
8
Alla fine dell’installazione del
driver
Periferica composita
USB
, appare la seguente
finestra di dialogo. Fare
clic su
[Fine]
.
Al passo 6, la finestra
visualizza il messaggio
“Ricerca del file del driver
per la periferica: Periferica
audio USB.”
Español Italiano Français Deutsch English
75
Page 76

Collegamenti e installazione del driver (Windows)
fig.02-11.e
9
Nella tappa successiva,
il dispositivo
USB Human Interface
rilevato automaticamente
e appare la finestra di dialogo
“Installazione guidata nuovo
hardware.”
[Avanti]
l’installazione seguendo
la stessa procedura fino
ai passi 4-7 (pag. 74-75).
fig.02-12.e
Periferica
viene
Fare clic su
e continuare
10
Alla fine dell’installazione del
driver
Periferica USB Human
Interface
finestra di dialogo. Fare clic
su
appare la seguente
[Fine]
.
76
Page 77

fig.02-13.e
11
Nella tappa successiva, il
dispositivo
audio USB
automaticamente e appare
la finestra di dialogo
“Installazione guidata
nuovo hardware.”
Fare clic su
la stessa procedura fino ai passi 4-7 (pag. 74-75).
fig.02-14.e
Periferica
viene rilevato
[Avanti]
e continuare l’installazione seguendo
Collegamenti e installazione del driver (Windows)
Al passo 6, la finestra
visualizza il messaggio
“Ricerca del file del driver
per la periferica: Periferica
audio USB.”
12
Alla fine dell’installazione del
driver
Periferica audio USB
verrà visualizzata una finestra
di dialogo simile a quella sotto
illustrata. Fare clic su
L’installazione dei driver Periferica USB composita, Periferica
USB Human Interface e infine Periferica audio USB è giunta
al termine. Riavviare Windows.
Successivamente sarà necessario configurare il driver.
→ Configurazione e verifica (pag. 78)
[Fine]
,
.
A seconda del sistema
utilizzato, la clessidra potrebbe
restare visualizzata per alcuni
minuti dopo aver fatto clic su
[OK]; è sufficiente attendere.
77
Español Italiano Français Deutsch English
Page 78

Collegamenti e installazione del driver (Windows)
Configurazione e verifica
■
Indicazione del dispositivo audio d’ingresso/uscita
1
In Windows, fare clic sul pulsante
Impostazioni - Pannello di controllo
fare clic sul pulsante
Start
e sul
Pannello di controllo
2
Aprire la finestra di dialogo
audio”
(in Windows 98,
Se si utilizza Windows XP/2000/Me:
Nel
Pannello di controllo
e multimedia
e multimedia.”
* Se l’icona
Windows XP:
Nel
Pannello di controllo
e periferiche audio
e periferiche audio
“Proprietà – Suoni e periferiche audio.”
Windows Me
Nel riquadro a sinistra, fare clic su
del Pannello di controllo.
Utenti Windows 98:
Nel
Pannello di controllo
Multimedia
per aprire la finestra
Suoni e periferiche audio
. Fare quindi clic sull’icona
per aprire la finestra di dialogo
per aprire la finestra
“Suoni e periferiche
“Proprietà multimediali”
, fare doppio clic sull’icona
“Proprietà - Suoni
non è visualizzata
, fare clic su
Visualizza tutte le opzioni
, fare doppio clic sull’icona
Proprietà multimediali
Start
e selezionare
.
(In Windows XP,
Suoni, voce
Suoni
.)
).
Suoni
.
78
Page 79

3
Fare clic sulla scheda
4
Come
Periferica preferenziale
suoni
e
suoni
, selezionare
audio USB
Audio
.
Periferica preferenziale
USB Audio CODEC
.
Collegamenti e installazione del driver (Windows)
Se si utilizza Windows XP,
impostare la Periferica
per
Riproduzione
per
Registrazione
o
Periferica
predefinita per Riproduzione
suoni e la Periferica
predefinita per Registrazione
suoni su USB Audio CODEC.
Fare clic su e nell’elenco visualizzato fare clic su
Audio CODEC
o
Periferica audio USB
5
Fare clic su
[OK]
per completare le impostazioni.
USB
per selezionarla.
Se si utilizza Windows 98,
impostare la Periferica
predefinita per Riproduzione
e la Periferica predefinita
per Registrazione su
USB Audio CODEC.
A seconda del sistema
utilizzato, Periferica audio
USB è seguito da un numero,
ad esempio “Periferica
audio USB (1).”
79
Español Italiano Français Deutsch English
Page 80

Collegamenti e installazione del driver (Windows)
Impostazioni Controllo volume
Il volume dell’UA-1X può essere regolato tramite il Controllo
volume di Windows.
1
Fare clic sul pulsante
Programmi
(In Windows XP,
Accessori – Svago – Controllo volume
Utenti Windows XP
fig.05-16ae_30
Utenti Windows Me
fig.02-17.e.eps
Start
in Windows e selezionare
Tutti i programmi
–
)
per avviarlo.
Se il Controllo volume non
è installato sul computer,
utilizzare Installazione
applicazioni nel Pannello
di controllo per installarlo.
Per ulteriori informazioni
sull’installazione, fare
riferimento al manuale
utente di Windows o alla
Guida in linea.
Utenti Windows 2000 /Utenti Windows 98
fig.02-18.e.eps
80
Se si utilizza Windows 2000
e “Lettore CD” non è
visualizzato, selezionare
Riproduzione CD digitale
in “Abilita riproduzione
digitale su questa
periferica CD-ROM.”
Se si utilizza l’unità CD-
→
ROM del computer per
riprodurre un CD audio o
se si riproduce musica di
sottofondo per i giochi con
l’UA-1X. (pag. 82)
Page 81

2
Se è selezionata la casella
Disattiva o lo slider è
completamente in basso,
l’UA-1X non emetterà alcun
suono.
Spostare lo slider verso l’alto o verso il basso per
regolare il volume dell’UA-1X. È possibile regolare
i seguenti elementi.
Collegamenti e installazione del driver (Windows)
Utilizzare il controllo volume
per avere una qualità ottimale
dell'audio in uscita dal
computer tramite l'UA-1X.
Audio USB
(altoparlanti)
Regola il volume delle uscite
analogiche (uscita linea e uscita cuffie).
L’uscita digitale non cambia (*1).
Lettore CD
Regola il volume “CD Musica”
dell’unità CD-ROM del computer (*2).
Wave
Regola il volume emesso dal
dispositivo di uscita audio “Periferica
audio USB.” L’uscita digitale e quella
analogica cambiano.
SW Synth
Regola il volume del software.
sintetizzatore integrato di Windows.
*1 In funzione della versione di Windows, potrebbe essere
visualizzato come un “connettore analogico.”
*2 Se la riproduzione del CD non cambia dopo aver regolato
questo volume, cambiare il volume WAVE.
Se l'UA-1X è collegato,
Windows non trasmetterà
alcun suono dagli altoparlanti
del computer. Dato che l'audio
del computer verrà emesso
dalla presa delle cuffie o dalle
uscite linea dell'UA-1X e non
dagli altoparlanti del
computer, sarà necessario
collegare le casse monitor
all'UA-1X. In alternativa è
possibile collegare le uscite
linea dell'UA-1X agli ingressi
LINE del computer.
Español Italiano Français Deutsch English
81
Page 82

Collegamenti e installazione del driver (Windows)
Se si utilizza l’unità CD-ROM del computer per riprodurre un CD audio o se
si riproduce musica di sottofondo per i giochi con l’UA-1X.
Utenti Windows XP/2000:
1. Aprire la finestra di dialogo Proprietà del sistema.
Selezionare Start | Impostazioni | Pannello di controllo e nel Pannello
di controllo, fare doppio clic sull’icona Sistema.
In Windows XP, selezionare Start | Pannello di controllo e nel Pannello
di controllo, fare doppio clic sull’icona Sistema.
Diversamente, fare clic su Pannello di controllo | Prestazioni
e manutenzione. Fare quindi doppio clic sull’icona Sistema.
2. Fare clic sulla scheda Gestione periferiche.
Fare clic sulla scheda Hardware e quindi sul pulsante Gestione periferiche.
3. Aprire la scheda Proprietà dell’unità CD-ROM.
Nell’unità CD-ROM fare doppio clic sull’unità CD-ROM utilizzata. In
Windows XP, a questo punto fare clic sulla scheda Proprietà.
In Riproduzione CD digitale, selezionare la casella “Abilita riproduzione
audio su questa periferica CD-ROM.”
Utenti Windows Me:
1. Aprire la finestra di dialogo Proprietà del sistema.
Selezionare Start | Impostazioni | Pannello di controllo e nel Pannello
di controllo, fare doppio clic sull’icona Sistema.
2. Fare clic sulla scheda Gestione periferiche.
3. Aprire la scheda Proprietà dell’unità CD-ROM.
Fare doppio clic sull’icona CD-ROM e successivamente doppio clic sull’unità
CD-ROM utilizzata.
4. Fare clic sulla scheda Proprietà e in Riproduzione CD digitale, selezionare
la casella “Abilita riproduzione audio su questo dispositivo CD-ROM.”
82
Utenti Windows 98:
1. Aprire la finestra di dialogo Proprietà multimediali.
Selezionare Start | Impostazioni | Pannello di controllo e nel Pannello
di controllo, fare doppio clic sull’icona Multimedia.
2. Fare clic sulla scheda CD musica e selezionare la casella “Abilita riproduzione
audio su questa periferica CD-ROM.”
*A seconda del sistema utilizzato, potrebbero esserci ancora dei problemi con la riproduzione.
Per maggiori informazioni, fare riferimento alle informazioni fornite dal costruttore del
computer. Se si utilizza un’unità CD-ROM di tipo PC-card (PCMCIA), la riproduzione
di dati WAVE a partire da un CD-ROM o la riproduzione di un CD audio potrebbe
provocare interruzioni dell’audio o addirittura nessun audio.
Page 83

Collegamenti e installazione del driver (Macintosh)
* Per gli utenti Windows, fare riferimento alla sezione
driver (Windows)
Se il computer viene avviato con l’UA-1X collegato, il computer potrebbe diventare
instabile. In questo caso avviare il computer prima di collegare l’UA-1X e collegare
l’UA-1X dopo l’avvio.
(pag. 71).
Prima di installare il driver
Per poter utilizzare l’UA-1X, è necessario installare prima il driver. L'UA-1X
utilizza un driver fornito con Mac OS. Non è necessario utilizzare il CD-ROM
fornito con l’UA-1X.
Definizione di un driver
Un driver è un programma informatico che permette di eseguire un’applicazione sul
computer per trasferire i dati da e verso l’UA-1X quando l’apparecchio è collegato al
computer tramite un cavo USB.
Il driver trasmette i dati dall’applicazione all’UA-1X e viceversa.
fig.05-01.e
Application
USB
Driver
USB
connector
USB cable
Collegamenti e installazione del
Computer
La procedura d’installazione dipenderà dal sistema
utilizzato. Passare ad una delle sezioni seguenti a seconda del
sistema utilizzato.
• Utenti Mac OS 9..................................pag. 84
• Utenti Mac OS X..................................pag. 88
UA-1X
Español Italiano Français Deutsch English
83
Page 84

Collegamenti e installazione del driver (Macintosh)
Collegamenti e installazione del driver (OS 9)
Per evitare malfunzionamenti e/o danni ai diffusori o ad altri
dispositivi, abbassare sempre il volume e accertarsi che tutti
gli apparecchi non siano alimentati prima di scollegare il cavo
USB. Non è necessario spegnere il computer. Utilizzare un
cavo USB per collegare l’UA-1X al computer prima di
accendere gli apparecchi audio.
1
Dopo essersi accertati che l’UA-1X è scollegato,
avviare il Macintosh.
Scollegare tutti i cavi USB, ad eccezione della tastiera e del
mouse USB, se utilizzati.
2
Chiudere tutti i programmi in corso di esecuzione.
Se si utilizza un programma antivirus o simile, accertarsi
che sia vanch’esso chiuso.
fig.03-02.e
3
Dopo aver avviato
Mac OS, selezionare
Apple System Profiler
nel menu
Viene visualizzata la
finestra di dialogo
System Profiler.”
Apple
.
“Apple
84
4
Fare clic sulla scheda
Devices and Volumes
5
Selezionare
Commands
Update all information
.
6
Utilizzare un cavo USB per collegare l’UA-1X
al computer.
.
nel menu
Questo apparecchio
è provvisto di un circuito
di protezione. È necessario
aspettare qualche secondo
dopo aver inserito un
connettore USB prima che
l’apparecchio funzioni
normalmente.
Page 85

7
Attendere circa cinque secondi.
L'UA-1X utilizza un driver fornito con Mac OS.
Durante l’operazione, l’UA-1X verrà rilevato anche se non
viene visualizzato alcun messaggio in questo senso. Evitare
di toccare il mouse o la tastiera.
fig.03-04.e
8
Per accertarsi che
l’apparecchio sia stato
rilevato correttamente,
riaprire
Profiler
Update all information
Nell’area USB, verranno visualizzati tre dispositivi audio.
Se sono visualizzati correttamente, l’installazione del driver
è riuscita. Nel menu File, fare clic su Quit per chiudere la
finestra “Apple System Profiler.”
Se non sono visualizzati correttamente, scollegare l’UA-1X,
aspettare circa dieci secondi, e ripetere la procedura fino
al passo 2.
Apple System
e selezionare
nel menu
Commands
Collegamenti e installazione del driver (Macintosh)
.
■
Configurazione e verifica
Impostazione dell’ingresso/uscita audio
fig.03-05.e
1
Nel menu
selezionare
Panels - Sound
aprire la finestra
Sound
.
Apple
Control
,
per
2
Fare clic sulla
scheda
Speakers
o
Speaker Settings
.
Español Italiano Français Deutsch English
85
Page 86

Collegamenti e installazione del driver (Macintosh)
fig.03-06.e
3
Abbassare al minimo
il volume dell’UA-1X
e degli apparecchi audio
e fare clic su
fig.03-07.e
[Start Test]
.
4
Utilizzare lo slider
Volume]
per regolare il
volume. Alla fine, fare
clic su
[Stop Test]
I suoni di prova sono emessi
da sinistra verso destra
insieme a quanto
visualizzato.
[Main
.
La schermata potrebbe essere
diversa in funzione del sistema
operativo utilizzato e dei dati.
A seconda della versione del
sistema operativo, lo slider
Main Volume potrebbe
mancare. In questo caso,
utilizzare lo slider Volume
nella scheda Output per
regolare il volume.
86
fig.03-08.e
5
Nella finestra di dialogo
Sound
, fare clic sulla
scheda
Input
In
Choose a source for
sound input:
USB audio
* Non selezionare
through output device.”
.
selezionare
.
“Play sound
Se USB audio” non
è visualizzato, chiudere la
finestra di dialogo “Sound”
e scollegare il cavo USB
dell’UA-1X dal Macintosh.
Ripetere l’installazione
del driver (pag. 84).
Page 87

Collegamenti e installazione del driver (Macintosh)
6
Alla fine delle impostazioni, chiudere la finestra
di dialogo
Selezionare
Problemi noti: UA-1X
• Se l’applicazione audio sta eseguendo una registrazione o riproduzione,
non collegare/scollegare il cavo USB. L’applicazione potrebbe bloccarsi.
• L’audio potrebbe essere irregolare e/o disturbato se la registrazione e la
riproduzione avvengono contemporaneamente con un conseguente sovraccarico
per la CPU. Tuttavia il disturbo non dovrebbe apparire nella registrazione ma
nel segnale di riproduzione.
• Il driver fornito in standard con Mac OS non è ASIO compatibile.
“Sound.”
Quit
nel menu
File
.
87
Español Italiano Français Deutsch English
Page 88

Collegamenti e installazione del driver (Macintosh)
Collegamenti e installazione del driver (OS X)
* Nella spiegazione che segue si fa riferimento all'
e a
Mac OS 10.2
■
Collegamenti e impostazioni di ingresso/
.
UA-1X
uscita audio del sistema
1
Utilizzare un cavo USB per collegare l’UA-1X
al Macintosh.
2
Aprire la finestra di dialogo
fare clic su
fig.macX-1
Sound
.
System Preference
3
Nella scheda
Effects
Play alerts and
sound effects
through
USB Audio CODEC
come periferica di
riproduzione per gli
effetti sonori.
figmacX-2, macOSX-3.
Sound
fare clic su
e selezionare
Non è possibile utilizzare
l'UA-1X in ambiente Classic
OS X Mac.
e
88
4
Fare clic sulla scheda
Output
USB Audio CODEC
come periferica di
emissione dell'audio.
e scegliere
Se dall'altoparlante interno del
Macintosh non proviene alcun
suono, selezionare Built-in
audio controller nelle schede
Output.
Page 89

figmacX-2, macOSX-3.
5
Se la scheda
risulta visualizzata,
selezionare
Audio CODEC
periferica di ingresso
dei suoni.
Problemi noti: UA-1X
Avvertenza
Prima di utilizzare il software, controllare quanto segue.
• Collegare l’UA-1X al computer mediante un cavo USB prima di
• Non scollegare il cavo USB dall'UA-1X mentre il software è in
• Chiudere il software prima di scollegare il cavo USB dall'UA-1X.
• Disattivare le impostazioni Sleep del Macintosh.
• L'UR-1X non funzionerà in ambiente Classic Mac OS X. Non lo si
Input
USB
come
avviare il software.
esecuzione.
potrà utilizzare se è in esecuzione l'ambiente Classic.
Collegamenti e installazione del driver (Macintosh)
■
Impostazioni audio del software
Collegare l’UA-1X al computer mediante un cavo USB prima
di avviare il software.
Se è possibile configurare l'ingresso/l'uscita audio nel
software, selezionare
* Per maggiori informazioni, fare riferimento al manuale del software
utilizzato.
Problemi noti: UA-1X
• Se l’applicazione audio sta eseguendo una registrazione o riproduzione, non
collegare/scollegare il cavo USB. L’applicazione potrebbe bloccarsi.
• L’audio potrebbe essere irregolare e/o disturbato se la registrazione e la
riproduzione avvengono contemporaneamente con un conseguente sovraccarico
per la CPU. Tuttavia il disturbo non dovrebbe apparire nella registrazione ma
nel segnale di riproduzione.
• Il driver fornito in standard con Mac OS non è ASIO compatibile.
USB Audio CODEC
.
Español Italiano Français Deutsch English
89
Page 90

MEMO
Page 91

Conexiones e instalación del controlador (Windows)
* Si es usuario de Macintosh, consulte el apartado
controlador (Macintosh)
(pág. 103).
Antes de instalar el controlador
* El UA-1X no puede utilizarse con Windows 95 o Windows NT.
* Antes de instalar el controlador de la unidad UA-1X, salga de cualquier otra aplicación
que se esté ejecutando.
* Si pretende conectar la unidad UA-1X y otros aparatos USB a su sistema y utilizarlos
simultáneamente, desconecte todos los aparatos USB que no sean el UA-1X del conector
USB antes de instalar el controlador. Si se deja algún aparato USB conectado que no sea
la unidad USB-1X al instalar el controlador, puede que éste no se instale correctamente.
Para utilizar la unidad UA-1X, primero debe instalar el controlador Dispositivo USB
Composite, el controlador (Dispositivo de interfaz humana USB y el controlador
Dispositivo de audio USB consecutivamente. Windows incluye estos controladores.
Si utiliza Windows 98, este controlador se proporciona con el CD-ROM de Microsoft
Windows, de modo que conviene que tenga dicho CD-ROM a mano.
(Para Windows Me, 2000 o XP, no es necesario.)
¿Qué es un controlador?
Un controlador es software que permite que una programa de aplicaciones que se
ejecuta en su sistema transfiera datos a la unidad UA-1X y viceversa cuando está
conectada al equipo mediante un cable USB.
El controlador transfiere los datos de la aplicación a la unidad UA-1X y de la unidad
UA-1X a la aplicación.
fig.05-01.e
Conexiones e instalación del
Application
USB
Driver
Computer
USB
connector
USB cable
UA-1X
Español Italiano Français Deutsch English
91
Page 92

Conexiones e instalación del controlador (Windows)
Realización de las conexiones e instalación del controlador
El procedimiento de instalación variará en función del
sistema. Pase a uno de los siguientes apartados, en función
del sistema que utilice.
• Usuarios de Windows XP/2000.......pág. 92
• Usuarios de Windows Me.................pág. 93
• Usuarios de Windows 98...................pág. 94
Para evitar anomalías en el funcionamiento o daños en los
altavoces u otros aparatos, baje siempre el volumen al
mínimo y apague todos los aparatos antes de desconectar
el cable USB. No es necesario que apague el sistema.
Conecte la unidad UA-1X al sistema con un cable USB
antes de encender el equipo de audio.
■
Usuarios de Windows XP/2000
1
Con la unidad UA-1X desconectada de su sistema,
encienda el sistema e inicie Windows.
Desconecte todos los cables USB excepto el del teclado USB
y el ratón USB (si se utilizan).
92
2
Utilice un cable USB para conectar el UA-1X al
sistema.
El sistema detectará la unidad UA-1X automáticamente
y se instalará el controlador.
3
Una vez instalado el controlador, reinicie Windows.
A continuación, deberá configurar el controlador.
→ Configuración y comprobación (pág. 98)
Si utiliza Windows XP, la
instalación finaliza cuando
desaparece el mensaje “Nuevo
hardware encontrado” que
surge cerca de la barra de
tareas.
Esta unidad viene equipada
con un circuito de protección.
Es necesario dejar pasar
un pequeño intervalo
(de unos segundos) después
de encender la unidad
para que ésta funcione
correctamente.
Page 93

■
Usuarios de Windows Me
1
Con la unidad UA-1X desconectada de su sistema,
encienda el sistema e inicie Windows.
Desconecte todos los cables USB excepto el del teclado USB
y el ratón USB (si se utilizan).
2
Utilice un cable USB para conectar la unidad UA-1X
al sistema.
fig.02-03.e
3
Windows detectará la unidad
UA-1X y aparecerá el cuadro
de diálogo
“Asistente para
agregar nuevo hardware.”
Asegúrese de que
automáticamente el controlador
(recomendado)
y haga clic en
Buscar
está seleccionado
[Siguiente]
4
Empieza la búsqueda del controlador.
Conexiones e instalación del controlador (Windows)
Esta unidad viene equipada
con un circuito de protección.
Es necesario dejar pasar un
pequeño intervalo de tiempo
(de unos segundos) después
de conectar un conector USB
para que la unidad funcione
correctamente.
.
Es posible que este cuadro
de diálogo tarde un tiempo
en aparecer.
5
Una vez se ha encontrado el controlador adecuado,
empieza la instalación del mismo.
fig.02-04.e
6
Cuando aparezca un cuadro
de diálogo informándole
de que la instalación del
controlador ha finalizado,
haga clic en
y reinicie Windows.
A continuación, deberá configurar el controlador.
→ Configuración y comprobación (pág. 98)
[Finalizar]
En función de la configuración
de su sistema, después de
que se haya instalado el
controlador, es posible
que deba esperar un breve
intervalo de tiempo hasta
que el sistema reconozca
el dispositivo.
Español Italiano Français Deutsch English
93
Page 94

Conexiones e instalación del controlador (Windows)
■
Usuarios de Windows 98
La instalación debe realizarse en el siguiente orden: primero
el controlador
el controlador
último, el controlador
el siguiente procedimiento para llevar a cabo la instalación.
Dispositivo USB Composite
Dispositivo de interfaz humana USB
Dispositivo de audio USB
1
Con la unidad UA-1X desconectada de su sistema,
encienda el sistema e inicie Windows.
Desconecte todos los cables USB excepto el del teclado USB
y el ratón USB (si se utilizan).
2
Inserte el CD-ROM de Microsoft Windows en la
unidad de CD-ROM y utilice un cable USB para
conectar el UA-1X al sistema.
Puesto que algunos sistemas se venden con el contenido
del CD-ROM de Microsoft Windows instalado previamente
en el disco duro, es posible que el CD-ROM de Microsoft
Windows se incluya.
Si éste es el caso, podrá instalar el controlador sin el CD-ROM
de Microsoft Windows.
fig.02-05.e
, a continuación,
y, por
. Realice
Esta unidad viene equipada
con un circuito de protección.
Es necesario dejar pasar un
pequeño intervalo de tiempo
(de unos segundos) después
de conectar un conector USB
para que la unidad funcione
correctamente.
94
3
El sistema detectará automáticamente un Dispositivo
USB Composite y aparecerá
el cuadro de diálogo
“Asistente para agregar
nuevo hardware.”
Haga clic en
fig.02-06.e
[Siguiente]
4
Cuando la pantalla aparezca un
mensaje en el que se pregunte
“¿Qué desea que haga
Windows?”
“Buscar el mejor controlador
para su dispositivo. (Recomendado)”
, seleccione
y haga clic en
.
[Siguiente]
Si no aparece este cuadro
de diálogo, consulte el
apartado Problems related
to the USB driver (pág. 111).
.
Page 95

fig.02-07.e
5
Active
fig.02-08.e
Unidad de CD-ROM
y haga clic en
[Siguiente]
.
6
Haga clic en
* Dependiendo del sistema, la ubicación
del controlador puede ser diferente
de la que se muestra en la ilustración,
pero esto no supone ningún problema.
[Siguiente]
.
7
El archivo (Controlador) se empezará a copiar.
fig.02-09.e
Si no inserta el CD-ROM
de Windows en la unidad
de CD-ROM, puede que
aparezca el cuadro de diálogo
“Insertar disco.” Si esto
ocurre, inserte el CD-ROM
de Microsoft Windows en la
unidad de CD-ROM y haga
clic en [Aceptar].
Conexiones e instalación del controlador (Windows)
95
Español Italiano Français Deutsch English
Page 96

Conexiones e instalación del controlador (Windows)
fig.02-10.e
8
Cuando haya finalizado la
instalación del controlador
Dispositivo USB Composite
,
aparecerá el siguiente cuadro
de diálogo. Haga clic en
[Finalizar]
fig.02-11.e
.
9
A continuación, el sistema
detectará automáticamente
el
Dispositivo de interfaz
humana USB
el cuadro de diálogo
“Asistente para agregar
nuevo hardware.”
clic en
con la instalación tal como
se describe en los pasos
del 4 al 7 (pág. 94-95).
fig.02-12.e
y aparecerá
[Siguiente]
Haga
y prosiga
En el paso 6, la pantalla
indicará: “Búsqueda del
archivo de controlador para
el dispositivo: Dispositivo
de audio USB.”
96
10
Cuando haya finalizado la
instalación del controlador
Dispositivo de interfaz
humana USB
siguiente cuadro de diálogo.
Haga clic en
, aparecerá el
[Finalizar]
.
Page 97

Conexiones e instalación del controlador (Windows)
fig.02-13.e
11
A continuación, se detectará
automáticamente el controlador
Dispositivo de audio
USB
y aparecerá el cuadro
de diálogo
“Asistente para
agregar nuevo hardware.”
Haga clic en
se describe en los pasos del 4 al 7 (pág. 94-95).
fig.02-1
[Siguiente]
y prosiga con la instalación tal como
12
Cuando la instalación del
controlador
audio USB
aparecerá un cuadro de
diálogo como éste. Haga
clic en
Con esto finaliza la instalación de los controladores
Dispositivo USB Composite, Dispositivo de interfaz humana
USB y Dispositivo de audio USB. Reinicie Windows.
Dispositivo de
haya finalizado,
[Finalizar]
.
En el paso 6, la pantalla
indicará: “Búsqueda del
archivo de controlador
para el dispositivo:
Dispositivo de audio
USB.”
En función del sistema que
utilice, es posible que el cursor
permanezca en forma de reloj
de arena durante varios
minutos después de que haya
hecho clic en [Aceptar], pero
lo único que tiene que hacer
es esperar.
A continuación, deberá configurar el controlador.
→ Configuración y comprobación (pág. 98)
Español Italiano Français Deutsch English
97
Page 98

Conexiones e instalación del controlador (Windows)
Configuración y comprobación
■
Especificación del aparato de entrada/ salida de audio
1
Haga clic en el botón
Configuración - Panel de control
haga clic en el botón
de control
).
Inicio
de Windows y seleccione
Inicio
.
(En Windows XP,
y, a continuación, en
Panel
2
Entre en
(en Windows 98,
Si utiliza Windows XP, 2000 o Me:
En
y multimedia
de Sonidos y multimedia.”
* Si el icono
pantalla,
Windows XP:
En
audio y voz
de sonido y audio
“Propiedades de dispositivos de sonido y audio.”
Windows Me:
En el marco izquierdo, haga clic en
del Panel de control
Usuarios de Windows 98:
En
para abrir el cuadro de diálogo
“Propiedades de Sonidos y multimedia”
“Propiedades multimedia”
Panel de control
Propiedades de Sonido y multimedia
Panel de control
. A continuación, haga clic en
Panel de control
, haga doble clic en el icono
para abrir el cuadro de diálogo
, haga clic en
para acceder al cuadro de diálogo
.
, haga doble clic en el icono
Dispositivos de sonido,
Ver todas las opciones
Propiedades multimedia
).
Sonidos
“Propiedades
no aparece en
Dispositivos
Multimedia
.
98
Page 99

Conexiones e instalación del controlador (Windows)
3
Haga clic en la ficha
Sonido
.
4
Como
Dispositivo preferido
de sonido
y para la
USB Audio CODEC
Haga clic en y, en la lista que aparece, haga clic en
USB Audio CODEC
para seleccionarlo.
Grabación de sonido
o
o en
para la
Dispositivo de audio USB
Dispositivo de audio USB
5
Haga clic en
[Aceptar]
para finalizar la configuración.
Reproducción
, seleccione
.
Si utiliza Windows XP,
establezca el Dispositivo
predeterminado para la
Reproducción de sonido y el
Dispositivo predeterminado
para la Grabación de sonido
en USB Audio CODEC.
Si utiliza Windows 98,
establezca el Dispositivo
preferido para la Reproducción y el Dispositivo
preferido para la Grabación
en USB Audio CODEC.
En función del sistema, la
opción Dispositivo de audio
USB aparecerá con un número
añadido, por ejemplo, “Dispo-
sitivo de audio USB (1).”
99
Español Italiano Français Deutsch English
Page 100

Conexiones e instalación del controlador (Windows)
Configuración del control de volumen
El volumen de salida del UA-1X se puede regular mediante
el Control de volumen de Windows.
1
Haga clic en el botón
Programas - Accesorios - Entretenimiento Control de volumen
Usuarios de Windows XP
fig.05-16ae_30
Usuarios de Windows Me
fig.02-17.e.eps
Inicio
de Windows y seleccione
para iniciarlo.
Si no tiene instalada en su
sistema la opción Control
de volumen, utilice la opción
Agregar o quitar programas
del Panel de control para
instalarla. Para obtener
información detallada sobre
la instalación, consulte el
manual del usuario de
Windows o la ayuda.
Usuarios de Windows 2000/usuarios de Windows 98
fig.02-18.e.eps
100
Si utiliza Windows 2000 y no
aparece el “Reproductor
de CD”, active la opción
“Habilitar el CD de sonido
digital para este
dispositivo de CD-ROM”
de la Reproducción
de CD Digital.
→ Cuando utilice la unidad
de CD-ROM del sistema
para escuchar un CD de
audio o cuando
reproduzca música de
fondo de juegos con la
unidad UA-1X, (pág. 102).
 Loading...