

Page 1
Owner’s Manual
Bedienungsanleitung
Mode d’emploi
Manuale d’uso
Manual del usuario
Before using this unit, carefully read the sections entitled:
“USING THE UNIT SAFELY” (P. 3, 4)
NOTES” (P. 5)
concerning the proper operation of the unit. Additionally, in
order to feel assured that you have gained a good grasp of
every feature provided by your new unit, this manual should
be read in its entirety. The manual should be saved and kept
on hand as a convenient reference.
. These sections provide important information
and
“IMPORTANT
Copyright © 2001 ROLAND CORPORATION
All rights reserved. No part of this publication may be
reproduced in any form without the written permission of
ROLAND CORPORATION.
Page 2
For EU Countries
This product complies with the requirements of European Directive 89/336/EEC.
For the USA
FEDERAL COMMUNICATIONS COMMISSION
RADIO FREQUENCY INTERFERENCE STATEMENT
This equipment has been tested and found to comply with the limits for a Class B digital device, pursuant to Part 15 of the
FCC Rules. These limits are designed to provide reasonable protection against harmful interference in a residential
installation. This equipment generates, uses, and can radiate radio frequency energy and, if not installed and used in
accordance with the instructions, may cause harmful interference to radio communications. However, there is no guarantee
that interference will not occur in a particular installation. If this equipment does cause harmful interference to radio or
television reception, which can be determined by turning the equipment off and on, the user is encouraged to try to correct the
interference by one or more of the following measures:
– Reorient or relocate the receiving antenna.
– Increase the separation between the equipment and receiver.
– Connect the equipment into an outlet on a circuit different from that to which the receiver is connected.
– Consult the dealer or an experienced radio/TV technician for help.
This device complies with Part 15 of the FCC Rules. Operation is subject to the following two conditions:
(1) This device may not cause harmful interference, and
(2) This device must accept any interference received, including interference that may cause undesired operation.
Tested To Comply With FCC Standards
FOR HOME OR OFFICE USE
Unauthorized changes or modification to this system can void the users authority to operate this equipment.
This equipment requires shielded interface cables in order to meet FCC class B Limit.
For the USA
DECLARATION OF CONFORMITY
Compliance Information Statement
Model Name :
Type of Equipment :
Responsible Party :
Address :
Telephone :
UA-1A
USB Audio Interface
Edirol Corporation North America
425 Sequoia Drive, Suite 114, Bellingham, WA 98226
(360) 594-4276
For Canada
NOTICE
This Class B digital apparatus meets all requirements of the Canadian Interference-Causing Equipment Regulations.
AVIS
Cet appareil numérique de la classe B respecte toutes les exigences du Règlement sur le matériel brouilleur du Canada.
Page 3
USING THE UNIT SAFELY
Used for instructions intended to alert
the user to the risk of death or severe
injury should the unit be used
improperly.
Used for instructions intended to alert
the user to the risk of injury or material
damage should the unit be used
improperly.
* Material damage refers to damage or
other adverse effects caused with
respect to the home and all its
furnishings, as well to domestic
animals or pets.
001
• Before using this unit, make sure to
read the instructions below, and the
Owner’s Manual.
..................................................................................................
002a
• Do not open or perform any internal
modifications on the unit.
..................................................................................................
003
• Do not attempt to repair the unit, or
replace parts within it (except when
this manual provides specific instructions directing you to do so). Refer all
servicing to your retailer, the nearest
Roland / EDIROL Service Center, or
an authorized Roland / EDIROL
distributor, as listed on the "Information"
page.
..................................................................................................
The symbol alerts the user to important instructions
or warnings.The specific meaning of the symbol is
determined by the design contained within the
triangle. In the case of the symbol at left, it is used for
general cautions, warnings, or alerts to danger.
The symbol alerts the user to items that must never
be carried out (are forbidden). The specific thing that
must not be done is indicated by the design contained
within the circle. In the case of the symbol at left, it
means that the unit must never be disassembled.
The ● symbol alerts the user to things that must be
carried out. The specific thing that must be done is
indicated by the design contained within the circle. In
the case of the symbol at left, it means that the powercord plug must be unplugged from the outlet.
004
• Never use or store the unit in places
that are:
• Subject to temperature extremes
(e.g., direct sunlight in an enclosed
vehicle, near a heating duct, on top
of heat-generating equipment); or
are
• Damp (e.g., baths, washrooms, on
wet floors); or are
• Humid; or are
• Exposed to rain; or are
• Dusty; or are
• Subject to high levels of vibration.
..................................................................................................
009
• Do not excessively twist or bend cable,
nor place heavy objects on it. Doing so
can damage the cord, producing
severed elements and short circuits.
Damaged cords are fire and shock
hazards!
..................................................................................................
3
Page 4
010
• This unit, either alone or in combination with an amplifier and
headphones or speakers, may be
capable of producing sound levels that
could cause permanent hearing loss.
Do not operate for a long period of
time at a high volume level, or at a
level that is uncomfortable. If you
experience any hearing loss or ringing
in the ears, you should immediately
stop using the unit, and consult an
audiologist.
..................................................................................................
011
• Do not allow any objects (e.g.,
flammable material, coins, pins); or
liquids of any kind (water, soft drinks,
etc.) to penetrate the unit.
..................................................................................................
012d
• Immediately turn the power off, and
request servicing by your retailer, the
nearest Roland / EDIROL Service
Center, or an authorized Roland /
EDIROL distributor, as listed on the
"Information" page when:
• Objects have fallen into, or liquid
has been spilled onto the unit; or
• The unit has been exposed to rain
(or otherwise has become wet); or
• The unit does not appear to operate
normally or exhibits a marked change in
performance.
..................................................................................................
013
• In households with small children, an
adult should provide supervision until
the child is capable of following all the
rules essential for the safe operation of
the unit.
..................................................................................................
014
• Protect the unit from strong impact.
(Do not drop it!)
..................................................................................................
104
• Try to prevent cords and cables from
becoming entangled. Also, all cords
and cables should be placed so they
are out of the reach of children.
..................................................................................................
106
• Never climb on top of, nor place heavy
objects on the unit.
..................................................................................................
108c
• Disconnect all cords coming from
external devices before moving the
unit.
..................................................................................................
4
Page 5

IMPORTANT NOTES
291a
In addition to the items listed under “USING THE UNIT SAFELY” on page 3, please read and
observe the following:
Power Supply
307
• Before connecting this unit to other devices, turn off the power to all units. This will help prevent
malfunctions and/or damage to speakers or other devices.
Placement
351
• Using the unit near power amplifiers (or other equipment containing large power transformers)
may induce hum. To alleviate the problem, change the orientation of this unit; or move it farther
away from the source of interference.
352
• This device may interfere with radio and television reception. Do not use this device in the vicinity
of such receivers.
354a
• Do not expose the unit to direct sunlight, place it near devices that radiate heat, leave it inside an
enclosed vehicle, or otherwise subject it to temperature extremes. Excessive heat can deform or
discolor the unit.
355
• To avoid possible breakdown, do not use the unit in a wet area, such as an area exposed to rain or
other moisture.
Maintenance
401a
• For everyday cleaning wipe the unit with a soft, dry cloth or one that has been slightly dampened
with water. To remove stubborn dirt, use a cloth impregnated with a mild, non-abrasive detergent.
Afterwards, be sure to wipe the unit thoroughly with a soft, dry cloth.
402
• Never use benzine, thinners, alcohol or solvents of any kind, to avoid the possibility of discoloration
and/or deformation.
Additional Precautions
553*
• Use a reasonable amount of care when using the unit’s connectors. Rough handling can lead to
malfunctions.
556*
• When connecting / disconnecting all cables, grasp the connector itself—never pull on the cable.
This way you will avoid causing shorts, or damage to the cable’s internal elements.
558a*
• To avoid disturbing your neighbors, try to keep the unit’s volume at reasonable levels. You may
prefer to use headphones, so you do not need to be concerned about those around you (especially
when it is late at night).
559a
• When you need to transport the unit, package it in the box (including padding) that it came in, if
possible. Otherwise, you will need to use equivalent packaging materials.
5
Page 6

IMPORTANT NOTES
562
• Use a cable from Roland to make the connection. If using some other make of connection cable,
please note the following precautions.
• Some connection cables contain resistors. Do not use cables that incorporate resistors for
connecting to this unit. The use of such cables can cause the sound level to be extremely low,
or impossible to hear. For information on cable specifications, contact the manufacturer of the
cable.
Copyright
851
• Unauthorized recording, distribution, sale, lending, public performance, broadcasting, or the like,
in whole or in part, of a work (musical composition, video, broadcast, public performance, or the
like) whose copyright is held by a third party is prohibited by law.
853
• Do not use this unit for purposes that could infringe on a copyright held by a third party. Roland
assumes no responsibility whatsoever with regard to any infringements of third-party copyrights
arising through your use of this unit.
205
* Microsoft, Windows are registered trademarks of Microsoft Corporation.
206c
* Windows® 98 is known officially as: “Microsoft® Windows® 98 operating system.”
206f
* Windows® 2000 is known officially as: “Microsoft® Windows® 2000 operating system.”
* Windows® Me is known officially as: “Microsoft® Windows® Millenium Edition operating system.”
207, 208, 209
* Apple, Macintosh and MacOS are registered trademarks of Apple Computer, Inc.
220
* All product names mentioned in this document are trademarks or registered trademarks of their
respective owners.
6
Page 7

Table of Contents
USING THE UNIT SAFELY .....................................................................3
IMPORTANT NOTES...............................................................................5
English
Introduction............................................................................................. 8
Connections and driver installation (Windows).................................. 9
Connections and driver installation (Macintosh).............................. 19
Troubleshooting................................................................................... 23
Deutsch
Einführung ............................................................................................31
Anschlüsse und Treiberinstallation (Windows) ................................ 32
Anschlüsse und Treiberinstallation (Macintosh) .............................. 44
Fehlerbehebung.................................................................................... 48
Français
Introduction........................................................................................... 58
Connexions et installation des pilotes (Windows)............................59
Connexions et installation des pilotes (Macintosh)..........................70
Dépannage............................................................................................ 74
Italiano
Introduzione.......................................................................................... 83
Collegamenti e installazione del driver (Windows)........................... 84
Collegamenti e installazione del driver (Macintosh)......................... 96
Ricerca e soluzione dei problemi...................................................... 100
Español
Introducción........................................................................................109
Instalación del controlador y conexiones (para Windows)............ 110
Instalación del controlador y conexiones (para Macintosh).......... 122
Resolución de problemas..................................................................126
Specifications..................................................................................... 136
7
Page 8
Introduction
Contents of the Package
The UA-1A package contains the following items. As soon as
you open the package, please verify that all items are present.
If any items are missing, please contact the dealer where you
purchased the package.
■
UA-1A USB Audio Interface
fig.UA1A
■
UA-1A Owner’s Manual (this document)
Names and Functions
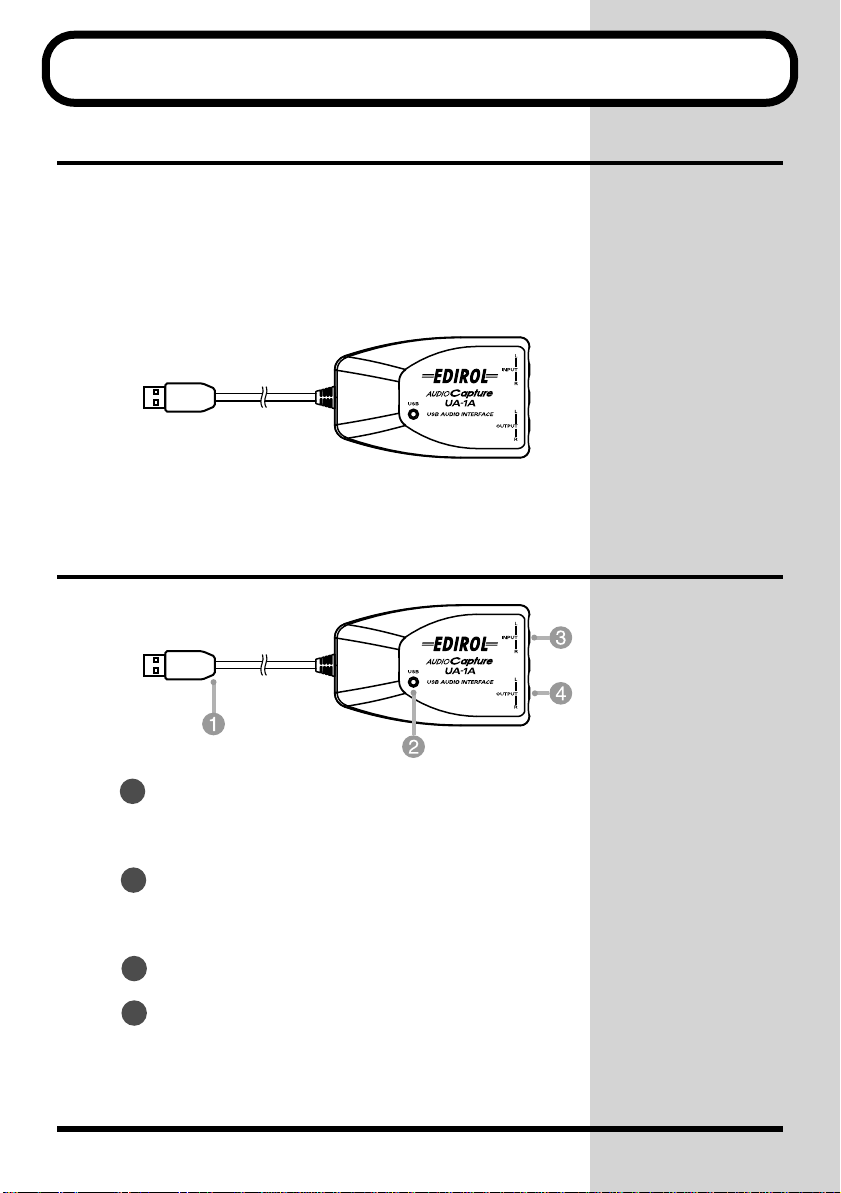
fig.UA1Afunc
1
USB Cable
Connect this cable to the USB connector of your computer.
(600 mm length.)
2
USB Indicator
This indicator will light when the unit is connected to your
computer and is ready to operate.
3
Line input jacks
4
Line output jacks
8
Page 9
Connections and driver installation (Windows)
* If you are a Macintosh user, refer to p. 19.
In order to use the UA-1A, you must first install the
Composite Device
and the
USB Audio Device
drivers are included with Windows. If you are using
Windows 98, this driver is provided in the
Windows CD-ROM
Windows CD-ROM
2000, the CD-ROM is not necessary.
driver, the
, so you will need to have the
ready. If you are using Windows Me or
What is a driver?
A driver is software that allows an application program
running on your computer to transfer data to and from the
UA-1A when it is connected to your computer via a USB
cable. The driver passes data from the application to the UA1A, and passes data from the UA-1A to the application.
fig.P10-1
USB Human Interface
driver consecutively. These
Microsoft
USB
driver,
Microsoft
Before installing the driver
The UA-1A cannot be used with Windows 95 or
Windows NT.
If other Windows programs are running, exit all of
them before you continue.
If you will be simultaneously connecting multiple
Roland USB devices (for example; the UA-1A and
other USB devices such as the UA-100G) to your
computer, disconnect the UA-100G or other devices
from the USB connector before installing the driver.
If you install the driver when the UA-100G or other
devices are connected, installation may not occur
correctly.
Español Italiano Français Deutsch English
9
Page 10
Connections and driver installation (Windows)
Making connections and installing the driver
■
Windows Me Users
* If you are using a Windows 2000 machine, refer to p. 11, if
Windows 98, refer to p. 11.
1
Turn on the power of your computer and start up
Windows, and use a USB cable to connect the UA-1A
to your computer.
fig.02-03.e
2
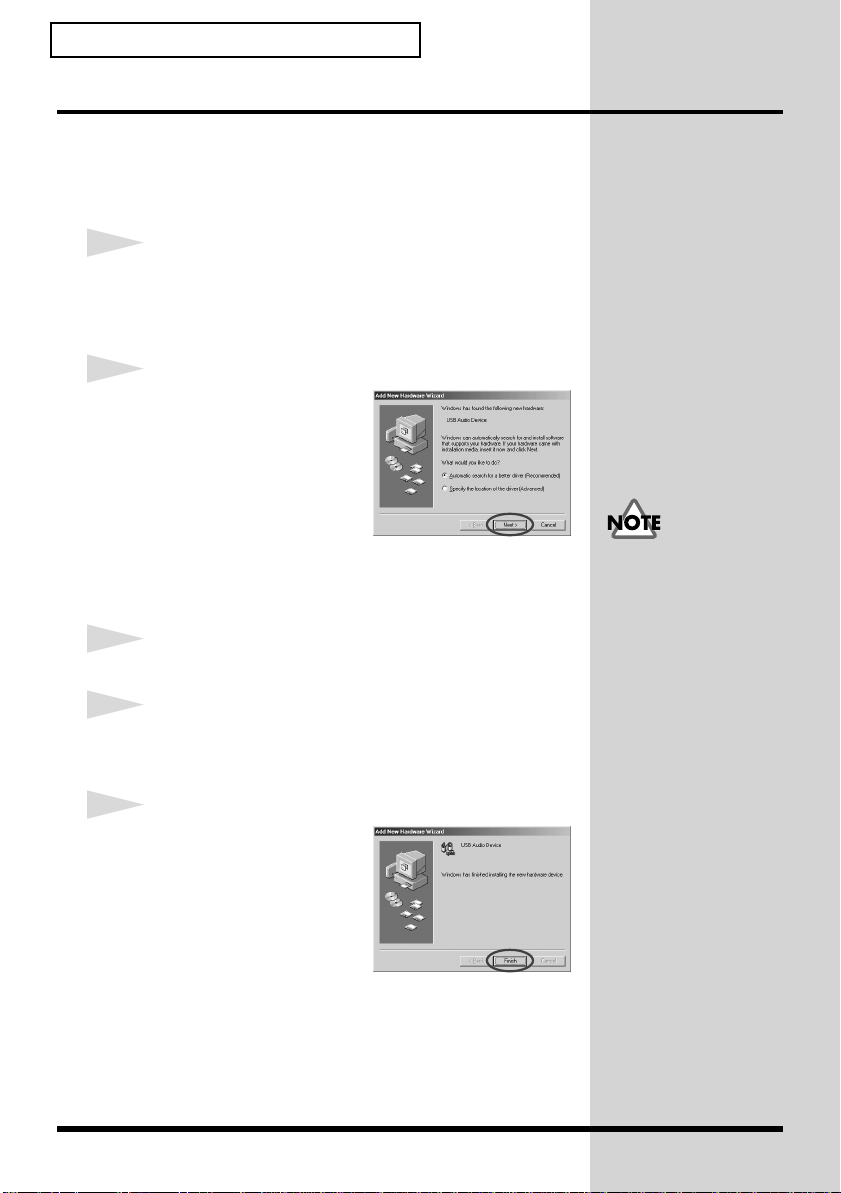
When Windows detects
the UA-1A and the
New Hardware Wizard
dialog box appears, make
sure
“Automatic search
for a better driver
(Recommended)”
selected, then click
Add
is
[Next]
.
Some time may be required
until this dialog box appears.
10
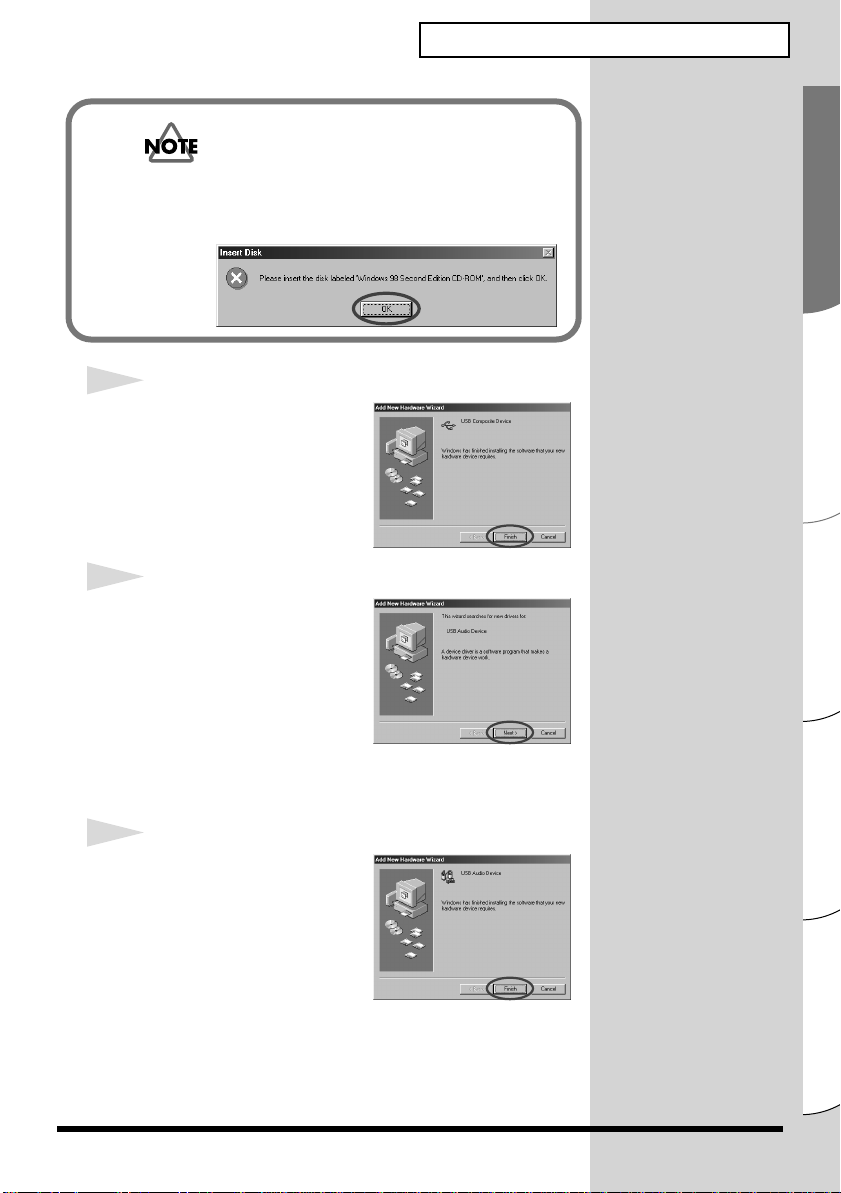
3
The search for the driver starts.
4
When the correct driver is found, driver installation
starts.
fig.02-04.e
5
When a dialog box
informing you that driver
installation has finished
appears, click
restart Windows.
After installing the driver,
refer to
input/output device
uses.
* Depending on your computing setup, there may be a short wait after
the driver is installed until the device is recognized.
[Finish]
Specifying the audio
, and
(p. 14) and select the device Windows
Page 11
■
Windows 2000 Users
* If you are using a Windows Me machine, refer to p. 10, if Windows
98, refer to p. 11.
1
Turn on the power of your computer and start up
Windows.
2
Use a USB cable to connect the UA-1A to your
computer. The UA-1A is recognized to the computer
and the driver is installed all automatically.
3
After installing the driver, restart Windows.
■
Windows 98 Users
* If you are using a Windows Me machine, refer to p. 10, if Windows
2000, refer to p. 11.
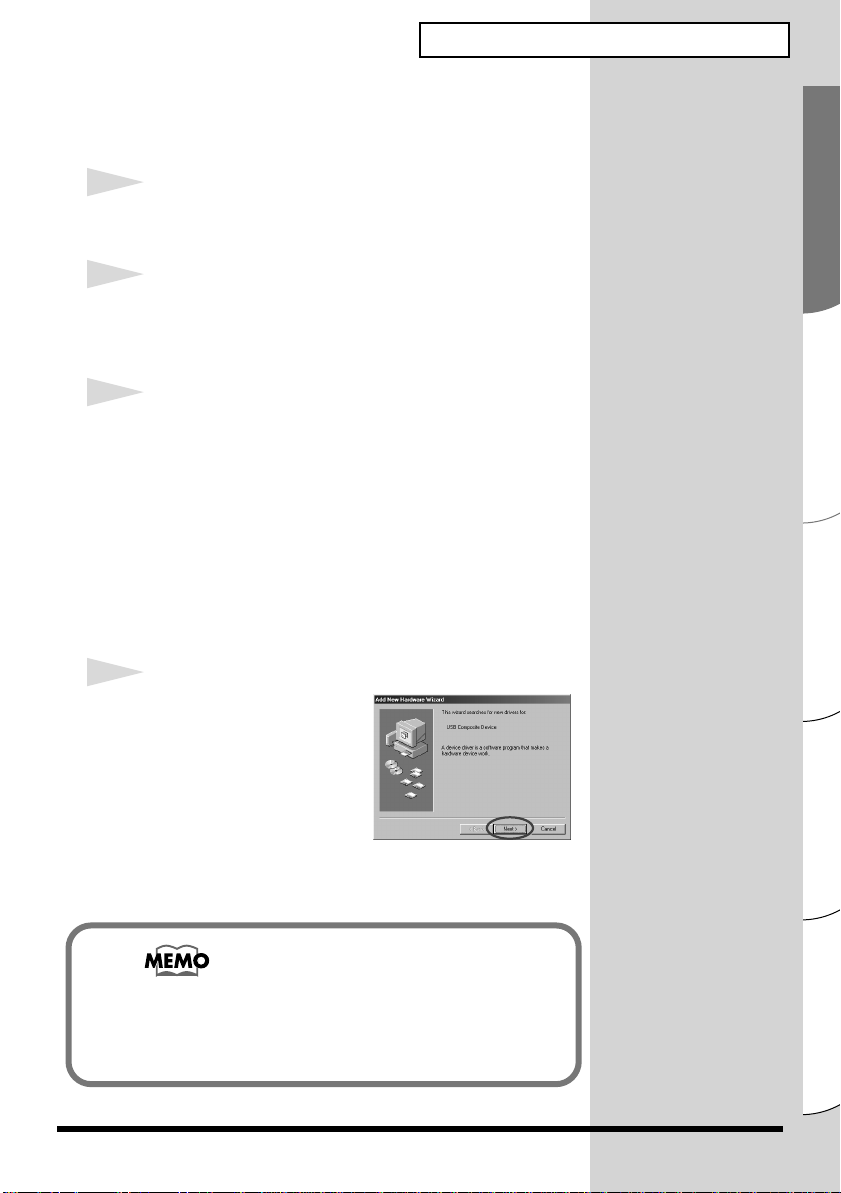
Installation must be performed in the order of the
Composite Device
driver. Use the following procedure to perform the
installation.
fig.02-05.e
1
Turn on the power of your
computer and start up
Windows. Insert the
Microsoft Windows CDROM
into your CD-ROM
drive, and use a USB cable
to connect the UA-1A to
your computer.
driver and then the
Connections and driver installation (Windows)
USB
USB Audio Device
Since some computers are sold with the contents
of the Microsoft Windows CD-ROM already in
the hard disk, a Microsoft Windows CD-ROM
may not have been included. If this is the case,
you will be able to install the driver without the
Microsoft Windows CD-ROM.
Español Italiano Français Deutsch English
11
Page 12

Connections and driver installation (Windows)
A
fig.02-06.e
USB Composite Device
and the
Add New Hardware Wizard
Click
[Next]
.
will be detected automatically,
2
When the display asks
“What do you want
Windows to do?”
, select
“Search for the best
driver for your device.
(Recommended).”
click
fig.02-07.e
[Next]
.
and
3
The following dialog box
will appear. Check
ROM drive
[Next]
fig.02-08.e
, and click
.
CD-
4
The following dialog box
will appear. Click
[Next]
.
dialog box will appear.
If this dialog box does
not appear, refer to
Problems related to
the USB driver (p. 23).
In step 4, the screen
will indicate “Windows
driver file search for the
device : USB Audio
Device.”
12
* Depending on your system, the
from the above illustration, but this is not a problem.
Location of driver
5
Copying of the file (Driver) will begin.
may differ
Page 13
If the Microsoft Windows CD-ROM is not inserted
in the CD-ROM drive, the following dialog box
may appear. If this occurs, insert the Microsoft
Windows CD-ROM into the CD-ROM drive, and
fig.02-09.e
fig.02-10.e
click [OK].
6
When installation of the
USB Composite Device
driver is finished, the
following dialog box will
appear. Click
fig.02-13.e
[Finish]
.
7
Next, a
USB Audio Device
will be detected
automatically, and the
New Hardware Wizard
Add
dialog box will appear.
Click
[Next]
, and continue
the installation using the
very same procedure as in steps 2 – 5 (p.12 – 12).
fig.02-14.e
8
When installation of the
USB Audio Device
is finished, the following
dialog box will appear.
Click
[Finish]
This completes installation of
the
USB Composite Device
driver and the
After installing the driver, refer to
input/output device
uses.
driver
.
USB Audio Device
(p. 14) and select the device Windows
driver. Restart Windows.
Specifying the audio
Connections and driver installation (Windows)
Español Italiano Français Deutsch English
13
Page 14
Connections and driver installation (Windows)
■
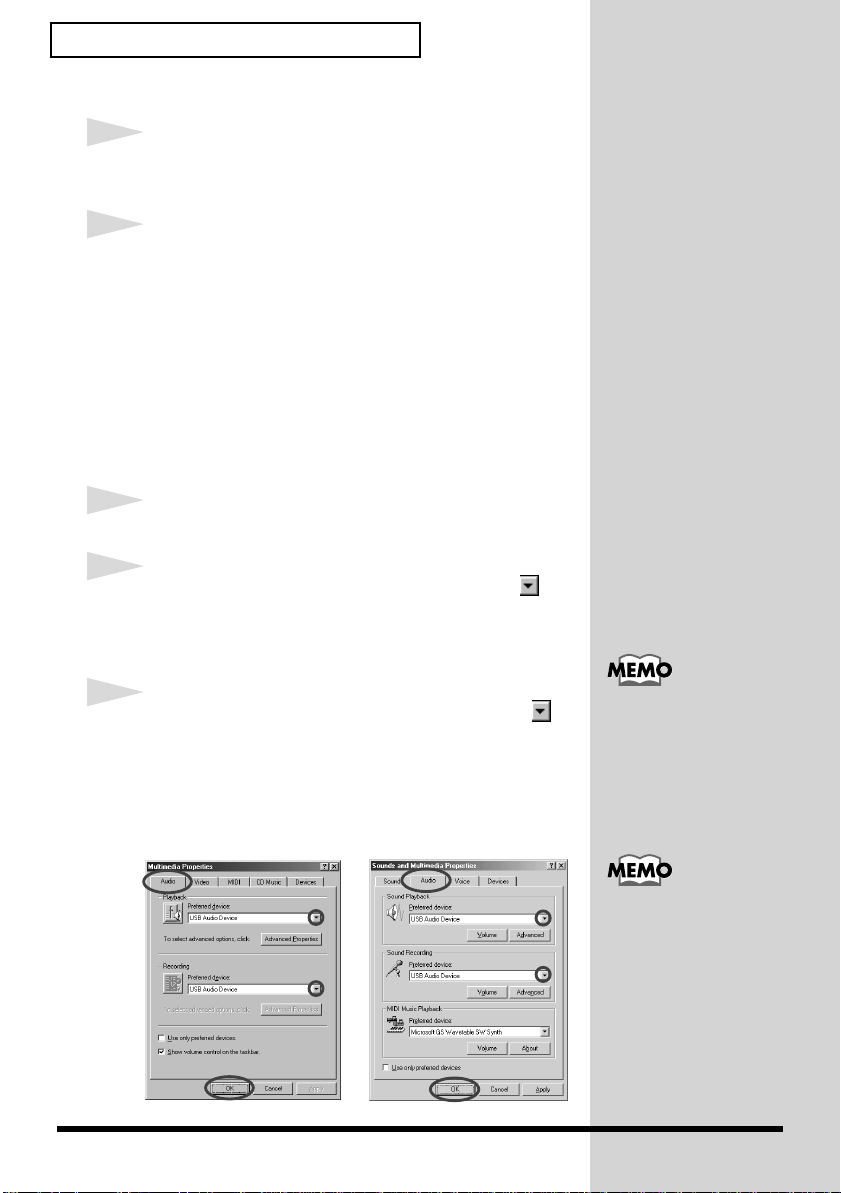
Specifying the audio input/output device
1
Click the Windows
[Settings]
-
[Start]
button, and select
[Control Panel]
.
2
Win 98 / Win 98SE:
In
Control Panel
the
Multimedia Properties
Win 2000 / Me:
In
Control Panel
Multimedia]
Properties
* If you don’t find a [Sounds and Multimedia] icon, then in
Panel
, click [view all Control Panel options].
, double-click the
, double-click the
icon to open the
dialog box.
[Multimedia]
dialog box.
[Sounds and
Sounds and Multimedia
3
Click the [Audio] tab.
4
For the Playback item Preferred device, click . In
the list that appears, click [USB Audio Device] to
select it.
icon to open
Control
14
5
For the Recording item Preferred device, click .
In the list that appears, click [USB Audio Device] to
select it.
Windows 98 / Windows 98SE Windows 2000 /Windows Me
fig.02-15.e
Depending on your
system, “USB Audio
Device” will be shown
a number added, ex.
“USB Audio Device
(1).”
It will not be possible to
press the “Advanced
Properties” button for
“Recording.”
Page 15
6
Click [OK] to complete the settings.
Volume Control settings
The output volume of the UA-1A can be controlled by the
Windows Volume Control.
1
Click the Windows [Start] button, and select
[Programs] - [Accessories] - [Entertainment] [Volume Control] to start it up.
Windows Me Windows 2000/
Windows 98/Windows 98SE
fig.02-17.e
2
You can raise or lower the slider to adjust the volume
of the UA-1A. The following items can be set.
Connections and driver installation (Windows)
If Volume Control is not
installed on your
computer, use Add/
Remove Applications in
the Control Panel to
install it. For details on
installation, refer to the
Windows owner’s manual
or Help.
The audio quality of the
UA-1A will be better if
you raise the Volume
Control levels.
If Mute is checked, or if the
slider is in the lowest
position, no sound will be
output from the UA-1A.
WAVE Adjust the volume that is output from the
audio output device “USB Audio Device.”
SW Synth Adjust the volume of the software
synthesizer built into Windows.
CD Player Adjust the “CD Music” volume for the CD-
ROM drive of your computer.(*1)
*1 If the playback of the CD does not change when you
adjust this volume, change the WAVE volume.
If you are using Windows
2000 and “CD Player” does
not appear, check the
[Digital CD playback] item
“Enable digital CD audio
for this CD-ROM device,”
as described in the
cautionary note on the
following page.
Español Italiano Français Deutsch English
15
Page 16
Connections and driver installation (Windows)
When using your computer’s CD-ROM drive to
play an audio CD, or when playing background
music for games with the UA-1A.
If using Windows Me:
Select [Start] - [Settings] - [Control Panel]. In the [Control
Panel], double-click the [System] icon to access the System
Properties dialog box. Click the [Device Manager] tab, and
double-click the [CDROM] icon. Below it, double-click the
CD-ROM drive that you are using and open its Properties.
Click the [Properties] tab, and select the check box located
beside the Digital CD playback item “Enable digital CD
audio for this CD-ROM device.”
If using Windows 2000
In the same way as for Windows Me, open the System
Properties dialog box. Click the [Hardware tab], and click
the [Device Manager] button to open the Device Manager.
From the CD-ROM drives, double-click the CD-ROM drive
that you are using to open its Properties. Click the
[Properties] tab, and select the check box located beside the
Digital CD playback item “Enable digital CD audio for this
CD-ROM device.”
16
using Windows 98 or Windows 98 SE:
Select [Start] - [Settings] - [Control Panel] - [Multimedia],
then click on the [CD Music] tab, then check “Enable CD
digital audio for this CD-ROM device.”
Depending on your computing environment, playback of
these CDs may still be impossible. For details, refer to
information provided by your computer’s manufacturer. If
you are using a PC-card (PCMCIA) type CD-ROM drive,
playing back WAVE data or an audio CD on the CD-ROM
drive may cause the sound to be interrupted, or no sound
may be heard at all.
Page 17
Connections and driver installation (Windows)
Deleting the USB Audio Device driver
■ If re-installing the USB Audio Device driver
■ If installation of the USB Audio Device
driver was terminated before completion
Use the following procedure to delete the driver that is
already installed.
1
Use a USB cable to connect the UA-1A to your
computer.
2
Click the Windows [Start] button, and select
[Settings] - [Control Panel].
3
In
[Control Panel]
System Properties dialog.
, double-click [System] to open the
4
Click the [Device Manager] tab.
5
Double-click [Sound, video and game controllers]
to see a list of the devices.
The explanation provided
here is for an average
Windows system.
Depending on your
computer, some of the
folder names may be
different.
6
From the list, select USB Audio Device, and click
[Remove]. In the Confirm Device Removal dialog
box, click [OK]. If USB Audio Device is not
displayed, proceed to step 8.
7
Make sure that USB Audio Device is not in the
Sound, video and game controllers list, and click
[Close] to close the System Properties dialog.
If a dialog box
suggesting that you
restart Windows
appears at this point,
follow the suggestion
and restart your
computer.
Español Italiano Français Deutsch English
17
Page 18
Connections and driver installation (Windows)
8
Follow the steps 1. – 4. again, and double-click
[Universal Serial Bus controllers] to display the list
of devices.
If is displayed for the USB-compatible device
icon:
Select the [USB Composite Device] icon, and click
[Remove]. In the Confirm Device Removal dialog
box, click [OK]. As in the step 7., close System
Properties.
If there is no USB-compatible device icon, or if
is not displayed:
Simply close System Properties.
If you are using Windows Me and is displayed:
Simply close System Properties.
9
Disconnect the USB cable from your computer, and
restart Windows.
18
Page 19
Connections and driver installation (Macintosh)
* If you are a Windows user, refer to p. 9.
In order to use the UA-1A, you must first install a driver. UA1A uses a driver included with Mac OS.
Known issues: UA-1A
• Some applications such as Cakewalk’s Metro Series
and TC Work’s Spark Series cannot record/playback
at 48 kHz. Please use the UA-1A at 44.1 kHz.
• While the audio application is recording or playing,
do not connect/disconnect the USB cable. Doing so
may cause the application to freeze.
• You may hear sound hopping and/or noise when
you record and play back at the same time due to
high load on the CPU. However, the noise should
not be in the recording itself. Such noise should only
be found in the playback signal.
• If you are going to use the Virtual Sound Canvas 3,
you will need to select [Performance] from the
[Setting] menu, and set the Expression Mode to
Response Priority.
• The standard driver that comes with Mac OS is not
ASIO compatible.
• When you start up your computer with the UA-1A
connected, the computer may become unstable. If
this occurs, start up your computer before
connecting the UA-1A, and connect the UA-1A after
start-up.
What is a driver?
-> p. 9
19
Español Italiano Français Deutsch English
Page 20
Connections and driver installation (Macintosh)
Making connections and installing the driver
■ Getting the unit to be recognized
1
Turn on the power of your computer and start up
MacOS.
2
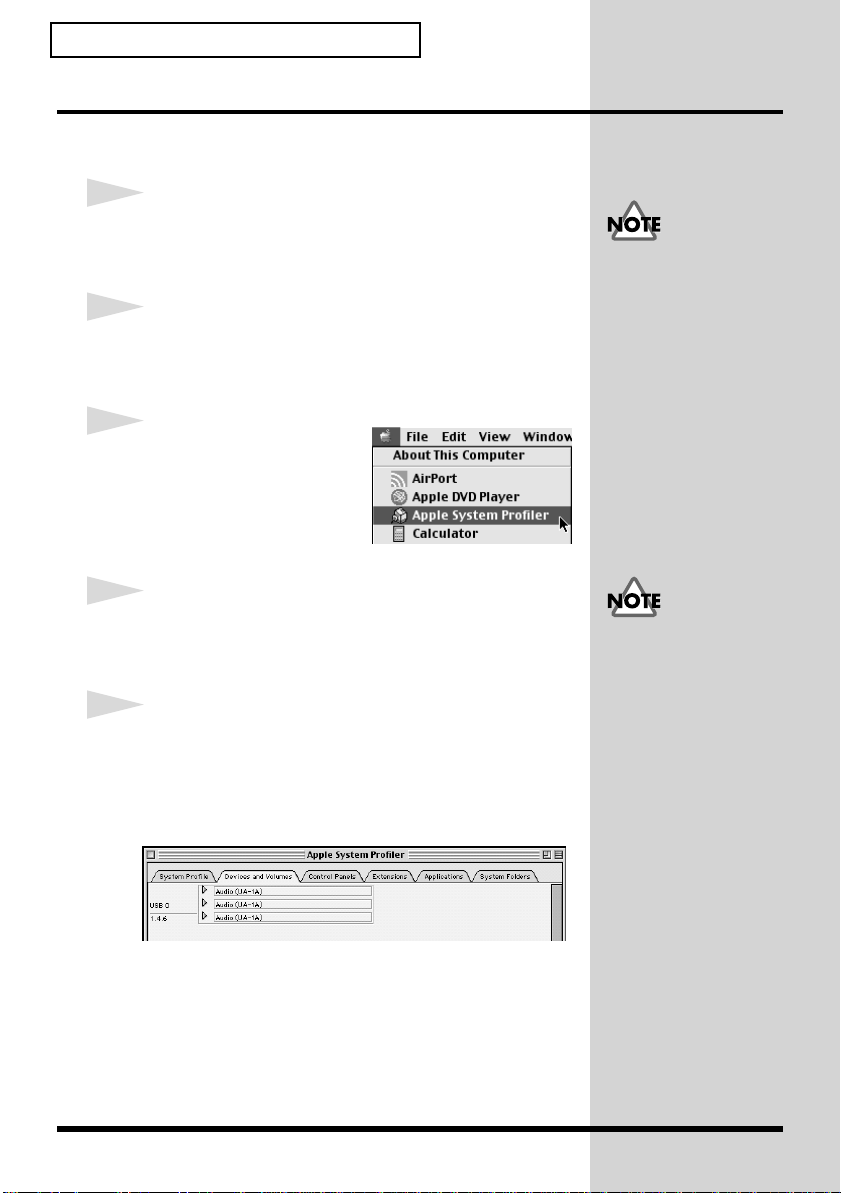
From the Apple menu, select the
[Apple System Profiler].
fig.03-02.e
To prevent damage to your
speakers, turn down the
volume on this unit, and
on any audio devices you
may have connected.
3
Click the
[Devices and Volumes]
tab control.
4
Use a USB cable to connect the UA-1A to your
computer.
Make sure to quit all
applications that may be
running before you make
the connection.
5
To make sure it is successfully recognized, select
[Update all information] from the [Commands]
menu. You should see the following three audio
devices in the USB section, as shown below:
fig.03-04.e
20
If the indication is correct, the installation of the UA-1A driver
is successful. Select [Quit] from the [File] menu to close the
Apple System Profiler dialog, then make the sound settings
explained below.
If the indication is incorrect, you should try disconnecting the
UA-1A from the USB port, and waiting about ten seconds.
Then, do the procedure over again, starting from the step 4.
Page 21
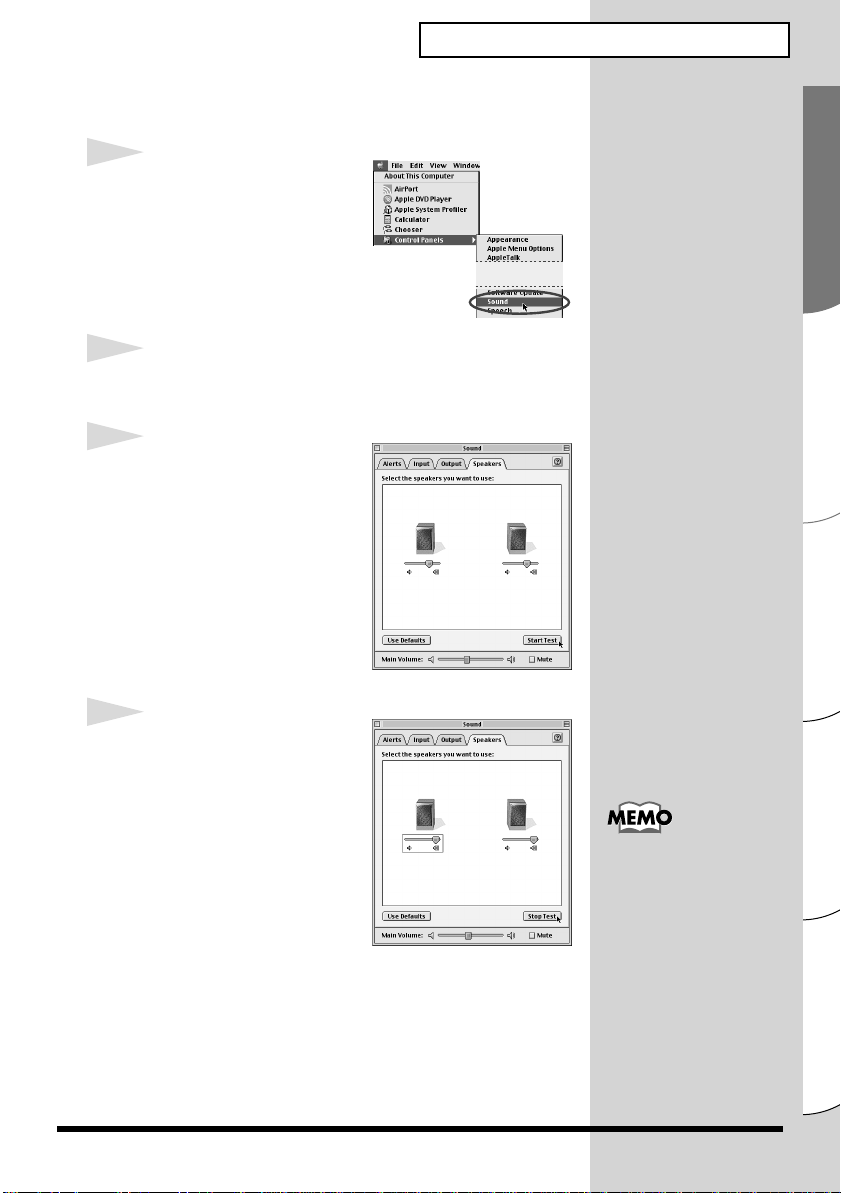
■ Making the sound settings
fig.03-05.e
6
From the Apple menu,
select [Control Panels] -
[Sound] to open the
Sound dialog.
7
Click the [Speakers] tab.
fig.03-06.e
8
Turn down the volume on
the UA-1A, and on your
audio equipment, then
click [Start Test].
Connections and driver installation (Macintosh)
fig.03-07.e
9
Test sounds are output
from left to right, along
with what appears on the
screen; adjust the volume
using the [Main Volume]
bar. When you are
finished, click [Stop Test].
Depend on the your OS version, there is no [Main Volume]
bar. In that case, use the [Volume] bar in the [Output] to
adjust the volume.
If the Recording input
select switch is set to
DIGITAL, it is not
possible to play back
audio data from your
computer. Set the
switch to INPUT +
GUITAR/MIC.
Español Italiano Français Deutsch English
21
Page 22
Connections and driver installation (Macintosh)
fig.03-08.e
10
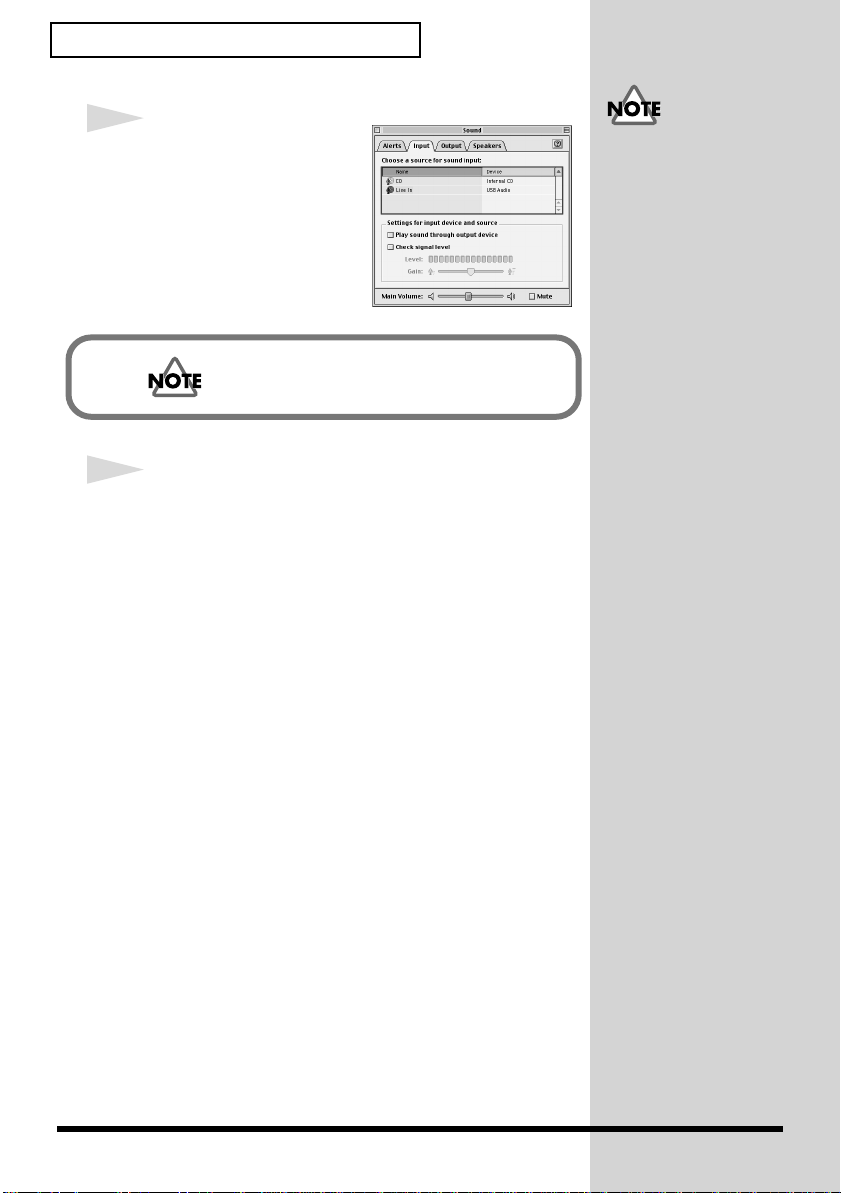
Select [Input] from the
Sound dialog. Then, in
Choose a source for
sound input:, choose USB
Audio.
Do not check [Play sound through output
device].
11
When you have finished making settings, select [Quit]
from the [File] menu to close the Sound dialog.
If you don’t see USB
Audio, you should close
the Sound dialog. Then,
disconnect the UA-1A, and
wait about ten seconds.
Then, try doing the
procedure over again,
starting at number 2.
22
Page 23
Troubleshooting
If an unexpected problem occurs while using the UA-1A, please read this
chapter first. It provides numerous hints that will help you solve problems.
The problems covered in the troubleshooting section are organized according
to the operating system on which the problem might be encountered. Use the
icon shown at the left of the title to find the information you need.
Problems common to both Windows
and Macintosh
Problems that occur only on Windows
Problems that occur only on Macintosh
If you are using computer for the first time, or do not understand the
explanation of a procedure, refer to the owner’s manuals for your computer or
for OS.
If the UA-1A does not operate as you expect, check the following points.
Problems related to the USB driver
“Add New Hardware Wizard” does not start
up automatically
“Add New Hardware Wizard” terminates
before completion
• When the USB cable is connected or disconnected, approximately
15 seconds (or more) may be required for the UA-1A to be
recognized.
• Is the USB cable connected correctly?
Make sure that the UA-1A and computer are connected correctly by the USB
cable.
• Can USB be used on your computer?
Refer to the owner’s manual for your computer, and make sure that it is able
to use USB.
Español Italiano Français Deutsch English
23
Page 24

Troubleshooting
• Does your computer or USB hub have sufficient power supply
• Does your computer meet the USB specifications?
• Is “Unknown Device” displayed for “Other devices” or “Universal
capacity?
The UA-1A cannot be connected if insufficient power is supplied to it. Check
whether one of the following cases apply.
If you are using the UA-1A with a notebook computer that is running on its
battery, operation may be unreliable with some models of computer. If this is
the case, connect the AC adaptor to your notebook computer.
The power conservation mode of your computer may limit the power that is
supplied to USB. Check the settings of your computer.
In some cases, the UA-1A cannot be used with a bus-powered hub (a hub that
does not contain a power supply). Please use a self-powered hub (a hub that
contains a power supply).
If you are using a computer that does not meet the USB specifications (such as
a homemade computer), operation may be unstable. In such cases, you may be
able to solve the problem by connecting a USB hub that contains a power
supply.
Serial Bus controllers”?
Use the following procedure to delete “Unknown Device” from “Other
devices” (Universal serial bus controller), and re-start your computer.
In order to check whether or not the “Unknown Device” is
the UA-1A, disconnect the USB cable of the UA-1A, and
verify that “Unknown Device” has disappeared. Then
connect the UA-1A once again, and delete “Unknown
Device.”
1. In the Windows Control Panel, double-click [System] to open the
System Properties dialog box.
2. Click the [Device Manager] tab.
3. Double-click [Other devices] (Universal Serial Bus controllers) to see the
list of devices.
4. In the list, select Unknown Device and click [Remove].
5. In the Confirm Device Removal dialog box, click [OK].
6. Make sure that the list does not show Other devices or Unknown
Device, and click [Close] to close the dialog box.
24
Page 25
Troubleshooting
The “Add New Hardware Wizard” dialog box
appears even though you installed the drivers
If your computer or USB hub has two or more USB connectors, connecting the
UA-1A to a USB connector to which the UA-1A has never before been
connected may cause the Add New Hardware Wizard dialog box will appear
even though the drivers have already been installed. Install the drivers once
again as described in Connections and driver installation (Windows) (p. 9).
This is not a malfunction.
Drivers are not installed correctly
Use the procedure described in Deleting the USB Audio Device driver (p. 17)
to delete the USB Audio Device driver installed in your computer, and install
the UA-1A drivers once again as described in Connections and driver
installation (Windows) (p. 9). Check whether there is an item named
“Unknown Device” in “Other devices” or in “Universal Serial Bus
controllers.”
If you find “Unknown Device,” delete it.
A dialog box saying “Unknown Device found”
appears, and I can’t install the driver
Depending on your computer, not all of the Windows 98 files required to
support audio over USB may have been installed when the computer was
shipped.
Please check with the manufacturer of your computer.
Problems when using the UA-1A
OS becomes unstable
• Starting up a computer when the UA-1A is already connected may
cause the computer to become unstable.
If this occurs, start up the computer with the UA-1A disconnected, and then
connect the UA-1A.
■ No sound
• Are you attempting to use the CD player of your computer to play
an audio CD?
If you wish to play an audio CD on the CD-ROM drive of your computer, refer
to When using your computer’s CD-ROM drive to play an audio CD, or
when playing background music for games with the UA-1A. (p. 16).
Español Italiano Français Deutsch English
25
Page 26
Troubleshooting
• Are you running multiple applications?
If multiple applications are running simultaneously, an error message may
appear. If this occurs, click [OK], and close the other applications.
Even if an application window is closed, it is still running if it remains in the
taskbar, so be sure to quit any unneeded applications shown in the taskbar.
• Have you specified the audio data output destination for OS?
The audio data output destination for a computer must be set to UA-1A. For
details on this setting, refer to Specifying the audio input/output device
(Windows p. 14) or Making the sound settings (Macintosh p. 21).
• Have you specified the audio data output destination for your
playback software?
For some software, you must set the audio data output destination as UA-1A.
For details on this setting, refer to the owner’s manual for the software.
• Have the drivers been installed correctly?
In order to playback audio data using the UA-1A, the USB Audio Device
driver must be installed. For details on installation and settings, refer to
Connections and driver installation (Windows p. 9, Macintosh p. 19).
• Are the various Volume Control faders raised?
Adjust the volume of each fader as described in Volume Control settings
(Windows p. 15) or Making the sound settings (Macintosh p. 21).
■ Sound is distorted
• Is the volume level of the instrument connected to LINE IN too
high?
Use the Line input adjustment slider of the UA-1A to reduce the input level.
■ The volume level of the instrument connected to LINE IN is
too low.
• Could you be using a connection cable that contains a resistor?
Use a connection cable that does not contain a resistor.
• Is the Line Input adjustment slider raised appropriately?
26
Page 27
■ Noise is heard when playing back audio
•
The graphic accelerator of your computer may cause noise to occur
during audio playback.
Use the following procedure to set graphic acceleration to “None.”
1. In the Windows Control Panel, double-click [Display] to open the
Display Properties dialog box, and click the [Settings] tab.
2. Click [Advanced] to open properties, and click the [Performance] tab.
3. In Graphics, move the Hardware acceleration: slider to None, and click
[OK].
4. In the Display Properties dialog box, click [OK] to close the dialog box.
Then restart your computer.
• Noise is heard in the line input
If a MIDI sound module and the UA-1A are connected via USB to the same
computer, and the output of the MIDI sound module is connected to the line
input jacks of the UA-1A, noise from the computer may enter via the MIDI
sound module and be heard from the UA-1A. In such cases, use a selfpowered hub to connect the MIDI sound module and the UA-1A in parallel, or
connect the MIDI sound module via the serial interface or MIDI interface.
• Noise may be heard if you record and play back simultaneously.
If you record and play back simultaneously, the playback may be interrupted
depending on the performance of the system, and this may be heard as noise.
However since priority is given to recording, the recorded data will not be
lost.
• This problem may be solved by properly grounding the chassis of
your computer, or the ground prong of the plug on the AC power
cord that was supplied with your computer. Also, make sure that
there are no devices nearby that emit a strong magnetic field, such
as a television or a microwave oven.
• Are a large number of audio devices connected?
If a large number of audio devices are connected, noise may occur. Do not
connect audio devices that you are not using.
Troubleshooting
27
Español Italiano Français Deutsch English
Page 28

Troubleshooting
■ Sound is interrupted during audio playback
• Try increasing the memory
You can increase the processing power of your computer by adding more
memory. For details on adding memory, refer to the owner’s manual for your
computer.
• Does your computer fulfill the USB specifications?
The audio may be interrupted if you are using a computer that does not
electrically meet the USB specifications. In this case, the problem may be
solved if you connect a USB hub that contains its own power supply.
• Are numerous applications running?
If you use numerous applications during playback, or start up another
application, the playback may be interrupted depending on your computer
system. Exit all unneeded applications, and try again. If this does not solve the
problem, try restarting a computer.
• Try making the following changes to the disk drive settings.
* The following settings may not exist on your computer.
1. In the Windows Control Panel, double-click [System] to open the
System Properties dialog box, and click the [Device Manager] tab.
2. Double-click [Disk drives] to see the list of devices.
3. From the list, select GENERIC IDE DISK TYPExx, and click [Properties]
to access the GENERIC IDE DISK TYPExx Properties dialog box.
* The “xx” in GENERIC IDE DISK TYPExx will be a number that will differ depending
on your system.
4. Click the [Settings] tab, check the [DMA] check box in the Options, and
click [OK] to close the dialog box.
* Depending on your system, a dialog box for DMA settings may appear. After checking the
contents, click OK or Cancel.
5. In the System Properties dialog box, click [OK] to close the dialog box.
Restart your computer so that the above settings will take effect.
■ Audio playback stops
• On some computers, the Power Management settings in the
Control Panel may cause audio playback to stop.
The Power Management Properties that are displayed when you double-click
Power Management will differ depending on your computer system. One
example is given below, but you should consult the owner’s manual for your
computer as well. Some computers may not have the following settings.
28
Page 29

Troubleshooting
1. In the Windows Control Panel, double-click [System] to open the
System Properties dialog box, and click the [Device Manager] tab.
2. Double-click [System devices] to see the list of devices.
3. From the list, select [Advanced Power Management support], and click
[Properties] to access the Advanced Power Management support
properties dialog box.
4. Click the [Settings] tab, and in Troubleshooting, check the [Disable
power status polling] check box. Then click [OK].
5. In the System Properties dialog box, click [OK] to close the dialog box.
6. Restart Windows.
Noise is present in the playback or recording
Depending on the virtual memory setting or network-related settings, noise
may occur.
Please make the following settings before use.
• In "Chooser" of the Apple menu, set AppleTalk to "Inactive."
(This setting is not changed as a result of turning off AppleTalk, as requested
by OMS when sequencer software is started up. You must change the setting
yourself using the "Chooser.")
• In the "Memory" Control Panel, set Virtual Memory to "Off."
• Depending on the way in which you connect to the Internet, use
the UA-1A with the following settings.
•If you connect to the Internet via a LAN cable
Use while the LAN cable is connected.
•If you connect to the Internet via the internal modem port, or are not
connected to the Internet
In the "TCP/IP" Control Panel, set "Connect via" to "PPP."
After you have made the settings, restart your Macintosh.
* Do not use software that accesses the network (such as a Web browser) at the same time that
you are using sequencer software or audio editing software
Noise is present in the recorded sound
• It has been found that noise tends to be introduced in sound
recorded on the iMac series models, which were released after
the summer of 2000.
• In the SimpleSound application that is included with MacOS, noise
will be heard in the sound if it is played back immediately after
being digitally recorded. Save the sound first, then try playing it
back.
Español Italiano Français Deutsch English
29
Page 30
Troubleshooting
• Update the USB Audio driver to 1.0.5f4.
If the USB Audio driver, which is provided with the Mac OS, is under 1.0.4,
update it to 1.0.5f4.
You can download the driver from the URL below:
http://asu.info.apple.com/swupdates.nsf/artnum/n11703
Checking the USB audio driver’s version
1. Connect the UA-1A to the computer.
2. From the Apple menu, select [Apple System Profiler].
3. Click the [Devices and Volumes] tab.
4. In the USB section, the screen will indicate “Audio (UA-1A USB Audio
Device).” Click the arrow at the left of this text.
5. The number displayed to the right of “Driver version” is the version of
the USB audio driver.
■ A blank (silent) file is created when you record
• Try setting the bit rate to “16bit.”
If you are using Windows98 Second Edition, and your recording software is
set to a bit rate of 8 bits, a blank file may be created, so that you may not be
able to record effectively. If this occurs, you will be able to record correctly by
setting the bit rate to “16 bit”.
30
Cannot Record Music CD
• The UA-1A cannot record music CDs in the computer’s CD-ROM
drive.
The volume changed when you resumed from
Suspend or Hibernation status
• When Windows 2000 resumes from Suspend or Hibernation, the
output volume setting is changed due to a problem of Windows.
Start up the Mixer application as described in Volume Control settings (p.
15), and adjust the USB Audio (Speaker) slider.
Game background music does not sound
• Does the game use an audio CD for background music?
If an audio CD is used to provide background music for the game, refer to
When using your computer’s CD-ROM drive to play an audio CD, or when
playing background music for games with the UA-1A. (p. 16).
Page 31

Einführung
Inhalt der Verpackung
Die UA-1A-Packung enthält folgende Artikel. Prüfen Sie
sofort nach dem Öffnen der Packung, ob alle Artikel
vorhanden sind.
Wenn einer der aufgeführten Artikel fehlt, nehmen Sie bitte
mit dem Händler Kontakt auf, von dem Sie das UA-1A
bezogen haben.
■ UA-1A USB Audio Interface
fig.UA1A
■ UA-1A Benutzerhandbuch (dieses
Dokument)
Namen und Funktionen
fig.UA1Afunc
1
USB-Kabel
Verbinden Sie dieses Kabel mit dem USB-Anschluss Ihres
Computers. (600 mm Länge.)
2
USB-Anzeige
Diese Anzeige leuchtet, wenn das UA-1A an Ihren Computer
angeschlossen ist und betriebsbereit ist.
3
Line-Eingangsbuchsen
4
Line-Ausgangsbuchsen
Español Italiano Français Deutsch English
31
Page 32

Anschlüsse und Treiberinstallation (Windows)
* Wenn Sie ein Macintosh-Anwender sind, lesen Sie bitte S. 44.
Bevor Sie das UA-1A benutzen können, müssen Sie die
Treiber USB Composite Device (USB-Gerät), USB Human
Interface sowie USB Audio Device (USB-Audiogerät)
installieren. Diese Treiber sind in Windows enthalten. Wenn
Sie Windows 98 verwenden, befinden sich diese Treiber auf
der Microsoft Windows CD-ROM, Sie sollten daher die
Microsoft Windows CD-ROM bereithalten. Wenn Sie
Windows Me oder 2000 einsetzen, ist die CD-ROM nicht
erforderlich.
Was ist ein Treiber?
Ein Treiber ist Software, die es einem
Anwendungsprogramm, das auf Ihrem Computer installiert
ist, erlaubt, Daten zum/vom UA-1A zu übertragen, wenn das
Gerät an Ihren Computer via USB-Kabel angeschlossen ist.
Der Treiber überträgt die Daten der Anwendung an das
UA-1A sowie die Daten vom UA-1A an die Anwendung.
fig.P10-1
32
Anwendung
Treiber
Computer
USB-
USB-Anschluss
USB-Kabel
USB AUDIO INTERFACE
Page 33

Anschlüsse und Treiberinstallation (Windows)
Vor der Installation des Treibers
Das UA-1A kann unter Windows 95 oder Windows
NT nicht verwendet werden.
Wenn noch andere Windows-Programme
ausgeführt werden, sollten Sie diese beenden,
bevor Sie Ihre Arbeit fortsetzen.
Wenn Sie mehrere Roland USB-Geräte gleichzeitig
an Ihren Computer anschließen (z.B. das UA-1A
und andere USB-Geräte, wie z.B. das UA-100G),
trennen Sie das UA-100G oder andere Geräte vom
USB-Anschluss, bevor Sie den Treiber installieren.
Wenn Sie den Treiber installieren, während das
UA-100G oder andere Geräte angeschlossen sind,
wird die Installation eventuell nicht korrekt
ausgeführt.
Anschlüsse und Treiberinstallation
■ Windows Me-Anwender
* Wenn Sie Windows 2000 verwenden, lesen Sie bitte S. 34, wenn Sie
Windows 98 verwenden, lesen Sie bitte S. 35.
1
Schalten Sie Ihren Computer ein und starten Sie
Windows. Verwenden Sie ein USB-Kabel, um das
UA-1A mit Ihrem Computer zu verbinden.
fig.02-03.e
2
Wenn Windows das UA1A erkennt und der
Assistent Neue Hardware
hinzufügen erscheint,
achten Sie darauf, dass
"Automatisch nach dem
besten Treiber suchen
(Empfohlen)" ausgewählt ist und klicken
anschließend auf [Weiter].
Es kann einige Zeit dauern, bis
dieses Dialogfeld erscheint
33
Español Italiano Français Deutsch English
Page 34

Anschlüsse und Treiberinstallation (Windows)
3
Die Suche nach dem Treiber beginnt.
4
Sobald der richtige Treiber gefunden wurde, beginnt
der Prozess der Treiberinstallation.
fig.02-04.e
5
Wenn ein Dialogfeld
erscheint, das Sie darüber
informiert, dass die
Treiberinstallation
abgeschlossen ist, klicken
Sie auf [Beenden] und
starten Windows neu.
Nach der Treiberinstallation lesen Sie bitte Angabe des
Audioeingabe/Ausgabegeräts (S. 38) und wählen das Gerät
aus, das von Windows verwendet wird.
* Abhängig von Ihrer Computerinstallation kann es etwas dauern, bis
das Gerät erkannt wird, nachdem der Treiber installiert wurde.
■ Windows 2000-Anwender
* Wenn Sie Windows Me verwenden, lesen Sie bitte S. 33, wenn Sie
Windows 98 verwenden, lesen Sie bitte S. 35.
34
1
Schalten Sie Ihren Computer ein und starten Sie
Windows.
2
Schließen Sie das UA-1A an Ihren Computer mit
einem USB-Kabel an. Das UA-1A wird vom
Computer erkannt und der Treiber wird automatisch
installiert.
3
Starten sie Windows neu, nachdem Sie den Treiber
installiert haben.
Page 35

■ Windows 98-Anwender
* Wenn Sie Windows Me verwenden, lesen Sie bitte S. 33, wenn Sie
Windows 2000 verwenden, lesen Sie bitte S. 34.
Vor dem USB Audio Device (USB-Audiogerät) muss der
Treiber für USB Composite Device (USB-Verbundgerät)
installiert werden. Gehen Sie bei der Installation wie
anschließend beschrieben vor.
fig.02-05.e
1
Schalten Sie Ihren
Computer ein und starten
Sie Windows. Legen Sie
die Microsoft Windows
CD-ROM in Ihr
CD-ROM-Laufwerk ein
und verwenden Sie ein
USB-Kabel, um das UA-1A an Ihren Computer
anzuschließen.
Da einige Computer beim Kauf bereits den Inhalt
der Microsoft Windows CD-ROM auf der
Festplatte speichern, befand sich die Microsoft
Windows CD-ROM eventuell nicht im
Lieferumfang Ihres PCs. Wenn das der Fall ist,
benötigen Sie für die Installation des Treibers
keine Microsoft Windows CD-ROM.
Anschlüsse und Treiberinstallation (Windows)
Das Gerät USB Composite Device (USB-Verbundgerät)
wird automatisch erkannt, und das Dialogfeld Hardware-
Assistent wird angezeigt. Klicken Sie auf [Weiter].
Wenn dieses Dialogfeld
nicht angezeigt wird,
lesen Sie bitte
Probleme in
Verbindung mit dem
USB-Treiber (S. 48).
Español Italiano Français Deutsch English
35
Page 36

Anschlüsse und Treiberinstallation (Windows)
fig.2-06.e
2
Wenn in der Anzeige die
Frage gestellt wird, "Wie
möchten Sie vorgehen?,
wählen Sie "Nach dem
besten Treiber für das
Gerät suchen.
"(Empfohlen)" Klicken
Sie anschließend auf [Weiter].
fig.02-07.e
3
Folgendes Dialogfeld wird
angezeigt: Wählen Sie
CD-ROM-Gerät, und
klicken Sie anschließend
auf [Weiter] .
fig.02-08.e
4
Folgendes Dialogfeld wird
angezeigt. Klicken Sie auf
[Weiter].
* Abhängig von Ihrem System kann sich die Position des Treibers
von der obigen Abbildung unterscheiden, aber das ist kein Problem.
In Schritt 4, zeigt der
Bildschirm die
Meldung "Die
Treiberdatei für
folgendes Gerät wird
gesucht: USB
Audio-Gerät."
36
5
Das Kopieren der Datei (Treiber) beginnt.
Page 37

Wenn sich die Microsoft Windows CD-ROM nicht
im CD-ROM-Laufwerk befindet, wird eventuell
folgendes Dialogfeld angezeigt. In diesem Fall
legen Sie dieMicrosoft Windows CD-ROM in das
CD-ROM-Laufwerk ein und klicken auf [OK].
fig.02-09.e
fig.02-10.e
6
Sobald die Installation des
Treibers
USB Composite Device
(USB-Verbundgerät)
beendet ist, wird folgendes
Dialogfeld angezeigt.
Klicken Sie auf [Beenden].
fig.02-13.e
7
Anschließend wird das
USB Audio Device
(USB-Audiogerät)
automatisch erkannt, und
das Dialogfeld
Hardware-Assistent wird
angezeigt. Klicken Sie auf
[Weiter], und setzen Sie die Installation wie
in den Schritten 2--5 beschrieben fort (S. 36 – 36).
Anschlüsse und Treiberinstallation (Windows)
37
Español Italiano Français Deutsch English
Page 38

Anschlüsse und Treiberinstallation (Windows)
fig.02-14.e
8
Sobald die Installation des
Treibers USB Audio
Device (USB-Audiogerät)
beendet ist, wird folgendes
Dialogfeld angezeigt.
Klicken Sie auf [Beenden].
Damit ist die Installation der
Treiber USB Composite Device (USB-Verbundgerät) und
USB Audio Device (USB-Audiogerät) abgeschlossen.
Starten Sie Windows neu.
Nach der Treiberinstallation lesen Sie bitte Angabe des
Audioeingabe/Ausgabegeräts (S. 38) und wählen das Gerät
aus, das von Windows verwendet wird.
■ Angabe des Audioeingabe/Ausgabegeräts
1
Klicken Sie auf die Windows-Schaltfläche [Start] und
wählen Sie[Einstellungen] - [Systemsteuerung].
2
38
Win 98 / Win 98SE
Doppelklicken Sie in der Systemsteuerung auf das Symbol
[Multimedia], um das Dialogfeld Eigenschaften für
Multimedia zu öffnen.
Win 2000 / Me
Doppelklicken Sie in der Systemsteuerung auf das Symbol
[Sounds und Multimedia], um das
DialogfeldEigenschaften für Sounds und Multimedia zu
öffnen.
* Wenn Sie kein Symbol [Sounds und Multimedia] sehen, klicken Sie
in der Systemsteuerung auf [View all Control Panel
Options] (Alle Optionen der Systemsteuerung anzeigen).
Page 39

3
Klicken Sie auf die Registerkarte [Audio].
4
Klicken Sie bei Wiedergabe unterBevorzugtes Gerät
auf . Klicken Sie in der angezeigten Liste auf [USB
Audio Device (USB-Audiogerät) ], um dieses Gerät
auszuwählen.
5
Klicken Sie bei Wiedergabe unter Bevorzugtes
Gerät auf . Klicken Sie in der angezeigten Liste auf
[USB Audio Device (USB-Audiogerät) ], um dieses
Gerät auszuwählen.
Windows 98 / Windows 98SE Windows 2000 /Windows Me
fig.02-15.e
Anschlüsse und Treiberinstallation (Windows)
Abhängig von Ihrem
System wird USB
Audio Device
(USB-Audiogerät) eine
zusätzliche Ziffer
anzeigen, z.B. "USB
Audio-Gerät (1)."
Es ist nicht möglich,
auf die Schaltfläche
"Erweitert" für
"Aufnahme" zu
klicken.
6
Klicken Sie auf [OK], um die Konfiguration
abzuschließen.
Español Italiano Français Deutsch English
39
Page 40

Anschlüsse und Treiberinstallation (Windows)
Einstellung der Lautstärkeregelung
Die Ausgabelautstärke des UA-1A kann mit der
Lautstärkeregelung von Windows gesteuert werden.
1
Klicken Sie auf die Windows-Schaltfläche[Start] und
wählen Sie [Programme] - [Zubehör] [Unterhaltungsmedien] - [Lautstärkeregelung], um
die Lautstärkeregelung aufzurufen.
Windows Me Windows 2000/
Windows 98/Windows 98SE
fig.02-17.e
Wenn die
Lautstärkeregelung auf
Ihrem Computer nicht
installiert ist, verwenden
Sie Anwendungen
hinzufügen/entfernen in
der Systemsteuerung, um
sie zu installieren. Um
Details zur Installation zu
erhalten, lesen Sie bitte das
Benutzerhandbuch für
Windows oder rufen die
Windows-Hilfe auf.
Die Audioqualität des
UA-1A wird besser,
wenn Sie die
Lautstärke-Pegel
erhöhen.
40
2
Sie können den Regler nach oben oder nach unten
verschieben, um die Lautstärke des UA-1A
anzupassen. Folgende Optionen können eingestellt
werden.
WAVE Passt die Lautstärke an, die vom Audio-
SW Synth Passt die Lautstärke des Software-
CDWiedergabe
*1 Wenn die Wiedergabe der CD durch die Anpassung der
Lautstärke nicht verändert wird, ändern Sie die
WAVE-Lautstärke.
Ausgabegerät "USB Audio-Gerät"
ausgegeben wird.
Synthesizer an, der in Windows
integriert ist.
Passt die "CD-Musik"-Lautstärke des
CD-ROM-Laufwerks Ihres
Computers an. (*1)
Wenn "Ton aus" aktiviert
ist oder wenn der
Schieberegler ganz unten
ist, wird aus dem UA-1A
kein Sound ausgegeben.
Wenn Sie mit Windows
2000 arbeiten und
"CD-Player" nicht
angezeigt wird, prüfen Sie
die Option in [Digitale
CD-Wiedergabe], "Digitale
CD-Wiedergabe für den
CD-Player aktivieren," wie
im folgenden Hinweis
erklärt wird.
Page 41

Anschlüsse und Treiberinstallation (Windows)
Wenn Sie das CD-ROM-Gerät Ihres Computers
für das Abspielen einer Audio-CD verwenden
oder wenn Sie Hintergrundmusik für Spiele mit
dem UA-1A abspielen
Bei Verwendung von Windows Me:
Wählen Sie [Start] - [Einstellungen] - [Systemsteuerung].
Doppelklicken Sie in der Systemsteuerung auf das Symbol
[System], um das DialogfeldSystemeigenschaften zu
öffnen. Klicken Sie auf das Register [Geräte-Manager] und
doppelklicken Sie auf das Symbol [CD-ROM]. Doppelklicken
Sie auf das von Ihnen verwendete CD-ROM-Laufwerk
unterhalb des Symbols und öffnen Sie dessen
Eigenschaften. Klicken Sie auf das Register
[Eigenschaften] und aktivieren Sie das Kontrollkästchen,
das sich neben der Digitale CD-Wiedergabe-Option "
Digitale CD-Wiedergabe für den CD-Player aktivieren"
befindet.
Bei Verwendung von Windows 2000
Gehen Sie so vor, wie für Windows Me beschrieben. Öffnen
Sie das Dialogfeld Systemeigenschaften. Klicken Sie auf die
Registerkarte [Hardware] und klicken Sie anschließend auf
[Geräte-Manager], um den Geräte-Manager zu öffnen.
Doppelklicken Sie auf das CD-ROM-Laufwerk, das Sie
verwenden, und öffnen Sie die Eigenschaften. Klicken Sie
auf das Register [Eigenschaften] und aktivieren Sie das
Kontrollkästchen, das sich neben der Digitale
CD-Wiedergabe-Option " Digitale CD-Wiedergabe für den
CD-Player aktivieren befindet."
Wenn Sie Windows 98 oder Windows 98 SE verwenden:
Wählen Sie [Start] - [Einstellungen] - [Systemsteuerung] [Multimedia], und klicken Sie anschließend auf [CD-Musik].
Anschließend aktivieren Sie "Digitale CD-Wiedergabe für
den CD-Player aktivieren."
Abhängig von Ihrer Computer-Umgebung kann es
vorkommen, dass die Wiedergabe dieser CDs trotzdem nicht
möglich ist. Einzelheiten finden Sie in den Informationen, die
Ihr Computer-Hersteller anbietet. Wenn Sie ein CD-ROMGerät vom PC-Card-Typ (PCMCIA) verwenden, kann die
Wiedergabe von WAVE-Daten oder einer Audio-CD auf dem
CD-ROM-Gerät dazu führen, dass der Sound unterbrochen
wird oder kein Sound erklingt.
Español Italiano Français Deutsch English
41
Page 42

Anschlüsse und Treiberinstallation (Windows)
Löschen des USB Audiogeräte-Treibers
■ Bei Neuinstallation des USB Audiogeräte-
Treibers
■ Wenn die Installation des USB
Audiogeräte-Treibers vor dem Abschluss
der Installation endete
Gehen Sie wie folgt vor, um den Treiber zu löschen, der
bereits installiert ist.
1
Schließen Sie das UA-1A an Ihren Computer mit
einem USB-Kabel an.
2
Klicken Sie auf die Windows-Schaltfläche [Start] und
wählen Sie[Einstellungen] - [Systemsteuerung].
3
Doppelklicken Sie in der
Symbol [System], um das
DialogfeldSystemeigenschaften zu öffnen.
[Systemsteuerung]
4
Klicken Sie auf die Registerkarte [Geräte-Manager].
5
Doppelklicken Sie auf[Audio-, Video und
Gamecontroller] um eine Liste der Geräte zu
erhalten.
Die Erklärungen, die Sie an
dieser Stelle finden, sind
für ein durchschnittliches
Windows-System
vorgesehen. Abhängig von
Ihrem Computer kann es
vorkommen, dass einige
der Ordnernamen anders
lauten.
auf das
42
6
Wählen Sie aus der Liste USB Audio Device (USBAudiogerät) und klicken Sie auf [Entfernen]. Klicken
Sie im Dialogfeld Entfernen des Geräts bestätigen
auf [OK]. Wenn USB Audio Device (USB-
Audiogerät) nicht angezeigt wird, arbeiten Sie mit
Schritt 8 weiter.
Page 43

7
Stellen Sie sicher, dass USB Audio Device
(USB-Audiogerät) sich nicht in der Liste Audio,
Video und Gamecontroller befindet, und klicken Sie
auf [Beenden] , um den Dialog
Systemeigenschaften zu schließen.
8
Folgen Sie erneut den Schritten 1. – 4. und
doppelklicken Sie auf [Universeller Serieller
Buscontroller], um die Geräteliste anzuzeigen.
Wenn als Symbol für das USB-kompatible
Gerät angezeigt wird:
Wählen Sie das Symbol [USB Composite Device]
(USB-Verbundgerät) und klicken Sie auf
[Entfernen]. Klicken Sie im Dialogfeld Entfernen des
Geräts bestätigen auf [OK]. Wie in Schritt 7.
schließen Sie nun die Systemeigenschaften.
Anschlüsse und Treiberinstallation (Windows)
Wenn an diesem Punkt
ein Dialogfeld
angezeigt wird, in dem
vorgeschlagen wird,
Windows neu zu
starten, folgen Sie dem
Vorschlag und starten
Ihren Computer neu.
Wenn kein Symbol für ein USB-kompatibles Gerät
vorhanden ist oder wenn nicht angezeigt wird:
Schließen Sie einfach die Systemeigenschaften.
Wenn Sie Windows Me verwenden und
angezeigt wird:
Schließen Sie einfach die Systemeigenschaften.
9
Trennen Sie das USB-Kabel von Ihrem Computer und
starten Sie Windows neu.
Español Italiano Français Deutsch English
43
Page 44

Anschlüsse und Treiberinstallation (Macintosh)
* Wenn Sie ein Windows-Anwender sind, lesen Sie bitte S. 32.
Bevor Sie das UA-1A verwenden können, müssen Sie einen
Treiber installieren. UA-1A benutzt einen Treiber, der im
Mac OS enthalten ist.
Bekannte Probleme: UA-1A
• Einige Anwendungen, wie z.B. Metro Series von
Cakewalk und Spark Series von TC Work können
Sound nicht mit 48 kHz aufnehmen/wiedergeben.
Bitte verwenden Sie das UA-1A mit 44.1 kHz.
• Während die Audioanwendung aufnimmt oder
Daten abspielt, schließen Sie das USB-Kabel nicht an
und trennen Sie es nicht vom Gerät. Dies kann dazu
führen, dass die Anwendung abstürzt.
• Sie hören eventuell Sound-Aussetzer und/oder
Rauschen, wenn Sie gleichzeitig Sound aufnehmen
und wiedergeben. Dies ist durch die hohe
CPU-Auslastung bedingt. Das Rauschen sollte
jedoch nicht in der Aufnahme selbst auftreten.
Derartiges Rauschen sollte nur im Wiedergabesignal
vorkommen.
• Wenn Sie den Einsatz von Virtual Sound Canvas 3
planen, müssen Sie die Option [Performance] im
Menü [Setting] wählen und den Expression Mode
auf Response Priority setzen.
• Der Standardtreiber, der mit Mac OS ausgeliefert
wird, ist nicht ASIO-kompatibel.
• Wenn Sie Ihren Computer mit angeschlossenem
UA-1A starten, wird der Computer eventuell
instabil. Starten Sie den Computer in diesem Fall,
bevor Sie das UA-1A anschließen, und verbinden Sie
das UA-1A mit dem Computer nach dem
Hochfahren.
Was ist ein Treiber?
-> S. 32
44
Page 45

Anschlüsse und Treiberinstallation (Macintosh)
Anschlüsse und Treiberinstallation
■ Erkennung des Geräts veranlassen
1
Schalten Sie Ihren Computer ein und starten Sie
MacOS.
2
Wählen Sie im Menü Apple die Option
[Apple System Profiler].
fig.03-02.e
3
Klicken Sie auf das
Register
[Devices and Volumes].
4
Schließen Sie das UA-1A an Ihren Computer mit
einem USB-Kabel an.
5
Um sicherzustellen, dass der UA-1A erfolgreich
erkannt wird, wählen Sie [Update all information] im
Menü [Commands]. Sie sollten die folgenden drei
Audio-Geräte im USB-Abschnitt sehen, wie unten
gezeigt:
fig.03-04.e
Um Schäden an Ihren
Lautsprechern zu
vermeiden, drehen Sie die
Lautstärkeregelung dieses
Geräts und aller
angeschlossenen
Audiogeräte zurück.
Achten Sie darauf, alle
aktuell ausgeführten
Anwendungen zu
schließen, bevor Sie den
Anschluss herstellen.
Wenn die Anzeige korrekt ist, war die Installation des
UA-1A-Treibers erfolgreich. Wählen Sie [Quit] im Menü
[File], um den Dialog Apple System Profiler zu schließen.
Anschließend nehmen Sie die Soundeinstellungen vor wie
unten beschrieben.
Español Italiano Français Deutsch English
45
Page 46

Anschlüsse und Treiberinstallation (Macintosh)
Wenn die Anzeige nicht korrekt ist, sollten Sie versuchen, das
UA-1A vom USB-Anschluss zu trennen und ca. zehn
Minuten zu warten. Anschließend wiederholen Sie das
Verfahren, beginnend mit Schritt 4.
■ Soundeinstellungen vornehmen
fig.03-05.e
6
Wählen Sie im Menü
Apple die Optionen
[Control Panels] [Sound], um den Dialog
Sound zu öffnen.
7
Klicken Sie auf die Registerkarte [Speakers].
fig.03-06.e
8
Reduzieren Sie die
Lautstärke des UA-1A und
Ihrer Audiogeräte und
klicken Sie anschließend
auf [Start Test].
46
fig.03-07.e
9
Testsounds werden von
links nach rechts - wie die
Bildschirmanzeige ausgegeben. Passen Sie die
Lautstärke mit der Leiste
[Main Volume] an. Wenn
Sie fertig sind, klicken Sie
auf [Stop Test].
Wenn der Recording
InputAuswahlschalter auf
DIGITAL gesetzt wird,
ist es nicht möglich,
Audiodaten von Ihrem
Computer aus
abzuspielen. Setzen Sie
den Schalter auf INPUT
+ GUITAR/MIC.
Page 47

Je nach OS-Version ist eventuell keine Leiste [Main Volume]
vorhanden. Verwenden Sie in diesem Fall die Leiste
[Volume] in [Output], um die Lautstärke anzupassen.
fig.03-08.e
Anschlüsse und Treiberinstallation (Macintosh)
10
Wählen Sie [Input] im
Dialog Sound.
Anschließend wählen Sie
in Choose a source for
sound input:die Option
USB Audio.
Aktivieren Sie nicht [Play sound through output
device].
11
Wenn Sie alle Einstellungen vorgenommen haben,
wählen Sie [Quit] im Menü [File], um den Dialog
Sound zu schließen.
Wenn sie USB Audio nicht
sehen, sollten Sie den
Dialog Sound schließen.
Anschließend stecken Sie
das UA-1A aus und warten
ca. zehn Sekunden.
Versuchen Sie danach, die
Schritte erneut
auszuführen, beginnend
mit Schritt 2.
47
Español Italiano Français Deutsch English
Page 48

Fehlerbehebung
Wenn während der Verwendung des UA-1-A unerwartete Fehler auftreten,
lesen Sie bitte zunächst dieses Kapitel. Es enthält eine Fülle von Hinweisen,
die Ihnen bei der Lösung der Probleme helfen werden.
Die Probleme, die im Abschnitt Fehlerbehebung behandelt werden, sind nach
den Betriebssystemen geordnet, unter denen das Problem eventuell auftreten
kann. Verwenden Sie das Symbol links von der Überschrift, um die benötigten
Informationen zu finden.
Probleme, die sowohl unter Windows
als auch auf dem Macintosh auftreten
können
Probleme, die nur unter Windows auftreten
Probleme, die nur auf dem Macintosh auftreten
Wenn Sie zum ersten Mal mit einem Computer arbeiten oder die Erklärung
einer Vorgehensweise nicht verstehen, lesen Sie bitte im Benutzerhandbuch
Ihres Computers oder Ihres Betriebssystems nach.
Wenn das UA-1A nicht wie erwartet funktioniert, sollten Sie zuerst folgende
Punkte prüfen.
Probleme in Verbindung mit dem USB-Treiber
"Hardware-Assistent" startet nicht automatisch
"Hardware-Assistent" endet vor
Installationsabschluss
• Wenn das USB-Kabel angeschlossen oder entfernt wird, dauert es
ca. 15 Sekunden (oder mehr), bis das UA-1A erkannt wird.
• Ist das USB-Kabel richtig angeschlossen?
Achten Sie darauf, dass das UA-1A und der Computer vorschriftsmäßig durch
das USB-Kabel verbunden sind.
• Kann USB auf Ihrem Computer verwendet werden?
Lesen Sie im Benutzerhandbuch Ihres Computers nach und stellen Sie sicher,
dass der Computer USB verwenden kann.
48
Page 49

Fehlerbehebung
• Verfügt Ihr Computer oder USB-Hub über ausreichende
Stromversorgungskapazität?
Das UA-1A kann nicht angeschlossen werden, wenn es nicht mit ausreichend
Spannung versorgt wird. Prüfen Sie, ob einer der folgenden Fälle zutrifft.
Wenn Sie das UA-1A mit einem Notebook verwenden, das sich im
Batteriebetrieb befindet, funktionieren einige Computermodelle
möglicherweise unzuverlässig. Wenn das der Fall ist, schließen Sie den
AC-Adapter an Ihr Notebook an.
Der Stromsparmodus Ihres Computers reduziert eventuell die Spannung, mit
der der USB-Anschluss versorgt wird. Prüfen Sie die Einstellungen Ihres
Computers.
In einigen Fällen kann das UA-1A nicht mit einem bus-betriebenen Hub (einem
Hub ohne eigene Stromversorgung) verwendet werden. Bitte verwenden Sie
einen Hub mit selbstständiger Stromversorgung (einen Hub mit eigener
Stromversorgung).
• Entspricht Ihr Computer den USB-Spezifikationen?
Wenn Sie einen Computer verwenden, der nicht den USB-Spezifikationen
entspricht (wie z.B. ein selbstgebauter Computer), wird das Gerät eventuell
instabil. In solchen Fällen können Sie das Problem möglicherweise lösen,
indem Sie einen USB-Hub mit eigener Stromversorgung anschließen.
• Wird "Unbekanntes Gerät" für "andere Geräte" oder "Universelle
Serielle Bus Controller" angezeigt?
Verwenden Sie folgendes Verfahren, um "Unbekanntes Gerät" aus "Andere
Geräte" (Universelle Serielle Bus Controller) zu löschen und starten Sie
anschließend den Computer neu.
Um zu prüfen, ob es sich bei "Unbekanntes Gerät" um das
UA-1A handelt, stecken Sie das USB-Kabel des UA-1A aus
und prüfen, ob "Unbekanntes Gerät" ausgeblendet wird.
Anschließend verbinden Sie das UA-1A wieder mit dem
Anschluss und löschen "Unbekanntes Gerät".
1. Doppelklicken Sie in der Systemsteuerung von Windows auf das Symbol
[System], um das DialogfeldEigenschaften von System zu öffnen.
2. Klicken Sie auf die Registerkarte [Geräte-Manager].
3. Doppelklicken Sie auf [Andere Geräte] (Universelle Serielle Bus
Controller), um eine Liste der Geräte zu erhalten.
4. Wählen Sie aus der Liste Unbekanntes Gerät und klicken Sie auf
[Entfernen].
5. Klicken Sie im Dialogfeld Entfernen des Geräts bestätigen auf [OK].
6. Stellen Sie sicher, dass die Liste nicht Andere Geräte oder Unbekanntes
Gerät enthält, und klicken Sie auf [Schließen], um das Dialogfeld zu
schließen.
Español Italiano Français Deutsch English
49
Page 50

Fehlerbehebung
Der Assistent für das Hinzufügen neuer
Hardware wird angezeigt, obwohl Sie die
Treiber installiert haben.
Treiber wurden nicht korrekt installiert
Ein Dialogfeld mit den Angaben "Unbekanntes
Gerät gefunden" wird angezeigt, und ich kann
den Treiber nicht installieren
Wenn Ihr Computer oder USB-Hub über zwei oder mehrere USB-Anschlüsse
verfügt, kann der erste Anschluss des UA-1A an einen USB-Anschluss dazu
führen, dass das Dialogfeld Hardware-Assistent angezeigt wird, obwohl die
Treiber bereits installiert wurden. Installieren Sie die Treiber erneut. Gehen Sie
dabei vor wie in Anschlüsse und Treiberinstallation (Windows) (S. 32)
beschrieben. Hierbei handelt es sich nicht um einen Fehler.
Verwenden Sie das Verfahren, das in Löschen des USB Audiogeräte-
Treibers (S. 42) beschrieben wird, um den USB Audio Device-Treiber zu
löschen, der auf Ihrem Computer installiert ist, und installieren Sie die UA1A-Treiber erneut, wie in Anschlüsse und Treiberinstallation (Windows)
(S. 32) beschrieben. Prüfen Sie, ob ein Gerät mit der Bezeichnung
"Unbekanntes Gerät" in "Andere Geräte" oder in "Universelle Serielle Bus
Controller" vorhanden ist.
Wenn Sie "Unbekanntes Gerät" finden, löschen Sie diesen Eintrag.
Abhängig von Ihrem Computer wurden bei Auslieferung Ihres PCs eventuell
nicht alle Windows 98-Dateien installiert, die für die Unterstützung von
Audio über USB erforderlich sind.
Bitte wenden Sie sich diesbezüglich an den Hersteller Ihres Computers.
50
Page 51

Probleme bei Verwendung des UA-1A
Betriebssystem wird instabil
• Wenn Sie einen Computer bei bereits angeschlossenem UA-1A
hochfahren, wird der Computer möglicherweise instabil.
In diesem Fall fahren Sie den Computer bitte hoch, während das UA-1A nicht
mit dem Computer verbunden ist, und schließen Sie das UA-1A erst nach dem
Hochfahren an.
■ Kein Sound
• Versuchen Sie, das CD-Gerät Ihres Computers für das Abspielen
einer Audio-CD zu verwenden?
Wenn Sie im CD-ROM-Laufwerk Ihres Computers eine Audio-CD abspielen
möchten, lesen Sie bitte Wenn sich die Microsoft Windows CD-ROM nicht
im CD-ROM-Laufwerk befindet, wird eventuell folgendes Dialogfeld
angezeigt. In diesem Fall legen Sie dieMicrosoft Windows CD-ROM in das
CD-ROM-Laufwerk ein und klicken auf [OK]. (S. 37).
• Werden mehrere Anwendungen ausgeführt?
Wenn mehrere Anwendungen gleichzeitig ausgeführt werden, wird eventuell
eine Fehlermeldung angezeigt. Klicken Sie in diesem Fall auf [OK], und
schließen Sie die anderen Anwendungen.
Auch bei geschlossenem Anwendungsfenster läuft die Anwendung noch,
wenn sie sich in der Taskleiste befindet. Achten Sie daher darauf, alle nicht
benötigten Anwendungen zu beenden, die in der Taskleiste angezeigt werden.
• Haben Sie das Audiodaten-Ausgabeziel für das Betriebssystem
angegeben?
Als Audiodaten-Ausgabeziel für den Computer muss UA-1A angegeben
werden. Details zu dieser Einstellung finden Sie unter Angabe des
Audioeingabe/Ausgabegeräts (Windows S. 38) oder Soundeinstellungen
vornehmen (Macintosh S. 46).
Fehlerbehebung
51
Español Italiano Français Deutsch English
Page 52

Fehlerbehebung
• Haben Sie das Audiodaten-Ausgabeziel für Ihre
Wiedergabesoftware angegeben?
Bei einigen Anwendungen müssen Sie als Audiodaten-Ausgabeziel UA-1A
angeben. Einzelheiten zu dieser Einstellung finden Sie im Benutzerhandbuch
der Software.
• Wurden die Treiber richtig installiert?
Bevor Sie mit dem UA-1A Audiodaten wiedergeben können, muss der USB
Audio Device (USB-Audio-Gerät)-Treiber installiert werden. Einzelheiten
zur Installation und zu den Einstellungen erhalten Sie unter Anschlüsse und
Treiberinstallation (Windows S. 32, Macintosh S. 44).
• Wurden die verschiedenen Lautstärke-Regler nach oben
geschoben?
Passen Sie die Lautstärke mit den Reglern an, wie in Einstellung der
Lautstärkeregelung (Windows S. 40) oder Soundeinstellungen vornehmen
(Macintosh S. 46) beschrieben.
■ Sound ist verzerrt.
• Ist der Lautstärke-Pegel des Instruments, das an LINE IN
angeschlossen ist, zu hoch?
Verwenden Sie den Line Input-Schieberegler des UA-1A, um die
Inputlautstärke zu reduzieren.
■ Der Lautstärke-Pegel des Instruments, das an LINE IN
angeschlossen ist, ist zu niedrig.
• Benutzen Sie eventuell ein Anschlusskabel, das einen Widerstand
enthält?
Verwenden Sie ein Anschlusskabel, das keinen Widerstand enthält.
• Wurde der Line Input-Schieberegler entsprechend nach oben
geschoben?
52
Page 53

Fehlerbehebung
■ Das Abspielen von Sound wird von Rauschen gestört
•
Der Grafikbeschleuniger Ihres Computers kann Rauschen während
der Audiowiedergabe verursachen.
Um die Hardwarebeschleunigung auf "Keine" einzustellen, gehen Sie wie
folgt vor:
1. Doppelklicken Sie in Windows in der Systemsteuerung auf [Anzeige],
um das Dialogfeld Eigenschaften von Anzeige zu öffnen, und klicken
Sie auf die Registerkarte [Einstellungen].
2. Klicken Sie auf [Erweitert], um die Eigenschaften zu öffnen, und klicken
Sie auf die Registerkarte [Leistung].
3. In Grafik verschieben Sie den Regler Hardwarebeschleunigung auf
Keine und klicken Sie auf [OK].
4. Klicken Sie im Dialogfeld Eigenschaften von Anzeige auf OK, um das
Dialogfeld zu schließen. Starten Sie Ihren Computer anschließend neu.
• Im Line-Eingang ertönt Rauschen
Wenn ein MIDI-Soundmodul und das UA-1A via USB an den gleichen
Computer angeschlossen sind und die Ausgabe des MIDI-Soundmoduls mit
den Line-Eingangsbuchsen des UA-1A verbunden ist, kann Rauschen vom
Computer via MIDI-Soundmodul übertragen und vom UA-1A ausgegeben
werden. In solchen Fällen verwenden Sie einen Hub mit selbständiger
Stromversorgung, um das MIDI-Soundmodul und das UA-1A parallel
anzuschließen, oder schließen Sie das MIDI-Soundmodul via serielle
Schnittstelle oder MIDI-Schnittstelle an.
• Rauschen kann auftreten, wenn Aufnahme und Wiedergabe
gleichzeitig erfolgen.
Wenn Sie gleichzeitig Daten aufnehmen und wiedergeben, wird die
Wiedergabe möglicherweise abhängig von der Systemleistung unterbrochen.
Dieser Effekt kann als Rauschen wahrgenommen werden. Da jedoch die
Aufnahme Priorität erhält, gehen die aufgenommenen Daten nicht verloren.
• Dieses Problem kann gelöst werden, indem das Gestell Ihres
Computers ordnungsgemäß geerdet wird bzw. durch
vorschriftsmäßige Erdung via Erdungsstift des Steckers im
AC-Netzkabel, das mit Ihrem Computer mitgeliefert wurde. Stellen
Sie auch sicher, dass sich keine Geräte in der Nähe befinden, die ein
starkes magnetisches Feld ausstrahlen, wie z.B. ein Fernsehgerät
oder ein Mikrowellenherd.
• Ist eine große Anzahl von Audiogeräten angeschlossen?
Wenn eine große Anzahl von Audiogeräten angeschlossen ist, kann Rauschen
auftreten. Schließen Sie keine Audiogeräte an, die Sie nicht verwenden.
Español Italiano Français Deutsch English
53
Page 54

Fehlerbehebung
■ Der Sound wird während der Audiowiedergabe unterbrochen.
• Versuchen Sie, den Speicher zu erhöhen
Sie können die Verarbeitungsleistung Ihres Computers verbessern, indem Sie
zusätzlichen Speicher einbauen. Detaillierte Informationen zum Hinzufügen
von Speicher finden Sie im Benutzerhandbuch Ihres Computers.
• Erfüllt Ihr Computer die USB-Anforderungen?
Der Sound kann unterbrochen werden, wenn Sie einen Computer verwenden,
der in Bezug auf Elektrik nicht die USB-Anforderungen erfüllt. In diesem Fall
kann das Problem gelöst werden, wenn Sie einen USB-Hub anschließen, der
eine eigene Stromversorgung enthält.
• Werden mehrere Anwendungen ausgeführt?
Wenn Sie während der Wiedergabe mit mehreren Anwendungen arbeiten
oder eine weitere Anwendung starten, wird die Wiedergabe eventuell auf
bestimmten Computersystemen unterbrochen. Schließen Sie alle nicht
benötigten Anwendungen und versuchen Sie es erneut. Wenn das Problem
damit nicht gelöst wird, versuchen Sie, den Computer neu zu starten.
• Versuchen Sie, folgende Änderungen an den
Laufwerkeinstellungen vorzunehmen.
* Die nachfolgend genannten Einstellungen sind möglicherweise auf Ihrem Computer nicht
vorhanden.
1. Doppelklicken Sie in Windows in der Systemsteuerung auf [System],
um das Dialogfeld Eigenschaften von System zu öffnen, und klicken
Sie auf die Registerkarte [Geräte-Manager].
2. Doppelklicken Sie auf Laufwerke, um eine Liste der Laufwerke
anzuzeigen.
3. Wählen Sie GENERIC IDE DISK TYPExx aus der Liste, und klicken Sie
auf [Eigenschaften], um das Dialogfeld Eigenschaften von GENERIC
IDE DISK TYPExx anzuzeigen.
* Das "xx" in GENERIC IDE DISK TYPExx steht für eine Nummer, die jeweils von Ihrem
System abhängt.
4. Klicken Sie auf die Registerkarte [Einstellungen], markieren Sie das
Kontrollkästchen [DMA] unter Optionen, und klicken Sie auf [OK], um
das Dialogfeld zu schließen.
* Abhängig von Ihrem System kann ein Dialogfeld für die DMA-Einstellungen angezeigt
werden. Nachdem Sie den Inhalt des Felds geprüft haben, klicken Sie auf OK oder
Abbrechen.
5. Klicken Sie im Dialogfeld Eigenschaften von System auf [OK], um das
Dialogfeld zu schließen.
Starten Sie Ihren Computer neu, so dass die obigen Einstellungen
übernommen werden.
54
Page 55

■ Audiowiedergabe stoppt
• Auf einigen Computern können die
Energieverwaltungseinstellungen in der Systemsteuerung dazu
führen, dass die Wiedergabe stoppt.
Die Energieverwaltungseinstellungen, die angezeigt werden, wenn Sie auf
Energieverwaltung klicken, sind je nach PC-System unterschiedlich. Ein
Beispiel für die Einstellungen erhalten Sie untenstehend, aber Sie sollten
zusätzlich im Handbuch Ihres Computers nachschlagen. Einige Computer sind
eventuell nicht so konfiguriert, wie nachfolgend beschrieben wird.
1. Doppelklicken Sie in Windows in der Systemsteuerung auf [System],
um das Dialogfeld Eigenschaften von System zu öffnen, und klicken Sie
auf die Registerkarte [Geräte-Manager].
2. Doppelklicken Sie auf [Systemgeräte] , um eine Liste der Geräte
anzuzeigen.
3. Wählen Sie aus dieser Liste [Unterstützung für Advanced Power
Management], und klicken Sie auf [Eigenschaften], um das Dialogfeld
Eigenschaften der Unterstützung für Advanced Power Management
anzuzeigen.
4. Klicken Sie auf die Registerkarte [Einstellungen] und aktivieren Sie in
Fehlerbehebung das Kontrollkästchen [Stromstatusabfrage
deaktivieren] . Klicken Sie anschließend auf [OK].
5. Klicken Sie im Dialogfeld Eigenschaften von System auf [OK], um das
Dialogfeld zu schließen.
6. Starten Sie Windows neu.
Fehlerbehebung
55
Español Italiano Français Deutsch English
Page 56

Fehlerbehebung
In der Wiedergabe oder in der Aufnahme ist
Rauschen zu hören
• Setzen Sie AppleTalk im "Chooser" des Apple-Menüs auf "Inactive."
• Setzen Sie im Kontrollfeld "Memory" Virtual Memory auf "Off."
• Abhängig von der Art und Weise, mit der Sie eine Verbindung mit
Abhängig von den Einstellungen für virtuellen Speicher oder von
netzwerkbezogenen Einstellungen kann es zu Rauschen kommen.
Bitte nehmen Sie vor der Verwendung folgende Einstellungen vor.
(Diese Einstellung wird nicht verändert, wenn AppleTalk wie von OMS beim
Starten der Sequenzer-Software gefordert deaktiviert wird. Sie müssen die
Einstellung selbst mit Hilfe des "Chooser" ändern.)
dem Internet herstellen, verwenden Sie das UA-1A mit den
folgenden Einstellungen.
•Wenn die Verbindung mit dem Internet via LAN-Kabel hergestellt wird
Verwenden Sie das UA-1A bei angeschlossenem LAN-Kabel.
•Wenn die Verbindung mit dem Internet via internem Modemanschluss
erfolgt oder wenn Sie nicht mit dem Internet verbunden sind
Setzen Sie im Kontrollfeld "TCP/IP" "Connect via" auf "PPP."
Nachdem Sie diese Einstellungen vorgenommen haben, starten Sie den
Macintosh neu.
* Do not use software that accesses the network (such as a Web browser) at the same time that
you are using sequencer software or audio editing software
56
Im aufgenommenen Sound ist Rauschen zu
hören
• Die Erfahrung zeigt, dass Rauschen bei Sound auftreten kann, der
auf den Computermodellen der iMac-Serie aufgenommen wurde,
die nach dem Sommer 2000 auf den Markt kamen.
• In der SimpleSound-Anwendung, die im MacOS enthalten ist,
erklingt Rauschen im Ton, wenn der Sound sofort nach einer
digitalen Aufnahme wiedergegeben wird. Speichern Sie den
Sound zuerst und versuchen Sie anschließend die Wiedergabe
erneut.
• Aktualisieren Sie den USB Audio-Treiber auf 1.0.5f4.
Wenn eine USB Audio-Treiberversion vor 1.0.4 mit dem Mac OS mitgeliefert
wurde, sollten Sie den Treiber auf 1.0.5f4 aktualisieren.
Sie können den Treiber von dieser URL herunterladen:
http://asu.info.apple.com/swupdates.nsf/artnum/n11703
Page 57

Fehlerbehebung
Prüfung der USB Audio-Treiberversion
1. Schließen Sie das UA-1A an den Computer an.
2. Wählen Sie im Menü Apple die Option [Apple System Profiler].
3. Klicken Sie auf die Registerkarte [Devices and Volumes].
4. Der Bildschirm zeigt im Abschnitt USB "Audio (UA-1A USB Audio
Device)" an. Klicken Sie auf den Pfeil links von diesem Text.
5. Die Nummer, die rechts von"Driver version" angezeigt wird, ist die
Version des USB Audio-Treibers.
■ Während der Aufnahme wird eine leere (stumme) Datei
erstellt
• Versuchen Sie, die Bitrate auf "16bit" einzustellen.
Wenn Sie Windows 98 Second Edition verwenden und Ihre Aufnahmesoftware
auf eine Bitrate von 8 Bit eingestellt wurde, wird eventuell eine leere Datei
erstellt und Sie können keine Aufnahmen erstellen. In diesem Fall wird eine
korrekte Aufnahme möglich, wenn Sie die Bitrate auf "16 bit" setzen.
Musik-CD-Aufnahme nicht möglich
• Das UA-1A kann keine Musik-CDs im CD-ROM-Laufwerk des
Computers aufnehmen.
Das Laufwerk veränderte sich nach der Rückkehr
vom Standby-Modus oder Ruhezustand
• Wenn Windows 2000 vom Standby-Modus oder Ruhezustand
zurückkehrt, ändern sich die Einstellungen des Ausgabelaufwerks
aufgrund eines Windowsproblems.
Starten Sie die Mixer-Anwendung wie in Einstellung der Lautstärkeregelung
(S. 40) beschrieben, und passen Sie den Regler USB Audio (Speaker) (USB
Audio – Lautsprecher) entsprechend an.
Hintergrundmusik bei Spielen wird nicht
ausgegeben
• Verwendet das Spiel eine Audio-CD für die Hintergrundmusik?
Wenn eine Audio-CD verwendet wird, um Hintergrundmusik für das Spiel
abzuspielen, lesen Sie bitte Wenn sich die Microsoft Windows CD-ROM
nicht im CD-ROM-Laufwerk befindet, wird eventuell folgendes Dialogfeld
angezeigt. In diesem Fall legen Sie dieMicrosoft Windows CD-ROM in das
CD-ROM-Laufwerk ein und klicken auf [OK]. (S. 37).
Español Italiano Français Deutsch English
57
Page 58

Introduction
Contenu du paquet
Le paquet UA-1A comprend les éléments suivants. A
l'ouverture du paquet, vérifiez que tous les éléments sont
inclus.
S’il en manque, veuillez contacter le revendeur qui vous a
vendu le paquet.
■ Interface Audio UA-1A USB
fig.UA1A
■ Manuel d'utilisation d'UA-1A (ce document)
Description de l'appareil
fig.UA1Afunc
58
1
Câble USB
Reliez ce câble au connecteur USB de votre ordinateur. (600
mm de longueur)
2
Voyant USB
Ce voyant s'allume lorsque l'unité est connectée à votre
ordinateur et qu'elle est prête à fonctionner.
3
Prises jack entrée ligne
4
Prises jack sortie ligne
Page 59

Connexions et installation des pilotes (Windows)
* Si vous possédez un Macintosh, reportez-vous à la p. 70.
Pour utiliser l'UA-1A, vous devez d'abord installer
consécutivement les pilotes Périphérique USB Composite,
Périphérique d'interface utilisateur USB et Périphérique
Audio USB. Ces pilotes sont inclus avec Windows. Si vous
utilisez Windows 98, ce pilote est fourni sur le CD-ROM de
Microsoft Windows, dont vous aurez besoin pendant
l'installation. (CD-ROM de Microsoft Windows). Si vous
utilisez Windows Me ou 2000, vous n'avez pas besoin du
CD-ROM.
Qu'est-ce qu'un pilote ?
Un pilote est un logiciel qui permet à un programme
s'exécutant sur votre ordinateur de transférer des données de
et vers un matériel (comme l'UA-1A) lorsque celui-ci est
connecté à votre ordinateur à l'aide d'un câble USB. Le pilote
transmet les données de l'application à l'UA-1A et vice-versa.
fig.P10-1
Application
Pilote
Ordinateur
USB
Connecteur USB
Câble USB
INTERFACE AUDIO USB
ENTREE
SORTIE
G
D
G
D
Español Italiano Français Deutsch English
59
Page 60

Connexions et installation des pilotes (Windows)
Avant d'installer le pilote
L'UA-1A ne peut être utilisé avec Windows 95 ou
Windows NT.
Si d'autres programmes s'exécutent dans Windows,
fermez-les tous avant de continuer.
Si vous prévoyez de connecter en même temps
plusieurs périphériques USB Roland (par exemple
l'UA-1A et d'autres périphériques USB comme
l'UA-100G) à votre ordinateur, déconnectez
l'UA-100G ou les autres périphériques du
connecteur USB avant d'installer le pilote. Si vous
installez le pilote lorsque l'UA-100G ou d'autres
périphériques sont connectés, l'installation risque
de ne pas se dérouler correctement.
Etablissement des connexions et installation du pilote
■ Utilisateurs de Windows Me
* Si vous utilisez une machine Windows 2000, voir p. 61, pour
Windows 98, voir p. 62.
60
1
Mettez votre ordinateur sous tension, démarrez
Windows et utilisez un câble USB pour connecter
l'UA-1A à votre ordinateur.
fig.02-03.e
2
Lorsque Windows détecte
l'UA-1A et que la boîte de
dialogue Assistant ajout
de nouveau matériel
apparaît, assurez-vous que
"Rechercher
automatiquement un
meilleur pilote (recommandé)" est sélectionné, puis
cliquez sur [Suivant].
Cette boîte de dialogue peut
nécessiter quelques instants
avant d'apparaître
Page 61
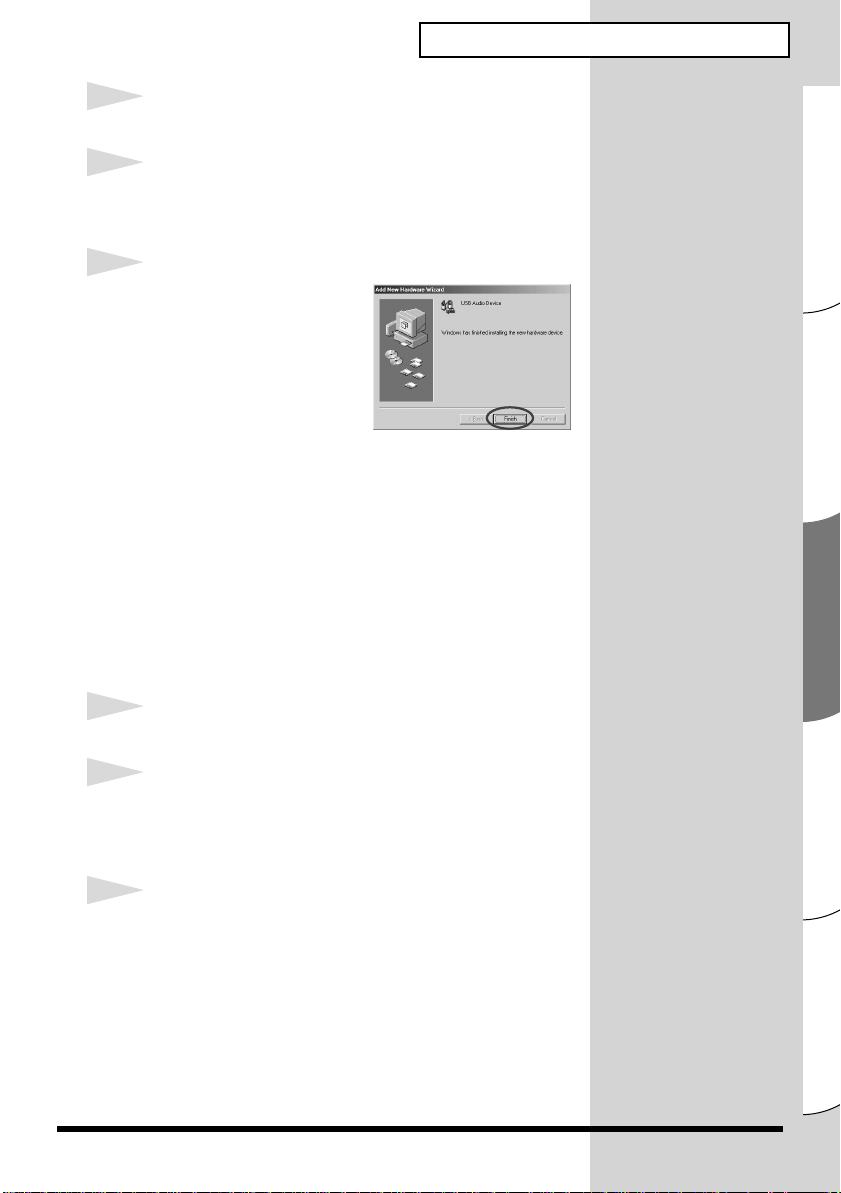
3
La recherche du pilote démarre.
4
Lorsque le bon pilote est trouvé, son installation
démarre.
fig.02-04.e
5
Lorsqu'une boîte de
dialogue vous informant
que l'installation du pilote
est terminée apparaît,
cliquez sur [Terminer] et
redémarrez Windows.
Une fois le pilote installé, voir
Spécification du périphérique d'entrée/sortie audio (p. 64)
et sélectionnez le périphérique utilisé par Windows.
* Selon la configuration de votre ordinateur, un court délai peut
intervenir après l'installation du pilote jusqu'à la reconnaissance
du périphérique.
■ Utilisateurs de Windows 2000
* Si vous utilisez une machine Windows Me, voir p. 60, pour
Windows 98, voir p. 62.
Connexions et installation des pilotes (Windows)
1
Allumez votre ordinateur et démarrez Windows.
2
Utilisez un câble USB pour connecter l'UA-1A à votre
ordinateur. L'UA-1A est reconnu par l'ordinateur et le
pilote est installé de façon totalement automatique.
3
Après installation du pilote, redémarrez Windows.
Español Italiano Français Deutsch English
61
Page 62

Connexions et installation des pilotes (Windows)
■ Utilisateurs de Windows 98
* Si vous utilisez une machine Windows Me, voir p. 60, pour
Windows 2000, voir p. 61.
Les pilotes doivent être installés dans cet ordre :
Périphérique USB Composite, puis Périphérique Audio
USB. Procédez comme suit pour effectuer l'installation.
fig.02-05.e
1
Mettez votre ordinateur
sous tension et démarrez
Windows. Insérez le
CD-ROM de Microsoft
Windows dans votre
lecteur de CD-ROM et
utilisez un câble USB pour
connecter l'UA-1A à votre ordinateur.
Certains ordinateurs étant vendus avec le contenu
du CD-ROM de Microsoft Windows déjà sur le
disque dur, ils peuvent ne pas inclure ce
CD-ROM. (CD-ROM de Microsoft Windows).
Dans ce cas, vous pourrez installer le pilote sans le
CD-ROM de Microsoft Windows.
Un Périphérique USB Composite est détecté
automatiquement et la boîte de dialogue Assistant ajout de
nouveau matériel apparaît. Cliquez sur [Suivant].
Si cette boîte de
dialogue n'apparaît
pas, reportez-vous à
Problèmes liés au
pilote USB (p. 74).
62
fig.02-06.e
2
Lorsque l'ordinateur vous
demande "Que voulez-
vous faire ?", sélectionnez
"Rechercher le meilleur
pilote pour votre
périphérique
(Recommandé)". et
cliquez sur [Suivant].
Page 63

Connexions et installation des pilotes (Windows)
fig.02-07.e
3
La boîte de dialogue
suivante s'affiche alors.
Vérifiez le lecteur de
CD-ROM et cliquez sur
[Suivant].
fig.02-08.e
4
La boîte de dialogue
suivante s'affiche alors.
Cliquez sur [Suivant].
* Selon votre système, l'emplacement du pilote peut différer de
celui de la figure ci-dessus, mais ceci ne constitue pas un problème.
5
La copie du fichier (pilote) démarre.
A l'étape 4, l'écran
indique : "Windows
recherche les fichiers
du pilote pour ce
périphérique :
Périphérique audio
USB".
Si le CD-ROM de Microsoft Windows n'est pas
inséré dans le lecteur de CD-ROM, la boîte de
dialogue suivante peut apparaître. Dans ce cas,
insérez le CD-ROM de Microsoft Windows dans le
lecteur de CD-ROM et cliquez sur [OK].
fig.02-09.e
fig.02-10.e
6
Une fois l'installation du
pilote Périphérique USB
Composite terminée, la
boîte de dialogue suivante
apparaît. Cliquez sur
[Terminer].
Español Italiano Français Deutsch English
63
Page 64

Connexions et installation des pilotes (Windows)
fig.02-13.e
7
Ensuite, le Périphérique
Audio USB est détecté
automatiquement et la
boîte de dialogue
Assistant ajout de
nouveau matériel
apparaît. Cliquez sur
[Suivant] et continuez l'installation en suivant
exactement les procédures décrites aux étapes 2 - 5
(p. 62 – 63).
fig.02-14.e
8
Une fois l'installation du
pilote Périphérique Audio
USB terminée, la boîte de
dialogue suivante
apparaît. Cliquez sur
[Terminer].
L'installation des pilotes
Périphérique USB Composite et Périphérique Audio USB
est terminée. Redémarrez Windows.
Après avoir installé le pilote, voir Spécification du
périphérique d'entrée/sortie audio (p. 64) et sélectionnez le
périphérique utilisé par Windows.
■ Spécification du périphérique d'entrée/
sortie audio
1
Cliquez sur le bouton [Démarrer] de Windows, puis
dans [Paramètres], choisissez [Panneau de
configuration].
2
Win 98 / Win 98SE :
Dans le Panneau de configuration, cliquez deux fois sur
l'icône [Multimédia] pour ouvrir la boîte de dialogue
Propriétés multimédia.
64
Page 65

Connexions et installation des pilotes (Windows)
Win 2000 / Me :
Dans le Panneau de configuration, cliquez deux fois sur
l'icône [Sons et Multimédia] pour ouvrir la boîte de dialogue
Propriétés de Sons et multimédia.
* Si vous ne trouvez pas l'icône [Sons et Multimédia], cliquez alors
sur [Afficher toutes les options du Panneau de
configuration] dans le Panneau de configuration.
3
Cliquez sur l'onglet [Audio].
4
Pour déterminer le Périphérique par défaut pour la
Lecture, cliquez sur . Dans la liste qui apparaît,
cliquez sur [Périphérique Audio USB] pour le
sélectionner.
5
Pour déterminer le Périphérique par défaut pour
l'Enregistrement, cliquez sur . Dans la liste qui
apparaît, cliquez sur [Périphérique Audio USB] pour
le sélectionner.
Windows 98 / Windows 98SE Windows 2000 /Windows Me
fig.02-15.e
Selon votre système,
"Périphérique Audio
USB" s'affiche avec un
numéro, par exemple,
"Périphérique Audio
USB (1)".
Il n'est alors pas
possible de cliquer sur
le bouton "Propriétés
avancées" pour
l’"Enregistrement".
Español Italiano Français Deutsch English
65
Page 66

Connexions et installation des pilotes (Windows)
6
Cliquez sur [OK] pour terminer les réglages.
Réglages de Contrôle du volume
Le volume de sortie de l'UA-1A peut être contrôlé par le
Contrôle du volume de Windows.
1
Cliquez sur le bouton [Démarrer] de Windows, puis
sélectionnez [Programmes] - [Accessoires] [Divertissement] -[Contrôle du volume] pour le
démarrer.
Windows Me Windows 2000/
Windows 98/Windows 98SE
fig.02-17.e
Si le Contrôle du volume
n'est pas installé sur votre
ordinateur, utilisez Ajout/
Suppression
d'applications dans le
Panneau de
configuration pour
l'installer. Pour plus de
précisions sur l'installation,
reportez-vous au manuel
d'utilisation de Windows
ou à l'Aide.
La qualité des sons de
l'UA-1A sera meilleure
si vous montez les
niveaux du Contrôle du
volume.
66
2
Vous pouvez monter ou baisser le curseur pour régler
le volume de l'UA-1A. Les éléments suivants peuvent
être réglés.
WAVE Règle le volume de sortie du périphérique
audio de sortie "Périphérique Audio USB".
Synthé SW Règle le volume du synthétiseur logiciel
intégré à Windows.
Lecteur de CDRègle le volume "CD Audio" du lecteur de
CD-ROM de votre ordinateur.(*1)
*1 Si la lecture du CD n'est pas modifiée en réglant ce
volume, utilisez le volume WAVE.
Si Muet est coché, ou si le
curseur est au plus bas,
aucun son ne sortira de
l'UA-1A.
Si vous utilisez Windows
2000 et que le "Lecteur de
CD" n'apparaît pas, cochez
l'élément [Lecture CD
numérique] "Activer la
lecture numérique sur ce
lecteur de CD-ROM", selon
la note d'avertissement de
la page suivante.
Page 67

Connexions et installation des pilotes (Windows)
Lorsque vous utilisez le lecteur de CD-ROM de
votre ordinateur pour lire un CD audio ou pour
lire la musique de fond des jeux avec l'UA-1A :
Avec Windows Me :
Sélectionnez [Démarrer] - [Paramètres] - [Panneau de
configuration]. Dans le [Panneau de configuration],
cliquez deux fois sur l'icône [Système] pour ouvrir la boîte de
dialogue Propriétés système. Cliquez sur l'onglet
[Gestionnaire de périphériques], puis cliquez deux fois sur
l'icône [CDROM]. En dessous, cliquez deux fois sur le lecteur
de CD-ROM que vous utilisez et ouvrez ses Propriétés.
Cliquez sur l'onglet [Propriétés] et cochez la case située à
côté de l'élément Lecture CD numérique "Activer la lecture
numérique sur ce lecteur de CD-ROM".
Avec Windows 2000
Comme pour Windows Me, ouvrez la boîte de dialogue
Propriétés système. Cliquez sur l'onglet [Matériel], puis sur
le bouton [Gestionnaire de périphériques] pour ouvrir
le Gestionnaire de périphérique. A partir des lecteurs de
CD-ROM, cliquez deux fois sur le lecteur de CD-ROM que
vous utilisez pour ouvrir ses Propriétés. Cliquez sur l'onglet
[Propriétés] et cochez la case située à côté de l'élément
Lecture CD numérique "Activer la lecture numérique
sur ce lecteur de CD-ROM".
Avec Windows 98 ou Windows 98 SE :
Sélectionnez [Démarrer] - [Paramètres] - [Panneau de
configuration] - [Multimédia], puis cliquez sur l'onglet
[CD Audio] et cochez "Activer la lecture numérique sur
ce lecteur de CD-ROM".
Selon l'environnement de votre ordinateur, la lecture des CD
peut encore poser des problèmes. Pour plus de détails,
reportez-vous aux informations fournies par le constructeur
de votre ordinateur. Si vous utilisez un lecteur de CD-ROM
de type PC-card (PCMCIA), la lecture de données WAVE ou
d'un CD audio sur ce lecteur peut interrompre le son ou le
supprimer totalement.
Español Italiano Français Deutsch English
67
Page 68

Connexions et installation des pilotes (Windows)
Suppression du pilote Périphérique Audio USB
■ Si vous réinstallez le pilote Périphérique
Audio USB.
■ Si l'installation du pilote Périphérique
Audio USB s'est interrompue avant la fin.
Procédez comme suit pour supprimer le pilote déjà installé.
1
Utilisez un câble USB pour connecter l'UA-1A à votre
ordinateur.
2
Cliquez sur le bouton [Démarrer] de Windows, puis
dans [Paramètres], choisissez [Panneau de
configuration].
3
Dans le
sur l'icône [Système] pour ouvrir la boîte de dialogue
Propriétés système.
[Panneau de configuration]
, cliquez deux fois
L'explication donnée ici
concerne un système
Windows standard. Selon
votre ordinateur, les noms
de certains dossiers
peuvent être différents.
68
4
Cliquez sur l'onglet [Gestionnaire de
périphériques].
5
Cliquez deux fois sur [Contrôleurs son, vidéo et jeu]
pour accéder à la liste des périphériques.
6
Dans la liste, sélectionnez Périphérique Audio USB
et cliquez sur [Supprimer]. Dans la boîte de dialogue
Confirmation de la suppression du périphérique,
cliquez sur [OK]. Si le Périphérique Audio USB n'est
pas affiché, passez à l'étape 8.
Page 69

7
Assurez-vous que le Périphérique Audio USB n'est
pas dans la liste Contrôleurs son, vidéo et jeux et
cliquez sur [Fermer] pour quitter la boîte de dialogue
Propriétés système.
8
Suivez à nouveau les étapes 1. – 4. et cliquez deux fois
sur [Contrôleurs de bus USB] pour afficher la liste
des périphériques.
Si est affiché comme icône de périphérique
compatible USB :
Sélectionnez l'icône [Périphérique USB Composite]
et cliquez sur [Supprimer]. Dans la boîte de dialogue
Confirmation de la suppression du périphérique,
cliquez sur [OK]. Comme à l'étape 7., fermez
Propriétés système.
Si aucune icône de périphérique compatible USB
n'apparaît, ou si ne s'affiche pas :
Fermez simplement Propriétés système.
Connexions et installation des pilotes (Windows)
Si une boîte de dialogue
vous proposant de
redémarrer Windows
apparaît à ce moment,
suivez la proposition et
redémarrez votre
ordinateur.
Si vous utilisez Windows Me et que est
affiché :
Fermez simplement Propriétés système.
9
Débranchez le câble USB de votre ordinateur et
redémarrez Windows.
Español Italiano Français Deutsch English
69
Page 70

Connexions et installation des pilotes (Macintosh)
* Si vous possédez un PC sous Windows, reportez-vous p. 59.
Pour pouvoir utiliser l'UA-1A, vous devez d'abord installer
un pilote. L'UA-1A utilise un pilote inclus dans le système
Mac OS.
Problèmes connus : UA-1A
• Certaines applications comme Cakewalk Metro
Series et TC Work Spark Series ne sont pas capables
d'enregistrer et de lire à 48 kHz. Utilisez l'UA-1A à
44.1 kHz.
• Pendant la lecture ou l'enregistrement, ne
connectez/déconnectez pas le câble USB. Le logiciel
risquerait de se bloquer.
• Il est possible que le son soit haché ou qu'il soit de
mauvaise qualité si vous enregistrez et lisez en
même temps, en raison d'une charge trop
importante au niveau du processeur (CPU). Ce
défaut ne devrait pas affecter le résultat de
l'enregistrement. Ce genre de problème ne devrait
concerner que le signal de lecture.
• Pour utiliser Virtual Sound Canvas 3, sélectionnez
[Performance] dans le menu [Setting], puis
choisissez Response Priority pour Expression
Mode.
• Le pilote standard livré avec Mac OS n'est pas
compatible ASIO.
• Lorsque vous démarrez votre ordinateur avec
l'UA-1A connecté, celui-ci peut devenir instable. Si
cela se produit, démarrez d'abord votre Macintosh,
puis connectez l'UA-1A.
Qu'est-ce qu'un pilote ?
-> p. 59
70
Page 71

Connexions et installation des pilotes (Macintosh)
Etablissement des connexions et installation du pilote
■ Reconnaissance de l'appareil
1
Mettez votre ordinateur sous tension et démarrez
MacOs.
2
Dans le menu Apple, sélectionnez
[Apple System Profiler].
fig.03-02.e
Pour éviter d'endommager
vos haut-parleurs, baissez
le volume sur cet appareil
et sur tout périphérique
audio connecté.
3
Cliquez sur l'onglet
[Devices and Volumes].
4
Utilisez un câble USB pour connecter l'UA-1A à votre
ordinateur.
5
Pour vérifier que l'appareil est bien reconnu,
sélectionnez [Update all information] du menu
[Commands]. Les trois périphériques audio suivants
doivent s'afficher dans la section USB, comme suit :
fig.03-04.e
Quittez toutes les
applications
éventuellement actives
avant d'établir la
connexion.
Si c'est le cas, l'installation du pilote UA-1A est réussie.
Sélectionnez [Quit] dans le menu [File] pour fermer la boîte
de dialogue Apple System Profiler, puis procédez au
réglage du son (voir ci-dessous).
Si les trois périphériques ne sont pas affichés, déconnectez
l'UA-1A du port USB et attendez environ dix secondes.
Répétez ensuite la procédure à partir de l'étape 4.
Español Italiano Français Deutsch English
71
Page 72

Connexions et installation des pilotes (Macintosh)
■ Réglages du son
fig.03-05.e
6
Dans le menu Apple,
sélectionnez [Control
Panels] - [Sound] pour
ouvrir la boîte de dialogue
Sound.
7
Cliquez sur l'onglet [Speakers].
fig.03-06.e
8
Baissez le volume sur
l'UA-1A et sur votre
appareil audio, puis
cliquez sur [Start Test].
72
fig.03-07.e
9
Les sons de test passent de
gauche à droite, en suivant
l'affichage à l'écran ; réglez
le volume à l'aide de la
barre [Main Volume].
Lorsque vous avez
terminé, cliquez sur
[Stop Test].
Avec certaines versions de Mac OS, la barre [Main Volume]
n'existe pas. Dans ce cas, utilisez la barre [Volume] dans
l'onglet [Output] pour régler le volume.
Lorsque le
commutateur
d'entrées
d'enregistrement est
positionné sur DIGITAL,
vous ne pouvez pas lire
les données audio sur
votre ordinateur.
Positionnez le
commutateur sur INPUT
+ GUITAR/MIC.
Page 73

fig.03-08.e
10
Sélectionnez [Input] dans
la boîte de dialogue
Sound. Pour Choose a
source for sound input:,
choisissez USB Audio.
Ne cochez pas [Play sound through output
device].
11
Lorsque vous avez terminé les réglages, sélectionnez
[Quit] dans le menu [File] pour fermer la boîte de
dialogue Sound.
Connexions et installation des pilotes (Macintosh)
Si USB Audio n'est pas
disponible, fermez la boîte
de dialogue Sound.
Déconnectez ensuite
l'UA-1A et attendez
environ dix secondes.
Recommencez l'opération,
en commençant par
l'étape 2.
73
Español Italiano Français Deutsch English
Page 74

Dépannage
Si un problème inattendu se produit avec l'UA-1A, veuillez lire ce chapitre. Il
offre de nombreux conseils pour vous aider à résoudre les problèmes.
Les problèmes décrits à la section Dépannage sont organisés selon le système
d'exploitation sur lequel le problème peut être rencontré. Utilisez les icônes à
gauche du titre pour trouver les informations dont vous avez besoin.
Problèmes communs à Windows et
Macintosh.
Problèmes propres à Windows.
Problèmes propres à Macintosh.
Si vous utilisez un ordinateur pour la première fois, ou si vous ne comprenez
pas l'explication d'une procédure, reportez-vous au manuel d'utilisation de
votre ordinateur ou de votre système d'exploitation.
Si l'UA-1A ne fonctionne pas comme vous l'attendez, vérifiez les points
suivants :
Problèmes liés au pilote USB
L' « Assistant ajout de nouveau matériel » ne
démarre pas automatiquement
74
L' « Assistant ajout de nouveau matériel » se
termine de façon impromptue
• Lorsque le câble USB est connecté ou déconnecté, il faut environ
15 secondes (ou plus) à l'UA-1A pour être reconnu.
• Le câble USB est-il correctement connecté ?
Vérifiez que l'UA-1A et l'ordinateur sont correctement connectés par le
câble USB.
• Le câble USB peut-il être utilisé sur votre ordinateur ?
Reportez-vous au manuel d'utilisation de votre ordinateur et vérifiez qu'il
peut utiliser USB.
Page 75

• Votre ordinateur ou votre concentrateur USB est-il suffisamment
alimenté ?
L'UA-1A ne peut être connecté s'il est insuffisamment alimenté. Vérifiez si l'un
de ces cas s'applique.
Si vous utilisez l'UA-1A avec un ordinateur portable fonctionnant sur ses
batteries, l'opération peut ne pas être fiable avec certains modèles
d'ordinateurs. Si c'est le cas, connectez l'adaptateur secteur à votre ordinateur
portable.
Le mode d'économie d'énergie de votre ordinateur peut limiter la puissance
fournie à USB. Vérifiez les paramètres de votre ordinateur.
Dans certains cas, l'UA-1A ne peut pas être utilisé avec un concentrateur
alimenté par un bus (c'est-à-dire, un concentrateur ne possédant pas
d'alimentation propre). Veuillez utiliser un concentrateur auto-alimenté (c'està-dire, un concentrateur possédant sa propre alimentation).
• Votre ordinateur répond-il aux normes USB ?
Si vous utilisez un ordinateur ne répondant pas aux normes USB (comme un
ordinateur assemblé par vos soins), le fonctionnement peut être instable. Dans
de tels cas, vous pouvez résoudre le problème en connectant un concentrateur
USB possédant sa propre alimentation.
• « Périphérique inconnu » s'affiche-t-il à la place de « Autres
périphériques » ou de « Contrôleurs de bus USB » ?
Procédez comme suit pour supprimer « Périphérique inconnu » de « Autres
périphériques » (Contrôleur de bus USB), puis redémarrez votre ordinateur.
Pour savoir si le « Périphérique inconnu » est l'UA-1A,
déconnectez le câble USB de l'UA-1A et vérifiez que
« Périphérique inconnu » a disparu. Puis reconnectez
l'UA-1A et supprimez « Périphérique inconnu ».
1. Dans le [Panneau de configuration] de Windows, cliquez deux fois sur
[Système] pour ouvrir la boîte de dialogue Propriétés système.
2. Cliquez sur l'onglet [Gestionnaire de périphériques].
3. Cliquez deux fois sur [Autres périphériques] (Contrôleurs de bus USB)
pour obtenir la liste des périphériques.
4. Dans la liste, sélectionnez Périphérique inconnu et cliquez sur
[Supprimer].
5. Dans la boîte de dialogue Confirmation de la suppression du
périphérique, cliquez sur [OK].
6. Vérifiez que la liste n'affiche pas Autres périphériques ou Périphérique
inconnu et cliquez sur [Fermer] pour fermer la boîte de dialogue.
Dépannage
Español Italiano Français Deutsch English
75
Page 76

Dépannage
La boîte de dialogue « Assistant ajout de
nouveau matériel » apparaît même si vous
avez installé les pilotes.
Si votre ordinateur ou concentrateur USB dispose de plusieurs connecteurs
USB, lorsque vous connectez l'UA-1A à un connecteur USB sur lequel il n'a
jamais été connecté, la boîte de dialogue « Assistant ajout de nouveau
matériel » peut s'afficher même si les pilotes ont déjà été installés. Installez à
nouveau les pilotes comme décrit dans Connexions et installation des
pilotes (Windows) (p. 59). Il ne s'agit pas d'un dysfonctionnement.
Les pilotes ne sont pas correctement installés
Procédez comme décrit dans Suppression du pilote Périphérique Audio
USB (p. 68) pour supprimer le pilote Périphérique Audio USB de votre
ordinateur, et installez à nouveau les pilotes de l'UA-1A comme décrit dans
Connexions et installation des pilotes (Windows) (p. 59). Vérifiez si vous
avez un élément nommé « Périphérique inconnu » ou « Autres
périphériques » dans « Contrôleurs de bus USB ».
Si vous trouvez un « Périphérique inconnu », supprimez-le.
Une boîte de dialogue « Périphérique inconnu
détecté » apparaît et il m'est impossible
d'installer le pilote
Selon votre ordinateur, tous les fichiers nécessaires à la prise en charge de
l'USB audio par Windows 98 n'ont peut-être pas été installés.
Veuillez vous renseigner auprès du constructeur de l'ordinateur.
76
Page 77

Problèmes d'utilisation de l'UA-1A
Le système d'exploitation devient instable
• Si vous démarrez un ordinateur avec l'UA-1A déjà connecté, il
peut devenir instable.
Dans ce cas, démarrez l'ordinateur avec l'UA-1A non connecté, puis
connectez-le.
■ Absence de son
• Tentez-vous d'utiliser le lecteur de CD de votre ordinateur pour lire
un CD audio?
Si vous voulez lire un CD audio à partir du lecteur de CD-ROM de votre
ordinateur, voir Lorsque vous utilisez le lecteur de CD-ROM de votre
ordinateur pour lire un CD audio ou pour lire la musique de fond des jeux
avec l'UA-1A : (p. 67).
• D'autres applications sont-elles ouvertes ?
Si plusieurs applications fonctionnent en même temps, un message d'erreur
peut apparaître. Dans ce cas, cliquez sur [OK] et fermez les autres
applications.
Même si une fenêtre d'application est fermée, elle fonctionne encore si elle
reste dans la barre des tâches ; veillez donc à quitter les applications inutiles
présentes dans la barre des tâches.
• Avez-vous défini la destination des données audio en sortie pour
le système d'exploitation ?
La destination des données audio en sortie d'un ordinateur doit être
positionnée sur UA-1A. Pour plus de détails sur ce paramètre, voir
Spécification du périphérique audio d'entrée/sortie (Windows p. 64) ou
Réglages du son (Macintosh p. 72).
• Avez-vous défini la destination des données audio en sortie pour
votre logiciel de lecture ?
Pour certains logiciels, vous devez régler la destination des données audio en
sortie sur UA-1A. Pour plus de détails sur ce réglage, reportez-vous au manuel
d'utilisation du logiciel.
• Les pilotes sont-ils correctement installés ?
Pour lire les données audio avec l'UA-1A, le pilote Périphérique Audio USB
doit être installé. Pour plus de détails sur l'installation et les réglages, voir
Connexions et installation des pilotes (Windows p. 59, Macintosh p. 70).
Dépannage
Español Italiano Français Deutsch English
77
Page 78

Dépannage
• Les différentes commandes d'atténuation du volume sont-elles
montées ?
Réglez le volume de chaque commande d'atténuation comme décrit dans
Propriétés de contrôle du volume (Windows p. 66) ou Réglages du son
(Macintosh p. 72).
■ Distorsion du son
• Le niveau du volume de l'instrument connecté à LINE IN est-il trop
élevé ?
Utilisez le curseur de réglage de l'entrée ligne de l'UA-1A pour réduire le
niveau d'entrée.
■ Le niveau du volume de l'instrument connecté à LINE IN
est trop bas.
• Utilisez-vous un câble de connexion contenant une résistance ?
Utilisez un câble de connexion ne contenant pas de résistance.
• Le curseur de réglage de l'entrée ligne est-il monté comme il faut ?
■ La lecture audio comporte du bruit
•
La carte graphique de votre ordinateur peut provoquer du bruit
lors de la lecture audio.
Procédez comme suit pour régler l'accélération graphique sur « Aucunee ».
1. Dans le Panneau de configuration de Windows, cliquez deux fois sur
[Affichage] pour ouvrir la boîte de dialogue [Propriétés d'affichage],
puis cliquez sur l'onglet [Paramètres].
2. Cliquez sur [Propriétés avancées] pour ouvrir les propriétés et cliquez
sur l'onglet [Performances].
3. Dans Graphiques, déplacez le curseur Accélération matérielle : sur
Aucune et cliquez sur [OK].
4. Dans la boîte de dialogue Propriétés d'affichage, cliquez sur [OK] pour
fermer la boîte de dialogue. Redémarrez ensuite votre ordinateur.
78
Page 79

• L'entrée ligne génère du bruit
Si un module sonore MIDI et l'UA-1A sont connectés via USB au même
ordinateur et que la sortie du module MIDI est connectée aux prises jack
d'entrée ligne de l'UA-1A, du bruit peut entrer par le module MIDI et être
entendu par l'UA-1A. Dans ce cas, utilisez un concentrateur auto-alimenté
pour connecter en parallèle le module sonore MIDI et l'UA-1A ou connectez le
module MIDI via l'interface série ou MIDI.
• L'enregistrement et la lecture simultanés provoquent du bruit
Si vous enregistrez et lisez en même temps, la lecture peut être interrompue en
fonction des capacités de votre système, et cela peut être perçu comme du
bruit. Cependant, la priorité étant donnée à l'enregistrement, les données
enregistrées ne sont pas perdues.
• Ce problème peut être résolu en reliant le châssis de votre
ordinateur à la terre, ou la fiche de terre de la prise du cordon
d'alimentation en courant alternatif fourni avec votre ordinateur.
Vérifiez également qu'aucun périphérique proche n'émet de fort
champ magnétique, comme une télévision ou un four à micro-
ondes.
• Beaucoup de périphériques audio sont-ils connectés ?
La connexion simultanée de nombreux périphériques audio peut provoquer
du bruit. Ne connectez pas les périphériques audio inutilisés.
Dépannage
■ Le son s'interrompt pendant la lecture audio
• Essayez d'augmenter la mémoire
Vous pouvez augmenter la capacité de traitement de votre ordinateur en y
ajoutant plus de mémoire. Pour plus de détails sur l'ajout de mémoire,
reportez-vous au manuel d'utilisation de votre ordinateur.
• Votre ordinateur répond-il aux normes USB ?
L'audio peut s'interrompre si vous utilisez un ordinateur ne répondant pas
aux normes électriques USB. Dans ce cas, le problème peut être résolu en
connectant un concentrateur USB possédant sa propre alimentation.
• Avez-vous beaucoup d'applications qui fonctionnent en même
temps ?
Si vous utilisez beaucoup d'applications pendant la lecture ou si vous
démarrez d'autres applications, la lecture peut s'interrompre en fonction de
votre ordinateur. Quittez toutes les applications qui ne sont pas nécessaires et
réessayez. Si cela ne résout pas le problème, essayez de redémarrer
l'ordinateur.
Español Italiano Français Deutsch English
79
Page 80

Dépannage
• Essayez de modifier les paramètres des lecteurs de disque
* Les paramètres suivants peuvent ne pas être inclus sur votre ordinateur.
1. Dans le Panneau de configuration de Windows, cliquez deux fois sur
[Système] pour ouvrir la boîte de dialogue [Propriétés Système], puis
cliquez sur l'onglet [Gestionnaire de périphériques].
2. Cliquez deux fois sur [Lecteurs de disque] pour accéder à la liste des
périphériques.
3. Dans la liste, sélectionnez GENERIC IDE DISC TYPExx, puis cliquez sur
[Propriétés] pour accéder à la boîte de dialogue Propriétés de GENERIC
IDE DISK TYPE xx.
* Les “xx” de GENERIC IDE DISK TYPExx représentent un nombre qui varie selon votre
système.
4. Cliquez sur l'onglet [Paramètres], cochez la case [DMA] figurant dans
Options, puis cliquez sur [OK] pour fermer la boîte de dialogue.
* En fonction de votre système, une boîte de dialogue des paramètres DMA peut apparaître.
Après vérification de son contenu, cliquez sur OK ou Annuler.
5. Dans la boîte de dialogue Propriétés Système, cliquez sur [OK] pour
fermer la boîte de dialogue.
Redémarrez votre ordinateur pour que les paramètres ci-dessus soient pris en
compte.
■ Arrêt de la lecture audio
• Sur certains ordinateurs, les paramètres de Gestion de
l'alimentation du Panneau de configuration peuvent provoquer
l'arrêt de la lecture.
Les Propriétés de la gestion de l'alimentation qui s'affichent lorsque vous
cliquez deux fois sur Gestion de l'alimentation varient selon votre ordinateur.
Nous donnons ci-dessous un exemple, mais vous devez également consulter le
manuel d'utilisation de votre ordinateur. Il se peut que certains ordinateurs ne
proposent pas les paramètres suivants.
1. Dans le Panneau de configuration de Windows, cliquez deux fois sur
[Système] pour ouvrir la boîte de dialogue Propriétés Système, puis
cliquez sur l'onglet [Gestionnaire de périphériques].
2. Cliquez deux fois sur [Périphériques système] pour accéder à la liste
des périphériques.
3. Dans la liste, sélectionnez [Prise en charge de la gestion d'énergie
avancée], puis cliquez sur [Propriétés] pour accéder à la boîte de
dialogue Propriétés Prise en charge de la gestion d'énergie avancée.
80
Page 81

4. Cliquez sur l'onglet [Paramètres], et dans Dépannage, cochez la case
[Désactiver l'observation de l'état de l'alimentation]. Cliquez ensuite
sur [OK].
5. Dans la boîte de dialogue Propriétés Système, cliquez sur [OK] pour
fermer la boîte de dialogue.
6. Redémarrez Windows.
Du bruit est audible en lecture ou pendant
l'enregistrement
Selon le paramétrage de la mémoire virtuelle ou ceux destinés à la gestion du
réseau, du bruit peut se produire.
Veuillez effectuer les réglages suivants avant utilisation.
• Dans le "Chooser" du menu Apple, définissez AppleTalk sur
"Inactive."
( Ce paramètre n'est pas modifié en désactivant AppleTalk, comme spécifié
par OMS lorsque le logiciel séquenceur est lancé. Vous devez modifier ce
paramètre vous-même en utilisant le "Chooser." )
• Dans le panneau de contrôle "Memory", définissez la mémoire
virtuelle sur "Off."
• Selon la manière par laquelle vous vous connectez à Internet,
utilisez l'UA-1A avec les paramètres suivants.
•Si vous vous connectez à Internet à l'aide d'un câble LAN
Utilisez l'appareil tant que le câble LAN est connecté.
•Si vous vous connectez à Internet à l'aide du port interne de modem, ou si
vous n'êtes pas connecté(e) à Internet
Dans le panneau de contrôle "TCP/IP", définissez "Connect via" sur "PPP."
Après avoir effectué le paramètrage, redémarrez votre Macintosh.
* Ne pas utiliser de logiciel qui accède au réseau ( tel qu'un navigateur Web ) en même temps
que vous utilisez un logiciel séquenceur ou un logiciel d'édition audio.
Dépannage
Le son enregistré comporte du bruit
• Nous avons détecté que du bruit tend à se produire dans les sons
enregistrés avec les iMac produits après l'été 2000.
• Du bruit se produit dans le son lu immédiatement après un
enregistrement numérique dans l'application SimpleSound incluse
avec Mac OS. Enregistrez d'abord le son, puis lisez-le ensuite.
• Mettez à jour le pilote Audio USB à la version 1.0.5f4.
Si la version du pilote Audio USB, fourni avec Mac OS, est inférieure à 1.0.4,
mettez-le à jour en 1.0.5f4.
Vous pouvez télécharger le pilote sur l'URL suivante :
http://asu.info.apple.com/swupdates.nsf/artnum/n11703
Español Italiano Français Deutsch English
81
Page 82

Dépannage
Vérification de la version du pilote audio USB.
1. Connectez l'UA-1A à l'ordinateur.
2. Dans le menu Apple, sélectionnez [Apple System Profiler].
3. Cliquez sur l'onglet [Devices and Volumes].
4. Dans la section USB, l'écran indique « Audio (UA-1A USB Audio
Device). ». Cliquez sur la flèche à gauche de ce texte.
5. Le numéro affiché à droite de la « Version du pilote » représente la
version du pilote audio USB.
■ Un fichier vide (muet) est créé à l'enregistrement
• Essayez de régler le débit à « 16 bits ».
Si vous utilisez la deuxième édition de Windows 98 et que votre logiciel
d'enregistrement est réglé pour un débit à 8 bits, un fichier vide peut être créé
et vous pouvez ne pas être capable d'enregistrer réellement. Dans ce cas, vous
devez pouvoir enregistrer normalement en réglant le débit à « 16 bits ».
Impossible d'enregistrer un CD audio
• L'UA-1A ne peut enregistrer de CD audio à partir du lecteur de CDROM de l'ordinateur.
82
Le niveau du volume est différent à la reprise
suivant un état de Suspension ou d'Hibernation
• Lorsque Windows 2000 reprend après une Mise en veille ou une
Hibernation, le réglage du volume de sortie est modifié par
Windows.
Démarrez l'application Mélangeur décrite dans Réglages de Contrôle du
volume (p. 66) et réglez le curseur USB Audio (Haut-parleur).
La musique de fond des jeux n'est pas audible
• Le jeu utilise-t-il un CD audio pour sa musique de fond ?
Si un CD audio est utilisé pour la musique de fond du jeu, voir Lorsque vous
utilisez le lecteur de CD-ROM de votre ordinateur pour lire un CD audio
ou pour lire la musique de fond des jeux avec l'UA-1A : (p. 67).
Page 83

Introduzione
Contenuto della confezione
La confezione UA-1A contiene i seguenti elementi. Dopo aver
aperto la scatola, controllare che tutti gli elementi siano
presenti.
Se ne mancano alcuni, contattare il rivenditore presso il quale
è stata acquistata la confezione.
■ Interfaccia audio UA-1A USB
fig. UA1A
■ Manuale d'uso UA-1A
(la presente documentazione)
Nomi e funzioni
fig. UA1Afunc
1
Cavo USB
Collegare questo cavo al connettore USB del computer.
(lunghezza: 600 mm)
2
Indicatore USB
Questo indicatore si accende quando l’unità è collegata al
computer ed è pronta a funzionare.
3
Prese d’ingresso linea
4
Prese d’uscita linea
Español Italiano Français Deutsch English
83
Page 84

Collegamenti e installazione del driver (Windows)
* Per gli utenti Macintosh, fare riferimento a pag. 96.
Per poter utilizzare l’UA-1A, è necessario installare prima il
driver USB Composite Device [Periferica composita USB]
e successivamente nell’ordine il driver USB Human
Interface [Interfaccia utente USB] e il driver USB Audio
Device [Periferica audio USB]. Questi driver sono forniti
con Windows. Se si utilizza Windows 98, questo driver si
trova nel CD-ROM di Microsoft Windows, che sarà quindi
necessario avere pronto (CD-ROM di Microsoft Windows).
Se si utilizza Windows Me o 2000, il CD-ROM non è
necessario.
Definizione di un driver
Un driver è un programma informatico che permette di
eseguire un’applicazione sul computer per trasferire i dati da
e verso l’UA-1A quando l’apparecchio è collegato al
computer tramite un cavo USB. Il driver trasmette i dati
dall’applicazione all’UA-1A3 e viceversa.
fig. P10-1
84
Applicazione
Driver
Computer
USB
Connettore USB
Cavo USB
INTERFACCIA AUDIO USB
(ingresso)
OUTPUT
Sx
INPUT
Dx
Sx
(uscita)
Dx
Page 85

Collegamenti e installazione del driver (Windows)
Prima di installare il driver
Non è possibile utilizzare l’UA-1A con Windows 95
o Windows NT.
Se altri programmi Windows sono in esecuzione,
chiuderli prima di continuare la procedura.
Se si devono collegare contemporaneamente più
apparecchi Roland USB (ad esempio l’UA-1A ed
altri dispositivi USB come l’UA-100G) al computer,
scollegare l’UA-100G o gli altri dispositivi dal
connettore USB prima di installare il driver. Se il
driver viene installato mentre sono collegati gli
apparecchi USB, come l’UA-100G, l’installazione
potrebbe non essere corretta.
Collegamenti e installazione del driver
■ Utenti Windows Me
* Se si lavora in ambiente Windows 2000, fare riferimento a pag. 86,
se Windows 98, fare riferimento a pag. 87.
1
Accendere il computer e avviare Windows; utilizzare
un cavo USB per collegare l’UA-1A al computer.
fig. 02-03.e
2
Non appena Windows
rileva l’UA-1A e compare
la finestra di dialogo Add
New Hardware Wizard
[Installazione guidata
Nuovo hardware],
accertarsi che la casella
“Automatic search for a better driver
(Recommended)” [Ricerca automatica di un driver
migliore di quello in uso (scelta consigliata)] sia
selezionata e fare clic su [Next] [Avanti].
Questa finestra potrebbe
richiedere un certo tempo
prima di essere visualizzata.
85
Español Italiano Français Deutsch English
Page 86

Collegamenti e installazione del driver (Windows)
3
Viene avviata la ricerca del driver.
4
Una volta che il driver corretto è stato trovato,
comincia l’installazione.
fig. 02-04.e
5
Nella finestra indicante che
l’installazione del driver è
giunta al termine, fare clic
su [Finish] [Fine] e
riavviare Windows.
Dopo aver installato il driver,
fare riferimento a Indicazione
del dispositivo audio d’ingresso/uscita (pag. 90) e
selezionare il dispositivo utilizzato da Windows.
* A seconda della configurazione informatica, potrebbe passare un
breve intervallo di tempo tra l’installazione e il riconoscimento del
driver.
■ Utenti Windows 2000
* Se si lavora in ambiente Windows Me, fare riferimento a pag. 85, se
Windows 98, fare riferimento a pag. 87.
86
1
Accendere il computer e avviare Windows.
2
Utilizzare un cavo USB per collegare l’UA-1A al
computer. L’UA-1A è riconosciuto dal computer e il
driver è installato automaticamente.
3
Dopo aver installato il driver, riavviare Windows.
Page 87

■ Utenti Windows 98
* Se si lavora in ambiente Windows Me, fare riferimento a pag. 85, se
Windows 2000, fare riferimento a pag. 86.
L’installazione dei driver deve rispettare la seguente
successione:USB Composite Device [Periferica composita
USB] e USB Audio Device [Periferica audio USB]. Seguire
la procedura sotto indicata per eseguire l’installazione.
fig. 02-05.e
1
Accendere il computer e
avviare Windows. Inserire
il CD-ROM di Microsoft
Windows nell’unità
corrispondente e utilizzare
un cavo USB per collegare
l’UA-1A al computer.
Poiché alcuni computer sono venduti con il
contenuto del CD-ROM di Microsoft Windows
già installato sul disco rigido, il CD in questione
potrebbe non essere stato fornito. In questo caso il
driver potrà essere installato senza il CD-ROM di
Microsoft Windows .
Il dispositivo USB Composite Device [Periferica
composita USB] viene rilevato automaticamente e appare la
finestra di dialogo Add New Hardware Wizard
[Installazione guidata Nuovo hardware]. Fare clic su
[Next].
fig. 02-06.e
2
Al messaggio “What do
you want Windows to
do? ”[Scegliere
l’operazione da
effettuare], selezionare
“Search for the best
driver for your device
[Cerca il miglior driver per la periferica].
(Recommended) [Scelta consigliata].” e fare clic su
[Next][Avanti].
Collegamenti e installazione del driver (Windows)
Se questa finestra non
appare, fare riferimento a
Problemi relativi al
driver USB (pag. 100).
Español Italiano Français Deutsch English
87
Page 88

Collegamenti e installazione del driver (Windows)
fig. 02-07.e
3
Appare la seguente
finestra di dialogo.
Selezionare la casella
CD-ROM drive [Unità
CD-ROM] e fare clic su
[Next][Avanti].
fig. 02-08.e
4
Appare la seguente
finestra di dialogo. Fare
clic su [Next].
* A seconda del sistema utilizzato, la finestra Location of driver
[Percorso del driver] potrebbe essere diversa da quella di seguito
illustrata, ma non è un problema.
Al passo 4, la finestra
visualizza il messaggio
“Windows driver file
search for the device
[Ricerca del file del
driver per la periferica]:
USB Audio Device
[Periferica audio USB].”
88
5
A questo punto comincerà la copia dei file.
Se il CD-ROM di Microsoft Windows non è
presente nell’unità CD-ROM, potrebbe apparire la
seguente finestra di dialogo. In questo caso, inserire
il CD-ROM di Microsoft Windows nell’unità
CD-ROM e fare clic su [OK].
fig. 02-09.e
Page 89

fig. 02-10.e
6
Alla fine dell’installazione
del driver USB
Composite Device
[Periferica composita
USB] , appare la seguente
finestra di dialogo. Fare
clic su [Finish].
fig. 02-13.e
7
Nella tappa successiva, il
dispositivo USB Audio
Device [Periferica audio
USB] viene rilevato
automaticamente e appare
la finestra di dialogo Add
New Hardware Wizard
[Installazione guidata Nuovo hardware]. Fare clic su
[Next][Avanti] e continuare l’installazione seguendo
la stessa procedura indicata ai passi 2 - 5 (p.87 – 88).
fig. 02-14.e
8
Alla fine dell’installazione
del driver USB Audio
Device [Periferica audio
USB], appare la seguente
finestra di dialogo. Fare
clic su [Finish].
L’installazione dei driver USB
Composite Device [Periferica composita USB] e USB
Audio Device [Periferica audio USB] è giunta al termine.
Riavviare Windows.
Dopo aver installato il driver, fare riferimento a Indicazione
del dispositivo audio d’ingresso/uscita (pag. 90) e
selezionare il dispositivo utilizzato da Windows.
Collegamenti e installazione del driver (Windows)
89
Español Italiano Français Deutsch English
Page 90

Collegamenti e installazione del driver (Windows)
■ Indicazione del dispositivo audio
d’ingresso/uscita
1
In Windows, fare clic sul pulsante [Start] e in
[Impostazioni] scegliere [Pannello di controllo].
2
Win 98 / Win 98SE:
NelPannello di controllo, fare doppio clic sull’icona
[Multimedia] per aprire la finestra Proprietà multimediali .
Win 2000 / Me:
NelPannello di controllo, fare doppio clic sull’icona [Suoni
e multimedia] per aprire la finestra Proprietà suoni e
multimedia .
* Se l’icona [Suoni e multimedia] non risulta visualizzata nel
Pannello di controllo, fare clic su [visualizza tutte le opzioni
del Pannello di controllo].
3
Fare clic sulla scheda [Audio].
90
4
Nella sezione Riproduzione, Periferica
preferenziale , fare clic su . Nell’elenco di
riepilogo, fare clic su [USB Audio Device [Periferica
audio USB]] per selezionarla.
Page 91

5
Nella sezione Registrazione, Periferica
preferenziale, fare clic su . Nell’elenco di
riepilogo, fare clic su [USB Audio Device [Periferica
audio USB]] per selezionarla.
Windows 98 / Windows 98SE Windows 2000 /Windows Me
fig. 02-15.e
6
Fare clic su [OK] per completare le impostazioni.
Collegamenti e installazione del driver (Windows)
A seconda del sistema
utilizzato, “USB Audio
Device [Periferica audio
USB]” è seguito da un
numero, ad esempio
“USB Audio Device
[Periferica audio USB]
(1).”
Il pulsante “Proprietà
avanzate” non sarà
accessibile per
“Registrazione.”
91
Español Italiano Français Deutsch English
Page 92

Collegamenti e installazione del driver (Windows)
Impostazioni Controllo volume
Il volume dell’UA-1A può essere regolato tramite il Controllo
volume di Windows.
1
Fare clic sul pulsante [Start] in Windows e selezionare
[Programmi] - [Accessori] - [Svago] - [Controllo
volume] per avviarlo.
Windows Me Windows 2000/
Windows 98/Windows 98SE
fig. 02-17.e
Se il Controllo volume non è
installato sul computer,
utilizzare Installazione
applicazioni nel Pannello di
controllo per installarlo. Per
ulteriori informazioni
sull’installazione, fare
riferimento al manuale utente
di Windows o alla Guida in
linea.
La qualità audio
dell’UA-1A risulterà
migliorata aumentando i
livelli di controllo del
volume.
92
2
Spostare lo slider verso l’alto o verso il basso per
regolare il volume dell’UA-1A. E' possibile regolare i
seguenti elementi.
WAVE Regola il volume emesso dal dispositivo di
uscita audio “USB Audio Device [Periferica
audio USB].”
SW Synth Regola il volume del sintetizzatore software
incorporato in Windows.
Lettore CD Regola il volume “CD musica” dell’unità
CD-ROM del computer. (*1)
*1 Se la riproduzione del CD non cambia dopo aver regolato
questo volume, cambiare il volume WAVE.
Se è selezionata la casella
Disattiva o lo slider è
completamente in basso,
l’UA-1A non emetterà alcun
suono.
Page 93

Collegamenti e installazione del driver (Windows)
Se si utilizza l’unità CD-ROM del computer per
riprodurre un CD audio o se si riproduce
musica di sottofondo per i giochi con l’UA-1A.
Se si utilizza Windows Me:
Selezionare [Start] - [mpostazioni] - [Pannello di controllo].
Nel[Pannello di controllo], fare doppio clic sull’icona
[Sistema] per aprire la finestra Proprietà sistema. Fare clic
sulla scheda [Gestione periferiche] e fare doppio clic
sull’icona [CDROM]. Nel livello inferiore, fare doppio clic
sull’unità CD-ROM utilizzata e aprirne le Proprietà. Fare clic
sulla scheda [Proprietà] e selezionare la casella accanto alla
voce Riproduzione CD digitale “Abilita riproduzione
digitale su questo dispositivo CD-ROM.”
Se si utilizza Windows 2000
Come per Windows Me, aprire la finestra di dialogo
Proprietà sistema. Fare clic sulla scheda [Hardware] e
quindi sul pulsante [Gestione periferiche] per aprire
“Gestione periferiche”. Tra le unità CD-ROM, fare doppio clic
sull’unità CD-ROM utilizzata per aprirne le Proprietà. Fare
clic sulla scheda [Proprietà] e selezionare la casella accanto
alla voce Riproduzione CD digitale “Abilita riproduzione
digitale su questo dispositivo CD-ROM.”
Se si utilizza Windows 98 o Windows 98 SE:
Selezionare [Start] - [Impostazioni] - [Pannello di controllo]
- [Multimedia], e fare clic sulla scheda [CD musica] e
selezionare “Abilita riproduzione audio su questo
dispositivo CD-ROM.”
A seconda della configurazione informatica, si potrebbero
avere ancora dei problemi per la riproduzione di questi CD.
Per maggiori informazioni, fare riferimento alle informazioni
fornite dal costruttore del computer. Se si utilizza un’unità
CD-ROM di tipo scheda PC (PCMCIA), la riproduzione di
dati WAVE o di un CD audio su questo tipo di unità potrebbe
essere interrotta o inesistente.
Español Italiano Français Deutsch English
93
Page 94

Collegamenti e installazione del driver (Windows)
La procedura di seguito
illustrata è valida per un
sistema Windows generico.
A seconda della
configurazione
informatica, alcune cartelle
potrebbero avere nomi
diversi da quelli qui
menzionati.
Cancellazione del driver USB Audio Device [Periferica audio USB]
■ Reinstallazione del driver USB Audio
Device [Periferica audio USB]
■ Se l’installazione del driver USB Audio
Device [Periferica audio USB] è stata
interrotta prima della fine
Seguire la procedura di seguito indicata per cancellare il
driver che è già stato installato.
1
Utilizzare un cavo USB per collegare l’UA-1A al
computer.
2
In Windows, fare clic sul pulsante [Start] e in
[Impostazioni] scegliere [Pannello di controllo].
3
Nel
[Pannello di controllo]
[Sistema] per aprire la finestra Proprietà sistema.
, fare doppio clic sull’icona
4
Fare clic sulla scheda [Gestione periferiche].
5
Fare doppio clic su [Controller audio, video e
giochi] per visualizzare un elenco di periferiche.
6
Nell’elenco selezionare USB Audio Device
[Periferica audio USB] e fare clic su [Rimuovi]. Nella
finestra Conferma rimozione periferica, fare clic su
[OK]. Se la finestra USB Audio Device [Periferica
94
audio USB] non è visualizzata, passare al passo 8.
Page 95

7
Accertarsi che USB Audio Device [Periferica audio
USB] non figuri nell’elenco Controller audio, video e
giochi e fare clic su [Chiudi] per chiudere la finestra
di dialogo Proprietà sistema.
8
Seguire la procedura indicata al passo 1. – 4. e fare
doppio clic su [Controller USB (Universal Serial
Bus)] per visualizzare un elenco delle periferiche.
Se è visualizzato per l’icona di periferica USB
compatibile:
Selezionare l’icona [USB Composite Device
[Periferica composita USB]] e fare clic su [Rimuovi].
Nella finestra Conferma rimozione periferica, fare
clic su [OK]. Come al passo 7., chiudere Proprietà
sistema.
Se l’icona di periferica USB compatibile o non
sono visualizzati:
Chiudere Proprietà sistema.
Collegamenti e installazione del driver (Windows)
Se appare un
messaggio richiedente
l’avvio di Windows,
conformarsi a tale
richiesta e riavviare il
computer.
Se si utilizza Windows Me e è visualizzato:
Chiudere Proprietà sistema.
9
Scollegare il cavo USB dal computer e riavviare
Windows.
Español Italiano Français Deutsch English
95
Page 96

Collegamenti e installazione del driver (Macintosh)
Definizione di un driver
-> pag. 84
* Per gli utenti Windows, fare riferimento a pag. 9.
Per poter utilizzare l’UA-1A, è necessario installare prima il
driver. L'UA-1A utilizza un driver fornito con Mac OS.
Problemi noti: UA-1A
• Alcune applicazioni come Cakewalk’s Metro Series e
TC Work’s Spark Series non possono registrare/
riprodurre a 48 kHz. Utilizzare l’UA-1A a 44.1 kHz.
• Se l’applicazione audio sta eseguendo una
registrazione o riproduzione, non collegare/
scollegare il cavo USB. L’applicazione potrebbe
bloccarsi.
• L’audio potrebbe essere irregolare e/o disturbato se
la registrazione e la riproduzione avvengono
contemporaneamente con un conseguente
sovraccarico per la CPU. Tuttavia il disturbo non
dovrebbe apparire nella registrazione ma nel segnale
di riproduzione.
• Se si utilizza Virtual Sound Canvas 3, sarà necessario
selezionare [Performance] nel menu [Setting] e
impostare Expression Mode su Response Priority.
• Il driver fornito in standard con Mac OS non è ASIO
compatibile.
• Se il computer viene avviato con l’UA-1A collegato,
il computer potrebbe diventare instabile. In questo
caso avviare il computer prima di collegare l’UA-1A
e collegare l’UA-1A dopo l’avvio.
96
Page 97

Collegamenti e installazione del driver (Macintosh)
Accertarsi di aver chiuso
tutte le applicazioni in
corso di esecuzione prima
di effettuare i collegamenti.
Collegamenti e installazione del driver
■ Riconoscimento dell’apparecchio
1
Accendere il computer e avviare MacOS.
2
Nel menu Apple selezionare
[Apple System Profiler].
fig. 03-02.e
Per evitare di danneggiare
gli altoparlanti, ridurre al
minimo il volume
dell’apparecchio e degli
altri dispositivi audio
eventualmente collegati.
3
Fare clic sulla
scheda [Devices and
Volumes] .
4
Utilizzare un cavo USB per collegare l’UA-1A al
computer.
5
Per essere sicuri che l’apparecchio venga riconosciuto,
selezionare [Update all information] nel menu
[Commands]. Nella sezione USB dovrebbero
comparire i seguenti tre dispositivi audio, come sotto
illustrato:
fig. 03-04.e
Se l’indicazione è corretta, l’installazione dell’UA-1A è
andata a termine con successo. Selezionare [Quit] nel menu
[File] per chiudere la finestra di dialogo Apple System
Profiler, quindi configurare i parametri audio come sotto
indicato.
Se l’indicazione non è corretta, provare a scollegare l’UA-1A
dalla porta USB e aspettare circa dieci secondi. Riprendere
Español Italiano Français Deutsch English
97
Page 98

Collegamenti e installazione del driver (Macintosh)
quindi la procedura a partire dal passo 4.
■ Impostazione dei parametri audio
fig. 03-05.e
6
Nel menu Apple,
selezionare [Control
Panels] - [Sound] per
aprire la finestra audio.
7
Fare clic sulla linguetta [Speakers].
fig. 03-06.e
8
Abbassare al minimo il
volume dell’UA-1A e degli
apparecchi audio e fare clic
su [Start Test].
98
fig. 03-07.e
9
Verranno emessi alcuni
segnali acustici di prova da
sinistra a destra secondo
quanto visualizzato;
regolare il volume con lo
slider[Main Volume].
Alla fine, fare clic su
[Stop Test].
A seconda della versione del sistema operativo, lo slider
[Main Volume] potrebbe mancare. In questo caso, utilizzare
lo slider [Volume] nella linguetta [Output] per regolare il
Se l’interruttore di
selezione ingresso
registrazione è impostato
su DIGITAL, non è
possibile riprodurre i
dati audio a partire dal
computer. Impostare
l’interruttore su
INPUT + GUITAR/MIC.
Page 99

fig. 03-08.e
Collegamenti e installazione del driver (Macintosh)
volume.
10
Selezionare la linguetta
[Input] nella finestra
Sound. In Choose a
source for sound input:,
scegliere USB Audio.
Non selezionare [Play sound through output
device].
11
Alla fine delle impostazioni, selezionare [Quit] nel
menu [File] per chiudere la finestra Sound.
Se l'USB Audio non è
visualizzato, chiudere la
finestra Sound. Scollegare
poi l’UA-1A e attendere
circa dieci secondi.
Riprendere quindi la
procedura a partire dal
passo 2.
99
Español Italiano Français Deutsch English
Page 100

Ricerca e soluzione dei problemi
Se nell’usare l’UA-1A si dovessero incontrare dei problemi, leggere questo
capitolo. Contiene numerosi suggerimenti che possono contribuire a risolvere
il problema.
I problemi esaminati in questa sezione sono organizzati in base al sistema
operativo sul quale si possono verificare. L’icona a sinistra del titolo indica il
sistema operativo interessato.
Problemi comuni a Windows e
Macintosh
Problemi che si verificano solo in Windows
Problemi che si verificano solo in Macintosh
Se si utilizza il computer per la prima volta o non si capisce una procedura,
fare riferimento ai manuali utenti del computer o del sistema operativo.
Se l’UA-1A non funziona come previsto, controllare i seguenti punti.
Problemi relativi al driver USB
“Add New Hardware Wizard” [Installazione
guidata Nuovo hardware] non si avvia
automaticamente
100
“Add New Hardware Wizard” [Installazione
guidata Nuovo hardware] si interrompe prima
di arrivare alla fine
• Quando il cavo USB è collegato o scollegato, ci vogliono circa 15
secondi (o più) perché il computer riconosca l’UA-1A.
• Il cavo USB è collegato correttamente?
Accertarsi che l’UA-1A e il computer siano collegati correttamente tramite il
cavo USB.
• Il computer utilizzato permette l’uso di un cavo USB?
Fare riferimento al manuale utente del computer per verificare la possibilità
d’uso di un cavo USB.
 Loading...