

Page 1
Page 2

Page 3
Before using this product, carefully read the sections
entitled: “Using the Unit Safely” and “Important Notes”
(p. 4–p. 7 ). These sections provide important information
concerning the proper operation of the product.
Additionally, in order to feel assured that you have gained
a good grasp of every feature provided by your new
product, Owner’s manual should be read in its entirety.
The manual should be saved and kept on hand as a
convenient reference.
In the interest of product improvement, the specifications
and/or contents of this package are subject to change
without prior notice.
Copyright © 2008 ROLAND CORPORATION
All rights reserved. No part of this publication may be
reproduced in any form without the written permission of
ROLAND CORPORATION.
3
Page 4
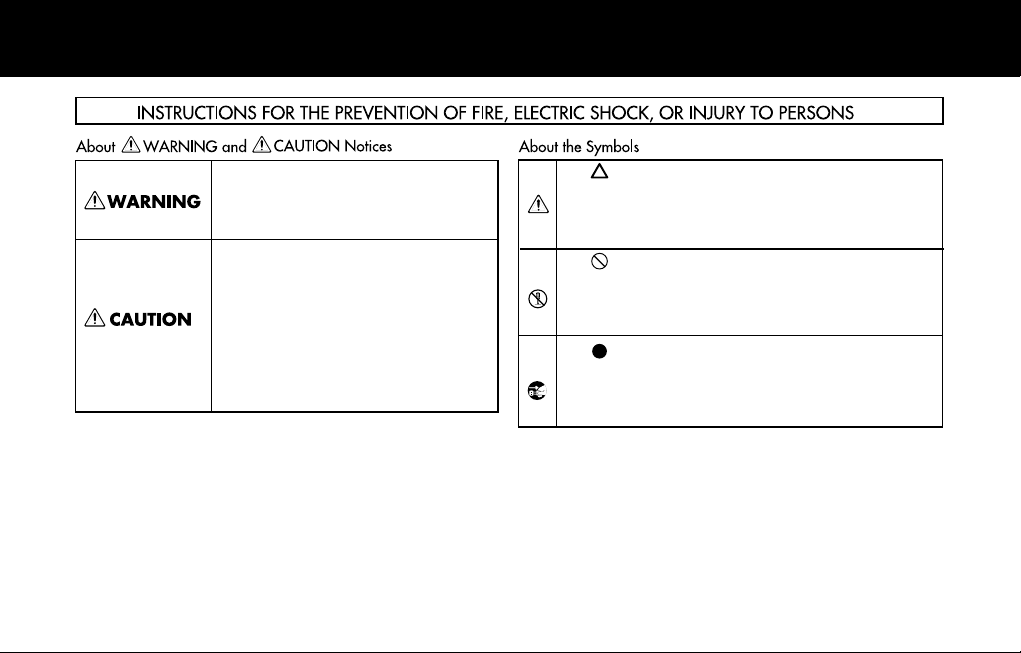
Using the Unit Safely
Used for instructions intended to alert the
user to the risk of death or severe injury
should the unit be used improperly.
Used for instructions intended to alert the
user to the risk of injury or material
damage should the unit be used
improperly.
* Material damage refers to damage or
other adverse effects caused with
respect to the home and all its
furnishings, as well to domestic animals
or pets.
4
The symbol alerts the user to important instructions or
warnings.The specific meaning of the symbol is
determined by the design contained within the triangle. In
the case of the symbol at left, it is used for general
cautions, warnings, or alerts to danger.
The symbol alerts the user to items that must never be
carried out (are forbidden). The specific thing that must
not be done is indicated by the design contained within
the circle. In the case of the symbol at left, it means that
the unit must never be disassembled.
The symbol alerts the user to things that must be
carried out. The specific thing that must be done is
indicated by the design contained within the circle. In the
case of the symbol at left, it means that the power-cord
plug must be unplugged from the outlet.
Page 5
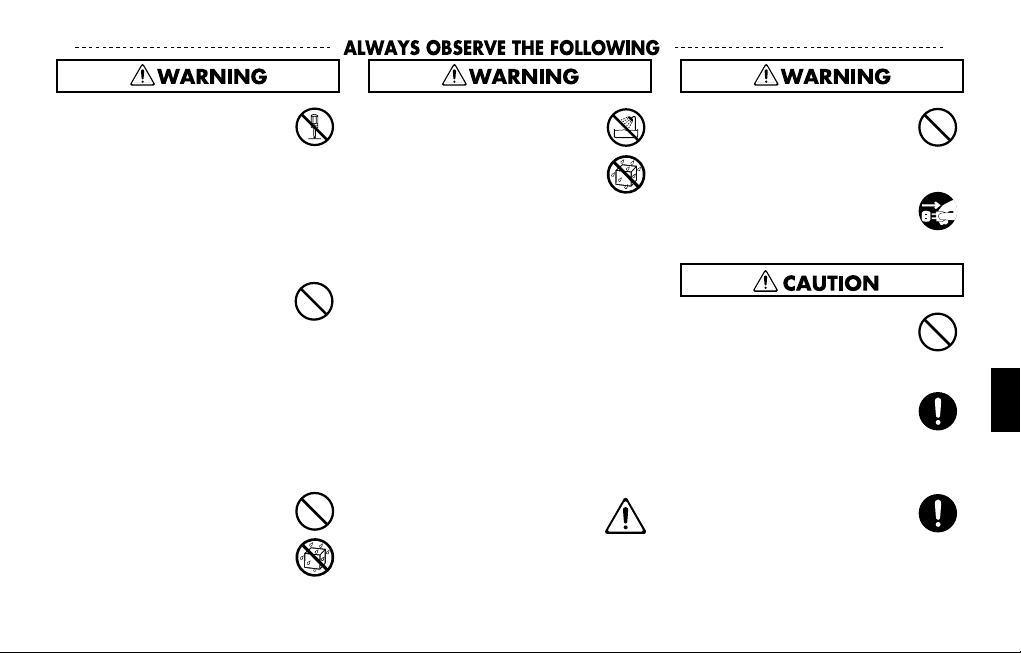
• Do not open or perform any
internal modifications on the
product. (The only exception
would be where this manual
provides specific instructions
which should be followed in
order to put in place userinstallable options; see p. 13.)
...............................................................................................
• Do not attempt to repair the
product, or replace parts within
it (except when this manual
provides specific instructions
directing you to do so). Refer all
servicing to your retailer, the
nearest Roland Service Center,
or an authorized Roland
distributor, as listed on the
“Information” page.
...............................................................................................
• Do not allow any objects (e.g.,
flammable material, coins,
pins); or liquids of any kind
(water, soft drinks, etc.) to
penetrate the TD-20.
...............................................................................................
• Never install the product in any
of the following locations.
• Subject to temperature
extremes (e.g., direct
sunlight in an enclosed
vehicle, near a heating duct,
on top of heat-generating
equipment); or are
• Damp (e.g., baths,
washrooms, on wet floors);
or are
• Exposed to steam or smoke;
or are
• Subject to salt exposure; or
are
• Humid; or are
• Exposed to rain; or are
• Dusty or sandy; or are
• Subject to high levels of
vibration and shakiness.
...............................................................................................
• In households with small
children, an adult should
provide supervision until the
child is capable of following all
the rules essential for the safe
operation of the product.
...............................................................................................
• Protect the product from
strong impact.
(Do not drop it!)
...............................................................................................
• Before installing the TDW-20,
you must first always turn off
the TD-20 and unplug its power
cord.
• Never step on, nor place heavy
objects on the product.
...............................................................................................
• Install the circuit board only
into the specified product (TD-
20). Remove only the specified
screws during the installation.
...............................................................................................
• Keep any screws you may
remove and the included
installation tool in a safe place
out of children’s reach, so there
is no chance of them being
swallowed accidentally.
...............................................................................................
5
Page 6

Important Notes
Placement
• Do not expose the product to direct sunlight, place it near
devices that radiate heat, leave it inside an enclosed vehicle, or
otherwise subject it to temperature extremes. Excessive heat
can deform or discolor the product.
• When moved from one location to another where the
temperature and/or humidity is very different, water droplets
(condensation) may form. Damage or malfunction may result if
you attempt to use the product in this condition. Therefore,
before using the product, you must allow it to stand for several
hours, until the condensation has completely evaporated.
Repairs and Data
• Please be aware that all data contained in the product’s
memory may be lost when the product is sent for repairs.
Important data should always be backed up on a memory card,
or written down on paper (when possible). During repairs, due
care is taken to avoid the loss of data. However, in certain cases
(such as when circuitry related to memory itself is out of order),
we regret that it may not be possible to restore the data, and
Roland assumes no liability concerning such loss of data.
6
Additional Precautions
• Unfortunately, it may be impossible to restore the contents of
data that was stored on a CompacfFlash card once it has been
lost. Roland Corporation assumes no liability concerning such
loss of data.
• When you need to transport the product, package it in the box
(including padding) that it came in, if possible. Otherwise, you
will need to use equivalent packaging materials.
Page 7

Before Using Cards
Copyright
Using CompactFlash Cards
• CompactFlash cards are constructed using precision
components; handle the cards carefully, paying particular note
to the following.
• To prevent damage to the cards from static electricity, be
sure to discharge any static electricity from your own body
before handling the cards.
• Do not touch or allow metal to come into contact with the
contact portion of the cards.
• Do not bend, drop, or subject cards to strong shock or
vibration.
• Do not keep cards in direct sunlight, in closed vehicles, or
other such locations (storage temperature: -25 to 85˚ C).
• Do not allow cards to become wet.
• Do not disassemble or modify the cards.
* CompactFlash and are trademarks of SanDisk
Corporation and licensed by CompactFlash association.
* Roland Corporation is an authorized licensee of the
CompactFlash™ and CF logo ( ) trademarks.
• When you purchase the TDW-20 expansion board for TD-20
from an authorized Roland dealer, the included sounds are
licensed, not sold, to you by Roland Corporation, for
commercial use in music production, public performance,
broadcast, etc.
You may use any of the included sounds in a commercial or
noncommercial recording without paying any additional
license fees. However, you must strictly adhere to the following
crediting guidelines on any music recording that utilize material
from TDW-20.
Reproduction or duplication of any of the sound contained in
the TDW-20, either as they exist on this sound module or by any
means of reformatting, mixing, filtering, re-synthesizing,
processing or otherwise editing for use in another product or for
re-sale, is strictly prohibited without the express written
consent of Roland. All unauthorized giving, trading, lending,
renting, re-issue, re-distribution or re-sale of the sounds
included in the TDW-20 are expressly prohibited.
In Plain English: Be creative and respectful in your application of
the TDW-20 sounds. These sounds are for your use only. DO NOT
COPY THEM.
7
Page 8

Contents
Using the Unit Safely............................................ 4
Important Notes ................................................... 6
Installing the TDW-20 in the TD-20................... 10
IMPORTANT! Please Read
before Beginning the Installation Process .................................10
IMPORTANT! Backing Up Your Data .............................................12
How To Install the TDW-20 Expansion Board............................13
Updating the TD-20 with the CompactFlash Card..................15
Installation du TDW-20 dans le TD-20 .............. 16
IMPORTANT! Lire ce qui suit
avant d’entreprendre la procédure d’installation ...................16
IMPORTANT! Sauvegarde des données.......................................18
Installation de la carte d’expansion TDW-20.............................19
Mise à jour du TD-20 à l’aide de la carte CompactFlash........21
Features............................................................... 22
About the Drum Kits...........................................................................24
8
New Functions .................................................... 26
Drum Instruments Parameters [INST]..........................................26
Instrument Selection.................................................................26
About V-EDIT Parameters ........................................................26
Mixer Settings....................................................................................... 29
Minimum Volume of Each Trigger Input............................ 29
Pad Compressor...................................................................................30
Parameter Improvements........................................................30
Ambience...............................................................................................30
New Room Types (15) ...............................................................30
New Wall Types (3).....................................................................31
Mic Positions (9) ..........................................................................31
New Output Gain Parameter..................................................32
Ambience Monitor (“solo” mode)......................................... 32
Multi-Effects ..........................................................................................32
New Output Gain Parameter..................................................32
Multi-Effects Monitor (“solo” mode) ....................................32
Master Compressor.............................................................................33
Gain Reduction (GR) Meter...................................................... 33
Drum Kit Parameters [KIT]................................................................33
Pad Pattern ON/OFF Switch.................................................... 33
Trigger Settings....................................................................................34
Advanced Trigger Parameter Function ..............................34
Checking the Trigger Information........................................34
Page 9

Copy Functions ....................................................................................35
Trigger Bank Copy ......................................................................36
Copying an Instrument Set .....................................................36
Copying an Instrument.............................................................37
Quick Jump Functions to the Copy Screen .......................37
Settings for the Entire TD-20...........................................................38
Master Output.............................................................................. 38
Output Assign (OTHER).............................................................38
Using Foot Switches and Pad Switches ..............................39
MIX IN new Function .................................................................39
Importing Original TD-20 Data into the Expanded TD-20
Other Functions ...................................................................................41
The Kit Selection Function.......................................................41
Choosing a Drum Kit from a CompactFlash......................41
......40
Appendices ......................................................... 42
Drum Instrument List.........................................................................42
Preset Drum Kit List ............................................................................46
Information......................................................... 53
9
Page 10

Installing the TDW-20 in the TD-20
IMPORTANT! Please Read before Beginning the Installation Process
Installation Procedure
1.
Check the package contents to be sure you have the expansion
board, screwdriver (for removing the cover on the back of the
TD-20), locking key (for securing the expansion board into
place) and CompactFlash card. Please leave the expansion
board in its package until it is time to install it.
2.
Back up your data (carefully read p. 12).
3.
Install the TDW-20 expansion board (p. 13).
4.
Update the TD-20 (p. 15).
Enclosed CompactFlash Card
• Do NOT use with a computer BEFORE executing the update
process.
10
Back up Your Original TD-20 Data!
• Save your current data to your CompactFlash card before you
install the TDW-20.
When executing an update, all data and settings in the TD-20
are lost. That’s why it is important to back up your data and
settings on a ConpactFlash card before updating. If you are
using the CompactFlash card included with your TDW-20,
insert the card ONLY AFTER turning the power on. Otherwise
the “updater” on the card will automatically open.
Page 11

Data Compatibility
• Data created on the original TD-20 and backups stored on a
CompactFlash card can be used with an expanded TD-20 (p.
40).
• The original TD-20’s factory preset drum kits can be used with
an expanded TD-20.
• Data created with an expanded TD-20 is not compatible with
original TD-20.
• The TD-20 will not function if you remove the TDW-20 after
performing the update.
Caution when Handling the TDW-20
• Components of the TDW-20 can be damaged by static
electricity. Please observe the following precautions when
handling it.
• Before touching the TDW-20, you must touch some other
metal object to safely discharge any static electricity that
might be in your body or clothing.
• When holding the TDW-20, grasp the edges of the circuit
board and DO NOT touch the components on the circuit
board or the connectors.
• If you need to store or ship the TDW-20, place it in the
original bag (conductive bag for electrostatic protection).
• DO NOT touch the circuitry or connectors inside the TD-20.
• When inserting the TDW-20, do not force it into the slot. If
insertion is difficult, take the TDW-20 out and then try again.
Use the provided tool to lock it in place.
• When you’ve finished installing the TDW-20, double-check
your work.
• If a foreign object should get inside the TD-20, request
servicing by your retailer, the nearest Roland Service Center, or
an authorized Roland distributor, as listed on the “Information”
page.
11
Page 12
IMPORTANT! Backing Up Your Data
If you are using the CompactFlash card included with your
TDW-20, insert the card ONLY AFTER turning the power on.
Otherwise the “updater” on the card will automatically open.
1. Insert a CompactFlash card into the TD-20’s front
panel memory card slot.
* Carefully insert the CompactFlash card all the way in—until
it is firmly in place.
2. Press [CARD].
The [CARD] and CompactFlash indicators light up. The “CARD
MENU” screen appears.
* If you insert a card that has never been used with the TD-20,
the screen will indicate “Unformatted!” Press [CARD] and [F4
(FORMAT)] to format.
3. Then press [F1 (SAVE)].
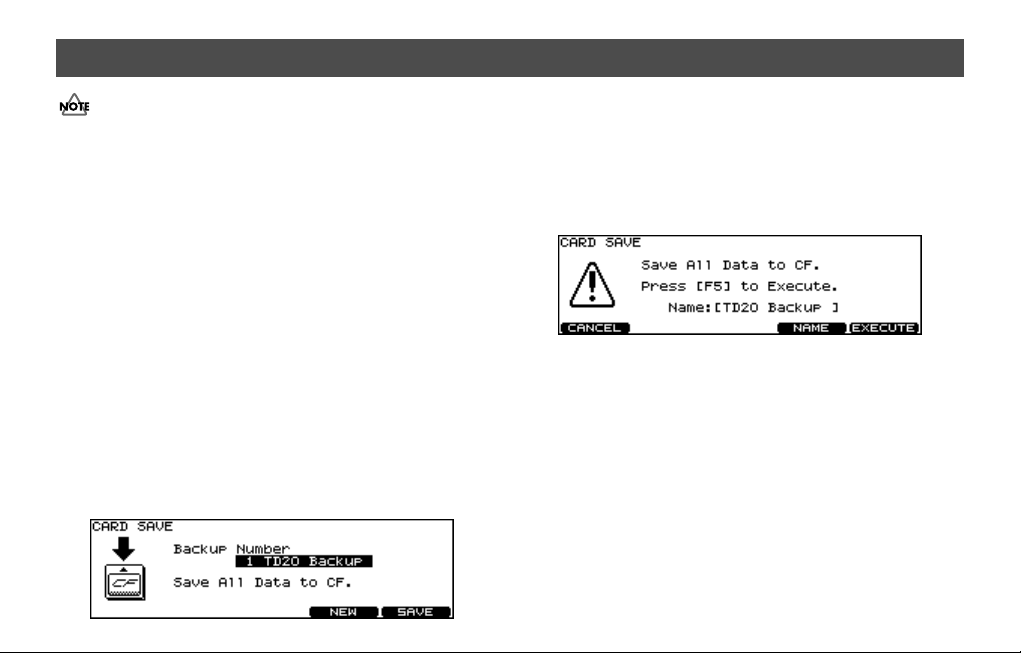
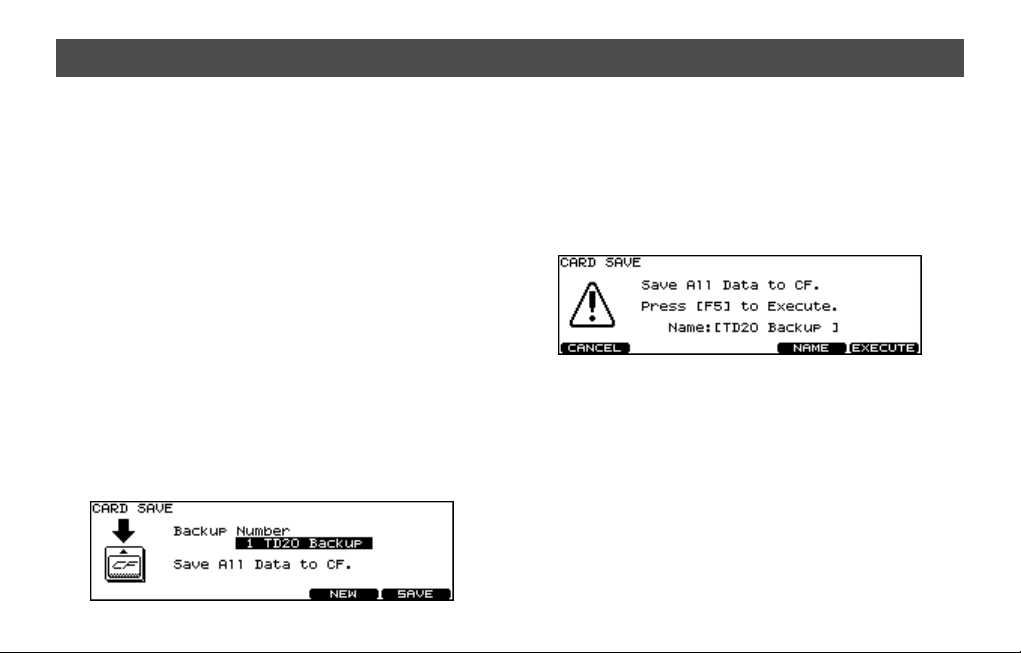
4. In the “CARD SAVE” screen, use [+/-] or [VALUE] to
select the backup destination for the data you are
saving.
12
5. Press [F5 (SAVE)].
If you want to rename the backup, press [F4 (NAME)].
6. The confirmation screen appears, press [F5
(EXECUTE)] to save the data.
If you decide not to proceed with the backup, press [F1
(CANCEL)].
7. Press [F5 (EXECUTE)] to save the data.
If You Have BULK DUMP Data Stored on Your
Computer
If you have individual kit data or your entire kit’s data stored on a
computer, in order for it to be compatible with the expanded
version, you must load it into the TD-20, and save the data to a
CompactFlash card BEFORE updating with the TDW-20.
Page 13

How To Install the TDW-20 Expansion Board
1. Power-off the TD-20, and unplug the power cord
from the AC outlet.
2. Turn the TD-20 over on its back.
* When turning the TD-20 on its back, take care not to damage
the buttons and knobs. To protect them, spread a cushion or
towel over your work surface.
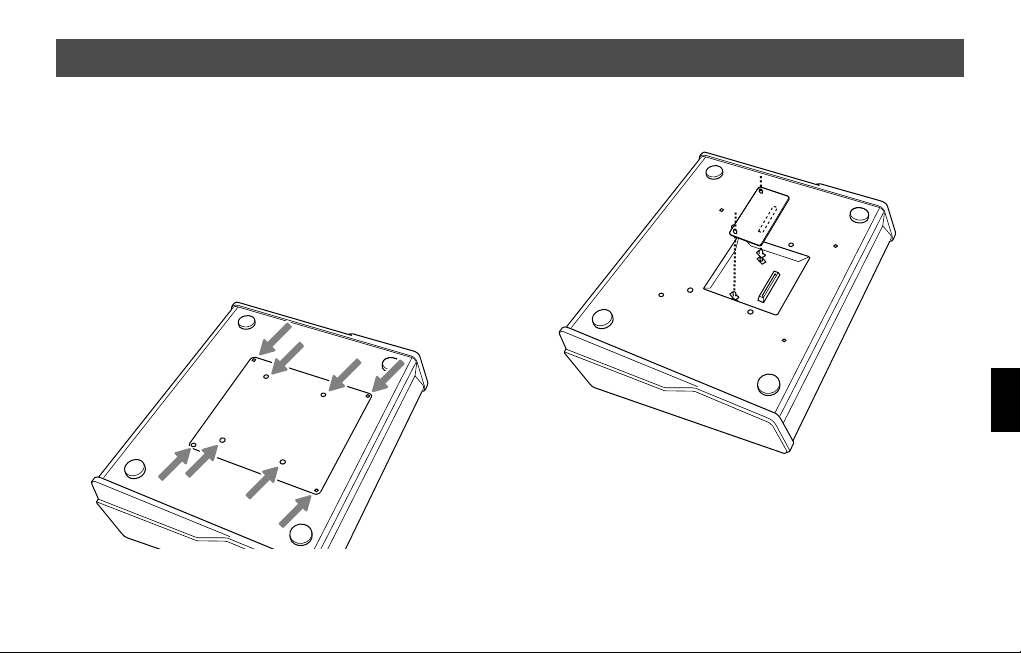
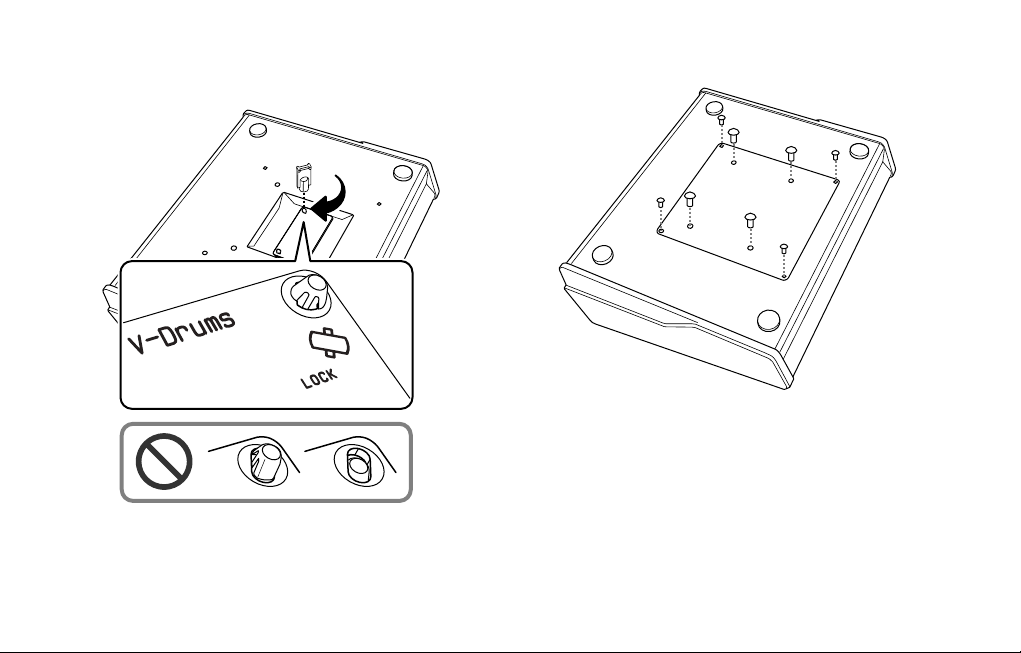
3. Remove the eight screws (marked by arrows) on the
bottom panel. Take off the cover.
* Do not remove any screws other than those marked by ar-
rows.
4. Orient the circuit board holder as shown in the
illustration.
5. Insert the connector of the expansion board all the
way into the connector of the TD-20. Make sure that
the tip of each circuit board holder protrudes
through the holes in the TDW-20.
13
Page 14
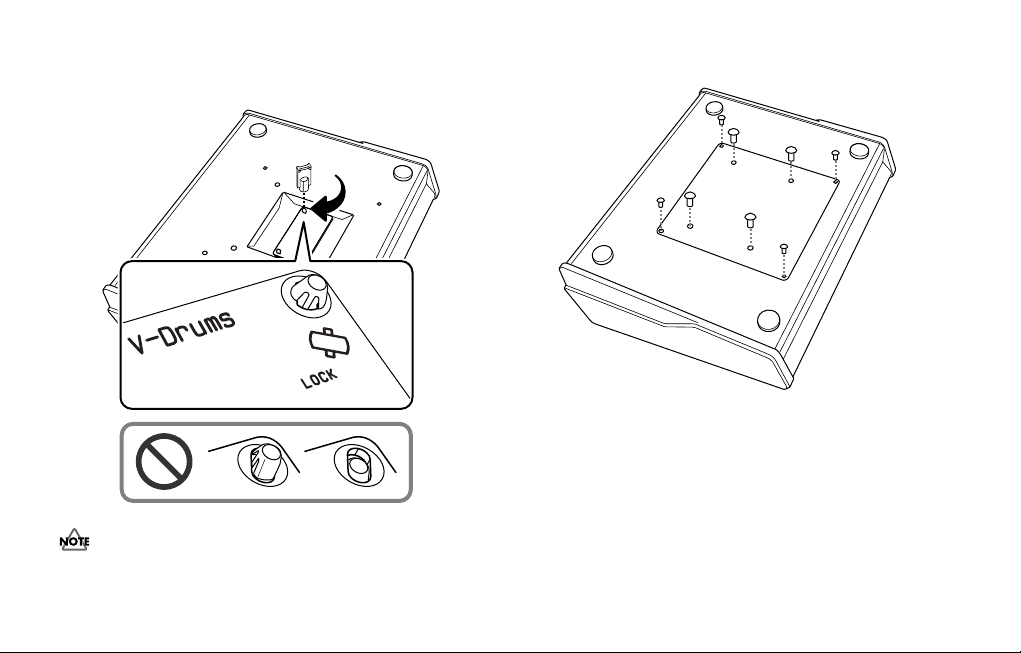
6. Using the tool included with the TDW-20, turn the
circuit board holders in the LOCK direction to fasten
the TDW-20 in place.
When you’ve finished installing the TDW-20, double-check to
make sure that it is installed correctly and that the circuit board
holders are in the LOCK position.
14
7. Reattach the cover using the eight screws you
removed in step 3.
Page 15

Updating the TD-20 with the CompactFlash Card
1. With the power off, insert the CompactFlash Card
provided in this package.
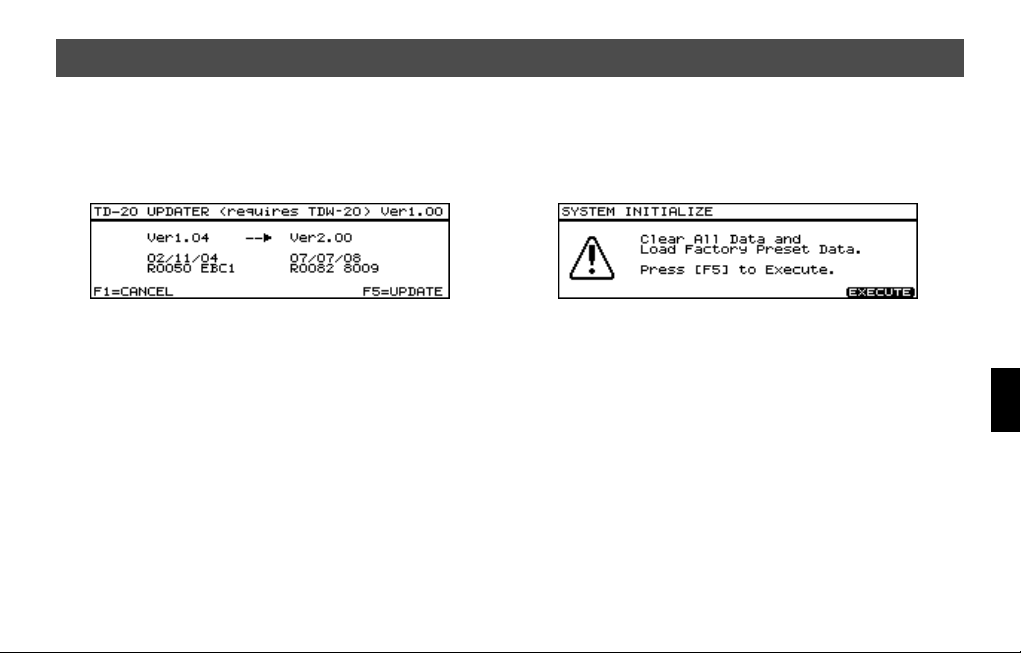
2. Turn the power on and the following screen
appears.
3. To execute the update, press the [F5=UPDATE]
button.
* It may take 3 minutes before update is finished.
* Do not turn the power off during the update process.
4. When the screen shows “Update Completed.”, turn
off the TD-20 and remove the CompactFlash card.
5. Turn the power back on and execute the system
initialize.
6. To initialize, press the [F5 (EXECUTE)] button.
15
Page 16

Installation du TDW-20 dans le TD-20
IMPORTANT! Lire ce qui suit avant d’entreprendre la procédure d’installation
Procédure d’installation
1.
Vérifier le contenu de l’emballage pour s’assurer d’avoir la carte
d’expansion, un tournevis (pour retirer la plaque à l’arrière du
TD-20), l’outil de verrouillage (pour fixer la carte d’expansion) et
la carte CompactFlash. Laisser la carte d’expansion dans son
emballage jusqu’au moment de l’installer.
2.
Faire une copie de sauvegarde des données (lire attentivement
la p. 18).
3.
Installer la carte d’expansion TDW-20 (p. 19).
4.
Mettre à jour le TD-20 (p. 21).
Carte CompactFlash jointe
• NE PAS utiliser avec un ordinateur AVANT d’avoir exécuté la
procédure de mise à jour.
16
Faire une copie de sauvegarde des données
originales du TD-20!
• Enregistrer les données sur la carte CompactFlash avant
d’installer le TDW-20.
Lors de l’exécution d’une mise à jour, toutes les données et
tous les paramètres enregistrés sur le TD-20 sont supprimés.
C’est pourquoi il est important de faire une copie de
sauvegarde des données et des paramètres sur une carte
CompactFlash avant de procéder à la mise à jour. Si la carte
CompactFlash jointe au TDW-20 est utilisée, elle doit être
insérée UNIQUEMENT APRÈS que l’appareil a été mis sous
tension. Sinon, le dispositif de mise à jour de la carte s’ouvrira
automatiquement.
Page 17

Compatibilité des données
• Les données créées sur le TD-20 original et les copies de
sauvegarde enregistrées sur une carte CompactFlash peuvent
être utilisées avec un TD-20 équipé d’une carte d’expansion.
• Les batteries originales du TD-20 réglées en usine peuvent être
utilisées avec un TD-20 équipé d’une carte d’expansion.
• Les données créées avec un TD-20 équipé d’une carte
d’expansion ne sont pas compatibles avec un TD-20 original.
• Le TD-20 ne fonctionne pas si le TDW-20 est retiré une fois que
la mise à jour a été faite.
Précautions à prendre pour manipuler le
TDW-20
• L’électricité statique peut endommager les composants du
TDW-20. Prendre les précautions suivantes pour le manipuler.
• Avant de toucher le TDW-20, il faut toucher un objet métal-
lique pour éliminer de façon sécuritaire l’électricité statique
qui peut s’être accumulée dans le corps ou dans les
vêtements.
• Pour tenir le TDW-20, saisir les côtés de la carte de circuits
imprimés et NE PAS toucher les composants sur la carte de
circuits imprimés ni les connecteurs.
• Si le TDW-20 doit être entreposé ou expédié, le placer dans
le sachet d’origine (sac conducteur offrant une protection
électrostatique).
• NE PAS toucher les circuits ni les connecteurs à l’intérieur du
TD-20.
• Lors de l’insertion du TDW-20, ne pas l’insérer de force dans la
fente. Si l’insertion est difficile, retirer le TDW-20 puis
réessayer. Utiliser l’outil fourni pour le verrouiller en place.
• Une fois l’installation du TDW-20 terminée, revérifier le travail
exécuté.
• Si un objet étranger tombe à l’intérieur du TD-20, s’adresser au
détaillant, au centre de services Roland le plus proche ou à un
distributeur Roland autorisé mentionnés dans la liste de la
page « Information » pour faire procéder à la réparation.
17
Page 18
IMPORTANT! Sauvegarde des données
* Si la carte CompactFlash fournie avec le TDW-20 est utilisée,
elle doit être insérée APRÈS que l’appareil a été mis sous tension. Sinon, le dispositif de mise à jour de la carte s’ouvrira automatiquement.
1.
Insérer une carte CompactFlash dans la fente pour carte
mémoire qui se trouve sur le panneau avant du TD-20.
* Insérer soigneusement la carte CompactFlash à fond –
jusqu’à ce qu’elle soit fermement en place.
2. Appuyer sur [CARD].
Les voyants [CARD] et CompactFlash s’allument. L’écran «
CARD MENU » s’affiche.
* Si la carte insérée n’a jamais été utilisée avec le TD-20, l’écran
affichera « Unformatted! ». Appuyer sur [CARD] et sur [F4
(FORMAT)] pour formater la carte.
3. Appuyer ensuite sur [F1 (SAVE)].
4.
À l’écran « CARD SAVE », utiliser [+/-] ou [VALUE] pour
sélectionner la destination des données à sauvegarder.
18
5. Appuyer sur [F5 (SAVE)].
Pour renommer la copie de sauvegarde, appuyer sur [F4
(NAME)].
6. L’écran de confirmation s’affiche; appuyer sur [F5
(EXECUTE)] pour enregistrer les données.
Pour annuler les commandes et ne pas faire de copie de
sauvegarde, appuyer sur [F1 (CANCEL)].
7. Appuyer sur [F5 (EXECUTE)] pour enregistrer les
données.
Si des données BULK DUMP sont
enregistrées dans l’ordinateur
Si des données de trousses individuelles ou toutes les données de
la trousse sont enregistrées dans un ordinateur, elles doivent être
chargées dans le TD-20 et enregistrées sur une carte CompactFlash
AVANT de procéder à la mise à jour avec le TDW-20, pour être
compatibles avec la version expansée.
Page 19
Installation de la carte d’expansion TDW-20
1. Mettre le TD-20 hors tension et débrancher le câble
d’alimentation de la prise.
2. Tourner le TD-20 sens dessus dessous.
* Veiller à ne pas endommager les boutons et les manettes en
tournant le TD-20 sens dessus dessous. Pour les protéger, déposer un coussin ou une serviette sur la surface de travail.
3. Retirer les huit vis (indiquées par des flèches) de la
plaque inférieure. Retirer la plaque.
* Ne retirer aucune vis autre que celles qui sont indiquées par
des flèches.
4. Placer les supports de la carte de circuits imprimés
comme le montre l’illustration.
5. Insérer le connecteur de la carte d’expansion à fond
dans le connecteur du TD-20. S’assurer que
l’extrémité de chaque support de la carte de circuits
imprimés dépasse des ouvertures du TDW-20.
19
Page 20
6. À l’aide de l’outil fourni avec le TDW-20, tourner les
supports de la carte de circuits imprimés en
position LOCK (verrouillé) pour fixer le TDW-20.
* Une fois l’installation du TDW-20 terminée, revérifier le tra-
vail pour s’assurer qu’il est installé correctement et que les
supports de la carte de circuits imprimés sont à la position
LOCK (verrouillé).
7. Remettre le couvercle en place et le fixer à l’aide des
huit vis retirées à l’étape 3.
20
Page 21
Mise à jour du TD-20 à l’aide de la carte CompactFlash
1. L’appareil étant hors tension, insérer la carte
CompactFlash fournie dans l’emballage
2. Mettre l’appareil sous tension; l’écran suivant
s’affiche.
3. Pour exécuter la mise à jour, appuyer sur le bouton
[F5=UPDATE].
* La mise à jour peut prendre 3 minutes.
* Ne pas mettre l’appareil hors tension pendant la procédure
de mise à jour.
4. Quand l’écran affiche « Update Completed » (mise à
jour terminée), mettre le TD-20 hors tension et
retirer la carte CompactFlash.
5. Remettre l’’appareil sous tension et initialiser le
système.
6. Pour initialiser l’appareil, appuyer sur le bouton
[F5=UPDATE].
21
Page 22

Features
New Sounds and 50 New Drum Kits (100 total)
The new acoustic sounds have more punch, expressiveness, stereo
presence and dynamic range. The Processed and Electronic sounds
give you lots of new choices for everything from Alternative Pop,
Hip Hop or Club music. The USER memory is now 100 kits, including
50 NEW kits, and the TD-20’s original preset kits.
New Editing and Performance Power
• A new, Large “Mic Size” choice for the kick drum enhances low
frequency attack (p. 26).
• More “Mic Position” choices for more precise microphone
placement (p. 30).
• Full “Kit Resonance” function, triggered by the bass drum,
adds overall kit depth and presence (p. 30).
• New Snare Drum Rim function allows selected layering choices
(p. 27).
• Electronic sounds now have a new Dynamic pitch bend
feature (p. 28).
• Turn the snares on or off, or change from a normal Hi-Hat to
“Fixed Hi-Hat” using foot or pad switches (p. 39).
• “Dynamic Interval Control” results in a more accurate response
to your playing dynamics and speed (p. 34).
• “Enhanced HH Control” improves the feel and response of the
V-Hi-Hat (p. 23).
22
• “Enhanced Snare Buzz Control” gives more dynamic response
and presence when adding “snare buzz” to the toms or kick (p.
26).
Ambience — User Interface, New functions
Not only has the interface has been improved, but new algorithms
offer high resolution definition and stereo presence. New functions
include 15 new room types, 3 new wall material choices and 7 new
mic positions (p. 30).
Page 23

Improved Memory Storage on a
CompactFlash Card
Up to 99 full backups on the CompactFlash Card. Your current
CompactFlash Card stays compatible on the new, expanded
version, as well as the original version (p. 24).
Directly “audition” a kit on the
CompactFlash card.
You can choose between preset kits: TD-20/TDW-20 and kits saved
on CompactFlash card (p. 41).
You can play the kit before loading it into the USER area. (however,
pad patterns will not work when being played from the
CompactFlash card)
Sequencer
• Additional Preset Patterns
• 50 new Preset Patterns have been added (P 101 – 150).
KD-120 Users
If you have imported your own trigger bank settings from the
original TD-20 version, we advise you to double check the
trigger parameters for the KD-120. As dynamic response has
been improved, re-adjusting those parameters will make you
feel even more comfortable while playing.
Important notes about the Hi-Hat
We strongly recommend that you spend time adjusting the
Hi-Hat parameters to adapt to your performance techniques.
• The most important is correctly setting the “offset”
before you play each time.
ACCESS: [KIT] + [TRIGGER]
• The “Foot Splash Sens” parameter is also important.
Spend some time testing this setting.
ACCESS: [TRIGGER]–[F3 (HI-HAT)]
• Also remember that for each kit, there is a separate
control for the sound level of the “Foot Closed (Pedal
HH)” sound.
ACCESS: [KIT]–[F2 (FUNC)]–[F1 (VOLUME)]
• Keep in mind that for the sound level of the Hi-Hat that
setting different levels for the “Head” and “Rim” can
help you get a good sound balance.
When in the MIXER screen. Press [F5] so you can adjust
the levels separately.
23
Page 24

About the Drum Kits
After you have completed the upgrade process, you will find that
the user memory has expanded to 100 Kits: 50 NEW kits from 1–50
and the original TD-20 pre-set Kits from 51–100. These 100 factory
preset kits are always available via the “copy” function, or when
totally re-setting the TD-20. So you have 100 USER kits to work
with.
CompactFlash Card Data
• All user drum kits can be backed up to the CompactFlash card
for a total of 99 full back-ups.
• Kit data on the CompactFlash card can be played (but not
edited) without loading it into the TD-20 (p. 41).
• The Import function allows you to load data saved prior to
updating (p. 40).
When importing a previously saved “backup” the kits will
appear from kit No.51.
Backup File Names
This is important for those who might want to organise their data
in their computers or share data with other TD-20 users.
How Names appear
Though you can give a name to your backup file that you can see
when loading/saving with a CompactFlash card in the TD-20, the
24
name that appears when looking at it in your computer is different.
Here we will explain the difference between “original” TD-20 data,
and data after upgrading with the TDW-20.
Original TD-20
Backup 1 appears like
“TD20” indicates the original version.
The “BK01” means Backup No.1, “BK08” would mean backup
No.08.
“TD20BK01.TD0.”
Expanded TD-20
Backup 1 appears like
“TDW2” indicates the upgraded version.
The “BK01” means Backup No.1, “BK99” would mean backup
No.99.
“TDW2BK01.TD0.”
Pattern Files
This refers to patterns saved independently on the CompactFlash
Card.
Pattern No.1 (on the card) will appear as
The “P001” means pattern No.1. Pattern No.100 appears as
“TD20P100.TD0.”
“TD20P001.TD0.”
Page 25
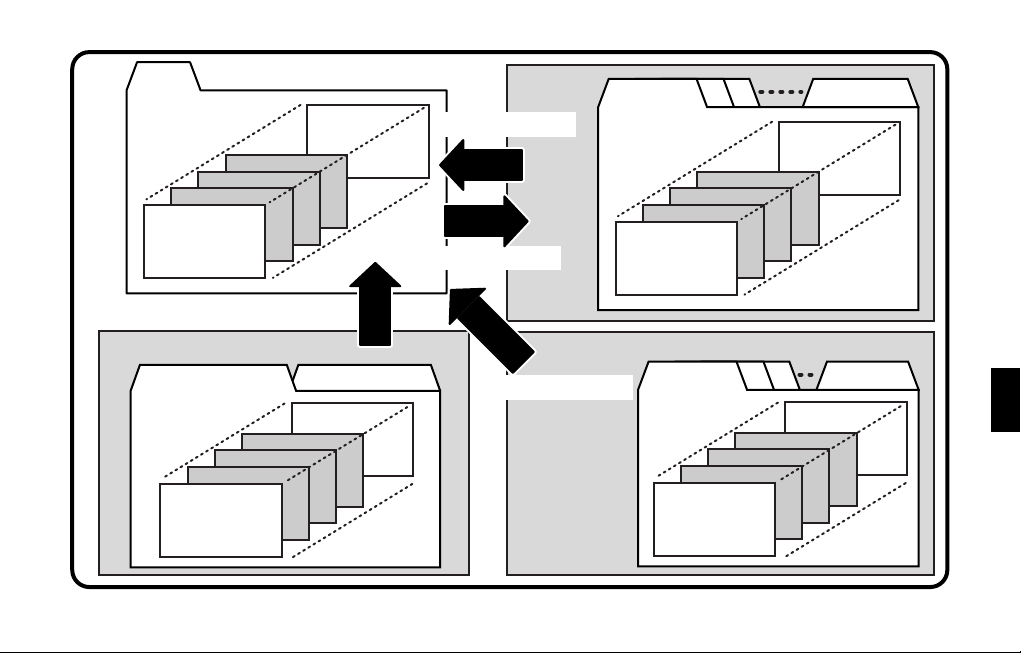
User
KIT 4
KIT 3
KIT 2
KIT 1
[COPY]–[F1(KIT)]–[F2 (PRESET)]
PRESET
TDW-20 Preset
KIT 4
KIT 3
KIT 2
KIT 1
TD-20
KIT 100
COPY
TD-20 Preset
KIT 100
CARD
[CARD]–[F2 (LOAD)]
LOAD
SAVE
[CARD]–[F1 (SAVE)]
IMPORT
[CARD]–[F3 (IMPORT)]
CARD
(Original TD-20)
Backup 3Backup 2Backup 1 Backup 99
KIT 100
KIT 4
KIT 3
KIT 2
KIT 1
Backup 3Backup 2Backup 1
KIT 50
KIT 4
KIT 3
KIT 2
KIT 1
Backup 8
25
Page 26
New Functions
Drum Instruments Parameters [INST]
Instrument Selection
After pressing the [INST], the [F4 (INT<>EXP)] allows you to choose
from the TD-20’s internal sounds or those on the TDW-20
expansion board.
The prefix “EXP” is attached to TDW-20’s Inst Group name.
26
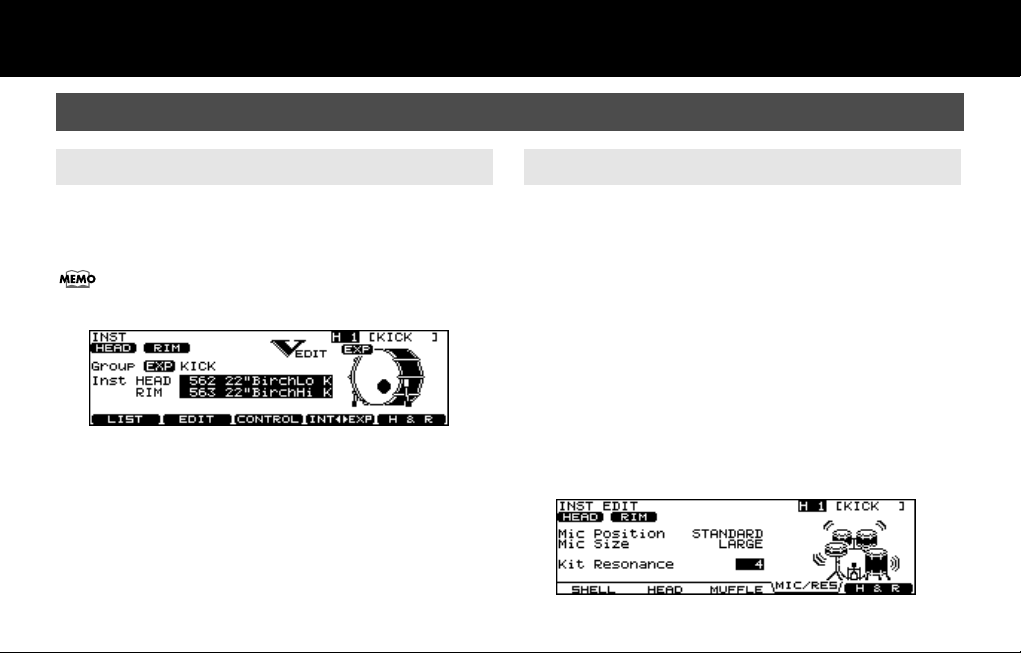
About V-EDIT Parameters
To restore an instrument to a non v-edited state press [SHIFT] and
[F4] while in the INST EDIT screen. This was previously referred to as
“default” in the original TD-20 version.
* Not all sounds have full V-Edit parameters.
For the KICK
• Snare Buzz: The dynamic response of this function
is improved.
• Mic Position: New positions allow even more realistic
microphone placement.
• Mic Size: Improvement in sub-low frequency
attack for the KICK.
• Kit Resonance: Accurately reproduces the whole kit
resonating when the kick is played.
Page 27
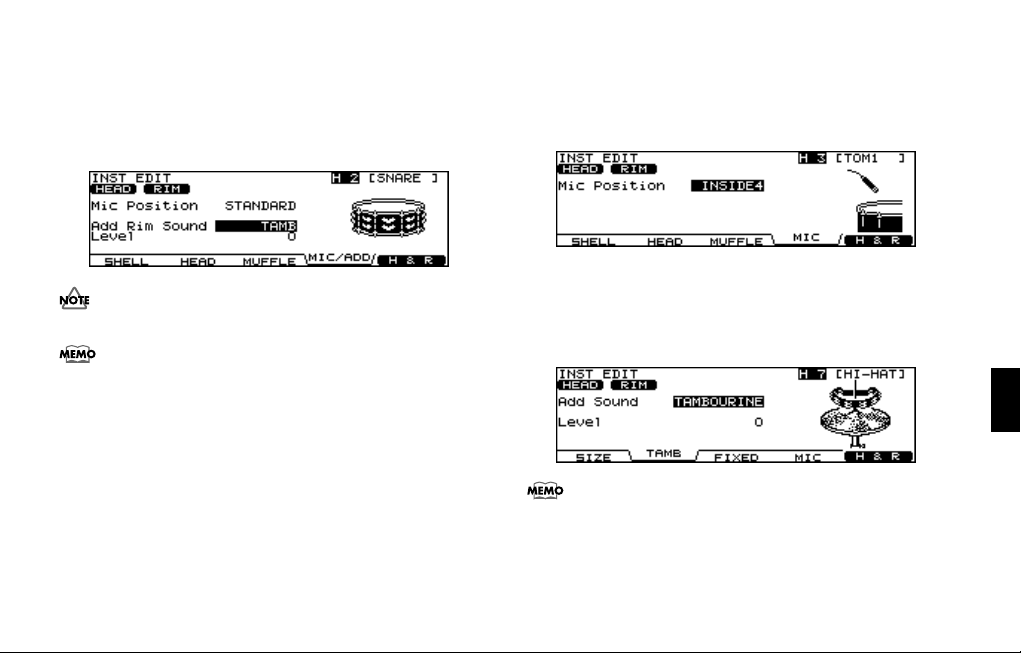
For the SNARE
• Mic Position: New positions allow even more realistic
microphone placement.
• Add Rim Sound: You can layer a tambourine, 909 claps
or Gate Hit sound to the RIM only.
• Level: Adjusts level of the added sound.
Not all sounds have full V-Edit parameters.
You can turn the “Snare Strainer Off” by pressing an optional
foot switch or hitting a “Pad Switch.” Please refer to
Foot Switches and Pad Switches”
(p. 39).
“Using
For the TOMs
• Snare Buzz: The dynamic response of this function
is improved.
• Mic Position: New positions allow even more realistic
microphone placement.
For the HI-HAT
• Add Sound: You can layer a tambourine, cabasa or
cowbell on the Hi-Hat (Head and/or Rim)
• Level: Adjusts the volume of the layered sound.
The “Fixed Hi-Hat” position can be enabled by pressing an
optional foot switch or hitting a pad switch. Please refer to
“Using Foot Switches and Pad Switches”
(p. 39).
27
Page 28
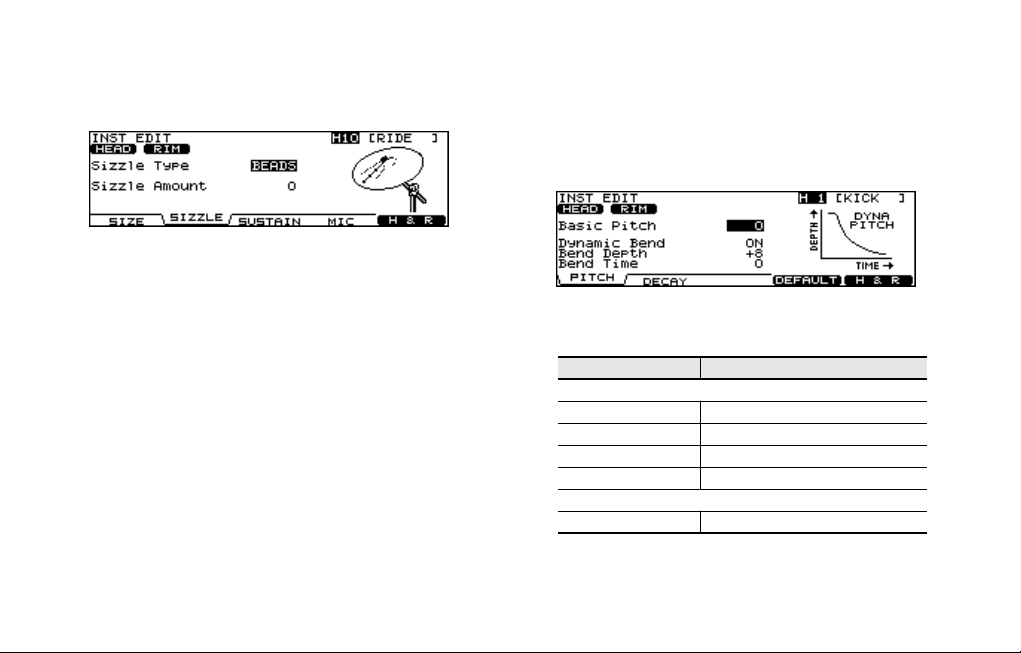
Additional Sizzle for All Cymbals
• Sizzle Type: New “BEADS” sizzle type.
• Sizzle Amount: Adjusts the amount (size) of the chosen
sizzles.
Dynamic Pitch Bend (only for NEW Electronic
Sounds on the TDW-20)
Before accessing this function, be sure there is an electronic sound
assigned to the pad.
Then press [F2 (EDIT)] and the following screen appears. Adjust the
parameters as you wish.
The pitch of the sound can be controlled by your playing dynamics.
The following parameters are available.
Parameter Value
[F1 (PITCH)]
Basic Pitch -480 – +480
Dynamic Bend OFF, ON
Bend Depth -24 – +24
Bend Time -31 – +31
[F2 (DECAY)]
Decay Time -31 – +31
28
Page 29
Mixer Settings
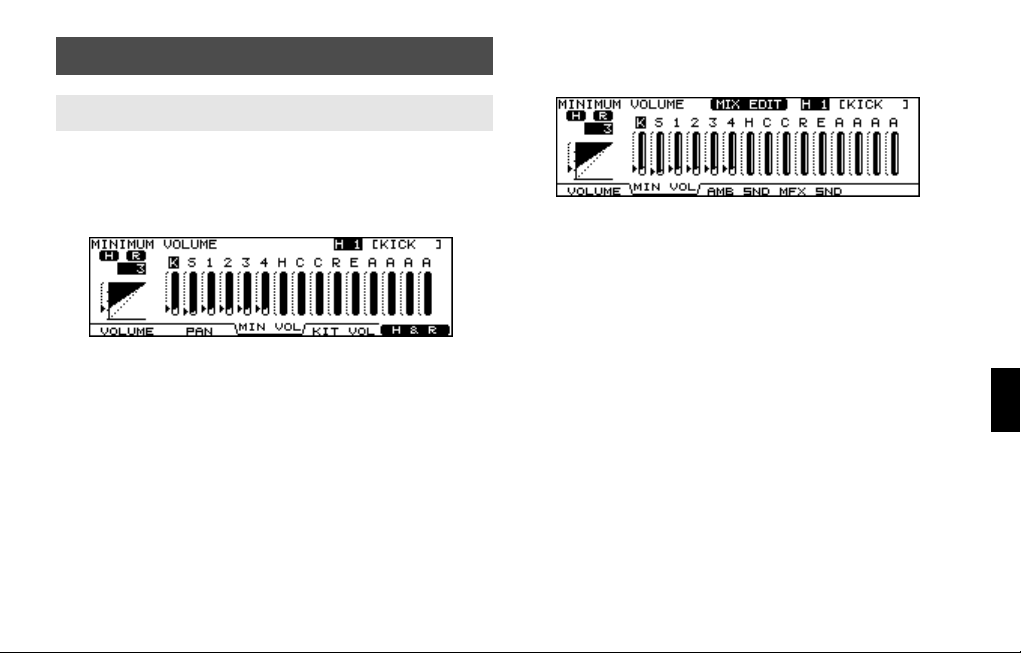
Minimum Volume of Each Trigger Input
The “MINIMUM VOLUME” function has new and improved dynamic
resolution, helping you to maintain a desired sound level for
specific pads and depending on your playing style. Also helping
you to capture ghost notes,
Access:
Press [MIXER]–[F3 (MIN VOL)]
Use The Group Faders
Adjust the “MINIMUM VOLUME” parameters with the group faders.
Access:
Press [MIXER] + [FADER]–[F2 (MIN VOL)]
* You can also use them for adjusting Volume, Ambience or
MFX send levels.
29
Page 30
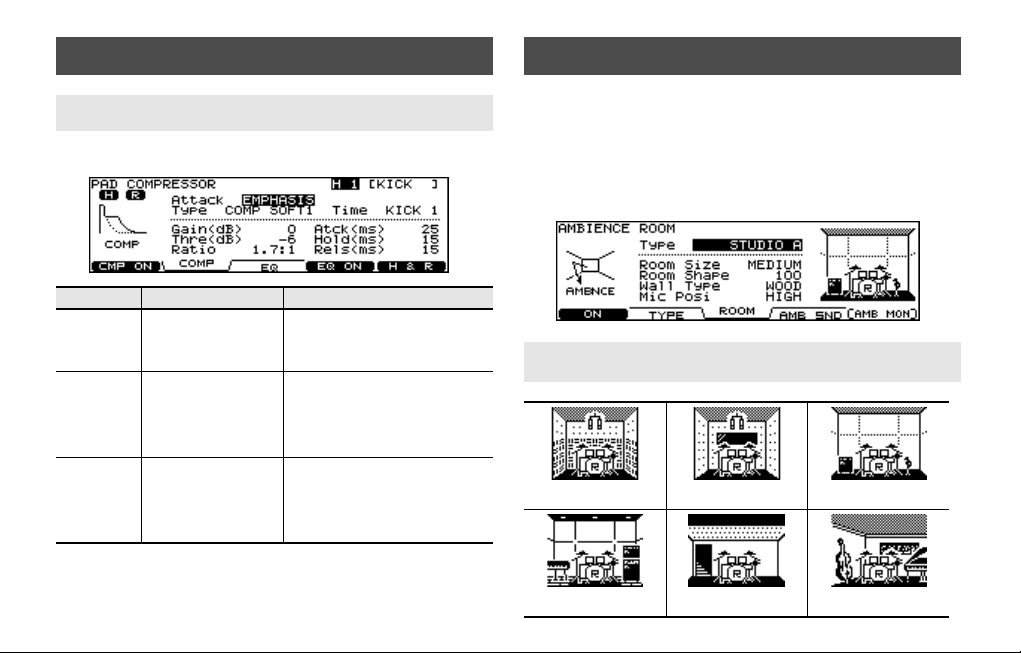
Pad Compressor
Parameter Improvements
New Individual Compressor Templates are improved.
Parameter Value Description
Attack EMPHASIS, CRUSH
Type
Time
30
COMP SOFT 1 – 2,
COMP MED,
COMP HARD,
LIMITER,
EXPANDER
KICK 1 – 3,
SNARE1 – 3,
TOM 1 – 3,
CYM 1 – 2,
OTHER1 – 3
EMPHASIS: Emphasizes the attack
CRUSH: Press the attack.
These change Threshold and ratio
values.
These change Attack, Hold, and
Release values.
of the sound.
Ambience
A lot of research went into creating new Ambience functions. The
result is a new collection of 15 Room Types, 3 new Wall Types, and
7 new Ambience Mic Positions. High density resolution of these
new algorithms, including enhanced stereo presence give you
more choices to create your own. personalized drum sound
“character.”
New Room Types (15)
Booth A
Studio B Basement Jazz Club
Booth B Studio A
Page 31

Rock Club
Ballroom Gate
Mic Positions (9)
Taking into consideration the importance of Ambience Mic
positions, the following have been added.
Concert Hall Sports Arena Expo Hall
[FX] Bottle [FX] City [FX] Spiral
New Wall Types (3)
Three new wall types are: “Curtain”, “Cloth”, and “Concrete”
Curtain Cloth Concrete
Next Door
Mid Low Mid Mid High
High Ceiling A Ceiling B
When in the ROOM screen, pressing [SHIFT] plus [F4] resets all
the parameters
Low Floor Low
31
Page 32

New Output Gain Parameter
A gain parameter has been added for the ambience output level.
You can boost the signal by +6 dB
Ambience Monitor (“solo” mode)
When in the AMBIENCE screen pressing [F5 (AMB MON)] allows you
to listen to JUST the ambience from the MASTER OUTPUT and/or
PHONES jacks.
32
Multi-Effects
New Output Gain Parameter
A gain parameter has been added for the multi-effects output
level.
You can boost the signal by +6 dB.
Multi-Effects Monitor (“solo” mode)
When in the MULTI EFFECTS screen, pressing the [F5 (MFX MON)]
allows you to listen to JUST the multi-effects from the MASTER
OUTPUT and/or PHONES jacks.
Page 33

Master Compressor
Drum Kit Parameters [KIT]
Gain Reduction (GR) Meter
A gain reduction meter has been added to this screen, allowing
you to monitor the MASTER COMP as it is functioning.
Access:
Press [MASTER COMP/EQ]
Pad Pattern ON/OFF Switch
This function allows you to turn off all the patterns that may be
assigned to a kit.
Access:
Press [KIT]–[F2 (FUNC)]–[F4 (PAD PTN)]
33
Page 34

Trigger Settings
Additional pad/trigger choices have been added to the trigger list.
• CY-5
• RT-10 series
Advanced Trigger Parameter Function
Checking the Trigger Information
You can visually confirm each trigger’s velocity as well as the Hi-Hat
open/close gaps and positional sensing on the Snare Drum and
Ride Cymbal, and RIMS of the TOMS and AUX.
The “interval meter” shows the intervals between strokes.
This screen allows you to monitor the positional sensing for the
following pads/inputs:
SNARE (Head, Rim), TOM (Rim), RIDE (Bow), and AUX (Rim).
You can turn the position detection ON or OFF here.
* If you select a non-positional sensing pad, “---” appears.
Access:
Press [TRIGGER]–[F5 (ADVANCE)]–[F4 (POSI)]–Pad Select
34
Interval control functions to create smooth rolls on cymbals or
the snare drum.
Access:
Press [TOOLS]–[F3 (TRG MON)]
Page 35

Copy Functions
Now you can copy inst sets (with or without COMP/EQ), ambience,
multi-effects, volume, panning and Trigger Banks from one kit to
another, between the internal memory and the CompactFlash card
or from the original, factory pre-set data.
Copying overwrites the data that exists in the new destination.
Be careful.
In this Screen, the [F5] is used to change the 3 pages of copy
options.
COPY A screen
COPY B screen
COPY C screen
Access:
Press [COPY]–[F1]–[F5]–Select the source with these buttons.
35
Page 36

Trigger Bank Copy
If you want to copy trigger bank data from your original TD-20, do
the following:
1.
Import the backup into the expanded TD-20 (upgraded
version).
2.
Then save once to the CompactFlash card.
3.
Now you can copy individual trigger bank settings back
into the TD-20.
Parameter
TOMS 1-4
CYM SET
AUX 1-4 AUX 1, 2, 3, 4
ICON Inst
Tom 1, 2, 3, 4
Hi-Hat, Crash1, 2,
Ride, Edge
Copying an Instrument Set
An instrument set consists of all instruments (every instrument
assigned to a trigger input).
Parameter
KICK/SNR
36
ICON Inst
Kick and Snare
When Selecting the Copy Target
In this screen, you have the choice to copy all instruments with,
without or JUST the COMP/EQ settings.
Page 37

Copying an Instrument
In this screen, you have the choice to copy the instrument and it’s
edited parameters with, without or JUST the COMP/EQ settings.
Quick Jump Functions to the Copy Screen
For Copying Drum Kit Settings
In the DRUM KIT screen, press [SHIFT] and [COPY] simultaneously.
For Copying Instrument Settings
In the INST screen, press [SHIFT] and [COPY] simultaneously.
For Copying Mixer Settings
In the MIXER screen, press [SHIFT] and [COPY] simultaneously.
For Copying Ambience Settings
In the AMBIENCE screen, press [SHIFT] and [COPY] simultaneously.
For Copying Multi-Effect Settings
In the MULTI EFFECTS screen, press [SHIFT] and [COPY]
simultaneously.
37
Page 38

Settings for the Entire TD-20
Master Output
Now, when using multi-output configurations, the entire kit’s
sound will remain in the headphones, even the sounds NOT sent to
the MASTER OUTPUT jacks.
Access:
Press [SETUP]–[F2 (OUTPUT)]–[F1 (MASTER)]
When in this screen, pressing [F5 (DEFAULT)] will reset the
parameters of that specific page. A confirmation screen will
appear before you execute.
38
Output Assign (OTHER)
You can assign the sequencer parts, the Metronome click sound &
MIX IN source to the MASTER OUT, PHONES and/or DIRECT OUT 5
to 8.
Page 39

Using Foot Switches and Pad Switches
MIX IN new Function
One or two optional foot switches (BOSS FS-5U: sold separately)
can be used with an optional cable (PCS-31: sold separately) to
allow switching to a “Fixed Hi-Hat” or to turn the snare strainer “off”
on the snare drum. You can also turn the ambience or multi-effects
on/off. The same can be done with Pad Switches.
The “FIXED HH” and “STRAINER” status are displayed on the “DRUM
KIT” screen
Access for Foot Switch Functions:
Press [SETUP]–[F3 (CONTROL)]–[F1 (FOOT SW)]
Access for Pad Switch Function:
Press [SETUP]–[F3 (CONTROL)]–[F2 (PAD SW)]
Pad switch functions are available only when using AUX 3 and
AUX 4 inputs.
The MIX IN jacks can handle mono or stereo signal.
If it occurs that the audio signal going to the MIX IN Jack has a click
on the Right side, and the backing track on the Left side, you can
use this function to merge the signals.
Parameter
Input
Mode STEREO, MONO
Gain 0 – +12
L + R, L ONLY, R ONLY
Value
Access:
Press [SETUP] – [F4 (OPTION)] – [F3 (MIX IN)]
39
Page 40

Importing Original TD-20 Data into the Expanded TD-20
You can import your original TD-20 setting to the expanded TD-20.
1.
Insert your CompactFlash Card.
2.
Press [CARD]–[F3 (IMPORT)].
3.
Select the backup.
4.
Press [F5 (IMPORT)].
Notes about importing data:
• Your drum kit data will be loaded to Kits No.51 to
No.100. The TDW-20 preset kit will be loaded to No.1 to
No.50
• The Program Change Number for Drum Kits is reset to
the default value.
40
Page 41

Other Functions
The Kit Selection Function
You can play preset drum kits and kits from the internal memory
and also those saved on a CompactFlash card without loading to a
user drum kit destination. When accessing kits in this manner, Pad
Patterns assigned to that particular kit will NOT function. And no
editing is possible. You can immediately copy the selected kit to
any user destination. When in this page, just push “copy.”
Access:
1.
Press [TOOLS]–[F1 (KIT SEL)].
2.
Press [F1]–[F3] to choose kit.
[F1 (TD-20)]: TD-20 preset kits
[F2 (TDW-20)]: TDW-20 preset kits
[F3 (CARD)]: Backup kit saved in CompactFlash
Choosing a Drum Kit from a CompactFlash
You can play a kit directly from the CompactFlash memory card.
Access:
Press [SHIFT] and [KIT] simultaneously.
41
Page 42

Appendices
Drum Instrument List
No.
562
563 22"BirchHi K
564 23"D-Maple K
565 22"NCMaple K
566 22"LwgVntg K
567 22"RokVntg K
568 22"PKMaple K
569 22"SnrVntg K
570 24"VLite K
571 22"Premium K
572 22"BirchWetK
573 22"GT Vntg K
574 22"LooseHd K
575 20"TightHd K
576 20"GT Open K
577 20"BigBand K
578 18"Combo K
579 18"BeBopLo K
580 18"BeBopHi K
581 Ambience K
EXP KICK PROCESSED
582
583 Tight2 K
42
Name
EXP KICK
22"BirchLo K
Tight1 K
No.
584 Tight3 K
585 Tight4 K
586 Tight5 K
587 Tight6 K
588 Solid1 K
589 Solid2 K
590 Solid3 K
591 Wild K
592 Mondo K
593 Reverb K
594 Distorted K
595 BreakBeats K
596 Woofer K
597 FX Stomp K
598 FX Chest K
599 FX Handle K
600 FX Door K
601
602 ClscElec8 K
603 ClscElec9 K
604 808Attack K
605 808Low K
606 909Power K
607 909Low K
Name
EXP KICK ELEC
ClscElec7 K
No.
608
609 AnalogQ2 K
610 AnalogQ3 K
611 Synthy K
612 Filter1 K
613 Filter2 K
614 Filter3 K
615 Filter4 K
616 Jungle K
617 FX Elec1 K
618 FX Elec2 K
619 FX Elec3 K
620 FX Elec4 K
621
622 CustomWoodSR
623 80s Metal S
624 80s Metal SR
625 Bronze S
626 Bronze SR
627 CraftStl S
628 CraftStl SR
629 OpenBrass S
630 OpenBrass SR
631 50s King S
Name
AnalogQ1 K
EXP SNARE
CustomWoodS
No.
632
633 GT Maple S
634 GT Maple SR
635 Piccolo S
636 Piccolo SR
637 12"Cmpact S
638 12"Cmpact SR
639 10"Cmpact S
640 10"Cmpact SR
641 Skanky2 S
642 Skanky2 SR
643 StlPhonic S
644 StlPhonic SR
645 50sKingMt S
646 50sKingMt SR
647 WhiteAsh S
648 WhiteAsh SR
649 Popcorn S
650 Popcorn SR
EXP SNARE PROCESSED
651 PrcsWood S
652 PrcsWood SR
653 PrcsMetal S
654 PrcsMetal SR
655 PrcsElec1 S
Name
50s King SR
No.
656
657 PrcsElec2 S
658 PrcsElec2 SR
659 PrcsXStik S
660 PrcsNoise S
661 DynaFilter S
662 ClscFat1 S
663 ClscFat1 SR
664 ClscFat2 S
665 ClscFat2 SR
666 SoundFX1 S
667 SoundFX2 S
668 SoundFX3 S
669 SoundFX4 S
670 SoundFX5 S
671 Distorted1 S
672 Distorted2 S
673 Wood XStik
674 Steel XStik
675 Brass XStik
676 80sMtl XStik
677 50sKingXStik
678 WhtAsh XStik
679 Light XStik
680 Lo-Fi XStik
Name
PrcsElec1 SR
Page 43

No.
681
682 ClscElec7 S
683 ClscElec8 S
684 ClscElec9 S
685 808Power S
686 808Power SR
687 909Power S
688 909Power SR
689 909Dist S
690 909Reverb S
691
692 8"NCMpl T1R
693 10"NCMpl T2
694 10"NCMpl T2R
695 12"NCMpl T3
696 12"NCMpl T3R
697 14"NCMpl T4
698 14"NCMpl T4R
699 16"NCMpl T5
700 16"NCMpl T5R
701 8"PKJaz T1
702 8"PKJaz T1R
703 10"PKJaz T2
704 10"PKJaz T2R
705 12"PKJaz T3
706 12"PKJaz T3R
707 13"PKJaz T4
708 13"PKJaz T4R
Name
EXP SNARE ELEC
ClscElec6 S
EXP TOM
8"NCMpl T1
No.
709 16"PKJaz T5
710 16"PKJaz T5R
711 10"Rock T1
712 10"Rock T1R
713 12"Rock T2
714 12"Rock T2R
715 14"Rock T3
716 14"Rock T3R
717 16"Rock T4
718 16"Rock T4R
719 18"Rock T5
720 18"Rock T5R
721 8"Pop T1
722 8"Pop T1R
723 10"Pop T2
724 10"Pop T2R
725 12"Pop T3
726 12"Pop T3R
727 13"Pop T4
728 13"Pop T4R
729 16"Pop T5
730 16"Pop T5R
731 8"Antiq T1
732 8"Antiq T1R
733 10"Antiq T2
734 10"Antiq T2R
735 12"Antiq T3
736 12"Antiq T3R
737 13"Antiq T4
738 13"Antiq T4R
739 16"Antiq T5
Name
No.
740 16"Antiq T5R
741
742 ClscElec5 T2
743 ClscElec5 T3
744 ClscElec5 T4
745 ClscElec6 T1
746 ClscElec6 T2
747 ClscElec6 T3
748 ClscElec6 T4
749 ClscElec7 T1
750 ClscElec7 T2
751 ClscElec7 T3
752 ClscElec7 T4
753 ClscElec8 T1
754 ClscElec8 T2
755 ClscElec8 T3
756 ClscElec8 T4
757 ClscElec9 T1
758 ClscElec9 T2
759 ClscElec9 T3
760 ClscElec9 T4
761
762 14"CstmDK HE
763 14"Medium HB
764 14"Medium HE
765 13"KZComb HB
766 13"KZComb HE
767 13"P-Crsp HB
Name
EXP TOM ELEC
ClscElec5 T1
EXP HI-HAT
14"CstmDK HB
No.
768 13"P-Crsp HE
769 Distorted HB
770 Distorted HE
771 Lo-Fi HH
772 808Chick HH
773 909Power HH
774 Impulse HH
775 Super-Q HH
776 DistJingleHH
777 MtlCrasherHH
778 Jingle HH
779 Beads HH
780 Ratchet HH
781
782 15"PaperCrEg
783 16"PoP CrBw
784 16"PoP CrEg
785 18"PoP CrBw
786 18"PoP CrEg
787 17"DarK CrBw
788 17"DarK CrEg
789 18"DarK CrBw
790 18"DarK CrEg
791 18"JazZ CrBw
792 18"JazZ CrEg
793 4"Paper SpBw
794 4"Paper SpEg
795 6"Splaz SpBw
Name
EXP CRASH
15"PaperCrBw
EXP SPLASH
No.
796 6"Splaz SpEg
797 10"UF SpBw
798 10"UF SpEg
799 10"ChinaSpBw
800 10"ChinaSpEg
801
802 13"Latin Eg
803 14"Trash Bw
804 14"Trash Eg
805 20"CB Low Bw
806 20"CB Low Eg
EXP STACKED CYMBAL
807 16"Stackd Bw
808 16"Stackd Eg
809 18"Stackd Bw
810 18"Stackd Eg
811
812 20"JazZ RdBl
813 20"JazZ RdEg
814 20"HvyDKRd
815 20"HvyDKRdBl
816 20"HvyDKRdEg
817 20"ASpecRd
818 20"ASpecRdBl
819 20"ASpecRdEg
820 20"KSpecRd
821 20"KSpecRdBl
822 20"KSpecRdEg
Name
EXP CHINA
13"Latin Bw
EXP RIDE
20"JazZ Rd
43
Page 44

No.
823 20"VntZ Rd
824 20"VntZ RdBl
825 20"VntZ RdEg
826 19"JzCrsRd
827 19"JzCrsRdBl
828 19"JzCrsRdEg
829 19"P-CrsRd
830 19"P-CrsRdBl
831 19"P-CrsRdEg
832 Timbale2Hi
833 Timbale2HiRm
834 Timb2HiPaila
835 Timbale2Lo
836 Timbale2LoRm
837 Timb2LoPaila
838 Pandeiro2
839 Pande2 Slap
840 Pande2 Close
841 Pande2 Edge
842 Pande2 Roll1
843 Pande2 Roll2
844 Caixa
845 Caixa Rim
846 Cajon2 Bass
847 Cajon2 Close
848 Cajon2 Open
849 Cajon2 Slap
850 Bendir
851 Darabuka Dom
852 Darabuka Tak
44
Name
EXP PERCUSSION
No.
853 AnkleBeads
854 AfricaJingle
855 Cabasa2
856 Tambourine4
857 TambStick
858 TambShake
859 Sagat Close
860 Sagat Open
861 MetalCrasher
862 ConcertBD2
863 ConcertBD2mt
864 LargeGong
865 Timpani2 C
866 Timpani2 G
867 HiraTaiko
868 HiraTaikoRim
869 YaguraTaiko
870 YaguraTaikoR
871 NagodoTaiko
872 NagadoTaikoR
873
874 Chick
875 Random
876 ReverbSlap
877 Hammer
878 Anvil
879 MetalDoor
880 MetalPhase
881 RvsMtlFaze
882 WhiteLazer
Name
EXP SFX
Tick
No.
883 CosmicWater
884 CosmicDrip
885 CosmicClaps
886 CosmicChirp
887 Falling
888 FlyAway
889 BounceDown
890 TimeTunnel1
891 TimeTunnel2
892 SpaceTrip
893 Growl
894 Ripping
895 SpaceAlien
896 SpaceWarp
897 Shake
898 ShakeDown
899 Gear
900 GearLong
901
902 High Claps
903 Mid Claps
904 Low Claps
905 Hi-Q Claps
906 Reverb Claps
907 IronWhip
908 Ratchet
909 Drawer
910 Explosion
911 ElecRide
912 ElecRide Bl
Name
EXP OTHER
Group Claps
No.
913 ElecRide Eg
914 Revrs Kick
915 Revrs Snare
916 Revrs Crash2
917 Revrs China2
918 AcousGuitar
919 FingerBass
920 SlapBass
921
Name
EXP OFF
EXP Off
Page 45

About Snare/Tom Instruments
The last letter of each instrument name means the sound of head
shot, or rim shot.
(Example)
S
: head sound of Snare
SR
: rim sound of Snare
T1
: head sound of Tom 1
T1R
: rim sound of Tom 1
About Cymbal Instruments
The last letter of each instrument name means the sound of bow
shot, edge shot, or bell shot.
(Example)
HB
: bow sound of hi-hat
HE
: edge sound of hi-hat
CrBw
: bow sound of crash
CrEg
: edge sound of crash
Rd
: bow sound of ride
RdBl
: bell sound of ride
RdEg
: edge sound of ride
About Electronic Instruments
Electronic sounds can produce VERY low-frequencies when using
the Dynamic Pitch Bend function.
Please be careful about the volume of your sound system, speakers
or headphones when using this function.
45
Page 46

Preset Drum Kit List
46
No. Kit Name Remark
TDW-20
1
2 50s King
3 ControlRoom
4 Metal Core
5 FunkGroove
6 40s BeBop
7 >processed>>
8 Cajon
9 Melodious *1 Tap
10 Premium
11 SwingJazz
12 BluesRock
13 Dry Studio
14 2HH House
15 TechFusion
16 LetItBeat
17 neotype *1 1Shot, Tap
18 JazzBop
19 RawBeat
20 VintageRock
21 D-N-B *1 Loop
22 GarageRock
23 80s Funk
24 Cashmirror
25 BREAKs
Pad
Pattern
No. Kit Name Remark
26 90s Rock
27 JazzClub
28 Jive
29 AmbientRock
30 Cosmic
31 Crossover
32 VintageJazz
33 Coolth
34 BulletBlue
35 FunkyJungle *1 Loop
36 Natural
37 LA BeBop
38 MBs House
39 Bronze Dry
40 DarkComper
41 DRUMS vs DJ
42 Gated
43 RotoFxCity
44 PopDelay
45 1985
46 Spaced Out
47 BrazilPerc
48 LatinDrums
49 InVasian
50 FLA>n<GER *1 1Shot, Tap
Pad
Pattern
Page 47

No.
51
52 Slamin' *1 Loop
53 METAL
54 JazzCombo
55 OverDrive *1 Tap
56 Titanium
57 RotoKit *1 Loop
58 UNIVERSE
59 Skanky
60 Brushes *2
61 Spark!
62 >>GT>>
63 Antique
64 =BreakBeats=
65 Studio
66 Groover *1 Loop
67 Mallet
68 Drumline
69 JazzGig *1 Loop
70 Airtime
71 Sploink!
72 Boogaloo
73 Zeppy
74 Arena
75 Maple
Kit Name Remark
VPro
Pad
Pattern
No.
76
77 Ballad *1 Loop
78 Raspy
79 PopReggae *1 Loop
80 BrassBiggie
81 WetBooth *1 Loop
82 70s Record
83 Lite
84 Mellow
85 Stadium
86 TiteOctas
87 90s Power
88 FxJungle *1 Tap
89 Tekno
90 TR-808 *1 Loop
91 TR-909
92 Hex< >Drum *1 Loop
93 Cosmosis
94 Technology
95 OrchPerc *1 Tap
96 Survivor
97 Latin Toys
98 African Perc
99 Tabla/Sitar *1 Loop, Tap
100 UserKit *3
Kit Name Remark
Shallow
Pad
Pattern
47
Page 48

About the Pad Patterns
Loop
: Loop Pattern: Playback starts when the pad to which
the pattern is assigned is struck, and
stops when hit again.
Tap
: Tap Pattern: Chords or melodies are played once
each time the pad to which the pattern
is assigned is struck.
1Shot
: One-Shot Pattern: Playback (one time only) starts when
the pad to which the pattern is assigned
is struck.
Remarks
*1: A Pattern is assigned (Loop, One-Shot, Tap).
* To stop a Loop pattern that is playing, either strike the pad
used to play the Loop pattern once again, or press the TD20’s [STOP] button.
* To turn off all pad patterns assigned to a drum kit at one time,
set the PadPtn Master SW setting to OFF. This is on a “per-kit”
basis.
Procedure
PadPtn Master SW to “ALL PADS OFF.”
*2: Brushes can be used.
*3: Parameters including volume etc. are set to standard values.
Use this when creating a kit from scratch.
: Press [KIT] - [F2 (FUNC)] - [F4 (PAD PTN)], then set
48
Page 49

MEMO
49
Page 50

This product complies with the requirements of EMC Directive 2004/108/EC.
For EU Countries
50
For C.A. US (Proposition 65
WARNING
This product contains chemicals known to cause cancer, birth defects and other reproductive harm, including lead.
)
Page 51

For EU Countries
51
Page 52

52
For China
Page 53

Information When you need repair service, call your nearest Roland Service Center or authorized Roland
AFRICA
EGYPT
Al Fanny Trading Office
9, EBN Hagar Al Askalany
Street,
ARD E1 Golf, Heliopolis,
Cairo 11341, EGYPT
TEL: (022)-418-5531
REUNION
Maison FO - YAM Marcel
25 Rue Jules Hermann,
Chaudron - BP79 97 491
Ste Clotilde Cedex,
REUNION ISLAND
TEL: (0262) 218-429
SOUTH AFRICA
T.O.M.S. Sound & Music
(Pty)Ltd.
2 ASTRON ROAD DENVER
JOHANNESBURG ZA 2195,
SOUTH AFRICA
TEL: (011)417 3400
Paul Bothner(PTY)Ltd.
Royal Cape Park, Unit 24
Londonderry Road, Ottery 7800
Cape Town, SOUTH AFRICA
TEL: (021) 799 4900
distributor in your country as shown below.
ASIA
CHINA
Roland Shanghai Electronics
Co.,Ltd.
5F. No.1500 Pingliang Road
Shanghai 200090, CHINA
TEL: (021) 5580-0800
Roland Shanghai Electronics
Co.,Ltd.
(BEIJING OFFICE)
10F. No.18 3 Section Anhuaxili
Chaoyang District Beijing
100011 CHINA
TEL: (010) 6426-5050
HONG KONG
Tom Lee Music Co., Ltd.
Service Division
22-32 Pun Shan Street, Tsuen
Wan, New Territories,
HONG KONG
TEL: 2415 0911
Parsons Music Ltd.
8th Floor, Railway Plaza, 39
Chatham Road South, T.S.T,
Kowloon, HONG KONG
TEL: 2333 1863
INDIA
Rivera Digitec (India) Pvt. Ltd.
411, Nirman Kendra
Mahalaxmi Flats Compound
Off. Dr. Edwin Moses Road,
Mumbai-400011, INDIA
TEL: (022) 2493 9051
INDONESIA
PT Citra IntiRama
Jl. Cideng Timur No. 15J-15O
Jakarta Pusat
INDONESIA
TEL: (021) 6324170
KOREA
Cosmos Corporation
1461-9, Seocho-Dong,
Seocho Ku, Seoul, KOREA
TEL: (02) 3486-8855
MALAYSIA
Roland Asia Pacific Sdn. Bhd.
45-1, Block C2, Jalan PJU 1/39,
Dataran Prima, 47301 Petaling
Jaya, Selangor, MALAYSIA
TEL: (03) 7805-3263
VIET NAM
Suoi Nhac Company, Ltd
370 Cach Mang Thang Tam St.
Dist.3, Ho Chi Minh City,
VIET NAM
TEL: 9316540
PHILIPPINES
G.A. Yupangco & Co. Inc.
339 Gil J. Puyat Avenue
Makati, Metro Manila 1200,
PHILIPPINES
TEL: (02) 899 9801
SINGAPORE
SWEE LEE MUSIC
COMPANY PTE. LTD.
150 Sims Drive,
SINGAPORE 387381
TEL: 6846-3676
TAIWAN
ROLAND TAIWAN
ENTERPRISE CO., LTD.
Room 5, 9fl. No. 112 Chung
Shan N.Road Sec.2, Taipei,
TAIWAN, R.O.C.
TEL: (02) 2561 3339
THAILAND
Theera Music Co. , Ltd.
100-108 Soi Verng
Nakornkasem, New
Road,Sumpantawongse,
Bangkok 10100 THAILAND
TEL: (02) 224-8821
AUSTRALIA/
NEW ZEALAND
AUSTRALIA/
NEW ZEALAND
Roland Corporation
Australia Pty.,Ltd.
38 Campbell Avenue
Dee Why West. NSW 2099
AUSTRALIA
For Australia
Tel: (02) 9982 8266
For New Zealand
Tel: (09) 3098 715
CENTRAL/LATIN
AMERICA
ARGENTINA
Instrumentos Musicales S.A.
Av.Santa Fe 2055
(1123) Buenos Aires
ARGENTINA
TEL: (011) 4508-2700
BARBADOS
A&B Music Supplies LTD
12 Webster Industrial Park
Wildey, St.Michael, Barbados
TEL: (246)430-1100
BRAZIL
Roland Brasil Ltda.
Rua San Jose, 780 Sala B
Parque Industrial San Jose
Cotia - Sao Paulo - SP, BRAZIL
TEL: (011) 4615 5666
CHILE
Comercial Fancy II S.A.
Rut.: 96.919.420-1
Nataniel Cox #739, 4th Floor
Santiago - Centro, CHILE
TEL: (02) 688-9540
COLOMBIA
Centro Musical Ltda.
Cra 43 B No 25 A 41 Bododega 9
Medellin, Colombia
TEL: (574)3812529
COSTA RICA
JUAN Bansbach Instrumentos
Musicales
Ave.1. Calle 11, Apartado
10237,
San Jose, COSTA RICA
TEL: 258-0211
CURACAO
Zeelandia Music Center Inc.
Orionweg 30
Curacao, Netherland Antilles
TEL:(305)5926866
DOMINICAN REPUBLIC
Instrumentos Fernando Giraldez
Calle Proyecto Central No.3
Ens.La Esperilla
Santo Domingo,
Dominican Republic
TEL:(809) 683 0305
ECUADOR
Mas Musika
Rumichaca 822 y Zaruma
Guayaquil - Ecuador
TEL:(593-4)2302364
EL SALVADOR
OMNI MUSIC
75 Avenida Norte y Final
Alameda Juan Pablo II,
Edificio No.4010 San Salvador,
EL SALVADOR
TEL: 262-0788
GUATEMALA
Casa Instrumental
Calzada Roosevelt 34-01,zona 11
Ciudad de Guatemala
Guatemala
TEL:(502) 599-2888
HONDURAS
Almacen Pajaro Azul S.A. de C.V.
BO.Paz Barahona
3 Ave.11 Calle S.O
San Pedro Sula, Honduras
TEL: (504) 553-2029
MARTINIQUE
Musique & Son
Z.I.Les Mangle
97232 Le Lamantin
Martinique F.W.I.
TEL: 596 596 426860
Gigamusic SARL
10 Rte De La Folie
97200 Fort De France
Martinique F.W.I.
TEL: 596 596 715222
MEXICO
Casa Veerkamp, s.a. de c.v.
Av. Toluca No. 323, Col. Olivar
de los Padres 01780 Mexico
D.F. MEXICO
TEL: (55) 5668-6699
NICARAGUA
Bansbach Instrumentos
Musicales Nicaragua
Altamira D'Este Calle Principal
de la Farmacia 5ta.Avenida
1 Cuadra al Lago.#503
Managua, Nicaragua
TEL: (505)277-2557
PANAMA
SUPRO MUNDIAL, S.A.
Boulevard Andrews, Albrook,
Panama City, REP. DE
PANAMA
TEL: 315-0101
PARAGUAY
Distribuidora De
Instrumentos Musicales
J.E. Olear y ESQ. Manduvira
Asuncion PARAGUAY
TEL: (595) 21 492147
PERU
Audionet
Distribuciones Musicales SAC
Juan Fanning 530
Miraflores
Lima - Peru
TEL: (511) 4461388
TRINIDAD
AMR Ltd
Ground Floor
Maritime Plaza
Barataria Trinidad W.I.
TEL: (868) 638 6385
53
Page 54

URUGUAY
Todo Musica S.A.
Francisco Acuna de Figueroa
1771
C.P.: 11.800
Montevideo, URUGUAY
TEL: (02) 924-2335
VENEZUELA
Instrumentos Musicales
Allegro,C.A.
Av.las industrias edf.Guitar
import
#7 zona Industrial de Turumo
Caracas, Venezuela
TEL: (212) 244-1122
EUROPE
AUSTRIA
Roland Elektronische
Musikinstrumente HmbH.
Austrian Office
Eduard-Bodem-Gasse 8,
A-6020 Innsbruck, AUSTRIA
TEL: (0512) 26 44 260
BELGIUM/FRANCE/
HOLLAND/
LUXEMBOURG
Roland Central Europe N.V.
Houtstraat 3, B-2260, Oevel
(Westerlo) BELGIUM
TEL: (014) 575811
CROATIA
ART-CENTAR
Degenova 3.
HR - 10000 Zagreb
TEL: (1) 466 8493
CZECH REP.
CZECH REPUBLIC
DISTRIBUTOR s.r.o
Voctárova 247/16
CZ - 180 00 PRAHA 8,
CZECH REP.
TEL: (2) 830 20270
DENMARK
Roland Scandinavia A/S
Nordhavnsvej 7, Postbox 880,
DK-2100 Copenhagen
DENMARK
TEL: 3916 6200
FINLAND
Roland Scandinavia As, Filial
Finland
Elannontie 5
FIN-01510 Vantaa, FINLAND
TEL: (0)9 68 24 020
GERMANY
Roland Elektronische
Musikinstrumente HmbH.
Oststrasse 96, 22844
Norderstedt, GERMANY
TEL: (040) 52 60090
GREECE/CYPRUS
STOLLAS S.A.
Music Sound Light
155, New National Road
Patras 26442, GREECE
TEL: 2610 435400
HUNGARY
Roland East Europe Ltd.
Warehouse Area ‘DEPO’ Pf.83
H-2046 Torokbalint,
HUNGARY
TEL: (23) 511011
IRELAND
Roland Ireland
G2 Calmount Park, Calmount
Avenue, Dublin 12
Republic of IRELAND
TEL: (01) 4294444
ITALY
Roland Italy S. p. A.
Viale delle Industrie 8,
20020 Arese, Milano, ITALY
TEL: (02) 937-78300
NORWAY
Roland Scandinavia Avd.
Kontor Norge
Lilleakerveien 2 Postboks 95
Lilleaker N-0216 Oslo
NORWAY
TEL: 2273 0074
POLAND
ROLAND POLSKA SP. Z O.O.
UL. Gibraltarska 4.
PL-03 664 Warszawa
POLAND
TEL: (022) 679 4419
PORTUGAL
Roland Iberia, S.L.
Portugal Office
Cais das Pedras, 8/9-1 Dto
4050-465, Porto, PORTUGAL
TEL: 22 608 00 60
ROMANIA
FBS LINES
Piata Libertatii 1,
535500 Gheorgheni,
ROMANIA
TEL: (266) 364 609
RUSSIA
MuTek
Dorozhnaya ul.3,korp.6
117 545 Moscow, RUSSIA
TEL: (095) 981-4967
SLOVAKIA
DAN Acoustic s.r.o.
Povazská 18.
SK - 940 01 Nové Zámky
TEL: (035) 6424 330
SPAIN
Roland Iberia, S.L.
Paseo García Faria, 33-35
08005 Barcelona SPAIN
TEL: 93 493 91 00
SWEDEN
Roland Scandinavia A/S
SWEDISH SALES OFFICE
Danvik Center 28, 2 tr.
S-131 30 Nacka SWEDEN
TEL: (0)8 702 00 20
SWITZERLAND
Roland (Switzerland) AG
Landstrasse 5, Postfach,
CH-4452 Itingen,
SWITZERLAND
TEL: (061) 927-8383
UKRAINE
EURHYTHMICS Ltd.
P.O.Box: 37-a.
Nedecey Str. 30
UA - 89600 Mukachevo,
UKRAINE
TEL: (03131) 414-40
UNITED KINGDOM
Roland (U.K.) Ltd.
Atlantic Close, Swansea
Enterprise Park, SWANSEA
SA7 9FJ,
UNITED KINGDOM
TEL: (01792) 702701
MIDDLE EAST
BAHRAIN
Moon Stores
No.1231&1249 Rumaytha
Building Road 3931, Manama
339 BAHRAIN
TEL: 17 813 942
IRAN
MOCO INC.
No.41 Nike St., Dr.Shariyati Ave.,
Roberoye Cerahe Mirdamad
Tehran, IRAN
TEL: (021)-2285-4169
ISRAEL
Halilit P. Greenspoon & Sons
Ltd.
8 Retzif Ha'alia Hashnia St.
Tel-Aviv-Yafo ISRAEL
TEL: (03) 6823666
JORDAN
MUSIC HOUSE CO. LTD.
FREDDY FOR MUSIC
P. O. Box 922846
Amman 11192 JORDAN
TEL: (06) 5692696
KUWAIT
EASA HUSAIN AL-YOUSIFI
& SONS CO.
Al-Yousifi Service Center
P.O.Box 126 (Safat) 13002
KUWAIT
TEL: 00 965 802929
LEBANON
Chahine S.A.L.
George Zeidan St., Chahine
Bldg., Achrafieh, P.O.Box: 165857
Beirut, LEBANON
TEL: (01) 20-1441
OMAN
TALENTZ CENTRE L.L.C.
Malatan House No.1
Al Noor Street, Ruwi
SULTANATE OF OMAN
TEL: 2478 3443
QATAR
Al Emadi Co. (Badie Studio &
Stores)
P.O. Box 62, Doha, QATAR
TEL: 4423-554
SAUDI ARABIA
aDawliah Universal
Electronics APL
Behind Pizza Inn
Prince Turkey Street
aDawliah Building,
PO BOX 2154,
Alkhobar 31952
SAUDI ARABIA
TEL: (03) 8643601
SYRIA
Technical Light & Sound
Center
Rawda, Abdul Qader Jazairi St.
Bldg. No. 21, P.O.BOX 13520,
Damascus, SYRIA
TEL: (011) 223-5384
TURKEY
ZUHAL DIS TICARET A.S.
Galip Dede Cad. No.37
Beyoglu - Istanbul / TURKEY
TEL: (0212) 249 85 10
U.A.E.
Zak Electronics & Musical
Instruments Co. L.L.C.
Zabeel Road, Al Sherooq Bldg.,
No. 14, Ground Floor, Dubai,
U.A.E.
TEL: (04) 3360715
As of Oct. 1, 2007 (ROLAND)
NORTH AMERICA
CANADA
Roland Canada Ltd.
(Head Office)
5480 Parkwood Way
Richmond B. C., V6V 2M4
CANADA
TEL: (604) 270 6626
Roland Canada Ltd.
(Toronto Office)
170 Admiral Boulevard
Mississauga On L5T 2N6
CANADA
TEL: (905) 362 9707
U. S. A.
Roland Corporation U.S.
5100 S. Eastern Avenue
Los Angeles, CA 90040-2938,
U. S. A.
TEL: (323) 890 3700
54
Page 55

この機器を正しくお使いいただくために、ご使用前に「安全上の
ご注意」(P.56)と「使用上のご注意」(P.59)をよくお読みく
ださい。また、この機器の優れた機能を十分ご理解いただくため
にも、取扱説明書をよくお読みください。取扱説明書は必要なと
きにすぐに見ることができるよう、手元に置いてください。
製品の仕様および内容は、改良のため予告なく変更することがあ
ります。
2008 ローランド株式会社
©
本書の一部、もしくは全部を無断で複写・転載することを禁じます。
555555
55
Page 56

安全上のご注意
火災・感電・傷害を防止するには
555566
注意の意味について警告と
取扱いを誤った場合に、使用者が
警告
注意
66
死亡または重傷を負う可能性が想
定される内容を表わしています。
取扱いを誤った場合に、使用者が
傷害を負う危険が想定される場合
および物的損害のみの発生が想定
される内容を表わしています。
※物的損害とは、家屋・家財およ
び家畜・ペットにかかわる拡大
損害を表わしています。
図記号の例
は、注意(危険、警告を含む)を表わしていま
す。
具体的な注意内容は、 の中に描かれています。
左図の場合は、「一般的な注意、警告、危険」を
表わしています。
は、禁止(してはいけないこと)を表わしてい
ます。
具体的な禁止内容は、 の中に描かれています。
左図の場合は、「分解禁止」を表わしています。
●
は、強制(必ずすること)を表わしています。
具体的な強制内容は、
左図の場合は、「電源プラグをコンセントから抜
くこと」を表わしています。
●
の中に描かれています。
Page 57

以下の指示を必ず守ってください
警告 警告
● この機器を分解したり(取扱説明書に記載されている
指示(P.67)を除く)、改造したりしないでくださ
い。
........................................................................................................................
● 修理/部品の交換などで、取扱説明書に書かれていな
いことは、絶対にしないでください。必ずお買い上げ
店またはローランドお客様相談センターに相談してく
ださい。
........................................................................................................................
● 次のような場所に設置しないでください。
○ 温度が極端に高い場所(直射日光の当たる場所、
暖房機器の近く、発熱する機器の上など)
○ 水気の近く(風呂場、洗面台、濡れた床など)や
湿度の高い場所
○ 湯気や油煙が当たる場所
○ 塩害の恐れがある場所
○ 雨に濡れる場所
○ ほこりや砂ぼこりの多い場所
○ 振動や揺れの多い場所
........................................................................................................................
● この機器を取り付けた TD-20 に、異物(燃えやすい
もの、硬貨、針金など)や液体(水、ジュースなど)
を絶対に入れないでください。
........................................................................................................................
● お子様のいるご家庭で使用する場合、お子様の取り扱
いやいたずらに注意してください。必ず大人のかた
が、監視/指導してあげてください。
........................................................................................................................
● この機器を落としたり、この機器に強い衝撃を与えな
いでください。
........................................................................................................................
● TDW-20 を取り付ける前に、TD-20 の電源を切って
電源プラグをコンセントから外してください。
........................................................................................................................
555577
77
Page 58

注意
● この機器の上に乗ったり、機器の上に重いものを置か
ないでください。
........................................................................................................................
● 指定の機器(TD-20)だけに取り付け、取り付け時
には指定されたネジだけを外してください。
........................................................................................................................
● 取り外したネジや付属の固定用具は、小さなお子様が
誤って飲み込んだりすることのないようお子様の手の
届かないところへ保管してください。
........................................................................................................................
88
555588
Page 59

使用上のご注意
設置について
● 直射日光の当たる場所や、発熱する機器の近く、閉め切った車内
などに放置しないでください。変形、変色することがあります。
● 極端に温湿度の違う場所に移動すると、水滴がつく(結露)こと
があります。そのまま使用すると故障の原因になりますので、数
時間放置し、結露がなくなってから使用してください。
修理について
● お客様がこの機器を分解(取扱説明書に記載されている指示
(P.67)を除く)、改造された場合、以後の性能について保証で
きなくなります。また、修理をお断りする場合もあります。
● 修理に出される場合、記憶した内容が失われることがあります。
大切な記憶内容は、メモリー・カードに保存するか、記憶内容を
メモしておいてください。修理するときには記憶内容の保存に細
心の注意を払っておりますが、メモリー部の故障などで記憶内容
が復元できない場合もあります。失われた記録内容の修復に関し
ましては、補償も含めご容赦願います。
● 当社では、この製品の補修用性能部品(製品の機能を維持するた
めに必要な部品)を、製造打切後 6 年間保有しています。この部
品保有期間を修理可能の期間とさせていただきます。なお、保有
期間が経過した後も、故障箇所によっては修理可能の場合があり
ますので、お買い上げ店、またはローランドお客様相談センター
にご相談ください。
その他の注意について
● コンパクトフラッシュの失われた記憶内容の修復に関しまして
は、補償を含めご容赦願います。
● 輸送や引っ越しをするときは、この機器が入っていたダンボール
箱と緩衝材、または同等品で梱包してください。
● この機器が入っていた梱包箱や緩衝材を廃棄する場合、各地域の
ゴミの分別基準に従って行ってください。
555599
99
Page 60

カードをお使いになる前に
コンパクトフラッシュ・カードの取り扱い
● コンパクトフラッシュは精密な電子部品で作られていますので、
取り扱いについては次の点に注意してください。
○ 静電気による破損を防ぐため、取り扱う前に身体に帯電して
いる静電気を放電しておく。
○ 端子部に手や金属で触れない。
○ 曲げたり、落としたり、強い衝撃を与えたりしない。
○ 直射日光の当たる場所や、閉め切った自動車の中などに放置
しない。(保存温度:-25 度〜 85 度)
○ 水に濡らさない。
○ 分解や改造をしない。
● CompactFlash(コンパクトフラッシュ)および は米国
SanDisk 社の商標であり、CFA(CompactFlash
Association)にライセンスされています。
™
● ローランド株式会社は、CompactFlash
( )のライセンシーとして認定されています。
および CF ロゴ
著作権について
● お客様がエクスパンション・ボード TDW-20(以下、「本製品」
といいます)をローランドの正規販売店からお買い上げになった
時点で、本製品に含まれる音色は、ローランド株式会社から、お
客様に対して、音楽制作、公共の場での演奏、放送などの商用目
的のための使用を許諾したものであって、著作権を譲渡したもの
ではありません。
お客様は、いかなる追加料金を支払うこともなく、本製品に含ま
れるあらゆる音色を、商用あるいは非商用目的の録音に使用でき
ます。ただし、お客様が本製品を使用して音楽の録音を行う際
は、以下のことにご注意ください。
本製品に含まれるいかなる録音物も、そのままの状態であれ、い
かなる手段によって再構成、ミキシング、フィルター加工、再合
成、加工処理、その他の編集作業をした状態であれ、ローランド
の書面による許可なく、他の製品に含めたり再販売するために複
製・複写することを禁止します。また、本製品に含まれるいかな
る音も、許可なく贈与、取引、貸与、賃貸、再発行、再配布、再
販売することを禁止します。
従って、本製品の音色は音楽制作の範囲でお使いいただくようお
願いします。そして、本製品の音色はお客様ご自身の個人的使用
の目的の範囲でお使いください。本製品の音色データの複製・複
写は禁止します。
666600
00
Page 61

MEMO
666611
11
Page 62

もくじ
安全上のご注意 ............................................................56
使用上のご注意 ............................................................59
TD-20 への TDW-20 の取り付け............................64
重要:取り付け前にご確認ください ..............................64
データのバックアップを保存する ..................................66
TDW-20 を取り付ける ...................................................67
付属のコンパクトフラッシュで
TD-20 をバージョン・アップする ................................69
主な特長........................................................................70
ドラム・キットの構成 .....................................................72
22
666622
新機能 ........................................................................... 74
インストのパラメーター[INST]................................. 74
インストの選択 .........................................................74
V-EDIT パラメーター............................................... 74
ミキサーの設定 ................................................................ 77
トリガー・インプット の
最小音量(MINIMUM VOLUME)設定............... 77
パッドごとのコンプレッサー......................................... 78
パッド・コンプレッサーのテンプレート改良 ....... 78
アンビエンス.................................................................... 78
新しい Room Type(15 種類)............................. 78
新しい Wall Type(3 種類)................................... 79
Mic Position(計 9 種類)..................................... 79
出力ゲイン・パラメーター追加 .............................. 80
アンビエンスのプレビュー...................................... 80
マルチエフェクト ............................................................ 80
出力ゲイン・パラメーターの追加 .......................... 80
マルチエフェクトのプレビュー .............................. 80
マスター・コンプレッサー............................................. 81
ゲイン・リダクション(GR)メーター ................ 81
ドラム・キットのパラメーター[KIT]......................... 81
パッド・パターン機能のオン/オフ ......................81
Page 63

トリガー・パラメーターの設定......................................82
アドバンスト・トリガー・パラメーターの追加....82
各パッドのトリガー情報の表示...............................82
コピー機能.........................................................................83
トリガー・バンクのコピー.......................................84
インスト・セットのコピー.......................................84
インストのコピー......................................................85
コピー画面へのジャンプ...........................................85
TD-20 全体の設定 ...........................................................86
マスター出力..............................................................86
その他のソースの出力先...........................................86
フット・スイッチ/パッド・スイッチの設定........87
MIX IN ジャックの設定............................................87
バージョン・アップ前の
バックアップ・データのインポート ..............................88
その他の機能.....................................................................89
キット・セレクション機能.......................................89
バックアップからのキット選択...............................89
資料................................................................................90
ドラム・インスト・リスト..............................................90
プリセット・ドラム・キット・リスト ..........................94
666633
33
Page 64

TD-20 への TDW-20 の取り付け
重要:取り付け前にご確認ください
インストールの手順
1111....付属品を確認する。
本製品のパッケージには以下のものが入っています。パッケージ
を開けたら、不足しているものがないか確認しましょう。
TDW-20 エクスパンション・ボード
•
静電気による破損防止のため、取り付けるまで袋(導電袋)に
入れたままにしておいてください。
ドライバー
•
TD-20 底面のカバーを外すときに使います。
固定用具
•
TDW-20 をホルダーに固定するときに使います。
コンパクトフラッシュ・カード
•
バージョンアップ・プログラムが記録されています。
2222....TD-20 のデータのバックアップを保存する(P.66)。
3333....TDW-20 を取り付ける(P.67)。
4444....TD-20 のプログラムをバージョン・アップする(P.69)。
44
666644
付属のコンパクトフラッシュ・カードについて
● 付属のコンパクトフラッシュは、TD-20 のバージョン・アップ
が完了するまで、パソコンなどの機器では使用しないでくださ
い。
TD-20 のデータのバックアップ
● TDW-20 の取り付け前に、現在お使いのデータをコンパクトフ
ラッシュに保存してください。
バージョン・アップを行うと、TD-20 にあるデータや設定は、
すべて失われます。必要なデータや設定は、コンパクトフラッ
シュに保存しておいてください。TD-20 のデータや設定を付属
のコンパクトフラッシュに保存する場合は、必ず TD-20 の電源
をオンにしたあとで、メモリー・カード・スロットに挿入してく
ださい。付属のコンパクトフラッシュをメモリー・カードスロッ
トに挿入したまま電源をオンにすると、TD-20 のバージョン・
アップ画面が表示されます。
MIDI バルク・ダンプで保存したデータがある場合
● ドラム・キット、パターンのデータ、設定などをバルク・ダンプ
で他の MIDI 機器などに保存している場合、TD-20 のバージョ
ン・アップ前に TD-20 に戻してから、それらのデータをコンパ
クトフラッシュに保存してください。
Page 65

データの互換性
● TD-20 で作成し、コンパクトフラッシュに記録したバックアッ
プは、バージョン・アップ後の TD-20 でもインポート可能です
(P.88)。
● バージョン・アップ前の TD-20 のプリセット・ドラム・キット
は、バージョン・アップ後も使用することができます。
● バージョン・アップした TD-20 のデータは、バージョン・アッ
プ前の TD-20 では使用できません。
● TD-20 のバージョン・アップ後に TDW-20 を外すと、TD-20
は動作しません。
TDW-20 取り扱いのご注意
● TDW-20 は、静電気により部品が破壊される恐れがあります。
TDW-20 を取り扱うときは、次の点に注意してください。
○ TDW-20 に触る前に、あらかじめ何らかの金属に触れて、
体や衣類にたまっている静電気を放電してください。
○ TDW-20 を持つときは、基板の縁を持ち、部品やコネク
ターの部分に直接手を触れないでください。
○ TDW-20 を保管するとき、または輸送するときなどは、購
入時に基板が入っていた袋(導電袋)に入れてください。
● TD-20 内部の、回路部やコネクター部には手を触れないでくだ
さい。
● 装着時は、TDW-20 を無理に押し込まないでください。装着し
にくい場合、いったん TDW-20 を外してやり直してください。
● TDW-20 の取り付けを終えたら、正しく取り付けられているこ
とを再度確認してください。
● TD-20 の内部に異物が入ってしまったときは、お買い上げ店ま
たはローランドお客様相談センターに修理を依頼してください。
666655
55
Page 66

データのバックアップを保存する
付属のコンパクトフラッシュにバックアップを保存する場合は、必
ず TD-20 の電源をオンにしたあとで、メモリー・カード・スロッ
トに挿入してください。付属のコンパクトフラッシュを挿入してか
ら電源をオンにすると、TD-20 のバージョン・アップ画面が表示
されます。
1.
コンパクトフラッシュを TD-20 フロント・パネルのメモ
リー・カード・スロットに差し込みます。
※ コンパクトフラッシュは挿入方向や表裏に注意し、確実に奥ま
で差し込んでください。また無理な挿入はしないでください。
2.
[CARD]を押します。
[CARD]と CompactFlash インジケーターが点灯し、「CARD
MENU」画面が表示されます。
※ TD-20 で初めて使用するコンパクトフラッシュを挿入した場
合は、「Unformatted!」と表示されます。TD-20 取扱説明書
を参照して、コンパクトフラッシュを初期化してください。
3.
[F1(SAVE)]を押します。
66
666666
4.
「CARD SAVE」画面で、[+/-]または[VALUE]で、
データを保存するバックアップを選びます。
5.
[F5(SAVE)]を押します。
バックアップに名前をつけるときは、[F4(NAME)]を押しま
す。
6.
確認画面が表示されたら[F5(EXECUTE)]を押して、
データを保存します。
中止するには[F1(CANCEL)]を押します。
7.
[F5(EXECUTE)]を押して、データを保存します。
Page 67

TDW-20 を取り付ける
1.
TD-20 の電源を切って電源プラグをコンセントから外して
ください。
2.
TD-20 を裏返します。
※ TD-20 を裏返す際は、ボタン、つまみなどを破損しないよう
に注意してください。また、ボタン、つまみなどの保護のた
め、十分厚みのあるクッションやタオルなどを敷いてくださ
い。
3.
TD-20 底面にある、矢印のついた 8 本のネジを外してカ
バーを開けます。
※ 矢印のネジ以外は外さないでください。
4.
基板ホルダーを、図の向きに合わせます。
5.
エクスパンション・ボードのコネクターを、本体のコネク
ターに完全に差し込みます。このとき、各基板ホルダーの先
端が、TDW-20 の取り付け穴から出るようにします。
666677
77
Page 68

6.
TDW-20 に付属の固定用具で、基板ホルダーを LOCK 方向
に回し、TDW-20 を固定します。
取り付けを終えたら、基板ホルダーが正しくロックされていること
を確認してください。
7.
手順 3 で取り外した 8 本 のネジでカバーを取り付けます。
666688
88
Page 69

付属のコンパクトフラッシュで TD-20 をバージョン・アップする
1.
TD-20 の電源がオフになっていることを確認し、付属のコ
ンパクトフラッシュを TD-20 のメモリー・カード・スロッ
トに挿入します。
2.
TD-20 の電源をオンにします。
以下の画面が表示されることを確認してください。
3.
[F5=UPDATE]を押して、バージョン・アップを開始しま
す。
※ バージョン・アップが完了するまで 3 分程度かかります。
※ バージョン・アップが完了するまで、TD-20 の電源をオフに
しないでください。
4.
画面に「Update Completed」と表示されたら、TD-20 の
電源をオフにして、付属のコンパクトフラッシュを抜きま
す。
5.
再度 TD-20 の電源をオンにします。
6.
[F5(EXECUTE)]を押して、TD-20 を初期化します。
666699
99
Page 70

主な特長
新たに 50のドラム・キットを追加
臨場感あふれるアコースティック・ドラム・サウンドを新たに搭載。
ロールやゴースト・ノートなどの繊細なショットからパワフルなリ
ム・ショットまで、幅広いダイナミクスで豊かな表現力を実現しまし
た。
また、プロセスド・サウンドやエレクトロニック・サウンドを多数搭
載し、オルタネイティブ・ポップやヒップ・ホップ、クラブ・ミュー
ジックなど、さまざまな音楽ジャンルに幅広く対応しました。
TDW-20 で追加された 50 のキットに加え、TD-20 のプリセット・
キット(50 キット)、計 100 のキットを活用できます。
拡張された V-EDITと表現力の向上
キックの「Mic Size」に、ラージ・ダイアフラムのバリエーショ
•
ンを追加。低域のアタックを増強できます(P.74)。
きめ細かな音色設定を可能にする「Mic Position」を拡張
•
(P.74)。
キックによる、キット全体の「鳴り」を再現する「Kit
•
Resonance」パラメーターを搭載。臨場感のあるドラム・サウ
ンドを実現します(P.74)。
スネアのリム・サウンドに厳選された音色をレイヤーすることが
•
でき、リム・ショットの演奏表現の幅を広げます。(P.75)。
叩いた強さでピッチベンドの深さが変化するエレクトロニック・
•
インストを搭載(P.76)。
パッド・スイッチ、フット・スイッチにより、スネアのストレイ
•
ナーのオン/オフと、通常の Hi-Hat と Fixed Hi-Hat を切り替え
可能(P.87)。
叩く強さ、打点位置、連打間隔に応じて、滑らかな音色変化を再
•
現する「Dynamic Interval Control」機能を搭載。スネアのロー
ル、シンバルの連打、ライド・シンバルのレガートやリム・
ショットのニュアンスなど、滑らかで自然なサウンドを実現しま
した(P.82)。
ハイハットの音色と音色制御の強化により、V-Hi-Hat の演奏を余
•
すところなく音に表現します(P.71)。
「Snare Buzz」の音色と音色制御を改良。キックではタイトなバ
•
ズを、タムではややルーズなバズを鳴らすことにより、ダイナミ
クスによる音色変化やキット全体のまとまり感が向上します
(P.74)。
アンビエンスの強化
新アルゴリズムを採用し、高品位で臨場感のある 15 の新しい Room
Type を追加。また 3 つの Wall Type の追加と、7 つの Mic
Position 追加によって、よりきめ細かな音色調整が可能になりまし
た(P.78)。
777700
00
Page 71

バックアップ機能の拡張
一枚のコンパクトフラッシュに、最大 99 個のバックアップを作成す
ることができるようになりました。TD-20 で作成したバックアップ
は、バージョン・アップ後のインポート機能を使うことにより、その
まま使うことができます(P.72)。
キット・セレクション機能
TD-20 / TDW-20 のプリセット・キットや、コンパクトフラッ
シュにバックアップされているキットを、ユーザー・メモリーにコ
ピーすることなく演奏できる「キット・セレクション機能」を搭載し
ました(P.89)。
※ キット・セレクション機能でキットを演奏する場合は、キット
をエディットすることはできません。またパッド・パターン機
能は使用できません。
パターンの追加
新たに 50 のプリセット・パターン(P101 〜 150)が追加されま
した。
KD-120 をお使いの場合
キックの音色のダイナミクスによるレスポンスが改良されてい
るため、トリガー設定を再調整することにより、より快適に演
奏できるようになります。
あなたがバージョン・アップ前の TD-20 から、あなた自身の
トリガー設定をロードして使用する場合、ロードした後でトリ
ガー設定を再調整をすることをお勧めします。
Hi-Hat に関する重要な注意点
ハイハットを快適に演奏するために、以下の調整をすることを
お勧めします。
•
最も重要なのは「Offset」の調整です。
操作:[KIT]ー[TRIGGER]
•
「Foot Splash Sens」も重要です。調整してみてくださ
い。
操作:[TRIGGER]ー[F3(HI-HAT)]
•
「foot closed (Pedal HH)」の音量は、ドラム・キッ
トごとに設定できます。
操作:[KIT]ー[F2(FUNC)]ー[F1(VOLUME)]
•
ハイハットのヘッド(Bow)とリム(Edge)の音量は、
それぞれ独立して音量を調節することができます。
操作:[MIXER]ー[F5(H & R)]
777711
11
Page 72

ドラム・キットの構成
TDW-20 を装着し、TD-20 をバージョン・アップすると、100 の
ドラム・キットを使えるようになります。初期状態では、キット 1 〜
50 には追加された 50 のキット、キット 51 〜 100 には、バー
ジョン・アップ前の TD-20 のプリセット・キットが読み込まれてい
ます。これら 100 のプリセット・キットは、ユーザー・キットとは
別に記憶されいるので、キット単位でユーザー・キットにコピーする
ことができます。
コンパクトフラッシュに記録されるデータ
100 のユーザー・キットを、まとめてバックアップすることがで
•
きます。1 枚のコンパクトフラッシュには、最大 99 のバック
アップを記録することができます。
コンパクトフラッシュにバックアップされたドラム・キットは、
•
本体にロードするだけでなく、キット・セレクション機能により
ユーザー・キットとしてロードすることなく演奏することができ
ます(エディットすることはできません)(P.89)。
バージョンアップ前の TD-20 で作られたバックアップは、イン
•
ポート機能によって、バージョンアップ後でも読み込むことがで
きます(P.88)。
バージョンアップ前の TD-20 で作られたバックアップをインポー
トした場合、ユーザー・キット 51 〜 100 に読み込まれます。
22
777722
バックアップのファイル名
TD-20 のデータが記録されたコンパクトフラッシュをパソコンで読
み込む場合、TD-20 に表示される名称と、パソコンで表示される
ファイル名は異なります。データをパソコンで管理したり、ユーザー
同士で交換するときの参考にしてください。
バージョンアップ前の TD-20 で保存したバックアップ
Backup 1 のファイル名は「TD20BK01.TD0」です。
最初の「TD20」はバージョンアップ前の TD-20 で保存されたこと
を意味します。「BK01」は、No.1 のバックアップを意味します。
No.8 のバックアップの場合は、「BK08」になります。
バージョンアップ後の TD-20 で保存したバックアップ
Backup 1 のファイル名は「TDW2BK01.TD0」です。
最初の「TDW2」はバージョンアップ後の TD-20 で保存されたこと
を意味します。「BK01」は、No.1 のバックアップを意味します。
No.99 のバックアップの場合は、「BK99」になります。
パターン・ファイル
セーブされた各パターンは、それぞれファイルとして記録されます。
セーブされたパターン 1(C1)のファイル名は
「TD20P001.TD0」です。「P001」は、パターン No.1 を意味し
ます。パターン No.100 のファイル名は「TD20P100.TD0」にな
ります。
Page 73

User
KIT 4
KIT 3
KIT 2
KIT 1
[COPY]–[F1(KIT)]–[F2 (PRESET)]
PRESET
TDW-20 Preset
KIT 4
KIT 3
KIT 2
KIT 1
TD-20
KIT 100
COPY
TD-20 Preset
KIT 100
CARD
[CARD]–[F2 (LOAD)]
LOAD
SAVE
[CARD]–[F1 (SAVE)]
IMPORT
[CARD]–[F3 (IMPORT)]
CARD
(Original TD-20)
Backup 3Backup 2Backup 1 Backup 99
KIT 100
KIT 4
KIT 3
KIT 2
KIT 1
Backup 3Backup 2Backup 1
KIT 50
KIT 4
KIT 3
KIT 2
KIT 1
Backup 8
777733
33
Page 74

新機能
インストのパラメーター[INST]
インストの選択 V-EDIT パラメーター
「INST」画面でインストを選択するときに、[F4(INT<>EXP)]を
押すと、TD-20 のインストと TDW-20 のインストを切り替えるこ
とができます。
TDW-20 のインスト・グループには、名前の前に「EXP」のアイ
コンが表示されます。
44
777744
「INST EDIT」画面で[SHIFT]+[F4]を押すと、インストのパラ
メーターを標準的な値に戻すことができます。
※ V-EDIT が可能なインストのエディット画面には、V-EDIT の
アイコンが表示されます。
キック(KICK / EXP KICK)
Snare Buzz: キックに適したタイトなバス・サウンドに
•
Mic Position: バリエーションが増え、音作りの自由度が
•
Mic Size: アタックの低域を強調させることができま
•
Kit Resonance: ドラム・キット全体の共鳴を加えることに
•
なり、臨場感と表現力が向上しました。
広がりました。
す。
より、臨場感のあるキットを再現します。
Page 75

スネア(SNARE / EXP SNARE)
Mic Position: バリエーションが増え、音作りの自由度が
•
Add Rim Sound: タンバリン、909 Claps、Gate Hit の音
•
Level: リム・サウンドで追加された音の音量バラ
•
インストによっては、「Material」と「Strainer Adj.」はエディッ
トできません。
フット・スイッチ、またはパッド・スイッチで、スネアのストレイ
ナーをはずした状態(Strainer Adj. = OFF)にすることができま
す。詳しくは『フット・スイッチ/パッド・スイッチの設定』
(P.87)を参照してください。
広がりました。
を追加できます。リム・ショットの演奏表
現の幅を広げます。
ンスを調整します。
タム(TOM / EXP TOM)
Snare Buzz: 臨場感と表現力のあるバズ・サウンドになりま
•
Mic Position:レコーディング時のマイク・ポジションによる
•
した。タムに適したややルーズなバズ・サウン
ドです。
音づくりを、忠実に再現しました。
ハイハット(HI-HAT / EXP HI-HAT)
Add Sound: ハイハット・サウンドにタンバリン、カバサ、
•
Level: 追加された音の音量バランスを調整します。
•
フット・スイッチ、またはパッド・スイッチで、ハイハットをク
ローズの状態(Fixed Hi-Hat = FIXED2)にすることができます。
詳しくは『フット・スイッチ/パッド・スイッチの設定』(P.87)
を参照してください。
カウベルを加えることができます。ハイハット
にパーカッションのグルーブが加わります。
777755
55
Page 76

各シンバルのシズル
Sizzle Type: シズル・タイプにビーズが追加されました。
•
Sizzle Amount:シズルの量を調節できます。
•
TDW-20 エレクトロニック・インストの
ダイナミック・ピッチ・ベンド
ダイナミック・ピッチ・ベンドは、TDW-20 で追加されたエレクト
ロニック・インストで使用できる機能です。
「INST」画面で TDW-20 で追加されたエレクトロニック・インスト
をパッドにアサインし、[F2(EDIT)]を押すと、以下の画面が表示
されます。
パッドを叩いた強さに応じて、ピッチが変化します。
以下のパラメーターでピッチの変化を調節します。
パラメーター 設定値 説明
[F1(PITCH)]
Basic Pitch -480 〜 +480 音の高さ
Dynamic Bend OFF、ON
Bend Depth -24 〜 +24 ベロシティによるピッチの変化量
Bend Time -31 〜 +31
[F2(DECAY)]
Decay Time -31 〜 +31 余韻の長さ(減衰時間)
ベロシティによってピッチを変化
させる機能のオン/オフ
ベロシティによるピッチの変化パ
ターン
777766
66
Page 77

ミキサーの設定
トリガー・インプット の最小音量
(MINIMUM VOLUME)設定
MINIMUM VOLUME の設定範囲が広がり、使い勝手が向上しまし
た。MINIMUM VOLUME は、最強打時の音量を保ったまま弱打時の
音量を大きくするパラメーターです。これにより、スネアのゴース
ト・ノートやライド・シンバルのレガート音を、より聴こえやすくす
ることができます。
操作:
[MIXER]ー[F3(MIN VOL)]
グループ・フェーダーによる設定方法
「MIX EDIT」画面で、グループ・フェーダーを使って各トリガー・イ
ンプットの最小音量(MINIMUM VOLUME)を調節できます。
操作:
[MIXER]+[FADER]ー[F2(MIN VOL)]
※ ボリューム、アンビエンスおよび MFX のかかり具合を調節す
ることもできます。
777777
77
Page 78

パッドごとのコンプレッサー
アンビエンス
パッド・コンプレッサーのテンプレート改良
パッド・コンプレッサーのテンプレートを改良しました。
パラメーター 設定値 説明
EMPHASIS: アタックが強調され
CRUSH: アタックが抑えられ
このパラメーターを変更すると、
Thre、Ratio が変更されます。
このパラメーターを変更すると、
Atck、Hold、Rels が変更されます。
ます。
ます。
777788
Attack
Type
Time
EMPHASIS、
CRUSH
COMP SOFT 1 〜 2、
COMP MED、
COMP HARD、
LIMITER、
EXPANDER
KICK 1 〜 3、
SNARE1 〜 3、
TOM 1 〜 3 、
CYM 1 〜 2 、
OTHER1 〜 3
88
新アルゴリズムを採用し、高品位で臨場感のある 15 の新しい Room
Type を追加。また 3 つの Wall Type の追加や、7 つの Mic
Position 追加によって、よりきめ細かな音色調整が可能になりまし
た。
新しい Room Type(15 種類)
Booth A Booth B Studio A
Studio B Basement Jazz Club
Page 79

Rock Club Ballroom Gate
Mic Position(計 9 種類)
よりリアルな臨場感を再現するため、アンビエンス・マイクのバリ
エーションを 7 種類追加しました。
Concert Hall Sports Arena Expo Hall
[FX] Bottle [FX] City [FX] Spiral
新しい Wall Type(3 種類)
「Curtain」、「Cloth」、「Concrete」の 3 種類が追加されました。
Curtain Cloth Concrete
Next Door Low Floor Low
Mid Low Mid Mid High
High Ceiling A Ceiling B
「ROOM」画面で[SHIFT]+[F4]を押すと、アンビエンスの
各パラメーターを初期化することができます。
777799
99
Page 80

出力ゲイン・パラメーター追加
アンビエンスのパラメーターに、出力ゲインが追加されました。
アンビエンスの出力を、6 dB 増幅することができます。
アンビエンスのプレビュー
アンビエンスの設定画面で[F5(AMB MON)]を押すと、
MASTER OUT ジャックと PHONES ジャックにはアンビエンス・
サウンドだけが出力されるようになります。
00
888800
マルチエフェクト
出力ゲイン・パラメーターの追加
マルチ・エフェクトのパラメーターに、出力ゲインが追加されまし
た。
マルチ・エフェクトの出力を、6 dB 増幅することができます。
マルチエフェクトのプレビュー
マルチエフェクトの設定画面で[F5(MFX MON)]を押すと、
MASTER OUT ジャックと PHONES ジャックにはエフェクト音だ
けが出力されるようになります。
Page 81

マスター・コンプレッサー
ドラム・キットのパラメーター[KIT]
ゲイン・リダクション(GR)メーター
MASTER COMP にゲイン・リダクション・メーターが追加され、
コンプレッサーの効果を視覚的に確認できるようになりました。
操作:
[MASTER COMP/EQ]を押す。
パッド・パターン機能のオン/オフ
キットごとにパッド・パターン機能を使用する/使用しないを切り替
えることができます。
操作:
[KIT]ー[F2(FUNC)]ー[F4(PAD PTN)]
888811
11
Page 82

トリガー・パラメーターの設定
最新のパッドに対応しました。
CY-5
•
RT-10 シリーズ
•
各パッドのトリガー情報の表示
各パッドのベロシティーや、ハイハットの開き具合、スネア、ライ
ド・シンバル、タムと AUX のリムの打点位置をリアルタイムに表示
することができます。
アドバンスト・トリガー・パラメーター の追加
以下のパッド/トリガー・インプットのアドバンスト・トリガー・パ
ラメーターに、打点位置検出に関するパラメーターが追加されまし
た。
SNARE(ヘッド/リム)
•
TOM(リム)
•
RIDE(ボウ)
•
AUX(リム)
•
打点位置検出機能のオン/オフを切り替えることもできます。
※ 打点位置検出に対応していないトリガー・インプットを選択す
ると、「---」と表示されます。
操作:
[TRIGGER]ー[F5(ADVANCE)]ー[F4(POSI)]ーパッド選択
22
888822
連打時の時間間隔に応じて、シンバルやスネアのロールの音色が滑
らかに変化します。
操作:
[TOOLS]ー[F3(TRG MON)]
Page 83

コピー機能
インスト・セット(COMP/EQ を含む/含まない)、アンビエンス、
マルチエフェクト、ボリューム、パン、トリガー設定などの設定を、
プリセットやコンパクトフラッシュのバックアップからコピーするこ
とができるようになりました。
コピーを実行するとコピー先のパラメーターが上書きされてしまい
ますのでご注意ください。
「COPY」画面では、[F5]を押すことにより 3 つの画面を切り替え
ることができます。
COPY A 画面
COPY B 画面
COPY C 画面
操作:
[COPY]ー[F1]〜[F5]でコピーするデータを選択
888833
33
Page 84

トリガー・バンクのコピー
バージョン・アップ前の TD-20 で作成して、コンパクトフラッシュ
にバックアップしたキットのトリガー・バンクを、コピーして使用す
ることができます。
1111....コンパクトフラッシュに保存されているバックアップを本体
にインポートします。
2222....データのバックアップをコンパクトフラッシュに保存しま
す。
3333....[COPY]ー[F5]ー[F1(TRIG)]を押して「COPY
TRIGGER BANK」画面を表示させます。
インスト・セットのコピー
複数のインストをまとめて別のキットにコピーすることができます。
設定値 アイコン インスト
KICK/SNR Kick、Snare
設定値 アイコン インスト
TOMS 1 〜 4 Tom 1、2、3、4
CYM SET
AUX 1 〜 4 AUX 1、2、3、4
Hi-Hat、
Crash 1、2、
Ride、Edge
パッドの COMP/EQ のコピー
インスト・セットのコピー時に、パッド COMP/EQ の設定を含める
か含めないかを選択することができます。
888844
44
Page 85

インストのコピー コピー画面へのジャンプ
インストのコピー時に、パッド COMP/EQ の設定を含めるか含めな
いかを選択することができます。
ドラム・キットのコピー
「DRUM KIT」画面で、[SHIFT]を押しながら[COPY]を押す。
インストのコピー
「INST」画面で、[SHIFT]を押しながら[COPY]を押す。
MIXER 設定のコピー
「MIXER」画面で、コピーしたいパラメーターの画面を表示させ、
[SHIFT]を押しながら[COPY]を押す。
アンビエンスのコピー
「AMBIENCE」画面で[SHIFT]を押しながら[COPY]を押す。
マルチエフェクトのコピー
「MULTI EFFECTS」画面で[SHIFT]を押しながら[COPY]を押
す。
888855
55
Page 86

TD-20 全体の設定
その他のソースの出力先
マスター出力
各インストの MASTER OUT ジャックへの出力をオフにすることが
できるようになりました。
これにより、ヘッドホンですべてのインストをモニターしながら、一
部のインストだけを MASTER OUT ジャックから出力することがで
きます。
操作:
[SETUP]ー[F2(OUTPUT)]ー[F1(MASTER)]
[F5(DEFAULT)]を押して、表示された画面で[F5
(EXECUTE)]を押すと、全インストのマスター出力の出力先が初
期設定に戻ります。
66
888866
シーケンサーのパート/クリック/ MIX IN の出力先として、
MASTER OUT、PHONES OUT と DIRECT OUT 5 〜 8 を同時に
指定することができるようになりました。
Page 87

フット・スイッチ/パッド・スイッチの 設定
フット・スイッチ(BOSS FS-5U:別売)と専用ケーブル(PCS31)を使って、クローズ・ハイハット(Fixed Hi-Hat = FIXED2)、
スネアのストレイナーをはずした状態(Strainer Adj. = OFF)をコ
ントロールすることができます。
これらは、パッド・スイッチでコントロールすることもできます。
MIX IN ジャックの設定
MIX IN ジャックを、ステレオ入力としてだけではなく、モノラル×
2 として使うことができます。
たとえば、MIX IN の L チャンネルでクリック音、R チャンネルで
バッキングが鳴るような機器を接続した場合は、 Mode = MONO に
することによってクリック音とバッキングがセンターから聴こえるよ
うになります。
フット・スイッチの設定:
[SETUP]ー[F3(CONTROL)]ー[F1(FOOT SW)]
パッド・スイッチの設定:
[SETUP]ー[F3(CONTROL)]ー[F2(PAD SW)]
パッド・スイッチ機能は、AUX 3、AUX 4 でのみ有効です。
パラメーター 設定値 説明
Input
Mode
Gain 0 〜 +12 入力レベルの調節
L+R、
L ONLY、
R ONLY
STEREO、
MONO
入力として使用するジャックを選択します。
L + R: 両チャンネルを使用
L ONLY: 左チャンネルのみ使用
R ONLY: 右チャンネルのみ使用
STEREO: ステレオ入力として使用
MONO: モノラル×2 として使用
操作:
[SETUP]ー[F4(OPTION)]ー[F3(MIX IN)]
888877
77
Page 88

バージョン・アップ前のバックアップ・ データのインポート
バージョン・アップ前に保存したバックアップは、バージョン・アッ
プ後の TD-20 でも読み込むことができます。
1111....コンパクトフラッシュをメモリー・カード・スロットに挿入
します。
2222....[CARD]を押してから[F3(IMPORT)]を押します。
3333....バックアップを選択します。
4444....[F5(IMPORT)]を押します。
インポートされたデータについて
バックアップされていたキットは、キット 51 〜 100 にロード
•
されます。キット 1 〜 50 には、TDW-20 のプリセット・
キットがロードされます。
ドラム・キットに設定されていたプログラム・チェンジ・ナン
•
バーは初期値に戻ります。
88
888888
Page 89

その他の機能
バックアップからのキット選択
キット・セレクション機能
TD-20、TDW-20 のプリセット・キットや、コンパクトフラッシュ
に保存されているバックアップのキットを、ユーザー・キットにロー
ドすることなく演奏することができます。
[COPY]を押すと、ユーザー・キットに素早くコピーすることもで
きます。
※ パッド・パターン機能は使用できません。また、エディットす
ることはできません。
操作:
1111....[TOOLS]を押してから[F1(KIT SEL)]を押します。
2222....演奏するキットを選びます。
[F1(TD-20)]: TD-20 のプリセット・キット
[F2(TDW-20)]: TDW-20 のプリセット・キット
[F3(CARD)]: コンパクトフラッシュに記録されてい
るバックアップのキット
コンパクトフラッシュにバックアップされているキットをユーザー・
キットに読み込むことなく、そのまま演奏することができます。
操作:
[SHIFT]+[KIT]
888899
99
Page 90

資料
ドラム・インスト・リスト
No. インスト名
562
563 22"BirchHi K
564 23"D-Maple K
565 22"NCMaple K
566 22"LwgVntg K
567 22"RokVntg K
568 22"PKMaple K
569 22"SnrVntg K
570 24"VLite K
571 22"Premium K
572 22"BirchWetK
573 22"GT Vntg K
574 22"LooseHd K
575 20"TightHd K
576 20"GT Open K
577 20"BigBand K
578 18"Combo K
579 18"BeBopLo K
580 18"BeBopHi K
581 Ambience K
EXP KICK PROCESSED
582 Tight1 K
583 Tight2 K
00
999900
EXP KICK
22"BirchLo K
No. インスト名
584 Tight3 K
585 Tight4 K
586 Tight5 K
587 Tight6 K
588 Solid1 K
589 Solid2 K
590 Solid3 K
591 Wild K
592 Mondo K
593 Reverb K
594 Distorted K
595 BreakBeats K
596 Woofer K
597 FX Stomp K
598 FX Chest K
599 FX Handle K
600 FX Door K
EXP KICK ELEC
ClscElec7 K
601
602 ClscElec8 K
603 ClscElec9 K
604 808Attack K
605 808Low K
606 909Power K
No. インスト名
909Low K
607
608 AnalogQ1 K
609 AnalogQ2 K
610 AnalogQ3 K
611 Synthy K
612 Filter1 K
613 Filter2 K
614 Filter3 K
615 Filter4 K
616 Jungle K
617 FX Elec1 K
618 FX Elec2 K
619 FX Elec3 K
620 FX Elec4 K
EXP SNARE
621
CustomWoodS
622 CustomWoodSR
623 80s Metal S
624 80s Metal SR
625 Bronze S
626 Bronze SR
627 CraftStl S
628 CraftStl SR
629 OpenBrass S
No. インスト名
OpenBrass SR
630
631 50s King S
632 50s King SR
633 GT Maple S
634 GT Maple SR
635 Piccolo S
636 Piccolo SR
637 12"Cmpact S
638 12"Cmpact SR
639 10"Cmpact S
640 10"Cmpact SR
641 Skanky2 S
642 Skanky2 SR
643 StlPhonic S
644 StlPhonic SR
645 50sKingMt S
646 50sKingMt SR
647 WhiteAsh S
648 WhiteAsh SR
649 Popcorn S
650 Popcorn SR
EXP SNARE PROCESSED
651
PrcsWood S
652 PrcsWood SR
No. インスト名
PrcsMetal S
653
654 PrcsMetal SR
655 PrcsElec1 S
656 PrcsElec1 SR
657 PrcsElec2 S
658 PrcsElec2 SR
659 PrcsXStik S
660 PrcsNoise S
661 DynaFilter S
662 ClscFat1 S
663 ClscFat1 SR
664 ClscFat2 S
665 ClscFat2 SR
666 SoundFX1 S
667 SoundFX2 S
668 SoundFX3 S
669 SoundFX4 S
670 SoundFX5 S
671 Distorted1 S
672 Distorted2 S
673 Wood XStik
674 Steel XStik
675 Brass XStik
676 80sMtl XStik
677 50sKingXStik
Page 91

No. インスト名
678 WhtAsh XStik
679 Light XStik
680 Lo-Fi XStik
EXP SNARE ELEC
681
ClscElec6 S
682 ClscElec7 S
683 ClscElec8 S
684 ClscElec9 S
685 808Power S
686 808Power SR
687 909Power S
688 909Power SR
689 909Dist S
690 909Reverb S
EXP TOM
691
8"NCMpl T1
692 8"NCMpl T1R
693 10"NCMpl T2
694 10"NCMpl T2R
695 12"NCMpl T3
696 12"NCMpl T3R
697 14"NCMpl T4
698 14"NCMpl T4R
699 16"NCMpl T5
700 16"NCMpl T5R
701 8"PKJaz T1
702 8"PKJaz T1R
703 10"PKJaz T2
704 10"PKJaz T2R
705 12"PKJaz T3
No. インスト名
12"PKJaz T3R
706
707 13"PKJaz T4
708 13"PKJaz T4R
709 16"PKJaz T5
710 16"PKJaz T5R
711 10"Rock T1
712 10"Rock T1R
713 12"Rock T2
714 12"Rock T2R
715 14"Rock T3
716 14"Rock T3R
717 16"Rock T4
718 16"Rock T4R
719 18"Rock T5
720 18"Rock T5R
721 8"Pop T1
722 8"Pop T1R
723 10"Pop T2
724 10"Pop T2R
725 12"Pop T3
726 12"Pop T3R
727 13"Pop T4
728 13"Pop T4R
729 16"Pop T5
730 16"Pop T5R
731 8"Antiq T1
732 8"Antiq T1R
733 10"Antiq T2
734 10"Antiq T2R
735 12"Antiq T3
736 12"Antiq T3R
No. インスト名
13"Antiq T4
737
738 13"Antiq T4R
739 16"Antiq T5
740 16"Antiq T5R
EXP TOM ELEC
741 ClscElec5 T1
742 ClscElec5 T2
743 ClscElec5 T3
744 ClscElec5 T4
745 ClscElec6 T1
746 ClscElec6 T2
747 ClscElec6 T3
748 ClscElec6 T4
749 ClscElec7 T1
750 ClscElec7 T2
751 ClscElec7 T3
752 ClscElec7 T4
753 ClscElec8 T1
754 ClscElec8 T2
755 ClscElec8 T3
756 ClscElec8 T4
757 ClscElec9 T1
758 ClscElec9 T2
759 ClscElec9 T3
760 ClscElec9 T4
EXP HI-HAT
14"CstmDK HB
761
762 14"CstmDK HE
763 14"Medium HB
764 14"Medium HE
No. インスト名
13"KZComb HB
765
766 13"KZComb HE
767 13"P-Crsp HB
768 13"P-Crsp HE
769 Distorted HB
770 Distorted HE
771 Lo-Fi HH
772 808Chick HH
773 909Power HH
774 Impulse HH
775 Super-Q HH
776 DistJingleHH
777 MtlCrasherHH
778 Jingle HH
779 Beads HH
780 Ratchet HH
EXP CRASH
15"PaperCrBw
781
782 15"PaperCrEg
783 16"PoP CrBw
784 16"PoP CrEg
785 18"PoP CrBw
786 18"PoP CrEg
787 17"DarK CrBw
788 17"DarK CrEg
789 18"DarK CrBw
790 18"DarK CrEg
791 18"JazZ CrBw
792 18"JazZ CrEg
EXP SPLASH
No. インスト名
4"Paper SpBw
793
794 4"Paper SpEg
795 6"Splaz SpBw
796 6"Splaz SpEg
797 10"UF SpBw
798 10"UF SpEg
799 10"ChinaSpBw
800 10"ChinaSpEg
EXP CHINA
13"Latin Bw
801
802 13"Latin Eg
803 14"Trash Bw
804 14"Trash Eg
805 20"CB Low Bw
806 20"CB Low Eg
EXP STACKED CYMBAL
807
16"Stackd Bw
808 16"Stackd Eg
809 18"Stackd Bw
810 18"Stackd Eg
EXP RIDE
811
20"JazZ Rd
812 20"JazZ RdBl
813 20"JazZ RdEg
814 20"HvyDKRd
815 20"HvyDKRdBl
816 20"HvyDKRdEg
817 20"ASpecRd
818 20"ASpecRdBl
819 20"ASpecRdEg
11
999911
Page 92

No. インスト名
820 20"KSpecRd
821 20"KSpecRdBl
822 20"KSpecRdEg
823 20"VntZ Rd
824 20"VntZ RdBl
825 20"VntZ RdEg
826 19"JzCrsRd
827 19"JzCrsRdBl
828 19"JzCrsRdEg
829 19"P-CrsRd
830 19"P-CrsRdBl
831 19"P-CrsRdEg
832
833 Timbale2HiRm
834 Timb2HiPaila
835 Timbale2Lo
836 Timbale2LoRm
837 Timb2LoPaila
838 Pandeiro2
839 Pande2 Slap
840 Pande2 Close
841 Pande2 Edge
842 Pande2 Roll1
843 Pande2 Roll2
844 Caixa
845 Caixa Rim
846 Cajon2 Bass
847 Cajon2 Close
848 Cajon2 Open
849 Cajon2 Slap
22
999922
EXP PERCUSSION
Timbale2Hi
No. インスト名
Bendir
850
851 Darabuka Dom
852 Darabuka Tak
853 AnkleBeads
854 AfricaJingle
855 Cabasa2
856 Tambourine4
857 TambStick
858 TambShake
859 Sagat Close
860 Sagat Open
861 MetalCrasher
862 ConcertBD2
863 ConcertBD2mt
864 LargeGong
865 Timpani2 C
866 Timpani2 G
867 HiraTaiko
868 HiraTaikoRim
869 YaguraTaiko
870 YaguraTaikoR
871 NagodoTaiko
872 NagadoTaikoR
EXP SFX
Tick
873
874 Chick
875 Random
876 ReverbSlap
877 Hammer
878 Anvil
879 MetalDoor
No. インスト名
MetalPhase
880
881 RvsMtlFaze
882 WhiteLazer
883 CosmicWater
884 CosmicDrip
885 CosmicClaps
886 CosmicChirp
887 Falling
888 FlyAway
889 BounceDown
890 TimeTunnel1
891 TimeTunnel2
892 SpaceTrip
893 Growl
No. インスト名
Explosion
910
911 ElecRide
912 ElecRide Bl
913 ElecRide Eg
914 Revrs Kick
915 Revrs Snare
916 Revrs Crash2
917 Revrs China2
918 AcousGuitar
919 FingerBass
920 SlapBass
EXP OFF
921 EXP Off
894 Ripping
895 SpaceAlien
896 SpaceWarp
897 Shake
898 ShakeDown
899 Gear
900 GearLong
EXP OTHER
901
Group Claps
902 High Claps
903 Mid Claps
904 Low Claps
905 Hi-Q Claps
906 Reverb Claps
907 IronWhip
908 Ratchet
909 Drawer
Page 93

スネア、タム音色について
音色名の最後の文字はヘッド・ショット時、またはリム・ショット時
の音色であることを表しています。
(例)
S: スネアのヘッド音色
SR: スネアのリム音色
T1: タム1のヘッド音色
T1R: タム1のリム音色
シンバル音色について
音色名の最後の文字はボウ・ショット、エッジ・ショット、ベル・
ショット時の音色であることを表しています。
(例)
HB: ハイハットのボウ音色
HE: ハイハットのエッジ音色
CrBw: クラッシュのボウ音色
CrEg: クラッシュのエッジ音色
Rd: ライドのボウ音色
RdBl: ライドのベル音色
RdEg: ライドのエッジ音色
エレクトロニック音色について
エレクトロニック・インストのダイナミック・ピッチ・ベンドを使用
する場合、非常に低い周波数の音が発生することがあります。この場
合は、アンプの音量を下げてスピーカーやヘッドホンを保護するな
ど、注意してご使用ください。
999933
33
Page 94

プリセット・ドラム・キット・リスト
999944
No. キット名 備考
1
TDW-20
2 50s King
3 ControlRoom
4 Metal Core
5 FunkGroove
6 40s BeBop
7 >processed>>
8 Cajon
9 Melodious *1 Tap
10 Premium
11 SwingJazz
12 BluesRock
13 Dry Studio
14 2HH House
15 TechFusion
16 LetItBeat
17 neotype *1 1Shot, Tap
18 JazzBop
19 RawBeat
20 VintageRock
21 D-N-B *1 Loop
22 GarageRock
23 80s Funk
24 Cashmirror
25 BREAKs
44
パッド・
パターン
No. キット名 備考
パッド・
パターン
26 90s Rock
27 JazzClub
28 Jive
29 AmbientRock
30 Cosmic
31 Crossover
32 VintageJazz
33 Coolth
34 BulletBlue
35 FunkyJungle *1 Loop
36 Natural
37 LA BeBop
38 MBs House
39 Bronze Dry
40 DarkComper
41 DRUMS vs DJ
42 Gated
43 RotoFxCity
44 PopDelay
45 1985
46 Spaced Out
47 BrazilPerc
48 LatinDrums
49 InVasian
50 FLA>n<GER *1 1Shot, Tap
Page 95

No. キット名 備考
VPro
51
52 Slamin' *1 Loop
53 METAL
54 JazzCombo
55 OverDrive *1 Tap
56 Titanium
57 RotoKit *1 Loop
58 UNIVERSE
59 Skanky
60 Brushes *2
61 Spark!
62 >>GT>>
63 Antique
64 =BreakBeats=
65 Studio
66 Groover *1 Loop
67 Mallet
68 Drumline
69 JazzGig *1 Loop
70 Airtime
71 Sploink!
72 Boogaloo
73 Zeppy
74 Arena
75 Maple
パッド・
パターン
No. キット名 備考
76
Shallow
パッド・
パターン
77 Ballad *1 Loop
78 Raspy
79 PopReggae *1 Loop
80 BrassBiggie
81 WetBooth *1 Loop
82 70s Record
83 Lite
84 Mellow
85 Stadium
86 TiteOctas
87 90s Power
88 FxJungle *1 Tap
89 Tekno
90 TR-808 *1 Loop
91 TR-909
92 Hex< >Drum *1 Loop
93 Cosmosis
94 Technology
95 OrchPerc *1 Tap
96 Survivor
97 Latin Toys
98 African Perc
99 Tabla/Sitar *1 Loop, Tap
100 UserKit *3
55
999955
Page 96

パッド・パターンについて
Loop: パターンが割り当てられたパッドを叩くとバッキング用のパ
ターンがループ再生し、同じパッドをもう一度叩くと止まり
ます(ループ・パターン)。
1Shot:パターンが割り当てられたパッドを叩くとあらかじめ用意さ
れたパターンが一度だけ鳴ります(1ショット・パターン)。
Tap: パターンが割り当てられたパッドを叩くたびにコード音やメ
ロディーなどが 1 つずつ鳴らせます(タップ・パターン)。
備考
*1:パッド・パターンが設定されています。
※ ループ・パターンを止めるときは、ループ・パターンを鳴らし
たパッドをもう一度叩くか、TD-20 本体の[STOP]を押し
てください。
※ ドラム・キットに設定されているすべてのパッド・パターンを
まとめてオフにしたい場合は、PadPtn Master SW の設定
をオフにしてください。PadPtn Master SW はドラム・
キットごとに設定できます。
設定方法: [KIT]ー[F2(FUNC)]ー[F4(PAD
PTN)]、PadPtn Master SW = ALL PADS
OFF
*2:ブラシでの演奏が可能です
*3:パッドのボリュームなどが標準的な値に設定されています。キッ
トを最初から作るときにお使いください。
66
999966
Page 97

MEMO
999977
77
Page 98

お問い合わせの窓口
製品に関するお問い合わせ先
999988
ローランドお客様相談センター
電話受付時間: 月曜日〜土曜日 10:00〜17:30(年末年始を除く)
※IP電話からおかけになって繋がらない場合には、お手数ですが、電話番号の前に0000
(ゼロ4回)をつけてNTTの一般回線からおかけいただくか、携帯電話をご利用ください。
※上記窓口の名称、電話番号等は、予告なく変更することがありますのでご了承ください。
050-3101-2555
最新サポート情報
製品情報、イベント/キャンペーン情報、サポートに関する情報など
ローランド・ホームページ
88
http://www.roland.co.jp/
'07.10.01現在(Roland)
Page 99

Page 100

* 5100000349-0 1 *
N1-70-809430000015
 Loading...