

Roland SP-404MKII Reference Manual

SP-404MK2 (Version 2.00)
Reference Manual

Table of contents
Table of contents
Introduction .............................................................................. 4
What You Should Know About This Unit (How Data is
Organized) ............................................................................. 4
What’s a Sample? ............................................................................. 4
What’s a Pattern? ............................................................................. 4
Banks and Projects .......................................................................... 5
Getting Things Ready ........................................................... 6
Connecting External Equipment ................................................ 6
About the Power Supply ............................................................... 8
Turning the Power On/Off ......................................................... 10
Playing Back Samples (SAMPLE MODE) ........................ 11
Selecting a Sample Bank ..................................................... 11
Adjusting the Volume for All Banks (BANK VOLUME) ....... 12
Playing Back a Sample to the Tempo of a Song (BPM SYNC)
.............................................................................................. 13
Playing Back Only While a Pad is Pressed (GATE) ............. 14
Playing Back Samples Repeatedly (LOOP) ........................ 15
Playing Back a Sample in Reverse (REVERSE) .................... 16
Playing Back Samples in Detailed Steps (ROLL) ................ 17
Setting the Roll Interval .............................................................. 17
Setting a Fixed Sample Volume (FIXED VELOCITY) .......... 19
Changing the Sample Volume for Playback (16 VELOCITY)
.............................................................................................. 20
Playing Back Samples in Scale Pitches (CHROMATIC) ...... 21
Muting the Playback of a Sample (PAD MUTE) ................. 22
Playing Back Multiple Pads at the Same Time (PAD LINK
GROUPS) .............................................................................. 23
Preventing Samples from Playing Back at the Same Time
(MUTE GROUP) .................................................................... 24
Stopping All Sample Playback (STOP) ............................... 25
Pausing the Sound of a Sample (PAUSE) .............................. 25
Disabling Buttons that Are Not Used When Playing Live
(LIVE MODE) ......................................................................... 26
Using the Effects ................................................................... 27
Adding Effects to a Sample (BUS FX) ................................. 27
Assigning Effects to BUS 1 and BUS 2 .................................... 28
Deciding on Effects to Use for Each Sample ........................ 29
Using the MFX Effects .................................................................. 29
Editing the Effects ............................................................... 31
Turning Effects On/Off at the Desired Timing ................... 32
Temporarily Output Only the Effect Sound (MUTE BUS) .. 33
Sampling (SAMPLING) ........................................................ 35
Configuring the Sampling Settings (RECORD SETTING) ... 35
Configuring the Input Effects (INPUT FX) ............................. 35
Sampling .............................................................................. 37
Adding a Count-in Before Sampling ...................................... 37
Automatically Setting the End Point of a Sample (END
SNAP) ................................................................................................ 37
Resampling a Sample (RESAMPLE) .................................... 39
Sampling What You Previously Played (SKIP-BACK
SAMPLING) .......................................................................... 40
Using a Marker to Split and Assign a Sample to a Pad
(CHOP) ............................................................................................... 46
Making Fade-in/Fade-out Settings (ENVELOPE) ............... 47
Changing the Pitch or Playback Speed of a Sample
(PITCH/SPEED) ..................................................................... 50
Displaying Parameters Set in a Sample ............................. 52
Initializing the Sample Parameters (INIT PARAM) ............ 53
Organizing the Samples ..................................................... 54
Exchanging (Swapping) Samples Between Pads ................ 54
Copying the Sample from a Pad ............................................... 54
Protecting a Sample (PROTECT) ............................................... 55
Deleting the Sample from a Pad .............................................. 55
Combining Samples to Create a Pattern (PATTERN
SEQUENCER) .......................................................................... 57
Playing a Pattern ................................................................. 57
Creating a New Pattern (Real-time Recording) ................. 58
Adding a Count-in Before Recording a Pattern ................... 59
Creating a New Pattern (TR-REC) ....................................... 60
Resampling a Pattern (RESAMPLE) .................................... 63
Selecting a Pattern Bank .................................................... 64
Playing Back Patterns in Order (PATTERN CHAIN) ........... 65
Editing a Pattern (PATTERN EDIT) ................................... 68
Copying and Connecting Patterns (DUPLICATE) .............. 68
Cropping Unnecessary Sections from a Pattern (CROP)... 69
Organizing the Pattern Data .............................................. 70
Exchanging (Swapping) Patterns Between Pads ................ 70
Copying the Pattern of a Pad .................................................... 70
Protecting a Pattern (PROTECT) ................................................ 71
Deleting the Pattern from a Pad ............................................... 71
Setting the Tempo ............................................................... 73
Setting the Tempo Data in a Sample ................................. 74
Setting the Tempo for a Bank or Project ........................... 75
Setting the Tempo in Time with the Rhythm (Tap Tempo)
.............................................................................................. 76
Mixing the Samples (DJ MODE) ....................................... 77
Monitoring with Headphones (CUE) ............................. 80
Inputting Sound from an Electronic Musical
Instrument, Mic or Guitar .................................................. 81
Inputting Audio from a Computer or Mobile Device
(USB AUDIO) ........................................................................... 82
Selecting a Project ............................................................... 83
Organizing Projects ............................................................. 84
Copying a Project ................................................................ 84
Deleting a Project ................................................................ 85
Editing a Sample (SAMPLE EDIT) ..................................... 42
Setting the Playback and Loop Regions (START/END) ..... 42
Processing a Sample .................................................................... 43
Marking and Splitting Samples (MARK) ............................ 44
2
Customizing This Unit......................................................... 86
Attaching/Removing the Faceplate of This Unit ............... 86
Customizing the Opening Screen ...................................... 88
Preparing an Opening Image .................................................... 88
Saving an Opening Image to a Project................................... 88

Table of contents
Customizing the Screen Saver ............................................ 89
Preparing a Screen Saver Image .............................................. 89
Enabling a Custom Screen Saver ............................................. 89
Saving the Screen Saver Image to a Project ........................ 90
Configuring the Various Settings (UTILITY) ................. 91
Editing the Settings Related to this Unit (System) ............ 91
Configuring the Pad-related Settings (PAD SETTING) ...... 92
Configuring the Effect Settings (EFX SET) ......................... 93
Configuring the Effect Routing ................................................ 93
Adding Effects to the Overall Sound (BUS 3, BUS 4) ......... 94
Changing the Effects Assigned to BUS 3 and BUS 4 ......... 94
Editing the Effects for BUS 3 and BUS 4 ................................. 95
Assigning the Desired Effect to an Effect Button (DIRECT
FX) ...................................................................................................... 96
Configuring the Input Effects (INPUT FX) ............................. 97
Sending the Audio Input from the INPUT Jack to a Bus .. 98
Importing/Exporting (Using the SD Card) ......................... 99
Importing Samples (IMPORT SAMPLE) ................................ 101
Exporting Samples (EXPORT SAMPLE) ................................. 102
Importing a Project (IMPORT PROJECT) .............................. 103
Exporting a Project (EXPORT PROJECT) ............................... 104
Backing up Your Data (BACKUP) ............................................ 105
Restoring from Backup Data (RESTORE) .............................. 105
Formatting an SD Card.............................................................. 106
Restoring the Factory Settings (FACTORY RESET) .......... 107
Appendix ............................................................................... 108
Parameter Guide ............................................................... 108
SYSTEM ........................................................................................... 108
PAD SET .......................................................................................... 111
EFX SET ........................................................................................... 112
MFX List .............................................................................. 114
Filter+Drive ................................................................................... 115
Resonator ...................................................................................... 115
Sync Delay ..................................................................................... 116
Isolator ............................................................................................ 116
DJFX Looper.................................................................................. 116
Scatter ............................................................................................. 116
Downer ........................................................................................... 117
Ha-Dou ........................................................................................... 117
Ko-Da-Ma ....................................................................................... 117
Zan-Zou .......................................................................................... 117
To-Gu-Ro ........................................................................................ 118
SBF ................................................................................................... 118
Stopper .......................................................................................... 118
Tape Echo ...................................................................................... 119
TimeCtrlDly ................................................................................... 119
Super Filter ................................................................................... 119
WrmSaturator .............................................................................. 120
VinylSim ......................................................................................... 120
VinylSim ......................................................................................... 120
Cassette Sim ................................................................................. 120
Lo-fi ................................................................................................. 120
Reverb ............................................................................................ 121
Chorus ............................................................................................ 121
JUNO Chorus ................................................................................ 121
Flanger ........................................................................................... 121
Phaser ............................................................................................. 122
Wah ................................................................................................. 122
Slicer................................................................................................ 122
Tremolo/Pan ................................................................................ 123
Chromatic PS ................................................................................ 123
Hyper-Reso ................................................................................... 123
Ring Mod ....................................................................................... 123
Crusher ........................................................................................... 124
Overdrive ....................................................................................... 124
Distortion ...................................................................................... 124
Equalizer ........................................................................................ 124
Compressor .................................................................................. 124
SX Reverb ...................................................................................... 125
SX Delay ......................................................................................... 125
Cloud Delay .................................................................................. 125
Back Spin ....................................................................................... 125
Auto Pitch ..................................................................................... 126
Vocoder .......................................................................................... 126
Harmony ........................................................................................ 126
Gt Amp Sim .................................................................................. 127
Control change messages and corresponding effects .. 127
List of Shortcut Keys ......................................................... 130
Error Messages .................................................................. 133
Audio Diagram .................................................................. 134
Main Specifications ........................................................... 135
MIDI Implementation Chart ............................................. 136
3

Introduction
This Reference Manual assumes that your unit is using software version 2.00 or later.
A collection of 16 samples is a called a “bank”, and you can store up to 10 banks (A–J).
Introduction
The SP-404MK2 lets you do everything from audio sampling to editing, creating your own songs and performing... all in one unit.
What You Should Know About This Unit (How Data is Organized)
The SP-404MK2 handles a large amount of data, including audio materials and data used to create songs. In this section, we
explain the role of each type of data and the structure used to manage data on the SP-404MK2.
What’s a Sample?
A sample is a collection of audio that has been sampled (recorded audio data) and settings such as loop settings and routings to
BUS FX (effects).
Samples can be assigned to pads [1]–[16] and played back, or you can use them as parts of patterns to construct your song.
What’s a Pattern?
A pattern is a set of data that contains the order in which the samples should be played back.
You can create a song by pressing the pads to play back several samples and then recording your performance as a pattern.
Use the pattern sequencer to record patterns.
4

A collection of 16 patterns is a called a “bank”, and you can store up to 10 banks (A–J).
Banks and Projects
The 10 banks of samples and 10 banks of patterns are collectively managed as a “project”.
The SP-404MK2 can store 16 different projects.
Introduction
5

Introduction
To prevent malfunction and equipment failure, always turn down the volume, and turn off all the units before making any
connections.
Getting Things Ready
Now, let’s get ready to use the SP-404MK2. This section explains how to prepare and connect to external equipment for
outputting sound, as well as the different ways to power this unit.
Connecting External Equipment
1. Connect your amp or speakers to the LINE OUT jacks on the rear panel.
2. Use the PHONES jack when connecting headphones or earphones.
Connect an electronic musical instrument (such as a synthesizer) to the LINE IN jack(s) on the rear panel.
3. Connect your mic or guitar to the INPUT jack on the front panel.
6

Introduction
You can change the input impedance of the INPUT jack on the front panel. When connecting a high-impedance instrument
(such as a guitar or bass guitar), flip the [MIC/GUITAR] switch to the right (towards the INPUT jack).
●
● Android devices are not guaranteed to work with this unit.
●
When using the latter type of cable, power this unit with the included AC adaptor, or use batteries.
●
● Commercially available USB Type-C
to Lightning conversion cables cannot be used.
Connecting to a Computer or Mobile Device
You can transmit and receive audio and MIDI data by connecting a USB cable from your computer or mobile device (smartphone
or tablet) to the SP-404MK2.
You don’t need to install a device driver on your computer or other device to do this (the SP-404MK2 supports USB Audio Device
Class 2.0 specs).
Connecting the SP-404MK2 to your computer or mobile device lets you transmit/receive audio output and MIDI data to
and from your computer or mobile device and the SP-404MK2.
● Note that data cannot be directly transmitted/received between the SP-404MK2 and your computer or mobile device if
you’re connecting through a USB hub.
● Do not use a USB cable that is designed only for charging a device. Charge-only cables cannot transmit data.
● We cannot guarantee the correct functionality of all apps.
Connecting to your computer
1. Connect your computer and the SP-404MK2 using a USB cable with USB Type-C® connectors on both
ends (commercially available).
You can also use a USB Type-C® to USB A cable to connect your computer to the SP-404MK2. However, the computer
cannot be used to power the unit in this case.
Connecting to a mobile device
For iOS devices with Lightning connectors
1. Connect the AC adaptor to the SP-404MK2, or use batteries.
2. For iOS devices, you must use an Apple-manufactured USB adaptor (such as the Lightning-USB Camera
Adapter, the Lightning to USB 3 Camera Adapter and so on) as a converter for the jack.
3. Use a USB Type-C® to USB A cable (commercially available) to connect the SP-404MK2 to the USB
adaptor.
When connecting with a USB cable (USB Type-C® to USB A; commercially available), you cannot power this unit from your
mobile device.
®
When using an iOS device with a USB Type-C® connector
1. Connect your iOS device and the SP-404MK2 using a USB cable with USB Type-C® connectors on both
ends (commercially available).
When doing so, you can power the SP-404MK2 from your iOS device.
Inputting audio from a computer or mobile device
You must make the appropriate settings when inputting audio from a computer or mobile device. For details, refer to “Inputting
Audio from a Computer or Mobile Device (USB AUDIO)(P.82)”.
7
Introduction
●
USB port, batteries.
About the Power Supply
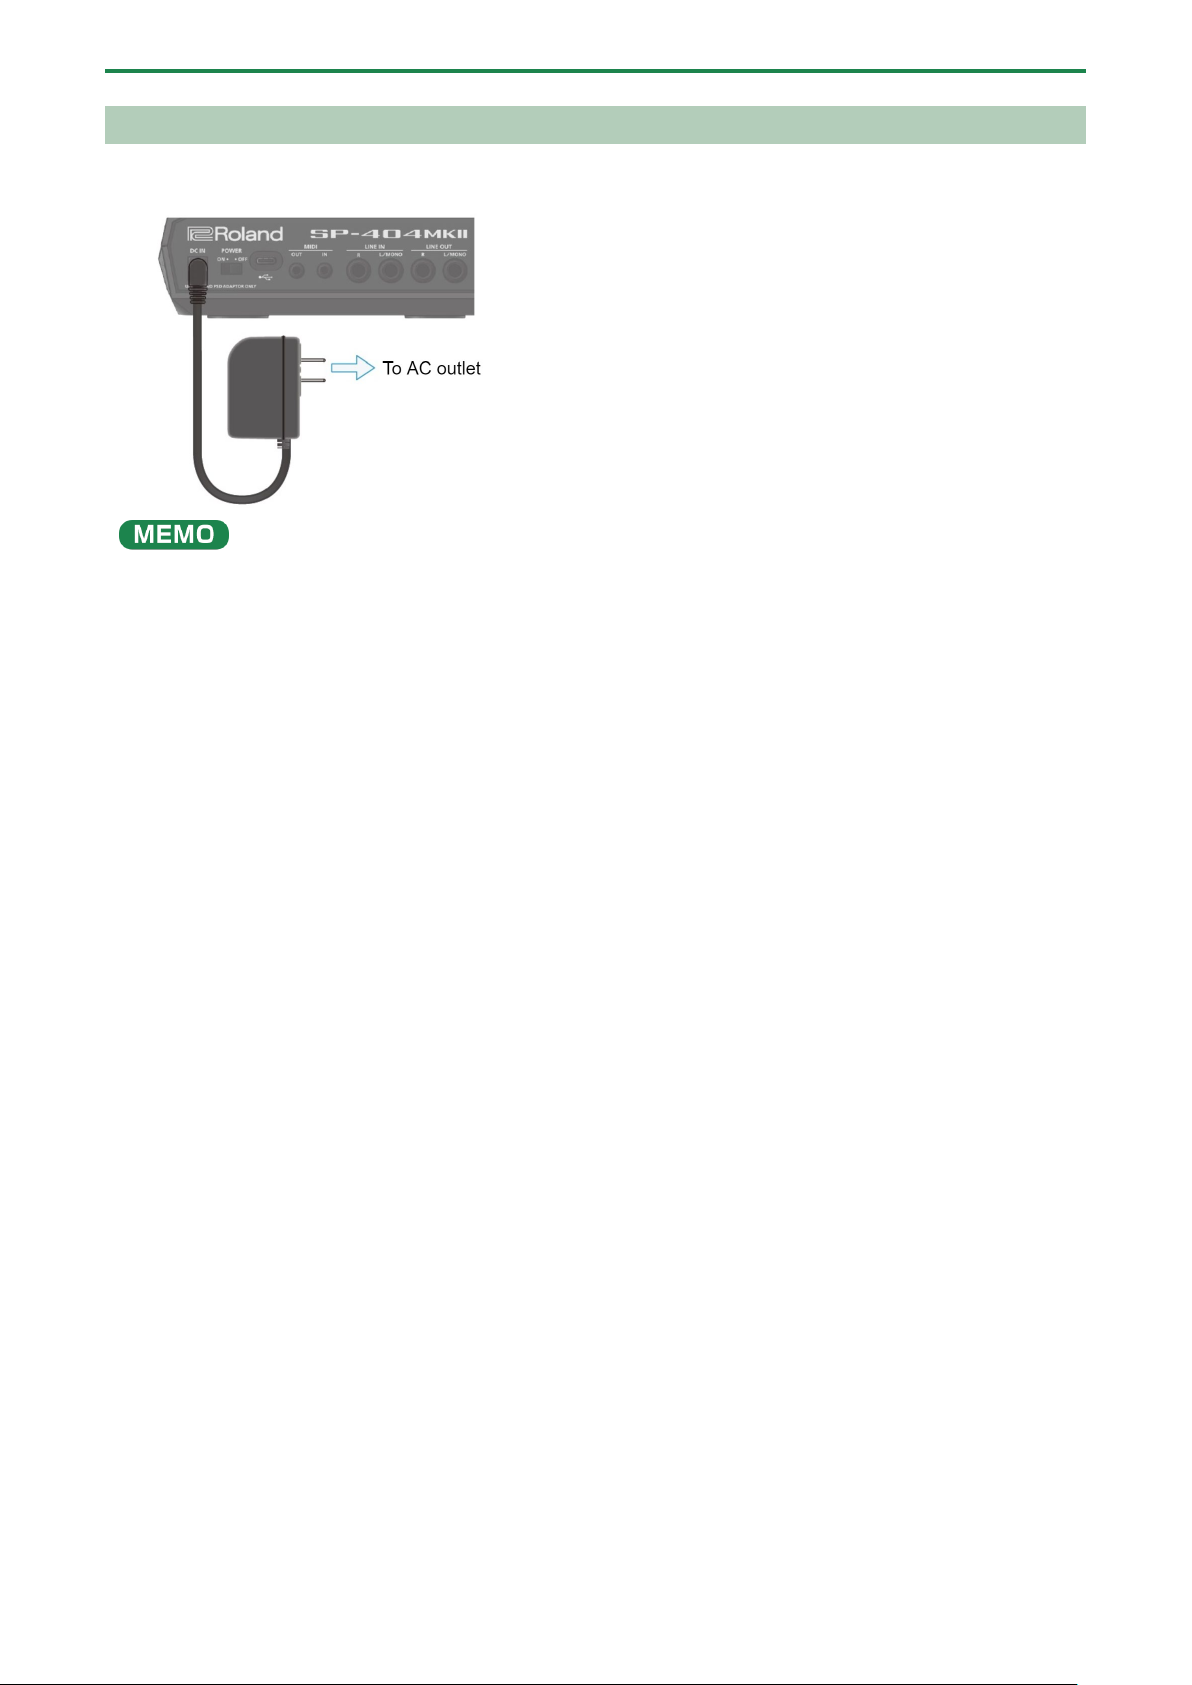
1. Connect the included adaptor to the DC IN jack of this unit, and plug the adaptor into an AC outlet.
You can also use this unit without an adaptor, such as by supplying power to the USB port or by using batteries.
→ “Powering the Unit via USB Port(P.9)” “Using Batteries(P.8)”
● If the unit is using multiple power sources, the sources are prioritized in this order: DC IN jack (the included AC adaptor),
Using Batteries
Before installing/removing batteries, make sure to turn off the power to this unit and disconnect all connections to other devices.
When turning the unit over, be careful so as to protect the buttons and knobs from damage. Also, handle the unit carefully; do not
drop it.
Remove the battery compartment cover located on the bottom of this unit, and insert the batteries in the correct polarity
(direction) as marked inside the battery compartment.
Close the cover securely.
8

Introduction
related to batteries that are listed in leaflet “Read Me First” (USING THE UNIT SAFELY.)
We cannot guarantee that this unit works universally with all USB AC adaptors, power from USB ports on computers or mobile
This unit uses six AA batteries (rechargeable Ni-MH or alkaline).
The unit can run for 3.5 hours on rechargeable Ni-MH batteries (1,900 mAh), and for 2.5 hours on alkaline batteries. (Note that
these times may differ depending on the conditions of use and of the batteries.)
If you handle batteries improperly, you risk explosion and fluid leakage. Make sure that you carefully observe all of the items
Powering the Unit via USB Port
You can power this unit with a commercially available USB adaptor, from the USB port on your computer and from similar sources.
The following USB power sources can be used.
● USB AC adaptor
● USB bus power (computer, etc.)
● Mobile battery
batteries.
Conditions for powering this unit via USB port
When supplying power to this unit via the USB port, be sure to use a cable with USB Type-C® connectors on both ends. No other
USB cables can be used, as they cannot provide enough power to operate the SP-404MK2. Also note that even when using cables
that have a USB Type-C® connector on both ends, you cannot power this unit from devices like USB hubs with insufficient current
output.
9
Introduction
Before turning the unit on/off, always be sure to turn the volume down. Even with the volume turned down, you might hear
The USB port on the device from which this unit draws power must supply 5 V of output voltage and at least 1.5 A of output
current.
When not enough power is supplied to the USB port
In the event that not enough power is supplied to the USB port of this unit (such as when you try to supply power from a USB
Type-A connector or when the output current is less than 1.5 A), the message “Switch to batteries” appears.
When this happens, press the [VALUE] knob to switch to battery power. Note that if there are no batteries installed, the unit
powers down.
Turning the Power On/Off
some sound when switching the unit on/off. However, this is normal and does not indicate a malfunction.
Turning the power on
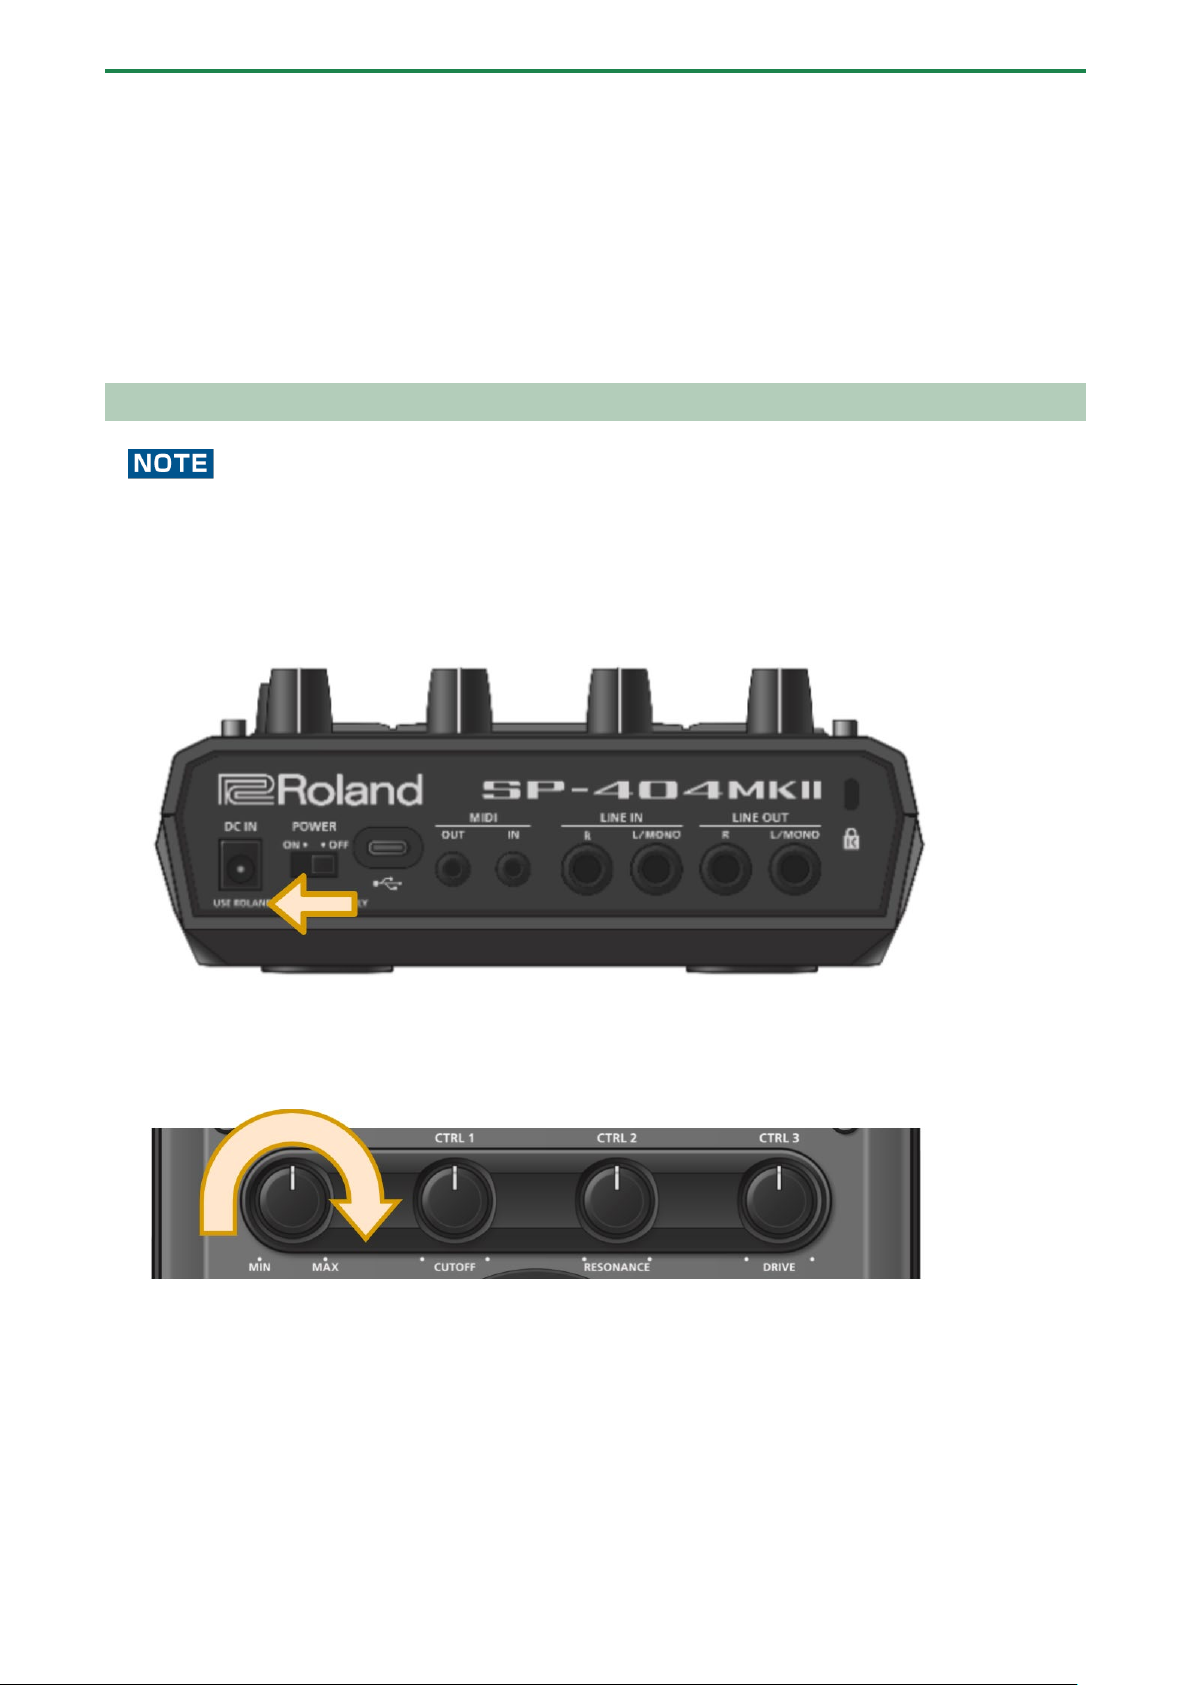
1. To turn on the power, slide the [POWER] switch of this unit to “ON”.
2. Next, turn on any connected devices, and then the amp/speakers, in that order.
3. Adjusts the volume of the connected instrument.
4. Adjust the volume of this unit with the [VOLUME] knob.
Turning the Power Off
1. Turn the volume of this unit and of your amp and speakers all the way down.
2. Turn off the power of your amp and speakers.
3. Slide the [POWER] switch of this unit to “OFF” to turn off this unit.
10

Playing Back Samples (SAMPLE MODE)
When you turn on the SP-404MK2, the pads light up orange and the unit enters sample mode.
When the pads are blinking blue, press the [EXIT] button a number of times and then press the [PATTERN SELECT] button.
●
SAMPLE)(P.101)”.
Playing Back Samples (SAMPLE MODE)
There are many preset samples available on this unit by factory default.
1. Press the pads of the SP-404MK2.
The corresponding samples play back.
If the unit is not in sample mode, press the [EXIT] button a number of times.
Refer to “Sampling (SAMPLING)(P.35)” if you want to record a new sample.
● If you want to use samples that are already saved on your computer or other device, see “Importing Samples (IMPORT
About the sample mode display (top screen)
The top screen is shown once you turn on the power of the SP-404MK2 and the unit is ready to play.
Selecting a Sample Bank
Select the bank to use from the 10 available banks (A–J).
1. Press the bank [A/F]–[E/J] buttons.
The bank switches.
Each time you press the bank [A/F] button, the bank switches between A and F.
11

Playing Back Samples (SAMPLE MODE)
You may notice a difference in playback volume when copying or exchanging samples between different banks, due to the
differences in the BANK VOLUME parameters set for each bank.
When bank A–E is selected, the bank [A/F]–[E/J] button lights up. When bank F–J is selected, the bank [A/F]–[E/J] button
blinks.
Adjusting the Volume for All Banks (BANK VOLUME)
Adjusts the volume for the specified bank overall. This lets you adjust the volume if the volume varies between banks.
1. Hold down the [SHIFT] button and press the bank [A/F]–[E/J] buttons.
The BANK VOLUME screen appears.
2. Turn the [VALUE] knob to set the bank volume.
3. When you are finished adjusting the values, press the [EXIT] button.
12

Playing Back Samples (SAMPLE MODE)
●
[SHIFT] button.
Playing Back a Sample to the Tempo of a Song (BPM SYNC)
You can synchronize the tempo (playback speed) of one sample with another sample.
You can also synchronize the tempo of a sample with that of an external device that’s playing, such as a musical instrument or
computer.
1. Press the [BPM SYNC] button.
This turns BPM SYNC on. The tempo of the sample then synchronizes with the bank tempo or the project tempo. The
playback speed is adjusted so that the sample plays back at the right tempo.
Set which tempo is used as the sample’s base tempo for playback in the system parameters.
For details, refer to “Parameter Guide(P.108)”.
● To use BPM SYNC, you must first set the accurate tempo data for each sample.
For details, refer to “Setting the Tempo Data in a Sample(P.74)”.
● You can make BPM SYNC synchronize either to the bank tempo or to the project tempo.
For details, refer to “Setting the Tempo for a Bank or Project(P.75)”.
● To turn the BPM SYNC parameter on/off for all samples in a bank, press the [BPM SYNC] button while holding down the
13
Playing Back Samples (SAMPLE MODE)
You can also use the gate function with the [EXT SOURCE] button.
SOURCE] button.
To turn the GATE parameter on/off for all samples in a bank, press the [GATE] button while holding down the [SHIFT] button.
Sample playback method
Operation
Stop the playback of samples whose GATE is off
Hold down the [EXIT] button and press pads [1]–[16].
Press the [HOLD] button while holding down pads [1]–[16].
Hold down the [HOLD] button and press pads [1]–[16].
Playing Back Only While a Pad is Pressed (GATE)
This switches the gate function on/off.
When the [GATE] button is on, samples play back only while the pads are pressed (gate playback).
When the [GATE] button is off, samples begin playing back each time a pad is pressed.
● When the [GATE] button is turned on, the sound from the external device is output only while you are pressing the [EXT
SOURCE] button.
● When the [GATE] button is turned off, the sound from the external device is switched on/off each time you press the [EXT
1. Press the [GATE] button to switch the function on (the button is lit) and off (the button goes dark).
Momentary gate control
Use the operations shown below to change how samples are played back.
Continue the playback of samples whose GATE is on
14

Playing Back Samples (SAMPLE MODE)
When you hold down the [HOLD] button and press a pad (sample) whose loop is turned on, the sample plays back from the
Samples that are playing back in a loop play back from the beginning, making it sound like the loop was momentarily canceled.
Playing Back Samples Repeatedly (LOOP)
Use the loop function to make a sample play back repeatedly. The loop settings can be made per sample.
When the [LOOP] button is turned on, the loop switches between playback and stopping with each press of the pad (trigger
playback).
When the [LOOP] button is off, samples play back from the beginning each time a pad is pressed.
beginning (retrigger). In this case, pressing the pad does not make the sample stop.
Setting the loop to play back forwards
1. Press the [LOOP] button to turn the loop on (the button lights up).
The loop plays back forwards.
Setting the loop to play back in reverse
1. Press the [LOOP] button to turn the loop on (the button lights up).
2. Press the [REVERSE] button to turn reverse playback on (the button lights up).
The loop plays back in reverse.
Setting the loop to play back forwards and then backwards
1. Hold down the [SHIFT] button and press the [LOOP] button.
The [LOOP] button blinks. The loop alternately plays back forwards and then in reverse.
15

Playing Back Samples (SAMPLE MODE)
When you press the [REVERSE] button while a sample is playing back, the sample plays back in reverse.
See “Reverse Type(P.109)” in the system parameters for details.
Playing Back a Sample in Reverse (REVERSE)
You can use the reverse function to play back samples in reverse (from end to start).
1. Press pads [1]–[16] to select the sample you want to play back in reverse.
2. Press the [REVERSE] button to turn reverse playback on (the button lights up).
Doing this sets the sample to play backwards.
The point (time) where reverse playback starts differs depending on the REVERSE TYPE settings.
16

Playing Back Samples in Detailed Steps (ROLL)
You can play back up to four samples at the same time as a roll.
The roll starts once you take your finger off the [ROLL] button after pressing it.
button at the desired timing.
If the roll interval (value) is longer than the sample length, the sample plays back in a loop.
than a quarter note (0.5 sec.).
You can use the roll function to repeatedly play back samples at a set interval.
1. Hold down the [ROLL] button and press pads [1]–[16].
The sample plays back as a roll.
Playing Back Samples (SAMPLE MODE)
Using a roll during sample playback
You can make a sample roll while it is playing back.
1. Press pads [1]–[16].
The sample plays back.
2. Press the [ROLL] button to turn the roll on (the button lights up).
The sample plays back rolled.
3. Press the [ROLL] button again to stop the roll while it is playing back.
To play rolls with the correct timing, press the [ROLL] button just before the roll should begin, and take your finger off the
Setting the Roll Interval
This shows how to set the roll interval (how fast the roll repeats).
1. Hold down the [SHIFT] button and press the [ROLL] button.
Set the roll interval. Each time you press the [ROLL] button while holding down the [SHIFT] button, the roll interval changes
as follows: quarter-note (1/4) Ó eighth note (1/8) Ó sixteenth note (1/16) Ó thirty-second note (1/32) Ó sixty-fourth note
(1/64).
The following are the conditions for roll playback or loop playback, when the tempo is 120 (bpm) and the sample length is less
17

Playing Back Samples (SAMPLE MODE)
When the roll interval is set to 1/4, the sample plays back in a loop.
You can’t make the roll interval longer (slower) than the original value.
When the roll interval is set to 1/64–1/8, the sample plays back as a roll.
Making the roll playback interval shorter (faster) partway through
You can shorten the roll interval while it is playing back.
1. Follow the steps in “Playing Back Samples in Detailed Steps (ROLL)(P.17)” to make the sample roll.
2. Hold down the [ROLL] button and turn the [VALUE] knob clockwise.
This shortens the roll interval. Turning the knob counter-clockwise returns the roll interval to its original value.
18

Playing Back Samples (SAMPLE MODE)
The FIXED VELOCITY setting can be set for each sample.
For details, refer to “Changing the Pitch or Playback Speed of a Sample (PITCH/SPEED)(P.50)”.
Setting a Fixed Sample Volume (FIXED VELOCITY)
You can set the sample’s velocity so that it always plays back at 127 (the maximum).
1. Hold down the [SHIFT] button and press the pad [1].
“FIXED VELOCITY ON” is shown. The sample velocity is fixed at 127.
2. To cancel this setting, hold down the [SHIFT] button again and press pad [1].
“FIXED VELOCITY OFF” is shown. The velocity changes (goes back to the original setting) according to how hard you play the
pads.
19

Playing Back Samples (SAMPLE MODE)
Changing the Sample Volume for Playback (16 VELOCITY)
You can use the 16 VELOCITY function to change a sample’s velocity (volume) in steps when it plays back.
1. Press pads [1]–[16] to select the sample you want to use with the 16 VELOCITY function.
2. Hold down the [SHIFT] button and press the pad [2].
The 16 VELOCITY screen appears.
3. Press pads [1]–[16].
The pad position corresponds to the velocity shown. The sample plays back at the velocity that matches the pad you press.
4. To exit 16 VELOCITY, press the [EXIT] button.
20

Playing Back Samples (SAMPLE MODE)
Turn the [VALUE] knob to change the key range.
Method of
playing
[REMAIN]
button
Blinks slowly
When you play legato (by pressing a pad while holding down another pad), portamento is
applied.
MONO
Lights up
The sample plays in single-note mode (monophonic).
POLY
Blinks quickly
Pressing multiple pads makes the samples play back at the same time (polyphonic).
Playing Back Samples in Scale Pitches (CHROMATIC)
You can play back samples (changing their pitches) as a chromatic scale with the pads.
1. Press pads [1]–[16] to select the sample to use in chromatic mode.
2. Hold down the [SHIFT] button and press the pad [4].
The unit enters chromatic mode.
3. Press pads [1]–[16].
The pad position corresponds to the key displayed. The sample plays back in the key that matches the pad you press.
4. To exit chromatic mode, press the [EXIT] button.
Changing how the samples play (how they sound)
You can change how samples play when they are triggered.
1. In chromatic mode, press the [REMAIN] button.
The method switches each time you press the [REMAIN] button.
Explanation
LEGATO
Changing the scale/mode
You can change the scale/mode that’s used when you play.
1. In chromatic mode, press the [VALUE] knob.
The scale/mode changes in the following order each time you press the [VALUE] knob.
Major scale → minor scale → Dorian mode → Phrygian mode → major scale → ...
Hold down the [ROLL] button and turn the [VALUE] knob to select the note (root) for the scale.
21

Playing Back Samples (SAMPLE MODE)
●
button and switch to sample mode (the pad lights up orange).
When PAD MUTE (SYSTEM parameter) is set to “MASTER”, the sound of the pad can be output from the PHONES jack, even if the
Refer to the “Pad Mute(P.109)” SYSTEM parameter for details.
Muting the Playback of a Sample (PAD MUTE)
You can momentarily mute (silence) the playback of a sample.
By using part mute on a sample that’s playing back, you can create a break.
1. Press a pad to play its sample.
You can mute individual samples, either one or more than one, or mute individual samples when a pattern is playing back.
2. In sample mode, hold down the [SHIFT] button and [REVERSE] button and press the pad (sample) you
want to mute.
Muted pads (samples) light up red.
To unmute a pad, hold down the [SHIFT] button and [REVERSE] button and press the pad (sample) you want to unmute.
You can also unmute a pad by pressing the [EXIT] button four times to stop the sample playback.
● When a pattern is selected (the pad lights up purple), the pad can’t be muted. To mute a pad, press the [PATTERN SELECT]
pad (sample) is muted (this lets you monitor the sounds from the pads). In this case, no effects are applied.
22

Playing Back Samples (SAMPLE MODE)
Playing Back Multiple Pads at the Same Time (PAD LINK GROUPS)
The PAD LINK GROUPS function lets you group multiple pads (up to four) into one group. By setting a group ahead of time, you
can make all the pads in the group play back just by operating a single pad within that group.
You can also register up to 10 groups (A–J).
1. Hold down the [SHIFT] button and press the pad [7].
The PAD LINK GROUPS screen appears.
2. Turn the [VALUE] knob to select the group (A-J).
3. Press pads [1]–[16] to select the samples you want to include in the group.
4. To finish making setting, press the [EXIT] button.
5. Press one of the pads that you set in the group.
All the pads in the group play back at the same time.
23

Playing Back Samples (SAMPLE MODE)
Preventing Samples from Playing Back at the Same Time (MUTE GROUP)
The MUTE GROUP function lets you group together all the samples that should not play at the same time (in other words, the
samples you don’t want to layer).
When you try and play the samples within that group all at the same time, only the sample that started playing back last is heard.
A group can consist of up to 16 samples. You can also register up to 10 groups (groups A–J).
1. Hold down the [SHIFT] button and press the pad [8].
The MUTE GROUP screen appears.
2. Turn the [VALUE] knob to select the group (A-J).
3. Press pads [1]–[16] to select the samples you want to include in the group.
4. To finish making the settings, press the [EXIT] button.
Out of the pads (samples) in the same group, sound is played back only for the last pad you play.
24

Stopping All Sample Playback (STOP)
You can also press the [EXIT] button while holding down the [SHIFT] button to stop all samples and patterns that are playing
back.
You can make all samples and patterns that are currently playing back stop.
1. Press the [EXIT] button quickly four times.
All samples and patterns that are playing back stop.
Pausing the Sound of a Sample (PAUSE)
You can make samples that are currently playing back pause.
1. Hold down the [SHIFT] button and press the [HOLD] button.
All samples that are playing back pause.
Playing Back Samples (SAMPLE MODE)
2. Hold down the [SHIFT] button and press the [HOLD] button again to resume playback.
The samples resume playback.
25

Playing Back Samples (SAMPLE MODE)
Disabling Buttons that Are Not Used When Playing Live (LIVE MODE)
Normally, the buttons related to features like sampling and editing are not used when you are playing live.
Accidentally pressing these buttons while you’re performing live might be a show-stopper.
By turning live mode on, you can disable these buttons and avoid such accidents.
1. Hold down the [SHIFT] button and long-press the [REMAIN] button for at least three seconds.
This turns live mode on, and the “ ” icon appears in the lower left corner of the screen.
The following buttons are disabled in live mode.
[DEL] button
[REC] button
[RESAMPLE] button
[COPY] button
[MARK] button
To turn live mode off, perform the same operation as described above.
26
Using the Effects
Using the Effects
You can use the built-in effects on the SP-404MK2 to process the audio in unique ways.
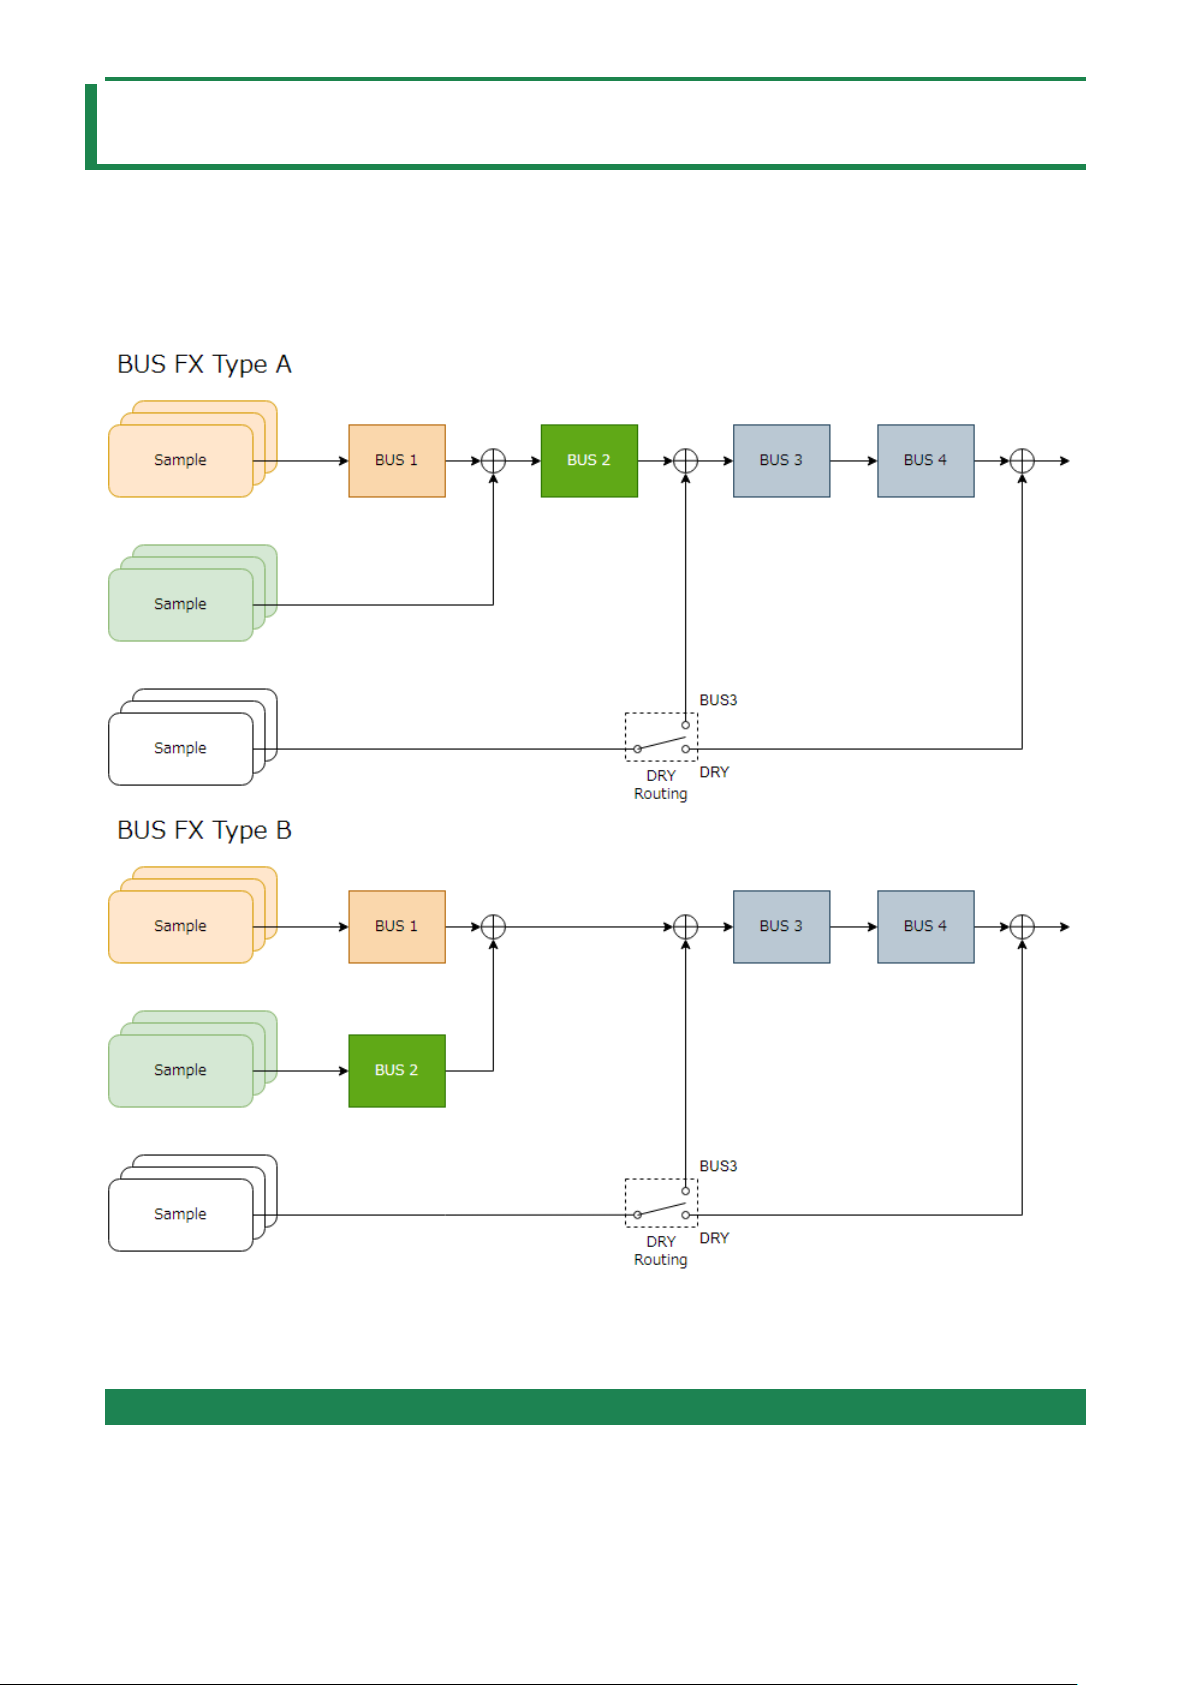
Use the built-in effects on the SP-404MK2 by assigning them to a bus (an audio routing inside the SP-404MK2).
With BUS 1 and BUS 2, you can apply the effects that are appropriate for your performance, per sample. BUS 3 and BUS 4 are
mainly used to apply effects to the overall sound output from the SP-404MK2.
There are two kinds of bus routings (in connection order) that you can select as you like.
Refer to “Configuring the Effect Routing(P.93)” for how to edit the bus routings.
To switch between DRY Routing parameters, see “DRY Routing(P.
エラー! ブックマークが定義されていません。)” in EFX SET.
Adding Effects to a Sample (BUS FX)
You can use the various effects built into the SP-404MK2 to process the playback audio in unique ways.
27
Using the Effects
You can assign the effects you like to the effect buttons.
For details, refer to “Assigning the Desired Effect to an Effect Button (DIRECT FX)(P.96)”.
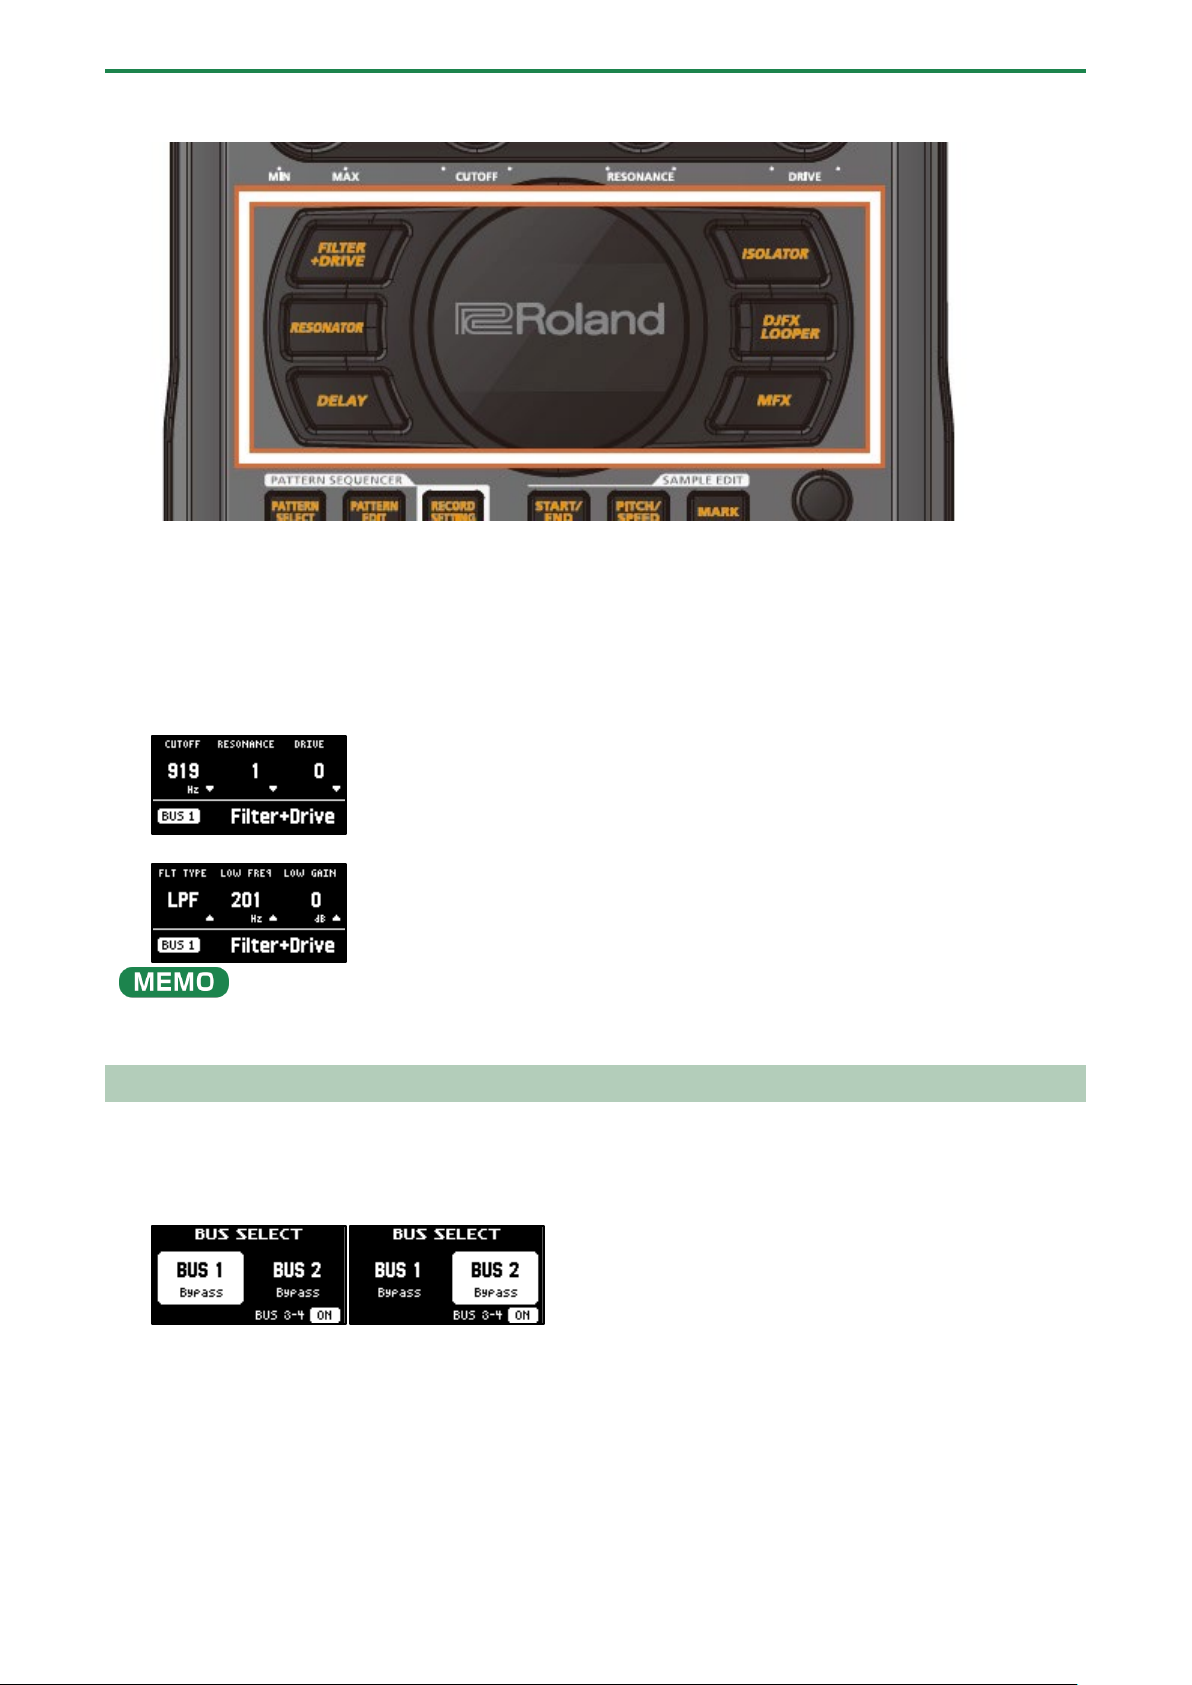
1. Press the effect buttons.
Press the buttons of the effects you want to apply, including the [FILTER+DRIVE] button, the [RESONATOR] button, the
[DELAY] button, the [ISOLATOR] button, the [DJFX LOOPER] button, and the [MFX] button.
This turns the effects on.
2. Press pads [1]–[16] to play back the samples.
Effects are applied to the samples.
3. Use the [CTRL 1]–[CTRL 3] knobs to adjust the parameters.
The parameters change how the effects are applied.
You can also access the effect sub-parameters by holding down the [VALUE] knob and operating the knobs.
Assigning Effects to BUS 1 and BUS 2
Here’s how to assign the built-in effects of this unit to BUS 1 or BUS 2. You can use two types of effects separately.
1. Press the [BUS FX] button to select the bus to configure.
When the button is lit orange, BUS 1 is selected; and when the button is blinking orange, BUS 2 is selected.
2. Press the [FILTER+DRIVE]–[MFX] buttons to select the effect to assign to the bus.
28

You can assign the built-in effects of this unit to BUS 3 or BUS 4. Up to four effects are available.
To assign an effect to BUS 3 or BUS 4, change the settings in the effect setting screen.
“Configuring the Effect Settings (EFX SET)(P.93)”
Set which effect is applied to the bus beforehand. For details, refer to “Assigning Effects to BUS 1 and BUS 2(P.28)”.
The pad’s color tells you the bus to which the sample is sent.
Pad color
Audio send destination (bus)
Lit orange
BUS 1
Lit green
BUS 2
Lit white
The sound is not sent to BUS 1 or BUS 2 (DRY).
→
Deciding on Effects to Use for Each Sample
Sets which sample playback audio is sent to which bus (meaning which effects are used) for each sample.
In this example, we apply the effect assigned to BUS 2 to the sample on pad [1].
1. Press the [BUS FX] button to select BUS 2.
2. Hold down the [REMAIN] button and press the pad [1].
The playback audio for the sample assigned to pad [1] is sent to the effect assigned to BUS 2.
Pad [1] lights up green at this time.
Using the Effects
Preventing samples from being sent to BUS 1/BUS 2
You can prevent the playback audio of samples from being sent to BUS 1 or BUS 2 (DRY). In this case, no effects are applied to the
samples.
1. While holding down the [REMAIN] button, press the pad [1]–[16] buttons a number of times to make
them light up white.
The BUS 1 and BUS 2 effects are not applied to the samples of pads that are lit up white.
Sending the audio input from the INPUT jack to a bus
As with the samples, you can set the bus to which the playback audio signals coming into the INPUT jack are sent (meaning which
effects are used).
For details, refer to “Sending the Audio Input from the INPUT Jack to a Bus(P.98)”.
Using the MFX Effects
You can select and use the effects you like for the MFX effects.
1. While holding down the [MFX] button, turn the [VALUE] knob or the [CTRL 3] knob to select the effect to
use.
29

Using the Effects
You can also use pads [1]–[16] instead of the [VALUE] knob or the [CTRL 3] knob to select an effect.
time.
To use pads [1]–[16] to select effects from #17 and up, hold down the [MFX] button and the [DJFX LOOPER] button at the same
2. After selecting the effect, take your finger off the [MFX] button.
The effect turns on, and the effect edit screen appears.
3. Play back a sample.
4. Use the [CTRL 1]–[CTRL 3] knobs to adjust the parameters.
You can also access the effect sub-parameters by holding down the [VALUE] knob and operating the knobs.
30
 Loading...