

Page 1

Owner’s Manual
Thank you, and congratulations on your choice of the BOSS
SP-303 Dr. Sample.
Before using this unit, carefully read the sections entitled:
• USING THE UNIT SAFELY (page 2–3)
• IMPORTANT NOTES (page 10)
These sections provide important information concerning
the proper operation of the unit.
Additionally, in order to feel assured that you have gained a
good grasp of every feature provided by your new unit,
Owner’s manual should be read in its entirety. The manual
should be saved and kept on hand as a convenient reference.
Copyright © 2001 BOSS CORPORATION
All rights reserved. No part of this publication may be reproduced in any form
without the written permission of BOSS CORPORATION.
Page 2
USING THE UNIT SAFELY
Used for instructions intended to alert
the user to the risk of death or severe
injury should the unit be used
improperly.
Used for instructions intended to alert
the user to the risk of injury or material
damage should the unit be used
improperly.
* Material damage refers to damage or
other adverse effects caused with
respect to the home and all its
furnishings, as well to domestic
animals or pets.
001
• Before using this unit, make sure to read the
instructions below, and the Owner’s Manual.
..........................................................................................................
002c
• Do not open (or modify in any way) the unit or its
AC adaptor.
..........................................................................................................
003
• Do not attempt to repair the unit, or replace parts
within it (except when this manual provides
specific instructions directing you to do so). Refer
all servicing to your retailer, the nearest Roland
Service Center, or an authorized Roland
distributor, as listed on the “Information” page.
..........................................................................................................
004
• Never use or store the unit in places that are:
• Subject to temperature extremes (e.g., direct
sunlight in an enclosed vehicle, near a heating
duct, on top of heat-generating equipment); or
are
• Damp (e.g., baths, washrooms, on wet floors);
or are
• Humid; or are
• Exposed to rain; or are
• Dusty; or are
• Subject to high levels of vibration.
..........................................................................................................
007
• Make sure you always have the unit placed so it is
level and sure to remain stable. Never place it on
stands that could wobble, or on inclined surfaces.
..........................................................................................................
008c
• Be sure to use only the AC adaptor supplied with
the unit. Also, make sure the line voltage at the
installation matches the input voltage specified on
the AC adaptor’s body. Other AC adaptors may
use a different polarity, or be designed for a
different voltage, so their use could result in
damage, malfunction, or electric shock.
..........................................................................................................
The symbol alerts the user to important instructions
or warnings.The specific meaning of the symbol is
determined by the design contained within the
triangle. In the case of the symbol at left, it is used for
general cautions, warnings, or alerts to danger.
The symbol alerts the user to items that must never
be carried out (are forbidden). The specific thing that
must not be done is indicated by the design contained
within the circle. In the case of the symbol at left, it
means that the unit must never be disassembled.
The ● symbol alerts the user to things that must be
carried out. The specific thing that must be done is
indicated by the design contained within the circle. In
the case of the symbol at left, it means that the powercord plug must be unplugged from the outlet.
009
• Do not excessively twist or bend the power cord,
nor place heavy objects on it. Doing so can
damage the cord, producing severed elements and
short circuits. Damaged cords are fire and shock
hazards!
..........................................................................................................
010
• This unit, either alone or in combination with an
amplifier and headphones or speakers, may be
capable of producing sound levels that could
cause permanent hearing loss. Do not operate for
a long period of time at a high volume level, or at
a level that is uncomfortable. If you experience
any hearing loss or ringing in the ears, you should
immediately stop using the unit, and consult an
audiologist.
..........................................................................................................
011
• Do not allow any objects (e.g., flammable material,
coins, pins); or liquids of any kind (water, soft
drinks, etc.) to penetrate the unit.
..........................................................................................................
012c
• Immediately turn the power off, remove the AC
adaptor from the outlet, and request servicing by
your retailer, the nearest Roland Service Center, or
an authorized Roland distributor, as listed on the
“Information” page when:
• The AC adaptor or the power-supply cord has
been damaged; or
• Objects have fallen into, or liquid has been
spilled onto the unit; or
• The unit has been exposed to rain (or otherwise
has become wet); or
• The unit does not appear to operate normally or
exhibits a marked change in performance.
..........................................................................................................
2
Page 3
013
• In households with small children, an adult
should provide supervision until the child is
capable of following all the rules essential for the
safe operation of the unit.
..........................................................................................................
014
• Protect the unit from strong impact.
(Do not drop it!)
..........................................................................................................
015
• Do not force the unit’s power-supply cord to share
an outlet with an unreasonable number of other
devices. Be especially careful when using
extension cords—the total power used by all
devices you have connected to the extension
cord’s outlet must never exceed the power rating
(watts/amperes) for the extension cord. Excessive
loads can cause the insulation on the cord to heat
up and eventually melt through.
..........................................................................................................
016
• Before using the unit in a foreign country, consult
with your retailer, the nearest Roland Service
Center, or an authorized Roland distributor, as
listed on the “Information” page.
..........................................................................................................
101b
• The unit and the AC adaptor should be located so
their location or position does not interfere with
their proper ventilation.
..........................................................................................................
102d
• Always grasp only the plug or the body of the AC
adaptor when plugging into, or unplugging from,
an outlet or this unit.
..........................................................................................................
103b
• Whenever the unit is to remain unused for an
extended period of time, disconnect the AC
adaptor.
..........................................................................................................
104
• Try to prevent cords and cables from becoming
entangled. Also, all cords and cables should be
placed so they are out of the reach of children.
..........................................................................................................
106
• Never climb on top of, nor place heavy objects on
the unit.
..........................................................................................................
107d
• Never handle the AC adaptor body, or its plugs,
with wet hands when plugging into, or
unplugging from, an outlet or this unit.
..........................................................................................................
108b
• Before moving the unit, disconnect the AC
adaptor and all cords coming from external
devices.
..........................................................................................................
109b
• Before cleaning the unit, turn off the power and
unplug the AC adaptor from the outlet.
..........................................................................................................
110b
• Whenever you suspect the possibility of lightning
in your area, disconnect the AC adaptor from the
outlet.
..........................................................................................................
118
• Should you remove the screws, make sure to put
them in a safe place out of children’s reach, so
there is no chance of them being swallowed
accidentally.
..........................................................................................................
3
Page 4

Contents
USING THE UNIT SAFELY...........2
Main Features..........................6
Panel Descriptions ...................7
IMPORTANT NOTES................10
QUICK START .........................11
Making Connections...............................................11
Turning On the Power.............................................12
Turning Off the Power ............................................12
Listen to the Samples.............................................13
Adding Effects to Samples.....................................14
Try Playing a Pattern ..............................................15
Playing with the Tempo Changed....................................15
Chapter 3. Sampling ..............27
Before Sampling..................................................... 27
Selecting Higher Quality Sampling, Extended Sampling,
or Lo-Fi Sampling (Sampling Grade)
Selecting Between Stereo and Mono Sampling .............. 27
About Sampling Time ........................................................ 27
Sampling from a Microphone................................ 28
Sampling from a CD or MD.................................... 29
Sampling With the Tempo Specified Beforehand
Starting Sampling Automatically
(Auto Sampling) ..................................................... 31
To stop auto sampling........................................................ 32
Making Samples with Effects Added
(Resampling) .......................................................... 32
Deleting an Individual Sample .............................. 33
Deleting All Samples Together ............................. 34
Changing the Assignment of Samples to the Pads
Checking the Remaining Sampling Time............. 35
......................................27
....... 30
..... 34
Sampling Your Own Sounds..................................16
Lifting the SP-303’s Memory Protection.......................... 16
If you don’t like the sampled sound ................................ 17
Chapter 1. Playing Samples... 18
Composition of Samples........................................18
Switching Sample Banks........................................18
Number of Samples That Can Be Played
Simultaneously (Polyphony)..................................18
Having a Sample Continue to Play Even
When the Pad is Released (Hold) ..........................19
Playing Sounds Input From External Devices
(EXT SOURCE Pad).................................................19
Adjusting the Volume of the External Input Sounds.....20
Chapter 2. Using the Effects ...21
Adding Effects to Samples.....................................21
Turning Effects On and Off Rapidly (Effect Grab)......... 22
Selecting an Effect From MFX........................................... 22
Applying Effects to Multiple Samples...................22
Applying Effects to All Samples Simultaneously
.........23
Chapter 4.
Changing the Sampling Settings
Playing Phrases Repeatedly (Loop Playback)/
Playing the Sound Only Once (One Shot Playback)
Having Samples Play Only While the
Pad Is Pressed (Gate Playback)............................ 36
Having Samples Play Even If the
Pad Is Not Held Down (Trigger Playback)............ 36
Playing Samples in the Reverse Direction
(Reverse Playback) ................................................ 37
Setting the Sample Volume................................... 38
Preventing Unneeded Portions from Being Played
(Markers/Start Point/End Point)
Adjusting both the Start and End points......................... 38
Adjusting only the End Point............................................ 39
Adjusting only the Start Point
(End Point is the end of the sample) ................................39
Finely Adjusting the Start Point and End Point ............. 40
Deleting Unwanted Portions (Truncate)............... 41
Changing the Sample’s BPM ................................ 41
Changing the Length of a Sample
Without Changing the Pitch (Time Modify)......... 42
................................. 38
..36
.... 36
Effects List...............................................................24
4
Page 5

Contents
Chapter 5.
Recording Sample Performances
(Pattern Sequencer)
Composition of Patterns ........................................43
Changing the Tempo of a Pattern..........................43
To Synchronize with a CD’s or Turntable’s Tempo....... 43
Stopping Patterns ...................................................44
Switching Patterns While Playback Is in Progress
Recording the Pattern.............................................44
Erasing the Data for Mistakes in Performances.............. 46
Deleting Patterns.....................................................46
Specifying and Deleting a Single Pattern ........................ 46
Deleting All Patterns Together.......................................... 47
Changing the Assignment of Patterns to the Pads
..................43
......44
......47
Chapter 6.
Using Memory Cards .............48
Chapter 7. Using the SP-303
With Other MIDI Devices ........53
Using the SP-303 With a MIDI Keyboard.............. 53
How to Change the MIDI Channel......................... 53
Note On Operating With MIDI................................ 54
Using the SP-303 With a MIDI Sequencer
(Tempo Sync) ......................................................... 54
Synchronizing the Pattern’s Tempo and Start/Stop
to the MIDI Sequencer........................................................54
Synchronizing Only the Pattern Tempo
with a MIDI Sequencer....................................................... 55
Playing Samples Without Synchronizing the Tempo....55
Using the SP-303 as a Rhythm Sound Module.... 56
Using the SP-303 With a Rhythm Machine .......... 56
Synchronizing the Performance of the
SP-303’s Patterns with a Rhythm Machine’s Tempo ..... 56
Using the Note Messages from the Rhythm Machine
to Play the SP-303’s Samples ............................................. 57
Restoring the MIDI Settings to the Factory Settings
... 58
Memory Cards .........................................................48
Inserting a memory card.................................................... 48
Initializing Memory Cards (Format).......................49
Saving Samples to Memory Cards
(Sample Save)..........................................................49
Loading Sample from a Memory Card
(Sample Load) .........................................................50
Saving Patterns to Memory Cards
(Pattern Save)..........................................................50
Loading Pattern from a Memory Card
(Pattern Load)..........................................................51
Protecting the Data on Memory Cards
(Protect) ...................................................................51
Importing Wave Data to the SP-303
From a Computer ....................................................52
Chapter 8.
Examples of Using the SP-303
Using Pattern Sequencer to Create a
Rhythm Pattern ...................................................... 59
Using the SP-303 with MIDI Devices .................... 61
Using the SP-303 as a rhythm sound module................. 61
Using the SP-303 With a Turntable....................... 62
Adding Effects to the Turntable Sound ...........................62
Playing a Sample Along With the Sound From a
Turntable .............................................................................. 63
....59
Appendices............................64
Chart of Operations ............................................... 64
Troubleshooting..................................................... 66
Initializing the SP-303’s Memory .......................... 68
Message List........................................................... 69
MIDI Implementation Chart.................................... 71
Specifications......................................................... 72
Index.....................................73
5
Page 6

Main Features
High-Capacity Memory Cards (SmartMedia)
for Extended Sampling Times
The SP-303 itself provides up to three minutes and twelve
seconds of sampling.
In addition, by using optional memory cards (SmartMedia: 8
MB–64 MB) you can sample for much longer lengths of time.
For example, using a 64 MB SmartMedia card in Standard
mode gives you 33 minutes of samples, and in Lo-Fi mode,
you can get up to 200 minutes.
* 1 MB, 2 MB, and 4 MB SmartMedia cards cannot be used.
* SmartMedia is a trademark of Toshiba Corporation.
26 Internal Effects Perfect for Groove Music
The SP-303 features twenty-six internal effects that are
indispensable for creating and performing Groove music,
including a Vinyl Simulator that mimics the sonic qualities of
analog records, filter effects that are essential in Techno
music, an Isolator effect–a must for remixing–a powerful
voice transformer for vocal effects, and more.
You can also use these effects on sounds input from external
sources as well.
Resampling? No Problem
Resampling the playback of sampled sounds with internal
effects added lets you create even more new sounds. And
since the process is entirely digital, there is no degradation in
sound quality. This makes it convenient to create different
variations from sounds that have already been sampled.
Automated Playback of Sampled Sounds
(Pattern Sequencer)
You can run a playback of some sampled sounds, and then
play back the sequence of sounds as a single pattern.
This lets you easily create combinations of rhythms and
samples, and combine different phrases to create a single
song.
Eight-Voice Polyphony
Using mono samples, you can have up to eight voices
playing simultaneously. What’s more, you can use effects
and memory cards with no reduction in polyphony, so you
get plenty of room to work with, even in performances using
layered samples with effects added.
...........................................................................................................
■ Printing Conventions in This Manual
● Text or numerals enclosed in square brackets [ ]
indicate bottons or pads.
[REC] REC button
BANK [A] Bank A button
[1] Pad 1
[HOLD] Hold pad
6
● Reference such as (p. **) indicate pages in this
manual to which you can refer.
...........................................................................................................
Page 7
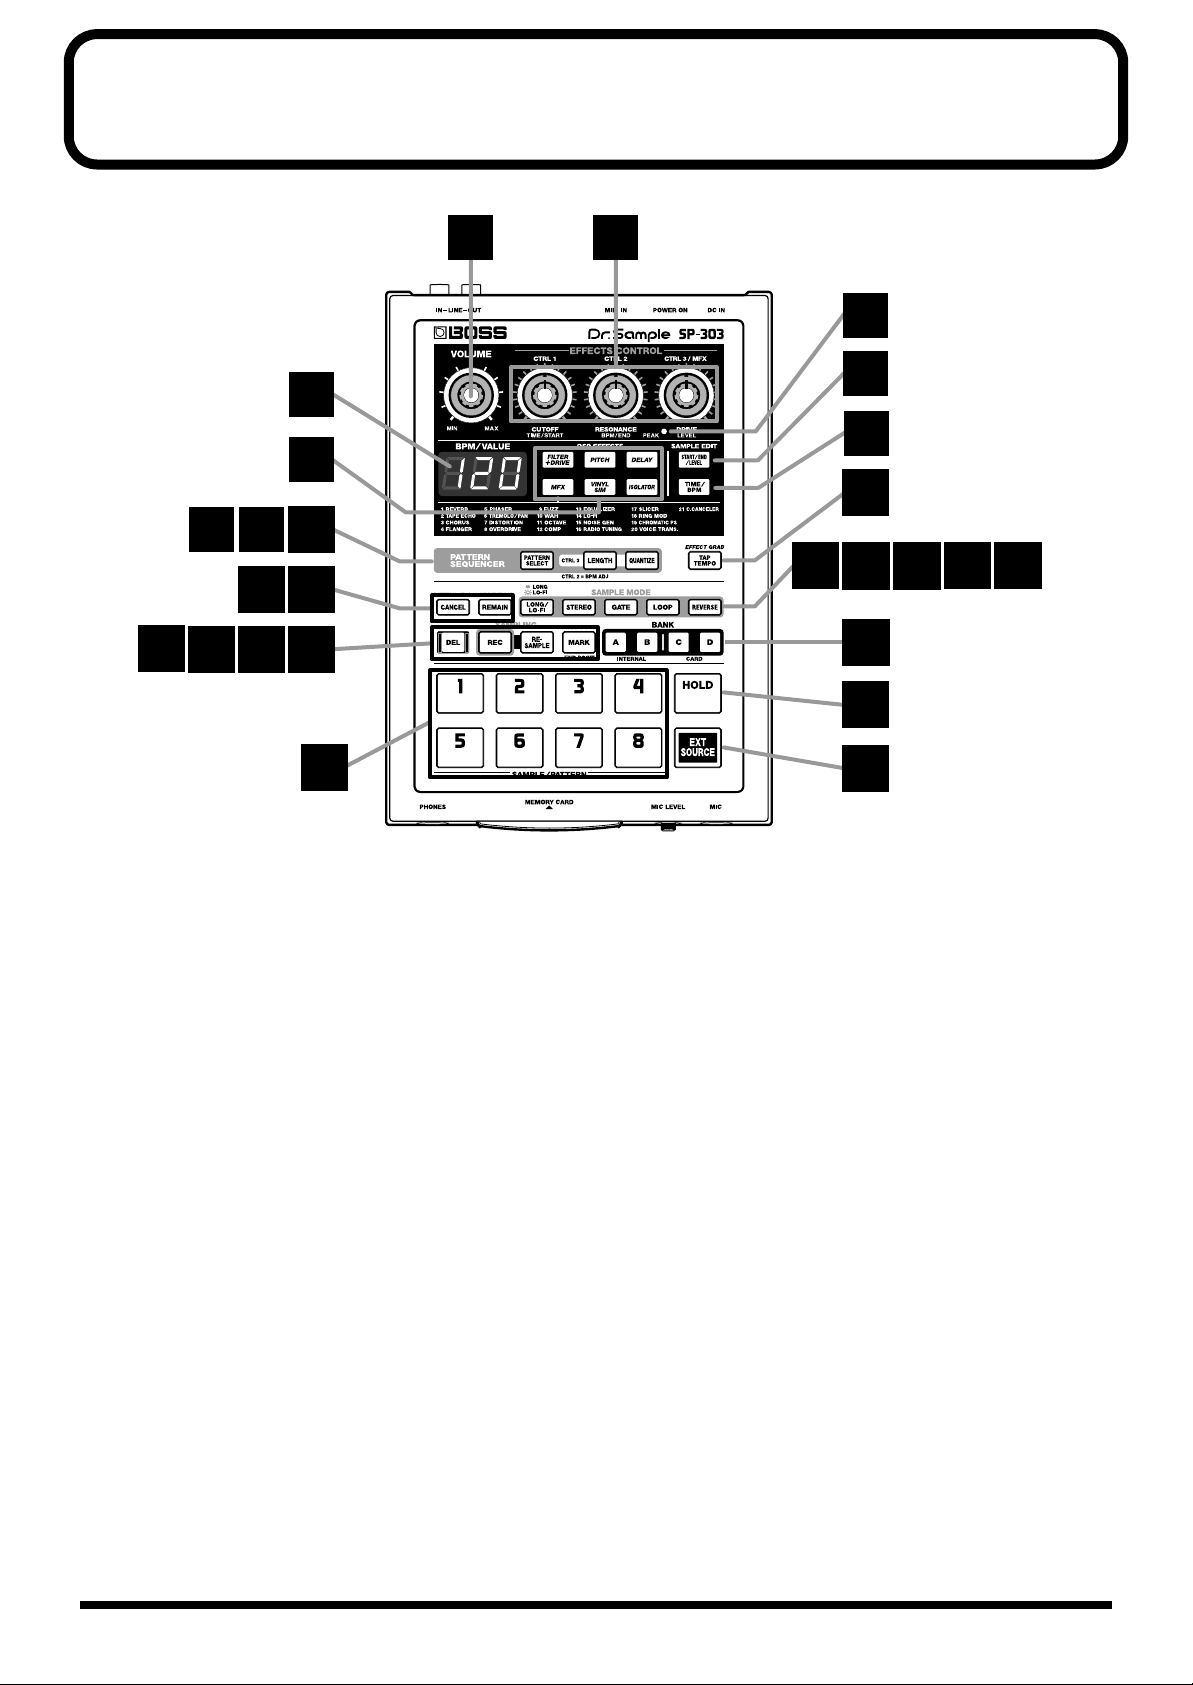
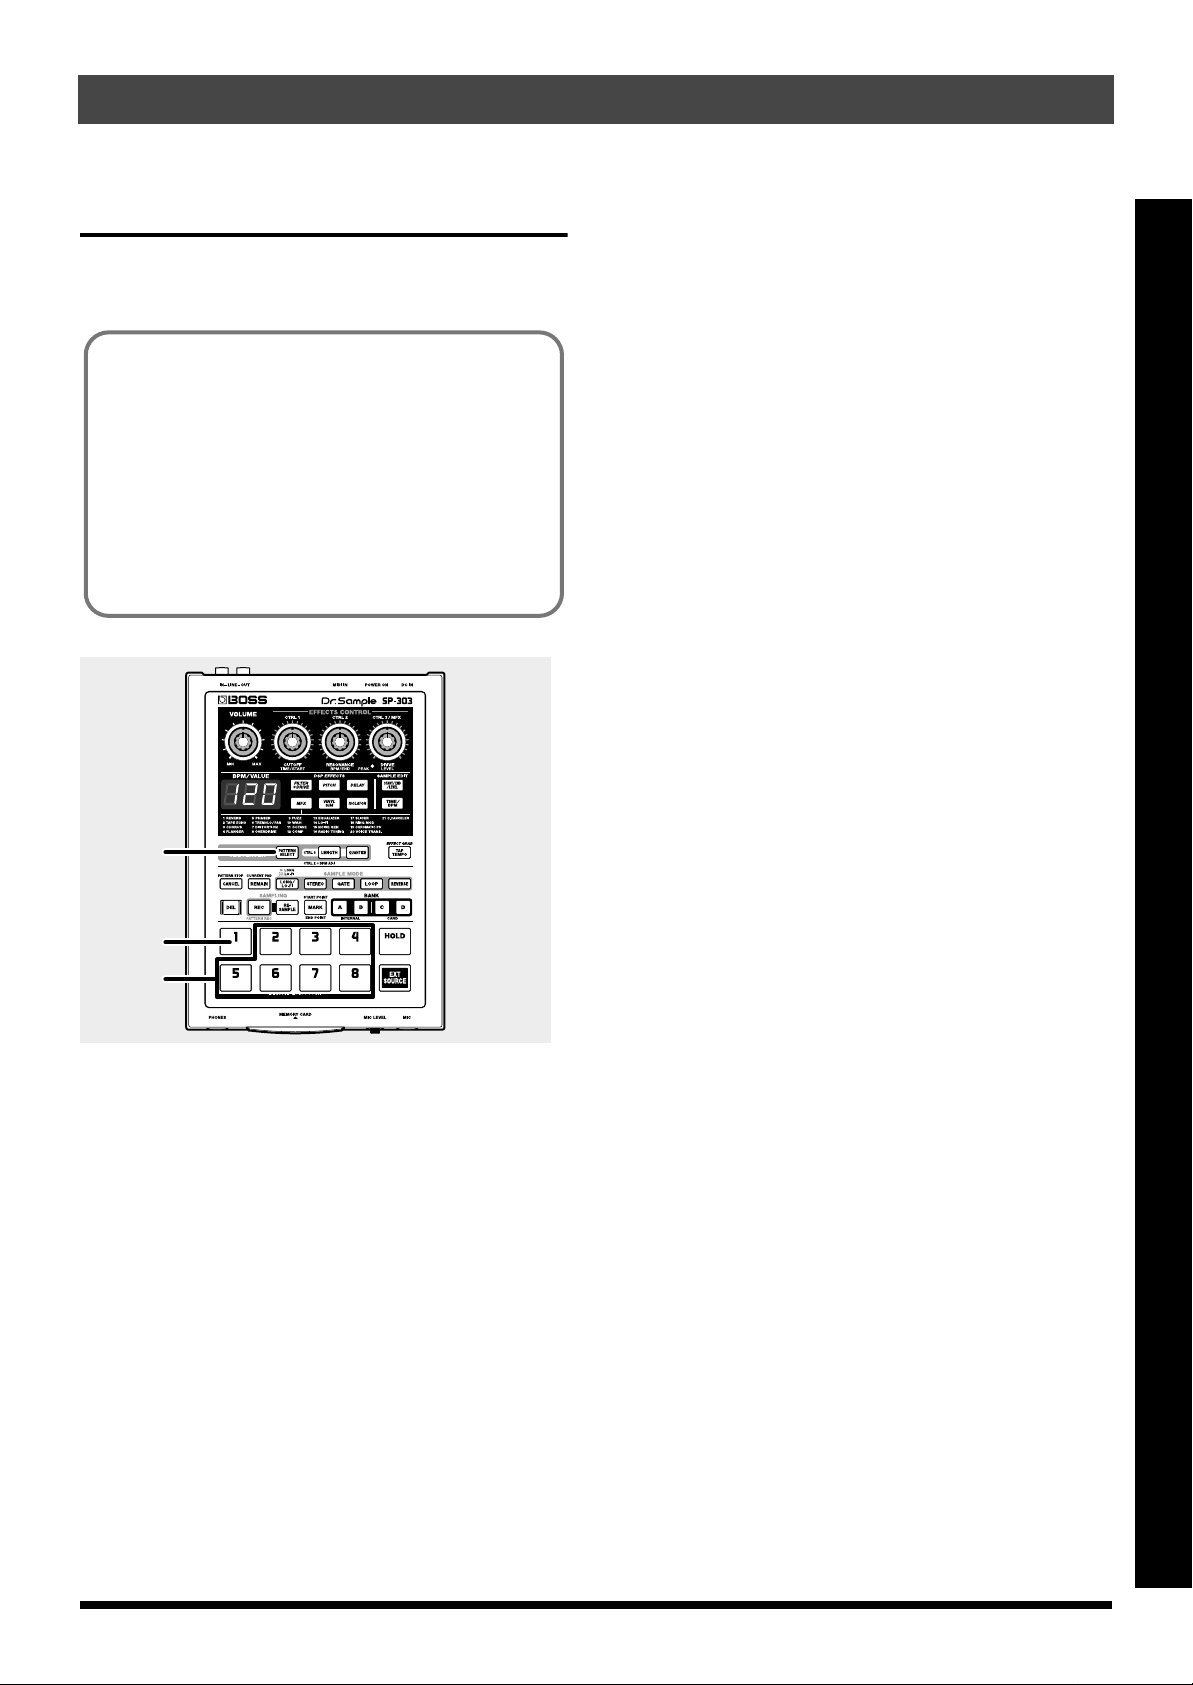
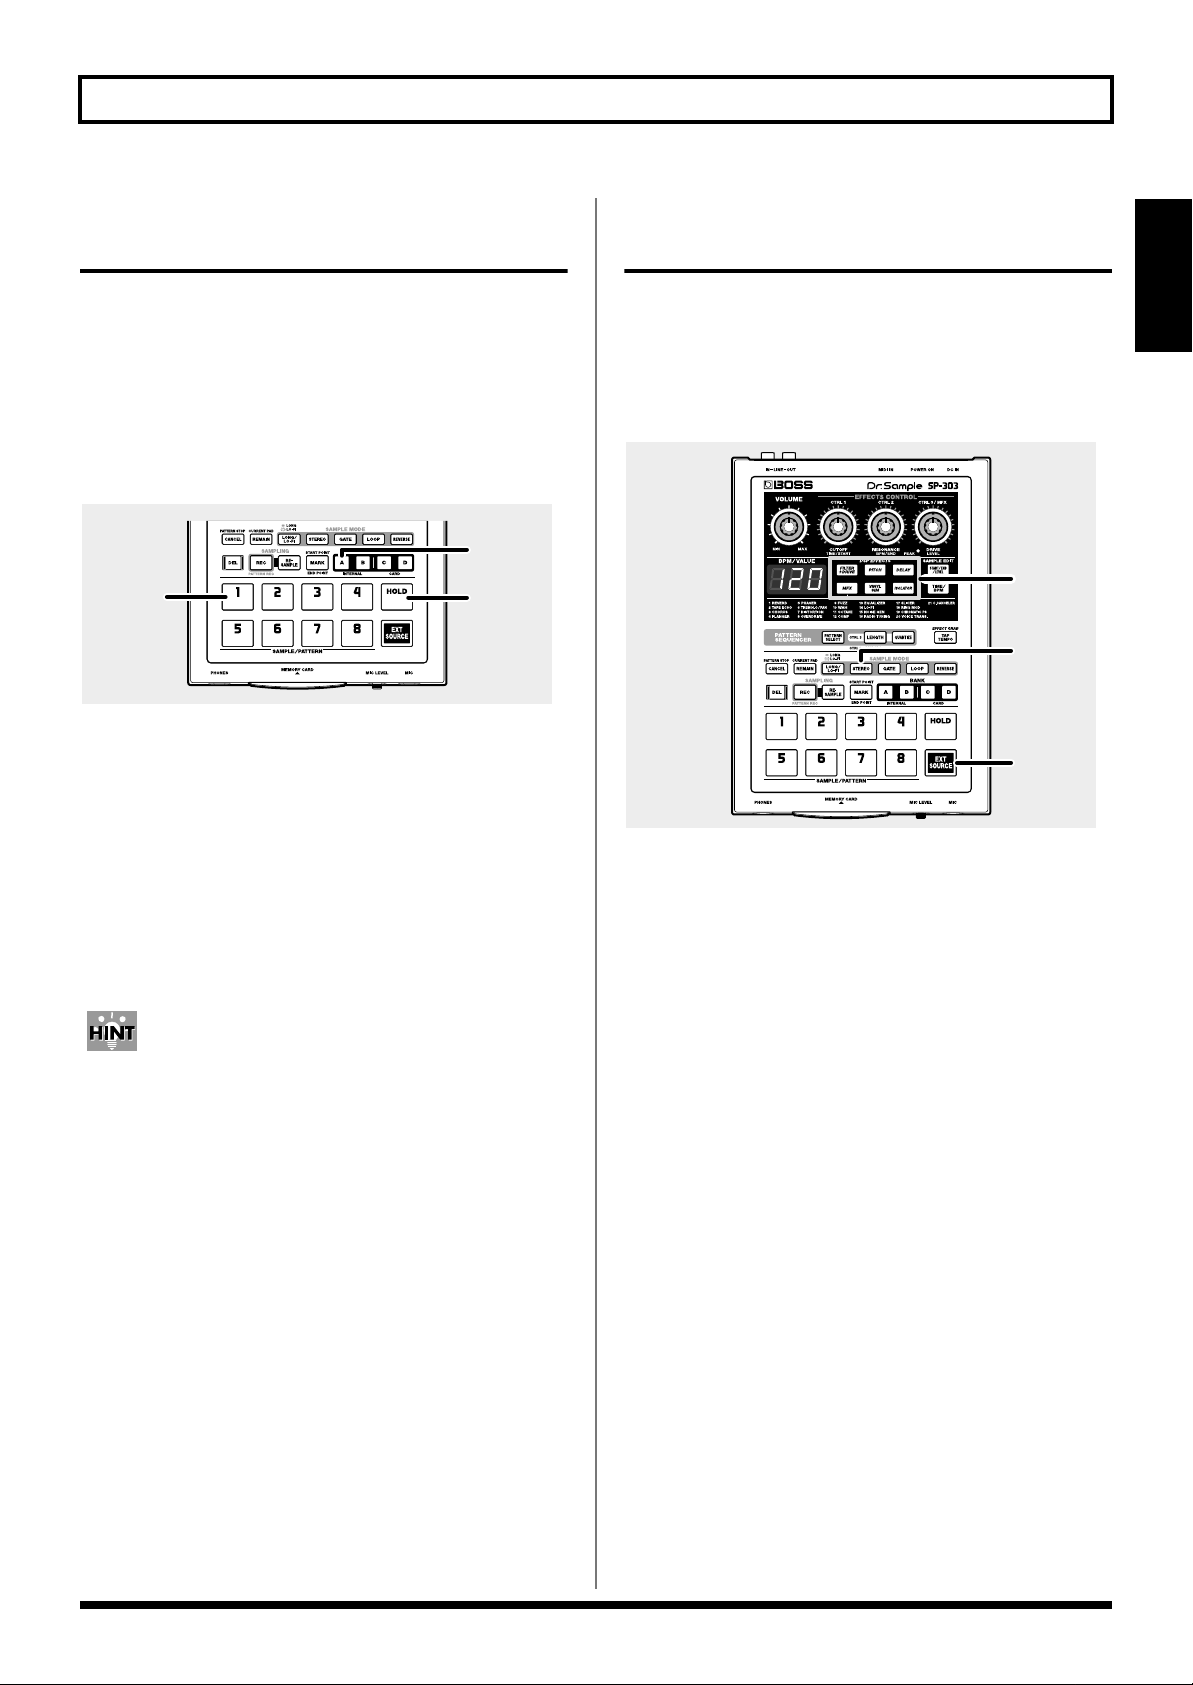
Panel Descriptions
fig.P01
1 2
4
5
3
6
7
11
19
8 9
20 21
12
10
13
22
24
1 VOLUME Knob
Adjusts the volume level of the LINE OUT and
headphones jacks.
2 EFFECTS CONTROL Knobs
Control the parameters assigned to each of the knobs
associated with the selected effect. Also use the knobs in
the following situations.
CTRL 1(Control 1) Knob
Use this to change the sample’s starting point and the
playback time of the sample.
14
15
16
17
18
23
25
26
4 Display
Displays sample and pattern BPM (tempo), settings
values, error messages, and other information. You can
also have the remaining time available for sampling
displayed.
5 EFFECTS Buttons
Select the effects you wish to use. A button is lit when its
effect is on; the light goes out when the effect is turned
off.
* It is not possible to apply two or more effects simultaneously.
CTRL 2 (Control 2) Knob
Use this when changing the BPM (tempo) of the pattern
or when changing the point when the sound of the
sample is to stop.
CTRL 3/MFX (Control 3/MFX) Knob
Use this when selecting the MFX type, or when changing
the sampling level or sampling volume.
3 PEAK Indicator
This indicator helps you to adjust the level when
sampling. For optimal sampling, adjust the level so that
this indicator lights occasionally.
6 START/END/LEVEL Button
Use this to change the point where the sample is to start
and end, and to adjust the level.
7 TIME/BPM Button
Use this to set the length of the playback time and the
BPM (tempo).
8 PATTERN SELECT Button
Press this when playing back or recording patterns.
When this button is lit, you can select patterns by
pressing the pads.
7
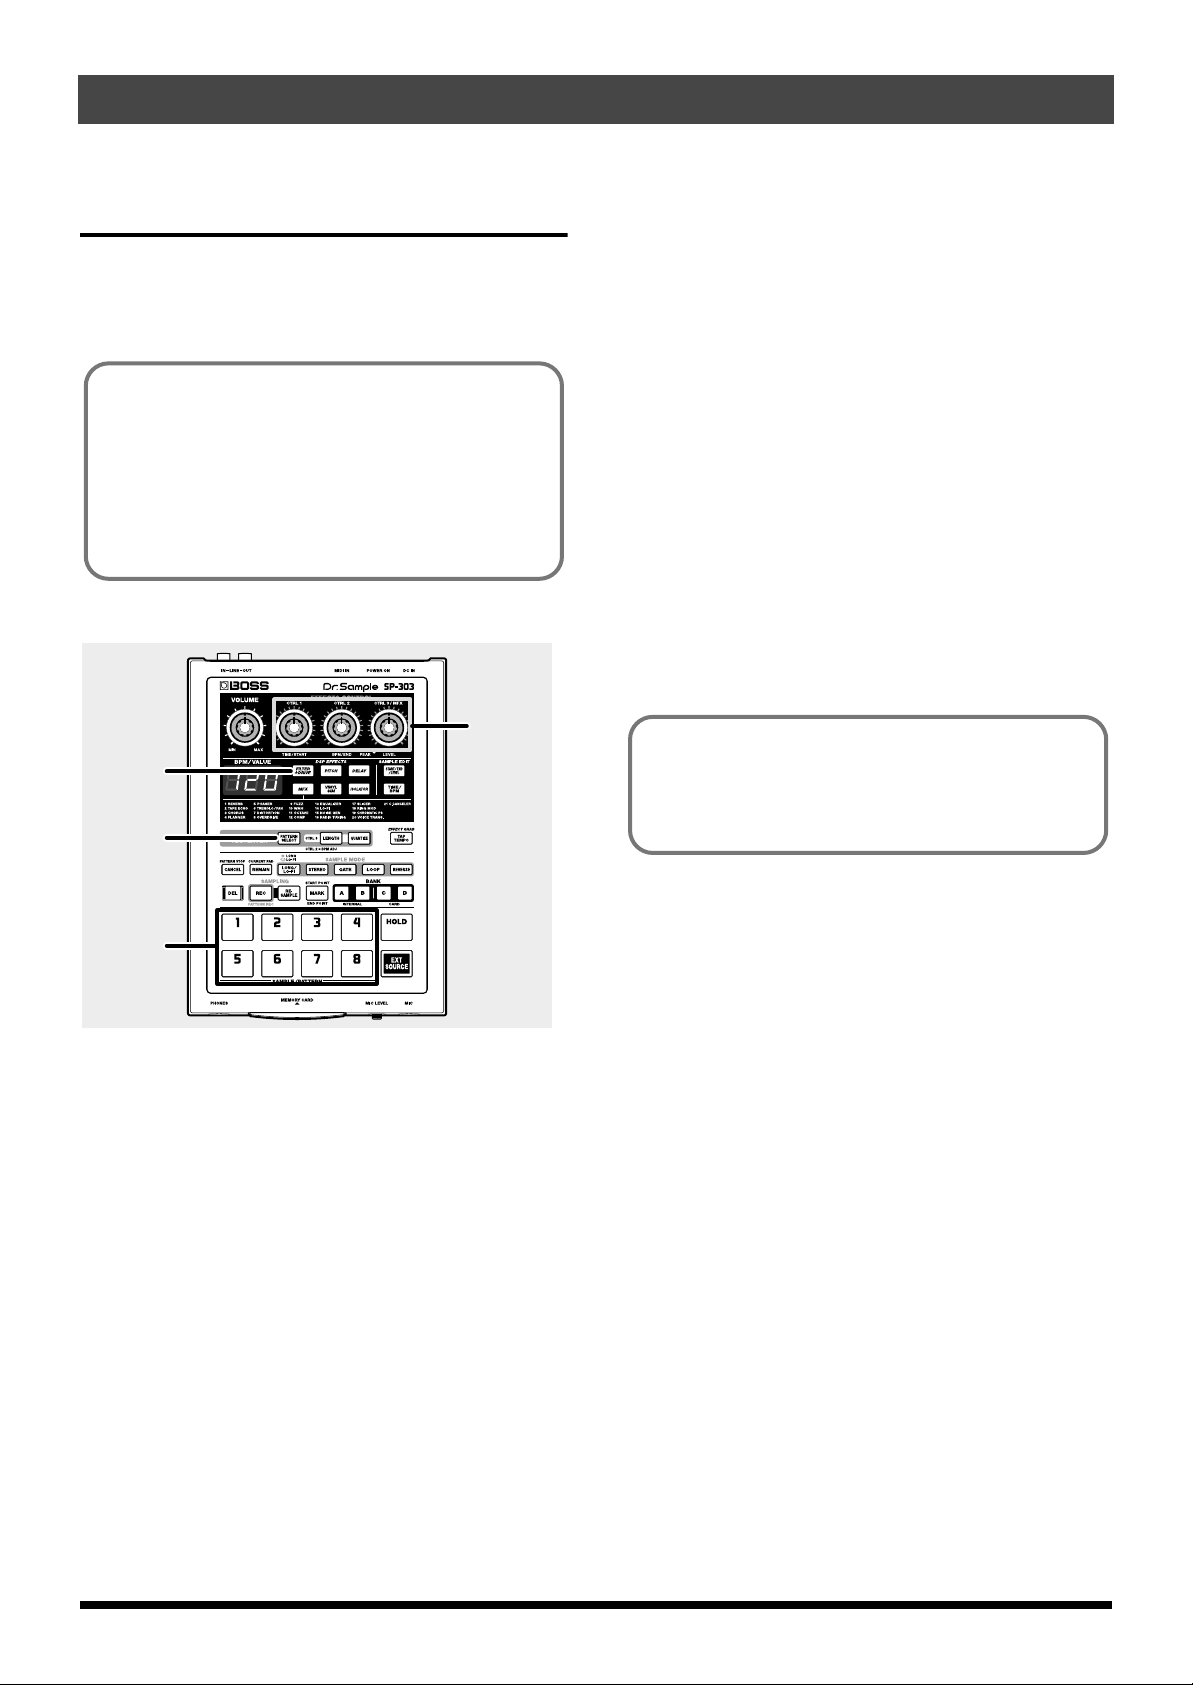
Page 8

Panel Descriptions
9 LENGTH (Pattern Length) Button
Specifies the length of the pattern.
10
QUANTIZE Button
Corrects (quantizes) the timing of the pattern recordings
automatically.
11
TAP TEMPO Button
Tap this button a number of times to change the tempo
so it accords with the timing you used while tapping it.
12
CANCEL Button
By pressing this button you cancel sampling or erasing
samples in progress.
You can also stop playback of the pattern in progress.
13
REMAIN Button
When this button is pressed, the display will indicate the
remaining time available for sampling.
Additionally, by pressing pads while holding down this
button, you can select the samples for which you want to
add effects or change settings.
18
REVERSE Button
This switches the SP-303 to “Reverse Playback,” where
samples are played backwards.
Reverse Playback is in effect when the button is lit; when
not lit, normal Playback is in effect.
19
DEL (Delete) Button
Use this button to delete a sample or pattern. The button
lights up while the deletion is in progress.
20
REC (Recording) Button
Use this when starting and stopping sampling, and
when starting and stopping recording patterns.
21
RESAMPLE (Resampling) Button
Use this when creating new samples made by playing
back previous samples with effects added (resampling).
22
MARK Button
Use this button when you wish to sound only a portion
of a sampled sound. While this button is lit, only the
specified portion will sound.
14
LONG/LO-FI Button
Switches the sampling grade (high-quality/extended
time/Lo-Fi).
Extended time is selected when the button is lit, highquality when the button is not lit, and Lo-Fi when the
button is blinking.
15
STEREO Button
Specifies whether sampling will be mono or stereo.
When the button is lit, sampling is in stereo; when not lit,
sampling is mono.
16
GATE Button
This switches between “Gate Playback,” where samples
play only while the pad is held down, and “Trigger
Playback,” whereby the pad is pressed to toggle between
play and stop of the sample.
Gate Playback is in effect when the button is lit; when
not lit, Trigger Playback is in effect.
17
LOOP Button
This switches between “Loop Playback,” where samples
play repeatedly when the pad is pressed, and “One Shot
Playback,” in which the sample is played only one time.
Loop Playback is in effect when the button is lit; when
not lit, One Shot Playback is in effect.
23
BANK Buttons A/B/C/D
When the PATTERN SELECT button is not lit, these
switch sample banks; when PATTERN SELECT is lit, the
buttons switch pattern banks.
The SP-303’s internal Bank A or B is selected by pressing
A or B. Press C or D to select Bank C or D on the memory
card.
24
Pads (1–8)
When [PATTERN SELECT] is not lit, pressing a pad
plays the sample assigned to that pad. The pad is lit
while the sample plays.
When [PATTERN SELECT] is lit, pressing the pad plays
back and stops the playback of patterns.
25
HOLD Pad
If you hold down this pad while pressing another pad,
the sample will continue to play even after you release
the pad.
26
EXT SOURCE (External Source) Pad
By using this pad you can sound/silence the sound from
an external input without having to sample it, and can
apply effects to the sound.
8
Page 9
Panel Descriptions
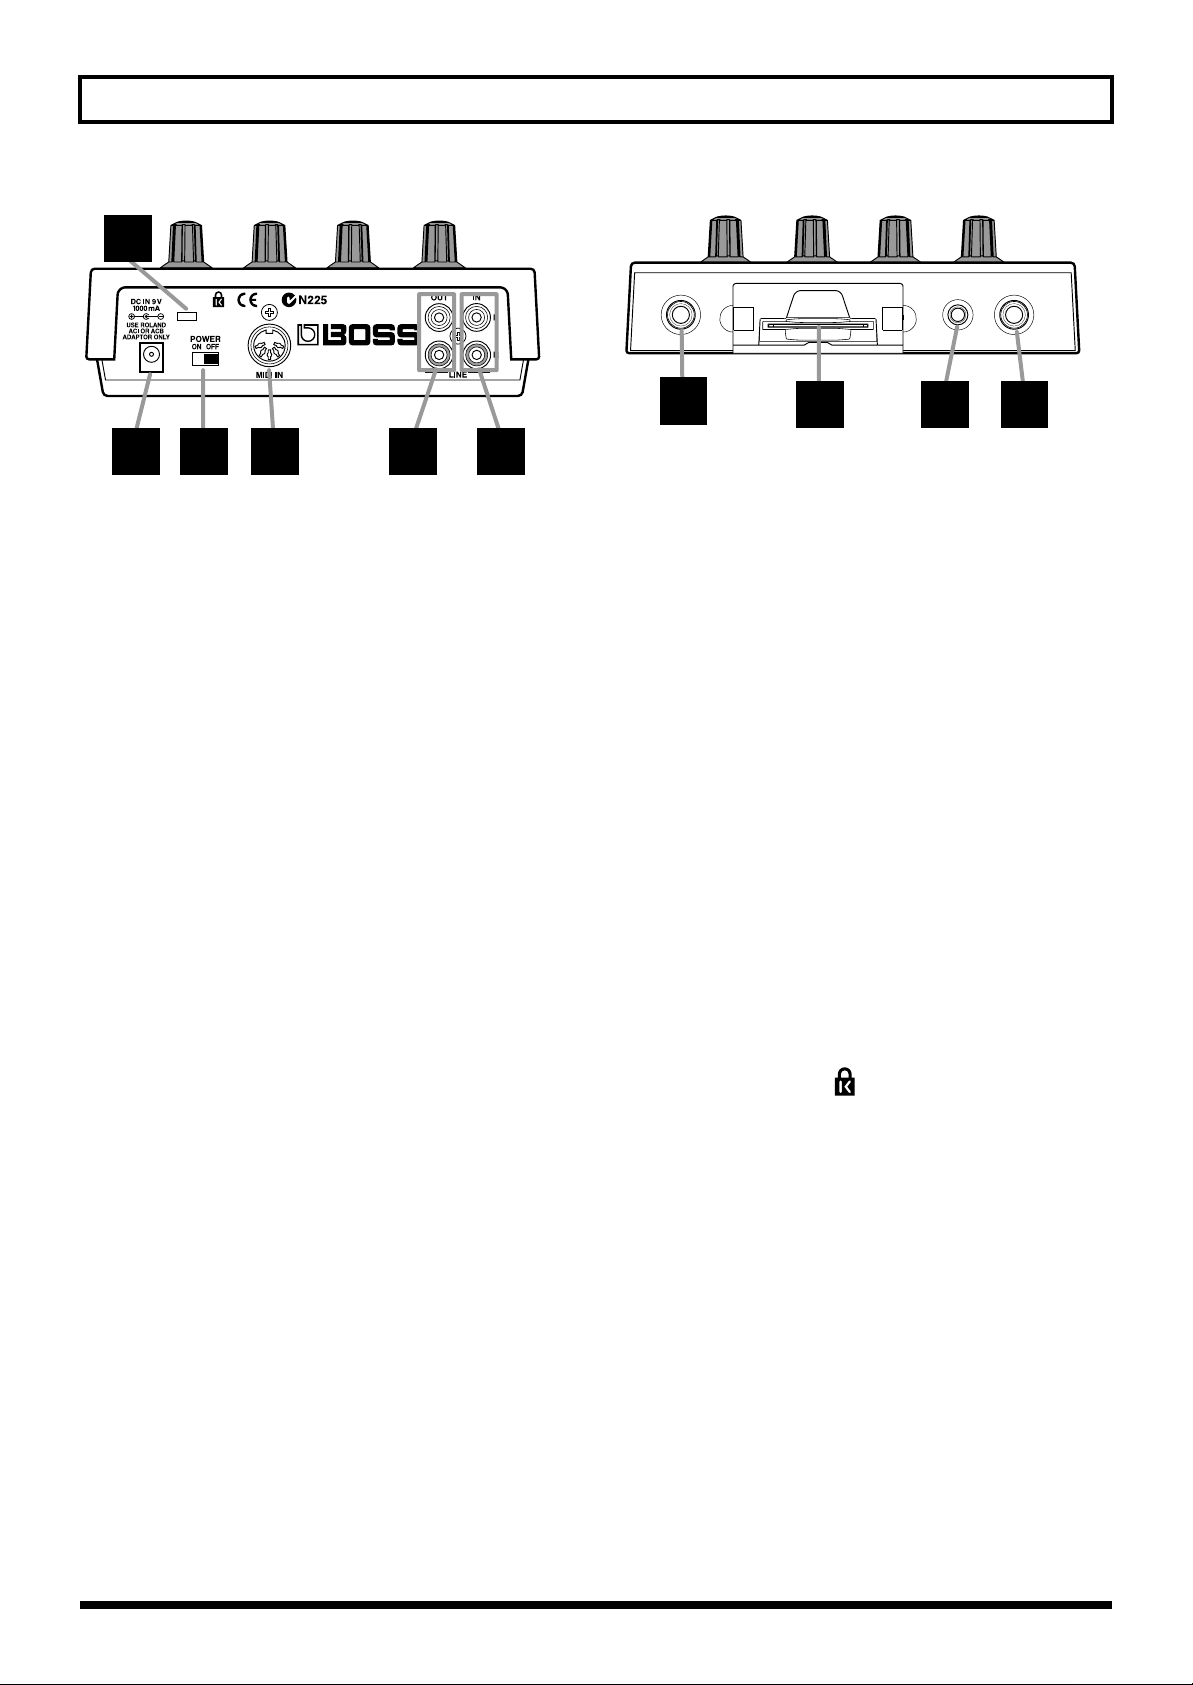
fig.P02
36
27 28 29 30 31
27
AC Adaptor Jack
Connect the AC adapter to this connector.
* Be sure to use only the specified AC adaptor. Doing so may
damage the unit.
28
Power Switch
Turns the power on/off.
29
MIDI IN Connector
You can connect an external MIDI device (such as a
sequencer, keyboard, or rhythm machine), and use the
device to control the SP-303. Use MIDI cable (sold
separately) to make connections.
30
LINE OUT Jacks (L/R)
These audio outputs are RCA phono type jacks for
connection to an amp or mixer through which you wish
to play the sampled sounds.
fig.P03
32
32
PHONES (Headphones) Jack
A set of headphones can be connected here to hear the
same sound as the line outputs. The jack accepts stereo
1/4 inch phone plug.
33
MEMORY CARD Slot
A memory card (SmartMedia: optional) can be inserted
here. It is also possible to use card banks C/D to record
long samples that the internal memory could not
accommodate.
A card can be used to store (backup) the data from
internal memory.
34
MIC LEVEL Knob
Adjusts the volume of the mic sound.
35
MIC Jack
Connect a microphone.
33 34 35
31
LINE IN Jacks (L/R)
RCA phono type audio input jacks for connecting a CD
player or other source device used for taking samples.
36
Security Slot ( )
Web:www.kensington.com
9
Page 10
IMPORTANT NOTES
291a
In addition to the items listed under “USING THE UNIT SAFELY” on page 2–3, please read and observe the following:
Power Supply
301
• Do not use this unit on the same power circuit with any
device that will generate line noise (such as an electric
motor or variable lighting system).
302
• The AC adaptor will begin to generate heat after long
hours of consecutive use. This is normal, and is not a
cause for concern.
307
• Before connecting this unit to other devices, turn off the
power to all units. This will help prevent malfunctions
and/or damage to speakers or other devices.
Placement
351
•
Using the unit near power amplifiers (or other equipment
containing large power transformers) may induce hum. To
alleviate the problem, change the orientation of this unit; or
move it farther away from the source of interference.
352
• This device may interfere with radio and television
reception. Do not use this device in the vicinity of such
receivers.
354a
• Do not expose the unit to direct sunlight, place it near
devices that radiate heat, leave it inside an enclosed
vehicle, or otherwise subject it to temperature extremes.
Excessive heat can deform or discolor the unit.
355
• To avoid possible breakdown, do not use the unit in a wet
area, such as an area exposed to rain or other moisture.
Maintenance
401a
• For everyday cleaning wipe the unit with a soft, dry cloth
or one that has been slightly dampened with water. To
remove stubborn dirt, use a cloth impregnated with a
mild, non-abrasive detergent. Afterwards, be sure to wipe
the unit thoroughly with a soft, dry cloth.
402
• Never use benzine, thinners, alcohol or solvents of any kind,
to avoid the possibility of discoloration and/or deformation.
Additional Precautions
551
• Please be aware that the contents of memory can be
irretrievably lost as a result of a malfunction, or the
improper operation of the unit. To protect yourself against
the risk of loosing important data, we recommend that
you periodically save a backup copy of important data
you have stored in the unit’s memory on a Memory card
(SmartMedia).
552
• Unfortunately, it may be impossible to restore the contents of
data that was stored in the unit’s memory, and on a Memory
card (SmartMedia) once it has been lost. Roland Corporation
assumes no liability concerning such loss of data.
553
• Use a reasonable amount of care when using the unit’s
buttons, sliders, or other controls; and when using its jacks
and connectors. Rough handling can lead to malfunctions.
554
• Never strike or apply strong pressure to the display.
556
• When connecting / disconnecting all cables, grasp the
connector itself—never pull on the cable. This way you
will avoid causing shorts, or damage to the cable’s
internal elements.
558a
• To avoid disturbing your neighbors, try to keep the unit’s
volume at reasonable levels. You may prefer to use
headphones, so you do not need to be concerned about
those around you (especially when it is late at night).
559a
• When you need to transport the unit, package it in the box
(including padding) that it came in, if possible. Otherwise,
you will need to use equivalent packaging materials.
562
• Use a cable from Roland to make the connection. If using
some other make of connection cable, please note the
following precautions.
Some connection cables contain resistors. Do not use cables
•
that incorporate resistors for connecting to this unit.
The use of such cables can cause the sound level to be
extremely low, or impossible to hear. For information on
cable specifications, contact the manufacturer of the cable.
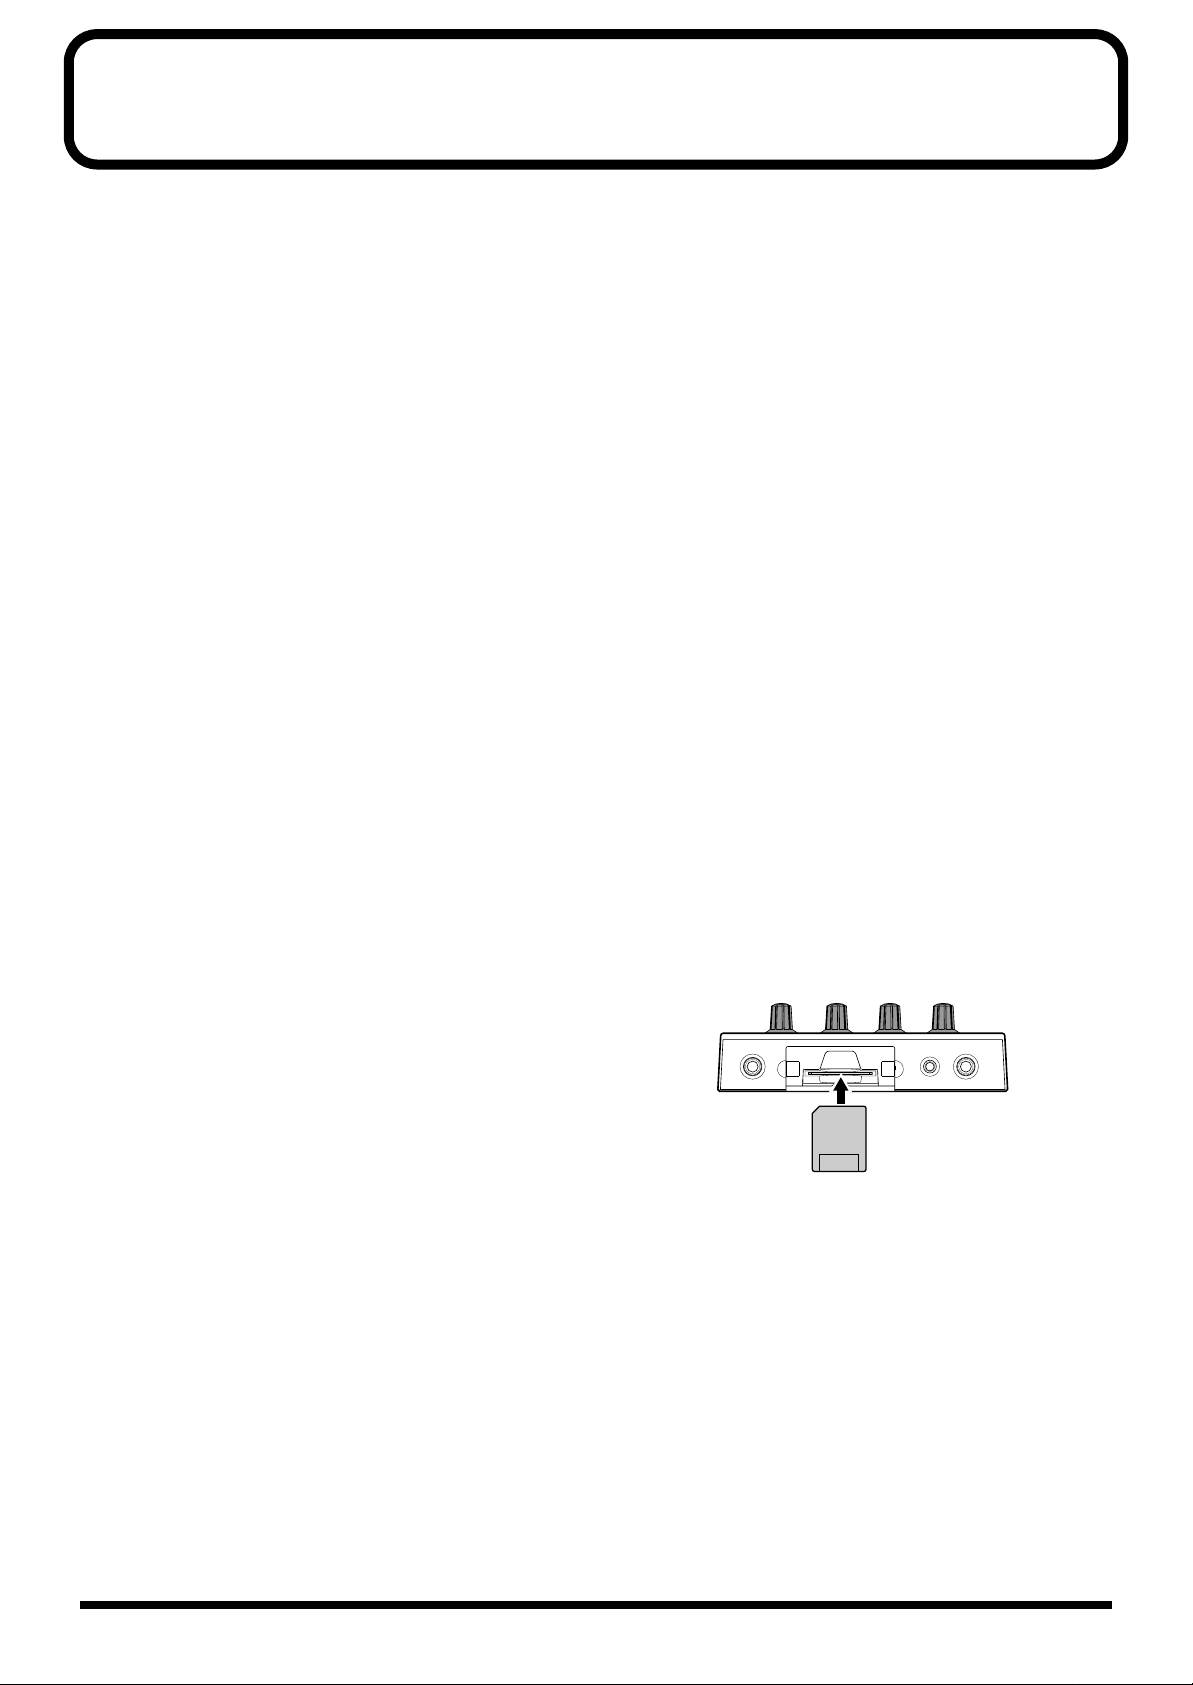
Before Using Cards
Using Memory Cards
• Never insert or remove a memory card while the power to
the SP-303 is on.
704
• Carefully insert the Memory card all the way in—until it is
firmly in place.
fig.00-01
The surface without
gold contacts
must face upward
705
• Never touch the terminals of the DATA card. Also, avoid
getting the terminals dirty.
Copyright
851
• Unauthorized recording, distribution, sale, lending, public
performance, broadcasting, or the like, in whole or in part,
of a work (musical composition, video, broadcast, public
performance, or the like) whose copyright is held by a
third party is prohibited by law.
853
• Do not use this unit for purposes that could infringe on a
copyright held by a third party. Roland assumes no
responsibility whatsoever with regard to any infringements of third-party copyrights arising through your use
of this unit.
10
Page 11
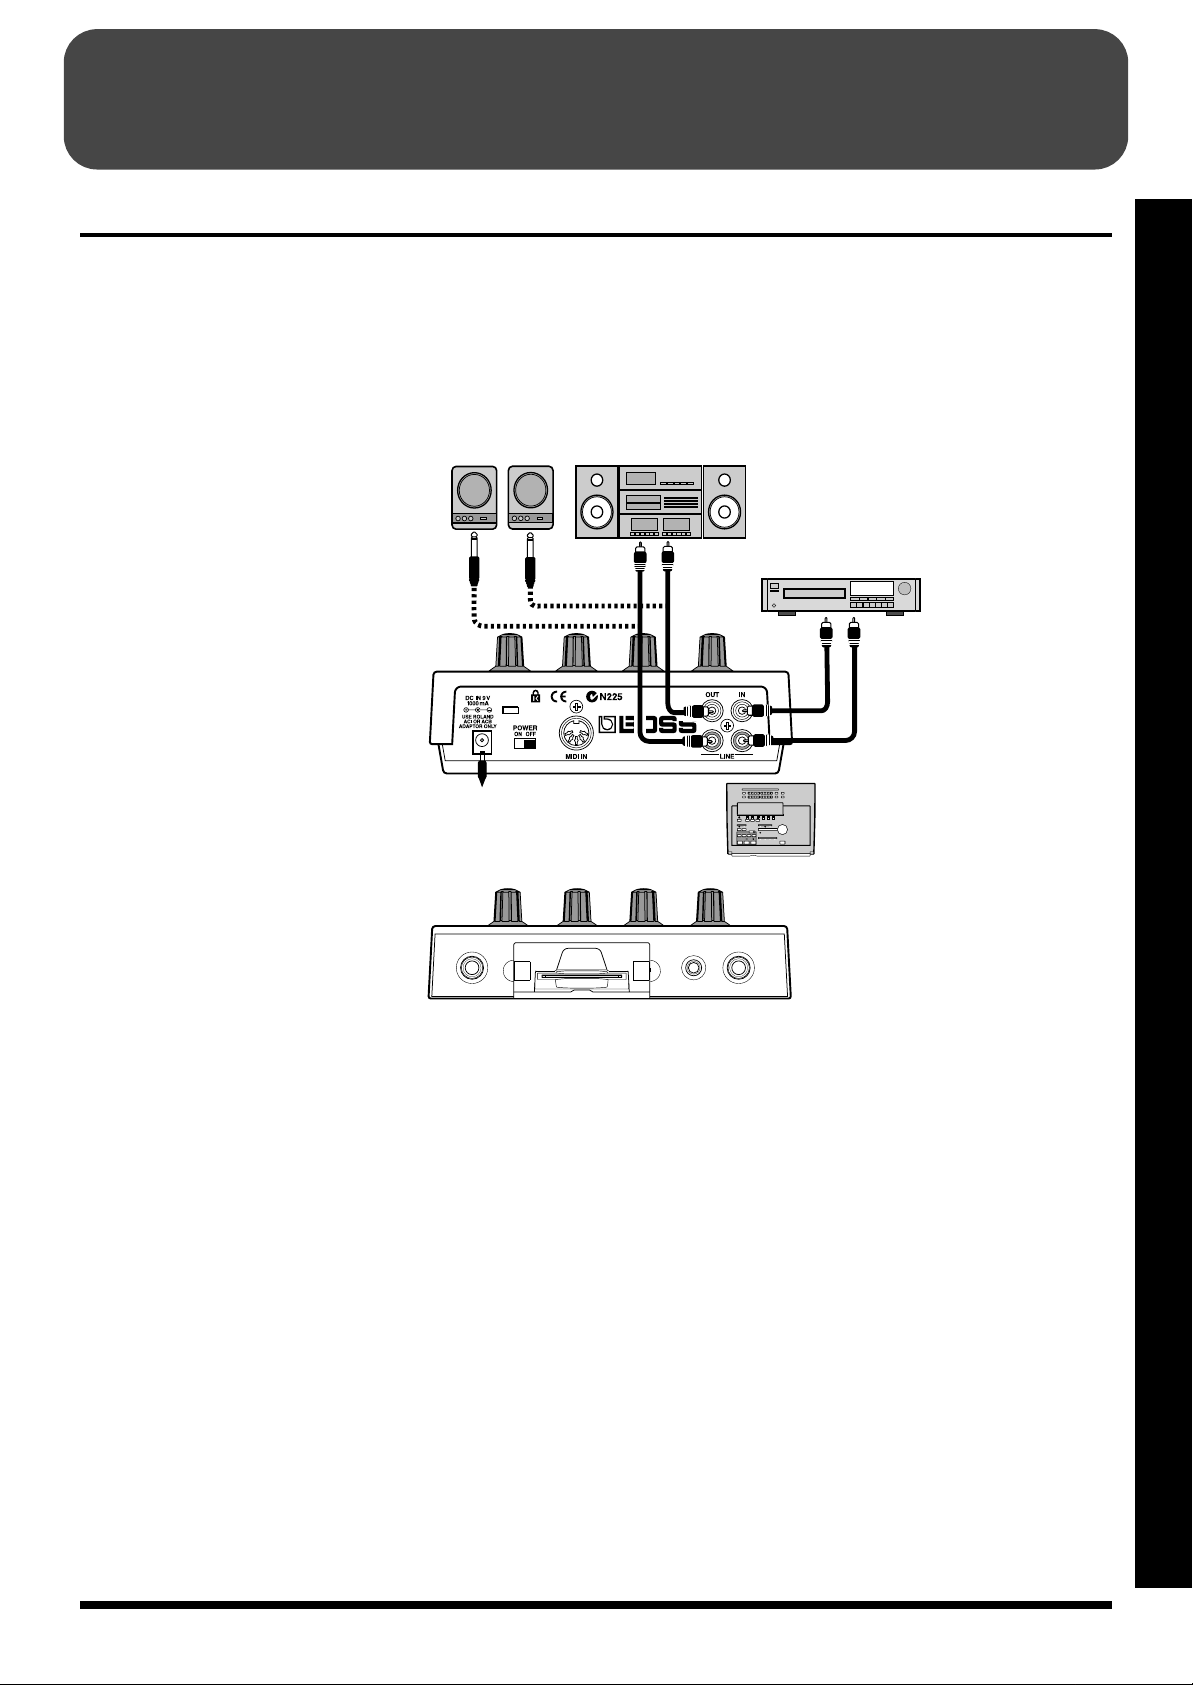
QUICK START
Making Connections
The SP-303 does not contain an amp or speaker. To hear
sound, either connect an amplifier and speakers or use
headphones. Refer to the following diagram and connect the
SP-303 to the other equipment.
fig.Q01
Audio Set / Amplified Speaker etc.
Audio Cable
AC Adaptor
(ACI or ACB series)
to an AC Outlet
Stereo Headphones
* Audio cables, MIDI cables, stereo headphones, and
microphones are not included. These may be purchased
separately from your dealer.
* To prevent malfunction and/or damage to speakers or other
devices, always turn down the volume, and turn off the power
on all devices before making any connections.
LINE IN
MIDI cable
MIDI OUT
CD/MD player
OUTPUT
Microphone
Quick Start
DJ system setup
fig.Q02
When sampling from a record, set the mixer fader to the
Turntable position (maximum).
The volume level during sampling is adjusted by the SP303’s REC level (p. 28, 30) and by the mixer’s effect send
level.
MIDI Sequencer etc.
Mixer settings
CH 1 Input: line Effect: OFF
CH 2 Input: PHONO Effect: ON
* Settings may be different depending on the mixer. For details
refer to the owner’s manual for your mixer.
11
Page 12

QUICK START
Turning On the Power
Once the connections have been completed (p. 11), turn on
power to your various devices in the order specified. By
turning on devices in the wrong order, you risk causing
malfunction and/or damage to speakers and other devices.
1. Before you turn the power on, check the following
points.
• Are peripheral devices connected correctly?
• Are the volume levels on the SP-303 and any amp or
mixer that is connected turned down to the lowest
settings?
2. Turn the SP-303’s power switch ON.
“303” appears on the display for a few seconds. The dots
will also blink.
fig.Q03
Turning Off the Power
1. Before you turn off the power, make sure that the
volumes of the SP-303 and the connected amp/mixer
are set to their minimum position.
2. Turn off the power of the amp/mixer etc.
3. Turn off the power switch of the SP-303.
Never turn off the power while the dots are blinking.
This may result in corruption of data in the SP-303’s
internal memory or on memory cards.
fig.Q04
Dots
3. Turn on the power of your amp/mixer etc.
4. Rotate the VOLUME knob to adjust the SP-303’s volume.
fig.Q05
5. Also adjust the volume of the connected amp/mixer etc.
* This unit is equipped with a protection circuit. A brief interval
(a few seconds) after power up is required before the unit will
operate normally.
* If you turn on the power with a memory card already inserted,
the dots will blink until the memory card is detected. The unit
will not operate during this time.
Never turn off the power while the dots are blinking.
12
Page 13
QUICK START
Listen to the Samples
When the SP-303 is shipped from the factory, 1–8 of bank A
already contain samples. Let’s listen to these samples.
● What is a sample?
A sample is a piece of sampled sound (a “waveform”)
together with various settings that determine how it can
be played during a performance, which has been
assigned to a pad.
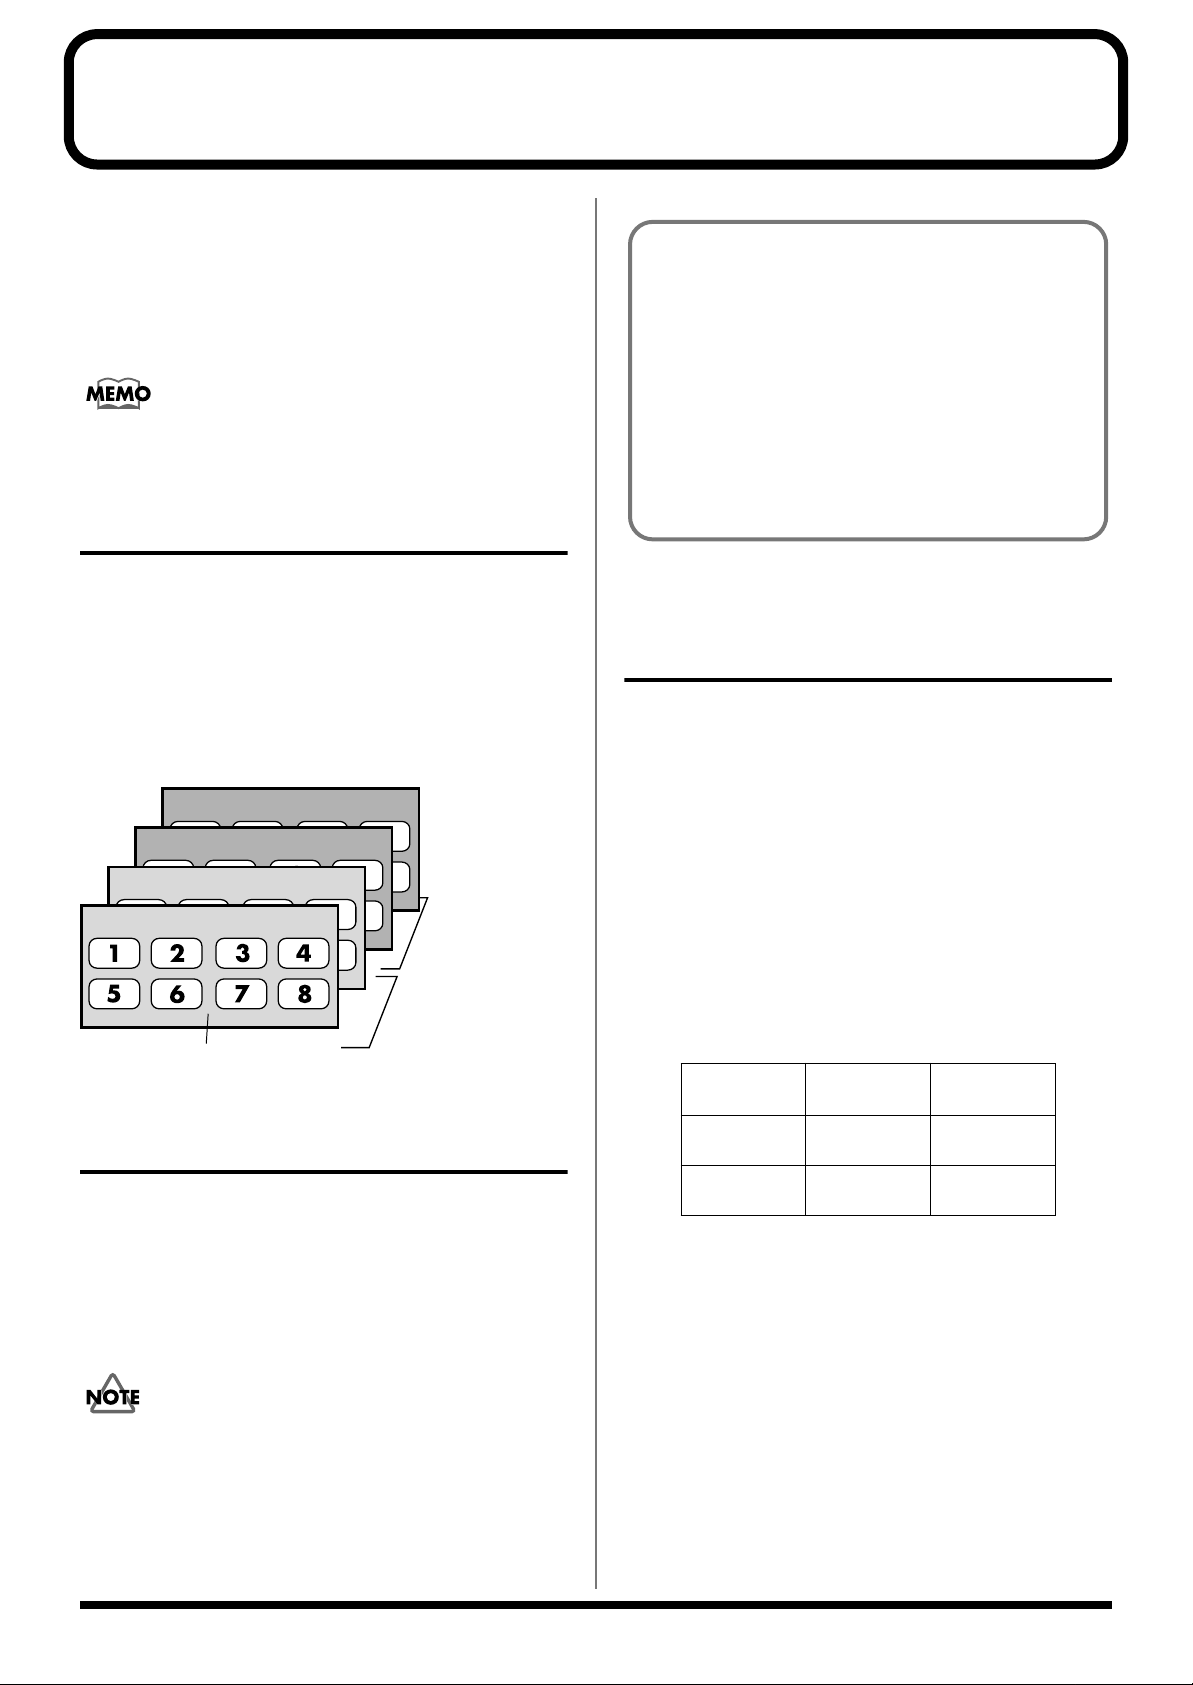
● What Is a Sample Bank?
The samples that are assigned to each of the eight pads
are collectively referred to as a bank. The SP-303 has four
sample banks: A–D.
fig.Q06
* The SP-303 is able to sound up to eight pads simultaneously.
If you press additional pads in an attempt to play more, the
sound of the first-pressed pad will be turned off (pad dark) to
make way for the newly-pressed pad (last-note priority).
However depending on the settings, it may not be possible to
sound eight pads simultaneously. For more detailed
instructions, refer to “Number of Samples That Can Be Played
Simultaneously (Polyphony)” (p. 18).
* Once deleted, the samples assigned in the factory settings
cannot be recovered. If there is any data you wish to retain,
purchase a memory card (SmartMedia: 8 MB–64 MB)
separately, then save the pattern to the memory card. For
instructions on saving samples to memory cards, refer to
“Saving Samples to Memory Cards (Sample Save)” (p. 49).
Quick Start
1
2
3
1. Confirm that [PATTERN SELECT] is not lit.
If [PATTERN SELECT] is lit, press it so that the button’s
light goes out.
2. Press pad 1.
The pad will remain lit while the sample is playing.
3. After verifying that you hear the sound, try pressing
pads 2–8 as well.
* If pressing a pad does not produce sound, make sure that
sample bank A is selected (BANK [A] is lit). If a different bank
is selected, press the BANK [A] button to switch to bank A.
* The volume does not change in response to playing dynamics.
Applying excessive force to a pad will cause malfunctions. For
more on how to adjust sample volume levels, refer to “Setting
the Sample Volume” (p. 38).
13
Page 14
QUICK START
Adding Effects to Samples
The SP-303 has 26 effects which can add special characters to
the sound.
Here’s how to try out these effects and hear what they can do.
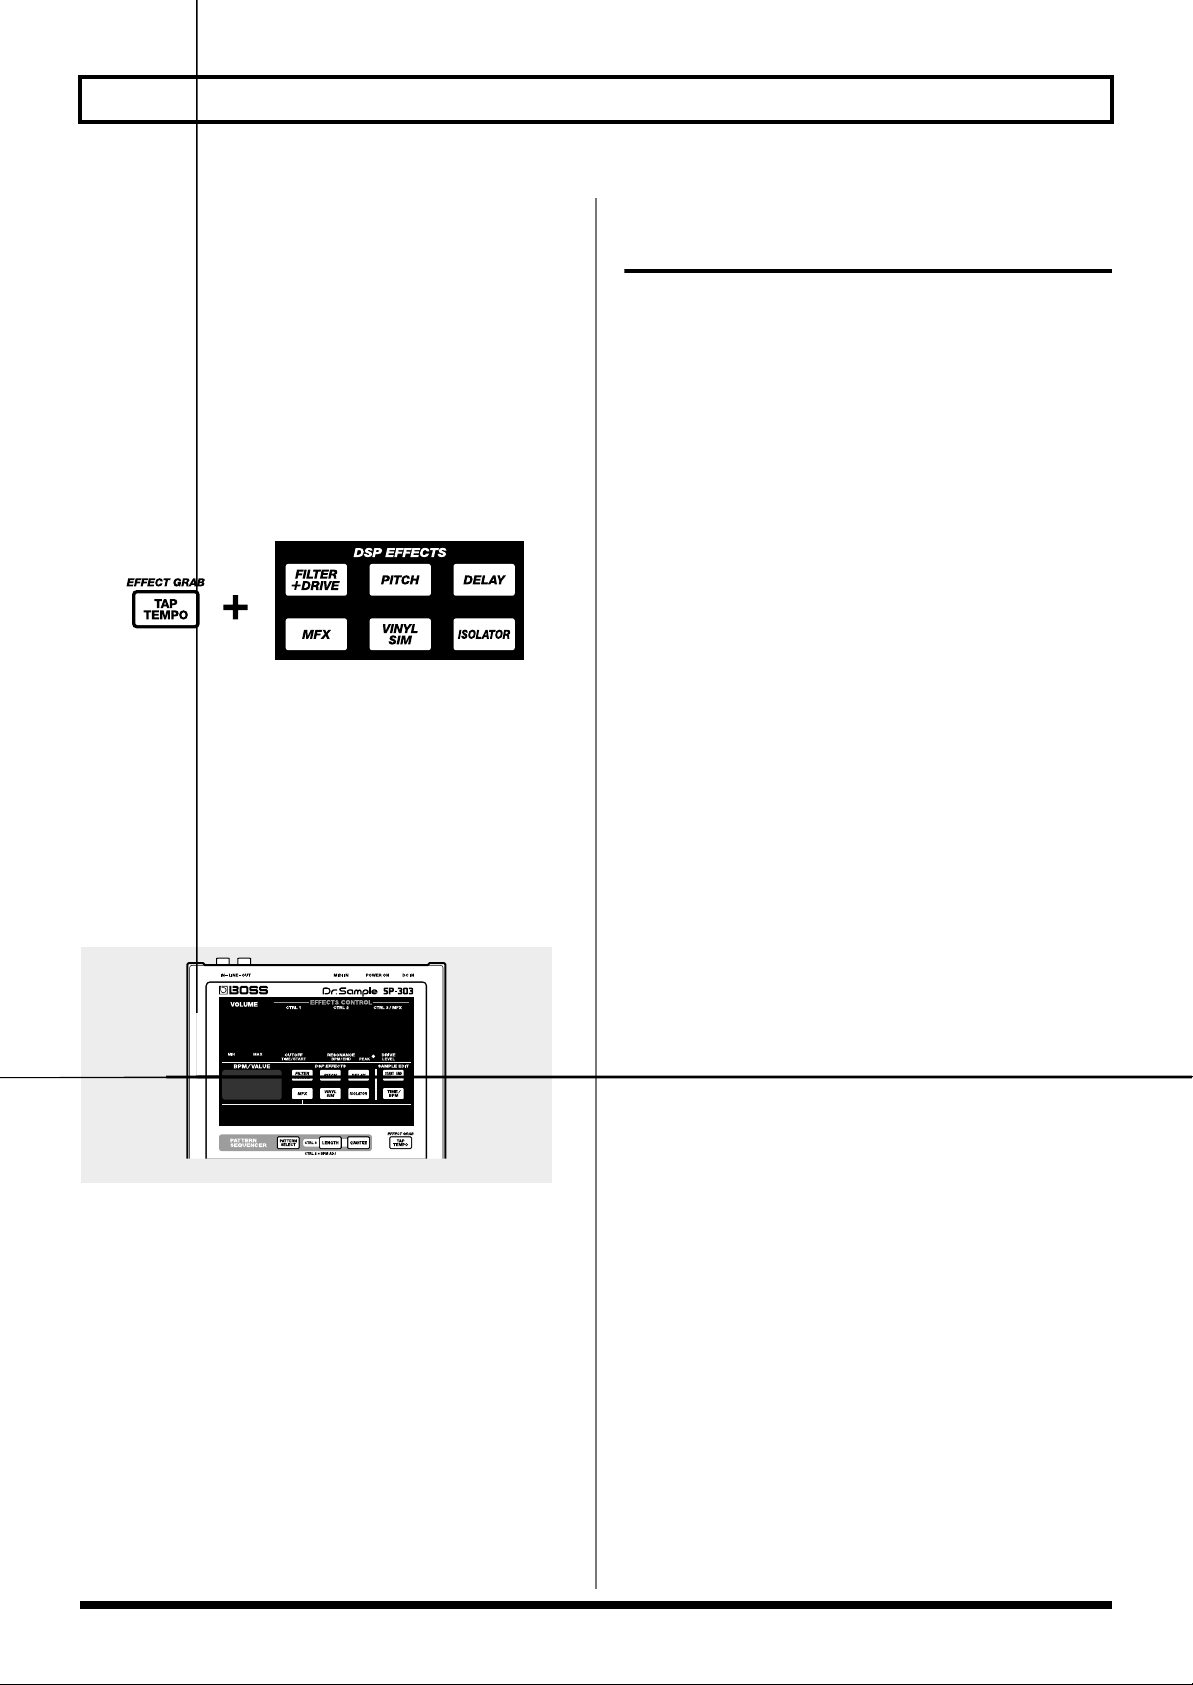
Of the twenty-six effects, you can select five of them–
Filter + Overdrive, Pitch Shifter, Delay, Vinyl Simulator,
and Isolator–by directly pressing their buttons.
The other twenty-one effects are grouped together in
MFX (the multi-effects). Hold down [MFX] and turn the
CTRL 3/MFX knob to select which of these twenty-one
effects is to be used.
Here, try applying Filter + Overdrive to the sample.
fig.Q07
4
3,5
1
4. Turn the CTRL 1–3 knobs to adjust the amount of Filter
+ Overdrive to be applied.
CTRL 1 (CUTOFF):
Adjusts the filter cutoff frequency. The more the knob is
turned to the left the darker the sound becomes;
conversely, turning this to the right (clockwise) gives the
sound a brighter, clearer feeling.
CTRL 2 (RESONANCE):
Adjusts the filter resonance. The more the knob is turned
to the right, the more the sound’s particular
characteristics are emphasized.
CTRL 3 (DRIVE):
Adjusts the amount of distortion in the filter. The more
the knob is turned to the right, the greater the amount of
distortion, creating a wilder sound.
5. To turn the Filter + Overdrive off, press
[FILTER+DRIVE]; the light goes out.
For explanations of the Pitch Shifter, Delay, Vinyl
Simulator, and Isolator effects, as well as instructions for
selecting effects used in MFX and the workings of these
effects, refer to “Chapter 2 Using the Effects” (p. 21).
2
1. Confirm that [PATTERN SELECT] is not lit.
If [PATTERN SELECT] is lit, press it so that the button’s
light goes out.
2. Press the pad which contains the sample to which you
wish to apply Filter + Overdrive effect.
The pad will light, and the sample will sound.
3. Press [FILTER+DRIVE], and confirm that the button
has lit.
The Filter + Overdrive are applied to the sample sound.
14
Page 15

QUICK START
Try Playing a Pattern
With the SP-303, you can press a number of pads in sequence
to play a series of samples, and record that sequence as
played. Such a sequential arrangement of performed samples
is called a “pattern.”
At the factory settings, a demo pattern is assigned to Pad 1 in
Pattern Bank A. Try listening to this pattern.
* All rights reserved. Unauthorized use of this material for
purposes other than private, personal enjoyment is a violation
of applicable laws.
* Once deleted, the demo pattern cannot be recovered. If you
want to keep the demo pattern, purchase a memory card
(SmartMedia: 8 MB–64 MB) separately, then save the pattern
to the memory card. For instructions on saving samples to
memory cards, refer to “Saving Patterns to Memory Cards
(Pattern Save)” (p. 50).
● Pattern Banks
Just as with the samples, patterns are assigned to the
pads. A set of patterns assigned to the eight pads is
treated collectively as a “pattern bank.”
The SP-303 has four pattern banks: A–D.
Pattern banks and sample banks are different. For
example, you do not necessarily need to use Bank A
samples in Pattern Bank A.
2. Press pad 1.
Pad 1 momentarily lights, then goes off, and the
[PATTERN SELECT] light goes out.
The performance of the demo pattern begins.
* If a pattern fails to start playing even when the pad is pressed,
check to make sure that [PATTERN SELECT] is lit, and that
Bank A is selected (BANK [A] is lit). If a different bank is
selected, press [PATTERN SELECT], illuminating the
button, then press BANK [A] to select Bank A.
3. After verifying that you hear the sound, try pressing
pads 2–8 as well.
The sample for the pad that is pressed is played.
* After the pattern starts playing, play of samples is enabled
when the pads are pressed.
You can then play samples along with the performance
of the pattern.
4. Press [CANCEL] (PATTERN STOP).
The pattern is stopped.
* After playing or switching patterns, the play of samples is
automatically enabled when the pads are pressed.
Playing with the Tempo Changed
Here’s how to change the tempo at which a pattern will be played.
fig.Q09
Quick Start
fig.Q08
1
4
2
3
1. Press [PATTERN SELECT], and confirm that the
button has lit.
“Ptn” appears in the display.
1. Press [PATTERN SELECT], and confirm that the
button has lit.
2. Press [TIME/BPM], and confirm that the button has lit.
3. Turn the CTRL 2 knob.
The performance tempo of the pattern changes. The
performance tempo is indicated by the BPM in the display.
BPM is short for “beats per minute,” or the number of
quarter notes played in a one-minute interval.
4. Press [TIME/BPM] once more, and confirm that the
button has turned off.
15
Page 16
QUICK START
Sampling Your Own Sounds
Here, let’s try sampling to Pad 1 in Sample Bank B, which has
had no samples assigned to it at the factory.
Unauthorized sampling from a CD, record, tape, video
production, or broadcast whose copyright is owned by a
third party is forbidden by law, with the exception of
special cases such as private use.
Lifting the SP-303’s
Memory Protection
The SP-303’s “
the factory to prevent accidental overwriting or deletion of
the samples and demo pattern stored in the SP-303’s memory.
If you attempt to sample, delete, record patterns, or carry out
other such operations while Protect is left on, “Prt” appears
in the display, and no further operations are permitted.
When you first sample or record after purchasing the SP-303,
use the procedure below to lift the Protect function.
1. Turn off the power.
2. Hold down [CANCEL] and slide the POWER switch to
ON.
This removes the protection (Protect Off).
* The Protect setting is stored even after the power is turned off,
so once you turn off the protection after purchase of the SP303, it remains off afterwards.
* If you want to turn Protect on again, hold down [REMAIN]
while switching ON the POWER switch.
fig.Q10
Protect
” (memory protection) is turned on at
1. Refer to p. 11 for instructions on connecting CD and
MD players, microphones, and other devices.
2. Press BANK [B], and confirm that the button has lit.
3. Press [REC] and confirm that the button has lit.
The SP-303 switches to sampling standby mode, and a
pad that has no sample assigned to it is automatically
selected and begins blinking.
* If you now decide not to sample, press [CANCEL].
[REC] light goes out.
4. Press pad 1.
When Pad 1 is pressed, the other pad lights go out.
[REC] will blink.
5. Adjust the sampling level.
● While playing back the sampled sound, then turn the
CTRL 3/MFX (LEVEL) knob, adjusting the level so that
the PEAK indicator lights up only from time to time.
* If the PEAK indicator does not light even when the CTRL 3/
MFX (LEVEL) knob is turned fully clockwise, it may be that
the volume level of the device connected to the input is too low.
While there is no particular problem with sampling under
these conditions, we recommend that the volume of the
connected input device be turned up until the PEAK indicator
lights up from time to time.
● When sampling with a mic, turn the MIC LEVEL knob
completely to the right (clockwise), then adjust the level
so that the PEAK indicator lights up only from time to
time.
* If the sound input is distorted, turn the MIC LEVEL knob to
the left (counterclockwise) until the sound is no longer
distorted.
6. Playback of the sound you want to sample, then press
[REC] at the point where you want the sampling to
begin.
The [REC] button will blink, and sampling will start.
16
7. Press [REC] at the point you want the sampling to end.
This completes the sampling, and the pad and [REC]
lights go out.
* If the available sampling time is exceeded, “FuL” appears in
the display, and sampling stops automatically. Refer to the
“Message List” (p. 69) for an explanation of the message
content.
8. Press pad 1, and you will hear the sound that you just
sampled.
Page 17
If undesired sound or silence was recorded at the
beginning or end of the sample, you can make settings so
that only the desired portion is played back.
For more detailed information, refer to “Preventing
Unneeded Portions from Being Played (Markers/Start
Point/End Point)” (p. 38).
If you don’t like the sampled sound
Delete the sound that you sampled, and start again from step
3. The procedure is as follows.
fig.Q11
a,c
QUICK START
b
a. Press [DEL] and confirm that the button has lit.
The pad to which the sample is assigned blinks.
“dEL” appears in the display.
b.
Press the pad to which the unwanted sample is
assigned.
The pad light stays on, and [DEL] blinks.
c. Press [DEL].
[DEL] changes from blinking to steadily lit, and the dots
in the display blink.
The deletion is complete when the dots remain off.
* The deletion process may take anywhere from several seconds
up to around a minute to complete; please wait until the
process is completed.
Never turn off the power while the dots are blinking.
Turning off the power at this point may result in
corruption of data not only in the sample that was being
deleted, but in other samples as well.
Quick Start
17
Page 18
Chapter 1. Playing Samples
On the SP-303, you can play samples by pressing pads 1–8
and the BANK buttons.
The pad will remain lit while the sample is playing.
The pad most recently pressed to play a sample is called the
“current pad.” The settings information for the current pad
is indicated on the panel.
Whenever sample settings are changed, it is the sample
assigned to the current pad that is affected.
Composition of Samples
One sample can be assigned to each of the Pads 1–8 on the
panel. The eight samples assigned to the eight pads are
collectively referred to as a “sample bank,” and the SP-303
allows you to use four banks, A–D. Banks A and B are the SP303’s own internal banks, and Banks C and D are banks
stored on memory cards.
* Sample Bank A is selected when the power is turned on.
fig.r01-01
Sample Bank D
Sample Bank C
Sample Bank B
Sample Bank A
Pads 1–8 (Samples)
Two banks on a
memory card
(total of 16 Samples)
Two banks in an
internal memory
(total of 16 Samples)
Switching Sample Banks
To switch sample banks, press one of the BANK buttons [A]–
[D]. The button that is pressed lights up, and the SP-303
switches to that bank.
When you insert an unused (i.e., unformatted on the SP-
303) memory card, and press BANK [C] or [D], then BANK
[C] and [D] blink, and “FMt” appears in the display.
If you want to format at this time, press BANK [C] or [D].
BANK [C] and [D] then remain lit, and [DEL] begins to
blink. When you press [DEL], formatting then begins.
Formatting the memory card erases all data on the card
and allows the card to be used with the SP-303.
Furthermore, do not turn off the power or remove the
memory card during formatting (while [DEL] is lit).
Number of Samples That Can Be Played Simultaneously (Polyphony)
The SP-303 can play up to eight samples simultaneously
(eight-voice polyphony). However, when a sample is set to
stereo, the sample uses two of these voices.
* A sample’s stereo/mono setting can only be made when
sampling, and cannot be changed later on. For instructions on
making settings when sampling, refer to “Sampling from a
CD or MD” (p. 29).
Also note that the maximum polyphony during resampling
is four voices.
* For more information on resampling, refer to “Making
Samples with Effects Added (Resampling)” (p. 32).
Number of Samples That Can Be Played Simultaneously
At
Normal Use
During
Resampling
Mono
Sample
8 4
4 2
Stereo
Sample
* If there is no memory card inserted in the slot, you will be
unable to select either Bank C or Bank D, even by pressing
BANK [C] or BANK [D].
Never remove a memory card while samples in Bank C
or D are being played. This can produce unexpected
noises that may result in damage to speakers and amps.
It can also damage the card itself.
18
Page 19
Chapter 1. Playing Samples
Having a Sample Continue to Play Even When the Pad is Released (Hold)
You can use the Hold function to cause the sample to
continue sounding even after you release the pad.
This is convenient for continuous repeat play of samples
(Loop Playback: p. 36).
In the following procedure, we will explain how to use the
Hold function with the sample on Pad 1 of Bank A as an
example.
fig.r01-02
Playing Sounds Input From External Devices (EXT SOURCE Pad)
Just as with samples, you can use the SP-303 to control the
start and stop of sound from external sources, including CD
or MD players and other device connected to the AUX IN
jack, and miked sounds input from the MIC jack; you can
also add effects to these sounds.
fig.r01-03
1
1
1. Make sure that BANK [A] is lit, and press pad [1] to
sound the sample.
2,3
Chapter
1
4
3
2
2. Press [HOLD] before releasing the pad.
This turns on Hold, and the sample will continue to
sound even after you release the pad.
* Even though Hold is in effect, [HOLD] does not light.
3. Press the [HOLD] pad once again to stop the sound.
* The pad will remain lit while the sample is playing.
Hold is valid only for samples set for Gate Playback
(when [GATE] is lit). With samples set for Trigger
Playback ([GATE] not lit), there will be no change in
function even if [HOLD] is pressed.
Gate playback/Trigger playback can be specified
independently for each pad. For more detailed
information, refer to p. 36.
1. Start playback of the CD or MD. Alternatively, input
vocals from the mic.
2. Press [EXT SOURCE], and confirm that the pad has lit.
The external input sounds while the pad remains lit.
If [GATE] is lit, the sound will be heard only while you
press the [EXT SOURCE] pad, and it will be silenced
when you release the pad (the pad will go dark).
If [GATE] is not lit, you can press [EXT SOURCE] to
toggle between sounding the sounds (pad lighted), and
muting them (pad extinguished).
GATE is illuminated/extinguished by pressing [GATE].
3. Press [STEREO], and confirm that the button has
turned on or off, to switch between stereo and mono
external input.
[STEREO] lit:
Sounds from the external input are heard in stereo.
[STEREO] not lit:
Sounds from the external input are heard in mono.
With CDs, MDs, and other input originally recorded in
stereo, you will want to have [STEREO] lit.
4. You can add effects to the external input sounds by
pressing one of the effects buttons, lighting that button.
* If pressing an effects button still does not add effects to the external
input sounds, hold down [REMAIN] (CURRENT PAD) and press
[EXT SOURCE]. This should apply the effect to the external input.
19
Page 20
Chapter 1. Playing Samples
Adjusting the Volume of the
External Input Sounds
If excessive input volume levels causes the sound to be
distorted, or if noise becomes noticeable because levels are
too low, use the following procedure to adjust the volume.
fig.r01-04
1. Press [EXT SOURCE], and confirm that the pad has lit.
The external input sounds are played.
2. Press [START/END/LEVEL], and confirm that the
button has lit.
3. Turn the LEVEL knob (the CTRL 3/MFX knob) to
adjust the volume of the external input sounds.
Rotating it toward the left will decrease the volume, and
rotating it toward the right will increase the volume.
Adjust the level so that the PEAK indicator lights
occasionally.
* If the input volume of the external source does not change even
when you rotate the LEVEL knob (the CTRL 3/MFX knob),
hold down [REMAIN] and press [EXT SOURCE] (this selects
the external input as the target for volume adjustment).
Afterwards, press [START/END/LEVEL] again, and make the
adjustment with the LEVEL knob.
4. Press [START/END/LEVEL] again.
The [START/END/LEVEL] light goes out, and the
volume setting is stored.
* At times, the volume level of sounds from a CD, MD, or other
such source may be too high, or if you are using a mic,
distortion may still be audible even after adjusting the volume,
or conversely, that you cannot get enough volume in the
sound. In such situations, adjust the volume of the CD or MD
player, or if using a microphone, turn the MIC LEVEL knob,
adjusting the volume until you achieve the proper level.
20
Page 21
Chapter 2. Using the Effects
The SP-303 features twenty-six internal effects, so you can
add effects to samples to alter the sounds, just with this one
unit.
● Of the twenty-six effects, you can select five of them–
Filter + Overdrive, Pitch Shifter, Delay, Vinyl Simulator,
and Isolator–by directly pressing their buttons. The other
twenty-one effects are grouped together in MFX (the
multi-effects). By holding down [MFX] and turning the
CTRL 3/MFX knob, you can select which of these
twenty-one effects that is to be used.
● You can have any one effect turned on at a given time.
Multiple effects cannot be on simultaneously. If you do
want to use multiple effects on a sample, or if you need
to have a different effect applied to each individual
effect, then use “resampling.” Resampling allows you to
use a sample that has effects added to it as a new sample.
For more detailed information, refer to “Making Samples
with Effects Added (Resampling)” (p. 32).
Adding Effects to Samples
fig.r02-01a
Chapter
2
1. Confirm that none of the effect buttons is lit.
If any of these buttons is lit, press it so that the light goes
off.
2. Press the pad which contains the sample to which you
wish to apply effects.
The pad will light, and the sample will sound. This pad
becomes the current pad.
3. Press one of the effects buttons.
The pressed button will light.
An effect is on when the button is lit, and off when it is
dark.
* With certain effects, there may be a slight delay after the effect
is turned on before the effect is applied.
4. Turn the CTRL 1–3/MFX knobs to adjust the
application of the effect.
The settings adjusted by turning the CTRL 1–3/MFX
knobs change according to the selected effect. For more
detailed information, refer to “Effects List” (p. 24).
21
Page 22
Chapter 2. Using the Effects
Turning Effects On and Off Rapidly
(Effect Grab)
When using the regular effects buttons, since the effects are
turned on or off each time these buttons are pressed, it means
that if you want to have an effect repeatedly turned on and
off, you then have to press the button many times. This can
be difficult, particularly when repeatedly turning the effect
on and off over a short interval.
In such cases, use the Effect Grab function.
To use the Effect Grab function, hold down [TAP TEMPO]
(EFFECT GRAB) and press the effect button.
fig.r02-01b
while holding
With [TAP TEMPO] (EFFECT GRAB) held down, the effect is
on only while the effect button is pressed, thus allowing you
to turn effects on and off rapidly in time with what you are
playing.
Applying Effects to Multiple Samples
Normally, when an effect is turned on, the effect is applied
only to the sample assigned to the current pad, with no other
samples using the effect.
However, with the procedure described below, you can
apply effects to multiple effects, including that of the current
pad.
fig.r02-04
Selecting an Effect From MFX
Use the following procedure to select the effect from MFX
(the MFX type) that you want to use.
fig.r02-02
1. Hold down [MFX] and turn the CTRL 3/MFX knob.
The number indicating the MFX type, from 1 to 21,
appears in the display. Rotating the knob toward the
right will increase the number, and rotating it toward the
left will decrease the number.
2. When the number for the MFX type you want to select
is displayed, release [MFX].
[MFX] lights up, and the MFX is turned on.
1. Press the button for the effect to be used, and confirm
that the button has lit.
2. Press [REMAIN] (CURRENT PAD).
The current pad blinks.
3. While holding down [REMAIN] (CURRENT PAD),
press the pads for which you want to apply the effect,
in order.
The pressed pad blinks and becomes the new current
pad.
All pressed pads other than the current pad remain lit.
The effect for a pad is alternately switched on and off
each time the same pad is pressed while [REMAIN]
(CURRENT PAD) is held down.
22
4. When you have pressed the pads for all samples to
have the effect applied, release [REMAIN] (CURRENT
PAD).
* You cannot apply a different effect to each pads.
Page 23
Applying Effects to All Samples Simultaneously
If you want an effect to be applied to all of the pads at once, it
would be time consuming if you needed to press all the pads.
Thankfully, though, a simple procedure you can use when
applying an effect to all of the pads has been provided.
* This operation applies the effect to all pads in Banks A–D.
fig.r02-05
Chapter 2. Using the Effects
Chapter
2
1. While holding down [REMAIN] (CURRENT PAD),
press the button for the effect to be used.
The pressed effect button blinks.
All of the pads light up (the current pad blinks), and the
effect is applied to all of the pads.
Effect Button Effect
Lit The effect is applied to one or more
Blinking The effect is applied to all 32
* A pad to which no sample is assigned doesn’t light up.
* To revert to having the effect applied only to the current pad,
hold down [REMAIN] (CURRENT PAD) again and press the
blinking effect button.
* You cannot apply/remove effects for individual pads while the
effect button is blinking.
samples.
samples (4 banks x 8 pads).
23
Page 24
Chapter 2. Using the Effects
Effects List
Effects That Can Be Selected Directly With the Effects Buttons
DSP EFFECTS CTRL 1
FILTER + DRIVE CUTOFF (CoF) RESONANCE (rES) DRIVE (drV)
Low-pass filter with overdrive.
Cuts the high frequencies and
adds distortion.
PITCH PITCH (Pit) FEEDBACK (Fdb)
Modifies the pitch. Changes the pitch up or down
DELAY DELA Y TIME (t32–t1) FEEDBACK (Fdb) E.LEVEL (LEV)
Repeats the sound. Adjusts the time of the delayed
VINYL SIM COMPRESSOR (CMP) NOISE LEVEL (noS) WOW FLUTTER (FLu)
Gives the sound the sonic qualities of an analog record.
ISOLATOR LOW (Lo) MID (Mid) HIGH (Hi)
Extracts and deletes sounds in the
low-, mid-, or high-frequency range.
(*1) Time (Delay Time) is based on the tempo for the longest of the samples to which the effect is applied; the setting is made in
note units.
The types of notes that can be set:
thirty-second note (t32)
sixteenth note (t16)
dotted sixteenth note (t16.)
eighth-note triplets (t8.3)
eighth note (t8)
dotted eighth note (t8.)
quarter-note triplets (t4.3)
quarter note (t4)
dotted quarter note (t4.)
half-note triplets (t2.3)
half note (t2)
dotted half note (t2.)
whole note (t1)
However, you cannot select delay time settings exceeding approximately 1450 milliseconds.
In addition, playback of a pattern is based on the pattern’s tempo.
Adjusts the cutoff frequency. Adjusts the peak level at the cut-
two octaves.
sound. (*1)
Adjusts the sense of compression in the sound that is characteristic of analog records.
Extracts/deletes sounds in the
low-frequency range.
(display)
CTRL 2
off frequency.
Adjusts the feedback amount of
the pitch shift sound.
Adjust the number of times that
the delay will repeat.
Adjusts the volume of analog
record noise.
Extracts/deletes sounds in the
midrange.
(display)
CTRL 3
Adds distortion.
DIRECT/EFFECT BALANCE (dAL)
Adjusts the volume balance
between the effect sound and
the direct sound.
Specifies the volume of the
delay.
Adjusts the rotational irregularities that occur when playing an
analog record.
Extracts/deletes sounds in the
high-frequency range.
(display)
24
Page 25

MFX
Chapter 2. Using the Effects
DSP EFFECTS CTRL 1
1. REVERB REVERB TIME (tiM) TONE (ton) E.LEVEL (LEV)
Adds reverberation to the sound Adjusts the time of reverb. Adjusts the quality of the reverb. Adjusts the volume of the reverb.
2. T APE ECHO REPEAT RATE (rAt) INTENSITY (int) E.LEVEL (LEV)
Vintage tape echo effect. Sets the tape speed. Sets the amount of repetition of
3. CHORUS DEPTH (dPt) RATE (rAt) E.LEVEL (LEV)
Adds spaciousness and depth to
the sound.
4. FLANGER DEPTH/MANUAL (dPt) RATE (rAt) RESONANCE (rES)
Adds a undulation like that of a jet
ascending or descending.
5. PHASER DEPTH/MANUAL (dPt) RATE (rAt) RESONANCE (rES)
Adds a kind of cyclic undulation
to the sound.
6. TREMOLO/P AN DEPTH (dPt) RATE (rAt)
Cyclically changes the volume or
pan.
7. DISTORTION DRIVE (drV) TONE (ton) LEVEL (LEV)
Strongly distorts the sound. Adjusts the depth of distortion. Adjusts the tonal character. Specifies the volume.
8. OVERDRIVE DRIVE (drV) TONE (ton) LEVEL (LEV)
Mildly distorts the sound. Adjusts the depth of distortion. Adjusts the tonal character. Specifies the volume.
9. FUZZ DRIVE (drV) TONE (ton) LEVEL (LEV)
Adds harmonics and distorts the
sound.
10. W AH SENS (SnS) FREQUENCY (Frq) RESONANCE (rES)
Produces a “wah” effect Adjusts the sensitivity of the Wah
11. OCTAVE -2OCT LEVEL (oC2) -1OCT LEVEL (oC1) DIRECT LEVEL (dir)
Adds sound octaves lower. Adds sound two octaves lower
12. COMP SUSTAIN (SuS) ATTACK (Att) LEVEL (LEV)
Makes the volume more consistent.
13. EQUALIZER LOW (Lo) MID (Mid) HIGH (Hi)
Adjusts the volume level for each
individual frequency range.
14. LO-FI SAMPLE RATE (rAt) BIT (bit) FILTER (FLt)
Sets the depth of the chorus. Specifies the rate of modulation. Adjusts the volume of the effect
Adjusts the depth of the undulation. When the CTRL 2 knob
(RATE) is turned fully counterclockwise, pitch (MANUAL) is
adjusted.
Adjusts the depth of the undulation. When the CTRL 2 knob
(RATE) is turned fully counterclockwise, pitch (MANUAL) is
adjusted.
Adjusts the amount of change in
the volume or pan.
Adjusts the depth of distortion. Adjusts the tonal character. Specifies the volume.
effect.
than the original sound.
Adjusts the amount of the compressor effect that is applied.
Adjusts the volume of the low frequency range.
(display)
CTRL 2
the echo sound.
Adjusts the rate of the undulation.
When turned fully counterclockwise, the undulation stops, and the
pitch (MANUAL) can be adjusted
with the CTRL 1 knob (DEPTH).
Adjusts the rate of the undulation.
When turned fully counterclockwise, the undulation stops, and the
pitch (MANUAL) can be adjusted
with the CTRL 1 knob (DEPTH).
Adjusts the rate of change in the
volume or pan.
Adjusts the pitch of the effect
sound.
Adds sound one octave lower
than the original sound.
Adjusts the sound's attack. Specifies the volume.
Adjusts the volume of the
midrange.
(display)
CTRL 3
Adjusts the volume of the echo
sound.
sound.
Adds a particular undulation to
the sound.
Adds a particular undulation to
the sound.
TREMOLO/PAN WAVEFORM (trM/
PAn)
Changes the periodic curve of the
change in volume or pan. When
turned counterclockwise, it is the
volume that changes; when turned
clockwise, the pan changes.
Adjusts the wah’s peak volume.
Adjusts the volume level of the
direct sound.
Adjusts the volume of the high
frequency range.
(display)
Chapter
2
25
Page 26

Chapter 2. Using the Effects
DSP EFFECTS CTRL 1
Gives the sound a “low-fidelity”
character.
15. NOISE GEN COLOR (CoL) QUALITY (qLt) LEVEL (LEV)
Generates noise. Adjusts the tone of the hissing
16. RADIO TUNING TUNING (tun) NOISE LEVEL (noS) FREQUENCY RANGE (Frq)
Reproduces the sound being
played on the radio.
17. SLICER TIMING PTN (P01–16) RATE (rAt) FEEDBACK (Fdb)
Continuously cuts the sound.
Includes a flanger effect.
18. RING MOD FREQUENCY (Frq) EFFECT LEVEL (EFF) DIRECT LEVEL (dir)
Creates a metallic sound quality. Adjusts the pitch of the metallic
19. CHROMATIC PS PITCH 1 (-C–CC) PITCH 2 (-C–CC)
Two-voice pitch shifter that
changes the pitch in semitone
steps.
20. V OICE TRANS. FORMANT (For) EFFECT LEVEL (EFF) DIRECT LEVEL (dir)
Processes human vocals to produce a variety of different voices.
21. C.CANCELER L-R BALANCE (bAL) LOW BOOST (Lo) HIGH BOOST (Hi)
Eliminates the vocals and other
sounds located at the center.
Adjusts the sampling frequency. Adjusts the bit count. Adjust the sensitivity with which
noise.
Adjusts the degree of noise that
occurs when tuning a radio.
Select a pattern to specify the timing
at which the sound will be cut. (*2)
sound.
Changes Pitch 1 up or down one
octave in semitone intervals.
Adjusts the vocal characteristics
(formant).
Finds the best point for deletion.
(display)
CTRL 2
Sets how often the scratch noise is
produced.
Specifies the volume of the noise. Adjusts the tonal character.
Adjusts the length of the
TIMING PTN. (*3)
Adjusts the volume of the effect
sound.
Changes Pitch 2 up or down one
octave in semitone intervals.
Adjusts the volume level of the
effect sound.
Boosts the bass and other low-frequency sounds located at the center.
(display)
CTRL 3
the filter will be affected.
Adjust the volume level of the
hissing noise.
Adjusts the degree of the flanger
effect.
Adjusts the volume level of the
direct sound.
DIRECT/EFFECT BALANCE (bAL)
Adjusts the balance of the effect
sound and direct sound.
Adjusts the volume level of the
direct sound.
Boosts the high-frequency sounds.
(display)
(*2) The following choices are available for TIMING PTN when the selection is made using the CTRL 1 knob, and “17. SLICER”
is selected for MFX.
fig.r02-10
P01
P02
P03
P04
P05
P06
P07
P08
(*3) The TIMING PTN period is synchronized to the longest of the samples to which the effect is applied.
However, if a pattern is being played back, then this is synchronized to the pattern tempo.
The sync rate can be adjusted with the RATE setting as shown below.
With RATE at minimum (the CTRL 2 knob turned completely to the left):
one TIMING PTN cycle corresponds to one measure.
With RATE at maximum (the CTRL 2 knob turned completely to the right):
P09
P10
P11
P12
P13
P14
P15
P16
26
Page 27

Chapter 2. Using the Effects
one TIMING PTN cycle corresponds to one-eighth of a measure.
You can set the cycle to one measure, one-half measure, one-quarter measure, or one-eighth measure according to the
CTRL 2 knob position.
Chapter
2
27
Page 28

Chapter 3. Sampling
About Sampling Time
Unauthorized sampling from a CD, record, tape, video
production, or broadcast whose copyright is owned by a
third party is forbidden by law, with the exception of
special cases such as private use.
Before Sampling
Before you begin sampling sound, here are descriptions of
the parameters to be set in the sampling process as well as
sampling time.
Selecting Higher Quality Sampling,
Extended Sampling, or Lo-Fi Sampling
(Sampling Grade)
You can select one of three grades (sampling grade),
STANDARD, LONG, or LO-FI, for each pad.
You can switch the sampling grade by pressing [LONG/LOFI].
When [LONG/LO-FI] is not lit ➔ STANDARD:
Select this when you want to sample with high-quality
sound.
Available sampling time for the SP-303 (the internal
memory) and memory cards are shown below.
* The times shown here are for mono sampling. For the internal
memory only, this indicates the total time of Sample Banks A
and B; with memory cards, the total time of the sixteen banks,
including Sample Banks C and D, is shown.
* When sampling in stereo, the available sampling time is
halved.
Internal Memory (Times Approximate)
STANDARD LONG LO-FI
31 seconds 63 seconds 3 minutes
Memory Cards (Times Approximate)
Capacity
8 MB 4 minutes 8 minutes 25 minutes
16 MB 8 minutes 16 minutes 50 minutes
32 MB 16 minutes 33 minutes 101 minutes
64 MB 33 minutes 66 minutes 202 minutes
* When saving data (Samples and Patterns) from the SP-303 to
memory cards (p. 49, 50), then depending on the amount of
data contained in the samples, available sampling time may be
lower than shown above.
STANDARD LONG LO-FI
10 seconds
Chapter
3
When [LONG/LO-FI] is lit ➔ LONG:
Sampling time is twice that of STANDARD. Sound quality is
somewhat lower.
When [LONG/LO-FI] is blinking ➔ LO-FI:
A lo-fi sound is created, and the sampling time is greatly
increased.
* The sampling grade cannot be changed after the sample is made.
Selecting Between Stereo and
Mono Sampling
You can set whether a sample is recorded in stereo or mono
for each individual pad.
When you press [STEREO], sampling is conducted in stereo
when the button is lit; sampling is in mono when the button
is not lit.
* Once a sound has been sampled, it is not possible to change it
from mono to stereo, or from stereo to mono.
If you have already sampled a sound to every pad, or if
you have used up the available sampling time, you will
need to first delete one or more unwanted samples, and
then record your new sample to a vacant pad. (Refer to
“Deleting an individual sample” on page 33.)
27
Page 29

Chapter 3. Sampling
Sampling from a Microphone
Sample the microphone input (mono).
Here is an example describing the procedure for sampling in
mono to Pad 2 in Bank B.
fig.r03-01
8
9
2
6
3,10,
11
5,
12
8
1. Refer to p. 11 for instructions on connecting the mic to
the MIC jack.
2. Confirm that [PATTERN SELECT] is not lit.
If [PATTERN SELECT] is lit, press it so that the button’s
light goes out.
3. Press the [REC], and confirm that the button has lit.
The pads to which you can sample then blink, and the
SP-303 goes into sampling standby.
* If you now decide not to sample, press [CANCEL].
[REC] light goes out.
4. Press BANK [B], and confirm that the button has lit.
Sample Bank B is selected.
5. Press pad 2.
Pad 2 lights up, and [REC] blinks.
7
4
* You can select stereo sampling with mono input. In this case,
the number of voices is doubled, which also uses twice the
memory.
8. Turn the MIC LEVEL knob completely to the right
(clockwise), while directing sounds into the mic, turn
the CTRL 3/MFX (LEVEL) knob to adjust the sampling
level so that the PEAK indicator lights only from time
to time.
* Howling could be produced depending on the location of
microphones relative to speakers. This can be remedied by:
1. Changing the orientation of the microphone(s).
2. Relocating microphone(s) at a greater distance from
speakers.
3. Lowering volume levels.
If the BPM (tempo) is set prior to the beginning of
sampling, then when sampling is completed, the timing
at which the sound stops (the End Point) is automatically
set to occur on a beat in time with the BPM value in
effect when the button was pressed, and [MARK] lights
up.
For more on how to set the BPM, refer to “Sampling
With the Tempo Specified Beforehand” (p. 30).
For more on how to set the End Point, and on [MARK],
refer to “Preventing Unneeded Portions from Being
Played (Markers/Start Point/End Point)” (p. 38).
9. If you want to add effects while sampling, press the
effect button at this point.
The pressed effect button lights up, and the effect is
added to the sound from the mic.
* At this point, you can turn the CTRL 1 and CTRL 2 knobs to
adjust the amount and quality of the effect. However, the
CTRL 3 knob is used for adjusting the sampling level, and
cannot be used for adjusting the effect.
10.Press [REC].
[REC] lights up, and sampling starts.
6. Press [LONG/LO-FI] to select the sampling grade.
[LONG/LO-FI] not lit:
STANDARD (Sampling with high-quality sound)
[LONG/LO-FI] lit:
LONG (Twice the sampling time of STANDARD)
[LONG/LO-FI] blinking:
LO-FI (Extended sampling time)
7. If [STEREO] is lit, then press [STEREO] so that the
light goes out.
Mono sampling is selected.
28
Never turn off the power while sampling is in progress.
This may result in corruption not only of the sample
currently being made, but other samples as well.
11.When you reach the point where you want sampling to
stop, press [REC].
[REC] and the pad lights go out, and sampling ends.
If effects were being applied while you were sampling,
the lights of effects buttons also go out.
Page 30

Chapter 3. Sampling
10
9
8
5
3
7
4,11,
12
6,
13
* You can also stop sampling without pressing [REC] by
pressing the lit (sampling) pad. In this case, after sampling
stops, the sound just sampled is played back automatically.
The BPM is automatically calculated to correspond to the
time of the sample (if BPM is set, the time from the start
to the End Point), and that value appears in the display.
* If the sampling time is two or more measures or is less than
one measure, the BPM display value may be double or half the
correct value. In this case, press [TIME/BPM], getting it to
light up, and turn CTRL 2 (BPM) to correct this to the desired
value (refer to “Changing the Sample's BPM” on p. 41).
* Note that the displayed BPM value is an approximate value
for the sampling time, and may not be entirely accurate.
12.Press the pad 2, and you will hear the sound that you
just sampled.
When you want to sample to a memory card, insert a
memory card into the card slot, and press BANK [C] or
[D] to select the sample bank for the memory card.
If the memory card being used here has not been
formatted for the SP-303, BANK [C] and [D] blink, and
“FMt” appears in the display.
If you want to format at this time, press BANK [C] or
[D].
BANK [C] and [D] then remain lit, and [DEL] begins to
blink. When you press [DEL], formatting then begins.
Formatting the memory card erases all data on the card
and allows the card to be used with the SP-303.
The power of the SP-303 must be turned off before
inserting or removing a memory card. If a memory card
is inserted when the power is turned on, the data in the
memory card may be destroyed, or the memory card
may become unusable.
Sampling from a CD or MD
Sounds input from a CD or MD are sampled in stereo.
Here is an example describing the procedure for sampling in
stereo to Pad 3 in Bank B.
fig.r03-02
Chapter
3
1. Refer to p. 11 for instructions on connecting the CD or
MD player to the LINE IN jack.
2. Turn on the power of your CD/MD player, and put the
player in play-standby mode.
3. Confirm that [PATTERN SELECT] is not lit.
If [PATTERN SELECT] is lit, press it so that the button’s
light goes out.
4. Press [REC], and confirm that the button has lit.
The pads to which you can sample then blink, and the
SP-303 goes into sampling standby.
* If you now decide not to sample, press [CANCEL].
[REC] light goes out.
5. Press BANK [B], and confirm that the button has lit.
Sample Bank B is selected.
If you select a bank or pad, or perform another operation
when sampling to a memory card, the dots in the display
may blink and the SP-303 may appear to stop working
for a short while; however, this does not indicate a
malfunction. Still, be absolutely sure never to turn off the
power while the dots are blinking.
* Depending on memory card capacity and the amount of
data stored on the card, operations may stop for about a
minute.
6. Press pad 3.
Pad 3 lights up, and [REC] blinks.
7. Press [LONG/LO-FI] to select the sampling grade.
[LONG/LO-FI] not lit:
STANDARD (Sampling with high-quality sound)
[LONG/LO-FI] lit:
LONG (Twice the sampling time of STANDARD)
[LONG/LO-FI] blinking:
LO-FI (Extended sampling time)
8. Press [STEREO], and confirm that the button has lit.
Stereo sampling is selected.
29
Page 31

Chapter 3. Sampling
* If you select mono sampling with stereo input, the same sound
is recorded to the left and right channels. In this case, the
stereophonic dimension is lost, but since the number of voices
is halved, the memory used is half that used in stereo; make
this setting according to your usage needs.
9. Start playback of the CD or MD, turn the CTRL 3/MFX
(LEVEL) knob to adjust the sampling level so that the
PEAK indicator lights only from time to time.
When you finish making this adjustment, stop the CD/
MD player, and put it once again in play-standby mode.
If the BPM (tempo) is set prior to the beginning of
sampling, then when sampling is completed, the timing
at which the sound stops (the End Point) is automatically
set to occur on a beat in time with the BPM value in effect
when the button was pressed, and [MARK] lights up.
For more on how to set the BPM, refer to “Sampling
With the Tempo Specified Beforehand”.
For more on how to set the End Point, and on [MARK],
refer to “Preventing Unneeded Portions from Being
Played (Markers/Start Point/End Point)” (p. 38).
10.If you want to add effects while sampling, press the
effect button at this point.
The pressed effect button lights up, and the effect is
added to the sound from the CD/MD.
The BPM is automatically calculated according to the
time of the sample (if BPM is set, the time from the Start
to the End Point), and that value appears in the display.
* If the sampling time is two or more measures or is less than
one measure, the BPM display value may be double or half the
correct value. In this case, press [TIME/BPM], getting it to
light up, and turn CTRL 2 (BPM) to correct this to the desired
value (refer to “Changing the Sample's BPM” on p. 41).
* Note that the displayed BPM value is an approximate value
for the sampling time, and may not be entirely accurate.
13.Press the pad 3, and you will hear the sound that you
just sampled.
Sampling With the Tempo Specified Beforehand
When the BPM (tempo) is set while the SP-303 is in sampling
standby mode, then when sampling is completed, the timing
at which the sound stops (the End Point) is automatically set
to occur on a beat in time with the BPM value in effect when
the button was pressed.
fig.r03-03
* At this point, you can turn the CTRL 1 and CTRL 2 knobs to
adjust the amount and quality of the effect. However, the
CTRL 3 knob is used for adjusting the sampling level, and
cannot be used for adjusting the effect.
11.Start playback of the CD/MD, using the timing at
which you want sampling to begin, press [REC].
[REC] lights up, and sampling starts.
Never turn off the power while sampling is in progress.
Turning off the power at this point may result in
corruption not only of the sample currently being made,
but other samples as well.
12.When you reach the point where you want sampling to
stop, press [REC].
[REC] and the pad 3 light go out and sampling ends.
If effects were being applied while you were sampling,
the light of effects buttons also go out.
* You can also stop sampling without pressing [REC] by
pressing the lit (sampling) pad. In this case, after sampling
stops, the sound just sampled is played back automatically.
1. Refer to Steps 1–8 of “Sampling From a Microphone”
or Steps 1–9 of “Sampling From a CD or MD” to
prepare for sampling.
2. Press [TIME/BPM], and confirm that the button has lit.
3. Turn the CTRL 2 (BPM) knob to set the BPM.
Turning the knob to the right increases the BPM (faster
tempo); turning the knob to the left decreases the BPM
(slower tempo). If the knob is turned completely to the left,
then “---” is displayed, and the tempo setting is cleared.
Settings range: 40–200
30
Page 32

At this point, you can set the BPM using [TAP TEMPO]
3
1
2
4,6,7
instead of the CTRL 2 (BPM) knob. When you strike
[TAP TEMPO] four times with a fixed interval, the BPM
is set with quarter notes lasting the set interval, and that
value then appears in the display. This is convenient
when sampling from CD/MD and other sources whose
tempos may not be clear.
4. Press [TIME/BPM], and confirm that the button has
turned off.
5. Press [REC].
[REC] lights up, and sampling starts.
6. When you reach the point where you want sampling to
stop, press [REC].
[REC] and the pad light go out and sampling ends.
* You can also stop sampling without pressing [REC] by
pressing the lit (sampling) pad. In this case, after sampling
stops, the sound just sampled is played back automatically.
When sampling is finished, the End Point is
automatically set according to the BPM, and [MARK]
lights up (refer to “Preventing Unneeded Portions from
Being Played (Markers/Start Point/End Point)” on p.
38).
Chapter 3. Sampling
Starting Sampling Automatically (Auto Sampling)
The SP-303 provides an Auto Sampling feature which
automatically begins sampling when the input sound (signal)
exceeds a specified level. This is convenient when you wish
to begin sampling from the introduction of a song.
If you make the following settings to specify the sampling
start level, sampling will begin automatically when the input
exceeds the specified level.
fig.r03-04
Chapter
3
* If the sampling time is two or more measures or is less than
one measure, the BPM display value may be double or half the
correct value. In this case, press [TIME/BPM], getting it to
light up, and turn CTRL 2 (BPM) to correct this to the desired
value (refer to “Changing the Sample's BPM” on p. 41).
* Note that the displayed BPM value is an approximate value
for the sampling time, and may not be entirely accurate.
* Depending on the BPM value, the timing as corresponds with
the BPM may not precisely match the time between the Start
Point and the End Point. This may result in a growing
discrepancy in timing if the sample is continuously played
back over an extended period in Loop Playback (p. 36).
7. When the pad to which the sample was made is
pressed, the current sample is then played back.
1. Confirm that [PATTERN SELECT] is not lit.
If [PATTERN SELECT] is lit, press it so that the button’s
light goes out.
2. While holding down [CANCEL], press [REC].
[REC] blinks, and “-0-” appears in the display.
3. Turn the CTRL 3/MFX (LEVEL) knob to set the level.
The level at which the PEAK indicator lights will be the
sampling start level. Rotating the knob toward the right
will raise the level. Here, the level setting (indicated in
nine steps, 0–8) is displayed.
Example of Display: -3-
* Normal sampling (not Auto Sampling) is in effect when “-0-”
is displayed.
* Now, with Auto Sampling stopped, press [CANCEL].
[REC] light goes out.
4. Press [REC] to set the sampling start level.
[REC] light goes out.
5. Refer to Steps 1–8 of “Sampling from a microphone” or
Steps 1–9 of “Sampling from a CD or MD” to prepare
for sampling.
31
Page 33

Chapter 3. Sampling
5
8
7
4
6,10,
12
3,
11
1
3,
11
7,
13
2
9
6. Press [REC].
[REC] will light, and the SP-303 will wait for an input
signal. “rdY” (ready) appears in the display.
When the input from the LINE IN or MIC rises above the
sampling start level, sampling will start.
When sampling begins, the display changes to “rEC.”
Never turn off the power while sampling is in progress.
Turning off the power at this point may result in
corruption not only of the sample currently being made,
but other samples as well.
7. When you wish to stop sampling, press the [REC]
button.
[REC] and the pad lights go out and sampling ends.
To stop auto sampling
If you wish to stop auto sampling, use the following procedure.
1. Confirm that [PATTERN SELECT] is not lit.
If [PATTERN SELECT] is lit, press it so that the button’s
light goes out.
Making Samples with Effects Added (Resampling)
With the SP-303, you can play back a sample that has effects
added to it, and then sample that sound, which is then
handled as a new sample. This process is called
“resampling.”
Here is an example describing the procedure for resampling
Pad 1 in BANK A with the Filter + Overdrive added, and
storing this to Pad 4 in Bank B.
fig.r03-05
2. While holding down [CANCEL], press [REC].
[REC] will blink.
3. Turn the CTRL 3/MFX (LEVEL) knob all the way to the
left until “-0-” appears in the display.
4. Press [REC].
[REC] light goes out.
1. Confirm that [PATTERN SELECT] is not lit.
If [PATTERN SELECT] is lit, press it so that the button’s
light goes out.
2. Press [RESAMPLE], and confirm that the button has lit.
“LEV” appears in the display.
3. Select a pad to which a sample has already been
assigned to use as the resampling source.
Here, select Pad 1 in Bank A.
Press BANK [A], illuminating the button, then press Pad 1.
Pad 1 lights up, and the sample assigned to Pad 1 is
played.
4. Press [FILTER+DRIVE], and confirm that the button
has lit.
The Filter + Overdrive is turned on, and the effect is
applied to the sound from Pad 1 in Bank A.
Adjust the effect as needed by turning the CTRL 1 and
CTRL 2 knobs.
* You cannot change the sound of the effect with the CTRL 3/
MFX knob when [RESAMPLE] is lit. If you want to use the
CTRL 3/MFX knob to change the sound of the effect, press
[CANCEL]; the [RESAMPLE] light then goes off.
32
Page 34

Chapter 3. Sampling
5. Turn the CTRL 3/MFX (LEVEL) knob to adjust the
sampling level so that the PEAK indicator lights only
from time to time.
6. Press [REC], and confirm that the button is blinking.
The bank buttons and pads that are available for holding
samples then blink.
7. Select the bank and pad to which the sample after
resampling is to be assigned.
Here, select Pad 4 in Bank B.
Press BANK [B], and confirm that the button has lit, then
press Pad 4.
The Pad 4 will light.
* You cannot resample to the same pad as the source sample’s.
8. Press [LONG/LO-FI] to select the sampling grade.
[LONG/LO-FI] not lit:
STANDARD (Sampling with high-quality sound)
[LONG/LO-FI] lit:
LONG (Twice the sampling time of STANDARD)
[LONG/LO-FI] blinking:
LO-FI (Extended sampling time)
9. Press [STEREO] to select either stereo or mono
sampling.
[STEREO] lit: Stereo sampling
[STEREO] not lit: Mono sampling
10.Press [REC], and confirm that the button has lit.
* Resampling does not yet start at this point.
Deleting an Individual Sample
To delete only a single sample, use the following procedure.
fig.r03-06
1. Confirm that [PATTERN SELECT] is not lit.
If [PATTERN SELECT] is lit, press it so that the button’s
light goes out.
2. Press [DEL], and confirm that the button has lit.
“dEL” appears in the display, and the pads to which
samples are assigned begin to blink.
* If there are no samples assigned to any of the pads, “EMP”
appears in the display for several seconds, and you cannot
proceed with the deletion.
3. Press the bank button and pad for the sample you want
to delete.
The selected pad lights up, and [DEL] blinks again.
* If you press a pad to which no sample is assigned, nothing will
happen.
* If you decide not to delete, press [CANCEL].
Chapter
3
11.Press the pad to which the source sample has been
assigned.
Press BANK [A], and confirm that the button has lit, then
press Pad 1.
The sample assigned to Pad 1 begins playing, while
resampling starts simultaneously.
Never turn off the power while resampling is in
progress. Turning off the power here may result in
corruption not only of the sample currently being made,
but other samples as well.
12.When you reach the point where you want sampling to
stop, press [REC].
[REC], pad, and the effect button lights go out and
resampling ends.
BANK [A] light goes out, and BANK [B] lights up.
13.When you press Pad 4, the sound that was just
resampled is played back.
4. Press [DEL].
[DEL] lights up, and the dots in the display blink.
During the deletion process, all Pads from [1] through [8]
will at first light up, then go out one by one (starting
with [1]), indicating the progress of the deletion.
The deletion is completed when the dots stop blinking
and remain off.
* Note that the deletion process may take up to approximately
one minute or longer to complete.
Never turn off the power while the dots are blinking in
the display. Turning off the power at this point may
result in corruption of data not only in the sample that
was being deleted, but in other samples as well.
33
Page 35

Chapter 3. Sampling
Deleting All Samples Together
You can delete all samples from the SP-303’s internal
memory or memory card in one operation.
* When this procedure is carried out on a memory card, the
memory card’s backup area (refer to p. 48) is deleted at the
same time. So, please check the data carefully before deleting.
fig.r03-07
1. Confirm that [PATTERN SELECT] is not lit.
If [PATTERN SELECT] is lit, press it so that the button’s
light goes out.
2. Hold down [CANCEL] and press [DEL].
“dAL” (Delete ALL) appears in the display.
[DEL] lights up, and the bank buttons blink.
3. Press the BANK button to select the memory to be cleared.
The selected memory bank lights up, and [DEL] blinks.
If deleting the samples in the internal memory, press
BANK [A] or [B]; if deleting the samples on a memory
card, press BANK [C] or [D].
When BANK [A] or [B] is pressed, both [A] and [B] light up.
When BANK [C] or [D] is pressed, both [C] and [D] light up.
* If no memory card is inserted, then pressing BANK [C] or [D]
creates no response.
* If you decide not to delete, press the [CANCEL] button.
4. Press [DEL].
[DEL] lights up, and the dots in the display blink.
During the deletion process, all Pads from [1] through [8]
will at first light up, then go out one by one (starting
with [1]), indicating the progress of the deletion.
The deletion is completed when the dots stop blinking
and remain off.
* Note that the deletion process may take up to approximately
one minute or longer to complete.
Changing the Assignment of Samples to the Pads
You can change the assignment of samples to the pads by
exchanging the samples of two pads.
You can also switch between a pad to which a sample has
already been assigned and a pad to which no pattern has
been assigned.
fig.r03-08
1. Confirm that [PATTERN SELECT] is not lit.
If [PATTERN SELECT] is lit, press it so that the button’s
light goes out.
2. While holding down [DEL], press [REC].
“CHG” appears in the display, and [DEL] and [REC]
light up.
The pads to which the samples are assigned then blink.
3. Press the BANK button and the pad for one of the
samples to be exchanged.
The pad that is pressed remains lit.
4. Press the BANK button and the pad for the other
sample to be exchanged.
The pad that is pressed remains lit, and [REC] blinks.
Lights for pads other than the two selected go out.
* To cancel the exchange, press [CANCEL].
5. Press [REC].
[DEL] and [REC] light, and the dots in the display blink.
During the exchange process, all Pads from [1] through
[8] will at first light up, then go out one by one (starting
with [1]), indicating the progress of the exchange.
The exchange is completed when the dots stop blinking
and remain off.
* Note that the exchange process may take up to approximately
one minute or longer to complete.
Never turn off the power while the dots on the display
are blinking. Turning off the power at this point may
result in corruption of data not only in the sample that
was being deleted, but in other samples as well.
34
* If insufficient free space is available when exchanging samples
between the SP-303's memory and a memory card, “FuL” is
displayed, and the exchange cannot be carried out. Note that
sufficient memory is needed particularly on the memory card.
Page 36

Never turn off the power while the dots on the display
are blinking. Turning off the power at this point may
result in corruption of data not only in the sample that
was being deleted, but in other samples as well.
Checking the Remaining
Chapter 3. Sampling
* When displaying the remaining sampling time of a memory
card, the indication of minutes and seconds changes according
to the amount of time left. If there are ten minutes or more
remaining, then the time is indicated only down to the tens of
seconds.
fig.r03-11
Sampling Time
To check the remaining available sampling time, do the
following.
fig.r03-09
1
3
1. Confirm that [PATTERN SELECT] is not lit.
If [PATTERN SELECT] is lit, press it so that the button’s
light goes out.
2. Select the memory whose remaining time you want to
check.
If checking the remaining time of the internal memory,
press either BANK [A] or [B], causing the button to light
up.
If checking the remaining time of a memory card, press
BANK [C] or [D], causing the button to light up.
2
minute (x10 sec)
Additionally, when one hundred minutes or more of
sampling time remains, seconds are not shown, and only
the “minutes” are indicated.
Chapter
3
* The same action is performed, regardless of whether BANK
[A] or [B] (or BANK [C] or [D]) is pressed.
3. Press [REMAIN].
The remaining sampling times for “STANDARD” and
“MONO” are indicated in the display.
fig.r03-10
minute second
* Please be aware that the displayed remaining time may not be
precisely accurate.
35
Page 37

Chapter 4. Changing the Sampling Settings
Having Samples Play Only While the
When changing the sampling settings for a memory
card, the changes may take some time to complete, and it
may appear that operation has stopped momentarily.
Please be aware of this fact beforehand.
Playing Phrases Repeatedly (Loop Playback)/ Playing the Sound Only Once (One Shot Playback)
If you have sampled a phrase of several measures and wish
to play it back repeatedly, use Loop Playback.
For sounds (such as drums) that you want to playback only
once when you press the pad, use One Shot Playback.
fig.r04-01
1
2
3
Pad Is Pressed (Gate Playback)
Having Samples Play Even If the Pad
Is Not Held Down (Trigger Playback)
If you select Gate Playback, the sample will play when you
press the pad, and will stop when you release the pad. i.e.,
the sample will play only while the pad is being pressed.
fig.r04-02
Press pad
Start playback Stop playback
In Trigger Playback, the sound is played when you press the
pad and then continues even after you release the pad.
The next time you press a pad, operation changes according
to the One Shot or Loop Playback settings.
When set to One Shot Playback ([LOOP] not lit):
Sound is played from the beginning of the sample again.
fig.r04-30
Press and release
the pad
Release pad
Press and release
the pad
1. Confirm that [PATTERN SELECT] is not lit.
If [PATTERN SELECT] is lit, press it so that the button’s
light goes out.
2. Press the pad to which the sample whose Loop or One
Shot setting you want to make is assigned.
The pad will light, and the sample will sound. This pad
becomes the current pad.
3. Press [LOOP], and confirm that the button has turned
on or off.
[LOOP] lit: Loop Playback
[LOOP] not lit: One Shot Playback
Start playback Start playback
When set to Loop Playback ([LOOP] lit):
The sound stops.
fig.r04-03
Press and release
the pad
Start playback Stop playback
Use Trigger Playback with Loop Playback when you wish to
continue playing long phrases or looped phrases. You will
also use Trigger Playback with One Shot Playback to play
samples such as drums, so that the sample will be played all
the way to the end even if the pad is pressed for a brief
moment.
* After a sample is recorded, Trigger Playback will be selected
automatically.
* Sounds may fail to stop playing in lengthy samples for which
the Trigger Playback with One Shot Playback setting is used.
To stop sounds from playing, temporarily change the playback
setting to Loop Playback, then press the pad.
Press and release
the pad
36
Page 38

Chapter 4. Changing the Sampling Settings
fig.r04-04
1
3
2
1. Confirm that [PATTERN SELECT] is not lit.
If [PATTERN SELECT] is lit, press it so that the button’s
light goes out.
2. Press the pad to which the sample whose Gate or
Trigger setting you want to make is assigned.
The pad will light, and the sample will sound. This pad
becomes the current pad.
3. Press [GATE], and confirm that the button has turned
on or off.
[GATE] lit: Gate Playback
[GATE] not lit: Trigger Playback
* If [LOOP] is not lit, then when the sample is played back to
the end, then playback stops automatically, even if the pad is
held down, and the pad light goes out.
Playing Samples in the Reverse Direction (Reverse Playback)
Reverse Playback plays samples backwards from the end of
the sample, providing an effect like that of a tape being
rewound.
fig.r04-05
Normal
Reverse playback
* Time Modify (p. 42) and Reverse Playback cannot be selected
at the same time. Time Modify settings are disregarded during
Reverse Playback.
fig.r04-06
1
2
3
Chapter
4
1. Confirm that [PATTERN SELECT] is not lit.
If [PATTERN SELECT] is lit, press it so that the button’s
light goes out.
2. Press the pad which contains the sample that you wish
to playback in reverse.
The pad will light, and the sample will sound. This pad
becomes the current pad.
3. Press [REVERSE], and confirm that the button has lit.
[REVERSE] lit: Reverse Playback
* Pressing [REVERSE] toggles between Reverse Playback and
normal playback ([REVERSE] is not lit).
* When Reverse Playback is selected, the Start and End Points
(p. 38) are reversed.
37
Page 39

Chapter 4. Changing the Sampling Settings
Setting the Sample Volume
With the SP-303, you can set the volume level for each
sample individually.
This is convenient for balancing the volume levels of samples
on different pads.
fig.r04-07
4
3,5
1
2
1. Confirm that [PATTERN SELECT] is not lit.
If [PATTERN SELECT] is lit, press it so that the button’s
light goes out.
2. Press the pad to which the sample whose volume you
want to adjust is assigned.
The pad will light, and the sample will sound. This pad
becomes the current pad.
3. Press [START/END/LEVEL], and confirm that the
button has lit.
4. Turn the CTRL 3/MFX (LEVEL) knob to adjust the
sample’s volume.
Turning the knob to the right increases the volume;
turning the knob to the left decreases the volume. The
volume is set to maximum when the value 127 is selected
using the knob. This is equivalent to the volume of the
sound directly sampled.
Preventing Unneeded
Portions from Being Played
(Markers/Start Point/End Point)
On the SP-303, the area of the waveform data which will
actually playback can be specified/memorized
independently for each sample.
The point at which the waveform data will begin playing is
called the Start Point, and the point at which it will stop
playing is called the End Point.
If the sound you sampled contains unwanted material at the
beginning, adjust the Start Point so that the unwanted
portion is not heard. If the unwanted material is at the end,
adjust the End Point. In this way, you can make only the
desired portion playback.
fig.r04-08
Beginning of
sample
unwanted
Start point End point
the portion which is played back
* When you modify the Start Point or End Point settings, the
BPM will be calculated according to the newly specified time,
and displayed. If the sampling time is two or more measures or
is less than one measure, the BPM display value may be double
or half the correct value. In this case, carry out the procedure
in “Changing the Sample's BPM” (p. 41) to reset this to the
desired value.
Also, please be aware that in some cases (such as triple
meter), it may not be possible to calculate or adjust the BPM
value accurately.
Adjusting both the Start and End points
fig.r04-09
End of
sample
unwanted
5. Press [START/END/LEVEL], and confirm that the
button has turned off.
* When [START/END/LEVEL] is lit, you can then use the
CTRL 1 and 2 knobs to change not only the volume, but the
Start Point and End Point as well. If you inadvertently move
the CTRL 1 or CTRL 2 knob, return the CTRL 1 and 2 knobs
to the center position. This restores the settings in effect before
the knobs were moved. If you press [START/END/LEVEL],
causing the button light to go out, without returning the
knobs to the center position, the changed settings are recorded
and stored.
38
1
3,4
2
1. Confirm that [PATTERN SELECT] is not lit.
If [PATTERN SELECT] is lit, press it so that the button’s
light goes out.
Page 40

Chapter 4. Changing the Sampling Settings
2. Press the pad to which the sample you want to change
is assigned.
The pad will light, and the sample will sound. This pad
becomes the current pad.
* For gate playback, continue pressing the pad.
3. At the location where you wish to set the Start Point,
press [MARK].
[MARK] blinks, and “---” appears in the display.
If you now set the BPM (tempo), the End Point will
automatically be adjusted to the location of the beat
closest to the timing (i.e., an interval of beats measured
from the Start Point according to the BPM value) which
set when you press [MARK] at Step 4.
fig.r04-10
beat beat beat beat
Start point
newly adjusted End Point
* To set the BPM, press [TIME/BPM], causing the button to
light, then either turn the CTRL 2 knob or press [TAP
TEMPO] four or more times.
4. At the location where you wish to set the End Point,
press [MARK] once again.
When [MARK] lights, the setting is complete.
timing at which
you pressed
[
]
MARK
adjusted
2. Hold down [MARK] and press the pad to which the
sample you wish to change is assigned.
The pad will light, and the sample will sound. This pad
becomes the current pad.
* For gate playback, continue pressing the pad.
3. Release your finger from [MARK].
[MARK] blinks, and “---” appears in the display.
If you now set the BPM (tempo), the End Point will
automatically be adjusted to the location of the beat
closest to the timing (i.e., an interval of beats measured
from the Start Point according to the BPM value) which
set when you press [MARK] at Step 4.
* To set the BPM, press [TIME/BPM], causing the button to
light, then either turn the CTRL 2 knob or press [TAP
TEMPO] four or more times.
4. At the location where you wish to set the End Point,
press [MARK].
When [MARK] lights, the setting is complete.
* If the setting was not made as desired, press the lit [MARK]
button while the sound is still playing to make it go dark, and
re-do the procedure from step 1.
Adjusting only the Start Point
(End Point is the end of the sample)
fig.r04-12
Chapter
4
* If the setting was not made as desired, press the lit [MARK]
button while the sound is still playing to make it go dark, and
re-do the procedure from step 1.
Adjusting only the End Point
fig.r04-11
1
2
3,4
1. Confirm that [PATTERN SELECT] is not lit.
If [PATTERN SELECT] is lit, press it so that the button’s
light goes out.
1. Confirm that [PATTERN SELECT] is not lit.
If [PATTERN SELECT] is lit, press it so that the button’s
light goes out.
2. Press the pad to which the sample you want to change
is assigned.
The pad will light, and the sample will sound. This pad
becomes the current pad.
* For gate playback, continue pressing the pad.
3. At the location where you wish to set the Start Point,
press [MARK].
[MARK] will blink.
39
Page 41

Chapter 4. Changing the Sampling Settings
4. Press the pad again (or in the case of Gate playback,
release the pad).
When [MARK] lights, the setting is complete.
* If the setting was not made as desired, press the lit [MARK]
button while the sound is still playing to make it go dark, and
re-do the procedure from step 1.
Finely Adjusting the Start Point
and End Point
To make fine adjustments to the Start Point and End Point,
use the following procedure.
fig.r04-13
* If you want to cancel the move, return the CTRL 1 (START)
knob to the center position, setting it so that “0” is displayed.
5. Turn the CTRL 2 (END) knob.
The center position sets the current End Point; turn the
knob to the left to move the End Point to an earlier point,
or to the right to move the End Point to a later point.
* If the End Point is set at the very end of the sample, then the
End Point will not move to a later point, even when the knob is
turned to the right.
* You cannot set the Start Point and End Point within 100
milliseconds of each other.
* If you want to cancel the move, return the CTRL 2 (END)
knob to the center position, setting it so that “0” is displayed.
6. Press [START/END/LEVEL], and confirm that the
button has turned off.
The Start Point and End Point settings are recorded.
* You can move the Start Point and End Point in a single
operation up to a total time of roughly 130 milliseconds.
If you want to move beyond this range, you will merely need to
repeat Steps 3–6.
1. Confirm that [PATTERN SELECT] is not lit.
If [PATTERN SELECT] is lit, press it so that the button’s
light goes out.
2. Press the pad to which the sample you want to change
is assigned.
The pad will light, and the sample will sound. This pad
becomes the current pad.
3. Press [START/END/LEVEL], and confirm that the
button has lit.
4. Turn the CTRL 1 (START) knob.
The center position sets the current Start Point; turn the
knob to the left to move the Start Point to an earlier
point, or to the right to move the Start Point to a later
point.
* If the resulting Start Point and End Point become the start
and end of the sample, the [MARK] light goes out.
* If the [MARK] light is off for a sample, when the Start Point
or End Point is moved, [MARK] then lights up.
* When the Start Point or End Point is changed, the sample’s
BPM (tempo) then also changes automatically. However,
values to the right of the dot are rounded off, which results in a
slight inaccuracy in timing.
* If the Start Point is set at the beginning of the sample, then the
Start Point will not move to a earlier point, even when the
knob is turned to the left.
* You cannot set the Start Point and End Point within 100
milliseconds of each other.
40
Page 42

Chapter 4. Changing the Sampling Settings
3,5
2
4
1
Deleting Unwanted Portions (Truncate)
When you specify the Start/End Points, unused portions of
waveform data will occur. By deleting (Truncating) these
portions, you can make more efficient use of memory.
fig.r04-20
Beginning of
sample
unwanted
Start point End point
the portion which is played back
Truncate
fig.r04-21
1
3,5
End of
sample
unwanted
6. Press [DEL].
[DEL] will light, and the dots in the display blink.
During the truncation process, all Pads from [1] through
[8] will at first light up, then go out one by one (starting
with [1]), indicating the progress of the truncation.
The truncation is completed when the dots stop blinking
and remain off.
* Note that the truncation process may take up to approximately
one minute to complete.
Never turn off the power while the dots are blinking.
This may result in corruption not only of the sample
currently being truncated, but may also damage other
samples as well as the memory card.
Changing the Sample’s BPM
The BPM (tempo) of a sample is determined automatically
according to the length of the interval between the Start Point
and End Point. Depending on the sampling time, the
calculated BPM value may be half or double the correct BPM.
In this case, use the following procedure to adjust the BPM.
fig.r04-14
Chapter
4
4,6
2
1. Confirm that [PATTERN SELECT] is not lit.
If [PATTERN SELECT] is lit, press it so that the button’s
light goes out.
2. Press the pad to which the sample whose Truncate you
want to make is assigned.
The pad will light, and the sample will sound. This pad
becomes the current pad.
3. Make sure that the Start and End Points have been set
([MARK] is lit).
4. Press [DEL], and confirm that the button has lit.
Although the pad also blinks at this time, do not press
the pad.
5. Press [MARK].
[DEL] blinks, and “trC” appears in the display.
1. Confirm that [PATTERN SELECT] is not lit.
If [PATTERN SELECT] is lit, press it so that the button’s
light goes out.
2. Press the pad to which the sample you want to change
is assigned.
The pad will light, and the sample will sound. This pad
becomes the current pad.
3. Press [TIME/BPM], and confirm that the button has lit.
41
Page 43

Chapter 4. Changing the Sampling Settings
4. Turn the CTRL 2 (BPM) knob to change the BPM value.
If you want to halve the displayed value, turn the knob
to the left; turn the knob to the right if you want to
double the value.
5. Press [TIME/BPM] again.
The [TIME/BPM] light goes out, and the BPM setting is
recorded.
* Note that when [TIME/BPM] is lit, the CTRL 1 (TIME) knob
then changes not only the BPM, but the sample playback time
as well.
Changing the Length of a Sample Without Changing the Pitch (Time Modify)
If you wish to consecutively playback samples which have
the same key (pitch) but a different tempo, you can use the
Time Modify function so that the natural tempo will be
preserved.
* When Reverse Playback (p. 37) is selected, the Time Modify
settings are disregarded, and the effect is disabled. When you
want to use Time Modify, turn Reverse Playback off.
fig.r04-15
4. Turn the CTRL 1 (TIME) knob.
The BPM value appearing in the display changes as the
length of the sample is changed.
Turn the knob to the left to increase the length, slowing
down the tempo. Turn the knob to the right to shorten
the sample, which increases the tempo.
When the knob is turned completely to the left, Time
Modify is turned off, and the samples are played at the
original length. (“oFF” appears in the display.)
When the knob is turned completely to the right,
samples are played at the tempo set in the pattern.
(“Ptn” appears in the display.)
* The BPM can be changed over a range from one-half to
approximately 1.3 times a sample's original BPM. However,
the BPM cannot be set outside the range of 40–200.
* When Time Modify is set to Ptn, the sample's tempo changes
according to the pattern tempo only when the pattern tempo is
set in a range from one-half to 1.3 times the sample's original
BPM. When the pattern tempo setting is outside this range,
the sample's tempo is restricted to the value for the upper limit
(200) or lower limit (40).
5. Press [TIME/BPM] again.
The [TIME/BPM] light goes out, and the value setting is
recorded.
1. Confirm that [PATTERN SELECT] is not lit.
If [PATTERN SELECT] is lit, press it so that the button’s
light goes out.
2. Press the pad to which the sample you want to change
is assigned.
The pad will light, and the sample will sound. This pad
becomes the current pad.
* Note that when Time Modify is used with a sample, a rapid
tremor or noise may become audible in the sound.
3. Press [TIME/BPM], and confirm that the button has lit.
42
Page 44

Chapter 5. Recording Sample Performances (Pattern Sequencer)
By recording the processes of playing samples as patterns,
you can then play back those samples in the same way later
on.
This is convenient for creating songs by combining a number
of sampled phrases and making rhythm patterns from
combinations of sampled rhythms.
Composition of Patterns
When [PATTERN SELECT] is lit, you can assign one pattern
to each of the Pads 1–8 on the panel. A set of eight patterns
assigned to the pads is collectively referred to as a “pattern
bank,” and the SP-303 has four pattern banks, A–D, for your
use. Pattern Banks A and B are the SP-303’s own internal
banks, and Pattern Banks C and D are banks stored on
memory cards.
* Pattern Bank A is selected when the power is turned on.
fig.r05-01
Pattern Bank D
Pattern Bank C
Changing the Tempo of a Pattern
The pattern tempo setting is applied to all patterns.
* You cannot save different tempo settings for individual patterns.
When changing the tempo, use the following procedure.
fig.r05-02
1. Press [PATTERN SELECT], and confirm that the
button has lit.
“Ptn” appears in the display.
* If already lit, there is no need to press the button.
Pattern Bank B
Pattern Bank A
Pads 1–8 (Patterns)
When [PATTERN SELECT] is lit, BANKs [A]–[D] are used as
pattern banks, with Pads 1–8 used to specify particular patterns.
Two banks on a
memory card
(total of 16 Patterns)
Two banks in an
internal memory
(total of 16 Patterns)
2. Press [TIME/BPM], and confirm that the button has lit.
The tempo (BPM) of a pattern appears in the display.
* When the pattern tempo is synchronized to the tempo of a
MIDI sequencer (p. 55), “---” appears in the display, and you
will not be able to carry out any other operations.
3. Turn the CTRL 2 (BPM) knob to change the BPM value.
The selected BPM appears in the display.
Turn the knob to the left to increase the BPM (speed up
the tempo). Turn the knob to the right to decrease the
BPM (slow down the tempo).
Settings range: 40–200
When the BPM is set from 40 to 60 or from 160 to 180,
then you can select only even-numbered values.
When the BPM is set from 180 to 200, then you can set
either 180, 183, 186, 190, 193, 196, or 200.
4. Press [TIME/BPM], and confirm that the button has
turned off.
The set BPM is recorded.
Chapter
5
To Synchronize with a CD’s or
Turntable’s Tempo
You can set a pattern’s tempo to that of a CD or turntable
performance by pressing [TAP TEMPO] in time with the
performance.
43
Page 45

Chapter 5. Recording Sample Performances (Pattern Sequencer)
When you strike [TAP TEMPO] four times using a fixed,
steady timing, the BPM is set with quarter notes of that
interval, and that value then appears in the display.
fig.r05-03
[TAP TEMPO] can be used when [PATTERN SELECT] is lit.
Stopping Patterns
Once playback begins, the pattern continues playing even
after you release the pad.
If you want to stop a pattern during playback, press
[CANCEL] (PATTERN STOP).
When [PATTERN SELECT] is lit and “Ptn” appears in the
display, you can press the lit pad (the pad for the pattern
currently being played back) to stop playback of the pattern.
* No action results if you press a pad to which no pattern is
assigned (no pattern is recorded).
Recording the Pattern
When recording patterns of sample performances, until the
recording is stopped, you can repeat recording of a specified
number of measures (Loop Recording), thus allowing you to
layer a sequence of sample performances over the same
section (Overdubbing).
fig.r05-05
Switching Patterns While Playback Is in Progress
During playback of a pattern, you can switch to a different
pattern in real time.
fig.r05-04
1. Press [PATTERN SELECT], and confirm that the
button has lit.
“Ptn” appears in the display.
2. Press any of BANK [A]–[D], causing that button to light
up, to select the bank containing the pattern to which
you want to switch.
* You cannot select Pattern Bank C or D if there is no memory
card inserted.
3. Press the pad for the pattern to which you want to switch.
The pattern currently being played back stops, and
playback of the new pattern immediately begins. At this
time, the [PATTERN SELECT] light goes out.
1. Press [PATTERN SELECT], and confirm that the
button has lit.
“Ptn” appears in the display. The pad to which the
pattern is assigned blinks.
* If already lit, there is no need to press the button.
* Take care to note that if [PATTERN SELECT] is not lit, the
SP-303 will then proceed with sampling.
2. Press [REC], and confirm that the button has lit.
All pads not assigned to the pattern blink, and the
metronome sound starts.
3. Press any of BANK [A]–[D] to select the bank
containing the pattern you want to record.
* You cannot select Pattern Bank C or D if there is no memory
card inserted.
4. Press the pad to which the pattern you want to record is
assigned.
The pressed pad lights up, and the lights for the other
pads go out. [REC] blinks.
5. Press [START/END/LEVEL], and confirm that the
button has lit.
6. Turn the CTRL 3/MFX (LEVEL) knob to adjust the
metronome volume.
44
Page 46

Chapter 5. Recording Sample Performances (Pattern Sequencer)
7. Press [TIME/BPM], and confirm that the button has lit.
The tempo (BPM) of a pattern appears in the display.
8. While listening to the metronome, turn the CTRL 2
(BPM) knob to adjust the pattern's tempo.
Settings range: 40–200
When the BPM is set from 40 to 60 or from 160 to 180,
then you can select only even-numbered values.
When the BPM is set from 180 to 200, then you can set
either 180, 183, 186, 190, 193, 196, or 200.
* You can also set the tempo by pressing [TAP TEMPO] four or
more times. When using [TAP TEMPO] to select the tempo,
you can set the BPM to any value in a range from 40 to 200.
9. Press [LENGTH], and confirm that the button has lit.
The length of the pattern being recorded (pattern length),
is indicated in the display as a number of measures.
10. Turn the CTRL 3/MFX knob to adjust the pattern length.
The pattern length value for the pattern being set
appears in the display.
Settings range: 1–99
You can set patterns of one to twenty measures in one-measure
units; longer patterns can be set in four-measure units.
11.Press [QUANTIZE], and confirm that the button has lit.
[LENGTH] light goes out.
The quantize setting value appears in the display.
What is Quantize?
When pressing the pads to play samples, a certain
amount of discrepancy in the timing is unavoidable.
Quantize is a recording function that provides accurate
timing by automatically correcting these differences.
Setting quantize allows you to record with the sounds
accurately synchronized to the closest quarter note,
eighth note, sixteenth note, or other setting.
This is especially convenient for creating exact timing in
Groove music and other genres.
This feature is also useful in creating rhythm patterns.
12.Turn the CTRL 3/MFX knob to set the quantization.
The quantize setting appears in the display.
The meaning of each indication is shown below.
oFF: No quantization. Notes generated by the pads are
recorded exactly as pressed.
4: Aligned to the nearest quarter note.
8: Aligned to the nearest eighth note.
8-3: Aligned to the nearest eighth-note triplet.
16: Aligned to the nearest sixteenth note.
13. Press [QUANTIZE], and confirm that the button has turned off.
14.Press [REC].
[REC] changes from a blinking to a steady light, and
recording starts.
One measure of a count sound is inserted before
recording actually begins; wait for one measure while
listening to the metronome beat. At this time, a
countdown showing “-4, -3, -2, -1” appears in the
display, with each count occurring on the beat.
When the count-in is finished, actual recording then begins,
and the measure and beat are indicated in the display.
* No pad played during the count is recorded.
15.Press the pads at the time you want them to be recorded.
During recording, the samples can be played with the
pads. You can also switch sample banks by pressing the
BANK buttons.
Pressing a pad plays its sample, and the sound is
recorded with the timing corrected according to the
quantization setting.
If the number of measures indicated in the display
exceeds the value set for the pattern length, recording
continues automatically after returning to the first
measure (Loop Recording).
At this point, the previously recorded samples are played back.
16. Press the pads for any additional samples you want to record.
The previously recorded pad performances and the
performances for the pads currently pressed are layered
and recorded together (overdubbing). When using many
overdubbed samples, even with complex performances
that cannot be recorded at one time, you can spread out
the recording over as many passes you need.
Chapter
5
When You Want To Change Quantize During the Recording
a. Press [QUANTIZE], and confirm that the button has lit.
b.
Turn the CTRL 3/MFX knob to change the quantization setting.
c. After making the setting, press [QUANTIZE], and
confirm that the button has turned off.
The quantize setting is recorded, and the new setting is
immediately reflected in the recording.
17.Press [REC] at the point you want recording to stop.
The dots blinks on the display. Recording ends when
this indication stops blinking.
Never turn off the power while the dots are blinking.
This may result in corruption not only of the pattern
currently being recorded, but may also damage other
patterns, as well as the memory card.
45
Page 47

Chapter 5. Recording Sample Performances (Pattern Sequencer)
Erasing the Data for Mistakes in
Performances
You can erase performances of samples recorded by mistake
by specifying the sample pads and erasing the data.
fig.r05-06
1. Press [PATTERN SELECT], and confirm that the
button has lit.
“Ptn” appears in the display.
The pad to which the pattern is assigned blinks.
* If already lit, there is no need to press the button.
* Take care to note that if [PATTERN SELECT] is not lit, the
SP-303 will proceed with sampling.
The dots blink in the display; when the blinking stops,
deletion is finished.
Never turn off the power while the dots are blinking.
This may result in corruption not only of the pattern
currently being recorded, but may also damage other
patterns as well as the memory card.
Deleting Patterns
Specifying and Deleting a Single
Pattern
fig.r05-07
2. Press [REC], and confirm that the button has lit.
[REC] lights, and the metronome starts sounding.
3. Press the pad for the pattern whose recorded
performance you want to erase.
The pressed pad lights, and the other pad lights go out.
[REC] blinks.
4. Press [REC].
[REC] changes from a blinking to a steady light, and
recording starts.
The recorded performance is played back.
* Take care to note that pressing a sample’s pad at this time will
result in that performance being recorded.
5. Press [DEL], and confirm that the button has lit.
“ErS” appears in the display.
6. Press the pad with the sample you want to erase at the
time it is to be erased.
The dots in the display blink while the pad is held down,
and the performance of that pad is erased.
7. Repeat Step 6 as needed.
8. When you have finished erasing the data, press [DEL].
[DEL] lights go out, and the pattern returns to normal
recording mode.
* Take care to note that pressing a sample’s pad at this time will
result in that performance being recorded.
9. Press [REC].
1. Press [PATTERN SELECT], and confirm that the
button has lit.
“Ptn” appears in the display.
The pad being recorded blinks.
* If already lit, there is no need to press the button.
* Take care to note that if [PATTERN SELECT] is not lit, the
SP-303 will then proceed with deletion of the sample (p. 33).
2. Press [DEL], and confirm that the button has lit.
“dEL” appears in the display.
* If there are no patterns assigned to any of the pads, “EMP”
appears in the display for several seconds, and you cannot
proceed with the deletion.
3. Press the bank button and pad to specify the bank and
pad of the pattern to be deleted.
The selected pad lights up, and [DEL] blinks.
* If you press a pad to which no pattern is assigned, nothing will happen.
* If you decide not to delete, press [CANCEL].
4. Press [DEL].
[DEL] is lit, and the dots in the display begin to blink.
When the blinking stops, deletion is finished.
Never turn off the power while the dots are blinking.
This may result in corruption not only of the pattern
currently being deleted, but may also damage other
patterns as well as the memory card.
46
Page 48

Chapter 5. Recording Sample Performances (Pattern Sequencer)
Deleting All Patterns Together
You can delete all patterns from the SP-303’s internal
memory or memory card in one operation.
* When this procedure is carried out on a memory card, the
memory card’s backup area (refer to p. 48) is deleted at the
same time. So, please check the data carefully before deleting.
fig.r05-08
1. Press [PATTERN SELECT], and confirm that the
button has lit.
“Ptn” appears in the display.
* If already lit, there is no need to press the button.
* Take care to note that if [PATTERN SELECT] is not lit, the
SP-303 will then proceed with deletion of the sample (p. 34).
2. While holding down [CANCEL], press [DEL].
“dAL” (Delete ALL) appears in the display.
[DEL] lights up, and the bank buttons blink.
3. Select the memory to be cleared.
If deleting the patterns in the internal memory, press
BANK [A] or [B]; if deleting the patterns on a memory
card, press BANK [C] or [D].
When BANK [A] or [B] is pressed, both [A] and [B] light
up. When BANK [C] or [D] is pressed, both [C] and [D]
light up.
[DEL] changes to a blinking light.
* If no memory card is inserted, then pressing BANK [C] or [D]
creates no response.
* If you decide not to delete, press [CANCEL].
4. Press [DEL].
[DEL] lights up, and the dots in the display blink. The
deletion is complete when the dots stop blinking and
remain off.
Changing the Assignment of Patterns to the Pads
You can change the assignment of patterns to the pads by
exchanging the patterns on two different pads.
You can switch between a pad to which a pattern has already
been recorded and a pad to which no pattern has been
assigned.
fig.r05-09
1. Press [PATTERN SELECT], and confirm that the
button has lit.
“Ptn” appears in the display.
* Take care to note that if [PATTERN SELECT] is not lit, the
samples will then be switched (p. 34).
2. While holding down [DEL], press [REC].
[DEL] and [REC] light up, and “CHG” appears in the
display.
The pads to which the patterns are assigned then blink.
3. Press the BANK button and pad for one of the patterns
to be exchanged.
The pad lights up.
4. Press the BANK button and pad for the other pattern to
be exchanged.
The pad lights up, and [REC] blinks.
5. Press [REC].
[DEL] and [REC] light, and the dots in the display blink.
The exchange is complete when the dots stop blinking
and remain off.
* If insufficient free space is available when exchanging patterns
between the SP-303’s memory and a memory card, “FuL” is
displayed, and the exchange cannot be carried out. Note that
sufficient memory is needed particularly on the memory card.
Chapter
5
Never turn off the power while the dots are blinking.
This may result in corruption not only of the pattern
currently being deleted, but may also damage other
patterns, as well as the memory card.
Never turn off the power while the dots are blinking.
This may result in corruption not only of the patterns
currently being exchanged, but may also damage other
patterns as well as the memory card.
47
Page 49

Chapter 6. Using Memory Cards
You can use commercially available SmartMedia cards as
memory cards for the SP-303; The 3.3 V type with the
capacities of 8 MB to 64 MB can be used.
1 MB, 2 MB, and 4 MB SmartMedia cards cannot be used.
SmartMedia can be purchased at computer stores and
vendors handling digital cameras.
* For details on using SmartMedia, refer to the SmartMedia
owner’s manual.
Memory Cards
In addition to the sixteen samples of Banks C and D and the
sixteen patterns of Pattern Banks C and D, you can also store
(save) up to seven sets of the SP-303’s own samples and
patterns (from internal memory) in the backup area of a
memory card.
The procedures below cannot be carried out when there
is no memory card inserted in the SP-303 or if the card is
not formatted.
• Recording and erasing of samples and patterns in
Banks C and D
• Playback, erasing, and exchanging of samples and
patterns in Banks C and D
• Saving and loading of samples and patterns
In addition, if you attempt to carry out one of the
following procedures with a write protect sticker affixed
to the memory card, “Prt” appears in the display, and
you are prevented for carrying out the operation (p. 51).
• Recording and erasing of samples and patterns in
Banks C and D
• Changing the settings of samples in Banks C and D
• Erasing and exchanging of samples and patterns in
Banks C and D
• Saving of samples and patterns
The memory in a card’s backup area is shared by Banks
C and D and Pattern Banks C and D, so if a large amount
of memory is used in saving data for a certain sample or
pattern, that portion becomes unavailable for the other
data.
* Once this portion is used as a backup area, the possible
sampling time will be correspondingly less. If you wish to use
long samples, either re-format the card or purchase additional
memory cards.
* Saving extended samples in card memory reduces the backup
area as well as the recording time available for patterns.
(With the backup area using more memory)
fig.r06-01
Sampling
data
C1–D8
(With the sampling data using more memory)
fig.r06-02
Sampling
Pattern
data
C1–D8
data
C1–D8
Backup
Area
1
Pattern
data
C1–D8
Backup
Area
2
Backup
Area
1
Inserting a memory card
The power of the SP-303 must be turned off before
inserting or removing a memory card (SmartMedia). If a
memory card is inserted when the power is turned on,
the data in the memory card may be destroyed, or the
memory card may become unusable.
Making sure that the memory card (SmartMedia) is oriented
correctly, insert it all the way into the slot.
fig.r06-03
The surface without
gold contacts
must face upward
* If you turn on the power with a memory card already inserted,
the dots will blink until the memory card is detected. The unit
will not operate during this time.
* In some cases, a SmartMedia card which was used by the SP-
303 may no longer be usable by other SmartMedia-compatible
devices.
48
Page 50

Chapter 6. Using Memory Cards
Initializing Memory Cards (Format)
Before the SP-303 can use a newly purchased SmartMedia
card or a card which was used by another device, the card
must be formatted (initialized) by the SP-303.
fig.r06-04
1
2
3
1. While holding down [CANCEL], press [REMAIN].
BANK [C] and [D] blinks, and “FMt” appears in the
display.
2. Press either BANK [C] or [D].
The BANK [C] and [D] lights remain on, and [DEL]
begins to blink.
* If you decide to cancel the format operation, press [CANCEL].
3. Press [DEL].
[DEL] remains lit, and formatting is executed.
The dots in the display blink while formatting is in
progress.
When the dots stop blinking and remain off, formatting
is completed.
Saving Samples to Memory Cards (Sample Save)
You can save sixteen samples from the SP-303’s internal
memory (Banks A and B) as one set to the backup area of a
memory card.
This operation is called Sample Save.
Data that has been saved in this way cannot be played back
until it is once again loaded into the SP-303.
fig.r06-05
2
1
4
3
1. Confirm that [PATTERN SELECT] is not lit.
If [PATTERN SELECT] is lit, press it so that the button’s
light goes out.
* Take care to note that if [PATTERN SELECT] is lit, the SP-
303 will then proceed with the Pattern Save operation.
2. Hold down [CANCEL] and press either BANK [C] or [D].
BANK [C] and [D] light up, and the pads corresponding
to blank portions of the backup area begin to blink.
3. Press a pad to specify the number of the area into
which you wish to save the data.
Pressed pads remain lit, and the other pad lights go out.
Chapter
6
Never turn off the power or remove the memory card
while the dots are blinking. This can result in damage to
the memory card, and may render the card unusable.
* When you format a card, all data that was in the card will be
erased.
* In some cases, a SmartMedia card which was formatted by the
SP-303 may no longer be usable by other SmartMediacompatible devices.
* You can select an area number by pressing a pad that is not
blinking (excluding a pad [8]). Take care to note here that any
data already saved to that area number is overwritten if you
continue with the current data to saving.
* If you decide to cancel the Save operation, press [CANCEL].
4. Press [REC].
[REC] lights up, and the dots in the display blink.
During the save process, all Pads from [1] through [8]
will at first light up, then go out one by one (starting
with [1]), indicating the progress of the save.
The saving is completed when the dots stop blinking and
remain off.
* Note that the save process may take up to approximately one
minute to complete.
49
Page 51

Chapter 6. Using Memory Cards
Never turn off the power while the dots are blinking.
This may result in damage to the memory card and
corruption of data in the internal memory.
Loading Sample from a Memory Card (Sample Load)
You can load the collected data for one set (of sixteen
samples) saved to a memory card, replacing the data in the
SP-303’s internal memory (Sample Banks A and B). This
operation is called Sample Load.
When this operation is performed, the internal data of
the SP-303 will be overwritten. Be sure to make a backup
of important data before you do this.
fig.r06-06
1. Confirm that [PATTERN SELECT] is not lit.
If [PATTERN SELECT] is lit, press it so that the button’s
light goes out.
* Take care to note that if [PATTERN SELECT] is lit, the SP-
303 will then proceed with the Pattern Load operation.
2. Hold down [CANCEL] and press either BANK [A] or
50
Page 52

Chapter 6. Using Memory Cards
* If you decide to cancel the Save operation, press [CANCEL].
4. Press [REC].
[REC] lights up, and the save is executed.
The dots in the display blink while the save is in progress.
When the dots stop blinking and remain off, the save is
completed.
Never turn off the power while the dots are blinking.
This may result in corruption of data on the memory
card.
Loading Pattern from a Memory Card (Pattern Load)
You can load the collected data for one set (of sixteen
patterns) saved to a memory card, replacing the data in the
SP-303’s internal memory (Pattern Banks A and B). This
operation is called Pattern Load.
3. Press a pad to specify the card area that you wish to
load into internal memory.
Pressed pads remain lit, and [REC] blinks.
* If you decide to cancel the Load operation, press [CANCEL].
4. Press [REC].
[REC] lights up, and loading is executed.
The dots in the display blink while loading is in progress.
When the dots stop blinking and remain off, loading is
completed.
Never turn off the power or remove the memory card
while the dots are blinking. This may result in damage to
the memory card and corruption of data in the internal
memory.
Protecting the Data on Memory Cards (Protect)
When this operation is performed, the internal data of
the SP-303 will be overwritten. Be sure to make a backup
of important data before you do this.
fig.r06-08
1. Press [PATTERN SELECT], and confirm that the
button has lit.
* If already lit, there is no need to press the button.
* Take care to note that if [PATTERN SELECT] is not lit, the
SP-303 will then proceed with the Sample Load operation.
Write protect stickers are included with SmartMedia.
These stickers are used to prevent data from accidentally
being deleted or overwritten.
Be sure to put these write protect stickers on SmartMedia
cards to which important data is saved.
fig.r06-09
Chapter
6
* You cannot sample or record patterns to a memory card
(Banks C and D) that has a write protect sticker affixed to it.
(Samples settings cannot be changed as well.)
Additionally, you cannot save samples and patterns to the
memory card.
2. Hold down [CANCEL] and press either BANK [A] or
[B].
BANK [A] or [B] light up, and the pads corresponding to
the area numbers containing data begin to blink.
* If there are no patterns saved to the memory card, then
“EMP” appears in the display, and you cannot proceed further
with the operation.
51
Page 53

Chapter 6. Using Memory Cards
Importing Wave Data to the SP-303 From a Computer
You can use SmartMedia cards to import WAVE and AIFF files
from a personal computer and transfer them to the SP-303.
Copying WAVE/AIFF files to SmartMedia cards
requires the purchase of an optional SmartMedia
adapter. Refer to the user’s guide provided with the
SmartMedia adapter when using such an adapter.
fig.r06-10
5
4
3
* No files with file names other than the those can be loaded.
* Only WAVE or AIFF files with a sampling frequency of 44.1
kHz can be loaded.
* You cannot load waves that are shorter than approximately
100 milliseconds.
* Waves can be loaded until the capacity of the SP-303’s
internal memory is reached. All wave data or files loaded after
the capacity of internal memory has been exceeded are ignored.
* If both WAVE files and AIFF files are saved to the same
SmartMedia card, the AIFF files are disregarded, and only the
WAVE files are loaded.
3. With the SP-303’s power turned off, insert a
SmartMedia memory card in the memory card slot,
then turn the POWER switch to ON.
“UAU” (WAV) or “AiF” appears in the display, and
BANK [A]–[D] blink.
4. Press any of BANK [A]–[D] to select the load destination
bank.
The pressed bank button remains lit, and [REC] blinks.
1. Format the SmartMedia card on the SP-303 (p. 49).
If not formatted on the SP-303, the card cannot be used
for handling data.
2. Copy WAVE/AIFF files from the computer to the
SmartMedia card using the following file names.
WAVE Files
SMPL0001.WAV ➔ Loaded to Pad 1
SMPL0002.WAV ➔ Loaded to Pad 2
SMPL0003.WAV ➔ Loaded to Pad 3
SMPL0004.WAV ➔ Loaded to Pad 4
SMPL0005.WAV ➔ Loaded to Pad 5
SMPL0006.WAV ➔ Loaded to Pad 6
SMPL0007.WAV ➔ Loaded to Pad 7
SMPL0008.WAV ➔ Loaded to Pad 8
AIFF Files
SMPL0001.AIF ➔ Loaded to Pad 1
SMPL0002.AIF ➔ Loaded to Pad 2
SMPL0003.AIF ➔ Loaded to Pad 3
SMPL0004.AIF ➔ Loaded to Pad 4
SMPL0005.AIF ➔ Loaded to Pad 5
SMPL0006.AIF ➔ Loaded to Pad 6
SMPL0007.AIF ➔ Loaded to Pad 7
SMPL0008.AIF ➔ Loaded to Pad 8
Here, the samples in the selected bank are overwritten
by the loaded WAVE or AIFF files. Be sure to back up
any important sample data before proceeding.
5. Press [REC].
[REC] lights up, and the dots in the display blink.
During the loading process, all Pads from [1] through [8]
will at first light up, and the display will indicate “100.”
Then, the indicators will go out one by one (starting with
[1]), and at the same time the number shown in the
display will grow smaller, thus indicating the progress
of the load.
The loading is completed when the dots stop blinking
and remain off.
* Note that, depending on the number of files being loaded, the
loading process could take as long as ten minutes or more to
complete.
* To cancel loading, press [CANCEL].
Never turn off the power while the dots are blinking.
This may result in corruption of data in the internal
memory or on the memory card.
52
Page 54

Chapter 7. Using the SP-303 With Other MIDI Devices
“MIDI” is short for “Musical Instrument Digital Interface,” a
global standard for the exchange of performance data and
tone data between devices and instruments.
With MIDI, you can use the SP-303 to play data from a
sequencer, keyboard, or other MIDI device.
When using MIDI, use a MIDI cable to connect the MIDI
OUT of the MIDI device you are connecting and the SP-303’s
MIDI IN connector (refer to “Making Connections” on p. 11).
Additionally, you must set the MIDI device’s Transmit
channel and the SP-303’s Receive channel to the same
channel.
* For more on the settings for the MIDI device being connected,
refer to the owner’s manual for that device.
If you want to restore the SP-303’s MIDI settings to the
original factory settings, refer to “Restoring the MIDI
Settings to the Factory Settings” (p. 58).
Using the SP-303 With a MIDI Keyboard
At the factory settings, you can just connect a MIDI keyboard
to the SP-303 to start playing samples.
fig.r07-01
MIDI OUT
MIDI Keyboard
1. Connect the MIDI keyboard’s MIDI OUT connector to
the SP-303’s MIDI IN connector with a MIDI cable.
2. Set the MIDI keyboard’s Transmit channel to 1.
For more on how to make this setting, refer to the MIDI
keyboard owner’s manual.
The SP-303’s pads correspond to the MIDI keyboard note
numbers as shown below.
Pad
Note B1 C2 C#2 D2 D#2 E2 F2 F#2 G2
Note Number
Pad B1 B2 B3 B4 B5 B6 B7 B8
Note G#2 A2 A#2 B2 C3 C#3 D3 D#3
Note Number
Pad C1 C2 C3 C4 C5 C6 C7 C8
Note E3 F3 F#3 G3 G#3 A3 A#3 B3
Note Number
Pad D1 D2 D3 D4 D5 D6 D7 D8
Note C4 C#4 D4 D#4 E4 F4 F#4 G4
Note Number
* No sample sounds when any note other than those shown here
is played.
EXT SOURCE
35 36 37 38 39 40 41 42 43
A1 A2 A3 A4 A5 A6 A7 A8
44 45 46 47 48 49 50 51
52 53 54 55 56 57 58 59
60 61 62 63 64 65 66 67
How to Change the MIDI Channel
The SP-303’s Receive channel is set to 1 at the factory. If the
MIDI keyboard’s Transmit channel cannot be set to 1, then
you must change the SP-303’s Receive channel in order to
match the MIDI keyboard’s channel.
1. Turn off the power switch of the SP-303.
2a.
If you wish to select a channel in the range of 1–8, turn
the power switch ON while holding down the
correspondingly-numbered pad 1–8.
2b.
If you wish to select a channel in the range of 9–16,
turn the power switch ON while holding down
[HOLD] together with pad (1–8) that is eight less than
the desired channel number.
The MIDI channel will be set to a value of 8 plus the pad
number.
Example:
To select channel 3, hold down pad number 3, and turn
the power ON.
To select channel 10, hold down [HOLD] together with
pad number 2, and turn the power ON.
* The MIDI channel setting is retained even when the power is
turned OFF.
Chapter
7
* When shipped from the factory, the SP-303’s receive channel is
set to 1.
3. When you play the keys on the MIDI keyboard, the SP-
303’s samples sound.
53
Page 55

Chapter 7. Using the SP-303 With Other MIDI Devices
Note On Operating With MIDI
If you are using a MIDI device to play samples from the SP303, you must change the way the external MIDI device’s
note messages are sent when playing samples using Trigger
Playback and Gate Playback.
When Using Gate Playback
fig.r07-03
On
Playback begins Playback ends
When using Gate Playback, where the sound plays only
as long as the pad is held down, send a Note On message
at the point you want the sound to start playing, and
send Note Off at the point you want the sound to stop.
When Using Trigger Playback
When set to One Shot Playback ([LOOP] not lit):
fig.r07-10
Note message
On Off
Note message
Gate Time
Off
Sample
Note message
On Off
* When continuously playing a sample of a looped phrase along
with a MIDI sequencer performance, the rhythm between them
may diverge as time passes. In such instances, rather than
using Loop Playback, use One Shot Playback and send a Note
On message from the MIDI sequencer to the SP-303 at the
beginning of each measure (or sampling measure).
* You cannot change the BPM settings for the SP-303’s samples
with MIDI clock.
Using the SP-303 With a MIDI Sequencer (Tempo Sync)
Here is an explanation of how to connect a MIDI sequencer
to the SP-303 and synchronize the SP-303’s patterns with the
MIDI sequencer.
Synchronizing the Pattern’s Tempo
and Start/Stop to the MIDI Sequencer
At the factory settings, you can simply connect a MIDI
sequencer to the SP-303, and you use the sequencer to control
the start and stop of patterns, as well as the tempo.
fig.r07-04
Gate Time
Playback begins Playback begins
Send a note message at the point you want the sound to
begin. When the note message is received, the sample is
played back, starting from the beginning of the sample.
In this case, the interval from the Note On message to the
Note Off message can be as short as you want.
The sample stops playing when the end of the sample is
reached.
When set to Loop Playback ([LOOP] lit):
fig.r07-02
Note message
On Off
Gate Time
Playback begins
Send a note message at the point you want the sound to
begin and when you want it to stop. In this case, the
interval from the Note On message to the Note Off
message can be as short as you want.
* You can change the playback volume on the SP-303 by
receiving Note On Velocity.
* The last pad to play becomes the current pad.
Note message
On Off
Sample
Playback ends
Sample
MIDI OUT
MIDI Sequencer
1. Connect the MIDI sequencer’s MIDI OUT connector to
the SP-303’s MIDI IN connector with a MIDI cable.
2. Press [PATTERN SELECT], and confirm that the
button has lit.
3. Press one of BANK [A]–[D] to select the bank holding
the pattern you want to play.
* If there is no memory card inserted in the slot, you will be
unable to select Pattern Bank C or D.
4. Hold down [REMAIN] and press the pad for the
pattern you want to play (specify the pattern).
The pad for the specified pattern lights up.
* Take care to note that the pattern will suddenly start playing if
you only press the pad without holding down [REMAIN].
54
Page 56

Chapter 7. Using the SP-303 With Other MIDI Devices
5. Start the MIDI sequencer.
The specified pattern begins playing in sync with the
MIDI sequencer.
The tempo of the pattern is synchronized to the MIDI
sequencer’s tempo.
6. When you press the pad that is blinking, the
corresponding pattern will be selected.
7. When the MIDI sequencer is stopped, the pattern stops
playing.
* If the pattern does not start playing when the MIDI sequencer
is started, or if the tempo is not synchronized to the MIDI
sequencer, it may be that MIDI clock or Start/Continue/Stop
is not being transmitted from the MIDI sequencer. Refer to the
MIDI sequencer owner’s manual and check the sequencer’s
settings.
Synchronizing Only the Pattern
Tempo with a MIDI Sequencer
To play the patterns on the SP-303 along with the
performance of song data recorded to a MIDI sequencer at
whatever timing you decide, layering the two performances,
you should set the SP-303 so that Start and Stop messages
sent from the MIDI sequencer are ignored.
1. Turn off the power switch of the SP-303.
2. Hold down [TIME/BPM] and slide the POWER switch
to ON.
MIDI Sync mode is indicated in the display. In MIDI Sync
mode, the SP-303 switches to synchronized operation.
The meaning of each symbol is given below.
Aut (Auto Sync) :
When MIDI Clock is used, it is detected automatically
and the tempo is synchronized. Additionally, patterns
start and stop according to the MIDI Start, Stop, and
Continue messages received.
* MIDI Start, Stop, and Continue messages are not received
during recording of patterns.
tMp (Tempo Sync) :
When MIDI Clock is used, it is detected automatically
and the tempo is synchronized. However, MIDI Start,
Stop, and Continue messages are not received.
3. Turn the CTRL 1 (TIME) knob to set the MIDI Sync
mode to “tMp.”
* With the factory settings, this is set to “Aut.”
4. Press [TIME/BPM].
The [TIME/BPM] light goes out, and the settings value is
recorded.
* The value set here remains in memory even after the power is
turned off.
5. Start the MIDI sequencer.
The pattern does not start playing at this time.
6. Press [PATTERN SELECT], and confirm that the
button has lit.
* Take care to note that if [PATTERN SELECT] is not lit, then
a sample will play.
7. Press one of BANK [A]–[D] to select the bank holding
the pattern you want to play.
* If there is no memory card inserted in the slot, you will be
unable to select Pattern Bank C or D.
8. Press the pads at the point you want the pattern to play.
The performance of the pattern starts. At this time, the
pattern’s tempo is synchronized to the MIDI sequencer.
9. Press [CANCEL] at the point you want the pattern to
stop playing.
The performance of the pattern stops.
* Stopping only the sequencer does not stop the pattern. Be sure
to press [CANCEL] to stop the pattern.
Playing Samples Without
Synchronizing the Tempo
If you only want to use the note messages from the MIDI
sequencer to play samples on the SP-303, it is easier if you
don’t synchronize the patterns to the MIDI sequencer.
In such instances, you can use the following procedure to
turn off synchronization of the tempo.
1. Turn off the power switch of the SP-303.
2. Hold down [TIME/BPM] and slide the POWER switch
to ON.
MIDI Sync mode is indicated in the display.
Chapter
7
oFF (Sync OFF) :
MIDI Clock and MIDI Start, Stop, and Continue
messages are not received.
3. Turn the CTRL 1 (TIME) knob to set the MIDI Sync
mode to “oFF.”
* With the factory settings, this is set to “Aut.”
55
Page 57

Chapter 7. Using the SP-303 With Other MIDI Devices
4. Press [TIME/BPM].
The [TIME/BPM] light goes out, and the settings value is
recorded.
* The value set here remains in memory even after the power is
turned off.
5. Start the MIDI sequencer.
The SP-303’s samples are played according to the note
messages from the MIDI sequencer.
6. Stop the MIDI sequencer at the point that you want the
sample to stop playing.
* This setting is retained even while the SP-303 is turned off.
Using the SP-303 as a Rhythm Sound Module
Using the SP-303 With a Rhythm Machine
For example, if you want to use the expansion rhythms of
one of the SP-303’s samples for a GS sound module’s rhythm
part, take the following procedure.
fig.r07-05
Synchronizing the Performance of
the SP-303’s Patterns with a Rhythm
Machine’s Tempo
GS Sound Module
1. Turn the power switch OFF.
2. Hold down [EXT SOURCE] and [HOLD], and slide the
POWER switch to ON.
This sets the SP-303’s MIDI Receive channel to Channel 10.
The rhythm part on GS sound modules and other MIDI
devices is ordinarily set to Channel 10, so setting the SP303’s MIDI channel to Channel 10 enables the sample to
be played on the same channel as the GS sound module’s
rhythm part.
Furthermore, set the correspondence between the note
numbers and pads as shown below to avoid having the
note numbers used for the GS sound module’s rhythm
part overlap with the SP-303’s note numbers.
At the factory settings, you can simply connect a rhythm
machine to the SP-303, and use the rhythm machine to
control the start and stop of patterns, as well as the tempo.
fig.r07-06 (Making Connections)
1. Connect the rhythm machine’s MIDI OUT connector to
the SP-303’s MIDI IN connector with a MIDI cable.
2. Press [PATTERN SELECT], and confirm that the
button has lit.
3. Press one of BANK [A]–[D] to select the bank holding
the pattern you want to play.
* If there is no memory card inserted in the slot, you will be
unable to select Pattern Bank C or D.
4. Hold down [REMAIN] and press the pad for the
pattern you want to play (specify the pattern).
The pad for the specified pattern lights up.
56
* Take care to note that the pattern will suddenly start playing if
you only press the pad without holding down [REMAIN].
Page 58

Chapter 7. Using the SP-303 With Other MIDI Devices
5. Start the rhythm machine.
The specified pattern begins playing in sync with the
rhythm machine. The tempo of the pattern is
synchronized to the rhythm machine’s tempo.
6. When a pad other than the one that is lit is pressed, the
pattern switches.
* If a pad with no pattern assigned to it is pressed, the action is
disregarded.
7. When the rhythm machine is stopped, the pattern stops
playing.
* If the pattern does not start playing when the rhythm machine
is started, or if the tempo is not synchronized to the rhythm
machine, if may be that MIDI clock or Start/Continue/Stop is
not being transmitted from the rhythm machine. Refer to the
rhythm machine owner’s manual and check the rhythm
machine’s settings.
Using the Note Messages from the
Rhythm Machine to Play the SP-303’s
Samples
* This setting is retained even while the SP-303 is turned off.
* If the rhythm machine’s MIDI channel is set to something
other than Channel 10, set the SP-303’s Receive channel to
match that setting. For more on how to make this setting, refer
to “How to Change the MIDI Channel” (p. 53).
8. Start the rhythm machine.
The SP-303’s samples are played according to the note
messages from the rhythm machine.
* Trigger Playback with One Shot Playback is the optimum
setting for samples when playing samples using note messages
from a rhythm machine.
* In some cases, when a sample is set to Gate Playback, the
rhythm machine may play the sample for only a moment and
then immediately cut off the sound.
* When a sample is set to Loop Playback, continuous repeated
playback of the sample may result in loss of the correct rhythm.
9. Stop the rhythm machine at the point that you want the
sample to stop playing.
If you only want to play the SP-303’s samples using the note
messages from the rhythm machine, it is easier if you don’t
synchronize the patterns to the rhythm machine.
In addition, on numerous rhythm machines, the MIDI
channel is normally set to Channel 10, so you will need to set
the SP-303’s Receive channel to Channel 10 in order to
receive the note messages from the rhythm machine.
1. Connect the rhythm machine’s MIDI OUT connector to
the SP-303’s MIDI IN connector with a MIDI cable.
2. Turn off the power switch of the SP-303.
3. Hold down [TIME/BPM] and slide the POWER switch
to ON.
MIDI Sync mode is indicated in the display.
4. Turn the CTRL 1 (TIME) knob to set the MIDI Sync
mode to “oFF.”
* With the factory settings, this is set to “Aut.”
5. Press [TIME/BPM].
The [TIME/BPM] light goes out, and the settings value is
recorded.
* This setting is retained even while the SP-303 is turned off.
6. Turn the SP-303’s power switch OFF again.
7. Hold down [HOLD] together with pad number 2, and
turn the power switch ON.
The Receive channel is set to Channel 10.
With many rhythm machines, the correspondence
between rhythms and note numbers is fixed. Therefore,
assigning sounds to the SP-303’s pads as described
below makes it easier to create the rhythm you have in
mind.
Bank A Pad 1 Kick
Pad 2 Stick/Rim Shot
Pad 3 Snare 1
Pad 4 Hand Clap
Pad 5 Snare 2
Pad 6 Low Tom 2
Pad 7 Closed Hi-Hat
Pad 8 Low Tom 1
Bank B Pad 1 Pedal Hi-Hat
Pad 2 Mid Tom 2
Pad 3 Open Hi-Hat
Pad 4 Mid Tom 1
Pad 5 High Tom 2
Pad 6 Crash Cymbal 1
Pad 7 High Tom 1
Pad 8 Ride Cymbal 1
Chapter
7
57
Page 59

Chapter 7. Using the SP-303 With Other MIDI Devices
Bank C Pad 1 Chinese Cymbal
Pad 2 Ride Cymbal (Bell)
Pad 3 Tambourine
Pad 4 Splash Cymbal
Pad 5 Cowbell
Pad 6 Crash Cymbal 2
Pad 7 Vibra-slap
Pad 8 Ride Cymbal 2
Bank D Pad 1 High Bongo
Pad 2 Low Bongo
Pad 3 Mute High Conga
Pad 4 Open High Conga
Pad 5 Low Conga
Pad 6 High Timbale
Pad 7 Low Timbale
Pad 8 Agogo
* Tone assignments for some rhythm machines may differ
from those listed above. In such cases, refer to the owner’s
manual for your rhythm machine and assign the tones
according to the rhythm machine’s tone assignments.
Restoring the MIDI Settings to the Factory Settings
To restore the MIDI settings, including the MIDI channel and
MIDI Sync mode settings, to the original factory settings, use
the following procedure.
1. Turn the power switch OFF.
2. Hold down [EXT SOURCE] and slide the POWER
switch to ON.
The MIDI settings are set as shown below.
MIDI Channel: 1
MIDI Sync Mode: Aut (Auto Sync)
58
Page 60

Chapter 8. Examples of Using the SP-303
QUANTIZE = 4
SNARE SNARE
KICK KICK KICK KICK
Using Pattern Sequencer to Create a Rhythm Pattern
Now let’s create a four-measure backing pattern including rhythm as Pattern 1.
Set up the following samples.
Pad 1: Kick Trigger, One Shot
Pad 2: Snare Trigger, One Shot
Pad 3: Hi-Hat Trigger, One Shot
Pad 4: Bass Phrase (One measure) Trigger, One Shot, BPM = 120
Pad 5: Chord Phrase (One measure) Trigger, One Shot, BPM = 120
Pad 6: Scratch Sound Trigger, One Shot
1. Press [PATTERN SELECT], and confirm that the
button has lit.
2. Press [REC], and confirm that the button is blinking.
3. Select the Pattern 1 recording destination.
Press Pad [1], and confirm that the button is blinking.
4. Adjust the metronome volume.
Press [START/END/LEVEL], and confirm that the
button has lit, then turn the CTRL 3 (LEVEL) knob to
adjust the metronome volume.
5. Set the pattern's tempo to 120, so it matches the BPM of
the bass and chord phrases.
Press [TIME/BPM], and confirm that the button has lit,
then turn the CTRL 2 (BPM) knob until “120” appears in
the display.
6. Set the length of the pattern at four measures.
Press [LENGTH], and confirm that the button has lit, then
turn the CTRL 3 knob until “4” appears in the display.
7. Set the quantization to quarter notes.
Press [QUANTIZE], and confirm that the button has lit,
then turn the CTRL 3 knob until “4” appears in the
display.
10.For the next loop, input Pad 2 (snare) on the second and
fourth beats.
fig.r08-02
11.First, set the quantization to eighth notes.
Press [QUANTIZE], and confirm that the button has lit,
then turn the CTRL 3 knob until “8” appears in the
display.
Press [QUANTIZE] once more, and confirm that the
button has turned off.
12.Starting at the beginning of the next pass, input Pad 3
(hi-hat) at eighth-note intervals.
The following time around, confirm that the hi-hat
sound is played back with the correct timing.
fig.r08-03
8. Press [REC] to start recording.
One measure of a count-in is played before recording
starts.
9. Input Pad 1 (Kick) at quarter-note intervals in time
with the metronome.
fig.r08-01
QUANTIZE = 4
KICK KICK
When the four measures are finished, the pattern
automatically returns to the beginning. The kick sound
just recorded is played back with the correct timing.
KICK KICK
13.Return the quantization setting to quarter-notes.
Press [QUANTIZE], and confirm that the button has lit,
then turn the CTRL 3 knob until “4” appears in the
display.
Press [QUANTIZE] once more, and confirm that the
button has turned off.
14.Starting at the beginning of the next pass, input Pad 4
(bass phrase) at the beginning of every measure.
The bass phrase is played on top of the rhythm already
input.
59
Chapter
8
Page 61

Chapter 8. Examples of Using the SP-303
ERASE
SNARE SNARE
KICK KICK KICK KICK
Bass Phrase
Chord Phrase
Hi-hat throughout this
passage deleted
Pad 3 pressed during this passage
fig.r08-04
QUANTIZE = 4
Bass Phrase
SNARE SNARE
KICK KICK KICK KICK
15.Starting at the beginning of the next pass, input Pad 5
(chord phrase) at the beginning of every measure.
fig.r08-05
QUANTIZE = 4
Chord Phrase
Bass Phrase
SNARE SNARE
16.Turn off quantization.
Press [QUANTIZE], illuminating the button, then turn
the CTRL 3 knob until “oFF” appears in the display.
Press [QUANTIZE] once more, and confirm that the
button has turned off.
fig.r08-07
18.When you have finished recording, press [REC],
causing the light to go out.
The dots blink in the display for a short while, the
process is done.
Never turn off the power while the dots are blinking.
17.Lastly, input Pad 6 (scratch sound) at whatever timing
you like.
The scratch sound is recorded just as played.
fig.r08-06
QUANTIZE = OFF
Chord Phrase
Bass Phrase
SNARE SNARE
KICK KICK KICK KICK
● If you want to delete any mistaken input, press [DEL]
while the recording is in progress, lighting the button,
then press the pad for the sample you want to delete.
The pad’s sample is deleted for as long as the pad is held
down, and the deletion ends when the pad is released.
60
Page 62

Chapter 8. Examples of Using the SP-303
Using the SP-303 with MIDI Devices
When using a MIDI sound module to play multiple parts, you can select any one of the parts and substitute it with the SP-303’s
performance.
For example, here is how to have the SP-303 play instead of a MIDI sound module’s Part 1.
Connections
fig.r08-08
Power Amplifier
MIDI
IN
MIDI Sequencer
MIDI
OUT
MIDI
MIDI Sound Module
● Set the MIDI THRU on the MIDI sequencer to be ON .
● Set the transmission channel of the MIDI keyboard to
Channel 1.
● Mute the sound module’s Part 1.
● If the SP-303 is set up for use as a rhythm sound module
(p. 56), return the SP-303 to its regular operating status
(holding down [EXT SOURCE] and turning the POWER
switch to ON returns the SP-303 to normal status).
1. Start recording with the MIDI sequencer and play the
MIDI keyboard. The SP-303’s sample plays.
The performance of the MIDI keyboard is
simultaneously recorded to the sequencer.
2. Stop the recording on the MIDI sequencer.
When the MIDI sequencer is played back, the SP-303’s
sample is played back just as before.
MIDI
LINE OUT
IN
LINE
OUT
IN
Using the SP-303 as a rhythm
sound module
Here is an introduction to the settings to make when using
the SP-303 sample sounds as expansion rhythms for MIDI
sound module rhythm parts.
● Set the MIDI THRU on the MIDI sequencer to be ON .
● Set the transmission channel of the MIDI keyboard to
Channel 10.
1. Hold down [EXT SOURCE] and [HOLD], and slide the
POWER switch to ON.
The SP-303 is set to be used as a rhythm sound module.
This enables the SP-303’s samples to be played using the
same channel as the MIDI sound module’s rhythm part.
2. Start recording with the MIDI sequencer, or play the
MIDI keyboard.
The MIDI sound module’s rhythm part or the SP-303’s
sample is played in response to the note played.
Chapter
8
61
Page 63

Chapter 8. Examples of Using the SP-303
The performance from the MIDI keyboard is
simultaneously recorded to the MIDI sequencer.
* For more on the correspondence between notes and samples,
refer to (p. 56).
3. Stop recording on the MIDI sequencer.
Just as before, when the MIDI sequencer is played back,
the MIDI sound module’s rhythm part or the SP-303’s
sample plays.
* To return the SP-303 to its regular operating status, hold
down [EXT SOURCE] while switching ON the POWER
switch.
Using the SP-303 With a Turntable
Adding Effects to the Turntable Sound
This describes the procedure for adding effects with the SP-303 to the sound from turntables, DJ mixers, and such devices.
Connections
fig.r08-09
Power Amplifier
PHONO A
1. Raise the send level of the DJ mixer.
2. Play a record on the turntable.
3. Press the SP-303’s [EXT SOURCE], causing the button
to light up.
Here, it is convenient to have [GATE] off, as the sound is
not cut off even when [EXT SOURCE] is released.
4. Press one of the SP-303’s effect buttons, and confirm
that the button has lit.
PHONO B
RETURN
DJ MixerTurntable Turntable
SEND
SP-303
5. Gradually raise the DJ mixer Return level and the SP-
303’s volume level.
The effect becomes audible.
6. Turn the CTRL 1–3 knobs to adjust the effect sound.
* If no effect sound is needed, turn the DJ mixer’s Return level
down completely.
62
Page 64

Chapter 8. Examples of Using the SP-303
Playing a Sample Along With the Sound From a Turntable
Here is how to have a sample from the SP-303 play while the sound from a turntable plays simultaneously.
Connections
fig.r08-10
Power Amplifier
PHONO A LINE B
1. Set the DJ mixer’s Fader to the SP-303 position.
2. Press the pad on the SP-303.
The sample sound is played. Turn the VOLUME knob to
adjust the volume.
3. Set the DJ mixer’s Fader near the center.
DJ MixerTurntable
SP-303
4. Play a record on the turntable.
5. Press the SP-303 pads along with the record’s
performance.
The samples play, mixing with the sounds on the record.
Chapter
63
8
Page 65

Appendices
Chart of Operations
Aim Operation
Play a sample Pad [1]–[8]
Play sounds input from an external source
Select mono/stereo for the external input
Sampling [REC] ➔ Pad [1]–[8] ➔ [REC]
Set Auto Sampling [CANCEL] + [REC] ➔ CTRL 3/MFX (LEVEL) knob ➔ [REC]
Release Auto Sampling
Resampling [RESAMPLE] ➔ CTRL 3/MFX (LEVEL) knob ➔ [REC] ➔ Pad [1]–[8] ➔ [REC] ➔
Delete an individual sample [DEL] ➔ Pad [1]–[8] ➔ [DEL]
Delete all samples [CANCEL] + [DEL] ➔ BANK [A]–[D] ➔ [DEL]
Set the sampling volume Pad [1]–[8] ➔ [START/END/LEVEL] ➔ CTRL 3/MFX (LEVEL) knob
Set the Start Point Pad [1]–[8] ➔ [MARK] ➔ Press Pad [1]–[8] to stop it sounding
Set the End Point [MARK] + Pad [1]–[8] ➔ [MARK]
Set the Start/End Point Pad [1]–[8] ➔ [MARK] ➔ [MARK]
Edit the Start/End Point Pad [1]–[8] ➔ [START/END/LEVEL] ➔ CTRL 1 (START) knob / CTRL 2 (END) knob
Set Time Modify Pad [1]–[8] ➔ [TIME/BPM] ➔ CTRL 1 (TIME) knob
Exchange samples between pads
Sample Save
Sample Load
Display available sampling time [REMAIN]
[EXT SOURCE]
[EXT SOURCE] ➔ [STEREO]
[CANCEL] + [REC] ➔ Turn the CTRL 3/MFX (LEVEL) knob completely to the left ➔ [REC]
Pad [1]–[8]
[DEL] + [REC] ➔ Specify exchange-source pad ➔ Specify exchange-destination pad ➔ [REC]
[CANCEL] + BANK [C] or [D] ➔ Press a pad ([1]–[7]) to specify the number of the area ➔ [REC]
[CANCEL] + BANK [A] or [B] ➔ Press a pad ([1]–[7]) to specify the number of the area ➔ [REC]
Select the MFX type Hold down [MFX] and turn the CTRL 3/MFX knob
Specify the sample to which to apply effects
Apply effects to all samples [REMAIN] + lit Effect button
Effect Grab [TAP TEMPO] + Effect button
Play back a pattern [PATTERN SELECT] ➔ Pad [1]–[8]
Stop a pattern (1) [CANCEL]
Stop a pattern (2) [PATTERN SELECT] ➔ Press the pattern’s pad during playback
Record a pattern [PATTERN SELECT] ➔ [REC] ➔ Pad [1]–[8] ➔ [REC]
Set the pattern tempo (1) [PATTERN SELECT] ➔ [TIME/BPM] ➔ CTRL 2 (BPM) knob
Set the pattern tempo (2) [PATTERN SELECT] ➔ Tap [TAP TEMPO] four times
Set Quantize Press [QUANTIZE] during recording of the pattern or while in recording standby ➔
Set the pattern length Press [LENGTH] during recording of the pattern or while in recording standby ➔
Set the metronome volume Press [START/END/LEVEL] during recording of the pattern or while in recording
Erase performance data Press [DEL] during recording of the pattern ➔ Pad [1]–[8]
Exchange patterns between pads [PATTERN SELECT] ➔ [DEL] + [REC] ➔ Pad [1]–[8] ➔ Pad [1]–[8] ➔ [REC]
Delete an individual pattern [PATTERN SELECT] ➔ [DEL] ➔ Pad [1]–[8] ➔ [DEL]
[REMAIN] + Pad [1]–[8]
CTRL 3/MFX knob
CTRL 3/MFX knob
standby ➔ CTRL 3/MFX (LEVEL) knob
64
Page 66

Appendices
Delete all patterns [PATTERN SELECT] ➔ [CANCEL] + [DEL] ➔ BANK [A]–[D] ➔ [DEL]
Pattern Save [PATTERN SELECT] ➔ [CANCEL] + BANK [C] or [D] ➔
Press a pad ([1]–[7]) to specify the number of the area ➔ [REC]
Pattern Load [PATTERN SELECT] ➔ [CANCEL] + BANK [A] or [B] ➔
Press a pad ([1]–[7]) to specify the number of the area ➔ [REC]
Set the MIDI channel Channel 1–8: Pad [1]–[8] + Power On
Channel 9–16: [HOLD] + Pad [1]–[8] + Power On
Set MIDI Sync mode [TIME/BPM] + Power On ➔ CTRL 1 (TIME) knob ➔ [TIME/BPM]
Make the settings for a rhythm sound module
Initialize MIDI settings [EXT SOURCE] + Power On
Initialize the SP-303’s memory [CANCEL] + [DEL] + [REMAIN] + Power On
Remove the SP-303’s memory protection
Protect the SP-303’s memory [REMAIN] + Power On
Format a memory card [CANCEL] + [REMAIN] ➔ BANK [C] or [D] ➔ [DEL]
[EXT SOURCE] + [HOLD] + Power On
[CANCEL] + Power On
65
Appendices
Page 67

Appendices
Troubleshooting
If the SP-303 does not function as you expect, please check the following points before assuming that a malfunction has occurred.
If this does not resolve the problem, contact a nearby Roland service center or your dealer.
Problems With the Sound
■ No Sound/Low Volume
❍ Is the power to SP-303 and connected devices turned on?
❍ Are the SP-303 and external devices connected properly?
➔ Check the connections (p. 11).
❍ Is there a short in any audio cable?
❍ Could you be using an audio cable containing a resistor?
➔ Use only connection cables (such as one in the Roland
PCS Series) that do not add resistance.
❍ Is the volume of your connected amp or mixer turned
down?
➔ Adjust to the proper levels.
❍ Is the SP-303’s volume turned down?
➔ Adjust to the proper level.
❍ If you are using a memory card, is the memory card
inserted correctly?
➔ Remove the memory card, and then reinsert it, making
sure it is seated securely in the slot (p. 48).
❍ If you are attempting to play a sample, is the sample’s
pad lit? (p. 13)
➔ A sample can be played when the relevant pad has been
pressed and is illuminated. If you’ve pressed a pad, and
it didn’t light, that means that no sample has been
assigned to that pad yet. First, sample a sound for the
pad (p. 16, 28, 29).
■ No Sound For a Specific Sample
❍ Is the sample’s level turned down?
➔ Adjust the sample’s level (p. 38).
■ No Sound/Low Volume From
External Input
❍ Is [EXT SOURCE] lit?
➔ To play sounds input from an external source, you must
press [EXT SOURCE] and illuminate the pad.
❍ Is the external input level setting turned down?
➔ Adjust the external input level (p. 20).
❍ Is the volume of the device connected to LINE IN turned
down?
➔ Adjust to the proper level.
❍ Are the audio cables properly connected?
➔ Check the connections (p. 11).
❍ Is there a short in any audio cable?
❍ Could you be using an audio cable containing a resistor?
➔ Use only connection cables (such as one in the Roland
PCS Series) that do not add resistance.
■ External Input Sound Not in Stereo/
Mono
❍ When [EXT SOURCE] is pressed and lit, is [STEREO]
lighted or not?
➔ If [STEREO] is lit, then the sound is in stereo; if not lit,
the sound is in mono. If the setting is not the one you
want, press [STEREO], illuminating/extinguishing the
light as needed to achieve the desired setting.
■ No Sound/Low Volume From Mic
❍ Is the mic cable properly connected?
➔ Check the connection (p. 11).
❍ Is there a short in the mic cable?
❍ Is the effect level turned down?
➔ With some effects, you can adjust the level with the
control knobs. For more on which knobs are used for
each effect, refer to p. 24.
66
❍ Is MIC LEVEL turned down?
➔ Turn the MIC LEVEL knob to adjust to the appropriate
level (p. 9).
Page 68

Appendices
■ Cannot Sample
❍ Could insufficient memory be the problem?
➔ “FuL” is displayed if you try to sample when there is not
enough available memory. Delete unneeded samples to
free up more memory (p. 33, 34).
❍ If attempting to sample to a memory card, is the memory
card inserted correctly?
➔ Remove the memory card, and then reinsert it, making
sure it is seated securely in the slot (p. 48).
❍ Do all of the pads have samples assigned to them?
You cannot sample when there are no free pads. Delete
➔
unneeded samples to free up one or more pads (p. 33, 34).
❍ Is [PATTERN SELECT] lit?
➔ You cannot sample when [PATTERN SELECT] is lit,
since the unit has then entered the pattern selection
mode. Press [PATTERN SELECT] to turn off the button’s
light.
❍ Is [DEL] lit or blinking?
➔ [DEL] is lit or blinking during deletion of samples; you
cannot sample at this time.
■ Sampled Sound Is Very Noisy or
Distorted
❍ Is the input level correct?
➔ Sampled sounds may be distorted when the input level
is set too high. Conversely, setting the level too low may
result in noticeable noise. Set the level so that the PEAK
indicator blinkes occasionally (p. 16, 28, 30).
❍ Are the appropriate effect settings being used?
➔ Some effects raise the level above that of the original
sample, or have the effect of distorting the sound itself.
Other effects emphasize noise.
First turn the effects off to check whether or not there is
noise or distortion in the sample itself, then change the
effect settings to get the desired result.
❍ Are you playing more than one complex sample at the
same time?
➔ Even when the level of each individual sample is right,
playing multiple samples simultaneously can raise the
total level and cause distortion. Lower the level of each
sample to eliminate the distortion.
Problems With the SP-303’s Memory
■ Data Cannot Be Saved Correctly to
the SP-303’s Memory
❍ One possibility is that the power was turned off while
data was being written to the internal memory (display
blinking). Lost data cannot be recovered.
➔
If this indeed is the problem, it may be that all of the data
in the SP-303’s internal memory has been corrupted.
Continued use of the unit in this state may result in
further malfunction; initialize the SP-303’s memory (p.
68).
* All data in the SP-303’s memory is lost when the initialization
is carried out.
Problems With Memory Cards
■ Data Cannot Be Saved Correctly to
Memory Cards
❍ One possibility is that the power was turned off while
data was being written to the memory card (display
blinking). Lost data cannot be recovered.
➔ If this indeed is the problem, it may be that all of the data
on the memory card has been corrupted. Continued use
in this state may result in further problems; reformat the
memory card (p. 49).
* All data on the memory card is lost when the card is formatted.
■ Memory Card Not Recognized Even
When Inserted
■
Memory Card Data Cannot Be Selected
❍ Is the memory card inserted correctly?
➔ Remove the memory card, and then reinsert it, making
sure it is seated securely in the slot (p. 48).
❍ Are you using the correct type of memory card?
➔ Use only 8 MB–64 MB SmartMedia memory cards. Other
cards cannot be used.
❍ Has the memory card been formatted correctly?
➔
The SP-303 is only able to use memory cards formatted on
the SP-303. If necessary, format the memory card (p. 49).
67
Appendices
Page 69

Appendices
Problems With MIDI/Synchronization
■ Cannot Play Samples Using
External MIDI Device
❍ Is the power to the external MIDI device turned on?
❍ Is the MIDI cable properly connected?
➔ Check the connections (p. 11).
❍ Is there a short in the MIDI cable?
❍ Are the MIDI channels matched?
➔ Match the SP-303’s and the external MIDI device’s MIDI
channels (p. 53).
❍ Is the external MIDI device set to transmit Note
messages?
➔ Check the external MIDI device settings.
■
Pattern Sequencer Not Synchronized
to the External Midi Device Tempo
❍ Is Pattern Sequencer correctly set for synchronization?
➔ Check the settings (p. 54).
❍ Is the external MIDI device set to transmit MIDI Clock?
➔ Some devices include a setting for turning the
transmission of MIDI Clock on and off. In addition,
certain external rhythm machines and sequencers only
send MIDI Clock when the device is playing back.
❍ Is the external MIDI device’s tempo set beyond the
tempo range to which the SP-303 can be synchronized?
➔ The SP-303 can be synchronized to tempos in the range
of 40–200. Synchronization beyond this range cannot be
assured.
Initializing the SP-303’s Memory
Initialize the SP-303’s internal memory.
All sample and pattern data in internal memory will be
erased as soon as this procedure is carried out.
* Be aware that the factory-supplied samples and patterns
cannot be restored.
* You cannot initialize the internal memory while the SP-303's
memory protection is turned on (while “Prt” is displayed). For
instructions on how to remove the protection, refer to p. 16).
1. While holding down [CANCEL], [REMAIN], and
[DEL], turn on the POWER switch.
“ini” appears in the display, and [REC] blink.
* To cancel, simply turn off the power without making any
changes.
2. If you want to proceed with the initialization, press
[REC].
[REC] lights up, and the dots in the display blink.
During the initialization process, all Pads from [1]
through [8] will at first light up, then go out one by one
(starting with [1]), indicating the progress of the
initialization.
When the initialization has been completed, [REC] lights
go out, and the unit will be placed in its normal powerup default status (p. 12).
* Note that the initialization process may take up to
approximately one minute or longer to complete.
68
* Memory protection remains off after the initialization.
Page 70

Message List
Appendices
Data Error
❍ The sample data is corrupted.
After pressing [CANCEL] to clear the message from the
display, delete all the samples together (p. 34).
* Corrupted samples cannot be restored.
❍ Pattern data is corrupted. After pressing [CANCEL] to
clear the message from the display, delete all the
patterns together (p. 47).
* Corrupted patterns cannot be restored.
❍ MIDI settings are corrupted.
Simultaneously hold down [EXT SOURCE] while you
switch on the power to restore the MIDI settings to their
original factory settings (p. 58).
❍ Data in the SP-303's internal memory is corrupted.
Initialize the internal memory (p. 68).
❍ Writing data to or reading data from the memory card
failed.
The memory card must be a SmartMedia card of from 8
through 64 MB. And, you need to make sure that the
card has been inserted securely in the memory card slot.
Data Empty
❍ When deleting a sample, all pads with no sample
assigned to it was specified.
❍ When deleting a pattern, all pads with no pattern
assigned to it was specified.
❍ You have attempted to load data from a memory card
onto which no data has been saved.
Format
❍ Formats the memory card (p. 49).
Resampling Level
❍ Adjusts the resampling level (p. 32).
By using the CTRL 3 (LEVEL) knob, you can adjust the
level of the sound being resampled.
❍ Data on the memory card is corrupted.
Reformat the card on the SP-303 (p. 49).
* Data on memory cards cannot be recovered.
❍ The memory card is damaged.
Obtain a new memory card.
Memory Full
❍ The current sample is in excess of available memory. To
allow further sampling, delete unneeded samples to free
up memory (p. 33, 34). Alternatively, use a new memory
card.
❍ The pattern being recorded is in excess of available
memory.
To allow further sampling, delete unneeded patterns to
free up memory (p. 46, 47). Alternatively, use a new
memory card.
❍ Memory reached capacity during import of .WAV/AIFF
file.
No more data can be imported.
Recording
❍ Now sampling is proceeded (p. 28, 29).
❍ Now resampling is proceeded (p. 32).
❍ Recording of pattern is in progress (p. 44).
Exchange
❍ Samples or patterns on two pads are exchanged (p. 34,
47).
Delete
❍ One sample or pattern is deleted (p. 33, 46).
Appendices
Delete All
❍ All samples or patterns are deleted in a single group (p.
34, 47).
69
Page 71

Appendices
Protected
❍ Internal memory protection is on; samples and patterns
cannot be recorded or deleted. Turn the Protect switch
off. (p. 16)
❍ A write protect sticker has been affixed to this memory
card; you cannot sample, record or erase patterns, nor
save anything onto it. Also, you will not be able to
format the card.
Peel off the write protect sticker (p. 51).
Truncate
❍ The sample is undergoing the Truncate operation (p. 41).
Erase
❍ Pattern data is being erased (p. 46).
Edit
❍ In the process of making settings for a sample’s start/
end points, volume, tempo, or playback time (p. 38–42).
Import .WAV
❍ Memory card containing WAVE files is inserted.
WAVE files can be loaded (p. 52).
Import AIFF
❍ Memory card containing AIFF files is inserted.
AIFF files can be loaded (p. 52).
Sample Save
❍ Sample being saved (p. 49).
Pattern
❍ Playback, recording, erasing, or saving or loading, or
some other operation involving the pattern is in
progress.
Initialize
❍
Initialization of the SP-303’s memory is in progress (p.
68).
Ready
❍ The SP-303 is ready for the input of the input signal in
Auto Sampling (p. 31).
Sample Load
❍ Sample being loaded (p. 50).
Pattern Save
❍ Pattern being saved (p. 50).
Pattern Load
❍ Pattern being loaded (p. 51).
70
Page 72

MIDI Implementation Chart
fig.r09-01_MIDI
Dr. Sample
Model SP-303
MIDI Implementation Chart
Appendices
Date :Jan. 10, 2001
Version : 1.00
Basic
Channel
Mode
Note
Number :
Velocity
After
Touch
Pitch Bend
Control
Change
Function...
Default
Changed
Default
Messages
Altered
True Voice
Note ON
Note OFF
Key's
Ch's
0–119
Transmitted Recognized Remarks
X
X
X
X
**************
X
**************
X
X
X
X
X
XX
1–16
1–16
Mode 3
X
35–67
O
X
X
X
X
Memorized
Can be changed 95–127
Prog
Change
System Exclusive
System
Common
System
Real Time
Aux
Message
Notes
Mode 1 : OMNI ON, POLY
Mode 3 : OMNI OFF, POLY
: True #
: Song Pos
: Song Sel
: Tune
: Clock
: Command
: All sound off
Local ON/OFF
:
: All Notes OFF
: Active Sense
: Reset
X
**************
X
X
X
X
X
X
X
X
X
X
X
* 1 Can be set to O or X.
A separate publication titled “MIDI Implementation” is also available. It provides complete
details concerning the way MIDI has been implemented on this unit. If you should require
this publication (such as when you intend to carry out byte-level programming), please
contact the nearest Roland Service Center or authorized Roland distributor.
Mode 2 : OMNI ON, MONO
Mode 4 : OMNI OFF, MONO
X
X
O
X
X
O
O
O
X
X
X
X
*1
*1
*1
O : Yes
X : No
Appendices
71
Page 73

Appendices
Specifications
SP-303: Dr. Sample
● Maximum Polyphony
8 voices
● Internal Memory
Samples: 16 (8 samples x 2 banks)
Patterns: 16 (8 patterns x 2 banks)
● Memory Card (SmartMedia)
Samples: 16 (8 samples x 2 banks)
Backup: 112 (2 banks x 7 sets)
Patterns: 16 (8 samples x 2 banks)
Backup: 112 (2 banks x 7 sets)
* Only 8 MB to 64 MB SmartMedia with a power-source
voltage of 3.3 V can be used.
●
Maximum Sampling Time
Internal Memory (Times Approximate)
STANDARD LONG LO-FI
31 seconds 63 seconds 3 minutes
Memory Cards (Times Approximate)
Capacity
8 MB 4 minutes 8 minutes 25 minutes
16 MB 8 minutes 16 minutes 50 minutes
32 MB 16 minutes 33 minutes 101 minutes
64 MB 33 minutes 66 minutes 202 minutes
STANDARD LONG LO-FI
10 seconds
● Sampling Frequency
STANDARD
LONG: 22.05 kHz
LO-FI 11.025 kHz
: 44.1 kHz
● Pattern Sequencer
Maximum Note Storage
Internal Memory: Approx. 7,500 notes
Memory Card (SmartMedia):
Resolution: 96 ticks per quarter note
Pattern Length: 1–99 measures
Approx. 7,500 notes
● Effects
26 types
● Signal Processing
A/D Conversion: 20 bit
D/A Conversion: 20 bit
● Nominal Input Level
Input (mic): -40– +4 dBu
Input (line): -10 dBu
● Input Impedance
23 k Ω (line)
2 k Ω (mic)
● Nominal Output Level
Output (line): -10 dBu
● Output Impedance
2 k Ω
● Display
7 segments, 3 characters (LED)
● Connectors
LINE INPUT Jacks (L, R)
LINE OUTPUT Jacks (L, R)
Headphone (PHONES) Jack (Stereo 1/4 inch phone type)
MIC Jack
MIDI IN Connector
AC Adaptor Jack
Memory Card Slot
● Power Supply
AC Adaptor
120/230 V: Roland ACI-Series
230 (UK)/240 V: Roland ACB-Series
● Current Draw
1000 mA
● Dimensions
170 (W) x 241 (D) x 67 (H) mm
6-3/4 (W) x 9-1/2 (D) x 2-11/16 (H) inches
● Weights
850 g / 1 lb 14 oz (excluding AC adaptor)
● Accessories
AC Adaptor
(120/230 V: Roland ACI-Series, 230 (UK)/240 V: Roland ACB-Series)
Owner’s Manual
Roland Service (information sheet)
* 0 dBu = 0.775 Vrms
In the interest of product improvement, the specifications
and/or appearance of this unit are subject to change without
prior notice.
72
Page 74

Index
A
AiF ............................................................................. 52, 70
AIFF File ......................................................................... 52
Auto Sampling ............................................................... 31
B
Backup Area ................................................................... 48
BPM ..................................................................... 15, 30, 41
C
CD/MD .......................................................................... 29
CHG .................................................................... 34, 47, 69
Clear .......................................................................... 34, 47
CURRENT PAD ............................................................ 22
Current Pad .................................................................... 18
D
dAL ...................................................................... 34, 47, 69
dEL ................................................................ 17, 33, 46, 69
Delay ......................................................................... 14, 21
Delete ...................................................... 17, 33–34, 41, 47
Demo Pattern ................................................................. 15
Dots ................................................................................. 12
E
Edt ................................................................................... 70
Effect .............................................................. 14, 21–22, 24
EFFECT GRAB ............................................................... 22
Effects Buttons ............................................................... 22
EMP ........................................................................... 33, 69
End Point ............................................................ 30, 38–40
Erase ................................................................................ 46
Err .................................................................................... 69
ErS .............................................................................. 46, 70
Exchange ................................................................... 34, 47
EXT SOURCE Pad ......................................................... 19
F
Filter + Overdrive .................................................... 14, 21
FMt ...................................................................... 29, 49, 69
Format ....................................................................... 29, 49
FuL ................................................................. 16, 34, 47, 69
G
Gate Playback .......................................................... 36, 54
H
Hold ................................................................................. 19
I
ini ............................................................................... 68, 70
Initialize .................................................................... 49, 68
Internal Memory ..................................................... 27, 68
Isolator ...................................................................... 14, 21
L
LEV ............................................................................ 32, 69
Load ........................................................................... 50–51
LO-FI ............................................................................... 27
Lo-Fi Sampling ............................................................... 27
LONG .............................................................................. 27
Loop Playback ................................................................ 36
Loop Recording ............................................................. 44
M
Memory Card ..................................................... 27, 29, 48
MFX ............................................................... 14, 21–22, 25
Microphone .................................................................... 28
MIDI ................................................................................ 53
MIDI Channel ................................................................ 53
Multi-Effects ................................................................... 14
N
Note Number ........................................................... 53, 56
O
oFF ................................................................................... 42
One Shot Playback ........................................................ 36
Overdubbing .................................................................. 44
P
P.Ld ................................................................................. 70
P.SV ................................................................................. 70
Pattern ..................................................... 15, 43, 48, 50–51
Pattern Bank ............................................................. 15, 43
Pattern Load ................................................................... 51
Pattern Save .................................................................... 50
PEAK Indicator ............................................ 16, 20, 28, 30
Pitch Shifter .............................................................. 14, 21
Polyphony ...................................................................... 18
Protect ................................................................. 16, 51, 68
Prt ........................................................................ 16, 68, 70
Ptn ...................................................... 15, 42–43, 46–47, 70
Q
Quantize .......................................................................... 45
R
rdY ............................................................................. 32, 70
rEC ............................................................................. 32, 69
Receive Channel ............................................................ 53
Recording the Pattern ................................................... 44
Resampling ..................................................................... 32
Reverse Playback ........................................................... 37
Rhythm Machine ........................................................... 56
S
S.Ld .................................................................................. 70
S.SV .................................................................................. 70
Sample ..................................................... 13, 18, 21, 48–50
Sample Bank ............................................................. 13, 18
Sample Load ................................................................... 50
Sample Save ................................................................... 49
Sampling ............................................................. 16, 27–30
Sampling Grade ............................................................. 27
Save ............................................................................ 48–50
SmartMedia .................................................................... 48
STANDARD ................................................................... 27
73
Page 75

Index
Start Point ................................................................. 38–40
Stereo Sampling ............................................................. 27
Synchronize .............................................................. 54–56
T
Tempo ................................................................. 15, 30, 41
Tempo Sync .................................................................... 54
Time Modify .................................................................. 42
trC .............................................................................. 41, 70
Trigger Playback ..................................................... 36, 54
Truncating ...................................................................... 41
U
UAU .......................................................................... 52, 70
V
Vinyl Simulator ....................................................... 14, 21
Volume ............................................................................ 38
W
WAVE File ...................................................................... 52
Write Protect Sticker ..................................................... 51
74
Page 76

For the U.K.
IMPORTANT: THE WIRES IN THIS MAINS LEAD ARE COLOURED IN ACCORDANCE WITH THE FOLLOWING CODE.
BLUE:
BROWN:
As the colours of the wires in the mains lead of this apparatus may not correspond with the coloured markings identifying
the terminals in your plug, proceed as follows:
The wire which is coloured BLUE must be connected to the terminal which is marked with the letter N or coloured BLACK.
The wire which is coloured BROWN must be connected to the terminal which is marked with the letter L or coloured RED.
Under no circumstances must either of the above wires be connected to the earth terminal of a three pin plug.
This product complies with the requirements of European Directive 89/336/EEC.
NEUTRAL
LIVE
For EU Countries
For the USA
FEDERAL COMMUNICATIONS COMMISSION
RADIO FREQUENCY INTERFERENCE STATEMENT
This equipment has been tested and found to comply with the limits for a Class B digital device, pursuant to Part 15 of the
FCC Rules. These limits are designed to provide reasonable protection against harmful interference in a residential
installation. This equipment generates, uses, and can radiate radio frequency energy and, if not installed and used in
accordance with the instructions, may cause harmful interference to radio communications. However, there is no guarantee
that interference will not occur in a particular installation. If this equipment does cause harmful interference to radio or
television reception, which can be determined by turning the equipment off and on, the user is encouraged to try to correct the
interference by one or more of the following measures:
– Reorient or relocate the receiving antenna.
– Increase the separation between the equipment and receiver.
– Connect the equipment into an outlet on a circuit different from that to which the receiver is connected.
– Consult the dealer or an experienced radio/TV technician for help.
This device complies with Part 15 of the FCC Rules. Operation is subject to the following two conditions:
(1) This device may not cause harmful interference, and
(2) This device must accept any interference received, including interference that may cause undesired operation.
Unauthorized changes or modification to this system can void the users authority to operate this equipment.
This equipment requires shielded interface cables in order to meet FCC class B Limit.
For Canada
NOTICE
This Class B digital apparatus meets all requirements of the Canadian Interference-Causing Equipment Regulations.
AVIS
Cet appareil numérique de la classe B respecte toutes les exigences du Règlement sur le matériel brouilleur du Canada.
75
Page 77

02560256 ’01-04-C3-21N
 Loading...