

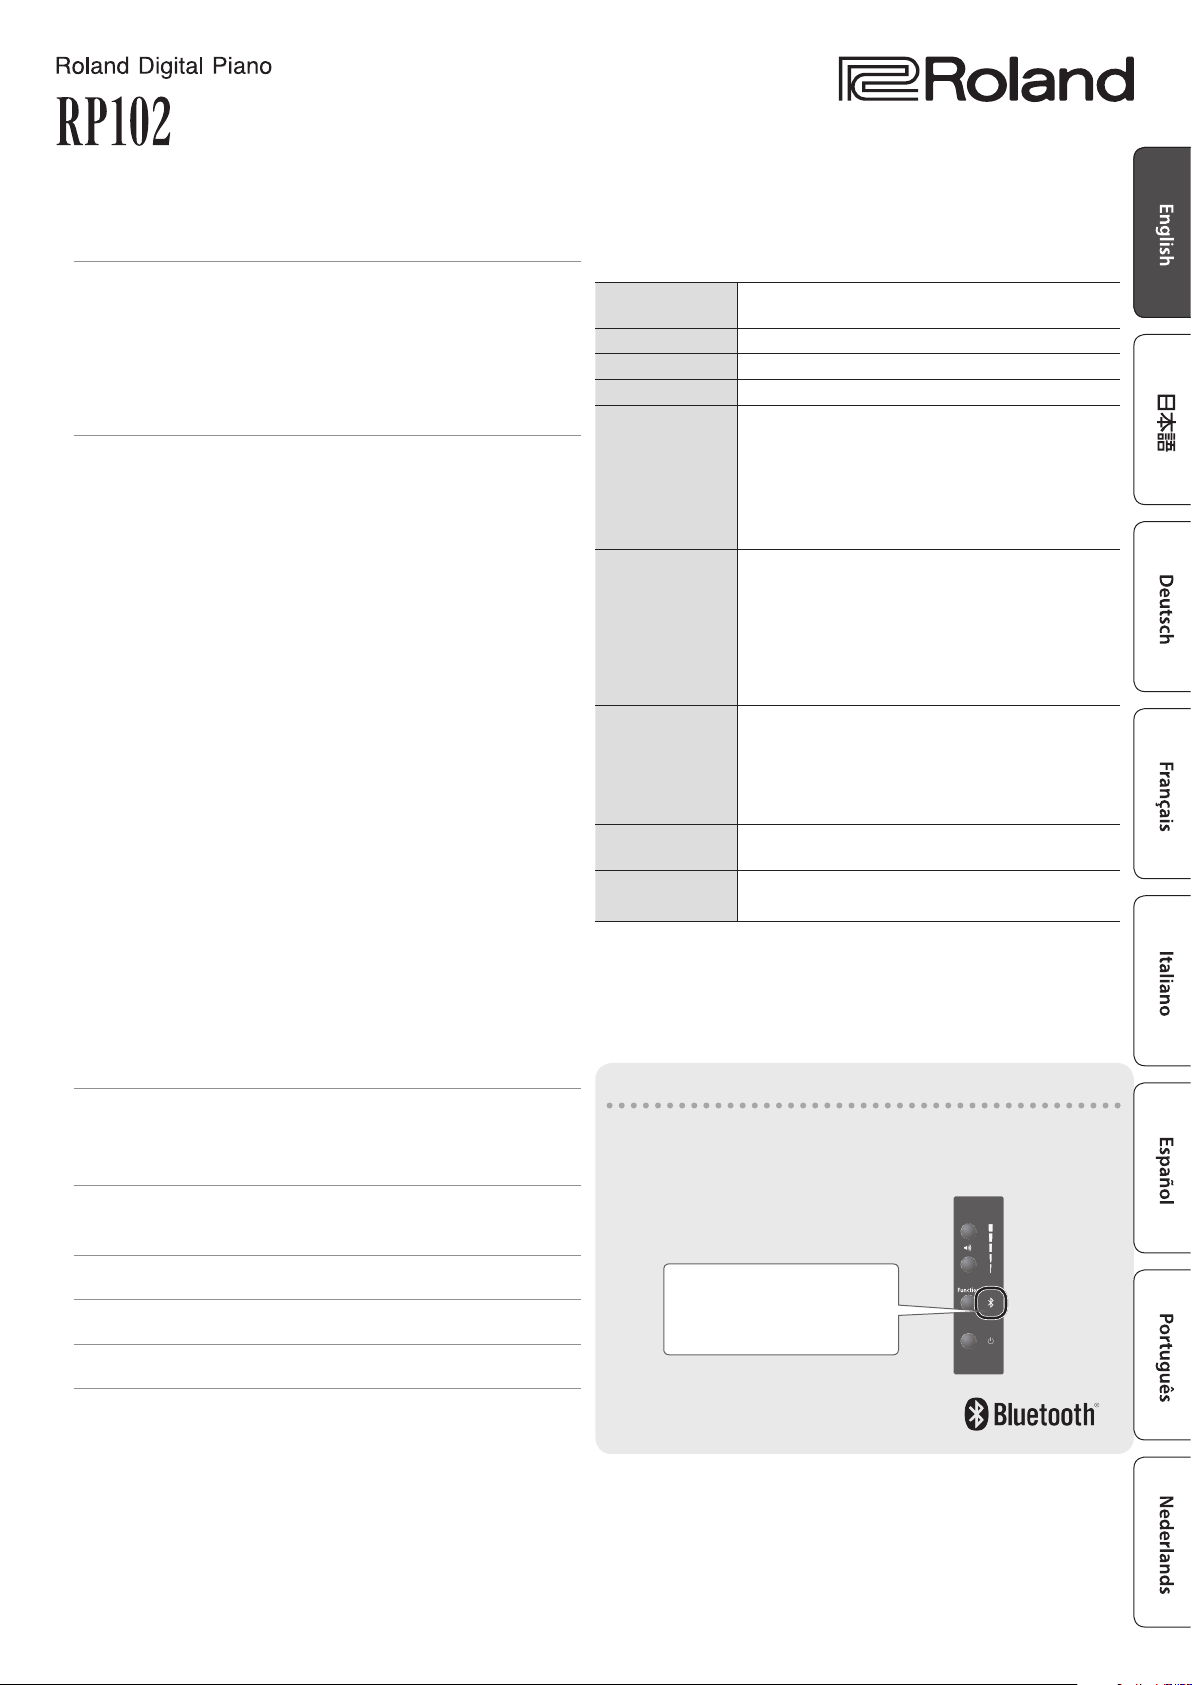
Owner’s Manual
Index
Read This First . . . . . . . . . . . . . . . . . . . . . . . . . . . . . . . . . . . . . . . . . . . 2
Opening/Closing the Keyboard Cover . . . . . . . . . . . . . . . . . . . 2
Opening the Keyboard Cover . . . . . . . . . . . . . . . . . . . . . 2
Closing the Keyboard Cover . . . . . . . . . . . . . . . . . . . . . . 2
Basic Operation of the RP102 . . . . . . . . . . . . . . . . . . . . . . . . . . . 2
Bottom Panel Connections . . . . . . . . . . . . . . . . . . . . . . . . . . . . . 3
Making Settings on the RP102 . . . . . . . . . . . . . . . . . . . . . . . . . . . 4
Selecting Tones. . . . . . . . . . . . . . . . . . . . . . . . . . . . . . . . . . . . . . . . 4
Selecting an Internal Song . . . . . . . . . . . . . . . . . . . . . . . . . . . . . 4
Playing/Stopping an Internal Song . . . . . . . . . . . . . . . . . . . . . 4
Changing the Volume of the Song . . . . . . . . . . . . . . . . . . . . . . 4
While the Song Plays, Specifying the Keyboard Sound
(SMF Play Mode). . . . . . . . . . . . . . . . . . . . . . . . . . . . . . . . . . . . . . . 4
Starting/Stopping the Metronome . . . . . . . . . . . . . . . . . . . . . . 4
Changing the Metronome Volume . . . . . . . . . . . . . . . . . . . . . . 4
Changing the Beat . . . . . . . . . . . . . . . . . . . . . . . . . . . . . . . . . . . . . 4
Changing the Tempo . . . . . . . . . . . . . . . . . . . . . . . . . . . . . . . . . . 4
Adding Reverberation to the Sound (Ambience) . . . . . . . . . 4
Adjusting the Brightness of the Sound (Brilliance) . . . . . . . 4
Dividing the Keyboard in Two (Twin Piano) . . . . . . . . . . . . . . 5
Changing the Keyboard Playing Feel (Key Touch) . . . . . . . . 5
Matching the Pitch with Other Instruments
(Master Tuning) . . . . . . . . . . . . . . . . . . . . . . . . . . . . . . . . . . . . . . . 5
Transposing the Pitch (Transpose) . . . . . . . . . . . . . . . . . . . . . . 5
Connecting a page-turning app . . . . . . . . . . . . . . . . . . . . . . . . 5
Connecting with Piano Partner 2 . . . . . . . . . . . . . . . . . . . . . . . 5
Making the Power Automatically Turn O After a Time . . . 5
Hearing Sound from the Built-in Speakers and the External
Speakers . . . . . . . . . . . . . . . . . . . . . . . . . . . . . . . . . . . . . . . . . . . . . . 6
Saving the Settings (Memory Backup) . . . . . . . . . . . . . . . . . . . 6
Restoring the Factory Settings (Factory Reset) . . . . . . . . . . . 6
Connect an App on a Mobile Device . . . . . . . . . . . . . . . . . . . . . 7
Piano Partner 2 – An App for Enjoying the RP102 Even More 7
Apps to Turn Pages Using the Pedals . . . . . . . . . . . . . . . . . . . . 9
Troubleshooting . . . . . . . . . . . . . . . . . . . . . . . . . . . . . . . . . . . . . . . . . 11
Problems with Bluetooth Functionality . . . . . . . . . . . . . . . . . . 12
Main Specications
Roland RP102: Digital Piano
Keyboard
Sound Generator Piano Sound: SuperNATURAL Piano Sound
Bluetooth MIDI, Turning music sheet: Bluetooth Ver 4.0
Power Supply AC adaptor
Power
Consumption
Dimensions
(including piano
stand)
Weight (including
piano stand)
Accessories
Option
(sold separately)
* This document explains the specications of the product at the
time that the document was issued. For the latest information, refer
to the Roland website.
88 keys (PHA-4 Standard Keyboard: with
Escapement and Ivory Feel)
4 W (3–10 W)
4 W: Average power consumption while piano is
played with volume at center position
3 W: Power consumption immediately after power-
up; nothing being played
10 W: Rated power consumption
With Music Rest:
1,379 (W) x 413 (D) x 977 (H) mm
54-5/16 (W) x 16-5/16 (D) x 38-1/2 (H) inches
Without Music Rest:
1,379 (W) x 423 (D) x 817 (H) mm
54-5/16 (W) x 16-11/16 (D) x 32-3/16 (H) inches
37.8 kg
83 lbs 6 oz
* Actual weight can vary slightly from that
indicated due to the fact that wooden parts are
involved.
Owner’s manual, Leaet “Stand Assembly,” AC
Adaptor, Power Cord (for AC Adaptor), Music rest
Headphones
Provision of Bluetooth functionality
Please be aware that depending on the country in which
you purchased the unit, Bluetooth functionality might not
be included.
If Bluetooth functionality is included
Internal Song List . . . . . . . . . . . . . . . . . . . . . . . . . . . . . . . . . . . . . . . . 13
The Bluetooth logo appears
when you turn on the power.
USING THE UNIT SAFELY . . . . . . . . . . . . . . . . . . . . . . . . . . . . . . . . . 14
IMPORTANT NOTES . . . . . . . . . . . . . . . . . . . . . . . . . . . . . . . . . . . . . . 16
Before using this unit, carefully read “USING THE UNIT SAFELY” (p. 14) and “IMPORTANT NOTES” (p. 16). After reading, keep the document(s) where it
will be available for immediate reference.
Copyright © 2017 ROLAND CORPORATION
Read This First
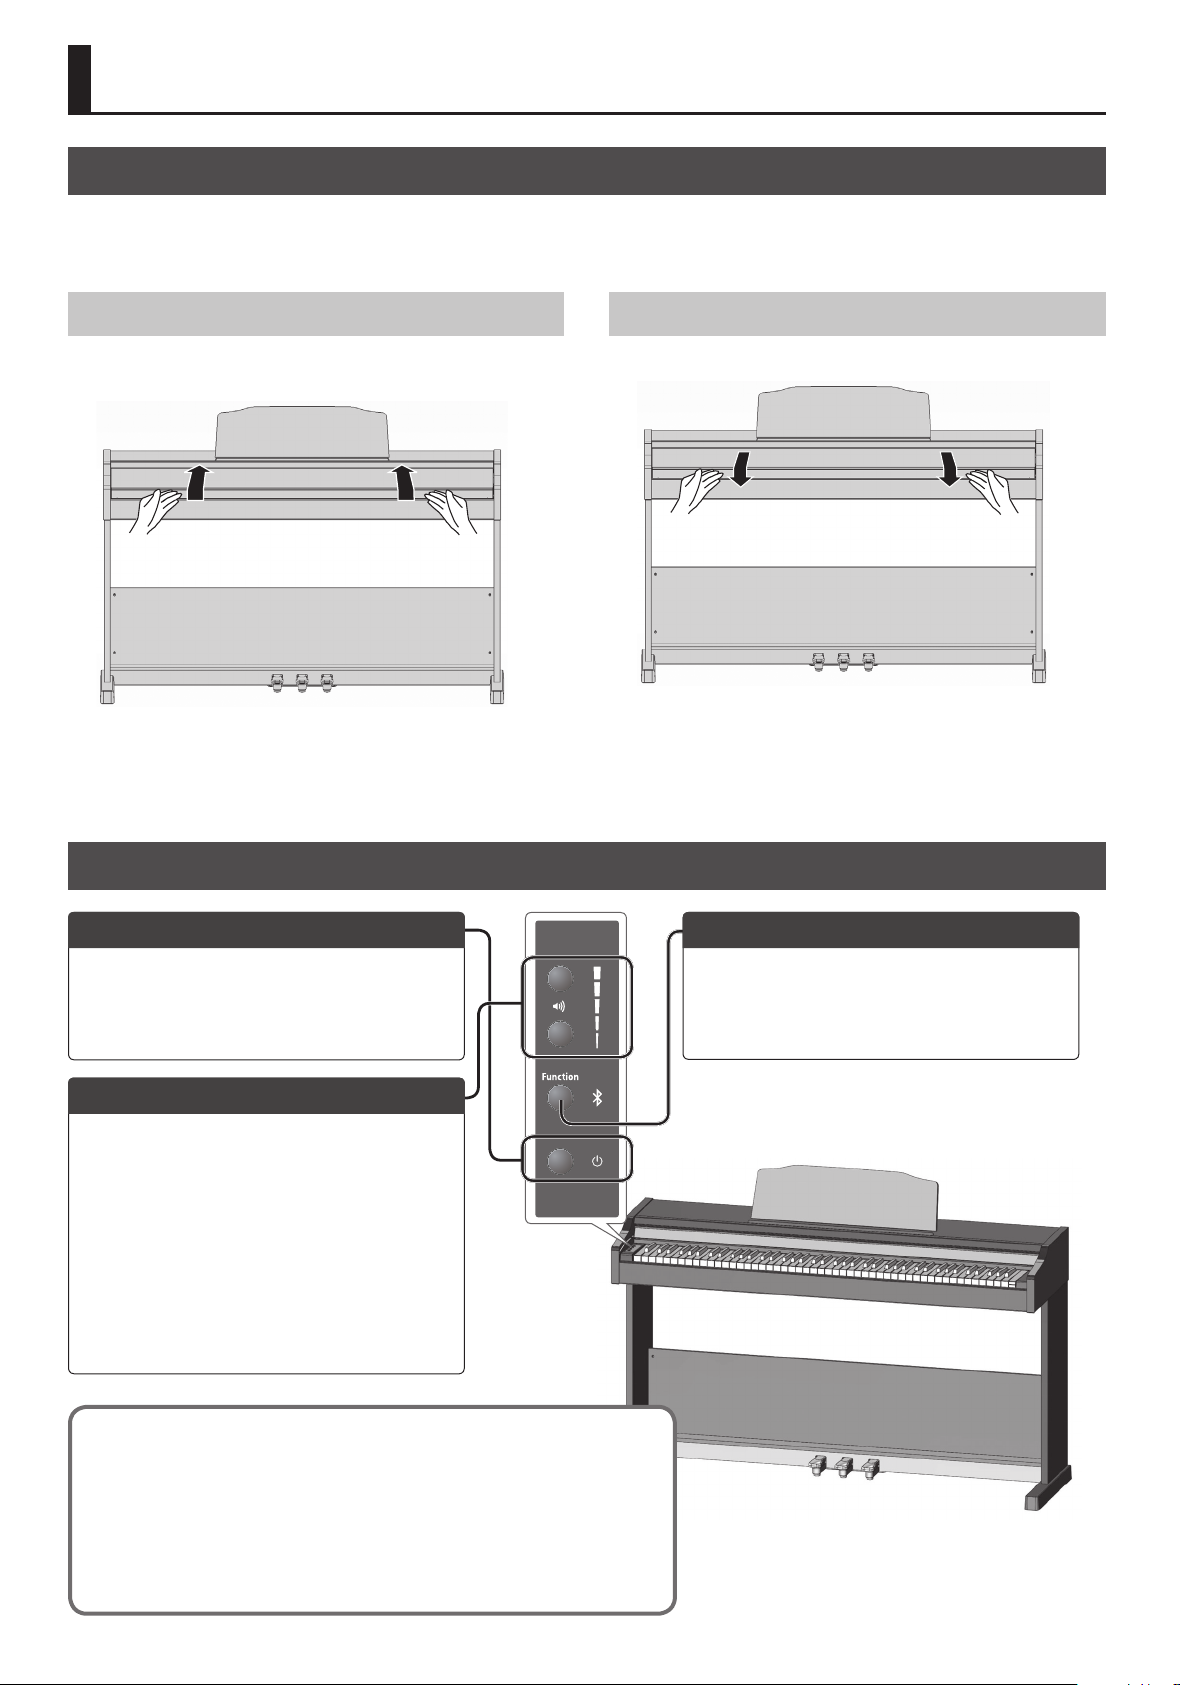
Opening/Closing the Keyboard Cover
You must use both hands to open or close the keyboard cover.
* When opening or closing the keyboard cover, please be careful not to get your ngers pinched between the movable part and the panel. In
places where small children are present, make sure that an adult provides supervision and guidance.
Opening the Keyboard Cover
Use both hands to lift the edge of the lid, and push it away from
yourself.
* If you have any objects (papers, metal objects, etc.) placed on
top of the keyboard cover, do not open the cover. Otherwise,
such objects may slip inside the instrument, and then become
irrecoverable.
Basic Operation of the RP102
Closing the Keyboard Cover
Grasp and gently lower the edge of the lid with both hands.
Turning the Power On/O
Press the [L] (power) button to turn on the power.
If you hold down the [L] (power) button for one
second or longer, the power turns o.
Adjusting the Volume
Use the two volume buttons to adjust the volume.
Volume (up) button: Increases the volume.
Volume (down) button: Decreases the volume.
You can adjust the speaker volume when using the
built-in speakers, or the headphones volume when
headphones are connected.
* The number of indicators lit at the right of the
volume buttons changes according to the
volume. If all indicators are lit, the volume is at its
maximum. If all indicators are unlit, there will be no
sound.
The power to this unit will be turned o automatically after a predetermined
amount of time has passed since it was last used for playing music, or its
buttons or controls were operated (Auto O function). If you do not want the
power to be turned o automatically, disengage the Auto O function (p. 5).
5 Any settings that you are in the process of editing will be lost when the power
is turned o. If you have any settings that you want to keep, you should save
them beforehand.
5 To restore power, turn the power on again.
Changing the Settings
By holding down the [Function] button and pressing
a key, you can select sounds or adjust the sensitivity
of the keyboard.
&
“Making Settings on the RP102” (p. 4)
2
* When operating the pedal, please be careful not
to get your ngers pinched between the movable
part and the panel. In places where small children
are present, make sure that an adult provides
supervision and guidance.
Read This First
Using the Pedals to Modify the Sound
Damper pedal
Use this pedal to sustain the sound. While this pedal is held down, notes will be
sustained for an extended time even if you release your ngers from the keyboard.
By pressing the pedal to dierent depths, you can adjust the length of sustain
(short, long). On an acoustic piano, holding down the damper pedal will cause the
strings for notes other than the ones you actually play to vibrate in sympathy with
what you’ve played, producing a rich resonance. This unit simulates this sympathetic
vibration (damper resonance).
Sostenuto pedal
This pedal sustains only the notes of the keys that were already pressed when you
pressed the pedal.
Soft pedal
This pedal is used to make the sound softer. Playing with the soft pedal depressed
produces a sound that is not as strong as when otherwise played with the equivalent
strength. This is the same function as the left pedal of an acoustic piano.
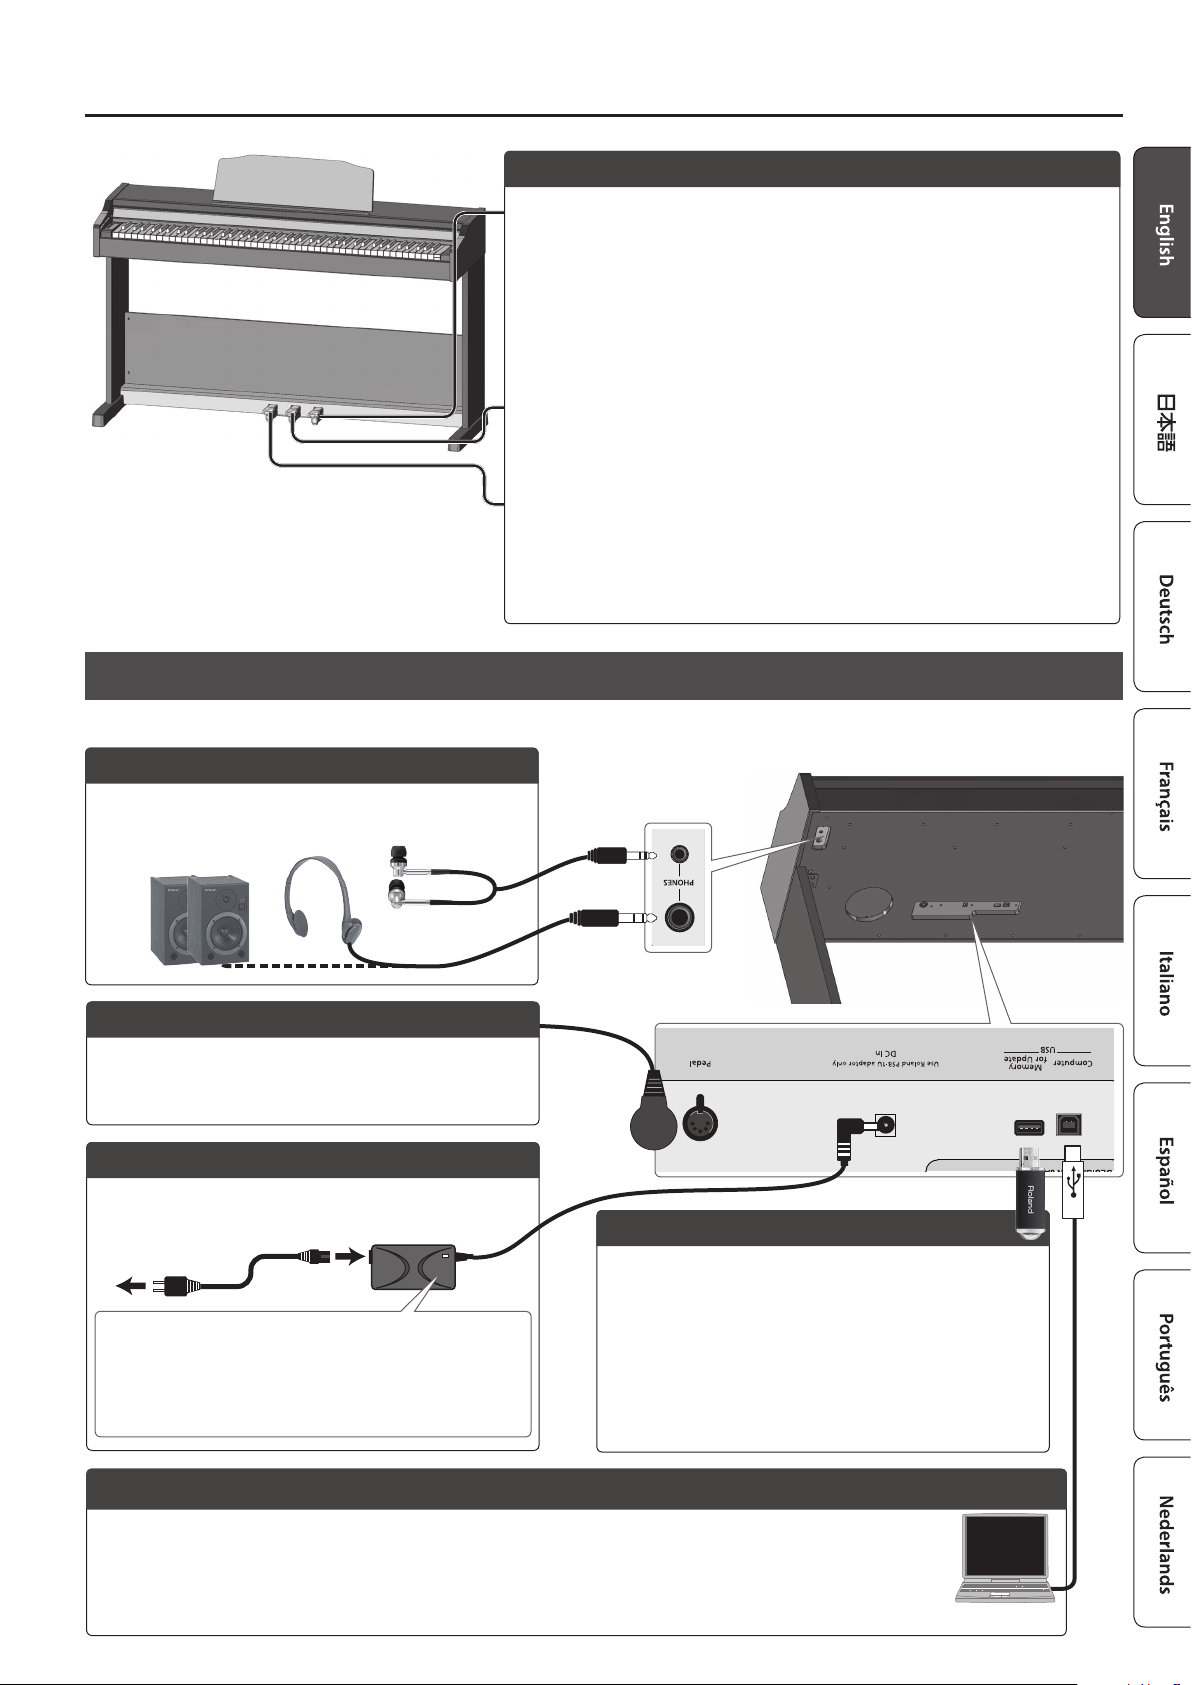
Bottom Panel Connections
* To prevent malfunction and equipment failure, always turn down the volume, and turn o all the units before making any connections.
PHONES Jacks
Since this unit has two headphones jacks, two people can
also use headphones simultaneously. And you can connect
the external ampliered speakers (p. 6)
Pedal Connector
Connect the pedal cord of the dedicated stand here. For
details, refer to the leaet “Stand Assembly.”
DC In Jack
Connect the included AC adaptor here. For details, refer to the
leaet “Stand Assembly.”
Power Cord
AC Outlet
Place the AC adaptor so the side with the indicator faces
upwards and the side with textual information faces
downwards. The indicator will light when you plug the AC
adaptor into an AC outlet.
Stereo-mini plug
Stereo phone plug
USB Memory for Update Port
This connector will be used if there are future additions or
expansions to the RP102’s functionality.
* Never insert or remove the USB ash drive while this unit is
turned on. Doing so may corrupt the unit’s data or the data
on the USB ash drive.
* Use a commercially available USB ash drive or a USB ash
drive sold by Roland. However, we cannot guarantee that
all commercially available USB ash drives will work with
this unit.
USB Computer Port
If you have a DAW program on your computer, or if you have SMF data, you can use a commercially available USB cable
to connect the RP102's USB Computer port to the USB port of your computer and do the following.
(DAW: music production software (sold separately), SMF: song les)
5 SMF data played back on your DAW can be sounded by the RP102.
5 MIDI data can be transferred between the RP102 and your DAW, letting you produce and edit music in a variety of ways.
3
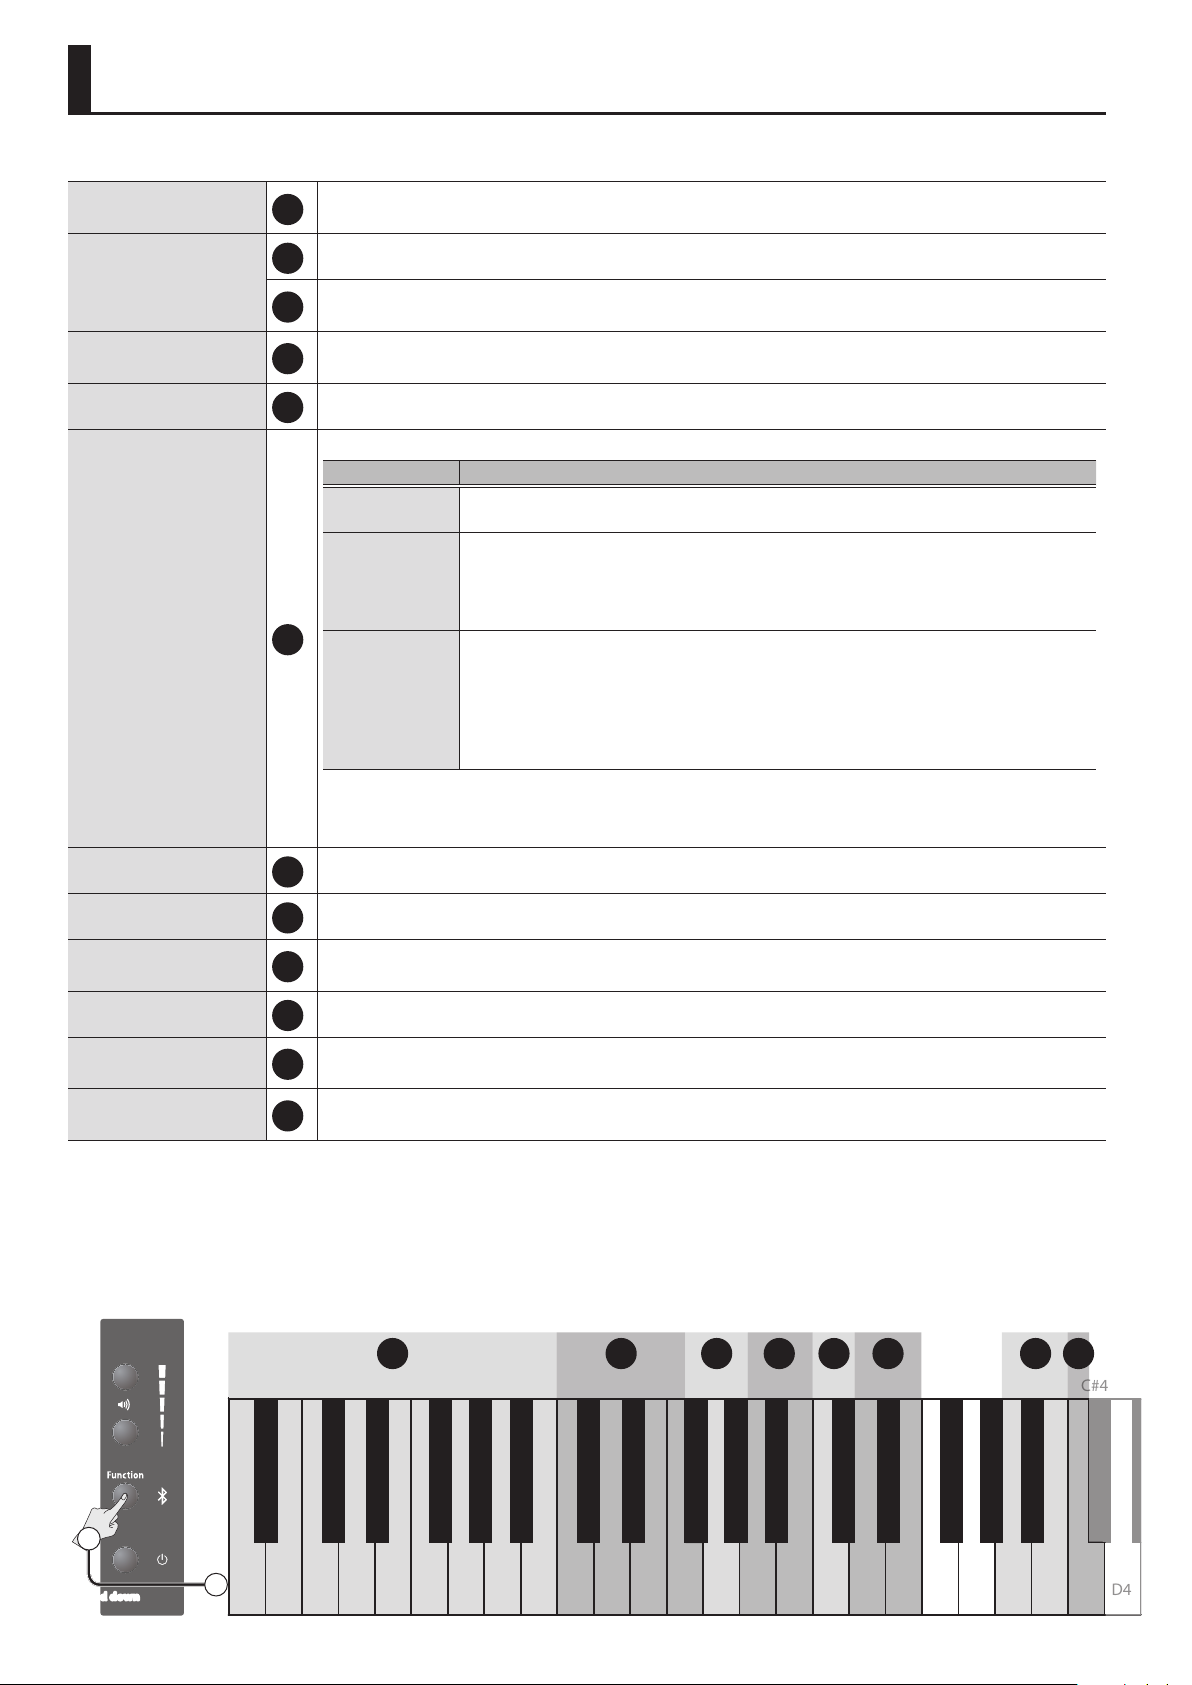
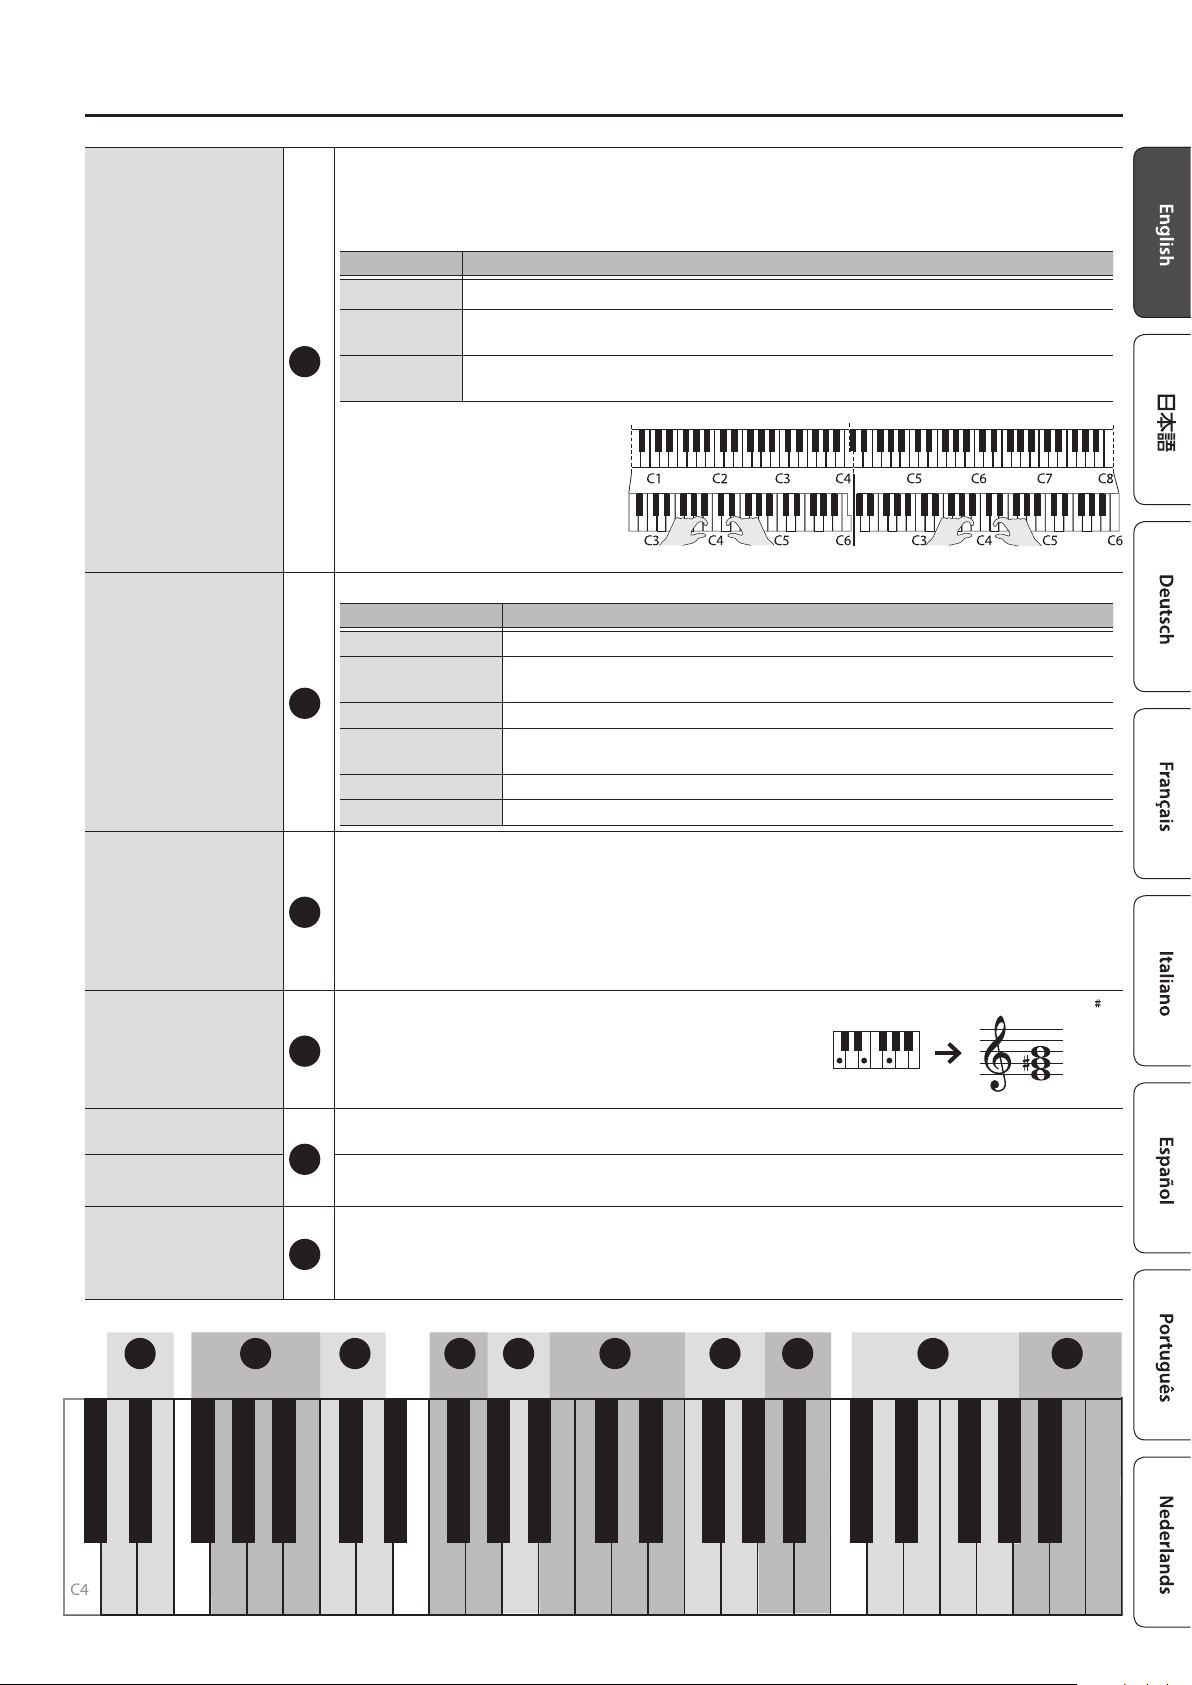
Making Settings on the RP102
C#4
You can control a variety of functions by holding down the [Function] button and pressing a key.
Selecting Tones
Selecting an Internal Song
Playing/Stopping an Internal Song
Changing the Volume of the Song
While the Song Plays, Specifying the Keyboard Sound (SMF Play Mode)
Press one key to play one sound at a time.
1
Press two keys simultaneously to play two sounds as a layer. This feature is called “Dual Play.”
Selects a category.
2
Selects a song.
3
&
“Internal Song List” (p. 13)
Play all songs in the selected category, or play just one song.
4
Press the same key again to stop playback.
0–10 (default: 10)
5
Normally you’ll use “AUTO SELECT.”
Setting Explanation
AUTO SELECT
(default)
INTERNAL
6
EXTERNAL
Automatically switches the SMF Play Mode to either “INTERNAL” or “EXTERNAL”
depending on the song that is being played.
The sound of the song that’s playing and the sound on which you’re performing will be
the same. If you switch sounds on the RP102, the sound of the song also changes.
This setting is recommended when you’re playing the internal songs.
A damper resonance (*) eect is applied to the piano sound of the song.
The sound of the song that’s playing can be specied independently of the sound that
you’re playing on the keyboard. Even if you switch sounds on the RP102, the sound of
the song won’t change.
This setting is recommended when you’re playing a song le from a USB-connected
computer.
The damper resonance (*) eect is not applied to the piano sound of the song.
Starting/Stopping the Metronome
Changing the Metronome Volume
Changing the Beat
Changing the Tempo
Adding Reverberation to the Sound (Ambience)
Adjusting the Brightness of the Sound (Brilliance)
Concert Piano
Ballad Piano
* This is the resonance of the overall piano (the sympathetic vibration of strings other than those that were
actually played, and the sympathetic vibration of the entire instrument) that is heard when you hold down
the damper pedal of an acoustic piano.
The metronome turns on (starts) or o (stops) each time you press this key.
7
O, 1–10 (default:5)
8
0/4 (*), 2/2, 3/2, 2/4, 3/4, 4/4, 5/4, 6/4, 7/4, 3/8, 6/8, 8/8, 9/8, 12/8 (default: 4/4)
9
* When the metronome is sounded, all beats are heard with the same sound.
10–500 (default: Song Tempo)
10
The reverberation that is characteristic of a performance in a concert hall can be added to the sound.
11
0–10 (default: 2)
You can adjust the brightness of the sound when you play the keyboard or when you play back a song.
12
-10–10 (default: 0)
1 2 3456 78
Mellow Piano
Bright Piano
Tremolo EP
Harpsichord
Pop EP
Celesta
Vibraphone
Pipe Organ
C#3C#2C#1A#0 D#3D#2D#1 A#3A#2A#1 G#3G#2G#1
Epic Strings
Combo Jz.Org
SymphonicStr1
Soft Pad
Jazz Scat
Listening
Masterpieces
Easy Piano
Czerny 100
Hanon
Scale
AUTO SELECT
INTERNAL
-1+110
EXTERNAL
Play/stop one song
Play/stop all song
Previous song
Next song
First song
F#3F#2F#1
5
-1
+1
ON/OFF
1
Hold down
4
2
A0 B0 C1
D1 D2 D3E1 E2 E3F1 F2 F3G1 G2 G3A1 A2 A3B1 B2 B3C2 C3 C4
D4
Dividing the Keyboard in Two (Twin Piano)
Changing the Keyboard Playing Feel (Key Touch)
Matching the Pitch with Other Instruments (Master Tuning)
Transposing the Pitch (Transpose)
Connecting a pageturning app
Connecting with Piano Partner 2
Making the Power
Automatically Turn O
After a Time
Making Settings on the RP102
You can divide the keyboard into left and right sections so that two people can play the same pitch ranges.
This function lets you use the unit as though it were two pianos.
The keyboard will be divided into left and right sections, with “middle C” located in the center of each section.
You can choose one of the following ways in which the sound will be heard.
Setting Explanation
OFF (default) Clears the setting that divides the keyboard into two sections.
PAIR
13
INDIVIDUAL
* The left and right sections will have
the same tone (Concert Piano).
* The damper pedal aects only the
right section of the keyboard.
* The soft pedal operates as the
damper pedal for the left section of
the keyboard.
You can change the playing feel of the keyboard.
Setting Explanation
SUPER HEAVY An even heavier setting than “HEAVY.”
HEAVY
14
MEDIUM (default) Sets the keyboard to the standard touch.
LIGHT
SUPER LIGHT An even lighter setting than “LIGHT.”
FIX The sound plays at one set volume, regardless of the force used to play the keys.
When playing ensemble with other instruments and in other such instances, you can match the standard
pitch to another instrument.
The standard pitch generally refers to the pitch of the note that’s played when you nger the middle A key.
For a cleaner ensemble sound while performing with one or more other instruments, ensure that each
15
instrument’s standard pitch is in tune with that of the other instruments. This tuning of all the instruments to a
standard pitch is called “master tuning.”
415.3 Hz–466.2 Hz (default: 440.0 Hz)
The keyboard or song can be transposed in semitone steps.
For example if a song is in the key of E major but you want to
play it using the ngering of the C major scale, you would set the
16
keyboard transpose setting to “4.”
-6–5 (default: 0)
p. 9
17
p. 7
The power to this unit will be turned o automatically after a predetermined amount of time has passed since
it was last used for playing music, or its buttons or controls were operated (Auto O function). If you do not
18
want the power to be turned o automatically, turn “OFF.”
10 minutes, 30 minutes, 240 minutes, OFF (default: 30 minutes)
The sound of the right area will be heard more loudly from the right speaker, and the
sound of the left area will be heard more loudly from the left speaker.
Notes played in the right area will be heard from the right speaker, and notes played in the
left area will be heard from the left speaker.
You have to nger the keyboard more forcefully than “MEDIUM” in order to play
fortissimo (), so the keyboard touch feels heavier.
You can achieve fortissimo () play with a less forceful touch than “MEDIUM” so the
keyboard feels lighter.
If you play C E G0It will sound E G B
C4
9 10 11 12 13 14 15 16 17 18
F#7 G#7C#7 D#7 A#7G#7F#6C#6 D#6 A#6G#6F#5F#4 C#5C#4 D#5D#4 A#5A#4 G#5G#4
OFF
4/4-+
-10
-1
Song Tempo
+1
+10
120
-1
+1
02-1
+1
PAIR
INDIVIDUAL
FIX
MEDIUM
SUPER LIGHT
LIGHT
C6 C7C5D4 D5 D6 D7E4 E5 E6 E7F4 F5 F6 F7G4 G5 G6 G7A4 A5 A6 A7B4 B5 B6 B7 C8
HEAVY
SUPER HEAVY
-0.1 Hz
440.0 Hz
+0.1 Hz
442.0 Hz
ON
OFF-1Page Turn & MIDI
MIDI0MODE 1
Page Turn+1MODE 2
10 minutes
MODE 3
30 minutes
240 minutes
OFF
5
Making Settings on the RP102
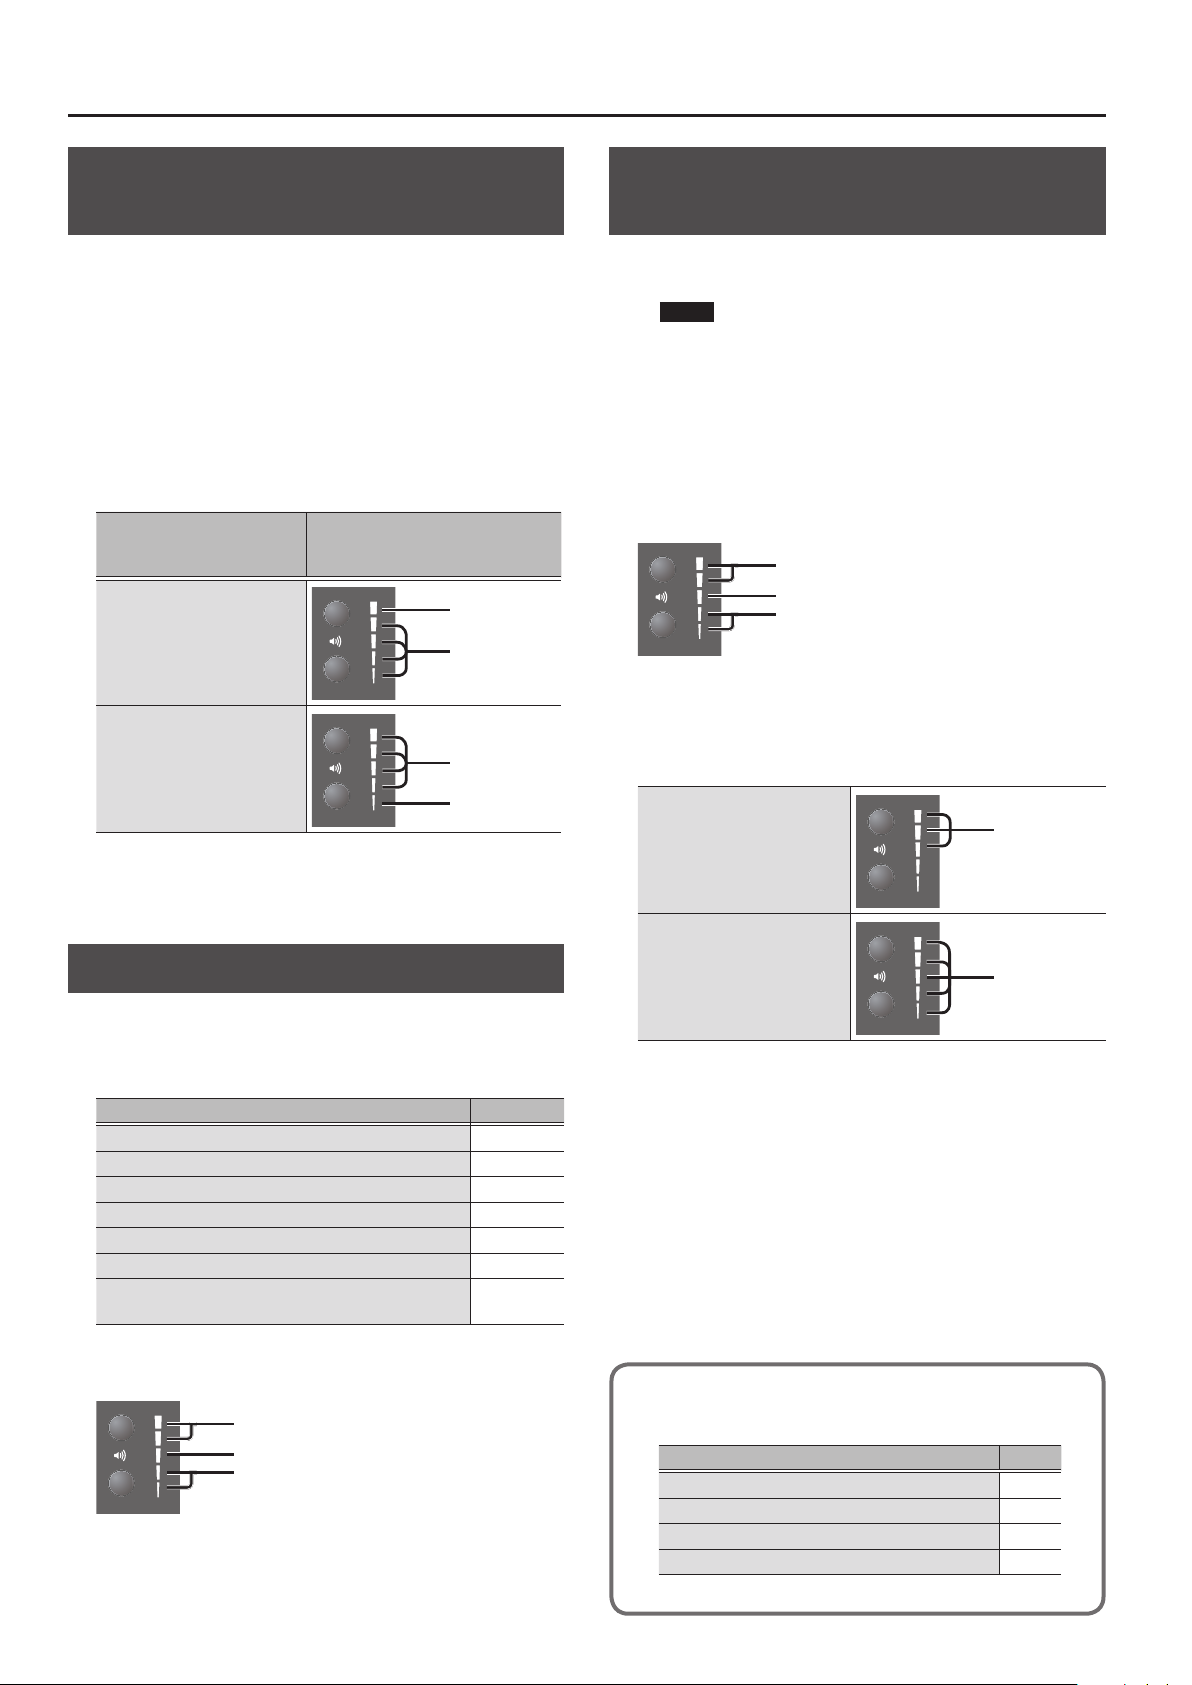
Hearing Sound from the Built-in Speakers and the External Speakers
With the factory settings, the built-in speakers do not produce
sound if the external ampliered speakers are connected to the
PHONES jack. However, you can change this setting so that sound
is output from the built-in speakers even if the external speakers
are connected to the PHONES jack.
* When you change the setting, the character from the external
speakers will change.
1. While holding down the volume (up) and volume
(down) buttons, press the [Function] button.
2. Press the [Function] button to change the setting.
When the external speaker
are connected to the
PHONES jack
Sound is output only from
the external speakers
Sound is output from both
the external speakers and
the built-in speakers
3. To complete the operation, press the volume (up)
button or volume (down) button.
Volume indicators
Blinking
Lit
Unlit
Blinking
Restoring the Factory Settings (Factory Reset)
The settings you’ve changed in the function mode can be restored
to their factory-set condition.
NOTE
When you execute a factory reset, all settings will be
initialized.
1. While holding down the volume (up) button and
the [Function] button, turn on the power and
continue holding the volume (up) button and
[Function] button.
When the volume indicators appear as follows, release the
buttons.
Blinking
Unlit
Lit
2. To execute the factory reset, press the volume (up)
button.
To cancel, press the volume (down) button or the [Function]
button.
Factory reset currently
executing
Blinking
Saving the Settings (Memory Backup)
When this unit’s power is turned o, it will return to its default
settings. However, if desired, you can save the following settings
so that they will be remembered even after the power is o. This is
called the “Memory Backup” function.
Settings saved by Memory Backup Page
Ambience p. 4
Brilliance p. 4
Key Touch p. 5
Metronome (Volume) p. 4
Master Tuning p. 5
SMF Play Mode p. 4
Hearing sound from the built-in speakers and the
external speakers
1. Hold down the [Function] button and press the
volume (up) button.
Blinking
Unlit
Lit
2. To save the setting, press the volume (up) button.
To cancel, press the volume (down) button or the [Function]
button.
p. 6
Completed
* Never turn o the power while factory reset is being executed.
Blinking
3. Turn the power o, then on again.
Settings that are saved automatically
On the unit, the following settings are saved automatically.
Setting Page
Bulit-in speakers volume p. 2
Headphones volume p. 2
All settings for the Bluetooth function p. 5
Auto o p. 5
6
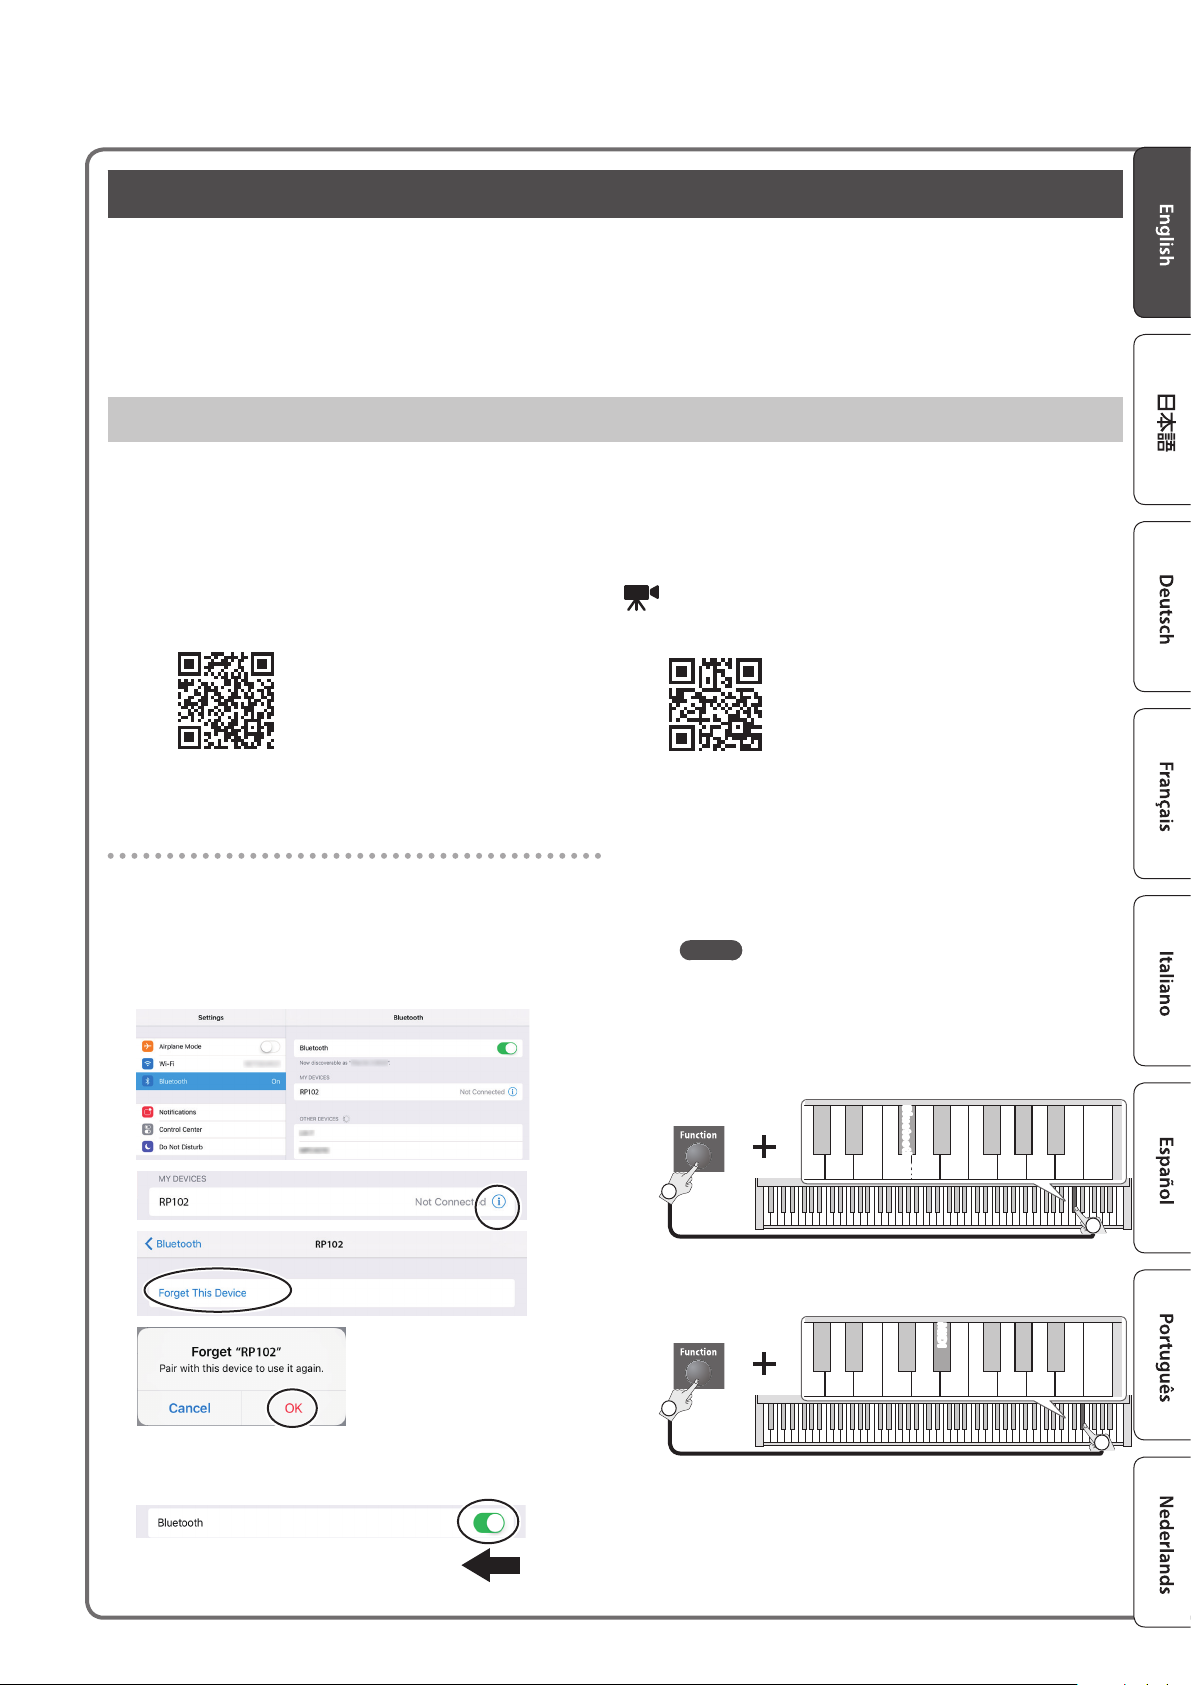
Connect an App on a Mobile Device
If you install an app on your smartphone, tablet, or other mobile device, and connect it via Bluetooth, you can use the app to view the
status of the RP102 on the large screen of your mobile device, and use the app to operate the RP102.
Here, we explain initial settings that let you use the Piano Partner 2 app to enjoy your RP102 even further, and that let you use the pedals of
the RP102 to control a page-turning app.
As an example, we’ll explain the settings when using an iPad.
If you’re using an Android device, refer to the owner’s manual of your unit for details on how to make settings for its Bluetooth functionality.
Piano Partner 2 – An App for Enjoying the RP102 Even More
You can connect your iPad or other tablet to the RP102 to enjoy your piano even more.
* Piano Partner 2 is an app made by Roland that supports iOS and Android.
It can display musical scores of the RP102’s internal songs, and lets you enjoyably boost your musical abilities through ear-training games.
Since it can take advantage of your tablet’s large screen, it’s easy to operate.
For details, refer to the following URL.
Piano Partner 2
http://roland.cm/pianopartner2
Quick Start Video
http://roland.cm/rp102
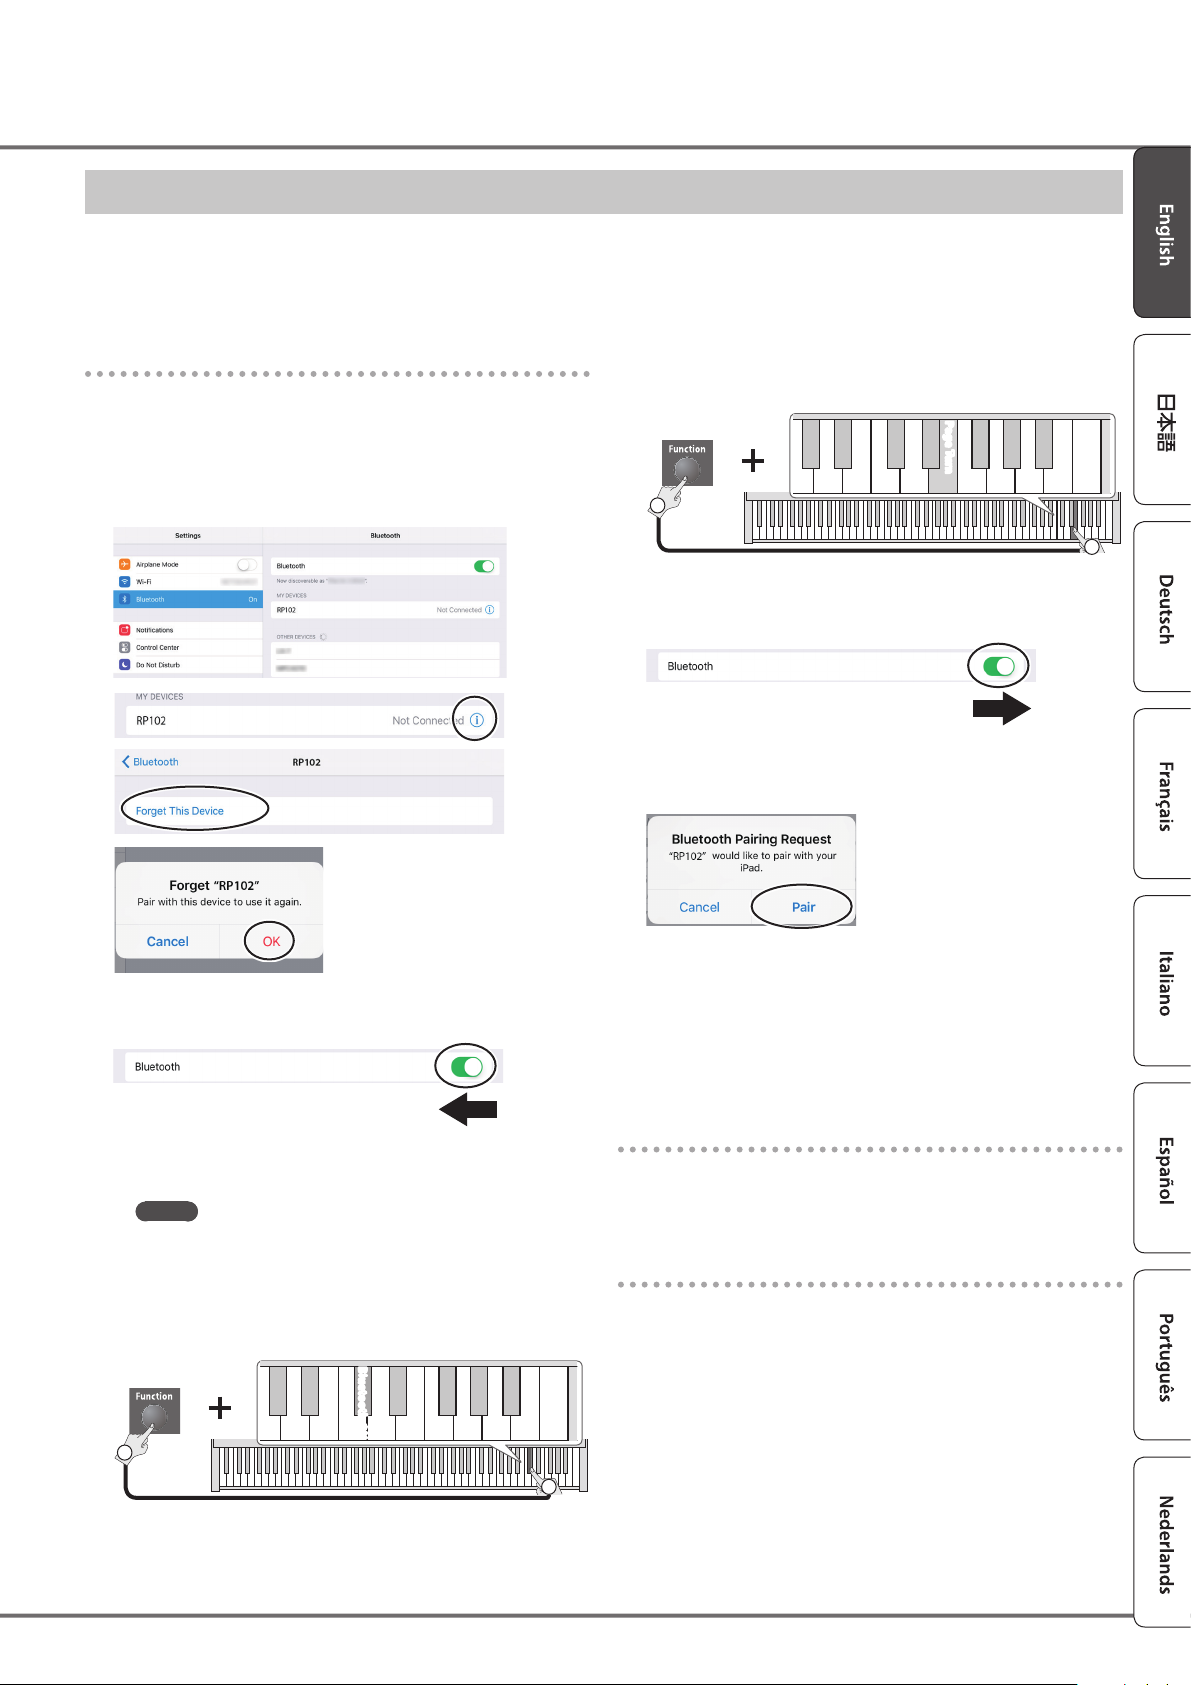
Making initial settings
1. If the RP102 has already been paired in the
Bluetooth settings of your mobile device, start by
clearing the pairing.
If the RP102’s device name is not shown, it has not been paired.
Proceed to the next step.
3. Place the mobile device in which you’ve installed
Piano Partner 2 near the RP102.
MEMO
If you have more than one unit of this model, power-on only
the unit that you want to pair (power-o the other units).
4. Power-on the RP102 and turn on its Bluetooth
function.
C7
Bluetooth ON
Hold down
1
2
5. Set the RP102’s Page Turn/MIDI function to “MIDI.”
C7
MIDI
Hold down
1
2. Turn o the Bluetooth function of your mobile
device.
2
7
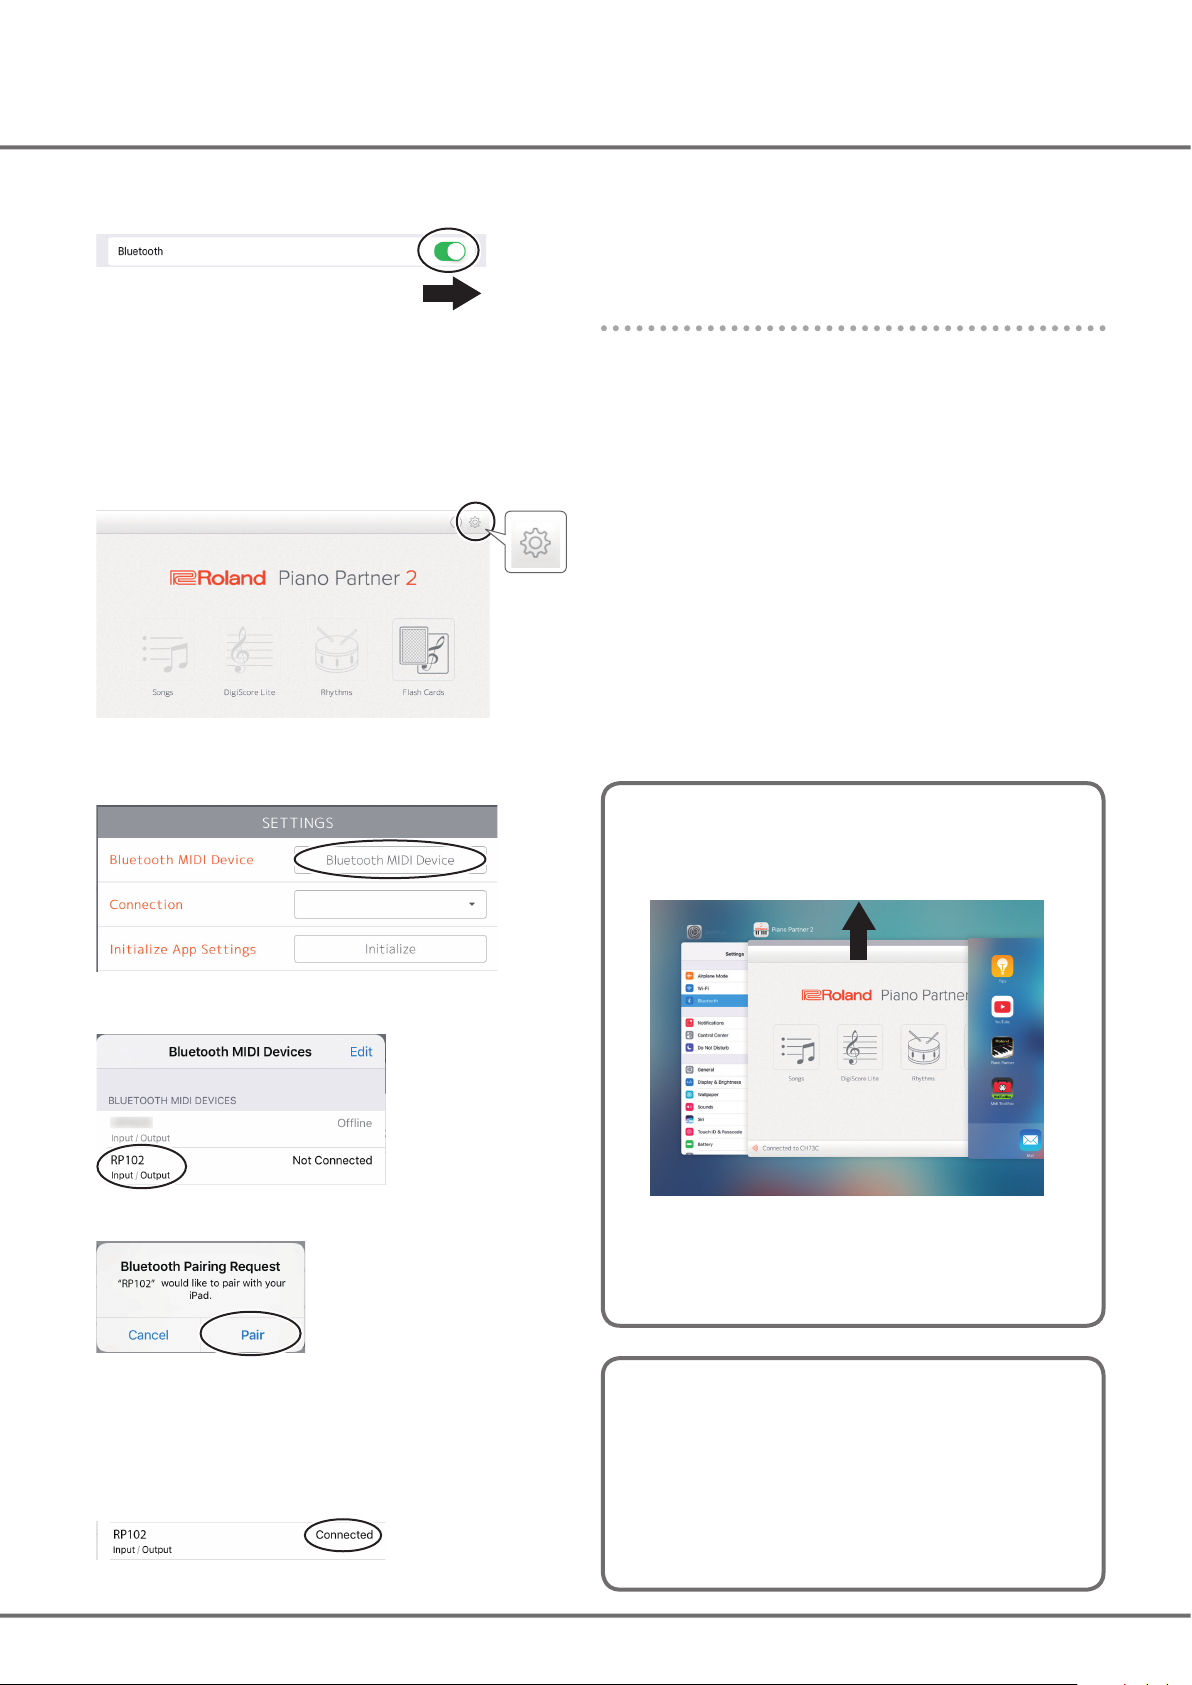
6. Turn on the Bluetooth function of your mobile
device.
11. Tap outside the “Bluetooth MIDI Devices” screen
to close it, and tap outside the “SETTINGS” screen to
close it.
Connecting the mobile device after completing the
initial settings
7. Start the Piano Partner 2 app that you installed on
your mobile device.
* The rst time that you start Piano Partner 2, make sure that
your mobile device is able to connect to the internet. If it can’t
connect to the internet, these settings can’t be completed.
8. Tap the gear icon in the upper right of the screen.
The “SETTINGS” screen opens.
9. Tap the box “Bluetooth MIDI Device.”
1. Perform steps 7-11 of “Making initial settings” (p. 7).
If you can’t connect to Piano Partner 2
In some cases, you can make the connection by closing Piano
Partner 2 and then performing steps 1–11 of “Making initial
settings” (p. 7)
10. When “RP102” appears, tap it.
If “Bluetooth Pairing Request” appears, tap “Pair.”
When pairing is successful, the RP102’s internal song data and
other data is downloaded via the internet to your mobile device.
* If your mobile device can’t connect to the internet, this cannot
be completed.
When the screen indicates “Connected,” the settings are complete.
Even if you press the home button or the back button, the
app closes without exiting, and continues in a standby state.
Double-click the home button, and swipe Piano Partner 2 to
the top.
Available on the Web
Apps made by Roland that can be used with the RP102 are
introduced at the following URL.
http://roland.cm/rp102_app
We’ve also posted video manuals of various products on
YouTube.
Roland Support Channel:
https://www.youtube.com/c/RolandSupportChannel/
8
Apps to Turn Pages Using the Pedals
When you’re practicing, you typically use your hand to turn the pages of the musical score while you play the keyboard.
If a music score app such as piaScore is installed on your iPad or other tablet connected to the RP102, you can use the pedals of the RP102 to
turn pages of the musical score without using your hands.
* piaScore is a music score viewing app for iOS made by Plussadd, Inc.
Making initial settings
1. If the RP102 has already been paired in the
Bluetooth settings of your mobile device, start by
clearing the pairing.
If the RP102’s device name is not shown, it has not been paired.
Proceed to the next step.
5. Set the RP102’s Page Turn/MIDI function to “Page
Turn.”
C7
Hold down
1
Page Turn
6. Turn on the Bluetooth function of your mobile
device.
7. In the display of your mobile device, tap “RP102.”
If “Bluetooth Pairing Request” appears, tap “Pair.”
2
2. Turn o the Bluetooth function of your mobile
device.
3. Place your mobile device with a music score viewing
app installed near the RP102.
MEMO
If you have more than one unit of this model, power-on only
the unit that you want to pair (power-o the other units).
4. Power-on the RP102 and turn on its Bluetooth
function.
C7
Bluetooth ON
Hold down
1
2
If the mobile device’s screen asks you to enter a “Pass Key,” enter
“0000” (four zeros).
When pairing is successful, the “RP102” is added to the “MY
DEVICES” list of your mobile device.
Connecting the mobile device after completing the
initial settings
1. Start the music score viewing app that’s installed on
your mobile device, and load a music score.
Turning pages
Press the sostenuto pedal (center pedal) to turn to the next page;
press the soft pedal (left pedal) to turn to the previous page.
If the keyboard is no longer shown on the mobile device
In some cases, depending on the mobile device app that you’re
using, the keyboard might stop being displayed (i.e., the keyboard
might become unavailable).
If you want the mobile device’s keyboard to be shown while you’re
using the page turning function, hold down this unit’s [Function]
button and press the volume (down) button.
To hide the mobile device’s keyboard, once again hold down the
[Function] button and press the volume (down) button.
9
 Loading...