

Thank you, and congratulations on your choice of the Roland RMP-3.
Before using this unit, carefully read the sections entitled: “USING THE UNIT SAFELY” and “IMPORTANT NOTES” (on another
leaflet). These sections provide important information concerning the proper operation of the unit. Additionally, in order to feel
assured that you have gained a good grasp of every feature provided by your new unit, Owner’s manual should be read in its
entirety. The manual should be saved and kept on hand as a convenient reference.
As shipped, the RMP-3’s battery is not installed. Please read “Preparations—Loading the Battery” and follow the
instructions to install the battery.
Copyright © 2005 ROLAND CORPORATION All rights reserved. No part of this publication may be reproduced in any form
without the written permission of ROLAND CORPORATION.
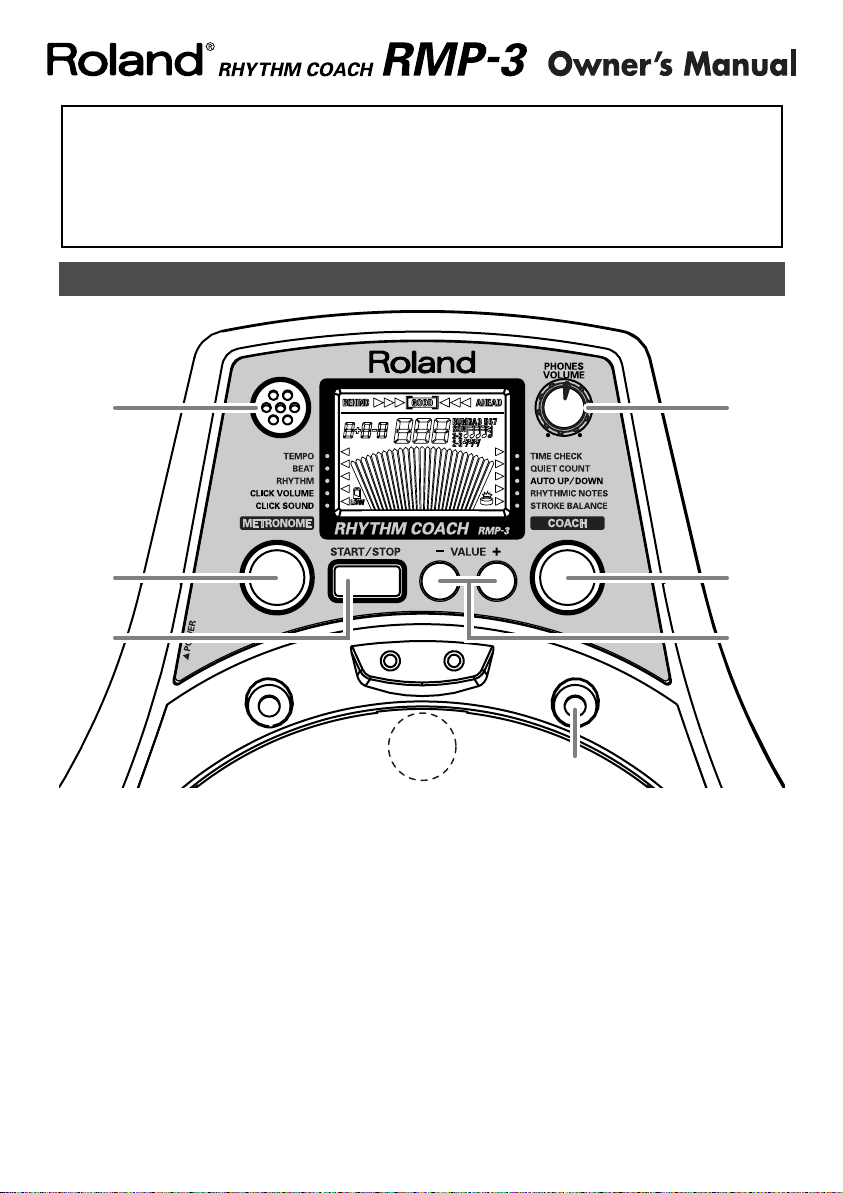
Panel Description
fig.Panel
1
2
3
8
1.
Mini Speaker
For the metronome’s beep sound only. If the
OUTPUT jack is being used, no sound is
output.
2.
[METRONOME] Button
Selects the metronome parameter.
3.
[START/STOP] Button
Starts and stops the metronome.
4.
PHONES VOLUME Knob
Adjusts the OUTPUT jack’s volume.
* The volume of the mini speaker is adjusted with CLICK
VOLUME.
5.
[COACH] Button
Selects the Coach mode.
7
9
10
6.
VALUE [+]/[-] Button
Use these buttons to change the values of
each parameter.
To increase the value rapidly, hold down [+]
and press [-]. To decrease the value rapidly,
hold down [-] and press [+].
7.
BEAT Indicator
Flashes along quarter notes.
Red indicator flashes on accent beats.
8.
Head
9.
Sensor
10.
Tuning Bolts
Adjusts the head tension.
4
5
6
– 1 –
C5100025 1RCC
2.
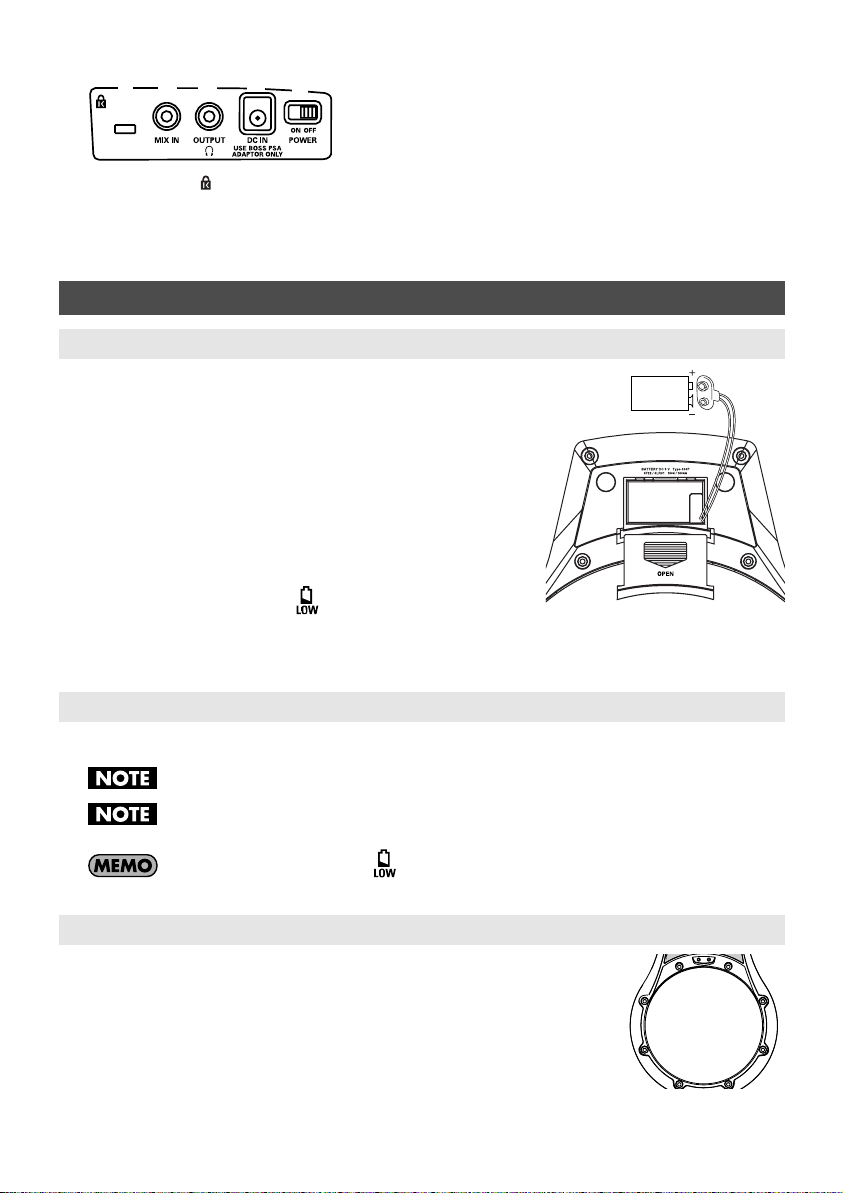
Side Panel
fig.Side
1
2
4
3
5
MIX IN Jack
For connecting an external audio source
(CD, MD, etc.) for playing along.
3.
OUTPUT Jack
For headphones, amp, or audio system.
* The RMP-3 outputs sounds in monaural.
1.
Security Slot ( )
http://www.kensington.com/
4.
AC Adaptor Jack
Connect the AC adaptor (optional) here.
5.
POWER Switch
Turns the power on/off.
Preparations
Loading the Battery
fig.BattCase.e_50
1.
Press down and slide off the lid of the battery compartment
(located on the bottom of the unit).
2.
Connect the snap cord to the battery, and place it inside the
battery compartment.
* Verify the battery’s polarity (+ versus -).
3.
Securely close the battery cover.
* Do not let the snap cord get caught in the battery compartment lid.
When to Change the Battery
The Battery LOW indicator ( ) at the lower left of the
display begins to flash when the battery power drops.
Insufficient battery power lowers the volume level of the mini speaker and causes unstable
operation. Replace the battery as soon as possible.
9V
Battery
Battery
Snap
Connecting the AC Adaptor
A BOSS PSA series AC adaptor (sold separately) can be used to power the RMP-3.
Turn off the power before connecting the AC adaptor.
Use only the BOSS PSA-series AC adaptor. Other adaptors may cause malfunction or damage
to the RMP-3 and must never be used.
The Battery LOW indicator ( ) flashes when the battery power drops while the AC
adaptor is used.
Adjusting the Head Tension
fig.Bolt
BEFORE playing the RMP-3, you must tune the head to your preferred
playing tension. The head is NOT tuned before shipping.
Always tighten the tuning bolts in the order shown in the figure.
* Failure to adjust the tension may result in damage to the head.
* Head tension may change with extended use. Make adjustments as needed.
– 2 –
1
8
63
45
7
2
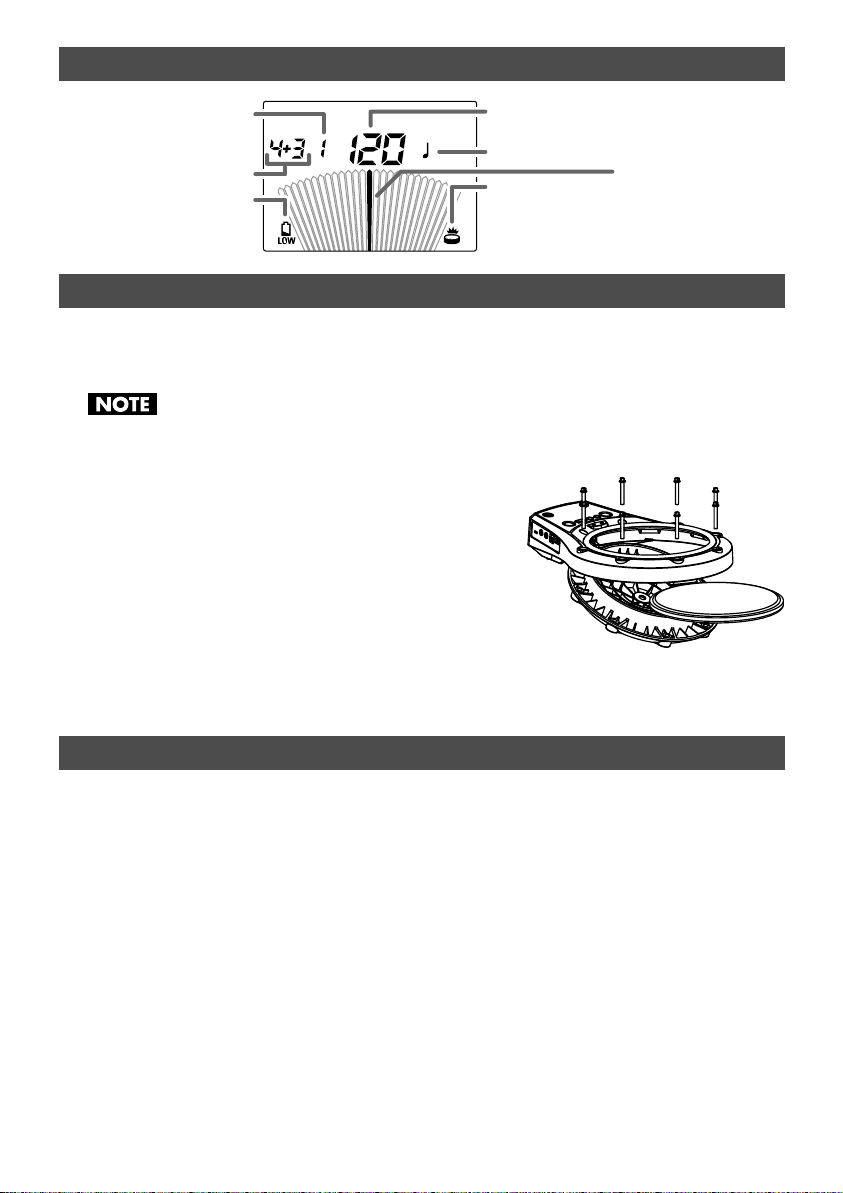
About the Display
fig.Display.e
Count
Tempo/Value
Rhythm Type
Beat
Battery LOW Indicator
Flashes when the battery
power drops.
Tr igger Indicator
Appears when the
head is struck.
Replacing the Head
If the head has been damaged or no longer maintains correct tension, replace it.
To order replacement heads (
the unit or the nearest Roland Service Center.
The MH-8 Mesh Head is not compatible and cannot be used.
Replacing the Head
When replacing or tuning, use the included tuning key.
fig.HeadChange
1.
Remove all tuning bolts.
Gradually loosen each one in order, turning them
counterclockwise.
* Do not lose the tuning bolts.
2.
Open the case, and then remove the old head.
3.
Place the new head in the case.
4.
Securely close the case.
5.
Attach all eight tuning bolts.
6.
Adjust the tension of the head. Refer to “Adjusting the Head Tension.”
RMP-3 Mesh Head
), contact the retailer from whom you purchased
Metronome Needle
Specifications
Pad Size
8 inches
Tempo
20–260
Beat
24 types
Rhythm Types
18 types
Metronome Sounds
5
Coach Mode
Functions: 5
Exercise Variations: 20
Connectors
PHONES/OUTPUT Jack: 1
(Stereo miniature phone type)
MIX IN Jack: 1 (Miniature phone type)
AC Adaptor Jack
Power Supply
DC 9 V:
Dry Battery 6F22/1604 (9 V) type
(carbon)
Dry Battery 6LR61/1604A (9 V) type
(alkaline)
AC Adaptor
Current Draw
55 mA
* Expected battery life under continuous use:
Carbon: 2 hours
Alkaline: 6 hours
These figures will vary depending on the
actual conditions of use.
Stand Screw Size
M8
Dimensions
263 (W) x 348 (D) x 78 (H) mm
10-3/8 (W) x 13-3/4 (D) x 3-1/8 (H)
inches
– 3 –
Weight
1.2 kg / 2 lbs 11 oz (including a battery)
Accessories
Dry Battery 6F22/1604 (9 V) type
(carbon)
Tuning Key
Owner’s Manual
Leaflet (“USING THE UNIT SAFELY”
and “IMPORTANT NOTES”)
Options
AC Adaptor: BOSS PSA series
Pad Stand: PDS-2
* In the interest of product improvement, the
specifications and/or appearance of this
unit are subject to change without prior
notice.
 Loading...