

Page 1
Model MPX-
Model MPX-60 Operation Guide
Page 2
METAZA Mechanical Operation
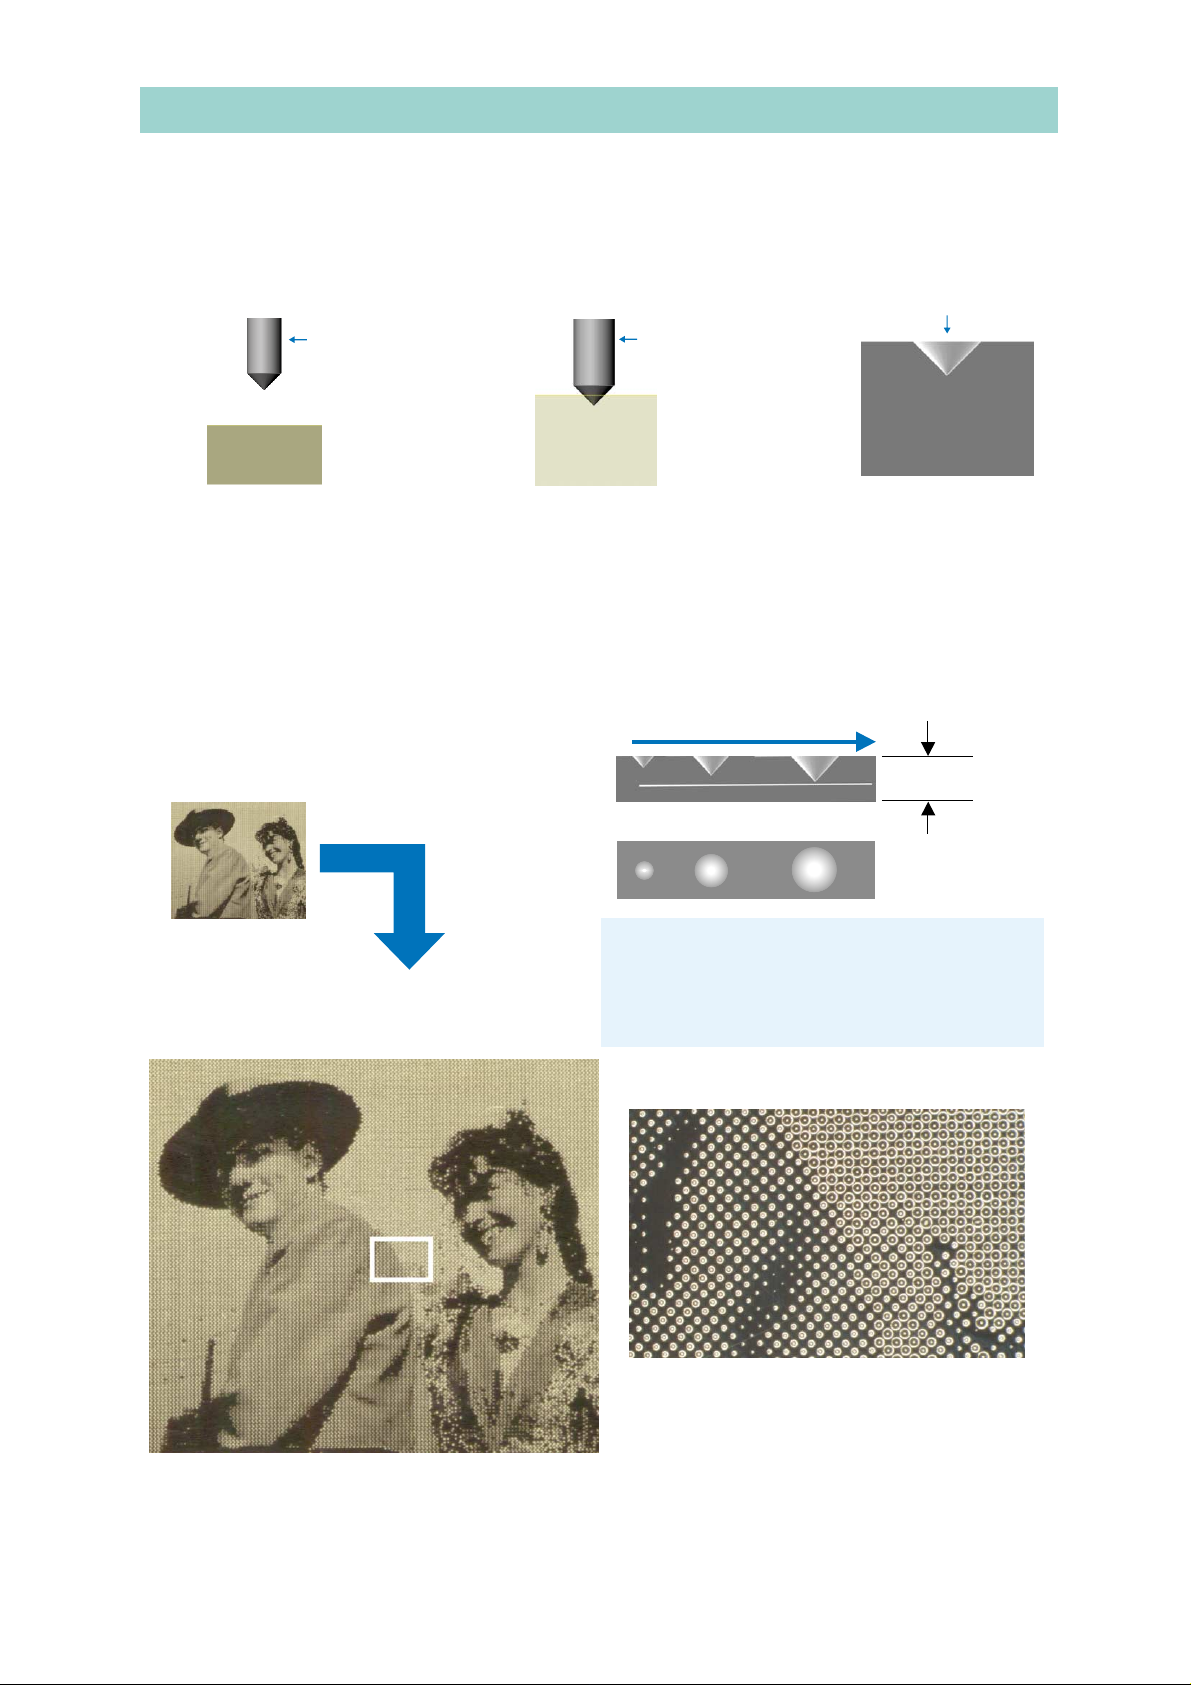
How METAZA marks dots on metal
METAZA impacts a conical diamond-tipped stylus onto a metallic surface to make a depression.
The areas with depressions look lighter than where there are none. These differences form an
image. (A depression = a dot.)
Depression
Diamond Tip
Metal
Metal
Diamond Tip
Metal
How METAZA creates tone
METAZA changes the size of a dot to create the tone of an image. (The stronger the impact, the
larger and deeper the depression will be.) METAZA varies the impact with a diamond tip so that
the image consists of smaller dots for darker areas and larger dots for brighter areas. METAZA
driver automatically controls the size of the impact. You can also change the size by adjusting the
settings as you wish.
Impact becomes larger
Dot depth
From the top
Each dot in the image below was impacted with the
diamond-tipped stylus. You can see larger dots in
brighter areas and smaller dots in the darker area.
(The black area with no dot is the surface color of
the metal reflecting darker.
Magnification
1
Page 3
Settings for the METAZA driver
Settings for the METAZA driver
Properties of the METAZA driver
Properties of the METAZA driver
Adjust the Brightness
Adjust the Brightness
Adjust the Contrast
Adjust the Contrast
Adjust the relationship between image and
Adjust the relationship between image and
impact.(Refer to ''The relationship between
impact.(Refer to ''The relationship between
image and impact below.)
image and impact below.)
Select the type of material
Select the type of material
(Default is brass)
(Default is brass)
Select the type of image:
Select the type of image:
Photo (default) – images like photos and illustrations having shades
Photo (default) – images like photos and illustrations having shades
Text – Images without having shades such as plain letters and logos whose contours you
Text – Images without having shades such as plain letters and logos whose contours you
Text – wish to be clear.
Text – wish to be clear.
*If your image has both, choose either mode for more important part.
*If your image has both, choose either mode for more important part.
The relationship between image and impact
The relationship between image and impact
Impact is the force used to depress metal with the diamond tip. Click the “Details” of the Material to
Impact is the force used to depress metal with the diamond tip. Click the “Details” of the Material to
change the values. The darkest point of the image is reproduced according to the value of MIN
change the values. The darkest point of the image is reproduced according to the value of MIN
impact. The whitest point of the image is reproduced according to the value of MAX impact. As
impact. The whitest point of the image is reproduced according to the value of MAX impact. As
the value of the impact increases, the entire image will be whiter. As the value of gamma is
the value of the impact increases, the entire image will be whiter. As the value of gamma is
changed, METAZA marks much darker (or much lighter) parts of the image with the same impact.
changed, METAZA marks much darker (or much lighter) parts of the image with the same impact.
You can see the relationship between impact and the shading of the image in the following graph.
You can see the relationship between impact and the shading of the image in the following graph.
Graph Explanation
Graph Explanation
MAX impact
The line in gamma = 1
The line in gamma = 1
Gamma = 0.5 (default)
Gamma = 0.5 (default)
Black White
Black White
MAX impact
MIN impact
MIN impact
At the upper range the blue line, the
At the upper range the blue line, the
contrast between darker and lighter
contrast between darker and lighter
parts of the image becomes stronger
parts of the image becomes stronger
and the entire image will be lighter
and the entire image will be lighter
(whitish).
(whitish).
The blue curve shows the relationship
The blue curve shows the relationship
of impact strength and the dark (light)
of impact strength and the dark (light)
point in the image.
point in the image.
e.g.
e.g.
Gentle curve: natural tone
Gentle curve: natural tone
Sharp curve: strong contrast and the
Sharp curve: strong contrast and the
entire image will be dark (white), etc.
entire image will be dark (white), etc.
2
2
2
Page 4

For Best Imprinting Results - Part 1
Loading a material
METAZA is a precision instrument. To obtain the best imprinting results, loading the workpiece
with care is very IMPORTANT. See User’s manual “Part 2 Performing Marking” for instructions
on how to mark materials.
1. Place the adhesive sheet and the material in the correct position
11111) Align the upper right corner of the adhesive sheet with the corner of the work table and set
1111 in place.
11112) Place the adhesive sheet on the work table so that the widest margin is in front (which is the
1111 screw side).
11113) Place the workpiece at the center of the work table where the grid lines cross in the middle.
*If the adhesive sheet is in the wrong position, you will not get a good result.
*If you are a first time user of the METAZA, try using the trial material included in the package
*first. Should the METAZA impact where it is not desired, refer to the User’s manual Part 5 “The
*marked position isn’t where desired” for details.
Yes
The wide margin
should be in front
No
The adhesive sheet is
placed front side back
on the work table.
The adhesive sheet is
not aligned with the
upper right corner of
the work table.
3
The workpiece is not
in the center of the
work table.
Page 5

Leveling the material
Press the material down with the Leveler very GENTLY. Great force is NOT necessary.
*Only about 1 kg maximum force is necessary to press down the leveler. Excessive force will have
a negative influence on the workpiece and the quality of imprinting.
Press down gently
(700 – 1000 gram
force) level.
Yes
Adjusting the base
Turn the knob slowly and gently. No excessive force is necessary.
Excessive force causes
the material to bend,
shift, etc.
No
Yes
Appropriate force
Base holds the workpiece level.
Excessive force
Base tilts and cannot hold the workpiece level.
No
The Adhesive Sheet
The adhesive sheet collects dust easily. Should the adhesive power become decreased, wash it
gently (don’t use a sponge or scrubbing brush) and dry naturally. The sheet will hold the workpiece
strongly again. (See the User’s manual Part 4, Maintenance.)
4
Page 6

For Best Imprinting Results - Part 2
Adjusting the image
To obtain the best imprinting quality, adjust gamma, brightnesss and contrast while looking at the
on-screen preview.
The on-screen preview displays an image for reference purposes only. The image in the preview
and your actual results may vary. If you are using METAZA for the first time, try the trial material
included in the package first.
How to adjust gamma, brightnesss and contrast
1. Open print preview from the File menu of Dr. METAZA. The preview will appear.
2. Use the control bar to adjust the image until you obtain the desired image. *If not familiar with
2. this operation, adjust the amount a little at a time while leaving the material loaded on the work
2. table.
Adjust one unit at a time: Gamma by 0.1 to 0.2, Brightness and Contrast by 1 to 2
Basic adjustments: Adjust gamma
Increase or decrease gamma by 0.1~0.2 units.
Advanced adjustments: Combine adjusting gamma, brightness and contrast.
There are various combinations available depending on the original photo image.
The brightness and contrast should be adjusted 1~2 units at a time.
After
Gamma increased
Before
Brightness decreased
Brightness increased
Contrast decreased
&
&
5
Page 7

Customizing Impact Values
Harder or softer materials
You can customize the impact values and register an item as a new material when the material is
harder or softer than the default values of Dr. METAZA2. Try your own settings if you are not
satisfied with the results even after adjusting the gamma, brightness and/or contrast values.
*Customized values are not reflected in the on-screen preview.
How to customize impact values
1) Open "Print Set Up" from the File menu.
2) Click "Properties" and then "Image Correction".
3) Select Set-a to -e and click "Details" of Material.
4) Increase or decrease the impact value by 10 units.
(Default impact value is MIN. 380, MAX. 540 for brass at Photo mode.)
5) Enter a name to register and click OK.
6) Return to the tag, Material and click on "Save settings". Enter a file name (***.txt) and save the
5) setting.
7) Click on the "Load Settings" of the Material tag when using this saved setting the next time.
Basic Adjustments: Change both MIN and MAX values
1. If the entire image is dark, the material may be too hard. Increase both MIN and MAX values by
1. 10 units while leaving the material loaded on the work table and impact it over again.
MIN600
MAX950
2. If the entire image is too light (whitish), replace the material, and then decrease both MIN and
2. MAX values.
MIN 610, 620, 630. . . .
MAX 960, 970, 980. . . .
Advanced adjustments: Change either MIN or MAX values to improve the
image impression.
If grayscale is too dark, increase MIN value only.
MIN600
MAX950
MIN 610, 620, 630. . . .
MAX 950
6
Page 8

Imprinting with the METAZA Driver when using commercially
available Drawing/Photo software:
Software Place to imprint
CorelDRAW® 9
Adobe
Adobe
*Imprinting results may vary depending on the application software used.
*Adjust data in application software while referring to the following illustrations.
®
Illustrator® 8.0
®
Photoshop® LE 5.0
On Screen:
Center
0.8mm upper left from the center
Center
®
CorelDRAW
9
Adobe
®
Illustrator® 8.0
Black Black
Where METAZA doesn't imprint
Results:
BlackBlack
Where METAZA imprints
 Loading...