

Page 1
Owner’s Manual
Before using this unit, carefully read the sections entitled: “IMPORTANT
SAFETY INSTRUCTIONS” (Owner’s Manual; p. 2), “USING THE UNIT
SAFELY” (Owner’s Manual; p. 4–5), and “IMPORTANT NOTES”
(Owner’s Manual; p. 6–7). These sections provide important information
concerning the proper operation of the unit. Additionally, in order to feel
assured that you have gained a good grasp of every feature provided by
your new unit, the Owner’s Manual, Screen Guide, and Appendices
should be read in its entirety. These manuals should be saved and kept
on hand as a convenient reference.
Copyright © 2006 ROLAND CORPORATION
All rights reserved. No part of this publication may be reproduced in any
form without the written permission of ROLAND CORPORATION.
Roland International Web Site: http://www.Roland.com
Page 2
INSTRUCTIONS
CAUTION
RISK OF ELECTRIC SHOCK
DO NOT OPEN
ATTENTION: RISQUE DE CHOC ELECTRIQUE NE PAS OUVRIR
CAUTION: TO REDUCE THE RISK OF ELECTRIC SHOCK,
DO NOT REMOVE COVER (OR BACK).
NO USER-SERVICEABLE PARTS INSIDE.
REFER SERVICING TO QUALIFIED SERVICE PERSONNEL.
The lightning flash with arrowhead symbol, within an
equilateral triangle, is intended to alert the user to the
presence of uninsulated “dangerous voltage” within the
product’s enclosure that may be of sufficient magnitude to
constitute a risk of electric shock to persons.
The exclamation point within an equilateral triangle is
intended to alert the user to the presence of important
operating and maintenance (servicing) instructions in the
literature accompanying the product.
INSTRUCTIONS PERTAINING TO A RISK OF FIRE, ELECTRIC SHOCK, OR INJURY TO PERSONS.
IMPORTANT SAFETY INSTRUCTIONS
SAVE THESE INSTRUCTIONS
WARNING - When using electric products, basic precautions should always be followed, including the following:
1. Read these instructions.
2. Keep these instructions.
3. Heed all warnings.
4. Follow all instructions.
5. Do not use this apparatus near water.
6. Clean only with a dry cloth.
7. Do not block any of the ventilation openings. Install in
accordance with the manufacturers instructions.
8. Do not install near any heat sources such as radiators,
heat registers, stoves, or other apparatus (including
amplifiers) that produce heat.
9. Do not defeat the safety purpose of the polarized or
grounding-type plug. A polarized plug has two blades with
one wider than the other. A grounding type plug has two
blades and a third grounding prong. The wide blade or the
third prong are provided for your safety. If the provided plug
does not fit into your outlet, consult an electrician for
replacement of the obsolete outlet.
WARNING:
IMPORTANT:
As the colours of the wires in the mains lead of this apparatus may not correspond with the coloured markings identifying
the terminals in your plug, proceed as follows:
The wire which is coloured GREEN-AND-YELLOW must be connected to the terminal in the plug which is marked by the
letter E or by the safety earth symbol or coloured GREEN or GREEN-AND-YELLOW.
The wire which is coloured BLUE must be connected to the terminal which is marked with the letter N or coloured BLACK.
The wire which is coloured BROWN must be connected to the terminal which is marked with the letter L or coloured RED.
THIS APPARATUS MUST BE EARTHED
THE WIRES IN THIS MAINS LEAD ARE COLOURED IN ACCORDANCE WITH THE FOLLOWING CODE.
GREEN-AND-YELLOW: EARTH, BLUE: NEUTRAL, BROWN: LIVE
For the U.K.
10. Protect the power cord from being walked on or pinched
particularly at plugs, convenience receptacles, and the
point where they exit from the apparatus.
11. Only use attachments/accessories specified
by the manufacturer.
12. Unplug this apparatus during lightning storms or when
unused for long periods of time.
13. Refer all servicing to qualified service personnel. Servicing
is required when the apparatus has been damaged in any
way, such as power-supply cord or plug is damaged, liquid
has been spilled or objects have fallen into the apparatus,
the apparatus has been exposed to rain or moisture, does
not operate normally, or has been dropped.
WARNING: To reduce the risk of fire or electric shock, do not expose this apparatus to rain or moisture.
M-2
MV-8800 Owner’s Manual
Page 3

Introduction
Checking the included items
The MV-8800 package contains the following items.
If any of the included items are missing, please contact a “Roland Service Center” or an “authorized Roland distributor” as
listed on the “Information” (p. 338).
❑
MV-8800
❑
AC cable
❑
Mouse
❑
Mouse pad
Checking the included itemsIntroduction
❑
Owner’s Manual
❑
Screen Guide
❑
Appendices
❑
Booklet “Content Discs”
(the document you are reading)
❑
Content Discs (CD-ROM)
The MV-8800 Contents CD-ROM contains the demo songs and
pre-installed patches. To use this data to restore the contents of
your hard disk, read the included booklet “MV-8800 Content
Discs.”
❑
Short pin
When the MV-8800 is shipped from the factory, a short pin is
installed in the PHONO jacks.
MV-8800 Owner’s Manual
M-3
Page 4
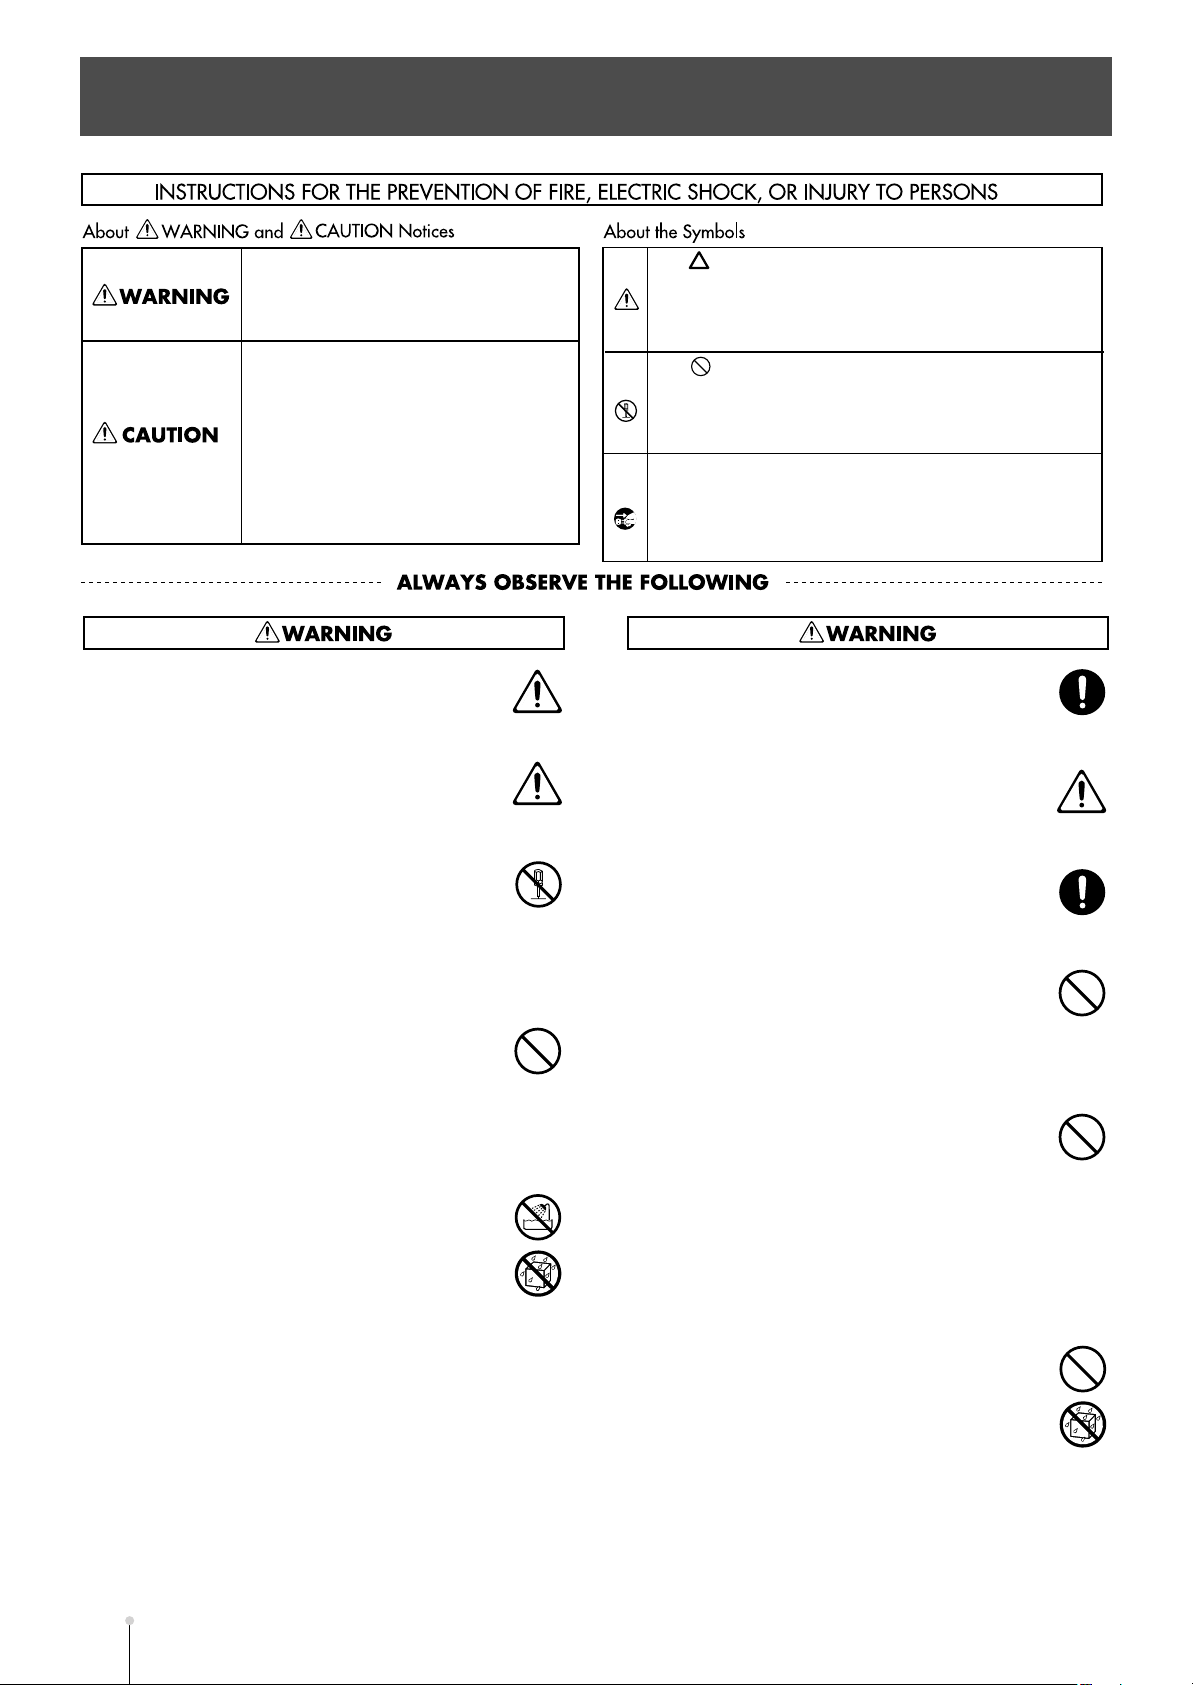
USING THE UNIT SAFELY
Used for instructions intended to alert
the user to the risk of death or severe
injury should the unit be used
improperly.
Used for instructions intended to alert
the user to the risk of injury or material
damage should the unit be used
improperly.
* Material damage refers to damage or
other adverse effects caused with
respect to the home and all its
furnishings, as well to domestic
animals or pets.
001
●
Before using this unit, make sure to read the
instructions below, and the Owner’s Manual.
..........................................................................................................
001-50
●
Connect mains plug of this model to a mains
socket outlet with a protective earthing
connection.
..........................................................................................................
002b
●
Do not open or perform any internal modifications
on the unit. (The only exception would be where
this manual provides specific instructions which
should be followed in order to put in place
user-installable options; see p. 323–324,
p. 325–326.)
..........................................................................................................
003
●
Do not attempt to repair the unit, or replace parts
within it (except when this manual provides
specific instructions directing you to do so). Refer
all servicing to your retailer, the nearest Roland
Service Center, or an authorized Roland
distributor, as listed on the “Information” page.
..........................................................................................................
004
●
Never use or store the unit in places that are:
❍
Subject to temperature extremes (e.g., direct
sunlight in an enclosed vehicle, near a heating
duct, on top of heat-generating equipment); or
are
❍
Damp (e.g., baths, washrooms, on wet floors);
or are
❍
Humid; or are
❍
Exposed to rain; or are
❍
Dusty; or are
❍
Subject to high levels of vibration.
..........................................................................................................
The symbol alerts the user to important instructions
or warnings.The specific meaning of the symbol is
determined by the design contained within the triangle.
In the case of the symbol at left, it is used for general
cautions, warnings, or alerts to danger.
The symbol alerts the user to items that must never
be carried out (are forbidden). The specific thing that
must not be done is indicated by the design contained
within the circle. In the case of the symbol at left, it
means that the unit must never be disassembled.
The ● symbol alerts the user to things that must be
carried out. The specific thing that must be done is
indicated by the design contained within the circle. In
the case of the symbol at left, it means that the powercord plug must be unplugged from the outlet.
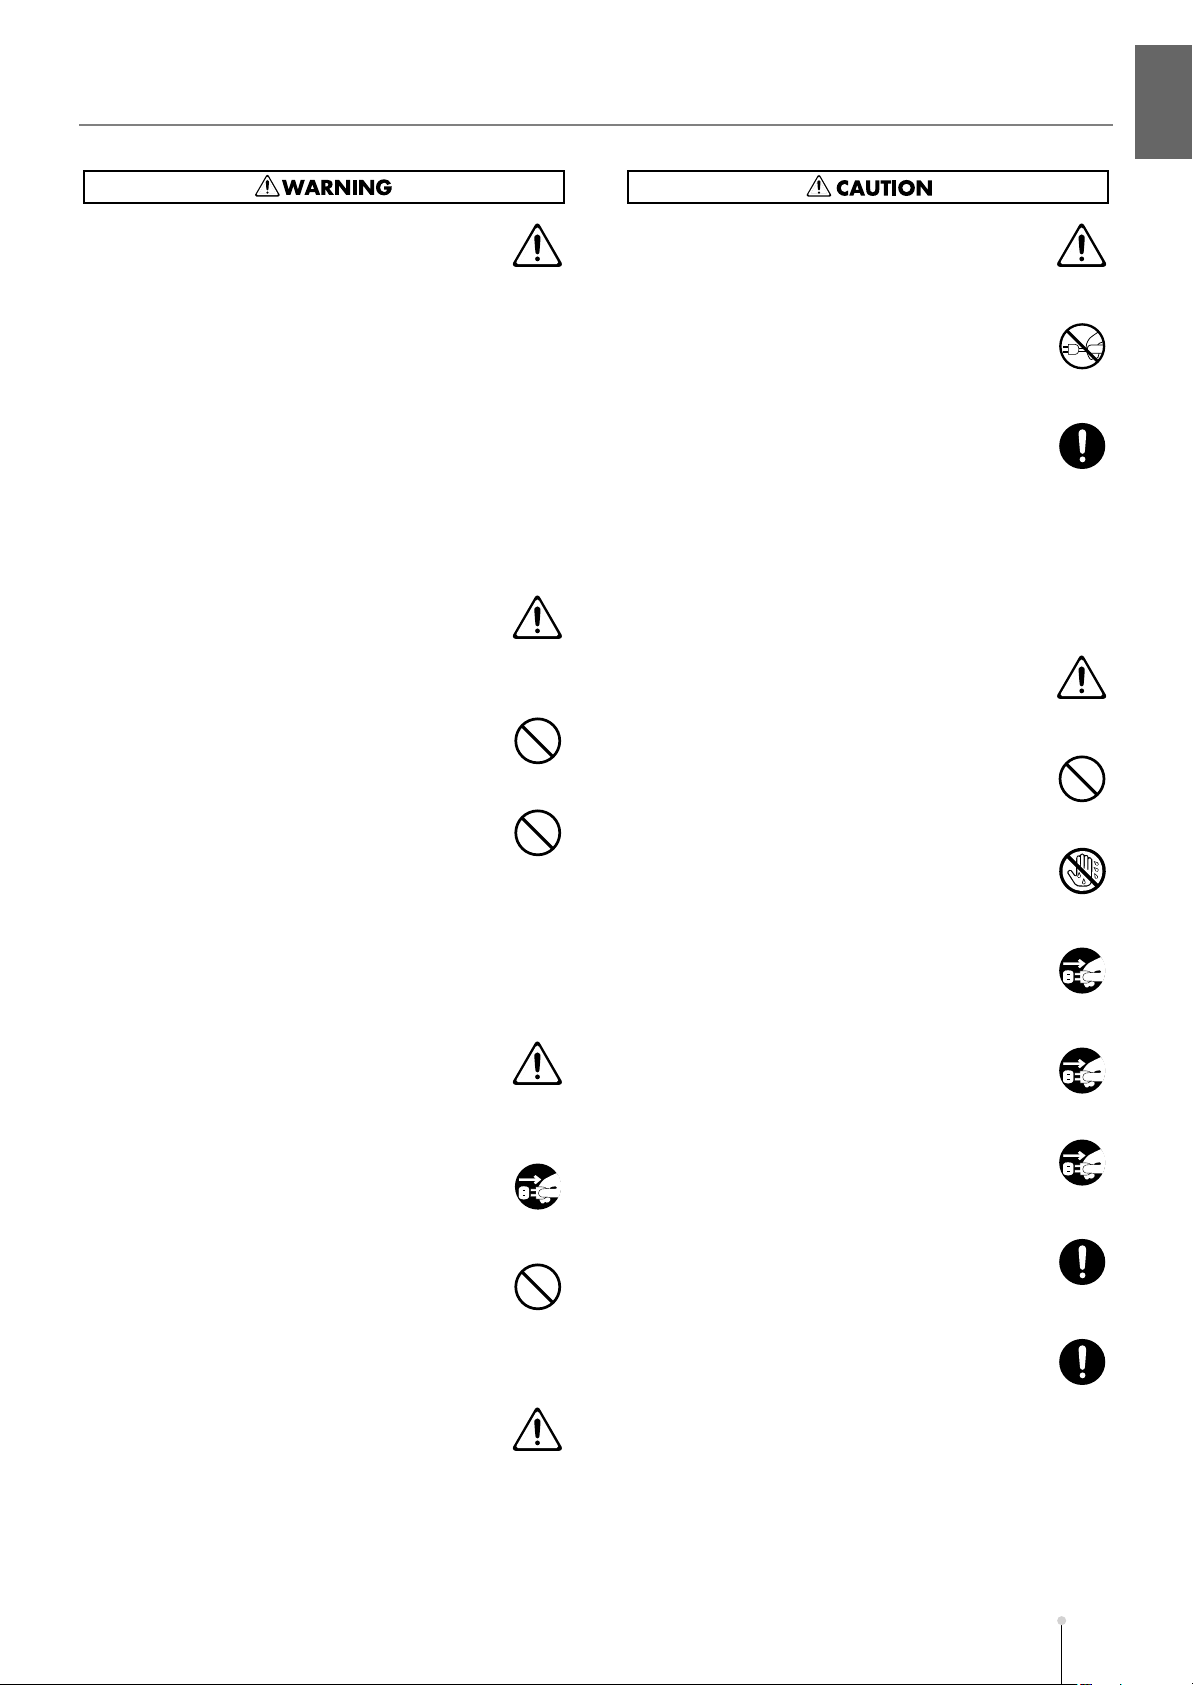
007
●
Make sure you always have the unit placed so it is
level and sure to remain stable. Never place it on
stands that could wobble, or on inclined surfaces.
..........................................................................................................
008a
●
The unit should be connected to a power supply
only of the type described in the operating instructions, or as marked on the rear side of unit.
..........................................................................................................
008e
●
Use only the attached power-supply cord. Also,
the supplied power cord must not be used with
any other device.
..........................................................................................................
009
●
Do not excessively twist or bend the power cord,
nor place heavy objects on it. Doing so can
damage the cord, producing severed elements
and short circuits. Damaged cords are fire and
shock hazards!
..........................................................................................................
010
●
This unit, either alone or in combination with an
amplifier and headphones or speakers, may be
capable of producing sound levels that could
cause permanent hearing loss. Do not operate for
a long period of time at a high volume level, or at
a level that is uncomfortable. If you experience
any hearing loss or ringing in the ears, you should
immediately stop using the unit, and consult an
audiologist.
..........................................................................................................
011
●
Do not allow any objects (e.g., flammable
material, coins, pins); or liquids of any kind (water,
soft drinks, etc.) to penetrate the unit.
..........................................................................................................
M-4
MV-8800 Owner’s Manual
Page 5
USING THE UNIT SAFELY
USING THE UNIT SAFELYIntroduction
012a
●
Immediately turn the power off, remove the power
cord from the outlet, and request servicing by your
retailer, the nearest Roland Service Center, or an
authorized Roland distributor, as listed on the
“Information” page when:
❍
The power-supply cord, or the plug has been
damaged; or
❍
If smoke or unusual odor occurs
❍
Objects have fallen into, or liquid has been
spilled onto the unit; or
❍
The unit has been exposed to rain (or
otherwise has become wet); or
❍
The unit does not appear to operate normally or
exhibits a marked change in performance.
..........................................................................................................
013
●
In households with small children, an adult should
provide supervision until the child is capable of
following all the rules essential for the safe
operation of the unit.
..........................................................................................................
014
●
Protect the unit from strong impact.
(Do not drop it!)
..........................................................................................................
015
●
Do not force the unit’s power-supply cord to share
an outlet with an unreasonable number of other
devices. Be especially careful when using
extension cords—the total power used by all
devices you have connected to the extension
cord’s outlet must never exceed the power rating
(watts/amperes) for the extension cord. Excessive
loads can cause the insulation on the cord to heat
up and eventually melt through.
..........................................................................................................
016
●
Before using the unit in a foreign country, consult
with your retailer, the nearest Roland Service
Center, or an authorized Roland distributor, as
listed on the “Information” page.
..........................................................................................................
022a
●
Always turn the unit off and unplug the power cord
before attempting installation of the circuit board
(DIMM; p. 324, p. 326).
..........................................................................................................
023
●
DO NOT play a CD-ROM disc on a conventional
audio CD player. The resulting sound may be of a
level that could cause permanent hearing loss.
Damage to speakers or other system components
may result.
..........................................................................................................
026
●
Do not put anything that contains water (e.g.,
flower vases) on this unit. Also, avoid the use of
insecticides, perfumes, alcohol, nail polish, spray
cans, etc., near the unit. Swiftly wipe away any
liquid that spills on the unit using a dry, soft cloth.
..........................................................................................................
101a
●
The unit should be located so that its location or
position does not interfere with its proper ventilation.
..........................................................................................................
102b
●
Always grasp only the plug on the power-supply
cord when plugging into, or unplugging from, an
outlet or this unit.
..........................................................................................................
103a
●
At regular intervals, you should unplug the power
plug and clean it by using a dry cloth to wipe all
dust and other accumulations away from its
prongs. Also, disconnect the power plug from the
power outlet whenever the unit is to remain
unused for an extended period of time. Any
accumulation of dust between the power plug and
the power outlet can result in poor insulation and
lead to fire.
..........................................................................................................
104
●
Try to prevent cords and cables from becoming
entangled. Also, all cords and cables should be
placed so they are out of the reach of children.
..........................................................................................................
106
●
Never climb on top of, nor place heavy objects on
the unit.
..........................................................................................................
107b
●
Never handle the power cord or its plugs with wet
hands when plugging into, or unplugging from, an
outlet or this unit.
..........................................................................................................
108a
●
Before moving the unit, disconnect the power plug
from the outlet, and pull out all cords from external
devices.
..........................................................................................................
109a
●
Before cleaning the unit, turn off the power and
unplug the power cord from the outlet.
..........................................................................................................
110a
●
Whenever you suspect the possibility of lightning
in your area, pull the plug on the power cord out of
the outlet.
..........................................................................................................
115a
●
Install only the specified circuit board(s) (DIMM).
Remove only the specified screws (p. 324,
p. 326).
..........................................................................................................
118a
●
Should you remove any screws (for the bottom
cover, option cover, and grounding terminal) and
short pin (for the PHONO jacks), keep them in a
safe place out of children’s reach, so there is no
chance of them being swallowed accidentally.
..........................................................................................................
MV-8800 Owner’s Manual
M-5
Page 6

INPORTANT NOTES
In addition to the items listed under “IMPORTANT SAFETY INSTRUCTIONS” and “USING THE UNIT SAFELY” on pages 2
and 4–5, please read and observe the following:
355b
●
When moved from one location to another where the
301
●
Do not connect this unit to same electrical outlet that is
being used by an electrical appliance that is controlled by
an inverter (such as a refrigerator, washing machine,
microwave oven, or air conditioner), or that contains a
motor. Depending on the way in which the electrical
appliance is used, power supply noise may cause this unit
to malfunction or may produce audible noise. If it is not
practical to use a separate electrical outlet, connect a
power supply noise filter between this unit and the
electrical outlet.
307
●
Before connecting this unit to other devices, turn off the
power to all units. This will help prevent malfunctions
and/or damage to speakers or other devices.
308
Although the LCD and LEDs are switched off when the
●
POWER switch is switched off, this does not mean that the
unit has been completely disconnected from the source of
power. If you need to turn off the power completely, first
turn off the POWER switch, then unplug the power cord
from the power outlet. For this reason, the outlet into which
you choose to connect the power cord’s plug should be
one that is within easy reach and readily accessible.
351
●
Using the unit near power amplifiers (or other equipment
containing large power transformers) may induce hum. To
alleviate the problem, change the orientation of this unit; or
move it farther away from the source of interference.
352a
●
This device may interfere with radio and television
reception. Do not use this device in the vicinity of such
receivers.
352b
●
Noise may be produced if wireless communications
devices, such as cell phones, are operated in the vicinity
of this unit. Such noise could occur when receiving or
initiating a call, or while conversing. Should you
experience such problems, you should relocate such
wireless devices so they are at a greater distance from
this unit, or switch them off.
***
●
Observe the following when using the unit’s CD-R/RW
drive. For further details, refer to “Cautions when using the
CD-R/RW drive” (p. 30).
❍
Install the unit on a solid, level surface.
❍
Do not move the unit or subject it to vibration while the
drive is operating.
354a
●
Do not expose the unit to direct sunlight, place it near
devices that radiate heat, leave it inside an enclosed
vehicle, or otherwise subject it to temperature extremes.
Excessive heat can deform or discolor the unit.
360
●
Depending on the material and temperature of the surface
on which you place the unit, its rubber feet may discolor or
mar the surface.\nYou can place a piece of felt or cloth
under the rubber feet to prevent this from happening. If
you do so, please make sure that the unit will not slip or
move accidentally.
temperature and/or humidity is very different, water
droplets (condensation) may form inside the unit. Damage
or malfunction may result if you attempt to use the unit in
this condition. Therefore, before using the unit, you must
allow it to stand for several hours, until the condensation
has completely evaporated.
401a
●
For everyday cleaning wipe the unit with a soft, dry cloth
or one that has been slightly dampened with water. To
remove stubborn dirt, use a cloth impregnated with a mild,
non-abrasive detergent. Afterwards, be sure to wipe the
unit thoroughly with a soft, dry cloth.
402
●
Never use benzine, thinners, alcohol or solvents of any
kind, to avoid the possibility of discoloration and/or
deformation.
552
●
Unfortunately, it may be impossible to restore the contents
of data that was stored on a CD-R/RW disc once it has
been lost. Roland Corporation assumes no liability
concerning such loss of data.
553
●
Use a reasonable amount of care when using the unit’s
buttons, sliders, or other controls; and when using its jacks
and connectors. Rough handling can lead to malfunctions.
554
●
Never strike or apply strong pressure to the display.
556
●
When connecting / disconnecting all cables, grasp the
connector itself—never pull on the cable. This way you will
avoid causing shorts, or damage to the cable’s internal
elements.
557
●
A small amount of heat will radiate from the unit dur
M-6
MV-8800 Owner’s Manual
Page 7

Handling Hard Disks
Important Performance and Image Data
811
●
Once a hard disk fails to function normally, all data that
has been stored on it could be destroyed.
All hard disks eventually wear out.
you consider the hard disk not as a permanent storage
site, but as a place to store data temporarily. We also
recommend that you back up important performance and
image data that cannot be recorded again onto the
external media that is supported by your device. For
instructions on how to make such backups, refer to the
owner’s manual for your device.
Note that Roland assumes no liability whatsoever,
including monetary compensation, for the loss of any
recorded content in the event of the malfunction of, or
physical damage to the hard disk, or for any direct or
incidental damages resulting from the loss of such data.
Precautions Regarding Setup and Use
812
●
Certain hard disk setup procedures and usage conditions
may result in the corruption of recorded data,
malfunctioning, or physical damage to the disk, so be sure
to observe the following precautions.
❍
Do not subject the hard disk to vibration or shock,
especially while the unit is in operation.
❍
Do not set up the unit in any location where it may be
affected by vibration from external sources, or on any
surface that is not stable and level.
❍
If the device includes a cooling fan, ensure that the fan
and the side panel air vents remain unobstructed.
❍
Do not leave the unit in any environment subject to
temperature extremes; for example, in a closed
automobile in summer or outdoors during winter.
❍
Do not use the unit in conditions of high temperature
and humidity or in any location subject to rapid
temperature changes.
❍
Do not unplug the power cord or switch off any circuit
breakers in the circuit to which the unit is connected
while the power is turned on.
❍
Do not move the unit while the power is turned on or
immediately after turning off the power. When
transporting the unit, first turn off the power and
confirm that the display screen has gone off,
disconnect the power plug, then wait at least two
minutes before moving the device.
We recommend that
INPORTANT NOTES
Emergency Procedures
813
The following procedures are to be used as
emergency measures only, and are not recommended
for normal operation.
●
If the device fails to respond to operational commands or
does not complete operations, turn off the power. If the
power does not shut off following normal shutdown
procedures, disconnect the power plug.
If the unit does not operate normally when the power is
turned on again, it may mean that the hard disk has been
damaged. In such instances, consult your dealer or the
nearest Roland Service Center. Note, however, that it may
not be possible to recover any data from the hard disk
once it has been lost.
If your device features drive check capabilities, use the
drive check function to regularly confirm that there are no
problems, even when the device is operating normally.
For more detailed information on the shutdown and drive
check procedures, refer to the Owner’s Manual.
Copyright
851
●
Recording, duplication, distribution, sale, lease,
performance, or broadcast of copyrighted material
(musical works, visual works, broadcasts, live
performances, etc.) belonging to a third party in part or in
whole without the permission of the copyright owner is
forbidden by law.
852
●
This product can be used to record or duplicate audio or
visual material without being limited by certain
technological copy-protection measures. This is due to the
fact that this product is intended to be used for the
purpose of producing original music or video material, and
is therefore designed so that material that does not
infringe copyrights belonging to others (for example, your
own original works) can be recorded or duplicated freely.
853
●
Do not use this unit for purposes that could infringe on a
copyright held by a third party. We assume no
responsibility whatsoever with regard to any infringements
of third-party copyrights arising through your use of this
unit.
INPORTANT NOTESIntroduction
204
* Microsoft and Windows are registered trademarks of Microsoft Corporation.
206j
* Windows® is known officially as: “Microsoft® Windows® operating system.”
207
* Apple and Macintosh are registered trademarks of Apple Computer, Inc.
209
* Mac OS is a trademark of Apple Computer, Inc.
***
* Dolby is a registered trademark of Dolby Laboratories.
***
* DTS is a registered trademark of Digital Theater Systems, Inc.
***
* ADAT is a registered trademark of Alesis Corporation.
***
* The Akai MPC2000 and MPC2000XL is a product manufactured by Akai Professional M.I. Corporation.
220
* All product names mentioned in this document are trademarks or registered trademarks of their respective owners.
MV-8800 Owner’s Manual
M-7
Page 8

Main features
Unifying the entire music production process
The MV-8800 contains a sampler, sequencer, effect processor, mastering functionality, and music CD-burning
functionality, unifying the entire music production process; collecting materials ➔ creating your song ➔
completing a final master.
●
Sampler section featuring high capacity, a broad range of file import capability,
and synthesis functionality
•
High-capacity sampling
The sampler section at the heart of the MV-8800 features 64 voices of simultaneous polyphony. The unit is
shipped with 128 MB of sampling memory that allows a maximum of approximately 24 minutes of sampling
(monaural). You can add commercially-available DIMM memory to expand the memory (maximum 512 MB).
•
Broad range of file import capability
You can acquire musical material not just by sampling/resampling, but also by importing files from the internal
CD-R/RW drive, from the USB. Numerous formats are supported, including Roland S-700 series, Akai
MPC2000(XL), Akai S1000/3000, WAV/AIFF, and music CD.
•
Powerful synthesis functionality
Materials obtained by sampling/resampling/importing can be processed by a variety of powerful editing
functionality such as Chop, Time Stretch, and Normalize. The MV-8800 also provides sophisticated filtering,
envelope, and LFO sound parameters taken from Roland’s line of synthesizers.
●
Newly developed sequencer that unifies MIDI and audio
•
Newly-developed sequencer
The MV-8800 comes with a newly developed sequencer that seamlessly handles MIDI and audio, and also
lets you create songs by placing patterns in the desired order. A variety of editing functionality is also provided,
including piano-roll and drum-grid editing.
•
Audio tracks with BPM Sync
The eight stereo audio tracks work in tandem with the sampler section, and allow you to directly record vocals
or acoustic instruments while the sequencer runs. BPM Sync functionality lets you synchronize the tempo
without affecting the pitch of the recorded phrases.
•
MIDI tracks that can also control external MIDI devices
The 128 MIDI tracks provide a Play Quantize function that corrects the timing during playback without
modifying the data that you actually input. The performance data can be sent not only to the internal sampler
section, but also from two MIDI outputs.
You can also use piano roll, event list and drum grid editing in both the large LCD screen and external VGA
display.
•
Pattern-based music production
You can easily create new songs by combining patterns of several measures.
•
Large velocity pads
The sixteen large velocity pads respond to both velocity and aftertouch, giving you fingertip control over subtle
performance nuances. There’s a Roll function, and a Multi Level function that lets you assign a single sample
to the sixteen pads at sixteen different velocity levels.
M-8
MV-8800 Owner’s Manual
Page 9

Main features
●
Three effect processors
Main featuresIntroduction
MV-8800 Owner’s Manual
M-9
Page 10

Contents
Introduction
........................................................................................................................................ 3
Checking the included items .......................................................................................................... 3
USING THE UNIT SAFELY............................................................................................................... 4
INPORTANT NOTES ........................................................................................................................ 6
Main features.................................................................................................................................... 8
Panel descriptions......................................................................................................................... 18
Top Panel ...............................................................................................................................................18
Rear Panel..............................................................................................................................................23
CD-RW Drive (Front Panel)....................................................................................................................25
Preparing your equipment and making connections................................................................. 26
Turning on the power .................................................................................................................... 28
Turning off the power..............................................................................................................................29
Using the CD-R/RW drive.............................................................................................................. 30
Recommended discs ..............................................................................................................................31
Inserting a disc .......................................................................................................................................31
If the disc tray fails to open.....................................................................................................................31
Basic operations............................................................................................................................ 32
Moving the cursor ...................................................................................................................................32
Editing the value of a parameter.............................................................................................................32
Using the F (function) buttons ................................................................................................................32
Using the SHIFT button ..........................................................................................................................33
Inputting text...........................................................................................................................................33
To zoom-in/zoom-out the waveform display...........................................................................................34
Stopping the output of the sampler.........................................................................................................34
Velocity pad operations ................................................................................................................ 35
Performing with the velocity pads...........................................................................................................35
Switching a pad bank .............................................................................................................................36
Naming a pad bank ................................................................................................................................37
Fixed Velocity function............................................................................................................................37
Multilevel function ...................................................................................................................................37
Hold function...........................................................................................................................................38
Roll function............................................................................................................................................38
Quick Start
........................................................................................................................................ 39
Listening to the demo songs........................................................................................................ 39
Loading a project....................................................................................................................................39
Start playback the demo song................................................................................................................40
About the demo songs............................................................................................................................40
Using the velocity pads................................................................................................................. 41
Performing instrument sounds................................................................................................................41
Performing audio phrases ......................................................................................................................42
Creating a song.............................................................................................................................. 43
Recording a pattern................................................................................................................................43
Saving a project......................................................................................................................................45
Assembling additional materials.................................................................................................. 46
Importing sound from an audio CD.........................................................................................................46
Sampling sounds using a mic.................................................................................................................48
Try using the various functions ................................................................................................... 50
M-10
MV-8800 Owner’s Manual
Page 11

Contents
Introduction Master Index
1—An overview of the MV-8800
Basic structure............................................................................................................................... 51
Sampler structure .......................................................................................................................... 52
Mixer structure............................................................................................................................... 55
Effect structure .............................................................................................................................. 56
Sequencer structure...................................................................................................................... 57
Data structure ................................................................................................................................ 59
About modes.................................................................................................................................. 61
2—Importing data
Loading the pre-installed patches ...............................................................................................63
Importing the WAV or AIFF files................................................................................................... 65
Options when importing..........................................................................................................................67
Importing from an audio CD ......................................................................................................... 70
The options during import.......................................................................................................................72
Loading sound libraries of other model ...................................................................................... 73
Auditioning or previewing before you import ..........................................................................................74
Playing the imported data immediately (Quick Assign)............................................................. 75
Assigning a sample to a patch................................................................................................................75
Assigning a sample to an audio phrase..................................................................................................75
Assigning a patch by chopping a sample ...............................................................................................76
Assigning multiple samples to a patch ...................................................................................................77
Assign multiple samples as audio phrases.............................................................................................78
Importing SMF (Standard MIDI File) data .................................................................................... 79
Loading audio phrases from the hard disk ................................................................................. 80
Loading effect settings from the hard disk ................................................................................. 81
........................................................................................................................ 63
......................................................................................... 51
Quick Start
1
2
3
4
5
6
7
8
9
10
11
12
3—Sampling
Making initial settings for sampling............................................................................................. 83
Sampling......................................................................................................................................... 84
Advanced sampling ................................................................................................................................88
Applying effects while you sample..........................................................................................................88
4—Making Instrument settings
Assigning the patch to a part ....................................................................................................... 89
Making instrument settings .......................................................................................................... 90
About maximum polyphony and Voice Reserve.....................................................................................91
Limit the performance data received by a part ........................................................................... 92
Copying the settings of a part to a different part ....................................................................... 93
Initializing the settings of a part................................................................................................... 94
5—Creating a patch
Making a patch settings ................................................................................................................ 95
Naming a patch ......................................................................................................................................97
Registration a patch in the patch library .................................................................................................97
Loading a patch from the patch library ...................................................................................................98
Saving a patch to the hard disk ..............................................................................................................99
Loading a patch from the hard disk ......................................................................................................100
Deleting the patch.................................................................................................................................101
Deleting a sample that’s used by more than one partial / audio phrase / audio event .........................101
.................................................................................................................................... 83
.......................................................................................... 89
.................................................................................................................... 95
13
14
15
16
17
18
19
20
21
22
23
MV-8800 Owner’s Manual
M-11
Page 12

Contents
Making a partial settings............................................................................................................. 102
To adjust the pitch ................................................................................................................................104
To adjust the brightness of the sound by filter......................................................................................104
To adjust the way in which the volume changes ..................................................................................104
To add modulation to the sound...........................................................................................................104
Making a sample settings .....................................................................................................................105
Finding a zero-cross point ....................................................................................................................106
Playing multiple samples together........................................................................................................106
Naming a partial ...................................................................................................................................107
Copying a partial...................................................................................................................................107
Deleting the partial................................................................................................................................108
Deleting a sample that’s used by more than one partial / audio phrase / audio event .........................108
Changing the assignment of partials ....................................................................................................109
6—Making audio phrase settings
.................................................................................. 111
Editing the settings of an audio phrase .................................................................................... 111
Making an audio phrase play in synchronization with the sequencer...................................................113
Adjusting the pitch ................................................................................................................................113
Replacing an assigned sample .................................................................................................. 114
Making the waveform of an audio phrase zoom-in .................................................................. 115
To create a patch by dividing an audio phrase (Chop) ............................................................ 116
To copy an audio phrase ............................................................................................................ 117
Saving audio phrases to the hard disk...................................................................................... 118
Deleting the audio phrase and the sample................................................................................ 119
Deleting a sample that’s used by more than one partial / audio phrase / audio event .........................119
Saving an audio phrase as a WAV-format or AIFF-format file ................................................ 120
7—Editing a sample
................................................................................................................. 121
Viewing a list of samples ............................................................................................................ 121
To emphasize or reduce the high-frequencies of the sample (Emphasis)............................ 122
Saving method of edited sample (Overwrite or Duplicate) ...................................................................122
To maximize the level of a sample (Normalize) ........................................................................ 123
To Change the length of a sample (Time Stretch) .................................................................... 124
Deleting unnecessary portions of a sample (Truncate)........................................................... 125
If the following message appears during truncation .............................................................................126
Converting a stereo sample to monaural (Set mono) .............................................................. 127
Applying a fade-in to the sample (Fade-in) ............................................................................... 128
Applying a fade-out to the sample (Fade-out) .......................................................................... 129
Assigning a sample to a partial or audio phrase...................................................................... 130
Saving a sample as a WAV-format or AIFF-format file............................................................. 130
M-12
8—Using the sequencer
........................................................................................................ 131
Overview....................................................................................................................................... 131
The Song Mode and The Pattern Mode ..................................................................................... 132
Silencing a specific track during playback (Mute) ................................................................... 133
Playing only a specific track (Solo) ........................................................................................... 134
Using the velocity pads to switch Track Mute and Solo.......................................................... 135
Applying quantization during playback (Play Quantize).......................................................... 136
Transmitting MIDI Program Changes at the beginning of a Pattern or Song ........................ 137
MV-8800 Owner’s Manual
Page 13

Contents
Introduction Master Index
Changing the playback tempo.................................................................................................... 138
Using the Tap function to set the tempo...............................................................................................138
Changing the tempo or time signature at the specified location of the song........................................138
Using the locator ......................................................................................................................... 140
Moving to a locate point........................................................................................................................140
Editing a locate point ............................................................................................................................141
Naming a locate point...........................................................................................................................141
Deleting a locate point..........................................................................................................................141
Using markers.............................................................................................................................. 142
Setting a marker point ..........................................................................................................................142
Moving to a marker point ......................................................................................................................142
Moving to the next (previous) marker ...................................................................................................142
Deleting a marker point ........................................................................................................................142
Using the velocity pads to play patterns................................................................................... 143
Assigning a pattern to a pad.................................................................................................................144
9—Recording a song / pattern
The work flow of recording......................................................................................................... 145
Creating a new song.................................................................................................................... 146
Starting a new song with your favorite settings (User Track Template) ...............................................147
Creating a new pattern ................................................................................................................ 148
Changing a name / length / tempo of a pattern ....................................................................................149
Recording MIDI tracks (instrument or external MIDI sound module) ..................................... 150
Events Handled with MIDI Tracks ........................................................................................................150
Adding MIDI tracks for recording MIDI data .........................................................................................151
Recording your pad performance just as you play (Realtime Recording) ............................................152
Step recording ......................................................................................................................................156
Inputting events in rhythm-machine style (Drum Grid) .........................................................................158
Recording audio tracks or audio phrases................................................................................. 160
Adding audio tracks for recording data.................................................................................................160
Directly recording an audio input (Direct Recording)............................................................................161
Recording performance of audio phrases ............................................................................................163
Placing patterns in the pattern track ......................................................................................... 164
Creating the pattern track .....................................................................................................................164
Placing patterns in the pattern track.....................................................................................................165
Undoing a recording or editing operation (Undo/Redo) .......................................................... 166
......................................................................................... 145
Quick Start
1
2
3
4
5
6
7
8
9
10
11
12
13
14
15
16
10—Editing a song / pattern
Selecting the song that you want to edit................................................................................... 167
Selecting a pattern....................................................................................................................... 168
Editing entire tracks .................................................................................................................... 169
Deleting tracks......................................................................................................................................169
Combining multiple MIDI tracks into one (Merge Tracks).....................................................................170
Editing a region you specify (Sequence Editing) ..................................................................... 171
Selecting a region quickly (Quick Region)............................................................................................173
Inserting blank measures at the specified time (Insert Measure) .........................................................174
Deleting specified measures (Delete Measure)....................................................................................175
Pasting the performance data of a pattern into a song.........................................................................176
Editing note events in a MIDI track (Piano Roll Editing) .......................................................... 177
Note event editing in the PIANO ROLL EDIT screen ...........................................................................179
Selecting a region quickly (Quick Region)............................................................................................180
.............................................................................................. 167
MV-8800 Owner’s Manual
17
18
19
20
21
22
23
M-13
Page 14

Contents
Editing events individually ........................................................................................................ 181
Event list editing ...................................................................................................................................181
Inserting performance data (Create Event) ..........................................................................................182
Erasing performance data (Erase) .......................................................................................................183
Copying performance data (Copy & Paste)..........................................................................................183
Editing a system exclusive message....................................................................................................184
Audio event parameter .........................................................................................................................185
Pattern event parameter.......................................................................................................................186
List of available editing commands ........................................................................................... 187
Moving performance data (Move).........................................................................................................188
Copying performance data ...................................................................................................................189
Correcting the timing of performance data (Quantize) .........................................................................191
Editing note accents (Change Velocity)................................................................................................192
Editing the length of the notes (Change Duration) ...............................................................................193
Moving the performance data backward or forward (Shift Timing).......................................................194
Thinning out the performance data (Data Thin)....................................................................................195
Transposing notes (Transpose)............................................................................................................196
Extracting specific note events (Split Notes) ........................................................................................197
Entering data with a smooth succession of values (Create Continuous Data).....................................198
Modifying data in a selected region (Change Continuous Data) ..........................................................199
Saving a portion of performance data in the library (Copy As MIDI Clip) .............................................200
Saving a region of a song as a pattern (Copy As New Pattern)...........................................................200
Restricting the type of events that will be edited (View Filter)................................................ 201
Note length (Step time) and the number of ticks...................................................................... 202
Copying a pattern ........................................................................................................................ 203
Initializing (Erasing) patterns ..................................................................................................... 203
Saving a song (or pattern) in SMF format (Save As SMF) ....................................................... 204
Note regarding saving to SMF..............................................................................................................204
Saving a song as SMF (Standard MIDI file) data .................................................................................204
Saving a pattern as SMF (Standard MIDI File) data.............................................................................205
Loading a song from another project ........................................................................................ 206
11—Using the Mixer
................................................................................................................. 207
Adjusting the volume balance of each part .............................................................................. 207
Adjusting the tone of an instruments or audio track ............................................................... 208
12—Using effects
....................................................................................................................... 209
Switching the effects on/off........................................................................................................ 209
Selecting an effect ....................................................................................................................... 210
Setting the effect parameters ..................................................................................................... 211
Storing the current effect settings in the library ...................................................................... 212
Saving a current effect setting to the hard disk ....................................................................... 213
Using the C (Control) knobs to operate parameters ................................................................ 214
Changing the MFX routing.......................................................................................................... 215
Applying an effect to the sound from an input ......................................................................................215
Applying MFX to an instrument or audio track......................................................................................216
Applying an effect to the master out.....................................................................................................216
Analog Modeling Bass ................................................................................................................ 217
Playing from the Effect knobs...............................................................................................................217
Playing from a MIDI track/the velocity pads/an external MIDI device...................................................218
M-14
MV-8800 Owner’s Manual
Page 15

Contents
Introduction Master Index
13—Automating mixing operations (Automation)
Automating operations of Mixer Channel ................................................................................. 219
Mixer parameters that can be recorded and played back ....................................................................219
Recording mixer operations for a Mixer Channel .................................................................................219
Playback mixer operations ...................................................................................................................220
Automating mute operations for each track ............................................................................. 221
Recording mute operations ..................................................................................................................221
Playback mute operations ....................................................................................................................222
Editing the recorded mute data ............................................................................................................223
Viewing the mute data of only a specific track......................................................................................224
Automating operations for each C (Control) knob ................................................................... 225
Recording C (Control) knob operations ................................................................................................225
Playback C (Control) knob operations to control effect parameters .....................................................226
14—Creating an audio CD
The work flow of creating an audio CD ..................................................................................... 227
Combining a song / pattern into two tracks (Mixdown) ........................................................... 228
Achieving the ideal volume and loudness for an audio CD (Mastering) ................................ 230
Writing the mastered data to CD ................................................................................................ 232
Playing an audio CD .................................................................................................................... 234
................................................................................................... 227
............................................. 219
Quick Start
1
2
3
4
5
6
7
8
9
15—Project and disk management
Managing projects ....................................................................................................................... 235
Loading a project..................................................................................................................................235
Naming a project ..................................................................................................................................236
Protecting a project...............................................................................................................................236
Deleting a project..................................................................................................................................237
Saving a project....................................................................................................................................238
Saving a project with a different name .................................................................................................238
Creating a new project..........................................................................................................................239
Deleting unused portions of a sample ..................................................................................................240
Backing up a project to a CD-R/RW disc..............................................................................................241
Restoring a project ...............................................................................................................................241
Folder structure ........................................................................................................................... 242
Managing files (File Utility) ......................................................................................................... 243
Changing the current drive ...................................................................................................................243
Changing the current folder..................................................................................................................244
Creating a folder ...................................................................................................................................245
Renaming a folder or file ......................................................................................................................245
Copying a file or a folder.......................................................................................................................246
Moving a file to another location (Move)...............................................................................................247
Deleting a folder or file..........................................................................................................................248
Disk management ........................................................................................................................ 249
Formatting a disk ..................................................................................................................................249
Naming a disk.......................................................................................................................................250
............................................................................... 235
10
11
12
13
14
15
16
17
18
19
20
21
MV-8800 Owner’s Manual
22
23
M-15
Page 16

Contents
16—
17—Using the velocity pads to display images (Pix Jam)
18—Connecting to your computer via USB
Using an external display and mouse to operate the MV-8800
Switching between the two operating modes........................................................................... 251
How to confirm the operating mode......................................................................................................251
Using a mouse ............................................................................................................................. 252
About the mouse ..................................................................................................................................252
Basic operation.....................................................................................................................................252
Mouse operations.................................................................................................................................253
Explanation of screens shown in the external display ............................................................ 255
Operations using the external display....................................................................................... 271
Quick Tour ............................................................................................................................................271
Using the mouse to edit sequence data (SONG screen or PATTERN screen)....................................276
Using the mouse to edit a MIDI track (PIANO ROLL EDIT screen) .....................................................277
Step Recording.....................................................................................................................................280
Changing the color theme of the SONG screen and PATTERN screen ................................. 282
Switching between SONG screen and PATTERN screen ........................................................ 283
........................... 285
Importing images......................................................................................................................... 285
Switching images by playing the pads..................................................................................................286
Switching images in synchronization with sequencer playback ...........................................................287
........................................................... 289
....... 251
To start communication with your computer............................................................................ 289
Copying files from your computer to the MV-8800................................................................... 290
Backing up a project from the MV-8800 to your computer...................................................... 292
Using your computer to delete unwanted files......................................................................... 293
To stop communication with your computer............................................................................ 294
19—Using MIDI devices
Playing a connected external MIDI sound module ................................................................... 295
Using the sliders to control an external MIDI sound module (Assignable Sliders) ...............................296
Playing the MV-8800 from an external MIDI device .................................................................. 297
Recording your playing from a MIDI keyboard .....................................................................................297
Using the MV-8800 in Multi Timbre Sampler Mode..............................................................................298
Playing audio phrases from an external MIDI device ...........................................................................300
Controlling MFX from an external MIDI device.....................................................................................301
Synchronizing the MV-8800 with a connected external sequencer ........................................ 302
Synchronizing with an external device (Master) ...................................................................................302
Synchronized operation with external devices (Slave) .........................................................................304
Monitoring the MIDI connection status ..................................................................................... 309
20—About V-LINK
What is V-LINK?........................................................................................................................... 311
The MV-8800’s V-LINK functionality.....................................................................................................311
Using the MV-8800 to operate an external V-LINK device (V-LINK Master) ........................... 312
Example connections ...........................................................................................................................312
Switching V-LINK on/off........................................................................................................................312
Making V-LINK settings ........................................................................................................................312
V-LINK Function chart ..........................................................................................................................313
Using V-LINK from an external device (V-LINK Slave)............................................................. 314
About the V-LINK messages ................................................................................................................315
Note regarding using the V-LINK..........................................................................................................315
...................................................................................................................... 311
........................................................................................................ 295
M-16
MV-8800 Owner’s Manual
Page 17

Contents
Introduction Master Index
21—Other functions
Settings for the entire MV-8800 .................................................................................................. 317
Settings for the MV-8800’s velocity pads .................................................................................. 318
Setting for the MV-8800’s sliders and buttons.......................................................................... 319
Checking the system status ....................................................................................................... 321
Viewing the system information............................................................................................................321
Testing the installed memory................................................................................................................321
Resetting the MV-8800’s parameters to the factory settings................................................................322
22—Adding options
Expanding the memory ............................................................................................................... 323
Precautions for expanding memory......................................................................................................323
Exchanging the memory (removing and installing)...............................................................................324
23—Ajout d’options
Expansion de la mémoire ........................................................................................................... 325
Precautions concernant l’extension de la mémoire ..............................................................................325
Echange de la mémoire (retrait et installation) .....................................................................................326
Master Index
.................................................................................................................................. 327
................................................................................................................. 317
................................................................................................................. 323
................................................................................................................. 325
Quick Start
1
2
3
4
5
6
7
8
9
10
Information
..................................................................................................................................... 338
11
12
13
14
15
16
17
18
19
20
21
22
MV-8800 Owner’s Manual
23
M-17
Page 18
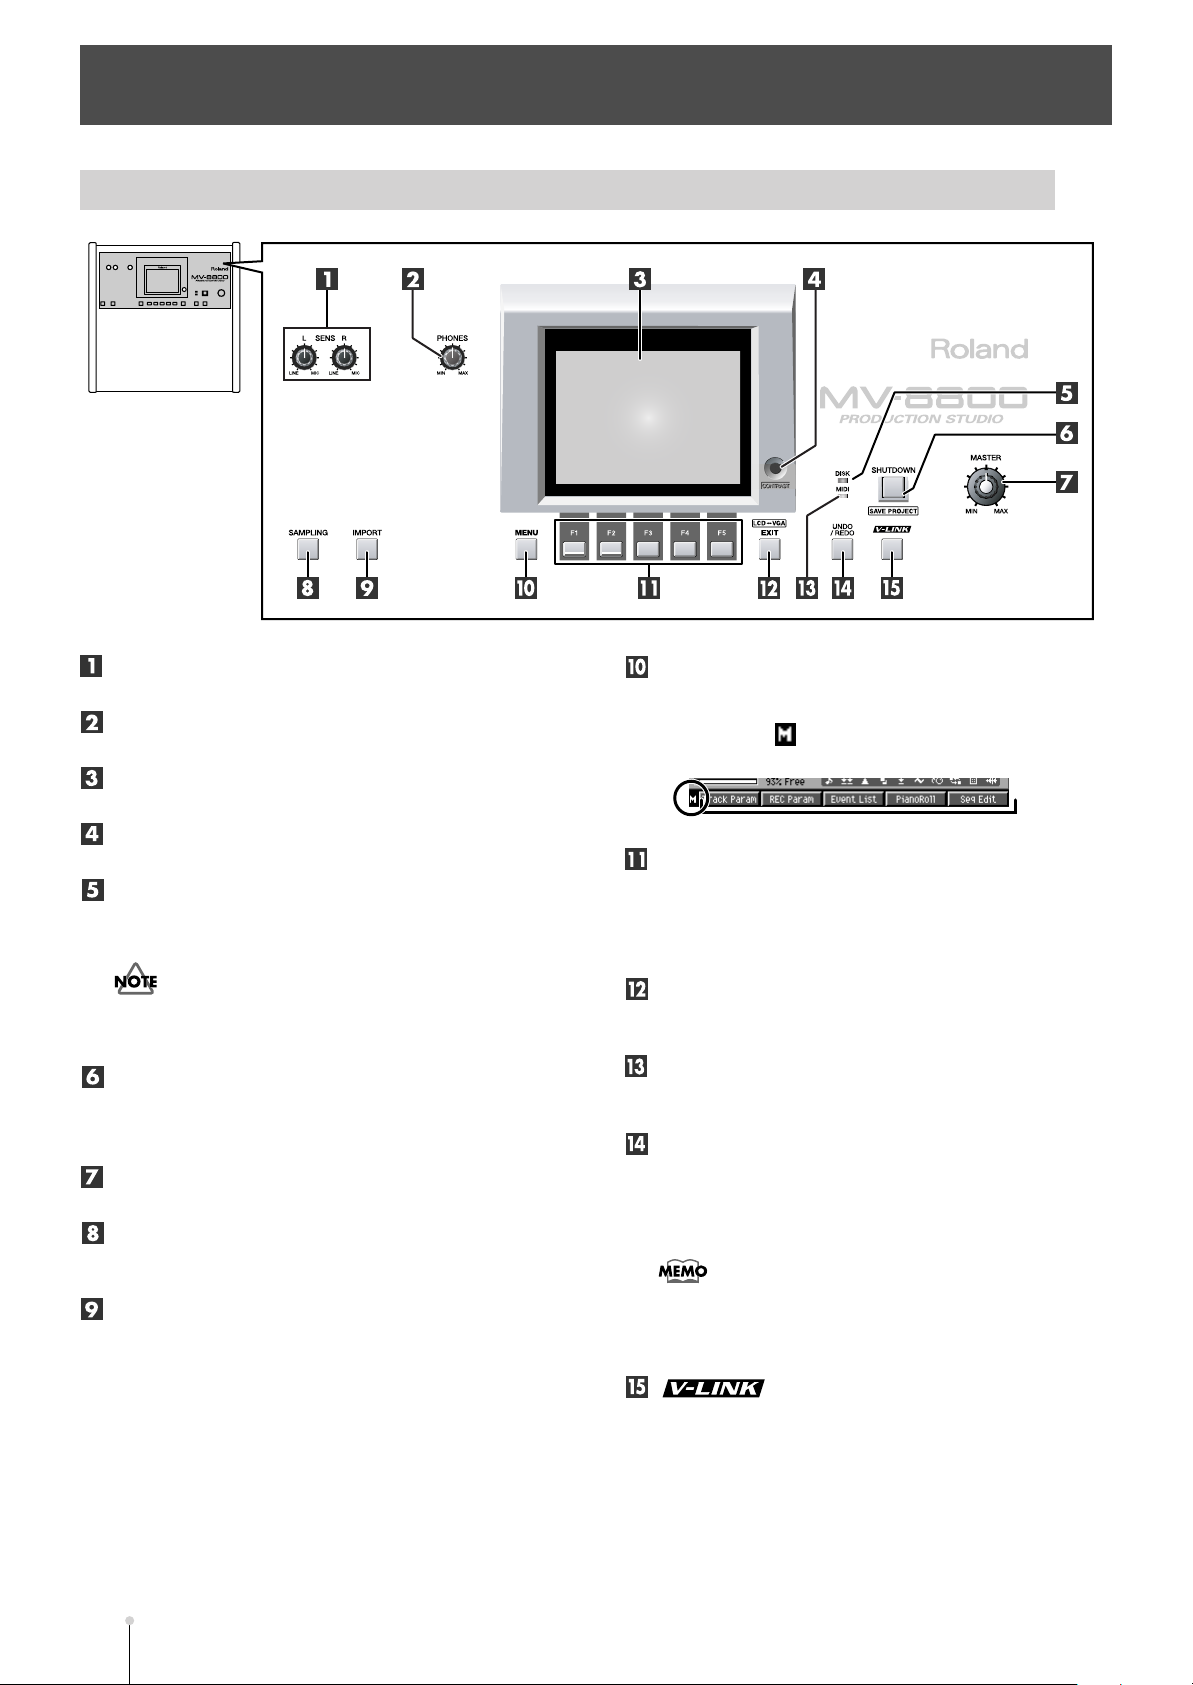
Panel descriptions
menu icon
function display area
Top Panel
SENS knobs
Adjusts the input sensitivity.
PHONE knob
Adjusts the headphone level.
LCD (Liquid Crystal Display)
This is a 320 x 240 pixel display screen with backlight.
Contrast knob
Adjusts the contrast of the LCD screen.
DISK indicator (red)
This indicator lights when the MV-8800 is transferring
data to/from its hard disk or CD-R/RW drive.
●
When the DISK indicator is lit, you must never turn off the
power or subject the MV-8800 to vibration such as striking a
pad. Doing so may cause malfunctions.
SHUTDOWN button
To shut down the MV-8800, press this button. You must
perform the shutdown operation when you are finished
working with the MV-8800.
Master output knob
Adjusts the overall volume.
SAMPLING button
The SAMPLING screen (Screen Guide; p. 209) will
appear.
IMPORT button
The IMPORT screen (Screen Guide; p. 219) will appear.
MENU button
When this button is lit orange, you can press it to display
a menu. Screens for which a menu is available are
indicated by a (menu icon) at the left of the function
display area.
F (function) buttons
The [F1]–[F5] buttons correspond to functions displayed
at the bottom of the screen.
The functions available will depend on the screen shown
in the screen.
EXIT button
Press this button to return to the previous screen or to
cancel an operation.
MIDI indicator (green)
This indicator lights when MIDI data is received at the
MIDI IN connector.
UNDO/REDO button
You can press this button to cancel (UNDO) the results of
an editing command in sequencer section. If you then
press the button again, you can cancel the UNDO (i.e.,
REDO).
●
[UNDO/REDO] will light orange if UNDO is available (i.e., if
the previous processing has been preserved). After you
perform UNDO, [UNDO/REDO] will blink, indicating that
REDO is available.
button
Press this button when you want to use the V-LINK
functionality (it will light blue). This lets you control
externally-connected V-LINK compatible video equipment
from the MV-8800, allowing you to “perform” on the video
device.
M-18
MV-8800 Owner’s Manual
Page 19
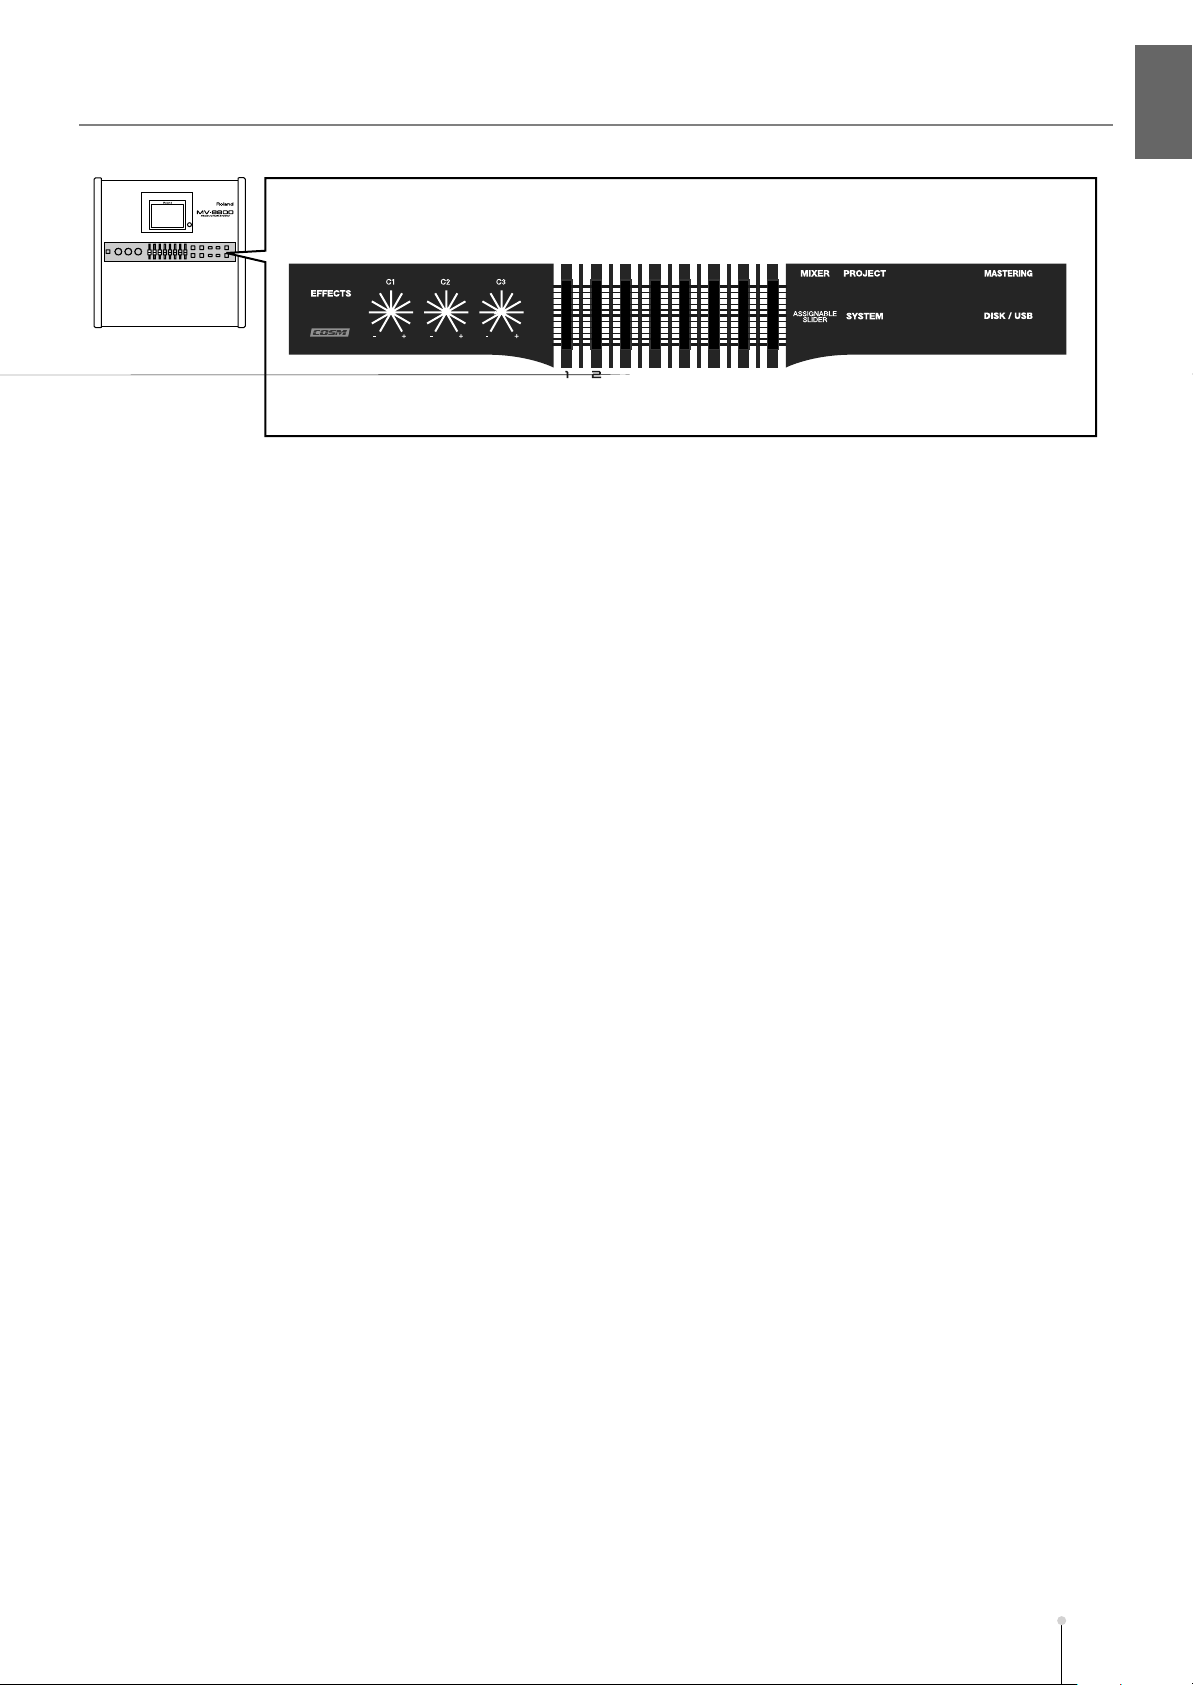
Panel descriptions
Panel descriptionsIntroduction
EFFECTS button
Accesses the EFFECTS screen (Screen Guide; p. 229)
(indicator lit orange). The MV-8800 provides built-in MFX
(multi-effect), delay/chorus, and reverb effects.
C (control) knobs
These control knobs let you adjust effect parameter
values directly.
Sliders
Normally you will use these as mixer sliders. The
parameters that are adjusted by the sliders will change
depending on the screen shown in the LCD. The
Assignable Slider function and the V-LINK function will
also change the parameters controlled by these sliders.
MIXER button
Accesses the MIXER screen (Screen Guide; p. 235)
(indicator lit orange).
PROJECT button
Accesses the PROJECT MENU screen (Screen Guide; p.
162) (indicator lit orange), letting you load or save a
project.
SONG button
Accesses the SONG screen (Screen Guide; p. 8)
(indicator lit orange). Used to play, record, and mix-down
songs.
INSTRUMENTS button
Accesses the INSTRUMENTS screen (Screen Guide; p.
114) (indicator lit orange), where audio data recorded
using the sampler or imported from another source can be
prepared for use as an instrument. These instruments are
managed as “patches” and can be recalled for use at any
time.
AUDIO PHRASES button
Accesses the AUDIO PHRASES (Screen Guide; p. 152)
screen (indicator lit orange). An “audio phrase” is a piece
of audio data with an appreciable length (e.g., a rhythm
pattern of several measures). Here you can manage and
edit audio phrases.
DISK/USB button
Accesses the DISK/USB MENU screen (Screen Guide; p.
188) (indicator lit orange). Here you can perform
maintenance on the internal disk, use the CD player
function, and communicate with your computer via USB.
PATTERN button
Accesses the PATTERN screen (Screen Guide; p. 91)
(indicator lit orange). Used to play and record patterns.
MASTERING button
Accesses the MIXDOWN / MASTERING MENU screen
(Screen Guide; p. 196) (indicator lit orange). Here you can
use the mastering tool kit to add the final finishing touches
to the two-channel audio data (WAV file) created by
mixing down the sequencer playback.
ASSIGNABLE SLIDER button
Press this button when you want to use the sliders as
controllers to transmit MIDI messages (indicator lit
orange).
SYSTEM button
Accesses the SYSTEM MENU screen (Screen Guide; p.
172) (indicator lit orange), letting you make system
settings for the MV-8800.
MV-8800 Owner’s Manual
M-19
Page 20
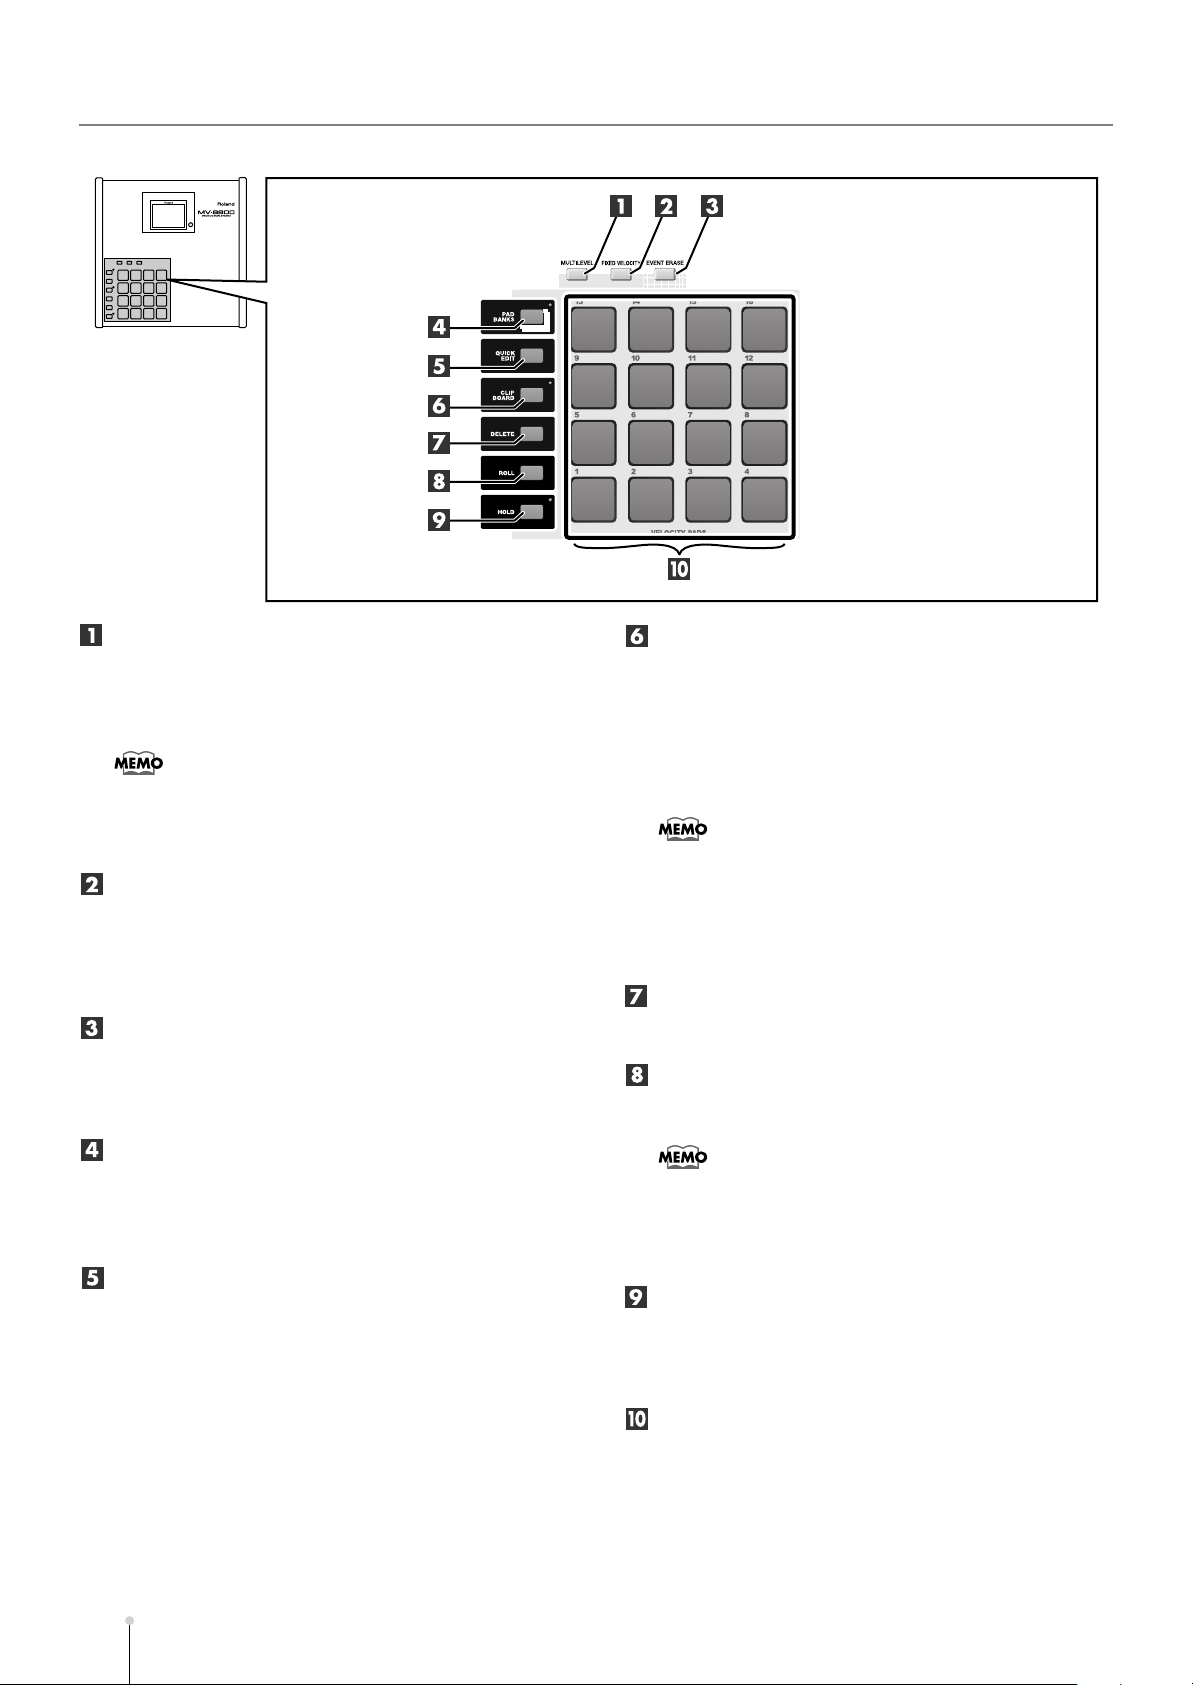
Panel descriptions
MULTILEVEL button
This button assigns a different level of velocity (playing
strength) to each of the sixteen velocity pads. Striking pad
1 will produce a velocity level of 7, and striking pad 16 will
produce a velocity level of 127 (p. 37).
●
If MULTILEVEL=on or FIXED VELOCITY=on, the force with
which you strike the pad is ignored.
●
Multilevel will be enabled for the velocity pad that you
pressed immediately before pressing [MULTILEVEL].
FIXED VELOCITY button
This button makes a velocity pad ignore the force
(velocity) with which you actually strike; the pad will
always produce a specified velocity value (indicator lit
orange). Use the PAD screen (Screen Guide; p. 174) to
specify the velocity value.
EVENT ERASE button
While recording sequence data, you can erase a specific
note message by holding down [EVENT ERASE] and
pressing the pad that corresponds to the unwanted note
message.
PAD BANKS button
Accesses the PAD BANKS popup (Screen Guide; p. 5).
By switching the sixteen velocity pads to another bank
you can use a larger variety of musical sources. Six patch
banks and 32 audio phrase banks are provided.
QUICK EDIT button
This button lets you edit the sounds that are assigned to
the velocity pads. Strike the pad whose sound you want to
edit, and then press [QUICK EDIT] to access the
PARTIAL EDIT screen (Screen Guide; p. 125) or AUDIO
PHRASE EDIT screen (Screen Guide; p. 155), where you
can immediately edit the sound of that pad.
CLIPBOARD button
This button lets you temporarily store data for the sound
assigned to a velocity pad. Hold down the pad that you
want to store and press [CLIPBOARD], and the pad data
will be copied to the clipboard (the indicator will light red).
When the red indicator is lit, hold down [CLIPBOARD] and
strike a different velocity pad; the data will be copied from
the clipboard to the velocity pad you struck.
●
The contents of the clipboard are preserved until you
perform one of the following actions.
• Turn off the power
• Load a project
• Overwrite the clipboard by copying data to it
• Press [DELETE]+[CLIPBOARD]
DELETE button
To delete the material (partial or audio phrase) assigned
to a velocity pad, hold down [DELETE] and strike that pad.
ROLL button
By holding down [ROLL] and striking a velocity pad you
can produce a roll (rapidly repeated strikes).
●
The spacing between notes of the roll can be set by the PAD
screen (Screen Guide; p. 174) Pad Roll Interval parameter,
or in a popup accessed by pressing [SHIFT] + [ROLL].
●
While you’re playing a roll, aftertouch data is converted to
velocity.
HOLD button
By holding down [HOLD] and striking a velocity pad you
can make the pad stay in the pressed state (the indicator
will light red). Press [HOLD] once again to cancel the hold
function (the indicator will go dark).
VELOCITY PADS
Use these pads to input sequence data and play samples.
Since the pads are velocity-sensitive (i.e., each pad
detects the force with which you strike it), you can use
them to add dynamic variation to your performance. The
pads are also sensitive to polyphonic aftertouch; they can
respond to the force with which you press them after the
initial strike.
M-20
MV-8800 Owner’s Manual
Page 21

Panel descriptions
Panel descriptionsIntroduction
Numeric keys
Use these keys to input sequence data, alphabetical
characters for names, or numerical parameter values.
These keys make it easy to input numerical values in
rapid succession.
DEC/INC buttons
These buttons decrement ([DEC]) or increment ([INC]) the
value of a parameter. If you continue holding down a
button, the value will change continuously.
If you hold down [SHIFT] while you press [DEC] [INC] or
turn the VALUE dial, the amount of the increase or
decrease will be multiplied by ten.
Cursor buttons
Use these buttons to select items from a menu or list, or
to move to the parameter that you want to adjust.
By operating the CURSOR buttons while holding down
[SHIFT], you can zoom-in or zoom-out on a desired
portion of the performance data (the Zoom function).
VALUE dial
Use this to increase or decrease the value of a parameter.
Turn the dial toward the left to decrease the value, or
toward the right to increase it.
SHIFT button
Use this button to access multiple functions provided by a
single button. To use a function enclosed by a blue frame
on the top panel (e.g., STEP REC or MARKER SET), hold
down [SHIFT] and press the desired button. If you want to
rapidly increase or decrease the value of a parameter,
hold down [SHIFT] and use [DEC] [INC] or the VALUE
dial.
ENTER button
Finalizes the numerical data that you entered by numeric
keys. This button can also function as an execute/confirm
button for the command at the cursor location in the
screen.
PREVIEW TO ( ) / PREVIEW FROM ( ) buttons
PREVIEW [TO ( )] plays the sequence data from a
point slightly earlier than the current location.PREVIEW
[FROM ( )] plays the sequence data for a short time
starting at the current location. By using these two
functions in conjunction with each other you can easily
find a precise location in your song.
The preview length is set by the GLOBAL screen (Screen
Guide; p. 173) Preview Length parameter.
AUTO PUNCH button
This function automatically enters and exits record mode
over a specified region of the sequence. When you press
[AUTO PUNCH] the indicator will light orange. When you
begin recording in this state, actual recording will begin at
the punch-in point (recording start location) you specify.
When you arrive at the punch-out point (recording end
location), recording will end automatically. To turn off the
Auto Punch function, press [AUTO PUNCH] once again
(the indicator will go dark).
The auto punch region is set in the RECORDING
PARAMETER screen that appears when you press
[REC ( )].
LOOP ON button
Press this button when you want playback or recording to
loop (continue repeating). LOOP [ON] will light orange. If
you begin sequence playback or recording in this state,
recording or playback will continue repeating between the
loop start time and loop end time you specify. By using the
Loop function in conjunction with the Auto Punch function,
you can perform Loop Recording.
The loop region is set by the Loop Top and Loop End
parameters in the LOOP popup (in the SONG screen,
press [MENU] ➜ and select Loop).
LOOP QUICK SET button
This button sets the current measure as the beginning of
the loop. You can then immediately begin loop recording
to capture a phrase or other idea.
The length of the loop is specified by the Quick Loop
Length parameter in the LOOP popup (in the SONG
screen, press [MENU] ➜ select Loop).
MV-8800 Owner’s Manual
M-21
Page 22
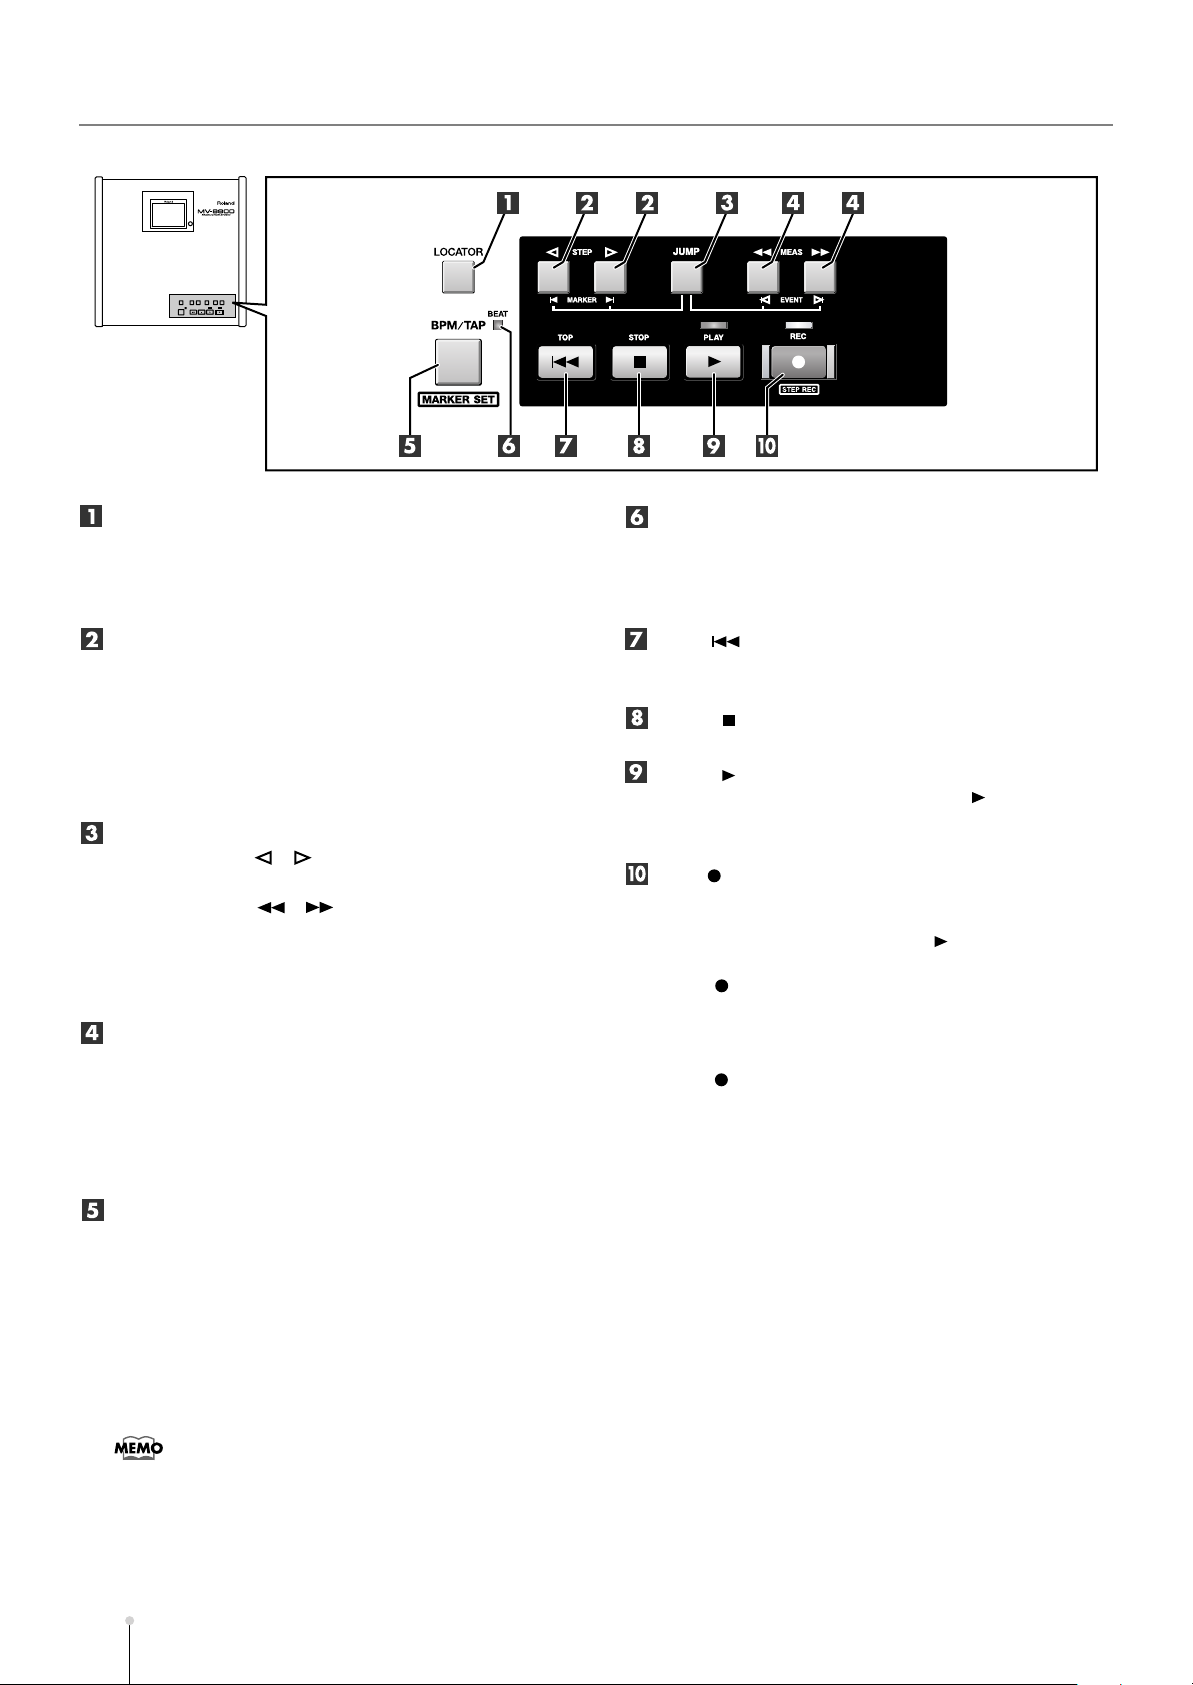
Panel descriptions
LOCATOR button
Accesses the LOCATOR popup (Screen Guide; p. 59) will
appear. You can place locator marks at ten desired time
locations in the sequence data. The Locator function lets
you jump instantly to one of these stored locations.
STEP buttons
Pressing these buttons by themselves will move the
current time location in units of the Step Time. If you
continue holding down the button, the time will move
continuously.
If you hold down [JUMP] and press one of these buttons,
you will move to the next or previous marker in the
sequence data.
JUMP button
[JUMP] + STEP [ ] [ ] moves the time location to the
previous or next marker.
[JUMP] + MEAS [ ] [ ] moves the time location to
the previous or next event.
[SHIFT] + [JUMP] displays the JUMP popup (Screen
Guide; p. 60), where you can directly input a time location
and jump to it.
MEAS buttons
Pressing these buttons by themselves will move the
current time in units of a measure. If you continue holding
down the button, the time will move continuously.
If you hold down [JUMP] and press one of these buttons,
you will move to the next or previous event in the
sequence data.
BEAT indicator (red/green)
Blinks (green) at each beat of the currently specified
tempo. When the sequencer is running, it will blink red on
the first beat (the downbeat) of each measure, and blink
green on other beats.
TOP ( ) button
Sets the current time to 0001-01-000 (measure 1 - beat 1
- tick 0); i.e., the beginning.
STOP ( ) button
Stops the sequencer.
PLAY ( ) button
Plays the sequencer. Pressing [PLAY ( )] in REC
standby mode (the REC indicator blinking red) will start
recording.
REC ( ) button
Use this when you want to record. Pressing this once will
enter REC standby mode (the indicator blinks red). In
REC standby mode, press [PLAY ( )] to begin recording
(the indicator will light red). During recording, press
[REC ( )] once to stop recording (punch-out; the
indicator blinks red). However, the sequencer will not
stop, but will continue playing back.
While the sequencer is stopped, you can press [SHIFT] +
[REC ( )] to show STEP REC screen (Screen Guide; p.
62), AUDIO PHRASE STEP REC screen (Screen Guide;
p. 63), or PATTERN STEP REC screen (Screen Guide; p.
110).
BPM/TAP button / MARKER SET button
Pressing this button once will display the BPM/TAP
popup, where you can specify the tempo of the sequencer
in units of BPM (quarter note Beats Per Minute). By
pressing [BPM/TAP] three or more times at the desired
tempo, you can set the sequencer to that tempo. In either
case, you are free to set the tempo whenever the Tempo
track (p. 138) is not being used.
By pressing [SHIFT] + [BPM/TAP] you can store a marker
in the sequence data.
●
If you’re using the tempo track, you can’t use [BPM/TAP] to
change the tempo. If you want change the tempo in this way,
disable the tempo track.
M-22
MV-8800 Owner’s Manual
Page 23
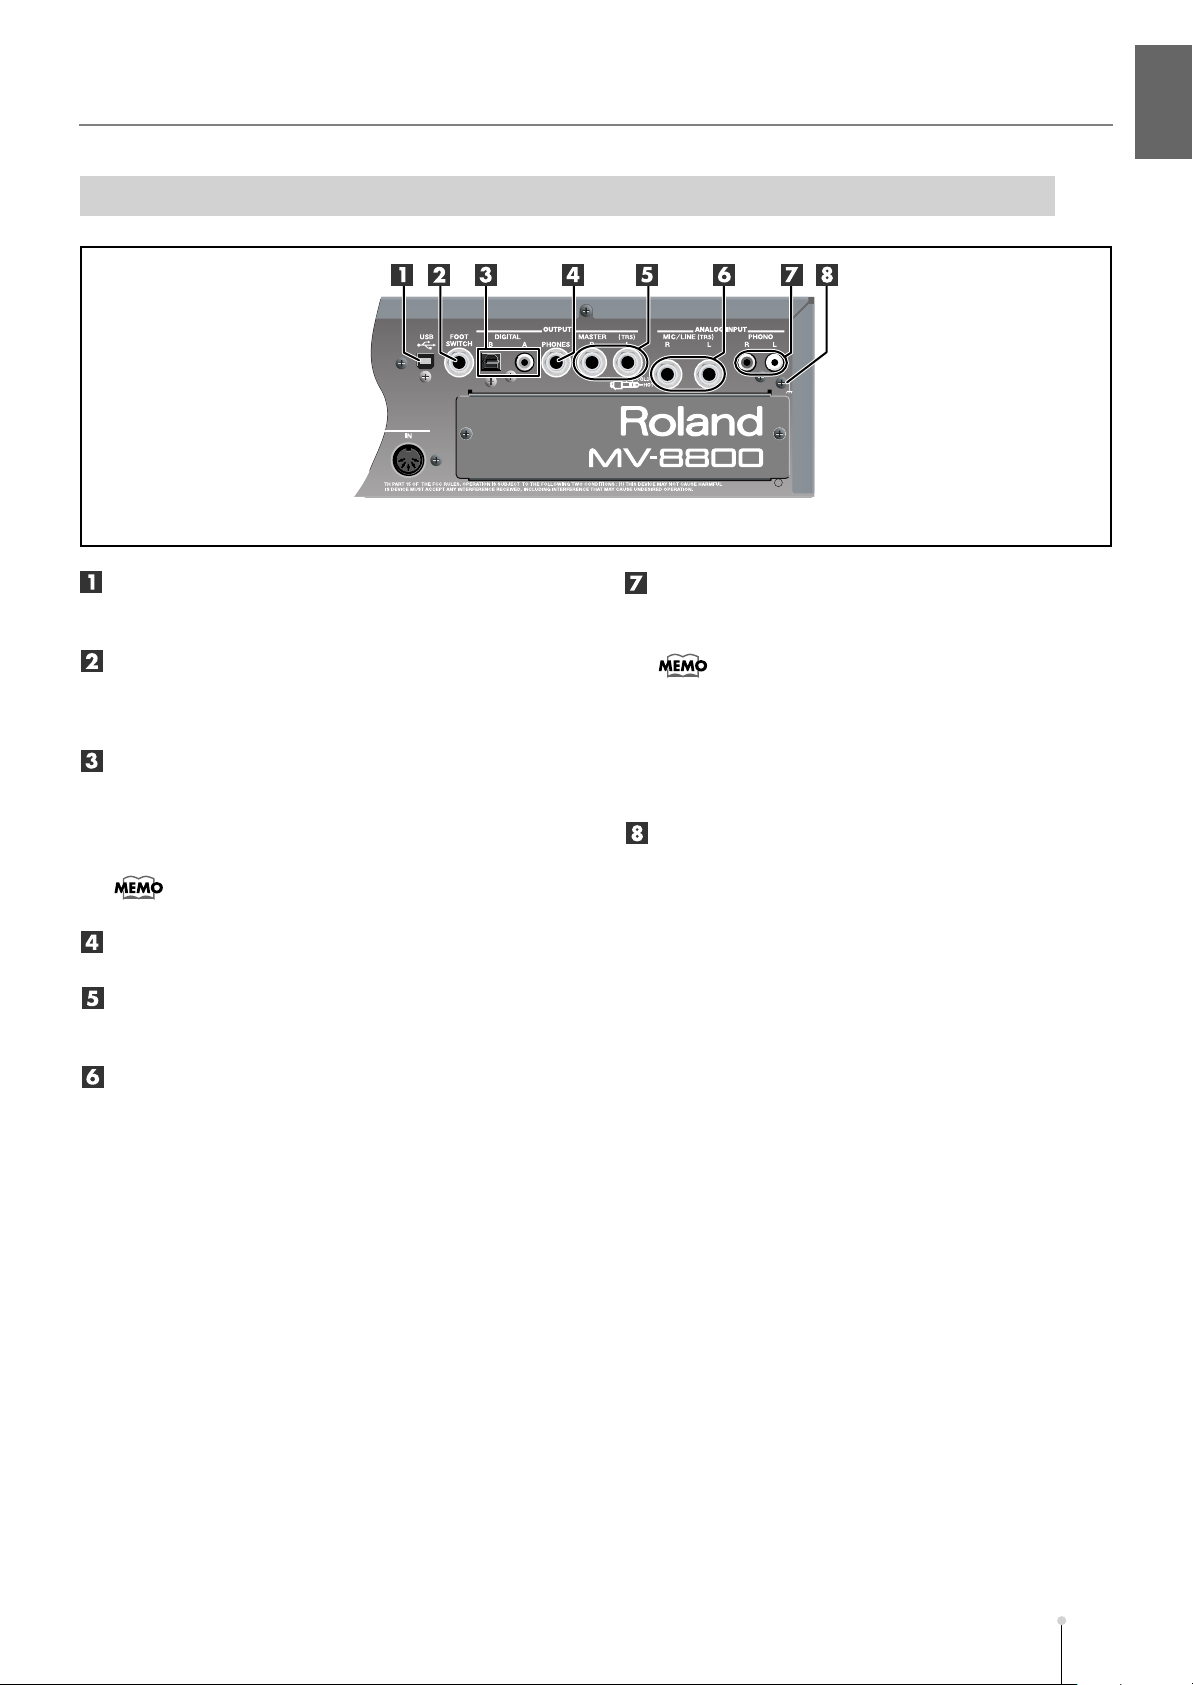
Rear Panel
Panel descriptions
Panel descriptionsIntroduction
USB
This connector lets you connect the MV-8800 to your
computer to transfer files.
FOOT SWITCH
You can connect a separately sold foot switch (e.g.,
Roland DP-2, BOSS FS-5U) here, and use it to control the
MV-8800 in a variety of ways.
OUTPUT DIGITAL A, B
These are digital audio output connectors. “A” is a coaxial
type connector, and “B” is an optical type connector. You
can switch these to output either the master out audio or
the audio from the MULTI OUTPUT bus.
●
The DIGITAL OUT jacks support IEC60958 (consumer).
OUTPUT PHONES
You can connect a set of headphones here.
OUTPUT MASTER
These are the analog master output jacks. Connect them
to your playback system or powered monitor speakers.
ANALOG INPUT MIC/LINE
These are analog input jacks. You can connect
microphones or line-level devices here.
ANALOG INPUT PHONO
You can connect a turntable (record player) to these
jacks.
●
The PHONO jacks provide a PHONO equalizer.
●
If you use the MIC/LINE jacks, you cannot use the PHONO
jacks simultaneously.
●
If you’re not using the PHONO jacks, insert the included
short pin. This will prevent noise from being introduced via
the PHONO jacks.
Grounding terminal
Use this if you’ve connected a turntable. By connecting
this to the grounding wire (“earth”) of your turntable you
can reduce the hum or buzz that may otherwise occur.
MV-8800 Owner’s Manual
M-23
Page 24
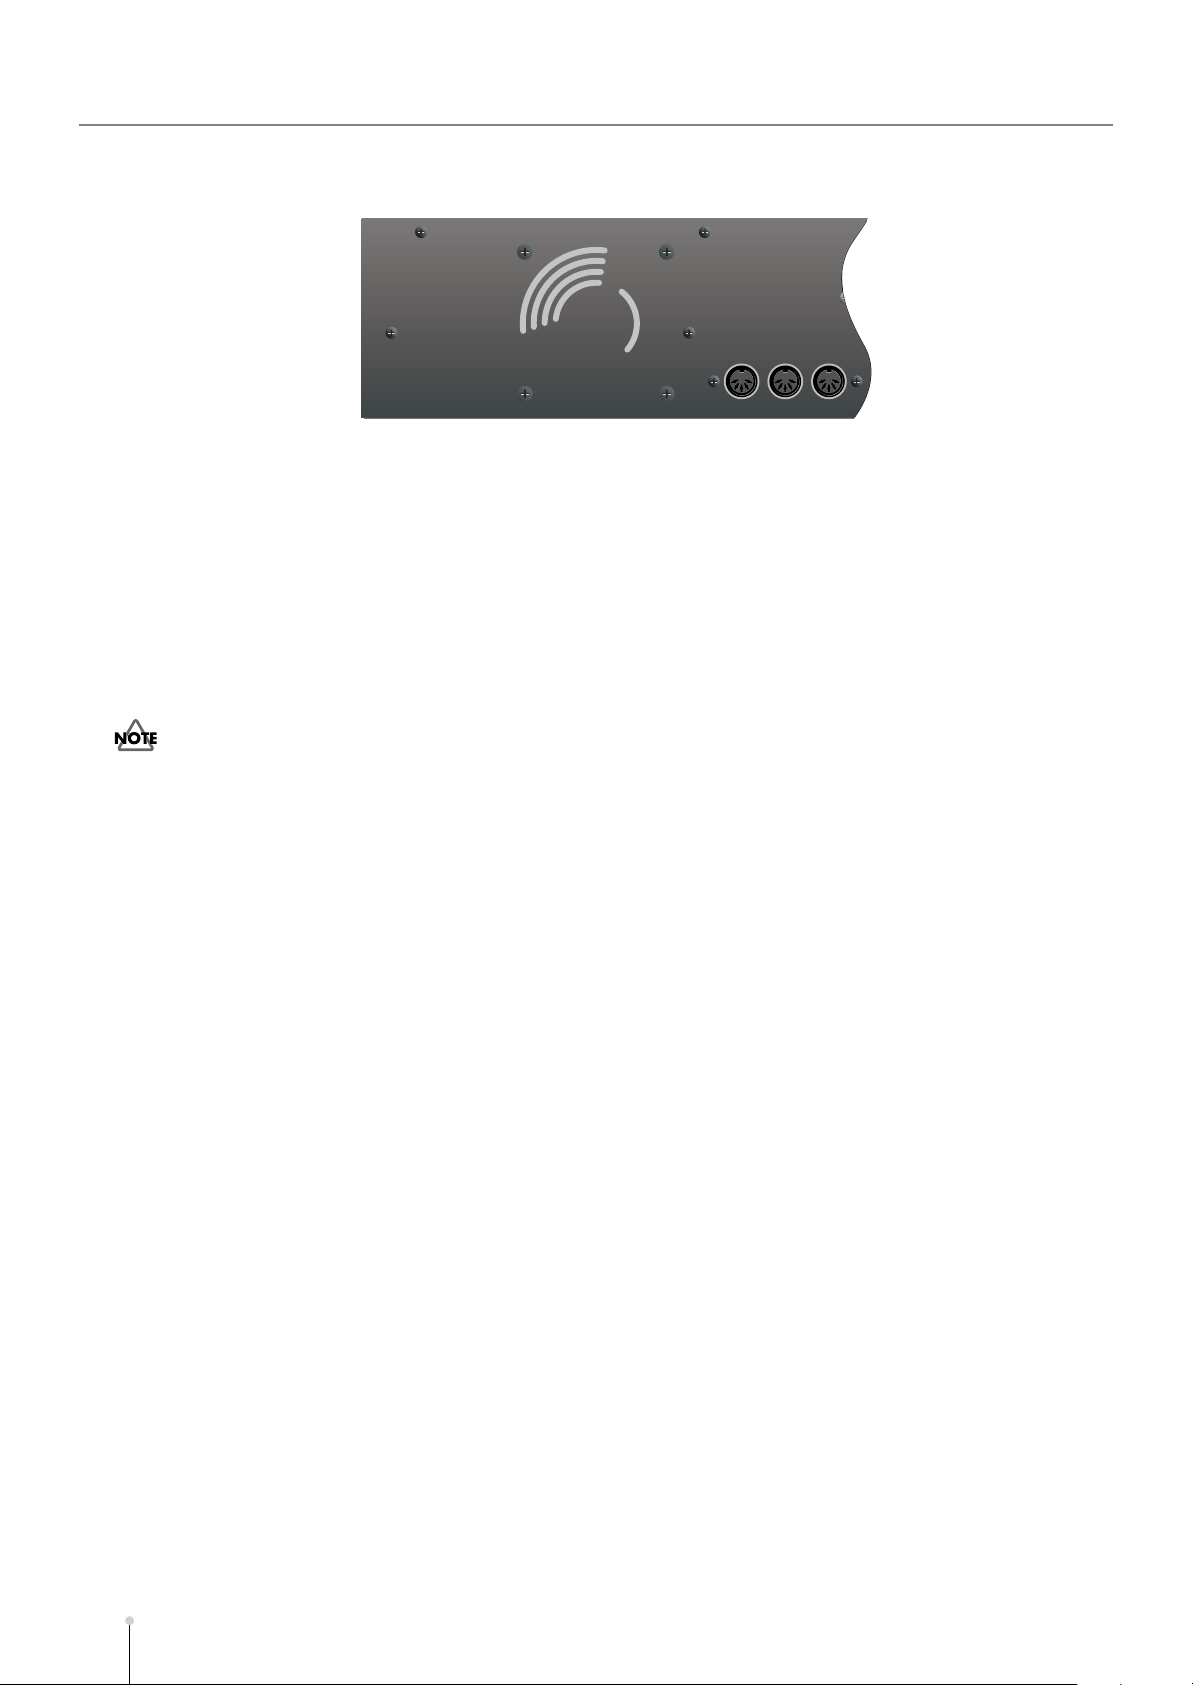
Panel descriptions
POWER ON switch
Turns the power on/off.
AC inlet
Connect the included power cable here.
Cooling fan vent
The MV-8800 contains a cooling fan that prevents the
internal temperature from becoming too high. The warm
air is exhausted from this vent.
●
Do not place any obstructing object in front of the cooling fan
vent. Doing so may make the MV-8800 overheat, causing
malfunctions.
MOUSE
Connect the included mouse to this connector.
VGA OUT
Connect a VGA display to this connector.
MIDI (IN/OUT A/OUT B)
Use these connectors to transmit/receive MIDI messages
to or from other MIDI devices.
M-24
MV-8800 Owner’s Manual
Page 25
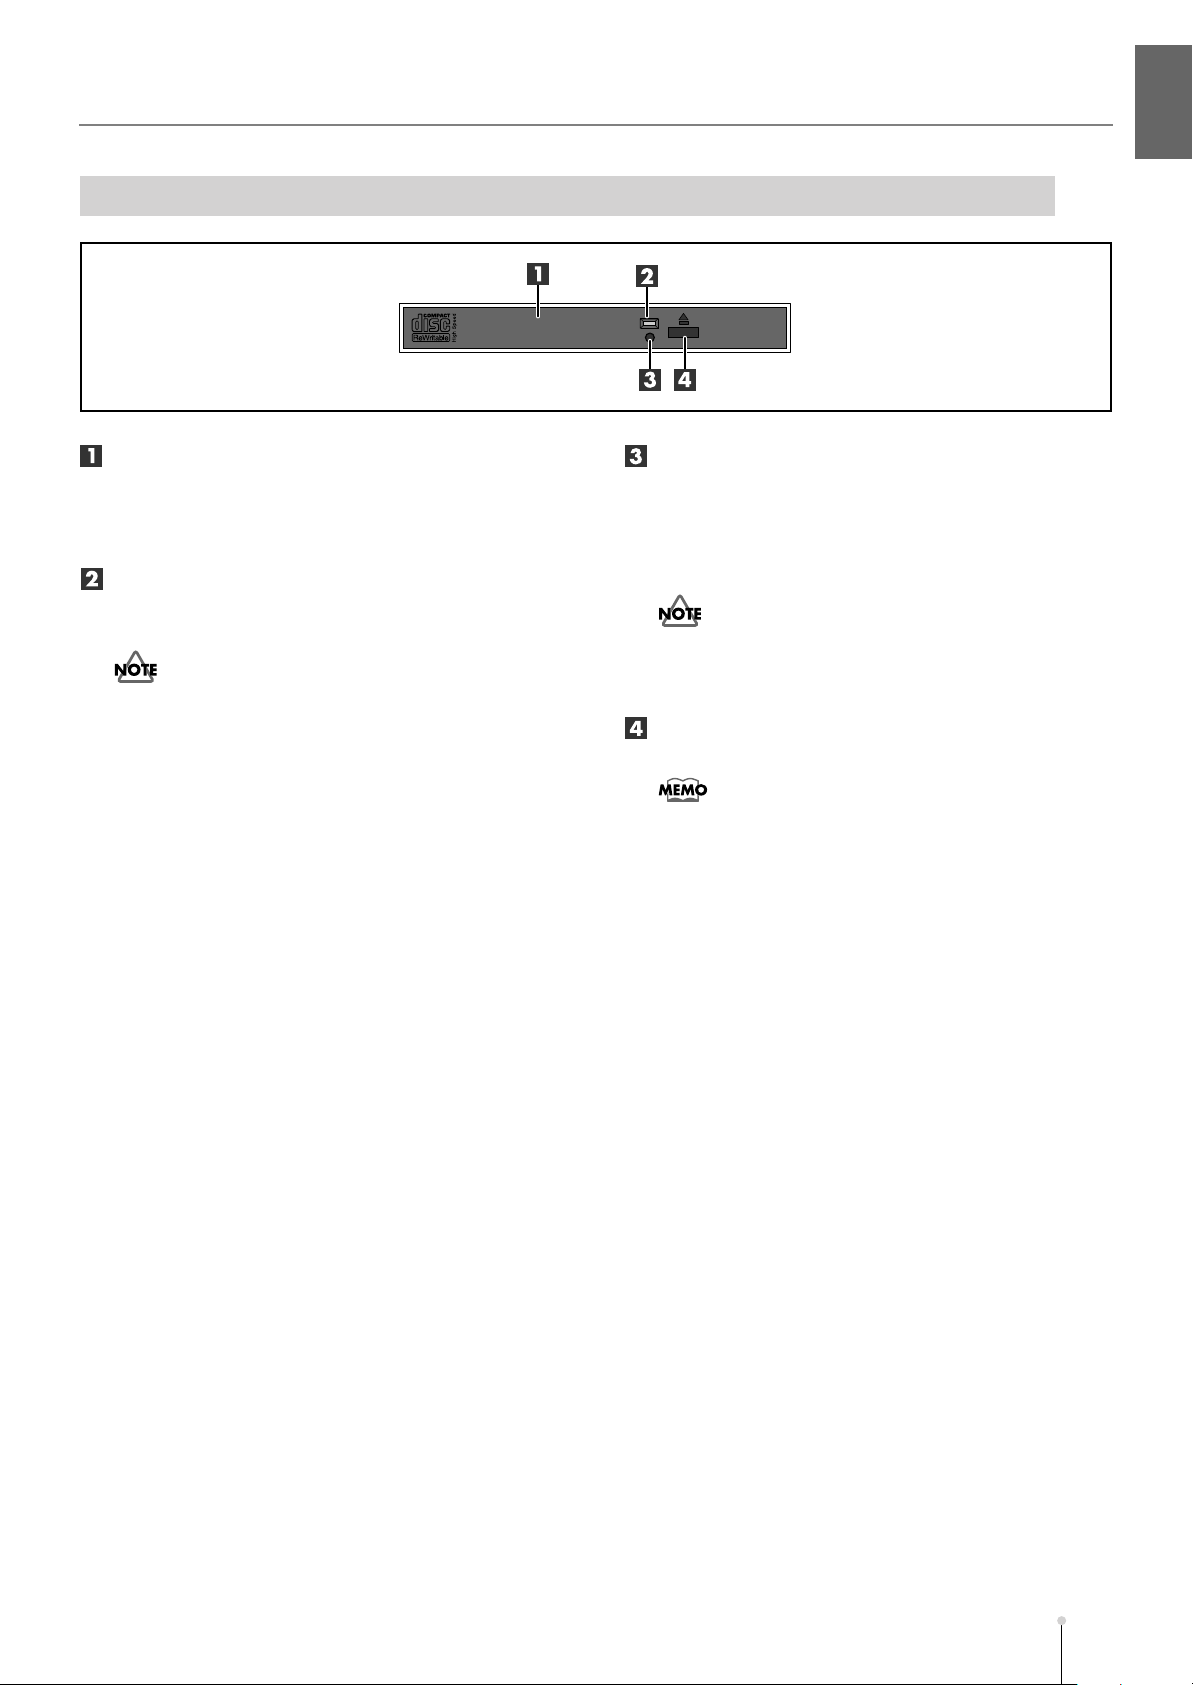
CD-RW Drive (Front Panel)
Panel descriptions
Panel descriptionsIntroduction
CD-R/RW drive tray
The tray will open when you press the CD-R/RW disc
eject button. This drive can handle CD-ROMs and music
CDs, and can also write data to CD-R discs or CD-RW
discs.
Disc access indicator
This indicator will light when the disc is being read or
written.
●
Never remove the disc while the disk access indicator is lit.
Doing so will damage the data and/or the disc.
Emergency disc eject hole
This is an emergency eject switch for the CD-R/RW disc.
If the power has been turned off (e.g., due to a power
failure), the tray will not open when you press the
CD-R/RW disc eject button. In this case, you can eject the
tray by pushing a straightened paper clip into this hole.
●
Never use the emergency disc eject hole to eject the disc
while the MV-8800 is operating. Doing so will damage the
disc and/or the drive, and may make the disc jump out of the
tray.
CD-R/RW disc eject button
Press this button to open the CD-R/RW disc tray.
●
If the MV-8800’s internal system is accessing the CD-R/RW
drive, pressing this button may not eject the CD tray. This is
a safety feature, not a malfunction.
MV-8800 Owner’s Manual
M-25
Page 26
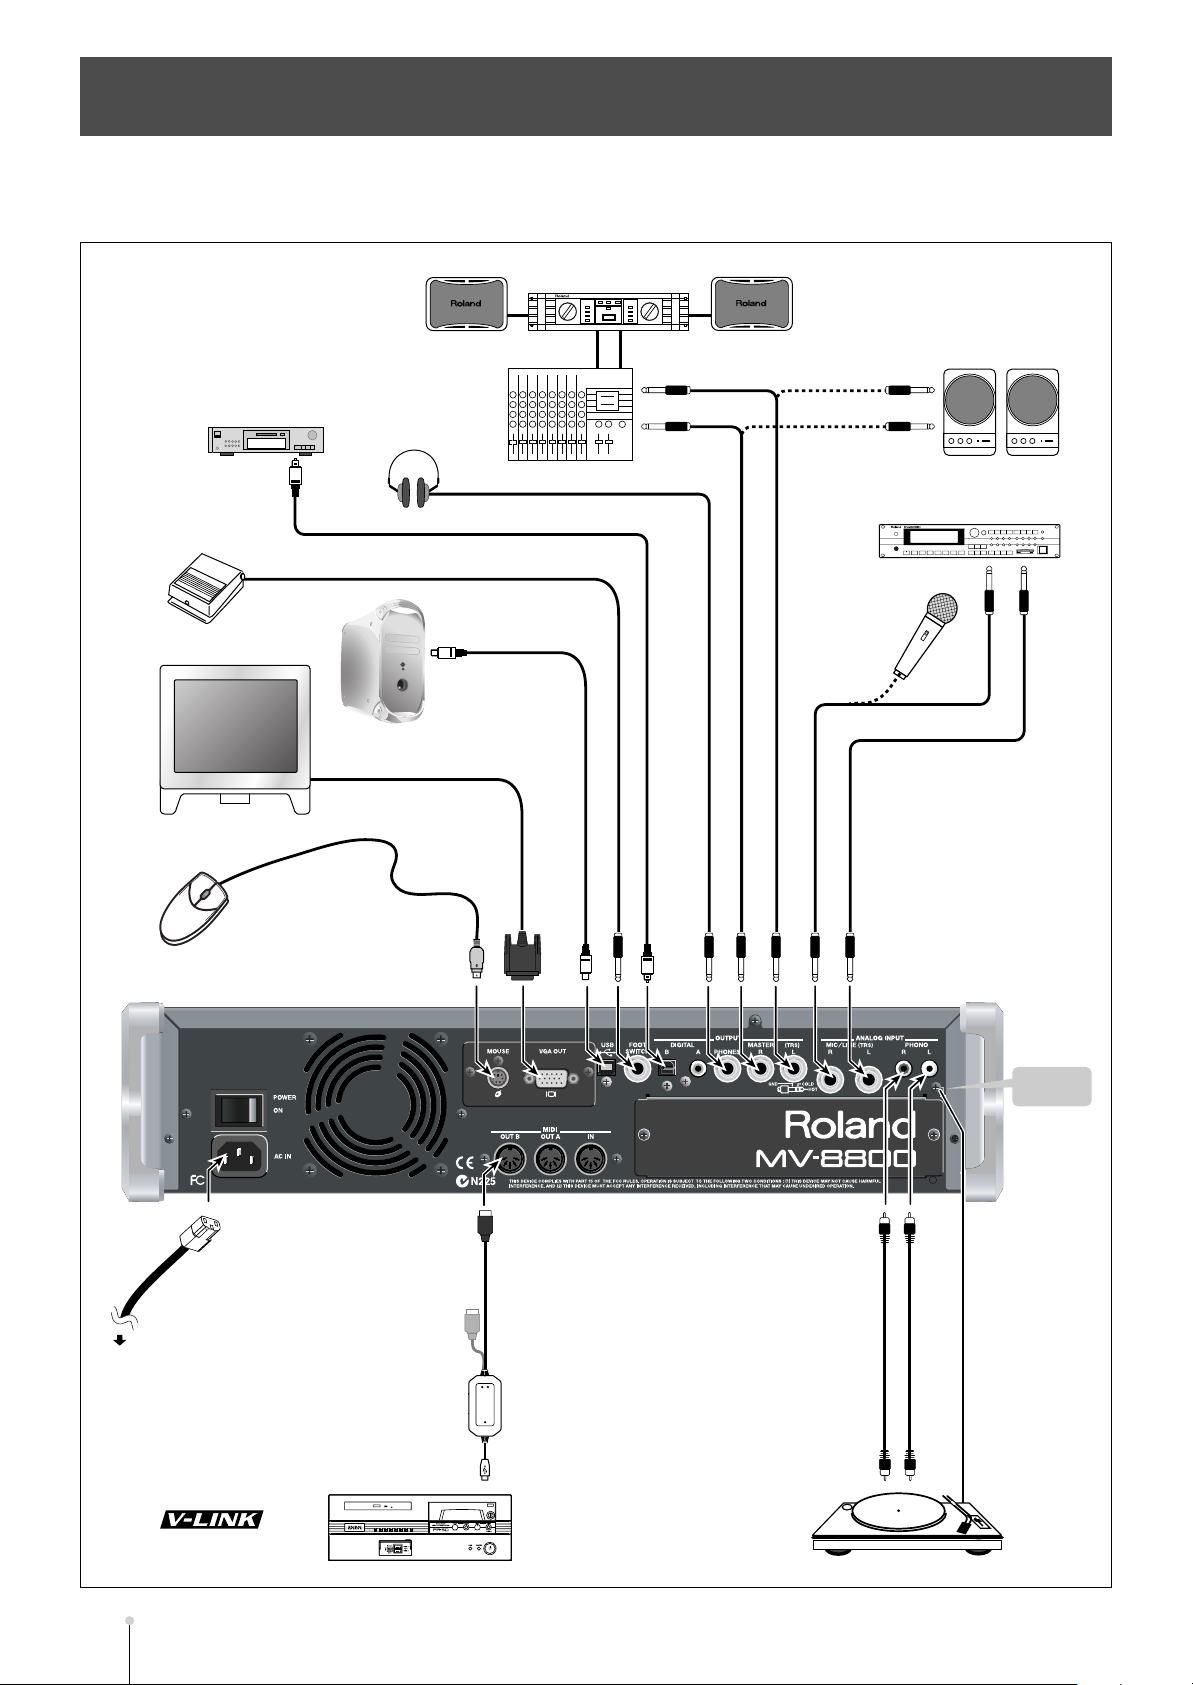
Preparing your equipment and making connections
Computer
e.g., PR-50
device
Power cable
(included)
Edirol
UM-1EX, etc.
MD Recorder, etc.
Mixer, etc.
Power amp
Turntable
Headphones
Foot Switch
Microphone
Sound module
VGA monitor
Grounding
terminal
Mouse (included)
To power outlet
Monitor speakers
(powered)
To prevent malfunction and/or damage to speakers or other devices, always turn down the volume, and turn
off the power on all devices before making any connections.
M-26
MV-8800 Owner’s Manual
Page 27

Cautions when making connections
●
AC inlet
Use the included power cable to connect the MV-8800 to an AC outlet.
●
Connection cables
When connection cables with resistors are used, the volume level of equipment connected to the inputs
(ANALOG INPUT) may be low. If this happens, use connection cables that do not contain resistors.
●
PHONO jacks
❍
If you’re not using the PHONO jacks, insert the included short pin. This will prevent noise from being
introduced via the PHONO jacks.
❍
You cannot use the PHONO and MIC/LINE analog inputs at the same time. If you
make connections to MIC/LINE, the PHONO input will be disabled.
●
MIC/LINE jacks
❍
Howling could be produced depending on the location of microphones relative to speakers. This can be
remedied by:
•
Changing the orientation of the microphone(s).
•
Relocating microphone(s) at a greater distance from speakers.
•
Lowering volume levels.
Preparing your equipment and making connections
Preparing your equipment and making connectionsIntroduction
❍
This instrument is equipped with balanced (TRS) type jacks. Wiring diagrams
for these jacks as shown in the illustration. Make connections after first
checking the wiring diagrams of other equipment you intend to connect.
●
Grounding terminal
❍
Use this if you’ve connected a turntable. By connecting this to the grounding wire (“earth”) of your turntable
you can reduce the hum or buzz that may otherwise occur.
●
Foot switch
If you are using a BOSSs FS-5U, set the polarity switch of the FS-5U as
shown in the illustration.
MV-8800 Owner’s Manual
M-27
Page 28
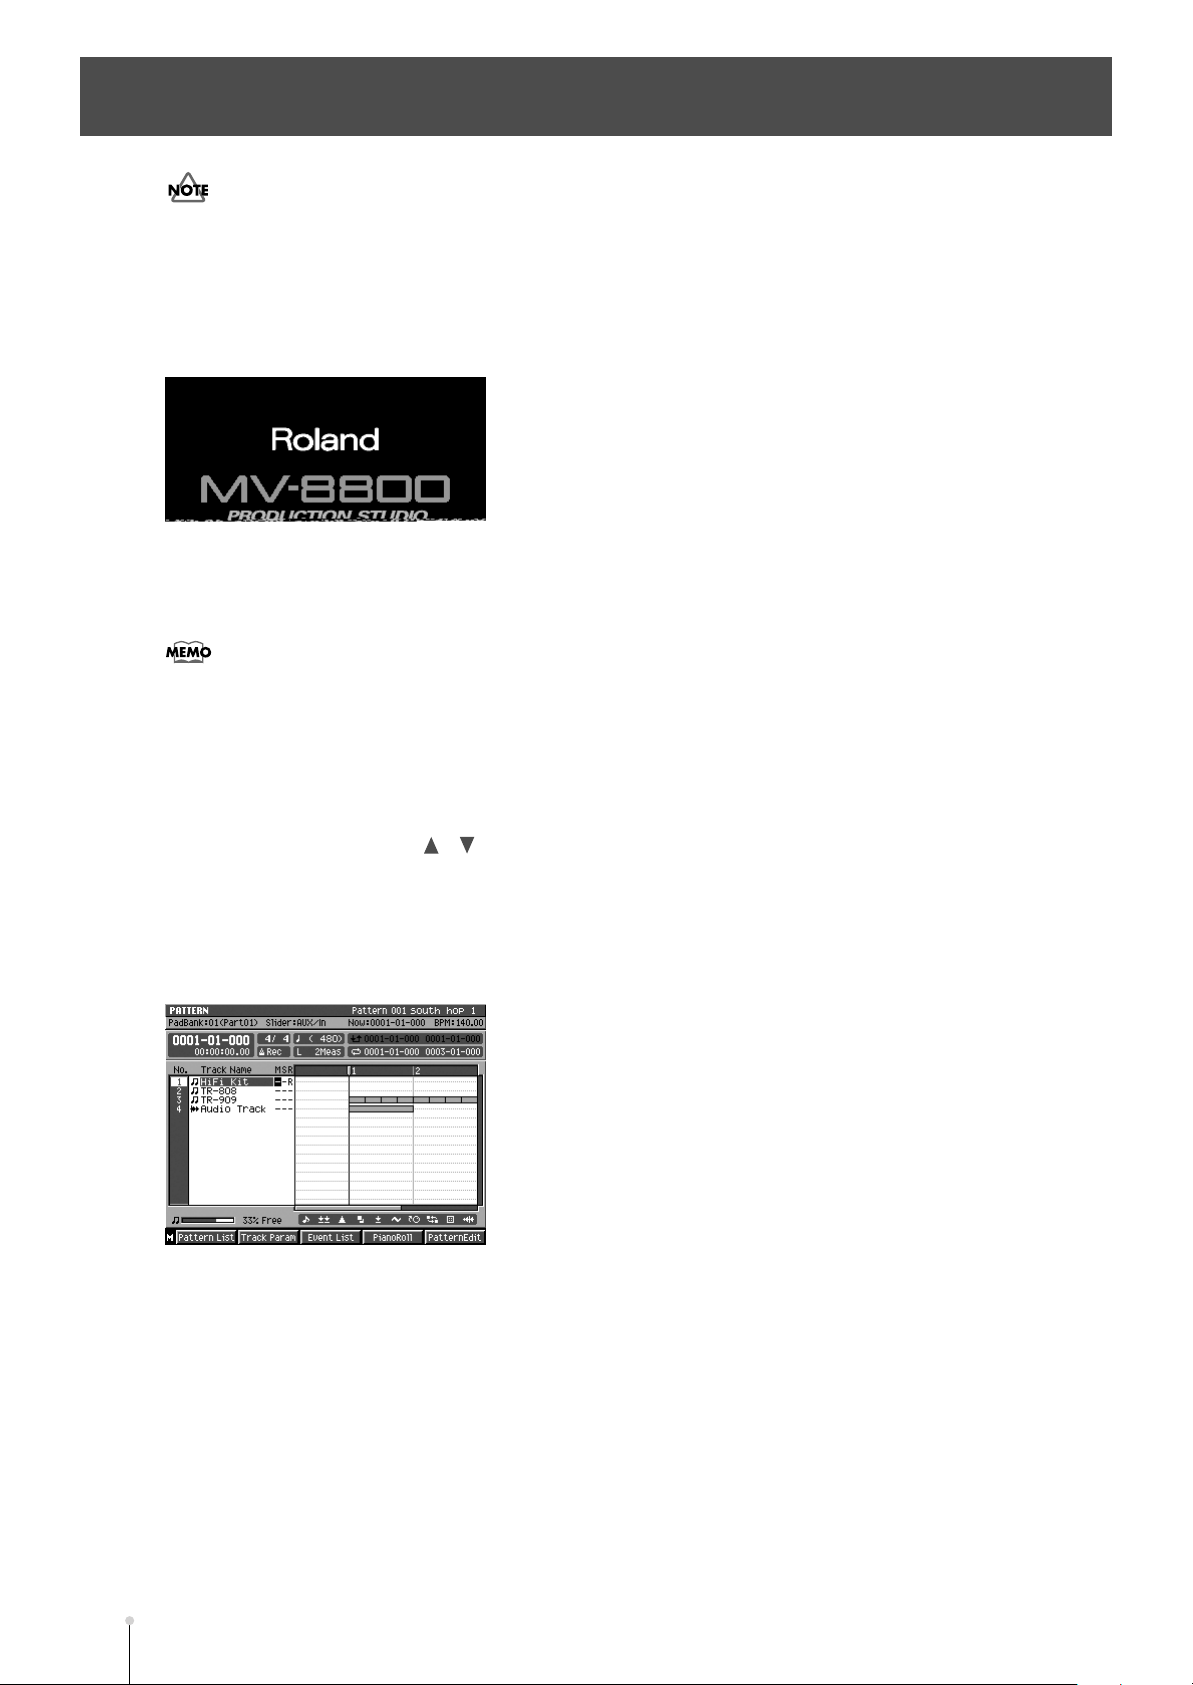
Turning on the power
●
Once the connections have been completed (p. 26), turn on power to your various devices in the order specified.
By turning on devices in the wrong order, you risk causing malfunction and/or damage to speakers and other
devices.
1.
Make sure that the audio devices connected to the MV-8800 are powered-off.
Set the rear panel POWER ON switch to the ON position.
2.
The LCD backlight (illumination) will light, and the opening screen and the MV-8800’s system software version
will be displayed.
●
This unit is equipped with a protection circuit. A brief interval (a few seconds) after power up is required before
the unit will operate normally.
●
When you turn on the power, you may hear a sound even though the MASTER knob is turned down; this is not
a malfunction.
●
While the opening screen is displayed, the MV-8800 is checking its system and loading data required for
startup. Please wait until it is ready to operate.
●
When the MV-8800 starts up, the project being worked with when the system was last shut down will be loaded
automatically.
●
If you want to select and load a different project, press [F5](Select Proj). The SELECT PROJECT popup will
appear. Use CURSOR [ ] [ ] to choose the desired project, and then press [F5](Select). Alternatively, you
can create a new project by pressing [F1](Create New).
●
To adjust the contrast of the display, turn the CONTRAST knob located at the right of the LCD.
When start-up is complete, the PATTERN screen will appear.
3.
If desired, you can change settings so that the SONG screen appears when start-up is complete. Refer to the
Power Up Mode parameter (Screen Guide; p. 173).
4.
Turn on the power of your audio equipment.
5.
Use the MV-8800’s MASTER knob and the volume controls of your audio equipment to
adjust the volume appropriately.
M-28
MV-8800 Owner’s Manual
Page 29
Turning off the power
You must perform the Shutdown operation before turning the power off. The Shutdown operation saves the
stored parameters before powering-off, and safely stops the hard disk.
If you turn off the power without performing Shutdown, or if you turn off the power
before “You May Turn Off.” is displayed, the data and the MV-8800 itself will be
damaged. Roland will accept no responsibility for any damage that results from your
failure to perform the Shutdown operation.
1.
Press [SHUTDWON].
A message of “SHUTDOWN Are you sure?” will appear.
2.
Press [F5](Yes).
A message of “Save Current Project before SHUTDOWN?” will appear.
●
If the Project Protect setting is turned on for the current project, the message in step 2 will not appear.
Turning on the power
Turning on the powerIntroduction
Press [F5](Yes).
3.
The current project will save. When save process is completed, the “SHUTDOWN Completed. You May Turn
Off.” message will appear.
●
If you press [EXIT] in step 3, shutdown will be cancelled. If you want to shutdown without saving the current
project, press [F1](No).
4.
Turn down the volume of all connected equipment
Turn off the rear panel POWER ON switch.
5.
Make sure that the “You May Turn Off.” message is displayed before you turn off the power.
If you need to turn off the power completely, first turn off the POWER switch, then unplug the power cord from
the power outlet. Refer to “Power Supply” (p. 6).
●
When you turn off the power, you may hear a sound even though the MASTER knob is turned down; this is not
a malfunction.
●
While the Shutdown process is occurring, system parameters and project data is being saved. This will require
a certain amount of time before the MV-8800 is ready for you to turn off the power.
MV-8800 Owner’s Manual
M-29
Page 30
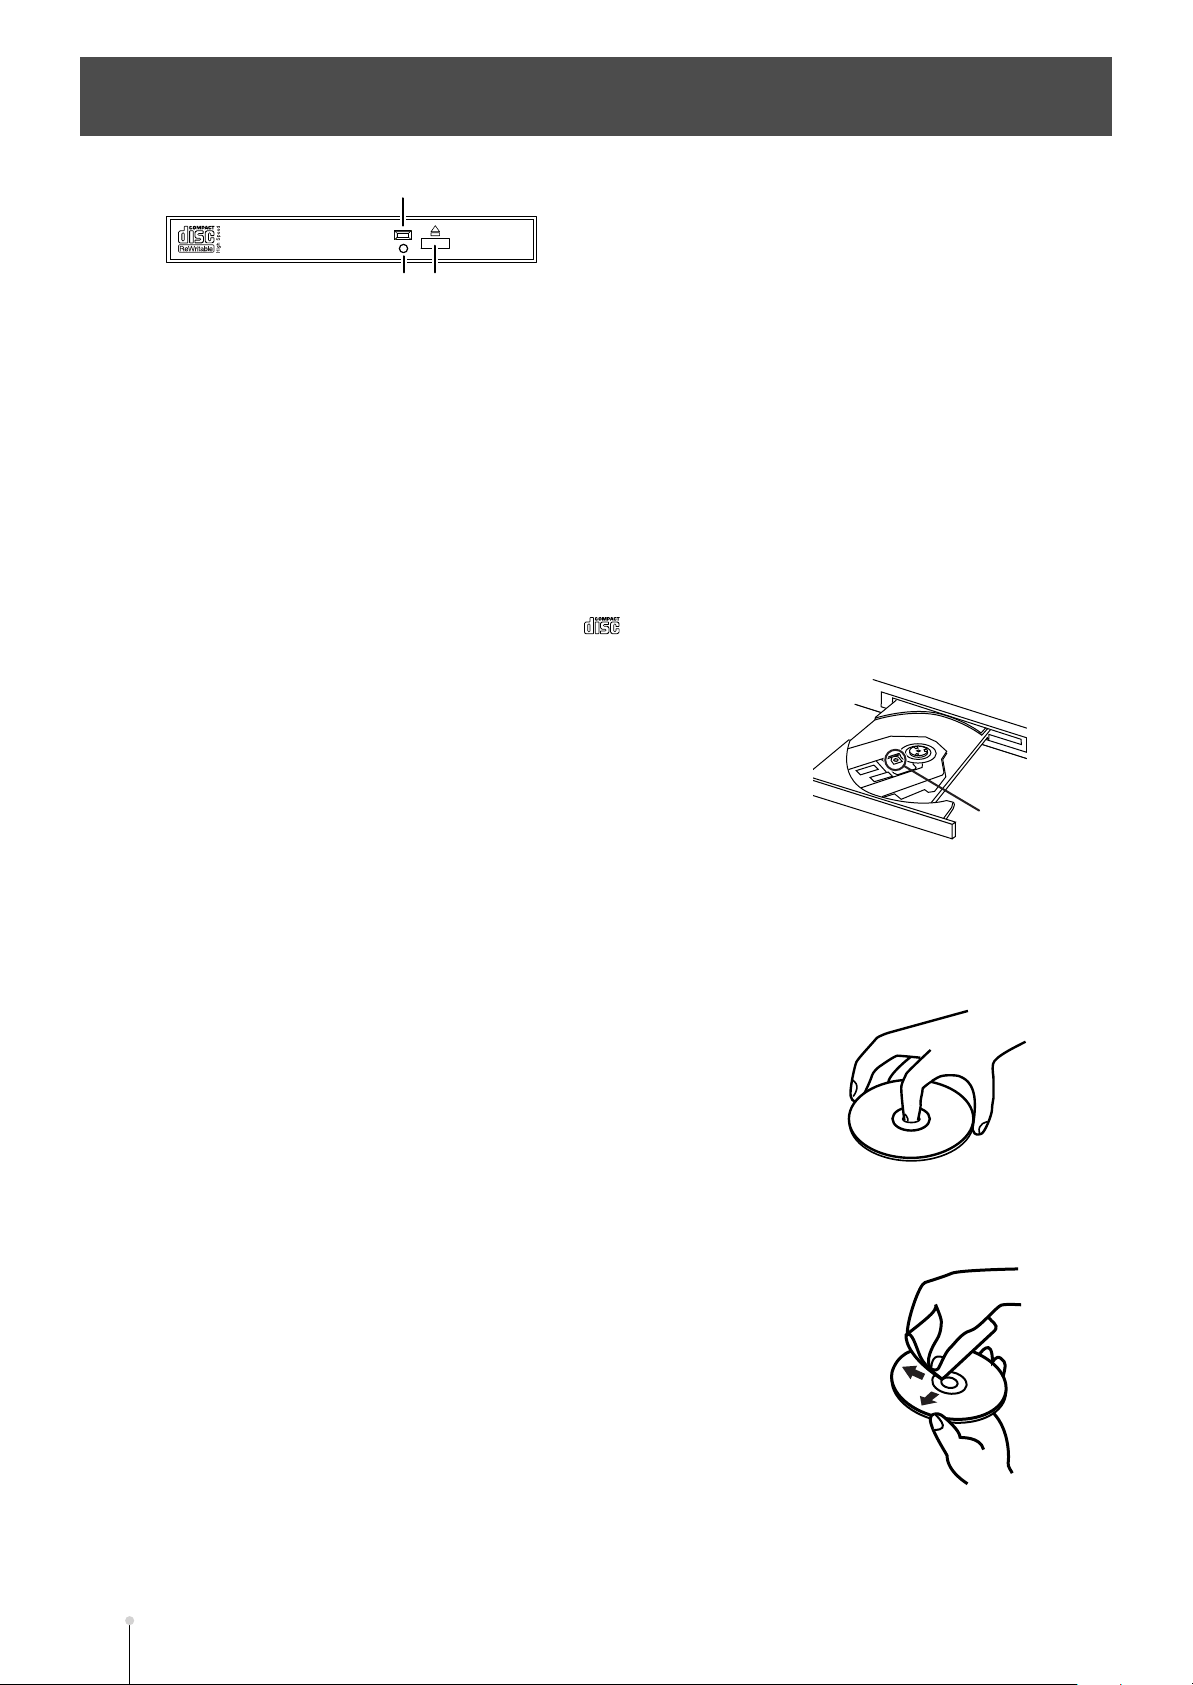
Using the CD-R/RW drive
Lens
Access indicator
Emergency eject hole Eject button
●
Cautions when using the CD-R/RW drive
•
Place the MV-8800 on a stable and level surface that is not subjected to vibration by external sources. If the
unit is tilted significantly, this may adversely affect the operation of the CD-R/RW drive.
•
If you move the unit between locations of dramatically differing temperature and humidity, condensation
(water droplets) may form on the CD-R/RW drive. Using the unit in this state will cause malfunctions; leave
the unit for several hours to allow the condensation to disappear before attempting to use it.
•
Never attempt to use the emergency eject hole to eject the disc tray when the MV-8800 is operating (when
the MV-8800’s DISK indicator or the CD-R/RW drive access indicator are lit).
•
Remove the disc from the disc tray before you turn the power on or off.
•
Remove the disc from the disc tray when transporting the MV-8800.
•
Do not place anything other than a disc bearing the logo (e.g., wires, coins, any other type of disc) on
the disc tray. Doing so will damage the CD-R/RW drive.
•
Do not touch the lens. Doing so will make it impossible for data to be read or
written normally, and you may experience skips during playback or recording.
•
If the lens becomes dusty, you may clean it using a commercially-available lens
blower-brush sold for use with camera equipment.
●
Cautions for CD-R/RW disc handling
•
Do not use a conventional audio CD player to play back a CD-R/RW disc used to back up a project. Doing
so will produce a high-volume sound that can damage your hearing and/or your speakers.
•
Do not bend a disc, since this may make the disc unreadable or unwritable, and may cause malfunctions.
•
Do not drop or stack discs.
•
Do not place heavy objects on a disc or subject it to strong impact.
•
To hold a disc, insert your finger in the hole and grasp it by the outer edge as
shown in the diagram. Do not allow fingerprints or scratches to occur on the
recording surface (the unprinted side), since this can make the data unreadable.
•
Do not use discs in excessively dusty locations.
•
Do not leave discs in direct sunlight or in a closed automobile.
•
Do not leave a disc in the CD-R/RW drive for an extended time.
•
To protect the disc, store it in its original case.
•
Do not affix foreign objects such as labels to the label surface of the disc.
•
When writing the title etc. on the label surface of the disc, use a soft felt-tipped marker.
•
If the disc becomes soiled, use a soft dry cloth to wipe it lightly from the center of the disc
straight toward the outer edge. Do not wipe in a circular direction.
•
Do not use cleaning agents such as cleaners or sprays made for vinyl records, or
solvents such as benzene.
M-30
MV-8800 Owner’s Manual
Page 31

Recommended discs
• We recommend CD-R discs made by the following manufacturers:
Taiyo Yuden Corporation, Mitsui Chemical Corporation, Mitsubishi Chemical Corporation,
Ricoh Corporation, Hitachi Maxell Corporation
• We recommend CD-RW discs made by the following manufacturers:
Mitsubishi Chemical Corporation, Ricoh Corporation
Inserting a disc
●
Make sure that the disc is firmly seated in the CD-R/RW drive tray. If the disc is not correctly in position, it may
catch inside the drive and may be impossible to remove.
Press the eject button.
1.
2.
Open the disc tray.
3.
Align the hold of the disc with the round retainer in the center of the CD-R/RW drive.
Press the disc downward until it locks into the three catches of the retainer.
4.
Using the CD-R/RW drive
Using the CD-R/RW driveIntroduction
●
To check whether the disc is correctly in position, try lightly rotating the outer edge of the disc with your finger.
Make sure that the disc does not come off the retainer or fail to rotate smoothly.
5.
Push the disc tray all the way in.
If the disc tray fails to open
If, due to a power failure or other reason, the power is turned off with a disc in the tray, you won’t be able to
eject the disc tray by pressing the eject button. If this happens, insert a straightened paper clip (or similar
object) into the emergency eject hole to eject the tray.
●
Never use the emergency eject hole to eject the disc tray when the MV-8800 is operating. Doing so may
damage the disc and/or drive, and may cause the disc to fly out.
●
The software locks the eject button while the MV-8800 system is using the CD-R/RW drive. This means that
pressing the eject button in such cases will not eject the tray. This is a design feature for reasons of safety, and
is not a malfunction.
Turn off the power of the MV-8800.
1.
Insert a straightened paper clip (or similar object) into the emergency eject hole. The disc
2.
tray will be ejected.
MV-8800 Owner’s Manual
M-31
Page 32

Basic operations
Moving the cursor
Each screen displays various parameters (items to set) or menus (items to select). To edit the value of a
parameter, move the cursor to the value you want to edit. To select a menu item, move the cursor to the
desired item. The cursor is enclosed in a frame as shown below.
Use CURSOR [ ] [ ] [ ] [ ] to move the cursor.
Cursor
Cursor (highlighted)
Black characters
on white background
(value display)
●
Finalizing a menu selection
Press [ENTER] to finalize the selected menu item. The selection or command (operation) will be executed.
Editing the value of a parameter
To edit the value of a parameter, use the VALUE dial or [DEC] [INC].
●
VALUE dial
Turn the VALUE dial toward the right to increase the value, or
toward the left to decrease it.
You can hold down [SHIFT] and use the VALUE dial to change a
value in larger steps.
●
[DEC] / [INC]
Press [INC] to increase a value. Press [DEC] to decrease a value.
You can continue holding down [DEC] or [INC] to make the value continue changing (“repeat”). At this time,
you can hold down the other button as well to make the value change even faster (“turbo repeat”). You can
hold down [SHIFT] and use [INC] [DEC] to change a value in larger steps.
decrease increase
Using the F (function) buttons
The top panel F-buttons ([F1]–[F5]) have various functions assigned to them depending on the screen shown.
These buttons correspond one-to-one with the function names shown at the bottom of the screen.
M-32
MV-8800 Owner’s Manual
Page 33

Using the SHIFT button
Some buttons have more than one function assigned to them; use [SHIFT] to access these additional
functions.
Hold down [SHIFT] and press the desired button.
In this manual, operations accessed using [SHIFT] are indicated as [SHIFT] + [(button name)]. Use [SHIFT]
to access the functions whose names are printed inside a blue frame on the panel of the MV-8800.
●
You can use the Shift Lock parameter (Screen Guide; p. 175) to change the operation of the SHIFT button.
Inputting text
Here’s how to input alphanumeric characters, such as when specifying a file name.
Move the cursor to the desired location.
1.
The cursor is the highlighted character, as shown below.
Basic operations
Basic operationsIntroduction
Cursor (highlighted)
2.
Turn the VALUE dial.
Input the desired character. To move to the next place (toward the right) the right cursor button.
If you use the VALUE dial to input characters, turning the dial toward the right will select characters in the order
of “(a blank space) ! “ # $ % & ’ ( ) * + , - . / 0–9 : ; < = > ? @ A–Z [ \ ] ^ _` a–z { | } ~ • ”.
●
File names may not contain a blank space or certain symbols (“ * / : ; < > ? \ | •).
●
Volume label names may not contain a blank space, lowercase characters, or certain symbols (“ * + , . / : ; < =
> ? [ \ ] | •).
• [F1](History)
You can recall (and re-input) up to the ten most recent names you input in the EDIT NAME popup since turning
on the power. Selects the name at the cursor in the history list then press [ENTER].
• [F2](Insert Space)
Inserts a space at the cursor location.
• [F3](Delete)
Deletes the character at the cursor location. Characters at the right of the cursor will be moved forward to fill
the gap.
• [F4](A➜a/a➜A): switch character case
Switches the character at the cursor location between uppercase and lowercase.
●
Using the numeric keys to input characters
You can use the numeric keys to input alphanumeric characters. To select one of the various characters
(letter, number, or symbol) that appear on a numeric key, press the key a number of times. For example, if you
repeatedly press [3], you will cycle through the available choices for that key, which are: 3 → G → H → I → 3.
MV-8800 Owner’s Manual
M-33
Page 34

Basic operations
To zoom-in/zoom-out the waveform display
In screens that display a waveform (such as the AUDIO PHRASE EDIT screen), you can use the following
button operations to zoom-in or zoom-out the waveform display.
Button
[SHIFT] + CURSOR [ ]
CURSOR [ ]
[SHIFT] +
[SHIFT] +
[SHIFT] + CURSOR [ ]
CURSOR [ ]
Operation
Zoom-out the time axis display
Zoom-in the time axis display
Zoom-out the amplitude (volume level) display
Zoom-in the amplitude (volume level) display
When editing the waveform, you will be able to work more accurately if you zoom-in (magnify) the waveform
display so that you can see the editing points in greater detail.
If you want to see the overall picture of the entire waveform, you can zoom-out the display.
Stopping the output of the sampler
If you press [SHIFT] + [STOP ( )], all currently playing sounds (audio phrases, partials, external MIDI
devices) and the sequencer will stop.
You can use this to forcibly stop the sound if a long audio phrase is playing.
●
Outputs the Note off messages from a MIDI OUT connector.
M-34
MV-8800 Owner’s Manual
Page 35

Velocity pad operations
Performing with the velocity pads
The sound source that is played by the velocity pads will change depending on the current track.
●
The part that is actually being played by the pads is shown in the following location. In the example shown here,
an instruments part 1 is being played.
• A.Phrs=Audio phrase
• Part01=Instrument part 1
1.
Press [SONG].
The SONG screen (Screen Guide; p. 8) will appear.
2.
Use CURSOR [ ] [ ] to select the track you want to play from the pads.
The selected track (the current track) will be highlighted. The sounds played by the velocity pads will change
depending on the type of track you’ve selected (MIDI track, audio track, or pattern track).
Velocity pad operationsIntroduction
Current track
MIDI track
Audio track Audio phrase
Pattern track Pattern
3.
Strike the VELOCITY PADS.
The volume will vary depending on the force (velocity) with which you strike the pads. Some sounds will also
change when you apply pressure (aftertouch) to a pad after striking it.
●
There will be no sound if no partial is assigned to the pad (note number) you strike, or if no audio phrase is
assigned. You’ll need to assign a sound to the pad as described in “Playing the imported data immediately
(Quick Assign)” (p. 75).
●
If the sound to be played is an audio phrase, you can have the volume change according to the force used in
tapping the pads by switching Velocity Control to On. For details, refer to “AUDIO PHRASE EDIT screen”
(Screen Guide; p. 155).
Audio source
Instruments or Note number
MV-8800 Owner’s Manual
M-35
Page 36

Velocity pad operations
Switching a pad bank
A “pad bank” is a group of settings for the sixteen pads of the top panel. By switching pad banks you can
access a large number of sounds. The MV-8800 provides the following number of pad banks.
Current track
MIDI track
Audio track Audio phrase 32 (32 x 16 = 512)
Pattern track Pattern 8 (8 x 16 = 128)
1.
Press [PAD BANKS].
The red PAD BANKS indicator will light, and the PAD BANKS popup (Screen Guide; p. 5) will appear.
2.
Select the desired pad bank.
Turn the VALUE dial to change pad banks.
3.
Press [PAD BANKS] once again.
The red PAD BANKS indicator will go dark, and the popup will disappear.
Audio source Number of banks (total available sounds)
Patch 6 (6 x 16 = 96)
●
Directly selecting a pad bank
You can switch pad banks by directly specifying a number.
Hold down [PAD BANKS], and strike the VELOCITY PADS (1–16) that corresponds to the
1.
desired pad bank.
The pad bank will switch. You can switch between pad banks 1–6 for instruments, or between pad banks 1–
16 for audio phrases.
●
You can’t use this method to switch to audio phrase pad banks 17–32. Press [PAD BANKS] and use the VALUE
dial or the numeric keys to specify the bank number.
M-36
MV-8800 Owner’s Manual
Page 37

Naming a pad bank
1.
Press [PAD BANKS].
The PAD BANKS indicator (red) will light, and the PAD BANKS popup (Screen Guide; p. 5) will appear.
2.
Press [F1](Name).
The EDIT PAD BANK NAME (Screen Guide; p. 3) will appear. Input the desired bank name.
3.
When you’ve finished entering the name, press [F5](OK).
Velocity pad operations
Velocity pad operationsIntroduction
Fixed Velocity function
Here’s how you can disable the velocity sensitivity of the pads.
1.
Press [FIXED VELOCITY].
The indicator will light orange, and the FIXED VELOCITY function will be turned on. In this state, the pads will
produce a fixed velocity (initial value = 127) regardless of how strongly you strike them.
You can set the velocity value as desired. Refer to “Fixed Velocity Level” (p. 174).
●
To turn off the FIXED VELOCITY function, press [FIXED VELOCITY] once again to make the indicator go dark.
Multilevel function
Here’s how you can use the sixteen velocity pads to play a single partial over sixteen different velocity levels.
Strike the VELOCITY PADS whose sound you want to play over sixteen pre-determined
1.
velocity levels.
The sound you play will be selected.
Press [MULTILEVEL].
2.
The indicator will light orange, and the MULTILEVEL function will be turned on. In this state, pad 1 plays a low
velocity and pad 16 plays the maximum velocity.
●
Your actual playing strength is ignored while MULTILEVEL is on.
●
To turn off the MULTILEVEL function, press [MULTILEVEL] once again to make the indicator go dark.
●
The pad you strike determines which of the sixteen velocity levels are produced.
Pad Velocity Pad Velocity Pad Velocity Pad Velocity
1 7 5 39 9 71 13 103
2 15 6 47 10 79 14 111
3 23 7 55 11 87 15 119
4 31 8 63 12 95 16 127
MV-8800 Owner’s Manual
M-37
Page 38

Velocity pad operations
Hold function
Here’s how you can “hold down” a velocity pad without having to actually keep your finger on it.
1.
Press and hold the pad you want to “hold.”
While continuing to press the VELOCITY PADS, press [HOLD].
2.
The HOLD indicator (red) will light, and the HOLD function will be turned on. Now that pad will continue
sounding even after you take your finger off of it.
●
To defeat HOLD, press [HOLD] once again to make the indicator go dark.
Roll function
Here’s how you can play a roll (rapidly repeated strikes).
1.
Press and hold [ROLL], and strike the VELOCITY PADS that you want to roll.
A roll will be played on the pad as long as you continue pressing [ROLL].
You can change the interval (spacing) of the roll. Refer to “Pad Roll Interval” (p. 174).
M-38
MV-8800 Owner’s Manual
Page 39

Quick Start
Listening to the demo songs
The MV-8800 comes equipped with a wide variety of features for creating songs. To get a better idea of what
these functions are, try listening to the demo songs.
Loading a project
A project containing a demo song was saved to the MV-8800’s internal hard disk when the unit was shipped
from the factory. Use the following procedure to load the project containing the demo song to the MV-8800’s
memory.
Quick Start
Press [PROJECT].
1
The PROJECT MENU screen (Screen Guide; p. 162) will appear.
Use CURSOR [ ] [ ] [ ] [ ] to select the LOAD PROJ icon, and
2
press [ENTER].
The LOAD PROJECT screen (Screen Guide; p. 164) will appear.
The project saved on the hard disk are listed in the display.
Move the cursor to the project that you want to load, and press
3
[F5](Execute).
The display will ask “Save Current Project before loading project?”
Press [F5](Yes) or [F1](No).
4
F-button
[F1](No)
[F5](Yes) The current project will be saved, and then the selected project will be loaded.
The project is loaded to the MV-8800’s memory.
Action
The selected project will be loaded without saving the current project.
MV-8800 Owner’s Manual
M-39
Page 40

Quick Start
Start playback the demo song
This procedure plays back the demo song in the loaded project.
Press [SONG].
1
The SONG screen (Screen Guide; p. 8) will appear.
(QS_SONG.bmp)
Press [PLAY ( )].
2
The PLAY indicator will light, and the demo song playback will begin.
Press [STOP ( )].
3
The PLAY indicator will go dark, and the demo song playback will stop.
About the demo songs
Use of the demo song supplied with this product for any purpose other than private, personal enjoyment
without the permission of the copyright holder is prohibited by law. Additionally, this data must not be copied,
nor used in a secondary copyrighted work without the permission of the copyright holder.
For more details about the demo songs, refer to the booklet “MV-8800 Content Discs.”
M-40
MV-8800 Owner’s Manual
Page 41

Using the velocity pads
If you want to use the MV-8800 in even more advanced ways, read the following pages.
• Velocity pad operations (p. 35)
• Making an instrument settings (p. 111)
Try tapping the velocity pads to play a variety of different sounds.
Performing instrument sounds
Tap the velocity pads to play drum kits, piano, and other instrument sounds.
Press [INSTRUMENTS].
1
The INSTRUMENTS screen (Screen Guide; p. 114) will appear.
Use CURSOR [ ] [ ] to select the part to which you want to play.
2
The selected part number is highlighted. The highlighted part is called the current part.
Strike the velocity pads.
3
The patch assigned to the current part plays.
Using the velocity padsQuick Start
MV-8800 Owner’s Manual
M-41
Page 42

Quick Start
Performing audio phrases
Tap the velocity pads to perform drum loops, vocal phrases, and other sounds.
Press [AUDIO PHRASES].
1
The AUDIO PHRASES (PAD) screen (Screen Guide; p. 152) will appear.
Strike the velocity pads.
2
You will hear the sound of audio phrases.
If you want to use the MV-8800 in even more advanced ways, read the following pages.
• Velocity pad operations (p. 35)
• Making an audio phrase settings (p. 111)
M-42
MV-8800 Owner’s Manual
Page 43

Creating a song
Try using the sequencer to record a performance.
Recording a pattern
This procedure records performances with the velocity pads to patterns.
Setting up a pattern
Press [PATTERN].
1
The PATTERN screen (Screen Guide; p. 91) will appear.
Press [F1](Pattern List).
2
The PATTERN LIST screen (Screen Guide; p. 96) will appear.
Creating a songQuick Start
Use CURSOR [ ] [ ] to select a pattern with the name “(Empty)” and
3
press [F5](Select).
A pattern (with a time signature of 4/4 and length of two measures) without anything recorded to it is
set up, and the PATTERN screen (Screen Guide; p. 91) is displayed.
MV-8800 Owner’s Manual
M-43
Page 44

Quick Start
Setting up tracks
4
5
6
(QS_TRACK_PARAMETER.bmp)
Use CURSOR [ ] [ ] to select the MIDI track which name is “MIDI
Track 1.”
Press [F2](Track Param).
The TRACK PARAMETER popup (Screen Guide; p. 11) will appear.
Using the Output Assign parameter, select the part for the instrument
to be played by the track.
When you tap the velocity pads, the sounds for the selected part are played.
Once you have determined the part to be performed, press [F5](Close).
7
Recording the performance
Press [REC ( )].
8
The REC indicator will blink, and the PATTERN RECORDING PARAMETER (MIDI) popup (Screen
Guide; p. 101) will appear.
Press [PLAY ( )].
9
The REC indicator and PLAY indicator will light, and recording will begin.
Start the performance. The performance is recorded to the pattern.
10
11
12
When you’ve finished recording, press [STOP ( )].
The REC and PLAY indicators will go dark, and recording will stop.
Playing back the performance
Press [TOP ( )].
The current time location will return to the beginning of the pattern.
Press [PLAY ( )].
The PLAY indicator will light, and the pattern playback will begin.
M-44
13
MV-8800 Owner’s Manual
Press [STOP ( )].
The PLAY indicator will go dark, and the pattern playback will stop.
If you want to use the MV-8800 in even more advanced ways, read the following pages.
• Using the sequencer (p. 131)
• Recording a song / pattern (p. 145)
• Editing a song / pattern (p. 167)
Page 45

Saving a project
To prevent the loss of the recorded performance data due to unanticipated accidents, save the data to the
MV-8800’s internal hard disk.
Press [PROJECT].
1
The PROJECT MENU screen (Screen Guide; p. 162) will appear.
Use CURSOR [ ] [ ] [ ] [ ] to select the SAVE PROJ icon, and press
2
[ENTER].
A message of “Save Current Project?” will appear.
(QS_SaveCurrent.bmp)
Quick Start
Creating a songQuick Start
Press [F5](Yes).
3
The project in the MV-8800's memory is saved to the internal hard disk.
MV-8800 Owner’s Manual
M-45
Page 46

Assembling additional materials
Performances with the MV-8800 can also involve importing sounds from audio CDs and sampling sounds
using a microphone, and then performing using the velocity pads. Using the sounds you assemble enables
you to create highly original works.
Importing sound from an audio CD
Here’s how to import sounds from an audio CD, then assign them to audio phrases.
Viewing the audio CD contents
Insert your audio CD into the CD-R/RW drive.
1
Press [IMPORT].
2
The IMPORT screen (Screen Guide; p. 219) will appear.
Press [F1](Select Drive).
3
The SELECT DRIVE popup (Screen Guide; p. 6) will appear.
Use CURSOR [ ] [ ] to select “Audio CD,” and press [F5](Select).
4
The contents of the audio CD are displayed.
(QS_IMPORT_CD.bmp)
Specifying the range and importing the sounds
Use CURSOR [ ] [ ] to select the CD track that you want to import,
5
and press [F5](Import).
The SET TIME popup (Screen Guide; p. 225) will appear.
M-46
MV-8800 Owner’s Manual
Page 47

Page 48

Quick Start
Sampling sounds using a mic
You can sample sounds using a mic and assign the sounds to patches.
Inputting audio with a mic
Connect a mic to the left ANALOG INPUT (MIC/LINE) jack.
1
Press [SAMPLING].
2
The SAMPLING screen (Screen Guide; p. 209) will appear.
Set the Input Select parameter to Analog(L).
3
The LEVEL meter fluctuates when the audio from the mic is input.
Adjust the audio input level using SENS knobs.
4
Adjust the audio input level so that the level meters move as high as possible in the range of -12 dB –
0 dB.
(QS_SAMPLING.bmp)
Sampling
Set the Sample Type parameter to Mono.
5
The input audio is monaurally sampled.
Press [F5](Start).
6
The sampling will begin. Input the audio.
7. Press [F5](Stop).
7
The sampling will stop. The input audio is recorded to the wave memory as a sample.
The RESULT popup (Screen Guide; p. 211) will appear. You can preview the recorded sample by
holding down the [F4] (Preview) button.
(QS_SAMPLING_RESULT.bmp)
M-48
MV-8800 Owner’s Manual
Page 49

Creating a patch from the sample
With the Original Key parameter, set the note number you want to use
8
for the performance with sampled pitches unchanged.
Press [F3](Quick Assign).
9
The Select Quick Assign message (Screen Guide; p. 213) will appear.
Quick Start
Assembling additional materialsQuick Start
10
(QS_Q_ASGN_TO_PATCH.bmp)
11
12
13
Press [F5](AsgnToPatch).
The PATCH QUICK ASSIGN popup (Screen Guide; p. 216) will appear.
Specify the Part parameter which you want to assign a sample.
Place a check mark (✔) at the Make Keyboard parameter.
This allows you to perform with scales included.
With the Assign To parameter, set the pad bank number and pad
number range to which you want to assign the sample, then press
[F5](Execute).
The sample will be assigned to the specified velocity pads (note number). After pressing
[INSTRUMENTS], you can then tap the velocity pads to play the sampled sounds.
If you want to use the MV-8800 in even more advanced ways, read the following pages.
• Sampling (p. 83)
• Creating a patch (p. 95)
• Editing a sample (p. 121)
MV-8800 Owner’s Manual
M-49
Page 50

Try using the various functions
The MV-8800 features many other functions in addition to the ones introduced here. Read the pages
corresponding to the features you want to use.
To learn more about how the MV-8800 is structured and the specialized vocabulary used:
•
An overview of the MV-8800 (p. 51)
To create finished songs:
•
Using the Mixer (p. 207)
•
Using effects (p. 209)
•
Automating mixing operations (Automation) (p. 219)
•
Creating an audio CD (p. 227)
To operate the MV-8800 using a mouse:
•
Using an external display and mouse to operate the MV-8800 (p. 251)
To combine audio and video:
•
About V-LINK (p. 311)
•
Using the velocity pads to display images (Pix Jam) (p. 285)
To connect the MV-8800 to a computer:
•
Connecting to your computer via USB (p. 289)
M-50
MV-8800 Owner’s Manual
Page 51

Chapter 1
Record
Play back
Perform
Performance data flow
Audio flow
Sampling
Import
Sampler section
Mixer section
Sequencer section
Controller section
(velocity pads and sliders)
Effects section
An overview of the MV-8800
Basic structure
Broadly speaking, the MV-8800 consists of five sections: controller, sequencer, sampler, mixer, and effects.
1
An overview of the MV-8800
Controller section
This contains the velocity pads, sliders, and C (control) knobs. The performance data produced when you
strike the velocity pads or turn the knobs is sent from the controller section to the sampler section, the
sequencer section, and to external MIDI devices.
Sequencer section
This records the performance data from the controller section, and the MIDI messages from an external MIDI
device. The recorded performance data and MIDI messages can be transmitted to the sampler for playback.
By sending the recorded MIDI messages from the sequencer to MIDI OUT, you can control an external MIDI
device or a V-LINK device.
Sampler section
A sampler is a device that captures audio from an analog input, or imports a wave file from a hard disk or CD,
and holds this data as waveform data in wave memory (DIMM).
When the sampler receives performance data from the controller section or sequencer section, or MIDI
messages from an external MIDI device, it can play back these samples while varying the pitch, applying a
filter, or modifying the envelope, and output the resulting sound to the mixer section and effects section.
●
For details on the types and specifications of DIMM that the MV-8800 can use, refer to “Wave Memory (RAM)”
(Appendices; p. 76).
Mixer section
This mixes the audio output from the sampler section, effects section, and analog inputs, and outputs the
combined sound to the master outputs and to headphones.
Effects section
The sound from the sampler output and the sound from the analog inputs can be processed by the effects
section in a variety of ways.
MV-8800 Owner’s Manual
M-51
Page 52

Sampler structure
The sampler consists of “samples,” which are stored in wave memory, and two types of sound generators --“Instrument” and “Audio Phrase” — which allow these samples to be played using the velocity pads and the
sequencer.
The Instrument sound generator is the appropriate choice when you want to play the sounds of pitched
instruments such as a piano, or instruments such as a drum set, for which each velocity pad (note) will have
a different sound.
The Audio Phrase sound generator is the appropriate one for handling looped phrases or vocal phrases of
several measures, since the phrase can be synchronized to the sequencer’s tempo without changing the pitch
of the phrase.
Samples
Each piece of waveform data in wave memory is called a “sample.”
Samples are created by the following operations.
•
Sampling
•
Importing (loading) a file from hard disk or CD-ROM
•
Recording to an audio track
Samples cannot be played directly from the velocity pads or sequencer. In order to play samples, you must
assign the samples to a patch used by an instrument, or assign a sample to an audio phrase.
Patches
A “patch” is a set of sounds played from the velocity pads or the sequencer. A patch is analogous to an
instrument such as a piano or drum set. Each patch is created by assigning sounds called “partials” to each
velocity pad (each note). Up to 96 partials can be assigned to one patch.
Sample
Partial01
SMT
Sample
Filter Envelope Amp Envelope
Filter
Wave memory
Partial96
Amplifier
LFO
(DIMM)
Patch
M-52
MV-8800 Owner’s Manual
Page 53

Partials
Sampler structure
Partials are the ingredients from which a patch is constructed. In the case of a drum set patch, each separate
sound such as snare or hi-hat corresponds to a different partial.
Wave memory
(DIMM)
SMT
Filter Envelope
Amp Envelope
1
An overview of the MV-8800
Filter
Determines the
character of the sound.
Amplifier
Determines the
volume change and pan.
LFO
Adds cyclic change.
Partial
Each partial consists of the following six things.
●
SMT (Sample Mix Table)
This assigns the samples that are the basis for the partial’s sound. You can assign up to four samples to the
SMT. If desired, you can make settings so that different samples will sound depending on how strongly you
play a velocity pad.
●
Filter
This specifies how the frequency content of the sound will change.
●
Amplifier
This specifies the volume and panning (stereo position).
●
Filter Envelope
This specifies how the frequency content will change over time.
●
Amp Envelope
This specifies how the volume will change over time.
●
LFO (Low Frequency Oscillator)
This specifies cyclic change (modulation). You can use the LFO to modulate the pitch, filter, or amp. Applying
LFO to the pitch produces vibrato, applying it to the filter produces wah, and applying it to the amp produces
tremolo.
MV-8800 Owner’s Manual
M-53
Page 54

Sampler structure
Wave memory
(DIMM)
Audio phrase
Sample
BPM sync
Pitch
Instruments
Instruments are where you can assign patches so that the patches can be played from the velocity pads or
sequencer. Each instrument has sixteen “parts,” and can handle sixteen patches simultaneously.
Audio phrases
Since audio phrases can be synchronized to the tempo of the sequencer without changing their pitch, they are
appropriate for handling loop phrases or vocal phrases of several measures in length.
Part16
Part1
Patch
Instruments
M-54
MV-8800 Owner’s Manual
Page 55

Mixer structure
Sound from the
analog inputs
Sounds from
the effects
Sound from
audio tracks
Sound from
instrument parts
1–16
Sound from
audio phrases
Volume
33-band EQ
Pan
Mixer
The mixer section mixes the following sounds.
•
Sound produced by each part in the instrument
•
Sound from audio phrases
•
Sound from audio tracks
•
Sound from the effects
•
Sound received at the analog inputs.
An independent three-band EQ is provided for each part of the instrument and each audio track.
1
An overview of the MV-8800
MV-8800 Owner’s Manual
M-55
Page 56

Effect structure
The effects section consists of three effects processors: MFX (multi-effect), delay/chorus, and reverb
The MTK (Mastering Tool Kit) can be used only when the MV-8800 is in Mastering mode.
MFX (multi-effect)
The multi-effect provides 25 different effects (algorithms), and you can select the desired one of these to use.
You can change the routing to apply this effect to a variety of locations.
●
MFX (multi-effect), delay/chorus, and reverb cannot be used while using MTK (mastering tool kit).
Delay/chorus
Delay is an effect that delays the sound.
Chorus is an effect that adds depth and spaciousness to the sound.
You can choose to use either delay or chorus.
Reverb
Reverb is an effect that simulates the reverberation occurring in a concert hall or cave.
MTK (mastering tool kit)
This is available only in Mastering mode.
It is an effect that makes the volume of the entire song more consistent, and boosts the loudness to an ideal
level.
M-56
MV-8800 Owner’s Manual
Page 57

Sequencer structure
The sequencer records and plays back the performance data from the velocity pads, etc. The performance
data recorded in the sequencer is collectively referred to as a “sequence” (or “sequence data”).
The MV-8800 has two types of sequencers: song and pattern.
Song
MIDI tracks
(up to 128 tracks)
Audio tracks
(up to 8 tracks)
1
An overview of the MV-8800
Pattern track
Pattern1 Pattern2 Pattern3
MIDI tracks
(up to 64 tracks)
Audio track Audio track Audio track
1123
MIDI tracks
(up to 64 tracks)
Songs
On the MV-8800, performance data for an entire composition is called a “song.”
A song consists of the following tracks.
•
MIDI tracks (up to 128 tracks)
•
Audio tracks (up to 8 tracks)
•
Pattern track
•
Mute control track
•
Tempo track
MIDI tracks
(up to 64 tracks)
In addition, a song also contains instrument, mixer, and effect settings.
Patterns
A pattern is another place (separate from a song) in which performance data can be recorded.
A pattern consists of the following tracks.
Unlike a song, a pattern does not include instrument, mixer, or effect settings. Since a pattern can be called
from the pattern track of a song, it’s convenient to use patterns to record phrases that are repeated several
times in your song.
Since patterns can also be called from the velocity pads, they can also be used in your live performances.
Yet another way to use patterns is as scratch pads for storing musical ideas that come to mind.
•
MIDI tracks (up to 64 tracks)
•
Audio track
•
Mute control track
MV-8800 Owner’s Manual
M-57
Page 58

Sequencer structure
Audio track
Audio event
Paste
:
Audio track
Audio phrase
MIDI tracks
A MIDI track records performance data for an instrument or an external MIDI channel.
Each item of performance data recorded on a MIDI track is called an “event.”
MIDI tracks also record automation data for audio tracks or effects.
There is also a Play Quantize function that non-destructively adjusts the playback timing for the performance
data of each track.
Event
MIDI track
MIDI track
Audio tracks
An audio track directly records audio data, just like a tape recorder. Each item of audio data recorded on an
audio track is called an “audio event.” Audio events can be synchronized to the tempo without affecting their
pitch.
You can also paste audio phrases into an audio track and play them.
Transmit automation data to
an audio track or effect
:
Transmit performance data to each
instrument part or external MIDI device
Pattern track
The pattern track lets you assign patterns. The pattern track records the pattern numbers, and each such
number is called a “pattern event.”
Pattern track
Mute control track
This track records mute data for MIDI tracks, audio tracks, and the pattern track.
Tempo track
This track records changes in tempo (BPM and time signature) over time.
M-58
MV-8800 Owner’s Manual
Pattern event
001
Recall Recall
001
002
499
499
. . .
500
Pattern
Page 59

Data structure
Song3
Song4
Song2
Song1
Song7
Song8
Song6
Song5
Song11
Song12
Song10
Song9
Song15
Song16
Song14
Song13
MFX library Delay/chorus library MTK libraryReverb libraryParch library MIDI clip library
Samples (up to 9999)
Project
Audio phrases
(up to 512)
Songs (up to 16)
Patterns (up to 500)
Image clips (up to 16)
Project
On the MV-8800, the data used to create your compositions is managed in units called “projects.”
A project consists of the following data.
•
Songs (up to 16 songs)
•
Patterns (up to 500 patterns)
•
Samples (up to 9999 samples)
•
Audio phrases (up to 512 audio phrases)
•
Various libraries
•
Image clips (up to 16 clips)
1
An overview of the MV-8800
Songs
When you save data to the hard disk or load data from the hard disk, the data is saved or loaded as a project.
Different songs within a project can share samples, audio phrases, patterns, and library data.
If you create a new project, you’ll be able to create completely different songs.
●
The entire project is loaded into the MV-8800’s internal memory, and all of the operations are performed in
memory. Unlike operations that use a hard disk or other media, processing will be quick and stress-free.
On the MV-8800, the data needed to play one composition is collectively called a “song.”
A song consists of the following data.
•
MIDI tracks (up to 128 tracks)
•
Audio tracks (up to 8 tracks)
•
Pattern track
•
Mute control track
•
Tempo track
•
Instrument
•
Mixer
•
Effects
●
There can be up to sixteen songs in a project, but the actual maximum number may be less depending on the
amount of data (events) that is created.
MV-8800 Owner’s Manual
M-59
Page 60

Data structure
Patterns
A “pattern” is another place (separate from a song) in which performance data can be recorded.
A pattern consists of the following tracks.
•
MIDI tracks (up to 64 tracks)
•
Audio track
•
Mute control track
Since a pattern can be called from the pattern track of a song, it’s convenient to use patterns to record phrases
that are repeated several times in your song.
Since patterns can also be called from the velocity pads, they can also be played in real time during a live
performance.
Yet another way to use patterns is as scratch pads for storing musical ideas that come to mind.
Libraries
Libraries are places that can store various types of settings.
When you’ve got some settings that you’re really pleased with you can register them in the appropriate library
and share them among different songs.
●
Patch library
This is a library for patches. You can register 128 patches in the patch library.
●
MFX library
This is a library for MFX settings. You can register 100 different settings in the MFX library. In addition, 34
preset settings are provided in a special read-only library.
●
Delay/chorus library
This is a library for delay/chorus settings. You can register 50 different settings in the delay/chorus library. In
addition, 2 preset settings are provided in a special read-only library.
●
Reverb library
This is a library for reverb settings. You can register 50 settings in the reverb library. In addition, 4 preset
settings are provided in a special read-only library.
●
MTK (mastering tool kit) library
This is a library for MTK (mastering tool kit) settings. You can register 50 settings in the MTK library. In
addition, 21 preset settings are provided in a special read-only library.
●
MIDI clip library
Up to 100 sections of a MIDI track (or multiple tracks) can be registered in the MIDI clip library.
For example, you could save different variations of drum patterns (intro, fill-in, break, etc.) in the MIDI clip
library, and use them to rapidly assemble the rhythm track for a song.
M-60
MV-8800 Owner’s Manual
Page 61

About modes
The MV-8800 operates in one of four modes: Song mode, Pattern mode, Mixdown mode, or Mastering mode.
Song mode
In this mode you can record, play, and edit songs. You will be able to use up to 128 MIDI tracks, 8 audio tracks,
the pattern track, the mute control track, and the tempo track.
The MV-8800 will always start up in this mode.
Pattern mode
In this mode you can record, play, and edit patterns. You will be able to use up to 64 MIDI tracks, one audio
track, and the mute control track.
Mixdown mode
In this mode you can record the playback of your song as a stereo WAV file on the internal hard disk. This
process is called “mixdown.” The files recorded in this mode are saved in the MIXDOWNTR folder of the
internal hard disk.
You can’t record into a song while this mode is selected, but you can play back and edit the song.
In order to master a completed song, you must first mix it down.
Mastering mode
In this mode you can use the MTK (mastering tool kit) to adjust the tonal character and loudness of a WAV file
you’ve created in Mixdown mode, and re-record it as a different WAV file on the hard disk. This process is
called “mastering.” The files recorded in this mode are saved in the MASTERTR folder of the internal hard disk.
When you’re in this mode, you can only play back or record the WAV file that’s being mastered.
Music CDs are normally created from WAV files that have been mastered.
1
An overview of the MV-8800
MV-8800 Owner’s Manual
M-61
Page 62

About modes
M-62
MV-8800 Owner’s Manual
Page 63

Chapter 2
Importing data
Loading the pre-installed patches
When shipped from the factory, the MV-8800’s internal hard disk contains a variety of patches (“pre-installed
patches”) that you will find convenient when creating songs, such as drum kits and bass sounds. To use the
pre-installed patches (Appendices; p. 14), load them in the same way as any other patches (Load Patch).
1.
Press [INSTRUMANTS].
The INSTRUMENTS screen (Screen Guide; p. 114) will appear.
2.
Press [MENU].
The MENU popup will appear.
2
Importing data
3.
Select “Load Patch” and press [F5](Select).
The LOAD PATCH screen (Screen Guide; p. 150) will appear.
4.
Make sure that the current drive is the MV-8800’s internal hard disk, and use CURSOR [ ]
[ ] [ ] [ ] to select the “PATCHES” folder.
Press CURSOR [ ].
5.
The contents of the PATCHES folder will appear.
6.
Select a folder and press CURSOR [ ].
The patches are organized into folders by their type. Select the folder containing the type of patches you want
to load, and press CURSOR [ ].
The contents of the selected folder (patch data) will appear.
●
You can audition a patch before actually loading and using it. Refer to “Auditioning or previewing before you
import” (p. 74).
MV-8800 Owner’s Manual
M-63
Page 64

Loading the pre-installed patches
7.
Move CURSOR [ ] [ ] to the patch that you want to load and press [F5](Load).
The ASSIGN TO PART / LIBRARY popup (Screen Guide; p. 224) will appear.
Specify the parameters.
8.
●
If you want to import into only one of these (part only or library only), turn the other setting Off.
•
Part
If the To parameter is set to “Part,” specifies the part in which the new patch will be loaded.
Range: Off, 1–16
•
Library
If the To parameter is set to “Library,” specifies the library number in which the new patch will be loaded.
Range: Off, 1–128
•
F-buttons
F-button
[F3](With Delete)
[F5](Execute) Loads the patch to the specified location.
Press [F5](Execute).
9.
The patch will be imported into the specified part and library,
Explanation
Deletes the samples used by the specified part or library patch (Delete Patch), and then load
the data
M-64
MV-8800 Owner’s Manual
Page 65

Importing the WAV or AIFF files
You can import a WAV file or AIFF file and use it as sample data for the MV-8800.
●
Some AIFF files are recorded in the AIFF-C (AIFC) format. The MV-8800 cannot import AIFF files recorded in
this format.
1.
Press [IMPORT].
The IMPORT screen (Screen Guide; p. 219) will appear.
2.
Press [F1](Select Drive).
The SELECT DRIVE popup will appear.
3.
Use CURSOR [ ] [ ] to select the disk containing the WAV/AIFF file you want to import,
and press [F5](Select).
The contents of the disk will be displayed.
Use CURSOR [ ] [ ] [ ] [ ] to select the WAV/AIFF file you want to import.
4.
Press CURSOR [ ] to show the contents of the folder. To return to the “parent folder” in which you were
previously, press CURSOR [ ].
•
F-buttons
F-button
[F1](Select Drive)
[F2](View) Here you can limit the type of the file that will appear in the IMPORT screen.
[F3](Mark On/Off) Turns the check mark on/off for a file.
[F4](Preview) Auditions the currently-highlighted file. To hear auditioning, press [F4](Preview).
[F5](Import) Imports the selected or check marked file(s).
Explanation
Displays the SELECT DRIVE popup, letting you switch the drive form which to select files.
2
Importing data
●
By using [F3](Mark On/Off) to assign a mark to files you want to import, you can import multiple files in a single
operation.
●
By pressing [MENU] and selecting “All Mark” you can select or de-select all files on the list.
5.
Press [F5](Import).
The data will be imported, and the RESULT popup will appear.Here you can audition the imported data. A
sample number will be assigned to the imported data.
●
The sample number is shown above the waveform display.
fig.sample-result-screen
Specify the parameters.
6.
•
Start Point / End Point
Specify the points at which the sample will start playing and stop playing. The Start Point - End Point region
is highlighted.
Range: 000000000.000–The end of sample
•
BPM Base Note
Draws measure and beat lines on the displayed sample.
●
The BPM is displayed below the BPM Base Note. The displayed BPM value is calculated from the BPM Base
Note setting and the playback length of the sample.
Range: , , (initial value), , / x 1–x 4–x 65535
MV-8800 Owner’s Manual
M-65
Page 66

Importing the WAV or AIFF files
•
Truncate
Deletes the portions of the sample before the Start Point and after the End Point.
Range: Off, On
•
Normalize
Raises the overall level of the sample without allowing the maximum level to be exceeded.
Range: Off, On
●
You can’t use Undo function to bring back a truncated or normalized sample.
•
Original Key
Specifies the basic pitch. When you play this key, the sample will sound at its original pitch (the pitch at which
it was sampled).
Range: 0 (C -)–60 (C 4)–127 (G 9)
•
Loop
Specifies how [F4](Preview) will operate. You can also make setting of loop playback when you assign the
sample to pad as a Partial or an Audio Phrase.
Value
Off
On The sample will repeatedly audition from the Start Point to the End Point.
Explanation
The sample will audition once from the Start Point to the End Point.
•
F-buttons
F-button
[F1](Retry)
[F2](Name) Displays the EDIT NAME popup, where you can edit the sample name.
[F3](Quick Assign) Displays the SELECT QUICK ASSIGN popup.
[F4](Preview) Auditions the currently-highlighted sample. To hear auditioning, hold down [F4](Preview).
[F5](OK) The RESULT popup will close. The imported data will be added to the list in the SAMPLE
●
If you want to use the imported data as an audio phrase or patch, press [F3](Quick Assign) to get the Select
Quick Assign message (Screen Guide; p. 213).
Explanation
Discards the displayed sample will be discarded, and retries the sampling operation. The
IMPORT screen will appear.
MANAGER screen (Screen Guide; p. 169).
You can use PREVIEW [FROM ( )] and [TO ( )] to audition the region (the side at which the cursor is
located) near the Start Point or End Point.
Preview
[TO ( )]
[FROM ( )] Playback sample for a short time (Preview Length) from the current editing point.
Press [F5](OK).
7.
Explanation
Playback sample from a point slightly earlier (Preview Length) than the current editing point.
The RESULT popup will close. The imported data will be added to the list in the SAMPLE MANAGER screen.
Check the sample number that was assigned in step 5.
●
If you want to use the imported data as a patch or audio phrase, use the Quick Assign function in step 7. For
details, refer to “Playing the imported data immediately (Quick Assign)” (p. 75).
M-66
MV-8800 Owner’s Manual
Page 67

Options when importing
If you press [MENU] then select “Importing the WAV or AIFF files” (p. 65) in step 4, the IMPORT OPTIONS
popup will appear.
•
Auto Divide
The Auto Divide function detects regions of silence during sampling, and divides the sample into several
samples at these points.
Importing the WAV or AIFF files
2
Importing data
Value
Off
On The waveform will be divided at regions of silence.
•
Gap Time
Explanation
The waveform will be imported without being divided.
When Auto Divide is On, this parameter specifies the length of the silent regions that will be detected.
Range: 0.5, 1.0, 1.5, 2.0 sec
●
If you are importing multiple files, the Auto Divide settings are not used.
●
A maximum of 96 samples can be divided.
•
Pre Emphasis
Specify whether emphasis processing will be applied when you import a music data file.
Value
Off
On Emphasis processing will be applied to the imported data.
●
The amount of time required to execute the emphasis.
●
The high frequency range of the inputted sample will be boosted when Pre Emphasis is On.
Explanation
Emphasis processing will not be applied to the imported data.
MV-8800 Owner’s Manual
M-67
Page 68

Importing the WAV or AIFF files
●
Check multiple samples you have captured
The RESULT (MULTIPLE) popup appears when multiple samples are captured as a result of sampling or
import process. On the RESULT (MULTIPLE) popup, following operations can be done.
•
Edit sample name
•
Preview samples
•
Assign multiple samples to pads at one time
•
Delete multiple samples at one time
Wave Display
Display waveform of the sample selected on sample list.
Sample List
Display captured samples as list. Below the list, number and total size of captured samples are displayed.
•
F-buttons
F-button Explanation
[F1](Retry)
[F2](Name) The EDIT NAME popup will appear. You can edit the name of sample selected on sample list.
[F3](Quick Assign) The SELECT QUICK ASSIGN popup will appear. Assign captured multiple samples to pads
[F4](Preview) Auditions the currently-highlighted file in the sample list.
[F5](OK) The RESULT (MULTIPLE) popup will close.
Press [F5](OK) when you complete to edit sample name or preview the sample. The RESULT (MULTIPLE)
popup will be closed.
If you like to assign captured samples to pads as partials or audio phrases, press [F3](Quick Assign). The
Select Quick Assign message (Screen Guide; p. 213) will appear.
“Retry sure?” message will appear. Press [F5](Yes) to delete captured sample.
at one time.
M-68
•
F-buttons
F-button
[F3](AssignToAphrs)
[F5](AssignToPatch) The PATCH QUICK ASSIGN (MULTIPLE) popup (Screen Guide; p. 218) will appear. The
MV-8800 Owner’s Manual
Explanation
The AUDIO PHRASE QUICK ASSIGN (MULTIPLE) popup (Screen Guide; p. 215) will
appear. The multiple samples will assign to the specified pads as audio phrase.
multiple samples will assign to the specified pads as patch.
Page 69

●
Viewing only specific types of file
Press [F2](View) in IMPORT screen, the VIEW FILE TYPE popup (Screen Guide; p. 221) will appear.
You can select the kind of files that will be shown in the list.
•
Type
Select the kind of files that will be shown in the list.
Importing the WAV or AIFF files
2
Importing data
Value
All
Sample
Patch
Song Standard MIDI File (.MID) will appear.
Pix
●
Roland S-700 series data (samples, partials, patches) will all be displayed, regardless of how the Type
parameter is set.
●
If you change the Type setting when check marks have already been assigned to files, all check marks will be
cleared.
●
Types of audio files that can be imported
Explanation
All files will be shown.
•
Windows Wave file
•
AIFF file
•
Akai MPC2000/2000XL sound file (.SND)
•
Akai S1000 sound file (.A1S)
•
Akai S3000 sound file (.A3S)
will appear.
•
Akai MPC2000/2000XL program file (.PGM)
•
Akai S1000 program file (.A1P)
•
Akai S3000 program file (.A3P)
•
MV-8800 patch (.MV0)
will appear.
•
JPG file (.JPG)
•
bitmap file (.BMP)
will appear.
The MV-8800 is able to import WAV files (extension .WAV) and AIFF files (extension .AIF) of the following
types.
Format Linear (PCM) format
Channels Monaural (1 channel) or stereo (2 channels)
Sampling frequency No limitation
Bit depth 8, 16, 24, or 32 bits
Audio files that don’t have a sampling frequency of 44.1 kHz will automatically be converted to 44.1 kHz when
they are imported.
MV-8800 Owner’s Manual
M-69
Page 70

Importing from an audio CD
You can import audio from an audio CD and use it as a patch or audio phrase.
●
Unauthorized use, distribution, sale, lending, performance, or broadcast etc. of copyrighted material belonging
to a third party is prohibited by law.
● Before you import from an audio CD
Carefully read the “Copyright” and “About the License Agreement” sections in the inside back cover
of the Owner’s Manual. You must abide by these conditions when using imported audio material.
In the CD drive, insert the audio CD that you want to import.
1.
2.
Press [IMPORT].
The IMPORT screen (Screen Guide; p. 219) will appear.
Press [F1](Select Drive).
3.
The SELECT DRIVE popup (Screen Guide; p. 6) will appear.
Use CURSOR [ ] [ ] to select the Audio CD, and press [F5](Select).
4.
The CD-R/RW drive will be selected and list of the files on the audio CD will appear.
If no audio CD is inserted in the drive, the message “Drive not ready.” will appear. In this case, internal hard
disk drive will be selected automatically.
5.
Move the cursor to the track number that you want to import from the audio CD.
●
You can press [F4](Preview) to audition. To stop auditioning, press [F4](Stop).
M-70
MV-8800 Owner’s Manual
Page 71

Importing from an audio CD
Page 72

Importing from an audio CD
The options during import
By setting various options in the Import screen you can change the behavior of import.
●
Applying emphasize while you import (Pre Emphasis)
1.
Make preparations for import as described in step 1–5 of “Importing from an audio CD” (p.
70) and then press [MENU].
The MENU popup will appear.
2.
Select “Import Options” and press [F5](Select).
The IMPORT OPTIONS popup (Screen Guide; p. 222) will appear.
3.
Turn the Pre Emphasis parameter On.
The pre emphasis function will be processed.
●
The amount of time required to execute the emphasis.
●
The high frequency range of the inputted sample will be boosted when Pre Emphasis is On.
4.
Press [F1](Close).
Proceed with import as described in step 6 of “Importing from an audio CD” (p. 70).
●
Automatically divide the sample at silent regions during import
1.
Make preparations for import as described in step 1–5 of “Importing from an audio CD” (p.
70) and then press [MENU].
2.
Select “Import Options” and press [F5](Select).
The IMPORT OPTIONS popup (Screen Guide; p. 222) will appear.
3.
Turn the Auto Divide parameter On.
When a silent region is detected during import, the MV-8800 will automatically divide the sample.
4.
Set the Gap Time value.
Specifies the length of the silent regions that will be detected.
5.
Press [F5](Close).
Proceed with import as described in step 6 of “Importing from an audio CD” (p. 70).
M-72
●
A maximum of 96 samples can be divided.
MV-8800 Owner’s Manual
Page 73

Loading sound libraries of other model
You can load sound library data that was created for a model other than the MV-8800.
When you load a Roland S-700 series patch file, or an AKAI MPC series or S-series program file, its structure
will be re-created on the MV-8800.
This lets you create a patch without having to make assignments to the velocity pads.
Format
Roland S-700 series patch file
Akai MPC2000/2000XL program file .PGM
Akai S1000 program file .A1P
Akai S3000 program file .A3P
Akai MPC2000/2000XL sound file .SND
Akai S1000 sound file .A1S
Akai S3000 sound file .A3S
●
Some imported data may not be reproduced correctly.
●
To create a patch using the types of data listed in the gray portion of the table, refer to “Importing the WAV or
AIFF files” (p. 65).
1.
Using the same procedure as described up to step 4 of “Importing the WAV or AIFF files”
Filename extension
-
(p. 65), select the sound library (patch or program) that you want to import.
2.
Press [F5](Import).
The ASSIGN TO PART / LIBRARY popup (Screen Guide; p. 224) will appear.
2
Importing data
●
If you want to import into only one of these (part only or library only), turn the other setting Off.
•
Part
If the To parameter is set to “Part,” specifies the part in which the new patch will be created.
Range: Off, 1–16
•
Library
If the To parameter is set to “Library,” specifies the library number in which the new patch will be created.
Range: Off, 1–128
•
F-buttons
F-buttons
[F3](With Delete)
[F5](Execute) Imports the patch to the specified location.
3.
Press [F5](Execute).
Explanation
Deletes the samples used by the specified part or library patch (Delete Patch), and then import
the data.
The patch will be imported into the specified part and library.
●
You cannot create a patch simply by loading Akai MPC2000/2000XL program files (.PGM) alone. The sound
files (.SND or .WAV) must also be present in the same folder as the program file.
●
The data on an Akai MPC2000/2000XL or S1000/S3000 CD-ROM is organized into proprietary units called
“partitions.” On the MV-8800, these will appear as folders named PARTITION A, PARTITION B, and so on.
●
When Akai MPC2000/2000XL or S1000/S3000 program files or sound files are converted, the category name
will be “AK” and the patch name will be the first twelve characters of the program file name.
MV-8800 Owner’s Manual
M-73
Page 74

Loading sound libraries of other model
Auditioning or previewing before you import
You can audition a Patch before actually loading and using it. Let’s try auditioning a pre-installed Patch before
actually loading it for use.
●
MV-8800 Patches (filename extension “.MV0”) can also be auditioned/previewed from the LOAD PATCH
screen.
1.
Press [IMPORT].
The IMPORT screen will appear.
Press [F1](Select Drive).
2.
The SELECT DRIVE popup will appear.
3.
Use CURSOR [ ] [ ] to select disk containing the Patch data you want to import, and
press [F5](Select).
The contents of the disk will be displayed.
4.
Use CURSOR [ ] [ ] [ ] [ ] to select the Patch data you want to import.
Press [F4](Preview).
5.
The IMPORT PREVIEW popup will appear. The screen will indicate “Reading patch for preview...,” and
loading will begin. When all the data has been loaded, the IMPORT PREVIEW popup will show the name of
the Patch that was loaded.
Strike VELOCITY PADS to audition the Patch.
6.
7.
If you decided to import the Patch, press [F5](Import).
If you’re finished auditioning/previewing, press [F4](Stop).
●
Depending on the Patch being loaded, it may take some time until you can preview or audition the Patch.
●
Only the Patch that is highlighted in step 4 can be auditioned/previewed/imported on the IMPORT PREVIEW
popup.
●
You can change the range of key (partial) if you switch the pad bank.
●
You can audition the sound from the connected external MIDI keyboard.
●
Types of Patches that can be auditioned/previewed
•
MV-8800 Patches (File extension “.MV0”)
•
Roland S-7x0 series Patches
•
AKAI MPC2000/2000XL series program (File extension “.PGM”)
•
AKAI S1000/S3000 series program (File extension “.A1P”, “A3P”)
●
If the display indicates “Wave memory is not enough to preview.”
The MV-8800’s wave memory is not enough.
No further audio data can be auditioned or previewed, and therefore this Patch data could not be auditioned
or previewed.
M-74
MV-8800 Owner’s Manual
Page 75

Playing the imported data immediately (Quick Assign)
In order to play a sample that you imported or sampled, you must assign the sample to a patch or an audio
phrase.
Assigning a sample to a patch
You can assign the sampled data to specified a partial of a patch.
1.
Press [F3](Quick Assign) in “Importing the WAV or AIFF files” (p. 65) step 6 or “Importing
from an audio CD” (p. 70) step 7.
The Select Quick Assign message (Screen Guide; p. 213) will appear.
2.
Press [F5](AsgnToPatch).
The PATCH QUICK ASSIGN popup (Screen Guide; p. 216) will appear.
fig.quick-assign-chop
2
Importing data
3.
Specify the Part (part number) which you want to assign a sample.
4.
Specify the Assign To parameter which you want to assign the pad bank number and pad
number (note number).
If you want to play chromatic pitches using the sample, check the Make Keyboard box. If you check the Make
Keyboard box, you can also specify the range over which the sample is to be assigned.
5.
Press [F5](Execute).
A sample will assign to the specified velocity pad (note number).
Assigning a sample to an audio phrase
You can assign the sampled data to specified an audio phrase.
1.
Press [F3](Quick Assign) in “Importing the WAV or AIFF files” (p. 65) step 6 or “Importing
from an audio CD” (p. 70) step 7.
The Select Quick Assign message (Screen Guide; p. 213) will appear.
2.
Press [F3](AsgnToAPhrs).
The AUDIO PHRASE QUICK ASSIGN popup (Screen Guide; p. 214) will appear.
fig.quick-assign-chop
3.
Specify the Assign To parameter which you want to assign the pad bank number and pad
number.
4.
Press [F5](Execute).
A sample will assign to the specified velocity pad.
MV-8800 Owner’s Manual
M-75
Page 76

Playing the imported data immediately (Quick Assign)
Assigning a patch by chopping a sample
You can divide a sample at the desired points and assign them to partials.
●
You cannot chop a sample if you’re importing multiple WAV or AIFF files, or multiple tracks from an audio CD.
1.
Press [F3](Quick Assign) in “Importing the WAV or AIFF files” (p. 65) step 6 or “Importing
from an audio CD” (p. 70) step 7.
The Select Quick Assign message (Screen Guide; p. 213) will appear.
2.
Press [F1](Chop).
The CHOP popup (Screen Guide; p. 159) will appear.
fig.quick-assign-chop
3.
Specify the Current Point parameter.
The sample will be divided at the Current Point you specify.
• You can assign up to 95 points (i.e., divide the sample into 96 pieces).
• If you want the dividing points to be determined automatically according to certain conditions, press
[F3](Auto Chop). The AUTO CHOP popup will appear. For details on the parameters (conditions) you can
set, refer to “AUTO CHOP popup” (Screen Guide; p. 160).
4.
Press [F1](Add Point).
A new dividing point with Current Point will be created. If you want to assign additional dividing points, repeat
step 4.
5.
Press [F5](AsgnToPatch).
The sample will be divide at the time location(s) you specified. The CHOP QUICK ASSIGN popup (Screen
Guide; p. 161) will appear.
• The divided samples assigned to the partial in the key follow zero (no pitch).
• If you attempt to overwrite the pads that has partial, “Overwrite sure?” message appears. If you want to
overwrite, press [F5](YES). Or press [F1](No) to cancel assignment.
fig.patch-quick-asgn-chop
M-76
Specify the Part (part number), part bank, and velocity pad number (note number) to which
6.
you want to assign the divided sounds.
Press [F5](Execute).
7.
The divided sample(s) will assign to the specified pads as partials of the part.
MV-8800 Owner’s Manual
Page 77

Playing the imported data immediately (Quick Assign)
Assigning multiple samples to a patch
Assign multiple samples you have captured on sampling or import process to the pads as partials.
●
If you’ve imported multiple WAV or AIFF files, or multiple tracks from an audio CD, you won’t be able to select
and assign individual velocity pads.
1.
Press [F5](AsgnToPatch) when the Select Quick Assign message (Screen Guide; p. 213) is
displayed.
The PATCH QUICK ASSIGN (MULTIPLE) popup (Screen Guide; p. 218) will appear.
2
Importing data
Specify the Part parameter which you want to assign the part number of the instrument.
2.
●
Samples are assigned as partials to the patch of the instrument pad you specified using the Part parameter.
3.
Specify the Assign To parameter which you want to assign the pad bank number and pad
number (note number).
Press [F5](Execute).
4.
The sample will assign to the specified pads.
●
Samples will be assigned consecutively, starting with the pad bank number and velocity pad number you
specified using the Assign To parameter. If you attempt to assign a sample to a velocity pad for which a sample
already exists, a message will ask “Overwrite sure?” Press [F5](Yes) if you want to overwrite the sample, or
press [F1](No) if you decide to stop assigning samples.
MV-8800 Owner’s Manual
M-77
Page 78

Playing the imported data immediately (Quick Assign)
Assign multiple samples as audio phrases
Assign multiple samples you have captured on sampling or import process to the pads as audio phrases.
●
If you’ve imported multiple WAV or AIFF files, or multiple tracks from an audio CD, you won’t be able to select
and assign individual velocity pads.
Press [F3](AsgnToAPhrs) when the Select Quick Assign message (Screen Guide; p. 213) is
1.
displayed.
The AUDIO PHRASE QUICK ASSIGN (MULTIPLE) popup (Screen Guide; p. 215) will appear.
Specify the Assign To parameter which you want to assign the pad bank number and pad
2.
number.
3.
Press [F5](Execute).
The sample will assign to the specified pads.
●
Samples will be assigned consecutively, starting with the pad bank number and velocity pad number you
specified using the Assign To parameter. If you attempt to assign a sample to a velocity pad for which a sample
already exists, a message will ask “Overwrite sure?” Press [F5](Yes) if you want to overwrite the sample, or
press [F1](No) if you decide to stop assigning samples.
M-78
MV-8800 Owner’s Manual
Page 79

Importing SMF (Standard MIDI File) data
You can import SMF data into a pattern or song.
●
SMF (Appendices; p. 13)
1.
Press [IMPORT].
The IMPORT screen (Screen Guide; p. 219) will appear.
Use CURSOR [ ] [ ] [ ] [ ] to select the SMF that you want to import, and press
2.
[F5](Import).
“Select import to SONG or PATTERN” message will appear.
fig.pattern-rec-param-midi.eps
3.
Select the type of data (song or pattern) into which you want to convert the imported SMF
data.
2
Importing data
Operation
[F3](To Song)
[F5](To Pattern) Convert the SMF data to a pattern.
[EXIT] Cancels the operation.
●
If you import by pressing [F3](To Song)
The imported SMF data will be saved as a new song in the current project.
●
If you import by pressing [F5](To Pattern)
SELECT PATTERN screen will appear. In this screen, you specify the location within the pattern list in which
the new pattern is to be saved.
Use CURSOR [ ] [ ] to specify the location for saving, and press [F5](Execute).
If you select a pattern other than Empty, the newly saved data will overwrite that pattern.
Explanation
Convert the SMF data to a song.
MV-8800 Owner’s Manual
M-79
Page 80

Loading audio phrases from the hard disk
Here’s how to load audio phrases that have been saved using the procedure explained in “Saving audio
phrases to the hard disk” (p. 118) into the specified pad bank.
1.
Press [IMPORT].
The IMPORT screen (Screen Guide; p. 219) will appear.
2.
Use CURSOR [ ] [ ] [ ] [ ] to select the audio phrase file (file extension “.MVA”) that
you want to import.
The procedure is the same as in the FILE UTILITY screen (Screen Guide; p. 189). For details, refer to
“Managing files (File Utility)” (p. 243).
3.
Press [F5](Import).
The AUDIO PHRASE BANK QUICK ASSIGN popup (Screen Guide; p. 227) will appear.
4.
Using the Assign To parameter, select the pad bank number to which you want to assign
the audio phrases.
Press [F5](Execute).
5.
The audio phrases will be imported into the specified pad bank.
M-80
MV-8800 Owner’s Manual
Page 81

Loading effect settings from the hard disk
Here’s how to assign effect settings that have been saved using the procedure explained in “Saving a current
effect setting to the hard disk” (p. 213) to the effects library.
1.
Press [IMPORT].
The IMPORT screen (Screen Guide; p. 219) will appear.
2.
Use CURSOR [ ] [ ] [ ] [ ] to select the effect setting file (file extension “.MVF”,
“.MVC”, or “.MVR”) that you want to import.
The procedure is the same as in the FILE UTILITY screen (Screen Guide; p. 189). For details, refer to
“Managing files (File Utility)” (p. 243).
3.
Press [F5](Import).
The popup that appears will depend on the effect setting file that you are importing.
2
Importing data
Effects type
MFX
Dly/Cho DELAY/CHORUS ASSIGN TO LIBRARY popup (Screen Guide; p. 228)
Reverb REVERB ASSIGN TO LIBRARY popup (Screen Guide; p. 228)
4.
Using the Library parameter, select the effect library number to which you want to assign
Popup displays
MFX ASSIGN TO LIBRARY popup (Screen Guide; p. 228)
the effect settings.
5.
Press [F5](Execute).
The effect settings will be imported into the specified effects library.
MV-8800 Owner’s Manual
M-81
Page 82

Loading effect settings from the hard disk
M-82
MV-8800 Owner’s Manual
Page 83

Chapter 3
Sampling
Here’s how to record (sample) from a connected external mic or synthesizer, and use the sample as an audio source for the
MV-8800’s sampler.
Making initial settings for sampling
●
To adjust the sensitivity and level of the analog input
●
If you’re recording an analog input source, adjust the recording level before sampling.
Press [MIXER].
1.
The MIXER screen will appear.
Press [F4](AUX/Phrs/In).
2.
The MIXER (AUX/FX/AUDIO PHRASE/INPUT) screen (Screen Guide; p. 237) will appear.
Set the Level of IN channel to 100 by using Slider 8.
3.
3
Sampling
4.
Input an audio signal to the ANALOG INPUT
The level meter will move.
Adjust the SENS L/R knobs.
5.
Adjust the knobs so that the level meters move as high as possible in the range of -12 dB–0 dB. If the clip
indicators light, the level is too high.
Clip
indicators
-12–0 dB
MIC/LINE (
or ANALOG INPUT PHONO) jacks.
MV-8800 Owner’s Manual
M-83
Page 84

Sampling
Press [SAMPLING].
1.
The SAMPLING screen (Screen Guide; p. 209) will appear.
2.
Set the parameters for sampling.
•
Sample Type
Specifies the number of channels that will be sampled.
Range
Mono
Stereo Stereo (two channels)
Explanation
Monaural (one channel)
●
Data sampled in stereo will occupy twice the space of monaural data.
●
Playing back stereo sampled data will use two voices of polyphony.
•
Input Select
Selects the input source for sampling or recording.
Range
Analog
Analog(L+R) ANALOG INPUT jack (Lch and Rch mixed to monaural)
Analog(L) ANALOG INPUT jack (Lch only, monaural)
•
Start Trigger
Explanation
Analog input jack (stereo)
Specifies how sampling will begin.
Range Explanation
Manual
Level Sampling will be triggered by the input level.
Pad Sampling will begin when you strike a pad.
Play Sampling will begin when you play back the sequencer.
•
Level
Sampling will be started by pressing [F5](Start) manually.
●
When you adjust the level of the Start Trigger, a will appear at the right of the level meter. Sampling will begin
when the input level exceeds this mark.
●
The way in which sampling starts and stops will depend on the Start Trigger and Stop Trigger setting.
Specifies the response level when using the input level to start sampling. Lower values will produce higher
sensitivity, meaning that even a small sound will trigger sampling.
Range: -36, -24, -18, -12, -8, -4 dB
•
Pre Sample Time
This specifies the duration of sound from before the sampling start time that will be included in the recorded
sample. Increasing the Pre Sample Time parameter value will cause sampling to capture the sound from
before the moment you initiate sampling. By speeding up the response, this allows the sharp attack at the
beginning of a sound to be captured.
Range: 0, 20 40, 80, 160, 320, 640, 1000 ms
M-84
●
The Pre Sample Time setting is valid if the Start Trigger is set to Level, Pad, or Play. With a setting of Pre
Sample Time=0, recording will begin the instant that sampling is initiated; i.e., the Pre Sample Time will have
no effect.
MV-8800 Owner’s Manual
Page 85

•
Stop Trigger
Specifies how sampling will stop.
If you set the Stop Trigger parameter to “Beat” or “Time,” sampling will stop automatically after the specified
time has elapsed.
Range
Manual
Beat Sampling will stop after the number of beats specified by the Length parameter.
Time Sampling will stop after the time specified by the Length parameter.
•
Beat / Time
Explanation
Sampling will be stopped manually.
Specifies the time after which sampling will stop when Stop Trigger parameter is Beat or Time.
Range: Beat 1–8–20000
Time 000:01–000:02–100:00 (minutes: seconds)
•
Auto Divide
The Auto Divide function detects regions of silence within the sample, and divides the sample into several
samples at these points.
Range
Off
On (✔) Divides the waveform at regions of silence.
Explanation
Samples without dividing the waveform.
Sampling
3
Sampling
●
A maximum of 96 samples can be divided. If a silent region in detected while sampling the 96th sample,
sampling will stop automatically.
●
If you used the Auto Divide function to create multiple samples, the RESULT (MULTIPLE) popup will appear.
For details, refer to “Check multiple samples you have captured” (p. 68)
•
Gap Time
Silences of a duration longer than the specified time will be considered as silence. The Gap Time parameter
is valid if Auto Divide parameter is on.
Range: 0.5, 1.0, 1.5, 2.0 sec
•
Auto Emphasis
Automatically pre-emphasis processes after sampling.
Range
Off
On (✔) Emphasis processing will be applied to the recorded data.
•
Auto Normalize
Explanation
Emphasis processing will not be applied to the recorded data.
●
High frequency range of the recorded sample will be boosted when Pre Emphasis is On.
Automatically normalizes the level after sampling.
Range
Off
On (✔) The level of the sampled sound will be boosted as high as possible without causing distortion.
Explanation
The level of the sample will not be normalized.
●
If you use Auto Normalize together with Auto Divide, each divided sample will be normalized.
Press [F5](Start).
3.
“Now Sampling..” message will appear, and starts sampling.
●
The remaining time available for sampling is shown in the Remain field of the SAMPLING screen.
MV-8800 Owner’s Manual
M-85
Page 86

Sampling
Press [F5](Stop).
4.
Stops sampling. The RESULT popup (Screen Guide; p. 211) will appear.
Audition the sampled result. Each sampled data item will be assigned to a sample number.
Set the parameters for adjusting.
5.
•
Start Point / End Point
Specify the points at which the sample will start playing and stop playing. The Start Point - End Point region
is highlighted.
Range: 000000000.000–The end of sample
•
BPM Base Note
Draws measure and beat lines on the displayed sample.
Range: , , (initial value), , / x 0–x 4–x 65535
●
The BPM is displayed below the BPM Base Note. The displayed BPM value is calculated from the BPM Base
Note setting and the playback length of the sample.
•
Original Key
Specifies the basic pitch. When you play this key, the sample will sound at its original pitch (the pitch at which
it was sampled).
Range: 0 (C -)–60 (C 4)–127 (G 9)
•
Truncate
Deletes the portions of the sample before the Start Point and after the End Point.
Range: Off, On (✔)
●
You can’t use Undo function to bring back a truncated or normalized sample.
•
Normalize
Raises the overall level of the sample without allowing the maximum level to be exceeded.
Range: Off, On (✔)
•
Loop
Specifies how [F4](Preview) will operate. You can also make setting of loop playback when you assign the
sample to pad as a Partial or an Audio Phrase.
Value
Off
On The sample will repeatedly audition from the Start Point to the End Point.
Explanation
The sample will audition once from the Start Point to the End Point.
M-86
MV-8800 Owner’s Manual
Page 87

•
F-buttons
F-button
[F1](Retry)
[F2](Name) Displays the EDIT SAMPLE NAME popup (Screen Guide; p. 3), where you can edit the sample
[F3](Quick Assign) Displays the Select Quick Assign message (Screen Guide; p. 213).
[F4](Preview) Auditions the currently-highlighted sample. To hear auditioning, hold down [F4](Preview).
[F5](OK) Closes the RESULT popup (Screen Guide; p. 211).
Explanation
Displays “Retry Sure?” message. If you press [F5](Yes), discards the sampled result and the
SAMPLING screen will appear.
name.
Sampling
●
If you want to use the sampled data as an audio phrase or patch, press [F3](Quick Assign) to get the Select
Quick Assign message (Screen Guide; p. 213).
You can use PREVIEW [FROM ( )] and [TO
] to audition the region (the side at which the cursor is
()
located) near the Start Point or End Point.
Preview
[TO ( )]
[FROM ( )] Playback sample for a short time (Preview Length) from the current editing point.
Press [F5](OK).
6.
Explanation
Playback sample from a point slightly earlier (Preview Length) than the current editing point.
The RESULT popup (Screen Guide; p. 211) will close. The sampled data will be added to the list in the
SAMPLE MANAGER screen (Screen Guide; p. 169). Check the sample number that was assigned in step 5.
●
If you want to discard the sampled result that is shown, press [F1](Retry).
3
Sampling
MV-8800 Owner’s Manual
M-87
Page 88

Sampling
Advanced sampling
●
Sampling the sound played by the MV-8800’s sampler (Re-sampling)
You can sample the sound that is being sent from the MV-8800’s mix bus. This is called “resampling.”
●
You can sample the sound that has been sent through an effect, or sample the sound of multiple samples played
simultaneously.
●
Since the external audio input (analog) is active even while resampling, you can mix these sources for
resampling.
Press [SAMPLING] and then press [F2](Re-Sampling).
1.
The RE-SAMPLING screen (Screen Guide; p. 209) will appear.
2.
Proceed with sampling as described in step 2 of “Sampling” (p. 84).
The rest of the procedure is the same. The sound produced by the MV-8800 will be recorded while sampling
continues.
Applying effects while you sample
You can apply an effect directly to the input source while you sample. For details, refer to “Applying an effect
to the sound from an input” (p. 215).
M-88
MV-8800 Owner’s Manual
Page 89

Chapter 4
Making Instrument settings
An instrument has sixteen parts, and you can assign a patch to each part.
Assigning the patch to a part
●
“Patch” (p. 52)
Press [INSTRUMENTS].
1.
The INSTRUMENTS screen (Screen Guide; p. 114) will appear.
Use CURSOR [ ] [ ] to select the part to which you want to assign a patch.
2.
The selected part number (the current part) is highlighted.
4
Making Instrument settings
Press [F4](Library).
3.
The PATCH LIBRARY popup (Screen Guide; p. 117) will appear.
●
Alternatively, you can access the PATCH LIBRARY popup by moving the cursor to the Patch column and
turning the VALUE dial or using [DEC] [INC].
4.
Move the cursor to the desired patch.
Press [F5](Use This).
5.
The specified patch will be loaded.
MV-8800 Owner’s Manual
M-89
Page 90

Making instrument settings
Press [INSTRUMENTS].
1.
The INSTRUMENTS screen (Screen Guide; p. 114) will appear.
2.
Use CURSOR [ ] [ ] [ ] [ ] to move the cursor to the parameter you want to adjust.
1 2 3
3.
Turn the VALUE dial or use [DEC] [INC] or the numeric keys to edit the value.
●
For details on the parameters, refer to “INSTRUMENTS screen” (Screen Guide; p. 114).
Mute Switch
1
Temporarily mutes (M) or un-mutes (Off) the playback of each part
Part Level
2
2
Adjusts the output volume of each part.
Part Pan
3
Sets the panning of each part. A setting of “L63” places the sound at far left, “0” at center, and “R63” at far right.
4
5
6
7
Part Delay/Chorus Send Level
4
Adjust the audio send level of the part to the delay/chorus effect.
Part Reverb Send Level
5
Adjusts the audio send level of the part to the reverb effect.
Part Output Assign
6
Adjusts the audio output destination of the part.
Voice Reserve
7
Specifies the number of voices that will be reserved for each part if you attempt to play more than 32 voices
of polyphony simultaneously.
●
You can’t set the Voice Reserve parameter in a way that would cause the total for all parts to exceed 32.
M-90
MV-8800 Owner’s Manual
Page 91

The MV-8800 can play 64 voices simultaneously, but there are certain limitations on polyphony due to the design of
the sound generator. Audio tracks are given priority so that they will be able to play 32 voices at any time. This means
that if audio tracks are playing 32 voices, the remaining 32 voices can be played by instruments.
● example 1
In example 1, instruments are being requested to play a total of 16 voices, and actually are playing 16 voices. Since
the audio tracks are playing 32 voices, the entire MV-8800 is playing a total of 32 + 16 = 48 voices.
● example 2
In example 2, the instruments by themselves are being requested to play a total of 72 voices, producing a shortage.
The number of voices specified by the voice reserve setting of each part are allocated and the remaining requests
are ignored so that a total of 64 voices are playing.
About maximum polyphony and Voice Reserve
Making instrument settings
Audio track 1~8
Instrument Part 1
(request)
Instrument Part 2
(request)
Audio track 1~8
Instrument part 1
(request)
Instrument part 2
(request)
(request) 32 voices
voice reserve
8
12345678910
voice reserve
8
12345678910
no sound
voice reserve
8
12345678910
voice reserve
8
12345678910
62 63 64
62 63 64
62 63 64
62 63 64
:
plays 32 voices
plays 6 voices
plays 10 voices
plays 0 voice
plays 56 voices
plays 8 voices
. . .
4
Making Instrument settings
● example 3
Audio track 1~8
request 32 voices
Instrument part 1
plays 24 voices
In example 3, the audio tracks are playing 32 voices, meaning that the instruments can play the remaining 32 voices.
However, there is a shortage because a total of 72 voices are being requested.
The number of voices specified by the voice reserve setting of each part are allocated, and the remaining requests
are ignored so that a total of 64 voices are playing.
MV-8800 Owner’s Manual
M-91
Page 92

M-92
Page 93

Copying the settings of a part to a different part
Here’s how you can copy the settings of the current part to a different part. This is convenient when you want
to create a different patch based on the settings of a certain part.
1.
Press [INSTRUMENTS].
The INSTRUMENTS screen (Screen Guide; p. 114) will appear.
2.
Use CURSOR [ ] [ ] to select the copy-source part.
The selected part (the current part) number will be highlighted.
3.
Press [MENU].
The MENU popup will appear.
4.
Select “Copy Part” and press [F5](Select).
The COPY PART popup (Screen Guide; p. 151) will appear.
4
Making Instrument settings
Turn the VALUE dial or use [DEC] [INC] to select the copy-destination part number.
5.
Press [F5](Execute).
6.
The settings will be copied to the part you specified.
●
The patch for the copy-destination part will be overwritten.
MV-8800 Owner’s Manual
M-93
Page 94

Initializing the settings of a part
Here’s how you can initialize all parameters of the current part.
1.
Press [INSTRUMENTS].
The INSTRUMENTS screen (Screen Guide; p. 114) will appear.
Use CURSOR [ ] [ ] to select the part number you want to initialize.
2.
The part number (the current part) will be highlighted.
3.
Press [MENU].
The MENU popup will appear.
4.
Select “Initialize Part” and press [F5](Select).
A message of “Initialize Part ##. Are you sure?” will appear. (## is a part number.)
F-button
[F1](No)
[F5](Yes) Initializes the current part.
●
You can’t recover the parameters that have been initialized. If you want to keep the patch, be sure to save it
before initializing.
Explanation
Cancels without initializing.
M-94
MV-8800 Owner’s Manual
Page 95

Chapter 5
1
2
3
4 5 6
7 8 9
10 11 12
Creating a patch
Making a patch settings
1.
Press [INSTRUMENTS].
The INSTRUMENTS screen (Screen Guide; p. 114) will appear.
2.
Use CURSOR [ ] [ ] to select the part that uses the patch you want to edit.
The selected part number (the current part) will be highlighted.
3.
Press [F5](Patch Edit).
The PATCH EDIT screen (Screen Guide; p. 118) will appear.
5
Creating a patch
●
For details on the parameters, refer to “PATCH EDIT screen” (Screen Guide; p. 118).
●
Strike the pads to hear the result of your settings. To check the pads to which the sounds are assigned, press
[PAD BANKS] to display the “PAD BANKS popup” (p. 5).
Part number/Patch name
1
Selects the part that use the patch you want to edit.
Patch Coarse Tune
2
2
Adjust the pitch of the entire patch in steps of one semitone.
Patch Fine Tune
3
Adjust the pitch of entire patch in steps of one cent.
●
One cent = 1/100th of a semitone
Analog Feel Depth
4
Applies irregularity to the patch, simulating the natural instability that is typical of an analog synthesizer.
Pitch Bend Range Down
5
Specifies the amount by which the pitch of the patch will change (in semitones) when you operate the pitch
bender downward.
MV-8800 Owner’s Manual
M-95
Page 96

Making a patch settings
Pitch Bend Range Up
6
Specifies the amount by which the pitch of the patch will change (in semitones) when you operate the pitch
bender upward.
Cutoff Offset
7
Applies a relative adjustment to the cutoff frequency of the entire patch.
Resonance Offset
8
Applies a relative adjustment to the resonance of the entire patch.
●
Resonance
Boosts the region near the cutoff frequency, adding a distinctive character to the sound.
Attack Time Offset
9
Applies a relative adjustment to the amplifier attack time.
●
Attack time
The time from when you strike the velocity pad and the sound begins, until the moment when the maximum
volume is reached.
Release Time Offset
10
Applies a relative adjustment to the amplifier release time.
●
Release time
The time from when you release the velocity pad until the sound decays to silence.
Velocity Sens Offset
11
Applies an adjustment to the velocity sensitivity of the entire patch.
●
Velocity
The force at which you strike the velocity pad.
Voice Priority
12
Specifies how voices are to be handled when you play patches in a way that would exceed the maximum
polyphony.
M-96
MV-8800 Owner’s Manual
Page 97

Making a patch settings
MV-8800 Owner’s Manual
M-97
Page 98

Making a patch settings
Loading a patch from the patch library
Here’s how to load a patch from the library and use it for the current part.
1.
Press [INSTRUMENTS].
The INSTRUMENTS screen (Screen Guide; p. 114) will appear.
Use CURSOR [ ] [ ] to select the part for which you want to change patches.
2.
The selected part number (the current part) is highlighted.
Press [F4](Library).
3.
The PATCH LIBRARY popup (Screen Guide; p. 117) will appear.
4.
Select the patch that you want to load and press [F5](Use This).
The selected patch will be recalled to the current part.
M-98
MV-8800 Owner’s Manual
Page 99

Saving a patch to the hard disk
Here’s how to save the current patch to disk. A patch saved in this way can be used by a different project. For
details, refer to “Loading a patch from the hard disk” (p. 100).
1.
Press [INSTRUMENTS].
The INSTRUMENTS screen (Screen Guide; p. 114) will appear.
Use CURSOR [ ] [ ] to select the part that uses the patch you want to save.
2.
The selected part number (the current part) is highlighted.
3.
Press [MENU].
The MENU popup will appear.
4.
Select “Save Patch” and press [F5](Select).
The SAVE PATCH popup (Screen Guide; p. 149) will appear.
Making a patch settings
5
Creating a patch
Specify the save destination (such as /USER) and press [F5](Save).
5.
The EDIT FILE NAME popup (Screen Guide; p. 3) will appear.
Specify the name of file you want to save.
6.
The file name will be the name you assigned plus an extension of “.MV0”.
7.
Press [F5](Execute).
The patch of the current part will be saved on the hard disk.
MV-8800 Owner’s Manual
M-99
Page 100

Making a patch settings
Loading a patch from the hard disk
Here’s how to load a patch from the hard disk and use it for the current part and the patch library.
●
For additional information, refer also to “Loading the pre-installed patches” (p. 63).
1.
Press [INSTRUMENTS].
The INSTRUMENTS screen (Screen Guide; p. 114) will appear.
2.
Press [MENU].
The MENU popup will appear.
3.
Select “Load Patch” and press [F5](Select).
The LOAD PATCH screen (Screen Guide; p. 150) will appear.
Select the patch that you want to load and press [F5](Load).
4.
The ASSIGN TO PART / LIBRARY popup (Screen Guide; p. 224) will appear.
Select the destination (instruments part and patch library).
5.
If you want to load into only one of these, turn the other setting Off.
Press [F5](Execute).
6.
The patch will loaded into the specified part and library.
M-100
MV-8800 Owner’s Manual
 Loading...