

Page 1

Setup Guide
Thank you very much for purchasing this product.
To ensure correct and safe usage with a full understanding of this product's performance, be sure to read through
this document completely and store it in a safe location.
Unauthorized copying or transferal, in whole or in part, of this document is prohibited.
The contents of this document and the specications of this product are subject to change without notice.
This product and this document have been prepared and tested as much as possible. If you nd any misprints or
errors, please inform us.
Roland DG Corporation assumes no responsibility for any direct or indirect loss or damage that may occur through
use of this product, regardless of any failure to perform on the part of this product.
Roland DG Corporation assumes no responsibility for any direct or indirect loss or damage that may occur with
respect to any article made using this product.
R2-170213
Page 2

Applicable EMC Standards: EN 61326-1 (Class A), EN 55011 (Class A, Group 1), EN 61000-3-2, EN
61000-3-3
This product is a Class A device.
Radio interference may occur if this product is used in a residential environment. In such cases, users
of this product may need to implement appropriate measures.
This product is a Group 1 device.
Radio frequency energies in the form of electromagnetic radiation, induction, and/or electrostatic
bonding are not used nor deliberately emitted when processing material or during examination/
analysis.
Roland DG Corporation has licensed the MMP technology from the TPL Group.
Page 3

For the USA
FEDERAL COMMUNICATIONS COMMIS-
SION RADIO FREQUENCY INTERFER-
ENCE STATEMENT
This equipment has been tested and found to comply
with the limits for a Class A digital device, pursuant to
Part 15 of the FCC Rules.
These limits are designed to provide reasonable protection against harmful interference when the equipment is
operated in a commercial environment.
This equipment generates, uses, and can radiate radio
frequency energy and, if not installed and used in accordance with the instruction manual, may cause harmful
interference to radio communications.
Operation of this equipment in a residential area is
likely to cause harmful interference in which case the
user will be required to correct the interference at his
own expense.
Unauthorized changes or modication to this system
can void the users authority to operate this equipment.
NOTICE
Grounding Instructions
In the event of a malfunction or breakdown, grounding provides a path of least resistance for electric
current to reduce the risk of electric shock. This tool
is equipped with an electric cord having an equipment-grounding conductor and a grounding plug. The
plug must be plugged into a matching outlet that is
properly installed and grounded in accordance with all
local codes and ordinances.
Do not modify the plug provided - if it will not t the
outlet, have the proper outlet installed by a qualied
electrician.
Improper connection of the equipment-grounding
conductor can result in a risk of electric shock. The
conductor with insulation having an outer surface that
is green with or without yellow stripes is the equipment-grounding conductor. If repair or replacement of
the electric cord or plug is necessary, do not connect
the equipment-grounding conductor to a live terminal.
Use only I/O cables that have been designed and manu-
factured specically for this device.
For Canada
CAN ICES-3 (A)/NMB-3(A)
Check with a qualied electrician or service personnel
if the grounding instructions are not completely understood, or if in doubt as to whether the tool is properly
grounded.
Use only 3-wire extension cords that have 3-prong
grounding plugs and 3-pole receptacles that accept the
tool's plug.
For California
WARNING
This product contains chemicals known to cause cancer,
birth defects and other reproductive harm, including lead.
Repair or replace damaged or worn cord immediately.
For EU Countries
Manufacturer:
ROLAND DG CORPORATION
1-6-4 Shinmiyakoda, Kita-ku, Hamamatsu-shi, Shizuoka-ken, 431-2103 JAPAN
The authorized representative in the EU:
Roland DG EMEA, S.L.
Parc Tecnologic del Valles C/ Ceramistes, 6 08290 Cerdanyola del Valles / Barcelona Spain
For EU Countries
WARNING
This is a Class A product. In a domestic environment this product may cause radio interference in which case the user
may be required to take adequate measures.
1
Page 4

Operating Instructions
KEEP GUARDS IN PLACE and in working order.
REMOVE ADJUSTING KEYS AND WRENCHES.
Form habit of checking to see that keys and adjusting
wrenches are removed from tool before turning it on.
KEEP WORK AREA CLEAN. Cluttered areas and
benches invite accidents.
DON'T USE IN DANGEROUS ENVIRONMENT.
Don't use power tools in damp or wet locations, or
expose them to rain. Keep work area well lighted.
KEEP CHILDREN AWAY. All visitors should be kept
safe distance from work area.
MAKE WORKSHOP KID PROOF with padlocks,
master switches, or by removing starker keys.
DON'T FORCE TOOL. It will do the job better and
safer at the rate for which it was designed.
USE RIGHT TOOL. Don't force tool or attachment to
do a job for which it was not designed.
USE PROPER EXTENSION CORD. Make sure your
extension cord is in good condition. When using an
extension cord, be sure to use one heavy enough to
carry the current your product will draw. An undersized cord will cause a drop in line voltage resulting in
loss of power and overheating.
WEAR PROPER APPAREL. Do not wear loose clothing, gloves, neckties, rings, bracelets, or other jewelry
which may get caught in moving parts. Nonslip footwear is recommended. Wear protective hair covering
to contain long hair.
USE SAFETY GLASSES, face or dust mask if cutting
or cleaning operation is dusty. Everyday eyeglasses
only have impact resistant lenses, they are NOT safety
glasses.
SECURE WORK. Use clamps or a vise to hold work
when practical.
REDUCE THE RISK OF UNINTENTIONAL
STARTING. Make sure switch is in o position before plugging in.
USE RECOMMENDED ACCESSORIES. Consult
the owner's manual for recommended accessories.
The use of improper accessories may cause risk of
injury to persons.
NEVER STAND ON TOOL. Serious injury could
occur if the tool is tipped or if the cutting tool is unintentionally contacted.
CHECK DAMAGED PARTS. Before further use of
the tool, a guard or other part that is damaged should
be carefully checked to determine that it will operate
properly and perform its intended function - check for
alignment of moving parts, binding of moving parts,
breakage of parts, mounting, and any other condi-
tions that may aect its operation. A guard or other
part that is damaged should be properly repaired or
replaced.
NEVER LEAVE TOOL RUNNING UNATTENDED.
TURN POWER OFF. Don't leave tool until it comes
to a complete stop.
USE POWER SUPPLY CORD WHICH IS ATTACHED WITH PRODUCTS. do not use other power supply cord.
PERFORM CLEANING USING A DUST
COLLECTOR OR A COMMERCIALLY
AVAILABLE BRUSH.
gasoline, alcohol, or thinner to perform cleaning.
CONNECT THE USB CABLE TO THE
COMPUTER (Certied with IEC/EN60950-1) with
the suitable ammability rating which was estimated
by IEC/EN61010-1 3rd Edition (Cl. 9).
USE AN EXTERNAL CABLE AND A DUST
COLLECTOR with the suitable ammability rating
which was estimated by IEC/EN61010-1 3rd Edition
(Cl. 9).
Never use a solvent such as
DON'T OVERREACH. Keep proper footing and balance at all times.
MAINTAIN TOOLS WITH CARE. Keep tools sharp
and clean for best and safest performance. Follow instructions for lubricating and changing accessories.
DISCONNECT TOOLS before servicing; when
changing accessories, such as blades, bits, cutters, and
the like.
2
Page 5

For China
产品中有毒有害物质或元素的名称及含量
有毒有害物质或元素
部件名称
印刷电路板 × ○ × ○ ○ ○
头部 × ○ ○ ○ ○ ○
壳体、底架 × ○ ○ ○ ○ ○
电源 × ○ × ○ ○ ○
其他(电缆、附件等) × ○ ○ ○ ○ ○
○:表示该有毒有害物质在该部件所有均质材料中的含量均在 GB/T26572-2011 标准规定的限量要求以下。
×:表示该有毒有害物质至少在该部件的某一均质材料中的含量超出 GB/T26572-2011 标准规定的限量要求。
环
保使用期限
For EU countries
铅(Pb) 汞(Hg) 镉(Cd)
此标志适用于在中国国内销售的电子信息产品,表示环保使用期限的年数。
所谓环保使用期限是指在自制造日起的规定期限内,产品中所含的有害物质
不致引起环境污染,不会对人身、财产造成严重的不良影响。
环保使用期限仅在遵照产品使用说明书,正确使用产品的条件下才有效。
不当的使用,将会导致有害物质泄漏的危险。
This product must be disposed of
separately at your local waste recycling
center. Do not dispose of in household
六价铬
(Cr(Ⅵ))
多溴联苯
(PBB)
Lever dit product in bij een lokaal
afvalverzamelpunt. NIET met normaal
huishoudelijk afval afvoeren.
waste bin.
多溴二苯醚
(PBDE)
Bitte führen Sie dieses Produkt separat
Ihrer örtlichen Entsorgungsstelle zu.
Bitte nicht mit dem normalen Hausmüll
entsorgen.
Ne jetez pas le produit avec vos
ordures ménagères. Portez-le dans un
centre recyclage des déchets.
Questo prodotto deve essere smaltito
negli appositi contenitori per la raccolta
differenziata, non buttare nel cestino
dei rifiuti casalinghi.
Este producto debe devolverse al
centro de reciclaje más cercano a su
domicilio para su correcta eliminación.
No lo tire a la basura.
Deite fora separadamente este produto
no seu centro de reciclagem local. Não
o deite fora no seu caixote do lixo.
Dette Produkt skal smides særskilt
væk på den lokale affalds- og
genbrugsstation. Må ikke smides ud
sammen med almindeligt
husholdningsaffald.
Tätä tuotetta ei saa hävittää
normaalien talousjätteiden mukana,
vaan se on toimitettava
ongelmajätteiden keräilypisteeseen
hävitettäväksi.
Produkten måste kasseras separat på
din lokala återvinningscentral. Släng
inte produkten tillsammans med
hushållssoporna.
Μην πετάξετε το αντικείμενο αυτό στο
καλάθι των απορριμμάτων. Αφαιρέστε
τις μπαταρίες και προσκομίστε το στο
τοπικό κέντρο ανακύκλωσης.
3
Page 6

Contents
Contents ........................................................................................................4
To Ensure Safe Use .................................................................................5
Pour utiliser en toute sécurité ................................................................ 11
Important Notes on Handling and Use ........................................................17
Installing the Machine .................................................................................18
Step 1: Deciding on an Installation Site..................................................................................18
Step 2: Removing the Retainers ................................................................................................20
Machine Highlights ......................................................................................21
Features of This Machine .............................................................................................................21
Operating the Machine ................................................................................................................21
Documentation Included with the Machine ........................................................................21
Part Names and Functions ..........................................................................22
Front ....................................................................................................................................................22
Inside the Machine.........................................................................................................................22
Side ......................................................................................................................................................24
Performing an Emergency Stop on This Machine .......................................25
Emergency Stop ..............................................................................................................................25
Emergency Stop or Pause Due to Opening or Closing the Cover ..............26
Emergency Stop Due to Opening or Closing the Cover ...................................................26
Pause Due to Opening or Closing the Cover ........................................................................27
Preparing the Machine for Use ...................................................................28
Step 1: Checking the Included Items ......................................................................................28
Step 2: Installing the Roland DG Software Package ..........................................................29
Step 3: Connecting the Cable ....................................................................................................32
Step 4
Step 5:
Step 6: Starting VPanel .................................................................................................................35
Step 7: Performing Spindle Run-in ...........................................................................................36
Step 8: Correcting the Machine (Automatic Correction) ..................................................37
Step 9: Exiting VPanel ....................................................................................................................39
Step 10: Switching O the Machine's Power ........................................................................39
Machine Specications ...............................................................................40
Power Rating and Serial Number Location ...........................................................................40
Expansion Port Specications ....................................................................................................40
Dimensional Drawings .................................................................................................................44
Specications ..............................................................................................46
System Requirements for USB Connection ...........................................................................46
:
Switching On the Machine's Power Switch (Setting the Panel Display Language)
Connecting the Machine to a Computer Using a USB Cable ............................... 34
..... 33
Company names and product names are trademarks
or registered trademarks of their respective holders.
Copyright © 2016-2017 Roland DG Corporation
4
http://www.rolanddg.com/
Page 7

To Ensure Safe Use
Improper handling or operation of this machine may result in injury or damage to property. Points
that must be observed to prevent such injury or damage are described as follows.
About WARNING and CAUTION Notices
WARNING
Used for instructions intended to alert the user to the risk of death or severe
injury should the unit be used improperly.
Used for instructions intended to alert the user to the risk of injury or material
damage should the unit be used improperly.
CAUTION
* Material damage refers to damage or other adverse eects caused with respect
to the home and all its furnishings, as well as to domestic animals or pets.
About the Symbols
The symbol alerts the user to important instructions or warnings.
The specic meaning of the symbol is determined by the design contained within the
symbol.
The symbol on the left means "danger of electrical shock."
symbol alerts the user to items that must never be carried out (are forbidden).
The
The specic meaning of the symbol is determined by the design contained within the
symbol.
The symbol on the left means "the unit must never be disassembled."
symbol alerts the user to things that must be carried out.
The
The specic meaning of the symbol is determined by the design contained within the
symbol.
The symbol on the left means "the power-cord plug must be unplugged from the outlet."
5
Page 8

To Ensure Safe Use
Incorrect operation may cause injury
WARNING
Always unplug the power cord when attaching or removing parts and optional
parts and when performing maintenance
that does not require the machine to be
connected to a power source.
Attempting such operations while the machine is connected to a power source may
result in injury or electrical shock.
Keep children away from the machine.
The machine includes areas and components that pose a hazard to children and
may result in injury, blindness, choking, or
other serious accidents.
Never attempt to disassemble, repair, or
modify the machine.
Doing so may result in re, electrical shock,
or injury. Entrust repairs to a trained service
technician.
Be sure to follow the operation procedures described in the user's manual.
Never allow anyone unfamiliar with the
usage or handling of the machine to
touch it.
Incorrect usage or handling may lead to an
accident.
Never operate the machine while tired or
after ingesting alcohol or any medication.
Operation requires unimpaired judgment.
Operating the machine with impaired judgment may result in an accident.
WARNING
Conduct operations in a clean, brightly
lit location.
Working in a location that is dark or cluttered
may lead to an accident, such as becoming
caught in the machine as the result of an
inadvertent stumble.
Be careful around the cutting tool.
The cutting tool is sharp. Broken cutting
tools are also dangerous. To avoid injury,
exercise caution.
Never use a cutting tool that has become
dull. Perform frequent maintenance to
keep the machine in good working order.
Inappropriate usage may result in re or
injury.
CAUTION
Never climb or lean on the machine.
The machine is not made to support a person. Climbing or leaning on the machine may
dislodge components and cause them to fall
o the machine.
Never operate the machine if the cover is
cracked or broken.
Doing so may result in injury. If the cover is
cracked or broken, contact your authorized
Roland DG Corporation dealer.
6
Page 9

To Ensure Safe Use
Danger of electrical short, electrical shock, or re
WARNING
Connect this machine to a power outlet
that complies with this machine’s ratings
(for voltage, frequency, and current).
Incorrect voltage or insucient current may
cause re or electrical shock.
If sparks, smoke, burning odors, abnormal noise, or abnormal operations occur,
immediately unplug the power cord.
Never use the machine if any component
is damaged.
Continuing to use the machine may result in
re, electrical shock, or injury. Contact your
authorized Roland DG Corporation dealer.
Never use the machine outside or in
any location where exposure to water or
high humidity may occur. Do not touch
the power cord, plug, or electrical outlet
with wet hands.
Doing so may result in re or electrical shock.
Never allow any foreign object to get
inside the machine. Never expose the
machine to liquid spills.
Inserting objects such as coins or matches
or allowing beverages to be spilled into the
ventilation ports may result in re or electrical
shock. If anything gets inside, immediately
disconnect the power cord and contact your
authorized Roland DG Corporation dealer.
WARNING
When using an extension cord or power
strip, use one that adequately satises
the machine's ratings (for voltage, frequency, and current).
Use of multiple electrical loads on a single
power outlet or use of a lengthy extension
cord may cause re.
Position the machine so that the power
plug is within immediate reach at all
times.
This is to enable quick disconnection of the
power plug in the event of an emergency.
Install the machine next to a power outlet.
Also, provide enough empty space to allow
immediate access to the power outlet.
For accessories (optional and consumable items, power cord, and the like), use
only genuine articles compatible with
this machine.
Incompatible items may lead to an accident.
Never use the machine for any purpose
for which it is not intended or use the
machine in an excessive manner that
exceeds its capacity.
Doing so may result in injury or re.
Do not use the supplied power cord for
other products.
Never place any ammable object nearby.
Never use a combustible aerosol spray
nearby. Never use the machine in any
location where gases can accumulate.
Combustion or explosion may occur.
Handle the power cord, plug, and power
outlet correctly and with care. Never use
any article that is damaged.
Using a damaged article may result in re
or electrical shock.
If the machine will not be used for a long
period, disconnect the power cord.
This prevents an accident caused by unexpected electric leakage or unintentional start
of the machine.
Connect the machine to ground.
This can prevent re or electrical shock
due to electric leakage in the event of a
malfunction.
7
Page 10

To Ensure Safe Use
WARNING
Never use cutting oil.
This machine is not designed for the ow of
cutting oil. Oil may get inside the machine
and cause re or electrical shock.
Never use a pneumatic blower.
This machine is not compatible with a pneumatic blower. Cutting waste may get inside
the machine and cause re or electrical
shock.
Important Notes about the Power Cord, Plug, and Power Outlet
Never place any
object on top
or subject to dam-
age.
Never allow to get
wet.
Never bend or twist
with excessive
force.
Never make hot. Dust may cause re.
This is a heavy machine
CAUTION
Unloading and placement are operations
that must be performed by 4 people or
more.
Tasks that require undue eort when performed by a small number of people may
result in physical injury. Dropping the machine may result in injury.
Never pull with ex-
cessive force.
Never bundle, bind,
or roll up.
CAUTION
Install the machine in a location that is
level, stable, and able to bear the weight
of the machine.
The total weight of the machine may reach
140 kg (309 lb.) or more. Installation in an
unsuitable location may cause a major accident, including tip over, fall, or collapse.
8
Page 11

To Ensure Safe Use
Cutting waste and workpieces are ammable and toxic.
WARNING
Never attempt to cut magnesium or any
other such ammable material.
Fire may occur during cutting.
Never attempt to cut metal, carbon, or any
other such conductive material.
Fire may occur during cutting.
Keep open ame away from the work
area.
Cutting waste may ignite. Powdered material
is extremely ammable, and even metal
material may catch re.
When using a vacuum cleaner to take up
cutting waste, exercise caution to prevent
re or dust explosion.
Taking up ne cuttings using an ordinary
vacuum cleaner may cause danger of re or
explosion. Check with the manufacturer of
the vacuum cleaner. When the safety of use
cannot be determined, clean the machine
using a brush or the like, without using a
vacuum cleaner.
CAUTION
Wear dust goggles and a mask. Wash
away any cutting waste remaining on
the hands.
Accidentally swallowing or inhaling cutting
waste may be hazardous to your health.
Danger of pinching, entanglement, and burns
WARNING
Securely fasten the cutting tool and
workpiece in place. After securing these
items in place, make sure no wrenches
or other articles have inadvertently been
left behind.
If you do not check for these articles, they
may be thrown from the machine with force,
posing a risk of injury.
Do not touch the spindle unit or the surrounding areas immediately after cutting
has ended.
Doing so may result in burns.
WARNING
Exercise caution to avoid being pinched
or becoming entangled in the machine.
Inadvertent contact with certain areas may
cause your hand or ngers to be pinched or
become entangled in the machine. Use care
when performing operations.
CAUTION
Never attempt operation while wearing
a necktie, a necklace, loose clothing, or
gloves. Bind long hair securely.
Such items may become caught in the machine, resulting in injury.
9
Page 12

To Ensure Safe Use
Warning labels are axed to make areas of danger immediately clear. The meanings of these labels
are as follows. Be sure to heed their warnings. Also, never remove the labels or allow them to become
obscured.
Front
Warning labels
Caution: Sharp Tool
The cutting tool has a
sharp point.
Inadvertent contact may
cause injury.
Caution: High Temperature
Do not touch the spindle
unit or the surrounding
areas immediately after
cutting has ended. Doing
so may result in burns.
Back
Caution: Pinching
Hazard
Exercise caution to pre-
vent ngers from being
pinched when closing
covers.
Never use a pneumatic blower.
This machine is not compatible with pneumatic blowers.
Cutting waste may get inside
the machine and cause re or
electrical shock.
10
Caution: High Voltage
Removing the cover may
result in high-voltage
electric shock.
Page 13

Pour utiliser en toute sécurité
La manipulation ou l’utilisation inadéquate de cet appareil peuvent causer des blessures ou des
dommages matériels. Les précautions à prendre pour prévenir les blessures ou les dommages sont
décrites ci-dessous.
Avis sur les avertissements
ATTENTION
PRUDENCE
À propos des symboles
Le symbole attire l’attention de l’utilisateur sur les instructions importantes ou les
avertissements.
Le sens précis du symbole est déterminé par le dessin à l’intérieur du symbole
Le symbole à gauche signie «danger d’électrocution».
Le symbole
Le sens précis du symbole est déterminé par le dessin à l’intérieur du symbole
Le symbole à gauche signie que l’appareil ne doit jamais être démonté.
avertit l’utilisateur de ce qu’il ne doit jamais faire, ce qui est interdit.
Utilisé pour avertir l’utilisateur d’un risque de décès ou de blessure
grave en cas de mauvaise utilisation de l’appareil.
Utilisé pour avertir l’utilisateur d’un risque de blessure ou de
dommage matériel en cas de mauvaise utilisation de l’appareil.
* Par dommage matériel, il est entendu dommage ou tout autre
effet indésirable sur la maison, tous les meubles et même les
animaux domestiques.
.
.
Le symbole
Le sens précis du symbole est déterminé par le dessin à l’intérieur du symbole
Le symbole à gauche signie que la che du câble d’alimentation doit être débranchée
de la prise.
prévient l’utilisateur sur ce qu’il doit faire.
.
11
Page 14

Pour utiliser en toute sécurité
Une utilisation incorrecte peut causer des blessures
ATTENTION
Toujours débrancher le câble d’alimen-
tation lors de la xation ou du retrait
de pièces et de pièces en option et du
nettoyage ou des travaux d’entretien qui
n’exigent pas un branchement de l’appa-
reil à une source d’alimentation.
Tenter ces opérations pendant que l’appareil
est branché à une source d’alimentation peut
causer des blessures ou un choc électrique.
Garder les enfants loin de l’appareil.
L’appareil comporte des parties et des composants qui présentent un danger pour les
enfants et qui peuvent causer des blessures,
la cécité, la suocation ou d’autres accidents
graves.
Ne jamais tenter de démonter, de réparer
ou de modier l’appareil.
Le non-respect de cette consigne peut provoquer un incendie, un choc électrique ou
des blessures. Coner les réparations à un
technicien ayant la formation requise.
ATTENTION
Utiliser l’appareil dans un endroit propre
et bien éclairé.
Travailler dans un endroit sombre ou encom-
bré peut entraîner un accident; l’utilisateur
risque, par exemple, de trébucher malencontreusement et d’être coincé par une partie
de l’appareil.
Être attentif dans le périmètre de l’outil
de coupe.
L’outil de coupe est acéré. Les outils de
coupes brisés sont aussi dangereux. Faire
preuve de prudence pour éviter les blessures.
Ne jamais utiliser un outil de coupe
émoussé. Procéder fréquemment aux
travaux d’entretien pour garder l’appareil
en bon état de fonctionnement.
L’usage inapproprié peut causer un incendie
ou des blessures.
12
S’assurer de suivre les procédures d’utilisation décrites dans le manuel utilisateur.
Ne jamais permettre à quiconque ne
connaissant pas le fonctionnement ou la
manutention de l’appareil de le toucher.
L’utilisation ou la manutention incorrectes
peuvent causer un accident.
Ne jamais faire fonctionner l’appareil
après avoir consommé de l’alcool ou des
médicaments, ou dans un état de fatigue.
L’utilisation de l’appareil exige un jugement
sans faille. L’utilisation avec les facultés
aaiblies peut entraîner un accident.
PRUDENCE
Ne jamais grimper ni s'appuyer sur la
machine.
La machine n'est pas conçue pour supporter le poids d'une personne. Grimper
ou s'appuyer sur la machine peut déplacer
des éléments et causer un faux pas ou une
chute, ce qui causerait des blessures.
Ne pas utiliser si un couvercle avant est
ssuré ou brisé.
Vous risqueriez de vous blesser. Si le cou-
vercle est ssuré ou brisé, communiquer
avec le représentant Roland DG autorisé.
Page 15

Pour utiliser en toute sécurité
Risque de court-circuit, d’électrocution ou d’incendie
ATTENTION
Brancher à une prise électrique conforme
aux caractéristiques de cet appareil (tension, fréquence et courant).
Une tension incorrecte ou un courant in-
susant peuvent causer un incendie ou un
choc électrique.
S'il se produit des étincelles, de la fumée,
une odeur de brûlé, des bruits inhabituels ou un fonctionnement anormal,
débrancher immédiatement le câble d'alimentation. Ne jamais utiliser l’appareil si
un composant est endommagé.
Continuer à utiliser l'appareil peut causer un
incendie, un choc électrique ou des blessures. Communiquer avec le représentant
Roland DG Corp. autorisé.
Ne jamais utiliser l’appareil à l’extérieur ni à
un endroit où il risque d’être exposé à l’eau
ou à une forte humidité. Ne pas toucher le
câble d’alimentation, la che ou la prise
électrique avec des mains mouillées.
Le non-respect de cette consigne peut provoquer un incendie ou un choc électrique.
ATTENTION
Manipuler le câble d’alimentation, la
che et la prise électrique correctement
et avec soin. Ne jamais utiliser un article
endommagé,
car cela pourrait causer un incendie ou un
choc électrique.
Si une rallonge ou une bande d'alimentation électrique sont utilisées,s'assurer
qu'elles correspondent aux caractéristiques de l'appareil (tension,fréquence
et courant).
L'utilisation de plusieurs charges électriques
sur une prise unique ou une longue rallonge
peut causer un incendie.
Placer l’appareil de façon à ce que la che
soit facile d’accès en tout temps.
Ainsi, l’appareil pourra être débranché rapidement en cas d’urgence. Installer l’appareil
près d’une prise électrique. En outre, prévoir
susamment d’espace pour que la prise
électrique soit facile d’accès.
Ne jamais insérer d’objet étranger dans
l’appareil. Ne jamais exposer l’appareil
aux déversements de liquides.
L’insertion d’objets comme des pièces de
monnaie ou des allumettes ou le déversement de liquides dans les orices de ventilation peuvent causer un incendie ou un choc
électrique. Si un objet ou du liquide s’inltre
dans l’appareil, débrancher immédiatement
le câble d’alimentation et communiquer avec
le représentant Roland DG autorisé.
Ne jamais placer d’objet inammable à
proximité de l’appareil. Ne jamais utiliser de produit inammable en aérosol à
proximité de l’appareil. Ne jamais utiliser
l’appareil dans un endroit où des gaz
peuvent s’accumuler.
Une combustion ou une explosion peuvent
se produire.
Utiliser uniquement des accessoires
d'origine (accessoires en option, articles
consommables, câble d'alimentation et
autres articles semblables), compatibles
avec l'appareil.
Les articles incompatibles risquent de causer des accidents.
Ne jamais utiliser l’appareil à des ns
autres que celles pour lesquelles il est
conçu. Ne jamais l’utiliser de manière
abusive ou excessive.
Le non-respect de cette consigne peut provoquer des blessures ou un incendie.
Ne pas utiliser le cordon électrique fourni
avec d’autres produits.
13
Page 16
Pour utiliser en toute sécurité
ATTENTION
Si l’appareil doit rester inutilisé pendant
une longue période, débrancher le câble
d’alimentation.
Cela peut prévenir les accidents en cas de
fuite de courant ou de démarrage accidentel.
Brancher l’appareil à la terre.
La mise à la terre peut prévenir un incendie
ou un choc électrique dus à une fuite de
courant en cas de défaillance.
Ne jamais utiliser d’huile de coupe.
Cet appareil n’est pas conçu pour traiter
l’huile de coupe. L’huile peut s’inltrer à
l’intérieur de l’appareil et causer un incendie
ou un choc électrique.
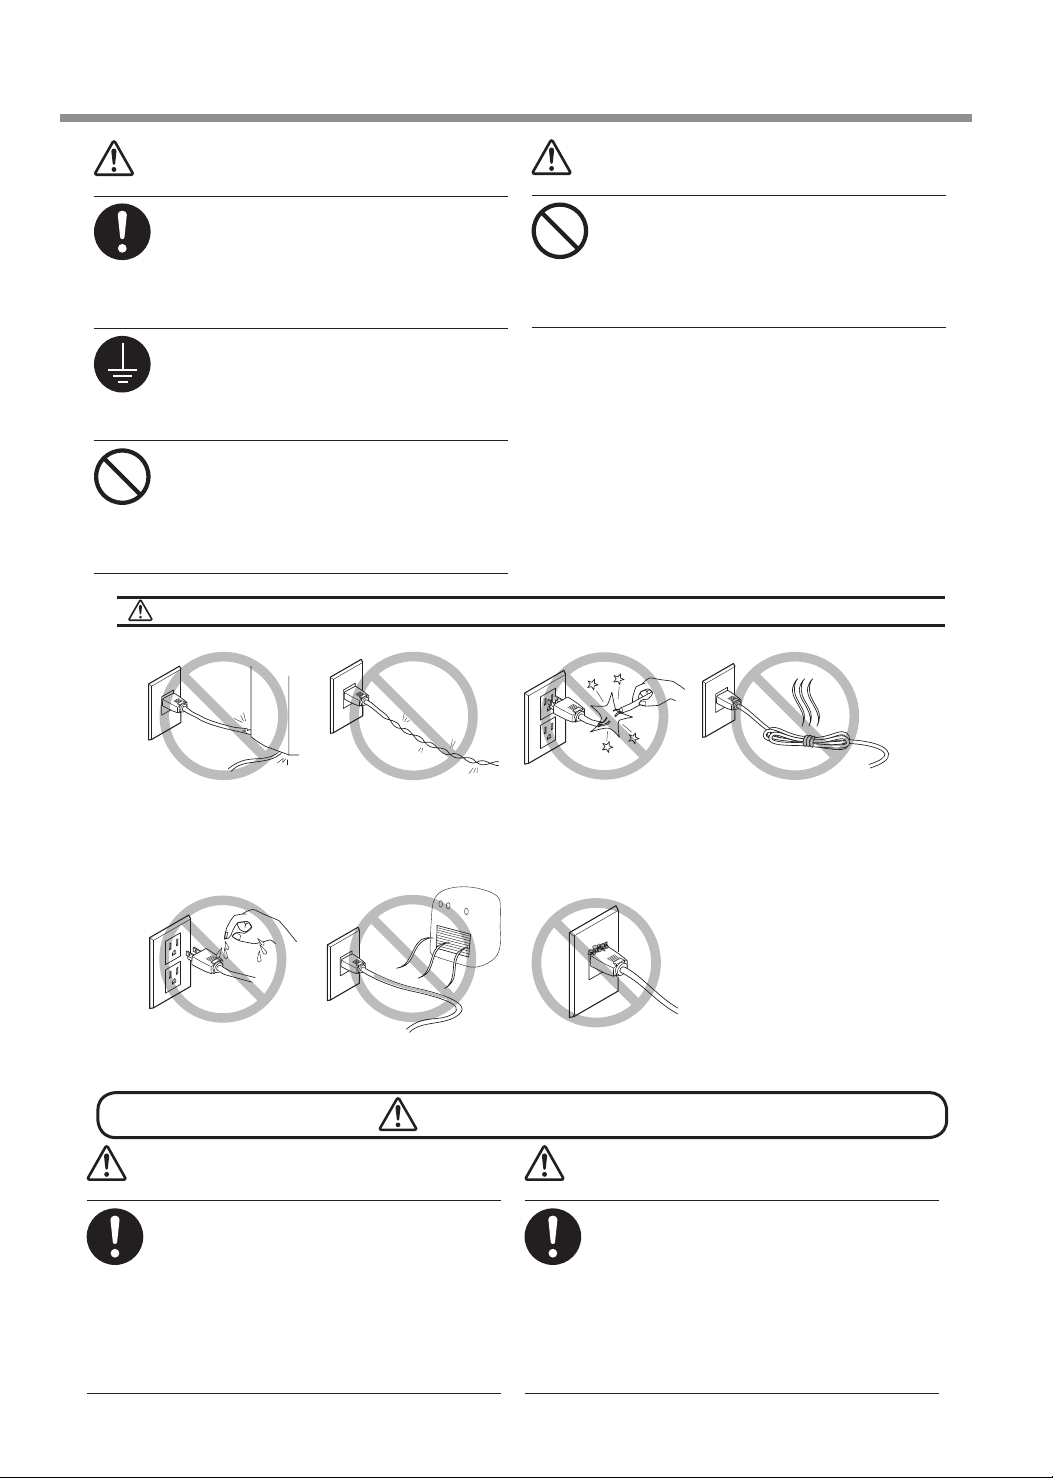
Remarques importantes à propos du câble d’alimentation, de la che et de la prise électrique
ATTENTION
Ne jamais utiliser d’air sous pression.
Cet appareil n'est pas conçu pour être net-
toyé à l'aide d'un appareil souant. Des rebuts de coupe peuvent s’inltrer à l’intérieur
et causer un incendie ou un choc électrique.
Ne jamais déposer
aucun objet dessus
au risque de les
endommager.
Ne jamais laisser
mouiller.
Ne jamais plier ni
tordre avec une
force excessive.
Ne jamais chauer.
Cet appareil est lourd.
PRUDENCE
Le déchargement et la mise en place
doivent être faits par au moins quatre
personnes.
Les tâches qui exigent un eort trop grand
si elles sont exécutées par un petit nombre
de personnes peuvent être cause de blessures. Échapper l’appareil peut causer des
blessures.
Ne jamais tirer avec
une force excessive.
La poussière peut
provoquer un incendie.
PRUDENCE
Installer l’appareil à un endroit de niveau,
stable et pouvant prendre en charge le
poids l’appareil.
Le poids total de la machine peut atteindre
140 kg kg (309 lb lb) ou plus. Installer l’appareil à un endroit inapproprié peut provoquer
un accident grave tel qu’un renversement,
une chute ou un écrasement.
Ne jamais plier ni
enrouler.
14
Page 17
Pour utiliser en toute sécurité
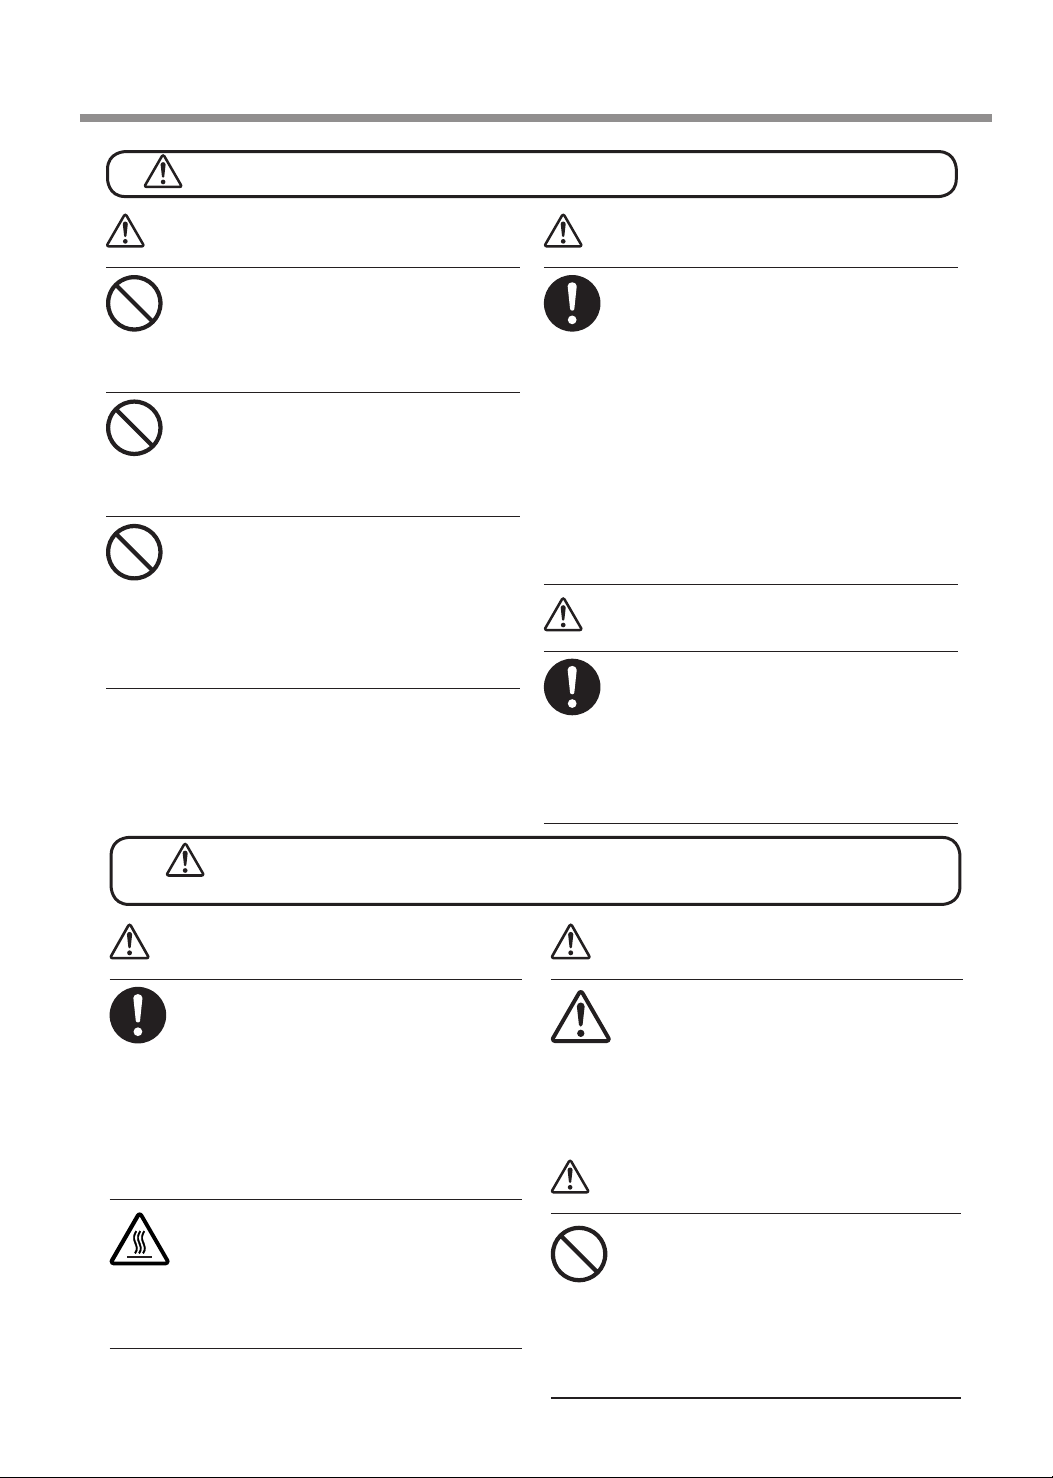
Les rebuts et morceaux de la coupe sont inammables et toxiques.
ATTENTION
Ne jamais tenter de couper du magnési-
um ni aucun autre matériau inammable.
Un incendie peut se produire pendant la
coupe.
Ne jamais essayer de couper du métal, du
carbone ou tout autre métal conducteur.
Un incendie peut se produire pendant la
coupe.
Garder toute amme nue loin de l’espace
de travail.
Les rognures de coupe peuvent s’enammer.
Les matériaux pulvérisés sont extrêmement
inammables. Les matériaux métalliques
peuvent également s’enammer.
ATTENTION
Si un aspirateur est utilisé pour ramasser
les rognures de coupe, faire preuve de
prudence pour empêcher que la pous-
sière s’enamme ou explose.
Ramasser des rognures nes à l’aide d’un
aspirateur ordinaire peut créer un risque
d’incendie ou d’explosion. Vérier auprès du
fabricant de l’aspirateur. Dans les cas où il
est impossible de déterminer si un aspirateur peut être utilisé sans danger, nettoyer
l’appareil à l’aide d’une brosse ou d’un article
semblable plutôt que d’un aspirateur.
PRUDENCE
Porter des lunettes de protection et un
masque. Rincer toutes les rognures de coupe
qui pourraient rester collées aux mains.
Ingérer ou respirer accidentellement des
rognures de coupe peut être dangereux
pour la santé.
Certains éléments peuvent présenter un risque de pincement,
d’emmêlement, de brûlure ou d’autres dangers.
ATTENTION
Fixer solidement l'outil de coupe et la
pièce à travailler. Une fois qu'ils sont
fixés solidement, s'assurer qu'aucun
outil ni aucun autre objet n'a été laissé
en place.
Si tel était le cas, ces objets peuvent être
projetés avec force hors de l’appareil et
causer des blessures.
Ne pas toucher l’outil de coupe ou les
parties avoisinantes immédiatement
après la coupe.
Le non-respect de cette consigne peut provoquer des brûlures.
ATTENTION
Faire preuve de prudence pour éviter
l’écrasement ou le coincement dans
l’appareil.
La main ou les doigts peuvent être écrasés
ou coincés s’ils entrent accidentellement en
contact avec certaines parties. Faire preuve
de prudence lors de l’utilisation de l’appareil.
PRUDENCE
Ne jamais faire fonctionner l’appareil si
l’on porte une cravate, un collier, des
vêtements amples ou des gants. Bien
attacher les cheveux longs.
Ces objets peuvent se retrouver coincés
dans l’appareil, ce qui pourrait causer des
blessures.
15
Page 18
Pour utiliser en toute sécurité
Vignettes d’avertissement
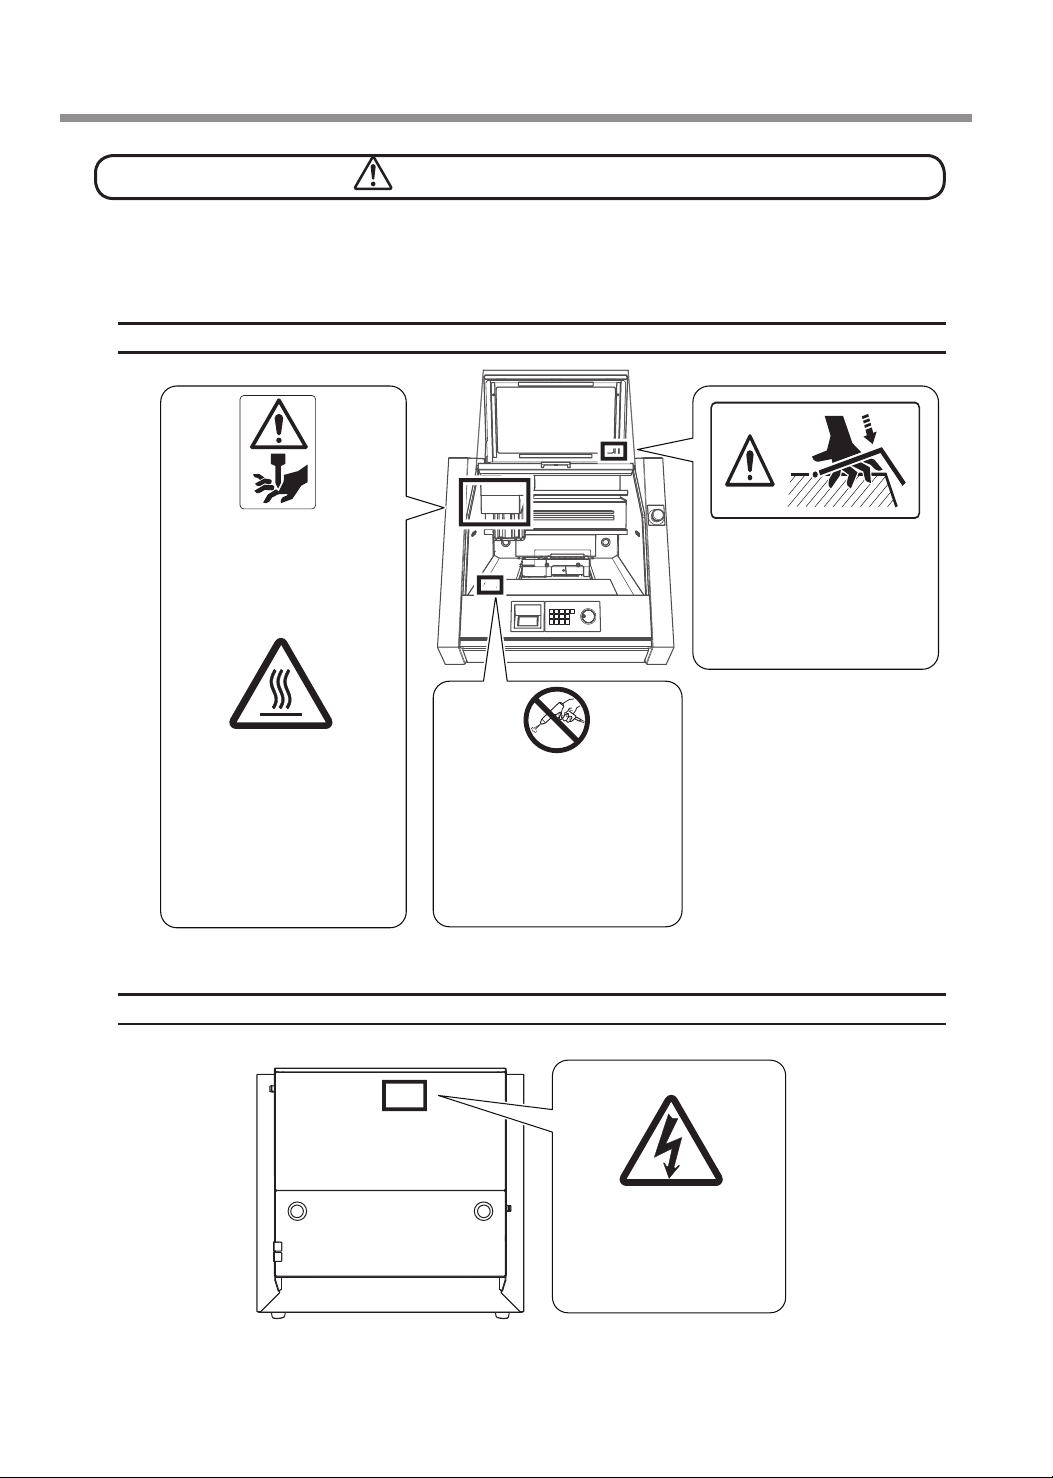
Des vignettes d’avertissement sont apposées pour qu’il soit facile de repérer les zones dangereuses. La signication des vignettes est donnée ci-dessous. Respecter les avertissements. Ne jamais retirer les vignettes
et ou les laisser s’encrasser.
Avant
Prudence : Outil acéré
L’outil de coupe possède
une pointe acérée.
Un contact accidentel peut
provoquer des blessures.
Prudence : Température
élevée
Ne pas toucher l’outil
de coupe ou les parties
avoisinantes immédiatement après la coupe.
Le non-respect de cette
consigne peut provoquer
des brûlures.
Arrière
Prudence : Risque de pincement
Faire preuve de prudence
pour éviter l’écrasement
des doigts lors de la fermeture du couvercle.
Ne jamais utiliser d’air sous
pression.
Cet appareil n’est pas conçu
pour être nettoyé à l’aide
d’air sous pression. Des
rebuts de coupe peuvent
s’inltrer à l’intérieur et causer un incendie ou un choc
électrique.
16
Prudence : Haute tension
Le retrait du couvercle peut
provoquer un choc électrique de haute tension.
Page 19

Important Notes on Handling and Use
This machine is a precision device. To ensure the full performance of this machine, be sure to observe the
following important points. Failure to observe these may not only result in loss of performance
but may also cause malfunction or breakdown.
This machine is a precision device.
Handle this machine carefully and never subject it to impacts or excessive force.
Carefully clean away cutting waste.
Use this machine within the range of its specications.
Never attempt to move the spindle head or table by hand with undue force.
Never needlessly touch anywhere inside the machine except for locations specied in this document.
Install this machine in a suitable location.
Install this machine in a location that meets the specied conditions for temperature, humidity, and the like.
Install this machine in a quiet, stable location oering good operating conditions.
Never install this machine outside.
Never use this machine in an environment where silicone substances (oil, grease, sprays, etc.) are present.
Doing so may cause poor switch contact.
This machine becomes hot.
Never cover this machine with cloth or a similar object or cover the gaps with tape.
Install this machine in a well-ventilated location.
About tool burs
Use an appropriate tool bur that matches the workpiece and the cutting method.
The tip of the tool bur is breakable. Handle the tool bur with care, being careful not to drop it.
This machine is suited to cutting resins.
Never use this machine to cut metal.
17
Page 20
Installing the Machine
Step 1 : Deciding on an Installation Site
Placement and Installation
WARNING
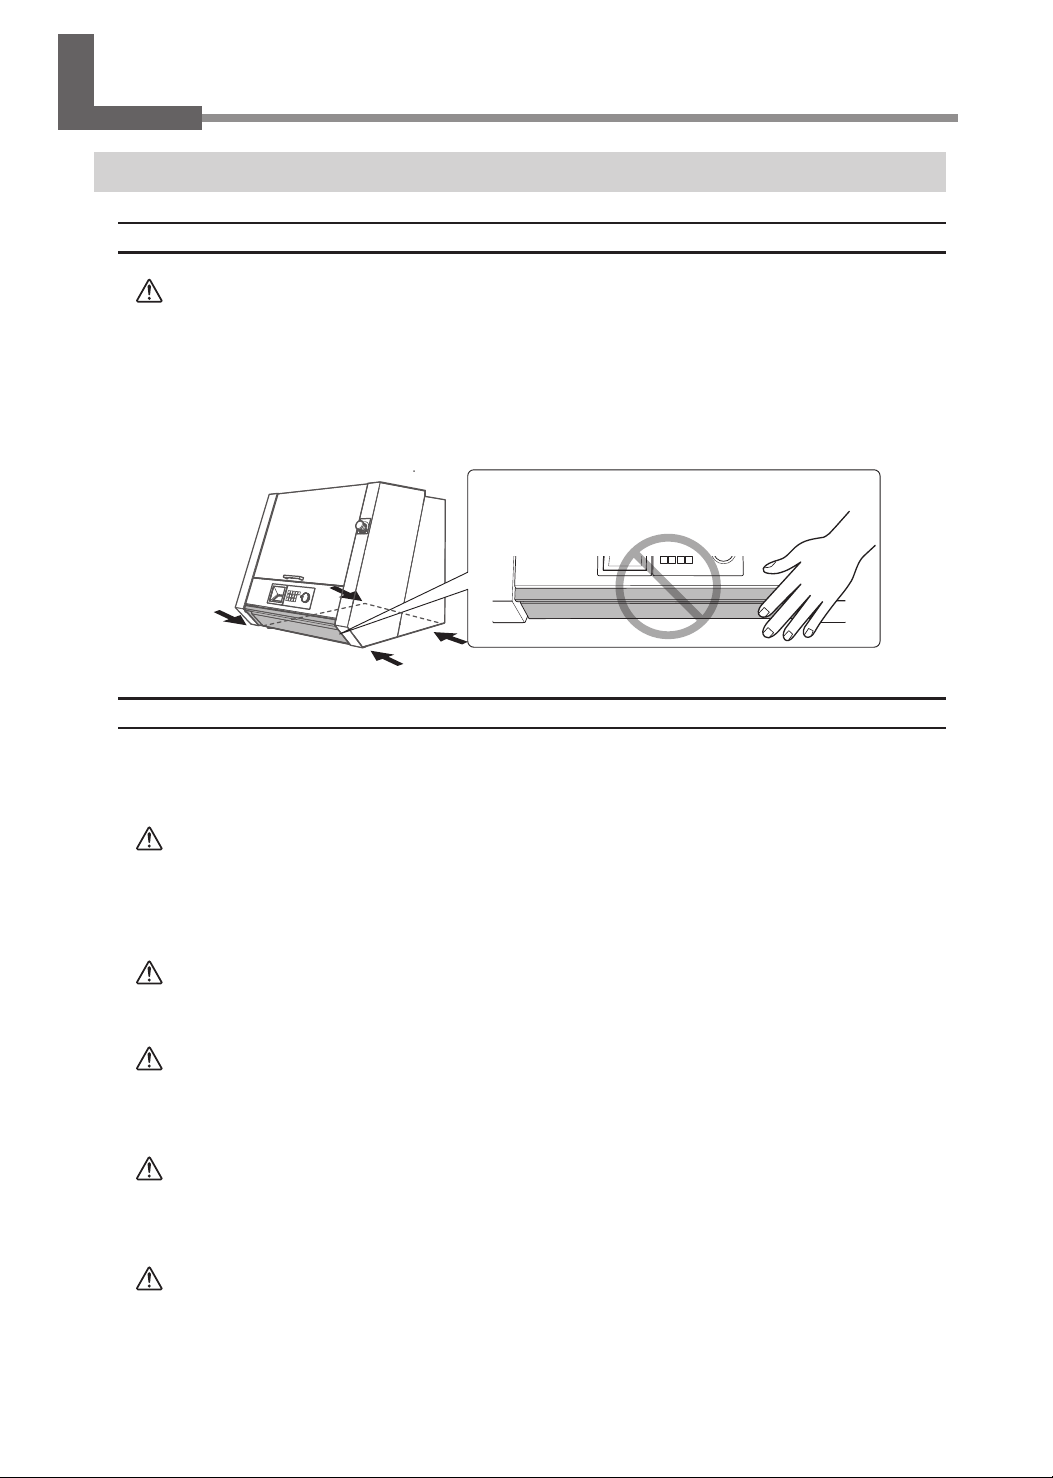
The weight of the machine alone is 120 kg (265 lb.). Unload and place the machine with care.
• When lifting the machine, hold the locations indicated with the arrows in the following gure.
Unloading and placement are operations that must be performed by 4
people or more.
Tasks that require undue eort when performed by a small number of people
may result in physical injury. Dropping the machine may result in injury.
Do not hold the dust box cover on
the front of the machine.
Installation Environment
Install the machine in a level, stable location oering good operating conditions. An unsuitable location can
cause accidents, re, faulty operation, or breakdown.
WARNING
Install the machine in a location that is level, stable, and able to bear the
weight of the machine.
The total weight of the machine may reach 140 kg (309 lb.) or more. Installation
in an unsuitable location may cause a major accident, including tip over, fall,
or collapse.
18
WARNING
WARNING
WARNING
WARNING
Never install the machine in a location exposed to open ame.
Cutting waste may ignite. Powdered material is extremely ammable, and even
metal material may catch re.
Never place any ammable object nearby. Never use a combustible aerosol
spray nearby. Never use the machine in any location where gases can
accumulate.
Combustion or explosion may occur.
Never use the machine outside or in any location where exposure to water
or high humidity may occur. Do not touch the power cord, plug, or power
outlet with wet hands.
Doing so may result in re or electrical shock.
Install the machine so that the power plug is within immediate reach at all times.
This is to enable quick disconnection of the power plug in the event of an
emergency. Install the machine next to a power outlet.
Also, provide enough empty space to allow immediate access to the power
outlet.
Page 21
Installing the Machine
Never install the machine in a location subject to wide uctuations in temperature or humidity.
Never install the machine in a location subject to shaking or vibration.
Never install the machine in a location where the oor is tilted, not level, or unstable.
Never install the machine in a dusty or dirty location or outdoors.
Never install the machine in a location exposed to direct sunlight or near air-conditioning or heating
equipment.
Never install the machine in a location exposed to considerable electrical or magnetic noise or other forms
of electromagnetic energy.
Never install the machine in an environment where silicone substances (oil, grease, sprays, etc.) are present.
Doing so may cause poor switch contact.
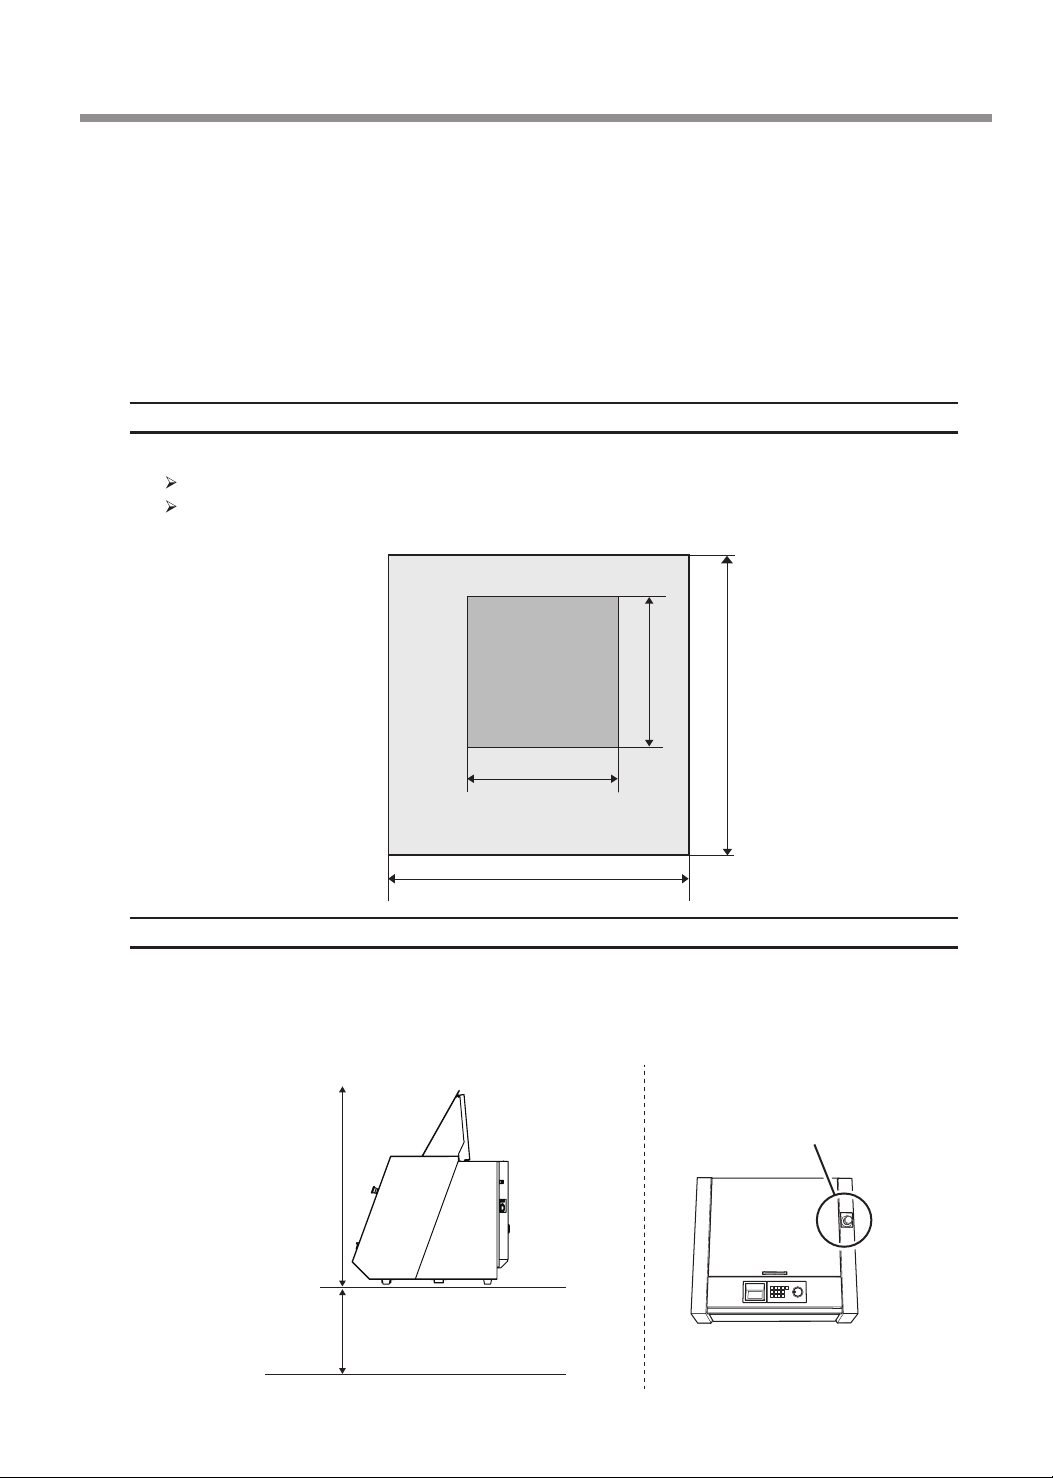
Installation Space
Ensure that at least the following amount of space is available.
Space for opening the dust box cover
Space to enable easy access of the power plug by hand
" P. 44 "External Dimensions"
Work space
Installation space
1 m (39.4 in.)
2 m (78.7 in.)
1 m (39.4 in.)
2 m (78.7 in.)
About Height
The installation location should be above the work oor by 0.6 m (23.6 in.) or more. This machine is a desktop-type unit. Install this machine in a position so that you can easily reach the emergency stop button when
operating this machine.
Ensure that a height is available to enable the opening of the front cover.
Emergency stop button
1108 mm
(43.6 in.)
600 mm (23.6 in.)
or more
Work oor
19
Page 22
Installing the Machine
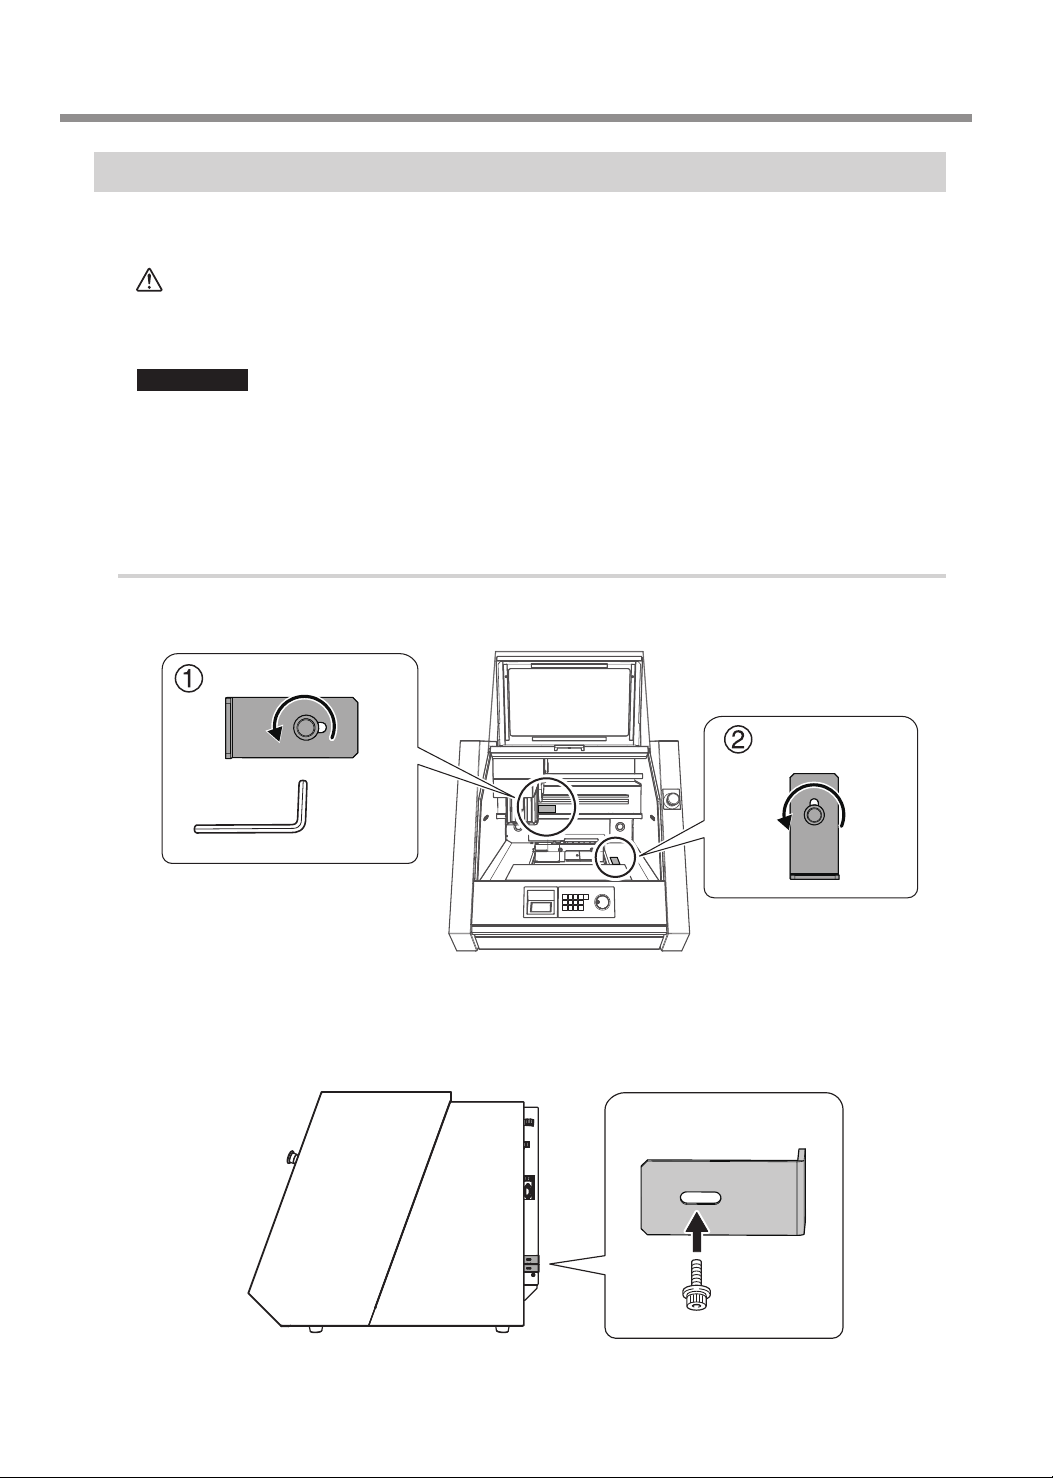
Step 2 : Removing the Retainers
Attach the retainers to protect the machine from vibration during shipment. When installation is complete,
remove these and store them in the specied locations.
WARNING
Important
• Remove all the retainers. Any that remain may cause faulty operation or a breakdown
when the power is switched on.
• The retainers will be required when moving the machine to a dierent location. Secure
them to this machine for storage so that they do not get misplaced.
Procedure
Remove the retainers in the locations shown in the following gure using a hexagonal
A
wrench. (2 locations)
Carry out these operations before you connect the power cord.
The power turning on inadvertently during these operations may result in
pinched hands or other injury.
20
Secure the removed retainers in place at the location shown in the following gure.
B
Use the screws that you removed in step
A
.
Page 23
Machine Highlights
Features of This Machine
This is a cutting machine that supports resin raw materials. Installing the exclusive software on your computer
and connecting your computer to this machine enables you to perform high-quality cutting. Also, installing
the optional rotary axis unit makes it possible to perform four-axis cutting operations such as multiple-surface
cutting.
For the latest information on this machine, see the Roland DG Corp. website (http://www.rolanddg.com).
Operating the Machine
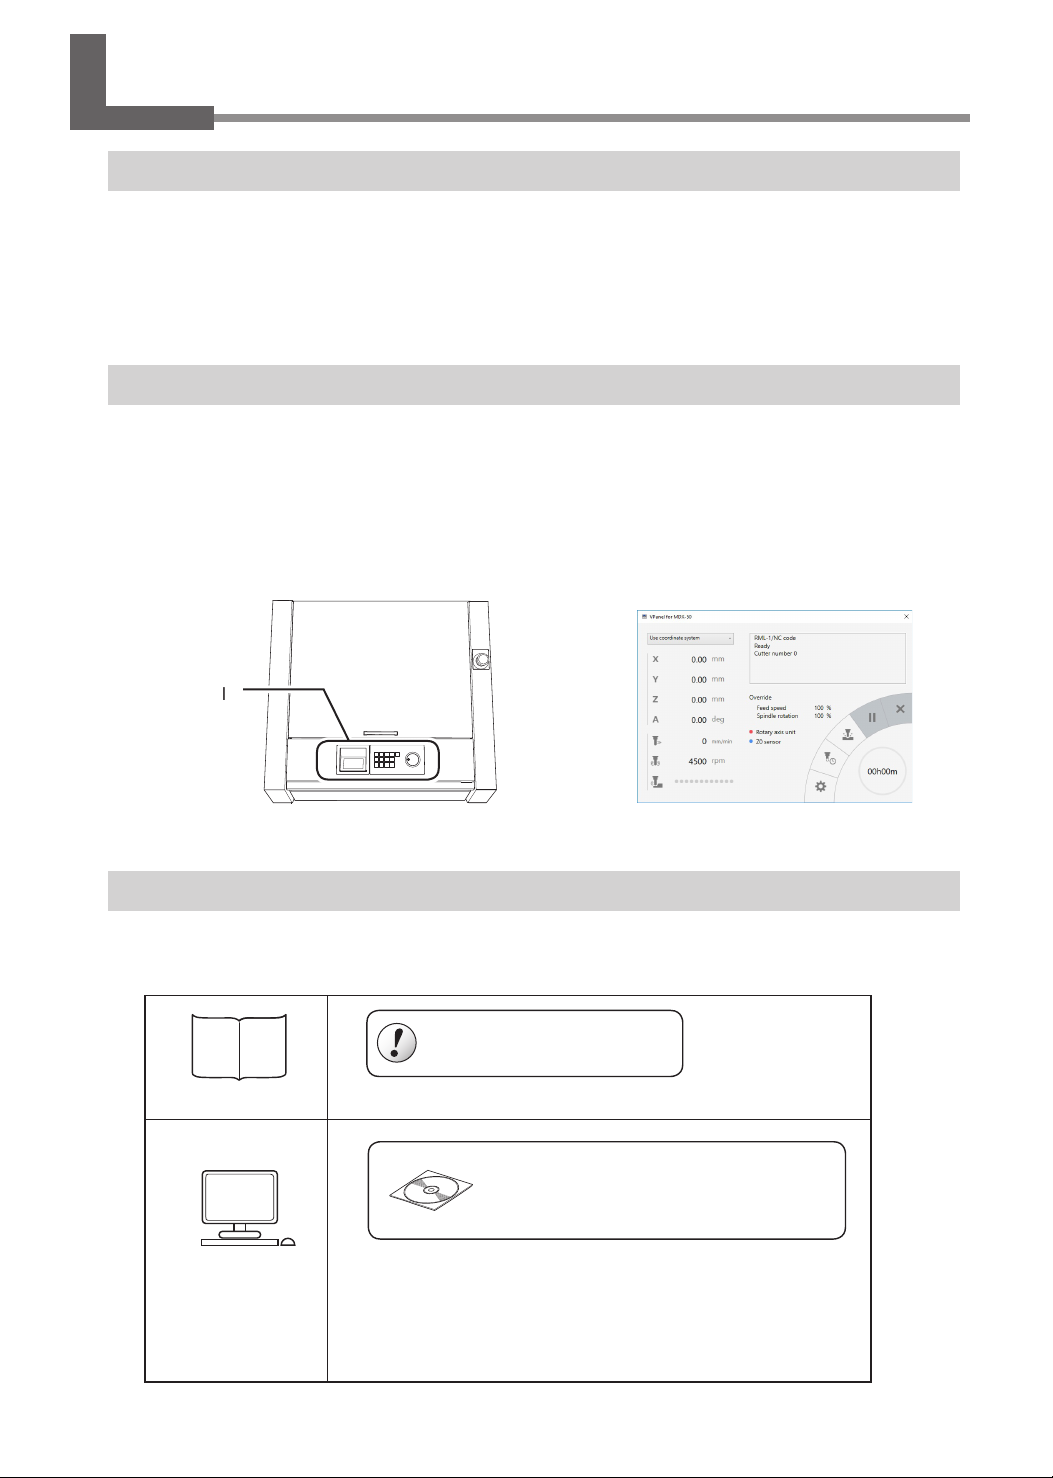
To operate this machine, use the built-in panel and VPanel. The built-in panel is the operation panel that is
installed in this machine. You can use this panel to perform basic functions directly. VPanel is a dedicated application that can be used to operate this machine from a computer screen. For information on how to operate
the built-in panel and VPanel, see the "MDX-50 User's Manual (electronic-format manual)."
" P. 29 "Step 2 : Installing the Roland DG Software Package"
" P. 32 "Viewing User's Manuals"
VPanel
Built-in
panel
Documentation Included with the Machine
This machine's documentation is organized as shown below. In order to use this machine to the extent of its
potential, read the appropriate manual according to your purpose.
Be sure to read this rst.
Paper manual
• MDX-50 Setup Guide (this document)
These are stored on the included Roland DG
Software Package CD.
" P. 32 "Viewing User's Manuals"
Electronic-for-
mat manuals
• MDX-50 User's Manual
• NC Code Reference Manual
• Manuals for the software programs included on the Roland DG
Software Package CD
21
Page 24
Part Names and Functions
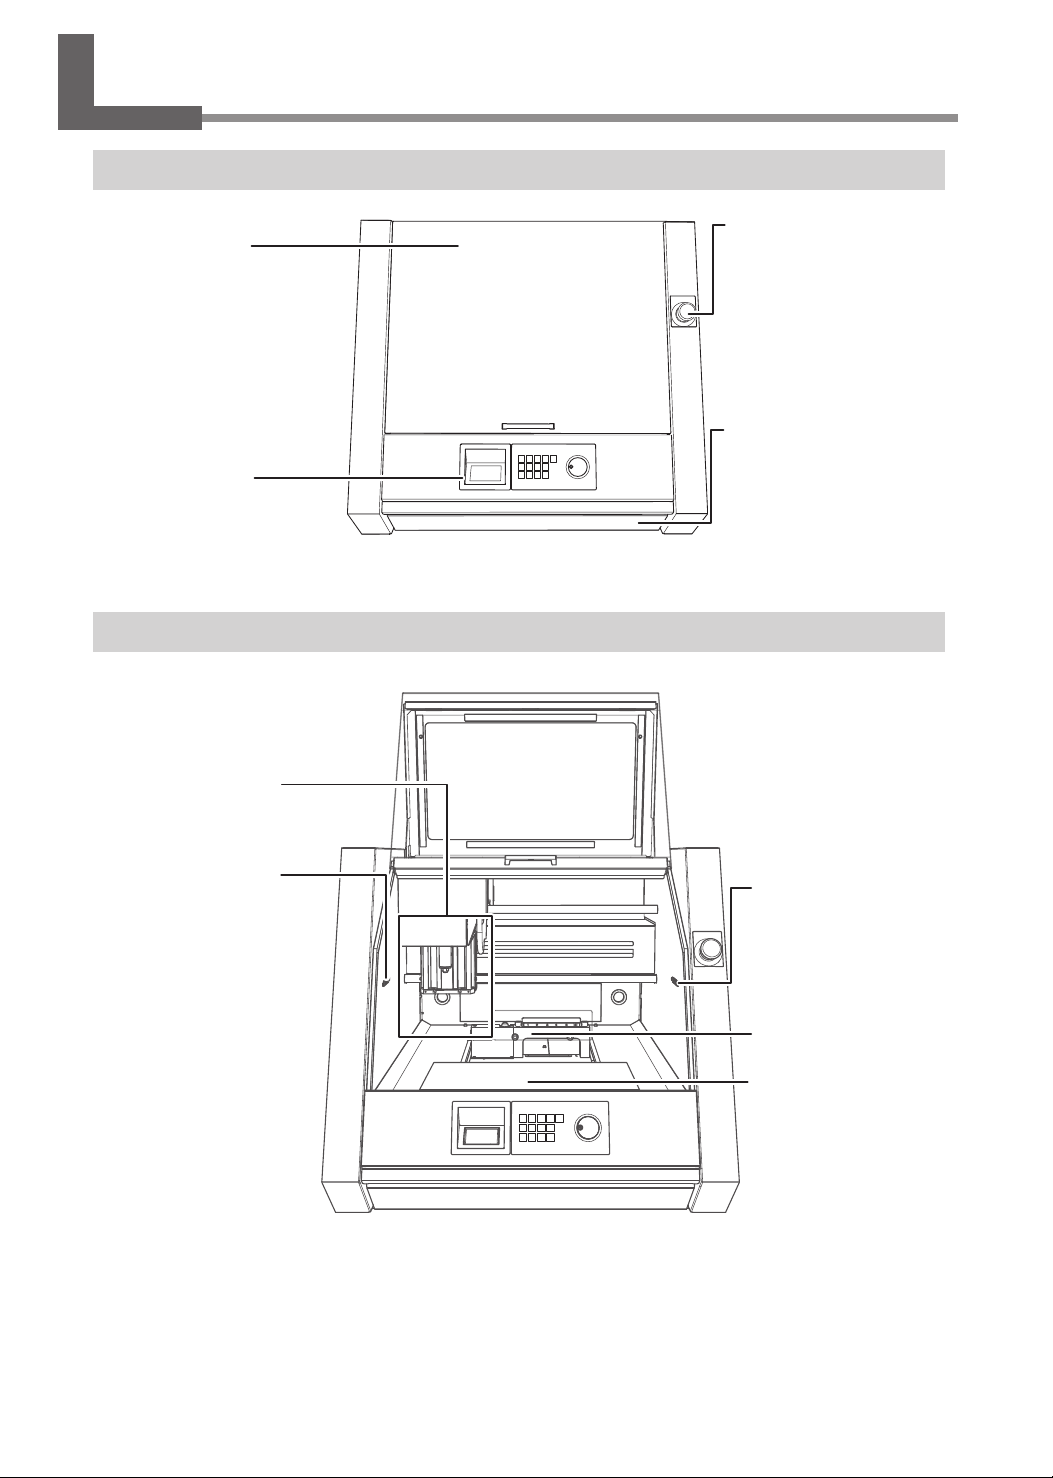
Front
Front cover
If you open this cover,
cutting automatically
stops for your safety.
" P. 26 "Emergency Stop
or Pause Due to Opening or
Closing the Cover
Built-in panel
" User's manual
(electronic-format manual)
"
Inside the Machine
Spindle head
" P. 23 "Spindle head"
Status light
Emergency stop button
Press this in an emergency to turn o the
power and stop the
machine.
" P. 25 "Performing an
Emergency Stop on This
Machine"
Dust box cover
The dust box is contained
within this cover. If you
open this cover, cutting
automatically stops for
your safety.
" P. 26 "Emergency Stop
or Pause Due to Opening or
Closing the Cover"
Status light
The color of the lights
changes depending
on the status of the
machine.
" User's manual (electron-
ic-format manual)
22
ATC magazine
" P. 23 "ATC mag-
azine"
Table
Set the workpiece to
cut on this table.
Page 25
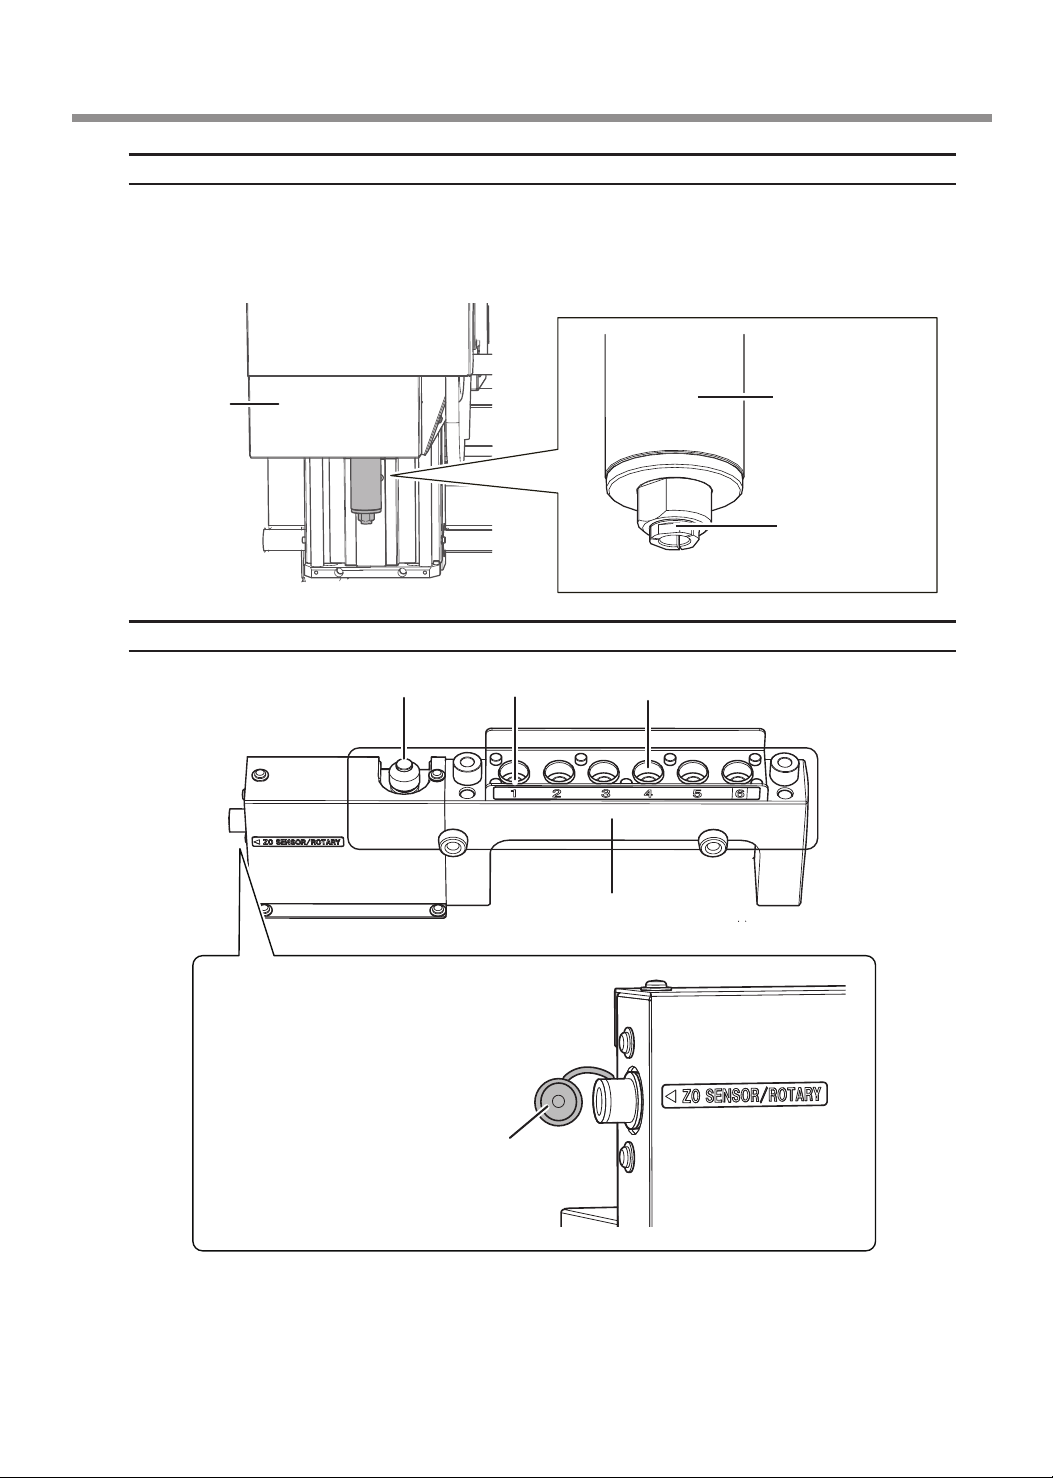
Part Names and Functions
Spindle head
In this document, the mechanisms around the spindle unit, including the spindle motor, are called the "spindle
head."
Spindle
cover
ATC magazine
Spindle
unit
Collet
Tool sensor StockerStocker number
Magazine cover
Z0 sensor/rotary axis connector
This is for connecting a Z0
sensor or rotary axis unit
(option).
To prevent cutting waste from entering into the connector, attach the
protective cap when the connector
is not in use.
Protective cap
23
Page 26
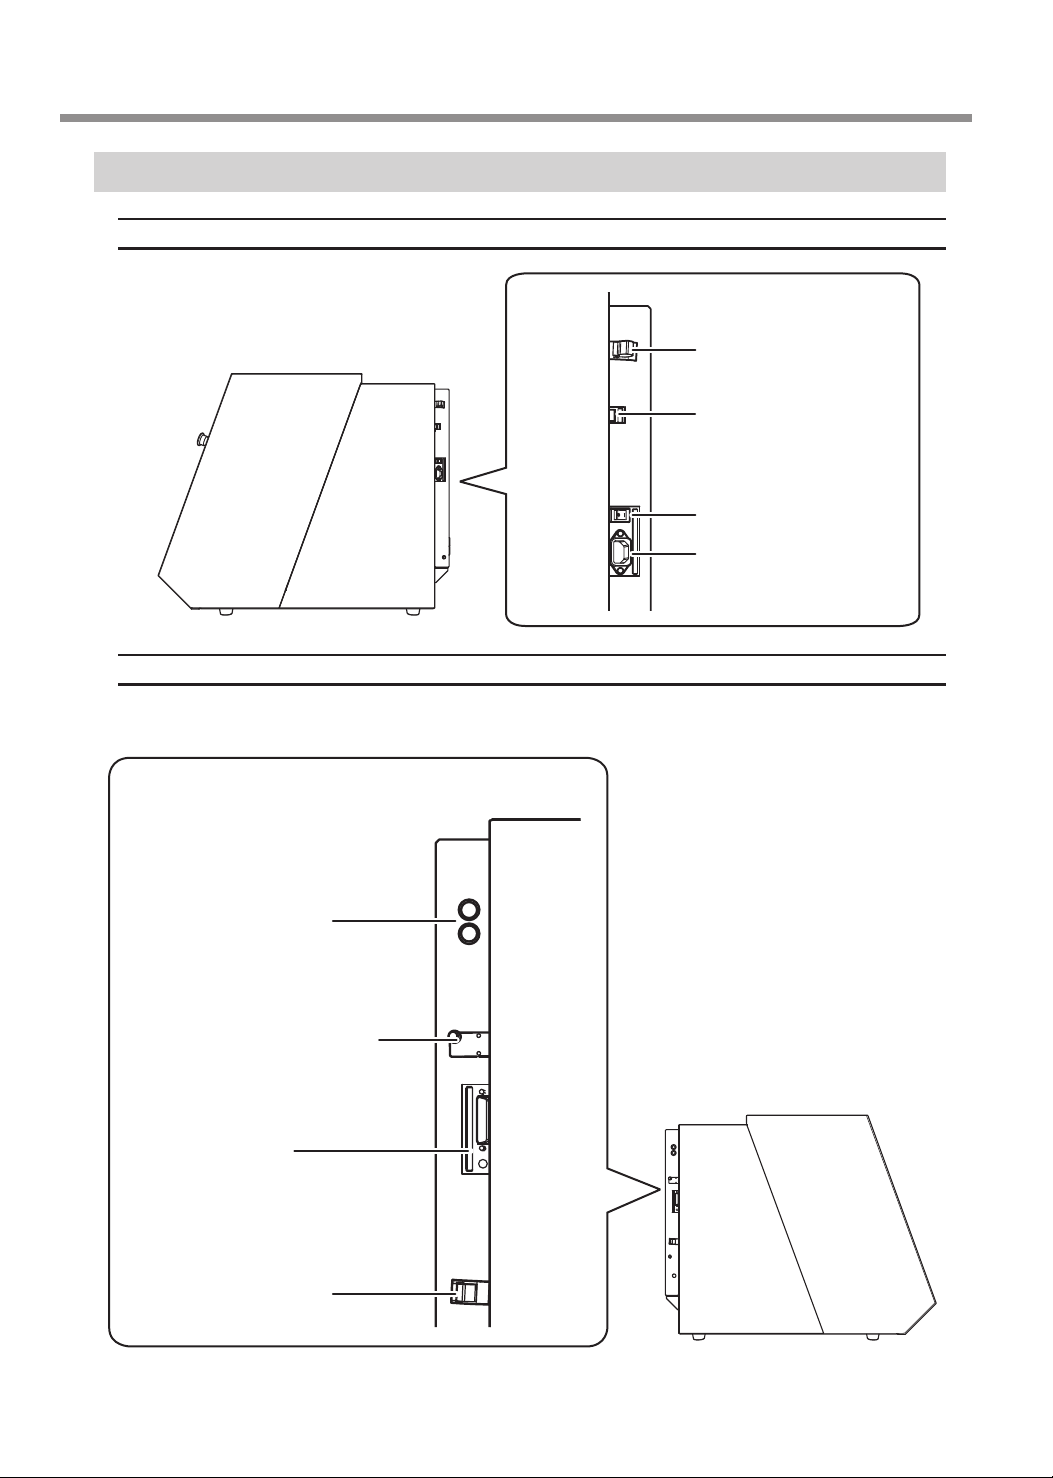
Part Names and Functions
Side
Right Side
Cable clamp
USB connector
This is for connecting a
USB cable.
Power switch
Power-cord connector
Left Side
Alarm lamp attachment location
Attach an alarm lamp (commercially available) to the machine
here. With the factory default
setting, a cover is in place over
the connection position.
Alarm Lamp Connector
Use this to connect an alarm
lamp to the machine.
With the factory default setting,
a cover is in place over the
connection position.
"P. 43 "Alarm Lamp Connector"
Expansion port 1
Expansion port 2
This is a connector for external
equipment.
"P. 40 "Expansion Port Specications"
24
Cable clamp
Page 27
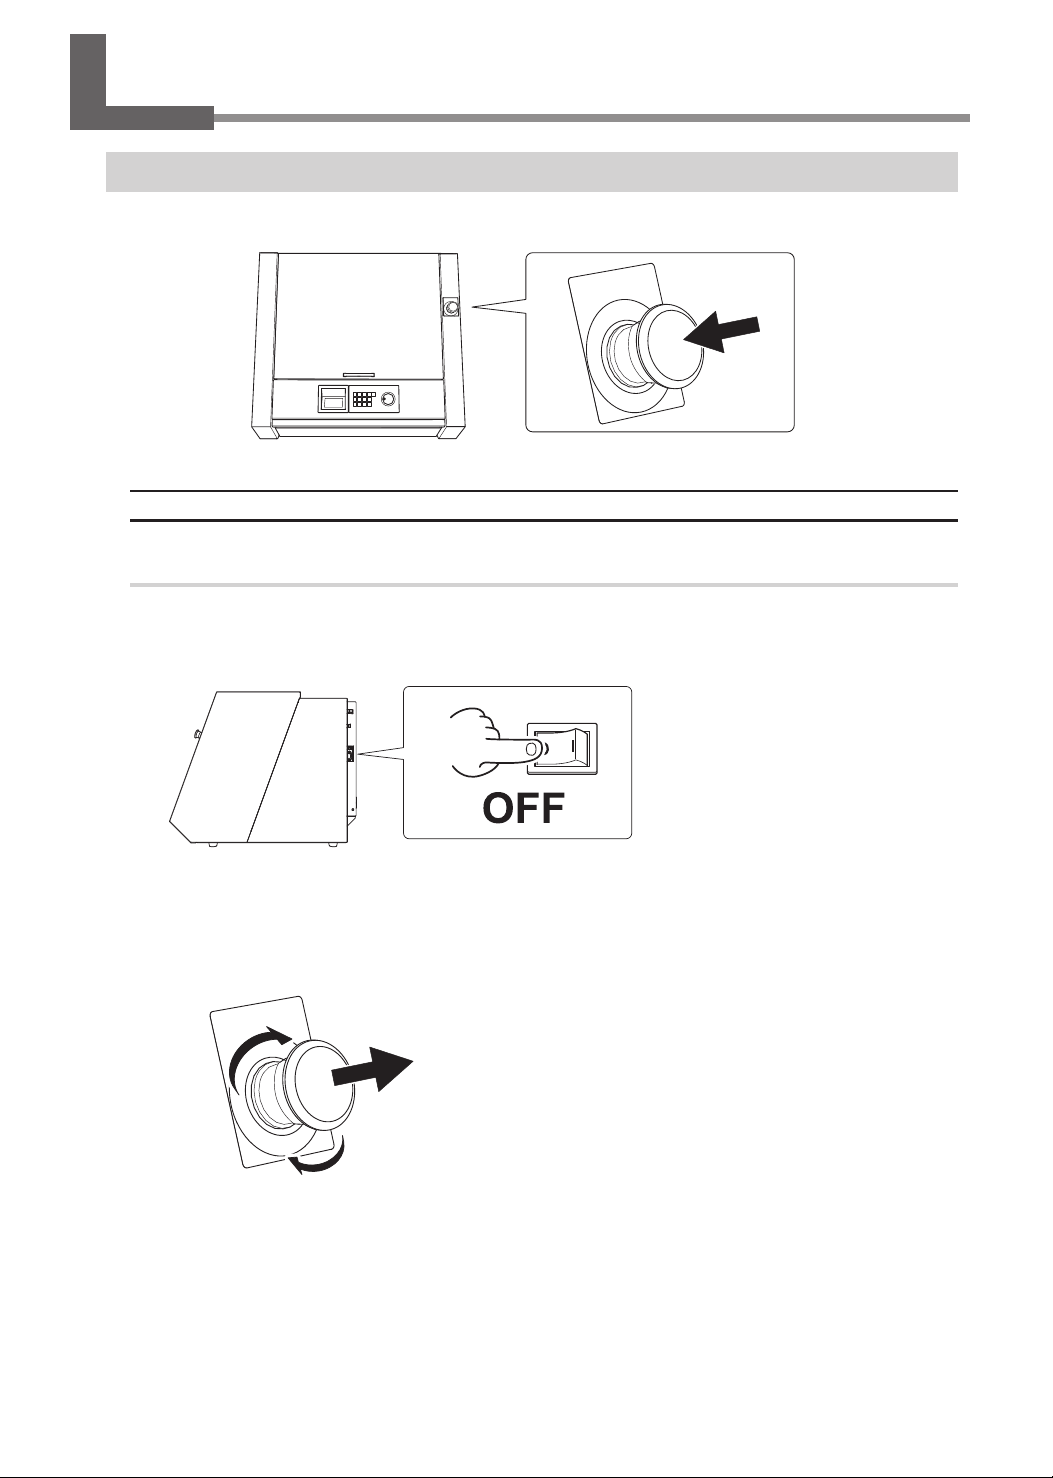
Performing an Emergency Stop on This Machine
Emergency Stop
When you press the emergency stop button, operation stops immediately.
Canceling an Emergency Stop
Procedure
Switch o the power switch.
A
Turn the button in the direction of the arrows.
B
Switch on the power switch.
C
25
Page 28
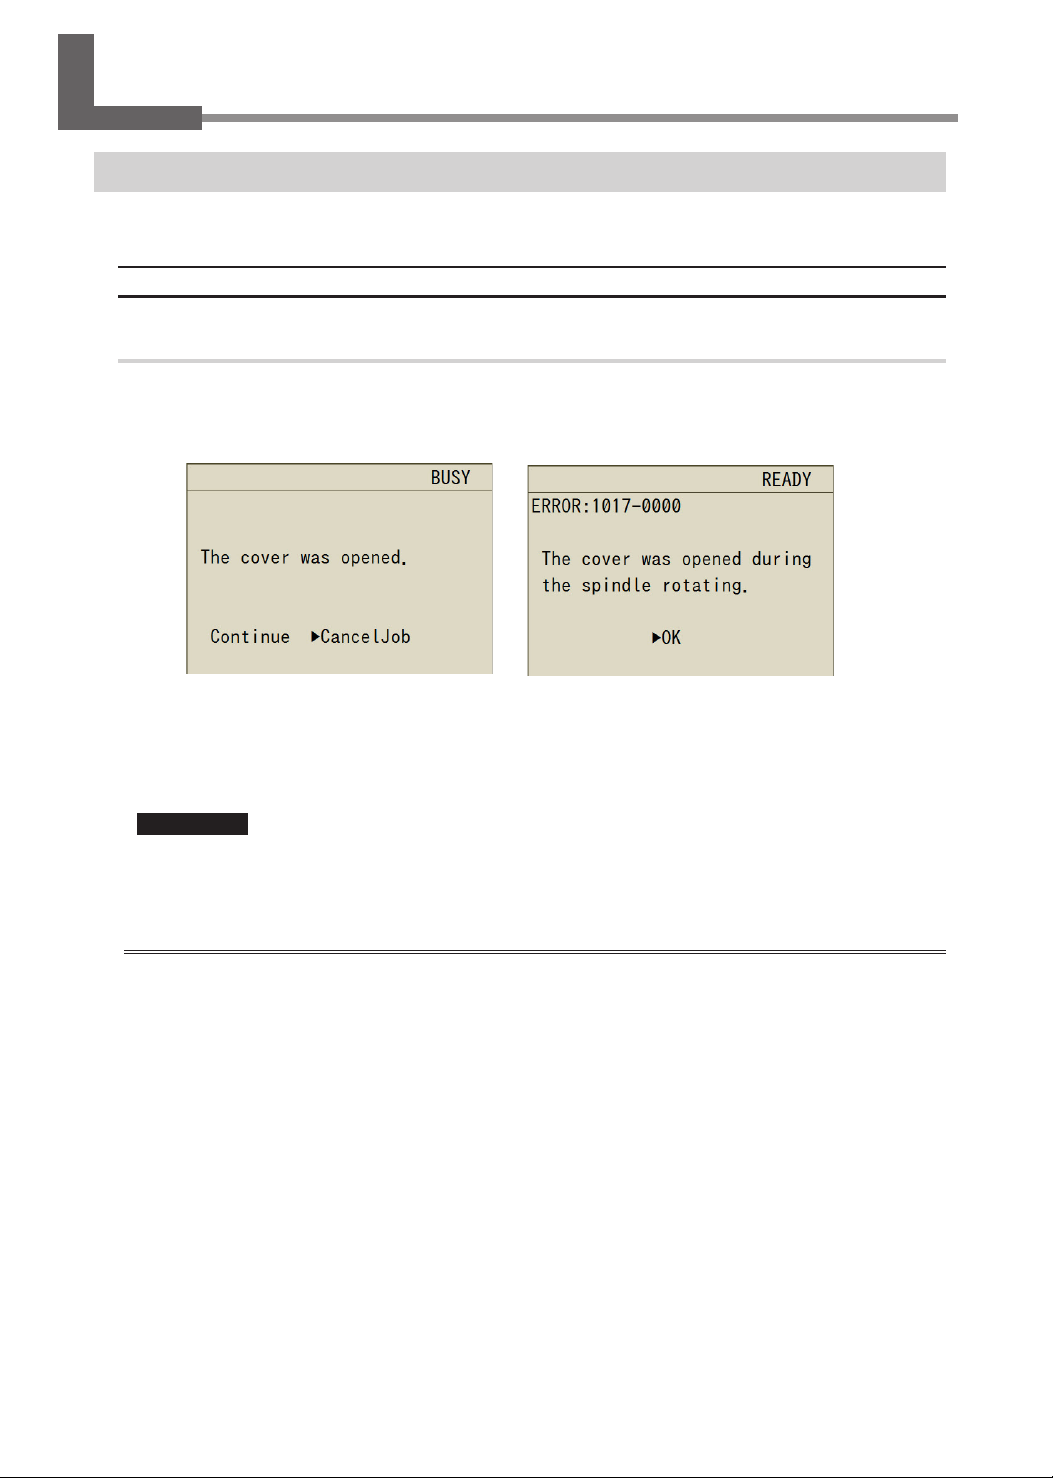
Emergency Stop or Pause Due to Opening or Closing the Cover
Emergency Stop Due to Opening or Closing the Cover
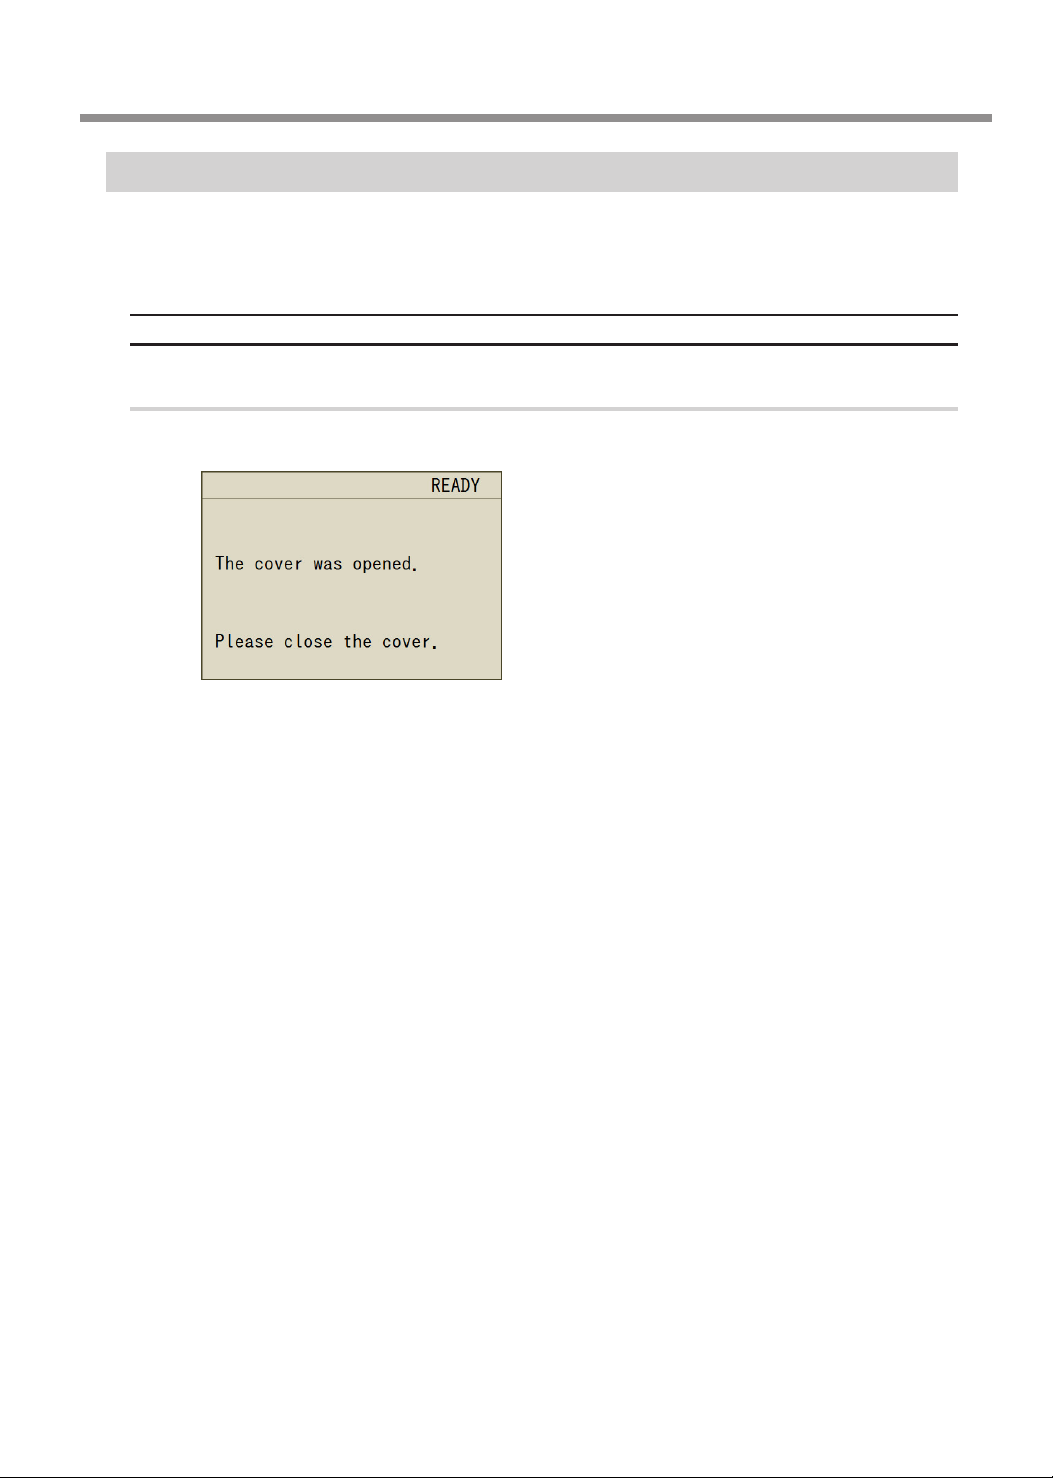
To ensure safety, opening the front cover or the dust box cover during cutting or spindle rotation causes this
machine to perform an emergency stop. Follow the displayed messages to cancel the emergency stop.
Canceling an Emergency Stop
Procedure
When you close the cover, a message is displayed on the built-in panel.
A
Example) Example)
When a screen is displayed asking you to select either "Continue" or "Cancel job,"
B
select and then press [ENTER].
The selection screen may not be displayed. In that situation, press [ENTER].
Important
When an emergency stop occurs due to the cover being opened during cutting, selecting to
continue cutting will have an adverse eect on the cutting results.
If you want to open the cover during cutting
If you want to open the cover during cutting, press [PAUSE/CANCEL] to pause the cutting,
wait for the operations to stop, and then open the cover. However, when you have disabled
the "Tool up in pause" function in VPanel, the spindle will not pause. Before opening the cover,
hold down [SPINDLE] on the built-in panel to stop the spindle.
" User's manual (electronic-format manual)
26
Page 29
Emergency Stop or Pause Due to Opening or Closing the Cover
Pause Due to Opening or Closing the Cover
To ensure safety, opening the front cover or the dust box cover during standby, when operations are paused,
or in other situations when the spindle is not rotating will cause the machine to pause its operations and
display a message. When you clear the message using the following procedure, the machine will return to
the previous screen.
Canceling a Pause
Procedure
A message is displayed on the built-in panel.
A
Close the cover, and then press [ENTER].
B
The machine returns to the state that it was in prior to the cover being opened. If the machine was
performing automatic correction or Z0 sensing, it completes the operation and moves to the view
position.
27
Page 30
Preparing the Machine for Use
Step 1 : Checking the Included Items
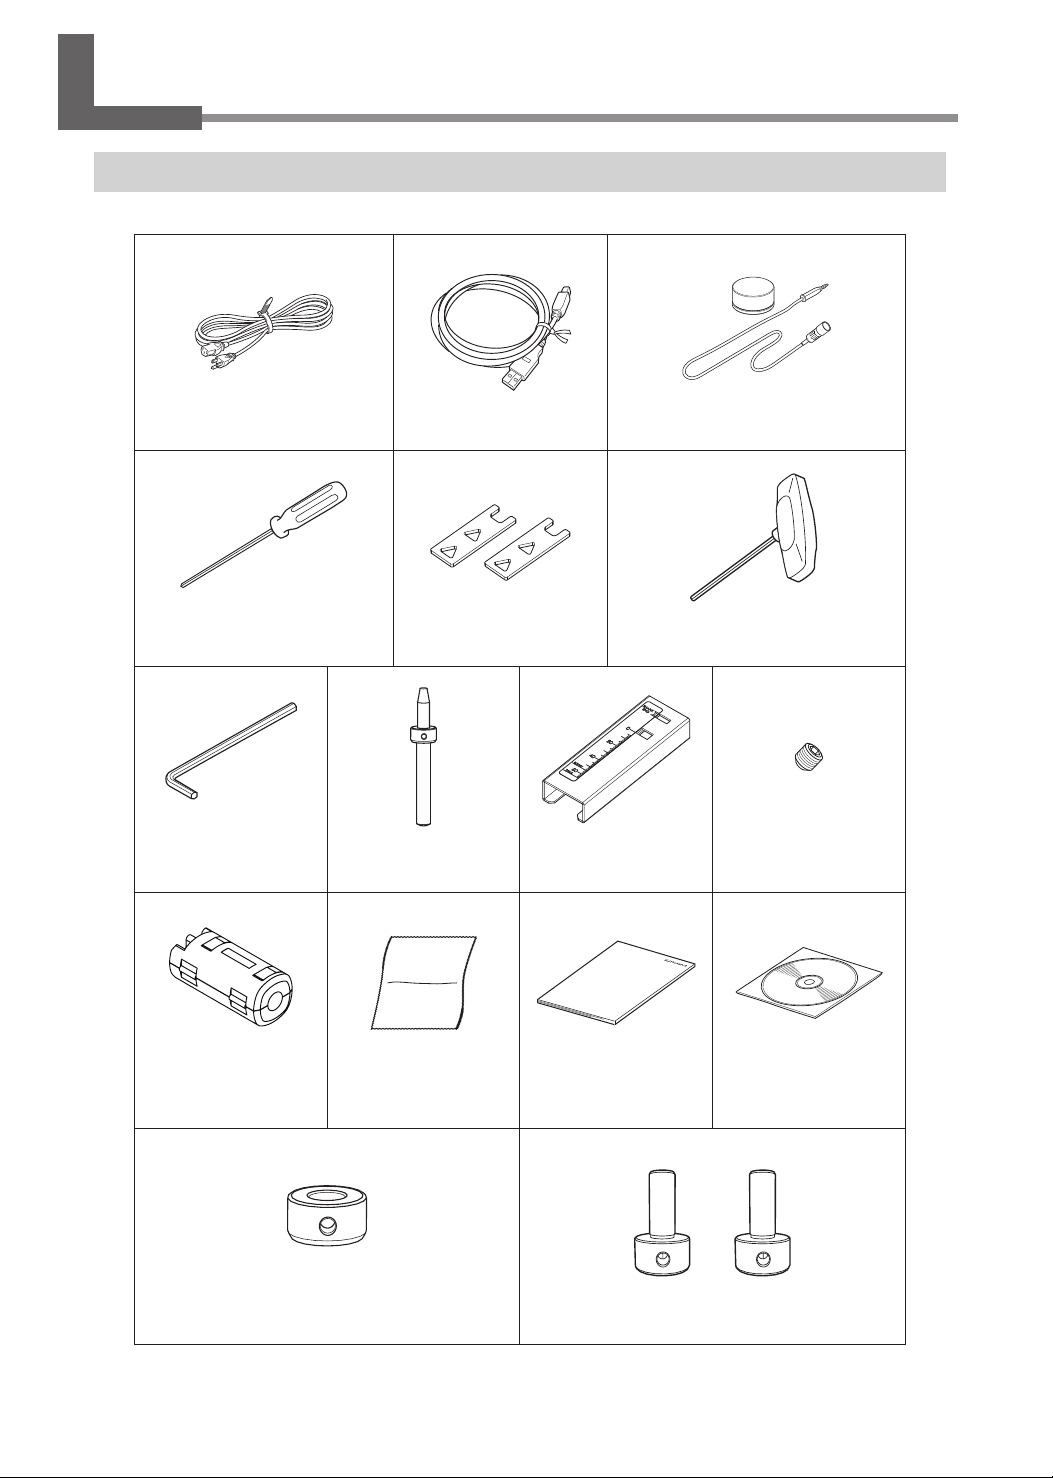
The following items are included with the machine. Make sure they are all present and accounted for.
Power cord (1 ) USB cable (1) Z0 sensor (1)
Hexagonal screwdriver (1) Wrenches (2) T-shaped hexagonal screwdriver (1)
Hexagonal wrench (1)
Ferrite Core (1) Cloth for care (1)
Tool holder (6)*
(6 mm or 0.25 in.)
* For attachable tool, refer to the P. 46 "Specications"
Detection pin (1) Tool positioner (1)
28
Mounting screws (16)
MDX-50 Setup Guide
(1) (this document)
Tool holder (2)*
(3 mm ,4mm ( 1each) or 0.125 in. (2))
.
Roland DG Software
Package CD (1)
Page 31
Preparing the Machine for Use
Step 2 : Installing the Roland DG Software Package
What Is the Roland DG Software Package?
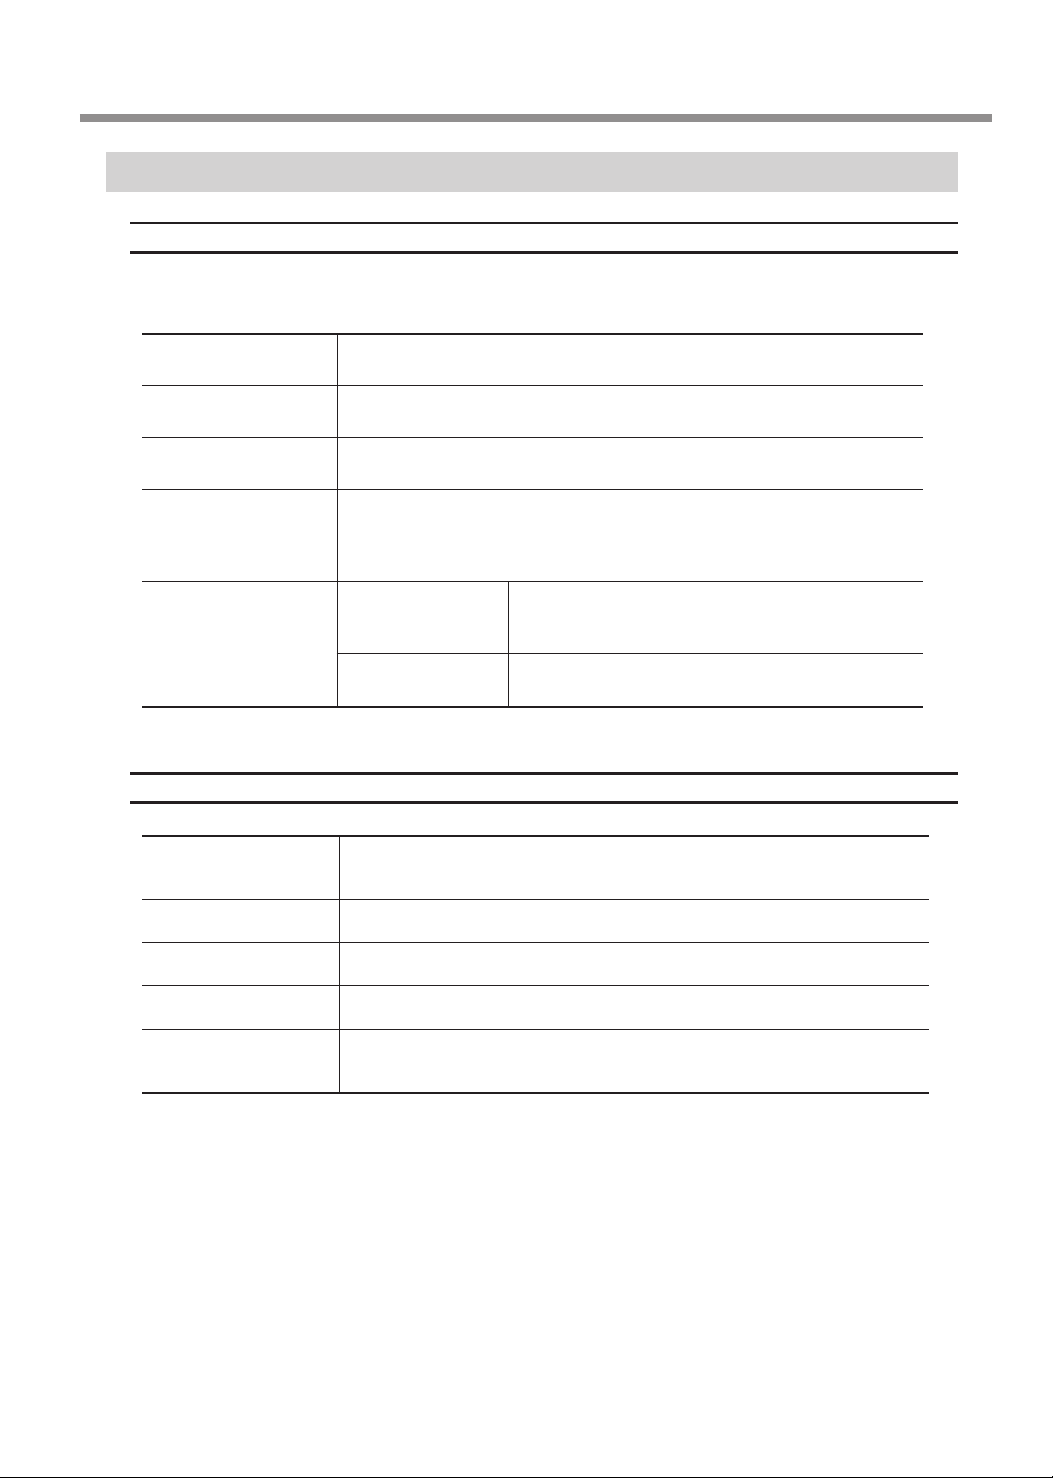
The following pieces of software are included on the Roland DG Software Package CD. "(*1)" indicates drivers
and software that are required for the operation of this machine.
Windows Driver(*1) This is a Windows-based driver required for sending data from a computer
VPanel for MDX-50
(*1)
SRP Player This is a piece of CAM software that imports general-use 3D data - such as
ClickMILL This software is useful for post-processing of existing workpieces such as
MDX-50 Manuals
(electronic-format
manuals)
to the machine.
This is the dedicated software for controlling this machine. This software is
used to operate this machine and congure various settings.
IGES, DXF (3D), or STL - and outputs tool paths to the machine.
"pocket-cutting" to cut o the inside of a shape of a graphic, "clipping" to
cut out the workpiece to the shape of the specied graphic, and "surface
leveling" to atten the surface of the workpiece.
MDX-50 User's
Manual
NC Code Reference Manual
This manual explains how to operate the software,
how to perform cutting using this machine, and how
to perform maintenance.
This manual explains information such as how to
program NC codes.
System Requirements for Installation
Operating system
(OS)
CPU Minimum required CPU for the operating system
Windows 10, 8.1, 7 (32- or 64-bit version)*1,*2,*3
Memory Minimum amount of required RAM for the operating system
Optical drive CD-ROM drive
Video card and monitor
For the latest information, see the Roland DG Corp. website (http://www.rolanddg.com).
(*1) This software is a 32-bit application and therefore runs in WOW64 (Windows-On-Windows 64) when
running on 64-bit versions of Windows operating systems.
(*2) Internet Explorer 8.0 or later is required.
(*3) Operations have not been veried in virtual Windows environments such as Hyper-V and Virtual PC.
A display with at least 16-bit color and a resolution of 1024 × 768 or more
is recommended (a video card that supports Open GL is recommended).
29
Page 32
Preparing the Machine for Use
Installation Procedure
You can install the driver, software, and electronic-format manual all at once. You can also install the driver
and each piece of software separately.
" User's manual (electronic-format manual) "Installing the Driver Separately"
Important
• Be sure to connect the machine to the computer as instructed in the procedure.
Failure to follow the correct procedure may make installation impossible.
• If an old version of SRP Player is installed, uninstall it, and then install a new version.
Procedure
Before installation, conrm that the machine and the computer are not connected with
A
the USB cable.
Log on to Windows as the computer's administrator (or as an "Administrators" account).
B
Insert the Roland DG Software Package CD into the CD-ROM drive of the computer.
C
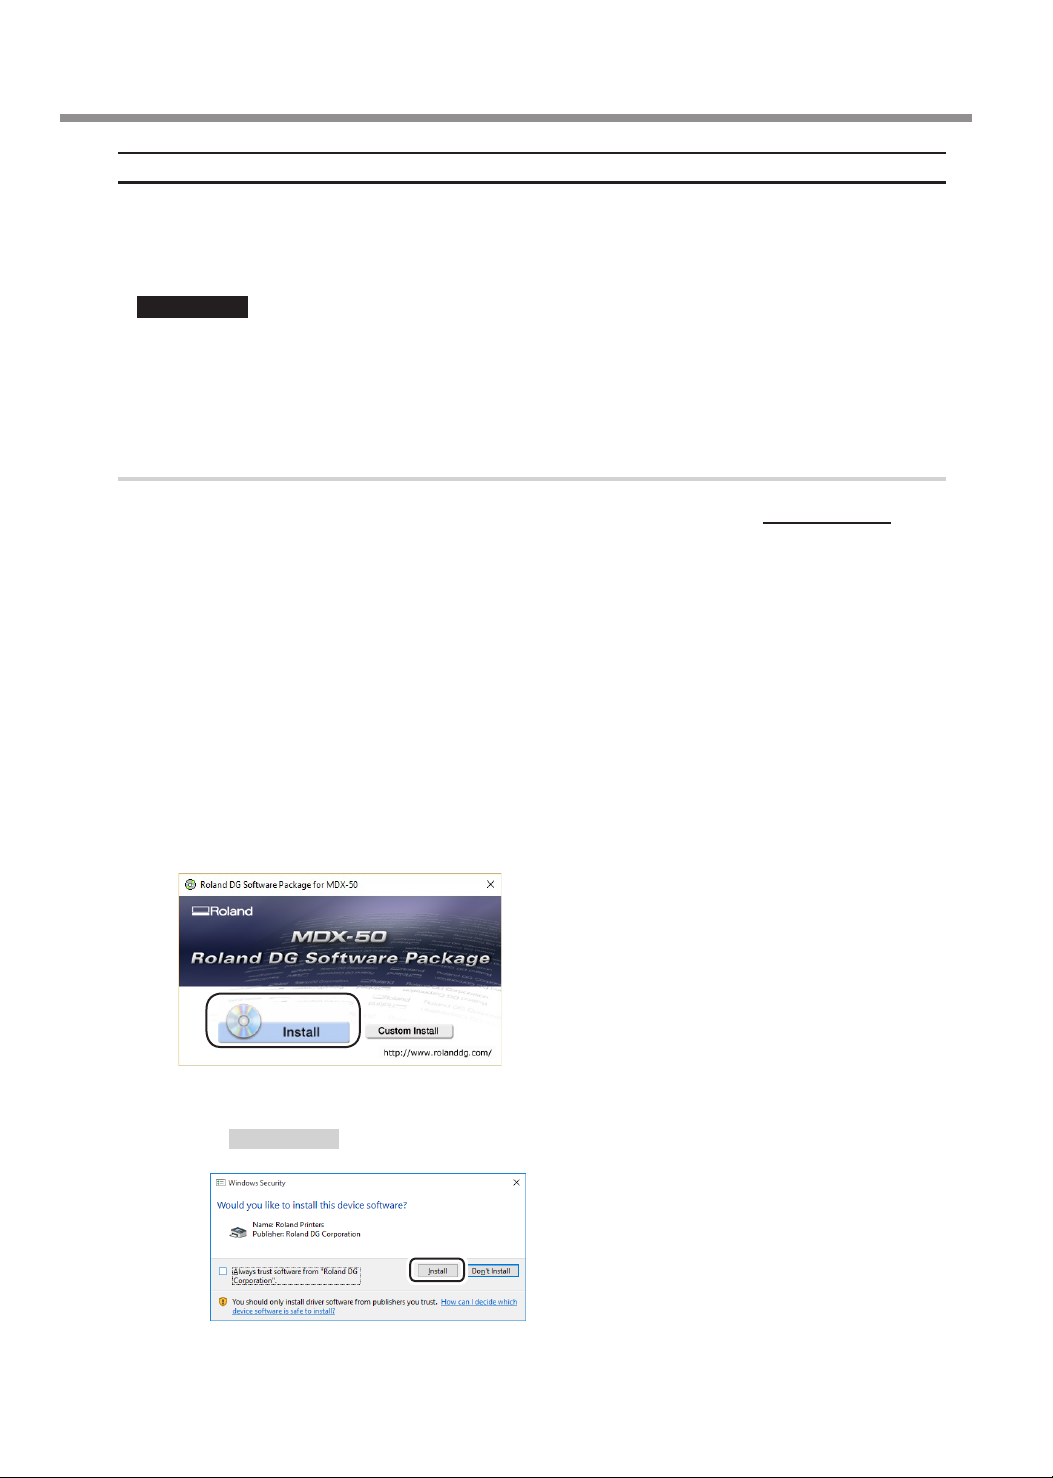
When the automatic playback window appears, click [Run menu.exe]. If a "User Account Control"
window appears, click [Allow] or [Yes], and then continue with the installation. The setup menu
screen appears automatically.
Click [Install].
D
Install the MDX-50 driver and the various software programs all at once. Follow the on-screen instructions to proceed with the installation.
" P. 29 "Step 2 : Installing the Roland DG Software Package"
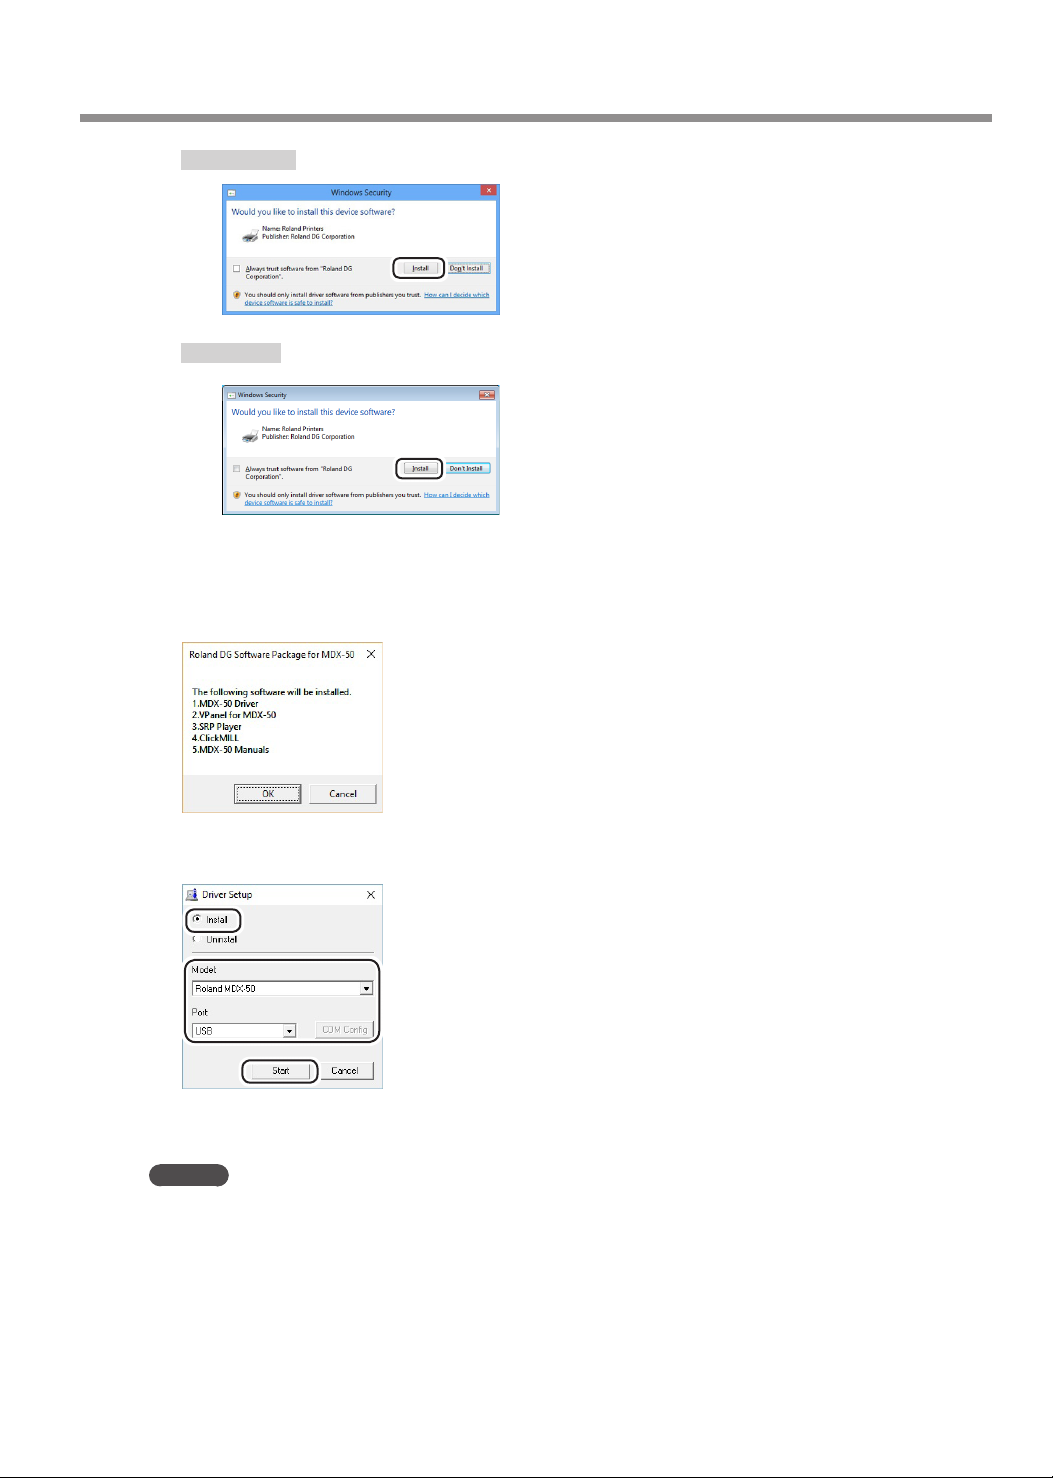
If the following screen appears during installation
Windows 10
Click [Install].
30
Page 33
Preparing the Machine for Use
Windows 8.1
Click [Install].
Windows 7
Click [Install].
When the window shown in the following gure appears, click [OK].
E
Click [Install], select "Roland MDX-50" for the device name and "USB" for the port, and
F
then click [Start].
The driver installation begins. Follow the on-screen explanations to proceed with the installation.
MEMO
When the driver installation is complete, the software installation begins. Follow the on-screen
explanations to proceed with the installation.
When the installation is complete, remove the Roland DG Software Package CD from
G
the computer.
31
Page 34
Preparing the Machine for Use
Viewing User's Manuals
The documentation for the machine and for the software programs is in electronic format. Follow the procedure below to view these manuals.
" P. 21 "Documentation Included with the Machine"
Windows 10 and 7
From the [Start] menu, click [All apps] (or [All Programs]), [MDX-50 Manuals], and then
click [User's Manual].
Windows 8.1
On the [Start] screen, click . On the [Apps] screen, click the [User's Manual] icon
under [MDX-50 Manuals].
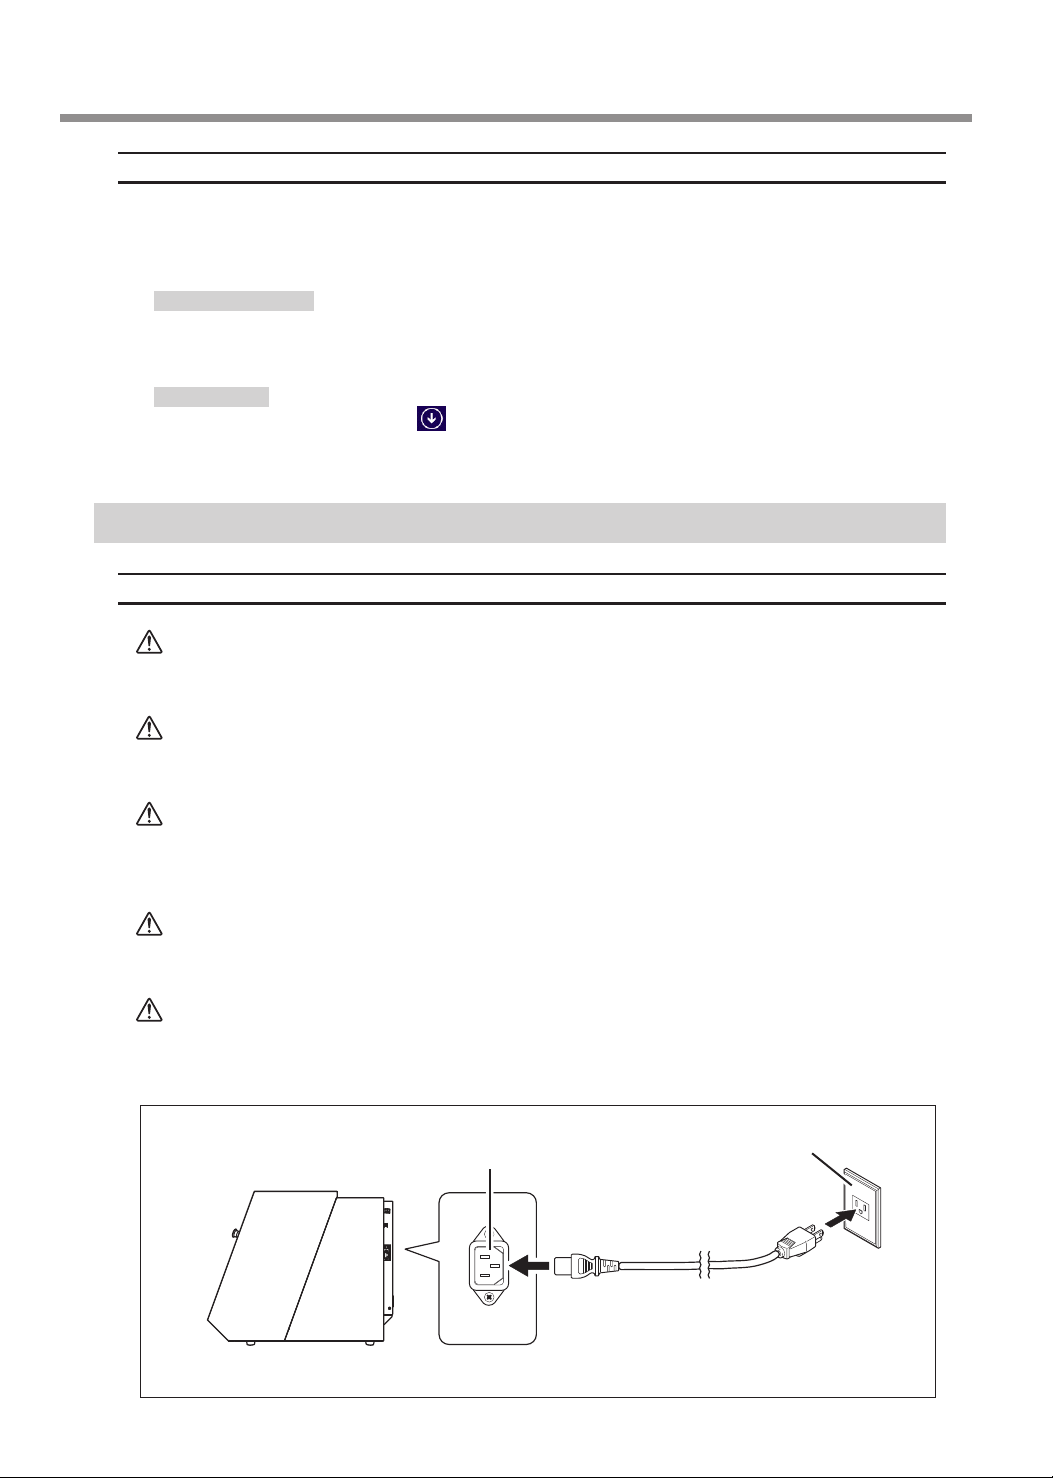
Step 3 : Connecting the Cable
Connecting the Power Cord
WARNING
WARNING
WARNING
WARNING
WARNING
Do not use the machine with any electrical power supply that does not
meet the ratings displayed on the machine.
Doing so may result in re or electrical shock.
Handle the power cord, plug, and power outlet correctly and with care.
Never use any article that is damaged.
Using a damaged article may result in re or electrical shock.
When using an extension cord or power strip, use one that adequately
satises the machine's ratings (for voltage, frequency, and current).
Use of multiple electrical loads on a single power outlet or use of a lengthy
extension cord may cause re.
Connect the machine to ground.
This can prevent re or electrical shock due to electric leakage in the event
of a malfunction.
Connect this machine to a power outlet (100 V). Never connect this ma-
chine directly to a power distribution panel or other such xed wiring
equipment.
Doing so increases the risk of re or electrical shock.
Power cord
Power outlet
32
Page 35
Preparing the Machine for Use
Step 4 :
Procedure
A
B
C
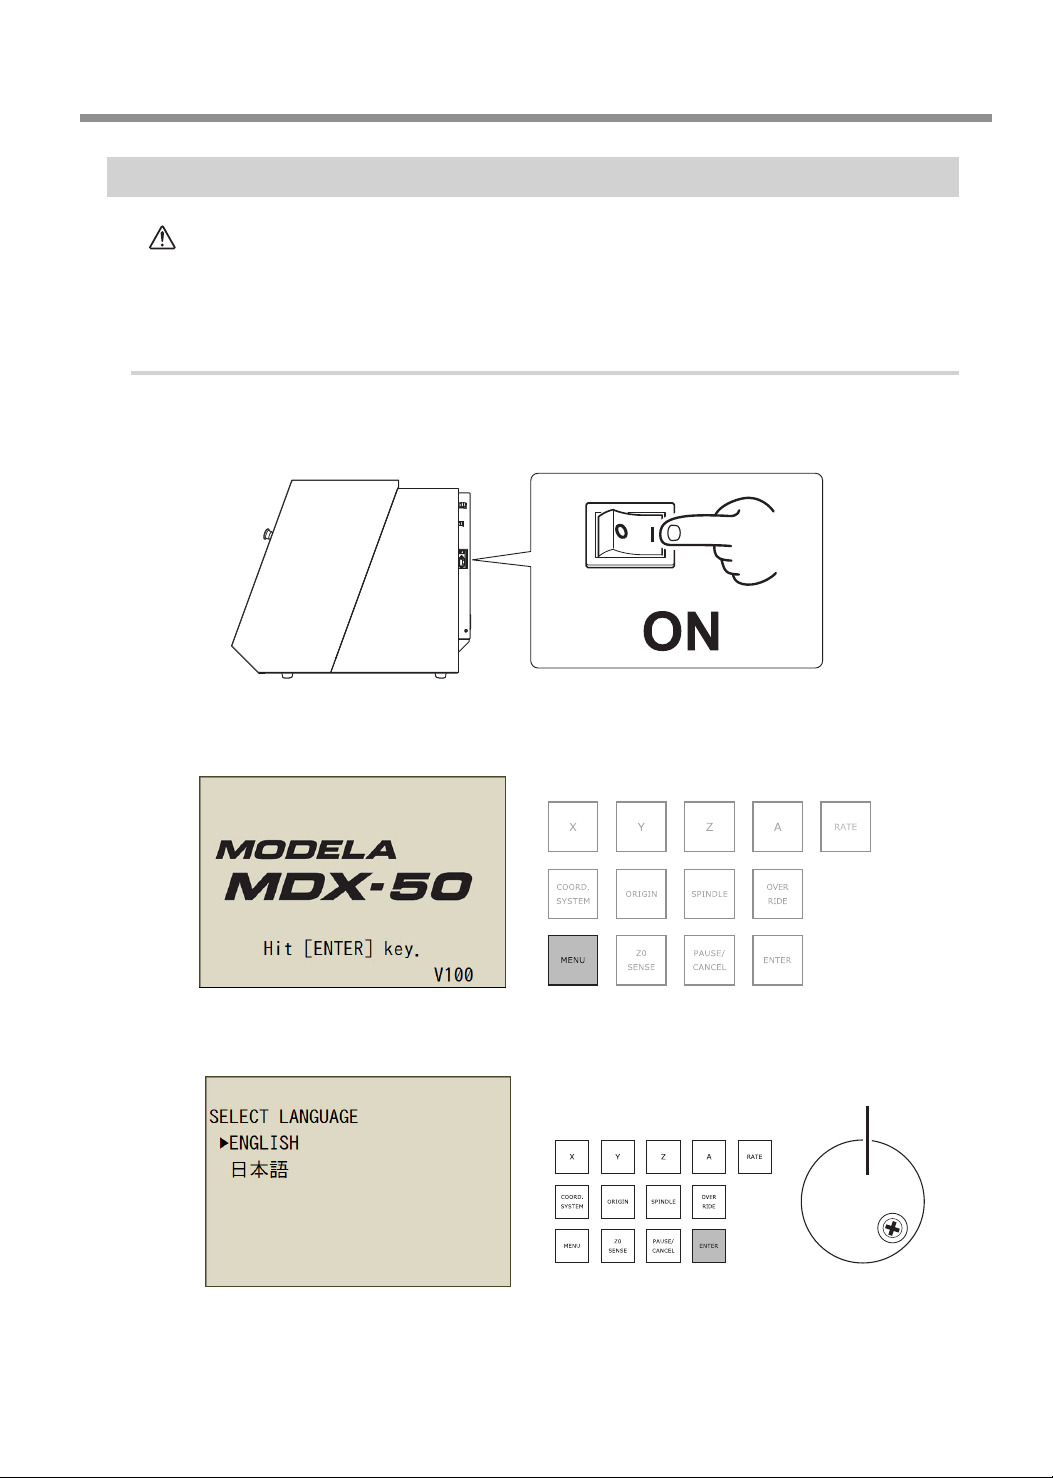
Switching On the Machine's Power Switch (Setting the Panel Display Language)
WARNING
Close the front cover and the dust box cover.
Switch on the power switch.
When the following screen appears, press [MENU] on the built-in panel.
"Please hit [ENTER] key." is displayed on the screen.
This procedure makes the machine operate.
Before you perform this procedure, check to make sure that operation of the
machine will not create any hazard or danger.
Use the hand-wheel to select the display language, and then press [ENTER].
D
When "Please hit [ENTER] key." is displayed on the screen, press [ENTER].
E
The initial operation starts.
Hand-wheel
33
Page 36
Preparing the Machine for Use
Step 5 :
Important
Procedure
A
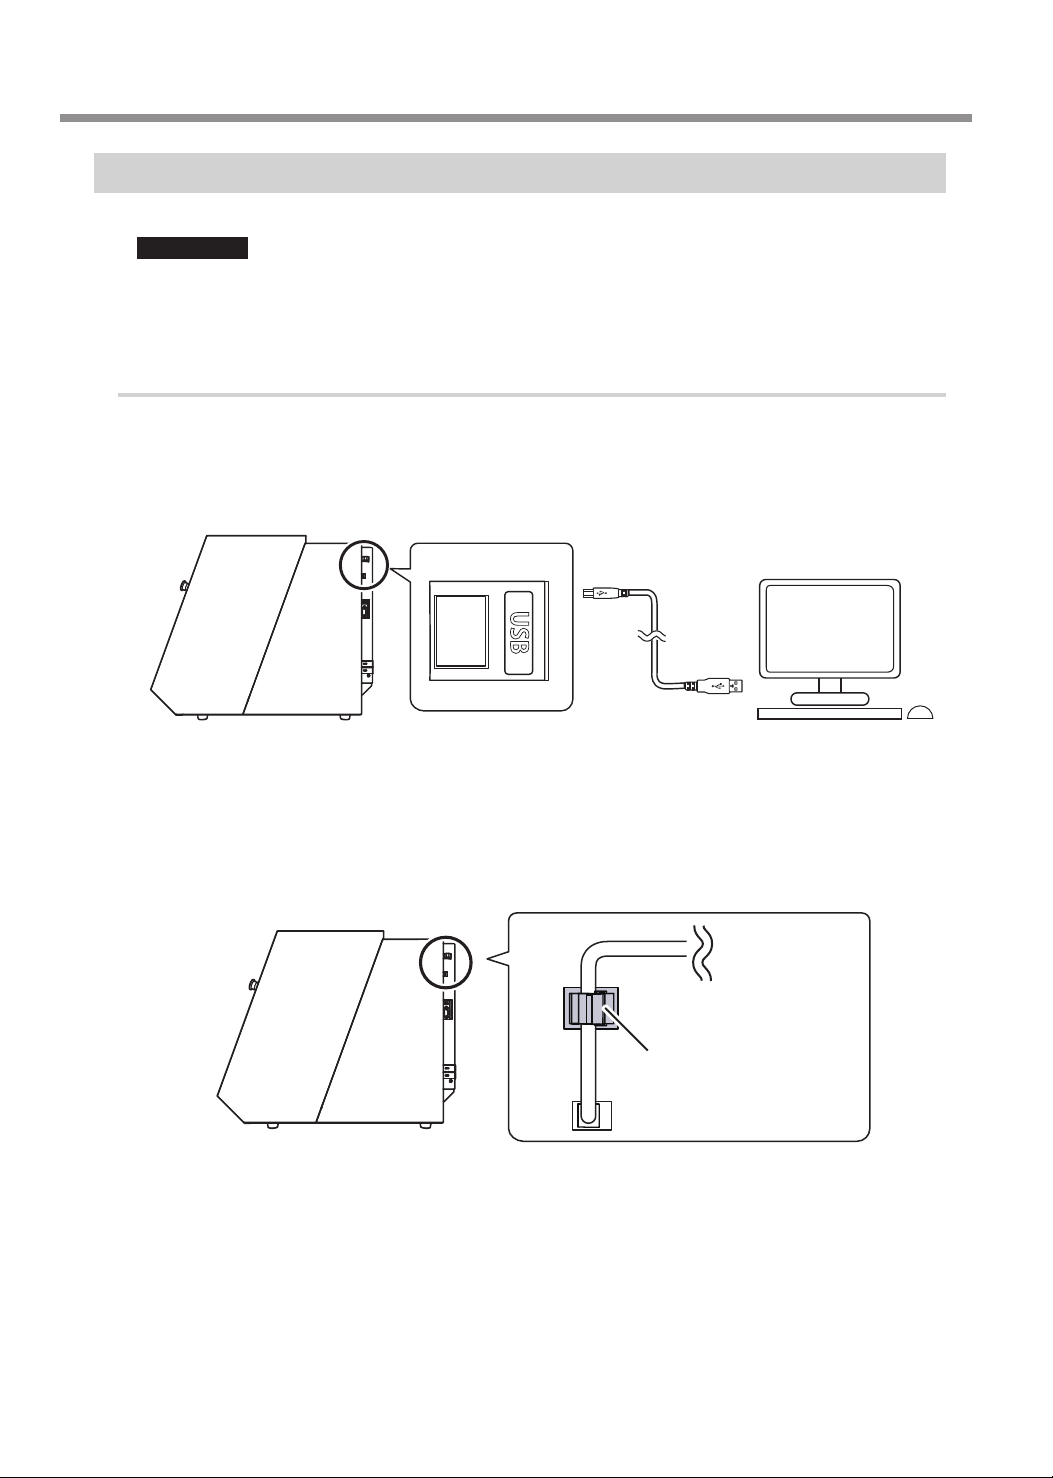
Connecting the Machine to a Computer Using a USB Cable
• For the USB cable, use the included cable.
• Do not use a USB hub. Connection may not be possible.
Connect the machine to the computer using the USB cable.
The driver will be installed automatically.
34
Secure the USB cable with a cable clamp.
B
Cable clamp
Page 37
Preparing the Machine for Use
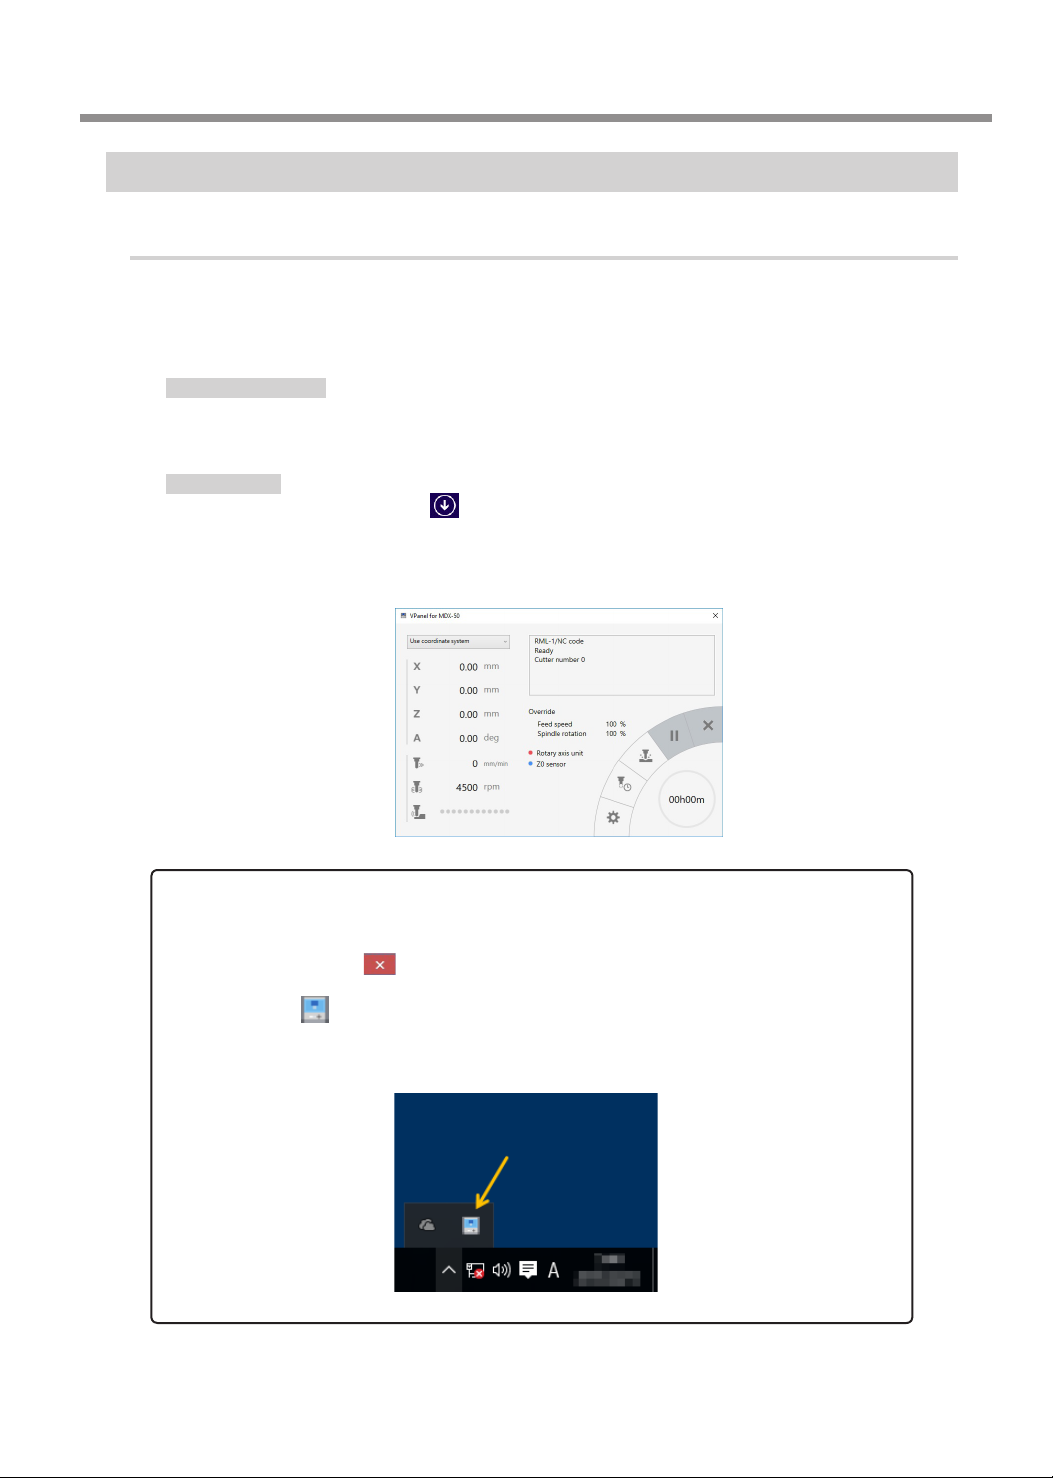
Step 6 : Starting VPanel
Procedure
Close the front cover and the dust box cover.
A
Display VPanel.
B
Windows 10 and 7
From the [Start] menu, click [All apps] (or [All Programs]), [VPanel for MDX-50], and
then click [VPanel for MDX-50].
Windows 8.1
On the [Start] screen, click . On the [Apps] screen, click the [VPanel for MDX-50]
icon under [VPanel for MDX-50].
The top window of VPanel will appear.
" User's manual (electronic-format manual) "VPanel Doesn't Start Correctly"
It is useful to set VPanel as resident software.
VPanel is a piece of resident software that is constantly working to manage the cutting machine and
send e-mails.* It is useful to congure VPanel so that it starts automatically when the computer starts.
Clicking the Close button (
the task tray. The window will disappear from the screen, but the program will not be exited. While
VPanel is running,
* E-mails are sent to notify the user of cutting completion or errors that occur.
For the setting method and other details, see the user's manual (electronic-format manual).
is constantly displayed in the task tray.
) in the upper right of the top window will minimize the window to
35
Page 38
Preparing the Machine for Use
Step 7 : Performing Spindle Run-in
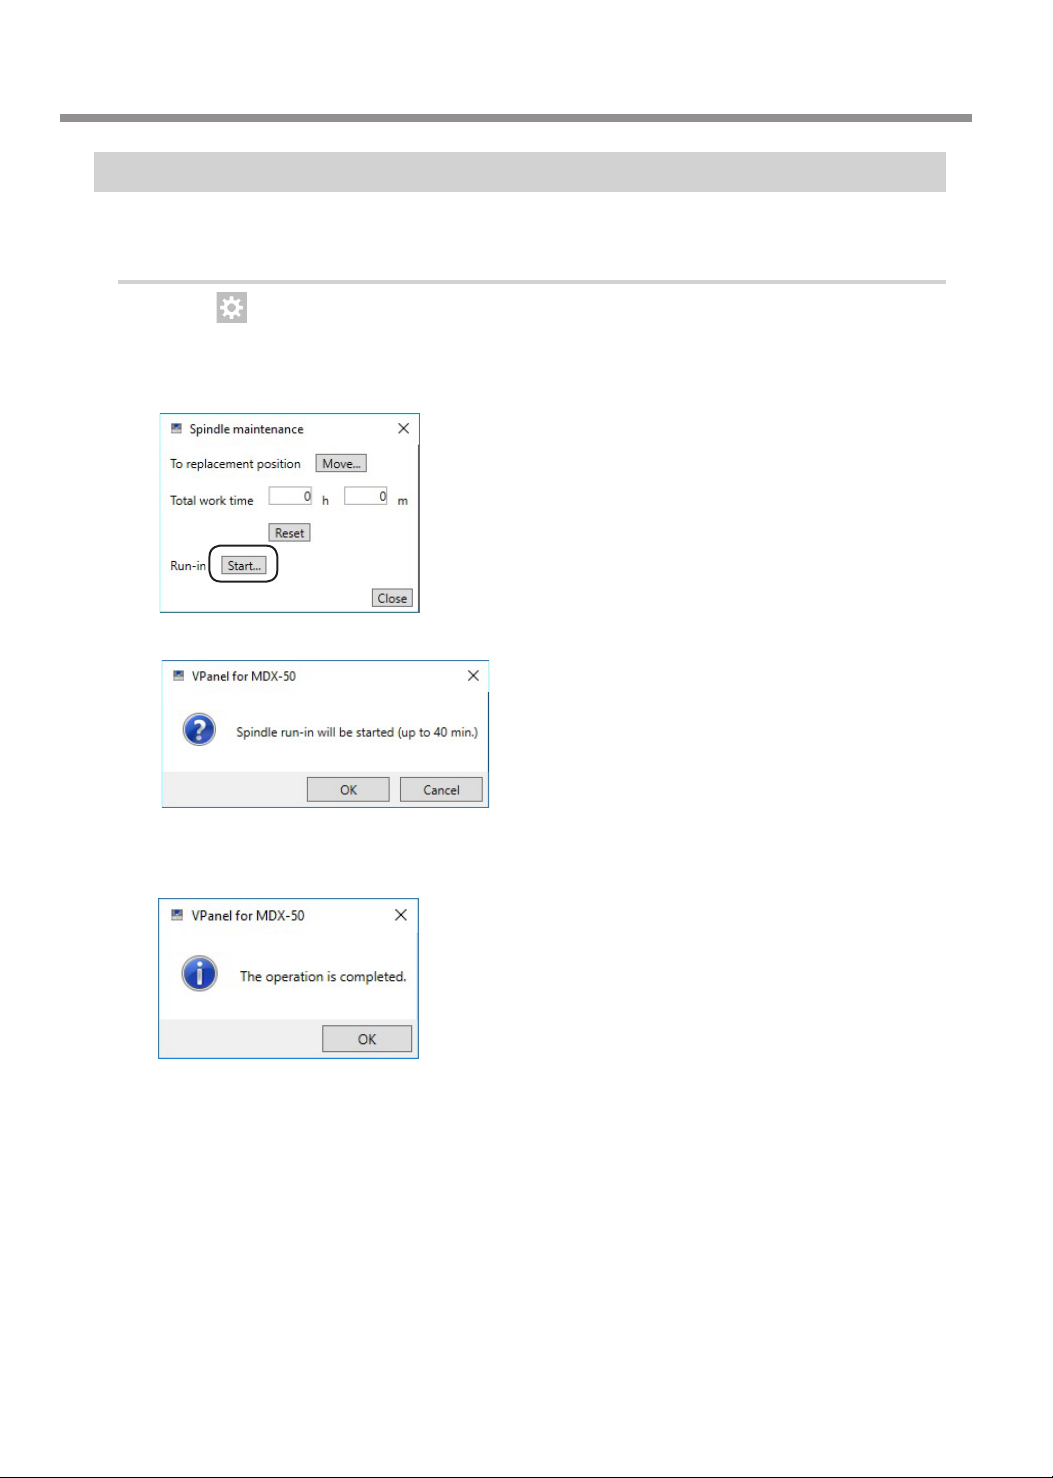
Perform spindle run-in to stabilize the rotation of the spindle.
Procedure
Click in the VPanel top window, the [Maintenance] tab, and then click [Spindle...].
A
The VPanel "Spindle maintenance" dialog box appears.
Click [Start] next to "Run-in."
B
When the window shown in the following gure appears, click [OK].
C
Run-in will begin. (It takes approximately 40 minutes.)
When the window shown in the following gure appears, click [OK].
D
36
Page 39
Preparing the Machine for Use
Step 8 : Correcting the Machine (Automatic Correction)
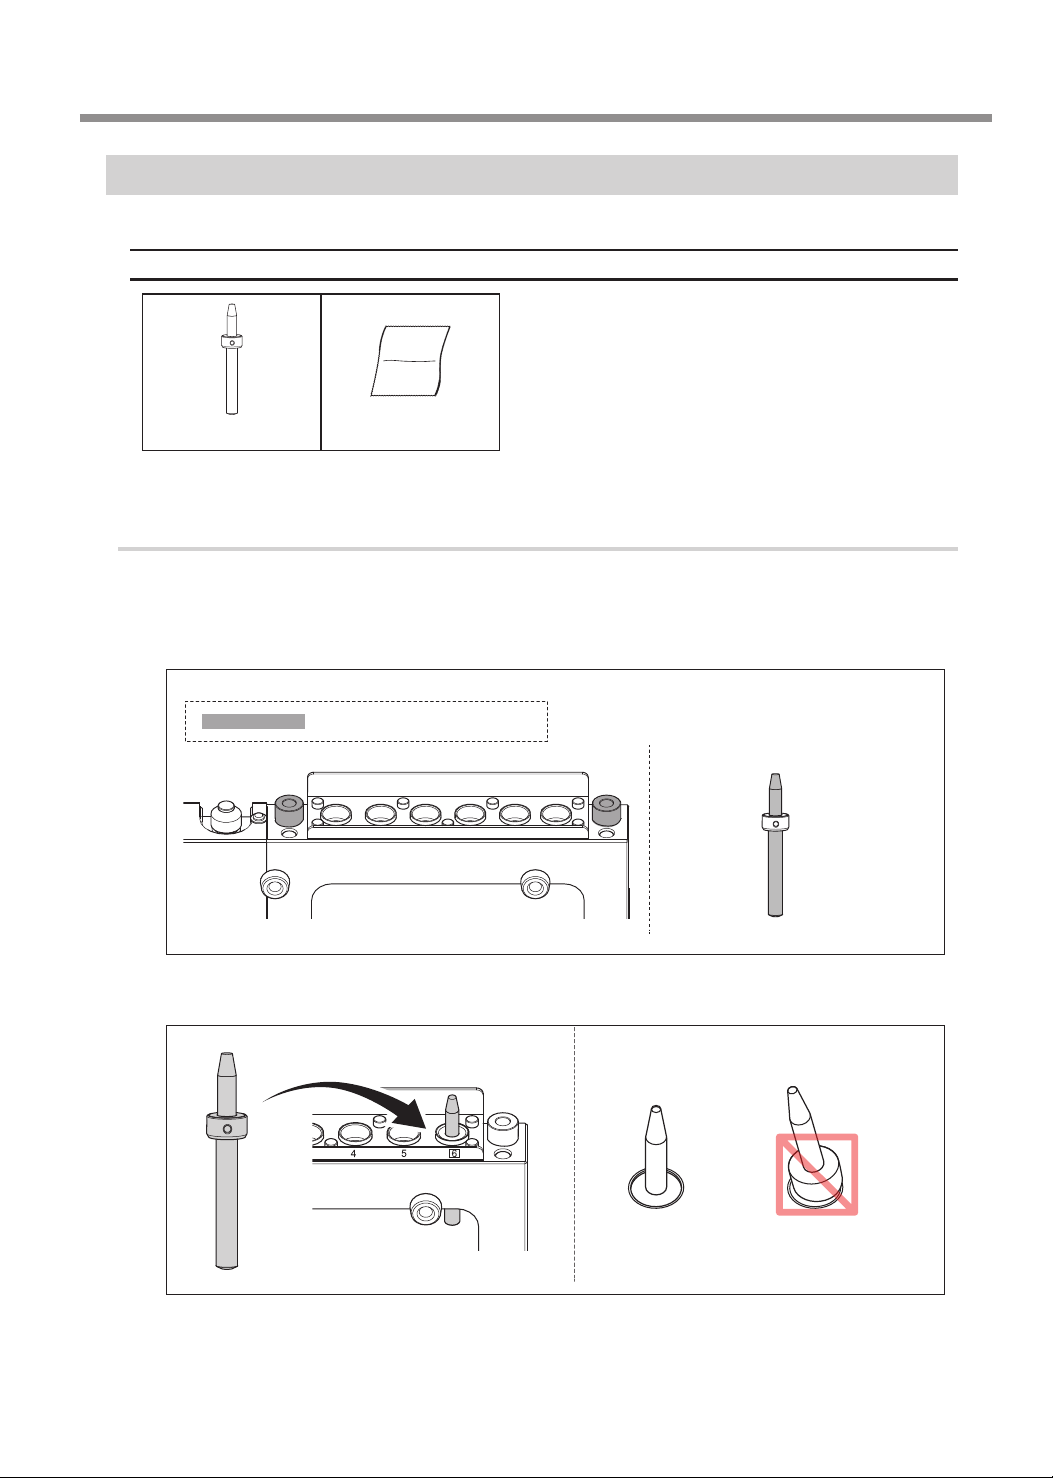
Performing automatic correction will correct the ATC magazine and rotary axis positions.
Required Items
Detection pin Cloth for care
1. Install the detection pin.
Use the included cloth for care to wipe clean the detection pin and the protrusions on
A
the left and right of the ATC magazine.
If any dirt is present in these locations, it may not be possible to perform the correction properly.
Part to wipe clean
Load the detection pin in the ATC magazine's number 6 position.
B
OK Not OK
Close the front cover.
C
Press [ENTER].
D
37
Page 40
Preparing the Machine for Use
2.
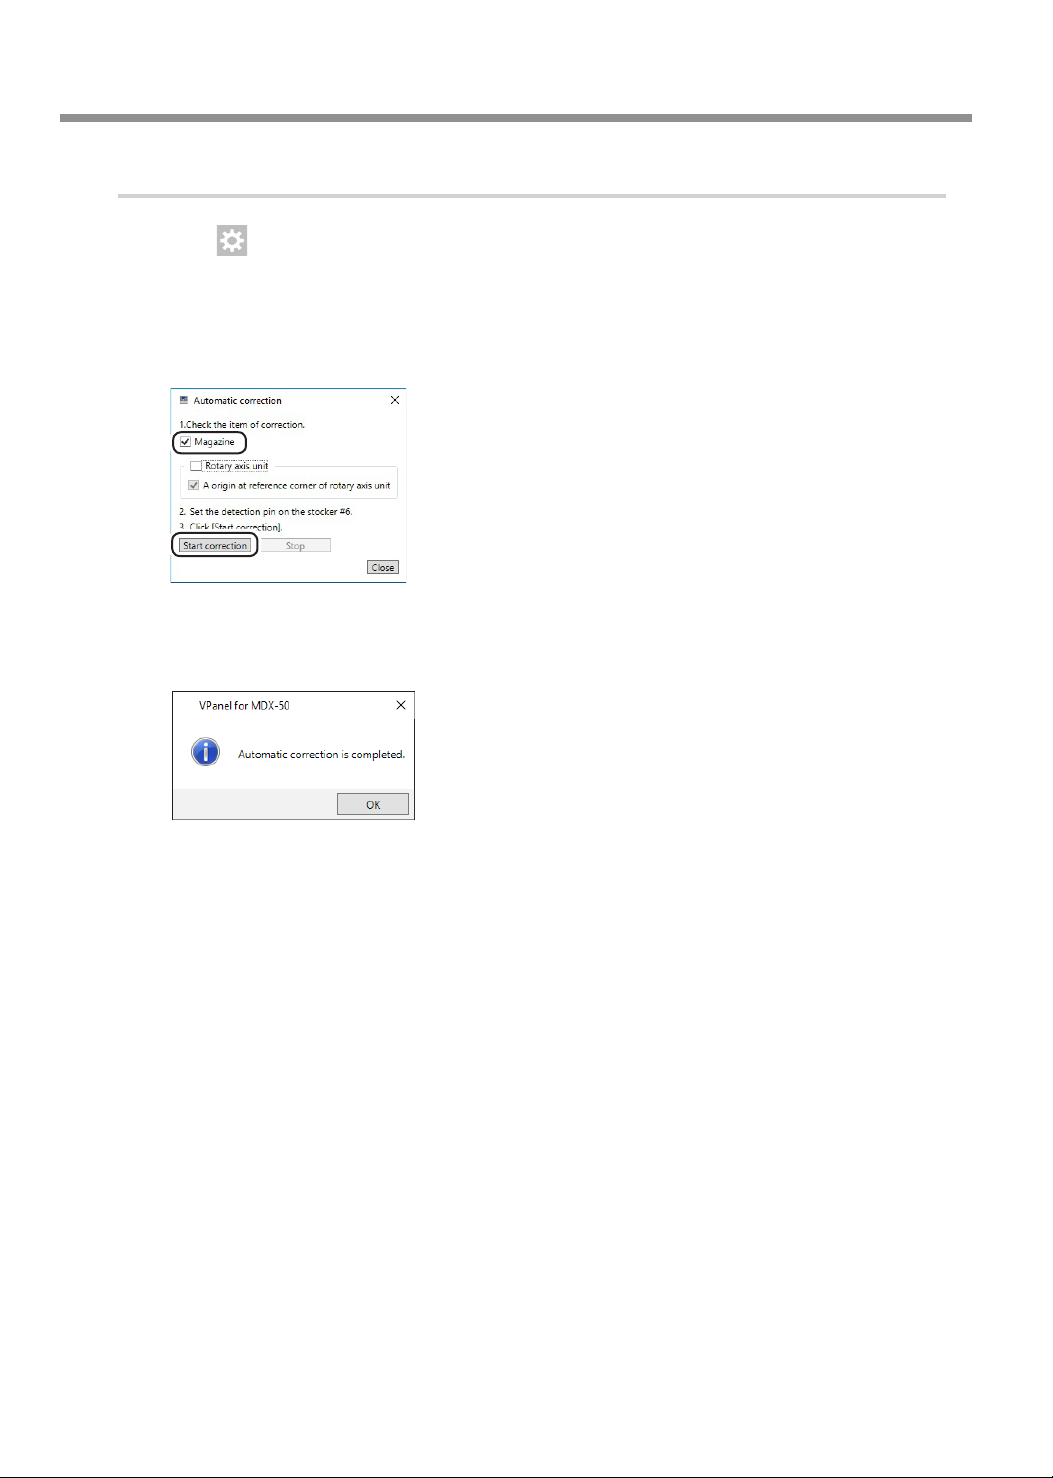
Perform automatic correction.
Click in the VPanel top menu, the [Correction] tab, and then click [Automatic cor-
A
rection].
The VPanel "Automatic correction" dialog box appears.
Select the [Magazine] check box, and then click [Start Correction].
B
You can use the [Rotary axis unit] check box when you are using the optional rotary axis unit.
Automatic correction starts.
When the window shown in the following gure appears, click [OK].
C
Once automatic correction is complete, remove the detection pin.
D
38
Page 41
Preparing the Machine for Use
Step 9 : Exiting VPanel
Procedure
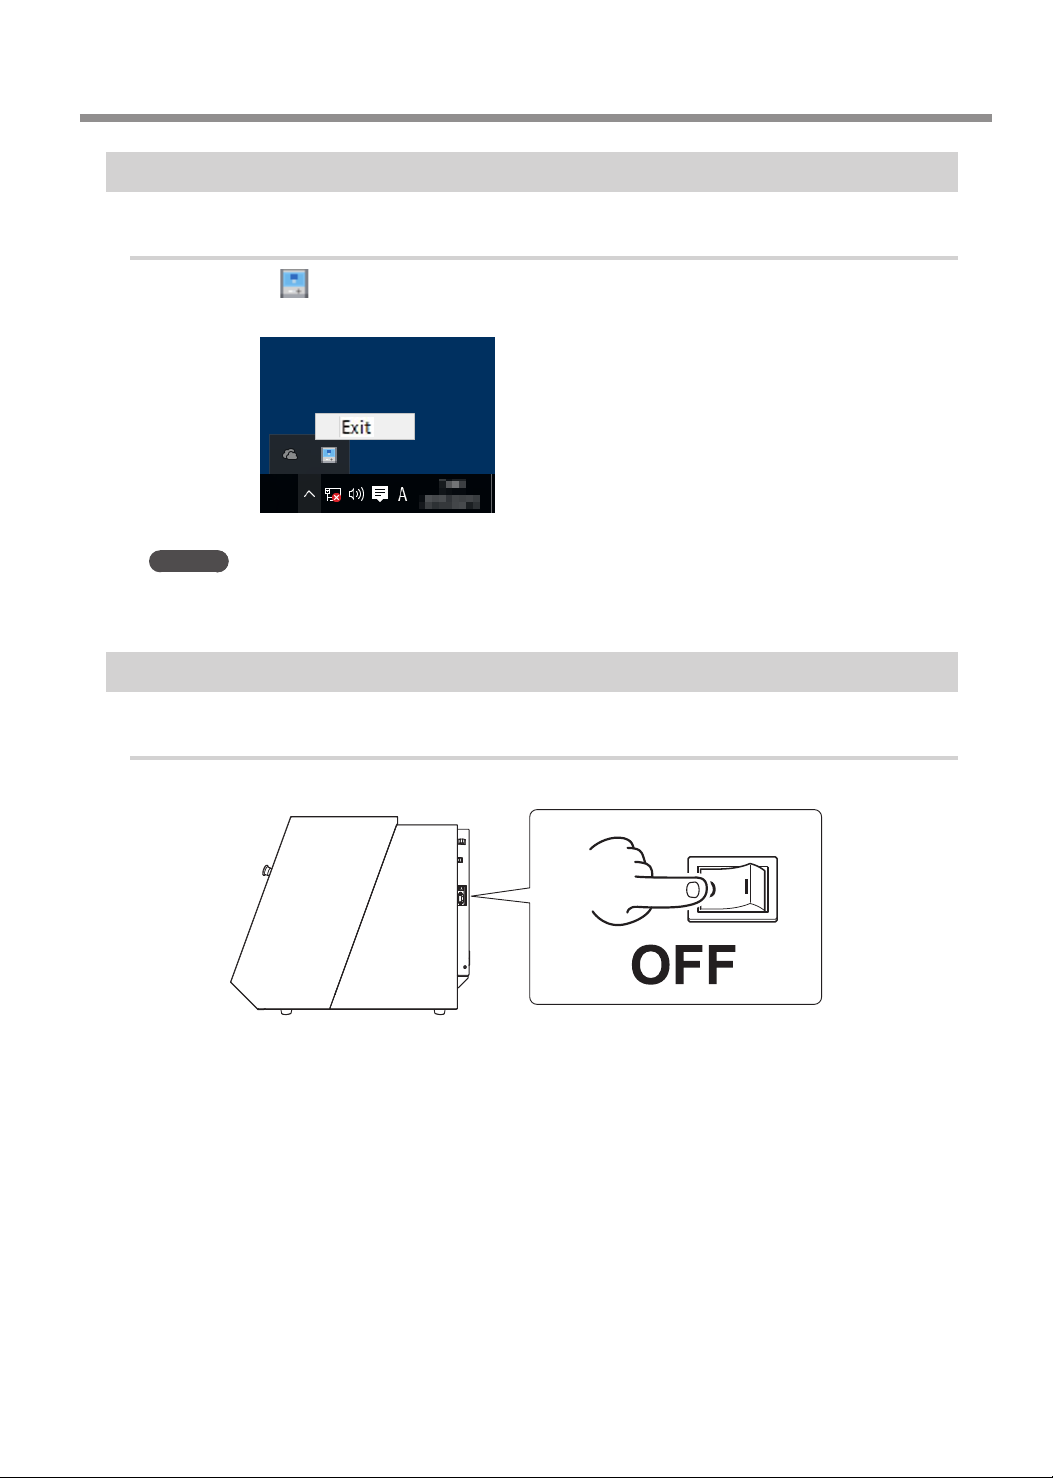
Right-click in the task tray, and then click [Exit].
A
MEMO
Even if you click the Close button ([x]) to close the top window, you will not exit VPanel.
Step 10 : Switching O the Machine's Power
Procedure
Switch o the power switch.
A
39
Page 42
Machine Specications
Power Rating and Serial Number Location
Serial number
The serial number is required for maintenance, servicing, and
support. Never peel o the label.
Power rating
Use a power supply that meets the requirements for voltage,
frequency, and amperage given here.
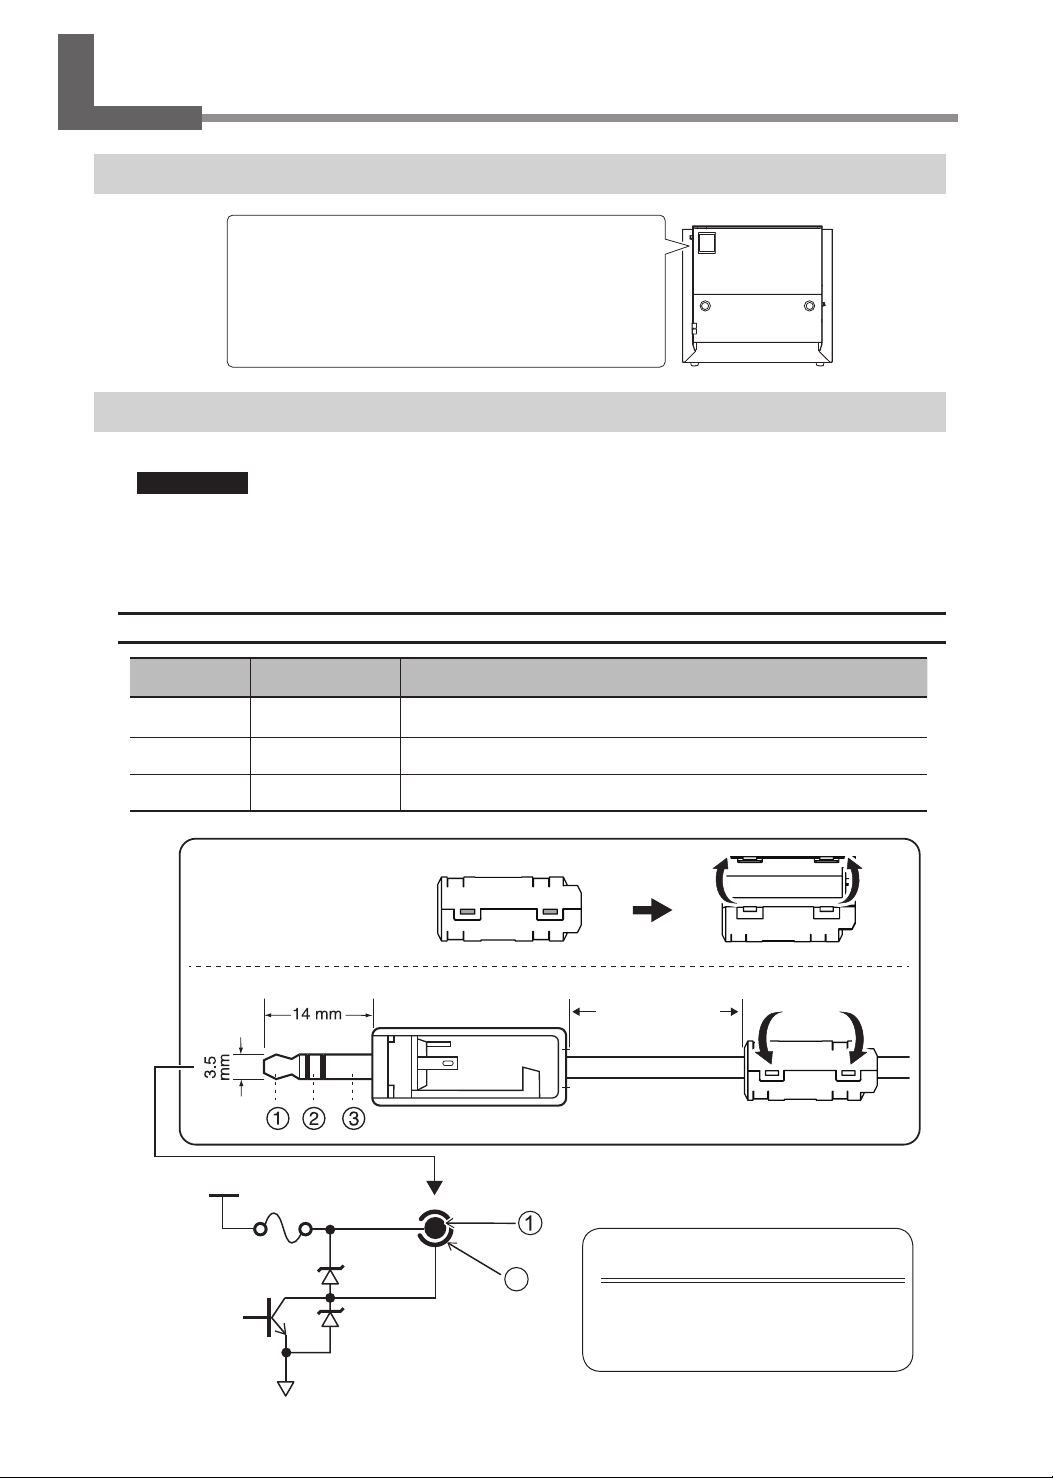
Expansion Port Specications
Important
Be sure to turn o the power of machine when the cable connect (or remove) to the machine.
Connecting (or removing) the cable to the cutting machine while the cutting machine is on may
cause malfunctions
* We are not responsible for devices connected to this port.
Expansion port 1
.
PIN number Signal Overview/function
1
2
3
Ferrite Core
Attach the ferrite core to the
cable to be connected to
the expansion port1.
+24 V
24V Set the output up to 100 mA.
SPINDLE_ON This signal activates during spindle rotation.
N.C.
30 mm or less
40
2
Note
Do not use terminal 3.
Use only terminals 1 and 2.
GND
Page 43
Note
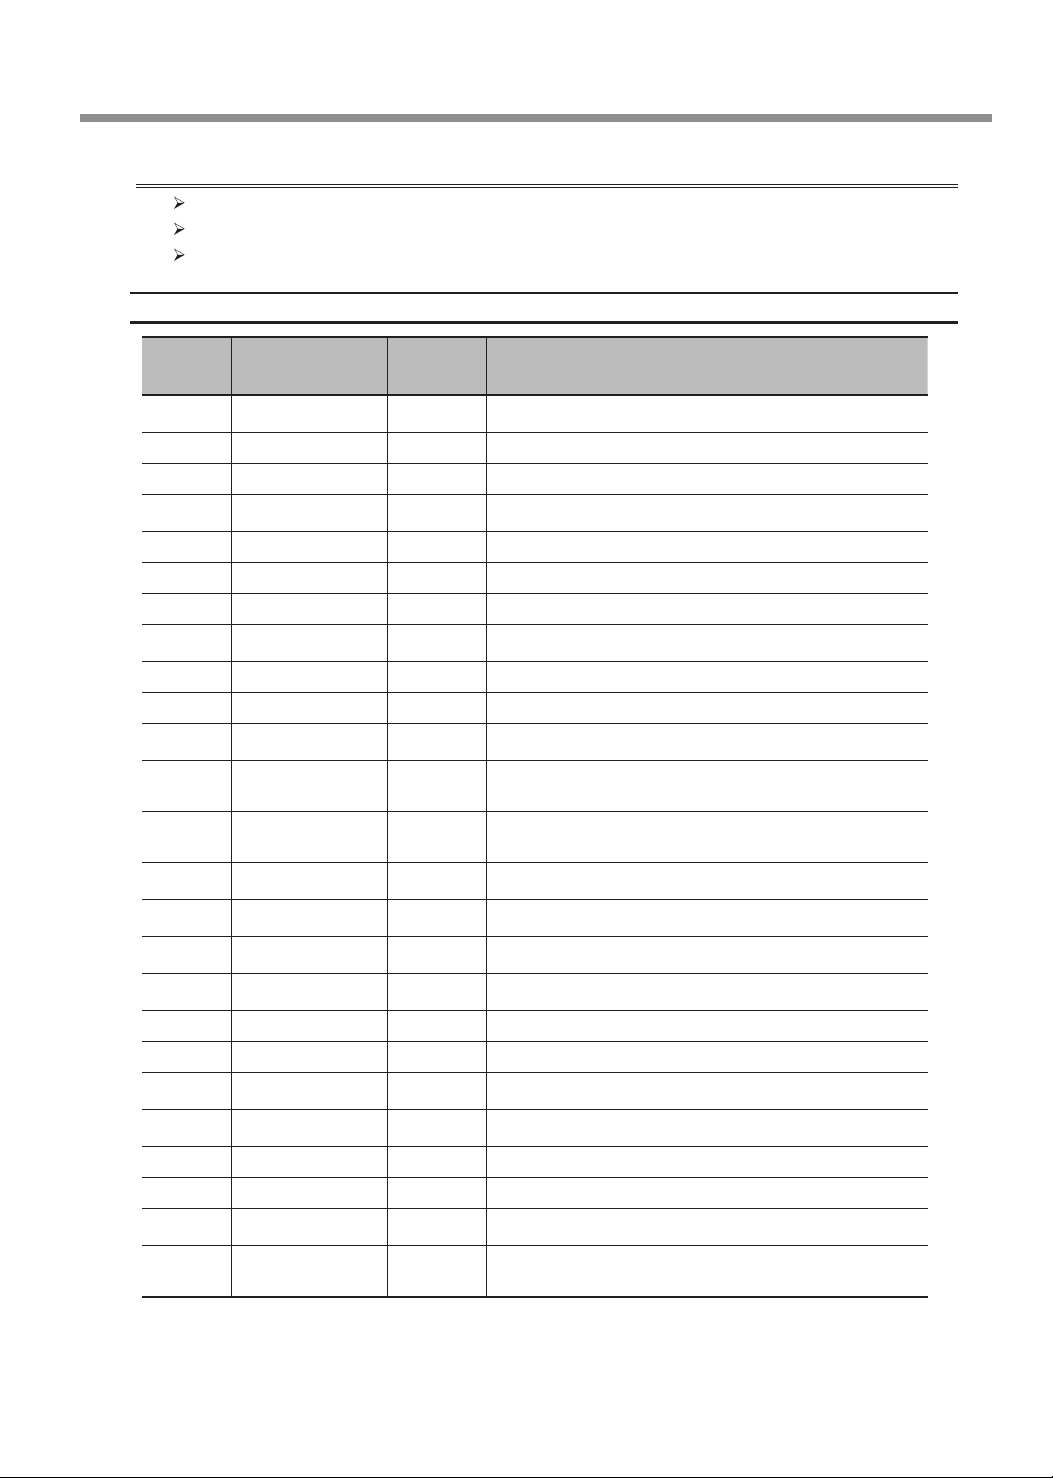
Be sure to use the expansion port within the rated range shown above.
Do not apply additional voltage to the terminal.
Do not short-circuit the terminal to ground.
Expansion Port 2
Machine Specications
PIN
number
1 GND Connect this to the power supply GND.
2 Reserve RXD IN This is a spare output for communication.
3 Reserve RXD OUT This is a spare output for communication.
4 N.C.
5 Reserve Out1 OUT This is a spare general-purpose output.
6 Reserve Out2 OUT This is a spare general-purpose output.
7 Reserve Input1 IN This is a spare general-purpose output.
8 GND Connect this to the power supply GND.
9 ERROR OUT This signal activates when a fatal error occurs.
10 PAUSE OUT This signal activates when cutting is paused.
11 N.C.
12 Reserve 5V This is a spare 5 V power supply input for communi-
13 24V_EXT Connect this to the 24 V power supply. Prepare a power
14 N.C.
15 N.C.
Signal IN/OUT Overview/function
cation.
supply that can supply 100 mA or more.
16 GND Connect this to the power supply GND.
17 N.C.
18 EMG_STOP IN Stop the machine.
19 SP_START OUT This signal activates during spindle rotation.
20 GND Connect this to the power supply GND.
21 GND Connect this to the power supply GND.
22 READY OUT This signal activates when cutting is possible.
23 BUSY OUT This signal activates when the machine is operating.
24 N.C.
25 24V_EXT Connect this to the 24 V power supply. Prepare a power
supply that can supply 100 mA or more.
41
Page 44
Machine Specications
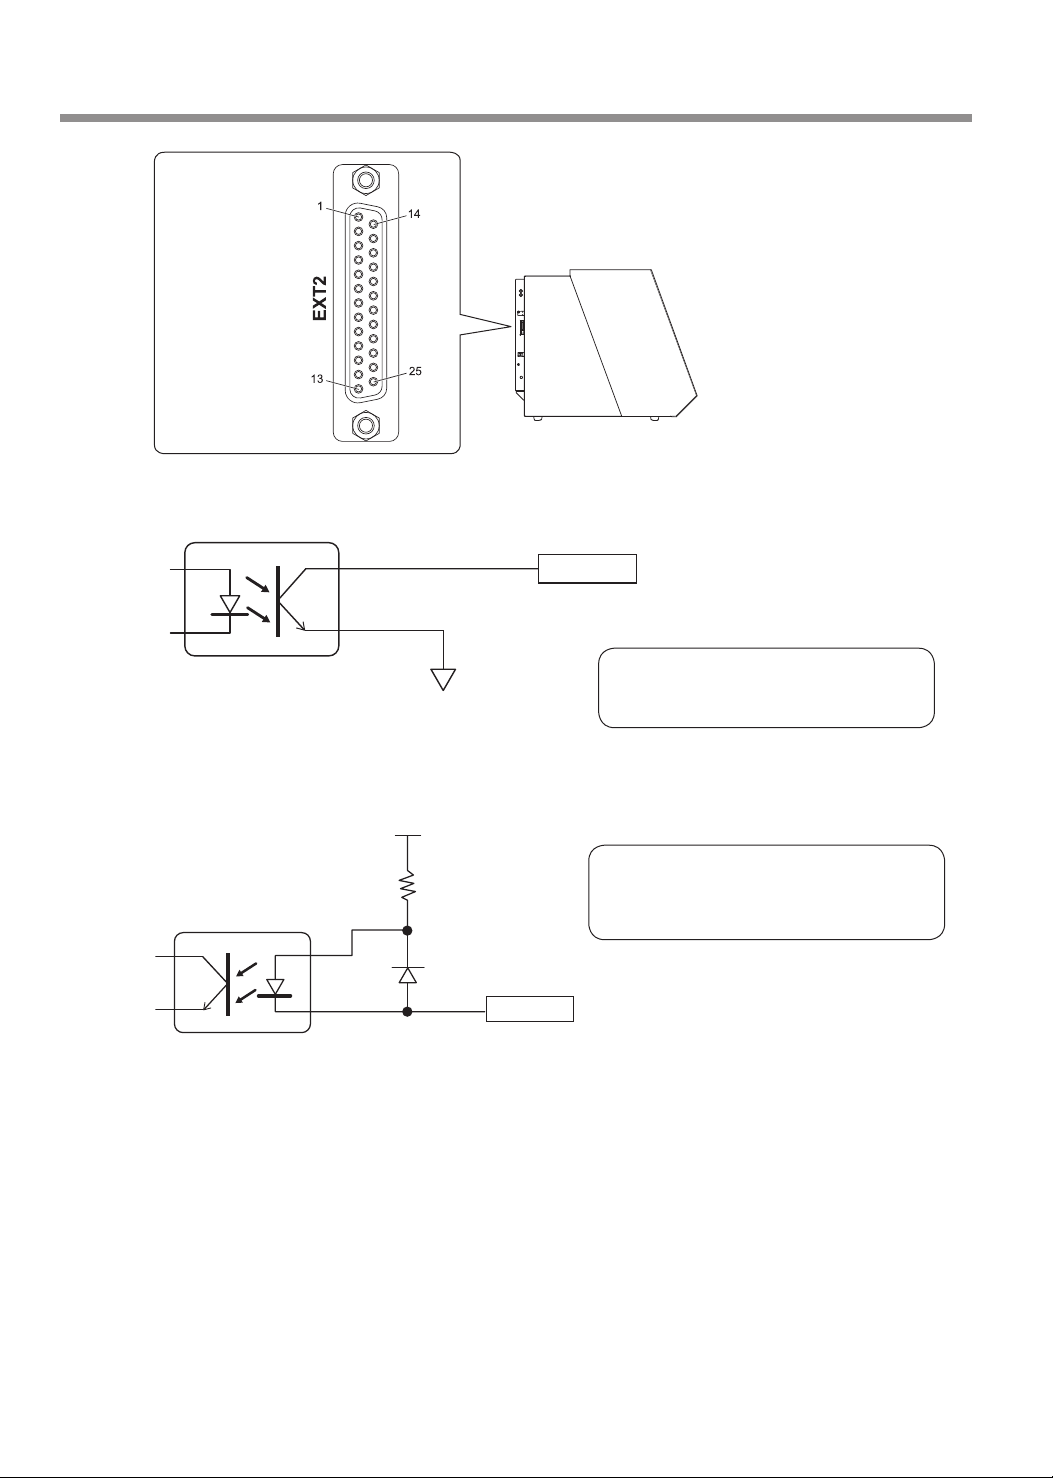
Female terminal
Output specications
Input specications
GND
+24 V
OUT
GND EXT
3.3 K
Input terminal
Output terminal
Output: Open collector
Output capacity: 10 mA max.
Power supply voltage: 24 V ± 10%
Input current: 10 mA or less
42
Page 45
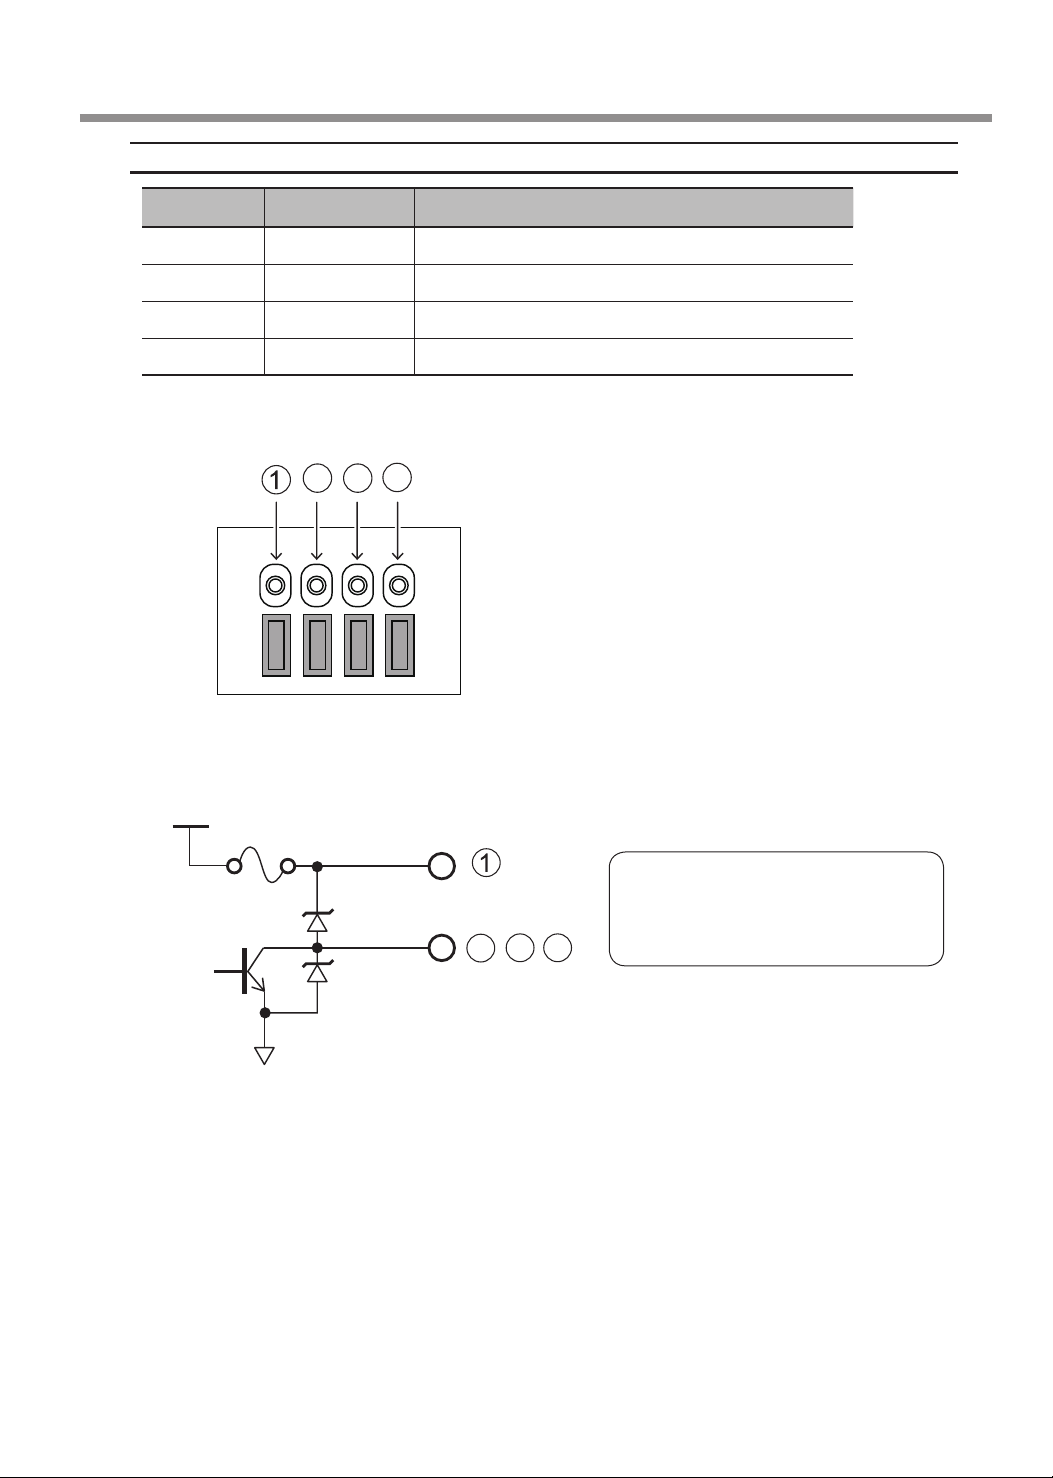
Alarm Lamp Connector
PIN number Signal Overview/function
Machine Specications
1
(left)
2
3
4
(right)
Connector layout
Output specications
Use 1 24V as the power supply, and then connect the lamp to 2, 3, and 4.
+24 V
24V Set the output up to 150 mA.
ERROR This signal activates when a fatal error occurs.
BUSY This signal activates when the machine is operating.
READY This signal activates when preparations are complete.
2 3
4
GND
Power supply: +24 V (150 mA)
Output: Open collector
3 4
2
Output capacity: 50 mA max.
43
Page 46
Machine Specications
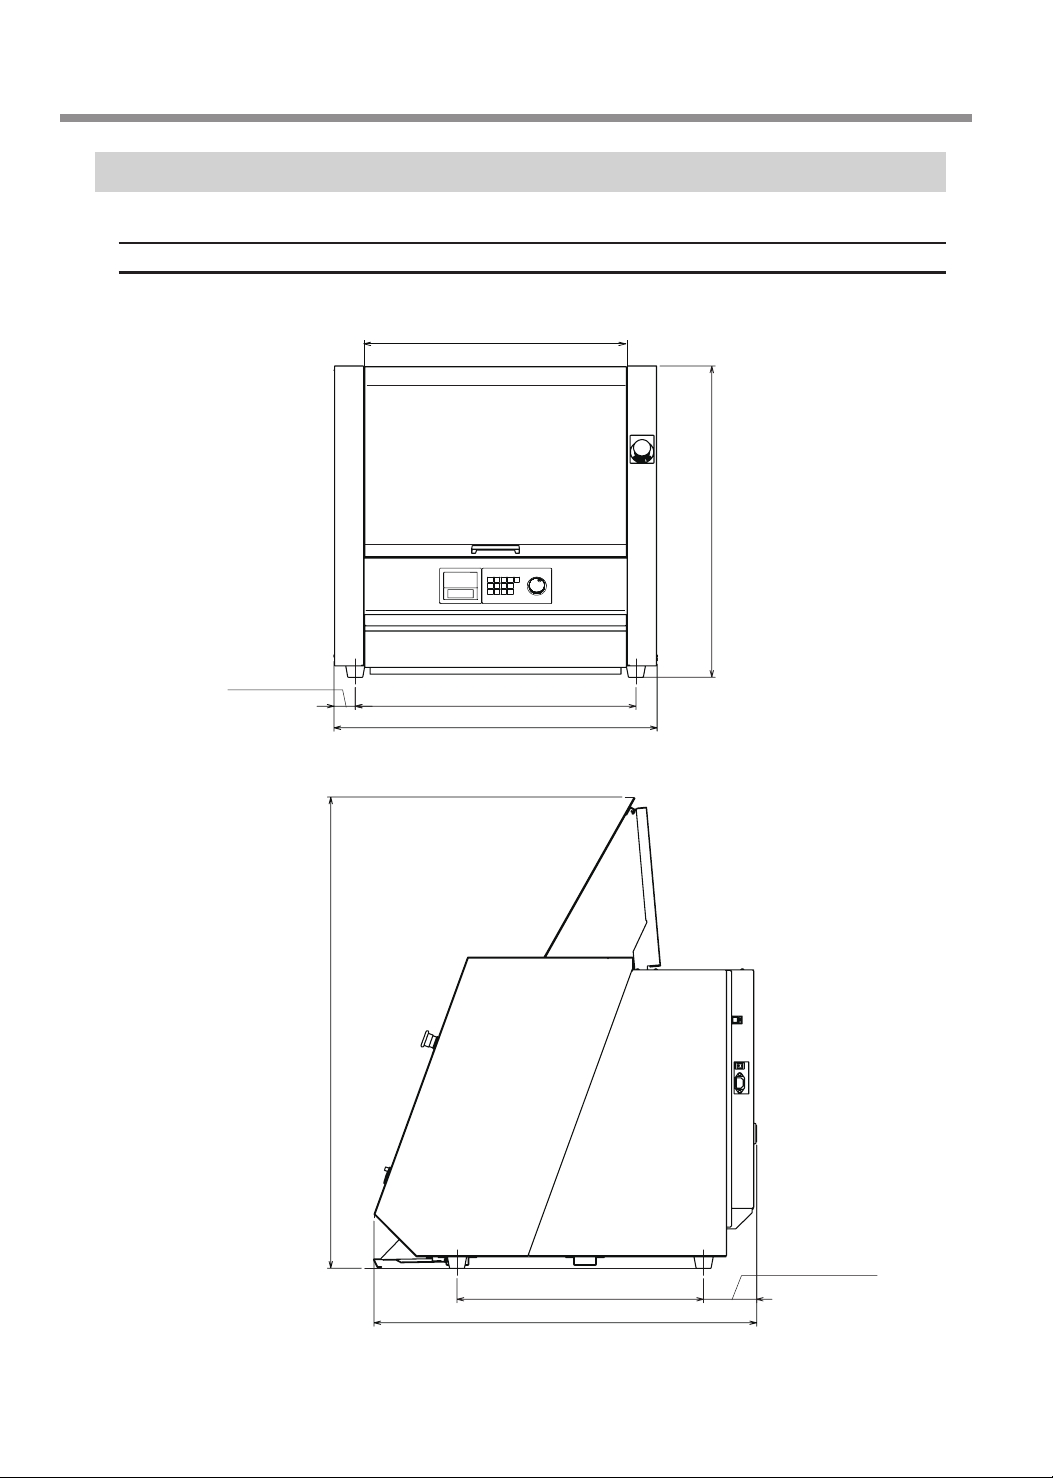
Dimensional Drawings
Unit: mm (inch)
External Dimensions
620 (24.41)
732 (28.82 )
50 (1.97)
660 (25.98)
760 (29.92)
1108 (43.62)
44
125 (4.92)
580 (22.83)
900 (35.43)
* A space of 700 mm (27.56 inch) in front of the product is required when pulling out the dust box cover.
Page 47
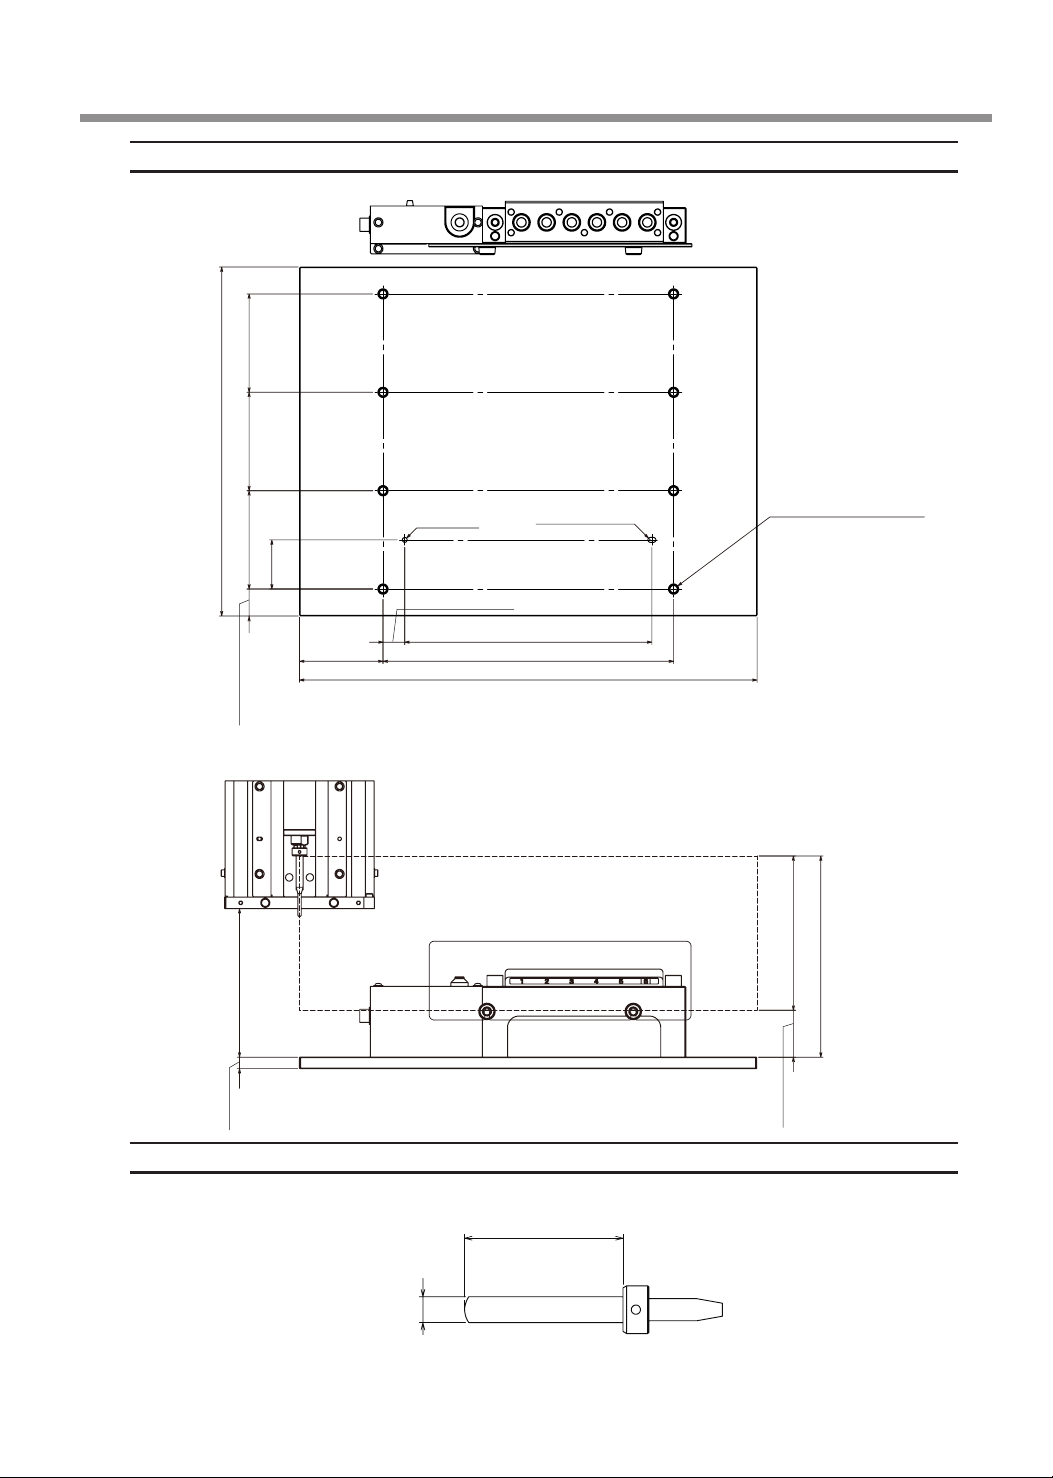
Table
Machine Specications
86 (3.39)
86 (3.39)
305 (12.01)
Y-axis travel
86 (3.39)
23.5 (0.93)
130 (5.12)
43 (1.69)
73 (2.87)
ø4.2
(ø0.17)
19 (0.75)
4.2 × 7
(0.17 × 0.28) slot
216 (8.50)
254 (10)
400 (15.75)
X-axis travel
8- ø4.5 (ø0.18),
ø9 (ø0.35)
countersunk surface
Z-axis travel
135 (5.31)
176 (6.93 )
10
(0.39)
Detection pin
ø7 (ø0.28)
43 (1.69)
41
(1.61)
45
Page 48
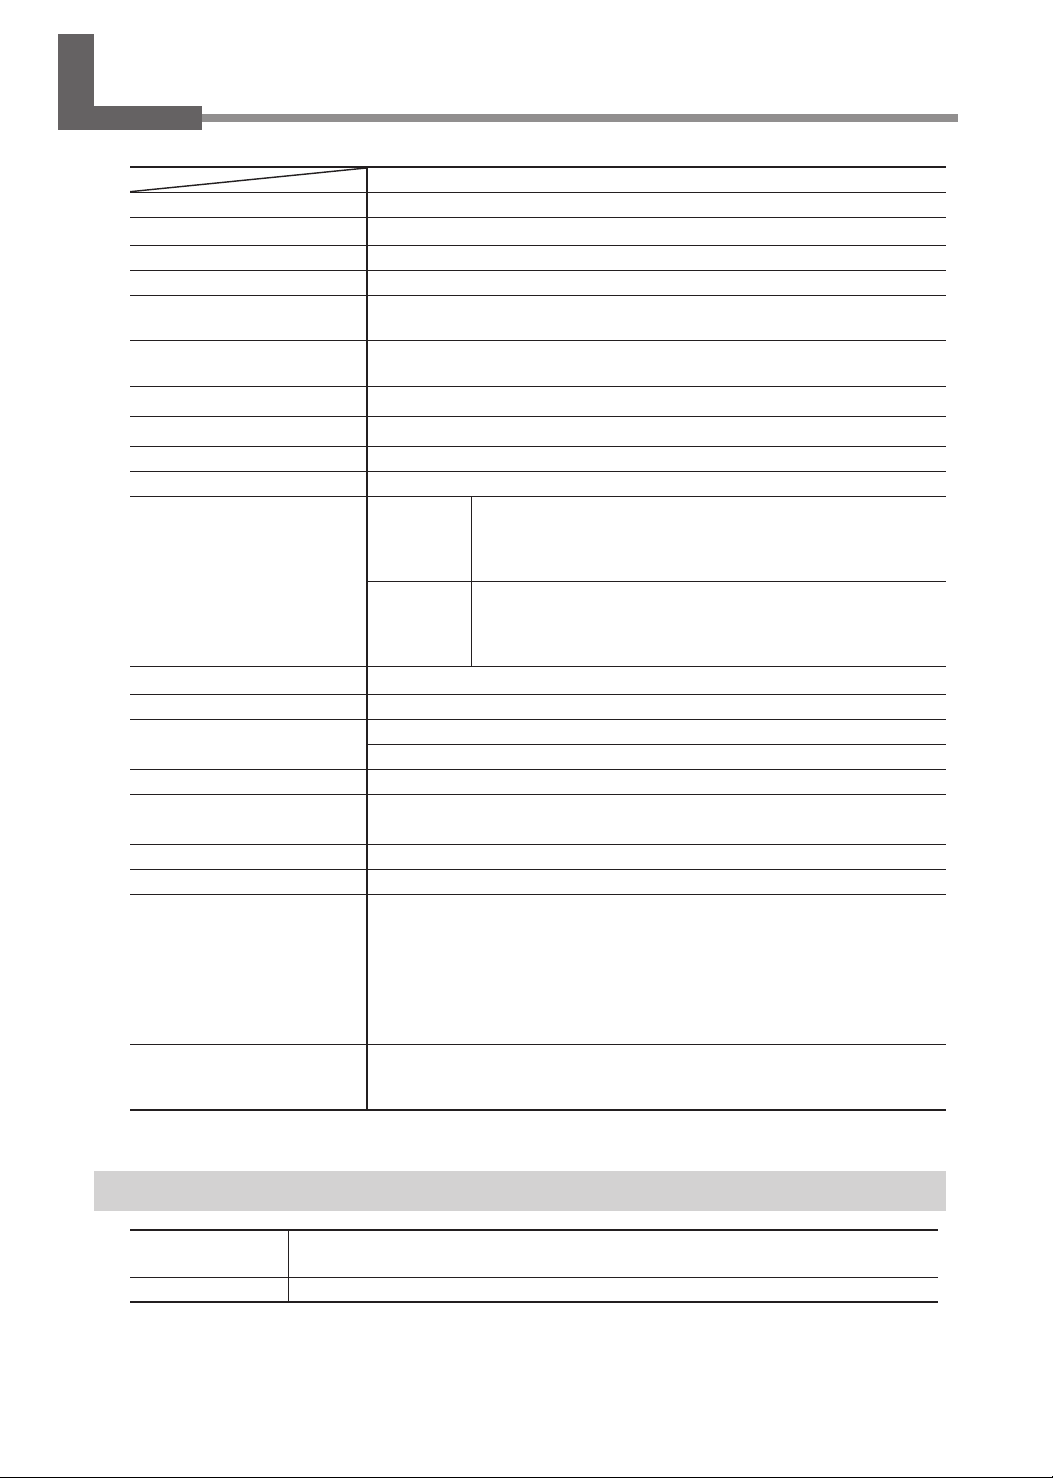
Specications
MDX-50
Cuttable material Resins such as chemical wood and modeling wax (metal not supported)
Operating range X, Y, Z: 400 × 305 × 135 mm (15.8 × 12.0 × 5.3 in.)
Loadable workpiece size X, Y, Z: 400 × 305 × 100 mm (15.8 × 12.0 × 3.9 in.)
Axis drive system Stepping motor
Operating speed X, Y: 7 to 3600 mm/min (0.3 to 141.7 in./min)
Software resolution 0.001 mm/step (0.039 mil/step; RML-1)
Mechanical resolution 0.01 mm/step (0.39 mil/step; half step)
Spindle motor Brushless DC motor
Spindle rotation 4500 to 15000 rpm
Number of tools housed 6 (However, one tool is also used as the detection pin.)
Attachable tool mm
Interface USB
Control command sets RML-1, NC code
Power requirements AC 100 to 240 V ±10%, 50/60 Hz (overvoltage category: II, IEC 60664-1)
Power consumption Approx. 95 W
Operating noise During operation: 60 dB (A) or less (when not cutting)
External dimensions Width × depth × height: 760 × 900 × 732 mm (29.92 × 35.43 × 28.82 in.)
Weight 122 kg (269 lb.)
Installation environment Indoor use at altitudes up to 2000 m
Included items Power cord, USB cable, manual, Roland DG Software Package CD, detection
Z: 7 to 3000 mm/min (0.3 to 118.1 in./min)
0.001 mm/step (0.039 mil/step; NC code)
specications
inch
specications
1.2 A
During standby: 45 dB (A) or less
Temperature: 5 to 40°C (41 to 104°F)
Humidity: 35 to 80%RH (no condensation)
Ambient pollution degree: 2 (as specied by IEC 60664-1)
Short-term temporary overvoltage: 1440 V
Long-term temporary overvoltage: 490 V
pin, hexagonal screwdriver, hexagonal wrench, wrench, tool holder, tool
positioner, Z0 sensor, etc.
Shank diameter: 6 mm, tip diameter: 6 mm or less, length:
30 to 90 mm
* Tools with shank diameters of 3 mm or 4 mm can be
used by installing them in the included tool holder.
Shank diameter: 0.25 in. tip diameter: 0.25 in. or less, length:
30 to 90 mm (1.18 to 3.54 in.)
* Tools with shank diameters of 0.125 in. can be used by
installing them in the included tool holder.
System Requirements for USB Connection
Computer
USB cable
46
A model preinstalled with Windows 10, 8.1, or 7 (32 or 64 bit) or an upgraded computer originally preinstalled with Windows 7 or later
Use the included USB cable.
Page 49
Page 50
 Loading...