

Page 1

Thank you, and congratulations
on your choice of the Roland
MC-307 Groove Box. The MC307 is a further evolution of
earlier groove boxes, making it
even more usable than ever,
providing enhanced realtime
operability, and boasting new
functionality optimized for DJ
play. Unlimited possibilities can
be achieved even by simply
editing the preset patterns,
making the MC-307 the ideal
piece of groove gear for creating
dance music.
The MC-307 comes with two
manuals: "Quick Start" and
"Owner’s Manual." This "Quick
Start" manual will help you to
quickly learn basic operation of
the MC-307.
QUICK START
Contents
Making the Connections ....................................................................... 2
Turning the Power On and Off.............................................................. 3
Using the MC-307................................................................................... 4
Listening to Various Patterns............................................................... 6
Playing Back Patterns Continuously..............................................6
Adding Variations to Pattern Playback................................................ 8
Using Mute Function......................................................................8
Changing to Another Patch.......................................................... 10
Functions for DJ Performance ........................................................... 12
Adding Variations to Sound Using Knobs....................................12
Cutting Sound of a Specified Band (Isolator)............................... 14
Delay (Echo) and Reverb Effects ................................................ 16
Combining a Turntable and BPM................................................. 17
Phrase Adding Function ..................................................................... 18
Using a Single Keyboard Pad to Sound Phrases
(Real-time Phrase Sequencing).............. 18
Using the Arpeggiator.................................................................. 19
Making Original Patterns..................................................................... 20
Creating Drum Part Play..............................................................20
Creating Bass Part Play............................................................... 26
Saving Created Patterns ..................................................................... 30
Before using this unit, carefully read the sections entitled:
“USING THE UNIT SAFELY”
and “IMPORTANT NOTES”
(REFERRENCE MANUAL p. 2;
p. 8). These sections provide
important information concerning the proper operation
of the unit. Additionally, in order to feel assured that you
have gained a good grasp of
every feature provided by
your new unit, REFERRENCE
MANUALshould be read in its
entirety. The manual should
be saved and kept on hand as
a convenient reference.
Copyright © 1999 ROLAND CORPORATION
All rights reserved. No part of this publication may be reproduced in any form without the written
permission of ROLAND CORPORATION.
Page 2
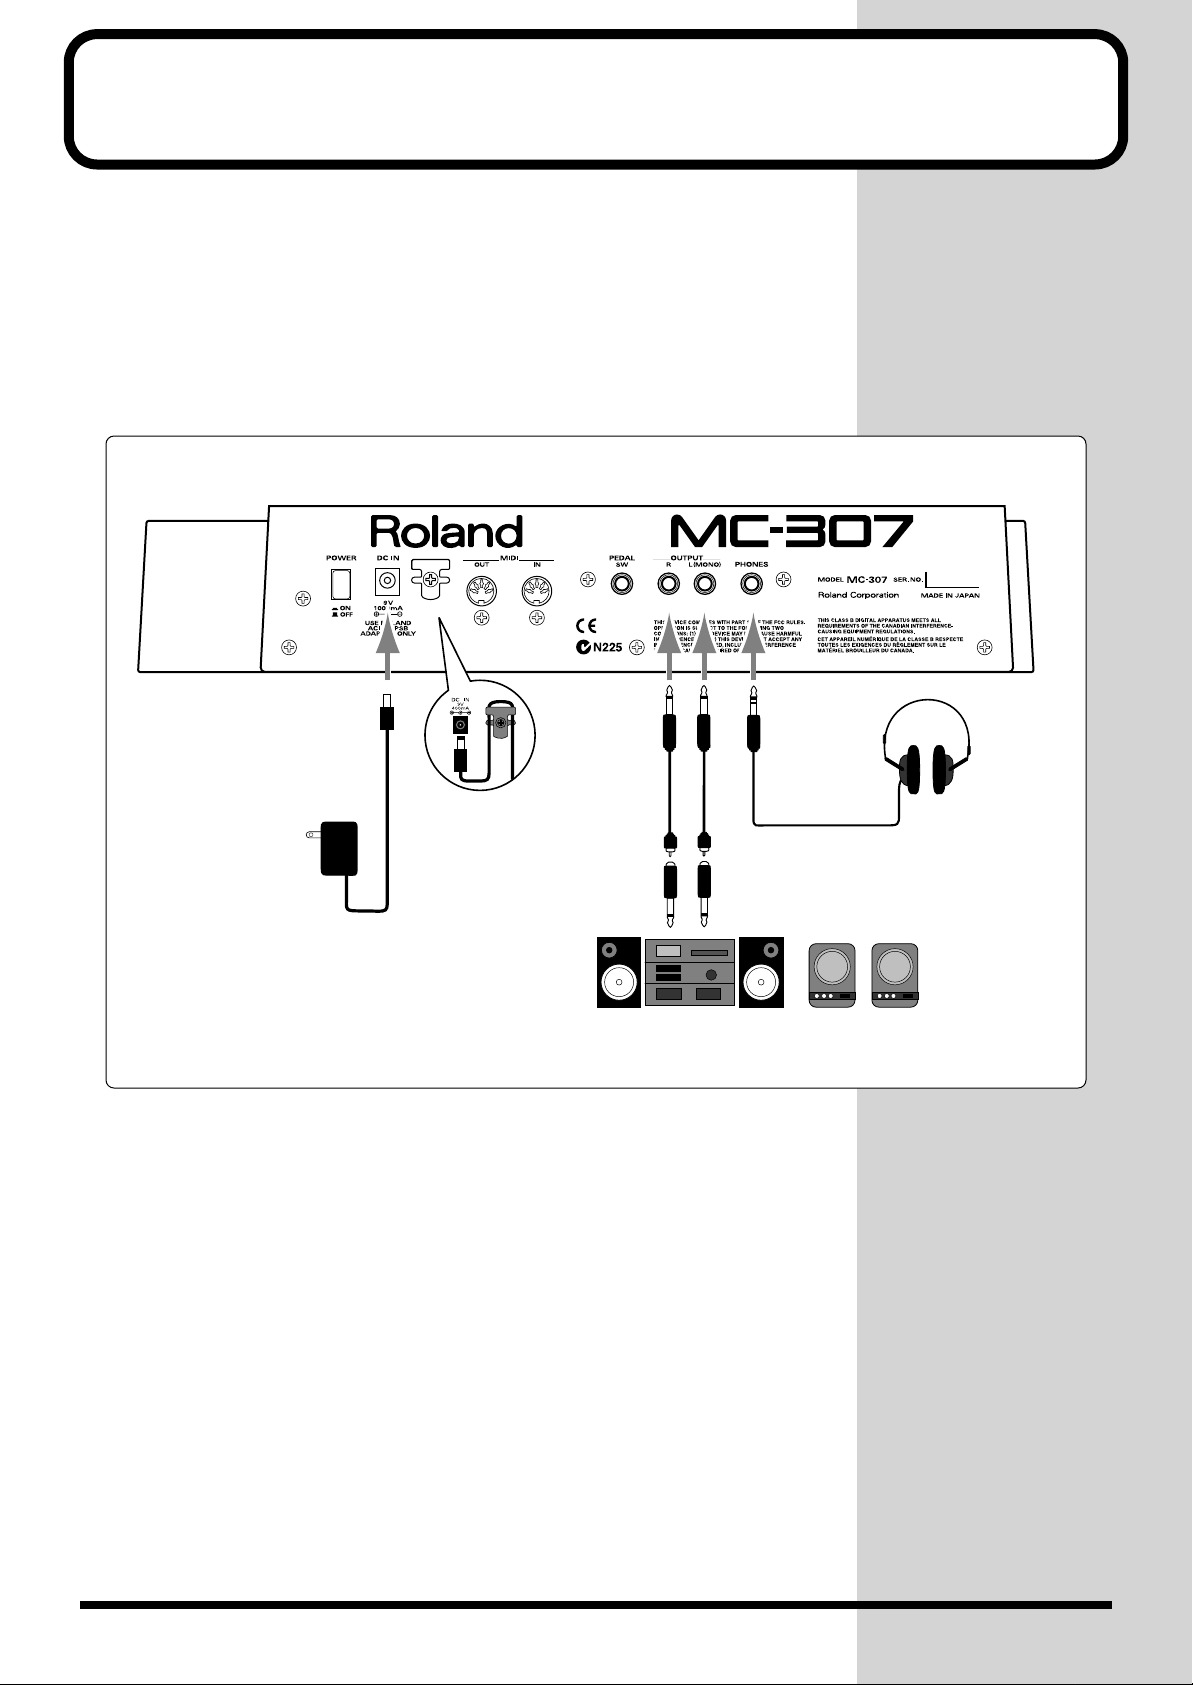
Making the Connections
The following describes how to get connected up for a typical setup.
If you intend to connect other external instruments, refer to the Owner’s
Manual (P.133).
* To prevent malfunction and/or damage to speakers or other devices, always turn down the
volume, and turn off the power on all devices before making any connections.
* Be sure to use the supplied AC adapter. Otherwise, malfunction may result.
Wind the cable around
the hook to prevent
accidental disconnection.
Audio Cable
Pin Jack (For connecting to audio equipment)
Phone Jack (For connecting to keyboard Amp.)
Included AC adapter
(to the AC outlet)
Keyboard amp, Audio set
* To prevent the inadvertent disruption of power to your unit (should the plug be
pulled out accidentally), and to avoid applying undue stress to the AC adaptor jack,
anchor the power cord using the cord hook, as shown in the illustration.
Stereo headphones
2
Page 3
Turning the Power On and Off
Turning the Power On
Once the connections have been completed (p. 2), turn on power to your various
devices in the order specified. By turning on devices in the wrong order, you risk
causing malfunction and/or damage to speakers and other devices.
* This unit is equipped with a protection circuit. A brief interval (a few seconds) after
power up is required before the unit will operate normally.
1
2
3
4
5
Make sure that the volume control Knob of the MC-307 and of
your amp system are turned to the minimum position.
Press the power switch on the MC-307’s rear panel to turn it
on.
Turn on the power of the amp that the MC-307 is connected to.
Put your amp’s volume at an appropriate level.
Press whatever keyboard pads you like, so you hear sound,
while you adjust the volume using the volume control knob on
the MC-307.
Turning the power off
Be sure to turn the power off in the proper order.
1
2
3
Turn down the volume control Knob on the MC-307, your
amp, and any other equipment so they are all at the minimum
position.
Turn off the power on the amp to which the MC-307 is
connected.
Then, turn off the power of the MC-307.
3
Page 4
Using
Page6
the MC-307
The MC-307 is a player-oriented version
of the groovebox. It features functions that
support real-time operation, and DJ-play.
This manual explains the major functions
of the MC-307.
See the appropriate pages for how to operate.
Wide range of
preset patterns
240 patterns are pre-installed,
covering almost all kinds of
dance music. Also, 200 original
patterns can be additionally stored.
4
Variety of patches
In addition to the 512 patches used
in the MC-505, 288 new dedicated
patches have been added to the MC-307.
Patches for any kind of situation are available.
Page10
Page 5
Page12 Page17
Page20
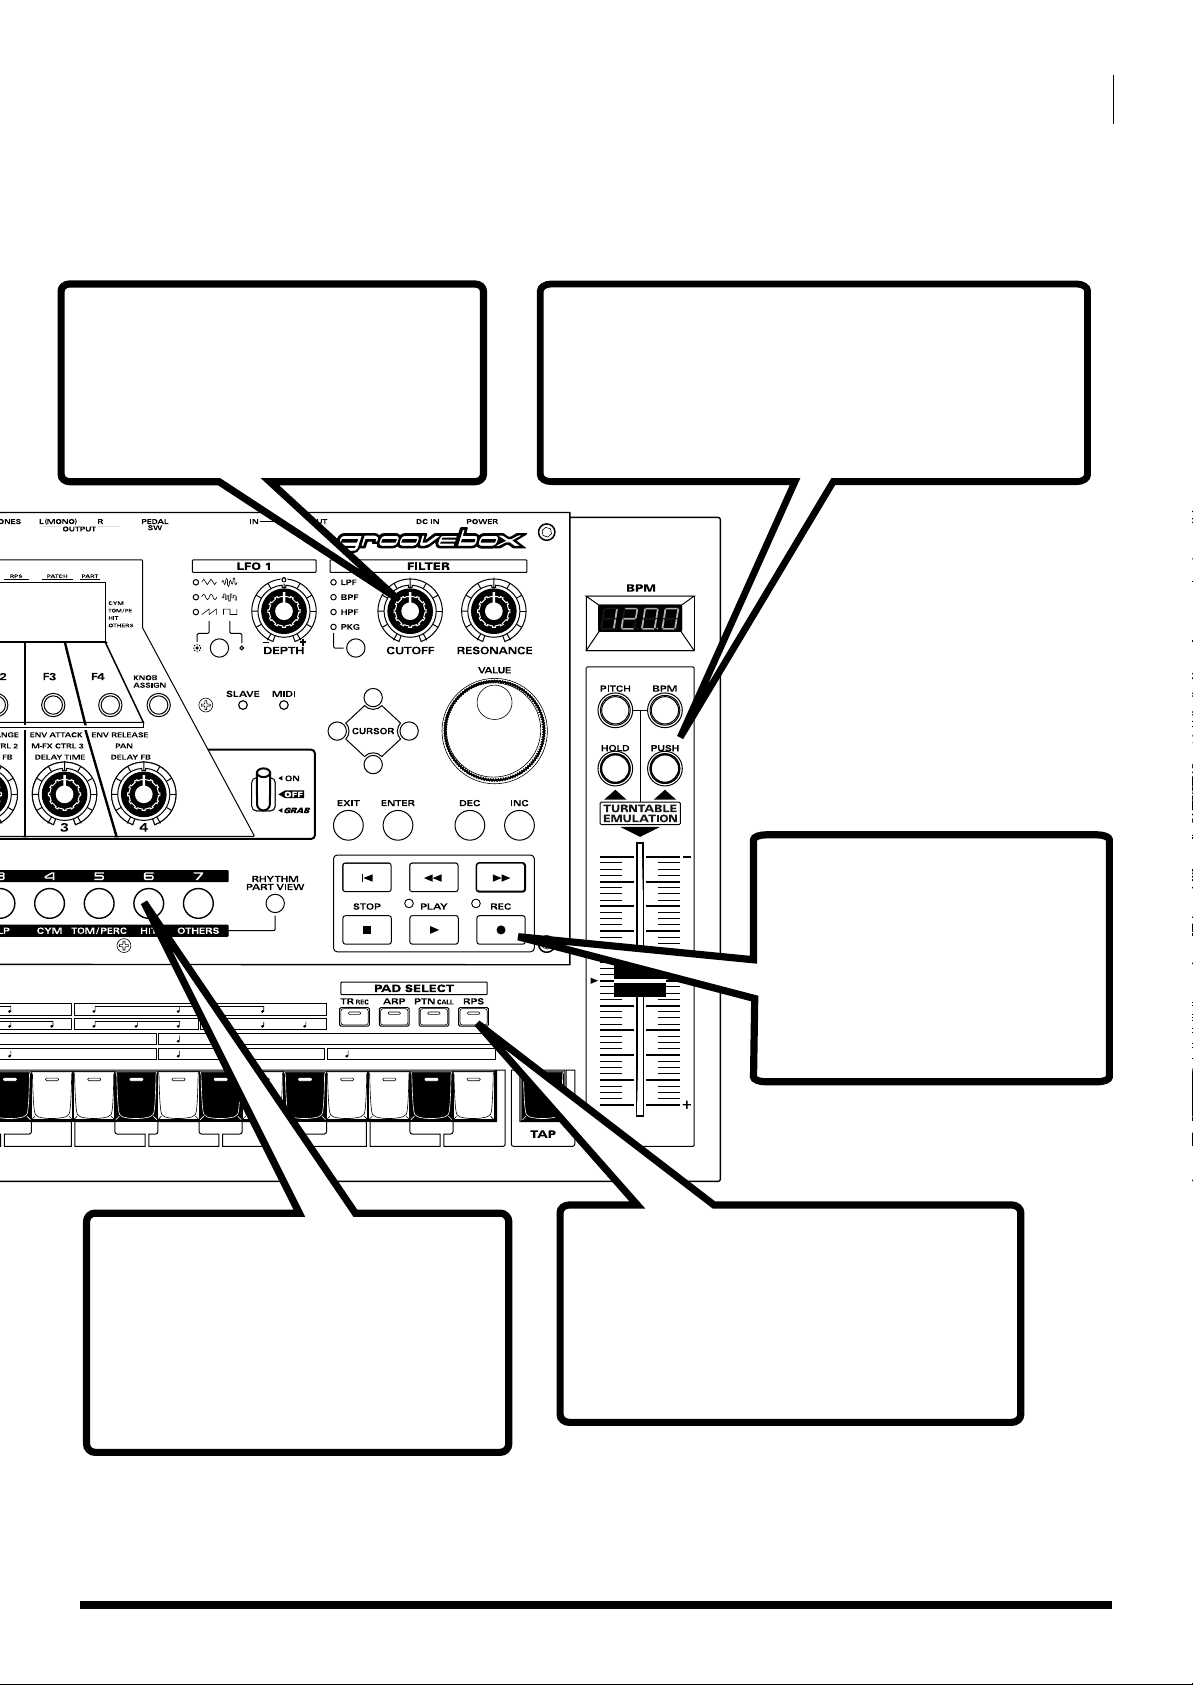
Various knobs capable
of real-time operation
These enable real-time tone changing
for use as one type of musical expression.
Dedicated "BPM display" and
"TURNTABLE EMULATION"
A display for indicating solely the tempo is provided.
This enables easy operation, similar to manually
finding the start of a track using a turntable.
Two types of
"Part mute button"
for adding variation to
pattern play
Starting with the piano solo, and then
adding bass and rhythm, musical
compositions can be handled in real time.
Page8
recording functions
Offers both "Real-time recording,"
which records play on the keyboard
pad as is, and "Tr-Rec" which
Records Using Simple Button
Operations.
"RPS" and "Arpeggiator"
for stronger sounds
Attractive live performance is possible
by adding phrases in real time.
Page18, 19
5
Page 6
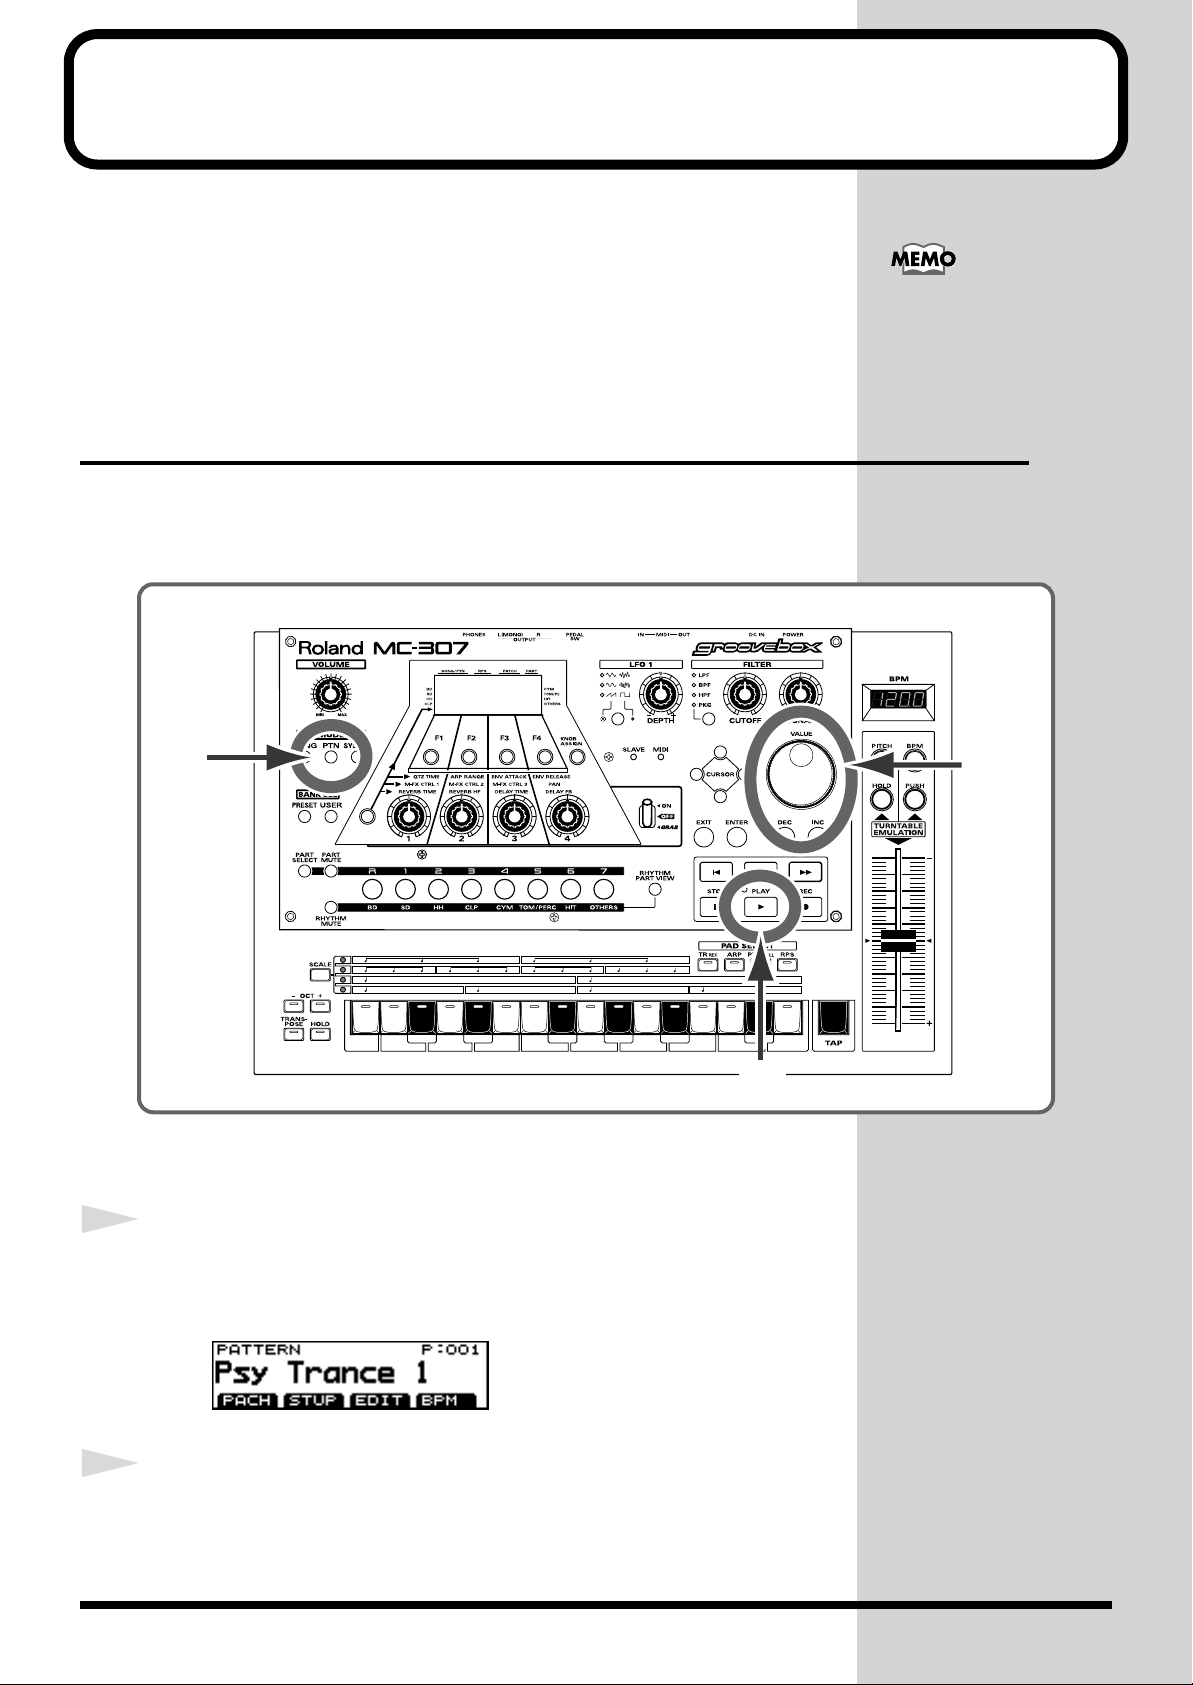
Listening to Various Patterns
A pattern consists of 1 to 32 measures of play that include patches and
rhythm sets of up to 8 parts.
The MC-307 is provided with 240 preset patterns. In addition to these, an
area for up to 200 user-created patterns is also available.
The procedure for playing back a preset pattern is explained here.
Playing Back Patterns Continuously
The procedure for playing back various patterns while maintaining the
tempo of the first pattern is explained here.
This method is useful for live performances.
For the procedure for
creating a user pattern, see
20page.
1
1
Procedure
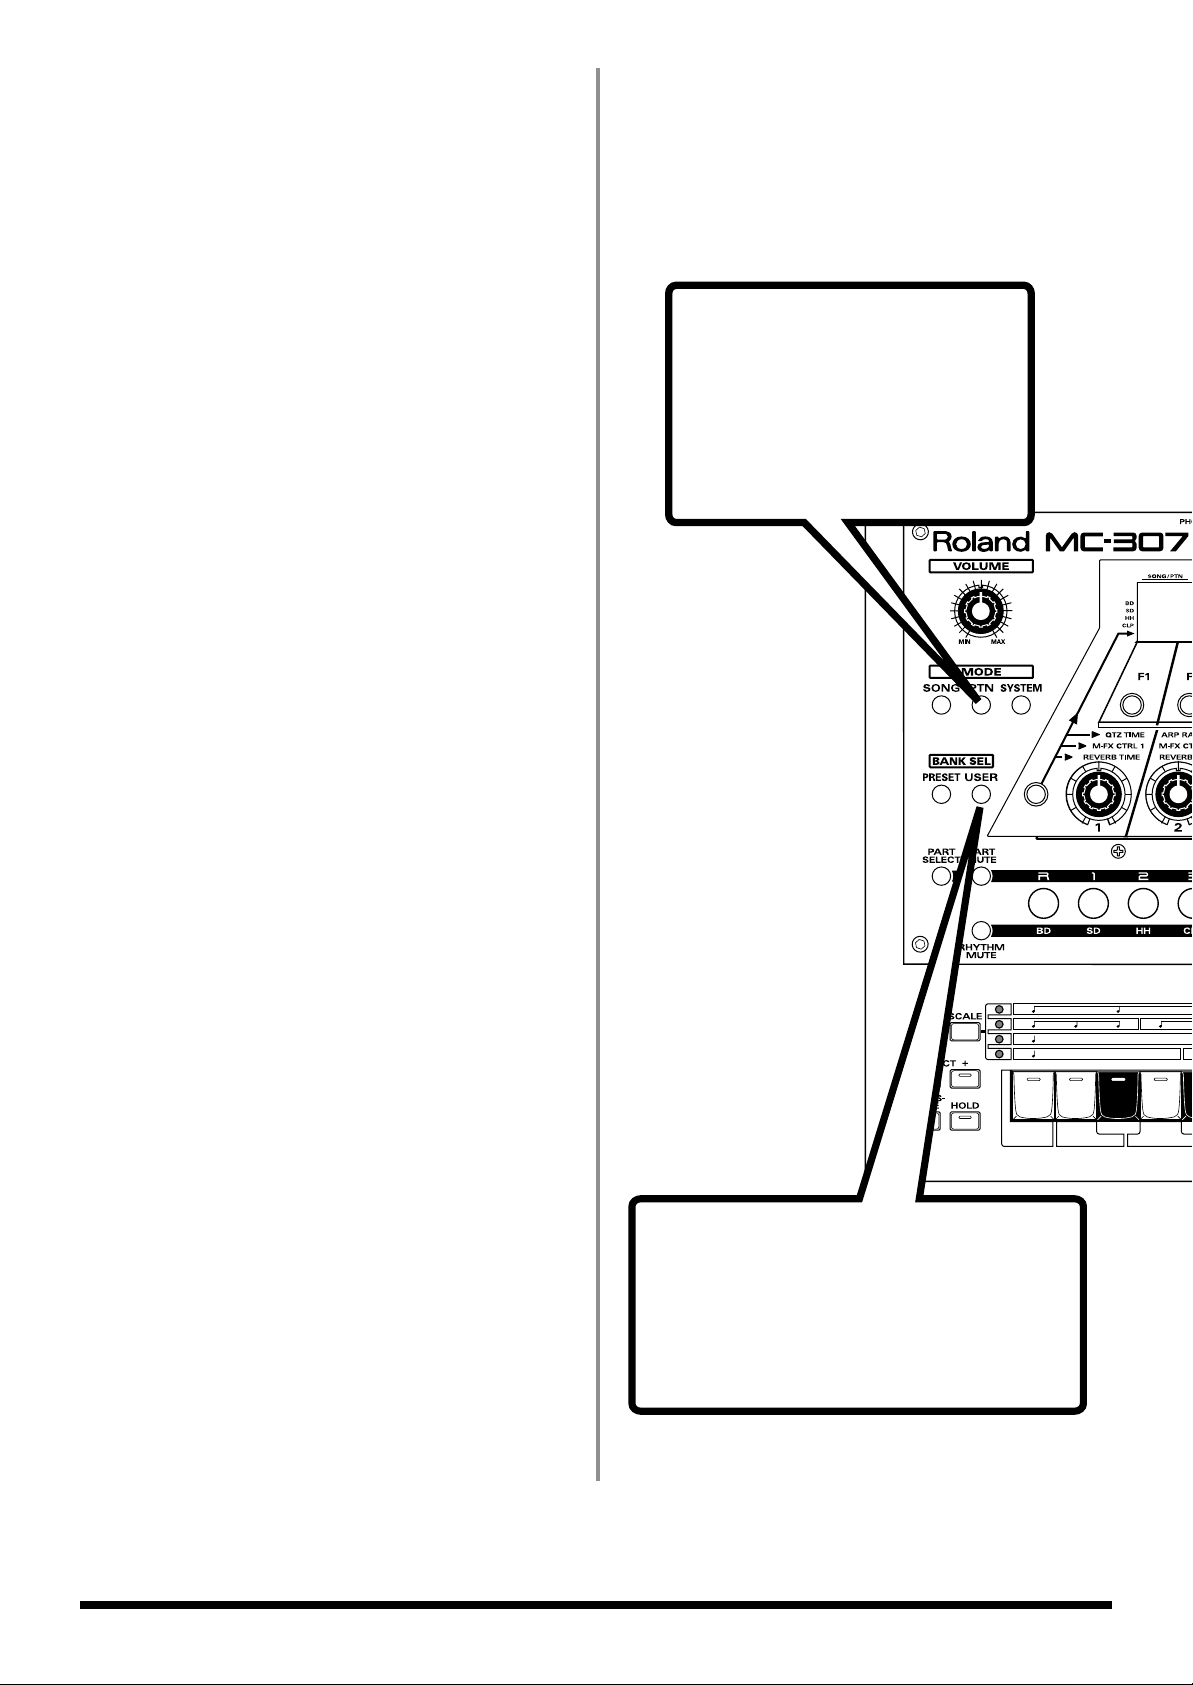
Press the [PTN] button.
The screen for playing back patterns appears.
3
2
6
2
Press the [PLAY] button.
The pattern is played.
Page 7
Listening to Various Patterns
b
3
4
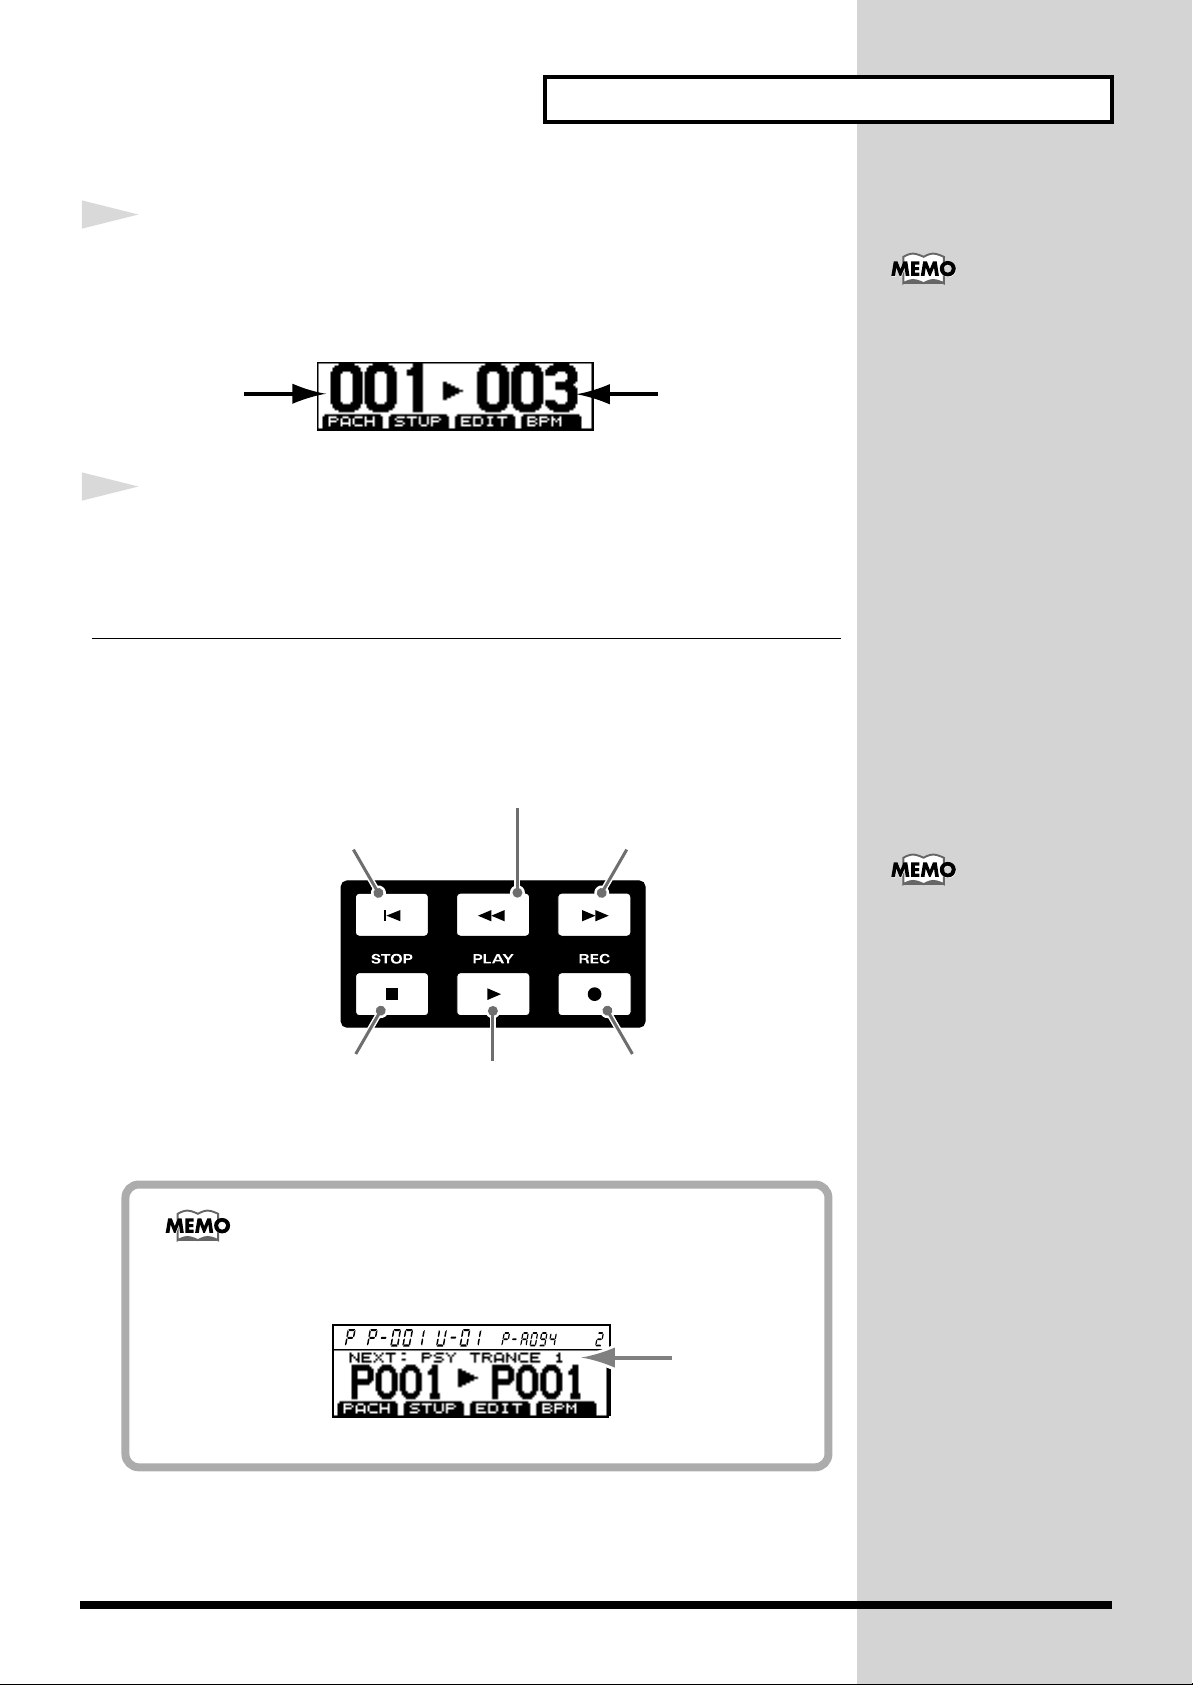
Using the [VALUE] dial or the [INC]/[DEC] buttons, select the
pattern to be played back.
Current Pattern
Number
Next Pattern
Number
After a while, playback is switched to the selected pattern.
In this way, various patterns can be played back successively without
stopping.
Playback-related operations are performed using the buttons shown in the
figure below.
Return to the previous measure.
The preset patterns are
classified as follows:
P: 001 - 090 Techno
P: 091 - 142 House
P: 143 - 179 Hip Hop
P: 180 - 203 Drum’n’Bass
P: 204 - 210 BreakBeats
P: 211 - 220 Jazz,Lounge
P: 221 - 225 Reggae
P: 226 - 240 Latin
During playback, you can
press the [CURSOR (left,
right)] buttons to
successively select the first
number of each genre.
Returns to the beginning of the pattern.
Starts playback.
Pressing the [PTN] button that appears in the screen in Step 3 allows you to
switch to the screen that also shows the name of the selected Pattern.
Proceeds to the next measure.
Used in recording. (P.20)Stops playback.
Next Pattern
Name
You can also have it so
Patterns play back at the
tempo set for each of them
every time there is a switch
to playback of a succeeding
Pattern.
- Stopping playback,
selecting a pattern, then
starting playback again
- Pressing the CURSOR
uttons (right or left)
during playback
7
Page 8
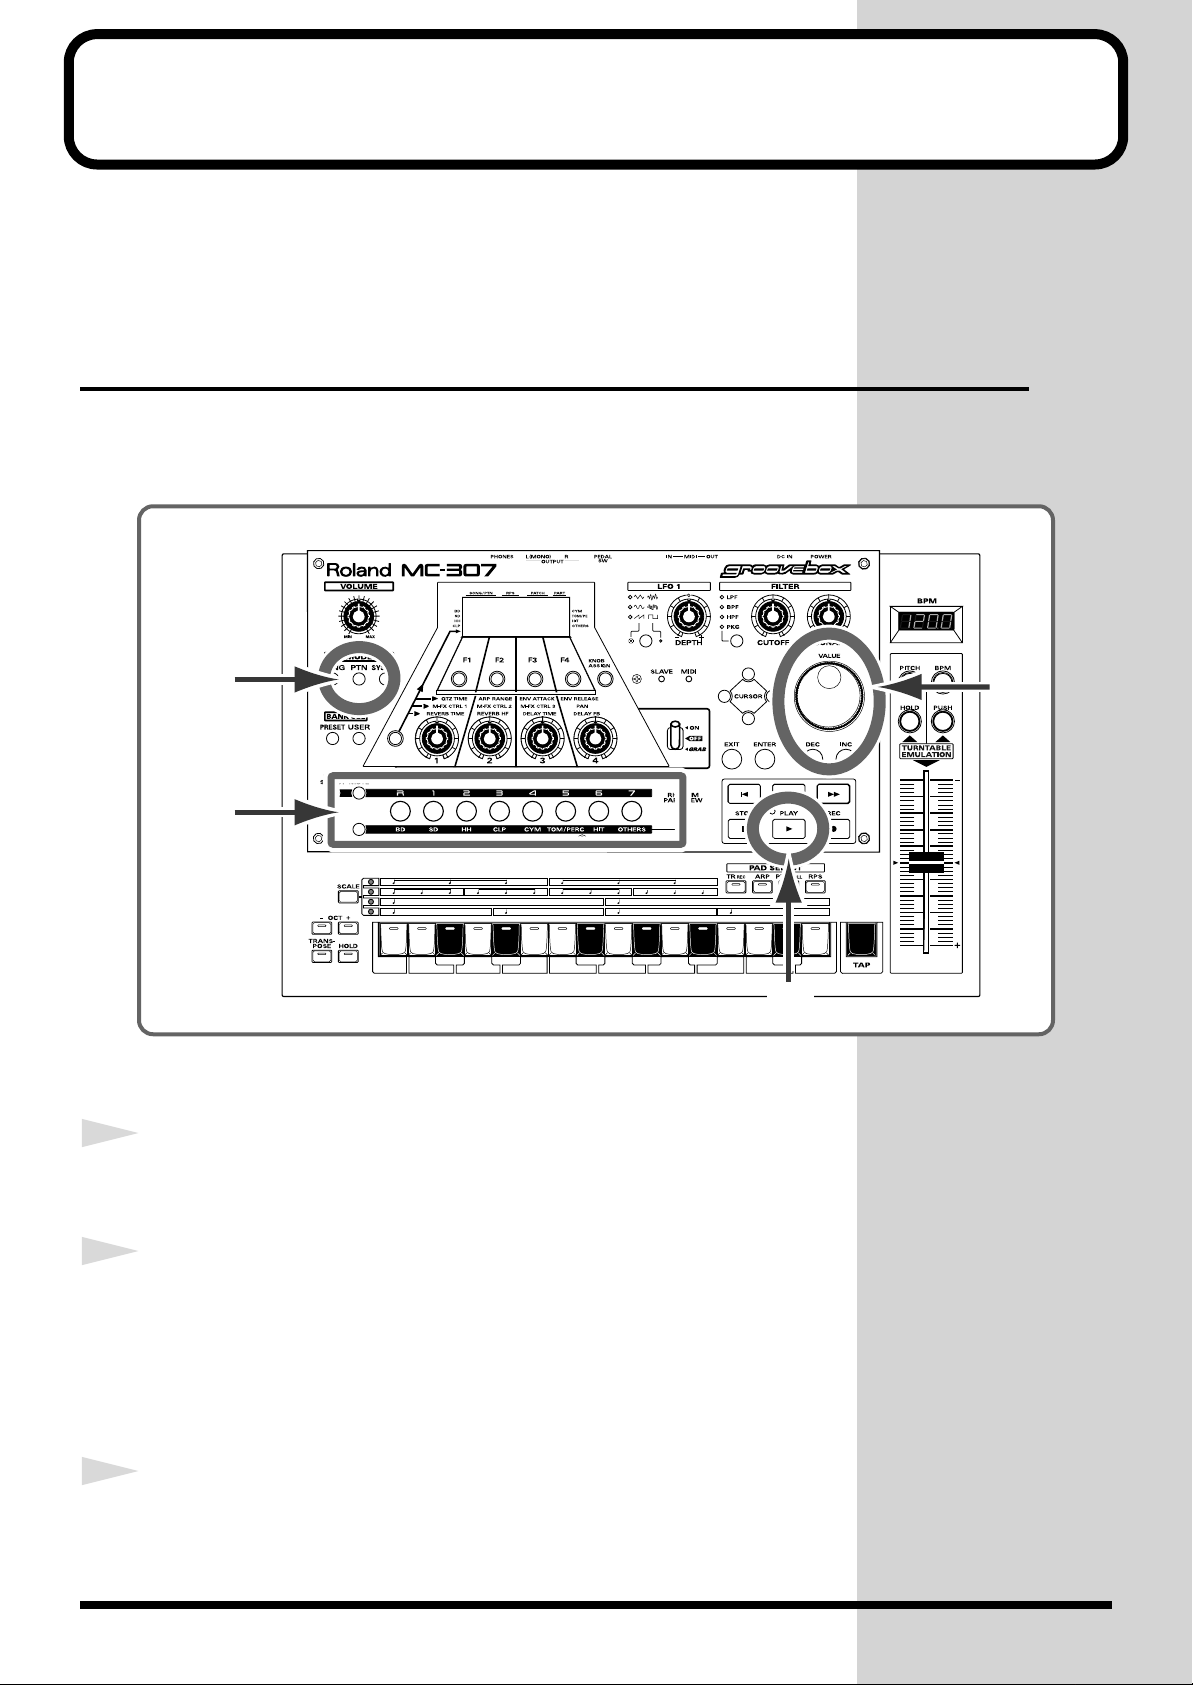
Adding Variations to Pattern Playback
The MC-307 is capable of adding variations to a pattern while playing it
back. While general sequencers are designed to play back pre-created music
only, the MC-307 is capable of adding variations to music in real time. This
is especially useful for dance music.
Using Mute Function
Use the mute function to add variations to sound play. Mute is one of the
most basic functions. It is also one of the essential techniques needed to
master the MC-307. Try playing a pattern in intro style.
1
2
1
3,5,
6,7,
8
Procedure
Press the [PTN] button.
The pattern playback screen appears.
Using the [VALUE] dial or the [INC]/[DEC] buttons, select
2
4
8
3
pattern P: 003.
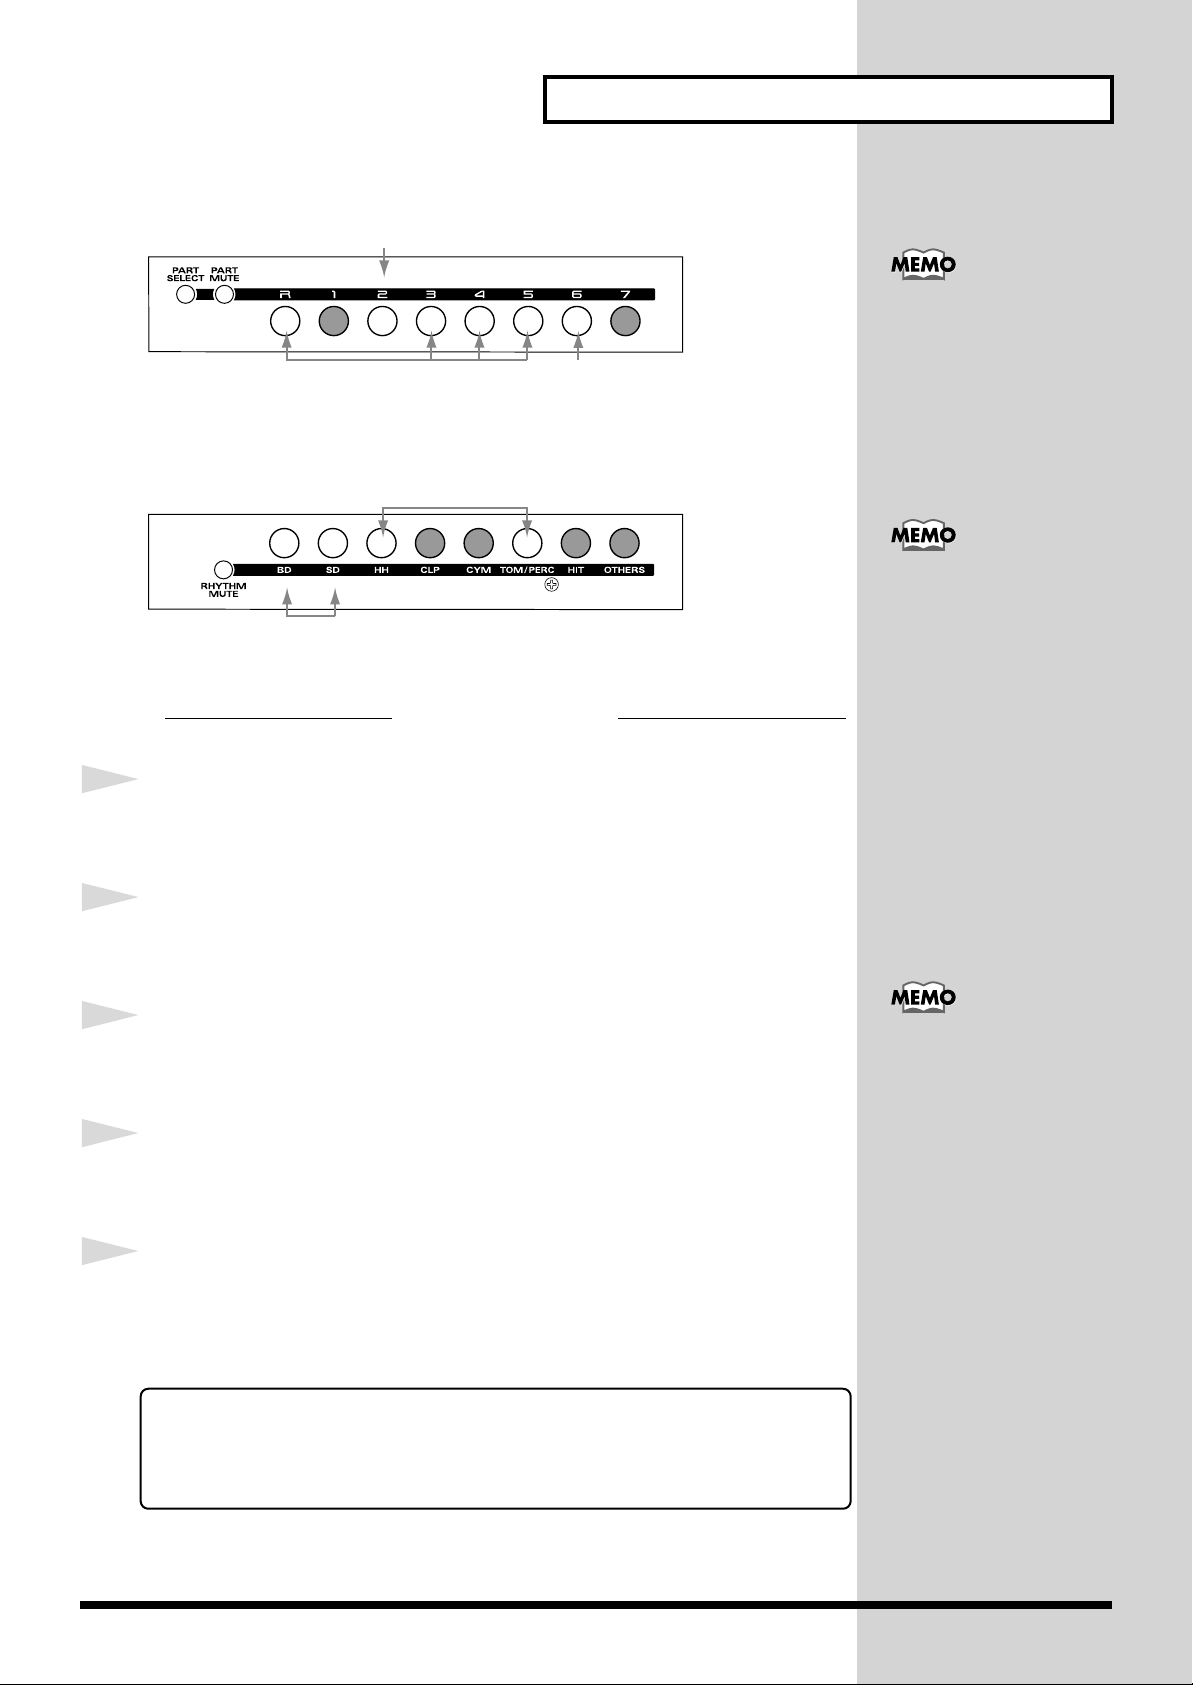
Set the part buttons [R] and [1] to [7] as shown in the figure on the following
page.
Press the [PART MUTE] button, then press the part buttons [R]
and [1] to [7] to set as follows.
Page 9
Adding Variations to Pattern Playback
b
Press it, and its indicator will start blinking
lit
Press the [RHYTHM MUTE] button, then press the part buttons [R] and [1]
to [7] (BD, SD.... OTHER) to set as follows.
Blinking
lit
Each part is equivalent to a
single player in a band or
orchestra. Parts 1 to 7 are
for playing chromatic
instruments such as piano
and bass, while part R is for
percussion instruments
such as drum.
The part buttons indicate
the following:
Press it, and its indicator will start blinking
Perform actual play.
4
5
6
7
8
Press the [PLAY] button.
The pattern is played back in intro style.
Press the [PART MUTE] button.
Then part muting can be operated.
After playback of several measures, press Part Button [2].
Bass starts to sound.
Press the [RHYTHM MUTE] button.
Now, rhythm muting can be operated.
After playback of several more measures, press [BD] button
(Part Button [R]).
Bass drum is added for more dynamism.
The above is a simple example. More complicated muting techniques, using
a variety of timings, could be used to create an entire song.
Try muting at various timings using other patterns.
Lit: Playback data exists,
Blinking:Muted,
Extinguished: No playback
data exists
The status, whether it is lit
or blinking, can be
switched by pressing the
part button.
With rhythm set muting,
the individual percussion
instruments making up
part R can be muted. Mute
uttons are classified as
follows:
BD: Bass Drum
SD: Snare Drum
HH: Hi-Hat
CLP: Hand Clap
CYM: Cymbal
TOM/PERC: TomTom/
Percussion
HIT: HIT/One Shot Sound
OTHERS: Others
9
Page 10
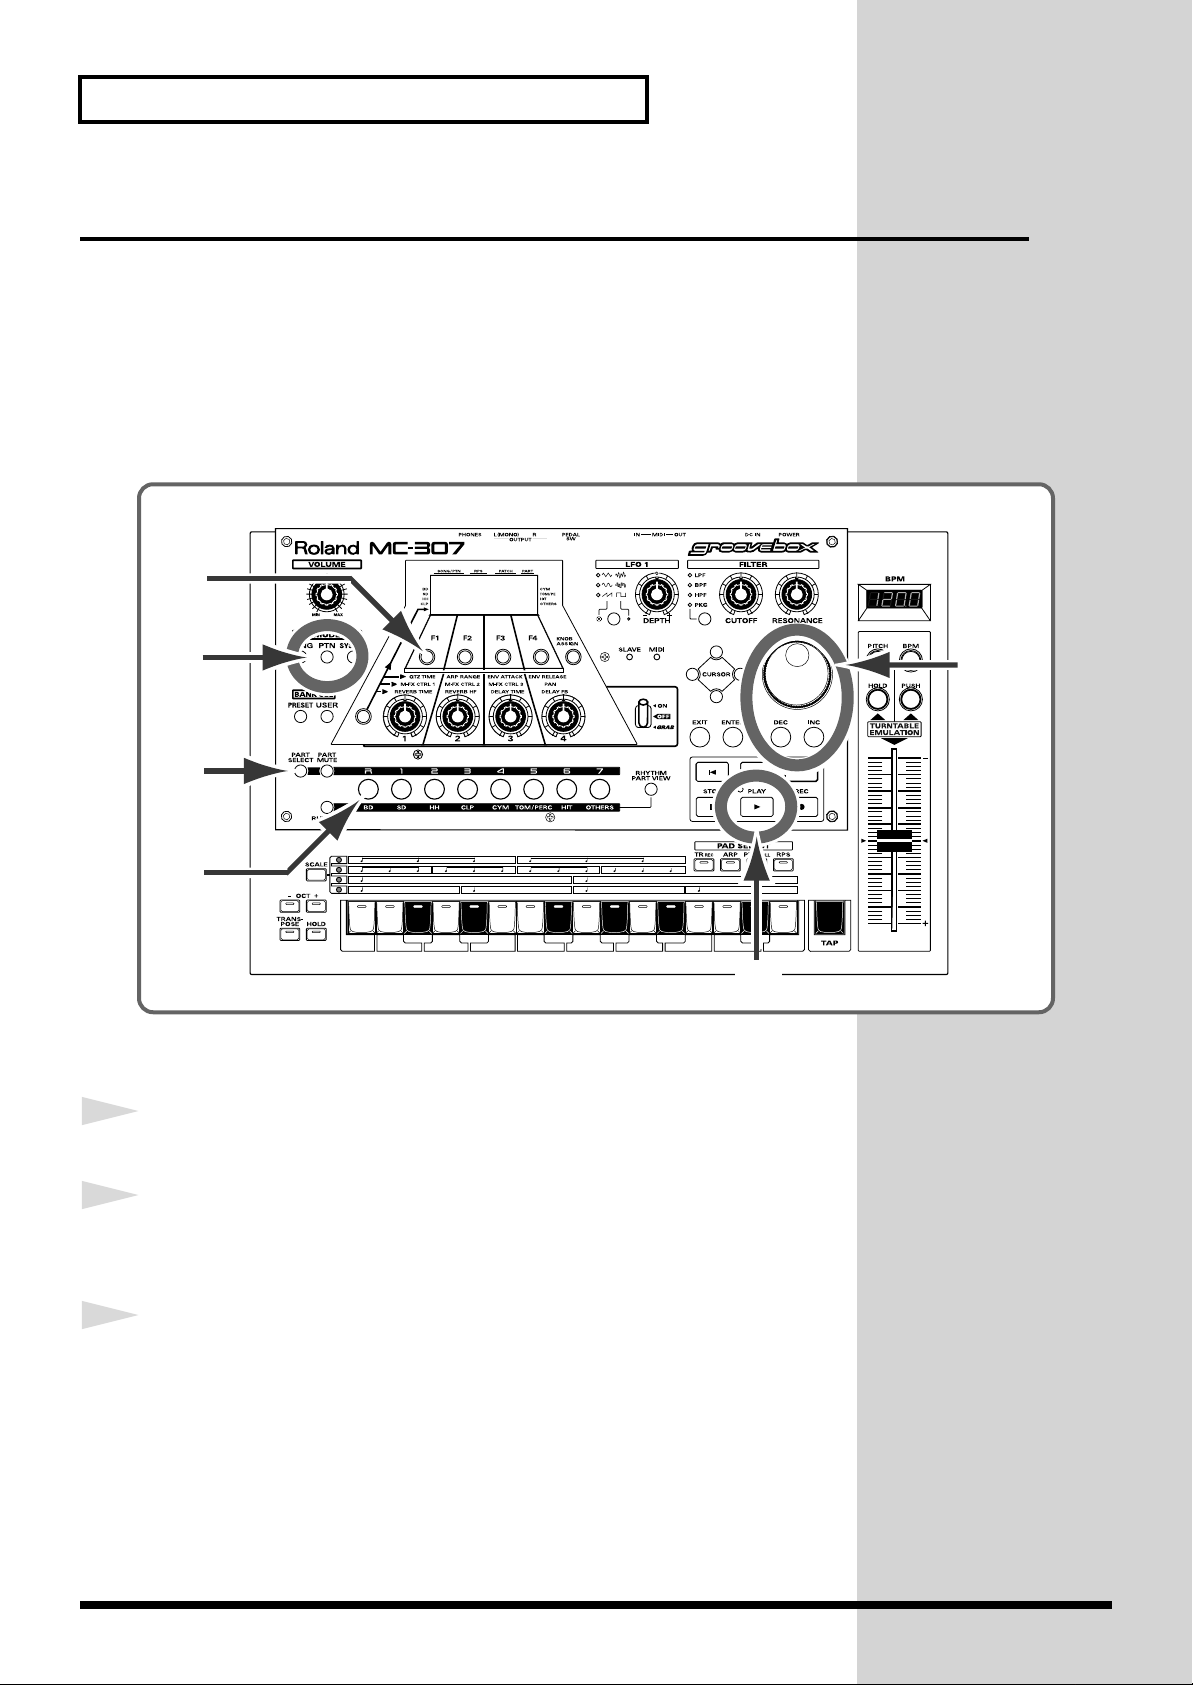
Adding Variations to Pattern Playback
Changing to Another Patch
By changing the patch (or rhythm set) used in the pattern, a completely
different pattern sound can be made. First, see how the pattern sound
changes by changing to various patches.
For example, try changing the rhythm set here. By changing the patch while
playing the pattern, the difference in sound between patches can be clearly
heard.
6
1
2
1
4
5
3
Procedure
Press the [PTN] button.
Using the [VALUE] dial or the [INC]/[DEC] buttons, select
2,7
3
10
pattern P: 003.
Press the [PLAY] button.
Pattern playback starts.
Page 11
4
5
6
Adding Variations to Pattern Playback
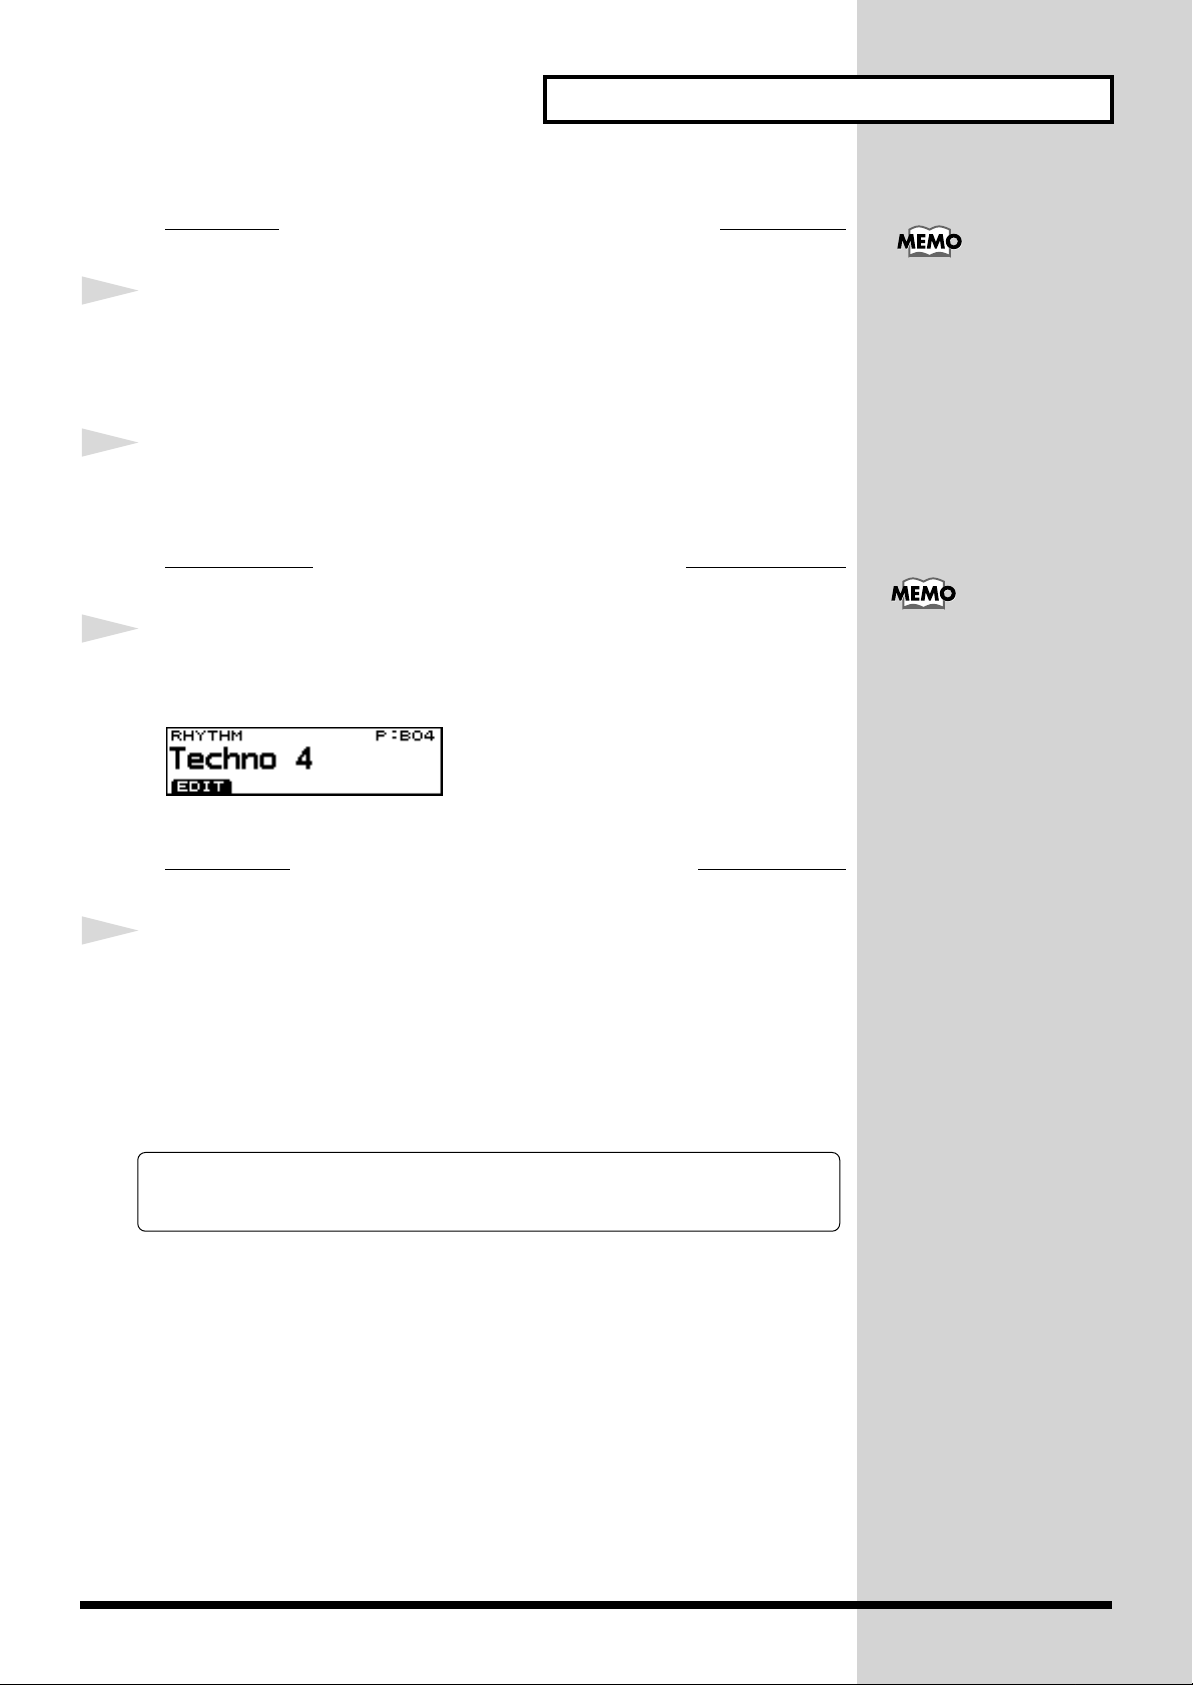
Switch to the screen indicating the patch names.
Press the [PART SELECT] button.
The part buttons [R] and [1] to [7] can be used to select the part.
The button of the currently selected part button is lit.
Press the [R] button.
The [R] button comes on, and the rhythm set part (part R) is selected.
Select the part of the sound to be varied.
Press the [F1 (PACH)] button.
The currently used rhythm set [P: B04 Techno4] is indicated.
The blinking button when
the [PART SELECT] button
is pressed indicates the
status of play. Since the
button blinks
corresponding to the
contents of play, it can be
used as a reference for part
selection.
[R] and [1] to [7] buttons
can be used for the
following three functions:
7
1. Part mute
2. Rhythm mute
3. Part select
Change to another rhythm set and play it.
Select a rhythm set using the [VALUE] dial or the [INC]/
[DEC] buttons.
For example, [P: A04 CR78 & Cheaps] makes the sound lighter, and [P: A24
Industrial] makes the sound heavier.
Just changing the patch or rhythm set make the sound very different. This
function is useful for getting the pattern to be more like what you envision.
11
Page 12
Functions for DJ Performance
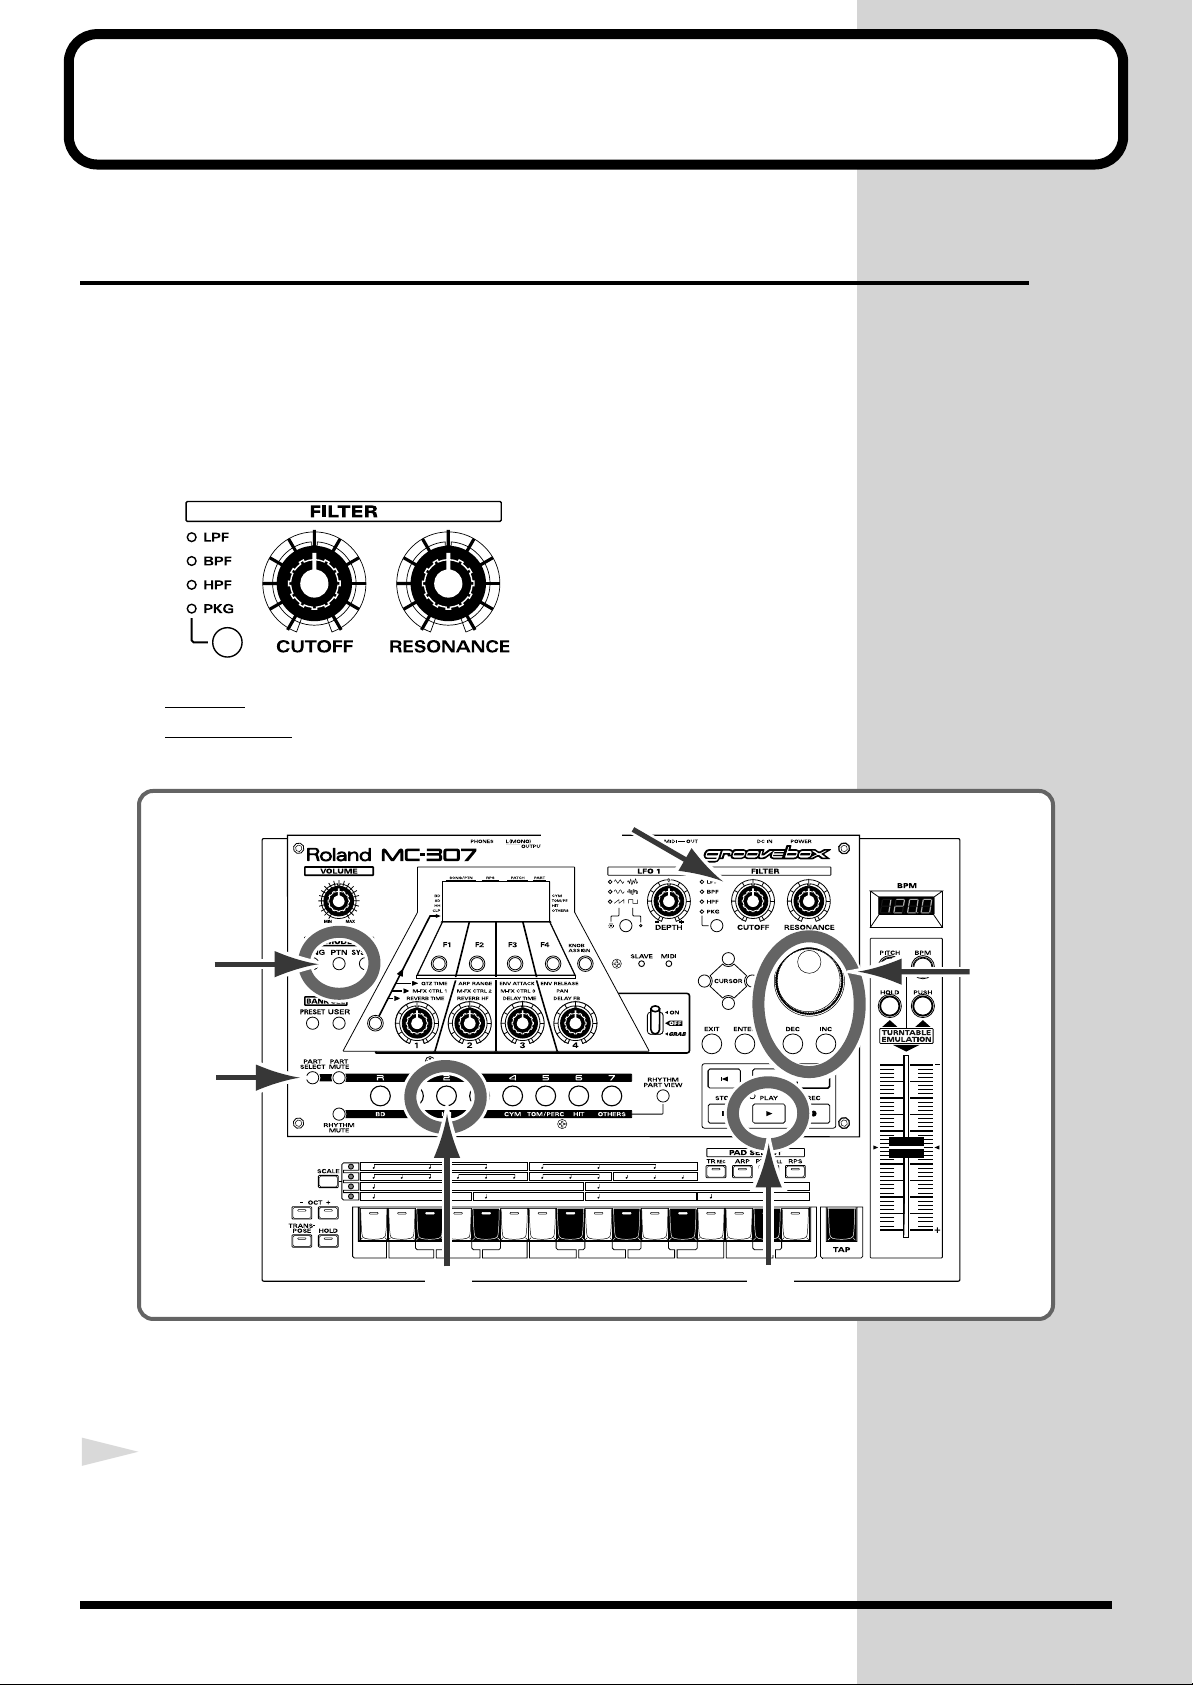
Adding Variations to Sound Using Knobs
The MC-307 is capable of changing how the patterns sound during playback
and using the changed version as one sound expression.
Try using the “CUTOFF” and “RESONANCE” knobs to enjoy sound
variations. You can enjoy sound variations unique to the synthesizer.
Function of each knob
CUTOFF: Makes the sound more brilliant or softer.
RESONANCE: Gives the sound qualities unique to the synthesizer.
6,7
1
4
2
1
12
35
Procedure
Press the [PTN] button.
The screen for playing patterns appears.
Page 13
Functions for DJ Performance
2
3
4
5
Using the [VALUE] dial or the [INC]/[DEC] buttons, select
pattern P: 002.
Press the [PLAY] button.
Playback starts.
Select the part of the sound to be varied.
Press the [PART SELECT] button.
The part buttons [R] and [1] to [7] can be used to select part.
Press part button [2].
The [2] button comes on, and Part 2 is selected.
Perform actual play.
[R] and [1] to [7] buttons
can be used for the
following three functions:
1. Part mute
2. Rhythm mute
3. Part select
6
7
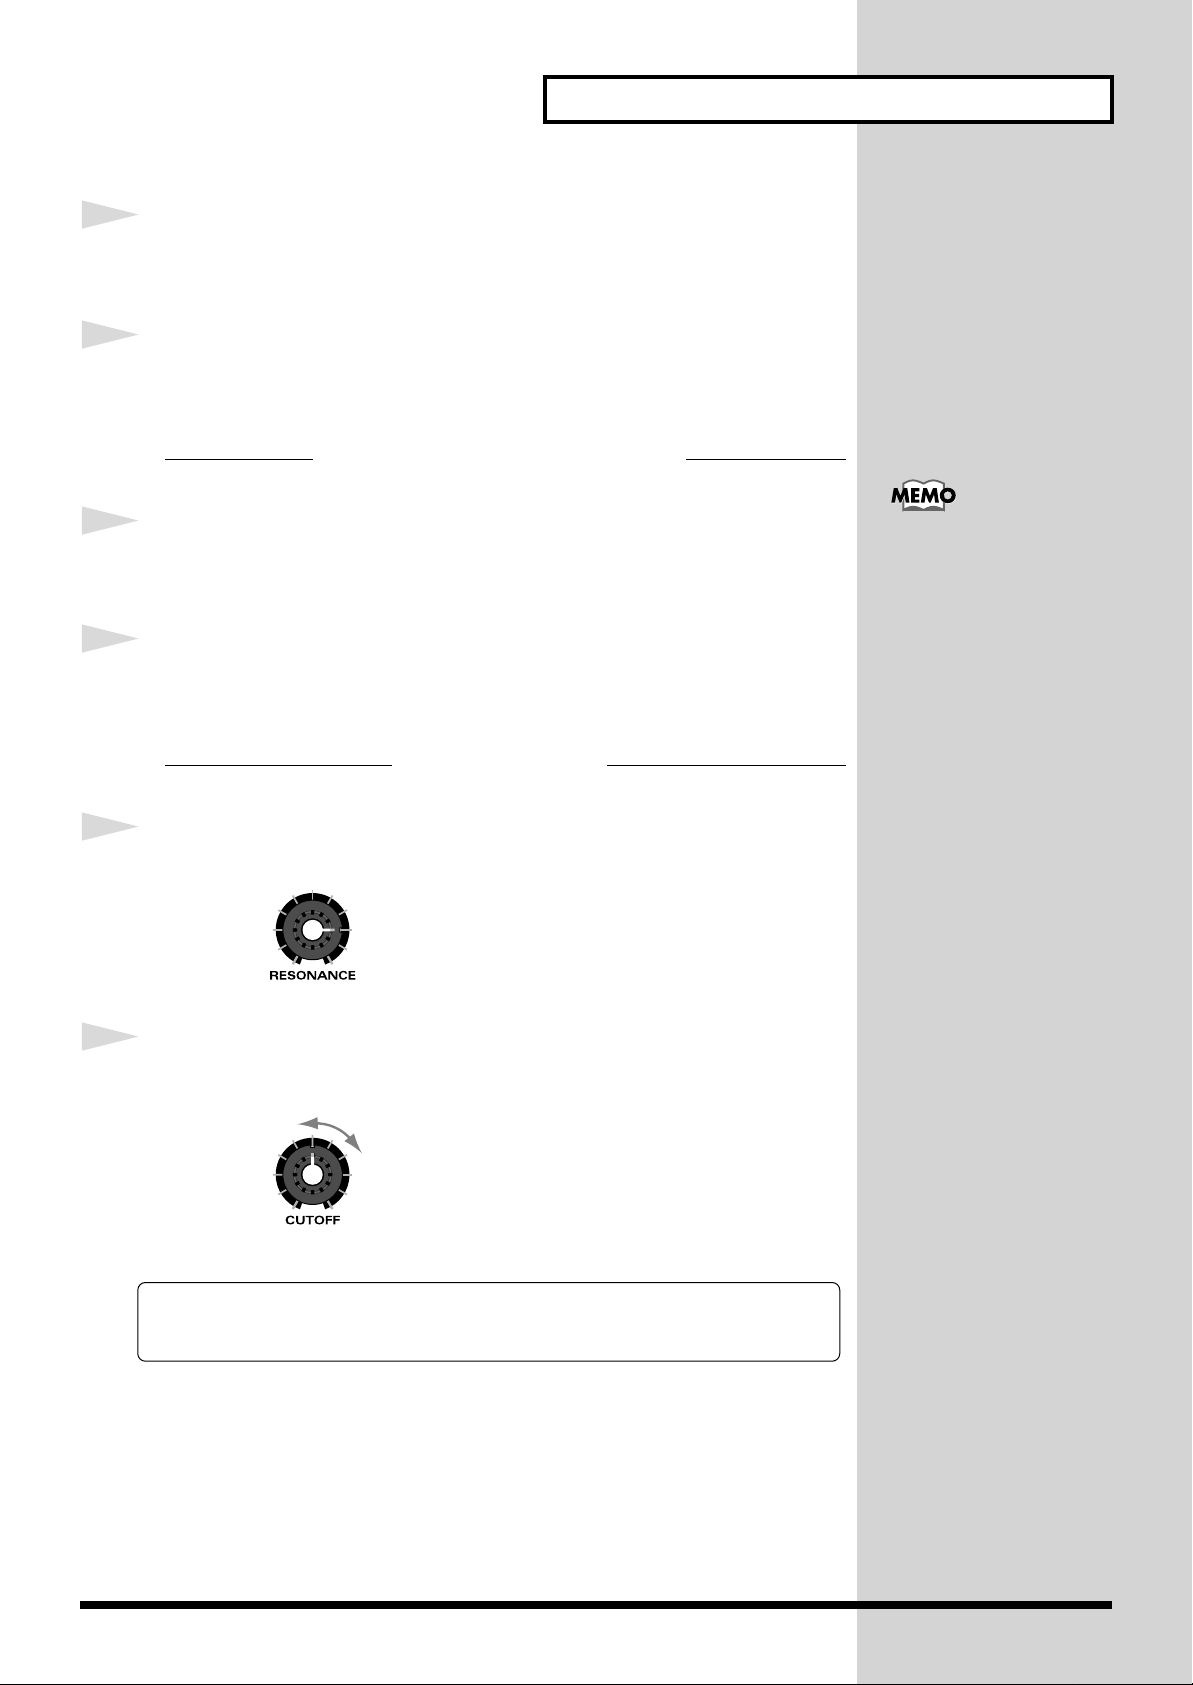
Place the [RESONANCE] knob as shown below.
Keep moving the [CUTOFF] knob as shown below.
As the knob is moved, the sound varies.
This way, by moving the knob along with the sound play, a more groovy
feeling can be added.
13
Page 14
Functions for DJ Performance
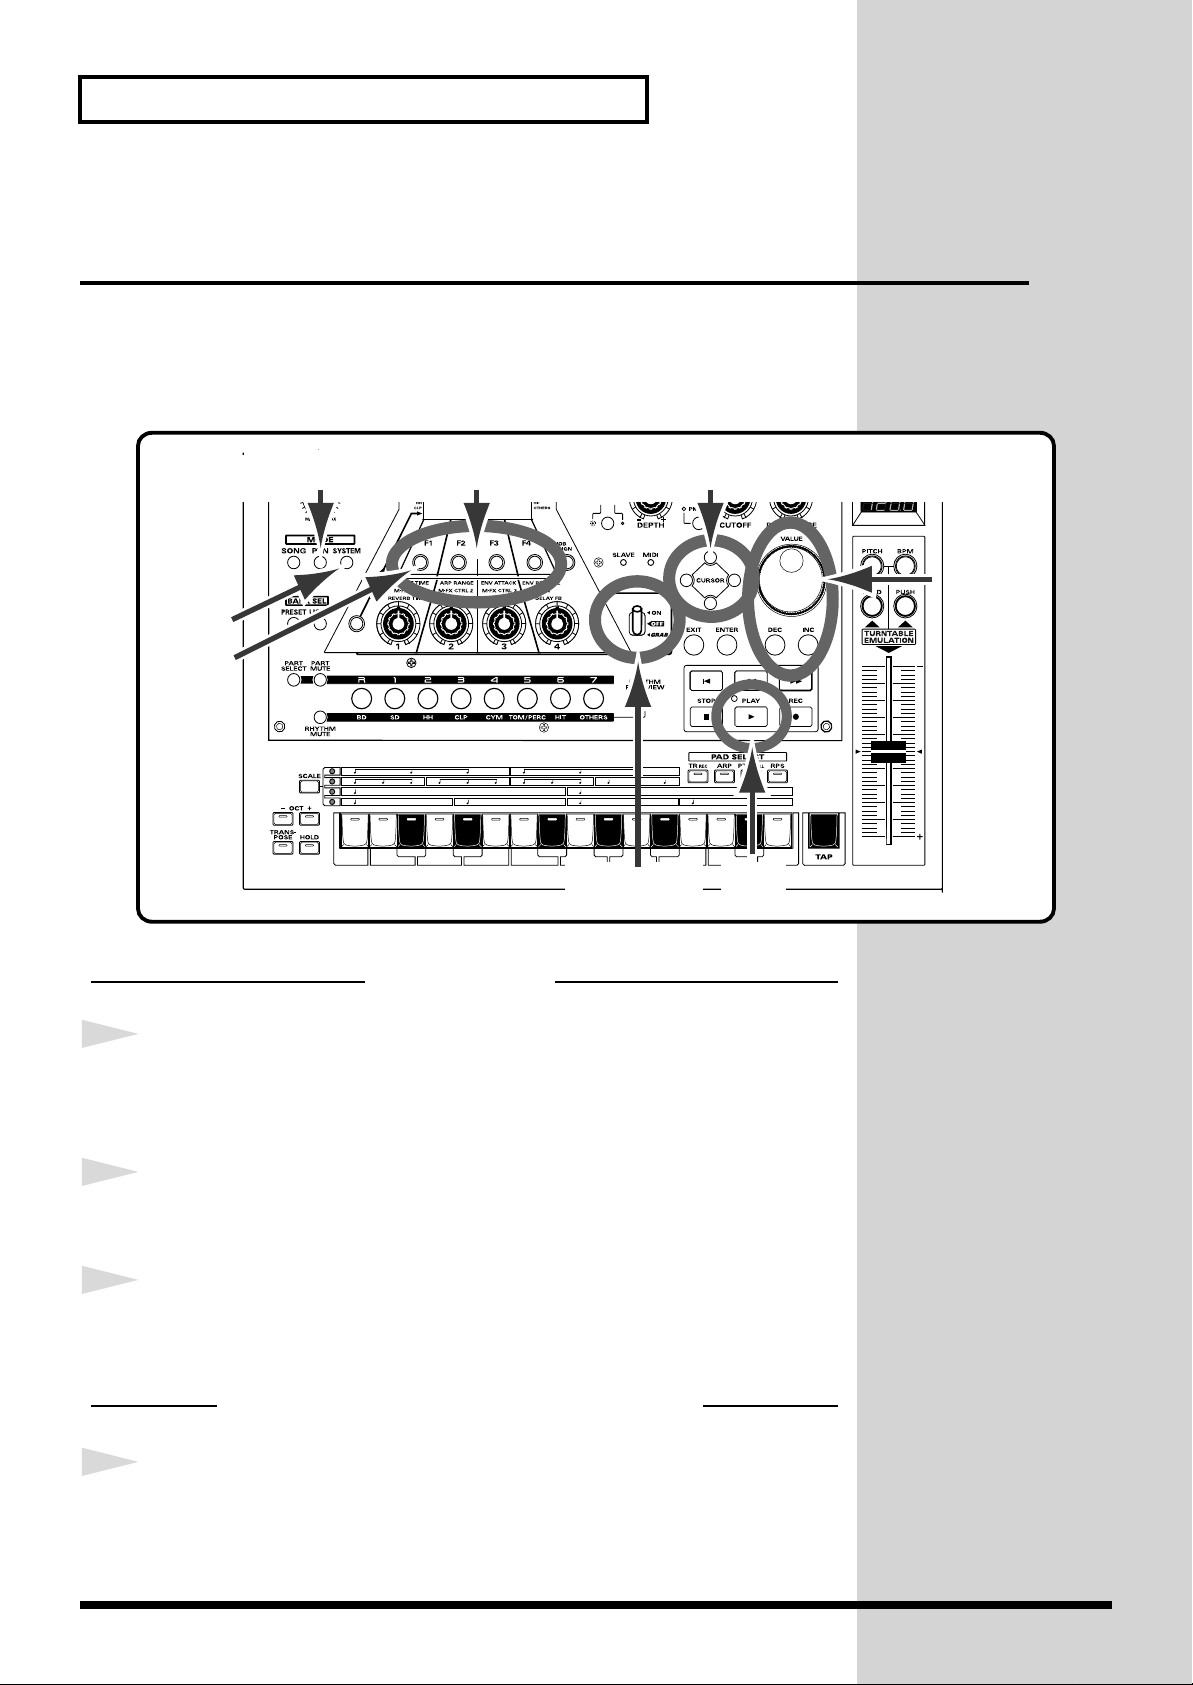
Cutting the Sound of a Specific Frequency Range (Isolator)
The Isolator can be used to cut a specific frequency range. It operates in
essentially the same way as an equalizer, but the isolator can cut the sound
more strongly. In addition, the isolator can be turned on/off in real time
using the GRAB switch to produce interesting effects.
2,5,9,117 3,6
1,4
8,10
1
2
3
4
1312,14
Procedure
Turn on all effects
Press the [SYSTEM] button and then the [F1 (SYS)] button.
System setting items 1–4 will be displayed. If they are not displayed, press [CURSOR
(up)].
Press [F1 (SND)] button.
The SYSTEM: SOUND screen will appear. If it does not appear, press [F1 (SND)].
Use the [CURSOR] buttons to move to the name of each effect
unit, and turn all of them "ON."
Make settings so that the GRAB switch will operate
Press the [SYSTEM] button and then the [F1 (SYS)] button.
14
System setting items 1–4 will be displayed. If they are not displayed, press [CURSOR
.
(up)]
Page 15
Functions for DJ Performance
5
6
7
8
9
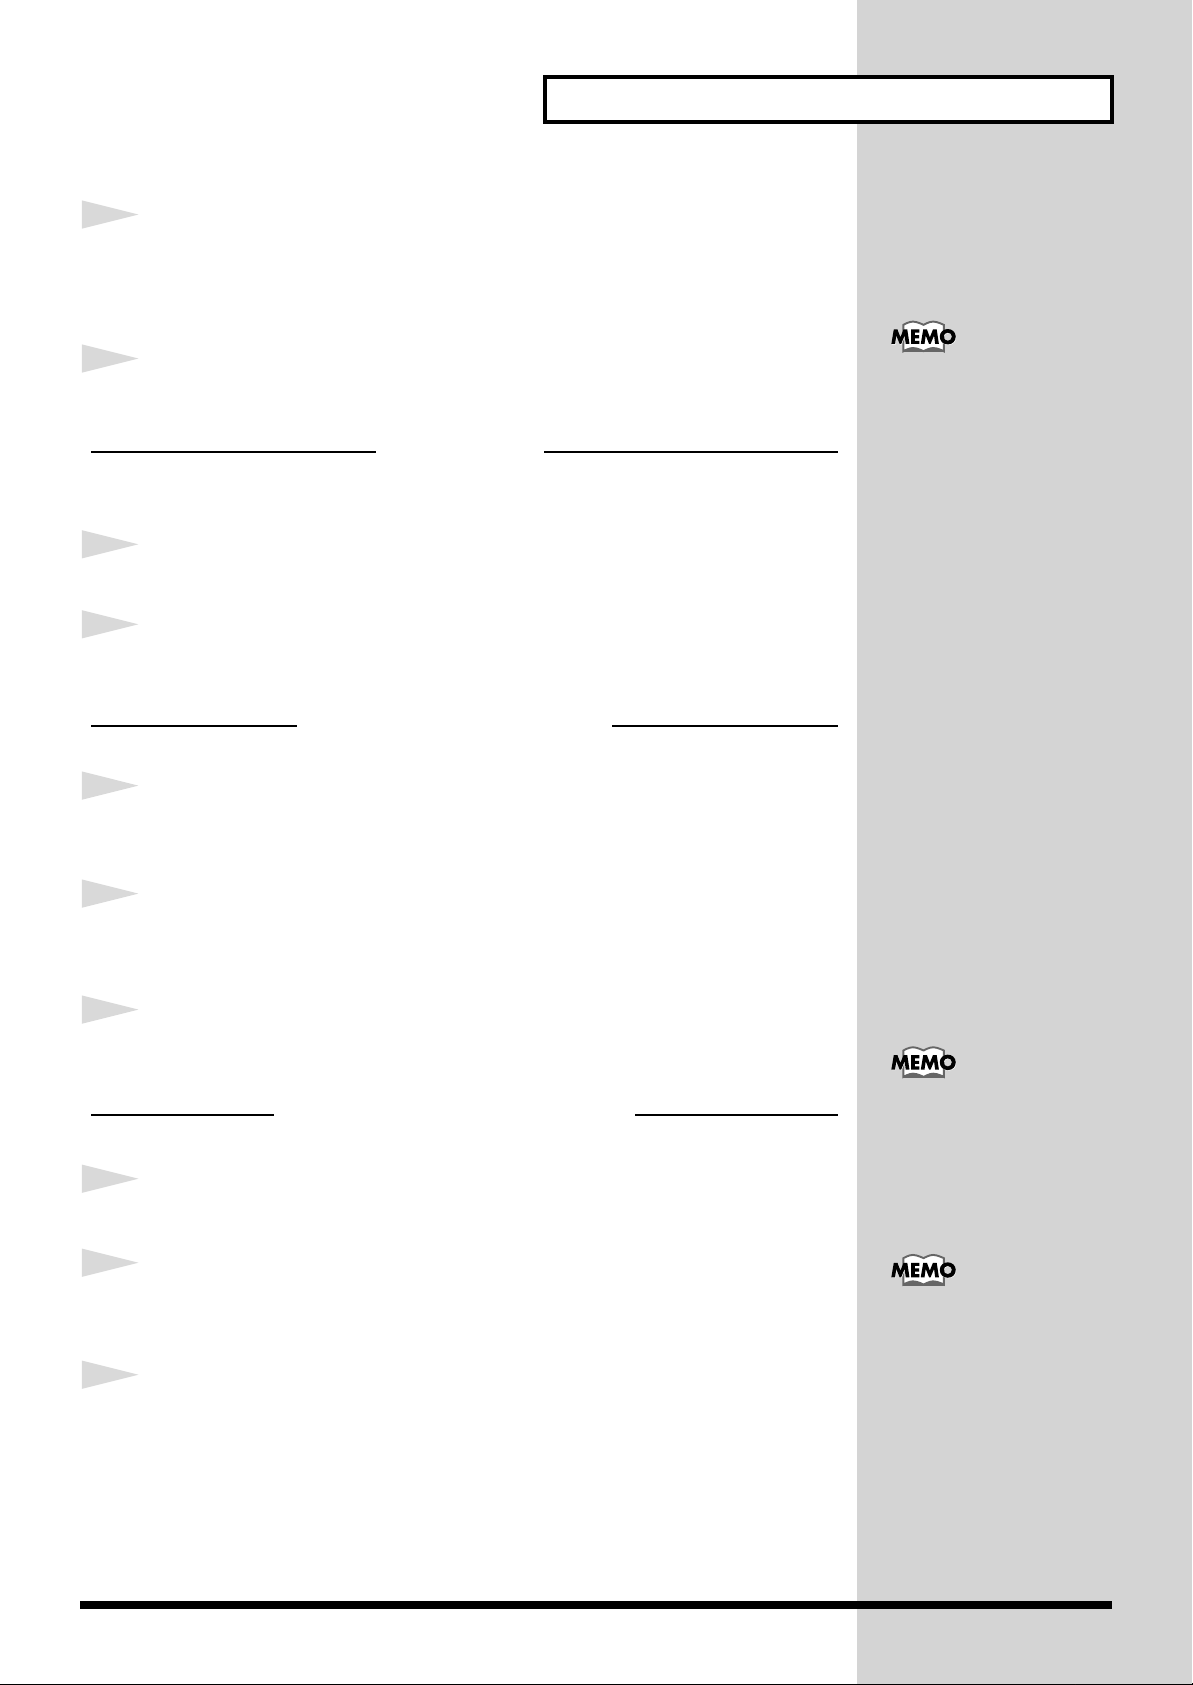
Press the [F2 (LCD)] button, and then press the [F3 (GRAB)]
button.
The SYSTEM: GRAB screen will appear.
Use the [CURSOR] buttons to move to the name of each effect unit, and
turn M-FX"ON," and REVERB and DELAY "OFF."
Select a pattern
This is a pattern that has been set so that M-FX will be applied to all parts.
Press the [PTN] button.
Use the [VALUE] dial or the [INC/DEC] buttons to select "P:
065 Dream Trance 2."
For M-FX Type, select "Isolator."
Press [F2 (STUP)], and then press [F4 (M-FX)].
The "M-FX TYPE:" screen will appear.
With the settings of step 6,
M-FX can be operated by
the GRAB switch, and
reverb and delay will
always be on regardless of
the GRAB switch.
10
11
12
13
14
Use the [VALUE] dial or the [INC/DEC] button to select "25
ISOLATOR."
Press [F4 (PRM)] to access the Isolator setting screen. Set LOW
GAIN and MID GAIN to "0," and HIGH GAIN to "127."
Now, let’s try using the GRAB switch.
Set the [GRAB] switch to the OFF position.
Press the [PLAY] button.
The pattern will begin playing.
In time with the playback tempo, repeatedly move the switch
to the "GRAB" position, and release it so that it returns to the
"OFF" position.
While the switch is being held in the "GRAB" position, the isolator will allow only
the high-frequency range of the performance will be heard. If the switch is moved to
the "ON" position, the isolator will remain in effect.
The settings of step 11 allow
only the high-frequency
range to remain.
The GRAB switch can be
used on the reverb, delay,
and multi-effect (M-FX)
that are used on the
pattern. Try switching to a
different pattern, and see
how the GRAB switch
affects it.
15
Page 16
Functions for DJ Performance
Delay (Echo) and Reverb Effects
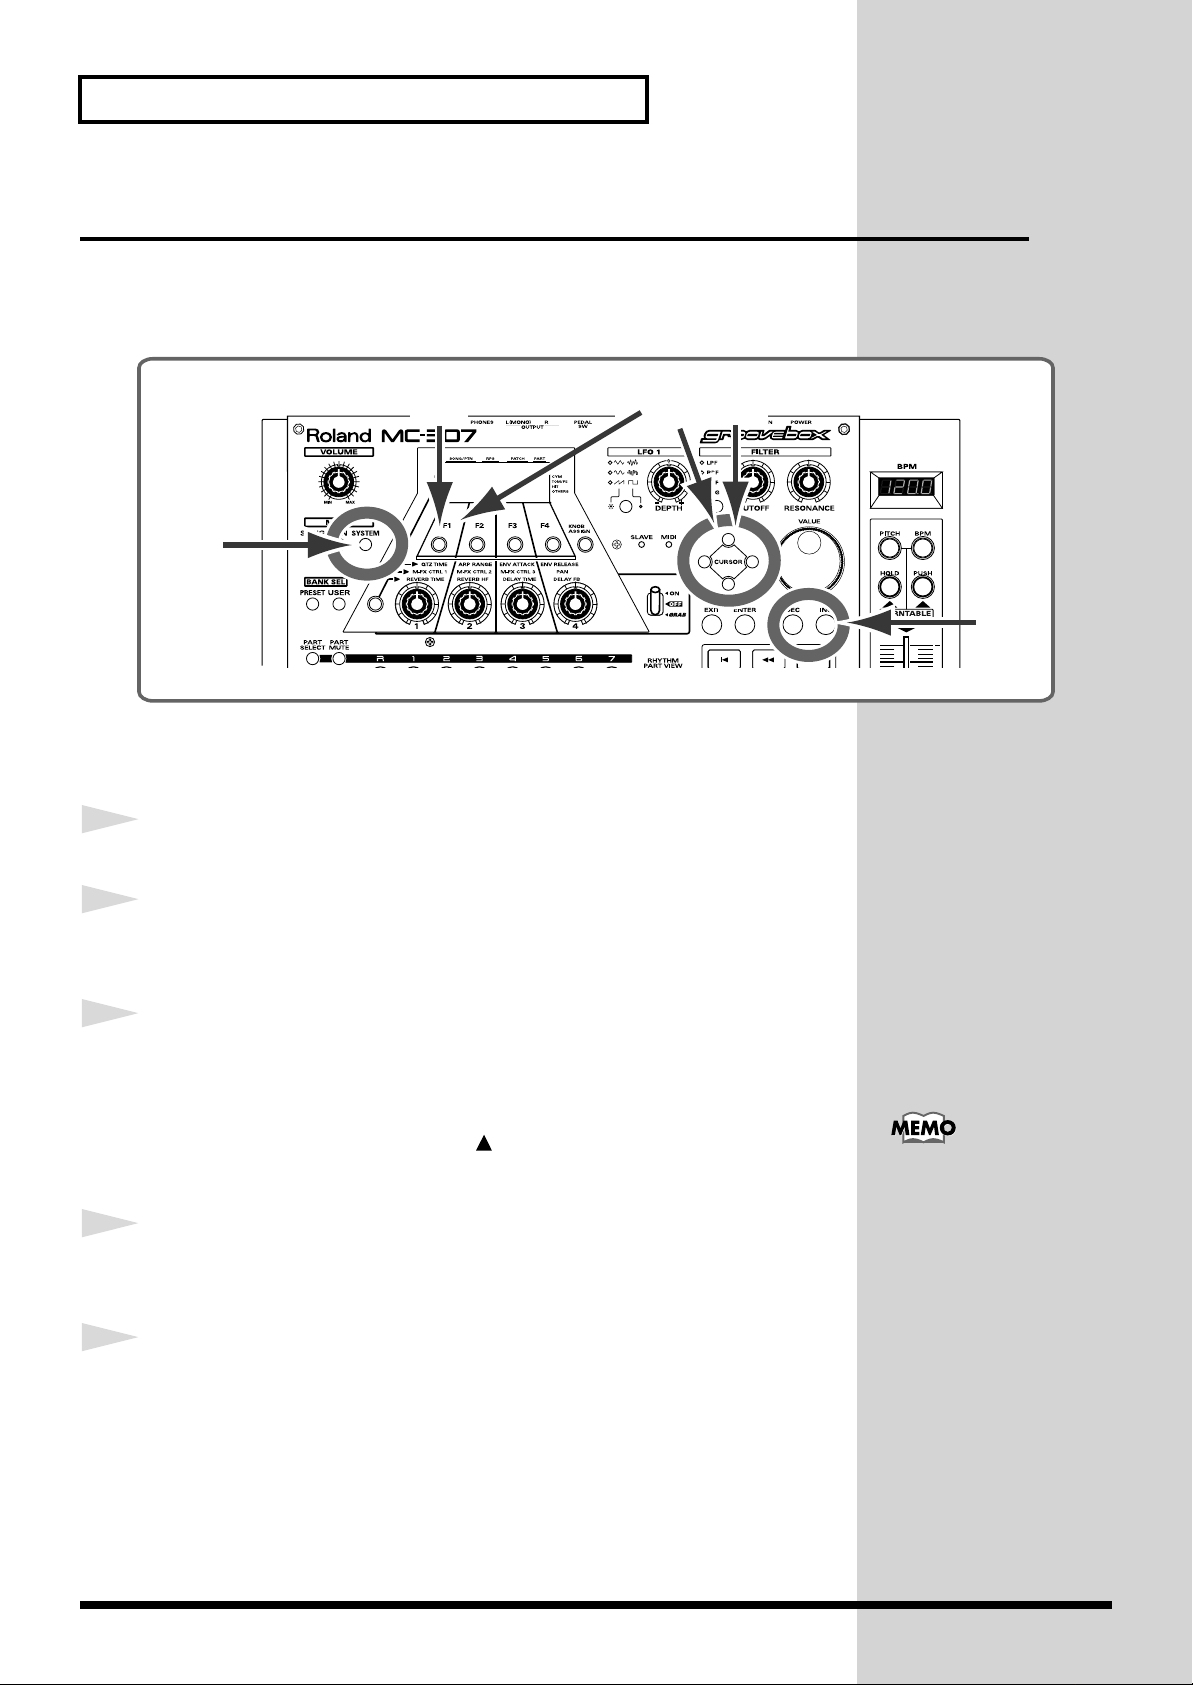
These effects are for adding breadth and spatiality to the sound.
Try comparing how the pattern sounds with and without the delay and
reverb effects.
1
2
2
34
1
Procedure
Before you begin, select pattern P: 154. Also, stop pattern playback.
Press the [SYSTEM] button.
Press the [F1 (SYS)] button.
The system setting selection screen appears.
5
3
4
5
Display “1 SOUND, FX SW/TUNE” using the [CURSOR (UP)]
button, then press the [F1 (SND)] button.
This process displays the screen in which "REVERB SW" is found.If the
screen does not appear, press [F4 ( )] several times until the screen is
displayed.
Place the cursor at “REVERB SW.”
This can be switched to delay effect using the “DELAY SW.”
Switch on/off using the [INC/DEC] button.
The INC button switches it on and the DEC button switches it off.
Press the [EXIT] button to return to the screen where you can play patterns,
and then press [PLAY] to hear how the pattern sounds.
The MC-307 is also has a
Multi-effect function (MFX) for even more effects.
For details, see
“Reference Manual.
(P.46)”
16
Page 17
Combining a Turntable and BPM
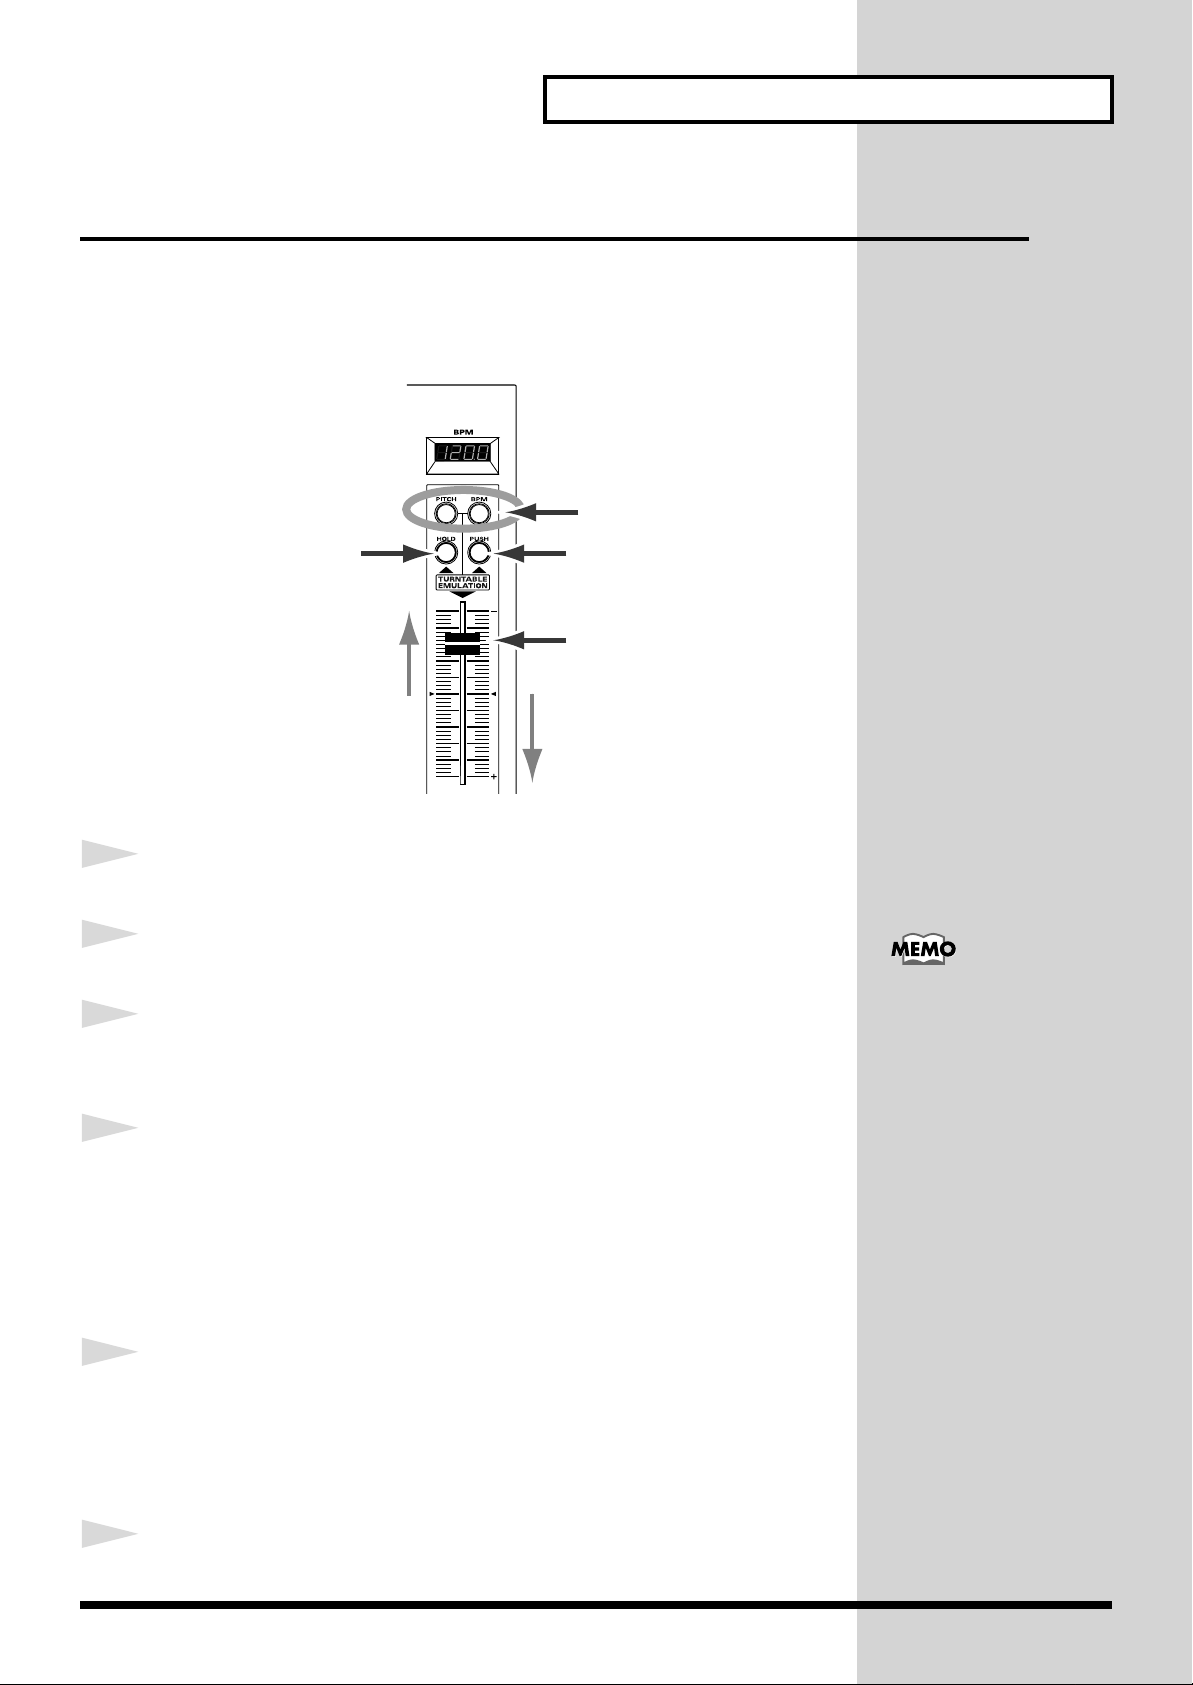
The MC-307 has a TURNTABLE EMULATION slider, just like a record
player, for BPM adjustment, and TURNTABLE HOLD/PUSH buttons that
make effects just like holding and turning the turntable possible.
They enable start and tempo alignment during turntable playback.
3
44
5
Decreases the BPM
Functions for DJ Performance
1
2
3
4
Increases the BPM
Procedure
Begin playback with the turntable.
Begin playback with the MC-307.
Make sure that both the [PITCH] and [BPM] buttons are lit.
If it is out, press the button to light it up.
If the MC-307’s playback is running slower than the
turntable’s, press the [PUSH] button to speed up the
performance. If the MC-307’s playback is running faster than
the turntable’s, press the [HOLD] button to slow down the
performance.
Lighting only the [PITCH]
button in Step 3 results in
only the pitch being
changed; when only
[BPM] is lit, then only the
BPM changes.
5
6
Move the slider to set the BPM.
Moving it upward decreases the BPM and moving it downward increases it.
Setting it at the middle detent position causes the original BPM to be
resumed.
Repeat steps 4–5 to synchronize the turntable performance to the MC-307.
17
Page 18
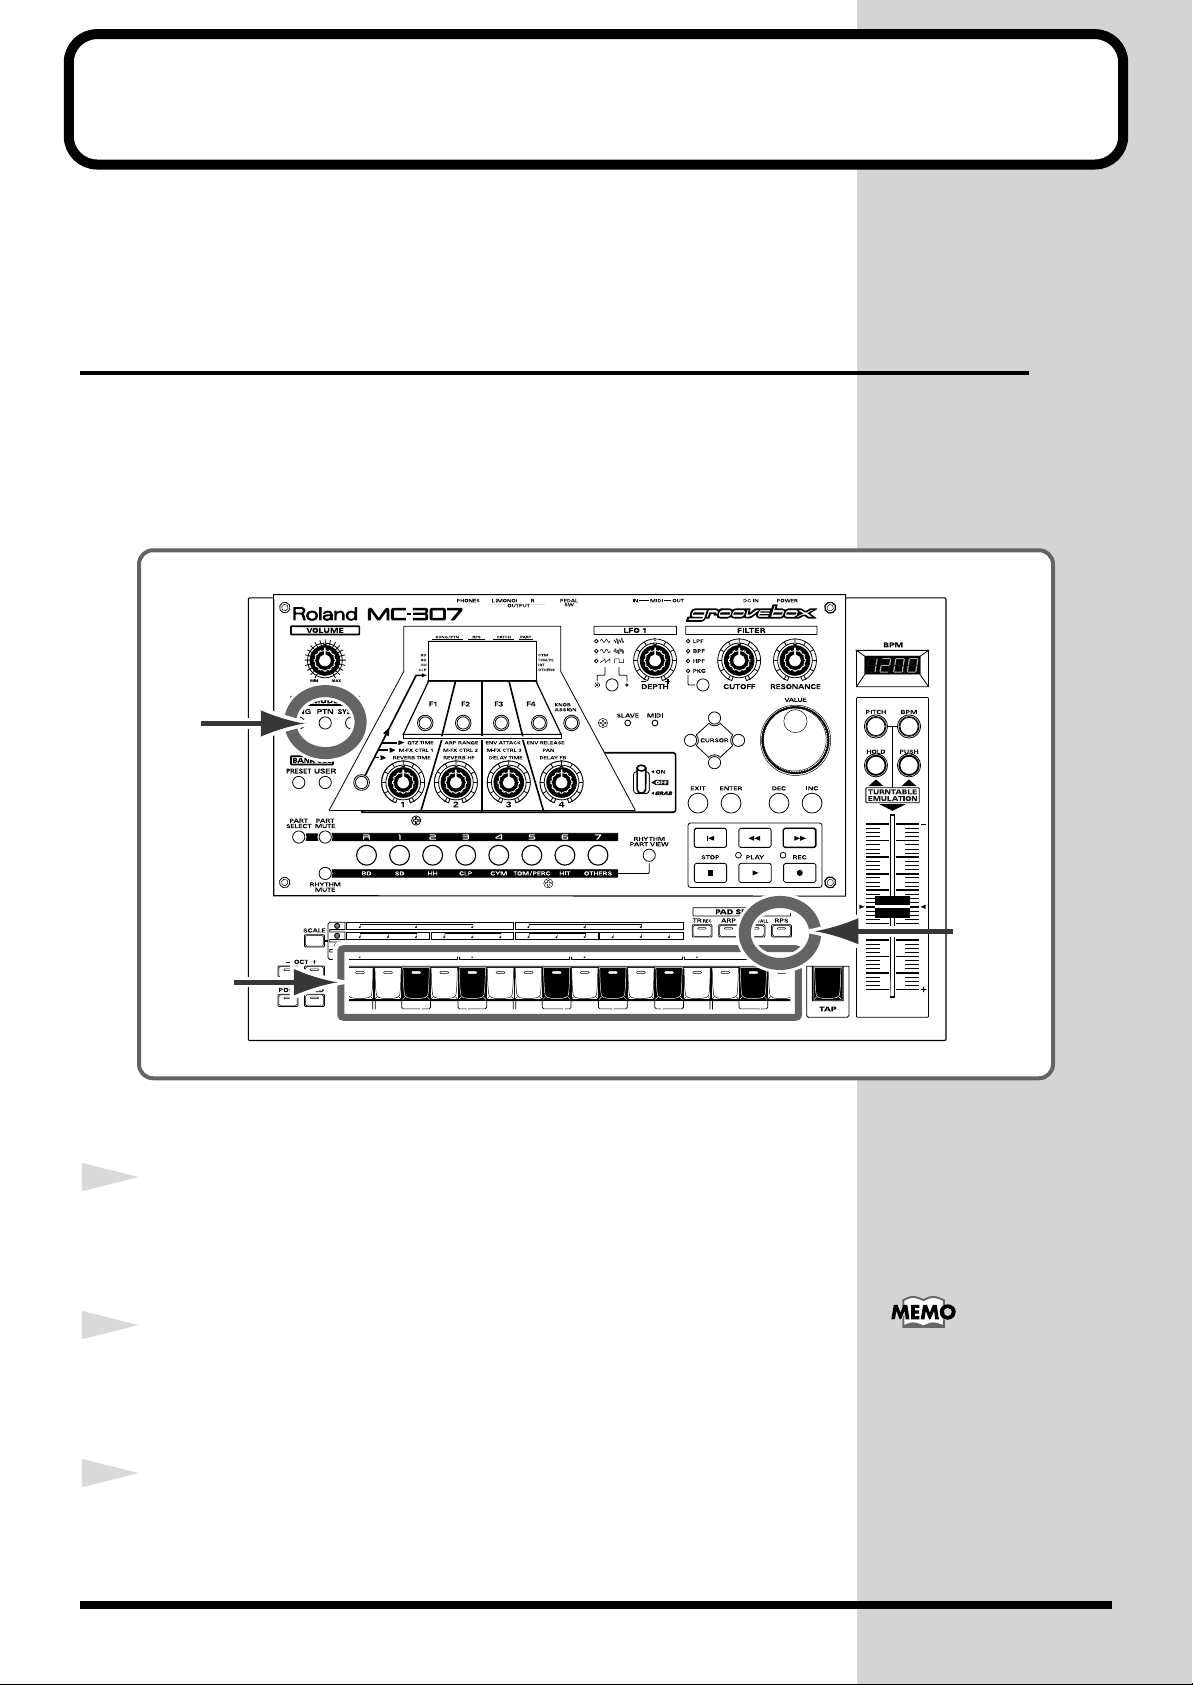
Phrase Adding Function
The MC-307 is capable of adding phrases to the sound of the part in the
pattern being played back.
Using a Single Keyboard Pad to Sound Phrases(Real-time Phrase Sequencing)
The RPS (Real-time Phrase Sequencing) function is used to disable keyboard
pads so that they no longer function as a normal keyboard. Instead, they
function as start buttons for playing phrases. RPS is useful not only for
adding phrases to the pattern being played back, but can also be used for
performance on its own.
1
1
2
3
Procedure
Press the [PTN] button.
The screen for playing patterns appears. Play back the pattern as necessary
6page.
2
3
18
Press the [RPS] button.
The indicator of the button comes on indicating that the RPS function is
turned on and the keyboard pad functions as an RPS controller.
Press the keyboard pad.
The pattern is played back. Check which phrase is assigned to which pad.
There are 60 RPS sets
(patterns assigned to the 16
keyboard pads) in all. To
select an RPS set, hold
down the [RPS] button and
select using the [VALUE]
dial. or [INC/DEC] button.
Page 19
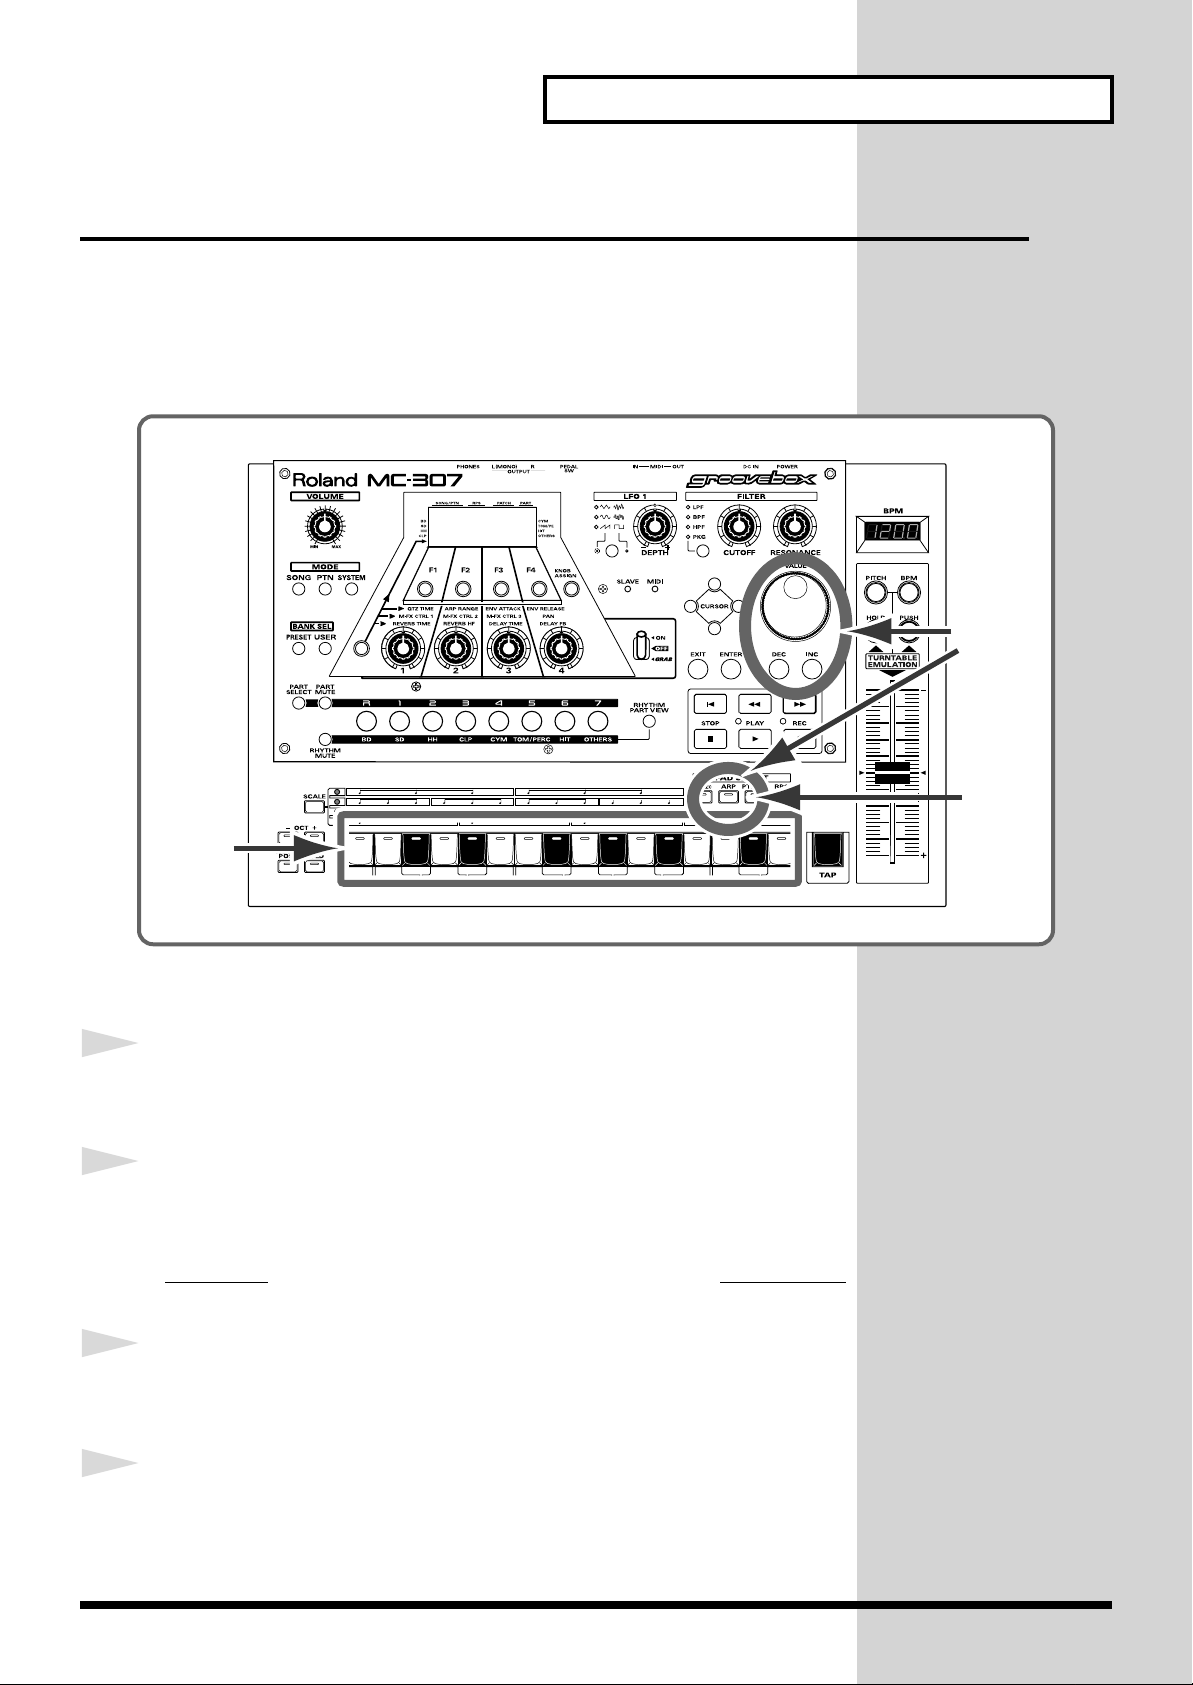
Using the Arpeggiator
The arpeggiator function enables arpeggio by simply holding down the
keyboard pad. Generally, to play with the keyboard you have to press the
appropriate keys in time with the rhythm. By using the arpeggiator,
however, the rhythm is automatically retained even while a chord is being
held down.
Phrase Adding Function
3
1
2
3
1
2,4
Procedure
Press the [ARP] button.
The arpeggiator is turned on.
Press a chord using the keyboard pads.
Using the notes of the pressed chord, the arpeggio phrase starts to sound.
Try listening to another style with the arpeggiator.
While holding down the [ARP] button, use the [VALUE] dial
4
or the [INC]/[DEC] button to select another arpeggio style.
Press a chord using the keyboard pad.
Another arpeggio phrase starts to sound.
19
Page 20
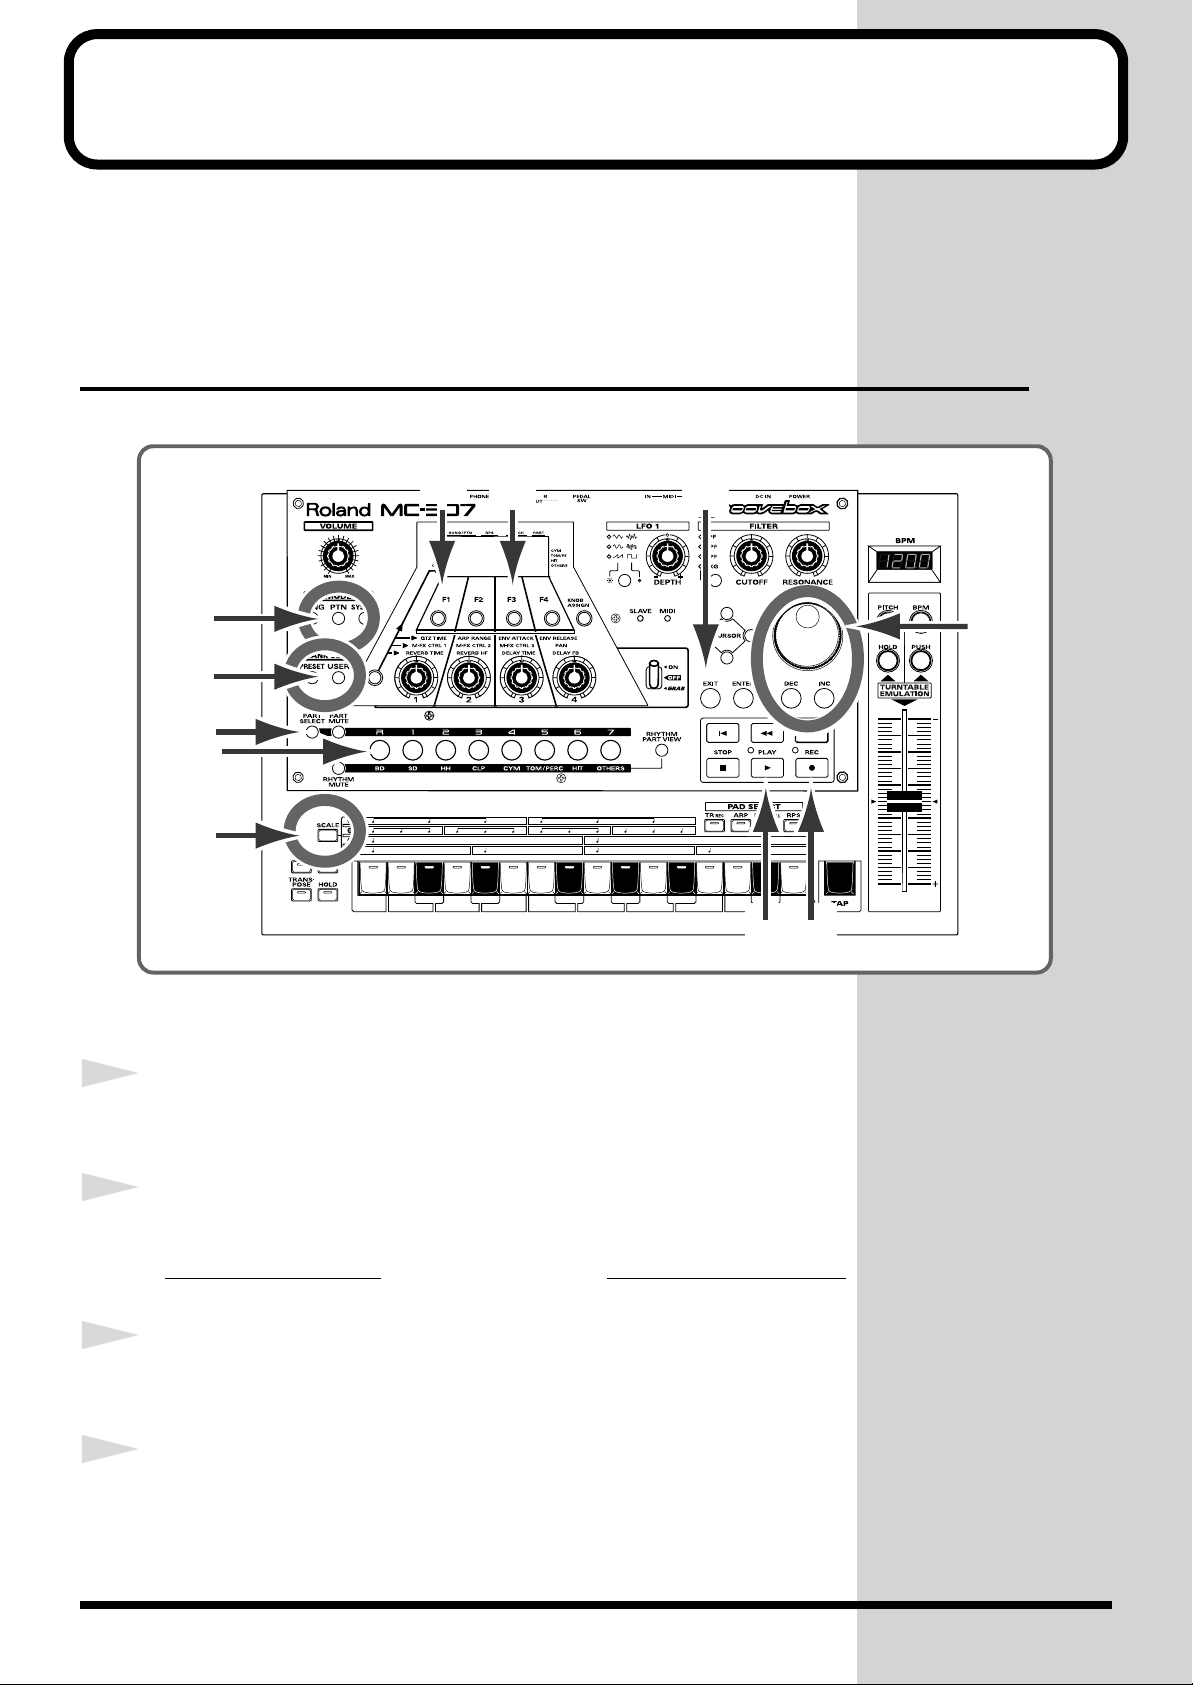
Making Original Patterns
The MC-307 is capable of creating original patterns and storing them. Of the
two recording methods available with the MC-307, try the one called “TRREC.” TR-REC is a recording method that allows you to create phrases very
simply just by pressing the buttons.
Creating Drum Part Play
First, let’s try creating a simple rhythm part phrase.
486
1
2
1
2
5
10
Procedure
Press the [PTN] button.
The screen for playing patterns appears.
Select User Pattern (U: 001 - 200.)
9
7
3
3
4
20
Get ready for recording.
Press the [REC] button.
The “REC MODE SELECT” screen appears.
Press the [F3 (TR-REC)] button.
The TR-REC stand-by screen appears.
Page 21
Making Original Patterns
5
6
7
8
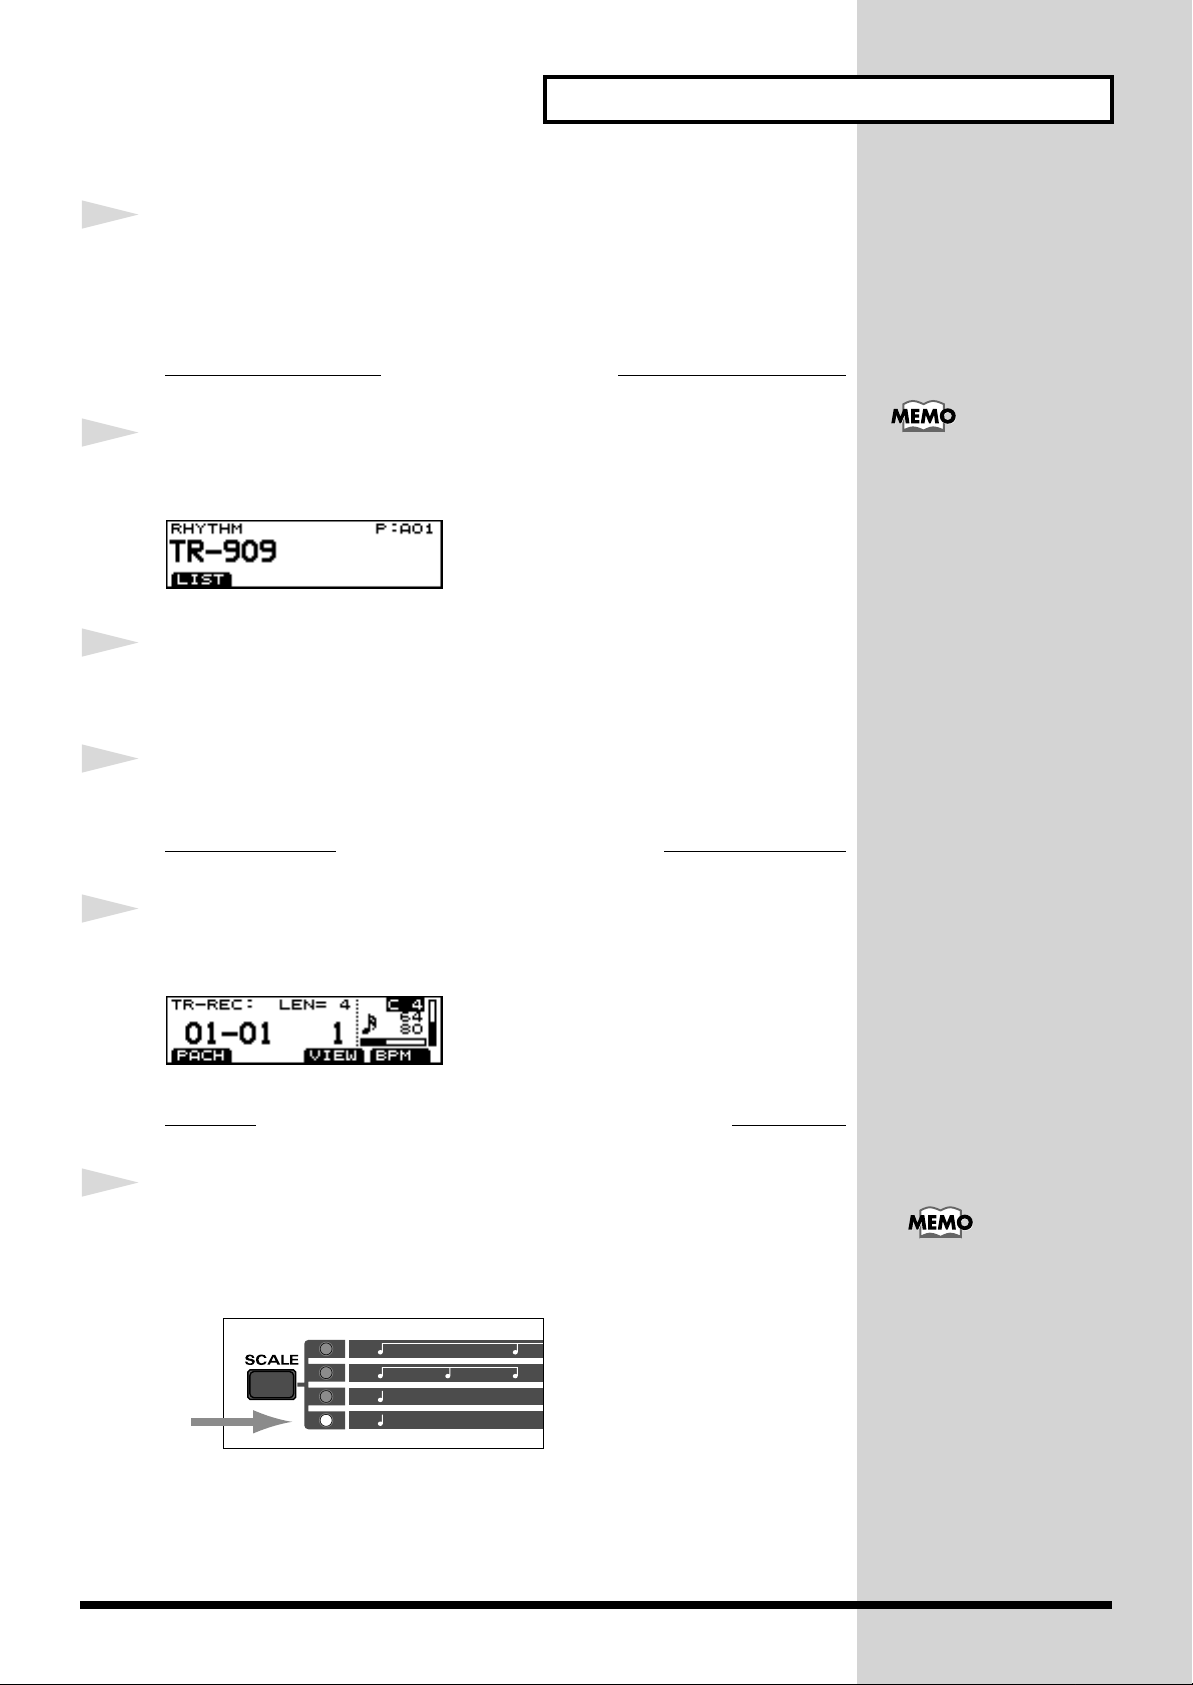
Press the [PART SELECT] button first, then press the [R]
button.
The rhythm part is selected.
First, select a rhythm set.
Press the [F1 (PACH)] button.
The name of the currently selected rhythm set is displayed.
Select a rhythm set using the [VALUE] dial or the [INC]/
[DEC] button.
Press the [EXIT] button to return to the recording stand-by
It is also possible to select
the rhythm set in advance
on the pattern playback
screen.
9
10
screen.
Ready the MC-307 for recording
Press the [PLAY] button.
The recording screen appears and the unit is ready for rhythm part entry.
Set the MC-307 to enable input using sixteenth-note
Press the [SCALE] button several times, until the light at the
very bottom lights.
This enables input using sixteenth-note scales.
A single keyboard pad is
equivalent to a 16th
note. Therefore, in this
example, a note is
entered in each 16th note
step.
21
Page 22
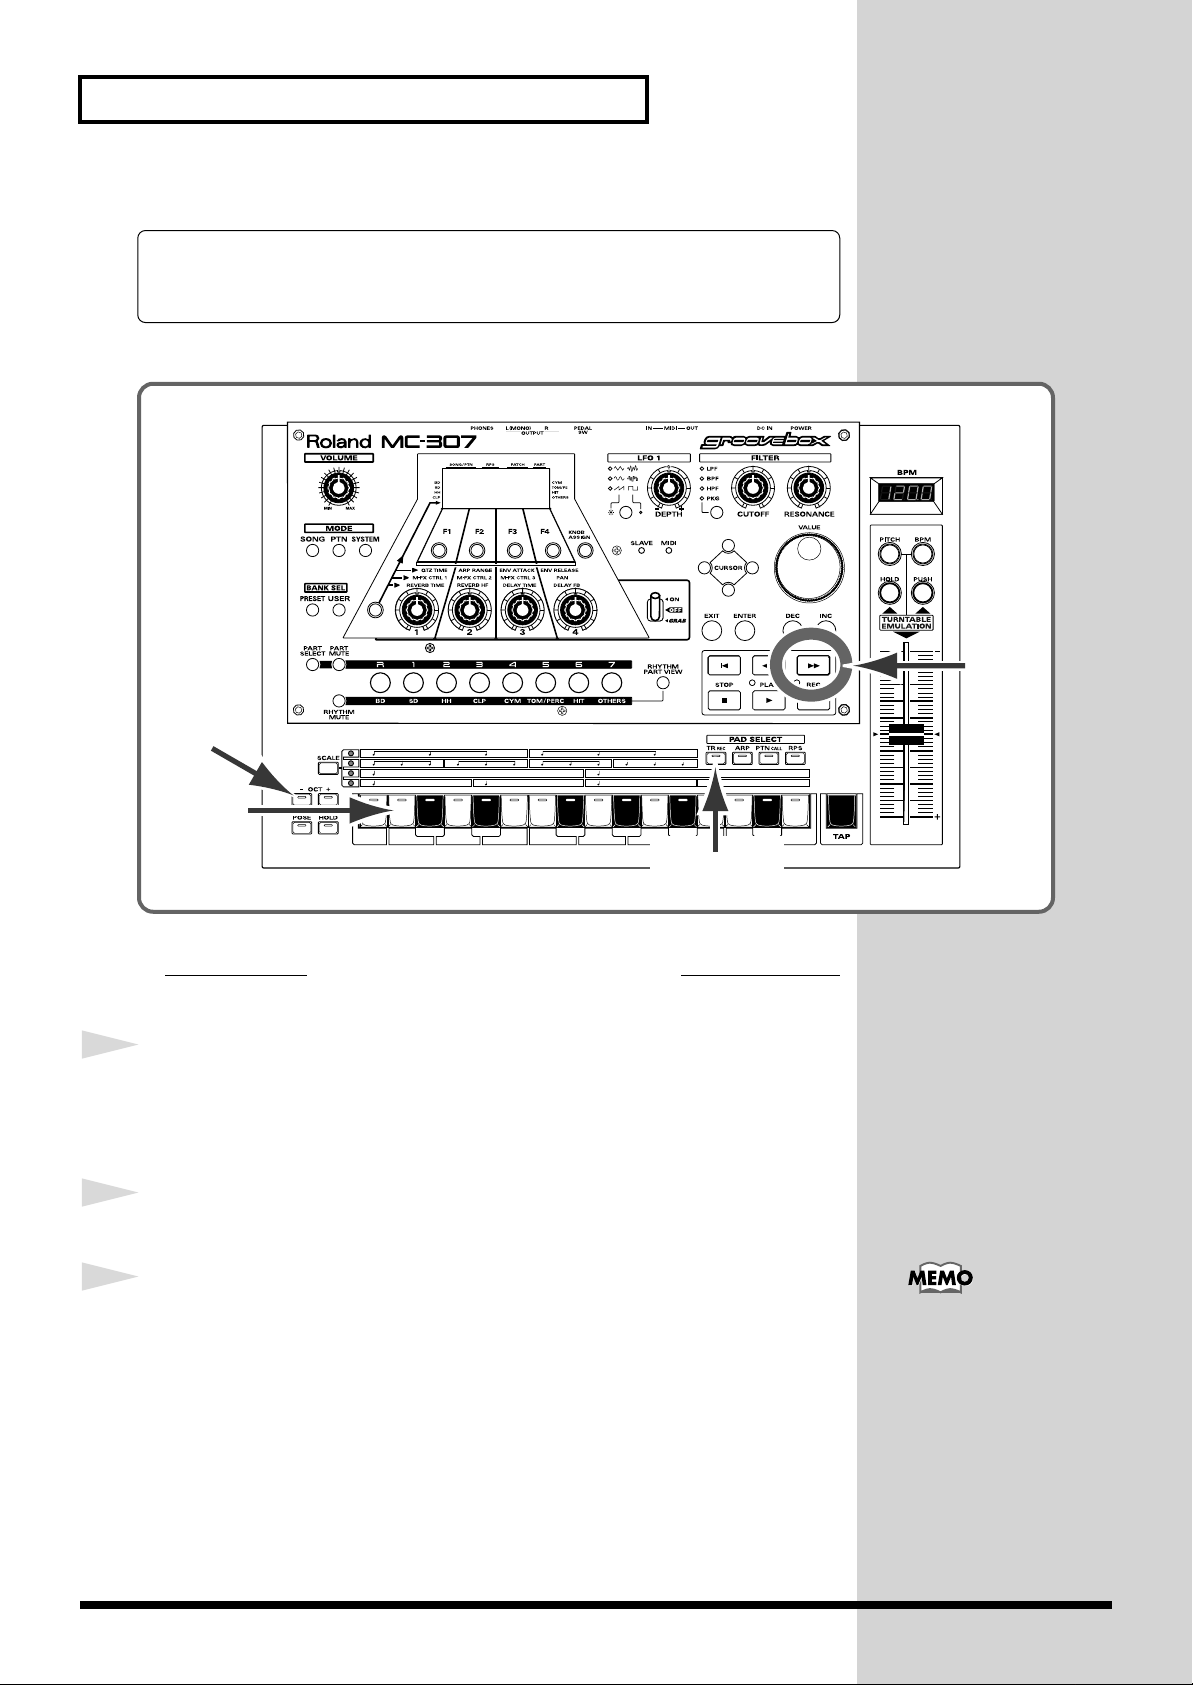
Making Original Patterns
Now, the TR-REC is ready.
On the following, try recording from the kick drum.
6
1
2
3
2
3,5
1,4
Select the rhythm tone to be entered.
Press the [TR-REC] button, turning off the light.
This disables recording of the data, even if the keyboard pad is pressed, and
switches to the function allowing you to select the rhythm tone to be input.
Press [OCT (-)] button twice.
Press the [2] keyboard pad.
The note number indication on the screen is changed to C2. Now, the kick
drum is selected for the rhythm tone to be input.
If the indication does not change to C2, press [OCT(- / +)] several times until
it does.
By selecting another note
number in step3, the
selected note (rhythm
tone) can be recorded.
22
Page 23
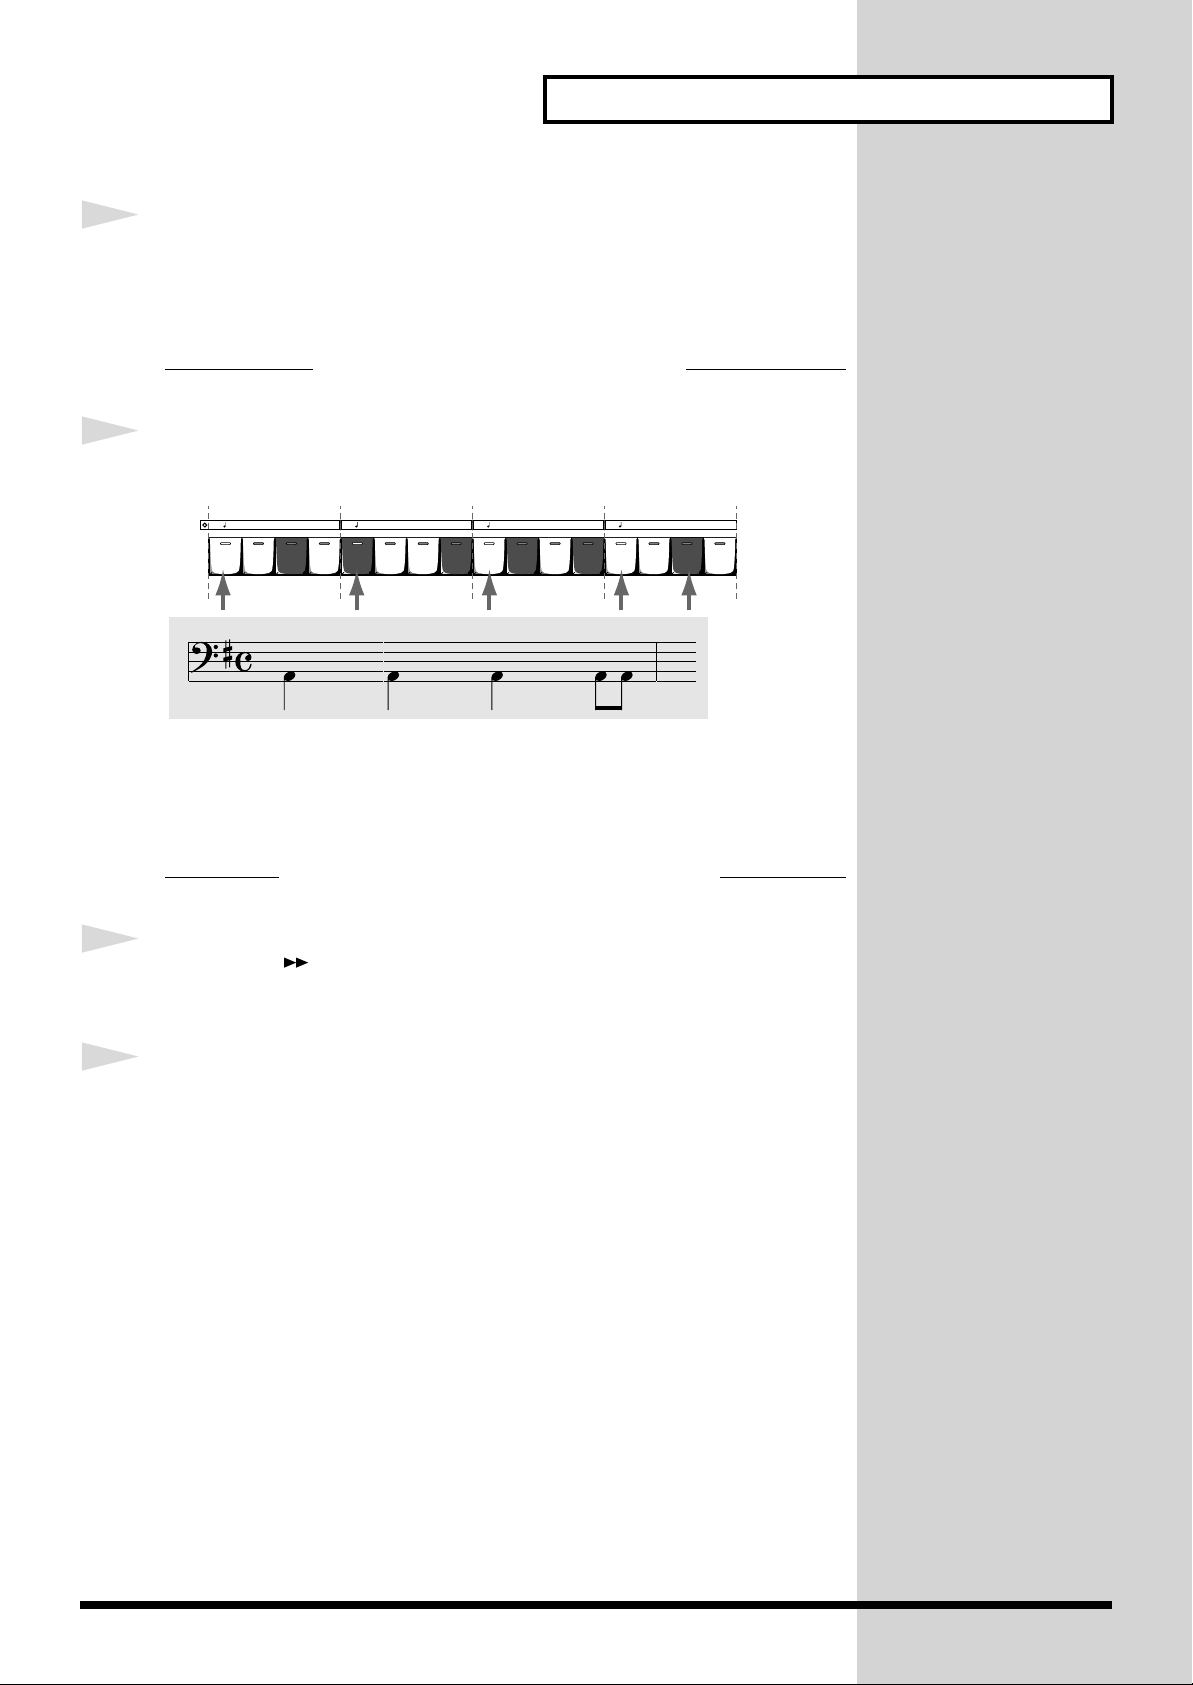
Making Original Patterns
4
5
Press the [TR-REC] button again to turn the indicator on.
The keyboard pad functions as a timing entry scale and is ready for
recording again.
Try recording the selected rhythm tone.
Press the keyboard pad marked with an arrow in the figure
below, to turn on the indicator of the keyboard pad.
12345678910111213141516
Entry of the first measure is now completed. The kick drum entered should
be heard.
6
7
Enter the following measures in the same way.
Press the [ ] button.
The keyboard pad is ready for entry of the second measure.
Enter the kick drum in the same way as in procedure 5.
Repeat until entry of the 4th measure is completed.
After you have completed entering the kick drum in the 1st to 4th measures,
try entering the high-hat next. Repeat procedures 1 to 7.
23
Page 24
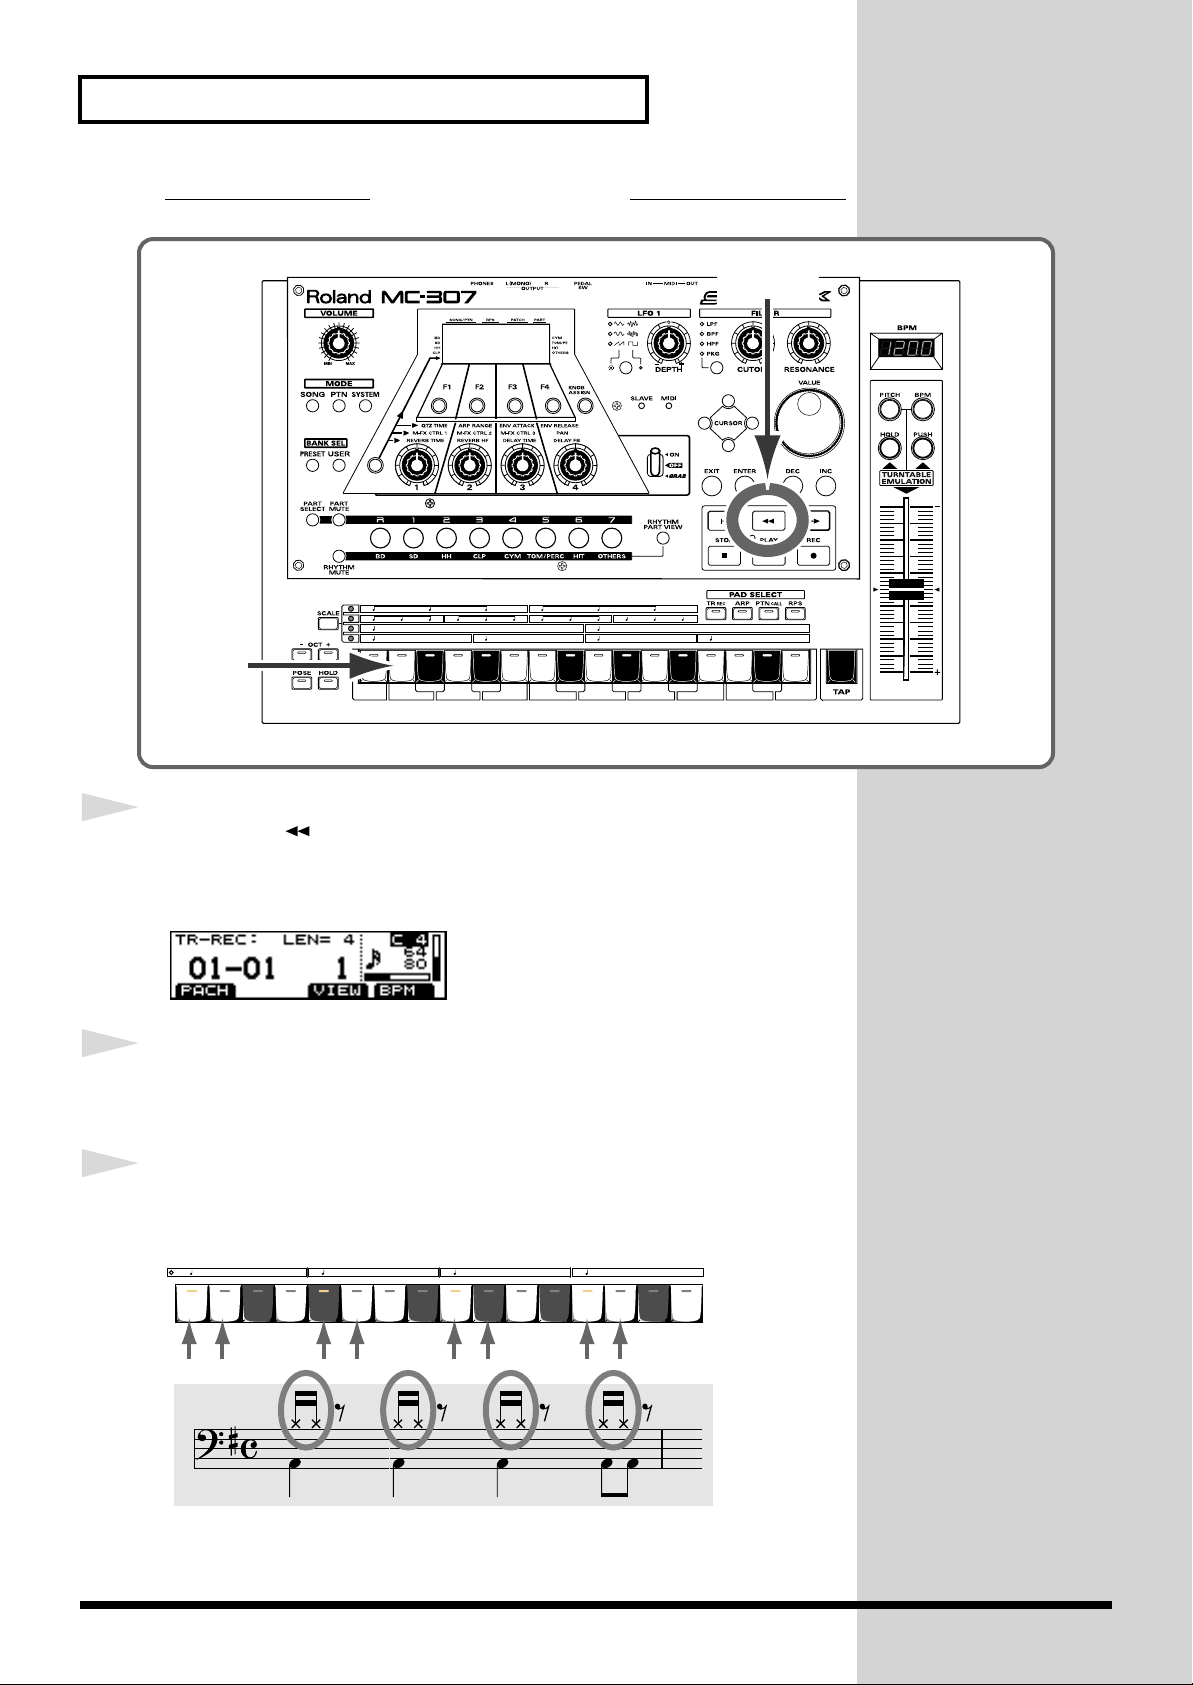
Making Original Patterns
Enter the closed high-hat.
10,
8,11
8
9
10
13
Press the [ ] button several times to make entry of the first
measure ready again.
Check by watching the screen indication.
Select “F#2” (the note number of the closed high-hat) of the
keyboard pad by following procedures 1 to 4.
Press the keyboard pad marked with an arrow in the following
figure, to turn on the indicator of the keyboard pad.
12345678910111213141516
24
Page 25
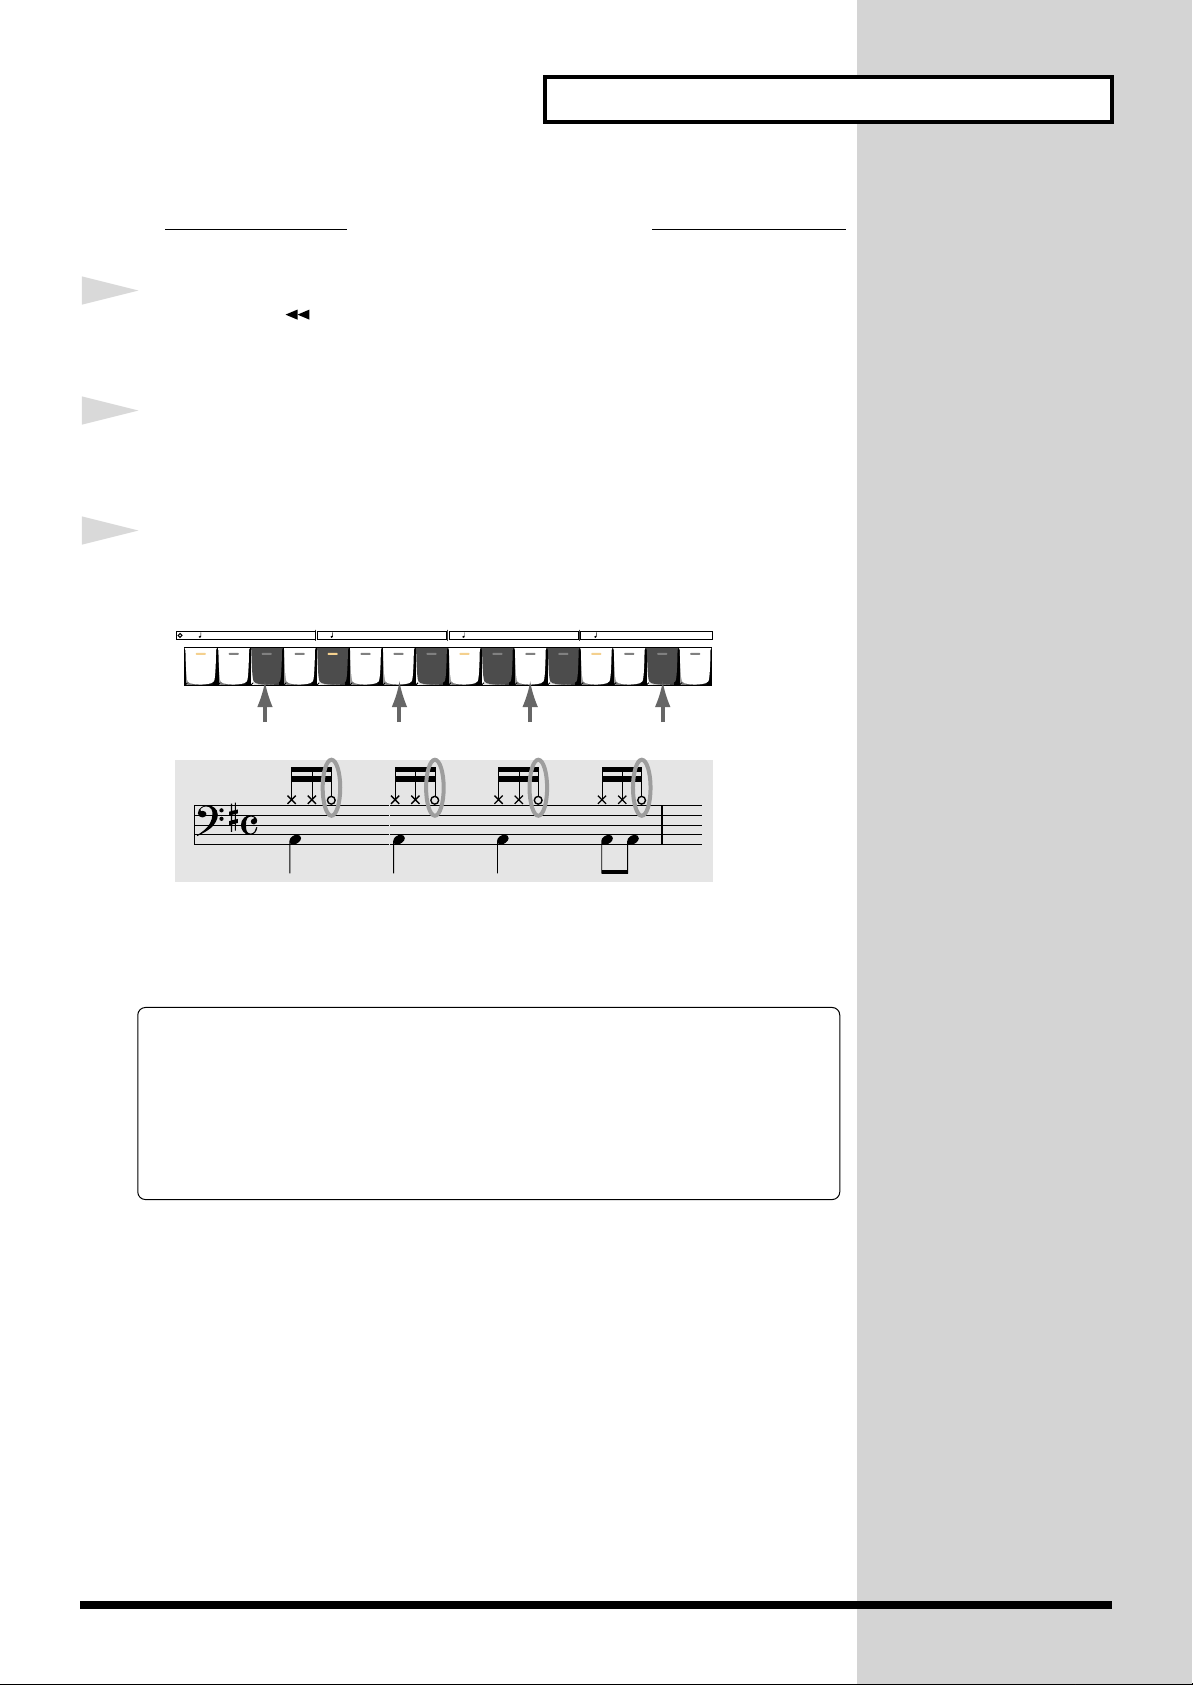
Lastly, enter the open hi-hat.
Making Original Patterns
11
12
13
Press the [ ] button several times to make entry of the first
measure ready again.
Select “A#2” (the note number of the closed high-hat) of the
keyboard pad by following procedures 9 to 10.
Press the keyboard pad marked with an arrow in the figure
below, to turn on the indicator of the keyboard pad.
12345678910111213141516
Recording of the drum part is done in this way.
When all the measures have been recorded, press STOP.
As you can see by now, TR-REC is an efficient recording method which
enables you to not only perform recording thoroughly thinking about
timing of entry, but also to check the entry results at any time.
With bass part recording explained below, scales can be added to the phrases recorded by TR-REC to make them complete. Try bass part recording
and master TR-REC.
25
Page 26
Making Original Patterns
Creating Bass Part Play
Next, create the bass part by first entering it at a constant pitch (this is done
using the same procedure as for the rhythm part). Then, add the scale to
make the part complete.
1
1
4
8
6
Procedure
Prepare for recording using the same procedure as in procedures 3 to 5 for
rhythm part recording (p. 20).
Select bass patch.
Press the [F1 (PACH)] button, then [F1 (LIST)].
5,7
2
3
2
3
26
Select a patch using the [VALUE] dial or the [INC]/[DEC]
button (p. 21).
Then, decide on the details of the notes to be entered.
Press the [PLAY] button.
The recording screen appears and the unit is ready to record.
P:A078 to P:A127 are
available as bass patches.
For details, see
“REFERENCE MANUAL
(P.21, P.155)”.
Page 27
Making Original Patterns
4
5
6
7
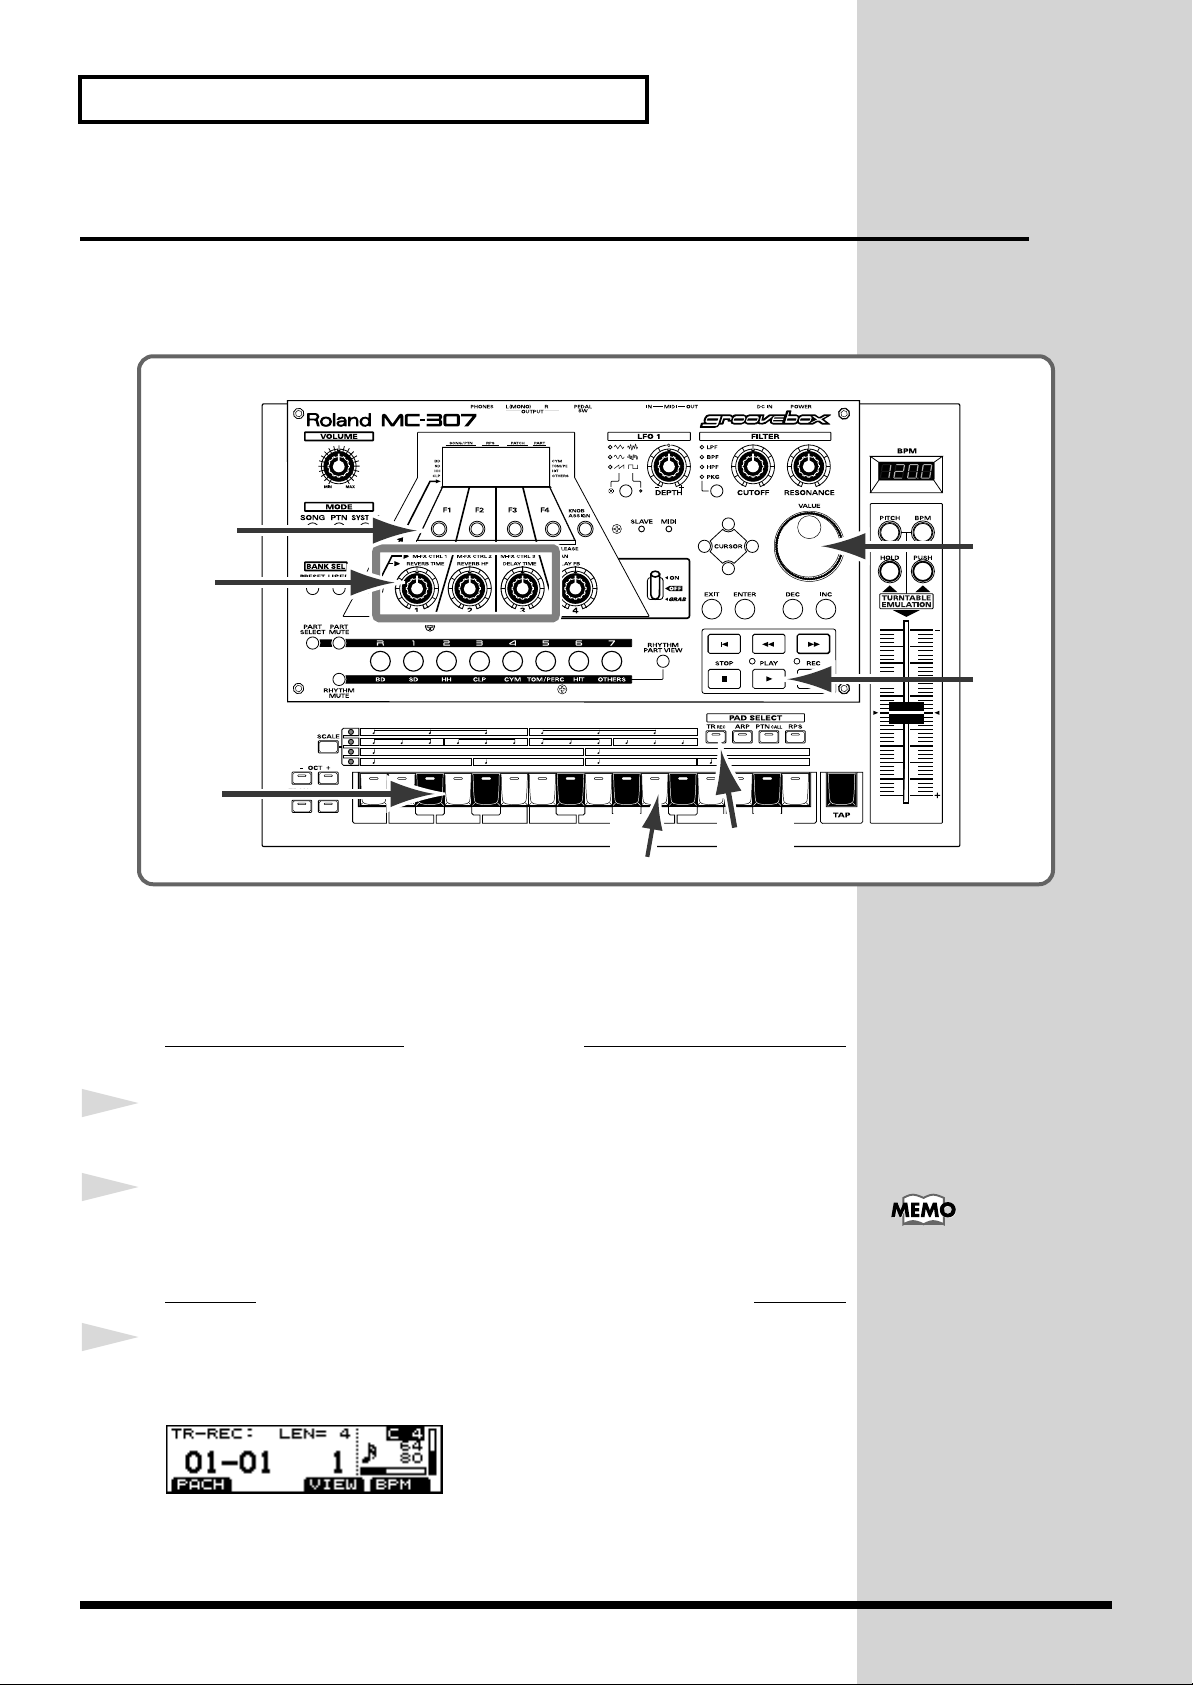
Use knob [2] to select the input volume, select the notes to be
entered using knob [3], then adjust the length of the note using
knob [4].
• Knob [2] is used for selecting the input velocity.
• Knob [3] is the note value (for example, "8th note").
Here we will set it to an 8th note.
• Knob [4] is used for adjusting within the range of 5 to 200% of the note
selected with knob [3].
* Knob [2] and [4] entries are indicated by the length of the bar on the screen.
Next, specify the pitch at which the notes are to be entered.
Press the [TR-REC] button to turn off the indicator.
Once the [TR-REC] indicator is out, the keyboard pad can be used to specify
the pitch at which the notes are to be entered.
Press pad [11].
The note number indication on the screen is changed to A1. Now A1 is
selected as the pitch at which notes are entered. If A1 cannot be selected,
press [OCT (- / +)] several times until it is.
Press the [TR-REC] button again to turn the indicator on.
The pitch is expressed by a
letter and a number, like
“C4.”
C corresponds to “do,”
and it is followed by D,
E, F, G, A, B.
The number after the
letter indicates the
octave. For example, the
note one octave below
“A2” is “A1.”
8
The keyboard pad functions as the timing entry scale and is ready for
recording again.
Enter notes.
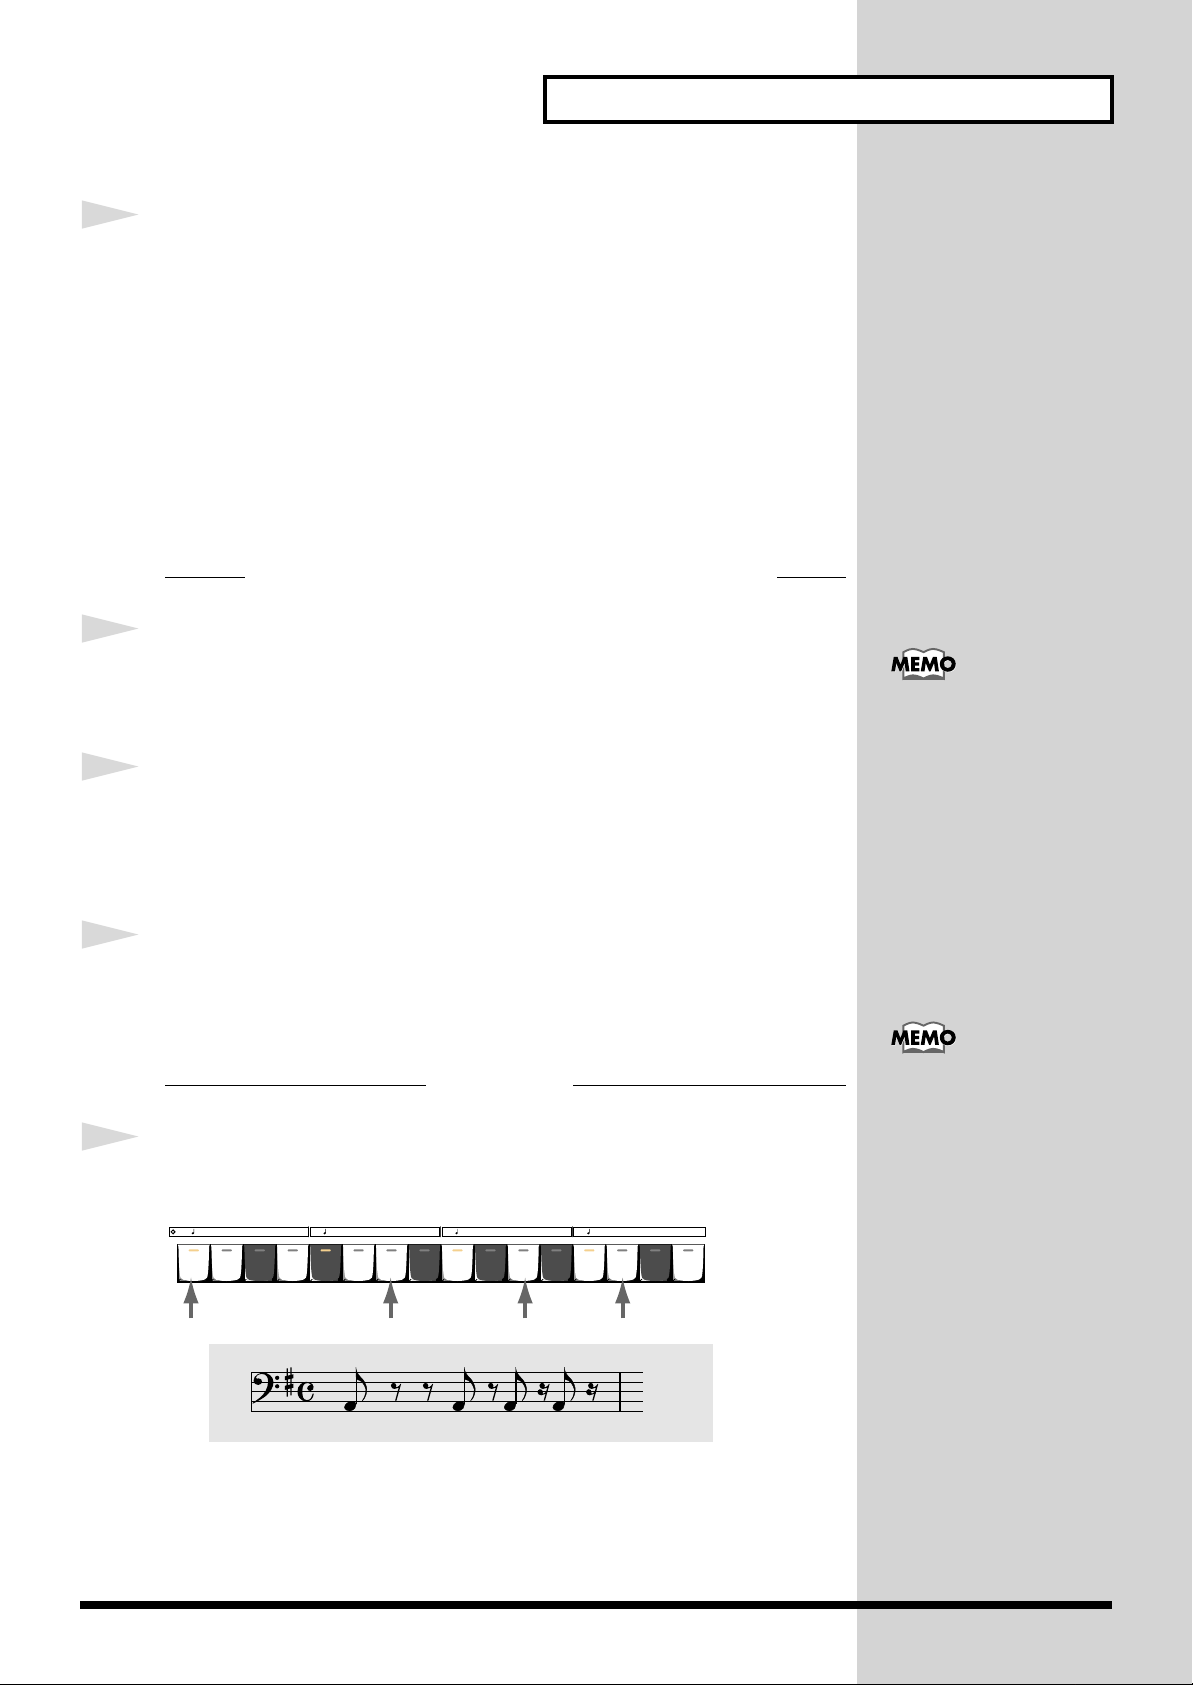
Press the keyboard pad as shown below to turn on the
indicator.
1 2 3 4 5 6 7 8 9 10111213141516
Notes are entered in the 1st measure at the specified timing.
In TR-REC of the rhythm
part previously explained,
the keyboard pad was used
as the timing scale.
In TR-REC of the bass part,
the keyboard pad is also
used as a normal keyboard
to specify the pitch.
27
Page 28
Making Original Patterns
This is the same as for rhythm part entry.So far, the procedures are almost
the same as those for TR-REC of the rhythm part.Unlike the rhythm part,
however, the bass part is played by changing the pitch.On the following ,
try changing the last note of notes A1 to C2 input. Once you master this,
you can handle TR-REC with ease.
Change the pitch of the last note
9
9
11 10
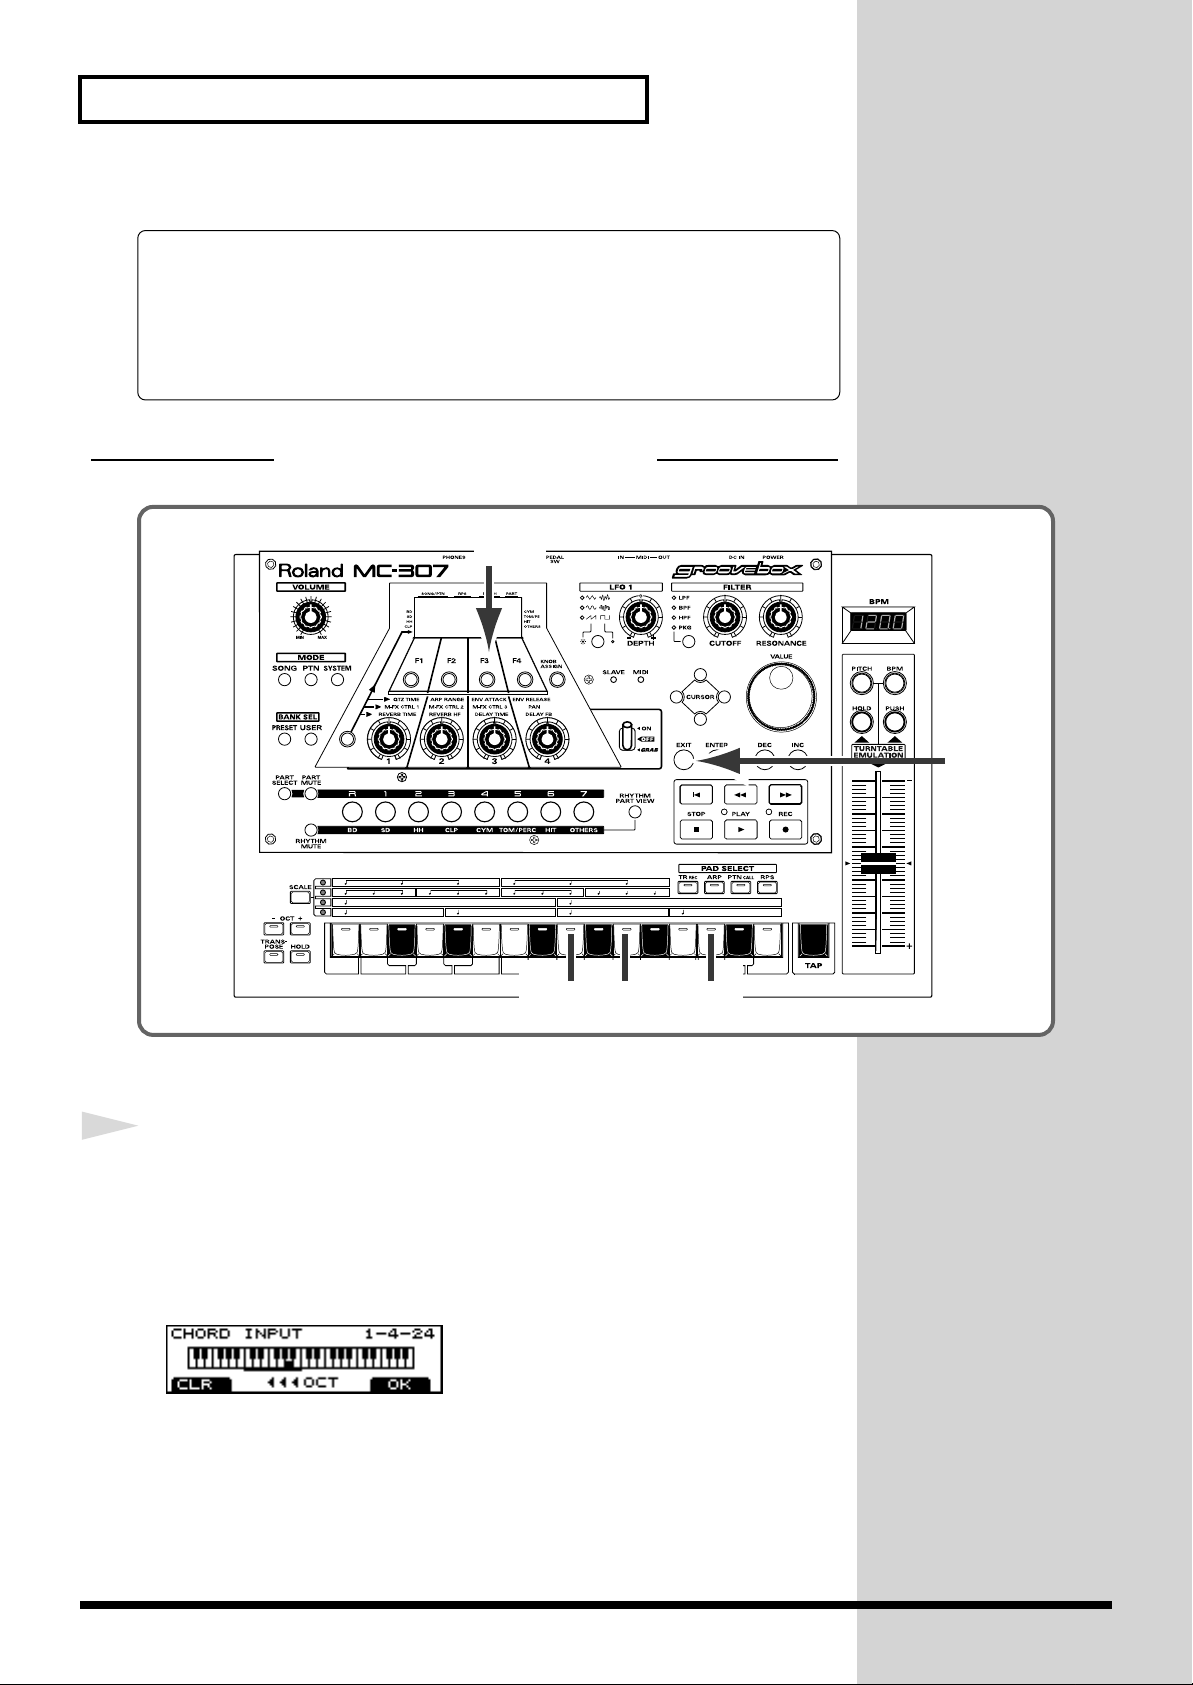
While holding down the [F3 (VIEW)] button, press the [14]
button of the keyboard pad.
This operation is used to change the pitch of the last note of the four notes
input. Upon operation, the screen should look as follows. The keyboard pad
now functions for pitch selection.
9
12
28
Page 29
Carry out Step 8 on p. 26 to delete the last sound input.
b
Making Original Patterns
10
11
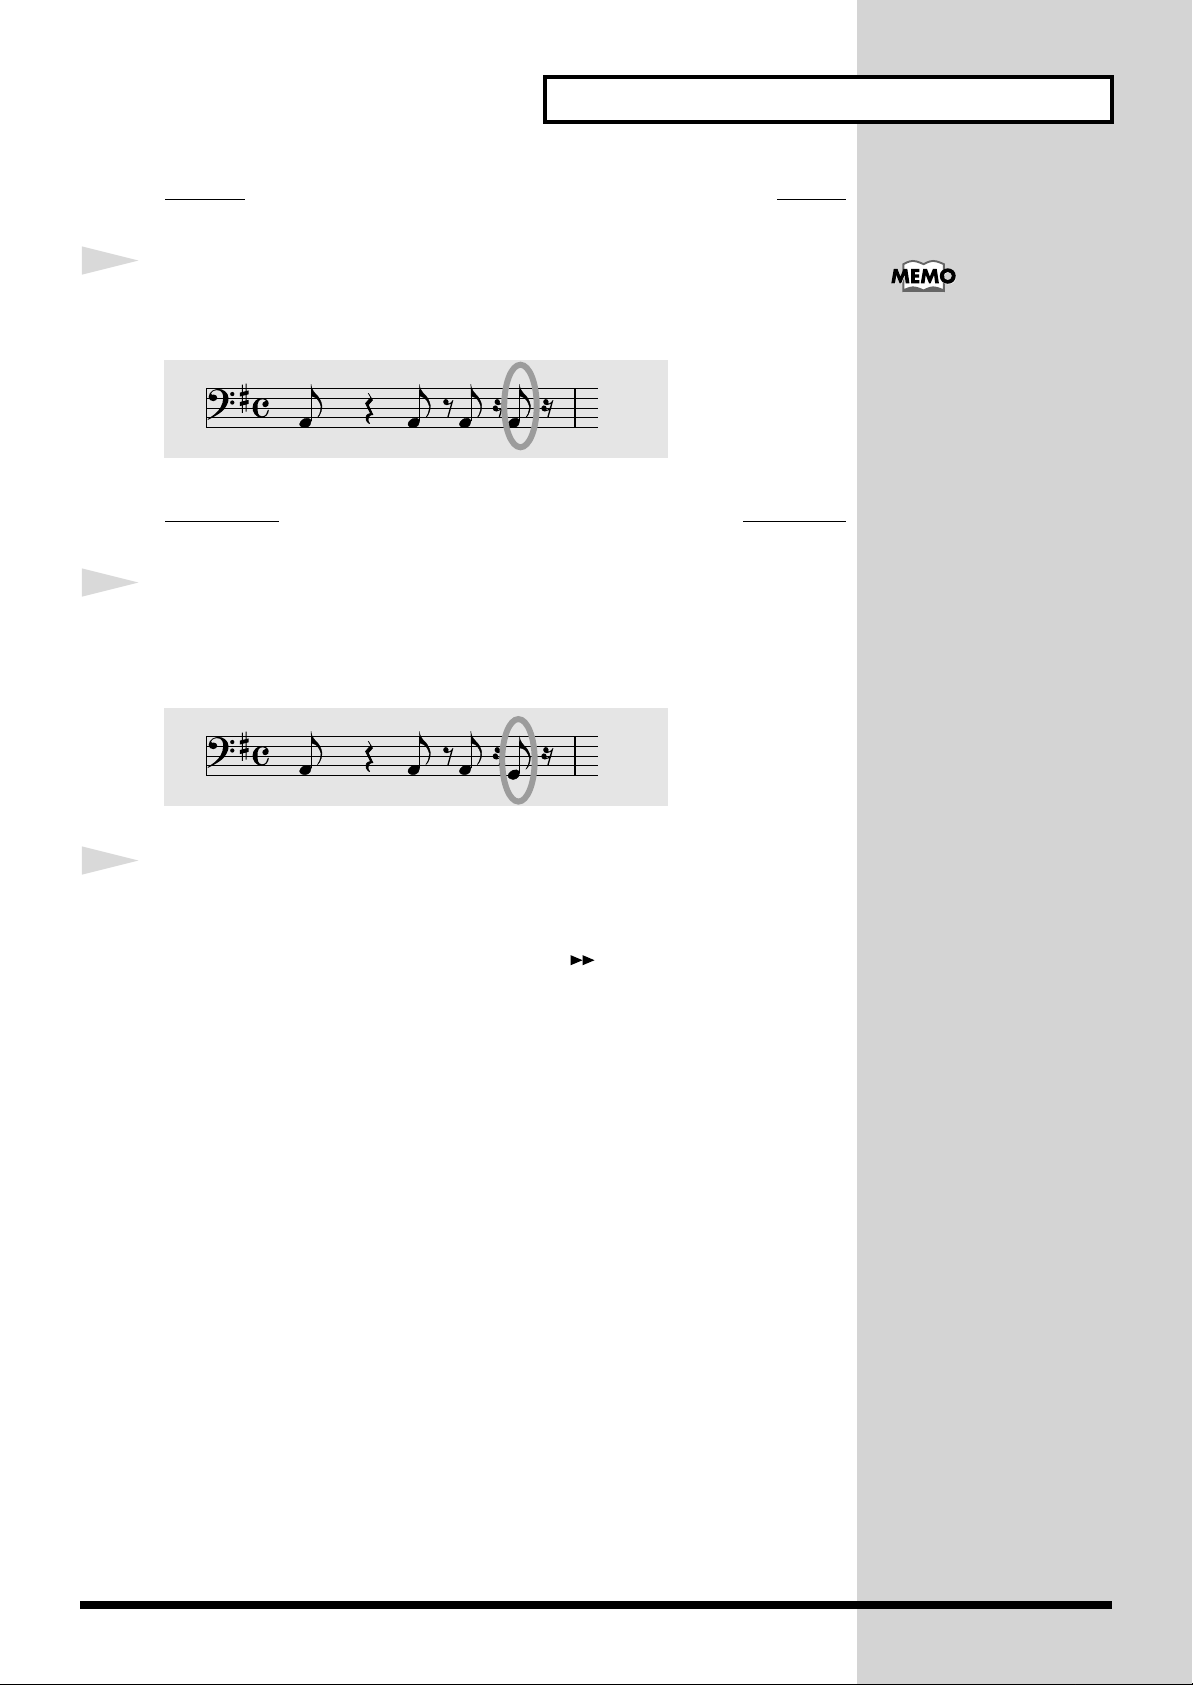
Press Keyboard Pad [11], turning of the light.
The sound "A1" input in Step 7 is deleted.
Delete
In place of the deleted sound, input the note "G1."
Press Keyboard pad [9], and confirm that its indicator has
lighted.
G1 is entered instead of A1, deleted in step 10.
If Keyboard pad [11]
wasn’t already lighted
when you got to step 10,
press the [OCT (-)(+)]
uttons enough times to
get it to light.
12
Press the [EXIT] button to exit the pitch change screen.
Proceed to the 2nd measure by pressing the [ ] button, and perform
recording of the 2nd, 3rd and 4th measures in the same way as for recording
of the 1st measure.When all the measures have been recorded, press STOP.
This completes recording of the Bass part.
29
Page 30
Making Original Patterns
Saving Created Patterns
If you like the pattern you have just created, you can save it. If you do not perform
saving, however, all the patterns you have created are deleted when the MC-307’s
power is turned off.
1
Procedure
2,3
5,7,8
6
4,6
1
2
3
30
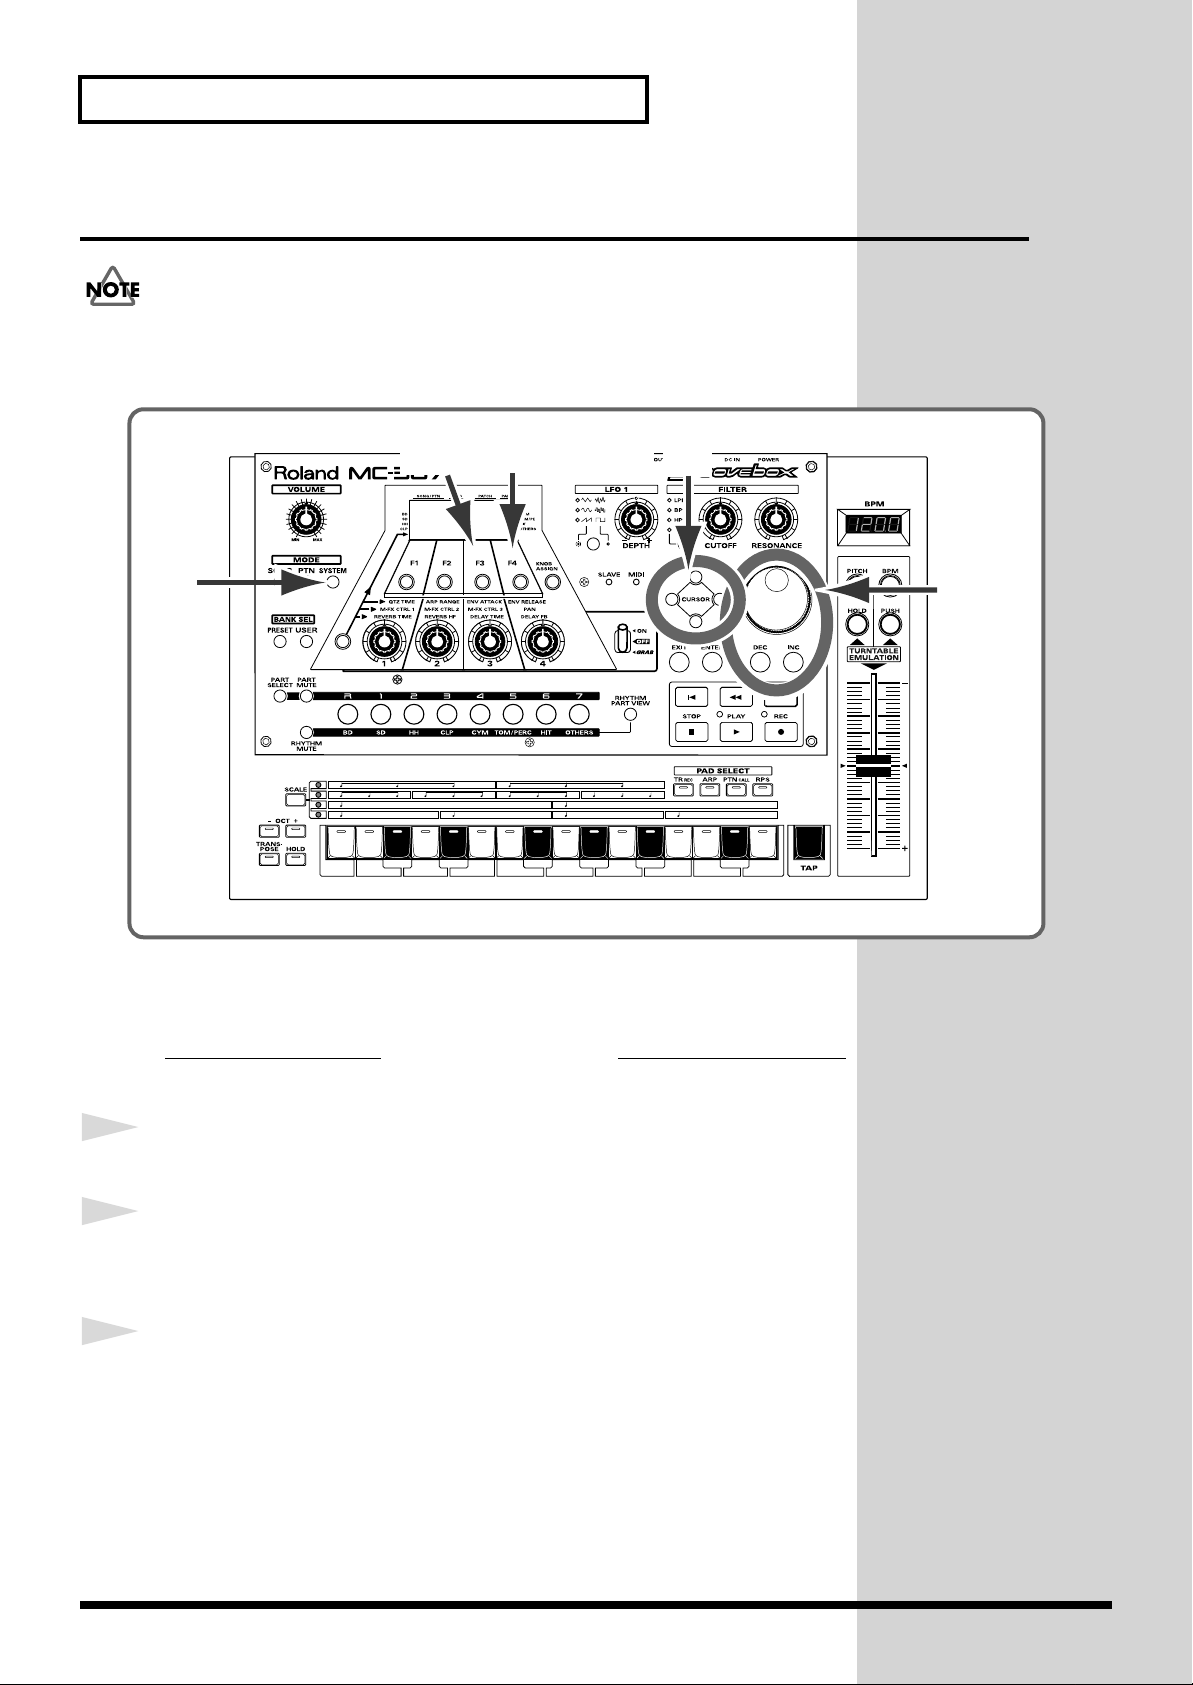
Display the Save screen.
Press the [SYSTEM] button.
Press the [F3 (WR)] button.
A screen in which you can select the data to be saved will appear.
Press the [F3 (PTN)] button.
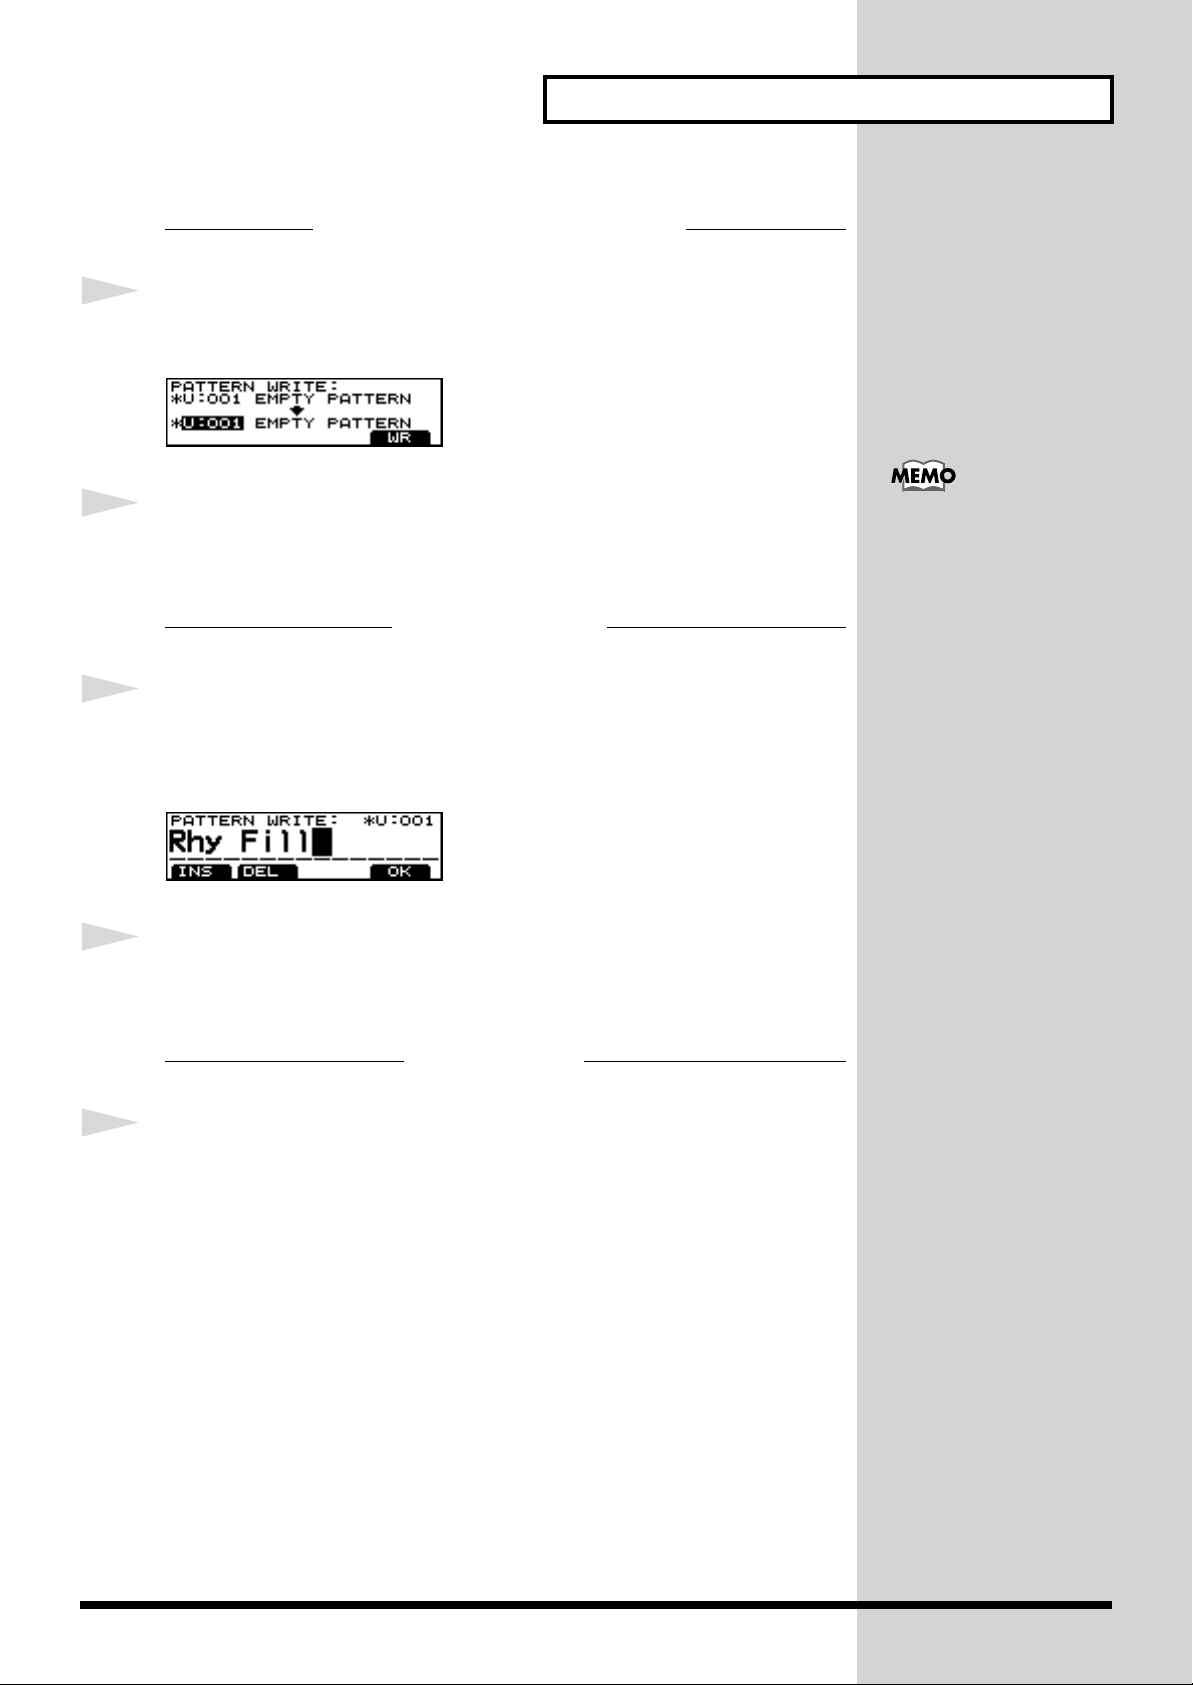
The “PATTERN WRITE” screen appears. The pattern to be saved is shown
on the top line, and the pattern number and name under which the pattern
is to be saved are shown on the bottom line.
Page 31
Determine the destination Pattern.
b
b
Making Original Patterns
4
5
6
Using the [VALUE] dial or the [INC]/[DEC] buttons, select the
pattern number to which the pattern is to be saved.
Press the [F4 (WR)] button.
The screen for entering the pattern name appears.
Name the Pattern.
Select characters using the [CURSOR (UP/DOWN)] buttons
and the name of the pattern using the [VALUE] dial or the
[INC/DEC] buttons.
If a pattern has already
een saved under the
selected pattern number, it
will be deleted, since it will
e overwritten by the new
one. So, be sure to confirm
that it is okay to delete it.
7
8
Press the [F4 (OK)] button.
The confirmation message “ARE YOU SURE?” appears.
Perform saving.
Press the [F4 (EXEC)] button to execute the save, or the [F3
(EXIT)] button to cancel it.
31
Page 32

Profile
B.U.S [Build Up Swing]
Okada Hideki, born in 1966, debuted in 1995 with a
Japanese house garage unit named Swell Emotion [DOHB
disk/Epic], and is a highly acclaimed creative talent of
house music.
He has signed a contract with the Paratone label, and
released an album as the solo project "B.U.S." His work has
appeared in the radio and TV charts, and has been praised
by DJ TOMO, YO-C, DJ Shinkawa and others.
He is also active as a producer for the YO-C solo album.
He is one of the most talked-about house creators in Japan
today, partially due to his highly successful remixes in 1998
of Debra Morgan, and the group "Every Little Thing."
Kent Sasaki DJ KENT
DJ/Producer of the hip-hop group Yotsukaido Nature. In
addition to playing at clubs, his activities include remixes
for Japanese and foreign artists. He is currently engaged in
producing albums for Sugar Soul and U.N.K.L.E.
HEIGO TANI
Began working as a DJ in 1985. Afterwards, in
addition to DJ work, he became active in
songwriting, song editing, and other musical
endeavors. Additionally, collaborating with WADA,
one of Japan’s best-known Techno DJs, in the Techno
and House groups "Co-Fusion" and "ATOM," he has
released numerous 12-inch analog records on
Japanese, German, American, and other labels. In
September of 1998, Japan’s Sublime Records released
"COFU," the duo’s first original album under the "CoFusion" name.
Soulmates Graphica
A unit consisting of programmers, designers, and DJ’s.
Originally they functioned as a sequenced house band, but
as the world-wide web developed, they broadened their
activities to include the web. They are also engaged in
producing flyers for club events, video, and art direction
for artists. The three members are Yuji Suzuki, "Ani"
Hironobu Fujiyoshi, and "Isa" Isamitsu Fujiyoshi. Each of
the three is a DJ and designer as well as a programmer.
YOJI BIOMEHANIKA
People call him the hard energy master. While based in
Osaka, his field of activities is always the world.
Yoji is respected by the hard energy scene around the
world. He has dropped compositions from numerous
labels such as DOS OR DIE and 3LANKA of Germany and
the UK’s CHOCI’S CHEWNS, earning high praise. In 1999
he founded his own label "Hellhouse," and made a highvoltage entry into the London, UK hard energy scene. He
has also done remixes for leading UK energy scene labels
such as DP, MOHAWK, and MOM, and in Japan has also
done remixes for DJ 19 and NISH.
This summer, his Hellhouse label made its second release
"SEDUCTION," bringing a flood of license requests from
labels around the world, and raising a storm of attention
around him.
Naoki "GigBag" Matsuura
Naoki began musical activity in 1983 during his university
days. As a bassist, he participated in numerous live and
studio sessions. Subsequently, he took a break from his
performance activities and began creating MIDI data and
working as a producer. At present, he is the chairman and
producer of Prest Ltd., which produces desktop music and
other digital content.
Sumie "Sue" Furuhashi
Born in 1973, Sue first took an interest in digital music
when she came across a keyboard that allowed step entry
of sequences. While attending university, she formed a
sequencer-based rap unit, and an MTR-based acappella
duo unit.
Currently she works as an assistant with Prest Ltd., and
also provides computer programming-based compositions
to musical groups.
MASA
Masa began his musical activity in the early 80’s, and by the
mid-90’s was performing live at parties both inside and
outside Japan. In 1994 he released a single on the German
label GAIA, and in 1996 an album
"Just Inside" from the German label East-West. He is also
represented on numerous compilations. In 1999 he released
"Walk In Space" on the British QUBE label, and the beatshifting "You Are Not Who You Are" from Equinox.
When this psychedelic genre-crossing DJ takes control, the
entire dance floor goes into a state of trance.
http://www.tk.xaxon.ne.jp/~masak/
Cappadocia Productions
Electronic sound tinkerers based in Japan.
Also active as an art performance unit named
GIGAHERTZ.
Also involved in the development of products such as the
Roland MC series.
E-mail:[email protected]
Tatsuya Kanamori
This DJ and artist runs the major Japanese Techno labels
Subvoice and Housedust. In addition to hits on his own
label, he is also very active in releasing numbers from
overseas labels. In heavy demand for DJ and live P.A. gigs
not only in Japan, but also abroad, he appears frequently in
many major festivals and concerts.
01904623 '00-2-C3-21N
 Loading...