

Page 1
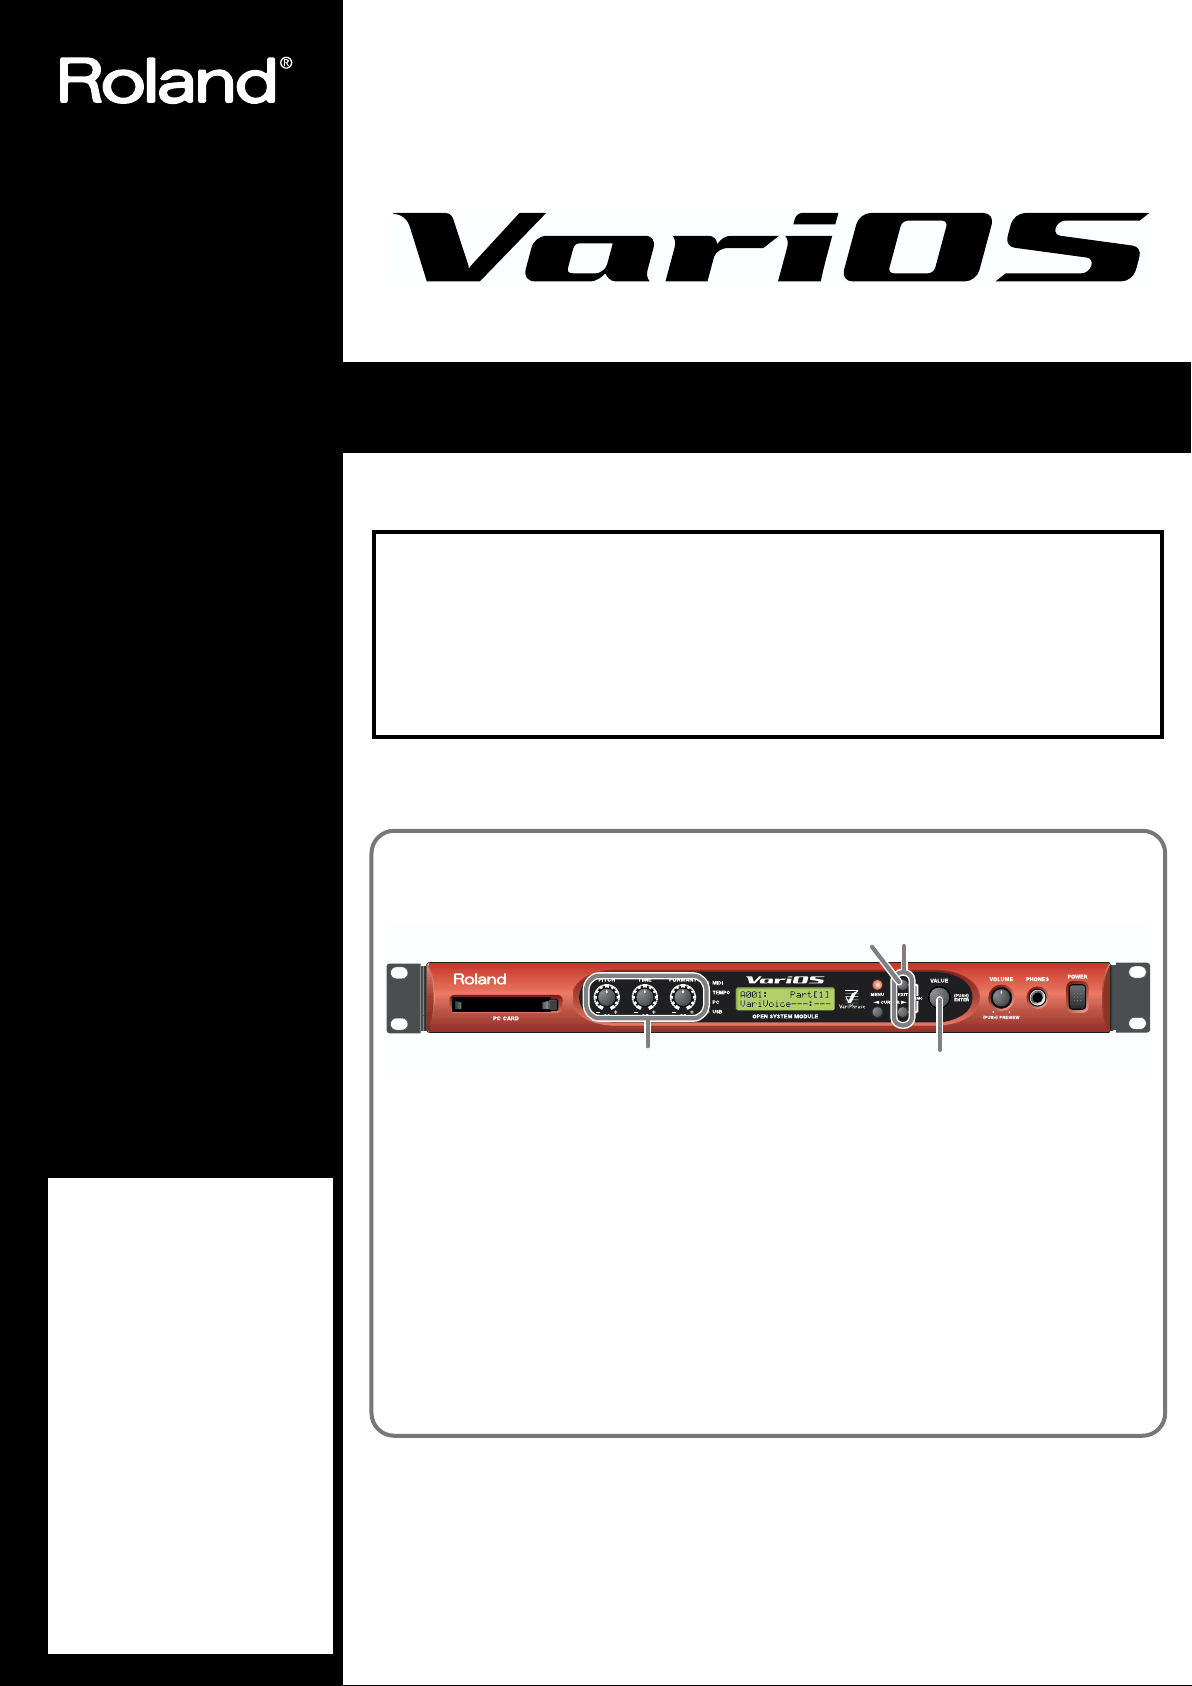
Listening to the demo song
fig.Cover
1. Hold down the [EXIT] button and press the [> (CURSOR)] button.
The demo play screen will appear.
2. Press the [VALUE] dial ([ENTER]) to start playback.
3. Turn the [PITCH]/[TIME]/[FORMANT] knobs to adjust these parameters.
4. Press the [ENTER] button to stop playback.
If you press the [EXIT] button, you're returned to the demo play screen.
* In addition to the VariOS demo song described here, you can also listen to V-Producer demo songs (p. 41).
* Since the demo song is stored in internal memory, it will not play if you have deleted the demo song data
from internal memory. In this case, refer to “Reloading the internal demo song into the VariOS”(p. 129).
* Use of the song data supplied with this product for any purpose other than private, personal enjoyment
without the permission of the copyright holder is prohibited by law. Additionally, this data must not be
copied, nor used in a secondary copyrighted work without the permission of the copyright holder.
User Guide
For details on all functions and screens of the VariOS, refer to "VariOS Reference Manual" (VariOS_Reference_E.pdf), found in the English -- Manual (PDF) folder of the CDROM. This manual can also be viewed by using the V-Producer "Help" command. This
manual also contains information such as a MIDI implementation chart for the VariOS.
Adobe Corporation's Acrobat Reader is required in order to read the PDF
file. You can download Acrobat Reader from the Adobe website (http://
www.adobe.com/). This address may change without notice.
1
4
Before using this unit, carefully read the sections entitled: “IMPORTANT SAFETY
INSTRUCTIONS” (p. 154),
“USING THE UNIT SAFELY” (pp. 2--3), and “IMPORTANT NOTES” (pp. 4--5).
These sections provide important information concerning the proper operation of
the unit. Additionally, in order to feel assured that you
have gained a good grasp of
every feature provided by
your new unit, User Guide
should be read in its entirety.
The manual should be saved
and kept on hand as a convenient reference.
All rights reserved. No part of this publication may be reproduced in any form without the
Copyright © 2002 ROLAND CORPORATION
written permission of ROLAND CORPORATION.
23
Page 2
USING THE UNIT SAFELY
Used for instructions intended to alert
the user to the risk of death or severe
injury should the unit be used
improperly.
Used for instructions intended to alert
the user to the risk of injury or material
damage should the unit be used
improperly.
* Material damage refers to damage or
other adverse effects caused with
respect to the home and all its
furnishings, as well to domestic
animals or pets.
001
• Before using this unit, make sure to read the
instructions below, and the Owner’s Manual.
..........................................................................................................
002a
• Do not open or perform any internal modifications on the unit.
..........................................................................................................
003
• Do not attempt to repair the unit, or replace parts
within it (except when this manual provides
specific instructions directing you to do so). Refer
all servicing to your retailer, the nearest Roland
Service Center, or an authorized Roland
distributor, as listed on the "Information" page.
..........................................................................................................
004
• Never use or store the unit in places that are:
• Subject to temperature extremes (e.g., direct
sunlight in an enclosed vehicle, near a heating
duct, on top of heat-generating equipment); or
are
• Damp (e.g., baths, washrooms, on wet floors);
or are
• Humid; or are
• Exposed to rain; or are
• Dusty; or are
• Subject to high levels of vibration.
..........................................................................................................
005
• This unit should be used only with a rack or stand
that is recommended by Roland.
..........................................................................................................
006
• When using the unit with a rack or stand recommended by Roland, the rack or stand must be
carefully placed so it is level and sure to remain
stable. If not using a rack or stand, you still need
to make sure that any location you choose for
placing the unit provides a level surface that will
properly support the unit, and keep it from
wobbling.
..........................................................................................................
The symbol alerts the user to important instructions
or warnings.The specific meaning of the symbol is
determined by the design contained within the
triangle. In the case of the symbol at left, it is used for
general cautions, warnings, or alerts to danger.
The symbol alerts the user to items that must never
be carried out (are forbidden). The specific thing that
must not be done is indicated by the design contained
within the circle. In the case of the symbol at left, it
means that the unit must never be disassembled.
The ● symbol alerts the user to things that must be
carried out. The specific thing that must be done is
indicated by the design contained within the circle. In
the case of the symbol at left, it means that the powercord plug must be unplugged from the outlet.
008a
• The unit should be connected to a power supply
only of the type described in the operating instructions, or as marked on the side of unit.
..........................................................................................................
008ey
• Use only the attached power-supply cord.
..........................................................................................................
009
• Do not excessively twist or bend the power cord,
nor place heavy objects on it. Doing so can
damage the cord, producing severed elements and
short circuits. Damaged cords are fire and shock
hazards!
..........................................................................................................
010
• This unit, either alone or in combination with an
amplifier and headphones or speakers, may be
capable of producing sound levels that could
cause permanent hearing loss. Do not operate for
a long period of time at a high volume level, or at
a level that is uncomfortable. If you experience
any hearing loss or ringing in the ears, you should
immediately stop using the unit, and consult an
audiologist.
..........................................................................................................
011
• Do not allow any objects (e.g., flammable material,
coins, pins); or liquids of any kind (water, soft
drinks, etc.) to penetrate the unit.
..........................................................................................................
013
• In households with small children, an adult
should provide supervision until the child is
capable of following all the rules essential for the
safe operation of the unit.
..........................................................................................................
014
• Protect the unit from strong impact.
(Do not drop it!)
..........................................................................................................
2
Page 3
015
• Do not force the unit’s power-supply cord to share
an outlet with an unreasonable number of other
devices. Be especially careful when using
extension cords—the total power used by all
devices you have connected to the extension
cord’s outlet must never exceed the power rating
(watts/amperes) for the extension cord. Excessive
loads can cause the insulation on the cord to heat
up and eventually melt through.
..........................................................................................................
016
• Before using the unit in a foreign country, consult
with your retailer, the nearest Roland Service
Center, or an authorized Roland distributor, as
listed on the "Information" page.
..........................................................................................................
023
• DO NOT play a CD-ROM disc on a conventional
audio CD player. The resulting sound may be of a
level that could cause permanent hearing loss.
Damage to speakers or other system components
may result.
101a
• The unit should be located so that its location or
position does not interfere with its proper ventilation.
..........................................................................................................
102b
• Always grasp only the plug on the power-supply
cord when plugging into, or unplugging from, an
outlet or this unit.
..........................................................................................................
104
• Try to prevent cords and cables from becoming
entangled. Also, all cords and cables should be
placed so they are out of the reach of children.
..........................................................................................................
106
• Never climb on top of, nor place heavy objects on
the unit.
..........................................................................................................
107b
• Never handle the power cord or its plugs with wet
hands when plugging into, or unplugging from,
an outlet or this unit.
..........................................................................................................
108a
• Before moving the unit, disconnect the power
plug from the outlet, and pull out all cords from
external devices.
..........................................................................................................
109a
• Before cleaning the unit, turn off the power and
unplug the power cord from the outlet.
..........................................................................................................
110a
• Whenever you suspect the possibility of lightning
in your area, pull the plug on the power cord out
of the outlet.
..........................................................................................................
118
• Whenever you've removed any screws—whether
it be when connecting something to the ground
terminal, or when installing a rack-mount adaptor
—be sure to place the screws out of reach of small
children, so they won't be swallowed accidentally.
..........................................................................................................
3
Page 4

IMPORTANT NOTES
291b
In addition to the items listed under “IMPORTANT
SAFETY INSTRUCTIONS” and “USING THE UNIT
SAFELY” on pages 2, 3 and 4, please read and observe
the following:
Power Supply
301
• Do not use this unit on the same power circuit with any
device that will generate line noise (such as an electric
motor or variable lighting system).
307
• Before connecting this unit to other devices, turn off the
power to all units. This will help prevent malfunctions
and/or damage to speakers or other devices.
Placement
351
• Using the unit near power amplifiers (or other equipment
containing large power transformers) may induce hum.
To alleviate the problem, change the orientation of this
unit; or move it farther away from the source of interference.
352a
• This device may interfere with radio and television
reception. Do not use this device in the vicinity of such
receivers.
352b
• Noise may be produced if wireless communications
devices, such as cell phones, are operated in the vicinity of
this unit. Such noise could occur when receiving or initiating a call, or while conversing. Should you experience
such problems, you should relocate such wireless devices
so they are at a greater distance from this unit, or switch
them off.
354a
• Do not expose the unit to direct sunlight, place it near
devices that radiate heat, leave it inside an enclosed
vehicle, or otherwise subject it to temperature extremes.
Excessive heat can deform or discolor the unit.
355
• To avoid possible breakdown, do not use the unit in a wet
area, such as an area exposed to rain or other moisture.
Maintenance
401a
• For everyday cleaning wipe the unit with a soft, dry cloth
or one that has been slightly dampened with water. To
remove stubborn dirt, use a cloth impregnated with a
mild, non-abrasive detergent. Afterwards, be sure to wipe
the unit thoroughly with a soft, dry cloth.
402
• Never use benzine, thinners, alcohol or solvents of any
kind, to avoid the possibility of discoloration and/or
deformation.
Additional Precautions
551
• Please be aware that the contents of memory can be
irretrievably lost as a result of a malfunction, or the
improper operation of the unit. To protect yourself against
the risk of loosing important data, we recommend that
you periodically save a backup copy of important data
you have stored in the unit’s memory on a PC card.
552
• Unfortunately, it may be impossible to restore the contents
of data that was stored on a PC card once it has been lost.
Roland Corporation assumes no liability concerning such
loss of data.
553
• Use a reasonable amount of care when using the unit’s
buttons, sliders, or other controls; and when using its jacks
and connectors. Rough handling can lead to malfunctions.
554
• Never strike or apply strong pressure to the display.
556
• When connecting / disconnecting all cables, grasp the
connector itself—never pull on the cable. This way you
will avoid causing shorts, or damage to the cable’s
internal elements.
557
•A small amount of heat will radiate from the unit during
normal operation.
558a
• To avoid disturbing your neighbors, try to keep the unit’s
volume at reasonable levels. You may prefer to use
headphones, so you do not need to be concerned about
those around you (especially when it is late at night).
559a
• When you need to transport the unit, package it in the box
(including padding) that it came in, if possible. Otherwise,
you will need to use equivalent packaging materials.
562
• Use a cable from Roland to make the connection. If using
some other make of connection cable, please note the
following precautions.
• Some connection cables contain resistors. Do not use
cables that incorporate resistors for connecting to this
unit. The use of such cables can cause the sound level
to be extremely low, or impossible to hear. For information on cable specifications, contact the manufacturer of the cable.
563
• Unauthorized duplication, reproduction, hiring, and
lending prohibited.
564
• Before you open the included CD-ROM, you must read
the “license agreement.” Opening the CD-ROM will be
taken to mean your acceptance of the license agreement.
4
Page 5

Using PC Cards
704
• Carefully insert the PC card all the way in—until it is
firmly in place.
fig.PC card
Eject
705
• Never touch the terminals of the PC card. Also, avoid
getting the terminals dirty.
Handling CD-ROMs
801
• Avoid touching or scratching the shiny underside
(encoded surface) of the disc. Damaged or dirty CD-ROM
discs may not be read properly. Keep your discs clean
using a commercially available CD cleaner.
Supported cards:
PC card, Compact Flash Type II compliant
You can use microdrives or media conversion cards that
are compliant with "Compact Flash Type II."
Interface specification:
PC Card ATA
Operating voltage:
5 V
* Cards that operate on 5 V or 5 V/3.3 V can be inserted.
Cards that operate only on 3.3 V cannot be used.
• In order to use a PC card, you must first
format it using the VariOS, according to the
procedure described in
“8-5 Format”
(p. 115).
of this document.
• Do not insert cards whose specifications
differ from those listed above. Doing so may
damage the device.
• Never insert or remove a PC card while data
is being written to the card or while a
formatting operation is being executed. Doing
so may damage the device.
Copyright
851
• Unauthorized recording, distribution, sale, lending, public
performance, broadcasting, or the like, in whole or in part,
of a work (musical composition, video, broadcast, public
performance, or the like) whose copyright is held by a
third party is prohibited by law.
853
• Do not use this unit for purposes that could infringe on a
copyright held by a third party. We assume no responsibility whatsoever with regard to any infringements of
third-party copyrights arising through your use of this
unit.
204
* Microsoft and Windows are registered trademarks of Microsoft Corporation.
206e
* Screen shots in this documents are reprinted with permission from Microsoft Corporation.
ADD
* Windows® XP is known officially as: “Microsoft® Windows® XP operating system.”
206f
* Windows® 2000 is known officially as: “Microsoft® Windows® 2000 operating system.”
206g
* Windows® Me is known officially as: “Microsoft® Windows® Millennium Edition operating system.”
207
* Apple and Macintosh are registered trademark of Apple Computer, Inc.
209
* MacOS is a trademark of Apple Computer, Inc.
220
* All product names mentioned in this document are trademarks or registered trademarks of their respective owners.
231
* OMS is a registered trademark of Opcode Systems, Inc.
232
* FreeMIDI is a trademark of Mark of the Unicorn, Inc.
233
* VST is a trademark of Steinberg Media Technologies AG.
5
Page 6

Contents
USING THE UNIT SAFELY......................................................................2
IMPORTANT NOTES ...............................................................................4
Contents ..................................................................................................6
Introduction...........................................................................................11
Check the contents of the package.........................................................................................................12
Startup.........................................13
Names of Things and What They Do...................................................14
Front Panel.................................................................................................................................................14
Rear Panel.................................................................................................................................................. 15
V-Producer screen....................................................................................................................................16
Restoring the factory settings (Factory Reset)......................................................................................18
Connections with external devices.....................................................19
Attaching the rackmount adaptors........................................................................................................19
Connecting MIDI and audio devices.....................................................................................................20
Installation.............................................................................................21
Windows users..........................................................................................................................................21
Installing V-Producer ................................................................................................................... 21
Installing the Driver...................................................................................................................... 22
Macintosh users........................................................................................................................................ 31
About the included MIDI drivers............................................................................................... 32
Installing OMS...............................................................................................................................32
Installing V-Producer ................................................................................................................... 33
Connections and OMS setup.......................................................................................................34
MIDI and audio settings........................................................................38
Listening to the demo songs...............................................................41
Loading the demo songs .........................................................................................................................41
Playing the demo song ............................................................................................................................ 42
Turning the VariOS on/off ....................................................................43
Turning on the VariOS when connected to a computer..................................................................... 43
Turning off the VariOS when connected to a computer..................................................................... 44
6
Page 7

Contents
Operation Guide: Software
(V-Producer).................................45
An overview of V-Producer..................................................................46
What is VariPhrase?......................................................................................................................48
What is encoding?......................................................................................................................... 49
Loading wave files (Load Wave Files) ................................................50
Make settings for samples and play them (Sample List) ..................52
Auditioning a sample ..............................................................................................................................53
Switching the keyboard map.................................................................................................................. 54
(Phrase Map)..................................................................................................................................54
(Groove Map).................................................................................................................................54
Deleting a sample.....................................................................................................................................55
Copying a sample.....................................................................................................................................55
Editing the sample parameters (Sample Edit)....................................56
Key Assign mode .......................................................................................................................... 56
Playback mode...............................................................................................................................57
Robot (robot voice switch)........................................................................................................... 58
Reset................................................................................................................................................58
Re-encoding a sample (Wave Edit) .....................................................59
Waveform preview ....................................................................................................................... 59
Changing the encoding type .......................................................................................................60
Changing the original tempo ......................................................................................................60
Changing the location of a event ................................................................................................61
Creating a song (Vari Track)................................................................62
Changing the tempo................................................................................................................................. 62
Setting the time signature........................................................................................................................62
Arranging samples................................................................................................................................... 63
Editing a frame..........................................................................................................................................64
Select the frame to edit.................................................................................................................64
Moving a frame ............................................................................................................................. 65
Changing the length of a frame...................................................................................................65
Copying a frame............................................................................................................................65
Deleting a frame............................................................................................................................66
Loop playback........................................................................................................................................... 67
Using the Quick Loop function to set the loop region.............................................................67
Editing the settings of a frame (Frame Properties)..............................................................................68
Solo/Mute/Volume/Pan settings.........................................................................................................68
Playing your MIDI keyboard and recording
(RealTime Rec)..........................................................................................................................................69
Phrase editing (Scope Editor)..............................................................70
Phrase scope................................................................................................................................... 70
Groove scope .................................................................................................................................70
Editing in the Phrase Scope ................................................................71
Waveform display area................................................................................................................71
Note display area .......................................................................................................................... 71
Controller display area.................................................................................................................71
7
Page 8

Contents
Editing the Pitch/Time/Formant/Dynamics...................................................................................... 72
Erasing controller data ................................................................................................................. 74
Editing notes .............................................................................................................................................75
Grid Snap setting........................................................................................................................... 75
Selecting multiple notes ............................................................................................................... 75
Changing the pitch (fixed movement of the note upward or downward)........................... 76
Adjusting the legato timing......................................................................................................... 76
Moving a note to another position .............................................................................................76
Adding a note................................................................................................................................76
Changing the length of a note.....................................................................................................77
Erasing a note ................................................................................................................................77
Copying a note...............................................................................................................................77
Dividing a note.............................................................................................................................. 77
Joining two notes........................................................................................................................... 78
Editing the velocity....................................................................................................................... 78
Modify Recording.....................................................................................................................................79
Quantize..................................................................................................................................................... 80
Editing in the Groove Scope................................................................81
Original waveform display area.................................................................................................81
Slice (note) display area................................................................................................................81
Controller display area.................................................................................................................81
Editing the Pitch/Time/Formant/Dynamics...................................................................................... 82
Editing a slice (note).................................................................................................................................82
Selecting multiple slices ............................................................................................................... 82
Moving a slice................................................................................................................................ 82
Adding a slice................................................................................................................................83
Adjusting the length of a slice..................................................................................................... 83
Deleting a slice...............................................................................................................................83
Copying a slice by dragging and dropping ..............................................................................83
Copying a slice with the Copy and Paste commands.............................................................. 84
Modify Recording.....................................................................................................................................84
Quantize..................................................................................................................................................... 84
Saving....................................................................................................85
Saving a song ............................................................................................................................................85
Exporting a wave file...............................................................................................................................85
Using the effects of the VariOS (Mixer) ..............................................86
Using the Mixer ........................................................................................................................................ 86
Using effects..............................................................................................................................................87
MULTI (Multi-effect).................................................................................................................... 87
CHORUS ........................................................................................................................................87
REVERB.......................................................................................................................................... 87
Switching the effect type..............................................................................................................88
Taking advantage of the VariOS Keyboard(VariOS Keyboard) ........89
Using the VariOS Keyboard....................................................................................................................89
Note name display........................................................................................................................ 89
Turning a note on/off from your computer keyboard............................................................ 90
Surface controller .......................................................................................................................... 90
8
Page 9

Contents
Operation guide:
Sound module (VariOS) ................91
An overview of the VariOS...................................................................92
Internal structure of the VariOS............................................................................................................. 92
“Samples” and “performances”..................................................................................................92
To play sounds ..............................................................................................................................92
Saving sounds................................................................................................................................92
What is “keyboard map”?............................................................................................................ 92
Sample playback ...........................................................................................................................92
Maximum sample time.................................................................................................................92
Maximum polyphony................................................................................................................... 92
Basic operation of the VariOS .............................................................94
The screen and basic operation .............................................................................................................. 94
Switching the screen ................................................................................................................................94
Editing a value..........................................................................................................................................95
Assigning a name ..................................................................................................................................... 96
Selecting a sample .................................................................................................................................... 97
Changing the tempo of a sample ...........................................................................................................98
Tempo sync setting.......................................................................................................................99
Playing the VariOS from a connected keyboard (MIDI Mode)....................................................... 100
PC mode ....................................................................................................................................... 100
Internal mode...............................................................................................................................100
Changing how the sounds are produced............................................................................................ 102
Changing the Keyboard Map setting....................................................................................... 102
Changing the Key Assign Mode............................................................................................... 102
Changing the Playback Mode ................................................................................................... 103
Loading and saving................................................................................................................................ 103
VariOS Menu Reference.....................................................................104
Menu 1 Sample Edit (sample settings)................................................................................................ 105
Menu 2 Part Edit (part settings) ........................................................................................................... 107
Menu 3 Controller Edit (Controller settings) .....................................................................................108
Menu 4 Effect Edit (Effect settings)...................................................................................................... 111
Menu 5 Tune (Tuning settings)............................................................................................................112
Menu 6 Utility......................................................................................................................................... 112
Menu 7 System........................................................................................................................................ 113
Menu 8 DISK........................................................................................................................................... 113
9
Page 10

Contents
Appendix...................................117
Synchronization settings ...................................................................118
Synchronizing as a slave (MIDI Clock)............................................................................................... 118
V-Producer synchronization settings.......................................................................................119
ProTools........................................................................................................................................ 120
Logic Audio..................................................................................................................................120
Cubase VST..................................................................................................................................121
SONAR 2.0 ................................................................................................................................... 122
Synchronizing as a slave (MTC)...........................................................................................................123
Synchronization settings on the master device ......................................................................123
Synchronizing as the master (MIDI Clock).........................................................................................124
Synchronization settings on the slave device(s)..................................................................... 124
Synchronizing as the master (MTC) .................................................................................................... 125
Synchronization settings on the slave device(s)..................................................................... 125
Controlling the VariOS from your MIDI sequencer..........................126
Using your MIDI sequencer to play data (SMF)
created by V-Producer........................................................................127
Export SMF data..........................................................................................................................127
Load the SMF data into your MIDI sequencer .......................................................................127
When not using the USB MIDI functionality of the VariOS
(Connecting the VariOS to an external MIDI interface) ...................128
Connections.............................................................................................................................................128
MIDI port settings in V-Producer ........................................................................................................ 128
MIDI MODE setting on the VariOS..................................................................................................... 128
Reloading the internal demo song into the VariOS.........................129
Troubleshooting..................................................................................130
Problems related to the USB driver (Windows) ................................................................................130
Problems related to the USB driver (Macintosh)............................................................................... 133
Problems when using the VariOS........................................................................................................134
Deleting the driver ................................................................................................................................. 142
List of messages.................................................................................144
Error messages displayed by V-Producer...........................................................................................144
VariOS (sound module) related errors.....................................................................................144
V-Producer errors........................................................................................................................144
Errors displayed by the VariOS (sound module)..............................................................................146
MIDI-related ................................................................................................................................ 146
Hardware-related........................................................................................................................146
Disk and file-related ...................................................................................................................146
List of shortcuts..................................................................................148
Specifications......................................................................................150
INDEX...................................................................................................151
IMPORTANT SAFETY INSTRUCTIONS .............................................154
10
Page 11
Introduction
Thank you, and congratulations on your choice of the VariOS.
The VariOS is a completely new type of audio-based music production environment, which
consists of a VariPhrase sound generator (VariOS) and software (V-Producer for VariOS).
VariPhrase not only lets you edit the tempo and pitch of audio material as easily as you can with
MIDI data, it also provides pinpoint control—graphically, and in real time—over any region
within a phrase sample that you choose to focus in on. Processes that were difficult to perform
on previous audio-based music production systems can now be performed with breathtaking
ease on the VariOS.
Conventions followed in this manual
• indicates Windows-related explanations.
• and indicate MacOS-related explanations.
MacOS
11
Page 12
Introduction
Check the contents of the package
This package contains the following items. When you open the package, check that no items are
missing. If any items are missing, please contact your dealer.
VariOS
fig.01-00aPanel_50
AC cable
This is the only AC cable you should use with the VariOS.
Do not use any AC cable other than the supplied one, since doing so may cause malfunction.
Rackmount adaptor
Use this if you want to install the VariOS in an audio rack.
For details on how to attach the adaptor, refer to “Attaching the rackmount adaptors” (p. 19).
❏
❏
❏
❏
VariOS CD-ROM
This CD-ROM contains the VariOS drivers and software (V-Producer).
* Please be sure to read the included license agreement before you open the CD-ROM case.
* Do not touch the shiny side (data side) of the disc, or allow it to become scratched. The disc may become
unreadable if you do so. If the disc gets dirty, use a commercially available CD cleaner to clean it.
❏ License agreement
This license agreement permits you to use specific software whose copyright is owned by
Roland Corporation. You must read this before you open the CD-ROM case.
■ VariOS User Guide
This is the manual you are holding. It describes how to connect the VariOS and get it set up,
guides you through its basic operation, and offers solutions for some of the problems you may
run into.
* For details on all functions and screens of the VariOS, refer to "VariOS Reference Manual"
(VariOS_Reference_E.pdf), found in the English -- Manual (PDF) folder of the CD-ROM. This manual
can also be viewed by using the V-Producer "Help" command. This manual also contains information
such as a MIDI implementation chart for the VariOS. Adobe Corporation’s Acrobat Reader is required
in order to read the PDF file.
You can download Acrobat Reader from the Adobe website (http://www.adobe.com/). This address may
change without notice.
12
Page 13

Startup
This section introduces the basic concepts of the VariOS, and explains how to install the
software and drivers, and how to make connections with external devices.
13
Page 14

Names of Things and What They Do
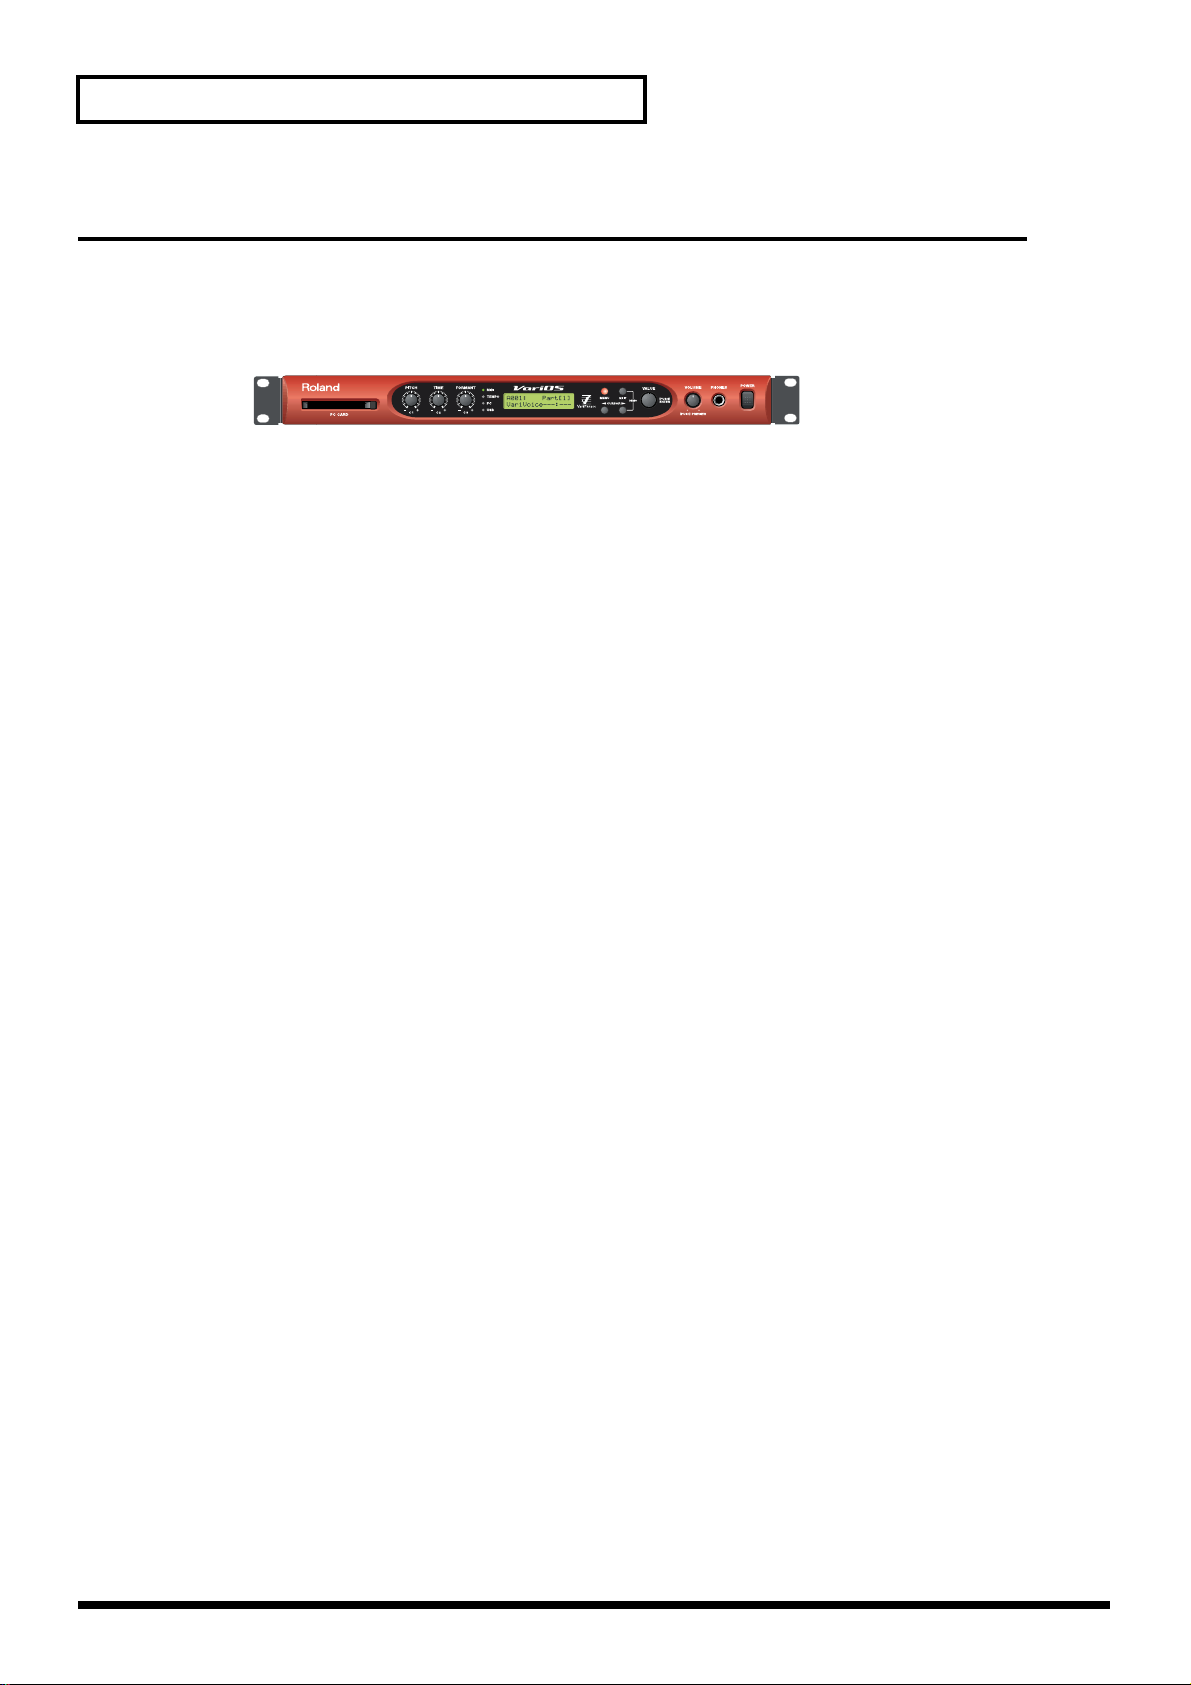
Front Panel
fig.01-01PanelFront_75
EF
A
A. PC Card Slot
This is used when saving VariOS data (p. 114).
B. PITCH/TIME/FORMANT Knobs
PITCH (C1) Knob Modifies the pitch.
TIME (C2) Knob Modifies the playback speed (time).
FORMANT (C3) Knob Modifies the tonal character (formant).
You are free to assign the parameter that will be adjusted by each knob (p. 108). The above
assignments are the power-on defaults.
C. Indicators
MIDI Lights when a MIDI message is received.
TEMPO Blinks at the tempo (p. 98).
PC Lights when the MIDI mode of the VariOS is “PC” (p. 100).
USB Lights when connected to a computer via USB.
D. Display
Various information is shown here according to the operations you perform.
E. MENU Button
Accesses the various functions of the VariOS.
F. EXIT Button
Returns you to the previously displayed screen (p. 94). Depending on the content of the menu,
this button also functions as CANCEL.
B
C
DGHIJK
G. CURSOR Buttons
Used to move the cursor (p. 95).
H. VALUE Dial
Turn this dial to edit a value. Pressing the VALUE dial will function as ENTER (confirm). If you
turn the VALUE dial while pressing it, the value will change in larger steps (p. 95).
I. VOLUME Knob
Adjusts the overall volume that is output from the MAIN OUT jacks and the HEADPHONE jack.
By pressing the VOLUME knob you can audition (preview) the current sample.
J. PHONES Jack
You can connect a set of headphones to this jack. Use headphones with an impedance in the
range of 32–600 ohms.
fig.1-01a
K. POWER Switch
Turns the power of the VariOS on/off (p. 43). The
power is on when the switch is in the inward
position, and off when the switch is in the outward
position.
Power is on when
switch is depressed
Power is off when
switch is released
14
Page 15
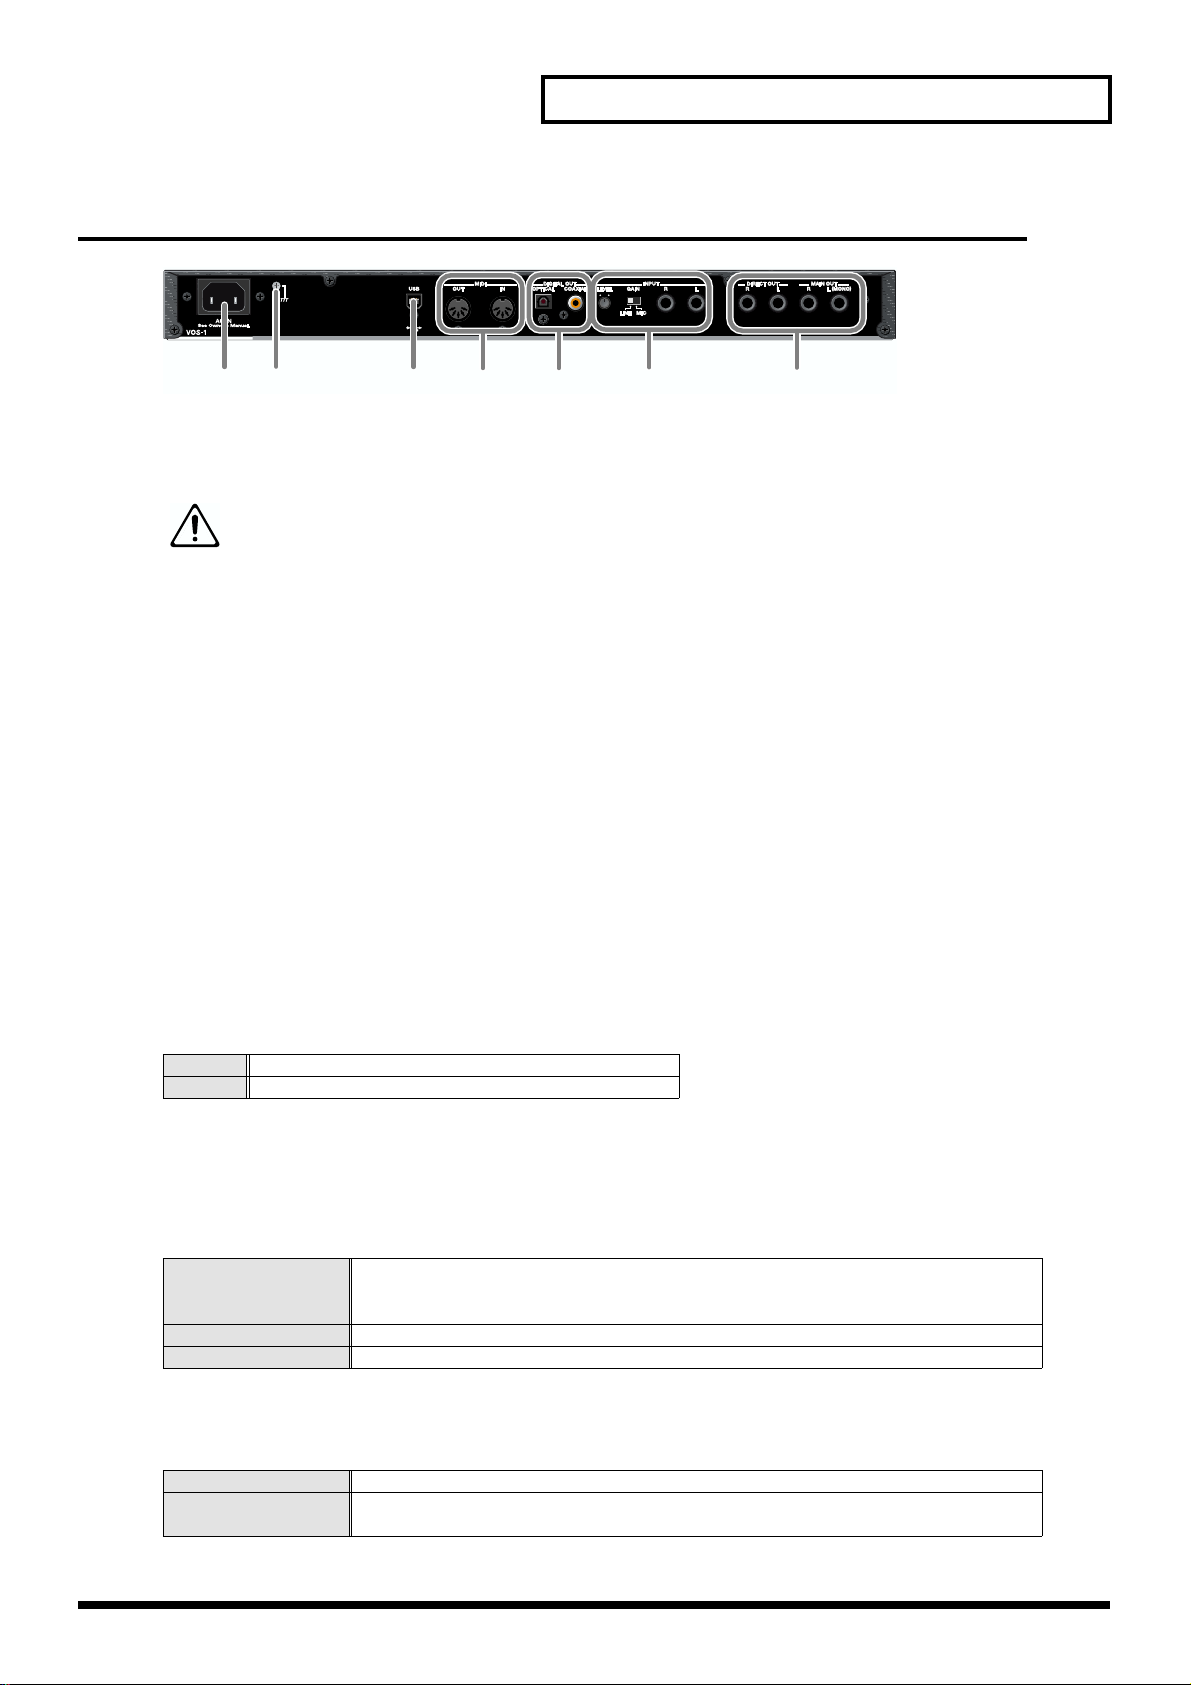
Rear Panel
fig.01-02PanelRear_75
LNOPQRM
L. AC Inlet
Connect the supplied power cord here.
* For details on the power consumption, refer to p. 150.
The unit should be connected to a power source only of the type marked on the side of
unit.
M. Grounding Terminal
In some cases, depending on the environment in which the unit is installed, the surface of the
panel may sometimes feel rough and grainy. This is due to an infinitesimal electrical charge,
which is absolutely harmless. However, if you are concerned about this, connect the ground
terminal (see figure) with an external ground. When the unit is grounded, a slight hum may
occur, depending on the particulars of your installation. If you are unsure of the connection
method, contact the nearest Roland Service Center, or an authorized Roland distributor, as
listed on the “Information” page.
● Unsuitable places for connection
• Water pipes (may result in shock or electrocution)
• Gas pipes (may result in fire or explosion)
• Telephone-line ground or lightning rod (may be dangerous in the event of lightning)
Names of Things and What They Do
N. USB Connector
Use a USB cable to connect the VariOS to your computer.
O. MIDI Connectors
Connect external MIDI devices here (p. 20). Use MIDI cables (sold separately) to make
connections.
IN Receives MIDI messages from an external device.
OUT Transmits MIDI messages to an external device.
P. DIGITAL OUT
These jacks output digital audio signals (stereo). Two types are provided; optical and coaxial.
Output settings are made in the screen where you specify the effect signal flow (p. 86, p. 111).
You can use both types of OUT connector simultaneously; they will output the same sound.
Q. INPUT
Connect a line-level source or mic here if you want to input audio into the VariOS.
AUDIO IN Jacks
LEVEL Knob Adjusts the level at which audio is input from the AUDIO IN jacks.
GAIN switch Switches the AUDIO IN input jacks between line level and mic level.
* The audio signal that is input to AUDIO IN will be mixed with the sound of the VariOS and output from MAIN OUT.
R. OUTPUT
Connect your amp or mixer to these jacks. Output settings are made in the screen where you
specify the effect signal flow (p. 86, p. 111).
DIRECT OUT Jacks Output the sound unprocessed by effects or only the multi-effect sound in stereo.
MAIN OUT Jacks
Output the audio signal in stereo. If you want to use monaural output, connect only
the L jack.
15
Page 16
Names of Things and What They Do
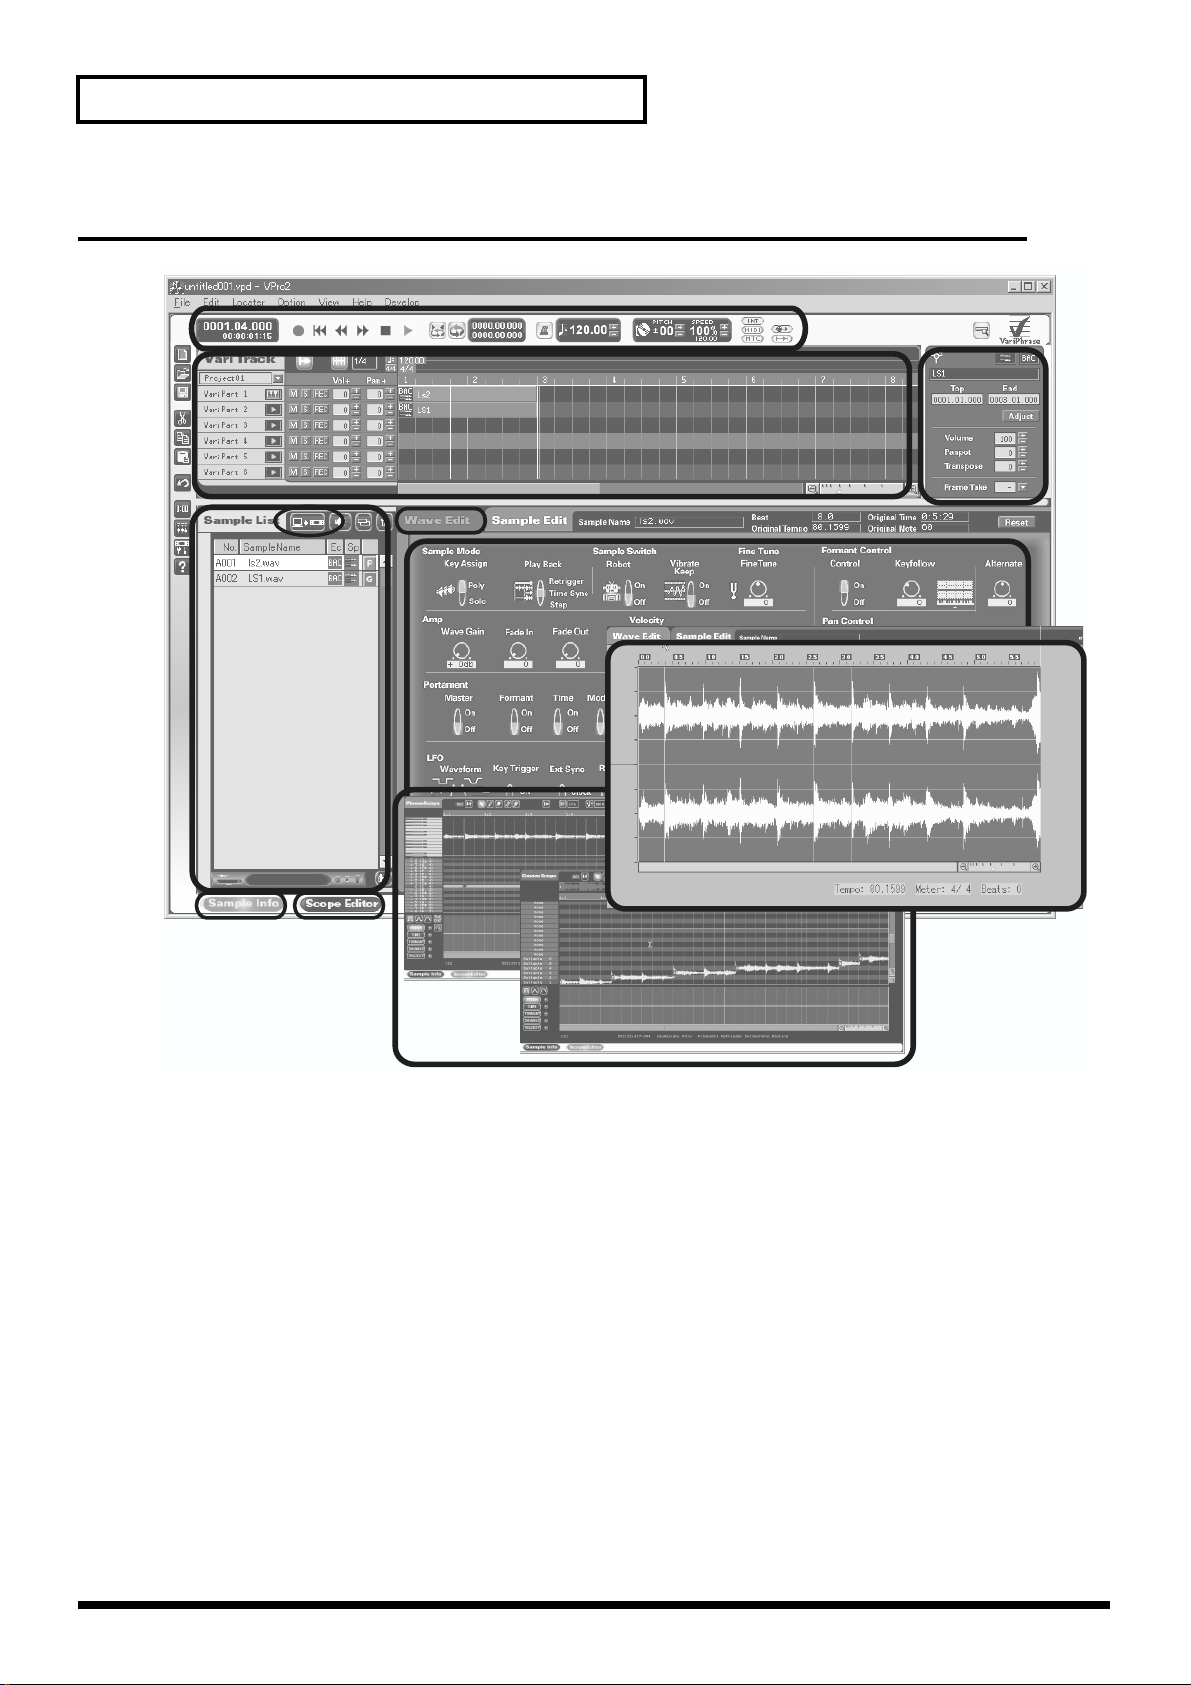
V-Producer screen
fig.02-03_75
A
E
b'
B
d
C
F
D
b
g
G
A. Locator (p. 41)
The locator contains functions for controlling the playback of V-Producer, such as song play/
stop.
B. Sample List (p. 52)
Sample List displays a list of the samples that are loaded into the VariOS. To load a sample into
the VariOS, press the [b’] (Load Wave Files) button (p. 50) and load a wave file (.wav or aiff)
from your computer. At this time the wave file will automatically be converted (encoded) into
a format that allows VariPhrase processing to be used.
The samples shown in the sample list can be played directly from your MIDI keyboard. You can
also drag and drop them to arrange them in the Vari Track.
To display the Sample List, click the [b] (Sample Info) button located at the bottom of the screen.
C. Sample Edit (p. 56)
Sample Edit lets you set various parameters for the samples in the sample list. These settings
determine how the sample will sound.
To display Sample Edit, click the [b] (Sample Info) button located at the bottom of the screen.
16
Page 17

Names of Things and What They Do
D. Wave Edit (p. 59)
Wave Edit lets you re-encode samples from the sample list (e.g., to change their encoding type
or modify the tempo data).
To display Wave Edit, click the [b] (Sample Info) button located at the bottom of the screen, and
then click the [d] (Wave Edit) tab.
E. Vari Track (p. 62)
Vari Track is the basic screen you will use when creating a song. Drag and drop samples from
the sample list to arrange them into a song. Samples that are placed in this way are called
“frames.”
F. Frame Properties (p. 68)
Frame Properties lets you modify the settings (volume, pitch, location, etc.) of a frame in the
Vari Track.
G. Scope Editor (p. 70)
Scope Editor is where you edit playback data for the frames that are placed in the Vari Track.
Here you can edit Pitch, Time, Formant, volume (Dynamics), and notes.
To display the Scope Editor, click the [g] (Scope Editor) button located at the bottom of the
screen, or double-click a frame that has been placed in the Vari Track.
The Scope Editor provides two methods of editing.
• If you want to freely modify the melody by editing the notes (pitch) of a phrase:
Phrase Scope
[Edits apply to] ..........Green frames that were placed with the sample list Keyboard Map (p. 54)
set to [P].
• If you want to divide a phrase into events and change the playback order:
Groove Scope
[Edits apply to] ..........Purple frames that were placed with the sample list Keyboard Map (p.
54) set to [G].
17
Page 18

Names of Things and What They Do
Restoring the factory settings (Factory Reset)
Here’s how to restore the VariOS to the factory-set condition.
1. Press the [MENU] button so it’s lighted. The MENU screen will appear.
* Initially, the MENU screen will show the most recently selected menu. You need to go to the top level
menu. You can get there by pressing and continuing to hold the [MENU] button for a few moments
(when the [MENU] button is not illuminated), or by pressing the [EXIT] button.
2. Turn the [VALUE] knob to select “Menu 6 Utility,” and press the [VALUE] knob.
3. Turn the [VALUE] knob to select “Menu 6-4 Factory Reset,” and press the [VALUE]
knob.
4. The display will ask “Factory Reset OK?,” so press the [VALUE] knob.
* If you press the [EXIT] button, the Factory Reset operation will be cancelled.
* This operation will not restore the internal demo song of the VariOS. Please read “Reloading the
VariOS internal demo song” (p. 129).
18
Page 19
Connections with external devices
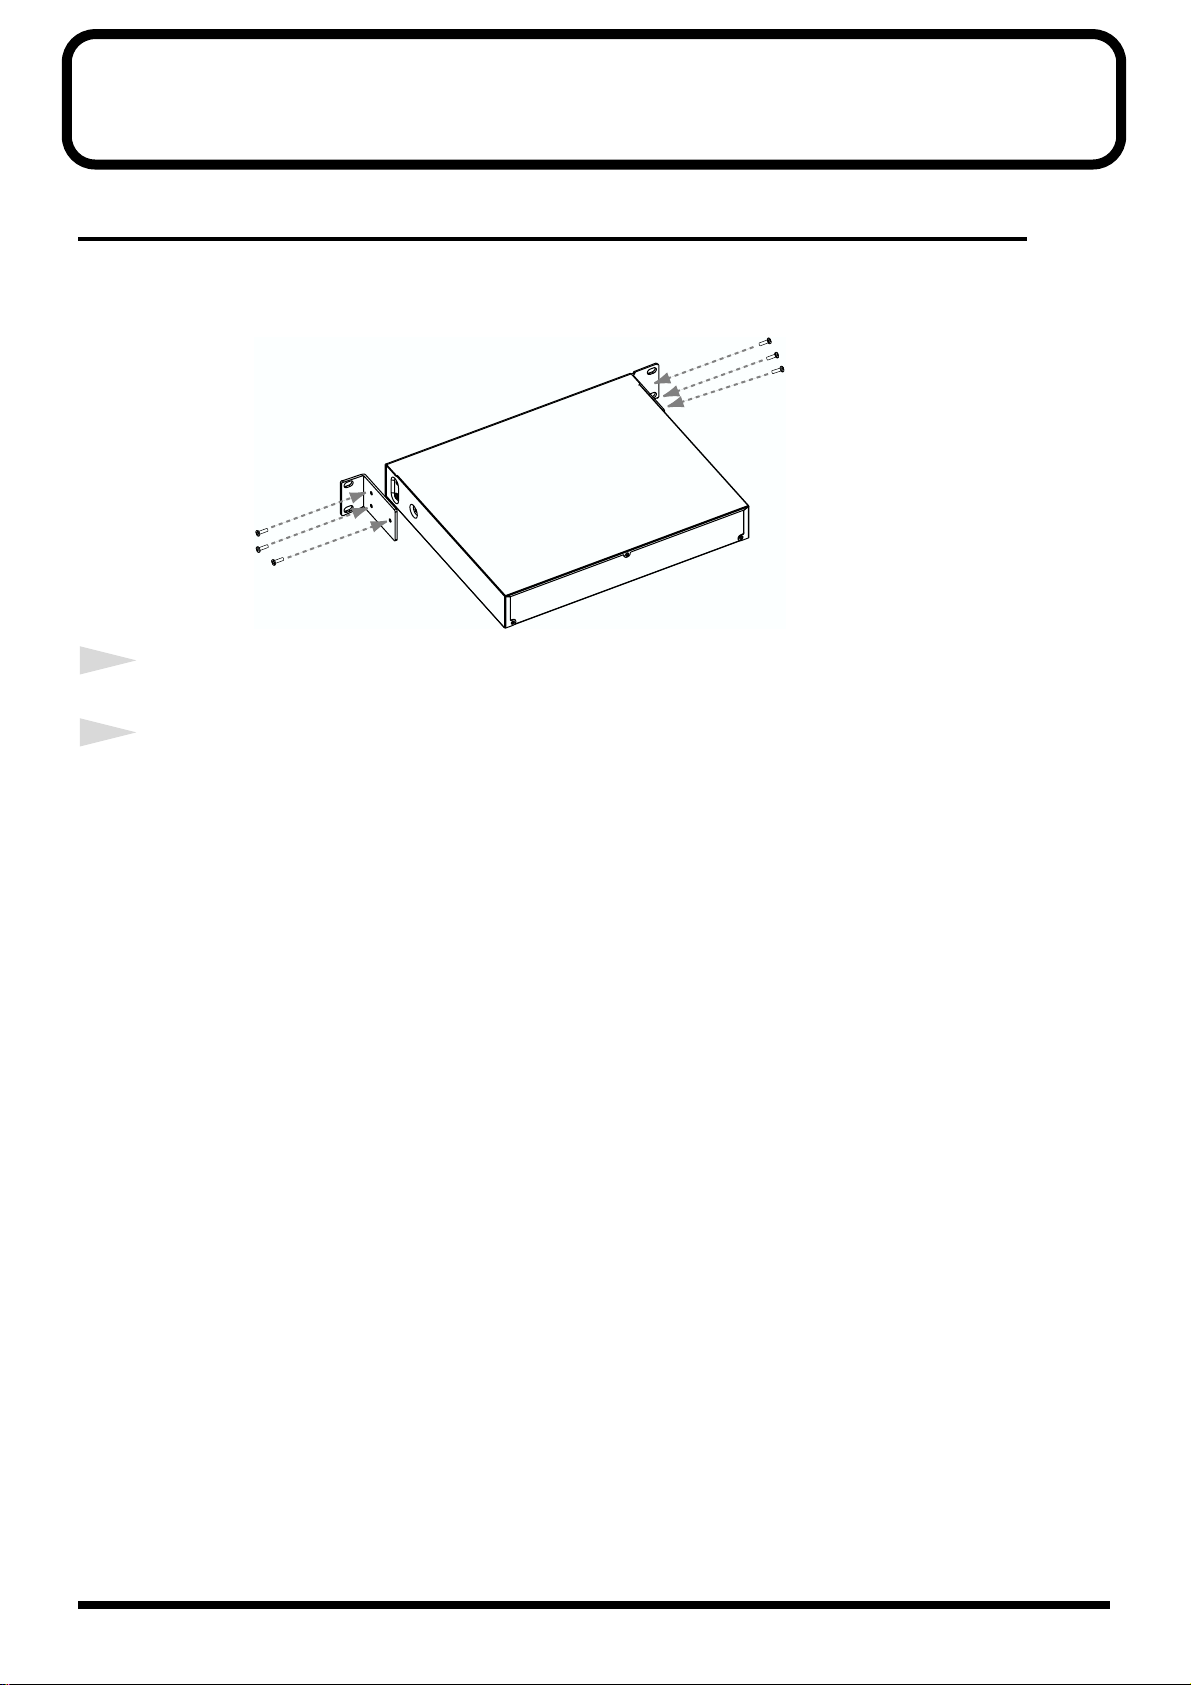
Attaching the rackmount adaptors
If you want to install the VariOS in a rack, attach the rackmount adaptors as shown in the
diagram.
fig.angle
1
Remove three screws (on each side) from the right and left panels of the VariOS.
2
Using the screws you removed in step 1, attach the rackmount brackets to the VariOS.
You must use the screws that you removed. Do not use any other screws.
19
Page 20
Connections with external devices
Connecting MIDI and audio devices
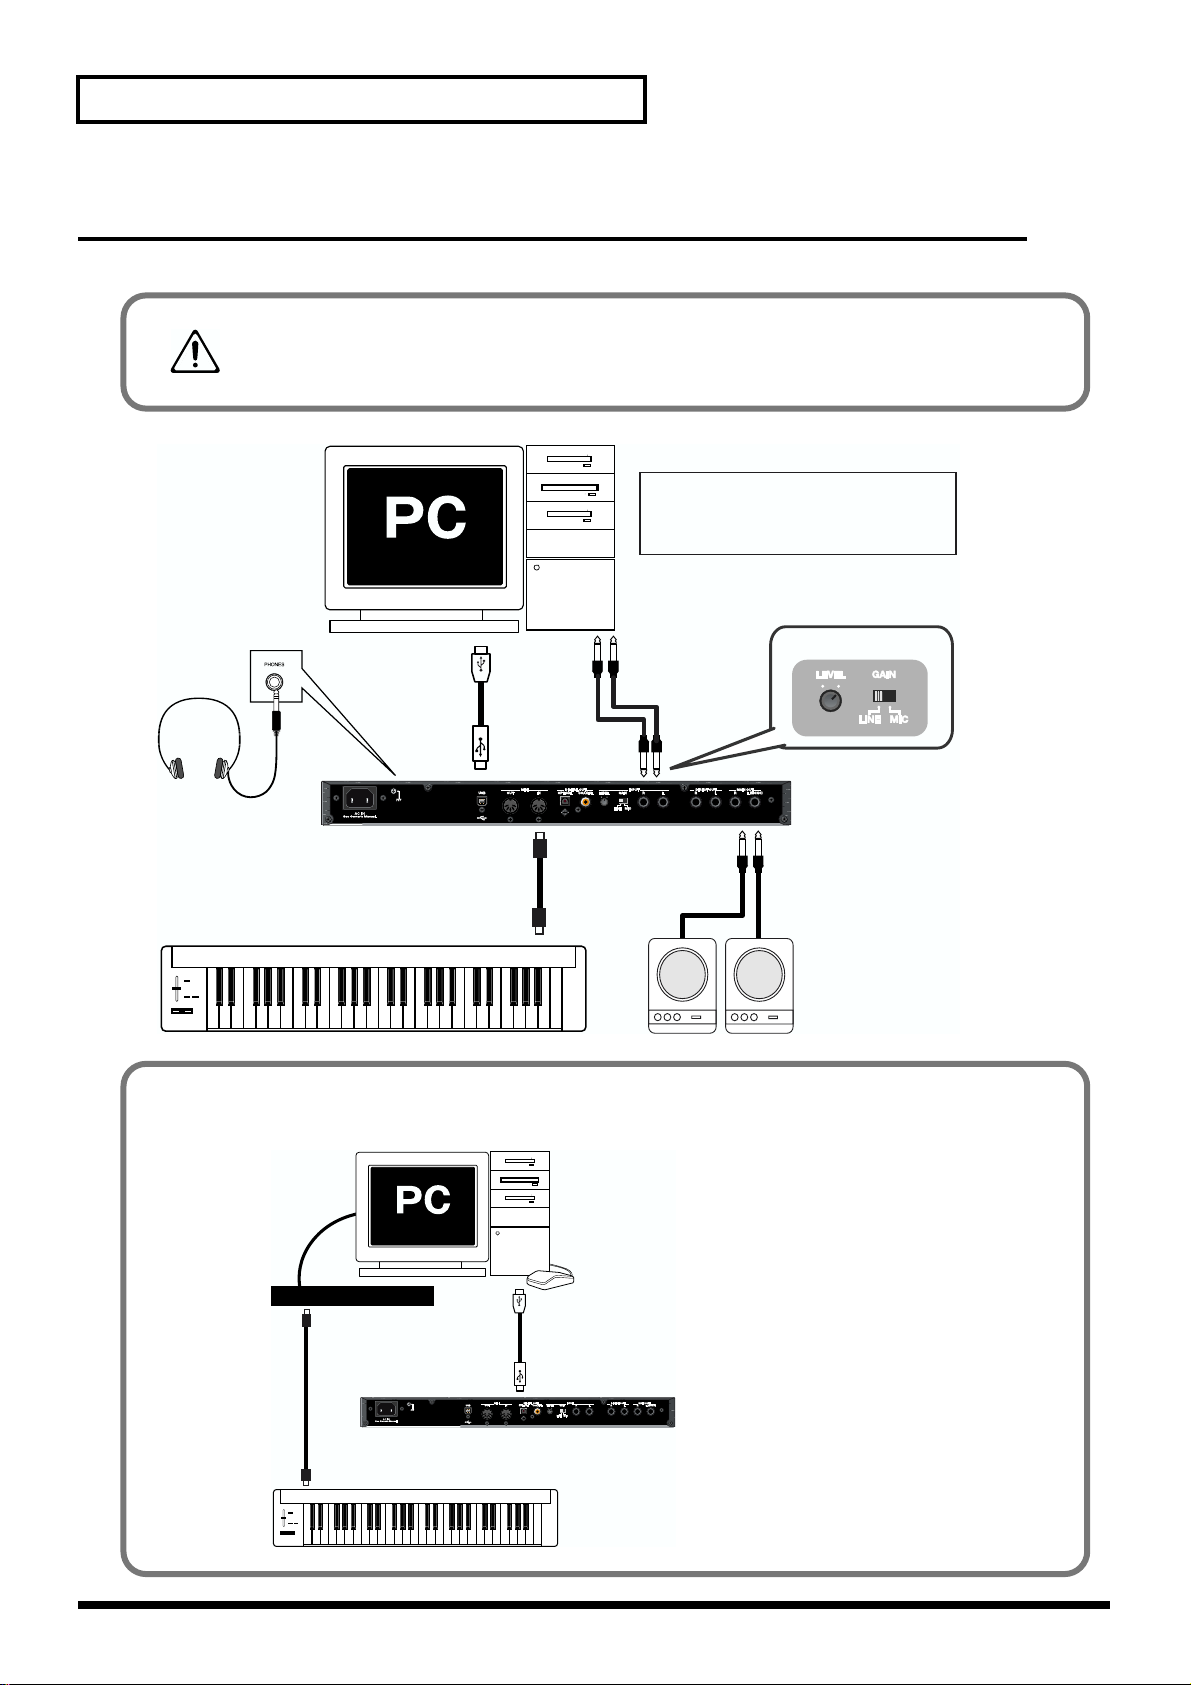
Connect your MIDI and audio devices to the VariOS as shown in the diagram below.
Do not connect the USB cable at this time. You will connect it later during the
“Installation” (p. 21) procedure. (If you connect the USB cable to your computer,
installation of the USB driver will begin.)
fig.02-connect.eps
* To prevent malfunction and/or damage to
speakers or other devices, always turn down
the volume, and turn off the power on all
devices before making any connections.
Set the GAIN switch to LINE, and
adjust the INPUT level.
Headphones
Front
USB connector
USB cable
USB
Audio
outputs
INPUT
* This can be switched by Audio
Input Jack (p. 113).
VariOS
MIDI keyboard
MIDI IN
MIDI cable
MIDI OUT
OUTPUT(MAIN)
INPUT
Powered
Speaker
If you have a MIDI interface that you are already using, you may connect your MIDI keyboard
to the MIDI interface as shown below.
fig.02-MIDI.eps
20
MIDI interface
MIDI IN
MIDI cable
MIDI OUT
VariOS
MIDI keyboard
USB cable
USB
Page 21
Installation
b
This chapter explains how to install the software and connect the VariOS
with your equipment.
The installation procedure will differ depending on your system. Please
proceed to one of the following sections, depending on the system you use.
• Windows users.....................................................p. 21
• Macintosh users...................................................p. 31
Windows users
■ Installing V-Producer
If you are using Windows XP Professional/2000, you must log on using a
user name with an administrative account type (e.g., Administrator).
1
2
3
4
Insert the CD-ROM into the CD-ROM drive of your computer.
* Exit all currently running software (applications) before you perform the
installation.
Click the Windows start menu, and from the menu, select “Run...”. Open
the “Run...” dialog box.
In the dialog box that appears, input the following into the “Open” field,
and click [OK].
D:\ENGLISH\V-Producer\Setup.exe
When the Choose Setup Language dialog box appears, make sure that
“English” is selected, and click [OK].
The installer will start up. Follow the on-screen directions to perform the
installation.
* If an earlier version of V-Producer is already installed, you'll be presented with the
“Confirm File Deletion” dialog box. Click [OK] to delete the old version of VProducer.
V-Producer 1.x (for VP-9000) cannot be used simultaneously
with this version of V-Producer.
The drive name “D:” may
e different for your
system. Specify the drive
name of your CD-ROM
drive. To check the drive
name of your CD-ROM
drive, double-click the My
Computer icon.
5
The InstallShield Wizard Complete dialog box will appear.
Next, install the driver.
(->Installing the Driver (p. 22))
21
Page 22

Installation
■ Installing the Driver
Here's how to install the driver that allows the VariOS to be detected and
handled as a MIDI device and an external storage device (expansion drive)
of your computer.
The installation procedure will differ depending on your system.
Please proceed to one of the following sections, depending on the system
you use.
• Windows XP users ..............................................p. 22
• Windows 2000 users............................................p. 26
• Windows Me users..............................................p. 29
Windows XP users
◆ Preparations for installing the driver
1
With the VariOS disconnected, start up Windows.
You must log on using a user name with an administrative account type
(e.g., Administrator).
What is a driver?
A “driver” is software that
transfers data between the
VariOS and application
software running on your
computer, when your
computer and the VariOS
are connected by a USB
cable. The driver sends
data from your application
to the VariOS, and from the
VariOS to your application.
Disconnect all USB cables
except for a USB keyboard
and USB mouse (if used).
2
3
4
Open the System Properties dialog box.
1. Click the Windows start menu, and from the menu, select Control
Panel.
2. In “Pick a category”, click “Performance and Maintenance.”
3. In “or pick a Control Panel icon”, click the System icon.
fig.2-1
Click the Hardware tab, and then
click [Driver Signing].
Open the Driver Signing Options
dialog box.
Make sure that “Driver Signing Options” is set to “Ignore.”
Depending on how your
system is set up, the
System icon may be
displayed directly in the
Control Panel (the Classic
view). In this case doubleclick the System icon.
22
If it is set to “Ignore”, simply click [OK].
If it is not set to “Ignore”, make a note of the current setting (“Warn” or
“Block”). Then change the setting to “Ignore” and click [OK].
Page 23
Installation
5
6
7
8
9
Click [OK] to close the System Properties dialog box.
Exit all currently running software (applications).
Also close any open windows. If you are using virus checking or similar
software, be sure to exit it as well.
Prepare the CD-ROM.
Insert the CD-ROM into the CD-ROM drive of your computer.
Click the Windows start menu, and from the menu, select “Run...”.
Open the “Run...” dialog box.
In the dialog box that appears, input the following into the “Open” field,
and click [OK].
D:\ENGLISH\Driver\USB_XP2K\SETUPINF.EXE
* The drive name “D:” may be different for your system. Specify the drive name of
your CD-ROM drive.
After installing the driver,
restore the original setting.
10
The SetupInf dialog box will appear.
You are now ready to install the driver.
◆ Installing the driver
11
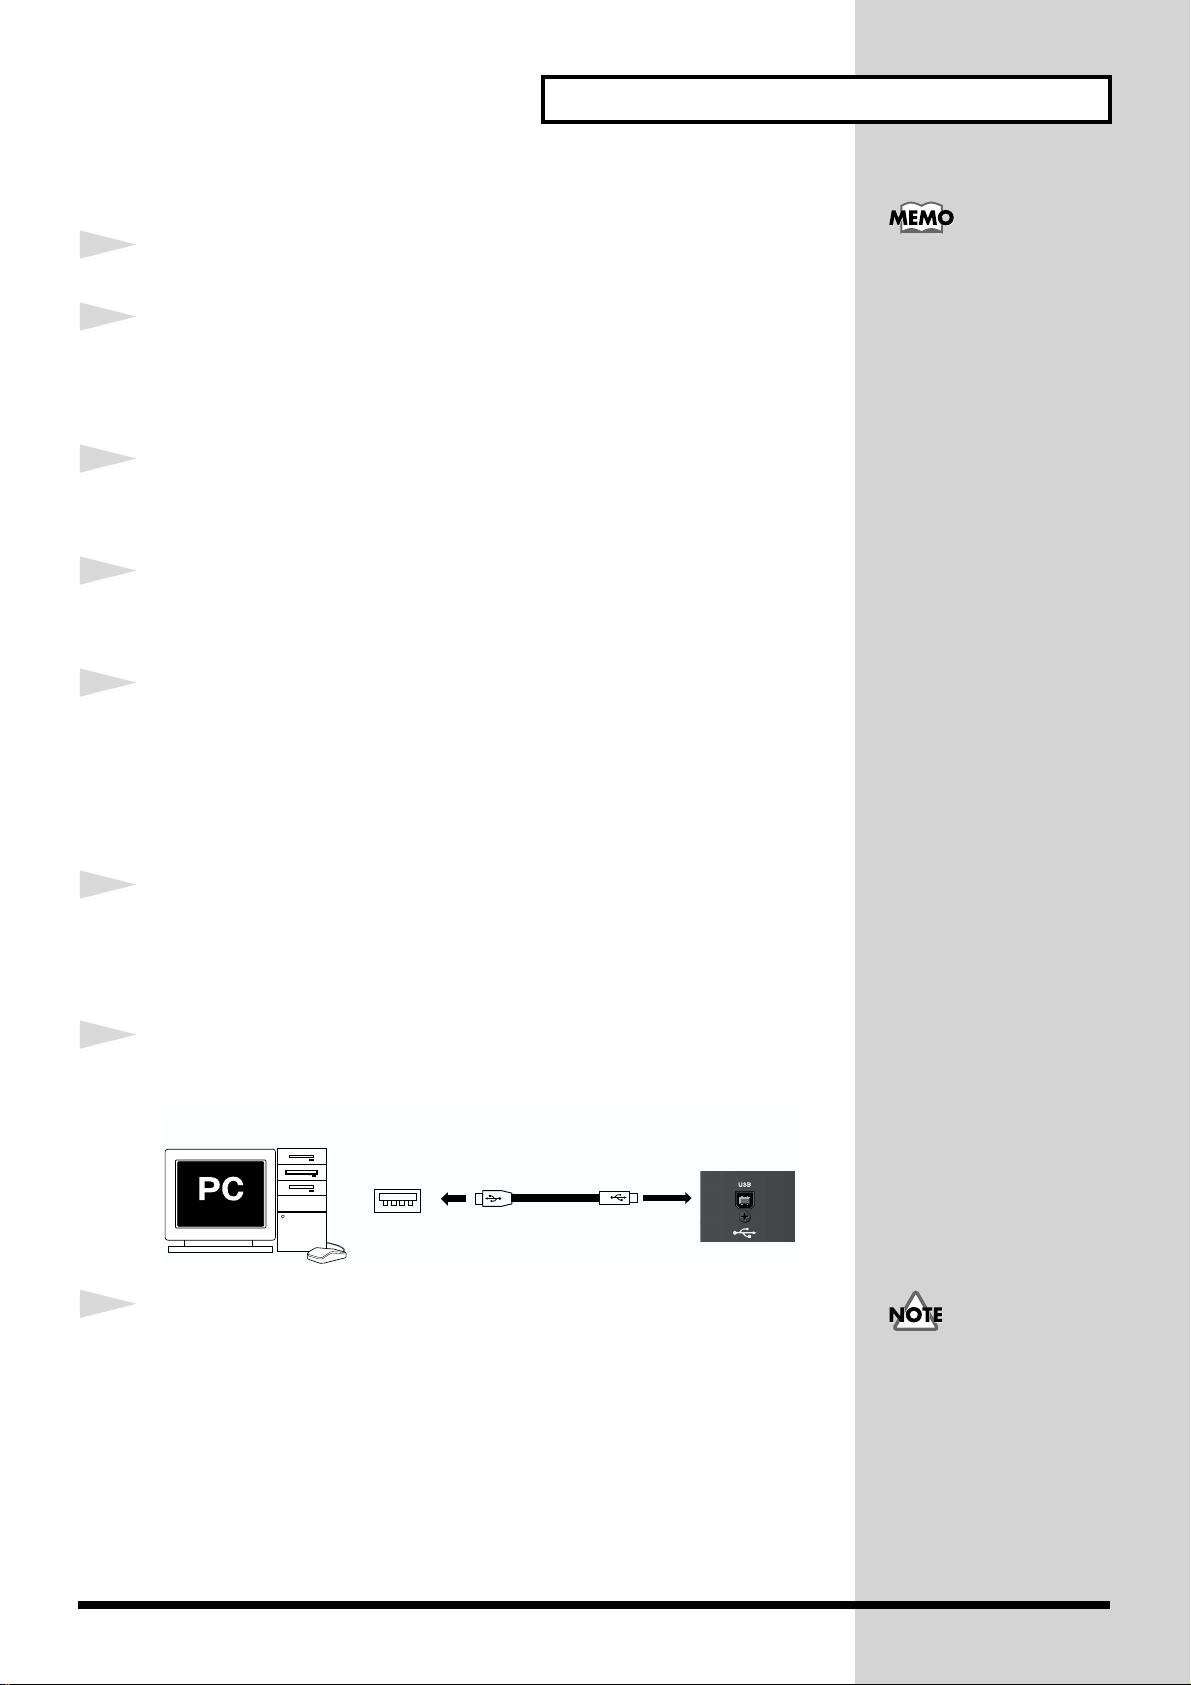
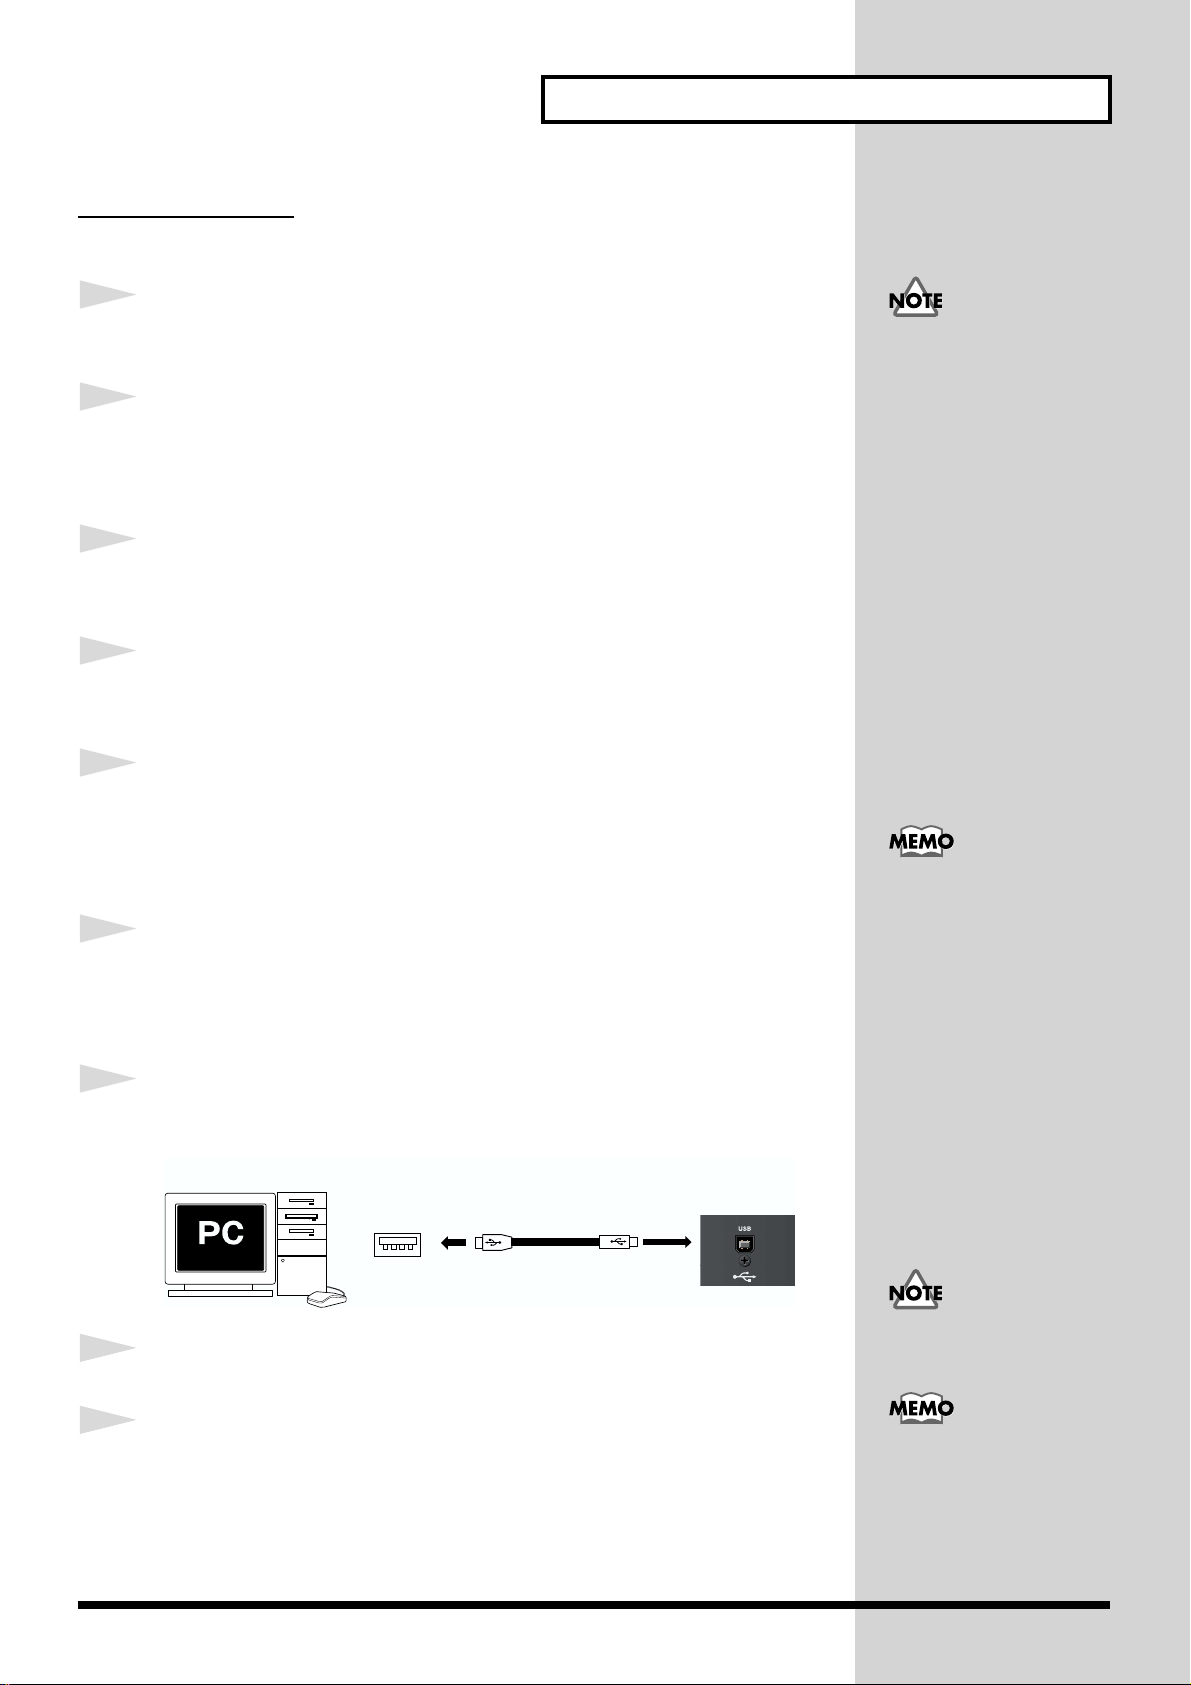
Use the USB cable to connect the VariOS to your computer.
fig.02-USB
Computer
12
Set the VariOS’s power switch to the ON position.
Near the task bar, your computer will indicate “Found New Hardware”.
Please wait.
USB connector
USB cable
VariOS
(Rear)
You must power up the
VariOS according to the
procedure given on p. 43.
23
Page 24
Installation
13
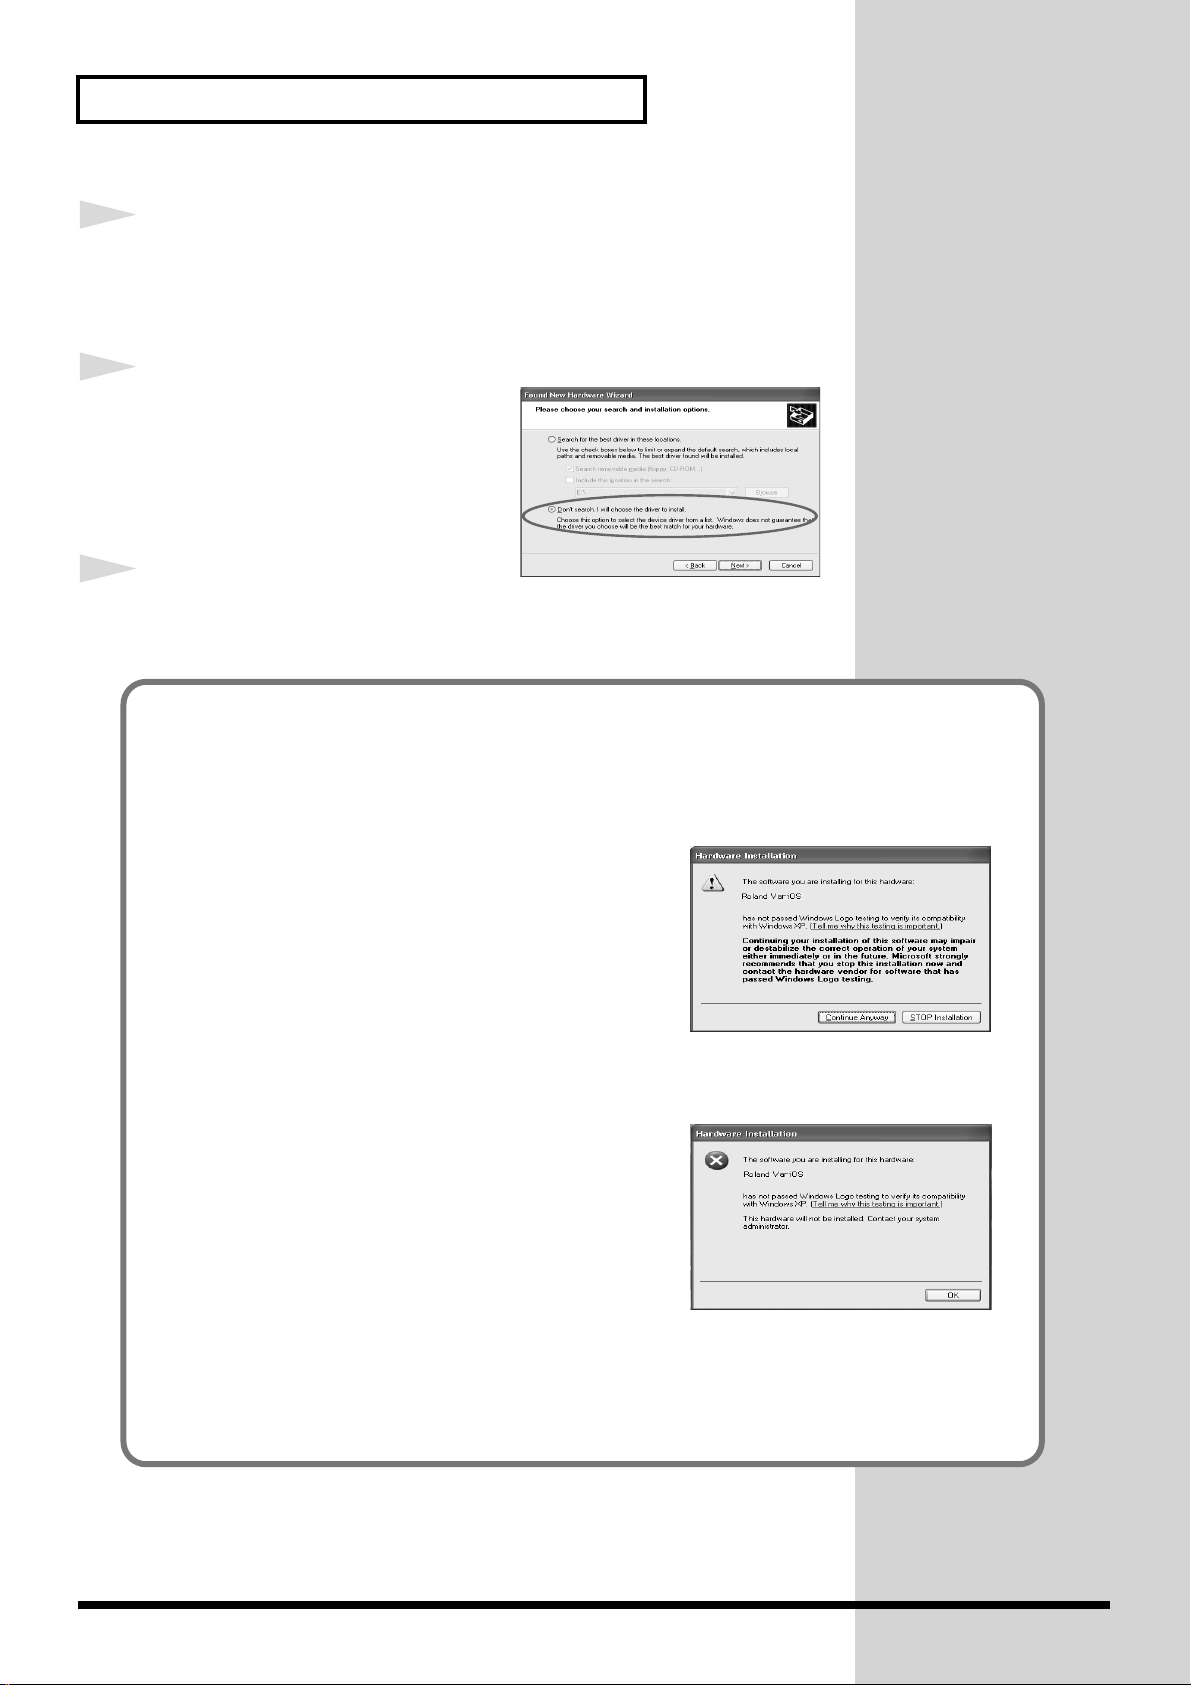
The Found New Hardware Wizard will appear.
Make sure that the screen indicates “Roland VariOS,” select “Install from
a list or specific location (Advanced),” and click [Next].
fig.2-7_20
14
The screen will indicate “Please
choose your search and installation
options.”
Select “Don’t search. I will choose
the driver to install,” and click [Next].
15
Make sure that the “Model” field
indicates “Roland VariOS,” and click [Next]. Driver installation will begin.
If the “Driver Signing Options” setting was not set to “Ignore”, a “Hardware Installation”
dialog box will appear.
If “Driver Signing Options” is set to “Warn,”
fig.2-5
1. Click [Continue Anyway].
2. Continue the installation.
If “Driver Signing Options” is set to “Block,”
fig.2-5a
1. Click [OK].
2. When the “Found New Hardware Wizard” appears,
click [Finish].
3. Using the procedure described in the
“Troubleshooting” section “Q. Device Manager
shows “?”, “!”, or “USB Composite Device”” (p.
131), delete the data for the VariOS that was wrongly
detected. Then install the driver using the procedure described in
“Installing the Driver” (p. 22). When doing so, set “Driver Signing
Options”in step 4 to "Ignore."
24
Page 25
16
b
17
18
The Insert Disk dialog box will appear.
Click [OK].
The Insert Disk dialog may not appear. In that case, proceed to next step.
The Files Needed dialog box will appear.
Input the following into the “Copy files from” field, and click [OK].
D:\ENGLISH\Driver\USB_XP2K
The Found New Hardware Wizard will appear.
Make sure that the display indicated “Roland VariOS,” and click Finish.
Wait until “Found New Hardware” appears near the taskbar.
A “VARIOS_DRV” window will appear. Click the [X] (close) button to close
the “VARIOS_DRV” window.
Installation
The drive name “D:” may
e different for your
system. Specify the drive
name of your CD-ROM
drive.
19
When driver installation has been completed, the System Settings
Change dialog box will appear.
Click [Yes]. Windows will restart automatically.
If you were unable to
(install the VariOS driver as
directed, or if you are
unable to use the VariOS
even after installing the
driver, please delete the
driver.
(->Deleting the driver (p.
142))
You have finished installing the VariOS driver.
Next, proceed to “MIDI and audio settings” (p. 38).
If you changed the driver signature option...
If you changed the driver signature option in step 4, restore the original
setting after Windows restarts. After you have restored the original setting,
proceed to “MIDI and audio settings” (p. 38).
25
Page 26
Installation
Windows 2000 users
◆ Preparations for installing the driver
1
With the VariOS disconnected, start up Windows.
2
Log on to Windows as a user with administrative privileges (such as
Administrator).
3
Open the System Properties dialog box.
Click the Windows start menu, and from the menu, select Settings |
Control Panel.
In Control Panel, double-click the System icon.
fig.05-2e_30
4
Click the Hardware tab, and then click
[Driver Signature].
Disconnect all USB cables
except for a USB keyboard
and USB mouse (if used).
5
6
7
Open the Driver Signing Options
dialog box.
Make sure that “Driver Signing Options” is set to “Ignore.”
If it is set to “Ignore”, simply click [OK].
If it is not set to “Ignore”, make a note of the current setting (“Warn” or
“Block”). Then change the setting to “Ignore” and click [OK].
Click [OK] to close the System Properties dialog box.
Exit all currently running software (applications).
Also close any open windows. If you are using virus checking or similar
software, be sure to exit it as well.
After installing the driver,
restore the original setting.
8
9
26
Prepare the CD-ROM.
Insert the CD-ROM into the CD-ROM drive of your computer.
Click the Windows start menu, and from the menu, select “Run...”. Open
the “Run...” dialog box.
Page 27
10
b
In the dialog box that appears, input the following into the “Open” field,
and click [OK].
D:\ENGLISH\DRIVER\USB_XP2K\SETUPINF.EXE
11
The SetupInf dialog box will appear.
You are now ready to install the driver.
◆ Installing the driver
12
Use the USB cable to connect the VariOS to your computer.
fig.02-USB
Installation
The drive name “D:” may
e different for your
system. Specify the drive
name of your CD-ROM
drive.
13
Computer
USB cable
USB connector
Set the VariOS’s power switch to the ON position.
If the “Driver Signing Options” setting was not set to “Ignore”, a “Digital Signature Not
Found” dialog box will appear.
If “Driver Signing Options” is set to “Warn,”
1. Click [Yes].
2. Continue the installation.
If “Driver Signing Options” is set to “Block”
VariOS
(Rear)
You must power up the
VariOS according to the
procedure given on p. 43.
1. Click [OK].
2. When the “Found New Hardware Wizard” appears, click [Finish].
3. Using the procedure described in the “Troubleshooting” section “Q. Device Manager
shows “?”, “!”, or “USB Composite Device”” (p. 131), delete the data for the VariOS
that was wrongly detected. Then install the driver using the procedure described in
“Installing the Driver” (p. 22). When doing so, set “Driver Signing Options”in step 5 to
"Ignore."
27
Page 28
Installation
b
14
The Insert Disk dialog box will appear.
Click [OK].
15
The Files Needed dialog box will appear.
Input the following into the “Copy files from” field, and click [OK].
D:\ENGLISH\DRIVER\USB_XP2K
16
The “Find New Hardware Wizard” may be displayed.
Verify that “Roland VariOS” is displayed, and click [Finish].
17
The System Settings Change dialog box may appear.
Click [Yes]. Windows will restart automatically.
The drive name “D:” may
e different for your
system. Specify the drive
name of your CD-ROM
drive.
If you were unable to install
the VariOS driver as
directed, or if you are
unable to use the VariOS
even after installing the
driver, please delete the
driver.
(->Deleting the driver (p.
142))
You have finished installing the VariOS driver.
Next, proceed to “MIDI and audio settings” (p. 38).
If you changed the driver signature option...
If you changed the driver signature option in step 5, restore the original
setting after Windows restarts. After you have restored the original setting,
proceed to “MIDI and audio settings” (p. 38).
28
Page 29
Windows Me users
b
b
◆ Preparations for installing the driver
1
With the VariOS disconnected, start up Windows.
2
Exit all currently running software (applications).
Also, close any open windows. If you are using a virus checker or similar
software, be sure to exit this as well.
3
Prepare the CD-ROM.
Insert the CD-ROM into the CD-ROM drive of your computer.
4
Click the Windows start menu, and from the menu, select “Run...”.
Installation
Disconnect all USB cables
other than those for a USB
keyboard or USB mouse.
Open the “Run...” dialog box.
5
In the dialog box that appears, input the following into the “Open” field,
and click [OK].
D:\ENGLISH\DRIVER\USB_ME\SETUPINF.EXE
6
Open the SetupInf dialog box.
You are now ready to install the driver.
◆ Installing the driver
7
Use the USB cable to connect the VariOS to your computer.
fig.02-USB
Computer
USB connector
USB cable
VariOS
(Rear)
The drive name “D:” may
e different depending on
your system. Type the
name of your CD-ROM
drive.
You must power up the
8
Set the VariOS’s power switch to the ON position.
VariOS according to the
procedure given on p. 43.
9
The New Hardware Found dialog box will appear.
Input the following into the “Copy files from” field, and click [OK].
D:\ENGLISH\DRIVER\USB_ME
The drive name “D:” may
e different depending on
your system. Type the
name of your CD-ROM
drive.
29
Page 30
Installation
10
Once the driver has been installed, the New Hardware Found dialog box
will close.
In the SetupInf dialog box, click [OK]. The SetupInf dialog box will close.
If you were unable to
install the VariOS driver as
directed, or if you are
unable to use the VariOS
even after installing the
driver, please delete the
driver.
(->Deleting the driver (p.
142))
30
You have finished installing the VariOS driver.
Next, proceed to “MIDI and audio settings” (p. 38).
Page 31

Macintosh users
Before installation
● To ensure that V-Producer will operate correctly, please make the following settings on
your Macintosh.
1. Open Control Panels from the Apple menu.
2. Make the following settings:
• In the Memory control panel, turn virtual memory “off.”
* If virtual memory is “on,” the performance of the Preview function will be impaired. V-Producer
will operate regardless of whether virtual memory is turned on or off.
• In the Energy Saver control panel, set “never” as the idle time until the computer
enters power-conserving sleep mode.
• In the Monitors (or Monitors & Sound) control panel, set the Color Depth to “Millions.”
• From the "Apple Menu," select "Chooser," and set "Apple Talk" to "Inactive."
Installation
3. If you have installed an antivirus program, use the Extensions Manager
to disable that program.
4. Restart your Macintosh.
● Disconnect the V-Producer from the Macintosh
If the power of the VariOS is turned on, a message like the following will appear when the
Macintosh is started up. Perform the steps described below as appropriate for the message that
is displayed.
• If the screen indicates:
“Driver needed for the USB device “VariOS” are not available. Would you like to
look for these drivers over the Internet?”
> click [Cancel].
• If the screen indicates:
“Software required for using device `unknown device’ cannot be found. Please
refer to the manual included with the device, and install the necessary software.”
> click [OK].
31
Page 32

Installation
■ About the included MIDI drivers
This product contains the following MIDI drivers.
Driver for OMS
This is a driver for using the VariOS with OMS.
Driver for FreeMIDI
This is a driver for using the VariOS with FreeMIDI. In order to use this
driver, you will need to separately obtain version 1.35 or higher of
FreeMIDI.
For instruction on how to install the VariOS Driver and how to make the
FreeMIDI settings, refer to Readme FM-E.HTM file in the English - Driver
- VariOS FreeMIDI Driver-E folder on the CD-ROM.
■ Installing OMS
In order to use V-Producer you must have OMS (Open Music System). OMS
is a MIDI driver that acts as a bridge in conveying data between V-Producer
and the VariOS.
OMS uses an application named OMS Setup to create a document called
“Studio Setup.” The names of your MIDI devices and the state of the actual
connections are registered in this document. Here we will give a brief
explanation on how to install OMS and make settings, but for details please
refer to the manual (OMS_2.3_Mac.pdf) included on the CD-ROM.
If you are already using OMS, proceed to “Installing V-Producer” (p. 33).
1
From the English folder of the CD-ROM, open Driver, then open
OMS2.3.8, and double-click Install OMS 2.3.8.
2
Click [Install].
3
When installation is completed, a dialog box will recommend that you
restart your Macintosh. Click [Restart].
You have now finished installing OMS. Next, you will install V-Producer.
You will need the Adobe
Acrobat Reader in order to
view OMS_2.3_Mac.pdf.
The latest version of Adobe
Adrobat Reader can be
downloaded from the
Adobe website. http://
www.adobe.com (This
URL may change without
notice.)
The driver can be installed
only on a drive on which
the system is installed.
32
Page 33

■ Installing V-Producer
b
1
Exit all currently running software (applications).
2
Insert the CD-ROM into the CD-ROM drive.
3
Double-click the V-Producer Installer Installer icon (found in the English
folder of the CD-ROM) to start up the installer.
4
Verify the [Install location], and click [Install].
5
Follow the on-screen instructions to proceed with the installation.
Installation
If you are using a virus
checker or similar software,
e sure to exit this as well.
When installation is completed, a message telling you that “Installation is
completed” will appear. Click [Quit].
About memory
The “Memory is full ...” error may appear if you open a large song or run
out of memory while editing a song, or depending on the monitor resolution
and color depth. It will not be possible to load files or edit further. If this
occurs, exit V-Producer. Then, in the Finder, click “V-Producer” to select it.
Next, from the Finder menu, choose File - Get Info - Memory, and under
Memory Requirements, increase the amount of memory used by VProducer.
*If you will be loading samples of the maximum length (150 seconds stereo; 300
seconds monaural), we recommend that you increase the memory allocation to
192 MB or more.
In the Finder, select the VProducer icon. Then, from
the Finder menu, choose
File - Get Info - Memory,
and under Memory
Requirements, Preferred
Size of Memory
Requirements.
33
Page 34

Installation
b
■ Connections and OMS setup
Installing the VariOS OMS driver
Use the following procedure to install the VariOS driver.
The included VariOS OMS Driver-E is an add-on module for using the
VariOS with OMS. In order for you to use it, OMS must already be
installed on the hard disk from which you started up.
* Disconnect the VariOS from the Macintosh before you perform the installation.
1
2
3
4
5
Exit all currently running software (applications).
Insert the CD-ROM into the CD-ROM drive.
Double-click the VariOS OMS Driver-E Installer icon (found in the
English - Driver - VariOS OMS Driver-E folder of the CD-ROM) to start
up the installer.
Verify the [Install Location], and click [Install].
fig.3-2
If a message like the following is
displayed, click [Continue].
The other currently running
applications will exit, and installation
will continue.
If you are using a virus
checker or similar software,
e sure to exit this as well.
6
A dialog box will indicate Installation completed.
Click [Restart] to restart your Macintosh.
34
Page 35

OMS settings
b
Here’s how to make OMS settings. Before you make these settings, make
sure that the MIDI devices connected to your Macintosh and all peripherals
are powered up.
1
Use a USB cable to connect the VariOS to your computer, and turn on the
power of the VariOS.
fig.02-USB
Computer
USB cable
VariOS
(Rear)
Installation
You must power up the
VariOS according to the
procedure given on p. 43.
2
3
4
USB connector
Easy method using the sample settings
The "Driver" folder of the CD-ROM contains a sample OMS setup file
named "VariOS OMS Studio." As an easy way to make OMS settings, you
can copy this file into the "Opcode" folder of your hard disk, double-click to
open it, and continue the setup procedure from step 9 of p. 37.
Within the location (hard disk) to which you installed OMS, go to the
Opcode - OMS Applications folder, and double-click OMS Setup.
In the “Create a New Studio Setup” dialog box, click [OK].
This creates a new studio setup.
fig.02-oms-set-1.eps_30
In the OMS Driver Search dialog box,
click [Search] without checking the
check box.
If your MIDI interface is connected to a
serial port, check the port to which it is
connected.
fig.02-oms-set-2.eps_30
If AppleTalk is on, a dialog
ox will appear, asking you
whether to turn it off or
leave it on. We recommend
that you use the Chooser in
the Apple menu to inactive
AppleTalk.
If the “Create a New
Studio Setup” dialog box
does not appear, select the
File menu and click “New
Studio Setup.”
If an error dialog box is
displayed during the setup,
disconnect all MIDI cables
connected to the VariOS,
and make the OMS settings
once again.
5
Make sure that the OMS Driver Setup
dialog box correctly indicates VariOS
USB IF.
Only the MIDI devices connected
directly to the Macintosh are displayed
here. Verify that your device(s) are
displayed correctly, and click [OK].
MIDI devices that are not
powered up will not be
detected automatically by
OMS. If a MIDI device that
you thought was connected
is not detected, click
[Troubleshoot] and follow
the on-screen directions.
35
Page 36

Installation
fig.02-oms-set-3.eps_30
6
The OMS MIDI Device Setup window
will appear.
Add a check mark to all of the VariOS
USB IF ports (Port 1, Port 2, DX7 II),
and click [OK].
7
In the screen for saving the studio setup, click [Save] to save the setup.
8
The ports for VariOS USB IF will be displayed. Each port has the following function.
Port name
displayed
Port 1 Roland VariOS MIDI Port for the VariOS sound module section
Port 2 Roland VariOS External MIDI Port for the VariOS rear panel MIDI connector
DX7 II Roland VariOS Sync Macintosh internal synchronization (sync) port
A problem with the OMS
Setup program causes the
third port to be displayed
as “DX7 II.” Please rename
this port in step 8.
Assign the following port name Function
Use the following procedure to specify the MIDI device for each VariOS port.
fig.02-oms-set-4.eps
Double-click "Port 1" for "Roland VariOS." The MIDI device
information dialog box shown below will appear.
Specify "Roland" as
the manufacturer
name.
Select the model. Since the
VariOS does not appear in the
list, select "Other."
Input the device ID number of the
sound module. Click the number
and enter it from the keyboard.
For the VariOS, enter "17."
Assign a name to the sound
module. Click the mouse here,
and enter "Roland VariOS MIDI."
Make transmission and reception
settings for synchronization
messages such as MIDI time
code. Chec k all of these bo x es .
36
Click the question mark
icon, and in the window
that appears, choose
an icon that you like
and double-click it.
Check "Controller,"
"Multitimbral," and all
"Receive Channels."
Use the same procedure to make settings for the other ports (“Port 2” and “DX7 II”). Input field
as follows.
Page 37

9
Installation
• Set “Port 2” to “Roland VariOS External MIDI”
• Set “DX7 II” to Roland VariOS Sync”
* For “DX7 II,” you must check all of the items in field . (By default these are
unchecked.) If these are left unchecked, synchronization will not operate correctly.
fig.02-oms-set-6.eps
* If a dialog box similar to this appears, click
“No More Warnings.”
fig.02-oms-set-5.eps_50
From the Edit menu choose OMS
MIDI Setup. In the dialog box that
appears, check [Run MIDI in the
background], and click [OK].
10
11
12
From the File menu, choose Make
Current. If you are unable to select
Make Current, it has already been
applied, and you may continue to the
next step.
To verify that MIDI transmission and reception are occurring normally,
choose [Test Studio] from the Studio menu.
You will enter MIDI transmission/reception test mode, and the cursor will
change to a shape. When the cursor changes to the shape, click the
"Roland VariOS MIDI (Port 1)" icon you specified earlier. If the “MIDI”
indicator of the VariOS (front panel) blinks, the settings have been made
correctly.
If MIDI transmission cannot be performed, the Macintosh warning sound
will play. Once again, check that all devices are set correctly. Then choose
[Test Studio] from the Studio menu, and exit test mode.
From the File menu choose Quit to exit OMS Setup. A dialog box will
suggest that you save, so click [Save]. Basic settings for OMS are now
completed.
A diamond mark(
) indicated the settings are enabled.
You have now finished installing the VariOS driver.
Proceed to “MIDI and audio settings” (p. 38).
37
Page 38

MIDI and audio settings
Here’s how to make settings for the MIDI port and the computer’s audio device that will be
used to communicate with the VariOS.
1
Turn on the power of the VariOS.
Before starting up V-Producer, you must power up the VariOS and connect the VariOS to your
computer via a USB cable.
If you inadvertently start up V-Producer before powering up the VariOS or connecting the USB
cable, or if you power down the VariOS or disconnect the USB cable while V-Producer is
running, you must exit V-Producer, and then restart it.
2
Start up V-Producer.
• Windows:
From the start button, choose Programs (or All Programs) - V-Producer - V-Producer for
VariOS.
• Macintosh:
In the Roland - V-Producer folder, double-click the V-Producer2 icon.
3
4
V-Producer will start up.
On Mac OS, V-Producer supports two MIDI drivers: OMS and FreeMIDI.
If your system has both of these MIDI drivers, a screen will appear the first time you
start up V-Producer, allowing you to select either OMS or FreeMIDI. You can also
choose between OMS or FreeMIDI in this MIDI Settings dialog box. (However, if no
driver is installed in your system, you will not be able to choose between OMS and
FreeMIDI.) For details on installing the OMS or FreeMIDI compatible drivers, refer to
“About the included MIDI drivers” (p. 32) in this manual.
In V-Producer’s Option menu, click MIDI/Audio Settings.
• Macintosh:
Click MIDI settings.
The first time you start up V-Producer, MIDI/Audio Settings (on the Mac, MIDI
Settings) will open automatically, so this operation will not be necessary.
fig.02-midi01
In the MIDI Device area, specify the MIDI port
to which the VariOS is connected. Normally,
you will select “Roland VariOS MIDI,” as
shown in the diagram.
38
If nothing is displayed in the port field, it is possible that the VariOS USB MIDI driver
was not installed correctly. Check the connection between the VariOS and the
computer, and install the USB MIDI driver using the procedure described in
“Installation” (p. 21).
Page 39

MIDI and audio settings
On the Macintosh, the name you assigned in step 8 of “OMS Settings” (p. 36) will
MacOS
If you will not be using the USB MIDI functionality of the VariOS (i.e., When not using the
USB MIDI functionality of the VariOS (Connecting the VariOS to an external MIDI
interface)), refer to page 128.
be displayed. Select the port that corresponds to the VariOS sound generator port
(Port 1).
About the MIDI Clock field
The MIDI Clock field is an on/off setting for the MIDI Clock (F8) messages transmitted from
the port to the VariOS. The VariOS can receive MIDI Clock messages from V-Producer and
synchronize to the master tempo of V-Producer. Normally, you will leave this field checked.
On some MIDI interfaces, such as Mark Of The Unicorn Corporation’s MIDI Express, or Emagic
Corporation’s amt8, MIDI Clock messages input to one port are output from all ports. This
means that if you have specified one of these MIDI interfaces in the Sync Mode dialog box
([Option] - [MIDI Sync]) as the MIDI Clock output destination, duplicate MIDI Clock (F8)
messages will be sent to the VariOS, causing the tempo to be doubled. In this case, uncheck the
MIDI Clock box so that the VariOS will play back at the correct master tempo.
5
6
fig.02-midi02
If you are using a MIDI keyboard, set the [MIDI
IN Port (Keyboard)] field to the MIDI input
port to which your MIDI keyboard is connected.
If your MIDI keyboard is connected to the
VariOS, select “Roland VariOS External MIDI”
as shown in the diagram.
OS On the Macintosh, the name you assigned in step 8 of “OMS Settings” (p. 36)
MacOS
fig.02-midi03
The VariOS Drive field indicates the drive letter
given the VariOS when it was mounted on your
computer. Press [Scan] to select the drive
automatically.
The VariOS Drive may not be detected
automatically for some systems. In this case,
open My Computer and check the drive name
for VariOS (e.g., F:), and then select this for the
VariOS Drive field.
will be displayed. Select the port that corresponds to the MIDI connector on the rear
panel of the VariOS (Port 2).
(Windows only)
39
Page 40

MIDI and audio settings
fig.02-midi04
7
(Windows only)
In the Audio Device (Preview) field, select the
audio device that you will use for V-Producer’s
preview function.
OS On the Macintosh version there is no Audio Device (Preview) field. The internal
MacOS
sound functionality of the Mac will be selected.
The Preview function lets you use the audio device of your computer to audition
sample data stored on your computer without loading it into the VariOS.
8
Audio device adjustments
Here you can make adjustments for the audio device in the Wave Edit screen (p. 59).
• Adjust slider
Adjusts the discrepancy between the Wave Edit screen display and when the audio is heard.
Play back a waveform in the Wave Edit screen. If the cursor (vertical line) is later than the actual
sound, move the slider toward the left. If the cursor (vertical line) is earlier than the actual
sound, move the slider toward the right.
• High CPU Load
Adjusts the CPU load.
If you check this, the CPU load will be heavier, but you will get a faster response when you click
the Wave Edit playback or stop button.
If you experience pops in the sound when you play something back in Wave Edit using USBconnected speakers, un-check this setting.
Click [OK].
If a message of “MIDI Offline!” appears, V-Producer and the VariOS are not communicating
correctly. Check the following points.
40
• Is the VariOS powered up?
• Is the VariOS connected correctly?
You have now completed preparations for using V-Producer.
Page 41

Listening to the demo songs
Loading the demo songs
1
Start up V-Producer.
Before starting up V-Producer, you must power up the VariOS and connect the VariOS to your
computer via a USB cable.
If you inadvertently start up V-Producer before powering up the VariOS or connecting the USB
cable, or if you power down the VariOS or disconnect the USB cable while V-Producer is
running, you must exit V-Producer, and then restart it.
2
In V-Producer, choose Open Song from the File menu. Browse to the [Roland] - [V-Producer]
folder -> Demo Songs folder, and open demo song files (.vpd).
* Loading the samples will require approximately one minute. Please wait until loading is complete.
In some cases when you open a song, a dialog box of “[sample name] Load File
Name” may appear. This will appear if the user has moved a sample file that is used
by the song file, or if V-Producer does not know the location of the sample file. Please
specify the file location of the sample name shown in the dialog box.
41
Page 42

Listening to the demo songs
Playing the demo song
You will use V-Producer’s Locator to play back the songs.
fig.02-locator
1
Current time
To beginning Fast-forward Stop Play
Click the [Play] button in the Locator to play back the song.
When you play the song, the current time will change.
* If the demo song does not play, read “Q. No sound when you play back the demo song” in the
“Troubleshooting” section (p. 136).
• To stop the song
Click the [Stop] button.
• To move the current location a measure at a time
Click the [Fast-forward] or [Rewind] buttons.
• To change the tempo of the song
Master tempo: Drag the tempo value upward or downward.
Relative tempo: Drag the speed value upward or downward.
* Relative tempo (speed) smoothly adjusts the tempo even while the song is playing. Use this when you
want to make a temporary change in tempo. This will not be saved in the song.
Upper value: measure.beat.tick
Lower value: hours:minutes:seconds:frames
Rewind
Tempo Pitch Speed
• To transpose the overall playback pitch in semitone steps
Drag the pitch value upward or downward.
To power down the VariOS, you must use the procedure described in "Turning the
VariOS on/off" (p. 43). "Turning the VariOS on/off" (p. 43) contains important
information about handling the VariOS, so please be sure to read it.
About the demo songs
For the song names and other details, refer to Readme.txt (found in the [Roland] - [V-Producer]
- [DemoSongs] folder).
42
Page 43

Turning the VariOS on/off
* Once the connections have been completed, turn on power to your various devices in the order specified.
By turning on devices in the wrong order, you risk causing malfunction and/or damage to speakers and
other devices.
* This unit is equipped with a protection circuit. A brief interval (a few seconds) after power up is required
before the unit will operate normally.
Turning on the VariOS when connected to a computer
1
Start up your computer.
2
Make sure that the USB cable is connected, and turn on the power of the VariOS.
The power is on when the switch is pressed inward, and off when the switch is in the outward
position.
fig.1-01a
fig.on
3
Power is on when
switch is depressed
Push
The computer will detect the VariOS as a drive.
• Windows 2000/Me:
In My Computer or Explorer, the VariOS will be displayed under the name “removable disk.”
• Windows XP:
In My Computer or Explorer, the VariOS will be displayed under the name “VARIOS_DRV.”
In Windows XP, when you power up the VariOS and it is recognized by your
computer as a USB drive, a “VARIOS_DRV” window will open, but you should click
the [X] (close) button to close the “VARIOS_DRV” window. You must not write files
directly into the VARIOS_DRV window or delete files from it. The system may fail to
operate correctly if you do so.
• Macintosh:
VariOS will displayed on the desktop as “VARIOS_DRV.”
Power is off when
switch is released
Your computer will detect the VariOS as a drive (VariOS drive) that can be read or written,
allowing wave files to be transferred to and from it. You must use the dedicated V-Producer
software to transfer files between your computer and the VariOS.
Do not use the Explorer or Finder to directly write or delete files on the mounted
VariOS drive. Doing so may cause the VariOS to malfunction.
* “Mounted” means that your computer has recognized the VariOS drive.
43
Page 44

Turning the VariOS on/off
Turning off the VariOS when connected to a computer
Use the following procedure to turn off the power of the VariOS. If you fail to use the correct
procedure to turn off the power, your computer may display a warning message.
In Windows Me, powering down the VariOS before unmounting the drive may
cause an error to occur in Windows. You must use the following procedure when
powering down.
1
If V-Producer is running, exit the program.
2
Unmount the VariOS drive that is mounted on your computer.
• Windows:
In the task tray, double-click the eject icon. Then click the item that indicates the VariOS
drive (this will differ depending on your version of Windows; see below) to unmount the
drive.
fig.02-taskicon
3
Windows XP, 2000 USB high-capacity storage device
Windows Me USB disk
• Macintosh:
Drag the VARIOS_DRV on the desktop into the “Trash”. Alternatively, click the
VARIOS_DRV on the desktop, then choose the Eject command from the Special menu
(shortcut [ ] + [E]).
Turn off the power of the VariOS.
When you power down the VariOS, the entire contents of the VariOS drive
recognized by your computer will be deleted. If you have stored important data in
the VariOS drive, you must save the song in V-Producer (p. 85) before powering
down the VariOS, or save it to the flash ROM or PC card of the VariOS.
44
Page 45

Operation Guide: Software
(V-Producer)
This chapter explains the basic operation for V-Producer in the order of your actual workflow. Once
you have read through this chapter, you will have mastered its basic operation.
45
Page 46

An overview of V-Producer
V-Producer is software that controls a sound module (VariOS).
It reads wave files stored on your computer and sends them to the VariOS. At the same time, it also
displays the files on the screen as samples. Simply by placing samples on a screen that corresponds to
the six "parts" of the VariOS, you can automatically control the VariOS, making it sound accordingly.
This lets you easily create a song using multiple tracks on the VariOS.
Since the VariOS uses Vari Phrase technology, there is no need for you to make time-consuming
adjustments to the size of the samples. You can also use your MIDI keyboard to play samples in real
time and record them. In addition, you can make use of a variety of editing features, which allow you
to edit the Time, Pitch, Formant, as well as perform transpositions.
The following diagram shows the actual workflow.
fig.03-01
From audio clip CDs, waveform
PC
V-Producer
editing programs, or
VariPhrase collections (.vpw)
Wave files
(.wav or .aiff)
VariPhrase format
files (.vpw)
Loaded into V-Producer next time
Load Wa ve Files
1
Load a wave file
2
Sample List
3
VariTrack
Samples
Make settings for
samples and play them
Create a song
Frame Frame Frame
Frame Frame Frame
Frame Frame Frame
ScopeEditor
4
5
Save
Save song
Export
wave
Export
SMF
Send samples
VariOS
(USB)
MIDI control
Edit Frame
46
V-Producer file
(.vpd)
Load into V-Producer
Wave file
(.wav)
Load waveform
into other software
SMF file
(.mid)
Use other software
to control the VariOS
via MIDI
Page 47

An overview of V-Producer
1. Loading wave files (Load Wave Files) (p. 50)
Load wave files (.wav or .aiff) from your computer into V-Producer.
At this time the following processes will be performed automatically.
• The wave file will be converted into a VariPhrase format file that can be handled as
VariPhrase data (Encoding, p. 49)
• The VariPhrase format file (.vpw) will be sent to the sound module (VariOS) via USB.
• The VariPhrase format file (.vpw) will be saved on the computer’s hard disk.
2. Make settings for samples and play them (Sample List) (p. 52)
The wave files that were loaded in step 1 will be displayed as a list of samples.
You can use your MIDI keyboard to directly play the samples that are shown in the sample list.
You can also place samples in the Vari Track by dragging and dropping them.
In the Sample Edit screen (p. 56) you can edit various sample parameters to specify how the
sample will play.
In the Wave Edit screen (p. 59) you can re-encode the sample (convert the encoding type or modify
the tempo data).
3. Creating a song (Vari Track) (p. 62)
Create a song by dragging and dropping samples from the sample list. A sample that is placed in
this way is called a “frame.” You can also use your MIDI keyboard to play the samples in real time
and record them.
In Frame Properties (p. 68) you can edit the settings (volume, pitch, location, etc.) of each frame
placed in the vari track.
4. Phrase editing (Scope Editor) (p. 70)
Edit the performance data for the frames that you placed in the track. You can edit Pitch, Time,
Format, volume (Dynamics), and notes. In the Scope Editor you can use two methods of editing.
Phrase Scope (p. 71)
The performance data in a frame is interpreted as a phrase. This method is used mainly to edit the
melodic aspect of a phrase. For example, in the case of a vocal sample, you can vary the melody
line, or add harmony to create chords. This type of editing is particularly useful for samples that
contain a monophonic melody, such as vocals.
Groove Scope (p. 81)
The performance data in a frame is interpreted as a rhythm pattern. This method is used mainly
to edit rhythm material.
For example, in the case of a drum pattern sample, each of the slices delineated by events will be
a drum sound, such as bass drum or snare. By changing the time location of the slices you can reconfigure the drum pattern. This type of editing is particularly useful for rhythm samples such as
drum patterns.
5. Saving (p. 85)
Save the results of your editing.
Save song Save a V-Producer file (.vpd). This file can be loaded by V-Producer (p. 85).
Export wave Convert the song into a wave file (.wav) and save it (p. 85)
Export SMF
Convert the song into an SMF (.mid) file and save it. This data (SMF) created by V-Producer can be played back in your MIDI sequencer (p. 127).
47
Page 48

An overview of V-Producer
What is VariPhrase?
VariPhrase is proprietary Roland technology that uses newly developed encoding methods with
several algorithms to analyze and extract the three elements of sound—pitch, time, and formant (tonal
character)—from the sample, allowing you to control these independently in real time.
fig.vari-E
value
formant
pitch
value
pitch
Original
value
0
Original
sampling key
On a conventional sampler,
pitch, time, and formant
always change together.
Pitch
"Here comes V ariPhrase"
Original phrase
Record the words
"Here comes VariPhrase"
sung at a constant pitch.
Original
time
note
number
Time Time
value
0
Original
sampling key
When you use VariPhrase Solo
encoding, time and formant will
remain fixed, and only the pitch
will vary. This lets a single
sample cover a wider range of
notes.
Pitch
s
e
m
o
c
re
"Heeeeee
VariPhrase lets you control the
phrase in real time. As shown
here, you can freely and
independently control the pitch,
time, and formant even while the
phrase is playing.
time
formant
note
number
Va
ri
P
h
r
a
s
e
"
48
This opens up possibilities for completely new performance expressions and sound design that were
unavailable on previous synthesizers or samplers.
On a conventional sampler, using phrase samples involved the following problems:
• Changing the tempo affected the pitch.
• Changing the pitch of a vocal sample would also change the playback speed (time) and tonal
character (formant).
• The sampled phrase was simply played back, and could not be varied.
• Since one sample could cover a range of only a few keys, you needed samples at multiple pitches
if you wanted to play a wider range.
• If you wanted to play multiple samples in synchronization, the samples had to be at the identical
tempo.
• If you play the keys in a chord at different moments, the sounds are heard out of sync with each
other.
• Changing the pitch or tempo degrades the sound quality.
VariPhrase eliminates all of the above problems.
Page 49

An overview of V-Producer
What is encoding?
In order use VariPhrase to freely control the pitch or time, the sample must be encoded in order to
extract its pitch/time/formant data.
There are three encoding types. Choose the encoding type that is most suitable for each phrase.
● SOLO
This type accurately extracts the pitch, time, and formant data. This encoding type is ideal for singlenote and melodic audio phrases such as vocals or sax, and lets you take full advantage of VariPhrase’s
potential. If you use this encoding type, you will be able to control the formants and use the robot voice
function (refer to “Sample Edit” p. 56). Even if you encode using SOLO, you will still be able to play
polyphonically.
● BACKING
This type extracts pitch and time data. It is the ideal encoding type for percussive phrases, such as
drum or percussion rhythm patterns.
● ENSEMBLE
This type extracts pitch and time data. It is the ideal encoding type for chordal phrases with ambience.
The pitch and time data that is extracted is simply added to the audio file, and the wave data itself is
not processed in any way; i.e., this is a non-destructive process. This means that you can later reencode using a different encoding type, or re-edit the wave.
49
Page 50

Loading wave files (Load Wave Files)
Here’s how you can load wave files from the hard disk of your computer and send them to the VariOS.
When you execute this command, the Load Wave Files dialog box will appear.
1. Start up V-Producer.
* Before starting up V-Producer, you must power up the VariOS and connect the VariOS to your
computer via a USB cable. If you inadvertently start up V-Producer before powering up the VariOS
or connecting the USB cable, or if you power down the VariOS or disconnect the USB cable while VProducer is running, you must exit V-Producer, and then restart it.
2. At the bottom of the screen, click the [Sample Info] button ( ) to access the Sample
List screen. In Sample List, click the [Load Wave Files] button (or choose File - Load Wave Files
menu).
fig.03-02LoadwavefileButton_50
* V-Producer is able to load wave files in Wave file format (.WAV), AIFF file format (.AIF), or VariPhrase
format (.VPW).
50
Page 51

Loading wave files (Load Wave Files)
3. Load the wave file as described in the illustration below.
fig.02-04Loadwavefile
This area shows the wave files that are on your
computer. The wave files within the folder you
selected at the left will be listed at the right.
- Conventional wave files (.wav, .aiff)
- VariPhrase format files (.vpw)
In the list at the right, click the wave file that you
want to load into the VariOS.
* By clicking the headings above the list you can
sort the list in various ways.
This area lists the samples that will be loaded into
the VariOS. The file name, encoding type, tempo,
and number of measures are displayed.
- To delete a sample from the list, right-click the
sample (in Mac OS, [Control]-click) and choose
"Delete." (Pressing the [Delete] key will also delete
the sample.)
- You can change the Encode Type and Tempo of
the sample you selected by clicking it.
* Samples that
have already been
encoded are displayed in light blue. In this case you
will not be able to change the Encode Type or T empo.
* What is encoding?
To make it possible for you to make realtime changes in the pitch, time, and formant of the samples used by
the VariOS, the wave data must be "encoded." There are three encoding types.
Specify the type of conversion (encoding *1)
that will be used for loading into the VariOS.
Normally, you will use the "Auto" setting.
In "Auto" mode, the encoding type will be set
to "Backing," and the tempo will be calculated
automatically (*2). (You can change these
settings in step 4.)
These settings are not needed for files that
are already encoded (.vpw).
Specify the location of the VariPhrase
format file that will be created by encoding.
- Same as original
The VariPhrase format file will be saved in the
same folder as the original wave file.
- Use
The VariPhrase format file will be saved in the
location you specify.
* If the original sample is on a non-rewritable
medium such as CD-ROM, the VariPhrase file
will automatically be saved in the specified "Use"
location.
* Next time you select files for loading into the
VariOS, you can specify the .vpw file that was
saved here, so the encoding process can be
omitted.
If you want to manually specify
the encoding type and tempo,
select "Manual."
The options shown at the right
will appear. This is convenient
when you are loading two or
more items of wave data of a
specific tempo.
* Set the encoding type as follows.
SOLO
BACKING
EMSEMBLE
Load the wave files of the Load List into
the VariOS.
* Loading will be halted when the memory
of the VariOS becomes full.
* Loading will perform the following
processes automatically:
- Encode wave files
- Save the encoded wave files
- Send the samples to the VariOS
If you click [Cancel], the content you
specified will be discarded and the dialog
box will close.
Single-note vocal or instrumental
phrase (sax, trumpet, etc.)
Phrases with a clear attack, such
as rhythm loops or guitar chording
Sustained phrases such as choir
or strings
Auditions the selected wave file.
The sound will be heard from the sound card
*
of your computer. (Sound will not be
produced from the VariOS.)
Auditions the selected Wav file.
Adds the selected Wav file to the
"Load List" below.
Displays the amount of memory used
within the VariOS.
This encoding type is suitable for monophonic vocals or instruments (sax, trumpet, flute, etc.). If you use this encoding type, you
SOLO
BACKING
EMSEMBLE
will be able to control the formants and use the robot voice function (refer to "Sample Edit"). Even if you encode using SOLO,
you will still be able to play polyphonically.
This encoding type is suitable for decay-type instruments. In particular it is suitable for phrases that contain instruments with a
clear attack (rhythm loops, drums, percussion, guitar chording).
This encoding type is suitable for sustained-type instruments. It is particularly suitable for sounds that contain gradual changes
in tone (such as choir or strings). This encoding type handles the broadest range of sounds.
* If you encode using BACKING or ENSEMBLE, you will not be able to control the formant or use the robot voice function.
* About tempo
"Auto" mode will automatically calculate the tempo of loop audio materials.
Audio material that has been trimmed for looping and has a 4/4 time signature will be automatically calculated in a tempo range of 80--160. If the
automatically set tempo of the sample is double or half what it should be, you can adjust it using the Tempo [x 2] or [x 1/2] b utton of the "Load List" ( ).
Original tempo
The sample tempo (original tempo) you specify here is the basic tempo used
to synchronize the sample to the master tempo of V-Producer. You must set
this to the correct tempo. Otherwise, the length of the note will not be correct.
[Example: if the original tempo of the sample is =100]
If the master tempo is set to
back at double the speed at which it was sampled.
If the master tempo is set to
at half the speed at which it was sampled.
=200, the sample will play
=50, the sample will play back
51
Page 52

Make settings for samples and play them (Sample List)
At the bottom of the screen, click the [Sample Info] button ( ) to access the Sample List
screen.
fig.03-03de
Opens the "Load Wave
Files" dialog box that lets
you load samples
Stereo/mono indication
VariOS sample
number
Preview button:
Auditions the
sample
Sample
name
Copies the sample
Encode type indication
SOL: Solo
BAC: Backing
ENS: Ensamble
Deletes the sample from the
VariOS's memory
(the file will not be deleted)
This switches the keyboard map.
Click to switch the setting
Phrase Map:
The sample can be edited in the Phrase Scope,
and can be played at the pitch of each key.
"Here comes V ariPhrase"
Groove Map:
The sample can be edited in the Groove
Scope, and can be divided at event locations
and assigned to each key.
"Here"
"comes"
"Va"
"ri"
"Phrase"
52
VariOS memory
status
When editing on a monitor with a limited viewing
area (800 x 600 pixels), use the mouse to drag the
boundary to left and right as necessary while you
edit.
Search button
When you click on a frame placed in the Vari Track,
the corresponding sample will be selected.
Page 53

Make settings for samples and play them (Sample List)
Auditioning a sample
1. Use the mouse to select the sample you want to audition.
You can also use the [ ][ ] keys of your computer keyboard to select a sample.
fig.03-03maru
2. Click the [Preview] button shown in the diagram,
or press the [P] key of your computer keyboard to
audition the sample.
• The sound will be heard from the VariOS.
3. You can play your MIDI keyboard to audition the selected sample.
* One free part in the Vari Track (p. 62) is required in order to audition the sample. If you have used
all six parts of the Vari Track, you will not be able to audition samples from the sample list while the
song is playing. The part being previewed will be indicated as in the Vari Track indicator.
* While you are auditioning a sample from your MIDI keyboard, you can turn the PITCH/TIME/
FORMANT knobs of the sound module (VariOS) to adjust the pitch, playback speed, and tonal
character (formant).
* FORMANT is available only for samples with an encoding type (p. 51) of SOLO.
53
Page 54

Make settings for samples and play them (Sample List)
Switching the keyboard map
“Keyboard Map” is a parameter that specifies how a sample loaded by V-Producer will be sounded
when it is triggered via MIDI. You can select one of the following two modes.
To switch between modes, press the button that is shown at the far right of each sample in the
sample list.
■ (Phrase Map)
The sample will be sounded at the pitch corresponding to the note number. When you edit a sample
for which this mode is specified, the Phrase Scope will automatically be used for editing (p. 71).
Samples set to this mode will be displayed as green frames on the Vari Track.
[Example: If the sample is of a voice saying “Here comes VariPhrase,” the pitch will vary
according to the key you play.]
fig.keymap
"Here comes VariPhrase"
■ (Groove Map)
The sample will be divided at event locations, and each slice of the waveform will be assigned to its
own note number (in semitone steps from C3). When you edit a sample for which this mode is
specified, the Groove Scope will automatically be used for editing (p. 81).
Samples set to this mode will be displayed as purple frames on the Vari Track.
[Example: If the sample is of a voice saying “Here comes VariPhrase,” each slice of the
waveform will be played by different semitones starting at C3.]
fig.keymap2
"Here"
"comes"
"V a"
"ri"
"Phrase"
Use your MIDI keyboard to try out each map, and listen to the difference.
54
Page 55

Deleting a sample
To make best use of the memory of the VariOS, here’s how you can delete unwanted samples from
VariOS memory.
1. At the bottom of the screen, click the [Sample Info] button ( ) to display the sample
list.
2. Click the sample that you want to delete.
3. Click the [Delete Sample] ( ) button.
The selected sample will be deleted from the memory of the VariOS.
*If the sample has already been placed in the Vari Track, the following message will appear: “Since this
sample is being used in the Vari Track, it cannot be deleted. This sample on the Vari Track
will be selected, so press the [Delete] key to delete it.” After this message is displayed, press the
[Delete] key to delete the selected sample from the Vari Track, and then click the [Delete Sample] button
once again.
Make settings for samples and play them (Sample List)
If you select [Delete All Unused Samples] from the Option menu, all samples not used in
any part of the Vari Track will be deleted in one operation.
Copying a sample
If you want to play the identical sample with different settings, use the following procedure to copy
the sample.
1. At the bottom of the screen, click the [Sample Info] button ( ) to display the sample
list.
2. Click the sample that you want to copy.
3. Click the [Copy Sample] ( ) button.
The selected sample will be copied within the VariOS.
4. The Save dialog box will appear. Specify a location on your computer in which to save the copied
sample.
55
Page 56
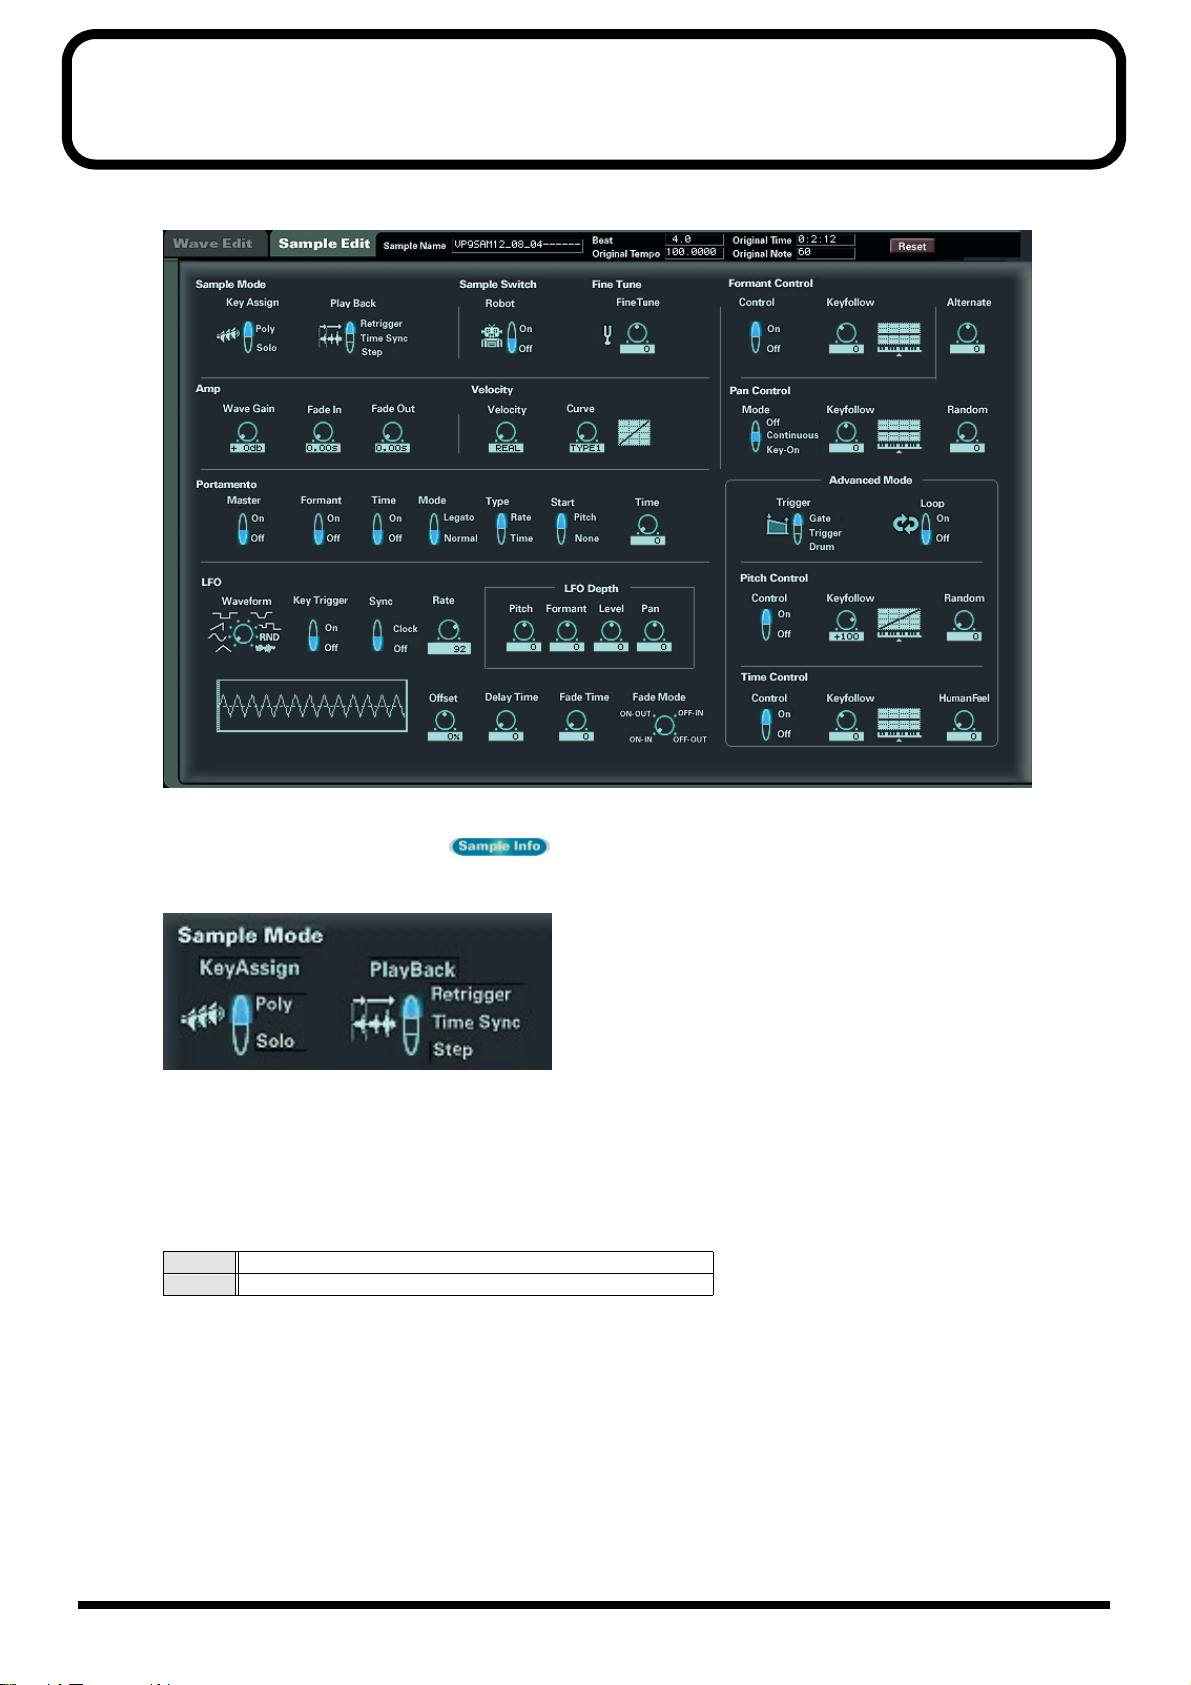
Editing the sample parameters (Sample Edit)
fig.sampleedit
In this screen you can edit various parameters for a sample that was sent to the VariOS.
Click the [Sample Info] button ( ) located at the bottom of the screen to display this screen.
Here we will explain the basic parameters used to play a sample on the VariOS.
fig.03-06
■ Key Assign mode
The Key Assign mode selects whether the sample will be played polyphonically (POLY) or
monophonically (SOLO). If you want to play a monophonic instrument (such as sax or flute) legato, it
is effective to select SOLO.
Values
Poly: More than one note can be played simultaneously.
Solo: Only the last-played note will sound.
Default setting: Poly
56
Page 57
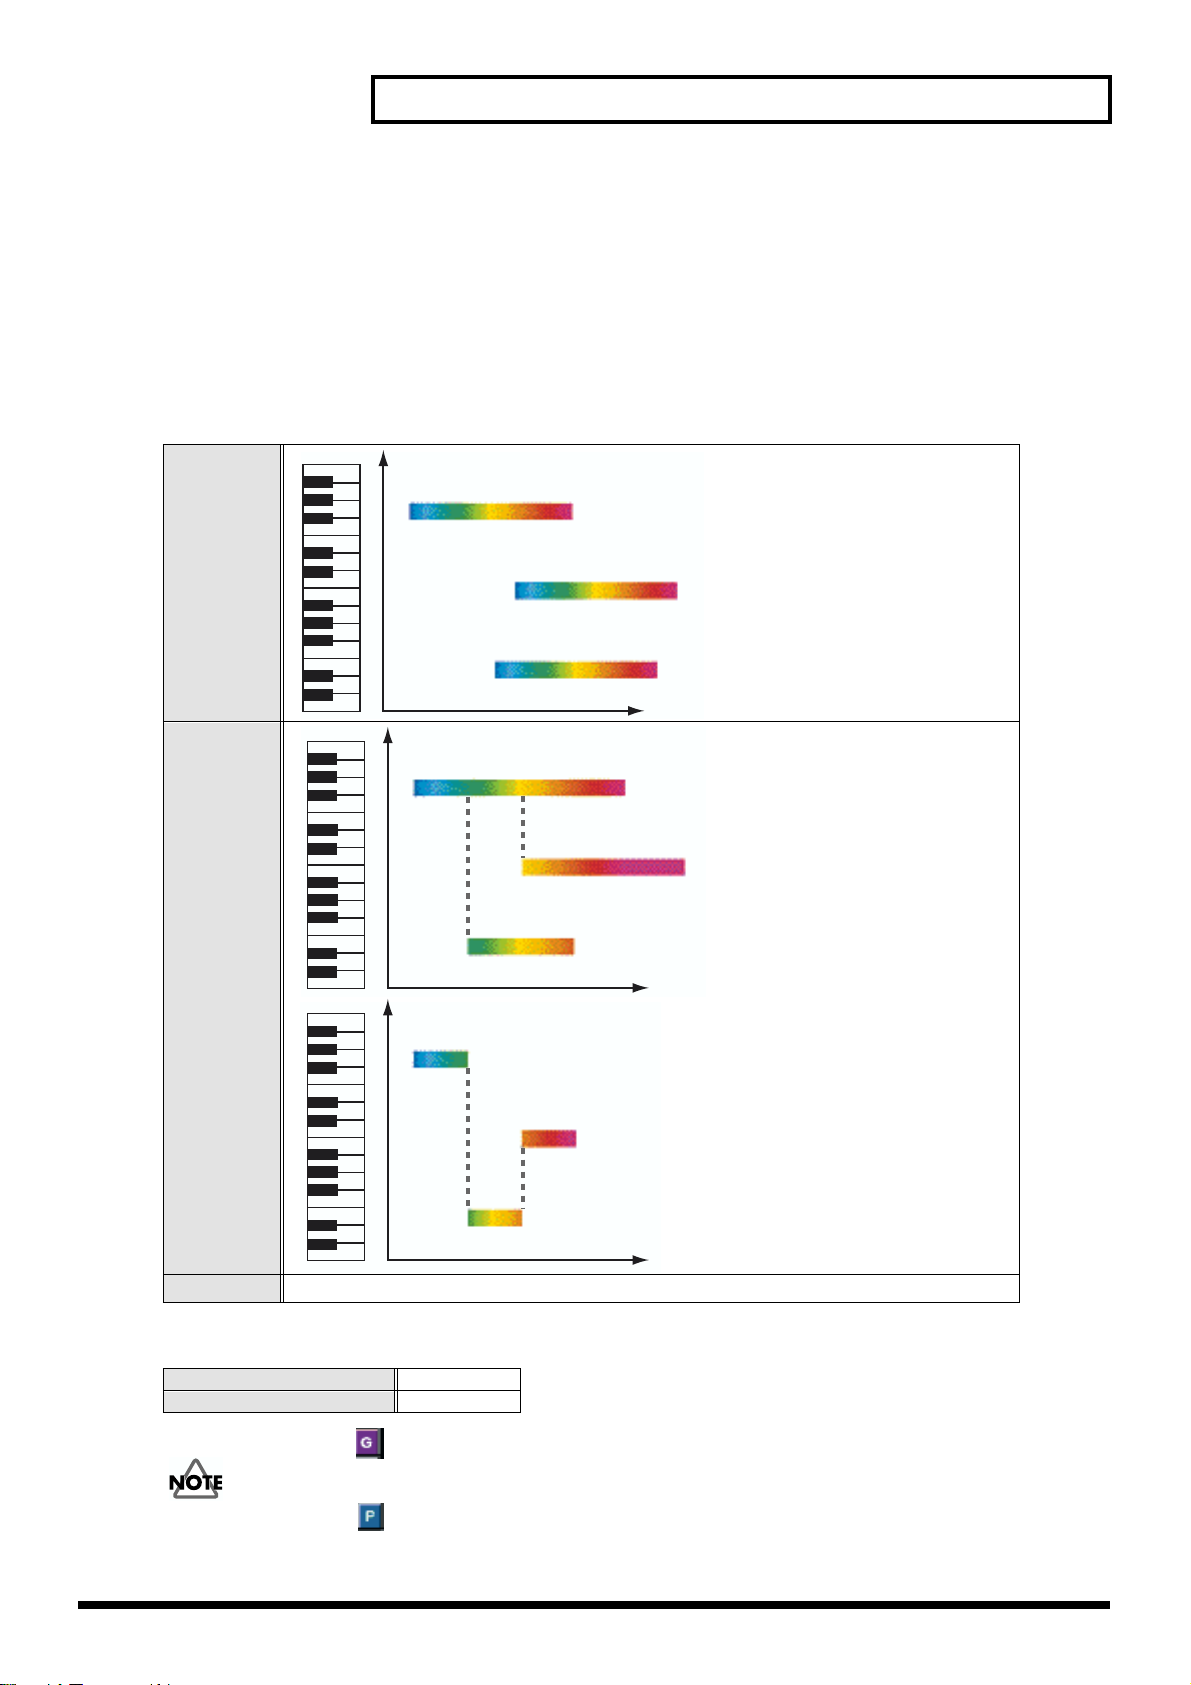
■ Playback mode
The Playback mode selects how the sample will be played. If you want to use legato (*) playing to play
a melody different than the original sample, choose “Time Sync.” If you want the sample to play back
from the beginning each time you press a key, choose “Retrigger.”
* “Legato” originally means to “play smoothly,” but here it refers to the technique of playing the next key
(note-on) before releasing the previous key (note-off) so that the sound is never halted.
Values:
Editing the sample parameters (Sample Edit)
"Here comes VariPhrase"
Retrigger:
Time Sync:
key OFFkey ON
"Here comes VariPhrase"
"Here comes VariPhrase"
"Here comes VariPhra"
"VariPhrase"
"comes Vari"
key OFFkey ON
"Here"
key OFF
key ON
"VariPhrase"
key OFF
key ON
"comes"
Each time you press a key, the sample will play back from the beginning. This will produce an effect
key OFFkey ON
key OFFkey ON
like a musical “round.”
● Key Assign: Poly
When you play legato, the playback point (of the newly played
key OFFkey ON
sounds) will be synchronized to
the sound that is playing from the
beginning. As shown in the diagram, you can produce chords
key OFFkey ON
even in the middle of a phrase.
● Key Assign: Solo
If you set the Key Assign mode to
SOLO and play legato, the pitch
will change starting at the playback point of the previously
played note. You can play your
keyboard to produce a melody that
is completely different than the
original phrase.
key OFF
key ON
Step: Each time you play a key, the sample will play to the next event (p. 61) and then stop.
Default setting:
In Phrase Scope mode Time Sync
In Groove Scope mode Retrigger
If you set a (Groove Map) sample to anything other than "Retrigger," the sound will be
interrupted and will not play back correctly.
If you set a (Phrase Map) sample to anything other than “Time Sync,” you cannot play
legato.
57
Page 58

Editing the sample parameters (Sample Edit)
■ Robot (robot voice switch)
Turn this ON if you want to remove the sense of pitch from the sample (i.e., to ignore the original pitch
of the sample and sound it at the pitch that you play). In the case of a phrase sample, you can use your
keyboard to play a melody that is entirely different than the original sample, in this way using a single
sample to play a variety of melodies.
Values: OFF, ON
Default value: OFF
* This setting is valid only for samples whose Encode Type (p. 51) is set to SOLO.
* If slight pitch changes in the original phrase are an important part of the performance expression, the
Robot Voice function may not produce satisfactory results. The results may also be unsatisfactory if the
key you play is far away from the pitch of the original phrase.
■ Reset
fig.03-08
If you press this button, the values you edited in Sample Edit will return to their default
settings. Try pressing this button if you have been editing the parameters and can no
longer hear any sound, or if you experience similar problems.
58
Page 59

Re-encoding a sample (Wave Edit)
If you want to change the encoding type of a sample that is already loaded into the VariOS (for
example, if the sample is a solo vocal phrase, and you want to change it from “Backing” to “Solo”), or
if you want to change the original tempo of the sample (for example, if the sample tempo does not
match the song, you can re-encode the sample in the Wave Edit screen).
At the bottom of the screen, click the [Sample Info] button ( ) and then click the [Wave
Edit] tab ( ) to access the following screen.
fig.03-10
To re-encode, click the [Edit] button ( ) to enter edit mode.
* For details on encoding, refer to “What is encoding?” (p. 49) .
■ Waveform preview
Rewind
Moves the cursor location to the beginning of the waveform.
Stop
Stops playback of the waveform.
Play
Plays the waveform starting from the cursor location.
* Waveform playback in the Wave Edit screen will be heard from the sound card of your computer (not from
the VariOS).
Play step
Plays the waveform one slice at a time (i.e., an individual region of the waveform separated
by events)
59
Page 60

Re-encoding a sample (Wave Edit)
Loop
If you want playback to occur repeatedly, turn looping on.
Zoom tool
Expands or contracts the waveform display.
■ Changing the encoding type
For details on the encoding type, refer to “What is encoding?” (p. 49).
1. At the bottom of the screen, click the [Sample Info] button ( ), and then click the
[Wave Edit] tab ( ) to access the Wave Edit screen.
2. In the sample list shown at the left, click the sample that you want to edit.
3. Click the [Edit] button ( ) to enter Edit mode.
4. Press a button in the diagram to specify the encoding type.
: Solo encoding
: Backing encoding
: Ensemble encoding
5. Finally, click the [Save] button. The sample will be saved, and re-sent to the VariOS. If you click
the [Cancel] button, your changes will be discarded and you will exit Edit mode.
■ Changing the original tempo
If the tempo of the sample does not match the song, you can change the original tempo of the sample.
fig.03-19
1. As described in steps 1–3 of “Changing the encoding type,” enter Edit mode.
2. Adjust the tempo by entering a new value in either the “Tempo” or “Beats” field.
To edit numerically, double-click the value and edit it in the dialog box that appears.
60
: Doubles the value
: Halves the value
3. Finally, click the [Save] button. The sample will be saved, and re-sent to the VariOS. If you click
the [Cancel] button, your changes will be discarded and you will exit Edit mode.
Page 61

■ Changing the location of a event
Events demarcate the notes that you edit in the Scope Editor screens (p. 70). In the Groove Scope (p.
81), you can slice the sample at the locations of the events you specify here, and reassemble the slices
as desired.
Initially, V-Producer will automatically place events in the sample, but you are free to add, delete, or
adjust the location of the events.
1. As described in steps 1–3 of “Changing the encoding type,” enter Edit mode.
2. The events are shown in the event display area.
fig.03-23
3. Click one of the Event Edit tools to select a tool, and edit the events in the event display area.
fig.03-24
Arrow.................... Drag an event to move it
Pen......................... Click to add an event
Eraser.................... Click to delete an event
Re-encoding a sample (Wave Edit)
Slider (Depth) ...... Moving the slider will cause an event to be automatically
assigned wherever a strong attack (a point where the volume
changes suddenly) is detected.
* Try using the play step button to play individual slices (waveform divided by events).
4. Finally, click the [Save] button. The sample will be saved, and re-sent to the VariOS. If you click
the [Cancel] button, your changes will be discarded and you will exit Edit mode.
61
Page 62

Creating a song (Vari Track)
Now let’s actually create a song. Songs are created using the Vari Track.
To create a song, you will drag and drop samples from the sample list into the Vari Track. The samples
placed in this way are called “frames.” You can also use your MIDI keyboard to play samples in real
time and record your performance.
fig.03-28E
Auto Scroll button Grid Snap button
MARKER
TEMPO
METER (time signature) area
Frame
Time ruler
Playback cursor
Changing the tempo
1. Double-click the TEMPO area
fig.03-29
2. The Add Tempo dialog box will appear. Specify the desired tempo.
* You can also right-click ( Control-click in MacOS) a tempo event you added, and edit or delete
it by choosing [Add Tempo] or [Delete Tempo] from the menu that appears.
Setting the time signature
1. Double-click the METER (time signature) area.
fig.03-30
2. The Add Meter dialog box will appear. Specify the desired time signature.
Zoom tool
62
* You can also right-click ( Control-click in MacOS) a time signature event you added, and edit
or delete it by choosing [Add Meter] or [Delete Meter] from the menu that appears.
Page 63

Arranging samples
The Vari Track consists of six parts, which correspond to the six parts of the sound module (VariOS).
The time ruler in the upper area of the screen indicates the measure numbers.
Now let’s place some samples in the Vari Track.
1. Drag a sample from the sample list (hold down the mouse button).
2. Continuing to hold the mouse button, move the sample over the Vari Track, and release the
mouse button (i.e., drag and drop the sample).
3. The sample will be placed at the location of the mouse cursor.
fig.03-31E
Drag and drop
Creating a song (Vari Track)
63
Page 64

Creating a song (Vari Track)
Editing a frame
Samples placed in the Vari Track are shown as rectangular bars, which are called “frames.”
You can edit the structure of your song by moving, copying, and pasting frames.
■ Select the frame to edit
First you need to select the frame(s) that you want to edit. There are several ways to do this.
To select one frame
Use the mouse to click the frame
To select multiple frames
Drag the mouse to describe a rectangle that includes the desired frames.
fig.03-32
* To select a rectangle from above a frame, hold
down the [Ctrl] key and [Shift] key of your
computer keyboard while you drag ( On
MacOS, hold down the [ ] key and
[Shift] key while you drag). You can hold
down the [Shift] key of your keyboard and
click a frame to add it to your selection.
To select a region of time
Drag the mouse over the time ruler to select the frames that are included in that region.
fig.03-33
If the Grid Snap button ( ) is pressed at
this time, the starting point and ending point of
the selected region will be automatically
adjusted to the nearest grid to the left.
* If you select a region of time, the marker,
time signature, and tempo data can also be
selected for copying. In addition, you can
select all parts that are in that region of
time.
64
Page 65

■ Moving a frame
1. Select the frame that you want to move. It will be highlighted.
2. Press and hold the mouse button on the selected frame, drag it to the desired destination, and
release the mouse button (“drag and drop”).
* You cannot move multiple frames that were selected as a time region (p. 64).
* If you turn off the Grid Snap button ( ), you will be able to make precise moves regardless of
the grid size.
* Using the zoom tool ( ) located in the lower right of Vari Track you can expand or
contract the size of the display grid.
■ Changing the length of a frame
1. When you move the mouse near the beginning or end of a frame, the cursor will change shape as
shown in the diagram.
* When dragging the left edge to shorten the frame, it is not possible to move it any further toward the
right than the note data existing in the frame.
fig.03-36
Creating a song (Vari Track)
2. Continuing to hold down the mouse button, drag to left or right and then release the mouse
button.
* Extending a frame will not affect the length of the phrase (sample). This means that if you extend a
frame beyond the length of the phrase, the extended portion will be silent.
■ Copying a frame
You can copy a frame any number of times to the desired locations. This is an easy way to create
repeated rhythms, etc.
Here are several ways in which you can copy a frame.
Copy by dragging and dropping
1. Select the frame that you want to copy.
2. Press and hold the mouse button on the selected frame, drag it to the desired location, and release
the mouse button while pressing the [Ctrl] key of your keyboard ( in MacOS, the [Option]
key).
* Two or more frames selected by time region (p. 64) cannot be copied by dragging and dropping.
65
Page 66
Creating a song (Vari Track)
Copy by using the
1. Select the frame that you want to copy.
2. Use one of the following methods to copy the frame.
• Choose Copy from the Edit menu.
• Right-click ( in MacOS, Control-click) the selected frame, and choose Copy from the
menu that appears.
• Press [Ctrl] + [C] on your keyboard ( in MacOS, [ ] + [C]).
3. Click the copy-destination location.
The part you clicked will be highlighted, and the playback cursor (vertical line) will move to the
location you clicked.
4. Use one of the following methods to paste the frame you copied.
• Choose Paste from the Edit menu.
• Right-click ( in MacOS, Control-click), and choose Paste from the menu that appears.
• Press [Ctrl] + [V] on your keyboard ( in MacOS, [ ] + [V])
Copy and Paste commands
Copy a frame more than once (the Repeat function)
You can use the Repeat function to easily create repeated rhythm patterns.
1. Select the frame that you want to copy.
2. Use one of the following methods to execute the Repeat function.
• Choose Repeat from the Edit menu.
• Right-click the selected frame ( in MacOS, Control-click), and choose Repeat from the
menu that appears.
• Press [Ctrl] + [R] on your keyboard ( in MacOS, [ ] + [R]).
3. When the Repeat Copy dialog box appears, specify the number of repetitions.
4. Click OK.
■ Deleting a frame
1. Select the frame that you want to delete.
2. Use one of the following methods to delete the frame.
• Choose Cut or Delete from the Edit menu.
• Right-click the selected frame ( in MacOS, Control-click), and choose Cut or Delete from
the menu that appears.
• Press [Ctrl] + [X] ( in MacOS, [] + [X]) or the [Delete] key on your keyboard.
* When you use these delete commands to delete a frame, the original location will become a blank, and
the overall length of the song will not change. If you want to shorten the song by deleting measures
(for example if you want to remove two measures from the introduction), use the Delete Measure
command on the Edit menu.
66
* If you right-click the PART name ( in MacOS, Control-click) and choose “Delete Frames”]
from the menu that appears, all frames will be deleted from that part.
Page 67

Creating a song (Vari Track)
Loop playback
You can use loop playback to listen repeatedly to a specific region.
1. In the locator, turn on the loop button.
fig.03-37
2. The loop markers will be displayed in the time ruler.
fig.03-38_75
3. Drag the loop markers to left or right to specify the start point and end point of the loop.
4. Press the play button, and playback will loop between the loop markers.
■ Using the Quick Loop function to set the loop region
The Quick Loop function sets the selected region as the loop region.
Select a frame in the Vari Track, and click the Quick Loop Position button in the locator. The beginning
and end of the frame will be set as the loop region. If you drag over the time ruler to select a region
and then click the Quick Loop Position button, that region will be set as the loop region.
fig.03-39
67
Page 68

Creating a song (Vari Track)
Editing the settings of a frame (Frame Properties)
You can edit the frame properties to change the settings (volume, pan, pitch, etc.) of a frame that was
placed on the Vari Track. Click to select the frame you want to edit. (It will be enclosed in a red border.)
f
i
Switches the frame properties
between displayed/hidden.
Sample
name
Stereo/mono
indication
Encode type indication
SOLO: Solo
BAC: Backing
ENS: Ensemble
Location of frame as beginning and end (measure:beat:tick)
Edit the numeric values by dragging them up or down with the
mouse.
Adjusts the length of frame to the length of the region actually
sounded by that frame. (The actual sounding locations of the frame
will depend on the locations of the note data within the frame.)
Adjusts the volume (0--127) of the frame
Edit the numeric value by dragging it up or down with the mouse.
Adjusts the panning of the frame (left L63--center 0--right R63)
Edit the numeric value by dragging it up or down with the mouse.
g
.
0
3
4
0
E
*If you loop the playback as
described in “Loop
playback” (p. 67) while
editing the various frame
property parameters, you
can hear the results of your
edits while you make them.
This makes it easier for you
to get exactly the right
pitch and volume.
Transposes the pitch in semitone steps (-63--0--+63)
Edit the numeric value by dragging it up or down with the mouse.
Selects the Take for realtime recording
Solo/Mute/Volume/Pan settings
The Vari Track contains six parts, and you can make Solo/Mute/Volume/Pan settings for each part.
fig.03-42E
Pan+ (offset pan)
Use this to adjust the panpot setting of each
part. The value you specify here is added to the
panpot value for each frame that you specified in
the frame property area. Edit the numeric value
by dragging it up or down with the mouse.
Vol+ (offset volume)
Use this to adjust the volume setting of each
part. The value you specify here is added to the
volume value for each frame that you specified
in the frame property area. Edit the numeric
MUTE
Mutes the part. To cancel
muting, click the button
once again.
SOLO
Plays only that part. To
cancel solo, click the button
once again.
value by dragging it up or down with the mouse.
68
Page 69

Creating a song (Vari Track)
Playing your MIDI keyboard and recording (RealTime Rec)
1. In the sample list, click to select the sample that you want to record.
When you play your MIDI keyboard you will hear the selected sample.
* If you do not hear sound when you play your MIDI keyboard, make sure that your keyboard is
connected as described in “Connecting MIDI and audio devices” (p. 20). Then click the Options
menu item “MIDI/Audio Settings” ( in MacOS, “MIDI Settings”), and make sure that the
port for your MIDI keyboard is selected in the [MIDI IN Ports (Keyboard)” field.
2. In the Vari Track, select the part that you want to record.
* Click a [Rec] (record-part) button ) to select the part that you want to record. The indicator of
that part will change to (MIDI keyboard is being thru-ed). When the song is played, the
frames placed in this part will not be heard.
* Frames that have already been placed in the part whose [Rec] (record-part) button ( ) is clicked
will be overwritten and lost when you record.
• If you do not press a ( ) button, recording will occur on an empty part.
• The state of each part is shown by the indicator as follows.
Playback: the part can be played back (normal state)
Muted: the part is muted (the [M] button is pressed, or another part is soloed [S])
Record: the indicator will be in this state when you press the [REC] button and then press the
[] button
MIDI thru: the MIDI keyboard is being thru-ed. The part for which you press the [REC] button
will be in this state. (During playback, the frames placed in this part will not sound.) If you
have not pressed the [REC] button, MIDI thru will be assigned automatically. When stopped,
part 1 will be selected as the MIDI thru part. While playing, a part containing no frames will
be selected as the MIDI thru part.
3. In the locator, press the record button ( ) and then press the play button ( ) to begin
recording. Perform by playing your MIDI keyboard and turning the PITCH/TIME/FORMANT
knobs of the VariOS.
* If desired, you can first press the play button ( ) to begin playback, and then press the record
button ( ). In this case, recording will begin at the moment you press the record button. You may
find it convenient to use loop playback while you practice, and then press the record button when you
are ready to begin recording.
4. In the locator, press the stop button ([ ]) to stop recording. The frame you recorded will be
created in the Vari Track.
5. If you recorded repeatedly while using loop-playback, a recorded take will be created for each
repetition of the loop. “Take 1” will be the recording for the first iteration, “take 2” for the second,
and so on. Use the Frame Take field in Frame Properties to select your favorite take.
* As an alternative to the recording method described here, you can use “Modify Recording” (p. 79),
in which you will add data while looping a single frame.
69
Page 70

Phrase editing (Scope Editor)
The scope editor lets you edit the performance data within a frame. By using the scope editor you can
visually edit pitch, time, and formant data for any location within a phrase.
The scope editor will be either the Phrase Scope or the Groove Scope, depending on the keyboard map
(p. 54) setting in the sample list.
Since you can edit while listening to the playback loop, you can hear the results of your editing while
you work. In addition, it’s easy to restore a phrase to its previous state, so you can repeat cycles of trial
and error as many times as you like.
■ Phrase scope
The Phrase Scope will appear when you edit a frame that was pasted with the sample’s “Keyboard
Map” set to (Phrase Map). As its name suggests, the Phrase Scope interprets the performance data
within the frame as a phrase, and is used mainly to edit melodic elements of the phrase. For example,
in the case of a vocal sample, you can change the melody line or even add harmony to turn the sound
into a chord. This technique is particularly powerful when applied to single-line samples such as
vocals.
fig.phrase1
■ Groove scope
The Groove Scope will appear when you edit a frame that was pasted with the sample’s “Keyboard
Map” set to (Groove Map). The Groove Scope interprets the performance data within the frame
as a rhythm pattern, and is used mainly to edit rhythmic elements.
For example, in the case of a drum pattern sample, each slice (a waveform region divided by events)
will be a drum sound such as bass drum, snare, etc., and you can re-configure the drum pattern by
changing the time location of these slices.
This is particularly useful when used on rhythm part samples such as drum patterns.
fig.phrase2
70
Page 71
Editing in the Phrase Scope
The phrase scope will open when you double-click a green frame.
fig.03-ps01e
Curve
select
Auto scrollTool buttonsModify record
Ruler
Grid snap Quantize
Waveform display area
Note display area
Reset
curve
Controller
select
Curve view
Time zero input
Time keep
● Waveform display area
The waveform of the encoded sample is displayed here. When you edit notes or time, the results will
appear in this area. You cannot directly edit the waveform in the waveform display area.
* If the waveform is not displayed, try using the scroll bar located at the right of the waveform display area
to adjust the displayed area (upward or downward).
Events (blue)
Controller display area
Sample data Zoom tool
fig.03-ps02e
If you play from the middle of a phrase, the sound will be heard starting at the
location of an event (blue line).
About pitches in the waveform display area
•For samples encoded in the SOLO type, the waveform will be displayed at the
positions of the notes.
•Pitches in the waveform display area are only approximate, and may not be
accurate for some samples.
•For samples encoded in a type other than SOLO, the entire waveform will be
displayed at the same pitch.
● Note display area
The notes corresponding to the waveform display area are shown here. You can use these notes to edit
the pitches of the phrase. To edit a note, select a tool from the tool buttons.
● Controller display area
In this area you can edit the PITCH, TIME, FORMANT, DYNAMICS, and VELOCITY parameters. Use
the [Controller select] buttons at the left to select the parameter you want to edit. Edit the selected
parameter by using the mouse to drag the curve directly.
71
Page 72

Editing in the Phrase Scope
Editing the Pitch/Time/Formant/Dynamics
Here’s how to edit the Pitch/Time/Formant/Dynamics in the specified region of the phrase.
1. Select the parameter that you want to edit.
At the left of the controller display area, press one of the [Controller select] buttons to select the
parameter you want to edit: [PITCH], [TIME], [FORMANT], or [DYNAMICS].
PITCH (Control change number 16) Varies the pitch.
TIME (control change number 17) Varies the playback speed.
FORMANT (control change number 18)
DYNAMICS (control change number 11 Expression) Varies the volume.
* You cannot edit the formant if the sample was encoded in a type other than “SOLO.” Even if you press
the FORMANT button, the red line indicating the formant will not be displayed.
2. Use one of the following methods to specify the region that you want to edit.
If the sample was encoded as “SOLO,” varies the
tonal character (formant).
To select a desired region
To extend the selected region
To select an event Click the waveform display area.
To select multiple events Drag the mouse to left or right in the waveform display area.
To cancel your selection
Drag the mouse to left or right in the controller display area. To select a region in grid units, turn on the Grid Snap button.
Hold down the [Shift] key of your keyboard and click in the control-
ler display area.
Click in an unselected part of the controller display area, or click the
border.
3. Use the [Curve select] buttons to select the type of curve.
fig.03-ps03
You can select one of three curves to specify how the parameter will change. Click
either the Flat, Linear, or Rounded curve button.
● Flat : The parameter will be increased or decreased equally.
● Linear : The parameter will be increased or decreased in a straight line.
72
Page 73

Editing in the Phrase Scope
● Rounded : The parameter will be increased or decreased in a rounded curve.
* You can also right-click ( in MacOS, control-click) the controller display area and choose a
curve from the menu that appears.
● Reset curve : Resets the curve in the selected region.
4. Hold down the mouse button on the selected region in the controller display area, and drag
upward or downward. When you reach the desired value, release the mouse button.
* If you selected the Linear or Rounded curve, the value will be increased or decreased around the point
at which you pressed the mouse button.
Time Keep function
When editing the time in Curve Edit mode, you can use the Time Keep function. If the Time Keep
function is turned on, the curve will be adjusted when you edit the Time so that the length of the
selected region will stay the same. You can use this when you want to create a slight change in the
Time parameter, but want the overall length to remain unchanged.
Click the [Time Keep] button ( ) to switch the Time Keep function on/off.
* This is not valid for Time Zero input.
Time Zero input
If you want to stop (“zero”) time in the Phrase Scope, click the [Time Zero] button ( ) to change
the cursor to the Time Zero input tool.
To use this, drag the Time Zero input tool across the Time curve, moving the mouse toward the right
and then releasing it. When you input Zero Time, a Time Zero line (a dark blue line shown at the
bottom of the control area when displaying the Time parameter) will appear, and the waveform
display area will be striped.
If you want to cancel the Time Zero line, click it with the eraser tool.
73
Page 74
Editing in the Phrase Scope
■ Erasing controller data
There are two ways to erase controller data.
● Using the Reset Curve button
1. Select a region.
2. Click the Reset Curve button ( ).
● Using the eraser tool
1. Select the eraser ( ) tool button.
2. When you drag the eraser tool over the controller display area to select a region, the controller
data in the selected region will be erased. You can also erase this data by clicking the selected
region of the controller display area.
To delete control data other than Pitch/Time/Formant/Dynamics that you input during realtime
recording, etc., select a region in the control display area, right-click ( in MacOS, control-click), and
choose “Clear Other Controls” to delete the data.
74
Page 75

Editing notes
By editing notes you can modify the melody of a phrase or create chords.
By default (when a frame is first pasted), a note is placed at the original pitch of the sample (the key
that will sound the sample at its original pitch). One note will be displayed for each event.
In the phrase scope you can move or add notes to freely play the sample just as if you were controlling
the VariOS from your keyboard. For example, you can create a chorus melody from just a single vocal
melody.
fig.03-ps12
If you want to play legato in the phrase scope, go to the Sample
Edit screen (p. 56) and set the sample Playback mode (p. 57) to
“TIME SYNC.”
If you edit a note with the Playback mode set to “RETRIGGER,” the
beginning of the sample will be played each time the pitch
changes, and you will be unable to play legato.
Editing in the Phrase Scope
■ Grid Snap setting
Turn this on if you want to place notes or select regions at intervals of the grid spacing.
When you drag a note to move it, the note will move in units of the grid. For example, if the grid
spacing is set to one measure, a note that was intentionally placed a 1/16th note ahead of the bar line
will move in steps of one measure, maintaining its position 1/16th note ahead of the bar line.
To switch the display grid, drag the numerical value shown at the right of the grid button, and choose
from the pulldown menu that appears.
Values:
BAR 1 measure
1/2 Half note
1/4 Quarter note
1/8 Eighth note
1/8T Eighth note triplet
1/16 16th note
1/16T 16th note triplet
1/32 32nd note
1/32T 32nd note triplet
1/64 64th note
1/64T 64th note triplet
Default setting:
1/16
■ Selecting multiple notes
1. Choose the arrow ( ) from the tool buttons.
2. You can use the following methods to select multiple notes. The selected notes will turn red.
• Use the arrow cursor to drag left or right in the note area to select a region. The notes in that
region will be selected.
• Hold down the [Shift] key of your computer keyboard and click the mouse on each desired note to
select two or more notes.
75
Page 76

Editing in the Phrase Scope
■ Changing the pitch (fixed movement of the note upward or downward)
1. Choose the arrow ( ) from the tool buttons.
2. Use the mouse to drag the note, and then press the [SHIFT] key of your computer.
The mouse cursor will be shown as an up/down arrow.
3. Drag the note upward or downward.
The waveform display area will show how the phrase has changed.
The keyboard shown in the vertical axis of the waveform display area will give you an idea of the
pitch that will sound. The vertical axis of the note area will indicate the note number with which
the phrase will be played.
■ Adjusting the legato timing
A note will be colored light blue to indicate that it is played legato with the adjacent notes.
* Notes colored light blue are the default notes generated when you paste a sample into the Vari Track. In
contrast, the notes you add by recording or by using the pen tool are colored purple. You cannot delete
light blue notes.
fig.03-ps15e
Legato
By moving a light blue note to left or right, you can adjust the
note-on and note-off timing while preserving the legato
playback.
1. Choose the arrow ( ) from the tool buttons.
2. Move the mouse near either end of the note.
3. Drag the note to left or right.
The notes at either side of the note you dragged will contract or expand automatically to preserve
the legato playback.
■ Moving a note to another position
You can move a note to a desired position. At this time, light blue notes will preserve the legato
playback.
1. Choose the arrow ( ) from the tool buttons.
2. Drag the note upward, downward, left, or right.
* If you want to limit the movement of the note to the vertical direction, hold down the [Shift] key and
drag the note upward or downward.
■ Adding a note
You can add new notes. Notes you add are displayed in purple.
1. Choose the pen ( ) from the tool buttons.
76
2. At the location where you want to add a note, press and hold the mouse button, drag to the right,
and then release the mouse button.
A purple note will be added.
Page 77

■ Changing the length of a note
You are free to change the length of a purple note.
1. Choose the arrow ( ) from the tool buttons.
2. Move the mouse near either end of the note.
3. Drag the note to left or right.
■ Erasing a note
Purple notes can be erased. Light blue notes cannot be erased.
1. Choose the eraser ( ) from the tool buttons.
2. Click the mouse on the note that you want to erase.
* By dragging the eraser cursor across the note display area to select a region, you can delete all the
purple notes in that region.
■ Copying a note
Purple notes can be copied. Light blue notes cannot be copied.
Editing in the Phrase Scope
1. Select the note that you want to copy.
2. Use one of the following methods to copy the note.
• Choose Copy from the Edit menu.
• Right-click ( in MacOS, control-click) the selected note, and choose Copy from the menu
that appears.
• On your computer keyboard, press [Ctrl] + [C] ( on MacOS, press [ ] + [C]).
3. Click the ruler of the phrase scope to move the playback cursor (the vertical line) to the starting
location at which you want to copy the note.
4. Once again click the note display area, and use one of the following methods to paste the note
you copied.
• Choose Paste from the Edit menu.
• Right-click ( in MacOS, control-click) and choose Paste from the menu that appears.
• On your computer keyboard, press [Ctrl] + [V] ( on MacOS, press [] + [V]).
■ Dividing a note
You can divide a note into two notes. For example, you can divide a note at the point where you want
to modify the melody, and then move the divided notes upward or downward to change the pitch at
the desired timing.
1. Choose the scissors ( ) from the tool buttons.
2. Click the mouse at the location where you want to divide the note.
77
Page 78

Editing in the Phrase Scope
■ Joining two notes
You can join two notes that were divided.
1. Adjust the two notes so that they are horizontally aligned.
2. Choose the bond ( ) from the tool buttons.
3. Click between the two notes that you want to join.
■ Editing the velocity
1. Using the [Controller select buttons] located at the left of the controller display area, choose
[VELOCITY].
A graph of the velocities will be displayed.
2. Use the arrow cursor to directly drag the velocity graph upward or downward.
The graph you are editing will turn red.
3. If more than one note exists at the identical timing, click in the note display area on the note that
you want to edit, and the corresponding velocity graph will turn red.
* In the phrase scope, adjacent legato notes are located at the same pitch, the velocity of the second and
subsequent notes will be ignored. Even though you will be able to edit the velocity of the second and
subsequent notes on the screen, the sound produced by the VariOS when you play legato will use the
velocity of the first note located at that pitch.
fig.03VeloE
Legato notes located at the
same pitch
The velocities can be edited
in the screen, but when the
sound module plays these
notes, the second and
subsequent notes will have
the same velocity as the first
note.
78
Page 79

Modify Recording
This function lets you modify or edit the selected frame in real time.
Modify Recording differs from conventional realtime recording (p. 69) in that when you loop-record,
the data will be added to the same take. For example, you would use Modify Recording if you want
to record the kick on the first cycle, snare on the second, and hi-hat on the third.
Realtime Recording
Modify Recording
1. Loop-playback a frame.
2. Click the Modify Record button shown below.
fig.03-ps20
Editing in the Phrase Scope
When loop-recording, the first cycle is recorded on take 1, the second as take 2,
and so on. Use the frame property parameter Frame Take to select your favorite
take.
When loop-recording, the data recorded on each cycle is added to the same
take. Events will be added, and Pitch, Time, Formant, and Dynamics data will
be overwritten over the previously recorded data.
● Punch-in/out button
fig.03-ps21
When you press the punch-in/out button, the punch-in/out anchors will be displayed at the
beginning and end of the selected region in the time ruler of the scope editor screen. Recording
will apply to the region indicated by the punch-in/out anchors—anything you play outside this
region will not be recorded.
*The location of the punch-in/out anchors will move according to any increases or decreases due
to TIME editing.
3. In the locator area, press the record button ( ) and then press the play button ( ) to begin
recording. Perform by playing your MIDI keyboard and/or turning the PITCH/TIME/FORMANT
of the VariOS.
knobs
* You can also press the play button ( ) first, and then press the record button ( ). In this case,
recording will begin at the moment you press the record button, so you can practice while the
playback continues looping, and then press the record button when you are ready to record.
4. In the locator area, press the stop button ( ) to stop recording.
79
Page 80

Editing in the Phrase Scope
Quantize
Quantize is a function that adjusts the note locations to left or right so that the notes line up with
intervals of the displayed grid.
1. As described in “Selecting multiple notes” (p. 75), specify the region that you want to quantize.
2. Set the numeric value at the right of the quantize button to specify the quantization rate (the
amount of adjustment).
You can adjust the quantization rate in a range of 0%–100% by dragging the numeric value
upward or downward. With a setting of 100%, the note locations will be aligned precisely with the
grid intervals.
3. Click the quantize button to execute the quantize operation.
fig.03-ps22
If you did not get the result you expected, choose [Undo] from the [Edit] menu, then
try the operation over again using other settings.
If notes are connected by legato, the first note will adhere to the grid, and subsequent notes
will move in parallel with the first.
80
Page 81

Editing in the Groove Scope
When you click a purple frame, the groove scope will open.
fig.03-gs01e
Ruler
Curve
select
Reset
Curve
Controller
select
Auto scrollTool buttons PreviewModify record
Grid snap Quantize
Original waveform display area
Slice (note) display area
Controller display area
Curve
View
Sample information Zoom tool
● Original waveform display area
The sample waveform is divided into slices at event locations, and the slices are displayed in this area.
Slices are numbered sequentially from the beginning.
If you hold down [Shift] and click a slice in the original waveform display area, the slice whose
number you clicked will be added to the original location of the slice display area.
● Slice (note) display area
Here you can edit slices (notes). Slices (waveforms) are displayed in stair-step fashion. The vertical
axis shows the type of slice (arranged in order from the bottom), and the horizontal axis shows the
timing at which each slice will be heard.
fig.03-gs02
Slice name display area
The name of the slice is shown here. You can double-click the slice name to
re-name it.
By right-clicking the slice name ( on MacOS, control-clicking), you
can switch the display between the slice name and the note name.
● Controller display area
Here you can edit the PITCH, TIME, FORMANT, DYNAMICS, and VELOCITY parameters. Use the
[Controller select buttons] at the left to switch parameters. Use the mouse to directly edit the curve.
Basic operation is the same as in the phrase scope.
81
Page 82

Editing in the Groove Scope
Editing the Pitch/Time/Formant/Dynamics
You can edit the Pitch/Time/Formant/Dynamics in the desired region of the phrase. The procedure
is the same as in the phrase scope, as described in “Editing the Pitch/Time/Formant/Dynamics” (p.
72).
* Unlike the phrase scope, the groove scope does not change the timing of a slice (note) when you edit the
TIME parameter. For this reason, the groove scope does not have the “Time Keep” and “Time zero
input” functions that are provided in the phrase scope. (Moving the TIME curve to the bottom will
produce a zero time.)
Editing a slice (note)
Editing a slice is essentially the same as editing a note in the phrase scope.
fig.03-gs03
When you want to edit slices in the groove scope, go to the Sample Edit
screen (p. 56) and set the playback mode of the sample to “Retrigger” (p.
57). If the playback mode is anything other than “Retrigger,” editing an
event will cause the sound to be interrupted or otherwise fail to play
correctly.
* The groove scope provides a preview function for each slice.
• If the button is on, you can audition a sample by clicking it.
• If the button is on, you can audition a sample by moving the mouse cursor over it.
■ Selecting multiple slices
1. Choose the arrow ( ) from the tool buttons.
2. You can use the following methods to select multiple slices. Selected slices will turn red.
• Drag the arrow cursor to the left or right in the event display area or controller display area to
specify a region. The slices in the region will be selected.
• Hold down the [Shift] key of your computer and click the mouse on a slice to add it to or remove
it from your selection.
■ Moving a slice
You can freely move a note to another location.
1. Choose the arrow ( ) from the tool buttons.
2. Drag the slice up, down, left, or right.
82
If there is no original waveform corresponding to the slice, the waveform display of the slice will
be a straight line.
* If you want to limit the movement of the slice to the vertical direction, hold down the [Shift] key and
drag the slice upward or downward.
Page 83

■ Adding a slice
Here’s how to add a new slice.
1. Choose the pen ( ) from the tool buttons.
2. Hold down the mouse button at the location where you want to add a slice, drag to the right, and
then release the mouse button.
If you extend the slice beyond the length of its original waveform, the waveform display of the
slice will be a straight line.
If you hold down [Shift] and click a slice in the original waveform display area, the slice of the
number you clicked will be added to the original location of the slice display area.
■ Adjusting the length of a slice
1. Choose the arrow ( ) from the tool buttons.
2. Move the mouse near either end of the slice.
Editing in the Groove Scope
3. Drag the slice to left or right.
If you extend the slice beyond the length of its original waveform, the waveform display of the
slice will be a straight line.
■ Deleting a slice
1. Choose the eraser ( ) from the tool buttons.
2. In the slice display area, click the mouse on the slice you want to delete.
* By dragging the eraser tool across the slice display area to select a region, you can delete the slices
from the corresponding region.
■ Copying a slice by dragging and dropping
1. Select the slice that you want to copy.
2. Press and hold the mouse button on the selected slice, move it to the desired destination, and
then hold down the [Ctrl] key ( in MacOS, the [Option] key) of your keyboard and release the
mouse button (drag and drop).
83
Page 84

Editing in the Groove Scope
■ Copying a slice with the Copy and Paste commands
1. Select the slice that you want to copy.
2. Use one of the following methods to copy the slice.
• Choose Copy from the Edit menu.
• Right-click ( in MacOS, control-click) the selected slice, and choose Copy from the menu
that appears.
• Press [Ctrl] + [C] ( in MacOS, [] + [C]) on your keyboard.
3. Click the ruler of the groove scope| to move the playback cursor (the vertical line) to the
location at which you want the pasted slice to begin.
4. Use one of the following methods to paste the copied slice.
• Choose Paste from the Edit menu.
• Right-click ( in MacOS, control-click) and choose Paste from the menu that appears.
• Press [Ctrl] + [V] ( in MacOS, [] + [V]) on your keyboard.
Modify Recording
The procedure is the same as for “Modify Recording” (p. 79) in the phrase scope.
Quantize
The procedure is the same as for “Quantize” (p. 80) in the phrase scope.
84
Page 85

Saving
Saving a song
In the same way as in most programs, you will save your work by choosing [Save Song] or [Save As]
from the File menu. The song will be saved in V-Producer format (in Windows, the file name extension
is .vpd).
In V-Producer, the actual audio data used by a song (.vpw files) is handled separately from the song
file (.vpd file) that uses this audio data. The song file contains only references to these audio files. This
means that if you copy or back up only the song file to another computer, you will be unable to play
back the song.
If you select "Save song with the sample files" when saving, all sample files (.vpw files) used by the
song will be copied to the same folder as the song file. By moving this entire folder, you can move your
song to another computer or create a backup.
About the sample files (.vpw) used by the song
The settings file named “song name + PRM.ini” that is saved in the same folder as the song
file (.vpd) stores the location (absolute path) of the sample files (.vpw) used in the song.
For this reason, if you change the location of the samples used in the song, V-Producer will
lose track of the sample file locations. In this case, the next time you open the song, the
"[sample name] Load File Name" dialog box will appear. Please specify the file location of
the sample name shown in the dialog box.
* The [Export SMF] command on the File menu will save the song in SMF format, so you can load it into
another sequencer and use it to play the VariOS. For details, refer to “Using your MIDI sequencer to
play data (SMF) created by V-Producer” (p. 127).
Exporting a wave file
The [Export Wave File] command on the File menu will export data as a wave file.
Since wave files are a standard format, they can be loaded into virtually any program.
When exporting wave files, you have the following options:
Song Export a single wave file for the entire song
Export separate wave files for each part of the song
Multiple Part
* The internal effects of the VariOS (see “Using effects” (p. 87) ) will not be reflected by the wave file
export function.
When you save, the parts that are checked in the “Export Part”
field will be output. Each part will be saved in the folder you've
specified, using this format: “specified file name _ part number.’
85
Page 86

Using the effects of the VariOS (Mixer)
V-Producer has a Mixer window in which you can control the level, pan, etc., of the six parts of the
VariOS, and an Effect window in which you can adjust the effect parameters.
The following diagram shows the effect signal flow.
fig.newmixer_80
Master Level
Reverb
Chorus
Multi-FX
Out Assign
Reverb
MAIN
OUT
DIGITAL
OUT
DIRECT
OUT
MAIN
M-FX
DIR
Sound
Generator
OUTPUT
Using the Mixer
Reverb Send
Level
Chorus Send
Level
Multi-FX Send
Level
Multi-FX Cho
Send Level
Multi-FX
fig.04-MIX01
The mixer window will appear when you click the mixer button in the tool bar
Chorus Rev
Send Level
Chorus
Multi-FX Rev
Send Level
Multi-FX
Master Level
Master Level
of the main window.
fig.04-MIX02E
M-FX send level
Adjusts the depth of the multi-effect
* Valid only when output assign is set to
[M-FX]
Chorus send level
Adjusts the depth of the chorus
* This has no effect if output assign is
set to [DIR]
Reverb send level
Adjusts the depth of the reverb
* This has no effect if output assign is
set to [DIR]
Panpot
Adjusts the stereo position of
each part
Slider (level)
Adjusts the volume of each
Output assign
Specifies the output
destination of the original
sound
Effects
Opens the effect window
corresponding to each
button
86
Page 87

Using effects
When you press the [MULTI], [REVERB], or [CHORUS] button of the mixer window, the
corresponding effect window will open.
Using the effects of the VariOS (Mixer)
■ MULTI (Multi-effect)
fig.04-MIX03E
ON/OFF switch
Type select button
■ CHORUS
fig.04-MIX04E
ON/OFF switch
Type select button
Multi-FX Master Level
Volume of the multi-effect output
Chorus Master Level
Volume of the chorus output
Multi-FX Cho Send Level
Adjusts the chorus depth for
the multi-effect output
Multi-FX Rev Send Level
Adjusts the reverb depth for the
multi-effect output
Multi-FX Out Assign
Specifies the output destination
of the multi-effect
MAIN: output from "MAIN OUT"
DIR: output from "DIRECT OUT"
Displays the list of types
Chorus Rev Send Level
Adjusts the reverb depth
for the chorus output
Displays the list of types
■ REVERB
fig.04-MIX05E
ON/OFF switch
Displays the list of types
Type select button
Reverb Master Level
Volume of the reverb output
87
Page 88

Using the effects of the VariOS (Mixer)
■ Switching the effect type
There are 40 types of multi-effect, eight types of chorus, and nine types of reverb.
1. Click the type select buttons ( ) located above the displayed effect type name. The effect
type will change.
Alternatively, you can click the TYPE field ( ) to view a list of effect types, and directly
select the desired type.
* For details on the parameters of each effect, refer to the Reference Manual (pdf).
88
Page 89

Taking advantage of the VariOS Keyboard(VariOS Keyboard)
Using the VariOS Keyboard
fig.toolbar
Click the keyboard button in the toolbar to open the keyboard.
PITCH/TIME/FORMANT knobs Control the pitch/time/formant of the part being auditioned.
Screen
Part buttons
Velocity fader Adjusts the velocity of the notes.
Keyboard Click the keyboard to listen to the part being auditioned.
fig.1_80
Shows the MIDI messages of the part being auditioned and the
part(s) specified by the MONITOR PART buttons.
Specify the part(s) whose MIDI messages will be displayed in
the screen.
ScreenPITCH/TIME/FORMANT knobs
Part buttons
Velocity
Velocity fader
■ Note name display
fig.3
By pressing the [Shift]+[N] keys, you can
switch the note names of the note-on keys
between displayed and hidden.
fig.2
By placing the mouse pointer on the
keyboard and right-clicking ( in
MacOS, control-clicking), and choosing
“View Note Name” from the menu that
appears, you can show or hide the note
name display for the note-on keys.
Keyboard
89
Page 90

Taking advantage of the VariOS Keyboard(VariOS Keyboard)
■ Turning a note on/off from your computer keyboard
1. Press the [Shift]+[K] keys.
fig.5
If you place the mouse pointer on the
keyboard and right-click ( in
MacOS, control-click), and choose
“Change PC Keyboard” from the
menu that appears, you will be able to
turn notes on/off from the keyboard of
your computer.
fig.trackkey
The keys of your computer keyboard will correspond to notes as shown in
the diagram..
You can use the up/down keys [ ][ ] to shift the octave.
Once again, press the [Shift]+[K] keys. Alternatively, right-click ( in
MacOS, control-click) and uncheck “Change PC Keyboard” in the menu
that appears to exit this function.
■ Surface controller
fig.6
When you double-click in the screen, a
rectangular frame as shown in the diagram
will appear. By dragging the mouse inside
this frame, you can simultaneously control
both pitch and time. When you click the
parameter name, the parameter indication
will change in the order of PITCH-TIMEFORMANT, and the parameter to be
controlled will be assigned to each axis.
It is possible to specify the same parameter for the X-axis and Y-axis, such as PITCH-PITCH or TIMETIME. However in this case, the X-axis movement will be ignored, and control will occur only on the
Y-axis.
* This function is disabled if the Part button is on.
Screen
90
Page 91

Operation guide:
Sound module (VariOS)
91
Page 92

An overview of the VariOS
Internal structure of the VariOS
■ “Samples” and “performances”
The VariOS uses two units of sound: “samples” and “performances.”
A “sample” consists of a wave with VariOS sample parameters. Data that assigns samples to the six parts is called a
“performance.” The internal memory of the VariOS can contain only one performance. A performance has six parts, and
can use up to a total of 128 samples. By assigning samples to the six parts and sending MIDI messages to each part, you
can play multiple samples simultaneously. The six parts in V-Producer’s Vari Track (p. 62) correspond to the six parts of
the performance.
■ To play sounds
The VariOS is not ready to produce sound immediately after you turn on the power. Samples must first be loaded into
internal memory. Connect the VariOS to your computer via a USB cable, and use the V-Producer’s “Load Wave Files”
command (p. 50) to send wave files (WAV or AIFF) or Vari Phrase format files (VPW) from your computer to the VariOS.
At this time, V-Producer will convert (encode) (p. 49) the wave files into Vari Phrase format. If you want to re-encode a
previously loaded sample in a different format, use V-Producer’s “Wave Edit” command (p. 59).
■ Saving sounds
The samples that are loaded into the VariOS can be saved in the internal flash ROM of the VariOS, or on a PC card
inserted into its card slot.
When you save a performance (p. 114), not only the performance settings but also all samples in internal memory will
be saved (excluding samples for which there is no wave data, or samples that cannot be saved). In other words, a
“performance” contains all the data necessary for playing one song.
When you load a performance into the VariOS, the samples that were saved with it will also be loaded. You can also save
or load samples individually (p. 113).
■ What is “keyboard map”?
The VariOS has a “Keyboard Map”(p. 107) parameter that describes the state of the keyboard. This parameter is set
separately for each part, and has two states.
If keyboard map is set to “Phrase Map,” the sample assigned to the part can be played at the pitch of each key.
If keyboard map is set to “Groove Map,” the sample assigned to a part is divided at events (p. 61), and assigned to each
key. This means that you can randomly play different sections of the sample from different keys without regard to their
original order within the sample. If you turn on the Loop switch (p. 106), you can repeatedly play a section within the
sample.
■ Sample playback
Samples will normally play from the beginning of the wave. You cannot play a sample from some arbitrary point.
If you want to play a sample from some point in the middle, set the keyboard map to “Groove Map.” Alternatively, you
can set the playback mode (p. 105) to “STEP” so that each press of the keyboard will sound successive slices (regions
between events) of the sample. When playing a sample from the middle in this way, playback will be in units (slices)
divided by events (p. 61).
■ Maximum sample time
The maximum sample length is 2 minutes 30 seconds stereo, or 5 minutes monaural. Samples longer than this cannot be
loaded. Also, the total time of all samples in the internal memory of the VariOS cannot exceed this amount.
■ Maximum polyphony
The maximum polyphony is 14 notes (voices). If the VariOS receives data attempting to play more than this number of
voices simultaneously, notes will be omitted. If the number of requested voices exceeds 14, the VariOS will give priority
to the most recently played sounds, and will begin turning off older notes.
A stereo sample will use up two notes (voices) for each sound.
92
Page 93

fig.041-VariOSGaiyou-E
Computer
Wave file (WAV)
An overview of the VariOS
Wave file (AIFF)
Vari Phrase format
file (VPW)
Internal memory
No. (PC#)
001
002
Save samples
003
:
016
:
128
Encode
Send samples
Name
SAMPLE 1
SAMPLE 2
SAMPLE 3
:
SAMPLE 16
:
NO WAVE DATA
Save performance
Re-encode
Part
1
2
3
4
5
6
Load performance
Sample No. (PC#)
002
002
001
003
016
003
Load samples
Perform
Internal flash ROMInternal flash ROMInternal flash ROM
SAMPLE 1
SAMPLE 2
SAMPLE 16
SAMPLE 1
SAMPLE 2
SAMPLE 3
PC cardPC card
SAMPLE 1
SAMPLE 2
SAMPLE 3
SAMPLE 16
SAMPLE 2
SAMPLE 9
SAMPLE 3
SAMPLE 15
93
Page 94

Basic operation of the VariOS
The screen and basic operation
The VariOS has the following two modes.
Sample select mode (MENU button dark)
In this screen you can select a sample to play.
Here you can also select parts and adjust the tempo of the sample.
MENU mode (MENU button lit)
Here you can make various settings for the VariOS.
Switching the screen
fig.042-002
Sample select switch
Press the [MENU] button so it's not lighted, and
the sample select screen wil0l appear.
MENU screen
Press the [MENU] button so it's lighted, and the
MENU screen will appear. (Initially, the MENU
screen will show the menu that you last selected.)
To see the top menu, press and hold the [MENU]
button.
Tempo adjustment screen
In the "sample select screen," press the [V ALUE]
knob and the tempo adjustment screen will appear.
To return to the "sample select screen," once again
press the [V olume] knob or press the [EXIT] button.
Moving to a lower le vel
Turn the [V ALUE] knob to
select a menu, and then
press the [V ALUE] knob .
94
Moving to a higher lev el
Press the [EXIT] button.
Page 95

Editing a value
fig.042-003
Moving the cursor
Use the [CURSOR] buttons to move the cursor to the v alue you w ant to edit.
* If the screen contains only one value that can be edited, the cursor will not
move.
Editing the value
Turn the [V ALUE] knob to edit the value.
If you press in on the [V ALUE] knob while y ou turn it, the value will change in
larger steps.
Basic operation of the VariOS
Cursor (underline)
95
Page 96

Basic operation of the VariOS
Assigning a name
Several screens of the VariOS allow you to assign a name. (For example, Menu 6-2 Sample Rename or
8-2 Save.)
Regardless of the type of name you are assigning, the procedure is the same.
Performance: up to 16 characters
Sample: up to 12 characters
Folder: up to 16 characters
Volume label: up to 11 characters
Access the screen in which you want to assign a name, and use the following procedure.
1. Use the [CURSOR] buttons to move the cursor to the location where you want to enter a
character.
fig.042-0031
Cursor (underline)
2. Turn the [VALUE] knob to specify the desired character.
You can use the following characters and symbols.
For a performance, sample, or folder A--Z a--z 0--9 ! # $ % & ' ( ) + - = @ [ ] ^ _ ` { } space
For a volume label A--Z 0--9 $ % ' - _ @ ! ` ( ) ~
By turning the [VALUE] knob while pressing it, you can conveniently shift between
uppercase characters, lowercase characters, numerals, symbols, and spaces. (Lowercase
characters will not be displayed for a volume label.)
3. Press the [VALUE] knob, and the display will ask “Are You Sure?” Press the [VALUE] knob
once again to finalize the name.
If you press the [EXIT] button you’re returned to the name entry screen.
In any of the name entry screens, you can press the [EXIT] button to discard the currently edited
name and return to the previous screen.
fig.042-0032
96
Page 97

Selecting a sample
* When the VariOS has just been powered up, it is not ready to produce sound. You must load samples into
its internal memory. Before you continue with the following procedure, you must use the V-Producer’s
“Load Wave Files” command to send samples to the VariOS (p. 50).
1. Press the [MENU] button so it’s not lighted. The sample select screen will appear.
fig.042-004
Basic operation of the VariOS
Sample number Part number
Sample nameCursor (underline)
Dark
2. Make sure that the cursor is located at the sample number, and turn the [VALUE] knob to select
the desired sample.
fig.042-0042
Sample number
Cursor (underline)
3. You can press the [VOLUME] knob to preview (audition) the selected sample.
* If there is no sample, the display will indicate “NO WAVE DATA,” and no sound will be heard.
fig.042-043
4. To select a different part, use the [CURSOR] buttons to move the cursor to the part number, and
turn the [VALUE] knob to select a part.
fig.042-0044
Cursor (underline)
97
Page 98

Basic operation of the VariOS
Changing the tempo of a sample
1. Press the [MENU] button so it’s not lighted. Access the sample select screen, and then press the
[VALUE] knob to access the tempo change screen.
fig.042-005
Tempo Clock source
Cursor (underline)
2. Move the cursor to ClockSrc (clock source), and use the [VALUE] knob to select either INT or
MIDI.
Clock Src (clock source) specifies whether the tempo clock of the VariOS will use its own internal
clock (INT) or an external clock (MIDI).
If you are using the VariOS by itself, select INT.
If you are using the VariOS in synchronization with a sequencer or other device, select MIDI. For
details, refer to “Controlling the VariOS from your MIDI sequencer” (p. 126).
fig.042-052
Clock source
Dark
Cursor (underline)
When you are using V-Producer, V-Producer will automatically set the clock source to
“MIDI.” This will cause the VariOS to synchronize to the tempo of V-Producer.
3. Move the cursor to Tempo (master tempo), and turn the [VALUE] knob to adjust the tempo in
steps of 0.1. If you turn [VALUE] knob while pressing it, the tempo will change in steps of 1.
Master Tempo specifies the master tempo of the VariOS.
If the Clock Src parameter is set to MIDI, the master tempo will be displayed as “—.-.”
Available Settings: 20.0–250.0
fig.042-053
Tempo
Cursor (underline)
f
ig.042-054
The tempo indicator on the front panel of the VariOS will blink to indicate
the tempo.
* If the tempo does not change when you adjust the master tempo, make sure
that the “Tempo sync setting” (p. 99) explained on the next page is
turned on.
98
Page 99

■ Tempo sync setting
If you want to play back the sample at its original tempo, turn off Tempo Sync (this is a part
parameter).
Tempo Sync specifies whether the playback speed of the sample assigned to each part will
synchronize to the master tempo or external clock (ON), or will not synchronize (OFF).
Procedure:
1. Press the [MENU] button so it’s lighted, and access the MENU screen.
fig.042-006
Menu name
* The MENU screen displays the menu that you selected most recently. You need to go to the top level
menu. You can get there by pressing and continuing to hold the [MENU] button for a few moments
(when the [MENU] button is not illuminated), or by pressing the [EXIT] button.
2. Turn the [VALUE] knob to select “MENU2 Part Edit,” and press the [VALUE] knob.
fig.042-0062
Basic operation of the VariOS
light
3. Turn the [VALUE] knob to select “Menu2-3 Tempo Sync,” and press the [VALUE] knob.
fig.042-0063
4. Use the [CURSOR] buttons to move the cursor to the part number, and turn the [VALUE] knob to
select a part.
fig.042-0064
5. Use the [CURSOR] buttons to move the cursor to the “ON” (or OFF) location, and turn the
[VALUE] knob to switch the setting ON/OFF.
fig.042-0065
While V-Producer is being used, V-Producer will automatically turn tempo sync “ON”
for all parts. This will cause the VariOS to synchronize to the tempo of V-Producer.
* If the master tempo is set to a value four times or more of the original tempo of the sample (p. 51), it will
not be possible to synchronize the sample to the master tempo.
99
Page 100

Basic operation of the VariOS
Playing the VariOS from a connected keyboard (MIDI Mode)
You can connect your MIDI keyboard to the VariOS. In this case, you can change the MIDI routing in
the following ways.
■ PC mode
When using a USB connection, the MIDI connectors on the rear panel of the VariOS will function as a
USB MIDI interface (Roland VariOS External MIDI). When USB is not connected (and when your
computer is not powered up), the MIDI connectors on the rear panel of the VariOS are connected
directly to the sound generator section.
fig.042-007
Computer
When USB is
connected
Sequencer software
When USB is
not connected
■ Internal mode
The MIDI connectors of the rear panel of the VariOS are connected directly to the sound generator
section.
fig.042-007a
VariOS
Sound generator
section
VariOS
Sound generator
section
Computer
Sequencer software
100
VariOS
Sound generator
section
 Loading...