

Page 1

/
Owner’s Manual
Before using this unit, carefully read the sections entitled: “IMPORTANT SAFETY
INSTRUCTIONS” (p. 2), “USING THE UNIT SAFELY” (p. 3, 4, 5), and “IMPORTANT NOTES”
(p. 6, 7, 8). These sections provide important information concerning the proper operation
of the unit. Additionally, in order to feel assured that you have gained a good grasp of
every feature provided by your new unit, Owner’s Manual should be read in its entirety.
The manual should be saved and kept on hand as a convenient reference
Copyright © 2003 ROLAND CORPORATION
All rights reserved. No part of this publication may be reproduced in any form without
the written permission of ROLAND CORPORATION.
Page 2

CAUTION
RISK OF ELECTRIC SHOCK
DO NOT OPEN
ATTENTION: RISQUE DE CHOC ELECTRIQUE NE PAS OUVRIR
CAUTION: TO REDUCE THE RISK OF ELECTRIC SHOCK,
DO NOT REMOVE COVER (OR BACK).
NO USER-SERVICEABLE PARTS INSIDE.
REFER SERVICING TO QUALIFIED SERVICE PERSONNEL.
The lightning flash with arrowhead symbol, within an
equilateral triangle, is intended to alert the user to the
presence of uninsulated “dangerous voltage” within the
product’s enclosure that may be of sufficient magnitude to
constitute a risk of electric shock to persons.
The exclamation point within an equilateral triangle is
intended to alert the user to the presence of important
operating and maintenance (servicing) instructions in the
literature accompanying the product.
INSTRUCTIONS PERTAINING TO A RISK OF FIRE, ELECTRIC SHOCK, OR INJURY TO PERSONS.
IMPORTANT SAFETY INSTRUCTIONS
SAVE THESE INSTRUCTIONS
WARNING - When using electric products, basic precautions should always be followed, including the following:
1. Read these instructions.
2. Keep these instructions.
3. Heed all warnings.
4. Follow all instructions.
5. Do not use this apparatus near water.
6. Clean only with a dry cloth.
7. Do not block any of the ventilation openings. Install in
accordance with the manufacturers instructions.
8. Do not install near any heat sources such as radiators,
heat registers, stoves, or other apparatus (including
amplifiers) that produce heat.
9. Do not defeat the safety purpose of the polarized or
grounding-type plug. A polarized plug has two blades with
one wider than the other. A grounding type plug has two
blades and a third grounding prong. The wide blade or the
third prong are provided for your safety. When the provided
plug does not fit into your outlet, consult an electrician for
replacement of the obsolete outlet.
WARNING:
IMPORTANT:
As the colours of the wires in the mains lead of this apparatus may not correspond with the coloured markings identifying
the terminals in your plug, proceed as follows:
The wire which is coloured GREEN-AND-YELLOW must be connected to the terminal in the plug which is marked by the
letter E or by the safety earth symbol or coloured GREEN or GREEN-AND-YELLOW.
The wire which is coloured BLUE must be connected to the terminal which is marked with the letter N or coloured BLACK.
The wire which is coloured BROWN must be connected to the terminal which is marked with the letter L or coloured RED.
THIS APPARATUS MUST BE EARTHED
THE WIRES IN THIS MAINS LEAD ARE COLOURED IN ACCORDANCE WITH THE FOLLOWING CODE.
GREEN-AND-YELLOW: EARTH, BLUE: NEUTRAL, BROWN: LIVE
10. Protect the power cord from being walked on or pinched
particularly at plugs, convenience receptacles, and the
point where they exit from the apparatus.
11. Only use attachments/accessories specified by the
manufacturer.
12. Never use with a cart, stand, tripod, bracket,
or table except as specified by the
manufacturer, or sold with the apparatus.
When a cart is used, use caution when
moving the cart/apparatus combination to
avoid injury from tip-over.
13. Unplug this apparatus during lightning storms or when
unused for long periods of time.
14. Refer all servicing to qualified service personnel. Servicing
is required when the apparatus has been damaged in any
way, such as power-supply cord or plug is damaged, liquid
has been spilled or objects have fallen into the apparatus,
the apparatus has been exposed to rain or moisture, does
not operate normally, or has been dropped.
For the U.K.
2
Page 3

USING THE UNIT SAFELY
Used for instructions intended to alert
the user to the risk of death or severe
injury should the unit be used
improperly.
Used for instructions intended to alert
the user to the risk of injury or material
damage should the unit be used
improperly.
* Material damage refers to damage or
other adverse effects caused with
respect to the home and all its
furnishings, as well to domestic
animals or pets.
001
• Before using this unit, make sure to read the
instructions below, and the Owner’s Manual.
..........................................................................................................
002a
• Do not open or perform any internal modifications on the unit.
..........................................................................................................
003
• Do not attempt to repair the unit, or replace parts
within it (except when this manual provides
specific instructions directing you to do so). Refer
all servicing to your retailer, the nearest Roland
Service Center, or an authorized Roland
distributor, as listed on the “Information” page.
..........................................................................................................
004
• Never use or store the unit in places that are:
• Subject to temperature extremes (e.g., direct
sunlight in an enclosed vehicle, near a heating
duct, on top of heat-generating equipment); or
are
• Damp (e.g., baths, washrooms, on wet floors);
or are
• Humid; or are
• Exposed to rain; or are
• Dusty; or are
• Subject to high levels of vibration.
..........................................................................................................
Add
• When installing the piano, be sure to fasten the
caster using the supplied caster cup.
..........................................................................................................
007
• Make sure you always have the unit placed so it is
level and sure to remain stable. Never place it on
stands that could wobble, or on inclined surfaces.
..........................................................................................................
008a
• The unit should be connected to a power supply
only of the type described in the operating instructions, or as marked on the bottom of unit.
..........................................................................................................
008e
• Use only the attached power-supply cord.
The symbol alerts the user to important instructions
or warnings.The specific meaning of the symbol is
determined by the design contained within the
triangle. In the case of the symbol at left, it is used for
general cautions, warnings, or alerts to danger.
The symbol alerts the user to items that must never
be carried out (are forbidden). The specific thing that
must not be done is indicated by the design contained
within the circle. In the case of the symbol at left, it
means that the unit must never be disassembled.
The ● symbol alerts the user to things that must be
carried out. The specific thing that must be done is
indicated by the design contained within the circle. In
the case of the symbol at left, it means that the powercord plug must be unplugged from the outlet.
009
• Do not excessively twist or bend the power cord,
nor place heavy objects on it. Doing so can
damage the cord, producing severed elements and
short circuits. Damaged cords are fire and shock
hazards!
..........................................................................................................
010
• This unit, either alone or in combination with an
amplifier and headphones or speakers, may be
capable of producing sound levels that could
cause permanent hearing loss. Do not operate for
a long period of time at a high volume level, or at
a level that is uncomfortable. If you experience
any hearing loss or ringing in the ears, you should
immediately stop using the unit, and consult an
audiologist.
..........................................................................................................
011
• Do not allow any objects (e.g., flammable material,
coins, pins); or liquids of any kind (water, soft
drinks, etc.) to penetrate the unit.
..........................................................................................................
012a:***
• Immediately turn the power off, remove the
power cord from the outlet, and request servicing
by your retailer, the nearest Roland Service
Center, or an authorized Roland distributor, as
listed on the “Information” page when:
• The power-supply cord, or the plug has been
damaged; or
• If smoke or unusual odor occurs
• Objects have fallen into, or liquid has been
spilled onto the unit; or
• The unit has been exposed to rain (or otherwise
has become wet); or
• The unit does not appear to operate normally or
exhibits a marked change in performance.
• If abnormal sound are produced.
• If error messages (Error.61, Error.62) have
appeared.
..........................................................................................................
..........................................................................................................
3
Page 4

013
• In households with small children, an adult
should provide supervision until the child is
capable of following all the rules essential for the
safe operation of the unit.
..........................................................................................................
014
• Protect the unit from strong impact.
(Do not drop it!)
..........................................................................................................
015
• Do not force the unit’s power-supply cord to share
an outlet with an unreasonable number of other
devices. Be especially careful when using
extension cords—the total power used by all
devices you have connected to the extension
cord’s outlet must never exceed the power rating
(watts/amperes) for the extension cord. Excessive
loads can cause the insulation on the cord to heat
up and eventually melt through.
..........................................................................................................
016
• Before using the unit in a foreign country, consult
with your retailer, the nearest Roland Service
Center, or an authorized Roland distributor, as
listed on the “Information” page.
..........................................................................................................
019
• Batteries must never be recharged, heated, taken
apart, or thrown into fire or water.
..........................................................................................................
023
• DO NOT play a CD-ROM disc on a conventional
audio CD player. The resulting sound may be of a
level that could cause permanent hearing loss.
Damage to speakers or other system components
may result.
..........................................................................................................
Add
• Be careful not to touch the keys while the
automatic keyboard is functioning, as this may
sprain your fingers or damage the keyboard.
..........................................................................................................
026
• Do not put anything that contains water (e.g.,
flower vases) on this unit. Also, avoid the use of
insecticides, perfumes, alcohol, nail polish, spray
cans, etc., near the unit. Swiftly wipe away any
liquid that spills on the unit using a dry, soft cloth.
..........................................................................................................
001-50
• Connect mains plug of this model to a mains
socket outlet with a protective earthing
connection.
..........................................................................................................
101a
• The unit should be located so that its location or
position does not interfere with its proper ventilation.
..........................................................................................................
102b
• Always grasp only the plug on the power-supply
cord when plugging into, or unplugging from, an
outlet or this unit.
..........................................................................................................
103a:
• At regular intervals, you should unplug the power
plug and clean it by using a dry cloth to wipe all
dust and other accumulations away from its
prongs. Also, disconnect the power plug from the
power outlet whenever the unit is to remain
unused for an extended period of time. Any
accumulation of dust between the power plug and
the power outlet can result in poor insulation and
lead to fire.
..........................................................................................................
104
• Try to prevent cords and cables from becoming
entangled. Also, all cords and cables should be
placed so they are out of the reach of children.
..........................................................................................................
106
• Never climb on top of, nor place heavy objects on
the unit.
..........................................................................................................
107b
• Never handle the power cord or its plugs with wet
hands when plugging into, or unplugging from,
an outlet or this unit.
..........................................................................................................
108a
• Before moving the unit, disconnect the power
plug from the outlet, and pull out all cords from
external devices.
..........................................................................................................
108c
• Disconnect all cords coming from external devices
before moving the unit.
..........................................................................................................
109a
• Before cleaning the unit, turn off the power and
unplug the power cord from the outlet (p. 20).
..........................................................................................................
110a
• Whenever you suspect the possibility of lightning
in your area, pull the plug on the power cord out
of the outlet.
..........................................................................................................
4
Page 5

111: Selection
• If used improperly, batteries may explode or leak
and cause damage or injury. In the interest of
safety, please read and observe the following
precautions.
1
• Carefully follow the installation instructions for
batteries, and make sure you observe the correct
polarity.
2
• Avoid using new batteries together with used
ones. In addition, avoid mixing different types
of batteries.
3
• Remove the batteries whenever the unit is to
remain unused for an extended period of time.
5
• If a battery has leaked, use a soft piece of cloth
or paper towel to wipe all remnants of the
discharge from the battery compartment. Then
install new batteries. To avoid inflammation of
the skin, make sure that none of the battery
discharge gets onto your hands or skin. Exercise
the utmost caution so that none of the discharge
gets near your eyes. Immediately rinse the
affected area with running water if any of the
discharge has entered the eyes.
6
• Never keep batteries together with metallic
objects such as ballpoint pens, necklaces,
hairpins, etc.
..........................................................................................................
112
• Used batteries must be disposed of in compliance
with whatever regulations for their safe disposal
that may be observed in the region in which you
live.
..........................................................................................................
116
• Be careful when opening/closing the lid so you do
not get your fingers pinched (p. 20). Adult supervision is recommended whenever small children
use the unit.
..........................................................................................................
118
• Should you remove screws and cord cramp, make
sure to put them in a safe place out of children’s
reach, so there is no chance of them being
swallowed accidentally.
..........................................................................................................
5
Page 6

IMPORTANT NOTES
291b
In addition to the items listed under “IMPORTANT SAFETY INSTRUCTIONS” and “USING THE UNIT SAFELY” on pages 2,
3, 4 and 5, please read and observe the following:
Power Supply
301
• Do not use this unit on the same power circuit with any
device that will generate line noise (such as an electric
motor or variable lighting system).
306b
•A batteries are supplied with the unit. The life of this
battery may be limited, however, since its primary
purpose was to enable testing.
307
• Before connecting this unit to other devices, turn off the
power to all units. This will help prevent malfunctions
and/or damage to speakers or other devices.
308
• Although the LCD and LEDs are switched off when the
POWER switch is switched off, this does not mean that the
unit has been completely disconnected from the source of
power. If you need to turn off the power completely, first
turn off the POWER switch, then unplug the power cord
from the power outlet. For this reason, the outlet into
which you choose to connect the power cord’s plug
should be one that is within easy reach and readily accessible.
.
Placement
351
• Using the unit near power amplifiers (or other equipment
containing large power transformers) may induce hum.
To alleviate the problem, change the orientation of this
unit; or move it farther away from the source of interference.
352a
• This device may interfere with radio and television
reception. Do not use this device in the vicinity of such
receivers.
352b
• Noise may be produced if wireless communications
devices, such as cell phones, are operated in the vicinity of
this unit. Such noise could occur when receiving or initiating a call, or while conversing. Should you experience
such problems, you should relocate such wireless devices
so they are at a greater distance from this unit, or switch
them off.
353
• Observe the following when using the unit’s floppy disk
drive. For further details, refer to “Before Using Floppy
Disks” (p. 7).
• Do not place the unit near devices that produce a
strong magnetic field (e.g., loudspeakers).
• Install the unit on a solid, level surface.
• Do not move the unit or subject it to vibration while
the drive is operating.
354b
• Do not expose the unit to direct sunlight, place it near
devices that radiate heat, leave it inside an enclosed
vehicle, or otherwise subject it to temperature extremes.
Also, do not allow lighting devices that normally are used
while their light source is very close to the unit (such as a
piano light), or powerful spotlights to shine upon the
same area of the unit for extended periods of time.
Excessive heat can deform or discolor the unit.
355b
• When moved from one location to another where the
temperature and/or humidity is very different, water
droplets (condensation) may form inside the unit. Damage
or malfunction may result if you attempt to use the unit in
this condition. Therefore, before using the unit, you must
allow it to stand for several hours, until the condensation
has completely evaporated.
356
• Do not allow rubber, vinyl, or similar materials to remain
on the unit for long periods of time. Such objects can
discolor or otherwise harmfully affect the finish.
• Do not allow objects to remain on top of the keyboard.
This can be the cause of malfunction, such as keys ceasing
to produce sound.
359
• Do not paste stickers, decals, or the like to this instrument.
Peeling such matter off the instrument may damage the
exterior finish.
Maintenance
401b
• Since your piano has a polished finish that is as delicate as
that found on finely crafted wooden furniture, it needs
careful, periodic care. A few important suggestions
concerning the proper care of the unit follow.
• For dusting, using a soft, clean cloth and/or piano-use
feather duster. Be sure to wipe gently. Even the tiniest
grains of sand or grit can leave scratches on the surface
if too much force is applied while wiping.
Do not use any cleaners or detergents, since they might
deteriorate the surface of the cabinet, and produce
cracks.
• If the cabinet’s surface loses its luster, wipe it
thoroughly with a soft cloth dampened with a little of
the polishing liquid.
Do not use any cleaners or detergents, since they might
deteriorate the surface of the cabinet, and produce
cracks. Do not use dusting cloths that contain
chemicals.
402
• Never use benzine, thinners, alcohol or solvents of any
kind, to avoid the possibility of discoloration and/or
deformation.
Repairs and Data
452
• Please be aware that all data contained in the unit’s
memory may be lost when the unit is sent for repairs.
Important data should always be backed up on a floppy
disk, or written down on paper (when possible). During
repairs, due care is taken to avoid the loss of data.
However, in certain cases (such as when circuitry related
to memory itself is out of order), we regret that it may not
be possible to restore the data, and Roland assumes no
liability concerning such loss of data.
6
Page 7

IMPORTANT NOTES
Automatic Keyboard
Add
• While the automatic keyboard is in operation, avoid doing
anything that could hamper the action of the keys, such as
using undue force to press a key, or forcing up a
depressed key. By doing so, you risk causing malfunction.
Additional Precautions
551
• Please be aware that the contents of memory can be
irretrievably lost as a result of a malfunction, or the
improper operation of the unit. To protect yourself against
the risk of loosing important data, we recommend that
you periodically save a backup copy of important data
you have stored in the unit’s memory on a floppy disk.
552
• Unfortunately, it may be impossible to restore the contents
of data that was stored on a floppy disk and the unit
memory once it has been lost. Roland Corporation
assumes no liability concerning such loss of data.
553
• Use a reasonable amount of care when using the unit’s
buttons, sliders, or other controls; and when using its jacks
and connectors. Rough handling can lead to malfunctions.
554
• Never strike or apply strong pressure to the display.
556
• When connecting / disconnecting all cables, grasp the
connector itself—never pull on the cable. This way you
will avoid causing shorts, or damage to the cable’s
internal elements.
557
•A small amount of heat will radiate from the unit during
normal operation.
558a
• To avoid disturbing your neighbors, try to keep the unit’s
volume at reasonable levels. You may prefer to use
headphones, so you do not need to be concerned about
those around you (especially when it is late at night).
558d
• This instrument is designed to minimize the extraneous
sounds produced when it’s played. However, since sound
vibrations can be transmitted through floors and walls to
a greater degree than expected, take care not to allow
these sounds to become a nuisance to neighbors,
especially when performing at night and when using
headphones.
559b
• When you need to transport the unit, pack it in shockabsorbent material. Transporting the unit without doing
so can cause it to become scratched or damaged, and
could lead to malfunction.
560
• Do not apply undue force to the music stand while it is in
use.
561
• Use only the specified expression pedal (EV-5; sold
separately). By connecting any other expression pedals,
you risk causing malfunction and/or damage to the unit.
562
• Use a cable from Roland to make the connection. If using
some other make of connection cable, please note the
following precautions.
• Some connection cables contain resistors. Do not use
cables that incorporate resistors for connecting to this
unit. The use of such cables can cause the sound level
to be extremely low, or impossible to hear. For information on cable specifications, contact the manufacturer of the cable.
565
Before opening or closing the keyboard lid, always make sure
•
that no pets or other small animals are located on top of the
instrument (in particular, they should be kept away from the
keyboard and its lid). Otherwise, due to the structural design of
this instrument, small pets or other animals could end up getting
trapped inside it. If such a situation is encountered, you must
immediately switch off the power and disconnect the power cord
from the outlet. You should then consult with the retailer from
whom the instrument was purchased, or contact the nearest
Roland Service Center.
Before Using Floppy Disks
Handling the Floppy Disk Drive
602
• Install the unit on a solid, level surface in an area free from
vibration. If the unit must be installed at an angle, be sure
the installation does not exceed the permissible range:
upward, 0°; downward, 0°.
603
• Avoid using the unit immediately after it has been moved
to a location with a level of humidity that is greatly
different than its former location. Rapid changes in the
environment can cause condensation to form inside the
drive, which will adversely affect the operation of the
drive and/or damage floppy disks. When the unit has
been moved, allow it to become accustomed to the new
environment (allow a few hours) before operating it.
604
• To insert a disk, push it gently but firmly into the drive—
it will click into place. To remove a disk, press the EJECT
button firmly. Do not use excessive force to remove a disk
which is lodged in the drive.
605b***
• Never eject a disk while reading or writing is in progress,
since that can damage the magnetic surface of the disk,
rendering it unusable. (The disk drive’s indicator will
light up at full brightness when the drive is busy reading
or writing data. Ordinarily, the indicator will be less
brightly lighted, or be extinguished.)
606
• Remove any disk from the drive before powering up or
down.
607
• To prevent damage to the disk drive’s heads, always try to
hold the floppy disk in a level position (not tilted in any
direction) while inserting it into the drive. Push it in
firmly, but gently. Never use excessive force.
608
• To avoid the risk of malfunction and/or damage, insert
only floppy disks into the disk drive. Never insert any
other type of disk. Avoid getting paper clips, coins, or any
other foreign objects inside the drive.
Handling Floppy Disks
651
• Floppy disks contain a plastic disk with a thin coating of
magnetic storage medium. Microscopic precision is
required to enable storage of large amounts of data on
such a small surface area. To preserve their integrity,
please observe the following when handling floppy disks:
• Never touch the magnetic medium inside the disk.
• Do not use or store floppy disks in dirty or dusty areas.
• Do not subject floppy disks to temperature extremes
(e.g., direct sunlight in an enclosed vehicle). Recommended temperature range: 10 to 50° C (50 to 122° F).
• Do not expose floppy disks to strong magnetic fields,
such as those generated by loudspeakers.
7
Page 8

IMPORTANT NOTES
652
• Floppy disks have a “write protect” tab which can protect
the disk from accidental erasure. It is recommended that
the tab be kept in the PROTECT position, and moved to
the WRITE position only when you wish to write new
data onto the disk.
Rear side of the disk
Write
(can write new data onto disk)
Write Protect Tab
653
Protect
(prevents writing to disk)
• The identification label should be firmly affixed to the
disk. Should the label come loose while the disk is in the
drive, it may be difficult to remove the disk.
654
• Store all disks in a safe place to avoid damaging them, and
to protect them from dust, dirt, and other hazards. By
using a dirty or dust-ridden disk, you risk damaging the
disk, as well as causing the disk drive to malfunction.
655
• Disks containing performance data for this unit should
always be locked (have their write protect tab slid to the
“Protect” position) before you insert them into the drive
on some other unit (except the PR-300, or a product in the
HP-G, MT, KR, or Atelier families), or into a computer’s
drive. Otherwise (if the write protect tab remains in the
“Write” position), when you perform any disk operations
using the other device’s disk drive (such as checking the
contents of the disk, or loading data), you risk rendering
the disk unreadable by this unit’s disk drive.
Before Using CDs
Handling the CD Drive
Add
• Avoid using the unit immediately after it has been moved
to a location with a level of humidity that is greatly
different than its former location. Rapid changes in the
environment can cause condensation to form inside the
drive, which will adversely affect the operation of the
drive and/or damage discs. When the unit has been
moved, allow it to become accustomed to the new
environment (allow a few hours) before operating it.
Add
• Remove any disc from the drive before powering up or
down.
Add
• To avoid the risk of malfunction and/or damage, insert
only discs with into the CD drive. Never insert any other
type of disc. Avoid getting paper clips, coins, or any other
foreign objects inside the drive.
Add
• Do not subject to vibrations or physical shock during use,
and do not move the unit while the power is turned on.
Add
• The pickup is of dust-resistant construction. Do not use
pickup cleaners or other such materials, as they may
damage the pickup.
Handling the CDs
Add
• When handling the discs, please observe the following.
• Do not touch the recorded surface of the disc.
• Do not use in dusty areas.
• Do not leave the disc in direct sunlight or an enclosed
vehicle.
801
• Avoid touching or scratching the shiny underside
(encoded surface) of the disc. Damaged or dirty CD-ROM
discs may not be read properly. Keep your discs clean
using a commercially available CD cleaner.
Add
• Keep the disc in the case.
Add
• Do not keep the disc in the CD drive for a long time.
Add
• Do not put a sticker on the label of the disc.
Add
• Wipe the disc with a soft and dry cloth radially from
inside to outside. Do not wipe along circumference.
Add
• Do not use benzine, record cleaner spray or solvents of
any kind.
Add
• Do not bend the disc. Bending discs may prevent proper
reading and writing of data, and may further result in
malfunction.
203
* GS ( ) is a registered trademark of Roland Corpo-
ration.
* XG lite ( ) is a registered trademark of Yamaha Corpo-
ration.
207
* Apple and Macintosh are registered trademark of Apple
Computer, Inc.
210
* IBM and IBM PC are registered trademark of International
Business Machines Corporation.
220
* All product names mentioned in this document are trade-
marks or registered trademarks of their respective owners.
8
Page 9

Introduction
Thank you, and congratulations on your choice of the Roland KR Intelligent Piano.
While the KR Intelligent Piano certainly allows you to achieve authentic piano
performances, it also features easy-to-use Automatic Accompaniment and numerous
other useful functions. In order to enjoy reliable performance of your new keyboard for
many years to come, please take the time to read through this manual in its entirety.
Main Features
❍
Piano Sounds with Rich Resonance and Wide-Ranging
Expressiveness
The stereo sampling piano sound generator realistically reproduces even the sound of
the hammers striking the strings, producing the tones of a high-quality concert grand
piano.
Maximum polyphony of 128 notes ensures that you can use the pedal freely without
running out of notes.
The KR features a new speaker system, “grand piano presence system,” to provide
sounds with depth and spatial realism.
❍
Pursuing the Playing Feel of a Grand Piano
These instruments feature a progressive hammer action keyboard, which duplicates the
touch of a grand piano, with a heavier touch in the lower register, and a lighter touch in
the upper register. In addition, even the distinctive “click” that you feel when pressing
a key on a grand piano has been faithfully simulated (escapement mechanism).
The pedal is designed for good-feeling response, and allows subtle performance nuances
to be expressed.
❍
Get Easy Results with the Main Buttons
You can play songs, display scores, play the Automatic Accompaniment, select Tones,
and perform other main KR functions easily by pressing the main buttons found on both
sides of the screen.
With the
songs for piano practice to the latest hits. Pressing the
display not only the score for any of the internal songs, but for your own recorded songs
and songs on floppy disks.
With the
Automatic Accompaniment settings that match that song, and while looking at the
chord score, perform with accompaniment added.
[Select/Listen to a Song] button
[Music Assistant] button
you can select a song you want to play, call up
, you can select over 150 internal songs, from
[Score Display] button
lets you
Thanks to the
from the more than 600 internal Tones; the
listen to a variety of arrangements of the internal popular songs, and transform them
into rock, jazz, or other forms of music; and the
you leave the chords and rhythm to the backing band, and give your performances the
feel of a group session, you can enjoy playing the KR in a great variety of creative ways.
[Select Various Tones] button
[Song Stylist] button
, which is used to select suggested Tones
, which allows you to
[Session Partner] button
, which lets
9
Page 10

Introduction
❍
A Variety of Support Functions for Fostering Rich Musical
Abilities
You can use the “DigiScore” feature, which lets you specify the information to be shown
in the score display, including notes, fingerings, and even a “bouncing ball” that keeps
the rhythm for the current performance. You can have specified segments be repeated,
allowing you to practice the part over as you like, easily play back and record each hand
separately, and enjoy a number of other handy practice features available only with
digital pianos.
Other useful practice features include a “Replay” pedal that you can press to stop the
performance and go back when you have trouble with what you’re playing, and “Touch
the Note,” a function that lets you confirm how a note sounds by touching the note on
the screen.
Features geared specifically for young children include “Wonderland,” where kids can
enjoy touching a variety of instruments; and the “Game,” an ear-training feature which
helps build their listening abilities with all the fun of a game.
❍
Connector for External Display of Enlarged Scores and Lyrics
The KR features a built-in connector for external displays.
By displaying scores and lyrics on a bigger screen, everyone playing in your group
should be able to get a clear view.
❍
Superior Player Piano Function (Only Instrument Equipped
with Moving Key)
The KR includes an automatic “Moving Key” function that actually moves the keys
while playing songs. Use the CD drive to play the enclosed CD and CDs for automatic
player pianos, as well as audio CDs. You can also connect an external display for a more
expanded view of your work, and use the remote control to select, start and stop songs.
❍
Connect to External Speakers for Concert Hall Presence
Connect external speakers, amps or other devices to the KR. Then play the reverb or
accompaniment sounds through the external speaker and experience the sensation of
being surrounded by an orchestra.
❍
Color Screen Makes Operation Easier
The KR’s color screen makes viewing easier. It also functions as a touch panel, so you can
carry out tasks simply by touching the panel.
10
Page 11

How To Use This Manual
Introduction
The KR Owner’s Manual consists of two volumes,
Manual
Please start out by reading “Before You Start Playing” (p. 18) in the
(this volume). This explains how to connect the KR’s power cord and how to turn on the
instrument’s power.
After turning on the KR’s power, please continue by reading
By trying out the various procedures while reading the
how to play the KR and make use of its major functions (especially procedures that
involve use of the “main buttons”).
The
special applications (for example, using the KR as an accompanist and creating songs),
that will help you master the KR’s many performance functions.
■
Conventions Used in This Manual
This manual uses the following conventions in the interest of simpler, more concise
instructions.
• Button names are enclosed in square brackets “[ ]”, as in One Touch Program [Piano]
button.
.
Owner’s Manual
describes procedures, from basic operation to procedures for
Quick Start
Quick Start
and the
Quick Start
Owner’s
Owner’s Manual
.
, you can easily learn
• The text incorporates KR-17 screen shots and panel diagrams. Thus, there will be some
portions where the information differs from that for the KR-15.
• For easier readability, some screens and colors used here may differ in part from actual
screens and colors.
• On screen text is enclosed in angled brackets “< >”, as in <Exit>.
• The act of lightly contacting the Touch Screen with your finger is called “touching.”
• An asterisk (*) or a at the beginning of a paragraph indicates a note or
precaution. These should not be ignored.
• (p. **) refers to pages within the manual.
NOTE
11
Page 12

Panel Descriptions
* The panel diagrams shown in this owner’s manual are those of the KR-17.
1 5 11 12 13 159 108 19 2120
Power
2 3 6 72317 1814
1. [Power] switch
Pressed to switch the power on and off (p. 21).
* The KR-15’s [Power] switch is positioned to the left of the keyboard.
2. [Volume] knob
Adjusts the overall volume (p. 22).
3. [Brilliance] knob
Adjusts the brightness of the sound (p. 22).
4. [Wonderland/Game] button
Here you can learn about instruments while having fun.
→
See the Quick Start
Balance
5. [Part Balance] button
This adjusts the relative volume levels of each of the
performance parts (p. 75).
6. [Balance] knob
Changes the volume balance for sounds played with the
keyboard and for songs and accompaniments (p. 75).
4
16 22
13. [User Function] Button
This is used to assign a variety of functions to the Performance
Pads (p. 157).
Performance Pads
14. [1]–[4] buttons
The operation of each is changed depending on the buttons
numbered 11–13.
15. Music Style buttons
Selects a Music Style for automatic accompaniment (p. 62).
Pressing the [User] button selects a User Style that you’ve made
yourself or a Music Style on floppy disk (p. 63).
16. Fill In buttons
Inserts a fill-in in an automatic accompaniment and changes the
accompaniment pattern (p. 69).
[To Variation] button
[To Original] button
17. [Intro/Ending] button
Play an intro or ending during automatic accompaniment (p. 66).
7. [User Program] button
Stores the selected functions and states of the buttons (p. 122).
DSP
8. [Reverb] button
Adds reverberation to the sound (p. 33).
9. [Surround] button
Adds three-dimensional breadth to the accompaniment sounds
(p. 38).
10. [Equalizer] button
Allows you to adjust the tone quality with the equalizer (p. 40).
11. [Style Orchestrator] button
This is used to change the arrangement type for automatic
accompaniment with the Performance Pads (p. 70).
12. [Phrase] Button
This is used to play a short phrase with the Performance Pads
(p. 71).
12
18. [Start/Stop] button
Starts and stops automatic accompaniment (
p. 66
).
Rhythm Partner
19. [Metronome] button
Activates the built-in metronome (p. 52).
You can change the count sound settings (p. 160).
20. Beat Indicator
This lights up in correspondence with the beat of the selected
song or accompaniment.
21. [Rhythm] button
Plays the Rhythm pattern (p. 56).
22. Tempo [-] [+] buttons
Adjusts the tempo.
Press the [-] and [+] buttons at the same time to return to the
original tempo.
Page 13

Panel Descriptions
30 32 40 4131 3824 25
26 27 28
29 33 34 35 36 37 39
23. Main Buttons
→
See the Quick Start
[Select/Listen to a Song], [Disk] button
Use this button to select internal songs or songs from floppy
disk (p. 77).
[Song Stylist] button
[Music Assistant] button
[Score Display] button
Displays scores (p. 88).
You can use the practice function (p. 92).
[Session Partner] button
[Select Various Tones] button
24. Touch Screen
This lets you perform a variety of operations just by touching
the screen (p. 24).
25. Contrast knob
Adjusts the contrast of the screen (p. 24).
26. Dial
Use this to change on-screen values.
27. [-] [+] buttons
Allow you to change on-screen values.
Record/Playback
31. [Menu] button
You can select functions for playing back, recording or editing a
song (p. 127, p. 144).
32. Track buttons
Used to play back or record each track of a song (p. 99, p. 111).
33. [ (Reset)] button
Resets the song playback-start location to the beginning of the
song.
34. [ (Play/Stop)] button
Starts and stops playback or recording a song.
35. [ (Rec)] button
When pressed, this button places the instrument in recording
standby (p. 106, p. 127).
36. [ (Bwd)] button
Rewinds the song.
37. [ (Fwd)] button
Fast-forwards the song.
38. [Transpose] button
Transposes the pitch of the keyboard or the song being played
(p. 103).
28. One Touch Program button
[Piano] button
Makes the optimal settings for a piano performance (p. 26).
[Arranger] button
Makes the optimal settings for playing with automatic
accompaniment (p. 59).
29. [Melody Intelligence] Button
Adds harmony to the sounds played with the keyboard (p. 72).
30. [Tone] buttons
Select the Tones that will be played from the keyboard (p. 27).
39. [Vocal Effect] Button
Applies a variety of effects to vocals from the microphone
(p. 43).
40. Disk Drive
You can insert a floppy disk for playing back or saving songs
(p. 77, p. 116).
41. Eject Button
Ejects a floppy disk from the disk drive (p. 114).
13
Page 14

Panel Descriptions
Bottom Panel
5 6 8 1097
1 2 43
1. AC Inlet
Connect the included power cable to this inlet (p. 20).
2. Input jacks
These jacks can be connected to another sound generating
device or an audio device, so that the sound of that device will
be output from the KR’s speakers (p. 176).
3. Output jacks (Main)
These jacks can be connected to your audio system to enjoy
more powerful sound. They can also be connected to a tape
recorder or similar device in order to record your performance
on a cassette tape (p. 176).
4. Output jacks (Aux)
You can connect an amp or external speaker to the Aux jack and
play the accompaniment and reverb sounds through it
(p. 35).
5. Expression Pedal jack
You can connect an expression pedal to the KR.
Bottom Panel (Front Left) Bottom Panel (Front Right)
6. Pedal connector
Connect the pedal cable of the stand to this connector (p. 20).
7. MIDI Out/In connectors
These can be connected to an external MIDI device to exchange
performance data (p. 172).
8. Computer connector
You can connect a computer to this connector to exchange
performance data (p. 178).
9. Computer switch
The setting for this switch made depending on the computer
connected – Mac/PC-1/PC-2.
Switches the connections for the MIDI connectors and the
computer port (p. 178).
* You can’t use the MIDI Out/In connector and the Computer
connector at the same time.
10. Ext Display connector
Connect an external display. You can put scores on the screen
and display lyrics (p. 23).
Right Side of Bottom Panel (Instrument with Moving Key)
11
11. Phones jacks
A set of headphones can be connected here (p. 22).
12. Mic In jack
Used for connecting microphones (p. 22).
13. Mic Volume knob
Adjusts the volume level for the microphone (p. 22).
14
12
13
15
1714 16
14. Access Indicator
This indicator will light when the inserted CD is being read.
15. Disc Tray
Place the CD to be loaded on this tray.
16. Emergency eject hole
This hole allows the disc tray to be opened in case of an
emergency.
17. Eject Button
Press this button to eject the CD.
* You cannot eject the CD unless the power is on.
Page 15

Contents
USING THE UNIT SAFELY...............................................................3
IMPORTANT NOTES.........................................................................6
Introduction ...............................................................9
Main Features.......................................................................................9
How To Use This Manual ................................................................11
Conventions Used in This Manual............................................11
Panel Descriptions..................................................12
Before You Start Playing ........................................18
Opening and Closing the Top (KR-17)...........................................18
Opening and Closing the Top (KR-15)...........................................19
Raising the Music Stand ...................................................................19
Using the Music Holders (KR-15)..............................................19
Opening and Closing the Lid...........................................................20
Connecting the Power Cord.............................................................20
Connect the Pedal Cable...................................................................21
Turning the Power On and Off........................................................21
About the Pedals................................................................................21
Adjusting the Sound’s Volume and Brilliance ..............................22
Connecting Headphones ..................................................................22
Connecting a Microphone................................................................22
Connecting an External Display......................................................23
Making the Connections .............................................................23
About the Touch Screen ...................................................................24
Adjusting the Contrast of the Screen ........................................24
Main Screens ......................................................................................24
Piano Screen..................................................................................24
Basic Screen...................................................................................24
Using the Main Icons...................................................................25
Chapter 1 Performance...........................................26
Playing the Keyboard Like a Piano (One-Touch Piano) ..............26
Performing with a Variety of Tones (Tone Buttons) ....................27
Playing Percussion Instruments or Sound Effects ..................28
Using Keywords to Search for Tones (Tone Search) ..............29
Performing with Two Sounds Layered Together (Layer) ...........30
Playing Different Tones with the Left and Right Hands (Split) .31
Shifting the Keyboard Pitch in Octave Steps (Octave Shift).. 32
Adding Reverberation to the Sound (Reverb)...............................33
Adding a Surround Sound to the Accompaniment and Reverb
(Surround) ..........................................................................................35
Giving More Breadth to the Accompaniment Sound.............35
Changing the Amount of Surround Accomp ..........................36
Broadening the Reverb Sound ...................................................37
Changing the Amount of Surround Reverb ............................37
Adding Three-Dimensional Breadth to the Sounds You Play
(Advanced 3D)...................................................................................38
Adjusting the Sound to Achieve the Preferred Tone Quality
(Equalizer) ..........................................................................................40
Applying Effects to the Sound (Effects) .........................................42
Adding Effects to Mic Vocals (Vocal Effect)..................................43
Enjoying Karaoke Performances with Music Files .................51
Using the Metronome and Rhythm (Rhythm Partner)................52
Using the Metronome..................................................................52
Changing the Metronome Settings............................................53
Playing Rhythm............................................................................56
Changing the Rhythm settings ..................................................56
Chapter 2 Automatic Accompaniment ................. 58
Music Styles and Automatic Accompaniment..............................58
Performing Using Automatic Accompaniment
(One-Touch Arranger) ......................................................................59
About Chords ...............................................................................60
Playing Chords with Simple Fingering (Chord Intelligence)60
Viewing Chord Fingerings (Chord Finder)..............................61
Selecting Music Styles (Music Style Buttons) ................................62
Selecting Music Styles on Floppy Disks ...................................63
Using Keywords to Search for Music Styles (Style Search) ...64
Playing Only Music Style Rhythm Patterns ..................................65
Adjusting the Accompaniment Tempo ..........................................65
Starting and Stopping the Accompaniment ..................................66
Having the Accompaniment Start Simultaneously
When You Play the Keyboard (Sync)........................................66
Stopping Automatic Accompaniment ......................................67
Having a Count Sound Play at the End of the Intro
(Countdown) ................................................................................68
Modifying an Accompaniment........................................................69
Changing the Accompaniment Pattern (Fill In Buttons)........69
Changing the Instrumental Makeup of Music Styles
(Style Orchestrator)......................................................................70
Playing Phrases (Phrase).............................................................71
Adding Harmony to the Right-Hand Part
(Melody Intelligence) ........................................................................72
Playing Sounds in the Left Hand During a Performance
(Lower Tone) ......................................................................................73
Playing the Piano with Accompaniment Added
(Piano Style Arranger) ......................................................................74
Adjusting the Volume Balance for Each Part (Balance)...............75
Changing the Volume Balance between the
Accompaniment and the Keyboard (Balance Knob) ..............75
Adjusting the Volume Balance for Each Performance Part
(Part Balance)................................................................................75
Chapter 3 Song Playback ...................................... 77
Playing a Song....................................................................................77
Using Keywords to Search for Songs (Song Search)...............79
Registering the Songs You Like (Favorites)...................................80
Removing Songs from Favorites................................................81
Playing Back Songs on CDs (Only for Instrument Equipped
with CD Drive)...................................................................................82
Cautions ........................................................................................82
Playing Back Songs on CDs........................................................83
Using the Remote Control
(Only for Instrument Equipped with CD Drive) ..........................85
Installing Batteries in the Remote Control ...............................85
15
Page 16

Contents
How to Use the Remote Control................................................85
About the Remote Control .........................................................86
Chapter 4 Practice Functions ................................88
Displaying the Score .........................................................................88
Touching Notes to Confirm the Sounds (Touch the Notes) ..89
Making Detailed Settings for the Score Display......................90
Saving Scores as Image Data......................................................91
Practicing Songs with the Practice Function ................................92
Adjusting the Tempo ........................................................................95
Setting the Tempo by Pressing the Button in Time
(Tap Tempo) .................................................................................96
Use Your Voice to Select the Tempo (Vocal Tap Tempo) ......97
Playing Back at a Fixed Tempo (Tempo Mute) .......................97
Match the Tempo Before You Begin Playing (Count In) .............98
Muting Some Parts Before Playing (Track Buttons).....................99
Setting Markers for Repeated Practice (Marker).........................100
Placing a Marker within a Song...............................................100
Playback from a Marker Location ...........................................101
Erasing a Marker........................................................................101
Moving a Marker .......................................................................101
Playing Back the Same Passage Over and Over....................102
Transposing Keyboard Sounds and Songs Played Back
(Transpose) .......................................................................................103
Chapter 5 Recording and Saving the Performance.....105
Recording a New Song (New Song) .............................................106
Recording With Accompaniment..................................................108
Recording Along with a Song........................................................110
Recording While Selecting the Track Buttons
(Redoing Recordings) .....................................................................111
Erasing Recorded Performances ...................................................112
Erasing the Performance on Specific Tracks..........................112
Changing How Recording Stops...................................................112
Recording Songs Starting with Pickups.......................................113
Using Floppy Disks .........................................................................114
Inserting and Ejecting a Floppy Disk...................................... 114
Formatting Floppy Disks (Format)..........................................114
Saving Songs ....................................................................................116
Deleting Saved Songs......................................................................119
Copying Songs on Floppy Disks to Favorites .............................120
Copying Songs Saved in Favorites to Floppy Disks.............121
Using the Pedal to Switch User Programs ...................................126
Simultaneously Switching User Program and Transmitting
PC Numbers .....................................................................................126
Chapter 7 Creating and Editing Songs .............. 127
Multitrack Recording with 16 Parts (16-Track Sequencer)........127
The 16-Track Sequencer Screen................................................127
Modifying the Settings of Each Part........................................128
Getting the Most Suitable Part Tones for the Musical Genre
(Tone Set).....................................................................................129
Recording a Performance..........................................................129
Changing the Recording Method (Rec Mode).............................130
Recording While Erasing the Previous Recording
(Replace Recording)...................................................................131
Layering a Recording Over Previously Recorded Sounds
(Mix Recording) .........................................................................131
Repeated Recording at the Same Location
(Loop Recording) .......................................................................132
Re-Recording Part of Your Performance
(Punch-in Recording) ................................................................133
Composing an Accompaniment By Entering Chords
(Chord Sequencer)...........................................................................134
Inputting Chords without Playing the Keyboard.................135
Editing Songs ...................................................................................135
Basic Operation of the Editing Functions...............................135
Undoing Edits (Undo)...............................................................136
Copying Measures (Copy)........................................................136
Copying Rhythm Patterns to Create Rhythm Parts..............137
Correcting Timing Discrepancies (Quantize) ........................137
Deleting Measures (Delete) ......................................................138
Inserting Blank Measures (Insert)............................................138
Transposing Individual Parts (Transpose).............................139
Making Measures Blank (Erase) ..............................................139
Exchanging Parts (Part Exchange)...........................................140
Correcting Notes One by One (Note Edit) .............................140
Modifying the Tone Changes in a Song (PC Edit) ................141
Changing the Beat in the Middle of a Song (Beat Map).............141
Changing the Tempo of Recorded Songs.....................................142
Changing the Tempo Within the Song.........................................142
Adjusting the Tempo While Listening to a Song ..................142
Adjusting the Tempo at a Particular Measure.......................143
Chapter 8 Creating Music Styles ........................ 144
Chapter 6 User Program Registration.................122
Saving Performance Settings (User Program).............................122
Calling Up Saved User Programs .................................................123
Changing the Way User Programs Are Called Up...............123
Saving the User Program Sets........................................................123
Loading Saved User Program Sets ..........................................124
Deleting Saved User Program Sets ...............................................125
Copying Sets of User Programs on Floppy Disks to
the User Memory.............................................................................125
Coping Sets of User Programs Stored in the User Memory
to Floppy Disks ..........................................................................126
16
Creating Original Styles (User Styles) ..........................................144
Creating New Styles by Combining Internal Music Styles
(Style Composer)........................................................................144
Creating a Style from a Song You Composed Yourself
(Style Converter) ........................................................................146
Saving a User Style..........................................................................149
Deleting Saved User Styles.......................................................150
Copying Styles on Floppy Disks to the User Memory...............151
Copying Styles Saved in the User Memory to
Floppy Disks...............................................................................151
Page 17

Contents
Chapter 9 Various Settings ..................................152
Changing the Settings for One-Touch Piano...............................152
Procedure ....................................................................................152
Adjusting Resonance (Resonance) ..........................................152
Changing the Tuning (Tuning)................................................153
Changing How Rapidly Sounds Are Expressed According
to the Force Used to Play the Keys (Hammer Response).....154
Adjusting the Resonant Sounds (String Resonance) ............154
Adjusting the Keyboard Touch (Key Touch).........................155
Changing the Settings for One-Touch Arranger.........................155
Procedure ....................................................................................155
Changing the Keyboard’s Split Point (Split Point) ...............156
Changing Music Styles Without Changing the Tone or
Tempo (One Touch Setting) .....................................................156
Assigning Functions to Pedals and Performance Pads
(Pedal Setting/User Functions) ...............................................157
Changing the Bend Range (Pedal Setting) .............................159
Changing How Chords Are Played and Specified
(Arranger Config) ......................................................................159
Placing a Marker in the Middle of a Measure .......................160
Changing the Settings for the Count-In and Countdown .........160
Settings for the Count-In...........................................................160
Settings for the Countdown .....................................................161
Other Settings...................................................................................161
Procedure ....................................................................................161
Changing Standard Pitch (Master Tune)................................162
Changing the Language (Language).......................................162
Changing the Screen Message When the Power Is Turned
On (Opening Message) .............................................................162
Changing the Settings for Showing Images with the
External Display (External Display)........................................163
Selecting Images To Be Shown on the KR and External
Displays (User Image Display) ................................................163
Turning Off the Beat Indicator (Beat Indicator) ....................164
Remembering the Settings Even When the Power is
Turned Off (Memory Backup) .................................................164
Restoring the Factory Settings (Factory Reset)......................165
Calibrating the Touch Screen (Touch Screen)........................165
Formatting the User Memory ........................................................165
Automatically Starting the Quick Tour........................................166
Disabling Functions Other Than Piano Performance
(Panel Lock)......................................................................................166
Changing the Functions of the Remote Control’s Buttons........167
Enabling the Moving Key...............................................................168
Changing the Moving Key Settings ........................................168
Changing the Part That Makes the Keys Move.....................168
Detailed Song Playback Settings ...................................................169
Changing the Tone Settings When Playing Back Songs
(Play Mode).................................................................................169
Hiding the Lyrics (Lyrics).........................................................170
Changing the Parts Assigned to the Track Buttons During
SMF Playback (Track Assign) ..................................................170
Changing the CD Settings ..............................................................171
Synchronizing the Timing of the Piano and
Accompaniment .........................................................................171
Setting the Type of CD To Be Played Back.............................171
Chapter 10 Connecting External Devices .......... 172
Connecting MIDI Devices ..............................................................172
Connectors ..................................................................................172
Making the Connections ...........................................................173
Performing in Ensemble with MIDI Instruments
(MIDI Ensemble)..............................................................................173
MIDI Settings ...................................................................................174
Selecting the Transmit Channel (Tx Channel).......................174
Disconnecting the Internal Sound Generator and Keyboard
(Local Control)............................................................................174
Sending Tone Change Messages (Program Change/
Bank Select MSB/Bank Select LSB) .........................................175
Sending Recorded Performance Data to a MIDI Device
(Composer MIDI Out)...............................................................175
Connecting to Audio Equipment ..................................................176
Connectors ..................................................................................176
Making the Connections ...........................................................176
Changing the Aux Jack Settings (Aux Out) ...........................177
Setup Examples With Aux Set to “Surround”.......................177
Connecting a Computer..................................................................178
Connect to the MIDI Connectors .............................................178
Connect to the Computer Connector ......................................178
Connectors ..................................................................................178
Making the Connections ...........................................................178
Appendices........................................................... 180
Troubleshooting...............................................................................180
Error Messages.................................................................................183
Tone List............................................................................................184
Drum Set List....................................................................................186
SFX Set List .......................................................................................190
Effects List.........................................................................................191
Music Style List (KR-17) .................................................................192
Music Style List (KR-15) .................................................................193
Chord List .........................................................................................194
Internal Song List.............................................................................196
Rhythm Pattern List ........................................................................199
Parameters Stored to Internal Memory........................................200
Music Files That the KR Can Use ..................................................201
The KR allows you to use the following music files.............201
About the KR Sound Generator...............................................201
MIDI Implementation Chart ..........................................................202
Main Specifications..........................................................................203
Index...................................................................... 205
17
Page 18

Before You Start Playing
Before You
Start Playing
Opening and Closing the Top (KR-17)
Opening only the front top
Children must not be permitted to open or close the top on their
own—adult supervision is required. Because the top is very heavy,
always use two or more people when opening and closing the top,
and be sure to handle it carefully.
1.
Lift the right front (the upper note side: A in the figure)
of the board with both hands, fold it back, and then lay
it down slowly on the top.
fig.
A
While holding up the top with one hand, lift up the top
3.
stick and insert its end into the appropriate top slip.
fig.
D
C
Do not move the piano with the top in the open position. The top
stick may disengage from the socket, causing the top to fall.
Opening both the front top and the top
Follow Step 1 to open the front top. Then lift the right
2.
front (the upper note side B: in the figure) of the board
with both hands.
fig.
B
When opening the top, be careful not to open it too far. Opening the
top at an angle in excess of 30 degrees may damage the unit, or cause
the top to drop. Also, before opening the top, make sure that no one
is in the path of the top as it is opened.
About the Topsticks and Topslip
The KR-17 has two topsticks, each a different length.
You can use the different topsticks to change the amount the
top is left open.
fig.
Long top stick
Short top stick
The topsticks and topslip work together as illustrated below.
The long top stick: for inner top slip (C)
The short top stick: for outer top slip (D)
18
If you use the wrong top slip, the top stick could slip out of the top
slip, causing the top to fall. Make sure that the end of the top stick is
inserted securely into the top slip.
To close the top, reverse the opening procedure.
Page 19

Opening and Closing the Top (KR-15)
Raising the Music Stand
Gently raise the music stand, then secure it in place.
1.
To collapse the stand, fold in the metal fittings while
2.
supporting the stand with both hands and gently fold
down the stand.
Always be sure to put the music stand in the upright position before
opening and raising the piano top. Be sure to leave the music stand
in the upright position before closing the piano top.
Open the Top board
Before You Start Playing
Do not move the piano with the top in the open position. The top
stick may disengage from the socket, causing the top to fall.
To close the top, reverse the opening procedure.
Raising the Music Stand
KR-17
fig.
Start Playing
Before You
Children must not be permitted to open or close the top on their
own—adult supervision is required.
Lift the right front (the upper note side: A in the figure)
3.
of the board with both hands, fold it up.
fig.
A
4.
While holding up the top with one hand, lift up the top
stick and insert its end into the appropriate top slip.
fig.
1.
Open the front top.
2.
Hold the music stand with both hands, then raise it
forward.
3.
Place the music stand prop, at the rear of the music
stand, into a slot.
KR-15
fig.
(1)
(2)
(2)
Gently raise the music stand, then secure it in place as
1.
shown in the figure.
2.
To collapse the stand, fold in the metal fittings while
supporting the stand with both hands and gently fold
down the stand.
When opening the top, be careful not to open it too far. Opening the
top at an angle in excess of 20 degrees may damage the unit, or cause
the top to drop. Also, before opening the top, make sure that no one
is in the path of the top as it is opened.
■
Using the Music Holders
You can use the holders to hold pages in place.
When not using the holders, leave them folded down.
fig.mu_stand4
(KR-15)
19
Page 20

Before You Start Playing
b
c
b
c
Before You
Start Playing
Opening and Closing the Lid
1.
When opening the lid, use both hands to gently lift the
lid and slide it inward.
2.
When closing the lid, be sure to use both hands to
grasp the lid, slowly pulling it down towards you, and
gently lower it until it stops (fully closed).
When opening and closing the lid, be careful not to let your fingers
get caught. Small children should use it only under the supervision
of an adult.
Connecting the Power Cord
Screw
b
→
c
Screw
e
Cord Cramp
KR-17
A
B
C
When moving the piano, for safety’s sake be sure to close the lid first.
NOTE
Make sure you don’t have anything (such as sheet music) on the
keyboard when you close the lid.
KR-17
fig.
D
E
1.
Connect the supplied power cord to the AC inlet jack.
Connect the pedal cord to the Pedal jack.
2.
3.
Cramp the power cord and pedal cord with Cord
Cramp and screw at A and B (see the picture
above).
Cramp the power cord and pedal cord with Cord
4.
Cramp and screw at C, D and E (see the picture
above).
5.
Plug the power cord into an AC outlet.
KR-15
e
e
A
B
C
Although the KR-17’s cover is designed to close slowly when you let
go of it, it will close immediately if it has been opened only slightly.
Take care not to catch or pinch your fingers in the cover.
KR-15
fig.
Connect the supplied power cord to the AC inlet jack.
1.
2.
Connect the pedal cord to the Pedal jack.
Cramp the power cord and pedal cord with Cord
3.
Cramp and screw at A (see the picture above).
4.
Cramp the power cord and pedal cord with Cord
Cramp and screw at B, C and D (see the picture
above).
5.
Plug the power cord into an AC outlet.
D
e
e
20
Page 21

Before You Start Playing
Start Playing
Before You
Connect the Pedal Cable
Insert the pedal cable into the Pedal connector on the
rear panel of the KR.
fig.00-01
Turning the Power On and Off
NOTE
Turn on power to your various devices in the order specified. By
turning on devices in the wrong order, you risk causing malfunction
and/or damage to speakers and other devices.
To turn the power on, turn the [Volume] knob all the
way down, and then press the [Power] switch.
The power will turn on, and the Power indicator at the
left front of the KR will light.
After a few seconds, you will be able to play the
keyboard to produce sound.
Use the [Volume] knob to adjust the volume.
NOTE
This unit is equipped with a protection circuit. A brief interval (a few
seconds) after power up is required before the unit will operate
normally.
fig.00-06.e
About the Pedals
The pedals have the following functions, and are used
mainly for piano performance.
fig.00-08.e
Soft Pedal
Sostenuto Pedal
Damper pedal (right pedal)
While this pedal is pressed, notes will be sustained even after
you take your fingers off the keys.
On an acoustic piano, holding down the damper pedal will
allow the remaining strings to resonate in sympathy with the
sounds that you played from the keyboard, adding a rich
resonance.
The KR simulates this sympathetic resonance.
You can change the amount of resonance applied with the damper
pedal. Please refer to “Adjusting Resonance (Resonance)” (p. 152).
Sostenuto pedal (center pedal)
This pedal sustains only the sounds of the keys that were
already played when you pressed the pedal.
Soft pedal (left pedal)
When you hold down this pedal and play the keyboard, the
sound will have a softer tone.
Damper Pedal
Powe r
Power Indicator
To turn the power off, turn the [Volume] knob all the
way to the left, and press the [Power] switch.
The Power indicator at the left front of the KR will go
dark, and the power will be turned off.
* If you need to turn off the power completely, first turn off the
POWER switch, then unplug the power cord from the power
outlet. Refer to “Power Supply” (p. 6).
You can assign functions to the pedal. Refer to “Assigning Functions
to the Pedal and Performance Pads (Pedal Functions/User
Functions)” (p. 157).
21
Page 22

Before You Start Playing
Before You
Start Playing
Adjusting the Sound’s Volume and Brilliance
Turn the [Volume] knob to adjust the overall volume.
Turn the [Brilliance] knob to adjust the brightness of
the sound.
fig.00-07.e
Min Max
The mark at the top of the Volume knob indicates the volume level
typically produced by an acoustic piano. This is usually the most
appropriate volume for your piano performances.
Devices Equipped with CD Drives
If your device is equipped with a CD drive, you can use the
remote control to change the volume.
Mellow
Bright
NOTE
Use Stereo headphones.
Some Notes on Using Headphones
• To prevent damage to the cord, handle the headphones
only by the headset or the plug.
• Connecting the headphones when the volume of
connected equipment is turned up may result in damage
to the headphones. Lower the volume on the KR before
plugging in the headphones.
• Listening at excessively high volume levels will not only
damage the headphones, but may also cause hearing
loss. Use the headphones at a moderate volume level.
Connecting a Microphone
You can connect a microphone into the Mic In jack, and enjoy
karaoke with the KR.
fig.00-10
* Turning up the [Volume] knob will not increase the volume if
the remote control for the CD drive-equipped device is set to 0.
If the volume level for either unit is set to 0 (minimum), no
sounds will be played even when the volume setting on the
other unit is increased.
Connecting Headphones
The KR has two jacks for plugging in headphones. This
allows two people to listen through headphones
simultaneously, making it very useful for lessons and
performing piano pieces for four hands. Additionally, this
allows you to play without bothering others around you,
even at night.
Plug the headphones into the Phones jack located at the
bottom left of the piano.
Connecting headphones will automatically mute the
sound from the internal speakers.
The headphone volume is adjusted by the [Volume]
knob of the KR.
fig.00-04.e
Connect a microphone (sold separately) to the Mic In
1.
jack on the lower-right area of the instrument.
2.
Rotate the [Mic Volume] knob in front of the Mic In
jack to adjust the volume level for the microphone.
3.
Adjust the mic echo (p. 44).
Some Notes on Using a Microphone
• Be careful of high volume levels when using mikes late
at night or early in the morning.
• When connecting a microphone to the KR, be sure to
lower the volume. If the volume control is too high when
the microphone is plugged in, noise may be produced by
the speakers.
• Howling could be produced depending on the location
of microphones relative to speakers. This can be
remedied by:
- Changing the orientation of the microphone.
- Relocating microphone at a greater distance from
speakers.
- Lowering volume levels.
22
Page 23

Connecting an External
Before You Start Playing
■
Making the Connections
Start Playing
Before You
Display
You can connect a computer monitor or other such external
display to the instrument, and display scores and lyrics on
the larger screen, and display whatever images as you like.
For more about the external display settings, refer to
“Changing the Settings for Showing Images with the
External Display (External Display)” (p. 163). For more on
displaying images, refer to “Selecting Images To Be Shown
on the KR and External Displays (User Image Display)” (p.
163)
If your instrument came with a CD drive, you can use the remote
control to switch screens.
Displays That Can Be Connected to This Instrument
In general, a great many of the VGA monitors and multiscan
monitors that are available on the market are compatible
with this instrument. However, before you connect any
monitor, make sure it meets the following specifications:
• Resolution 640 x 480 pixels
• Horizontal scan frequency 31.5 kHz
• Vertical scan frequency 60 Hz
• Connector 3-row, 15-pin D-Sub type
• Signal Analog
NOTE
Confirm that the display to be used is compatible with the
frequencies mentioned above. Using a display that is not compatible
with the above frequencies may result in incorrect image output
when images move, and in certain cases may even damage the
display.
NOTE
To prevent malfunction and/or damage to speakers or other devices,
always turn down the volume, and turn off the power on all devices
before making any connections.
D-sub 15 pin
(Mini)
KR Bottom
Ext Display Connector
Turn off the power to the KR and the display to be
1.
connected.
2.
Use display cable (sold separately) to connect the
display to the Ext Display connector on the KR.
3.
Switch on the KR.
Switch on the connected display.
4.
For more on handling the external display, refer to your display’s
owner’s manual.
Display Cable
(Sold separately)
D-sub 15 pin
(Mini)
External Display
Turning the Power Off
After use, turn off the power using the following procedure.
Turn the volume all the way down on the KR.
1.
Turn off the KR.
2.
3.
Turn off the connected display.
23
Page 24

Before You Start Playing
Before You
Start Playing
About the Touch Screen
Main Screens
The KR makes use of a touch screen.
This lets you carry out a wide variety of actions just by
touching the screen lightly.
NOTE
The touch screen is operated by touching it lightly with your finger.
Pressing hard, or using a hard object can damage the touch screen.
Be careful not to press too hard, and be sure to use only your fingers
to operate the touch screen.
NOTE
The positioning of the touch screen may become displaced due to
changes in the surrounding environment and over time. If this
happens, follow the steps in “Calibrating the Touch Screen (Touch
Screen)” (p. 165) to correct the pointer position.
NOTE
Do not place items on the touch screen.
■
Adjusting the Contrast of the Screen
■
Piano Screen
Immediately after the power is turned on, the Piano screen
like the one below is displayed. For details, refer to p. 26.
■
Basic Screen
The following screen is called Basic screen.
Song name or
Tempo
Music Style name
Beat Measure
The Tone names are
selected appear.
To adjust the contrast of the screen, turn the Contrast
knob located at the right side of the screen.
These information are
displayed, when you use the
automatic accompaniment.
You can usually display this screen by touching <Exit>
several times.
Follow either of the procedures described below to display it.
• Press the One Touch Program [Arranger] button.
The Basic screen appears and the settings are made for
automatic accompaniment.
• Press the One Touch Program [Piano] button, then press
one of the Tone buttons, then touch <Exit>.
24
Page 25

■
Using the Main Icons
You can many other screens besides the Basic screen to do
things. The on-screen graphics that appear three dimensional
work like buttons. These are called “Icons.”
The main icons you can use on these screens are as follows.
Some screens consist on two or more pages.
You can display the next page or the
previous page of the screen by touching
these icons.
Touch this to cancel the currently editing
setting or exit the screen that is currently
displayed. You can usually display the
Basic screen by touching <Exit> several
times.
When you select an internal song or music
files that includes the lyrics data, this icon
appears in the Piano screen or Basic screen.
Touch this to display the lyrics.
Before You Start Playing
Start Playing
Before You
NOTE
The explanations in this manual include illustrations that depict
what should typically be shown by the display. Note, however, that
your unit may incorporate a newer, enhanced version of the system
(e.g., includes newer sounds), so what you actually see in the display
may not always match what appears in the manual.
25
Page 26

Chapter 1 Performance
Playing the Keyboard Like a Piano (One-Touch Piano)
You can create the optimal settings for a piano performance with the press of a single
button.
fig.panel1-1
Chapter 1
Press the One Touch Program [Piano] button.
1.
A “Piano screen” like the one shown below will appear.
fig.d-piano.eps_60
When you press the One Touch Program [Piano] button, the KR will switch to the
following settings, regardless of the current panel settings.
• If the keyboard has been split into upper and lower sections (p. 31), the
keyboard returns to a single section.
• The pedals return to their usual functions (p. 21).
• The Grand Piano sound is automatically selected.
• The effect is automatically set to “Sympathetic Resonance” (p. 42).
Changing the Piano Sound
Touch the piano lid on the screen, and listen to the tone change as you slide your
Since this instrument faithfully
reproduces real acoustic piano
action and response, keys
played in the top one-and-one-
half-octave range continue to
resonate, regardless of the
damper pedal action, and the
tone in this range is audibly
different. The Key Transpose
setting (p. 103) can also be
used to change the range that
is unaffected by the damper
pedal.
You can change the piano
performance settings by
touching <Functions> on the
screen. For more information,
take a look at “Changing the
Settings for One-Touch Piano”
(p. 152).
26
finger or touch
This simulates the actual changes in sound that occur when the lid of a grand piano
is set at different heights.
or
to open and close the lid.
When you select an internal
song or music file that includes
the lyrics data, < >
appears in the Piano screen or
Basic screen. Touch this to
display the lyrics.
Page 27

Performing with a Variety of Tones (Tone Buttons)
Chapter 1 Performance
The KR comes with a many built-in instrument sounds and effects. This lets you
enjoy perform in a wide range of musical styles.
The built-in sounds are called “Tones.” The sounds are organized into six tone
groups, which are assigned to the [Tone] buttons.
fig.panel1-2
Press any one of the Tone buttons to select a tone group.
1.
You’ll see that button’s indicator light up.
The screen displays the tone names included in the tone group you’ve selected.
fig.d-tonesel.eps_60
For more about the names of
Tones, take a look at the “Tone
List” (p. 184).
Chapter 1
This screen is called the “Tone selection screen.”
You can touch <Audition> for an audio demonstration of a particular tone.
Touch to switch the screen and display the next selection.
You can touch <Effects> to add effect sounds to a variety of tones (p. 42).
You can touch <Search> to find tones according to the search criteria you specify
(p. 29).
Touch a tone name to select the tone.
2.
You’ll hear the tone you’ve selected when you play the keyboard.
You can use the [-] [+] buttons and the dial to automatically switch pages and select
tones.
Touch <Exit>.
3.
This returns you to the Basic screen or the previous screen.
27
Page 28

Chapter 1 Performance
■
Playing Percussion Instruments or Sound Effects
You can use the keyboard to play percussion sounds or effects like sirens and animal
sounds.
fig.panel1-2
Chapter 1
Press the [Select Various Tones] button and watch the indicator light up.
1.
Touch <Drums> or <SFX>.
2.
fig.d-drum.eps_60
Each note of the keyboard will play a different sound.
You can also have play sounds by touching the screen.
Touch <Exit> several times.
3.
This returns you to the Basic screen or the previous screen.
The combination of sounds
assigned to the keyboard
varies according to the drum
set. Take a look at the “Drum
Set List” (p. 186) and “SFX Set
List” (p. 190).
28
Page 29

■
Using Keywords to Search for Tones (Tone Search)
You can search for tones that match the conditions you set for instrument or musical
style. You can also search the tones using the first character of the tone name.
Chapter 1 Performance
Press any Tone button.
1.
The tone selection screen appears.
2.
Touch <Search>.
The following “Tone search screen” appears.
fig.d-tonesrch1.eps_60
Condition Search screen Name Search screen
Touch here to switch these screens.
Searching by Conditions
Touch <Category> or <Genre>, then use the [-] [+] buttons and the dial to
3.
select the search conditions.
Chapter 1
In condition search, tones
satisfying all of the selected
search criteria are sought.
4.
Touch <Search>.
The search results appear in the display.
Touch the tone name to select the tone.
Touch <Exit> to return to the tone search screen.
Searching by Tone Name
3
Touch <By Name>.
Touch <By Key> to go to the condition search screen.
Decide which character is to be used for the search.
4.
The selected character appears in the middle of the screen.
Enter the character you’re searching for. For example, touching <ABC> in succession
cycles you through the available choices in that character group (“A”→”B”→”C”...).
Touching <A-0> selects the type of character. Each time you touch <A-0>, the
character switches between alphabets and numerals.
Touch <Search>.
5.
The search results appear in the display.
Touch the tone name to select the Tone.
Touch <Exit> several times to return to the Basic screen or the previous screen.
29
Page 30

Chapter 1 Performance
b
Performing with Two Sounds Layered Together (Layer)
Two tones sounding together when you press a single key is referred to as a “layer
performance.”
For instance, it’s possible to play the Tones for both Piano and Strings simultaneously.
Chapter 1
fig.layer.e
Grand Piano 1
Strings
1.
Touch <Layer> at the bottom of the Basic screen.
fig.d-layer.eps_60
The tone that was sounding before you switched to layer performance, plus the tone
indicated in the lower part of the display, are now played together.
Here, the tone appearing in the upper part of the display is called the “right-hand
tone,” and the tone appearing in the lower part of the display is called the “layer
tone.”
Changing the tones
2.
Touch the name of the tone to be changed.
The tone name will be highlighted in orange.
Press a Tone button to select the new tone (p. 27).
3.
4.
When you have selected the tone, touch <Exit>.
The display returns to the Basic screen.
Cancelling the Layer
5.
Touch <Layer>.
The <Layer> icon returns to the original color, and the layer performance is
cancelled.
When you select an internal
song or music file that includes
the lyrics data, < >
appears in the Basic screen.
Touch this to display the lyrics.
When you touch Octave
<-><+> on the tone selection
screen, the pitch of the
keyboard’s sound is changed
in octave units. To learn more,
see “Shifting the Keyboard
Pitch in Octave Steps (Octave
Shift)” (p. 32).
You can vary the volume-level
alance of the two tones. For
instructions, see “Adjusting
the Volume Balance for Each
Performance Part (Part
Balance)” (p. 75).
Now when you play the keys, only the tone indicated on the screen is sounded.
30
Page 31

Playing Different Tones with the Left
b
and Right Hands (Split)
Chapter 1 Performance
Dividing the keyboard into right-hand and left-hand areas, then playing different
sounds in each section is called “split performance.” The boundary key is called the
“split point.”
The split point key is included in the left-hand keyboard area. Each time power to
the keyboard is turned on, the split point is reset to “F#3.”
fig.split.e
Split Point
Grand Piano 1Acoustic Bass
1.
At the Basic screen, touch <Split>.
fig.d-split.eps_60
Chapter 1
You can change the split point;
refer to “Changing the
Keyboard’s Split Point (Split
Point)” (p. 156).
When you select an internal
song or music file that includes
the lyrics data, < >
appears in the Basic screen.
Touch this to display the lyrics.
The tone sounding prior to the split performance is played in the right-hand section
of the keyboard, and the tone indicated at the left of the screen is played in the left-
hand section of the keyboard.
Here, the tone appearing at the right part of the display is called the “right-hand
tone,” and the tone appearing at the left part of the display is called the “left-hand
tone.”
Changing the Tones
2.
Touch the name of the tone to be changed.
The tone name will be highlighted in orange.
Press a Tone button to select the tone (p. 27).
3.
When you have selected the tone, touch <Exit>.
4.
The display returns to the Basic screen.
Cancelling the Split
Touch <Split>.
5.
The <Split> icon returns to the original color, and the split performance is cancelled.
When you play the keys, only the tone indicated on the screen is sounded.
When you touch Octave
<-><+> in the tone selection
screen, the pitch of the
keyboard’s sound is changed
in octave units. To learn more,
see “Shifting the Keyboard
Pitch in Octave Steps (Octave
Shift)” (p. 32).
You can change the volume
alance between the left- and
right-hand parts of the
keyboard; refer to “Adjusting
the Volume Balance for Each
Performance Part (Part
Balance)” (p. 75).
31
Page 32

Chapter 1 Performance
Turning On Layer and Split Performance Simultaneously
Turning on both layer performance and split performance allows you to split the
keyboard into two sections while playing two layered Tones in the right-hand part.
fig.d-layersplit.eps_60
Chapter 1
■
Shifting the Keyboard Pitch in Octave Steps (Octave Shift)
When using layer performance (p. 30) or split performance (p. 31), you can change
the pitch of the keyboard’s sound in octave units. This function is called “Octave
Shift.”
For example, when using a layer performance, you can change the pitch of each
sound and layer the sounds. You can make the pitch of the keyboard’s left-hand part
match the pitch of the right-hand part during split performance.
When the keyboard has been
divided into upper and lower
sections, the damper pedal is
applied to only the upper
section. If you want to add
lingering reverberations to the
notes of the lower section, see
“Assigning Functions to
Pedals and Performance Pads
(Pedal Setting/User
Functions)” (p. 157).
You cannot use Octave Shift
when using a single tone for
the entire keyboard or in the
right-hand Tone during layer
performances.
1.
On the Basic screen, touch <Layer> or <Split>.
The KR switches to layer performance or split performance.
2.
To apply Octave Shift, touch the name of the tone you’ve selected.
3.
Press the Tone button to display the Tone selection screen.
fig.d-octshift.eps_60
4.
Touch Octave <-> or <+> in the lower part of the screen to adjust the
pitch of the sound.
Each time you touch <+>, the pitch is raised one octave.
Each time you touch <->, the pitch is lowered one octave.
The sound can be changed from two octaves lower than the original sound (-2) to
two octaves above the original (+2).
Touch <Exit> to return to the Basic screen or the previous screen.
32
Page 33

Adding Reverberation to the Sound (Reverb)
b
Apply a reverb effect to the notes you play with the KR.
Chapter 1 Performance
Reverb makes it sound as if you are playing in a concert hall.
fig.panel1-3
Press the [Reverb] button and watch the its indicator light up.
1.
A “Reverb screen” like the one shown below appears.
fig.d-reverb.eps_60
Chapter 1
Connecting an external
speaker to the Aux jack
provides an effect in which the
listener seems to be enveloped
y sound (p. 35).
Touch an icon to select the performance space.
2.
;
Display
Ground
Room
Lounge
Studio
Gymnasium
Hall
Dome
Cave
GS Room 1
GS Room 2
GS Room 3
GS Hall 1
GS Hall 2
GS Plate
GS Delay
GS Pan Delay
Wide open space with no reverberations.
Small room
Larger room
A recording studio
In a gymnasium
Large concert hall reverberation
A domed ballpark
Adds the extended reverberations found inside a cave
Reproduces an indoor-type reverb.
Provides a clear, expansive reverberation.
Reproduces the reverberation found in a hall. Gives
reverberation with a greater sense of depth than GS Room.
Reproduces a plate echo (reverberation created using the
vibrations of a metal plate).
A delayed sound that is added to the original, similar to the
reflected sounds of mountain echoes.
The reflected sounds are panned (shifted) laterally.
Explanation
33
Page 34

Chapter 1 Performance
b
Touch the slider beneath the icons to adjust the effect selected.
3.
Touch and slide the knob on the screen to the right for a deeper reverb, and to the
left for less.
You can also move the slider with the [-] [+] buttons and the dial.
Pressing the [-] [+] buttons simultaneously returns the slider to the initial value.
When you touch <Exit>, the reverb effect is activated, and you return to the previous
Chapter 1
screen.
Cancelling the Effect
Press the [Reverb] button, and watch the indicator light go out.
4.
The reverb effect is eliminated.
No effect is applied when the
slider is moved all the way to
the left. In this case, the
utton’s indicator won’t light
up when you press the
[Reverb] button.
34
Page 35

Adding a Surround Sound to the
Chapter 1 Performance
Accompaniment and Reverb (Surround)
You can connect an amp or external speaker to the Aux jack and play
accompaniment and reverb sounds through it. By using an external speaker this
way, it will seem that you are surrounded by the accompaniment or reverb. This is
called the “surround effect.”
fig.panel1-4
Giving More Breadth to the Accompaniment Sound
■
Connect amp or external speaker to the Aux jack.
1.
2.
Press the [Surround] button and watch the indicator light up.
Touch <Surround Accomp>.
3.
The “Surround Accomp Screen” appears.
Touch to switch the screen.
NOTE
You cannot use both
“Surround Reverb” and
“Advanced 3D”
simultaneously with
“Surround Accomp.”
When using the Surround
function, sounds are output
from the external speaker even
when headphones are
connected.
When using headphones,
touch <Advanced 3D> to have
the Advanced 3D effect
applied.
Chapter 1
ON OFF
Touch a part’s icon to switch the surround on and off.
4.
The sounds of parts set to ON are played from the external speaker and the KR’s
internal speaker. Parts set to OFF are played only from the KR’s speaker.
When you touch <Exit>, the Surround effect is activated, and you return to the
previous screen.
Cancelling the Effect
5.
Press the [Surround] button and watch the light go out.
The Surround effect is eliminated, and the effect is no longer applied to any of the
parts.
NOTE
You cannot use the Surround
function when Aux Out is set
to “Concert Mode” (p. 177).
For more on the speaker
settings when the Surround
function is used, refer to
“Setup Examples With Aux Set
to Surround” (p. 177).
You can adjust the volume of
the external and built-in
speakers (p. 37).
35
Page 36

Chapter 1 Performance
■
Changing the Amount of Surround Accomp
1.
2.
3.
Chapter 1
4.
❍
1.
2.
3.
Press the [Surround] button and watch the indicator light up.
Touch <Surround Accomp> to display the Surround Accomp screen.
Touch <Options>.
Touch the “External” and “Internal” sliders to adjust the volume levels
of the external speaker and the KR’s speaker.
The Surround Accomp (Accompaniment) volume is adjusted.
When you touch <Exit>, you return to the Surround screen.
Selecting the tone to which the effect is applied
With “Keyboard” in Surround set to On, you can select the parts to which the
surround effect is to be applied.
Press the [Surround] button and watch the indicator light up.
Touch <Surround Accomp> to display the Surround Accomp screen.
On the Surround Accomp Screen, touch <Option>.
You can use the Memory
Backup function to store these
settings to the KR (p. 164).
Touch to switch the screen.
fig.d-adv3dopt.eps_60
4.
Touch <All Parts> or <Layer Part>.
Display
All Parts
Layer Part
The effect is applied to all tones played with the keyboard (the lefthand tone, right-hand tone, and layer tone).
The effect is applied only to the layer part.
When not using a layer performance (p. 30), the Surround effect is not
applied to the keyboard performance, even if <Keyboard> on the
Surround Accomp Screen is set to On.
Explanation
36
When you touch <Exit>, you return to the Surround Accomp Screen.
Page 37

■
Broadening the Reverb Sound
Chapter 1 Performance
NOTE
Connect amp or external speaker to the Aux jack.
1.
Press the [Surround] button and watch the indicator light up (p. 35).
2.
Touch <Surround Reverb>.
3.
The following “Surround Reverb screen” appears.
The reverb sounds from the external speaker and the KR’s internal speaker.
When you touch <Exit>, the Surround effect is activated, and you return to the
previous screen.
You cannot use both
“Surround Accomp” and
“Advanced 3D”
simultaneously with
“Surround Reverb.” When
“Surround Accomp” is on, the
reverb sound is broadened as
well.
Chapter 1
Cancelling the Effect
4.
Press the [Surround] button and watch the light go out.
The Surround effect is eliminated, and the effect is no longer applied to any of the
parts.
■
Changing the Amount of Surround Reverb
Press the [Surround] button and watch the indicator light up.
1.
Touch <Surround Reverb> to display the Surround Reverb screen.
2.
Touch <Options>.
3.
4.
Touch the “External” and “Internal” sliders to adjust the volume levels
of the external speaker and the KR’s speaker.
The Surround Reverb volume is adjusted.
When you touch <Exit>, you return to the Surround screen.
You can use the Memory
Backup function to store these
settings to the KR (p. 164).
37
Page 38

Chapter 1 Performance
Adding Three-Dimensional Breadth to the Sounds You Play (Advanced 3D)
You can add three-dimensional breadth to the sounds you play with automatic
accompaniment (p. 58), or to internal songs or music files. With this effect, called
“Advanced 3D,” you seem to be surrounded by the sound of the performance.
Chapter 1
fig.panel1-4
Press the [Surround] button and watch the indicator light up.
1.
Touch <Advanced 3D>.
2.
The following “Advanced 3D screen” appears.
fig.d-adv3d.eps_60
NOTE
You cannot use both
“Surround Accomp” and
“Surround Reverb”
simultaneously with
“Advanced 3D.”
ON
Touch the icon to switch the effect on or off for each individual part.
3.
Three-dimensional breadth is added to the performance part you’ve selected.
When you touch <Exit>, the Advanced 3D effect is activated, and you return to the
previous screen.
Cancelling the Effect
4.
Press the [Surround] button and watch the indicator goes out.
The Advanced 3D effect is eliminated, and the effect is no longer applied to any of
the parts.
OFF
If all of the parts are switched
off, the [Surround] button’s
indicator won’t light up when
you press the button.
38
Page 39

❍
Selecting the tone to which the effect is applied
With “Keyboard” in Advanced 3D set to On, you can select the parts to which the 3D
effect is to be applied when the keyboard is played.
Chapter 1 Performance
1.
Press the [Surround] button and watch the indicator light up.
2.
Touch <Advanced 3D>.
On the Advanced 3D screen, touch <Option>.
3.
fig.d-adv3dopt.eps_60
Touch <All Parts> or <Layer Part>.
4.
Display
All Parts
Layer Part
The effect is applied to all tones played with the keyboard (the lefthand tone, right-hand tone, and layer tone).
The effect is applied only to the layer part.
When not using a layer performance (p. 30), the Advanced 3D effect
is not applied to the keyboard performance, even if <Keyboard> on
the Advance 3D screen is set to On.
Explanation
Chapter 1
When you touch <Exit>, you return to the Advanced 3D screen.
39
Page 40

Chapter 1 Performance
b
Adjusting the Sound to Achieve the Preferred Tone Quality (Equalizer)
The KR features a built-in, five-band digital equalizer.
An equalizer boosts or cuts specific sound pitches (frequency ranges) to adjust the
sound balance for the overall performance. For example, you can boost the highs to
Chapter 1
get a crisper sound, or boost the low end for a more powerful sound.
You can also adjust the sound to compensate for the acoustical characteristics of the
performance space.
If raising the slider for each frequency ends up distorting the sound, you can correct
the distortion with the Master Level slider.
1.
Press the [Equalizer] button.
The “Equalizer screen” appears.
fig.d-eq.eps_60
NOTE
Raising the overall volume
with the Master Level slider
and the [Volume] knob when
the frequency sliders are
already at high levels not only
may distort the sound and
cause ear pain, it can also place
unreasonable strain on the
uilt-in speakers and internal
circuitry. Use the KR at a
moderate volume level.
Touch the Type icon to make your selection.
2.
Display
Piano
Power
Mild
Clear
Bright
Flat
User
3.
Touch the slider to make adjustment.
Displayed
Low
–
The optimal settings for piano performance are selected.
Boosts both the low- and high-frequency ranges.
Lows and highs are restrained for a pleasant-sounding tone.
This setting slightly boosts the midrange for a simple pop feeling.
This setting boosts the high frequencies for a brilliant, sparkling sound.
All slider values are set to “0.”
Store your own preferred settings (p. 41).
Settings
Value
Low-frequency range. This is the range of
-60–0–+60
-60–0–+60
frequencies for instruments like drums, bass,
organ, guitar and strings.
Mid-low-frequency range. This is the range of
frequencies for lower brass and woodwind
instruments.
When <Flat> is selected (when
all sliders are at “0”), then even
when [Equalizer] is pressed,
the indicator does not light up.
Explanation
Explanation
40
Page 41

Chapter 1 Performance
Displayed
Mid
–
High
Master Level
You can also move the slider with the [-] [+] buttons and the dial.
Pressing the [-] [+] buttons simultaneously returns the slider to “0.”
When you touch <Exit>, the equalization is placed in effect, and you return to the
previous screen.
Cancelling the effect
4.
Press the [Equalizer] button and watch the indicator light go out.
The equalizer effect is cancelled.
Settings
Value
-60–0–+60
-60–0–+60
-60–0–+60
-60–0–+60
Explanation
Midrange. This is the range of frequencies where
most instrument sounds are concentrated.
Mid-high-frequency range. The ear is most
sensitive to this frequency range.
High-frequency range. These frequencies add
brilliance to the sound.
You can temper the distortion in the sound by
lowering the level. Raising the level too much may
cause the sound to become distorted.
Chapter 1
❍
Storing the settings
You can store adjusted equalizer settings to <User>.
Even after editing the settings, you can touch <User> to call up your preferred
settings.
Press the [Equalizer] button and watch the indicator light up.
1.
The Equalizer screen appears.
2.
Adjust the equalizer.
Touch <Write>.
3.
The settings are stored.
Even after editing the settings, you can touch <User> to select the stored settings.
41
Page 42

Chapter 1 Performance
Applying Effects to the Sound (Effects)
1.
Chapter 1
2.
Applying effects to the sound
You can apply a wide range of different effects to the notes you play on the
keyboard.
First, press the Tone button to select a Tone (p. 27).
The “Tone selection screen” appears.
Then, touch <Effects>.
The “Effect screen” appears.
fig.d-effects.eps_60
For more on the effect types,
refer to the “Effects List” (p.
191).
NOTE
Selecting a different effect for
the left-hand Tone than the
one applied to the right-hand
Tone and Layer Tone may not
result in the effect you want.
Select the same effect as that
used for the right-hand Tone.
NOTE
Touch <ON>.
3.
The effect selected with <Type> will be applied.
Setting the Effect
4.
Touch <Type> to select the type of effect.
5.
Touch <Depth> to adjust the amount of effect applied.
The amount increases as the value is raised.
You can also move the slider with the [-] [+] buttons and the dial.
Pressing the [-] [+] buttons simultaneously returns the slider to the initial value.
Touch <Exit> to return to the Tone selection screen.
Cancelling the Effect
6.
On the Effects screen, touch <Off>.
About the Effect Settings
When the effects is set to ON, the appropriate effect is applied for the currently
selected sound. You can also apply different effect types to each tone (except GS
tones and tones with the “ ” logo). Although turning off the power returns effects
to their initial settings, carrying out Memory Backup (p. 165) allows you to save and
store the settings even after the power is turned off.
When you select an effect type
that starts with “GS,” that type
of effect is also applied for the
chorus effect for the song or
Music Style (p. 58) selected at
that time.
All [Voice] button tones with a
“GS” or “ ” logo appearing
after the tone name have the
same effect applied to them. If
the effect for one of the tones
with the “GS” or “ ” logo is
changed, then the effects for
the other tones with the “GS”
or “ ” logo are also changed
automatically.
42
Page 43

Adding Effects to Mic Vocals (Vocal Effect)
Chapter 1 Performance
With a microphone connected, you can add effects to the microphone vocals.
Adding effects to the vocals is referred to as “Vocal Effect.”
❍
How to select Vocal Effect
fig.panel1-5
Press the [Vocal Effect] button.
1.
The “Vocal Effects screen” appears.
Models Featuring Moving Key Models Without Moving Key
fig.d-vocalsfx.eps_60
For details on connecting a
microphone, refer to
“Connecting a Microphone”
(p. 22).
Chapter 1
2.
Touch any one of the icons.
Icon
Echo
Transformer
Harmonist
Vocal Count In
Vocal Keyboard
Music Files
3.
When you touch <Exit>, the effect is applied and you return to the
previous screen.
Adjusts the microphone echo.
Alters the microphone vocals.
Adds harmonies to the original voice.
Allows you to start songs and Automatic
Accompaniment using your own tempo.
Allows you to produce sounds conforming to the
vocal scale.
You can play a specific part as harmony while
playing back a song.
Explanation Page
p. 44
p. 45
p. 47
p. 48
p. 48
p. 49
43
Page 44

Chapter 1 Performance
Cancelling the Vocal Effect
Press the [Vocal Effect] button and watch the indicator light go out.
4.
The Vocal Effect function is cancelled.
❍
Adjusting the Echo (Echo)
Chapter 1
1.
2.
3.
Touch <Echo> in Step 2 of “How to select Vocal Effect” (p. 43).
fig.d-vo-echo.eps_60
Touch the bar graph to adjust the amount of echo applied to the vocal.
Touch the Echo Type <1> or <2> to change the echo type.
Displayed
1
2
Adds basic reverberations.
Adds reverberations for a karaoke-type echo.
Explanation
Touch <Exit> to return to the Vocal Effects screen.
44
Page 45
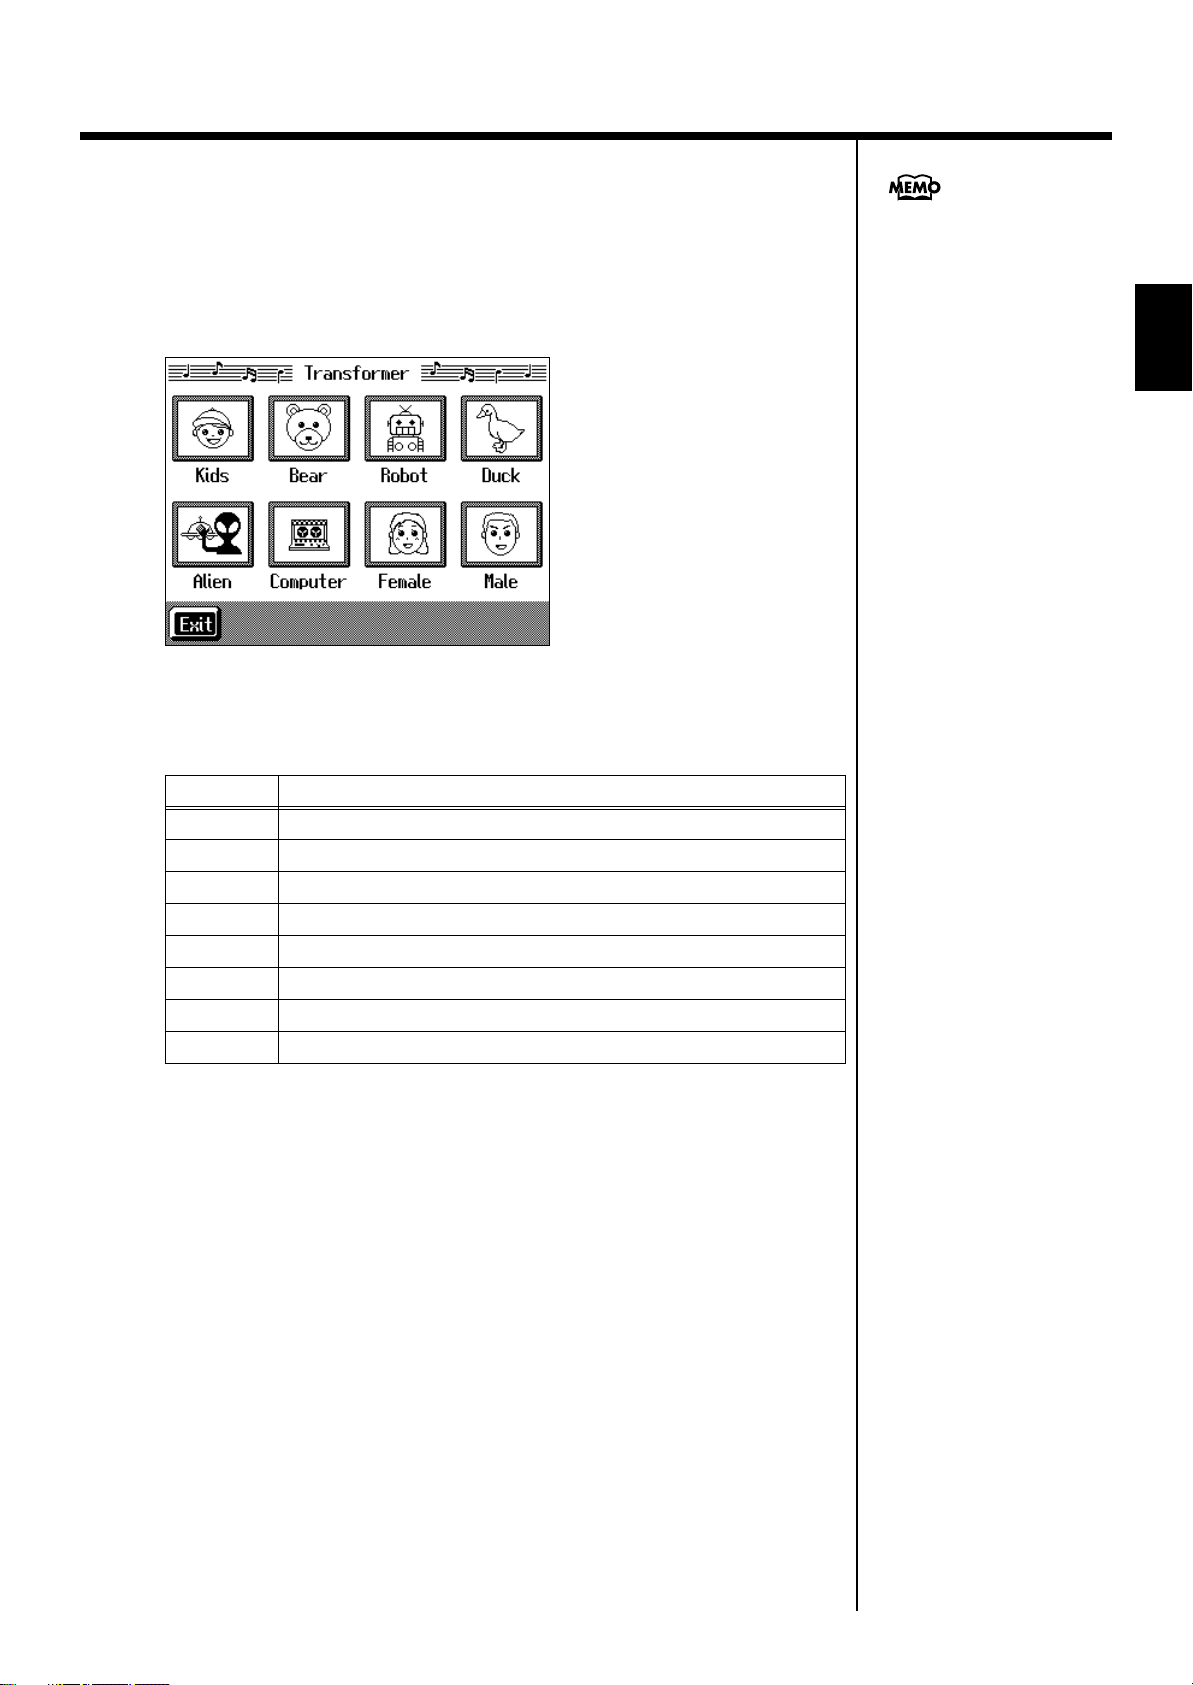
❍
Altering Vocals (Transformer)
Chapter 1 Performance
You can modify the way your voice sounds through the microphone. This is called
the “Voice Transformer” function.
Touch <Transformer> in Step 2 of “How to select Vocal Effect” (p. 43).
1.
fig.d-vo-trans.eps_60
2.
Touch any one of the icons.
Here’s what the different icons do.
Display
Kids
Bear
Robot
Duck
Alien
Computer
Female
Male
Transforms the input into the sound of a child’s voice.
Transforms the input sound into the voice of a large animal.
Transforms the input into the sound of a robot’s voice.
Transforms the input into a duck’s quacking sound.
Transforms the input into an alien voice.
Transforms the input into a voice like that from a computer.
Transforms male voices into female voices.
Transforms female voices into male voices.
Explanation
When you use the Voice
Transformer function, the
resonance setting for the piano
(see p. 152) may sometimes be
reset.
Chapter 1
Sing through the microphone.
3.
Your voice is transformed according to the item you selected.
Cancelling the Effect
4.
Once again, touch the icon you selected in Step 2.
The Voice Transformer effect is eliminated.
Touch <Exit> to return to the Vocal Effects screen.
45
Page 46

Chapter 1 Performance
❍
Adding Harmonies (Harmonist)—Models Equipped With Moving Key
1.
Chapter 1
2.
You can sing with a harmony accompaniment, even when you’re playing solo. This
is called the “Harmonist” function.
Touch <Harmonist> in Step 2 of “How to select Vocal Effect” (p. 43).
Touch to switch the screen.
fig.d-vo-harmo.eps_60
Touch any one of the icons.
Here’s what the different icons do.
Display
My Voice
Duo1
Duo2
Variety
Trio
Chord
Unison
Oct-Up
Oct-Down
5th Up
3rd Up
4th Down
The melody played on the keyboard is played as the harmony.
The harmony is added to your voice regardless of the pitch.
The added harmony matches the chords specified on the
keyboard. Adding harmony to a single voice gives the effect of
two people singing together.
The melody played on the keyboard is played as the harmony.
The harmony added is matched to the pitch; for example, higher
pitches are used for female voices, lower pitches for male voices.
The added harmony matches the chords specified on the
keyboard. This adds a two-voice harmony that makes it seem that
a trio is singing.
The added harmony matches the chords specified on the
keyboard.
You can change the way harmonies are added with the Melody
Intelligence type (p. 72).
Sounds like two people singing the same melody.
Adds another voice one octave higher than the original.
Adds another voice one octave lower than the original.
Adds harmony a fifth above the original.
Adds harmony a third above the original.
Adds harmony a major fourth below the original.
Explanation
When you use the Harmonist
function, the resonance setting
for the piano (see p. 152) may
sometimes be reset. And the
effects applied to the keyboard
(p. 42) may be canceled.
NOTE
With some Harmonist types,
you may not be able to play
harmony with some of the
vocals on the enclosed CD.
46
Page 47
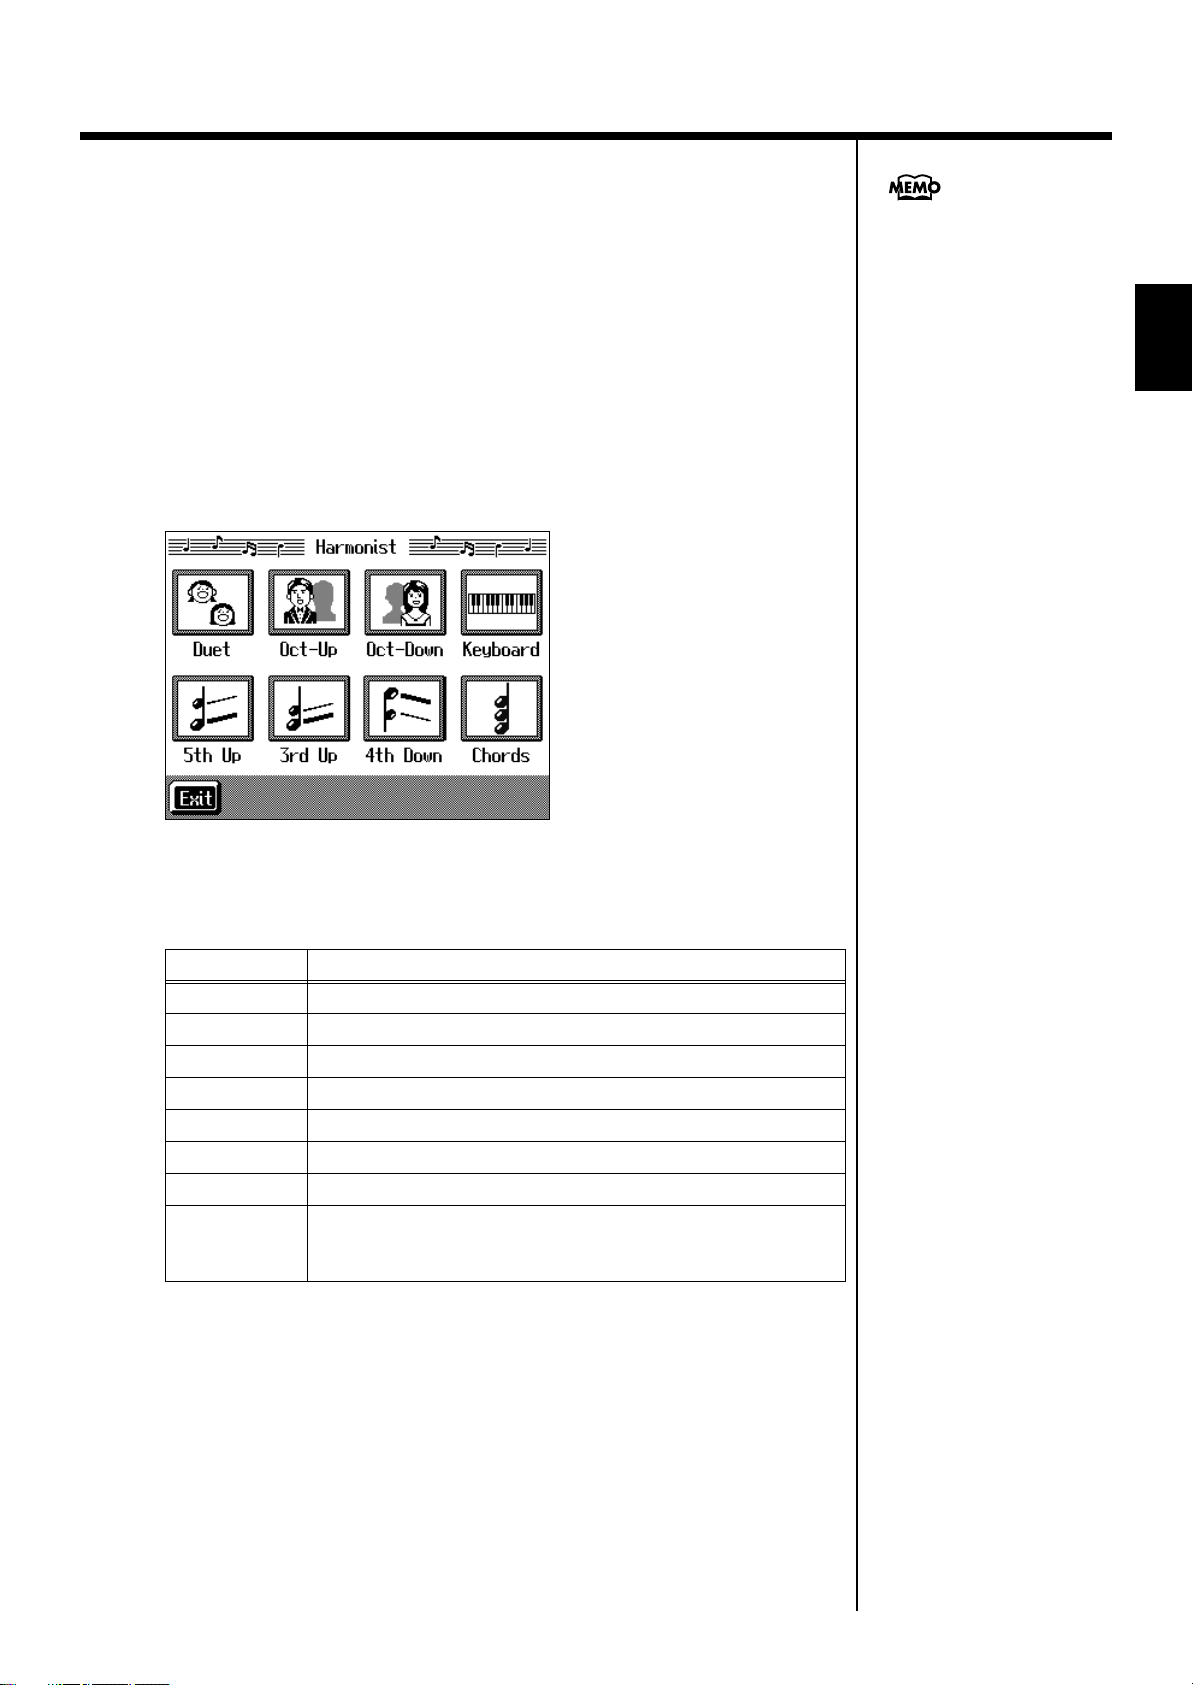
Cancelling the Effect
Chapter 1 Performance
Touch the Harmonist type you selected in Step 2 again.
3.
The Harmonist function is cancelled.
Touch <Exit> to go back to the Vocal Effects screen.
Adding Harmonies (Harmonist)—Models Without Moving Key
❍
You can sing with a harmony accompaniment even when you’re playing solo. This
is called the “Harmonist” function.
1.
Touch <Harmonist> in Step 2 of “How to select Vocal Effect” (p. 43).
fig.d-vo-harmo.eps_60
When you use the Harmonist
function, the resonance setting
for the piano (see p. 152) may
sometimes be reset, and the
effects applied to the keyboard
(p. 42) may be canceled.
Chapter 1
2.
Touch any one of the icons.
Here’s what the different icons do.
Display Explanation
Duet
Oct-Up
Oct-Down
Keyboard
5th Up
3rd Up
4th Down
Chords
Sounds like two people singing the same melody.
Adds another voice one octave higher than the original.
Adds another voice one octave lower than the original.
The melody being played on the keyboard becomes the harmony.
Adds harmony a fifth above the original.
Adds harmony a third above the original.
Adds harmony a major fourth below the original.
Adds harmonies matching the chords designated with the keys.
You can change the way harmonies are added with the Melody
Intelligence type (p. 72).
Cancelling the Effect
3.
Touch the Harmonist type you selected in Step 2 again.
The Harmonist function is cancelled.
Touch <Exit> to go back to the Vocal Effects screen.
47
Page 48

Chapter 1 Performance
❍
Enabling the start of songs and automatic accompaniment with the
sound of your voice (Vocal Count-In)
You can start songs and the Automatic Accompaniment by counting into the
microphone.
1.
Touch <Vocal Count In> in Step 2 of “How to select Vocal Effect” (p. 43).
Chapter 1
fig.d-vo-coin.eps_60
2.
Touch <Arranger> or <Song>.
Display
Arranger
Song
Count to four (“One, two, three, four”) into the mic.
3.
Count out the number of beats per measure in the time signature of the selected song
or Music Style.
For example, if you select a time signature of 4/4, then count to four; count to three
when 3/4 time is selected.
The tempo is automatically set according to the interval between the counts as you
speak into the microphone, and the song or Arranger begins.
Touch <Exit> to return to the Vocal Effects screen.
❍
Playing instrument sounds at vocal pitches (Vocal Keyboard)
You can have melodies sung into the microphone played with the KR’s internal
Tones.
Touch <Vocal Keyboard> in Step 2 of “How to select Vocal Effect” (p. 43).
1.
fig.d-vo-key.eps_60
Automatic Accompaniment starts at the tempo used for the count.
The song starts at the tempo used for the count.
Explanation
48
Page 49

If the <OFF> icon is selected, touch the <ON> icon.
2.
Touch any of the icons to select a Tone.
3.
You can also select the Tone by pressing the Tone button.
When you sing into the microphone, the sung pitches are played using the selected
Tone.
Cancelling the effect
4.
Touch <OFF>.
The Vocal Keyboard function is cancelled.
Touch <Exit> to go back to the Vocal Effects screen.
❍
Adding harmonies to a specified part (Music Files)
—Models Equipped With Moving Key
When you sing while playing back a specified part from song data, harmony is
added based on pitches of the specified part.
Chapter 1 Performance
When you play the keys while
using Vocal Keyboard, the
tone selected for Vocal
Keyboard is played.
The harmony data on Part 5 is
contained on the included CD.
Chapter 1
1.
Select the song to which you want to add harmony.
If selecting a song on a floppy disk, insert the floppy disk in the disk drive. For more
on how to select songs, refer to “Playing a Song” (p. 77).
Touch <Music Files> in Step 2 of “How to select Vocal Effect” (p. 43).
2.
fig.d-vo-music.eps_60
3.
Touch the icon for the part to which you want to add harmony.
When you sing into the microphone, harmony is added using the pitches of the
specified part.
Touch <Variety>.
4.
When <Variety> is ON, the melody played on the keyboard is played as the
harmony. The harmony added is matched to the pitch.
Cancelling the effect
5.
Touch the icon you selected in Step 3 again.
The Music Files function is cancelled.
Touch <Exit> to go back to the Vocal Effects screen.
49
Page 50

Chapter 1 Performance
❍
Adding harmonies to a specified part (Music Files)
—Models Without Moving Key
When you sing while playing back a specified part from song data, harmony is
added based on pitches of the specified part.
1.
Select the song to which you want to add harmony.
Chapter 1
2.
3.
Cancelling the effect
If selecting a song on a floppy disk, insert the floppy disk in the disk drive. For more
on how to select songs, refer to “Playing a Song” (p. 77).
Touch <Music Files> in Step 2 of “How to select Vocal Effect” (p. 43).
fig.d-vo-music.eps_60
Touch the icon for the part to which you want to add harmony.
When you sing into the microphone, harmony is added using the pitches of the
specified part.
Touch the icon you selected in Step 3 again.
4.
The Music Files function is cancelled.
Touch <Exit> to go back to the Vocal Effects screen.
50
Page 51

■
Enjoying Karaoke Performances with Music Files
Chapter 1 Performance
Connect a microphone.
1.
Adjust the volume level and the amount of echo applied.
2.
On the KR, use the Vocal Effect function to adjust the echo (p. 44).
You can also enjoy this effect with the Voice Transformer function (p. 45) and
Harmonist function (p. 46, 47).
Select a song.
3.
If selecting a song on a floppy disk, insert the floppy disk in the disk drive. For
instructions on how to select songs, refer to “Playing a Song” (p. 77).
4.
Adjust the tempo as required with the Tempo [-] [+] buttons.
5.
If necessary, change the key of the song (p. 103).
When you press the [ (Play/Stop)] button, the accompaniment starts playing.
Sing along with the accompaniment.
When you play back a Music File with lyrics, the lyrics appear on screen.
Commercial music files
designed for “karaoke” sing-
along are also available.
Consult your KR dealer when
purchasing music files. Refer
to “Music Files That the KR
Can Use” (p. 201).
On the KR, lyrics can also be
shown on an external display.
Refer to “Connecting an
External Display” (p. 23) and
“Selecting Images To Be
Shown on the KR and External
Displays (User Image
Display)” (p. 163).
Chapter 1
Press the [ (Play/Stop)] button to stop the accompaniment.
6.
You can stop lyrics from being
displayed. Refer to “Hiding
the Lyrics (Lyrics)” (p. 170).
51
Page 52

Chapter 1 Performance
Using the Metronome and Rhythm (Rhythm Partner)
The KR features a built-in metronome. Additionally, you can have Rhythm patterns
play, in the same manner as the metronome, just by pressing the [Rhythm] button.
The combination of the internal metronome and rhythm functions is called “Rhythm
Chapter 1
■
Partner.”
fig.panel1-6
Using the Metronome
During playback of a song, or
when performing with
automatic accompaniment, the
sound of the metronome keeps
time with the beat of the song
or accompaniment.
Press the [Metronome] button and watch the indicator light up.
1.
You will hear the metronome.
The following “Metronome screen” appears.
fig.d-metro.eps_60
You can touch <Exit> to have the metronome continue to play while you return to
the previous screen.
Stopping the metronome
Press the [Metronome] button once more, and the indicator light goes
2.
It is not possible to use the
metronome and rhythm (p. 56)
simultaneously.
52
out.
Page 53

■
Changing the Metronome Settings
Adjusting the tempo
❍
Chapter 1 Performance
You can adjust the tempo of the metronome. The tempo of the metronome changes
automatically if you use an Automatic Accompaniment or play back a song.
1.
Press the Tempo [-] or [+] buttons to adjust a tempo.
You can adjust the metronome tempo over a range of = 20–250.
The metronome is automatically set to =108 when the power is turned on.
Pressing the [-] and [+] buttons simultaneously returns the selected song
accompaniment to the basic tempo.
❍
Determining the tempo with tempo marks
You can set the tempo by choosing a tempo indicator, such as “Allegro,” indicated
on the score.
On the Metronome screen, touch the tempo indicator bar graph.
1.
The tempo is set to match the tempo mark.
fig.d-metro.eps_60
Chapter 1
You can also use the dial to
adjust the tempo. Turn it
clockwise for a faster tempo, or
counterclockwise for a slower
tempo.
❍
Changing the beat of the metronome
On the Metronome screen, touch <Beat>.
1.
The available choices for the beat appear at the bottom of the screen.
2.
Choose the beat from among the selections by touching your choice.
You can scroll the display to one side or the other and show other choices for the beat
by touching .
When is selected,
only the upbeat will sound.
53
Page 54

Chapter 1 Performance
❍
Changing the volume
The volume of the metronome can be adjusted to ten different levels.
On the Metronome screen, touch <Volume>.
1.
The available choices for the volume level appear at the bottom of the screen.
2.
Chapter 1
❍
Touch the volume icon you’ve selected.
When you touch , the selection moves to the side, allowing you to access
other volume levels.
Choosing sets the volume to the lowest level, and choosing sets
it to the highest level.
Choose to silence the metronome sound.
Changing the Type of Sound
You can change the sound the metronome makes.
The setting is at “normal metronome sound” when the KR is powered up.
1.
On the Metronome screen, touch <Sound>.
The available choices for the type of sound appear at the bottom of the screen.
Touch one of the items in the group to select a metronome sound.
2.
Displayed
Explanation Displayed Explanation
Normal metronome
sound
“1, 2, 3” in Japanese “1, 2, 3” in English
Dog and cat sounds Wood block
Triangle and castanet Hand clap
Electronic metronome
sound
54
Page 55

❍
Changing the Animation
A metronome that moves along with the tempo is usually displayed at the center of
the Metronome screen. You can change that picture to an animated bouncing ball, or
other animation.
1.
On the Metronome screen, touch the <Type>.
The animation type will change.
Each time you touch the icon, the animation switches between “Metronome,” “Dr.
KR,” and “Bouncing Ball.”
❍
Changing how the metronome beat (pattern) sounds
You can set the Metronome to play at even smaller intervals.
1.
On the Metronome screen, touch <Pattern>.
The available choices for the metronome pattern appear at the bottom of the screen.
Choose a pattern by touching your choice.
2.
Chapter 1 Performance
Chapter 1
You can scroll the display to one side or the other and show other pattern choices by
touching .
Displayed
Explanation Displayed Explanation
Usual sound
Half-note intervals
Quarter-note intervals
Eighth-note intervals Sixteenth-note intervals
Single back beat added Triplet rhythm added
Shuffle rhythm added
Dotted half-note intervals
Dotted quarter-note
intervals
Dotted eighth-note
intervals
55
Page 56

Chapter 1 Performance
■
Playing Rhythm
The KR features numerous internal rhythm patterns, which, like the metronome, can
be played and stopped with the press of a single button.
Playing rhythm patterns instead of the metronome lets you enjoy performances that
feel like live sessions.
1.
Chapter 1
Press the [Rhythm] button and watch the indicator light up.
The Rhythm will sound.
The following “Rhythm screen” appears.
fig.d-rhythm.eps_60
You cannot have the
metronome or automatic
accompaniment play
simultaneously with the
Rhythm. When you start
playing the metronome or
automatic accompaniment
while a Rhythm is playing, the
Rhythm stops.
When you touch <Exit>, the Rhythm sound continues to play, as you return to the
previous screen.
Stopping the Rhythm
Press the [Rhythm] button once more and the indicator light goes out.
2.
■
Changing the Rhythm settings
❍
Changing the Rhythm
1.
Touch a Rhythm name on the Rhythm screen.
The selected Rhythm plays.
The Rhythms available for selection will depend on the beat.
Touch to switch the screens and show other choices.
Changing the beat of Rhythm
❍
In the Rhythm screen, touch <Beat>.
1.
Depending on the beat, there
may be only one Rhythm to
choose form.
For more on the Rhythm types,
refer to the “Rhythm Pattern
List” (p. 199).
56
The available choices for the beat appear at the bottom of the screen.
2.
Choose the beat by touching your choice.
You can scroll the display to one side or the other and show other choices by
touching .
Page 57

❍
Changing the volume
The rhythm volume can be adjusted to ten different levels.
On the Rhythm screen, touch <Volume>.
1.
The available choices for volume level appear at the bottom of the screen.
2.
Select a volume icon.
When you touch , the selection moves to the side, allowing you to access
other volume levels.
Choosing sets the volume to the lowest level, and choosing sets
it to the highest level.
Choose to silence the Rhythm sound.
Chapter 1 Performance
Chapter 1
57
Page 58

Chapter 2 Automatic Accompaniment
Music Styles and Automatic Accompaniment
What is Automatic Accompaniment?
What Are Music Styles?
Chapter 2
Elements of Music Styles
Press the One Touch Program [Arranger] button for Automatic Accompaniment’s
optimum settings. Automatic Accompaniment is a function that provides you with
accompaniment in a variety of musical genres, just by specifying chords in the left
hand. Automatic Accompaniment lets you play with an orchestra, even when
performing alone!
Accompaniment patterns in various musical genres are called “Music Styles.”
There are many different kinds of music around the world, and each has its own
unique features. What gives jazz or classical music their unmistakable sounds are a
unique combination of elements like instrumentation, melody, and phrasing, which
interact to create the musical character.
A Music Style consists of a set of six sections called “divisions.”
Division
Intro
Original
Variation
Fill In To Original
Fill In To
Variation
Ending
Played at the start of a song.
The basic accompaniment pattern.
This is a variation on the Original accompaniment pattern.
This is a one-measure phrase inserted at a point where the
mood changes and the accompaniment returns to the original.
This is a one-measure phrase inserted at a point where the
mood changes and the accompaniment moves ahead to the
variation.
The conclusion of a song.
Explanation
For instructions on playing the
Automatic Accompaniment,
refer to “Selecting Music Styles
(Music Style Buttons)” (p. 62).
In addition, Music Styles are built from: “Rhythm,” “Bass,” “Accompaniment 1,”
“Accompaniment 2,” and “Accompaniment 3.”
58
Page 59

Chapter 2 Automatic Accompaniment
Performing Using Automatic Accompaniment (One-Touch Arranger)
Here’s how to create the settings for Automatic Accompaniment.
fig.panel2-1
Press the One Touch Program [Arranger] button.
1.
The Basic screen like the one shown below appears.
fig.d-arrbasic.eps_60
Chapter 2
When you select an internal
song or music file that includes
the lyrics data, < >
appears in the Piano screen or
Basic screen. Touch this to
display the lyrics.
Observe the settings:
• The keyboard is split into left- and right-hand parts, with accompaniment
chords specified for the left-hand side of the keyboard.
•A tone appropriate for the selected Music Style is chosen.
• The tempo and beat for the selected Music Style is set.
2.
Play a chord on the lower-part of keyboard.
The accompaniment begins, starting from the intro.
Play chords with the left hand, and the melody with the right.
When you change chords in the left hand, the accompaniment also changes.
fig.arr-split.e
Split Point ( )
The range specifyed a chord
F 3
Normally, when you change a
Music Style, the tempo and
tone change to selections that
go well with the selected
Music Style. If you do not want
to change the tempo and tone,
refer to “Changing Music
Styles Without Changing the
Tone or Tempo (One Touch
Setting)” (p. 156).
For instructions on selecting
Music Styles, refer to
“Selecting Music Styles (Music
Style Buttons)” (p. 62).
For instructions on starting
and stopping the
accompaniment, refer to
“Starting and Stopping the
Accompaniment” (p. 66).
Press the [Intro/Ending] button.
3.
After the ending plays, the accompaniment stops.
You can change the range in
which chords are played.
Please refer to “Changing the
Keyboard’s Split Point (Split
Point)” (p. 156).
59
Page 60
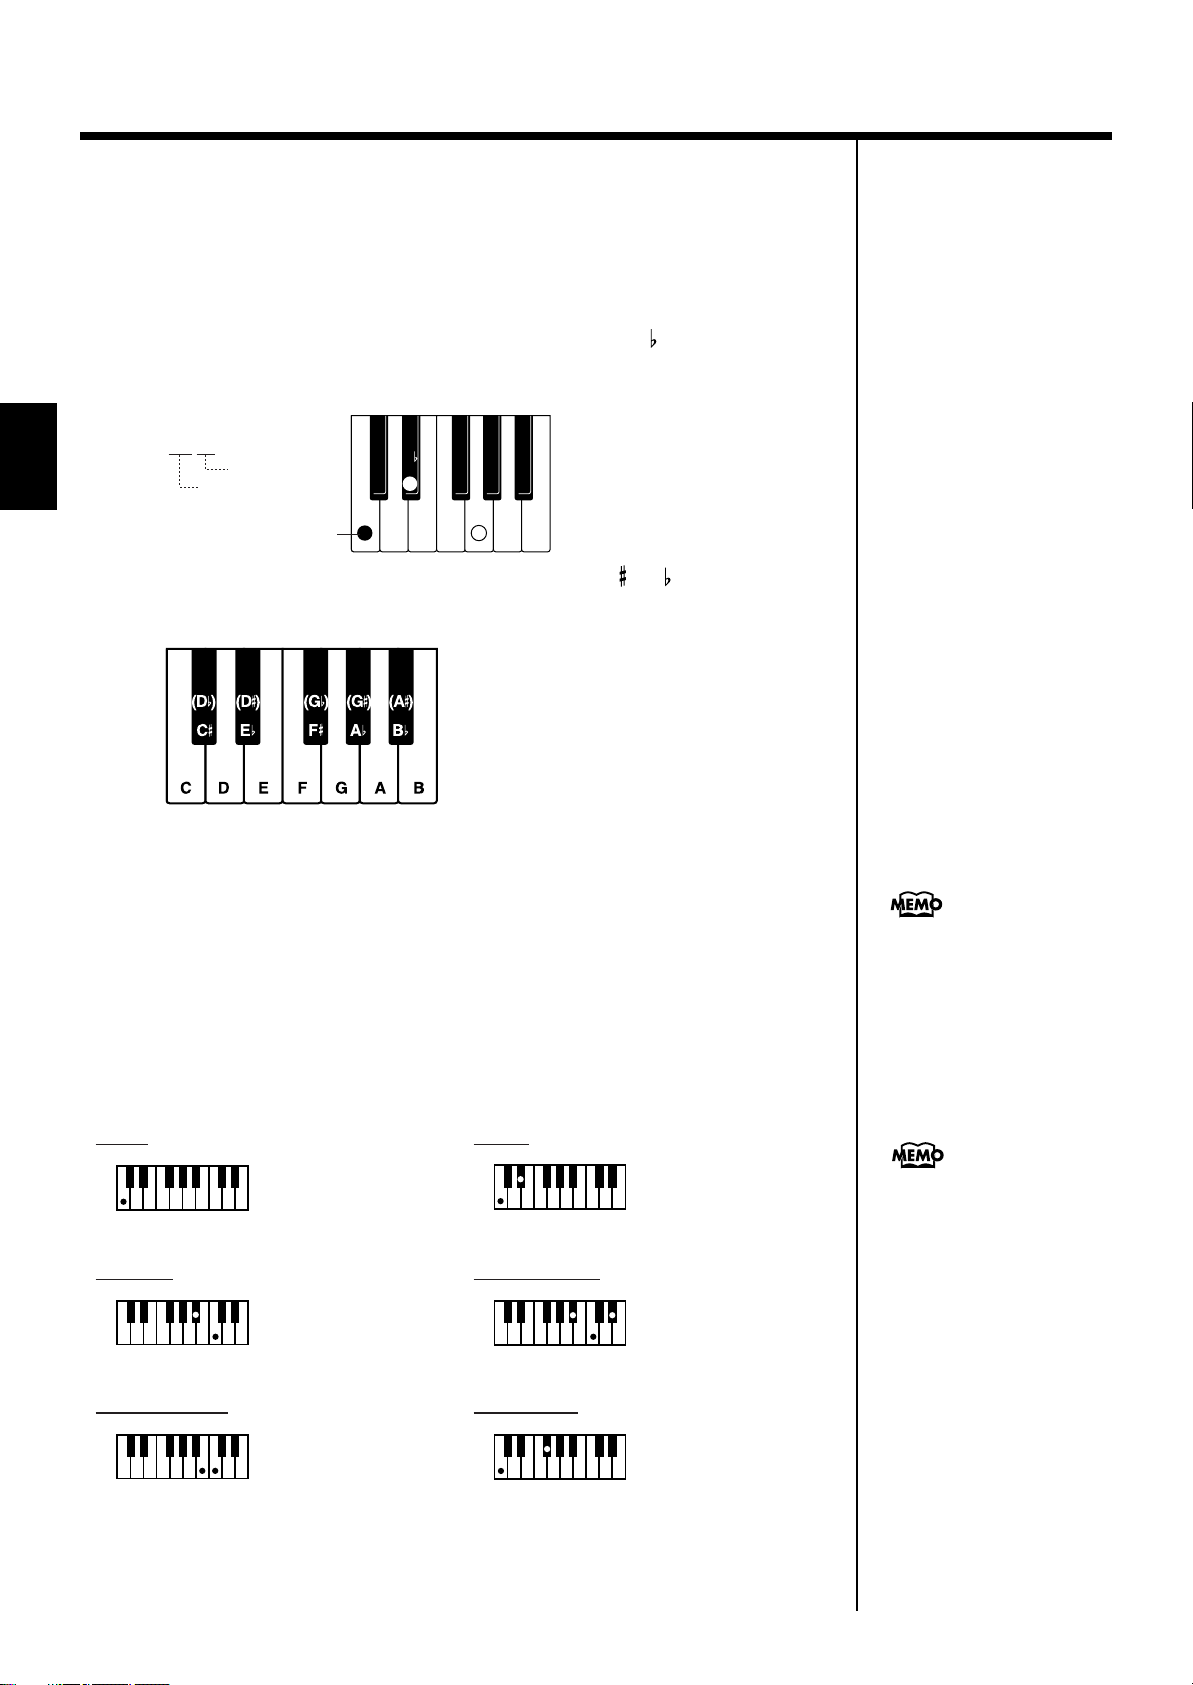
Chapter 2 Automatic Accompaniment
■
About Chords
A chord is produced when several notes are played simultaneously. Chords are
indicated by the pitch of the fundamental note of the chord (the root) and the chord
type, which is determined by the other notes of the chord.
For example, the C m chord is expressed in terms of the root note “C” and the chord
type “m” (minor). C m is made up of the three notes “C,” “E ” and “G.”
“C m” is indicated as the chord name on the Basic screen.
fig.chord.e
C
m
E
CG
Chapter 2
Chord Type
Root Note
Root Note
All chord roots are indicated as a letter, sometimes with or added, and
correspond to the notes shown below.
fig.chord-root.e
■
Playing Chords with Simple Fingering (Chord Intelligence)
“Chord Intelligence” is a feature that chooses the accompaniment chords the
moment you play a key.
To play a “C” chord, for example, you normally have to play the three keys C, E, and
G. But with Chord Intelligence, you only have to press the C key to start a “C” chord
accompaniment.
fig.chord-intel.e
• How to play chords in the Chord Intelligence mode:
Major
Ex:
C
Play the chord root.
Seventh
C 7
Ex:
Play the root and
the second key above it.
Major Seventh
C maj 7
Ex: Ex:
Play the root and
the first key below it.
Minor
C m
Ex:
Minor Seventh
C m7
Ex:
Diminished
C dim
Play the root and
the third key above it.
Play the root,
the third key above it, and
the second key below it.
Play the root and
the sixth key above it.
You can cancel the Chord
Intelligence function. For more
information, see “Changing
How Chords Are Played and
Specified (Arranger Config)”
(p. 159).
For more information about
chord fingering, refer to the
“Chord List” (p. 194).
60
Page 61

■
Viewing Chord Fingerings (Chord Finder)
Whenever you are not sure how a certain chord is fingered, you can display the notes
of the chord on the screen.
On the Basic screen, touch < >.
1.
fig.d-arrbasic.eps_60
Touch the root of the chord you want to learn about.
2.
Chapter 2 Automatic Accompaniment
Chapter 2
The chord fingering appears on screen.
fig.d-crdfind.eps_60
For example, if you wanted to see the fingering for a C# chord, you would touch
<C>, then touch <#>.
Touch <Exit> to go back to the Basic screen.
61
Page 62

Chapter 2 Automatic Accompaniment
Selecting Music Styles (Music Style Buttons)
You can select a variety of different Music Styles by pressing the Music Style buttons.
Music Styles are divided into six groups, with each assigned to one of the Music Style
buttons.
fig.panel2-2
Chapter 2
1.
Press the One Touch Program [Arranger] button.
2.
Press one of the Music Style buttons to select the Music Style group.
Watch the indicator button light up.
For more on the Music Style
names, refer to the “Music
Style List” (p. 192, p. 193).
Six of the Music Styles included in that group are displayed on the screen.
fig.d-stylesel.eps_60
This screen is called the “Style Selection screen”.
You can listen to the Music Style by touching <Audition>.
Touch to switch the screen and display the next selections.
You can touch <Search> to find Styles that match the selected criteria (p. 64).
Touch a Music Style name to select the Music Style.
3.
You can use the [-] [+] buttons and the dial to automatically switch pages and select
Styles.
4.
Touch Preset <A>, <B>, <C>, or <D> in the lower part of the screen.
When the Music Style is selected, Preset A is selected.
When any of the Presets from <A> through <D> are selected, the Music Style tempo,
right-hand Tone, Style Orchestrator settings (p. 70) and other settings change.
By changing the tempo and
Tone, you can enjoy
performing with a different
ambience, even in the same
Music Style.
62
Page 63

Touch <Exit>.
5.
The display returns to the Basic screen.
When you play a chord in the left-hand part of the keyboard, the selected Music Style
is automatic.
■
Selecting Music Styles on Floppy Disks
You can play other User Styles saved to floppy disks or User memory (p. 149).
fig.panel2-3
Insert the floppy disk into the disk drive (p. 114).
1.
Press the Music Style [User] button.
2.
fig.d-styldisk.eps_60
Chapter 2 Automatic Accompaniment
Chapter 2
If you’re using the disk drive
for the first time, be sure to
read the important notes on
p. 6.
When you touch <User/Disk> on the lower part of the screen, the screen for
selecting user memory or disk Styles appears.
When you touch <Preset>, the screen for selecting “Trad/Kids” Music Styles
appears.
Touch .
3.
The Music Styles saved on the floppy disk are displayed.
When you touch < >, the Music Styles stored in User memory are displayed.
Select a Music Style, and touch the Music Style name.
4.
Press the One Touch Program [Arranger] button.
5.
You can now perform in the selected Music Style.
Music Styles selected from floppy disks are stored until the power is turned off. Even
after ejecting the floppy disk, by pressing the Music Style [User] button, you can
perform using the most recently selected Music Style.
You can save multiple user
Styles to user memory. Take a
look at “Saving a User Style”
(p. 149).
63
Page 64

Chapter 2 Automatic Accompaniment
■
Using Keywords to Search for Music Styles (Style Search)
You can search for Music Styles that match the tempo of the song, musical genre, or
other criteria you set.
You can also search Music Styles using the first character of the Style names.
Press one of the Music Style buttons.
1.
Touch <Search>.
2.
The following “Style Search screen” appears.
Chapter 2
fig.d-stylsrch1.eps_60
Condition Search screen Name Search screen
Only the KR’s internal Music
Styles are searchable.
Touch here to switch these screens.
❍
Searching by Conditions
3.
Touch the parameter you want to set, then use the [-] [+] buttons and the
dial to select the search conditions.
4.
Touch <Search>.
The search results appear in the display.
Touch a Music Style name to select a Music Style.
Touch <Exit> to return to the Style Search screen.
❍
Searching by Music Style name
3.
Touch <By Name>.
Touch <By Key> to return to the Condition Search screen.
4.
Decide which character you’ll use for the search.
The selected character appears in the middle of the screen.
Enter the character you are searching for. For example, touching <ABC> in
succession cycles you through the available choices in that character group
(“A”→”B”→”C”...).
In a condition search, the KR
looks for Music Styles
satisfying all of the selected
search criteria.
64
Touch <A-0> to toggle between alphabets and numerals.
5.
Touch <Search>.
The search results appear on the display.
Touch a Music Style name to select a Music Style.
Touch <Exit> several times to return to the Basic screen or the previous screen.
Page 65

Chapter 2 Automatic Accompaniment
Playing Only Music Style Rhythm Patterns
You can also play only the rhythm patterns of Music Styles.
fig.panel2-4
Chapter 2
Select a Music Style (p. 62).
1.
Press the One Touch Program [Piano] button.
2.
The performance is set so that only the rhythm patterns are played.
Press the [Intro/Ending] button.
3.
The Rhythm part of accompaniment begins, starting from the Intro.
Just as with regular Automatic Accompaniment, you can add intros and endings by
pressing the [Intro/Ending] button, and make changes to the rhythm patterns with
the Fill In button (p. 69).
Adjusting the Accompaniment Tempo
fig.panel2-5
NOTE
Some Music Styles do not
include rhythm patterns.
When you select these Style
patterns, no rhythm patterns
are played, even when you
play on the left side of the
keyboard.
When the Basic screen is displayed, you can use the Tempo [-] [+] buttons or the [-]
[+] buttons and the dial to change the tempo.
The tempo is indicated on the upper left of the screen.
fig.d-arrbasic.eps_60
Pressing the [-] [+] buttons simultaneously returns the selected Music Style or song
to the basic tempo.
You can change the tempo of Automatic Accompaniment even while the
accompaniment is playing.
65
Page 66

Chapter 2 Automatic Accompaniment
Starting and Stopping the Accompaniment
Pressing the One Touch Program [Arranger] button activates Sync Start for the
accompaniment (which starts the accompaniment simultaneously when you play on
the lower section of the keyboard), and automatically sets an appropriate intro for
the accompaniment. You can also change the way the accompaniment starts and
stops.
fig.panel2-6
Chapter 2
■
Having the Accompaniment Start Simultaneously When You Play the Keyboard (Sync)
1.
Press the [Intro/Ending] button and [Start/Stop] button simultaneously,
causing the indicators of both buttons to flash.
The Sync Start settings go into effect.
2.
Play a chord on the lower-part of keyboard.
As you play the keys, the intro and accompaniment begins simultaneously.
❍
Changing the intro
When set for Sync Start (the indicators of both the [Intro/Ending] button and [Start/
Stop] button are flashing), you can use the following procedure to change the intro,
or prevent the intro from playing.
Starting without an intro
Press the [Intro/Ending] button and watch the indicator go out.
Now when you play a chord with the keyboard, the accompaniment starts without
the intro.
To start with a short intro added
On the Basic screen, touch the Intro/Ending Type <2>.
fig.d-intro2.eps_60
Sync Start is set immediately
after the One Touch Program
[Arranger] button is pressed.
66
Now when you specify a chord with the keyboard, a short intro is played, and the
accompaniment starts.
Page 67

❍
Starting at the press of a button
1.
Press the [Intro/Ending] button and [Start/Stop] button simultaneously,
and the indicators lights go out.
The Sync Start function is cancelled.
2.
Play a chord on the lower part of keyboard.
Chapter 2 Automatic Accompaniment
Choose the chord to be played when the accompaniment begins playing.
Press the [Intro/Ending] button or the [Start/Stop] button.
3.
When you press the [Intro/Ending] button, the intro plays, and the accompaniment
starts. When you press the [Start/Stop] button, the accompaniment starts without
the intro.
When you press the [Intro/Ending] button after touching Intro/Ending Type <2> on
the Basic screen, a short intro plays.
Chord Tones and Bass Tones
When you play the keys in the left-hand side of the keyboard while the [Start/Stop]
button’s indicator is not lit, chords play. This note is called the “Chord Tone,” and
the root of the chord being played at the same time is called the “Bass Tone.”
■
Stopping Automatic Accompaniment
❍
Stopping with an added ending
Chapter 2
You can change the sound of
the chord tone and bass tone.
Take a look at “Changing How
Chords Are Played and
Specified (Arranger Config)”
(p. 159).
1.
Press the [Intro/Ending] button.
An ending plays and the Automatic Accompaniment stops.
When you press the [Intro/Ending] button after touching Intro/Ending Type <2> on
the Basic screen, a short ending plays.
❍
Stopping at the same time the button is pressed
Press the [Start/Stop] button.
1.
The Automatic Accompaniment stops as soon as you press the button.
67
Page 68

Chapter 2 Automatic Accompaniment
■
Having a Count Sound Play at the End of the Intro (Countdown)
If an intro plays before your performance, you can have a count-in sound played to
the end of the intro, helping you hear when to start playing.
fig.countdown.e
Chapter 2
1.
2.
Ex: 4/4
Intro
1234
Press the [Metronome] button and watch the indicator light up.
The Metronome screen (p. 52) appears.
If you don’t want the metronome to play, press the [Metronome] button and
indicator light goes out.
Touch <Countdown>.
The following “Countdown settings screen” appears.
fig.d-cntdwn.eps_60
When the Intro has finished playing,
the accompaniment plays.
Count Sound
Touch <Switch> to set this to “ON.”
3.
When you press the One Touch Program [Arranger] button, the performance starts,
and the countdown sound plays at the end of the intro.
❍
Cancelling the countdown
In the Metronome screen, touch <Countdown>.
1.
2.
Touch <Switch> to set this to “OFF.”
This sets the KR so that the countdown does not play.
68
For more about settings on the
Countdown screen, refer to
“Settings for the Countdown”
(p. 161).
Page 69

Modifying an Accompaniment
Chapter 2 Automatic Accompaniment
When you use Automatic Accompaniment, you can easily add Fill Ins to the
accompaniment patterns, change arrangements, and make other changes.
■
Changing the Accompaniment Pattern (Fill In Buttons)
There are two accompaniment patterns: the Original, and a Variation. In addition, a
fill-in (or short phrase) is added at the points where the accompaniment patterns
change, which adds more interest to the song. It can be effective to use the simpler
original pattern for the first half of the song, and the variation pattern for the second
half.
What’s a “Fill In”?
A short improvisational phrase inserted at the bar line is called a “Fill In.”
The KR automatically plays the appropriate phrase for the selected Music Style.
fig.panel2-7
You can add variation to the
Automatic Accompaniment by
assigning different functions to
the Performance Pads and
pedals. For more information,
see “Assigning Functions to
Pedals and Performance Pads
(Pedal Setting/User
Functions)” (p. 157).
Chapter 2
Press the Fill In [Variation] button and watch the indicator light up.
The instrument is set so that the variation performance pattern is played.
Press the Fill In [Original] button and watch the indicator light up.
The instrument is set so that the original performance pattern is played.
Pressing these buttons during a performance inserts a one-bar fill-in at the
appropriate place and time.
Adding a fill-in without changing the accompaniment pattern
You can play only the fill-in, without changing the accompaniment pattern.
Press the lit [Original] or [Variation] Fill In button during the performance.
69
Page 70

Chapter 2 Automatic Accompaniment
b
b
■
Changing the Instrumental Makeup of Music Styles (Style Orchestrator)
You can change the arrangement of an accompaniment. This function is called “Style
Orchestrator.” Each Music Style has four different accompaniment arrangements.
fig.panel2-8
Chapter 2
1.
Press the [Style Orchestrator] button and watch the indicator light up.
The instrument is set to allow you to change the arrangement with the Performance Pads.
2.
Press Performance Pad [1]–[4] to change the arrangement for the
accompaniment.
Watch the indicator of the button you pressed light up.
.
When you press the [Phrase]
utton or [User Function]
uttons, the [Style
Orchestrator] button’s
indicator goes out, and the
function of the Performance
Pads changes. For details refer
to p. 71 and p. 157.
Display
Basic
Advanced 1
Advanced 2
Full
Explanation
This is the simplest arrangement.
This is a more involved arrangement.
This is the most elavorate arrangement.
NOTE
When simple Music Styles are
selected, there may be no
change in the arrangement
even when you use the Style
Orchestrator function.
70
Page 71

■
Playing Phrases (Phrase)
You can play sound effects and other short phrases.
fig.panel2-9
Press the [Phrase] button and watch the indicator light up.
1.
The instrument is set so that phrases play with the Performance Pads.
A screen like the one shown below appears.
fig.d-phrase.eps_60
Chapter 2 Automatic Accompaniment
Chapter 2
Touch to choose the type of phrase.
2.
Press one of the Pads.
3.
The selected phrase plays.
When the phrase continues playing, press the Pad once more to stop it.
With certain phrases, the accompaniment stops while the phrase is playing.
When you touch <Exit>, you’re returned to the previous screen, while the same
function remains assigned to the Pads.
When you switch Music Styles,
the phrases assigned to the
Performance Pads are
switched. If you do not want to
have the phrase settings
change when you change
Music Styles, refer to
“Changing Music Styles
Without Changing the Tone or
Tempo (One Touch Setting)”
(p. 156).
71
Page 72

Chapter 2 Automatic Accompaniment
Adding Harmony to the Right-Hand Part (Melody Intelligence)
You can add harmony to the notes you play on the keyboard.
While an Automatic Accompaniment is playing, the matching harmony is
automatically added to the notes you are playing with the right hand. This function
is called “Melody Intelligence.”
fig.panel2-10
Chapter 2
1.
Press the [Melody Intelligence] button and watch the indicator light up.
When you play something on the right-hand section of the keyboard, harmony is
added.
The following “Melody Intelligence screen” appears.
fig.d-melointel.eps_60
Select and touch a harmony type.
2.
Then when you play a melody on the keyboard, a harmony style is automatically
added.
When you touch <Exit>, you’re returned to the previous screen, while the Melody
Intelligence function remains selected.
3.
Press the [Melody Intelligence] button once more and the indicator light
goes out.
With some harmonies, Tones
may change automatically.
Also, when you play several
keys at the same time, in some
cases harmony may be added
to one note.
72
The Melody Intelligence function is cancelled.
Page 73

Chapter 2 Automatic Accompaniment
Playing Sounds in the Left Hand During a Performance (Lower Tone)
Normally, when using Automatic Accompaniment in a performance, sounds are not
produced by playing the left-hand part of the keyboard. When you touch the
<Lower> icon, you can have Tones from the left side of the keyboard play
simultaneously with the Automatic Accompaniment.
Press the One Touch Program [Arranger] button.
1.
This sets the Automatic Accompaniment.
2.
On the Basic screen, touch <Lower>.
Now when you play a chord in the left-hand keyboard area, the notes you play will
sound, and the accompaniment chord changes.
fig.d-lower.eps_60
Stopping the sound in the left-hand
3.
Touch <Lower>.
Chapter 2
The <Lower> icon returns to the original color, and the left-hand Tones stop playing.
73
Page 74

Chapter 2 Automatic Accompaniment
Playing the Piano with Accompaniment Added (Piano Style Arranger)
Usually with Automatic Accompaniment, you play chords on the left-hand side of
the keyboard and the melody on the right-hand side. Chords can also be recognized
over the entire keyboard, allowing you to perform using Automatic Accompaniment
without splitting the keyboard. This function is called “Piano Style Arranger.”
This makes it possible to add an accompaniment automatically as you play a song
by playing chords in the ordinary way, without giving any thought to the location
of a keyboard split.
Chapter 2
1.
2.
3.
4.
Press the One Touch Program [Arranger] button.
Touch <Split> to turn the Split function off.
fig.d-pianist.eps_60
Select a Music Style (p. 62).
Play the keyboard.
The accompaniment starts when you play a chord anywhere on the keyboard.
74
Page 75

Chapter 2 Automatic Accompaniment
Adjusting the Volume Balance for Each Part (Balance)
You can adjust the volume balance between the accompaniment and the keyboard,
and the volume balance for each of the parts in a Music Style.
■
Changing the Volume Balance between the Accompaniment and the Keyboard (Balance Knob)
You can change the volume balance between a song and accompaniment and the
notes you play on the keyboard.
Adjust the volume balance with the Balance knob.
1.
fig.volbal.e
NOTE
When this knob is turned
completely to the
Accompaniment side, no
sounds from the keyboard are
audible, even when the keys
are pressed. You can usually
leave the knob at the center
position.
Chapter 2
■
Adjusting the Volume Balance for Each Performance Part (Part Balance)
You can adjust the volume of each performance part in a Music Style, and the
balance between parts when playing multiple Tones on the keyboard.
fig.panel2-11
Press the [Part Balance] button and watch the indicator light up.
1.
The following “Part Balance screen” appears.
Touch to switch the screens.
fig.d-partbal1.eps_60
Screen for models featuring
the Moving Key
Switch the screens
The volume balance between the performance parts in the Music Style is indicated.
75
Page 76
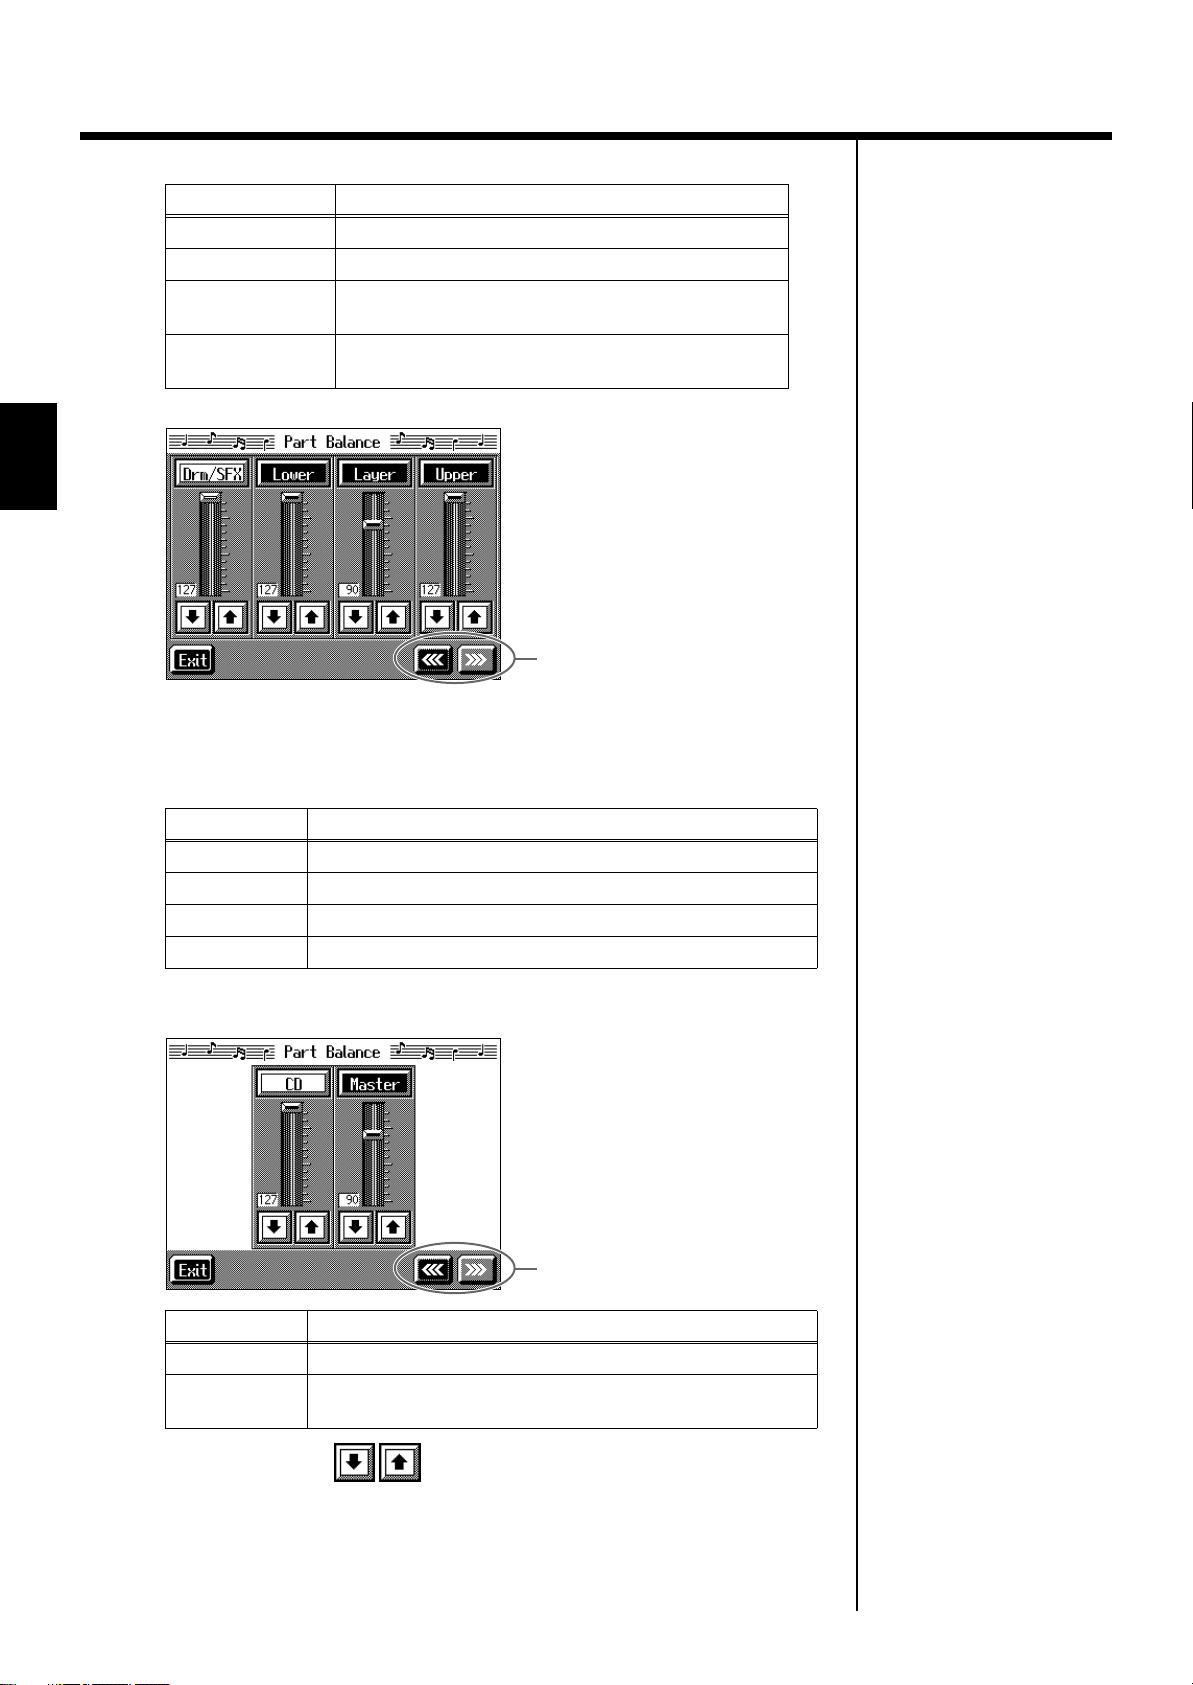
Chapter 2 Automatic Accompaniment
Chapter 2
Display
Rhythm
Bass
Accomp
Phrase
fig.d-partbal2.eps_60
This shows the volume balance between the keyboard’s Tones when either layer
performance (p. 30) or split performance (p. 31) are used, or the volume balance
when using the keyboard to play percussion instruments or sound effects (p. 28).
Music Style Rhythm Part
Bass, Bass Tone (p. 67)
Accompaniment 1, Accompaniment 2,
Accompaniment 3, Chord Tone (p. 67)
Short phrases sounded when the Performance Pads
are pressed (p. 71).
Performance part
Screen for models featuring
the Moving Key
Switch the screens
Displayed
Drums
Lower
Layer
Upper
Only with models featuring Moving Key
fig.d-partbal2.eps_60
Displayed
CD
Master
Percussion instruments or sound effects played with the keys
Left-hand Tone
Layer Tone
Right-hand Tone
Sounds other than the keyboard parts when a CD is playing
Overall sound (this is the same as the volume set with the
remote control VOL [-] [+] buttons)
Tone Part
Only with models featuring Moving Key
Switch the screens
Tone Part
76
2.
Touch each slider to adjust the volume balance.
You can also make these adjustments by touching sliders and then using [-] [+]
buttons or the dial.
Touch <Exit> to go back to the previous screen.
Page 77

Chapter 3 Song Playback
Playing a Song
Now, let’s try practicing while playing back internal songs, commercial music files,
and songs saved to floppy disks.
You can use rewind or fast-forward to go to any desired measure, and play back
from that point.
fig.panel3-1
Selecting the song
When playing back songs on floppy disks, first insert the floppy disk in the disk
drive.
Press the [Select/Listen to a Song] button.
1.
The following “Genre Selection screen” appears.
fig.d-genre.eps_60
When you touch the genre for the song you want to play, the screen changes.
Record/Playback buttons
If the floppy disk is being used
for the first time, refer to p. 6.
Chapter 3
When selecting a song from a floppy disk, touch, <Disk>.
The following “Song Selection screen” appears.
fig.d-songsel.eps_60
77
Page 78

Chapter 3 Song Playback
b
When you touch < >, songs selected from all of the internal songs are played in
2.
Chapter 3
Playing back
3.
Stopping the Song
4.
random order.
When you touch < >, all of the songs in the genre you have selected are played
in order, starting from the selected song. When the last song is finished, playback
resumes from the initial song.
< >: Information for the selected song is displayed.
< >: The selected song is played back. This changes to < > while the song
is played back; playback stops when you touch < >.
<><>: The song genre changes.
Touch the name of the song to be played back.
The selected song name appears at “0:.”
You use the [-] [+] buttons and the dial to select songs.
Press the [ (Play/Stop)] button.
The button indicator lights up, and playback of the song begins.
Press the [ (Play/Stop)] button once again.
The button indicator light goes out, and the song stops.
When the song is finished, playback stops automatically.
Press the [ (Reset)] button to return to the beginning of the song.
If there is recorded song data,
the “Delete song” screen
appears.
If it’s okay to delete the song,
touch <OK>. If you do not
want to delete the song, touch
<Cancel>, and either save the
song to a floppy disk (p. 116)
or register the song to the
Favorites (p. 80).
NOTE
When you start playback of
songs, the measure number on
the Basic screen appears in
reverse video. The
performance data is being
loaded while the indication is
highlighted; please wait a few
moments for this to be
completed.
Record/Playback Buttons
fig.composer.e
Track buttons:
Each performance part of the song being played back is assigned to a track button. Use these
buttons to select the performance parts that are muted or played. For more detailed
information, refer to p. 99.
[ (Reset)] button: Returns to the beginning of the song.
[ (Play/Stop)] button:
Plays back the song, or if the song is currently being played, it stops the song.
[ (Rec)] button: Records the performance. For more detailed information, refer to p. 105.
[ (Bwd)] button: Moves back the playback position of the song one measure each time
the button is pressed. When held down, the song “rewinds” continuously.
[ (Fwd)] button: Advances the playback position of the song one measure each time the
button is pressed. When held down, the song is forwarded continuously.
Holding down the [ (Play/Stop)] button and pressing the [ (Fwd)] button moves
you to the end of the song.
Song Number <0:>
In the Song Selection screen,
the title of the currently
selected song appears at “0.”
Song Number “0” is used by
all genres. Recorded
performances are also stored to
“0.” The song in Song Number
“0” is erased when the power
is turned off.
NOTE
When using markers to specify
a section to be repeated (p.
102), you can rewind and fast
forward only within the range
etween Marker A and
Marker B.
78
Page 79

■
Using Keywords to Search for Songs (Song Search)
You can search for songs that match the conditions you set regarding the song tempo
or genre.
You can also search the songs using the first character of the song name.
1.
Press the [Select/Listen to a Song] button.
2.
Touch <Search>.
The following “Song Search screen” appears.
fig.d-songsrch1.eps_60
Condition Search screen Name Search screen
Chapter 3 Song Playback
Only the KR’s internal songs
are searchable.
Chapter 3
Searching by conditions
❍
3.
Touch the parameter you want to set, then use the [-] [+] buttons and the
dial to select the search conditions.
With <Data>, songs are searched according to data included in the internal songs.
You can use four different criteria in searches: “Chords,” “Lyrics,” “Fingering”
(fingering numbers), and “Any.” By selecting a song containing any of this data, then
displaying it in the KR’s score, you can display information about the selected data.
Touch <Search>.
4.
The search results appear in the display.
Touch the song name to select the song.
Touch <Exit> to return to the Song Search screen.
Searching by song name
❍
Touch <By Name>.
3.
Touch <By Key> to return to the Condition Search screen.
4.
Decide which character you will use for the search.
Touch here to switch these screens.
The selected character appears in the middle of the screen.
Enter the character you are searching for. For example, touching <ABC> in
succession cycles you through the available choices in that character group
(“A”→”B”→”C”...).
Touch <A-0> to toggle between alphabets and numerals.
5.
Touch <Search>.
The search results appear in the display.
Touch the song name to select the song.
Touch <Exit> several times to return to the previous screen.
79
Page 80

Chapter 3 Song Playback
Registering the Songs You Like (Favorites)
You can register songs you are currently practicing or enjoy playing to “Favorites,”
allowing you to select these songs easily.
Selecting the Song
1.
2.
Registering to Favorites
3.
Chapter 3
4.
Press the [Select/Listen to a Song] button.
The Genre Selection screen or the Song Selection screen appears (p. 77).
Touch the song name to select the song to be registered.
Touch <Add>.
A screen like the one shown below appears.
fig.m-fvrtadd.eps_60
Touch <OK>.
The selected song is registered to Favorites.
You can also register songs on
floppy disks to the Favorites.
For details, refer to “Copying
Songs on Floppy Disks to
Favorites” (p. 120).
NOTE
You cannot register songs on
CDs to the Favorites.
Now you can select the registered song by selecting Favorites for the genre in the
Song Selection screen.
80
Page 81

■
Removing Songs from Favorites
This deletes registered songs for Favorites.
1.
In the Song Selection screen, select Favorites for the genre.
fig.d-song-fvrt.eps_60
2.
Touch the name of the song to be deleted.
Chapter 3 Song Playback
Chapter 3
3.
Touch <Del>.
A screen like the one shown below appears.
fig.m-fvrtdel.eps_60
4.
Touch <OK>.
The song is deleted.
81
Page 82
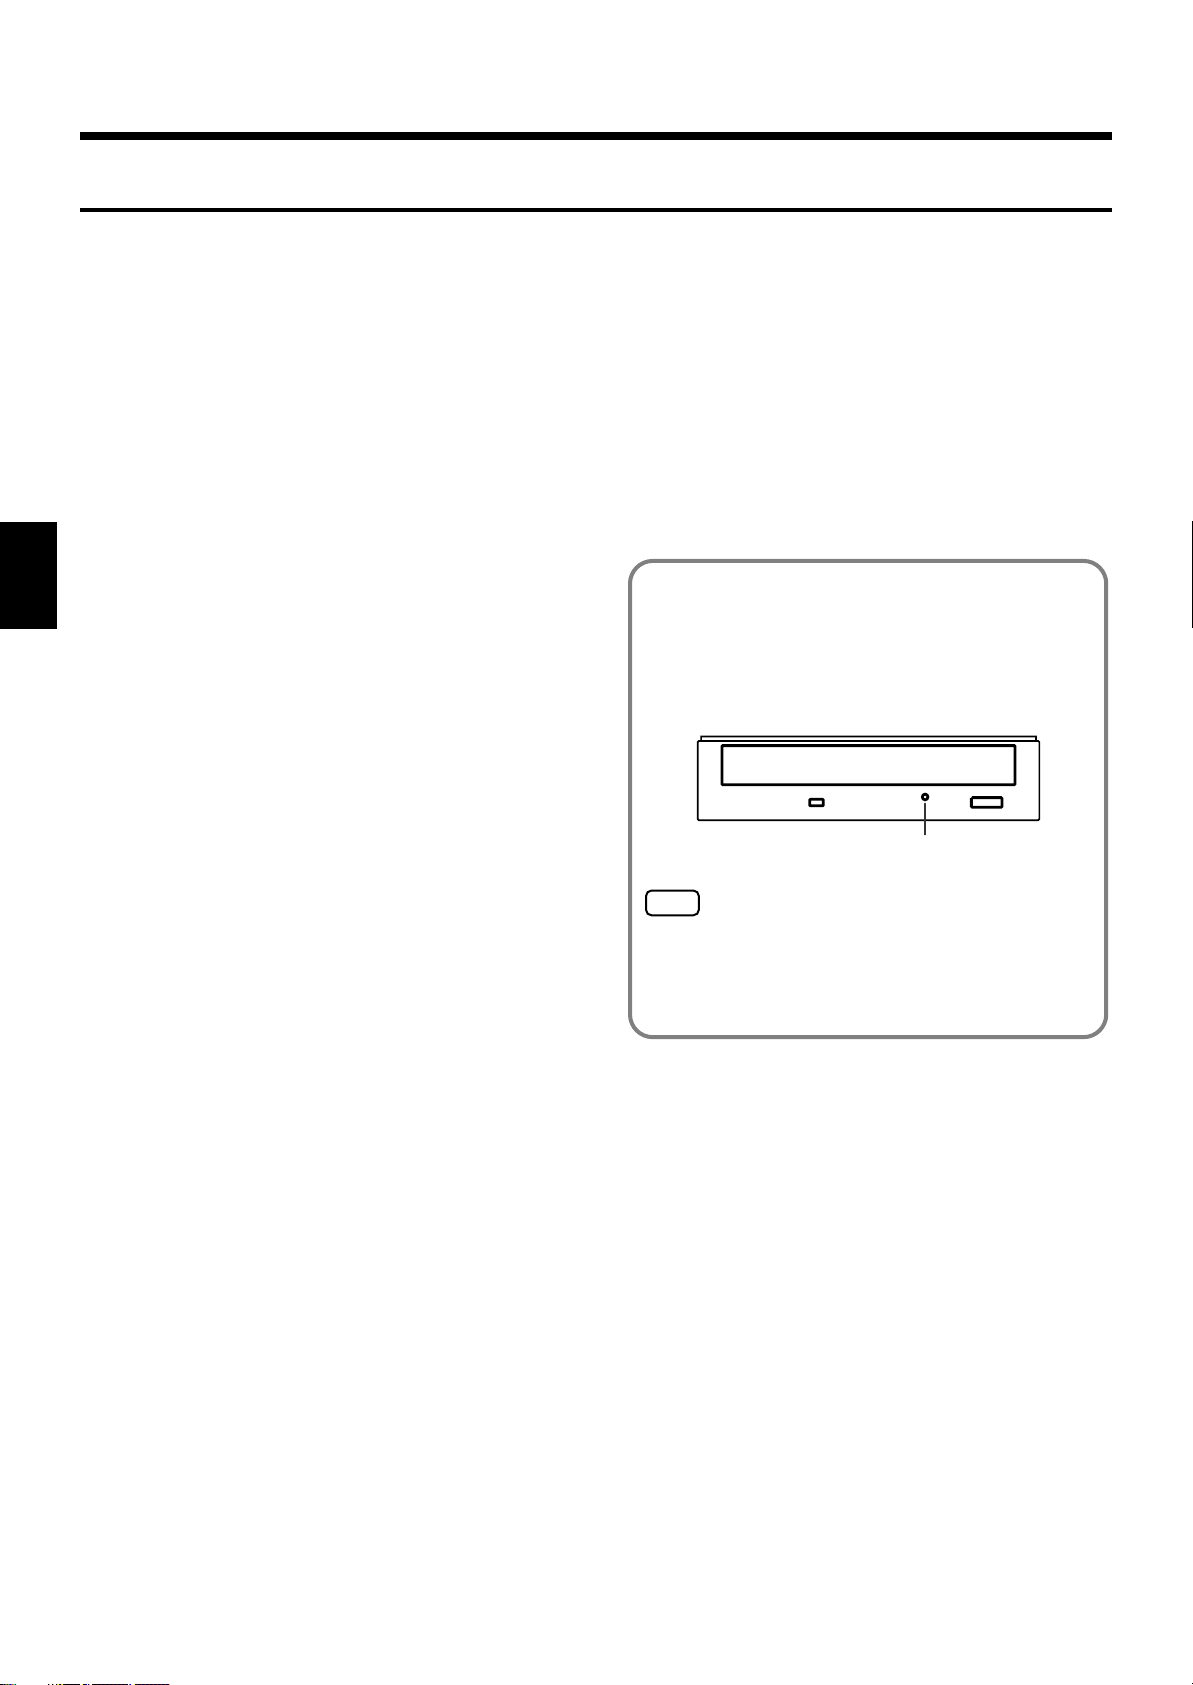
Chapter 3 Song Playback
NOTE
Emergency eject hole
Playing Back Songs on CDs
■
Cautions
Handling CDs
• Do not leave discs exposed to direct sunlight for extended
periods.
• Handle CDs with your finger and thumb, holding the disc
by the center hole and outer rim. Do not touch or scratch
the disc’s recording surface (the green side).
• Do not drop or stack discs.
• Do not place heavy objects on discs or subject them to
strong impact.
• Do not affix stickers or other such materials on the label
side. Placing stickers on the disc may result in errors when
Chapter 3
data writing and scratch the disc.
• Use a felt-tip marker or other soft-tipped implement to
write titles and other information on the label side of
discs.
• Store discs in their original cases or other suitable cases for
protection.
• Before using the CD, please read the warning on the CD
cover.
(Only for Instrument Equipped with CD Drive)
Insert the CD in the CD Drive
1.
Press the eject button and open a disc tray.
Put a CD on a disc tray.
2.
Press the eject button again to close the disc tray.
3.
Removing a CD
1.
Press the eject button and open a disc tray.
2.
Remove the CD from the disc tray.
If a disc tray does not open
If the power is turned off with the disc still in the drive
(such as due to a power failure), the disc tray cannot be
opened by pressing the eject button. In this case, you can
insert a piece of wire to force the tray open.
Cleaning Discs
• If a disc becomes dusty or soiled, gently wipe the disc
with a soft cloth. Always wipe outwards from the center
using light, gentle strokes. Do not wipe the disk in a
circular pattern.
Precautions Concerning Use of the CD
• CD-R/RW discs to which audio tracks have been added,
and CDs with mixed audio tracks and data will not play
back properly.
• The KR is capable of playing back only commercial CDs
that conform the official standards—those that carry the
“COMPACT DISC DIGITAL AUDIO” logo. The usability
and sound quality of audio discs that incorporate
copyright protection technology and other non-standard
CDs cannot be guaranteed.
• For more detailed information on audio discs featuring
copyright protection technology and other non-standard
CDs, please consult the disc vendor.
• You cannot save songs and styles to CDs, and you cannot
delete songs or styles recorded to CDs. Furthermore, you
cannot format CDs.
• The prescribed format for CD-R/RW discs is “ISO9660
Level 1 Mode 1.” You may be unable to read using other
formats.
Make sure the KR’s power has been turned OFF before
attempting to engage the emergency eject hole. If you insert
something while the power is on, the disc could be damaged, or
unexpected problems may occur.
82
Page 83

■
Playing Back Songs on CDs
You can play back the enclosed CD and CDs for player piano as well as audio CDs.
fig.panel3-1
Selecting the song
Chapter 3 Song Playback
Record/Playback buttons
Insert the CD you want to play back in the CD drive.
1.
Press the [Select/Listen to a Song] button.
2.
The following “Song Selection screen (CD)” appears.
Icon
Songs are played back in random order.
All songs are played back in the regular order, starting from
the selected song.
Explanation
Chapter 3
Wait a few moments after
placing the CD in the CD drive
for the display to change to the
Song Selection (CD) screen.
If using the CD drive for the
first time, refer to p. 82.
The selected song is played back. This changes to < >
while the song is playing back; playback stops when you
touch < >.
By touching an item with the < >, the songs in that folder
will be displayed.
By touching an item with the < >, you can close the
folder.
83
Page 84

Chapter 3 Song Playback
Press the remote control’s [ ] button or [ ] button to select a song to
3.
play back.
Use the [-] [+] buttons and the dial to select songs.
When Selecting Songs in Folders
1. Touch the folder name, then touch < >.
You can also use the remote control’s [ ] [ ] buttons, [-] [+] buttons, and
dial to select songs.
After a moment, a list of songs in the folder is displayed.
2. Touch a song from the list that appears to select the song you want to
play back.
Chapter 3
The selected song name appears at “0:.”
* Depending on the number of songs contained in a folder, this may take some
time.
If there is recorded song data,
the “Delete song” screen
appears.
If it’s okay to delete the song,
touch <OK>. If you do not
want to delete the song, touch
<Cancel>, and either save the
song to a floppy disk (p. 116)
or register the song to the
Favorites (p. 80).
Playing back
Press the [ (Play/Stop)] button.
3.
The button indicator lights up, and playback begins.
Stopping the Song
Press the [ (Play/Stop)] button once again.
4.
The button indicator light goes out, and the song stops.
When the song is finished, playback stops automatically.
Press the [ (Reset)] button to return to the beginning of the song.
Song Number <0:>
In the Song Selection screen,
the title of the currently
selected song appears at “0.”
Song Number “0” is used by
all genres. Recorded
performances are also stored to
“0.” The song in Song Number
“0” is erased when the power
is turned off.
84
Page 85

Using the Remote Control
Chapter 3 Song Playback
(Only for Instrument Equipped with CD Drive)
You can use the included remote control to easily start and stop performances and
switch songs.
■
Installing Batteries in the Remote Control
Install the batteries provided in the remote control.
Open the battery cover on the back of the remote control.
1.
2.
Insert the supplied AA batteries, as shown in the figure of remote
control.
3.
Close the battery cover.
■
How to Use the Remote Control
When using the remote control, aim the remote control at the infrared receiver,
keeping in mind the range of operation (below).
NOTE
No remote control is included
with models that are not
equipped with a CD drive.
NOTE
Be careful to observe
the correct polarity (+, -
direction) when installing
the batteries.
Chapter 3
Infrared Receiver
Range of operation
CD Drive
Remote Control
Distance:
4 m (approximately 13 feet)
Angle:
30 degrees to the left and right
of the receiver.
Precautions Concerning Use of the Remote Control
• The remote control is able to transmit only one operation at a time.
• The remote control may not operate even within the range of operation if there
is an obstacle between it and the main unit.
• Using the remote control near other equipment that uses remote control systems
may result in operational errors.
• The life of the battery depends on the amount and conditions of use. If the
operational range of the remote control decreases, change the batteries.
• If you will not be using the remote control for a long period of time, remove the
batteries.
85
Page 86

Chapter 3 Song Playback
■
About the Remote Control
Adding Effects to Mic
1
Vocals
Turning the Advanced
3D Function or Surround
2
Function On and Off
Selecting the Song Genre
3
Chapter 3
Infrared Emitter
Restoring the Original
“TONE,” “HARMONY,”
6
and “TRANSFORM”
Settings
Selecting the Tone of
the Part Activated by
7
the Keys
Switching the Screen of
8
the External Display
Starting and Stopping
Songs, Selecting
9
Previous and
Following Songs
4
Muting the Sound
Using the Function
5
Assigned to the [FUNC]
Button
You can also switch the functions for the
Please refer to “Changing the Functions of the Remote Control’s Buttons” (p. 167).
[]
(Play/Stop) button, the [FUNC] button, and the TEMPO [-] [+] button.
Changing the Volume
10
Changing the Tempo of
11
the Song and Automatic
Accompaniment
86
Page 87

Chapter 3 Song Playback
Button
TRANSFORM
1
HARMONY
2
3D
INTERNAL
3
CD
FD
MUTE
4
FUNC
5
CANCEL
6
TONE
7
8 DISPLAY
Explanation
This changes the vocals from the mic. You can also use this to change vocals on the
CD included with the instrument. The setting switches each time you press the
button, cycling through male, female, child, and normal voice settings.
This adds harmonies to the mic vocals. You can also add harmonies to vocals on the
included CD.
The harmony setting switches each time you press the button, cycling through
Music Files (p. 49), Oct-Up (p. 46), Oct-Down (p. 46), and normal voice settings.
This adds greater breadth to the sound. When the [Surround] button is set to
“Advanced 3D,” pressing this button toggles the Advanced 3D effect on and off.
When the [Surround] button is set to “Surround,” each press of this button takes
you to the next choice among the available selections, which are: Surround Effect
off, Surround Accompaniment, and Surround Reverb.
This switches the genres of the internal songs.
If a CD is inserted when you press the button, the CD is selected.
If a floppy disk is inserted when you press the button, the floppy is selected.
This mutes all of the sounds. The Moving Key function stops at this time.
You can use the function assigned to this button. You can also change the function
assigned to the button (p. 167).
This restores the [HARMONY] and [TRANSFORM] button settings to their original
condition. The [TONE] button is set to piano tone.
This changes the part that is currently active when the keyboard is played. The tone
is switched each time you press the button.
Each press of the button takes you to the next selection among the available choices,
which are, in order: song list, lyrics, score, score + keyboard, and user screen image.
You can press the [DISPLAY] button while the Tempo screen or Volume screen is
displayed to clear the Tempo screen or Volume screen.
* Some songs may not feature screens with lyrics or scores.
Chapter 3
9
VOL - +
10
(Volume)
11 TEMPO - +
When you press the [ ] button while the song is stopped, the previous song is
selected. Pressing the [ ] button while a song is playing returns you to the
beginning of that song.
This starts and stops playback of the song.
Playback alternately starts and stops each time you press the [ ] button.
You can also assign functions to the button (p. 167).
When you press the [ ] button, the next song is selected.
You can adjust the volume.
* If the volume is set to 0 with the VOL [-] [+] buttons, then no sounds will be
played, even if you try to raise the volume with the KR’s [Volume] knob. To raise
the volume, use the VOL [-] [+] buttons as well.
➝
You can use the Memory Backup function to store these settings to the KR
(p. 164).
This adjusts the tempo.
You can also assign functions to the button (p. 167).
* You cannot change the tempos for CDs.
87
Page 88

Chapter 4 Practice Functions
Displaying the Score
The KR can display scores not only for the internal songs, but for music files and
performances recorded with the KR. This is very convenient for performing while
reading the music and for checking songs that have been recorded. When you play
back a music file with lyrics, the lyrics appear on screen.
Selecting the song
When playing back songs on floppy disks, first insert the floppy disk in the disk
drive.
Press the [Select/Listen to a Song] button to select a song.
1.
For details refer to “Playing a Song” (p. 77).
2.
Press the [Score Display] button.
The “Score screen” appears.
fig.d-score.eps_60
NOTE
The functions described in
“Chapter 4 Practice Functions”
cannot be used during
playback of songs on CDs.
Chapter 4
Icon
Displays an enlarged score.
You can also display the note names.
The score and keyboard are displayed. This allows you to
check the keys that are pressed for the sounds played back.
Selects the part for which the score is displayed.
* You can specify the track or part to be displayed with
<Option> (p. 90).
<Option> Makes detailed settings for the score display (p. 90).
<Tutor>
<Replay>
This allows you to practice the song repeatedly while reading
the music (p. 92).
The left pedal functions as the “Replay.” When you press the
pedal during the playback of the song, playback stops, and
when you release the pedal, playback resumes starting at the
beginning of that measure. When the pedal is pressed in rapid
succession, playback is returned the same number of
measures as the number of times the pedal is pressed.
In situations such as when you want to hear a difficult phrase
repeated a number of times, you can press the pedal to go to
an earlier point in the song.
Explanation
In some internal songs, the
fingering is displayed.
The fingering numbers shown
in the screen indicate one
possible fingering.
Chord names can be displayed
in some of the internal songs
and recorded performances
using the KR’s Chord
Sequencer (p. 134).
88
Page 89

Chapter 4 Practice Functions
Press the [ (Play/Stop)] button.
3.
Playback of the song begins, and the score advances along with the progression of
the performance.
Notes Regarding the Score Display
• When playback of a song begins, appears in the Score screen. While this
symbol is displayed, performance data is being loaded from floppy disk or
internal memory. It may take thirty seconds to a minute or more to read the
data. Please wait.
• The displayed scores are based on music files. Priority is placed on the
readability of the displayed music, not on the accurate rendition of difficult,
high-level performances. Thus, there may be discrepancies seen when compared
with commercially available printed music. The display is not intended for
viewing advanced songs requiring precisely detailed scores, or complex songs.
• On the score display screen, lyrics and notes may extend beyond the range
displayed on the screen and may not be visible.
• Playback may start over from the beginning if you display the score or change
the displayed part during playback of the song.
NOTE
No notes are shown in the
score if the selected part
contains no data. To change
the part being displayed, refer
to “Making Detailed Settings
for the Score Display” (p. 90).
Chapter 4
■
Touching Notes to Confirm the Sounds
(Touch the Notes)
In the Score screen, you can have notes played by touching the notes on the screen.
When you touch < > to show the keyboard on the screen, the touched note is
indicated by the corresponding note on the keyboard. This allows you confirm notes
by sight, sound, and touch.
In addition, when you trace part of the score with your finger, the traced segment is
played back. This allows you to easily play back phrases you like.
fig.d-score-key.eps_60
You can operate the keys on
instruments featuring the
Moving key function (p. 168).
89
Page 90

Chapter 4 Practice Functions
■
Making Detailed Settings for the Score Display
You can change the part appearing on the score display and change the manner in
which the score is displayed.
Press the [Score Display] button to display the Score screen.
1.
Touch <Option>.
2.
A screen like the one shown below appears.
fig.d-scoreopt.eps_60
Switch the screens
Chapter 4
3.
Touch for the parameter being set to select the value.
Touch <Exit> to return to the Score screen.
Item
Lyrics
Sets whether or not the lyrics
appear in the score.
Finger Numbers
Whether or not the fingering
appears in the score.
Chords
Whether or not chord names
appear in the score.
Pitches
Sets whether or not the note
names appear in the music
when the score is expanded.
Clef L
Determines whether a treble or
bass clef is shown in the score
for the left-hand part.
Clef R
Determines whether treble or
bass clef is shown in the score
for the right-hand part.
Key
Score is displayed in the
specified key.
ON The lyrics are displayed.
OFF Not displayed.
ON The fingering is displayed.
OFF Not displayed.
ON The chord names are displayed.
OFF Not displayed.
OFF Not displayed.
C, D, E The pitch names (C, D, E) are displayed.
Do, Re, Mi
(Fixed)
Do, Re, Mi
(Movable)
Auto Display is switched automatically.
G Clef G (treble) clef is displayed in the score.
F Clef F (bass) clef is displayed in the score.
Auto Display is switched automatically.
G Clef G (treble) clef is displayed in the score.
F Clef F (bass) clef is displayed in the score.
Auto Key is switched automatically.
b x 5–0–
# x 6
The pitch names (fixed Do) are displayed.
The syllable names (movable Do) are
displayed.
Score is displayed in the specified key.
Setting
In some internal songs, the
fingering is displayed.
The fingering numbers shown
in the screen indicate one
possible fingering.
Chord names can be displayed
in some of the internal songs
and recorded performances
using the KR’s Chord
Sequencer (p. 134).
90
Page 91

Chapter 4 Practice Functions
b
Item
User Part
Selects the part to display when “User” is selected as
the part to be displayed.
Lower Part
Selects the part to display when “Lower” is selected as
the part to be displayed.
Upper Part
Selects the part to display when “Upper” is selected as
the part to be displayed.
■
Saving Scores as Image Data
You can take scores that are displayed on the KR and save them to floppy disks. You
can also use saved image data to your computer.
Insert the floppy disk onto which you want to save the image data in the
1.
KR’s disk drive.
Use a floppy disk formatted on the KR.
For more on formatting disks, refer to p. 114.
2.
Press the [Select/Listen to a Song] button to select a song.
Setting
User Track,
Parts 1–16
Lower Track,
Parts 1–16
Upper Track,
Part 1–16
NOTE
Other than for your own
personal enjoyment, use of the
scores that are output without
the permission of the
copyright holder is prohibited
y law.
Chapter 4
3.
Press the [Score Display] button.
The Score screen appears.
Touch <Option>.
4.
Touch <Export>.
5.
A screen like the one shown below appears.
fig.d-scorebmp.eps_60
6.
Touch for each parameter to set the range of the image data.
NOTE
Do not remove the floppy disk
7.
Touch <Execute>.
The score is saved to the floppy disk as image data in BMP (bitmap) format.
.
while “save” is in progress.
91
Page 92
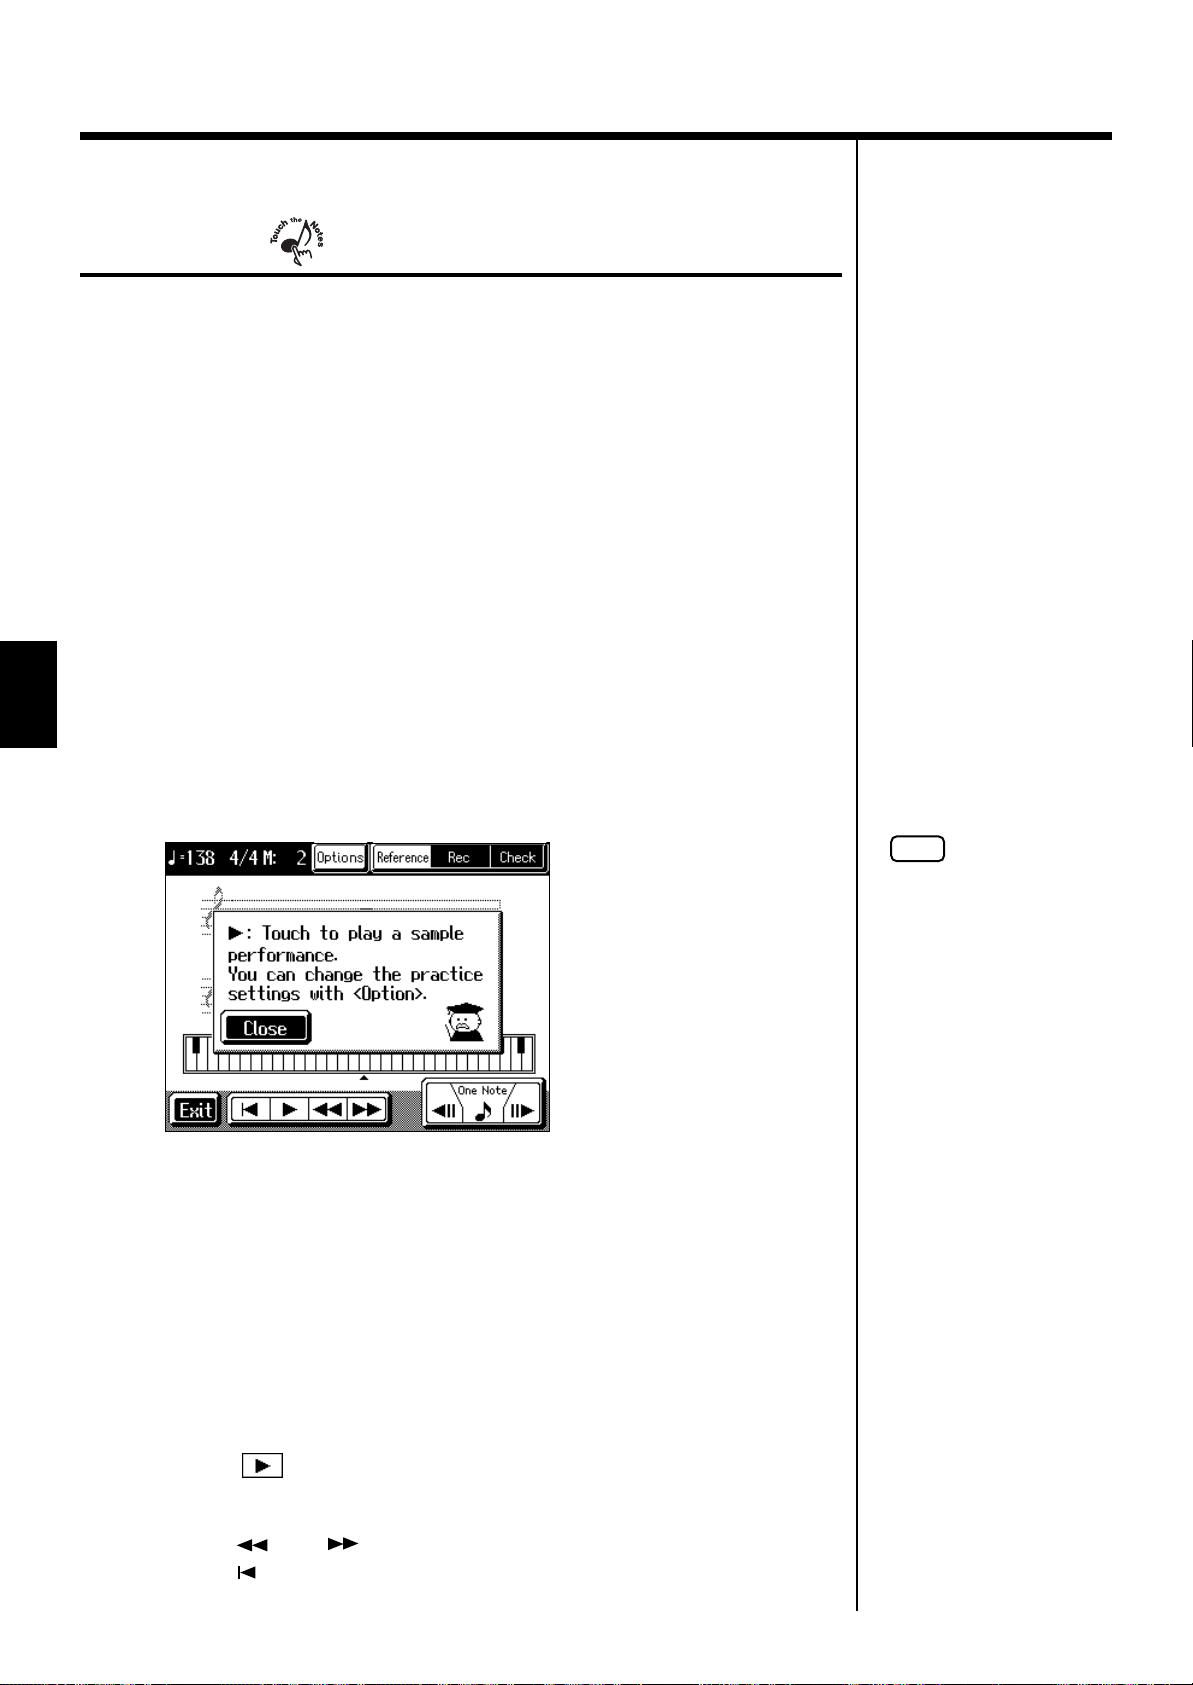
Chapter 4 Practice Functions
Practicing Songs with the Practice Function
Try using the KR’s practice function to practice a song you like.
This feature makes it simple to specify the segment you want for repeated practice,
check your own performance against the score, and practice at a slower tempo.
❍
1 Displaying the Score Screen
Selecting the song
Press the [Select/Listen to a Song] button to select the song you want to
1.
practice.
For more on how to select songs, refer to p. 77.
Displaying the Score screen
2.
Press the [Score Display] button.
Chapter 4
3.
❍
Listening to a reference of the Performance
The Score screen appears.
Touch <Tutor>.
The following “Tutor screen” appears.
fig.d-tutor1.eps_60
NOTE
When you select this function
after turning on the power, a
message screen like the one
shown in the figure at left
appears only once.
When the Message screen appears, touch <Close>.
2 Practicing
First, listen to the song you are going to practice.
Once you’re familiar with the song, practice it a number of times along with the
example.
92
Touch <Reference>.
1.
When the Message screen appears, touch <Close>.
2.
Touch < > on the screen.
The example performance is played back.
Touch < > or < > to rewind or fast forward within the practice range.
Touch < > to return to the beginning of the practice range.
Page 93

Chapter 4 Practice Functions
b
b
Touch the Notes
When you touch a note on the Practice screen, the KR plays that note.
When you trace along the displayed score with your finger, the KR plays the traced
segment.
One Note
When you touch < >, the KR plays the note currently indicated by the bouncing
ball. When you touch < > or < >, you can return or advance one note at a time
to check the notes.
➝ On instruments equipped with the Automatic Keyboard function, the automatic
keyboard will move.
When the Transpose function
(p. 103) is set to ON, the
original tone is sounded when
you touch notes or <One
Note> on the screen.
Chapter 4
Recording Your Performance
Once you are able to play the song, try recording your own performance.
3.
Touch <Rec>.
When the Message screen appears, touch <Close>.
Touch < > on the screen.
4.
You’ll hear a count, and recording begins.
Play along with the accompaniment.
Checking Your Performance
Compare your recorded performance with the example.
Touch <Check>.
5.
When the Message screen appears, touch <Close>.
6.
Touch < > on the screen.
The Check screen display compares the example performance with your own
performance.
Analyze and practice any trouble spots.
Changing the Performance
Played Back in the Check
Screen
You can switch the
performance that is played
ack by touching the score for
“User” or “Reference” in the
Check screen.
When the keyboard is
displayed in the Check screen,
touch <User> or <Reference>
to switch the performance to
e played back.
❍
3 Changing the practice settings
Immediately after turning on the power, all measures are set for practice at the
original tempo.
In the beginning, you’ll probably want to select specific phrases, and practice that
material repeatedly at a slower tempo.
1.
Touch <Options>.
A screen like the one shown below appears.
93
Page 94

Chapter 4 Practice Functions
fig.d-tutoropt.eps_60
Switch the screens
Parameter
Part
Range
Chapter 4
Tempo
Accomp
Tone
Check
Set
Value Explanation
Left Hand,
Right Hand,
Both Hands
1–
Original Tempo,
A Little Slower,
Slower,
Much Slower
On, Quiet, Off
Do Re Mi,
Original
Score, Keyboard
Selects the part or parts to be practiced.
Specifies measures for practice.
Most of the KR’s internal songs have markers set in order
to make repeated practice easier. You can specify the
markers’ range by touching <Prev> or <Next>.
Selects the practice tempo.
When “On” is selected, song accompaniment parts are
also played back.
When “Quiet” is selected, song accompaniment parts are
played back at a lower volume.
When “Off” is selected, song accompaniment parts are
muted.
Selects the tone played when the notes are touched.
When “Original” is selected, a original tone for the song is
selected.
When “Do Re Mi Voice” is selected, the notes are “sung”
as “Do-Re-Mi.”
Selects whether the score display or the keyboard display
is used in demonstrating the example performance and
your own recorded performance in the Check screen.
When the Transpose function
(p. 103) is set to ON, the
original tone plays even if
“Tone” is set to “Do Re Mi.”
94
2.
Touch the icon for the parameter you want to set.
The selections appear.
Touch the setting icon.
3.
Repeat Steps 2 and 3 to set each of the parameters.
Set the tempo, practice range and other variables to the values you prefer.
Touch <Audition>.
4.
The practice range is played back using the selected settings.
5.
Touch <Exit>.
You’re returned to the Practice screen.
Page 95

Adjusting the Tempo
This changes the song and Music Style tempos.
If songs seem difficult to play at their original speed, you may find it helpful to first
practice with the tempo slowed down. Then, after becoming more familiar with the
song, you can practice it at a gradually faster tempo.
Changing the tempo has no effect on the pitch of the notes. And you can change the
tempo even when the song is in progress.
fig.panel3-2
Chapter 4 Practice Functions
Adjusting the tempo with the Tempo [-] [+] buttons
Pressing the [+] button once increases the tempo by one unit. Holding down the
button makes the tempo increase continuously.
Pressing the [-] button once decreases the tempo by one unit. Holding down the
button makes the tempo decrease continuously.
Pressing the [-] [+] buttons simultaneously returns the selected Music Style or song
to the basic tempo.
Adjusting the tempo with the dial
When the tempo is displayed at the upper-left area of the screen (except at the
Rhythm screen (p. 56)), you can use the dial to adjust the tempo.
Turn the dial clockwise to speed up the tempo.
Turn the dial counterclockwise to slow the tempo.
Chapter 4
95
Page 96

Chapter 4 Practice Functions
■
Setting the Tempo by Pressing the Button in Time (Tap Tempo)
You can also set the tempo by pressing the Performance Pad. This feature is called
“Tap Tempo.” By using the Tap Tempo function, you can quickly set the tempo you
are thinking of, without specifying the tempo in numerical terms.
fig.panel3-3
Assigning functions to the Performance Pads
Press the [User Function] button and watch the indicator light up.
1.
fig.d-usrfunc.eps_60
Chapter 4
2.
3.
Specifying the Tempo
4.
Touch for the Performance Pad to which the function is
assigned, then select “Tap Tempo.”
Touch <Exit>; the tempo is indicated in the upper left of the screen.
Press the Pad to which “Tap Tempo” is assigned at least twice.
The tempo is set to the rhythm you used when tapping the button.
You can also assign the Tap
Tempo function to the pedal,
and use the pedal to specify
the tempo. For details, refer to
“Assigning Functions to
Pedals and Performance Pads
(Pedal Setting/User
Functions)” (p. 157).
96
Page 97

■
Use Your Voice to Select the Tempo (Vocal Tap Tempo)
Just as in “Tap Tempo Function” (p. 96), you can set tempos using your voice. This
feature is called “Vocal Tap Tempo.”
1.
Connect a microphone (p. 22).
Press the [Metronome] button.
2.
3.
Touch <Vocal Tap>.
fig.d-vocaltap.eps_60
Chapter 4 Practice Functions
Vocal Tap Tempo does not
function well when the mic
volume is too low. Adjust the
volume level with the Mic
[Volume] knob.
4.
Count to four (“One, two, three, four”) into the mic.
The tempo is set to the beat you used speaking into the microphone. The new tempo
setting is indicated in the screen.
After setting the tempo, touch <Exit> and you’re returned to the Metronome screen.
■
Playing Back at a Fixed Tempo (Tempo Mute)
If a song has tempo changes, it helps to practice the song first at a steady tempo.
Overriding tempo changes is called “Tempo Muting.”
1.
Hold down the [ (Play/Stop)] button and press one of the Tempo [-]
[+] buttons.
When tempo muting is in effect, the tempo display appears in reverse video.
fig.d-tempmute.eps_60
You can start the song by
giving the count through the
microphone. For more detailed
information, refer to “Enabling
the start of songs and
automatic accompaniment
with the sound of your voice
(Vocal Count-In)” (p. 48).
Chapter 4
When you play back the song, it will play at a constant tempo.
Cancel the tempo mute setting
1.
Hold down the [ (Play/Stop)] button and press one of the Tempo [-]
[+] buttons.
Tempo muting is canceled.
Tempo Mute will also be cancelled when you select a different song.
97
Page 98

Chapter 4 Practice Functions
b
Match the Tempo Before You Begin Playing (Count In)
When you’re playing along with a song, you can listen to the tempo before you start
playing by adding a count-in.
This audible count before the song playback is called a “Count-In.”
fig.panel3-3
1.
Press the [Metronome] button and watch the indicator light up.
The Metronome screen (p. 52) appears.
Chapter 4
2.
3.
Cancelling the Count In
If you are not using the metronome, press the [Metronome] button so its indicator
goes out.
Touch <Count In>.
The following “Count In settings screen” appears.
fig.d-cntin.eps_60
You can have a count sound be
played before the song starts
playing back by holding down
the [Reset] button while you
press the [Play/Stop]
utton.The status of the
<Count In> settings won’t be
affected by your use of this
procedure.
Touch <Switch> to set this to “ON.”
With this setting, two measures count down before the song playback starts.
In the Metronome screen, touch <Count In>.
1.
Touch <Switch> to set this to “OFF.”
2.
This sets the KR so that the count sound is not played.
For more about other settings
on the Count-In settings
screen, refer to “Settings for
the Count-In” (p. 160).
98
Page 99

Muting Some Parts Before Playing
b
b
(Track Buttons)
Chapter 4 Practice Functions
With commercially available music files for piano lessons, the part for each hand can
be played back independently. This makes it easy to practice hands separately. For
example, you can follow along with your right hand while you listen to that same
right-hand part be played, or you can practice the left-hand part while the right-hand
part plays.
A music file for piano lessons may be assigned to the five Track buttons as shown below.
fig.trackbuttons.e
Drums/SFX Accom-
By using these Track buttons, you can eliminate the sound of specific parts. This is
referred to as “muting.”
By recording your own performances to the Track Buttons in this fashion, you can
mute parts the same way. For details, refer to “Recording While Selecting the Track
Buttons (Redoing Recordings)” (p. 111).
1.
Select the song that you wish to play back (p. 77).
paniment
Left-hand
Par t
For more on music files, refer
to “Music Files That the KR
Can Use” (p. 201).
Right-hand
Par t
Chapter 4
If a single Track button
includes more than one
instrument and you want to
mute just one of those
instruments, take a look at
“Modifying the Settings of
Each Part” (p. 128).
Selecting the part that you’ll be playing
Press any one of the Track buttons to make the button’s indicator light go
2.
dark.
The sound for the selected part no longer plays.
For example, when practicing the right hand, press the [4/Upper] button.
When you play back the song, the right-hand performance will not sound. Practice
your right-hand performance along with the left-hand playback.
Playing back a song
3.
Press the [ (Play/Stop)] button.
The song will begin playing back.
The part you selected in step 2 will not sound.
Once again press the button you selected in step 2. The button’s indicator will light
up, and the part will be heard once again.
Even while the song is playing, you can press the track buttons to mute or un-mute
the sound.
Stopping the song
Press the [ (Play/Stop)] button.
4.
The song will stop.
When a single Part is not
played, it is called “Minus
One.” Using Minus One, you
can mute out a particular
instrument and play the part
yourself.
When playing back SMF files
for Roland Piano Digital series
instruments, and the [3/
Lower] button and [4/Upper]
utton do not correctly control
the left/right-hand
performances, please change
the “Track Assign” settings.
Please refer to “Changing the
Parts Assigned to the Track
Buttons During SMF Playback
(Track Assign)” (p. 170).
You can adjust the balance
etween the keyboard and
song volume levels. Check out
“Adjusting the Volume
Balance for Each Part
(Balance)” (p. 75).
99
Page 100

Chapter 4 Practice Functions
Setting Markers for Repeated Practice (Marker)
By setting markers at points in a song that you want to practice repeatedly, you can
then easily go to and repeat play back of the selected measures.
■
Placing a Marker within a Song
You can place two separate markers (Marker A and Marker B) in one song. These
markers are placed at the beginning of a measure to make the beginning and end of
a section of music. Placing markers is a handy way to start playback at the same
place as many times as you like. You can add markers or move to a marker even
while playback is in progress.
Access the Marker screen
First, select the song in which you’ll set the markers (p. 77).
1.
Press the [Menu] button.
Chapter 4
2.
Placing Markers
3.
Touch to switch the screens.
Touch <Marker>.
The Marker screen appears.
fig.d-marker.eps_60
Go to the measure where you want to set a marker using the [ (Bwd)]
and [ (Fwd)] buttons.
4.
5.
100
Touch <- - -> for Marker A.
Marker A is placed at the beginning of the measure you selected.
“- - -” on the screen will change to the number of the measure where you placed the
marker.
In the same way, touch the Marker B <- - -> to set Marker B.
It is not possible to assign marker B to the same location or a measure before marker A.
Markers can also be assigned
in units of beats rather than
measures. Refer to “Placing a
Marker in the Middle of a
Measure” (p. 160).
 Loading...