

Roland Kiwi-8P User Manual


Table of Contents
Kiwi-8P Features................................................................6
Kiwi 8P Flow Chart............................................................7
Kiwi 8P Front Panel...........................................................8
Front Panel Description.....................................................9
RED BUTTONS...........................................................................................................9
WRITE BUTTON.........................................................................................................9
MIDI PANIC BUTTON.................................................................................................9
CANCEL BUTTON......................................................................................................9
GREY EDIT BUTTONS.............................................................................................10
MASTER TUNE BUTTON........................................................................................10
MIDI BUTTON..........................................................................................................10
NAME BUTTON.......................................................................................................10
PARAMETER BUTTON............................................................................................11
CONTROL BUTTONS...............................................................................................11
HOLD BUTTON........................................................................................................11
ARP BUTTON...........................................................................................................11
SEQ BUTTON...........................................................................................................11
KEY MODE BUTTON................................................................................................11
CHORD BUTTON.....................................................................................................12
GLOBAL TEMPO BUTTON.......................................................................................12
KEY TRANSPOSE.....................................................................................................12
TAP TIMER................................................................................................................12
SYSEX DUMP...........................................................................................................13
QUICK EDIT BUTTON..............................................................................................13
NAME EDIT LEFT.....................................................................................................13
NAME EDIT RIGHT...................................................................................................13
GREEN BUTTONS....................................................................................................14
GROUP 1-8...............................................................................................................14
BLUE BUTTONS.......................................................................................................15
BANK 1......................................................................................................................15
BANK 2......................................................................................................................15
BANK 3......................................................................................................................15
BANK 4......................................................................................................................15
BANK 5......................................................................................................................15
BANK 6......................................................................................................................16
BANK 7......................................................................................................................16
2
www.kiwitechnics.com JX-8P Upgrade User Manual v130

BANK 8......................................................................................................................16
RED BUTTONS.........................................................................................................17
TONE 1-8..................................................................................................................17
PG-800 Support..............................................................18
PG-800......................................................................................................................18
Performance Control Section..........................................19
Pitch Bender Range.................................................................................................19
LFO Trigger...............................................................................................................19
Portamento...............................................................................................................19
Aftertouch..................................................................................................................19
JX-8P Upgrade Notes......................................................20
Digital Oscillators......................................................................................................20
Front Panel Buttons..................................................................................................20
Tuning.......................................................................................................................20
Display......................................................................................................................21
Factory Presets.........................................................................................................21
Midi Received...........................................................................................................21
Midi Panic.................................................................................................................21
Note Hold..................................................................................................................21
Edit Buffer Compare.................................................................................................21
LFO Generators........................................................................................................22
Envelopes.................................................................................................................22
3
Sequencer.......................................................................23
Sequencer Writing / Editing.....................................................................................24
C) Playing.................................................................................................................26
Arpeggiator......................................................................27
Chord Mode....................................................................28
Parameter Editing............................................................29
DCO Parameters.......................................................................................................29
VCF Parameters........................................................................................................30
LFO Parameters........................................................................................................30
Modulation Matrix.....................................................................................................31
VCA Level..................................................................................................................33
VCA LFO Level..........................................................................................................33
VCA LFO Select........................................................................................................33
VCA ENV Select........................................................................................................33
VCA Dynamics..........................................................................................................33
www.kiwitechnics.com JX-8P Upgrade User Manual v130

Chorus......................................................................................................................33
Voice Assign Mode...................................................................................................34
Voice Mode Steal......................................................................................................34
Voice Mode Staccato................................................................................................34
Detune.......................................................................................................................34
Analogue Feel...........................................................................................................34
Seq One Shot...........................................................................................................34
Seq Key Down Play..................................................................................................35
Seq Auto Transpose.................................................................................................35
Seq Auto Trans Reset...............................................................................................35
Sequence Complete.................................................................................................35
Patch Clock...............................................................................................................35
ARP Step Timing.......................................................................................................35
SEQ Step Timing......................................................................................................36
ENV ADSR................................................................................................................36
ENV KEY...................................................................................................................36
Quick Edit Assign.....................................................................................................36
Mod Wheel Destination...........................................................................................36
Mod Wheel Level......................................................................................................36
AT Destination...........................................................................................................37
GLOBAL PARAMETERS...........................................................................................37
Device ID...................................................................................................................37
Master Clock Source................................................................................................37
Midi Clock Gen.........................................................................................................37
Mod Wheel Level......................................................................................................37
Aftertouch Level Multiplier........................................................................................37
Not Used...................................................................................................................37
Hold Pedal Mode......................................................................................................38
Cart Import................................................................................................................38
Factory Reset............................................................................................................38
4
Setting up with External Devices.....................................39
Importing/Exporting Tones..............................................40
Importing Tones........................................................................................................40
Exporting Tones........................................................................................................40
Firmware Updates...........................................................42
Test Mode........................................................................43
Upgrade install................................................................44
www.kiwitechnics.com JX-8P Upgrade User Manual v130

Adjustments for the JX-8P...............................................53
Midi Data.........................................................................55
Continuous Controllers............................................................................................56
Real Time Commands..............................................................................................60
Midi Sysex Support.........................................................61
Midi Sysex Data........................................................................................................62
5
www.kiwitechnics.com JX-8P Upgrade User Manual v130

6
Kiwi-8P Features
• 512 Tones can be stored and edited. It is also possible to temporarily edit any Tone
• Tones are stored in Flash memory so no battery is required.
• MidiCC & Sysex support for all parameters and Midi Sysex support for Tone Dump & Load
• PG-800 Support for Control of Parameters
• Key Assign Modes are Poly Single, Poly Dual, Poly Triple, Unison & Solo
• Each Key Assign mode can have Rotate/Reassign, Staccato/Legato, Steal/No Steal with five steal modes (Highest,
Lowest, Oldest, Newest, Quietest)
• Portamento in all modes
• DCO Key Assign Detune available in all key modes except Solo. In addition there is a 'Analog Feel' parameter that
add an adjustable small random frequency to each note. Detune is best used with Poly Dual, Poly Triple or Unison
keying modes for greatest effect
• Three independent envelope generators. These are traditional ADSR type and are modeled on the Original JX-8P.
Each ENV Mod can select from ENV 1 - 3 and has an Inverted or Normal modes. These are faster than the traditional
JX-8P envelopes
• Three independent Low Frequency Oscillators with 6 waveforms each. Each LFO Mod can select from LFO 1-3.
LFOs can be plus and minus base note or plus base note only.
• Aftertouch scaling option to help with the failing 8P aftertouch strip.
• Key transpose allows transposition to any key with a range of plus 2 or minus 1 octaves. Sequencer key can be
shifted while playing
• Internal Master Clock with the range 5-299 BPM.
• Full Matrix mod system that can channel any mod source to any destination. The matrix mod control parameter can
itself be modified from various sources making the matrix very powerful
• A quality Front Panel Overlay is provided with the Kiwi-8P upgrade
CHORD MODE
• Any chord with up to 6 notes can be set and played from any key
ARPEGGIATOR
• The Arpeggiator is clocked from the Master Clock and can be independently divided to Half Note, Quarter Note, 1/8
Note, 1/8 Note Half Swing, 1/8 Note Full Swing, 1/8 Note Triplets, 1/16 Note, 1/16 Note Half Swing, 1/16 Note Full
Swing, 1/16 Note Triplets, 1/32 Note, 1/32 Note Triplets, 1/64 Note.
• Arp modes are Up, Down, Up and Down, Random, As Played, 1, 2, 3 or 4 octaves
• Arp can be Started, Stopped & Continued using Midi Commands
• Appeggiator will Output Midi Data
SEQUENCER
• 8 separate 124 Max step Polyphonic sequences can be created and stored
• Sequences can be edited
• The Sequencer is clocked from the Master Clock and can be independently divided to Half Note, Quarter Note, 1/8
Note, 1/8 Note Half Swing, 1/8 Note Full Swing, 1/8 Note Triplets, 1/16 Note, 1/16 Note Half Swing, 1/16 Note Full
Swing, 1/16 Note Triplets, 1/32 Note, 1/32 Note Triplets, 1/64 Note.
• Sequencer will Output Midi Data
• Sequencer tracks can optionally be used to control parameters or output midi data
www.kiwitechnics.com JX-8P Upgrade User Manual v130

Kiwi 8P Flow Chart
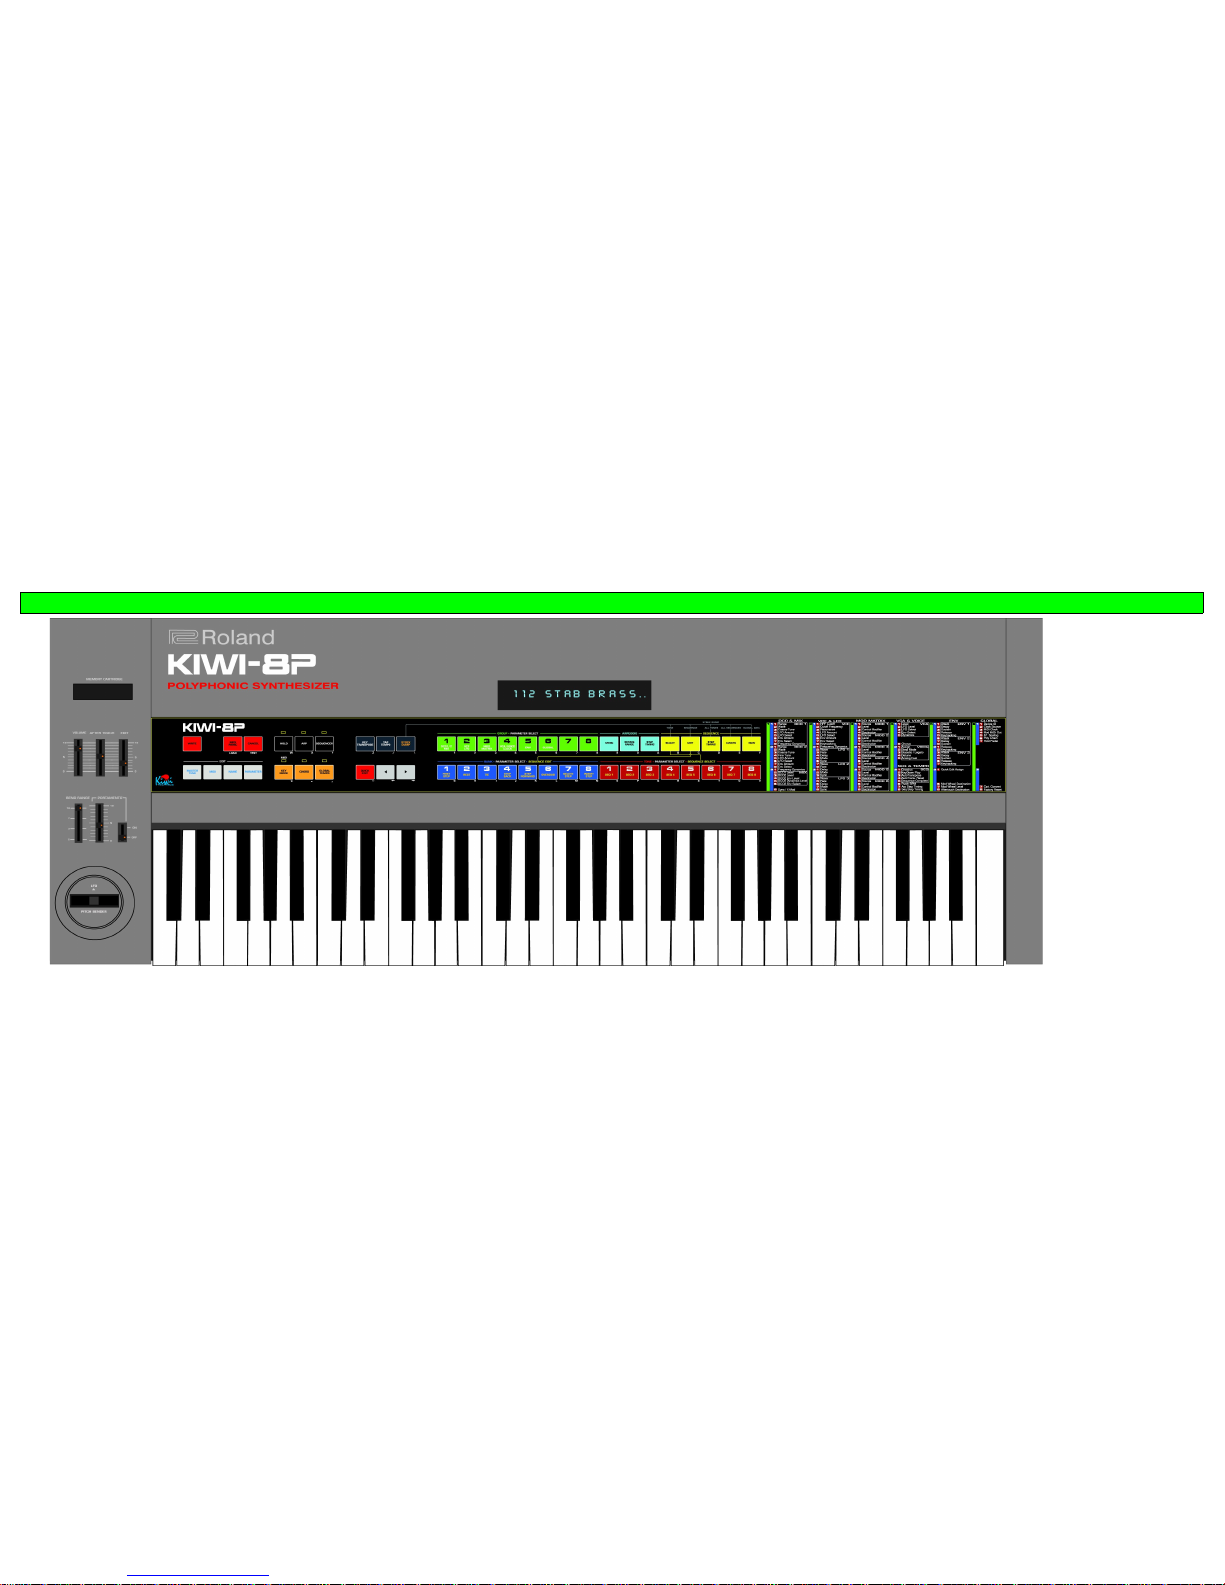
Kiwi 8P Front Panel
9
Front Panel Description
The Kiwi-8P front panel differs from the original 8P in a number of ways and the Kiwi-8P Upgrade redefines most of the
buttons on the Roland JX-8P. Many of the buttons have been assigned new functions and others now operate differently. An
overlay label is supplied with the upgrade that fits over the existing JX-8P front panel label. This has the additional benefit of
fixing the very common label cracking that occurs on the jx-8p front panel
The new layout can be seen on the front panel layout on the previous page.
Because of the number of parameters in the Kiwi-8P the parameter editing system has also been altered. Each parameter
has a three button addressing system that looks like G1 B1 T1. These refer to the Group buttons 1-8, Bank buttons 1-3 &
Tone buttons 1-8.
Most of the other buttons have also changed use and function and are described here in more detail.
RED BUTTONS
WRITE BUTTON
MIDI PANIC BUTTON
The WRITE button has different
operation depending on the mode
the Kiwi-8P is currently in.
For writing a Tone to permanent
memory in normal play mode simply
press WRITE followed by the Group
(1-8), Bank (1-8) and Tone (1-8). The
actual write is done when the Tone
button is pressed and the Group and
Bank buttons are optional. If the
Tone you wish to save is in the same
Group or Bank you can skip
selecting these again.
A Tone can be easily copied from
one location to another by selecting
a different Group and/or Bank before
pressing the Tone button.
The MIDI PANIC will stop all sound
from the Kiwi-8P.
This button is also used to put the
Kiwi-8P into update mode. This is
done by holding down this button
during power on.
If you are editing a sequence then the
editing can be finished by pressing
the Write if you wish to save the seq to
permanent memory. To save a
sequence press WRITE followed by
Tone 1-8. The Group and Bank are not
used for Sequences.
If the memory is protected then an
error message will display when a
write is attempted.
To perform a FACTORY RESET which
will clear all memory hold WRITE and
MIDI PANIC down as you power on
the Kiwi-8P.
Warning – this will clear all memory
in the synth and there will be no
confirmation.
CANCEL BUTTON
The CANCEL button will exit most
operations. The Arp & Seq Step
Timing button edits will need to be
exited via the same Step Timing
button.
This button is also used to put the
Kiwi-8P into test mode. This is done
by holding down this button during
power on.
www.kiwitechnics.com JX-8P Upgrade User Manual v130

GREY EDIT BUTTONS
10
MASTER TUNE
BUTTON
MIDI BUTTON
The MASTER TUNE button allows the
synth global fine tune to be set.
The Tune is changed by moving the
EDIT slider.
The MIDI button allows the synth
global midi options to be set. These
will be memorised and retained when
the power is turned off.
The button will cycle though the seven
global midi parameters and the value
is changed using the Edit Slider
1) Midi In – This can be 1-16 or Omni
If omni is set any midi channel is
recognised by the Kiwi-8P
2) Midi Out - This can be 1-16
3) Seq Midi Out - This can be 1-16
and will only apply to notes from the
sequencer output
4) Soft Through – There are four
possible options.
Stop All – No incoming midi is sent
out the Midi Out
Pass All – All incoming midi is sent out
the Midi Out
Pass Only Non CC – All Midi except
CC is passed to Midi Out
Stop Used CC – All Midi is passed to
Midi Out except CC commands that
are recognised and used by the Kiwi8P
The Master Tune can be set from A395
to A485.
Press Master Tune Again or CANCEL
to exit master tune mode.
5) Program Change Enable – There
are four possible options.
Off – No program change is sent or
received
In Only – Program Change commands
are received but not sent
Out Only – Program Change
commands are sent but not received
Both In & Out – All Program
Commands are both sent & received
6) CC Enable – There are four
possible options.
Off – No MidiCC is sent or received
In Only – MidiCC are received but not
sent
Out Only – MidiCC are sent but not
received
Both In & Out – All MidiCC are both
sent & received
7) Sysex Enable – There are two
options
Off – No sysex is recognised by the
Kiwi-8P
On – Sysex with correct header
information will be recognised
NAME BUTTON
The NAME button allows the Name of
the currently selected Tone to be
edited. Name editing is temporary
until the Tone is changed and will only
be retained if the Tone is written to
memory.
Editing is done by selecting the letter
to change using the Left & Right Arrow
buttons and using either the Edit
Slider or any button with a letter on it.
E.g. The Bank 1 button can be used
for the letter 'G'.
Once editing is finished control can be
returned to normal mode by any of the
following methods.
1) CANCEL is pressed
2) WRITE is pressed to save the Tone
3) NAME is pressed
www.kiwitechnics.com JX-8P Upgrade User Manual v130

11
PARAMETER
BUTTON
CONTROL BUTTONS
HOLD BUTTON
Edit Letter “W”
The PARAMETER button allows
editing of all the parameters for a Tone
as well as some of the Global
Parameters. A parameter is made up
of three sections.
1) a 'G' number. These are selected
using the Group buttons 1-8.
2) a 'B' number. This number is
selected from the Bank buttons 1-3
3) a 'T' number. This number is
selected using the Tone buttons 1-8.
The HOLD button will toggle HOLD
mode. The LED will be on when
HOLD is on.
Every parameter will have an ID. For
example the VCF cutoff looks like 212
(G2B1T2). To get to this parameter for
editing press Parameter, Group button
2, Bank button 1, Tone button 2 in that
order. The value of the cutoff can now
be changed using the EDIT SLIDER.
If edits are made using the PG-800 the
parameter being edited will be
identified on the display using the
same numbering system.
Also see the Quick Edit Button.
During Name Editing this button will
select the letter W
ARP BUTTON
Edit Letter “X”
SEQ BUTTON
Edit Letter “Y”
KEY MODE BUTTON
Edit Letter “*”
This button will toggle the ARP On
and Off. The LED will be on when
the ARP is playing.
This button will toggle the SEQ On
and Off. The LED will be on when
the Sequence is playing.
The KEY MODE button will rotate
around 5 Key Mode types.
POLY SINGLE – Each note played
will select a single sounding voice.
Voice assign parameters 421 – 423
will effect how notes are assigned.
POLY DUAL – Each note played
will select two sounding voices.
POLY TRIPLE – Each note played
will select three sounding voices.
UNISON – Only the last note
played will select 6 sounding
voices.
During Name Editing this button will
select the letter X
During Name Editing this button will
select the letter Y
SOLO – Only the last note played will
select 1 sounding voices.
During Name Editing this button will
select the symbol '*'
www.kiwitechnics.com JX-8P Upgrade User Manual v130

CONTROL BUTTONS
12
CHORD BUTTON
Edit Letter “-”
GLOBAL TEMPO
BUTTON
Edit Letter “,”
The CHORD button allows Chords
to be set or cleared. To set a chord
play the chord near middle C &
press and release the CHORD
button while the keys are being
held. The Chord Light will be lit
when a chord is set.
The GLOBAL TEMPO BUTTON is
used to set the master internal
clock rate. This is done by pressing
the GLOBAL TEMPO button and
setting the speed using the EDIT
SLIDER. The speed range can be
set from 5 BPM to 299 BPM. Press
the GLOBAL TEMPO Button again
to return to the previous mode.
Each note played with the chord set
will be used as the base note for the
chord. Keying will behave the same as
Unison or Solo and some keying
mode parameters will not have any
effect.
To clear a chord press and release the
Chord Button with no keys pressed.
The Chord light will turn off.
During Name Editing this button will
select the letter - (Minus)
The Master Clock source can be
selected from one of 2 sources using
Global parameter edit G6B1T2.
1) Internal clock
2) Midi
During Name Editing this button will
select the letter , (Comma)
KEY TRANSPOSE
Edit Letter “Z”
TAP TIMER
Edit Letter “/”
The Kiwi-8P Key Transpose can be
changed using this button.
While the Key Transpose Button is
pressed, press the note you wish to
transpose to on the keyboard. Then
release the Key Transpose button.
The current transpose will show on
the display while the button is
pressed.
It is also possible to step the
transpose up and down using the
left & right arrow buttons while the
Key Transpose button is pressed
The internal clock rate can be set
by using this button. Tapping this
button in time with the beat will set
the internal clock to this rate. The
first tap will display “TIMING TAP”
and the second tap will display the
actual BPM that was measured.
During Name Editing this button will
select the letter Z
During Name Editing this button will
select the letter / (forward slash)
www.kiwitechnics.com JX-8P Upgrade User Manual v130

CONTROL BUTTONS
13
SYSEX DUMP
Edit Letter “\”
The Kiwi-8P can output a number
of different sysex dumps and this
button is used to start the dump
process.
The button sequence to send a
sysex dump out the midi out is
press SYSEX DUMP, then select the
DUMP type using the Yellow SEQ
buttons then followed by the
WRITE button. The dump will only
start when the WRITE is pressed.
A Dump can be canceled before it
starts by pressing the CANCEL
button.
Note - Write Protect must be off to
Load Dumps into the Kiwi-8P
Note – The Kiwi-8P may become
unresponsive during a large sysex
dump
Seq Select – Dump Current Tone
The currently selected tone will
be dumped
Seq Edit – Dump Current
Sequence. The currently
selected Sequence will be
dumped
Seq Step Timing – Dump All 64
Tones from currently selected
Group.
Warning – Large file size
Seq Length – Dump All Sequences
Warning – Large file size
Seq New – Dump Global Data
During Name Editing this button will
select the letter \ (back slash)
QUICK EDIT BUTTON
Edit Letter “ “
NAME EDIT LEFT
Move Edit Position Left
NAME EDIT RIGHT
Move Edit Position Right
This button can be set up with a
Edit Parameter ID as a short cut
into Parameter Editing. To assign
an edit parameter to this button use
parameter edit 531
This button will move the Name
letter being edited to the Left if
possible.
Note – The Kiwi-8P tone name is 20
characters. Due to display size on
the 8P only the first 12 characters
are displayed
This button will move the Name
letter being edited to the Right if
possible.
During Name Editing this button will
select a space
During Name Editing this button will
move the selected letter one position
to the left if possible.
During Name Editing this button will
move the selected letter one position
to the right if possible.
www.kiwitechnics.com JX-8P Upgrade User Manual v130

GREEN BUTTONS
14
GROUP 1-8
Edit Letters “1-8”
These buttons will select Group 1 to
Group 8 Tones under normal play
mode. The Tone will immediately
load.
When writing a Tone these buttons
will select the Group 1-8 that the
Tone will be stored under. The Tone
is not written to memory until the
Tone Button is pressed. This allows a
tone to be written (or moved) to any
position in memory.
Each Group has 64 Tones (8 Banks x
8 Tones) and there are 8 Groups
making a total of 512 Tones in total.
During Parameter Editing these
buttons will select the G1 to G6 parts
of the parameter number.
During Name Editing these buttons
will select the numbers 1-8
www.kiwitechnics.com JX-8P Upgrade User Manual v130

BLUE BUTTONS
15
BANK 1
Edit Letter “G”
BANK 2
Edit Letter “H”
BANK 3
Edit Letter “I”
This button will select Bank 1 Tones
under normal play mode. The Tone
will immediately load. Each Bank has
8 Tones which are selected using the
TONE buttons
When writing a Tone these buttons
will select the Bank that the Tone will
be stored under. The Tone is not
written to memory until the Tone
Button is pressed. This allows a tone
to be written (or moved) to any
position in memory.
This button will select Bank 2 Tones
under normal play mode. The Tone
will immediately load. Each Bank has
8 Tones which are selected using the
TONE buttons
This button will select Bank 3 Tones
under normal play mode. The Tone
will immediately load. Each Bank has
8 Tones which are selected using the
TONE buttons
During Seq Editing this button will
change the editing step to the first
step. This is explained in more detail
in the Sequencer description
During Name Editing this button will
select the number G
During Seq Editing this button will
insert a Rest. This is explained in more
detail in the Sequencer description
During Name Editing this button will
select the number H
During Seq Editing this button will
insert a Tie. This is explained in more
detail in the Sequencer description
During Name Editing this button will
select the number I
BANK 4
Edit Letter “J”
BANK 5
Edit Letter “K”
This button will select Bank 4 Tones
under normal play mode. The Tone
will immediately load. Each Bank has
8 Tones which are selected using the
TONE buttons
This button will select Bank 5 Tones
under normal play mode. The Tone
will immediately load. Each Bank has
8 Tones which are selected using the
TONE buttons
During Seq Editing this button will
step the editing position forward one
position if possible. This is explained
in more detail in the Sequencer
description
During Name Editing this button will
select the number J
During Seq Editing this button will
step the editing position backward
one position if possible. This is
explained in more detail in the
Sequencer description
During Name Editing this button will
select the number K
www.kiwitechnics.com JX-8P Upgrade User Manual v130

BLUE BUTTONS
16
BANK 6
Edit Letter “L”
BANK 7
Edit Letter “M”
BANK 8
Edit Letter “N”
This button will select Bank 6 Tones
under normal play mode. The Tone
will immediately load. Each Bank has
8 Tones which are selected using the
TONE buttons
This button will select Bank 7 Tones
under normal play mode. The Tone
will immediately load. Each Bank has
8 Tones which are selected using the
TONE buttons
This button will select Bank 8 Tones
under normal play mode. The Tone
will immediately load. Each Bank has
8 Tones which are selected using the
TONE buttons.
During Seq Editing this button will
allow overdubs on an existing
sequence. This is explained in more
detail in the Sequencer description
During Name Editing this button will
select the number L
During Seq Editing this button will
allow a step to be inserted at the
current step on an existing sequence.
This is explained in more detail in the
Sequencer description
During Name Editing this button will
select the number M
During Seq Editing this button will
allow a step to be deleted at the
current step on an existing sequence.
This is explained in more detail in the
Sequencer description
During Name Editing this button will
select the number N
www.kiwitechnics.com JX-8P Upgrade User Manual v130

RED BUTTONS
17
TONE 1-8
Edit Letters “O-V”
These buttons will select Tones 1 to
8. The Tone will immediately load.
The same tone that is selected when
the synth is switched off will
automatically loaded when the Kiwi8P is switched on.
Note - If the tone being used when
the synth is powered off has an Arp
or Sequence running when it is
saved it will automatically start
running when the synth is powered
on or the Tone is loaded.
When writing a Tone these buttons
will select the Tone number that the
Tone will be stored under. The Tone
will be written to memory when the
Tone Button is pressed.
Note – Write protect must be off to
write a tone to memory. A MEM
PROTECTED message will show on
the display if a write is attempted
with the protect on.
To Load a sequence the SEQ SELECT
button must be pressed before the
Tone button.
During Name Editing these buttons
will select the letters O to V
www.kiwitechnics.com JX-8P Upgrade User Manual v130

PG-800 Support
18
PG-800
The PG-800 is supported by the Kiwi8P. Because of the nature of the PG800 interface the edits made this way
can have audible stepping. This is
because the hardware interface in
the PG-800 is fairly slow. Smoother
edits can be achieved by using the
Parameter Editing system and using
the Edit slider or by using a midi
editor. If this is a problem it is
recommended to use a midi
controller.
All PG-800 Parameters are supported
in the Kiwi-8P
www.kiwitechnics.com JX-8P Upgrade User Manual v130

Performance Control Section
19
Pitch Bender Range
LFO Trigger
Portamento
This four position switch allows you to
change the range of the Bend lever. In
the original JX-8P these ranges were 2,
3, 5 & 7 semitones. The Kiwi-8P has
extended the range and it is now 2, 3, 5
& 12 semitones
The Bend lever LFO trigger in the JX-8P
is a simple on/off switch. The output
level of this can be set separately for
the Midi Output (Global Parameter 614)
and Tone modulation (Tone Parameter
537)
Portamento is available in all playing
modes. The Portamento On/Off and
Rate are set on the Panel next to the
Bend Lever.
Changing the Portamento On/Off or
moving the Rate Control will change the
saved setting in the edit buffer.
Note - This Switch settings is saved
with the Tone.
This was not possible with the
original JX-8P
On all factory programs the LFO
button has been configured to a
moderate level of DCO LFO level on
the DCO to give a vibrato effect.
Note – The LFO source from the
bend lever trigger does not include
the LFO Delay and is always
present.
Note - This Slider setting is saved
with the Tone.
This was not possible with the
original JX-8P.
Note - The Portamento setting will
only be changed and overwritten in
the Tone while the Portamento
Switch is set to 'ON'. If the switch is
'OFF' then the Portamento Rate will
be saved as zero when the Tone is
written to memory.
Aftertouch
The After touch slider is a hardware
level that changes the after touch level
before it reaches the Kiwi-8P. For this
reason this level cannot be saved with
the Tone.
The JX-8P has a problem with the after
touch strip that is under the keys. These
oxidize internally over time and this
reduces the AT effect that can be
produced. This is a difficult and labour
intensive repair as the entire keyboard
needs to be disassembled and is
usually expensive and has limited long
term success rate.
The Kiwi-8P has tried to address this
by adding a AT multiplier parameter.
This parameter will allow the AT strip
output to be made more sensitive
by multiplying the output from this
by 2, 4 or 8 times.
This parameter is a Global setting
number 515.
www.kiwitechnics.com JX-8P Upgrade User Manual v130

JX-8P Upgrade Notes
20
Digital Oscillators
The JX-8P Synthesizer uses
programmable dividers from a single
master oscillator to generate the
pitch of the notes. While this does
create very a stable pitch it does
create some issues.
Because the dividers are being
reprogrammed every time the pitch
for that voice changes, the leading
edge of the DCO pulse is constantly
changing in relation to the other
voices.
This is a 'feature' of the JX-8P
hardware and cannot be altered.
This is especially noticeable when
playing in Square wave with Unison
or one of the Poly multiple voice
modes as more than one voice is
playing the same pitch but the start
point of the voice waves will not be
the same. The audible result of this is
that random notes can sound 'thin'
with much of the bass portion
missing at certain start point
combinations. Anything that effects
the pitch of a voice (detune,
analogue feel, pitch bending, lfo
mod, Portamento etc) will change
the DCO wave voice start points and
change the sound.
Another 'feature' of this type of
oscillator is with smooth changes
between notes audible stepping
will increase the higher the
frequency. The reason for this is
the change required in the divider
ratio gets smaller as the
frequencies get higher with fewer
divider steps between notes.
This will be audible on LFO, Bend,
portamento etc and the higher the
frequency and the faster the
change the worse the problem.
This is a hardware problem and
cannot be addressed
Front Panel Buttons
Tuning
All the front panel buttons on the JX8P have been designed without
blocking diodes. The result of this is
if you push two buttons at the same
time unintended effects happen.
In version 4+ of the Kiwi-8P program
the synth will undergo a tuning
process whenever the Kiwi-8P is
switched on.
This also happens in the JX-8P
but is more obvious in the Kiwi-8P
as the display updates any switch
presses. The JX-8P does not
display many of the button or
switch changes.
This tuning fine tunes the SAW
waveform shape.
www.kiwitechnics.com JX-8P Upgrade User Manual v130

21
Display
Factory Presets
Midi Received
Midi Panic
The Kiwi-8P display provides
feedback and instructions that make
navigating the menu much easier.
On normal play the display will show
the Tone number (G/B/T) followed by
a space followed by the first 12
characters of the tone name.
The factory presets are now supplied
as sysex dumps labelled Kiwi
Factory 1-4 and can be restored if
required.
Midi data received will flash the MIDI
Led if it is recognized by the JX-8P.
The MIDI PANIC button next to the
WRITE button will cancel any
sounding notes including internal.
As edits are made with the PG800 or midi the parameter being
edited will display along with the
GBT location and the value.
The factory restore option will
wipe all the internal tones so
make sure you have back up your
tones first.
To stop all output from the JX-8P
press and release MIDI PANIC.
Note Hold
Edit Buffer Compare
The Original JX-8P has no Note
Hold except when using a hold
pedal. A Hold Function has been
added to the Kiwitechnics Kiwi-8P
Upgrade front panel and uses the
HOLD button. Pressing HOLD will
toggle Hold on or off. The HOLD
LED will be lit when hold is on.
Whenever the edit buffer does not
match the saved Tone showing on
the display the three decimal
points on the G/B/T part of the
display will be lit.
The HOLD light will flash when the
Hold Pedal is used
To retain these changes when the
Tone is changed or the JX-8P is
powered off the Tone must be
written to memory.
www.kiwitechnics.com JX-8P Upgrade User Manual v130

22
LFO Generators
The Kiwi-8P has 3 independent
LFO generators. These each have
6 waveforms and can be free
running or sync'd with the master
clock with a divider. Each LFO has
it's own sync divider with 16
possible divide ratios including
swing options.
LFO 1 & 2 will continue to free run
when a new note is pressed after
all notes were lifted. LFO 3 will
restart (sync) its wave to a first
note played after all notes lifted.
When LFO's are running as sync'd
they need 2-3 cycles of the clock
to correctly measure the current
rate and generate a sync'd rate.
Until this is measured the LFO will
not run correctly. This can take a
while with a slow master clock
and/or long division times.
Each LFO can be Normal or Plus
mode. Normal will move the base
above and below the normal
parameter level and plus mode
will only move the base level up.
Each section of the Kiwi-8P that
uses LFO input can select from
one of the 3 LFOs and can also
select whether the LFO is normal
or inverted.
Envelopes
The Kiwi-8P has three independent
Envelope Generators. The
Envelopes generated are also
available as Matrix sources.
Envelopes 1-3 are the traditional
ADSR type and closely match the
existing JX-8P envelopes.
Note – Due to technical problems
the EnvKey control is currently
disabled. We are not sure if this can
be solved or not at this stage.
www.kiwitechnics.com JX-8P Upgrade User Manual v130

Sequencer
23
The JX-8P Upgrade contains a
polyphonic 6 track sequencer that
has the capacity of 124 step
automatic playing.
The clock for the Sequencer is
always the Master Clock and this can
be divided by one of 13 different
ratios including swing options. The
Seq Clock Divide parameter is
G4B3T8 or the Seq Step button on
the front panel.
Note - If the Master clock source is
set to the Midi Clock and no midi
clock is present the Sequencer will
not run.
SEQ SELECT
This button followed by a Tone
button is used to select and load a
sequence.
There are 8 Sequence memories and
only one of these can be selected at
a time. If a new sequence is loaded
while one is playing the playing one
will finish before the new one will take
effect.
SEQ EDIT
This button will enter sequence edit
mode (see the sequence edit section)
SEQ STEP TIMING
This button is a shortcut to editing
parameter 438 Seq Step Timing. The
step timing is changed using the
EDIT slider. Press Seq Step Timing
again to exit this mode.
SEQ LENGTH
The playing length of a sequence
can be changed non-destructively. If
the length is made longer than the
seq in memory the extra steps are
treated as REST steps and will not
sound
SEQ NEW
This button followed by a tone button
1-8 followed by the WRITE button will
blank a sequence
www.kiwitechnics.com JX-8P Upgrade User Manual v130
 Loading...