


Roland Cloud Sound Pack/Wave Expansion User’s Guide
JUPITER-X/Xm
This manual explains how to use Sound Packs and Wave Expansions with the JUPITER-X/Xm.
Read this in conjunction with the JUPITER-X/Xm Owner’s Manual and Reference Manual (PDF).
There are two ways to use Sound Packs and Wave Expansions.
In this manual, we explain how to do this via Roland Cloud Manager.
Using Roland Cloud Manager
On your computer, use the Roland Cloud Manager to download
the Sound Pack and Wave Expansion sound files from Roland
Cloud.
Use a USB flash drive to import the sound files into the
JUPITER-X/Xm.
¹ Click here for more information on Roland Cloud.
¹ Click here to download the Roland Cloud Manager and
Owner’s Manual.
* You must purchase a Lifetime Key for the data if you want to
use Roland Cloud Manager.
* Data that was downloaded with only a Roland Cloud
membership can’t be loaded into the JUPITER-X/Xm.
Updating the JUPITER-X/Xm to the Latest
Version
Before using the Sound Pack and Wave Expansion, you must
update the JUPITER-X/Xm to the latest version.
Download the latest software from the website below, and follow
the steps listed to update.
https://roland.cm/jupiter-x_dl (JUPITER-X)
https://roland.cm/jupiter-xm_dl (JUPITER-Xm)
Using Roland Cloud Connect
Use Roland Cloud Connect (sold separately) and your
smartphone to import the Sound Pack and Wave Expansion
sound files into the JUPITER-X/Xm.
¹ Click here for more information on Roland Cloud Connect.
* If you are using Roland Cloud Connect (sold separately), you
can use the Sound Pack and Wave Expansion sound files
even on a membership basis.
Downloading the Sound Pack/Wave Expansion
1. Start Roland Cloud Manager.
2. Click “Hardware” on the Menu tab.
A list of hardware appears.
3. Click “JUPITER-X/XM.
A list of contents appears.
Importing the Sound Pack/Wave Expansion
by Using Roland Cloud Manager
This explains how to use Roland Cloud Manager to download and
import the Sound Pack and Wave Expansion sound files.
Installing the Roland Cloud Manager
1. On your computer, download Roland Cloud Manager
from the Roland Cloud website.
Access the website listed below to download the appropriate
installer for your computer.
https://roland.cm/RolandCloudManager
2. Double-click the installer you downloaded to begin the
installation.
Proceed with the installation by following the directions shown
onscreen.
When you see a message saying that the installation was
successful, click the [Close] or [Finish].
3. Start the Roland Cloud Manager that you installed, and
register your account.
Follow the onscreen instructions to register.
4. Click Sound Pack or Wave Expansion that you want to
import.
The Sound Pack or Wave Expansion download page appears.
5. Click “Get Lifetime Key” to purchase a Lifetime Key.
6. Once you’ve made your purchase, click “Library” on the
Menu tab.
A list of the contents you have purchased appears.
7. Select the Sound Pack or Wave Expansion and
download.
Saving the Sound Files to a USB Flash Drive
* If you’re using the USB flash drive for the first time, format it
using the JUPITER-X/Xm.
Ø “Formatting a USB Flash Drive” (
Owner’s Manual)
1. Prepare the sound file that you will add on the
JUPITER-X/Xm.
2. Connect the USB flash drive to your computer.
3. Save the file in the appropriate directory of your USB
flash drive.
Sound Pack (extension: .sdz): ROLAND/SOUND folder
Wave Expansion (extension: .exz): Root directory
© 2020 Roland Corporation
1
Roland Cloud Sound Pack/Wave Expansion User’s Guide
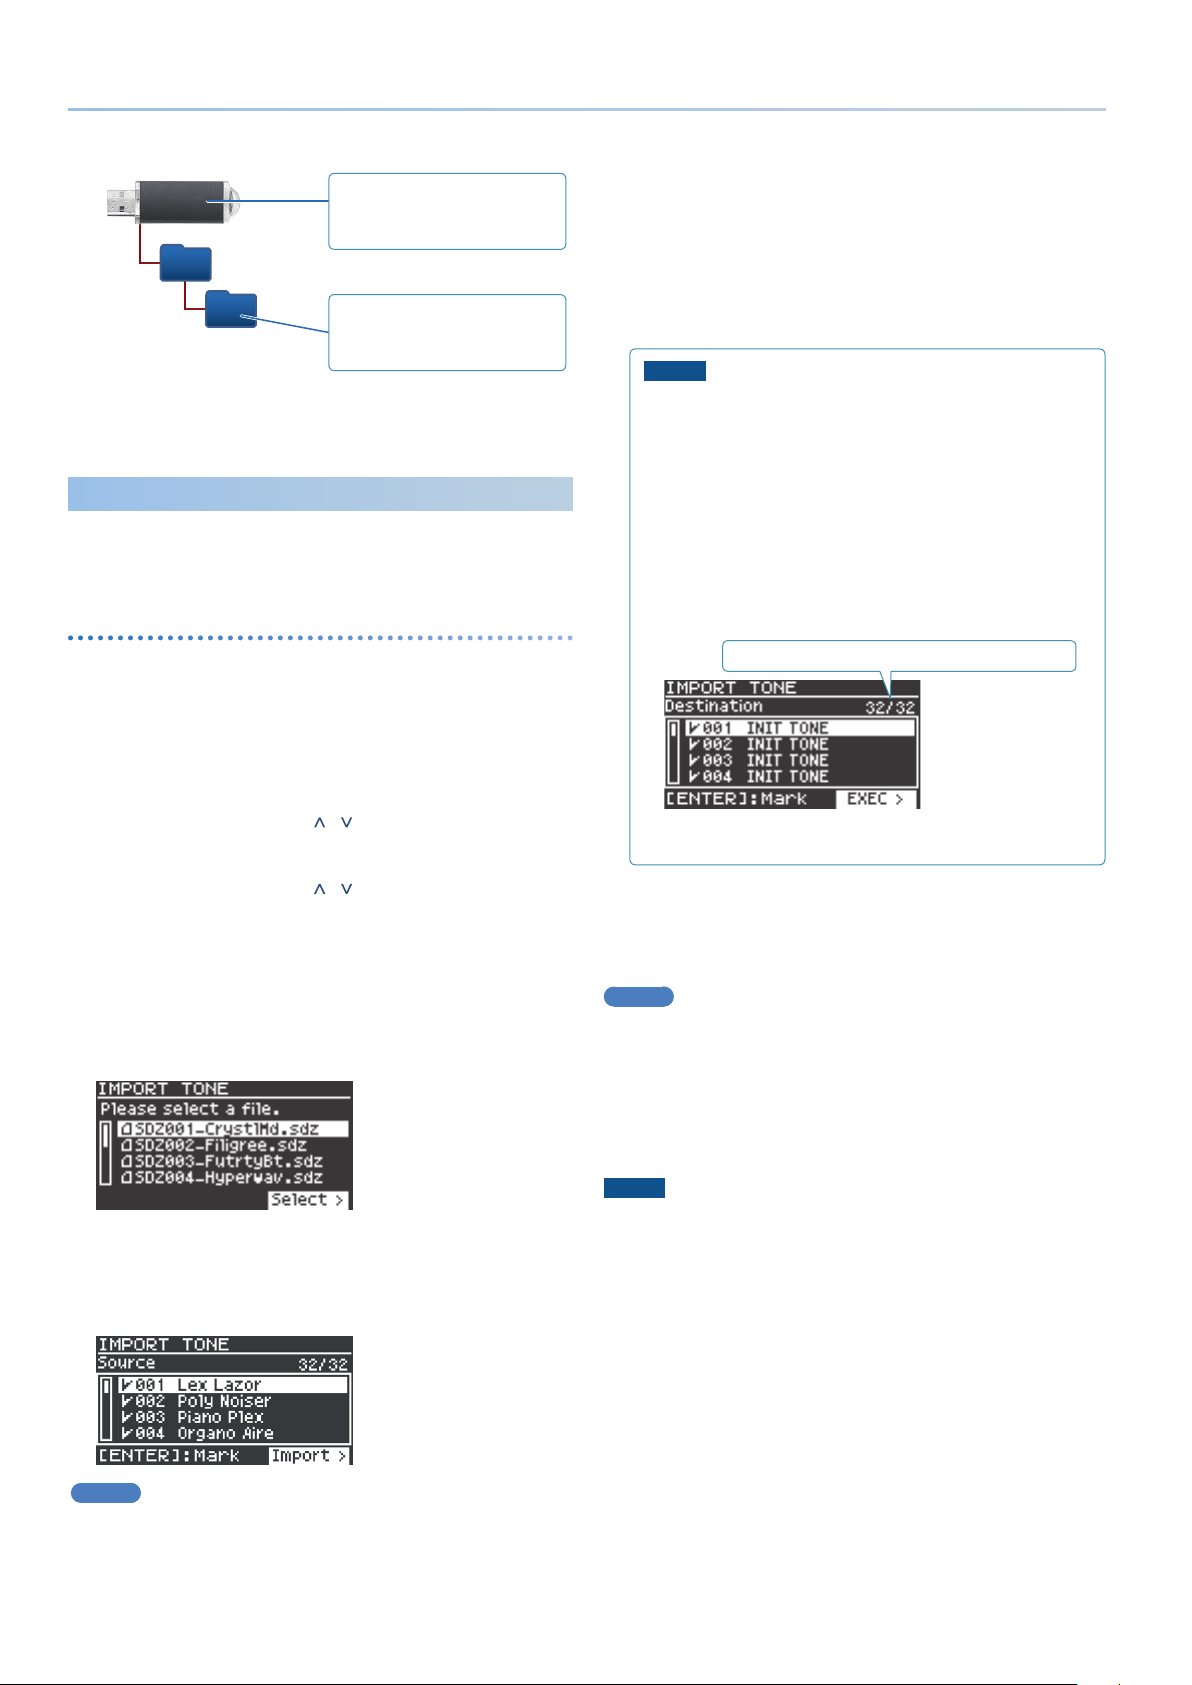
USB flash drive folder architecture
Copy the Wave Expansion files
(.exz) to the root directory.
ROLAND
SOUND
Copy the Sound Pack files (.sdz) to
the ROLAND/SOUND folder.
4. Disconnect the USB flash drive from your computer.
Adding the Sounds
Depending on the sounds that you are adding, perform the steps
described in “Importing a Sound Pack” or “Installing a Wave Expansion”
(p. 3).
Importing a Sound Pack
1. Connect the USB flash drive in which you saved the tone
file to the JUPITER-X/Xm.
Ø “Saving the Sound Files to a USB Flash Drive” (p. 1)
To select or de-select a specific range of tones, press the
[ENTER] button at the beginning of the range, then at the
end of the range, hold down the [SHIFT] button and press the
[ENTER] button.
8. Press the PAGE [>] button.
9. Use the [1] knob to select the import-destination tone,
and then press the [ENTER] button to add a check mark.
NOTE
¹ If there is a tone named “INIT TONE”, it is automatically
selected as the import-destination tone.
If you want to keep that tone, clear the check mark.
¹ Be aware that the import-destination tone you select will
be overwritten.
¹ An “ * ” is displayed for tones used in scene.
¹ If the import-destination has fewer tones than the import-
source, not all of the selected tones will be imported.
¹ The number of tones is shown in the upper right of the
screen.
Number of import-destination/import-source tones
2. Press the [MENU] button.
3. Use the [1] knob or PAGE [ ] [ ] buttons to select
“UTILITY,” and then press the [ENTER] button.
4. Use the [1] knob or PAGE [ ] [ ] buttons to select
“IMPORT/EXPORT,” and then press the [ENTER] button.
5. Use the [1] knob to select “IMPORT TONE,” and then
press the [ENTER] button.
6. Use the [1] knob to select the file that contains the tones
that you want to import, and then press the PAGE [>]
button.
7. Select the tone that you want to import.
Use the [1] knob to select the tone that you want to import, and
then use the [2] knob to add a check mark.
* Deselect (uncheck) the tones you don’t want to import.
10.
Press the PAGE [>] button.
A confirmation screen appears.
If you decide to cancel, press the [EXIT] button.
MEMO
The first time you import, the user license registration screen
appears.
11.
To execute, use the PAGE [>] button to select “OK,” and
then press the [ENTER] button.
When import is completed, the message “Import Tone
Completed!” appears.
NOTE
Never turn off the power or disconnect the USB flash drive
during a process, such as while the “Executing…” display is
shown.
MEMO
All tones are already selected when this screen appears.
To select or de-select all tones, hold down the [SHIFT] button
and operate the [2] knob.
2
 Loading...