

Page 1

®
®ÂØÒňÎ
JUPITER-80 ReleaseNote
JUPITER-80—All About Version 2
© 2012 Roland Corporation U.S.
All rights reserved. No part of this publication may be reproduced in
any form without the written permission of Roland Corporation U.S.
JP80RNV2
1
Page 2
Welcome to the JUPITER-80, Version 2
About This Booklet
This booklet explains how to install Version 2 on your JUPITER-80, and
how to use the new Version 2 features.
Understanding the Symbols in This Booklet
Throughout this booklet, you’ll come across information that deserves
special attention—that’s the reason it’s labeled with one of the following
symbols.
A note is something that adds information about the topic at hand.
With the Version 2 operating system software upgrade, the Roland
JUPITER-80 becomes an even more powerful instrument. Here’s what
Version 2 brings to the JUPITER-80:
• New, cutting-edge sounds—We’ve added new internal tones, live
sets, and registrations to make the JUPITER-80’s sound set even
more exciting. (A Version 2 sound list document is included with
the Version 2 updater file.)
• The Registration Play screen—This new screen makes it easier
than ever to find registrations, and to jump into Single Part Play
mode for playing live sets. (To read about this now, click here.)
• Three new low-pass filters—We’ve added three new vintage low-
pass filter types to the SuperNATURAL synth tone, making the
synth engine even more of a sound designer’s dream. (To jump to
this section, click here.)
• New MFX Combinations—With Version 2, the MFX can be
arranged parallel to each other (as in Version 1), or in one of four
other configurations, allowing you to take greater advantage of
their processing power by combining MFX in new and interesting
ways. (To read about this now, click here.)
• The JUPITER-80 as SONAR Controller—By simply activating the
new ACT feature, the JUPITER-80 becomes a control surface for
Cakewalk by Roland’s SONAR digital audio workstation. (To jump
to more information on this, click here.)
A tip offers suggestions for using the feature being discussed.
Warnings contain important information that can help you avoid
possible damage to your equipment, your data, or yourself.
This booklet is designed to be read in order from beginning
to end. However, if you see this link button—you can click
it to jump immediately to a related section in this booklet.
Checking Your JUPITER-80’s System Version
If you’ve just purchased your JUPITER-80, you may already be running
the Version 2 software or higher. Here’s how to find out.
1 Power on the JUPITER-80.
2 Press the MENU button.
3 Touch System.
4 Touch the Information tab at the bottom of the screen to reveal
the system version. If you see
• a system version number lower than 2.00—continue with
the installation instructions in this booklet.
• “2.00” or higher—you’ve already got Version 2 installed.
2
Page 3
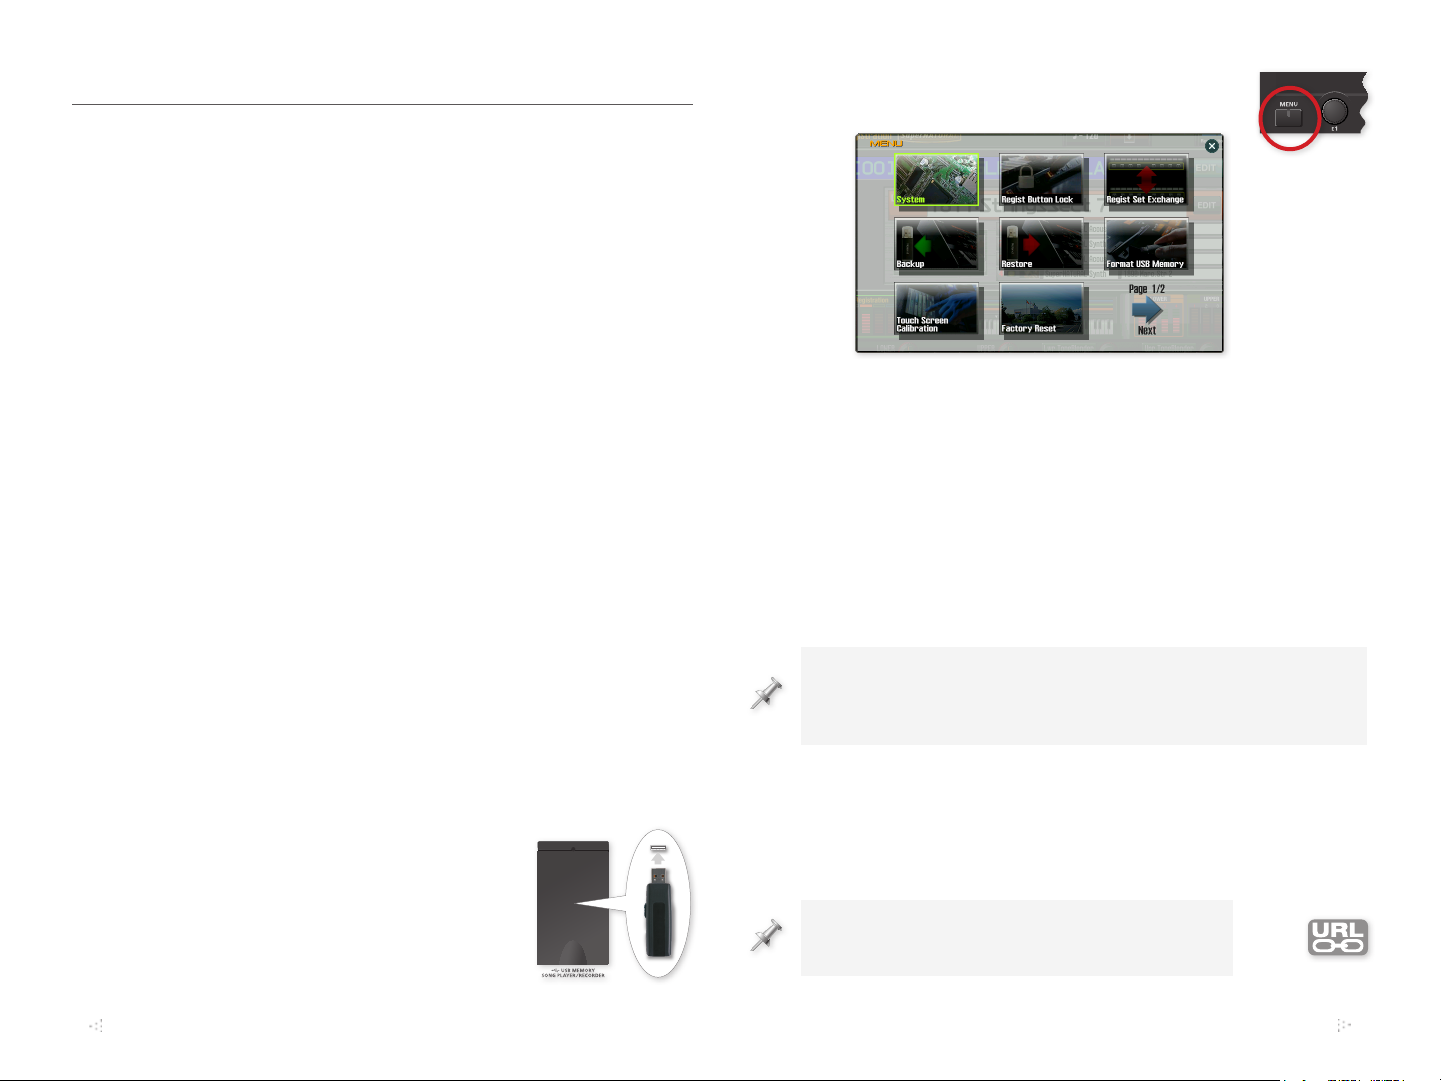
Installing Version 2
Getting Ready to Upgrade
We recommend performing a backup of your JUPITER-80’s internal
memory to a USB thumb drive before upgrading to Version 2. There
are two reasons:
• The new Version 2 sounds replace the old ones—Version 2
replaces the original JUPITER-80 internal tones, live sets, and
registrations with a fresh sound set. A backup preserves the
original JUPITER-80 collection of sounds, allowing you to reload
them whenever you like.
• You may have personal User data you want to preserve—If you’ve
been using the JUPITER-80 for a while, odds are that you’ve
stored some of your own data in its User memory. You may have
saved
• registrations • live sets • tones
• system settings that customize the JUPITER-80’s setup
3 Press the MENU button to display the MENU
window.
4 Touch Format USB Memory.
5 Touch EXEC to proceed, or CANCEL.
6 Touch OK to format the drive, or CANCEL.
7 When formatting’s complete, touch OK.
Backing Up the JUPITER-80’s Entire Internal Memory
Backup Strategies
There are two ways to save your current data onto a thumb drive:
• You can save the entire contents of internal memory—using the
JUPITER-80’s Backup tool. This is the way to go to preserve the
JUPITER-80’s original sound set.
• You can back up specific registrations, live sets, and tones—if you
have specific sounds you want to hang onto.
Formatting a USB Thumb Drive for the JUPITER-80
1 With the JUPITER-80’s power off,
connect a thumb drive to the jack in
the front-panel USB MEMORY•SONG
PLAYER/RECORDER compartment.
2 Turn on the JUPITER-80.
After installing your formatted thumb drive in the USB MEMORY•SONG
PLAYER/RECORDER compartment, here’s how to back up all of your
JUPITER-80’s internal data as a single backup file on the drive.
You can store a single backup file on each USB thumb drive. If you
back up to a thumb drive that already contains a backup file, the new
backup file replaces the old one.
1 Press the MENU button to display the Menu window.
2 Touch Backup.
3 Touch EXEC.
4 Touch OK to finish saving your backup.
After we explain how to update your JUPITER-80,
we’ll discuss reloading the data in your backup file.
3
Page 4
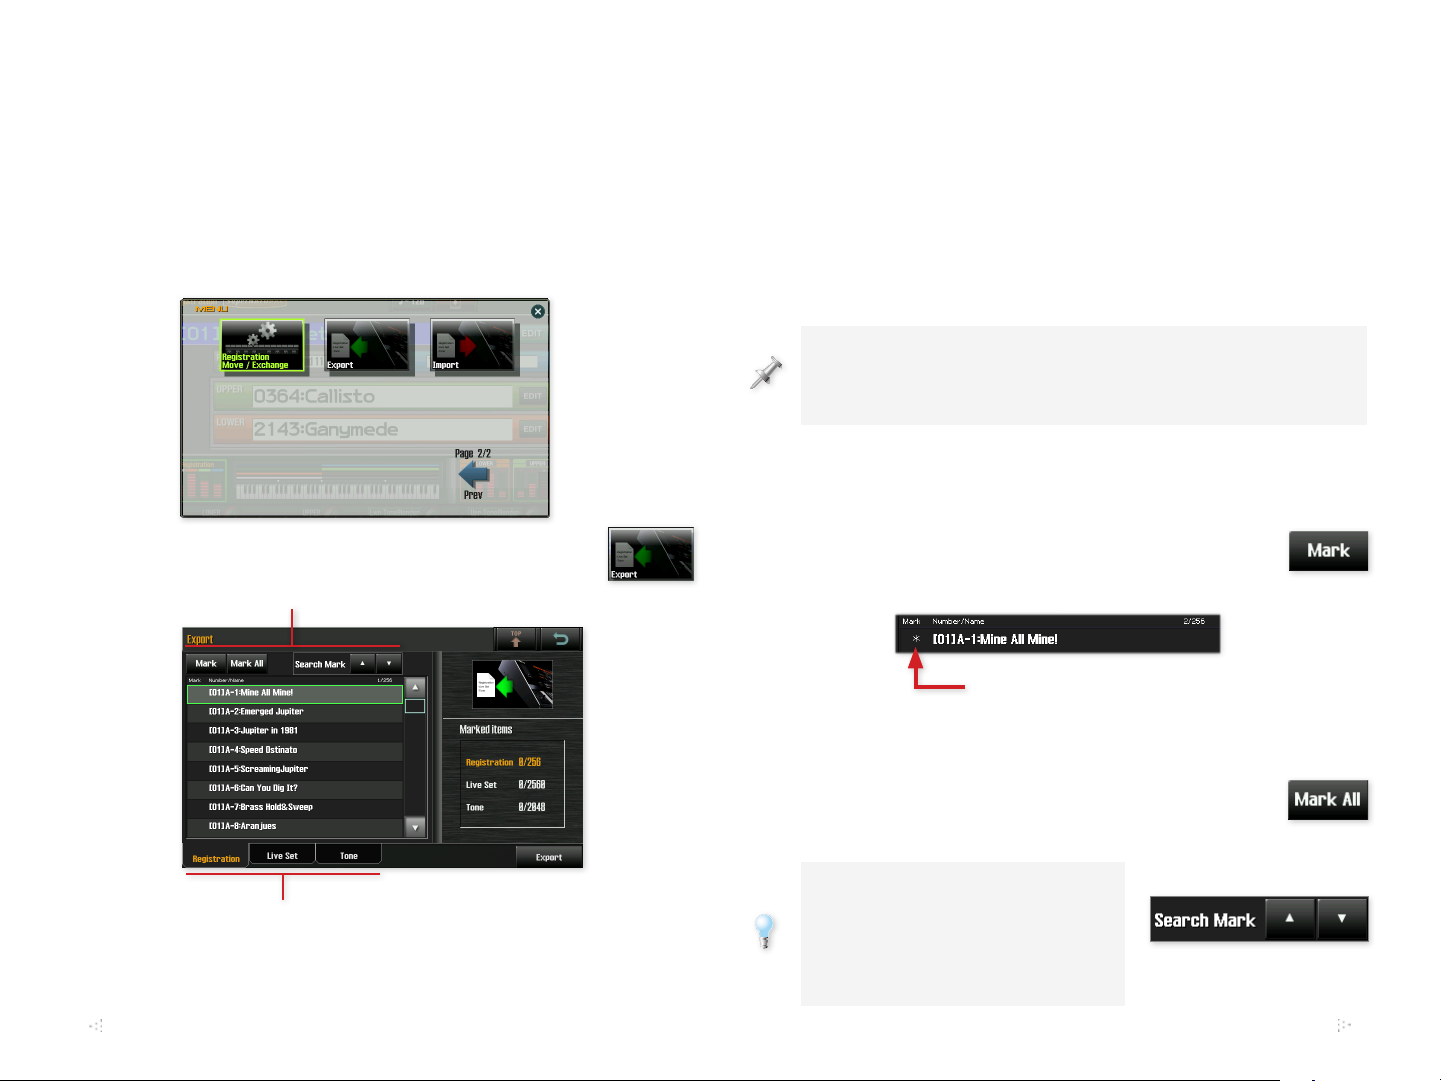
Backing Up Specific Sounds
After installing your formatted thumb drive in the USB MEMORY•SONG
PLAYER/RECORDER compartment, here’s how to save, or “export,”
specific registrations, live sets, and tones to the thumb drive.
1 Press the MENU button to display the MENU window.
2 Touch the Page 1/2•Next arrow to display the second page of
the MENU window.
3 Touch Export to display the Export screen.
Marking buttons
4 Start selecting the type of sound you want to export by touching
the appropriate sound-type tab at the bottom of the screen.
Touch
• Registration—to display a list of the registrations currently
stored the JUPITER-80’s internal memory.
• Live Set—to display a list of the live sets currently stored in
the JUPITER-80’s internal memory.
• Tone—to display a list of the tones currently stored in the
JUPITER-80’s internal memory.
When you export a registration, the live sets and tones it uses are
exported along with it to ensure the registration sounds the same
when it’s brought back into the JUPITER-80.
The JUPITER-80 exports any sound that has a mark—and
asterisk—to its left.
5 To
• mark an individual sound for export—touch
the sound to highlight it, and then touch Mark
to place an asterisk to the left of the sound.
Sound-type tabs
You begin by letting the JUPITER-80 know what type of sound
it is you want to export to your thumb drive.
We’ve marked this registration for export.
• unmark a currently marked sound—touch the sound to
highlight it, and then touch Mark.
• mark all of the sounds in the displayed list for
export—touch Mark All to asterisk all of the
sounds in the list at once.
To quickly see which of the sounds in
a list are marked, touch the Search
Mark 5 and 6 buttons to jump
up or down in the list from marked
sound to marked sound.
4
Page 5

You can jump between the Registration, Live Set, and Tone lists to
mark different types of sounds to be exported together.
6 Once you’ve marked all the desired sounds, touch the Export
button—the JUPITER-80 presents you a screen from which you
can name the exported sound data file.
7 Touch Name to display a keyboard
with which you can give the file a new
name, and then touch OK when you’re
done.
8 Touch EXEC to finish exporting the
marked sounds to your thumb drive.
After we show you how to update your JUPITER-80,
we’ll explain how to import your sounds.
Preparing the Upgrade File
We’re going to assume you’re reading this booklet because it
accompanied the Version 2 updater file you downloaded from
RolandUS.com. If you haven’t already downloaded the updater, do
so now, and unzip the file on your computer.
1 Insert a USB thumb drive that’s been formated for the
JUPITER-80—if you need formatting instructions, see page
3—into an unused USB port on your computer, and locate
the drive’s icon on your computer.
You can use a thumb drive that contains other JUPITER-80 data,
including a backup file, as long as there’s room for the Version 2
updater file, which is 13-14 MB in size.
In the downloaded Version 2 folder, you’ll find the jp80_up.bin
file—this is the actual updater file.
2 Drag the jp80_up.bin file directly onto the thumb drive’s icon to
copy the file to the thumb drive’s top-level, or “root,” directory.
(Don’t place it in the Roland folder on the thumb drive.)
3 Safely eject the thumb drive from your computer as you would
any other removable USB device.
Performing the Version 2 Upgrade
1 Power down the JUPITER-80.
2 Insert the thumb drive containing the updater file into the jack
beneath the USB MEMORY•SONG PLAYER/RECORDER panel.
3 While holding down the TEMPO
button in the CONTROL area of the
JUPITER-80’s front panel, turn on the
JUPITER-80.
4 Continue holding down TEMPO
until you see “Update Mode” on the
JUPITER-80 display, and then release
the button.
The update takes a few minutes, at the
end of which the JUPITER-80 displays
“Finished.”
5 Turn the JUPITER-80 off.
6 Remove the thumb drive. (You can now return the thumb drive
to your computer and delete the updater file.)
7 Turn the JUPITER-80 back on.
5
Page 6

Performing a Factory Reset
Importing Exported Sounds
To install the new Version 2 sounds after updating the operating
system, perform a Factory Reset.
If you’d like to retain all of the Version 1 sounds while taking
advantage of Version 2’s features, don’t perform a Factory Reset.
Of course, if you backed up your older sounds prior to updating,
you can try out the Version 2 sounds and then restore them—or any
individual sounds you’ve exported—any time you like.
1 Press the MENU button.
2 Touch Factory Reset.
3 Touch EXEC.
4 Touch OK to install the JUPITER-80 Version 2 sound set.
Reloading Backup Data and Exported Sounds
Restoring Backup Data
If you backed up all of your internal data before updating the
JUPITER-80, you can reload it using the following steps.
If you’ve saved any tones, live sets, or registrations—or changed any
system settings—that new data will be replaced by your backup data
as it’s reloaded into your JUPITER-80, unless you back it up first.
Here’s how to reload sounds you exported prior to updating your
JUPITER-80.
1 Turn off the JUPITER-80 and insert the thumb drive containing
your exported sounds into the jack in the USB MEMORY•SONG
PLAYER/RECORDER compartment.
2 Turn on the JUPITER-80.
3 Press the MENU button, and then touch the Page 1/2•Next
arrow to display the second page of the MENU window.
Version 2’s second MENU screen has some new options.
4 Touch the Import button to display the Import screen.
1 Turn off the JUPITER-80 and install the thumb drive containing
your backup file in the USB MEMORY•SONG PLAYER/
RECORDER compartment.
2 Turn on the JUPITER-80.
3 Press the MENU button.
4 Touch Restore.
5 Touch EXEC.
6 Touch OK to reload the data in the backup file.
5 Touch the sound file you’d like to import.
6
Page 7

In the File Information panel at the right
of the screen, the JUPITER-80 shows
you the registrations, live sets, and tones
contained in the selected sound file.
6 Touch Select to display the Import screen
where you choose the sounds to be
imported.
7 Mark any registration you wish to import
so that an asterisk appears to the left of
its name.
All live sets and tones used by a marked registration are automatically
tagged with a “+” for import.
8 If you want to import live sets or tones, touch the appropriate
sound-type tab, and then mark any live set or tone you wish to
import so it’s asterisked.
9 When you’ve finished marking sounds, touch Import.
The JUPITER-80 presents you a list of its internal memory
locations. This is where you choose the locations in which the
imported sounds are to be stored.
By default, the JUPITER-80 offers locations named “INIT,” based
on the assumption they’re empty—this is one good reason why you
should name your customized sounds.
10 Moving between the sound types
using the tabs at the bottom of the
screen, select location destinations
for the sounds you’re importing.
Be sure to select the number of registration,
live set, and tone locations you need to
for the number of registrations, live sets,
and tones you’re importing. The Marked
Items panel at the right of the screen
tells you how many memory locations
you need.
11 When you’ve finished marking the memory locations, touch
Here we’ve marked one out
of one required registration
location, 0 out of 3 live set
locations, and 14 out of 14 tone
locations. The live set numbers
are red to show that we need to
mark more live set locations.
Execute, and then OK to import your sounds.
7
Page 8

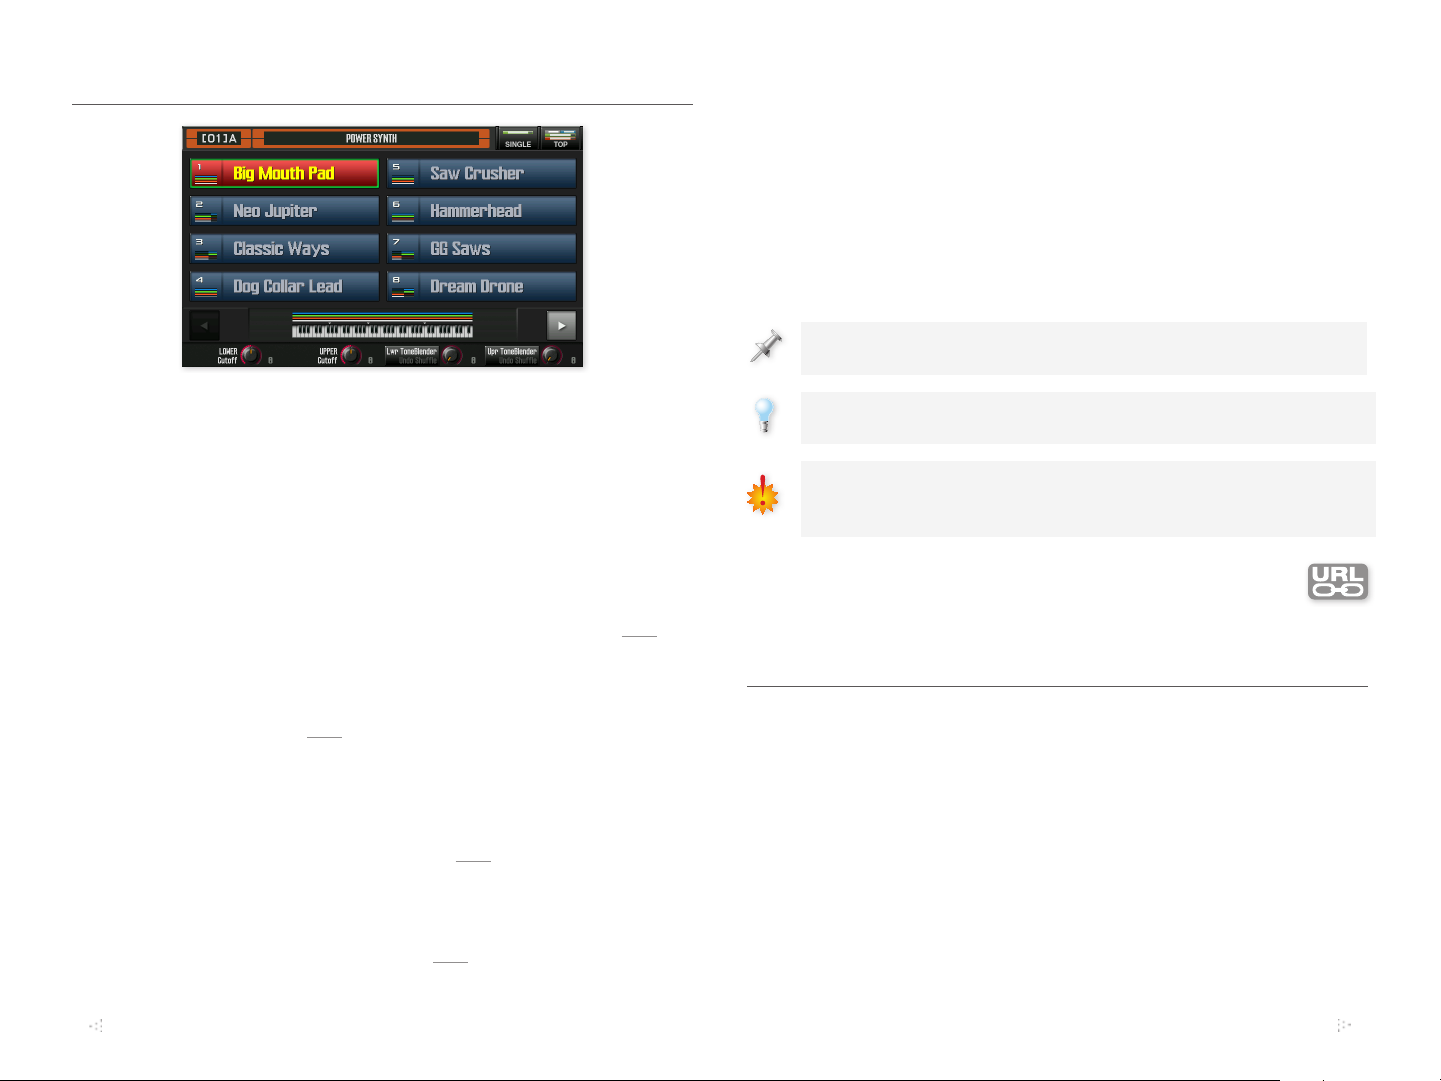
The Registration Play Screen
Sound set, letter, and name of
current registration bank.
Registration buttons
Bank
Back
button
Lower part
Cutoff
When the JUPITER-80 starts up in Version 2, by default it displays the
Registration Play screen. This screen provides some handy tools.
Upper part
Cutoff
Lower part
ToneBlender
• Sound set, letter, and name of the current registration bank—This
shows the sound-set number, bank letter, number and name of
the currently selected registration bank. Bank names are new in
Version 2.
You can jump rename registration banks by touching the Registration
Bank Name button on the second MENU screen.
• Registration buttons—Touch any of these buttons to select its
registration.
• SINGLE button—Touch this to jump to the SinglePartPlay screen
so you can play a single live set by itself. When a single live set is
currently selected, the SINGLE button turns red to show you that
you can select live sets using the JUPITER-80’s colored buttons.
When a registration’s selected, the SINGLE button is black.
SINGLE
button
button
Upper part
ToneBlender
TOP
Registration buttons
Bank
Forward
button
• TOP Button—Touch TOP to jump to the main page of the currently
selected sound. If a
• a live set is currently selected—touching TOP takes you to
the SinglePartPlay screen.
• a registration is selected—touching TOP takes you to the
Registration’s main screen, where you can see its details.
• Bank Back and Forward buttons—touch these to navigate between
the JUPITER-80’s registration banks.
• Lower and Upper Part Cutoff knobs—These adjusts the Cutoff
values in the Lower or Upper part’s live set.
• Lower and Upper Part ToneBlender knobs—Turn these knobs
to change a pre-set group of important sound settings in the
Lower or Upper part’s live set with the ToneBlender feature. Press
the knob to experiment with random value changes for these
parameters using the ToneBlender’s Shuffle feature. Shuffle can be
a great way discover new, unexpected sounds.
In Version 2, both the SinglePartPlay and main Registration screens
have a new Registration Play button you can touch to return to the
Registration Play screen.
The SuperNATURAL® Synth Tone Low-Pass Filters
A synth’s low-pass filter is an important
factor in its sound, and the SuperNATURAL
synth tone at the heart of the JUPITER-80
just got three brand-new low-pass filters,
for a total of four. Each of these three new
filters gets you the sound of a specific
classic synthesizer, including Roland’s own
JUPITER-8 low-pass filter, which is LPF2.
(LPF1 is the JUPITER-80’s original lowpass filter.)
You’ll find the new low-pass filters in the FILTER section of any synth
tone’s Synth Tone Edit screen.
8
Page 9

Combining MFX in Version 2
Powerful as the JUPITER-80’s live-set MFX are on their own—running
side-by-side—there’s a whole world of new sonic possibilities when
you combine them, one after another, in a series, causing one
effect to affect another. In Version 2, we’ve added new live set MFX
configurations that make the MFX more flexible than ever.
You get to the configurations by touching the STRUCT button on the
Live Set Effects Routing screen.
With the STRUCT button highlighted as shown above, turn the
VALUE dial to select, or press ENTER and touch, the desired MFX
configuration. Here’s how audio—shown as a light gray arrow—flows
through the MFX in each combination.
• Structure 1—MFX 1-4 are all processing audio separately, in
parallel.
MFX 1
• Structure 2—MFX 1’s output is going into MFX 2. MFX 3 and 4
are running separately from each other and from the combined
MFX 1/2.
MFX 1
MFX 2
MFX 3
MFX 4
• Structure 3—MFX 1’s output is going into MFX 2. MFX 3’s output
is going into MFX 4. The MFX 1/2 combination and MFX 3/4
combination are running separately from each other.
MFX 1
MFX 2
MFX 3
MFX 4
• Structure 4—MFX 1’s output is going into MFX 2, and MFX 1/2’s
output is going into MFX 3. MFX 4 is operating separately from the
MFX 1/2/3 combination.
MFX 1
MFX 2 MFX 3
MFX 4
• Structure 5—All four MFX are running in a series, with MFX 1’s
output going into MFX 2, MFX 1/2’s output going into MFX 3, and
MFX 1/2/3’s output going into MFX 4.
MFX 1 MFX 2 MFX 3 MFX 4
MFX 2
MFX 3
MFX 4
This is the JUPITER-80’s original MFX configuration.
9
Page 10

Controlling SONAR with the JUPITER-80
If you use Cakewalk by Roland’s popular SONAR digital audio
workstation, you can now use the JUPITER-80 as a control
surface, allowing you to operate SONAR using the JUPITER-80’s
sliders, buttons, and knobs. A USB MIDI connection between the
JUPITER-80’s rear-panel USB COMPUTER jack and your computer
makes this especially easy to do.
Since the JUPITER-80 and SONAR communicate via USB MIDI,
you’ll need to have installed the JUPITER-80’s USB driver on your
computer before proceeding. You’ll find the latest driver for your
version of Windows here. Download and install the driver according
to the instructions included in the download file.
About ACT
5 In SONAR’s Edit menu, select “Preferences...”, and then select
the MIDI Devices tab.
ACT—short for “Active Controller Technology”—allows you to control
SONAR from a remote device such as the JUPITER-80 with minimal
setup and configuration.
Preparing SONAR for JUPITER-80 Control
We’re going to assume that you’ve installed the JUPITER-80’s USB
driver, and that the JUPITER-80 is now connected to your computer
via USB.
Here’s how to set up SONAR:
1 You can find the JUPITER-80 control surface driver for SONAR
by clicking here.
2 Download the file to your computer, and unzip it to your desktop.
This produces the Jupiter-80_Setup.exe file.
3 Double-click the Jupiter-80_Setup.exe file and follow the
onscreen instructions to install the control surface driver.
4 After installation completes, launch SONAR.
6 If they’re not already selected, select the JUPITER-80 as
SONAR’s MIDI Input and Output, as shown above, and click
Apply.
7 On the JUPITER-80, press MENU, touch the
Page 1/2•Next arrow, and then touch the ACT
button to display the JUPITER-80’s ACT screen.
8 Touch the ACT ON/OFF button so it lights red to turn ACT on.
10
Page 11

9 Set Mode to
• ALL—to control SONAR using the JUPITER-80’s PART
BALANCE LEVEL sliders and buttons, knobs under the
display, and the SONG PLAYER/RECORDER buttons. If
you don’t need the PART SELECT sliders and buttons or
the knobs for the JUPITER-80 sounds you’re playing, this is
the setting you want.
• SONG PLAYER RECORDER ONLY—to use only the SONG
PLAYER/RECORDER buttons for controlling SONAR. This
setting leaves the other controls free for manipulating
sounds you’re playing the JUPITER-80.
10 Set the TX MIDI Channel value to the desired MIDI transmission
channel if you need to change it from its default setting for some
reason. Most of the time, though, Channel 1 is fine.
11 Set Local Sw (“Switch”) to
• On—if you’d like to play the JUPITER-80 keyboard as you
control SONAR.
• Off—if you’d like to lock out the keyboard for playing as you
use the JUPITER-80 as SONAR’s control surface.
12 In SONAR, select the MIDI Control Surface tab, and then click
the yellow Add MIDI Controller button.
13 Click the Controller/Surface button
and select “JUPITER-80 CSP” from
the popup menu.
14 Release the popup, and then click OK.
15 Click OK to leave the Preferences
window.
The JUPITER-80 now appears as the
ACT control surface in the ACT pane
of the control bar, and the
JUPITER-80’s sliders, buttons, and
knobs are in control of the designated
SONAR settings.
To see a map of the SONAR settings controlled
by the JUPITER-80—and to customize the
settings if you like—click the Controller/
Surface Properties button belonging to the
ACT panel in SONAR’s control bar.
This opens the JUPITER-80 control surface plug-in’s window.
The End
We hope you’ve found this ReleaseNote helpful. Keep an eye out
for other JUPITER-80 publications available for downloading at
www.RolandUS.com.
The Controller Surface/Settings window opens.
11
 Loading...