

Page 1

Installation Guide
Installationsanleitung
Guide d'Installation
Guida all'Installazione
Guía de instalación
Page 2
IMPORTANT NOTES
023
DO NOT play a CD-ROM disc on a conventional audio CD player.
The resulting sound may be of a level that could cause permanent hearing loss.Damage to speakers or other
system components may result.
552
● Unfortunately, it may be impossible to restore the contents of data that was stored device (e.g., hard disk) and / or in another
MIDI device (e.g., a sequencer) once it has been lost. Roland Corporation assumes no liability concerning such loss of data.
558a
● To avoid disturbing your neighbors, try to keep the unit’s volume at reasonable levels. You may prefer to use headphones,
so you do not need to be concerned about those around you (especially when it is late at night).
801
● Avoid touching or scratching the shiny underside (encoded surface) of the disc. Damaged or dirty CD-ROM discs may not
be read properly. Keep your discs clean using a commercially available CD cleaner.
563
● Unauthorized duplication, reproduction, hiring, and lending prohibited.
564
● Before you open the included CD-ROM, you must read the "license agreement." Opening the CD-ROM will be taken to mean
your acceptance of the license agreement.
981b
● Use of the song data of the CD-ROM supplied with this product for any purpose other than private, personal enjoyment
without the permission of the copyright holder is prohibited by law. Additionally, this data must not be copied, nor used in
a secondary copyrighted work without the permission of the copyright holder.
GM 2 / General MIDI 2
The upwardly compatible General MIDI 2 ( ) recommendations pick up where the original General
MIDI left off, offering enhanced expressive capabilities, and even greater compatibility.
Issues that were not covered by the original General MIDI recommendations, such as how sounds are to be
edited, and how effects should be handled, have now been precisely defined. Moreover, the available sounds
have been expanded.
General MIDI 2 compliant sound generators are capable of reliably playing back music files that carry either
the General MIDI or General MIDI 2 logo.
In some cases, the conventional form of General MIDI, which does not include the new enhancements, is
204 (changed)
* Microsoft, Windows and DirectX are registered trademarks of Microsoft Corporation.
206f
* Windows® 2000 is known officially as: “Microsoft® Windows® 2000 operating system.”
add
* Windows® XP is known officially as: “Microsoft® Windows® XP operating system.”
206g
* Windows® Me is known officially as: “Microsoft® Windows® Millennium Edition operating system.”
206c
* Windows® 98 is known officially as: “Microsoft® Windows® 98 operating system.”
add
* DirectX® is known officially as: “Microsoft® DirectX® application programming interface.”
206e
* Screen shots reprinted with permission from Microsoft Corporation.
207
* Apple and Macintosh are registered trademarks of Apple Computer, Inc.
209
* Mac OS is a trademark of Apple Computer, Inc.
233
* VST is a trademark of Steinberg Media Technologies AG.
220
* All product names mentioned in this document are trademarks or registered trademarks of their respective owners.
962b
* In the interest of product improvement, the specifications and/or contents of this package are subject to change without
prior notice.
referred to as "General MIDI 1" as a way of distinguishing it from General MIDI 2.
2
Page 3
Introduction
Thank you for purchasing the High Quality Software Synthesizer.
The High Quality Software Synthesizer is a software synthesizer that runs on
Windows 2000/XP/Me/98 and on Mac OS 8.6.1/9 series. It can be plugged
in to your host application, allowing you to enjoy high quality sound.
This manual contains the information you need in order to install and use the
High Quality Software Synthesizer. Please be sure to read it.
In this manual, the right side of the page contains the icons shown below, in
conjunction with explanations of terms and various points that you need to
be aware of. Please be sure to read these as well, since they include important
information.
Helpful information, such as terminology definitions.
Points that you need to be aware of
The screen shots shown in this manual are taken from Hyper Canvas. The
product name shown in the screen will differ depending on the product you
purchased.
The screen shots printed in this manual are taken from Windows Me and
MacOS 9.1, but the software will also run correctly on Windows 2000/XP/98
and MacOS 8.6/9 series.
202
Copyright © 2002 ROLAND CORPORATION
All rights reserved. No part of this publication may be reproduced in any
form without the written permission of ROLAND CORPORATION.
3
Page 4

Contents
English
Introduction....................................................................... 3
Contents............................................................................4
Software installation(Windows) ......................................5
Software installation(Macintosh) ..................................14
Troubleshooting .............................................................16
Deutsch
Software-Installation (Windows)...................................21
Software-Installation (Macintosh).................................31
Fehlerbehebung.............................................................. 33
Français
Installation du logiciel (Windows)................................. 38
Installation du logiciel (Macintosh)............................... 47
En cas de problème........................................................ 49
Italiano
Installazione del software (Windows)...........................54
Installazione del software (Macintosh).........................63
Ricerca e soluzione dei problemi.................................. 65
Español
Instalación del software (Windows).............................. 70
Instalación del software (Macintosh)............................ 80
Resolución de problemas..............................................82
4
Page 5
Software installation(Windows)
This section explains how to install the software from the included CD-ROM.
You will need the
Synthesizer, so have it ready.
You must read the license agreement before you install the software. The
license agreement may be displayed during the process of installing the
software, so please be sure to read it.
Before you install the High Quality Software Synthesizer, you must install a host
application that supports DXi/VST instruments.
Installing the software
Install either the DXi or VST instruments as appropriate for the host
application you are using.
software CD-ROM
for the High Quality Software
The license agreement is
the agreement subject to
which Roland grants you
permission to use the
software.
• Installing the DXi........................................................p. 6
• Installing the VST instruments .................................p. 8
5
Español Italiano Français Deutsch English
Page 6
Software installation(Windows)
b
■
Installing the DXi
1
Exit all currently-running software (applications). Also close any window
that is open.
2
Prepare the CD-ROM.
Insert the software CD-ROM into the CD-ROM drive of your computer.
3
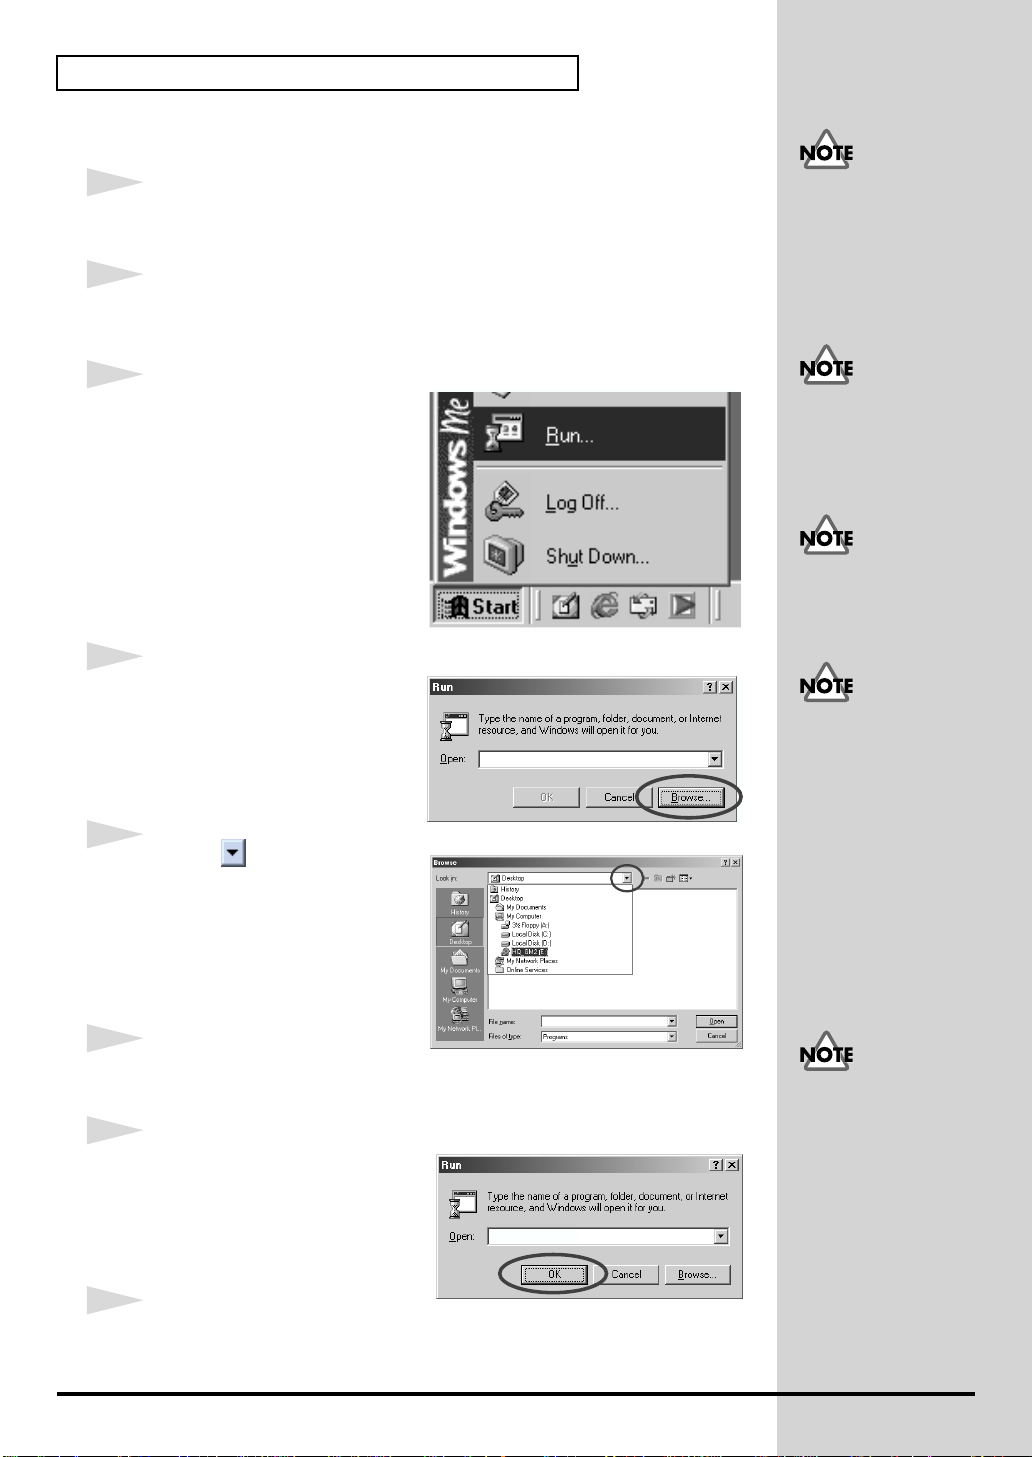
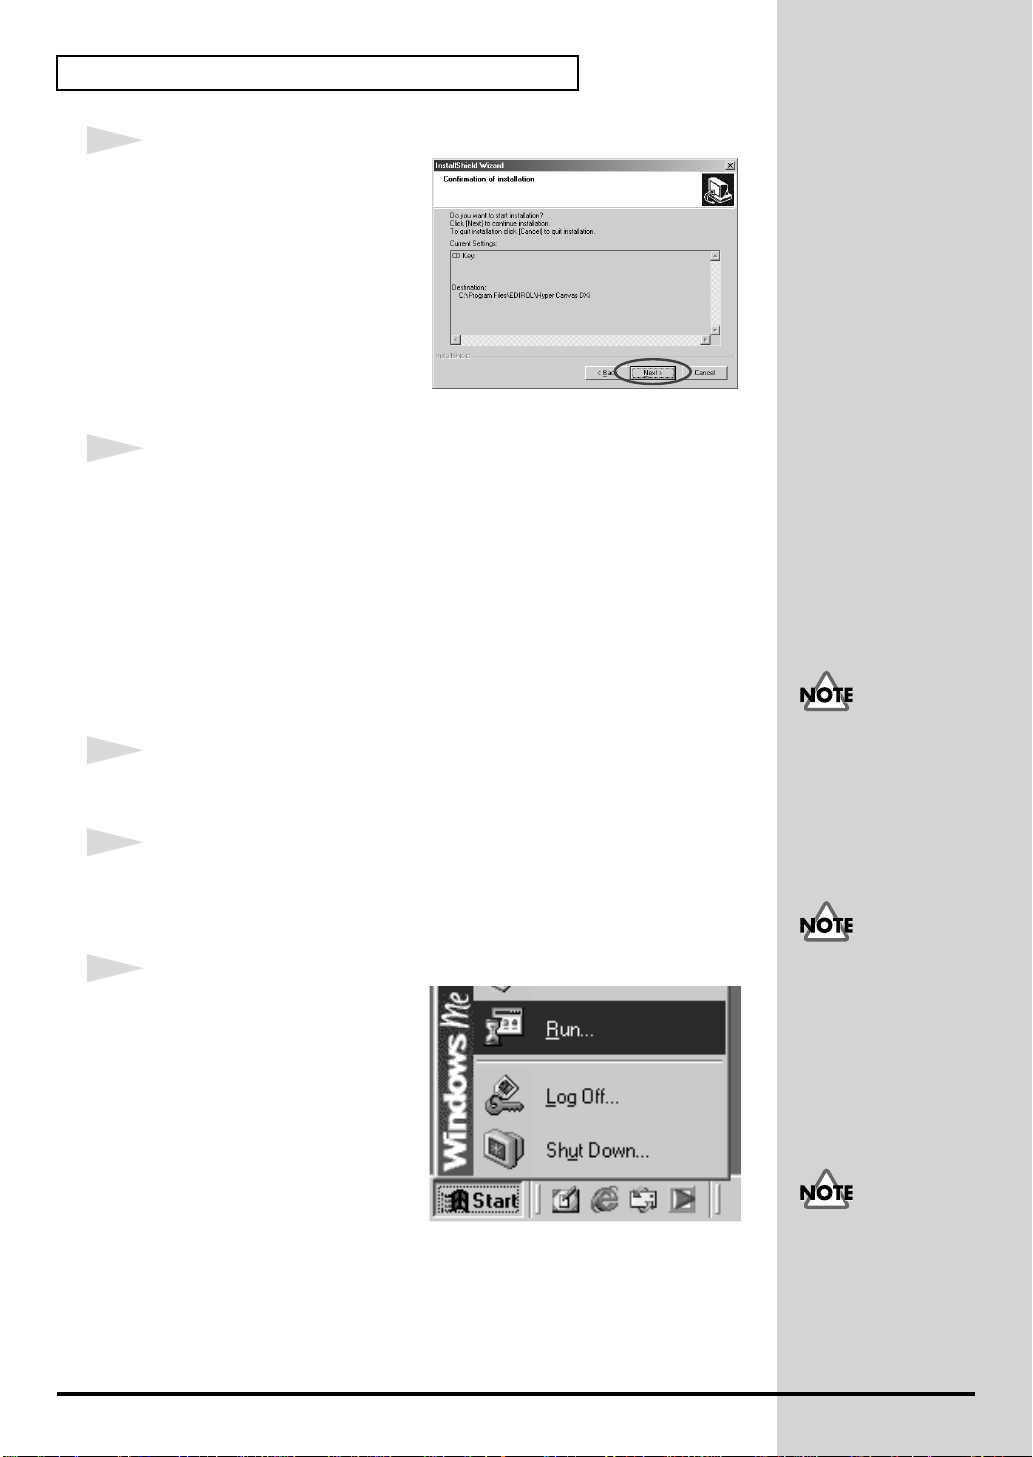
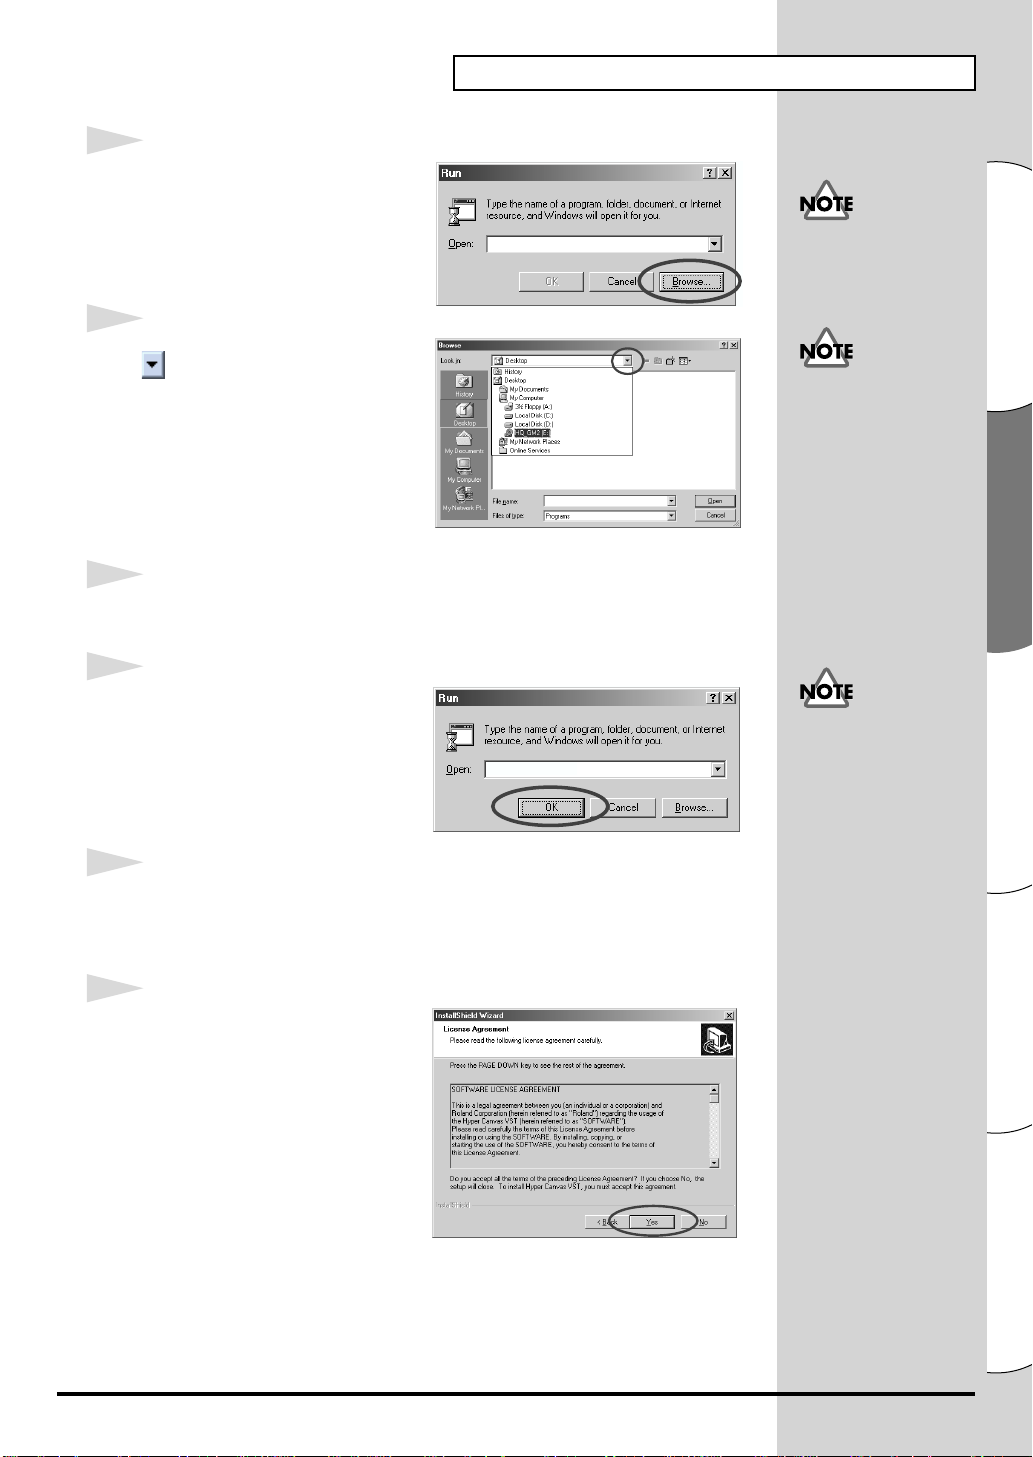
Open the "
Click the
Windows. From the menu that
appears, select
4
In the dialog box that appears,
click
The
appear.
5
Click the button in the upper
part of the dialog box, and from
the list that appears, select the
drive with the CD-ROM icon.
Run...
Start
[Browse...]
Browse
dialog box will
" dialog box.
button of
"Run..."
.
.
If you are using Windows
2000/XP, you must log in
as a user with
administrative privileges
(such as Administrator)
efore installing the
software.
If you are using Windows
XP, make sure that all
users other than the
installing user are logged
off.
If you are using software
such as virus checkers, you
must exit all such software.
If you are using Windows
XP, a dialog box entitled
"What do you want
Windows to do" may
appear. If it does, click
"Take no action," and
then click [OK].
The folders in the software
CD-ROM will be displayed.
6
Double-click the
SETUP.EXE
7
Verify that the name of the file
you selected in
displayed in the
Run
dialog box, and click
8
The installer will start up.
When the
6
DXI
folder, select
, and click
step 6
Welcome to the InstallShield Wizard
Open
[Open]
.
is
field of the
[OK]
.
E:\DXI\SETUP.EXE
screen appears, click
[Next]
Depending on your
system, the filename
extension may not be
displayed.
.
Page 7
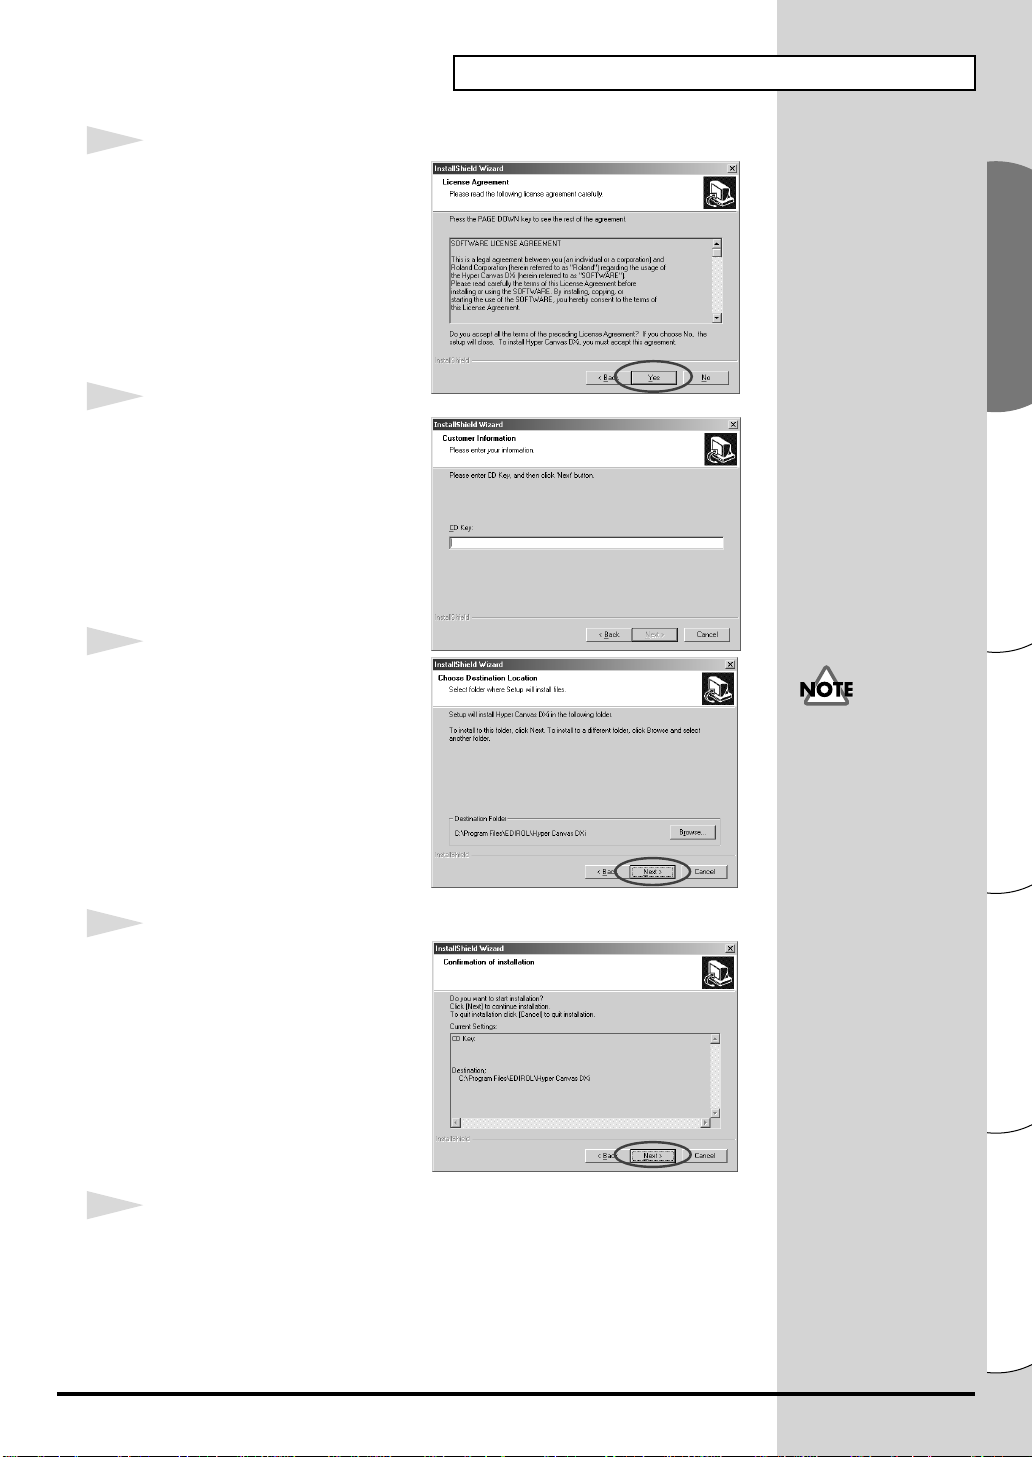
9
You will be asked whether you
consent to the terms of the license
agreement. Read the license
agreement, and click
agree. If you click
installation will be halted.
10
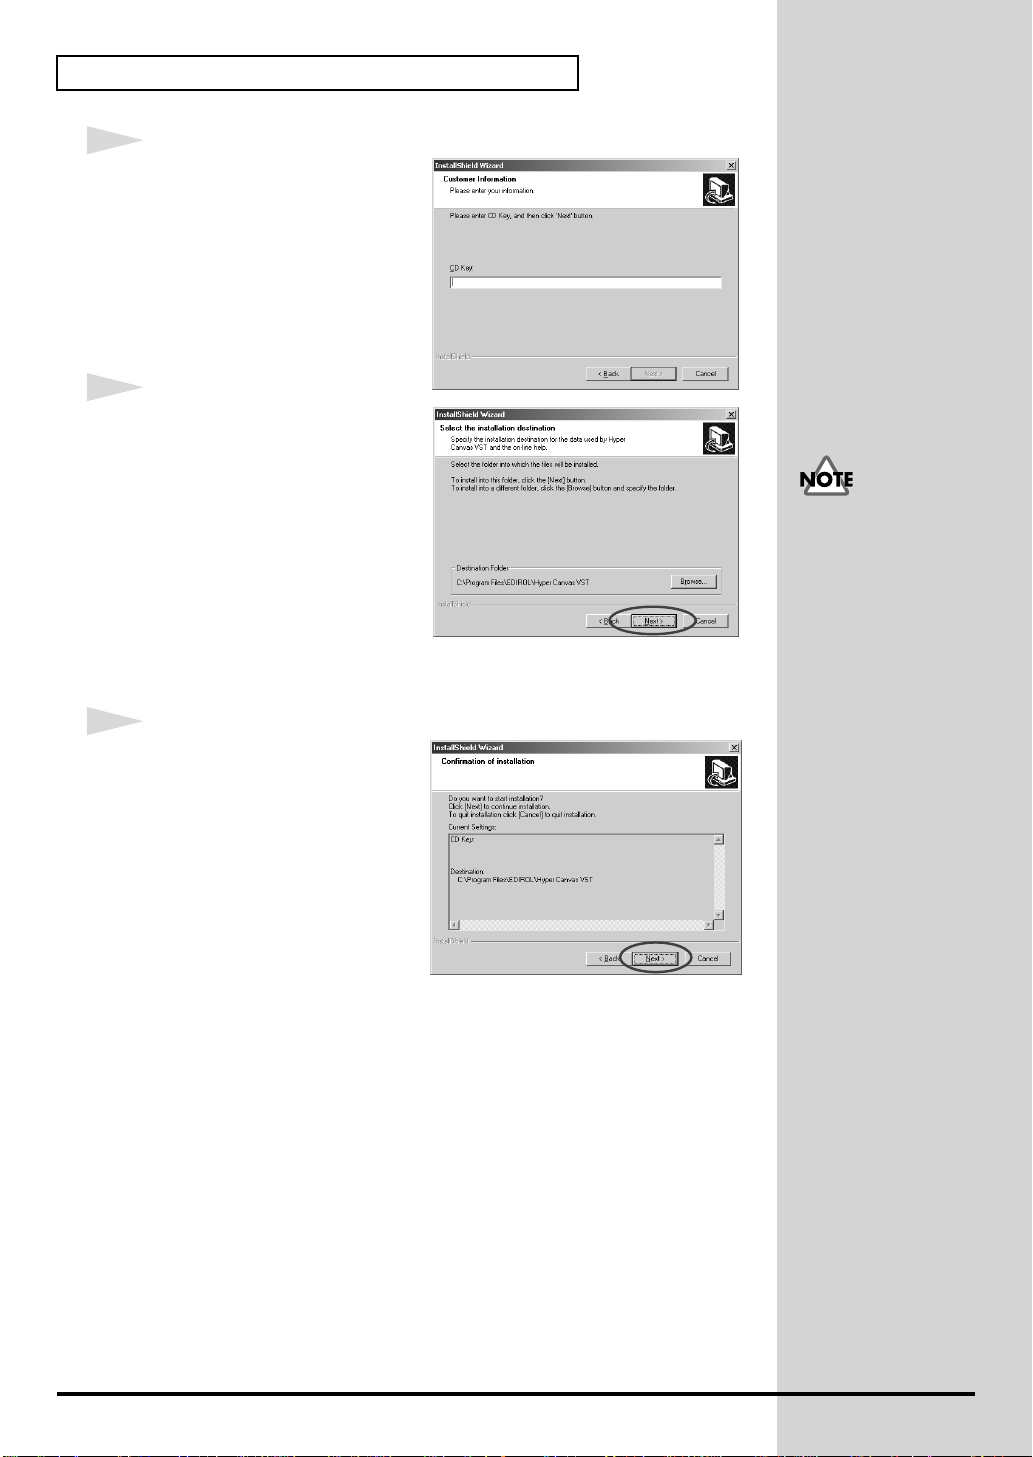
A dialog box will appear, asking
you to input the
Input the CD key found on the
back of the CD-ROM case.
Click
[Next]
[No]
CD key
.
[Yes]
, the
.
Software installation(Windows)
if you
11
A dialog box will appear,
allowing you to select the
installation location. To accept the
suggested location, click
If you want to change the
Destination Folder
[Browse...]
desired folder.
12
Verify the
the
Confirmation of installation
screen.
After verifying the settings, click
[Next]
the installation location, click
[Back]
13
When the files have been copied, the
will appear.
and specify the
Current Settings
. If you want to re-specify
.
, click
[Next]
of
.
InstallShield Wizard Complete
If you have already
installed the DXi, the
Choose Destination
Location screen will not
appear. If you want to
change the installation
location, you must uninstall and then re-install
the software.
screen
Click
[Finish]
Installation of the DXi has now been completed.
.
Español Italiano Français Deutsch English
7
Page 8
Software installation(Windows)
b
■
Installing the VST instruments
* If you simply want to copy the plug-in module, refer to
plug-in module
1
Exit all currently-running software (applications). Also close any window
that is open.
2
Prepare the CD-ROM.
Insert the software CD-ROM into the CD-ROM drive of your computer.
3
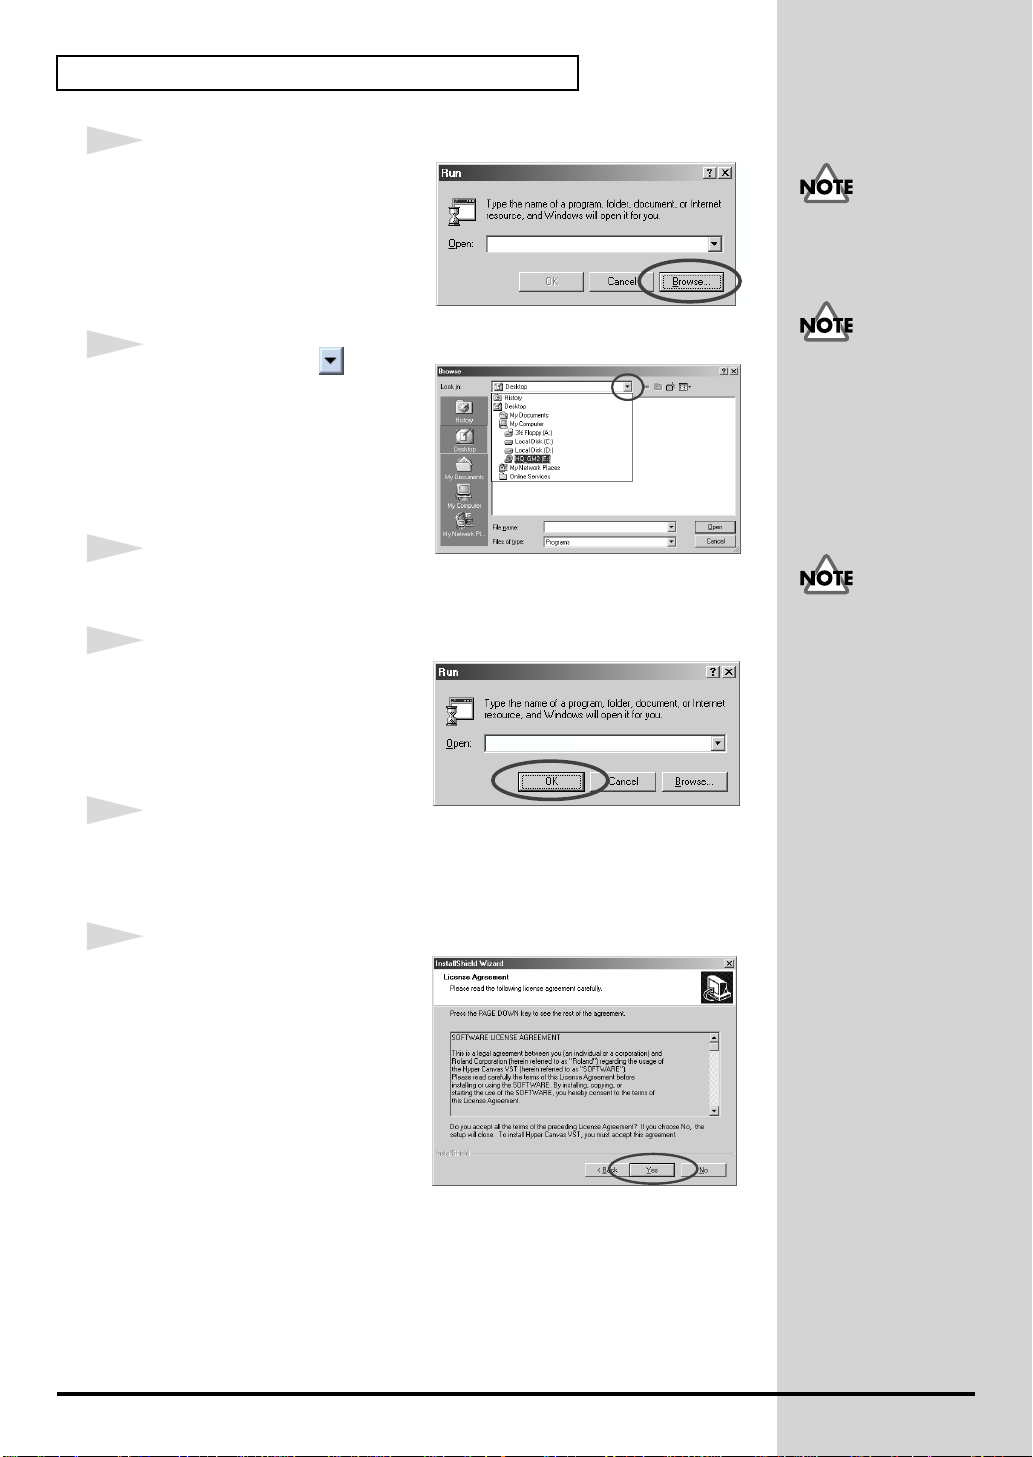
Open the "
Click the
Windows. From the menu that
appears, select
4
In the dialog box that appears,
click
[Browse...]
Run..."
Start
(p. 11).
dialog box.
button of
"Run..."
.
.
Adding or removing the
If you have not yet
installed a host
application, you must first
install your host
application before
continuing.
If you are using Windows
2000/XP, you must log in
as a user with
administrative privileges
(such as Administrator)
efore installing the
software.
If you are using
Windows XP, make sure
that all users other than the
installing user are logged
off.
The
Browse
appear.
5
Click the button in the upper
part of the dialog box, and from
the list that appears, select the
drive with the CD-ROM icon.
The folders in the software CDROM will be displayed.
6
Double-click the
select
7
Verify that the name of the file
you selected in
displayed in the Open field of the
Run dialog box, and click
dialog box will
SETUP.EXE
step 6
VST
, and click
folder,
is
[OK]
[Open]
.
.
If you are using software
such as virus checkers, you
must exit all such software.
If you are using Windows
XP, a dialog box entitled
"What do you want
Windows to do" may
appear. If it does, click
"Take no action," and
then click [OK].
Depending on your
system, the filename
extension may not be
displayed.
E:\VST\SETUP.EXE
8
Page 9
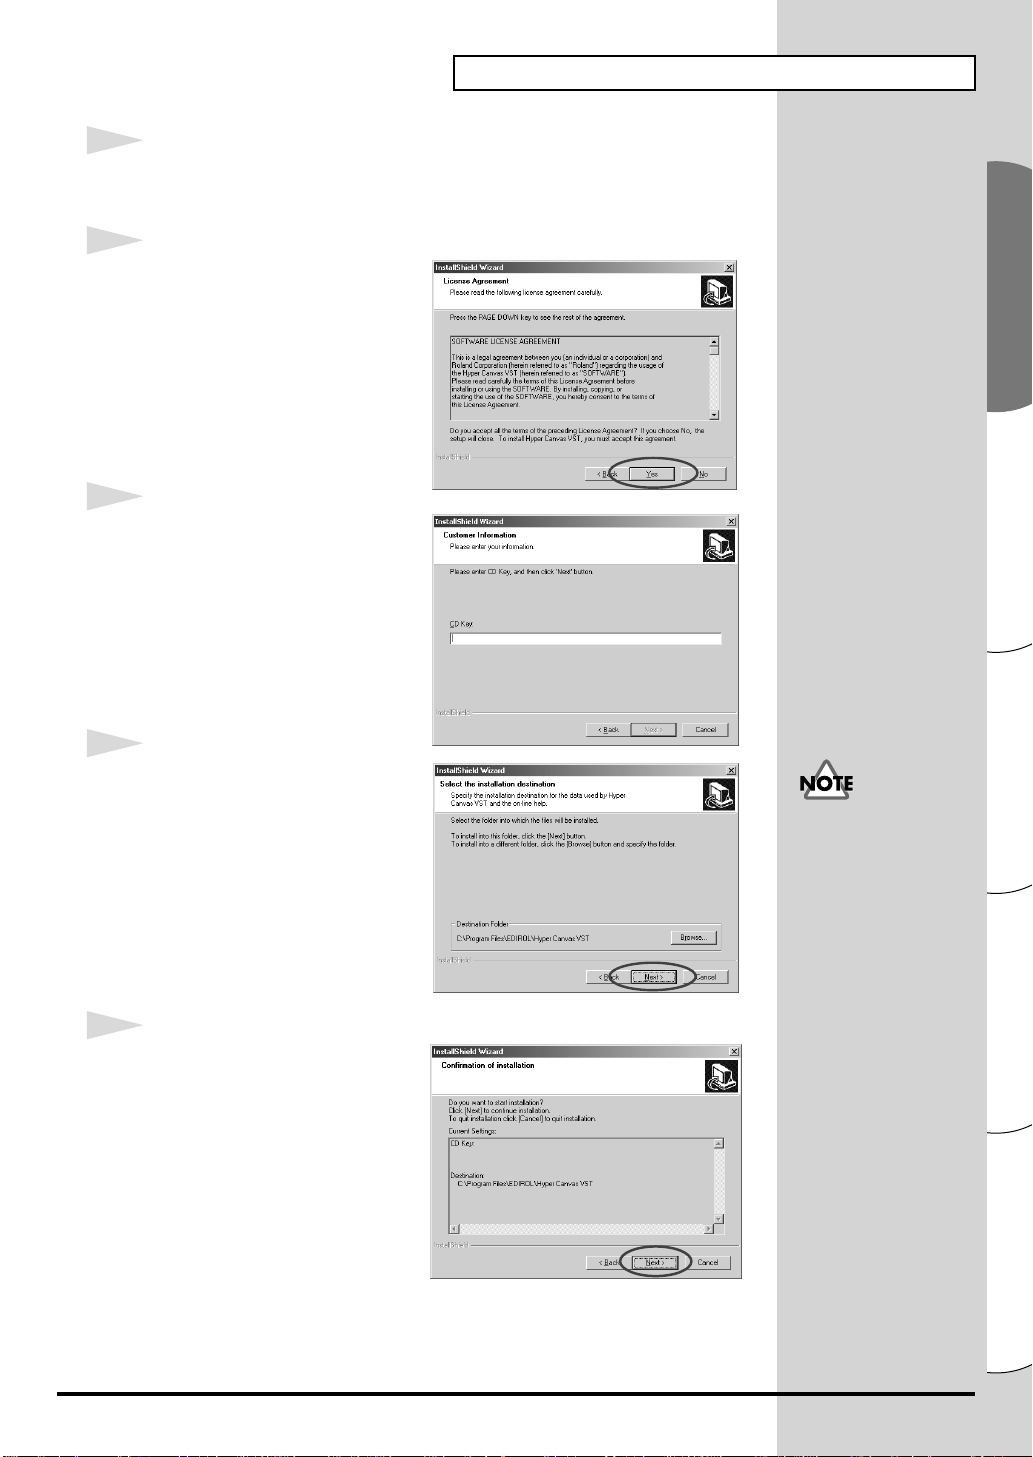
8
The installer will start up.
Software installation(Windows)
When the
9
You will be asked whether you
consent to the terms of the license
agreement. Read the license
agreement, and click
agree. If you click
installation will be halted.
10
A dialog box will appear, asking
you to input the
Input the CD key found on the
back of the CD-ROM case.
Click
11
A dialog box will appear,
allowing you to select the
installation location. To accept the
suggested location, click
you want to change the
Destination Folder
[Browse...]
desired folder.
12
Verify the current settings of the
Confirmation of installation
screen.
Welcome to the InstallShield Wizard
[No]
CD key
[Next]
.
and specify the
[Yes]
, the
, click
if you
.
[Next]
screen appears, click
. If
[Next]
.
If you have already
installed the VST
instruments, the Select
the installation
destination screen will not
appear.
If you want to change the
installation location, you
must un-install and then
re-install the software.
After verifying the settings, click
[Next]
. If you want to re-specify
the installation location, click
[Back]
.
Español Italiano Français Deutsch English
9
Page 10
Software installation(Windows)
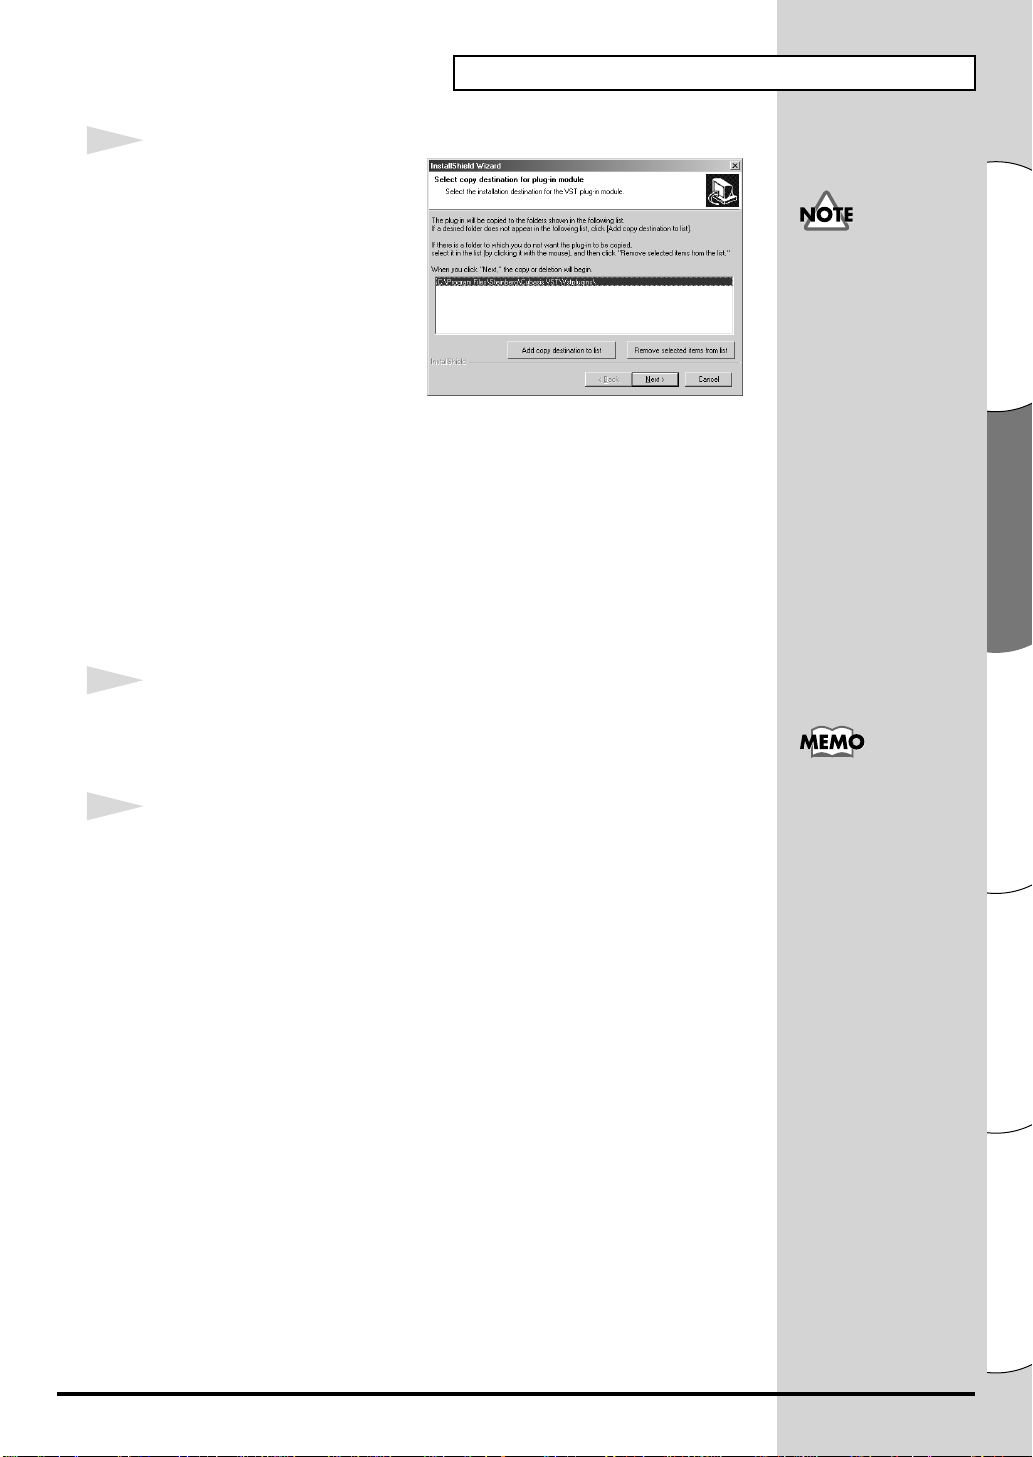
13
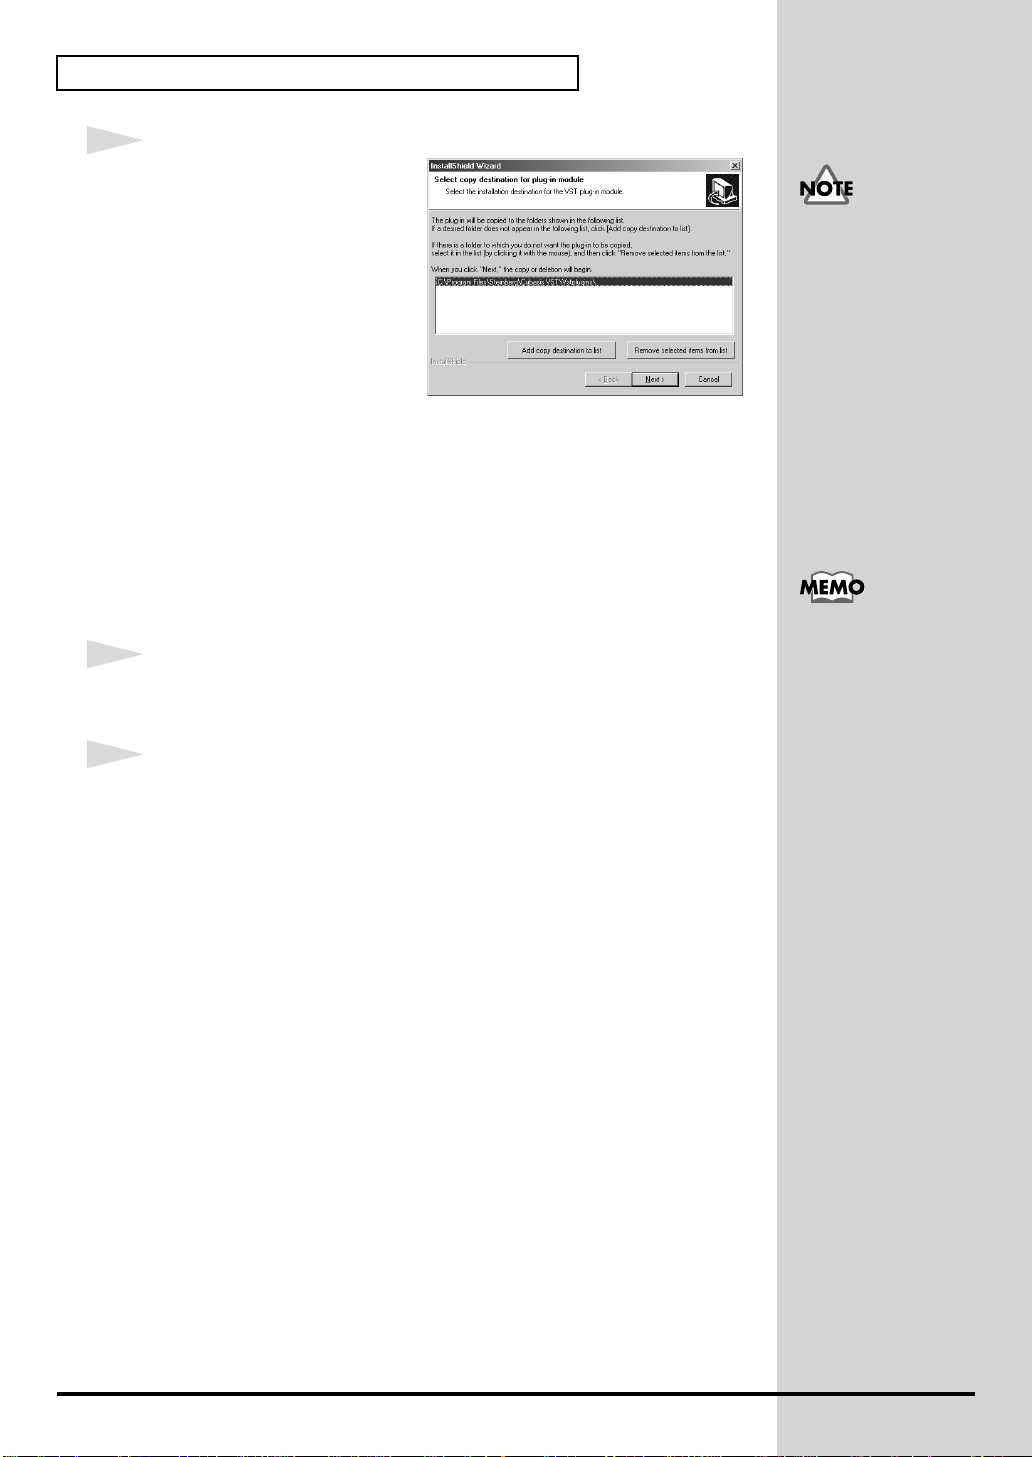
When copying of the files has
been completed, a screen will
appear in which you can specify
the destination(s) to which the
plug-in module will be copied.
Here you need to select the folders
into which the VST instruments
plug-in will be installed.
[If the desired folder is not in the list]
Click
[Add copy destination to list]
plug-in module will be copied.
[If the list contains an unwanted folder]
Select the folder to which you do not want to copy the plug-in module, or the
folder from which you want to delete the plug-in module, and click
selected items from list]
14
After you have specified the desired folder(s), click
The plug-in module is a
file that allows the host
application to use the VST
instruments. The plug-in
module must be copied to
the folder specified for
each application (the plugin folder). Refer to the
owner's manual for your
VST instruments-
, and specify the folder to which the
[Remove
.
[Next]
.
compatible host
application to determine
the location of its plug-in
folder.
Plug-in modules can be
added or deleted even
after installation.
The plug-in module will be copied.
15
When the
Installation of the VST instruments has now been completed.
InstallShield Wizard complete
screen appears, click
[Finish]
.
10
Page 11
Software installation(Windows)
Adding or removing the plug-in module
If you install a new host application after installing VST instruments, or if
you decide that you want to use VST instruments with another host
application, you simply need to copy the plug-in module into the plug-in
folder of the host application.
Conversely, if you decide that you no longer want to use VST instruments
with a host application, all you need to do is delete the plug-in module from
that application's plug-in folder.
1. Click the Windows Start button, and select [Programs] - [HQ
Software Synthesizer] - [(Product name ) VST] - [Copy or delete
Plug-in module].
2. The "Select copy destination for plug-in module" screen will
appear. Refer to the manual of your host application(s) that uses VST
instruments to find its plug-in folder, and make sure that only the
desired folders are shown in the list.
[If the desired folder is not in the list]
Click [Add copy destination to list], and specify the folder into
which the plug-in module is to be copied.
[
If the list contains an unwanted folder]
In the list, select the folder into which you do not want to copy the
plug-in module, or the folder that you want to remove from the list,
and click [Remove selected items from list].
If you are using Windows
XP, click the Start button
and choose [All programs]
- [HQ Software
Synthesizer] - [(Product
name) VST] - [Copy or
delete Plug-in module].
3. After you have specified the desired folder(s), click [Next].
4. The plug-in module will be copied/deleted.
Español Italiano Français Deutsch English
11
Page 12
Software installation(Windows)
Uninstalling the software
To uninstall the software, use the following procedure.
When you uninstall the software, the user sounds and effect patches that you yourself
created will be erased. Data that you want to keep must be saved to a file before you
uninstall the software. For details on how to save your data, refer to the online manual
for the software.
Windows Me/98 users
1
Click the Windows Start button, and click [Settings]-[Control Panel].
2
Double-click the "Add/Remove
Programs" icon. The "Add/
Remove Programs Properties"
dialog box will appear.
3
Click the "Install/Uninstall" tab .
4
In the list, click the software that
you want to remove.
5
Click [Add/Remove...].
6
If you are removing VST instruments, the "Modify or Uninstall" screen will
appear. Add a check mark next to "Remove," and click [Next].
7
A screen will inform you that the uninstallation has been completed. Click
[Finish].
If you simply want to
delete the plug-in module,
refer to Adding or
removing the plug-in
module (p. 11).
12
Page 13
Windows 2000/XP users
b
Software installation(Windows)
1
Log on as a user with administrative privileges (such as Administrator).
2
Click the Windows Start button, and click [Settings]-[Control Panel]. (In
Windows XP, click the Start button and then click Control Panel.)
3
Double-click the "Add/Remove
Programs" icon. (In Windows
XP, double-click the "Add or
Remove Programs" icon.) The
"Add/Remove Programs" dialog
box ("Add or Remove
Programs" in Windows XP) will
appear.
4
Click the "Change or Remove
Programs" icon.
5
In the list, click the software that you want to delete.
6
Click [Change/Remove].
If you simply want to
delete the plug-in
module, refer to Adding
or removing the plug-in
module (p. 11).
If you have selected the
Classic display mode for
the Start menu, this will
e [Settings] - [Control
Panel].
7
If you are removing VST instruments, the "Modify or Uninstall" screen will
appear. Add a check mark next to "Remove," and click [Next].
8
A screen will inform you that the uninstallation has been completed. Click
[Finish].
Español Italiano Français Deutsch English
13
Page 14
Software installation(Macintosh)
This section explains how to install the software from the included CD-ROM.
You will need the software CD-ROM for the High Quality Software
Synthesizer, so have it ready.
You must read the license agreement before you install the software. The
license agreement may be displayed during the process of installing the
software, so please be sure to read it.
The license agreement is
the contract under which
Roland allows you to use
the software.
Before you install the High Quality Software Synthesizer, you must install a host
application that supports VST instruments. You must also increase the memory
allocated to your host application by the following amounts.
Hyper Canvas/Super Quartet: approximately 40--50 MB
Orchestral: approximately 100 MB
Installing the software
1
Start up your Macintosh.
2
Exit all software that may be running.
3
Prepare the CD-ROM.
Insert the software CD-ROM into the CD-ROM drive of your Macintosh.
Increase the memory
allocation to suit the type
and version of your host
application, as well as
other factors such as the
number of plug-ins you
are using.
About increasing the
memory, refer to MacOS
guide.
The screen shots printed in
this manual are taken from
Mac OS 9.1. The screens
you actually see on your
computer may differ
depending on the version
of your operating system.
14
4
In the software CD-ROM, double-click [Installer E].
5
The license dialog box will appear.
This message asks whether you
consent to the terms of the license
agreement. Read the license
agreement, and click [Accept] if you
agree. If you click [Decline], the
installation will be halted.
If you are using anti-virus
or similar software, you
must disable it before
installing this software.
Page 15
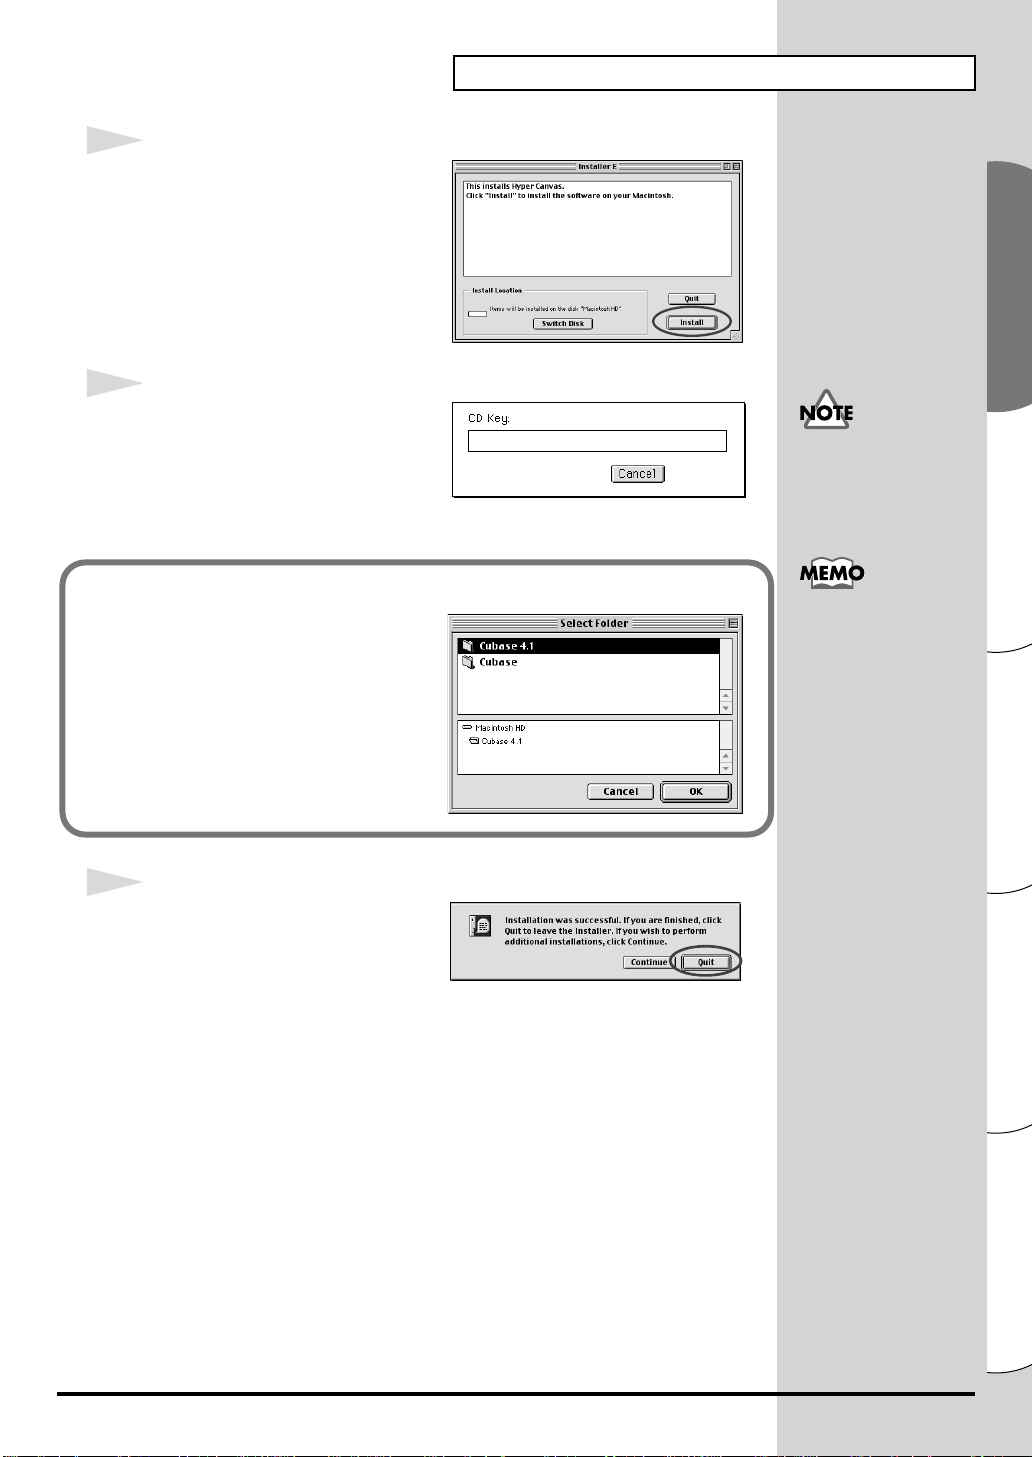
6
b
The installation dialog box will
appear.
Select the installation location, and
click [Install].
* The VST instruments will be installed in
the VstPlugIns folder.
7
The dialog box shown at right will
appear. Input the CD key.
The CD key can be found on the back
of the CD-ROM case.
Software installation(Macintosh)
If the CD Key is incorrect,
the [OK] button will not
e displayed.
■ Select Folder dialog box appears
A Select Folder dialog box like the
one shown at right may appear
during the installation. In this dialog
box, select the folder into which you
want to install the VST instrument,
and click [OK]. The necessary files
will be copied to the selected folder.
8
When all of the software has been
installed, a dialog box will inform
you that installation has been
completed.
Normally you will click [Quit].
If you want to install into another folder, click [Continue].
This completes installation of VST instruments.
The dialog box shown at
left will appear if the
hard disk contains more
than one VstPlugIns
folder into which a VST
instruments can be
installed.
Español Italiano Français Deutsch English
15
Page 16
Troubleshooting
* Please read the “Readme_e.txt” file in the software CD-ROM. You can get any
additional information not written in the installation guide from the “Readme_e.txt”
file.
■ A dialog box asks for the CD-ROM
◆ A dialog box asking for the CD-ROM may appear when a DXi/
VST instruments is plugged in.
If this dialog box appears, insert the High Quality Software Synthesizer
software CD-ROM into your CD-ROM drive, and click [OK]. After plug-in
has been completed, remove the software CD-ROM from the CD-ROM drive.
■ Can't install the software
◆ Does the CPU of your computer meet the operating
requirements?
If you are using Windows, the High Quality Software Synthesizer cannot be
used with a CPU that does not support either the SSE instruction set or the
Enhanced 3DNow! instruction set.
If you are using a Macintosh, the High Quality Software Synthesizer cannot
be used with a CPU that does not support AltiVec.
■ Can't install the VST instruments
◆ Does your host application have a VstPlugIns folder?
Some host applications do not provide a VstPlugIns folder. For this reason,
the screen in which you specify the copy destination for the plug-in module
(on the Macintosh, the folder selection dialog box), which appears during
installation of the VST instruments, may not show the folder of the desired
host application. In this case, refer to the owner's manual for your host
application, create a VstPlugIns folder, and then re-install the VST
instruments.
If you are using Windows
XP, a dialog box entitled
"What do you want
Windows to do" may
appear. If it does, click
"Take no action," and
then click [OK].
■ Can't plug-in (can't select) DXi/VST instruments
◆ Is the DXi/VST instruments installed correctly?
If you are using Windows, re-install the DXi/VST instruments as described
in Software installation(Windows) (p. 5).
If you are using Macintosh, re-install the VST instruments as described in
Software installation(Macintosh) (p. 14).
16
Page 17

■ Plug-in failed
Check the following points:
• If you are using Macintosh, increase the memory allocation of your
host application as described in Software installation(Macintosh)
(p. 14).
Increase the memory allocation to suit the type and version of your
host application, as well as other factors such as the number of plugins you are using.
• This product can be used only with the following audio formats.
Check the audio format of your host application.
Sampling Rate ..... 44.1, 48, 96 kHz
• It is possible that your computer has insufficient memory. Try exiting
other applications that you are not using. If the plug-in frequently
fails due to insufficient memory, we recommend that you expand the
memory of your computer.
◆ Is the DXi/VST instruments installed correctly?
Re-install the DXi/VST instruments as described in Software
installation(Windows) (p. 5).
◆ Is the VST instruments installed correctly? (Macintosh)
In some cases, a dialog box with a message of "This module is not installed
correctly. Please install again." may be displayed when you attempt to
plug-in the VST instruments using your host application. If this occurs, reinstall the VST instruments as described in Software
installation(Macintosh) (p. 14).
Troubleshooting
About increasing the
memory, refer to MacOS
guide.
◆ Does your host application support DXi/VST instruments?
Refer to the owner's manual of your host application, and check whether the
host application supports DXi/VST instruments.
■ An error of "Can't allocate Memory" is displayed
when you plug-in (Macintosh)
This error occurs when there is insufficient memory to run the plug-in. Please
increase the amount of memory allocated to your application.
Español Italiano Français Deutsch English
17
Page 18
Troubleshooting
■ Sound is too loud/too soft/not heard
◆ Is the DXi/VST instruments set correctly?
Check the volume setting of the DXi/VST instruments.
◆ If the level meter of the DXi/VST instruments is moving, it is
possible that there is a problem with the audio output settings.
Check the following points:
• Check the audio volume of your host application. Also make sure
that the audio device you are using has been selected correctly.
• Check the volume and any other necessary settings of your audio
device.
• Check the connections and volume of your audio system (e.g., amp
and speaker).
◆ Is a heavy processing load being placed on your computer?
If a heavy processing load is placed on your computer, the host application
may stop processing audio, causing there to be no sound. Refer to the
troubleshooting items "Sound is interrupted/Playback tempo is irregular/
Playback stops mid-way."
■ Sound is interrupted/Playback tempo is irregular/
Playback stops mid-way
Check the following points:
• If your host application lets you change the size of the audio buffer,
try increasing the size.
• It is possible that playback cannot occur correctly because other
software is placing a processing load on your computer. Exit any
software you are not using.
• Refer to the troubleshooting documentation for your host application
or audio device. If there are troubleshooting items regarding
problems with audio playback, they may help you solve this
problem as well.
• If you are using Windows 2000/XP, try using the following
procedure to change the performance option settings.
Windows 2000 users
1. Right-click My Computer, and select Properties.
2. Open the Advanced tab, and click the Performance Options
button.
3. In the Application Response field, check Background Service.
4. Click the [OK] button to close the dialog box.
Windows XP users
1. Click the Start button and right-click My Computer, and select
Properties.
Increasing the buffer size
will increase the delay in
notes ("latency").
18
2. Open the Advanced tab, and click the Setting button in the
Performance field.
Page 19
3. Open the Advanced tab, and check Background services in the
b
Processor scheduling field.
4. Click the [OK] button to close the dialog box.
■ Notes are delayed
Check the following points:
• If your host application or audio device allows you to change the size
of the audio buffer, try decreasing the size.
• If the manual of your host application or audio device contains
information on resolving problems with delayed notes, refer to those
explanations.
You will need a low-latency audio device if you want to play this product in
real time. For details, refer to the owner's manual of your audio device or the
owner's manual of your host application.
■ Polyphony is insufficient/Notes are omitted
It is possible that this limitation is due to the maximum polyphony setting.
Check the maximum polyphony setting.
Troubleshooting
Decreasing the buffer
size may cause notes to
e interrupted or fail to
sound. Set the buffer size
according to the
performance of your
computer and audio
device.
◆ You may be able to improve the situation by adjusting the ASIO
buffer size. (Macintosh)
If you are using Cubase VST/Cubasis VST, you may be able to improve the
polyphony by increasing or decreasing the ASIO buffer size.
◆ Are you using Macintosh with the Cubase VST?
If you are using Macintosh with the Cubase series, check the "Favor MIDI
Timing" setting found in the General section of Audio System Setup.
■ Sound is distorted
Check the following points:
• Try lowering the master volume of the DXi/VST instruments.
• Try lowering the track volume and/or master volume of your host
application.
• Check the settings of your sound card.
• Check the volume of your playback equipment.
Set the buffer size as
appropriate for the
performance of your
computer and audio
device.
19
Español Italiano Français Deutsch English
Page 20

Troubleshooting
■ Can't receive system exclusive messages
If you are using the VST instruments version, system exclusive messages
cannot be received due to the VST instruments specifications.
■ VST instruments do not receive control change
messages
If you are using Emagic's "Logic" series as the host application, some control
change messages cannot be received by VST instruments, due to the
specifications of the Logic series. (For the current specifications of Logic, refer
to the documentation of the Logic series.)
To modify a parameter that cannot be modified by control change messages,
you can either directly operate its knob or slider in the VST instruments
window, or use the Automation function to control it.
■ Can't play back the included demo songs (when
using Cakewalk series software)
The CAKEWALK folder within the SONGS folder on the software CD-ROM
contains demo songs for the High Quality Software Synthesizer in the native
format (*.wrk) of Cakewalk series software. Even though these files are saved
in a format that can be used by the High Quality Software Synthesizer, you
will need to set the output port of each MIDI track appropriately for your
system. If the High Quality Software Synthesizer does not produce sound,
please check the output port settings of the MIDI tracks.
20
Page 21
Software-Installation (Windows)
In diesem Abschnitt wird die Installation der Software von der mitgelieferten
CD-ROM erläutert. Sie benötigen die Software-CD-ROM für den High
Quality Software Synthesizer; halten Sie sie deshalb bereit.
Bevor Sie die Software installieren, müssen Sie die Lizenzvereinbarung lesen.
Die Lizenzvereinbarung wird während des Installationsprozesses angezeigt.
Lesen Sie die Vereinbarung aufmerksam durch.
Bevor Sie den High Quality Software Synthesizer installieren, müssen Sie eine HostAnwendung installieren, die DXi/VST Instruments unterstützt.
Installation der Software
Installieren Sie je nach verwendeter Host-Anwendung entweder DXi oder
VST Instruments.
Die Lizenzvereinbarung
ist der Vertrag, mit dem
Roland Ihnen die
Verwendung der
Software erlaubt.
• Installation von DXi....................................................S. 22
• Installation von VST Instruments.............................S. 24
21
Español Italiano Français Deutsch English
Page 22
Software-Installation (Windows)
b
J
■ Installation von DXi
1
Beenden Sie alle aktuell ausgeführten Programme (Anwendungen).
Schließen Sie außerdem alle geöffneten Programmfenster.
2
Halten Sie die CD-ROM bereit.
Legen Sie die Software-CD-ROM in das CD-ROM-Laufwerk Ihres
Computers ein.
3
Öffnen Sie das Dialogfeld
"Ausführen...".
Klicken Sie auf die WindowsSchaltfläche Start. Wählen Sie im
angezeigten Menü die Option
Ausführen.
Wenn Sie Windows 2000/
XP verwenden, müssen Sie
sich als Benutzer mit
Administrationsrechten
(zum Beispiel als
Administrator) anmelden,
evor Sie die Software
installieren.
Wenn Sie mit Windows XP
arbeiten, stellen Sie sicher,
dass alle anderen Benutzer
außer demjenigen, der die
Installation durchführt,
abgemeldet sind.
4
Klicken Sie im angezeigten
Dialogfeld auf [Durchsuchen...].
Das Dialogfeld zum Auswählen
einer Datei wird angezeigt:
5
Klicken Sie auf die Schaltfläche
im oberen Bereich des
Dialogfelds und wählen Sie aus
der angezeigten Liste das
Laufwerk mit dem CD-ROMSymbol aus.
Die Ordner auf der SoftwareCD-ROM werden angezeigt.
6
Doppelklicken Sie auf den Ordner DXI, wählen Sie die Datei SETUP.EXE
aus und klicken Sie auf [Öffnen].
Wenn Sie Anti-VirenSoftware einsetzen, muss
diese beendet werden.
Wenn Sie mit Windows XP
arbeiten, wird
möglicherweise ein
Dialogfeld mit dem
Namen "Wie möchten Sie
vorgehen?" angezeigt.
Klicken Sie in diesem Fall
auf "Keinen Vorgang
durchführen" und
anschließend auf [OK].
e nach
Systemkonfiguration wird
die Dateierweiterung
eventuell nicht angezeigt.
22
Page 23
7
Prüfen Sie, ob der Name der in
Schritt 6 ausgewählten Datei im
Feld Öffnen des Dialogfelds
"Ausführen" angezeigt wird, und
klicken Sie auf [OK].
8
Anschließend startet das Installationsprogramm.
Wenn der Bildschirm "Welcome to the InstallShield Wizard" angezeigt
wird, klicken Sie auf [Next].
9
Sie werden gefragt, ob Sie mit den
Bedingungen der
Lizenzvereinbarung
einverstanden sind. Lesen Sie die
Lizenzvereinbarung, und klicken
Sie auf [Yes], wenn Sie
einverstanden sind. Wenn Sie auf
[No] klicken, wird die Installation
abgebrochen.
E:\DXI\SETUP.EXE
Software-Installation (Windows)
10
Im nächsten Dialogfeld werden
Sie aufgefordert, den CD key
einzugeben.
Geben Sie den CD-Schlüssel ein,
den Sie auf der Rückseite der
CD-ROM-Hülle finden.
Klicken Sie auf [Next].
11
Es wird ein Dialogfeld angezeigt,
in dem Sie den Ordner für die
Installation wählen können. Um
den vorgeschlagenen Ordner zu
akzeptieren, klicken Sie auf
[Next].
Wenn Sie den Installationsordner
ändern möchten, klicken Sie auf
[Browse...] und geben den
gewünschten Ordner an.
Wenn Sie DXi bereits
installiert haben, wird der
Installationsbildschirm
nicht angezeigt.
Wenn Sie den Speicherort
für die Installation
ändern möchten, müssen
Sie die Software zunächst
deinstallieren und
anschließend wieder
installieren.
Español Italiano Français Deutsch English
23
Page 24
Software-Installation (Windows)
j
12
Überprüfen Sie die aktuellen
Einstellungen des Fensters
Confirmation of installation.
Sind die Einstellungen korrekt,
klicken Sie auf [Next]. Wenn Sie
einen anderen Ort für die
Installation wählen möchten,
klicken Sie auf [Back].
13
Nachdem die Dateien kopiert wurden, wird das Fenster InstallShield
Wizard Complete angezeigt.
Klicken Sie auf [Finish].
Die Installation von DXi ist abgeschlossen.
■ Installation von VST Instruments
* Wenn Sie lediglich das Plugin-Modul kopieren möchten, lesen Sie den Abschnitt
Plugin-Modul hinzufügen oder entfernen (S. 28).
1
Beenden Sie alle aktuell ausgeführten Programme (Anwendungen).
Schließen Sie außerdem alle geöffneten Programmfenster.
2
Halten Sie die CD-ROM bereit.
Legen Sie die Software-CD-ROM in das CD-ROM-Laufwerk Ihres
Computers ein.
3
Öffnen Sie das Dialogfeld
"Ausführen...".
Klicken Sie dazu auf die
Windows-Schaltfläche Start.
Wählen Sie im angezeigten Menü
die Option Ausführen.
Wenn Sie noch keine HostAnwendung installiert
haben, müssen Sie dies
etzt tun, ehe Sie die
Installation fortsetzen
können.
Wenn Sie Windows 2000/
XP verwenden, müssen Sie
sich als Benutzer mit
Administrationsrechten
(zum Beispiel als
Administrator) anmelden,
ehe Sie die Software
installieren können.
Wenn Sie mit Windows XP
arbeiten, stellen Sie sicher,
dass alle anderen Benutzer
außer demjenigen, der die
Installation durchführt,
abgemeldet sind.
24
Page 25
4
J
Klicken Sie im angezeigten
Dialogfeld auf [Durchsuchen...].
Software-Installation (Windows)
Das Dialogfeld zum Auswählen
einer Datei wird angezeigt:
5
Klicken Sie auf die Schaltfläche
im oberen Bereich des
Dialogfelds und wählen Sie aus
der angezeigten Liste das
Laufwerk mit dem CD-ROMSymbol aus.
Die Ordner auf der SoftwareCD-ROM werden angezeigt.
6
Doppelklicken Sie auf den Ordner VST, wählen Sie die Datei SETUP.EXE
aus und klicken Sie auf [Öffnen].
7
Stellen Sie sicher, dass der Name
der in Schritt 6 ausgewählten
Datei im Feld Öffnen des
Dialogfelds "Ausführen"
angezeigt wird, und klicken Sie
auf [OK].
E:\VST\SETUP.EXE
Wenn Sie Anti-VirenSoftware einsetzen, muss
diese beendet werden.
Wenn Sie mit Windows
XP arbeiten, wird
möglicherweise ein
Dialogfeld mit dem
Namen "Wie möchten
Sie vorgehen?"
angezeigt. Klicken Sie in
diesem Fall auf "Keinen
Vorgang durchführen"
und anschließend auf
[OK].
e nach
Systemkonfiguration
wird die
Dateierweiterung
eventuell nicht angezeigt.
8
Anschließend startet das Installationsprogramm.
Wenn der Bildschirm "Welcome to the InstallShield Wizard" angezeigt
wird, klicken Sie auf [Next].
9
Sie werden gefragt, ob Sie mit den
Bedingungen der
Lizenzvereinbarung
einverstanden sind. Lesen Sie die
Lizenzvereinbarung, und klicken
Sie auf [Yes], wenn Sie
einverstanden sind. Wenn Sie auf
[No] klicken, wird die Installation
abgebrochen.
Español Italiano Français Deutsch English
25
Page 26
Software-Installation (Windows)
b
10
Im nächsten Dialogfeld werden
Sie aufgefordert, den CD key
einzugeben.
Geben Sie den CD-Schlüssel ein,
den Sie auf der Rückseite der
CD-ROM-Hülle finden.
Klicken Sie auf [Next].
11
Es wird ein Dialogfeld angezeigt,
in dem Sie den Ordner für die
Installation wählen können. Um
den vorgeschlagenen Ordner zu
akzeptieren, klicken Sie auf
[Next]. Wenn Sie den
Installationsordner ändern
möchten, klicken Sie auf
[Browse...] und geben den
gewünschten Ordner an.
12
Überprüfen Sie die aktuellen
Einstellungen des Fensters
Confirmation of installation.
Wenn Sie VST Instruments
ereits installiert haben,
wird der
Installationsbildschirm
nicht angezeigt.
Wenn Sie den Speicherort
für die Installation ändern
möchten, müssen Sie die
Software zunächst
deinstallieren und
anschließend wieder
installieren.
Sind die Einstellungen korrekt,
klicken Sie auf [Next]. Wenn Sie
einen anderen Ort für die
Installation wählen möchten,
klicken Sie auf [Back].
26
Page 27
13
j
Wenn der Kopiervorgang der
Dateien abgeschlossen ist, wird
ein Bildschirm angezeigt, in dem
Sie Ordner angeben können, in
die die Plugin-Module kopiert
werden sollen.
Wählen Sie nun die Ordner aus, in
die das VST Instruments Plugin
installiert werden soll.
[Wenn sich der gewünschte Ordner nicht in der Liste befindet]
Klicken Sie auf [Add copy destination to list], und geben Sie den Ordner an,
in den das Plugin-Modul kopiert werden soll.
[Wenn die Liste einen unerwünschten Ordner enthält]
Wählen Sie den Ordner, in den das Plugin-Modul nicht kopiert werden soll
oder aus dem Sie das Modul löschen möchten, und klicken Sie auf [Remove
selected items from list].
14
Nachdem Sie den/die gewünschten Ordner angegeben haben, klicken Sie
auf [Next].
Software-Installation (Windows)
Das Plugin-Modul ist
eine Datei, die es der
Host-Anwendung
ermöglicht, VST
Instruments zu
verwenden. Das PluginModul muss in den
eweiligen Ordner
kopiert werden, der für
die einzelnen
Anwendungen
vorgesehen ist (den
Plugin-Ordner). Im
Benutzerhandbuch der
VST Instrumentskompatiblen HostAnwendung können Sie
den Speicherort des
Plugin-Ordners
nachlesen.
Anschließend wird das Plugin-Modul kopiert.
15
Wenn das Abschlussfenster des InstallShield-Assistenten angezeigt wird,
klicken Sie auf [Finish].
Die Installation von VST Instruments ist abgeschlossen.
Plugin-Module können
auch nach der
Installation hinzugefügt
oder gelöscht werden.
Español Italiano Français Deutsch English
27
Page 28

Software-Installation (Windows)
Plugin-Modul hinzufügen oder entfernen
Wenn Sie nach der Installation von VST Instruments eine neue HostAnwendung installieren oder wenn Sie VST Instruments mit einer anderen
Host-Anwendung verwenden möchten, müssen Sie das Plugin-Modul
lediglich in den Plugin-Ordner der Host-Anwendung kopieren.
Wenn Sie umgekehrt VST Instruments später nicht mehr mit einer HostAnwendung verwenden möchten, müssen Sie das Plugin-Modul lediglich
aus dem Plugin-Ordner dieser Anwendung löschen.
1. Klicken Sie auf die Schaltfläche "Start" von Windows, und wählen Sie
[Programme]-[HQ Software Synthesizer]-[(Produktname) VST] [Copy or delete Plug-in module].
2. Das Fenster Select copy destination for plug-in module wird
angezeigt. Schlagen Sie im Handbuch der Host-Anwendung nach, die
VST Instruments verwendet, um den zugehörigen Plugin-Ordner zu
finden. Prüfen Sie, ob in der Liste nur die gewünschten Ordner
angezeigt werden.
[Wenn sich der gewünschte Ordner nicht in der Liste befindet]
Klicken Sie auf [Add copy destination to list], und geben Sie den
Ordner an, in den das Plugin-Modul kopiert werden soll.
[Wenn die Liste einen unerwünschten Ordner enthält]
Wählen Sie in der Liste den Ordner aus, in den das Plugin-Modul
nicht kopiert werden soll oder den Sie aus der Liste entfernen
möchten, und klicken Sie auf [Remove selected items from list].
Wenn Sie mit Windows XP
arbeiten, klicken Sie auf
die Schaltfläche "Start" und
wählen [Alle Programme]
- [HQ Software
Synthesizer] [(Produktname) VST] [Copy or delete Plug-in
module].
3. Nachdem Sie den/die gewünschten Ordner angegeben haben, klicken
Sie auf [Next].
4. Anschließend werden die Plugin-Module kopiert/gelöscht.
28
Page 29

Deinstallation der Software
Um die Software zu deinstallieren, gehen Sie wie folgt vor:
Wenn Sie die Software deinstallieren, werden die von Ihnen erstellen Sounds und
Effektroutinen gelöscht. Speichern Sie alle Daten, die Sie behalten möchten, in einer
Datei, bevor Sie die Software deinstallieren. Einzelheiten zum Speichern von Daten
finden Sie im Online-Benutzerhandbuch der Software.
Windows Me/98-Anwender
1
Klicken Sie auf die Windows-Schaltfläche Start und anschließend auf
[Einstellungen] - [Systemsteuerung].
Software-Installation (Windows)
2
Doppelklicken Sie auf das Symbol
Software. Das Dialogfeld
"Eigenschaften von Software"
wird angezeigt.
3
Klicken Sie auf die Registerkarte
"Installieren/Deinstallieren".
4
Klicken Sie in der Liste auf die
Software, die Sie entfernen
möchten.
5
Klicken Sie auf [Hinzufügen/
Entfernen...].
6
Wenn Sie VST Instruments entfernen, wird das Fenster Modify or Uninstall
angezeigt. Aktivieren Sie das Kästchen "Remove", und klicken Sie auf
[Next].
Wenn Sie lediglich das
Plugin-Modul löschen
möchten, lesen Sie den
Abschnitt Plugin-Modul
hinzufügen oder
entfernen (S. 28).
7
Ein Fenster informiert Sie darüber, dass die Deinstallation abgeschlossen ist.
Klicken Sie auf [Finish].
Español Italiano Français Deutsch English
29
Page 30

Software-Installation (Windows)
Windows 2000/XP-Anwender
1
Melden Sie sich als Benutzer mit Administratorrechten an (z. B. als
Administrator).
2
Klicken Sie auf die Windows-Schaltfläche "Start" und anschließend auf
[Einstellungen] - [Systemsteuerung]. (In Windows XP klicken Sie auf die
Schaltfläche Start und anschließend auf Systemsteuerung.)
Wenn Sie lediglich das
Plugin-Modul löschen
möchten, lesen Sie den
Abschnitt Plugin-Modul
hinzufügen oder
entfernen (S. 28).
3
Doppelklicken Sie auf das Symbol
Software. (In Windows XP
klicken Sie doppelt auf das
Symbol "Software".) Das
Dialogfeld Eigenschaften von
Software (bei Windows XP
Software) wird angezeigt.
4
Klicken Sie auf die Schaltfläche
"Installieren/Deinstallieren".
5
Klicken Sie in der Liste auf die Software, die Sie löschen möchten.
6
Klicken Sie auf [Ändern/Entfernen].
7
Wenn Sie VST Instruments entfernen, wird das Fenster Modify or Uninstall
angezeigt. Aktivieren Sie das Kästchen "Remove", und klicken Sie auf
[Next].
8
Ein Fenster informiert Sie darüber, dass die Deinstallation abgeschlossen ist.
Klicken Sie auf [Finish].
Wenn Sie den klassischen
Anzeigemodus für das
Menü "Start" gewählt
haben, lauten die
Menüpunkte
[Einstellungen] [Systemsteuerung].
30
Page 31

Software-Installation (Macintosh)
In diesem Abschnitt wird die Installation der Software von der mitgelieferten
CD-ROM erläutert. Sie benötigen die Software-CD-ROM für den High
Quality Software Synthesizer; halten Sie sie deshalb bereit.
Bevor Sie die Software installieren, müssen Sie die Lizenzvereinbarung lesen.
Die Lizenzvereinbarung wird während des Installationsprozesses angezeigt.
Lesen Sie die Vereinbarung aufmerksam durch.
Die Lizenzvereinbarung
ist der Vertrag, mit dem
Roland Ihnen die
Verwendung der
Software erlaubt.
Bevor Sie den High Quality Software Synthesizer installieren, müssen Sie eine HostAnwendung installieren, die VST Instruments unterstützt. Sie müssen den der HostAnwendung zugewiesenen Speicherplatz um die folgenden Mengen erweitern.
Hyper Canvas/Super Quartet: ca. 40 - 50 MB
Orchestral: ca. 100 MB
Installation der Software
1
Starten Sie Ihren Macintosh.
2
Schließen Sie alle Anwendungen, die eventuell ausgeführt werden.
3
Halten Sie die CD-ROM bereit.
Legen Sie die Software-CD-ROM in das CD-ROM-Laufwerk Ihres
Computers ein.
4
Doppelklicken Sie auf der CD-ROM auf die Datei [Installer E].
*Vergrößern Sie die
Speicherplatz-Zuweisung
entsprechend dem Typ
und der Version der HostApplikation, ebenso wie
anderen Faktoren wie etwa
der Anzahl der
verwendeten Plug-ins.
Informationen hierzu
finden Sie im Handbuch
Ihres MacintoshBetriebssystems.
Die in diesem Handbuch
gezeigten
Bildschirmkopien (Screen
Shots) stammen aus
Mac OS 9.1. Die auf
Ihrem Computer
angezeigten Fenster
können je nach Version
des Betriebssystems
etwas anders aussehen.
5
Das Dialogfeld mit der
Lizenzvereinbarung wird angezeigt.
Sie werden gefragt, ob Sie mit den
Bedingungen der
Lizenzvereinbarung einverstanden
sind. Lesen Sie die
Lizenzvereinbarung, und klicken Sie
auf [Accept], wenn Sie
Wenn Sie ein
Virenschutzprogramm
oder ähnliche Software
verwenden, müssen Sie
sie vor Installation dieser
Software deaktivieren.
31
Español Italiano Français Deutsch English
Page 32

Software-Installation (Macintosh)
einverstanden sind. Wenn Sie auf [Decline] klicken, wird die Installation
abgebrochen.
6
Das Dialogfeld Installer E wird
angezeigt.
Wählen Sie den Installationsordner,
und klicken Sie auf [Install].
* VST Instruments wird im Ordner
VstPlugIns installiert.
7
Ein Dialogfeld ähnlich dem rechts
abgebildeten wird angezeigt. Geben
Sie den CD-Schlüssel ein.
Sie finden den CD-Schlüssel auf der
Rückseite der CD-ROM-Hülle.
Wenn Sie den CDSchlüssel falsch
eingegeben haben, wird
die Schaltfläche [OK] nicht
angezeigt.
■ Das Dialogfeld "Select Folder" wird angezeigt.
Während der Installation wird ein
Dialogfeld namens Select Folder
ähnlich dem rechts abgebildeten
Dialogfeld angezeigt. In diesem
Dialogfeld wählen Sie den Ordner, in
dem VST Instruments installiert
werden soll, und klicken Sie auf
[OK]. Die erforderlichen Dateien
werden in den ausgewählten Ordner
kopiert.
8
Nachdem die gesamte Software
installiert wurde, informiert Sie ein
Dialogfeld darüber, dass die
Installation abgeschlossen ist.
Normalerweise klicken Sie dann auf [Quit].
Wenn die Software in einem anderen Ordner installiert werden soll, klicken
Sie auf [Continue].
Das links abgebildete
Dialogfeld wird angezeigt,
wenn die Festplatte über
mehrere VstPlugInsOrdner verfügt, in denen
VST Instruments installiert
werden kann.
32
Dadurch wird die Installation von VST Instruments abgeschlossen.
Page 33

Fehlerbehebung
* Lesen Sie die Datei " Readme_e.txt", die Sie auf der Software-CD-ROM finden. Die
Datei "Readme_e.txt" enthält zusätzliche Informationen, die im
Installationshandbuch nicht erwähnt werden.
■ Ein Dialogfeld fordert Sie auf, die CD-ROM
einzulegen
◆ Möglicherweise werden Sie über ein Dialogfeld dazu
aufgefordert, die CD-ROM einzulegen, wenn DXi/VST
Instruments eingebunden wird.
Legen Sie dann die High Quality Software Synthesizer CD-ROM in Ihr
CD-ROM-Laufwerk ein, und klicken Sie auf [OK]. Wenn der Prozess
abgeschlossen ist, nehmen Sie die Software-CD-ROM wieder aus Ihrem
CD-ROM-Laufwerk.
■ Die Software kann nicht installiert werden
◆ Erfüllt die CPU Ihres Computers die Voraussetzungen für die
Inbetriebnahme?
Wenn Sie mit Windows arbeiten, kann der High Quality Software
Synthesizer nur dann eingesetzt werden, wenn Ihre CPU entweder den SSEBefehlssatz oder den Enhanced 3DNow!-Befehlssatz unterstützt.
Wenn Sie mit einem Macintosh arbeiten, kann der High Quality Software
Synthesizer nur dann eingesetzt werden, wenn die CPU AltiVec unterstützt.
■ VST Instruments kann nicht installiert werden
◆ Verfügt Ihre Host-Anwendung über einen VstPlug-ins-Ordner?
Manche Host-Anwendungen stellen keinen VstPlug-ins-Ordner bereit. Aus
diesem Grund zeigt der Bildschirm, in dem Sie das Kopierziel für das Plugin-Modul angeben (auf dem Macintosh das Dialogfeld "Folder Selection")
und der während der Installation von VST Instruments angezeigt wird, den
Ordner der gewünschten Host-Anwendung möglicherweise nicht an.
Schlagen Sie in diesem Fall im Handbuch Ihrer Host-Anwendung nach,
erstellen Sie einen VstPlug-ins-Ordner und installieren Sie VST Instruments
erneut.
Wenn Sie mit Windows XP
arbeiten, wird
möglicherweise ein
Dialogfeld mit dem
Namen "Wie möchten Sie
vorgehen?" angezeigt.
Klicken Sie in diesem Fall
auf "Keinen Vorgang
durchführen" und
anschließend auf [OK].
■ Plug-in (Auswahl) von DXi/VST Instruments nicht
möglich
◆ Ist DXi/VST Instruments korrekt installiert?
Wenn Sie mit Windows arbeiten, installieren Sie DXi/VST Instruments wie
unter Software-Installation (Windows) (S. 21) beschrieben erneut.
Wenn Sie mit einem Macintosh arbeiten, installieren Sie VST Instruments wie
unter Software-Installation (Macintosh) (S. 31) beschrieben erneut.
Español Italiano Français Deutsch English
33
Page 34

Fehlerbehebung
■ Plug-in fehlgeschlagen
Überprüfen Sie die folgenden Punkte:
• Wenn Sie einen Macintosh verwenden, vergrößern Sie die
Speicherplatz-Zuweisung Ihrer Host-Anwendung, wie unter
Software-Installation (Macintosh) (S. 31). Vergrößern Sie die
Speicherplatz-Zuweisung entsprechend dem Typ und der Version
der Host-Applikation, ebenso wie anderen Faktoren wie etwa der
Anzahl der verwendeten Plug-ins.
• Dieses Produkt kann nur zusammen mit den folgenden
Audioformaten eingesetzt werden. Überprüfen Sie das Audioformat
Ihrer Host-Anwendung.
Abtastfrequenzrate .........44,1, 48, 96 kHz
• Möglicherweise ist der Arbeitsspeicher Ihres Computers
unzureichend. Beenden Sie andere Anwendungen, die Sie nicht
benötigen. Wenn das Plug-in aufgrund unzureichenden
Arbeitsspeichers häufig fehlschlägt, raten wir Ihnen, den
Arbeitsspeicher Ihres Computers zu erhöhen.
◆ Wurde DXi/VST Instruments korrekt installiert?
Installieren Sie DXi/VST Instruments wie unter Software-Installation
(Windows) (S. 21) beschrieben erneut.
Informationen hierzu
finden Sie im Handbuch
Ihres MacintoshBetriebssystems.
◆ Wurde VST Instruments korrekt installiert? (Macintosh)
In einigen Fällen wird ein Dialogfeld mit der Meldung "This module is not
installed correctly. Please install again." angezeigt, wenn Sie versuchen,
VST Instruments über die Host-Anwendung einzubinden. Installieren Sie in
diesem Fall VST Instruments wie unter Software-Installation (Macintosh)
(S. 31) beschrieben erneut.
◆ Unterstützt Ihre Host-Anwendung DXi/VST Instruments?
Schlagen Sie im Handbuch Ihrer Host-Anwendung nach und prüfen Sie, ob
die Host-Anwendung DXi/VST Instruments unterstützt.
■ Bei der Einbindung wird die Meldung "Can't
allocate Memory" angezeigt (Macintosh)
Dieser Fehler tritt auf, wenn für die Ausführung des Plug-ins nicht genügend
Speicher zur Verfügung steht. Erhöhen Sie die Speicherzuweisung für die
Anwendung.
34
Page 35

■ Sound zu laut/zu leise/nicht hörbar
◆ Wurde DXi/VST Instruments korrekt eingestellt?
Überprüfen Sie die Lautstärkeeinstellung von DXi/VST Instruments.
◆ Wenn sich der Pegelmesser in DXi/VST Instruments bewegt, ist
es möglich, dass ein Problem bei den Einstellungen der
Audio-Ausgabe vorliegt.
Überprüfen Sie die folgenden Punkte:
• Überprüfen Sie die Audiolautstärke Ihrer Host-Anwendung. Stellen
Sie sicher, dass das verwendete Audiogerät korrekt ausgewählt
wurde.
• Überprüfen Sie die Lautstärke und andere notwendige Einstellungen
Ihres Audiogeräts.
• Überprüfen Sie die Anschlüsse und die Lautstärke Ihres
Audiosystems (z. B. Verstärker und Lautsprecher).
◆ Sind die Ressourcen des Computers stark belastet?
Wenn die Ressourcen des Computers stark belastet sind, stellt die HostAnwendung die Audioverarbeitung möglicherweise ein, wodurch kein
Sound mehr zu hören ist. Lesen Sie die Abschnitte zur Fehlerbehebung
"Sound wird unterbrochen/Das Wiedergabetempo ist unregelmäßig/
Wiedergabe wird unterbrochen".
Fehlerbehebung
■ Sound wird unterbrochen/Das Wiedergabetempo
ist unregelmäßig/Wiedergabe wird unterbrochen
Überprüfen Sie die folgenden Punkte:
• Wenn Sie in der Host-Anwendung die Größe des Audiopuffers
ändern können, erhöhen Sie den Pufferwert.
• Eventuell ist eine korrekte Wiedergabe nicht möglich, weil andere
Software-Anwendungen Ihren Computer zu stark belasten. Beenden
Sie Software, die Sie nicht benötigen.
• Schlagen Sie in der Dokumentation zur Fehlerbehebung in den
Handbüchern der Host-Anwendung oder des Audiogeräts nach.
Wenn dort Punkte zur Fehlerbehebung von Problemen bei der
Audiowiedergabe genannt werden, helfen Ihnen diese eventuell
auch bei der Lösung des aktuellen Problems.
• Wenn Sie mit Windows 2000/XP arbeiten, führen Sie folgende
Schritte aus, um die Leistungsmerkmale zu ändern.
Windows 2000-Anwender
1. Klicken Sie mit der rechten Maustaste auf das Symbol
"Arbeitsplatz", und wählen Sie die Option "Eigenschaften".
2. Wechseln Sie zur Registerkarte Erweitert, und klicken Sie auf die
Schaltfläche "Systemleistungsoptionen".
3. Aktivieren Sie im Feld "Systemleistung optimieren für" die
Option "Hintergrunddienste".
4. Klicken Sie auf die Schaltfläche [OK], um das Dialogfeld zu
schließen.
Eine Vergrößerung der
Puffergröße erhöht die
Verzögerung der Noten
("Latenz").
Español Italiano Français Deutsch English
35
Page 36

Fehlerbehebung
Windows XP-Anwender
1. Klicken Sie auf die Schaltfläche Start und anschließend mit der
rechten Maustaste auf Arbeitsplatz. Wählen Sie die Option
Eigenschaften.
2. Wechseln Sie zur Registerkarte Erweitert, und klicken Sie auf die
Schaltfläche Einstellungen im Feld Systemleistung.
3. Wechseln Sie zur Registerkarte Erweitert, und aktivieren Sie die
Option Hintergrunddienste im Feld Prozessorzeitplanung.
4. Klicken Sie auf die Schaltfläche [OK], um das Dialogfeld zu
schließen.
■ Noten werden verzögert
Überprüfen Sie die folgenden Punkte:
• Wenn Sie in der Host-Anwendung oder im Audiogerät die Größe
des Audiopuffers ändern können, setzen Sie den Pufferwert herab.
• Falls das Handbuch Ihrer Host-Anwendung oder Audiogeräts
Informationen zur Problemlösung bei verzögerten Noten enthält,
lesen Sie diese Erläuterungen.
Sie benötigen ein Audiogerät mit niedriger Latenz, wenn Sie dieses Produkt
für Echtzeit-Wiedergabe verwenden möchten. Einzelheiten entnehmen Sie
den Handbüchern des Audiogeräts und der Host-Anwendung.
■ Ungenügende Polyphonie/Noten werden
Eine Verringerung des
Puffers kann zur
Unterbrechung von Noten
oder keinem Sound
führen. Passen Sie die
Puffergröße entsprechend
der Leistung Ihres
Computers und des
Audiogeräts an.
ausgelassen
Möglicherweise liegt diese Einschränkung an der maximalen PolyphonieEinstellung. Überprüfen Sie die maximale Polyphonie-Einstellung.
◆ Es kann sein, dass Sie eine Verbesserung erzielen, indem Sie
die ASIO-Puffergröße ändern. (Macintosh)
Wenn Sie Cubase VST/Cubasis VST verwenden, kann die Polyphonie
womöglich durch eine Veränderung der ASIO-Puffergröße optimiert
werden.
◆ Verwenden Sie einen Macintosh mit Cubase VST?
Wenn Sie einen Macintosh mit der Cubase-Serie verwenden, prüfen Sie die
Einstellung "Bevorzugtes MIDI-Timing" aus der Kapitel Allgemeines imn
der Audio-System-Einrichtung.
■ Sound ist verzerrt
Überprüfen Sie die folgenden Punkte:
• Versuchen Sie, das Master Volume von DXi/VST Instruments zu
verringern.
• Versuchen Sie, das Track Volume und/oder Master Volume der
Host-Anwendung zu verringern.
• Überprüfen Sie die Einstellungen Ihrer Sound-Karte.
• Überprüfen Sie die Lautstärke Ihrer Wiedergabegeräte.
Stellen Sie die
Puffergröße
entsprechend der
Leistung Ihres
Computers und des
Audiogeräts ein.
36
Page 37

■ Empfang von Nachrichten des Typs "System
Exclusive" nicht möglich
Wenn Sie die VST Instruments-Version einsetzen, können aufgrund der VST
Instruments-Spezifikationen keine Nachrichten des Typs "System Exclusive"
empfangen werden.
■ VST Instruments empfängt keine Control Change-
Nachrichten
Wenn Sie Emagic's "Logic"-Serie als Host-Anwendung einsetzen, können
aufgrund der Spezifikationen der Logic-Serie einige Control ChangeNachrichten nicht von VST Instruments empfangen werden. (Die aktuellen
Spezifikationen finden Sie in der Dokumentation der Logic-Serie.)
Um einen Parameter zu ändern, der von Control Change-Nachrichten nicht
geändert werden kann, können Sie den Regler im VST Instruments-Fenster
entweder direkt betätigen oder die Funktion "Automation" zu dessen
Steuerung verwenden.
■ Wiedergabe der mitgelieferten Demosongs (bei
Fehlerbehebung
Verwendung der Cakewalk-Software) nicht
möglich
Der Ordner CAKEWALK im Ordner SONGS auf der Software-CD-ROM
enthält Demosongs im nativen Cakewalk-Format (*.wrk) für den High
Quality Software Synthesizer. Obwohl diese Dateien in einem Format
gespeichert sind, die vom High Quality Software Synthesizer verwendet
werden können, müssen Sie den Ausgabe-Port jeder MIDI-Spur für Ihr
System entsprechend einstellen. Wenn der High Quality Software
Synthesizer keinen Sound ausgibt, überprüfen Sie die Einstellungen des
Ausgabe-Ports der MIDI-Spuren.
37
Español Italiano Français Deutsch English
Page 38

Installation du logiciel (Windows)
Ce chapitre explique comment installer le logiciel inclus dans le CD-ROM.
Vous aurez besoin du CD-ROM Software pour le High Quality Software
Synthesizer, gardez-le à portée de main.
Avant d’installer le logiciel, vous devez lire l’accord de licence. Cet accord de
licence peut s’afficher pendant l’installation du logiciel, veuillez le lire.
Avant d'installer le High Quality Software Synthesizer, vous devez installer une
application hôte qui supporte les instruments DXi/VST.
Installation du logiciel
Installez les instruments appropriés à l'application hôte utilisée (DXi ou VST).
• Installation de DXi......................................................p. 39
• Installation des instruments VST..............................p. 41
L’accord de licence est le
contrat stipulant les
conditions selon
lesquelles Roland vous
accorde le droit d’utiliser
le logiciel.
38
Page 39

■ Installation de DXi
Installation du logiciel (Windows)
1
Quittez tous les logiciels (applications) actifs. Fermez les fenêtres
éventuellement ouvertes.
2
Préparez le CD-ROM.
Introduisez ce CD-ROM dans le lecteur de votre ordinateur.
3
Ouvrez la boîte de dialogue
“Exécuter...”.
Cliquez sur le bouton Démarrer
de Windows. Dans le menu qui
s’affiche, sélectionnez
“Exécuter...”.
4
Dans la boîte de dialogue qui
s'affiche, cliquez sur
[Parcourir...].
La boîte de dialogue suivante
s'affiche.
5
Cliquez sur le bouton en haut
de la boîte de dialogue et, dans la
liste qui s'affiche, sélectionnez le
lecteur associé à l'icône CD-ROM.
Si vous utilisez Windows
2000/XP, vous devez
ouvrir une session sous un
compte utilisateur
disposant des privilèges
d’administrateur (comme
Administrateur) avant
d’installer le logiciel.
Si vous utilisez Windows
XP, assurez-vous que tous
les utilisateurs sont
déconnectés, à l'exception
de l'utilisateur qui installe.
Si vous utilisez un
détecteur de virus,
désactivez-le.
Si vous utilisez Windows
XP, une boîte de dialogue
“Que voulez-vous
faire ?” peut s'afficher. Si
c'est le cas, cliquez sur
“Rien”, puis sur [OK].
Les dossiers du CD-ROM
s'affichent.
6
Cliquez deux fois sur le dossier
DXI, sélectionnez SETUP.EXE et cliquez sur [Ouvrir].
L'extension du fichier
affichée peut varier en
fonction de votre
environnement
informatique.
Español Italiano Français Deutsch English
39
Page 40

Installation du logiciel (Windows)
7
Vérifiez que le nom du fichier
sélectionné à l'étape 6 s'affiche
dans le champ Ouvrir de la boîte
de dialogue Exécuter, puis cliquez
sur [OK].
8
L’installeur démarre.
Lorsque l’écran de bienvenue de l’assistant InstallShield s’affiche, cliquez sur
[Next].
9
Il vous est demandé si vous
acceptez les termes de l’accord de
licence. Lisez l’accord de licence
et cliquez sur [Yes] si vous êtes
d’accord. Si vous cliquez sur [No],
l’installation s’arrête.
E:\DXI\SETUP.EXE
10
Une boîte de dialogue s'affiche,
vous demandant d'entrer la clé
du CD.
Entrez le numéro de la clé du CD
inscrit au dos du boîtier.
Cliquez sur [Next].
11
Une boîte de dialogue s’affiche
pour vous permettre de
sélectionner l’emplacement de
l’installation. Pour accepter
l’emplacement proposé, cliquez
sur [Next].
Cependant, si vous voulez
installer dans un autre dossier,
cliquez sur [Browse] et spécifiez
le dossier désiré.
Si vous avez déjà installé
le DXi, l'écran de
sélection d'installation
ne s'affiche pas.
Si vous désirez modifier
l'emplacement
d'installation, vous
d'abord procéder à la
désinstallation, puis à la
réinstallation du logiciel.
40
Page 41

12
Vérifiez les paramètres présents
dans l’écran Confirmation of
installation (Confirmation de
l’installation).
Après vérification des paramètres,
cliquez sur [Next]. Si vous voulez
modifier l’emplacement de
l’installation, cliquez sur [Back].
13
Quand les fichiers sont copiés, la boîte de dialogue InstallShield Wizard
Complete (Fin de l’assistant InstallShield) s’affiche.
Cliquez sur [Finish].
L'installation de DXi est terminée.
■ Installation des instruments VST
Installation du logiciel (Windows)
* Si vous voulez seulement copier le plug-in, reportez-vous à la section Ajout ou
suppression du plug-in (p. 44).
1
Quittez tous les logiciels (applications) actifs. Fermez les fenêtres
éventuellement ouvertes.
2
Préparez le CD-ROM.
Introduisez ce CD-ROM dans le lecteur de votre ordinateur.
3
Ouvrez la boîte de dialogue
“Exécuter...”.
Cliquez sur le bouton Démarrer
de Windows. Dans le menu qui
s’affiche, sélectionnez
“Exécuter...”.
Si vous n’avez pas encore
installé d’application hôte,
vous devez le faire avant
de pouvoir continuer.
Si vous utilisez Windows
2000/XP, vous devez
ouvrir une session sous un
compte utilisateur
disposant des privilèges
d’administrateur (comme
Administrateur) avant
d’installer le logiciel.
Si vous utilisez Windows
XP, assurez-vous que tous
les utilisateurs sont
déconnectés, à l'exception
de l'utilisateur qui installe.
Español Italiano Français Deutsch English
41
Page 42
Installation du logiciel (Windows)
4
Dans la boîte de dialogue qui
s'affiche, cliquez sur
[Parcourir...].
La boîte de dialogue suivante
s'affiche.
Si vous utilisez un
détecteur de virus,
désactivez-le.
5
Cliquez sur le bouton en haut
de la boîte de dialogue et, dans la
liste qui s'affiche, sélectionnez le
lecteur associé à l'icône CD-ROM.
Les dossiers du CD-ROM
s'affichent.
6
Cliquez deux fois sur le dossier
VST, sélectionnez SETUP.EXE et cliquez sur [Ouvrir].
7
Vérifiez que le nom du fichier
sélectionné à l'étape 6 s'affiche
dans le champ Ouvrir de la boîte
de dialogue Exécuter, puis cliquez
sur [OK].
8
L’installeur démarre.
Lorsque l’écran de bienvenue de l’assistant InstallShield s’affiche, cliquez sur
[Next].
E:\VST\SETUP.EXE
Si vous utilisez Windows
XP, une boîte de dialogue
“Que voulez-vous
faire ?” peut s'afficher. Si
c'est le cas, cliquez sur
“Rien”, puis sur [OK].
Selon votre
environnement
informatique, l'extension
du nom de fichier peut ne
pas s'afficher.
42
9
Il vous est demandé si vous
acceptez les termes de l’accord de
licence. Lisez l’accord de licence
et cliquez sur [Yes] si vous êtes
d’accord. Si vous cliquez sur [No],
l’installation s’arrête.
Page 43

10
Une boîte de dialogue s'affiche,
vous demandant d'entrer la clé
du CD.
Entrez le numéro de la clé du CD
inscrit au dos du boîtier.
Cliquez sur [Next].
11
Une boîte de dialogue s’affiche
pour vous permettre de
sélectionner l’emplacement de
l’installation. Pour accepter
l’emplacement proposé, cliquez
sur [Next]. Cependant, si vous
voulez installer dans un autre
dossier, cliquez sur [Browse]. et
spécifiez le dossier désiré.
12
Vérifiez les paramètres présents
dans l’écran Confirmation of
installation.
Installation du logiciel (Windows)
Si vous avez déjà installé
les instruments VST,
l'écran de sélection
d'installation ne s'affiche
pas.
Si vous désirez modifier
l'emplacement
d'installation, vous devez
d'abord procéder à la
désinstallation, puis à la
réinstallation du logiciel.
Après vérification des paramètres,
cliquez sur [Next]. Si vous voulez
modifier l’emplacement de
l’installation, cliquez sur [Back].
13
Après la copie des fichiers, un
écran s’affiche pour vous
permettre de spécifier la ou les
destinations de copie du plug-in.
Vous devez sélectionner les
dossiers dans lesquels seront
installés les plug-ins
d'instruments VST.
[Si le dossier désiré n’est pas dans la liste]
Cliquez sur [Add copy destination to list] (Ajouter une destination de copie
à la liste) et spécifiez le dossier dans lequel le plug-in doit être copié.
Le plug-in est un fichier
qui permet à l'application
hôte d'utiliser les
instruments VST. Le plugin doit être copié dans son
dossier spécifié. Reportezvous au manuel
d'utilisation de votre
application hôte
compatible avec les
instruments VST afin de
déterminer l'emplacement
de son dossier de plug-ins.
Español Italiano Français Deutsch English
43
Page 44

Installation du logiciel (Windows)
[Si la liste contient un dossier indésirable]
Sélectionnez le dossier dans lequel vous ne voulez pas copier le plug-in ou
dans lequel vous voulez le supprimer et cliquez sur [Remove selected
items from list] (Supprimer les éléments sélectionnés de la liste).
14
Après spécification du ou des dossiers, cliquez sur [Next].
Le plug-in est copié.
15
Lorsque l’écran de fin de l’assistant InstallShield s’affiche, cliquez sur
[Finish] (Terminer).
L'installation des instruments VST est terminée.
Ajout ou suppression du plug-in
Si vous installez une nouvelle application hôte après l’installation des
instruments VST, ou si vous décidez d’utiliser ces derniers avec une autre
application hôte, vous devez simplement copier le plug-in dans le dossier
de plug-ins de l'application.
Inversement, si vous décidez de ne plus vouloir utiliser les instruments VST
avec une application hôte, il vous suffit de supprimer le plug-in de son
dossier de plug-ins.
Les plug-ins peuvent être
installés ou supprimés
même après l'installation.
Si vous utilisez
Windows XP, cliquez
sur le bouton Démarrer
de Windows et
sélectionnez [Tous les
programmes]-[HQ
Software Synthesizer][(Nom du produit )
VST] - [Copy or delete
Plug-in module].
1. Cliquez sur le bouton Démarrer de Windows et sélectionnez
[Programmes]-[HQ Software Synthesizer]-[(Nom du produit) VST]
- [Copy or delete Plug-in module].
2. L’écran “Select copy destination for plug-in module” (Sélectionnez
la destination de copie pour le plug-in) s’affiche. Reportez-vous à la
documentation de l’application hôte utilisant les instruments VST
pour trouver son dossier de plug-ins ; vérifiez que seuls les dossiers
désirés figurent dans la liste.
[Si le dossier désiré n’est pas dans la liste]
Cliquez sur [Add copy destination to list] (Ajouter une destination
de copie à la liste) et spécifiez le dossier dans lequel le plug-in doit être
copié.
[Si la liste contient un dossier indésirable]
Sélectionnez dans la liste le dossier dans lequel vous ne voulez pas
copier le plug-in ou dans lequel vous voulez le supprimer et cliquez
sur [Remove selected items from list] (Supprimer les éléments
sélectionnés de la liste).
3. Après spécification du ou des dossiers, cliquez sur [Next].
4. Les plug-ins sont copiés ou supprimés.
44
Page 45

Désinstallation du logiciel
Pour désinstaller le logiciel, suivez la procédure ci-après.
Lorsque vous désinstallez le logiciel, les patches de sons et d'effets que vous avez créés
sont effacés. Les données que vous voulez conserver doivent être enregistrées dans un
fichier avant la désinstallation du logiciel. Pour plus de détails sur l'enregistrement de
données, reportez-vous au manuel d'utilisation du logiciel.
Windows Me/98
1
Cliquez sur le bouton Démarrer de Windows, puis sur [Paramètres][Panneau de configuration].
Installation du logiciel (Windows)
2
Cliquez deux fois sur l’icône
“Ajout/Suppression de
programmes”. La boîte de
dialogue Ajout/Suppression de
programmes s'affiche.
3
Cliquez sur l'onglet “Installation/
Désinstallation”.
4
Dans la liste, cliquez sur le logiciel
que vous voulez supprimer.
5
Cliquez sur [Ajouter/
Supprimer...].
6
Si vous supprimez les instruments VST, l’écran “Modifier ou désinstaller”
s’affiche. Sélectionnez l'option en regard de “Supprimer”, et cliquez sur
[Suivant].
Si vous voulez seulement
supprimer le plug-in,
reportez-vous à la section
Ajout ou suppression du
plug-in (p. 44).
7
Un écran vous confirme la fin de la désinstallation. Cliquez sur [Terminer].
Español Italiano Français Deutsch English
45
Page 46

Installation du logiciel (Windows)
Utilisateurs de Windows 2000/XP
1
Ouvrez une session Windows en tant qu’utilisateur doté de droits
d’administration (Administrateur, par exemple).
2
Cliquez sur le bouton Démarrer de Windows, puis sur [Paramètres][Panneau de configuration]. (Sous Windows XP, cliquez sur le bouton
Démarrer, puis sur Panneau de configuration.)
Si vous voulez
seulement supprimer le
plug-in, reportez-vous à
la section Ajout ou
suppression du plug-in
(p. 44).
3
Cliquez deux fois sur l’icône
“Ajout/Suppression de
programmes”. (Sous
Windows XP, cliquez deux fois
sur l'icône “Ajouter ou
supprimer des programmes”.)
La boîte de dialogue “Ajout/
Suppression de programmes”
(dans Windows 2000, “Ajouter et
supprimer des programmes”)
s’affiche.
4
Cliquez sur l'icône “Modification ou suppression de de programmes”.
5
Dans la liste, cliquez sur le logiciel que vous voulez supprimer.
6
Cliquez sur [Modification/Suppression].
7
Si vous supprimez les instruments VST, l’écran “Modification ou
désinstallation” s’affiche. Sélectionnez l'option en regard de “Supprimer”,
et cliquez sur [Suivant].
Si vous avez choisi le
mode d'affichage
classique pour le menu
Démarrer, sélectionnez
[Paramètres] - [Panneau
de configuration].
46
8
Un écran vous confirme la fin de la désinstallation. Cliquez sur [Terminer].
Page 47

Installation du logiciel (Macintosh)
Ce chapitre explique comment installer le logiciel inclus dans le CD-ROM.
Vous aurez besoin du CD-ROM Software pour le High Quality Software
Synthesizer, gardez-le à portée de la main.
Avant d’installer le logiciel, vous devez lire l’accord de licence. Cet accord de
licence peut s’afficher pendant l’installation du logiciel, veuillez le lire.
Avant d'installer le High Quality Software Synthesizer, vous devez installer une
application hôte qui supporte les instruments VST. Vous devez également
augmenter la mémoire allouée à l'application hôte comme suit :
Hyper Canvas/Super Quartet : environ 40-50 MO
Orchestral : environ 100 MO
L’accord de licence est le
contrat stipulant les
conditions selon lesquelles
Roland vous accorde le
droit d’utiliser le logiciel.
Augmentez l'allocation de
mémoire pour qu'elle
corresponde au type et à la
version de votre
application hôte ainsi qu'à
d'autres critères comme,
par exemple, le nombre de
plugiciels que vous
utilisez.
Installation du logiciel
1
Démarrez votre Macintosh.
2
Quittez toutes les applications en cours.
3
Préparez le CD-ROM.
Introduisez ce CD-ROM dans le lecteur de votre ordinateur.
4
Sur le CD-ROM, cliquez deux fois sur [Installer E].
5
La boîte de dialogue de licence
s'affiche. Ce message vous demande
si vous acceptez les termes de
l’accord de licence. Lisez l’accord de
licence et cliquez sur [Accept] si
vous êtes d’accord. Si vous cliquez
sur [Decline], l’installation s’arrête.
Pour savoir comment
augmenter la mémoire,
reportez-vous à la
documentation MacOS.
Les copies d’écran
imprimées dans ce manuel
proviennent de
Mac OS 9.1. Les écrans que
vous voyez réellement sur
votre ordinateur peuvent
être différents en fonction
de la version de votre
système d’exploitation.
Si vous utilisez un
détecteur de virus ou
équivalent, vous devez le
désactiver avant
l’installation de ce logiciel.
Español Italiano Français Deutsch English
47
Page 48

Installation du logiciel (Macintosh)
6
La boîte de dialogue Installation
s'affiche.
Sélectionnez l’emplacement de
l’installation et cliquez sur [Install].
* Les instruments VST seront installés
dans le dossier VstPlugIns.
7
La boîte de dialogue présentée à
droite s’affiche. Entrez la clé du CD.
Le numéro de la clé du CD est inscrit
au dos du boîtier.
Si la clé du CD est
incorrecte, le bouton
[OK] ne s'affiche pas.
■ La boîte de dialogue Select Folder (Sélectionner
un dossier) s’affiche.
Une boîte de dialogue Select Folder
semblable à celle présentée ci-contre
peut apparaître pendant
l'installation. Dans cette boîte de
dialogue, sélectionnez le répertoire
où vous voulez installer l'instrument
VST et cliquez sur [OK]. Les fichiers
nécessaires seront copiés dans le
dossier sélectionné.
8
Après installation de tous les
logiciels, une boîte de dialogue
confirme la fin de l’installation.
Vous devez en principe cliquer sur
[Quit].
Cependant, si vous voulez installer dans un autre dossier, cliquez sur
[Continue].
La boîte de dialogue
présentée ci-contre
s’affiche s’il existe plus
d’un dossier VstPlugIns
dans lesquels les
instruments VST
peuvent être installés.
48
L'installation des instruments VST est terminée
Page 49

En cas de problème
* Veuillez lire le fichier “Readme_f.txt” présent sur le CD-ROM. Vous y trouverez
toutes les informations complémentaires qui n'apparaissent pas dans le manuel
d'installation.
■ Une boîte de dialogue vous demande d'insérer le
CD-ROM
◆ Une boîte de dialogue demandant le CD-ROM peut s'afficher
lorsqu'un instrument DXi/VST est activé.
Si cette boîte de dialogue s'affiche, insérez le CD-ROM High Quality Software
Synthesizer dans votre lecteur de CD-ROM, puis cliquez sur [OK]. Le plug-in
installé, retirez le CD-ROM.
■ Impossible d'installer le logiciel
◆ Le processeur de votre ordinateur répond-il aux
spécifications ?
Si vous utilisez Windows, le High Quality Software Synthesizer ne peut être
utilisé avec un processeur qui ne supporte pas les jeux d'instructions SSE et
Enhanced 3DNow!.
Si vous utilisez un Macintosh, le High Quality Software Synthesizer ne peut
être utilisé avec une UC qui ne supporte pas AltiVec.
■ Impossible d'installer les instruments VST
◆ Votre application dispose-t-elle d’un dossier VstPlugIns ?
Certaines applications hôtes ne contiennent pas de dossier VstPlugIns. Pour
cette raison, l'écran dans lequel vous spécifiez la destination de copie du
plug-in (sur le Macintosh, la boîte de dialogue de sélection de dossier), qui
s'affiche pendant l'installation des instruments VST, peut ne pas indiquer le
dossier de l'application hôte désirée. Dans ce cas, reportez-vous au manuel de
votre application hôte, créez un dossier VstPlugIns et réinstallez les
instruments VST.
Si vous utilisez Windows
XP, une boîte de dialogue
“Que voulez-vous
faire ?” peut s'afficher. Si
c'est le cas, cliquez sur
“Rien”, puis sur [OK].
■ Impossible d’activer (de sélectionner) des
instruments DXi/VST
◆ Les instruments DXi/VST sont-ils correctement installés ?
Si vous utilisez Windows, réinstallez les instruments DXi/VST comme
expliqué à la section Installation du logiciel (Windows) (p. 38).
Si vous utilisez un Macintosh, réinstallez les instruments VST comme
expliqué à la section Installation du logiciel (Macintosh) (p. 47).
Español Italiano Français Deutsch English
49
Page 50

En cas de problème
■ Le plug-in ne fonctionne pas
Vérifiez les points suivants :
• Si vous utilisez Macintosh, augmentez la mémoire allouée de votre
application hôte de la façon décrite à la rubrique Installation du
logiciel (Macintosh) (p. 47).
Augmentez l'allocation de mémoire pour qu'elle corresponde au
type et à la version de votre application hôte ainsi qu'à d'autres
critères comme, par exemple, le nombre de plugiciels que vous
utilisez.
• Ce produit ne peut être utilisé qu'avec les formats audio suivants.
Vérifiez le format audio de votre application hôte.
Taux d'echantillonnage.............. 44.1, 48, 96 kHz
• Il se peut que votre ordinateur manque de mémoire. Essayez de
quitter les logiciels non utilisés. Si le plug-in cesse souvent de
fonctionner en raison d'une mémoire insuffisante, nous vous
recommandons d'augmenter celle-ci.
◆ Les instruments DXi/VST sont-ils correctement installés ?
Réinstallez les instruments DXi/VST comme expliqué à la section
Installation du logiciel (Windows) (p. 38).
◆ Les instruments VST sont-ils correctement installés ?
(Macintosh)
Dans certains cas, une boîte de dialogue avec le message “This module is not
installed correctly. Please install again.” (“Ce module n'est pas
correctement installé. Veuillez le réinstaller.”) peut s'afficher lorsque vous
essayez d'activer les instruments VST avec votre application hôte. Dans ce
cas, réinstallez les instruments VST comme expliqué à la section Installation
du logiciel (Macintosh) (p. 47).
Pour savoir comment
augmenter la mémoire,
reportez-vous à la
documentation MacOS.
◆ Votre application hôte prend-elle en charge les instruments
VST ?
Reportez-vous au manuel d'utilisation de votre application hôte, et vérifiez
que celle-ci supporte les instruments DXi/VST.
■ Une erreur “Can't allocate Memory” (“Impossible
d'allouer la mémoire”) s'affiche lorsque vous
tentez d'activer le plug-in (Macintosh)
Cette erreur se produit lorsqu'il n'y a pas assez de mémoire pour le plug-in.
Veuillez augmenter la taille de la mémoire allouée à votre application.
50
Page 51

■ Le son est trop fort, trop faible ou absent
◆ Les instruments DXi/VST sont-ils correctement réglés ?
Vérifiez le réglage du volume des instruments DXi/VST.
◆ Si le vumètre des instruments Dxi/VST bouge, il se peut qu’il y
ait un problème avec les paramètres de sortie audio.
Vérifiez les points suivants :
• Vérifiez le volume audio de votre application hôte. Vérifiez
également que le périphérique audio désiré est bien sélectionné.
• Vérifiez le volume et tous autres paramètres requis par votre
périphérique audio.
• Vérifiez les connexions et le volume de votre système audio (par
exemple, amplificateur et haut-parleurs).
◆ Votre ordinateur supporte-t-il une lourde charge ?
Si une charge lourde est placée sur votre ordinateur, l’application hôte peut
arrêter le traitement audio et aucun son ne se produira. Reportez-vous aux
sections “Interruption du son/Irrégularités du tempo de lecture/Arrêt de
la lecture en cours”.
■ Interruption du son/Irrégularités du tempo de
En cas de problème
lecture/Arrêt de la lecture en cours
Vérifiez les points suivants :
• Si votre application hôte vous permet de modifier la taille du tampon
audio, essayez de l’augmenter.
• Il est possible que la lecture ne puisse s'exécuter si d'autres logiciels
ont placé une lourde charge sur l'ordinateur. Quittez les logiciels non
utilisés.
• Reportez-vous à la documentation de dépannage de votre
application hôte et de votre périphérique audio. Si des problèmes
sont répertoriés concernant la lecture audio, les solutions données
peuvent s’appliquer également à ce problème.
• Si vous utilisez Windows 2000/XP, essayez d'utiliser la procédure
suivante pour modifier les réglages de performances.
Windows 2000
1. Cliquez avec le bouton droit sur Poste de travail et sélectionnez
Propriétés.
2. Ouvrez l'onglet Avancé, puis cliquez sur le bouton Performances.
3. Dans le champ Etat des performances, sélectionnez Ressources
système.
4. Cliquez sur [OK] pour fermer la boîte de dialogue.
L’augmentation de la taille
du tampon accroît la
latence (le retard avec
lequel les notes se font
entendre).
51
Español Italiano Français Deutsch English
Page 52

En cas de problème
Windows XP
1. Cliquez sur le bouton Démarrer et cliquez avec le bouton droit
sur Poste de travail, puis sélectionnez Propriétés.
2. Ouvrez l'onglet Avancé, puis cliquez sur le bouton Paramètre du
champ Performances.
3. Ouvrez l'onglet Avancé, puis sélectionnez Ressources système
dans le champ Planification du processeur.
4. Cliquez sur [OK] pour fermer la boîte de dialogue.
■ Les notes ont du retard
Vérifiez les points suivants :
• Si votre application hôte ou votre périphérique audio vous permet
de modifier la taille du tampon audio, essayez de la diminuer.
• Si les manuels de votre application hôte ou de votre périphérique
audio contiennent des sections sur la façon de réduire les délais,
reportez-vous à ces explications.
Vous aurez besoin d'un périphérique à faible latence pour un jeu en temps
réel. Pour plus de détails, reportez-vous à la documentation de votre
périphérique audio et de votre application hôte.
■ Polyphonie insuffisante/Notes omises
Une réduction trop
importante de la taille du
tampon peut interrompre
des notes ou introduire
des silences. Réglez la
taille du tampon en
fonction des
performances de votre
ordinateur et de votre
périphérique audio.
Il est possible que ce problème soit dû à un dépassement de polyphonie.
Vérifiez le paramètre de polyphonie maximum.
◆ Vous pouvez améliorer la situation en réglant la taille du tampon
ASIO. (Macintosh)
Si vous utilisez Cubase VST/Cubasis VST, vous pouvez améliorer la
polyphonie en augmentant ou en diminuant la taille du tampon ASIO.
◆ Utilisez-vous Macintosh avec le Cubase VST?
Si vous utilisez Macintosh avec un modèle Cubase, vérifiez le réglage “Favor
MIDI Timing” qui se trouve dans la section Généralités de la rubrique
Configuration du système audio.
■ Distorsion du son
Vérifiez les points suivants :
• Essayez de baisser le volume général des instruments DXi/VST.
• Essayez de baisser le volume de la piste concernée ou le volume
général de l'application hôte.
• Vérifiez les paramètres de votre carte son.
• Vérifiez le volume de votre système audio (ampli, enceintes
amplifiées, etc.).
Réglez la taille du
tampon en fonction des
performances de votre
ordinateur et de votre
périphérique audio.
52
Page 53

■ Impossible de recevoir des messages système
exclusifs
Si vous utilisez la version Instruments VST, les messages système exclusifs ne
peuvent être reçus en raison des spécifications des instruments VST.
■ Les instruments VST ne reçoivent pas de
messages Control Change
Si vous utilisez les séries "Logic" Emagic comme application hôte, certains
messages Control Change ne peuvent pas être reçus par les instruments VST,
en raison des spécifications propres à la série Logic. (Pour connaître les
spécifications de Logic, reportez-vous à la documentation du produit.)
Pour modifier un paramètre qui ne peut être modifié par des messages
Control Change, vous pouvez soit actionner directement le bouton ou le
curseur dans la fenêtre des instruments VST, soit utiliser la fonction
Automation.
■ Impossible de lire les morceaux de démo livrés
(avec Cakewalk)
En cas de problème
Le dossier CAKEWALK dans le dossier SONGS sur le CD-ROM contient des
morceaux de démo pour High Quality Software Synthesizer au format natif
(*.wrk) de Cakewalk. Bien que ces fichiers soient enregistrées dans un format
utilisable par High Quality Software Synthesizer, vous devez définir le port
de sortie de chaque piste MIDI. Si High Quality Software Synthesizer ne
produit aucun son, vérifiez les paramètres des ports de sortie des pistes
MIDI.
53
Español Italiano Français Deutsch English
Page 54
Installazione del software (Windows)
In questa sezione viene spiegato come installare il programma a partire dal
CD-ROM in dotazione. Accertarsi di avere pronto il CD-ROM del
programma relativo a High Quality Software Synthesizer.
Prima di installare il software, leggere il contratto di licenza. Tale contratto
viene visualizzato durante l'installazione del programma; accertarsi di
leggerlo.
Prima di installare High Quality Software Synthesizer, è necessario installare
un’applicazione host che supporta gli strumenti DXi/VST.
Installazione del software
Installare gli strumenti DXi o VST in base all’applicazione host utilizzata.
Il contratto di licenza
descrive i termini e le
condizioni in base alle
quali Roland permette
l’uso del programma.
• Installazione degli strumenti DXi.............................pag. 55
• Installazione degli strumenti VST ............................pag. 57
54
Page 55

■ Installazione degli strumenti DXi
Installazione del software (Windows)
1
Chiudere tutti i programmi in corso di esecuzione. Chiudere anche le altre
finestre aperte.
2
Preparare il CD-ROM.
Inserire il CD nell’unità CD-ROM del computer.
3
Aprire la finestra di dialogo
"Esegui...".
Fare clic sul pulsante Start di
Windows. Nel menu visualizzato,
selezionare "Esegui".
4
Nella finestra di dialogo fare clic
su [Sfoglia...].
Appare la finestra di dialogo di
ricerca dei file.
5
Fare clic sul pulsante nella
parte superiore della finestra di
dialogo e nell’elenco visualizzato
selezionare l’unità indicata
dall’icona CD-ROM.
Se si utilizza Windows
2000/XP, è necessario
collegarsi come un utente
dotato dei privilegi di
amministratore (come
Administrator) prima di
installare il software.
Se si utilizza Windows XP,
accertarsi che tutti gli altri
utenti siano scollegati.
È necessario chiudere
l’eventuale programma
antivirus utilizzato.
Se si utilizza Windows XP,
potrebbe comparire il
messaggio "Scegliere
l’operazione da
effettuare". In questo caso
fare clic su "Nessuna
azione," e fare clic su
[OK].
Verranno visualizzate le cartelle
del CD-ROM del software.
6
Fare doppio clic sulla cartella DXI, selezionare SETUP.EXE e fare clic su
[Apri].
7
Accertarsi che il nome del file
selezionato al passo 6 sia
visualizzato nel campo Apri della
finestra Esegui e fare clic su [OK].
E:\DXI\SETUP.EXE
A seconda delle
impostazioni del sistema
utilizzato, l’estensione del
nome file potrebbe non
essere visualizzata.
Español Italiano Français Deutsch English
55
Page 56

Installazione del software (Windows)
8
Verrà avviato il programma di installazione.
Nella finestra di benvenuto InstallShield Wizard fare clic su [Next].
9
Verrà chiesto se si accettano i
termini del contratto di licenza.
Leggere il contratto di licenza e
fare clic su [Yes] se si accetta. Se si
fa clic su [No], l'installazione
viene interrotta.
10
Compare una finestra di dialogo
nella quale si dovrà digitare il
codice CD key.
Digitare il codice CD key riportato
sul retro della confezione del
CD-ROM.
Fare clic su [Next].
11
Verrà visualizzata una finestra di
dialogo nella quale selezionare la
destinazione dell'installazione.
Per accettare la posizione
suggerita, fare clic su [Next].
Per cambiare cartella di
destinazione, fare clic su
[Browse…] e specificare la
cartella desiderata.
12
Controllare le impostazioni
correnti della finestra
Confirmation of installation.
Dopo aver controllato le
impostazioni, fare clic su [Next].
Per ridefinire la posizione
d'installazione, fare clic su [Back].
Se gli strumenti Dxi sono
già stati installati, la
finestra di scelta
dell’installazione non
comparirà.
Per cambiare la cartella
d’installazione, sarà
necessario disinstallare e
reinstallare il
programma.
56
Page 57
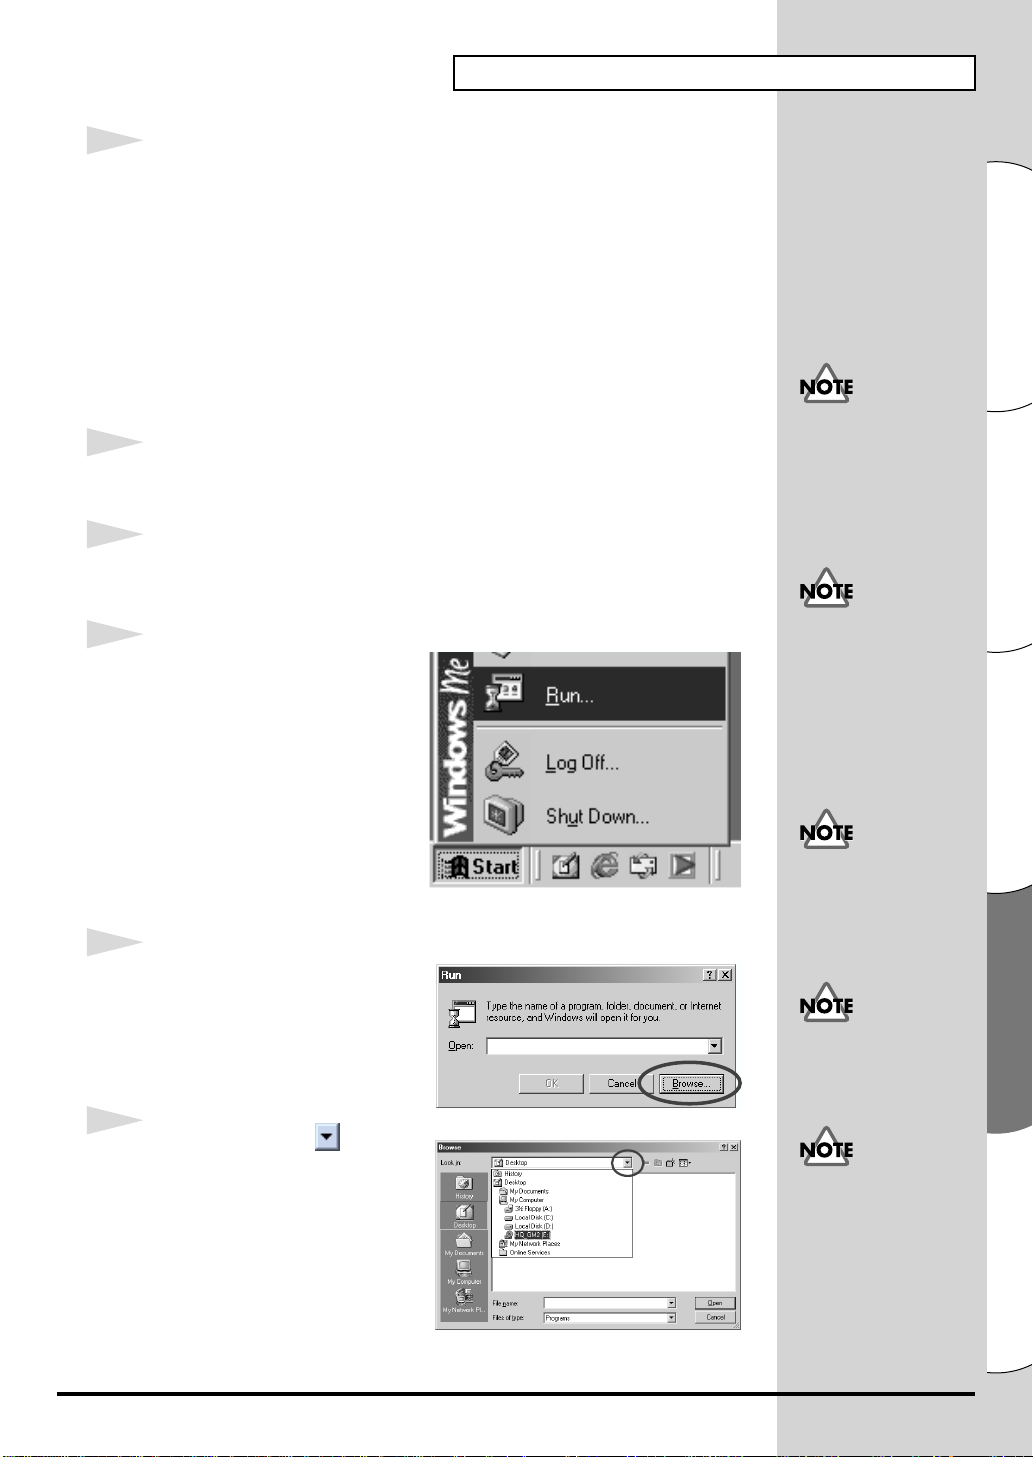
13
Dopo che tutti i file sono stati copiati verrà visualizzata la finestra
InstallShield Wizard Complete.
Fare clic su [Fine].
L’installazione di Dxi è giunta al termine.
■ Installazione degli strumenti VST
* Per limitarsi a copiare il modulo plug-in, fare riferimento alla sezione Aggiunta o
eliminazione del modulo plug-in (pag. 60).
1
Chiudere tutti i programmi in corso di esecuzione. Chiudere anche le altre
finestre aperte.
2
Preparare il CD-ROM.
Inserire il CD nell’unità CD-ROM del computer.
3
Aprire la finestra di dialogo
"Esegui...".
Fare clic sul pulsante Start di
Windows. Nel menu visualizzato,
selezionare "Esegui".
Installazione del software (Windows)
Se non è ancora stata
installata l'applicazione
host, sarà necessario
installarla prima di
continuare.
Se si utilizza Windows
2000/XP, è necessario
collegarsi come un utente
dotato dei privilegi di
amministratore (come
Administrator) prima di
installare il software.
4
Nella finestra di dialogo fare clic
su [Sfoglia...].
Appare la finestra di dialogo di
ricerca dei file.
5
Fare clic sul pulsante nella
parte superiore della finestra di
dialogo e nell’elenco visualizzato
selezionare l’unità indicata
dall’icona CD-ROM.
Verranno visualizzate le cartelle
del CD-ROM del software.
Se si utilizza Windows XP,
accertarsi che tutti gli altri
utenti siano scollegati.
È necessario chiudere
l’eventuale programma
antivirus utilizzato.
Se si utilizza Windows XP,
potrebbe comparire il
messaggio "Scegliere
l’operazione da
effettuare". In questo caso
fare clic su "Nessuna
azione," e fare clic su [OK].
57
Español Italiano Français Deutsch English
Page 58

Installazione del software (Windows)
6
Fare doppio clic sulla cartella VST, selezionare SETUP.EXE e fare clic su
[Apri].
7
Accertarsi che il nome del file
selezionato al passo 6 sia
visualizzato nel campo Apri della
finestra Esegui e fare clic su [OK].
8
Verrà avviato il programma di
installazione.
Nella finestra di benvenuto InstallShield Wizard fare clic su [Next].
9
Verrà chiesto se si accettano i
termini del contratto di licenza.
Leggere il contratto di licenza e
fare clic su [Yes] se si accetta. Se si
fa clic su [No], l'installazione
viene interrotta.
A seconda delle
impostazioni del sistema
utilizzato, l’estensione
del nome file potrebbe
non essere visualizzata.
E:\VST\SETUP.EXE
10
Compare una finestra di dialogo
nella quale si dovrà digitare il
codice CD key.
Digitare il codice CD key riportato
sul retro della confezione del
CD-ROM.
Fare clic su [Next].
11
Verrà visualizzata una finestra di
dialogo nella quale selezionare la
destinazione dell'installazione.
Per accettare la posizione
suggerita, fare clic su [Next]. Per
cambiare cartella di destinazione,
fare clic su [Browse…] e
specificare la cartella desiderata.
Se gli strumenti VST sono
già stati installati, la
finestra di scelta
dell’installazione non
comparirà.
Per cambiare la cartella
d’installazione, sarà
necessario disinstallare e
reinstallare il
programma.
58
Page 59
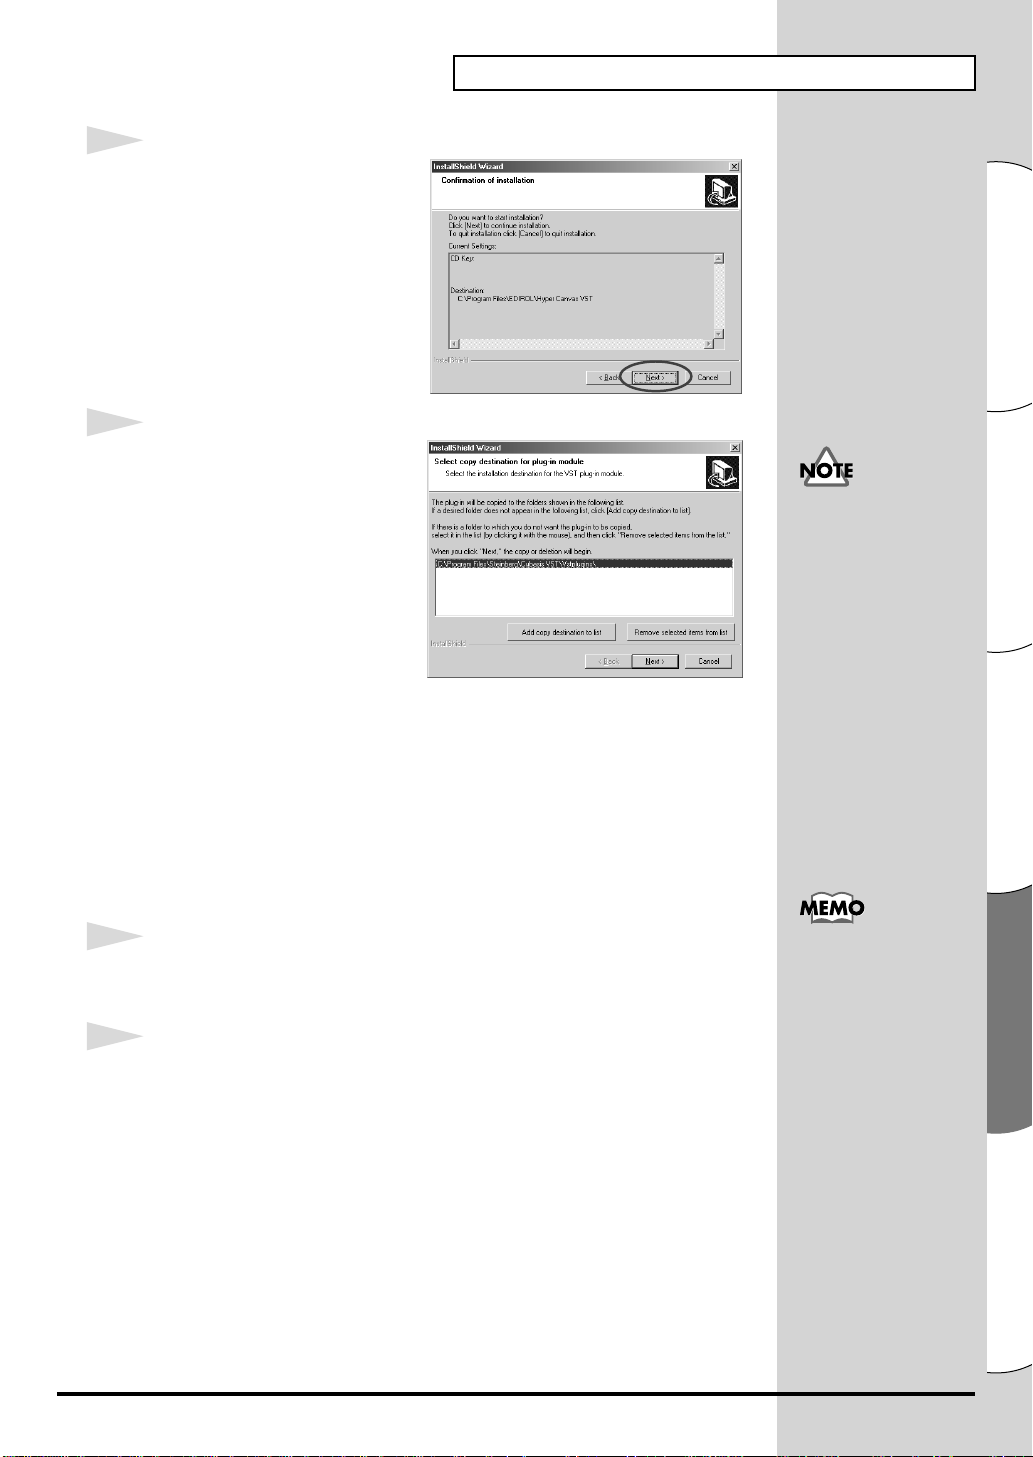
12
Controllare le impostazioni
correnti della finestra
Confirmation of installation.
Dopo aver controllato le
impostazioni, fare clic su [Next].
Per ridefinire la posizione
d'installazione, fare clic su [Back].
13
Alla fine della copia dei file,
comparirà una finestra nella quale
specificare la destinazione dove
verrà copiato il modulo plug-in.
Sarà necessario selezionare le
cartelle nelle quali verranno
installati gli strumenti plug-in
VST.
[Se la cartella desiderata non è nell'elenco]
Fare clic su [Add copy destination to list] e specificare la cartella dove verrà
copiato il modulo plug-in.
[Se nell'elenco figura una cartella indesiderata]
Nell'elenco selezionare la cartella nella quale non si desidera copiare il
modulo plug-in o quella dalla quale si desidera cancellarlo e fare clic su
[Remove selected items from list].
Installazione del software (Windows)
Il modulo plug-in è un file
che permette l’uso degli
strumenti VST tramite
l’applicazione host. Sarà
necessario copiare il
modulo plug-in nella
cartella specificata per ogni
applicazione, ovvero la
cartella plug-in. Fare
riferimento al manuale
utente dell’applicazione
host compatibile con gli
strumenti VST per
individuare la posizione
della cartella plug-in.
14
Dopo aver specificato la o le cartelle, fare clic su [Next].
Il modulo plug-in verrà copiato.
15
Quando appare la schermata di chiusura InstallShield Wizard, fare clic su
[Finish].
L’installazione degli strumenti VST è giunta al termine.
I moduli plug-in verranno
aggiunti o cancellati anche
dopo l’installazione.
Español Italiano Français Deutsch English
59
Page 60

Installazione del software (Windows)
Aggiunta o eliminazione del modulo plug-in
Se dopo aver installato gli strumenti VST, si installa una nuova
applicazione host oppure se si decide di utilizzare gli strumenti VST con
un'altra applicazione, sarà sufficiente copiare il modulo plug-in nella
cartella plug-in dell'applicazione host.
Al contrario, se si decide di non utilizzare più gli strumenti VST con
un'applicazione host, basterà eliminare il modulo plug-in dalla cartella
corrispondente dell'applicazione in questione.
1. Fare clic sul pulsante Start di Windows e selezionare [Programmi][Software Synthesizer]-[(Product name ) VST] - [Copy or delete
Plug-in module].
2. Verrà visualizzata la finestra "Select copy destination for plug-in
module". Fare riferimento al manuale dell'applicazione host che
utilizza gli strumenti VST per trovarne la cartella plug-in e accertarsi
che le cartelle desiderate siano presenti nell'elenco.
[Se la cartella desiderata non è nell'elenco]
Fare clic su [Add copy destination to list] e specificare la cartella
dove deve essere copiato il modulo plug-in.
[
Se nell'elenco figura una cartella indesiderata.
Nell'elenco selezionare la cartella nella quale non si desidera copiare
il modulo plug-in o quella dalla quale si desidera cancellarlo e fare clic
su [Remove selected items from list].
Se si utilizza Windows
XP, fare clic sul pulsante
Start e selezionare
[Programmi]-[HQ
Software Synthesizer][(Product name ) VST] [Copy or delete Plug-in
module].
3. Dopo aver specificato la o le cartelle, fare clic su [Next].
4. I moduli plug-in verranno copiati/eliminati.
60
Page 61

Disinstallazione del software
Per disinstallare il software, seguire la procedura sotto indicata.
Durante la disinstallazione del programma, le patch di suoni ed effetti create dall’utente
verranno cancellate. Prima di disinstallare il programma è quindi necessario salvare in
un file tutti i dati che si desidera conservare. Per maggiori informazioni sul salvataggio
dei dati, consultare il manuale in linea del software.
Utenti Windows Me/98
1
In Windows, fare clic sul pulsante [Start] e in [Impostazioni] scegliere
[Pannello di controllo].
Installazione del software (Windows)
2
Fare doppio clic sull'icona
"Installazione applicazioni".
Verrà visualizzata la finestra di
dialogo "Proprietà –
Installazione applicazioni".
3
Fare clic sulla scheda [Installa/
Rimuovi].
4
Nell'elenco visualizzato, fare clic
sul software da rimuovere.
5
Fare clic su [Aggiungi/
Rimuovi...].
6
Se la disinstallazione riguarda gli strumenti VST, verrà visualizzata la
finestra di dialogo "Modifica o Disinstalla". Selezionare l'opzione
"Rimuovi," e fare clic su [Avanti].
Per eliminare solo il
modulo plug-in, fare
riferimento alla sezione
Aggiunta o eliminazione
del modulo plug-in
(pag. 60).
7
Verrà visualizzata una finestra indicante che la disinstallazione è stata
completata. Fare clic su [Fine].
Español Italiano Français Deutsch English
61
Page 62

Installazione del software (Windows)
Utenti Windows 2000/XP
1
Collegarsi a Windows con i privilegi di un amministratore, ad esempio come
Administrator.
2
In Windows, fare clic sul pulsante Start e in [Impostazioni]-[Pannello di
controllo]. (In Windows XP, fare clic sul pulsante Start e quindi su
Pannello di controllo.)
Per eliminare solo il
modulo plug-in, fare
riferimento alla sezione
Aggiunta o eliminazione
del modulo plug-in
(pag. 60).
3
Fare doppio clic sull'icona
"Installazione applicazioni". (In
Windows XP, fare doppio clic
sull’icona "Installazione
applicazioni".) Verrà visualizzata
la finestra "Installazione
applicazioni" (per Windows XP,
"Installazione applicazioni").
4
Fare clic sull’icona "Cambia/
Rimuovi programmi".
5
Nell'elenco visualizzato, fare clic sul software da rimuovere.
6
Fare clic su [Cambia/Rimuovi].
7
Se la disinstallazione riguarda gli strumenti VST, verrà visualizzata la
finestra di dialogo "Modifica o Disinstalla". Selezionare l'opzione
"Rimuovi," e fare clic su [Avanti].
La visualizzazione
classica del menu Start è
[Impostazioni] [Pannello di controllo].
62
8
Verrà visualizzata una finestra indicante che la disinstallazione è stata
completata. Fare clic su [Fine].
Page 63

Installazione del software (Macintosh)
In questa sezione viene spiegato come installare il programma a partire dal
CD-ROM in dotazione. Accertarsi di avere pronto il CD-ROM del
programma relativo a High Quality Software Synthesizer.
Prima di installare il software, leggere il contratto di licenza. Tale contratto
viene visualizzato durante l'installazione del programma; accertarsi di
leggerlo.
Il contratto di licenza
descrive i termini e le
condizioni in base alle
quali Roland permette
l’uso del programma.
Prima di installare High Quality Software Synthesizer, è necessario installare
un’applicazione host che supporta gli strumenti VST. È necessario aumentare la
memoria assegnata alla vostra applicazione host secondo le seguenti quantità.
Hyper Canvas/Super Quartet: approssimativamente 40-50 MB
Orchestrale: approssimativamente 100 MB
Installazione del software
1
Avviare il Macintosh.
2
Chiudere tutte le applicazioni eventualmente in esecuzione.
3
Preparare il CD-ROM.
Inserire il CD nell’unità CD-ROM del Macintosh.
4
Sul CD-ROM del software fare doppio clic su [Installer E].
5
Appare la finestra di dialogo del
contratto di licenza. Verrà chiesto se
si accettano i termini del contratto di
licenza. Leggere il contratto di
licenza e fare clic su [Accept] se si
accetta. Se si fa clic su [Decline],
l'installazione viene interrotta.
Aumentate l'assegnazione
di memoria per rispondere
alle necessità del tipo e
della versione della vostra
applicazione host, così
come altri fattori quali il
numero di plug-in che
state utilizzando.
Per aumentare la memoria,
fare riferimento alla guida
MacOS.
Le schermate di questo
manuale provengono da
Mac OS 9.1. Le finestre
visualizzate sul proprio
computer potrebbero
essere diverse da quelle
riportate in queste pagine
in quanto dipendono dal
sistema operativo
utilizzato.
Se si utilizzano programmi
anti-virus o simili,
disattivarli prima di
installare questo
programma.
Español Italiano Français Deutsch English
63
Page 64
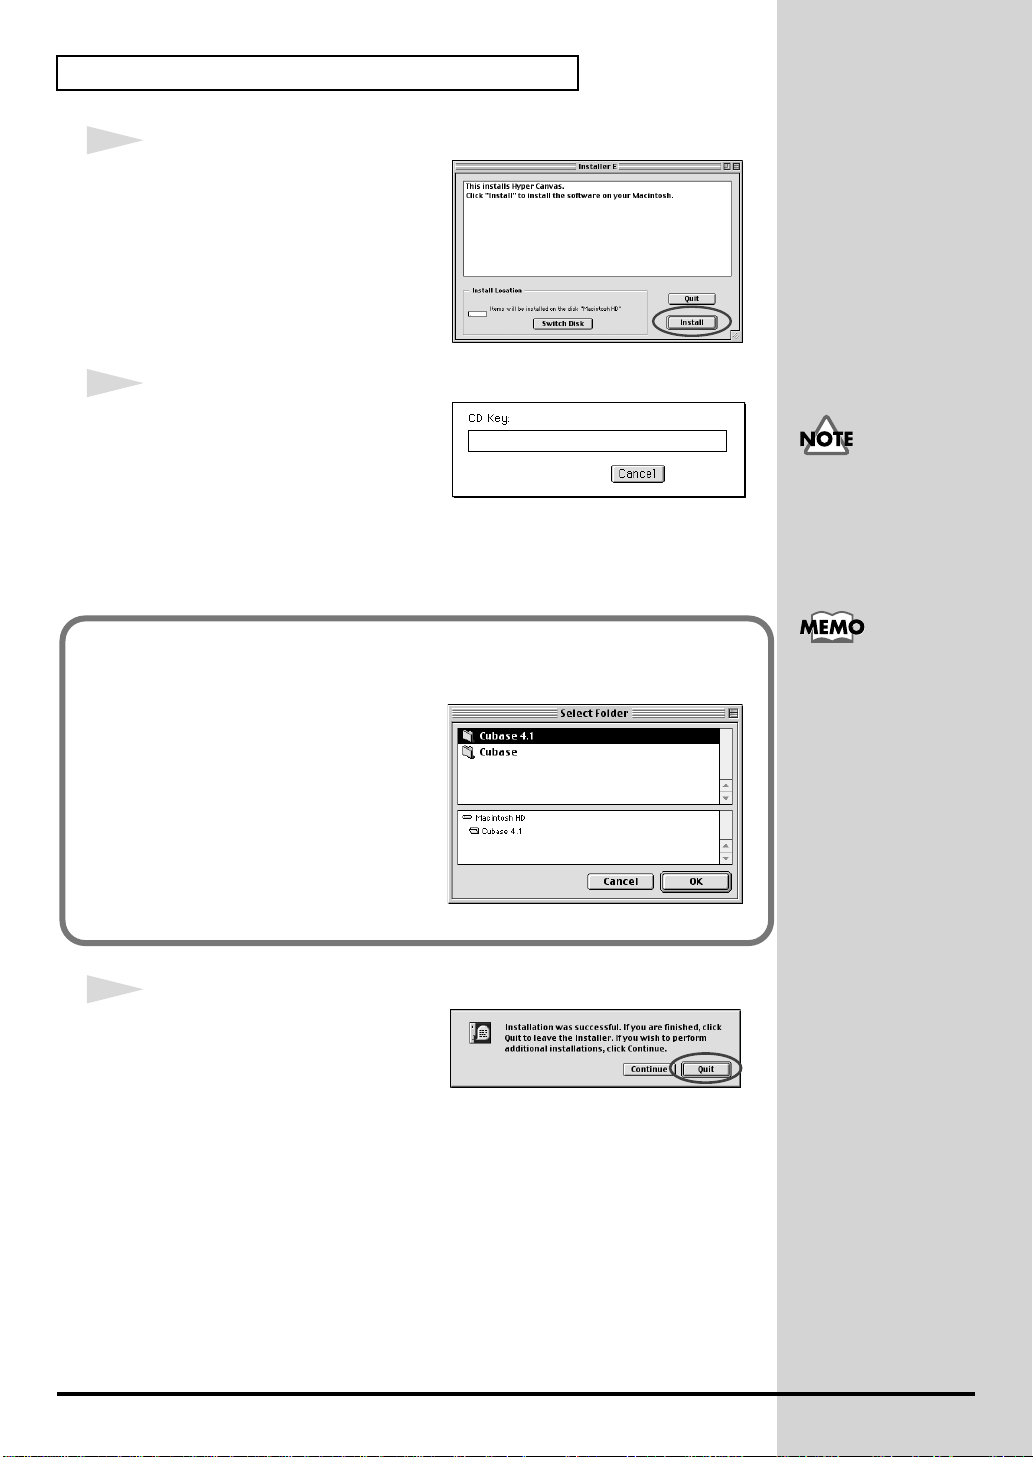
Installazione del software (Macintosh)
6
Appare la finestra di dialogo
d’installazione.
Selezionare la destinazione
dell'installazione e fare clic su
[Install].
* Gli strumenti VST verranno installati
nella cartella VstPlugIns.
7
Verrà visualizzata la finestra
illustrata a destra. Immettere il
codice CD key.
Il codice CD key è riportato sulla
confezione del CD-ROM.
Se il codice CD Key è
sbagliato, il pulsante [OK]
non verrà visualizzato.
■ Verrà visualizzata la finestra di dialogo Select
Folder
Nel corso dell’installazione potrebbe
essere visualizzata una finestra di
dialogo Select Folder come quella
illustrata a destra. In questa finestra
di dialogo selezionate la cartellina
nella quale volete installare lo
strumento VST e fate click su [OK].
I file necessari verranno copiati nella
cartella selezionata.
8
Dopo aver installato tutto il
software, comparirà una finestra di
dialogo indicante che l'installazione
è stata completata.
A questo punto fare clic su [Quit].
Per effettuare l'installazione in una cartella diversa, fare clic su [Continue].
La finestra di dialogo
illustrata a sinistra viene
visualizzata quando sul
disco fisso sono presenti
più cartelle VstPlugIns
nelle quali potrebbero
essere installati gli
strumenti VST.
64
L’installazione degli strumenti VST è giunta al termine.
Page 65

Ricerca e soluzione dei problemi
* Leggere il file “Readme_e.txt” sul CD-ROM del software. Nel file “Readme_e.txt” si
troveranno informazioni aggiuntive non contenute nella guida d’installazione.
■ Compare un messaggio che chiede di inserire il
CD-ROM
◆ Dopo aver collegato uno strumento DXi/VST potrebbe apparire
un messaggio che richiede l’introduzione del CD-ROM.
Se questo messaggio viene visualizzato, inserire il CD-ROM del programma
High Quality Software Synthesizer nell’unità corrispondente e fare clic su
[OK]. Alla fine della procedura di installazione del modulo plug-in, estrarre
il CD-ROM dall’unità corrispondente.
■ Impossibile installare il programma
◆ La CPU del computer utilizzato soddisfa i requisiti operativi?
Se si lavora in ambiente Windows, non è possibile utilizzare High Quality
Software Synthesizer su un computer che non supporta il set di istruzioni SSE
o Enhanced 3DNow!.
Se si lavora in ambiente Macintosh, non è possibile utilizzare High Quality
Software Synthesizer su un computer che non supporta AltiVec.
Se si utilizza Windows XP,
potrebbe comparire il
messaggio "Scegliere
l’operazione da
effettuare". In questo caso
fare clic su "Nessuna
azione," e fare clic su
[OK].
■ Impossibile installare gli strumenti VST
◆ L'applicazione host ha una cartella VstPlugIns?
Alcune applicazioni host sono sprovviste di una cartella VstPlugIns. Per
questo motivo la finestra visualizzata durante l’installazione degli strumenti
VST nella quale viene indicata la posizione in cui verrà copiato il modulo
plug-in (in Macintosh la finestra di selezione della cartella) potrebbe non
contenere la cartella dell’applicazione host desiderata. In questo caso
consultare il manuale dell'applicazione host, creare una cartella VstPlugIns
e reinstallare gli strumenti VST.
■ Impossibile collegare (selezionare) gli strumenti
DXi/VST
◆ Gli strumenti DXi/VST sono installati correttamente?
Se si utilizza Windows, reinstallare gli strumenti DXi/VST come descritto
nella sezione Installazione del software (Windows) (pag. 54).
Se si utilizza Macintosh, reinstallare gli strumenti DXi/VST come descritto
nella sezione Installazione del software (Macintosh) (pag. 63).
Español Italiano Français Deutsch English
65
Page 66

Ricerca e soluzione dei problemi
■ I plug-in non funzionano
Verificare i seguenti punti:
• Se state utilizzando un Macintosh, aumentate l'assegnazione di
memoria del vostro host come descritto nell'Installazione del
software (Macintosh) (pag. 63).
Aumentate l'assegnazione di memoria per rispondere alle necessità
del tipo e della versione della vostra applicazione host, così come
altri fattori quali il numero di plug-in che state utilizzando.
• Questo prodotto può essere utilizzato solo con i seguenti formati
audio. Controllare il formato audio dell'applicazione host.
Velocita di campionamento....... 44.1, 48, 96 kHz
• Forse la memoria del computer è insufficiente. Provare a chiudere le
applicazioni non utilizzate. Se la memoria è insufficiente e causa
spesso problemi di funzionamento con il modulo plug-in, è
opportuno aumentarla.
◆ Gli strumenti DXi/VST sono installati correttamente?
Reinstallare gli strumenti DXi/VST secondo quanto descritto nella sezione
Installazione del software (Windows) (pag. 54).
◆ Gli strumenti VST sono installati correttamente? (Macintosh)
In alcuni casi potrebbe comparire il messaggio "This module is not installed
correctly. Please install again." quando si cerca di collegare gli strumenti
VST con l’applicazione host. In questo caso, reinstallare gli strumenti VST
secondo quando precisato nella sezione Installazione del software
(Macintosh) (pag. 63).
Per aumentare la
memoria, fare
riferimento alla guida
MacOS.
◆ L'applicazione host supporta gli strumenti DXi/VST?
Consultare il manuale dell’applicazione host e controllare se l’applicazione
host supporta gli strumenti DXi/VST.
■ Viene visualizzato un errore "Can't allocate
Memory" (impossibile allocare memoria) con il
modulo plug-in (Macintosh)
Questo errore si verifica se la memoria è insufficiente per eseguire il modulo
plug-in. Aumentare la memoria destinata all’applicazione.
■ L'audio è troppo forte o troppo debole o assente
◆ Gli strumenti DXi/VST sono impostati correttamente?
Controllare l’impostazione del volume degli strumenti DXi/VST.
◆ Se l'indicatore di livello degli strumenti DXi/VST si sposta, è
probabile che ci sia un problema con le impostazioni dell’uscita
audio.
Verificare i seguenti punti:
• Controllare il volume audio dell'applicazione host. Accertarsi inoltre
di aver selezionato correttamente il dispositivo audio utilizzato.
66
Page 67

• Controllare il volume e le altre impostazioni eventualmente
necessarie del dispositivo audio.
• Controllare i collegamenti e il volume del sistema audio
(amplificatore e altoparlante).
◆ Il computer è sovraccarico?
Se il computer è sovraccarico, l’applicazione host potrebbe non riuscire ad
elaborare l’audio e quindi a non produrre suoni. Consultare i punti "L'audio
è interrotto/Il tempo di riproduzione è irregolare/La riproduzione si
interrompe a metà."
■ L'audio è interrotto/Il tempo di riproduzione è
irregolare/La riproduzione si interrompe a metà.
Verificare i seguenti punti:
• Se l'applicazione host permette di cambiare le dimensioni del buffer
audio, provare ad aumentarle.
• È possibile che la riproduzione non si verifichi correttamente perché
è il computer è sovraccaricato da un’altra applicazione. Chiudere le
applicazioni non utilizzate.
• Consultare le sezioni sulla ricerca e soluzione dei problemi
dell'applicazione host o del dispositivo audio. In particolare,
soffermarsi sui punti relativi alla riproduzione audio perché
potrebbero contribuire a risolvere il problema.
• Se si utilizza Windows 2000/XP, provare a seguire la procedura sotto
indicata per cambiare le impostazioni dell’opzione sulle prestazioni.
Utenti Windows 2000
Ricerca e soluzione dei problemi
Aumentando le
dimensioni del buffer
aumenterà l’intervallo tra
le note ("latenza").
1. Fare clic con il pulsante destro su Risorse del computer e
selezionare Proprietà.
2. Aprire la scheda Avanzate e fare clic sul pulsante Opzioni di
prestazione.
3. Nel campo Risposta applicazione, selezionare Servizi in
background.
4. Fare clic sul pulsante [OK] per chiudere la finestra di dialogo.
Utenti Windows XP
1. Fare clic sul pulsante Start e fare clic con il pulsante destro del
mouse su Risorse del computer e selezionare Proprietà.
2. Aprire la scheda Avanzate e fare clic sul pulsante Opzioni
prestazioni nel campo Prestazioni.
3. Aprire la scheda Avanzate e fare clic sul pulsante Servizi in
background nel campo Pianificazione processore.
4. Fare clic sul pulsante [OK] per chiudere la finestra di dialogo.
Español Italiano Français Deutsch English
67
Page 68

Ricerca e soluzione dei problemi
b
■ Le note sono ritardate
Verificare i seguenti punti:
• Se l'applicazione host o il dispositivo audio permette di cambiare le
dimensioni del buffer audio, provare a diminuirle.
• Se il manuale dell’applicazione host o il dispositivo audio contiene
informazioni sulla soluzione dei problemi con le note ritardate, fare
riferimento a tali spiegazioni.
Per utilizzare questo prodotto in tempo reale, è necessario un dispositivo
audio a bassa latenza. Per maggiori informazioni, fare riferimento al manuale
del dispositivo audio e a quello dell'applicazione host.
■ La polifonia è insufficiente/Le note sono omesse
Probabilmente ciò è dovuto all’impostazione relativa alla polifonia massima.
Controllare tale impostazione.
◆ Si potrebbero ottenere dei miglioramenti regolando le
dimensioni del buffer ASIO. (Macintosh)
Se si utilizza Cubase VST/Cubasis VST, si potrebbe migliorare la polifonia
aumentando o diminuendo le dimensioni del buffer ASIO.
◆ State utilizzando Macintosh con il Cubase VST?
Se state utilizzando Macintosh con le serie Cubase, controllate le
impostazioni "Favor MIDI Timing" che si trovano nella sezione Generale
delle impostazioni del sistema Audio.
La riduzione delle
dimensioni del buffer
potrebbe provocare
l’interruzione o l’assenza
di audio. Impostare le
dimensioni del buffer in
ase alle prestazioni del
computer e al dispositivo
audio.
Impostare le dimensioni
del buffer in base alle
prestazioni del computer
e al dispositivo audio.
■ L'audio è distorto
Verificare i seguenti punti:
• Abbassare il volume principale degli strumenti DXi/VST.
• Abbassare il volume del brano e/o il volume principale
• Controllare le impostazioni della scheda audio.
• Controllare il volume dell’apparecchio di riproduzione.
dell’applicazione host.
68
Page 69

■ Impossibile ricevere i messaggi system exclusive
Se si utilizza la versione strumenti VST, non è possibile ricevere i messaggi
system exclusive a causa delle specifiche tecniche degli strumenti VST.
■ Gli strumenti VST non ricevono messaggi Control
Change
Se si utilizza un’applicazione della serie "Logic" di Emagic come applicazione
host, non sarà possibile ricevere alcuni messaggi Control Change dagli
strumenti VST a causa delle specifiche tecniche della serie Logic. (Riguardo
alle specifiche tecniche di Logic, fare riferimento alla documentazione della
serie Logic.)
Per modificare un parametro che non può essere modificato tramite i
messaggi Control Change, utilizzare la manopola o lo slider corrispondente
nella finestra degli strumenti VST o utilizzare la funzione Automation.
■ Impossibile riprodurre i brani esempio in
dotazione quando si usa un programma della
serie Cakewalk
Ricerca e soluzione dei problemi
La cartella CAKEWALK all’interno della cartella SONGS sul CD-ROM del
programma contiene alcuni brani esempio per il programma High Quality
Software Synthesizer nel formato nativo (*.wrk) dei programmi della serie
Cakewalk. Anche se questi file hanno un formato che può essere letto da
High Quality Software Synthesizer, sarà necessario impostare
opportunamente la porta di uscita di ogni traccia MIDI in base al sistema
utilizzato. Se il programma High Quality Software Synthesizer non emette
suoni, controllare le impostazioni della porta d’uscita delle tracce MIDI.
69
Español Italiano Français Deutsch English
Page 70

Instalación del software (Windows)
Este apartado explica cómo instalar el software desde el CD-ROM que se
incluye. Necesitará el CD-ROM de software para el High Quality Software
Synthesizer, de modo que debe tenerlo preparado.
Debe leer el contrato de licencia antes de instalar el software. Puede
visualizar el contrato de licencia durante el proceso de instalación del
software, así que asegúrese de que lo lee.
Antes de instalar el High Quality Software Synthesizer, debe instalar una aplicación
principal que dé soporte a instrumentos DXi/VST.
Instalación del software
Instale los instrumentos DXi o VST de la manera adecuada para la aplicación
principal que esté utilizando.
El contrato de licencia es
el contrato mediante el
cual Roland le otorga
permiso para utilizar el
software.
• Instalación del DXi......................................................pág. 71
• Instalación de los instrumentos VST........................pág. 73
70
Page 71
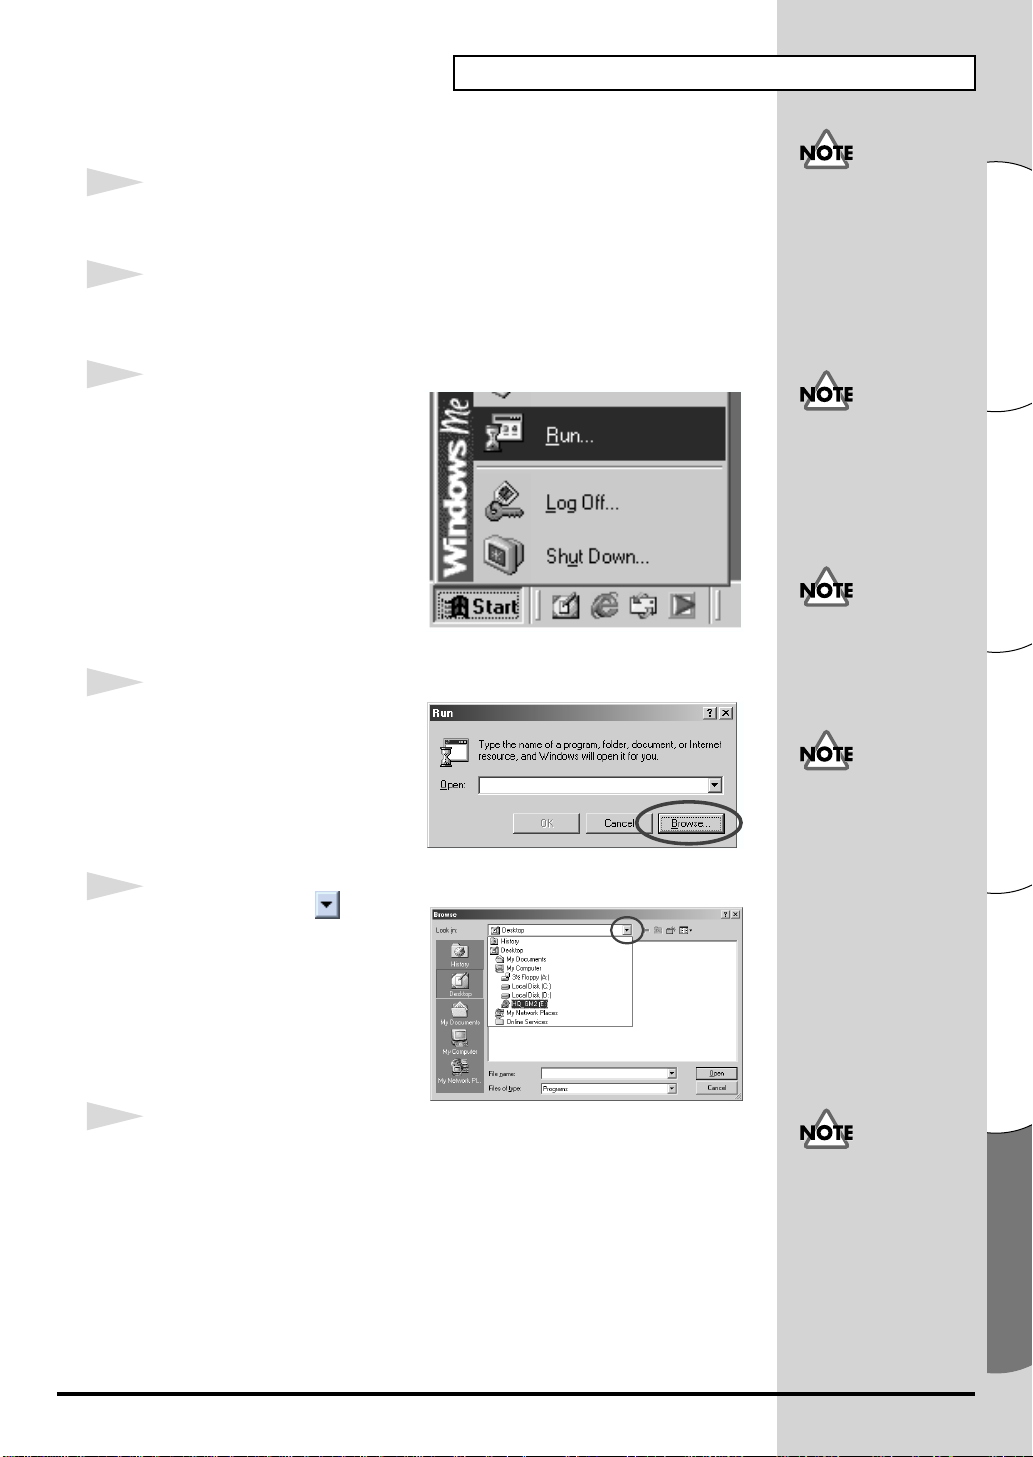
■ Instalación del DXi
Instalación del software (Windows)
1
Salga de todo el software que se esté ejecutando (aplicaciones). Cierre
también las ventanas que tenga abiertas.
2
Prepare el CD-ROM.
Inserte el CD-ROM de software en la unidad de CD-ROM del PC.
3
Abra el cuadro de diálogo
"Ejecutar...".
Haga clic en el botón Inicio de
Windows. En el menú que
aparece, seleccione "Ejecutar...".
4
En el cuadro de diálogo que
aparece, haga clic en
[Examinar...].
Aparece el cuadro de diálogo para
examinar los archivos.
5
Haga clic en el botón de la
parte superior del cuadro de
diálogo y, en la lista que aparece,
seleccione la unidad con el icono
de CD-ROM.
Si utiliza Windows 2000/
XP, debe iniciar la sesión
como usuario con
privilegios administrativos
(como Administrador)
antes de instalar el
software.
Si utiliza Windows XP,
asegúrese de que todos los
usuarios que no sean el
que está instalando cierren
la sesión.
Si utiliza software como
programas antivirus, debe
salir de todo el software.
Si utiliza Windows XP,
puede que aparezca el
cuadro de diálogo "Qué
quiere que haga
Windows". Si aparece,
haga clic en "No hacer
nada" y, a continuación,
haga clic en [Aceptar].
Aparecen las carpetas del
CD-ROM de software.
6
Haga doble clic en la carpeta DXI, seleccione SETUP.EXE y haga clic en
[Abrir].
En función de su sistema,
puede que no se visualice
la extensión del nombre
del archivo.
Español Italiano Français Deutsch English
71
Page 72

Instalación del software (Windows)
7
Compruebe que el nombre del
archivo que ha seleccionado en el
paso 6 aparece en el campo Abrir
del cuadro de diálogo Ejecutar y,
a continuación, haga clic en
[Aceptar].
8
Se iniciará el instalador.
Cuando aparezca la pantalla Bienvenido al asistente InstallShield, haga clic
en [Siguiente].
9
Se le preguntará si está de
acuerdo con los términos del
contrato de licencia. Lea el
contrato de licencia y haga clic en
[Sí] si está de acuerdo. Si hace clic
en [No], se detendrá la
instalación.
E:\DXI\SETUP.EXE
10
Aparece un cuadro de diálogo
que le pedirá que indique la clave
del CD.
Indique la clave del CD que se
encuentra en la parte inferior del
estuche del CD-ROM.
Haga clic en [Siguiente].
11
Aparece un cuadro de diálogo
que le permite seleccionar la
ubicación de la instalación. Para
aceptar la ubicación sugerida,
haga clic en [Siguiente].
Si desea cambiar la carpeta de
instalación, haga clic en
[Examinar...] y especifique la
carpeta deseada.
Si ya tiene instalado el
DXi, no aparecerá la
pantalla de selección de
instalación.
Si desea cambiar la
ubicación de la
instalación, debe
desinstalar el software y,
a continuación, volver a
instalarlo.
72
Page 73

12
Verifique la configuración actual
de la pantalla Confirmación de la
instalación.
Tras verificar la configuración,
haga clic en [Siguiente]. Si desea
volver a especificar la ubicación
de la instalación, haga clic en
[Retroceder].
13
Cuando se hayan copiado los archivos, aparecerá la pantalla Asistente
InstallShield completado.
Haga clic en [Finalizar].
La instalación del DXi ha finalizado.
■ Instalación de los instrumentos VST
Instalación del software (Windows)
* Si sólo desea copiar el módulo de conexión, consulte el apartado Cómo agregar o
eliminar el módulo de conexión (pág. 77).
1
Salga de todo el software que se esté ejecutando (aplicaciones). Cierre
también las ventanas que tenga abiertas.
2
Prepare el CD-ROM.
Inserte el CD-ROM de software en la unidad de CD-ROM del PC.
3
Abra el cuadro de diálogo
"Ejecutar...".
Haga clic en el botón Inicio de
Windows. En el menú que
aparece, seleccione "Ejecutar...".
Si aún no ha instalado una
aplicación principal, debe
hacerlo antes de continuar.
Si utiliza Windows 2000/
XP, debe iniciar la sesión
como usuario con
privilegios administrativos
(como Administrador)
antes de instalar el
software.
Si utiliza Windows XP,
asegúrese de que todos los
usuarios que no sean el
que está instalando cierren
la sesión.
Español Italiano Français Deutsch English
73
Page 74

Instalación del software (Windows)
4
En el cuadro de diálogo que
aparece, haga clic en
[Examinar...].
Aparece el cuadro de diálogo para
examinar los archivos.
5
Haga clic en el botón de la
parte superior del cuadro de
diálogo y, en la lista que aparece,
seleccione la unidad con el icono
de CD-ROM.
Aparecen las carpetas del
CD-ROM de software.
6
Haga doble clic en la carpeta VST, seleccione SETUP.EXE y haga clic en
[Abrir].
7
Compruebe que el nombre del
archivo que ha seleccionado en el
paso 6 aparece en el campo Abrir
del cuadro de diálogo Ejecutar y,
a continuación, haga clic en
[Aceptar].
E:\VST\SETUP.EXE
Si utiliza software como
programas antivirus,
debe salir de todo el
software.
Si utiliza Windows XP,
puede que aparezca el
cuadro de diálogo "Qué
quiere que haga
Windows". Si aparece,
haga clic en "No hacer
nada" y, a continuación,
haga clic en [Aceptar].
En función de su sistema,
puede que no se visualice
la extensión del nombre
del archivo.
74
Page 75

8
Se iniciará el instalador.
Cuando aparezca la pantalla Bienvenido al asistente InstallShield, haga clic
en [Siguiente].
9
Se le preguntará si está de
acuerdo con los términos del
contrato de licencia. Lea el
contrato de licencia y haga clic en
[Sí] si está de acuerdo. Si hace clic
en [No], se detendrá la
instalación.
10
Aparece un cuadro de diálogo
que le pedirá que indique la clave
del CD.
Instalación del software (Windows)
Indique la clave del CD que se
encuentra en la parte inferior del
estuche del CD-ROM.
Haga clic en [Siguiente].
11
Aparece un cuadro de diálogo
que le permite seleccionar la
ubicación de la instalación. Para
aceptar la ubicación sugerida,
haga clic en [Siguiente]. Si desea
cambiar la carpeta de instalación,
haga clic en [Examinar...] y
especifique la carpeta deseada.
12
Verifique la configuración actual
de la pantalla Confirmación de
la instalación.
Tras verificar la configuración,
haga clic en [Siguiente]. Si desea
volver a especificar la ubicación
de la instalación, haga clic en
[Retroceder].
Si ya tiene instalado los
instrumentos VST, no
aparecerá la pantalla de
selección de instalación.
Si desea cambiar la
ubicación de la instalación,
debe desinstalar el
software y, a continuación,
volver a instalarlo.
Español Italiano Français Deutsch English
75
Page 76

Instalación del software (Windows)
13
Cuando los archivos ya se hayan
copiado, aparecerá una pantalla
en la que puede especificar el
destino o destinos en los que se
copiará el módulo de conexión.
Aquí debe seleccionar las carpetas
en las que se instalará la conexión
de los instrumentos VST.
[Si la carpeta deseada no está en la lista]
Haga clic en [Agregar destino de copia en la lista] y especifique la carpeta
en la que se copiará el módulo de conexión.
[Si la lista contiene una carpeta no deseada]
Seleccione la carpeta en la que no desea copiar el módulo de conexión, o la
carpeta de la cual quiere borrar el módulo de conexión y haga clic en [Quitar
elementos seleccionados de la lista].
El módulo de conexión es
un archivo que permite a
la aplicación principal
utilizar los instrumentos
VST. El módulo de
conexión debe copiarse
en la carpeta especificada
para cada aplicación (la
carpeta de conexión).
Consulte el manual del
usuario de su aplicación
principal compatible con
instrumentos VST para
determinar la ubicación
de la carpeta de
conexión.
14
Tras haber especificado la carpeta o carpetas deseadas, haga clic en
[Siguiente].
Se copiará el módulo de conexión.
15
Cuando aparezca la pantalla de finalización del asistente InstallShield, haga
clic en [Finalizar].
La instalación de los instrumentos VST se ha completado.
Los módulos de
conexión se pueden
agregar o borrar incluso
después de la instalación.
76
Page 77
Instalación del software (Windows)
Cómo agregar o eliminar el módulo de conexión
Si instala una nueva aplicación principal después de instalar los
instrumentos VST, o si decide que quiere utilizar los instrumentos VST con
otra aplicación principal, sólo tiene que copiar el módulo de conexión en la
carpeta de conexión de la aplicación principal.
Y, a la inversa, si decide que ya no quiere utilizar los instrumentos VST con
una aplicación principal, todo lo que debe hacer es eliminar el módulo de
conexión de la carpeta de conexión de dicha aplicación.
1. Haga clic en el botón Inicio de Windows y seleccione [Programas] [HQ Software Synthesizer] - [VST (nombre del producto)] - [Copiar
o eliminar módulo de conexión].
2. Aparecerá la pantalla "Seleccione el destino de copia para el
módulo de conexión". Consulte el manual de su aplicación o
aplicaciones principales que utilizan los instrumentos VST para
encontrar su carpeta de conexión y asegúrese de que sólo aparezcan en
la lista las carpetas deseadas.
[Si la carpeta deseada no está en la lista]
Haga clic en [Agregar destino de copia en la lista] y especifique la
carpeta en la que se copiará el módulo de conexión.
[
Si la lista contiene una carpeta no deseada]
En la lista, seleccione la carpeta en la que no desea copiar el módulo
de conexión, o la carpeta que desea eliminar de la lista y haga clic en
[Quitar elementos seleccionados de la lista].
Si utiliza Windows XP,
haga clic en el botón Inicio
y seleccione [Todos los
programas] - [HQ
Software Synthesizer] [VST (nombre del
producto)] - [Copiar o
eliminar módulo de
conexión].
3. Tras haber especificado la carpeta o carpetas deseadas, haga clic en
[Siguiente].
4. Se copiará/eliminará el módulo de conexión.
Español Italiano Français Deutsch English
77
Page 78

Instalación del software (Windows)
Desinstalación del software
Para desinstalar el software, utilice el siguiente procedimiento.
Cuando desinstala el software, se borrarán los parches de efectos y sonidos que creó
usted. Los datos que desee mantener deberán guardarse en un archivo antes de
desinstalar el software. Para obtener más información sobre cómo guardar sus datos,
consulte el manual en línea del software.
Usuarios de Windows Me/98
1
Haga clic en el botón Inicio de Windows y en [Configuración]-[Panel de
control].
2
Haga doble clic en el icono
"Agregar/quitar programas".
Aparecerá el cuadro de diálogo
"Agregar/quitar propiedades de
programas".
3
Haga clic en la ficha "Instalar/
desinstalar".
4
En la lista, haga clic en el software
que desee eliminar.
5
Haga clic en [Agregar/Quitar...].
6
Si está eliminando instrumentos VST, aparecerá la pantalla "Modificar o
desinstalar". Escriba una marca de verificación al lado de "Eliminar" y
haga clic en [Siguiente].
Si sólo desea eliminar el
módulo de conexión,
consulte el apartado
Cómo agregar o
eliminar el módulo de
conexión (pág. 77).
78
7
Una pantalla le informará de que la desinstalación ha finalizado. Haga clic
en [Finalizar].
Page 79

Usuarios de Windows 2000/XP
1
Inicie la sesión como usuario con privilegios administrativos (como
Administrador).
2
Haga clic en el botón Inicio de Windows y en [Configuración]-[Panel de
control]. (En Windows XP, haga clic en el botón Inicio y, a continuación, en
Panel de control.)
Instalación del software (Windows)
Si sólo desea eliminar el
módulo de conexión,
consulte el apartado Cómo
agregar o eliminar el
módulo de conexión
(pág. 77).
3
Haga doble clic en el icono
"Agregar/quitar programas".
(En Windows XP, haga doble clic
en el icono "Agregar o quitar
programas".) Aparecerá el
cuadro de diálogo "Agregar/
quitar programas" ("Agregar o
quitar programas" en
Windows XP).
4
Haga clic en el icono "Cambiar o
eliminar programas".
5
En la lista, haga clic en el software que desee eliminar.
6
Haga clic en [Cambiar/eliminar].
7
Si está eliminando instrumentos VST, aparecerá la pantalla "Modificar o
desinstalar". Escriba una marca de verificación al lado de "Eliminar" y
haga clic en [Siguiente].
Si ha seleccionado el modo
de visualización clásico
para el menú Inicio, será
[Configuración] - [Panel
de control].
8
Una pantalla le informará de que la desinstalación ha finalizado. Haga clic
en [Finalizar].
Español Italiano Français Deutsch English
79
Page 80

Instalación del software (Macintosh)
Este apartado explica cómo instalar el software desde el CD-ROM que se
incluye. Necesitará el CD-ROM de software para el High Quality Software
Synthesizer, de modo que debe tenerlo preparado.
Debe leer el contrato de licencia antes de instalar el software. Puede
visualizar el contrato de licencia durante el proceso de instalación del
software, así que asegúrese de que lo lee.
El contrato de licencia es
el contrato mediante el
cual Roland Corporation
le permite utilizar el
software.
Antes de instalar el High Quality Software Synthesizer, debe instalar una
aplicación principal que dé soporte a instrumentos VST. Debe incrementar también
la memoria asignada a la aplicación servidor como se indica a continuación.
Hyper Canvas/Super Quartet: aproximadamente 40--50 MB
Orquestal: aproximadamente 100 MB
Instalación del software
1
Inicie su Macintosh.
2
Salga de todo el software que esté ejecutando.
3
Prepare el CD-ROM.
Inserte el CD-ROM de software en la unidad de CD-ROM del Macintosh.
Aumente la asignación
de memoria para
adaptarla al tipo y
versión de la aplicación
servidor, así como otros
factores como el número
de complementos que se
usen.
Para obtener más
información sobre cómo
aumentar la memoria,
consulte la guía para
MacOS.
Las capturas de este
manual se han extraído
de Mac OS 9.1. Puede
que las pantallas que vea
en su PC varíen en
función de la versión del
sistema operativo.
80
4
En el CD-ROM de software, haga doble clic en [Installer E].
5
Aparece el siguiente cuadro de
diálogo de contrato. El mensaje le
preguntará si está de acuerdo con los
términos del contrato de licencia.
Lea el contrato de licencia y haga clic
en [Accept] si está de acuerdo. Si
hace clic en [Decline], se detendrá la
instalación.
Si utiliza software como
programas antivirus,
debe deshabilitarlo
antes de instalar este
software.
Page 81

6
b
Aparece el cuadro de diálogo de
instalación.
Seleccione la ubicación de la
instalación y haga clic en [Install].
* Los instrumentos VST se instalarán en
la carpeta VstPlugIns.
7
Aparece el cuadro de diálogo que se
muestra a la derecha. Indique la
clave del CD.
La clave del CD se encuentra en la
parte inferior del estuche del
CD-ROM.
Instalación del software (Macintosh)
Si la clave del CD es
incorrecta, no aparecerá el
otón [OK].
■ Aparece el cuadro de diálogo Select Folder
Puede que aparezca un cuadro de
diálogo Select Folder como el de la
derecha durante la instalación. En
este cuadro de diálogo, seleccione la
carpeta en la cual desea instalar el
instrumento VST y haga clic en
[Aceptar}. Se copiarán los archivos
necesarios en la carpeta seleccionada.
8
Cuando se haya instalado todo el
software, un cuadro de diálogo le
informará de que la instalación ha
finalizado.
Normalmente, debe hacer clic en [Quit].
Si desea realizar la instalación en otra carpeta, haga clic en [Continue].
Con ello finaliza la instalación de los instrumentos VST.
Aparecerá el cuadro de
diálogo que se muestra a la
izquierda si el disco duro
contiene más de una
carpeta VstPlugIns en las
que se pueden instalar los
instrumentos VST.
Español Italiano Français Deutsch English
81
Page 82

Resolución de problemas
* Lea el archivo “Readme_e.txt” del CD-ROM de software. Puede obtener información
adicional no impresa en la guía de instalación del archivo “Readme_e.txt”.
■ Un cuadro de diálogo le pedirá el CD-ROM.
◆ Puede que aparezca un cuadro de diálogo que le pida el
CD-ROM cuando conecte un instrumento DXi/VST.
Si aparece este cuadro de diálogo, inserte el CD-ROM del software de High
Quality Software Synthesizer en la unidad de CD-ROM y haga clic en
[Aceptar]. Una vez completada la conexión, extraiga el CD-ROM de software
de la unidad de CD-ROM.
■ No se puede instalar el software
◆ ¿La CPU de su sistema cumple los requisitos de
funcionamiento?
Si utiliza Windows, no se puede utilizar el High Quality Software Synthesizer
con una CPU que no dé soporte a un conjunto de instrucciones SSE o el
conjunto de instrucciones Enhanced 3DNow!.
Si utiliza Macintosh, no se puede utilizar el High Quality Software
Synthesizer con una CPU que no dé soporte a AltiVec.
Si utiliza Windows XP,
puede que aparezca el
cuadro de diálogo "Qué
quiere que haga
Windows". Si aparece,
haga clic en "No hacer
nada" y, a continuación,
haga clic en [Aceptar].
■ No se pueden instalar los instrumentos VST
◆ ¿Su aplicación principal contiene una carpeta VstPlugIns?
Algunas aplicaciones no proporcionan una carpeta VstPlugIns. Por ese
motivo, puede que la pantalla en la cual especifica el destino de copia para el
módulo de conexión (en Macintosh, el cuadro de diálogo de selección de
carpetas), que aparece durante la instalación de los instrumentos VST, no
muestre la carpeta de la aplicación principal deseada. En ese caso, consulte el
manual del usuario de su aplicación principal, cree una carpeta VstPlugIns
y vuelva a instalar los instrumentos VST.
■ No se pueden conectar (no se pueden
seleccionar) los instrumentos DXi/VST.
◆ ¿Están los instrumentos DXi/VST correctamente instalados?
Si utiliza Windows, vuelva a instalar los instrumentos DXi/VST tal como se
describe en el apartado Instalación del software (Windows) (pág. 70).
Si utiliza Macintosh, vuelva a instalar los instrumentos VST tal como se
describe en el apartado Instalación del software (Macintosh) (pág. 80).
82
Page 83

■ No se ha establecido la conexión
Compruebe lo siguiente:
• SSi está usando Macintosh, aumente la asignación de memoria de la
aplicación servidor como se describe en Instalación del software
(Macintosh) (pág. 80). Aumente la asignación de memoria para
adaptarla al tipo y versión de la aplicación servidor, así como otros
factores como el número de complementos que se usen.
• Este producto sólo puede utilizarse con los siguientes formatos de
audio. Compruebe el formato de audio de su aplicación principal.
Velocidad de sampling............... 44.1, 48, 96 kHz
• Es posible que su sistema no tenga suficiente memoria. Salga de
todas las aplicaciones que no esté utilizando. Si la conexión falla con
frecuencia debido a una memoria insuficiente, le recomendamos que
amplíe la memoria del sistema.
◆ ¿Están los instrumentos DXi/VST correctamente instalados?
Vuelva a instalar los instrumentos DXi/VST tal como se describe en el
apartado Instalación del software (Windows) (pág. 70).
◆ ¿Están los instrumentos VST correctamente instalados?
(Macintosh)
En algunos casos, puede que aparezca un cuadro de diálogo con el mensaje
"Este módulo no está instalado correctamente. Vuelva a realizar la
instalación." cuando trate de conectar los instrumentos VST utilizando su
aplicación principal. Si esto sucede, vuelva a instalar los instrumentos VST tal
como se describe en el apartado Instalación del software (Macintosh) (pág.
80).
Resolución de problemas
Para obtener más
información sobre cómo
aumentar la memoria,
consulte la guía para
MacOS.
◆ ¿Su aplicación principal da soporte a instrumentos DXi/VST?
Consulte el manual del usuario de su aplicación principal y compruebe si ésta
da soporte a instrumentos DXi/VST.
■ Aparecerá el mensaje de error "No se puede
asignar memoria" cuando se conecte
(Macintosh).
Este error se produce cuando no hay memoria suficiente para ejecutar la
conexión. Aumente la cantidad de memoria asignada a su aplicación.
Español Italiano Français Deutsch English
83
Page 84

Resolución de problemas
b
■ El sonido está demasiado alto/bajo/no se oye
◆ ¿Están los instrumentos DXi/VST correctamente configurados?
Compruebe la configuración del volumen de los instrumentos DXi/VST.
◆ Si el medidor de nivel de los instrumentos DXi/VST se mueve, es
posible que haya un problema en la configuración de salida de
audio.
Compruebe lo siguiente:
• Compruebe el volumen de audio de su aplicación principal.
Asegúrese también de que haya seleccionado correctamente el
aparato de audio que está utilizando.
• Compruebe el volumen y los demás ajustes necesarios de su aparato
de audio.
• Compruebe las conexiones y el volumen de su sistema de audio (p.ej.
los amplificadores y el altavoz).
◆ ¿Ha asignado a su sistema una gran carga de proceso?
Si ha asignado una gran carga de proceso a su sistema, puede que la
aplicación principal deje de procesar el audio, con lo cual no se produce
ningún sonido. Consulte los apartados de resolución de problemas "El
sonido se interrumpe/el tempo de reproducción es irregular/la
reproducción se detiene".
■ El sonido se interrumpe/el tempo de
reproducción es irregular/la reproducción se
detiene.
Compruebe lo siguiente:
• Si su aplicación principal le permite cambiar el tamaño del búfer de
audio, intente aumentarlo.
• Es posible que no se reproduzca correctamente porque haya otro
software que está asignando carga de proceso a su sistema. Salga de
todo el software que no esté utilizando.
• Consulte la documentación de resolución de problemas de su
aplicación principal o aparato de audio. Si hay apartados de
resolución de problemas relacionados con la reproducción de audio,
puede que le ayuden a resolver este problema.
• Si utiliza Windows 2000/XP, intente utilizar el siguiente
procedimiento para cambiar la configuración de la opción de
rendimiento.
Usuarios de Windows 2000
1. Haga clic con el botón secundario en Mi PC y seleccione
Propiedades.
2. Abra la ficha Avanzadas y haga clic en el botón Opciones de
rendimiento.
3. En el campo Respuesta de la aplicación, seleccione Servicio de
fondo.
Si aumenta el tamaño del
úfer, aumentará el
retardo de las notas
("latencia").
4. Haga clic en el botón [Aceptar] para cerrar el cuadro de diálogo.
84
Page 85

Usuarios de Windows XP
b
b
1. Haga clic en el botón Inicio y con el botón secundario en Mi PC, y
seleccione Propiedades.
2. Abra la ficha Avanzadas y haga clic en el botón Configuración
del campo Rendimiento.
3. Abra la ficha Avanzadas y seleccione Servicios de fondo en el
campo Planificación del procesador.
4. Haga clic en el botón [Aceptar] para cerrar el cuadro de diálogo.
■ Las notas se oyen con retardo
Compruebe lo siguiente:
• Si su aplicación principal o aparato de audio le permite cambiar el
tamaño del búfer de audio, intente disminuirlo.
• Si el manual de su aplicación principal o aparato de audio contiene
información sobre cómo solucionar los problemas relacionados con
las notas con retardo, lea esas explicaciones.
Necesitará un aparato de audio de baja latencia si desea reproducir con este
producto a tiempo real. Para obtener más información, consulte el manual del
usuario de su aparato de audio o el manual del usuario de la aplicación
principal.
Resolución de problemas
Disminuir el tamaño del
úfer puede hacer que las
notas se interrumpan o no
suenen. Establezca el
tamaño de búfer según el
rendimiento de su sistema
y aparato de audio.
■ La polifonía no es suficiente/se omiten notas
Es posible que esta limitación se deba a la configuración de polifonía máxima.
Compruebe la configuración de polifonía máxima.
◆ Puede mejorar la situación ajustando el tamaño de búfer ASIO.
(Macintosh)
Si utiliza Cubase VST/Cubasis VST, puede mejorar la polifonía aumentando
o disminuyendo el tamaño de búfer ASIO.
◆ ¿Está usando Macintosh con Cubase VST?
Si está usando Macintosh con la serie Cubase, compruebe que la
configuración "Favorecer temporización MIDI" que se encuentra en la
sección General de la configuración de audio del sistema.
Establezca el tamaño de
úfer según el
rendimiento de su
sistema y aparato de
audio.
Español Italiano Français Deutsch English
85
Page 86

Resolución de problemas
■ El sonido está distorsionado
Compruebe lo siguiente:
• Baje el volumen global de los instrumentos DXi/VST.
• Baje el volumen de pista y/o volumen global de su aplicación
principal.
• Compruebe la configuración de la tarjeta de sonido.
• Compruebe el volumen de su equipo de reproducción.
■ No se pueden recibir mensajes System Exclusive
Si utiliza la versión de instrumentos VST, no se pueden recibir mensajes
System Exclusive debido a las especificaciones de los instrumentos VST.
■ Los instrumentos VST no reciben mensajes de
cambio de control
Si utiliza la serie "Logic" de Emagic como aplicación principal, puede que los
instrumentos VST no reciban algunos mensajes de cambio de control debido
a las especificaciones de la serie Logic. (Para ver las especificaciones actuales
de Logic, consulte la documentación de la serie Logic).
Para modificar un parámetro que no pueden modificar los mensajes de
cambio de control, puede modificar directamente el control o deslizador en
la ventana Instrumentos VST o utilizar la función Automatización para
controlarlo.
■ No se pueden reproducir las canciones de demo
que se incluyen (cuando se utiliza el software de
la serie Cakewalk)
La carpeta CAKEWALK dentro de CANCIONES del CD-ROM de software
contiene canciones de demo para el High Quality Software Synthesizer en
formato nativo (*.wrk) del software de la serie Cakewalk. Aunque estos
archivos se guarden en un formato que puede utilizar el High Quality
Software Synthesizer, necesitará establecer correctamente el puerto de salida
de cada pista MIDI para su sistema. Si el High Quality Software Synthesizer
no produce ningún sonido, compruebe la configuración del puerto de salida
de las pistas MIDI.
86
Page 87

Information
When you need repair service, call your nearest EDIROL/Roland Service Center or authorized EDIROL/Roland distributor
in your country as shown below.
AUSTRALIA
EDIROL Australia Pty. Ltd.
72 Central Avenue
Oak Flats NSW 2529
AUSTRALIA
TEL: (02) 4257 9091
http://www.edirol.com.au
EUROPE
EDIROL (Europe) Ltd.
Studio 3.4 114 Power Road
London W4 5PY
U. K.
TEL: +44 (0)20 8747 5949
FAX:+44 (0)20 8747 5948
http://www.edirol.com/europe
Deutschland
TEL: 0700 33 47 65 20
France
TEL: 0810 000 371
Italia
TEL: 02 93778329
U. S. A. / CANADA
EDIROL Corporation North
America
425 Sequoia Drive, Suite 114
Bellingham, WA 98226
U. S. A.
TEL: (360) 594-4276
FAX: (360) 594-4271
http://www.edirol.com/
AFRICAAFRICA
EGYPT
Al Fanny Trading Office
9, EBN Hagar A1 Askalany Street,
ARD E1 Golf, Heliopolis,
Cairo 11341, EGYPT
TEL: 20-2-417-1828
REUNION
Maison FO - YAM Marcel
25 Rue Jules Hermann,
Chaudron - BP79 97 491
Ste Clotilde Cedex,
REUNION ISLAND
TEL: (0262) 218-429
SOUTH AFRICA
That Other Music Shop
(PTY) Ltd.
11 Melle St., Braamfontein,
Johannesbourg, SOUTH AFRICA
P.O.Box 32918, Braamfontein 2017
Johannesbourg, SOUTH AFRICA
TEL: (011) 403 4105
Paul Bothner (PTY) Ltd.
17 Werdmuller Centre,
Main Road, Claremont 7708
SOUTH AFRICA
P.O.BOX 23032, Claremont 7735,
SOUTH AFRICA
TEL: (021) 674 4030
ASIA
CHINA
Roland Shanghai Electronics
Co.,Ltd.
5F. No.1500 Pingliang Road
Shanghai, CHINA
TEL: (021) 5580-0800
Roland Shanghai Electronics
Co.,Ltd.
(BEIJING OFFICE)
10F. No.18 Anhuaxili
Chaoyang District, Beijing,
CHINA
TEL: (010) 6426-5050
HONG KONG
Tom Lee Music Co., Ltd.
Service Division
22-32 Pun Shan Street, Tsuen
Wan, New Territories,
HONG KONG
TEL: 2415 0911
INDIA
Rivera Digitec (India) Pvt. Ltd.
409, Nirman Kendra Mahalaxmi
Flats Compound Off. Dr. Edwin
Moses Road, Mumbai-400011,
INDIA
TEL: (022) 493 9051
INDONESIA
PT Citra IntiRama
J1. Cideng Timur No. 15J-150
Jakarta Pusat
INDONESIA
TEL: (021) 6324170
KOREA
Cosmos Corporation
1461-9, Seocho-Dong,
Seocho Ku, Seoul, KOREA
TEL: (02) 3486-8855
MALAYSIA
BENTLEY MUSIC SDN BHD
140 & 142, Jalan Bukit Bintang
55100 Kuala Lumpur,MALAYSIA
TEL: (03) 2144-3333
PHILIPPINES
G.A. Yupangco & Co. Inc.
339 Gil J. Puyat Avenue
Makati, Metro Manila 1200,
PHILIPPINES
TEL: (02) 899 9801
SINGAPORE
CRISTOFORI MUSIC PTE
LTD
Blk 3014, Bedok Industrial Park E,
#02-2148, SINGAPORE 489980
TEL: 6243-9555
TAIWAN
ROLAND TAIWAN
ENTERPRISE CO., LTD.
Room 5, 9fl. No. 112 Chung Shan
N.Road Sec.2, Taipei, TAIWAN,
R.O.C.
TEL: (02) 2561 3339
THAILAND
Theera Music Co. , Ltd.
330 Verng NakornKasem, Soi 2,
Bangkok 10100, THAILAND
TEL: (02) 2248821
VIETNAM
Saigon Music
138 Tran Quang Khai St.,
District 1
Ho Chi Minh City
VIETNAM
TEL: (08) 844-4068
AUSTRALIA/
NEW ZEALAND
NEW ZEALAND
Roland Corporation Ltd.
32 Shaddock Street, Mount Eden,
Auckland, NEW ZEALAND
TEL: (09) 3098 715
CENTRAL/LATIN
AMERICA
ARGENTINA
Instrumentos Musicales S.A.
Av.Santa Fe 2055
(1123) Buenos Aires
ARGENTINA
TEL: (011) 4508-2700
BRAZIL
Roland Brasil Ltda
Rua San Jose, 780 Sala B
Parque Industrial San Jose
Cotia - Sao Paulo - SP, BRAZIL
TEL: (011) 4615 5666
CHILE
Comercial Fancy II S.A.
Rut.: 96.919.420-1
Nataniel Cox #739, 4th Floor
Santiago - Centro, CHILE
TEL: (02) 688-9540
MEXICO
Casa Veerkamp, s.a. de c.v.
Av. Toluca No. 323, Col. Olivar
de los Padres 01780 Mexico D.F.
MEXICO
TEL: (55) 5668-6699
URUGUAY
Todo Musica S.A.
Francisco Acuna de Figueroa 1771
C.P.: 11.800
Montevideo, URUGUAY
TEL: (02) 924-2335
VENEZUELA
Musicland Digital C.A.
Av. Francisco de Miranda,
Centro Parque de Cristal, Nivel
C2 Local 20 Caracas
VENEZUELA
TEL: (212) 285-8586
EUROPE
AUSTRIA
Roland Austria GES.M.B.H.
Siemensstrasse 4, P.O. Box 74,
A-6063 RUM, AUSTRIA
TEL: (0512) 26 44 260
BELGIUM/HOLLAND/
LUXEMBOURG
Roland Benelux N. V.
Houtstraat 3, B-2260, Oevel
(Westerlo) BELGIUM
TEL: (014) 575811
DENMARK
Roland Scandinavia A/S
Nordhavnsvej 7, Postbox 880,
DK-2100 Copenhagen
DENMARK
TEL: (039)16 6200
FRANCE
Roland France SA
4, Rue Paul Henri SPAAK,
Parc de l'Esplanade, F 77 462 St.
Thibault, Lagny Cedex FRANCE
TEL: 01 600 73 500
FINLAND
Roland Scandinavia As,
Filial Finland
Lauttasaarentie 54 B
Fin-00201 Helsinki, FINLAND
TEL: (9) 682 4020
GERMANY
Roland Elektronische
Musikinstrumente HmbH.
Oststrasse 96, 22844 Norderstedt,
GERMANY
TEL: (040) 52 60090
GREECE
STOLLAS S.A.
Music Sound Light
155, New National Road
Patras 26442, GREECE
TEL: (061) 043-5400
HUNGARY
Intermusica Ltd.
Warehouse Area ‘DEPO’ Pf.83
H-2046 Torokbalint, HUNGARY
TEL: (23) 511011
IRELAND
Roland Ireland
Audio House, Belmont Court,
Donnybrook, Dublin 4.
Republic of IRELAND
TEL: (01) 2603501
ITALY
Roland Italy S. p. A.
Viale delle Industrie 8,
20020 Arese, Milano, ITALY
TEL: (02) 937-78300
NORWAY
Roland Scandinavia Avd.
Kontor Norge
Lilleakerveien 2 Postboks 95
Lilleaker N-0216 Oslo
NORWAY
TEL: 273 0074
POLAND
P. P. H. Brzostowicz
UL. Gibraltarska 4.
PL-03664 Warszawa POLAND
TEL: (022) 679 44 19
PORTUGAL
Tecnologias Musica e Audio,
Roland Portugal, S.A.
Cais Das Pedras, 8/9-1 Dto
4050-465 PORTO
PORTUGAL
TEL: (022) 608 00 60
ROMANIA
FBS LINES
Piata Libertatii 1,
RO-4200 Gheorgheni
TEL: (066) 164-609
RUSSIA
MuTek
3-Bogatyrskaya Str. 1.k.l
107 564 Moscow, RUSSIA
TEL: (095) 169 5043
SPAIN
Roland Electronics
de España, S. A.
Calle Bolivia 239, 08020
Barcelona, SPAIN
TEL: (93) 308 1000
SWEDEN
Roland Scandinavia A/S
SWEDISH SALES OFFICE
Danvik Center 28, 2 tr.
S-131 30 Nacka SWEDEN
TEL: (08) 702 0020
SWITZERLAND
Roland (Switzerland) AG
Musitronic AG
Gerberstrasse 5, Postfach,
CH-4410 Liestal, SWITZERLAND
TEL: (061) 927-8383
UKRAINE
TIC-TAC
Mira Str. 19/108
P.O. Box 180
295400 Munkachevo, UKRAINE
TEL: (03131) 414-40
UNITED KINGDOM
Roland (U.K.) Ltd.
Atlantic Close, Swansea
Enterprise Park, SWANSEA
SA7 9FJ,
UNITED KINGDOM
TEL: (01792) 700139
MIDDLE EAST
BAHRAIN
Moon Stores
No.16, Bab Al Bahrain Avenue,
P.O.Box 247, Manama 304,
State of BAHRAIN
TEL: 211 005
CYPRUS
Radex Sound Equipment Ltd.
17, Diagorou Street, Nicosia,
CYPRUS
TEL: (02) 66-9426
IRAN
MOCO, INC.
No.41 Nike St., Dr.Shariyati Ave.,
Roberoye Cerahe Mirdamad
Tehran, IRAN
TEL: (021) 285-4169
ISRAEL
Halilit P. Greenspoon &
Sons Ltd.
8 Retzif Ha’aliya Hashnya St.
Tel-Aviv-Yafo ISRAEL
TEL: (03) 6823666
JORDAN
AMMAN Trading Agency
245 Prince Mohammad St.,
Amman 1118, JORDAN
TEL: (06) 464-1200
KUWAIT
Easa Husain Al-Yousifi
Abdullah Salem Street,
Safat, KUWAIT
TEL: 243-6399
LEBANON
Chahine S.A.L.
Gerge Zeidan St., Chahine Bldg.,
Achrafieh, P.O.Box: 16-5857
Beirut, LEBANON
TEL: (01) 20-1441
QATAR
Badie Studio & Stores
P.O. Box 62,
Doha, QATAR
TEL: 423554
SAUDI ARABIA
aDawliah Universal
Electronics APL
Corniche Road, Aldossary Bldg.,
1st Floor, Alkhobar,
SAUDI ARABIA
P.O.Box 2154, Alkhobar 31952
SAUDI ARABIA
TEL: (03) 898 2081
SYRIA
Technical Light & Sound
Center
Khaled Ebn Al Walid St.
Bldg. No. 47, P.O.BOX 13520,
Damascus, SYRIA
TEL: (011) 223-5384
TURKEY
Barkat Muzik aletleri ithalat
ve ihracat Ltd Sti
Siraselviler Caddesi Siraselviler
Pasaji No:74/20
Taksim - Istanbul, TURKEY
TEL: (0212) 2499324
U.A.E.
Zak Electronics & Musical
Instruments Co. L.L.C.
Zabeel Road, Al Sherooq Bldg.,
No. 14, Grand Floor, Dubai, U.A.E.
TEL: (04) 3360715
As of June 1, 2002 (EDIROL-1)
Page 88

Barcode Label
03015078 ’02-6-**-11N
 Loading...