


KSC-40/42
STAND ASSEMBLY
- Make sure that another person is on hand to help with the assembly and setup.
- Be very careful, when you assemble and move the piano, to make sure that you do not drop it on your
hands or feet.
- To move the piano, lift it carefully—all the while keeping it level.
- Be sure to keep any screws, caps, and other small components out of the reach of small children so as to
prevent any child from accidentally swallowing these items.
- Do not use a power tool (e.g., an electric screwdriver) to assemble the stand. You risk damaging or
stripping the screws.
■
Parts Check
Before you begin assembling the stand, check that all the parts
were supplied. You will also need to have a Phillips screwdriver.
KSC-42
A: Side Board (left) 1: Screw “a” (M5 x 40 mm) x4
B: Side Board (right) 2: Screw “b” (M5 x 20 mm) x6
C: Pedal Board
D: Rear Board
■
Assembly Procedure
* Fasten each screw tightly, then place the stand in a stable and horizontal place.
Also, carry out assembly of the instrument on an even surface.
* Do not allow the pedal cord or power cable to get twisted or pinched while
assembling the stand.
* Do not set up the instrument on long-piled carpeting. This can cause instability
in the stand and unsteadiness in the pedals, possibly resulting in damage to the
unit.
* Lay a soft cloth or similar material on the floor, and assemble the stand atop this
surface.
* When tightening the screws, turn them two or three revolutions by hand before
using a screwdriver.
Stand Assembly
At first, assemble the entire stand in a temporary fashion, without really
tightening the screws. Then, after checking the overall alignment of the
boards (and gently shifting certain parts where necessary), go around
and tightly fasten each of the screws.
1.
Attach the side boards for the right and left sides to the
pedal board (so that the metal parts face inside) using
screws “a” (M5 x 40 mm).
2.
Loosen the screws attached to the left and right side
boards approximately three turns, so that they protrude
about 3mm, as shown in the illustration.
2
3.
Hook the metal brackets of the rear board over the screws
you loosened (c), as shown in the illustration.
4.
Use four screws “b” (M5 x 20mm) to provisionally fasten
the pedal board.
5.
Securely tighten the two side board screws and four pedal
board screws.
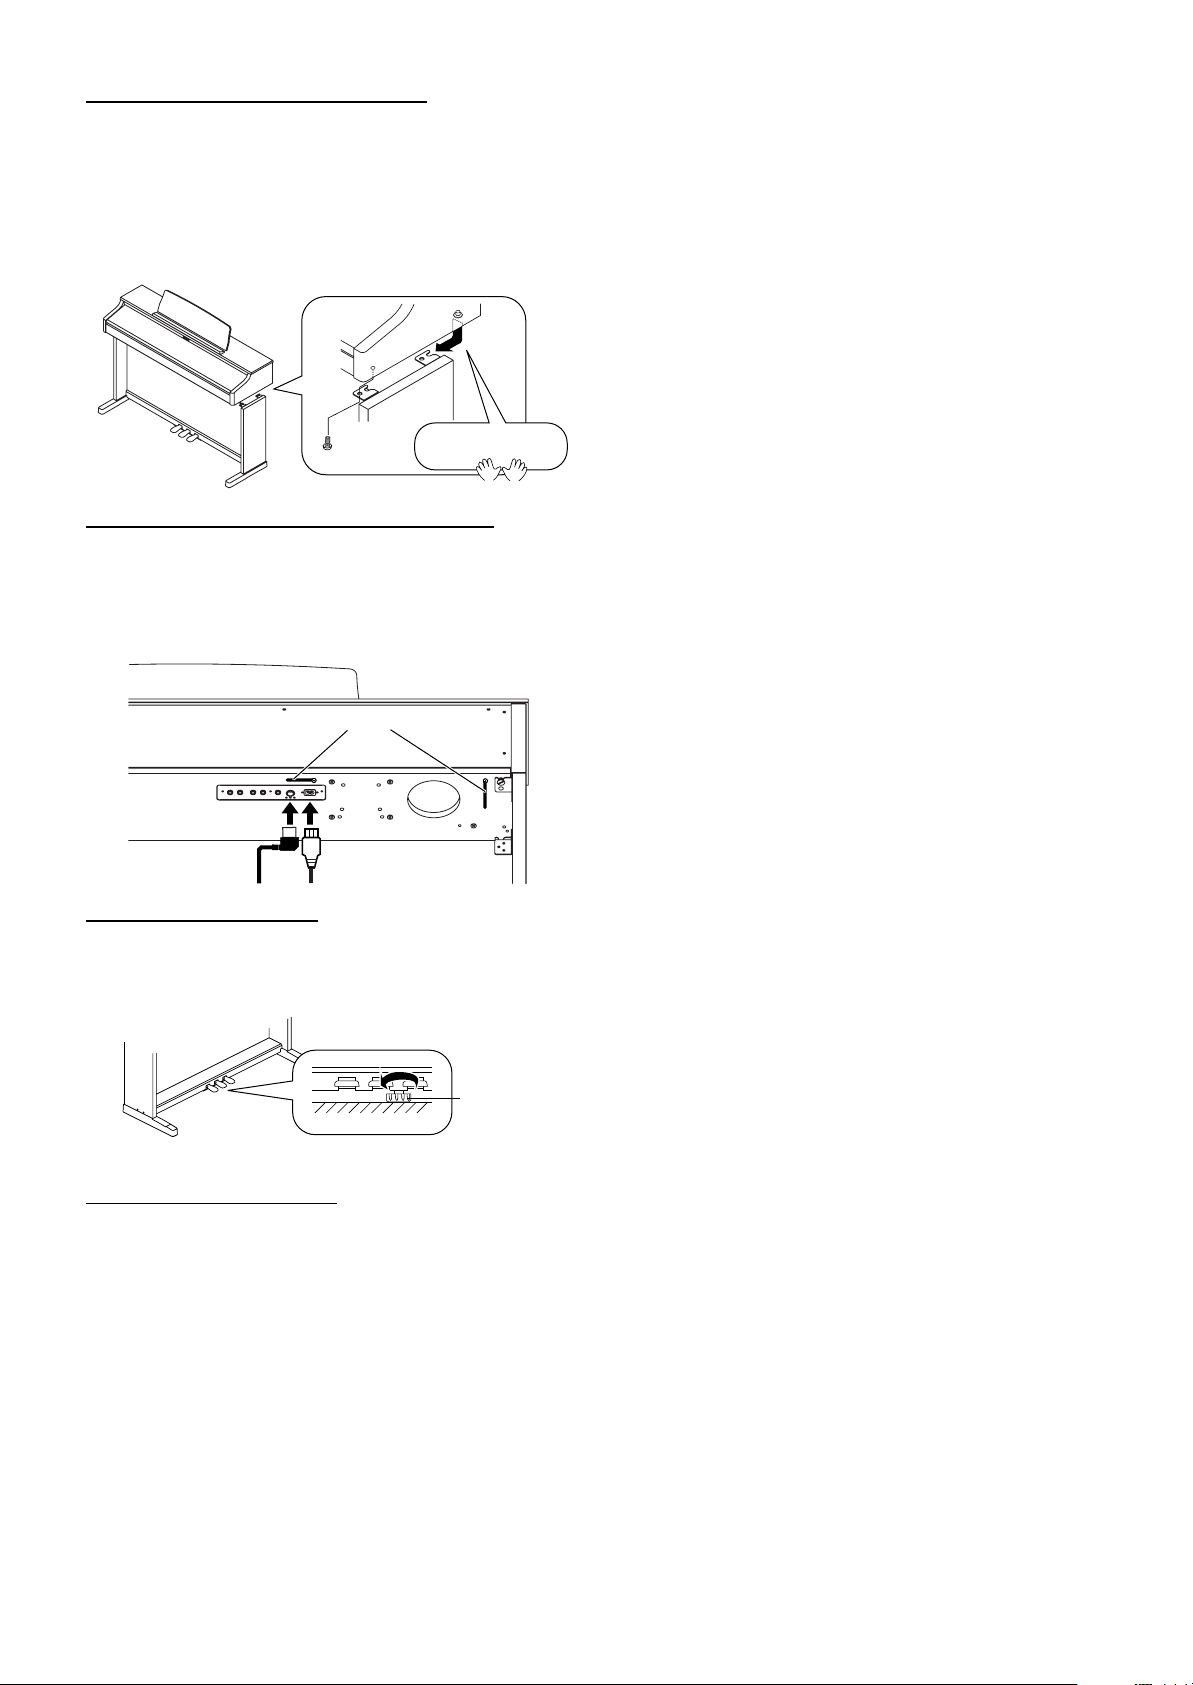
When attaching the rear board, before tightening the screws, adjust
things as necessary at all the points where there are screws so as to assure
that the rear board is aligned in parallel with the pedal board.
Rear view
3
5
Screws you loosened
4, 5
Screw “b” (4 pieces)
in step 2 (2 screws)
Screw “a” 2pcs
1
Screw “a” 2pcs
* When attaching the pedalboard, do not allow any gap to remain between the side
board and pedalboard when the pieces are assembled.
Correct
Side board
Improper
Side board
Space
Pedal
Pedal board
Copyright © 2007 ROLAND CORPORATION
All rights reserved. No part of this publication may be reproduced in any form without the written permission of ROLAND CORPORATION.
board
1
Installing the Piano on the Stand
6.
Align the protruding screws (one each at right and left) on
the bottom of the piano with the openings in the metal
fittings on the side board, then slide the piano forward until
the screws are held in place.
* When handling the piano, firmly grasp it. Be careful, so you do not get your
fingers pinched.
7.
Fasten the piano to the stand with the screw “b” (M5 x
20mm).
6
7
Please don’t get your
Screw “b”
fingers pinched.
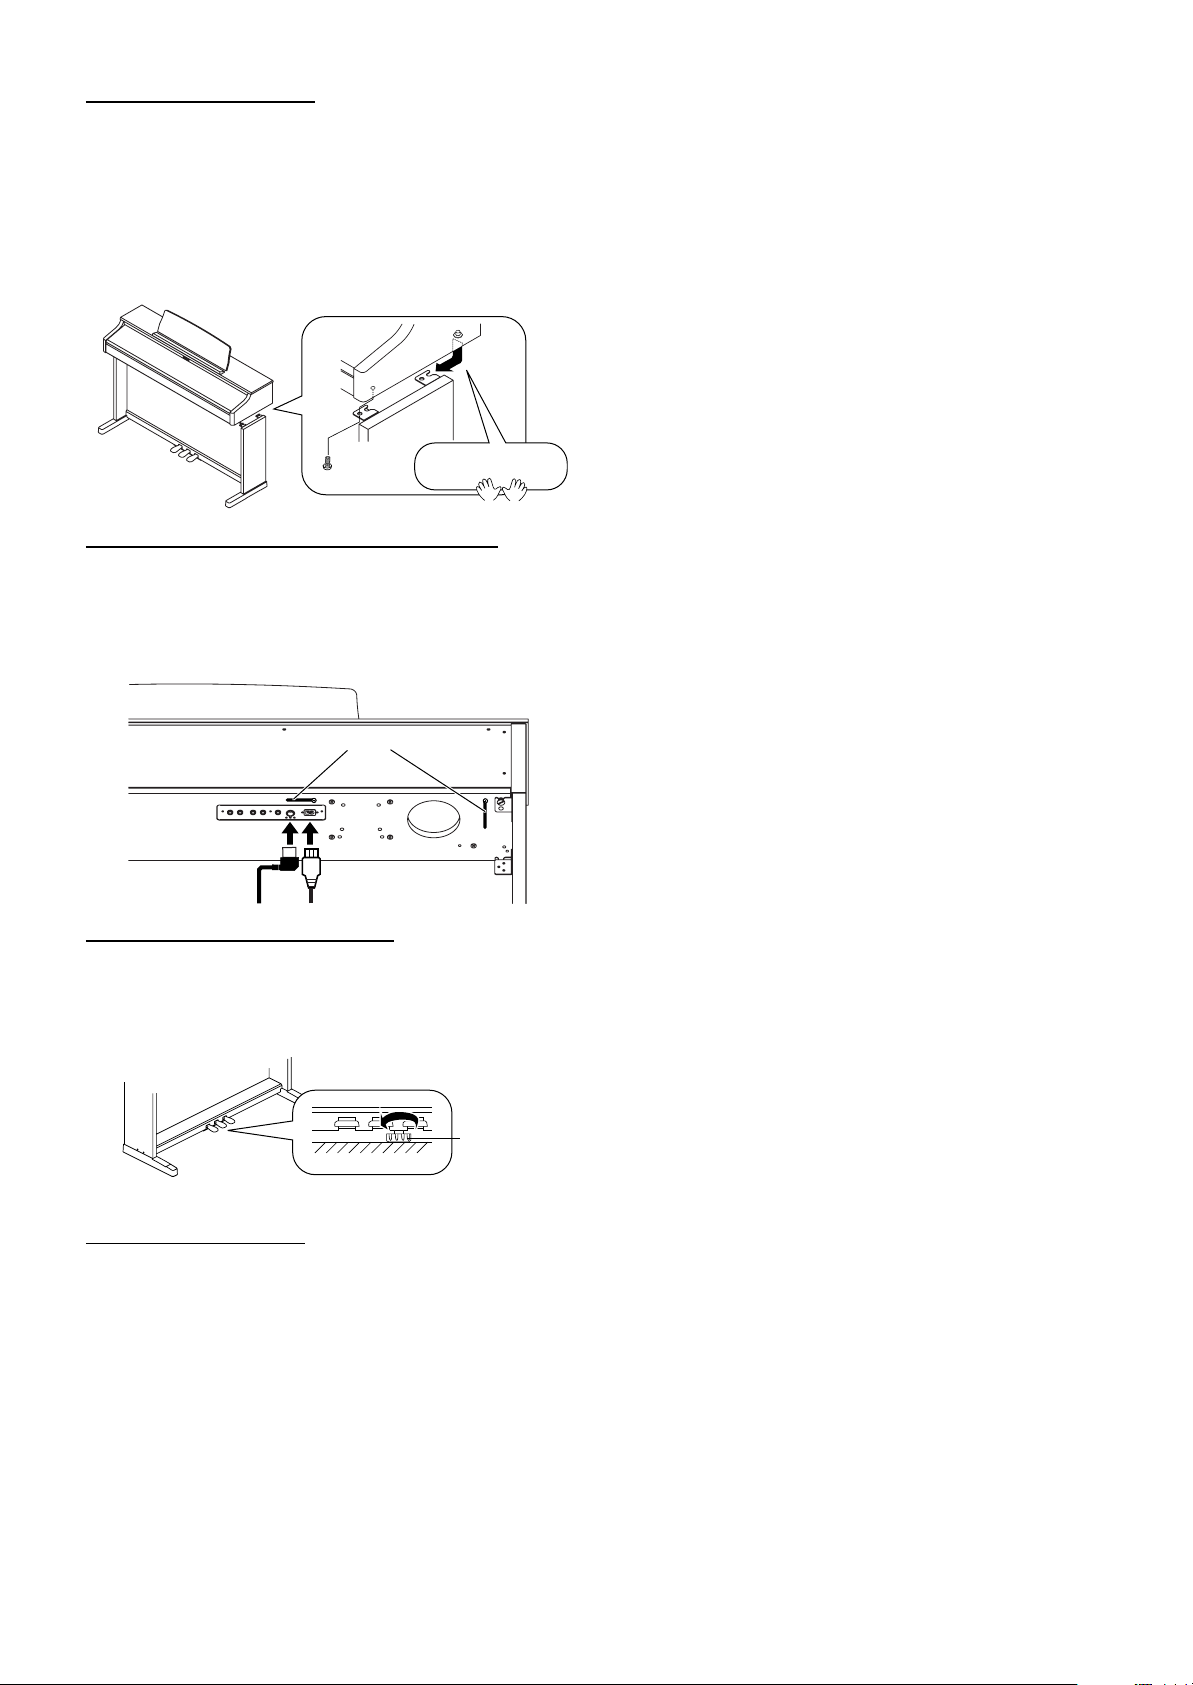
Connecting the Pedal and Power Cords
8.
Connect the pedal cord to the Pedal connector.
9.
Connect the power cord to the AC Inlet on the piano, then
plug the other end into AC Outlet.
10.
Secure the pedal cord and power cord in place with the
coated clip at the lower rear of the piano.
Coated clip
98
Adjusting the Adjuster
11.
Lower the adjuster at the bottom of the pedal board (by
rotating it), so that the adjuster touches the floor. If you
have the piano placed on a carpet, lower it until it pushes
into the carpet.
Adjuster
11
When Moving the Piano
Disconnect the power cord , cables, and raise the stand’s
adjuster. Then lift the piano while keeping it level, and
move it with care, so that you do not drop it on your feet,
or get your hands caught.
2

KSC-40/42
ZUSAMMENBAU DES STÄNDERS
- Bitten Sie jemanden, Ihnen beim Zusammenbau und der Aufstellung zu helfen.
- Seien Sie beim Zusammenbau vorsichtig, um sich weder an den Händen, noch an den Füßen zu verletzen.
- Für den Transport müssen Sie das Piano leicht anheben und waagerecht halten.
- Bewahren Sie Schrauben, Kappen und andere kleine Teile außerhalb der Reichweite von Kindern auf,
um zu verhindern, dass sie verschluckt werden.
- Verwenden Sie niemals einen elektrischen Schraubenzieher für den Zusammenbau des Ständers, weil
Sie damit die Schrauben beschädigen könnten.
■
Lieferumfang
Überprüfen Sie vor dem Zusammenbau, ob Sie folgende Dinge
bekommen haben. Zusätzlich benötigen Sie einen Kreuzschlitzschraubenzieher.
KSC-42
2.
Lösen Sie die Schrauben der linken und rechten
Seitenplatte ca. drei Drehungen, damit sie ±3mm
hervorstehen (siehe die Abbildung).
2
A: Linke Seitenplatte 1: Schraube “a” (M5 x 40mm) x4
B: Rechte Seitenplatte 2: Schraube “b” (M5 x 20mm) x6
C: Pedaleinheit
D: Rückwand
■
Zusammenbau
* Ziehen Sie alle Schrauben fest an und stellen Sie die Ständereinheit auf einen
waagerechten Untergrund. Auch die Befestigung des Instruments muss auf einer
ebenen Oberfläche erfolgen.
* Vermeiden Sie beim Zusammenbau das Abklemmen oder Quetschen des Pedal-
und Netzkabels.
* Stellen Sie das Instrument niemals auf einen besonders dicken Teppich. Sonst
fängt der Ständer nämlich an zu wackeln, was zu Schäden am Gestell und
eventuell am Instrument führt.
* Am besten legen Sie die Einzelteile auf ein Laken o.ä., um Kratzer beim
Zusammenbau zu vermeiden.
* Drehen Sie die Schrauben erst zwei oder drei Umdrehungen mit der Hand fest
und verwenden Sie erst danach einen Schraubenzieher.
3.
4.
5.
Zusammenbau des Ständers
Bauen Sie die gesamte Ständereinheit zuerst provisorisch zusammen. Drehen Sie
die Schrauben aber noch nicht vollständig fest. Kontrollieren Sie schließlich die
Ausrichtung der Platten (verschieben Sie sie bei Bedarf, bis der Ständer wirklich
rechtwinklig ist) und drehen Sie die Schrauben danach fest.
1.
Befestigen Sie die beiden Seitenplatten mit den Schrauben
“a” (M5 x 40mm) an der Pedaleinheit (die Metallteile
müssen nach innen weisen).
Schraube “a” (2 Stück)
Schraube “b” (4 Stück)
Hängen Sie die Metallhalterungen der Rückwand über die
soeben gelösten Schrauben (“c”, siehe die Abbildung).
Befestigen Sie die Pedaleinheit mit vier Schrauben “b” (M5
x 20mm) provisorisch an der Pedaleinheit.
Drehen Sie die beiden Schrauben der Seitenplatten und die
vier Schrauben der Pedaleinheit ordnungsgemäß fest.
Beim Anbringen der Rückwand müssen Sie darauf achten, dass sie
parallel zur Pedaleinheit verläuft, bevor Sie die Schrauben festdrehen.
Rückansicht
3
5
Schrauben, die Sie in
2
gelöst haben (2
Schritt
4, 5
Schrauben)
1
Schraube “a” (2 Stück)
* Überprüfen Sie nach dem Befestigen der Pedaleinheit an der Seitenplatte, dass
kein Spalt sichtbar ist.
Richtig
Seitenplatte
Falsch
Seitenplatte
Spalt
Pedal-
Pedaleinheit
Alle Rechte vorbehalten. Diese Bedienungsanleitung darf ohne die schriftliche Genehmigung der ROLAND CORPORATION weder
3
Copyright © 2007 ROLAND CORPORATION
auszugsweise, noch vollständig kopiert werden.
einheit
Anbringen des Pianos
6.
Halten Sie die an der Piano-Unterseite hervorstehenden
Schrauben (eine an jeder Seite) vor die Aussparungen der
Halterungen an den Seitenplatten. Schieben Sie das Piano
anschließend so weit in die Halterungen, bis die
Schrauben blockiert werden.
* Halten Sie das Piano an der Vorder- und Rückseite fest. Seien Sie vorsichtig,
damit Sie sich nicht die Finger klemmen.
7.
Befestigen Sie das Piano mit den Schrauben “b” (M5 x
20mm) an der Ständereinheit.
6
7
Klemmen Sie sich nicht
Schrauben “b”
die Finger!
Anschließen des Pedal- und Netzkabels
8.
Verbinden Sie das Pedalkabel mit der PEDAL-Buchse.
9.
Verbinden Sie das Netzkabel zuerst mit dem Anschluss am
Piano und danach mit einer Steckdose.
10.
Arretieren Sie das Kabel mit der Klemme an der Unterseite
(hinten) des Pianos.
Kabelklemme
98
Justieren der Einstellschraube
11.
Drehen Sie die Einstellschraube an der Unterseite der
Pedaleinheit so weit heraus, bis sie den Fußboden berührt.
Wenn Sie das Instrument auf einen Teppich gestellt haben,
muss die Schraube so weit herausgedreht werden, bis sie
gegen den Fußboden drückt.
Einstell-
11
schraube
Transport des Pianos
Lösen Sie den Netzanschluss sowie alle anderen Kabel
und drehen Sie die Einstellschraube wieder hinein.
Heben Sie das Piano (horizontal) hoch und halten Sie es
so, dass es Ihnen nicht auf die Füße fallen kann.
40677423 8AST
4

KSC-40/42
ASSEMBLAGE DU PIED
- Faites-vous aider par une autre personne pour l’assemblage et le montage.
- Soyez très prudent lors du montage et du déplacement du piano. Veillez à ne pas le laisser tomber sur
vos mains ou sur vos pieds.
- Pour déplacer le piano, soulevez-le prudemment et maintenez-le horizontal.
- Veillez à conserver les vis, les capuchons et autres petites pièces hors de portée des enfants pour éviter
qu’ils ne les avalent accidentellement.
- N’utilisez pas d’outil puissant (un tournevis électrique, p.ex.) pour assembler le stand. Vous risquez
d’endommager les vis ou de les rendre inutilisables.
■
Vérification des éléments
Avant d’entamer le montage du pied, vérifiez qu’aucun élément
ne manque. Il vous faut aussi un tournevis en croix.
KSC-42
A: Panneau latéral gauche 1: Vis “a” (M5 x 40mm) x4
B: Panneau latéral droit 2: Vis “b” (M5 x 20mm) x6
C: Pédalier
D: Panneau arrière
■
Procédure d’assemblage
* Serrez convenablement chaque vis puis placez le pied à un endroit stable et
horizontal. Effectuez également le montage de l’instrument sur une surface plane.
* Veillez à ne pas tordre ou coincer le cordon d’alimentation ou le câble du pédalier
durant le montage du pied.
* N’installez pas l’instrument sur de la moquette ou un tapis épais. Cela peut
rendre le pied instable, empêcher le bon fonctionnement des pédales et, à terme,
endommager l’instrument.
* Placez une couverture ou autre tissu doux sur le sol et assemblez le pied sur cette
surface.
* Pour serrer les vis, faites deux ou trois tours à la main avant d’utiliser un
tournevis.
Assemblage du pied
Commencez par assembler tout le pied de façon provisoire, sans
vraiment serrer les vis. Ensuite, après un contrôle de l’alignement général
des panneaux (et après avoir ajusté doucement certains éléments si
nécessaire), serrez convenablement chaque vis.
1.
Fixez les panneaux latéraux droit et gauche au pédalier (en
dirigeant les parties métalliques vers l’intérieur) au moyen
des vis “a” (M5 x 40mm).
2.
Desserrez les vis attachées aux panneaux latéraux gauche
et droit de plus ou moins trois tours pour qu’elles
dépassent de 3mm (voyez l’illustration).
2
3.
Faites glisser les parties métalliques du panneau arrière
sur les vis qui dépassent (“c”, voyez l’illustration).
4.
Utilisez quatre vis “b” (M5 x 20mm) pour fixer
provisoirement le pédalier.
5.
Serrez les deux vis des panneaux latéraux et les quatre vis
du pédalier.
Avant de serrer les vis lors du montage du panneau arrière, ajustez-le
bien au niveau de toutes les vis pour qu’il soit parallèle au pédalier.
Vue arrière
3
5
Vis desserrées à
4, 5
Vis “b” (4 pièces)
l’étape 2 (2 vis)
Vis “a” (2 pièces)
1
Vis “a” (2 pièces)
* Lors de la fixation du pédalier, veillez à ne pas laisser d’espace entre les panneaux
latéraux et le pédalier.
Correct
Panneau latéral
Incorrect
Panneau latéral
Espace
Pédalier
Pédalier
Copyright © 2007 ROLAND CORPORATION
Tous droits réservés. Toute reproduction intégrale ou partielle de ce document est interdite sous quelque forme que ce soit sans
l’autorisation écrite de ROLAND CORPORATION.
5
 Loading...