

Page 1
Page 2

Page 3

Cable
PCS-31L
Pad Stand
PDS-10
Audio Cable
Monitor Amplifier
PM-10
Kick Trigger Unit
KD-7
Bass Drum Pedal
Foot Switch
FS-5U
Page 4

Contents
Features ......................................................3
Demo Songs ...............................................3
Panel Descriptions .......................................4
Top Panel...................................................4
Display ......................................................5
Rear Panel..................................................6
Getting Familiar...........................................7
Basic Operations ........................................7
Preset Kit Buttons .....................................7
Instrument View Mode ..............................7
Positional Sensing ....................................7
D BEAM .................................................8
Ambience ...............................................8
Effects ....................................................8
Control Knob ..........................................8
Basic Editing...............................................9
Assigning a Sound to a Pad............................9
PRESSURE...................................................11
EFFECTS (Basic)...........................................12
Naming a Kit ..............................................12
D BEAM...................................................13
METRONOME (STYLE GUIDE) ....................14
Tempo........................................................14
Volume.......................................................14
Tempo Change ...........................................15
METRONOME (NORMAL) .........................15
Tempo........................................................15
Beat (Time Signature) ...................................15
Rhythm .......................................................15
Metronome Sound .......................................16
Volume.......................................................16
COACH MODE ........................................17
Quiet Count ................................................17
Rhythm Check .............................................18
Time Check.................................................18
Pad Follow..................................................19
Auto Up/Down ...........................................20
Tap Tempo .................................................20
Advanced Edit ........................................... 21
ROLL........................................................21
EFFECTS ..................................................21
KIT Parameters..........................................22
KIT Volume .................................................22
MIDI ..........................................................22
TOOLS.....................................................23
KIT COPY ...................................................23
Restoring an Individual Kit to the
Factory Settings..................................... 23
KIT EXCHANGE ..........................................23
KIT CLEAR ..................................................23
PAD COPY .................................................23
PAD EXCHANGE ........................................23
PAD CLEAR.................................................23
L-R EXCHANGE.......................................... 23
UNDO ....................................................23
Setup.......................................................24
METRONOME ........................................... 24
AMBIENCE................................................ 24
SYSTEM .................................................... 24
D BEAM .................................................... 25
Pad Settings (PAD)...................................... 25
External Trigger Settings (EXT TRIG) .............. 26
Foot Switch Functions............................ 26
MIDI ......................................................... 27
BULK DUMP............................................... 27
FACTORY RESET ........................................ 27
Short Cuts ................................................ 28
Favorite Kit Jump Function............................ 28
Appendices
Error Messages/Troubleshooting ................29
Effects List..................................................30
Instrument List............................................34
Kit List .......................................................36
Style Guide Metronome Pattern List ............37
Glossary....................................................38
Interface Profile .........................................40
MIDI Implementation Chart.........................42
Specifications.............................................43
Attaching the HandSonic 10 to the Stand
(optional)...................................................44
Index ........................................................45
MEMO.......................................................47
USING THE UNIT SAFELY............................48
IMPORTANT NOTES ...................................50
201a
Before using the HandSonic 10, please read the
sections, “USING THE UNIT SAFELY” (p. 48) and
“IMPORTANT NOTES” (p. 50). They provide
important information concerning proper
operations of the HandSonic 10. This Owner’s
manual should be read in its entirety in order for
you to understand all features and operations. Keep
the manual on hand for reference purposes.
202
Copyright © 2006 ROLAND CORPORATION
All rights reserved. No part of this publication may be
reproduced in any form without the written permission of
ROLAND CORPORATION.
2
Page 5
Features
410 Sounds
Sound selection is made easy thanks to sound category Groups
or Alphabetical listing.
Specially Selected Effects
Ambience (5 Types) and a choice from on-board Multi Effects
(20 types) can be used at the same time.
Friendly Interface
The large, custom LCD lets you easily view various functions
and information. The panel buttons and the friendly interface
make modifying a kit a very simple process. The Control knob
gives you instant editing access. The Preset Kit buttons give you
quick access to 5 specially selected kits and 5 of your favorite
kits.
Pads and Expandability
10 velocity sensitive and pressure reactive pads. 2 of these
pads also feature positional sensing. The D Beam can be used
for triggering and controlling sounds and effects. The stereo
input for external triggers lets you have a choice to use optional
kick triggers, a head/rim capable pad, cymbal pads or foot
switches (with multi-functions possible).
Play With External Audio Sources
The mix in allows one to connect external audio sources, ideal
for playing along with CDs or for connecting external sound
modules.
For Improving Techniques
In addition to normal metronome functions, the HandSonic 10
includes a unique Style Guide Metronome, featuring a wide
range of rhythmical categories; perfect for learning, practicing
and performing.
The Coach Mode's functions include Time Check, Rhythm
Check and Pad Follow. These exercises will challenge you and
help you to improve your technique.
Set Up & Portability
Lightweight and compact, the HandSonic 10 mounts easily on
the optional PDS-10 stand, (recommended) or on a cymbal
stand when using the APC-33.
This Manual
This manual should be read carefully as it will not only explain
WHAT is possible, but will guide you in a friendly way so you
can understand HOW to use the on-board sounds, functions
and the potential of the incorporated technology.
Demo Songs
To hear some of the HandSonic 10’s possibilities, we have incorporated 5 different demo songs.
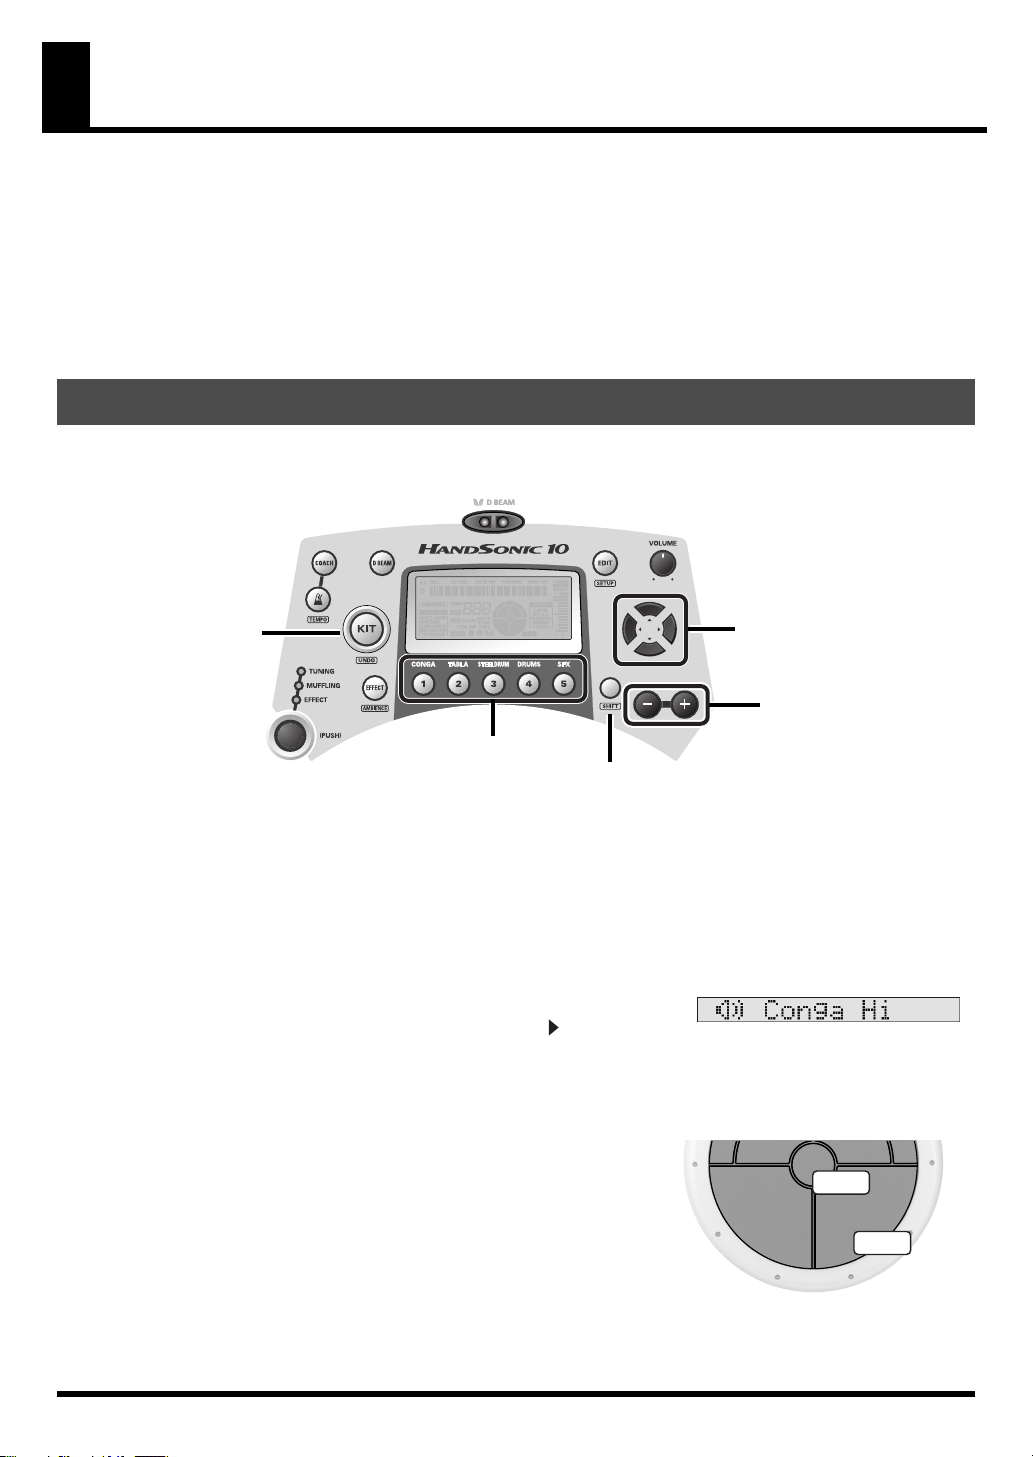
KIT Button
1.
Press the [CONGA] button (or any of the 5 Preset Kit buttons) and hold it down for 2 seconds.
The demo song will start to play.
If you press the [CONGA] button again, the demo song will re-start from the beginning.
If you press any of the other Preset Kit buttons, the demo songs assigned to those will play.
You can also use the [+]/[-] buttons to change songs.
2.
To stop the demo, press [KIT] button.
While the demo song is playing, all pads are disabled. Also, the kit being played in the demo song may not
be the same as indicated by the button name.
982
* No data for the music that is played will be output from MIDI OUT.
Value Buttons
Preset KIT Buttons
3
Page 6
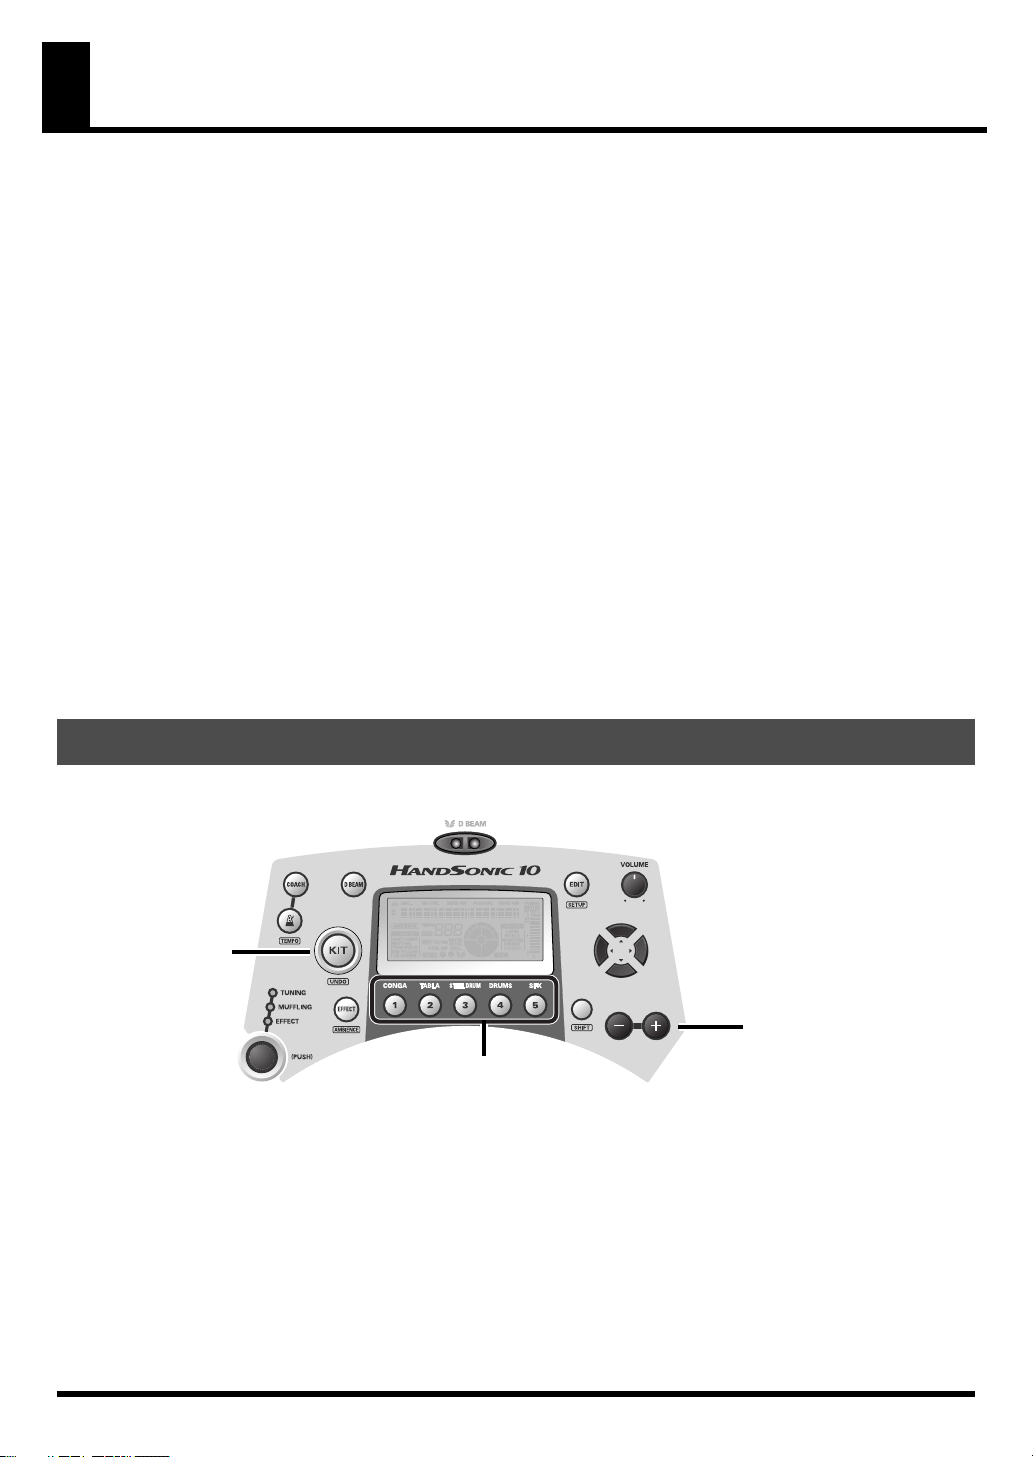
Panel Descriptions
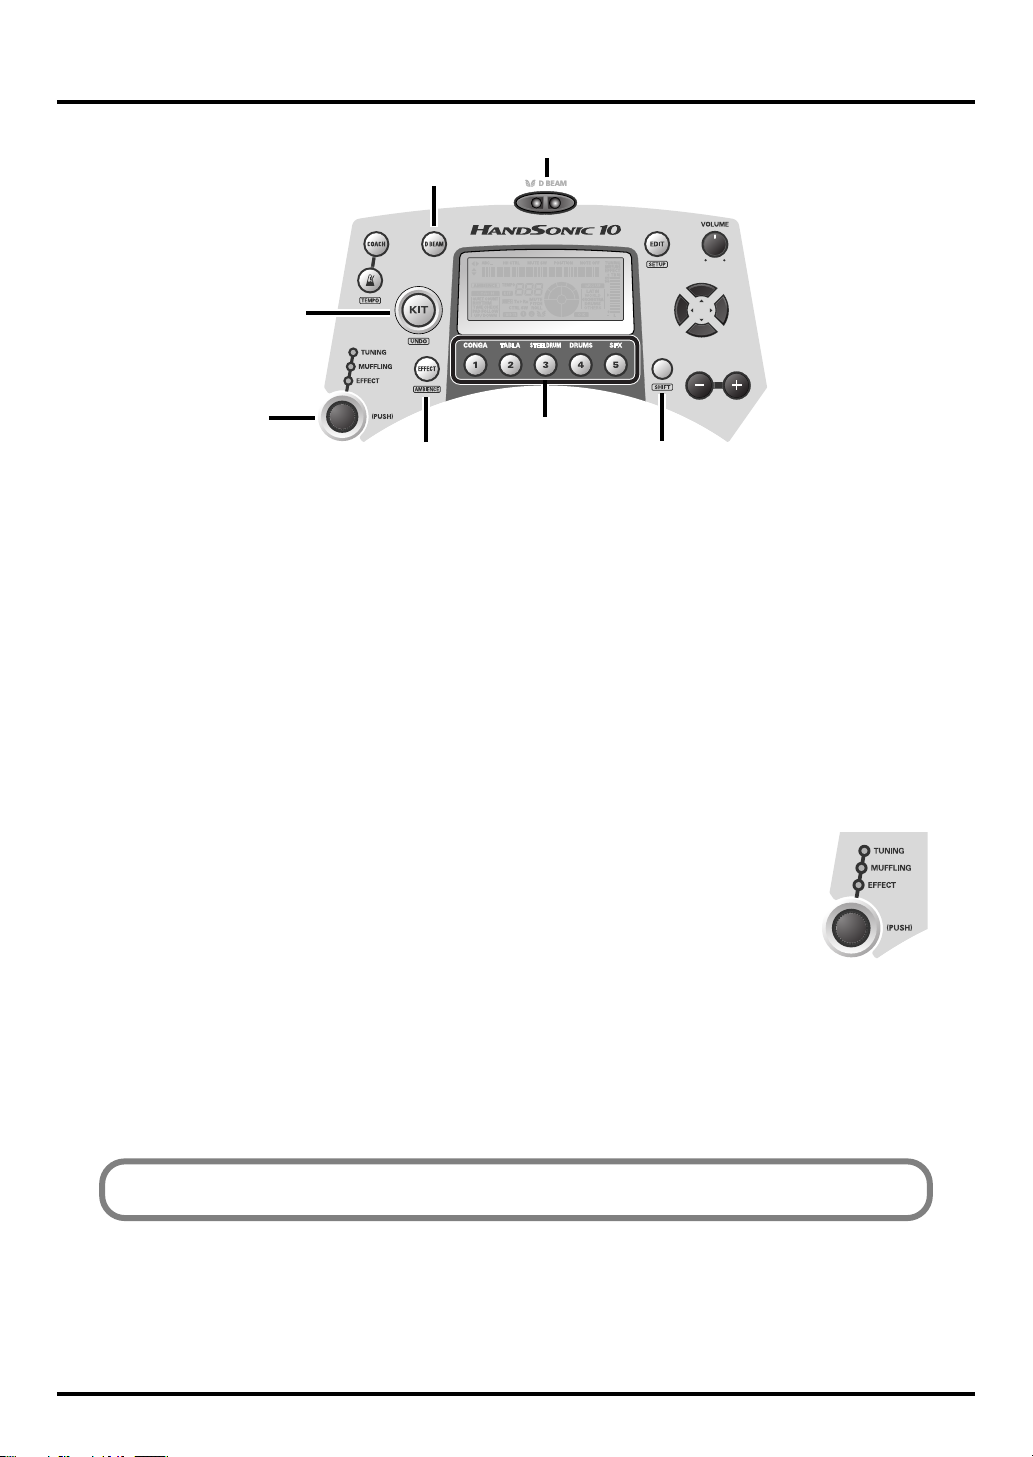
Top Panel
fig.0-01.e
KIT Button
Main play page return function
[SHIFT] + this button for UNDO function
See p. 23
COACH Button
Coach Mode access
LED is lit when in use.
See p. 17
(METRONOME)
Button
Start & Stop function
Blinks in tempo
[SHIFT] + this button
for TEMPO setting
See p. 14
Control Knob
Multi-function, push & turn
easy editing knob
See p. 8
D BEAM Button
On/Off LED is lit when ON.
See p. 8, 13
EDIT Button
Access to all EDIT parameters
[SHIFT] + this button for SETUP parameters
See p. 9–13
D BEAM Controller
VOLUME Knob
Master Volume control
CURSORS
For moving through
edit pages
EFFECT Button
On/Off
LED is lit when ON.
[SHIFT] + this button for AMBIENCE ON/OFF
See p. 8, 12
PRESET KIT Buttons [1]–[5]
Preset kit instant access
Demo Song access (hold down for 2 seconds)
User programable functions
See p. 3, 7, 28
+/- Value Button
For changing kits, or for
modifying parameters
SHIFT Button
In combination with other buttons,
provides short cut access to many
functions
Pad
Strike to produce a sound or
press to control the tone
4
Page 7
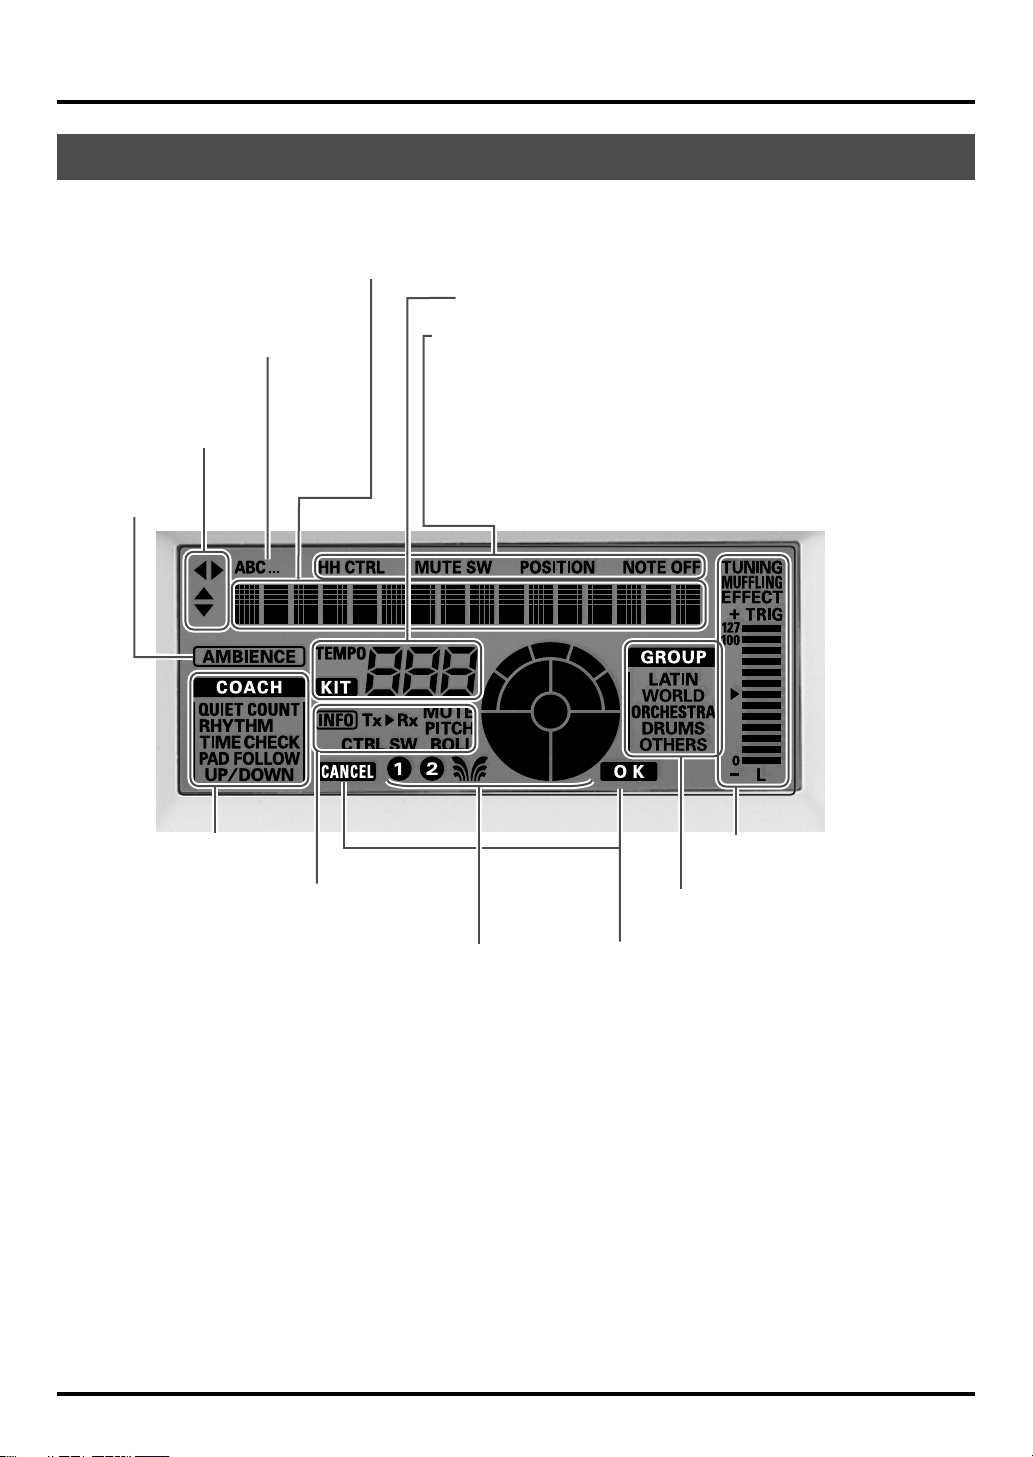
Display
Appears during instrument
selection when instrument
sorting is set to alphabetical order.
Page direction indicators
during edit modes
Appears when
AMBIENCE is on.
Panel Descriptions
Kit names, instrument names, parameter names and
messages appear here.
Kit numbers and Tempo appears here when in COACH Mode
These individual indications appear during EDIT mode showing the
respective status:
HH CTRL appears, indicating Hi Hat sounds that work
with the Hi Hat control function of an optional foot switch
MUTE or MUTE SW appears, indicating sounds that react
with the Rx MUTE pressure control
POSITION appears, indicating sounds that react to positional
sensing (Pad M1, M5 only)
NOTE OFF appears, indicating sounds that react to Gate Time settings
In COACH mode, the current
function appears in this menu.
Various information status indicators
relative to the pad currently being edited
Pad/D BEAM/External trigger status
indicators during EDIT mode
Velocity level, and various parameter
status indications appear here.
Current Instrument Group
name is highlighted here.
These appear for confirming execution of
functions like Copy, Exchange etc.
5
Page 8

Panel Descriptions
Rear Panel
fig.0-02.e
EXT TRIG / FOOT SW Jack
For connecting external pads, kick triggers
or foot switches (FS-5U/DP-2)
MIDI Connectors (IN, OUT)
OUT: For playing external modules
from the HandSonic 10
For saving data
IN: For using the HandSonic 10 as
a sound module
For loading data
MIX IN Jack (STEREO)
For connecting external audio sources. Sound input here
goes to the output jacks and headphone jack.
OUTPUT Jacks
For connecting to amplifiers, recording equipment.
When using in MONO, use only the L (MONO) jack.
AC Adaptor Jack
For connecting the included
AC adaptor
POWER Switch
Turns power on or off.
Cord hook
AC adaptor
Cable
PCS-31L
PHONES Jack
Connect stereo headphones.
Even if headphones are connected,
sound will still be output from the
OUTPUT jacks.
Headphones
L
Audio cable
R
Audio cable
Monitor Amplifier, etc.
Dual-Trigger
Cymbal Pad
CY-8
921
* To prevent malfunction and/or damage to speakers or other devices, always turn down the volume, and turn off the
Dual-Trigger Pad
PD-8
Kick trigger unit, External pad, etc.
Foot Switch
FS-5U
Kick Trigger Unit
KD-7
Portable music player, etc.
power on all devices before making any connections.
924
* Anchor the power cord, using the cord hook (see diagram). This prevents the plug from being pulled out accidently, and
reduces stress to the jack itself.
926a
* When connection cables with resistors are used, the volume of equipment connected to the inputs (MIX IN) may be low.
If this happens, use connection cables that do not contain resistors.
6
Page 9
Getting Familiar
Turning the Power On/Off
941, 942
Basic Operations
Make sure the volume controls on the HandSonic 10, and any connected devices are set to “0.” Then turn
on the device connected to the MIX IN Jack. Turn on the HandSonic 10’s power switch. As there is a built-in
protection circuit, it will take a few seconds before you see the kit name appear in the display. Until that
time, Do NOT touch any pad, or use the D BEAM. Turn on the device connected to the output jacks. Then
adjust the respective volume settings.
When turning the HandSonic off, turn down all respective volumes before turning off the power.
Preset Kit Buttons
KIT Button
Preset KIT Buttons
SHIFT Button
The 5 Preset kit Buttons, [1]–[5], will take you to the indicated kits. These 5 kits can NOT be modified, as
they are separate from the 64 user kits. Using the [+]/[-] buttons will let you scroll only through those 5 kits.
To return to the user kits, press [KIT]. However, when used in combination with the [SHIFT] button, they can
be used to quickly jump to your own pre-determined selection. How to make settings for this function will be
explained further on. We’ll use a few of these kits to help you get to know the HandSonic.
CURSOR
+/- Buttons
Instrument View Mode
There is a way to call up the name of the sounds being played without
using the EDIT function. While in Kit mode, press the [ ] cursor once.
Then when you play any pad you can see the instrument name in the
display.
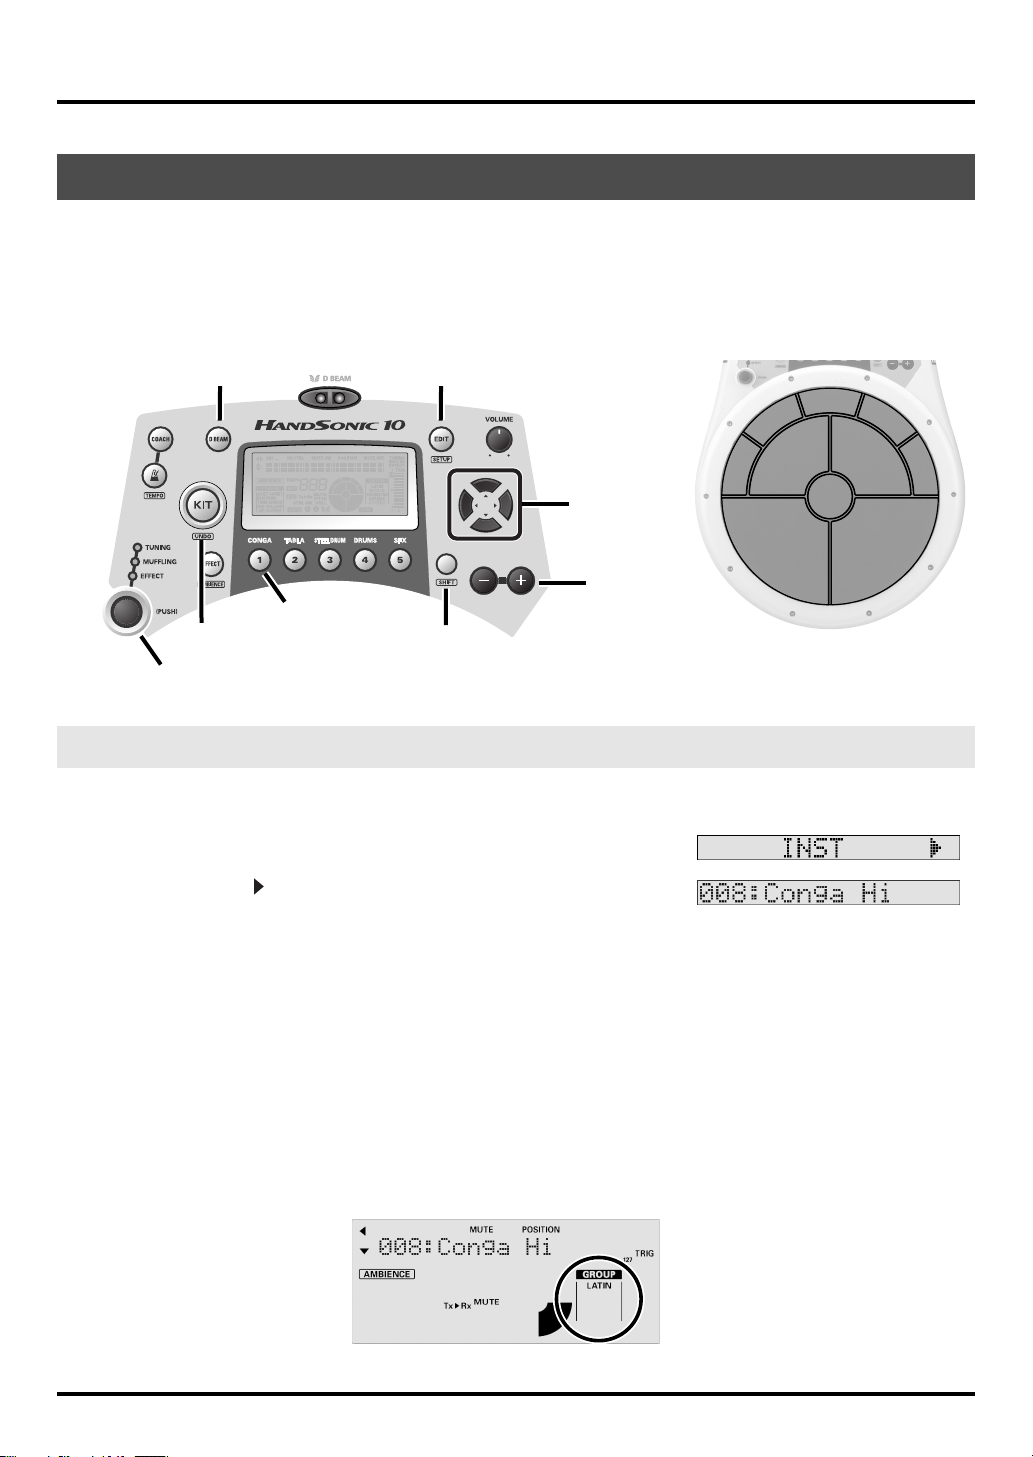
Positional Sensing
Press the [CONGA] kit button (#1).
near the center, and as you move towards the edge, play a bit
harder, and you will hear what the positional sensing function does.
Slap the edge. This works on specific sounds only. (More about that
is explained later.)
Play the 2 larger pads starting
M1 M5
center
edge
7
Page 10
Getting Familiar
D BEAM Controller
D BEAM Button
KIT Buton
Control Knob
EFFECT Button
Preset KIT Buttons
SHIFT Button
D BEAM
Now pass your hand over the D Beam. Here you are simply triggering a sound with it.
Make sure the [D BEAM] button is lit.
Ambience
Next, while holding down the [SHIFT] button, press the [EFFECT] button. This is how you turn the Ambience
on or off, and you will see the indication in the display.
Effects
Press the [SFX] kit button (#5).
Play the pads and D Beam. Press the [EFFECT] button to hear the difference.
Control Knob
TUNING: Press the [STEEL DRUM] kit button (#3).
next to TUNING will light. Tap any pad, and turn the control knob. This is
a quick way to tune the sounds.
MUFFLING:
EFFECT:
Press the Control Knob and the LED next to MUFFLING will light. Tap any
pad and turn the Control knob.
Press the Control knob and the LED next to EFFECT will light. Tap any pad
and turn the Control knob. In this case, you are changing a parameter in
the Effects assigned to this kit.
* If you make any of the above adjustments while in a User Kit (1–64), those changes will be written. You
can undo them however. (see page 23)
Now, push the Control Knob, LED
8
Press the [KIT] button and try out some of the 64 user kits.
Page 11
Basic Editing
In order to understand the possibilities of the various editing functions, there are a few basic points you must
take into consideration. These will help save you time, and avoid frustration whether this is your first
electronic musical instrument or not. Any changes you make are automatically registered as there is no
“write” function. Taking that into consideration, we recommend that you explore the editing process first by
using one of the 5 preset kits shown here. The reason we suggest this is because these kits are pre-set. You
can edit them temporarily, but once you change the kit, they automatically return to their factory settings.
Getting Familiar
D BEAM Button
CONGA Button
KIT Button
Control Knob
EDIT Button
SHIFT Button
Assigning a Sound to a Pad
1.
Push the [CONGA] button.
2.
Press [EDIT], and you will see <INST> in the display.
3.
Press the [ ] cursor and here you will see the sound assigned to
any pad you touch (or D Beam, optional external pad/foot
switch).
The D Beam button must be lit in order for it to function.
* Remember that during the EDIT mode, the [EDIT] button will blink. Also, the pad you are editing will be
highlighted in the display.
CURSOR
+/- Buttons
S3
S1
S2
M2
M3
M1
M4
M5
S4
S5
Pad references used in this manual
4.
Let’s work with just one pad for the moment. Tap pad M5.
To change the sound you have a few choices:
• You can use the [+]/[-] buttons, or the Control knob.
• Or press [SHIFT], and while holding it down, press the [+]/[-] buttons. You can jump between instrument
groups, as shown in the display. Try this once to see what happens, and watch the display to see the
instrument group names change.
9
Page 12
Getting Familiar
Tuning
1.
Press [KIT]
<INST>. Press the [ ] cursor and you will see the instrument
name.
*1: This is only to reset this kit to the factory settings and ONLY for this basic functions explanation.
2.
Now press the [ ] once, you will see <Tuning> in the display.
Now you can use the [+]/[-] buttons or the Control knob to change the pitch.
Muffling
3.
Push the [ ] again, and you will see <Muffling> in the display.
While tapping one of the pads, use the [+]/[-] buttons or the Control knob, and you will not only hear what
is happening to the sound, but the Value meter on the right hand side of the display will indicate how much
muffling is being applied, as well as the numerical values in the display.
If you want to apply the same amount of muffling to all sounds in the kit, while holding down the [SHIFT]
button press the CONTROL knob.
The display shows <same for all>.
This function will work with all of the pad specific parameters.
Volume
, then press [CONGA], then [EDIT] and you see
(*1)
4.
Press the [ ] again and you will see:
This sets the level of the sound for each pad.
Pan
5.
Press the [ ] again, and here you can adjust the position in the
stereo field of the sound for each pad.
Exiting the Edit Mode
6.
Press [EDIT], extinguishing its indicator.
10
Page 13
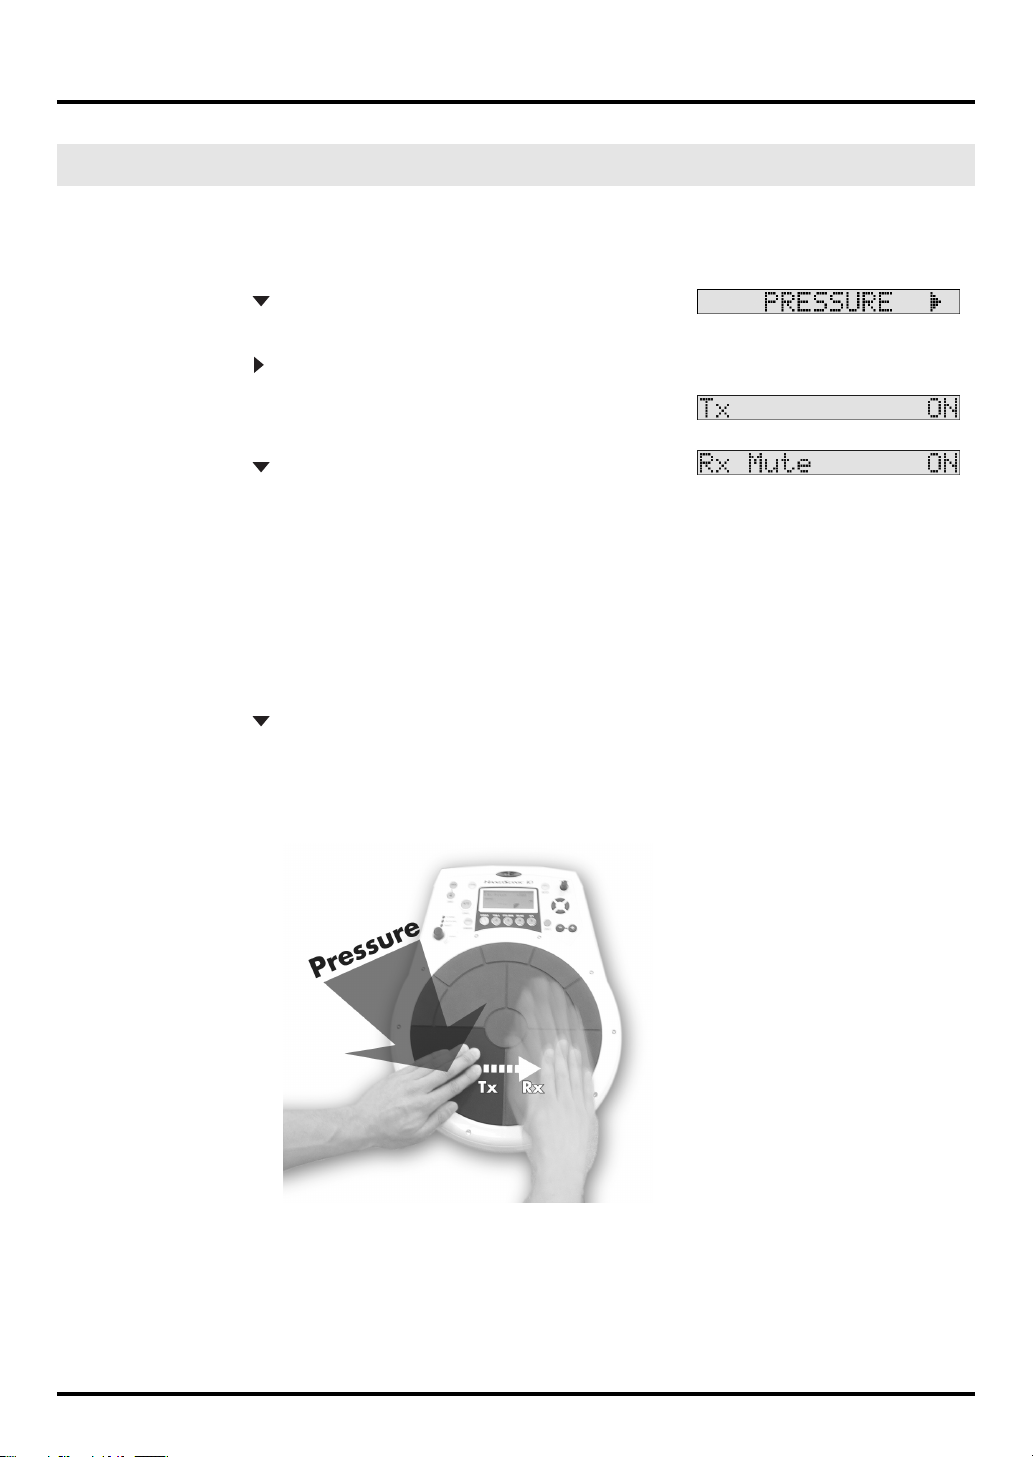
PRESSURE
1.
Press [KIT], then press [CONGA], then [EDIT], so you see <INST> in
the display again.
2.
Press the [ ] cursor once and you will see <PRESSURE> in the
display.
3.
Press the [ ], and you will see <Tx> (this means “transmit pressure control”).
4.
Play the large left pad and you will see <ON> in the display.
5.
Press the [ ] once again, and you will see <Rx Mute> (receive
mute control) in the display.
6.
Play the right pad once. Now, place your left hand on the left pad, while playing the right pad. If
you don’t hear a difference in the sound of the right pad, press a little harder on the left pad.
You will hear how the pressure placed on one pad can mute the sound of another, very useful when playing
congas or bongos etc. This is an example of the “mute” function, and demonstrates pad interactivity and
control. The [+]/[-] buttons or Control knob can be used for on/off switching.
7.
Now play the right pad once, and use the [+]/[-] button or Control knob to turn “Rx Mute” to
“OFF.”
Getting Familiar
8.
Press the [ ] again and you will see <Rx Pitch> (receive pitch control) in the display.
Hit the right pad once, and use the [+]/[-] buttons or the Control knob change the pitch-change amount. Set
this as you wish. Then while playing the right pad, place your left hand on the left pad, and apply pressure.
Now you can hear how one pad can control the pitch of another with pressure.
fig.0-03.e
11
Page 14
Getting Familiar
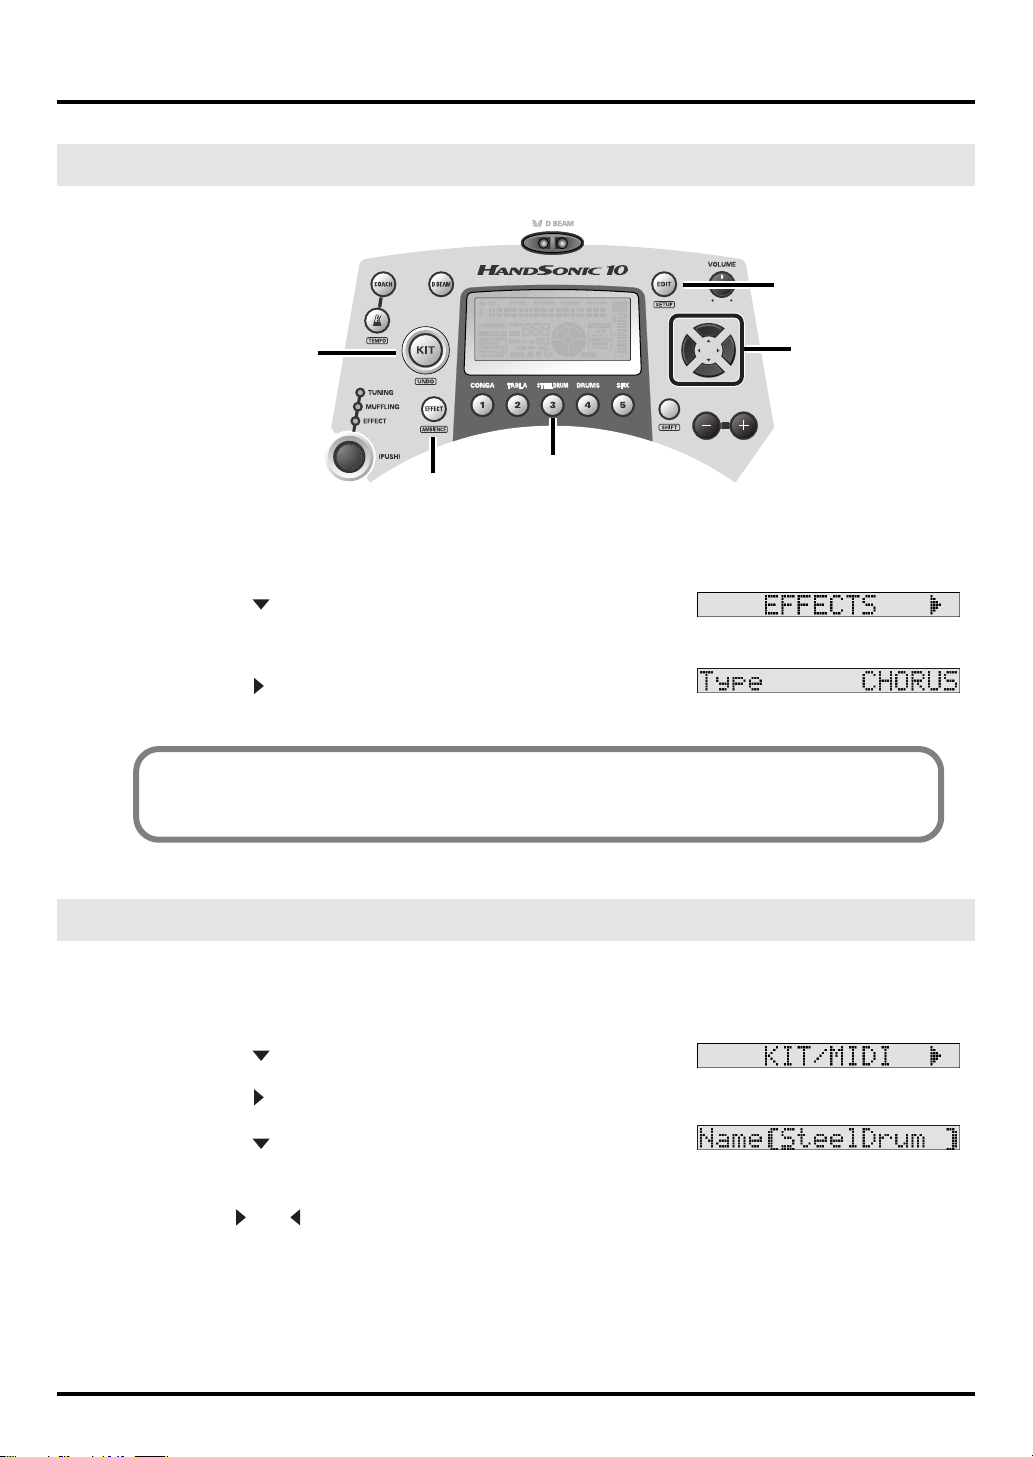
EFFECTS (Basic)
EDIT Button
KIT Button
1.
Press [KIT], then press [STEEL DRUM], then [EDIT], so you see
<INST> in the display again.
2.
Press the [ ] cursor until you see <EFFECTS> in the display.
Verify that the [EFFECT] button is also lit.
3.
Press the [ ] and you will see <Type> in the display.
Here is where you can change the effect being used. More about effects will be explained on page 21 and 30.
Short Cut Access to Effects Editing
While holding down the [EDIT] button, press [EFFECT].
Naming a Kit
CURSOR
STEEL DRUM Button
EFFECT Button
12
1.
Press [KIT], then press [STEEL DRUM], then [EDIT] so you see
<INST> in the display again.
2.
Press the [ ] cursor until you see <KIT/MIDI> in the display.
3.
Press the [ ], and you will see <Kit Volume>.
4.
Press the [ ] again and you will see:
5.
Use the [+]/[-] buttons or Control knob to change the name as you desire.
Use the [ ] or [ ] to move between the letters.
Page 15
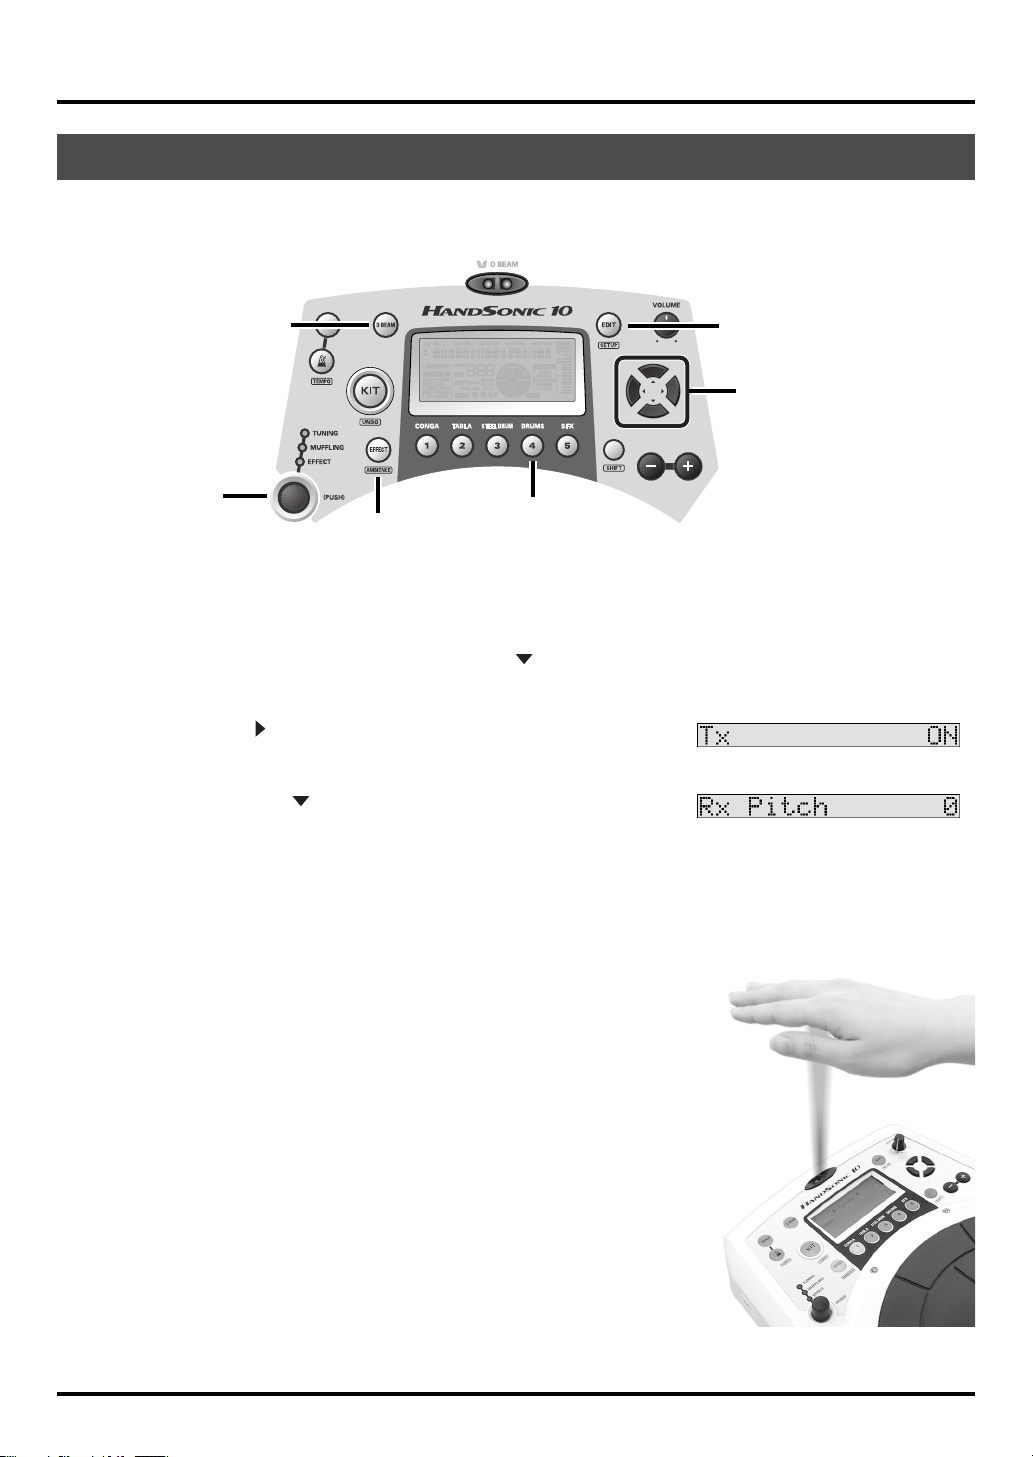
D BEAM
The D Beam functions not only for triggering sounds, but for controlling them as well.
During this explanation, make sure the [EFFECT] button is NOT lit. (OFF)
Getting Familiar
D BEAM Button
Control Knob
1.
As an example, push the [DRUMS] button.
2.
Make sure the [D BEAM] button is lit, and pass your hand over the D Beam.
In this case the D Beam is just triggering the sound assigned there.
3.
Next, push the [EDIT] button, and press the [ ] cursor once.
You see <PRESSURE> in the screen.
4.
Push the [ ], and in the display you see <Tx> (transmit) and
DRUMS Button
EDIT Button
CURSOR
<OFF>. Use the [+] button to turn it “ON.”
5.
Now push the [ ] twice and you will see <Rx Pitch> in the
display.
Here you can adjust the pitch bending range you will control with the D Beam.
Use the [+]/[-] buttons or the Control knob, and set it to -1200.
When using the [+]/[-] buttons for data entry, by holding down [SHIFT] and then pressing either of the
buttons, the increments/decrements move much quicker.
Or just turn the Control knob quickly to the left, to get to the -1200 position.
6.
Now pass your hand over the D Beam quickly and at close
range, and you will hear the sound bend.
7.
Then move your hand over the D Beam, and once the sound is
heard, move your hand up and down, to hear how you are
controlling the sound.
8.
Try this:
While you can still see <Rx Pitch> -1200 in the display, tap once the
large pad on the left and set this also to -1200. Now, while tapping the
pad with your left hand, place your right hand above the D Beam, and
then slowly lower your hand. Here you can see how the D Beam can
control the pitch of sounds assigned to other pads.
* Remember, the D Beam is sensitive to the light in the space where
you are playing it. See p. 25 for adjustments to the D Beam.
*Actual infrared beam is invisible.
13
Page 16
Getting Familiar
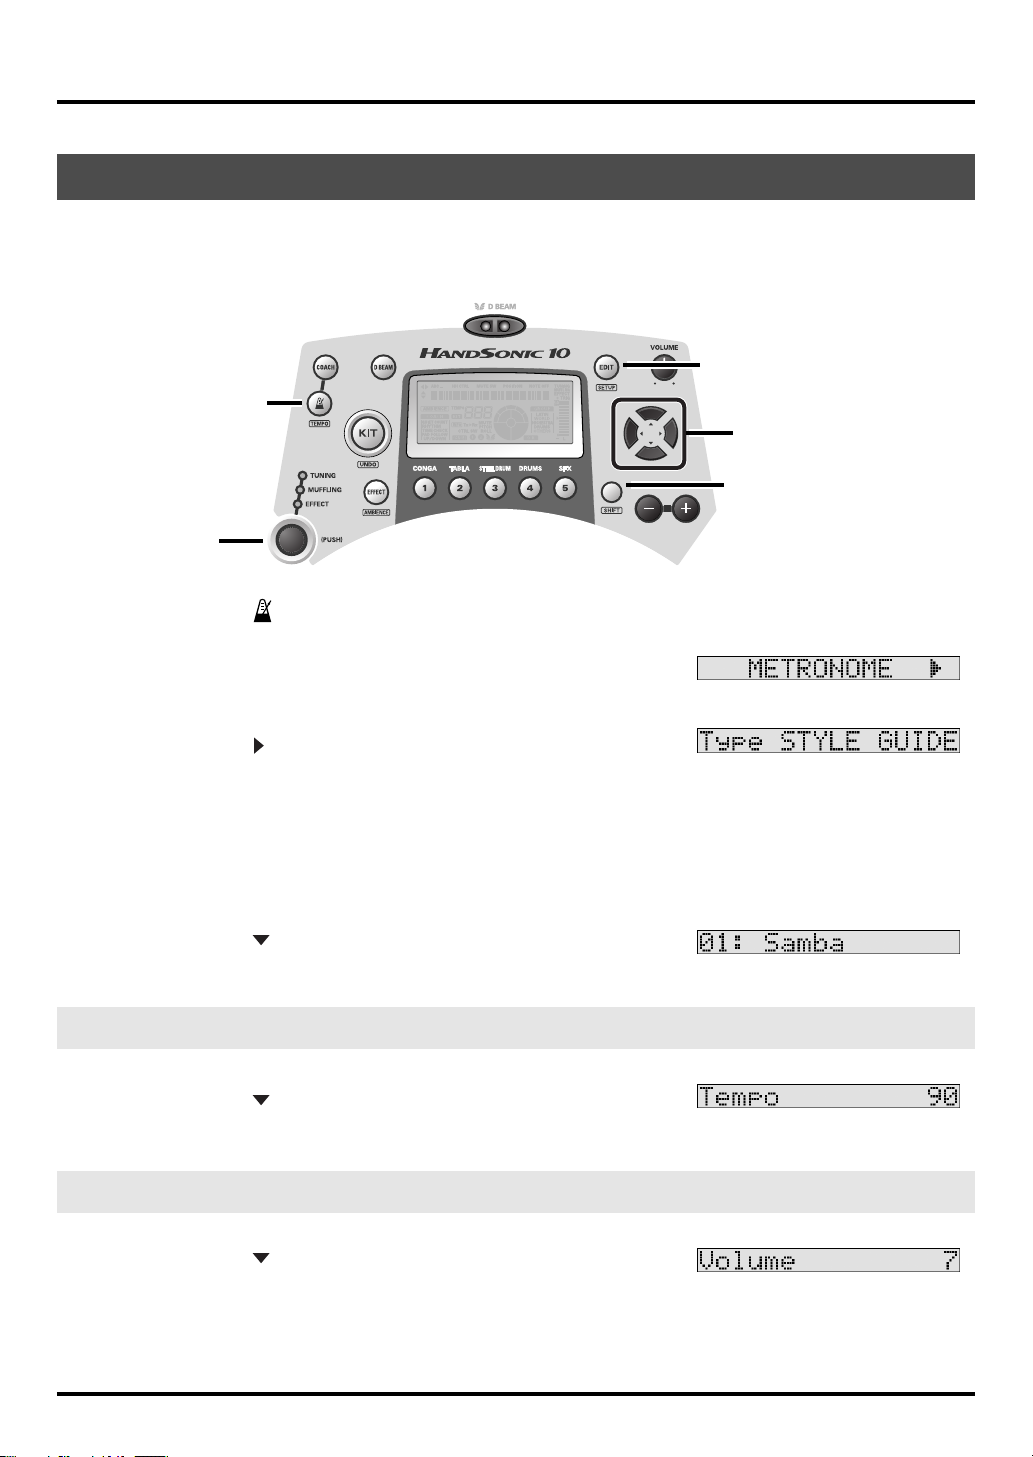
METRONOME (STYLE GUIDE)
STYLE GUIDE Metronome patterns include 86 variations and are not only fun to play along with, but can
help you learn different rhythms and styles.
(All adjustments to settings can be made with the [+]/[-] buttons or the Control Knob.)
METRONOME
Button
Control Knob
1.
Press the [ ] button to start.
EDIT Button
CURSOR
SHIFT Button
2.
3.
4.
Tempo
5.
Volume
While holding down the [SHIFT] button, press [EDIT] and you will
see <METRONOME> in the display.
Press the [ ] cursor you will see:
There are two choices here, NORMAL and STYLE GUIDE. NORMAL will be explained further on, so keep
the setting at STYLE GUIDE.
* IMPORTANT: When the TYPE is set to STYLE GUIDE, all uses of the metronome will use the currently
selected pattern, even when using the COACH function (except for RHYTHM CHECK and PAD
FOLLOW). See page 17.
Press the [ ] and you will see the current pattern in the display.
Use the [+]/[-] buttons or the Control knob to make a selection.
Press the [ ] once, and here you can set the TEMPO.
(Range = 40–200 BPM)
14
6.
Press the [ ] again, and you’ll see:
The volume range is 0–10.
Page 17
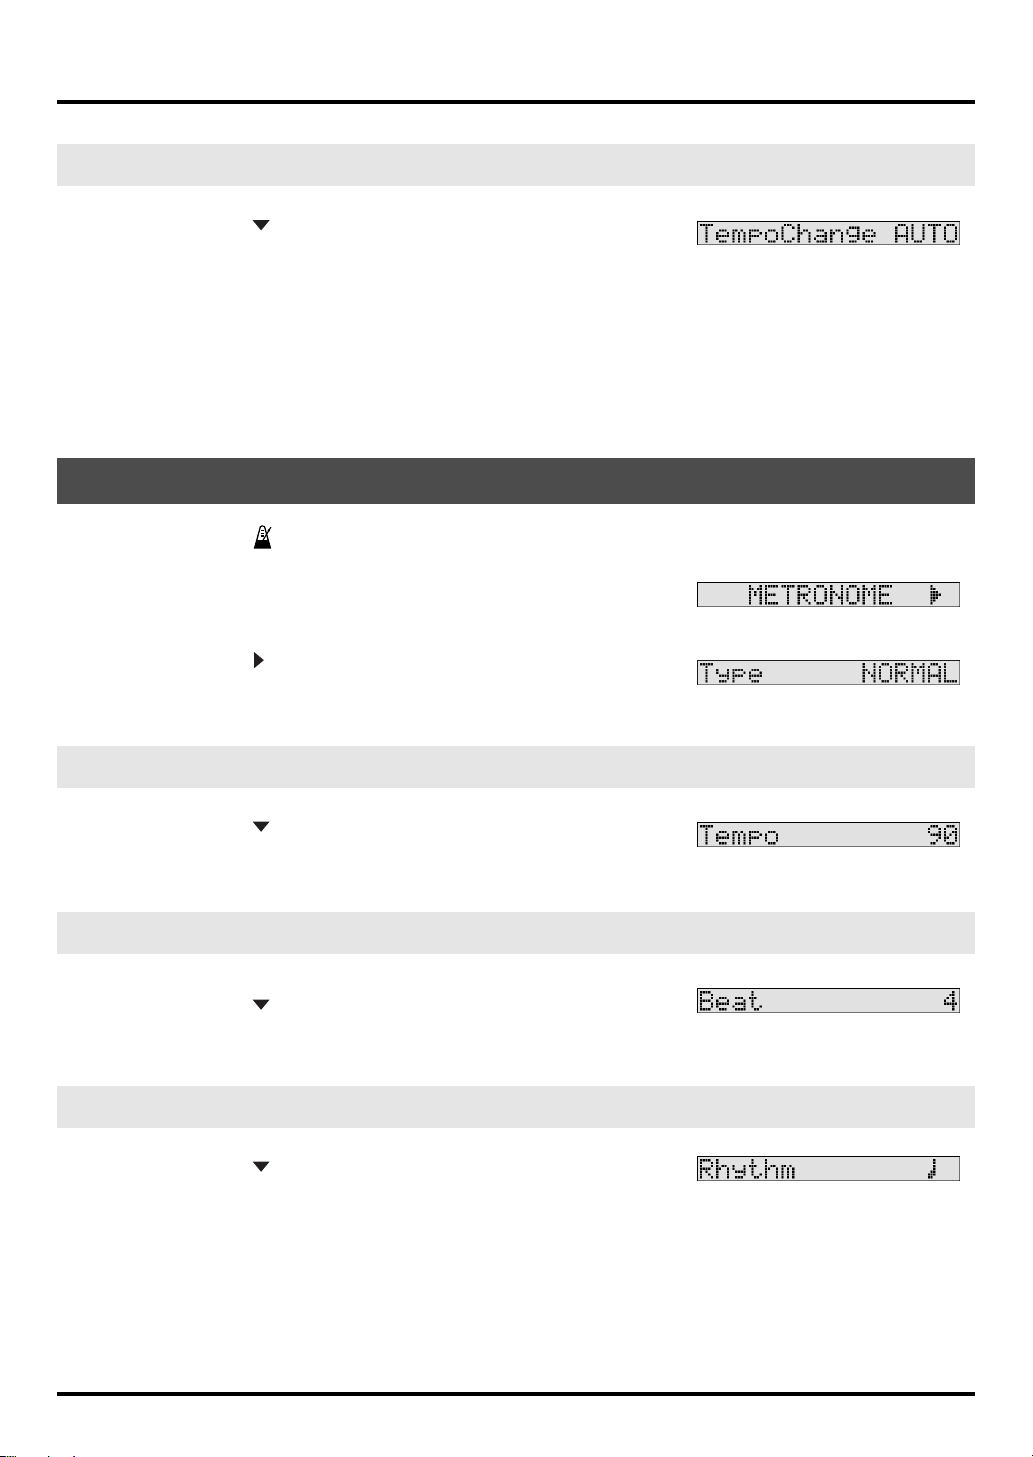
Tempo Change
7.
Press the [ ] until you see:
Style Guide patterns have their own tempo settings.
If Tempo Change is set to OFF, then those tempos will be ignored, and all Style Guide patterns will play at
the Metronome’s tempo setting.
If Tempo Change is set to AUTO, then, in general, each time you change a pattern the tempo will change as
well.
* Depending on the pattern chosen and the kit you are playing, you may notice sounds drop out, or mute.
METRONOME (NORMAL)
1.
Press the [ ] button to start.
2.
While holding down the [SHIFT] button, press [EDIT] and you will
see <METRONOME> in the display.
Getting Familiar
3.
Press the [ ] cursor and you will see <Type> in the display.
Change this to NORMAL.
Tempo
4.
Press the [ ] once, and here you can set the TEMPO.
(Range = 40–200 BPM)
Beat (Time Signature)
5.
Press the [ ] again, and here you see <Beat> in the display.
The possibilities are from 0 beats to 9 beats per measure.
Rhythm
6.
Press the [ ] again, and here you see <Rhythm> in the display.
The choices include (whole notes), (half notes), (quarter notes), (quarter-note triplets),
3
(eighth notes), (eighth-note triplets) and (sixteenth notes).
Should you need to practice in tempos higher than 200 BPM, changing the Rhythm to eighth-notes and the
Beat to 0 can be helpful.
3
15
Page 18

Getting Familiar
Metronome Sound
7.
Press the [ ] again, and you’ll see:
You have 12 different types of sounds to use as a metronome sound.
Metronome Sound List
No. Sound No. Sound
01:
ELECTRONIC
02:
OLD STYLE
03:
PULSE
04:
BEEP
05:
SWEEP
06:
ZAPP
Volume
8.
Press the [ ] again, and you’ll see:
The volume range is 0–10. (Some of the metronome sounds are rich in high frequencies, so please be
careful with this level setting, especially if you are using headphones.)
07:
08:
09:
10:
11:
12:
STICKS
COWBELL
CLAVES
WOODBLOCK
TRIANGLE
SHAKER
16
Short Cut Access
Metronome Parameters
While holding down the [EDIT] button, press the [ ] button.
If the TYPE selected is STYLE GUIDE, then this will immediately take you to the STYLE GUIDE pattern
select page.
If the TYPE is NORMAL, then this will take you to the TYPE select page.
Metronome Tempo
While holding down the [SHIFT] button, press the [ ] button.
Page 19

COACH MODE
COACH Button
METRONOME
Button
Here you will find 6 different functions, all designed to challenge and
help you improve your timing, rhythmical sense, stamina and make
you more comfortable with the pad positions. When entering this
mode, you will also see which function you are using appear in the
left side of the display. We advise to check each function as
explained here first, before make any adjustments to the factory
settings. This way you will have a good grasp of the possibilities.
Getting Familiar
CURSOR
Quiet Count
1.
Press the [COACH] button and you see <QUIET COUNT> in the
display.
2.
Press the [ ] button now to see what it does.
3.
Press it again to stop.
4.
Press the [ ] cursor and you see:
5.
Press the [ ], and here you will see:
This means that in a four measure pattern, there will be a one measure
break on the 4th measure.
If you set “QUIET” to “2” then it means the last two measures are the break.
Depending on your metronome setting for TYPE, you can use this function with the NORMAL metronome
function or with the STYLE GUIDE.
Setting Possibilities:
Measures
Quiet
Depending on the amount of MEASURES chosen, the QUIET possibilities will differ. RANDOM means the
COACH will change the break lengths in a random way.
6.
If you push the [ ] one more time, you can set the tempo.
From 2 to 16 measures.
From RANDOM and 0.5 to 4 measures.
17
Page 20

Getting Familiar
Rhythm Check
* This function uses the sound assigned to the large right pad (M5) in the current kit. Be sure there is a
sound assigned there or that the volume of that sound is not too low.
1.
Press the [COACH] button and use the [ ] or [ ] cursors until
you see <RHYTHM CHECK> in the display.
2.
Press the [ ] button now to see what it does.
Within the 2 measure count in, you will see <Listen> appear and then
<Play>.
The idea here is to simply copy the rhythm you hear.
When you play/copy the rhythm correctly, <Good> will appear and the Coach will advance to another
pattern.
If you make a mistake, you will see <Again> in the display until you get it right.
It does not make any difference which pad you play during this exercise.
So if you have optional foot switches or kick triggers connected, you can use them for training your foot
timing as well.
3.
Press the [ ] button again to stop.
4.
Press the [ ] and you see:
There are 5 Grade levels. 1 is the simplest, and 5 is the most difficult.
5.
Press the [ ] again and you will see:
6.
Push the [ ] until you see <Tempo>. Adjust as needed.
7.
Push the [ ] until you see <Beat>. Adjust as needed.
8.
Push the [ ] until you see <Metronome Vol>. Adjust as needed.
Time Check
1.
Press the [COACH] button and use the [ ] or [ ] cursors until
you see <TIME CHECK> in the display.
2.
Press the [ ] button, watch the display and start playing in time
with the metronome.
You will see a little dark ball indicating exactly where you are playing in reference to the tempo. When you
play ON the beat the little dark ball appears in the center over the + indicator.
“S” at the left side of the bar graph means you are slow, or behind the beat, and “F” on the right side
means you are fast, or ahead of the beat.
18
3.
Press the [ ] button again to stop.
4.
Press the [ ] and you see:
There are 2 Grades: EASY & HARD.
5.
If you push the [ ] one more time, you can set the tempo.
Page 21

Pad Follow
Designed to help you become more familiar with the positions of the pads, it provides some challenging
variations. Remember this does NOT check your timing, but only your ability to know what sounds are on
which pads (or external triggers).
* This function uses all sounds assigned to all pads (and external triggers, if you have selected Ext Trig
ON). Be sure there is a sound assigned there or that the volume of that sound is not too low.
1.
Press the [COACH] button and use the [ ] or [ ] cursors until
you see <PAD FOLLOW> in the display.
2.
Press the [ ] button and within the 2 measure count in, you will
see <Listen> appear and then <Play>.
The display indicator will show you which pad has been played, and you just have to play the same one,
before the Coach advances to the next variation.
3.
Press the [ ] button again to stop.
This function operates in a similar way to the Rhythm Check function.
4.
Press the [ ] and you see:
There are 5 Grade levels. Level 1 is the easiest, and Level 5 is the most difficult.
Getting Familiar
5.
Press the [ ] again and you will see:
If you turn it OFF, then this will help you memorize which sounds are where.
6.
Press the [ ] again and you will see:
If you are using optional external foot switches or triggers, then turn this
to ON and it/they will be included in the PAD FOLLOW exercise.
7.
If you push the [ ] one more time, you can set the Tempo.
8.
Push the [ ] again and you’ll see <Beat>. Adjust as needed.
9.
Push the [ ] again and you’ll see <Metronome Vol>. Adjust as needed.
19
Page 22

Getting Familiar
Auto Up/Down
1.
Press the [COACH] button and use the [ ] or [ ] cursors until
you see <AUTO UP/DOWN> in the display.
2.
Press the [ ] button and watch the display.
You will see the tempo indicator increase 1 BPM every two beats.
3.
Press the [ ] button again to stop.
4.
Press the [ ] and you see:
If you set the RATE to 1, the tempo will increase 1 BPM every measure, and if you set the RATE to 3, the
tempo will increase 1 BPM on every beat.
While the metronome is playing, you’ll also notice in the left side of the display, 90→200.
This is showing you the MINIMUM TEMPO and MAXIMUM TEMPO. This means that the metronome will
start playing at 90 BPM, increase to 200 BPM, and then go back down to 90 BPM.
You can adjust this by pressing the [ ] once, where you will see <Min Tempo> in the display. Use the [+]/
[-] buttons or the Control knob to set your desired tempo. Push the [ ] once more and you see <Max
Tempo>.
Also, while the metronome is playing, you can set the Max Tempo by pushing the [-], and you will see <set
max tempo> in the display. If you push the [+] you will see <reset max tempo> and it will be reset to 200
BPM.
Tap Tempo
1.
Press the [COACH] button and use the [ ] cursor until you see
<TAP TEMPO>.
Here, you can tap any pad, or external trigger to set the Tempo.
This is useful as a training exercise, because as you tap the pads, you can see the tempo indicated in the
display. Very good for tempo training.
You can adjust the tempo(min tempo) when any of the coach mode functions appears in the display, or while
the metronome is running with the Control knob or using the [+]/[-] buttons. (except for Auto Up/Down)
20
Page 23

Advanced Edit
ROLL
1.
Select any kit.
2.
Press [EDIT], and then the [ ], until you see
<PRESSURE>.
3.
Press the [ ] once and then the [ ] again until you
see:
If this is set to OFF, raise the value.
The roll speed range is 1–30 beats per second OR
3
(eighth notes), (eighth-note triplets),
3
(sixteenth notes), (sixteenth-note triplets),
and (thirty-second notes), who’s speed will be
determined by the metronome’s current tempo setting. Set
the value as you wish.
If you want all the pads to roll, while holding down
[SHIFT], push down the Control Knob.
4.
Press any pad, or place your hand over the D Beam.
The sound will roll.
Each pad, including the D Beam can use this function.
Another way to assign the Roll function to a pad is to press
the [SHIFT] button, and tap the respective pad. Also, if you
just hold down the [SHIFT] button, the display will show
you which pads have the roll function active.
EFFECTS
1.
Verify that the [EFFECT] button is lit.
2.
Press [EDIT], and then the [ ], until you see
<EFFECTS>.
3.
Press the [ ] and you see the EFFECT TYPE.
4.
Press the [ ] until you see the status of Pad Sw.
Each pad has its own individual EFFECT on/off switch. Set
this as you wish.
If you just hold down the [SHIFT] button, the display will
show you which pads are using EFFECTS or not.
→
If you want to assign effects to all pads, turn one pad to
the “ON” position, then while holding [SHIFT], push the
Control Knob down once. Or press [SHIFT] and tap a
selected pad.
5.
Pushing the [ ] again will take you to the various
parameters of the EFFECT selected.
You will see <D Beam> and then <Knob>. As they both
can control different parameters of the effect currently in
use, use the [+]/[-] buttons or Control Knob to see what is
possible. For an overall idea please refer to the EFFECT
chart for more details. (p. 30)
* After you have selected an effects parameter to manipulate
with the Control Knob, while you are still in the Edit mode,
you can test the function. Press the Control Knob, (the LED
will light) and then turn it while playing a pad. You will see
changes in numerical values and the bar graph in the
display. If you decide to assign a different effect parameter
to the knob, first use it to return the values to where they
were, or execute the UNDO function.
* When using the Roll function set to high speeds, and
depending on the sounds you are “rolling,” sometimes
noise may occur.
Short Cut Access to Effects Editing
While pressing the [EDIT] button, press [EFFECT]
button.
21
Page 24

Advanced Edit
KIT Parameters
KIT Volume
1.
Press [EDIT], and then the [ ], until you see
<KIT/MIDI>.
2.
Press the [ ] and you see the Kit Volume.
MIDI
Note#
3.
Press the [ ] until you see:
* The MIDI Note # for each pad can be changed, and the
HandSonic will remember these on a “per kit” basis. You
would only need to do this when triggering an external
sound module. An “*” will appear to the right of the note
number if two pads use the same note number within the
same kit. Please be careful, because if identical MIDI
messages are received from an external sequencer or MIDI
controller, the HandSonic will not sound as you expect.
* If recording a performance on an external sequencer, and
using a Foot Switch for Hi-hat control, the HandSonic will
transmit a note number 4 steps lower than the one
assigned to the pad being played. (ONLY if this pad has a
sound capable of Hi-hat control.) This will occur only while
the foot switch is pressed and the pad is played.
For an example, go to KIT #18 “Pot Drum”.
1.
Press [EDIT], then the [ ] and play the large pad on
the right.
You will see <NOTE OFF> appear above the instrument
name.
2.
Press and hold the pad for a few seconds, then
release your hand.
This is how GATE functions.
3.
Press the [ ] once and then [ ] until you see
<KIT/MIDI>.
Press the [ ] and then the [ ] until you see
<Gate Time>.
4.
Play the same pad, and change the Gate Time
parameter to “ALT.”
5.
Now tap the pad once, and then again.
You will hear how ALT works.
SCRAPE works only with the D Beam and literally allows
you to scrape a sound with your hand movement.
Gate Time
All Pads
D Beam
External Trigger/
Foot Switch
ALT & GATE refer how “note on/note off” is handled. Only
certain sounds respond to these functions, the indications
appear above the instrument name in the display or you can
see this in the instrument list on page 34.
GATE, ALT, 0.1–8 seconds.
SCRAPE, GATE, ALT,
0.1–8 seconds.
ALT, 0.1–8 seconds.
22
Page 25

Advanced Edit
TOOLS
* If you have selected a preset kit, the only functions
available here are KIT COPY and L-R EXCHANGE.
1.
To access the TOOLS, press [EDIT] and then the [ ]
until you see:
2.
Press the [ ] and you see <KIT COPY>, and the [ ]
for selecting the functions as explained below.
KIT COPY
From the KIT COPY page press the [ ] to select the source (Src
in the display) and then press the [ ] to select the destination
(Dst in the display).
To execute, press the [ ] again, and a confirmation message
will appear in the display. Press the [4] (OK) button if OK, and
the [2] (CANCEL) button to cancel the operation.
Restoring an Individual Kit to the Factory Settings
KIT COPY can also be used to restore the selected kit to the
original factory settings. When selecting the “source” as
mentioned above, scroll to where you see a <P: > before the kit
name.
KIT EXCHANGE
PAD EXCHANGE
Here you can swap the parameters between two pads. Follow
the same procedure as explained in KIT COPY.
PAD COPY/EXCHANGE
(between different kits)
You can also copy or exchange pad parameters
between two different kits. To do that, follow the same
instructions for copy or exchange, but in this case you
need to press the [SHIFT] button, and use the [+]/[-]
buttons when choosing the source or destination kit.
Upon pressing [SHIFT], you will see the KIT NAME
appear in the display, and you can listen to the sound
assigned to the pad in the destination (Dst) or source
(Src) kit.
PAD CLEAR
This function completely clears all parameters assigned to one
pad. Follow the same procedure as explained in KIT COPY.
L-R EXCHANGE
Perfect for exchanging all pad parameters, especially if you are
Left Handed. Follow the same procedure as explained in KIT
COPY. When you select this function, the display highlights the
pads that will be exchanged. All pad parameters will be
exchanged except for the M3 pad and the S3 pad.
This is a useful function for re-arranging the order of your kits.
Follow the same procedure as explained in KIT COPY.
KIT CLEAR
This function completely clears all parameters assigned to all
pads.
PAD COPY
This allows you to copy all parameters of one pad to another.
Follow the same procedure as explained in KIT COPY. In this
case you can select your source and destination pads by simply
tapping the pad or external trigger/foot switch. (MIDI Note#
will not be copied)
UNDO
The undo function allows you restore the Kit to the state it was in
BEFORE you made changes to any parameter. However, if you
make changes to a kit, and then change kits, your modifications
will be permanent. If you want to UNDO any changes made,
do so before going to another kit. While holding down [SHIFT],
press the [KIT] button, and follow the commands in the display.
* When executing the UNDO function, you can preview or
compare the newly edited kit with the kit as it was before
you made changes.
When this screen appears, you can play the pads, and
you will hear the previous version.
23
Page 26

Advanced Edit
Setup
METRONOME
Refer to page 14.
AMBIENCE
EDIT Button
CURSOR
EFFECT Button
1.
While holding down the [SHIFT] button, press [EDIT].
2.
Use the [ ] until you see <AMBIENCE>.
SHIFT Button
SYSTEM
LCD Contrast
1.
While holding down the [SHIFT] button, press [EDIT].
2.
Use the [ ] until you see <SYSTEM> in the display.
3.
Press the [ ], and here you see:
Range: 1–10.
Depending on the lighting of where you are playing you
may need to adjust this.
Short Cut for Changing the Contrast
Press and hold down the [KIT] button, and use the
[+]/[-] buttons.
Inst Sort (Instrument Selection Choices)
4.
Press the [ ] again, and you’ll see:
3.
Press the [ ] once, and you’ll see:
You can also turn the AMBIENCE on and off, while
holding down the [SHIFT] button, and pressing the
[EFFECT] button. You will see the relative indication in the
display.
4.
Press the [ ] once, and you’ll see:
Here you can select from 5 different types of AMBIENCE.
The choices are:
STUDIO, ROOM 1, ROOM 2, THEATER, CHURCH
5.
Press the [ ] again, and you’ll see:
This is where you adjust the overall level of the
AMBIENCE. Remember that this is a global parameter,
meaning that when AMBIENCE is on, all sounds will be
included.
There are two choices.
GROUP
means that the instruments are arranged in 5
Groups.(LATIN, WORLD, ORCHESTRA, DRUMS, OTHERS)
ABC
means the instruments are arranged in alphabetical
order.
Pad Chase
5.
Press the [ ] again, and you’ll see:
If you turn this OFF, then when editing sounds, playing the
pads will NOT call up the triggered sound to the display,
requiring you to use just the combination of [SHIFT] and
the [ ] or [ ] to change the sound being edited.
24
Page 27

fig.0-03.e
Advanced Edit
D BEAM
1.
While holding down the [SHIFT] button, press [EDIT].
2.
Use the [ ] until you see <D BEAM>.
3.
Press the [ ], and you’ll see:
Range: 1–10
This needs to be adjusted, if for example, the D Beam
switch is on, you are not playing the instrument, but you
notice the Value Meter is moving or NOT in the zero
position.
Bring the sensitivity down until it stops moving.
If the response is not as you wish, raise the sensitivity.
4.
Press the [ ] again, and you’ll see:
This needs to be adjusted if you feel there is not a good
linear, or smooth response when pitch bending, or
controlling effects. Raise and lower your hand over the D
Beam, and watch the Value Meter.
If the meter moves suddenly at any point, change the
Curve Type.
S3
S1
S2
M2
M3
M1
S4
M4
M5
Curve
5.
Press the [ ] and you’ll see:
Choices are:
LINEAR, EXP1, EXP2, LOG1, LOG2, SPLINE, LOUD1,
LOUD2 (See Glossary. p. 38)
Pressure Sens
6.
Press the [ ] and you’ll see:
S5
Pad Settings (PAD)
Playing Style (Hands or Fingers)
1.
While holding down the [SHIFT] button, press [EDIT].
2.
Use the [ ] until you see <PAD>.
3.
Press the [ ], and here you’ll see:
You can choose between HAND or FINGER, obviously
referring to your playing preference.
Sensitivity
4.
Press the [ ], and you’ll see:
Range: 1–10
The 5 Main pads (M1–M5), have their own individual
Sensitivity.
The 5 Sub pads (S1–S5) share the same Sensitivity.
Tap the respective pad in order to adjust as you wish.
Range: 1–10
Position
7.
Press the [ ] and you’ll see:
Range: OFF, -3–+3
Position (M1 & M5 pads only)
* Adjusting this parameter will affect the way the M1 and
M5 pads respond depending where you play them,
provided the sound assigned is positional sensing
capable. (see inst list on p. 34) A good way to understand
how this function works, is to use the pre-set CONGA kit.
Play the M1 or M5 pads, moving from the center to the
edge, while at the same time, changing the Position value.
To be more specific, if you set this to +3 you will notice
that the “edge” sound will be very easy to produce, even
when playing in the middle of the pad. Adjust according
to your playing style.
25
Page 28

Advanced Edit
External Trigger Settings
(EXT TRIG)
1.
While holding down the [SHIFT] button, press [EDIT].
2.
Press the [ ] until you see <EXT TRIG> (external
trigger).
3.
Press the [ ], and you’ll see:
Foot/Pad x2:
Pad (Rim):
Foot Switch
4.
Press the [ ] and when you see this screen, use the
[+]/[-] button and select “FOOTSW.”
Optional foot switches can be used for triggering sounds and
for performing various other functions.
You can use either a single foot switch, (DP-2 etc.) or 2 FS-5Us
(Boss) which will need to be connected with an optional PCS31L cable (insert cable). When using 2 foot switches, each one
can have its own individual functions, in addition of course, to
also triggering sounds. Assigning sounds to the foot switches
works exactly like assigning a sound to one of the on-board
pads, as explained on page 9.
When you step on a foot switch, you will see its relative number
(1 or 2) appear at the bottom of the display.
5.
Press the [ ] and you will see:
For using 2 foot switches, 2 pads or a
combination of Foot switch and a pad or
kick trigger.
When using a head/rim capable pad.
7.
Press the [ ] and you will see:
Foot Switch Functions
OFF
HH CTRL
:
This allows you to close the open Hi-hat sound (see the
instrument list to know which sounds allow this).
#329: AcuHH
#334: AcuHH 2
#339: ClubHH
#343: ClubHH2
#347: 808 HH
#351: 909 HH
<HH CTRL> will appear above the instrument name in the
display.
KIT+, KIT-
This allows you to change kits: one step up, or one step
down.
START/STOP
This lets you start or stop the metronome.
EFFECT SW
This turns the effects on or off.
D BEAM SW
This turns the D Beam on or off.
ROLL SW
When activating this function, it means that if the ROLL
function is ON for a specific pad, it will only roll while the
foot switch is pressed.
:
:
:
:
:
Other Triggers
After you have executed steps 1-3 (left column of this
page).
Depending on the foot switch you are using, you may
need to change this parameter. For example, if when you
step on the switch, and you only hear the sound when you
take your foot off, then you should change the polarity.
Some foot switches (ex:FS-5U) have polarity switching
possibilities.
6.
Press the [ ] and you will see:
Range: 1–127
As a foot switch can not respond to playing dynamics, this
is an important setting.
26
4.
From the Type screen use the [+]/[-] buttons and
select the type of pad you are using.
Display
KD7/8
KD85/120 KD-80, KD-85, KD-120
PD8 PD-7, PD-8, PD-9
PDX8 PDX-8
PD85/125 PD-80, PD-80R, PD-85, PD-100,
CY5/8 CY-5, CY-8
CY12/14 CY-12R/C, CY-14C, CY-15R
Pad Compatibility
KD-7, KD-8
PD-105, PD-120, PD-125
Page 29

5.
Continuing to press the [ ] will give you access to
the following parameters.
Normally you do not have to adjust them, as the settings
are automatically changed depending on your choice of
pads (listed previously).
Advanced Edit
Pressure Control Change Number
(For details on PAf, see Glossary →p. 38)
D BEAM Control Change Number
Display
Sens
(Sensitivity)
Threshold 0–15
Curve LINEAR, EXP1, EXP2, LOG1, LOG2,
Scan Time 0–4
Retrig Cancel 1–16
Mask Time 0–64
XTalk Cancel OFF, 20–80
Rim Sens OFF, 1–20
Rim Gain 0.5–2.0
For detailed explanations of the above trigger parameters,
please see Glossary (p. 38).
Range/Choices
1–16
SPLINE, LOUD1, LOUD2
MIDI
1.
While holding down the [SHIFT] button, press [EDIT].
Press the [ ] until you see <MIDI>.
Changes to any of the following parameters are only
needed if you are using the HandSonic to control an
external sound module or in exceptional situations.
2.
Press the [ ], and here you see:
3.
Press the [ ] to access the following parameters.
Local Control
Knob Control Change Number
* Control change information is ONLY transmitted from the
knob when it is in the EFFECT position (LED is lit). Use this
when you want to control an external MIDI module. If the
HandSonic receives this information via MIDI, nothing will
happen.
Device ID
BULK DUMP
1.
While holding down the [SHIFT] button, press [EDIT].
Press the [ ] until you see <BULK DUMP>.
Used for saving the HandSonic settings to an external
sequencer.
Press the [ ], then use tha [+]/[-] button to select the type.
Choices are: 1 KIT, ALL KITS, ALL
To execute, press the [ ] again, and a confirmation
message will appear in the display. Press the [4](ok) button
if OK, and the [2](cancel) button to cancel the operation.
* Saving/Re-Loading individual kits example: If you save
Kit #1, and then later want to re-load it, select the
destination for that kit BEFORE loading. It will not
automatically be loaded into the Kit #1 position.
Turn this off when recording your HandSonic performance
on an external sequencer, as long as you are also
receiving the MIDI signal FROM that sequencer.
PC Tx/Rx
This allows the HandSonic to transmit & receive “Program
Change” information.
CC Tx/Rx
Determines if you want to send or receive control changes.
(like pressure information etc..)
FACTORY RESET
1.
While holding down the [SHIFT] button, press [EDIT].
Press the [ ] until you see <FACTORY RESET>.
Press the [ ], then use tha [+]/[-] button to select the type.
The choices here are
To execute, press the [ ] again, and a confirmation
message will appear in the display. Press the [4](ok) button
if OK, and the [2](cancel) button to cancel the operation.
* This resets all parameters to the original factory version.
You can not use Undo after executing this function. Make
sure you save your settings first. (Bulk Dump)
SETUP, ALL KITS, ALL
27
Page 30

Advanced Edit
Short Cuts
EFFECT
While pressing the [EDIT] button, press [EFFECT] button to
access to Effects editing.
D BEAM
While holding down the [EDIT] button, press [D BEAM]
button to access to D Beam setup parameters.
METRONOME
While holding down the [EDIT] button, press
[ ] button to access to Metronome parameters.
“ALL” Function
While in EDIT mode, you can hold down the [SHIFT]
button and press the Control Knob to execute the “all”
function, allowing you to quickly set the same value to all
pads. This works with all pad specific parameters.
Editing Without Hitting a Pad
After pressing the [EDIT] button, you can select the pad by
holding down [SHIFT] and pressing either the [ ] or [ ].
LCD Contrast Adjust
Press and hold down the [KIT] button, and use the [+]/[-]
buttons.
Quick Increment/Decrement changes
While holding [SHIFT] and pressing the [+] or [-] buttons,
you can increase or decrease the selected parameter
value, or kit choice rapidly.
Also while holding the [-] button down and pressing the [+]
button, you can decrease the value quickly.
Also while holding the [+] button down and pressing the [-]
button, you can increase the value quickly.
Favorite Kit Jump Function
Using the Preset Kit buttons as a “jump function” to your
favorite kits.
Write
1.
First, select the kit.
2.
Then, while holding down the [SHIFT] button, press
any one of the 5 Preset Kit buttons, and hold them
both down until the following message appears.
“registered!”
Recall
To call up that kit, just press [SHIFT], and then the
button you have registered a favorite kit to.
Kit Naming
Hold down [SHIFT] and press the [ ] to insert a space.
Hold down [SHIFT] and press the [ ] to delete a
character.
Hold down [SHIFT] and press the [+] or [-] buttons to scroll
through the character set (letters, numbers, symbols,
space).
Press the Control Knob to change a character from small
letters to capital letters.
28
Page 31

Error Messages/Troubleshooting
This section lists the messages (error messages) that the HandSonic 10 produces and explains the meaning of each
message, giving you to appropriate action to take.
MESSAGE
midi offline!
midi buf full!
midi rx error!
bulk rx error!
bulk checksum!
battery low!
MEANING WHAT TO DO
MIDI Cable was disconnected, or
communication with external MIDI device was
interrupted.
Too much MIDI information was received at
once and could not be processed correctly.
The HandSonic 10 did not receive a MIDI
message correctly.
The HandSonic 10 did not receive BULK MIDI
data correctly.
Checksum value of a System Exclusive
message was not correct.
The internal battery, used for maintaining data
in the user memory, has become weak.
Check MIDI connections/cables.
Verify connections, and the type of MIDI
information you are sending.
Re-transmit the message again.
Re-transmit the message again. If the problem
continues, there’s a problem with the data
being transmitted to the HandSonic 10.
Correct the checksum value.
Contact your dealer, or Roland service to
have it replaced.
Troubleshooting
Before contacting a local Roland service center, be sure you have read this manual in its entirety.
1.
NO SOUND?
Double check all audio connections, volume controls on
the HandSonic 10 or external amplifier.
2.
OVERALL SOUND OF A KIT HAS CHANGED?
Did you use the Control Knob to modify Tuning, Muffling
or Effects? If you did, and you changed kits without
executing UNDO, then you have re-written various
parameters in that kit.
For info on the Control Knob functions, see page 8. For
info on UNDO, see page 23. For info on recalling any
KIT’s original factory settings, see page 27.
3.
THE [EFFECT] BUTTON IS OFF, BUT YOU STILL HEAR
REVERB?
Look at the display to see if AMBIENCE is still ON. To
turn it off, while holding [SHIFT], press the [EFFECT] button.
(AMBIENCE-page 24)
4.
FOOT SWITCH SEEMS TO WORK BACKWARDS?
When using foot switches, if you hear the sound when you
release your foot from it, this means you need to switch the
POLARITY, or you have not set the correct TYPE of external
trigger. See page 26.
5.
STYLE GUIDE METRONOME - TEMPO PROBLEMS?
a.
You have set the tempo of the metronome, but the
pattern plays at a different tempo?
b.
All the patterns play back at the same speed.
Remember there is a Tempo Change parameter that
determines if the patterns play back at their own
individual, pre-set tempos, or at the tempo set by the
Metronome itself. See page 15.
6.
PLAYING WITH THE STYLE GUIDE METRONOME.
Depending on the pattern chosen and the kit you are
playing, you may notice sounds drop out, or mute.
7.
WHEN CHANGING FROM ONE KIT TO ANOTHER, YOU
HEAR A SOUND?
Depending on the EFFECT assigned to a specific kit, and
the length or decay, of the last sound played, this may
occur. If you play a cymbal sound, and then change the kit
while you can still hear that sound, then the effects
assigned to the new kit will be applied to that last sound.
8.
TEMPO DELAY
Because of the way the Tempo Delay operates, at low
tempos, depending on the BEAT selection, it may not work
as you expect.
Also, the Tempo Delay will not follow correctly if you are
using the Auto Up/Down function in COACH mode.
9.
COACH MODE- RHYTHM CHECK AND PAD FOLLOW
If you set the BEAT to “0” or “1” the HandSonic will play
in 4.
10.
ROLL
When using the Roll function set to high speeds, and
depending on the sounds you are “rolling,” sometimes
noise may occur.
29
Page 32

Effects List
3Band EQ
Standard 3 Band Equalizer
Parameter
LowGain
MidFreq 50Hz – 12.5kHz
MidGain -12.0dB –
HighGain -12.0dB –
TotalLvl -12.0dB –
Dbeam (control
possibilities)
Knob (control
possibilities)
Value
-12.0dB –
+12.0dB
(1/3oct step)
+12.0dB
+12.0dB
+12.0dB
OFF, TRANS,
INVERT
OFF, HGAIN,
MGAIN, LGAIN
Comments/
Descriptions
Low Frequency Level
adjustment
Mid Frequency
adjustment
Mid Frequency Level
adjustment
High Frequency
Level adjustment
EQ’s overall level
adjustment
Filter
Cuts high or low frequencies. Drive modulates the cut-off
frequency.
Parameter
FilterType
Cutoff 0 – 100
Resonance 0 – 100
Rate 0 – 100
Depth 0 – 100
Drive 0 – 100
Dry:Effect 100:0 –
Dbeam (control
possibilities)
Knob (control
possibilities)
Value
LPF, HPF Low Pass Filter, High Pass
0:100
OFF, ZAP,
COLOR,
MODULAT,
DRIVE, MIX
OFF,
CUTOFF,
COLOR,
MODULAT,
DRIVE, MIX
Comments/
Descriptions
Filter
Balance of the noneffected sound and the
effected sound
ZAP = cutoff+filtertype,
COLOR = cutoff+reso,
MODULAT = rate+depth,
MIX = Dry/Effect balance
Compressor
Attenuates high-level sounds, & boosts low-level sounds,
compressing the overall variation in volume level.
Parameter
Mode
Sens 0 – 100 Sensitivity of the
Threshold -60 – +6dB
Ratio 1.0, 1.2, 1.5,
Attack 0.25 – 100ms Attack start point
Release 50ms – 2.0s Release point of
Gain -6.0 – +18.0dB
Dbeam (control
possibilities)
Knob (control
possibilities)
Value
AUTO, MANUAL
2.0, 2.8, 4.0,
8.0, 16.0, INF:1
OFF, SENS SENS =
OFF, SENS
Comments/
Descriptions
compressor
compressed sound
Sens+Threthold+
Ratio+Gain
(Only Mode =
MANUAL)
Enhancer
An Enhancer can sharpen the sound.
Parameter
Sens
Level 0 – 100
EQ Low -12.0 – +12.0dB Boosts low
EQ High -12.0 – +12.0dB Boosts high
Dbeam (control
possibilities)
Knob (control
possibilities)
Value
0 – 100
OFF, PRESENCE,
LOWCUT
OFF, PRESENCE,
LOWCUT
Comments/
Descriptions
frequencies
frequencies
PRESENCE =
Sens+Level+EQ
High,
LOWCUT=
Presence+EQ Low
Delay
Standard Delay Unit
Parameter
DelayTime
Feedback -98 – +98%
LF Damp THRU, 50 –
HF Damp 200Hz –
Dry:Effect 100:0 – 0:100 Balance of the non-
Value
0.8 – 270ms
4000Hz
12.5kHz, THRU
Comments/
Descriptions
effected sound and
the effected sound
30
Page 33

Effects List
Parameter Value
Dbeam (control
possibilities)
Knob (control
possibilities)
OFF, INPUTSW,
DELAYTIME,
FEEDBACK, MIX
OFF, FEEDBACK,
MIX
Comments/
Descriptions
MIX = Dry/Effect
balance
Tempo Delay
Tempo Synchronized Delay
Parameter Value
Tempo 40 – 200,
Metronome
Beat
Feedback 0 – 98%
Dry:Effect 100:0 – 0:100 Balance of the
Dbeam (control
possibilities)
Knob (control
possibilities)
3
, , , ,
3
, , , ,
3
, ,
OFF, INPUTSW,
FEEDBACK, MIX
OFF, FEEDBACK,
MIX
Comments/
Descriptions
Can sync with it’s
own tempo or the
Metronome
delay time in note
values
non-effected sound
and the effected
sound
MIX = Dry/Effect
balance
TapeEcho
Old Style Tape Echo Machine
Parameter
RepeatRate
Intensity 0 – 100
EchoLevel 0 – 100 Return level
Dbeam (control
possibilities)
Knob (control
possibilities)
Value
0 – 100
OFF, RATE,
INTENSITY, LEVEL
OFF, RATE,
INTENSITY, LEVEL
Comments/
Descriptions
Overdrive
Similar to Overdrive Pedal
Parameter
Drive
Tone 0 – 100
DriveCutoff 0 – 100
DriveLevel 0 – 100
LowMix OFF, ON
Dbeam (control
possibilities)
Value
0 – 100
OFF, DRIVE,
LEVEL, DYNAMIC
Comments/
Descriptions
DYNAMIC =
Drive+Tone+Cutoff+
Level
Parameter Value
Knob (control
possibilities)
OFF, DRIVE,
LEVEL, DYNAMIC
Comments/
Descriptions
Distortion
Standard Distortion Unit
Parameter Value
Drive 0 – 100
Tone 0 – 100
DriveCutoff 0 – 100
DriveLevel 0 – 100
LowMix OFF, ON Adds low
Dbeam (control
possibilities)
Knob (control
possibilities)
OFF, DRIVE,
LEVEL, DYNAMIC
OFF, DRIVE,
LEVEL, DYNAMIC
Comments/
Descriptions
frequencies
DYNAMIC =
Drive+Tone+Cutoff+
Level
Lo-Fi
Creates Low Quality Effect
Parameter
CompSens
FsRate 0 – 100
BitRate 0 – 20
LPFcutoff 0 – 100 Low Pass Filter cut
Dbeam (control
possibilities)
Knob (control
possibilities)
Value
0 – 100 Compressor
OFF, RATE RATE = Fs rate+LPF
OFF, QUALITY,
RATE
Comments/
Descriptions
sensitivity
off point
cutoff,
QUALITY = Comp
Sens+FsRate+
BitRate+LPFcutoff
Ring Mod (Ring Modulator)
Standard Ring Modulator Effect
Parameter
Rate
Depth 0 – 100
Frequency 0 – 100
Sens -50 – +50
Dry:Effect 100:0 – 0:100 Balance of the non-
Dbeam (control
possibilities)
Knob (control
possibilities)
Value
0 – 100
OFF, RATE, FREQ,
SENS, MIX
OFF, RATE, FREQ,
SENS, MIX
Comments/
Descriptions
effected sound and
the effected sound
MIX =
Dry/Effect balance
31
Page 34

Effects List
3
3
3
Pitch Sweep
Pitch Bending with a Sweep Effect
Parameter Value
Pitch -50 – +50
Sens -50 – +50
Feedback 0 – 98%
Dry:Effect 100:0 - 0:100 Balance of the non-
Dbeam (control
possibilities)
Knob (control
possibilities)
OFF,
PITCH+,
PITCH-,
FEEDBACK,
MIX
OFF, PITCH,
FEEDBACK, MIX
Comments/
Descriptions
effected sound and
the effected sound
PITCH+ = pitch –
maximum,
PITCH- = pitch –
minimum,
MIX = Dry/Effect
balance
Wah
Similar to a Wah Wah Pedal
Parameter
Sens
Frequency 0 – 100
Resonance 0 – 100
Dbeam (control
possibilities)
Knob (control
possibilities)
Value
0 – 100
OFF, SENS,
FREQ, RESO,
PEDAL
OFF, SENS,
FREQ, RESO
Comments/
Descriptions
PEDAL = Frequency
(Sens=0)
Flanger
Standard Flanger Unit
Step Flange (Step Flanger)
Standard Step Flanger
Parameter Value
Sync OFF, ON Determines tempo
Tempo 40 – 200,
Metronome
Beat
StepRate 0 – 100 Values when SYNC
Depth 0 – 100
Rate 0 – 100
Resonance 0 – 100
Delay 0 – 100
Dry:Effect 100:0 – 0:100 Balance of the non-
Dbeam (control
possibilities)
Knob (control
possibilities)
, , ,
, , ,
, , ,
,
OFF, RATE, MOD,
RESO, MANUAL,
MIX
OFF, RATE, MOD,
RESO, MIX
Comments/
Descriptions
source
Can be
synchronized with
the Metronome’s
tempo or the tempo
set in the effect
parameters
Values when SYNC
is ON
is OFF
effected sound and
the effected sound
RATE = beat when
sync is on steprate
when sync is off,
MOD =
Depth+Rate+Mix,
MANUAL =
rate+delay,
MIX = Dry/Effect
balance
Parameter
Depth
Rate 0 – 100
Resonance 0 – 100
Delay 0 – 100
Sens -50 – +50
Dry:Effect 100:0 – 0:100 Balance of the non-
Dbeam (control
possibilities)
Knob (control
possibilities)
Value
0 – 100
OFF, MOD,
RESO, MANUAL,
MIX
OFF, MOD,
RESO, MIX
Comments/
Descriptions
effected sound and
the effected sound
MANUAL =
Rate+Delay
(Rate=0),
MOD =
Depth+Rate+Mix,
MIX = Dry/Effect
balance
32
Page 35

Effects List
Phaser
Standard Flanger Unit
Parameter Value
Depth 0 – 100
Rate 0 – 100
Resonance 0 – 100
Dry:Effect 100:0 – 0:100 Balance of the non-
Dbeam (control
possibilities)
Knob (control
possibilities)
OFF, MOD, MIX MOD =
OFF, MOD, MIX
Comments/
Descriptions
effected sound and
the effected sound
Depth+Rate+Mix
Chorus
Chorus can “fatten” the sound
Parameter Value
Depth
Rate 0 – 100
Dry:Effect 100:0 – 0:100 Balance of the non-
Dbeam (control
possibilities)
Knob (control
possibilities)
0 – 100
OFF, MOD, MIX MOD =
OFF, MOD, MIX
Comments/
Descriptions
effected sound and
the effected sound
Depth+Rate+Mix
Auto Pan
Automated Panning Effect
Parameter
Speed
Depth 0 – 100
WaveShape 1 – 10
Dbeam (control
possibilities)
Knob (control
possibilities)
Value
0 – 100
OFF, MOD MOD =
OFF, MOD
Comments/
Descriptions
Speed+Depth
Reverb
Standard Reverb Unit
Parameter Value
Type HALL. ROOM,
PLATE
Time 0.1 – 5.0sec Reverb length
LF Damp THRU,
50 – 4000Hz
HF Damp 1000Hz –
12.5kHz, THRU
Dry:Effect 100:0 – 0:100 Balance of the
Dbeam (control
possibilities)
Knob (control
possibilities)
OFF, DEPTH, MIX DEPTH =
OFF, DEPTH, MIX
Comments/
Descriptions
Reverb choices
non-effected sound
and the effected
sound
Time+Mix
Delay Verb (Delay Reverb)
Delay and Reverb Combination
Parameter
DelayTime
Feedback 0 – +98%
LowCut THRU,
ReverbType HALL. ROOM,
Time 0.1 – 5.0sec
HF Damp 1000Hz –
Dry:Effect 100:0 – 0:100 Balance of the non-
Dbeam (control
possibilities)
Knob (control
possibilities)
Value
0.8 – 560ms Pre-reverb delay
50 – 4000Hz
PLATE,
12.5kHz, THRU
OFF, FEEDBACK,
DEPTH, MIX
OFF, FEEDBACK,
DEPTH, MIX
Comments/
Descriptions
time
effected sound and
the effected sound
DEPTH =
Feedback+Time+
Mix
33
Page 36

Instrument List
Instrument Name Abbreviations/Terms
When you see a “/” for example: AgogoBell L/H— it means that the sound will “velocity switch.” Soft dynamics will play the
low sound and stronger dynamics will play the high sound.
OP = Open HT = Heel, Toe Botm = Bottom
Cl, Cls = Close Ft = Foot Rels = Release
Mt = Mute HnMt = Hand Mute Scrpe = Scrape Strke = Stroke
Instrument List Indications
*H (HH Control): The Hi-hat sound works with Foot Switch Hi-hat control. (p. 26)
*M (MUTE): The sound will change when muting with the hand. (p. 11)
*P (POSITION): The sound, when assigned to the M 1 or M 5 pads, will change according to where it is played on the pads.
*N (NOTE OFF): The sound reacts to Note on/off messages. (p. 22)
:
The group it is assigned to, as indicated in the LCD display. (p. 9)
LATIN
No. Inst Remarks
001 Bongo Hi *M, *P
002 Bongo H /HT *M, *P
003 Bongo H Cls *P
004 Bongo H Slap *M
005 Bongo H Heel
006 Bongo H Toe
007 Bongo Lo *P
008 Conga Hi *M, *P
009 Conga H /HT *M, *P
010 Conga H Cls *P
011 Conga H Slap *M
012 Conga H Bass
013 Conga H Heel
014 Conga H Toe
015 CongaH Slide
016 Conga Lo
017 Conga2 Hi *M, *P
018 Conga2H /HT *M, *P
019 Conga2H Cls *P
020 Conga2H Slap *M
021 Conga2H Bass
022 Conga2 Lo
023 Timbale Hi *P
024 TimbalH Rim
025 TimbalH /Rim
026 TimbalH Pila
027 Timbale Lo *P
028 TimbalL Rim
029 TimbalL /Rim
030 TimbalL Hand *M
031 TimbalL HnMt
No. Inst Remarks
032 TimbalL Pila
033 Claves 1
034 Claves 2
035 Cowbell 1
036 Cowbell 2
037 Cowbell 3
038 Cowbell 4
039 Cowbell 5
040 Cowbell 6L/H
041 Shaker 1 *N
042 Shaker 2 *N
043 Ganza 1 *N
044 Ganza 2 *N
045 Ganza 3 *N
046 Maracas 1
047 Maracas 2
048 Caxixi
049 Shekere Bead
050 Shekere Botm
051 Cabasa *N
052 Afuche *N
053 Guiro1 Scrpe *M
054 Guiro1 Strke
055 Guiro1 Notch
056 Guiro2 Scrpe *M
057 Guiro2 Strke
058 AgogoBell Hi
059 AgogoBell Lo
060 AgogoBel L/H
061 Surdo *M, *P
062 Surdo Mute
063 Surdo Rim
064 Repinique *P
065 Repiniq Rim
No. Inst Remarks
066 Repiniq Hand *M
067 Repiniq HnMt
068 Pandeiro
069 Pande Thumb *M
070 Pande ThmbMt
071 Pande Heel
072 Pande Slap
073 Tamborim *M
074 Tamborim Mt
075 Cuica *M
076 Cuica Mute
077 Caixa *P
078 Caixa Rim
079 Vibra-slap
080 Rain Stick
081 Cricket
082 Flex Metal +
083 Flex Metal
084 MetalCrasher
085 SteelDrum C
086 SteelDrum D
087 SteelDrum E
088 SteelDrum F
089 SteelDrum G
090 SteelDrum A
091 SteelDrum B
092 SteelDrum c
WORLD
No. Inst Remarks
093 Cajon *P
094 Cajon Slap
095 Cajon Bass1
096 Cajon Bass2
097 Djembe *M, *P
098 Djembe Cls *P
099 Djembe Slap *M
100 Djembe Bass
101 Djembe2 *M, *P
102 Djembe2 Cls *P
103 Djembe2 Slap *M
104 Djembe2 Bass
105 Talking Drum
106 PotDrum Body
107 PotDrum Mute
108 PotDrum Botm
109 PotDrum Hole *N
110 PotDrum Rels
111 Tabla Na
112 Tabla Tin
113 Tabla Tun
114 Tabla Ti
115 Tabla TinNa *P
116 Tabla TiNa *P
117 Tabla TunTin *P
118 Tabla Gin
119 Baya Ka
120 Baya Ge
121 Baya GeKa *P
122 Baya GeSlide
123 Dholak Ga
34
Page 37

Instrument List
No. Inst Remarks
124 Dholak Ta
125 Dholak Tun
126 Dholak Na
127 Dholak TunNa *P
128 Darabuka Dom *P
129 Darabuka Tak
130 Doira Dun *P
131 Doira Tik
132 Doholla Dom *M, *P
133 Doholla Sak
134 Doholla Tak *M
135 Rek Dom *P
136 Rek Tek
137 Rek Jing
138 Bendir
139 AnkleBeads
140 AfricaJingle
141 Quijada
142 Sagat *M
143 Sagat Mute
144 Bonang
145 Sitar
146 Sitar Gliss
147 Gyilli C
148 Gyilli D
149 Gyilli E
150 Gyilli F
151 Gyilli G
152 Gyilli A
153 Gyilli B
154 Gyilli c
155 Santoor C
156 Santoor D
157 Santoor E
158 Santoor F
159 Santoor G
160 Santoor A
161 Santoor B
162 Santoor c
163 JewsHarp
164 Nagado Taiko *P
165 Nagado Rim
166 Hira Taiko *P
167 Hira Rim
168 Tsuzumi
169 Ohkawa
170 Atarigane
171 Hyoshigi
172 Gengari *M
173 Gengari Mute
174 HuYinLuo *M
No. Inst Remarks
175 HuYinLuo Mt
176 Nao Bo
177 Xiao Bo
178 FingerCymbal *M
179 FingerCym Mt
180 Chenchen *M
181 Chenchen Mt
182 BaliCymbal *M
183 BaliCym Mute
184 Ban Gu
185 Buk *P
186 Buk Rim
187 Jang Gu
188 Tang Gu
ORCHESTRA
No. Inst Remarks
189 ConcertBD
190 ConcertSnare
191 PairCymbals
192 Mallet Cym
193 Large TamTam
194 Sleigh Bell
195 Tree Chimes
196 Pin Chimes
197 Bell Tree
198 Crotale
199 Wood Block H
200 Wood Block M
201 Wood Block L
202 Wood Bk L/H
203 TempleBlk H
204 TempleBlk L
205 TempleBk L/H
206 Triangle *M
207 Triangle Mt
208 Triang Mt/Op
209 Tambourine 1
210 Tambourine 2
211 Tambourine 3
212 Castanets
213 Ratchet
214 Ratcht Notch
215 ClapStick
216 Whistle Shrt
217 Whistle Long *M
218 Whistle L/H
219 Timpani F
220 Timpani G
221 Timpani A
No. Inst Remarks
222 Timpani B
223 Timpani c
224 Timpani d
225 Timpani e
226 Timpani f
227 Glocken C
228 Glocken D
229 Glocken E
230 Glocken F
231 Glocken G
232 Glocken A
233 Glocken B
234 Glocken c
235 Xylophone C
236 Xylophone D
237 Xylophone E
238 Xylophone F
239 Xylophone G
240 Xylophone A
241 Xylophone B
242 Xylophone c
243 Vibraphone C
244 Vibraphone D
245 Vibraphone E
246 Vibraphone F
247 Vibraphone G
248 Vibraphone A
249 Vibraphone B
250 Vibraphone c
251 Marimba C
252 Marimba D
253 Marimba E
254 Marimba F
255 Marimba G
256 Marimba A
257 Marimba B
258 Marimba c
259 HandBell C
260 HandBell D
261 HandBell E
262 HandBell F
263 HandBell G
264 HandBell A
265 HandBell B
266 HandBell c
267 TubularBel C
268 TubularBel D
269 TubularBel E
270 TubularBel F
271 TubularBel G
272 TubularBel A
No. Inst Remarks
273 TubularBel B
274 TubularBel c
DRUMS
No. Inst Remarks
275 AcuKick 1
276 AcuKick 2
277 AcuKick 3
278 AcuKick 4
279 ClubKick 1
280 ClubKick 2
281 ClubKick 3
282 ClubKick 4
283 808 Kick
284 909 Kick
285 AcuSnare1 *P
286 AcuSnare1 Rm
287 AcuSnare2 *P
288 AcuSnare2 Rm
289 AcuSnare3 *P
290 AcuSnare3 Rm
291 AcuSnare4 *P
292 AcuSnare4 Rm
293 AcuSnare5
294 MarchSnare *P
295 BrushSnare *P
296 BrushSwish
297 CrossStick 1
298 CrossStick 2
299 ClubSnare 1
300 ClubSnare 2
301 ClubSnare 3
302 ClubSnare 4
303 ClubSnare 5
304 ClubSnare 6
305 ClubSnare 7
306 808 Snare
307 909 Snare
308 Kick/Snare *P
309 AcuTom 1 Hi
310 AcuTom 1 Mid
311 AcuTom 1 Lo
312 AcuTom 2 Hi
313 AcuTom 2 Mid
314 AcuTom 2 Lo
315 BrushTom Hi
316 BrushTom Lo
317 ElecTom Hi
318 ElecTom Mid
319 ElecTom Lo
35
Page 38

Kit List
No. Inst Remarks
320 SpokeTom Hi
321 SpokeTom Mid
322 SpokeTom Lo
323 OctTom Hi
324 OctTom Mid
325 OctTom Lo
326 808 Tom Hi
327 808 Tom Mid
328 808 Tom Lo
329 AcuHH *H
330 AcuHH Cl
331 AcuHH Op
332 AcuHH Cl/Op
333 AcuHH Ft
334 AcuHH2 *H
335 AcuHH2 Cl
336 AcuHH2 Op
337 AcuHH2 Cl/Op
338 AcuHH2 Ft
339 ClubHH *H
340 ClubHH Cl
341 ClubHH Op
342 ClubHH Cl/Op
343 ClubHH2 *H
344 ClubHH2 Cl
No. Inst Remarks
345 ClubHH2 Op
346 ClubHH2 C/O
347 808 HH *H
348 808 HH Cl
349 808 HH Op
350 808 HH Cl/Op
351 909 HH *H
352 909 HH Cl
353 909 HH Op
354 909 HH Cl/Op
355 CrashCym 1
356 CrashCym 2
357 SplashCym 1
358 SplashCym 2
359 ChinaCym
360 AccentCym
361 Cup Chime
362 808 Cym
363 RideCym
364 RideCym Bell
365 RideCym/Bell
366 Brush Ride
367 Ride/Crash
OTHERS
No. Inst Remarks
368 HandClap
369 ClubClap
370 FlamencoClap
371 808 Claps
372 909 Claps
373 FingerSnap
374 78 Claves
375 78 Cowbell
376 78 Maracas
377 78 MetalBeat
378 78 Tamb
379 Scratch
380 Scratch LE
381 Scratch PP *M, *N
382 Super Low
383 SweepDown
384 Hammer
385 AirDraft
386 AirRelease
387 CarHorn
388 FightGong
389 Bottle Blow
No. Inst Remarks
390 Bubble
391 Junk Beat
392 Glass Beat
393 Noise Beat
394 Toy Sound Hi *M, *N
395 Toy Sound Lo *M, *N
396 Clock Tick
397 Squelch
398 Glass Crash
399 Trash Can
400 VerbyStick
401 Thunder
402 SpaceGun
403 TechnoChirp
404 Zweeper
405 Ricochet
406 Transponder
407 WarpDrive *M
408 MicroScratch *M
409 MarsCode
410 Off
Kit List
No. Kit
01 Latin Perc
02 Djembe
03 Cajon
04 Jazz Kit
05 MiddleEast
06 Pandeiro
07 LatinHouse
08 Nature
09 China
10 Orchestral
11 Conga
12 Bongo
13 Timbales
14 BongoConga
15 Repinique
16 Batucada
36
No. Kit
17 Talking Dr
18 Pot Drum
19 African
20 Rek
21 Tabla
22 Dholak
23 Darabuka
24 India
25 Silkroad
26 Gamelan
27 Japan
28 Korea
29 Handbells
30 Gyilli
31 HonkyTonk
32 SteelDrum
No. Kit
33 Xylophone
34 Vibraphone
35 MelodicTom
36 Marching
37 BalladPerc
38 MuteContrl
39 Drums
40 Brushes
41 Electronik
42 Metal
43 808 Kit
44 909 Kit
45 Club Kit
46 BreakBeats
47 JunkBeat
48 Drum Set
No. Kit
49 BitCrushGT
50 DrumChat
51 DubDrum
52 HandPowerD
53 Tee Bits
54 Cosmo 42
55 Scientific
56 Creature
57 Droid
58 Horror
59 Suspense
60 CarChase
61 Foley
62 Breath
63 Noizes
64 Resounder
Page 39

Style Guide Metronome Pattern List
No. Pattern Name Tempo Meas TimeSig
01 Samba 90 1 4/4
02 SambaKick 126 2 4/4
03 Baiao 110 2 2/4
04 Surdo 100 8 2/4
05 Repinique 115 1 4/4
06 Tamborim 120 2 2/4
07 Carnival 120 4 4/4
08 AfroCuban 88 1 6/8
09 Bolero 120 2 4/4
10 Mambo 95 2 2/4
11 Merengue 160 2 2/4
12 Calypso 100 1 2/4
13 Guaguanco 150 4 2/4
14 Comparsa 100 2 4/4
15 Salsa 87 2 4/4
16 ChaCha 1 100 2 4/4
17 ChaCha 2 120 2 4/4
18 Bongo 104 2 4/4
19 Djembe 1 117 1 4/4
20 Djembe 2 113 1 4/4
21 Djembe 3 120 4 4/4
22 African 1 130 2 4/4
23 African 2 145 1 4/4
24 African 9bt 97 1 9/8
25 Spanish 12 120 1 12/8
26 Flamenco 1 106 4 4/4
27 Flamenco 2 102 1 12/8
28 Flamenco 3 102 4 12/8
29 Arab 4beat 100 2 4/4
30 Arab 10beat 120 2 5/4
31 BellyDance 120 2 4/4
32 Moroccan 100 2 4/4
33 Orient 1 96 4 4/4
34 Orient 2 96 2 4/4
35 Polynesian 155 1 4/4
36 Tabla Folk 99 2 4/4
37 Tabla 16beat 120 4 4/4
38 Tabla 10beat 113 1 10/8
39 Tabla 7beat 120 1 7/4
40 PunjabiFolk 96 1 2/4
41 Gamelan 129 4 4/4
42 China 1 90 4 4/8
43 China 2 175 4 4/4
No. Pattern Name Tempo Meas TimeSig
44 Matsuri 1 86 2 4/4
45 Matsuri 2 131 2 4/4
46 SamulNori 1 160 4 4/4
47 SamulNori 2 100 4 5/8
48 Pops Perc 96 4 4/4
49 GyilliBass 132 8 4/4
50 MarimBass 116 4 4/4
51 House 125 4 4/4
52 2Step 132 4 4/4
53 909 Techno 126 2 4/4
54 Abstract 78 2 4/4
55 R&B 100 2 4/4
56 808 Slow 78 2 4/4
57 Jungle 148 4 4/4
58 Funk 108 4 4/4
59 Rock 114 2 4/4
60 HardRock 144 2 4/4
61 Metal 186 4 4/4
62 8Beat 100 2 4/4
63 16Beat 116 4 4/4
64 DiscoBeat 116 2 4/4
65 SlowRock 68 4 4/4
66 Shuffle 122 4 4/4
67 Ballad 66 4 4/4
68 BossaNova 144 4 4/4
69 Reggae 74 4 4/4
70 Swing 100 1 4/4
71 Brushes 80 4 4/4
72 March 120 4 4/4
73 Waltz 160 8 3/4
74 Son 3-2 100 1 4/4
75 Son 2-3 100 1 4/4
76 Rumba 3-2 100 1 4/4
77 Rumba 2-3 100 1 4/4
78 Cowbell 1 120 2 4/4
79 Cowbell 2 120 2 4/4
80 Cowbell 3 112 1 4/4
81 Shaker 104 1 4/4
82 Maracas 112 1 4/4
83 SleighBells 92 1 4/4
84 Triangle 1 108 1 4/4
85 Triangle 2 108 1 4/4
86 TempleBlocks 106 2 4/4
37
Page 40

Glossary
PAf (Polyphonic Aftertouch)
(from
p. 27
)
An example of PAf is as follows: Let’s say you are using the
ROLL function on all the pads. IF you press lightly on one pad,
and more strongly on another, then their respective sound levels
will be different.
Sens (Sensitivity)
(from
p. 27
)
Define the sensitivity of the pad or the like to control the
balance between the strike force and the sound volume. As the
value increases, the sensitivity gets higher, which means that a
louder sound is produced with weak strikes.
Threshold
(from
p. 27
)
Setting the Minimum Levels for the Pads
Allows a trigger signal to be received only above a determined
velocity level. In the following example, B will sound but A and
C will not sound.
LINEAR
The standard setting, producing the most natural
correspondence between playing dynamics and volume
change.
fig.VeloC-LINEAR.e
Volume
Striking Force
LINEAR
EXP1 (Exponential 1),
EXP2 (Exponential 2)
Stronger dynamics produce a greater change.
fig.VeloC-EP.e
Volume Volume
Striking Force
EXP 2EXP 1
Threshold
CBA
Curve (Velocity Curve)
(from
p. 25, 27
This setting determines the relation between playing velocity
and changes in volume.
)
LOG1, LOG2
Softer dynamics produces a greater change.
fig.VeloC-LOG.e
Volume Volume
LOG2LOG1
SPLINE
Extreme changes are made in response to playing dynamics.
fig.VeloC-SPLINE.e
Volume
Striking Force
SPLINE
Striking Force
38
Page 41

LOUD1, LOUD2
Hardly any dynamic response, easy to maintain strong volume
levels. Ideal when using drum triggers.
fig.VeloC-LOUD.e
Volume Volume
Striking Force
LOUD2LOUD1
Scan Time
(from
p. 27
)
A trigger signal may differ slightly depending on the
characteristics of each pad or acoustic drum trigger (drum
pickup) being used. If identical hits produce sound at different
volumes, you can adjust the “SCAN TIME” so that your way of
playing can be detected more precisely. The higher the value
the longer it will take for the sound to be played.
fig.scan time1.e
Scan Time
Time
fig.scan time2.e
Glossary
this to the lowest value possible while still ensuring that there is
no retriggering.
You can also eliminate this problem of retriggering
with the Mask Time setting.
Mask Time
(from
p. 27
)
Once a pad has been hit, any additional trigger signals
received within the specified “Mask Time” (0-64 msec) will be
ignored.
fig.mask time.e
Mask Time
Time
Sound not produced
XTalk Cancel
(Crosstalk Cancel)
(from
p. 27
)
An example of crosstalk is If two pads are mounted on the same
stand, or nearby, and hitting one pad causes the other pad to
sound. To eliminate this, adjust Crosstalk Cancel on the pad
that is sounding inadvertently.
Retrig Cancel
(Retrigger Cancel)
(from
p. 27
)
This is important if you are using acoustic drum triggers which
can produce altered waveforms that may also cause inadvertent
sounding at Point A in the following figure.
fig.Retrigger.e
A
Time
Retrigger Cancel detects such distortion in and prevents
retriggering from occurring.
Setting this to a high value prevents retriggering, but may also
cause sounds to be omitted during fast playing (roll etc.). Set
Rim Sens (Rim Sensitivity)
(from
p. 27
)
Control the sensitivity of the rim. As the value increases, the rim
is more likely to produce a sound. When it is set to OFF, the
instrument of the head is reproduced at a rim shot. Note that if
the value is too large, the instrument of the rim will be produced
when you strike the head.
Rim Gain
(from
p. 27
)
Control the sensitivity of the rim. Configure this parameter to
change the sensitivity of the rim alone with that of the head left
unchanged.
39
Page 42

Interface Profile
[EDIT]
Depend on “Type”
40
Page 43

SETUP ([SHIFT] + [EDIT])
Interface Profile
Only for Dump = 1KIT
Only for Mode = PAD(RIM)
41
Page 44

MIDI Implementation Chart
MIDI Implementation Chart
PERCUSSION SOUND MODULE
Model HPD-10
MIDI Implementation Chart
Date : February 1, 2006
Version : 1.00
Basic
Channel
Mode
Note
Number :
Velocity
After
Touch
Pitch Bend
Control
Change
Function...
Default
Changed
Default
Messages
Altered
True Voice
Note ON
Note OFF
Key’s
Ch’s
16
17
81
1–5, 7–31, 64–95
Transmitted Recognized Remarks
1
–16, OFF
1
–16, OFF
Mode 3
x
************** **************
0–127
**************
O 9nH, v=1-127
O 9nH, v=0
O 8nH, v=1-127 *1 *1
O
x
x
4
O (Foot Sw)
O (Pad Position)
O (Pad Position)
O (D Beam)
O
1–16, OFF
1
–16, OFF
Mode 3
x
0–127
0–127
O
x
O
*2 *2
O
x
x
O
*2
O
*2
O
*2
O
*2
O
*2
Memorized
Foot Control
*2
General Purpose Controller 1
*2
General Purpose Controller 2
*2
General Purpose Controller 6
*2
Pad Pressure, D Beam, Knob
*2
Prog
Change
: True #
System Exclusive
System
Common
System
Real Time
Aux
Message
: Song Pos
: Song Sel
: Tune
: Clock
: Commands
: All sound off
:
Reset all controllers
: Local Control
: All Notes OFF
: Active Sense
: Reset
Notes
Mode 1 : OMNI ON, POLY
Mode 3 : OMNI OFF, POLY
O
**************
O
x
x
x
x
x
x
x
x
x
O
x
O
*2 *2
0–63
O
x
x
x
x
x
O
O
x
x
O
x
Program number 1–64
* 1 Transmitted/Recognized when “Gate Time” is “GATE” or “ALT.”
* 2 o x is selectable.
Mode 2 : OMNI ON, MONO
Mode 4 : OMNI OFF, MONO
O : Yes
X : No
42
Page 45

Specifications
HPD-10: HandSonic 10
Pad
10 inches, 10 sections, Pressure-Sensitive
Instruments
410
Kits
64
Effects
Ambience (5 types)
Multi-Effects (20 types)
Style Guide Metronome
86 patterns
Tempo
40–200
Coach Mode
QUIET COUNT
RHYTHM CHECK
TIME CHECK
PAD FOLLOW
AUTO UP/DOWN
TAP TEMPO
Weight
2.9 kg / 6 lbs 7 oz (excluding AC adaptor)
Accessories
Owner’s Manual
AC Adaptor
Options
Pad Stand (PDS-10)
Carrying Bag (CB-HPD-10)
Foot Switch (BOSS: FS-5U, FS-6)
Pedal Switch (DP-2)
Kick Triggers (KD-7, KD-8, KD-85BK/WT, KD-120BK/WT)
Pads (PD-8, PDX-8, PD-85BK/WT, PD-105BK/WT, PD-125BK/
WT)
Cymbals (CY-5, CY-8, CY-12R/C, CY-14C, CY-15R)
Connection Cable (PCS-31L)
962a
* In the interest of product improvement, the specifications
and/or appearance of this unit are subject to change
without prior notice.
Controllers
D Beam Controller
Control Knob
Display
Icon-driven Backlit LCD
Connectors
Output Jacks (L/MONO, R)
Phones Jack (Stereo)
Mix In Jack (Stereo)
Trigger Input/Foot Sw Jack (Dual)
MIDI Connectors (IN, OUT)
Power Supply
AC Adaptor (DC 9 V)
Current Draw
350 mA
Dimensions
323 (W) x 427 (D) x 75 (H) mm
12-3/4 (W) x 16-13/16 (D) x 3 (H) inches
Demo Song List
1. Latin Passion Music by Ikuo Kakehashi
Copyright © 2006 Roland Corporation
2. Drums of India Music by Ikuo Kakehashi
Copyright © 2006 Roland Corporation
3. Tropical Waves Music by Ikuo Kakehashi
Copyright © 2006 Roland Corporation
4. Drums from Africa Music by Roland Corporation
Copyright © 2006 Roland Corporation
5. Samba de Droid Music by Ikuo Kakehashi
Copyright © 2006 Roland Corporation
981a
* All rights reserved. Unauthorized use of this material
for purposes other than private, personal enjoyment is
a violation of applicable laws.
43
Page 46

Attaching the HandSonic 10 to the Stand (optional)
1.
Using the screws already mounted on the bottom of the HandSonic 10, attach the stand holder as shown in
the diagram below.
Use ONLY these screws, otherwise damage may result.
fig.0-03.e
2.
Mount the HandSonic 10 to the stand. (PDS-10)
For details on assembling the pad stand and attaching the HandSonic 10, refer to the owner’s manual for
the pad stand.
fig.0-04.e
Options
Pad Stand
PDS-10
Kick Trigger Unit
KD-7
Bass Drum Pedal
not included.
Foot Switch
FS-5U
Personal Monitor Amplifier
PM-10
Dual-Trigger Pad
PD-8
Gig Bag for HandSonic
CB-HPD-10
Dual-Trigger
Cymbal Pad
CY-8
The CB-HPD-10 gig
bag can hold the
HandSonic, the PDS10, AC adaptor, and
headphones.
Trigger Cable
PCS-31L
Stereo
Headphones
RH-200S
44
Page 47

Index
A
Ambience
Assigning a Sound to a Pad
Auto Up/Down
.............................................................. 8, 24
........................................ 9
......................................................... 20
B
Beat
Metronome
Pad Follow
Bulk Dump
.......................................................... 15
.......................................................... 19
................................................................. 27
C
CC Tx/Rx (MIDI)
[COACH] button
Coach Mode
Control Knob
Cord Hook
Curve
........................................................................ 27
D Beam
Grossaly
Pad
...................................................................... 25
....................................................... 27
................................................. 17–20
............................................................. 17
.............................................................. 8
.................................................................. 6
............................................................... 25
.............................................................. 38
D
D Beam
[D BEAM] button
D BEAM Control Change Number (MIDI)
Demo Song
Demo Song List
Device ID (MIDI)
..................................................... 8, 13, 25, 28
Effects
.................................................................. 21
Gate Time
........................................................... 22
................................................... 8, 13
................. 27
................................................................. 3
......................................................... 44
........................................................ 27
E
[EDIT] button
Effect
[EFFECT] button
Effects List
Error Messages
EXP
........................................................................... 38
Exponential
External Trigger Settings (EXT TRIG)
......................................................... 9, 21
......................................................... 8, 12, 21, 28
..................................................... 8, 12
.................................................................. 30
......................................................... 29
............................................................... 38
.......................... 26
F
Factory Reset
Favorite Kit Jump Function
Foot Switch
Foot Switch Functions
............................................................. 27
......................................... 28
............................................................... 26
................................................ 26
G
Gate Time (Kit/MIDI)
Glossary
.................................................................... 38
................................................. 22
H
HH CTRL
.................................................................... 26
I
Inst Sort
Instrument List
...................................................................... 24
............................................................. 34
K
.............................................................................. 22
Kit
Kit Clear
Kit Copy
Kit Exchange
Kit List
Kit Naming
KIT Volume (Kit/MIDI) ................................................ 22
Knob (Effects) ............................................................. 21
Knob Control Change Number (MIDI) ....................... 27
.................................................................... 23
.................................................................... 23
.............................................................. 23
........................................................................ 36
.......................................................... 12, 28
L
LCD Contrast ....................................................... 24, 28
Level (Ambience) ........................................................ 24
Linear ......................................................................... 38
Local Control (MIDI) ................................................... 27
Log ............................................................................ 38
Loud ........................................................................... 39
L-R Exchange .............................................................. 23
M
Mask Time ........................................................... 27, 39
Metronome
Normal
................................................................ 15
Short Cut .............................................................. 28
Style Guide .......................................................... 14
Metronome Sound ..................................................... 16
MIDI ........................................................................... 27
Kit/MIDI ............................................................... 22
Mode (Ext Trig) .......................................................... 26
Muffling ................................................................. 8, 10
Mute .......................................................................... 11
N
Naming a Kit ............................................................. 12
Short Cut .............................................................. 28
45
Page 48

Index
NOTE OFF
Note#
................................................................ 22
....................................................................... 22
O
Option
...................................................................... 44
P
Pad
............................................................................. 9
Pad Chase
Pad Clear
Pad Copy
Pad Exchange
Pad Follow
Pad Settings
Pad Switch (Effects)
PAf
Pan
PC Tx/Rx (MIDI)
PlayStyle (Pad)
Polarity (Ext Trig)
Polyphonic Aftertouch
Position
Position (Pad)
Positional Sensing
Power
Preset Kit button
Pressure
Pressure Control Change Number (MIDI)
Pressure Sens (Pad)
................................................................ 24
.................................................................. 23
.................................................................. 23
........................................................... 23
................................................................ 19
.............................................................. 25
................................................... 21
............................................................................ 38
........................................................................... 10
........................................................ 27
.......................................................... 25
....................................................... 26
............................................... 38
....................................................................... 7
............................................................ 25
....................................................... 7
.......................................................................... 7
...................................................... 3, 7
.................................................................... 11
.................. 27
................................................... 25
Q
Quiet Count
.............................................................. 17
R
Rate (Auto Up/Down)
Restoring an Individual Kit to the Factory Settings
Retrig Cancel (Retrigger Cancel)
Rhythm (Metronome)
Rhythm Check
Rim Gain
Rim Sens
Roll (Pressure)
Rx Mute
Rx Pitch
D Beam
........................................................... 18
............................................................. 27, 39
............................................................. 27, 39
............................................................ 21
..................................................................... 11
..................................................................... 11
............................................................... 13
............................................... 20
......................... 27, 39
................................................. 15
S
Scan Time
........................................................... 27, 39
..... 23
SCRAPE
Sens
Sensitivity (Pad)
Setup
Short Cut
Sound
Spline
Stand ......................................................................... 44
Style Guide ................................................................ 14
Style Guide Metronome Pattern List ............................ 37
Switch (Ambience) ..................................................... 24
..................................................................... 22
........................................................................... 27
D Beam
................................................................ 25
.......................................................... 25
......................................................................... 24
.................................................................... 28
Effects
.................................................................. 21
Effects Editing
LCD Contrast
Metronome
Naming a Kit
....................................................... 12
........................................................ 24
........................................................... 16
....................................................... 28
.......................................................................... 9
........................................................................ 38
T
Tap Tempo ................................................................. 20
Tempo
Metronome (Normal)
Metronome (Style Guide) ..................................... 14
Tempo Change (Metronome) ..................................... 15
Threshold ............................................................. 27, 38
Time Check ................................................................ 18
Time Signature (Beat) ................................................. 15
Tools .......................................................................... 23
Troubleshooting ......................................................... 29
Tuning .................................................................... 8, 10
Tx (D Beam) ............................................................... 13
Type
Ambience
Effects .................................................................. 12
Ext Trig ................................................................. 26
............................................................. 24
........................................... 15
U
Undo ......................................................................... 23
V
Velocity (Ext Trig) ....................................................... 26
Velocity Curve ........................................................... 38
Volume ...................................................................... 10
Metronome ..................................................... 14, 16
X
XTalk Cancel (Crosstalk Cancel) .......................... 27, 39
46
Page 49

MEMO
47
Page 50

USING THE UNIT SAFELY
Used for instructions intended to alert the
user to the risk of death or severe injury
should the unit be used improperly.
The symbol alerts the user to important instructions or
warnings.The specific meaning of the symbol is
determined by the design contained within the triangle.
In the case of the symbol at left, it is used for general
cautions, warnings, or alerts to danger.
Used for instructions intended to alert the
user to the risk of injury or material
damage should the unit be used
improperly.
* Material damage refers to damage or
other adverse effects caused with
respect to the home and all its
furnishings, as well to domestic animals
or pets.
The symbol alerts the user to items that must never
be carried out (are forbidden). The specific thing that
must not be done is indicated by the design contained
within the circle. In the case of the symbol at left, it
means that the unit must never be disassembled.
The ● symbol alerts the user to things that must be
carried out. The specific thing that must be done is
indicated by the design contained within the circle. In
the case of the symbol at left, it means that the power-
cord plug must be unplugged from the outlet.
001
• Before using this unit, make sure to read the instructions
below, and the Owner’s Manual.
................................................................................................
002c
• Do not open (or modify in any way) the unit or its AC
adaptor.
................................................................................................
003
• Do not attempt to repair the unit, or replace parts within
it (except when this manual provides specific instructions
directing you to do so). Refer all servicing to your
retailer, the nearest Roland Service Center, or an
authorized Roland distributor, as listed on the
“Information” page.
................................................................................................
004
• Never use or store the unit in places that are:
• Subject to temperature extremes (e.g., direct sunlight
in an enclosed vehicle, near a heating duct, on top
of heat-generating equipment); or are
• Damp (e.g., baths, washrooms, on wet floors); or
are
• Humid; or are
• Exposed to rain; or are
USING THE UNIT SAFELY Please Read This Section
• Dusty; or are
• Subject to high levels of vibration.
................................................................................................
005
• This unit should be used only with a stand (PDS-10) that
is recommended by Roland (p. 44).
................................................................................................
006
• When using the unit with a stand (PDS-10)
recommended by Roland, the stand must be carefully
placed so it is level and sure to remain stable. If not
using a stand, you still need to make sure that any location you
choose for placing the unit provides a level surface that will
properly support the unit, and keep it from wobbling.
008c
• Be sure to use only the AC adaptor supplied with the
unit. Also, make sure the line voltage at the installation
matches the input voltage specified on the AC adaptor’s
body. Other AC adaptors may use a different polarity,
or be designed for a different voltage, so their use could
result in damage, malfunction, or electric shock.
................................................................................................
008e
• Use only the attached power-supply cord. Also, the
supplied power cord must not be used with any other
device.
................................................................................................
009
• Do not excessively twist or bend the power cord, nor
place heavy objects on it. Doing so can damage the
cord, producing severed elements and short circuits.
Damaged cords are fire and shock hazards!
................................................................................................
010
• This unit, either alone or in combination with an
amplifier and headphones or speakers, may be capable
of producing sound levels that could cause permanent
hearing loss. Do not operate for a long period of time at
a high volume level, or at a level that is uncomfortable. If
you experience any hearing loss or ringing in the ears,
you should immediately stop using the unit, and consult
an audiologist.
................................................................................................
011
• Do not allow any objects (e.g., flammable material,
coins, pins); or liquids of any kind (water, soft drinks,
etc.) to penetrate the unit.
................................................................................................
................................................................................................
48
Page 51

012b
• Immediately turn the power off, remove the AC adaptor
from the outlet, and request servicing by your retailer,
the nearest Roland Service Center, or an authorized
Roland distributor, as listed on the “Information” page
when:
• The AC adaptor, the power-supply cord, or the plug
has been damaged; or
• If smoke or unusual odor occurs
• Objects have fallen into, or liquid has been spilled
onto the unit; or
• The unit has been exposed to rain (or otherwise has
become wet); or
• The unit does not appear to operate normally or
exhibits a marked change in performance.
................................................................................................
012c
• Immediately turn the power off, remove the AC adaptor
from the outlet, and request servicing by your retailer,
the nearest Roland Service Center, or an authorized
Roland distributor, as listed on the “Information” page
when:
• The AC adaptor or the power-supply cord has been
damaged; or
• If smoke or unusual odor occurs
• Objects have fallen into, or liquid has been spilled
onto the unit; or
• The unit has been exposed to rain (or otherwise has
become wet); or
• The unit does not appear to operate normally or
exhibits a marked change in performance.
................................................................................................
013
• In households with small children, an adult should
provide supervision until the child is capable of
following all the rules essential for the safe operation of
the unit.
................................................................................................
014
• Protect the unit from strong impact.
(Do not drop it!)
................................................................................................
015
• Do not force the unit’s power-supply cord to share an
outlet with an unreasonable number of other devices. Be
especially careful when using extension cords—the total
power used by all devices you have connected to the
extension cord’s outlet must never exceed the power
rating (watts/amperes) for the extension cord. Excessive
loads can cause the insulation on the cord to heat up
and eventually melt through.
................................................................................................
016
• Before using the unit in a foreign country, consult with
your retailer, the nearest Roland Service Center, or an
authorized Roland distributor, as listed on the
“Information” page.
................................................................................................
101b
• The unit and the AC adaptor should be located so their
location or position does not interfere with their proper
ventilation.
................................................................................................
101c
• This (HandSonic 10) for use only with Roland stand
PDS-10. Use with other stands (or carts) is capable of
resulting in instability causing possible injury.
................................................................................................
102c
• Always grasp only the plug on the AC adaptor cord
when plugging into, or unplugging from, an outlet or this
unit.
................................................................................................
102d
• Always grasp only the output plug or the body of the AC
adaptor when plugging into, or unplugging from, this
unit or an outlet.
................................................................................................
103b
• At regular intervals, you should unplug the AC adaptor
and clean it by using a dry cloth to wipe all dust and
other accumulations away from its prongs. Also,
disconnect the power plug from the power outlet
whenever the unit is to remain unused for an extended
period of time. Any accumulation of dust between the
power plug and the power outlet can result in poor
insulation and lead to fire.
................................................................................................
104
• Try to prevent cords and cables from becoming
entangled. Also, all cords and cables should be placed
so they are out of the reach of children.
................................................................................................
106
• Never climb on top of, nor place heavy objects on the
unit.
................................................................................................
107c
• Never handle the AC adaptor or its plugs with wet
hands when plugging into, or unplugging from, an outlet
or this unit.
................................................................................................
107d
• Never handle the AC adaptor body, or its output plugs,
with wet hands when plugging into, or unplugging from,
an outlet or this unit.
................................................................................................
108b
• Before moving the unit, disconnect the AC adaptor and
all cords coming from external devices.
................................................................................................
109b
• Before cleaning the unit, turn off the power and unplug
the AC adaptor from the outlet (p. 6).
................................................................................................
110b
• Whenever you suspect the possibility of lightning in your
area, disconnect the AC adaptor from the outlet.
................................................................................................
118a
• Should you remove screws for the stand, keep them in a
safe place out of children’s reach, so there is no chance
of them being swallowed accidentally.
................................................................................................
USING THE UNIT SAFELY Please Read This Section
49
Page 52

IMPORTANT NOTES
291a
In addition to the items listed under “USING THE UNIT SAFELY” on page 48–49, please read and observe the following:
Power Supply
301
• Do not connect this unit to same electrical outlet that is being used by
an electrical appliance that is controlled by an inverter (such as a
refrigerator, washing machine, microwave oven, or air conditioner),
or that contains a motor. Depending on the way in which the
electrical appliance is used, power supply noise may cause this unit
to malfunction or may produce audible noise. If it is not practical to
use a separate electrical outlet, connect a power supply noise filter
between this unit and the electrical outlet.
302
• The AC adaptor will begin to generate heat after long hours of
consecutive use. This is normal, and is not a cause for concern.
307
• Before connecting this unit to other devices, turn off the power to all
units. This will help prevent malfunctions and/or damage to speakers
or other devices.
Placement
351
• Using the unit near power amplifiers (or other equipment containing
large power transformers) may induce hum. To alleviate the problem,
change the orientation of this unit; or move it farther away from the
source of interference.
352a
• This device may interfere with radio and television reception. Do not
use this device in the vicinity of such receivers.
352b
• Noise may be produced if wireless communications devices, such as
cell phones, are operated in the vicinity of this unit. Such noise could
occur when receiving or initiating a call, or while conversing. Should
you experience such problems, you should relocate such wireless
devices so they are at a greater distance from this unit, or switch
them off.
354a
• Do not expose the unit to direct sunlight, place it near devices that
radiate heat, leave it inside an enclosed vehicle, or otherwise subject
it to temperature extremes. Excessive heat can deform or discolor the
unit.
355b
• When moved from one location to another where the temperature
and/or humidity is very different, water droplets (condensation) may
form inside the unit. Damage or malfunction may result if you attempt
to use the unit in this condition. Therefore, before using the unit, you
must allow it to stand for several hours, until the condensation has
completely evaporated.
IMPORTANT NOTES Please Read This Section
Maintenance
401a
• For everyday cleaning wipe the unit with a soft, dry cloth or one that
has been slightly dampened with water. To remove stubborn dirt, use
a cloth impregnated with a mild, non-abrasive detergent. Afterwards,
be sure to wipe the unit thoroughly with a soft, dry cloth.
402
• Never use benzine, thinners, alcohol or solvents of any kind, to avoid
the possibility of discoloration and/or deformation.
Repairs and Data
452
• Please be aware that all data contained in the unit’s memory may be
lost when the unit is sent for repairs. Important data should always be
backed up in another MIDI device (e.g., a sequencer)., or written
down on paper (when possible). During repairs, due care is taken to
avoid the loss of data. However, in certain cases (such as when
circuitry related to memory itself is out of order), we regret that it may
not be possible to restore the data, and Roland assumes no liability
concerning such loss of data.
Memory Backup
501b
• This unit contains a battery which powers the unit’s memory circuits
while the main power is off. When this battery becomes weak, the
message shown below will appear in the display. Once you see this
message, have the battery replaced with a fresh one as soon as
possible to avoid the loss of all data in memory. To have the battery
replaced, consult with your retailer, the nearest Roland Service
Center, or an authorized Roland distributor, as listed on the
“Information” page.
Additional Precautions
551
• Please be aware that the contents of memory can be irretrievably lost
as a result of a malfunction, or the improper operation of the unit. To
protect yourself against the risk of loosing important data, we
recommend that you periodically save a backup copy of important
data you have stored in the unit’s memory in another MIDI device
(e.g., a sequencer).
552
• Unfortunately, it may be impossible to restore the contents of data
that was stored in user kit. once it has been lost. Roland Corporation
assumes no liability concerning such loss of data.
553
• Use a reasonable amount of care when using the unit’s buttons,
sliders, or other controls; and when using its jacks and connectors.
Rough handling can lead to malfunctions.
554
• Never strike or apply strong pressure to the display.
556
• When connecting / disconnecting all cables, grasp the connector
itself—never pull on the cable. This way you will avoid causing
shorts, or damage to the cable’s internal elements.
558a
• To avoid disturbing your neighbors, try to keep the unit’s volume at
reasonable levels. You may prefer to use headphones, so you do not
need to be concerned about those around you (especially when it is
late at night).
558d
• This instrument is designed to minimize the extraneous sounds
produced when it’s played. However, since sound vibrations can be
transmitted through floors and walls to a greater degree than
expected, take care not to allow these sounds to become a nuisance
to neighbors, especially when performing at night and when using
headphones.
559a
• When you need to transport the unit, package it in the box (including
padding) that it came in, if possible. Otherwise, you will need to use
equivalent packaging materials.
566a
• The usable range of D Beam controller will become extremely small
when used under strong direct sunlight. Please be aware of this when
using the D Beam controller outside.
566b
• The sensitivity of the D Beam controller will change depending on the
amount of light in the vicinity of the unit. If it does not function as you
expect, adjust the sensitivity as appropriate for the brightness of your
location.
50
Page 53

For the U.K.
IMPORTANT: THE WIRES IN THIS MAINS LEAD ARE COLOURED IN ACCORDANCE WITH THE FOLLOWING CODE.
BLUE:
BROWN:
As the colours of the wires in the mains lead of this apparatus may not correspond with the coloured markings identifying
the terminals in your plug, proceed as follows:
The wire which is coloured BLUE must be connected to the terminal which is marked with the letter N or coloured BLACK.
The wire which is coloured BROWN must be connected to the terminal which is marked with the letter L or coloured RED.
Under no circumstances must either of the above wires be connected to the earth terminal of a three pin plug.
NEUTRAL
LIVE
For EU Countries
Danger of explosion if battery is
Apparatus containing
Lithium batteries
Lithiumbatteri - Eksplosionsfare ved
fejlagtig håndtering.
Udskiftning må kun ske med batteri af
samme fabrikat og type.
Levér det brugte batteri tilbage til
leverandøren.
Eksplosjonsfare ved feilaktig skifte av
batteri.
Benytt samme batteritype eller en
tilsvarende type anbefalt av
apparatfabrikanten.
Brukte batterier kasseres i henhold til
fabrikantens instruks joner.
ADVARSEL!
ADVARSEL
This product complies with the requirements of European Directive 89/336/EEC.
incorrectly replaced.
Replace only with the same or
equivalent type recommended by the
manufacturer.
Discard used batteries according to the
manufacturer’s instructions.
Explosionsfara vid felaktigt batteribyte.
Använd samma batterityp eller en
ekvivalent typ som rekommenderas av
apparattillverkaren.
Kassera använt batteri enligt
fabrikantens instruktion.
Paristo voi räjähtää, jos se on
virheellisesti asennettu.
Vaihda paristo ainoastaan
laitevalmistajan suosittelemaan
tyyppiin. Hävitä käytetty paristo
valmistajan ohjeiden mukaisesti.
CAUTION
VARNING
VAROITUS
For EU Countries
For the USA
FEDERAL COMMUNICATIONS COMMISSION
RADIO FREQUENCY INTERFERENCE STATEMENT
This equipment has been tested and found to comply with the limits for a Class B digital device, pursuant to Part 15 of the
FCC Rules. These limits are designed to provide reasonable protection against harmful interference in a residential
installation. This equipment generates, uses, and can radiate radio frequency energy and, if not installed and used in
accordance with the instructions, may cause harmful interference to radio communications. However, there is no guarantee
that interference will not occur in a particular installation. If this equipment does cause harmful interference to radio or
television reception, which can be determined by turning the equipment off and on, the user is encouraged to try to correct the
interference by one or more of the following measures:
– Reorient or relocate the receiving antenna.
– Increase the separation between the equipment and receiver.
– Connect the equipment into an outlet on a circuit different from that to which the receiver is connected.
– Consult the dealer or an experienced radio/TV technician for help.
This device complies with Part 15 of the FCC Rules. Operation is subject to the following two conditions:
(1) This device may not cause harmful interference, and
(2) This device must accept any interference received, including interference that may cause undesired operation.
Unauthorized changes or modification to this system can void the users authority to operate this equipment.
This equipment requires shielded interface cables in order to meet FCC class B Limit.
For Canada
NOTICE
This Class B digital apparatus meets all requirements of the Canadian Interference-Causing Equipment Regulations.
AVIS
Cet appareil numérique de la classe B respecte toutes les exigences du Règlement sur le matériel brouilleur du Canada.
Page 54

Information When you need repair service, call your nearest Roland Service Center or authorized Roland
distributor in your country as shown below.
AFRICA
EGYPT
Al Fanny Trading Office
9, EBN Hagar A1 Askalany
Street,
ARD E1 Golf, Heliopolis,
Cairo 11341, EGYPT
TEL: 20-2-417-1828
REUNION
Maison FO - YAM Marcel
25 Rue Jules Hermann,
Chaudron - BP79 97 491
Ste Clotilde Cedex,
REUNION ISLAND
TEL: (0262) 218-429
SOUTH AFRICA
T.O.M.S. Sound & Music
(Pty)Ltd.
11 Melle St., Braamfontein,
Johannesbourg,
SOUTH AFRICA
TEL: (011) 403 4105
FAX: (011) 403 1234
Paul Bothner(PTY)Ltd.
Royal Cape Park, Unit 24
Londonderry Road, Ottery 7800
Cape Town, SOUTH AFRICA
TEL: (021) 799 4900
ASIA
CHINA
Roland Shanghai Electronics
Co.,Ltd.
5F. No.1500 Pingliang Road
Shanghai 200090, CHINA
TEL: (021) 5580-0800
Roland Shanghai Electronics
Co.,Ltd.
(BEIJING OFFICE)
10F. No.18 3 Section Anhuaxili
Chaoyang District Beijing
100011 CHINA
TEL: (010) 6426-5050
HONG KONG
Tom Lee Music Co., Ltd.
Service Division
22-32 Pun Shan Street, Tsuen
Wan, New Territories,
HONG KONG
TEL: 2415 0911
Parsons Music Ltd.
8th Floor, Railway Plaza, 39
Chatham Road South, T.S.T,
Kowloon, HONG KONG
TEL: 2333 1863
INDIA
Rivera Digitec (India) Pvt. Ltd.
409, Nirman Kendra
Mahalaxmi Flats Compound
Off. Dr. Edwin Moses Road,
Mumbai-400011, INDIA
TEL: (022) 2493 9051
INDONESIA
PT Citra IntiRama
J1. Cideng Timur No. 15J-150
Jakarta Pusat
INDONESIA
TEL: (021) 6324170
KOREA
Cosmos Corporation
1461-9, Seocho-Dong,
Seocho Ku, Seoul, KOREA
TEL: (02) 3486-8855
MALAYSIA
Roland Asia Pacific Sdn. Bhd.
45-1, Block C2, Jalan PJU 1/39,
Dataran Prima, 47301 Petaling
Jaya, Selangor, MALAYSIA
TEL: (03) 7805-3263
PHILIPPINES
G.A. Yupangco & Co. Inc.
339 Gil J. Puyat Avenue
Makati, Metro Manila 1200,
PHILIPPINES
TEL: (02) 899 9801
SINGAPORE
SWEE LEE MUSIC
COMPANY PTE. LTD.
150 Sims Drive,
SINGAPORE 387381
TEL: 6846-3676
SRI LANKA
Penguin Electronics (Pvt) Ltd.
115, Maya Avenue,
Colombo 06, SRI LANKA
TEL: (11) 2552376
TAIWAN
ROLAND TAIWAN
ENTERPRISE CO., LTD.
Room 5, 9fl. No. 112 Chung
Shan N.Road Sec.2, Taipei,
TAIWAN, R.O.C.
TEL: (02) 2561 3339
THAILAND
Theera Music Co. , Ltd.
330 Soi Verng NakornKasem,
New Road, Sumpantawongse,
Bangkok 10100, THAILAND
TEL: (02) 224-8821
VIETNAM
SAIGON MUSIC
DISTRIBUTOR
(TAN DINH MUSIC)
138 Tran Quang Khai Street
Dist. 1, Ho Chi Minh City
VIETNAM
TEL: (08) 848-4068
AUSTRALIA/
NEW ZEALAND
AUSTRALIA/
NEW ZEALAND
Roland Corporation
Australia Pty.,Ltd.
38 Campbell Avenue
Dee Why West. NSW 2099
AUSTRALIA
For Australia
Tel: (02) 9982 8266
For New Zealand
Tel: (09) 3098 715
CENTRAL/LATIN
AMERICA
ARGENTINA
Instrumentos Musicales S.A.
Av.Santa Fe 2055
(1123) Buenos Aires
ARGENTINA
TEL: (011) 4508-2700
BARBADOS
A&B Music Supplies LTD
12 Webster Industrial Park
Wildey, St.Michael, Barbados
TEL: (246)430-1100
BRAZIL
Roland Brasil Ltda.
Rua San Jose, 780 Sala B
Parque Industrial San Jose
Cotia - Sao Paulo - SP, BRAZIL
TEL: (011) 4615 5666
CHILE
Comercial Fancy II S.A.
Rut.: 96.919.420-1
Nataniel Cox #739, 4th Floor
Santiago - Centro, CHILE
TEL: (02) 688-9540
COLOMBIA
Centro Musical Ltda.
Cra 43 B No 25 A 41 Bododega 9
Medellin, Colombia
TEL: (574)3812529
COSTA RICA
JUAN Bansbach Instrumentos
Musicales
Ave.1. Calle 11, Apartado 10237,
San Jose, COSTA RICA
TEL: 258-0211
CURACAO
Zeelandia Music Center Inc.
Orionweg 30
Curacao, Netherland Antilles
TEL:(305)5926866
DOMINICAN REPUBLIC
Instrumentos Fernando Giraldez
Calle Proyecto Central No.3
Ens.La Esperilla
Santo Domingo,
Dominican Republic
TEL:(809) 683 0305
ECUADOR
Mas Musika
Rumichaca 822 y Zaruma
Guayaquil - Ecuador
TEL:(593-4)2302364
EL SALVADOR
OMNI MUSIC
75 Avenida Norte y Final
Alameda Juan Pablo II,
Edificio No.4010 San Salvador,
EL SALVADOR
TEL: 262-0788
GUATEMALA
Casa Instrumental
Calzada Roosevelt 34-01,zona 11
Ciudad de Guatemala
Guatemala
TEL:(502) 599-2888
HONDURAS
Almacen Pajaro Azul S.A. de C.V.
BO.Paz Barahona
3 Ave.11 Calle S.O
San Pedro Sula, Honduras
TEL: (504) 553-2029
MARTINIQUE
Musique & Son
Z.I.Les Mangle
97232 Le Lamantin
Martinique F.W.I.
TEL: 596 596 426860
Gigamusic SARL
10 Rte De La Folie
97200 Fort De France
Martinique F.W.I.
TEL: 596 596 715222
MEXICO
Casa Veerkamp, s.a. de c.v.
Av. Toluca No. 323, Col. Olivar
de los Padres 01780 Mexico
D.F. MEXICO
TEL: (55) 5668-6699
NICARAGUA
Bansbach Instrumentos
Musicales Nicaragua
Altamira D'Este Calle Principal
de la Farmacia 5ta.Avenida
1 Cuadra al Lago.#503
Managua, Nicaragua
TEL: (505)277-2557
PANAMA
SUPRO MUNDIAL, S.A.
Boulevard Andrews, Albrook,
Panama City, REP. DE
PANAMA
TEL: 315-0101
PARAGUAY
Distribuidora De
Instrumentos Musicales
J.E. Olear y ESQ. Manduvira
Asuncion PARAGUAY
TEL: (595) 21 492147
PERU
Audionet
Distribuciones Musicales SAC
Juan Fanning 530
Miraflores
Lima - Peru
TEL: (511) 4461388
TRINIDAD
AMR Ltd
Ground Floor
Maritime Plaza
Barataria Trinidad W.I.
TEL: (868) 638 6385
URUGUAY
Todo Musica S.A.
Francisco Acuna de Figueroa
1771
C.P.: 11.800
Montevideo, URUGUAY
TEL: (02) 924-2335
VENEZUELA
Instrumentos Musicales
Allegro,C.A.
Av.las industrias edf.Guitar
import
#7 zona Industrial de Turumo
Caracas, Venezuela
TEL: (212) 244-1122
EUROPE
AUSTRIA
Roland Elektronische
Musikinstrumente HmbH.
Austrian Office
Eduard-Bodem-Gasse 8,
A-6020 Innsbruck, AUSTRIA
TEL: (0512) 26 44 260
BELGIUM/FRANCE/
HOLLAND/
LUXEMBOURG
Roland Central Europe N.V.
Houtstraat 3, B-2260, Oevel
(Westerlo) BELGIUM
TEL: (014) 575811
CZECH REP.
K-AUDIO
Kardasovska 626.
CZ-198 00 Praha 9,
CZECH REP.
TEL: (2) 666 10529
DENMARK
Roland Scandinavia A/S
Nordhavnsvej 7, Postbox 880,
DK-2100 Copenhagen
DENMARK
TEL: 3916 6200
FINLAND
Roland Scandinavia As, Filial
Finland
Elannontie 5
FIN-01510 Vantaa, FINLAND
TEL: (0)9 68 24 020
GERMANY
Roland Elektronische
Musikinstrumente HmbH.
Oststrasse 96, 22844
Norderstedt, GERMANY
TEL: (040) 52 60090
GREECE/CYPRUS
STOLLAS S.A.
Music Sound Light
155, New National Road
Patras 26442, GREECE
TEL: 2610 435400
HUNGARY
Roland East Europe Ltd.
Warehouse Area ‘DEPO’ Pf.83
H-2046 Torokbalint,
HUNGARY
TEL: (23) 511011
IRELAND
Roland Ireland
G2 Calmount Park, Calmount
Avenue, Dublin 12
Republic of IRELAND
TEL: (01) 4294444
ITALY
Roland Italy S. p. A.
Viale delle Industrie 8,
20020 Arese, Milano, ITALY
TEL: (02) 937-78300
NORWAY
Roland Scandinavia Avd.
Kontor Norge
Lilleakerveien 2 Postboks 95
Lilleaker N-0216 Oslo
NORWAY
TEL: 2273 0074
POLAND
MX MUSIC SP.Z.O.O.
UL. Gibraltarska 4.
PL-03664 Warszawa POLAND
TEL: (022) 679 44 19
PORTUGAL
Roland Iberia, S.L.
Portugal Office
Cais das Pedras, 8/9-1 Dto
4050-465, Porto, PORTUGAL
TEL: 22 608 00 60
ROMANIA
FBS LINES
Piata Libertatii 1,
535500 Gheorgheni,
ROMANIA
TEL: (266) 364 609
RUSSIA
MuTek
Dorozhnaya ul.3,korp.6
117 545 Moscow, RUSSIA
TEL: (095) 981-4967
SPAIN
Roland Iberia, S.L.
Paseo García Faria, 33-35
08005 Barcelona SPAIN
TEL: 93 493 91 00
SWEDEN
Roland Scandinavia A/S
SWEDISH SALES OFFICE
Danvik Center 28, 2 tr.
S-131 30 Nacka SWEDEN
TEL: (0)8 702 00 20
SWITZERLAND
Roland (Switzerland) AG
Landstrasse 5, Postfach,
CH-4452 Itingen,
SWITZERLAND
TEL: (061) 927-8383
UKRAINE
TIC-TAC
Mira Str. 19/108
P.O. Box 180
295400 Munkachevo,
UKRAINE
TEL: (03131) 414-40
UNITED KINGDOM
Roland (U.K.) Ltd.
Atlantic Close, Swansea
Enterprise Park, SWANSEA
SA7 9FJ,
UNITED KINGDOM
TEL: (01792) 702701
MIDDLE EAST
BAHRAIN
Moon Stores
No.16, Bab Al Bahrain Avenue,
P.O.Box 247, Manama 304,
State of BAHRAIN
TEL: 17 211 005
IRAN
MOCO INC.
No.41 Nike St., Dr.Shariyati Ave.,
Roberoye Cerahe Mirdamad
Tehran, IRAN
TEL: (021) 285-4169
ISRAEL
Halilit P. Greenspoon & Sons
Ltd.
8 Retzif Ha'aliya Hashnya St.
Tel-Aviv-Yafo ISRAEL
TEL: (03) 6823666
JORDAN
MUSIC HOUSE CO. LTD.
FREDDY FOR MUSIC
P. O. Box 922846
Amman 11192 JORDAN
TEL: (06) 5692696
KUWAIT
EASA HUSAIN AL-YOUSIFI
& SONS CO.
Abdullah Salem Street,
Safat, KUWAIT
TEL: 243-6399
LEBANON
Chahine S.A.L.
Gerge Zeidan St., Chahine
Bldg., Achrafieh, P.O.Box: 165857
Beirut, LEBANON
TEL: (01) 20-1441
OMAN
TALENTZ CENTRE L.L.C.
Malatan House No.1
Al Noor Street, Ruwi
SULTANATE OF OMAN
TEL: 2478 3443
QATAR
Al Emadi Co. (Badie Studio &
Stores)
P.O. Box 62, Doha, QATAR
TEL: 4423-554
SAUDI ARABIA
aDawliah Universal
Electronics APL
Corniche Road, Aldossary
Bldg., 1st Floor, Alkhobar,
SAUDI ARABIA
P.O.Box 2154, Alkhobar 31952
SAUDI ARABIA
TEL: (03) 898 2081
SYRIA
Technical Light & Sound
Center
Rawda, Abdul Qader Jazairi St.
Bldg. No. 21, P.O.BOX 13520,
Damascus, SYRIA
TEL: (011) 223-5384
TURKEY
ZUHAL DIS TICARET A.S.
Galip Dede Cad. No.37
Beyoglu - Istanbul / TURKEY
TEL: (0212) 249 85 10
U.A.E.
Zak Electronics & Musical
Instruments Co. L.L.C.
Zabeel Road, Al Sherooq Bldg.,
No. 14, Grand Floor, Dubai,
U.A.E.
TEL: (04) 3360715
NORTH AMERICA
CANADA
Roland Canada Ltd.
(Head Office)
5480 Parkwood Way
Richmond B. C., V6V 2M4
CANADA
TEL: (604) 270 6626
Roland Canada Ltd.
(Toronto Office)
170 Admiral Boulevard
Mississauga On L5T 2N6
CANADA
TEL: (905) 362 9707
U. S. A.
Roland Corporation U.S.
5100 S. Eastern Avenue
Los Angeles, CA 90040-2938,
U. S. A.
TEL: (323) 890 3700
As of April 1, 2006 (ROLAND)
Page 55

Page 56

*04129645 -02 *
04129645 ’06-04-2N
 Loading...