

Page 1

Using E-A7 Tone Manager
Copyright © 2017 ROLAND CORPORATION
* Roland is a registered trademark or trademark of Roland Corporation in the United States and/or other countries.
* Company names and product names appearing in this document are registered trademarks or trademarks of their respective owners.
1. Introduction
E-A7 Tone Manager is an application that lets you use your computer to manage libraries of the E-A7’s tones and samples, and to edit their
parameters. It lets you eciently manage and edit large numbers of tones on your computer.
The data structure of the E-A7
E-A7
Global Parameter User Program
Style Part Keyboard Part
Master Tune
UP1 EQ/MFX Link
Output Mode
Style
5 Keyboard Part Mixer
5 Tone/Drum Kit
5 Sample/Multisample
5 Keyboard Part Eects
The structure of the Keyboard Parts
Keyboard Part
Upper 1
E-A7 Tone Manager lets you manage and edit these portions of the data.
Lower
Upper 3
Upper 2
Tone/Drum Kit
Partial 1/Wave 1
Partial 2/Wave 2
Partial 3/Wave 3
Partial 4/Wave 4
INT
(Internal)
SAMP
(Sample)
SAMP
(Sample)
MSAMP
(Multisample)
SAMP
(Sample)
For each partial, you can choose from INT,
SAMP, or MSAMP.
SAMP
(Sample)
1
01
Page 2

Using E-A7 Tone Manager
2. Connections and Settings
5 E-A7 Tone Manager is available with E-A7 Ver.2.00 or later. Check the version and update your E-A7 if needed.
5 Connect the E-A7 and your computer as described in E-A7 owner’s manual. E-A7 Tone Manager may not operate correctly if these
connections are not made correctly.
2-1. About the E-A7’s Screen Indications
While using E-A7 Tone Manager, press the [Exit] button so that the left screen and right screen of the E-A7 both show the top page.
If a screen other than the top screen is shown, the system might not work correctly.
Left screen (shows the style name) Right screen (shows the tone list)
While data is being read or written, the E-A7’s display indicates “PC Mode,” and it no longer accepts operations.
When reading or writing is completed, the E-A7 automatically returns to its normal state.
If a problem occurs during reading or writing, and the E-A7 does not return from PC Mode, press the [Exit] button to return to the normal
state.
2-2. Connecting via USB Cable
If the E-A7 is connected to your computer by a USB cable, you must power up the E-A7 before you start up E-A7 Tone Manager.
When using the software for the rst time, you must set up MIDI devices using the procedure below.
1. Select “VENDOR” as the USB driver on the E-A7.
[MENU] button0 “Global” 0 “USB Driver”
* For details on switching the USB driver, refer to the E-A7 reference manual.
2. On your computer, install the USB driver that you downloaded from the Roland website.
3. Start up E-A7 Tone Manager.
4. Click the [System] button to open the dialog box, and for INPUT/OUTPUT DEVICE, choose “Roland Arranger.”
NOTE
Do not disconnect the USB cable connected to the E-A7 while E-A7 Tone Manager is running.
2-3. Connecting via MIDI Cables
If you want to connect E-A7 Tone Manager via MIDI cables, you’ll also need a MIDI interface.
Using MIDI cables, connect both the MIDI IN and MIDI OUT connectors on the MIDI interface connected to your computer to the MIDI
connectors on the E-A7.
Before using E-A7 Tone Manager for the rst time, be sure to click the [System] button to open the dialog box, then specify the port to which
the E-A7 is connected.
2
Page 3

Using E-A7 Tone Manager
3. Overview of the E-A7 Tone Manager
Broadly speaking, E-A7 Tone Manager provides the following three functions.
Librarian
You can copy, add, delete, and rearrange user tones and user drum kits, and edit their name and memo.
You can also read and write tone les for the E-A7.
Editor
You can edit the parameters of a tone/drum kit or the parameters of the keyboard part mixer.
You can also edit the parameters of a user sample or multisample.
Sample Creator
You can import audio les, and create WAV data that can be imported by the E-A7 arranger as user samples.
In addition to editing the parameter settings, you can delete unwanted portions of a sample, and process the sample so that loops are
smoothly connected.
Audio les that can be imported
WAV/AIFF/SF2 formats (on Mac OS, CoreAudio compatible les are also included)
There’s also a System mode that lets you make settings for E-A7 Tone Manager. To switch between these functions, use the mode buttons
located in the upper part of the screen.
3
Page 4

3-1. Librarian Mode
Using E-A7 Tone Manager
[Load] button
Loads a sound le. The
loaded le is added as a new
list in the far right.
[Select All] button
Selects all tones in the list.
MODE select
Switches the tone/drum kit list.
[Save] button
Writes the sounds in the list
as a library le (*.EAL).
[Clear] button
De-selects all tones in the list.
Finder
Searches for text in the Number, NAME,
or MEMO eld of the list.
[New] button
Adds a new list.
[Copy] button
Copies the currently selected
tone ([Ctrl] key + [C] key has
the same result). If you execute
this in the left-most list, only
the parameters are copied; the
sample les are not copied.
[Duplicate] button
Duplicates a list, and adds
it as a new list.
[Replace] button
Overwrites the copied tone
onto the currently selected tone
([Ctrl] key + [R] key has the same
result). If you execute this in the
left-most list, only the parameters
are replaced; the sample les are
not replaced.
[Close] button
Closes the list.
[Initialize] button
Returns all parameters of
the selected tone to their
default values.
[Insert] button
Inserts the copied tone below the
selected tone ([Ctrl] key + [V] has
the same result). If you execute
this in the left-most list, only
the parameters are inserted; the
sample les are not inserted.
[Delete] button
Deletes the selected tone.
Expanding the sound parameters
If you hold down the [Ctrl] key + [Shift] key, and then click a tone, the parameters
of the selected tone are expanded, and you’ll switch to Editor mode.
Tone Number
Click this to select a tone.
You can select a consecutive
range of tones by holding down
the [Shift] key and clicking.
You can select multiple specic
tones by holding down the [Ctrl]
key and clicking.
NAME input
Enter the tone name (up to 12
characters).
[Read] button
Reads the tone of the selected number
from the currently-connected E-A7.
However, the samples themselves are
not loaded.
STATUS
Lock symbol
This is shown if the tone is copyprotected. This tone cannot be
used with a dierent E-A7 unit.
S symbol
This is shown if the tone uses a
user sample or multisample.
[Write] button
Writes the tone of the selected number
to the currently-connected E-A7.
However, the samples themselves are
not written.
List NAME input
Enter the list name (up to 12
characters).
MEMO input
Enter a memo for each tone (up to
32 characters).
Add Tone button
Adds a new tone to the end
of the list.
[SYNC] button
Synchronizes the tone to the
panel of the currently-connected
E-A7. However, the samples
themselves are not synchronized.
4
Page 5

3-2. Editor Mode
Editor mode has four groups, and each group lets you edit the following content.
Using E-A7 Tone Manager
Samples group
Lets you edit the parameters of the
samples and multisamples.
[Read] button
In a single operation, loads
the parameters of all four
Editor mode groups.
Tones group
Lets you edit the parameters of the
tone or drum kit.
[Sync] button
Synchronizes the edited
parameters to the panel of
the E-A7.
Part group
Lets you edit the Keyboard Part Mixer
parameters.
[Keyboard] button
Opens the keyboard popup; notes that
you click are sounded by the E-A7. You can
also change the MIDI channel that plays
the notes.
Part Default MIDI Ch
Upper 1 4
Upper 2 6
Upper 3 13
Lower 11
Global group
Lets you edit the global parameters
for the sound.
[Manual] button
Opens the PDF manual.
How Editor Mode is structured
Editor Mode
Edit Edit Edit Edit
Sample Tone
Multi
Sample
Part (Mixer) GlobalTonesSamples
Drum Kit
5
Page 6

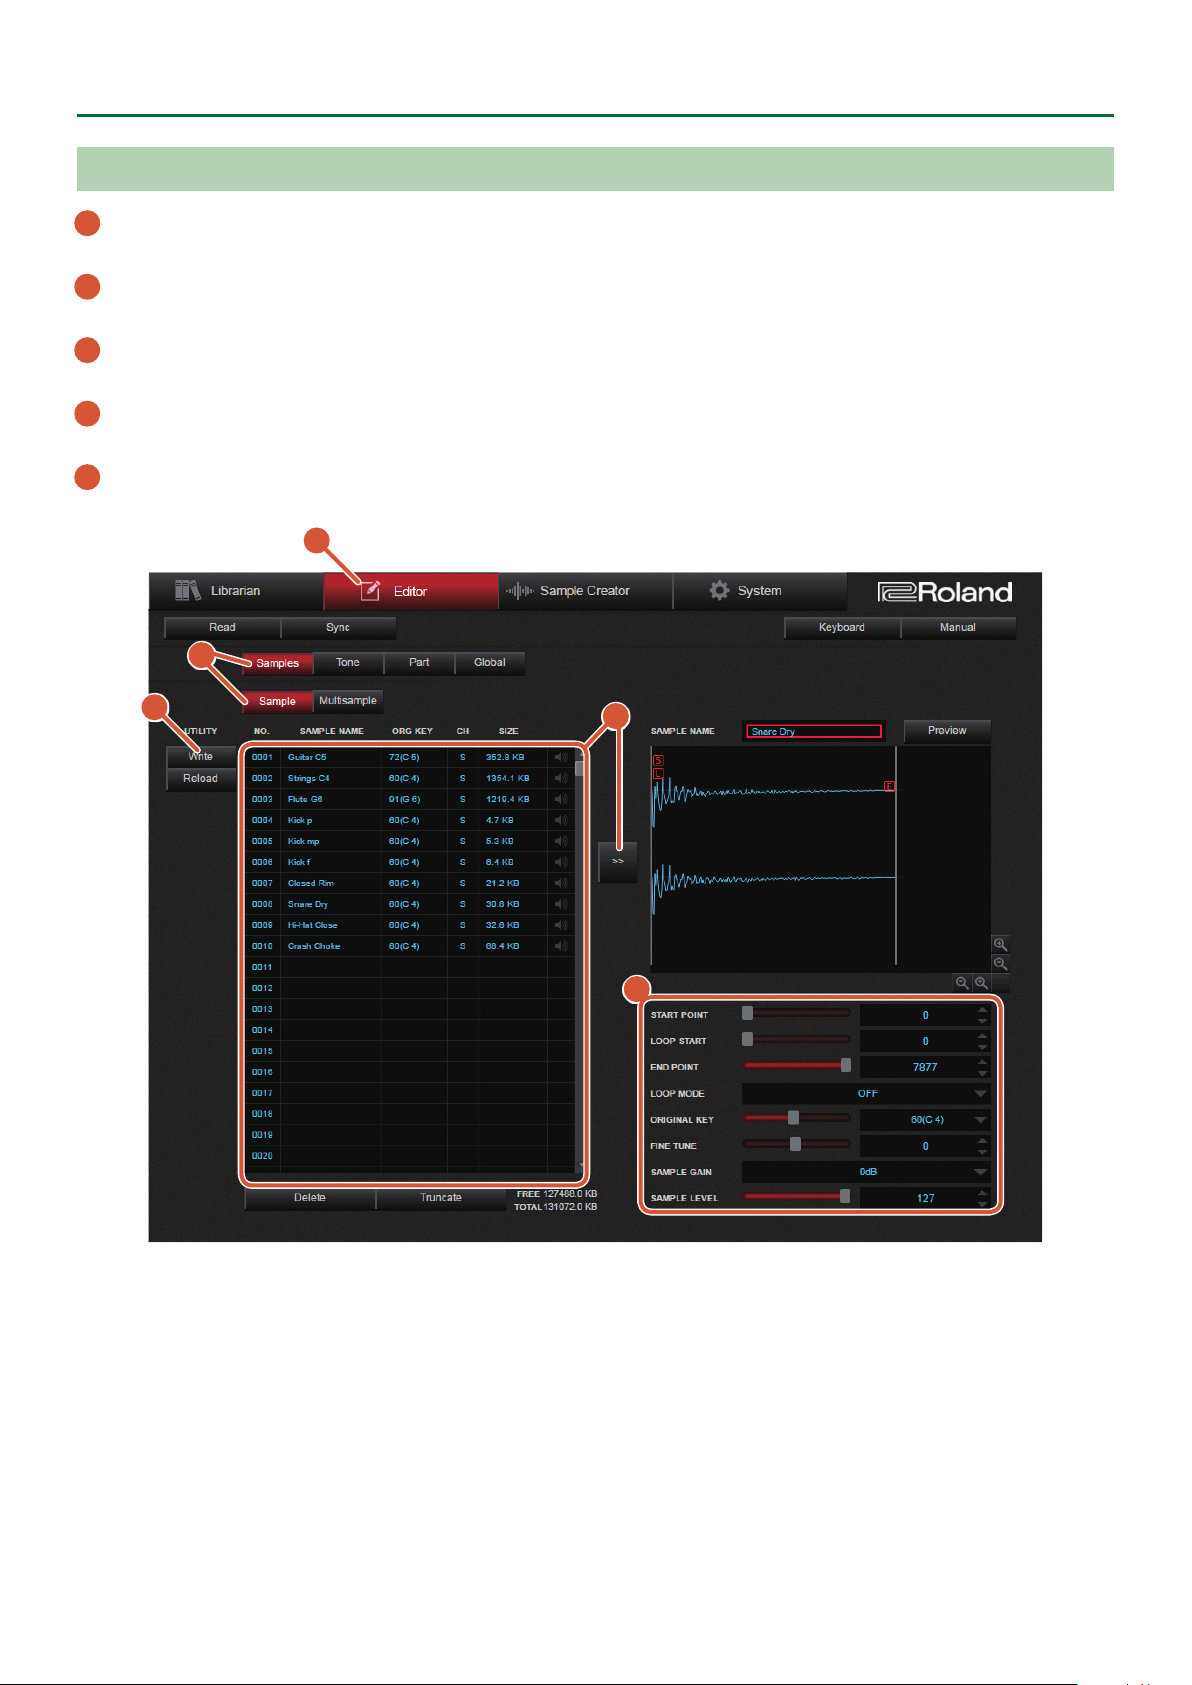
Samples group (Sample screen)
Using E-A7 Tone Manager
[Write] button
Writes the edited sample
to the user sample area of
the E-A7.
[Reload] button
Loads the latest sample data
from the E-A7.
Channel indication
This indicates “S” for a stereo
sample and “M” for a mono
sample.
Sample list
Shows information for all user
samples.
[Delete] button
Deletes the selected sample.
[Preview] button
Auditions each sample as it is.
[Truncate] button
Truncates the selected sample.
Waveform display
This shows the sample name and
waveform. You can click Name and
enter a name (up to 12 characters).
Sample capacity
Shows the available space and
total used space of the E-A7’s
user memory.
[Edit] button
Shows the selected sample
in the edit window at the
right.
[Edit Preview] button
Auditions the currentlyedited sample. The sound
reects the parameters as
you’ve edited them.
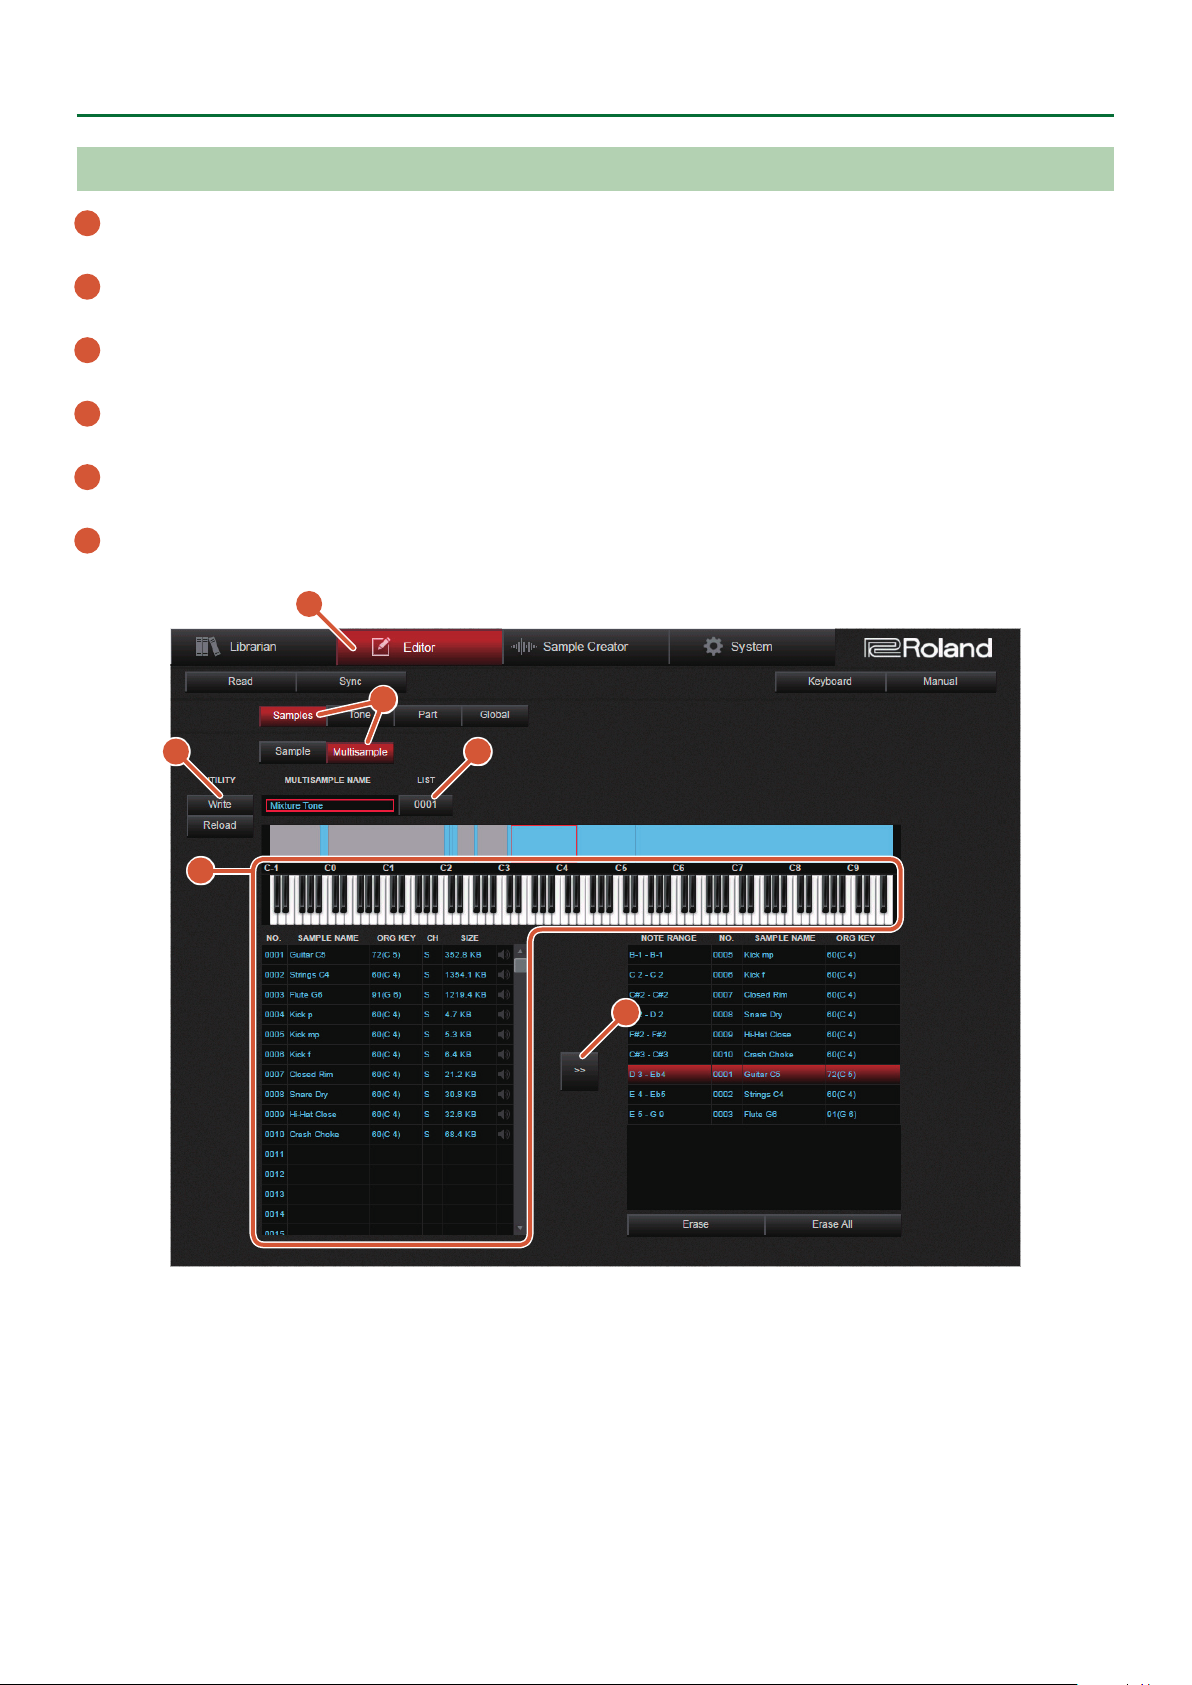
Samples group (Multisample screen)
MULTISAMPLE NAME
Enter a multisample name
(up to 12 characters).
[Write] button
Writes the edited
multisample to the E-A7’s
multisample area.
[Reload] button
Loads the latest multisample
data from the E-A7.
[LIST] button
Displays a list where you can
select a multisample.
Sample list
Shows information for all
user samples.
Channel indication
This indicates “S” for a stereo sample and “M” for
a mono sample.
Zone list
Shows information for the samples/zones that are
assigned to the current multisample.
Click to see a keyboard diagram of the zones to
which the samples are assigned.
[Preview] button
Auditions each sample as it is.
Keyboard and zone display
You can select the key that you want to assign the sample.
By holding down the [Shift] key when you click, you can select
multiple keys.
[Assign] button
Assigns the selected sample
to the specied zone.
[Erase] button
Erases the selected zone.
6
[Erase All] button
Erases all zones that are
in use.
Page 7
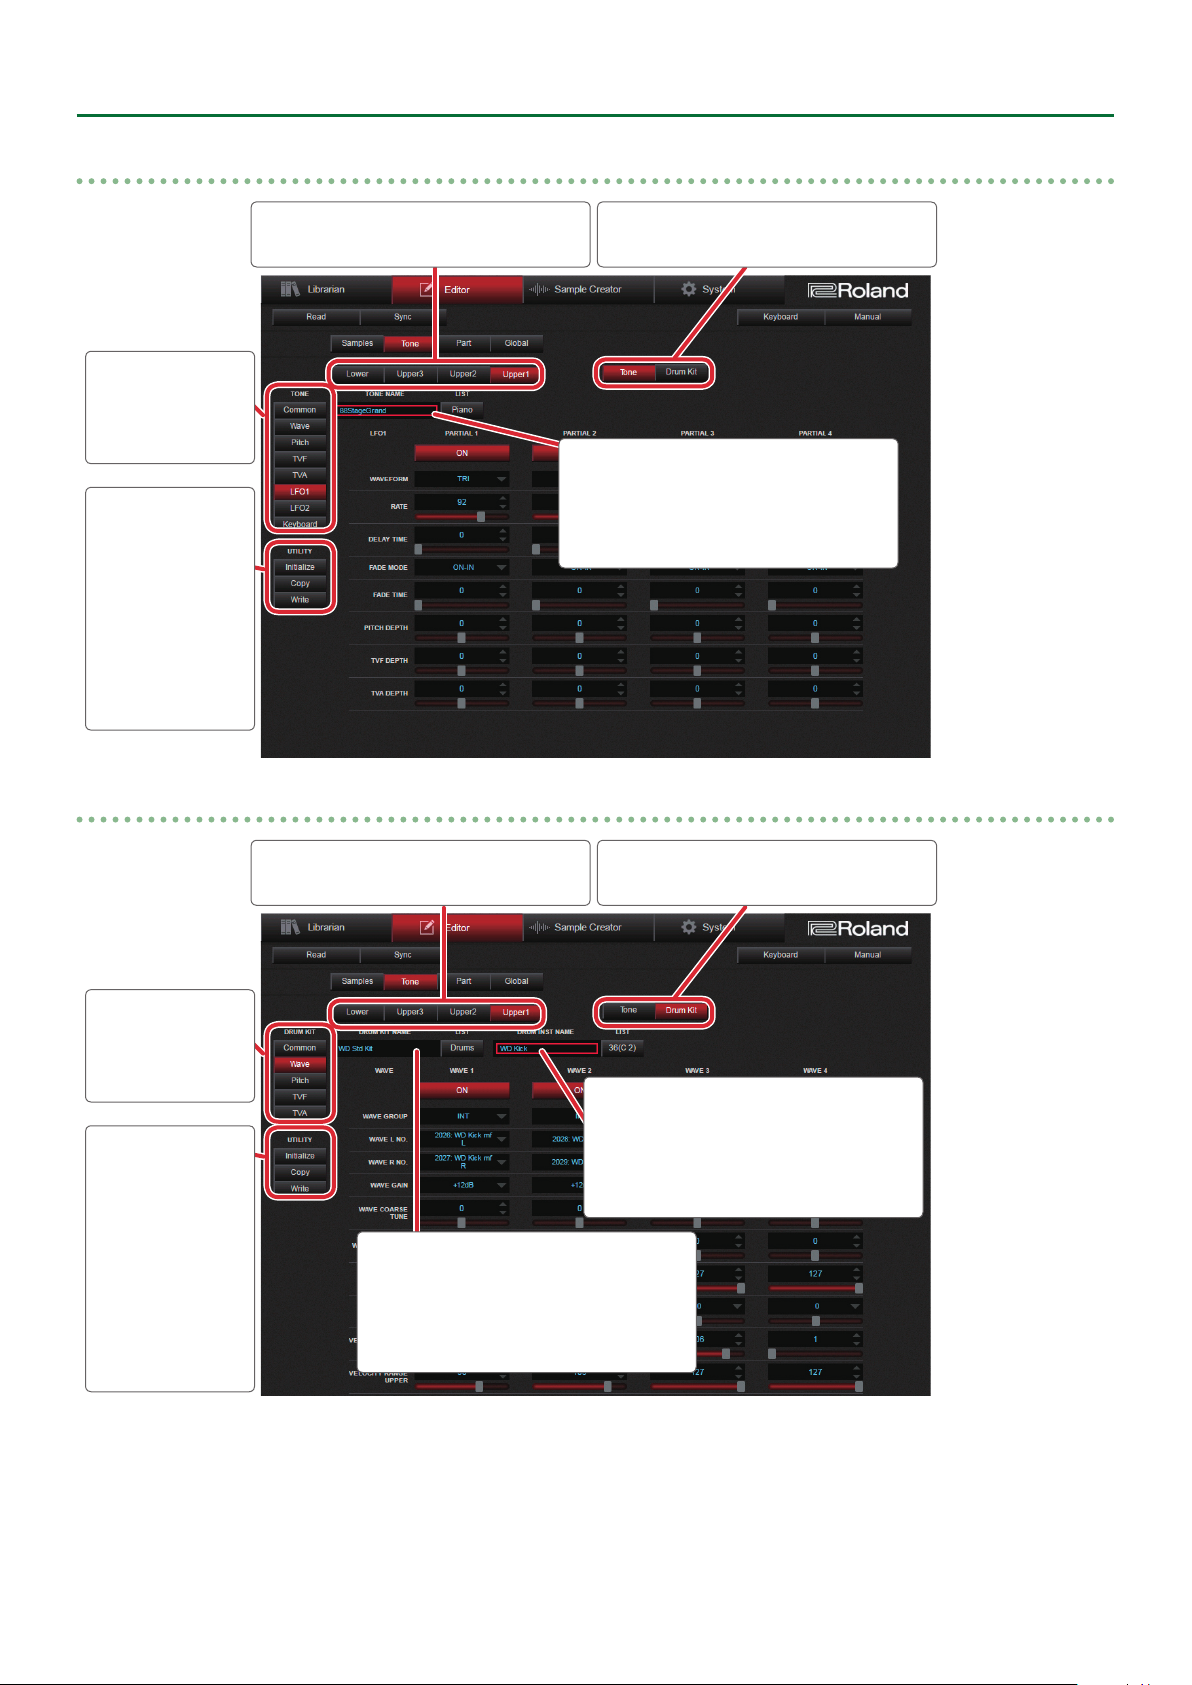
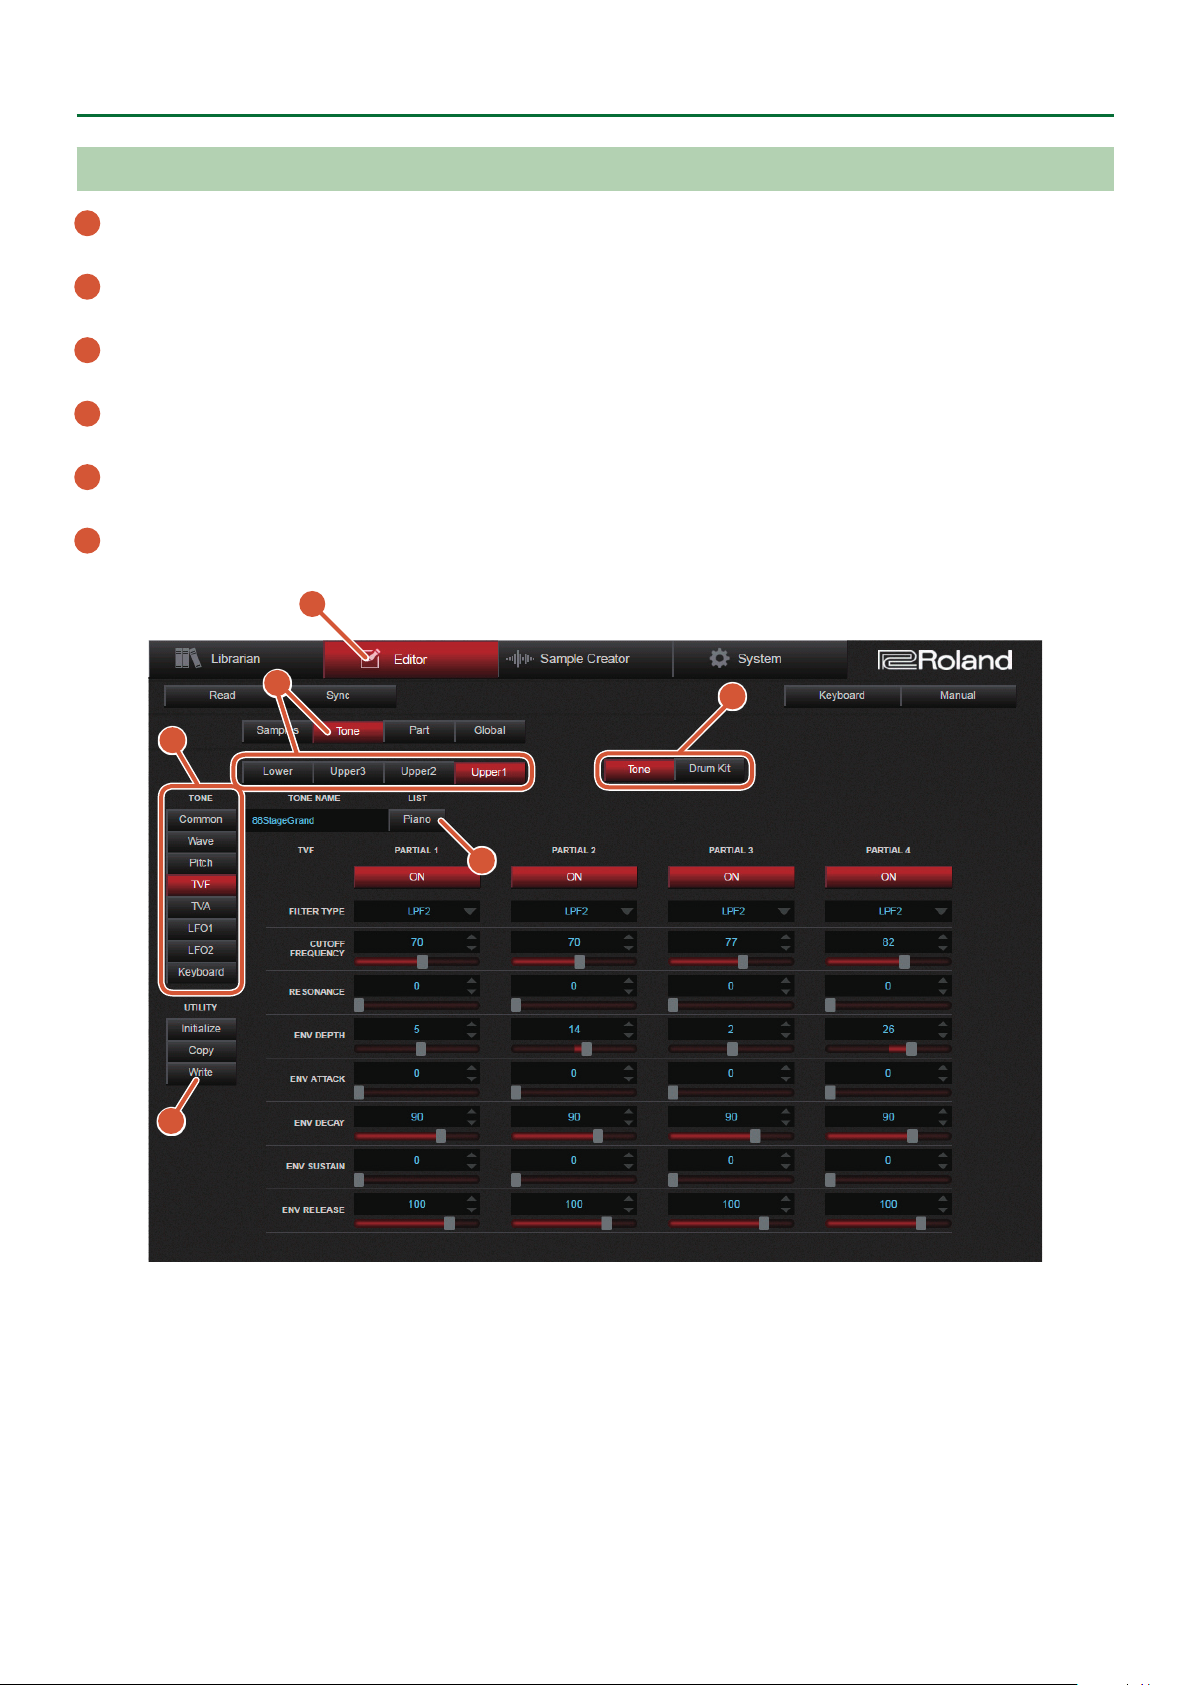
Tones group (Tone screen)
Using E-A7 Tone Manager
Parameter Group
select
Select the parameter group
that you want to edit.
[Initialize] button
Initializes the parameters of
the selected partial.
[Copy] button
Copies the parameters of
the specied source partial
to the specied destination
partial.
[Write] button
Writes the current tone to
the user tone of the currently
connected E-A7.
Part select
Switch the part that you’re editing.
Type select
Switch the part type between tone and drum kit.
TONE name
Enter the tone name (up to
12 characters).
[LIST] button
Selects a tone from each
category. Tones that can be
edited are indicated by “YES”
in the Editable eld.
Tones group (Drum Kit screen)
Part select
Switch the part that you’re editing.
Parameter Group
select
Select the parameter group
that you want to edit.
[Initialize] button
Initializes the parameters
of the selected drum
instrument.
[Copy] button
Copies the parameters
of the specied source
drum instrument to the
specied destination drum
instrument.
[Write] button
Writes the current drum kit
to the user drum kit of the
currently connected E-A7.
Type select
Switch the part type between tone and drum kit.
DRUM INST NAME
Enter the drum instrument name (up to 12 characters).
DRUM INST [LIST] button
Shows a list of the drum instruments that are assigned to each
key. You can select the key that you want to edit.
DRUM KIT NAME
Enter the drum kit name (up to 12 characters).
DRUM KIT [LIST] button
Selects a drum kit from the tone group. Drum kits that can be
edited are indicated by “YES” in the Editable eld.
7
Page 8
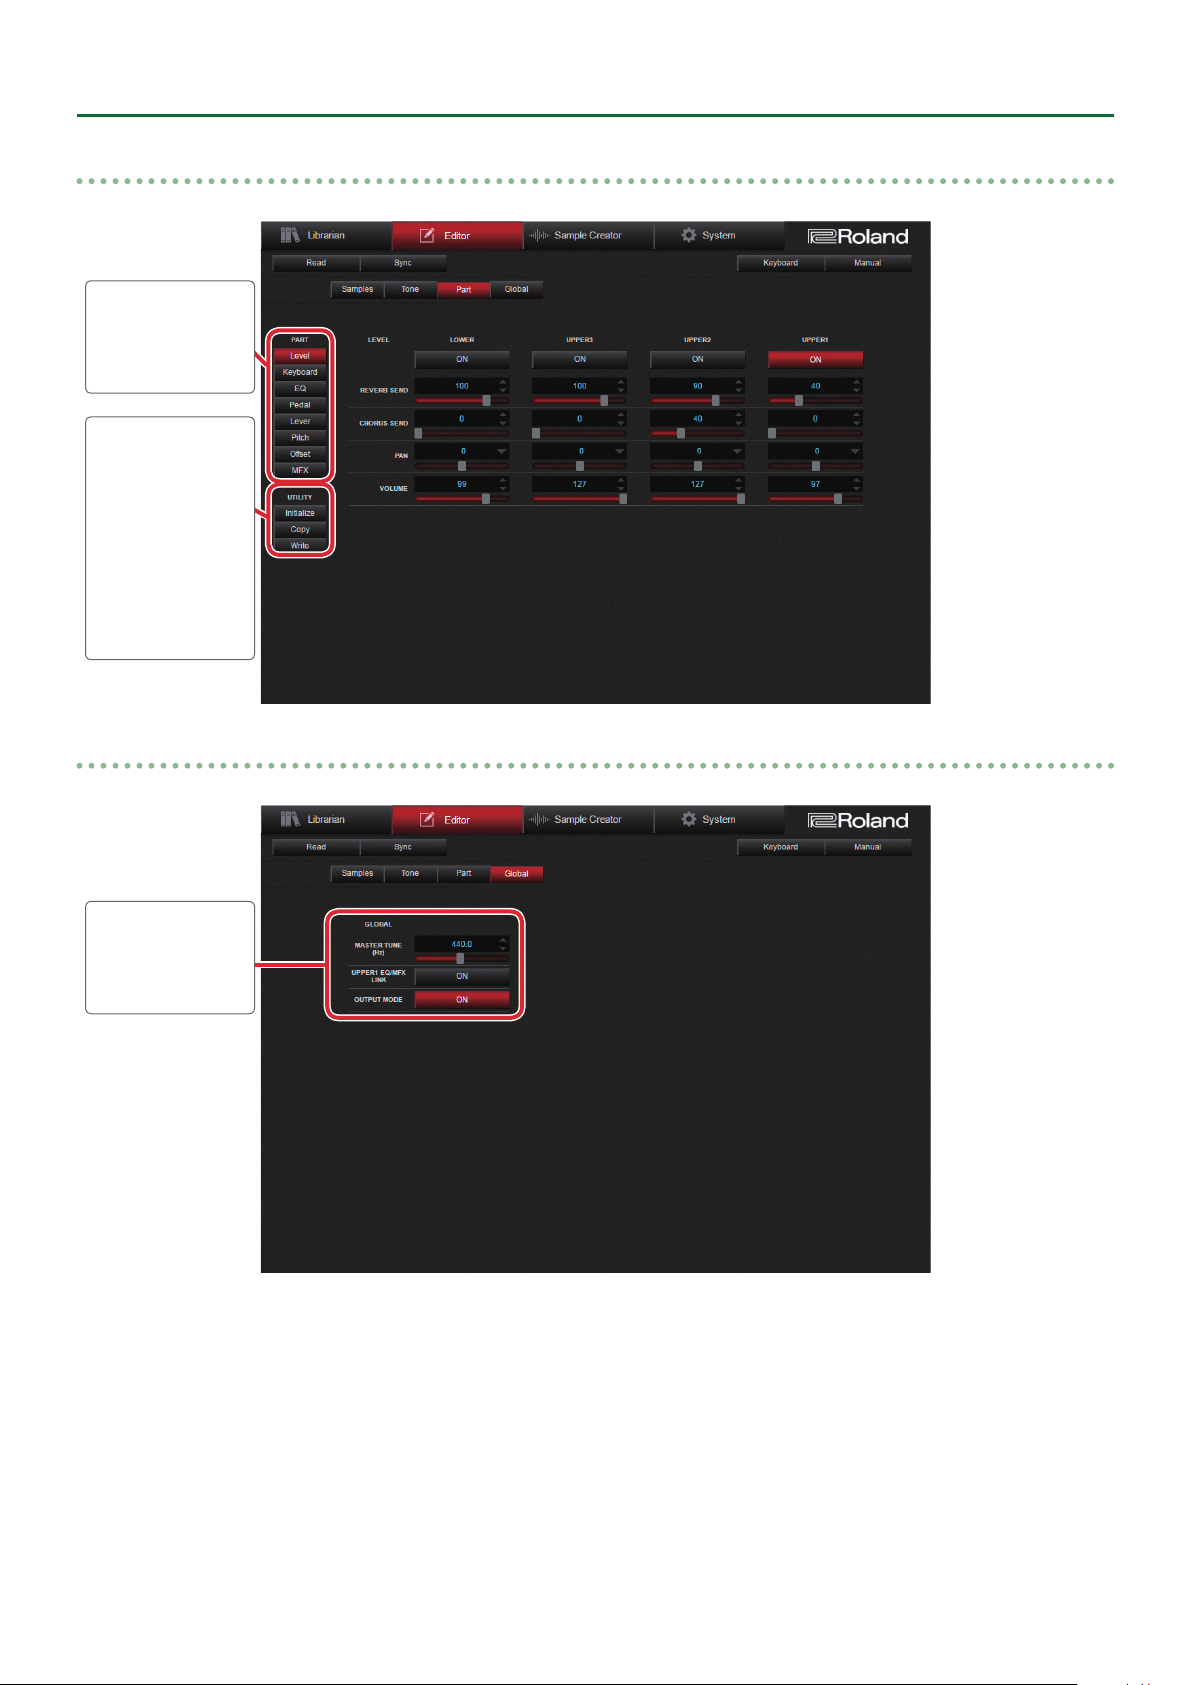
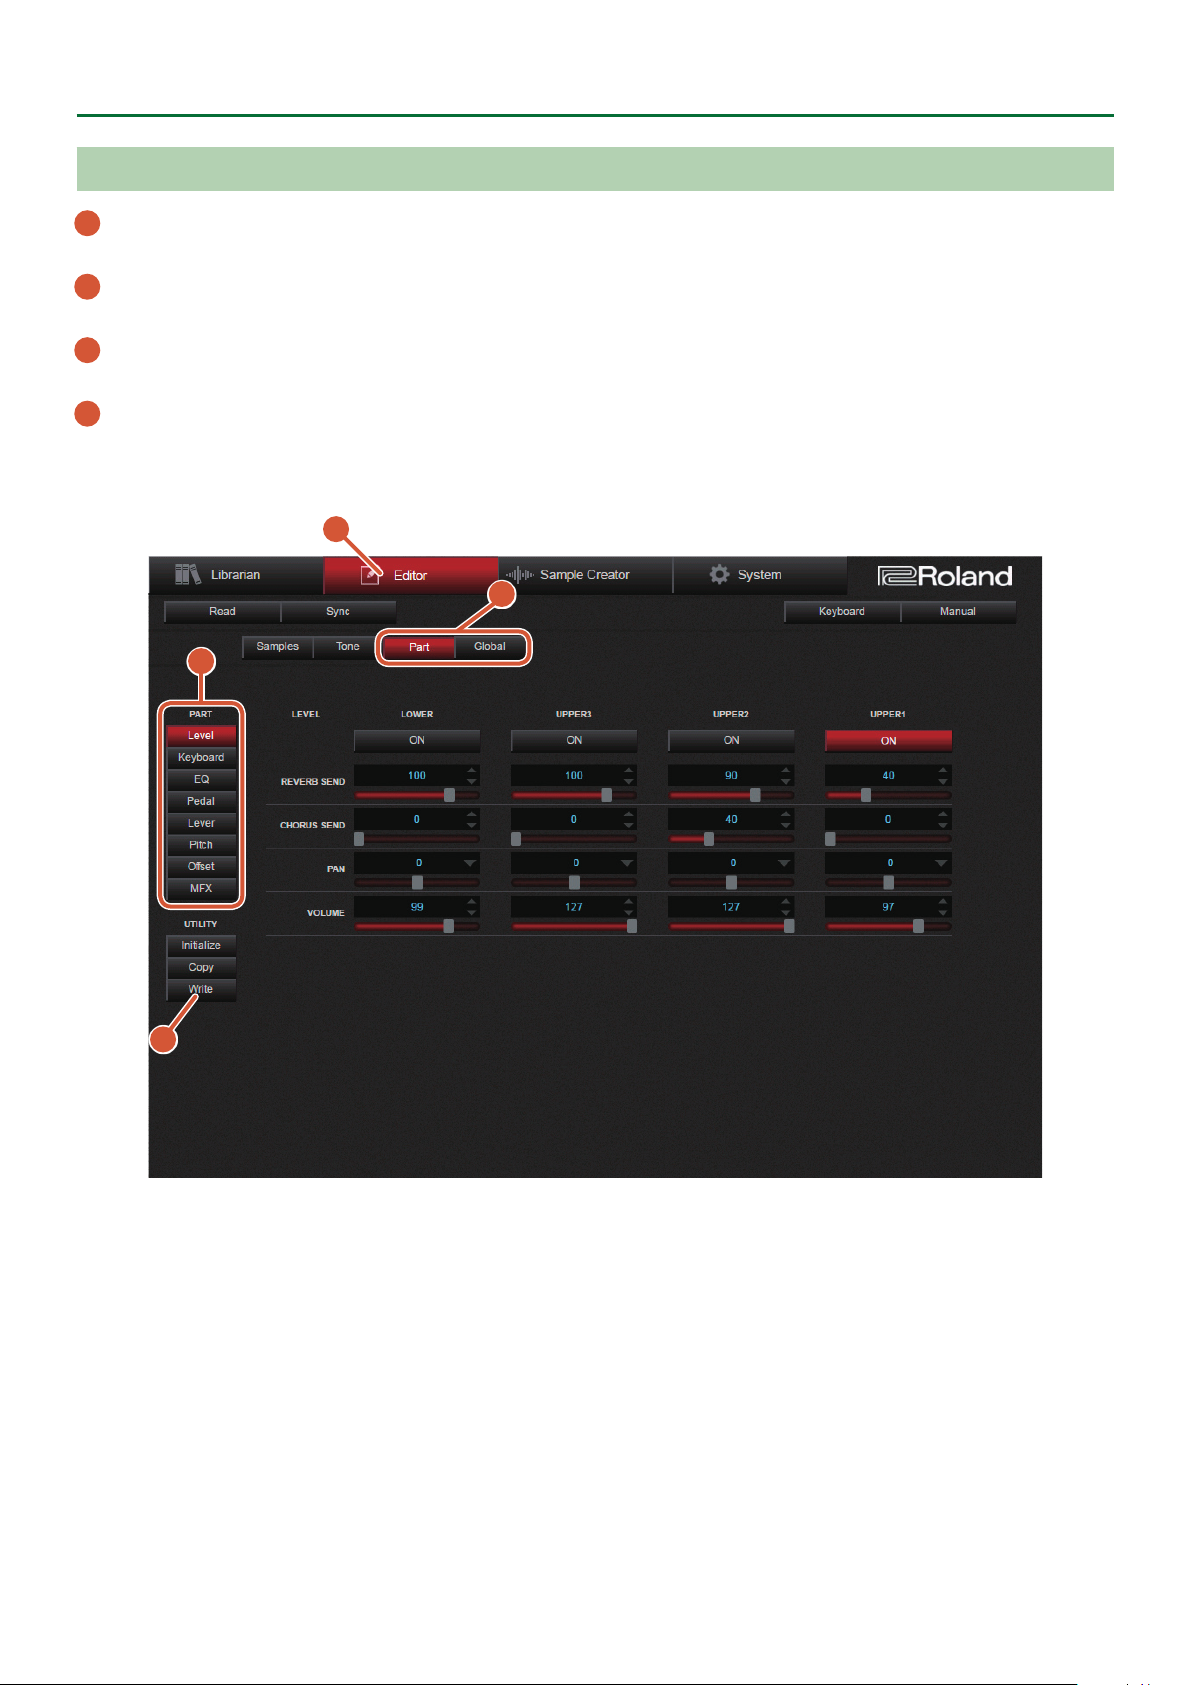
Part group
Parameter Group
select
Select the parameter group
that you want to edit.
[Initialize] button
Initializes the parameters of
the selected part.
[Copy] button
Copies the parameters of the
specied source part to the
specied destination part.
[Write] button
Writes the part parameters
as the user program to the
currently connected E-A7.
Using E-A7 Tone Manager
Global group
Global Parameter
Directly rewrite the global
parameter settings of the
currently-connected E-A7.
8
Page 9
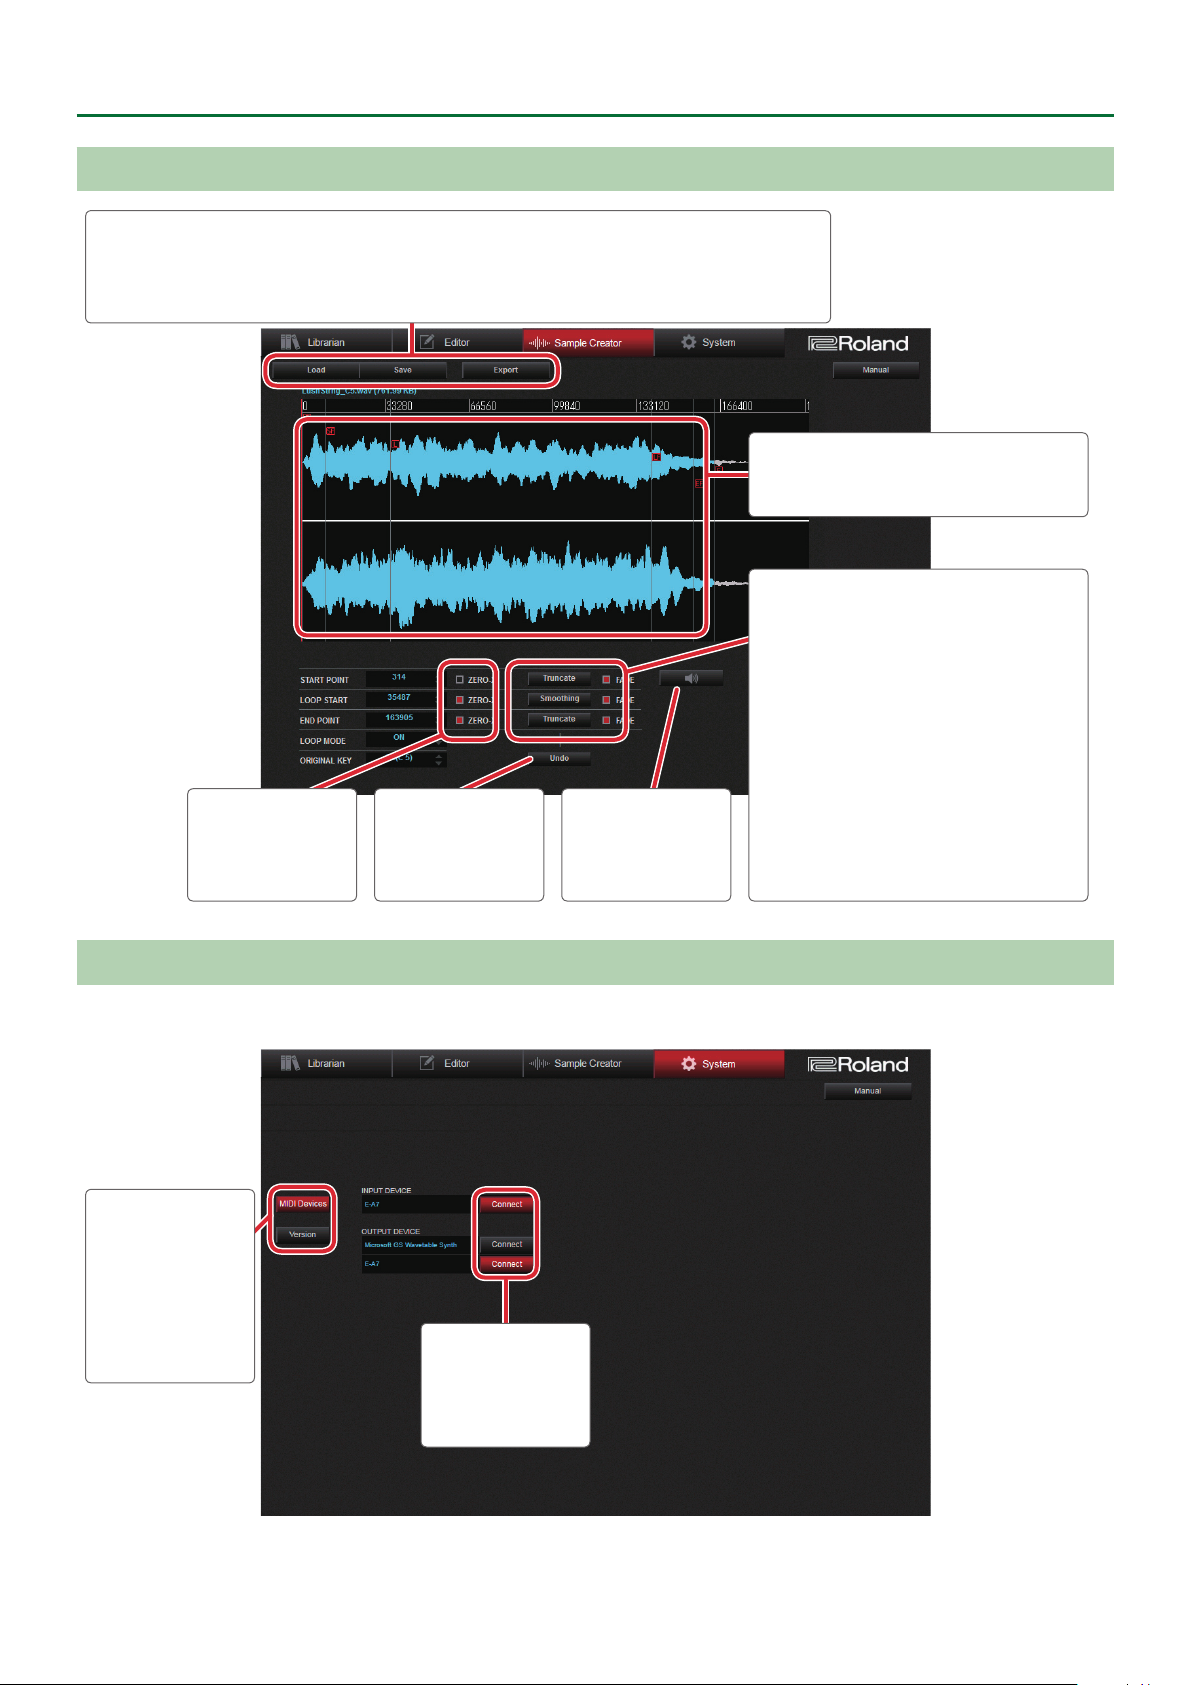
3-3. Sample Creator Mode
Using E-A7 Tone Manager
[Load] button
Loads the audio le that you want to edit.
[ZERO-X] switch
When setting the Start/
Loop/End points, this switch
makes the value jump to
“zero-crossing” points where
the waveform level is zero.
[Save] button
Saves the edited sample.
[Undo] button
Lets you undo up to three
Truncate or Smoothing
operations.
[Export] button
Exports the edited sample to a USB ash drive
so that it can be imported by the E-A7.
Waveform display area
Here you can move the Start/Loop/End/Fade point display
bars.
[FADE] switch
Start Point: The waveform is processed so that it star ts
Loop Start: Use the LF bar to specify the start point of the
End Point: Processes the waveform so that it ends
[Truncate] button
Deletes the portions of the waveform that are before the start
[Preview] button
Auditions the currentlyedited sample. The sound
reects the parameters as
you’ve edited them.
point or after the end point; this reduces the size of the sample.
[Smoothing] button
Processes the waveform so that the loop is connected
smoothly.
You’ll need to turn on the Loop Start [FADE] switch.
smoothly when it is truncated. Use the SF bar
to specify the end point of the processing.
processing that applies smoothing to make the
sample loop smoothly.
smoothly when it is truncated. Use the EF bar
to specify the start point of the processing.
3-4. System Mode
Lets you select, connect, or disconnect MIDI devices, and shows the software version number of E-A7 Tone Manager.
[MIDI Devices] button
Shows the MIDI devices
(Input/Output) that are
recognized by the computer.
[Version] button
Shows the software version
number of E-A7 Tone
Manager.
[Connect] button
Connects to a MIDI device
(Input/Output) that is
recognized by the computer.
If already connected, you can
click this to disconnect.
9
Page 10
Using E-A7 Tone Manager
4. Usage Examples (Specic Workows)
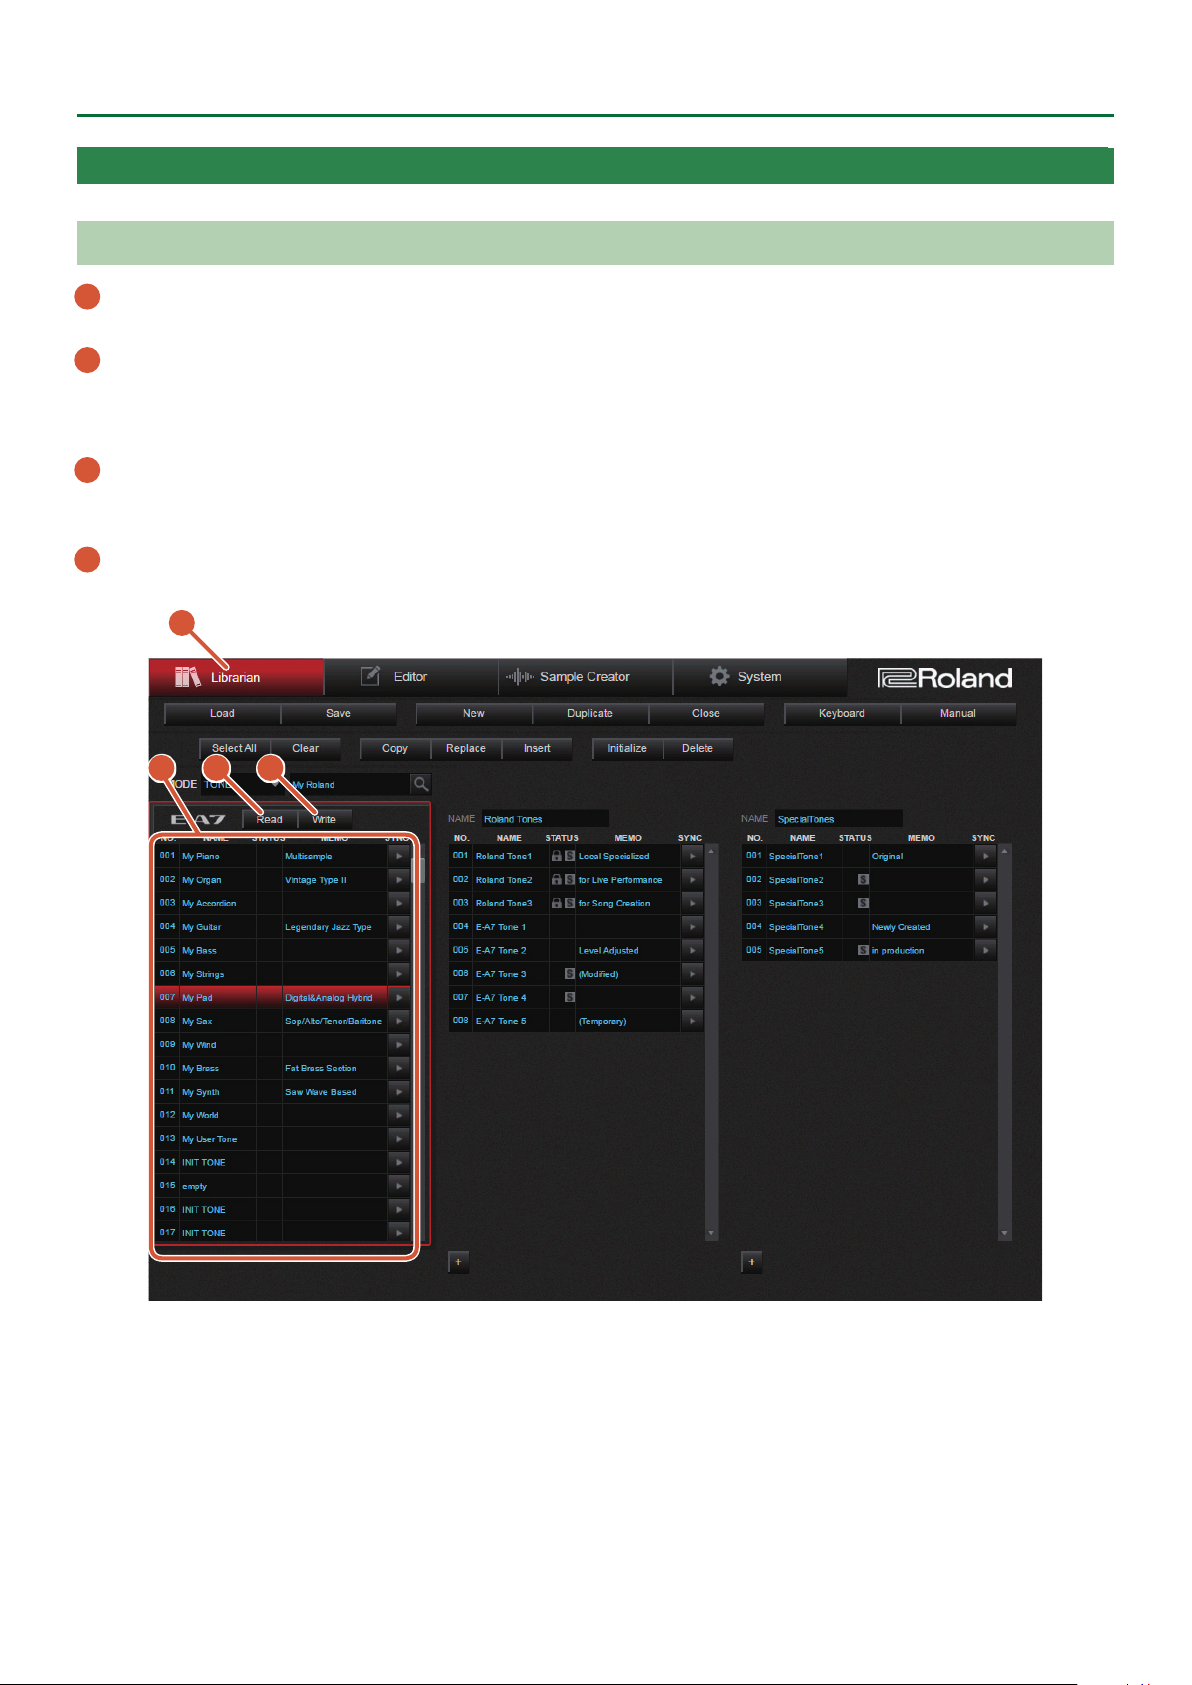
4-1. Reading Sounds from or Writing Sounds to the E-A7
1 Select Librarian mode.
%
2 In the left-most list, select one or more user tone or user drum kit locations.
If you want to select more than one location, click while holding down the [Ctrl] key; if you want to select a contiguous range, click while
holding down the [Shift] key.
%
3 To read the sounds from the E-A7, click the [Read] button.
The list shows the names of the sounds that were read.
%
4 To write the sounds to the E-A7, click the [Write] button.
1
3 4 2
10
Page 11
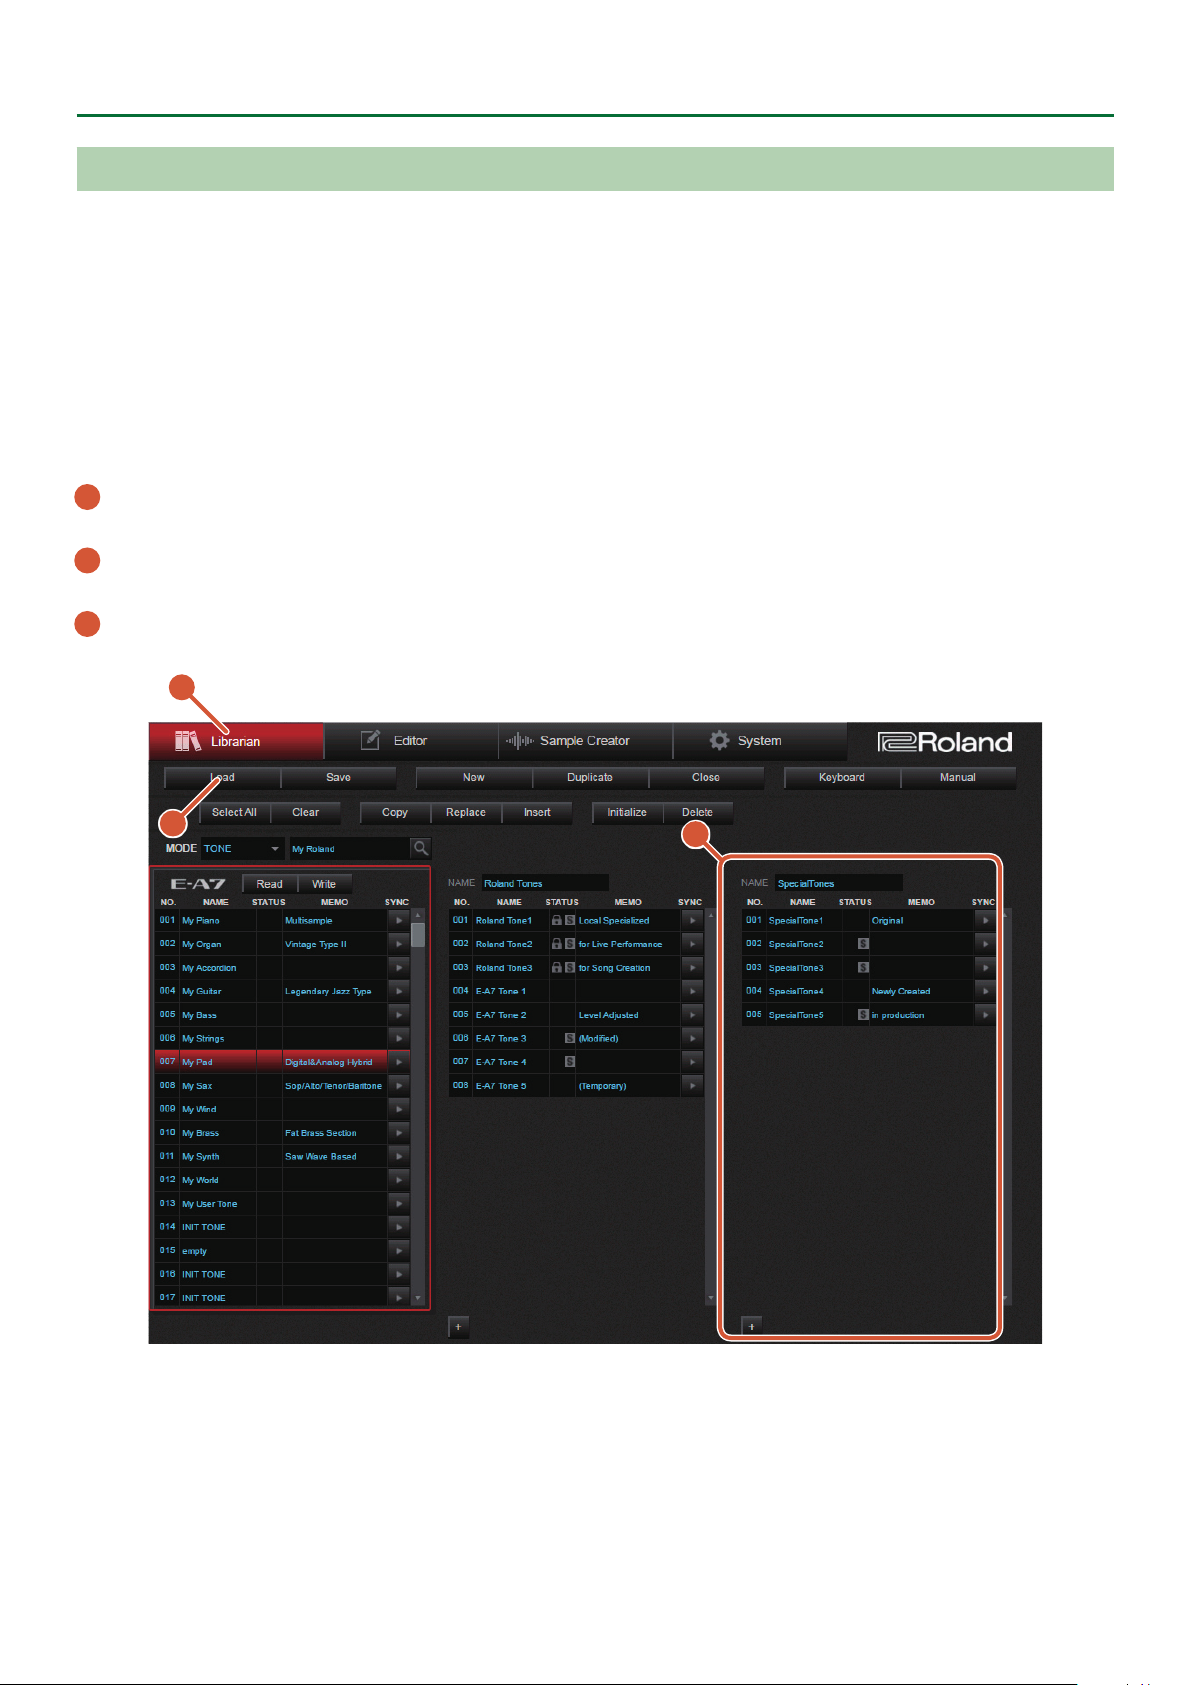
4-2. Loading/Saving E-A7 Sound Files
E-A7 Tone Manager can load or save the following les.
Load
5 Sound library les (.EAL)
5 Sound les created by the E-A7 arranger’s Backup function (ea7bkup_snd.SVD)
5 User Tone les (.UST)
5 User Drum Kit les (.UDK)
Save
5 Sound library les (.EAL)
Loading les
1 Select Librarian mode.
%
2 Click the [Load] button, and select the sound le that you want to load.
%
3 A list of the loaded sounds is added at the far right.
Using E-A7 Tone Manager
1
2
3
11
Page 12
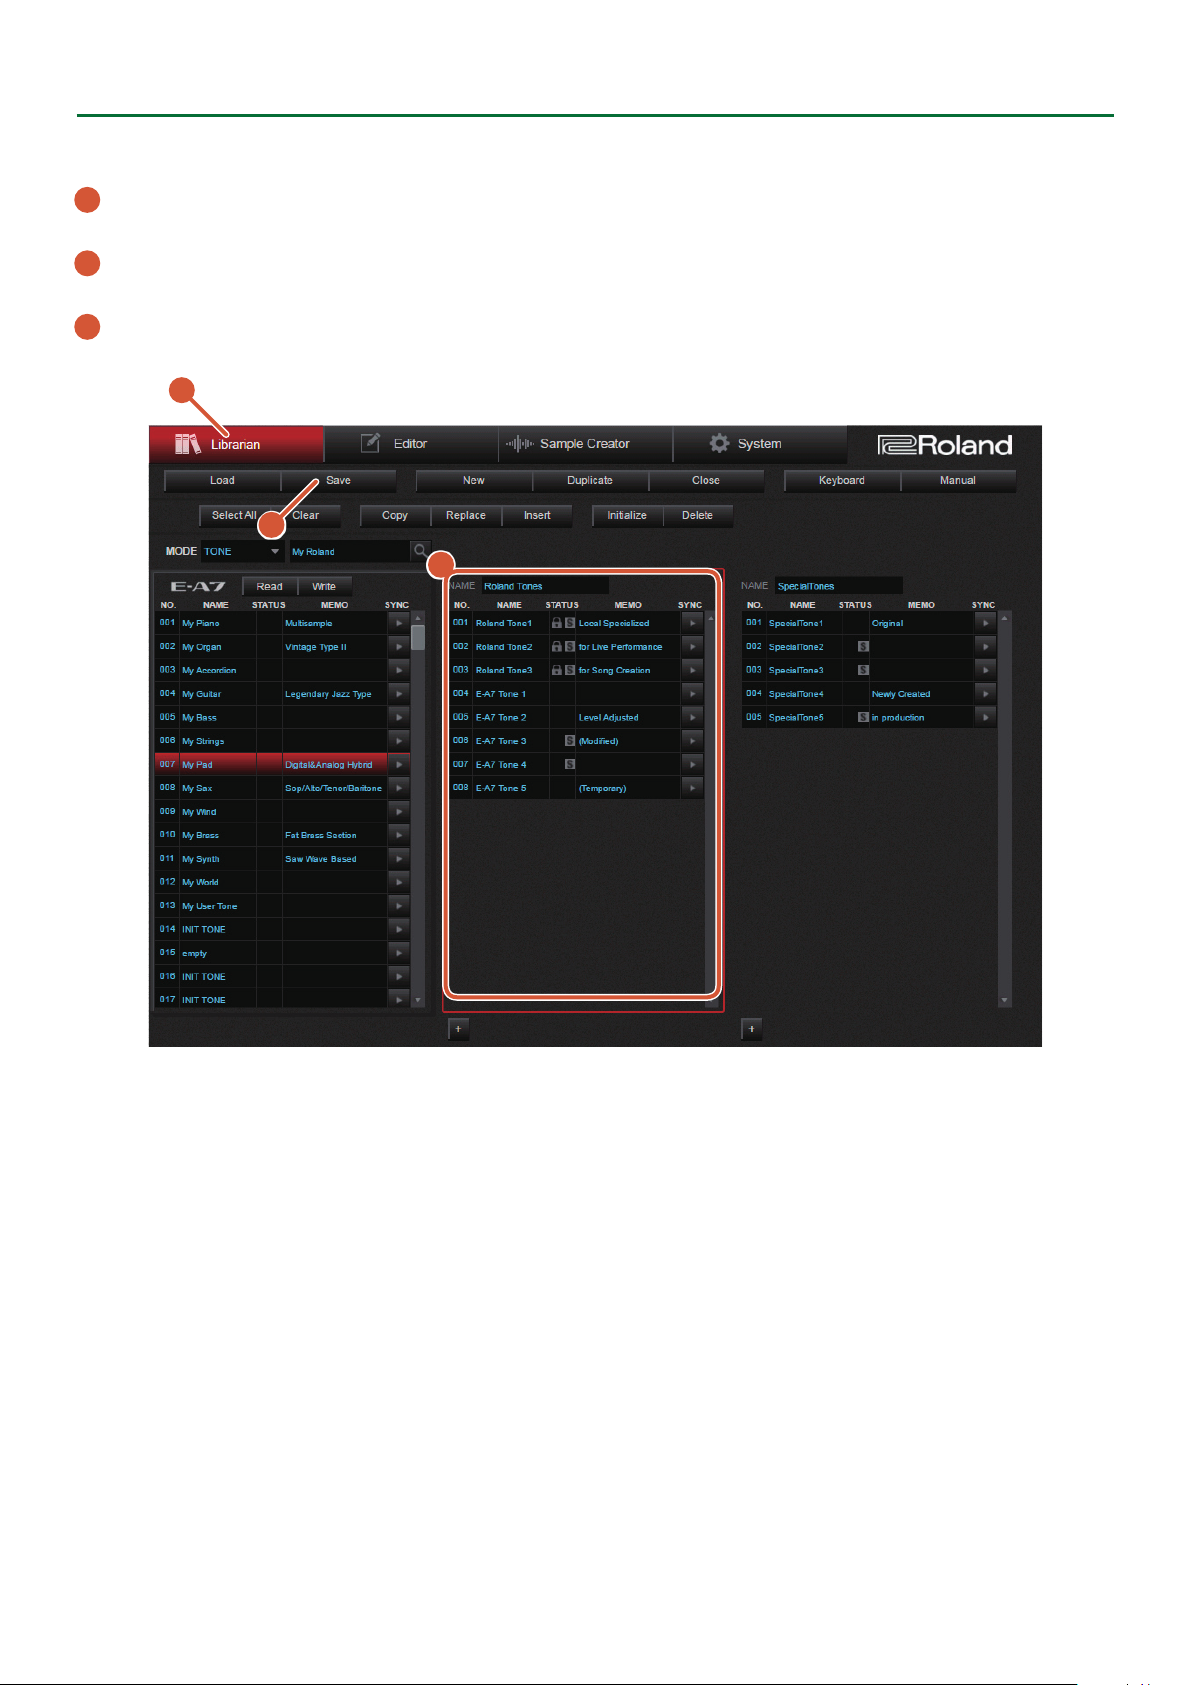
Saving les
1 Select Librarian mode.
%
2 Select the sound library that you want to save.
%
3 Click the [Save] button, specify the le name and save-location, and save the sound library le.
1
3
2
Using E-A7 Tone Manager
12
Page 13
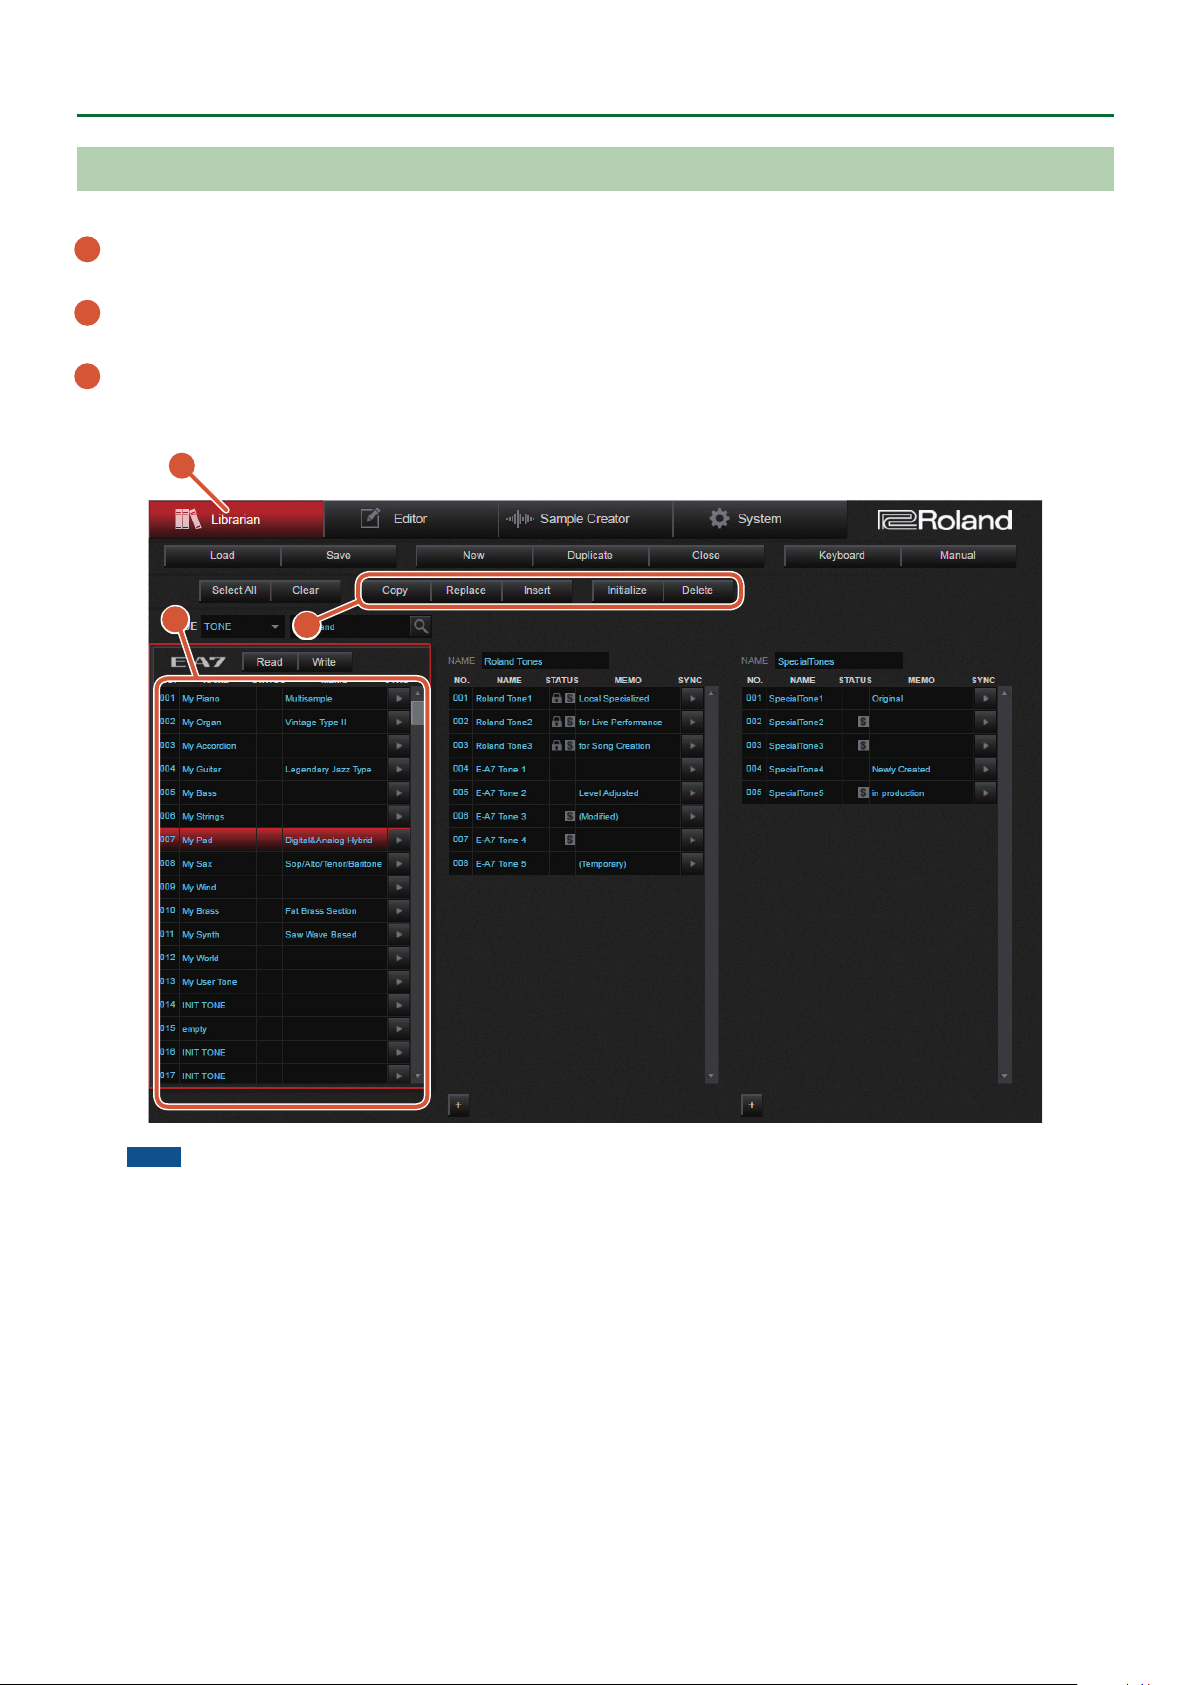
4-3. Copying/Replacing/Inserting/Initializing/Deleting a User Tone or Drum Kit
Here’s how to copy, replace, insert, initialize, or delete a user tone or drum kit.
1 Select Librarian mode.
%
2 In the sound list, select the applicable user tone or drum kit.
%
3 Click the desired item to edit the list.
You can also copy by dragging and dropping a user tone or drum kit number.
1
Using E-A7 Tone Manager
2
NOTE
If you copy/replace/insert tones in the left-most list, only the parameters are excuted; the sample les are not executed.
3
13
Page 14
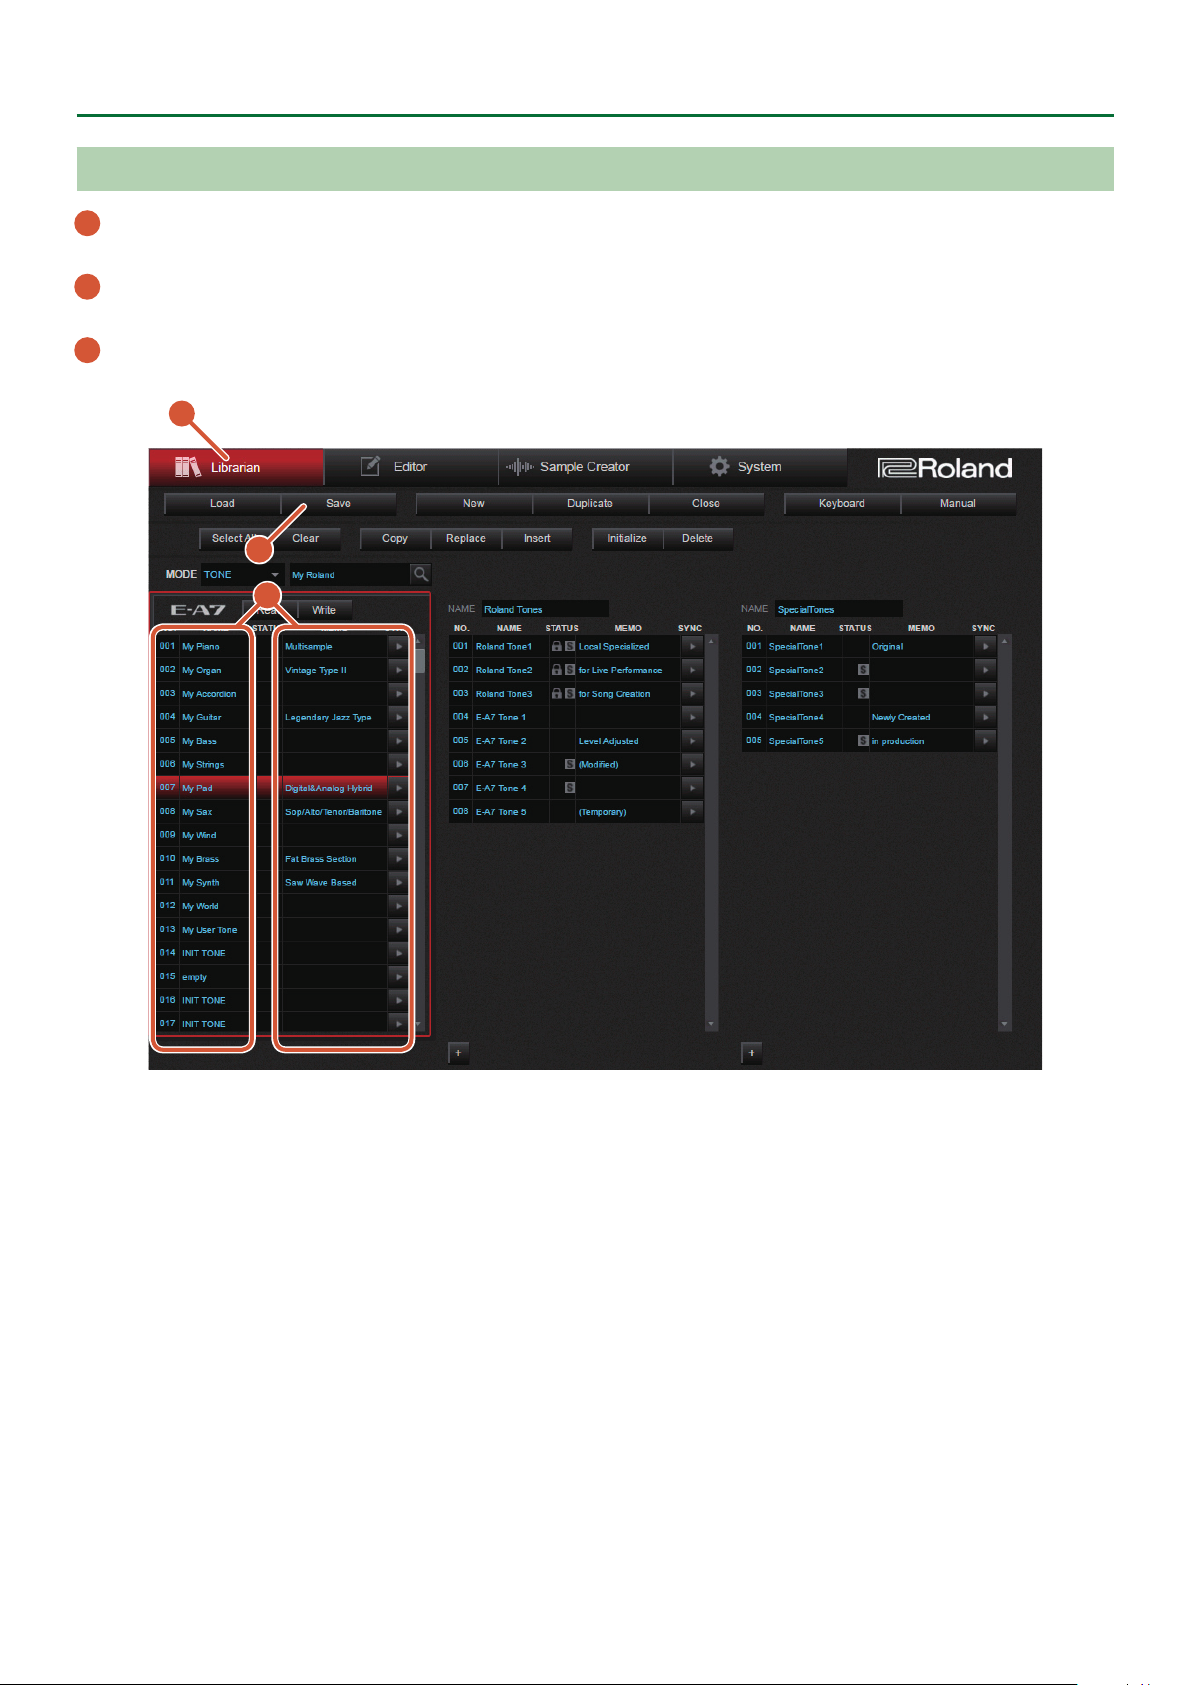
4-4. Renaming a User Tone / Entering a Memo
1 Select Librarian mode.
%
2 Select the NAME or MEMO eld of a user tone or drum kit, and enter the desired name or memo.
%
3 Press the [Save] button, enter the le name and save-location, and save the sound library le.
1
3
2
Using E-A7 Tone Manager
14
Page 15
Using E-A7 Tone Manager
4-5. Editing Sample Parameters
1 Select Editor mode.
%
2 Click the [Samples] button and then the [Sample] button.
%
3 In the sample list, select the sample that you want to edit, and then click the select button.
%
4 Edit the parameters.
%
5 When you’ve nished editing, click the [Write] button, specify the save-location, and save the sample to the E-A7.
1
2
5
3
4
15
Page 16
Using E-A7 Tone Manager
4-6. Editing a Multisample
1 Select Editor mode.
%
2 Click the [Samples] button and then the [Multisample] button.
%
3 From the [LIST] button, select the multisample that you want to edit.
%
4 Specify the keyboard region, and select the sample that you want to assign.
%
5 Click the select button to assign the sample to the multisample.
%
6 When you’ve nished editing, click the [Write] button, specify the save-location, and save the multisample to the E-A7.
1
2
6
4
3
5
16
Page 17
Using E-A7 Tone Manager
4-7. Editing a Tone/Drum Kit
1 Select Editor mode.
%
2 Click the [Tones] button, and select the part that you want to edit.
%
3 Switch between Tone and Drum Kit.
%
4 From the [LIST] button, select the sound that you want to edit.
%
5 Select the desired group and item, and edit the parameters.
%
6 When you’ve nished editing, click the [Write] button, specify the save-location, and save the tone or drum kit to the E-A7.
1
2
5
4
6
3
17
Page 18
Using E-A7 Tone Manager
4-8. Editing Part/Global Parameters
1 Select Editor mode.
%
2 Click the [Part] button or the [Global] button.
%
3 Select the desired group and item, and edit the parameters.
%
4 When you’ve nished editing, click the [Write] button to save the edited content to the E-A7.
In the case of Part parameters: Parameters are saved as a User Program. Enter a name, and specify whether to overwrite or to add as a new item.
In the case of Global parameters: Parameters are written directly to the E-A7.
1
2
3
4
18
Page 19
Using E-A7 Tone Manager
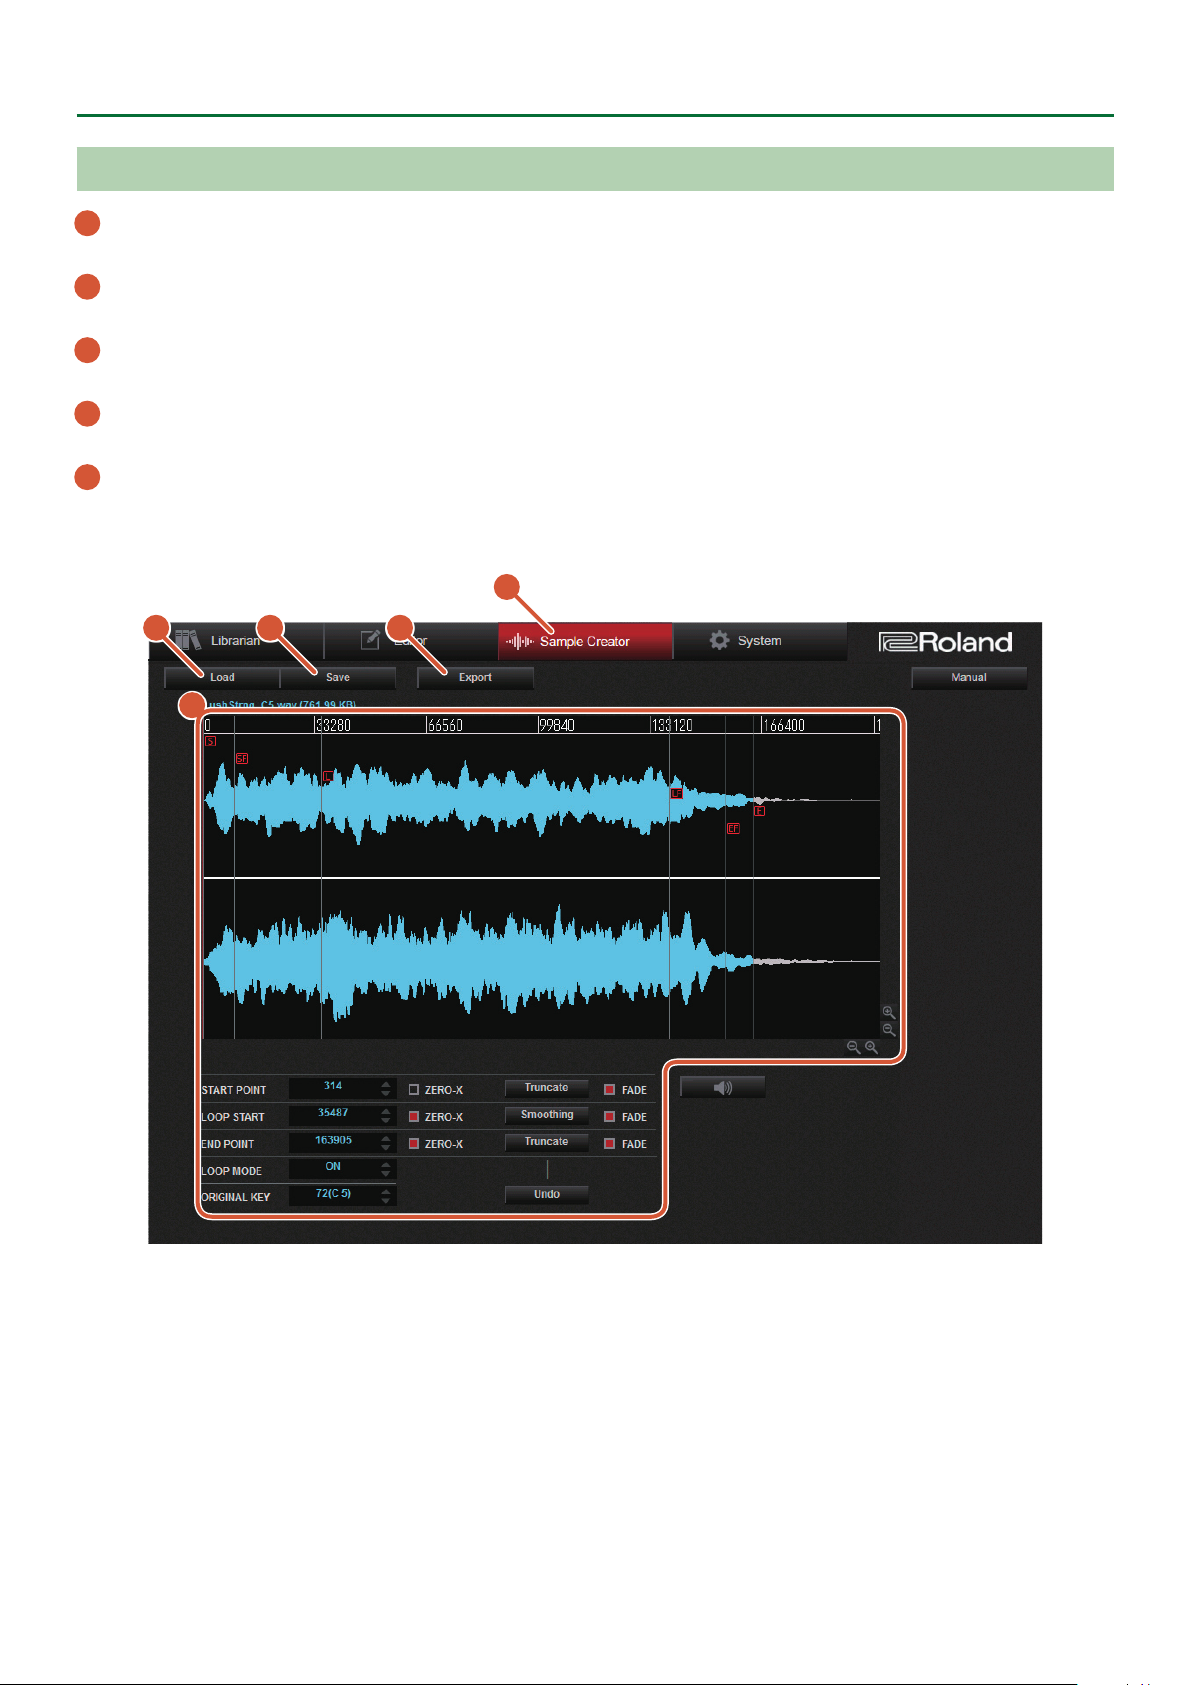
4-9. Creating Samples to Import into the E-A7
1 Select Sample Creator mode.
%
2 Click the [Load] button and specify the audio le that you want to load.
%
3 Edit the sample’s waveform and parameters.
%
4 When you’ve nished editing, click the [Save] button, specify the name and save-on, and save the sample as a WAV le.
%
5 If you want to import the sample into the E-A7, connect your USB ash drive to the computer, and click the [Export] button to export
the sample.
You can connect this USB ash drive to the E-A7 and directly select the sample that you want to import.
1
2
3
4 5
19
 Loading...