

Page 1

Quick Start
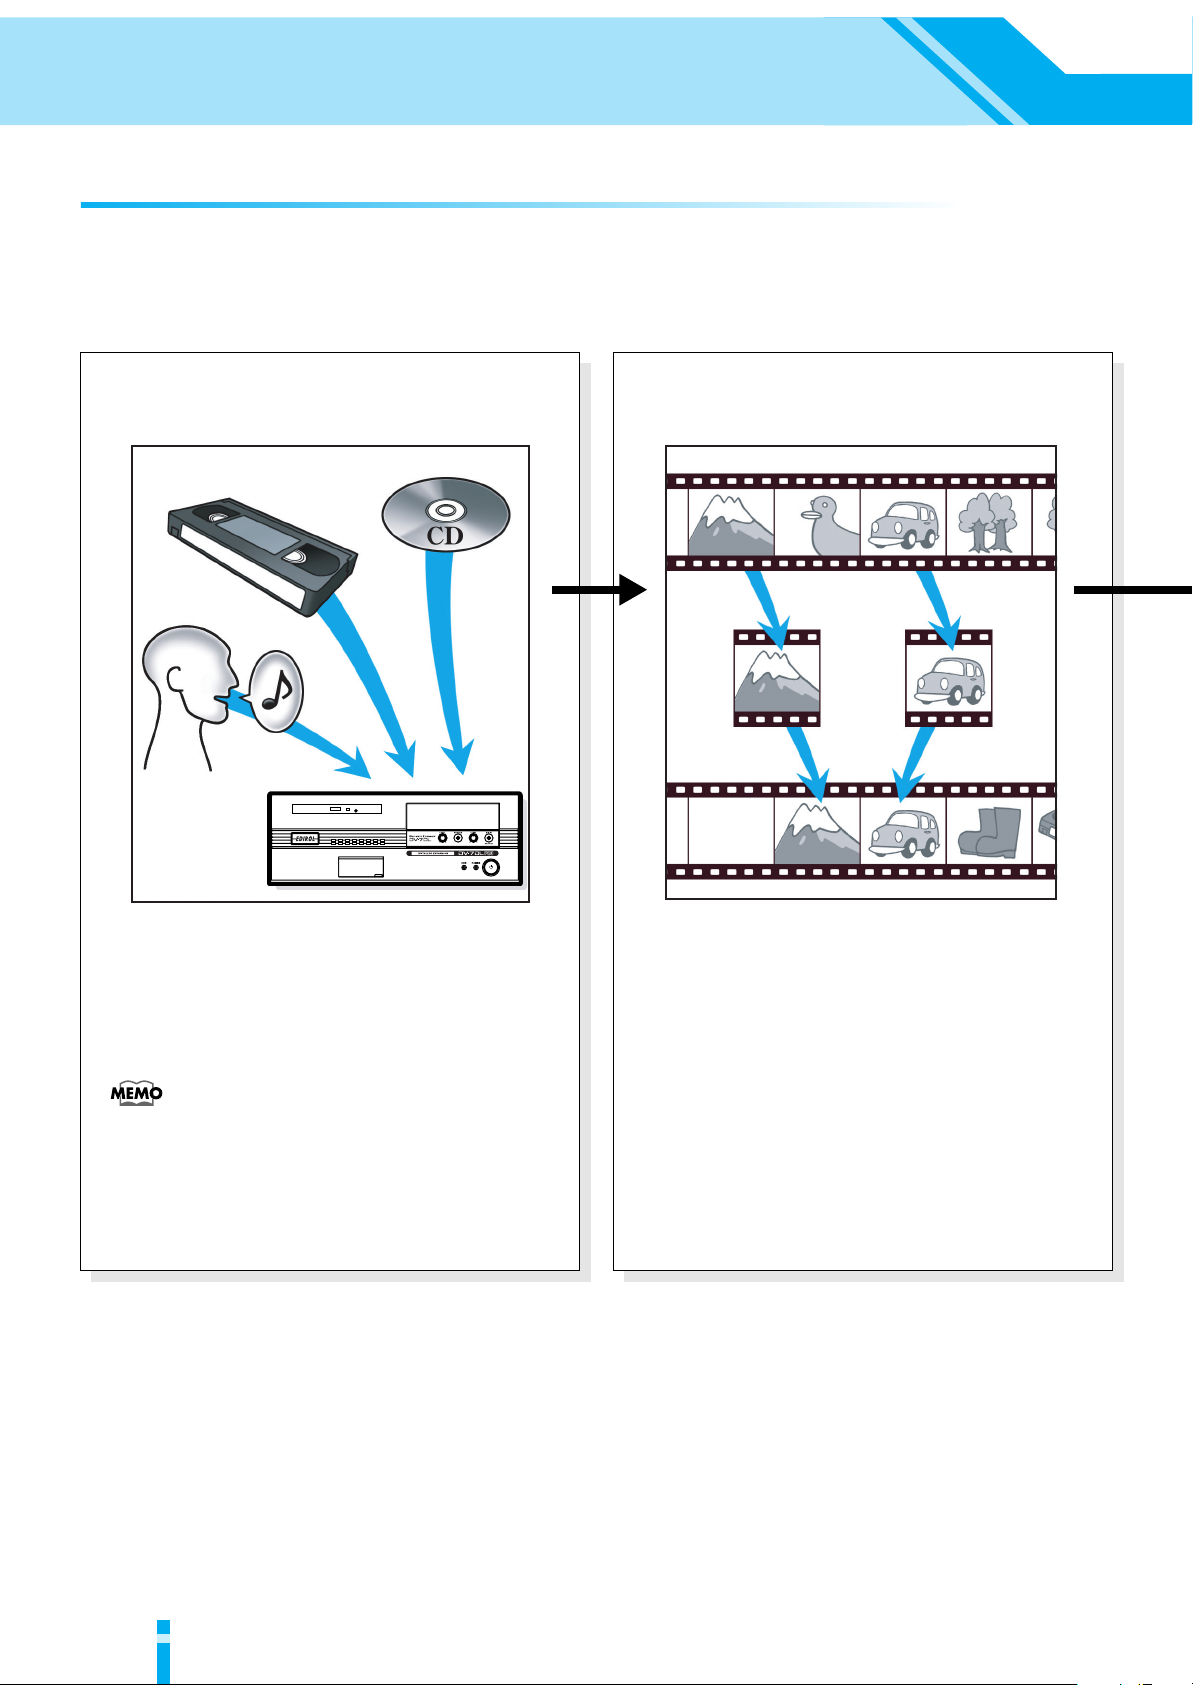
Create sequences of your very own!
This leaflet describes the use of the DV-7DL PRO, from
installation through to completing a video sequence.
Before using this unit, carefully read the sections entitled: “IMPORTANT
SAFETY INSTRUCTIONS” (Owner’s Manual p. 2), “USING THE UNIT
SAFELY” (Owner’s Manual p. 4), and “IMPORTANT NOTES” (Owner’s
Manual p. 6). These sections provide important information concerning the
proper operation of the unit. Additionally, in order to feel assured that you
have gained a good grasp of every feature provided by your new unit, Quick
Start, Owner’s Manual, and Appendices should be read in their entirety.
These manuals should be saved and kept on hand as a convenient reference.
Copyright © 2004 ROLAND CORPORATION
All rights reserved. No part of this publication may be reproduced in any
form without the written permission of ROLAND CORPORATION.
Page 2

Contents
Before You Begin Editing.......................................................................4
Making the Connections............................................................................................................................ 4
How to Connect a Digital Video Deck Provided with a DV Jack ............................................ 5
How to Connect Headphones and a Microphone...................................................................... 5
Using the Mouse......................................................................................................................................... 6
Moving the Mouse .......................................................................................................................... 6
Clicking............................................................................................................................................. 7
Double-clicking ............................................................................................................................... 7
Dragging and Dropping................................................................................................................. 7
Right-clicking................................................................................................................................... 7
Starting Up .................................................................................................................................................. 8
Creating a Project .................................................................................................................................... 10
Opening Previously Created Projects.................................................................................................... 11
Editing....................................................................................................12
How to Edit ...............................................................................................................................................12
Capturing Video Material ....................................................................................................................... 14
Arranging Video Material....................................................................................................................... 16
Changing the Order of Placed Material..................................................................................... 18
Deleting Material........................................................................................................................... 18
Undoing an Operation ................................................................................................................. 19
Changing the Length of Material................................................................................................ 20
Capturing Audio Material ...................................................................................................................... 22
Arranging Audio Material ...................................................................................................................... 24
Timeline Palette............................................................................................................................. 25
Moving Material............................................................................................................................ 27
Deleting Material........................................................................................................................... 27
Undoing an Operation ................................................................................................................. 27
Changing the Length of Audio Material ...................................................................................28
Adjusting the Volume ..................................................................................................................29
Inserting Narration .......................................................................................................................30
Inserting Titles into a Sequence.............................................................................................................. 32
Changing the Size of Text ............................................................................................................ 34
Changing the Location of Text .................................................................................................... 34
Changing the Duration of a Title ................................................................................................35
Changing How a Title Appears .................................................................................................. 35
Arranging Titles ............................................................................................................................ 36
Applying Effects ....................................................................................................................................... 38
Applying a Transition Effect (Transition FX)............................................................................ 38
Applying Effects to Video Material............................................................................................ 40
Deleting an Effect .......................................................................................................................... 41
Previewing the Sequence......................................................................................................................... 42
Finishing the Sequence................................................................................................................. 43
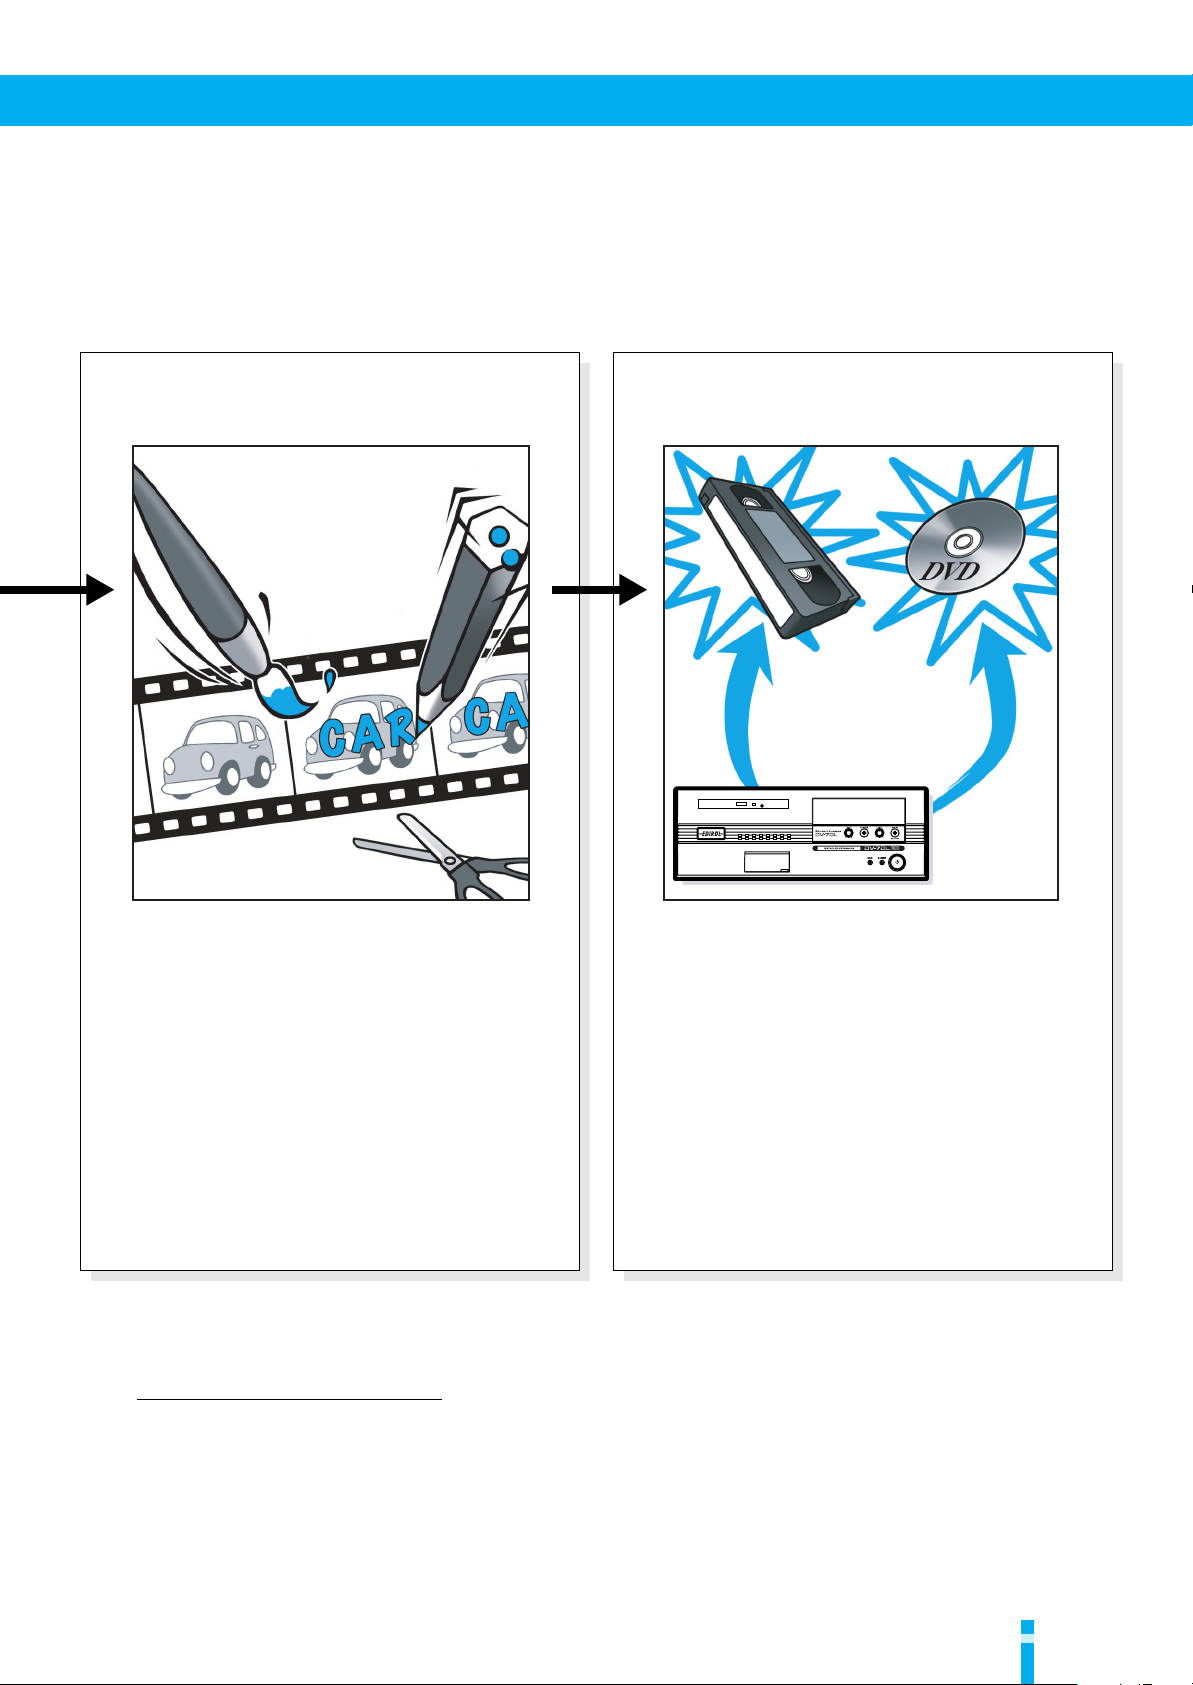
Recording a Sequence on Videotape or DVD....................................................................................... 44
After Finishing Editing .........................................................................46
Shutting Down.......................................................................................................................................... 46
2
Page 3
Welcome to the world of stress-free editing—Direct Linear.
With a direct feel for edits, a more intuitive editing process is at the heart of the
Direct Linear concept.
With a focus on creativity and productivity, Direct Linear editors from Edirol bring
outstanding stability, ease-of-use and expressiveness. They offer a world without
loss or interruption that combines the feel of linear editing with the flexibility of non
linear editing. A world where the edit comes first, where the feel is real.
3
Page 4
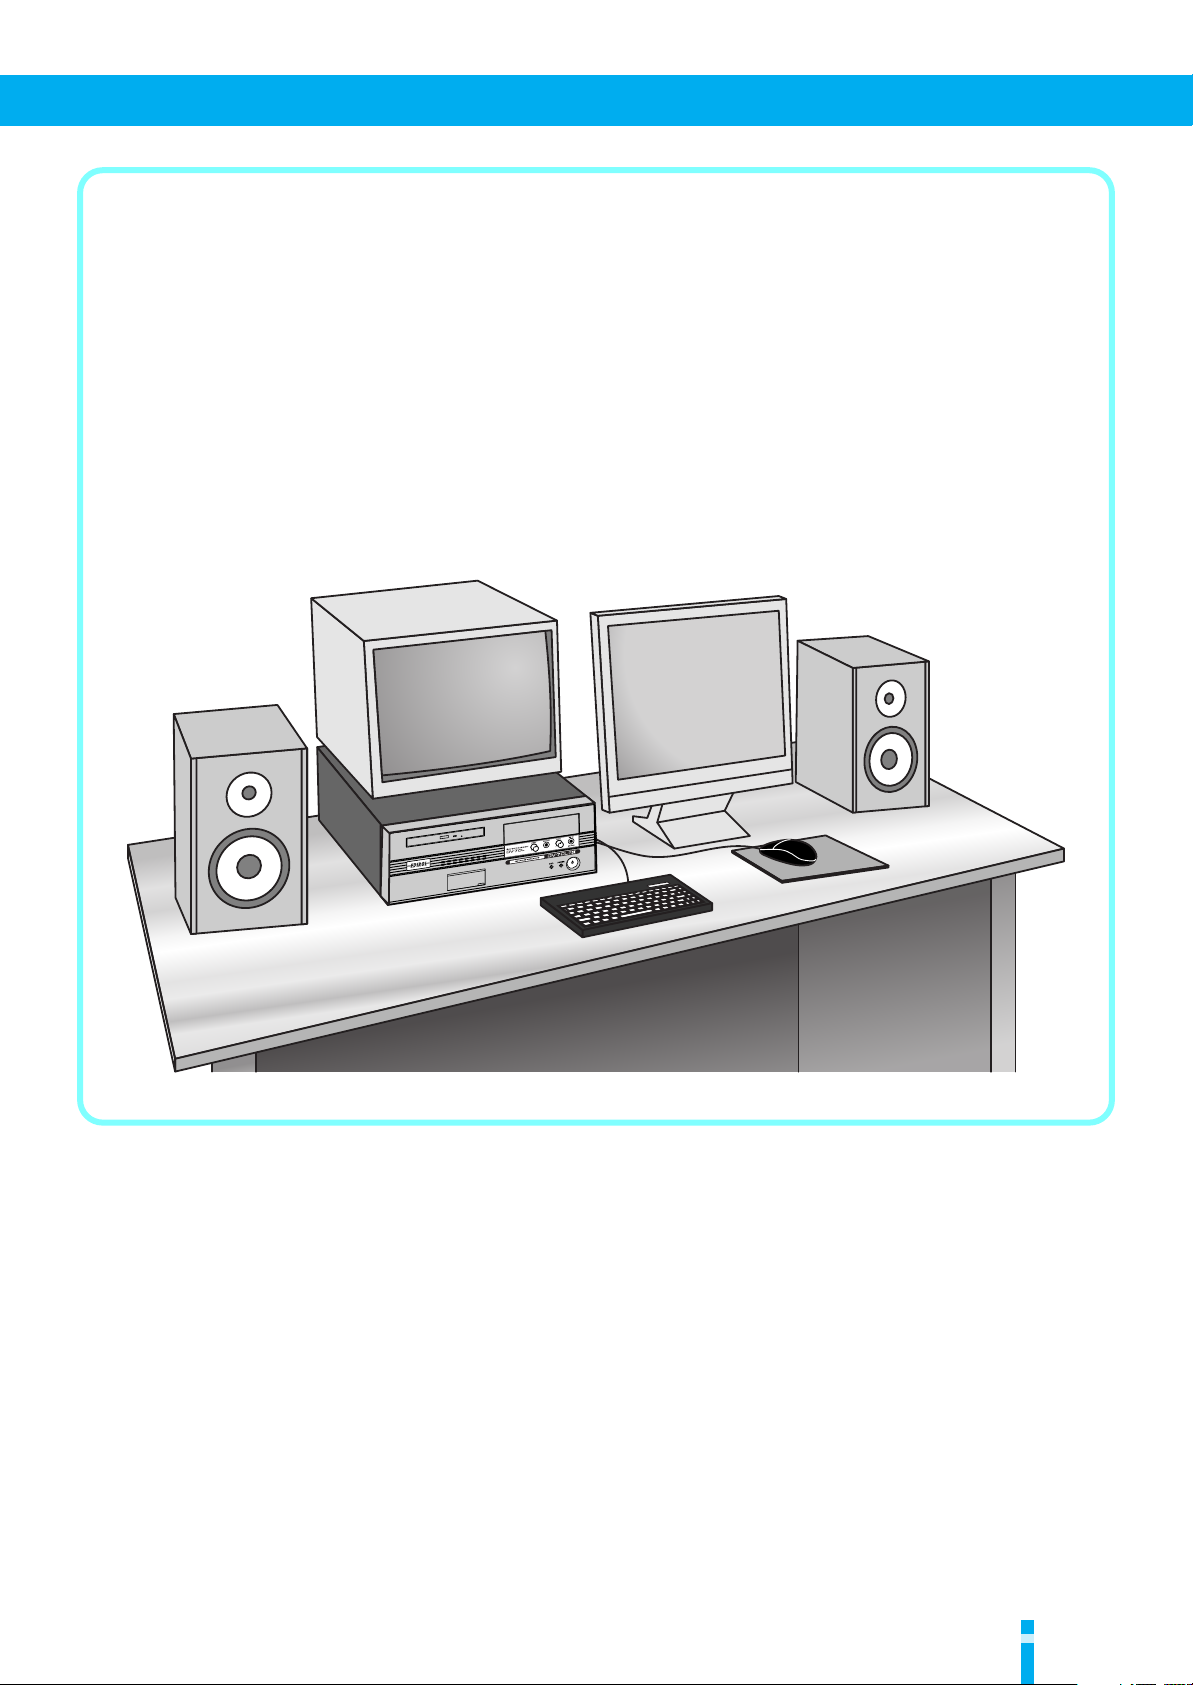
Before You Begin Editing
Audio
RLVideoS
Television MonitorDisplay
To Power Outlet
Mouse
Keyboard
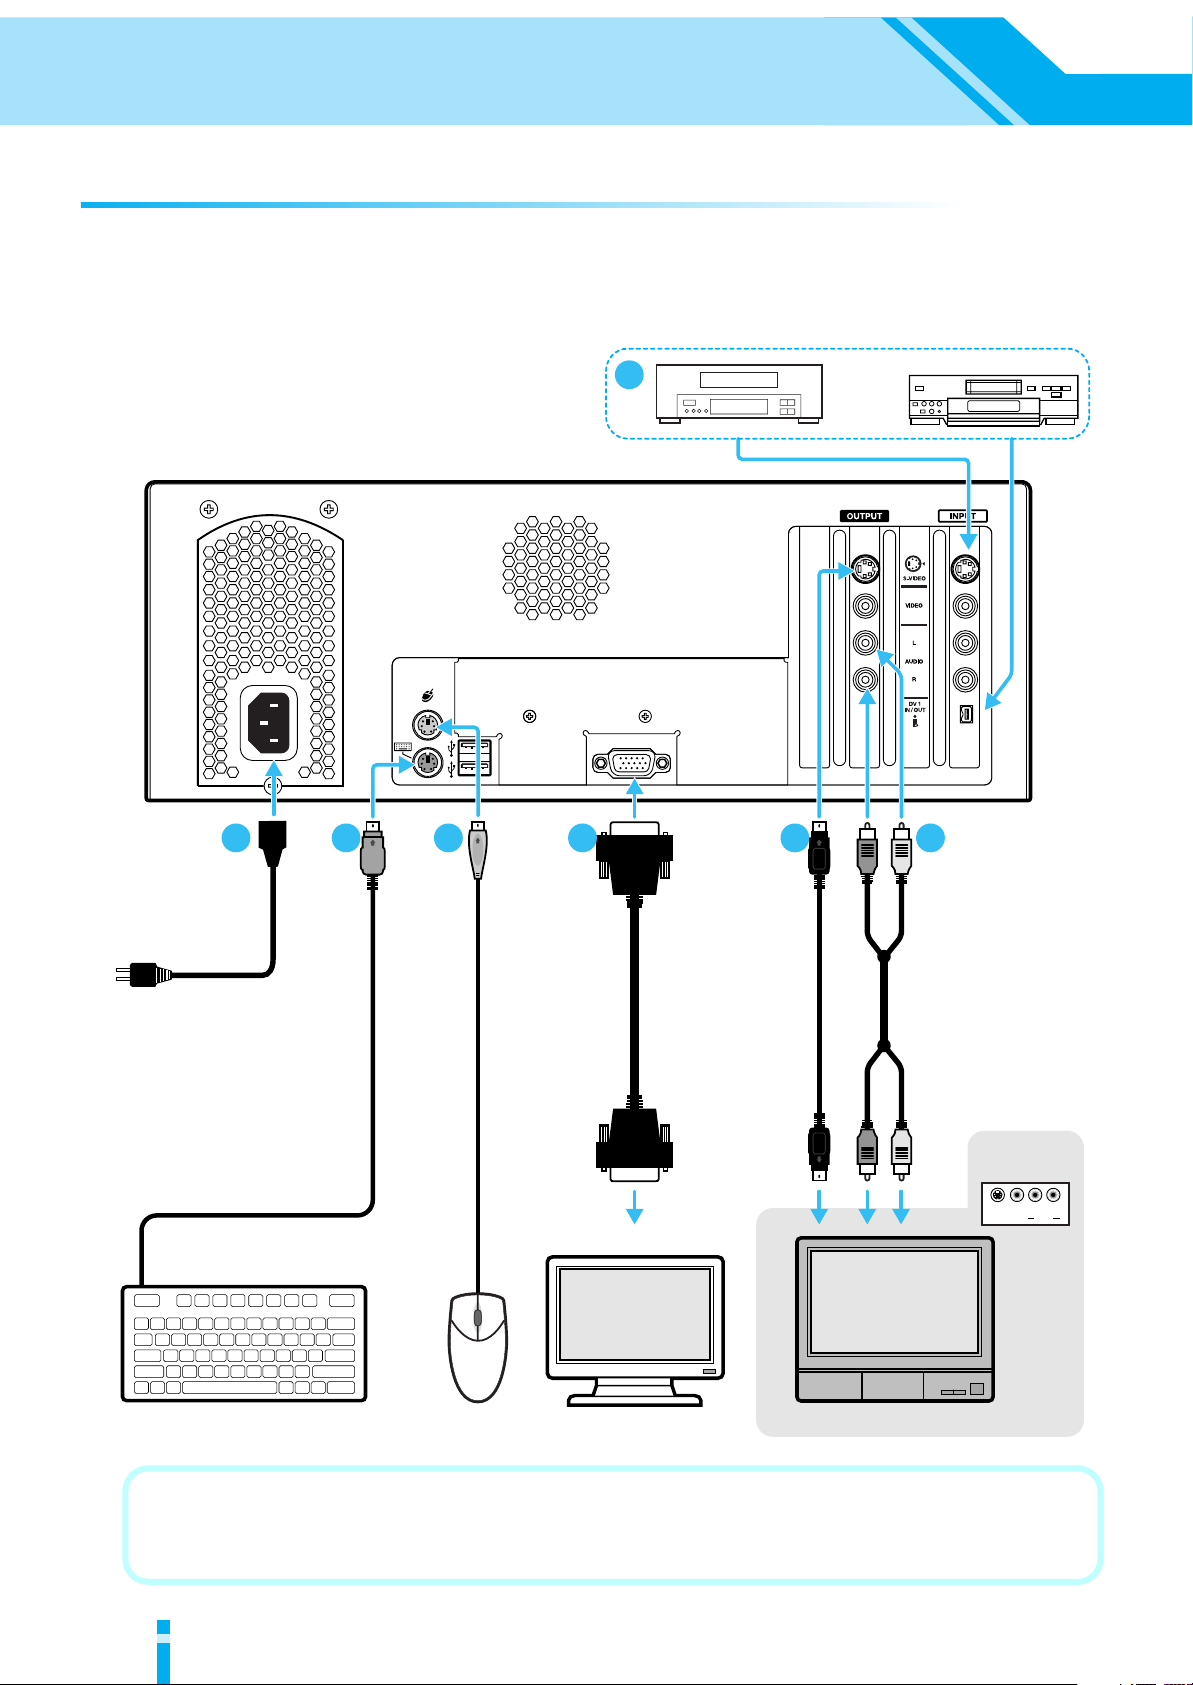
DV-7DL PRO Rear Panel
INPUT
Making the Connections
Before you start work, you need to connect the DV-7DL PRO and the other equipment.
Follow the steps on the following pages to make the connections.
* To prevent malfunction and/or damage to speakers or other devices, always turn down the volume and turn off
the power on all devices before making any connections.
7
1 2 3 4 5 6
Red White
Power
Cord
To V GA Connector
VGA
Cable
S-Video
Cable
To S-Video
Connector
Audio
Cable
Red White
4
Operating the DV-7DL PRO near a television or radio may cause uneven color on the television screen
or noisy sound from the radio. This is due to the effects of electromagnetic noise. If this happens, move
the DV-7DL PRO away from the television or radio.
Page 5
Before You Begin Editing
5
6
7
Connect the power.
1
Insert the power cord included with the DV-7DL
PRO (or the DV-7DL) at the location shown in
the figure, then plug the other end of the cord
into a power outlet.
Connect the keyboard.
2
Locate the symbol on the connector that’s on
the end of the cable running from the keyboard.
With this symbol facing upwards, insert the
connector at the location shown in the figure.
Connect the mouse.
3
Locate the symbol on the connector that’s
attached to the mouse cord. With this symbol
facing upwards, insert the connector at the
location shown in the figure.
Connect the display.
4
Using a VGA cable, connect between the VGA
connectors on the DV-7DL PRO and the display
(available separately).For more information,
refer to page 24 of the Owner’s Manual.
Connect the television monitor.
Using an S-Video cable, connect between the SVideo connectors on the DV-7DL PRO and the
television monitor (available separately).
You can also use the composite-video
connectors to make the connection to the
television monitor. For more information, refer
to page 24 of the Owner’s Manual.
Connect the monitor speakers.
Using an audio cable, connect between the audio
connectors on the DV-7DL PRO and the monitor
speakers (available separately).
If the television monitor supports audio input,
you can also make the connection to the
television monitor.
Connect the video deck for video input.
Connect a video deck for copying video to the
DV-7DL PRO.
For more information, refer to page 26 of the
Owner’s Manual.
■
How to Connect a Digital Video Deck Provided with a DV Jack
If you’re connecting a digital video (DV) device that is equipped with DV jacks, use a commercially
available digital video cable to make the connection as shown below.
For more information, refer to the documentation for the digital video device you’re connecting.
a Video Deck Provided with a DV Jack
DV2 jack
DV Cable
■
How to Connect Headphones and a Microphone
If you have headphones and a microphone, you can connect them to the unit’s front panel.
You can also use the volume knobs to adjust the volume level for each.
* Before you make the connection, turn the volume knob in the figure fully counterclockwise to lower the volume level.
IN/OUT
DV jack
For a more detailed explanation, refer to page 22 of the Owner’s Manual.
Microphone
Headphone
5
Page 6
Using the Mouse
Using the Mouse
You use the mouse included with the DV-7DL PRO (or the DV-7DL) to operate the DV-7DL PRO.
First let’s learn how to use the mouse.
Left button Right button
The mouse has two buttons, called the “left button” and the “right button.”
How to Hold the Mouse
How to Hold the Mouse
As the figure shows, you hold the mouse by placing the palm of your right hand on it.
When you do this, place your index finger on the left button and your middle finger on the right button.
Mouse Placement
Use the mouse on the included mouse pad or on a commercially available optical mouse pad.
Place the mouse pad on a flat and level surface.
* Using the mouse on any surface without a pad may result in unintended operation. Be sure to use a mouse pad.
■
Moving the Mouse
Pointer
6
Pointer
Display
Moving the mouse while the DV-7DL PRO is running makes the hand-shaped symbol on the editing
screen move in the same way. This hand-shaped symbol is called the “
important tool, needed to operate the DV-7DL PRO. When the instructions in this document say to
“click” a certain item (such as an on-screen button), you must first move the pointer to the specified
item.
Moving the mouse causes the pointer to movein the same way.
pointer
.” This pointer is an
Page 7
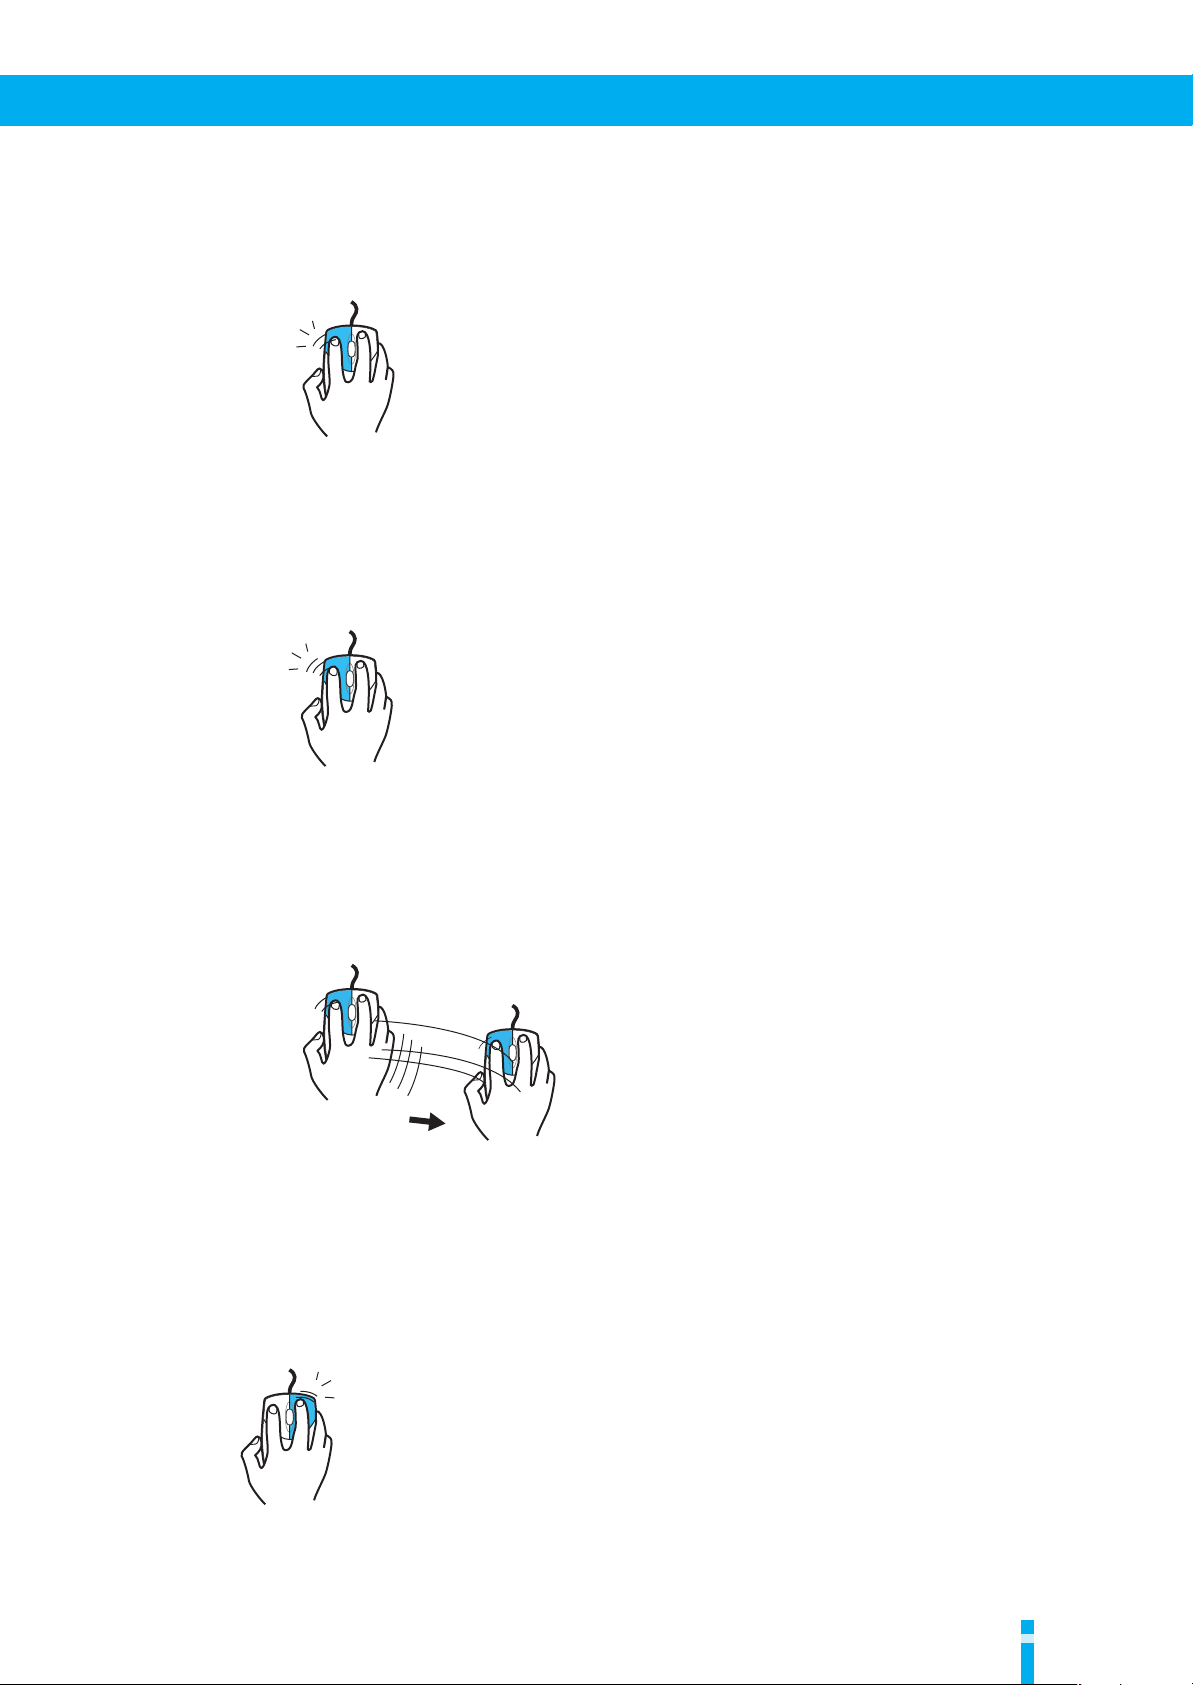
■
Clicking
Lightly press the left button once with your index finger to produce an audible click.
Use this when selecting material, effects, and the like.
* This is also called “single-clicking.”
■
Double-clicking
Lightly press the left button two times in rapid succession with your index finger to produce two
audible clicks. Use this for operations such as “opening” (displaying) windows.
s
Before You Begin Editing
Click
Click
Click
■
Dragging and Dropping
Use this when moving on-screen “objects.”
First, move the mouse pointer to the object you want to move. Then press the left button until it clicks,
and without releasing the button, move the mouse. When the mouse pointer reaches the target location,
release the button.
Press and hold
the left button.
■
Right-clicking
Lightly press the right button once with your middle finger to produce an audible click.
Use this for such operations as displaying the Edit menu for material.
Click
Move
Release the
left button.
7
Page 8

Starting Up
Starting Up
Now that the setup is complete, we’re ready to switch on the DV-7DL PRO and start it up.
Press the power button.
1.
You can hear the DV-7DL PRO as it begins to operate, and the POWER light comes on.
Wait for the system to start. This takes a few minutes.
s
After a short while, the screen shown below appears on the display.
This screen is called the “
window
next page.
* Clicking the “EXIT” button turns off the power to the
.” To start work, follow the procedure on the
DV-7DL PRO.
Project Management
8
For a more detailed explanation, refer to page 30 of the Owner’s Manual.
Page 9
Before You Begin Editing
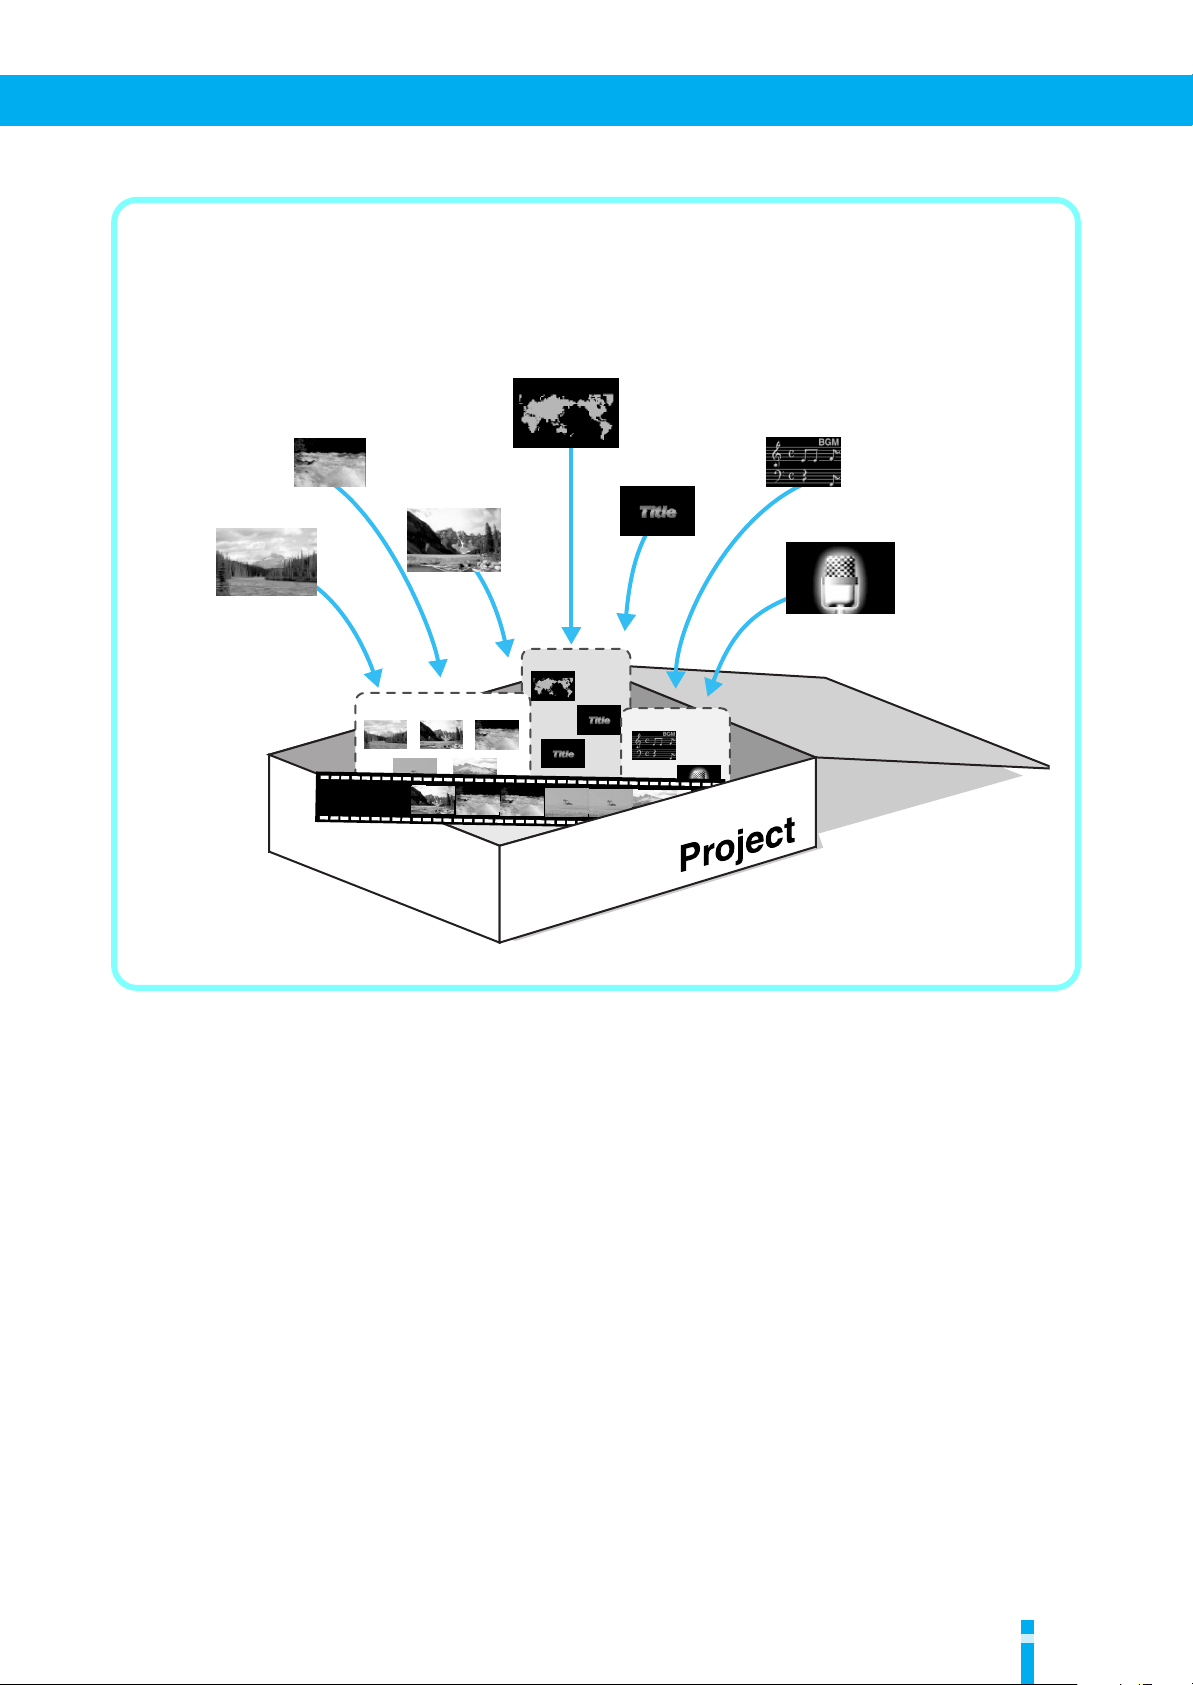
What Is a Project?
To create a sequence on the DV-7DL PRO, you always need a
project. A project holds material
such as video, audio, and titles, as well as the sequences that you have edited. You manage your
sequences by managing a project. A project could be termed an “organizing box” for creating
sequences.
Title
Video
Video
Video
Title
Video
Sequence
Audio
Title
Audio
Audio
9
Page 10
Creating a Project
Editing screen
Creating a Project
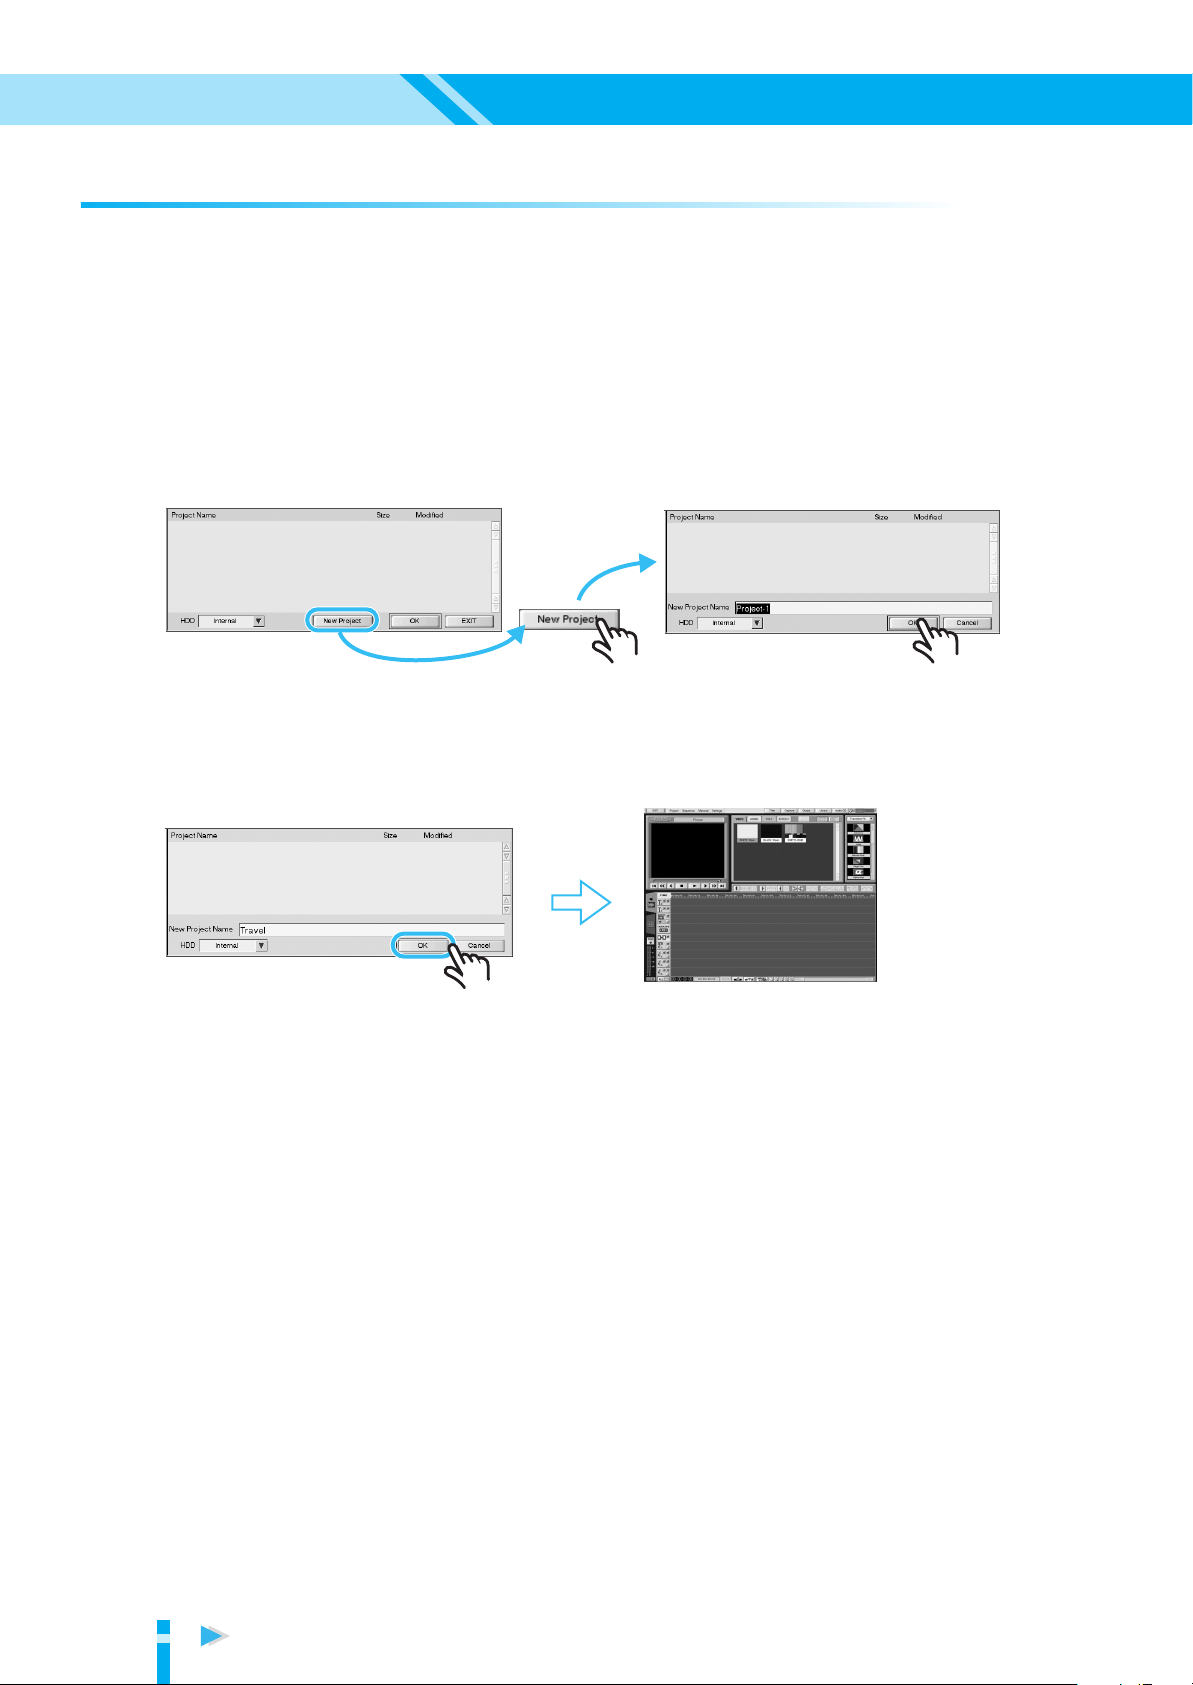
To begin editing, you must either open an existing project or create a new one.
Click the “New Project” button.
1.
After you have started the DV-7DL PRO and the Project Management window has appeared, click the
“New Project” button. The screen changes, and a window for naming the project appears. To give the
project a different name, click the area next to “New Project Name” to highlight the area. Next, use the
keyboard to type in a name for the project.
* If the project is a new one, it is automatically given a name (such as Project 1, Project 2, and so on).
* You can re-name the project later.
2.
Click the “OK” button.
An empty project is created. The Project Management window disappears and the editing screen
appears.
10
For a more detailed explanation, refer to page 35, 338 of the Owner’s Manual.
Page 11
Opening Previously Created Projects
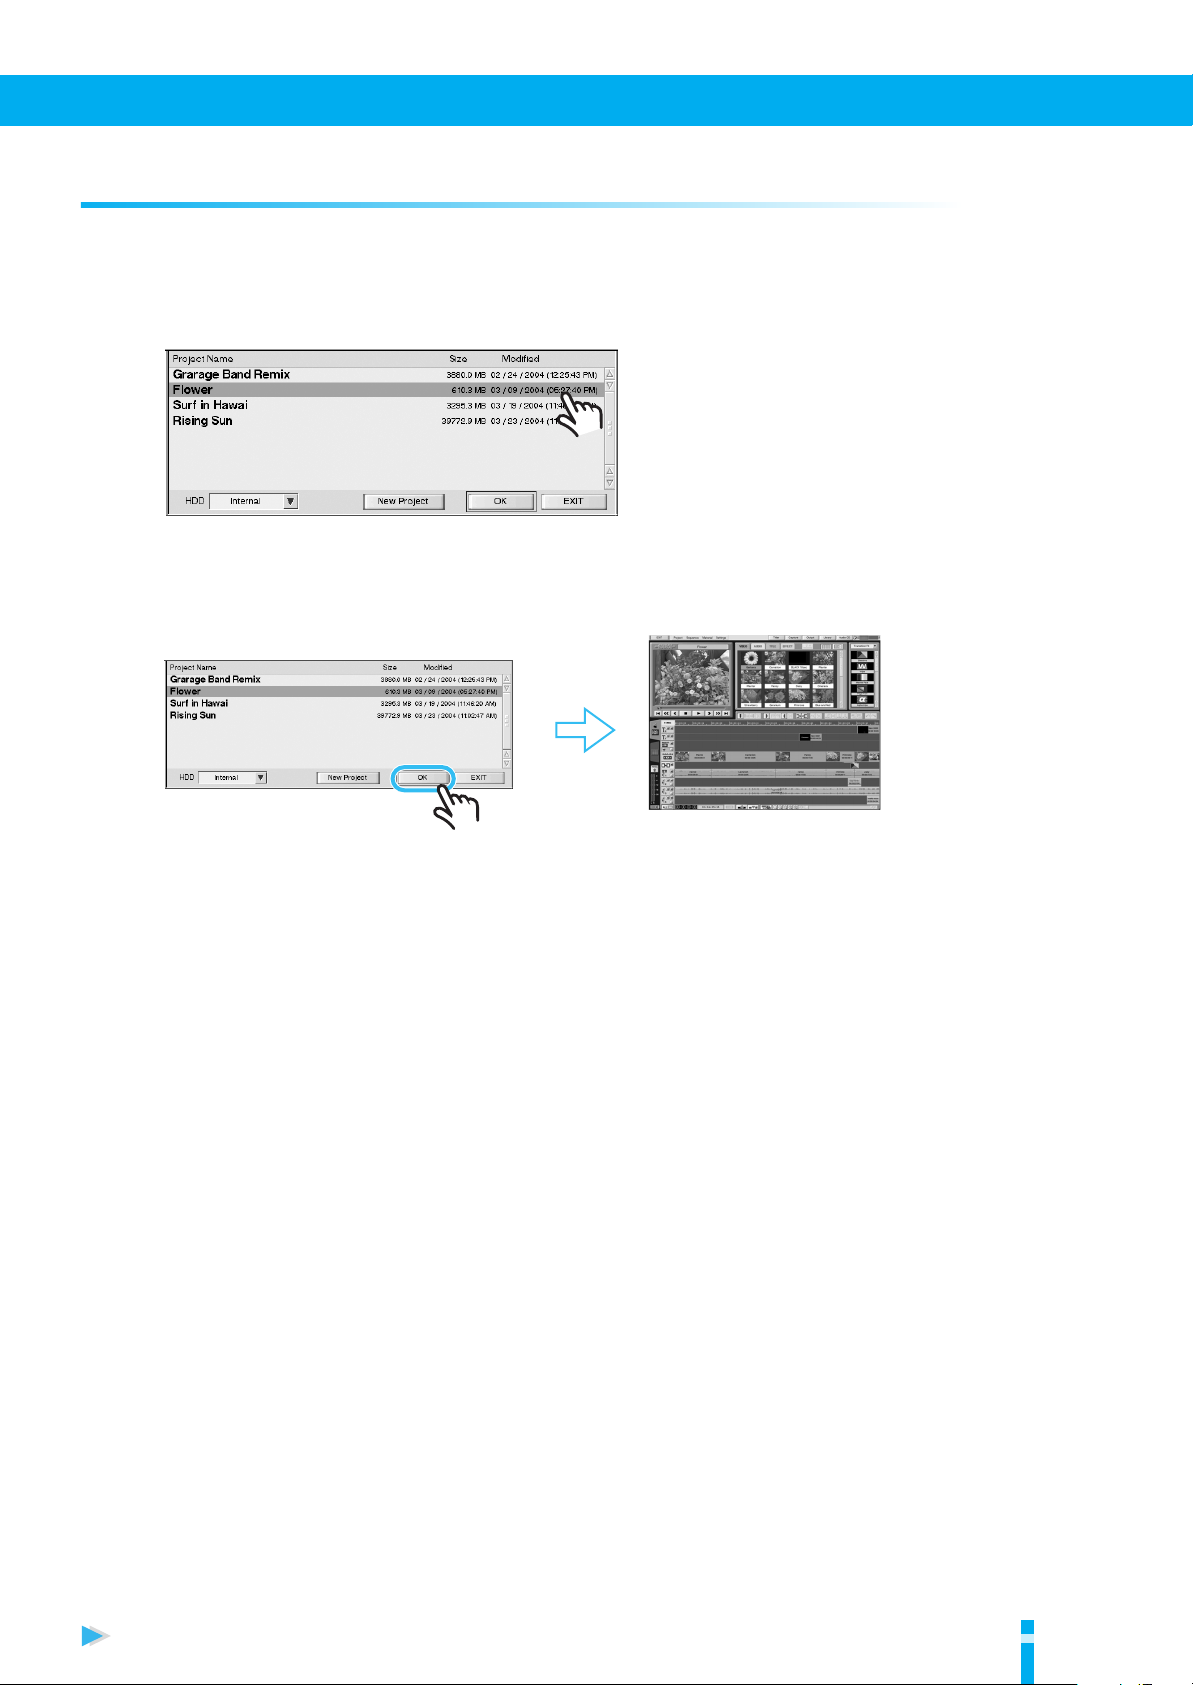
The projects you create are stored inside the DV-7DL PRO. To work on a project, you need to open it.
Select the project.
1.
From the list in the “Project Management” window, select the project you want to open by clicking it.
2.
Click the “OK” button.
The project you selected opens. The editing screen appears.
Before You Begin Editing
Editing screen
For a more detailed explanation, refer to page 36, 339 of the Owner’s Manual.
11
Page 12
Editing
How to Edit
Let’s try doing some editing using the DV-7DL PRO.
To perform editing follow the steps described below.
1.
Capture material.
2.
Edit the material.
Capture the video, music, and other
material to use in the sequence.
Captured video and audio is saved on
the
hard disk
Hard Disk
This is a device for storing material,
editing data, and other such information.
The DV-7DL PRO comes with one built
in. You can expand the unit by installing
the optional DV-HD120 hard disk.
as
material
.
Arrange and edit the material.
You can alter the length of material and
change its order to flesh out the story of
the sequence.
12
Page 13
3.
Modify the sequence.
4.
Save the sequence.
How to Edit
Add titles and effects to the edited
sequence.
The methods just described are called “
nonlinear editing
Save the finished sequence on
videotape or DVD.
* You will need to prepare a video recording device
that is appropriate for the type of media on which
you plan to output your finished work.
.”
What Is Nonlinear Editing?
This refers to a method of editing video by using a computer or the like to capture the video and other
material into the editing device, then carrying out editing. This method offers the big advantage of
letting you index and fast-forward captured video data instantly. This is called “nonlinear” because it
differs from the older method of editing using videotape, which is known as “linear editing.”
13
Page 14

Capturing Video Material
Let’s try capturing video from a videotape that you have prepared.
This section describes how to make the connection to a DV device using the method described in “How
to Connect a Digital Video Deck Provided with a DV Jack” (p. 5).
* When you do this, the audio recorded simultaneously with the video (synchronized audio) is also captured along
with the video.
* For information on how to perform capture from an analog video device, refer to “Capturing from Analog Jacks
(S-VIDEO or VIDEO Jacks)” on page 49 of the Owner’s Manual.
1.
Insert the videotape into the playback unit.
Insert the videotape you’ve shot into the digital video device (digital video camera or the like).
* For information on how to insert the videotape, refer to the documentation for your digital video device.
* If you are performing playback on a digital video camera, switch the camera to the playback mode.
a Video Deck Provided
with a DV Jack
2.
Display the capture window.
In the editing screen, click the “Capture” button to display the Capture window.
fig. click capture.eps
3.
Select the input connector.
Click the in the “Input Select” area to display the list of input connectors. From the list, select the
connector where the digital video device is connected. In this example, choose “DV jack 2” (“DV2”). The
video appears in the preview window.
* The television monitor may flicker when you select the connector, but this is normal and does not indicate a
malfunction.
fig. input select.eps
DV cable
Capture windowEditing screen
14
Preview window
Page 15
Capturing Video Material
Preview the input.
4.
Clicking the “Play” button in the Capture window operates the connected digital video device and
starts playback of the videotape you loaded. Check the video that appears on the Preview window.
You can also operate the digital video device using the other buttons near the “Play” button (the DV deck
controls).
* If no video appears, check the connections between the DV-7DL PRO and the digital video device.
fig. play stop VTR.eps
“Rewind” button
“Stop” button
DV deck controls
Index to the location you want to capture.
5.
Use the DV deck controls to index the videotape to the location you want to use for editing.
6.
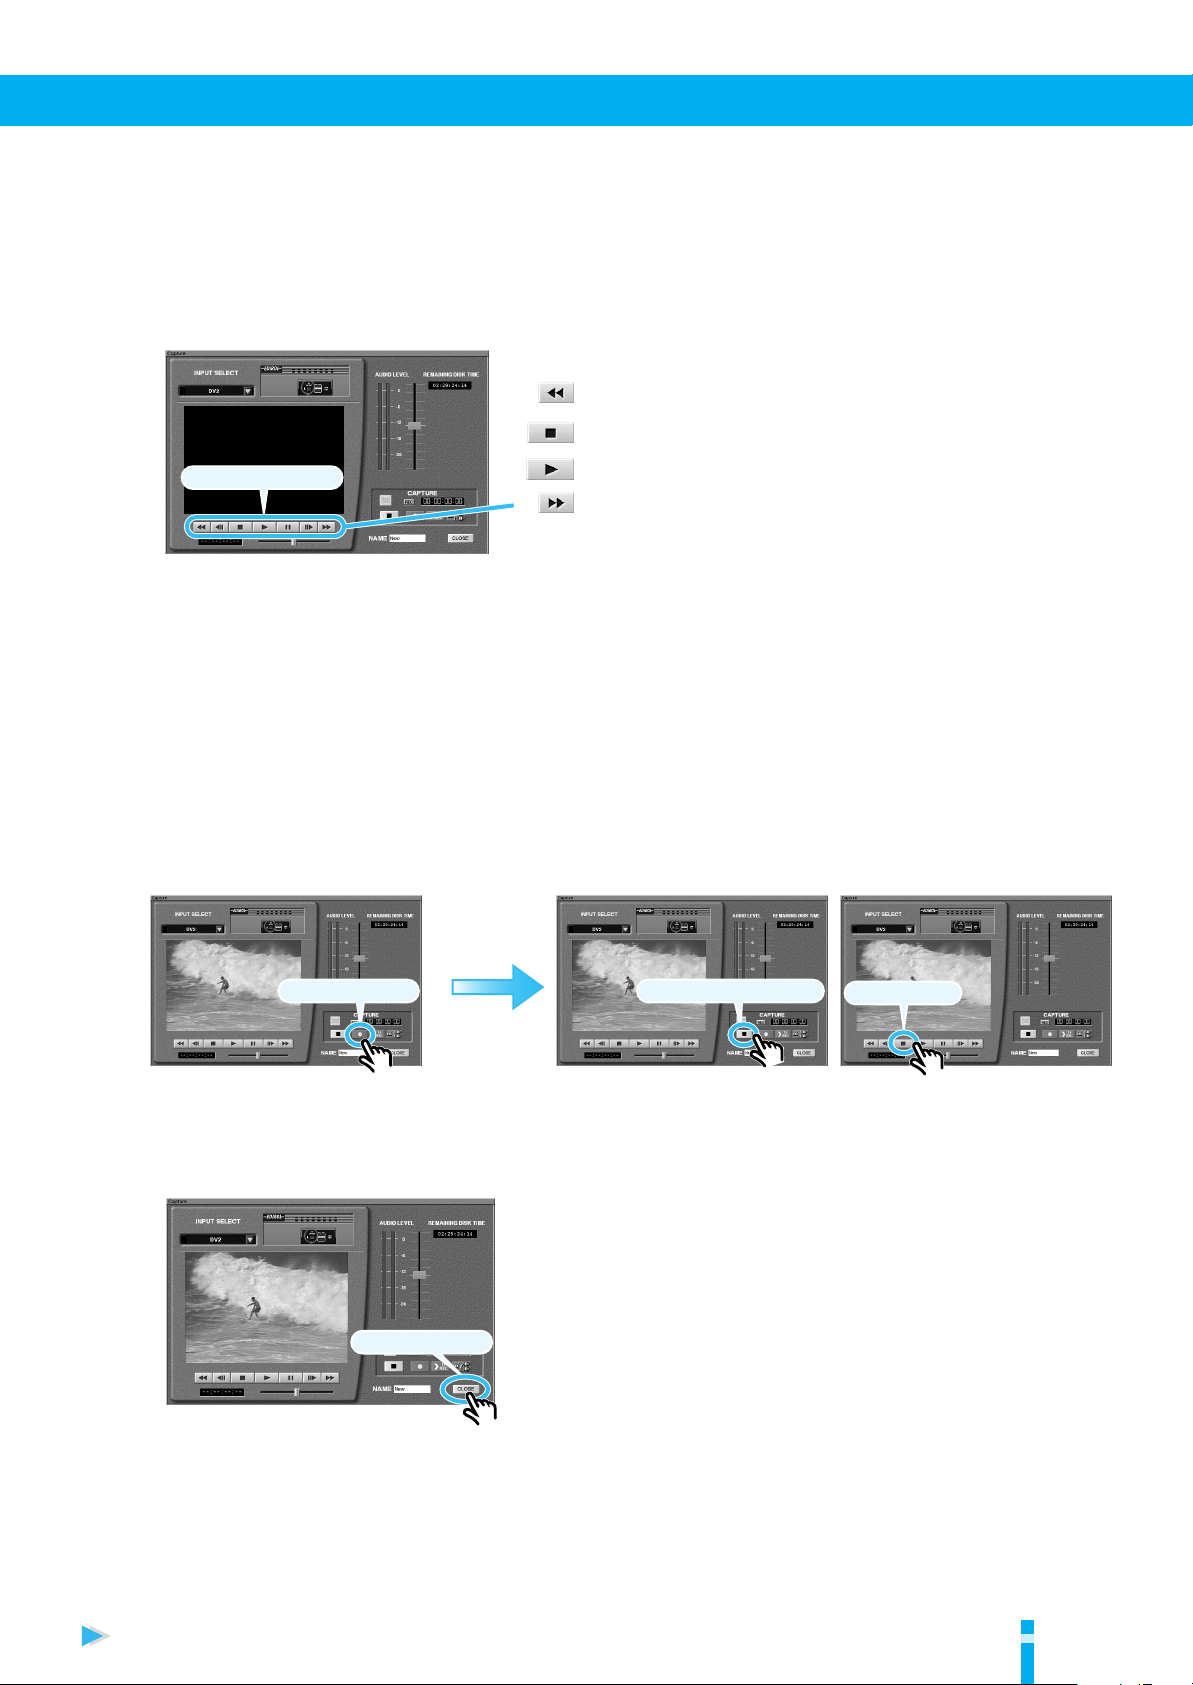
Capture the video.
To start capture, click the “Play” button to start playback of the videotape, then click the “Capture”
button. When the scene you want to capture ends, click the “Stop Capture” button.
When capture ends, click the “Stop” button to stop playback of the videotape.
* Starting capture immediately after playback of the tape starts may result in corruption of the video image. It may be
a good idea to wait for several seconds after playback begins to start capture.
fig. start capture.eps
capture
the video
“Play” button
“Forword” button
* For descriptions of other buttons, refer to page 43 of the Owner’s Manual.
Rewinds the videotape.
Stops playback.
Starts playback.
Fast-forwards.
“Capture” button “Stop Capture” button
7.
Close the capture window.
Clicking the “CLOSE” button returns you to the original editing screen.
fig. close capture.eps
“CLOSE” button
“Stop” button
For a more detailed explanation, refer to page 42 of the Owner’s Manual.
15
Page 16

Arranging Video Material
video material
Let’s try arranging video material to create the flow of the narrative. Using the Storyboard Palette makes
a single picture out of each piece of video material, letting you create the flow of the narrative by arranging
these pictures. Because you can see the flow of the narrative at a glance, like a Sunday comic, you can carry
out editing while maintaining a view of the entire story.
1.
Change to the Storyboard Palette.
Click the Storyboard tab. The lower half of the window changes to a palette like a light board for photo
negatives (the Storyboard Palette).
fig. click storyboard.eps
Storyboard Palette
Storyboard tab
Find the video material to place.
2.
In the editing screen, click the VIDEO tab to display the video material. Find the video material that you
want to place, then click the material. The name of the selected video material turns red.
fig. drag first clip.eps
3.
Place the first piece of video material.
Drag the material you selected in step 2 to the white box. A picture of the video material appears in the
white box. The white box is shifted to the right.
fig. drag first clip.eps
16
Page 17

Arranging Video Material
* For descriptions of other buttons, refer to page 81 of
the Owner’s Manual.
Starts playback.
“Play” button
Stops playback.
“Stop” button
Returns to the beginning
of the sequence.
“Rewind” button
Arrange the next piece of material.
4.
Drag the next piece of material to the white box in the same way as in step 3. To arrange more material,
keep dragging each new piece in the same way.
fig. drag second clip.eps
5.
Try playing it back.Now that you have placed material, let’s try playing back
the sequence to see how it looks.
Click the first piece of material on the Storyboard Palette, then click the “Play” button. Playback starts
from the beginning of the sequence.
As playback proceeds, the red box on the Storyboard Palette moves in step to indicate the current
location.
fig. click play.eps
For a more detailed explanation, refer to page 68 of the Owner’s Manual.
17
Page 18

Arranging Video Material
Right-clicking
Deleted
menu
Shifted forwardShifted forward
■
Changing the Order of Placed Material
Try moving material placed in the middle of the Storyboard Palette forward and backward.
Line up the mouse pointer with the material you want to move, then click. This puts the material in a
selected state. You can then drag the material to a different material location. You can move the material
to the location when a blue vertical line is displayed to the left side of the material.
fig. reorder storyboard.eps
■
Deleting Material
You can erase material you no longer need from the Storyboard Palette.
Line up the mouse pointer with the material you want to delete, then right-click. A edit menu appears
at that location. Moving the pointer to “Delete” and clicking deletes the material.
fig. reorder storyboard.eps
18
For a more detailed explanation, refer to page 72 of the Owner’s Manual.
Page 19

■
“Undo” button
“Redo” button
1st
operation
Undo Undo Undo
Redo Redo Redo
The Passage of Time
2nd
operation
3rd
operation
4th
operation
The Relationship Between “Undo” and “Redo”
Undoing an Operation
If you happen to make a mistake in your work, you can restore the original state. Clicking the “Undo”
button at the upper right of the Storyboard Palette restores the state in effect before the last operation
you carried out. Clicking this button repeatedly lets you go back to successively earlier stages, with each
click taking you one stage further back. Also, if you go too far back, clicking the “Redo” button next to
the “Undo” button lets you redo (do over) the operation.
Also, if you go too far back, clicking the “Redo” button next to the “Undo” button lets you redo (do
over) the operation.
fig. reorder storyboard.eps
Arranging Video Material
For a more detailed explanation, refer to page 67 of the Owner’s Manual.
19
Page 20

Arranging Video Material
■
Changing the Length of Material
When video material is too long, you can remove excess portions and extract just the portion you need.
To keep what you require and cut away what you don’t, you need to decide on the point where material
use starts (
between the In point and the Out point in editing.
* When no In point and Out point have been set explicitly, the In point is set at the beginning of the material and the
Out point at the end.
the In point
Unneeded
portion
) and the point where material use ends (
In point Out point
Needed portion
Editing
the Out point
Unneeded
portion
). You can use the portion
Setting an In Point and Out Point in the Detail View Window
1.
Display the Detail View window.
Double-click a piece of material on the Storyboard Palette to display the Detail View window.
Double-click
Detail View window
2.
Index the portion where you want to start using material.
Click the “Play” button. The material is played back. When playback reaches the place where you want
to start using material, click the “Stop” button. Playback stops.
20
“Play” button
“Stop” button
* For descriptions of other buttons, refer to page 56 of the
position bar
* The position bar moves in the waveform display as playback proceeds. The location of the position bar shows you
what portion of the overall sequence is being played back. You can fine-tune the stop position by dragging the
position bar.
Owner’s Manual.
Starts playback.
Stops playback.
Page 21

Arranging Video Material
Starts playback.
“Play” button
Stops playback.
“Stop” button
* For descriptions of other buttons, refer to page 56 of
the Owner’s Manual.
Set an In point.
3.
Clicking the “Set In Point” button sets an In point at the location of the position bar.
The portion after the In point in the waveform display turns blue.
“Set In Point” button
waveform display
4.
Index the portion where you want to stop using material.
Click the “Play” button. The material is played back. When the portion of material that you need ends,
click the “Stop” button. Playback stops.
Set an Out point.
5.
When playback of the required portion ends, click the “Set Out Point” button to set an Out point. The
area between the In point and the Out point turns blue. The area in blue is the portion that you can use
in editing.
“Set Out Point” button
Update the settings.
6.
Click the “OK” button. The settings are applied and the Detail View window closes.
For a more detailed explanation, refer to page 58 of the Owner’s Manual.
21
Page 22

Capturing Audio Material
Let’s try capturing audio. This section describes how to capture narration from a microphone and how to
capture background music from an audio CD.
For information on how to perform capture from other audio equipment, refer to “Capturing Audio from
a Cassette Tape or Other Audio Device” on page 102 of the Owner’s Manual.
Capturing Background Music from an Audio CD
Let’s try capturing audio from the included Sound Library CD-ROM.
* Capture is possible only from an audio CD that can be played in an ordinary compact-disc player. For more
information, refer to “About Capturing from CD Extra” on page 108 of the Owner’s Manual.
1.
Open the tray for the CD-ROM drive.
Press the EJECT button on the front of the DV-7DL PRO to open the tray.
fig. press CD eject.eps
Eject Button Tray
2.
Insert the audio CD.
Place the CD in the tray with the recorded side (the side opposite the printed label) facing down. When
you do this, make the hole in the CD snap onto the spindle in the center of the tray. Place the CD on the
tray, then press down near the hole until it snaps into place. Once the CD is loaded correctly, press in
the tray to make it go back into the unit.
fig. set audio CD.eps
CD
Click
Press in until it clicks
into place.
3.
Display the Audio CD Capture window.
Click the “Audio CD” button. The Audio CD window appears. After a short wait, a list showing the
track numbers and track times of the songs on the loaded audio CD appears.
22
Editing Screen Audio CD window
List
Page 23

Capturing Audio Material
Capture progress window
Select and listen to a song.
4.
Clicking a track number makes it change color, allowing you to select it. You can now play it by clicking
the “Play” button.
fig. audio CD capture.eps
“Rewind” button
“Stop” button
“Play” button
“Pause” button
* For descriptions of other buttons, refer to page 107 of
the Owner’s Manual.
5.
Perform capture.
Click the track you want to capture to select it, then click the “CAPTURE” button. Capture of the audio
for the track you selected starts. A window showing the progress of capture appears at this time. Wait
until capture ends. When capture finishes, this window automatically closes.
* The text for the captured track is displayed in green.
fig. capture audio CD.eps
Rewinds the deck.
Stops playback.
Starts playback.
Pauses playback.
6.
Close the Audio CD window.
When you have finished capturing the songs you need, click the “CLOSE” button. The original editing
screen returns.
fig. close audio CD.eps
When you’re using audio CDs, give full attention to copyright issues.
For a more detailed explanation, refer to page 106 of the Owner’s Manual.
23
Page 24

Arranging Audio Material
Material Palette
audio material
Let’s try inserting audio material and narration into a sequence edited on the Storyboard Palette. You can
use the Timeline Palette to arrange audio material.
1.
Changing to the Timeline Palette
Clicking the Timeline tab displays the Timeline Palette.
fig. click timeline.eps
Timeline Palette
Find the audio material you want to place.
2.
At the editing screen, click the AUDIO tab to display the audio material. Find the audio material that
you want to use, then click the material. The name of the selected audio material turns red.
fig. drag first clip.eps
3.
Drag the audio material.
Drag the material on the Audio Palette to Audio track 2, 3, or 4.
* Synchronized audio for video material is inserted on Audio track 1, so audio material cannot be placed on this track.
fig. drag BGM.eps
24
Audio Track 2–4
Page 25

Arranging Audio Material
T2
T1
2
1
3
4
INSERT
MAIN
TIME
You can place title material here.
You can place video material here.
You can place transition effects (Transition) here.
You can place audio material here.
Synchronized audio for video material placed on the Main
Video track is inserted.
The Passage of Time
Title Track 2
Title Track 1
Main Track
Insert Track
Control Track
Audio Track 1
Audio Track 2
Audio Track 3
Audio Track 4
Try playing it back.
4.
Now that you have arranged the audio material, let’s try playing back the sequence to check the results.
fig. click play.eps
■
Timeline Palette
Material is arranged side by side according to time on the Timeline Palette. Lengthy material is
displayed as long, and short material is displayed as short. The flow of time starts at the left and
proceeds to the right. Material on the right is played back at the end of the sequence.
“Play” button
“Stop” button
“Rewind” button
Starts playback.
Stops playback.
Returns to the beginning
of the sequence.
* For descriptions of other buttons, refer to page 81 of
the Owner’s Manual.
As the figure above shows, the type of a piece of material determines the location where it is placed on
the Timeline Palette.
You can place audio material on Audio tracks. There are four Audio tracks, so you can play four sounds
at the same time.
Position Bar
The red vertical bar on the Timeline Palette that moves during sequence playback is called the position
bar.
It indicates the position on the Timeline Palette that is currently being played back. You can also move
it by dragging it with the mouse.
position bar
00:00:12 00:00:18 00:00:24
TIME
T2
T1
INSERT
MAIN
1
2
3
4
For a more detailed explanation, refer to page 120 of the Owner’s Manual.
00:00:12 00:00:18 00:00:24
TIME
T2
T1
INSERT
MAIN
1
2
3
4
25
Page 26

Arranging Audio Material
* For descriptions of other buttons, refer to page 81 of
the Owner’s Manual.
Starts playback.
“Play” button
Stops playback.
“Stop” button
Returns to the beginning
of the sequence.
“Rewind” button
Placing Audio Material with the Timing You Want
You can place audio material with the timing you want during playback of the sequence.
This is useful when you want to insert audio matched to the video, such as sound effects.
1.
Choose the sound you want to place.
Go to “Capturing Audio Material” (p. 22) and follow steps 1 and 2 to select the audio you want to insert.
Click the button.
2.
Click the button for the Audio track where you want to record narration. The button turns red.
Start playback.
3.
Click the “Play” button. The sequence is played back.
Click the “Punch Recording” button.
4.
Clicking the “Punch Recording” button plays the audio material and places the material on the track
you selected in step 2.
* Clicking the “Punch Recording” button a second time before the audio finishes playing cuts off the audio material at
that location.
26
“Punch
Recording”
button
For a more detailed explanation, refer to page 123 of the Owner’s Manual.
Page 27

■
Right-clicking
menu
Moving Material
You can move the position of material on the Timeline Palette.
When you move the pointer to a piece of material you want to move, the shape of the pointer changes to
(or ). Drag the material to the desired destination. When a black bar appears at the intended
destination for the material, release the button. The material moves to the location of the black bar.
dragging
■
Deleting Material
You can delete material you no longer need from the Timeline Palette.
Line up the mouse pointer with the material you want to delete, then right-click. A menu appears at
that location. Moving the pointer to “Delete” and clicking deletes the material.
fig. reorder storyboard.eps
Arranging Audio Material
Material
Material
black bar
Material
■
Undoing an Operation
If you happen to make a mistake in your work, you can restore the original state. Clicking the “Undo”
button at the upper right of the Timeline Palette restores the state in effect before the last operation you
carried out. Clicking this button repeatedly lets you go back to successively earlier stages, with each
click taking you one stage further back. Also, if you go too far back, clicking the “Redo” button next to
the “Undo” button lets you redo (do over) the operation.
fig. reorder storyboard.eps
“Undo” button
For a more detailed explanation, refer to page 90, 88, 67 of the Owner’s Manual.
“Redo” button
27
Page 28

Arranging Audio Material
Material
lowew
upper
■
Changing the Length of Audio Material
You can set an In point and an Out point in audio material and use just the portion you need. When
captured audio material is too long, you can adjust the length of the audio material to match the video.
* For more information about In points and Out points, refer to “Changing the Length of Material” (p. 20).
Changing the In point and Out point for material on the Timeline Palette
Dragging the edge of a piece of material with the mouse lets you change the position of the In point or
Out point.
In point Out point
Material
When you move the pointer close to the edge of a piece of material on the Timeline, the shape of the
pointer changes.
The shape of the pointer depends on whether it is at the top or bottom of the edge of the material, as the
figure shows.
The shape of the pointer determines how adjacent material behaves when you shorten the length of the
material.
* When you lengthen (extend) material, subsequent material is shifted toward the end by an amount corresponding
to the extended length.
When the pointer has this shape,
shortening the material leaves an empty
Material1 Material2
space in the area where the material used
to be. Also, the position of subsequent
material does not change.
Material1 Material2
Empty space
When the pointer has this shape,
shortening the material makes subsequent
Material1 Material2
material shift forward.
* This pointer appears only at the place where
two pieces of material touch.
Material1 Material2
28
Shifted forward
Page 29

■
Adjusting the Volume
When the audio is too loud or too quiet, you can adjust the volume level.
You can adjust the volume independently for Audio Tracks 1 through 4.
Raising and Lowering the Volume Level
Drag the Volume Line on the Audio track.
Raising the line increases the volume level. Lowering the line reduces the volume level.
High
volume
Arranging Audio Material
Volume Line
Maximum volume
Minimum volume
Level Point
Low
volume
Raising the Volume Level Gradually
Moving a level point by dragging it bends the Volume Line.
You can raise or lower the volume level according to the angle of the Volume Line.
Low volume
High volume
In the figure shown above, the volume level rises gradually.
Raising and Lowering the Volume Level at the Location You Want
You can raise and lower the volume level at locations you choose by adding level points.
Hold down the “Ctrl” key on the Keyboard and click the Volume Line at the location you want to add
a level point. You can change the volume level by moving the level point up or down.
You can add as many level points as you like to adjust the volume as needed.
Hold down “Ctrl” and click the Volume Line.
In this way you can make the volume level changing in complex ways.
For a more detailed explanation, refer to page 128, 129, 131 of the Owner’s Manual.
29
Page 30

Arranging Audio Material
level meter
“REC” button
level meter
slider
■
Inserting Narration
Let’s try using the Narration feature to insert narration directly into an edited sequence.
Connect a microphone to the MIC IN jack on the DV-7DL PRO.
1.
* To prevent malfunction and/or damage to speakers or other devices, always turn down the volume, and turn off the
power on all devices before making any connections.
* Howling could be produced depending on the location of microphones relative to speakers. This can be remedied by:
1. Changing the orientation of the microphone(s).
2. Relocating microphone(s) at a greater distance from speakers.
3. Lowering volume levels.
microphone volume control knob
Microphone
2.
Select a track for recording the narration.
Click the button for the Audio track where you want to record the narration. The button turns
red. The “REC” button and level meter also appears to the right of the Timeline Palette.
Adjust the input level.
3.
Face the microphone, and speak toward it while delivering the narration.
Clicking the “Mic Preview” button causes the level meter on the editing screen to respond, allowing
you to view the volume level entering the microphone. While monitoring this response, adjust the
volume level of input to the microphone by turning the microphone volume control knob on the front
of the DV-7DL PRO and by dragging the Level control on the editing screen.
Adjust them so that the maximum response is around -12.
30
“Mic Preview” button
microphone volume control knob
level meter
* Sound distortion may occur if the response of the level meter exceeds 0. Be sure to adjust it.
Page 31

Arranging Audio Material
“Undo” button
Perform recording.
4.
Click the “Play” button to play back the sequence. When you come to the place where you want to insert
narration, click the “REC” button to start recording. Speak the narration into the microphone. When the
narration ends, click the “REC” button again to stop recording.
* Recorded audio is saved on the Audio Palette.
“PLAY” button
“REC” button
Speaking
If a Problem Occurs During Recording
You can erase what you have recorded by clicking the “Undo” button during recording.
“REC” button
Try playing it back.
5.
Try rewinding the sequence and click the “Play” button.
“Play” button
“Stop” button
“Rewind” button
* For descriptions of other buttons, refer to page 81 of
the Owner’s Manual.
Starts playback.
Stops playback.
Returns to the beginning
of the sequence.
For a more detailed explanation, refer to page 125 of the Owner’s Manual.
31
Page 32

Inserting Titles into a Sequence
After you’ve finished editing the video and audio, let’s try adding titles to make the sequence more
complete.To create titles, you use the “Titler.” The DV-7DL PRO’s “Titler” lets you create high-quality
titles easily. In this example, let’s try creating a title that uses text.
1.
Display the Titler.
Play back the sequence, and stop at the place where you want to insert a title. Go to the top of the editing
screen and click the “Titler” button. The display changes to the Titler window. The Titler displays the
picture of the scene where you want to insert the title at this time. This area is called the Preview
window, and here is where you can place text and other elements.
fig. click titler.eps
Preview window
Editing screen
Change to the Text Entry Mode.
2.
Click the “Text Entry” button. The button turns green, and you can now type in text.
fig. click T button.eps
Click the location where you want to insert text.
3.
Click the appropriate location in the Preview window. A dotted-line rectangle appears at the area you
clicked in the displayed location.
fig. click preview area.eps
Titler window
32
Page 33

Inserting Titles into a Sequence
Type in the text.
4.
Type in text from the keyboard. The text you enter appears at the location you clicked.
Save the title.
fig. input text.eps
Save The Title.
5.
When you have finished the title, go to the bottom right of the Titler and click the “Close” button.
The message “Save change to Title data?” appears. Click the “Save” button. The title you created is
saved and placed on the Title Palette. After that, you’re returned to the editing screen.
fig. close titler.eps
For a more detailed explanation, refer to page 132 of the Owner’s Manual.
33
Page 34

Inserting Titles into a Sequence
■
Changing the Size of Text
You can change the size of text that has been typed in. When you type in text, it is enclosed by the dotted
lines that you made appear previously. At the bottom right of this box is a red point.
Moving the pointer to this point makes the pointer change shape. Dragging at this point changes
the size of the text.
fig. change text size.eps
■
Changing the Location of Text
You can move text to a different location.
When text is enclosed by the dotted lines that you made appear previously, moving the mouse pointer
to a location near the center of the text string makes the pointer change to . When the pointer has
changed to this shape, drag to move the position of the text.
fig. change text location.eps
34
For a more detailed explanation, refer to page 182 of the Owner’s Manual.
Page 35

Inserting Titles into a Sequence
■
Changing the Duration of a Title
“Length” indicates the length of time over which a title is to appear. By adjusting this value, you can
alter the length of time that you want the title to be displayed.
You click the portion of “Length” that you want to adjust, then click the “adjustment” buttons to change
the value.
* The value for “Length” appears as “00:00:00:00,” which indicates “hours: minutes: seconds: number of frames.”
* On the DV-7DL PRO, one frame is equivalent to one-thirtieth of a second.
“Adjustment” buttons
Area you want to change
* The length (duration) of the title includes the “Title In” and “Title Out” times, which are explained in the following
section, “Changing How a Title Appears.” This means that it cannot be set shorter than these two times.
■
Changing How a Title Appears
You can change the “movement” of a title when it appears, as well as the timing with which it appears.
You can change the following items for “Title In” to create a variety of kinds of “movement.”
“Title In” time
This sets the time at
which the title appears.
* 00:00 = Second:Frame
* By making the settings for the “Title Out” items, you can also determine how a title disappears.
“Title In” effect
This sets the “motion” applied
when the title appears.
For a more detailed explanation, refer to page 214, 215 of the Owner’s Manual.
35
Page 36

Inserting Titles into a Sequence
Material Palette
title material
■
Arranging Titles
Let’s try inserting the text title you’ve created into the sequence. You can insert titles into a sequence
simply by placing material on the Title track of the Timeline Palette.
Change to the Timeline Palette.
1.
Clicking the Timeline tab displays the Timeline Palette.
fig. click timeline.eps
Timeline Palette
2.
Choose the title you want to place.
At the editing screen, click the TITLE tab to display the title material. Find the title material that you
want to use, then click the material. The name of the selected title material turns red.
fig. open title palette.eps
3.
Drag the material to the Title track.
The title is pasted onto the Title track.
fig. drag to title track.eps
36
Titile Track1, 2
Page 37

Try playing it back.
4.
Try rewinding the sequence and checking the title.
Inserting Titles into a Sequence
“Play” button
“Stop” button
“Rewind” button
* For descriptions of other buttons, refer to page 81 of
the Owner’s Manual.
Starts playback.
Stops playback.
Returns to the beginning
of the sequence.
Inserting a Title with the Timing You Want
You can place a title with the timing you want during playback of the sequence.
This lets you insert titles in tempo with the video.
1.
Choose the title you want to place.
Follow steps 1 and 2 on the previous page to choose the title you want to use.
2.
Click the button.
Click the button for the Title track where you want to place the title. The button turns red.
3.
Start playback.
Click the “Play” button. The sequence is played back.
4.
Click the “Punch Recording” button.
Clicking the “Punch Recording” button displays the title on the output monitor and places the title on
the track you selected in step 2.
“Punch
Recording”
button
*A title bar cannot be inserted for a time shorter than the total of the title-in and title-out times set in “Changing
How a Title Appears” (p. 35).
For a more detailed explanation, refer to page 218, 221 of the Owner’s Manual.
37
Page 38

Applying Effects
Timeline Palette
■
Applying a Transition Effect (Transition FX)
You can make material more vivid and engaging by applying effects to it. Some effects modify or
composite the video or audio directly, but in this example we’ll apply an effect that creates a transition
between two video scenes.
For example, you can connect two unrelated video scenes by applying a transition effect (Transition FX)
at the “seam” (juncture) between the two scenes.
No transition effect applied
No effect occurs at the seam between the two video scenes, so it is not
apparent how the two scenes are related.
Transition effect applied
Tr ansition effect (zoom)
The car grows out of the mountain, creating the impression that
the car is driving over the mountain and showing the viewer the
relationship between the first and second scenes.
1.
Change to the Timeline Palette.
Clicking the Timeline tab displays the Timeline Palette.
fig. select transition.eps
2.
At the Effect palette, choose “Transition FX.”
Go to the Effect palette and click the , then move the pointer to “Transition FX” and click. The
Transition FX icon appears.
* For information on the types of Transition FX (transition effects), refer to page 12 of the Appendices.
* Transition effects that have red icons require
rendering
(p. 41).
38
Page 39

Applying Effects
Drag the Transition FX icon
3.
Drag the Transition FX icon to the Control track on the Timeline Palette. Aligning the icon with a seam
(cut point) between two pieces of video material causes a black line to appear on the Control track. Go
ahead and release the mouse button at the black line.
fig. drag dissolve.eps
4.
Try playing it back.
Now that you have arranged the transition material, let’s try playing back the sequence to check the
results.If the transition effect is not applied smoothly, try creating a “bridge.”
* The results of transition effects that have red icons cannot be checked until you perform rendering (p. 41).
fig. click play.eps
“Play” button
“Stop” button
“Rewind” button
Starts playback.
Stops playback.
Returns to the beginning
of the sequence.
* For descriptions of other buttons, refer to page 81 of
the Owner’s Manual.
What Is a Bridge?
A bridge is the portion of a video seam that is
required when you apply a transition effect
(Transition FX). When you set the In point and
Out point, the remaining portion is used for the
bridge. When no portion is made to serve as the
bridge, the transition effect cannot be applied
correctly.
In point
Preceding material
Tr ansition-effect range
Total length of the
material
Bridge
Out point
Bridge
Total length of the
material
Succeeding material
In point
Out point
Creating a Bridge Automatically
When no portion has been created to serve as
the bridge, you can right-click the Transition
FX icon, and “Make Margin for Transition
Effect” will appear in the resulting menu.
Moving the pointer to this item and clicking
creates a bridge. Using this feature shortens the
material by an amount corresponding to the
length of the bridge.
Right-clicking
For a more detailed explanation, refer to page 226 of the Owner’s Manual.
39
Page 40

Applying Effects
■
Applying Effects to Video Material
By using filter effects (Filter FX), you can alter the impression that a
video will impart by changing the color or other qualities of video
material, or by adding blur or other modifications. This is useful
when you want to use a single piece of material in different
situations.
Change to the Timeline Palette.
1.
Clicking the Timeline tab displays the Timeline Palette.
fig. select transition.eps
Timeline Palette
2.
At the Effect palette, choose “Filter FX.”
Go to the Effect palette and click the , then move the pointer to “Filter FX” and click. The Filter FX icons
appear.
Place a Filter FX icon on the video material.
3.
Drag the icon to the video material where you want to apply the effect. The transition effect appears on
the video material.
* For information on the types of Filter FX (filter effects), refer to page 16 of the Appendices.
40
Page 41

Start playback.
Rendering
Rendering is necessary when you use an effect that requires complex processing. Rendering is the
process of imaging a special effect through computer calculation. Although it may take some time,
it is performing correspondingly complex processing.
Effects that need rendering are shown by red icons. When you use one of these, rendering is
required in order to verify the video on the television monitor or save it on videotape.
To perform rendering, go to the bottom of the screen and click the “Rendering” button. When the processing
has finished, you can preview the video on the television monitor.
4.
Play back the portion to which the filter effect is applied to check how it looks.
Applying Effects
“Play” button
“Stop” button
“Rewind” button
Starts playback.
Stops playback.
Returns to the beginning
of the sequence.
* For descriptions of other buttons, refer to page 81 of
the Owner’s Manual.
Time Scale
Por tion needed rendering
(shown in red)
Tr ansition FX needed rendering
You can use the Time Scale on the Timeline Palette to determine what portion requires rendering.
Portions that need rendering are red, as shown in the figure.
“rendering” button
■
Deleting an Effect
When you want to delete an effect, right-click the icon for the effect to display a menu, then click “Delete
Effect” to select it. The icon disappears and the effect is removed.
fig. delete effect.eps
Right-clicking
For a more detailed explanation, refer to page 232 of the Owner’s Manual.
41
Page 42

Previewing the Sequence
Starts playback.
“Play” button
Stops playback.
“Stop” button
Returns to the beginning
of the sequence.
“Rewind” button
* For descriptions of other buttons, refer to page 81 of
the Owner’s Manual.
When you have finished the main editing, try previewing your work. Watching the entire sequence lets
you verify the flow of the narrative and check the video, audio, title text, and other aspects of the
sequence.
1.
Change to the Timeline Palette.
Click the Timeline tab. The Timeline Palette appears.
Timeline Palette
2.
Perform playback from the beginning.
Click the “Rewind” button to rewind the sequence to its beginning portion. Then click the “Play” button
to play back the sequence.
If the preview reveals places that need to be fixed, then make the corrections. For information on
manipulating material on the Timeline Palette, refer to “Capturing Audio Material” (p. 22). In addition
to audio material, you can also work with video material and titles in the same way.
Zooming In on Detailed Areas on the Timeline Palette
You can magnify (zoom) the Timeline Palette to check detailed areas.
To zoom in, go to the bottom of the Timeline Palette and click . Clicking this repeatedly
progressively magnifies the view.
If you zoom in too far, or if you want to zoom out to view the entire thing, then click to zoom out
and reduce the size of the Timeline Palette.
42
Zoom in
Zoom out
Page 43

■
Finishing the Sequence
When you have finished correcting the detailed areas, make the final adjustments for preparing to
record your sequence on videotape or other media.
Insert black video at the beginning of the sequence.
1.
Drag “BLACK 10 sec” to the beginning of the Main Video track on the Timeline Palette. This makes it
possible to watch the sequence without an abrupt start when you play it back.
Previewing the Sequence
Main Video track
2.
Perform rendering.
If rendering is required, then perform rendering. Video cannot be output to a digital-video device
unless rendering is performed. For more information, refer to “Rendering” (p. 41).
3.
Decide on the range to record.
Decide on the range within the sequence that you want to record on videotape or similar media. Set an
In point and an Out point in the sequence to determine the range to record.
Setting an In Point Where You Want to Start Recording
Drag the position bar to the place where you want to start recording. Click the “Set In Point” button for
the sequence to set an In point in the sequence.
Setting an Out Point Where You Want to Stop Recording
Drag the position bar to the place where you want to stop recording. Click the “Set Out Point” button
for the sequence to set an Out point in the sequence.
“Set In Point” button for the sequence
Out pointIn point
For a more detailed explanation, refer to page 282 of the Owner’s Manual.
“Set Out Point” button for the sequence
“Remove In/Out Points” button
43
Page 44

Recording a Sequence on Videotape or DVD
Editing screen
Output Window
Now that you have finished the sequence, let’s try recording it on videotape or DVD.
This section describes how to make the connection to a DV device using the method in “How to Connect
a Digital Video Deck Provided with a DV Jack” (p. 5).
* If only an analog connector is available, refer to “Connecting Video Equipment for Saving Video” on page 27
of the Owner’s Manual.
1.
Connect the DV-7DL PRO and the recording unit.
If the recording unit has a DV input connector, use a DV cable to connect a DV jack on the DV-7DL PRO
(on either the front or rear panel) to the DV jack on the recording unit.
2.
Display the Output window.
Go to the top of the window and click “Output.” The Output window appears.
fig. open output.eps
3.
Specify “Region Play (IN-OUT).”
Click “Region Play (IN-OUT).” Select the check box in front of the text (that is, place an “✔” in the check
box).
4.
Start recording.
Go to “Recording DV Control” and click the “Record” button. Recording starts on the connected digital
video device.
44
* Depending on the type of digital video device that is connected, remote control may not work. In such cases, start
recording by pressing the “Record Start” button on the digital video device.
Page 45

Recording a Sequence on Videotape or DVD
Start output from the DV-7DL PRO.
5.
Click the “Play” button. Playback and output of the sequence start. The sequence is recorded on the
digital-video device.
* The video recorded immediately after recording starts may not be stable. You can make what you record more stable
by starting recording and then waiting for several seconds until you start output.
fig. play start output.eps
When playback of the area you set in step 2 ends, output from the DV-7DL PRO and recording on the
digital-video device both stop automatically.
* Depending on the type of digital-video device that is connected, remote control may not work. In such cases, stop
recording by pressing the button used to stop recording on the digital-video device.
6.
Close the Output window.
Go to the bottom right of the Output window and click the “CLOSE” button. The Output window goes
away and the editing screen returns.
fig. close output.eps
For a more detailed explanation, refer to page 328 of the Owner’s Manual.
45
Page 46

After Finishing Editing
Shutting Down
When you have finished editing, turn off the power and end your work.
* If you want to continue with editing a different sequence, you need to open another project. For more information,
refer to “Open the project” on page 339 of the Owner’s Manual.
* You can also save the project while editing a sequence. For more information, refer to “Saving a project” on page
340 of the Owner’s Manual.
Click the “EXIT” button.
1.
Go to the top left of the editing screen and click the “EXIT” button. A window prompting you to confirm
shutdown appears. Click “EXIT” button. A window prompting you to save your project appears.
Shutdown prompt window
2.
Save the project.
A window prompting you to save your project appears. Click the “Save” button to save the project.
After the project is saved, the power is turned off.
* Projects that have been saved can be edited again later. For more information, refer to “Opening Previously
Created Projects” (p. 11).
* If you don’t want to save the project, click the “Don’t Save” button.
3.
Turn off the display and other peripheral equipment.
Switch off the power to the display, television monitor, and other equipment connected to the DV-7DL
PRO.
46
Page 47

After Finishing Editing
Turning Off the Power Using the Power Button on the DV-7DL PRO
You can turn off the power by pressing the power button on the DV-7DL PRO. If you are currently
editing a sequence, a window prompting you to save your project appears. To save the project, click
“Save” button. After the project is saved, a window prompting you to confirm shutdown appears.
Prompt window for saving your project
Shutdown prompt window
Clicking the “OK” button turns off the power to the DV-7DL PRO.
* If you take no action, the power is turned off automatically after five seconds.
For a more detailed explanation, refer to page 31 of the Owner’s Manual.
47
Page 48

03784023 ’04-9-2KS
 Loading...