

Page 1
Owner’s Manual
取扱説明書
Page 2

Page 3

Owner’s Manual
Before using this product, carefully read the sections entitled: “USING THE UNIT
SAFELY” and “IMPORTANT NOTES” (p. 4; p. 6). These sections provide important
information concerning the proper operation of the product. Additionally, in order
to feel assured that you have gained a good grasp of every feature provided by
your new product, Owner’s Manual should be read in its entirety. The manual
should be saved and kept on hand as a convenient reference.
Copyright © 2008 ROLAND CORPORATION
All rights reserved. No part of this publication may be reproduced in any form
without the written permission of ROLAND CORPORATION.
Page 4
USING THE UNIT SAFELY
Used for instructions intended to alert the
user to the risk of death or severe injury
should the unit be used improperly.
Used for instructions intended to alert the
user to the risk of injury or material
damage should the unit be used
improperly.
* Material damage refers to damage or
other adverse effects caused with
respect to the home and all its
furnishings, as well to domestic animals
or pets.
The symbol alerts the user to important instructions or
warnings.The specific meaning of the symbol is
determined by the design contained within the triangle.
In the case of the symbol at left, it is used for general
cautions, warnings, or alerts to danger.
The symbol alerts the user to items that must never
be carried out (are forbidden). The specific thing that
must not be done is indicated by the design contained
within the circle. In the case of the symbol at left, it
means that the unit must never be disassembled.
The ● symbol alerts the user to things that must be
carried out. The specific thing that must be done is
indicated by the design contained within the circle. In
the case of the symbol at left, it means that the powercord plug must be unplugged from the outlet.
4
Page 5
• Do not open or perform any internal
modifications on the product.
................................................................
• Do not open or perform any internal
modifications on the product. (The
only exception would be where this
manual provides specific instructions which should be followed in
order to put in place user-installable
options; see p. 8.)
................................................................
• Do not attempt to repair the
product, or replace parts within it
(except when this manual provides
specific instructions directing you to
do so). Refer all servicing to your
retailer, the nearest Roland Service
Center, or an authorized Roland
distributor, as listed on the “Information” page.
................................................................
• Never use or store the product in
places that are:
• Subject to temperature extremes
(e.g., direct sunlight in an
enclosed vehicle, near a heating
duct, on top of heat-generating
equipment); or are
• Damp (e.g., baths, washrooms,
on wet floors); or are
• Humid; or are
• Exposed to rain; or are
• Dusty; or are
• Subject to high levels of
vibration.
.................................................................
• In households with small children,
an adult should provide supervision
until the child is capable of
following all the rules essential for
the safe operation of the product.
.................................................................
• Protect the product from strong
impact.
(Do not drop it!)
.................................................................
• Before installing the ARX-02, you
must first always turn off the unit
(Fantom-G6/G7/G8) and unplug
its power cord.
.................................................................
• Install the circuit board only into the
specified unit (Fantom-G6/G7/
G8). Remove only the specified
screws during the installation.
.................................................................
5
Page 6

IMPORTANT NOTES
When you purchase the ARX-02 SuperNATURAL Expansion Board
from an authorized Roland dealer, the included sounds and samples
are licensed, not sold, to you by Roland Corporation, for commercial
use in music production, public performance, broadcast, etc.
You may use any of the included phrases and/or samples in a
commercial or non-commercial recording without paying any
additional license fees. However, you must strictly adhere to the
following crediting guidelines on any music recording that utilize
material from ARX-02.
Reproduction or duplication of this collection or any of the sound
recording contained in the ARX-02, either as they exist on this
expansion board or by any means of reformatting, mixing, filtering,
re-synthesizing, processing or otherwise
editing for use in another product or for re-sale, is strictly prohibited
without the express written consent of Roland. All unauthorized
giving, trading, lending, renting, re-issue, redistribution or re-sale of
the sounds included in the ARX-02 are expressly prohibited.
In Plain English: Be creative in your application of the ARX-02
sounds, and keep this library for your use only. DO NOT COPY IT.
Roland constantly monitors other Soundware releases to check for
copyright infringements, and will prosecute all piracy and copyright
violations to the fullest extent of the law.
THIS LIBRARY IS GUARANTEED TO BE 100% COPYRIGHT CLEAN.
Placement
• This device may interfere with radio and television reception. Do not
use this device in the vicinity of such receivers.
Additional Precautions
• To avoid disturbing your neighbors, try to keep the product’s volume at
reasonable levels (especially when it is late at night).
• When you need to transport the product, package it in the box
(including padding) that it came in, if possible. Otherwise, you will
need to use equivalent packaging materials.
* In the interest of product improvement, the specifications and/or appear-
ance of this product are subject to change without prior notice.
6
Page 7

Contents
USING THE UNIT SAFELY..................................... 4
IMPORTANT NOTES............................................6
Installing the Expansion Board in Your Product ....8
Installation in Your Product...............................................8
Confirmation After Installation........................................11
To Remove the Board from the Product ...........................12
Installation de la carte d’expansion dans un appareil
Installer la carte dans un appareil ..................................13
Retirer la carte de l’appareil...........................................16
.13
Introduction......................................................17
Main Features................................................................17
ARX Series SuperNATURAL Expansion Boards ........17
Roland SuperNATURAL Technology....................... 17
ARX-02 ELECTRIC PIANO..................................... 17
The Structure of ARX-02 ELECTRIC PIANO .......................18
Setting of Patch ................................................ 20
The Basic Screen ............................................................20
Selecting a patch.................................................21
Saving a patch (on the Fantom-G)..........................21
Selecting a Type (Type/Level Screen)...............................22
Adjusting the Sound (Pickup/Bell Screen) ........................24
Selecting an Effect (MFX Screen) .....................................26
MFX Switch.........................................................26
MFX Types ..........................................................26
Selecting the Type of Pre Amp (Pre Amp Screen)..............32
Pre Amp Switch ................................................... 32
Pre Amp Types ....................................................32
Selecting the Type of Speaker (Speaker Screen)...............35
Initializing a Patch (Utility Screen) ...................................35
Specifications ................................................... 37
Index............................................................... 38
7
Page 8
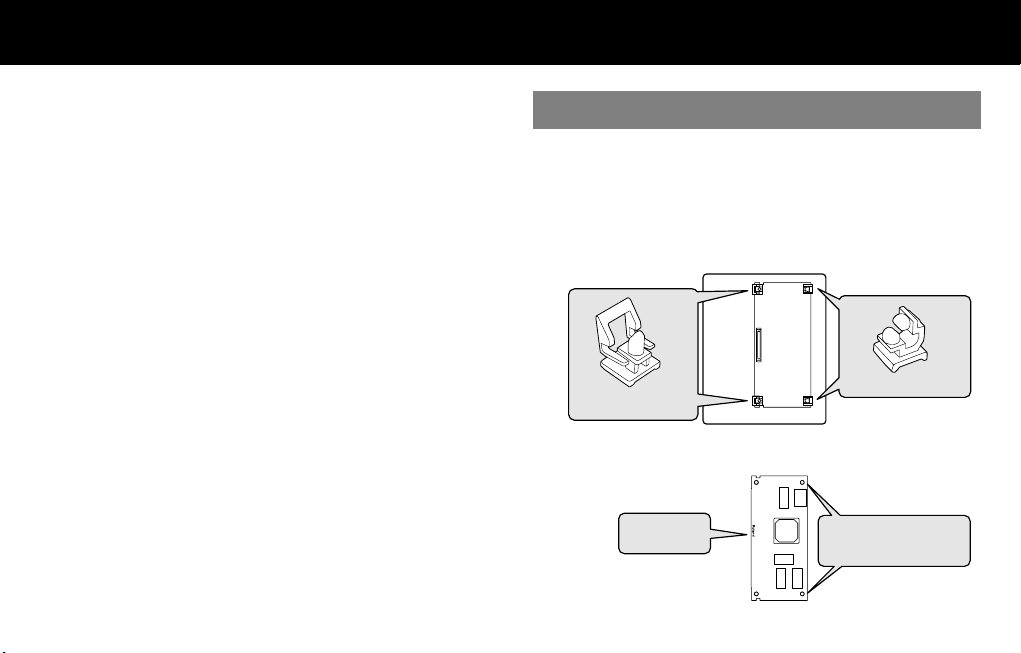
Installing the Expansion Board in Your Product
Cautions when installing
• Before you install this expansion board (hereafter referred to as “the
board”), you should carefully read the procedure for installing
expansion boards given in the owner’s manual of the product in which
you’re installing it.
• To avoid the risk of damage to internal components that can be
caused by static electricity, please carefully observe the following
whenever you handle the board.
• Before you touch the board, always first grasp a metal object (such
as a water pipe), so you are sure that any static electricity you
might have been carrying has been discharged.
• When handling the board, grasp it only by its edges. Avoid
touching any of the electronic components or connectors.
• Save the bag in which the board was originally shipped, and put
the board back into it whenever you need to store or transport it.
• Do not touch any of the printed circuit pathways or connection
terminals.
• Never use excessive force when installing a circuit board. If it doesn’t
fit properly on the first attempt, remove the board and try again.
• When you’ve finished installing the expansion board, follow the steps
described in the owner’s manual of your device to verify that the
board was installed correctly.
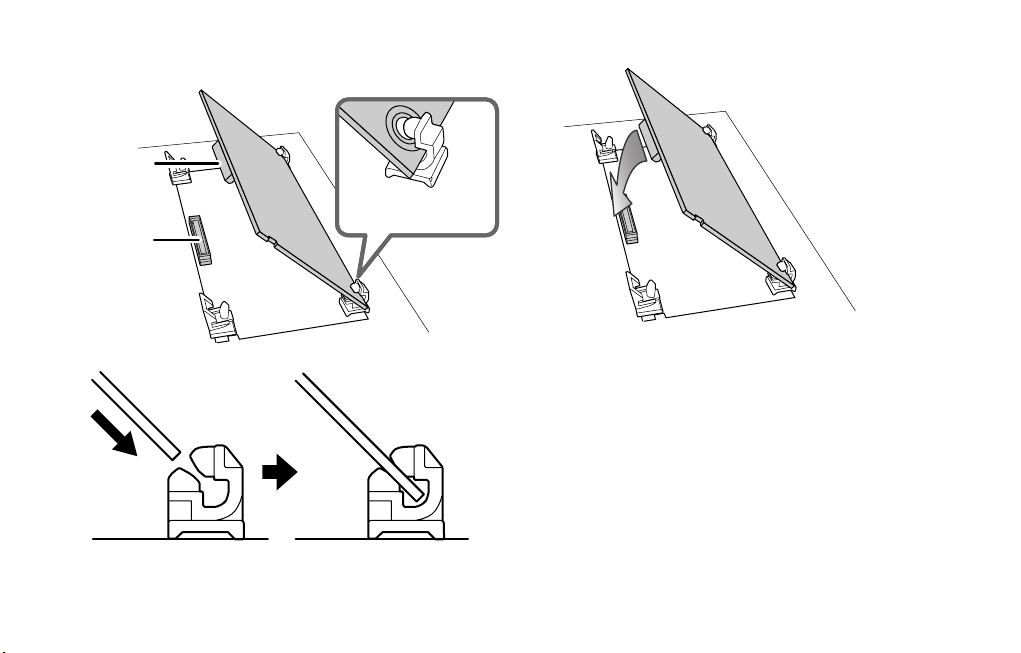
Installation in Your Product
1.
As described in your product’s owner’s manual, expose
the slot in which the expansion board is to be installed.
2.
Orient the board with the slot of your product as shown
in the illustration.
Slot of the product
Latched holders
Board
(expansion board)
Roland logo
Non-latched holders
Holes that engage the
non-latched holders
8
Page 9
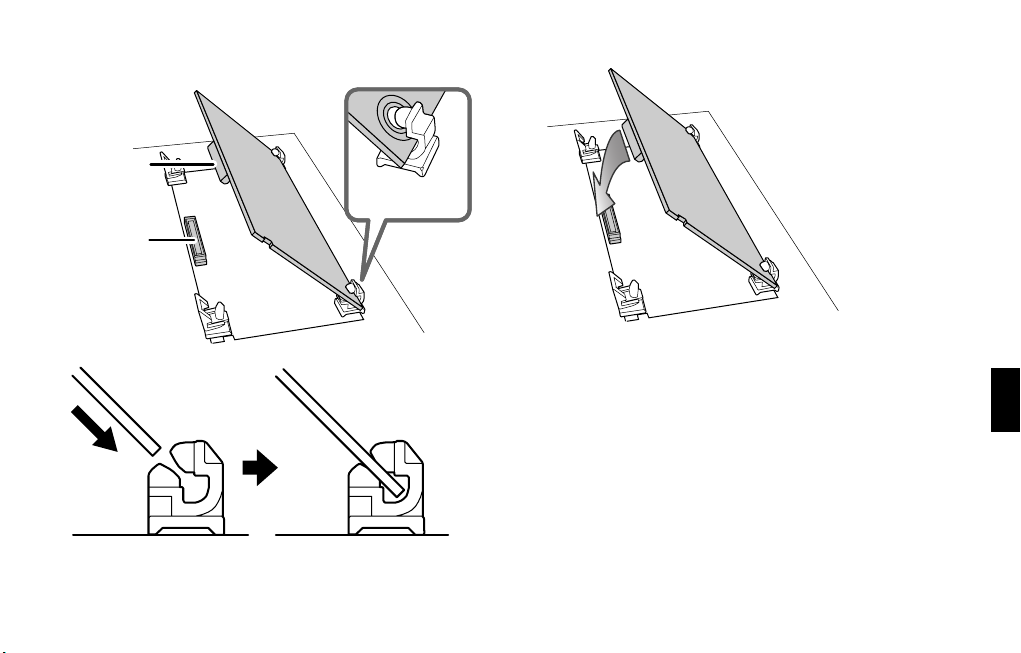
3.
Insert the board into the product’s non-latched board
holders until you hear a click.
Connector
of board
Connector
of product
Align board’s
holes with holders
Board
Non-latched holders
4.
Gently lower the board into place.
9
Page 10
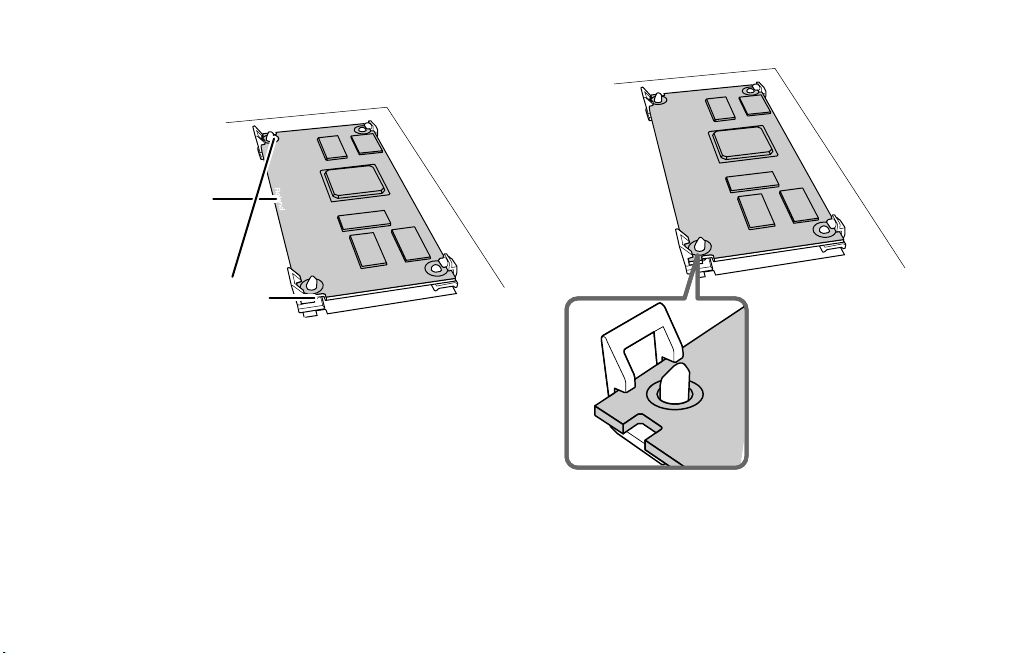
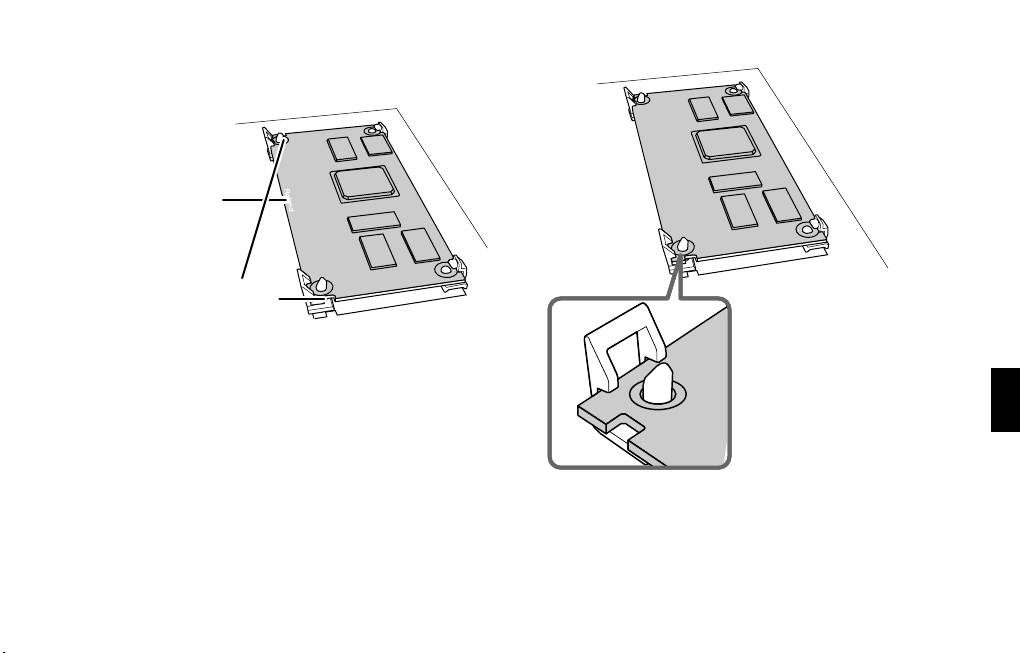
5.
From above, press down on the board at the three
locations indicated in the illustration until the latched
board holders lock into place.
Edge of the board
where the logo
is affixed
Near the cutouts
in the board
6.
Verify that the latched board holders are locked.
7.
Return the expansion board installation slot to its
original state.
10
Page 11
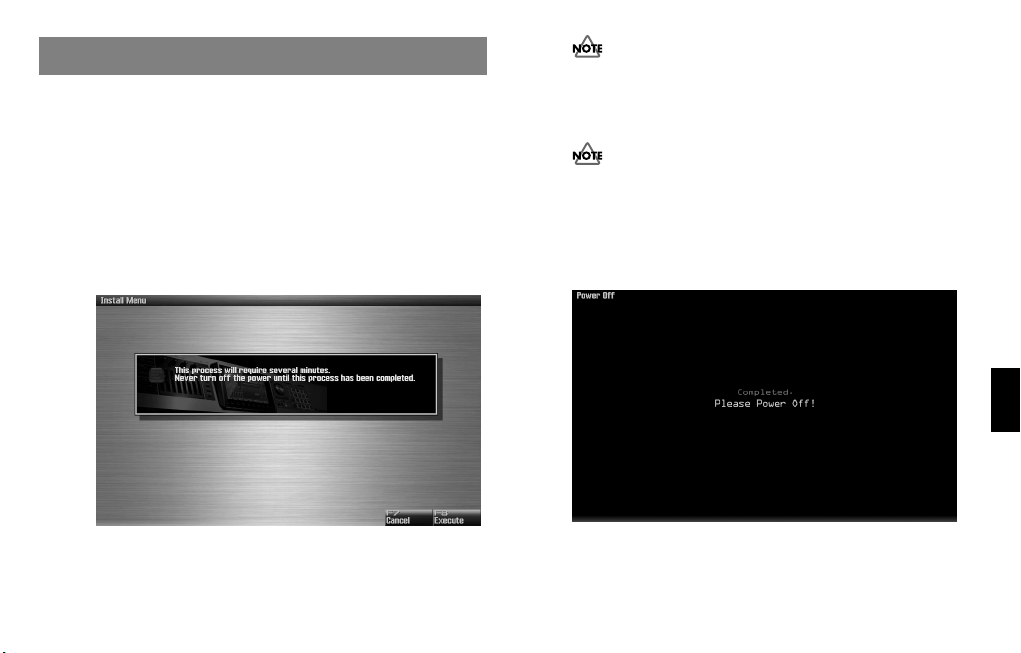
Confirmation After Installation
After you’ve finished installing the expansion board, you will need
to perform the following procedure to confirm the installation.
This installation procedure needs to be performed only the first time
you power up your device after installing the expansion board.
1.
Power up your device as described in its owner’s
manual.
2.
If the expansion board was installed correctly, an
installation confirmation screen will appear.
Press the [F8 (Execute)] button to begin installation.
If the installation confirmation screen does not appear the first
time you power up after installing the expansion board, it is
likely that the board was not installed correctly. Check once
again to make sure that the board is correctly installed.
It may take one to five minutes before installation is finished.
Never turn off the power during this installation process.
3.
When you see the Power Off screen indicating that
installation is finished, switch your device’s power off,
then on again as described in its owner’s manual.
* The screen shown here is for when the board is installed in the
Fantom-G.
This completes the expansion board installation process.
11
Page 12
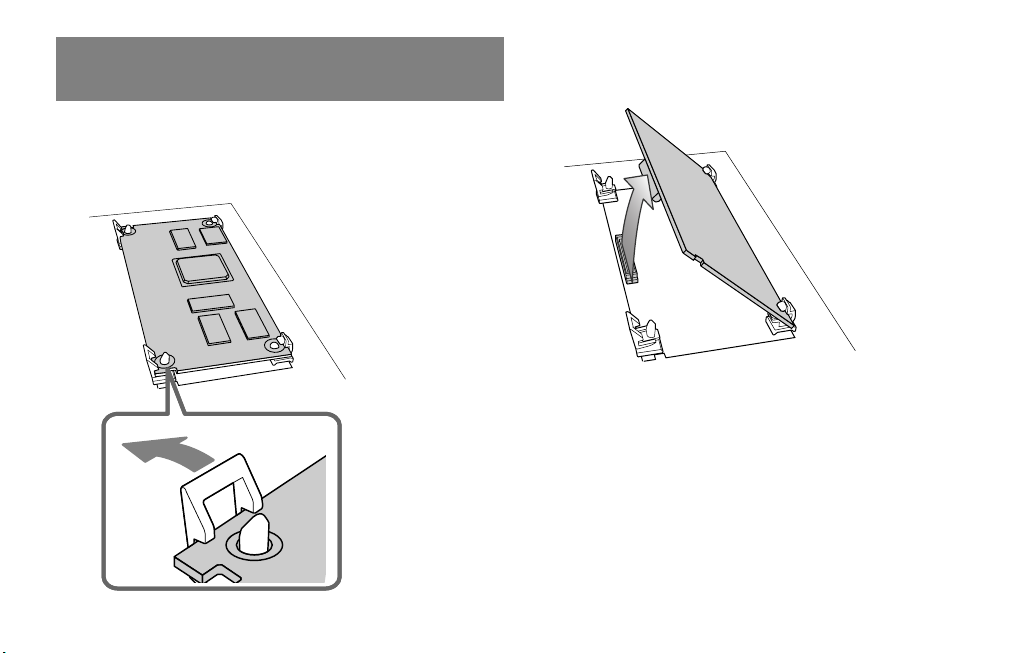
To Remove the Board from the Product
1.
As described in your product’s owner’s manual, expose
the slot in which the expansion board was installed.
2.
Unlatch the latched board holders.
3.
Verify that the two latched board holders are unlocked,
then gently pull up the board and disconnect the
connector.
4.
Disengage the board from the non-latched board
holders, and remove the board.
12
Page 13

Installation de la carte d’expansion dans un appareil
Installer la carte dans un appareil
1.
Suivre les instructions données dans le guide
Mises en garde relatives à l’installation
• Avant d’installer cette carte d’expansion (la carte), il faut lire attentivement la procédure d’installation des cartes d’expansion décrite
dans le guide d’utilisation de l’appareil dans lequel la carte sera
installée.
• Veuillez suivre attentivement les instructions suivantes quand vous
manipulez la carte afin d’éviter toutrisque d’endommagement des
pièces internes par l’électricité statique.
• Toujours toucher un objet métallique relié à la terre (comme un
tuyau par exemple) avant de manipuler la carte pour vous
décharger de l’électricité statique que vous auriez pu accumuler.
• Lorsque vous manipulez la carte, la tenir par les côtés. Évitez de
toucher aux composants ou aux connecteurs.
• Conservez le sachet d’origine dans lequel était la carte lors de
l’envoi et remettez la carte dedans si vous devez la ranger ou la
transporter.
• Ne pas toucher aux circuits imprimés ou aux connecteurs.
• Ne jamais forcer lors de l’installation de la carte de circuits imprimés.
Si la carte s’ajuste mal au premier essai, enlevez la carte et recommencez l’installation.
• Une fois la carte installée, il faut suivre la procédure décrite dans le
guide d’utilisation pour vérifier que la carte est installée correctement.
d’utilisation de l’appareil pour dégager la fente où la
carte d’expansion doit être installée.
2.
Orienter la carte de façon à ce qu’elle s’aligne avec la
vente de l’appareil, comme le montre l’illustration.
Fente de l’appareil
Supports bloqués
Supports non bloqués
Carte
(carte d’expansion)
Logo Roland
Trous de retenue des
supports non bloqués
13
Page 14
3.
Insérer la carte dans les supports non bloqués jusqu’à
ce qu’un clic se fasse entendre.
Connecteur
de la carte
Aligner les trous de la
Connecteur
de l’appareil
carte et les supports
Carte
Supports non bloqués
4.
Abaisser la carte délicatement.
14
Page 15
5.
Appuyer sur la carte aux trois points indiqués sur
l’illustration jusqu’à ce que les supports se bloquent en
place.
Bord de la carte
où se trouve le logo
Près des découpes
de la carte
6.
S’assurer que les supports de carte sont bien bloqués.
7.
Suivre les instructions données dans le guide
d’utilisation et vérifier que la carte d’expansion est
installée correctement.
15
Page 16

Retirer la carte de l’appareil
1.
Suivre les instructions données dans le guide
d’utilisation de l’appareil pour dégager la fente où la
carte d’expansion a été installée.
2.
Débloquer les supports de carte.
3.
Vérifier que les deux supports de carte sont débloqués
puis tirer délicatement sur la carte et déconnecter le
connecteur.
4.
Retirer la carte des supports débloqués, et la retirer
ensuite complètement.
16
Page 17
Introduction
Main Features
ARX Series SuperNATURAL Expansion Boards
The ARX series SuperNATURAL expansion boards represent a further
evolution for Roland’s line of expansion solutions, which began with
the SR-JV80 series and SRX series–-they are a completely new type of
expansion board. SuperNATURAL technology delivers natural, richly
expressive sounds and effects along with a dedicated graphic user
interface, all adding up to a comprehensive application environment
that allows an unprecedented degree of expressive playability and
customization.
Roland SuperNATURAL Technology
SuperNATURAL is Roland’s breakthrough sound-generating
technology that enables a new level of realism and expression.
SuperNATURAL reproduces the delicate, organic tonal changes and
playing nuances of acoustic and electric musical instruments.
ARX-02 ELECTRIC PIANO
Functions for detailed and intuitive
customization
The ARX-02 uses SuperNATURAL technology to faithfully reproduce
the sound-producing mechanism and tonal characteristics of an
electric piano. You’ll be able to enjoy performing electric piano
sounds with an unprecedented degree of realism.
Customization allows you to change not only the type of electric
piano model, but also details such as the distance between the tone
bars and pickups, the angle of the tone bars, the character of the bell,
and tonal differences resulting from the condition of the instrument.
You’ll be able to create the exact electric piano sounds you want, in
the same way as a specialist electric piano technician.
Electric piano sounds with SuperNATURAL
technology for the ultimate in expressive feel
The ARX-02 provides five amp models that are tuned for electric
piano. These allow variations of volume dynamics to create infinite
gradations of the tone and distortion that are characteristic of the
electric piano, in ways that would be difficult for tone-generation
methods based on sampled waveforms. You’ll have the same detailed
and dynamic performance control as on a real electric piano.
Numerous multi-effects suitable for an electric piano (such as phaser
and chorus) are also provided, allowing you to create a wide variety
of electric piano sounds.
17
Page 18
The Structure of ARX-02 ELECTRIC PIANO
Basic structure
The ARX series SuperNATURAL expansion boards receive
performance data and control data from a host instrument compatible
with the ARX series, and send audio signals to the host instrument.
* The ARX series supports up to sixteen parts, but this product is
* When this product is installed to the Fantom-G, you can apply
* Since this product realizes a wide range of editing, depending on
* This product does not correspond to the following parameters of
18
designed with only one part.
effects to its output such as reverb that are inside the Fantom-G.
the playback device that you use and the settings of the
parameters of this product, symptoms such as distorting and
cracking sounds may occur. In this case, please do the following.
• Make the parameters that are related to the level of this
product to a smaller value.
• Make the output level of the device that this product is
installed smaller.
• Lower the volume of the playback device.
the Fantom-G. When this product is installed to the Fantom-G, the
following parameters will be ignored if they are edited.
• Part Output Level
• Part EFX1 Send Level
• Part EFX2 Send Level
Patch 050
Patch 001
From ARX compatible device
(Performance data)
ARX-02 ELECTRIC PIANO
Tone
Bar Angle Bell/Thump
Type
Pickup Distance
Effect
Pre Amp
Speaker
To ARX compatible device
(Audio signal)
Bell Character
Page 19

Sound generator section
Sound generation on the ARX-02 involves four stages: Tone (Type,
Pickup/Bell), MFX, Pre Amp, and Speaker.
The Tone stage specifies mainly the settings of the electric piano itself,
such as differences due to the type or model of the electric piano, and
the way in which the condition of the instrument affects the sound.
The MFX stage lets you apply various effects.
The Pre Amp stage lets you make pre-amp settings. Since it is
independent of the Tone stage, you can also create combinations that
do not exist in reality.
The Speaker stage let you make speaker settings.
Patches
The sound generator settings can be saved as “patches.”
The ARX-02 Electric Piano contains fifty patches.
If the ARX-02 is installed in a Fantom-G, this patch data is saved in
the Fantom-G Project.
19
Page 20
Setting of Patch
About this manual
• The screen images used in this manual are taken from a Fantom-G with the ARX-02 installed. The various procedures described also
assume that you are using the ARX-02 installed in a Fantom-G.
• For details on how to move the cursor or edit a value, refer to the owner’s manual for the device in which you’ve actually installed the
ARX-02.
The Basic Screen
20
The basic screen shows the PATCH NAME, as well as the main
parameters of the patch.
Parameter
Condition
Pickup Level Volume of the electric piano tone. p. 22
Amp Level Output Level of the “Pre Amp.” p. 32
MFX Switch Turns MFX on/off. p. 26
Pre Amp Switch Turns Pre Amp on/off. p. 32
* For details on the parameters in MFX section, refer to
an Effect (MFX Screen)”
* For details on the parameters in Pre Amp section, refer to
ing the Type of Pre Amp (Pre Amp Screen)”
Specifies the condition of the electric
piano.
Description Page
p. 22
“Selecting
(p. 26)
(p. 32)
“Select-
Page 21

Selecting a patch
Move the cursor to PATCH NAME and change the value to select a
patch (001–050).
Saving a patch (on the Fantom-G)
A patch you’ve created is temporary; it will be lost if you select a
different patch. If you want to save the patch you’ve edited, proceed
as follows.
P
ress the [WRITE] button on the Fantom-G.
1.
Assign a name to the patch.
2.
For details on how to assign a name, refer to the Fantom-G
owner’s manual.
When you’ve finished assigning the name, press the [F8 (OK)]
3.
button
.
4.
Select a patch number, and press the [F8 (WRITE)]
When the confirmation screen appears, press the [F7 (OK)]
5.
button
to save the patch.
button
.
21
Page 22
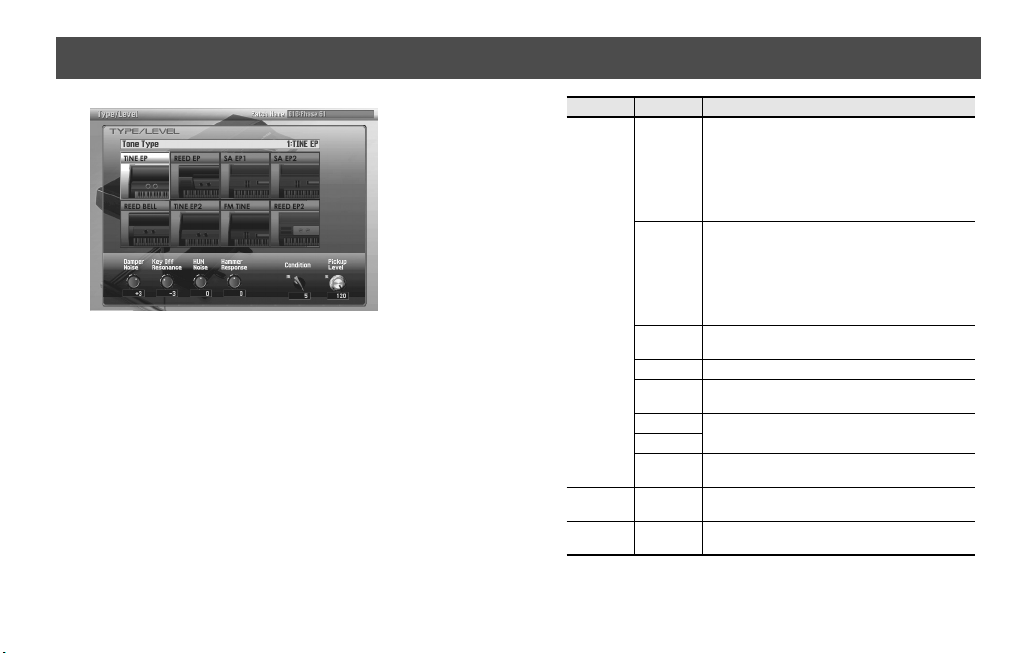
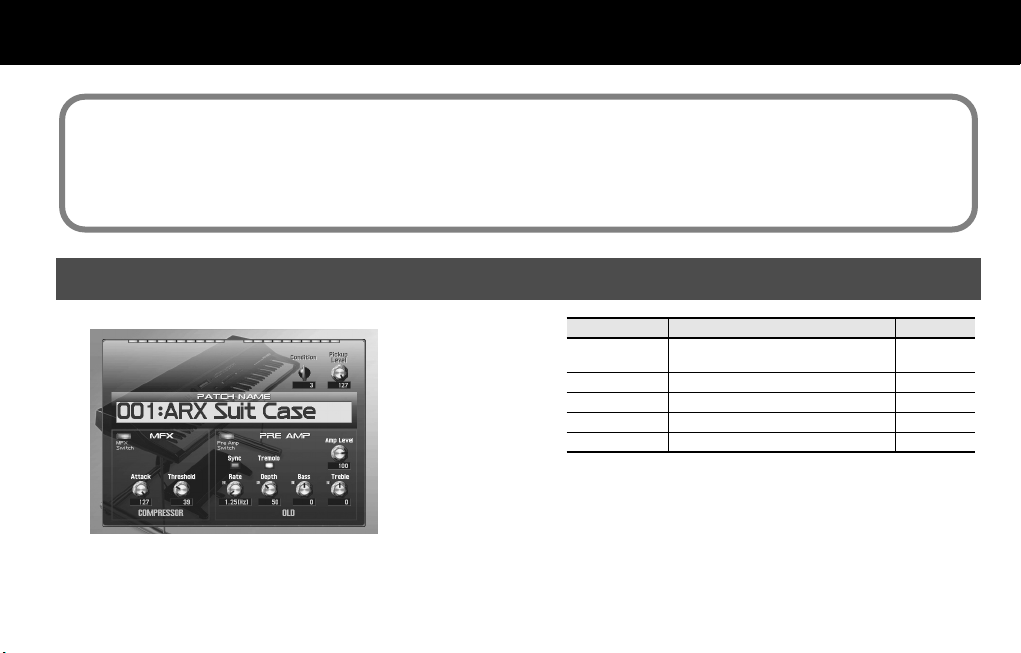
Selecting a Type (Type/Level Screen)
22
In the Type/Level screen you can select the type, condition and
character of the electric piano.
Parameter
TINE EP
REED EP
Tone Type
SA EP1
SA EP2 This is the E.Piano 2 sound of the RD-1000.
REED BELL
TINE EP2
FM TINE
REED EP2
Condition 1–5
Pickup
Level
0–127 This adjusts the volume of the Electric Piano tone.
Value Description
This is an Electric Piano that widely used in the
‘70s. It is a standard sound that was loved by jazz
and fusion players, and continues to have
numerous fans to this day. This sound is
characterized by a belllike attack and a mild tone,
and is indispensable in today’s styles, such as
smooth jazz and acid jazz.
This is an Electric Piano that made its appearance
in the ‘60s and was widely used in rock and R&B.
It has a distinctive dynamism, with gentle
pianissimo sounds and strongly played notes that
are reminiscent of resonance sounds on a
synthesizer. This Electric Piano continues to be
used by numerous musicians today.
This is the E.Piano 1 sound of the Roland RD-1000,
which was released in 1986.
This is a new type of Electric Piano, combining the
characteristics of a TINE EP and a REED EP.
This is a new type of Electric Piano. It is a variation
of the TINE EP.
This is a new type of Electric Piano. It is a variation
of the REED EP.
Specifies the condition of
was selected in “Tone Type.”
the
Electric Piano that
Page 23

Adjusting the Damper Noise (Damper Noise)
This adjusts the damper noise (the noise heard when you press the
damper pedal to release the tone bars).
Parameter
Damper Noise
* Depending on the selected
Value Description
-10–0–+10
Increasing this value will make the
damper noise louder.
Tone Type
(p. 22), this may have no
effect.
Adjusting the Key-off Sound (Key Off Resonance)
This adjusts resonances such as the key-off sound (the faint sound
heard when you release a key).
Parameter
Key Off
Resonance
* Depending on the selected
effect.
Value Description
-10–0–+10
Higher values will produce a louder keyoff sound. At a setting of -10 there will be
no key-off sound at all.
Tone Type
(p. 22), this may have no
Adjusting the Hum Noise (HUM Noise)
This adjusts the amount of hum and other noise that leaks into the
pickups.
Electric Pianos were susceptible to various types of noise, and this
noise would sometimes be output along with the sounds of the
performance. Depending on the effect settings, such noises can
produce an authentic, lively atmosphere.
Parameter Value Description
Adjusting this value from 0 toward the
negative side will produce a clearer
HUM Noise
-10–0–+10
* Depending on the selected
sound, while adjusting it toward the
positive side will produce a dirty sound.
At a setting of -10 there will be no hum at
all.
Tone Type
(p. 22), this may have no
effect.
Changing the Timing of Sounds in Response to the Velocity
(Hammer Response)
This sets the interval from the time the key is played to when the
sound is produced.
Parameter
Hammer
Response
Value Description
-64–0–+63
As the value is decreased, the timing of
the sound is delayed more when more
force is used to play the keys.
As the value is increased, the timing of the
sound is delayed more when less force is
used to play the keys.
23
Page 24
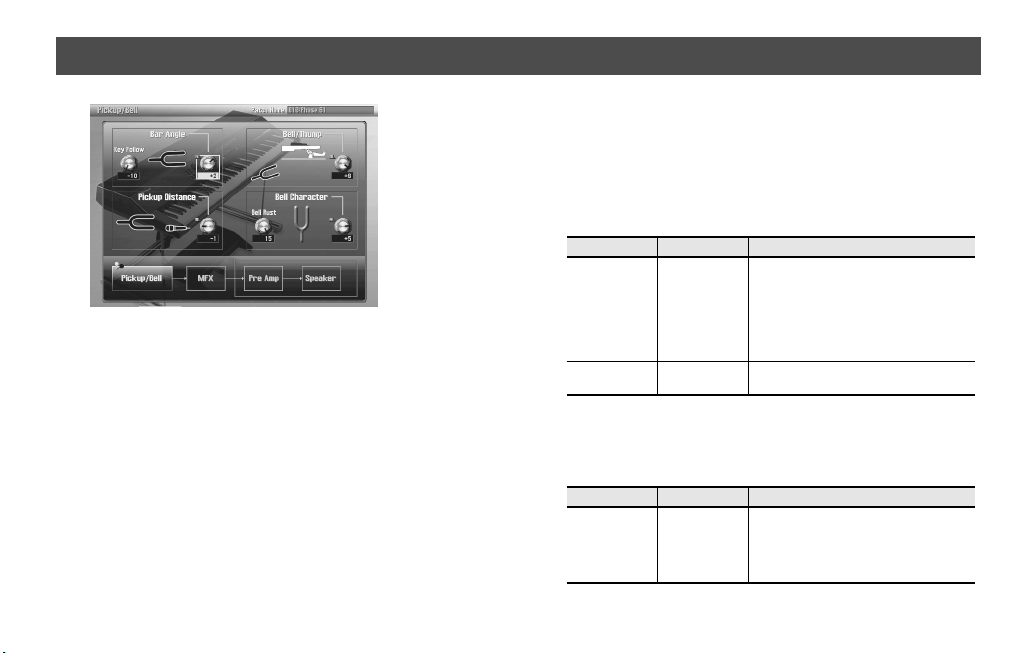
Adjusting the Sound (Pickup/Bell Screen)
fig.ARX-003.eps
In the Pickup/Bell screen you can adjust the sound of electric piano.
24
Adjusting the Thickness of the Sound (Bar Angle)
The typical Electric Piano produces sound when a hammer strikes a
metal rod called the tine with tone bar, whose vibrations are
detected by a pickup. On this type of piano, the tonal character can
be adjusted by changing the angle of the tone bars and pickups.
Equivalent tonal changes can also be produced for Electric Pianos
that don’t use tone bars.
Parameter
Key Follow
Bar Angle -10–0–+10
Value Description
Changes the Bar Angle effect relative to
the key. Higher settings will produce more
-10–0–+10
change. Positive (+) settings will increase
the Bar Angle effect when higher keys are
pressed. Negative (-) settings will
decrease the Bar Angle effect when
higher keys are pressed.
Higher settings will emphasize the
fundamental, producing a thicker sound.
Adjusting the Character of the Attack (Bell/Thump)
This adjusts the balance between two components of the attack; the
Bell component and the Thump produced by the hammer.
Parameter
Bell/Thump
Value Description
Adjusting this value from 0 toward the
-10–0–+10
negative side will emphasize the bell
sound, while adjusting it toward the
positive side will emphasize the hammer
sound.
Page 25
Adjusting the Nuances of the Sound (Pickup Distance)
The typical Electric Piano uses pickups to convert the vibrations of the
tone bars into sound. By adjusting this parameter, you can obtain the
effect of changing the distance between the tone bars and the
pickups.
Equivalent tonal changes can also be produced for Electric Pianos
that don’t use tone bars.
Parameter Value Description
Lowering this value will move the tone
Pickup
Distance
-2–0–+2
bars and pickups farther apart. This
makes it easier for you to produce varied
dynamics. Increasing this value will
produce a more powerful sound.
Adjusting the Character of the Bell (Bell Character)
This adjusts the tonal character of the bell sound included in the
attack.
Parameter
Bell Rust
Bell Character -10–0–+10
Value Description
0–
15
Increasing this value will reduce
highfrequency content of the bell sound.
Adjusting this value from 0 toward the
negative side will produce a heavier
character, while adjusting it toward the
positive side will produce a lighter
character.
25
Page 26
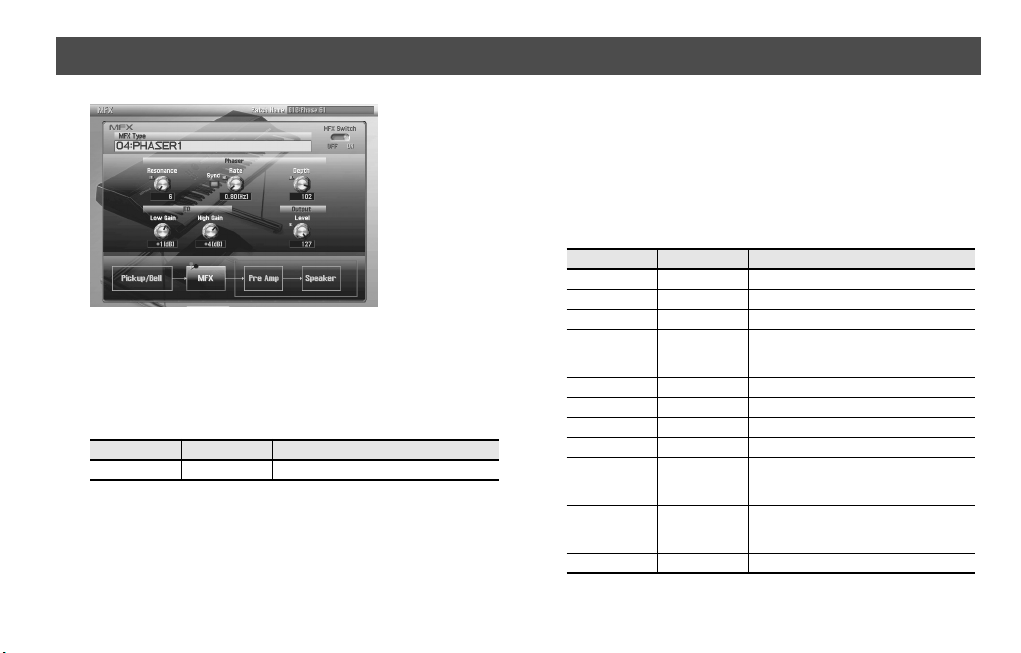
Selecting an Effect (MFX Screen)
fig.ARX-005.eps
You can apply effects that are tuned specifically for the Electric
Piano.
The available parameters will depend on the effect you select.
MFX Switch
Parameter
MFX Switch
26
Value Description
OFF, ON Turns MFX on/off.
MFX Types
* For details on the “note” that can be selected for some parame-
ters, refer to
MFX 00: THRU
No effect will be applied.
MFX 01: EQUALIZER
Parameter
Low Freq
Mid1 Freq 200–8000 Hz Frequency of Middle Range 1.
Mid2 Freq 200–8000 Hz Frequency of Middle Range 2.
High Freq
Low Gain -15–+15 dB Gain of the low frequency range.
Mid1 Gain -15–+15 dB Gain of Middle Range 1.
Mid2 Gain -15–+15 dB Gain of Middle Range 2.
High Gain -15–+15 dB Gain of the high frequency range.
Mid1 Q
Mid2 Q
Level 0–127 Output level
“About Note”
Value Description
200, 400 Hz Frequency of the low range.
2000,
4000,
8000 Hz
0.5, 1.0, 2.0,
4.0, 8.0
0.5, 1.0, 2.0,
4.0, 8.0
(p. 36)
Frequency of the high range.
Width of Middle Range 1
Select a higher value to narrow Middle
Range 1.
Width of Middle Range 2
Select a higher value to narrow Middle
Range 2.
Page 27

MFX 02: SUPER FILTER
Parameter
Type
Slope
Cutoff 0–127
Resonance 0–127
Gain 0–+12 dB Amount of boost for the filter output
Mod Sw OFF, ON On/off switch for cyclic change
Modulation
Wave
Sync OFF, ON
Rate
Depth 0 –127 Depth of modulation
Value Description
Filter type
LPF,
BPF,
HPF,
NOTCH
-12,
-24,
-36 dB
TRI,
SQR,
SIN,
SAW1,
SAW2
0.05–
10.00 Hz,
note
Frequency range that will pass through
each filter
LPF
: frequencies below the cutoff
BPF
: frequencies in the region of the cutoff
HPF
: frequencies above the cutoff
NOTCH
: frequencies other than the region
of the cutoff
Amount of attenuation per octave
-12 dB
: gentle
-
24 dB
: steep
-36 dB
: extremely steep
Cutoff frequency of the filter
Increasing this value will raise the cutoff frequency.
Filter resonance level
Increasing this value will emphasize the region near the cutoff frequency.
How the cutoff frequency will be modulated
TRI
: triangle wave
SQR
: square wave
SIN
: sine wave
SAW1
: sawtooth wave (upward)
SAW2
: sawtooth wave (downward)
When this is set to ON, the effect is
synchronized with the tempo.
See
“About Note”
Frequency of modulation
(p. 36).
Parameter
Attack 0–127
Level 0–127 Output level
Value Description
Speed at which the cutoff frequency will
change
This is effective if Modulation Wave is
SQR, SAW1
, or
SAW2
MFX 03: CHORUS
Parameter
Mode
Pre Delay 0.0–100 ms
Sync OFF, ON
Rate
Depth 0–127 Depth of modulation
Phase 0–180 deg Spatial spread of the sound
Balance
Level 0–127 Output Level
Value Description
1-PHASE,
2-PHASE,
3-PHASE,
6-PHASE
0.05–
10.00 Hz,
note
D100:0W–
D0:100W
Number of chorus stages.
Adjusts the delay time from the direct
sound until the chorus sound is heard.
When this is set to ON, the effect is
synchronized with the tempo.
See
“About Note”
Frequency of modulation
Volume balance between the direct sound
(D) and the chorus sound (W)
(p. 36).
.
27
Page 28

MFX 04: PHASER1 MFX 05: PHASER2
Parameter
Resonance
Sync OFF, ON
Rate
Depth 0–127 Depth of modulation
Low Gain -15–+15dB Boost or cut in the low end
High Gain -15–+15dB Boost or cut in the high end
Level 0–127 Output Level
Value Description
0–127 Amount of feedback
When this is set to ON, the effect is
synchronized with the tempo.
See
0.05–
10.00 Hz,
note
“About Note”
Frequency of modulation
(p. 36).
Parameter
Mode
Manual 0–127
Resonance 0.127 Amount of feedback
Feedback -98–+98 %
Mix 0–127 Level of the phase-shifted sound
Sync OFF, ON
Rate
Depth 0–127 Depth of modulation
Polarity
Low Gain -15–+15 dB Gain of the low range
High Gain -15–+15 dB Gain of the high range
Level 0–127 Output Level
4-STAGE,
8-STAGE,
12-STAGE
0.05–
10.00 Hz,
note
INVERSE,
SYNCHRO
Value Description
Number of stages in the phaser
Adjusts the basic frequency from which
the sound will be modulated.
Adjusts the proportion of the phaser
sound that is fed back into the effect.
Negative (-) settings will invert the phase.
When this is set to ON, the effect is
synchronized with the tempo.
See
“About Note”
Frequency of modulation
Selects whether the left and right phase of
the modulation will be the same or the
opposite.
INVERSE
be opposite. When using a mono
source, this spreads the sound.
SYNCHRO
be the same. Select this when inputting
a stereo source.
(p. 36).
: The left and right phase will
: The left and right phase will
28
Page 29

MFX 06: FLANGER MFX 07: DELAY
Parameter
Pre Delay
Sync OFF, ON
Rate
Depth 0–127 Depth of modulation
Phase 0–180 deg Spatial spread of the sound
Feedback -98–+98 %
Low Gain -15–+15 dB Gain of the low range
High Gain -15–+15 dB Gain of the high range
Balance
Level 0–127 Output Level
Value Description
0.0–100 ms
0.05–
10.00 Hz,
note
D100:0W–
D0:100W
Adjusts the delay time from the direct
sound until the flanger sound is heard.
When this is set to ON, the effect is
synchronized with the tempo.
See
“About Note”
Frequency of modulation
Adjusts the proportion of the flanger
sound that is fed back into the effect.
Negative (-) settings will invert the phase.
Volume balance between the direct sound
(D) and the flanger sound (W)
(p. 36).
Parameter
Sync
Delay Time
Acceleration 0–15
Feedback -98–+98 %
HF Damp
Low Gain -15–+15 dB Gain of the low range
High Gain -15–+15 dB Gain of the high range
Balance
Level 0–127 Output Level
Value Description
OFF, ON
0–1300 ms,
note
200–
8000 Hz,
BYPASS
D100:0W–
D0:100W
When this is set to ON, the effect is
synchronized with the tempo.
See
“About Note”
Delay time from when sound is input to
delay until the delay sound is heard.
When you change the delay time, this
setting specifies the time over which it will
change from the current delay time to the
new setting.
The speed of pitch change will change
together with the delay time.
Specifies the percentage (%) of the delay
sound that will be returned to the input.
Positive (+) settings return the sound at
the original phase, and negative (-) settings return the phase-reversed sound.
Specifies the frequency at which to cut the
high range of the delay sound returned to
the input.
Choose the BYPASS setting if you don’t
want to cut.
Volume balance between the direct sound
(D) and the delay sound (W)
(p. 36).
29
Page 30

MFX 08: REVERB MFX 09: LINE DRIVE
Parameter
Type
Pre Delay 0.0–100 ms
Time 0–127 Time length of reverberation
HF Damp
Low Gain -15–+15dB Boost or cut in the low end
High Gain -15–+15dB Boost or cut in the high end
Balance
Level 0–127 Output Level
Value Description
Type of reverb
ROOM1
ROOM1,
ROOM2,
STAGE1,
STAGE2,
HALL1,
HALL2
200–
8000 Hz,
BYPASS
D100:0W–
D0:100W
: short reverb with high density
ROOM2
: short reverb with low density
STAGE1
: reverb with greater late rever-
beration
STAGE2
: reverb with strong early reflec-
tions
HALL1
: very clear-sounding reverb
HALL2
: rich reverb
Adjusts the delay time from the direct
sound until the reverb sound is heard.
Adjusts the frequency above which the
high frequency content of the reverb
sound will be cut, or “damped.” If you do
not want to cut the high frequencies, set
this parameter to BYPASS.
Volume balance between the direct sound
(D) and the reverb sound (W)
Parameter
Strength
Type 1, 2 Varies the nuances of the distortion.
Drive 0–127
Low Gain -15–+15dB Boost or cut in the low end
High Gain -15–+15dB Boost or cut in the high end
Level 0–127 Output Level
* This reproduces the distortion that occurs when an electrical cir-
cuit is slightly overloaded.
MFX 10: COMPRESSOR
Parameter
Attack
Threshold 0–127
Post Gain 0–+18dB Adjusts the output gain.
Low Gain -15–+15dB Boost or cut in the low end
High Gain -15–+15dB Boost or cut in the high end
Level 0–127 Output Level
Value Description
SOFT, HARD
Value Description
0–127
HARD produces stronger distortion than
SOFT.
Degree of distortion
This also affects the volume.
This sets the time it takes until the level is
compressed after the input exceeds the
Threshold.
Adjusts the volume at which compression
begins
30
Page 31

MFX 11: WAH MFX 12: RING MODULATOR
Parameter
Filter Type
Manual 0–127
Peak 0–127
Sens 0–127
Control Type
Depth 0–127 Depth of modulation
Level 0–127 Output Level
Value Description
Filter Type
LPF
LPF, BPF
TOUCH,
PEDAL
: The wah effect will be applied over
a wide frequency range.
BPF
: The wah effect will be applied over
a narrow frequency range.
When Control Type is set to “PEDAL,” you
can use this parameter to modify the tonal
character.
Adjusts the amount of the wah effect that
will occur in the range of the center
frequency.
Set a higher value to narrow the range to
be affected.
When Control Type is set to “TOUCH,”
this adjusts the sensitivity to the volume
used in changing the tone.
Effect Control Types
TOUCH
: The tone changes in response
to changes in the volume.
PEDAL
: The tone changes according to
the function of the Manual parameter
and controller number 4 (CC#4) of MIDI
message
.
Parameter
Frequency
Sens 0–127
Polarity UP, DOWN
Low Gain -15–+15dB Boost or cut in the low end
High Gain -15–+15dB Boost or cut in the high end
Balance
Level 0–127 Output Level
,
Value Description
0–127
D100:0W–
D0:100W
Adjusts the frequency at which
modulation is applied.
Adjusts the amount of frequency
modulation applied.
Determines whether the frequency
modulation moves towards higher
frequencies (UP) or lower frequencies
(DOWN).
Volume balance between the direct sound
(D) and the effect sound (W)
31
Page 32

Selecting the Type of Pre Amp (Pre Amp Screen)
Pre Amp Types
This switches the amp of the Electric Piano. By changing the
combination of Electric Piano type and amp type, you can create a
variety of sounds ranging from standard Electric Piano sounds to
new sounds that have not been heard before.
Pre Amp Switch
32
Parameter
Pre Amp
Switch
Value Description
OFF, ON Turns Pre Amp on/off
* For details on the “note” that can be selected for some parameter,
refer to
“About Note”
(p. 36)
THRU
No
pre
amp will be used.
OLD
This combines TINE EP(p. 22), reproducing a typical Electric Piano
sound of the early ‘70s.
Parameter
Tremolo Switch
Tremolo Sync OFF, ON
Tremolo Rate
Tremolo Depth 0–127 Depth of the tremolo
Tremolo Duty -10–+10
Bass -50–+50
Treble -50–+50
Level 0–127 Output Level
Value Description
OFF, ON Turns tremolo on/off.
0.05–10.00 Hz,
note
When this is set to ON, the effect is
synchronized with the tempo
See
“About Note”
Frequency of the tremolo
Specifies the duty cycle of the LFO
waveform used to apply tremolo.
Increasing this value will increase the
duty cycle of the LFO waveform for
the L-channel; the duty cycle for the Rchannel will decrease.
Amount of boost/cut for the low
frequency range
Amount of boost/cut for the high
frequency range
(p. 36).
Page 33

NEW
This combines TINE EP (p. 22), reproducing a typical Electric Piano
sound of the late ‘70s through ‘80s.
Parameter
Tremolo Switch
Tremolo Sync OFF, ON
Tremolo Rate
Tremolo Depth 0–127 Depth of the effect
Tremolo Duty -10–+10
Bass -50–+50
Treble -50–+50
Level 0–127 Output Level
Value Description
OFF, ON Turns the tremolo on/off.
When this is set to “note,” the effect is
synchronized with the tempo
See
0.05–
10.00 Hz,
note
“About Note”
Frequency of the tremolo
Specifies the duty cycle of the LFO
waveform used to apply tremolo.
Increasing this value will increase the
duty cycle of the LFO waveform for the
L-channel; the duty cycle for the R-channel will decrease.
Amount of boost/cut for the low
frequency range
Amount of boost/cut for the high
frequency range
(p. 36).
DYNO
This amp type is a modification of OLD case or NEW case, and is
marked by a bright sound and distinctive distortion that occurs when
you play strongly. When used in conjunction with TINE EP (p. 22),
this will reproduce the Electric Piano sounds used in numerous
recordings of the early ‘80s.
Parameter
Tremolo Switch OFF, ON Turns the tremolo on/off.
Tremolo Sync OFF, ON
Tremolo Rate
Tremolo Depth 0–127 Depth of the tremolo
Tremolo Shape 0–127
Bass Boost 0–127
Filter Curve 0–127
Over Tone 0–127
Limiter OFF, ON
Level 0–127 Output Level
Value Description
When this is set to ON, the effect is
synchronized with the tempo
See
0.05–
10.00 Hz,
note
“About Note”
Frequency of the tremolo
Adjusts the tremolo waveform
Values near 0 will approach a triangle
wave, and values near 127 will approach a pulse wave.
The effect will also change depending
on the Tremolo Depth setting.
Amount of boost/cut for the low
frequency range
Amount of boost/cut for the middle
frequency range
Amount of boost/cut for the high
frequency range
Selects whether the limiter will be applied
(on) or not (off).
(p. 36).
33
Page 34

WURLY
This combines REED EP (p. 22), reproducing a typical Electric Piano
sound of the ‘60s.
Parameter
Vibrato Switch
Vibrato Sync OFF, ON
Vibrato Rate
Vibrato Depth
Bass
Treble -50–+50
Level 0–127 Output Level
Value Description
OFF, ON Turns the
0.05–
10.00 Hz,
note
0–127 Depth of the
-50–+50
vibrato
When this is set to ON, the effect is
synchronized with the tempo
See
“About Note”
Frequency of the
vibrato
Amount of boost/cut for the low
frequency range
Amount of boost/cut for the high
frequency range
on/off.
(p. 36).
vibrato
STAGE
This simulates playing a stage piano.
Parameter
Tremolo Switch
Tremolo Sync OFF, ON
Tremolo Rate
Tremolo Depth 0–127 Depth of the tremolo
Tremolo Duty -10–+10
Bass -50–+50
Treble -50–+50
Level 0–127 Output Level
Value Description
OFF, ON Turns the tremolo on/off.
When this is set to ON, the effect is
synchronized with the tempo
See
0.05–
10.00 Hz,
note
“About Note”
Frequency of the tremolo
Specifies the duty cycle of the LFO
waveform used to apply the tremolo.
Increasing this value will increase the
duty cycle of the LFO waveform for the
L-channel; the duty cycle for the R-channel will decrease.
Amount of boost/cut for the low
frequency range
Amount of boost/cut for the high
frequency range
(p. 36).
34
Page 35

Selecting the Type of Speaker (Speaker Screen)
In the Speaker screen you can select the type of the speaker.
Parameter
Speaker Switch
Speaker Type
Value Description
OFF, ON Turns speaker on/off.
LINE
OLD
NEW
WURLY
TWIN
This is a sound via LINE OUT. No
speaker used.
Reproducing a typical Electric Piano
sound of the early ‘70s.
Reproducing a typical Electric Piano
sound of the late ‘70s through ‘80s.
Reproducing a typical Electric Piano
sound of the ‘60s.
This simulates playing through a
guitar amp.
Initializing a Patch (Utility Screen)
In the Utility screen you can initialize patches.
This operation lets you return the settings of the current patch to their
default values.
1.
Select the patch that you want to initialize.
2.
In the Utility screen, choose Patch Init.
3.
When the confirmation screen appears, press the [F7
(OK)] button.
If you decide to cancel, press the [F8 (EXIT)] button.
* If you’ve installed the ARX-02 in a Fantom-G6/G7/G8, executing
a Factory Reset for the Fantom-G6/G7/G8 will reset the expansion boards to their factory-set condition.
35
Page 36

36
About Note
Some parameters (such as Rate or Delay Time) can be set in terms
of a note value instead of a time value.
Such parameters provide the “Sync” switch that allows you to
switch between setting the parameter as a note value or as a
numerical value.
If you want to set Rate (Delay Time) as a numerical value, set the
Sync switch to “OFF” (unlit). If you want to set it as a note value,
set the Sync switch to “ON” (lit).
Value Description
1/64T()
1/64( )
1/32T( )
1/32( )
1/16T( )
1/32.( )
1/16( )
1/8T( )
1/16.( )
1/8( )
1/4T( )
1/8.( )
1/4( )
1/2T( )
1/4.( )
1/2( )
1/1T( )
1/2.( )
1/1( )
2/1T( )
1/1.( )
2/1()
Sixty-fourth-note triplet
Sixty-fourth note
Thirty-second-note triplet
Thirty-second note
Sixteenth-note triplet
Dotted thirty-second note
Sixteenth note
Eighth-note triplet
Dotted sixteenth note
Eighth note
Quarter-note triplet
Dotted eighth note
Quarter note
Half-note triplet
Dotted quarter note
Half note
Whole-note triplet
Dotted half note
Whole note
Double-note triplet
Dotted whole note
Double note
Page 37

Specifications
ARX-02 ELECTRIC PIANO
Maximum Polyphony
Part 1 part
User Memory Patches: 50 (including pre-loaded Patches)
Effects
Customize Functions
Accessories
* In the interest of product improvement, the specifications and/or appearance of this unit are subject to change without prior notice.
64 voices (varies according to the sound generator load)
MFX: 1 system (12 types)
EQUALIZER
SUPER FILTER
CHORUS
PHASER1
PHASER2
FLANGER
DELAY
REVERB
LINE DRIVE
COMPRESSOR
WAH
RING MODULATOR
Condition
Bar Angle
Pickup Distance
Bell/Thump
Bell Character
Damper Noise
Key Off Resonance
HUM Noise
Hammer Response
Model Type
Speaker Type
and more
Owner’s manual
Screwdriver
37
Page 38

Index
A
Amp Level ................................................................................. 20
B
Bar Angle ................................................................................. 24
Basic screen .............................................................................. 20
Bell Character ........................................................................... 25
Bell Rust .................................................................................... 25
Bell/Thump ............................................................................... 24
C
CHORUS .................................................................................. 27
COMPRESSOR .......................................................................... 30
Condition ............................................................................ 20, 22
D
Damper Noise ........................................................................... 23
DELAY ...................................................................................... 29
DYNO ...................................................................................... 33
E
EQUALIZER ............................................................................... 26
F
FLANGER ................................................................................. 29
FM TINE ................................................................................... 22
H
Hammer Response ..................................................................... 23
HUM Noise ............................................................................... 23
38
K
Key Follow ................................................................................ 24
Key Off Resonance ..................................................................... 23
L
LINE ......................................................................................... 35
LINE DRIVE ................................................................................ 30
M
MFX Screen ............................................................................... 26
MFX Switch ......................................................................... 20, 26
N
NEW ........................................................................................ 33
O
OLD .......................................................................................... 32
P
Patch
Initialize ............................................................................. 35
Save .................................................................................. 21
Select ................................................................................. 21
PATCH NAME ........................................................................... 21
PHASER1 .................................................................................. 28
PHASER2 .................................................................................. 28
Pickup Distance .......................................................................... 25
Pickup Level ............................................................................... 20
Pickup/Bell Screen ..................................................................... 24
Pre Amp .................................................................................... 32
Pre Amp Screen ......................................................................... 32
Pre Amp Switch .................................................................... 20, 32
Page 39

R
REED BELL ................................................................................. 22
REED EP ................................................................................... 22
REED EP2 ................................................................................. 22
REVERB .................................................................................... 30
RING MODULATOR ................................................................... 31
S
SA EP1 ..................................................................................... 22
SA EP2 ..................................................................................... 22
Speaker Screen ......................................................................... 35
Speaker switch .......................................................................... 35
STAGE ..................................................................................... 34
SUPER FILTER ............................................................................. 27
T
THRU ................................................................................. 26, 32
TINE EP .................................................................................... 22
TINE EP2 .................................................................................. 22
Tone Type ................................................................................. 22
Type/Level screen ...................................................................... 22
U
Utility Screen ............................................................................. 35
W
WAH ....................................................................................... 31
WURLY ..................................................................................... 34
39
Page 40

For EU Countries
This product complies with the requirements of EMC Directive 2004/108/EC.
For the USA
FEDERAL COMMUNICATIONS COMMISSION
RADIO FREQUENCY INTERFERENCE STATEMENT
This equipment has been tested and found to comply with the limits for a Class B digital device, pursuant to Part 15 of the
FCC Rules. These limits are designed to provide reasonable protection against harmful interference in a residential
installation. This equipment generates, uses, and can radiate radio frequency energy and, if not installed and used in
accordance with the instructions, may cause harmful interference to radio communications. However, there is no guarantee
that interference will not occur in a particular installation. If this equipment does cause harmful interference to radio or
television reception, which can be determined by turning the equipment off and on, the user is encouraged to try to correct the
interference by one or more of the following measures:
– Reorient or relocate the receiving antenna.
– Increase the separation between the equipment and receiver.
– Connect the equipment into an outlet on a circuit different from that to which the receiver is connected.
– Consult the dealer or an experienced radio/TV technician for help.
This device complies with Part 15 of the FCC Rules. Operation is subject to the following two conditions:
(1) this device may not cause harmful interference, and
(2) this device must accept any interference received, including interference that may cause undesired operation.
Unauthorized changes or modification to this system can void the users authority to operate this equipment.
This equipment requires shielded interface cables in order to meet FCC class B Limit.
For Canada
NOTICE
This Class B digital apparatus meets all requirements of the Canadian Interference-Causing Equipment Regulations.
AVIS
Cet appareil numérique de la classe B respecte toutes les exigences du Règlement sur le matériel brouilleur du Canada.
40
Page 41

Model Name :
Type of Equipment :
Responsible Party :
Address :
Telephone :
DECLARATION OF CONFORMITY
Compliance Information Statement
ARX-02
Expansion Board
Roland Corporation U.S.
5100 S. Eastern Avenue, Los Angeles, CA 90040-2938
(323) 890-3700
For the USA
41
Page 42

42
For EU Countries
Page 43

For China
43
Page 44

Information When you need repair service, call your nearest Roland Service Center or authorized Roland
AFRICA
EGYPT
Al Fanny Trading Office
9, EBN Hagar Al Askalany
Street,
ARD E1 Golf, Heliopolis,
Cairo 11341, EGYPT
TEL: (022)-418-5531
REUNION
Maison FO - YAM Marcel
25 Rue Jules Hermann,
Chaudron - BP79 97 491
Ste Clotilde Cedex,
REUNION ISLAND
TEL: (0262) 218-429
SOUTH AFRICA
T.O.M.S. Sound & Music
(Pty)Ltd.
2 ASTRON ROAD DENVER
JOHANNESBURG ZA 2195,
SOUTH AFRICA
TEL: (011)417 3400
Paul Bothner(PTY)Ltd.
Royal Cape Park, Unit 24
Londonderry Road, Ottery 7800
Cape Town, SOUTH AFRICA
TEL: (021) 799 4900
distributor in your country as shown below.
ASIA
CHINA
Roland Shanghai Electronics
Co.,Ltd.
5F. No.1500 Pingliang Road
Shanghai 200090, CHINA
TEL: (021) 5580-0800
Roland Shanghai Electronics
Co.,Ltd.
(BEIJING OFFICE)
10F. No.18 3 Section Anhuaxili
Chaoyang District Beijing
100011 CHINA
TEL: (010) 6426-5050
HONG KONG
Tom Lee Music Co., Ltd.
Service Division
22-32 Pun Shan Street, Tsuen
Wan, New Territories,
HONG KONG
TEL: 2415 0911
Parsons Music Ltd.
8th Floor, Railway Plaza, 39
Chatham Road South, T.S.T,
Kowloon, HONG KONG
TEL: 2333 1863
INDIA
Rivera Digitec (India) Pvt. Ltd.
411, Nirman Kendra
Mahalaxmi Flats Compound
Off. Dr. Edwin Moses Road,
Mumbai-400011, INDIA
TEL: (022) 2493 9051
INDONESIA
PT Citra IntiRama
Jl. Cideng Timur No. 15J-15O
Jakarta Pusat
INDONESIA
TEL: (021) 6324170
KOREA
Cosmos Corporation
1461-9, Seocho-Dong,
Seocho Ku, Seoul, KOREA
TEL: (02) 3486-8855
MALAYSIA
Roland Asia Pacific Sdn. Bhd.
45-1, Block C2, Jalan PJU 1/39,
Dataran Prima, 47301 Petaling
Jaya, Selangor, MALAYSIA
TEL: (03) 7805-3263
VIET NAM
Suoi Nhac Company, Ltd
370 Cach Mang Thang Tam St.
Dist.3, Ho Chi Minh City,
VIET NAM
TEL: 9316540
PHILIPPINES
G.A. Yupangco & Co. Inc.
339 Gil J. Puyat Avenue
Makati, Metro Manila 1200,
PHILIPPINES
TEL: (02) 899 9801
SINGAPORE
SWEE LEE MUSIC
COMPANY PTE. LTD.
150 Sims Drive,
SINGAPORE 387381
TEL: 6846-3676
TAIWAN
ROLAND TAIWAN
ENTERPRISE CO., LTD.
Room 5, 9fl. No. 112 Chung
Shan N.Road Sec.2, Taipei,
TAIWAN, R.O.C.
TEL: (02) 2561 3339
THAILAND
Theera Music Co. , Ltd.
100-108 Soi Verng
Nakornkasem, New
Road,Sumpantawongse,
Bangkok 10100 THAILAND
TEL: (02) 224-8821
AUSTRALIA/
NEW ZEALAND
AUSTRALIA/
NEW ZEALAND
Roland Corporation
Australia Pty.,Ltd.
38 Campbell Avenue
Dee Why West. NSW 2099
AUSTRALIA
For Australia
Tel: (02) 9982 8266
For New Zealand
Tel: (09) 3098 715
CENTRAL/LATIN
AMERICA
ARGENTINA
Instrumentos Musicales S.A.
Av.Santa Fe 2055
(1123) Buenos Aires
ARGENTINA
TEL: (011) 4508-2700
BARBADOS
A&B Music Supplies LTD
12 Webster Industrial Park
Wildey, St.Michael, Barbados
TEL: (246)430-1100
BRAZIL
Roland Brasil Ltda.
Rua San Jose, 780 Sala B
Parque Industrial San Jose
Cotia - Sao Paulo - SP, BRAZIL
TEL: (011) 4615 5666
CHILE
Comercial Fancy II S.A.
Rut.: 96.919.420-1
Nataniel Cox #739, 4th Floor
Santiago - Centro, CHILE
TEL: (02) 688-9540
COLOMBIA
Centro Musical Ltda.
Cra 43 B No 25 A 41 Bododega 9
Medellin, Colombia
TEL: (574)3812529
COSTA RICA
JUAN Bansbach Instrumentos
Musicales
Ave.1. Calle 11, Apartado
10237,
San Jose, COSTA RICA
TEL: 258-0211
CURACAO
Zeelandia Music Center Inc.
Orionweg 30
Curacao, Netherland Antilles
TEL:(305)5926866
DOMINICAN REPUBLIC
Instrumentos Fernando Giraldez
Calle Proyecto Central No.3
Ens.La Esperilla
Santo Domingo,
Dominican Republic
TEL:(809) 683 0305
ECUADOR
Mas Musika
Rumichaca 822 y Zaruma
Guayaquil - Ecuador
TEL:(593-4)2302364
EL SALVADOR
OMNI MUSIC
75 Avenida Norte y Final
Alameda Juan Pablo II,
Edificio No.4010 San Salvador,
EL SALVADOR
TEL: 262-0788
GUATEMALA
Casa Instrumental
Calzada Roosevelt 34-01,zona 11
Ciudad de Guatemala
Guatemala
TEL:(502) 599-2888
HONDURAS
Almacen Pajaro Azul S.A. de C.V.
BO.Paz Barahona
3 Ave.11 Calle S.O
San Pedro Sula, Honduras
TEL: (504) 553-2029
MARTINIQUE
Musique & Son
Z.I.Les Mangle
97232 Le Lamantin
Martinique F.W.I.
TEL: 596 596 426860
Gigamusic SARL
10 Rte De La Folie
97200 Fort De France
Martinique F.W.I.
TEL: 596 596 715222
MEXICO
Casa Veerkamp, s.a. de c.v.
Av. Toluca No. 323, Col. Olivar
de los Padres 01780 Mexico
D.F. MEXICO
TEL: (55) 5668-6699
NICARAGUA
Bansbach Instrumentos
Musicales Nicaragua
Altamira D'Este Calle Principal
de la Farmacia 5ta.Avenida
1 Cuadra al Lago.#503
Managua, Nicaragua
TEL: (505)277-2557
PANAMA
SUPRO MUNDIAL, S.A.
Boulevard Andrews, Albrook,
Panama City, REP. DE
PANAMA
TEL: 315-0101
PARAGUAY
Distribuidora De
Instrumentos Musicales
J.E. Olear y ESQ. Manduvira
Asuncion PARAGUAY
TEL: (595) 21 492147
PERU
Audionet
Distribuciones Musicales SAC
Juan Fanning 530
Miraflores
Lima - Peru
TEL: (511) 4461388
TRINIDAD
AMR Ltd
Ground Floor
Maritime Plaza
Barataria Trinidad W.I.
TEL: (868) 638 6385
44
Page 45

URUGUAY
Todo Musica S.A.
Francisco Acuna de Figueroa
1771
C.P.: 11.800
Montevideo, URUGUAY
TEL: (02) 924-2335
VENEZUELA
Instrumentos Musicales
Allegro,C.A.
Av.las industrias edf.Guitar
import
#7 zona Industrial de Turumo
Caracas, Venezuela
TEL: (212) 244-1122
EUROPE
AUSTRIA
Roland Elektronische
Musikinstrumente HmbH.
Austrian Office
Eduard-Bodem-Gasse 8,
A-6020 Innsbruck, AUSTRIA
TEL: (0512) 26 44 260
BELGIUM/FRANCE/
HOLLAND/
LUXEMBOURG
Roland Central Europe N.V.
Houtstraat 3, B-2260, Oevel
(Westerlo) BELGIUM
TEL: (014) 575811
CROATIA
ART-CENTAR
Degenova 3.
HR - 10000 Zagreb
TEL: (1) 466 8493
CZECH REP.
CZECH REPUBLIC
DISTRIBUTOR s.r.o
Voctárova 247/16
CZ - 180 00 PRAHA 8,
CZECH REP.
TEL: (2) 830 20270
DENMARK
Roland Scandinavia A/S
Nordhavnsvej 7, Postbox 880,
DK-2100 Copenhagen
DENMARK
TEL: 3916 6200
FINLAND
Roland Scandinavia As, Filial
Finland
Elannontie 5
FIN-01510 Vantaa, FINLAND
TEL: (0)9 68 24 020
GERMANY
Roland Elektronische
Musikinstrumente HmbH.
Oststrasse 96, 22844
Norderstedt, GERMANY
TEL: (040) 52 60090
GREECE/CYPRUS
STOLLAS S.A.
Music Sound Light
155, New National Road
Patras 26442, GREECE
TEL: 2610 435400
HUNGARY
Roland East Europe Ltd.
Warehouse Area ‘DEPO’ Pf.83
H-2046 Torokbalint,
HUNGARY
TEL: (23) 511011
IRELAND
Roland Ireland
G2 Calmount Park, Calmount
Avenue, Dublin 12
Republic of IRELAND
TEL: (01) 4294444
ITALY
Roland Italy S. p. A.
Viale delle Industrie 8,
20020 Arese, Milano, ITALY
TEL: (02) 937-78300
NORWAY
Roland Scandinavia Avd.
Kontor Norge
Lilleakerveien 2 Postboks 95
Lilleaker N-0216 Oslo
NORWAY
TEL: 2273 0074
POLAND
ROLAND POLSKA SP. Z O.O.
UL. Gibraltarska 4.
PL-03 664 Warszawa
POLAND
TEL: (022) 679 4419
PORTUGAL
Roland Iberia, S.L.
Portugal Office
Cais das Pedras, 8/9-1 Dto
4050-465, Porto, PORTUGAL
TEL: 22 608 00 60
ROMANIA
FBS LINES
Piata Libertatii 1,
535500 Gheorgheni,
ROMANIA
TEL: (266) 364 609
RUSSIA
MuTek
Dorozhnaya ul.3,korp.6
117 545 Moscow, RUSSIA
TEL: (095) 981-4967
SLOVAKIA
DAN Acoustic s.r.o.
Povazská 18.
SK - 940 01 Nové Zámky
TEL: (035) 6424 330
SPAIN
Roland Iberia, S.L.
Paseo García Faria, 33-35
08005 Barcelona SPAIN
TEL: 93 493 91 00
SWEDEN
Roland Scandinavia A/S
SWEDISH SALES OFFICE
Danvik Center 28, 2 tr.
S-131 30 Nacka SWEDEN
TEL: (0)8 702 00 20
SWITZERLAND
Roland (Switzerland) AG
Landstrasse 5, Postfach,
CH-4452 Itingen,
SWITZERLAND
TEL: (061) 927-8383
UKRAINE
EURHYTHMICS Ltd.
P.O.Box: 37-a.
Nedecey Str. 30
UA - 89600 Mukachevo,
UKRAINE
TEL: (03131) 414-40
UNITED KINGDOM
Roland (U.K.) Ltd.
Atlantic Close, Swansea
Enterprise Park, SWANSEA
SA7 9FJ,
UNITED KINGDOM
TEL: (01792) 702701
MIDDLE EAST
BAHRAIN
Moon Stores
No.1231&1249 Rumaytha
Building Road 3931, Manama
339 BAHRAIN
TEL: 17 813 942
IRAN
MOCO INC.
No.41 Nike St., Dr.Shariyati Ave.,
Roberoye Cerahe Mirdamad
Tehran, IRAN
TEL: (021)-2285-4169
ISRAEL
Halilit P. Greenspoon & Sons
Ltd.
8 Retzif Ha'alia Hashnia St.
Tel-Aviv-Yafo ISRAEL
TEL: (03) 6823666
JORDAN
MUSIC HOUSE CO. LTD.
FREDDY FOR MUSIC
P. O. Box 922846
Amman 11192 JORDAN
TEL: (06) 5692696
KUWAIT
EASA HUSAIN AL-YOUSIFI
& SONS CO.
Al-Yousifi Service Center
P.O.Box 126 (Safat) 13002
KUWAIT
TEL: 00 965 802929
LEBANON
Chahine S.A.L.
George Zeidan St., Chahine
Bldg., Achrafieh, P.O.Box: 165857
Beirut, LEBANON
TEL: (01) 20-1441
OMAN
TALENTZ CENTRE L.L.C.
Malatan House No.1
Al Noor Street, Ruwi
SULTANATE OF OMAN
TEL: 2478 3443
QATAR
Al Emadi Co. (Badie Studio &
Stores)
P.O. Box 62, Doha, QATAR
TEL: 4423-554
SAUDI ARABIA
aDawliah Universal
Electronics APL
Behind Pizza Inn
Prince Turkey Street
aDawliah Building,
PO BOX 2154,
Alkhobar 31952
SAUDI ARABIA
TEL: (03) 8643601
SYRIA
Technical Light & Sound
Center
Rawda, Abdul Qader Jazairi St.
Bldg. No. 21, P.O.BOX 13520,
Damascus, SYRIA
TEL: (011) 223-5384
TURKEY
ZUHAL DIS TICARET A.S.
Galip Dede Cad. No.37
Beyoglu - Istanbul / TURKEY
TEL: (0212) 249 85 10
U.A.E.
Zak Electronics & Musical
Instruments Co. L.L.C.
Zabeel Road, Al Sherooq Bldg.,
No. 14, Ground Floor, Dubai,
U.A.E.
TEL: (04) 3360715
As of Oct. 1, 2007 (ROLAND)
NORTH AMERICA
CANADA
Roland Canada Ltd.
(Head Office)
5480 Parkwood Way
Richmond B. C., V6V 2M4
CANADA
TEL: (604) 270 6626
Roland Canada Ltd.
(Toronto Office)
170 Admiral Boulevard
Mississauga On L5T 2N6
CANADA
TEL: (905) 362 9707
U. S. A.
Roland Corporation U.S.
5100 S. Eastern Avenue
Los Angeles, CA 90040-2938,
U. S. A.
TEL: (323) 890 3700
45
Page 46

Page 47

取扱説明書
こ の製品を正し くお使いいただくために、ご使用前に「安全上のご注
意」(P.48)と「使用上のご注意」(P.50)をよくお読みください。ま
た、この製品の優れた機能を十分ご理解いただくためにも、取扱説明書
をよくお読みください。取扱説明書は必要なときにすぐに見ることがで
きるよう、手元に置いてください。
ローランド株式会社
© 2008
本書の一部、もしくは全部を無断で複写・転載することを禁じます。
Page 48

安全上のご注意
火災・感電・傷害を防止するには
444488
注意の意味について警告と
警告
注意
取扱いを誤った場合に、使用者が
死亡または重傷を負う可能性が想
定される内容を表わしています。
取扱いを誤った場合に、使用者が
傷害を負う危険が想定される場合
および物的損害のみの発生が想定
される内容を表わしています。
※物的損害とは、家屋・家財およ
び家畜・ペットにかかわる拡大
損害を表わしています。
図記号の例
は、注意(危険、警告を含む)を表わしていま
す。
具体的な注意内容は、 の中に描かれています。
左図の場合は、「一般的な注意、警告、危険」を
表わしています。
は、禁止(してはいけないこと)を表わしてい
ます。
具体的な禁止内容は、 の中に描かれています。
左図の場合は、「分解禁止」を表わしています。
●は、強制(必ずすること)を表わしています。
具体的な強制内容は、
左図の場合は、「電源プラグをコンセントから抜
くこと」を表わしています。
●の中に描かれています。
以下の指示を必ず守ってください
88
Page 49

警告 警告
注意
● この製品を分解したり、改造したり
しないでください。
..................................................................................
● この製品を分解したり(取扱説明書
に記載されている指示(P.52)を
除く)、改造したりしないでくださ
い。
..................................................................................
● 修理/部品の交換などで、取扱説明
書に書かれていないことは、絶対に
しないでください。必ずお買い上げ
店またはローランド・サービスに相
談してください。
..................................................................................
● 次のよう な場所で の使用や保存は
しないでください。
○ 温度が極端に高い場所(直射日
光の当たる場所、暖房機器の近
く、発熱する機器の上など)
○ 水気 の近 く(風呂場、洗面台、
濡れた床など)や湿度の高い場
所
○ 雨に濡れる場所
○ ホコリの多い場所
○ 振動の多い場所
..................................................................................
● お子様の いるご家 庭で使用する場
合、お子様 の取り扱 いやいたずら
に注意 してくだ さい。必ず大人の
かたが、監 視/指導 してあげてく
ださい。
..................................................................................
● この製品を落としたり、この製品に
強い衝撃を与えないでください。
..................................................................................
● このエクスパンション・ボードを取
り付ける前に、取り付ける機器
(Fantom-G6/G7/G8)の電源を
切って 電源プラ グをコンセントか
ら外してください。
..................................................................................
● 指定の機器(Fantom-G6/G7/
G8)だけに取り付け、取り付け時
には指 定され たネジだけを外して
ください。
..................................................................................
444499
99
Page 50

使用上のご注意
お客様が SuperNATURAL エクスパンション・ボード ARX-02
(以下、「本製品」といいます)をローランドの正規販売店からお買
い上げになった時点で、本製品に含まれる音やサンプルは、ローラ
ンド株式会 社から、お客様 に対して、音楽制作、公共の場での演
奏、放送などの商用目的のための使用を許諾したものであって、著
作権を譲渡したものではありません。
お客様は、いかなる追加料金を支払うこともなく、本製品に含まれ
るあらゆるフレーズやサンプルを、商用あるいは非商用目的の録音
に使用できます。ただし、お客様が本製品を使用して音楽の録音を
行う際は、以下のことにご注意ください。
本製品に含まれるいかなる録音物も、そのままの状態であれ、いか
なる手段によって再構成、ミキシング、フィルター加工、再合成、
加工処理、その他の編集作業をした状態であれ、ローランドの書面
による許可なく、他の製品に含めたり再販売するために複製・複写
することを禁止します。また、本製品に含まれるいかなる音も、許
可なく贈与、取引、貸与、賃貸、再発行、再配布、再販売すること
を禁止します。
従って、本製品の音色は音楽制作の範囲でお使いいただくようお願
いします。そして、本製品のライブラリーはお客様ご自身の個人的
使用の目的の範囲でお使いください。本製品の音色データの複製・
複写は禁止します。
ローランドは、著作権侵害がないかどうか、常時他のサウンド・ラ
イブラリーの発売を把握しており、著作権侵害に対しては法的手段
を行使する場合があります。
なお、本製品のライブラリーは第三者の著作権を一切侵害していな
いことを保証します。
00
555500
設置について
● テレビやラジオの近くでこの製品を動作させると、テレビ画面に色ム
ラが出たり、ラジオから雑音が出ることがあります。この場合は、こ
の製品を遠ざけて使用してください。
修理について
● お客様がこの製品を分解、改造された場合、以後の性能について保証
できなくなります。また、修理をお断りする場合もあります。
● 当社では、この製品の補修用性能部品(製品の機能を維持するために
必要な部品)を、製造打切後 6 年間保有しています。この部品保有
期間を修理可能の期間とさせていただきます。なお、保有期間が経過
した後も、故障箇所によっては修理可能の場合がありますので、お買
い上げ店、または最寄りのローランド・サービスにご相談ください。
その他の注意について
● 音楽をお楽しみになる場合、隣近所に迷惑がかからないように、特に
夜間は、音量に十分注意してください。
● 輸送や引っ越しをするときは、この製品が入っていたダンボール箱と
緩衝材、または同等品で梱包してください。
● この製品が入っていた梱包箱や緩衝材を廃棄する場合、各市町村のゴ
ミの分別基準に従って行ってください。
※ 製品の仕様および外観は、改良のため予告なく変更することがあ
ります。
Page 51

目次
安全上のご注意.........................................................................48
使用上のご注意.........................................................................50
エクスパンション・ボードを機器に取り付ける................... 52
機器への取り付け方 ............................................................................52
取り付け後の確認方法 ........................................................................55
機器から取り外す場合 ........................................................................56
はじめに ....................................................................................57
主な特長 ...............................................................................................57
SuperNATURAL エクスパンション・ボード ARX シリーズ
Roland SuperNATURAL テクノロジー ...................................57
ARX-02 ELECTRIC PIANO ......................................................57
ARX-02 ELECTRIC PIANO の構成 .............................................58
......57
音色の設定................................................................................. 60
基本画面 ...............................................................................................60
パッチの選択...................................................................................61
パッチの保存(Fantom-G の場合)............................................61
タイプを選ぶ(Type/Level 画面)..................................................62
音色を調節する(Pickup/Bell 画面)..............................................64
エフェクトを選ぶ(MFX 画面)........................................................66
MFX スイッチ(MFX Switch)................................................... 66
MFX タイプ(MFX Type)..........................................................66
プリ・アンプの種類を選ぶ(Pre Amp 画面)................................ 72
Pre Amp スイッチ(Pre Amp Switch)..................................72
Pre Amp のパラメーター.............................................................72
スピーカーの種類を選ぶ(Speaker 画面)..................................... 75
パッチの初期化(Utility 画面).........................................................75
主な仕様.....................................................................................77
索引 ............................................................................................78
555511
11
Page 52

エクスパンション・ボードを機器に取り付ける
取り付け時のご注意
● このエクスパンション・ボード(以下、基板と呼びます)を取り付け
る前に、取り付ける機器の取扱説明書に記載されている、エクスパン
ション・ボードの取り付け方法をよくお読みください。
● この基板は、静電気により部品が破壊される恐れがあります。基板を
取り扱うときは、次の点に注意してください。
○ 基板を持つときは、あらかじめ何らかの金属に触れて、体や衣類
にたまっている静電気を放電してください。
○ 基板を持つときは、基板の縁を持ち、部品やコネクターの部分に
直接手を触れないでください。
○ 基板を保管するとき、または輸送するときなどは、購入時に基板
が入っていた袋(導電袋)に入れてください。
● 基板や 機器内部の回路 部、コネクター部には手を触れないでくださ
い。
● 基板を無理に押し込まないでください。取り付けにくい場合、いった
ん基板を外してやり直してください。
● 取り付けを終えたら、機器の取扱説明書に従ってエクスパンション・
ボードが正しく取り付けられていることを確認してください。
22
555522
機器への取り付け方
1. 機器の取扱説明書に従って、エクスパンション・ボー
ド取り付け用のスロットを露出させます。
2. 図のように、機器のスロットと基板の向きを合わせ
てください。
機器のスロット
ツメ付きホルダー
基板
(エクスパンション・ボード)
ローランドの
ロゴ
ツメなしホルダー
ツメなしホルダー用
取り付け穴
Page 53

3. 基板を、機器側にあるツメなし基板ホルダーに、カ
チッと音がするまで差し込みます。
基板の
コネクター
機器の
コネクター
基板
ツメなしホルダー
基板の穴をホル
ダーに合わせる
4. 基板を静かに倒します。
555533
33
Page 54

5. ツメ付き基板ホ ルダーがロッ クされるまで、基板の
図の場所(3ヶ所)を上から押し込みます。
ロゴがついている
部分の基板の端
基板の切り欠き付近
(2ケ所)
6. ツメ付き基板ホルダーがロックされていることを確
認します。
7. エクスパンション・ボード取り付け用のスロットを
元の状態に戻します。
555544
44
Page 55

取り付け後の確認方法
エクスパンション・ボードの取り付けが終わったら、次にエク
スパンション・ボードのインストール作業を行います。
このインストール作業は、エクスパンション・ボードの取り付
け直後の電源投入時のみに行われます。
1. 取り付けた機器の取扱説明書に従って、機器の電源
を入れます。
2. エクスパンション・ボードが正常に取り付けられて
いると、インストールの確認画面が表 示され ます。
[F8(Execute)]ボタンを押して、インストールを
開始します。
取り付け直後の電源投入時にインストール確認画面が表示さ
れない場合は、エクスパンション・ボードが正しく認識され
ていない恐れがあります。エクスパンション・ボードが正し
く装着されていることを確認してみてください。
インストールが完了するまで、1 〜 5 分程度かかる場合が
あります。インストール中は、絶対に電源を切らないでくだ
さい。
3. 画面に「Please Power Off!」と表示されたら、機
器の取扱説明書に従って、機器の電源を入れ直しま
す。
※ 画面は Fantom-G 装着時のものです。
これでエクスパンション・ボードのインストール作業は終了し
ました。
555555
55
Page 56

機器から取り外す場合
1. 機器の取扱説明書に従って、エクスパンション・ボー
ド取り付け用のスロットを露出させます。
2. ツメ付き基板ホルダーのロックを外します。
3. ツメ付き基板ホルダー(2ヶ所)のロックが外れている
ことを確認し、基板を上にゆっくり引き起こして、コ
ネクターを外します。
4. ツメなし基板ホルダーから、基板を抜き取ります。
555566
66
Page 57

はじめに
主な特長
SuperNATURAL エクスパンション・ ボード ARX シリーズ
SuperNATURAL エクスパンション・ボード ARX シリーズは、
SR-JV80 シリーズ、SRX シリーズで築き上げたローランドの
拡張コンセプトをさらに発展、そして進化させた、まったく新し
いエクスパンション・ボードです。自然で豊かな演奏表現を実現
した SuperNATURAL により、音色、エフェクト、専用のグラ
フィック・ユ ーザー・イン ターフェースなど、統合的なアプリ
ケーション環境までをも拡張し、これまでにない演奏表現と新感
覚のサウンド・カスタマイズを可能にします。
Roland SuperNATURAL テクノロジー
logosupernatural.eps
SuperNATURAL は、アコースティック楽器や電 気楽器の音色
変化や楽器特有の奏法をリアルに再現し、「自然で豊かな表現」を
可能にしたローランド独自の音源技術です。
ARX-02 ELECTRIC PIANO
緻密かつ直感的なカスタマイズ機能
ARX-02 は、エレクトリック・ピアノの発音構造や音色特性を、
SuperNATURAL により忠実に再現。これまでにない、極限まで
リアルなエレピ・サウンドによる演奏を楽しむことができます。
カスタマイズでは、エレクトリック・ピアノのモデル・タイプはも
ちろん、トーン・バーとピックアップの距離やトーン・バーの角
度、ベルのキャラクター、コンディションによる音色の違いなど、
緻密なパラメーター設定が可能。エレピ専門のエンジニアのよう
に、こだわりのセッティングによるエレピ音色がつくり出せます。
SuperNATURAL により極限まで表現力を高め
たエレクトリック・ピアノ
ARX-02 は、エレクトリック・ピアノ用に チューニングされた
5 種類のアンプを搭載。これにより、音量の強弱によるエレクト
リック・ピアノ特有のトーンや歪みなど、従来のサンプリング波
形の切り替 えでは難し かったスムーズな音色変化を無段階に実
現。エレクトリック・ピアノならではの繊細かつダイナミックな
演奏表現を可能にします。
また、フェイザーやコーラスなど、エレクトリック・ピアノに最
適なマルチ・エフェクトも多数装備。多彩なキャラクターのエレ
クトリック・ピアノ・サウンドをつくることが可能です。
555577
77
Page 58

ARX-02 ELECTRIC PIANO の構成
基本構成
SuperNATURAL エクスパンション・ボード ARX シリーズは、
ARX シリーズに対応した機器から演奏情報、制御情報を受けて
音を発生し、対応機器にオーディオ信号を送信します。
※ ARX シリーズは最大 16 までのパートをサポートしています
が、本製品は 1 パートのみの仕様です。
※ 本製品を Fantom-G に装着した場合、Fantom-G に搭載され
ているリバーブなどのエフェクトを、本製品の出力にかける
ことができます。
※ 本製品は、幅広いエディットを実現しているため、使用する
再生機器や本製品のパラメーター設定によっては、音が割れ
る、歪むなどの現象が生じることがあります。この場合は、
以下のように対処してください。
本製品のレベルに関するパラメーターを小さな値にする。
•
本製品を搭載している機器の出力レベルを小さくする。
•
再生機器の音量を下げる。
•
※ 本製品は Fantom-G の以下のパラメーターには対応していま
せん。本製品を Fantom-G に装着し以下のパラメーターをエ
ディットした場合は、無視されます。
Part Output Level(パート・アウトプット・レベル)
•
Part EFX1 Send Level(エクスパンション・パート・エ
•
フェクト 1・センド・レベル)
Part EFX2 Send Level(エクスパンション・パート・エ
•
フェクト 2・センド・レベル)
88
555588
fig.01-002j.eps
Patch 001
ARX対応機器より(演奏情報)
ARX-02 ELECTRIC PIANO
Patch 050
Tone
Bar Angle Bell/Thump
Type
Pickup Distance
Effect
Pre Amp
Speaker
ARX対応機器へ(オーディオ信号)
Bell Character
Page 59

音源部
ARX-02 は、Tone、MFX、Pre Amp、Speaker の 4 つのス
テージで構成されています。
Tone (Type、Pickup/Bell) ステージでは、エレクトリック・ピ
アノのタイ プやモデル や、コンディションによる音色の違いな
ど、主にエレクトリック・ピアノ本体の設定をします。
MFX ステージではさまざまなエフェクトをかけることができま
す。
Pre A mp ステージでは、プリ・アンプの設定を行います。Tone
ステージとは独立しているため、現実には存在しない組み合わせ
を作ることも可能です。
Speaker ステージは、スピーカーの設定をします。
パッチ
音源部の設定は、パッチとして保存することができます。
ARX-02 ELECTRIC PIANO は、50 のパッチを持っています。
Fantom-G に装着した場合、パッチの情報は Fantom-G のプロ
ジェクトに保存されます。
555599
99
Page 60

音色の設定
本書について
本書では、Fantom-G に装着したときの画面写真を使用しています。また、各種操作方法は、Fantom-G 装着時の場合を想定して
•
説明しています。
カーソルを移動させる方法や、値を変更する方法については、お使いの機器の取扱説明書を参照してください。
•
基本画面
fig.ARX-001.eps
基本画面には、PATCH NAME(パッチ名)およびパッチの代
表的なパラメーターが表示されます。
パラメーター 解説 ページ
Condition
Pickup Level
Amp Level Pre Amp の出力音量を調節します。 P.72
MFX Switch MFX をオン/オフします。 P.66
Pre Amp Switch Pre Amp をオン/オフします。 P.72
エレクトリック・ピアノの状態を設定し
ます。
エレクトリック・ピアノの音量を調節し
ます。
P.62
P.62
※ MFX に関するパラメーターについて詳しくは、『エフェクト
を選ぶ(MFX 画面)』(P.66)を参照してください。
※ Pre Amp 関するパラメーターについて詳しくは、『プリ・ア
ンプの種類を選ぶ(Pre Amp 画面)』(P.72)を参照してく
ださい。
666600
00
Page 61

パッチの選択
PATCH NAME(パッチ名)にカーソルを合わせて値を変更す
ると、パッチ(001 〜 050)を選択することができます。
パッチの保存(Fantom-G の場合)
作成したパッチ(音色)は一時的なもので、パッチを選び直し
た場合には作成した音色が失われてしまいます。パッチの状態
を保存しておきたいときは、以下の方法で保存してください。
Fantom-G の[WRITE]ボタンを押します。
1.
パッチに名前を付けます。
2.
名前の付け方については、Fantom-G 取扱説明書を参照
fig.ARX-000.eps
してください。
3.
名前を付け終わったら、[F8(OK)]ボタンを押します。
4.
パッチ番号を選び、[F8(WRITE)]ボタンを押します。
5.
確認の画面が表示されたら、[F7(OK)]ボタンを押し
て、パッチを保存します。
666611
11
Page 62

タイプを選ぶ(Type/Level 画面)
fig.ARX-002.eps
Type/Level 画面では、エレクトリック・ピアノのタイプ、状
態、特性を設定します。
22
666622
パラメーター 設定値 説明
70 年代に多用されたエレクトリック・ピ
アノです。ジャズやフュージョンのミュー
ジシャンに使用され、現代でも多くのファ
TINE EP
REED EP
Tone Type
SA EP1
SA EP2 RD-1000 の E.Piano 2 サウンドです。
REED BELL
TINE EP2
FM TINE
REED EP2
Condition 1〜5
Pickup
Level
0〜127
ンを持つ代表的なタイプです。ベルのよう
なアタックとマイルドな音色が特徴で、ス
ムース・ジャズやアシット・ジャズなどの
現代の音楽シーンにおいてもなくてはなら
ないエレクトリック・ピアノです。
60 年代に登場し、ロックや R&B などに
多用されたエレクトリック・ピアノです。
柔らかな弱音とシンセサイザーのレゾナン
ス・サウンドを思わせる強音を併せ持つダ
イナミクスが特徴です。現代でも多くの
ミュージシャンに使用され続けているエレ
クトリック・ピアノです。
ローランドが 1986 年に発売した RD1000 の E.Piano 1 サウンドです。
比較的新しいタイプのエレクトリック・ピ
アノです。TINE EP と REED EP の両方
の特徴を持っています。
比較的新しいタイプのエレクトリック・ピア
ノです。TINE EP のバリエーションです。
比較的新しいタイプのエレクトリック・ピア
ノです。REED EP のバリエーションです。
選択した Tone Type に対して、エレクト
リック・ピアノのコンディションを設定し
ます。
エレクトリック・ピアノの音量を調節しま
す。
Page 63

ダンパー・ノイズを調節する(Damper Noise)
ダンパー・ノイズ(ダンパー・ペダルを踏んで、トーンバーが
開放されたときに鳴る音)を調節します。
パラメーター 設定値 解説
Damper
Noise
-10 〜
0〜
+10
値を大きくすると、ダンパー・ノイズが
大きくなります。
※ 選ばれている Tone Type(P.62)によっては効果がありま
せん。
キー・オフ音を調節する(Key Off Resonance)
キー・オフ音(鍵盤を離したときの微妙な音)などの共鳴音を
調節します。
パラメーター 設定値 解説
Key Off
Resonance
-10 〜
0〜
+10
※ 選ばれている Tone Type(P.62)によっては効果がありま
せん。
値を大きくすると、キー・オフ音が大き
くなります。-10 では完全にキー・オフ
音が鳴らなくなります。
ハム・ノイズを調節する(HUM Noise)
ピックアップが拾ってしまうハムなどのノイズ量を調節します。
電気式のピアノでは各種のノイズが混入し、演奏している音と
共に出力されることがあります。エフェクトの設定によっては、
そのノイズにより生々しい雰囲気を出すことができます。
パラメーター 設定値 解説
0 からマイナス側に値を変えるとクリア
なサウンドに、プラス側に変えるとダー
ティーなサウンドになります。-10 では
完全にハムが鳴らなくなります。
HUM Noise
-10 〜
0〜
+10
※ 選ばれている Tone Type(P.62)によっては効果がありま
せん。
弾く強さによって発音のタイミングを変える
(Hammer Response)
パラメーター 設定値 解説
鍵盤を押した瞬間から発音するまでの時
Hammer
Response
-64 〜
0〜
+63
間を設定します。
0 からマイナス側に値を変えると、強く
弾いたときの発音のタイミングが遅くな
り、プラスに値を変えると、弱く弾いた
ときの発音のタイミングが遅くなりま
す。
666633
33
Page 64

音色を調節する(Pickup/Bell 画面)
fig.ARX-003.eps
Pickup/Bell 画面では、エレクトリック・ピアノの音色を調節
します。
44
666644
音の太さを調節する(Bar Angle)
典型的なエレクトリック・ピアノではトーンバーとタインと呼
ばれる金属片をハンマーで叩き、その振動をピックアップで拾
うことで音を出しています。そのようなピアノではトーンバー
とピックアップの角度を変えることで音色を調節できます。
トーンバーを持たないエレクトリック・ピアノでも同様な音色
変化を実現します。
パラメーター 設定値 解説
押さえる鍵盤の位置による Bar Angle パ
ラメーターの効果を設定します。値を大
きくすると、効果が大きくなります。プ
ラスの値にすると、高い鍵ほど Bar
Angle の変化が大きくなります。マイナ
スの値にすると、高い鍵ほど Bar Angle
の変化が小さくなります。
値を大きくすると、基本音が強調された、
太い音になります。
Key Follow
Bar Angle
-10 〜
0〜
+10
-10 〜
0〜
+10
アタックの音質を調節する(Bell/Thump)
アタックに含まれるコロコロした音(Bell)とハンマーのゴツ
ンとした音(Thump)のバランスを調節します。
パラメーター 設定値 解説
Bell/Thump
-10 〜
0〜
+10
0 からマイナス側に値を変えるとベル・
サウンドが強調され、プラスに値を変え
るとハンマー音が強調されます。
Page 65

音のニュアンスを調節する(Pickup Distance)
典型的なエレクトリック・ピアノはトーンバーの振動をピック
アップによって音に変換しています。このパラメーターを調節
すると、トーンバーとピックアップの距離を変える効果が得ら
れます。
トーンバーを持たないエレクトリック・ピアノでも同様な音色
変化を実現します。
パラメーター 設定値 解説
値を小さくすると、トーンバーとピック
アップの距離を離します。ダイナミクス
がつきやすくなります。値を大きくする
と、よりパワー感のある力強い音になり
ます。
Pickup
Distance
-2 〜
0〜
+2
ベルの音質を調節する(Bell Character)
アタックに含まれるベル・サウンドの質感を調節します。
パラメーター 設定値 解説
Bell Rust 0〜15
Bell
Character
-10 〜
0〜
+10
値を大きくすると、ベル・サウンドの高
域成分を減らします。
0 からマイナス側に値を変えると重い感
じに、プラス側に変えると軽い感じにな
ります。
666655
55
Page 66

エフェクトを選ぶ(MFX 画面)
fig.ARX-005.eps
エレクトリック・ピアノに、エフェクトをかけることができま
す。
選択しているエフェクトによって、設定できるパラメーターが
異なります。
MFX スイッチ(MFX Switch)
パラメーター 設定値 解説
MFX Switch OFF、ON MFX をオン/オフします。
66
666666
MFX タイプ(MFX Type)
※ 設定値の 「音符」について、詳しくは『音符について』
(P.76)を参照してください。
MFX00:THRU
エフェクトがかかりません。
MFX 01:EQUALIZER(イコライザー)
パラメーター 設定値 解説
Low Freq 200、400Hz 低域の基準周波数
Mid1 Freq
Mid2 Freq
High Freq
Low Gain -15 〜 +15dB 低域の増幅/減衰量
Mid1 Gain -15 〜 +15dB 中域 1 の増幅/減衰量
Mid2 Gain -15 〜 +15dB 中域 2 の増幅/減衰量
High Gain -15 〜 +15dB 高域の増幅/減衰量
Mid1 Q
Mid2 Q
Level 0〜127 出力音量
200
〜 8000Hz
200 〜
8000Hz
2000、4000、
8000Hz
0.5、1.0、2.0、
4.0、8.0
0.5、1.0、2.0、
4.0、8.0
中域 1 の基準周波数
中域 2 の基準周波数
高域の基準周波数
中域 1 の尖度
値を大きくするほど幅が狭くなりま
す。
中域 2 の尖度
値を大きくするほど幅が狭くなり
ます。
Page 67

MFX 02:SUPER FILTER(スーパー・フィルター)
パラメーター 設定値 解説
LPF、
Type
Slope
Cutoff 0 〜 127
Resonance 0 〜 127
Gain 0 〜 +12dB フィルター出力の増幅量
Mod Sw OFF、ON 周期的な変化のオン/オフ
Modulation
Wave
Sync OFF 、ON
Rate
Depth 0 〜 127 揺れの深さ
BPF、
HPF、
NOTCH
-12、
-24、
-36dB
TRI、
SQR、
SIN、
SAW1、
SAW2
0.05 〜
10.00Hz、
音符
フィルターの種類
各フィルターを通過する周波数
LPF:Cutoff 以下の周波数
BPF:Cutoff 付近の周波数
HPF:Cutoff 以上の周波数
NOTCH:Cutoff 付近以外の周波数
フィルターの傾き(減衰特性、1 オク
ターブあたりの減衰量)
-12dB:緩やか
-24dB:急峻
-36dB:非常に急峻
フィルターのカットオフ周波数
値を大きくするほど高い周波数にな
ります。
フィルターの共振レベル
値を大きくするほどカットオフ周波
数付近が強調されます。
カットオフ周波数の変化のしかた
TRI:三角波
SQR:矩形波
SIN:正弦波
SAW1:のこぎり波(上昇)
SAW2:のこぎり波(下降)
オンにするとテンポに同期
『音符について』(P.76)を参照。
揺れの周波数
パラメーター 設定値 解説
Attack 0 〜 127
Level 0 〜 127 出力音量
カットオフ周波数の変化の速さ
Modulation Wave が SQR、
SAW1、SAW2 の場合に効果があ
ります。
MFX 03:CHORUS(コーラス)
パラメーター 設定値 解説
1-PHASE、
Mode
Pre Delay
Sync OFF 、ON
Rate
Depth 0 〜 127 揺れの深さ
Phase
Balance
Level 0 〜 127 出力音量
2-PHASE、
3-PHASE、
6-PHASE
0.0 〜
100ms
0.05 〜
10.00Hz、
音符
0〜
180deg
D100:0W 〜
D0:100W
コーラスの段数
原音が鳴ってからコーラス音が鳴るまで
の遅延時間
オンにするとテンポに同期
『音符について』(P.76)を参照。
揺れの周波数
コーラス音の広がり具合
原音(D)とコーラス音(W)の音量バ
ランス
666677
77
Page 68

MFX 04:PHASER1(フェイザー 1) MFX 05:PHASER2(フェイザー 2)
パラメーター 設定値 解説
Resonance 0〜127 フィードバック量
Sync OFF、ON
Rate
Depth 0〜127 うねりの深さ
Low Gain
High Gain
Level 0〜127 出力音量
0.05 〜
10.00Hz、
音符
-15 〜
+15dB
-15 〜
+15dB
オンにするとテンポに同期
『音符について』(P.76) を参照。
揺れの周波数
低域の増幅/減衰量
高域の増幅/減衰量
パラメーター 設定値 説明
Mode
Manual 0〜127 音をうねらせる基準周波数
Resonance 0〜127 フィードバック量
Feedback
Mix 0〜127 位相をずらした音の音量
Sync OFF、ON
Rate
Depth 0〜127 うねりの深さ
Polarity
Low Gain
High Gain
Level 0〜127 出力音量
4-STAGE、
8-STAGE、
12-STAGE
-98 〜
+98%
0.05 〜
10.00Hz、
音符
INVERSE、
SYNCHRO
-15 〜
+15dB
-15 〜
+15dB
フェイザーの段数
フェイザー音を入力に戻す割合(マイナ
ス:逆相)
オンにするとテンポに同期
『音符について』(P.76)を参照。
うねりの周期
モジュレーションの左右の位相
INVERSE:左右逆相
モノ・ソースを使用したときに音の広
がりがでます。
SYNCHRO:左右同相
ステレオ・ソースを使用するときに選
びます。
低域の増幅/減衰量
高域の増幅/減衰量
666688
88
Page 69

MFX 06:FLANGER(フランジャー) MFX 07: DELAY(ディレイ)
パラメーター 設定値 解説
Pre Delay
Sync OFF 、ON
Rate
Depth 0 〜 127 揺れの深さ
Phase 0 〜 180deg フランジャー音の広がり具合
Feedback
Low Gain
High Gain
Balance
Level 0 〜 127 出力音量
0.0 〜
100ms
0.05 〜
10.00Hz、
音符
-98 〜
+98 %
-15 〜
+15dB
-15 〜
+15dB
D100:0W 〜
D0:100W
原音が鳴ってからフランジャー音が鳴る
までの遅延時間
オンにするとテンポに同期
『音符について』(P.76)を参照。
揺れの周波数
フランジャー音を入力に戻す割合(マイ
ナス:逆相)
低域の増幅/減衰量
高域の増幅/減衰量
原音(D)とフランジャー音(W)の音
量バランス
パラメーター 設定値 解説
Sync OFF 、ON
Delay Time
Acceleration 0〜15
Feedback
HF Damp
Low Gain
High Gain
Balance
Level 0 〜 127 出力音量
0〜
1300ms、
音符
-98 〜
+98 %
200 〜
8000Hz、
BYPASS
-15 〜
+15dB
-15 〜
+15dB
D100:0W 〜
D0:100W
オンにするとテンポに同期
『音符について』(P.76)を参照。
原音が鳴ってからディレイ音が鳴るまで
の遅延時間
ディレイ・タイムを変化させた場合、現
在のディレイ・タイムから指定のディレ
イ・タイムに達するまでの時間
ディレイ・タイムと同時にピッチ変
化の速さも変わります。
ディレイ音を再び入力に戻す割合(%)
プラスの値にすると正相で、マイナ
スの値にすると逆相で入力に戻され
ます。
入力に戻すディレイ音について、高域成
分をカットする周波数
カットしないときは BYPASS に設
定します。
低域の増幅/減衰量
高域の増幅/減衰量
原音(D)とディレイ音(W)の音量バ
ランス
666699
99
Page 70

MFX 08:REVERB(リバーブ) MFX 09:LINE DRIVE(ライン・ドライブ)
パラメーター 設定値 解説
ROOM1、
ROOM2、
Type
Pre Delay
Time 0〜127 リバーブ音の余韻の長さ
HF Damp
Low Gain
High Gain
Balance
Level 0〜127 出力音量
STAGE1、
STAGE2、
HALL1、
HALL2
0.0 〜
100ms
200 〜
8000Hz、
BYPASS
-15 〜
+15dB
-15 〜
+15dB
D100:0W 〜
D0:100W
ディレイの種類
ROOM1:余韻が短く高密度
ROOM2:余韻が短く低密度
STAGE1 :後部残響音多め
STAGE2 :初期反射強め
HALL1:澄んだ響き
HALL2:豊かな響き
原音が鳴ってからリバーブ音が鳴るまで
の遅延時間
リバーブ音の高域成分をカットする基準
周波数(BYPASS:カットしない)
低域の増幅/減衰量
高域の増幅/減衰量
原音(D)とリバーブ音(W)の音量バ
ランス
パラメーター 設定値 解説
Strength
Type 1、2 歪みのニュアンスを変えます。
Drive 0〜127
Low Gain
High Gain
Level 0〜127 出力音量
SOFT、
HARD
-15 〜
+15dB
-15 〜
+15dB
SOFT よりも HARD の方がより強い歪
みが得られます。
歪み具合を変えます。音量も変化しま
す。
低域の増幅/減衰量
高域の増幅/減衰量
※ 電気回路を軽くオーバーロードさせたときの歪みを再現しま
す。
MFX 10:COMPRESSOR(コンプレッサー)
パラメーター 設定値 解説
Attack 0〜127
Threshold 0〜127 圧縮を始める音量レベル
Post Gain 0 〜+18dB 出力する音のレベル
Low Gain
High Gain
Level 0〜127 出力音量
-15 〜
+15dB
-15 〜
+15dB
Threshold を超える入力があったとき
に、音量を圧縮するまでの時間
低域の増幅/減衰量
高域の増幅/減衰量
777700
00
Page 71

MFX 11:WAH(ワウ) MFX 12 :RING MODULATOR
パラメーター 設定値 解説
フィルターの種類
Filter Type LPF、BPF
Manual 0 〜 127
Peak 0 〜 127
Sens 0 〜 127
Control Type
Depth 0 〜 127 ワウ効果の揺れの深さ
Level 0 〜 127 出力音量
TOUCH、
PEDAL
LPF:広い周波数範囲でワウ効果が
得られます。
BPF:狭い周波数範囲でワウ効果が
得られます。
Control Type が「PEDAL」のとき、
このパラメーターで音色を変化させるこ
とができます。
ワウ効果のかかる周波数の幅
値を大きくするほど周波数帯の幅が狭く
なります。
Control Type が「TOUCH」のとき、
このパラメーターで音量による音色の変
化の感度が変わります。
エフェクトの制御方法
TOUCH:音量の変化に伴って音色が
変わります。
PEDAL:Manual パラメーター、ま
たはコントローラー・ナンバー 4
(CC#4)の MIDI メッセージを受信
すると音色が変わります。
(リング・モジュレーター)
パラメーター 設定値 解説
Frequency 0 〜 127 変調をかける周波数
Sens 0 〜 127 周波数の変調のかかり具合
Polarity UP、DOWN
Low Gain
High Gain
Balance
Level 0 〜 127 出力音量
-15 〜
+15dB
-15 〜
+15dB
D100:0W 〜
D0:100W
周波数の変調を動かす方向
UP:高い周波数方向
DOWN:低い周波数方向
低域の増幅/減衰量
高域の増幅/減衰量
原音(D)とエフェクト音(W)の音量
バランス
777711
11
Page 72

プリ・アンプの種類を選ぶ(Pre Amp 画面)
fig.ARX-006.eps
エレクトリック・ピアノのアンプを切り替えます。タイプとア
ンプの種類を組み合わせることで、定番の音色から、今までに
ない新しい音色まで作り出せます。
Pre Amp スイッチ(Pre Amp Switch)
パラメーター 設定値 解説
777722
Pre Amp
Switch
22
OFF、ON Pre Amp をオン/オフします。
Pre Amp のパラメーター
※ 設定値の 「音符」については、『音符について』(P.76)を
参照してください。
THRU
プリ・アンプを使用しません。
OLD
TINE EP(P.62)との組み合わせで、70 年代前半の定番エレ
クトリック・ピアノ・サウンドを再現します。
パラメーター 設定値 解説
Tremolo
Switch
Tremolo
Sync
Tremolo
Rate
Tremolo
Depth
Tremolo
Duty
Bass -50 〜 +50 低音の増幅/減衰量
Treble -50 〜 +50 高音の増幅/減衰量
Level 0〜127 出力音量
OFF、ON トレモロをオン/オフします。
OFF、ON
0.05 〜
10.00Hz、
音符
0〜127 トレモロのかかる深さ
-10 〜 +10
オンにするとテンポに同期します。
『音符について』(P.76)を参照。
トレモロのかかる周波数
トレモロをかける LFO 波形のデュー
ティーを設定します。値を大きくする
と、L チャンネルの LFO 波形のデュー
ティーが大きくなります。R チャンネル
は小さくなります。
Page 73

NEW
TINE EP(P.62)との組み合わせで、70 年代後半から 80 年
代前半の定番エレクトリック・ピアノ・サウンドを再現します。
パラメーター 設定値 解説
Tremolo
Switch
Tremolo
Sync
Tremolo
Rate
Tremolo
Depth
Tremolo
Duty
Bass -50 〜 +50 低音の増幅/減衰量
Treble -50 〜 +50 高音の増幅/減衰量
Level 0 〜 127 出力音量
OFF、ON トレモロをオン/オフします。
OFF、ON
0.05 〜
10.00Hz、
音符
0 〜 127 トレモロのかかる深さ
-10 〜 +10
オンにするとテンポに同期します。
『音符について』(P.76)を参照。
トレモロの周波数
トレモロをかける LFO 波形のデュー
ティーを設定します。値を大きくする
と、L チャンネルの LFO 波形のデュー
ティーが大きくなります。R チャンネル
は小さくなります。
DYNO
OLD や NEW を改造したアンプで、明るいサウンドと、強く弾
いたときの歪みが特徴的なアンプ・タイプです。TINE EP
(P.62)と組み合わせることにより、80 年代前半に多くのレ
コーディングで使われたエレクトリック・ピアノ・サウンドを
再現します。
パラメーター 設定値 解説
Tremolo
Switch
Tremolo
Sync
Tremolo
Rate
Tremolo
Depth
Tremolo
Shape
Bass Boost 0 〜 127 低音域の増幅/減衰量
Filter Curve 0 〜 127 中音域の増幅/減衰量
Over Tone 0 〜 127 高音域の増幅/減衰量
Limiter OFF、ON
Level 0 〜 127 出力音量
OFF、ON トレモロをオン/オフします。
OFF、ON
0.05 〜
10.00Hz、
音符
0 〜 127 トレモロのかかる深さ
0 〜 127
オンにするとテンポに同期します。
『音符について』(P.76)を参照。
トレモロのかかる周波数
トレモロの波形を調節します。値を 0 に
近づけると三角波に近くなり、値を
127 に近づけると矩形波に近くなりま
す。Tremolo Depth の設定によっても
効果が変わります。
リミッターをかけるか(オン)、かけな
いか(オフ)を選択
777733
33
Page 74

WURLY
REED EP(P.62)との組み合わせで、60 年代の定番エレク
トリック・ピアノ・サウンドを再現します。
パラメーター 設定値 解説
Vibrato
Switch
Vibrato
Sync
Vibrato Rate
Vibrato
Depth
Bass -50 〜 +50 低音の増幅/減衰量
Treble -50 〜 +50 高音の増幅/減衰量
Level 0〜127 出力音量
OFF、ON ビブラートをオン/オフします。
OFF、ON
0.05 〜
10.00Hz、
音符
0〜127 ビブラートのかかる深さ
オンにするとテンポに同期します。
『音符について』(P.76) を参照。
ビブラートのかかる周波数
STAGE
ステージ・ピアノでの演奏を再現します。
パラメーター 設定値 解説
Tremolo
Switch
Tremolo
Sync
Tremolo
Rate
Tremolo
Depth
Tremolo
Duty
Bass -50 〜 +50 低音の増幅/減衰量
Treble -50 〜 +50 高音の増幅/減衰量
Level 0〜127 出力音量
OFF、ON トレモロをオン/オフします。
OFF、ON
0.05 〜
10.00Hz、
音符
0〜127 トレモロのかかる深さ
-10 〜 +10
オンにするとテンポに同期します。
『音符について』(P.76)を参照。
トレモロのかかる周波数
トレモロをかける LFO 波形のデュー
ティーを設定します。値を大きくする
と、L チャンネルの LFO 波形のデュー
ティーが大きくなります。R チャンネル
は小さくなります。
777744
44
Page 75

スピーカーの種類を選ぶ
(Speaker 画面)
fig.ARX-007.eps
Speaker 画面では、スピーカーの種類を選びます。
パラメーター 設定値 解説
Speaker Switch OFF、ON
LINE
OLD
Speaker Type
NEW
WURLY
TWIN ギター・アンプのサウンドです。
スピーカーのオン、オフを切り替えま
す。
LINE OUT から出力されたサウンドで
す。
70 年代前半の定番エレクトリック・
ピアノのアンプです。
70 年代後半から 80 年代前半の定番
エレクトリック・ピアノのアンプで
す。
60 年代の定番エレクトリック・ピア
ノのアンプです。
パッチの初期化(Utility 画面)
Utility 画面では、パッチを初期化することができます。
初期化(Patch Init)を実行すると、カレント・パッチの設定
を標準の値にすることができます。
1 初期化したいパッチを選びます。
2 Utility 画面の Patch Init を選びます。
3 確認の画面が表示されたら、[F7(OK)]ボタンを
押します。
中止するときは、[F8(EXIT)]ボタンを押してください。
※ Fantom-G6/G7/G8 に取り付けている場合、Fantom-
G6/G7/G8 のファクトリー・リセットを実行すると、エク
スパンション・ボードが工場出荷時の設定になります。
777755
55
Page 76

777766
66
音符について
時間の代わりに音符の単位で指定し、テンポに同期させるこ
とができるパラメーターがあります(Rate や Delay Time
といったパラメーターが該当します)。このようなパラメー
ターには、値を音符で設定するか、あるいは数値で設定する
かを切り替える Sync スイッチがついています。
Rate(Delay Time)を数値で設定するときには、Sync ス
イッチをオフにします。また、音符で設定するときには、
Sync スイッチをオンにします。
設定値 意味
1/64T( ) 3 連 64 分音符
1/64( ) 64 分音符
1/32T( )
1/32( ) 32 分音符
1/16T( )
1/32.( ) 付点 32 分音符
1/16( )
1/8T( ) 3連8分音符
1/16.( ) 付点 16 分音符
1/8( )
1/4T( ) 3連4分音符
1/8.( )
1/4( ) 4 分音符
1/2T( )
1/4.( ) 付点 4 分音符
1/2( ) 2 分音符
1/1T( )
1/2.( ) 付点 2 分音符
1/1( )
2/1T( ) 3 連倍全音符
1/1.( )
2/1( ) 倍全音符
3 連 32 分音符
3 連 16 分音符
16 分音符
8 分音符
付点 8 分音符
3連2分音符
3 連全音符
全音符
付点全音符
Page 77

主な仕様
ARX-02 ELECTRIC PIANO
最大同時発音数 64 音(音源負荷に依存して変化)
パート数 1 パート
ユーザー・メモリー パッチ:50(プリロード・データ含む)
エフェクト
カスタマイズ機能
付属品
※ 製品の仕様および外観は、改良のため予告なく変更されることがあります。
MFX:1 系統(12 種類)
EQUALIZER
SUPER FILTER
CHORUS
PHASER1
PHASER2
FLANGER
DELAY
REVERB
LINE DRIVE
COMPRESSOR
WAH
RING MODULATOR
Condition
Bar Angle
Pickup Distance
Bell/Thump
Bell Character
Damper Noise
Key Off Resonance
HUM Noise
Hammer Response
Model Type
Speaker Type
など
取扱説明書
保証書
ローランド ユーザー登録カード
ドライバー
777777
77
Page 78

索引
777788
B
Bar Angle ......................................................... 64
Bell Character ................................................ 65
Bell Rust ........................................................... 65
Bell/Thump ......................................................64
C
CHORUS ..........................................................67
COMPRESSOR ............................................... 70
Condition .......................................................... 62
D
Damper Noise ................................................ 63
DELAY ............................................................... 69
DYNO ................................................................ 73
E
EQUALIZER ..................................................... 66
F
FLANGER .........................................................69
FM TINE ............................................................ 62
H
Hammer Response ....................................... 63
HUM Noise ...................................................... 63
K
Key Follow .......................................................64
Key Off Resonance ...................................... 63
88
L
LINE DRIVE ..................................................... 70
N
NEW ................................................................... 73
O
OLD .................................................................... 72
P
PATCH NAME ................................................ 61
PHASER1 ........................................................ 68
PHASER2 ........................................................ 68
Pickup Distance ............................................ 65
Pickup/Bell 画面 ............................................. 64
Pre Amp 画面 ................................................... 72
R
REED BELL ..................................................... 62
REED EP ..........................................................62
REED EP2 ....................................................... 62
REVERB ........................................................... 70
RING MODULATOR ...................................... 71
Page 79

S
SA EP1 ............................................................. 62
SA EP2 ............................................................. 62
Speaker 画面 ................................................... 75
STAGE .............................................................. 74
SUPER FILTER .............................................. 67
SuperNATURAL ............................................. 57
T
THRU ....................................................... 66、72
TINE EP ............................................................ 62
TINE EP2 .........................................................62
Tone Type ........................................................62
Type/Level 画面 .............................................. 62
U
Utility 画面 ........................................................ 75
W
WAH .................................................................. 71
WURLY ............................................................. 74
い
イコライザー ..................................................... 66
インストール ..................................................... 55
お
音符 ..................................................................... 76
き
基板ホルダー ..................................................... 53
こ
コーラス .............................................................. 67
コンプレッサー .................................................. 70
し
初期化 ................................................................. 75
す
スーパー・フィルター ...................................... 67
スピーカー .......................................................... 75
スロット .............................................................. 52
せ
選択 ..................................................................... 61
た
タイプ ................................................................. 62
ダンパー・ノイズ .............................................. 63
て
ディレイ .............................................................. 69
と
トーンバー .......................................................... 64
の
ノイズ ................................................................. 63
777799
99
Page 80

は
パッチ
初期化 ......................................................... 75
選択 ............................................................. 61
保存 ............................................................. 61
ハンマー ............................................................. 64
ひ
ピックアップ ...................................................... 65
ふ
フェイザー 1 ...................................................... 68
フェイザー 2 ...................................................... 68
フランジャー ...................................................... 69
プリ・アンプ ...................................................... 72
へ
ベル ..................................................................... 65
ほ
保存 ..................................................................... 61
ら
ライン・ドライブ .............................................. 70
り
リバーブ ............................................................. 70
リング・モジュレーター .................................. 71
わ
ワウ ..................................................................... 71
888800
00
Page 81

お問い合わせの窓口
製品に関するお問い合わせ先
ローランドお客様相談センター
電話受付時間: 月曜日〜土曜日 10:00〜17:30(年末年始を除く)
※IP電話からおかけになって繋がらない場合には、お手数ですが、電話番号の前に0000
(ゼロ4回)をつけてNTTの一般回線からおかけいただくか、携帯電話をご利用ください。
※上記窓口の名称、電話番号等は、予告なく変更することがありますのでご了承ください。
050-3101-2555
最新サポート情報
製品情報、イベント/キャンペーン情報、サポートに関する情報など
ローランド・ホームページ
http://www.roland.co.jp/
'07.10.01現在(Roland)
Page 82

Page 83

Page 84

*04908101 -01 *
04908101 08-03-1N
 Loading...