

Page 1
Owner’s Manual
Before using this unit, carefully read the sections entitled: “USING THE UNIT
SAFELY” and “IMPORTANT NOTES” (Page 8–10; Page 11–12). These sections
provide important information concerning the proper operation of the unit.
Additionally, in order to feel assured that you have gained a good grasp of
every feature provided by your new unit, Owner’s Manual should be read in
its entirety. The manual should be saved and kept on hand as a convenient
reference.
Copyright © 2010 ROLAND CORPORATION
All rights reserved. No part of this publication may be reproduced in any form
without the written permission of ROLAND CORPORATION.
Roland is a registered trademark of Roland Corporation in the United States and/or
other
countries.
Selecting English, German, French, Italian, Spanish, or Japanese as the operating language.
☞
Page 120
Page 2

For the U.K.
IMPORTANT: THE WIRES IN THIS MAINS LEAD ARE COLOURED IN ACCORDANCE WITH THE FOLLOWING CODE.
BLUE:
BROWN:
NEUTRAL
LIVE
As the colours of the wires in the mains lead of this apparatus may not correspond with the coloured markings identifying
the terminals in your plug, proceed as follows:
The wire which is coloured BLUE must be connected to the terminal which is marked with the letter N or coloured BLACK.
The wire which is coloured BROWN must be connected to the terminal which is marked with the letter L or coloured RED.
Under no circumstances must either of the above wires be connected to the earth terminal of a three pin plug.
Page 3
Advanced UsesRecording Listening Deleting Creating a CD Editing an SD Appendices
Convenient
Functions
Information
/ Display
Checking /
Preparations
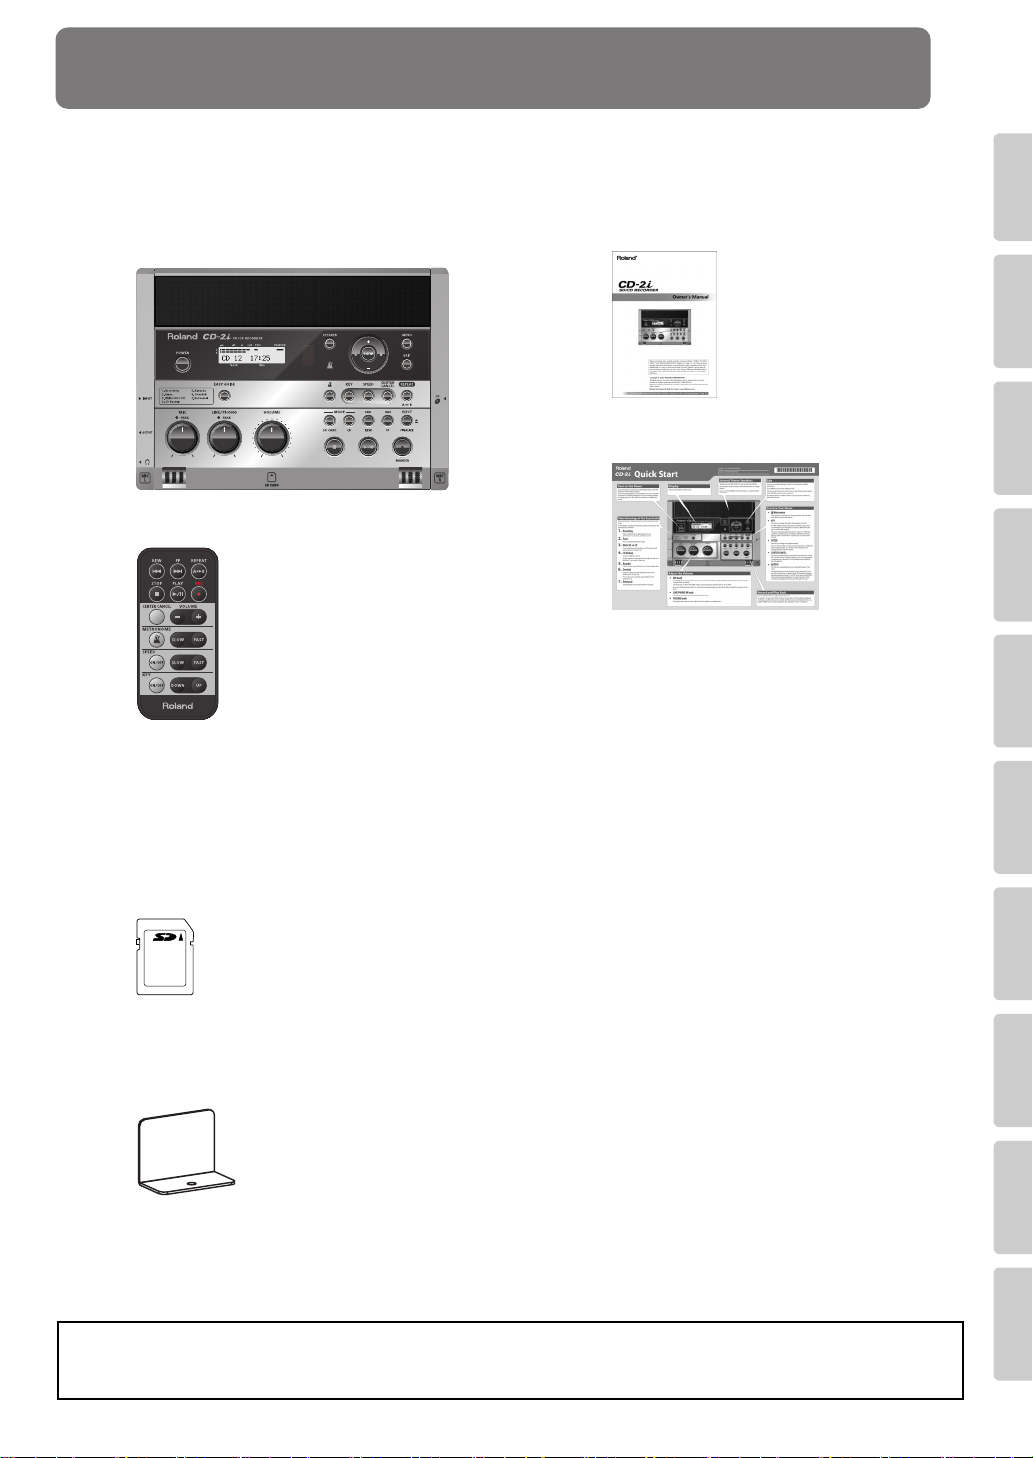
Check the Included Items
The CD-2i includes the following items. Please take a moment to confirm that all of these items have
been included with the CD-2i. If you find that any item is missing, contact the nearest authorized
Roland distributor in your country.
CD-2i
❍
Remote controller
❍
Owner’s Manual
❍
❍
Quick Start
❍
AC Adaptor/Power cord
* The shape of the power cord’s plug varies
depending on the country.
❍
SD memory card
* The SD memory card contains sample
songs.
Blank CD-R disc
❍
❍
SD memory card Protector
* Use of the sample songs on the
without the permission of the copyright holder is prohibited by law. Additionally, this data must not be copied, nor used
in a secondary copyrighted work without the permission of the copyright holder.
included
SD memory card for any purpose other than private, personal enjoyment
Page 4

Table of Contents
USING THE UNIT SAFELY............................................................................. 8
Checking
and
Preparations
Recording
to SD/CD-R/CD-RW
IMPORTANT NOTES................................................................................... 11
Panel Descriptions ..................................................................................... 13
Recordable Media and Functionality......................................................... 19
Turning the Power On and Off.................................................................. 21
Preparing an SD Memory Card ................................................................. 25
Preparing a CD........................................................................................... 28
Preparing the Remote Control .................................................................. 30
Menu Operations ....................................................................................... 32
About Easy Guide....................................................................................... 36
Setting Items in Easy Guide....................................................................... 37
Recording Acoustic Instruments or Vocals................................................ 40
Recording an Electronic Instrument.......................................................... 49
Recording a Cassette or MD...................................................................... 52
Recording a record .................................................................................... 55
Recording Karaoke..................................................................................... 58
Layering your Performance onto an SD Memory Card
Convenient Functions for Recording......................................................... 64
Using the Dedicated AC Adaptor .......................................................................... 21
Using Batteries...................................................................................................... 23
Replacing the Remote Control’s Battery................................................................ 30
Using the Remote Control .................................................................................... 30
Recording with the Internal Mics .......................................................................... 40
Connecting an External Mic for Recording............................................................ 44
Song and Recording It........ 61
Automatically Starting Recording When Audio is Detected ...................................64
Assigning Song Numbers While Recording (Marker)............................................. 66
Preventing Loud Sounds from Distorting (Limiter) ................................................ 69
Inserting a Count Before Recording Begins (Count-in) .......................................... 70
Listening
Convenient Functions
for practicing
4
Listening to a CD/Listening to an SD Memory Card ................................ 72
Convenient Functions for Playback ........................................................... 74
Adjusting the Tone (Bass/Treble) ..........................................................................74
Adding Reverberation (Reverb) ............................................................................. 75
Muting the Sound of the Speakers........................................................................ 76
Changing the Key of the Playback ............................................................ 77
Making Fine Adjustments to the Playback Pitch (Pitch)........................... 78
Slowing Down or Speeding Up Playback .................................................. 79
Enjoying Simple Karaoke (Center Cancel) ................................................ 80
Repeatedly Playing Tracks (1 Track/All Repeat) ....................................... 81
Repeatedly playing a portion of the song (A/B Repeat) .......................... 82
Sounding the Metronome ......................................................................... 83
Tuning Your Instrument (Tuner Function)................................................ 85
Changing the Tuner’s Reference Pitch ..................................................................86
Listening to a Guide Tone While Tuning ............................................................... 87
Page 5
Advanced UsesRecording Listening Deleting Creating a CD Editing an SD Appendices
Convenient
Functions
Information
/ Display
Checking /
Preparations
Deleting
Creating a CD
Editing
an SD memory card
Table of Contents
(continued)
Deleting Songs from an SD Memory Card................................................ 88
Deleting Songs Individually .................................................................................. 88
Erasing All Tracks .................................................................................................. 89
Deleting an Unwanted Region at the Beginning of the Song (Trim In).................. 90
Deleting an Unwanted Region at the End of the Song (Trim Out)......................... 92
Erasing Tracks from a CD-RW Disc ............................................................ 94
Deleting One Song at a Time (Only the Last Song)............................................... 94
Erasing All Tracks .................................................................................................. 95
Removing Finalization........................................................................................... 96
Selecting Songs from an SD Memory Card to Create a CD...................... 97
Making a music CD from a song recorded on a device such as the
Roland R-09 series.... 101
Making a CD-R/RW Disc for Playback on Another CD Player (Finalize). 102
Creating a Duplicate of an Original Music CD (Backup)......................... 103
Moving a Song......................................................................................... 106
Dividing a Track ....................................................................................... 107
Joining Songs ........................................................................................... 109
Maximizing the Volume of a Song .......................................................... 110
Creating a Copy of a Song in a New Key ................................................ 111
Creating a Copy of a Song in a New Pitch .............................................. 112
Creating a Copy of a Song at a New Playback Speed............................. 113
Creating a Copy of a Song with the Center Cancelled ........................... 114
Viewing Information
Screen Display
Advanced Uses
Appendices
and
Viewing the Remaining Recording/Playback Time ................................. 115
Viewing Information about an SD Memory Card ................................... 116
Viewing Information about a CD-R/RW Disc .......................................... 117
Adjusting the Readability of the Screen (Contrast)................................ 118
Automatically Dimming the Screen (Backlight Timer) ........................... 119
Changing the Screen Display Language ................................................. 120
Returning the Menu Settings to their Factory-Set Condition
(Factory Reset) ............ 121
Formatting an SD Memory Card ............................................................. 122
Adjusting the Left/Right Volume Balance of the Internal Mics.............. 123
Reversing the Stereo Field of the Internal Mics ...................................... 124
Connecting External Speakers................................................................. 126
Troubleshooting ...................................................................................... 128
Messages .................................................................................................. 135
Specifications ...........................................................................................137
Index ........................................................................................................ 138
Information .............................................................................................. 141
5
Page 6
List of Common Tasks
Recording
●
Automatically start new songs at silent spaces when
recording from a cassette or MD
●
Automatically start recording when a performance begins
●
Let the CD-2i adjust the input level
●
Sound a count before recording begins
●
Record your vocal along with karaoke backing
●
Overdub-record
●
Make a well-balanced recording of an ensemble
☞
Page 68
☞
Page 64
(Automatically Recording)
☞
Page 43
☞
Page 70
Page 58
☞
Page 61
☞
Page 123
☞
(Internal Mics Balance)
(Auto Marker)
(Auto Level)
(Count-in)
(Overdubbing)
(Overdubbing)
●
Record without distortion
●
Return a CD-RW disc to a recordable state
●
Check how much recording time is left
●
Check the capacity of the currently inserted SD memory card
●
Check the capacity of the currently inserted CD-R/RW disc
Deleting
●
Delete a song from an SD memory card
●
Delete a song from a CD-RW disc
●
Delete unwanted silence before or after a song
Page 69
☞
☞
Page 96
☞
Page 115
☞
Page 116
☞
Page 117
☞
Page 88
Page 89
☞
☞
Page 94
☞
Page 95
Page 90
☞
☞
Page 92
(Limiter)
(Unfinalize)
(Remaining Time)
(Card Information)
(Disc Information)
(One Track)
(All Tracks)
(Last Track)
(All Tracks)
(Trim In)
(Trim Out)
●
Protect an important song from accidental erasure
6
☞
Page 26
(Protect Switch)
Page 7
Advanced UsesRecording Listening Deleting Creating a CD Editing an SD Appendices
Convenient
Functions
Information
/ Display
Checking /
Preparations
Listening
●
●
●
●
●
●
●
Listen to the same phrase repeatedly
Listen to a song repeatedly
Listen to a song at different speeds
Use a commercial music CD for karaoke
Resume playback where you last stopped
Apply reverb
Boost a softly recorded song to maximum volume
List of Common Tasks
Page 82
☞
☞
Page 81
Page 79
☞
☞
Page 80
☞
Page 73
Page 75
☞
☞
Page 110
(A-B Repeat)
(Repeat)
(Speed)
(Center Cancel)
(Resume)
(Reverb)
(Normalize)
(continued)
Creating a CD
●
Make a duplicate of an original music CD you created
●
Complete a CD
Others
●
Use the CD-2i where there’s no AC power
●
Extend battery life
●
Connect speakers to listen
●
Restore the CD-2i to its factory-set condition
●
Change the metronome’s sound or tempo
●
Tune your instrument
Page 103
☞
☞
Page 102
Page 23
☞
☞
Page 119
Page 126
☞
☞
Page 121
☞
Page 78
Page 85
☞
(Backup)
(Finalize)
(Batteries)
(Backlight Timer)
(External Speakers)
(Factory Reset)
(Metronome)
(Tuner)
●
Use the remote controller
☞
Page 30
(Remote Control)
7
Page 8
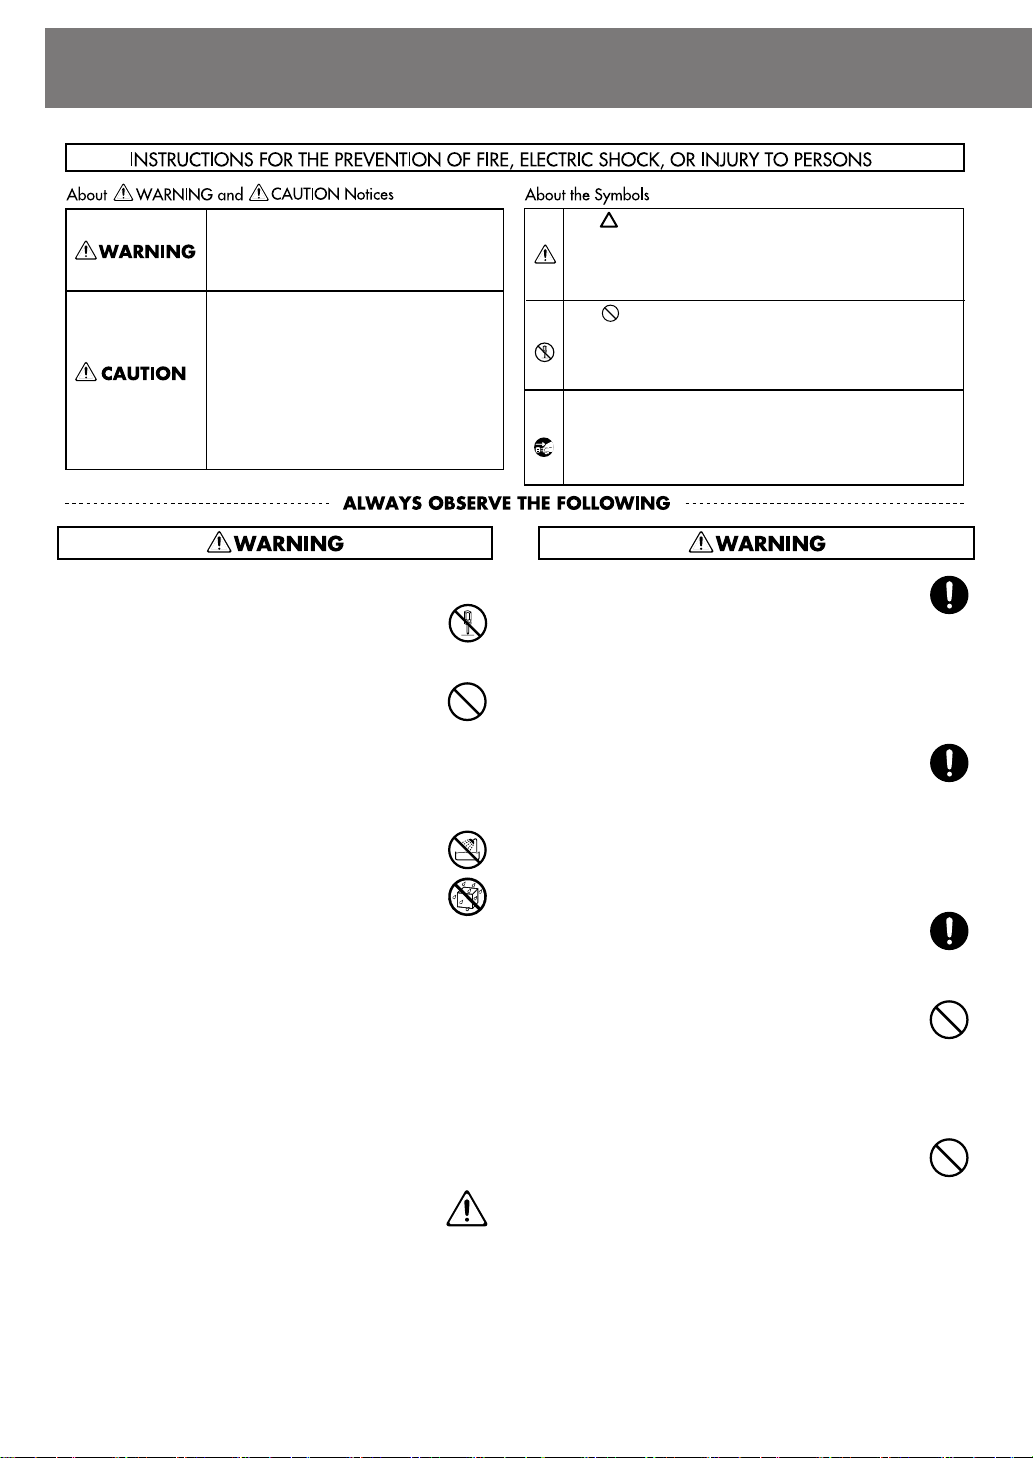
USING THE UNIT SAFELY
Used for instructions intended to alert
the user to the risk of death or severe
injury should the unit be used
improperly.
Used for instructions intended to alert
the user to the risk of injury or material
damage should the unit be used
improperly.
* Material damage refers to damage or
other adverse effects caused with
respect to the home and all its
furnishings, as well to domestic
animals or pets.
....................................................................................
002c
●
Do not open (or modify in any way) the unit or its
AC adaptor.
....................................................................................
003
●
Do not attempt to repair the unit, or replace parts
within it (except when this manual provides
specific instructions directing you to do so). Refer
all servicing to your retailer, the nearest Roland
Service Center, or an authorized Roland
distributor, as listed on the “Information” page.
....................................................................................
004
●
Never install the unit in any of the following
locations.
❍
Subject to temperature extremes (e.g., direct
sunlight in an enclosed vehicle, near a heating
duct, on top of heat-generating equipment); or
are
❍
Damp (e.g., baths, washrooms, on wet floors);
or are
❍
Exposed to steam or smoke; or are
❍
Subject to salt exposure; or are
❍
Humid; or are
❍
Exposed to rain; or are
❍
Dusty or sandy; or are
❍
Subject to high levels of vibration and
shakiness.
....................................................................................
005
●
This unit should be used only with the SS-PC1
mounting bracket that is recommended by
Roland.
....................................................................................
The symbol alerts the user to important instructions
or warnings.The specific meaning of the symbol is
determined by the design contained within the
triangle. In the case of the symbol at left, it is used for
general cautions, warnings, or alerts to danger.
The symbol alerts the user to items that must never
be carried out (are forbidden). The specific thing that
must not be done is indicated by the design contained
within the circle. In the case of the symbol at left, it
means that the unit must never be disassembled.
The ● symbol alerts the user to things that must be
carried out. The specific thing that must be done is
indicated by the design contained within the circle. In
the case of the symbol at left, it means that the powercord plug must be unplugged from the outlet.
006
●
When using the unit with a SS-PC1 recommended
by Roland, the SS-PC1 must be carefully placed so
it is level and sure to remain stable. If not using a
SS-PC1, you still need to make sure that any
location you choose for placing the unit provides
a level surface that will properly support the unit,
and keep it from wobbling.
...................................................................................
008c
●
Be sure to use only the AC adaptor supplied with
the unit. Also, make sure the line voltage at the
installation matches the input voltage specified on
the AC adaptor’s body. Other AC adaptors may
use a different polarity, or be designed for a
different voltage, so their use could result in
damage, malfunction, or electric shock.
...................................................................................
008e
●
Use only the attached power-supply cord. Also,
the supplied power cord must not be used with
any other device.
...................................................................................
009
●
Do not excessively twist or bend the power cord,
nor place heavy objects on it. Doing so can
damage the cord, producing severed elements
and short circuits. Damaged cords are fire and
shock hazards!
...................................................................................
010
●
This unit, either alone or in combination with an
amplifier and headphones or speakers, may be
capable of producing sound levels that could
cause permanent hearing loss. Do not operate for
a long period of time at a high volume level, or at
a level that is uncomfortable. If you experience
any hearing loss or ringing in the ears, you should
immediately stop using the unit, and consult an
audiologist.
...................................................................................
8
Page 9
USING THE UNIT SAFELY
Advanced UsesRecording Listening Deleting Creating a CD Editing an SD Appendices
Convenient
Functions
Information
/ Display
Checking /
Preparations
(continued)
011
●
Do not allow any objects (e.g., flammable
material, coins, pins); or liquids of any kind (water,
soft drinks, etc.) to penetrate the unit.
....................................................................................
012b
●
Immediately turn the power off, remove the AC
adaptor from the outlet, and request servicing by
your retailer, the nearest Roland Service Center, or
an authorized Roland distributor, as listed on the
“Information” page when:
❍
The AC adaptor, the power-supply cord, or the
plug has been damaged; or
❍
If smoke or unusual odor occurs
❍
Objects have fallen into, or liquid has been
spilled onto the unit; or
❍
The unit has been exposed to rain (or
otherwise has become wet); or
❍
The unit does not appear to operate normally
or exhibits a marked change in performance.
....................................................................................
013
●
In households with small children, an adult should
provide supervision until the child is capable of
following all the rules essential for the safe
operation of the unit.
....................................................................................
014
●
Protect the unit from strong impact.
(Do not drop it!)
....................................................................................
015
●
Do not force the unit’s power-supply cord to
share an outlet with an unreasonable number of
other devices. Be especially careful when using
extension cords—the total power used by all
devices you have connected to the extension
cord’s outlet must never exceed the power rating
(watts/amperes) for the extension cord. Excessive
loads can cause the insulation on the cord to heat
up and eventually melt through.
....................................................................................
016
●
Before using the unit in a foreign country, consult
with your retailer, the nearest Roland Service
Center, or an authorized Roland distributor, as
listed on the “Information” page.
....................................................................................
019
●
Batteries must never be recharged, heated, taken
apart, or thrown into fire or water.
....................................................................................
020
●
Keep lithium batteries out of reach of small
children. If a child has accidentally swallowed a
battery, see a doctor immediately.
....................................................................................
021
●
Lithium batteries must never be recharged,
heated, taken apart, or thrown into a fire or water.
027
●
Never expose batteries for CD-2i and Remote
controller to excessive heat such as sunshine, fire
or the like.
...................................................................................
028
●
Incorrect handling of batteries, rechargeable
batteries, or a battery charger can cause leakage,
overheating, fire, or explosion. Before use, you
must read and strictly observe all of the precautions that
accompany the batteries, rechargeable batteries, or
battery charger.
...................................................................................
101b
●
The unit and the AC adaptor should be located so
their location or position does not interfere with
their proper ventilation.
...................................................................................
102c
●
Always grasp only the plug on the AC adaptor
cord when plugging into, or unplugging from, an
outlet or this unit.
...................................................................................
103b
●
At regular intervals, you should unplug the AC
adaptor and clean it by using a dry cloth to wipe
all dust and other accumulations away from its
prongs. Also, disconnect the power plug from the
power outlet whenever the unit is to remain
unused for an extended period of time. Any
accumulation of dust between the power plug
and the power outlet can result in poor insulation
and lead to fire.
...................................................................................
104
●
Try to prevent cords and cables from becoming
entangled. Also, all cords and cables should be
placed so they are out of the reach of children.
...................................................................................
106
●
Never climb on top of, nor place heavy objects on
the unit.
...................................................................................
107c
●
Never handle the AC adaptor or its plugs with wet
hands when plugging into, or unplugging from,
an outlet or this unit.
...................................................................................
108b
●
Before moving the unit, disconnect the AC
adaptor and all cords coming from external
devices.
...................................................................................
109b
●
Before cleaning the unit, turn off the power and
unplug the AC adaptor from the outlet (p. 21).
...................................................................................
110b
●
Whenever you suspect the possibility of lightning
in your area, disconnect the AC adaptor from the
outlet.
...................................................................................
9
Page 10
USING THE UNIT SAFELY
(continued)
111: Selection
●
If used improperly, batteries may explode or leak
and cause damage or injury. In the interest of
safety, please read and observe the following
precautions (p. 23).
1
❍
Carefully follow the installation instructions for
batteries, and make sure you observe the
correct polarity.
2
❍
Avoid using new batteries together with used
ones. In addition, avoid mixing different types
of batteries.
3
❍
Remove the batteries whenever the unit is to
remain unused for an extended period of time.
5
❍
If a battery has leaked, use a soft piece of cloth
or paper towel to wipe all remnants of the
discharge from the battery compartment. Then
install new batteries. To avoid inflammation of
the skin, make sure that none of the battery
discharge gets onto your hands or skin.
Exercise the utmost caution so that none of the
discharge gets near your eyes. Immediately
rinse the affected area with running water if
any of the discharge has entered the eyes.
6
❍
Never keep batteries together with metallic
objects such as ballpoint pens, necklaces,
hairpins, etc.
....................................................................................
112
●
Used batteries must be disposed of in compliance
with whatever regulations for their safe disposal
that may be observed in the region in which you
live.
....................................................................................
113
●
Use only the specified type (model no. CR2025) of
lithium battery (p. 30). Be sure to insert it as
directed (to ensure correct polarity).
....................................................................................
114
●
Used lithium batteries must be disposed of in
compliance with whatever regulations for their
safe disposal that may be observed in the region
in which you live.
....................................................................................
118c
●
Keep ground terminal screw, lithium batteries for
the remote, the battery cover, and attachment
screw for SD memory card protector you may
remove and the included
SD memory card protector
SD memory card, and
in a safe place out
●
of children’s reach, so there is no chance of them
being swallowed accidentally.
....................................................................................
120
Always turn the phantom power off when
connecting any device other than condenser
microphones that require phantom power. You
risk causing damage if you mistakenly supply
phantom power to dynamic microphones, audio
playback devices, or other devices that don’t
require such power. Be sure to check the specifications of any microphone you intend to use by
referring to the manual that came with it.
(This instrument’s phantom power: 48 V DC, 10
mA Max)
...................................................................................
10
Page 11

Advanced UsesRecording Listening Deleting Creating a CD Editing an SD Appendices
Convenient
Functions
Information
/ Display
Checking /
Preparations
IMPORTANT NOTES
Power Supply: Use of Batteries
301
●
302
●
303a
●
304a
●
306a
●
307
●
330
●
Do not connect this unit to same electrical outlet that is
being used by an electrical appliance that is controlled by
an inverter (such as a refrigerator, washing machine,
microwave oven, or air conditioner), or that contains a
motor. Depending on the way in which the electrical
appliance is used, power supply noise may cause this unit
to malfunction or may produce audible noise. If it is not
practical to use a separate electrical outlet, connect a
power supply noise filter between this unit and the
electrical outlet.
The AC adaptor will begin to generate heat after long
hours of consecutive use. This is normal, and is not a
cause for concern.
The use of an AC adaptor is recommended as the unit’s
power consumption is relatively high. Should you prefer
to use batteries, please use the alkaline type or Nickelhydride type.
When installing or replacing batteries, always turn off the
power on this unit and disconnect any other devices you
may have connected. This way, you can prevent
malfunction and/or damage to speakers or other devices.
A battery was installed in the unit before it left the factory.
The life of this battery may be limited, however, since its
primary purpose was to enable testing.
Before connecting this unit to other devices, turn off the
power to all units. This will help prevent malfunctions
and/or damage to speakers or other devices.
Even if batteries are installed, the power will turn off if you
connect or disconnect the power cord from the AC outlet
while the power is turned on, or if you connect or
disconnect the AC adaptor from the product. When this
occurs, unsaved data may be lost. You must turn off the
power before you connect or disconnect the power cord
or AC adaptor.
354a
●
Do not expose the unit to direct sunlight, place it near
devices that radiate heat, leave it inside an enclosed
vehicle, or otherwise subject it to temperature extremes.
Excessive heat can deform or discolor the unit.
355b
●
When moved from one location to another where the
temperature and/or humidity is very different, water
droplets (condensation) may form inside the unit.
Damage or malfunction may result if you attempt to use
the unit in this condition. Therefore, before using the unit,
you must allow it to stand for several hours, until the
condensation has completely evaporated.
360
●
Depending on the material and temperature of the
surface on which you place the unit, its rubber feet may
discolor or mar the surface.
You can place a piece of felt or cloth under the rubber feet
to prevent this from happening. If you do so, please make
sure that the unit will not slip or move accidentally.
Maintenance
401a
●
For everyday cleaning wipe the unit with a soft, dry cloth
or one that has been slightly dampened with water. To
remove stubborn dirt, use a cloth impregnated with a
mild, non-abrasive detergent. Afterwards, be sure to wipe
the unit thoroughly with a soft, dry cloth.
402
●
Never use benzine, thinners, alcohol or solvents of any
kind, to avoid the possibility of discoloration and/or
deformation.
Repairs and Data
452
●
Please be aware that all data contained in the unit’s
memory may be lost when the unit is sent for repairs.
Important data should always be written down on paper
(when possible). During repairs, due care is taken to avoid
the loss of data. However, in certain cases (such as when
circuitry related to memory itself is out of order), we
regret that it may not be possible to restore the data, and
Roland assumes no liability concerning such loss of data.
351
●
352a
●
352b
●
Placement
Using the unit near power amplifiers (or other equipment
containing large power transformers) may induce hum.
To alleviate the problem, change the orientation of this
unit; or move it farther away from the source of
interference.
This device may interfere with radio and television
reception. Do not use this device in the vicinity of such
receivers.
Noise may be produced if wireless communications
devices, such as cell phones, are operated in the vicinity of
this unit. Such noise could occur when receiving or
initiating a call, or while conversing. Should you
experience such problems, you should relocate such
wireless devices so they are at a greater distance from this
unit, or switch them off.
Additional Precautions
551
●
Please be aware that the contents of memory can be
irretrievably lost as a result of a malfunction, or the
improper operation of the unit. To protect yourself against
the risk of loosing important data, we recommend that
you write down important data you have stored in the
unit’s memory on paper.
552
●
Unfortunately, it may be impossible to restore the
contents of data that was stored SD memory card, CD, or
in the unit’s memory once it has been lost. Roland
Corporation assumes no liability concerning such loss of
data.
553
●
Use a reasonable amount of care when using the unit’s
buttons, sliders, or other controls; and when using its jacks
and connectors. Rough handling can lead to
malfunctions.
554
●
Never strike or apply strong pressure to the display.
11
Page 12
IMPORTANT NOTES
(continued)
556
●
When connecting / disconnecting all cables, grasp the
connector itself—never pull on the cable. This way you
will avoid causing shorts, or damage to the cable’s internal
elements.
558a
●
To avoid disturbing your neighbors, try to keep the unit’s
volume at reasonable levels. You may prefer to use
headphones, so you do not need to be concerned about
those around you (especially when it is late at night).
559a
●
When you need to transport the unit, package it in the
box (including padding) that it came in, if possible.
Otherwise, you will need to use equivalent packaging
materials.
562
●
Some connection cables contain resistors. Do not use
cables that incorporate resistors for connecting to this
unit. The use of such cables can cause the sound level to
be extremely low, or impossible to hear. For information
on cable specifications, contact the manufacturer of the
cable.
985
●
The explanations in this manual include illustrations that
depict what should typically be shown by the display.
Note, however, that your unit may incorporate a newer,
enhanced version of the system (e.g., includes newer
sounds), so what you actually see in the display may not
always match what appears in the manual.
Handling the CD-R/RW Drive
602
●
Install the unit on a solid, level surface in an area free from
vibration.
603
●
Avoid using the unit immediately after it has been moved
to a location with a level of humidity that is greatly
different than its former location. Rapid changes in the
environment can cause condensation to form inside the
drive, which will adversely affect the operation of the drive
and/or damage CDs. When the unit has been moved,
allow it to become accustomed to the new environment
(allow a few hours) before operating it.
❍
Do not touch or allow metal to come into contact with
the contact portion of the cards.
❍
Do not bend, drop, or subject cards to strong shock or
vibration.
❍
Do not keep cards in direct sunlight, in closed vehicles,
or other such locations.
❍
Do not allow cards to become wet.
❍
Do not disassemble or modify the cards.
Handling CD-ROMs
801
●
Avoid touching or scratching the shiny underside
(encoded surface) of the disc. Damaged or dirty CD-ROM
discs may not be read properly. Keep your discs clean
using a commercially available CD cleaner.
Copyright
851
●
Recording, duplication, distribution, sale, lease,
performance, or broadcast of copyrighted material
(musical works, visual works, broadcasts, live
performances, etc.) belonging to a third party in part or in
whole without the permission of the copyright owner is
forbidden by law.
852
●
This product can be used to record or duplicate audio or
visual material without being limited by certain
technological copy-protection measures. This is due to the
fact that this product is intended to be used for the
purpose of producing original music or video material,
and is therefore designed so that material that does not
infringe copyrights belonging to others (for example, your
own original works) can be recorded or duplicated freely.
853
●
Do not use this unit for purposes that could infringe on a
copyright held by a third party. We assume no
responsibility whatsoever with regard to any
infringements of third-party copyrights arising through
your use of this unit.
Handling SD memory cards
704
●
Carefully insert the SD memory card all the way in—until
it is firmly in place.
Printed surface
upward
705
●
Never touch the terminals of the SD memory card. Also,
avoid getting the terminals dirty.
708
●
SD memory cards are constructed using precision
components; handle the cards carefully, paying particular
note to the following.
❍
To prevent damage to the cards from static electricity,
be sure to discharge any static electricity from your
own body before handling the cards.
12
SD card slot
220
* All product names mentioned in this document are
trademarks or registered trademarks of their respective
owners.
236
* Fugue © 1999-2010 Kyoto Software Research, Inc. All
rights reserved.
239
* The SD logo ( ) and SDHC logo ( ) are
trademarks.
Page 13
Advanced UsesRecording Listening Deleting Creating a CD Editing an SD Appendices
Convenient
Functions
Information
/ Display
Checking /
Preparations
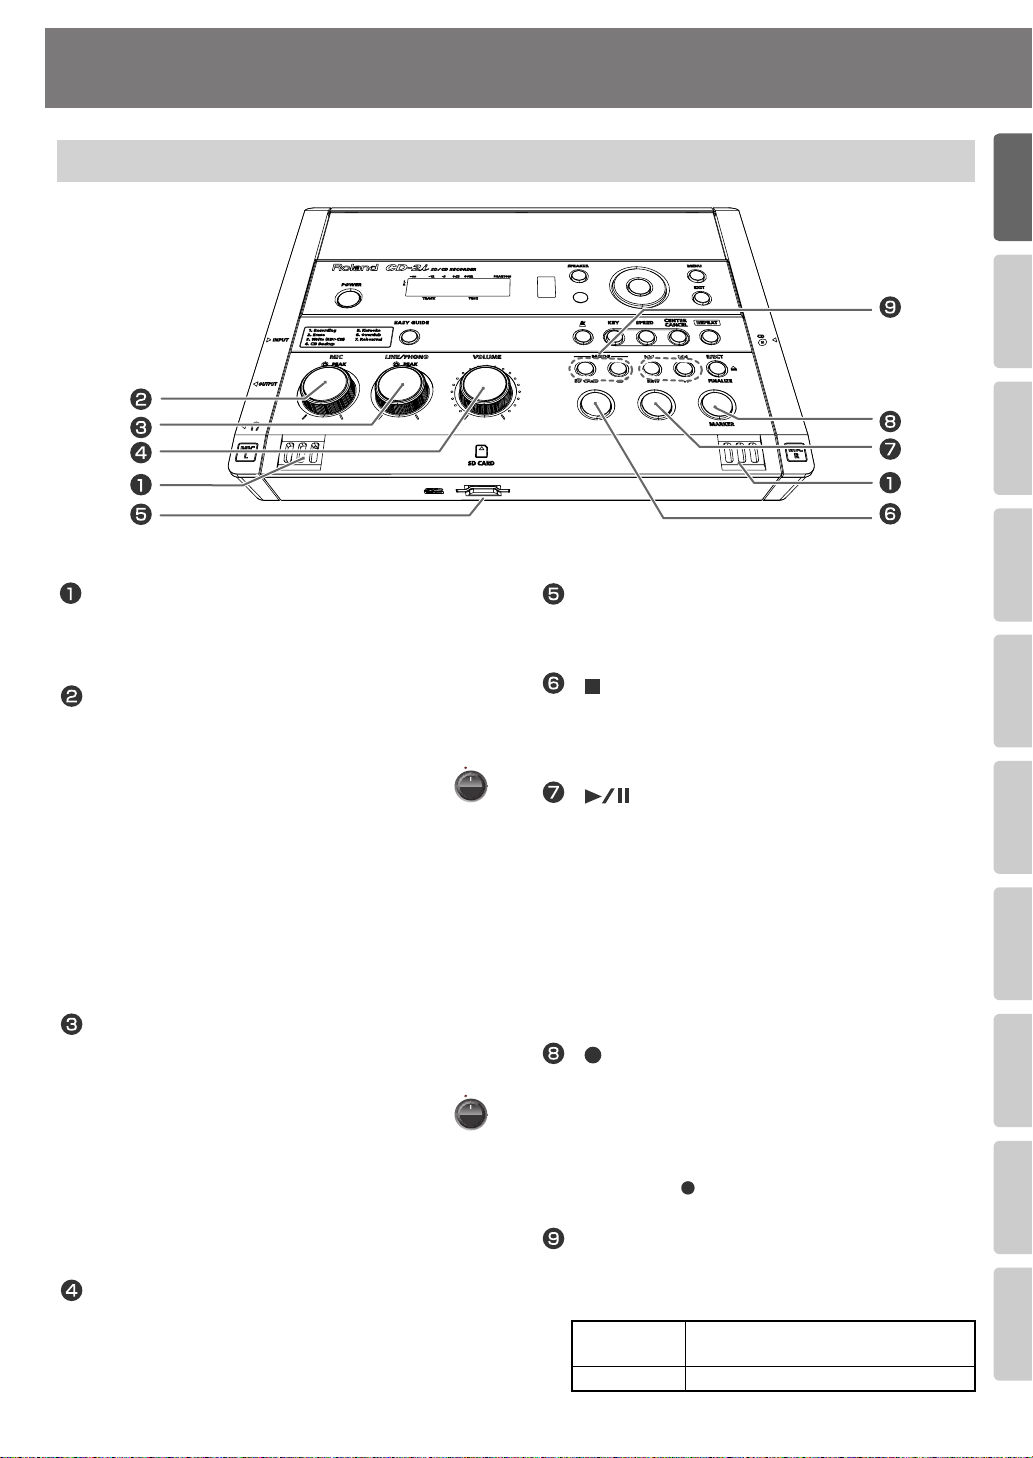
Panel Descriptions
Top Panel
fig.unit01-e.eps
MIC L/MIC R
This is a stereo pair of mics built into the CD-2i. You
can use these mics to record.
☞
“Recording with the Internal Mics” (Page 40)
[MIC] Knob
This adjusts the input level of the internal mics and
the EXT MIC jack.
If the input sound is too loud, the PEAK
fig.mic-peak.eps
indicator above the [MIC] knob will light.
* If you turn the [MIC] knob all the way to the left, no
sound will be input from the internal mics or the EXT
MIC jack.
* If the [MIC LEVEL] switch is in the “AUTO” position
(Page 43), the input level will be set automatically, and
you won’t be able to adjust the input level using the
[MIC] knob.
☞
“Recording with the Internal Mics” (Page 40),
“Connecting an External Mic for Recording” (Page 44)
[LINE/PHONO] Knob
This adjusts the input level of the LINE/PHONO IN
jack.
If the input sound is too loud, the PEAK
fig.mic-peak.eps
indicator above the [LINE/PHONO] knob
will light.
* If you turn the [LINE/PHONO] knob all the way to the
left, no sound will be input from the LINE/PHONO IN
jacks.
☞
“Recording an Electronic Instrument” (Page 49),
“Recording a Cassette or MD” (Page 52)
[VOLUME] Knob
This knob adjusts the volume of the internal
speakers and the headphones.
☞
“Listening to a CD/Listening to an SD Memory Card”
(Page 72)
SD Card Slot
You can insert an SD memory card here.
☞
“Preparing an SD Memory Card” (Page 25)
[ ](Stop) Button
This button stops playback or recording.
☞
“Listening to a CD/Listening to an SD Memory Card”
(Page 72)
[ ](Play) Button
●
This button starts playback or recording.
●
During playback or recording, you can press this
button to pause. Press it once again to resume
playback or recording from the location at which
you paused.
●
If you pause recording, the next track will be
started at the point you resumed recording.
☞
“Listening to a CD/Listening to an SD Memory Card”
(Page 72)
[ ](Record) Button
●
Press this button to enter recording-standby
mode.
●
During recording, you can press this button to
assign a track number.
“Press the [ ](Record) button to Assign a Song
☞
number” (Page 66)
MODE Button
These buttons select the audio source. The selected
button will light.
[SD CARD]
button
[CD] button Selects “CD” as the audio source.
Selects “SD memory card” as the audio
source.
13
Page 14
Panel Descriptions
(continued)
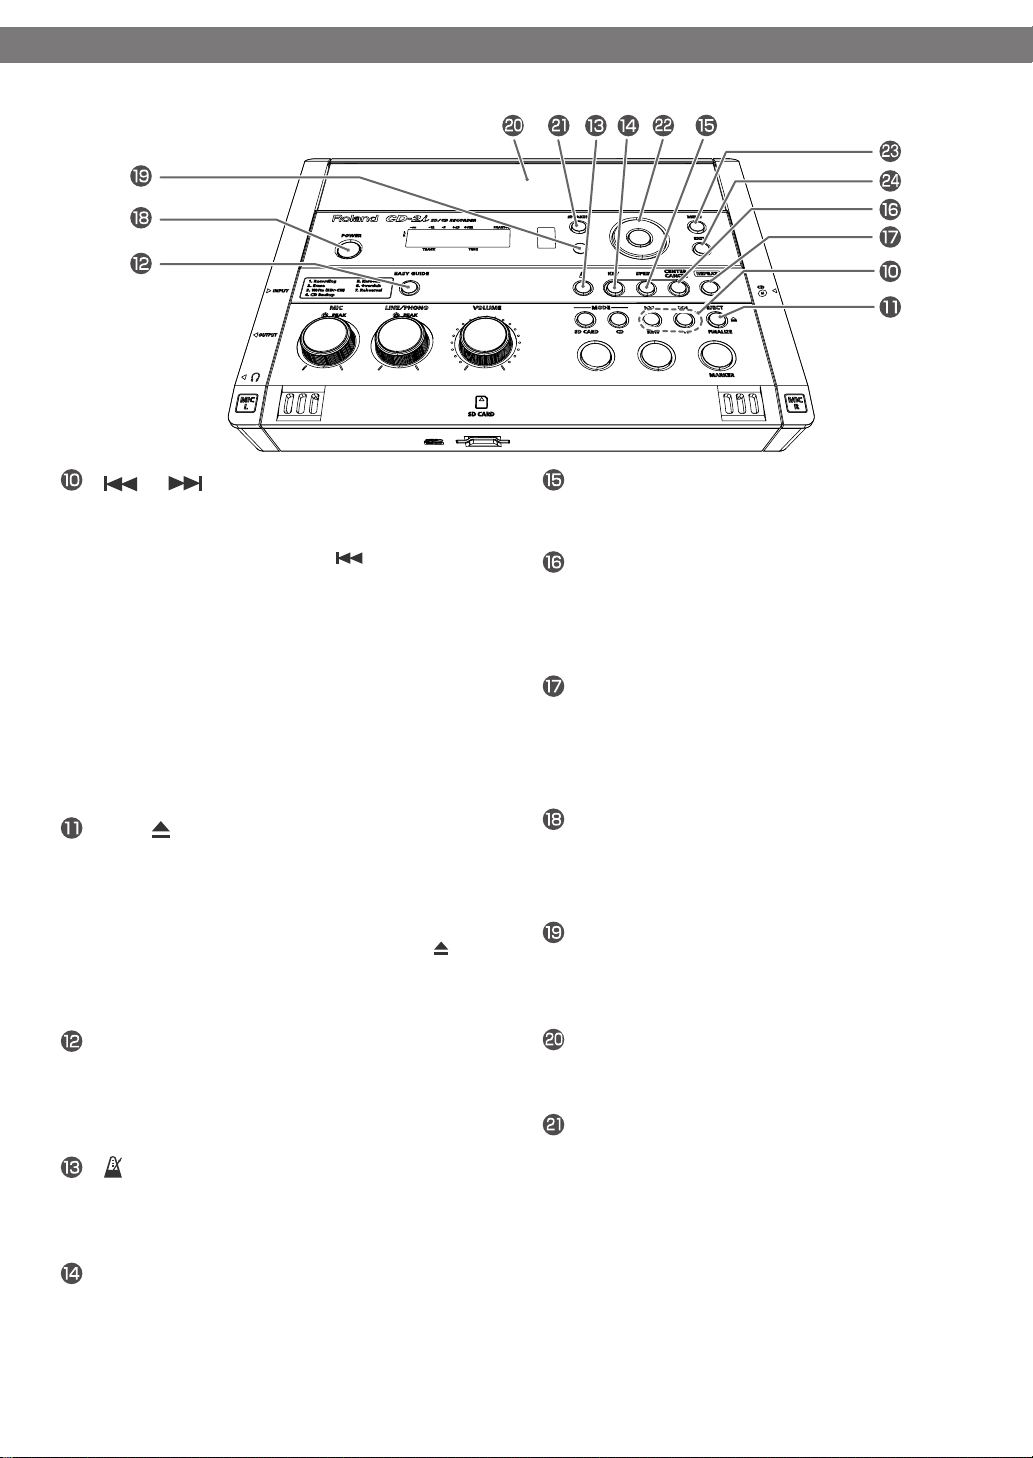
[ ] [ ] Buttons
●
You can use these buttons to jump to the
beginning of the preceding or the following
track. During playback, the[ ] button takes
you back to the beginning of the currently
playing track.
●
While stopped, press and hold these buttons to
rapidly move to the beginning of the track.
●
During playback, press and hold one of these
buttons to rewind or fast-forward.
●
While paused, press and hold these buttons to
rapidly rewind or fast-forward.
☞
“Listening to a CD/Listening to an SD Memory Card”
(Page 72)
[EJECT ] Button
Press this to eject the CD.
“Removing a CD” (Page 29)
☞
* If an unfinalized CD-R/RW disc is inserted, a message
asking whether you want to finalize the disc before
ejecting will appear when you press the [EJECT( )]
button.
“Making a CD-R/RW Disc for Playback on Another CD
☞
Player (Finalize)” (Page 102)
[EASY GUIDE] Button
This button accesses the Easy Guide screen. Here
you can record or create a CD by following the onscreen instructions.
☞
“About Easy Guide” (Page 36)
[ ](Metronome) Button
This turns the metronome on/off.
“Making Fine Adjustments to the Playback Pitch
☞
(Pitch)” (Page 78)
[KEY] button
This button changes the pitch of the playback
sound.
☞
“Changing the Key of the Playback” (Page 77)
☞
“Making Fine Adjustments to the Playback Pitch
(Pitch)” (Page 78)
14
[SPEED] button
This button changes the playback speed.
☞
“Slowing Down or Speeding Up Playback” (Page 79)
[CENTER CANCEL] button
This button eliminates or minimizes the sound
heard from the center, such as the main vocal of
the song.
“Enjoying Simple Karaoke (Center Cancel)” (Page 80)
☞
[REPEAT] Button
This button repeatedly plays back the region you
specify.
☞
“Repeatedly playing a portion of the song (A/B
Repeat)” (Page 82)
[POWER] Switch
This turns the power on/off.
“Using the Dedicated AC Adaptor” (Page 21),
☞
“Using Batteries” (Page 23)
☞
Metronome Indicator
This will blink if the metronome is on.
☞
“Making Fine Adjustments to the Playback Pitch
(Pitch)” (Page 78)
Stereo Speakers
These are a pair of stereo speakers built into the
CD-2i.
[SPEAKER] button
This button turns the speaker on/off.
☞
“Muting the Sound of the Speakers” (Page 76)
Page 15
Advanced UsesRecording Listening Deleting Creating a CD Editing an SD Appendices
Convenient
Functions
Information
/ Display
Checking /
Preparations
●
* From the audio source display, pressing the [ ] [ ]
●
* From the audio source display, pressing the [-] button
Function Button
This button is used mainly to perform menu
operations.
☞
“Menu Operations” (Page 32)
[ ] [ ] Buttons (Left/Right)
These buttons select menu items from a menu
screen.
Panel Descriptions
●
[ENTER] Button (Center)
●
This button confirms a menu item and displays a
screen where you can edit that item.
●
Press this to answer “yes” to messages shown in
the display.
[MENU] Button
This button accesses the menu screen. Here you
(continued)
can make settings for recording/playback, and
buttons will access a screen where you can specify the
playback level of the player (SD/CD).
☞
“Recording Karaoke” (Page 58), “Layering Your
Performance onto an SD Memory Card Song and
Recording It” (Page 61)
[+] [-] Buttons (Up/Down)
These buttons modify the value of a menu item.
will access a screen where you can confirm whether you
want to delete the song.
☞
“Deleting Songs Individually” (Page 88), “Deleting
One Song at a Time (Only the Last Song)” (Page 94)
settings for the CD-2i itself.
☞
“Menu Operations” (Page 32)
[EXIT] Button
●
After you’ve modified the setting for a menu
item, press this to return to the audio source
display.
●
Press this to answer “no” to messages shown in
the display.
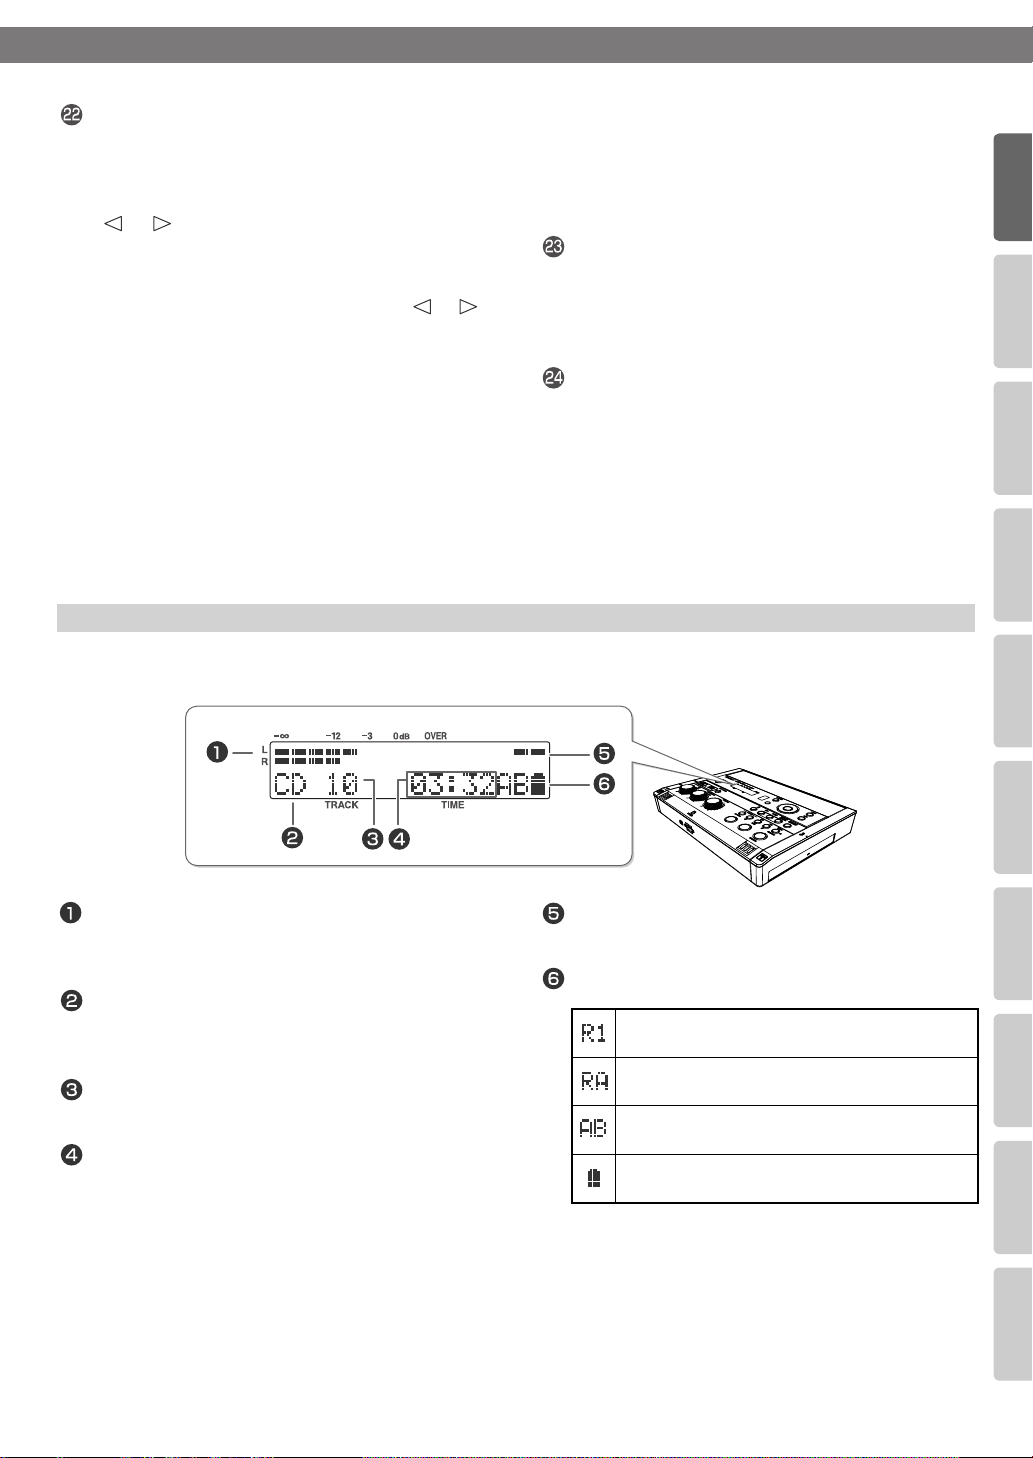
Display
The display shows information or messages related to the operation you’re performing, such as when you’re
making various settings or editing tracks.
LEVEL Meter
This indicates the volume level of the track that’s
playing or the instrument or mic that’s being input.
Source Name Indicator
This indicates the name of the currently selected
audio source.
TRACK Indicator
This indicates the track number.
TIME Indicator
This indicates the elapsed playback or recording
time.
You can switch the time information that’s shown
here
☞
“Viewing the Remaining Recording/Playback Time”
(Page 115)
Phantom power indicator
This indicates the phantom power on/off status.
Symbol Indicators
Displayed during one-track repeat playback.
☞ Page 81
Displayed during all-track repeat playback.
☞ Page 81
Displayed during A-B repeat playback.
Page 82
☞
This is shown if the CD-2i is running on batteries.
It indicates the remaining battery power.
15
Page 16
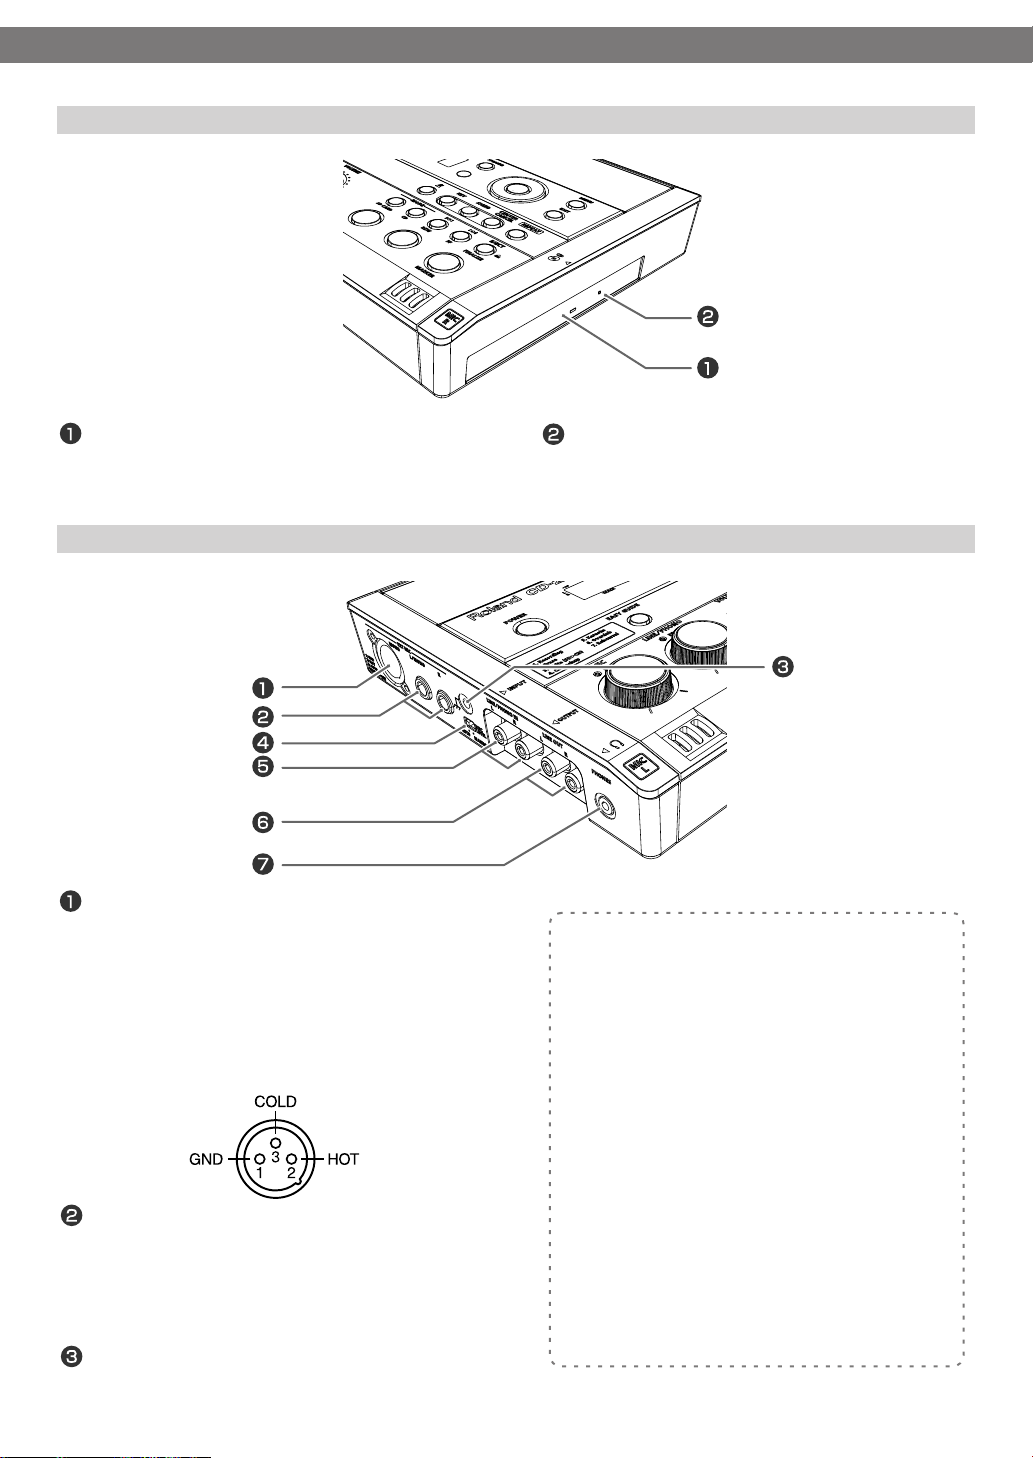
Panel Descriptions
Right Side Panel
(continued)
fig.unit02-e.eps
CD Tray
This is where you insert a CD.
“Inserting a CD” (Page 28)
☞
Left Side Panel
fig.unit02-e.eps
EXT MIC Jacks (XLR type, MONO jack)
Connect external mics to these jacks.
This connector can supply phantom power.
☞
“Connecting an External Mic for Recording” (Page 44)
* This instrument is equipped with balanced (XLR) type
jacks. Wiring diagrams for these jacks are shown below.
Make connections after first checking the wiring
diagrams of other equipment you intend to connect.
EXT MIC Jacks (R jack, L/MONO jack)
Connect external mics to these jacks.
If you’re using only one mic, connect it to the L/
MONO jack.
“Connecting an External Mic for Recording” (Page 44)
☞
Ground Terminal
Connect this to an external electrical ground.
16
Emergency Eject Hole
You can use this to remove the CD in case of
emergency. Normally, it is not used.
“If You are Unable to Eject the Disc” (Page 29)
☞
Depending on the circumstances of a particular setup,
you may experience a discomforting sensation, or
perceive that the surface feels gritty to the touch when
you touch this device, microphones connected to it,
or the metal portions of other objects, such as guitars.
This is due to an infinitesimal electrical charge, which
is absolutely harmless. However, if you are concerned
about this, connect the ground terminal (see figure)
with an external ground. When the unit is grounded,
a slight hum may occur, depending on the particulars
of your installation. If you are unsure of the connection
method, contact the nearest Roland Service Center, or
an authorized Roland distributor, as listed on the
“Information” page
Unsuitable places for connection
●
Water pipes (may result in shock or electrocution)
●
Gas pipes (may result in fire or explosion)
●
Telephone-line ground or lightning rod (may be
dangerous in the event of lightning)
Page 17
Panel Descriptions
Advanced UsesRecording Listening Deleting Creating a CD Editing an SD Appendices
Convenient
Functions
Information
/ Display
Checking /
Preparations
(continued)
[MIC LEVEL] Switch
This selects how the mic input level is to be
adjusted.
Switch
position
MANUAL
AUTO The mic input level will be adjusted
☞
“Recording Acoustic Instruments or Vocals” (Page 40),
“Adjusting the Input Level Automatically (Auto Level
Function)” (Page 43)
Explanation
The [MIC] knob will adjust the mic’s
input level.
automatically. Operating the [MIC]
knob will not affect the input level.
LINE/PHONO IN Jacks
Connect an electronic piano, keyboard, cassette
deck, etc. to these jacks.
☞
“Recording an Electronic Instrument” (Page 49),
“Recording a Cassette or MD” (Page 52)
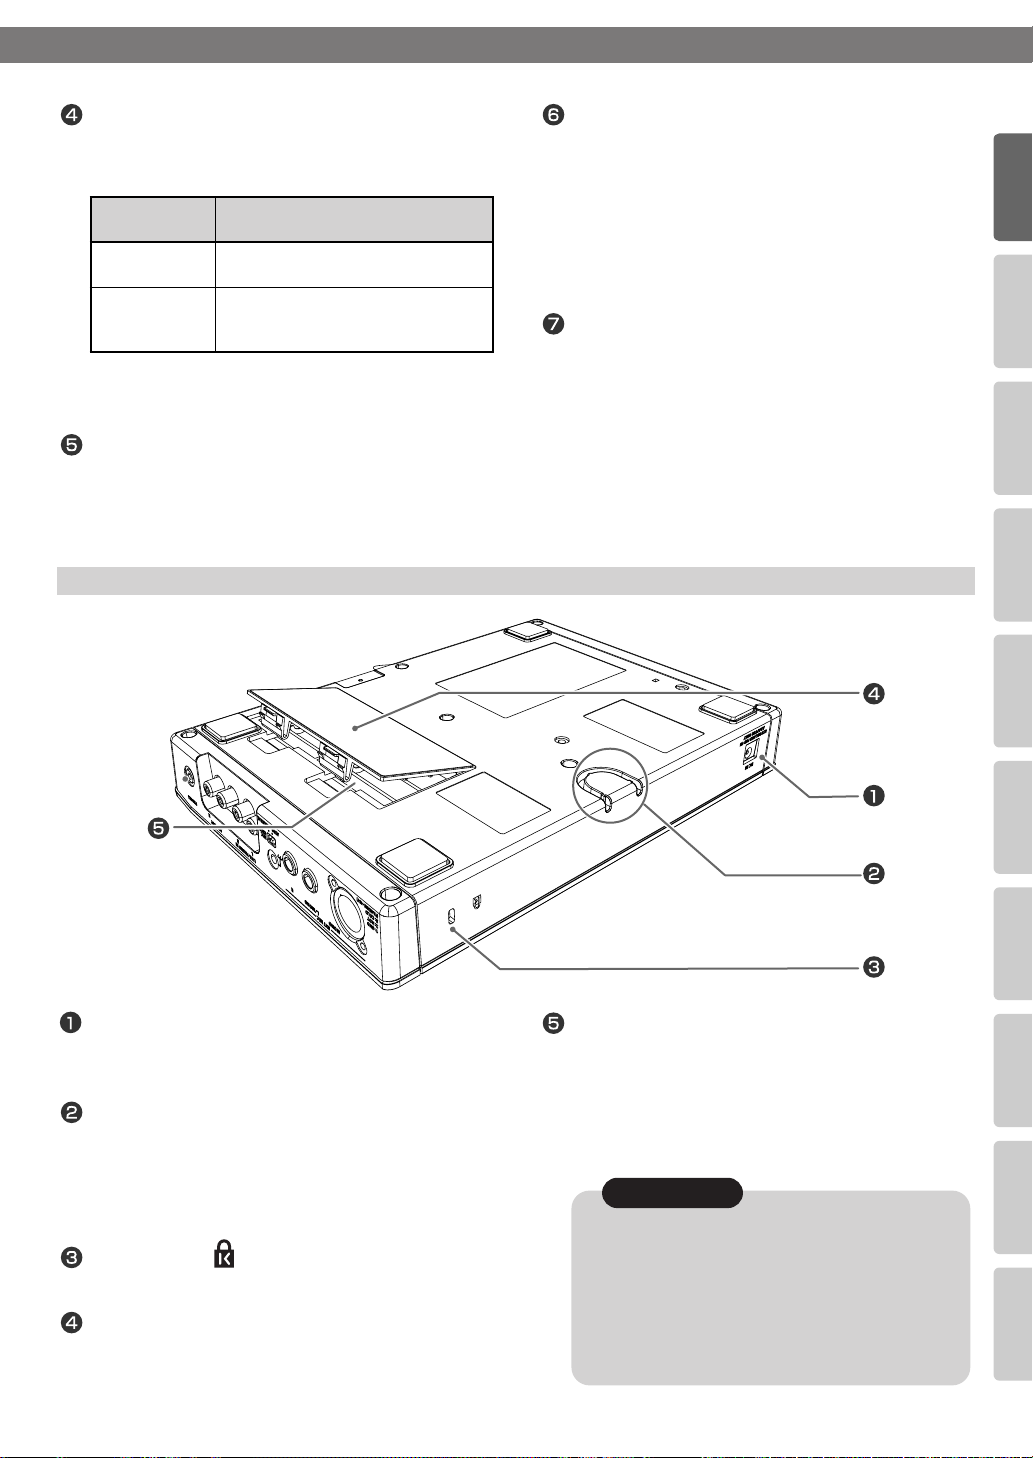
Rear Panel/Bottom Panel
fig.unit03.eps
LINE OUT Jack
Use this jack to output analog audio signals to an
external speaker system or electronic piano.
☞
“Connecting External Speakers” (Page 126)
You can choose the audio signal that will be output
from the LINE OUT jack.
☞
“Selecting the Audio Source that’s Sent from the LINE
OUT Jack” (Page 127)
PHONES Jack
You can connect a set of headphones to this jack.
* If headphones are connected, there will be no sound
from the speakers.
Step 4 on “Recording with the Internal Mics” (Page
☞
40)
AC Adaptor Connector
Connect the dedicated AC adaptor (included) here.
“Using the Dedicated AC Adaptor” (Page 21)
☞
Cord Hook
Use this cord hook to fasten the cord of the
dedicated AC adaptor (included) so that it doesn’t
become accidentally unplugged.
☞
“Using the Dedicated AC Adaptor” (Page 21)
Security Slot ( )
http://www.kensington.com/
Battery Cover
“Using Batteries” (Page 23)
☞
Battery Compartment
Install batteries here if you want to operate the
CD-2i on batteries.
If you’re using the dedicated AC adaptor, it’s not
necessary to install batteries.
“Using Batteries” (Page 23)
☞
Note
You must turn off the power before performing the
following operations.
●
Switching from operation with the dedicated
AC adaptor to battery operation
●
Switching from battery operation to operation
with the dedicated AC adaptor
17
Page 18
Panel Descriptions
(continued)
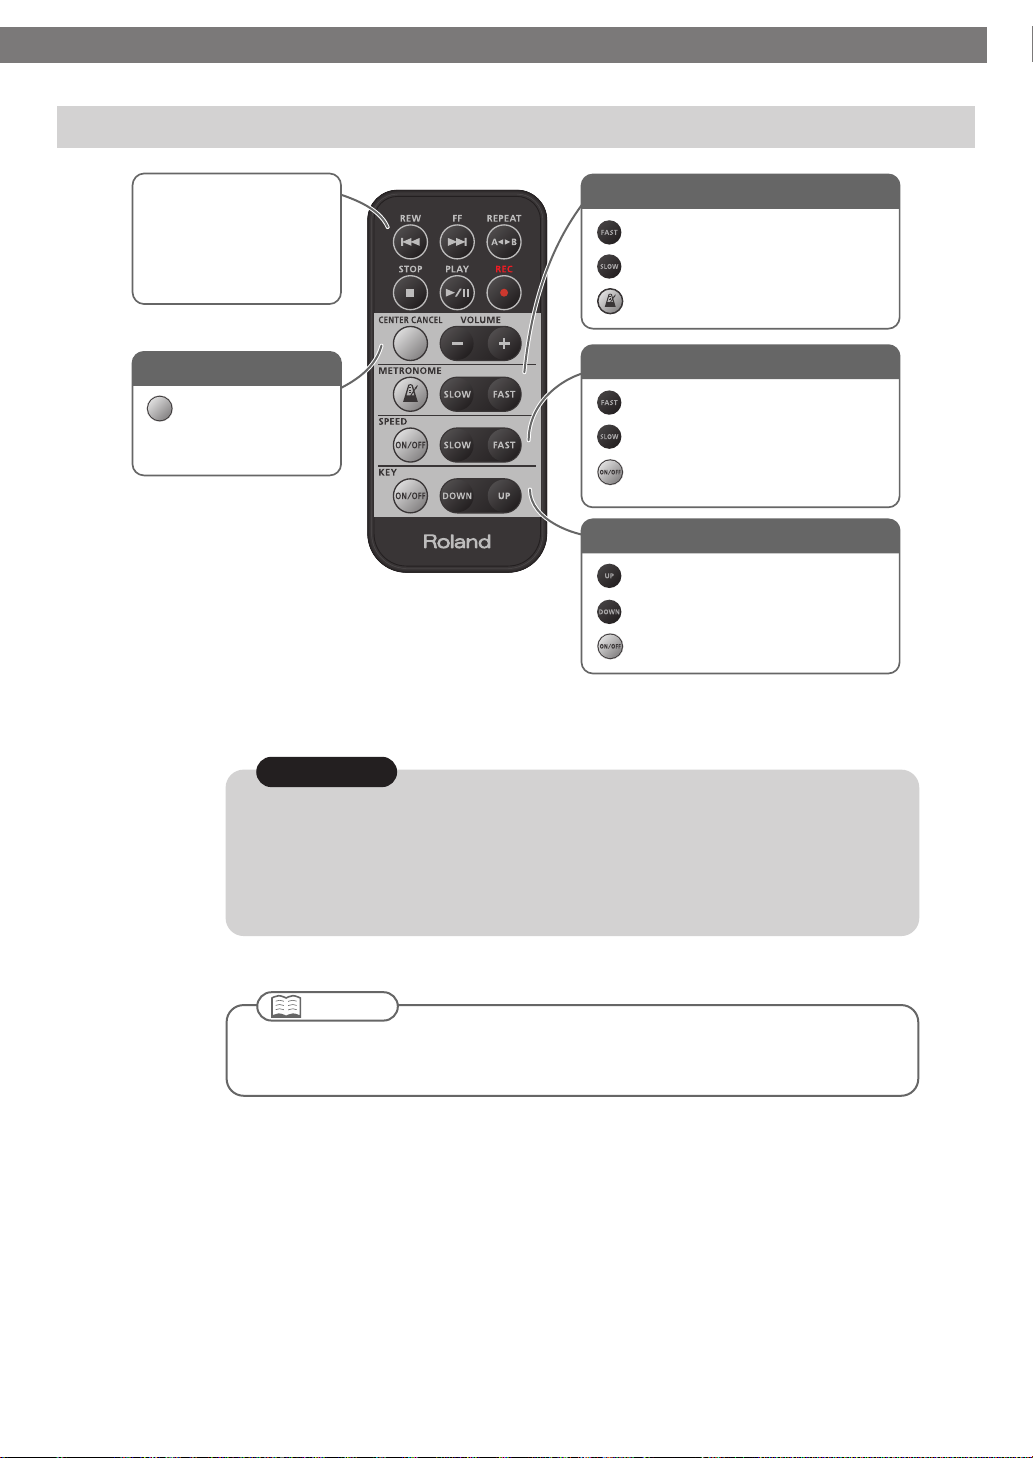
Remote Control
Performs record/playback
operations for the CD or
SD memory card.
These have the same
function as the buttons
on the CD-2i itself.
Center Cancel
Turns Center Cancel
on/off.
Metronome settings
Makes the metronome tempo faster.
Makes the metronome tempo slower.
Turns the metronome on/off.
Playback speed settings
Makes the playback faster.
Makes the playback slower.
Turns the playback speed
setting on/off.
Playback key settings
Raises the key of the playback sound.
Lowers the key of the playback sound.
Turns the key setting on/off
Note
The [VOLUME] knob of the CD-2i itself does not move when you adjust the volume from the
remote control. This may cause the actual volume to no longer match the position of the
[VOLUME] knob.
If you’re using headphones, use the [VOLUME] knob of the CD-2i itself to lower the volume
before you start listening. This will help prevent high volume from damaging your hearing.
Important
For details on installing batteries in the remote control and using the remote control, refer
to “Preparing the Remote Control” (Page 30).
18
Page 19
Advanced UsesRecording Listening Deleting Creating a CD Editing an SD Appendices
Convenient
Functions
Information
/ Display
Checking /
Preparations
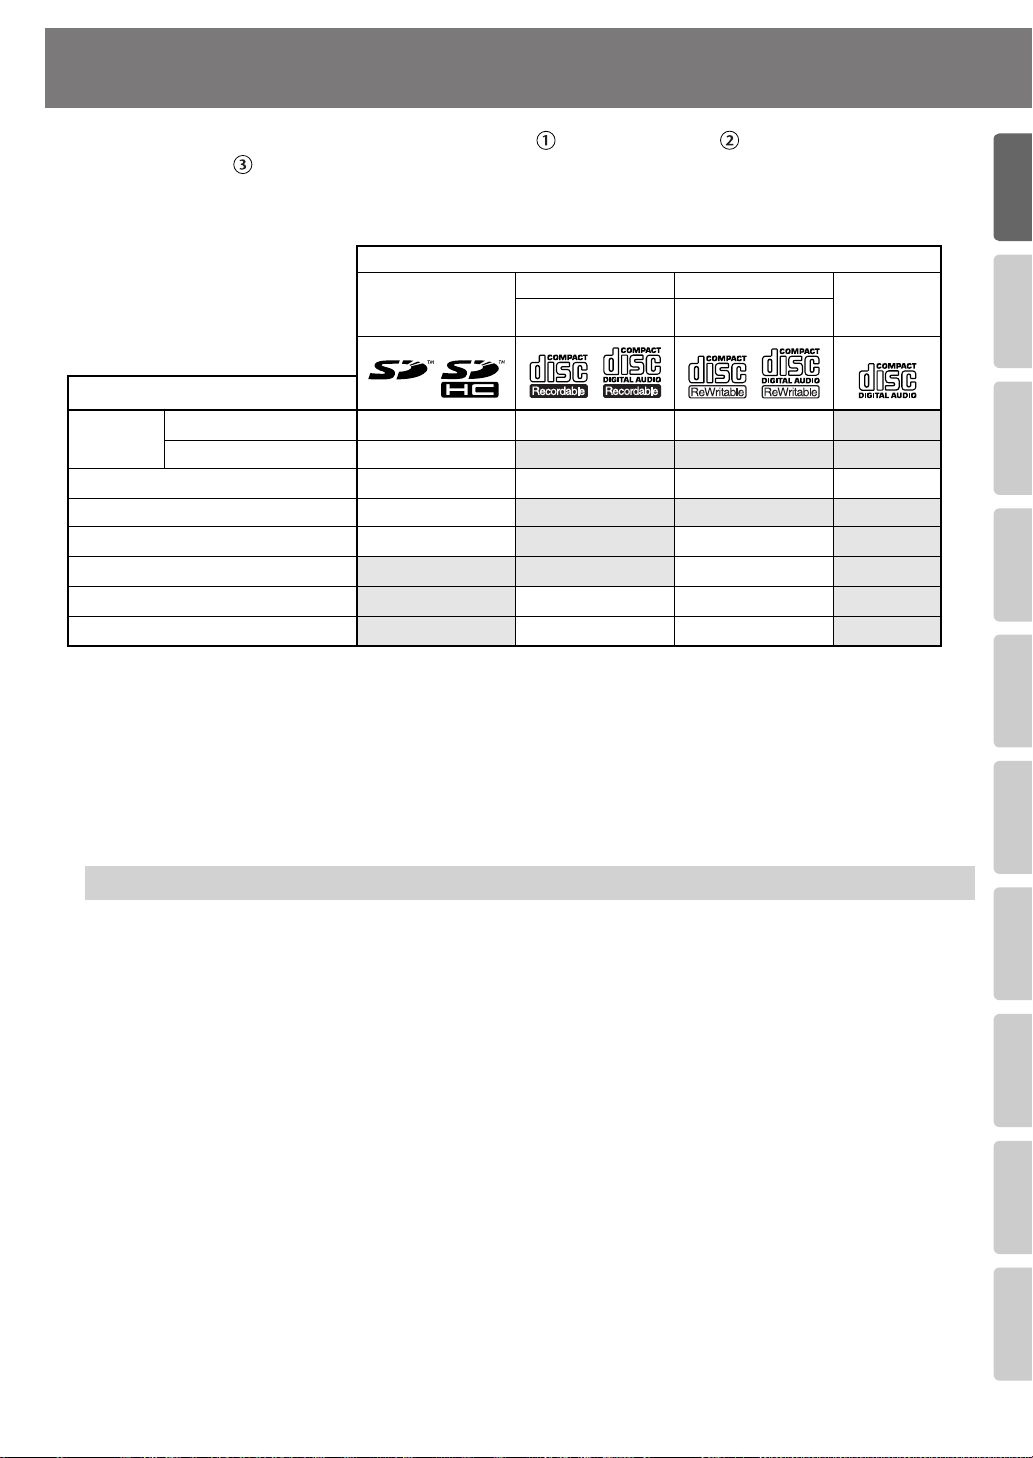
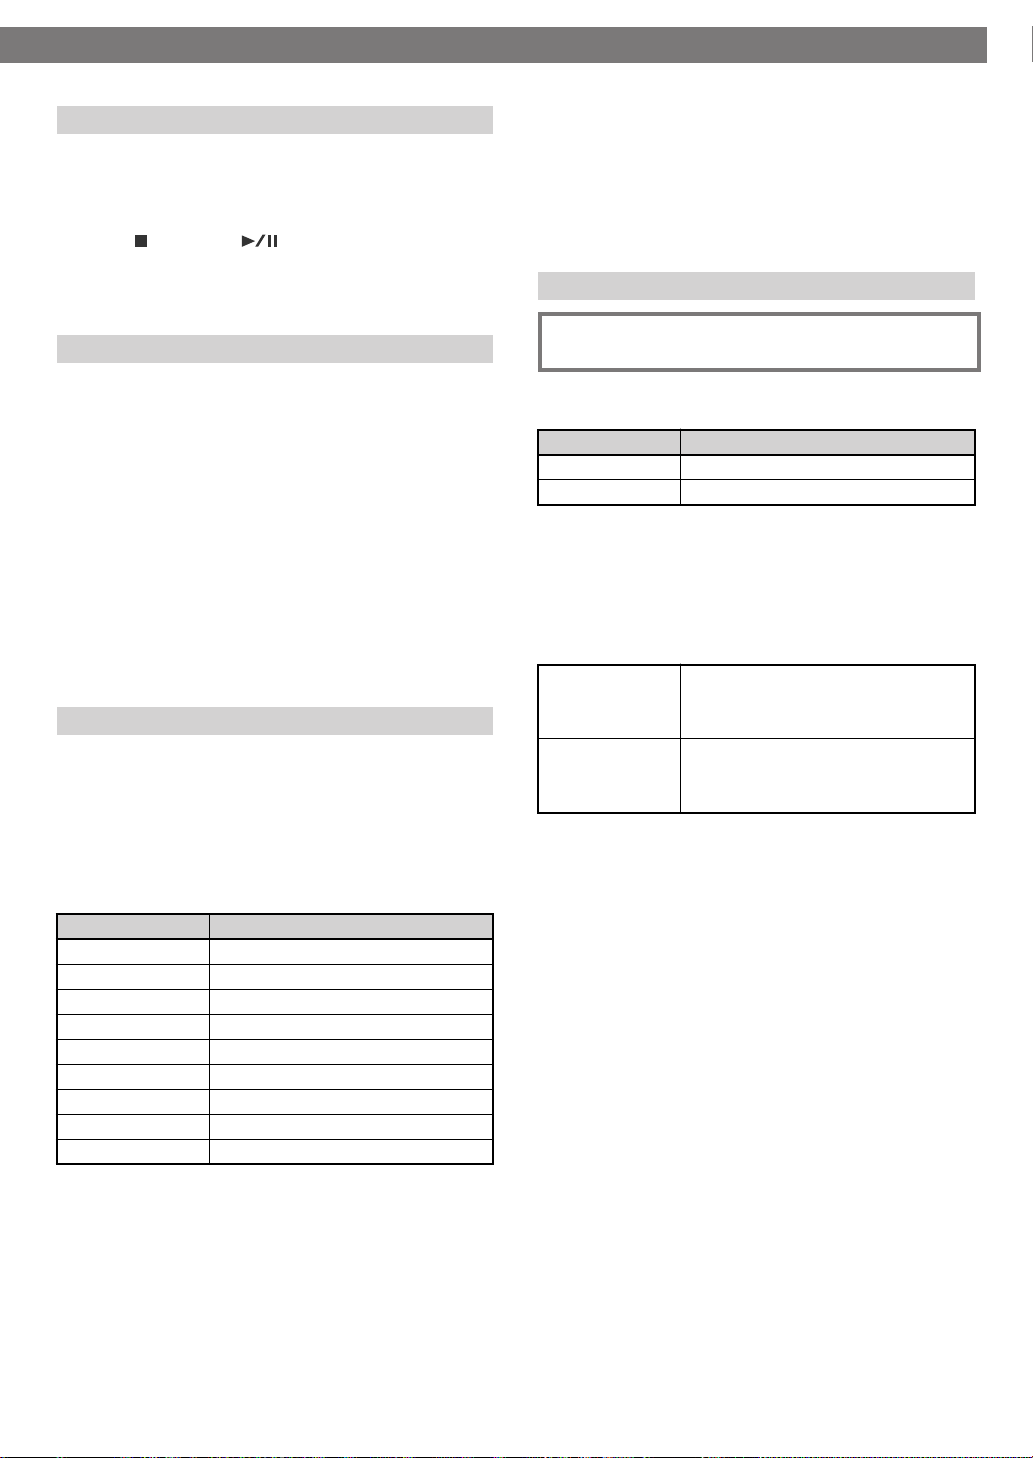
Recordable Media and Functionality
Recording
Playback
Edit tracks
Delete tracks
Cancel finalization (Page 96)
Create an original music CD
Backup an original music CD
As its recording media, the CD-2i uses SD memory cards, CD-R discs, and
CD-RW discs. The functions available for editing or deleting songs (tracks) after
recording will differ according to the media you use.
The table below shows the functions available for each type of media.
Media
CD-2i function
Conventional recording
Overdubbing
SD
memory card
✓
✓
✓
CD-R disc
8x speed supported
✓ ✓
✓ ✓ ✓
CD-RW disc
4x/8x speeds sup-
ported
✓
✓
✓
✓
✓
✓
* In order for a CD-R/RW disc recorded on the CD-2i to be playable on another CD player, an
operation called “finalizing” (Page 102) must be performed on that disc.
* We cannot guarantee that a music CD created on the CD-2i will play on all CD players.
Depending on your CD player’s support for CD-R/RW discs, music CDs you create may or may
not play correctly.
* The CD-2i supports SDHC memory cards.
* Some SD memory card types or SD memory cards from some manufacturers may not record or
back properly
play
on the CD-2i.
✓
✓
Music CD
Differences between CD-R discs and CD-RW discs
Unlike conventional music CDs, both of these discs allow recording.
A song recorded on a CD-R (Compact Disc Recordable) disc cannot be erased later.
You should use CD-R discs in the following cases.
●
To record an important performance
●
To create a CD from songs you’ve recorded on an SD memory card
●
To back up an original music CD
CD-RW (Compact Disc ReWritable) discs allow you to erase a song you’ve recorded.
Songs can be erased one by one starting at the last-recorded song, or you can erase all
songs in a single operation.
CD-RW discs can be recorded and erased approximately 1,000 times.
You should use CD-RW discs in the following cases.
●
To record your practicing
●
To Make a “sketchpad” of your musical ideas
19
Page 20
Recordable Media and Functionality
(continued)
Minimum Recording Time for One Track
Each track on a music CD must be at least four seconds
long. Since the CD-2i creates music CDs from the songs
you record, it does not allow you to record a track that’s
less than four seconds long.
Pressing [ ](Stop) or [ (Pause)] will not stop
recording if less than four seconds have passed since you
began recording. Moreover, you cannot assign a track
number (Page 66) in such cases.
In Case Your Performance is Not Recordable
Further recording is not possible once you’ve reached the
maximum recordable time or the maximum number of
songs that can be recorded.
●
If there is no more recordable time, the message “SD
Card Full” or “CD Disc Full” will appear.
●
If the maximum number of tracks have already been
recorded, the message “SD Track Full” or “CD Track
Full” will appear.
This message goes away when you press the [ENTER]
button.
If you’re using an SD memory card or a CD-RW disc, you
can erase unwanted songs (Page 88, 94) and then
continue recording.
When Recording on an SD memory card
Data Format
■
Wave (Stereo)
●
Sampling Rate: 441 kHz
●
Bit Depth: 16 bits
* CD-2i only supports above data format.
■
Recording Modes and Maximum Recording Times
Capacity Maximum recording time (approx.)
64 MB
128 MB
256 MB
512 MB
1 GB
2 GB
4 GB
8 GB
16 GB
* The maximum times given above are approximate. The
actual time may be slightly less depending on how tracks
have been edited.
* You can view the remaining time in the display.
115, “Viewing the Remaining Recording/Playback Time”
*“
5 minutes
11 minutes
23 minutes
47 minutes
94 minutes
189 minutes
377 minutes
755 minutes
1511 minutes
Page
☞
■
Recording Time for One Track (One Song)
The maximum length of one track is 74 minutes.
If a recording exceeds 74 minutes, a new track division will
automatically be created.
■
The Number of Recording Tracks
A maximum of 99 tracks can be recorded on one SD
memory card.
When Recording on a CD-R/RW disc
You must use the dedicated AC adaptor when
recording on a CD-R/RW disc.
Maximum Recording Times
■
Capacity
650 MB
700 MB
* The maximum times given above are approximate. The
actual time may be slightly less depending on the number
of tracks that are recorded.
* You can view the remaining time in the display.
115, “Viewing the Remaining Recording/Playback Time”
■
Types of Discs that You Can Record
CD-R discs
CD-RW discs
Blank disc ” refers to an “empty” disc on which nothing
has been recorded or stored.
The Number of Recording Tracks
■
A maximum of 99 tracks can be recorded on one
CD-R/RW disc.
■
Recorded Songs
When you record on a CD-R/RW disc, a blank space of two
seconds will automatically be added at the end of each
track (song).
■
Finalization
“Finalization” is a process that can be applied to a CD-R/
RW disc so that it will be playable by a conventional CD
player. Once a CD-R disc or CD-RW disc has been finalized,
it can be played back as a music CD in a CD player that
supports CD-R or CD-RW playback.
For more information, refer to “Making a CD-R/RW Disc for
Playback on Another CD Player (Finalize)” (Page 102).
* No further songs can be recorded on a CD-R/RW disc that
has been finalized.
●
If you’re using a CD-RW disc, you can remove the
finalization and add additional material.
☞
Page 96, “Removing Finalization”
Maximum recording time
approximately 74 minutes
approximately 80 minutes
☞
●
Blank CD-R discs
●
Partially recorded (not yet finalized)
CD-R discs
●
Blank CD-RW discs
●
Partially recorded (not yet finalized)
CD-RW discs
Page
20
Page 21
Advanced UsesRecording Listening Deleting Creating a CD Editing an SD Appendices
Convenient
Functions
Information
/ Display
Checking /
Preparations
Turning the Power On and Off
You can operate the CD-2i either from an electrical outlet or using six AA batteries (sold
separately).
* Always make sure to have the volume level turned down before switching on power. Even with
the volume all the way down, you may still hear some sound when the power is switched on, but
this is normal, and does not indicate a malfunction.
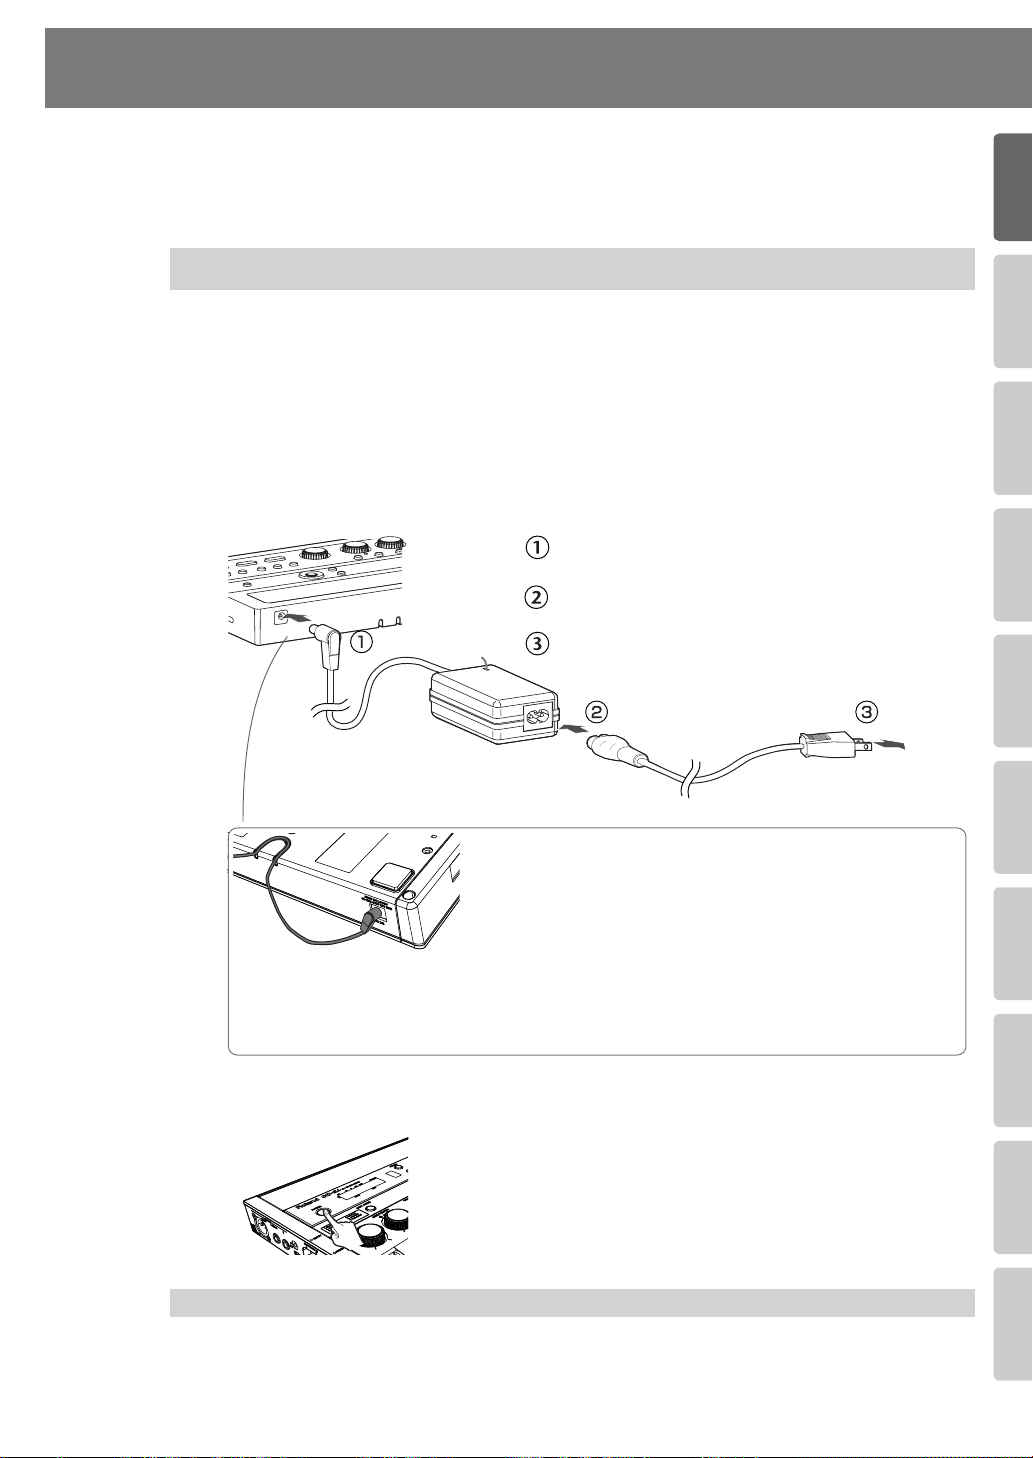
Using the Dedicated AC Adaptor
If you’re using the dedicated AC adaptor, batteries are not required.
* Even if batteries are installed, the power will turn off if you connect or disconnect the power cord
from the AC outlet while the power is turned on, or if you connect or disconnect the AC adaptor
from the product. When this occurs, unsaved data may be lost. You must turn off the power
before you connect or disconnect the power cord or AC adaptor.
..
..
Connect the power
1
* Place the AC adaptor so the side with the indicator (see illustration) faces upwards and the side
with textual information faces downwards.
The indicator will light when you plug the AC adaptor into an AC outlet.
fig.ACadaptor-e.esp
Indicator
Connect the plug of the dedicated AC adaptor to
the AC adaptor jack on the CD-2i’s rear panel.
Connect the included power cord to the dedicated
AC adaptor.
Plug the power cord all the way into the AC outlet.
Dedicated AC Adaptor (included)
Cord hook
To prevent the inadvertent disruption of power to your unit (should
the plug be pulled out accidentally), and to avoid applying undue
stress to the AC adaptor jack, anchor the power cord using the cord
hook, as shown in the illustration.
Bottom
of the CD-2i
2
Press and hold the [POWER] switch.
When the screen appears in the display, release the switch.
fig.power-on.eps0
* Do not force the cord into the slot. Doing so may break it.
* When turning the CD-2i upside down, place stacks of newspapers or magazines to
support the four corners (or two sides) so that stress is not placed on the buttons or knobs,
possibly damaging them. Also, handle the CD-2i with care, and avoid dropping it.
AC cord (included)
* The shape of the power cord’s plug varies
depending on the country.
To AC
outlet
Turning the Power Off
Press and hold the [POWER] switch until the shutdown screen appears in
1
the display.
* Do not disconnect the AC adaptor until the display backlight turns off.
21
Page 22
Turning the Power On and Off
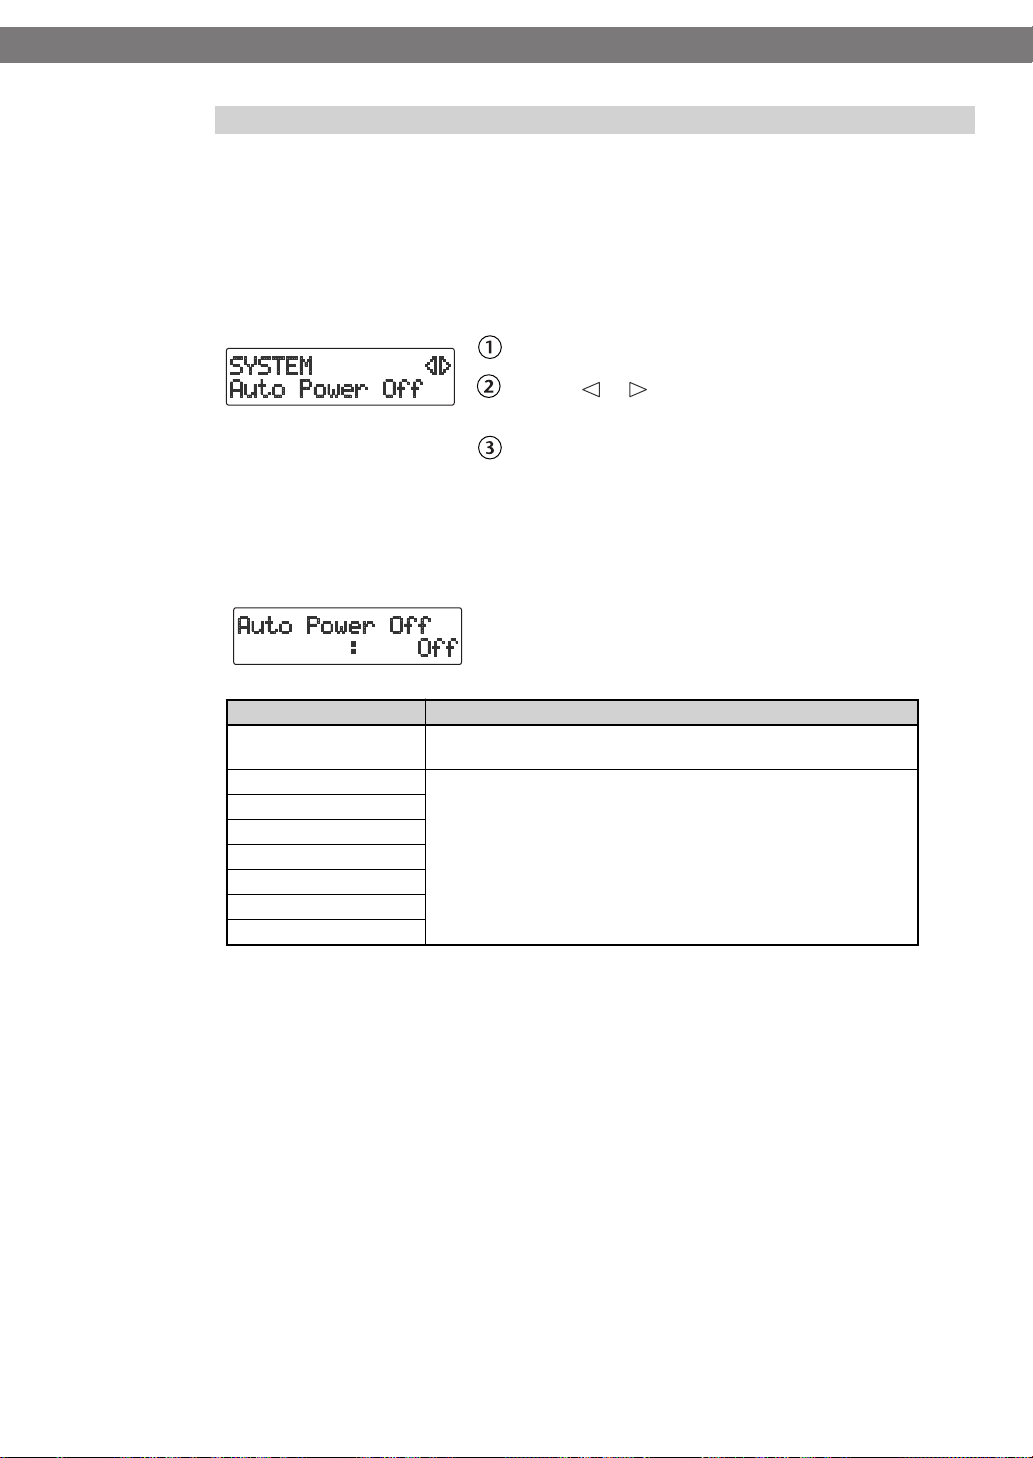
About the Auto Power-off function
This device is set so its power will automatically be turned off after no operation has been
performed for a certain length of time. This is called the Auto Power-off function. If you
want to disable this function, you can do so as follows.
1
Press the [MENU] button to access the menu screen, and choose “Auto
Power-off.”
2
Use the [+] [-] buttons to change the value for the Auto Power-off
function.
(continued)
fig.menu-automarker01-e.eps
Press the [MENU] button to access the menu screen.
Use the [ ] [ ] buttons to choose “Auto Power
off”
Press the [ENTER] button to confirm your choice.
fig.menu-automarker01-e.eps
Value
Off
5 min
10 min
15 min
30 min
60 min
90 min
120 min (Factory Setting)
Press the [EXIT] button twice.
3
Explanation
The power will not turn off automatically. Use the [POWER] switch
to turn the power on/off.
Power will automatically turn off when the specified time has
elapsed following the last operation.
You are returned to the audio source screen.
22
Page 23
Advanced UsesRecording Listening Deleting Creating a CD Editing an SD Appendices
Convenient
Functions
Information
/ Display
Checking /
Preparations
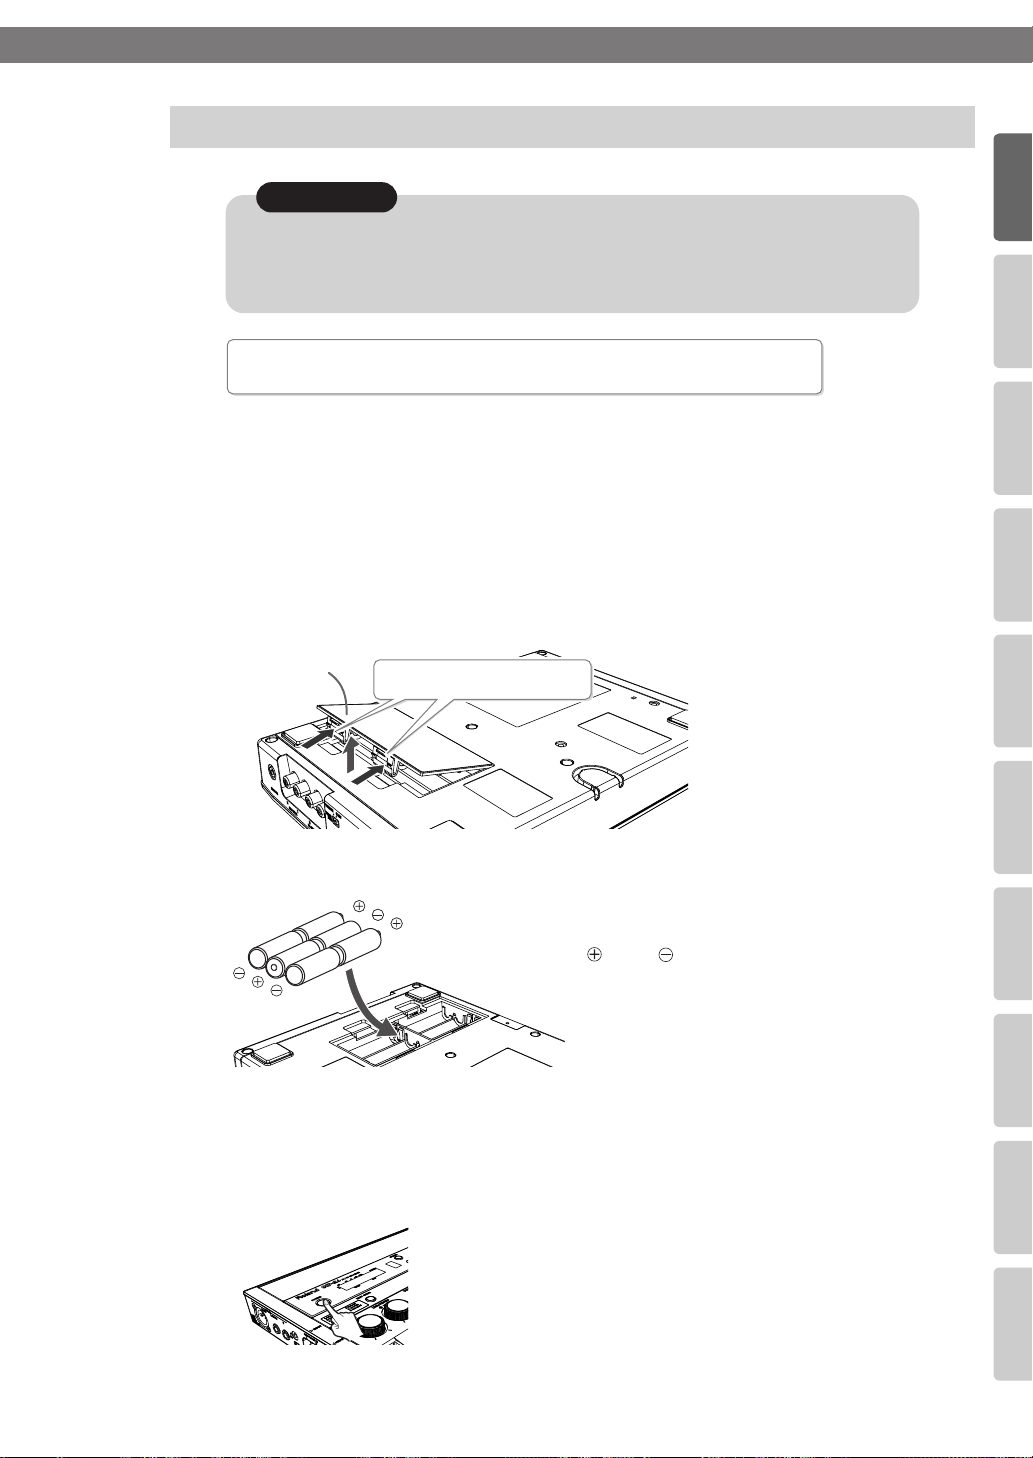
Using Batteries
Turning the Power On and Off
(continued)
Note
If you’re operating the CD-2i on batteries, you won’t be able to perform CD-related
operations such as recording, playing, or writing songs, etc. Nor will it be possible to
use phantom power.
fig.battery06-e.esp
Batteries to use
AA alkaline batteries or Nickel-metal hydride batteries.
Turn the power off.
1
Disconnect all cables from the CD-2i.
Turn the CD-2i upside down and remove the battery cover.
2
* When turning the unit upside-down, get a bunch of newspapers or magazines, and place them
under the four corners or at both ends to prevent damage to the buttons and controls. You
should try to orient the unit so no buttons or controls get damaged. Also, handle with care, and
avoid dropping it.
fig.battery01-e.esp
Battery cover
Press here and pull upward.
3
Install six AA batteries.
fig.battery02-e.esp
* Make sure that the “ ” and “ ”
are oriented correctly.
Close the battery cover and turn the CD-2i right side up.
4
Press and hold the [POWER] switch
5
Release the switch when the screen appears in the display.
fig.power-on-battery.eps
..
..
23
Page 24
Turning the Power On and Off
Turning the Power Off
1
Press and hold the [POWER] switch until the shutdown screen appears in
the display.
* Do not disconnect the AC adaptor until the display backlight turns off.
Remaining Battery Indicator
If you’re operating the CD-2i on batteries, the battery indicator will be shown on the
screen.
If you continue use the CD-2i when the batteries are low, the display will indicate
“Battery Low,” and eventually the power will turn off.
fig.icon-battery-e.eps
Battery Life
(continued)
Sufficient capacity remaining.
Batteries are running low.
Batteries are almost empty.
Replace the batteries.
* The remaining battery indicator is only an approximation.
Continuous use
Alkaline batteries: approximately 5 hours
Nickel-metal hydride batteries: approximately 6 hours
* The battery life given here is only an approximation. It will vary depending on the frequency and
conditions of use.
Note
You must turn off the power before performing the following operations.
●
Switching from operation with the dedicated AC adaptor to battery operation
●
Switching from battery operation to operation with the dedicated AC adaptor
Important
●
If you want to use batteries, disconnect the dedicated AC adaptor. The batteries will not
be used as the power supply if the dedicated AC adaptor is connected.
●
Carefully follow the installation instructions for batteries, and make sure you observe the
correct polarity.
●
Avoid using new batteries together with used ones. In addition, avoid mixing different
types of batteries.
●
Remove the batteries whenever the unit is to remain unused for an extended period of
time.
●
If a battery has leaked, use a soft piece of cloth or paper towel to wipe all remnants of the
discharge from the battery compartment. Then install new batteries. To avoid
inflammation of the skin, make sure that none of the battery discharge gets onto your
hands or skin. Exercise the utmost caution so that none of the discharge gets near your
eyes. Immediately rinse the affected area with running water if any of the discharge has
entered the eyes.
●
Never keep batteries together with metallic objects such as ballpoint pens, necklaces,
hairpins, etc.
●
Incorrect handling of batteries, rechargeable batteries, or a battery charger can cause
leakage, overheating, fire, or explosion. Before use, you must read and strictly observe all
of the precautions that accompany the batteries, rechargeable batteries, or battery
charger.
24
Page 25
Advanced UsesRecording Listening Deleting Creating a CD Editing an SD Appendices
Convenient
Functions
Information
/ Display
Checking /
Preparations
Preparing an SD Memory Card
Here’s how to prepare an SD memory card for recording.
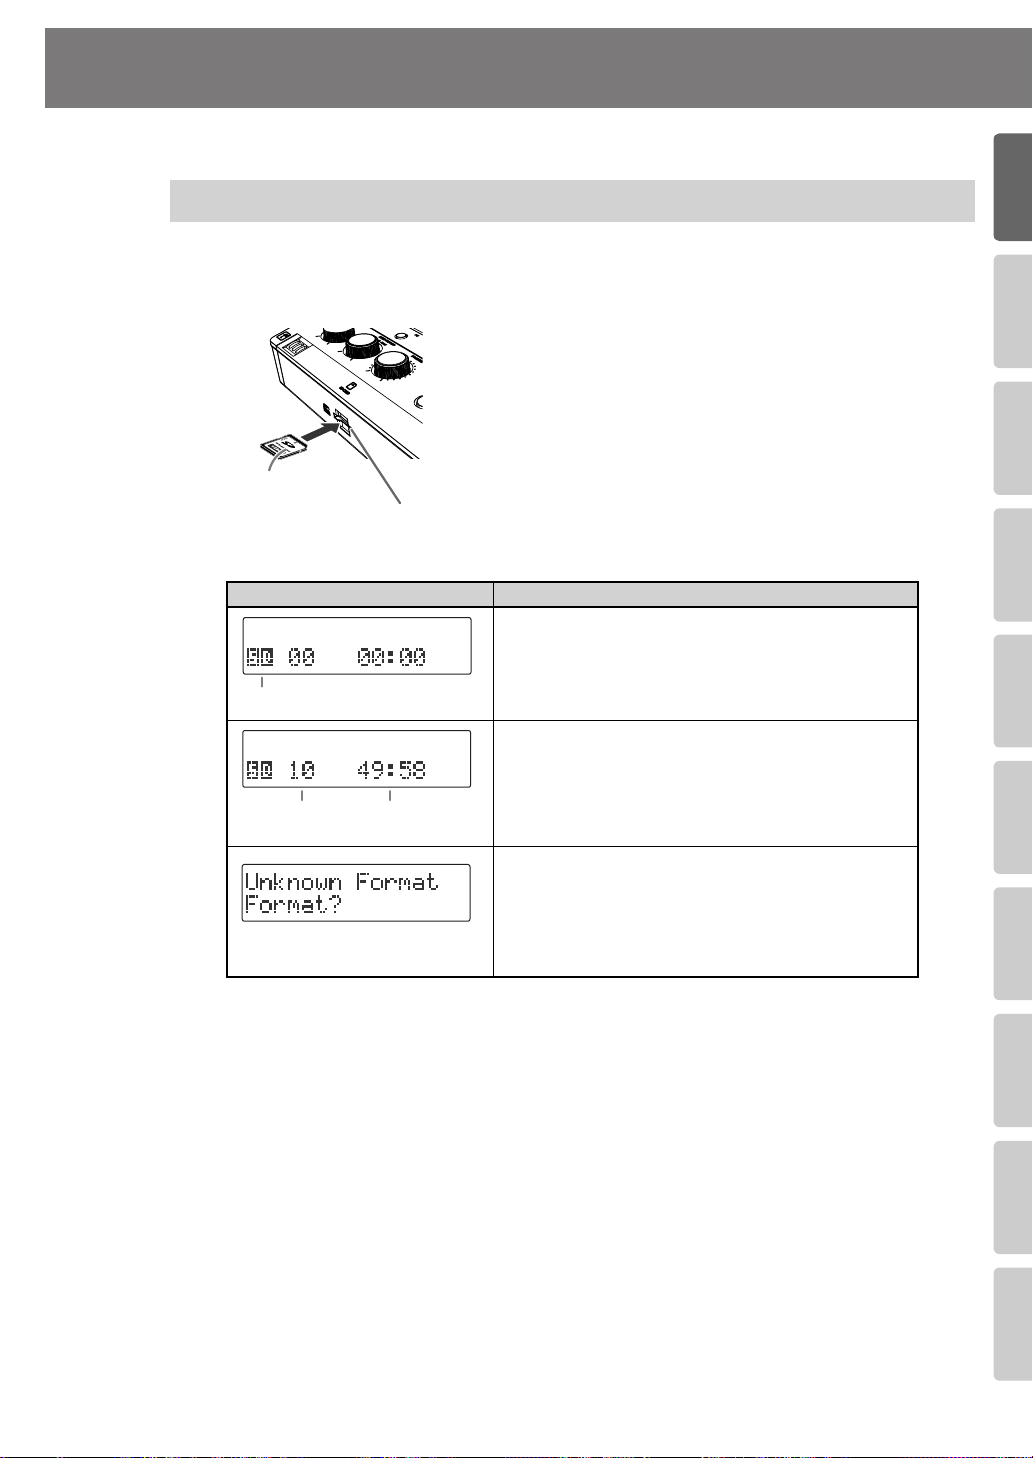
Inserting an SD Memory Card
1
Insert the SD memory card into the SD card slot on the CD-2i’s front
panel.
Printed surface
upward
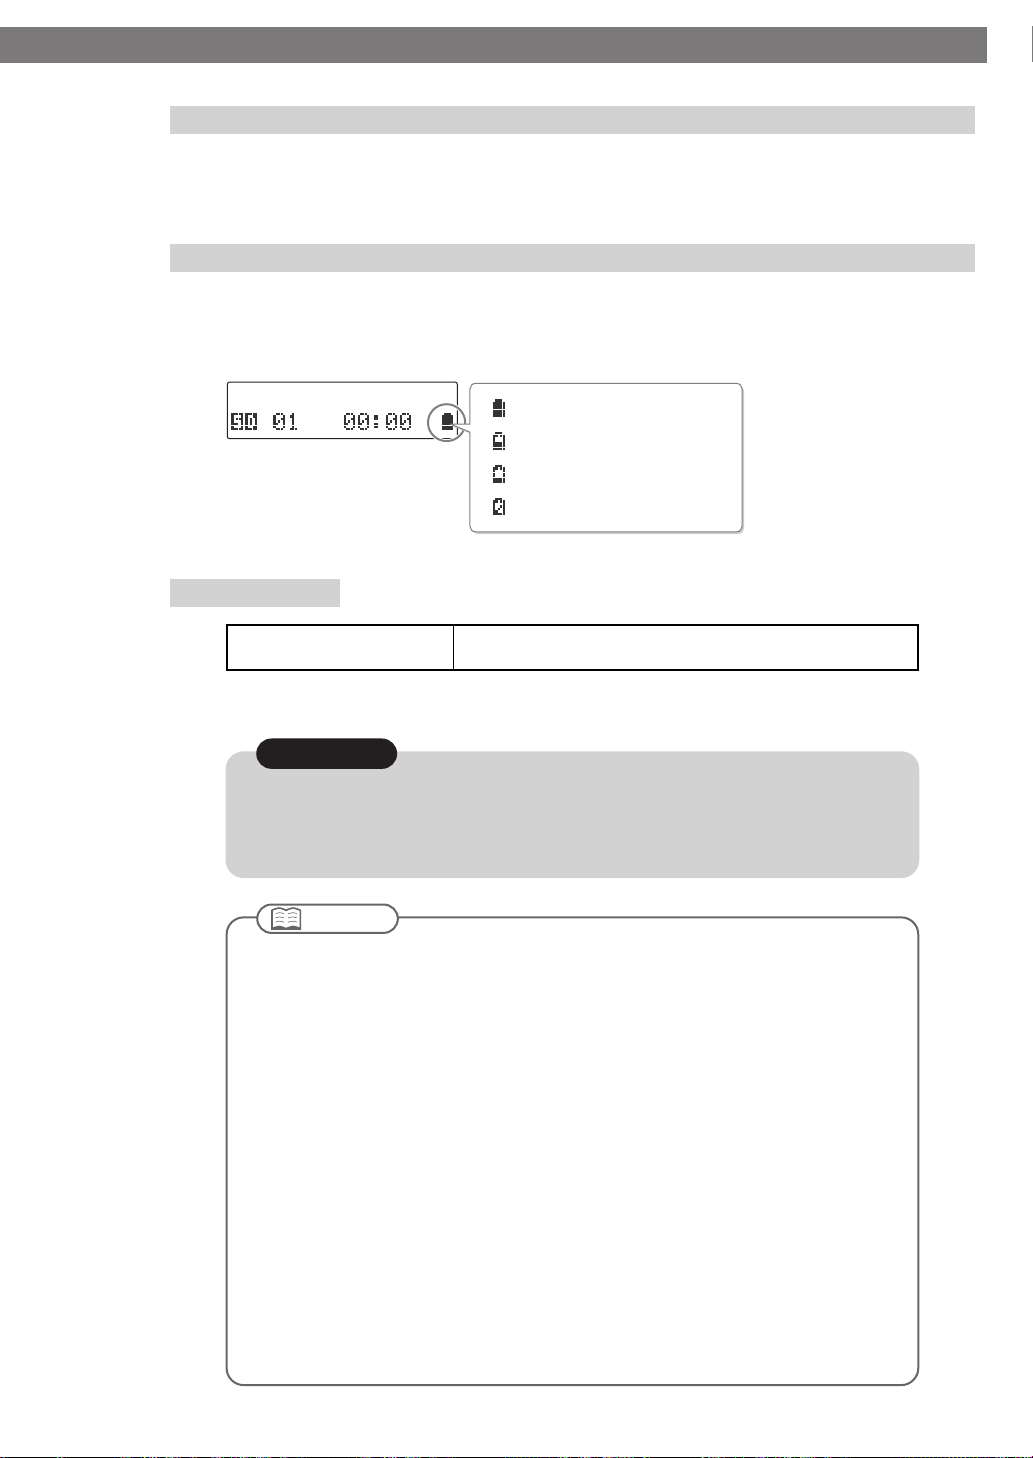
Displayed screen
Audio source
Total number
of tracks
SD card slot
Total playback time
fig.SDcard01-e.eps
With the printed surface of the SD memory card
facing upward, insert the card until it clicks into
position.
* Carefully insert the SD memory card all the way in-
until it is firmly in place. Forcing it in the wrong
way may damage the CD-2i or the SD memory
card.
fig.SDcard02.eps
Status of the SD memory card
Nothing has been recorded yet.
A song has been recorded.
* If the SD memory card has already been recorded, the
total number of songs and the total playback time will
be displayed when the SD memory card information is
loaded.
This SD memory card cannot be used by the CD-2i in its
current state.
* If this message is shown, you’ll need to format the card
before using it with the CD-2i. For details, refer to the
section on the following page entitled “If the screen
indicates ‘Not CD-2i Format’.”
25
Page 26

Preparing an SD Memory Card
The memory card write protect feature (LOCK)
fig.SDlock.eps
The contents of the memory card can be protected by
write protecting it. To write protect a card, slide the write
protect switch on the side of the memory card to the
“LOCK” position.
Unlock write protect to delete data on the card.
If the screen indicates “Unknown Format”
In some cases when you insert an unused SD memory card that you purchased at a
consumer electronic retailer, or an SD memory card that has been used with a computer
or digital camera, the screen may indicate “Unknown Format. Format?”
In order to use this SD memory card with the CD-2i, you’ll need to format the card.
Proceed as follows to format the card.
(continued)
Protect switch
Note
●
While formatting is in progress, you must never turn off the power or remove the SD
memory card.
●
When you format an SD memory card, any data that was on that card will be erased. Data
that’s been lost in this way cannot be recovered. Please make sure that you really want to
format the card.
1 To begin formatting, press the [ENTER] button.
fig.SDcard05.eps
2 If you’re sure you want to proceed, press the [ENTER] button.
(If you decide to cancel, press the [EXIT] button.)
fig.SDcard06.eps
The screen will indicate “Processing..,” and the card will be formatted. When formatting
is completed, you’re returned to the audio source screen.
26
Page 27
Advanced UsesRecording Listening Deleting Creating a CD Editing an SD Appendices
Convenient
Functions
Information
/ Display
Checking /
Preparations
Removing an SD Memory Card
Preparing an SD Memory Card
(continued)
Note
Never insert or remove an SD memory card while this unit’s power is on. Doing so may
corrupt the unit’s data or the SD memory card.
Turn the power off (☞
1
Gently press the SD memory card inward, and then release your finger.
2
Page 21, 24)
.
When the memory card pops part of the way out, pull it all the way out.
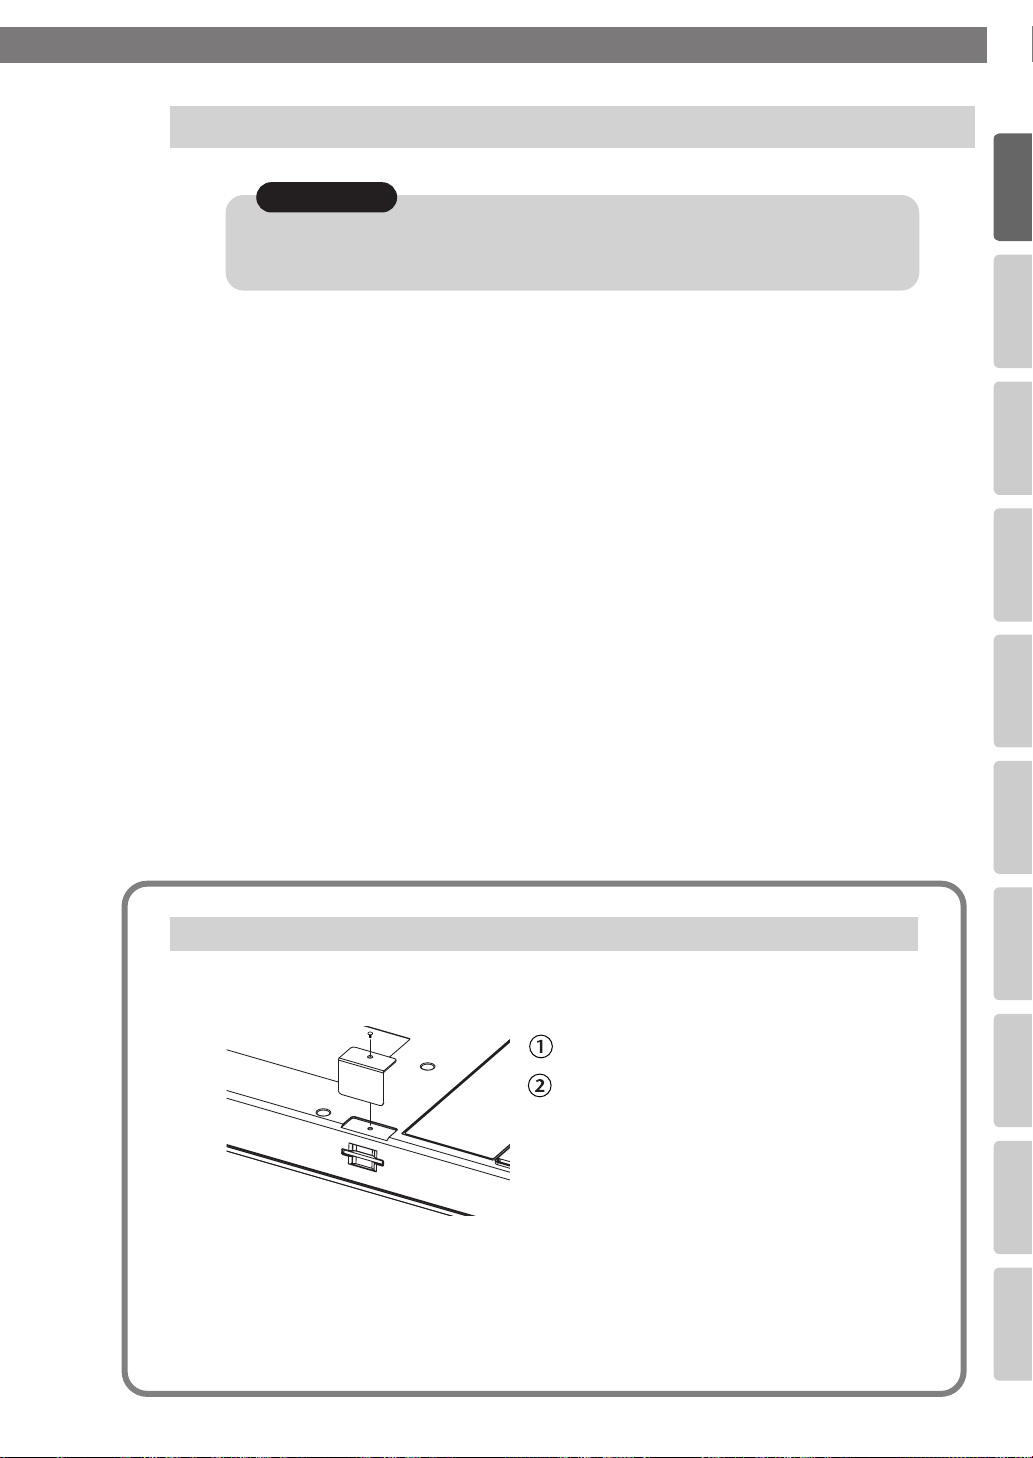
Using the Included SD Memory Card Protector
You can use the included SD memory card protector to prevent theft of an SD memory
card inserted in the CD-2i.
*
Bottom
of CD-2i
* When fastening the screw, take care not to overtighten it. Doing so may strip the threads or the
head of the screw.
* Take care not to lose the screw.
* Keep the removed screw out of the reach of small children so that it will not be swallowed
accidentally.
*
*
Remove the screw from the bottom panel....
Use the removed screw to attach the protector.
27
Page 28
Preparing a CD
Here’s how to prepare a CD-R/RW disc for recording or a music CD for playback.
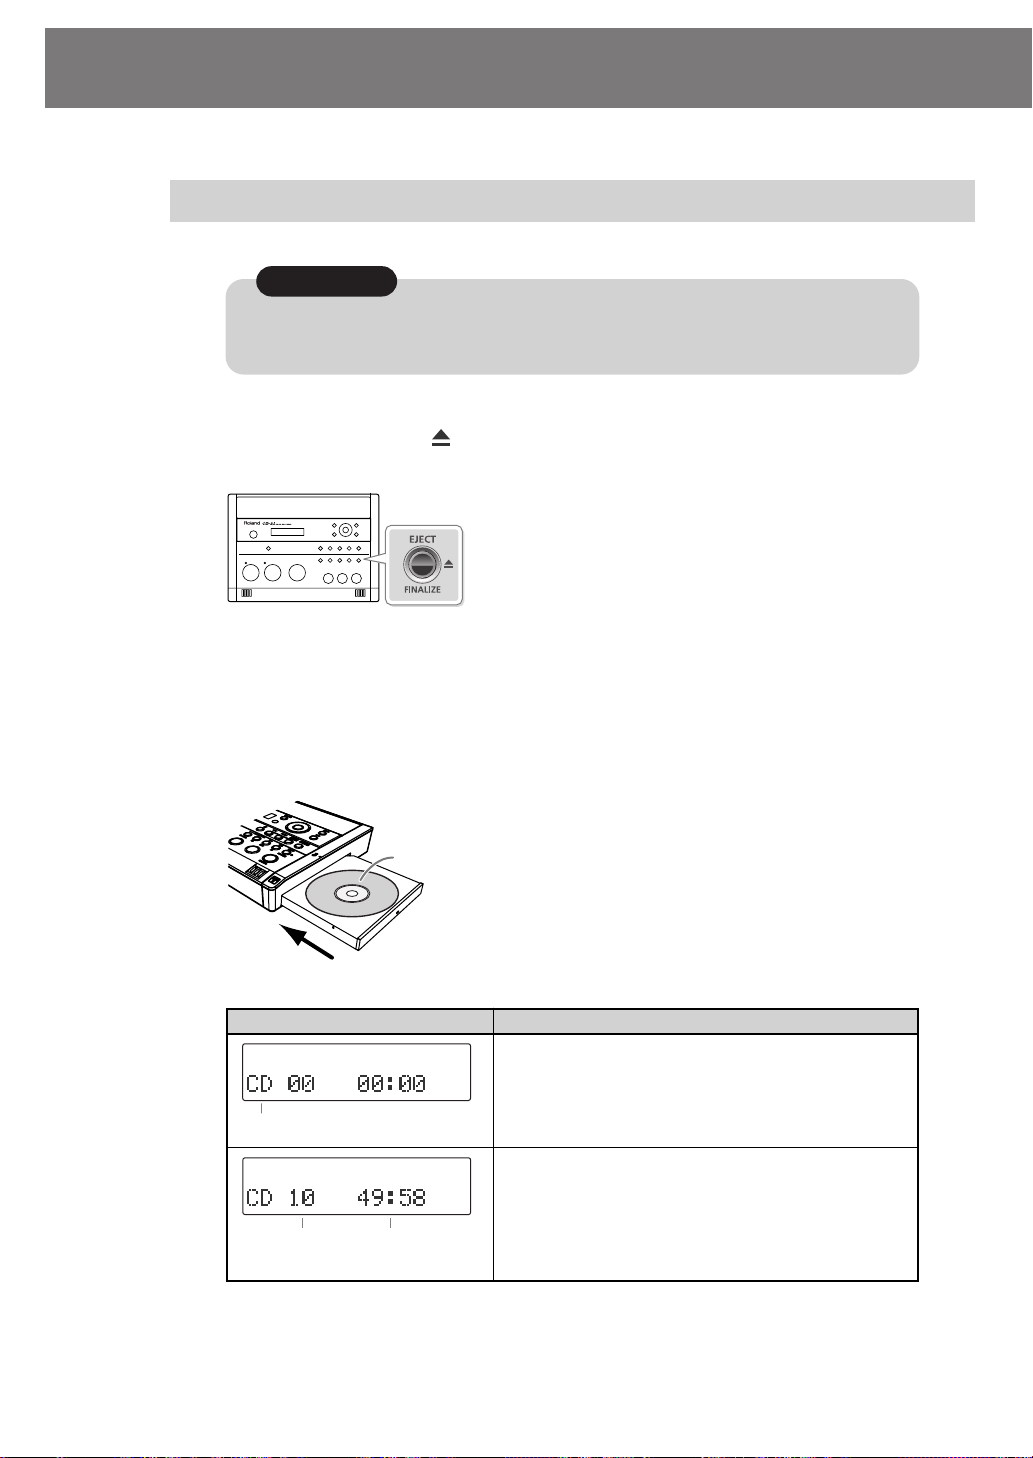
Inserting a CD
Note
Do not use CDs that have a CD label or sticker affixed to them. You may be unable to remove
the CD, or it may cause the CD-2i to malfunction.
Press the [CD EJECT ( )] button.
1
The tray will open partially. Use your hand to pull it open.
2
Place the CD in the tray.
Make sure that the CD is securely locked onto the spindle.
3
Press the tray inward to close it.
fig.CD01.eps
Insert with the label surface facing upward.
Screen display CD status
Audio source
Total number
of tracks
Total playback time
Nothing has been recorded yet.
Songs have been recorded (or written).
* In the case of an already-recorded (or written) CD-R/
RW disc or music CD, the total number of songs and
the total playback time will be displayed once the CD
information has been read.
28
Page 29
Advanced UsesRecording Listening Deleting Creating a CD Editing an SD Appendices
Convenient
Functions
Information
/ Display
Checking /
Preparations
Emergency eject hole
Preparing a CD
Removing a CD
1
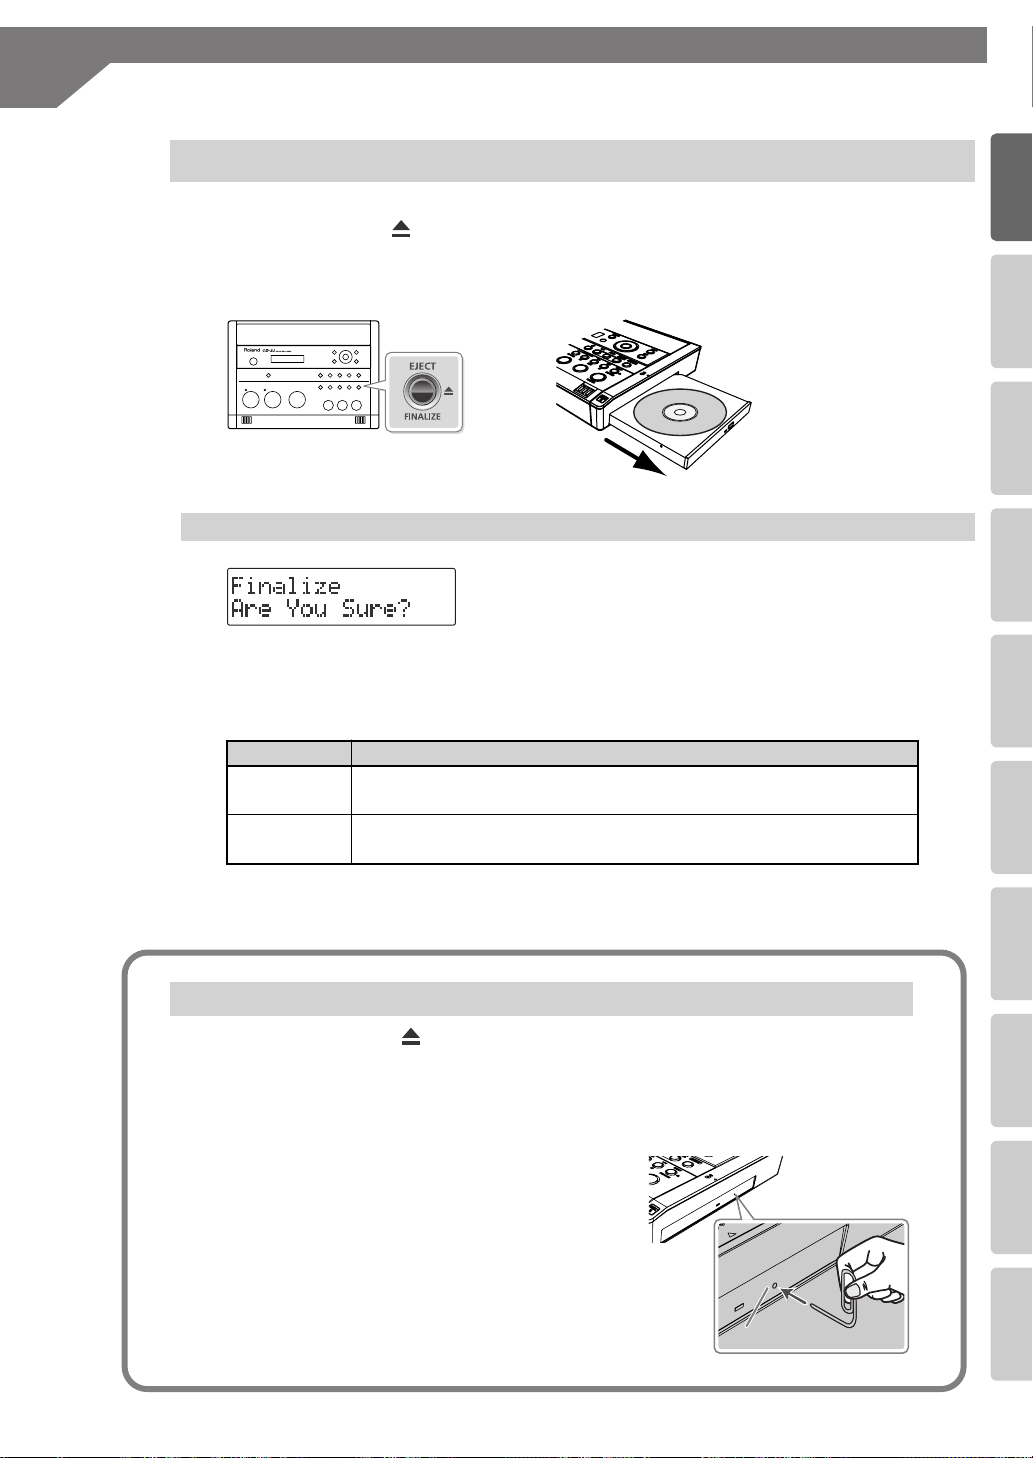
Press the [EJECT( )] button.
After the CD has been ejected, pull it all the way out.
fig.CD04.eps
If the screen shows “Finalize Are You Sure?”
fig.finalize-mssg01.eps
If the CD-R/RW disc has not been finalized, a message
will ask “Finalize Are You Sure?” If you don’t want to
finalize the disc for playing on other CD players, press the
[EXIT] button and remove the disc after it’s been ejected.
For details on finalizing, refer to “Making a CD-R/RW Disc for Playback on Another CD
Player (Finalize)” (Page 102).
(continued)
Finalize
Yes
No
Response
Press the [ENTER] button.
The CD-RW disc will be finalized and then ejected.
Press the [EXIT] button.
The CD-R/RW disc will be ejected.
If You are Unable to Eject the Disc
If pressing the [EJECT ] button does not eject the disc, you can use the emergency
eject hole to forcibly eject the CD.
* Before using the emergency eject hole to eject the CD, you must turn off the power of the CD-2i.
1 Turn off the power (☞ Page 21).
2 Insert a thin wire (such as a straightened
paper clip) into the emergency eject hole.
Insert and remove the wire repeatedly until the CD
comes out.
29
Page 30
Preparing the Remote Control
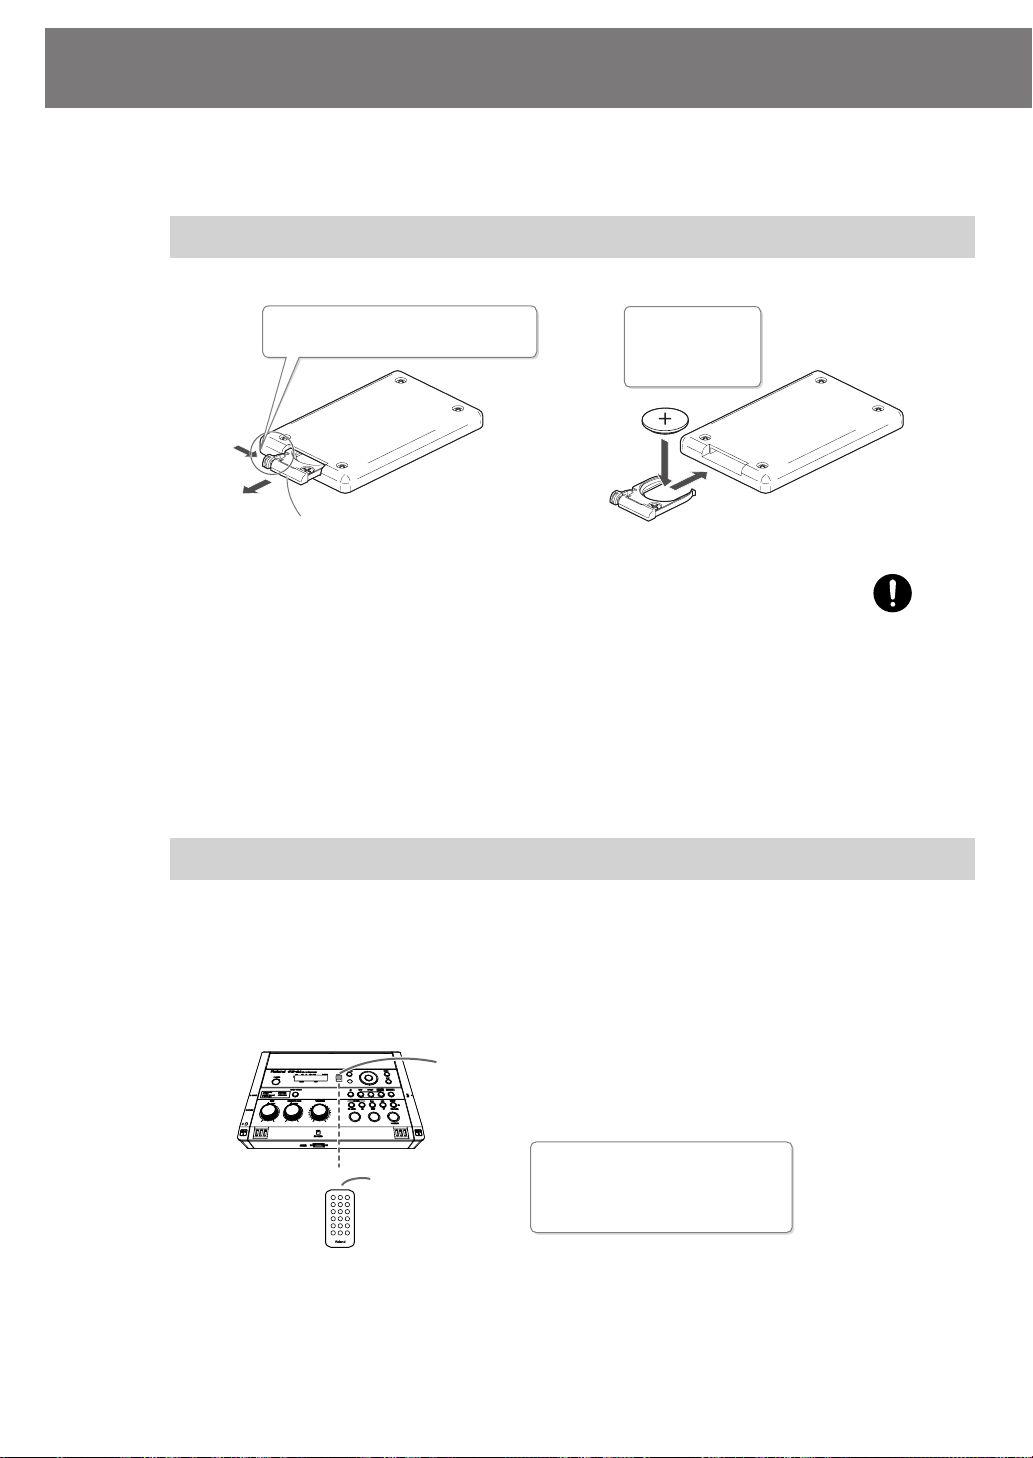
When shipped from the factory, a coin-type lithium battery is installed in the remote
control unit. To start using the remote control unit, simply pull out the insulating sheet
that extends from the battery compartment.
Replacing the Remote Control’s Battery
Install a coin-type
fig.remote01-e.eps
Press here in the direction of the
arrow while you pull out the holder.
1
Battery holder
* Use only the specified type (model no.CR2025) of lithium battery. Be sure to insert it as
directed to ensure correct polarity.
1
Pull out the battery holder.
2
Insert a lithium battery (CR2025) as shown in the illustration.
3
Replace the battery holder.
Push it inward until it clicks into place.
battery in the remote control.
lithium
Back side of the
remote control
2
Batteries to use:
Lithium battery
(CR2025)
30
Using the Remote Control
Point the remote control toward the CD-2i’s sensor, and operate it within the specified
operating range.
When the remote sensor detects a remote control operation, the [ENTER] button will
blink.
fig.remote02-e.eps
Remote sensor
Transmitter
* Even if the remote control is within range, it may not work if there is an obstruction between it
and the remote sensor, or if the angle is excessive.
* The battery life will depend on the conditions of use. When the battery runs down, the operating
angle will become narrower. Replace the battery if this occurs.
* If you won’t be using the remote control for an extended period of time, remove the battery.
* If a spotlight or other strong light is directed at the remote sensor, it will be less responsive.
Remote control operating range
Distance: 5 meters
Angle: 45 degrees or less
Page 31

Preparing the Remote Control
Advanced UsesRecording Listening Deleting Creating a CD Editing an SD Appendices
Convenient
Functions
Information
/ Display
Checking /
Preparations
(continued)
Disabling Remote Control Operation
If you want to prevent inadvertent operation of the remote control, you can disable
remote operation.
1 Press the [MENU] button to access the menu screen, and choose “Remote
Control.”
Press the [MENU] button to access the menu screen.
Use the [ ] [ ] buttons to choose “Remote
Control.”
Press the [ENTER] button to confirm your choice.
2 Use the [+] [-] buttons to turn the remote control operation on/off.
fig.menu-remote02.eps
Value Explanation
Off Remote operation will be disabled (off).
On (factory setting) Remote operation will be enabled (on).
3 Press the [EXIT] button twice.
You’re returned to the audio source screen.
31
Page 32

Menu Operations
When you press the [MENU] button, the menu screen will appear. In the menu screen you can
make settings for recording/playback, and settings for the CD-2i itself.
You can’t access the menu screen during recording-standby mode or recording. Also, there
are some settings that cannot be made while the CD-2i is running on batteries or is playing
back.
For details on each setting, refer to “List of Settings” on the following page.
1
Press the [MENU] button to access the menu screen.
fig.menu01-e.eps
Use the [ ] [ ] buttons to choose the item you wish to set.
2
fig.menu02.eps
Category
Setting
* You can use the [+] [-]
buttons to switch the
display between
categories.
3
Press the [ENTER] button to confirm your choice.
fig.menu03.eps
4
Use the [+] [-] buttons to change the value.
* Some items, such as SD memory card editing, do not have a value.
fig.menu04-e.eps
Setting
Press the [EXIT] button twice.
5
Pressing the [EXIT] button once will take you back to the menu screen.
fig.menu05.eps
Value
32
Page 33

Advanced UsesRecording Listening Deleting Creating a CD Editing an SD Appendices
Convenient
Functions
Information
/ Display
Checking /
Preparations
List of Settings
Category
Menu Operations
* The default value (factory setting) is printed in bold characters.
* The ✓ symbol in the “Battery” or “Playback” column indicates a setting that can be made while the CD-2i is
running on batteries or playing back.
Battery
Playback
Setting (details) Values
(continued)
Reference
page
Audio
RECORDING
PLAYBACK
MIC Select
(Selects either the built-in mics or an external mic.)
PHANTOM Power
(Determines whether phantom power will be supplied to the
external mic.)
EXT MIC Sens
(Adjusts the sensitivity of the external mic.)
INT MIC Balance
(Adjusts the left/right volume balance of the internal mics.)
INT MIC Exchange
(Exchanges the left and right channels of the internal mics.)
Limiter
(Automatically adjusts the input level during recording so that
loud sounds will not cause distortion.)
LINE/PHONO Input
(Selects line input or phono input)
OUTPUT Select
(Specifies the audio source that will be output from the LINE
OUT jack.)
Auto Rec Start
(Automatically initiates recording when audio input is
detected.)
Auto Marker
(Automatically adds a song number while recording.)
Auto Marker Lvl
(Specifies the audio level that will be considered to be silence
when automatically adding song numbers during recording.)
Auto Marker Time
(Specifies the time interval at which song numbers will
automatically be added during recording.
Count-in (Beat)
(Inserts a count-in at the beginning of recording.)
Repeat
(Repeatedly plays one song or all songs.)
Resume
(Remembers the location at which the song was stopped, and
resumes playback from that point the next time.)
Bass
(Adjusts the tone of the low-frequency range.)
Treble
(Adjusts the tone of the high-frequency range.)
Reverb
(Adds reverberation.)
Internal
, External
Off
, On
Low,
High
L50–C–R50
Off
, On
Off,
On
LINE
, PHONO
Mix
, MIC, LINE, SD/CD
Off
, -48dB, -36dB,
-24dB, -12dB, -6dB
Off
, Time, Level
-60dB
, -54dB, -48dB,
-42dB, -36dB, -30dB,
-24dB
2min
–15min
Off
, 1–16
Off
, 1 Track, All Tracks
Off
, On
-10–0–+10
-10–0–+10
Off, Light, Medium,
Deep
✓
✓
✓
✓
✓
✓
✓
✓ ✓
✓ ✓
✓ ✓
✓ ✓
✓ ✓
✓ ✓
✓ ✓
✓ ✓
✓
✓
Page 47
Page 123
Page 124
Page 69
Page 127
Page 64
Page 67
Page 68
Page 68
Page 67
Page 70
Page 81
Page 73
Page 74
Page 74
Page 75
33
Page 34

Menu Operations
Category
Setting (details) Values
(continued)
Battery
Playback
Reference
page
SD CARD
CD-R/RW
TUNER
Erase One?
(Deletes the selected song.)
SD Erase All?
(Deletes all songs.)
Move?
(Moves the song.)
Trim In?
(Deletes silence from the beginning of the song.)
Trim Out?
(Deletes silence from the end of the song.)
Divide?
(Divides the song in two.)
Combine?
(Joins two songs into a single song.)
Normalize?
(Maximizes the volume of the entire song.)
Change Key?
(Changes the key of the selected song, and creates a new
song.)
Change Pitch?
(Changes the pitch of the selected song, and creates a new
song.)
Change Speed?
(Changes the playback speed of the selected song, and creates
a new song.)
Center Cancel
(Eliminates the audio heard from the center of the song, and
creates a new song.)
Overdub CD→SD?
(Layers a performance or vocal onto a CD song.)
Overdub SD→SD?
(Records another performance or vocal onto a song you
recorded on an SD memory card.)
Format?
(Formats the SD memory card.)
Card Info
(Displays information about the SD memory card.)
Erase Last?
(Deletes the last song from the CD-RW disc.)
CD Erase All?
(Deletes all songs from the CD-RW disc.)
Unfinalize?
(Removes finalization from the CD-RW disc.)
Make Backup?
(Backs up an original music CD.)
Write (SD→CD)?
(Creates a CD from the selected songs of the SD memory card.)
Disc Info
(Displays information about the CD-R/RW disc.)
Tuner/Tone?
(Activates the tuner or sounds a tuning reference tone.)
—
—
—
—
—
—
—
—
-6–0–+5
-100–0–+100
50–
100
–+125
On1
, On2
— Page 58
—
—
—
— Page 94
— Page 95
— Page 96
— Page 103
— Page 97
— Page 117
“Pitch“
435–
440
–445
“Tone”
A3–A4–A5
✓
✓
✓
✓
✓
✓
✓
✓
✓
✓
✓
✓
✓
✓
✓
✓
Page 88
Page 89
Page 106
Page 90
Page 92
Page 107
Page 109
Page 110
Page 111
Page 112
Page 113
Page 114
Page 61
Page 122
Page 116
Page 86
Page 87
34
Page 35

Advanced UsesRecording Listening Deleting Creating a CD Editing an SD Appendices
Convenient
Functions
Information
/ Display
Checking /
Preparations
Category
Setting (details) Values
Menu Operations
Battery
Playback
(continued)
Reference
page
SYSTEM
Category
METRONOME
Auto Power Off
(Enables/disables automatic power-off when no panel
operation has been performed for a specified length of time.)
Remote Control
(Enabled/disables remote control operation.)
Contrast
(Adjusts the visibility of the characters in the screen.)
Backlight Timer
(Specifies the time until the screen will be dimmed.)
Language ( )
(Selects the screen display language.)
Factory Reset?
(Returns the menu settings to their factory-set state.)
Off
, 5min, 10 min,
15,min, 30 m in, 60 min,
90 min,
Off, On
1– 5 –8
Off, 2 sec, 5 sec,
10 sec, 20 sec
EN English ,
ES Español, DE Deutsch
FR Français, IT Italiano
—
Setting (details) Values
Sound
(Specifies the metronome sound.)
Tempo
(Specifies the metronome tempo.)
Beat
(Specifies the timing of the metronome’s accented beats.)
Level
(Specifies the volume of the metronome.)
Silent, Bell , Click, Voice ✓ ✓ Page 83
20– 120 –250
0– 4 –7, ,
-6– 0 –+6
120 min
JP
Page 22
✓
,
✓
✓
✓
✓
✓
✓
Battery
Page 31
✓
Page 118
✓
Page 119
✓
Page 120
✓
Page 121
Playback
Reference
page
✓ ✓ Page 83
✓ ✓ Page 84
✓ ✓ Page 84
Category
Setting (details) Values
Key
(Changes the playback pitch of the song in semitone steps.)
Key
Pitch
(Changes the playback pitch of the song in steps of 1/100th of
a semitone.)
Category Setting (details) Values
Speed
(Makes the Playback speed slower/faster.)
Speed
Category
Center
Cancel
Tape Mode
(Causes the playback pitch to change along with the playback
speed, as in tape playback.)
Setting (details) Values
Center Cancel
(Eliminates the sound heard from the center, such as vocals.)
-6– 0 –+5
-100–0–+100
50–
100
–125
Off
,On
On1 , On2
Battery
Playback
Reference
page
✓
✓
✓
Battery
Page 77
✓
Page 78
Playback
Reference
page
✓ ✓
Page 79
✓ ✓ Page 79
Battery
Playback
Reference
page
✓
✓
Page 80
35
Page 36

About Easy Guide
Easy Guide is a convenient function that lets you operate the CD-2i simply by following the
on-screen instructions without having to open the owner’s manual.
1
Press the [EASY GUIDE] button.
fig.guide01-e.eps
Use the [ ] [ ] buttons to select the item for which you want to see an
2
operation guide.
fig.menu02.eps
Easy Guide is available for the following seven operations.
Item
Explanation of operation
Item
1. Recording
2. Erase Erase a track on either an SD memory card or a CD-RW disc.
3. Write (SD→CD)
4. CD Backup Make a backup of your original music CD.
5. Karaoke
6. Overdub
7. Rehearsal
3
Press the [ENTER] button to confirm your choice.
fig.menu03.eps
4
Operate the CD-2i as directed by the screen.
Explanation
Record a vocal or instrumental performance to either an SD memory
card or a CD-R/RW disc.
Create a music CD by writing tracks from an SD memory card to a
CD-R/RW disc.
While playing back a music CD you can add your own vocal, and record
the combined result on an SD memory card.
While playing back a previously recorded performance from an SD
memory card, you can layer (or overdub) another vocal or instrumental
performance and record the combined result to a new track.
Automatically sets the optimal input level while you rehearse your
performance.
If you change your mind during a procedure, press the [EXIT] button.
36
For details on items that need to be set in the screens appearing in Easy Guide, refer to
“Setting Items in Easy Guide” (Page 37).
Page 37

Advanced UsesRecording Listening Deleting Creating a CD Editing an SD Appendices
Convenient
Functions
Information
/ Display
Checking /
Preparations
Setting Items in Easy Guide
This section explains items that you can set in the screens appearing in Easy Guide.
1. Recording
Displayed screen
Explanation
Select the media to be used for recording.
CD-R/RW Choose this if you’re recording on a CD-R/RW disc.
SD Card Choose this if you’re recording on an SD memory card.
Select what you want to record.
Easy INT MIC Choose this if you’re making a test recording using the internal
mics.
Acoustic Inst Choose this if you’re recording an acoustic instrument (e.g.,
piano, guitar, string instrument, or wind instrument).
Vocal Choose this if you’re recording a vocal.
Digital Piano Choose this if you’re recording an electronic musical
instrument (e.g., digital piano or synthesizer).
Casette Tape Choose this if you’re recording from a cassette tape or a MD.
Record Player Choose this if you want to record from a record.
Speech Choose this if you’re recording a conference.
Select the way in which the recording level is to be adjusted.
No Adjust the input level manually using the [MIC] knob or [LINE/
PHONO] knob.
2. Erase
Displayed screen
Yes After a rehearsal, the level will be set to the appropriate level
automatically.
Explanation
Select the media that you want to erase.
CD-RW Choose this if you’re erasing tracks from a CD-R/RW disc.
SD Card Choose this if you’re erasing tracks from an SD memory card.
Select how the songs are to be erased.
All Tracks All songs will be erased.
Last Track The last song on the CD-RW disc will be erased.
1 Track The selected song will be erased.
* If you’re using an SD memory card, you can choose “All Tracks” or “1 Track.”
* If you’re using a CD-RW disc, you can choose “All Tracks” or “Last Track.”
37
Page 38

Setting Items in Easy Guide
3. Write (SD→CD)
(continued)
Displayed screen
4. CD Backup
5. Karaoke
Displayed screen
Explanation
Select whether or not the disc is to be finalized once writing is complete.
Yes When writing has been completed, the disc will be finalized to
CD
complete your music
No The disc will not be finalized when writing has been completed.
Explanation
Select a song.
Make settings for Center Cancel (Page 80).
The setting will turn on/off each time you press the [CENTER CANCEL] button.
“
On1 ”and “On2 ”provide different center cancellation effects. Try out both,
and use the setting that is best for your situation.
On1
.
6. Overdub
Displayed screen
On2
Select the way in which the recording level is to be adjusted.
No Adjust the input level manually using the [MIC] knob.
Yes After a rehearsal, the level will be set to the appropriate level
automatically.
Explanation
Select a song.
38
Page 39

Setting Items in Easy Guide
Advanced UsesRecording Listening Deleting Creating a CD Editing an SD Appendices
Convenient
Functions
Information
/ Display
Checking /
Preparations
: MIC
Select
(continued)
7. Rehearsal
Displayed screen
Explanation
Select what you want to record.
Easy INT MIC Choose this if you’re making a test recording using the internal
mics.
Acoustic Inst Choose this if you’re recording an acoustic instrument (e.g.,
piano, guitar, string instrument, or wind instrument).
Vocal Choose this if you’re recording a vocal.
Digital Piano Choose this if you’re recording an electronic musical
instrument (e.g., digital piano or synthesizer).
Casette Tape Choose this if you’re recording from a cassette tape or a MD.
Record Player Choose this if you want to record from a record.
Select the way in which the recording level is to be adjusted.
No Adjust the input level manually using the [MIC] knob or [LINE/
PHONO] knob.
Yes After a rehearsal, the level will be set to the appropriate level
automatically.
Displayed screen
* The input level adjustment made by the rehearsal function will remain in effect until the
Explanation
Specifies which input level is to be adjusted.
MIC The MIC input level will be adjusted.
LINE/PHONO The LINE/PHONO input level will be adjusted.
corresponding input knob is operated or the power is turned off. You’ll need to execute the
rehearsal function again the next time you turn the power on.
39
Page 40

Recording Acoustic Instruments or Vocals
Recording with the Internal Mics
ig.intmic-e.eps
The internal mics are stereo mics. Sound picked up
by the mic on the left side of the CD-2i is recorded
on the left channel (L), while sound from the mic on
the right side is recorded on the right channel (R).
Internal mic
(left channel)
Internal mic
(right channel)
If You’re Recording to an SD
Memory Card
1
Turn on the power (☞
2
Insert the SD memory card
(☞ Page 25).
3
Set the audio source to “SD.”
Press the [SD CARD] button so it’s lit.
If you want to listen to the recorded audio while you record, connect
4
fig.selectCD-e.eps
Page 21, 23).
If You’re Recording to a
CD-R/RW Disc
1
Turn on the power (☞
2
Insert the CD (☞
3
Set the audio source to “CD.”
Press the [CD] button so it’s lit.
Page 28).
fig.selectSD-e.eps
headphones to the PHONES jack located on the side of the CD-2i.
The sound received by the internal mics will not be heard from the internal speakers.
You’ll need to use headphones if you want to monitor the sound being recorded. Use
the [VOLUME] knob to adjust the headphone volume.
fig.connect-headphone-e.eps
Page 21).
40
Type of plug that can
be connected
Stereo mini type
Page 41

Advanced UsesRecording Listening Deleting Creating a CD Editing an SD Appendices
Convenient
Functions
Information
/ Display
Checking /
Preparations
5
Select the internal mics.
fig.menu-overdub-e.eps
Recording Acoustic Instruments or Vocals
(continued)
Press the [MENU] button to access the menu screen.
Use the [ ] [ ] buttons to choose “MIC Select.”
Press the [ENTER] button to confirm your choice.
Use the [+] [-] buttons to change the value to select
“Internal.“
Adjust the input level of the internal mics.
6
On the CD-2i’s left side, set the [MIC LEVEL] switch to its “MANUAL” position.
fig.rec-intmic02.eps
Turn the [MIC] knob to adjust the input level of the internal mics.
Adjust the loudness of the sound you’re recording. Since you’re not using the LINE/PHONO
input, turn the [LINE/PHONO] knob all the way to the left (off).
While producing the sound that you’ll actually be recording, turn the [MIC] knob to adjust the
input level.
Adjust the level so that the PEAK indicator located above the [MIC] knob lights briefly at the
loudest moments of the performance or vocal you’ll be recording.
* When using the [MIC] knob or [LINE/PHONO] knob, you might hear a slight noise when the
recording level changes; this does not indicate a malfunction.
fig.rec-intmic03-e.eps
LouderQuieter
The level meter will move according
to the level of the audio input.
At this position
PEAK indicator
The input level and the recorded result
●
If the input level is high There is a limit on the level that the CD-2i is able to record.
The PEAK indicator will light to indicate that the audio input has exceeded this limit (i.e.,
the input is too loud). If you record even though the PEAK indicator is lit, the recorded
audio will be distorted.
●
If the input level is too low The recorded audio will not be distorted, but the playback
will not be as loud as it should be.
41
Page 42

Recording Acoustic Instruments or Vocals
7
Press the [ ](Record) button to enter recording-standby mode.
fig.rec-intmic04-e.eps
Press the [ ](Play) button to begin recording.
8
Start your performance.
fig.rec-intmic05-e.eps
Press the [ ](Stop) button to stop recording.
9
fig.rec-intmic06-e.eps
(continued)
Lit
Blinking
Remote control
Remote control
Remote control
The recorded song will be added to the end of the SD memory card or CD-R/RW disc.
If you want to listen to the song you recorded, press the [ ](Play) button
immediately after you stop recording.
Important
●
Since the CD-2i is equipped with highly-sensitive mics, undesired sounds such as the
operating noise of the CD-R/RW drive or the sound of buttons being pressed may be
recorded inadvertently. If you notice such problems, you can try lowering the input level
of the internal mics.
If you’re recording to an SD memory card, no CD-R/RW drive operating noise will be
recorded.
●
Depending on where the CD-2i is positioned in relation to the sound source, the recorded
sound may not be evenly distributed between the left and right speakers. In such cases,
you can adjust the left/right volume balance of the internal mics and record your
performance again. For details, refer to “Adjusting the Left/Right Volume Balance of the
Internal Mics” (Page 123).
●
When turning the [MIC] knob, you may hear a faint noise when the input level changes,
but this is not a malfunction.
●
If you’ve finished recording a CD-R/RW disc and would like to play that disc on another
CD player, you’ll need to execute the “Finalize” operation. You can finalize the CD-R/RW
disc when ejecting it. For details, refer to “Making a CD-R/RW Disc for Playback on
Another CD Player (Finalize)” (Page 102).
42
Page 43

Advanced UsesRecording Listening Deleting Creating a CD Editing an SD Appendices
Convenient
Functions
Information
/ Display
Checking /
Preparations
Recording Acoustic Instruments or Vocals
Automatically Setting the Optimal Input Level from Your Rehearsal
Performance (Rehearsal Function)
Instead of manually adjusting the [MIC input] knob or [LINE/PHONO input] knob, you
can use this function to automatically set the optimal input level while you perform the
music you intend to record.
“7. Rehearsal” (Page 39)
Play the loudest portion in the song.
Adjusting the Input Level Automatically (Auto Level Function)
The Auto Level function can adjust the input level automatically during recording in
response to the loudness of the audio signal. Auto Level is particularly suitable for
recordings that are mainly of human voices, such as a conference or lecture.
To use the Auto Level function, make the following settings in Step 6- on Page 41.
In this case, the input level will be adjusted automatically, so you won’t need to perform
Step 6- .
(continued)
Set the [MIC LEVEL] switch located on the CD-2i’s side panel to its
“AUTO” (automatic) position.
Switch setting Explanation
MANUAL Record at the input level determined by the [MIC] knob.
AUTO
Turn on the Auto Level function. The input level will be adjusted automatically.
The input level will not change even if you turn the [MIC] knob.
43
Page 44

Recording Acoustic Instruments or Vocals
Connecting an External Mic for Recording
fig.extmic.eps
Here’s how to record using a connected dynamic mic or
stereo mic. Dynamic mics are highly durable, and are suitable
for recording instruments or vocals. They also have the
advantage of not requiring a power supply.
* The CD-2i supports condenser mics that require phantom power. In
this case, connect your mic to the XLR connector.
* If you encounter a problem with noise or distortion, see “The
recorded sound is noisy or distorted” (Page 130).
(continued)
If You’re Recording to an SD
memory Card
1
Turn on the power (☞
Insert the SD memory card
2
(☞ Page 25).
3
Set the audio source to “SD.”
Press the [SD CARD] button so it’s lit.
Connect your mic to the EXT MIC jack located on the CD-2i’s side panel.
4
fig.connect-extmic-e.eps
Types of plugs that can
be connected
Phone type, XLR type
fig.selectCD-e.eps
Page 21, 23).
If You’re Recording to a
CD-R/RW Disc
1
Turn on the power (☞
Insert the CD (☞
2
3
Set the audio source to “CD.”
Press the [CD] button so it’s lit.
Page 28).
fig.selectSD-e.eps
Page 21).
LR
44
When connecting one mic (monaural)
Connect to the MONO jack (XLR type) or the
L/MONO jack.
* If you connect it to the R jack, only the right
channel (R) will be recorded.
When connecting two mics (stereo)
The sound from the mic connected to the L/
MONO jack will be recorded on the left
channel (L), and the sound from the mic
connected to the R jack will be recorded on the
right channel (R).
Page 45

Advanced UsesRecording Listening Deleting Creating a CD Editing an SD Appendices
Convenient
Functions
Information
/ Display
Checking /
Preparations
5
Select the External mics.
Recording Acoustic Instruments or Vocals
fig.menu-overdub-e.eps
Press the [MENU] button to access the menu screen.
(continued)
Use the [ ] [ ] buttons to choose “MIC Select.”
Press the [ENTER] button to confirm your choice.
Use the [+] [-] buttons to change the value to select
“External.“
Adjust the input level of the external mic.
6
On the CD-2i’s left side, set the [MIC LEVEL] switch to its “MANUAL” position.
fig.rec-intmic02.eps
Turn the [MIC] knob to adjust the input level of the external mics.
Adjust the loudness of the sound you’re recording. Since you’re not using the LINE/PHONO
input, turn the [LINE/PHONO] knob all the way to the left (off).
While producing the sound that you will actually be recording, turn the [MIC] knob to adjust
the input level.
Adjust the level so that the PEAK indicator located above the [MIC] knob lights briefly at the
loudest moments of the performance or vocal you’ll be recording.
* When using the [MIC] knob or [LINE/PHONO] knob, you might hear a slight noise when the
recording level changes; this does not indicate a malfunction.
fig.rec-intmic03-e.eps
LouderQuieter
The level meter will move according
to the level of the audio input.
At this position
PEAK indicator
* If sound from the speakers enters the mic, you won’t be able to adjust the level correctly. While
adjusting the level, either turn the [VOLUME] knob all the way down or turn the speakers off, so
no sound will be produced. Use headphones if you want to monitor the sound that’s being
recorded.
If the sound from the microphone distorted even though you’ve turned the [MIC] knob down,
you can decrease the external mic sensitivity. At the factory settings, the external mic
sensitivity is set to “High.” If the level meter does not move sufficiently, change this setting to
“Low.” For details, refer to the text box “Selecting the External Mic Sensitivity” on Page 47.
45
Page 46

Recording Acoustic Instruments or Vocals
7
Press the [ ](Record) button to enter recording-standby mode.
fig.rec-intmic04-e.eps
Press the [ ](Play) button to begin recording.
8
Start your performance.
fig.rec-intmic05-e.eps
Press the [ ](Stop) button to stop recording.
9
fig.rec-intmic06-e.eps
(continued)
Lit
Blinking
Remote control
Remote control
Remote control
The recorded song will be added to the end of the SD memory card or CD-R/RW disc.
If you want to listen to the song you recorded, press the [ ](Play) button
immediately after you stop recording.
Important
●
Sound will not be produced from the speakers while in recording-standby mode or while
recording. If you want to listen to the sound that’s being recorded, you’ll need to use
headphones. (Refer to Step 4 on Page 40.)
●
If you hear acoustic feedback (a squealing sound) while using the mic, try changing the
direction of the mic, moving it away from the speakers, or lowering the volume.
●
When turning the [MIC] knob, you may hear a faint noise when the input level changes,
but this is not a malfunction.
●
If you’ve finished recording a CD-R/RW disc and would like to play that disc on another
CD player, you’ll need to execute the “Finalize” operation. You can finalize the CD-R/RW
disc when ejecting it. For details, refer to “Making a CD-R/RW Disc for Playback on
Another CD Player (Finalize)” (Page 102).
46
Page 47

Advanced UsesRecording Listening Deleting Creating a CD Editing an SD Appendices
Convenient
Functions
Information
/ Display
Checking /
Preparations
Selecting the External Mic Sensitivity
Recording Acoustic Instruments or Vocals
(continued)
You can set the sensitivity as appropriate for the external mic you’re using.
1 Press the [MENU] button to access the menu screen, and choose “EXT
MIC Sens.”
fig.menu-micsens02.eps
Press the [MENU] button to access the menu screen.
Use the [ ] [ ] buttons to choose “EXT MIC
Sens.”
Press the [ENTER] button to confirm your choice.
2 Use the [+] [-] buttons to change the external mic sensitivity setting.
Value Explanation
Lowers the sensitivity of the external mic. If the movement of the level meter
Low
High
(factory setting)
does not decrease when you adjust the input level, select the “Low” setting.
This is appropriate for a condenser mic.
Raises the sensitivity of the external mic. If the movement of the level meter
does not increase when you adjust the input level, select the “High” setting.
This is appropriate for a dynamic mic.
3 Press the [EXIT] button twice.
You’re returned to the audio source screen.
47
Page 48

Recording Acoustic Instruments or Vocals
Using Phantom Power
The EXT MIC MONO jack can supply 48 V phantom power, allowing you to connect a
condenser mic that requires phantom power.
Turn on the phantom power switch if you’re using a condenser mic that requires
phantom power.
* The included AC adaptor is required if you’re using phantom power.
* Be sure to turn off the phantom power switch unless you’ve connected a mic that requires
phantom power. Supplying phantom power to a dynamic mic or an audio playback device will
cause malfunctions. Before use, please check the specifications of the mic you’re connecting.
(This device’s phantom power supply: DC 48 V, 10 mA max.)
1 Press the [MENU] button to access the menu screen, and choose
“Phantom Power.”
(continued)
fig.menu-micsens02.eps
Press the [MENU] button to access the menu screen.
Use the [ ] [ ] buttons to choose “Phantom
Power”
Press the [ENTER] button to confirm your choice.
2 Use the [+] [-] buttons to change the setting to select phantom power.
Value Explanation
Off
On Phantom power will be supplied.
* It takes several seconds for phantom power to be switched. Please note that during this time, the
audio from the mic will be muted so that recording and output will not be possible.
Phantom power will not be supplied.
3 Press the [EXIT] button twice.
You’re returned to the audio source screen.
48
Page 49

Advanced UsesRecording Listening Deleting Creating a CD Editing an SD Appendices
Convenient
Functions
Information
/ Display
Checking /
Preparations
Recording an Electronic Instrument
Here’s how to connect an electronic instrument such as a digital piano or keyboard, and
record your performance.
If you’re Recording to an SD
Memory Card
1
Turn on the power (☞
Page 21, 23)
.
If you’re Recording to a
CD-R/RW Disc
1
Turn on the power (☞
Page 21)
.
2
Insert the SD memory card
(☞ Page 25).
3
Set the audio source to “SD.”
Press the [SD CARD] button so it’s lit.
Connect the CD-2i’s LINE/PHONO IN jacks to your electronic instrument
4
fig.selectCD-e.eps
2
Insert the CD (☞
3
Set the audio source to “CD.”
Press the [CD] button so it’s lit.
Page 28).
fig.selectSD-e.eps
(digital piano, keyboard, etc.).
Use audio cables to connect the CD-2i’s LINE/PHONO IN jacks to the output jacks of
your electronic musical instrument.
fig.connect-piano-e.eps
To the output jacks of your
electronic musical instrument
RL
Types of plugs that can be connected
CD-2i: RCA phono type
Electronic musical instrument: RCA phono type or phone type
* Refer to the owner’s manual of your electronic musical instrument for the appropriate
type of plug to use.
5
Press the [MENU] button to access the menu screen and select “LINE/
PHONO Input.“
fig.menu-overdub-e.eps
Press the [MENU] button to access the menu screen.
Use the [ ] [ ] buttons to choose “LINE/PHONO
Input.”
Press the [ENTER] button to confirm your choice.
Use the [+] [-] buttons to change the value to select
“LINE.“
* With the factory settings, this is set to Line.
49
Page 50

Recording an Electronic Instrument
6
Turn the [LINE/PHONO] knob to adjust the input level at the LINE/
PHONO IN jacks.
Adjust the loudness of the sound you’re recording. Since you’re not using the mic input,
set the [MIC LEVEL] switch to the “MANUAL” position, and then turn the [MIC] knob all
the way to the left (off).
While producing the sound that you will actually be recording, turn the [LINE/PHONO]
knob to adjust the input level.
Adjust the level so that the PEAK indicator located above the [LINE/PHONO] knob lights
briefly at the loudest moments of the performance you’ll be recording.
* When using the [MIC] knob or [LINE/PHONO] knob, you might hear a slight noise when the
recording level changes; this does not indicate a malfunction.
fig.rec-line-e.eps
At this position
Press the [ ](Record) button to enter recording-standby mode.
7
fig.rec-intmic04-e.eps
(continued)
LouderQuieter
PEAK indicator
Blinking
The level meter will move according
to the level of the audio input.
Remote control
Press the [ ](Play) button to begin recording.
8
Start your performance.
fig.rec-intmic05-e.eps
Lit
9
Press the [ ](Stop) button to stop recording.
fig.rec-intmic06-e.eps
Remote control
Remote control
The recorded song will be added to the end of the SD memory card or CD-R/RW disc.
If you want to listen to the song you recorded, press the [ ](Play) button
immediately after you stop recording.
50
Page 51

Advanced UsesRecording Listening Deleting Creating a CD Editing an SD Appendices
Convenient
Functions
Information
/ Display
Checking /
Preparations
Recording an Electronic Instrument
Important
●
Sound will not be produced from the speakers while in recording-standby mode or while
recording. If you want to listen to the sound that’s being recorded, you’ll need to use
headphones. (Refer to Step 4 on Page 40.)
●
When turning the [LINE/PHONO] knob, you may hear a faint noise when the input level
changes, but this is not a malfunction.
●
When connection cables with resistors are used, the volume level of equipment connected
to the LINE/PHONO IN
not contain resistors.
●
If you’ve finished recording a CD-R/RW disc and would like to play that disc on another
CD player, you’ll need to execute the “Finalize” operation. You can finalize the CD-R/RW
disc when ejecting it. For details, refer to “Making a CD-R/RW Disc for Playback on
Another CD Player (Finalize)” (Page 102).
●
If you want to record your performance on an
electronic piano together with your voice, make
connections as shown in this illustration so that
the sound from the mic will also be output from
the speakers of the electronic piano.
With this setup, set LINE OUT Select to “MIC” to
prevent a feedback loop from occurring
between the CD-2i and the electronic piano. For
details, refer to “Selecting the Audio Source
that’s Sent from the LINE OUT Jack” (Page 127).
jacks
may be low. If this happens, use connection cables that do
INPUT
OUTPUT
Electronic
piano
Mic
EXT MIC (L/MONO)
LINE IN
LINE OUT
(continued)
CD-2i
51
Page 52

Recording a Cassette or MD
Here’s how to record the sound from a cassette or MD.
If You’re Recording to an SD
Memory Card
1
Turn on the power (☞
2
Insert the SD memory card
(☞ Page 25).
3
Set the audio source to “SD.”
Press the [SD CARD] button so it’s lit.
Connect your audio device (e.g., cassette deck) to the CD-2i’s LINE/
4
fig.selectCD-e.eps
Page 21, 23).
If You’re Recording to a
CD-R/RW Disc
1
Turn on the power (☞
2
Insert the CD (☞
3
Set the audio source to “CD.”
Press the [CD] button so it’s lit.
Page 28).
fig.selectSD-e.eps
PHONO IN jacks.
Use audio cables to connect the CD-2i’s LINE/PHONO IN jacks to the output jacks of
your audio device (e.g., cassette deck).
fig.connect-record-e.eps
To the output jacks of
the record player
RL
Page 21).
52
Types of plugs that can be connected
CD-2i: RCA phono type
Audio device: RCA phono type
5
Press the [MENU] button to access the menu screen and select “LINE/
PHONO Input.“
* Portable players use a stereo mini type jack.
fig.menu-overdub-e.eps
Press the [MENU] button to access the menu screen.
Use the [ ] [ ] buttons to choose “LINE/PHONO
Input.”
Press the [ENTER] button to confirm your choice.
Use the [+] [-] buttons to change the value to select
“LINE.“
* With the factory settings, this is set to Line.
Page 53

Advanced UsesRecording Listening Deleting Creating a CD Editing an SD Appendices
Convenient
Functions
Information
/ Display
Checking /
Preparations
Recording a Cassette or MD
6
Turn the [LINE/PHONO] knob to adjust the input level at the LINE/
PHONO IN jacks.
Adjust the loudness of the sound you’re recording. Since you’re not using the mic input,
set the [MIC LEVEL] switch to the “MANUAL” position, and then turn the [MIC] knob all
the way to the left (off).
While playing the song to be recorded, turn the [LINE/PHONO] knob to adjust the input
level.
Adjust the level so that the PEAK indicator located above the [LINE/PHONO] knob lights
briefly during the loudest passages of the song that’s being recorded.
* When using the [MIC] knob or [LINE/PHONO] knob, you might hear a slight noise when the
recording level changes; this does not indicate a malfunction.
fig.rec-line-e.eps
(continued)
LouderQuieter
At this position
PEAK indicator
7
Press the [ ](Record) button to enter recording-standby mode.
fig.rec-intmic04-e.eps
Blinking
Press the [ ](Play) button to begin recording.
8
Lit
9
Play back your audio device (e.g., cassette deck).
The level meter will move according
to the level of the audio input.
Remote control
Remote control
The song being played will be recorded.
10
Press the [ ](Stop) button to stop recording.
fig.rec-intmic06-e.eps
Remote control
The recorded song will be added to the end of the SD memory card or CD-R/RW disc.
If you want to listen to the song you recorded, press the [ ](Play) button
immediately after you stop recording.
53
Page 54

Recording a Cassette or MD
●
Sound will not be produced from the speakers while in recording-standby mode or while
recording. If you want to listen to the sound that’s being recorded, you’ll need to use
headphones. (Refer to Step 4 on Page 40.)
●
When turning the [LINE/PHONO] knob, you may hear a faint noise when the input level
changes, but this is not a malfunction.
●
When connection cables with resistors are used, the volume level of equipment connected
to the LINE/PHONO IN may be low. If this happens, use connection cables that do not
contain resistors.
●
If you’ve finished recording a CD-R/RW disc and would like to play that disc on another
CD player, you’ll need to execute the “Finalize” operation. You can finalize the CD-R/RW
disc when ejecting it. For details, refer to “Making a CD-R/RW Disc for Playback on
Another CD Player (Finalize)” (Page 102).
(continued)
Important
54
Page 55

Advanced UsesRecording Listening Deleting Creating a CD Editing an SD Appendices
Convenient
Functions
Information
/ Display
Checking /
Preparations
Recording a record
Here’s how to record the sound of a record.
You can connect a record player directly to the CD-2i. If your record player has a phono
equalizer, refer to “Recording a cassette or MD” (Page 52).
* If you encounter a problem with noise or distortion, see “The recorded sound is noisy or
distorted” (Page 130).
If You’re Recording to an SD
Memory Card
1
Turn on the power (☞
Page 21, 23)
.
If You’re Recording to a
CD-R/RW Disc
1
Turn on the power (☞
Page 21).
2
Insert the SD memory card
(☞ Page 25).
3
Set the audio source to “SD.”
Press the [SD CARD] button so it’s lit.
Connect your audio device (e.g., cassette deck) to the CD-2i’s LINE/
4
fig.selectCD-e.eps
2
Insert the CD (☞
3
Set the audio source to “CD.”
Press the [CD] button so it’s lit.
Page 28).
fig.selectSD-e.eps
PHONO IN jacks.
Use audio cables to connect the CD-2i’s LINE/PHONO IN jacks to the output jacks of
your audio device (e.g., cassette deck).
fig.connect-record-e.eps
To the output jacks of
the record player
RL
Types of plugs that can be connected
CD-2i: RCA phono type
Audio device: RCA phono type
* The grounding wire from your record player should be connected to the ground terminal on the
side of the CD-2i.
Press the [MENU] button to access the menu screen and select “LINE/
5
PHONO Input.“
fig.menu-overdub-e.eps
Press the [MENU] button to access the menu screen.
Use the [ ] [ ] buttons to choose “LINE/PHONO
Input.”
Press the [ENTER] button to confirm your choice.
Use the [+] [-] buttons to change the value to select
“PHONO.“
* With the factory settings, this is set to Line.
55
Page 56

Recording a record
6
(continued)
Turn the [LINE/PHONO] knob to adjust the input level at the LINE/
PHONO IN jacks.
Adjust the loudness of the sound you’re recording. Since you’re not using the mic input,
set the [MIC LEVEL] switch to the “MANUAL” position, and then turn the [MIC] knob all
the way to the left (off).
While playing the song to be recorded, turn the [LINE/PHONO] knob to adjust the input
level.
Adjust the level so that the PEAK indicator located above the [LINE/PHONO] knob lights
briefly during the loudest passages of the song that’s being recorded.
* When using the [MIC] knob or [LINE/PHONO] knob, you might hear a slight noise when the
recording level changes; this does not indicate a malfunction.
fig.rec-line-e.eps
LouderQuieter
At this position
PEAK indicator
7
Press the [ ](Record) button to enter recording-standby mode.
fig.rec-intmic04-e.eps
Blinking
8
Press the [ ](Play) button to begin recording.
Start your performance.
9
Play back your audio device (e.g., cassette deck).
The song being played will be recorded.
10
Press the [ ](Stop) button to stop recording.
fig.rec-intmic06-e.eps
The level meter will move according
to the level of the audio input.
Remote control
Remote control
56
The recorded song will be added to the end of the SD memory card or CD-R/RW disc.
If you want to listen to the song you recorded, press the [ ](Play) button
immediately after you stop recording.
Page 57

Advanced UsesRecording Listening Deleting Creating a CD Editing an SD Appendices
Convenient
Functions
Information
/ Display
Checking /
Preparations
Recording a record
Important
●
Sound will not be produced from the speakers while in recording-standby mode or while
recording. If you want to listen to the sound that’s being recorded, you’ll need to use
headphones. (Refer to Step 4 on Page 40.)
●
When turning the [LINE/PHONO] knob, you may hear a faint noise when the input level
changes, but this is not a malfunction.
●
When connection cables with resistors are used, the volume level of equipment connected
to the LINE/PHONO IN jack may be low. If this happens, use connection cables that do
not contain resistors.
●
If you’ve finished recording a CD-R/RW disc and would like to play that disc on another
CD player, you’ll need to execute the “Finalize” operation. You can finalize the CD-R/RW
disc when ejecting it. For details, refer to “Making a CD-R/RW Disc for Playback on
Another CD Player (Finalize)” (Page 102).
(continued)
57
Page 58

Recording Karaoke
Here’s how the sound from a karaoke CD and the sound of your voice from a mic can be
recorded together to an SD memory card (i.e., overdubbing that adds your voice or
performance to a song from CD).
The CD-2i provides a Center Cancel function, which lets you use a commercial CD as a simple
karaoke source. For details, refer to “Enjoying Simple Karaoke (Center Cancel)” (Page 80).
* In order to perform this operation, you’ll need the included, dedicated AC adaptor.
1
Turn on the power (☞
2
Insert the SD memory card for recording (☞
3
Connect your mic to the EXT MIC jack located on the CD-2i’s side panel.
fig.connect-extmic-e.eps
Page 21)
.
Page 25)
.
Types of plugs that can
be connected
Phone type, XLR type
When connecting one mic (monaural)
Connect to the MONO jack (XLR type) or the
L/MONO jack.
* If you connect it to the R jack, only the right
channel (R) will be recorded.
4
Select the External mics.
5
On the CD-2i’s left side, set the [MIC LEVEL] switch to its “MANUAL”
position.
fig.rec-intmic02.eps
fig.menu-overdub-e.eps
Press the [MENU] button to access the menu screen.
Use the [ ] [ ] buttons to choose “MIC Select.”
Press the [ENTER] button to confirm your choice.
Use the [+] [-] buttons to change the value to select
“External.“
When connecting two mics (stereo)
The sound from the mic connected to the L/
MONO jack will be recorded on the left
channel (L), and the sound from the mic
connected to the R jack will be recorded on the
right channel (R).
58
Page 59

Advanced UsesRecording Listening Deleting Creating a CD Editing an SD Appendices
Convenient
Functions
Information
/ Display
Checking /
Preparations
Recording Karaoke
6
Prepare your karaoke CD.
Insert the karaoke CD (☞ Page 28).
Press the [CD] button so it’s lit, and set the audio source to “CD.”
Use the [ ] [ ] buttons to select the song that you want to record.
7
Adjust the CD’s playback level and the mic’s input level.
Adjust the levels to obtain the desired volume balance between the CD and the mic.
* If sound from the speakers enters the mic, you won’t be able to adjust the level correctly. While
adjusting the level, either turn the [VOLUME] knob all the way down or turn the speakers off, so
no sound will be produced. Use headphones if you want to monitor the sound that’s being
recorded.
Press the [ ](Play) button to play back the CD.
(continued)
Press the [ ] or [ ] button to access the SD/CD Level setting screen.
Use the [+] [-] buttons to adjust the CD’s playback level (“SD/CD Level”).
fig.player-level.eps
* If you don’t press the [+] [-] buttons for five seconds,
you’ll automatically be returned to the audio source
display.
Value (units: dB)
-6–0 (factory setting)–6
Turn the [MIC] knob to adjust the input level of the external mics.
As a guideline, adjust the level so that the level meter’s “-3 dB” indicator lights briefly when
the CD audio and mic audio are heard together.
Adjust the loudness of the sound you’re recording. Since you’re not using the LINE/PHONO
input, turn the [LINE/PHONO] knob all the way to the left (off).
When you’ve finished adjusting the level, press the [ ](Stop) button to stop the CD
playback.
* When using the [MIC] knob or [LINE/PHONO] knob, you might hear a slight noise when the
recording level changes; this does not indicate a malfunction.
fig.overdub-CD01.eps
LouderQuieter
Explanation
Decreasing this value will lower the playback level.
Increasing it will raise the playback level.
“0” is the CD’s original playback level.
-3dB
At this position
59
Page 60

Recording Karaoke
8
(continued)
Press the [MENU] button to access the menu screen, and choose
“Overdub CD→SD?”
Press the [MENU] button to access the menu screen.
Use the [ ] [ ] buttons to choose “Overdub CD→SD?”
fig.menu-overdub-e.eps
Press the [ENTER] button to confirm your choice.
The CD-2i will be in recording-standby mode.
fig.overdub-CD02-e.eps
Blinking
CD song number
to record
Press the [ ](Play) button to begin recording.
9
Recording-destination
song number on the
SD memory card
The music CD track you selected in Step 6- begins playing, and recording on the SD
memory card begins simultaneously. Record your vocal or instrumental performance.
fig.overdub-CD03-e.eps
Lit
During recording, the upper right
of the screen will show “CD → SD.”
Remote control
When CD playback stops at the end of the song, recording will also end automatically.
If you want to stop recording in the middle of the song, press the [ ](Stop) button.
The recorded song will be added to the end of the SD memory card. If you want to listen
to the song you recorded, press the [ ](Play) button immediately after you stop
recording.
60
Important
●
“Key” (Page 77), “Pitch” (Page 78), and “Speed” (Page 79) settings will automatically
revert to the values of the original song only during recording. When recording ends,
these settings will return to the values you specified.
●
Sound will not be produced from the speakers while in recording-standby mode or while
recording. If you want to listen to the sound that’s being recorded, you’ll need to use
headphones. (Refer to Step 4 on Page 40.)
●
If you hear acoustic feedback (a squealing sound) while using the mic, try changing the
direction of the mic, moving it away from the speakers, or lowering the volume.
●
When turning the [MIC] knob, you may hear a faint noise when the input level changes,
but this is not a malfunction.
●
The playback level (“SD/CD Level”) setting is common to the CD and the SD memory
card. When you turn off the power, this setting will return to “0.”
Page 61

Advanced UsesRecording Listening Deleting Creating a CD Editing an SD Appendices
Convenient
Functions
Information
/ Display
Checking /
Preparations
Layering Your Performance onto an SD Memory
Card Song and Recording It
Here’s how you can play back a recorded performance from an SD memory card, add a vocal
or a performance of another instrument, and re-record the combined result onto the SD
memory card (overdubbing a vocal or other performance onto an SD memory card song).
Since you can perform and overdub each part separately, this allows you to record your piano
performance, and then sing along to add a vocal to your performance.
fig.SDtoSD-e.eps
SD memory card
Track number
Track number
All audio received via the external mics, internal mics, and LINE/PHONO input can be
overdubbed with a song on the SD memory card. Make settings as appropriate for your
instruments and your setup.
1
Piano
playback
1
New song with vocal added
2
Piano + VocalPiano
Turn on the power (☞
1
Insert the SD memory card (☞
2
Make preparations for recording.
3
If you’re using the internal mics
If you’re using an external mic
If you’re using the LINE inputs
If you’re using the PHONO
inputs
4
Prepare your SD memory card.
Press the [SD CARD] button so it’s lit, and set the audio source to “SD.”
Use the [ ] [ ] buttons to select the song that you want to record.
Page 21, 23).
Page 25).
Make preparations as described in Steps 5 on Page 40.
☞
Make preparations as described in Steps 4–5 on Page 44.
☞
Make preparations as described in Steps 4–5 on Page 49.
☞
Make preparations as described in Steps 4–5 on Page 55.
☞
61
Page 62

Layering Your Performance onto an SD Memory Card Song and Recording It
5
Adjust the playback level of the SD memory card and the input level of the
audio input.
Adjust each level to obtain the appropriate volume balance between the SD memory
card audio and the audio input.
Press the [ ](Play) button to play back the SD memory card.
Press the [ ] or [ ] button to access the SD/CD Level setting screen.
Use the [+] [-] buttons to adjust the SD memory card’s playback level (“SD/CD Level”).
fig.player-level.eps
* If you don’t press the [+] [-] buttons for five seconds,
you’ll automatically be returned to the audio source
display.
(continued)
Value (units: dB)
-6–0 (factory setting)–6
Adjust the input level of the audio input.
Adjust the levels so that the level meter briefly reaches the “-3 dB” indicator when the audio
from the SD memory card and the audio from the external source are being input
simultaneously.
When you’ve finished adjusting the level, press the [ ](Stop) button to stop the SD memory
card playback.
-3dB
Press the [MENU] button to access the menu screen, and choose
6
Explanation
Decreasing this value will lower the playback level.
Increasing it will raise the playback level.
“0” is the playback level of the original song.
fig.overdub-SD01.eps
Using the internal mics
Make adjustments as described in Step 6 of Page 41.
☞
Using the external mics
Make adjustments as described in Step 6 of Page 45.
☞
Using the LINE/PHONO inputs
Make adjustments as described in Step 6 of Page 50.
☞
Using the PHONO inputs
Make adjustments as described in Step 6 of Page 53.
☞
“Overdub SD→SD?”
Press the [MENU] button to access the menu screen.
62
Use the [ ] [ ] buttons to choose “Overdub SD→SD?”
fig.menu-overdubSD-SD-e.eps
Press the [ENTER] button to confirm your choice.
The CD-2i will be in recording-standby mode.
fig.overdub-SD02-e.eps
Song to record Recording-destination
song number
Blinking
Page 63

Advanced UsesRecording Listening Deleting Creating a CD Editing an SD Appendices
Convenient
Functions
Information
/ Display
Checking /
Preparations
Layering Your Performance onto an SD Memory Card Song and Recording It
7
Press the [ ](Play) button to begin recording.
When the SD memory card song you selected in Step 4- begins playing, recording
on the SD memory card will begin simultaneously. Start your performance.
fig.overdub-SD03.eps
Lit
During recording, the upper right
of the screen will show “SD → SD.”
Remote control
Press the [ ](Stop) button to stop recording.
8
The recorded song will be added to the end of the SD memory card. If you want to listen
to the song you recorded, press the [ ](Play) button immediately after you stop
recording.
Important
(continued)
●
“Key” (Page 77), “Pitch” (Page 78), and “Speed” (Page 79) settings will automatically
revert to the values of the original song only during recording. When recording ends,
these settings will return to the values you specified.
●
Sound will not be produced from the speakers while in recording-standby mode or while
recording. If you want to listen to the sound that’s being recorded, you’ll need to use
headphones. (Refer to Step 4 on Page 40.)
●
The playback level (“SD/CD Level”) setting is common to the CD and the SD memory
card. When you turn off the power, this setting will return to “0.”
●
If you decide to stop recording midway through the track, press the [ ](Stop) button.
63
Page 64

Convenient Functions for Recording
Automatically Starting Recording When Audio is Detected
When the CD-2i is in recording-standby mode and it detects audio input that exceeds
the specified level, recording will start automatically.
1
Press the [MENU] button to access the menu screen, and choose “Auto
Rec Start.”
2
Use the [+] [-] buttons to change the value that specifies the level at which
recording will begin automatically.
fig.menu-autorec02-e.eps
fig.menu-autorec01-e.eps
Press the [MENU] button to access the menu screen.
Use the [ ] [ ] buttons to choose “Auto Rec
Start.”
Press the [ENTER] button to confirm your choice.
Value
Off (factory setting)
-48dB The minimum level (volume) that will automatically initiate recording.
-36dB
-24dB
-12dB
-6dB
When you’re setting the input level, it’s a good idea to check how the level meter moves
at the beginning of the performance. To avoid losing any of the beginning of your
performance, set this trigger level lower than the level at which the performance begins.
3
Press the [EXIT] button twice.
You’re returned to the audio source screen.
This completes preparations for automatically initiating recording.
Explanation
Recording will start when you press [ ](Play) during recording
standby.
fig.autorec-level-e.eps
Low
Audio that will automatically initiate recording
-48dB -6dB
High
64
Page 65

Advanced UsesRecording Listening Deleting Creating a CD Editing an SD Appendices
Convenient
Functions
Information
/ Display
Checking /
Preparations
Convenient Functions for Recording
(continued)
When you make settings for automatic recording, the procedure for starting to record will be
as follows.
1
Press the [ ](Record) button.
fig.autorec01-e.eps
Blinking
Press the [ ](Play) button.
2
The CD-2i will be in recording-standby mode.
fig.autorec02-e.eps
Blinking
3
Start performing.
When the CD-2i detects audio, recording will begin automatically.
* In order to avoid losing any audio at the beginning of the performance, recording will actually
begin up to 0.5 seconds earlier than the point at which audio exceeding the specified level is
detected.
4
Press the [ ](Stop) button to stop recording.
The recorded song will be added to the SD memory card or to the end of the CD-R/RW
disc.
Important
●
Recording will pause when you press the [ ](Play) button. When audio is detected
once again, recording will begin automatically. The point at which recording is resumed
will be the next song.
●
Automatic recording will not work if you’ve specified a count-in (Page 70).
65
Page 66

Convenient Functions for Recording
Assigning Song Numbers While Recording (Marker)
During recording, you can assign a song number so that the subsequent material will be
recorded as the next song. You can assign song numbers in the following three ways.
(continued)
Assigning song numbers
Press the [ ](Record) button to assign the song number
Automatically assign song numbers at fixed intervals
Assign track numbers when silence is detected
Reference page
This page
Page 67
Page 68
Important
●
You can’t delete a track number once it’s been assigned.
●
You can assign track numbers only during recording.
●
You can’t assign a new track number less than four seconds after assigning the previous
track number.
●
You can assign up to 98 track numbers (99 tracks).
●
When you assign a track number to a CD-R/RW disc, two seconds of silence is
automatically inserted in front of the new track number.
Performance
CD-R/RW
Disc
●
If you’re assigning song numbers to a CD-R/RW disc,
you can’t assign a new song number while the
message at right is displayed.
* Recording will continue even while this message is displayed.
fig.marker02-e.eps
Track number Track number
AB
123
A
C
B
C
Silence (two seconds)
66
Press the [ ](Record) Button to Assign a Song Number
This lets you assign a song number whenever you like during recording. If several songs
are being recorded in succession, such as during a live performance, you can assign a
track number to each song while you continue recording.
1
At the point where you want to assign a track number during recording,
press the [ ] (Record) button.
The track number is incremented, and the material that follows will be recorded on the
new track.
fig.marker01-e.eps
Remote control
Page 67

Advanced UsesRecording Listening Deleting Creating a CD Editing an SD Appendices
Convenient
Functions
Information
/ Display
Checking /
Preparations
Convenient Functions for Recording
Automatically Assigning a Song Number at Fixed Intervals
When making a long recording such as a lecture, you can automatically assign track
numbers at fixed time intervals to divide the recording into tracks. If you’ve assigned
track numbers, it will be easier to find a desired location in the recording.
1
Specify how the song numbers will be assigned.
Value Explanation
Off Song numbers will not be assigned automatically.
Time
Level
Song numbers will be automatically assigned at the specified interval (units of
minutes) during recording.
Song numbers will be automatically assigned when silence is detected during
recording.
fig.menu-automarker01-e.eps
Press the [MENU] button to access the menu screen.
Use the [ ] [ ] buttons to choose “Auto Marker.”
Press the [ENTER] button to confirm your choice.
Use the [+] [-] buttons to specify the desired “Time.”
(continued)
Specify the time interval at which song numbers will be assigned.
2
Value (units: Minutes) Explanation
2 minutes (factory setting)–15 minutes
Press the [EXIT] button twice.
3
fig.menu-automarker03-e.eps
Press the [EXIT] button to return to the menu screen.
Use the [ ] [ ] buttons to choose “Auto Marker
Time.”
Press the [ENTER] button to confirm your choice.
Use the [+] [-] buttons to change the value to the
interval of time at which you want to assign song
numbers.
Specifies the time interval (minutes) at which song
numbers will be assigned.
You’re returned to the audio source screen.
Subsequently, when you begin recording, track numbers will automatically be assigned
at every time interval you’ve specified in Step 2.
To defeat this setting, choose “Off” in Step 1.
67
Page 68

Convenient Functions for Recording
Assigning Track Numbers When Silence is Detected
If a period of silence lasting longer than one second is detected during recording,
recording will automatically pause. Then, when audio exceeding the specified level is
subsequently detected, a song number will be assigned and recording will automatically
resume.
This function is convenient when you’re recording songs from a cassette tape or a MD,
since the songs will automatically be divided at regions of silence.
1
Specify how the song numbers will be assigned.
Value Explanation
Off Song numbers will not be assigned automatically.
Song numbers will be automatically assigned at the specified interval (units of minutes)
Time
during recording.
Level Song numbers will be automatically assigned when silence is detected during recording.
(continued)
fig.menu-automarker01-e.eps
Press the [MENU] button to access the menu screen.
Use the [ ] [ ] buttons to choose “Auto Marker.”
Press the [ENTER] button to confirm your choice.
Use the [+] [-] buttons to specify the desired “Level.”
Specify the audio level that will be considered to be silence.
2
Value
-60dB (factory setting)
-54dB
-48dB
-42dB
-36dB
-30dB
-24dB
Press the [EXIT] button twice.
3
fig.menu-automarker-lvl02-e.eps
Press the [EXIT] button to return to the menu screen.
Use the [ ] [ ] buttons to choose “Auto Marker
Lvl.”
Press the [ENTER] button to confirm your choice.
Use the [+] [-] buttons to specify the audio level that
will be considered to be silence.
Explanation
Audio below the specified level will be considered to be silence.
Low
Audio considered to be silence
-60dB -24dB
High
You’re returned to the audio source screen.
Now when you start recording, and a region of audio below the level specified in Step
2 continues for longer than one second, the next song number will be assigned
automatically.
To defeat this setting, choose “Off” in Step 1.
68
Page 69

Advanced UsesRecording Listening Deleting Creating a CD Editing an SD Appendices
Convenient
Functions
Information
/ Display
Checking /
Preparations
Convenient Functions for Recording
Preventing Loud Sounds from Distorting (Limiter)
This function automatically adjusts the input level so that the audio will not distort even
when unexpectedly loud sounds are received while recording.
1
Press the [MENU] button to access the menu screen, and choose
“Limiter.”
Use the [+] [-] buttons to turn the limiter on/off.
2
fig.menu-limiter02-e.eps
fig.menu-limiter01.eps
Press the [MENU] button to access the menu screen.
Use the [ ] [ ] buttons to choose “Limiter.”
Press the [ENTER] button to confirm your choice.
(continued)
Value
Off
On (factory setting) The limiter is on.
Press the [EXIT] button twice.
3
Explanation
The limiter is off.
You’re returned to the audio source screen.
Important
You can’t use the limiter function with the LINE/PHONO input. Using the [LINE/PHONO]
knob, adjust the input until it’s at an appropriate level.
69
Page 70

Convenient Functions for Recording
Inserting a Count Before Recording Begins (Count-in)
You can sound a count before recording begins. Hearing a count can help you practice
the timing or tempo of your performance before you actually start recording.
1
Press the [ ](Metronome) button to turn on the metronome.
fig.countin01-e.eps
Lit
Specify the sound, tempo, and time signature of the count.
2
The sound, tempo, and time signature of the count will be the same as specified by the
metronome settings. For details, refer to Steps 2–4 of “Making Fine Adjustments to the
Playback Pitch (Pitch)” (Page 78).
Press the [MENU] button to access the menu screen, and choose “Count-
3
in (Beat).”
(continued)
fig.menu-countin01-e.eps
Press the [MENU] button to access the menu screen.
Use the [ ] [ ] buttons to choose “Count-in
(Beat).”
Press the [ENTER] button to confirm your choice.
4
Use the [+] [-] buttons to adjust the value that specifies how many count
notes will be sounded before recording begins.
fig.menu-countin02-e.eps
Value
Off (factory setting)
1–16 The specified number of count-in beats will sound.
5
Press the [EXIT] button twice.
You’re returned to the audio source screen.
Explanation
No count-in will sound.
70
Page 71

Advanced UsesRecording Listening Deleting Creating a CD Editing an SD Appendices
Convenient
Functions
Information
/ Display
Checking /
Preparations
Convenient Functions for Recording
If you’ve specified a count-in, the procedure for starting to record will be as follows.
1
Press the [ ](Record) button.
The CD-2i will be in recording-standby mode.
fig.autorec01-e.eps
Blinking
2
Press the [ ](Play) button.
The specified number of counts will be sounded, and then recording will begin.
fig.countin02-e.eps
Blinking
(continued)
* The metronome will continue sounding even after recording begins.
71
Page 72

Listening to a CD/Listening to an SD Memory Card
* In order to play a CD, you’ll need to use the dedicated AC adaptor, which was included with the CD-2i.
Listening to a CD Listening to an SD memory Card
1
Turn on the power (☞
Page 21).
1
Turn on the power (☞
Page 21, 23)
.
2
Insert the CD (☞
3
Set the audio source to “CD.”
Press the [CD] button so it’s lit.
Press the [ ](Play) button to start playback.
4
Turn the [VOLUME] knob to adjust the volume.
5
Page 28)
fig.selectCD-e.eps
Softer Louder
Source name Elapsed playback time
If you don’t need the mic or LINE/PHONO input, you
should turn down the input level to the minimum
position.
Mic input Set the [MIC LEVEL] switch to the
“MANUAL” position, and turn the [MIC] knob all the
way to the left (off).
LINE/PHONO input Turn the [LINE/PHONO] knob
all the way to the left (off).
2
Insert the SD memory card
(☞ Page 25).
3
Set the audio source to “SD.”
Press the [SD CARD] button so it’s lit.
Currently playing
track number
fig.selectSD-e.eps
72
To do this
Stop playback
Pause playback
Go to the beginning
of a track (Skip)
Skip between songs at
high-speed
Rewind/
fast-forward (Search)
High-speed rewind/
fast-forward
Perform this action
Press the [ ](Stop) button.
If you press this button while stopped, you will return to the first track.
Press the [ ](Play) button.
Press it once again to resume playback from the point at which you
paused.
Press the [ ] button.
Each time you press this button, you go back by one track. If you press
this button during playback, you will return to the beginning of the
track that was playing.
Press the [ ] button.
Each time you press this button, you advance to the next track.
While stopped, press and hold the [ ] or [ ] button.
During playback, press and hold.
[ ] button: Rewind.
[ ] button: Fast-forward.
While paused, press and hold the [ ] or [ ] button.
Page 73

Advanced UsesRecording Listening Deleting Creating a CD Editing an SD Appendices
Convenient
Functions
Information
/ Display
Checking /
Preparations
fig.tansport-remote-e.eps
Remote operations
Continuing Playback from When You Stopped a Song (Resume Function)
1 Press the [MENU] button to access the menu screen, and choose
Listening to a CD/Listening to an SD Memory Card
(continued)
Song cue, rewind/fast-forward
Song stop/play (pause)
Adjusting the volume
Higher volume.
Lower volume.
Note
The [VOLUME] knob of the CD-2i itself does not
move when you use the remote control to adjust
the volume. This will mean that the position of the
[VOLUME] knob may not match the actual volume.
If you press the [ ](Stop) button during playback, the CD-2i can remember the
position at which you paused, and will resume playback from that location the next time
you start playback. This is called the Resume function.
“Resume.”
fig.menu-resume01-e.eps
Press the [MENU] button to access the menu screen.
Use the [ ] [ ] buttons to choose “Resume.”
Press the [ENTER] button to confirm your choice.
2 Use the [+] [-] buttons to turn the Resume function on/off.
fig.menu-resume02-e.eps
Value Explanation
Off (factory setting) The Resume function will be off.
On
The Resume function will be on. The CD-2i will remember the
position at which playback was stopped.
3 Press the [EXIT] button twice.
You’re returned to the audio source screen.
Operation When Resume is On
After pressing the [ ](Stop) button to halt playback, you can press the [ ](Play)
button to re-start playback from the location at which you stopped.
If after pressing the [ ](Stop) button to stop playback, you then press the [ ](Stop)
button or eject the SD memory card or CD, the Resume function, which had
remembered the location at which you stopped, will be cancelled.
73
Page 74

Convenient Functions for Playback
Adjusting the Tone (Bass/Treble)
Here’s how to adjust the tone of the playback sound to your taste.
1
Press the [MENU] button to access the menu screen, and choose “Bass” or
“Treble.”
2
Use the [+] [-] buttons to change the tone setting
fig.menu-key02-e.eps
3
Press the [EXIT] button twice.
You’re returned to the audio source screen.
fig.menu-key01-e.eps
Press the [MENU] button to access the menu screen.
Use the [ ] [ ] buttons to choose “Bass” or
“Treble.”
Press the [ENTER] button to confirm your choice.
..
..
74
Page 75

Advanced UsesRecording Listening Deleting Creating a CD Editing an SD Appendices
Convenient
Functions
Information
/ Display
Checking /
Preparations
Adding Reverberation (Reverb)
Convenient Functions for Playback
(continued)
This function adds reverberation (reverb) to the audio played back from an SD memory
card or CD, creating the impression that the performance is occurring in a concert hall
or other real-world acoustic environment.
1
Press the [MENU] button to access the menu screen, and choose
“Reverb.”
2
Use the [+] [-] buttons to adjust the reverb depth.
Play back from the SD memory card or CD, and check the reverb depth.
fig.reverb-e.eps
Value
Off
Light Reverb depth: minimum
Medium
Deep
fig.menu-key01-e.eps
Press the [MENU] button to access the menu screen.
Use the [ ] [ ] buttons to choose “Reverb.”
Press the [ENTER] button to confirm your choice.
Explanation
No reverb
Reverb depth:
Reverb depth:
normal
maximum
Press the [EXIT] button.
3
You’re returned to the audio source screen.
Important
●
Reverb is not added to sound from an external input source such as the built-in mic or an
external mic.
75
Page 76

Convenient Functions for Playback
Muting the Sound of the Speakers
If you don’t want sound to come from the speakers, press the [SPEAKER] button to turn
them off. The speakers can be turned back on by pressing the button once again.
fig.speaker.eps
Important
When using the internal mics, you won’t hear any sound from the speakers when you’re
recording or are in recording-standby mode, even if you press the [SPEAKER] button to turn
them on (get them to produce sound). This is to prevent the internal mics (or an external
microphone) from picking up the sound emanating from the speakers, which would then
become part of your recordings.
When using an external microphone, you should turn the speakers on or off as necessary
depending on the circumstances.
(continued)
76
Page 77

Advanced UsesRecording Listening Deleting Creating a CD Editing an SD Appendices
Convenient
Functions
Information
/ Display
Checking /
Preparations
Changing the Key of the Playback
This adjusts the key (pitch) of the playback sound in semitone steps. This can be useful
in situations like the following.
• You want to practice flute along with an accompaniment CD that was created for alto sax.
• You want to sing along with a karaoke CD at a key that’s easier for you to sing.
1
Press the [KEY] button to access the menu screen, and choose “Key.”
The setting will turn on/off each time you press the [KEY] button.
* Whenever the unit has remained inactive for a predetermined amount of time, it will go back to
displaying the Source (Sound Source) screen.
2
Use the [+] [-] buttons to adjust the value, changing the key.
If you press the [
fig.menu-key02-e.eps
ENTER
] button, the value will return to “0.”
fig.menu-key01-e.eps
Press the [KEY] button to access the menu screen.
Use the [ ] buttons to choose “Key.”
* If you change the key setting during playback, the audio will
be interrupted momentarily.
Value
-6–0 (factory setting)–+5
Press the [EXIT] button.
3
Explanation
Decreasing the value by one will lower the overall pitch of the
song by a semitone. Increasing the value by one will raise the
overall pitch of the song by a semitone. A setting of “0” is the
original key of the song.
You’re returned to the audio source screen.
When you turn off the power, the Key setting will return to “Off.”
Remote operations
Raises the key of the playback sound.
Lowers the key of the playback sound.
Turns the key setting on/off.
77
Page 78

Making Fine Adjustments to the Playback Pitch (Pitch)
This adjusts the pitch of the playback sound in one-cent steps. One cent is 1/100th of a
semitone.
Sometimes when you are practicing your instrument along with a CD, you may have
difficulty because the CD playback is pitched slightly different than your instrument. In
such cases, you can adjust the CD playback pitch to match your instrument.
When you’re using an instrument that is not easily tuned, such as an acoustic piano, you
can adjust the pitch of the CD so that it matches your instrument.
1
Press the [KEY] button to access the menu screen, and choose “Pitch.”
The setting will turn on/off each time you press the [KEY] button.
* Whenever the unit has remained inactive for a predetermined amount of time, it will go back to
displaying the Source (Sound Source) screen.
2
Use the [+] [-] button to adjust the Pitch setting.
If you press the [ ] button, the value will return to “0.”
fig.menu-pitch02-e.eps
fig.menu-pitch01-e.eps
Press the [KEY] button to access the menu screen.
Use the [ ] buttons to choose “Pitch.”
* If you change the pitch setting during playback, the audio
will be interrupted momentarily.
Value (units: Cents)
-100–0 (factory setting)–+100
If you have a CD that was recorded at a
reference pitch of A=440 Hz, and you want to
play it back at a reference pitch of A=442 Hz,
you would set Pitch to “+8.”
Refer to the table at right.
Press the [EXIT] button.
3
Explanation
Lowering the value will lower the overall pitch of the song.
Raising the value will raise the overall pitch of the song. A
setting of “0” is the original pitch of the song.
Frequency of A4
after adjustment
438Hz -8 (cents)
439Hz -4 (cents)
440Hz 0
441Hz +4 (cents)
442Hz +8 (cents)
You’re returned to the audio source screen.
When you turn off the power, the Key setting will return to “Off.”
Pitch setting
78
Page 79

Advanced UsesRecording Listening Deleting Creating a CD Editing an SD Appendices
Convenient
Functions
Information
/ Display
Checking /
Preparations
Slowing Down or Speeding Up Playback
You can make the playback speed slower or faster. You can also change the playback
speed without affecting the pitch.
This is useful when you are learning a song by ear and want to hear it slowly, or if you
want to quickly listen to a song that you recorded.
1
Press the [SPEED] button to access the menu screen, and choose “Speed.”
The setting will turn on/off each time you press the [SPEED] button.
* Whenever the unit has remained inactive for a predetermined amount of time, it will go back to
displaying the Source (Sound Source) screen.
2
Use the [+] [-] buttons to adjust the playback speed.
If you press the [ ] button, the value will return to “100.”
fig.menu-speed02-e.eps
fig.menu-speed01-e.eps
Press the [SPEED] button to access the menu screen.
Use the [ ] buttons to choose “Speed.”
* If you change the speed setting during playback, the
audio will be interrupted momentarily.
Value (units: %)
50 (1/2 speed)–100 (factory setting)–
125 (1.25x normal speed)
Press the [EXIT] button twice.
3
You’re returned to the audio source screen.
fig.remote-icon-e.epsfig.speed-remote-e.eps
Remote operations
Explanation
Decreasing this value will slow down the playback,
and increasing it will speed up the playback. A setting
of “100” is the original playback speed of the song.
Makes the playback faster.
Makes the playback slower.
Turns the playback speed
setting on/off.
When you turn off the power, the Speed setting will return to “Off.”
Important
Slowing down the playback speed to an extreme extent may change the tonal character or
cause the audio to not play back smoothly.
Tape Mode setting
Off:
Changing the playback speed will not affect the pitch. This is useful for music practice.
On:
Changing the playback speed will affect the pitch, just as it would for tape playback. This
is useful when you want to create a special effect, or if you’re trying to hear how words
are being pronounced.
* If Tape Mode is turned “on,” the key/pitch settings will be ignored, and the speed setting will
vary the pitch.
79
Page 80

Enjoying Simple Karaoke (Center Cancel)
This function cancels the portion of the sound that is heard in the center of its stereo
image, such as the main vocal or lead guitar, making it less audible. This lets you use a
commercially available CD as a simple karaoke source, giving you an easy way to enjoy
karaoke or to practice singing or playing an instrument.
1
Press the [CENTER CANCEL] button to access the “Center Cancel” screen.
The setting will turn on/off each time you press the [CENTER CANCEL] button.
* Whenever the unit has remained inactive for a predetermined amount of time, it will go back to
displaying the Source (Sound Source) screen.
2
Use the [+] [-] buttons to change the CENTER CANCEL setting.
fig.menu-centercancel02-e.eps
fig.menu-centercancel01-e.eps
Press the [CENTER CANCEL] button to access the menu
screen.
Value
On1 (factory setting)
On2
Press the [EXIT] button.
3
You’re returned to the audio source screen.
When you turn off the power, the Center Cancel setting will return to the “Off” state.
Important
You may fail to obtain the desired effect if the song has deep reverb, or if the sounds you
want to eliminate are not positioned in the center.
Remote operations
Explanation
Center Cancel will be on. Sounds heard in the stereo center
during playback will be eliminated.
On1 ”and “On2 ”provide different center cancellation
“
effects. Try out both, and use the setting that is best for
your situation.
Turns Center Cancel on/off.
80
Page 81

Advanced UsesRecording Listening Deleting Creating a CD Editing an SD Appendices
Convenient
Functions
Information
/ Display
Checking /
Preparations
Repeatedly Playing Tracks (1 Track/All Repeat)
You can have a favorite track (or all tracks) play back repeatedly.
1
Press the [MENU] button to access the menu screen, and choose
“Repeat.”
2
Use the [+] [-] buttons to change the Repeat Playback setting.
fig.menu-repeat02-e.eps
Value
Off (factory setting)
1 Track
All Tracks
Press the [EXIT] button twice.
3
fig.menu-repeat01-e.eps
Press the [MENU] button to access the menu screen.
Use the [ ] [ ] buttons to choose “Repeat.”
Press the [ENTER] button to confirm your choice.
Explanation
Repeat Playback will be off.
One-track repeat. The currently playing track, or any track you play
subsequently, will play back repeatedly.
All repeat. All tracks will play repeatedly. If you select this during
playback, all tracks will play repeatedly, starting with the currently
playing track.
You’re returned to the audio source screen.
The Repeat icons
fig.icon-repeat-e.eps
The following icon is displayed
if you’ve specified Repeat Playback.
(All repeat)(1 track repeat)
The “ ” or symbol will disappear if you set the “Repeat” to “Off” in Step 2.
Important
The Repeat Playback setting will be turned “Off” if you operate the [REPEAT] button.
81
Page 82

Repeatedly playing a portion of the song (A/B Repeat)
You can have a specified section play back repeatedly.
Repeatedly listening to a section of a song is convenient when you’re practicing your
instrument along with the song, or learning the song by ear.
1
During playback, press the [REPEAT] button at the point where you want
Repeat Play to start.
The starting point (A) of A-B Repeat playback is registered, and the Point A icon blinks.
fig.ABrepeat01-e.eps
Blinking
Press the [REPEAT] button once again at the point where you want A-B
2
Repeat to end.
The end point (B) of A-B Repeat playback is registered, and the A-B region will play back
repeatedly.
fig.ABrepeat02-e.eps
The “ ” icon is displayed
during A-B Repeat playback.
To defeat A-B Repeat, press the [REPEAT] button while A-B Repeat
3
playback is occurring.
If you press the [ ](Stop) button to stop playback, A-B Repeat playback will also be
cancelled.
fig.ABrepeat-remote-e.eps
Remote operations
Register the start/end points for
A-B Repeat.
82
Page 83

Advanced UsesRecording Listening Deleting Creating a CD Editing an SD Appendices
Convenient
Functions
Information
/ Display
Checking /
Preparations
Sounding the Metronome
The CD-2i has built-in metronome—a convenient feature for practicing an instrument.
1
Press the [ ](Metronome) button to turn the metronome on.
The setting will turn on/off each time you press the
* Whenever the unit has remained inactive for a predetermined amount of time, it will go back to
displaying the Source (Sound Source) screen.
fig.metro-indicator-e.eps
Red: strong beats
Green: weak beats
Metronome indicator (blinking)
(Metronome)
[]
button.
If the metronome is on, the [ ](Metronome) button will light. At the same time, the
metronome’s indicator will start blinking on the beat.
When you press the [ ](Metronome) button once again, the metronome will turn off
(unlit).
Setting the sound.
2
fig.menu-metro01-e.eps
Press the [
menu screen.
Use the [ ] buttons to choose “Sound.”
Use the [+] [-] buttons to select the desired metronome
sound.
]
(Metronome)
button to access the
Value
Silent
Bell (factory setting) A bell will mark the beats.
Click An electronic sound will mark the beats.
Voice A human voice (English) will count the beats
3
Setting the tempo.
Explanation
There will be no sound; the metronome indicator will blink to mark the
beats.
fig.menu-metro03-e.eps
Use the [ ] [ ] buttons to choose “Tempo.”
Specify the tempo of the metronome
•Use the [+] [-] buttons to change the tempo value.
•Specify the desired tempo by tapping it out using
the [ENTER] button.
Value
=20–120 (factory setting)–250
Explanation
Specifies the number of quarter-notes in one minute.
Decreasing this value will make the tempo slower. Increasing
this value will make the tempo faster.
83
Page 84

Sounding the Metronome
4
Specifying which beats are emphasized.
(continued)
fig.menu-metro05-e.eps
Use the [ ] [ ] buttons to choose “Beat.”
Use the [+] [-] buttons to specify the timing at which
the metronome will mark the strong beats.
Value
0
1 Every beat is emphasized.
2 Every second beat is emphasized.
3 Every third beat is emphasized.
4 (factory setting) Every fourth beat is emphasized.
5 Every fifth beat is emphasized.
6 Every sixth beat is emphasized.
7 Every seventh beat is emphasized.
* (a quarter-note) will be counted as one beat.
* If you’ve selected “Voice” as the “Sound” setting, there will be no accent on the strong beats.
5
Adjust the volume.
Explanation
No beats are emphasized.
Each beat is divided into a triplet, and an emphasized beat will sound
at the beginning of each triplet.
Each beat is divided into sixteenth notes, and an emphasized beat will
sound on the sixteenth note at the beginning of each beat.
fig.menu-metro05-e.eps
Use the [ ] [ ] buttons to choose “Level.”
Use the [+] [-] buttons to adjust the metronome volume
as desired.
84
6
Press the [EXIT] button.
You’re returned to the audio source screen.
Important
●
The metronome sound will not be audible during recording standby or while recording.
If you want to hear the metronome, you’ll need to use headphones.
●
The metronome cannot be used while overdubbing a performance with a music CD (☞
Page 58).
Remote operations
Specify the metronome tempo.
Make the tempo faster.
Make the tempo slower.
Turn the metronome on/off.
Page 85

Advanced UsesRecording Listening Deleting Creating a CD Editing an SD Appendices
Convenient
Functions
Information
/ Display
Checking /
Preparations
Tuning Your Instrument (Tuner Function)
You can tune your instrument using the chromatic tuner function, which detects the name of
the note in semitone steps.
1
Select the internal mics.
Press the [MENU] button to access the menu screen.
Use the [ ] [ ] buttons to choose “MIC Select.”
fig.menu-overdub-e.eps
Press the [ENTER] button to confirm your choice.
Use the [+] [-] buttons to change the value to select “Internal.“
Press the [EXIT] button twice.
2
You’re returned to the audio source screen.
Press the [MENU] button to access the menu screen, and choose “Tuner/
3
Tone?”
Watch the tuner screen, and play a note on the instrument you want to
4
tune.
Note Name
fig.menu-tuner01-e.eps
Press the [MENU] button to access the menu screen.
Use the [ ] [ ] buttons to choose “Tuner/Tone?”
Press the [ENTER] button to confirm your choice.
fig.menu-tuner02-e.eps
The name of the note closest to the pitch you played will
appear in the tuner screen. Tune your instrument so that
the desired note name appears.
If the tuner does not respond, make sure that the [MIC]
knob’s level is raised.
85
Page 86

Tuning Your Instrument (Tuner Function)
5
Tune the instrument so that the left and right tuning guides are both
displayed.
When your instrument is within ±50 cents of the correct pitch, a tuning guide will
appear in the screen. This indicates the distance between the displayed note name and
the pitch your instrument is actually producing.
Tuning guides
When only the right guide is displayed: When only the left guide is displayed:
(continued)
fig.menu-tuner03-e.eps
Tune your instrument so that the left and right guides are
visible.
The pitch is above the displayed note
name (i.e., sharp).
6
When you’re finished using the tuner, press the [EXIT] button twice.
The pitch is below the displayed note
name (i.e., flat).
You’re returned to the audio source screen.
Important
●
The tuner can also use an external mic. When you want to use an external mic, choose
MIC SELECT from the menu, then set it to “External.“
●
You can’t play back or record while using the tuner.
●
If you don’t want to hear sound while you’re tuning, you can turn down the [VOLUME]
knob or turn the speakers off so that the sound is muted.
Changing the Tuner’s Reference Pitch
You can calibrate the CD-2i’s Tuner to another instrument or tuning standard by
adjusting its “reference pitch.”
The reference pitch is the frequency of the A4 note. This is the pitch of the middle A note
on a piano.
86
Press the [MENU] button to access the menu screen, and choose “Tuner/
1
Tone?”
fig.menu-tuner01-e.eps
Press the [MENU] button to access the menu screen.
Use the [ ] [ ] buttons to choose “Tuner/Tone?”
Press the [ENTER] button to confirm your choice.
Page 87

Advanced UsesRecording Listening Deleting Creating a CD Editing an SD Appendices
Convenient
Functions
Information
/ Display
Checking /
Preparations
Tuning Your Instrument (Tuner Function)
2
Use the [+] [-] buttons to adjust the reference pitch as desired.
fig.menu-tuner06-e.eps
Reference pitch
(continued)
Value (units: Hz)
435–440 (factory setting)–445
Press the [EXIT] button twice.
3
You’re returned to the audio source screen.
Explanation
Decreasing this value will lower the pitch. Increasing this value
will raise the pitch.
Listening to a Guide Tone While Tuning
As a tuning aid, you can have the CD-2i sound a guide tone from the internal speakers.
Press the [MENU] button to access the menu screen, and choose “Tuner/
1
Tone?”
2
While the tuner screen is displayed, press the [ENTER] button.
(The tuner screen and the guide tone screen will alternate each time you press the
[ENTER] button.)
Guide tone
fig.menu-tuner01-e.eps
Press the [MENU] button to access the menu screen.
Use the [ ] [ ] buttons to choose “Tuner/Tone?”
Press the [ENTER] button to confirm your choice.
fig.menu-tuner05-e.eps
You’ll hear the guide tone shown in the screen.
3
Use the [+] [-] buttons to select the name of the note you want to use as
the guide tone.
Value Explanation
A3–A4 (factory setting)–A5
4
Tune your instrument to the guide tone.
5
To stop the guide tone, press the [EXIT] button twice.
You’re returned to the audio source screen.
Important
The reference pitch for the guide tone can be adjusted in the Tuner screen (☞ Page 86).
You can choose one of 25 chromatic notes in the range A3–A5.
87
Page 88

Deleting Songs from an SD Memory Card
Deleting Songs Individually
Here’s how to delete a single, selected song.
When you delete a song, subsequent songs will be moved
forward, incrementing their song numbers.
fig.SDedit-erase-e.eps
1
Insert the SD memory card that you want to edit, and press the
Track
Number
Track
Number
[SD CARD] button.
SD becomes the audio source.
2
Use the [ ] or [ ] button to select the track you want to erase.
3
Press the [MENU] button to access the menu screen, and choose “Erase
One?”
4
If you’re sure you want to proceed, press the [ENTER] button.
(If you decide to cancel, press the [EXIT] button.)
fig.SDerase-mssg-e.eps
Number of the track you’re erasing
fig.menu-SDerase-e.eps
Press the [MENU] button to access the menu screen.
Use the [ ] [ ] buttons to choose “Erase One?”
Press the [ENTER] button to confirm your choice.
123
A B C
Delete
12
A C
Blank
88
The display will show “Processing..,” and the song will be deleted. When the deletion is
completed, you’re returned to the audio source screen.
Note
Once you delete a song, you cannot recover the recorded content. Use this operation with care.
Important
●
If you select the song you want to delete in Step 2 and then press the
[-] button, the message screen of Step 4 will appear immediately.
This lets you skip the step of selecting the menu item.
●
Deletion is not possible if the SD memory card’s write protect switch
(Page 26) is in the “LOCK” position.
Page 89

Advanced UsesRecording Listening Deleting Creating a CD Editing an SD Appendices
Convenient
Functions
Information
/ Display
Checking /
Preparations
I
Erasing All Tracks
Deleting Songs from an SD Memory Card
(continued)
Here’s how to delete all songs from the SD memory card.
1
Insert the SD memory card that you want to edit.
2
Press the [MENU] button to access the menu screen, and choose “SD
Erase All?”
3
If you’re sure you want to proceed, press the [ENTER] button.
fig.SDeraseall-mssg01-e.eps
4
If you’re still sure you want to proceed, press the [ENTER] button.
(If you decide to cancel, press the [EXIT] button.)
fig.SDeraseall-mssg02-e.eps
fig.menu-SDeraseall-e.eps
Press the [MENU] button to access the menu screen.
Use the [ ] [ ] buttons to choose “SD Erase All?”
Press the [ENTER] button to confirm your choice.
The display will show “Processing..,” and all songs will be deleted. When the deletion is
completed, you’re returned to the audio source screen.
Note
Once you delete a song, you cannot recover the recorded content. Use this operation with
care.
Important
Deletion is not possible if the SD memory card’s write protect switch (Page 26) is in the
“LOCK” position.
89
Page 90

Deleting Songs from an SD Memory Card
Deleting an Unwanted Region at the Beginning of the Song (Trim In)
If you start recording slightly ahead of the beginning of the performance so as to avoid
missing anything, there will be some unwanted silence at the beginning of the song.
You can delete this unwanted silence so that you will hear sound as soon as the song
starts playing.
1
Insert the SD memory card that you want to edit, and press the
[SD CARD] button.
SD becomes the audio source.
2
Use the [ ] or [ ] button to select the track you want to edit.
3
Press the [MENU] button to access the menu screen, and choose “Trim
In?”
(continued)
fig.menu-trimin01-e.eps
Press the [MENU] button to access the menu screen.
Use the [ ] [ ] buttons to choose “Trim In?”
Press the [ENTER] button to confirm your choice.
4
Press the [ ](Play) button to play back the selected song.
fig.menu-trimin02-e.eps
Number of the track you’re editing
5
When you come to the point that you want to be the beginning of the
song (the Start Point), press the [ ](Record) button.
Four seconds of sound preceding the Start Point will play repeatedly.
Plays repeatedly
Four seconds
Deleted region
Start Point—this will be the beginning of the song after editing.
6
Use the [+] or [-] button to precisely adjust the Start Point.
Adjust the Start Point so that you no longer hear the beginning of the song.
Button
[+] button
[-] button Moves the Start Point forward.
Explanation
Moves the Start Point backward.
90
Page 91

Advanced UsesRecording Listening Deleting Creating a CD Editing an SD Appendices
Convenient
Functions
Information
/ Display
Checking /
Preparations
Deleting Songs from an SD Memory Card
7
Press the [ENTER] button.
8
If you’re sure you want to proceed, press the [ENTER] button.
(If you decide to cancel, press the [EXIT] button.)
fig.trimin-mssg-e.eps
Progress indication
The display will show “Processing..,” and the unwanted beginning of the song will be
deleted. When the deletion is completed, you’re returned to the audio source screen.
Note
The deleted region cannot be recovered. Use this operation with caution.
(continued)
Important
●
You can’t specify Start Point locations that would cause the edited song to be less than
four seconds long.
●
The Trim In editing process will take a certain amount of time. In general, the time will be
approximately half the playback time of the song. For example, in order to edit a fourminute song, it will take approximately two minutes for the editing process to be
completed.
●
The Trim In editing operation requires free space equal to the size of the song you’re
editing. For example, if you’re editing a five-minute song, you won’t be able to execute
this operation unless you have at least five minutes of recording time remaining.
●
This operation cannot be performed if the SD memory card’s write protect switch (Page
26) is in the “LOCK” position.
91
Page 92

Deleting Songs from an SD Memory Card
Deleting an Unwanted Region at the End of the Song (Trim Out)
If you stop recording slightly after the end of the performance so as to avoid missing
anything, there will be some unwanted silence at the end of the song. You can delete
this unwanted silence so that the song contains only the performance itself.
1
Insert the SD memory card that you want to edit, and press the
[SD CARD] button.
SD becomes the audio source.
2
Use the [ ] or [ ] button to select the track you want to edit.
3
Press the [MENU] button to access the menu screen, and choose “Trim
Out?”
(continued)
fig.menu-trimout01-e.eps
Press the [MENU] button to access the menu screen.
Use the [ ] [ ] buttons to choose “Trim Out?”
Press the [ENTER] button to confirm your choice.
4
Press the [ ](Play) button to play back the selected song.
fig.menu-trimout02-e.eps
Number of the track you’re editing
5
When you come to the point that you want to be the end of the song (the
End Point), press the [ ](Record) button.
(If the song is long, you can fast-forward until you’re near the desired End Point.)
Four seconds of sound following the End Point will play repeatedly.
Plays repeatedly
Four seconds
Deleted region
End Point—this will be the end of the song after editing.
6
Use the [+] or [-] button to precisely adjust the End Point.
Adjust the End Point so that you no longer hear the end of the song.
92
Button
[+] button
[-] button Moves the End Point forward.
Explanation
Moves the End Point backward.
Page 93

Advanced UsesRecording Listening Deleting Creating a CD Editing an SD Appendices
Convenient
Functions
Information
/ Display
Checking /
Preparations
Deleting Songs from an SD Memory Card
7
Press the [ENTER] button.
8
If you’re sure you want to proceed, press the [ENTER] button.
(If you decide to cancel, press the [EXIT] button.)
fig.trimout-mssg-e.eps
Progress indication
The display will show “Processing..,” and the unwanted end of the song will be deleted.
When the deletion is completed, you’re returned to the audio source screen.
Note
The deleted region cannot be recovered. Use this operation with caution.
Important
(continued)
●
You can’t specify End Point locations that would cause the edited song to be less than four
seconds long.
●
The Trim Out editing process will take a certain amount of time. In general, the time will
be approximately half the playback time of the song. For example, in order to edit a fourminute song, it will take approximately two minutes for the editing process to be
completed.
●
The Trim Out editing operation requires free space equal to the size of the song you’re
editing. For example, if you’re editing a five-minute song, you won’t be able to execute
this operation unless you have at least five minutes of recording time remaining.
●
This operation cannot be performed if the SD memory card’s write protect switch (Page
26) is in the “LOCK” position.
93
Page 94

Erasing Tracks from a CD-RW Disc
Deleting One Song at a Time (Only the Last Song)
Here’s how to erase the last track recorded on a CD-RW disc.
* In order to perform this operation, you’ll need the included, dedicated AC adaptor.
1
Insert the CD-RW disc that you want to edit.
2
Press the [MENU] button to access the menu screen, and choose “Erase
Last?”
3
If you’re sure you want to proceed, press the [ENTER] button.
(If you decide to cancel, press the [EXIT] button.)
fig.menu-RWerase-mssg-e.eps
fig.menu-RWerase-e.eps
Press the [MENU] button to access the menu screen.
Use the [ ] [ ] buttons to choose “Erase Last?”
Press the [ENTER] button to confirm your choice.
Count-down (min:sec)
The display will show “Processing..,” and the last song will be deleted.
During this process, a timer is displayed, counting down the time until the operation is
completed.
Note
Once you delete a song, you cannot recover the recorded content. Use this operation with care.
Important
●
You can’t erase tracks from a CD-R disc.
●
If you want to erase a track from a CD-RW disc that’s been finalized (Page 102), you’ll need
to first remove finalization.
●
If you press the [-] button after Step 1, the message screen of
Step 3 will appear immediately. This lets you skip having to
choose a menu item.
☞ “Removing Finalization” (Page 96)
94
Page 95

Advanced UsesRecording Listening Deleting Creating a CD Editing an SD Appendices
Convenient
Functions
Information
/ Display
Checking /
Preparations
Erasing Tracks from a CD-RW Disc
Erasing All Tracks
Here’s how to erase all tracks from the CD-RW disc.
* In order to perform this operation, you’ll need the included, dedicated AC adaptor.
1
Insert the CD-RW disc that you want to edit.
2
Press the [MENU] button to access the menu screen, and choose “CD
Erase All?”
3
If you’re sure you want to proceed, press the [ENTER] button.
fig.RWeraseall-mssg01-e.eps
fig.menu-RWeraseall-e.eps
Press the [MENU] button to access the menu screen.
Use the [ ] [ ] buttons to choose “CD Erase All?”
Press the [ENTER] button to confirm your choice.
(continued)
4
If you’re still sure you want to proceed, press the [ENTER] button.
(If you decide to cancel, press the [EXIT] button.)
fig.RWeraseall-mssg02-e.eps
Count-down (min:sec)
The display will show “Processing..,” and all songs will be deleted. During this process,
a timer is displayed, counting down the time until the operation is completed.
When the deletion is completed, you’re returned to the audio source screen.
Note
Once you delete a song, you cannot recover the recorded content. Use this operation with care.
Important
●
You can’t erase tracks from a CD-R disc.
●
If the CD-R/RW disc has been finalized (Page 102), finalization will automatically be
removed when you erase all tracks.
95
Page 96

Erasing Tracks from a CD-RW Disc
Removing Finalization
You can remove finalization from a CD-RW disc (Page 102) so that the disc can once
again be used for recording. Removing finalization will not erase the recorded tracks.
* In order to perform this operation, you’ll need the included, dedicated AC adaptor.
1
Insert the CD-RW disc that you want to edit, and press the [CD] button.
CD becomes the audio source.
2
Press the [MENU] button to access the menu screen, and choose
“Unfinalize?”
3
If you’re sure you want to proceed, press the [ENTER] button.
(If you decide to cancel, press the [EXIT] button.)
fig.finalize-mssg-e.eps
(continued)
fig.menu-finalize-e.eps
Press the [MENU] button to access the menu screen.
Use the [ ] [ ] buttons to choose “Unfinalize?”
Press the [ENTER] button to confirm your choice.
Count-down (min:sec)
The display will show “Processing..,” and finalization will be removed from the disc.
During this process, a timer is displayed, counting down the time until the operation is
completed.
When finalization has been removed, you’re returned to the audio source screen.
Important
You can’t remove finalization from a CD-R disc.
96
Page 97

Advanced UsesRecording Listening Deleting Creating a CD Editing an SD Appendices
Convenient
Functions
Information
/ Display
Checking /
Preparations
Selecting Songs from an SD
Here’s how selected songs from an SD memory card can be written to a CD-R/RW disc to
create a music CD.
M
emory Card to Create a CD
* In order to perform this operation, you’ll need the included, dedicated AC adaptor.
1
Insert the SD memory card that contains the songs you want to turn into
a music CD.
2
Press the [MENU] button to access the menu screen, and choose “Write
(SD→CD)?”
Press the [MENU] button to access the menu screen.
Use the [ ] [ ] buttons to choose “Write
(SD→CD)?”
Press the [ENTER] button to confirm your choice.
3
When you see this screen, insert a blank or un-finalized CD-R/RW disc.
fig.writeCD-mssg01-e.eps
4
The CD-2i asks whether you want to write all of the songs.
fig.writeCD-mssg02-e.eps
* This message won’t appear if it’s not possible for all of
the songs on the SD memory card to be written to the
CD-R/RW disc. (Proceed to Step 5.)
If you want to write all songs
Press the [ENTER] button.
Proceed to
Select the song that you want to write to the CD-R/RW disc.
5
SD memory card track number
CD track number increases
6
When you’ve selected all of the tracks that you want to write to the CD-R/
Step 7
.
CD track number
fig.menu-writeCD02-e.eps
Using the [ ] [ ] or [+] [-] buttons to select the
desired song.
If you want to audition the selected song, press the
[ ](Play) button. To stop playback, press the
[ ](Stop) button.
Press the [ENTER] button to confirm the song to be
written.
* To select additional tracks, repeat Step 5.
If you want to write selected songs
Press the [EXIT] button.
Proceed to
Step 5
.
RW disc, press the [ ] button.
97
Page 98

Selecting Songs from an SD Memory Card to Create a CD
7
If you’re sure you want to proceed, press the [ENTER] button.
(If you decide to cancel, press the [EXIT] button.)
fig.writeCD-mssg03-e.eps
Use the [+] [-] buttons to specify the Finalize setting.
8
* For details on “Finalize,” refer to the text box “What’s finalization?” on Page 102.
fig.writeCD-finalize-e.eps
Value
Explanation
When writing is finished, the disc will be finalized to complete the music CD.
No further data can be written to a CD-R/RW disc that has been finalized, even if space
Yes
remains on the disc.
However, if you’re using a CD-RW disc, you can remove the finalization and add
additional material.
The disc will not be finalized when writing is finished.
After the tracks have been written, you will still be able to add more tracks if space
No
remains on the disc.
If you don’t finalize at this point, you can still finalize later to complete your music CD.
“Making a CD-R/RW Disc for Playback on Another CD Player (Finalize)” (Page 102)
☞
“Removing Finalization” (Page 96)
☞
(continued)
Write to the CD-R/RW disc.
9
If you selected Finalize “Yes”
Press the [ENTER] button.
(If you decide to cancel writing, press
the [EXIT] button.
If you’re sure you want to proceed,
press the [ENTER] button.
(If you want to return to Step 8, press
the [EXIT] button.)
Indicates the progress relative to
the total number of songs
Indicates the progress for each song
The display will show “Processing..,” and
writing to the CD-R/RW disc will begin.
When writing is completed, the display will
show “Finalize...,” and the finalization
process will begin. Please wait.
When all processing has been completed,
the CD-R/RW will be ejected.
fig.writeCD-mssg04-e.eps
CD is now ready.
Your music
If you selected Finalize “No”
Press the [ENTER] button.
(If you decide to cancel writing, press
the [EXIT] button.
Indicates the progress relative to
the total number of songs
Indicates the progress for each song
The display will show “Processing..,” and
writing to the CD-R/RW disc will begin.
Please wait.
When all processing has been completed,
the CD-R/RW will be ejected.
fig.writeCD-mssg05-e.eps
98
Page 99

Advanced UsesRecording Listening Deleting Creating a CD Editing an SD Appendices
Convenient
Functions
Information
/ Display
Checking /
Preparations
Selecting Songs from an SD Memory Card to Create a CD
10
The CD-2i asks whether you want to create another identical CD.
fig.writeCD-mssg06-e.eps
If you want to create another identical CD If you are finished writing
(continued)
Press the [ENTER] button.
Press the [EXIT] button to end the
procedure.
When you see this screen, insert a
blank or un-finalized CD-R/RW disc.
Return to
Step 7
fig.writeCD-mssg01.eps
and continue the
You’re returned to the audio source
screen.
procedure.
Important
●
We cannot guarantee that a music CD created on the CD-2i will play on all CD players.
Depending on your CD player’s support for CD-R/RW discs, music CDs you create may
not play correctly.
●
Two seconds of silence are automatically inserted between tracks on the CD-R/RW disc
when you create a music CD.
●
The time required for writing will be approximately half the total playback time of the
songs being written. For example, if you’re writing songs that total twenty minutes of
playback time, the process will require approximately ten minutes.
If you want to create a music CD containing songs from more than
one SD memory card
If the CD-R/RW disc has not been finalized, you can add tracks from another SD memory
card. If you want to create a music CD using tracks from more than one SD memory
card, simply keep adding tracks to a CD-R/RW disc and finalize (Page 102) the disc when
you’re finished.
* You must turn off the power before exchanging SD memory cards (Page 27).
Write Write
Selected
song
SD memory
card
A B
SD memory
card
Finalize
Selected
song
Completed music CD!
99
Page 100

Selecting Songs from an SD Memory Card to Create a CD
Adjusting the tone, adding reverb, and creating a CD
You can adjust the tone and add reverb to the sound played back from an SD memory
card or CD, and use the result to create a new CD.
If you want to create a CD with these effects applied, use the appropriate menus to make
the desired settings for these effects before you proceed.
* For details on the CD creation procedure, refer to “Selecting Songs from an SD Memory Card to
Create a CD” (Page 97)
For mix recording as well, you can adjust the tone and add reverb to the song from the
SD memory card or CD that you’re recording.
* For details on the mix recording procedure, refer to “Recording Karaoke” (Page 58) or “Layering
Your Performance onto an SD Memory Card Song and Recording It” (Page 61).
(continued)
100
 Loading...