


SCRAMBLER IS DE-ACTIVATED
RMR-C495
Radar and Laser Detector
Radar and Laser Scrambler
Owners Manual
SPECIFICATIONS:
Radar & Laser Detector:
Frequencies: |
24.125 GHz |
|
33-36 GHz |
|
904 Nano-meter |
Sensitivity: |
K-110Dbm |
|
Ka-wide-102 Dbm |
|
Laser < 200 nano-watt |
Alarm: |
Separate for each Band |
|
Variable alarm for Range |
Controls: |
Volume, On/Off, Voice, Language, |
|
Tone, Dim, Mute, City/Highway, |
|
Test, Scrambler, All Reset |
Spectre: |
100% Undetectable [Spectre I, II, |
VG-2: |
III; VG-2,3] |
Size: 1.4” x 3.0” x 4.4”
Other: 1-Year Ticket Rebate Program and a 3- Year Warranty. (Complete, sign, and mail Ticket Rebate Registration card within 30 days of purchase.)
The RMR-C495 is the result of Rocky Mountain
Radar’s commitment to provide you, our valued customer, with the most innovative and technologically advanced radar and laser detectors on the market. Created for drivers who will not settle for anything less than the best, the RMRC495 is a full-featured radar and laser detector supporting 360° of high powered detection. The sensitivity was increased on K and Ka bands in order to extend its range to as far as 5 miles, while also helping to eliminate false alarms. This hightech unit has increased laser scrambling, bi-lingual voice capability, a red dot matrix LED display, and even offers dark mode, which prevents distraction at night. The radar detector is a dual conversion scanning superheterodyne receiver with separate alarms for each of the radar bands. Even with all this technology Rocky Mountain Radar was able to add more features that you will love. The RMRC495 model incorporates a Monolithic Microwave Integrated Circuit (MMIC) that reduces internal signals from leaking out of the antenna by up to 1/1,000,000 (one millionth) of previous levels which make the unit totally undetectable to police.
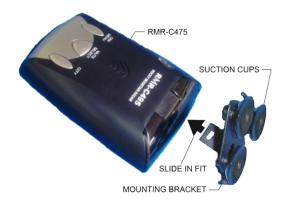
Mounting the RMR-C495 to your windshield:
1)Attach the windshield bracket to the RMR-C495 unit. Align the edge on the bracket with the slot opening on the front of the case. Slide the bracket gently into the case until it locks into place. Make sure not to twist the bracket while inserting.
2)Place the windshield bracket in the upper center portion of the windshield. The ideal position will be right below the rearview mirror. Press suction cups firmly against windshield to adhere suction cups. Note: Place away from wipers or other objects that might interfere with performance of the unit. Tinted glass will degrade the laser performance.
3)Bend the windshield mount bracket so the unit is in a level position.
4)The RMR-C495 will hang from the bottom of the bracket and must have an unobstructed view of the road ahead.
5)Insert the small end of the power cord gently into the power jack on the left side of the unit and the large end into the cigarette lighter receptacle.
Remote-mounting is not recommended.
Hard wire: Remove cigarette lighter plug. Connect the red wire to +12 Volts, and connect the white wire to ground.
This product has been designed and certified to comply with Part 15 of the FCC Rules. Any changes or modifications not expressly approved by Rocky Mountain Radar may void your authority to use this product. Operation is subject to the following two conditions: (1) this device may not cause harmful interference, and (2) this device must accept any interference received, including interference that may cause undesired operation.
2
CONTROLS: There are 3 buttons on top of the RMR-C495: Dim/Menu, Mute/Select and City.
Dim: To adjust brightness press the Dim button for a split second (momentary contact) to select between Bright, Dim, Dimmer, and Dark. To brighten the alarm lights press the Dim Button again until you reach desired setting. In Dark mode there will be a “P” light on. If a signal is present there will be no visual band alert only a sound alert.
Note: If the unit is in Dark mode the Mute mode cannot be engaged.
Menu: Press and hold the Menu button down for an extended period of time (approximately 3 to 5 seconds) to go into Menu mode. When Menu mode is displayed press and release in step increments then press Select button to change the setting. The menu items are: Voice on/off, English/Spanish voice, High/Low tone, Test on/off, All Reset. If All Reset is selected Cleared is displayed and all settings go to factory default. If no button is pressed after 5 seconds of being on Menu mode the current settings are stored and exits automatically the word
Exit is displayed. During the start up sequence the current menu settings are displayed. The factory settings are: Bright, Highway, Mute off, Voice on, English voice, High tone, Scrambler on, Test on.
Mute: Press the Mute button for a split second
(momentary contact) to select “Mute On”, “Auto Mute”, or “Mute Off”, Mute On mode disables voice and beeping sounds for quiet operation. Auto Mute mode will alarm 4 times then go into mute mode, but the display will keep blinking.
City: Engage the City function to reduce false alarms in high RF noise areas. City function reduces the K-Ka sensitivity by 50%. Highway mode has all bands at 100% sensitivity.
Reminder: If you forget the settings you last used on the unit use the ALL Reset mode to set the unit back to factory default.
3
 Loading...