Rocky Mountain Radar RMR-C435 User Manual

SCRAMBLER IS DE-ACTIVATED
RMR-C435
Radar and Laser Detector
Radar and Laser Scrambler
Owners Manual
SPECIFICATIONS:
Radar & Laser Detector:
Frequencies: 10.525 GHz
24.125 GHz
33-36 GHz
904 Nano-meter
Sensitivity: |
X-112 Dbm |
|
K-110 Dbm |
|
Ka-wide-102 Dbm |
|
Laser < 200 nano-watt |
Alarm: |
Separate for each Band |
|
Variable alarm for Range |
Controls: |
Volume, On/Off, Dim, Mute, |
|
City/Highway, Test |
VG-2, VG-3: Frequency Plan
Size: 1.4” x 3.0” x 4.4”
The RMR-C435 model is a full-featured radar and laser detector. It detects 360° radar and laser. The radar detector is a dual conversion scanning superheterodyne receiver with separate alarms for each of the radar bands, dim function, city/highway and mute select. It detects front and rear laser and radar.
Other:
1-Year Ticket Rebate Program and a 3-Year
Warranty
This product has been designed and certified to comply with Part 15 of the FCC Rules. Any changes or modifications not expressly approved by Rocky Mountain Radar may void your authority to use this product. Operation is subject to the following two conditions: (1) this device may not cause harmful interference, and (2) this device must accept any interference received, including interference that may cause undesired operation.
Radar detectors are not legal in Washington D.C., Virginia or most provinces in Canada.
1

Installation:
1)Complete, sign, and mail Ticket Rebate Registration card within 30 days from the date of purchase.
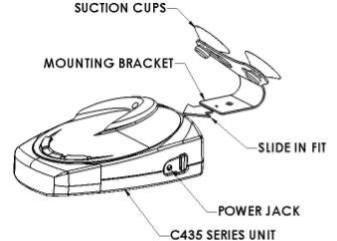
2)Attach the windshield bracket to the RMR-C435 unit. Align the edge on the bracket with the slot opening on the front of the case. Slide the bracket gently into the case until it locks into place.
3)Place the windshield bracket in the upper center portion of the windshield. The ideal position will be right below the rearview mirror. Press suction cups firmly against windshield to adhere suction cups. Note: Tinted glass will degrade the laser performance.
4)Bend the windshield mount bracket so the unit is in a level position.
5)The RMR-C435 will hang from the bottom of the bracket and must have an unobstructed view of the road ahead.
6)Insert the small end of the power cord gently into the power jack on the right side of the unit and the large end into the cigarette lighter receptacle.
Remote mounting is not recommended.
Hard wire: Remove cigarette lighter plug. Connect the red wire to +12 Volts, and connect the white wire to ground. If your power cord has a dashed white stripe then connect this white stripe wire to ground and solid black wire to +12 Volts.
2
CONTROLS: There are 3 buttons on top of the RMR-C435: Dim, Mute and City.
Dim: Press the Dim button for a split second (momentary contact) to dim the alarm lights. There are 3 levels of illumination. To brighten the alarm lights press the dim button again. The unit will have two beeps for “dim”, “dimmer” and “dark”, and one beep for “bright”.
Mute: Press the Mute button for a split second (momentary contact) to disable the alarm speaker for quiet operation. To reactivate the alarm speaker press the Mute button again. The unit will have two beeps for “mute on” and one beep for “mute off”.
Auto-Mute: Press the Mute button for a split second (momentary contact) to disable the alarm speaker for quiet operation. In Auto-Mute operation it will beep the signal 3 times then switch to mute automatically.
City: Engage the City function to reduce false alarms in high RF noise areas. City function has 3 levels of sensitivity, City 1, City 2, and Highway mode. Press the City button for a split second
(momentary contact). With City 1 mode “X” Band
will be turned off and K – Ka sensitivity will remain
100% active. City 2 mode “X” Band will remain off and K – Ka sensitivity will reduce to 50% sensitivity. Highway mode has all bands at 100% sensitivity. The unit will have two beeps for “city 1”, three beeps for “city 2” and one beep for “highway”.
Selectable Tone: The RMR-C435 has selectable tones. To change the tone of the unit, press and hold the Mute button down for an extended period of time (approximately 3 to 5 seconds). A flat tone buzz changes the tone. Three beeps returns the setting to normal.
Selectable VG2 alarm: To activate VG-2 detection, press and hold the City button down for an extended period of time (approximately 3 to 5 seconds) until unit beeps 3 times, VG2 is now on. VG-2 detection is now activated. To deactivate press and hold the City button for an extended period of time (approximately 3 to 5 seconds) until unit beeps a flat tone buzz. VG-2 is now off. The unit will have three beeps for “VG2 on” and a flat tone buzz for “VG2 off”.
3
 Loading...