

Page 1
AK DBU Dynamic Braking
Unit
600/690 VAC
User Manual
Page 2
Important User Information
Solid state equipment has operational characteristics differing from those of
electromechanical equipment. “Safety Guidelines for the Application, Installation
and Maintenance of Solid State Controls” (Publication SGI-1.1 available from
your local Rockwell Automation Sales Office or online at
www.rockwellautomation.com/literature
between solid state equipment and hard-wired electromechanical devices. Because
of this difference, and also because of the wide variety of uses for solid state
equipment, all persons responsible for applying this equipment must satisfy
themselves that each intended application of this equipment is acceptable.
In no event will Rockwell Automation be responsible or liable for indirect or
consequential damages resulting from the use or application of this equipment.
The examples and diagrams in this manual are included solely for illustrative
purposes. Because of the many variables and requirements associated with any
particular installation, Rockwell Automation cannot assume responsibility or
liability for actual use based on the examples and diagrams.
No patent liability is assumed by Rockwell Automation with respect to use of
information, circuits, equipment, or software described in this manual.
Reproduction of the contents of this manual, in whole or in part, without written
permission of Rockwell Automation is prohibited.
Throughout this manual, when necessary we use notes to make you aware of safety
considerations.
WA R NI NG : Identifies information about practices or circumstances
that can cause an explosion in a hazardous environment, which may
!
lead to personal injury or death, property damage, or economic loss.
) describes some important differences
http://
Important: Identifies information that is critical for successful application and
understanding of the product.
ATTENTION: Identifies information about practices or
circumstances that can lead to personal injury or death, property
!
damage, or economic loss. Attentions help you:
• identify a hazard
• avoid the hazard
• recognize the consequences
Shock Hazard labels may be located on or inside the equipment
(e.g., drive or motor) to alert people that dangerous voltage may be
present.
Burn Hazard labels may be located on or inside the equipment
(e.g., drive or motor) to alert people that surfaces may be at dangerous
temperatures.
PowerFlex is a registered trademark of Rockwell Automation.
Page 3

Preface Overview
Who Should Use this Manual?. . . . . . . . . . . . . . . . . . . . . . . . P-1
Reference Materials . . . . . . . . . . . . . . . . . . . . . . . . . . . . . . . . P-1
Manual Conventions . . . . . . . . . . . . . . . . . . . . . . . . . . . . . . . P-2
General Precautions . . . . . . . . . . . . . . . . . . . . . . . . . . . . . . . . P-2
Catalog Number Explanation. . . . . . . . . . . . . . . . . . . . . . . . . P-3
Description and Block Diagram. . . . . . . . . . . . . . . . . . . . . . . P-4
Line Voltage Selection . . . . . . . . . . . . . . . . . . . . . . . . . . . . . . P-7
Permissible Loading of the DBU. . . . . . . . . . . . . . . . . . . . . . P-8
Chapter 1 Installation/Wiring
Minimum Mounting Clearances . . . . . . . . . . . . . . . . . . . . . . 1-1
Grounding Requirements . . . . . . . . . . . . . . . . . . . . . . . . . . . . 1-2
Fuses. . . . . . . . . . . . . . . . . . . . . . . . . . . . . . . . . . . . . . . . . . . . 1-3
Protection of Brake Resistors and Conductors . . . . . . . . . . . 1-3
Power Wiring . . . . . . . . . . . . . . . . . . . . . . . . . . . . . . . . . . . . . 1-4
Control Wiring . . . . . . . . . . . . . . . . . . . . . . . . . . . . . . . . . . . . 1-8
CE Conformity. . . . . . . . . . . . . . . . . . . . . . . . . . . . . . . . . . . . 1-9
Chapter 2 Start Up / Troubleshooting
Start-Up . . . . . . . . . . . . . . . . . . . . . . . . . . . . . . . . . . . . . . . . . 2-2
DC Power on LED. . . . . . . . . . . . . . . . . . . . . . . . . . . . . . . . . 2-3
Troubleshooting . . . . . . . . . . . . . . . . . . . . . . . . . . . . . . . . . . . 2-4
Table of Contents
Appendix A Specifications
DBU . . . . . . . . . . . . . . . . . . . . . . . . . . . . . . . . . . . . . . . . . . . A-1
Dimensions. . . . . . . . . . . . . . . . . . . . . . . . . . . . . . . . . . . . . . . A-3
Diagnostic Card BUB . . . . . . . . . . . . . . . . . . . . . . . . . . . . . A-4
Resistor Specification . . . . . . . . . . . . . . . . . . . . . . . . . . . . . . A-4
Fuse Ratings. . . . . . . . . . . . . . . . . . . . . . . . . . . . . . . . . . . . . A-4
Appendix B CE Conformity
General Installation & Wiring Guidelines for CE Conform. . B-1
Essential Requirements for CE Compliance . . . . . . . . . . . . . B-2
Mounting Instructions . . . . . . . . . . . . . . . . . . . . . . . . . . . . . . B-3
Wiring Instruction . . . . . . . . . . . . . . . . . . . . . . . . . . . . . . . . . B-4
Configuration Examples . . . . . . . . . . . . . . . . . . . . . . . . . . . . B-6
Appendix C Design Information
Determining Dynamic Brake Requirements . . . . . . . . . . . . . C-1
Determine Values of Equation Variables . . . . . . . . . . . . . . . . C-4
Selecting the Brake Resistor . . . . . . . . . . . . . . . . . . . . . . . . . C-7
Example Calculation . . . . . . . . . . . . . . . . . . . . . . . . . . . . . . C-10
Page 4

2 Table of Contents
Page 5

Preface
Overview
The purpose of this manual is to provide the necessary information for
the installation, start-up and trouble shooting of the AK Dynamic
Braking Unit.
For information on…
Who Should Use this Manual?
Reference Materials P-1 Description and Block Diagram P-4
Manual Conventions P-2 Line Voltage Selection P-7
General Precautions P-2 Permissible Loading of the DBU P-8
See
page For information on…
P-1 Catalog Number Explanation P-3
See
page
Who Should Use this Manual?
This manual is intended for personnel qualified in the installation,
programming, and operation of adjustable Frequency Drives and their
use in common DC bus systems.
Reference Materials
The following manuals are recommended for general drive information:
Title Publication Available Online at …
Wiring and Grounding Guide for
PWM AC Drives
Preventive Maintenance of
Industrial Control and Drive
System Equipment
Reactors and Isol. Transformers 1321-TD001D-EN-P
Guarding Against Electrostatic
Damage
Safety Guidelines for the Appli-
cation, Installation and Maintenance of Solid State Control
A Global Reference Guide for
Reading Schematic Diagrams
DRIVES-IN001A-EN-P
www.ab.com/manuals/dr
DRIVES-SB001A-EN-E
8000-4.5.2
www.ab.com/manuals/gi
SGI-1.1
0100-2.10 Not available online, contact
your local RA Sales Office
For detailed PowerFlex Inverter information including specifications:
Title Publication Available . . .
PowerFlex
Reference Manual
Common Bus Application
Guide
PFLEX-RM001D-EN-E on the CD supplied with the drive
TBD TBD
or at
www.ab.com/manuals/dr
Page 6

P-2 Overview
Manual Conventions
• In this manual we refer to the AK Dynamic Braking Unit as DBU
and to the Adjustable Frequency AC Drive (AFD) as; drive, inverter
or PowerFlex Drive.
• The following words are used in the manual to describe an action:
Word Mean ing
Can Possible, able to do something
Cannot Not possible, not able to do something
May Permitted, allowed
Must Unavoidable, you must do this
Shall Required and necessary
Should Recommended
Should Not Not Recommended
General Precautions
ATTENTION: This DBU contains ESD (Electrostatic Discharge)
sensitive parts and assemblies. Static control precautions are required
!
when installing, testing, servicing or repairing this assembly.
Component damage may result if ESD control procedures are not
followed. If you are not familiar with static control procedures,
reference A-B publication 8000-4.5.2, “Guarding Against Electrostatic
Damage” or any other applicable ESD protection handbook.
ATTENTION: An incorrectly applied or installed DBU can result in
component damage or a reduction in product life. Wiring or application
!
errors, such as, incorrect or inadequate AC supply, or excessive ambient
temperatures may result in malfunction of the system.
ATTENTION: Only qualified personnel familiar with AFD’s and
associated machinery should plan or implement the installation,
!
start-up and subsequent maintenance of the system. Failure to comply
may result in personal injury and/or equipment damage.
ATTENTION: To avoid an electric shock hazard, verify that the
voltage on the DC bus terminals (which are connected to the DC bus
!
capacitors of the Inverter) has discharged before performing any work
on the DBU. Measure the DC bus voltage at the +DC and -DC terminal
of the Output Power Terminals. The voltage must be zero.
ATTENTION: Second source of power for cooling blower is present.
To avoid an electric shock hazard or moving blades, verify the
!
AC-power supply has been removed prior to performing any
maintenance or repairs.
Page 7
Overview P-3
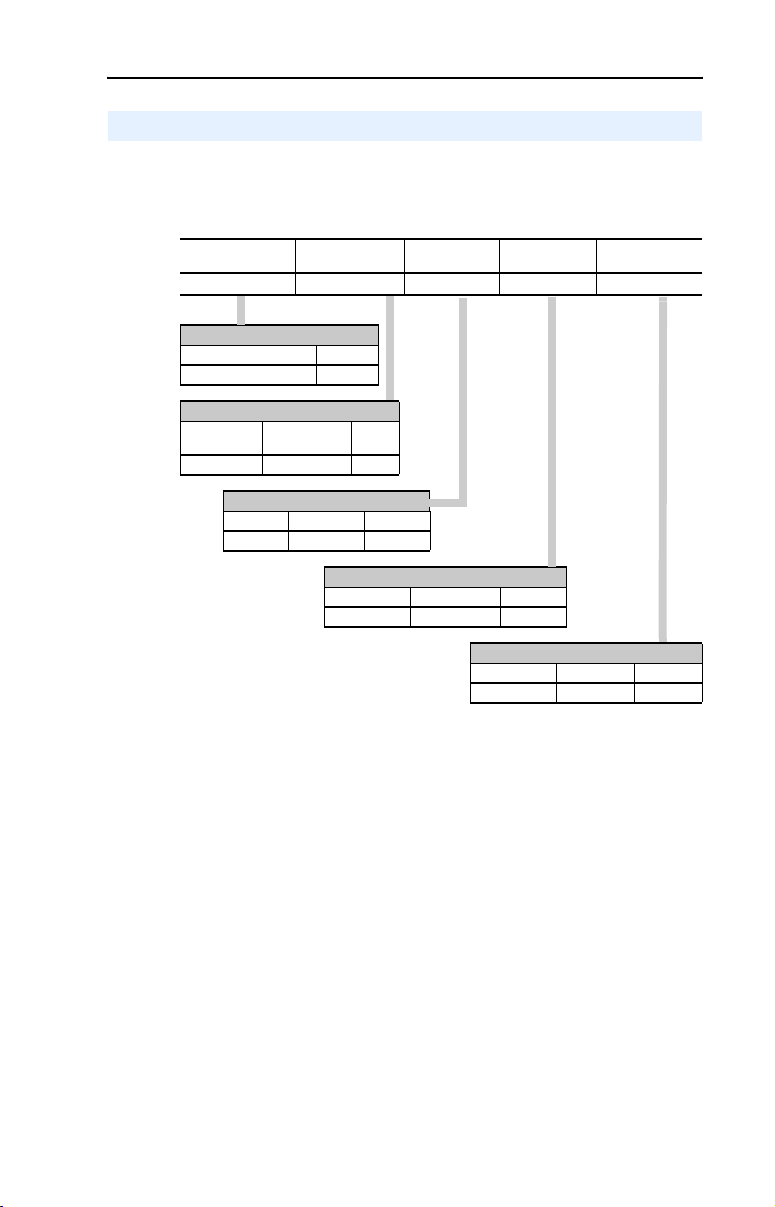
Catalog Number Explanation
The catalog numbering scheme for the AK Dynamic Braking Unit is
shown below.
AK DBU F 300 N E
Product Voltage Rating Rating Enclosure Documentation
Product
Name Cat.Code
AK Dynamic Braking Unit AK DBU
Version & Voltage Rating
Input Voltage
600/690 VAC 950/1090 VDC F
Full On
Vo lt ag e
Rating - Output Peak Current
Amps Voltage Cat. Code
300.0 600/690 VAC 300
Cat.
Code
Enclosure Type & Conformal Coating
Rating Conf. Coating Cat. Code
Open / IP00 No N
Documents & Shipping Carton
Document(s) Ship. Carton Cat. Code
English U. M. Yes E
Page 8

P-4 Overview
Description and Block Diagram
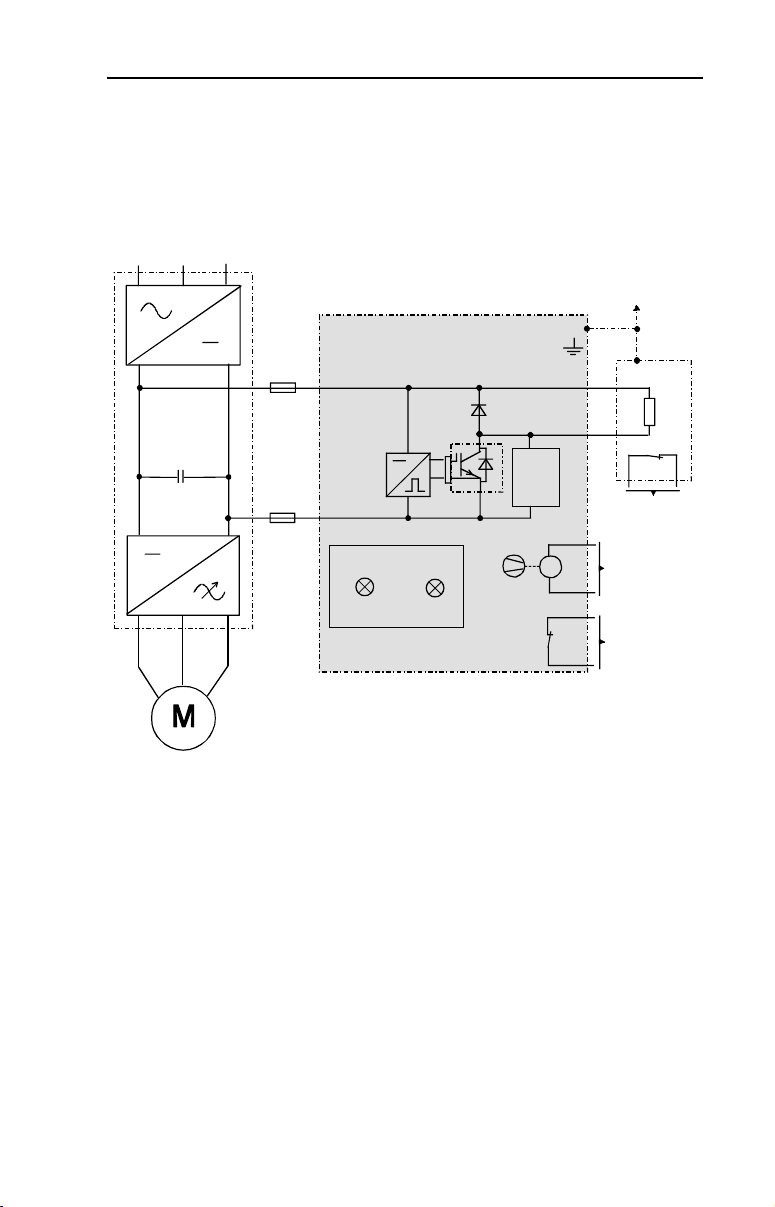
The DBU includes the following main components:
The Chopper Transistor
(IGBT). The Chopper Transistor is either ON or OFF. When in the
ON state the Dynamic Brake Resistor connects to the inverter’s DC
bus and dissipates regenerated energy from the load. When in the
OFF state, the Dynamic Brake Resistor is electrically isolated from
the inverter’s DC bus and no energy regeneration occurs. Several
transistor ratings are used in the available DBUs. The most important
rating is the collector current rating of the Chopper Transistor that
contributes in determining the minimum ohmic value used for the
Dynamic Brake Resistor.
is an Isolated Gate Bipolar Transistor
Chopper Transistor Voltage Control BUC (PWM type) regulates
the voltage of the DC Bus during regeneration. The average DC bus
voltage is 950V DC for 600V AC input and 1090V DC for 690V AC
input.
DBU Overtemperature Sensor located in the heat-sink for thermal
protection of the DBU.
Power Resistor (customer supplied) or resistor assembly with
Overtemperature Sensor for thermal protection. If the resistor
overheats, this contact disables the connected drive(s).
RC-snubber circuit
Cooling Fan that must be connected to a customer supplied 115V AC
Power Supply. The fan must run if the inverter is energized.
Diagnostic card BUB
The breaking unit includes the BUB diagnostic card with the two
indicating LEDs DC Power on and Brake on.
Page 9
Overview P-5
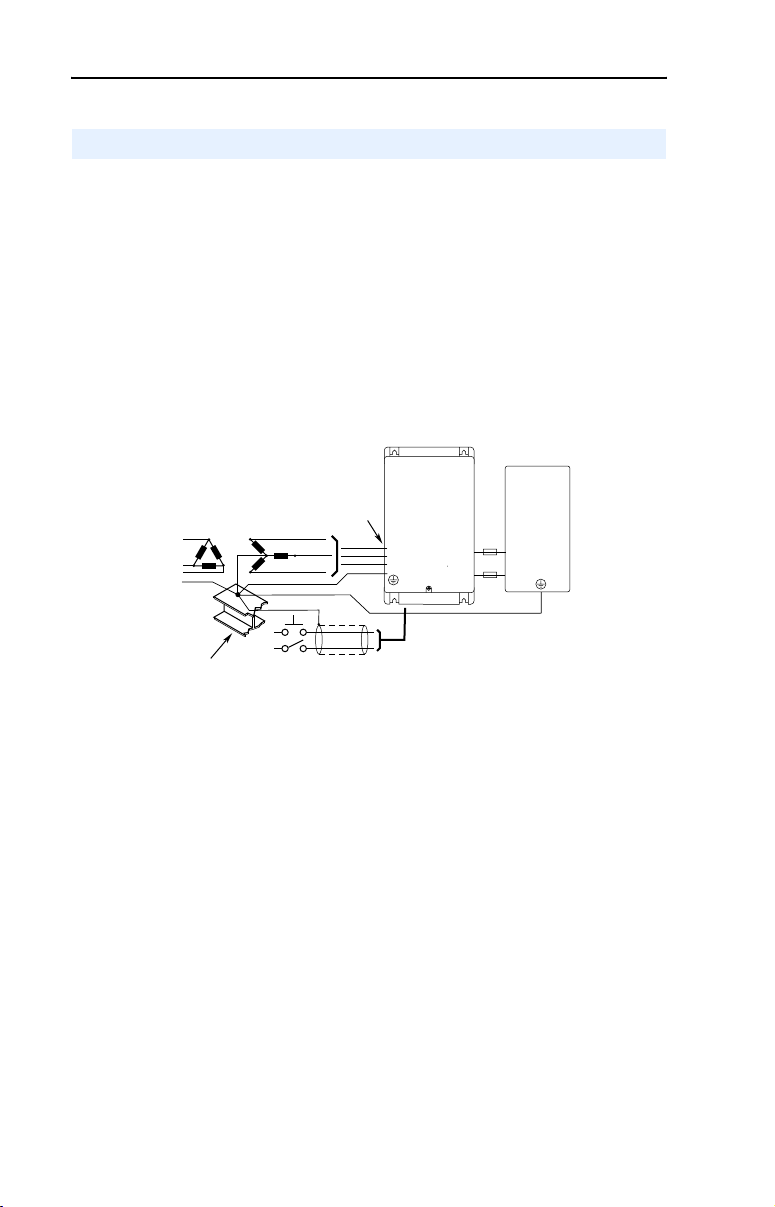
Figure P.1 shows the block diagram of the DBU with the Dynamic Brake
Resistor. The DBU is shown connected to the positive (DC+) and negative (DC-) terminals of an AC PWM Drive.
Figure P.1 Block diagram of Inverter with Dynamic Braking Unit
DC+
Inverter
DC-
Field
installed
Fuses
F1
F2
DC+
Transist or
Control
BUC
DC-
BUB
DC Power on Brake on
DBU
to customer grounding scheme
or earth gr ound
PE
BR1
BR2
RC
Snubber
>°C
115
M
to inverter's main
contactor circuit
to customer's
suppl ied
115 VAC
0
power source
11
to inverter's
main contactor
10
circuit
PE
R
>°C
Page 10

P-6 Overview
Theory of Operation
When the rotor of an induction motor is turning slower than the
synchronous speed set by the drive’s output power, the motor is
transforming electrical energy obtained from the drive into mechanical
energy available at the drive shaft of the motor. This process is referred
to as motoring. When the rotor is turning faster than the synchronous
speed set by the drive’s output power, the motor is transforming
mechanical energy available at the drive shaft of the motor into electrical
energy that can be transferred back into the utility grid. This process is
referred to as regeneration.
Most AC PWM drives convert AC power from the fixed frequency utility
grid into DC power by means of a diode rectifier bridge or controlled
SCR bridge before it is inverted into variable frequency AC power.
Diode and SCR bridges can only handle power in the motoring direction.
Therefore, if the motor is regenerating, the bridge cannot conduct the
necessary negative DC current. Depending on parameter setting, the
drive regulator will either increase the DC bus voltage and cause a Bus
Overvoltage trip at the drive, or extend the set deceleration rate or
increase the output frequency.
When a drive is dissipating regenerative electrical energy on an
occasional or periodic basis, a DBU connected to the DC bus of a drive
and feeding a power resistor can be specified. When a drive is
consistently operating in the regenerative mode, a regenerative unit or
RGU should be used to transform the DC regenerated energy to the fixed
frequency utility energy.
Parameter Setting on the Inverter
ATTENTION: When the braking unit is connected to a drive, the drive
Bus Regulation should be turned off. In addition the Regen Power Limit
should be set to the motor power limit or the braking unit power limit,
whichever is greater.
For example on a PowerFlex 700
• Parameters 161/162 [Bus Reg. Mode A/B] must be set to 0 (Disabled)
• Parameter 163 [DB Resistor Type] must be set to 2 (None)
• Parameter 153 [Regen Power Lim] must be set to the motor power
limit or braking unit power limit, whichever is greater.
Page 11
Overview P-7
-
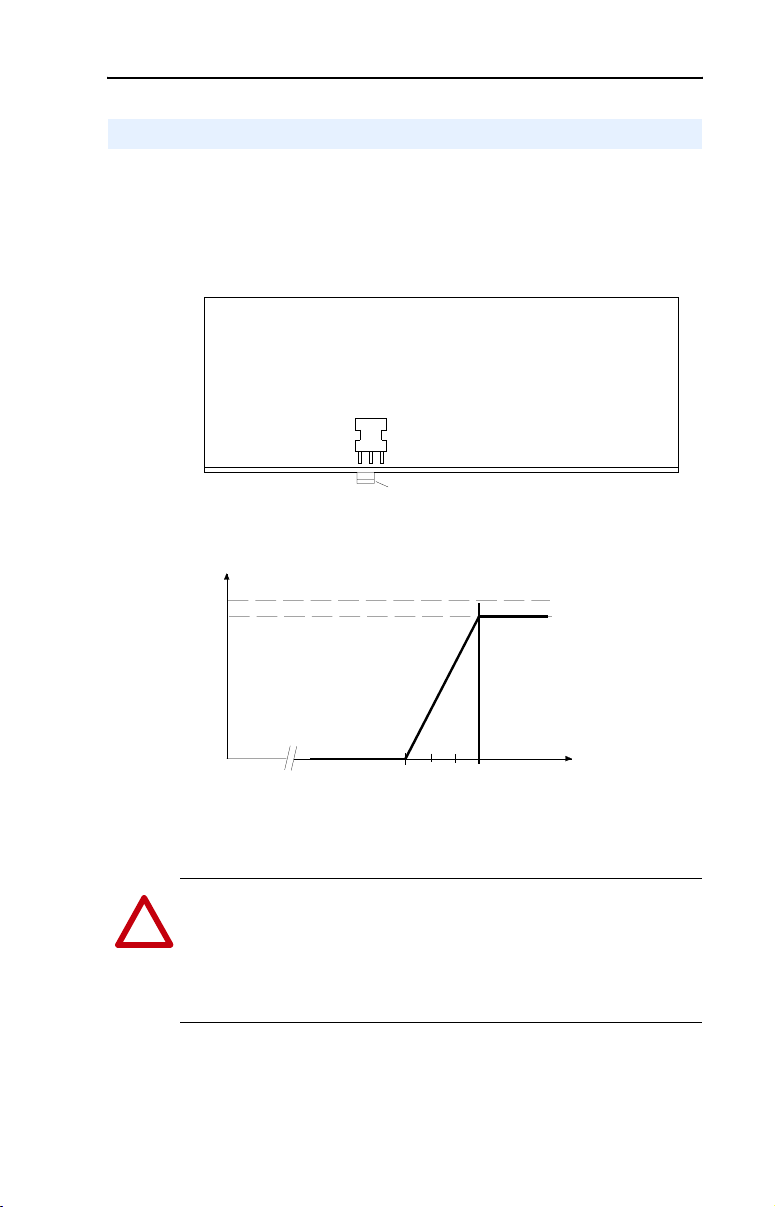
Line Voltage Selection
After removing the cover plate of the DBU, a red jumper plug located on
the BUC card allows for the line voltage selection of 690V / 600V.
The selection of this jumper plug defines the DC bus voltage at which
the DBU switches the brake resistor to the DC bus.
Figure P.2 Jumper plug location on the BUC card
BUC-Card
600V
Figure P.3 Pulse Width (Jumper Setting) in Relation to DC Bus Voltage
100%
95%
0%
Jumper at 600: 913V
690V
Jumper plug on rear side,
shown in position for 600V AC line
VDC
950V
690: 1047V 1090V
The default jumper voltage selection shipped from the factory is
690V AC line voltage.
ATTENTION: Without the jumper plug in place, the default line
voltage selection of the DBU is set to 600V AC. When operating on a
!
690V AC line the brake resistor will be constantly switched on. This
can cause an overtemperature trip on the DBU and/or the brake resistor.
Verify the jumper plug is present and has been properly selected for the
application.
Page 12
P-8 Overview
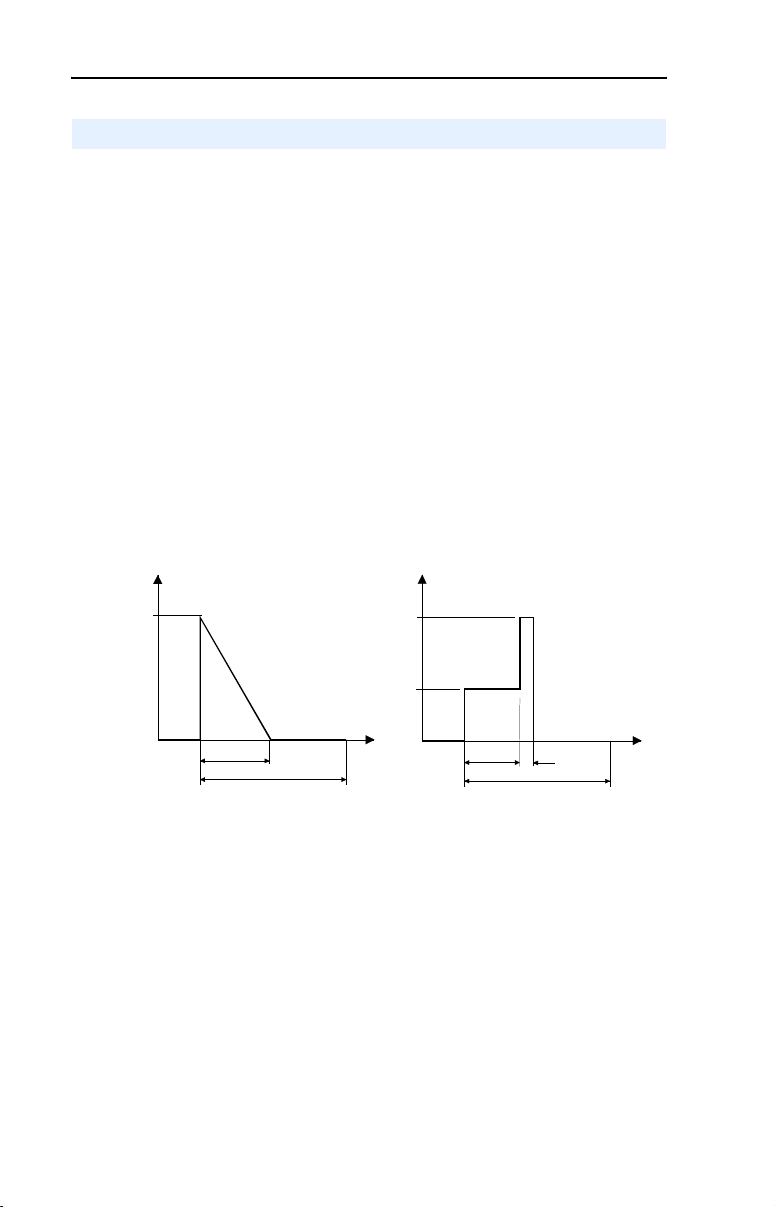
Permissible Loading of the DBU
To prevent thermal overload of the Braking Unit, it must operate within
the following limits:
In a time range of 10 minutes the permissible loading must be limited
to the maximum peak current of the DBU (300A) up to a maximum of
2.5 minutes.
This maximum current-time area of 750 Amp.-minutes can be of any
shape, as long as 300A is not exceeded.
The peak current (I
(maximum current with R
) in the following two examples is 300 Amp
Peak
= 3.2 ohm at 600 VAC line) and the
min
current-time area also meets the 750 Amp.-minutes requirement.
Figure P.4 Examples for Permissible Loading of the DBU
1) Linear deceleration to zero speed of
a drive with high inertia connected
(e.g. centrifuge)
I
Peak
300A
0
5
10
minutes
Current-time area:
(300 * 5) / 2 = 750 Amp-Min.
2) Drive with active load
(e.g. crane)
I
Peak
300A
112.5A
0
t
4
1
Current-time area:
(300 * 1) + (112.5 * 4) = 750 Amp-Min.
10
t
minutes
Page 13

Chapter
Installation/Wiring
This chapter provides the information needed for the installation and
wiring of the Allen-Bradley Dynamic Braking Module.
1
For information on…
Minimum Mounting Clearances
Grounding Requirements 1-2 Control Wiring 1-8
Fuses 1-3 CE Conformity 1-9
Protection of Brake Resistors and Conductors 1-3
Most start-up difficulties are the result of incorrect wiring. Every
precaution must be taken to assure that the wiring is done as instructed.
All items must be read and understood before the actual installation
begins.
ATTENTION: The following information is merely a guide for proper
installation. The Rockwell Automation Company cannot assume
!
responsibility for the compliance or the noncompliance to any code,
national, local or otherwise for the proper installation of this device or
associated equipment. A hazard of personal injury and/or equipment
damage exists if codes are ignored during installation.
See
page For information on…
1-1 Power Wiring 1-4
Minimum Mounting Clearances
For free air circulation through the cooling fins of the power section, the
braking unit must be mounted in the vertical position only. In order to
prevent overheating due to heat build-up, minimum clearances for air
circulation of 100 mm (25 in) above and below the unit must be
observed.
The rate of cooling air for the forced ventilated DBU is 158 m
with a bottom to top of the unit air flow.
See Appendix
A, Figure A.3 for detailed dimension information.
3
See
page
/h,
Page 14
1
-2
Installation/Wiring
Grounding Requirements
The Safety Ground terminal (PE) must be connected to the building
grounding scheme. Ground impedance must conform to the
requirements of national and local industrial safety regulations and/or
electrical codes. The integrity of all ground connections should be
periodically checked.
For installations within a cabinet, a single safety ground point or ground
bus bar connected directly to building steel should be used. All circuits
should be grounded independently and directly to this point/bar.
Figure 1.1 Typical Grounding
Ground Gr id, Girder or Ground
Rod (Building Ground Potential)
R (L1)
S (L2)
T (L3)
Drive
+DC
-DC
PE
+DC
-DC
DBU
PE
Safety Ground Terminal - PE
The DBU safety ground (PE) must be connected to the customer
grounding scheme or earth ground. This is the safety ground for the
DBU that is required by code. This point must be connected to adjacent
building steel (girder, joist, a floor ground rod, bus bar or building
ground grid) see Figure 1.1. Grounding points must comply with
national and local industrial safety regulations and/or electrical codes.
For additional information refer to publication DRIVES-IN001A-EN-P.
Page 15

Installation/Wiring 1-3
Fuses
National and local industrial safety regulations and/or electrical codes
may determine additional requirements for these installations.
ATTENTION: The DBU does not provide DC Bus branch short
circuit protection. Specifications for the recommended fuse to provide
!
protection against short circuits are provided in Appendix
A.
Protection of Brake Resistors and Conductors
In case of a failed DBU (IGBT short circuit or a constantly ON
command), the rectified AC line voltage is passed to the brake resistor.
Since the IGBT in the DBU is not switching and therefore its
temperature is not increasing, this fault will not be detected by the
temperature sensor located on the heat sink of the DBU.
To prevent possible damages due to the overloading of the brake
resistors, leads and input rectifier, the installation of a thermal switch on
the brake resistor heat sink is recommended:
The contact of the thermal switch on the brake resistor should be wired
in series with the thermal switch on the DBU to the drives main
contactor control circuit. Refer to Figure 1.5
.
Page 16

1
-4
Installation/Wiring
Power Wiring
ATTENTION: National Codes and standards (NEC, VDE, BSI etc.)
and local codes outline provisions for safely installing electrical
!
equipment. Installation must comply with specifications regarding wire
types, conductor sizes, and disconnect devices. Failure to do so may
result in personal injury and/or equipment damage.
Recommendations for the selection and wiring of power cables
• Cable must have copper conductors only
• Cable with 1,000V rating or greater is required
• Shielded cable is preferred
• For unshielded cable allow a spacing of 0.3 meters (1 foot) for every
10 meters (32.8 feet) of length. Long parallel runs must be avoided.
• Do not use cable with an insulation thickness less than or equal to
15 mils (0.4 mm/0.015 in.).
• See “Use of Unshielded Cable”
Use of Unshielded Cable
THHN, THWN or similar wire is acceptable for drive installation in dry
environments provided adequate free air space and/or conduit fill rates
limits are provided. Do not use THHN or similarly coated wire in wet
areas. Any wire chosen must have a minimum insulation thickness of
15 mils and should not have large variations in insulation concentricity.
EMC Compliance
Refer to Appendix B for details.
Cable Trays and Conduit
If cable trays or large conduits are to be used, refer to guidelines
presented in the PowerFlex 700 Reference Manual.
ATTENTION: To avoid a possible shock hazard caused by induced
voltages, unused wires in the conduit must be grounded at both ends.
!
For the same reason, if a drive sharing a conduit is being serviced or
installed, all drives using this conduit should be disabled. This will help
minimize the possible shock hazard from “cross coupled” motor leads.
Connect DBU, fuses and brake resistors according to the block diagram
in Figure P.1
for CE Conformity on page B-1.
. Refer also to General Installation and Wiring Guidelines
Page 17
Installation/Wiring 1-5
Connection leads between Inverter and DBU
During switching of the braking unit’s IGBT the inductance of the leads
between the DC bus capacitors of the inverter and the DBU generates
short time (milliseconds) bus over voltage peaks.
These bus over voltages, which are dampened by the RC snubber circuits
in the DBU, must not exceed 200 volts.
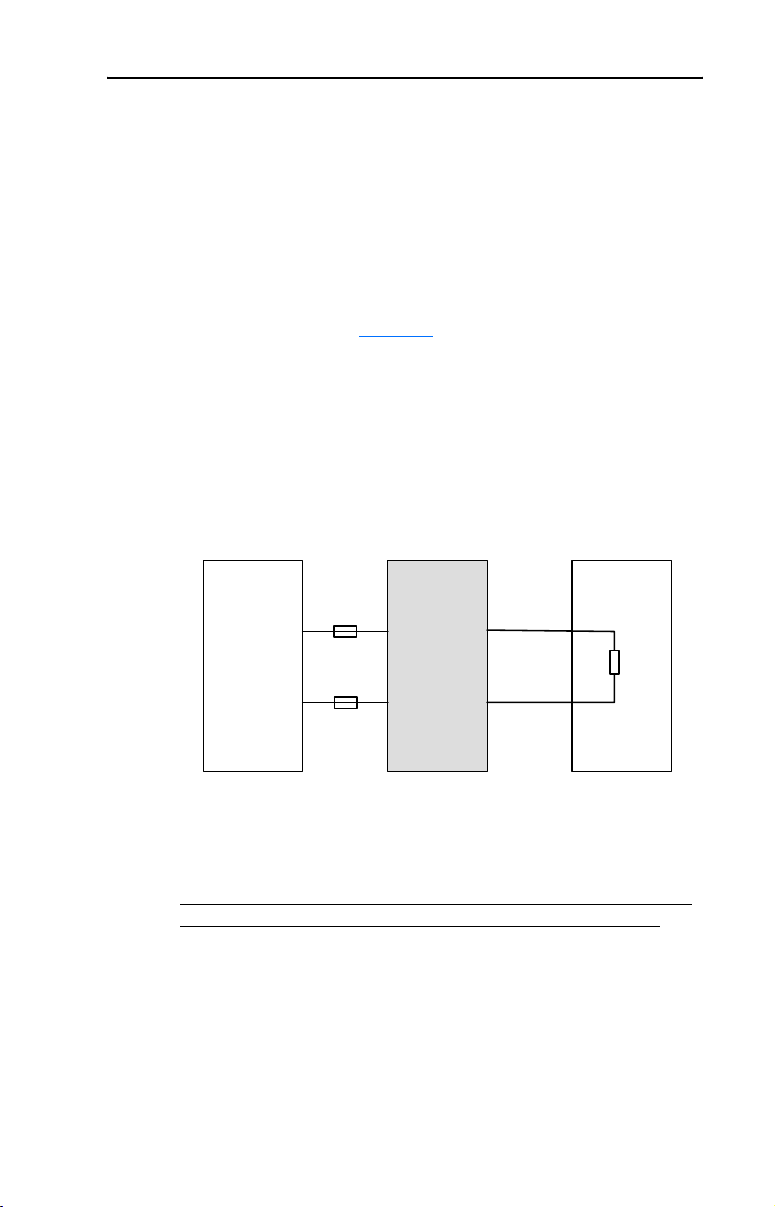
Drives Connected to a Single Motor
For drives connected to a single motor this can be accomplished by the
DC+
):
DBU
BR1
Cable length
max.30m
DB-Resistor
Assembly
following measures (see Figure 1.2
• The conductors must be bound together and run separatedly from
other conductors or multi-core cables (EMC shielded). This is to
reduce the cable inductance.
• Limiting the total cable length between the drive and the DBU to a
maximum of 3 m (120 in)
Connection example
Figure 1.2 Connection to single motor drive
AC-Drive
DC+
Cable length
max.3m
F1
R
DC- DC-
F2
Field
Installed
Fuses
BR2
10 11
Multiple Drives Coupled through a Common DC Bus
For a DBU that is connected to several drives which are coupled through
a common DC bus, the bus over voltages must also not exceed 200 V.
The inductance of the DC bus connection leads to the engaged DC bus
capacitors must be kept low by adhering to the following measures:
• Use short leads with low inductance.
• Locate the DBU as close as possible to the largest DC bus capacitors.
• Wires should be twisted
Page 18

1
-6
Installation/Wiring
Connection leads between the DBU and the Brake Resistor (R)
The cable length between the DBU and the Brake Resistor must not
exceed 30 meters, but the limiting factor for this connection is the time
constant of the brake resistor (Ratio of Inductance to Resistance).
See Brake Resistor Specifications
The inductance of the cables or leads can be reduced by bundling single
leads or using multi core (EMC shielded) cable.
To connect the brake resistors, heat-resistant cables and cable sockets
must be used (min. 90°C). Brake resistor cable selection should be based
on the maximum mean rms braking current of the DBU
For Max./Min. cable cross sections (mm2 and AWG) and tightening
torque see
Table 1.B.
on page A-4
. See page A-1.
Cooling Fan Supply Voltage
A 115 VAC (50/60 Hz, 0.2A) customer supplied power supply is
required for the DBU cooling fans. The 115V AC Power source should
be connected between terminals (0) and (115) located on the fan unit.
See Figure 1.3
and Figure 1.4.
Page 19

Power and Control Terminals
Installation/Wiring 1-7
Figure 1.3 Location of Power Connections and Control Terminals
for Customer Wiring (Front View Shown)
PE
BR2 DC-
DC+ BR1
Table 1.A Power Terminals
No. Description Notes
BR1 DC Brake (+) Brake Resistor Connection (+)
BR2 DC Brake (-) Brake Resistor Connection (-)
DC+ DC Bus (+) DC Bus Connection (+)
DC- DC Bus (-) DC Bus Connection (+)
PE Protective Earth
10/11 Thermostat N.C. contact For control terminals see Figure 1.4
Table 1.B Power Terminal Specifications
No. Description
Power Connections
Bus Bars with Bolts M10
PE
Bolt M10
Thermostat N.C. contact and
Fan Supply Terminal
(1)
Max./Min. sizes the terminals will accept - these are not recommendations.
Wire Size Range
Maximum Minimum Maximum Recommend
2
95 mm
(4/0 AWG)
2
50 mm
(6 AWG)
For control terminal specifications see Ta b l e 1 .C
50 mm
(AWG)
(1)
2
Torq ue
10 N-m
(89 lb.-in)
10 N-m
(89 lb.-in)
10 N-m
(89 lb.-in)
10 N-m
(89 lb.-in)
Page 20

1
-8
Installation/Wiring
Control Wiring
Recommendations for the selection and wiring of the control cables:
• Cable must have copper conductors only.
• Cable with 600V rating or greater is required.
• Control cables outside the cabinet should be separated from power
cables by at least 0.3 meters (1 foot).
Figure 1.4 Input Control Terminals
11
10
115
Thermostat N.C. output contact
Fan Supply Input Terminals
0
Table 1.C Input Control Terminal Specifications
Wire Size Range
No. Connection
0, 115 Fan Supply, 115V AC 4 mm
10, 11 Thermostat NC Output Contact,
Opens at power stack over temperature
(1)
Max./Min. sizes the terminals will accept - these are not recommendations.
2
(11 AWG)
0.5 mm
(22 AWG)
Drive(s) Run Interlock
ATTENTION: The DBU and the drive(s) do not offer protection for
externally mounted brake resistors. Risk of fire exists if the brake
!
resistors are not protected. Resistor packages must be self-protected
from overtemperature or a circuit equivalent to the one shown in Figure
1.5 must be supplied.
In order to protect the DBU from an overtemperature condition, the
normally closed contact (DBU Overtemperature - terminals 10 and 11)
must be connected in series with a resistor thermostat to an AC-line
input contactor to ensure the drives are stopped if an overtemperature
condition occurs either in the DBU or the Brake Resistor.
See Appendix
A for contact ratings.
(1)
2
Tor queMaximum Minimum
0.8 Nm
(7 lb.-in.)
Page 21

Installation/Wiring 1-9
Figure 1.5 Control Wiring of Drive(s) Main Contactor Interlock
Tree-Phase
AC Input
K1M
R (L1)
S (L2)
T (L3)
Power
Source
AC-Drive
Power off
F1
F2
Power on
K1M
DBU
Temperature
Sensor
F3 F4
>°C >°C
10 11
10 11
Brake Resistor
Assembly
R
Resistor
Thermostat
K1M
CE Conformity
For Mounting and Wiring Instructions concerning CE Conformity refer
to Appendix
B.
Page 22

1
-10
Installation/Wiring
Page 23

Chapter
Start Up / Troubleshooting
This chapter provides the necessary information for the start up and
troubleshooting of the DBU.
For information on . . . See page . . .
Start-Up
DC Power ON LED 2-3
Troubleshooting 2-4
ATTENTION: Power must be applied to the connected drive(s) to
perform the following start-up procedure. Some of the voltages present
!
are at dangerous level. To avoid electric shock hazard or damage to
equipment, only qualified service personnel should perform the
following procedure. Thoroughly read and understand the start up and
troubleshooting procedures before beginning. If an event does not occur
while performing these procedures, Do Not Continue. Remove Power
including user supplied control voltages. User supplied voltages may
exist even when main AC power is not applied to the drive(s). Correct
the malfunction before continuing.
ATTENTION: Second source of power for cooling blower is present.
To avoid an electric shock hazard or moving blades, verify the
!
AC-power supply has been removed prior to performing any
maintenance or repairs.
2-2
2
ATTENTION: Disabling the drive does not stop the AC line from
being rectified. Full potential will still be present on the DC bus. A
!
failure of the IGBT will result in brake resistor failure. The AC line
must be disconnected from the drive.
Page 24

2-2 Star t Up / Troubleshooting
Start-Up
Before Applying Power to the Drive(s)
❏ 1. Verify all inputs are connected to the correct terminals and are
properly torqued.
❏ 2. Verify the AC line power at the drive(s) disconnecting device is
within the rated value of the drive(s).
❏ 3. Verify the control power voltage is correct (115V AC for the fan).
❏ 4. Verify the DBU Overtemperature N.C. contact output is correctly
wired. This normally closed contact output is used to stop the
drive(s) when an overtemperature condition exists. Verify this
interlocking circuit has been wired correctly according to customer’s
application. See Figure 1.5 on page 1-9
Applying Power to the Drive(s)
❏ 1. Apply AC power to the drive(s) and control voltage (115V AC) to the
fan of the DBU.
The red DC Power ON LED on the DBU should be on if power is
applied to terminals R, S, T (L1, L2, L3) of the connected drive(s).
See Figure 2.1.
❏ 2. If the red DC Power ON LED is not on at this point, refer to the Tab le
2.A for troubleshooting guidelines.
.
Page 25

Start Up / Troubleshooting 2-3
DC Power ON LED
The red DC Power ON LED is visible through the front panel and will
illuminate when power is applied to the drive and the DC bus voltage has
exceeded 50V.
ATTENTION: The LEDs on the DBU are only operational when the
unit is energized. Servicing energized equipment can be hazardous.
!
Severe injury or death can result from electrical shock, burn, or
unintended actuation of the controlled equipment. Follow Safety related
practices of NFPA 70E, ELECTRICAL SAFETY FOR EMPLOYEE
WORKPLACES. DO NOT work alone on energized equipment!
Figure 2.1
DC Power on and Brake on
DC Power On
Indicating LEDs
Brake On
Page 26

2-4 Star t Up / Troubleshooting
Troubleshooting
Table 2.A Possible Faults and Corrective Actions
Fault Cause Corrective Action
Heat sink Over
Temperature
DC Output
Voltage Loss
Heat sink temperature
exceeds maximum
rating.
Loss of DC Bus Power 1. Check 3-Phase AC Incoming Power on the
1. Verify the maximum ambient temperature
has not been exceeded.
2. Check fan for correct operation.
Replace fan if necessary with fan kit
No. SK-D9-FAN1
3. Check for excess load on the DBU.
Refer to Appendix
Verify the braking duty cycle does not
exceed the drive(s) design specification.
4. Check for proper clearance around the
DBU.
5. Contact your local RA sales office.
drive(s) for undervoltage or phase loss.
2. Check Fuses on DC bus input leads.
3. Check Inverter.
4. Contact your local RA sales office
C for calculations.
Page 27

Appendix A
Specifications
This appendix provides electrical, environmental, functional and
physical specifications for the DBU and the diagnostic card BUB.
For information on…
DBU
Dimensions A-3 Fuse Ratings A-4
Diagnostic Card BUB A-4
See
page For information on…
A-1 Brake Resistor Specifications A-4
See
page
DBU
Specifications
Power Ratings
Input Voltage 600V 690V
Peak Braking Power 268 kW 305 kW
Minimum Brake Resistor Value permitted
for Peak Braking Power
Max. Peak Braking Current with 150sec ON
time at up to 25% duty cycle
Maximum Mean RMS Braking Current 150 Amp
Heat Dissipation (Average) at 25% duty cycle 170 W
Power consumption of the control circuits 27mA
Maximum DC bus Voltage
at terminals DC+,DC-
Pulse width modulation PWM,
switching frequency
Capacitance of the built-in snubber 4µF
Control Output Specifications
Heat sink temperature sensor The temperature sensor trips if heat sink
temperature exceeds maximum
temperature.
NC contact output rating (max.) Resistive Rating: 15A at 125V AC,
Inductive Rating: 10A at 125V AC,
3.2 ohm 3.7 ohm
300 Amp
DC 1150V
0.67 kHz
10A at 250V AC,
7A at 24V DC
6A at 250V AC
Page 28

A-2 Specifications
C
Specifications
Approvals and Standards Compliance
The DBU is designed to meet the following specifications:
NFPA 70 - US National Electrical Code
NEMA ICS 3.1 - Safety standards for Construction and Guide for Selection,
IEC 146 - International Electrical Code.
Environmental Specifications
Altitude: 1000 m (3300 ft.) max. without derating.
Degree of protection Open / IP00
Ambient Operating Temperature
without derating:
Storage Temperature: –25 to 55°C (–25 to 131°F)
Transportation Temperature: –25 to 70°C (–25 to 158°F)
Relative Humidity: 5 to 95% non-condensing
Shock: 15G peak for 11ms duration (±1.0 ms)
Vibration: 0.152 mm (0.006 in.) displacement,
Installation and Operation of Adjustable Speed Drive Systems.
UL and cUL Listed to UL508C
and CAN/CSA-C2.2 No. 14-M91
(600V AC only)
Marked for all applicable European
Directives
EMC Directive (89/336/EEC)
Emissions: EN 61800-3 Adjustable
Speed electrical power drive
systems Part 3
Immunity: EN 61800-3 Second
Environment, Category C3
Low Voltage Directive (73/23/EEC)
EN 50178 Electronic Equipment for use
in Power Installations
Above 1000 m the derating for the
nominal current is 1% per 100 m
(330 ft.).
0 to 40°C (32 to 104°F)
For temperatures higher than 40°C up to
max 55°C (131°F), the max. peak
braking current must be derated by 1.5%
per °C (0.8% per °F)
(70°C max 24 hours)
1G peak
Page 29

Dimensions
Figure A.3 Dimensions and Location of Bus-Bar Customer Connection Points
Min.
100
(4.0)
32
(1.3)
42 36 36 36 25 50
(1.65) (1.42)
(1.42) (1.42) (1 .0) (2.0)
ø
6.5
(0.26)
89
(3.5)
Specifications A
5
(0.2)
-3
350
(13.8)
80
(3.15)
Min.
100
(4.0)
(12.2)
8
(0.3)
310
(0.2)
PE
BR2 DC-
5
215
(8.46)
2)
225
(8.86)
DC+ BR1
Front view Side view
Dimensions are in millimeters and (inches)
Weight: 10 kg (22 lb.)
(0.2)
356
(14.0)
Air Flow
5
157
(6.18)
Required cooling air: 158 m
3
/h
Page 30

A-4 Specifications
Diagnostic Card BUB
The DBU contains the BUB diagnostic card which includes the two red
indication LEDs Po w er ON and Brake ON.
Table A.1 Function/State of Indication LEDs
Function LED Status Condition
DC Power ON ON when DC bus voltage exceeds 50V
Brake ON ON when braking current flows
Brake Resistor Specifications
The time constant (t) of the brake resistor: t = L/R, must be <40 µs
L: Effective inductance of the brake resistor and cable
R: Resistance of the resistor (R)
Due to the many different types of brake resistor constructions their
inductance varies widely. Specifically wire wound resistors on ceramic
core can have high inductance. For example a brake resistor with 3.1
ohm resistance shall not have more than 110µH inductance if the cable
inductance for 30m (90ft) is assumed to be 10µH..
Fuse Ratings
Table A.2 provides the recommended fuse ratings for the DBU.
The recommended fuses meet the UL and IEC requirements and are
based on 40°C (104°F) and the U.S. National Electrical Code.
country, state or local codes may require different ratings.
If the available fuse ampere ratings do not match those recommended,
the next higher fuse rating should be chosen.
• IEC – BS88 (British Standard) Parts 1 & 2,
EN60269-1, Parts 1 & 2, type aR or equivalent should be used.
• UL – Recognised; A100P (Ferraz) or FWJ (Bussmann) must be used.
Table A.2
AC Line DBU Rating Fuse Fuse Holder
Volt kW Amps Amps Volt Type Type Manufacturer
600 268 300 300 700-800 FWJ-300 BH-3 Bussmann
690 305 300 315 1000 G300547 SI DIN 110 630 Ferraz
Notes:
(1)
Recommended Short Circuit Protection Fusing
A100P300-4TI P266L Ferraz
Minimum protection device size is the lowest rated device that supplies maximum
protection without nuisance tripping.
Other
Page 31

Appendix B
CE Conformity
This appendix provides the installation and wiring instructions necessary
for the CE-conformity of the Dynamic Braking Unit.
For information on…
General Installation and Wiring Guidelines for CE Conformity
Essential Requirements for CE Compliance B-2 Configuration Examples B-6
Conformity with the Low Voltage (LV) Directive and Electromagnetic
Compatibility (EMC) Directive has been demonstrated using
harmonized European Norm (EN) standards published in the Official
Journal of the European Communities. The DBUs comply with the EN
standards listed below when installed according to the instructions
provided in the User Manual.
CE Declarations of Conformity are available online at:
http://www.ab.com/certification/ce/docs
See
page For information on…
B-1 Mounting Instructions B-3
Wiring Instructions B-4
.
See
page
Low Voltage Directive (73/23/EEC)
• EN50178 Electronic equipment for use in power installations
EMC Directive (89/336/EEC)
• EN61800-3 Adjustable speed electrical power drive systems Part 3:
EMC product standard including specific test methods.
General Installation and Wiring Guidelines for CE Conformity
• The cable length between the DBU and inverter should be kept less
than 3m (10ft) in order to reduce electromagnetic emission as well as
capacitive currents. The inverter should be located in the same
cabinet or next to the cabinet with the DBU. If the connection leads
between DBU and inverter(s) leave the cabinet, shielded cables must
be used and cable length must be minimized.
• Cabinets should be designed for radiated EMC attenuation.
Recommended cabinets include Rittal TS8 series.
• Brake resistor assemblies should be mounted outside of the control
cabinet in a separate metal cabinet or screened enclosure designed to
dissipate the thermal energy.
• The DBU meets CE EMC emission limits for the industrial
Page 32

B-2 CE Conformity
environment, it is not intended to be used on a low-voltage public
network which supplies domestic premises. If used in a residential or
domestic environment it will cause radio interference. The user is
required to take all the necessary measures to prevent interference in
addition to the essential requirements for CE compliance listed
below.
• Conformity of the drive with CE EMC requirements does not
guarantee that the entire machine installation will comply with CE
EMC requirements. Many factors can influence total machine and
installation compliance.
Essential Requirements for CE Compliance
Conditions 1 to 6 listed below must be satisfied in order for the DBU to
meet the requirements of EN61800-3.
1. The DBU and brake resistors must be installed in a cabinet or
enclosure which provides good attenuation of radiated radio
frequency emissions from the DBU and brake resistor.
Such enclosures incorporate the following construction features:
• enclosure of steel construction surrounds the DBU and the brake
resistor on all sides, top and bottom
• conductive, corrosion-resistant (not painted) mounting surfaces
inside
• high frequency, low impedance electrical bonding between all
sides and earth
• continuous metal-to-metal contact between adjacent sides, top
and bottom
• continuous conductive gasketing at mating surfaces of opening
doors or removable covers
• conductive screening over all enclosure openings, including
ventilation openings, such that no single opening is larger than
6mm in diameter (0.24 in).
2. Use of CE compliant inverter(s).
3. Review important precautions/attentions statements throughout this
document before installing the DBU.
4. Grounding as described on page B.4.
5. All Power wiring (except line input) and control wiring outside the
cabinet must be braided, shielded cable with a coverage of 75% or
better, or metal conduit, or conductors with equivalent attenuation.
6. The shield of all cables outside the cabinet must be connected to the
cabinets earthed bus bar or to the cabinet enclosure using EMC style
cable glands.
For additional requirements refer to the Drive(s) User Manual.
Page 33

Mounting Instructions
CE Conformity B-3
Cabinet Mounted Drives
If the drive related components are mounted in a cabinet, the following
rules must be observed:
• If located in a common cabinet, all drive related components must be
screwed directly to a blank (non painted) panel with good
conductivity and the largest possible contact area.
• The support panel for the DBU and an inverter with filters must be a
conducting steel sheet with a common ground bus bar located at the
bottom of the support panel. This ground bus bar, must be solidly
connected to the panel to ensure good conductivity.
• All cable screens for cables entering the cabinet must be solidly
connected to the cabinet’s ground bus bar or to the ground stud of the
inverter with a large connection area and good conductivity to ensure
that the grounding represents a low impedance for HF signals.
• Either galvanized cable brackets or EMC cable glands are required.
Standalone Drives and Related Components
• If the drive and related components (inverter, RFI-Filter, DBU and
brake resistor) are mounted in separate enclosures, these must be of
conductive metallic material in which the diameter of ventilation
holes should not exceed 6 mm (0.24 in).
• The spacing between brake resistor assembly and the enclosure wall
shall be 100 mm (4 in) minimum.
(see Figure B.2)
(see Figure B.3)
Page 34

B-4 CE Conformity
Wiring Instructions
General
• Earth conductors must be either 16 mm2 or 50% of the cross section
of the phase conductor whichever is larger.
• The connections between the inverter and the DBU should not
exceed 3 m (10 ft.).
• Signal leads inside the cabinet must be separated from power leads.
• Input power wires on the line side of the drive or EMC filter for the
drive should be widely separated from other wiring inside the cabinet
or should be shielded.
Shielded Cables entering the Cabinet
(
see
Figure B.1 and Figure B.2
• The shield or screen must be tinned copper braid or tinned steel
braid.
• If shielded cable is not available (limited by the obtainable cross
sections) the individual conductors and protective conductors must
be run in steel conduits or enclosed metal cable ducts also connected
to earth at both ends.
)
• Signal and control leads (e.g. reference, feedback, relays) must be
shielded cable. The individual conductors must be stranded, but
twisted pairs are not required. The shield must be grounded at both
ends.
• The motor cable shall be 4-wire shielded cable (3 phases and earth
conductor green/yellow) or run in a separate steel conduit.
Page 35

CE Conformity B-5
Power Connections between Enclosures
(
see
Figure B.1 and Figure B.3
• The power cables between the enclosures housing of the inverter, the
DBU and the brake resistor shall be 3-wire shielded cable (+, -, and
earth conductor green/yellow) or run in a separate steel conduit.
• Between each enclosure and the protective earth (PE) of the line
input, an uninterrupted connection (green/yellow conductors) must
be provided to ensure correct grounding of the equipment.
• The braid of shielded cables must be connected to the enclosures by
the use of suitable EMC type cable glands.
Figure B.1 Specification for shielded cable
)
Stranded copper wire
Plastic insulation
Inner plastic sheath
Compact screen of galvanized
(tinned) copper or steel braid
Outer plastic jacket
Cable Glands
• Use suitable EMC-tested cable glands only.
• The conductivity of the shield to earth connection is ensured by
laying the braid over a plastic cone which will press it to the inner
side of the gland when mounted.
• It is important that the connection area is 360 degree around the
cone.
• The cable glands provide pull-relief through the cable jacket.
Page 36

B-6 CE Conformity
Configuration Examples
Figure B.2 Cabinet Mounted Drive and Related Components
DBU
Cabinet
R
Panel
Brake resistor
PE
DC+, DC-
U, V, W
(T1,T2,T3)
U,V,W
M
R, S, T
(L1,L2,L3)
1
2
3
4
5
Speed
Feedback
Device
PE
Inverter
RFI Filter
(if used)
External
line reactor
(if used)
Input contactor
Input fuses
Terminals for 4-wi re
line input cable
Cabinet protective
ground bus bar
Cable bracket
1
Shield
2
Shielded 4-wire motor cable
3
Shielded signal conductor cable
4
(feedback, reference)
5
EMC type armoured cable gland
at terminal box
Page 37

Figure B.3 Stand Alone Drive and Related Components
1
K1M
CE Conformity B-7
Stand Alone
RFI Filter
(if used)
Inverter Enclosure
INVERTER
DC+
DC-
R, S, T
(L1,L2,L3)
U, V, W
(T1,T2,T3)
to
K1M
control
circuit
6
3
4
PE
U,V,W
M
DBU Enclosure
DBU
>°C
PE
DC+
DC-
BR1
BR2
11
10
6 6
4-wire line input cable
1
Shielded 4-wire motor cable
3
Shielded control or signal
4
conductor cable
5
EMC type armoured cable gland
at all enclosure entries and motor
6
Shielded cable with PE conductor
Resistor
Enclosure
>°C
R
Page 38

B-8 CE Conformity
Notes:
Page 39

Appendix C
Design Information
This appendix provides the design information which is necessary for
calculating and selecting an external brake resistor for connecting to the
Dynamic Braking Unit.
For information on… See page
Determining Dynamic Brake Requirements
Determine Values of Equation Variables C-4
Selecting the Resistor C-7
Example Calculation C-10
Determining Dynamic Brake Requirements
How to Determine Dynamic Brake Requirements
When a drive is consistently operating in the regenerative mode of
operation, serious consideration should be given to equipment that will
transform the electrical energy back to the fixed frequency utility grid.
As a general rule, Dynamic Braking is used when the need to dissipate
regenerative energy occurs on an occasional or periodic basis. In general,
the motor power rating, speed, torque, and details regarding the
regenerative mode of operation will be needed in order to estimate what
Dynamic Brake Resistor value is needed.
C-1
The Peak Regenerative Power and Average Regenerative Power
required for the application must be calculated in order to determine the
brake resistor value, and to verify the suitability of the DBU.
The power rating of the Dynamic Brake Resistor is estimated by
applying what is known about the drive’s motoring and regenerating
modes of operation. The Average Power Dissipation must be estimated
and the power rating of the Dynamic Brake Resistor chosen to be greater
than that average. If the Dynamic Brake Resistor has a large thermodynamic heat capacity, then the resistor element will be able to absorb a
large amount of energy without the temperature of the resistor element
exceeding the operational temperature rating. Thermal time constants in
the order of 50 seconds and higher satisfy the criteria of large heat
capacities for these applications. If a resistor has a small heat capacity
(defined as thermal time constants less than 5 seconds) the temperature
of the resistor element could exceed its maximum.
Page 40

C-2 Design Information
The Peak Regenerative Power can be calculated as:
• Horsepower (English units)
• Watts (The International System of Units, SI)
• Per Unit System (pu) which is relative to a value
The final number must be in watts of power to estimate the resistance
value of the Dynamic Brake Resistor. The following calculations are
demonstrated in SI units.
Gather the following information
• Power rating from motor nameplate in watts, kilowatts, or
horsepower
• Speed rating from motor nameplate in rpm or rps (radians per sec.)
• Required decel time (per Figure C.1
,
t3 – t2). This time is a process
requirement and must be within the capabilities of the drive
programming.
• Motor inertia and load inertia in kg-m
• Gear ratio
(GR)
if a gear is present between the motor and load
2
or WK2 in lb.-ft.
2
• Motor shaft speed, torque, and power profile of the drive application
Figure C.1
power. The examples are for cyclical application that is periodic over
seconds. The following variables are defined for Figure C.1
shows typical application profiles for speed, torque and
(t)
= Motor shaft speed in radians per second (rps)
ω
N
= Motor shaft speed in Revolutions Per Minute
T(t)
= Motor shaft torque in Newton-meters
:
ω
(RPM)
2πN
----------=
60
t4
1.0 lb.-ft. = 1.356 N-m
P(t)
= Motor shaft power in watts
ωb= Rated angular rotational speed
= Angular rotational speed less than ωb
ω
o
1.0 HP = 746 watts
Rad
---------
s
(can equal 0)
Rad
---------
s
-Pb= Motor shaft peak regenerative power in watts
Page 41

Design Information C-3
Figure C.1 Application Speed, Torque and Power Profiles
Speed
ω
(t)
ω
b
ω
o
0
t
t2t
1
3t4
t1 + t
4
Torque
T(t)
t
0
Power
P(t)
0
-P
b
t
t
t2t
1
1
t2t
3t4
3t4
t1 + t
t1 + t
4
4
t
t
Page 42

C-4 Design Information
Determine Values of Equation Variables
Step 1 Total Inertia
JTJmGR2JL×()+=
JT= Total inertia reflected to the motor shaft
2
or WK2 in lb.-ft.2)
(kg-m
Jm= Motor inertia (kg-m2 or WK2 in lb.-ft.2)
GR
= Gear ratio for any gear between motor and load
(dimensionless)
Load Speed
GR
------------- ------------- ---=
Mo t o r Speed
If the gear ratio is 2:1 then
JL= Load inertia (kg-m2 or WK2 in lb.-ft.2)
1.0 lb.-ft.
2
= 0.042 kg-m
GR
2
Calculate Total Inertia:
J
oooooooooo
[]
T
oooooooooo oooooooooo
Record Total Inertia:
JT=
1
--
0.5
==
2
×()+=
Page 43

Design Information C-5
Step 2 Peak Braking Power
JTωbωbωo–()[]
----------- ------------- ------------- ---=
P
b
Pb= Peak braking power (watts). 1.0 HP = 746 watts
t3t2–()
Pb1=
Pb x (motor efficiency x drive efficiency)
JT= Total inertia reflected to the motor shaft (kg-m2)
ηM, ηD = Motor and drive efficiency
ωb= Rated angular rotational speed
ωo= Angular rotational speed,
less than rated speed down to zero
= Maximum application motor speed (RPM)
N
b
Rad
---------
s
Rad
---------
b
------------=
60
s
2πN
t3 – t2= Deceleration time from ωb to ωo (seconds)
Calculate Peak Braking Power:
ooooo
P
b
[]
------------ ------------- ------------- ------------- ------------ ------------- ------------- -------=
oooooo
[]
ooooooooo ooooooooo
ooooo ooooo
–()××
–()
Record the Peak Braking Power:
Pb=
Calculate
Compare the
(P
Pb1:
Pb1 =
Pb x (motor efficiency x drive efficiency)
Pb1 to the Maximum Peak Braking Power of the DBU
). If
Pb1 is greater than P
max
, the decel time must be increased, or
max
the inertia or the speed must be decreased, so that the drive does not
enter current limit.
Table C.A DC bus Voltage and Minimum Brake Resistance
Line Voltage V
600 VAC 950 VDC 3.2 Ohms 268 kW
690 VAC 1090 VDC 3.7 Ohms 305 kW
d
RP
max
For the purposes of this document, it is assumed that the motor used in
the application is capable of producing the required regenerative torque
and power.
Page 44

C-6 Design Information
Step 3 Minimum Power Requirements for the Dynamic Brake
Resistors
It is assumed that the application exhibits a periodic function of
acceleration and deceleration. If
necessary for deceleration from rated speed to ω
time in seconds before the process repeats itself, then the average duty
cycle is
(t3 – t2)/t4. The power as a function of time is a linearly
decreasing function from a value equal to the peak regenerative power to
some lesser value after
regenerated over the interval of
(t3 – t2)
equals the time in seconds
speed, and
o
(t3 – t2)
seconds have elapsed. The average power
(t3 – t2)
seconds is:
t4 is the
P
-----
2
b
------------- -----------
×
+()
ω
bωo
ω
b
Pav= Average dynamic brake resister dissipation (watts)
t3 – t2= Deceleration time from ωb to ωo (seconds)
t4= Total cycle time or period of process (seconds)
t4 cannot exceed 900 + (
t3 – t2). See Note below.
Pb= Peak braking power (watts)
Rad
P
b
-----
------------- -----------
2
---------
s
Rad
---------
s
+()
ω
bωo
ω
b
t4 is:
= Rated angular rotational speed
ω
b
ωo= Angular rotational speed,
less than rated speed down to zero
The Average Power in watts regenerated over the period
t3t2–()
av
=
------------ ------
t
4
P
Calculate Average Power in watts regenerated over the period
oooooo oooooo
P
----------- ------------- ------------- ----------
av
–()
oooooo
[]
oooooo
[]
-----------------------
×
×=
2
oooooo oooooo
------------- ------------- ------------ ---------
+()
oooooo
[]
t4:
Record Average Power in watts regenerated over the period
t4:
Pav=
Note: Since a resistor will typically cool in 15 minutes (900 seconds),
it will not be possible to take advantage of a higher duty cycle.
Page 45

Design Information C-7
Selecting the Resistor
In order to select the appropriate Dynamic Brake Resistor for your
application, the following data must be calculated.
Peak Regenerative Power
(Expressed in watts)
This is used to determine the maximum resistance value of the Dynamic
Brake Resistor. If this value is greater than the maximum imposed by the
peak regenerative power of the drive, the drive can trip off due to
transient DC bus overvoltage problems.
Power Rating of the Dynamic Brake Resistor
The average power dissipation of the regenerative mode must be
estimated and the power rating of the Dynamic Brake Resistor chosen to
be greater than the average regenerative power dissipation of the drive.
(See Step 3 on page C-6
Protecting External Resistor Packages
).
ATTENTION: The DBU and most drives do not offer protection for
externally mounted brake resistors. Risk of fire exists if external
!
braking resistors are not protected. External resistor packages must be
self-protected from overtemperature or circuit equivalent to the one
shown in Figure 1.5
must be supplied.
Step 4 Calculate the Maximum Dynamic Brake Resistance Value
The maximum allowable Dynamic Brake resistance value (R
calculated.
0.95 Vd()×
db1
------------- ------------- --
R
R
= Maximum allowable value for the dynamic brake resistor
db1
Vd= DC bus voltage used for calculating maximum power.
Pb= Peak breaking power calculated in Step 2 (watts)
(ohms)
(950V DC for 600V AC, or 1090V DC for 690V AC)
2
P
R
×
max
P
b
------------ ---------==
P
b
) must be
db1
Page 46

C-8 Design Information
·
Calculate Maximum Dynamic Brake Resistance:
oooooooo
R
[]
------------ ------------- -------=
db1
ooooooooo
[]
Line Voltage V
600V AC 950V DC 268,000 W 3.2 Ohms 857375 Ohm
690V AC 1090V DC 305,000 W 3.7 Ohms 1128695 Ohm
= DC Bus Regulation Voltage
V
d
R
d
= Minimum Brake Resistance Value
Record the Maximum Dynamic Brake Resistance R
P
RP
max
x R R
max
db1
db1
in above table.
The choice of the Dynamic Brake resistance value should be less than
the value calculated in this step. If the value is greater, the drive can trip
on DC bus overvoltage.
Step 5 Calculate Required Joule Rating
(joules = Watt-Seconds):
P
b
⎛⎞
-----
Watt-second losses
⎝⎠
2
P
b
------ x t
2
t3t2–()×
–()
3t2
watt-seconds
=
x 1 motor efficiency x drive efficiency
()–[]=
Drive Efficiency = 0.975
Total watt-seconds watt-seconds watt-second losses
–=
Step 6 Select a Resistor
Select a resistor bank from the following tables or from your resistor
supplier that has all of the following:
• a resistance value that is less than the value (R
calculated in Step 4
, but as close as possible below this value.
in Ohms)
db1
• a resistance value that is greater than the minimum resistance for the
DBU listed in Tab l e C . A
,
• a power value that is greater than the value calculated in Step 3
(Pav in watts),
• a watt-second value greater than the value calculated in Step 5.
Page 47

Design Information C-9
ATTENTION: Damage of the IGBT will result if the resistance value
of the resistor bank is less than the minimum resistance value for the
!
DBU as indicated in the product’s nameplate data and in Ta b l e C . A
Verify the resistance value of the selected resistor bank is greater than
the minimum resistance for the DBU.
If no resistor appears in the following tables that is greater than the
minimum allowable resistance (R) and is less than the calculated
maximum resistance (R
• Adjust the deceleration time of the application to fit an available
resistor package.
or
• Use the calculated data to purchase resistors locally.
):
db
.
Page 48

C-10 Design Information
Example Calculation
A 250 HP, 600 Volt motor and drive are accelerating and decelerating as
depicted in Figure C.1
• Cycle period (t
• Rated speed is 1600 RPM
• Deceleration time from rated speed to 0 speed is 2.0 seconds
• Motor load can be considered purely as an inertia and all power
expended or absorbed by the motor is absorbed by the motor and
load inertia.
• Load inertia is 44.0 lb-ft2 directly coupled to the motor
• Motor inertia is 166 lb-ft
• A PowerFlex 700H, 250 HP, 600V Normal Duty rating is chosen.
• Drive efficiency is 0.975 and motor efficiency is 0.86.
Proceed with the following calculation to verify the AKDBU300 is
suitable for the application, and select the Dynamic Brake Resistor.
.
) is 40 seconds
4
2
Rated Power 250 HP=746 watts 186500 W
=×
This information was given and must be known before the calculation
process begins. This can be given in HP, but must be converted to watts
before it can be used in the equations.
Rated Speed
Lower Speed
ωb1600= RPM 2
ωo0= RPM 2
1600
----------
π==
×
π
60
×
0
-----
60
167.5 Rad
-----------------------=
s
0 Rad
-------------===
s
This information was given and must be known before the calculation
process begins. This can be given in RPM, but must be converted to
radians per second before it can be used in the equations.
Step 1 Total Inertia
JTJmGR2JL×()+=
JT166=.44+210 lb.-ft.2210 0.042 8.82 kg-m
This value can be in lb.-ft.2 or Wk2, but must be converted into kg-m2
before it can be used in the equations.
(GR)2 = 0
=×==
2
Page 49

Design Information C-11
Deceleration Time t3t2–()
Cycle Period t440 seconds
==
==
2 seconds
DC Bus Regulation Voltage = Vd = 950 Volts
This was known because the drive is rated at 600 Volts rms.
All of the preceding data and calculations were made from knowledge of
the application under consideration. The total inertia was given and did
not need further calculations as outlined in Step 1
Step 2 Calculate the Peak Braking Power (
compare (
P
) to the Peak Braking Power of the DBU (
b1
Peak Braking Power P
8.82 167.5 167.5 0
P
------------- ------------- ------------- ------------ --
==
b
Pb1 =
Pb
x (motor effic. x drive effic.)
Pb1 =
123 700 x (0.975 x 0.86) = 103 722 watts < P
b
–()[]
2
.
P
) and (
P
b
JTωbωbωo–()[]
------------- ------------ ------------- --==
t3t2–()
) then
b1
P
max
123700 watts
max
Note that this is 56% of rated power and is less than the maximum drive
limit of 150% current limit. This calculation determines the power that
must be dissipated by the Dynamic Brake Resistor.
The DBU is suitable for this application because P
is less than P
b1
max
.
)
Step 3 Calculate the Average Braking Power
t3t2–()
P
+()
ω
b
Average Braking Power P
⎛⎞
-----
P
==
av
⎝⎠
40
==
2
123700
⎛⎞
------------ ----
⎝⎠
2
------------------
av
167.5 0
⎛⎞
------------- --------
⎝⎠
167.5
t
4
+
Verify the power rating of the Dynamic Brake Resistor, or if applicable
the sum of the power ratings of the Dynamic Brake Resistors chosen in
Step 6 is greater than the value calculated in Step 3.
bωo
-----
------------ ------------
ω
2
4120 watts
b
Page 50

C-12 Design Information
Step 4 Calculate the Maximum Dynamic Brake Resistance
R
= (P
db1
R
= (268 000 x 3.2) / 123 700 = 6.93 Ohm
db1
Line Voltage V
600V AC 950V DC 268 000 W 3.2 Ohms 857 375 Ohm
690V AC 1090V DC 305 000 W 3.7 Ohms 1 128 695 Ohm
V
= DC Bus Regulation Voltage
d
R
= Minimum Brake Resistance Value
Record the Maximum Dynamic Brake Resistance R
The choice of the Dynamic Brake resistance value should be less than
the value calculated in this step. If the value is greater, the drive can trip
on DC bus overvoltage.
Step 5 Calculate Required Joule Rating (joules = watt-seconds)
(Pb /2) x (t3 - t2) = (123 700/2) x 2 = 123 700 watt-seconds
Drive Efficiency = 0.975, Motor Efficiency = 0.86
max
d
x R) / P
P
b
RP
max
x R R
max
db1
db1
in above table.
Watt-second losses = [P
/2 x (t3 - t2)] x [1 – Motor Effic. x Drive Effic.)]
b
Watt-second losses = 123 700 x [1 – 0.86 x 0.975] = 20 000
Calculate total watt-seconds
Total watt-seconds 123700 20000 103700
=–=
Step 6 Select a Resistor
From Ta ble C.B resistor PF6F5R4K39 with 6.5 ohm, 4394 watts and
256 400 watt-seconds should be selected based on the following data:
• Maximum Dynamic Brake Resistance Value (R
The selected resistor must be less than (R
db1
below 6.9 ohms.
• Minimum Brake Resistance (R) of 3.2 ohms.
See Table C.A
. The selected resistor must be greater than (R).
• Average Braking Power (Pav). The power rating of the selected
resistor must be greater than 4120 W or 4.12 kW.
• Watt-seconds. The watt-seconds for the selected resistor must be
greater than 103 700 Watt-seconds or 103.7 kW-seconds.
) of 6.9 ohms.
db1
) but as close as possible
Page 51

Table C.B IPC & PowerOhm Braking Resistors
for 600/690V AC Drives - 950/1090V DC Full-on
Ohms Watts
14.0 1200 24500 T14R1K2 IPC
14.0 1200 39800 PR2210-8A P.O.
14.0 1200 153900 PRT14R1K2 P.O.
14.0 1600 61500 PR2210-8 P.O.
14.0 1800 27800 T14R1K8 IPC
14.0 1800 153900 PR14R1K80 P.O.
14.0 1800 251300 PRT14R1K8 P.O.
14.0 2012 61344 222-8A IPC
14.0 2400 50200 PR222-8 P.O.
14.0 2657 154455 222-8 IPC
14.0 3150 251300 PR14R3K15 P.O.
14.0 4495 117367 225-8A IPC
14.0 4536 157200 PR14R4K53 P.O.
14.0 4536 164900 PR225-8A P.O.
14.0 6160 216700 PRT14R6K16 P.O.
14.0 6160 232000 T14R6K16 IPC
14.0 6642 172138 225-8 IPC
14.0 6708 172138 220-8A IPC
14.0 7406 376000 PR225-8 P.O.
14.0 9464 600500 PR220-8 P.O.
14.0 10045 523728 220-8 IPC
14.0 11400 734000 T14R11K4 IPC
14.0 11400 1027000 PRT14R11K4 P.O.
14.0 12700 1027000 PRT14R12K7 P.O.
14.0 12700 1038000 T14R12K7 IPC
13.0 1200 88900 PR13R1K20 P.O.
13.0 1600 111200 PF13R1K60 P.O.
13.0 2250 233400 PR13R2K25 P.O.
13.0 2800 238800 PF13R2K80 P.O.
13.0 3328 144900 PR13R3K32 P.O.
13.0 5200 193100 PR13R5K20 P.O.
13.0 5457 191600 PF13R5K45 P.O.
13.0 11000 1048200 PF13R11K0 P.O.
12.0 1200 134700 PR12R1K20 P.O.
12.0 2250 215400 PR12R2K25 P.O.
12.0 2400 215300 PR4405-14A P.O.
12.0 3072 133600 PR12R3K07 P.O.
12.0 3888 140800 PR5505-16A P.O.
12.0 3888 155500 PR4405-14 P.O.
12.0 4800 191500 PR4410-14A P.O.
12.0 6348 342000 PR12R6K34 P.O.
12.0 6348 376000 PR5505-16 P.O.
12.0 8112 500400 PR4410-14 P.O.
12.0 9641 440372 442-14A IPC
12.0 10092 898400 PR442-14A P.O.
12.0 10092 1048100 PR5510-16 P.O.
12.0 12288 1433800 PR552-16A P.O.
12.0 12398 890985 442-14 IPC
12.0 13780 890985 552-16A IPC
12.0 15552 1955200 PR442-14 P.O.
12.0 19200 3595700 PR552-16 P.O.
12.0 20673 599876 552-16 IPC
Seconds
Watt-
Catalog No.
Manuf.
Design Information C-13
Ohms Watts
12.0 21531 1924486 445-14A IPC
12.0 24300 3941400 PR445-14A P.O.
12.0 30000 6169500 PR445-14 P.O.
12.0 30000 6450000 PR555-16A P.O.
12.0 30776 1040221 555-16A IPC
12.0 32136 1040221 440-14A IPC
12.0 32297 1040221 445-14 IPC
12.0 43200 10984300 PR555-16 P.O.
12.0 45934 2387466 550-16A IPC
12.0 46170 2247026 555-16 IPC
12.0 48204 1314510 440-14 IPC
12.0 58800 16476500 PR440-14 P.O.
12.0 68911 10015318 550-16 IPC
12.0 86700 28607000 PR550-16 P.O.
11.0 1200 48300 PR2205-9 P.O.
11.0 1600 39400 PR2210-9A P.O.
11.0 2000 197400 PR2210-9 P.O.
11.0 2400 197400 PR222-9A P.O.
11.0 2561 121123 222-9A IPC
11.0 3381 100080 222-9 IPC
11.0 3564 116600 PR222-9 P.O.
11.0 5720 237243 225-9A IPC
11.0 5819 321000 PR225-9A P.O.
11.0 8454 407344 225-9 IPC
11.0 8537 407344 220-9A IPC
11.0 9251 898400 PR225-9 P.O.
11.0 12784 890985 220-9 IPC
11.0 14256 1737900 PR220-9 P.O.
10.4 1500 25400 T10F4R1K5 IPC
10.4 1500 186700 PRT10F4R1K5 P.O.
10.4 1800 186700 PR10F4R1K80 P.O.
10.4 2662 115900 PR10F4R2K66 P.O.
10.4 2970 81600 PRT10F4R2K97 P.O.
10.4 2970 95100 T10F4R2K97 IPC
10.4 4160 153300 PR10F4R4K16 P.O.
10.4 5360 274400 PRT10F4R5K36 P.O.
10.4 5360 329000 T10F4R5K36 IPC
10.4 6040 274400 PRT10F4R6K4 P.O.
10.4 6040 489000 T10F4R6K4 IPC
10.4 8746 855700 PR10F4R8K74 P.O.
10.4 8890 770300 PRT10F4R8K89 P.O.
10.4 8890 801000 T10F4R8K89 IPC
10.4 11000 359000 T10F4R11K0 IPC
10.4 11000 1168200 PRT10F4R11K0 P.O.
10.4 15500 1742000 T10F4R15K5 IPC
10.4 15500 2490600 PRT10F4R15K5 P.O.
10.4 16640 2966900 PR10F4R16K6 P.O.
10.4 18900 1991000 T10F4R18K9 IPC
10.4 18900 3790000 PRT10F4R18K9 P.O.
10.4 26000 2002000 T10F4R26K0 IPC
10.4 26000 5718700 PR10F4R26K0 P.O.
10.4 26000 5885300 PRT10F4R26K0 P.O.
Seconds
Watt-
Catalog No.
Manuf.
Page 52

C-14 Design Information
Ohms Watts
10.4 35600 1230000 T10F4R35K6 IPC
10.4 35600 10024700 PRT10F4R35K6 P.O.
10.4 43900 1367000 T10F4R43K9 IPC
10.4 43900 14328100 PRT10F4R43K9 P.O.
10.4 72300 4620000 T10F4R72K3 IPC
10.4 72300 18257600 PRT10F4R72K3 P.O.
10.1 1200 112100 PF10F1R1K20 P.O.
10.0 4000 163500 PR5505-17A P.O.
10.0 6760 400300 PR5505-17 P.O.
10.0 8410 898400 PR5510-17A P.O.
10.0 12960 1737900 PR5510-17 P.O.
10.0 16000 2824200 PR552-17A P.O.
10.0 17713 479901 552-17A IPC
10.0 25000 5328200 PR552-17 P.O.
10.0 26569 903350 552-17 IPC
10.0 36000 8787400 PR555-17A P.O.
10.0 39559 1956117 555-17A IPC
10.0 49000 13730400 PR550-17A P.O.
10.0 51840 6453800 PR555-17 P.O.
10.0 59043 1950414 550-17A IPC
10.0 59339 1950414 555-17 IPC
9.50 3800 135500 PR4405-15A P.O.
9.50 5025 266000 PR4405-15 P.O.
9.50 6422 400300 PR4410-15A P.O.
9.50 9728 1075300 PR4410-15 P.O.
9.50 11926 316618 442-15A IPC
9.50 12312 1520700 PR442-15A P.O.
9.50 15200 2596900 PR442-15 P.O.
9.50 17890 479901 442-15 IPC
9.50 23750 5047800 PR445-15A P.O.
9.50 26636 3000513 445-15A IPC
9.50 34200 8787400 PR445-15 P.O.
9.50 38912 4056700 PR440-15A P.O.
9.50 39755 2851152 440-15A IPC
9.50 39955 1079776 445-15 IPC
9.50 49248 6146500 PR440-15 P.O.
9.50 59635 1820386 440-15 IPC
9.20 1200 102200 PF9F2R1K20 P.O.
9.20 1600 75500 PF9F2R1K60 P.O.
9.20 2000 161600 PF9F2R2K00 P.O.
9.20 2355 98000 PF9F2R2K35 P.O.
9.20 2981 116700 PF9F2R2K98 P.O.
9.20 3751 135600 PF9F2R3K75 P.O.
9.20 4867 282100 PF9F2R4K86 P.O.
9.20 6601 341800 PF9F2R6K60 P.O.
9.20 7737 748700 PF9F2R7K73 P.O.
9.20 9421 1075400 PF9F2R9K42 P.O.
9.20 11923 1520800 PF9F2R11K9 P.O.
9.20 15001 545200 PF9F2R15K0 P.O.
9.20 19467 1064100 PF9F2R19K4 P.O.
9.20 24876 1416000 PF9F2R24K8 P.O.
9.20 30948 2965500 PF9F2R30K9 P.O.
Seconds
Watt-
Catalog No.
Manuf.
Ohms Watts
9.20 37683 4056800 PF9F2R37K6 P.O.
9.20 47693 6146600 PF9F2R47K6 P.O.
9.20 58880 10387700 PF9F2R58K8 P.O.
9.20 69635 6672400 PF9F2R69K6 P.O.
9.20 90001 9127700 PF9F2R90K0 P.O.
9.20 132480 23372300 PF9F2R132K2 P.O.
8.0 4232 240700 PR4405-16A P.O.
8.0 5408 300200 PR4405-16 P.O.
8.0 8192 896100 PR4410-16A P.O.
8.0 10368 1303400 PR4410-16 P.O.
8.0 14093 401656 442-16A IPC
8.0 16200 2786200 PR442-16A P.O.
8.0 16200 2846600 PR442-16 P.O.
8.0 21143 693480 442-16 IPC
8.0 23427 1211023 552-18A IPC
8.0 28800 7322900 PR445-16A P.O.
8.0 31474 1564893 445-16A IPC
8.0 35138 2494758 552-18 IPC
8.0 39200 10984300 PR552-18 P.O.
8.0 41472 4917200 PR445-16 P.O.
8.0 46977 2966898 440-16A IPC
8.0 47219 1560331 445-16 IPC
8.0 52321 1559677 555-18A IPC
8.0 57800 19071300 PR555-18A P.O.
8.0 64800 10510600 PR440-16 P.O.
8.0 70477 3325398 440-16 IPC
8.0 78475 5345909 555-18 IPC
8.0 80000 15704400 PR555-18 P.O.
7.30 1200 26200 PR2205-10A P.O.
7.30 1600 131000 PR2205-10 P.O.
7.30 1868 77700 PR2210-10A P.O.
7.30 2920 107400 PR2210-10 P.O.
7.30 3826 164245 222-10A IPC
7.30 3861 199500 PR222-10A P.O.
7.30 5095 267369 222-10 IPC
7.30 6139 598900 PR222-10 P.O.
7.30 7475 896100 PR225-10A P.O.
7.30 8545 566990 225-10A IPC
7.30 11680 2259300 PR225-10 P.O.
7.30 12738 359925 225-10 IPC
7.30 12754 359925 220-10A IPC
7.30 14782 2476600 PR220-10A P.O.
7.30 18250 3964700 PR220-10 P.O.
7.30 19264 656981 220-10 IPC
7.0 1200 123900 PF7R1K20 P.O.
7.0 1600 77000 PF7R1K60 P.O.
7.0 1792 77800 PR7R1K79 P.O.
7.0 2800 107500 PF7R2K80 P.O.
7.0 4732 269500 PR7R4K73 P.O.
7.0 7383 765100 PF7R7K38 P.O.
7.0 11251 436200 PF7R11K2 P.O.
7.0 14812 802700 PF7R14K8 P.O.
Seconds
Watt-
Catalog No.
Manuf.
Page 53

Design Information C-15
Ohms Watts
7.0 23548 2330100 PF7R23K5 P.O.
7.0 36912 4610000 PF7R36K9 P.O.
7.0 55001 5083700 PF7R55K0 P.O.
7.0 81648 10141900 PF7R81K6 P.O.
7.0 127575 21021300 PF7R127K7 P.O.
7.0 157500 34493700 PF7R157K7 P.O.
6.50 2106 92600 PF6F5R2K10 P.O.
6.50 2600 90400 PF6F5R2K60 P.O.
6.50 3438 188100 PF6F5R3K43 P.O.
6.50 4394 256400 PF6F5R4K39 P.O.
6.50 5466 599000 PF6F5R5K46 P.O.
6.50 6656 717000 PF6F5R6K65 P.O.
6.50 8424 1086300 PF6F5R8K42 P.O.
6.40 4326 256300 PR4405-17A P.O.
6.40 6553 716900 PR4405-17 P.O.
6.40 8294 1086200 PR4410-17A P.O.
6.40 12960 2167000 PR4410-17 P.O.
6.40 16000 3568300 PR442-17A P.O.
6.40 17529 574859 442-17A IPC
6.40 23040 5858300 PR442-17 P.O.
6.40 26292 719851 442-17 IPC
6.40 33177 4302500 PR445-17A P.O.
6.40 39148 1231840 445-17A IPC
6.40 58430 4818224 440-17A IPC
6.40 58718 4929414 445-17 IPC
6.40 64000 13460900 PR445-17 P.O.
6.0 7776 1086200 PR5505-19A P.O.
6.0 12150 1857400 PR5505-19 P.O.
6.0 15000 3171800 PR5510-19A P.O.
6.0 21600 5176500 PR5510-19 P.O.
6.0 28008 1960167 552-19A IPC
6.0 29400 8238200 PR552-19A P.O.
6.0 38400 6392400 PR552-19 P.O.
6.0 42015 1981674 552-19 IPC
6.0 60000 12900000 PR555-19A P.O.
6.0 62551 2135190 555-19A IPC
5.70 1846 61700 PR2205-11 P.O.
5.70 2280 90300 PR2210-11A P.O.
5.70 3853 212300 PR2210-11 P.O.
5.70 4793 449200 PR222-11A P.O.
5.70 4938 260816 222-11A IPC
5.70 5836 612000 PR222-11 P.O.
5.70 6525 421193 222-11 IPC
5.70 11029 905640 225-11A IPC
5.70 11542 1857400 PR225-11A P.O.
5.70 16314 880744 225-11 IPC
5.70 16461 880744 220-11A IPC
5.70 20520 5176500 PR225-11 P.O.
5.70 24694 1781970 220-11 IPC
5.70 27930 8238200 PR220-11 P.O.
5.40 1200 97000 PR5F4R1K20 P.O.
5.40 1382 59900 PR5F4R1K38 P.O.
Seconds
Watt-
Catalog No.
Manuf.
Ohms Watts
5.40 1670 55700 T5F4R1K67 IPC
5.40 1670 81800 PRT5F4R1K67 P.O.
5.40 1749 61700 PR5F4R1K74 P.O.
5.40 1949 61700 PR5F4R1K94 P.O.
5.40 2680 182900 PRT5F4R2K68 P.O.
5.40 2680 185000 T5F4R2K68 IPC
5.40 2856 154800 PR5F4R2K85 P.O.
5.40 3650 207900 PR5F4R3K65 P.O.
5.40 4541 444300 PR5F4R4K54 P.O.
5.40 5080 385200 PRT5F4R5K8 P.O.
5.40 5080 401000 T5F4R5K8 IPC
5.40 5529 603100 PR5F4R5K52 P.O.
5.40 5780 169000 T5F4R5K78 IPC
5.40 5780 500700 PRT5F4R5K78 P.O.
5.40 6998 902500 PR5F4R6K99 P.O.
5.40 7280 328000 T5F4R7K28 IPC
5.40 7280 809200 PRT5F4R7K28 P.O.
5.40 8640 1540500 PR5F4R8K64 P.O.
5.40 12000 699000 T5F4R12K0 IPC
5.40 12000 3328300 PRT5F4R12K0 P.O.
5.40 13500 2973600 PR5F4R13K5 P.O.
5.40 19440 4904100 PR5F4R19K4 P.O.
5.40 20300 738000 T5F4R20K3 IPC
5.40 20300 5451100 PRT5F4R20K3 P.O.
5.40 22000 717000 T5F4R22K0 IPC
5.40 22000 5451100 PRT5F4R22K0 P.O.
5.40 27993 3607800 PR5F4R27K9 P.O.
5.40 34560 6164200 PR5F4R34K5 P.O.
5.40 37700 2310000 T5F4R37K7 IPC
5.40 37700 9294800 PRT5F4R37K7 P.O.
5.40 43740 7276600 PR5F4R43K7 P.O.
5.40 48100 712100 PRT5F4R48K1 P.O.
5.40 48100 1845000 T5F4R48K1 IPC
5.40 51900 712100 PRT5F4R51K9 P.O.
5.40 51900 1953000 T5F4R51K9 IPC
5.40 54000 11877300 PR5F4R54K0 P.O.
5.40 104000 3444000 T5F4R104K0 IPC
5.40 104000 29551700 PRT5F4R104K0 P.O.
5.0 6480 868900 PR4405-18A P.O.
5.0 8000 1412100 PR4405-18 P.O.
5.0 12500 2775300 PR4410-18A P.O.
5.0 18000 4658800 PR4410-18 P.O.
5.0 22848 1603773 442-18A IPC
5.0 24500 6865200 PR442-18A P.O.
5.0 30978 1651395 552-20A IPC
5.0 32000 5593300 PR442-18 P.O.
5.0 34269 959801 442-18 IPC
5.0 36125 11352000 PR552-20A P.O.
5.0 46464 3891643 552-20 IPC
5.0 50000 11217400 PR552-20 P.O.
5.0 51028 1733701 445-18A IPC
5.0 76534 3651418 445-18 IPC
Seconds
Watt-
Catalog No.
Manuf.
Page 54

Design Information C-16
Ohms Watts
5.0 98000 6865200 PR5510-20 P.O.
5.0 98000 25630100 PR445-18 P.O.
4.80 2580 185000 T4F8R2K58 IPC
4.80 4036 395900 PR4F8R4K03 P.O.
4.80 4590 401000 T4F8R4K59 IPC
4.80 4590 500700 PRT4F8R4K59 P.O.
4.80 5490 169000 T4F8R5K49 IPC
4.80 5490 809200 PRT4F8R5K49 P.O.
4.80 6220 802200 PR4F8R6K22 P.O.
4.80 7680 1369400 PR4F8R7K68 P.O.
4.80 8880 260000 T4F8R8K88 IPC
4.80 8880 1674500 PRT4F8R8K88 P.O.
4.80 10900 359000 T4F8R10K9 IPC
4.80 10900 2912200 PRT4F8R10K9 P.O.
4.80 19200 586000 T4F8R19K2 IPC
4.80 19200 4360900 PRT4F8R19K2 P.O.
4.80 23520 6752000 PR4F8R23K5 P.O.
4.80 25800 984000 T4F8R25K8 IPC
4.80 25800 6330400 PRT4F8R25K8 P.O.
4.80 34600 628300 PRT4F8R34K6 P.O.
4.80 34600 2310000 T4F8R34K6 IPC
4.80 38880 6468100 PR4F8R38K8 P.O.
4.80 58200 3696000 T4F8R58K2 IPC
4.80 58200 18507200 PRT4F8R58K2 P.O.
4.80 61000 3916000 T4F8R61K0 IPC
4.80 61000 18507200 PRT4F8R61K0 P.O.
4.80 69120 17575000 PR4F8R69K1 P.O.
4.80 99300 6159000 T4F8R99K3 IPC
4.80 99300 25969700 PRT4F8R99K3 P.O.
4.80 132000 8077000 T4F8R132K0 IPC
4.80 132000 33527500 PRT4F8R132K0 P.O.
4.50 1800 71600 PR2205-12A P.O.
4.50 2380 133000 PR2205-12 P.O.
4.50 3042 168400 PR2210-12A P.O.
4.50 4608 537600 PR2210-12 P.O.
4.50 4608 2028300 PR225-12 P.O.
4.50 5832 741800 PR222-12A P.O.
4.50 6184 152850 222-12A IPC
4.50 8266 239950 222-12 IPC
4.50 9112 1547800 PR222-12 P.O.
4.50 13810 660558 225-12A IPC
4.50 16200 4141200 PR225-12A P.O.
4.50 20612 1425576 220-12A IPC
4.50 20715 1425576 225-12 IPC
4.50 22050 6407500 PR220-12A P.O.
4.50 28800 4794300 PR220-12 P.O.
4.50 30918 1486256 220-12 IPC
4.0 8100 1238300 PR4405-19A P.O.
4.0 10000 2378800 PR5505-21A P.O.
4.0 14400 3623500 PR4405-19 P.O.
4.0 19600 5492100 PR5510-21A P.O.
4.0 20736 2765900 PR4410-19 P.O.
Seconds
Watt-
Catalog No.
Manuf.
Ohms Watts
4.0 25600 4394700 PR442-19A P.O.
4.0 32400 5255300 PR5510-21 P.O.
4.0 40000 8413000 PR442-19 P.O.
4.0 40000 8973900 PR552-21A P.O.
4.0 42308 1386961 442-19 IPC
4.0 44057 3441020 552-21A IPC
4.0 57600 14645800 PR445-19A P.O.
4.0 66084 1799627 552-21 IPC
3.90 7897 1238300 PR4405-20A P.O.
3.90 14040 3623500 PR4405-20 P.O.
3.90 24960 4394700 PR4410-20 P.O.
3.90 31590 5255300 PR442-20A P.O.
3.90 32736 2405659 442-20A IPC
3.90 45489 5531800 PR442-20 P.O.
3.90 49108 3246136 442-20 IPC
3.90 62996 8013142 445-19A IPC
3.80 2010 105400 PR2205-13A P.O.
3.80 3195 317700 PR2205-13 P.O.
3.80 3891 459000 PR2210-13A P.O.
3.80 6080 1129600 PR2210-13 P.O.
3.80 7227 182571 222-13A IPC
3.80 7695 1238300 PR222-13A P.O.
3.80 9500 1982300 PR222-13 P.O.
3.80 9788 328491 222-13 IPC
3.80 16139 430346 225-13A IPC
3.80 18620 5176500 PR225-13A P.O.
3.80 24089 751149 220-13A IPC
3.80 24212 1321116 225-13 IPC
3.80 24320 3995200 PR225-13 P.O.
3.80 36138 2672955 220-13 IPC
3.80 38000 8413000 PR220-13 P.O.
3.30 1200 61000 PF3F3R1K20 P.O.
3.30 1876 105500 PF3F3R1K87 P.O.
3.30 2230 124600 PF3F3R2K23 P.O.
3.30 2775 317800 PF3F3R2K77 P.O.
3.30 3379 380400 PF3F3R3K37 P.O.
3.30 4299 556400 PF3F3R4K29 P.O.
3.30 6982 376100 PF3F3R6K98 P.O.
3.30 9251 512700 PF3F3R9K25 P.O.
3.30 11101 1197900 PF3F3R11K1 P.O.
3.30 13516 1530100 PF3F3R13K5 P.O.
3.30 21489 3595800 PF3F3R21K4 P.O.
3.30 24977 2541900 PF3F3R24K9 P.O.
3.30 38491 5071000 PF3F3R38K4 P.O.
3.30 47520 8390100 PF3F3R47K5 P.O.
3.30 75001 15984900 PF3F3R75K0 P.O.
3.30 106920 26362500 PF3F3R106K6 P.O.
3.30 150001 41191400 PF3F3R150K0 P.O.
3.30 214582 70836500 PF3F3R214K4 P.O.
Seconds
Watt-
Catalog No.
Manuf.
Page 55

Page 56

www.rockwellautomation.com
Corporate Headquarters
Rockwell Automation, 777 East Wisconsin Avenue, Suite 1400, Milwaukee, WI, 53202-5302 USA, Tel: +1 414.212.5200, Fax: +1 414.212.5201
Headquarters for Allen-Bradley Products, Rockwell Software Products and Global Manufacturing Solutions
Americas: Rockwell Automation, 1201 South Second Street, Milwaukee, WI 53204-2496 USA, Tel: +1 414.382.2000, Fax: +1 414.382.4444
Europe/Middle East/Africa: Rockwell Automation SA/NV, Vorstlaan/Boulevard du Souverain 36, B-1170 Brussels, Belgium, Tel: +32 2 663 0600, Fax: +32 2 663 0640
Asia Pacific: Rockwell Automation, Level 14, Core F, Cyberport 3, 100 Cyberport Road, Hong Kong, Tel: +852 2887 4788, Fax: +852 2508 1846
Headquarters for Dodge and Reliance Electric Products
Americas: Rockwell Automation, 6040 Ponders Court, Greenville, SC 29615-4617 USA, Tel: +1 864.297.4800, Fax: +1 864.281.2433
Europe/Middle East/Africa: Rockwell Automation, Herman-Heinrich-Gossen-Strasse 3, D-50858 Köln, Germany, Tel: +49 (0)2234 379410, Fax: +49 (0)2234 3794164
Asia Pacific: Rockwell Automation, 55 Newton Road, #11-01/02 Revenue House, Singapore 307987, Tel: +65 6356 9077, Fax: +65 6356 9011
Publication AKDBU-UM001A-EN-P – January 2005
Copyright 2005 Rockwell International Corporation. All rights reserved.
 Loading...