

Page 1

Powerline Networking Kit
RF-GUV1124
User Guide
Page 2

Rocketfish RF-GUV1124
Powerline Networking Kit
Safety information
Take the following precautions when using this product:
• Read all instructions before installing and operating.
• Keep all instructions for later reference.
• Follow all warnings and instructions.
• This product should not be installed in any electrical socket so that
the product’s venting holes are pointing downward.
• Use a dry cloth for cleaning. Unplug the device from the power
outlet before cleaning. Do not use liquid cleaners or aerosol
cleaners.
• Do not operate this product near water.
• Do not place this product near or over a radiator or heat register.
• This product relies on the building’s electrical installation for
short-circuit (over-current) protection.
• Do not allow anything to rest on the product’s power plug. Do not
locate this product where the cords may be stepped on.
• Because this product sends data over power lines, we recommend
that you plug it directly into a power outlet. Do not plug the device
into a UPS (uninterruptible power supply) or power strip with surge
protection. The product has its own power filter for protection
against surges.
• Only a qualified technician should service this product. Opening or
removing covers may result in exposure to dangerous voltage
points or other risks.
• Unplug the product from the power outlet and refer the product to
qualified service personnel for the following conditions:
• When the power cords are damaged or frayed.
• When liquid has been spilled into the product.
• When the product has been exposed to rain or water.
• When the product does not operate normally when the
operating instructions are followed.
• When the product exhibits a distinct change in performance.
2
Page 3

Contents
Introduction ........................................................................................ 4
Features................................................................................................. 4
Setting up your powerline network............................................9
Frequently asked questions.........................................................14
Troubleshooting ..............................................................................15
Specifications....................................................................................17
Legal notices .....................................................................................18
90-day limited warranty................................................................19
RF-GUV1124
3
Page 4

Introduction
Congratulations on your purchase of the Rocketfish RF-GUV1124
powerline Ethernet kit. This easy-to-use system enables you to connect
any Ethernet network device (such as computers and game consoles) to
other devices on your home network and to the Internet. Your
powerline kit also lets you connect your network without the hassle of
setting up wireless networking and complex security measures.
The powerline Ethernet bridge converts Ethernet signals from a router or
Internet modem to powerline signals that can travel along your home’s
electrical wiring. The powerline Ethernet switch then converts the
powerline signals back to Ethernet signals, allowing you to connect up
to four Ethernet-enabled devices to the switch for easy home
networking.
Features
Package contents
Powerline Ethernet bridge (1)
Powerline Ethernet switch (1)
Ethernet cables (2)
Quick Setup Guide
4
Page 5
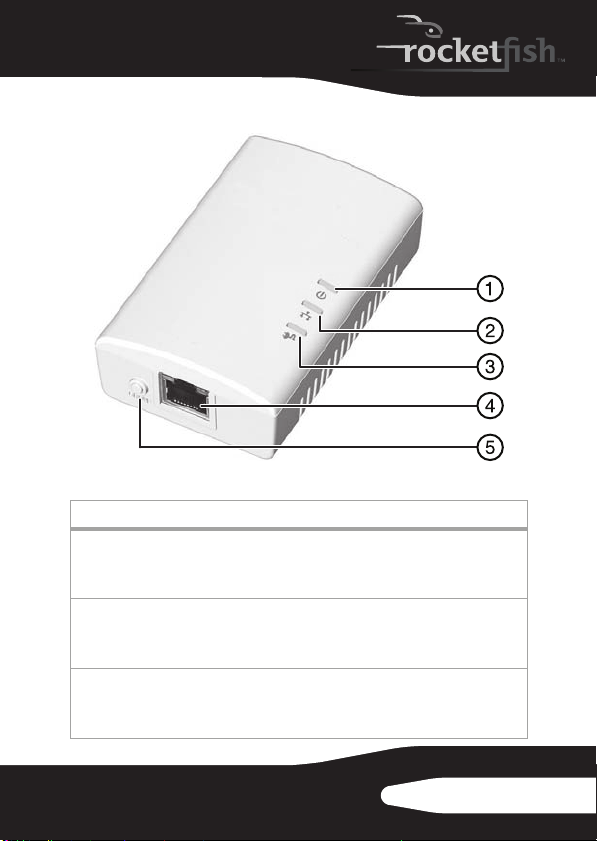
Powerline Ethernet bridge
Item Description
Power i ndicator
On—Power is on.
1
Blinking—Device in stan dby mode or is in group joining mod e.
Off—Power is off.
Ethernet link/activit y indicator
On—Ethernet network link detected.
2
Blinking—Network traffic detected.
Off—No Ethernet network link detected.
Powerline link/activity indic ator
On—Powerline link detected, but no powerline network traffic is detected.
3
Blinking—Powerline network traffic is detected.
Off—Powerline link not detected.
RF-GUV1124
5
Page 6
Item Description
Ethernet port—Connect to your router (recommended) or Internet modem. For
4
more information, see “Connec ting your powerline devices” on page 10.
GROUP button—For custom network configuration, press this to create or join an
additional powerline network. For more information, se e “Creating additional
5
networks” on page 12. Note: These devices are pre-configured at the factory and
are ready to plug in and use. Do not press this button during first-time setup.
Item Description
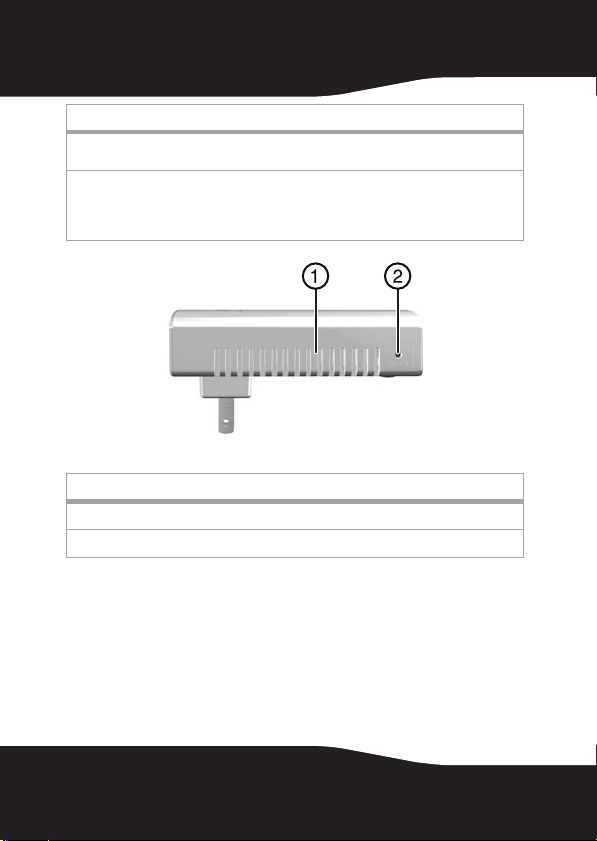
Vent holes—Do not block.
1
RESET button—Press to restore all factory default settings.
2
6
Page 7
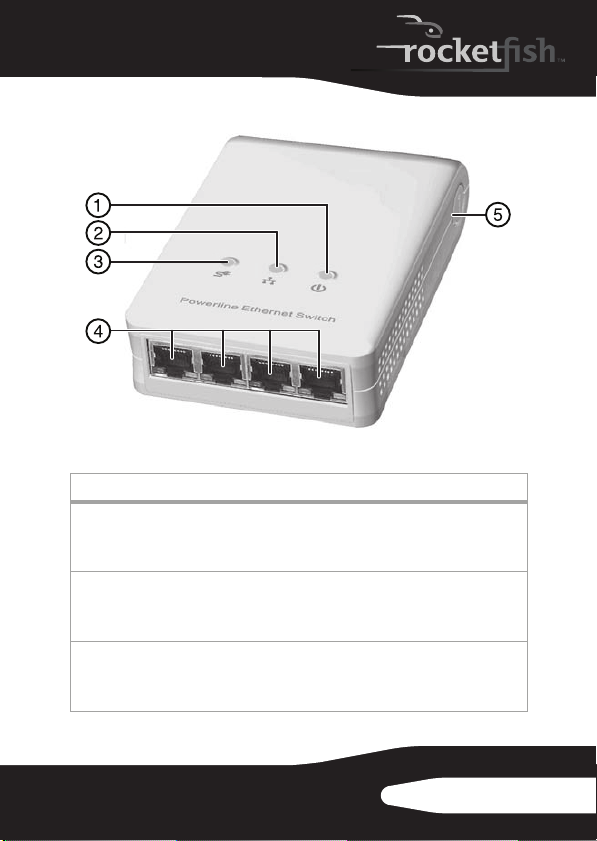
Powerline Ethernet switch
Item Description
Power i ndicator
On—Power is on.
1
Blinking—Device in stan dby mode or is in group joining mod e.
Off—Power is off.
Ethernet link/activit y indicator
On—Ethernet network link detected.
2
Blinking—Network traffic detected.
Off—No Ethernet network link detected.
Powerline link/activity indic ator
On—Powerline link detected, but no powerline network traffic is detected.
3
Blinking—Powerline network traffic is detected.
Off—Powerline link not detected.
RF-GUV1124
7
Page 8
Item Description
Ethernet port—Connect to your router (recommended) or Internet modem. For
4
more information, see “Connec ting your powerline devices” on page 10.
GROUP button—For custom network configuration, press this to create or join an
additional powerline network. For more information, se e “Creating additional
5
networks” on page 12. Note: These devices are pre-configured at the factory and
are ready to plug in and use. Do not press this button during first-time setup.
Item Description
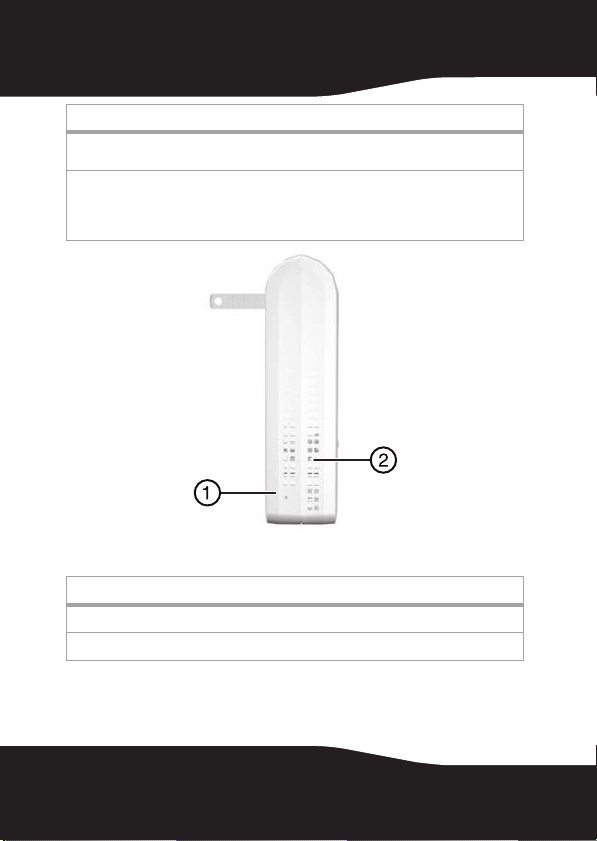
RESET button—Press to restore all factory default settings.
1
Vent holes—Do not block.
2
8
Page 9

Setting up your powerline network
Choosing a location
Before connecting your powerline devices, you need to determine
where they need to be installed.
Notes:
• Make sure that the two powerline devices are in the same home
power circuit.
• These devices shoul d be installed only in a residential setting. Do
not install in a business environment.
Powerline Ethernet bridge
To use this kit to set up Internet
access for your home network,
you should install the bridge
near the router that’s connected
to your modem. For security, we
recommend that you connect
your bridge to the router, and
not directly to the modem.
For more information on your
network’s modem or router, see
the modem or router’s
documentation.
RF-GUV1124
9
Page 10

Powerline Ethernet switch
Install the powerline
Ethernet switch on
the same home
power circuit as your
powerline Ethernet
bridge, and near
your g aming con sole
or other device.
Connecting your powerline devices
To connect your powerline bridge:
1
Plug your powerline bridge directly into a wall power socket. If
other appliances are plugged into the same outlet, isolate them
from the powerline bridge by using a noise-filtering power strip.
2
Plug an Ethernet cable into the Ethernet port on the powerline
bridge and to an available Ethernet port on your network router.
To connect your powerline switch:
1
Plug your powerline switch directly into a wall power socket. If
other appliances are plugged into the same outlet, isolate them
from the powerline bridge by using a noise-filtering power strip.
2
Plug an Ethernet cable into an available Ethernet port on the
powerline switch and into an Ethernet port on a networkable
device, such as a computer, Internet-connected TV, or game
console. You can connect up to four network devices to your
powerline switch.
10
Page 11

Connecting tips
Powerli ne
device
Outlet
Noise-filtering power strip
Use a noise-filtering power strip to isolate
powerline devices from AC power adapters.
Recommended
Powerline networking sends data along the electrical wiring of your
home, so the data can be corrupted by electrical interference
(sometimes called “noise”) and the length of wiring it must pass
through. Although your powerline devices can overcome most
interference, it’s best to avoid creating interference so ensure the
highest reliability. To reduce electrical interference, follow these tips:
• Connect powerline devices directly to the wall power outlet
Notes:
•Do not connect your powerline device to an uninterruptible power
supply (UPS), backup power supply, or a noise-filtering power strip.
•Do not connect other high power-consuming devices to the same wall
power outlet that your powerline device uses.
•Do not connect electrical noise-emitting appliances to the same wall
power outlet that your powerline device uses, such as:
RF-GUV1124
11
Page 12

• Battery chargers (including cell phone chargers)
•Hair dryers
• Power drills and other power tools
•Halogen lights
• Vacuum cleaners
• Connect powerline devices to a power strip without noise filters
If you must connect your powerline devices to a power strip, use the
following guidelines:
• Make sure that the power strip does not have a noise filter or a
surge protector, because the powerline network signals may
become corrupted.
• Use a power strip with an AC cord that is as short as possible.
• Do not connect the adapter to a power strip that receives power
from another power strip (daisy-chained).
• Keep distanc es short
If two powerline devices are separated by a great distance of electrical
wiring, they may not communicate well with each other.
• Reduce electrical interference
Electrical interference (“noise”) from other electrical appliances can
interfere with the performance, speed, and reliability of your powerline
devices. For best results, unplug or isolate the following devices with a
noise-filtering power strip:
• Air conditioners
• Fluorescent lights (especially industrial-grade lights)
•Blowers
• Large electrical motors
Note: Powerline devices can interfere with appliances, such as lamps,
that have a touch-sensitive power switch.
Creating additional networks
Your Rocketfish powerline devices are all pre-configured to see each
other as part of the same network. Each has the default network name
of HomePlugAV, and any other Rocketfish powerline devices with the
same network name recognize these as part of the same network. For a
standard home network, you’ll keep these settings as they are.
12
Page 13

If, however, you want to set up multiple powerline networks in your
home or change your powerline network’s name (for added security),
you can configure the powerline devices to do so.
To create an additional network and join devices to it:
1
Make sure that your powerline devices are plugged into a powered
wall outlet and are not in standby mode.
2
Determine which powerline devices will be part of your new
network, then choose one to be the first device to reconfigure. This
device will be the first to get the new network name.
Tip: Gather all powerline devices for your new network into the same
room to make this procedure easier. After you’re done configuring
them, install them in any room you want.
3
On that first device, press and hold the GROUP button for more than
10 seconds until all indicator lights turn off and on again at the
same time. A random network name (different than “HomePlugAV”)
is generated for the device and all original settings are erased.
4
Press and hold the GROUP button again for two seconds, then release
it. The power indicator starts blinking. Your device is now in
“Broadcasting new network” mode.
Note: The power indicator will not start blinking if you press and hold
the GROUP button for longer than two seconds.
Tip: To cancel the “Broadcasting new network” mode, press and hold
the GROUP button again for three seconds.
5
On each additional device you want to connect to the new network:
a
Press and hold the GROUP button for more than 10 seconds until
all indicator lights turn off then on again at the same time. This
erases the original network name of the device and frees it to
join a new network group.
b
Press and hold the GROUP button again for two seconds, then
release it. The power indicator starts blinking. Your device is now
in “Broadcasting new network” mode.
Note: The power indicator will not start blinking if you press and
hold the GROUP button for longer than two seconds.
Tip: To cancel the “Finding new network” mode, press and hold the
GROUP button again for three seconds.
RF-GUV1124
13
Page 14

After your first and additional devices’ power indicators stop
blinking, your additional device has successfully joined your first
device’s network.
Resetting a powerline device to factory defaults
You can easily restore factory default settings for any of your powerline
devices.
To reset a powerline device to its factory default settings:
1
Make sure that your powerline devices are plugged into a powered
wall outlet and are not in standby mode.
2
On the powerline device, insert a small, stiff wire (such as a
straightened paper clip) into the RESET hole. All factory defaults,
including the network name, are restored.
Standby mode
When your powerline device is not connected to any network device
(such as a computer) that’s turned on and active, it enters standby
mode two minutes after the last activity.
Standby mode saves power. During standby, the power indicator light
blinks slowly. To exit standby mode, turn on or awaken the connected
network device.
Caution: Some computers support wake-on-LAN, which may prevent
the powerline device from entering standby mode.
Frequently asked questions
How far can these devices send a network signal?
Your network coverage may vary, depending on the number of
electrical appliances in use. The theoretical maximum distance of
wiring you can expect network signals to travel through is about
984 feet (300 m).
Do I have to rewire my home electrical outlets or install special filters for these devices?
No. Powerline devices use your home’s existing electrical wiring to
network computers in different rooms so that they can share files,
printers, and Internet connections.
Can these devices work with circuit breakers?
Yes, if the powerline devices are used within the United States or
Canada.
14
Page 15

Is it secure to send private data over these devices?
Yes. Data encryption is used to secure your data from prying eyes. For
details, see “Specifications” on page 17.
How many devices can be assigned to a single group?
Because several powerline devices share the same electrical wiring
(physical bandwidth), we recommend that a maximum of 10 powerline
devices be connected on a single group. Data transfer speed slows as
more powerline devices are connected.
Can these devices communicate with other brands of powerline devices?
Powerline devices using different powerline communication protocols
may have difficulty communicating with each other, although they all
can co-exist on same electrical wiring.
Your Rocketfish powerline devices are HomePlug AV compliant. They
can communicate with any other HomePlug AV-compliant powerline
device, regardless of brand.
Troubleshooting
Problem: The power indicator is off
Solution—Make sure that the device is plugged in to a powered outlet,
not an extension cord, power strip, or surge protector.
Problem: The powerline link/activity indicator is off
Cause—The powerline devices can’t find each other.
Solution—Make sure that all powerline devices are plugged into
powered outlets and that all are connected to the same powerline
network group. If the problem occurred after you reconnected a device,
reset the devices to the default settings and try again. For more
information, see “Resetting a powerline device to factory defaults” on
page 14.
Problem: The Ethernet link/activity indicator is off
Cause—The network contains no data traffic.
Solution—Make sure that:
• Your router is on.
• The Ethernet cable is connected between a powerline device’s
Ethernet port and your router’s LAN port.
RF-GUV1124
15
Page 16

• The computer can access the Internet if you connect it directly
to the router. If there is no Internet connection, troubleshoot
the router or contact your ISP (Internet service provider).
Troubleshooting tips
• Powerline products work better when plugged directly into the
wall power outlet, not power strips, extension cords, surge
protectors, or uninterruptable power supplies.
• If you’ve moved a powerline device or disconnected the cables,
other network devices may need about five minutes to refresh their
information about the powerline network’s current status.
• To test whether your home’s electrical wiring is contributing to
powerline problems, plug units into power outlets in the same
room.
Examples of wiring problems are:
•Old fuse boxes
• Old wiring that does not meet modern wiring building codes
• Swap powerline devices to determine whether one particular
powerline device is causing the problem.
• Reset the powerline adapters to the factory default settings.
• For best performance, use the same brands and models of
powerline devices throughout your network. Remember that one
model’s software may not work for another model, especially
remote and advanced features.
• We do not recommend that you use powerline networking in a
businesses environment.
16
Page 17

Specifications
Description
Items
PHY rate 200 Mbps
Effective data rate TCP: Up to 91 Mbps
Frequency band 2~28 MHz (with mask)
Access methods CSMA/CA channel-access schemes
QoS Four-level priority-based contention access, and multi-segment bursting
Modulation OFDM (QAM 8/16/64/256/1024, QPSK, BPSK, ROBO)
10/100 RJ-45 ports 1 port 4 ports
Distance AC wire: up to 300 meters
LAN standards IEEE 802.3, IEEE 802.3U
PLC standard HomePlug AV
Operating system OS independent
Maximum devices in
a network group
IGMP Support for IPv4/IGMP v1, v2, v3 snooping
Encryption 128-bit AES Link Encryption w ith key management
LED indicators Power, powerline activit y,
Temperature Operating: 32~104°F (0~40°C)
Powerline bridge Powerline switch
UDP: Up to 94 Mbps
8-level VLAN prio rity field, TOS field
QoS classification by desti nation MAC address and IP port
Up to 63 slaves with 1 master (64 total)
Support for IPv6 and MLD v1, v2 snooping
Maximum 16 source addresses and group members
Ethernet link/activity
Storage: -4~140°F (-20~60°C)
TCP: Up to 91 Mbps
UDP: Up to 93 Mbps
Power, powerline activi ty,
AV/1 .0 d ete ct
RF-GUV1124
17
Page 18

Description
Items
Relative humidity Operating: 10~85% non-condensing
Power source 100 ~ 240 VAC 50/60 Hz
Power consumption Full load:
Certific ation CE, FCC Cla ss B, Rohs, cTUVus, ICES-0 05
Powerline bridge Powerline switch
Storage: 5~90% non-condensing
Full load:
110 VAC=3.3 W
220 VAC=3.8 W
240 VAC = 4.2 W
Standby mode <1.6 W
110 VAC=4.2 W
220 VAC=5.3 W
240 VAC=5.8 W
Standby mode <1.8 W
Legal notices
FCC Part 15
This device complies with Part 15 of the FCC Rules. Operation of this
product is subject to the following two conditions: (1) this device may
not cause harmful interference, and (2) this device must accept any
interference received, including interference that may cause undesired
operation.
FCC warning
Changes or modifications not expressly approved by the party
responsible for compliance with the FCC Rules could void the user’s
authority to operate this equipment.
Canada ICES-006 statement
Complies with IC: ICES-006; En conformité avec IC: NMB-006.
18
Page 19

90-day limited warranty
Rocketfish Products (“Rocketfish”) warrants to you, the original purchaser of this new RF-GUV1124 (“Product”), that the
Product shall be free of defec ts in the original manufacture of the material or workmanship for 90 days from the pu rchase
of the Product (“Warranty Period”). This Produc t must be purchased from an authorized dealer of Rocketfi sh brand
products and packa ged with this warranty statement. This warran ty does not cover refurbished Produc t. If you notify
Rocketfish during the Warranty Period of a de fect covered by this warranty that requires service, terms of th is warranty
apply.
How long does the coverage last?
The Warranty Period lasts for 90 days, beginnin g on the date you purchased the Product. The purchase date is printed on
the receipt you received with the product.
What does this warranty cover?
During the Warranty Period, if the original manufacture of the material or workmanship of the Product is determined to be
defective by an authorized Rocketfish repair center or store personnel, Rocketfish will (at its sole option): (1) repair the
Product with new or rebuilt part s; or (2) replace the Product at no charge with new or rebuilt comparable products or parts.
Products and parts replaced under this warranty become the property of Rocketfish and are not returned to you. If ser vice
of Products and par ts are required after the Warranty Period expires, you must pay all labor and part s charges. This
warranty lasts as lon g as you own your Rocketfish Product duri ng the Warranty Period. Warranty coverage terminates if
you sell or otherwise transfer the Produc t.
How to obtain warranty service?
If you purchased the Product at a retail store location, take your original receipt and the Product to the store you purchased
it from. Make sure that you place the Product in its original packaging or packaging that provides t he same amount of
protection as the original p ackaging. If you purchased the Product from an online web site, mail your original receipt and
the Product to the address listed on the web site. Make sure that you put the Product in its original packaging or packaging
that provides the same amount of protec tion as the original packaging.
Where is the warranty valid?
This warranty is valid only to the original purchaser of the Product in the United States, Canada, and Mexico.
What does the warranty not cover?
This warranty does not cover:
•
Customer instruction
•
Installation
•
Set up adjustments
•
Cosmetic d amage
•
Damage due to acts of God, such as lightning strikes
•
Accident
•
Misuse
•
Abuse
•
Negligence
•
Commercial use
•
Modification of any par t of the Product, including the antenn a
RF-GUV1124
19
Page 20

This warranty also doe s not cover:
•
Damage due to incorrect operation or maintenance
•
Connection to an incorrect voltage supply
•
Attempted repair by anyone other than a facility authorized by Rocketfish to service the
Product
•
Products sold as is or with all faults
•
Consumables, such as fuses or batteries
•
REPAIR REPLACEMENT AS PROVIDED UNDER THIS WARRANTY IS YOUR EXCLUSIVE REMEDY. ROCKETFISH SHALL NOT BE
LIABLE FOR ANY INCIDENTAL OR CONSEQUENTIAL DAMAGES FOR THE BREACH OF ANY EXPRESS OR IMPLIED WARRANTY ON
THIS PRODUCT, INCLUDING, BUT NOT LIMITED TO, LOST DATA, LOSS OF USE OF YOUR PRODUCT, LOST BUSINESS OR LOST
PROFITS. ROCKETFISH PRODUCTS MAKES NO OTHER EXPRESS WARRANTIES WITH RESPECT TO THE PRODUCT, ALL EXPRESS
AND IMPLIED WARRANTIES FOR THE PRODUCT, INCLUDING, BUT NOT LIMITED TO, ANY IMPLIED WARRANTIES OF AND
CONDITIONS OF MERCHANTABILITY AND FITNESS FOR A PARTICULAR PURPOSE, ARE LIMITED IN DURATION TO THE
WARRANTY PERIOD SET FORTH ABOVE AND NO WARRANTIES, WHETHER EXPRESS OR IMPLIED, WILL APPLY AFTER THE
WARRANTY PERIOD. SOME STATES, PROVINCES AND JURISDICTIONS DO NOT ALLOW LIMITATIONS ON HOW LONG AN
IMPLIED WARRANTY LASTS, SO THE ABOVE LIMITATION MAY NOT APPLY TO YOU. THIS WARRANTY GIVES YOU SPECIFIC
LEGAL RIGHTS, AND YOU MAY ALSO HAVE OTHER RIGHTS, WHICH VARY FROM STATE TO STATE OR PROVINCE TO PROVINCE.
Conta ct Ro cketfi sh:
For customer service please c all 1-800-620-2790
www.rocketfishproducts.com
Distributed by Best Buy Purchasin g, LLC
7601 Penn Avenue South, Richf ield, Minnesota, U.S.A. 55423-3645
© 2010 BBY Solutions, Inc.
All rights reserved. ROCKETFISH is a trademark of BBY So lutions, Inc. Registered in some countries. All other products and
brand names are trademarks of their resp ective owners.
Products where the factory app lied serial number has been altered or removed
20
Page 21

RF-GUV1124
21
Page 22

22
Page 23

RF-GUV1124
23
Page 24

www.rocketfishproducts.com (800) 620-2790
Distributed by Best Buy Purchasing, LLC
7601 Penn Avenue South, Richfield, MN 55423-3645 USA
© 2010 BBY Solutions, Inc.
All rights reserved. ROCKETFISH is a trademark of BBY Solutions, Inc.
All other products and brand names are trademarks of their respective owners.
10-0764
ENGLISH
 Loading...