

Page 1
Robustel Centre Manager RobustLink
Centralized M2M Management Platform
For GoRugged Series Router & Gateway
User Guide
Document Name: User Guide
Firmware : 1.01.00
Date : 2013-12-12
Status : Confidential
Doc ID : )RT_UG_RobustLink_v.1.0.0
www.robustel.com
Page 2

Robustlink Central Manager User Guide
About This Document
This document describes the software of Robustel RobustLink, Centralized M2M Management Platform.
Copyright© Guangzhou Robustel Technologies Co., Limited
All Rights Reserved.
Trademarks and Permissions
Robustel are trademark of Guangzhou Robustel Technologies Co. Limited.
All other trademarks and trade names mentioned in this document are the property of their respective holders.
Disclaimer
No part of this document may be reproduced in any form without the written permission of the copyright owner.
The contents of this document are subject to revision without notice due to continued progress in methodology,
design and manufacturing. Robustel shall have no liability for any error or damage of any kind resulting from the use
of this document.
Technical Support Contact Information
Tel: +86-18924045664
Fax: +86-20-82321505
E-mail: support@robustel.com
Web: ) www.robustel.com
RT_UG_RobustLink_v.1.0.0 12.12.2013 2 / 43
Confidential
Page 3

Robustlink Central Manager User Guide
Release Date
RobustLink Version
Doc Version
Details
2013-12-12
1.00
v.1.0.0
First release
Revision History
Updates between document versions are cumulative. Therefore, the latest document version contains all updates
made to previous versions.
RT_UG_RobustLink_v.1.0.0 12.12.2013 3 / 43
Confidential
Page 4

Robustlink Central Manager User Guide
Contents
Chapter 1. Product ....................................................................................................................................................... 5
1.1. Overview .................................................................................................................................................... 5
1.2. Selection and Ordering Data ...................................................................................................................... 5
Chapter 2. Installation .................................................................................................................................................. 6
2.1. System requirement ................................................................................................................................... 6
2.2. Installation steps ........................................................................................................................................ 6
Chapter 3. Configuration settings over web browser .................................................................................................. 9
3.1. Control Panel .............................................................................................................................................. 9
3.2. HOME ......................................................................................................................................................... 9
3.3. CONFIGURATION -> Basic Setting ............................................................................................................. 10
3.4. CONFIGURATION -> Data forwarding ....................................................................................................... 11
3.5. CONFIGURATION -> XML .......................................................................................................................... 13
3.6. ADMINISTRATION -> My Account ............................................................................................................ 14
3.7. ADMINISTRATION -> New Account .......................................................................................................... 14
3.8. ADMINISTRATION -> Account List ............................................................................................................ 15
3.9. ADMINISTRATION -> Upload Firmware .................................................................................................... 15
3.10. ADMINISTRATION -> Update Firmware .................................................................................................... 16
3.11. ADMINISTRATION -> Update Plans -> New Plans ..................................................................................... 17
3.12. ADMINISTRATION -> Update Plans -> Plans List ....................................................................................... 18
3.13. ADMINISTRATION -> Agent Server ........................................................................................................... 18
3.14. ADMINISTRATION -> MySQL .................................................................................................................... 19
3.15. ADMINISTRATION -> Device Register ....................................................................................................... 21
Chapter 4. Examples .................................................................................................................................................. 23
4.1. Application Diagram for Introduction ...................................................................................................... 23
4.2. Manage M1000 Pro V2 via RobustLink .................................................................................................... 23
4.2.1. Connect M1000 Pro V2 to RobustLink .............................................................................................. 23
4.2.2. Forward data from M1000 Pro V2 to RobustLink ............................................................................. 27
4.3. Manage R3000 via RobustLink ................................................................................................................. 32
4.3.1. Connect to RobustLink ...................................................................................................................... 32
4.3.2. Forward data from R3000 to RobustLink .......................................................................................... 35
Chapter 5. Troubleshooting ....................................................................................................................................... 41
5.1. Troubleshooting for installing RobustLink ................................................................................................ 41
RT_UG_RobustLink_v.1.0.0 12.12.2013 4 / 43
Confidential
Page 5
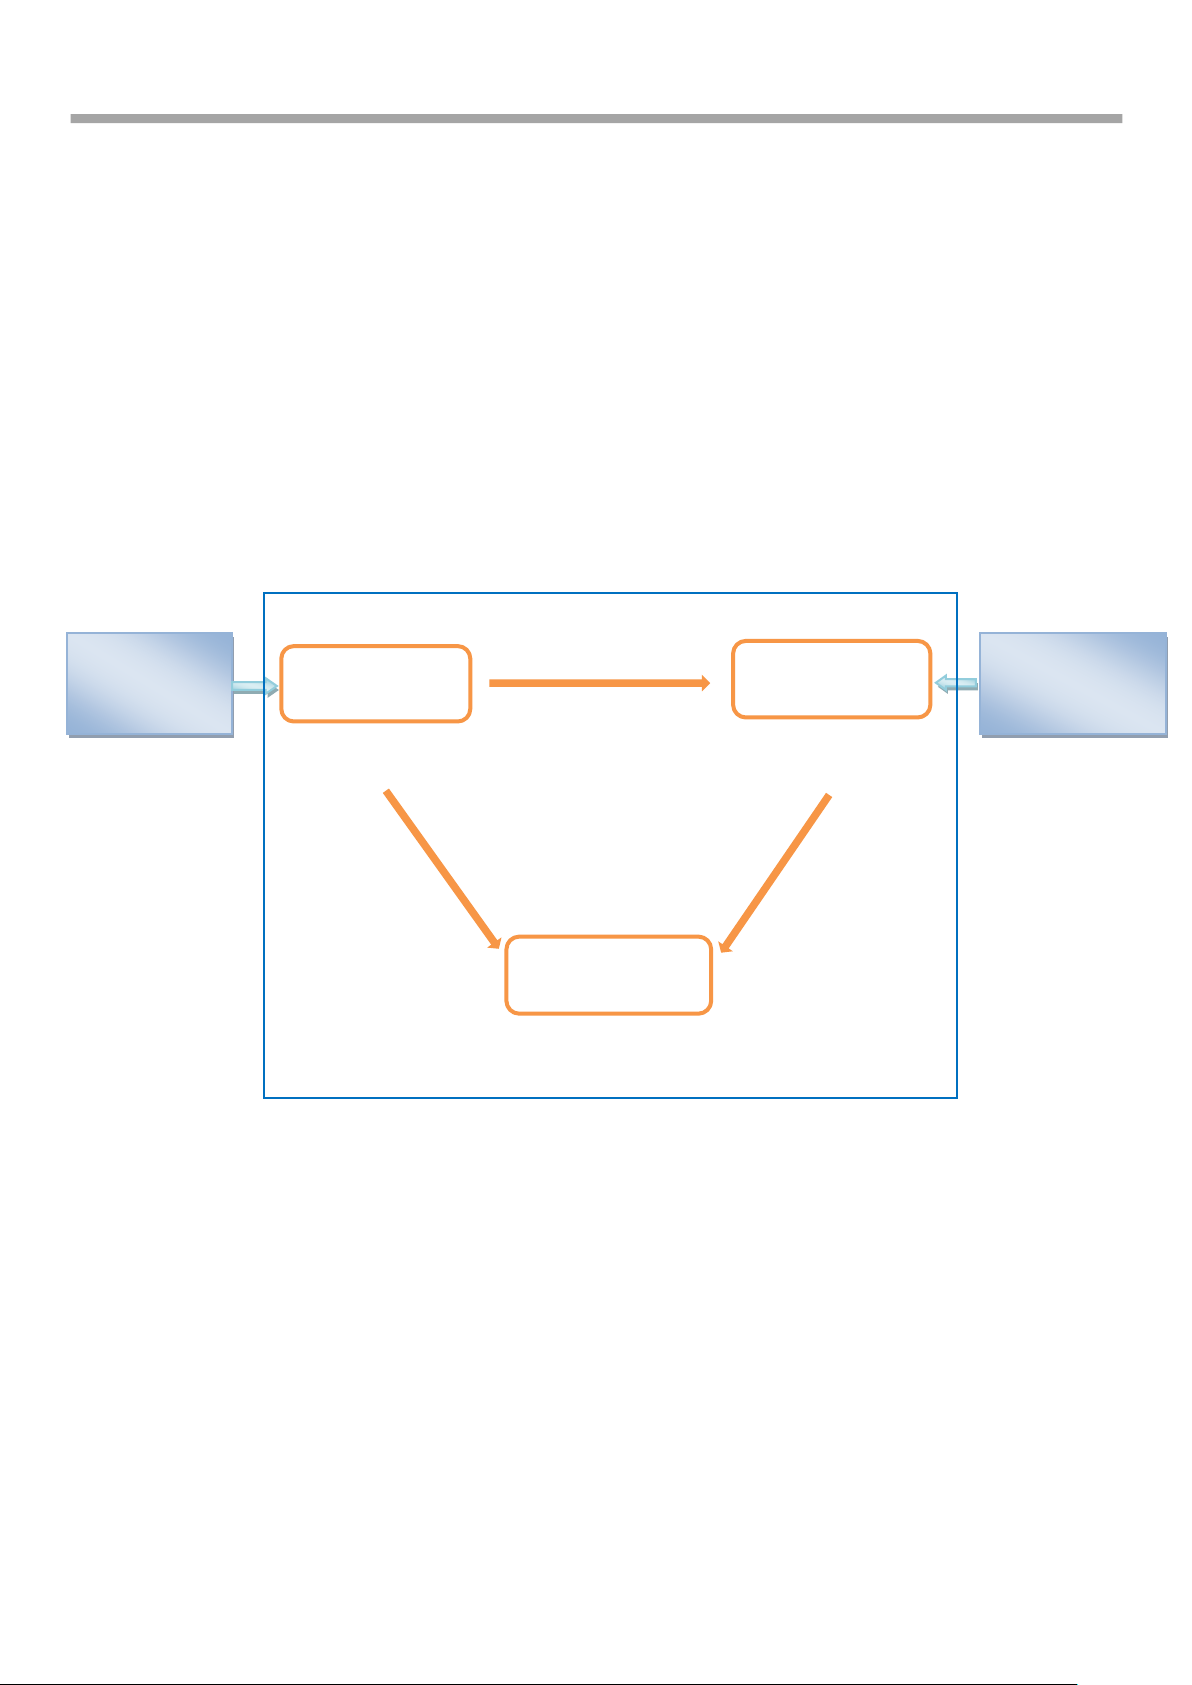
Robustlink Central Manager User Guide
Local /Remote
PC/IPAD/iPhone
Connect to Web
Server via port
80/443
Open port numbers:
31009/31000/31001
Open port number: 3306
Connect to Agent
Server via 31001
Connect to
MySQL via 3306
Connect to
MySQL via 3306
RobustLink
Open port numbers:
80/443
M1000 Pro V2
/M1000XP/R3000
Connect to Agent
Server via port
31000
Web Server
Agent Server
MySQL
Chapter 1. Product
1.1. Overview
Robustel RobustLink is an industrial-grade centralized management and administration system for Robustel
GoRugged series router & gateway, including R3000, M1000 XP and M1000 Pro V2.
RobustLink consists of three parts: Web Server (Apache), Agent Server and MySQL. Users can configure relevant
parameters of RobustLink via Web Server; Agent Server is platform for data communication which will process all the
data coming from slave device, or via vise; MySQL is a database used to store parameters and transaction data. Three
parts should work together to ensure all the functions of RobustLink.
RobustLink allows user to monitor, configure and manage large numbers of remote devices on a private network over
the web.
It mainly has following features:
Remote Monitoring
Remote Configuration
Remote Firmware Updates
Data Forwarding
Number of Devices: 1000+
Management: Web
1.2. Selection and Ordering Data
Please refer to corresponding RobusLink datasheet.
RT_UG_RobustLink_v.1.0.0 12.12.2013 5 / 43
Confidential
Page 6
Robustlink Central Manager User Guide
Chapter 2. Installation
2.1. System requirement
Windows 7 (32/64), Windows Vista (32/64), Windows 2008 (32/64), Windows 2003 (32/64), Windows 2000,
Windows XP (32/64)
2.2. Installation steps
1 Download RobustLink installation packet xampp.rar via link: https://app.box.com/s/e7p0lrx3o3mv6csgech8.
2 Extract xampp.rar to computer’s root directory, non-system root directory will be advised, such as D hard dish,
and then the path will be “D:\xampp”.
3 Close software applications which will use port 80, 443 and 3306. Normally, Skype.exe will occupy port 80, so
please close Skype.exe every time before you start RobustLink.
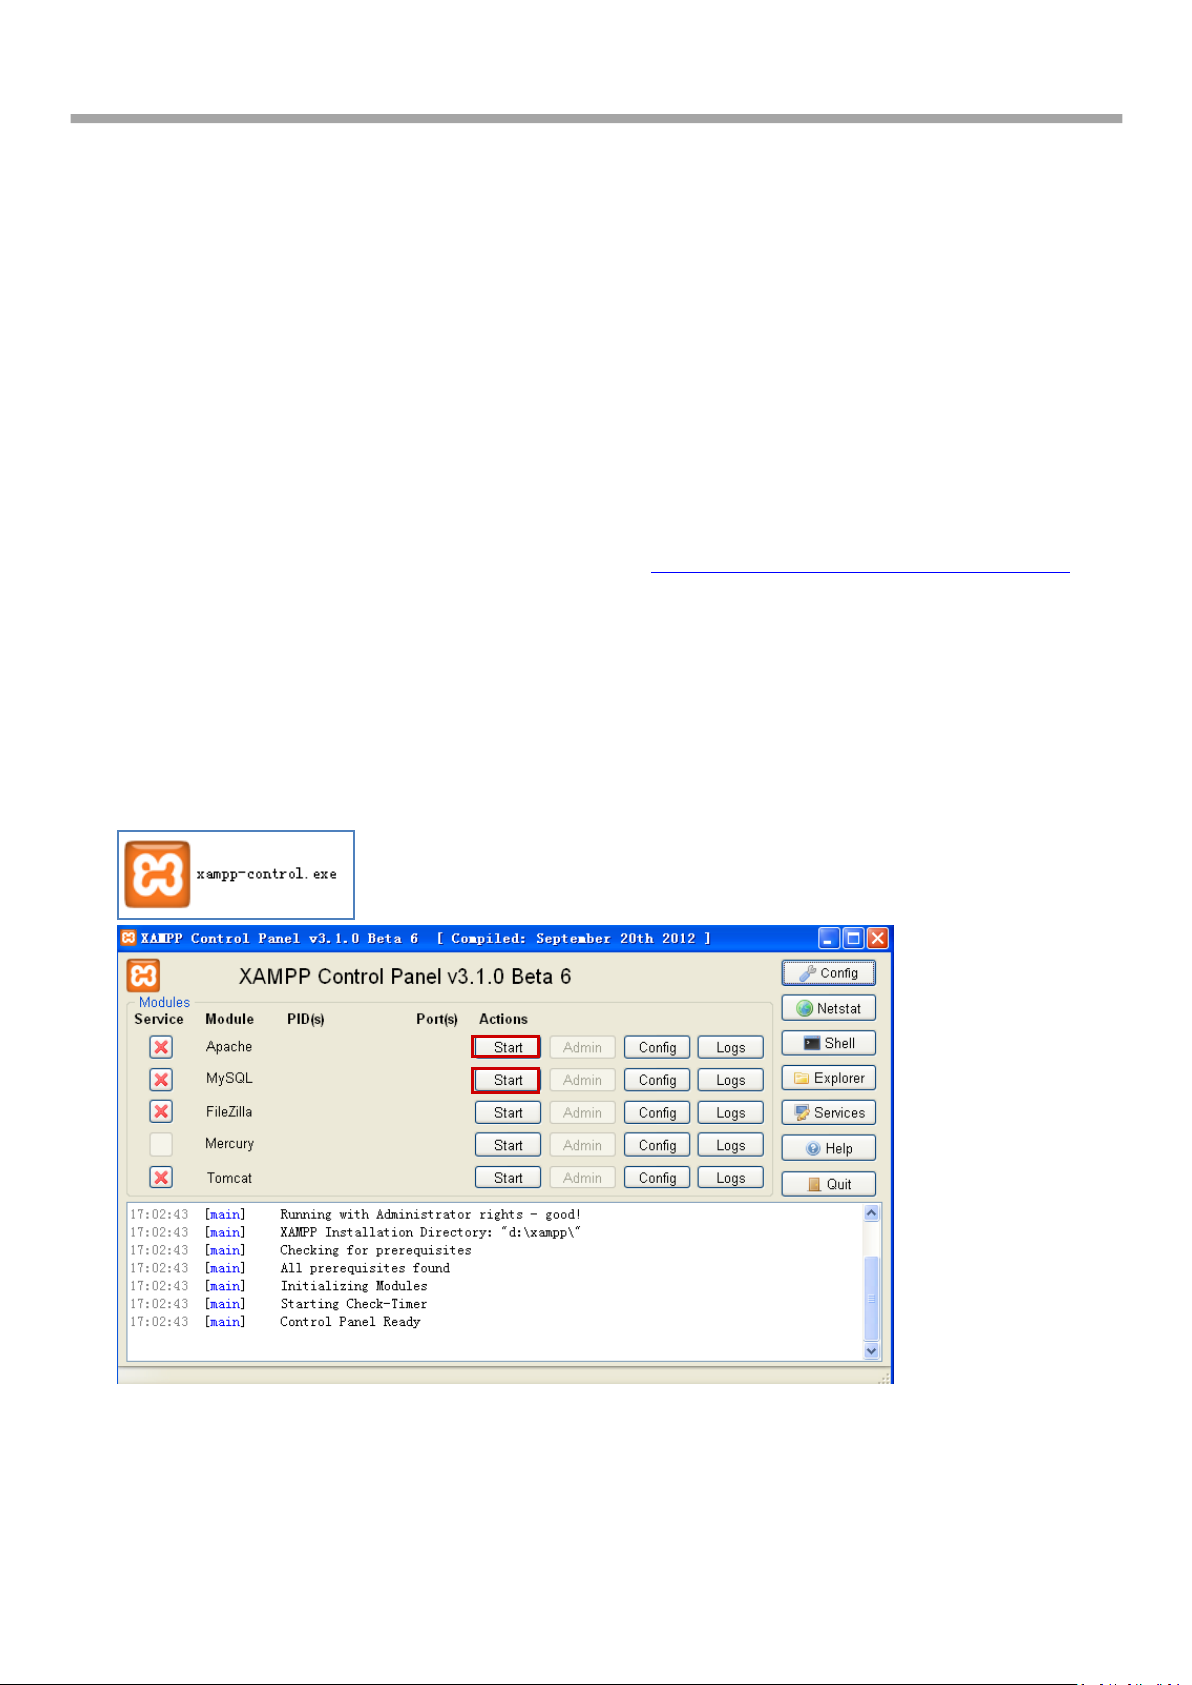
4 Double click “xampp-control.exe” --> click “Start” to enable both “Apache” (Web Server) and “MySQL”.
RT_UG_RobustLink_v.1.0.0 12.12.2013 6 / 43
Confidential
Page 7
Robustlink Central Manager User Guide
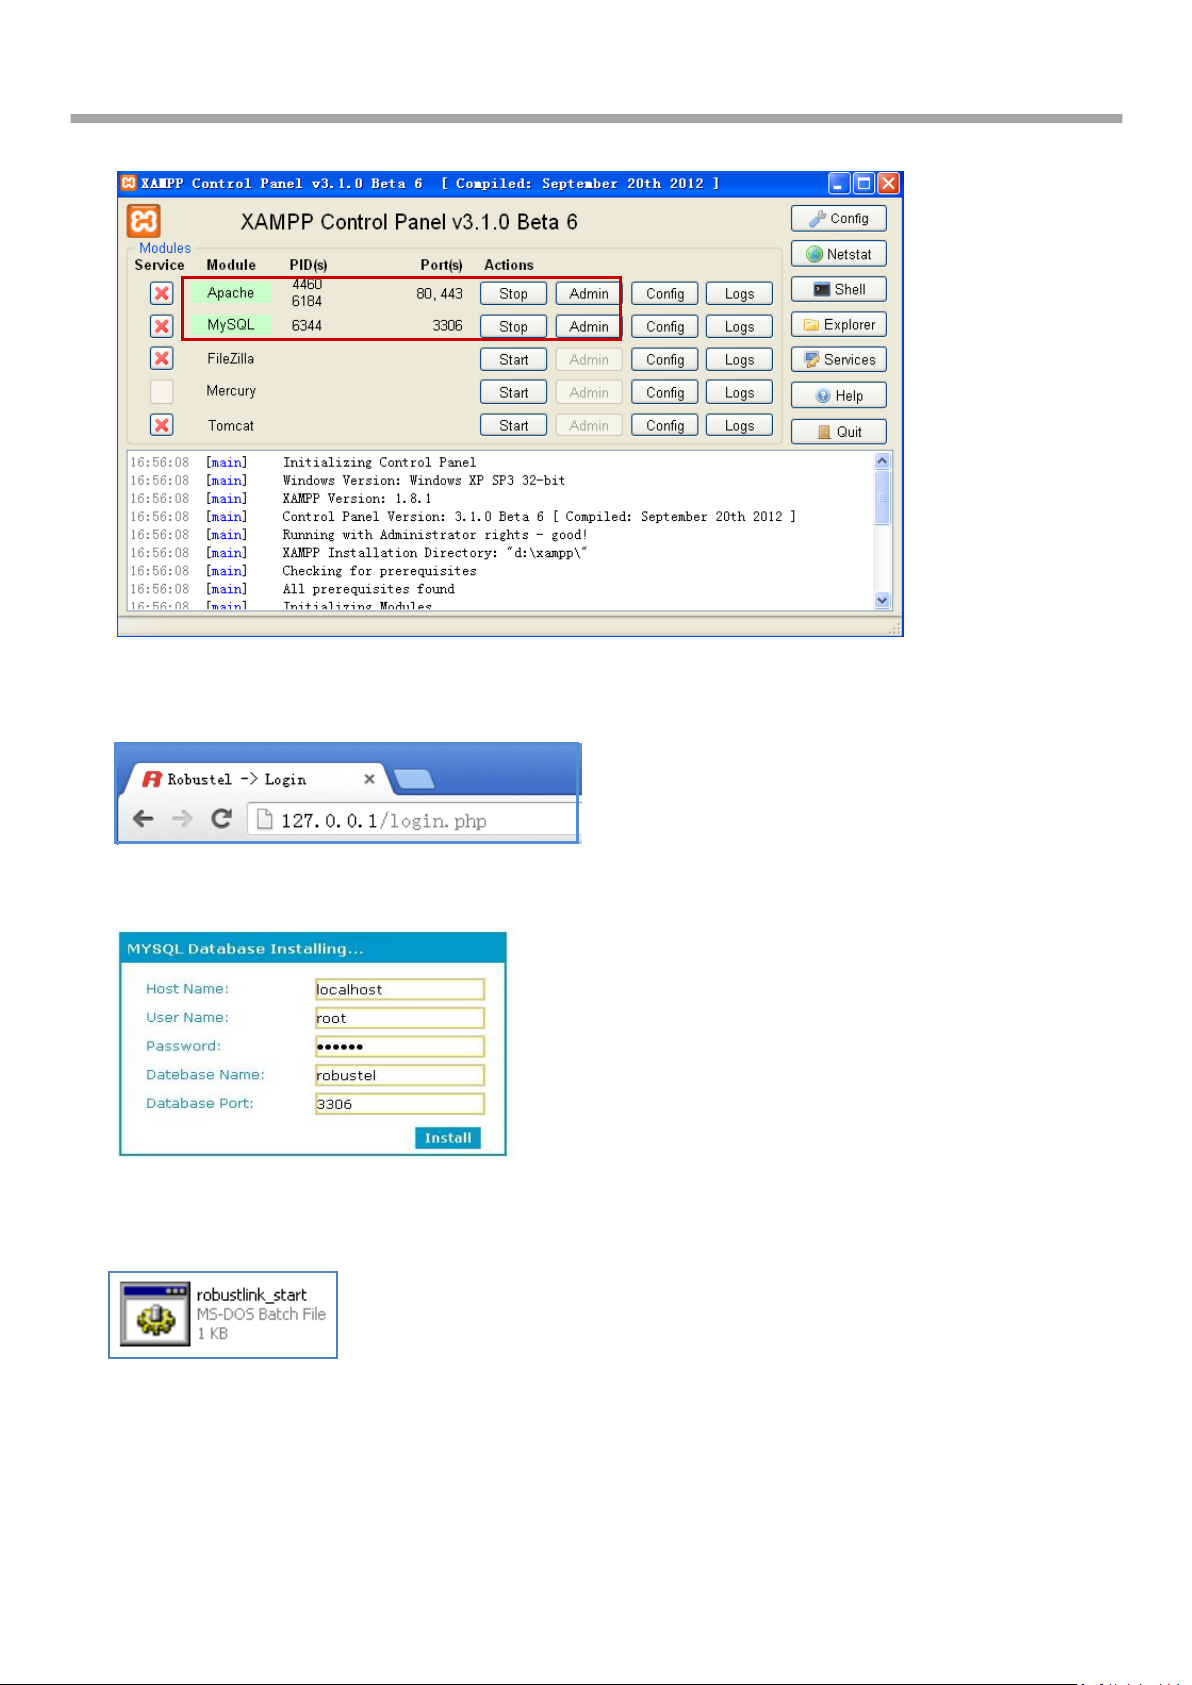
5 If succeed to start Apache and MySQL, Characters like “80, 443” and “3306” will show up.
6 Open the browser, such as Opera, Google Chrome and Firefox --> enter http://127.0.0.1/login.php or
http://localhost/login.php in the address bar.
7 Enter password 123456 in the new page to install MySQL (database), other parameters stay default.
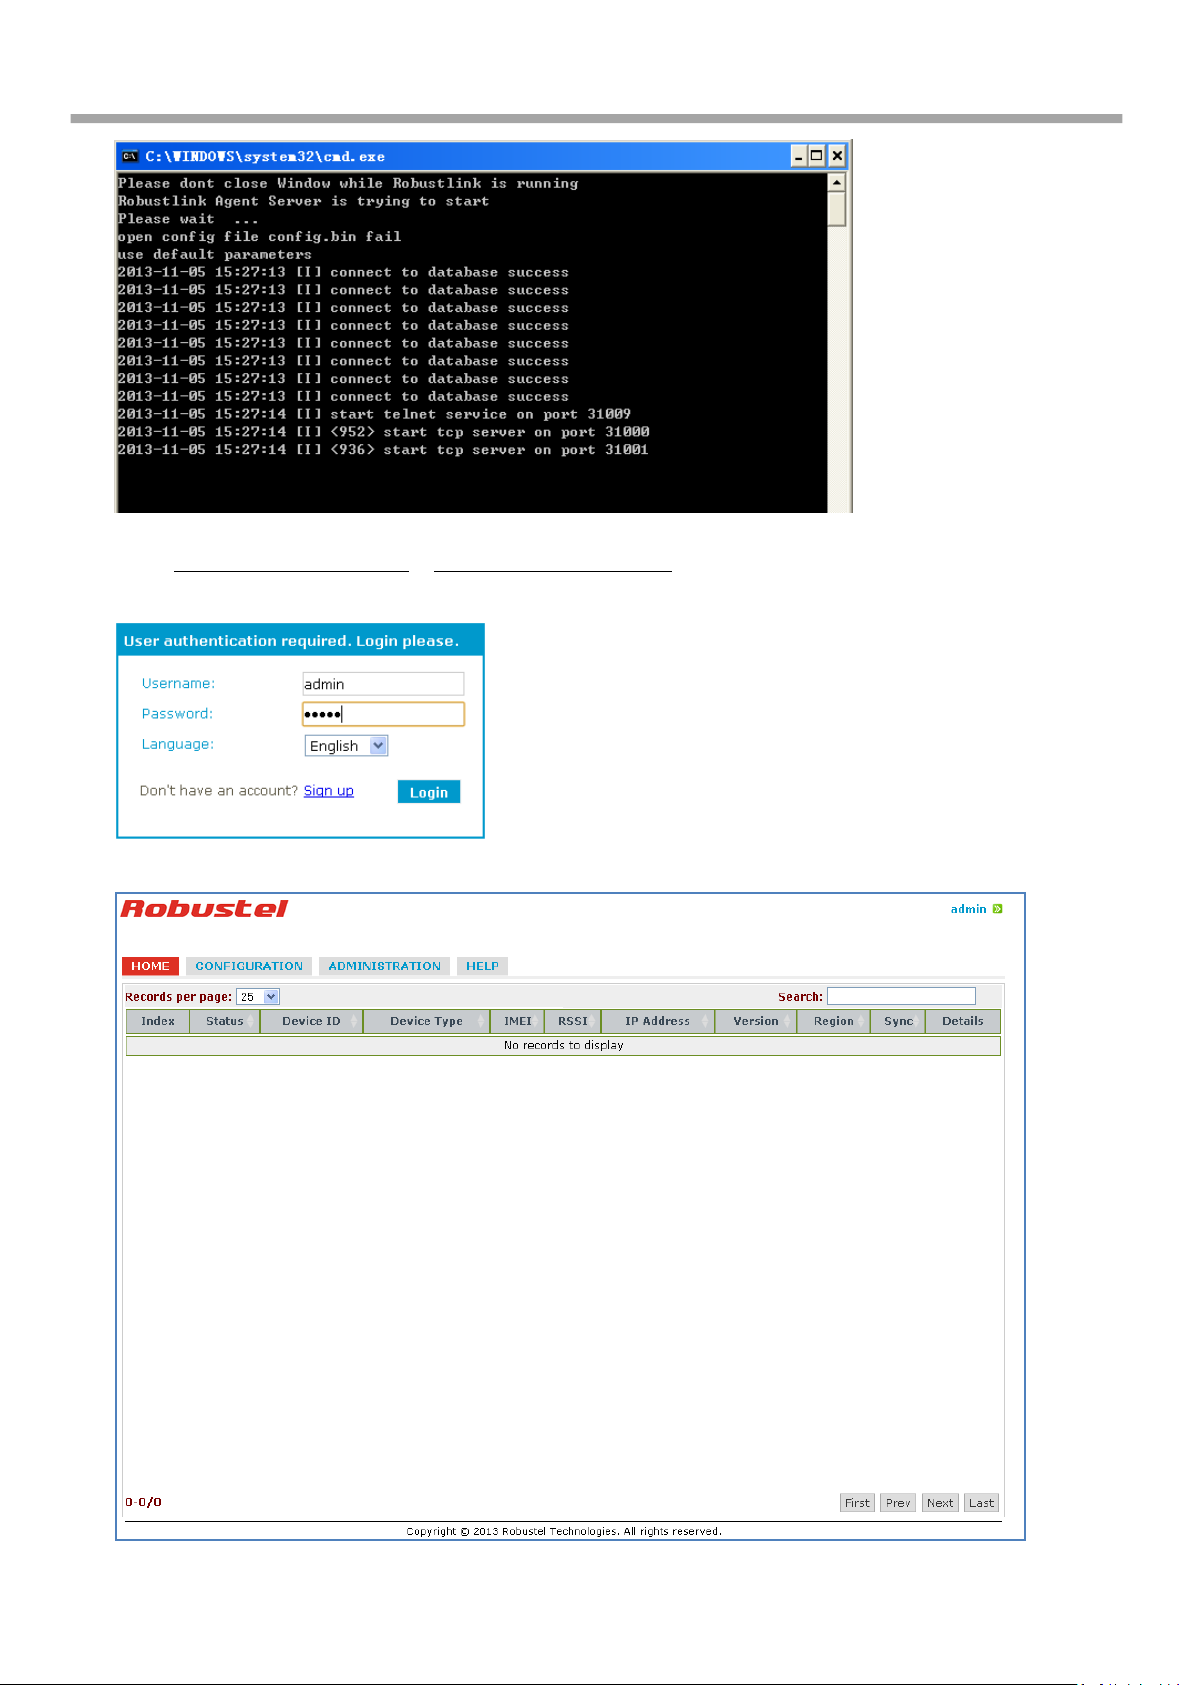
8 Double click “RobustLink_start.bat” (Agent Server). If connect to MySQL (database) successfully, it will show the
following diagram.
RT_UG_RobustLink_v.1.0.0 12.12.2013 7 / 43
Confidential
Page 8
Robustlink Central Manager User Guide
9 Enter: http://127.0.0.1/login.php or http://localhost/login.php in the address bar again --> Username “admin” -->
Password “admin” --> click “Login”.
10 After successfully login, you can see Web Server of RobustLink.
RT_UG_RobustLink_v.1.0.0 12.12.2013 8 / 43
Confidential
Page 9
Robustlink Central Manager User Guide
Chapter 3. Configuration settings over web browser
3.1. Control Panel
User can click “admin” --> “Logout” to logout web browser of RobustLink.
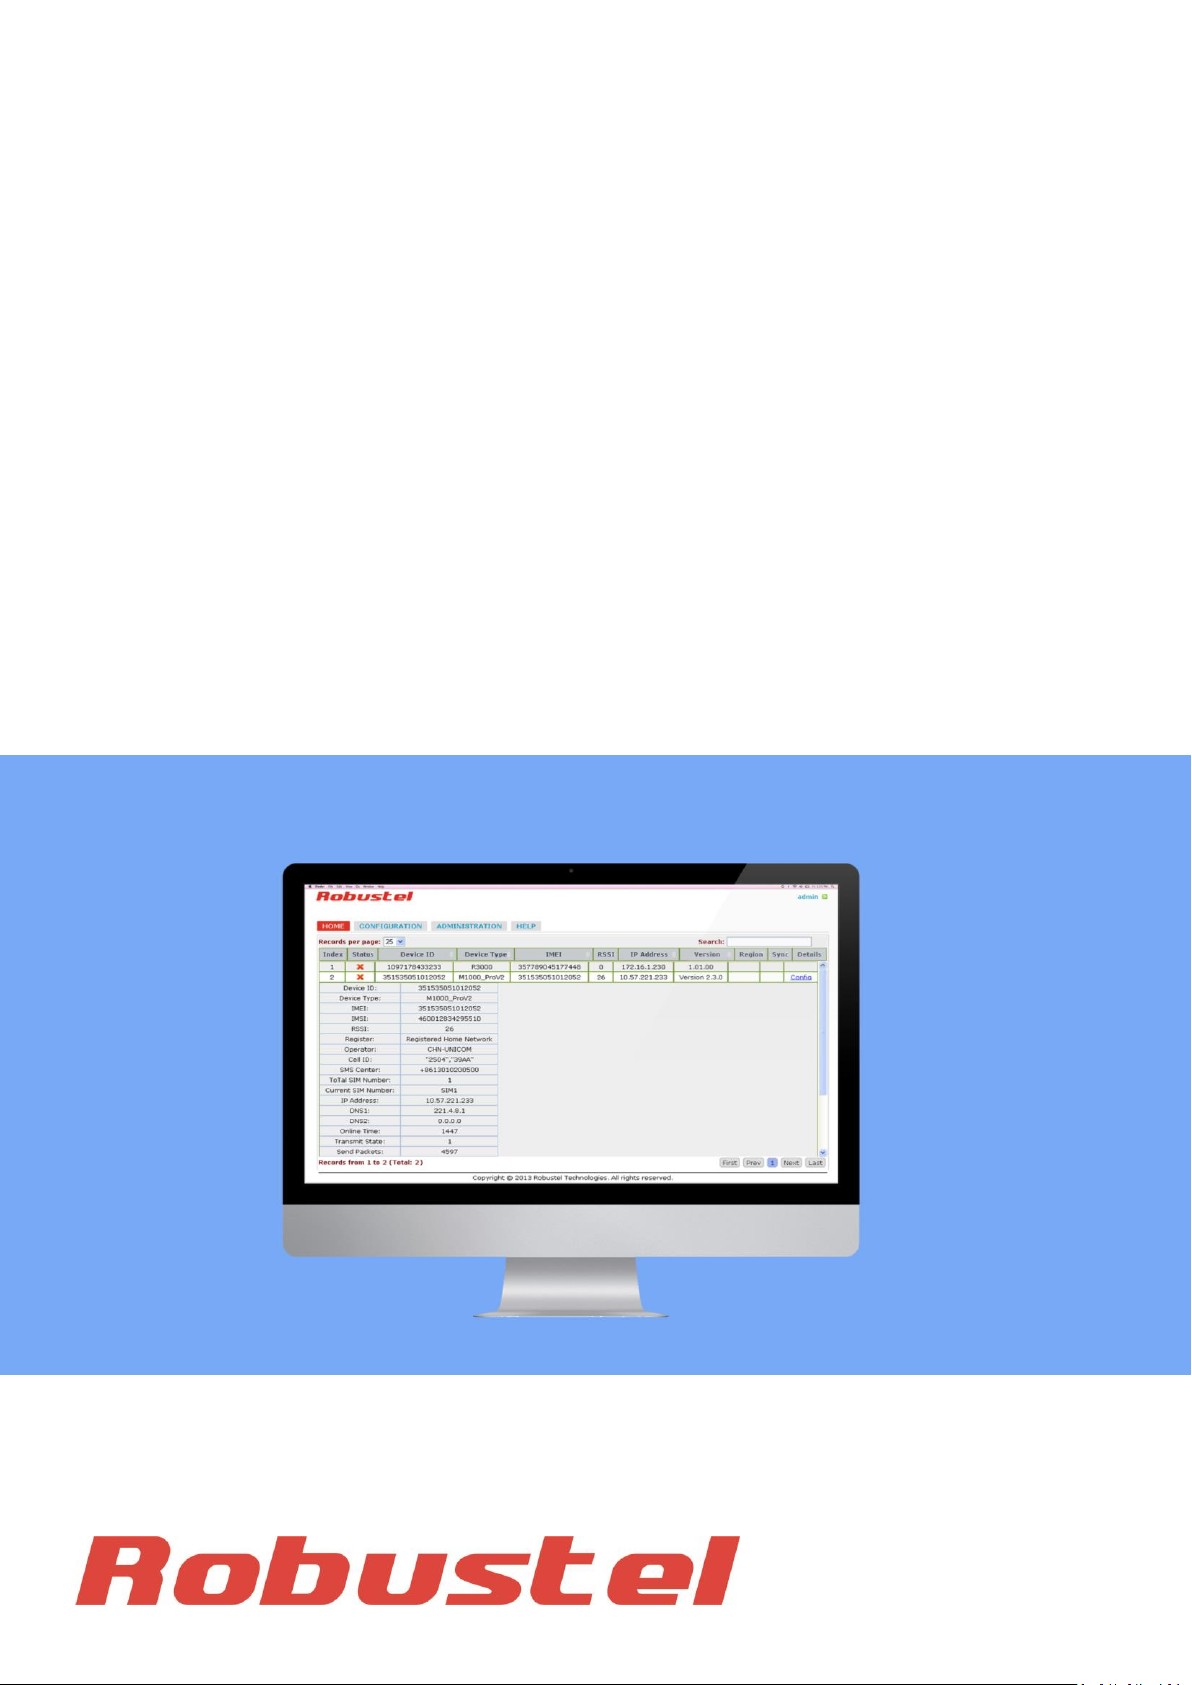
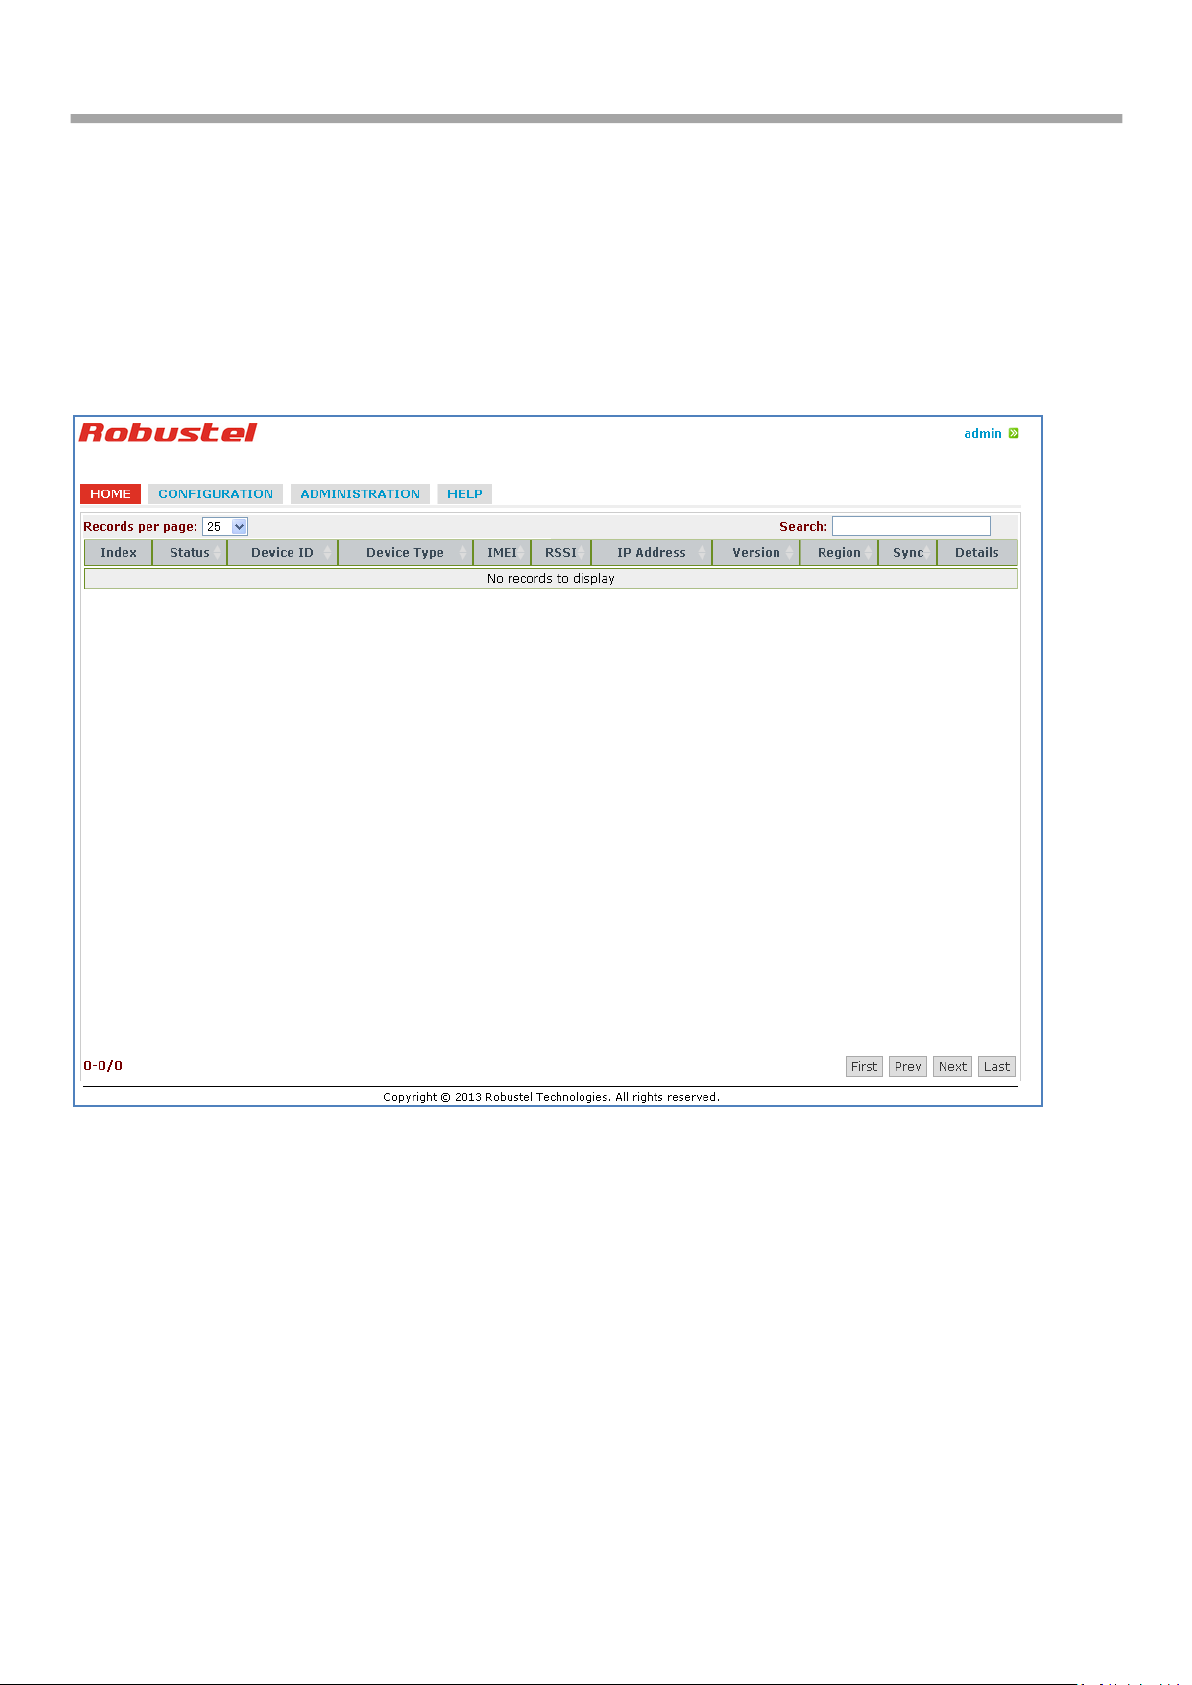
3.2. HOME
This section shows status of slave devices which had ever logged in RobustLink, or the devices which are connecting
to RobustLink.
RT_UG_RobustLink_v.1.0.0 12.12.2013 9 / 43
Confidential
Page 10
Robustlink Central Manager User Guide
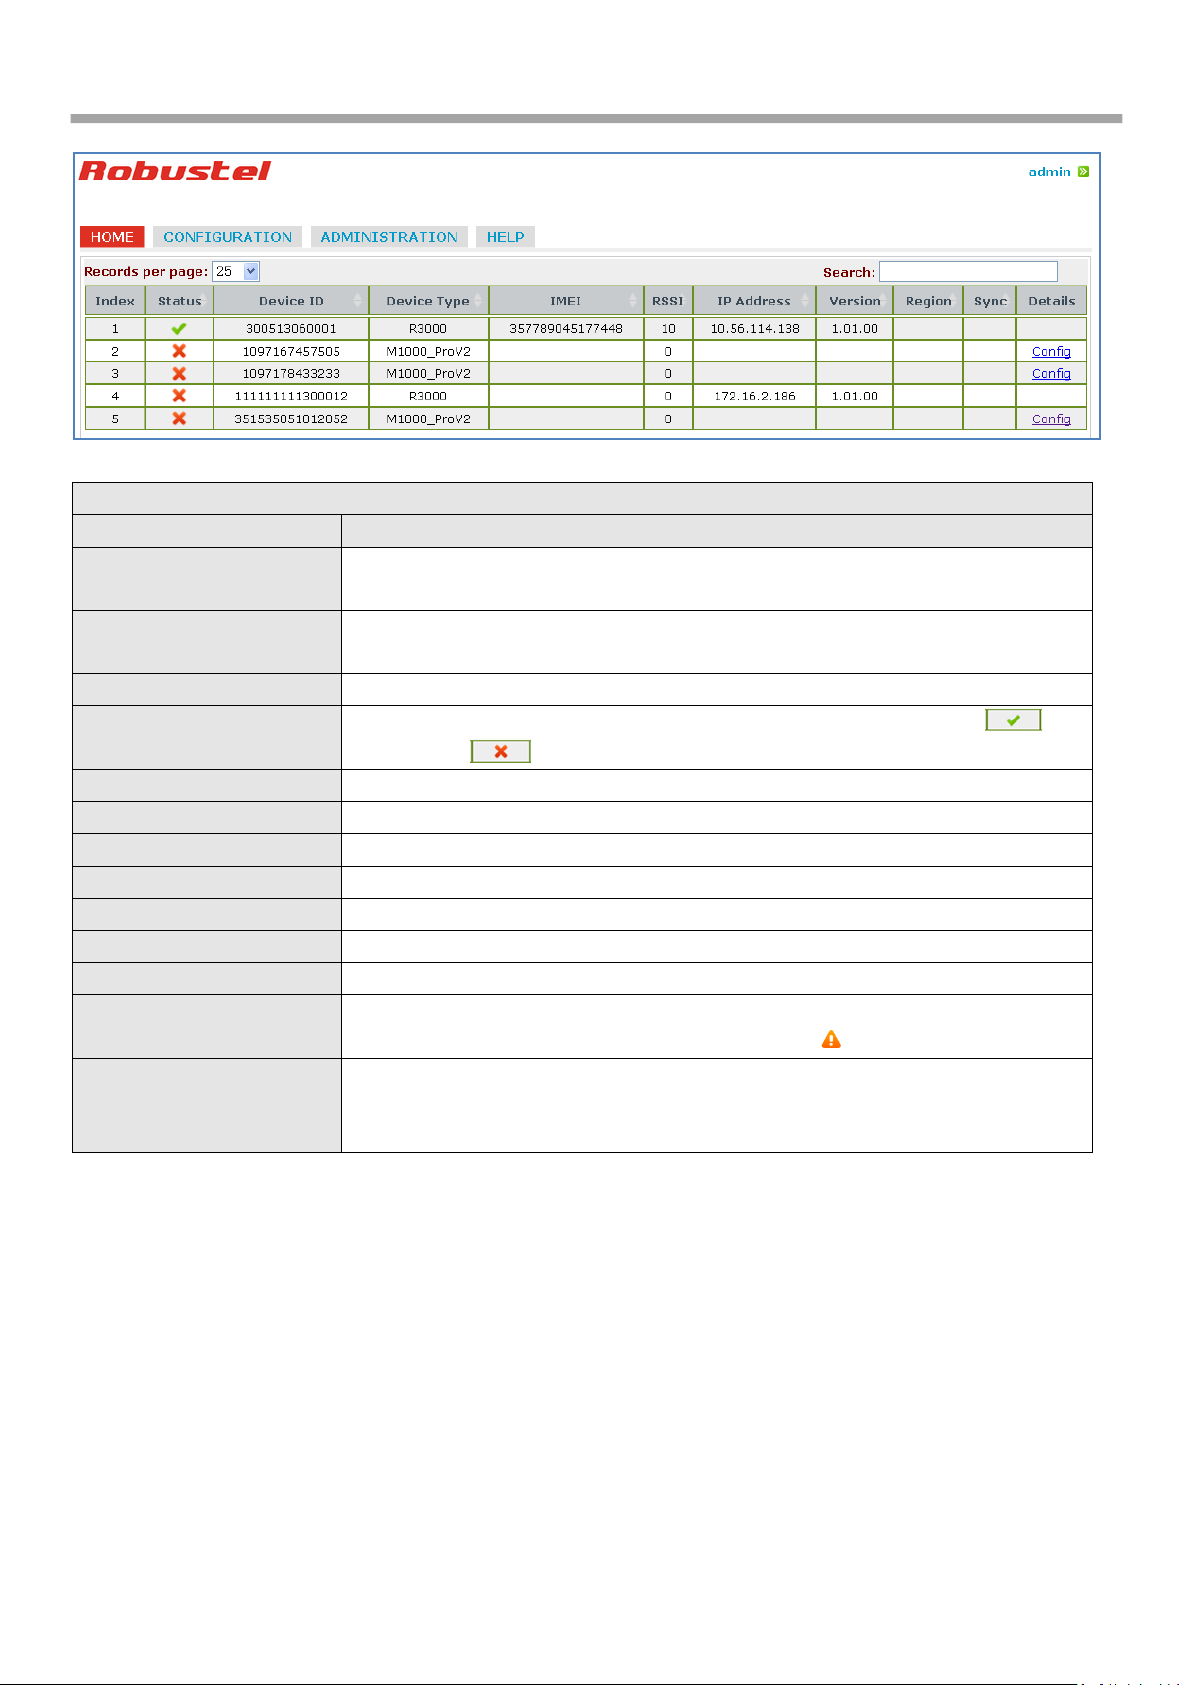
HOME
Item
Description
Records Per page
Selected from “10”, “25”, “50”, “all”, user can set how many devices are wanted
to show in one page.
Search
User can enter characters to search specific information. For example, when
enter “R3000”, all information relevant to R3000 will show up.
Index
Show the index of devices.
Status
Show the status of devices. If device login to RobustLink, it will show “ ”, or
it will show “ ”.
Device ID
Show the ID of device.
Device Type
Show the type of device: M1000 XP, M1000 Pro V2 or R3000.
IMEI
Show the IMEI number of device’s wireless module.
RSSI
Show device’s current signal level.
IP Address
Show device’s current IP address.
Version
Show device’s firmware version.
Region
Show specific region information of device.
Sync
Show whether the device information is synchronous with RobustLink. It shows
blank while synchronous, If not it will show symbol “ ”.
Details
Show note information. User can click “Config” to open another configure web
page.
Note: It’s only available for M1000 XP and M1000 Pro V2.
3.3. CONFIGURATION -> Basic Setting
This section allows user to do basic settings of RobustLink.
RT_UG_RobustLink_v.1.0.0 12.12.2013 10 / 43
Confidential
Page 11
Robustlink Central Manager User Guide
Basic Setting
Item
Description
Default
Device Login Password
Set devices login password. Devices need to enter this password before login
RobustLink.
Null
Heartbeat Interval(s)
When using GPRS/UMTS with a session running, most ISPs will monitor the
traffic flow. If there is none for a predetermined period of time then it will
shut the connection down at either the DHCP server or the APN, this is
performed so that system resources are not taken up unnecessarily. To stop
this happening you will need to send periodic Heartbeat bytes to keep the
TCP connection always online.
This item allows user to time interval between two Heartbeat packets.
Setting from 10 to 3600 secs.
60
Enable Data Forwarding
Click to enable data forwarding function.
After enable this function, RobustLink is acted as a data forwarding platform
preparing to receive data from slave sites (M1000XP, M1000 Pro V2 or
R3000). If the modem or router also enable data forwarding function and
register to RobustLink, then all the data will be forwarded from slave sites to
RobustLink. And RobustLink will forward the data to other site (user can
configure the destination site in tab “Configuration” --> “Data Forwarding”).
User can check data record in Agent Server (RobustLink_start.bat) which will
show what data has been sent to RobustLink.
Disable
Forward Data By
Modbus Address
(Modbus TCP)
Click to allow RobustLink to forward data according to Modbus Address of
slave devices.
Note: If user clicks to enable this function, “Enable Data Forwarding” will be
enabled automatically, this function should be enabled together with “Enable
Data Forwarding”.
Disable
Apply
Click to apply above configurations.
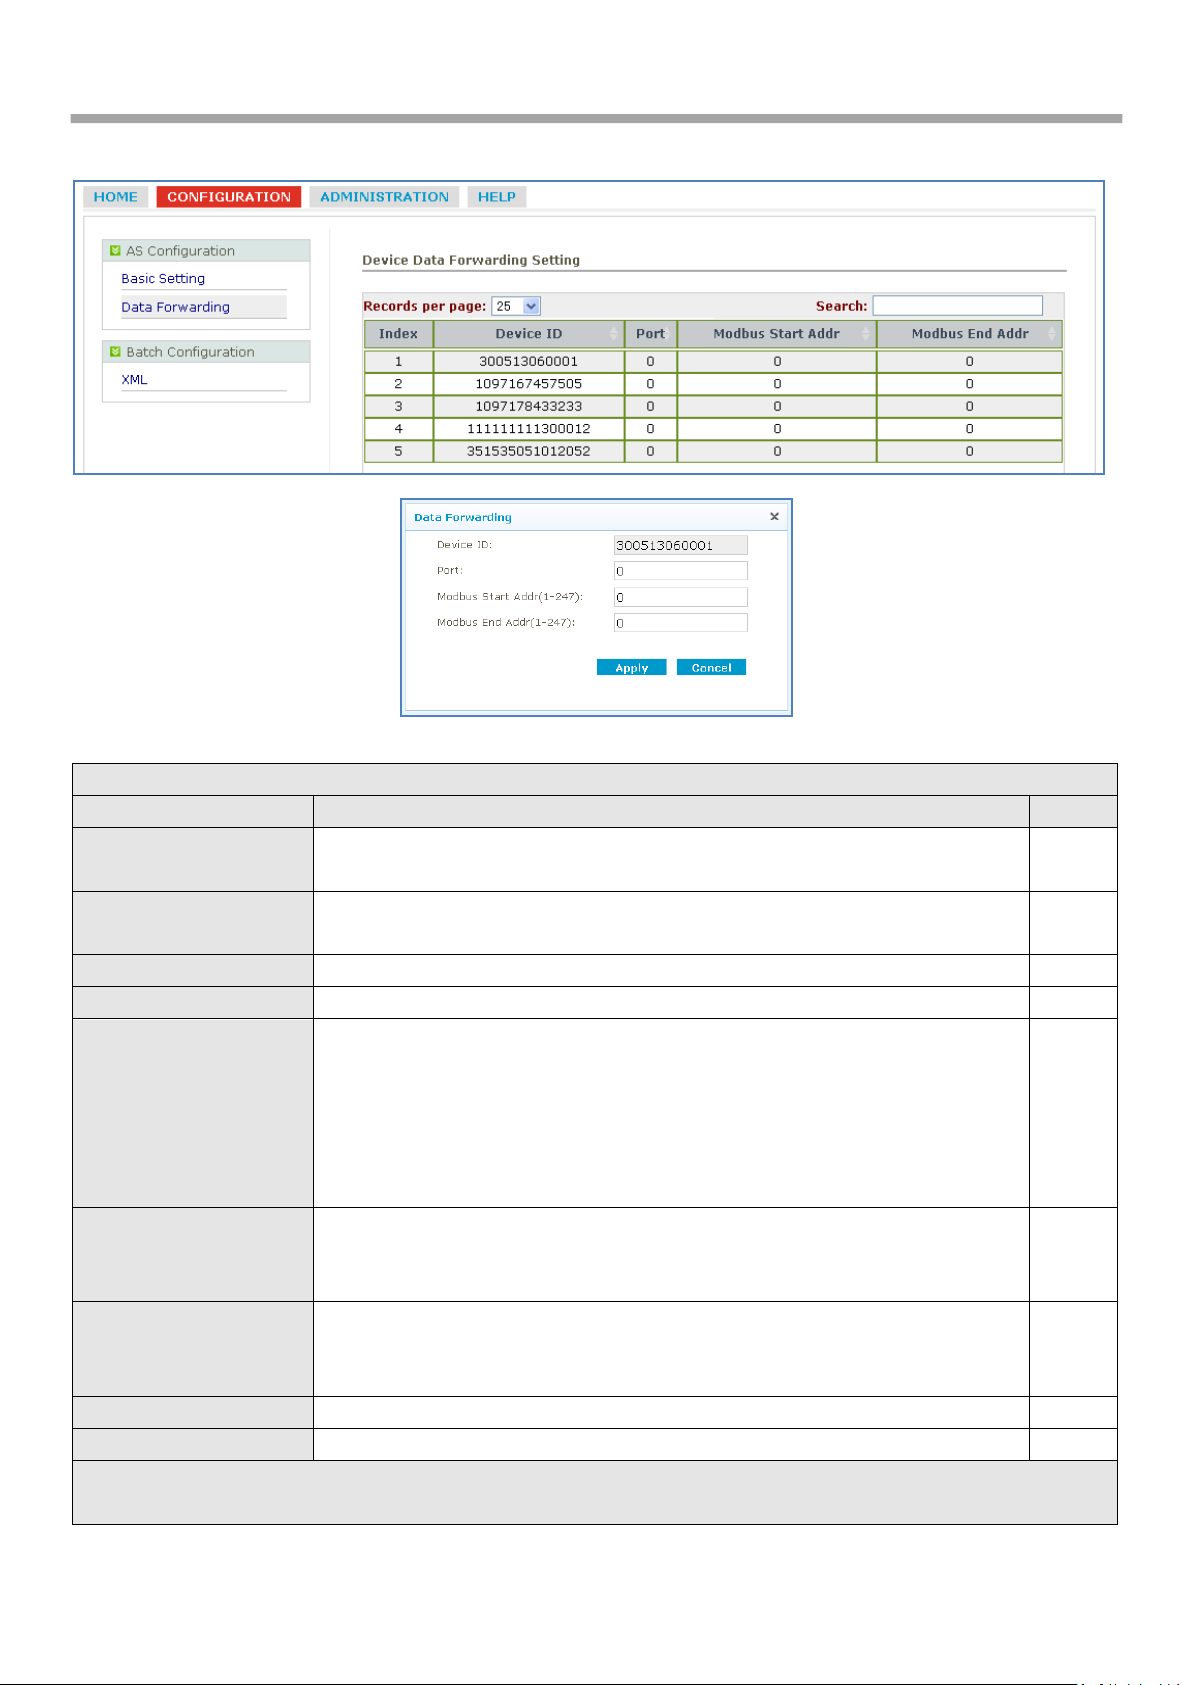
3.4. CONFIGURATION -> Data forwarding
This section allows user to do data forwarding configurations. For example, port number of RobustLink, Modbus Start
and End address. Clicking anywhere of records page will pop up a new subpage “Data Forwarding” (blue color
RT_UG_RobustLink_v.1.0.0 12.12.2013 11 / 43
Confidential
Page 12
Robustlink Central Manager User Guide
Data forwarding
Item
Description
Default
Records Per page
Selected from “10”, “25”, “50”, “all”, user can set how many devices are
wanted to show in one page.
25
Search
User can enter characters to search specific information. For example, when
enter “R3000”, all information relevant to R3000 will show up.
Null
Index
Show the index of each device.
/
Device ID
Show the ID of device.
/
Port
Show the local port number assigned to each device which have logged in
RobustLink. Default port number is “0”.
In the new subpage “Data Forwarding”, user can assign each device a new
local idle port whose range is 0-65535. Please avoid using famous ports which
often spread over 0-1023. For example, “80” is for Web browser. So we
recommend you to use the ports above 5000.
0
Modbus Start Addr
Show Modbus start address (ID) of slave device.
In the new subpage “Data Forwarding”, user can assign a new Modbus Start
Address (ID) to each device.
0
Modbus End Addr
Show Modbus End address (ID) of slave device.
In the new subpage “Data Forwarding”, user can assign a new Modbus End
Address (ID) to each device.
0
Apply
Click to apply above port forwarding settings.
/
Cancel
Click to cancel above port forwarding settings.
/
Note: There are 2 ways to do data forwarding. One is to enable “Enable Data Forwarding”, then RobustLink will
forward data from different slave devices to different ports according to device ID; the other is to enable “Forward
characters).
RT_UG_RobustLink_v.1.0.0 12.12.2013 12 / 43
Confidential
Page 13

Robustlink Central Manager User Guide
Data By Modbus Address (Modbus TCP)” and define a range of Modbus Address basing on the settings of “Port”,
“Modbus Start Addr” and “Modbus End Addr”, then RobustLink will forward data from different devices to one
port or different ports according to the range of Modbus Address. It depends on the users whether use one port or
different ports to accept data from different range of Modbus Address.
XML
Item
Description
Default
Records Per page
Selected from “10”, “25”, “50”, “all”, user can set how many devices are
wanted to show in one page.
25
Search
User can enter characters to search specific information. For example, when
enter “R3000”, all information relevant to R3000 will show up.
Null
Index
Show the index of each device
Null
Status
Show the status of devices. If device login to RobustLink, it will show
“ ”, or it will show “ ”.
Null
Device ID
Show the ID of device.
Null
Device Type
Show the type of device. For example, “M1000 XP”, “M1000 Pro V2” or
“R3000”.
Null
IMEI
Show the IMEI number of device.
Null
Version
Show the firmware version of device.
Null
Click to select the device you want to do batch configuration.
Null
Reboot devices after
configure
Click to reboot device after configuration.
Null
Browse
Click to upload configuration file (XML).
/
3.5. CONFIGURATION -> XML
This section allow user to import configuration file of R3000 for batch configuration. This function only available for
R3000.
RT_UG_RobustLink_v.1.0.0 12.12.2013 13 / 43
Confidential
Page 14

Robustlink Central Manager User Guide
Batch Configuration
Click to do batch configuration.
Note: before click to do batch configuration, please click “ ” to select the
device.
/
New Account
Item
Description
Default
Username
Enter a new username here. The range of data length is from 5 to 64.
Null
New Password
Enter a new password here. The range of data length is from 5 to 64.
Null
Confirm Password
Enter again the password as what you set in “New Password”. The range of
data length is from 5 to 64.
Null
Access Level
Selected from “ReadOnly”, “ReadWrite”, “Administrator”.
ReadOnly: User can read the status of tab “HOME”, “CONFIGURATION”
and “ADMINISTRATOR”, but can’t change the settings.
ReadWrite: User can read the status of tab “HOME”, “CONFIGURATION”
ReadOnly
3.6. ADMINISTRATION -> My Account
This section allows user to check current account which has logged in RobustLink.
3.7. ADMINISTRATION -> New Account
This section allows user to add new accounts.
RT_UG_RobustLink_v.1.0.0 12.12.2013 14 / 43
Confidential
Page 15

Robustlink Central Manager User Guide
and “ADMINISTRATOR”, also can change the settings of “CONFIGURATION
-> Basic Settings”, “CONFIGURATION ->Data Forwarding”,
“CONFIGURATION -> XML” and “ADMINISTRATOR -> Device Register”.
Administrator: User have highest authority to access RobustLink, can read
and change the settings of all configuration items.
Register
Click to register the new account.
Upload Firmware
Item
Description
Default
3.8. ADMINISTRATION -> Account List
This section allows user to check the list of current account.
Note: click “ ” to delete an account.
3.9. ADMINISTRATION -> Upload Firmware
This section allows user to upload firmware of different type of device to RobustLink. And when need to update, user
can select proper firmware to update.
RT_UG_RobustLink_v.1.0.0 12.12.2013 15 / 43
Confidential
Page 16

Robustlink Central Manager User Guide
Records Per page
Selected from “10”, “25”, “50”, “all”, user can set how many devices are
wanted to show in one page.
25
Search
User can enter characters to search specific information. For example,
when enter “R3000”, all information relevant to R3000 will show up.
Null
Index
Show the index of each device
/
Device Type
Show the type of each device. For example, “M1000 XP”, “M1000 Pro V2”
or “R3000”.
/
Firmware Name
Show the name of firmware.
/
Please Select Device
Type
Click to select the device type the firmware belong to. Selected from
“M1000 XP”, “M1000 Pro V2” and “R3000”.
/
Browse
Click to choose the firmware you want to upload to RobustLink.
/
Upload Firmware
Click to upload firmware.
/
Note: click “ ” to delete the uploaded firmware.
Update Firmware
Item
Description
Default
Records Per page
Selected from “10”, “25”, “50”, “all”, user can set how many devices are
wanted to show in one page.
25
Search
User can enter characters to search specific information. For example,
when enter “R3000”, all information relevant to R3000 will show up.
Null
Index
Show the index of each device
/
Device ID
Show the ID of device.
/
3.10. ADMINISTRATION -> Update Firmware
This section allows user to update firmware to RobustLink. And when need to update, user can select different
firmware relevant to different device types.
RT_UG_RobustLink_v.1.0.0 12.12.2013 16 / 43
Confidential
Page 17

Robustlink Central Manager User Guide
Device Type
Show the type of device. For example, “M1000 XP” and “M1000 Pro V2” or
“R3000”.
/
IMEI
Show the IMEI number of device.
/
Version
Show the firmware version of device.
/ Click to select the device you want to upgrade the firmware.
/
Please Select Firmware
Click to select one firmware which is uploaded in tab “Upload Firmware”.
/
Update Firmware
Click to update the firmware you have selected.
/
New Plans @ Update Plans
Item
Description
Default
Records Per page
Selected from “10”, “25”, “50”, “all”, user can set how many devices are
wanted to show in one page.
25
Search
User can enter characters to search specific information. For example,
when enter “R3000”, all information relevant to R3000 will show up.
Null
Index
Show index of each device
/
Status
Show the status of devices. If device login to RobustLink, it will show
“ ”, or it will show “ ”.
/
Device ID
Show the ID of device.
/
Device Type
Show the type of device. For example, “M1000 XP”, “M1000 Pro V2” or
“R3000”.
/
IMEI
Show the IMEI number of device.
/
Version
Show the firmware version of device.
/
3.11. ADMINISTRATION -> Update Plans -> New Plans
This section allows user to set firmware update plans according to the time. Different firmware has to match
correspond device. For example, firmware of M1000 Pro V2 has to match M1000 Pro V2, cannot match R3000.
RT_UG_RobustLink_v.1.0.0 12.12.2013 17 / 43
Confidential
Page 18

Robustlink Central Manager User Guide
Click to select the device you want to upgrade the firmware.
/
Please Select Firmware
Click to select one firmware which is uploaded in tab “Upload Firmware”.
/
Set a specified time. RobustLink will upgrade firmware automatically if
reach this time.
/
Add to Update Plan
Click to add a new plan.
/
Plans List @ Update Plans
Item
Description
Default
Records Per page
Selected from “10”, “25”, “50”, “all”, user can set how many devices are
wanted to show in one page.
25
Search
User can enter characters to search specific information. For example,
when enter “R3000”, all information relevant to R3000 will show up.
Null
Index
Show the index of each device.
Device ID
Show the ID of device.
Device Type
Show the type of device. For example, “M1000 XP”, “M1000 Pro V2” or
“R3000”.
Update Time
Show the time you which you have set in tab “New Plans”.
Firmware Name
Show the firmware version which you have set in tab “New Plans”.
Note: click “ ” to delete an update plan.
3.12. ADMINISTRATION -> Update Plans -> Plans List
This section shows the list of firmware update plans.
3.13. ADMINISTRATION -> Agent Server
This section allows user to set parameters of Agent Server.
RT_UG_RobustLink_v.1.0.0 12.12.2013 18 / 43
Confidential
Page 19

Robustlink Central Manager User Guide
Agent Server
Item
Description
Default
Agent-Server Address
Set IP address of Agent Server. For example, when Agent Server is installed
in the same IP address of MySQL and Apache, user can enter “localhost”,
“127.0.0.1” in this filed; If Agent Server is set away from MySQL and
Apache, not in the same IP address, user should enter the IP address of
Agent Server. For example, when Agent Server is installed in remote server
(PC), its IP address is 120.197.58.89, and then we shall enter
“120.197.58.89” in this filed.
Localhost
Port
Set a local port number of Agent server.
31001
Protocol
Set transport layer protocol which device used to connect to Agent Server.
Note: can’t be selected yet.
tcp
Timeout(s)
Set timeout when slave device connect to Agent Server. For example, if
“Timeout” is set as “30”, when device keep on connecting Agent Server,
after 30 seconds but still can’t succeed to connect to Agent Server, log
information will show connection timeout.
Data range is from 5 to 60 seconds.
30
Connect
Click to update settings to Agent Server after above settings.
/
3.14. ADMINISTRATION -> MySQL
This section allows user to set parameters of MySQL.
RT_UG_RobustLink_v.1.0.0 12.12.2013 19 / 43
Confidential
Page 20

Robustlink Central Manager User Guide
MySQL
Item
Description
Default
Hostname
Enter the IP address where MySQL is installed in. For example, if MySQL
is installed in the same PC of Web Server, user can enter “localhost” or
“127.0.0.1” in this filed; if MySQL is installed in different location
(120.197.59.63 for example) from Web Server, user shall enter
“120.197.59.63” in this filed.
localhost
Username
Enter user name of MySQL.
root
Password
Enter password of MySQL.
Note: Username and Password are used to login MySQL, we suggest user
do not change the settings of Username and Password.
123456
Port
Enter port number of MySQL.
3306
Connect
Click to update settings to MySQL after above settings.
/
DataBase Name
Set name of MySQL.
robustel
Enable MySQL persistent
connection (Recommend)
Click to connect MySQL to Web Server persistently. If do not enable this
function, Web Server will just connect to MySQL if needed. For example,
add new account to RobustLink.
Enable
Notify connection setting
to Agent-Server
(Recommend)
Click to send “MySQL Connection” information such as “Hostname”,
“Username”, “Password”, etc to Agent Server, and then Agent Server can
be abled to connect to MySQL according to this information.
Note: when you change the MySQL Connection information, remember to
click “Connect” to let Agent Server know the credentials of MySQL.
Enable
Connect
Click to update settings to Agent Server after above settings.
/
RT_UG_RobustLink_v.1.0.0 12.12.2013 20 / 43
Confidential
Page 21

Robustlink Central Manager User Guide
Device Register
Item
Description
Default
Records Per page
Selected from “10”, “25”, “50”, “all”, user can set how many devices are
wanted to show in one page.
25
Search
User can enter characters to search specific information. For example,
when enter “R3000”, all information relevant to R3000 will show up.
Null
Index
Show index of each device
/
Status
Show the status of devices. If device login to RobustLink, it will show
“ ”, or it will show “ ”.
/
Device ID
Show the ID of device.
/
Device Type
Show the type of device. For example, “M1000 XP”, “M1000 Pro V2” or
“R3000”.
/
IMEI
Show the IMEI number of device.
/
Version
Show the firmware version of device.
/
Browse
Click to upload register file.
Browse
Batch Register
Click to start registering devices to RobustLink.
/
Export
Click to export register file: device_register.xls, user need to fill in device’s
information such as “Device Type” and “Device ID” in this file.
Device ID of M1000 XP/M1000 Pro V2 is its IMEI number which will be
found in the back label, or you can check this in ModemConfigurator ->
NMS -> M2M Platform -> Device ID.
/
3.15. ADMINISTRATION -> Device Register
This section allows user to set parameters of Device Register.
RT_UG_RobustLink_v.1.0.0 12.12.2013 21 / 43
Confidential
Page 22

Robustlink Central Manager User Guide
Device ID of R3000 is its SN number which will be found in the side label of
R3000, or you can check this SN number in R3000’s Web GUI -> Status ->
System -> Router Information -> Serial Number.
Note: section 4.2.1 and section 4.3.1’s step 1 to step 4 will show how to
register devices.
RT_UG_RobustLink_v.1.0.0 12.12.2013 22 / 43
Confidential
Page 23

Robustlink Central Manager User Guide
Chapter 4. Examples
4.1. Application Diagram for Introduction
1. M1000 Pro V2/ R3000 works as TCP Client with any IP which can access to Internet.
2. RobustLink works as TCP Server with fixed public IP or dynamic IP with domain name.
3. Another TCP Client site, Control Center for example, works as another TCP Client which connects with
RobustLink via intranet (LAN port) or via Internet.
4.2. Manage M1000 Pro V2 via RobustLink
4.2.1. Connect M1000 Pro V2 to RobustLink
1. Login RobustLink Web GUI, go to tab “ADMINISTRATION” -> “Device Register”, click “Export” to export register
file: device_register.xls.
RT_UG_RobustLink_v.1.0.0 12.12.2013 23 / 43
Confidential
Page 24

Robustlink Central Manager User Guide
2. Open device_register.xls, enter IMEI number of M1000 Pro V2 in tab “Device ID” and M1000_ProV2 in tab
“Device Type”, and then save this file. Section 3.15 -> “Export” will show how to find IMEI number of M1000 Pro
V2.
Note: In tab “Device Type”, make sure enter M1000_ProV2, any other format like M1000 ProV2 or M1000_Prov2
will be unavailable.
3. Click tab “Browse” to import file device_register.xls which you have filled in “Device ID” and “Device Type” of
M1000 Pro V2.
4. Click “Batch Register”.
RT_UG_RobustLink_v.1.0.0 12.12.2013 24 / 43
Confidential
Page 25

Robustlink Central Manager User Guide
5. Regarding of M1000 Pro V2: install an antenna -> insert SIM card into one of the SIM card slots -> connects
M1000 Pro V2 to the PC’s serial port -> switch to Config Mode -> power on M1000 Pro V2.
6. Run M1000 Pro V2 Configurator, Upgrade M1000 Pro V2’s firmware to “Version 2.5.0” (firmware version greater
than or equal to version 2.3.3, such as version 2.5.0, will support RobustLink function), and then use M1000 Pro
V2 Configurator V2.5.0.exe to configure.
Note: Please check the firmware version at the button of the Configurator to confirm that if it is newer than
Version 2.3.3. If not please let us know what your firmware version is, we will provide you the proper firmware
and configurator.
7. Go to tab “COM”, select relevant com Type and Baud Rate. For example, COM type RS232, Baud Rate 115200,
Data Bits 8, Flow Ctrl None, Parity None, and Stop Bits 1.
8. Go to tab “GPRS” --> enter relevant ISP information, for example APN, User Name, etc. Make sure M1000 Pro V2
can establish PPP connection successfully.
9. Go to tab “Connection” --> go to item “Connection Control” --> select “Always Online” mode. Other settings stay
default.
10. Go to tab “NMS”-->M2M Platform, click Enable to allow M1000 Pro V2 connect to RobustLink --> enter IP
address and Port number of RobustLink's in item “Address” and “Port”--> enter a password which set in the
RT_UG_RobustLink_v.1.0.0 12.12.2013 25 / 43
Confidential
Page 26

Robustlink Central Manager User Guide
RobustLink’s Web in item “Password” --> click to enable data forwarding in item “Data Forwarding Enable”.
Note:
Address: This address is RobustLink’s IP address, which should be a public IP address or domain name. For
example, 113.113.49.201, the address of USB dongle we use for test in this document.
Port: This port number is the local port number of Agent Server (default port number is 31000), and then
enter this number in this field. If Agent Server’s port number is changed to another port number basing on
the real application, 11021 for example, please enter 11021 in this field. Then go to xampp folder and find
out file “RobustLink_start.bat” -> right click and select “edit” --> change line 7 “RobustLink.exe” to
“RobustLink.exe -p 11021” --> save and quit.
Password: This password is configured in the RobustLink. This item shall be same with the password set in
the RobustLink. Please refer to section 3.3 CONFIGURATION -> Basic Setting -> Device Login Password.
Device ID: This item let you know the default single ID number of M1000 Pro V2, can’t be changed.
Data Forwarding Enable: Click to enable data forwarding, the topology is: data from M1000 Pro V2 (TCP
client) --> RobustLink (TCP server) --> another TCP Client. At this time tab “Connection”--> “Socket
Application” can’t be configure. If you disable this tab, data will not be forwarded via RobustLink, they will
be sent normally as you set in tab “Connection”--> “Socket Application”. But RobustLink still can manage and
monitor the status of M1000 Pro V2. Whether Data Forwarding should be enabled depends on customer
(user). “Data Forwarding Enable” will be enabled for instruction in this document.
11. Go to tab “Status” --> go to item “TCP/IP”, if succeed to establish PPP connection and TCP connection, “PPP
Status” will show “Up” and “TCP Status” will show “Connected”.
RT_UG_RobustLink_v.1.0.0 12.12.2013 26 / 43
Confidential
Page 27

Robustlink Central Manager User Guide
12. Other tabs stay default. Click “Write” to save the settings --> click “Reboot”.
13. Switch to Normal Mode (data transmission mode).
14. If M1000 Pro V2 login RobustLink successfully, it will show the following diagram.
15. If click the any place of Index 1, it will show the status information of M1000 ProV2.
4.2.2. Forward data from M1000 Pro V2 to RobustLink
1. Open RobustLink, go to tab “CONFIGURATION” --> “Basic Settings” --> click “Enable Data Forwarding”--> click
“Apply” to activate these settings.
RT_UG_RobustLink_v.1.0.0 12.12.2013 27 / 43
Confidential
Page 28

Robustlink Central Manager User Guide
2. Go to tab “CONFIGURATION”--> “Data Forwarding”.
3. Click the any place of Index 1, show details of Data Forwarding information. Set an idle port number, for example
22233. Then click “Apply”.
Note: Now RobustLink agent has become a TCP server, IP address is 113.113.49.201, local port number is 22233.
RT_UG_RobustLink_v.1.0.0 12.12.2013 28 / 43
Confidential
Page 29

Robustlink Central Manager User Guide
4. Run Hercules (download via link http://www.hw-group.com/products/hercules/index_en.html ) --> go to tab
“TCP Client” --> enter IP address and Port number of above TCP server which has been created in RobustLink -->
click “Connect”. If succeed to connect to the TCP Server, in this document, it will show up message
“Connecting to 113.113.49.201 …
Connected to 113.113.49.201”.
5. Run Terminal exe (download via link https://www.box.com/s/67a68jraki9k1r0lijuz) --> select the same serial port
settings of M1000 Pro V2: COM 1, Baud Rate 115200, Data Bits 8, Parity none, Stop Bits 1, Handshaking none -->
click “Connect” --> enter characters like “123456” --> click “Send”.
RT_UG_RobustLink_v.1.0.0 12.12.2013 29 / 43
Confidential
Page 30

Robustlink Central Manager User Guide
6. Check Hercules, if data “123456” shows up, that means RobustLink succeed to forward data “123456” sent from
M1000 Pro V2.
RT_UG_RobustLink_v.1.0.0 12.12.2013 30 / 43
Confidential
Page 31

Robustlink Central Manager User Guide
7. Enter characters “Hello” in Hercules --> click “Send”.
8. Check Terminal.exe, if data “Hello” shows up, that means RobustLink succeed to forward data “Hello” which is
sent from Control Center.
RT_UG_RobustLink_v.1.0.0 12.12.2013 31 / 43
Confidential
Page 32

Robustlink Central Manager User Guide
4.3. Manage R3000 via RobustLink
4.3.1. Connect to RobustLink
There are two ways for R3000 to connect to RobustLink, one is R3000 connect to Internet through cellular network
(GPRS), then connect to RobustLink; the other is to connect to Internet through Ethernet (broadband), then connect
to RobustLink. In this document we use the first method.
1. Login RobustLink Web GUI, go to tab “ADMINISTRATION” -> “Device Register”, click “Export” to export register
file: device_register.xls.
2. Open device_register.xls, enter SN number of R3000 in tab “Device ID” and R3000 in tab “Device Type”, and then
save this file. Section 3.15 -> “Export” will show how to find SN number of R3000.
Note: In tab “Device Type”, make sure R3000 is entered, any other format like R 3000 or r3000 will be
unavailable.
3. Click tab “Browse” and import file device_register.xls which you have filled in “Device ID” and “Device Type” of
R3000.
RT_UG_RobustLink_v.1.0.0 12.12.2013 32 / 43
Confidential
Page 33

Robustlink Central Manager User Guide
4. Click “Batch Register”.
5. Regarding of R3000, Install an antenna, insert SIM card into one of the card slot. Power on R3000, login R3000’s
Web GUI page.
RT_UG_RobustLink_v.1.0.0 12.12.2013 33 / 43
Confidential
Page 34

Robustlink Central Manager User Guide
6. Go to tab “Configuration”--> “Cellular WAN” --> enter relevant correct ISP settings --> click “Apply”.
7. Go to tab “Configuration”--> “RobustLink” --> enter server (RobustLink) address and local port in the item
“Server Address” and “Port”. If you want set a login password for RobustLink, go to item “Password”, enter a
password which is preseted in the RobustLink. For example, if RobustLink set password “1234”, we need to enter
“1234” in here --> click “Apply” --> click “Save” --> click “Reboot”.
Note:
Server Address: This address is RobustLink’s IP address, which should be a public IP address or URL. For
example, 113.113.49.201, the address of USB dongle we use for test in this document.
Port: This port number is the local port number of Agent Server (default port number is 31000), and then
RT_UG_RobustLink_v.1.0.0 12.12.2013 34 / 43
Confidential
Page 35

Robustlink Central Manager User Guide
enter this number in this field.
If Agent Server’s port number is changed to another port number basing on the real application,
11021 for example, please enter 11021 in this field. Then go to xampp folder and find out file
“RobustLink_start.bat” -> right click and select “edit” --> change line 7th “RobustLink.exe” to
“RobustLink.exe -p 11021” --> save.
Password: Enter the password which set in the RobustLink. Please refer to section 3.3 CONFIGURATION ->
Basic Setting -> Device Login Password.
8. If R3000 login RobustLink successfully, it will show the following diagram.
9. If click any place of Index 1, it will show the status information of R3000.
4.3.2. Forward data from R3000 to RobustLink
1. Before forwarding data from R3000 via RobustLink, please check section 4.3.1 Connect to RobustLink, configure
settings such as “Cellular WAN” and “Portal” to confirm R3000 can successfully connect to RobustLink. After that,
RT_UG_RobustLink_v.1.0.0 12.12.2013 35 / 43
Confidential
Page 36

Robustlink Central Manager User Guide
go to tab “Configuration” --> “Serial” --> “RS232” --> “Protocol Settings” --> “Protocol”, select “Transparent Over
Rlink”. Other settings such as “Interval Timeout” and “Serial Port Settings” stay default --> click “Apply” --> click
“Save” --> click “Reboot”.
2. Open RobustLink, go to tab “Home”, confirm R3000 (device number is 300513060001) has logged in RobustLink.
3. Go to tab “CONFIGURATION” --> “Basic Settings” --> click “Enable Data Forwarding”--> click “Apply” to activate
these settings.
RT_UG_RobustLink_v.1.0.0 12.12.2013 36 / 43
Confidential
Page 37

Robustlink Central Manager User Guide
4. Go to tab “CONFIGURATION”--> “Data Forwarding”.
5. Click any place of Index 1, show details of Data Forwarding information. Set an idle port number, for example
22222. Then click “Apply”.
Note: Now RobustLink agent has become a TCP server, IP address is 113.113.49.201, local port number is 22222.
RT_UG_RobustLink_v.1.0.0 12.12.2013 37 / 43
Confidential
Page 38

Robustlink Central Manager User Guide
6. Run Hercules (download via link http://www.hw-group.com/products/hercules/index_en.html ) --> go to tab
“TCP Client” --> enter IP address and Port number of above TCP server which has been created in RobustLink -->
click “Connect”. If succeed to connect to the TCP Server, in this document, it will show up message
“Connecting to 113.113.49.201 …
Connected to 113.113.49.201”.
7. Run Terminal exe (download via link https://www.box.com/s/67a68jraki9k1r0lijuz) --> select the same serial
port settings of R3000: COM 1, Baud Rate 115200, Data Bits 8, Parity none, Stop Bits 1, Handshaking none -->
click “Connect” --> enter characters like “123456” --> click “Send”.
RT_UG_RobustLink_v.1.0.0 12.12.2013 38 / 43
Confidential
Page 39

Robustlink Central Manager User Guide
8. Check Hercules, if data “123456” shows up, that means RobustLink succeed to forward data “123456” sent from
R3000.
9. Enter characters “Hello” in Hercules --> click “Send”.
RT_UG_RobustLink_v.1.0.0 12.12.2013 39 / 43
Confidential
Page 40

Robustlink Central Manager User Guide
10. Check Terminal.exe, if data “Hello” shows up, that means RobustLink succeed to forward data “Hello” which is
sent from Control Center.
RT_UG_RobustLink_v.1.0.0 12.12.2013 40 / 43
Confidential
Page 41

Robustlink Central Manager User Guide
Chapter 5. Troubleshooting
5.1. Troubleshooting for installing RobustLink
This section will help user to find out solutions when encounter problems in the process of installing RobustLink. For
Windows XP system, pals check as follow the steps below.
1. Check if file xampp.rar has been extracted to computer’s root directory. For example, if you extract xampp.rar to
C hard dish, it should show the following diagram.
2. Normally port number of Apache is 80 or 443; port number of MySQL is 3306. If these ports have been used by
other services, when you click “Start” to start Apache, error information will show up in red. There are two
methods to solve above issue: one is to close those services, and the other is to change the port numbers of
Apache and MySQL. We suggest user use the first method.
RT_UG_RobustLink_v.1.0.0 12.12.2013 41 / 43
Confidential
Page 42

Robustlink Central Manager User Guide
3. Go to these steps to close those services who occupy port number “80”, “443”, “3306”.
Click “Start” --> click “Run” --> enter “cmd” and click “OK” --> enter “netstat -ano”. In the follow screenshot
we can find out PID 3424 has occupied port 80 and 443.
Open “Tab Manager” (also you can use shortcut keys: Shift+Ctrl+Esc), click “Process” --> click “View”
-->select “Select Columns” --> enable “PID (Process Identifier)” --> click “OK”.
Look for PID 3424. In this document, we find service Skype.exe has occupied port 80 and 443. Select
“Skype.exe”, Click “End Process” to end service Skype.exe.
4. If you do not want to close the service which occupies port 80, 443, or 3306, we can change these port numbers
of Apache and MySQL to others. For example, change port 80 to 8080 and change 443 to 4433. Please do
RT_UG_RobustLink_v.1.0.0 12.12.2013 42 / 43
Confidential
Page 43

Robustlink Central Manager User Guide
following steps to modify these port numbers.
If xampp.rar extracted to C hard dish, please try to find file: httpd.conf via route C:\xampp\apache\conf and
file: httpd-ssl.conf via route C:\xampp\apache\conf\extra. You can select notepad to open these two files.
Open httpd.conf, search “Listen 80”, then change “80” to “8080” (or other idle port numbers) --> Save;
Open httpd-ssl.conf, search “Listen 443”, then change “443” to “4433” (or other idle port numbers) -->Save;
After above modification, please add the port number at the end of IP address. For example, enter:
http://127.0.0.1:8080 in the address bar
5. Click “Start” to start both “Apache” and “MySQL” again.
RT_UG_RobustLink_v.1.0.0 12.12.2013 43 / 43
Confidential
 Loading...