

Robot Coupe R502X Service Manual

OPERATION MANUAL
FOR
Models
R502 Series E
Serial Numbers: 537xxxxx03
and
R602 Series E
Serial Numbers: 540xxxxx03
Also includes submodels R502Y,
R602Y, R502X and R602X
I. INTRODUCTION
II. ASSEMBL Y/DISASSEMBL Y INSTRUCTIONS
III. OPERA TING INSTRUCTIONS
IV . PREVENTIVE MAINTENANCE GUIDE
V . TROUBLE SHOOTING AIDS
VI. SERVICE AGENCY LISTING
PARTS DRA WINGS & P ART LISTS
ELECTRICAL SCHEMA TICS
SERVICE AGENCY LIST
robot coupe U.S.A., Inc.
P.O. Box 16625, Jackson, MS 39236-6625 264
South Perkins St., Ridgeland, MS 39157
email: info@robotcoupeusa.com
website: www.robotcoupeusa.com
1-800-824-1646
August 2009
IMPORTANT NOTICE
3-PHASE MOTORS
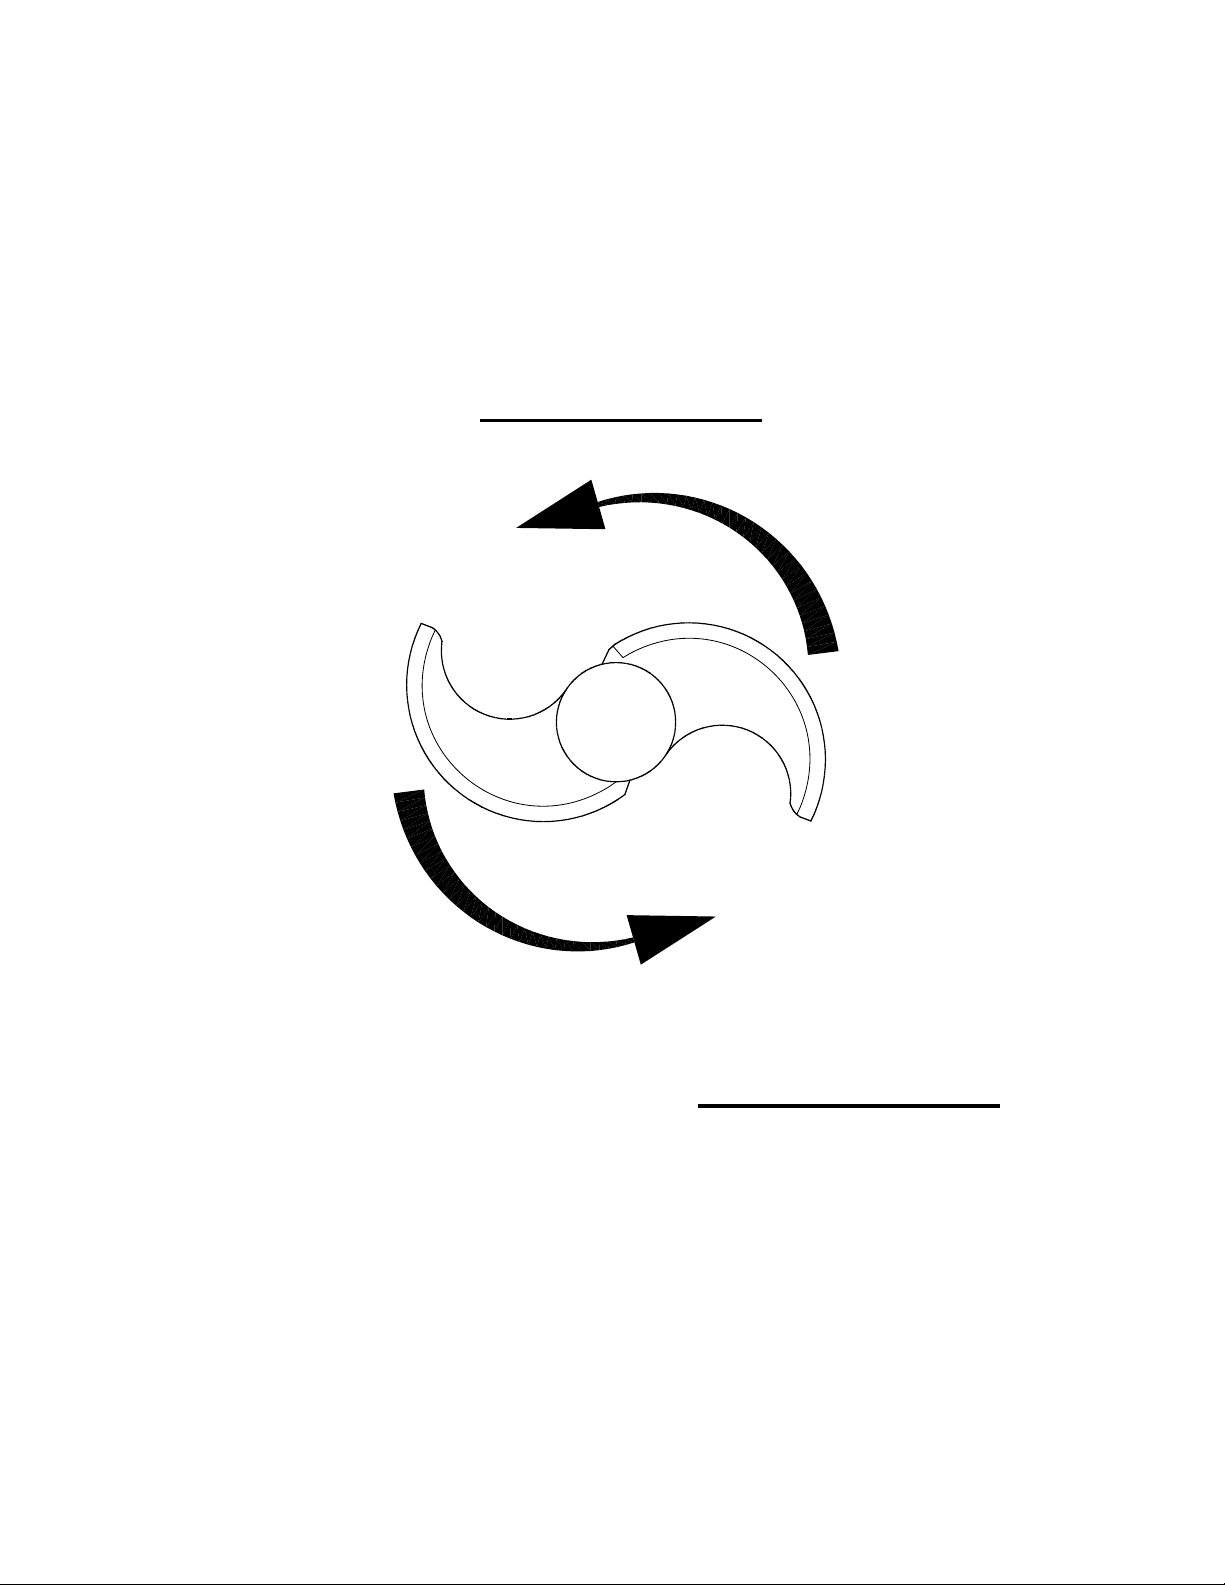
DRIVE SHAFT ROTATION
R502 and R602 Operation Manual
Series E versions
Three phase motors may rotate either direction.
The required motor rotation is counterclockwise.
Check the rotation before attaching the cutter blades.
Changing the motor rotation requires a qualified electrician.
Also, see the note attached to the end of the power cord.
2

R502 and R602 Operation Manual
Series E versions
CAUTION:
Always connect the Robot Coupe to a grounded
outlet with Ground fault circuit interrupter
(GFCI) protection device.
Disconnect the machine from the power outlet
when not in use and when cleaning or servicing the unit.
Machine must be operated and stored in a location not subject to water drips or spray or
explosive vapors.
The machine must not be modified in any way
from its original configuration.
Should the machine malfunction or should any
part be damaged, it must not be operated until
it is repaired by a qualified technician using only
genuine Robot Coupe® repair parts.
Operating times of 5 minutes or longer can
cause processed food to increase to temperatures above 125 F.
Failure to follow operating instructions or attempts to operate the machine outside its design limits may create a hazardous condition
that could damage the machine and /or injure
users.
I. INTRODUCTION
The Robot Coupe commercial food processor performs a host
of culinary feats. It is specifically designed for high speed and
quality vegetable processing. The Robot Coupe also provides
a wealth of safety and operating features to make volume food
preparation a pleasure rather than a chore.
This operators manual is broken down into sections giving
you detailed instructions for assembly and operation of the
continuous feed attachment and the cutter bowl attachment.
Close attention should be paid to all instructions in this manual
to ensure a long life and safe utilization of your food proces-
sor.
This manual should be kept within easy access
to all users for reference, and should be read
completely by all first time users of the machine.
CAUTION: Y our Robot Coupe comes with sharp
cutting blades and or, cutting “Discs”. Always
handle with safety in mind. Always wear a pair
of cut-resistant gloves when handling any cutting discs or blades.
Never put nonfood items in the machine.
NOTICE: If the machine fails to operate as described in this manual, or if the machine malfunctions in any way , remove the machine from
use and have it serviced. Additionally, discard
all food processed at the time of the malfunc-
tion.
The machine must be operated on a clean sturdy
counter or table. Keep the area around and
under the machine clear to allow air circulation.
Otherwise, the motor can overheat.
Machine Specifications:
Models R502 and R602 are equipped with 2 speed motors that
plug into a standard 208/240 volt 60 Hz 3 phase power outlet.
The full load amperage rating is 2.6 amps on low speed and 2.8
amps on high speed. The machines are supplied with stainless steel bowls: the R502 with a five quart and the R602 having a 7 quart bowl. Both machines are supplied with s-blade
and clear polycarbonate cover. The machines are supplied
with a continuous feed attachment and 2 cutting discs as
standard equipment. Additional cutting discs are available as
optional equipment.
3
R502 and R602 Operation Manual
Series E versions
II. ASSEMBLY / DISASSEMBLY
INSTRUCTIONS
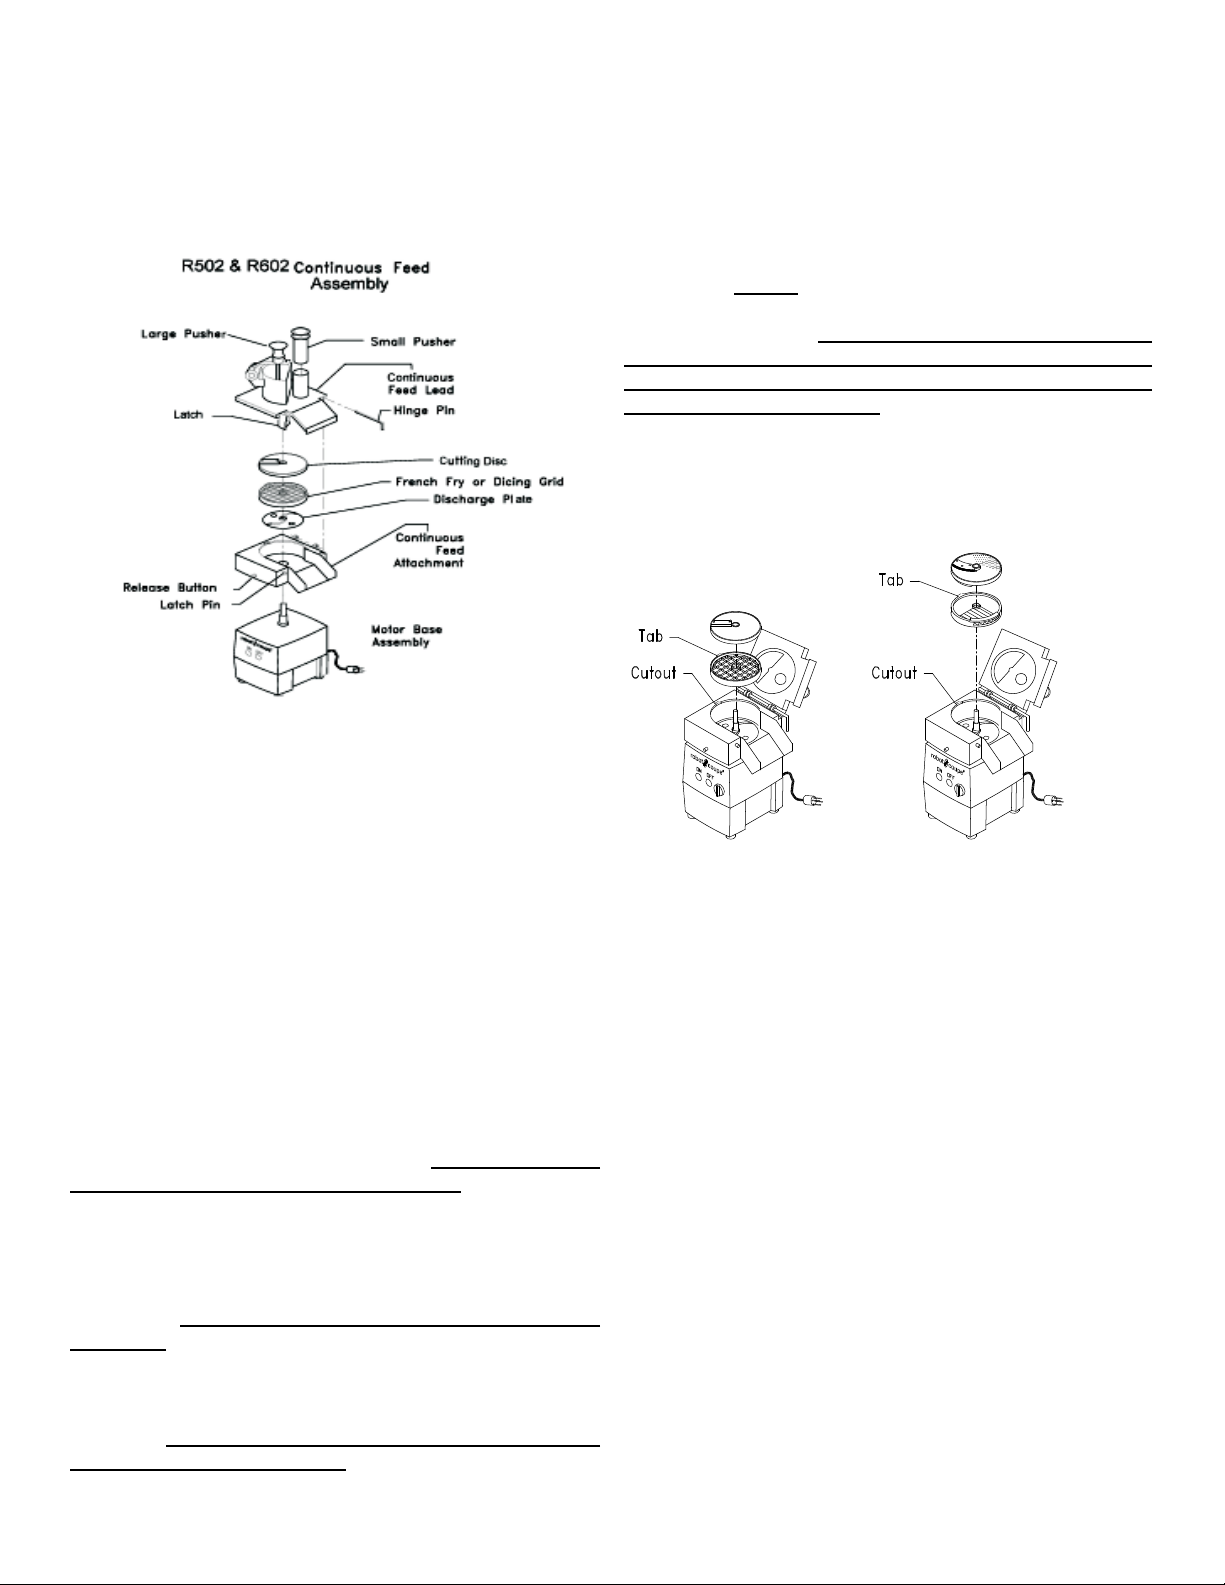
A. Assembling the Continuous Feed
Attachment
and clean so the grid can be firmly seated. The discharge
plate must be in the machine or the product will not exit.
With the tab on the plastic grid aligned with the cutout in the
Continuous Feed Attachment, place the plastic grid onto the
recessed rim of the Continuous Feed Attachment. Put the
appropriate slicing plate on top of the dicing grid with the stem
of the plate DOWN. NOTE: Only those slicing plates designed with a locking “L” shape slot can be used in conjunction with a dicing grid. Never attempt to use a “regular” slicing
disc (1mm, 2mm, 3mm) in conjunction with a dicing grid as it
may cause damage to the continuous feed lead and/or the
pusher (see chart on page 7). Rotate the disc until the cutout
in the stem drops into place on the motor shaft pin. Continue
rotating the disc a full turn. If rubbing occurs,
DO NOT PROCEED-call your service agency .
French Fry Combination
Dicing Combination
Assembly
Assembly
ALWAYS UNPLUG THE CORD DURING
ASSEMBL Y AND DISASSEMBL Y
STEP #1 Place the motor base assembly at a comfortable
height on a sturdy work surface. Remove the plastic discharge
plate from inside the continuous feed attachment. Place the
continuous feed attachment on the motor base with the release button at front center of the motor base assembly . Rotate the attachment counterclockwise until it locks into place
with a snap action. When the attachment is in the proper
position, it should be level with the top surface of the motor
base assembly. NOTE: The machine will not operate correctly unless the continuous feed attachment is fully seated
and secured in place.
STEP #2 Place the discharge plate on the motor shaft with
the appropriate side up. Use the side with the small straight
fins for all julienne cuts or other delicate cuts. The large finned
side may be used for dicing or shredding. The product will not
exit the machine without the discharge plate.
Warning Wear cut-resistant gloves when
handling the cutting plates or the blade.
STEP #3 IF YOU ARE PREPARING TO SLICE OR
JULIENNE: Place the plate of your choice on the motor shaft
and turn clockwise until it drops into place and is fully seated.
The top of the plate should be just above the surface of the
continuous feed attachment.
STEP #4 IF YOU ARE PREPARING TO DICE OR USE A
FRENCH FRY COMBINATION: NOTE: The recessed rim
on the continuous feed attachment must be free from product
STEP #5 Place the continuous feed lead on the continuous
feed attachment and secure in place with the holding pin. The
lead should fit flush on the continuous feed attachment.
B. Disassembly of the continuous feed
attachment
STEP #1 Turn the unit off and unplug the power cord from
the wall outlet.
STEP #2 Pull out the hinge pin from continuous feed lead
and lift the latch at upper right front of machine and remove
the continuous feed lead.
STEP #3 Remove the cutting disc. Wear cut-resistant gloves.
Rotate the disc slightly counterclockwise, then lift up and off of
the motor shaft. Remove the dicing or French fry grid (if any)
then, lift out the plastic discharge plate.
STEP #4 Press the release button on the continuous feed
attachment and at the same time turn the continuous feed
clockwise . The continuous feed releases and can be lifted
off over the motor shaft.
4
R502 and R602 Operation Manual
Series E versions
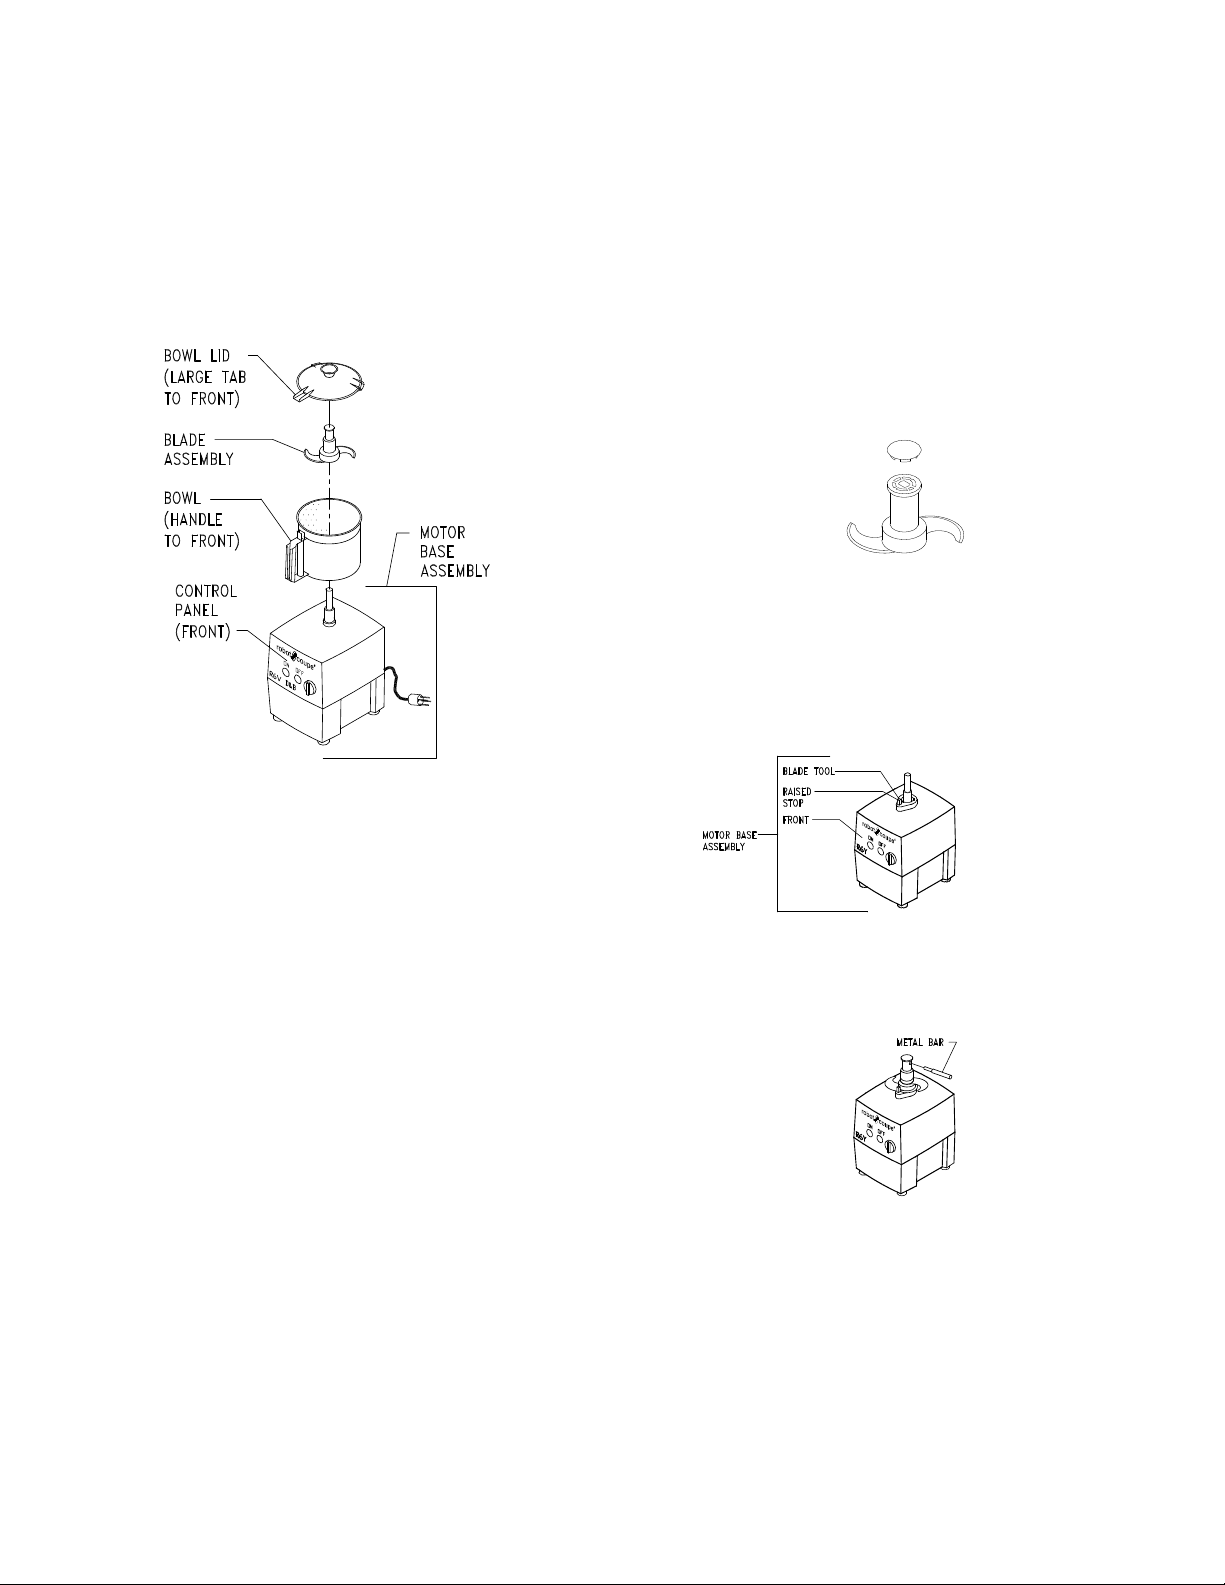
C. Assembling the Cutter Bowl Attachment
1. The cord should always be unplugged during assembly
and disassembly .
2. With the handle turned to the front, put the bowl down on
the motor base. Turn the bowl handle to the lef t of center
and the bowl should drop into place level with the top of the
motor base.
E. Blade Assembly / Disassembly
The blade should be disassembled and cleaned at least
once a day and after each day’s use.
R502 Blade:
1. Unplug the cord and wear cut-resistant gloves!
2. There is a removable cap in the top of the Blade. The cap
should be removed before cleaning. T o remove the cap, push
a long blunt object such as a screwdriver, through the bottom
of the blade, and knock out the top cap.
R602 Blade:
1. Unplug the cord and wear cut-resistant gloves!
2. Locate the blade tool shipped with your machine and put
it down over the motor shaft with the raised stop facing the
front of the machine.
3. Turn the handle back to the right until it comes to a stop
and is centered with the front of the motor base.
4. Put the blade on the motor shaft and turn until it drops
into place. The bottom blade should be parallel to and
almost touching the bottom of the bowl.
5. With the long tab on the bowl lid turned to the left of
center, put the lid on the bowl and turn counterclockwise
until it stops. The long tab should be centered over the
bowl handle.
6. DO NOT OPERA TE THE MACHINE UNLESS IT IS
PROPERLY ASSEMBLED AND THE LID IS FULLY
SEA TED AND CENTERED OVER THE BOWL!
D. Disassembly of the cutter bowl attachment.
STEP #1 Turn the machine OFF and UNPLUG it.
STEP #2 Rotate bowl lid clockwise and lift off.
STEP #3 Remove the blade assembly.
STEP #4 Locate the release trigger on the lower back portion
of the bowl handle. Pull the trigger and, at the same time,
turn the bowl clockwise and lift free.
3. Put the blade on the motor shaft so that the center of the
blade assembly rests flat on the blade tool. Insert the metal
bar into one of the holes in the blade cap.
4. Turn the blade cap clockwise to tighten or counterclockwise to loosen. The bottom blade should hit the stop on the
blade tool which prevents the assembly from turning. Do
not overtighten.
Continued next page
5
R502 and R602 Operation Manual
Series E versions
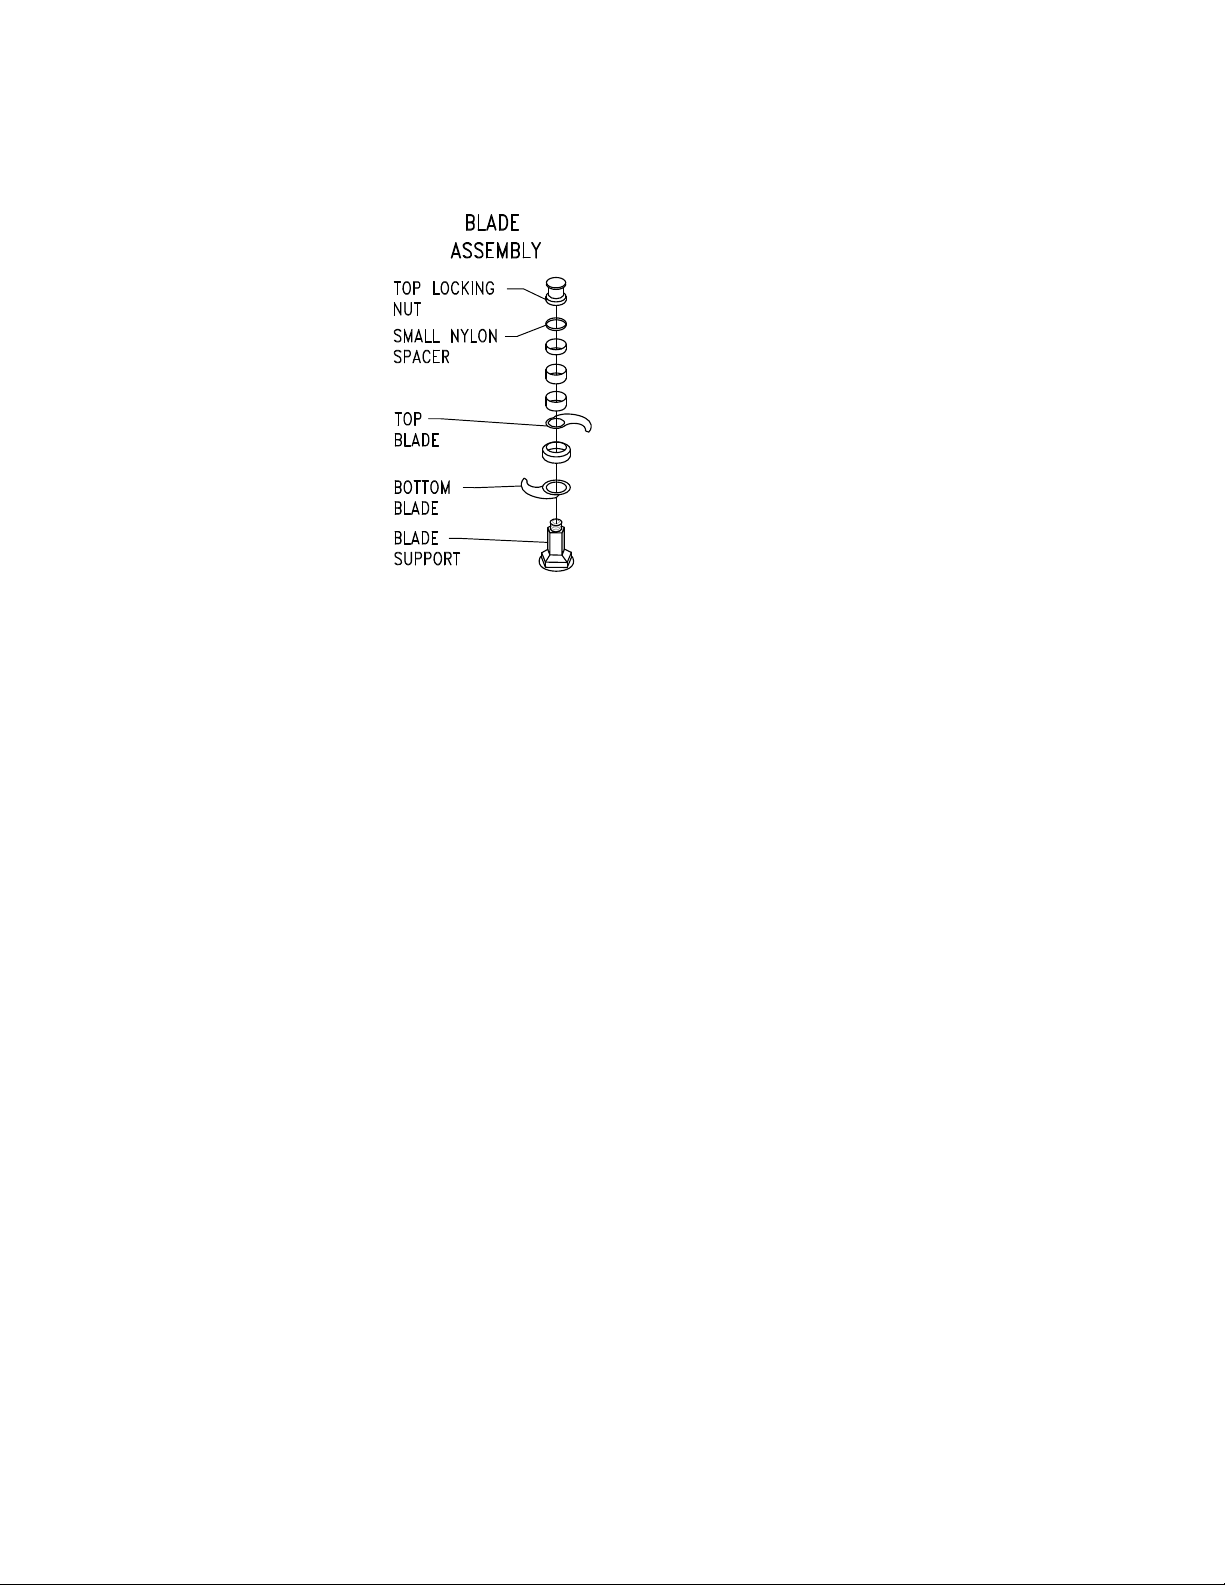
5. Assemble the blades as shown, with the small nylon
spacer directly under the top locking nut. The blades
should be installed beveled side up. The correctly assembled
blade looks like the letter “S”.
THE BLADE ASSEMBLY
SHOULD BE TAKEN
AP ART AND CLEANED
AT LEAST ONCE A DAY.
APPLY SOME FOODGRADE GREASE OR OIL
TO THE R6N ASSEMBLY
TO EASE DISASSEMBLY.
III. OPERATING INSTRUCTIONS
A. Operation of the Continuous Feed Attachment
THE UNIT SHOULD BE IN THE OFF POSITION EXCEPT
WHEN PROCESSING IS UNDERWAY. It is recommended
that the machine be operated on a 50% duty cycle. This is
easily accomplished since the preparation time (cleaning, coring, peeling, and loading) takes longer than the processing
time.
If necessary , cut products to fit the chosen opening. Use the
small round opening for (carrots, cucumbers, etc.).
Always use the food pushers to force the product through the openings.
DO NOT attempt to run frozen products through
the cutting plates.
(1) Slicing Operation:
The vegetables must be prepared so that they will fit into the
chosen entry port. Produce such as carrots, cucumbers, etc.,
should be “squared” at both ends. This will provide a consistent slice throughout the whole product. Remove the core
from cabbage and lettuce and cut into halves or thirds to fit in
the large entry port.
(2) Grating Operation:
Veget ables must be prepared so that they will fit into the chosen entry port.
Use cold cheese and apply a fine coating of cornstarch before
grating to keep the finished product from sticking together.
The cornstarch will not be visible and is tasteless. Grating
cheese can cause overheating of the motor if not grated in the
recommended manner. It is recommended that a slight pulsating pressure be applied with the pusher, alternating slight
pressure then no pressure. Prepare the cheese in volumes
that will permit motor cool down time during long production
runs.
(3) Dicing Operation: The dicing operation requires that product be sliced both horizontally and vertically . The smaller the
dice required, the more difficult the cut is to achieve. Soft or
juicy produce will tend to mush if the dice is too small or the
produce is too soft.
Do not attempt to dice meats or cheeses.
Damage could occur to the blades and/or the motor that will
not be covered under warranty .
Constant pressure with the pusher will yield a consistent output. More pressure will increase the thickness of the product,
while light pressure will result in a thin product. If no pressure
is applied, the result is sometimes inconsistent. When the
pusher comes to a stop, push the off button and reload the
entry port.
Note: Application of too much pressure will
increase the motor load without increasing the
amount of product being cut.
DO NOT remove the continuous feed lead when
the motor is running. Wait until the motor has
come to a full stop.
DO NOT put anything other than food products
inside the entry or exit port.
During the dicing operation, attention should be given to the
finished product. A visible change in the product will occur
when the dicing grid requires cleaning eg., more liquid. The
best way to clean the grid is to remove it from the machine
and force any produce on the grid through with a stiff bristle
brush.
(4) Julienne Operation: Insertion of the product to be cut must
be horizontal if a long “stick” is to be achieved, e.g. julienne
zucchini for sauté. Vertical insertion will result in finely chopped
products, e.g. celery. A finely chopped onion product may
also be obtained with this operation by quartering the food
and letting it gravity feed.
Do not attempt to julienne meats or cheeses.
6
 Loading...