


R6VN series D Operation Manual
OPERATION MANUAL
FOR
MODEL
R6VN SERIES D
I.INTRODUCTION
II.ASSEMBLY/DISASSEMBLY INSTRUCTIONS
III.OPERATING INSTRUCTIONS
IV. |
PREVENTIVE MAINTENANCE GUIDE |
V.TROUBLE SHOOTING AIDS
VI. |
SERVICE AGENCY LISTING |
robot coupe U.S.A., Inc.
P.O. Box 16625, Jackson, MS 39236-6625 280 South Perkins St., Ridgeland, MS 39157 email: robocoup@misnet.com
website: www.robotcoupeusa.com
1-800-824-1646

R6VN series D Operation Manual
R6VN series D Operation Manual
I. INTRODUCTION
The Robot Coupe commercial food processor performs a host of culinary feats. It is specifically designed for high speed and quality vegetable processing. The Robot Coupe also provides a wealth of safety and operating features to make volume food preparation a pleasure rather than a chore.
The operators’ manual is designed to guide the user through the simple steps of use for a safe, long life utilization.
The manual should be read completely by the operator before any attempt is made to use the machine. Also, the manual should be referred to any time there is a question on operation.
Your Robot Coupe comes with sharp cutting blades and or, cutting “plates”. Always handle with safety in mind. We suggest that a pair of cutting gloves be worn when handling any plates or blades. Also, never put your fingers inside of the bowl or feed lead openings.
If the machine fails to operate as described in this manual, or if the machine malfunctions in any way, remove the machine from use and have it serviced. Additionally, discard all food processed at the time of the malfunction.
Page 1
R6VN series D Operation Manual
II.ASSEMBLY / DISASSEMBLY INSTRUCTIONS
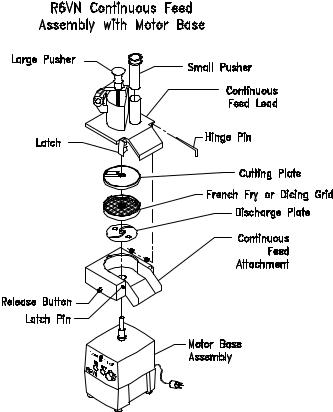
A.Assembling the Continuous Feed Attachment
STEP #1 Unplug the machine. Place the motor base assembly at a comfortable height on a sturdy work surface. Remove the plastic discharge plate from inside the continuous feed attachment. Place the continuous feed attachment on the motor base with the release button at front center of the motor base assembly. Rotate the attachment counterclockwise until it locks into place with a snap action. When the attachment is in the proper position, it should be level with the top surface of the motor base assembly. NOTE: The machine will not operate correctly unless the continuous feed attachment is fully seated and secured in place.
STEP #2 Place the discharge plate on the motor shaft with the appropriate side up. Use the side with the small straight fins for all julienne cuts or other delicate cuts. The large finned side may be used for dicing or shredding. The product will not exit the machine without the discharge plate.
STEP #3 IF YOU ARE PREPARING TO SLICE OR JULIENNE: Place the plate of your choice on the motor shaft and turn clockwise until it drops into place and is fully seated. The top of the plate should be just above the surface of the continuous feed attachment.
Page 2
R6VN series D Operation Manual
Warning Wear cutting gloves when handling the cutting plates or the blade.
STEP #3 IF YOU ARE PREPARING TO SLICE OR JULIENNE: Place the plate of your choice on the motor shaft and turn clockwise until it drops into place and is fully seated. The top of the plate should be just above the surface of the continuous feed attachment.
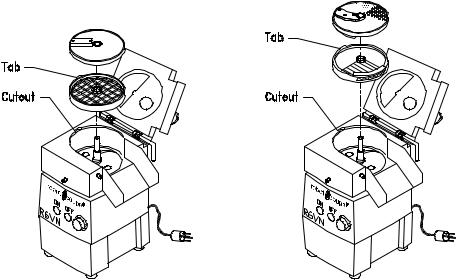
STEP #4 IF YOU ARE PREPARING TO DICE OR USE A FRENCH FRY COMBINATION: NOTE: The recessed rim on the continuous feed attachment must be free from product and clean so the grid can be firmly seated. The discharge plate must be in the machine or the product will not exit.
With the tab on the plastic grid aligned with the cutout in the Continuous Feed Attachment, place the plastic grid onto the recessed rim of the Continuous Feed Attachment. Put the appropriate slicing plate on top of the dicing grid with the stem of the plate DOWN. NOTE: Only those slicing plates designed with a locking
“L” shape slot can be used in conjunction with a dicing grid. Never attempt to use a “regular” slicing plate (1mm, 2mm, 3mm) in conjunction with a dicing grid as it may cause damage to the continuous feed lead and/or the pushers. Rotate the plate until the cutout in the stem drops into place on the motor shaft pin. Continue rotating the plate a full turn. If rubbing occurs DO NOT PROCEED-call your service agency.
STEP #5 Place the continuous feed lead on the continuous feed attachment and secure in place with the holding pin. The lead should fit flush on the continuous feed attachment.
B. Disassembly of the continuous feed attachment
STEP #1 Turn the unit off and unplug the power cord from the wall outlet.
Step #2 Pull out the hinge pin from continuous feed lead and lift the latch at upper right front of machine. Remove the continuous feed lead.
Page 3

R6VN series D Operation Manual
Step #3 Remove the cutting plate. wise, then lift up and off of the motor shaft. plastic discharge plate.
Wear cutting gloves. Rotate the plate slightly counterclockRemove the dicing or French fry grid (if any) then, lift out the
Step #4 Press the release button on the continuous feed attachment and at the same time turn the continuous feed clockwise. The continuous feed releases and can be lifted off over the motor shaft.
C. Assembling the Cutter Bowl Attachment
D. Disassembly of the Cutter Bowl Attachment.
The blade should be disassembled and cleaned after each day’s use.
STEP #1 Turn the machine OFF and UNPLUG the power cord from the wall socket.
STEP #2 Rotate the bowl lid clockwise and lift off.
STEP #3 Firmly grasp the top of the blade assembly and lift up and off of the motor shaft.
STEP #4 Locate the release trigger on the lower back portion of the bowl handle. Pull the trigger and, at the same time, turn the bowl clockwise and lift free.
Page 4

R6VN series D Operation Manual
E. Blade Assembly/Disassembly
III.OPERATING INSTRUCTIONS
A.GENERAL OPERATION INSTRUCTIONS
The R6VN is a state-of-the-art processor. It utilizes state-of-the-art electronics to control and monitor the motor speed. This unit offers a infinitely variable speed ranging from 370 to 3000 revolutions per minute (RPM). This wide range of speed is used to match the product to be processed to the best cutting speed of the cutting blades. There are a few general rules which apply to speed control.
NOTE: This machine is equipped with manual reset thermal overload protection. If the machine is overloaded or run too long under heavy load conditions then the overload will trip. If this occurs, first remove the bowl and reduce the amount of food being processed. The reset button is located on the bottom right corner of the motor base. Press the button in to reset the overload protector.
BOWL ATTACHMENT: Generally, the medium high and high speeds will be used for the bowl operation. Medium high speed (1725 RPM) is used to chop products, and mix and knead dough and pastry. Also, the medium high speed is used as a first stage of reduction for a puree, sauce or other homogeneous mixture. As a general rule, the bowl should be operated using the medium high speed. Use higher speeds after the product has been reduced or mixed initially on the medium high speed.
Page 5
R6VN series D Operation Manual
Some applications, such as mixing dry powders, may require the use of lower speeds with the bowl attachments. However, a controlled chop and good puree will not be accomplished at the lower speeds with the bowl attachment.
The cutter bowl attachment is used for grinding, pureeing, blending, mixing, of ingredients.
With the power switch off and the bowl and blade secured in place (per previous instructions) you are now ready to add product to the bowl. There are two ways to run your machine. Chop by using a quick start/stop action or running continuously for a fine chop or puree. Most operations start by using the medium high speed (1725 RPM). Use this speed for chopping and general mixing requirements. Medium high is also used to initially reduce meats and vegetables prior to turning the machine to high speed. Some dough applications, like pie crust work best around 1100 RPM.
1.TO CHOP: To achieve a chopped consistency for vegetables, meats, cheese, etc.. Fill the bowl 2/3 to 3/4 full with chunks no larger than 1 to 2 inch square (1/4 full for meats, cheeses and very dense products). Start the machine allowing the machine to come up to speed then quickly press the stop switch. Continue this process until the desired consistency is reached. If the motor stalls, reduce the amount of product in the bowl.
2.TO PUREE OR FINE CHOP: For a fine puree , emulsification or fine chop fill the bowl 2/3 to 3/4 full with chunks no larger than 1 to 2 inches square. With the speed set at medium high, turn the machine on and allow to run a short time until the product is finely chopped, then increase to high speed to finish. High speed is only used to finish a product after it has been reduced at a lower speed. Some purees may require the addition of a liquid to obtain the correct consistency.
3.TO CHOP HARD CHEESE: Place uniform chunks of chilled cheese into the bowl and quickly press the on, then the off buttons. For powdered cheese, do the same, until the cheese is about pea size then allow the motor to run continuously until you have a fine powder.
4.TO CHOP ONIONS, CELERY, CABBAGE, ETC. Quarter onions, and cut other vegetables into 2 to 3 inch chunks. Place the product into the bowl up to 3/4 full and pulse the unit until you reach the desired consistency.
CAUTION: If you turn the unit on and let it run too long the bottom blade will puree the ingredients and the top blade will be of little value leaving an uneven consistency.
5. TO PUREE OR MIX: To puree, make sauces, or to mix and blend, place the ingredients into the bowl, turn the unit on and allow to run continuously.
DO NOT allow the machine to run unattended.
Page 6
 Loading...