

Page 1

OPERATION MANUAL
FOR
MODELS
R4Y Series A
Serial Numbers-R4YxxxxxxA
and
R6Y Series A
Serial Numbers-R6YxxxxxxA
robot coupe U.S.A., Inc.
P.O. Box 16625, Jackson, MS 39236-6625
280 South Perkins St., Ridgeland, MS 39157
email: robocoup@misnet.com
website: www.robotcoupeusa.com
1-800-824-1646
Page 2
R4Y and R6Y Series A
Operation Manual
I. INTRODUCTION
The Robot Coupe commercial food processor performs a host
of culinary feats. It is designed for high speed and quality
vegetable processing. The Robot Coupe will chop, grind,
puree, mix, or knead using the cutter bowl attachment.
This operators manual is broken down into sections giving
you detailed instructions for assembly and operation of the
continuous feed attachment and the cutter bowl attachment.
Close attention should be paid to all instructions in this manual
to ensure a long life utilization of your food processor.
This manual should be kept within easy access
to all users for reference, and should be read
completely by all first time users of the machine.
Maintaining the food processor in good working condition is
one of the most important measures to be taken. Inspect the
machine and all parts regularly to make sure they are in good
working condition.
I. INTRODUCTION
II. ASSEMBLY/DISASSEMBLY
INSTRUCTIONS
III. OPERATING INSTRUCTIONS
IV. PREVENTIVE MAINTENANCE
GUIDE
V. TROUBLE SHOOTING AIDS
VI. SERVICE AGENCY LISTING
DO NOT operate a machine that has malfunctioned in any way.
Discard any food processed at the time of a malfunction and have the machine inspected and repaired at
one of the Robot Coupe Authorized Service Agencies, a list is
provided in the back of this manual. Contact one of these
service agencies for all of your service, parts and accessory
requirements.
CAUTION: Your Robot Coupe comes with a
sharp cutting “S” blade. Always handle with
safety in mind. We suggest that a pair of cutresistant gloves be worn when handling the “S”
blade.
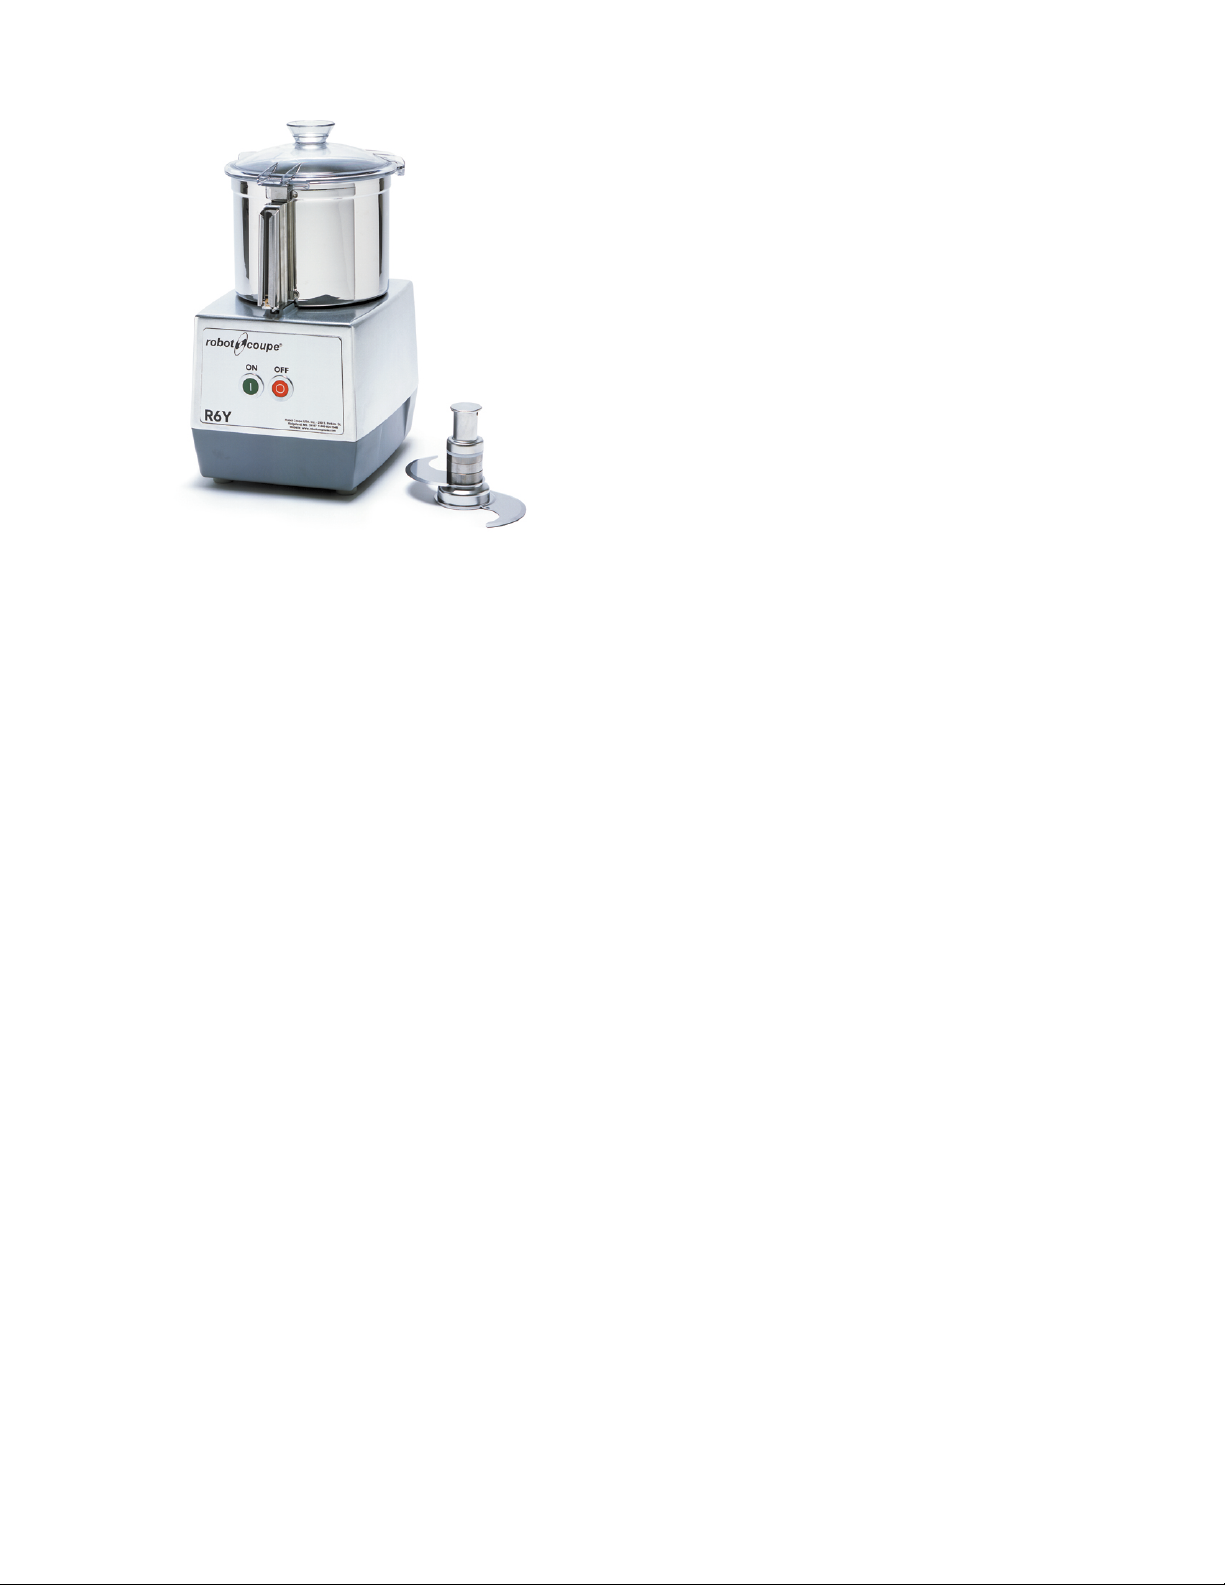
Machine Specifications:
The Models R4Y and R6Y are equipped with a high speed
motor generating 1 Hp which plugs into a standard 120 volt/
60 Hz, 15 amp power outlet. The full load amperage rating is
12 amps. The machines are supplied with a stainless steel
bowl. The R4Y has a 4 liter bowl and the R6Y has a 6 liter
bowl. The machines are supplied with S-blade and clear plastic cover. The machines are equipped with push type on/off
buttons.
Page 3
R4Y and R6Y Series A
Operation Manual
II. ASSEMBLY/DISASSEMBLY
INSTRUCTIONS
Your Robot Coupe should be placed on a sturdy work surface at a comfortable working height and have a standard 115 volt
power outlet available. Always keep the machine unplugged during assembly and disassembly.
A. CUTTER BOWL ATTACHMENT
ASSEMBLY INSTRUCTIONS
Illustration #1
Become familiar with the part names as you
assemble the unit.
Always use caution and wear cut-resistant
gloves when handling the blade.
Always unplug the machine during
assembly and disassembly.
Illustration #2
1. Unplug the machine.
2. Place the bowl on the motor base assembly with the
handle located just off center, and to the left, as you are
facing the front of the unit.
Bowl Lid
(large tab to
front)
Blade
Assembly
Bowl
Control Panel
(front)
Illustration
#1
Motor Base
Assembly
Illustration
2
3
#2
3. Then, turn the bowl back counterclockwise, locking it
in place.
Illustration #3
4. Place the blade on the motor shaft. Rotate the blade
until it falls into place on the motor shaft. The bottom
blade should be just off of and parallel with the bottom of
the bowl.
4
Illustration
#3
Page 4
R4Y and R6Y Series A
Operation Manual
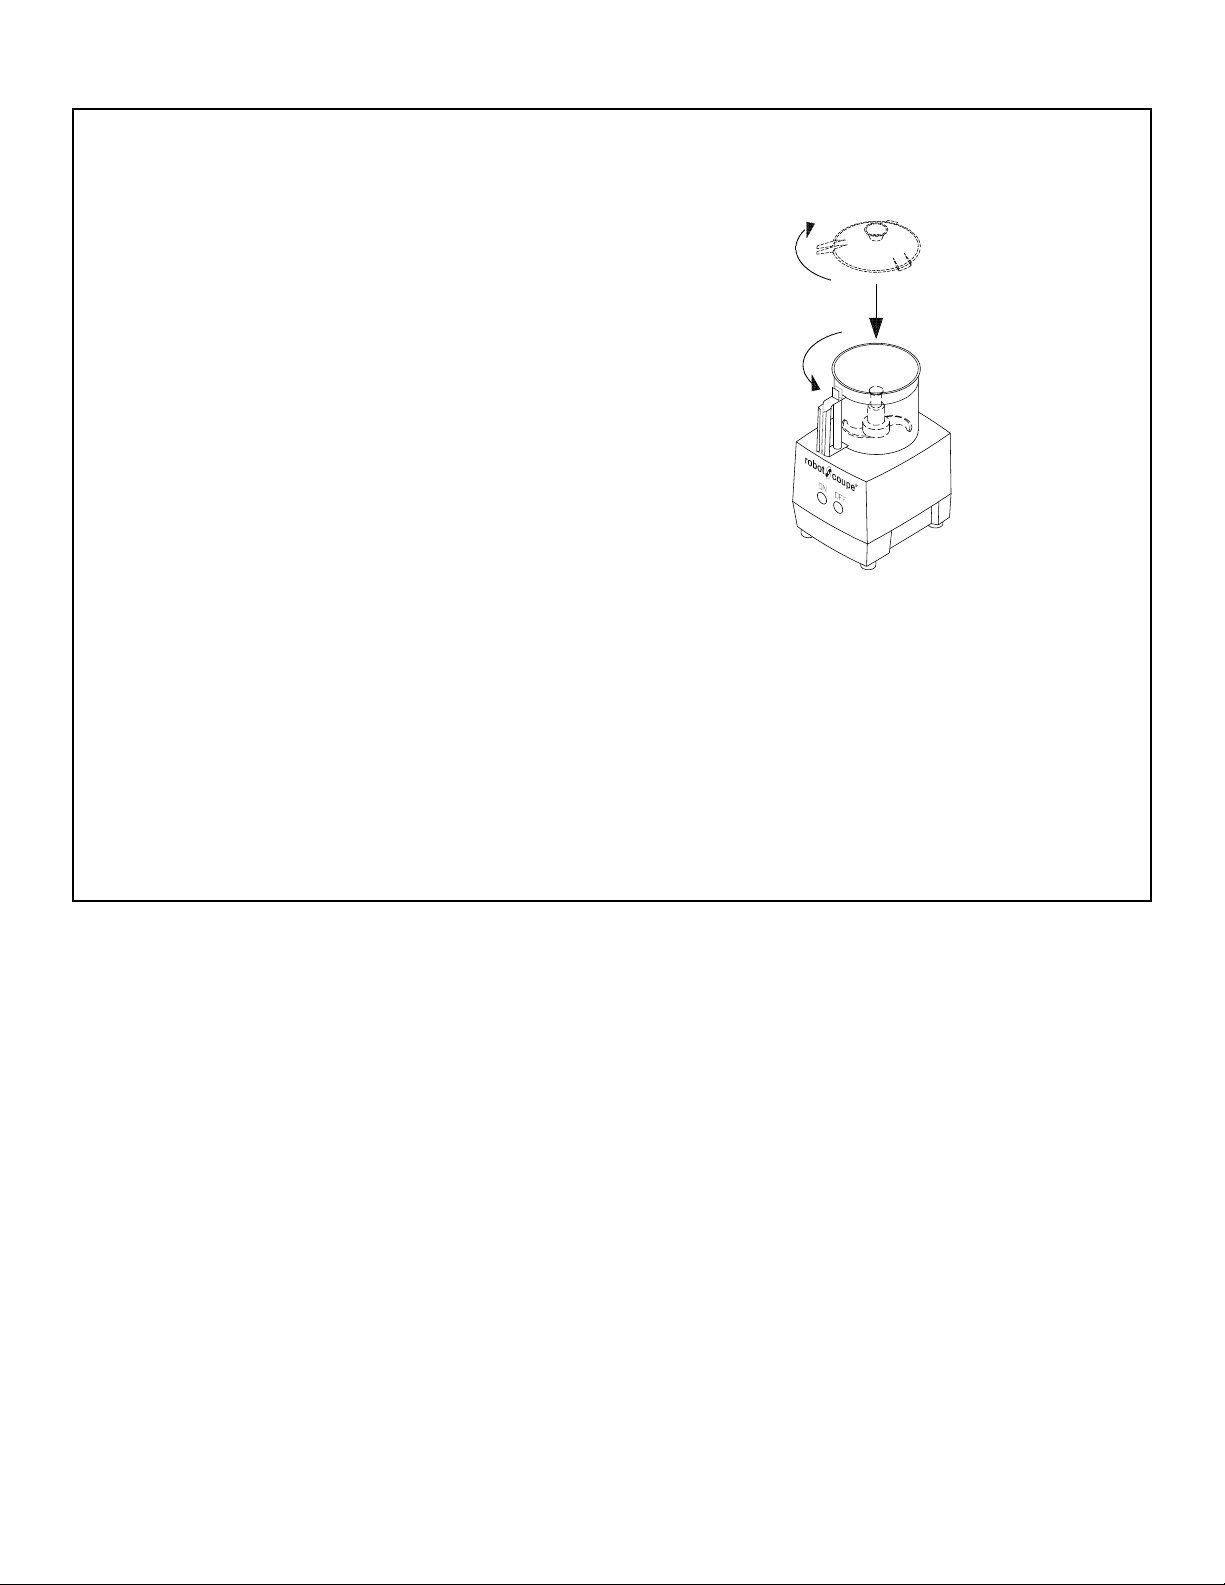
Illustration #4
5. Facing the front of the motor base assembly, place the lid
on the bowl with the long tab turned off-center and to the left.
6. Turn the lid back to the right (counterclockwise) until it
locks in place and the long tab is centered over the handle.
7. DO NOT OPERATE THE MACHINE UNLESS
IT IS PROPERLY ASSEMBLED WITH THE LID
CENTERED ON THE BOWL AND THE LONG
TAB LOCKED IN PLACE OVER THE BOWL
HANDLE!
NEVER ATTEMPT TO DEFEAT THE SAFETY
SWITCH MECHANISM.
ALWAYS USE THE OFF SWITCH TO TURN THE
MACHINE OFF.
The Food Processor is now assembled and ready to perform its desired function.
Illustration #4
5
6
BEFORE CONTINUING YOU SHOULD COMPLETELY READ THE INSTRUCTIONS CONTAINED IN THE REST OFF THIS MANUAL.
Page 5

R4Y and R6Y Series A
Operation Manual
B. CUTTER BOWL ATTACHMENT
DISASSEMBLY INSTRUCTIONS
STEP #1 Turn the machine OFF and UNPLUG the power
cord from the wall socket.
STEP #2 Rotate the bowl lid clockwise and lift off.
STEP #3 Firmly grasp the top of the blade assembly and lift
off of the motor shaft.
STEP #4 Locate the release trigger on the lower back portion
of the bowl handle. Pull the trigger, and at the same time, turn
the bowl clockwise and lift free.
C. BLADE DISASSEMBLY
INSTRUCTIONS
(6 Liter Models Only)
The blade assembly comes from the factory completely
assembled. To take the assembly apart, use the plastic bladestop and metal rod shipped with the machine.
Put the blade on the blade-stop, and insert the metal rod into
the hole near the top of the blade assembly. Then, turn the
blade assembly counterclockwise until it contacts the raised
tab on the blade stop. The blade assembly will come to a
stop when it hits the tab on the blade-stop. At this point,
continue to turn the rod in the counterclockwise direction, until
the top locking nut releases and unscrews.
Wear cut-resistant gloves when handling
the blade assembly.
Put the blade-stop on the machine as shown.
D. BLADE ASSEMBLY INSTRUCTIONS
(6 Liter Models Only)
Put the blade assembly together as shown. The blade turns
counterclockwise, so assemble the blades with the bevelled
side up. The blades should be spaced opposite each other at
180 degrees apart.
Page 6

R4Y and R6Y Series A
Operation Manual
III. OPERATING INSTRUCTIONS
THE UNIT SHOULD BE OFF EXCEPT WHEN PROCESSING IS UNDERWAY.
It is recommended that the machine be operated on a 50%
duty cycle. This is easily accomplished since the preparation
time (cleaning, coring, peeling, and loading) takes longer than
the processing time. This will yield the longest life for your
machine.
NOTE: Some models may be equipped with a manual reset
circuit breaker. If the machine is overloaded or run too long
under heavy load conditions, the breaker will trip. If this occurs, first remove the bowl and reduce the amount of food
being processed. The reset button is located on the bottom
left side of the motor base. Press the button in to reset the
overload protector. It may be necessary to allow the machine
to cool a few minutes before restarting.
DO NOT allow the machine to run unattended.
INSTRUCTIONS FOR USE OF THE CUTTER
BOWL
The cutter bowl attachment is used for grinding, pureeing,
blending, mixing, of ingredients. With the power switch off
and the bowl and blade secured in place (per previous instructions) you are now ready to add product to the bowl.
There are two ways to run your machine. Chopping using a
quick start/stop action, or running continuously for a fine chop
or puree.
3. TO CHOP HARD CHEESE: Place uniform 1” to 1 1/2”
cubes of chilled cheese up to 1 1/2 pounds into the bowl and
follow the instructions for chopping. For powdered cheese
chop until the cheese is about pea size then allow the motor
to run continuously until you have a fine powder.
4. TO CHOP ONIONS, CELERY, CABBAGE, ETC. Quarter onions, and cut other vegetables into 2 to 3 inch portions.
Place the product into the bowl up to 3/4 full and follow the
previous chopping instructions until you reach the desired consistency. CAUTION: If you overfill or allow the machine to run
continually, the product on the top may not be cut while that
on the bottom will be pureed.
5. TO PUREE OR MIX: To puree, make sauces, or to mix
and blend, place the ingredients into the bowl (do not overfill),
turn the unit on, and allow to run continuously.
6. TO MAKE MAYONNAISE: Place in the bowl 6 eggs, 3
tsp. of salt, 3 tsp. of sugar, 2/3 tsp of dry mustard, a pinch of
white pepper, and a pinch of red pepper. Turn the unit on.
Begin adding 2 qts. of oil pouring very slowly through the top
allowing the stream of oil to fall on the top of the cutter blade.
When you have added 1/2 of the oil, pour in 4 oz. of vinegar
and the balance of the oil. After all of the oil has been added
let the machine run for 20 seconds longer. The mayonnaise
is now homogenized.
7. TO MAKE BREAD CRUMBS: Place torn fresh or dried
bread in the bowl, and quickly start and stop the unit. Continue this process until you reach the desired consistency, or
allow the unit to run continuously for fine powered bread
crumbs as used in stuffing mix.
1. TO CHOP
To achieve a chopped consistency for vegetables, meats,
cheese, etc., fill the bowl 2/3 to 3/4 full with portions no larger
than 1 to 2 inches square. Quickly press the on and then the
off button alternately until the desired consistency is reached.
If the motor stalls, reduce the amount of product in the bowl.
2. TO PUREE OR FINE CHOP: For a fine puree, emulsification, or fine chop, fill the bowl 2/3 to 3/4 full with portions no
larger than 1 to 2 inches square. Begin as with the chopping
instructions to reduce the size, then press the on button, and
allow the machine to run until the product is finely chopped or
pureed. Some purees may require the addition of a liquid to
obtain the correct consistency.
DO NOT remove the bowl lid until the blades
have come to a complete stop.
DO NOT remove the bowl while the motor is
running.
DO NOT put nonfood objects into the bowl.
Page 7

R4Y and R6Y Series A
Operation Manual
Sharpening the “S” blade
The “S” blade will require sharpening on a periodic basis depending on use. The use of a dull blade will
sometimes give unsatisfactory results. Follow the directions shown to sharpen the blade, or have the
blades sharpened professionally if you prefer.
1. Put on your cut-resistant gloves
2. Use a Robot Coupe stone or any good sharpening
stone.
3. Hold or clamp the blade flat on the edge or corner of
a sturdy table.
4. With the other hand hold the stone at a 30 degree
angle against the top bevel of one blade.
5. Pull the stone into the blade edge moving from hub
to tip, several strokes, until the blade is sharp.
6. Turn the blade over and rub the stone flat against the
underside of the blade to remove the feather edge
formed at step 5.
7. Repeat the procedure for the other blade.
8. Wash the blades before use.
Page 8

R4Y and R6Y Series A
Operation Manual
IV. CLEANING/PREVENTIVE
MAINTENANCE
(1) CLEANING: Proper cleaning of the machine is one of the
most important preventive maintenance measures the user
can employ. The high acid content of food can cause harm to
the electrical parts contained within the housing. Although a
seal isolates these elements from the outside, food juices will
tend to seep. If food juices are allowed to collect on the machine over periods of use, erosion of the seal can occur. It is
recommended that the machine be cleaned after each operational use.
Correct cleaning procedures are required to assure that damage is not inflicted in the cleaning process. The motor base
assembly contains the motor and electrical components.
DO NOT IMMERSE THE MOTOR BASE ASSEMBLY IN WATER!
CLEANING INSTRUCTIONS
The machine should be cleaned per the following instructions
or as required by local health department regulations.
ATTACHMENTS: Remove and all attachments before cleaning. The bowl, blade, and lid are dishwasher safe. These
attachments can be washed in a dish machine or three tank
system pot sink. Pre-rinse the attachments before washing
to remove any bulk food. A stiff bristle brush or power sprayer
faucet attachment is effective in knocking the food out of the
crevices as a pre-rinse procedure. The washer should have
an industry standard wash, rinse and sanitization cycle. Allow the parts to air-dry after sanitizing and before reassembly.
NOTE: The high temperatures of dish machines
will tend to shorten the life of plastic and rubber parts. Hand washing using a three pot sink
will provide for the longest life of these parts.
MOTOR BASE: Cleaning of the motor base assembly must
be done with care. First unplug the unit. A sponging with a
cloth lightly soaked (not dripping) in a mild detergent is acceptable, making sure the water is not permitted to penetrate
the shaft seal or around the switches. Clean around the shaft
seal with a small brush, taking care to remove all food. Do
not forget to clean the motor shaft. Rinse the motor base first
using a cloth lightly dampened (not dripping) with water, then
with a sanitizing solution, and dry the machine with a soft cloth
removing all liquids from seal areas.
BLADE ASSEMBLY:
Wear cut-resistant gloves when cleaning the blade.
The blade assembly on the 6 liter models must be disassembled before cleaning. See the Assembly/Disassembly
section of this manual. After washing, allow the parts to airdry before reassembly.
(2) PREVENTIVE MAINTENANCE CHECKS
While your Robot Coupe is a ruggedly constructed machine,
overall handling should be accomplished with a sense of use
rather than abuse. Reasonable care should be exercised.
While the machine is reasonably portable, care should be taken
not to drop it. Equally, caution should be exercised in handling all the parts to assure they are not damaged.
An examination should be made periodically to assure that a
seal against liquids is being maintained around the motor shaft.
With proper care, and depending on use, the seal should last
for a year or more. However, it can and should be replaced
whenever wear or erosion is noted, or once every three to six
months. It is recommended that the seal be replaced by an
authorized repair agency.
Blades should be kept sharp. It is not necessary to have a
razor edge however, they will need sharpening periodically.
See the directions for sharpening within this manual. Replacement of the dull blades is recommended.
(3) CARE: Your Robot Coupe is a piece of kitchen equipment
and like all other kitchen equipment, care and caution should
be used when operating. Although training requirements are
minimal, only responsible individuals familiar with this operation manual should be allowed to operate your Robot Coupe.
In general, the best preventive measures that can be applied
are close adherence to the assembly, operation, cleaning,
and handling instructions, common sense and regular maintenance.
Page 9

R4Y and R6Y Series A
Operation Manual
TROUBLE SHOOTING AIDS: The following sections indicate potential problems and the correct solution which should
be implemented by the user. Problems which extend beyond
these will require an experienced serviceman. A list of the
authorized agencies is supplied.
V. TROUBLE SHOOTING AIDS
A. Unit does not start when assembled correctly
1. Pull plug and try another outlet
2. Make sure bowl lid is in the proper position with
the long tab centered at the front of the machine.
C. Unit stops during processing
1. Turn the machine off and unplug.
2. Reduce the amount of product in the bowl.
4. Reassemble the bowl attachment, plug in the
machine, and try to restart by pressing the on button.
D. If unit does not operate after following above:
1. Some models have a circuit breaker. Look for the
white button on the underside of the machine. If the
breaker has tripped, press the button back in. If the
machine doesn’t start after pressing the on button.
Allow the machine to cool, for several minutes and try
again.
2. Check outlet for current (Breaker or Fuse)
2. Try unit again
3. Call local authorized service agency.
VI. SERVICE INFORMATION /SERVICE
AGENCY LIST
Your Robot Coupe has a one year limited warranty against
defects in parts and workmanship. Should the unit require
service, check with your distributor to see where local service
is available. If not or if you wish your unit to be serviced at the
factory, call for a return merchandise authorization (RMA) number, and upon receipt of same, ship it PREPAID and insured
to our factory address.
Robot Coupe USA, Inc. Service Dept.
Phone: 1-800-824-1646
601-898-8411
E. Unit starts to spark or smoke
1. Turn unit off, unplug it, call local authorized service
agency.
Page 10

Page 11

PRICES AND OTHER INFORMATION SUBJECT TO CHANGE WITHOUT NOTICE
MODEL
R4Y
Series A Serial Numbers R4YxxxxxxA
Series A
Part # Description
Indexes
1
RA443
2
RA441
3
RA406
4
RA4933
5
RA418
6
RA419
7
Number NA
8
R664S
9
RA441.1
10
RA441.2
11
RA442
12
C420
13
RA4940
14
R611
15
RA489
16
RA467
17
RA455
18
R604S
19
R492A
20
Number NA
21
S193552
22
Number NA
23
Number NA
24
Number NA
25
Number NA
26
29620
27
BX658
28
RA490
29
R496
30
Number NA
31
117770
32
R694
33
R492A
34 RA604F No longer available
35
R662
36
R237
37
R4950
38
RA494
39
RA493
40
RA402
41
RA420
42
RA451
43
RA422
44
RA423
45
RA472
46
RA424
47
RA424.2
48
RA424.3
49
RA424.4
50
R199
Pad,Rear
Support/Pad,Front
Motor Support
Front Data Plate (R4Y)
Green "On" Switch Assy
Red "Stop" Switch Assy
Description NA
Relay DPST
Gasket
Metal Plate
Support,Magnetic Switch
Mag Swtch w/Hse (single)
R4Y Motor Base Assy
Motor Support Seal
O Ring, Seal Support
Seal Assembly (Seal Support)
Plate, Motor Mounting
Seal, Motor
Shaft Pin (new style)
Description NA
(D) Motor R4Y/R6Y Low Profile
Description NA
Description NA
Description NA
Description NA
(E) Plastic Base, Low Profile
Base Bolt W/Washer
Strain Relief
Cord W/Plug (R4X,S,P,Y)
Description NA
(D) Din Rail 2"L, R4/R6 'D"
Contactor R6Y-1
Shaft Pin (new style)
Bearing, Motor Top
6203 Bearing R2 Top/Btm
Capacitor (R4S R4Y)
Baffle
Base
Foot
Lid
Seal,Lid
* Blade Assy
* Serrated Blade Assy
* Bowl Assy (4 Qt)
Bowl
Pin, Bowl
Spring, Bowl Pin
Nut For Bowl Pin
* Robo-Cart
Page 12

PRICES AND OTHER INFORMATION SUBJECT TO CHANGE WITHOUT NOTICE
MODEL
R6Y
Series A
Series A
Serial Numbers
R6YxxxxxxA
Indexes
Part # Description
1
RA443
2
RA441
3
RA406
4
RA612Y
5
RA418
6
RA419
7
Number NA
8
R664S
9
RA441.1
10
RA441.2
11
RA442
12
C420
13
RA696
14
R611
15
RA489
16
RA467
17
RA455
18
R604S
19
R492A
20
Number NA
21
S193552
22
Number NA
23 CL5547 Switch/Relay
24
Number NA
25
Number NA
26
29620
27
BX658
28
RA490
29
R496
30
Number NA
31
117770
32
R694
33
R492A
34 RA604F No longer available
35
R662
36
R237
37
R4950
38
RA494
39
RA493
40
RA402
41
103903
42
RA645.2
43
RA424.3
44
RA424.4
45
RA451
46
RA653
47
RA657
48
RA654
49
RA654
50
RA655
51
RA656
52
RA617
53
RA658
54
RA659
55
102071
56
RA420
57
RA616
58
RA644
59
RA651
60
RA651A
61
RA645
62
R199
Pad,Rear
Support/Pad,Front
Motor Support
Front Data Plate (R6Y)
Green "On" Switch Assy
Red "Stop" Switch Assy
Description NA
Relay DPST
Gasket
Metal Plate
Support,Magnetic Switch
Mag Swtch w/Hse (single)
R6Y Motor Base Assy
Motor Support Seal
O Ring, Seal Support
Seal Assembly (Seal Support)
Plate, Motor Mounting
Seal, Motor
Shaft Pin (new style)
Description NA
(D) Motor R4Y/R6Y Low Profile
Description NA
Description NA
Description NA
(E) Plastic Base, Low Profile
Base Bolt W/Washer
Strain Relief
Cord W/Plug (R4X,S,P,Y)
Description NA
(D) Din Rail 2"L, R4/R6 'D"
Contactor R6Y-1
Shaft Pin (new style)
Bearing, Motor Top
6203 Bearing R2 Top/Btm
Capacitor (R4S R4Y)
Baffle
Base
Foot
(D) 10mm S.S. Spacer (R6N)
Pin, Bowl
Spring, Bowl Pin
Nut For Bowl Pin
Seal,Lid
Blade Locking Nut
Plastic Spacer(5mm)
SS Spacer(15mm)
SS Spacer(15mm)
Top Blade (Straight)
Top Blade(Serrated)
Spacer,Blade
Bottom Blade (Straight)
Bottom Blade(Serrated)
(D) Blade Support
Lid
Blade Tool Assy.
* Bowl Kit
*Smooth Blade Assembly
*Serrated Blade Assy
Bowl
* Robo-Cart
Page 13

U.S.A., Inc.U.S.A., Inc.
U.S.A., Inc.
U.S.A., Inc.U.S.A., Inc.
PP
.O. Box 16625, Jackson, MS 39236-6625.O. Box 16625, Jackson, MS 39236-6625
P
.O. Box 16625, Jackson, MS 39236-6625
PP
.O. Box 16625, Jackson, MS 39236-6625.O. Box 16625, Jackson, MS 39236-6625
280 South Perkins St., Ridgeland, MS 39157280 South Perkins St., Ridgeland, MS 39157
280 South Perkins St., Ridgeland, MS 39157
280 South Perkins St., Ridgeland, MS 39157280 South Perkins St., Ridgeland, MS 39157
email: robocoup@misnet.comemail: robocoup@misnet.com
email: robocoup@misnet.com
email: robocoup@misnet.comemail: robocoup@misnet.com
website: www.rwebsite: www.r
website: www.r
website: www.rwebsite: www.r
1-800-824-16461-800-824-1646
1-800-824-1646
1-800-824-16461-800-824-1646
obotcoupeusa.comobotcoupeusa.com
obotcoupeusa.com
obotcoupeusa.comobotcoupeusa.com
ROBOT COUPE U.S.A., INC. LIMITED WARRANTY
YOUR NEW ROBOT COUPE PRODUCT IS WARRANTED TO THE ORIGINAL PURCHASER
FOR A PERIOD OF ONE YEAR FROM THE DATE OF PURCHASE.
This LIMITED WARRANTY is against defects in the material and/or workmanship, and includes labor for
replacement of defective parts, provided repairs are performed by an authorized service agency (see attached
list). The
copy of the dated sales or delivery receipt BEFORE WARRANTY REPAIRS ARE BEGUN. Replacement parts
and accessories are warranted for ninety (90) days from the date of purchase when purchased separately and
will be verified by dated sales receipt OR packing slip which lists that item. All parts or accessories replaced
under warranty must be returned to the Service Agency.
CUSTOMER must inform the Service Agency of the possibility of warranty coverage and provide a
THE FOLLOWING ARE
1. Damage caused by abuse, misuse, dropping, or other similar incidental damage caused by or as
a result of failure to follow assembly, operating, cleaning, user maintenance, or storage
instructions.
2. Labor to sharpen and/or parts to replace knife assemblies or blades which have become dull,
chipped, or worn due to normal use.
3. Material or labor to renew or repair scratched, stained, chipped, dented or discolored surfaces,
blades, knives, attachments, or accessories.
4. Transportation charges to or from an authorized service agency for repairs of a machine designated
as “CARRY IN SERVICE” (table top models). NOTE: R4N/R6N are now field service units.
5. Labor charges to install or test attachments or accessories (i.e., bowls, cutting plates, blades,
attachments) which are replaced for any reason.
6. Charges to change Direction-of-Rotation of Three Phase electric motors (INSTALLER IS
RESPONSIBLE).
7. SHIPPING DAMAGE IS NOT COVERED BY WARRANTY. Visible and hidden damages are the
responsibility of the freight carrier. The consignee must file a damage claim promptly against the
carrier, or upon discovery in the case of hidden damage.
KEEP ALL ORIGINAL CONTAINERS AND PACKING MATERIALS FOR CARRIER INSPECTION.
Robot Coupe U.S.A., Inc., Robot Coupe S.A. or any of their affiliates, distributors, officers, directors, agents,
employees, or insurers will not be obligated for consequential or other damages, losses, or expenses in connection
with or by reason of the use of or inability to use the machine for any purpose.
“NOT” COVERED UNDER WARRANTY:
THIS WARRANTY IS GIVEN EXPRESSLY AND IN LIEU OF ALL OTHER WARRANTIES, EXPRESSED
OR IMPLIED, FOR MERCHANTABILITY AND FOR FITNESS TOWARD A PARTICULAR PURPOSE
AND CONSTITUTES THE ONLY WARRANTY MADE BY ROBOT COUPE, U.S.A., Inc.
 Loading...