

Page 1

OPERATION MANUAL
FOR
MODEL
R4X and R6X
Series D
Series D Serial Numbers
R4X- 233xxxxx03
R6X- 237xxxxx03
robot coupe U.S.A., Inc.
P.O. Box 16625, Jackson, MS 39236-6625
280 South Perkins St., Ridgeland, MS 39157
email: robocoup@misnet.com
website: www.robotcoupeusa.com
1-800-824-1646
Page 2

R4X and R6X Operation Manual
2
Page 3
R4X and R6X Operation Manual
INTRODUCTION
The Robot Coupe commercial food processor performs
a host of culinary feats. It is designed for high speed
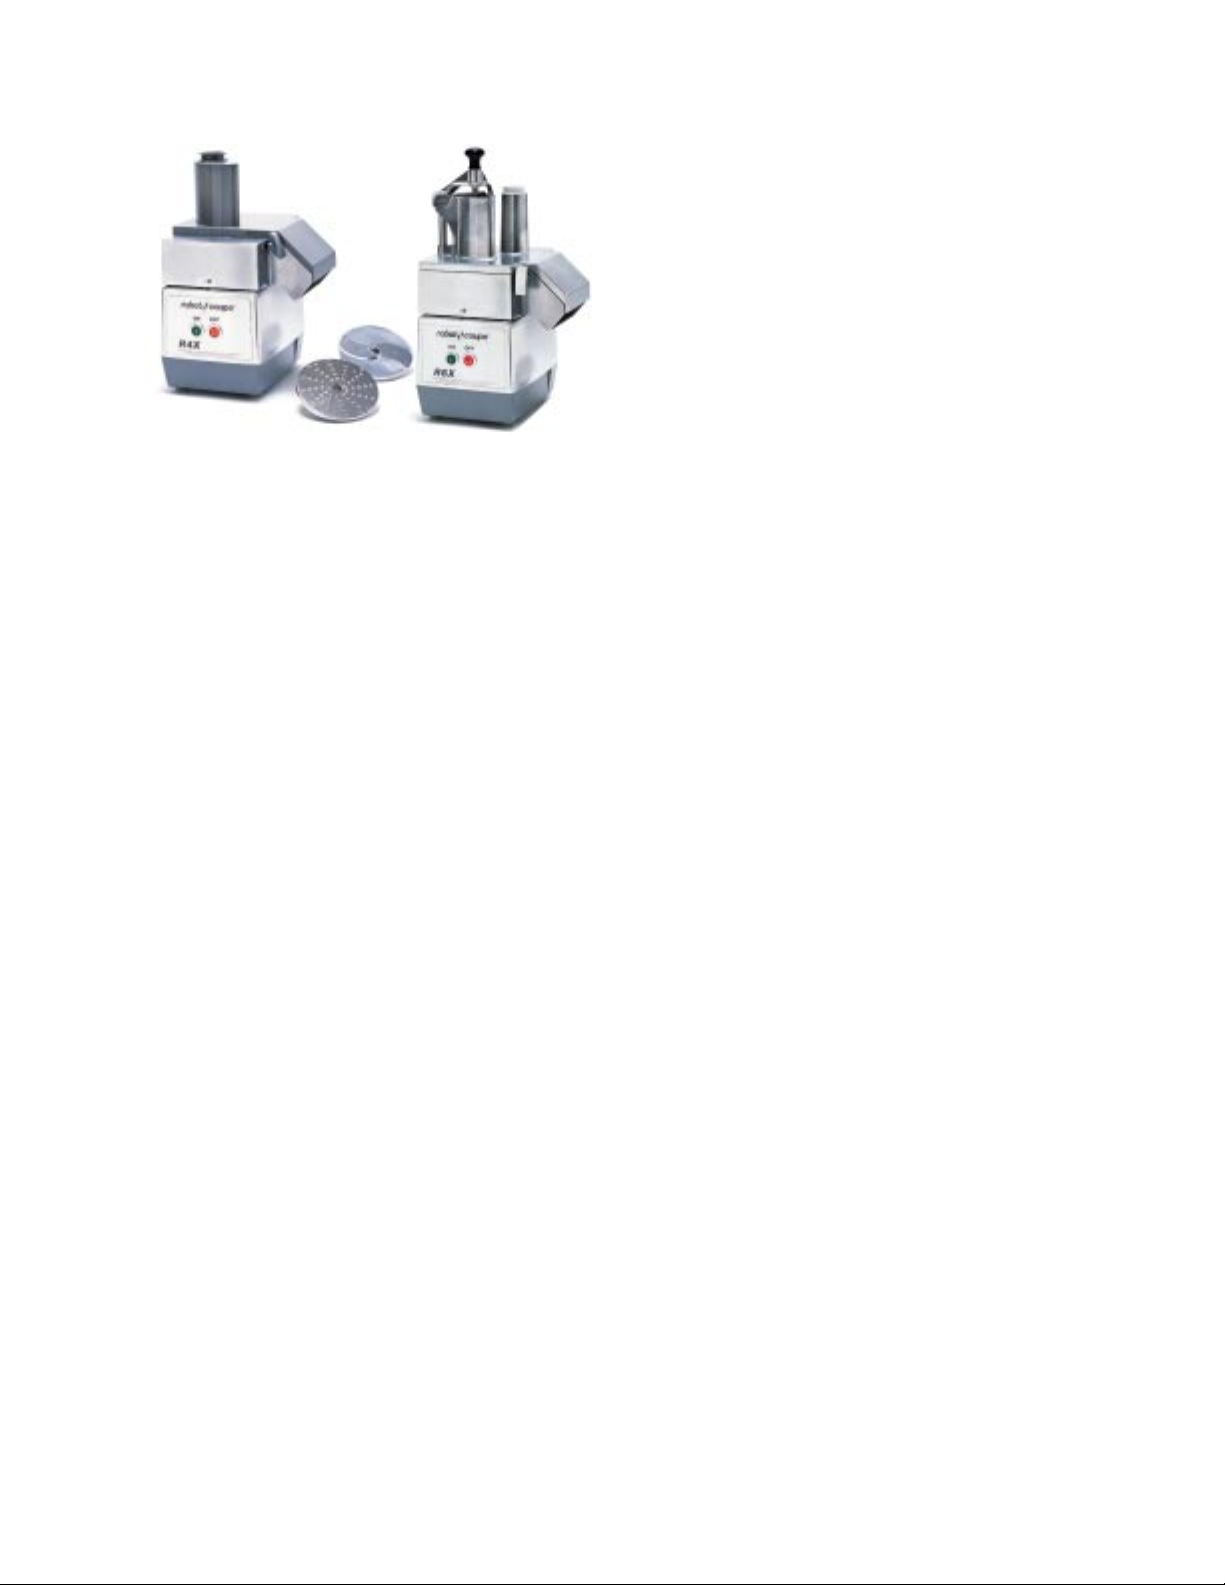
and quality vegetable processing. The models R4X
and R6X will slice, julienne, shred, grate and also cut
French fries and dice many products with the continuous feed attachment.
This operators manual is broken down into sections
giving you detailed instructions for assembly and operation of the continuous feed attachment and the cutter bowl attachment. Close attention should be paid to
all instructions in this manual to ensure a long life utilization of your food processor.
This manual should be kept within easy
access to all users for reference, and
should be read completely by all first time
users of the machine.
I. INTRODUCTION
II. ASSEMBLY/DISASSEMBLY
INSTRUCTIONS
III. OPERATING INSTRUCTIONS
IV. PREVENTIVE MAINTENANCE
GUIDE
V. TROUBLE SHOOTING AIDS
VI. SERVICE AGENCY LISTING
Maintaining the food processor in good working condition is one of the most important measures to be taken.
Inspect the machine and all parts regularly to make
sure they are in good working condition.
DO NOT operate a machine that has malfunctioned in any way.
Discard any food processed at the time of
a malfunction and have the machine inspected and
repaired at one of the Robot Coupe Authorized Service Agencies, a list is provided in the back of this
manual. Contact one of these service agencies for all
of your service, parts, and accessory requirements.
CAUTION: Your Robot Coupe comes with
sharp cutting plates. Always handle with
safety in mind. We suggest that a pair of
cut-resistant gloves be worn when handling the cutting plates.
Machine Specifications:
The Models R4X and R6X are equipped with a high
speed motor generating 1 Hp which plugs into a standard 120 volt/ 60 Hz, 15 amp power outlet. The full
load amperage rating for the R4X is 7.5 amps, and the
amperage rating for the R6X is 7.6 amps. The standard machines are supplied with a continuous feed attachment, and two cutting plates. The machines are
equipped with push type on and off buttons. The R6X
has a metal feed lead with a hinged pusher and the
R4X has a plastic feed lead.
3
Page 4
R4X and R6X Operation Manual
II. ASSEMBLY/DISASSEMBLY INSTRUCTIONS
Your Robot Coupe should be placed on a sturdy work surface at a comfortable working height and have a
standard 115 volt power outlet available. Always keep the machine unplugged during assembly and disas-
sembly.
A. ASSEMBLY INSTRUCTIONS
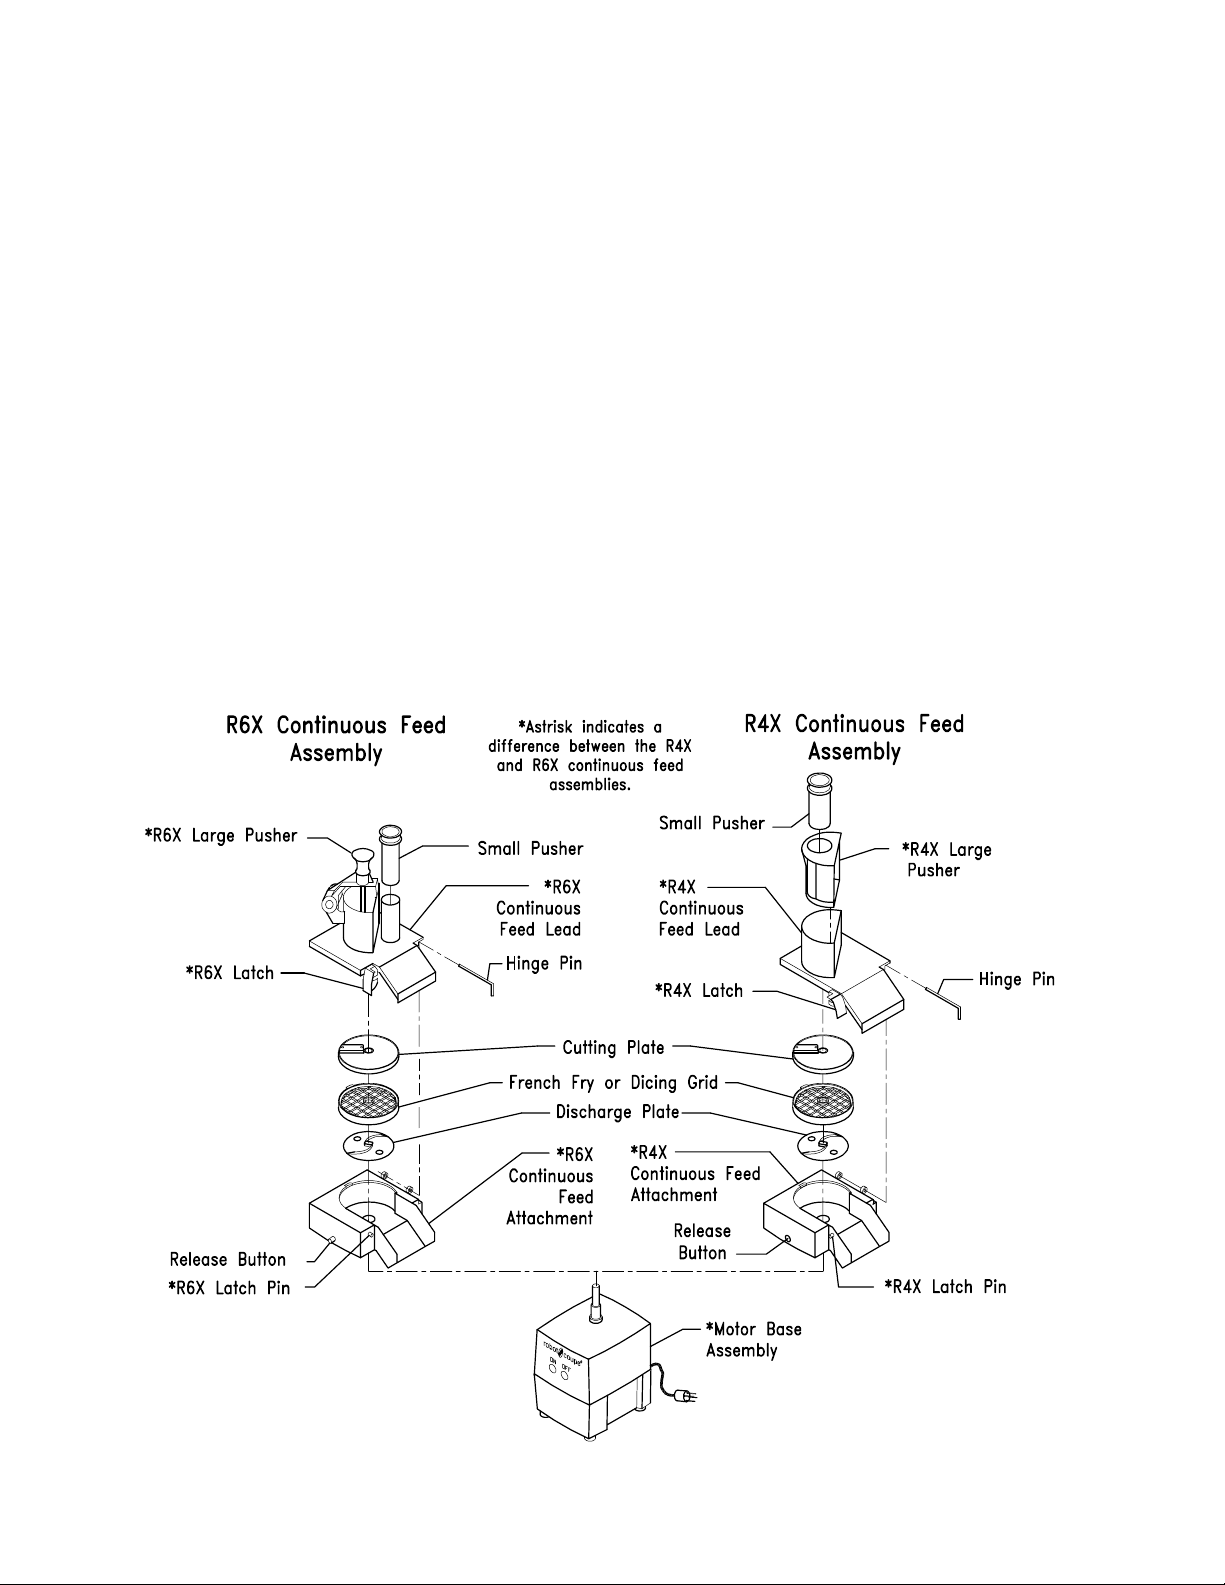
Illustration #1
Become familiar with the part names as you assemble the unit.
Always use caution and wear cut-resistant gloves when handling the blade or
the cutting plates.
Always unplug the machine during assembly and disassembly.
4
Page 5
ASSEMBLY INSTRUCTIONS
R4X and R6X Operation Manual
1 Place the motor base assembly at a comfortable
height on a sturdy work surface. Remove the plastic
discharge plate from inside the continuous feed attachment. Place the continuous feed attachment on
the motor base with the release button at front center
of the motor base assembly (see drawing). Rotate
the attachment counterclockwise until it locks into
place with a snap action. When the attachment is in
the proper position, it should be level with the top surface of the motor base assembly. NOTE: The machine will not operate correctly unless the continuous
feed attachment is fully seated and secured in place.
2 Place the discharge plate on the motor shaft with
the appropriate side up. Use the side with the small
straight fins for all julienne cuts or other delicate cuts.
The large finned side may be used for dicing or shredding. The product will not exit the machine without
the discharge plate.
Warning: The plates are sharp. Always use caution and we suggest that a pair of cut-resistant
gloves be worn when handling the plates and
grids.
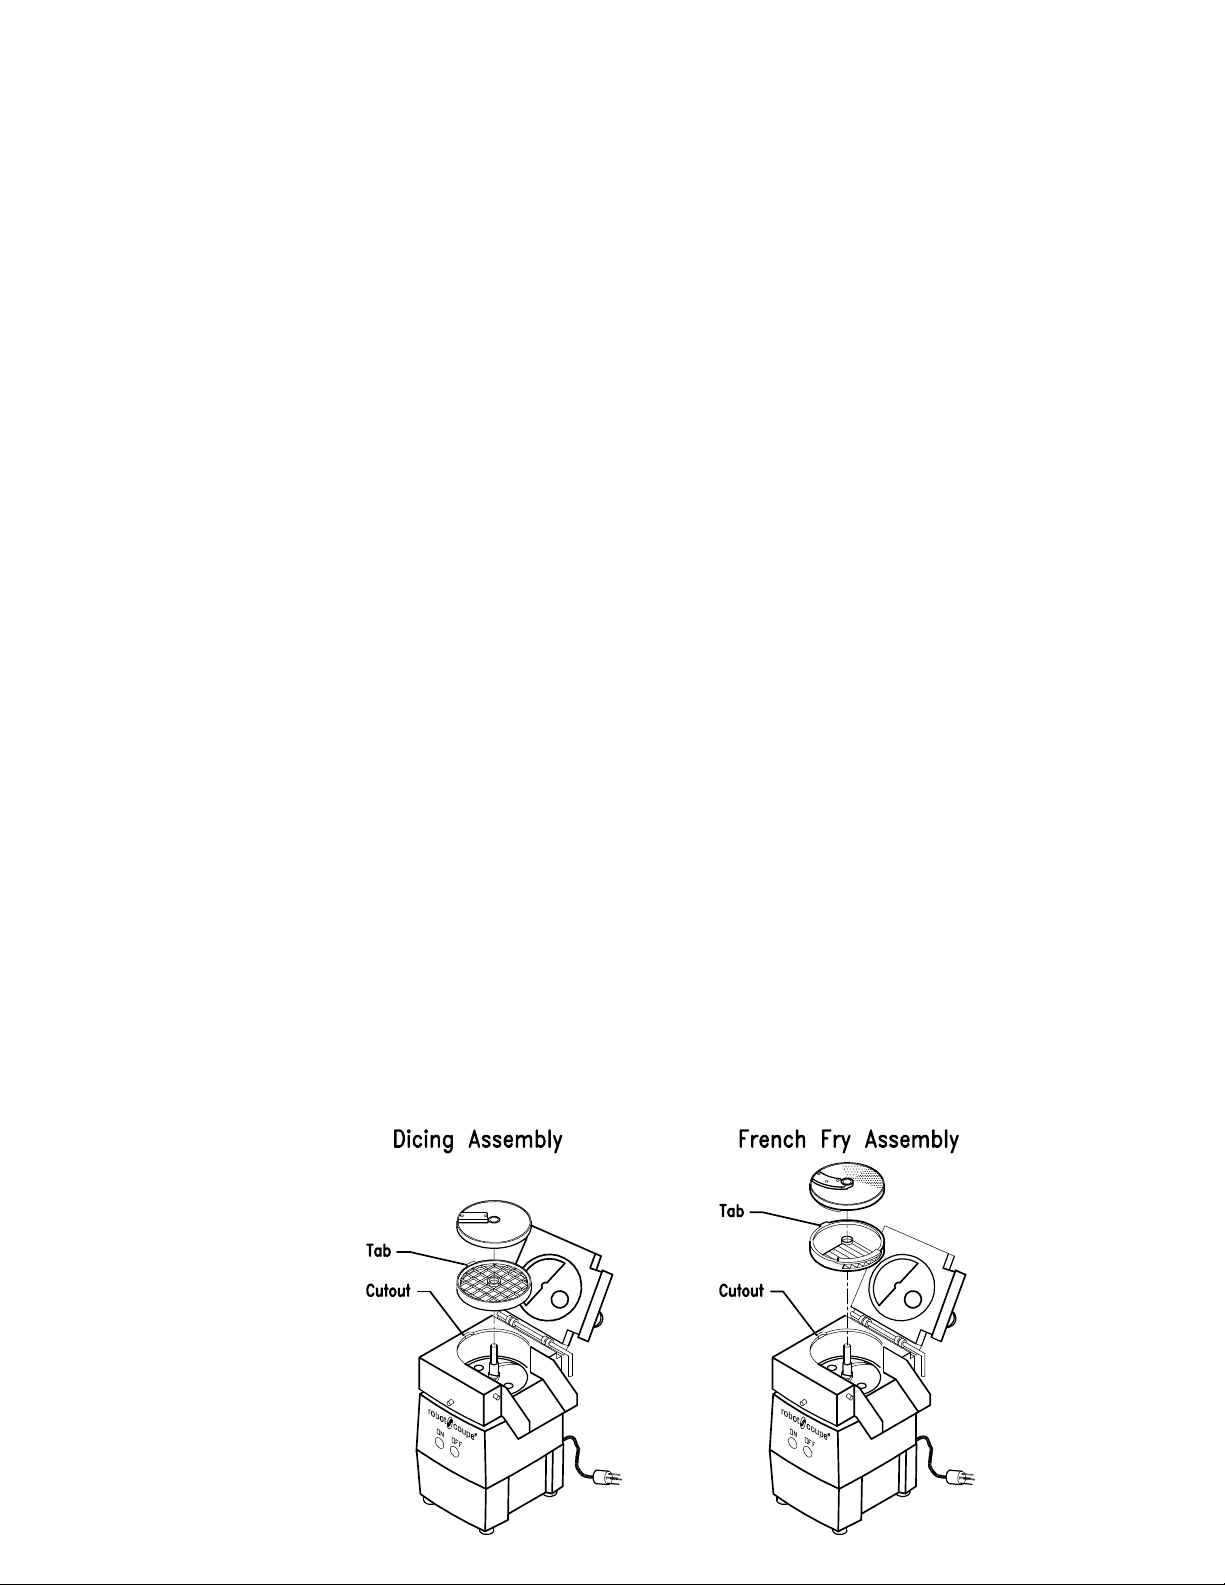
4 IF YOU ARE PREPARING TO USE A DICING
OR FRENCH FRY KIT:
NOTE: The recessed rim on the continuous feed attachment must be free from product and clean so the
grid can be firmly seated. The discharge plate must
be in the machine or the product will not exit.
With the tab on the plastic grid aligned with the cutout
in the Continuous Feed Attachment, place the plastic
grid onto the recessed rim of the continuous feed attachment. Put the slicing plate on top of the dicing
grid with the stem of the plate DOWN. Rotate the
plate until the cutout in the stem drops into place on
the motor shaft pin. Continue rotating the plate a full
turn. If rubbing occurs, DO NOT PROCEED-call your
service agency. The rim on the plate when properly
installed should be slightly above the surface of the
continuous feed attachment.
5 Place the continuous feed lead on the continuous
feed attachment and secure in place with the holding
pin. The lead should fit flush on the continuous feed
attachment. Close the lead and lock the latch.
3 IF YOU ARE PREPARING TO SLICE, GRATE,
OR JULIENNE: Place the plate of your choice on the
motor shaft and turn it clockwise until it drops into
place and is fully seated. The top of the plate should
be just above the surface of the continuous feed attachment. Proceed to step 5.
6. Place the pushers in their corresponding openings in the continuous feed lead.
7. DO NOT OPERATE THE MACHINE UNLESS IT IS PROPERLY ASSEMBLED AND
THE CONTINUOUS FEED LEAD IS FULLY
SEATED AND CENTERED OVER THE
ATTACHMENT!
5
Page 6

R4X and R6X Operation Manual
B. DISASSEMBLY OF THE
CONTINUOUS FEED ATTACHMENT
1 Turn the unit OFF and UNPLUG it from the wall
socket.
2 Pull the plastic pushers out of the openings.
3 Pull out hinge pin from continuous feed lead and lift
up latch at upper right front of machine (see drawing). Remove the continuous feed lead.
4 Remove cutting plate. Rotate plate slightly counterclockwise, then lift free of shaft. Remove dicing or
French fry grid if any, then lift out the plastic discharge
plate.
5 Press the release button (see drawing) on the continuous feed attachment and at the same time turn
the continuous feed attachment clockwise. The continuous feed attachment releases and can be lifted
off over the motor shaft.
Before continuing, you should completely read the instructions contained in
the rest of this manual.
The continuous feed lead has two feed openings, one
large and one small, with matching pushers. The food
is inserted in the chosen opening by removing the
pusher with one hand and then depositing the food
into the chute with the other hand. The pusher should
then be used to push the food through the opening.
III. OPERATING INSTRUCTIONS
THE UNIT SHOULD BE OFF EXCEPT WHEN PROCESSING IS UNDERWAY.
It is recommended that the machine be operated on
a 50% duty cycle. This is easily accomplished since
the preparation time (cleaning, coring, peeling, and
loading) takes longer than the processing time. This
will yield the longest life for your machine.
The Robot Coupe Food Processor will slice, grate,
shred and julienne. These processes will be performed in a matter of seconds. Because of the speed
of the process, it is necessary that the operator perform preliminary steps before turning the machine on.
Food preparation, feed chute loading, and availability
of a receptacle (catch pan) for receiving the finished
product are some of the steps to assure positive control of the processing operation.
Food preparation will be required to assure that the
produce will fit a feed chute opening. Additionally,
according to personal preference, some products may
or may not be cored or peeled. Feed chute selection
should be made depending upon the product to be
processed. As an example, good consistency of small
round produce (carrots, cucumbers, etc.) necessitates
use of the small feed chute to allow better operator
control. Use of the larger port for this type of produce
may result in an undesired finished product, e.g., slicing with the grain. In general, more control of the
processing operation can also be obtained by filling
the selected feed chute and placing the pusher in position before turning the machine on.
Adherence to certain operational techniques will also
enhance the processing operation. For instance, a
consistent pressure with the pusher upon the produce
will yield a consistent output. Application of more pressure will increase the thickness of the product, e.g.,
thicker slice, while reduction in pressure will result in
a finer product. However, do not apply enough pressure to stall or slow the motor. This will cause damage to both the plate and the motor. If no pressure is
applied at all and the produce is permitted to bounce
around, an inconsistent product may result. When
the pusher has settled fully in the feed chute, press
the off switch and re-load the entry port for a repeat
process.
6
Page 7

R4X and R6X Operation Manual
DO NOT remove the continuous feed lead
when the motor is running. Wait until the
motor has come to a full stop.
DO NOT attempt to run frozen products
through the cutting plates.
DO NOT put anything other than food
products in the feed chute.
Wear cut-resistant gloves when handling
the cutting plates.
Keep hands out of the feed openings.
Always use the food pushers.
(1) Slicing Operation: When preparing food to be
sliced, make sure the food will fit into the proper feed
chute. Produce such as carrots, cucumbers, etc.,
should be “squared” at both ends. This will provide a
consistent slice throughout the whole product. With
cabbage, lettuce or any product that has an undesirable core, the core should be removed. Medium
size heads of lettuce or cabbage may be cut into
thirds to fit in the feed chute. It is also suggested that
the rounded half be squared to permit a consistent
cut. The rounded portion can be dropped into the
chute at the end and with no pressure applied, it will
normally be processed uniformly. Larger heads of
cabbage or lettuce may be more effectively processed
if they are cut into fourths. When the preparation has
been accomplished, fill the selected feed chute, place
the pusher in position, turn the machine on and observe the results.
(2) Grating Operation: Again, prepare the product
as to allow insertion into the feed chute. Consider
which chute will be used. As an example, placement
of carrots horizontally in the large chute will result in
a long grated product, while vertical insertion in the
smaller chute will result in a short grated product. It
is recommended that chilled cheese be used when
grated cheese is desired, otherwise a gumminess may
result. A fine coating of cornstarch applied to the
cheese before grating will aid in keeping the finished
product separated. A fine coating of cornstarch will
not be visible and is tasteless. Grating cheese is one
of the most trying processes and may cause overheating of the motor if not done in the recommended
manner. It is recommended that a slight pulsating
pressure be applied with the pusher while grating,
alternating slight pressure on the pusher—no pressure—continuing in this manner until the block of
cheese is completely grated. It is recommended that
the cheese be prepared to fit the opening in volumes
which will permit motor cool-down time during long
production runs.
(3) Julienne Operation: Insertion of the product to
be cut must be horizontal if a long stick is to be
achieved, e.g., squash sticks. Vertical insertion will
result in finely chopped products, e.g., chopped celery. A finely chopped onion product may also be
obtained with this operation.
DO NOT attempt to julienne meats or
cheeses.
(4) Dicing Operation: The dicing operation requires
that product be sliced both horizontally and vertically
by the machine. The smaller the dice required, the
more difficult the cut is to achieve. Soft or juicy produce will tend to mush if the dice is too small or the
produce is too soft. Cheeses and meats represent
the opposite extreme.
DO NOT ATTEMPT TO DICE MEATS OR
CHEESES. Damage could occur to the
blades and/or the motor and will not be
covered under warranty. NOTE; You cannot julienne or dice meats or cheeses on
any food processor.
During the dicing operation, attention should be given
to the finished product. A visible change in the product will occur when the dicing grid requires cleaning.
If this occurs remove the continuous feed lead and
the slicing plate, then take a stiff bristle brush and
force any product on the grid through.
7
Page 8

R4X and R6X Operation Manual
PLATE UTILIZATION:
NEVER attempt to process frozen
products!
The standard machine comes with 2 plates (C446SA
slicing and the C450GPA grating) at the time of printing. Check your most current price list for which plates
are included as standard. User applications may require additional plates. The Robot Coupe processor
will preform a variety of functions: slicing grating, dicing, and julienne. There are a total of 34 different
plates available to perform these functions (see below).
8 slicing plates
8 grating plates
6 dicing plates
7 julienne plates
3 wave slicing plates
3 straight french fry plate combina
tions
The eight (8) slicing plates range form 1mm (approx.
1/64") to 14mm (approx. 1/2"):
Part Number MM Slicing Inches (Approx.)
C444SA 1mm 1/32"
C445SA 2mm 5/64"
C446SA 3mm 1/8"
C477SA 4mm 5/32"
C437SA 5mm 3/16"
C436SA 8mm 5/16"
C435SA 10mm 3/8"
C434SA 14mm 9/16"
The C444SA (1/32") slicing plate offers a very fine
cut. A possible use for such a fine cut is the preparation of Japanese style vegetables. Typically these
products (such as carrots or celery) will be placed in
the pusher horizontally to obtain a long thin product.
The C477SA (5/32") and C437SA (3/16") slicing plates
are also ideal for salad bar use, for the stock pot where
thicker cuts are desired. This blade is excellent also
for orange or lemon slices as well as tomatoes, where
a nice smooth surface is desired. NOTE: You can
not slice meats or cheeses on any food processor.
The C434SA, C435SA, C436SA slicing plates are
used in conjunction with the dicing grids. In addition
thicker slices can be obtained for use in soups and
stews. The C434SA (9/16") slicer also provides an
excellent cut of lettuce for use in a salad.
There are eight grating plates available:
Part Number Size MM Inches (Approx.)
C495GPA X-Fine
C452GPA Hard cheese
C494GPA 1.5 mm 1/16"
C451GPA 2 mm 5/64"
C450GPA 3 mm 1/8"
C453GPA 5 mm 3/16"
C478GPA 7 mm 5/16"
C433GPA 9 mm 3/8"
The C452GPA hard cheese grating plate is designed
specifically to grate Parmesan or Romano cheese.
CAUTION: Softer cheese will tend to gum up the
plate. The grated product is very fine. This plate can
be used for making cracker or cookie crumbs. Dried
bread crumbs can be obtained CAUTION: the moisture in fresh bread will cause clogging and poor results.
Use of either the C451GPA, C450GPA, or C453GPA,
fine, medium, and course grating plates are much
dependent upon personal choice and specific application. The medium and coarse grating plates offer
a quality grated product with cheese, carrots, cabbage for cole slaw, etc..
There are seven Julienne plates available:
The C445SA (5/64") slicing plate. Cabbage may be
sliced with this plate for New York Style Cole Slaw.
Carrots curls which adorn many dishes can be
achieved with this slicer. The carrot slices should be
dropped into cold water to permit curling. A nice carrot coin for salads can also be obtained.
The C446SA (1/8") slicing plate is ideal for salad bars
i.e.., cucumber slices, carrot “coins” (vertically sliced
Carrots). Lettuce sliced by this plate is readily used
with sandwiches, tacos, etc..
Part Number Size MM Inches (Approx.)
C460JA 2 x 2 mm (5/64")
C483JA 2 x 4 mm (5/64" x 5/32")
C484JA 2 x 6 mm (5/64" x 1/4")
C486JA 2 x 8 mm (5/64" x 5/16")
C462JA 4 x 4 mm (5/32")
C438JA 6 x 6 mm (1/4")
C466JA 8 x 8 mm (5/16")
Products such as julienne carrots, chopped
celery and finely chopped onions are
obtainable as well as julienned celery roots.
DO NOT ATTEMPT TO JULIENNE MEATS
OR CHEESES!
8
Page 9

R4X and R6X Operation Manual
A diced product requires two actions. First, a horizontal slice is made and then this slice is forced by
the machine through the dicing grid to obtain a vertical cut. This results in a cubed product. The dimensions of this cube are varied via the selection of the
slicing plate and dicing grid.
dicing
grid 5x5 mm 8x8 mm 10x10 mm 14x14 mm 20x20 mm 25x25 mm
Plate
5 mm 28110
8 mm 28111
10 mm 28112
14 mm 28113
20 mm 28114
25 mm 28115
The shaded areas indicate additional combinations that can be used.
The 5mm dicing combination is generally used for
potatoes and squash because of its small size.
The 8mm smaller dicing combinations can be used
for finely diced carrots, celery, etc. and readily used
in soups or stews. The larger (14 mm or greater)
dicing combinations work well with fruits such as
apples, pears, pineapple, etc.
There are three (3) wave slicing plates available:
Part Number MM Slicing Inches (Approx.)
C445W 2mm Waved 5/64”
C446W 3mm Waved 1/8”
C464W 5mm Waved 3/16”
The waved slicing plates work just like the straight slicing
plates, except that the product has waved or ruffled sides.
This can be an attractive alternative to the flat slices that
are so prevalent on salad bars. By adding a waved plate,
you can dramatically alter the presentation of the food. As
with the straight slicing plates, remember that harder foods
slice best when cut thinner and softer foods slice best when
cut thicker.
While the standard Robot Coupe comes with two specific
plates (C446SA and C450GPA) at time of printing, many
user applications may require some of the optional plates
available with the unit. Typically 5 - 7 plates will perform
most of the functions called by any one customer.
When dicing tomatoes, green peppers, onions, or
celery always insure that the product is introduced
into the machine so that the slicing plate will be slicing across the grain of the vegetable.
CAUTION: The softer the produce, the
less acceptable will be the finished product.
When dicing tomatoes, green peppers, onions, or
celery always insure that the product is introduced
into the machine so that the slicing plate will be slicing across the grain of the vegetable.
After a time of use, the dicing grid will require cleaning. A visible difference in the finished product will
occur when cleaning is required. The best way to
clean the grid is: remove the slicing plate, take a stiff
bristle brush and force the product that is on the grid
to go through.
9
Page 10

R4X and R6X Operation Manual
IV. PREVENTIVE MAINTENANCE
TROUBLE SHOOTING AIDS:
The Robot Coupe has been designed to provide maximum trouble free performance. Adherence to the assembly and operating instructions will further assure
good performance. Additionally, if simple common
sense rules are applied to the unit, a long life utilization will be achieved.
(1) Care: While the Robot Coupe is a ruggedly constructed machine, overall handling should be accomplished with a sense of use rather than abuse. The
motor housing is made of rugged cast aluminium and
will yield a long life if not maltreated. While the machine is reasonably portable, care should be taken
not to drop it. Remove the continuous feed assembly and any plates or other attachments before relocating the machine. Your machine should never
be picked up by the continuous feed lead or the
cord. Always lift from the bottom of the motor
base assembly. Equal caution should be exercised
in handling all of the parts for your own safety and to
assure they are not subject to undue force.
Many other cleaning detergents can also cause corrosion of soft metals.
Clean the aluminum parts using only soft
metal (Aluminum) safe detergents.
The continuous feed assembly, pushers, and plates
are dishwasher safe if used with a soft metal safe
detergent. These attachments can also be washed
in a three tank system pot sink.
NOTE: The high temperatures of dish machines
will tend to shorten the life of the plastic and rubber parts. Hand washing using a three pot sink
will provide for the longest life of these parts.
Pre-rinse the attachments before washing to remove
any bulk food on the parts. A stiff bristle brush or
power sprayer faucet attachment is effective in knocking the food out of the crevices especially when cleaning the cutting plates. The washer should have an
industry standard wash, rinse, and sanitization cycle.
Allow the parts to air dry after sanitizing and before
reassembly.
(2) Cleaning: The machine should be cleaned per
the following instructions or as required by local health
department regulations. Proper cleaning of the machine is one of the MOST IMPORTANT preventive
maintenance measures the user can employ. The
high acid content of some foods can cause harm to
the seals protecting the electrical parts contained
within the housing. It is recommended that the machine be cleaned after each operational use and minimally once per day.
Correct cleaning procedures are required to assure
that damage is not inflicted in the cleaning process.
The motor base assembly contains the motor and
electrical components.
DO NOT IMMERSE THE MOTOR BASE
ASSEMBLY IN WATER!
Cleaning of the motor/base assembly must be done
with care. First, unplug the unit - A sponging
with a soluble soft metal (Aluminum) safe detergent
is acceptable, making sure the water is not permitted
to penetrate the seals. Clean around the seals with a
small brush, taking care to remove all food. Clean
the motor shaft with a small brush.
Read the label for the dish machine detergent you
are using to determine if it is safe for soft metals. If
you can not determine if it is safe for soft metals, then
contact your supplier for this information.
(3) Preventive Maintenance: In addition to cleaning
the seals, an examination should be made periodically to assure that a seal against food is being maintained. With proper care, and depending on use, the
seals should last for a year or more. However, they
can and should be replaced when wear or erosion is
noted or at least once every three to six months to
prevent motor bearing damage. It is recommended
that the seals be replaced by an authorized repair
agency.
Good operational performance is obtained when the
blades are sharp. Continued use can dull the blades.
All of the cutting plates are made so that the blades
or grids can be replaced when they become dull. Always store the plates in the plate holders. Additional
plate holders can be obtained from your food service
distributor.
In general, the best preventive measure that can be
applied is close adherence to the assembly and operation instructions along with common sense and
regular cleaning.
Your Robot Coupe is a piece of kitchen equipment
and like all other kitchen equipment, care and caution should be used when operating. Although training requirements are minimal, only responsible individuals familiar with this operation manual should be
allowed to operate your machine.
10
Page 11

R4X and R6X Operation Manual
V. TROUBLE SHOOTING AIDS
The following section indicates potential problems and
the probable solution which should be
implemented by users. Problems which extend beyond these will require an experienced serviceman.
A list of authorized service agencies is supplied.
A. Unit does not start.
1. Are all the attachments tightly in place? Be
sure the continuous feed lead is flush with the
continuous feed attachment.
2. Press the off button and unplug the machine.
3. Remove continuous feed lead.
4. Remove any product from inside continuous
feed lead and attachment.
5. Is there any product jamming the plate? If so
press the OFF button and unplug the machine.
Wear cut-resistant gloves when removing a jam!
6. Try another outlet.
B. Continuous feed lead will not fit flush with motor
base.
1. Processing plate is not in it’s proper position.
2. Rim of plate should be slightly above the upper edge of continuous feed attachment.
C. Unit stops running.
1. Turn off and unplug the machine.
2. Follow A. above and try again.
D. If unit does not operate after following A above
1. Check outlet for current (breaker for fuse).
2. Try unit again.
3. Call local service agency.
G. Food is going into machine, but not coming out.
1. The discharge Plate is not in the continuous
feed attachment.
H. Cucumbers coming out with torn skins.
1. Blade is dull on plate and must be changed.
NOTE: cucumber condition before process
ing should be considered.
2. Make sure the small “vane” side of the dis
charge plate is up.
VI. SERVICING OF YOUR
ROBOT COUPE
Your Robot Coupe has a one year limited warranty
against defects in parts and workmanship. Should
the unit require service, check with your distributor to
see where local service is available. If not or if you
wish your unit to be serviced at the factory, call for a
return merchandise authorization (RMA) number, and
upon receipt of same, ship it PREPAID and insured
to our factory address.
Robot Coupe USA, Inc.
Service Dept. Phone:1-800-824-1646
601-898-8411
E. Unit starts to spark or smoke.
1. Turn the unit off, unplug it and call local authorized service agency.
F. Unit Makes a grinding noise.
1. Turn off and unplug the machine, disassemble, check the continuous feed lead and processing plate to see if they have been rubbing
together.
2. If this was the case, the processing plate was
not fully seated. Discard any food processed.
Check for and remove any food particles inside
stem of processing plate. Replace the plate insuring that the processing plate is fully
seated. Make sure there are no food particles
on the motor shaft.
11
Page 12

Page 13

Page 14

Page 15

Model Price list for USA only Model Price list for USA only
A
A
g
X
g
X
X
R4X
Series D
PRICES AND OTHER INFORMATION SUBJECT TO CHANGE WITHOUT NOTICE
Series D
Serial Numbers
233xxxxx03
Use "Series D" Cutting Plates Use "Series D" Cutting Plates
R6X
Series D
Series D
Serial Numbers
237xxxxx03
Part # Description Part # Description
27198
28107
29620
29784
102690
117770
118433
BX658
C420
CL520
CL523
CL575
R199
R237
R255
R475
R4906
R4907
R4911
R492
R496
R604S
R611
R662
R662
R664S
RA402
RA406
RA409
RA411
RA412
RA418
RA419
RA429
RA441
RA441.1
RA441.2
RA442
RA443
RA455
RA467
RA477
RA489
RA490
RA493
RA494
RA495 Front Data Plate R4X RA442
RA497
RA604E No lon
S16213632
S17586350
S18388701
S194565
* (D) Cont Feed Kit/R4
(D)Locking Pin Assy
(E) Plastic Base, Low Profile
(D)Cont Feed Bowl (R4 Series D)
(K)Discharge Plate
(D) Din Rail 2"L, R4/R6 'D"
(D)Locking Collar
Base Bolt W/Washer
Mag Swtch w/Hse (single)
Hinge Pin
Hinge Pin Bushing
* Plate Rack (wall mount)
* Robo-Cart
6203 Bearing R2 Top/Btm
* Plate Rack
* Plate Rack (Individual)
Start Capacitor R4X Mtr
Run Capacitor R4X
Circuit Breaker/R4X/10A
Shaft Pin (new style)
Cord W/Plug (R4X,S,P,Y)
Seal, Motor
Motor Support Seal
Bearing, Motor Top
Bearing, Motor Top
Relay DPST
Foot
Motor Support
Continuous Feed Lead
Large Pusher
Small Pusher
Green "On" Switch Assy
Red "Stop" Switch Assy
Latch
Support/Pad,Front
Gasket
Metal Plate
Support,Magnetic Switch
Pad,Rear
Plate, Motor Mounting
Seal Assembly (Seal Support)
Pin for Latch
O Ring, Seal Support
Strain Relief
Base
Baffle
R4X Motor Base Assy
er available RA455
(D) Start Cap. R4X/R6X
(D) Run Cap R4X/R6
(D) Electronic Switch R4X/R6X
(D) Motor R4X/R6X Low Profile
27199
28107
29102
29501
29620
29695
29696
29697
100556
100581
102690
117770
118324
118374
118376
118377
118433
BX658
C420
CL520
CL523
CL569
CL573
CL575
CL576
CL588
R199
R237
R255
R475
R4906
R4907
R4911
R492
R496
R604S
R611
R662
R664S
RA402
RA406
RA418
RA419
RA441
RA441.1
RA441.2
RA443
RA467
RA489
RA490
RA493
RA494
RA604E No lon
RA612
RA698
S16213632 (D) Start Cap. R4X/R6X
S17586350 (D) Run Cap R4X/R6
S18388701 (D) Electronic Switch R4X/R6X
S194565
* (D) Cont Feed Kit W/Extra Safety/R6
(D)Locking Pin Assy
(D)Bracket-Pusher Return Assy
(K)Lock for Feed Cover
(E) Plastic Base, Low Profile
(D) Hinge Bracket
(D)Cont Feed Lead Assy W/Extra Safety
(D)Cont Feed Bowl (R6 Series D)
Description NA
(K)Bushing for Spring
(K)Discharge Plate
(D) Din Rail 2"L, R4/R6 'D"
(L)Small Pusher
(K)Pivot, Pusher Return Bracket
(D)Cont Feed Lead w/Extra Safety
(K)Extra Safety Rod
(D)Locking Collar
Base Bolt W/Washer
Mag Swtch w/Hse (single)
Hinge Pin
Hinge Pin Bushing
Pusher Knob
Stud Bolt, Latch
* Plate Rack (wall mount)
Large Pusher Assembly
Insert, Plastic
* Robo-Cart
6203 Bearing R2 Top/Btm
* Plate Rack
* Plate Rack (Individual)
Start Capacitor R4X Mtr
Run Capacitor R4X
Circuit Breaker/R4X/10A
Shaft Pin (new style)
Cord W/Plug (R4X,S,P,Y)
Seal, Motor
Motor Support Seal
Bearing, Motor Top
Relay DPST
Foot
Motor Support
Green "On" Switch Assy
Red "Stop" Switch Assy
Support/Pad,Front
Gasket
Metal Plate
Support,Magnetic Switch
Pad,Rear
Plate, Motor Mounting
Seal Assembly (Seal Support)
O Ring, Seal Support
Strain Relief
Base
Baffle
er available
Front Data Plate (R6X)
R6X Motor Base Assy
(D) Motor R4X/R6X Low Profile
* Denotes Accessories
NA -Not Available
1/20/2004
Page 16

U.S.A., Inc.U.S.A., Inc.
U.S.A., Inc.
U.S.A., Inc.U.S.A., Inc.
PP
.O. Box 16625, Jackson, MS 39236-6625.O. Box 16625, Jackson, MS 39236-6625
P
.O. Box 16625, Jackson, MS 39236-6625
PP
.O. Box 16625, Jackson, MS 39236-6625.O. Box 16625, Jackson, MS 39236-6625
280 South Perkins St., Ridgeland, MS 39157280 South Perkins St., Ridgeland, MS 39157
280 South Perkins St., Ridgeland, MS 39157
280 South Perkins St., Ridgeland, MS 39157280 South Perkins St., Ridgeland, MS 39157
email: robocoup@misnet.comemail: robocoup@misnet.com
email: robocoup@misnet.com
email: robocoup@misnet.comemail: robocoup@misnet.com
website: www.rwebsite: www.r
website: www.r
website: www.rwebsite: www.r
1-800-824-16461-800-824-1646
1-800-824-1646
1-800-824-16461-800-824-1646
obotcoupeusa.comobotcoupeusa.com
obotcoupeusa.com
obotcoupeusa.comobotcoupeusa.com
ROBOT COUPE U.S.A., INC. LIMITED WARRANTY
YOUR NEW ROBOT COUPE PRODUCT IS WARRANTED TO THE ORIGINAL PURCHASER
FOR A PERIOD OF ONE YEAR FROM THE DATE OF PURCHASE.
This LIMITED WARRANTY is against defects in the material and/or workmanship, and includes labor for
replacement of defective parts, provided repairs are performed by an authorized service agency (see attached
list). The
copy of the dated sales or delivery receipt BEFORE WARRANTY REPAIRS ARE BEGUN. Replacement parts
and accessories are warranted for ninety (90) days from the date of purchase when purchased separately and
will be verified by dated sales receipt OR packing slip which lists that item. All parts or accessories replaced
under warranty must be returned to the Service Agency.
CUSTOMER must inform the Service Agency of the possibility of warranty coverage and provide a
THE FOLLOWING ARE
1. Damage caused by abuse, misuse, dropping, or other similar incidental damage caused by or as
a result of failure to follow assembly, operating, cleaning, user maintenance, or storage
instructions.
2. Labor to sharpen and/or parts to replace knife assemblies or blades which have become dull,
chipped, or worn due to normal use.
3. Material or labor to renew or repair scratched, stained, chipped, dented or discolored surfaces,
blades, knives, attachments, or accessories.
4. Transportation charges to or from an authorized service agency for repairs of a machine designated
as “CARRY IN SERVICE” (table top models). NOTE: R4N/R6N are now field service units.
5. Labor charges to install or test attachments or accessories (i.e., bowls, cutting plates, blades,
attachments) which are replaced for any reason.
6. Charges to change Direction-of-Rotation of Three Phase electric motors (INSTALLER IS
RESPONSIBLE).
7. SHIPPING DAMAGE IS NOT COVERED BY WARRANTY. Visible and hidden damages are the
responsibility of the freight carrier. The consignee must file a damage claim promptly against the
carrier, or upon discovery in the case of hidden damage.
KEEP ALL ORIGINAL CONTAINERS AND PACKING MATERIALS FOR CARRIER INSPECTION.
“NOT” COVERED UNDER WARRANTY:
Robot Coupe U.S.A., Inc., Robot Coupe S.A. or any of their affiliates, distributors, officers, directors, agents,
employees, or insurers will not be obligated for consequential or other damages, losses, or expenses in connection
with or by reason of the use of or inability to use the machine for any purpose.
THIS WARRANTY IS GIVEN EXPRESSLY AND IN LIEU OF ALL OTHER WARRANTIES, EXPRESSED
OR IMPLIED, FOR MERCHANTABILITY AND FOR FITNESS TOWARD A PARTICULAR PURPOSE
AND CONSTITUTES THE ONLY WARRANTY MADE BY ROBOT COUPE, U.S.A., Inc.
 Loading...