

Page 1

12/02/2018
NEW
Register
your product
on line
R 2 N Ultra R 2 N R 2 N CLR
Robot Coupe U.S.A., Inc.,
264 South Perkins, Ridgeland, MS 39157 - Phone : 800/824-1646 • 601/898-8411 • Fax: 601/898-9134
email: info@robotcoupeusa.com - website: www.robotcoupeusa.com
Page 2

WARNING
IMPORTANT WARNING
KEEP THESE INSTRUCTIONS IN A SAFE PLACE
WARNING: In order to limit accidents such as electric shocks or personal injury, and in order to limit material damage due to misuse of the
appliance, please read these instructions carefully and follow them strictly. Reading the operating instructions will help you get to know your
appliance and enable you to use the equipment correctly. Please read these instructions in their entirety and make sure that anyone else who
may use the appliance also reads them beforehand. Our equipment is designed for professional use and must not be used by children under any
circumstances.
UNPACKING
• Carefully remove the equipment from the packaging
and take out all the boxes or packets containing
attachments or specific items.
• WARNING - some of the tools are very sharp e.g.
blades, discs... etc.
• Store manuals, tools and spare parts in a safe
place available to the users of the machine.
INSTALLATION
• Install the machine on a clear counter space with
sufficient room to safely operate and clean the
machine.
CONNECTION
• Always check that your power supply corresponds
to that indicated on the identification plate on the
motor unit and that it can withstand the amperage.
• The machine must be grounded.
• Always check that the motor shaft rotates in
anticlockwise direction before the blades are
installed.
HANDLING
• Always take care when handling the blades, as
they are extremely sharp.
• Wear cut-proof gloves when handling the blades.
12/07/2018
ASSEMBLY PROCEDURES
• Follow the various assembly procedures carefully
(see page 6) and make sure that all the attachments
are correctly positioned.
USE
• Never try to override the locking and safety systems.
• Never insert any object into the container where
the food is being processed.
• Never push the ingredients down with your hand.
• Do not overload the appliance.
• Maximum fill level is ⅔ full, less if the product is
very dense or sticky.
CLEANING
• As a precaution, always unplug your appliance
before cleaning it.
• Always clean the appliance and its attachments at
the end of each cycle.
• Never immerse the motor base in water.
• For parts made from aluminum, use metal safe
detergents intended for aluminum.
• Caustic detergents used in automatic dishwashers
quickly degrade plastic parts. Hand wash plastic
parts if possible.
• Robot-Coupe can in no way be held responsible for
the user’s failure to follow the basic rules of cleaning
and hygiene.
MAINTENANCE
• Do not open the motor housing. There are no
user serviceable components inside the electrical
housing. Refer control component repairs to qualified
technicians.
• Remove and clean shaft seals monthly. Replace
seals every 3 to 6 months. Lubricate with food safe
grease.
• It is particularly important to maintain and check
the attachments since certain ingredients contain
corrosive agents, e.g. citric acid.
• Never operate the appliance if the power cord or
plug has been damaged or if the appliance fails to
work properly or has been damaged in any way.
• If the machine malfunctions in any way discard any
food being processed and refer service to qualified
maintenance technicians.
Page 3
ENGLISH
s.n.c.
s.n.c.
s.n.c.
www.robotcoupeusa.com
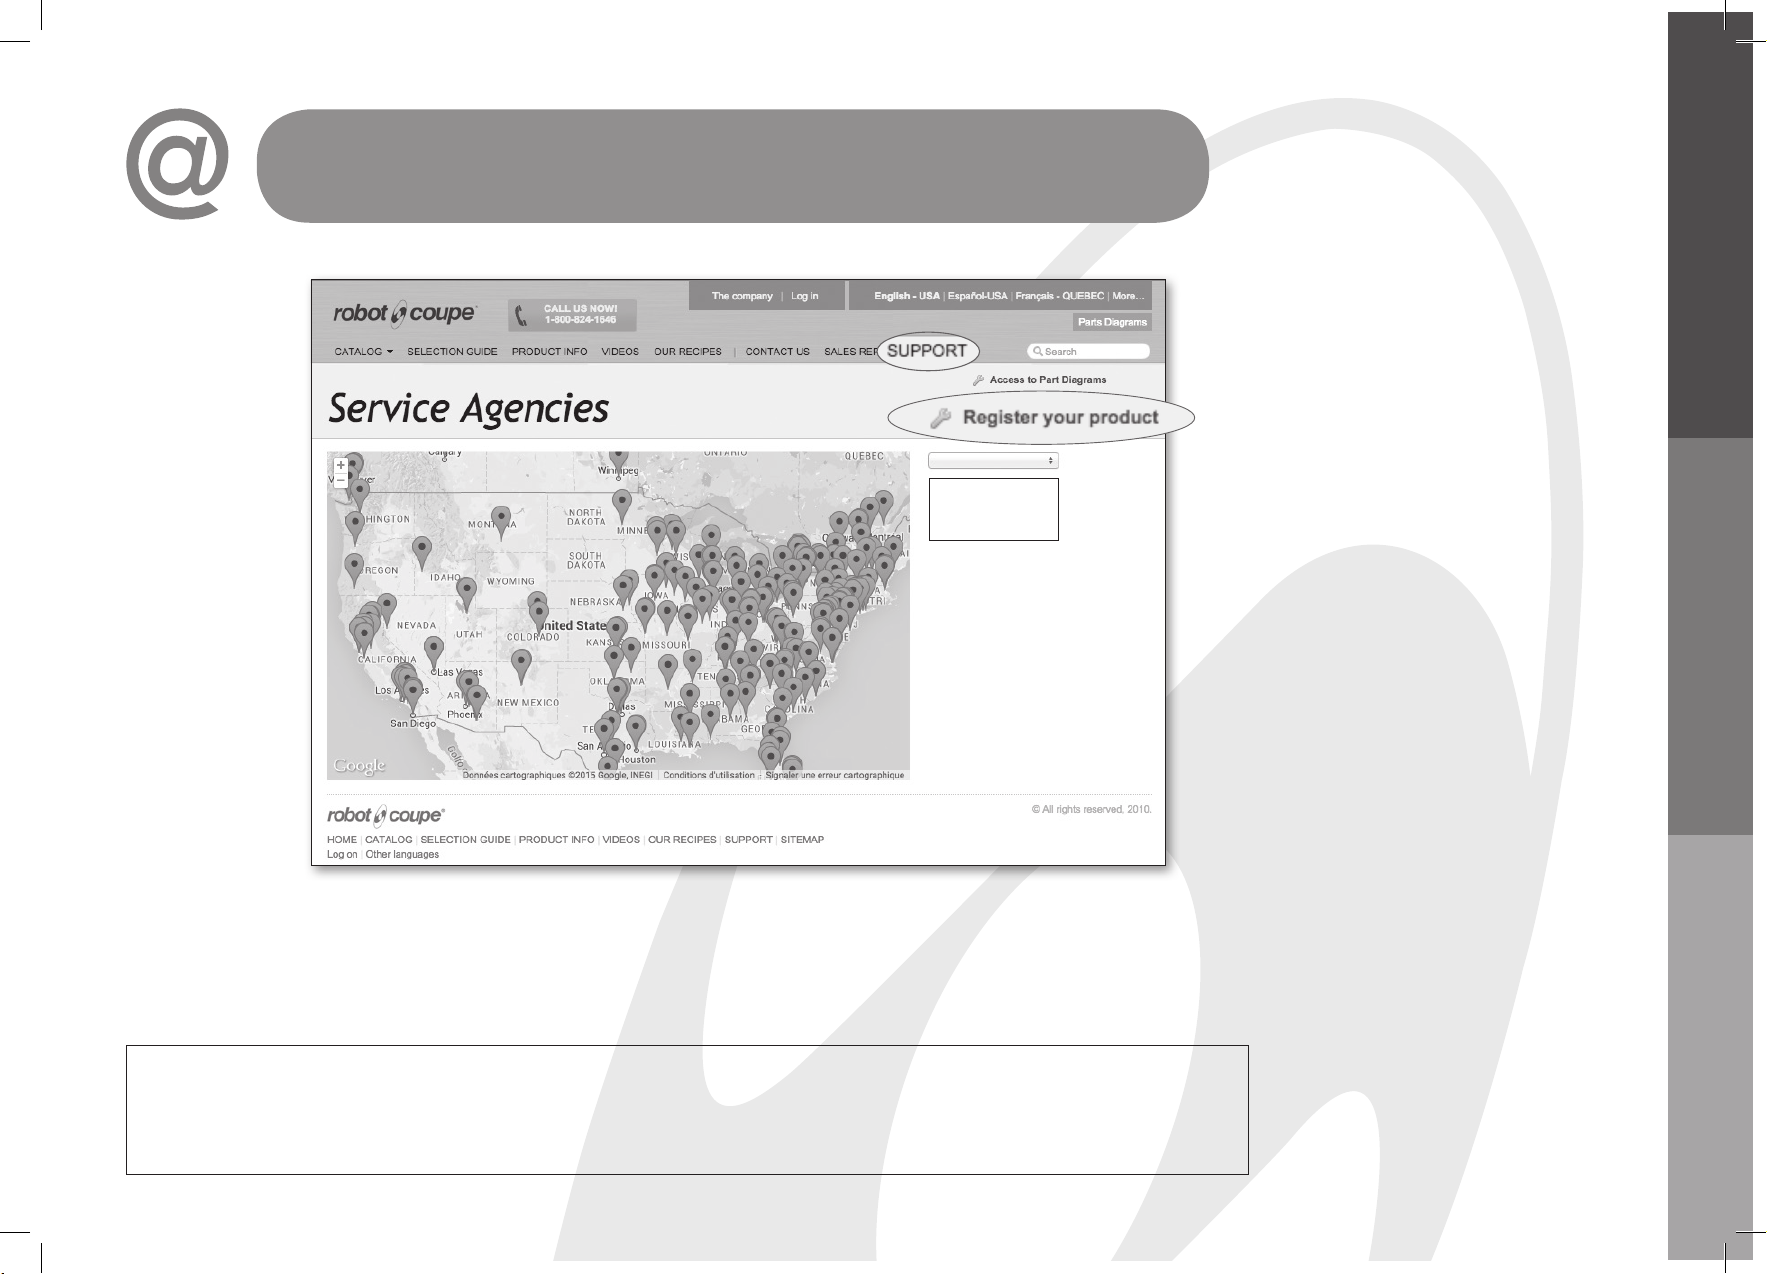
OPERATING
INSTRUCTIONS
http://www.robot-
coupe.com/en-usa/
service/register/
It is recommended that the machine
be operated no longer than 5
minutes of continuous run time and
should be operated on a 50% duty
cycle.
MANUAL DE
INSTRUCCIÓN
Se recomienda no hacer funcionar
la máquina más de 5 minutos
continuos y respetar un ciclo de
servicio del 50 %
Eng
Es
product online
We reserve the right to alter at any time without notice the technical specifications of this appliance. None of the information contained in this document is of a contractual nature.
Modifications may be made at any time. © All rights reserved for all countries by: ROBOT-COUPE
Nos reservamos el derecho de modificar en todo momento y sin previo aviso las características técnicas de este aparato. Las informaciones que figuran en este documento no son
contractuales y pueden ser modificadas en todo momento. © Todos los derechos reservados para todos los países por : ROBOT-COUPE
Nous nous réservons le droit de modifier à tous moments et sans préavis les caractéristiques techniques de cet appareil.
Les informations figurant dans ce document ne sont pas contractuelles et peuvent être modifiées à tout moment. © Tous droits réservés pour tous pays par : Robot-Coupe
Register your
Registre su
producto en línea
Fr
Enregistrez votre
produit en ligne
NOTICE
D’INSTRUCTIONS
Il est recommandé de ne pas faire
fonctionner la machine en continu
pendant plus de 5 minutes et de
respecter un cycle de service de
50%.
12/07/2018
FRANÇAIS ESPAGNOL
1
Page 4

Page 5

ENGLISH
SUMMARY
WARRANTY
IMPORTANT WARNING
INTRODUCTION TO YOUR NEW
R 2 N • R 2 N Ultra • R 2 N CLR
BOWL CUTTER/VEGETABLE PREPARATION
SWITCHING ON THE MACHINE
• Advice on electrical connections
• Control panel
ASSEMBLY
• Bowl attachment
OPERATING INSTRUCTIONS
• Bowl attachment
• Vegetable preparation attachment
CLEANING
• Motor base
• Attachments
MAINTENANCE
• Motor seal
• Blade
• Blades and discs
SAFETY
SERVICE
TECHNICAL DATA (page 27)
• Exploded views
• Vegetable preparation attachment
• Electrical and wiring diagrams
12/07/2018
3
Page 6

ROBOT COUPE U.S.A., INC. ONE YEAR LIMITED WARRANTY
YOUR NEW ROBOT COUPE PRODUCT
IS WARRANTED TO THE ORIGINAL
PURCHASER FOR A PERIOD OF ONE
YEAR FROM THE DATE OF PURCHASE.
This LIMITED WARRANTY is against
defects in the material and/or
workmanship, and includes labor for
replacement of defective parts, provided
repairs are performed by an authorized
service agency (see attached list). The
CUSTOMER must inform the Service
Agency of the possibility of warranty
coverage and provide a copy of the
dated sales or delivery receipt BEFORE
WARRANTY REPAIRS ARE BEGUN. All
parts or accessories replaced under
warranty must be returned to the Service
Agency. The warranty for work done or
parts replaced under warranty expires at
the end of the original warranty period.
Replacement parts and accessories are
warranted for ninety (90) days from
the date of purchase when purchased
separately and will be verified by dated
sales receipt OR packing slip which list
that item.
THE FOLLOWING ARE NOT
COVERED UNDER WARRANTY:
1 - Damage caused by abuse, misuse,
dropping, or other similar incidental damage
caused by or as result of failure to follow
installation, assembly, operating, cleaning, user
maintenance or storage instructions, including
failure to verify and correct rotation of three
phase motors.
2 - Labor to sharpen and/or parts to replace
knife assemblies or blades which have become
dull, chipped, or worn due to normal use.
3 - Material or labor to renew or repair
scratched, stained, chipped, dented, or
discolored surfaces, blades, knives, attachments,
or accessories.
4 - Transportation charges to or from an
authorized service agency for repairs of a
machine designated as “CARRY IN SERVICE’
(Table Top Models).
5 - Transportation of the appliance to or from
an approved service agency.
6 - Charges to change Direction-of-Rotation
of Three Phase electric motors (INSTALLER IS
RESPONSIBLE). All Robot Coupe products must
operate counter-clock-wise.
7 - SHIPPING DAMAGE IS NOT COVERED
BY WARRANTY. Visible and hidden damages
are the responsibility or the freight carrier. The
consignee must file a damage claim promptly
against the carrier, or upon discovery in the case
of hidden damage.
KEEP ALL ORIGINAL CONTAINERS AND
PACKING MATERIALS FOR CARRIER
INSPECTION
Robot Coupe U.S.A., Inc., Robot Coupe S.A.,
or any of their affiliates, distributors, officers,
directors, agents, employees or insurers will
not be obligated for consequential or other
damages, losses, or expenses in connection with
or by reason of the use of or the inability to use
the machine for any purpose.
THIS WARRANTY IS GIVEN EXPRESSLY AND IN
LIEU OF ALL OTHER WARRANTIES EXPRESSED
OR IMPLIED, FOR MERCHANTABILITY AND FOR
FITNESS TOWARD A PARTICULAR PURPOSE
AND CONSTITUTES THE ONLY WARRANTY
MADE BY ROBOT COUPE, U.S.A., Inc.
4
12/07/2018
Page 7

ENGLISH
WARNING
IMPORTANT WARNING
KEEP THESE INSTRUCTIONS IN A SAFE PLACE
WARNING: In order to limit accidents such as electric shocks or personal injury, and in order to limit material damage due to misuse of the
appliance, please read these instructions carefully and follow them strictly. Reading the operating instructions will help you get to know your
appliance and enable you to use the equipment correctly. Please read these instructions in their entirety and make sure that anyone else who
may use the appliance also reads them beforehand. Our equipment is designed for professional use and must not be used by children under any
circumstances.
UNPACKING
• Carefully remove the equipment from the packaging
and take out all the boxes or packets containing
attachments or specific items.
• WARNING - some of the tools are very sharp e.g.
blades, discs... etc.
• Store manuals, tools and spare parts in a safe
place available to the users of the machine.
INSTALLATION
• Install the machine on a clear counter space with
sufficient room to safely operate and clean the
machine.
CONNECTION
• Always check that your power supply corresponds
to that indicated on the identification plate on the
motor unit and that it can withstand the amperage.
• The machine must be grounded.
• Always check that the motor shaft rotates in
anticlockwise direction before the blades are
installed.
HANDLING
• Always take care when handling the blades, as
they are extremely sharp.
• Wear cut-proof gloves when handling the blades.
ASSEMBLY PROCEDURES
• Follow the various assembly procedures carefully
(see page 6) and make sure that all the attachments
are correctly positioned.
USE
• Never try to override the locking and safety systems.
• Never insert any object into the container where
the food is being processed.
• Never push the ingredients down with your hand.
• Do not overload the appliance.
• Maximum fill level is ⅔ full, less if the product is
very dense or sticky.
CLEANING
• As a precaution, always unplug your appliance
before cleaning it.
• Always clean the appliance and its attachments at
the end of each cycle.
• Never immerse the motor base in water.
• For parts made from aluminum, use metal safe
detergents intended for aluminum.
• Caustic detergents used in automatic dishwashers
quickly degrade plastic parts. Hand wash plastic
parts if possible.
• Robot-Coupe can in no way be held responsible for
the user’s failure to follow the basic rules of cleaning
and hygiene.
MAINTENANCE
• Do not open the motor housing. There are no
user serviceable components inside the electrical
housing. Refer control component repairs to qualified
technicians.
• Remove and clean shaft seals monthly. Replace
seals every 3 to 6 months. Lubricate with food safe
grease.
• It is particularly important to maintain and check
the attachments since certain ingredients contain
corrosive agents, e.g. citric acid.
• Never operate the appliance if the power cord or
plug has been damaged or if the appliance fails to
work properly or has been damaged in any way.
• If the machine malfunctions in any way discard any
food being processed and refer service to qualified
maintenance technicians.
12/07/2018
5
Page 8
INTRODUCTION TO
YOUR NEW R 2 N •
R 2 N Ultra • R 2 N CLR
The R 2 N / R 2 N Ultra / R 2 N CLR is a versatile
machine designed to meet your professional needs.
It can perform a number of tasks, as well as save
much in time and labor.
This food processor consists of a bowl assembly
and a vegetable preparation attachment. The 3
liter bowl is used for chopping, grinding, pureeing,
blending, mixing, and kneading ingredients used in
most recipes.
A wide range of cutting discs are available for use
with the vegetable preparation attachment. Cutting
discs are available for slicing, waved slicing,
grating, pulping and julienne.
Its numerous functions will open the door to a whole
new culinary world.
Thanks to its simple design, all components
requiring frequent handling for maintenance or
cleaning can be easily assembled or removed.
All users should read this operation manual before
operating the machine.
WARNING
This appliance must be plugged into a grounded
socket (risk of electrocution).
• CONTROL PANEL
R 2 N / R 2 N Ultra / R 2 N CLR
Red knob = Off switch
Green knob = On switch
Black knob = Pulse control
ASSEMBLY
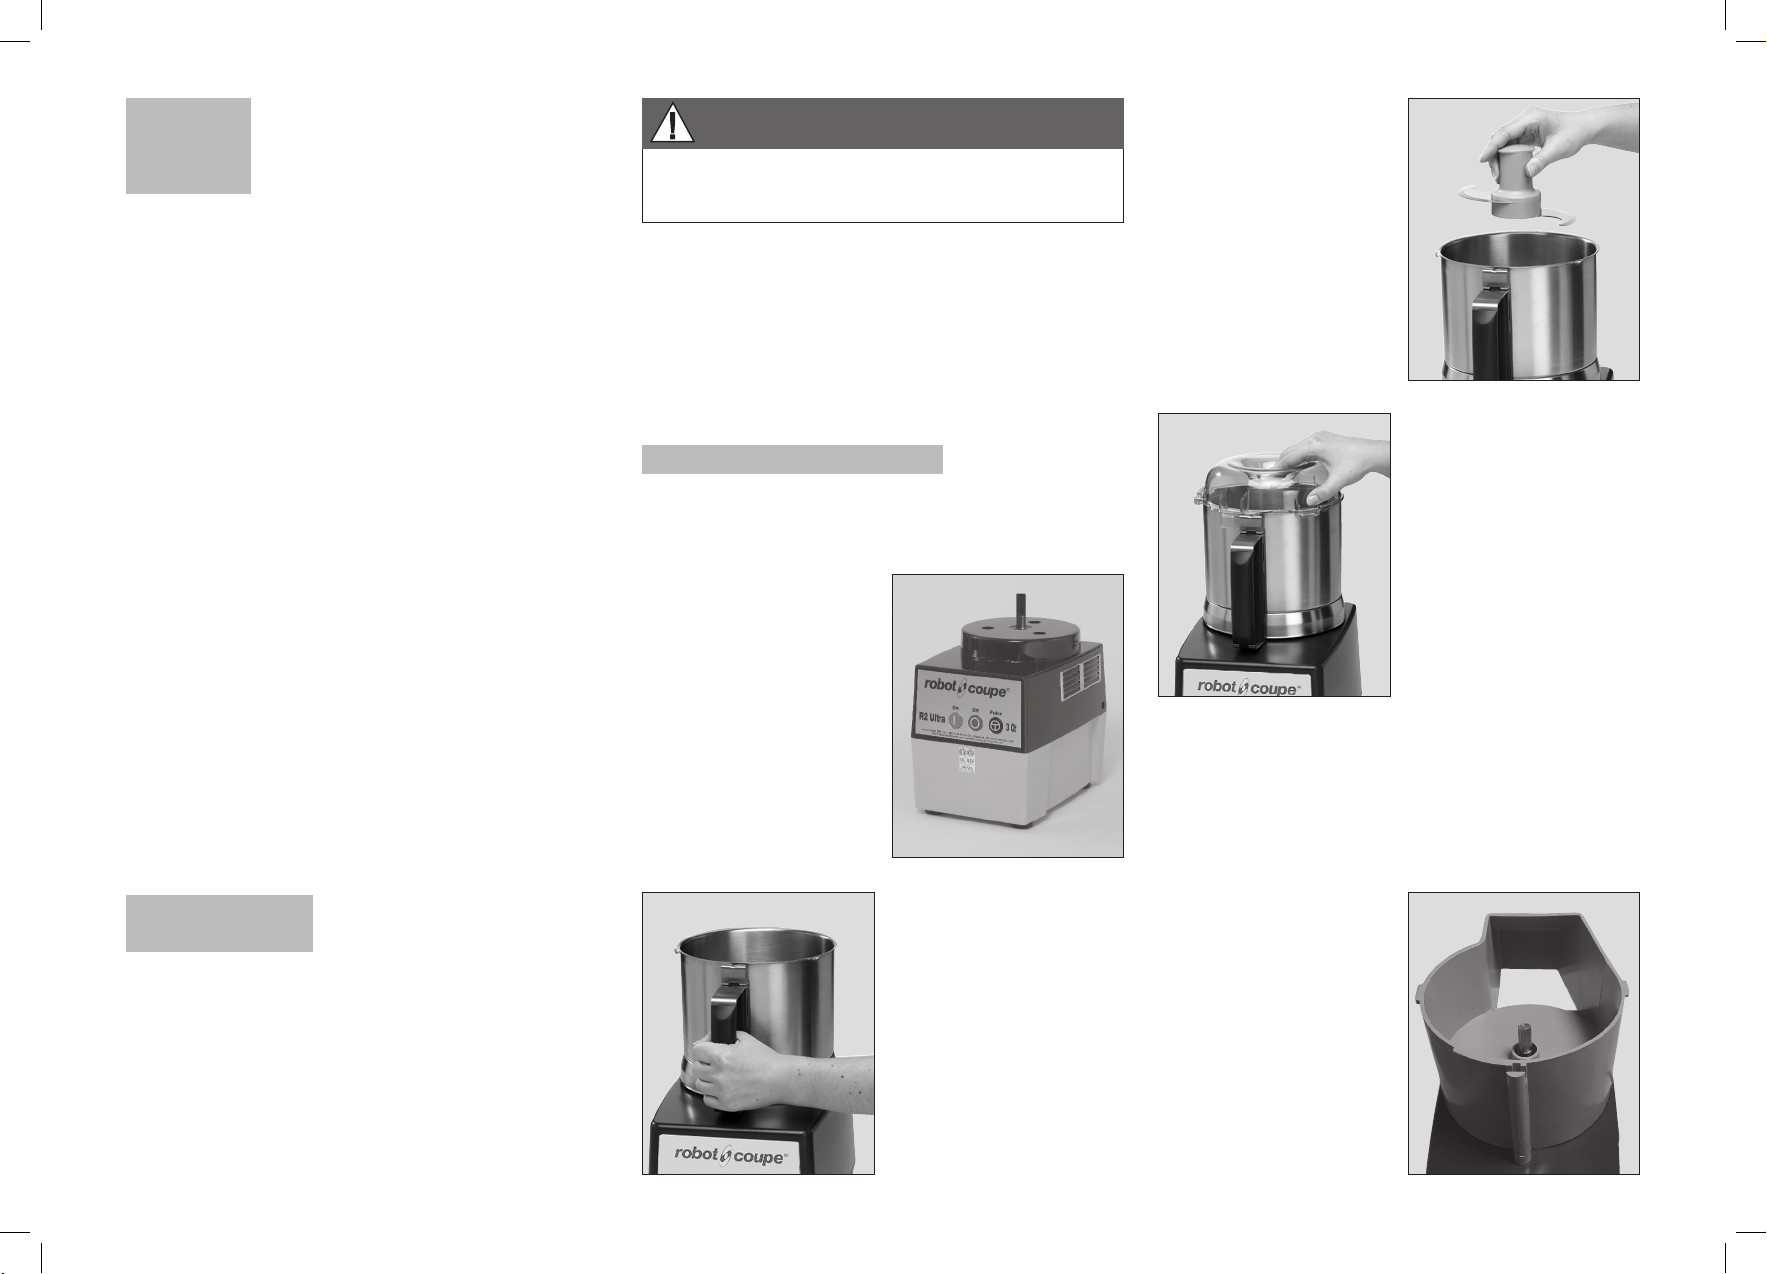
• BOWL ATTACHMENT
1) With the motor base
facing you, place the
bowl onto the motor
base with the handle
toward the front. Turn
the bowl just off-center
and to the left as you
lower it onto the base.
3) Place the blade onto
the motor shaft. Rotate
the blade until it drops
into place. The bottom
blade should be level with and just off the
bottom of the bowl.
4) Note the plastic tab
on the bowl lid. Place
the lid on the bowl with
the tab turned to the
front and slightly to the
left of the bowl handle;
then, turn the lid back to
the right until it comes to
a stop with the tab over
the bowl handle.
The device is now ready for use.
• VEGETABLE PREPARATION ATTACHMENT
The vegetable preparation attachment consists of
two main detachable parts: the vegetable preparation top and the vegetable preparation bowl.
SWITCHING
ON THE MACHINE
• ADVICE ON ELECTRICAL CONNECTIONS
Before plugging in, check that your power supply
corresponds to that indicated on the machine’s
serial number plate.
12/07/2018
6
1) With the motor
base facing you, fit the
vegetable preparation
bowl attachment onto
the motor base; the exit
chute should be at the
rear of the machine.
2) Then, turn it back to
the right, (counterclockwise) locking it onto
the motor base tabs.
Page 9

ENGLISH
2) Turn the attachment
to the right until it locks
onto the motor base
tabs.
5) Place the vegetable
preparation top onto
the vegetable preparation bowl attachment,
and rotate it back to the
right until it locks onto
the bowl tabs.
USES
Max. processing
quantity
(in pounds)
Processing
time
(in mn)
CHOP
• MEAT
Hamburgers / steak tartare 2 3
Sausagemeat / tomatoes 2 3
Terrine / pâté 2 4
3) Place the discharge
plate onto the motor
shaft. It should fall into
place just off the bottom
of the vegetable preparation bowl attachment.
USING A REGULAR DISC:
4) Place the cutting disc
of your choice onto the
discharge plate. It may
be necessary to rotate
the plate until it drops
fully onto the discharge
plate.
Follow step 5.
OPERATING INSTRUCTIONS
THE UNIT SHOULD BE OFF EXCEPT WHEN
PROCESSING IS UNDERWAY
It is recommended that the machine be operated
on a 50 % duty cycle. This is easily accomplished
since the preparation time (cleaning, coring,
peeling, and loading) takes longer than the
processing time. This will yield the longest life for
your machine.
• BOWL ATTACHMENT
The cutter bowl is used for grinding, kneading,
pureeing, blending, mixing, and emulsifying. Before
placing the product into the bowl, some products
such as meats and cheeses should be precut into
1-2 inch portions. When filling the bowl, allow
space above the product for circulation. Fill the
bowl no more than ⅔ full.
There are two ways to run your machine: chopping,
using a quick start/stop action with the Pulse button
or running continuously for a fine chop or puree.
To obtain a uniform chop of products such as meats
and cheeses, begin with a uniformly portioned
product.
Pulse the machine until the desired result is
reached. Then, if a puree or fine chop is desired,
press the On button, and allow the machine to run
until the product has the right consistency.
• FISH
Brandade 2 5
Terrines 2 5
• VEGETABLES
Garlic / parsley /onion / shallots ¾ 3
Soup / purées 2 4
• FRUIT
Compotes /purées 2 4
EMULSIFY
Mayonnaise / Ailloli / remoulade sauce 2 ¼ 3
Hollandaise / Béarnaise 2 ¼ 5
Snail or salmon butter 2 ¼ 4
KNEAD
Shortcrust pastry / shortbread 2 4
Flaky pastry 2 4
Pizza dough 2 4
GRIND
Dried fruit 1 4
Ice 1 4
Breadcrumbs 1 4
12/07/2018
7
Page 10

• VEGETABLE PREPARATION ATTACHMENT
The vegetable preparation attachment is used
for slicing, grating, waved slicing, julienne and
pulping.
The vegetable preparation attachment consists of
two feed openings :
- one large feed opening for cutting vegetables
such as cabbage, celeriac, etc.
- a cylindrical feed opening inside the large
pusher for long or hard vegetables and highprecision cutting.
For optimum cutting, use this section as a guide.
Do not attempt to run frozen products through the
cutting discs.
Do not put anything other than food products into
the feed openings.
Do not remove atta
running.
Do not apply excess pressure to the food pushers:
This can cause damage to the motor, discs, and
other parts.
HOW TO USE THE LARGE FEED OPENING
Never fill the hopper while the unit is running.
Fill the hopper with the foodstuff. Apply the pusher
on the food with a constant and moderate pressure.
Press the On button to start the motor. To get the
best quality cut, maintain a moderate pressure on
the pusher until the full hopper is processed. Once
all the foodstuff is processed, turn off the unit and
repeat as needed to finish the prep.
HOW TO USE THE CYLINDRICAL SMALL OPENING
Remove the small pusher from the large pusher. Fill
the small opening with the foodstuff and follow the
same procedure as above.
12/07/2018
8
chments while the motor is
SLICERS
3/64”
5/64” / 1/8”
5/32” / 3/16”
1/4”
carrot / cabbage / cucumber / onion / potato / leek
lemon / carrot / mushroom / cabbage / potato / cucumber /
zucchini / onion / leek / bell pepper
eggplant / beet root / carrot / mushroom / cucumber / bell
pepper /radish / lettuce / potato / leek / tomato
eggplant / beetroot / carrot / mushroom / cucumber /bell
pepper /radish / lettuce / potato / leek
RIPPLE CUT SLICER
5/64”
beetroot / potato
GRATERS
1/16”
5/64”
1/8”
1/4”
celeriac / cheese
carrot / celeriac / cheese
carrot
cabbage/cheese
9/32”
cabbage/cheese
Hard cheese
1/32”
Extra fine 0.7mm
3/64”
Pulping 1 mm
JULIENNE
5/64”x 5/64”
5/64”x 5/32”
5/64”x 1/4”
5/32”x 5/32”
1/4”x 1/4”
5/16”x 5/16”
carrot / celeriac / potato
carrot / beetroot / zucchini / potato
carrot / beetroot / zucchini / potato
eggplant / beetroot / zucchini / potato
eggplant / beetroot / celeriac / zucchini / potato
celeriac / potato
CLEANING
WARNING
As a precaution, always unplug your appliance
before cleaning it (risk of electric shock).
• MOTOR BASE
Never immerse the motor base in water. Clean
using a damp cloth or sponge.
Cleaning of the motor base assembly must be done
with care.
First unplug the unit. A sponging with a cloth lightly
dampened (not dripping) in a mild detergent is
acceptable, making sure the water is not permitted
to penetrate the shaft seal or around the switches
and in the ventilation openings. Clean around
the shaft seal with a small brush, taking care to
remove all food. Do not forget to clean the motor
shaft. Rinse the motor base first using a cloth lightly
dampened (not dripping) with water, then with a
sanitizing solution. Dry the machine with a soft cloth
removing all liquids from seal areas.
• ATTACHMENTS :
CLEANING THE BLADE ASSEMBLY
There is a removable cap
attached to the top of the
S-blade assembly. This
cap should be removed
before cleaning the
blade assembly. Always
replace the cap once
cleaning is complete
Caution: The blades are sharp. Wear cut-resistant
gloves when handling the blade.
The blade cap may be removed by carefully pulling
the cap up away from the blade. It may be helpful
to pull slightly to the side. The cap is held in place
by small plastic clips that snap into the body of the
blade assembly. If the cap is difficult to remove,
you can use a small diameter rod or screwdriver
inserted through the bottom side of the blade
assembly to knock out the cap using a quick sharp
impact. Again, use caution when handling the
blade.
Page 11

ENGLISH
Remove all attachments before cleaning. The bowl
and vegetable preparation assemblies should be
cleaned per the following instructions or as required
by local health department regulations.
The bowl, blade, lid, vegetable preparation bowl,
vegetable preparation top, pushers, and plates
are dishwasher safe. All of the attachments listed
above can be washed in a dish machine or threetank system pot sink. Pre-rinse the attachments
before washing to remove any bulk food on the
parts. A stiff bristle brush or power sprayer faucet
attachment is effective in knocking the food out of
the crevices as a pre-rinse procedure. The washer
should have an industry standard wash, rinse, and
sanitization cycle. Allow the parts to air dry after
sanitizing and before reassembly.
NOTE : The high temperatures of dish machines
will tend to shorten the life of the plastic and
rubber parts. Hand washing using a three-pot sink
will provide for the longest life of these parts.
Wear cut-resistant gloves when cleaning the blade
and plates.
Inspect the area on the outside of the bowl around
the handle and the outside of the continous feed
bowl around the interlock pin to ensure they are
clean. Use a brush on these areas if necessary.
IMPORTANT
Check that your detergent is suitable for
cleaning plastic parts. Some washing agents
are too alkaline (e.g. high levels of caustic
soda or ammonia) and totally incompatible
with certain types of plastic, causing them to
deteriorate rapidly.
MAINTENANCE
• MOTOR SEAL
An examination should be made periodically
to ensure that a seal against liquids is being
maintained around the motor shaft. The seal can
and should be replaced whenever wear or erosion
is noted or minimally once every three to six
months. It is recommended that the seal be replaced
by an authorized repair agency.
• BLADE
Blades should be kept sharp. It is not necessary
to have a razor edge. However, they will need
sharpening periodically. Replacement of the dull
blades or plates is recommended.
SHARPENING THE BLADE
The blade will
require sharpening
on a periodic basis
depending on use. The
use of a dull blade
will sometimes give
unsatisfactory results.
Follow the directions
shown to sharpen the
blade, or have the
blades sharpened professionally if you prefer.
Put on your cut-resistant gloves
1. Use a Robot Coupe stone or any good
sharpening stone.
2. Hold or clamp the blade flat on the edge or
corner of a sturdy table.
3. With the other hand, hold the stone at a 30
degree angle against the top bevel of one blade.
4. Pull the stone into the blade edge moving from
hub to tip, several strokes, until the blade is
sharp.
5. Turn the blade over, and rub the stone flat
against the underside of the blade to remove the
feather edge formed at step 5.
- Repeat the procedure for the other blade.
- Wash the blade before use.
• BLADES AND DISCS
The blades on the slicing and julienne discs are all
subject to wear and should be changed as required
to ensure high quality cutting.
SAFETY
The R 2 N / R 2 N Ultra / R 2 N CLR are fitted
with an interlock system.
When you open the bowl lid, the motor stops.
When you open the vegetable preparation top, the
motor stops.
WARNING
The blades and cutting discs are extremely
sharp. Handle with care.
To avoid splashing when running liquids in the
bowl, allow the blades to come to a complete stop
before opening the lid.
NOTE : The machines are equipped with a thermal
protector which automatically stops the motor if
the machine is overloaded. If this happens, press
the Off button and allow the machine to cool
completely before restarting.
12/07/2018
9
Page 12

12/02/2018
REMEMBER
Never try to override or defeat the purpose of,
the locking and safety systems.
Never put nonfood objects into the machine
openings.
Only use the food pushers to force the food into
the machine.
Do not overload the appliance.
Never leave the machine running unattended.
SERVICE
See warranty first then;
Should your unit require service, check with your
distributor to see where local service is available.
If not or if you wish your unit to be serviced at the
factory, call for return instructions and ship the unit
prepaid to our factory address.
PH : 800/824-1646
Robot Coupe U.S.A., Inc.,
Service Department Repair
264 South Perkins Street
Ridgeland, MS 39157
For service in Canada contact the Robot-Coupe
USA factory for repair instructions.
10
Page 13

ESPAGNOL
INDICE
GARANTÍA
MEDIDAS IMPORTANTES DE SEGURIDAD
INTRODUCCIÓN A SU NUEVO
COMBINADO CUTTER
Y CORTA-HORTALIZAS
R 2 N • R 2 N Ultra • R 2 N CLR
PUESTA EN SERVICIO DE LA MÁQUINA
• Consejos eléctricos
• Panel de control
MONTAJE
• Accesorio cutter
• Accesorio corta-hortalizas
EJEMPLOS
• Accesorio cutter
• Accesorio corta-hortalizas
LIMPIEZA
• Bloque motor
• Accesorios
MAINTENIMIENTO
• Junta hermetica
• Cuchilla
• Hojas y placas
SEGURIDAD
REPARACIÓN
DATOS TÉCNICOS (Página 27)
• Vista detallada
• Esquema de conexiones y del cableado
12/07/2018
11
Page 14

ROBOT COUPE U.S.A., INC. GARANTÍA LIMITADA DE UN AÑO
SU NUEVO APARATO ROBOT COUPE ESTÁ
GARANTIZADO UN AÑO A PARTIR DE LA
FECHA DE COMPRA. ESTA GARANTÍA ES
VÁLIDA ÚNICAMENTE PARA EL COMPRADOR
ORIGINAL.
La presente GARANTÍA LIMITADA cubre los
defectos relativos a los materiales y a la
fabricación e incluye la mano de obra necesaria para reemplazar las piezas defectuosas,
a condición de que las reparaciones sean
efectuadas por un centro de servicio posventa autorizado (véase la lista adjunta). El
CLIENTE debe informar al centro de servicio
si se trata de una reclamación de garantía y
proporcionar la copia de la factura o del documento de entrega que mencione la fecha de
compra ANTES DE QUE SE EMPIECEN LAS REPARACIONES BAJO GARANTÍA. La totalidad
de las piezas o los accesorios reemplazados
bajo garantía deben ser retornados al centro
de servicio posventa. La mano de obra y las
piezas reemplazadas bajo garantía quedan
cubiertas hasta el fin del periodo de garantía
inicial.
Las piezas y los accesorios reemplazados
gozan de una garantía de noventa (90) días
a partir de la fecha de compra cuando se
adquieren separadamente, tras presentación
de la factura fechada O del documento de
envío en el que figure el artículo en cuestión.
LOS SIGUIENTES ELEMENTOS NO ESTÁN
CUBIERTOS POR LA GARANTÍA:
Los daños causados por un uso incorrecto
1 -
o indebido, una caída o cualquier otro daño
accidental similar causado o resultante del
incumplimiento por el usuario de las instrucciones
de instalación, montaje, limpieza, mantenimiento
o almacenamiento, incluido el incumplimiento
de verificación y corrección de la rotación de los
motores trifásicos.
2 - La mano de obra necesaria para el
afilamiento y/o las piezas necesarias para
reemplazar o reparar las cuchillas completas o
las hojas desafiladas, desportilladas o gastadas
por un uso normal.
3 - Las piezas o la mano de obra para
reemplazar o reparar superficies, cuchillas o
accesorios rayados, manchados, desportillados,
abollado o descoloridos.
4 - Los gastos de transportar hasta o desde
el centro de servicio posventa autorizado para
la reparación de un aparato de categoría
«REPARACIÓN EN TALLER» (modelos de
sobremesa).
5 - Los gastos de mano de obra necesarios para
instalar o probar las piezas o los accesorios (es
decir, cubas, discos o cuchillas) reemplazados
por cualquier motivo.
6 - Los costes para cambiar de sentido de
rotación los motores trifásicos (EL RESPONSABLE
ES EL INSTALADOR). Todos los productos RobotCoupe deben funcionar en sentido antihorario.
7 - LOS DAÑOS QUE OCURRAN DURANTE
EL ENVÍO, NO SON CUBIERTOS POR LA
GARANTÍA. La responsabilidad de los vicios
visibles y ocultos recaen en el transportista. El
destinatario debe presentar inmediatamente una
reclamación por daños al transportista o apenas
descubra el defecto si se trata de un vicio oculto.
CONSERVE TODAS LAS CAJAS Y EMBALAJES
ORIGINALES, PUES SERVIRÁN EN EL
MOMENTO DE LA INSPECCIÓN POR EL
TRANSPORTISTA.
Ni Robot Coupe U.S.A, Inc., Robot Coupe
S.A. ni sus filiales, distribuidores, agentes,
gerentes, empleados o aseguradores pueden
ser considerados responsables de los daños,
pérdidas o gastos indirectos o de cualquier otro
tipo resultantes del uso uso del aparato o de la
imposibilidad de utilizarlo.
ESTA GARANTÍA, QUE SUSTITUYE CUALQUIER
OTRA GARANTÍA, EXPLÍCITA O IMPLÍCITA, ES
UNA GARANTÍA DE CALIDAD COMERCIAL
ADAPTADA A UN USO PRIVADO Y CONSTITUYE
LA ÚNICA GARANTÍA OTORGADA POR ROBOT
COUPE, U.S.A, INC.
12
12/07/2018
Page 15

ESPAGNOL
ATENCION
PRECAUCIONES IMPORTANTES
CONSERVE ESTAS INSTRUCCIONES
ATENCION: A fin de limitar el número de accidentes (cortocircuitos, heridas...) y de reducir los daños materiales debidos a la utilización inadecuada del
aparato, le aconsejamos que lea atentamente las instrucciones siguientes y que las siga en todo momento. Este manual le permitirá conocer mejor su aparato
y utilizarlo correctamente. Lea la totalidad de las instruciones y haga que las lean las personas que podrían utilizar el aparato. Nuestro equipo está previsto
para un uso profesional y en ningún caso debe ser utilizado por niños.
DESEMBALAJE
• Saque el aparato de su embalaje con cuidado y
saque todas las cajas o los paquetes que contienen
los accesorios o material específico.
• Tenga CUIDADO con los accesorios cortantes
(hojas, discos...).
• Conservar los manuales, herramientas y piezas
de recambio en un lugar seguro y accesible a los
usuarios de la máquina.
INSTALACIÓN
• Instalar la máquina en el piso, en una superficie
suficientemente grande para poder utilizar y limpiar
la máquina con toda seguridad.
CONEXIÓN
• Asegúrese siempre de que el tipo de corriente de
su instalación eléctrica corresponde al indicado en la
placa de características del bloque motor y soporta
el amperaje.
• Conecte siempre el aparato a una toma de tierra.
• Verificar siempre que el eje del motor gire en el
sentido contrario a las agujas de un reloj antes de
instalar las cuchillas.
MANIPULACIÓN
• Manipule siempre los discos y hojas con precaución, ya que son accesorios cortantes.
• Utilizar guantes de protección para manipular las
cuchillas.
FASES DE MONTAJE
• Siga minuciosamente las distintas fases de montaje
(véase página 14) y asegúrese de que todos los
accesorios están colocados correctamente.
UTILIZACIÓN
• Nunca traten de suprimir los sistemas de bloqueo
y de seguridad.
• No deben introducirse ningún objeto en el
recipiente de trabajo.
• Nunca se deben empujar los alimentos con la
mano.
• No debe sobrecargarse el aparato.
• El nivel máximo de llenado es los ⅔ de la
capacidad o menos, si el producto es muy denso
o pegajoso.
LIMPIEZA
• Por precaución, desenchufe siempre el aparato
antes de proceder a las operaciones de limpieza.
• Limpie sistemáticamente el aparato y sus accesorios
al final del ciclo de trabajo.
• No sumerja el bloque motor en el agua.
• Para las piezas de aluminio, utilizar detergentes
adecuados para el aluminio.
• Los detergentes cáusticos que se utilizan en los
lavavajillas degradan rápidamente las piezas de
plástico. Es posible lavar estas piezas a mano.
• Robot Coupe nunca podrá ser considerado
responsable en caso de incumplimiento por parte
del usuario de las reglas fundamentales de limpieza
e higiene.
MANTENIMIENTO
• No abrir la carcasa del motor. No hay ningún
componente en la caja eléctrica que pueda ser
reparado o manipulado por el usuario. Hacer reparar
las piezas de mando por técnicos cualificados.
• Retirar y limpiar las juntas del eje cada mes.
Remplazar las juntas cada 3 ó 6 meses y lubricarlas
con grasa alimentaria.
• El mantenimiento y el examen de los accesorios
deben ser tanto más minuciosos cuanto que en
las preparaciones se utilizan productos corrosivos
(ácido cítrico...).
• No ponga en marcha el aparato si el cable de
alimentación o la clavija están deteriorados, si el
aparato funciona mal o si ha sufrido cualquier tipo
de daño.
• Si la máquina presenta un defecto cualquiera de
funcionamiento, vaciar completamente los alimentos
que se estén trabajando y llamar al servicio de
mantenimiento cualificado.
12/07/2018
13
Page 16

12/02/2018
SU NUEVO COMBINADO
CUTTER Y CORTA-HORTALIZAS
R 2 N • R 2 N Ultra • R 2 N CLR
El combinado cutter y corta-hortalizas R 2 N/R 2 N
Ultra/R 2 N CLR es un aparato ideal para cocinas profesionales. Le rendirá innumerables servicios que Vd.
irá descubriendo a medida que la utiliza más y más.
El combinado consiste de un accesorio tipo cutter y
un accesorio para cortar-hortalizas. En la función
cutter, (para el modelo R 2 N Ultra, cuba de 3 litros
en acero inoxidable y para el modelo R 2 N/R 2 N
clear, cuba en material composite), el combinado
pica y prepara carne, verduras, rellenos finos,
mousses, patés, pastas amasadas, licuados, etc. en
menos de 5 minutos para las preparaciones que
llevan más tiempo. Para la función corta-hortalizas,
el combinado se equipa con una selección de
discos cortantes para rebanar picar y rayar.
Con las cosas que puede hacer esta máquina Vd. rápidamente ampliará su compo en las artes culinarias.
La sencillez del aparato le permitirá fácilmente
alternar de uso del accesorio cutter y el accesorio
corta-hortalizas. Ambos se colocan y quitan sin
más que una vuelta de la mano.
Este folleto da información importante que ayuda al
usuario a beneficiarse al máximo de su inversión en
el combinado.
Por lo tanto le aconsejamos leer detenidamente este
folleto antes de comenzar a utilizar su máquina.
PUESTA EN SERVICIO
DE LA MÁQUINA
ATENCIÓN
ESTE APARATO DEBE ESTAR CONECTADO A LA TIERRA
IMPERATIVAMENTE. (PELIGRO DE ELECTROCUCIÓN).
14
• CONSEJOS ELÉCTRICOS
Antes de conectar la máquina a la toma de corriente,
verifique si la del lugar es efectivamente la indicada
en la placa designatoria del motor.
• PANEL DE CONTROL
R 2 N / R 2 N Ultra / R 2 N CLR
Botón rojo = Paro
Botón verde = Marcha
Botón negro = Mando de pulsar
MONTAJE
• ACCESORIO CUTTER
1) El bloque motor se
colocar frente a usted.
Colocar la cuba a la derecha respecto a la base
motor. La barra magnética ligeramente a la izquierda.
2) Girar la cuba a la
dere cha hasta que encaje
bien en los salientes del
cuerpo del motor.
El mango se halla ahora
frente a usted
3) Colocar el cuchillo
sobre el eje motor y bajarlo hasta el fondo de la
cuba.
Girarlo en la cuba para
cerciorarse de haberlo
colocado en el sentido
correcto.
4) Girar la tapa sobre la
cuba hacia la derecha
hasta su bloqueo.
Una vez que están en
contacto la máquina estará lista para funcionar.
• ACCESORIO CORTA-HORTALIZAS
El accesorio corta-hortalizas consiste de dos
piezas desmontables : la cuba corta-hortalizas y
la tapa.
1) Con la cara del
cuerpo del motor, hacia
Vd., situar la cuba, con
la descarga hacia la
derecha.
Page 17

12/02/2018
ESPAGNOL
2) Girar la cuba o la
derecha hasta que se
encastre en las salientes
del cuerpo del motor.
3) Encajar en el eje del
motor el disco expulsor
de plástico blanco y
cerciorarse que quede
bien posicionado en el
fondo de la cuba.
UTILIZACIÓN DE UN DISCO STANDARD:
4) Despues escoger el
disco y ponerlo sobre el
disco expulsor.
Dar vueltas el disco
hasta que caiga en la
pieza de extensión.
Siga el paso 5.
5) Coloque el empujador
en el accesorio de alimentación continua y gírelo
nuevamente hacia la derecha hasta que se enganche en los dientes del recipiente.
EJEMPLOS
DEJE SIEMPRE LA MAQUINA APAGADA, EXCEPTO
CUANDO LA ESTÉ UTILIZANDO
Se recomienda someter la máquina a un régimen
de utilización del 50 %. Esto es fácil de lograr,
dado que el tiempo de preparación (limpieza de la
verdura, extracción de las semillas, pelado y carga
de la máquina) es más largo que el tiempo de procesamiento en sí. De este modo, la máquina tendrá
una larga vida útil.
• ACCESORIO CUTTER
El cutter permite realizar todar clase de preparaciones
picadas, relleno fino, emulsiones, preparaciones molidas
y masas, trabajando a gran velocidad. Por eso le
recomendos que no deje de vigilar atentamente los
productos que esté procesando para obtener así el
meyor resultado. Antes de colocar los alimentos en
la cuba, algunos productos como carnes y queso
debe cortarse en trozos de de 2 a 5 cm. Dejar sitio
entre los trozos para una mejor turbulencia cuando
llene la cuba. Llene la cuba hasta los ⅔ de su
capacidad como máximo.
Hay dos maneras de utilizar la máquina :
1- Picar de manera gorda impulsos utilizando la
función «pulsar».
2- Para un picado fino, active el botón «Marcha»
y deje la máquina en funcionamiento hasta
obtener la consistencia que desea.
USOS
Cantidad de
elaboración
(in pounds)
Tiempo de
elaboración
minutos
TAJAR
• CARNE
Humburguesas / albóndigas 2 3
Para salchichas / al tomate 2 3
Patés 2 4
• PESCADO
Brandada 2 5
Pasta 2 5
• VERDURAS
Ajo / perejil / cebolla / chalota ¾ 3
Sopas / puré de verduras 2 4
• FRUTAS
Compota / trituración de frutas 2 4
EMULSIONAR
Mayonesas / ailloli / remoulade 2 ¼ 3
Salsa Bearnesa / Holandesa 2 ¼ 5
Mantequilla de caracoles / de salmón 2 ¼ 4
AMASAR
Masa quebrada / Pastaflora 2 4
Para Hojaldres 2 4
Masa de pizza / Masa de pan 2 4
TRITURACION
Frutos secos 1 4
Glacés 1 4
Pan rayado 1 4
15
Page 18

• ACCESORIO CORTA-HORTALIZAS
El accesorio para cortar hortalizas permite realizar
toda clase de cortes en frutas y hortalizas, a saber:
rodajas, cortes ondulados, rallados y bastoncillos.
El conjunto corta-hortalizas tiene dos conductos de
toma intercambiables :
- Un conducto grande que permite picar legumbres
como repollos, apio, etc.
- Un conducto cilíndrico más apropiado para
hortalizas de forma alargada.
El conducto asegura una excelente precisíon de
corte al guiar el avance del producto a picar.
No introduzca congelados en el aparato.
No retire ningún accesorio de la máquina cuando
aún esté en funcionamiento.
No introduzca objeto alguno en el recipiente de
trabajo.
No sobrecargue el aparato.
USO DEL CONDUCTO GRANDE
Nunca llene la tolva mientras la unidad está funcionand
Alzar la palanquita para librar la boca del
-
conducto de toma.
- Introducir los legumbres hasta llenar el conducto
de toma.
-
-
Volver la palanquita al pie del conducto.
E mpezar a apr et ar s obre l a pal anquit a, ent onces
poner l a pi cador a en marcha, y s eguir apret ando
l a pal anquit a hast a que no quede nada de
l egu mbr e en el conduct o
USO DEL CONDUCTO CILINDRICO
- Introducir las legumbres hasta llenar el conducto.
Empezar a apretar sobre la palanquita, poner
la picadora en marcha, y seguir apretando la
palanquita hasta que la legumbre esté totalmente
picada.
12/07/2018
16
REBANADORES
3/64”
5/64” / 1/8”
5/32” / 3/16”
1/4”
zanahoria / col / cebolla / patatas / puerro
limones / zanahoria / champiñones / col / patatas / pepino /
calabaza / cebolla / puerro / pimiento
barenjena / betabel / zanahoria / champiñones /pepino /
pimiento / rabano / lechuga / patatas / tomate
berenjena / betabel / zanahoria / champiñones / pepino /
pimiento / rabano / lechuga / patatas
REBANADOR ONDULADO
5/64”
betabel / patatas
RALLADORES
1/16”
5/64”
1/8”
1/4”
apio / queso
zanahoria /apio / queso
zanahoria
col / queso
9/32”
col / queso
Parmesano
1/32”
Rabano 0,7 mm
3/64”
Rabano 1 mm
BASTONCILLOS
5/64”x 5/64”
5/64”x 5/32”
5/64”x 1/4”
o.
5/32”x 5/32”
zanahoria /apio / patatas
zanahoria / betabel / calabaza / patatas
zanahoria / betabel / calabaza / patatas
berenjena / betabel / calabaza / patatas
Ante todo, desenchufe el aparato. Limpie el bloque
motor con un paño ligeramente humedecido (que
no esté empapado), pase una solución desinfectante
y seque la máquina con un paño seco y retire todo
resto de líquido alrededor de la junta hermética.
No deje en ningún caso que el agua entre en el eje
hermético o alrededor de los botones de mando.
Limpie alrededor del eje hermético con un cepillo
retirando todos los restos de alimentos. No se
olvide de limpiar el eje del motor.
• ACCESORIOS
LIMPIEZA DE LA CUCHILLA
Hay una tapita desmontable instalada en la parte
superior del eje portacuchillas, que deberá retirar antes de limpiar las
hojas de corte. Siempre
hay que cerrar la tapa tras la limpieza del aparato.
1/4”x 1/4”
5/16”x 5/16”
berenjena / betabel / apio /calabaza / patatas
apio / patatas
Cuidado: La cuchilla es afilada; utilice guantes
resistentes a los cortes cuando la manipule.
LIMPIEZA
La tapita se puede retirar simplemente tirando de
ella cuidadosamente hacia arriba. Puede resultar
¡CUIDADO!
Por precaución, le aconsejamos que desenchufe
siempre el aparato antes de proceder a las
operaciones de limpieza (peligro de electrocución)
útil tirar ligeramente hacia un costado. La tapita
está fijada en su lugar por medio de pequeños
ganchitos de plástico que la mantienen sujeta al
eje portacuchillas. Si le cuesta retirarla, puede utilizar una varilla o un destornillador de diámetro
• BLOQUE MOTOR
Nunca sumergir el bloque motor en agua.
Limpiarlo con un trapo o una esponja húmedos.
El bloque motor debe limpiarse con cuidado.
reducido e introducirlo por la parte inferior del eje
portacuchillas para dar un golpe seco y rápido a la
tapita desde abajo. Nuevamente le instamos a que
tenga cuidado cuando manipula la cuchilla.
Page 19

ESPAGNOL
Antes de limpiar la máquina, retire los accesorios.
La cuba y la tapa deben limpiarse siguiendo las
instrucciones que se dan a continuación o de
acuerdo a las recomendaciones de la legislación
local en vigor.
La cuba, cuchilla, tapa, empujador y discos pueden
lavarse en el lavavajillas o a mano en tres baños
diferentes.
Enjuagar los accesorios antes de lavarlos para
retirar los restos de alimento que hayan quedado
adheridos.
Un cepillo o un aerosol suficientemente fuerte son
medios eficaces para retirar restos de alimento en
los intersticios y constituyen un buen preenjuague.
El proceso de limpieza en vigor comprende 1 lavado,
1 enjuague y 1 ciclo de desinfección. Deje secar al
aire libre los elementos después de deinfectarlos y
antes de volver a instalarlos en la máquina.
¡ATENCIÓN! Si la temperatura del lavavajillas es
demasiado elevada, los elementos de plástico y
caucho tendrán una vida útil más breve. Lavar los
elementos a mano con los tres baños sucesivos
garantiza una mayor vida útil de las piezas.
Emplee guantes adaptados a la limpieza de las
cuchillas y los discos.
Limpiar la parte exterior de la cuba, la tapa y la
barra de seguridad, verificando que todo quede
perfectamente limpio. De ser necesario, emplee un
cepillo.
IMPORTANTE
Verifique que su detergente se puede utilizar
con piezas en materia plástica. En efecto, ciertos agentes de lavado demasiados alcalinos
(con fuerte concentración en sosa o en amoniaco por ejemplo) son totalmente incompatibles con ciertas materias plásticas y las deterioran muy rápidamente.
MANTENIMIENTO
• JUNTA HERMÉTICA
Debe controlarse con regularidad este elemento de
modo tal que el eje del motor permanezca perfectamente hermético. La junta hermética, embargo,
debe ser reemplazada cuando se observen signos de
desgaste o de erosión, o como mínimo una vez cada
3 ó 6 meses. Recomendamos que la junta hermética
sea reemplazada por un reparador oficial.
• CUCHILLA
Las hojas deben estar bien afiladas. Sugerimos
que las afile con regularidad. Recomendamos
reemplazar las hojas o los discos gastados.
AFILADO DE LA CUCHILLA
Será necesario afilar
las hojas de la cuchilla
periódicamente en
función del uso que
haga del aparato. El
utilizar hojas desafiladas puede dar, en
ocasiones, resultados
insatisfactorios. Para
afilar las hojas, puede
hacerlo usted mismo siguiendo las instrucciones
indicadas a continuación o bien, si lo prefiere, entregárselas a un profesional.
Póngase guantes resistentes a los cortes.
1. Emplee una piedra Robot-Coupe o cualquier
otra piedra de afilar de buena calidad.
2. En una mesa sólida, sujete o enganche la cuchilla
de forma plana con respecto a la superficie.
3. Con la otra mano, sujete la piedra de afilar en
un ángulo de 30° contra el bisel superior de una
de las hojas.
4. Deslice la piedra contra el borde de la hoja
desde el centro hacia la punta, varias veces,
hasta que la hoja esté afilada.
5. Dé vuelta la hoja y frote la piedra de forma
plana contra la parte inferior de la hoja para
retirar la rebaba que se ha formado en el paso
anterior.
- Repita la operación con la otra hoja.
- Lave la cuchilla antes de volver a utilizarla.
• HOJAS Y PLACAS
Las hojas en los discos de cortar y las placas en los
discos tipo julienne, todas son piezas que se gastan
y tendrán que cambiarse de vez en cuando para
asegurar que se obtienen cortes de alta calidad
homogeneo.
SEGURIDAD
Estos modelos están equipado de un sistema de
seguridad electrónico y sistema de frenado del
motor.
El motor se detiene en cuanto se abre la tapadera
del triturador.
El motor se detiene en cuanto se abre la palanca
del Corta-Hortalizas.
CUIDADO!
Los cuchillos y discos son objetos que cortan.
Hay que manipularlos con precaución.
12/07/2018
17
Page 20

12/02/2018
Para evitar salpicaduras de preparaciones liquidas
en el bastidor, se le aconseja siempre parar la
máquina antes de abrir la tapa.
Estos modelos disponen de una protección termica
que para el motor automáticamente si se deja la
máquina encendida durante un tiempo excesive o si
la sobrecarga.
Si esto ocurre, deja enfriarse la máquina por
completo antes de volver a arrancarla.
REPARACIÓN
Como primera medida, consulte la garantía.
Si el aparato necesita servicio, buscar en www.
robotcoupeusa.com el servicio posventa autorizado
Robot-Coupe más cercano o llamar a la fábrica.
Si se prefiere enviar el aparato a la fábrica para
su mantenimiento, preguntar por teléfono el
procedimiento que hay que seguir y despachar la
máquina en porte pagado.
RECUERDEN
Nunca traten de suprimir los sistemas de
bloqueo y de seguridad.
No deben introducirse ningún objeto en el
recipiente de trabajo.
Nunca se deben empujar los alimentos con la
mano.
No debe sobrecargarse el aparato.
Nunca se debe hacer funcionar el aparato en
vacío.
PH : 1-800-824-1646
Robot Coupe U.S.A., Inc.
Service Department
264 South Perkins St.,
Ridgeland, MS 39157
Para el servicio de postventa en el Canada,
contacta la fabrica de Robot-Coupe
en Estados Unidos.
18
Page 21

FRANÇAIS
SOMMAIRE
GARANTIE
PRÉCAUTIONS IMPORTANTES
VOUS VENEZ D'ACQUÉRIR UN COMBINÉ
R 2 N • R 2 N Ultra • R 2 N CLR
CUTTER / COUPE-LÉGUMES
MISE EN SERVICE DE L’APPAREIL
• Conseils électriques
• Tableau de bord
PHASES DE MONTAGE
• Accessoire cutter
• Accessoire coupe légumes
UTILISATIONS ET FABRICATIONS
• Accessoire cutter
• Accessoire coupe légumes
NETTOYAGE
• Bloc moteur
• Accessoires
ENTRETIEN
• Bague d’étanchéité
• Couteau
• Lames et peignes
SÉCURITÉ
DÉPANNAGE
DONNÉES TECHNIQUES (page 27)
• Vues éclatées
• Schémas électriques et de câblage
12/07/2018
19
Page 22

ROBOT COUPE U.S.A., INC. GARANTIE LIMITÉE D’UN AN
VOTRE NOUVEL APPAREIL ROBOT COUPE
EST GARANTI UN AN À PARTIR DE LA DATE
D’ACHAT. CETTE GARANTIE NE S’APPLIQUE
QU’À L’ACHETEUR D’ORIGINE.
Cette GARANTIE LIMITÉE couvre les défauts
liés aux matériaux et/ou à la fabrication
et inclut la main d’œuvre nécessaire au
remplacement des pièces défectueuses,
sous réserve que les réparations soient
effectuées par un centre de service aprèsvente agréé (voir la liste jointe). Le CLIENT
doit informer le centre de service aprèsvente d’une éventuelle réclamation en
garantie et fournir une copie de la facture
ou du bon de livraison mentionnant
la date d’achat AVANT LE DÉBUT DES
RÉPARATIONS SOUS GARANTIE. La totalité
des pièces ou accessoires remplacés sous
garantie doivent être retournés au centre
de service après-vente. La main d’œuvre
et les pièces remplacées sous garantie sont
couvertes jusqu’à la fin de la période de
garantie initiale.
Les pièces et accessoires remplacés sont
garantis quatre-vingt-dix (90) jours à partir
de la date d’achat lorsqu’ils sont achetés
séparément, sur justificatif de la facture
datée OU du bordereau d’expédition sur
lequel l’article figure.
LES POINTS SUIVANTS NE SONT
PAS COUVERTS PAR LA GARANTIE :
1 -
incorrecte ou inappropriée, une chute ou tout
autre dommage accidentel similaire causé par
ou résultant du non-respect des instructions
d’installation, de montage, de nettoyage, de
maintenance par l’utilisateur ou de stockage, y
compris l’absence de vérification et de correction
de la rotation des moteurs triphasés.
Dommages causés par une utilisation
2 - Main d’œuvre nécessaire à l’affûtage et/
ou pièces nécessaires au remplacement des
couteaux ou lames émoussés, ébréchés ou usés
par une utilisation normale.
3 - Pièces ou main d’œuvre pour remplacer ou
réparer des surfaces, lames, couteaux, pièces ou
accessoires rayés, tachés, ébréchés, bosselés ou
décolorés.
4 - Frais de transport vers ou depuis un centre
de service après-vente agréé pour la réparation
d’un appareil de catégorie « RÉPARATION EN
ATELIER » (modèles de table).
5 - Frais de main d’œuvre engagés pour installer
ou tester des pièces ou accessoires (c.-à-d. cuves,
disques, lames) remplacés quel que soit le motif.
6 - Les frais engagés pour modifier le sens
de rotation des moteurs électriques triphasés
(l’INSTALLATEUR EN EST RESPONSABLE). Tous
les produits Robot Coupe doivent fonctionner
dans le sens anti-horaire.
7 - LES DOMMAGES SURVENUS LORS DE
L’EXPÉDITION NE SONT PAS COUVERTS PAR LA
GARANTIE. La responsabilité des vices visibles et
cachés incombe au transporteur. Le destinataire
doit déposer une réclamation pour dommages
immédiatement auprès du transporteur ou dès
qu’un défaut est découvert en cas de vice caché.
CONSERVEZ TOUS LES CARTONS ET
EMBALLAGES D’ORIGINE QUI SERVIRONT
LORS DE L’INSPECTION DU TRANSPORTEUR
Robot Coupe U.S.A, Inc., Robot Coupe S.A. ainsi
que toutes leurs filiales, distributeurs, agents, gérants, employés ou assureurs ne peuvent être tenus
responsables des dommages, pertes ou dépenses
indirects ou autres liés à ou résultant de l’utilisation
de l’appareil ou de l’impossibilité de l’utiliser.
CETTE GARANTIE, QUI REMPLACE TOUTE
AUTRE GARANTIE, EXPLICITE OU IMPLICITE, EST
UNE GARANTIE DE QUALITÉ MARCHANDE ET
D’ADAPTATION À UN USAGE PARTICULIER ET
CONSTITUE LA SEULE GARANTIE ACCORDÉE
PAR ROBOT COUPE, U.S.A, INC.
20
12/07/2018
Page 23

FRANÇAIS
ATTENTION
PRÉCAUTIONS IMPORTANTES
CONSERVER CES INSTRUCTIONS
ATTENTION : Afin de limiter le nombre d’accidents (chocs électriques, blessures...) et afin de réduire les dégâts matériels liés à une mauvaise
utilisation de votre machine, lisez attentivement les instructions suivantes et respectez-les impérativement. La lecture de cette notice vous apportera
une meilleure connaissance de votre appareil et vous permettra une utilisation correcte de votre machine. Lire la totalité des instructions et les
faire lire à toute personne susceptible d’utiliser l’appareil. Notre matériel est prévu pour un usage professionnel et ne doit être en aucun cas
utilisé par les enfants.
DÉBALLAGE
• Retirer précautionneusement l’équipement de son
emballage et extraire toutes les boîtes ou paquets
contenant les accessoires ou matériel spécifique.
• ATTENTION aux outils coupants : lames, disques…
• Garder vos notices, outils et pièces détachées dans
un lieu sûr auquel toutes les personnes susceptibles
d’utiliser l’appareil ont accès.
INSTALLATION
• Installer votre appareil dans une zone dégagée
avec suffisamment d’espace pour permettre son
utilisation et son nettoyage en toute sécurité.
BRANCHEMENT
• Toujours vérifier que la nature du courant de
votre installation électrique correspond bien à celle
indiquée sur la plaque signalétique du bloc moteur et
qu’elle supporte l’ampérage.
• Relier impérativement l’appareil à la terre.
• Toujours s’assurer que l’axe moteur tourne dans
le sens inverse des aiguilles d’une montre avant
d’installer le couteau.
MANIPULATION
• Toujours manipuler les disques ou lames avec
précaution, ce sont des outils tranchants.
• Toujours porter des gants anti-coupures lorsque
vous manipulez les lames.
PHASES DE MONTAGE
• Bien respecter les différentes phases de montage
(se reporter page 22) et s’assurer que tous les
accessoires sont correctement positionnés.
UTILISATION
• Ne jamais essayer de supprimer les systèmes de
verrouillage et de sécurité.
• Ne jamais introduire un objet dans le récipient de
travail.
• Ne jamais pousser les ingrédients avec la main.
• Ne pas surcharger l’appareil.
• Ne jamais remplir la cuve au-delà des ⅔ (moins,
si le produit est particulièrement épais ou collant).
NETTOYAGE
• Par précaution, avant de procéder aux opérations
de nettoyage, toujours débrancher votre appareil.
• Nettoyer systématiquement la machine ainsi que
les accessoires à la fin du cycle de travail.
• Ne pas mettre le bloc moteur dans l’eau.
• Toujours utiliser un produit de lavage « spécial
aluminium » pour nettoyer les pièces en aluminium.
• Les produits lessiviels destinés aux lave-vaisselle
dégradent rapidement les pièces en plastique. Nous
vous recommandons plutôt d’effectuer un lavage à la
main, si possible.
• En aucun cas, Robot-Coupe ne peut être tenu
responsable d’un manquement de l’utilisateur aux
règles élémentaires de nettoyage et d’hygiène.
ENTRETIEN
• Ne jamais ouvrir le bloc moteur. Il n’y a aucune
pièce réparable par l’utilisateur à l’intérieur du
boîtier électrique. Faire réparer les composants de
commande par un réparateur qualifié.
• Retirer et nettoyer les joints de l’axe moteur une
fois par mois. Remplacer les joints tous les 3 à 6
mois. Les lubrifier avec une graisse alimentaire.
• L’entretien et l’examen des accessoires doivent
être d’autant plus soignés que dans les préparations
interviennent des produits corrosifs (acide citrique...).
• Ne pas faire fonctionner l’appareil si le cordon
d’alimentation ou la fiche sont endommagés, si
l’appareil fonctionne mal ou s’il a été endommagé
d’une manière quelconque.
• En cas de dysfonctionnement quelconque de
l’appareil, jeter tous les produits travaillés et faire
appel à un service d’entretien qualifié.
12/07/2018
21
Page 24

12/02/2018
VOUS VENEZ D’ACQUÉRIR UN
COMBINÉ R 2 N • R 2 N Ultra
• R 2 N CLR
Le R 2 N/R 2 N Ultra/R 2 N CLR est un outil de travail
parfaitement adapté aux besoins des professionnels.
Il vous rendra d’innombrables services que vous
découvrirez au fur et à mesure de son utilisation.
Ce combiné se compose d’un accessoire cutter et d’un
accessoire coupe-légumes. En fonction cutter (cuve
de 3 litres en inox pour le R 2 N Ultra et en matériau
composite pour le R 2 N/R 2 N clear), il vous
permettra de réaliser le travail des viandes, légumes,
farces fines, mousses, broyages, pétrissages... en
moins de 5 minutes pour les opérations les plus
longues. En fonction coupe-légumes, il est doté d’un
large éventail de disques pour tous vos travaux
d’éminçages, râpages et bâtonnets.
Ses performances vous feront découvrir très vite un
autre univers de l’art culinaire.
La conception simple de cet appareil vous permet
d’utiliser aussi facilement votre accessoire cutter que
coupe-légumes : I’un comme l’autre se montent et se
démontent en un tour de main.
Cette notice contient des informations importantes
élaborées pour que l’utilisateur tire le plus grand
profit de son investissement.
Aussi, nous vous conseillons vivement de lire attentivement cette notice avant la mise en route de l’appareil.
MISE EN SERVICE DE L’APPAREIL
• CONSEILS ÉLECTRIQUES
Avant branchement, vérifier si la nature du courant
de votre installation électrique correspond bien à
celle indiquée sur la plaque signalétique du moteur.
22
ATTENTION
CET APPAREIL DOIT ÊTRE IMPÉRATIVEMENT
RELIÉ À LA TERRE (RISQUE D’ÉLECTROCUTION).
• TABLEAU DE BORD
R 2 N / R 2 N Ultra / R 2 N CLR
Bouton rouge = Arrêt
Bouton vert = Marche
Bouton noir = Commande impulsions
PHASES DE MONTAGE
• ACCESSOIRE CUTTER
1) Le bloc moteur face
à vous, positionner la
cuve bien droite par
rapport à l’axe moteur,
le barreau magnétique
légèrement décalé sur la
gauche.
2) Tourner la cuve vers
la droite jusqu’à ce que
les ergots du bloc moteur soient bien positionnés dans leurs emplacements.
La poignée est alors face
à vous.
3) Engager le couteau
sur l’axe moteur et
faites-le descendre
jusqu’au fond de la
cuve.
Assurez-vous qu’il est
positionné correctement,
en le faisant tourner
dans la cuve.
4) Mettre le couvercle
sur la cuve et faites-le
pivoter sur la droite
jusqu’au blocage.
Le contact est établi,
votre appareil est alors
prêt à fonctionner.
• ACCESSOIRE COUPE-LÉGUMES
L’accessoire coupe légumes se compose de deux
parties démontables: la cuve coupe-légumes et le
couvercle.
1) Le bloc moteur face à
vous, emboîter la cuve
du coupe-légumes sur
le bloc moteur, la goulotte d’éjection se situe à
votre droite.
Page 25

FRANÇAIS
3) Engager le disque
évacuateur en plastique
blanc sur l’axe moteur
et vérifier qu’il est bien
positionné en fond de
cuve.
2) Tourner la cuve vers
la droite jusqu’à ce que
les ergots du bloc moteur
soient bien dans leurs
emplacements.
5) Positionner le couvercle Coupe-légumes
sur la cuve Coupelégumes et effectuer une
rotation sur la droite
jusqu’à l’enclenchement
de celui-ci sur la cuve.
UTILISATIONS & FABRICATIONS
ARRÊTER L’APPAREIL UNE FOIS SON UTILISATION
TERMINÉE
Nous recommandons de faire fonctionner la
machine selon un cycle 50 % travail, 50 % repos.
Ceci ne pose pas de problème, dans la mesure
où le temps de préparation (nettoyage, évidage,
épluchage, chargement…) est plus long que le
temps de fonctionnement. Ceci assurera une durée
de vie optimale à votre machine.
UTILISATIONS
Quantité Maxi
en Produit fini
(en livres)
Temps de
travail
(en inches)
HACHER
• VIANDES
Steak haché / tartare 2 3
Chair à saucisse / à tomate 2 3
Terrine / pâté de campagne 2 4
• POISSONS
Brandade 2 5
Terrine de poisson 2 5
• LEGUMES
Ail / persil / oignon / échalote ¾ 3
Potage / purée de légumes 2 4
• FRUITS
Compote /réduction de fruits 2 4
EMULSIONNER
UTILISATION D’UN DISQUE NORMAL :
4) Puis, placer le disque
de votre choix sur le
disque évacuateur.
Tourner le disque
jusqu’à ce qu’il tombe
en place sur le prolongateur.
Suivre étape 5.
• ACCESSOIRE CUTTER
Le cutter permet de réaliser tous types de hachage,
farce fine, émulsions, broyages et pétrissages en un
minimum de temps, aussi nous vous conseillons de
surveiller attentivement la réalisation des préparations
afin d’obtenir le résultat souhaité. Avant de placer
les aliments dans la cuve, certains produits tels que la
viande et le fromage devront être coupés en portions de
2 à 5 cm. Lors du remplissage de la cuve, laisser de la
place entre les portions pour une meilleure turbulence.
Remplir le bol jusqu’au ⅔ maximum.
Il y a 2 manières d’utiliser la machine :
1 - Hachage grossier par impulsions, en utilisant la
fonction Pulse.
2 - Hachage fin en laissant la machine en marche
continue pour un hachage fin.
Mayonnaise / ailloli / rémoulade 2 ¼ 3
Sauce Béarnaise / Hollandaise 2 ¼ 5
Beurre d’escargot / de saumon 2 ¼ 4
PETRIR
Pâte brisée / pâte sablée 2 4
Détrempage de feuilletage 2 4
Pâte à pizza 2 4
BROYER
Fruits secs 1 4
Glace 1 4
Chapelure 1 4
12/07/2018
23
Page 26

• ACCESSOIRE COUPE-LÉGUMES
L’accessoire coupe-légumes permet de réaliser tous
types de coupes de fruits et légumes, à savoir : émincés,
coupes ondulées, râpés et bâtonnets.
L’accessoire coupe-légumes comprend deux goulottes :
- Une grande goulotte permettant la coupe de
légumes de type choux, céleri...
- Une goulotte cylindrique prévue pour les
légumes longs et garantissant une précision de
coupe remarquable.
Cette qualité de coupe est optimisée lorsque ce
compartiment est utilisé comme guide de coupe.
Ne pas introduire d’aliments congelés dans
l’appareil.
Ne pas détacher les accessoires de l’appareil si
celui-ci est en marche.
Ne jamais introduire d’objet dans le récipient de
travail.
Ne pas surcharger l’appareil.
UTILISATION DE LA GRANDE GOULOTTE
Ne remplissez jamais la trémie lorsque l'appareil est en marche.
- Lever le levier et dégager l’entrée de la goulotte.
- Introduire les légumes jusqu’en haut.
- Replacer le levier à l’aplomb de la goulotte.
-
Commencer à appuyer sur le levier, puis mettre
en marche l’appareil et maintenir votre pression
jusqu’à ce qu’il n’y ait plus de légumes dans la
goulotte.
UTILISATION DE LA GOULOTTE CYLINDRIQUE
-
Introduire les légumes jusqu’en haut de la
goulotte.
- Commencer à appuyer sur le poussoir et mettre
l’appareil en marche puis maintenir la pression
jusqu’à ce que le légume soit entièrement émincé.
12/07/2018
24
SLICERS
3/64”
5/64” - 1/8”
5/32” - 3/16”
1/4”
carotte / chou / concombre / oignon / pomme de terre /
poireau
citron / carotte / champignon / chou / pomme de terre /
concombre / courgette / oignon / poireau / poivron
aubergine / betterave / carotte / champignon / concombre /
poivron / radis / salade / pomme de terre / tomate
aubergine / betterave / carotte / champignon / concombre /
poivron / radis / salade / pomme de terre
EMINCEUR ONDULE
5/64”
betterave / pomme de terre
RAPEURS
1/16”
5/64”
1/8”
1/4”
céleri / fromage
carotte / céleri / fromage
carotte
chou / fromage
9/32”
chou / fromage
Parmesan
1/32”
Radis 0,7 mm
3/64”
Radis 1 mm
BATONNETS
5/64”x 5/64”
5/64”x 5/32”
5/64”x 1/4”
5/32”x 5/32”
1/4”x 1/4”
5/16”x 5/16”
carotte / céleri / pomme de terre
carotte / betterave / courgette / pomme de terre
carotte / betterave / courgette / pomme de terre
aubergine / betterave / courgette / pomme de terre
aubergine / betterave / céleri / courgette / pomme de terre
céleri / pomme de terre
NETTOYAGE
ATTENTION
Par précaution, nous vous recommandons de
toujours débrancher votre appareil avant de
procéder aux opérations de nettoyage (risque
d’électrocution).
• BLOC MOTEUR
Ne jamais immerger le bloc moteur dans l’eau,
le nettoyer à l’aide d’un chiffon humide ou d’une
éponge.
Le nettoyage du bloc moteur doit être effectué avec
précaution.
Premièrement, débrancher l’appareil. Essuyer
le bloc moteur en utilisant un chiffon légèrement
humide (non trempé), puis avec une solution
désinfectante et sécher l’appareil avec un chiffon
sec en retirant tout liquide se trouvant autour de la
bague d’étanchéité.
Ne laisser en aucun cas l’eau pénétrer dans l’axe
d’étanchéité ou autour des boutons de commande.
Nettoyer autour de l’axe d’étanchéité avec une
petite brosse, en retirant bien toute la nourriture. Ne
pas oublier de nettoyer l’axe moteur.
• ACCESSOIRES
NETTOYAGE DU COUTEAU
Avant de nettoyer le
couteau, il faut enlever
le capuchon démontable
qui se trouve sur la partie
supérieure du couteau
en forme de S. Remettre
toujours le bouchon en place après nettoyage.
Attention : Les lames sont très coupantes. Il faut
toujours porter des gants anti-coupures lorsque
vous les manipulez.
Pour enlever le capuchon, le retirer doucement
du couteau, légèrement de côté. Le capuchon est
maintenu en place par de petites attaches qui se
fixent sur le corps du couteau. Si le capuchon
s’avère dur à enlever, vous pouvez introduire une
tige fine ou un tournevis par le dessous du couteau
pour déloger le capuchon, d’un coup sec. Encore
une fois, il faut manipuler le couteau avec soin.
Page 27

FRANÇAIS
Ôter les accessoires avant le nettoyage. La cuve et le
couvercle doivent être nettoyés selon les instructions
suivantes ou comme recommandé par la législation
sanitaire locale en vigueur.
La cuve, couteau, couvercle, poussoir et disques
peuvent être nettoyés en lave-vaisselle ou à la main
dans 3 bains différents.
Rincer les accessoires avant le lavage afin d’ôter
tout aliment resté collé.
Une brosse ou un spray puissant est efficace pour
retirer la nourriture des interstices, comme une
procédure de pré-rincage.
La procédure de nettoyage en vigueur doit
comprendre 1 lavage, 1 rinçage et 1 cycle de
désinfection. Laisser les éléments sécher à l’air
libre après la désinfection et avant de remonter
l’appareil.
ATTENTION : Une température trop élevée en
lave-vaisselle aura tendance à raccourcir la durée
de vie des pièces en plastiques et en caoutchouc.
Le lavage à la main en utilisant le procédé de
lavage dans 3 bains différents garantira une
durée de vie optimale à ces pièces.
Utiliser des gants adaptés pour le nettoyage des
couteaux et des disques.
Nettoyer l’extérieur de la cuve, le couvercle et la
tige de sécurité et vous assurer qu’ils sont propres.
Utiliser une brosse pour nettoyer ces endroits si
nécessaires.
ENTRETIEN
• BAGUE D’ÉTANCHÉITÉ
Une vérification doit être faite régulièrement de
manière à conserver l’étanchéité autour de l’axe
moteur. La bague doit être remplacée quand
l’usage ou l’érosion est constaté, ou au minimum
une fois tous les 3 à 6 mois. Il est recommandé de
changer la bague d’étanchéité par une société de
réparation agrée.
• COUTEAU
Les lames doivent restées affûtées.
Il est conseillé d’ affûter les lames régulièrement.
Si les lames des couteaux ou des disques sont
émoussés, il est recommandé de les changer.
AFFUTAGE DU COUTEAU
Il faut périodiquement
affûter les lames, selon
l’intensité d’usage. Des
lames moins tranchantes
réduiront la qualité de
coupe.
Pour affûter les lames,
suivez les consignes suivantes ou, si vous préfé-
rez, faites appel à un professionnel.
4. Tirer la pierre vers le bord de la lame, partant
du moyeu vers la pointe, effectuant plusieurs
passages, jusqu’à ce que la lame soit affûtée.
5. Retourner la lame et frotter la pierre à plat contre
le dessous de la lame afin d’éliminer le biseau
formé pendant l’étape 5.
- Répéter cette procédure pour l’autre lame.
- Laver le couteau avant usage.
• LAMES ET PEIGNES
Les lames des disques éminceurs ainsi que les
peignes des disques bâtonnets constituent des
pièces d’usure, qu’il est nécessaire de changer
épisodiquement pour toujours obtenir la même
qualité de coupe.
SÉCURITÉ
Les R 2 N / R 2 Ultra N / R 2 N CLR sont munis
d’un système de sécurité magnétique et d’un frein
moteur.
Dès l’ouverture du couvercle du cutter, le moteur
s’arrête.
Dès l’ouverture du levier du Coupe-Légumes, le
moteur s’arrête.
ATTENTION
IMPORTANT
Vérifiez que votre détergent est utilisable sur les
pièces en matière plastique. En effet, certains
agents lessiviels trop alcalins (avec forte
concentration en soude ou en ammoniaque par
exemple) sont totalement incompatibles avec
certaines matières plastiques et les détériorent
très rapidement.
Porter des gants anti-coupures.
1. Utiliser soit la pierre Robot-Coupe livrée avec
l’appareil, soit une autre pierre de bonne qualité.
2. Serrer ou maintenir le couteau à plat sur le bord
ou l’angle d’un couteau solide.
3. De l’autre main, tenir la pierre avec un angle de
30° contre la partie supérieure d’une des lames.
Les couteaux et les disques sont des outils
tranchants, les manipuler avec précaution.
Pour éviter les éclaboussures dans le cadre de
préparations liquides en cutter, arrêter la machine
et n’ouvrir le couvercle que lorsque le couteau est
complètement arrêté.
12/07/2018
25
Page 28

12/02/2018
Ces modèles sont équipés d’une protection
thermique qui arrête automatiquement le moteur
en cas de fonctionnement trop prolongé ou de
surcharge.
Dans ce cas, appuyer sur le bouton arrêt et
attendre le refroidissement complet de l’appareil
pour remettre en marche.
RAPPEL
Ne jamais essayer de supprimer les systèmes
de verrouillage et de sécurité.
Ne jamais introduire un objet dans le récipient
de travail.
Ne jamais pousser les ingrédients avec la main.
Ne pas surcharger l’appareil.
Ne jamais faire fonctionner la machine à vide.
DÉPANNAGE
Regarder la garantie au préalable.
Si votre appareil a besoin d’être réparé, vérifier
avec votre distributeur le service après-vente le plus
proche.
Si il n’en a pas ou si vous souhaitez que votre
appareil soit réparé à l’usine, nous contacter pour
obtenir un numéro d’autorisation de retour de la
marchandise (RMA), et dès réception, l’expédier en
port payé et assuré à l’adresse de l’usine.
PH : 1-800-824-1646
Robot Coupe U.S.A., Inc.
Service Department
264 South Perkins St.,
Ridgeland, MS 39157
Pour le service après-vente sur le Canada,
contacter l’usine Robot-Coupe aux USA.
26
Page 29

12/02/2018
TECHNICAL DATA
DATOS TÉCNICOS
DONNÉES TECHNIQUES
27
Page 30

28
12/02/2018
Page 31

12/02/2018
29
Page 32

30
12/02/2018
Page 33

12/02/2018
31
Page 34

Century
/
87
89
Black
L1
o
Blue
Purple
White
Yellow
Red
o
L2
White from power cord
L1
L2
Blue
Page 35

R239D
Purple
White
R2 – R2Ultra Emerson or US Motors
Page 36

Page 37

Page 38

Robot Coupe U.S.A., Inc.,
Phone: 800/824-1646 • 601/898-8411
Fax: 601/898-9134
264 South Perkins St., Ridgeland, MS 39157
e-mail: info@robotcoupeusa.com
website: www.robotcoupeusa.com
Réf. : 403 574 - 12/07/2018 - R 2 N / R 2 N Ultra / R 2 N CLR
 Loading...