


Roborock S4 Robot Vacuum User Manual
Read this user manual carefully before using this product and store it properly for future reference.


Safety Information
01
FCC Statement
Baery and Charging
Welcome
Product Introduction
Installation
Instructions for Use
Routine Maintenance
Basic Parameters
Troubleshooting
FAQs
06
08
09
10
14
17
20
25
26
28

Safety Information
IMPORTANT SAFETY INSTRUCTIONS
When using an electrical appliance, basic precautions should always be followed, including the following:
READ ALL INSTRUCTIONS BEFORE USING (THIS APPLIANCE), Failure to follow the warnings and instructions may result in
electric shock, fire and/or serious injury.
WARNING
To reduce the risk of fire, electric shock, or injury:
Do not use outdoors or on wet surfaces.
Do not allow to be used as a toy. Close aention is necessary when used by or near children, pets or plants.
Use only as described in this manual. Use only manufacturer’s recommended aachments.
Do not use with damaged cord or plug. If appliance is not working as it should, has been dropped, damaged, le outdoors,
or dropped into water, return it to a service center.
Do not pull or carry by cord, use cord as a handle, close a door on cord, or pull cord around sharp edges or corners.
Do not run appliance over cord. Keep cord away from heated surfaces.
Do not unplug by pulling on cord. To unplug, grasp the plug, not the cord.
Do not handle charger, including charger plug, and charger terminals with wet hands.
Do not put any object into openings. Do not use with any opening blocked; keep free of dust, lint, hair, and anything that
may reduce air flow.
Keep hair, loose clothing, fingers, and all parts of body away from openings and moving parts.
Do not use to pick up flammable or combustible liquids, such as gasoline, or use in areas where they may be present.
Do not pick up anything that is burning or smoking, such as cigarees, matches, or hot ashes.
Do not use without dust bag.
Prevent unintentional starting. Ensure the switch is in the off-position before connecting to baery pack, picking up or
carrying the appliance. Carrying the appliance with your finger on the switch or energizing appliance that have the switch
on invites accidents.
01

Safety Information
For use only with roborock CDZ10RR charger. Recharge only with the charger specified by the manufacturer.
A charger that is suitable for one type of baery pack may create a risk of fire when used with another baery pack.
Use appliances only with specifically designated baery packs. Use of any other baery packs may create a risk of injury
and fire.
Turn off the appliance before making any adjustments, changing accessories, or storing appliance. Such preventive safety
measures reduce the risk of starting the appliance accidentally.
When baery pack is not in use, keep it away from other metal objects, like paper clips, coins, keys, nails, screws or other
small metal objects, that can make a connection from one terminal to another. Shorting the baery terminals together
may cause burns or a fire.
Under abusive conditions, liquid may be ejected from the baery; avoid contact. If contact accidentally occurs, flush with
water. If liquid contacts eyes, additionally seek medical help. Liquid ejected from the baery may cause irritation or burns.
Do not use a baery pack or appliance that is damaged or modified. Damaged or modified baeries may exhibit unpredictable behavior resulting in fire, explosion or risk of injury.
Do not expose a baery pack or appliance to fire or excessive temperature. Exposure to fire or temperature above 130°C
may cause explosion.
Follow all charging instructions and do not charge the baery pack or appliance outside of the temperature range specified
in the instructions. Charging improperly or at temperatures outside of the specified range may damage the baery and
increase the risk of fire.
Have servicing performed by a qualified repair person using only identical replacement parts.This will ensure that the safety
of the product is maintained.
Do not modify or aempt to repair the appliance or the baery pack except as indicated in the instructions for use and care.
Place the cords from other appliances out of the area to be cleaned.
Do not operate the vacuum in a room where an infant or child is sleeping.
Do not operate the vacuum in an area where there are lit candles or fragile objects on thefloor to be cleaned.
Do not operate the vacuum in a room that has lit candles on furniture that the vacuum may accidentally hit or bump into.
02

Safety Information
Do not allow children to sit on the vacuum.
Do not use the vacuum cleaner on a wet surface.
Risk Of Injury. Brush May Start Unexpectedly.Disconnect the main Brush Before Cleaning or Servicing.
Do not use the product when the temperature is higher than 40℃ or lower than 4℃, or there is any liquid or sticky substance on the floor.
SAVE THESE INSTRUCTIONS
Household use only.
IMPORTANTES MESURES DE S CURIT
L’utilisation d’un appareil électrique demande certaines précautions:
LIRE TOUTES LES INSTRUCTIONS AVANT DE FAIRE FONCTIONNER (CETAPPAREIL), Le non-respect des mises en garde
et des instructions peut causer des chocs électriques, des incendies et/ou des blessures graves.
AVERTISSEMENT
Pour réduire les risques d’incendie, de choc électrique ou de blessure:
Ne pas exposer à la pluie, Ranger à l’intérieur.
Ne pas permere aux enfants de jouer avec l’appareil. Une aention particulière est nécessaire lorsque l’appareil est
utilize par des enfants ou à proximité de ces derniers.
N’utiliser que conformément à cee notice avec les accessories recommandés par le fabricant.
Ne pas utiliser si le cordon ou la fiche est endommagé. Retourner l’appareil à un atelier de reparation s’il ne fonctionne
pas bien, s’il est tombé ou s’il a été endommagé, oublié à l’extérieur ou immergé.
Ne pas tirer soulever ni trainer l’appareil par le cordon. Ne pas utiliser le cordon comme une poignée, le coincer dans
l’embrasure d’une porte ou l’appuyer contre des arêtes vives ou des coins. Ne pas faire rouler l’appareil sur le cordon.
Garder le cordonà l’écart des surfaces chaudes. Ne pas débrancher en tyrant sur le cordon. Tirer plu la fiche.
Ne pas manipuler le chargeur, y compris la prise du chargeur, et les bornes du chargeur avec les mains mouillées.
03

Safety Information
N’insérer aucun objet dans les ouvertures. Ne pas utiliser l’appareil lorsqu’une ouverture est bloquée. S’assurer que de
la poussière, de la peluche, des cheveux ou d’autres matières ne réduisent pas le debit d’air. Maintenir les cheveux, les
vêtements amples, les doigts et toutes les parties du corps à l’écart des ouvertures et des pieces mobiles.
User de prudence lors du neoyage des escaliers.
Ne pas aspirer des liquids inflammables ou combustibles, comme de l’essence, et ne pas faire fonctionner dans des endroits où peuvent se trouver de tells liquides.
Ne pas aspirer de matières en combustion ou qui dégagent de la fumée, comme des cigarees, des allumeesou des cendres chaudes.
Ne pas utiliser l’appareil si le sac à poussière ou le filter n’est pas en place.
Emêcher une mise en marche accidentelle. S’assurer que l’interrupteur est à la position arrêt avant de raccorder la baerie,
de lever ou de déplacer l’appareil. Transporter l’appareil en gardant un doigt sur l’interrupteur, ou mere sous tension un
appareil dont l’interrupteur est à la position marche peut causer un accident.
Pour emploi seulement avec roborock CDZ10RR chargeur.Recharger uniquement avec le chargeur prescrit par le fabricant.
Un chargeur convenant à un type de baerie peut présenter un risque d’incendie lorsqu’il est utilisé avec une autre baerie.
Retirer la baerie de l’appareil avant d’effectuer des réglages, changer les accessoires ou ranger l’appareil. Ces mesures
de sécurité ont pour but d’éviter une mise en marche accidentelle de l’appareil.
Lorsque l’appareil n’est pas utilisé, tenir la baerie loin d’objets métalliques comme des trombones, des pièces de monnaie, des clés, des clous, des vis ou autres petits objets qui pourraient établir une liaison entre les bornes. Un courtcircuit
des bornes des baeries peut causer des brûlures ou un incendie.
Utiliser uniquement les baeries recommandées pour l’appareil. L’utilisation d’autres types de baeries peut présenter
un risque de blessure ou d’incendie.
Lorsque l’appareil n’est pas utilisé, tenir la baerie loin d’objets métalliques comme des trombones, des pièces de monnaie,
des clés, des clous, des vis ou autres petits objets qui pourraient établir une liaison entre les bornes. Un courtcircuit des
bornes des baeries peut causer des brûlures ou un incendie.
Encondition d’usage abusif, du liquide peut s’échapper de la baerie ; éviter tout contact avec ce liquide.
En cas de contact accidentel, rincer abondamment avec de l’eau. En cas de contact avec les yeux, consulter également
un médecin. Le liquide projeté peut causer des irritations ou des brûlures.
04

Safety Information
Ne pas utiliser une baerie ou un appareil endommagé ou qui a été modifié. Des baeries endommagées ou modifies
peuvent avoir un comportement imprévisible pouvant causer un incendie, une explosion ou un risque de blessure.
Ne pas exposer une baerie ou un appareil à la flamme ou à des températures excessives. L’exposition à une flamme ou
à des températures supérieures à 130 °C peut causer une explosion.
Respecter toutes les instructions de chargement et ne pas charger la baerie ou l’appareil à des températures qui ne sont
pas incluses dans la gamme de températures indiquées dans la notice d’instructions. Un chargement mal effctué.
Confier les réparations à une personne qualifiée qui utilisera uniquement des pièces de remplacement identiques. Cee
façon de faire garantira la sécurité du produit.
Ne pas modifier ni tenter de réparer l’appareil ou la baerie sauf comme il est indiqué dans les instructions d’utilisation
et d’entretien.
Éloigner les cordons d’autres appareils de la zone à neoyer.
Ne pas utiliser l’aspirateur dans une pièce où un nourrisson ou un enfant dort.
Ne pas utiliser l’aspirateur dans un endroit où il ya des bougies allumées ou des objets fragiles sur le plancher à neoyer.
Ne pas utiliser l’aspirateur dans une pièce où il ya des bougies allumées sur les meubles que l’aspirateur peut heurter ou
se cogner accidentellement.
Ne pas laisser les enfants s’assoir sur l’aspirateur.
Ne pas utiliser l’aspirateur sur une surface mouillée.
Risque de blessures. La brosse motorisée peut se mere en marche d’une manière imprévue.
Déconnecter la brosse principale avant le neoyage ou le service.
CONSERVER CES INSTRUCTIONS
Usage Domestique seulement.
Laser Safety
Class 1 laser product,Complies with FDA 21 CFR 1040.10 and 1040.11 except for conformance with IEC 60825-1 Ed. 3.,
as described in Laser Notice 56, dated May 8, 2019.
05

FCC Statement
Compliance Information
Product Name Robotic Vacuum Cleaner with Dock Charger
Produce Model
Compliance Statement
Correspondence of the responsible party in USA
Company Roborock Technology Co.
Address 108 West 13th Street, Wilmington, Delaware 19801.
Email support@roborock.com
Robotic Vacuum Cleaner Model: roborock S4
Dock Charger Model: CDZ10RR
This device complies with part 15 of the FCC Rules.
Operation is subject to the following two conditions:
(1) This device may not cause harmful interference, and (2) this
device must accept any interference received, including interference that may cause undesired operation.
Warning
Any changes or modifications to this unit not expressly approved by the party responsible for compliance could void the
user's authority to operate the equipment.
Le présent appareil est conforme aux CNR d'Industrie Canada applicables aux appareils radio exempts de licence.
L'exploitation est autorisée aux deux conditions suivantes :
(1) l'appareil ne doit pas produire de brouillage, et
(2) l'utilisateur de l'appareil doit accepter tout brouillage radioélectrique subi, même si le brouillage est susceptible d'en
compromere le fonctionnement.
06

FCC Statement
Changes or modifications not expressly approved by the party responsible for compliance could void the user's authority
to operate the equipment.
This equipment has been tested and found to comply with the limits for a Class B digital device, pursuant to part 15 of the
FCC Rules. These limits are designed to provide reasonable protection against harmful interference in a residential installation.
This equipment generates uses and can radiate radio frequency energy and, if not installed and used in accordance with
the instructions, may cause harmful interference to radio communications. However, there is no guarantee that interference will not occur in a particular installation. If this equipment does cause harmful interference to radio or television
reception, which can be determined by turning the equipment off and on, the user is encouraged to try to correct the
interference by one or more of the following measures:
—Reorient or relocate the receiving antenna.
—Increase the separation between the equipment and receiver.
—Connect the equipment into an outlet on a circuit different from that to which the receiver is connected.
—Consult the dealer or an experienced radio/TV technician for help.
MPE Requirements
To satisfy FCC / IC RF exposure requirements, a separation distance of 20 cm or more should be maintained between the
antenna of this device and persons during device operation. To ensure compliance, operations at closer than this distance
is not recommended.
L’antenne installée doit être située de facon à ce que la population ne puissey être exposée à une distance de moin de 20 cm.
Installer l’antenne de facon à ce que le personnel ne puisse approcher à 20 cm ou moins de la position centrale de l’antenne.
La FCC des éltats-unis stipule que cet appareil doit être en tout temps éloigné d’au moins 20 cm des personnes pendant
son functionnement.
CAN ICES-3 (B)/NMB-3(B)
07

Baery and Charging
Please keep the dock charger away from heat (such as heating plates).
The baery must be removed from the appliance before it is scrapped.
The appliance must be disconnected from the supply mains when removing the baery.
The baery is to be disposed of safely.Please do not discard waste baeries. Leave them to a professional recycling
organization.
Do not wipe or clean the chargers shrapnel with a piece of wet cloth or wet hands.
Please make sure the cleaner is powered off in shipment and original packaging is advised.
If le unused for a long period, please store the cleaner in a cool and dry place aer having it fully charged and switched
off, charge it at least every three months to avoid the baery being over discharged.
Please do not use the product when the temperature is higher than 40°C or lower than 4°C , or there is any liquid or sticky
substance on the floor.
Baery pack charging temperature
Baery pack using temperature
Storage(1month)
Baery pack
storage
temperature
Long Storage(3months)
Long Storage(1year)
4°C ~ 40°C @Max Charging Current:0.5C
4°C ~ 40°C @Max Discharge Current:0.5C
-20°C ~ 60°C
@Less than 70% RH
-20°C ~ 45°C
@Less than 70% RH
-20°C ~ 20°C
@Less than 70% RH
08
If the baery pack store at 25°C
over the 3 months period, it should
be recharged.

Welcome
Thank you for choosing a Roborock S4 robot vacuum.
This robot vacuum features a precision laser mapping system able to quickly and accurately create maps of your home. Adaptive
routing algorithms then allow it to plan the most effective cleaning route for each room based on the shape of the room and the
obstacles within. Suction is generated by a powerful fan and advanced airflow management. A floating main brush keeps close
to the ground, flicking dust and hair into the suction flow for a more thorough clean.
Through the Roborock app, you can see a map of your home, the location of the robot, and its cleaning path in real-time, set
cleaning schedules and specific cleaning areas, and more, for full remote control. When at home, you can also control your robot
with your voice through a voice assistant.
Roborock S4 was designed to make your life simpler through technology.
Now you can step away from vacuuming and focus on spending time with the people you love. We hope you enjoy your robot.
09
Product introduction
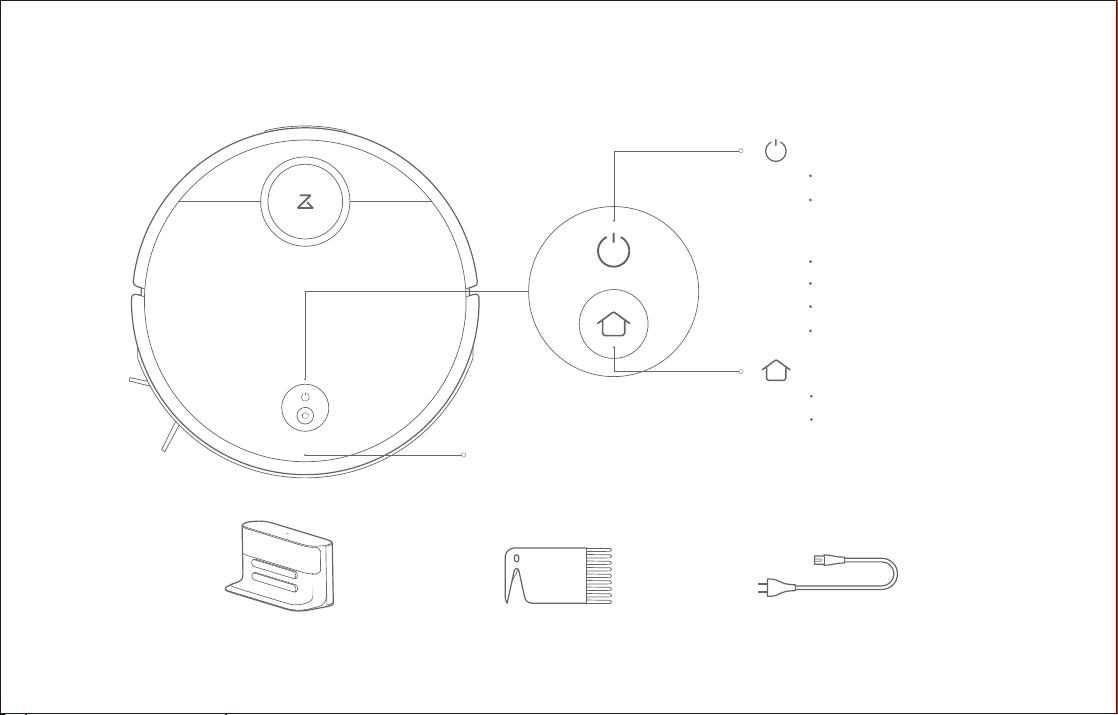
Robot
Parts list
Charging dock Main brush cleaning tool Power cable
Cover latch
On/Off
Press to start cleaning
Press and hold to power on or off
Power indicator
White: Baery level ≥ 20%
Red: Baery level < 20%
Flashing: Charging or starting up
Flashing red: Error
Dock/spot clean
Press to return to the dock
Press and hold to spot clean
Note: Press any buon to pause cleanup,
return to the dock, or spot clean.
10

Product introduction
Dustbin Robot
Dustbin latch
Air filter
Dustbin cover
WiFi indicator light
Off: WiFi disabled
Slow flashing: Waiting
for connection
Fast flashing: Connecting
Steady: WiFi connected
System reset buon
11

Product introduction
Charging dock
Locator beacon
Charging points
Latch
Rear cover
Cable channel
Power socket
Cable exit points
Note: Cables can exit either the right or le opening.
12
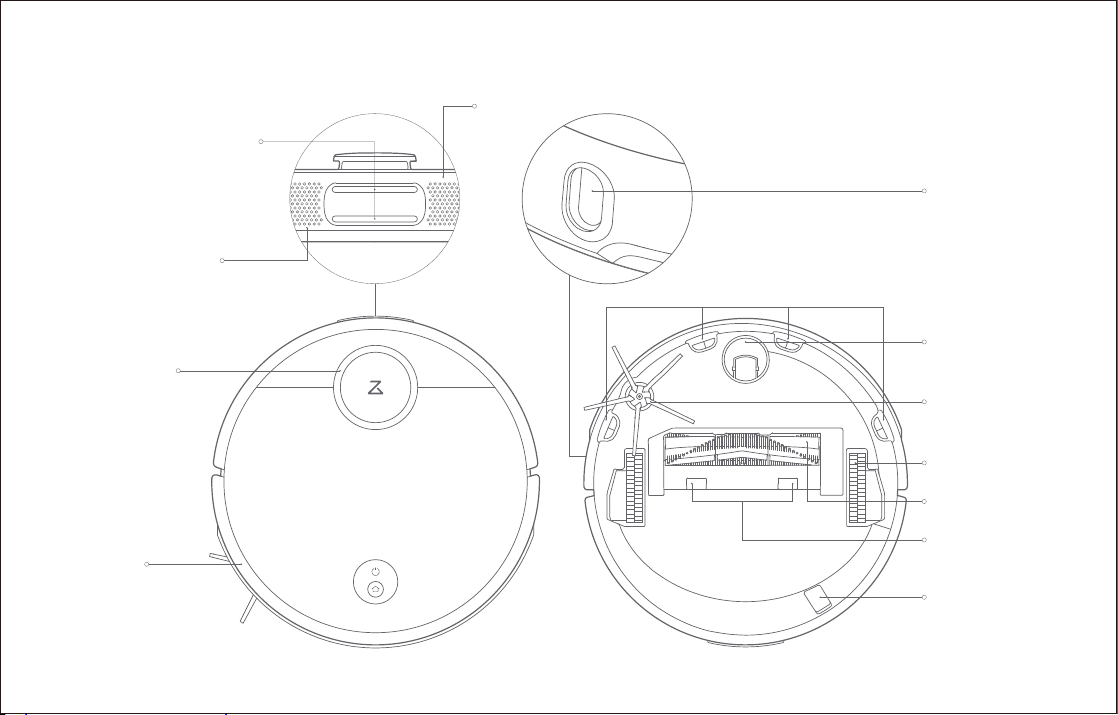
Product introduction
Charging contacts
Speaker
Laser distance
sensor
Bumper
Air vent
Wall sensor
Cliff sensors
Omnidirectional
wheel
Side brush
Driving wheels
Main brush
Main brush
cover latch
USB debugging port
(for service use only)
13
Installation
Using the robot
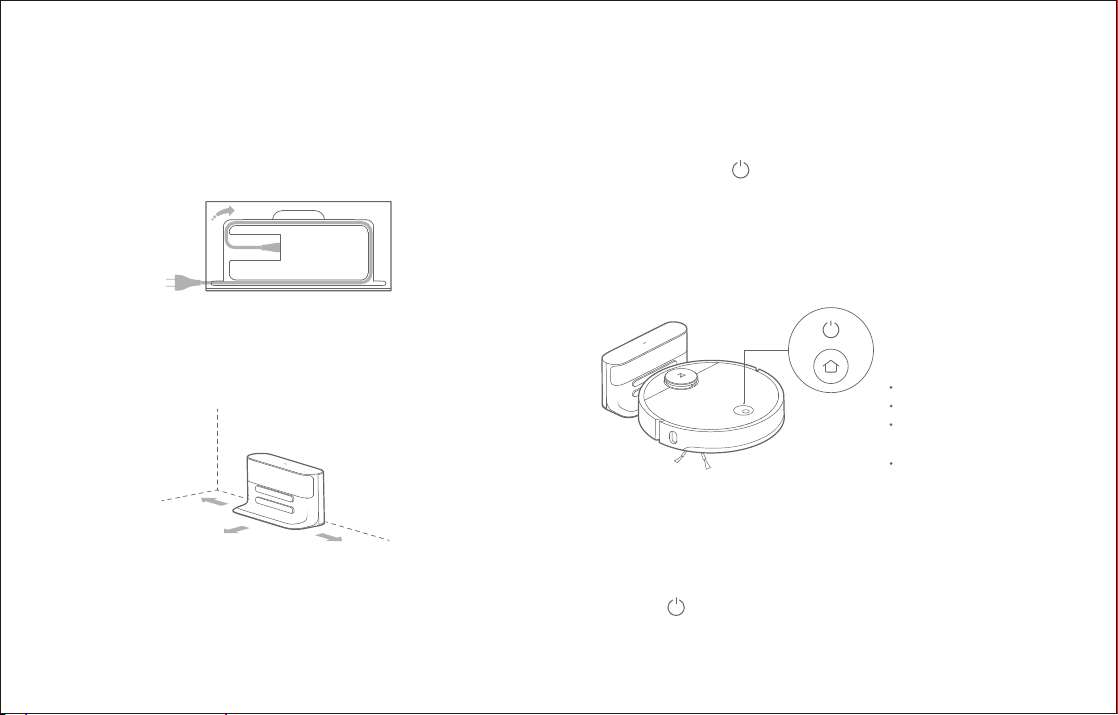
1. Connect the power cable to the charging dock and tidy cables
using the cable channel as necessary.
3. Turn on and charge
Press and hold the buon to turn on the robot. When the
power indicator lights up, place the robot onto the charging dock
to begin charging. The robot uses a high-performance lithium-ion
rechargeable baery. To maintain peak baery performance,
always keep the robot charged.
Note: The robot will not turn on when the baery is low. Place the robot directly onto
the charging dock to begin charging.
Note: If the power cable is vertical to the ground, it may get dragged by the robot,
causing the charging dock to be disconnected.
2. Place the charging dock against the wall on a flat surface and
plug it into mains power.
More than 0.5m (1.6)
More than 1m (3.3)
Note: The charging dock should have more than 0.5m (1.6) of clearance on each
side, and more than 1m (3.3) in the front.
More than 0.5m (1.6)
The color of the power
indicator indicates the
baery level.
White: Baery level ≥ 20%
Red: Baery level < 20%
Flashing:
Charging or starting up
Flashing red: Error
4. Connect to the mobile app. (recommended)
5. Start cleanup
When the baery is fully charged, the power indicator will remain lit.
Press the buon or use the app to start a cleanup.
14

Installation
Connect to the Mi Home App
This robot is controlled through the Mi Home app. Through the MIUI system, it can be connected to other smart home products.
Download app
1
Search for "Mi Home" in the App Store or Google Play, or scan the QR code below, then download and install the app.
Reset WiFi
2
1. Open the top cover of the robot to reveal the WiFi indicator light.
2. Press and hold the and buon until you hear the "Reset WiFi"
voice alert. When the WiFi indicator light is flashing slowly, the robot
has entered network configuration mode.
Note: If you cannot connect your phone to the robot, reset the WiFi, and add your robot
as a new device.
Add device
3
Open the Mi Home app and click "+" in the top right corner, then follow the instructions in-app. Once your robot has been added,
it will be found in a list on the Mi Home homepage.
Note:
Due ongoing Mi Home development, the actual process may differ slightly from the above description. Always follow instructions given in-app.
Only 2.4GHz WiFi is supported.
15
WiFi indicator light
Off: WiFi disabled
Slow flashing: Waiting
for connection
Fast flashing: Connecting
Steady: WiFi connected

Instructions for use
On/off
Press and hold the buon to turn on the robot. The power
indicator will turn on, and the robot will enter Standby mode. If the
robot is asleep, press and hold the buon to turn it off and end
the current cleanup.
Note: The robot cannot be turned off when it is charging.
Start cleanup
Press the buon to start a cleanup. Once started, the robot will
plan its cleaning route based on its scan of the area. It cleans
along the wall of a zone first and then moves in a Z-shaped
cleaning route to cover the whole area efficiently and thoroughly.
Zone 1: Cl ean Zone 2: C lean
Zone 4: Pe nding Zone 3: C leaning
Note:
Cleaning cannot start if the baery level is too low. Allow the robot to charge before
restarting cleanup.
Tidy away any cables on the ground (including the power cable of the charging dock)
before cleaning to avoid losing power or damaging either the robot or any connected
devices.
If a cleanup finishes within 10 minutes, cleaning repeats by default.
If the baery runs low before cleanup is complete, the robot will carry out a top-up charge
before resuming cleanup from where it le off.
Pause
When the robot is cleaning, press any buon to pause it.
Then press the buon to continue cleaning or the buon to stop
the cleanup and send it back to the dock.
Note: Placing a paused robot on the charging dock manually will end the current cleanup.
Sleep
If the robot is paused for over 10-minutes, it will go to sleep, and its
power indicator will flash slowly. Press any buon to wake it back up.
Note:
The robot will not go to sleep when it is on the charging dock.
The robot will shut down if le asleep for over 12-hours.
16

Instructions for use
Charging
Auto: Aer cleanup, the robot will automatically return to the
charging dock to recharge.
Manual: In Pause mode, press the buon to send the robot
back to the charging dock.
The power indicator will flash slowly as the robot charges.
Note: If the cleanup was started away from the charging dock and the robot could not
return to the dock aer cleanup, it will instead return to its starting point. Place the
robot directly on the dock to start recharging.
Error
If an error occurs while the robot is cleaning, the power indicator
will flash red quickly, and you will hear a voice alert. See
"Troubleshooting" for resolution options.
Note:
The robot will go to sleep automatically if le in an Error state for over 10-minutes.
Placing the robot on the charging dock in an error state will stop the current cleanup.
Reset WiFi
If your phone cannot connect to the robot because you have
changed your router configuration, forgoen your password, or any
other reason, open the top cover to see the WiFi indicator light then
press and hold the buon and buon until you hear the
“Reseing WiFi” voice alert. When the WiFi indicator light flashes
slowly, reset is complete.
Note: If the robot is le connecting to the network for over an hour, its WiFi will be
disabled. Reset WiFi before aempting reconnection.
Spot cleaning
In Standby or Pause modes, press and hold the buon to spot
clean. A 1.5m x 1.5m square area centered on the robot will be cleaned.
Aer cleanup, the robot will return to the center of the square.
Note: Pressing any buon will cancel the current spot cleanup
<
<
1.5m
<
17
1.5m
<
Instructions for use
Scheduled cleanup
Use the Mi Home app to set start times and suction levels for
scheduled cleanups. The robot will return to the charging dock
aer each cleanup.
Pin n go
Use the Mi Home app to set a destination for the robot. It will then go
to that point.
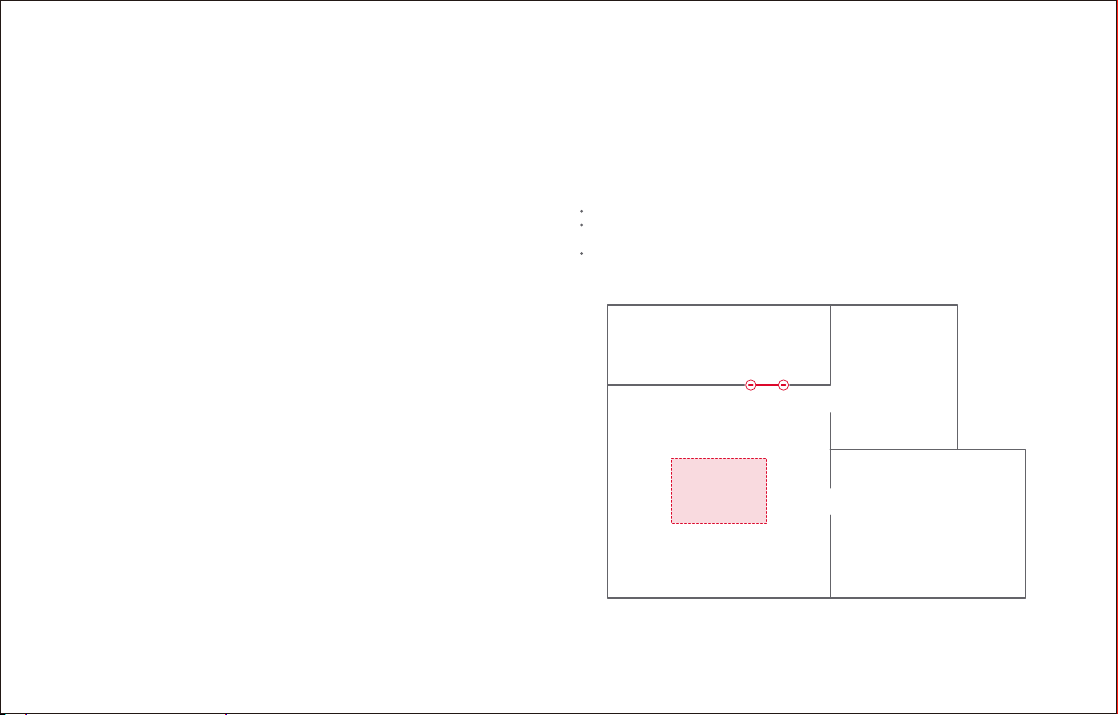
Zone cleanup
Use the Mi Home app to draw a specific zone for the robot to clean.
Note: While cleaning the designated zone, the robot may move outside zone borders.
Make sure that there are no cables or obstacles placed close to the cleanup zone.
Cleaning mode
Use the Mi Home app to chose from Quiet, Balanced, Strong, or
MAX modes. The Balanced mode is the default.
Do not disturb (DND) mode
In DND mode, no cleanups will start, no voice alerts will play, and the
power indicator will dim. DND mode is set from 22:00 to 08:00 by
default and can be disabled or modified in the Mi Home app.
Virtual no-go zone and barrier
The Mi Home app can be used to draw virtual no-go zones and barriers
to keep the robot from entering the areas you define.
Note:
"Map Saving Mode" must be turned on in the Mi Home app to use virtual no-go zones.
Virtual no-go zones and barriers should only be used to customize the cleaning area. It
should not be used to isolate hazards.
Moving the robot manually or making significant changes to the home environment may
cause the loss of virtual no-go zones and barriers
Virtual barrier
Virtual no-go zone
18
Instructions for use
More app functions
Live map
Change cleaning mode
View cleaning history
Firmware updates
Note: Functions and details of the Mi Home app may vary slightly due to the continuous app
development and upgrades.
Cleanup records
Remote control mode
View robot status
Robot location
Control other Mi Home devices
Change voice pack
19

Instructions for use
Routine maintenance
Charging dock
The charging dock should be plugged in and placed against a
wall on level ground, with more than 0.5m (1.6) of clearance
on each side, and more than 1m (3.3) in front. For the best
experience, when using the mobile app, place the charging
dock in an area with strong WiFi coverage.
Note: Do not place the charging dock in direct sunlight or block the locator beacon;
otherwise, the robot may not be able to return to the charging dock.
Locator
beacon
More than 0.5m (1.6)
More than 0.5m (1.6)
More than 1m (3.3)
Main brush
* Weekly cleaning recommended
1. Turn the robot over then unlatch and remove the main
brush cover.
2. Take out the main brush, remove and clean its bearings.
3. Remove the main brush cap rotating in the unlock direction.
4. Use the supplied main brush cleaning tool to remove any
entangled hair.
5. Re-install the cap and bearing following the lock direction.
6. Re-insert the main brush and replace the brush cover.
Note: Main brush replacement every 6-12 months is recommended.
Lock direction
Unlock direction
Main brush cover
Latch
Alignment mark
Main brush bearing
Main brush
Main brush cap
20

Routine maintenance
Using the main brush cleaning tool
Cut hair Clean dirt
Dustbin and filter * Weekly cleaning is recommended
1. Open the top cover of the robot, squeeze the dustbin latch,
and remove the dustbin.
2. Open the dustbin lid as indicated by the arrow and pour out
the contents.
Clean the filter
1. Open the dustbin lid as before.
21
* Bi-weekly cleaning is recommended

Routine maintenance
Clean the filter * Bi-weekly cleaning is recommended
2. Fill the dustbin with clean water and close the cover. Gently
shake the dustbin, then pour out the dirty water.
Note: Only use fresh water without cleaning liquid.
3. Remove the filter and clean it with water.
4. Rinse repeatedly and tap the filter frame to remove as much
dirt as possible.
5. Leave the filter to dry before reinstalling it.
Note:
Allow the filter to dry thoroughly before use. 24-hours of drying is recommended.
Alternating between two filters is recommended.
Baery
The robot is equipped with a high-performance lithium-ion
rechargeable baery pack. To maintain baery performance,
keep the robot charged.
Note: If the robot is to be le unused for an extended period, turn it off before
storage and charge it at least once every three months to avoid baery damage
resulting from over-discharging.
Note: To avoid damage, do not touch the surface of the filter with hands,
brushes, or sharp objects.
Charging dock
* Monthly cleaning recommended
Use a so dry cloth to clean the charging contacts of the charging dock.
22

Routine maintenance
Side brush * Monthly cleaning recommended
1. Turn the robot over and remove the screw holding the side brush.
2. Remove and clean the side brush.
3. Reinstall the side brush.
Note: Side brush replacement every 3-6 months is recommended.
Restore factory seings
If the robot is not functioning aer a system reset, turn it on, then
press the buon. Then press and hold the Reset buon until
you hear the “Start restoring initial version" voice alert. The robot
will then be restored to factory seings.
Omnidirectional wheel
1. Turn the robot over and remove the omnidirectional wheel.
2. Remove any hair and dirt on the wheel and axle.
3. Press the wheel back into its mounting point.
Wheel
Axle
Rack
* Monthly cleaning recommended
System reset
If the robot does not respond when you press a buon or the robot
cannot be shut down, press the Reset buon (see page 2). The robot
will then restart.
Aer a system reset, cleaning schedules, WiFi and other seings will be restored to
factory seings.
Firmware update
Firmware updates are carried out using your phone. Connect the
robot to the charging dock and ensure that the baery level is
higher than 20% before updating. The power indicator will flash
white quickly during the firmware update.
23

Routine maintenance
Holiday Energy Saving Function Machine sensors
When the cleaner is on the charging dock, hold and press "Recharge"
for 10 seconds until you hear a "Ding-dong" sound, and Holiday mode
will be activated.
In this mode, the LED indicator will dim, functions that has nothing
to do with charging such as cleaning, recharging and remote control
via WIFI will be disabled, and the cleaner will enter low power consumption mode to maintain optimal baery performance.
Aer Holiday mode is activated, you can disable it by holding and pressing
"Recharge" for 10 seconds until the LED indicator brightens.
Use a so dry cloth to wipe and clean all sensors, including:
1. Four cliff sensors at the boom of the robot.
2. The wall sensor on the right of the robot.
3. The charging contact on the rear of the robot.
Cliff sensor
Omnidirectional
wheel
Side brush
Charging contact
Wall sensor
24

Basic parameters
Robot
Name Parameters
Dimensions
Rated voltage 14.4VDC
Note: The serial number is on a sticker on the underside of the robot.
354.7×350×96 mm
14.4 V/5200 mAh lithium baeryBaery
Approx. 3.8 kgWeight
WiFi Smart ConnectWireless connection
58WRated power
25
Charging dock
Name Parameters
Dimensions
Rated input
Rated output 20VDC 1.8A
Rated frequency 50-60Hz
265×109×129mm
42WRated power
100-240VAC

Troubleshooting
If an error occurs during cleanup, the power indicator will flash red quickly, and a voice alert will play. Refer to the table below for resolution options.
Errors Troubleshooting
Error 1: Rotate the laser head to check that it turns freely.
Error 2: Clean and lightly tap the bumper.
Error 3: Move the robot to a new location and restart. A wheel is suspended. Move the robot to a new location and restart.
Error 4: Wipe the cliff sensors, move the robot away from
raised edges, and restart.
Error 5: Remove the main brush and clean the brush
and bearing.
Error 6: Remove and clean the side brush. The side brush may be tangled up. Remove and clean it.
Error 7: Look for anything stuck in the driving wheels
then move the robot to a new location and restart.
Error 8: Clear away any obstacles around the robot. The robot may be stuck. Clear any obstacles from around it.
Error 9: Install the dustbin and filter.
Error 10: Filter is either wet or blocked.
Error 11: High-intensity magnetic field detected. Move
the robot away from barrier tape and restart.
The LDS unit is jammed. Remove any items blocking it then move the robot to a new
location and restart.
The bumper is stuck. Tap the bumper repeatedly to dislodge any jammed items. If
nothing falls out, move the robot to a new location and restart.
The robot is suspended. Move it to a new location and restart. If the problem persists,
clean the cliff sensors.
The main brush may be tangled up. Remove and clean both it and its bearings.
The driving wheels may be jammed. Remove and clean them.
Reinstall the dustbin and filter and check that they are installed properly. If the
problem persists, try replacing the filter.
The filter is not completely dry. Dry the filter for at least 24 hours. The filter may also
require cleaning. If the problem persists, replace the filter.
The robot is too close to barrier tape and cannot start. Move it to a new location
and restart.
26

Troubleshooting
If an error occurs during cleanup, the power indicator will flash red quickly, and a voice alert will play. Refer to the table below for resolution options.
Errors
Error 12: The baery is too low. Recharge before use. Low baery. Recharge before use.
Error 13: Charging error. Clean the charging contact area. Use a dry cloth to wipe the charging contacts on the robot and on the charging dock.
Error 14: Baery error. The baery temperature is either too high or too low. Wait until it returns to normal.
Error 15: Wipe the wall sensor. The wall sensor is dirty. Wipe it clean.
Error 16: Robot is tilted. Place it on flat ground and restart. The robot is placed at an angle. Move it to flat ground and restart.
Error 17: Side brush module error. Reset the system. The side brush module is experiencing a fault. Reset the system.
Error 18: Vacuum fan error. Reset the system. The vacuum fan is experiencing a fault. Reset the system.
Error 19: The charging dock has no power. Check that the
power cable is properly inserted.
Error 24: Virtual no-go zone or barrier detected. Move the
robot to a new location and restart.
Internal error. Reset the system. Malfunction due to an internal error. Reset the system.
Note: A system reset may not resolve all problems.
If the problem persists aer using the recommendations in the table above, please email our aer-sales service team:
US/Non-Europe Support: support@roborock.com Europe Support: support@roborock-eu.com
Troubleshooting
The charging dock power cable may have come loose. Re-insert the power cable
then retry recharging.
Move the robot out of the virtual no-go zone or barrier and restart.
27

FAQs
Problem Solution
Unable to power on
Unable to charge
Slow charging
Unable to recharge
Abnormal behavior Restart the robot.
Noise during cleaning The main brush, side brush or main wheel may be jammed. Turn off the robot and clean them.
Poor cleaning ability or dust falling out
Baery level may be too low. Charge the robot and retry. Baery temperature may be too low or
too high. Try again when the baery is between 0°C (32°F) to 40°C (104°F).
If the charging dock is not receiving power, check that both ends of the power cable are
properly connected. If contact is poor, clean the contact areas of the charging dock and
the robot. Power is restored when the power indicator light turns on.
If the robot is being used in a very hot or very cold environment, it will reduce its charging
speed to extend its baery life. The charging contact points also may be dirty. If that is the
case, clean them using a dry cloth.
There are too many obstacles near the charging dock. Please place itin an open area.
The robot is too far from the charging dock. Place it closer.
If the dustbin is full, empty it. If the filter is blocked, wash it. If the main brush is tangled up,
clean it.
28

FAQs
Problem Solution
If WiFi is disabled, reset it and try again; if the WiFi signal is weak, make sure the robot is within
Unable to connect to WiFi
Scheduled cleanups are not starting The baery level is too low. Scheduled cleanup can only begin when the baery level is above 20%.
Is power always being drawn when the robot is on the
charging dock?
Does the robot need to be charged for at least 16
hours the first three times it is used?
Cleaning does not resume aer recharging
The robot cannot return to the charging dock aer
spot cleaning or when it has been moved manually.
Robot Vacuum Cleaner
Manufacturer: Beijing Roborock Technology Co. Ltd.
Product Model: roborock S4
Address of Manufacturer: Floor 6, Suite 6016, 6017, 6018, Building C, Kangjian Baosheng Plaza,
No.8 Heiquan Road, Haidian District, Bejing, P.R.CHINA
For more product information, visit our website: www.roborock.com
For aer-sales support, email our aer-sales service team:
US/Non-Europe Support: support@roborock.com
Europe Support: support@roborock-eu.com
the coverage of a WiFi signal. If the WiFi connection is abnormal, reset the WiFi, download the
latest mobile app, then try reconnecting to the WiFi. The app may not support your model
of robot. You can view supported robots in-app.
The robot will draw power while it is docked to maintain baery performance, but power
consumption is incredibly low.
No. The robot can be used any time aer it has been fully charged once.
Make sure that the robot is not in DND mode because DND mode will prevent cleanup. When
cleaning a space requiring a top-up charge, if the robot was placed manually on the charging
dock before it topped up automatically, it will not be able to continue cleanup.
Aer a spot cleanup or a significant position change, the robot will re-generate the map. If the
charging dock is too far away, it may not be able to return for recharging and must be placed
on the charger manually.
 Loading...