

Page 1
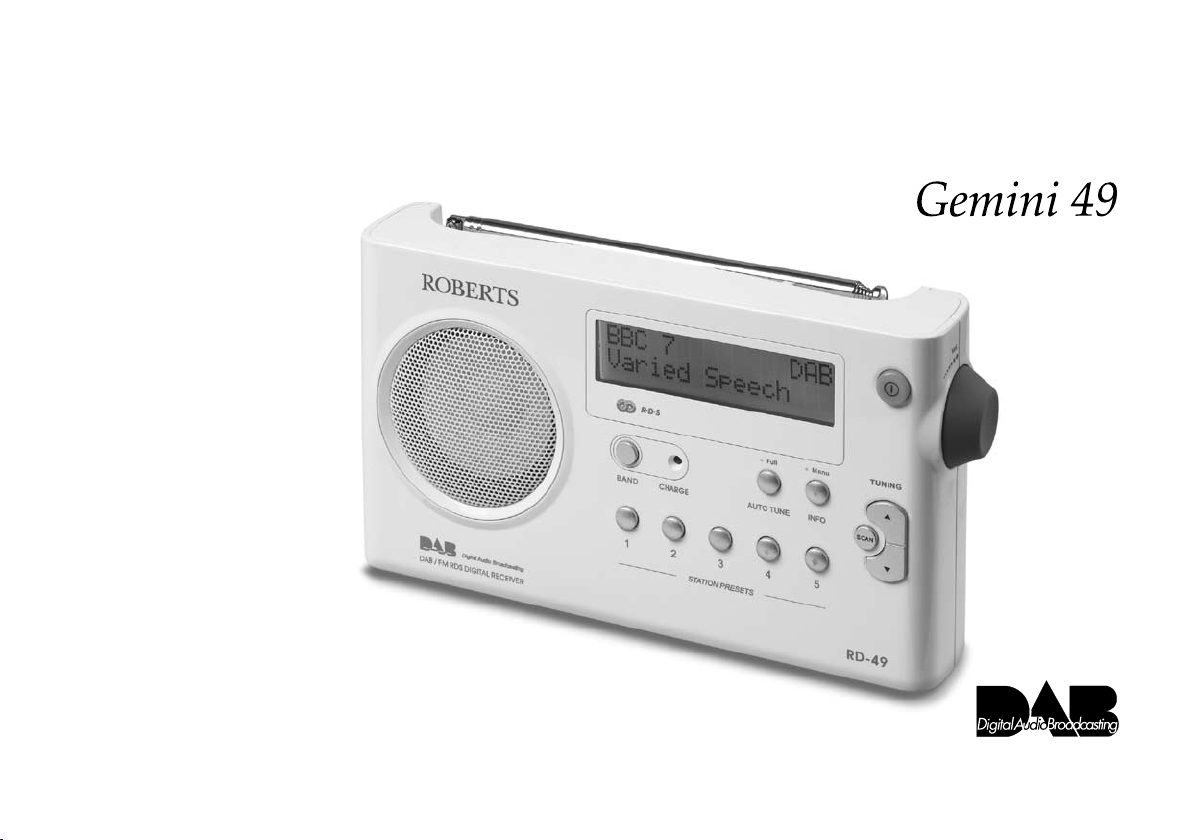
RD-49
FM RDS/DAB digital radio
ROBERTS
Sound for Generations
Please read this manual before use
Page 2

Contents
Controls ........................................................................... 2-3
Battery operation
Using the AC adaptor
Operating your radio - DAB
Selecting a station - DAB
Secondary services - DAB
Display modes - DAB
Finding new stations - DAB
Signal strength display - DAB
Manual tuning - DAB
Autoselect - DAB
Dynamic range control - DAB
Operating your radio - FM
Manual tuning - FM
Display modes - FM
Software version
Presetting stations
Recalling a preset
System reset
............................................................. 4-5
..........................................................5
.................................................6
.....................................................7
...................................................7
..........................................................8
.................................................9
..............................................9
.........................................................10
...............................................................10
............................................ 11
.................................................12
............................................................13
...........................................................14
................................................................15
.............................................................15
..............................................................16
......................................................................16
Headphone socket.............................................................17
Display backlight
................................................................17
General ..............................................................................18
Specications ....................................................................18
Circuit features
..................................................................18
Guarantee..........................................................................19
1
Page 3
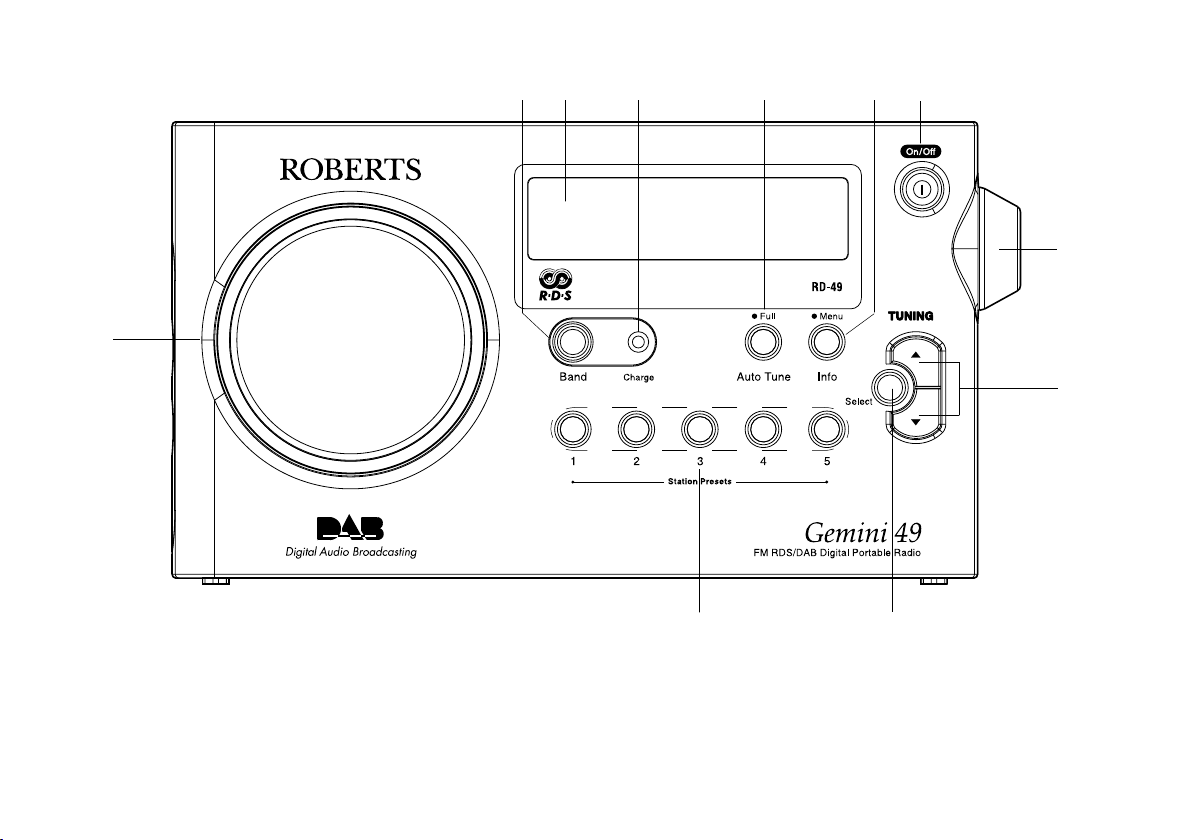
Controls
(Front)
1
2
3
4
5 6
7
8
9
1. Speaker
2. Band button
3. LCD display
4. Charge LED indicator
5. Auto Tune button
6. Menu/info button
If you need any further advice, please call our Technical Helpline on :-
020 8758 0338 (Mon-Fri)
7. On/Off button
8. Volume control
9. Tuning Up/Down buttons
10. Select button
11. Preset buttons
11
10
2
Page 4
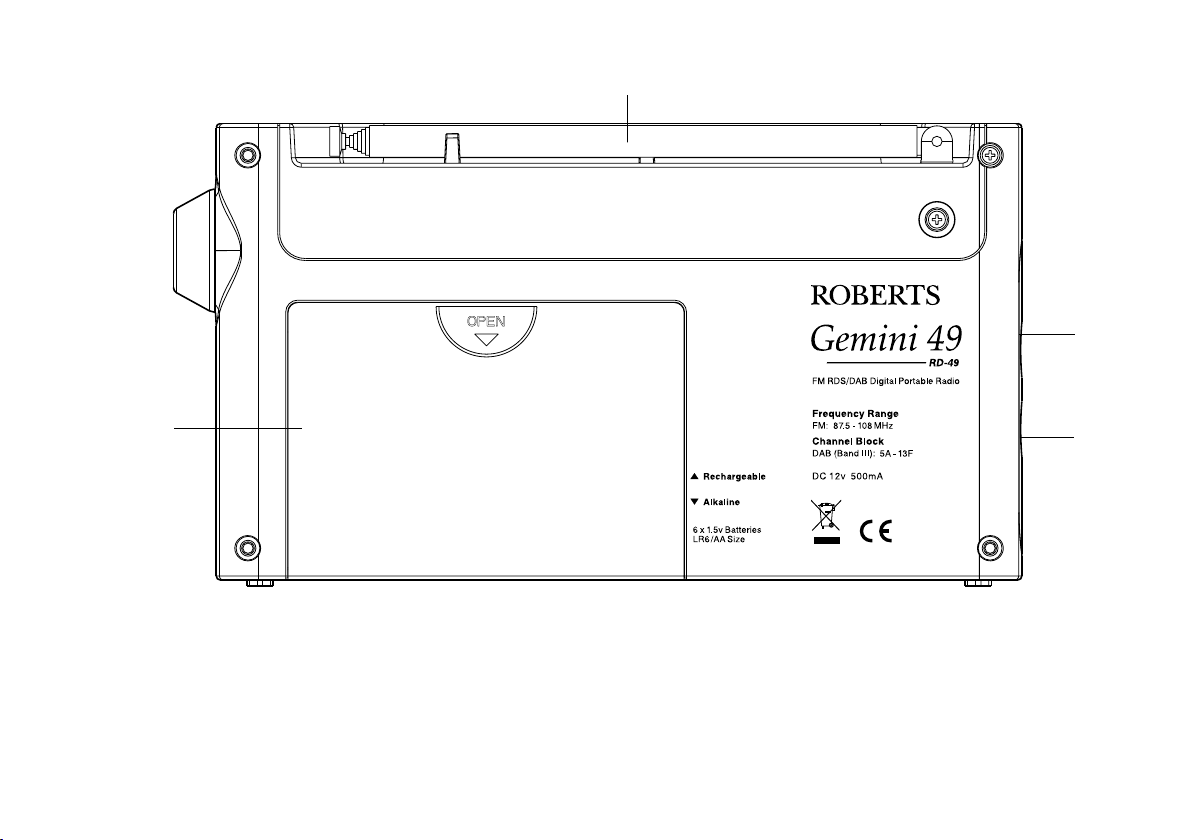
Controls
(Back)
13
14
12
12. Battery compartment
13. Telescopic aerial
3
14. Headphone socket
15. DC jack socket
15
Page 5
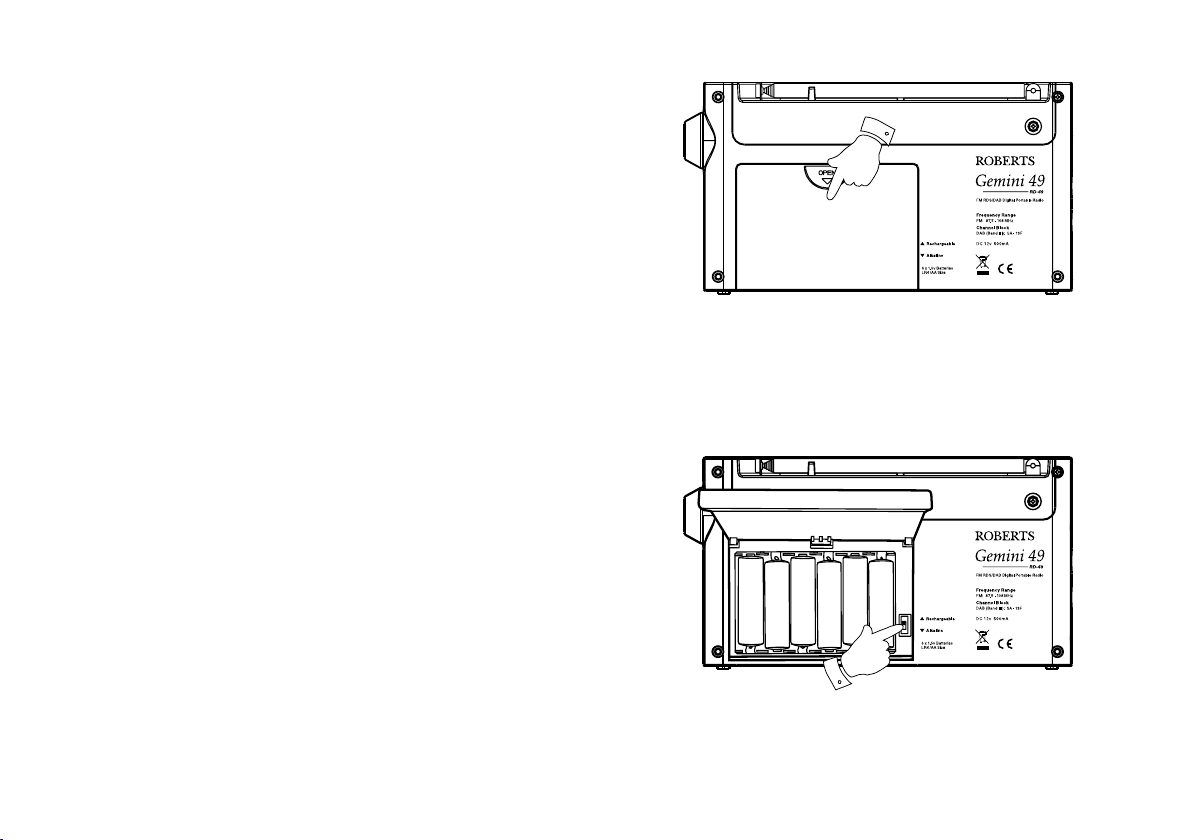
Battery operation using alkaline batteries
1. Remove the battery cover on the back of the unit by sliding the cover
in the direction of the arrow.
2. Insert six LR6 (AA size) alkaline batteries into the spaces in the
compartment. Take care to ensure all batteries are inserted with the
correct polarity as shown inside the battery compartment.
3. Slide the battery switch to the
battery cover.
• Important: when using alkaline batteries the battery switch must
be placed in the alkaline position. Failure to do so could result
in serious damage to the batteries or radio.
• Reduced power, distortion and a ‘stuttering’ sound are all signs that
the batteries may need replacing.
• If the radio is not to be used for any extended period of time it is
recommended that the batteries are removed from the radio.
• We would recommend for economy that the RD-49 is used via the AC
adaptor whenever possible with battery operation for occasional or
stand-by use only. If extended listening using batteries is anticipated,
then the use of rechargeable batteries is recommended.
Alkaline position and then replace the
Battery operation using rechargeable batteries
1. Remove the battery cover on the back of the unit by sliding the cover
in the direction of the arrow.
2. Insert six Rechargeable LR6 (AA size) batteries into the spaces in the
compartment. Take care to ensure all batteries are inserted with the
correct polarity as shown inside the battery compartment. The radio is
designed to be used with Nickel Metal Hydride (NiMH) rechargeable
batteries.
3. Slide the battery switch to the
the battery cover.
Rechargeable position and then replace
1
continued on next page
If you need any further advice, please call our Technical Helpline on :-
020 8758 0338 (Mon-Fri)
4
Page 6
4. The charge light will ash indicating batteries are charging. Batteries
will be fully charged in around 7 hours.
• Important: when using rechargeable batteries the battery switch
must be placed in the rechargeable position. Batteries will only
be charged when the radio is switched off and connected to the
AC adaptor.
• Reduced power, distortion and a ‘stuttering’ sound are all signs that
the batteries may need recharging.
• If the radio is not to be used for any extended period of time it is
recommended that the batteries are removed from the radio.
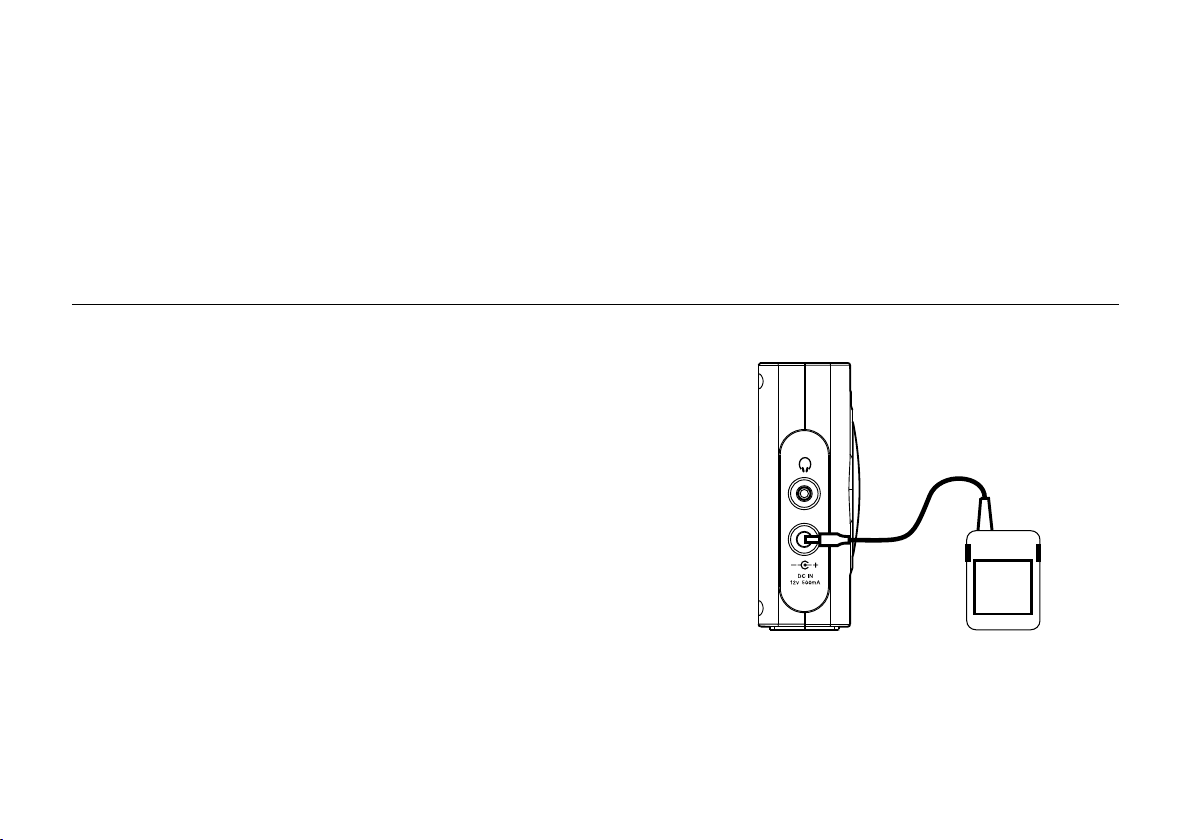
Using the AC adaptor
The AC adaptor for use with the RD49 should provide 12 volts DC
output at 500mA centre pin positive.
1. Insert the adaptor plug into the DC in socket on the left hand side of
your radio.
2. Plug the adaptor into a standard 13A mains socket outlet. Whenever
the adaptor is plugged in to the radio and switched on at the mains the
batteries are automatically disconnected. If the adaptor is plugged in to
the radio but not switched on then the radio will run from the batteries
if tted.
The AC adaptor should be disconnected from the mains supply and
the radio when not in use.
5
Page 7
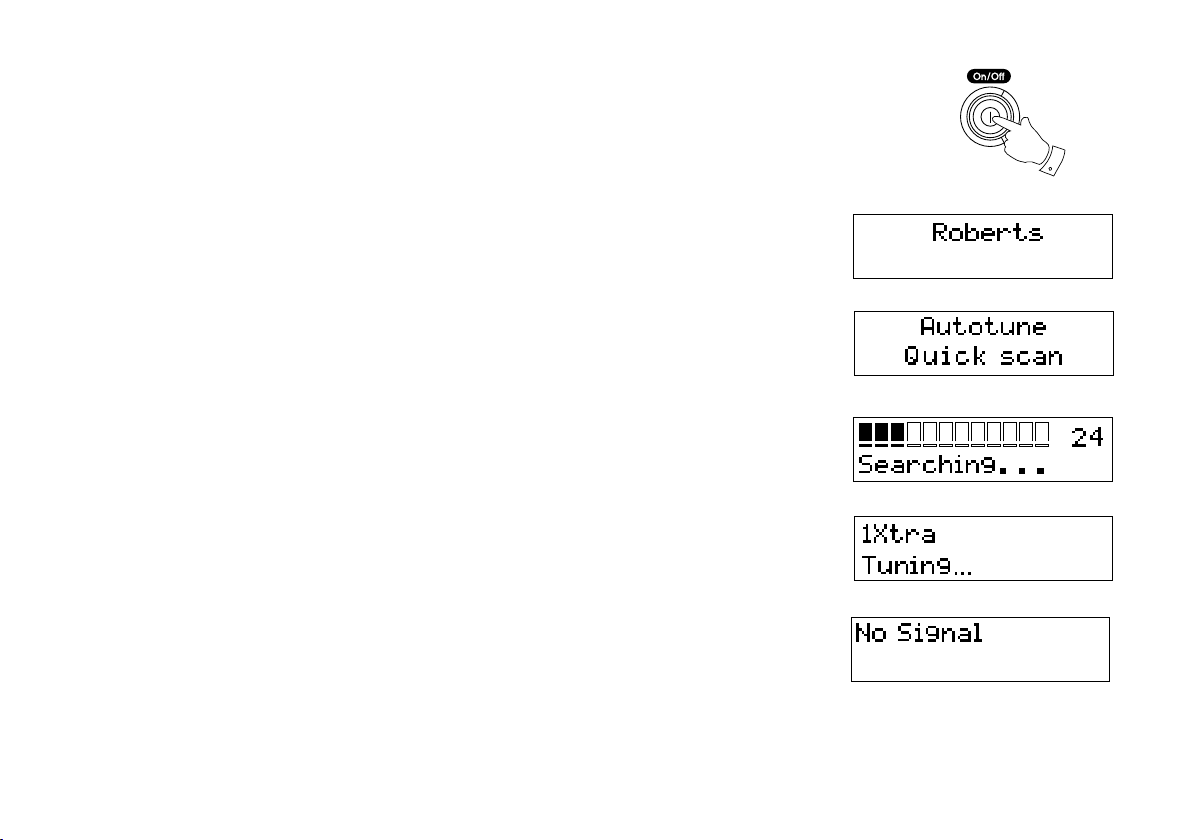
Operating your radio - DAB
1. Carefully extend the telescopic aerial.
2. Press the
"Roberts" for a few seconds.
3. If this is the rst time the radio is used a quick scan of UK Band III
DAB channels will be carried out. The display will show "Autotune
Quick scan". If the radio has been used before the last used station
will be selected.
4. During Autotune, as new stations are detected the station counter
on the right hand side of the display will increase and stations will be
added to the list. The top line of the display shows a bargraph indicating progress of autotune.
5. When the Autotune is completed the rst station (in numeric-alpha
order 0...9...A....Z) will be selected.
6. If the station list is still empty after the Autotune your radio will display
"No Signal".
7. If no signals are found it may be necessary to relocate your radio to
a position giving better reception.
On/Off button to switch on your radio. The display will show
2
If you need any further advice, please call our Technical Helpline on :-
020 8758 0338 (Mon-Fri)
6
Page 8
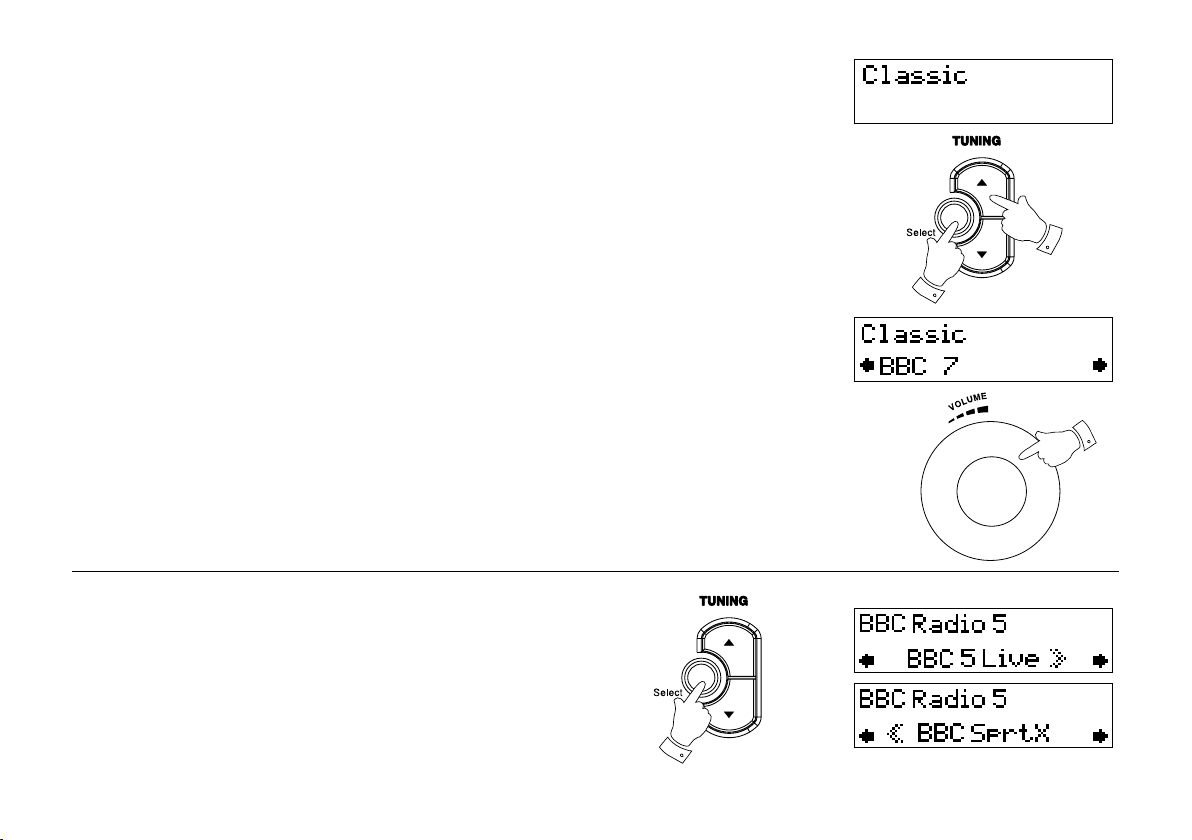
Selecting a station - DAB
1. The top line of the display shows the name of the station currently
selected.
2. Press the
able stations.
3. Press and release the
may show "Tuning" while your radio nds the new station.
4. Adjust the
Note: If after selecting a station the display shows "Not Available" it
may be necessary to relocate your radio to a position giving better
reception.
Tuning Up/Down buttons to scroll through the list of avail-
Select button to select the station. The display
Volume control to the required setting.
Secondary services - DAB
1. Certain radio stations have one or more secondary services associated
with them. If a station has a secondary service associated with it the
display will show ">>" next to the station name on the station list. The
secondary service will then appear immediately after the primary
service as you press the Tuning Up button.
2. Press the
Select control to select the station.
2
3
4
2
7
Page 9
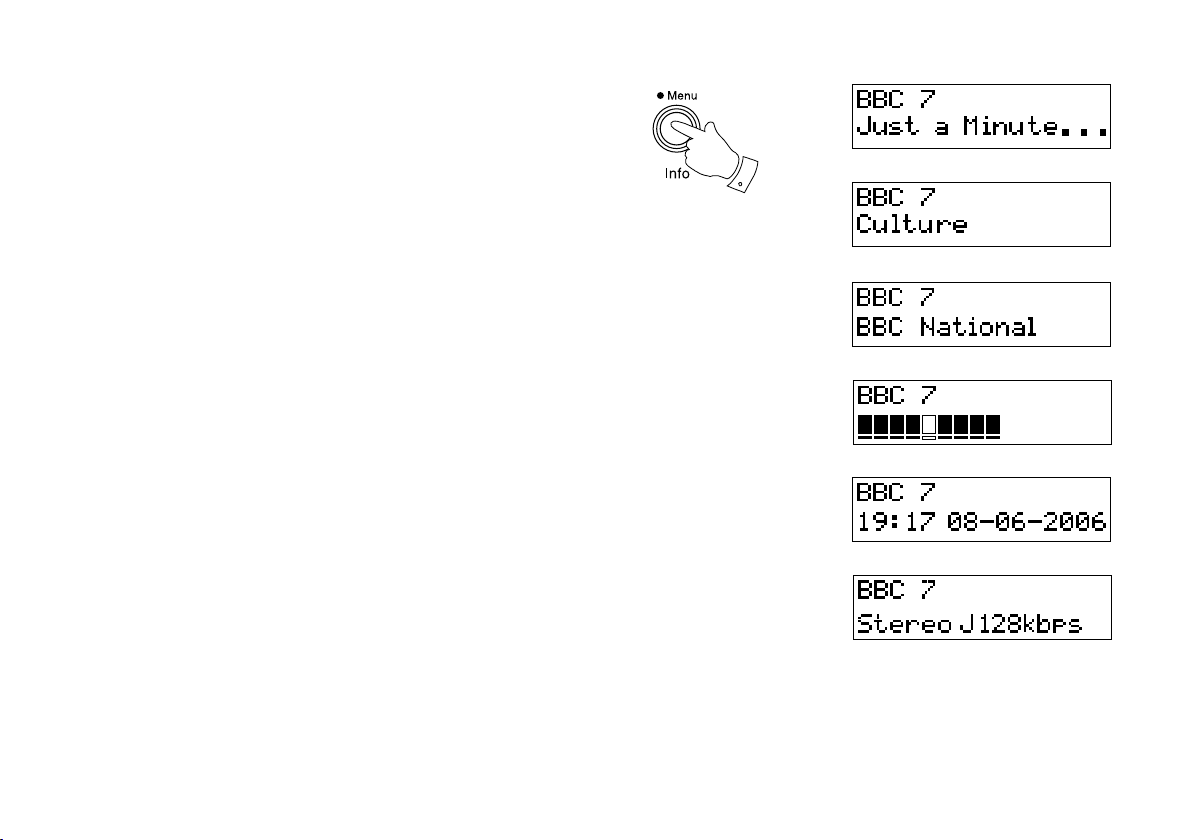
Display modes - DAB
Your radio has six display modes:-
1. Press and release the
modes.
a. Scrolling text Displays scrolling text messages such
as artist/track name, phone in number,
etc.
b. Programme type Displays type of station being listened to
e.g. Pop, Classic, News, etc.
c. Multiplex name Displays name of multiplex to which
current station belongs.
d. Signal strength Displays signal strength for station being
listened to.
e. Time and date Displays current time and date.
f. Audio type and bit rate Displays audio type and bit rate.
Menu/Info button to cycle through the various
a
1
b
c
d
e
f
If you need any further advice, please call our Technical Helpline on :-
020 8758 0338 (Mon-Fri)
8
Page 10
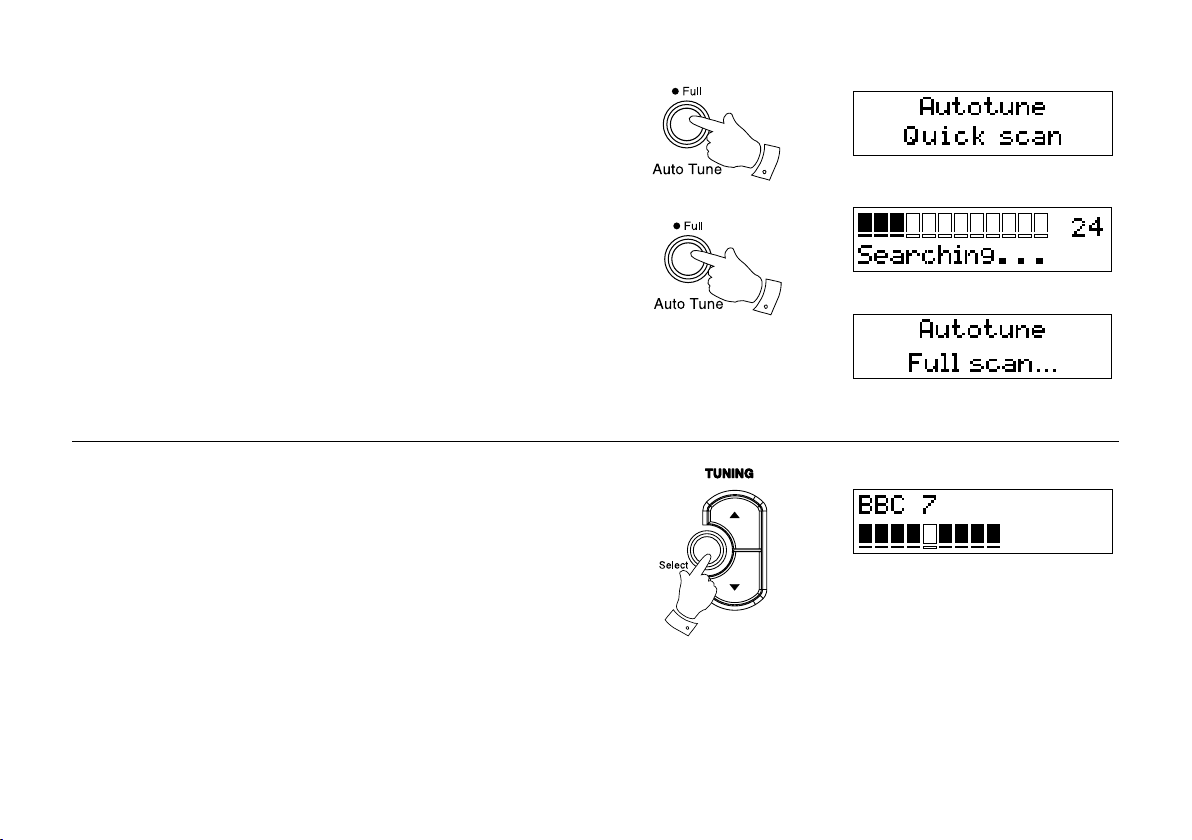
Finding new stations - DAB
As time passes new stations may become available. To nd new stations
proceed as follows:-
1
1. Press and release the
"Autotune Quick scan". Your radio will perform a scan of the UK DAB
frequencies. As new stations are found the station counter on the
right-hand side of the display will increase and stations will be added
to the list.
2. To carry out a full scan of the entire DAB Band III frequencies press and
hold down the Auto Tune button for more than 2 seconds and then
release. The display will show "Autotune Full scan". As new stations
are found the station counter on the right-hand side of the display will
increase and stations will be added to the list.
Auto Tune button, the display will show
Signal strength display - DAB
1. Press and release the Select button until the display will show signal
strength.
2. Position your radio and carefully angle the telescopic aerial for best
reception using the signal strength display as a guide. Move your
radio around and position so as to give maximum number of black
rectangles on signal strength display. The clear unlled rectangle
indicates minimum signal level required for satisfactory reception.
3. Press the
Select button to exit the signal strength display.
2
1,3
9
Page 11
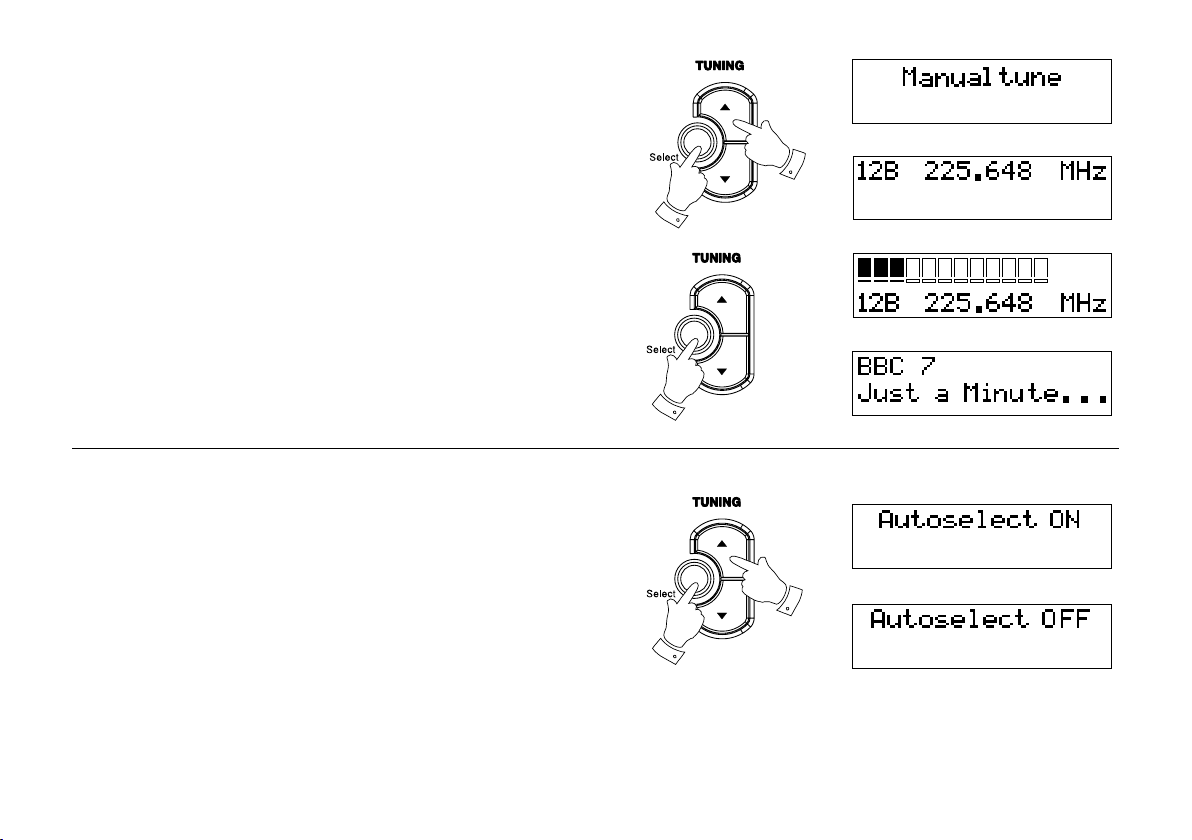
Manual Tuning - DAB
Manual tuning allows you to tune directly to the various DAB Band III
channels. UK DAB stations are located in the range 11B to 12D.
1. Press and hold the
tune". Release the Select button.
2. Press either the
channel.
3. Press and release the
channel. The open bar in the middle shows you the minimum signal
strength needed for good DAB reception. The signal strength bars will
go up and down showing the changing signal strength as you adjust
the telescopic aerial on your radio.
4. When a DAB signal is found, the display will show the name of the
DAB multiplex. Any new radio stations found will be added to the list
stored in the radio.
5. Press and release the
Select button until the display shows "Manual
Tuning Up/Down buttons to select the required DAB
Select button to select the required DAB
Select button to return to normal tuning.
Autoselect - DAB
As an alternative to pressing the Select button to select a station your
radio can be set so as to automatically select a station.
1. Press and release either the
times, immediately press and hold down the Select button until the
display shows "Autoselect ON".
2. Press the
the display. After a few seconds your radio will automatically select
the station shown on the display.
3. To switch off autoselect press and release the
buttons a few times, immediately press and hold down the Select
button until the display shows "Autoselect Off".
If you need any further advice, please call our Technical Helpline on :-
020 8758 0338 (Mon-Fri)
Tuning buttons until the station you require is visible on
Tuning Up or Down buttons a few
Tuning Up or Down
2
1
3,5
1,2,3
1,3
10
Page 12
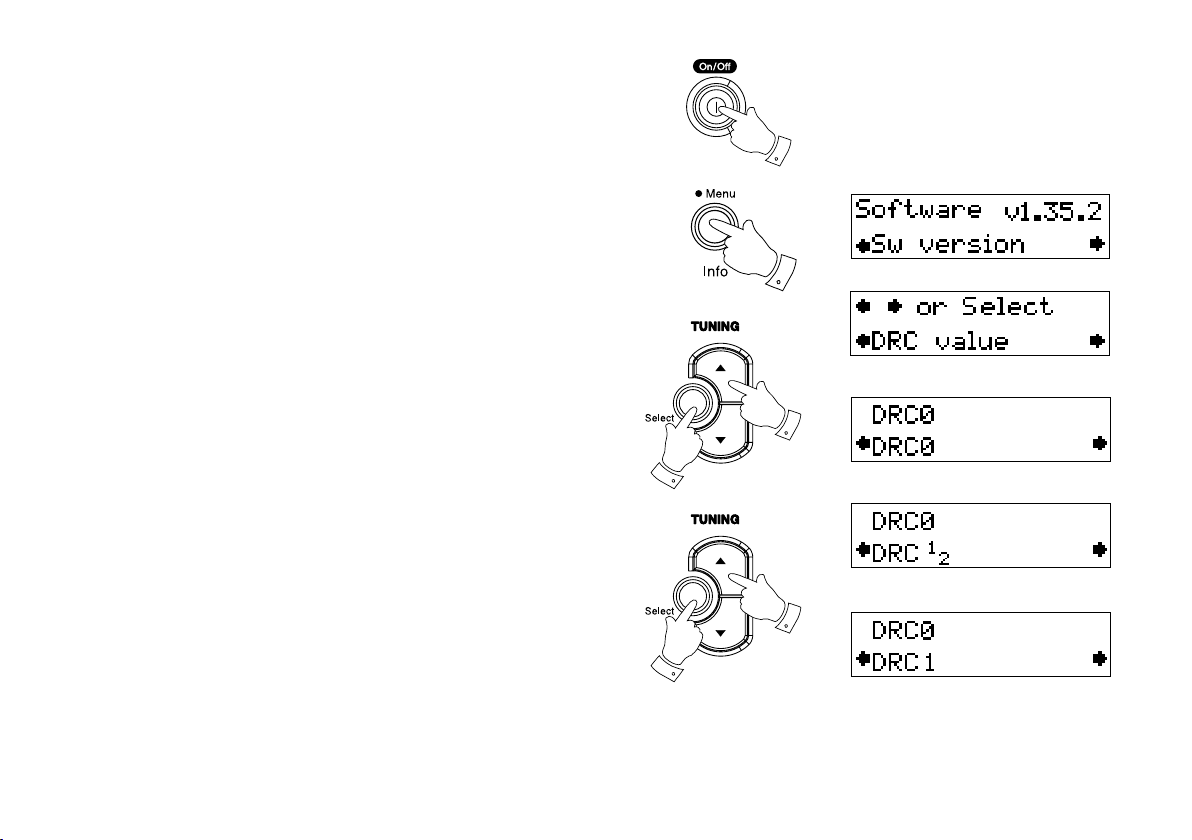
Dynamic Range Control (DRC) settings - DAB
DRC can make quieter sounds easier to hear when your radio is used in
a noisy environment.
1
1. Press the
2. Press and hold in the
“Software.”
3. Press the
value".
4. Press and release the
5. Press the
(default is 0) .
DRC 0 DRC is switched off, Broadcast DRC will be ignored.
DRC 1/2 DRC level is set to 1/2 that sent by broadcaster.
DRC 1 DRC is set as sent by broadcaster.
6. Press and release the
will return to normal tuning mode.
Note: Not all DAB broadcasts are able to use the DRC function. If the
broadcast does not support DRC, then the DRC setting in the radio will
have no effect.
On/Off button to switch on your radio.
Menu/Info button the display will show
Tuning Up/Down buttons until the display shows "DRC
Select button to enter adjustment mode.
Tuning Up/Down buttons to select required DRC setting
Select button to conrm the setting. The display
2
3
4
5
6
11
Page 13
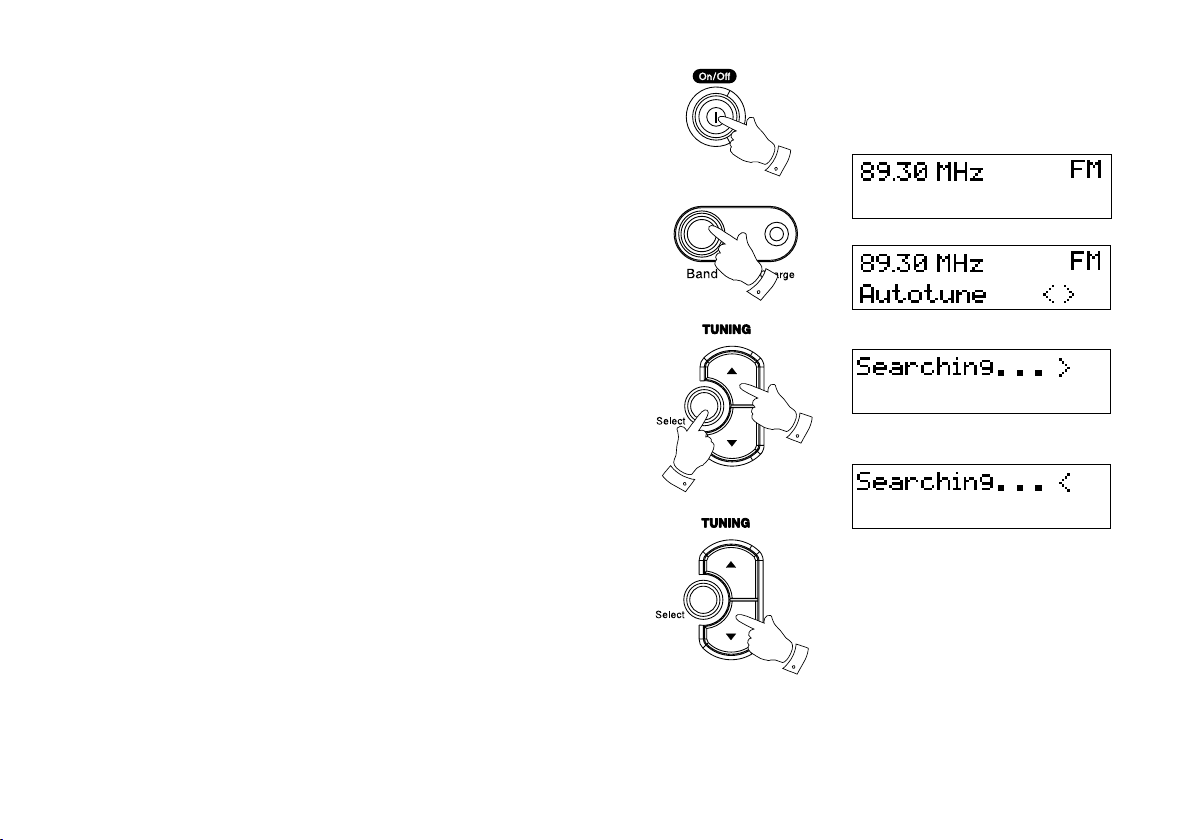
Operating your radio - FM
1. Carefully extend the telescopic aerial.
2. Press the
"Roberts" for a few seconds.
On/Off button to switch on your radio. The display will show
2
3. Press the
4. Press and release the
tune <>".
5. Press the
direction (low frequency to high frequency) and stop automatically
when it nds a station of sufcient strength.
6. After a few seconds the display will update and show station name
(if RDS information is available).
7. Press the
direction (high frequency to low frequency).
8. When the waveband end is reached your radio will recommence tuning
from the opposite waveband end.
9. Adjust the
10. To switch off your radio press the
If you need any further advice, please call our Technical Helpline on :-
020 8758 0338 (Mon-Fri)
Band button to select the FM band.
Select button until the display shows "Auto
Tuning Up button your radio will scan in an upwards
Tuning Down button to scan the FM band in a downwards
Volume control to the required setting.
On/Off button.
3
5
4
7
12
Page 14
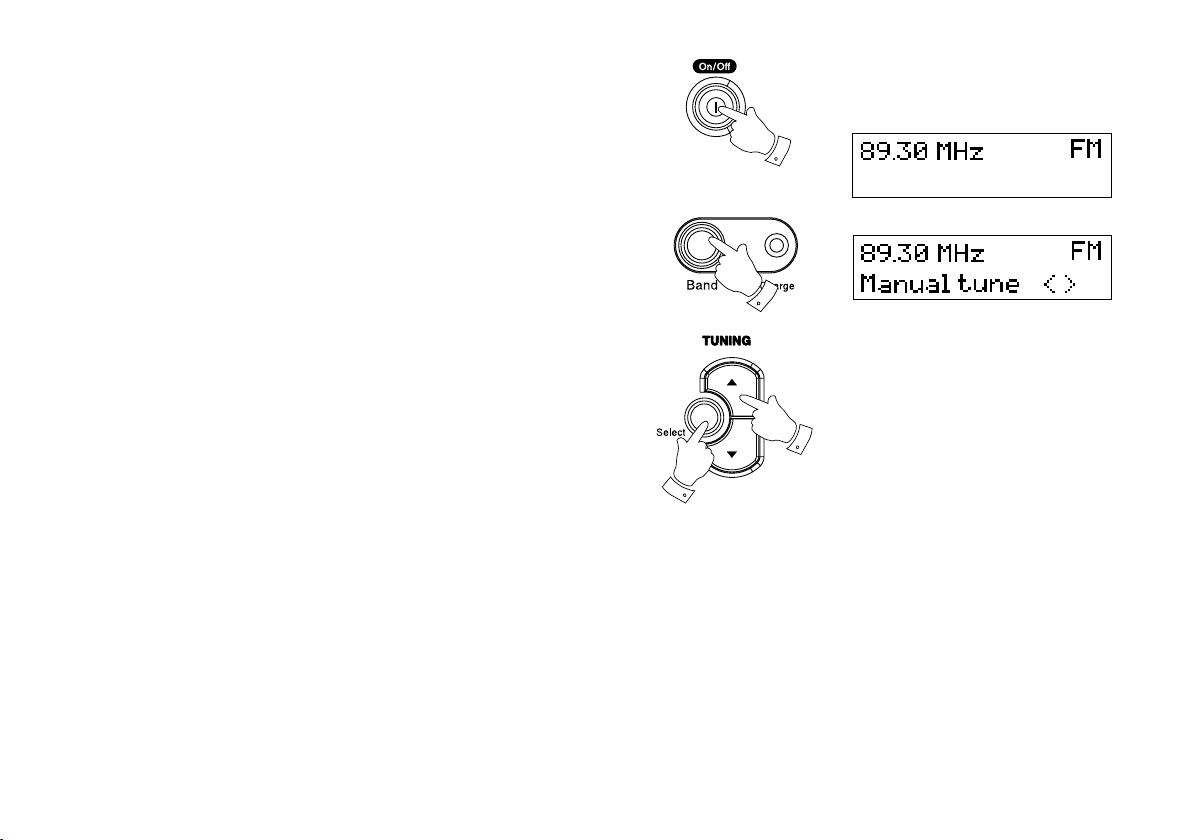
Manual tuning - FM
1. Press the On/Off button to switch on your radio.
2. Press the
escopic aerial.
3. Press and release the
tune <>".
4. Press either the
The frequency will change in steps of 50kHz.
5. When the waveband end is reached the radio will recommence tuning
from the opposite waveband end.
6. Set the
7. To switch off your radio press the
Band button to select the FM band. Fully extend the Tel-
Select button until the display shows "Manual
Tuning Up or Down buttons to tune to a station.
Volume control to the required setting.
On/Off button.
1
2
4
3
13
Page 15
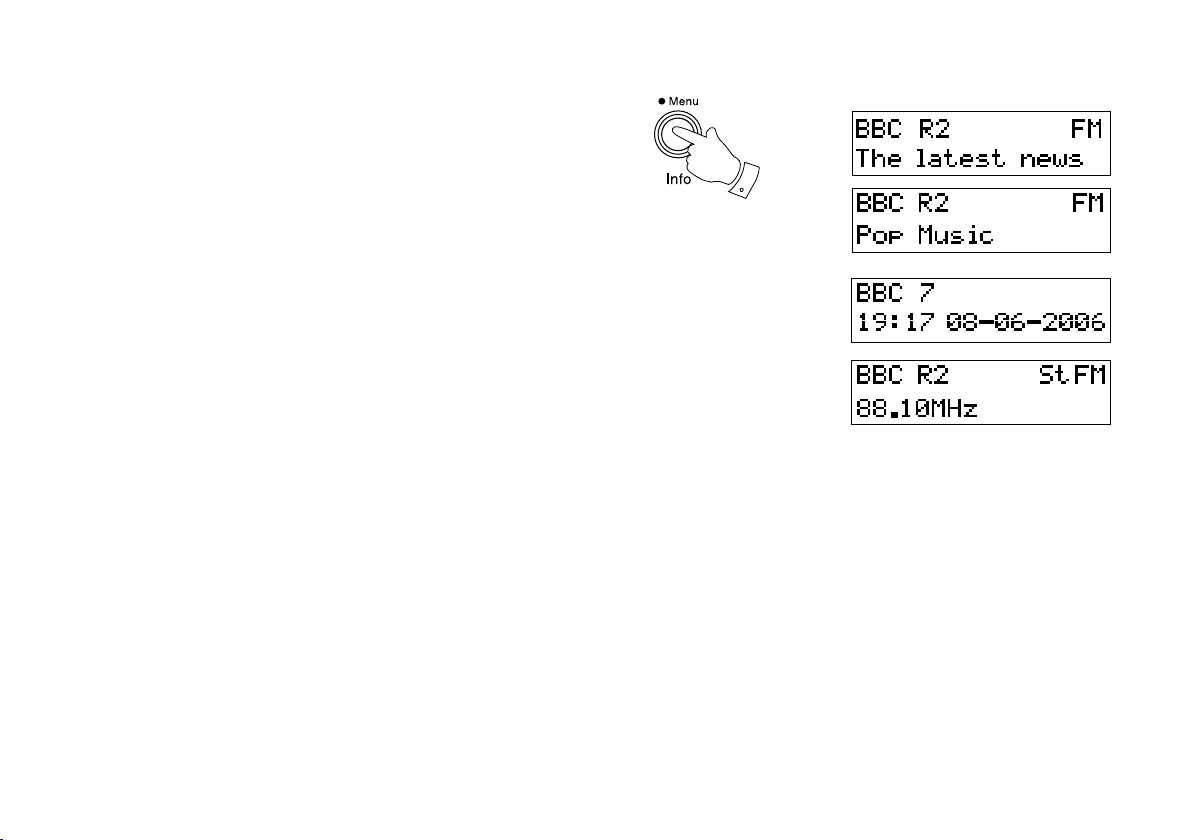
Display modes - FM
On FM the bottom line of the display can be set to any of the following
modes:-
1. Press the
a. Scrolling text Displays scrolling text messages such
as artist/track name, phone in number
etc.
b. Program Type Displays type of station being listened to
e.g. Pop, Classic, News, etc.
c. Time and date Displays current time and date.
Menu/Info button to cycle through the various modes.
a
1
b
c
d. Frequency & Displays frequency of the station being
audio mode listened to and displays the audio mode,
Auto (stereo) or mono
Note: When tuned to the FM band, information display is only available
when the radio is able to receive RDS information from the broadcaster.
If you need any further advice, please call our Technical Helpline on :-
020 8758 0338 (Mon-Fri)
d
14
Page 16
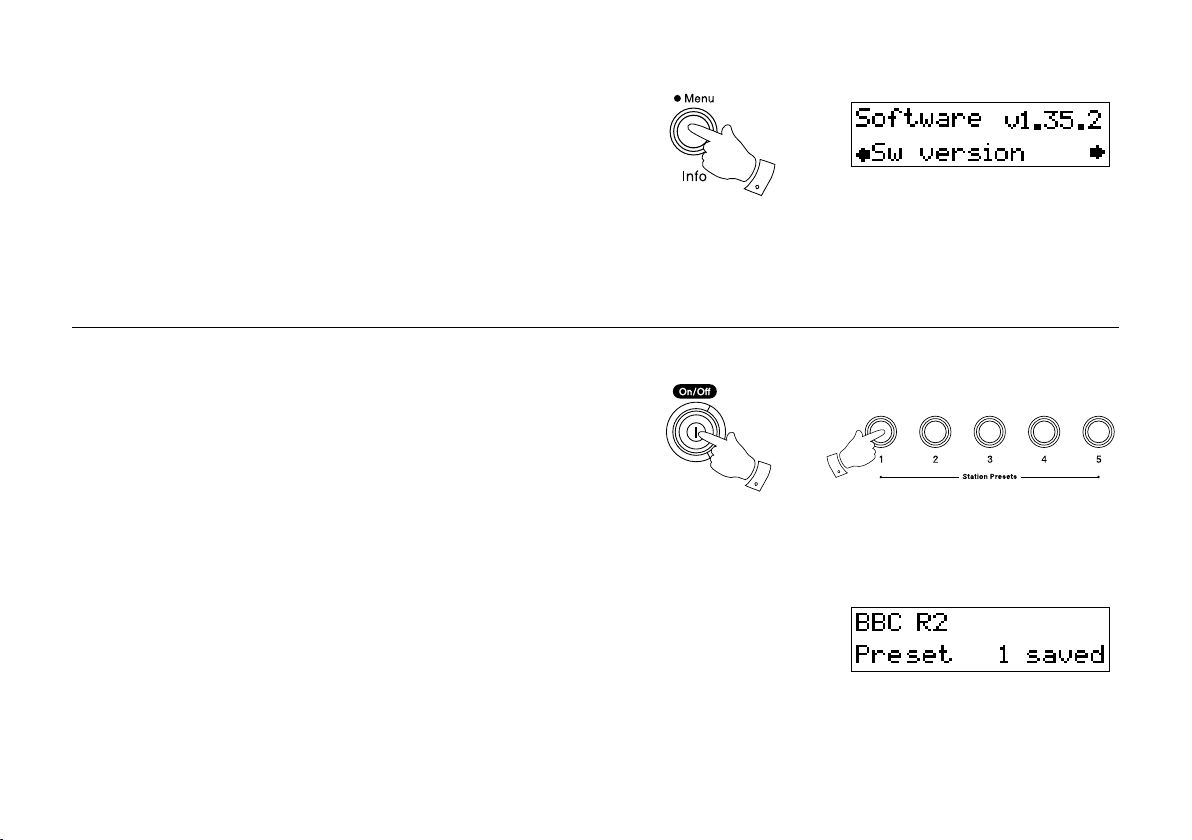
Software version
The software display cannot be altered and is just for your reference.
1. Ensure the DAB waveband is selected. To view the software version
on the display press and hold in the Menu/Info button the display
will show “Software.”
2. After a few seconds the display will revert to normal tuning mode.
Presetting stations
There are 5 memory presets for each of the two wavebands.
1. Press the
2. Tune to the required station as previously described.
3. Press and hold the required
Preset 1 saved. The station will be stored under the chosen preset
button. Repeat this procedure for the remaining presets.
4. Stations stored in the memories may be overwritten by following the
above procedure.
On/Off button to switch on your radio.
Preset button until the display shows e.g.
1
1
3
15
Page 17
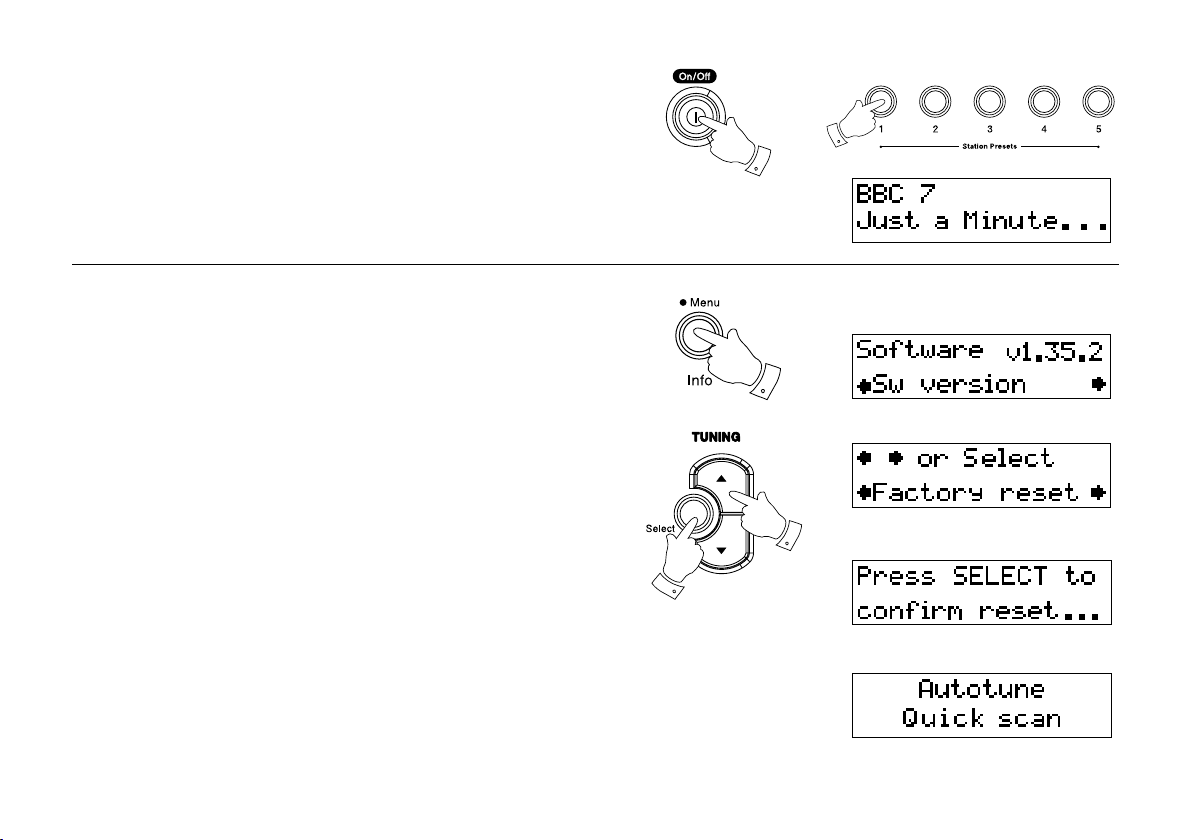
Recalling a preset
1. Press the On/Off button to switch on your radio.
2. Select the required waveband.
3. Momentarily press the required
the station stored in preset memory.
Preset button, your radio will tune to
System reset
If your radio fails to operate correctly, or some digits on the display are
missing or incomplete carry out the following procedure.
1. Press and hold down the
will be displayed.
2. Press the
SELECT Factory reset".
3. Press in and release the
4. Press the
station lists will be erased.
5. After a system reset a scan of the DAB band will be performed.
In case of malfunction due to electrostatic discharge, reset the product
(reconnection of power source may be required) to resume normal
operation.
If a problem persists our technical staff would be pleased to of-
fer any assistance on operating the radio. Our technical helpline
number is 020 8758 0338.
Tuning Up/Down buttons until the display shows "or
Select button, a full reset will be performed. All presets and
Menu/Info button for 2 seconds "Software"
Select button to select System reset.
3
1
1
2
3,4
If you need any further advice, please call our Technical Helpline on :-
020 8758 0338 (Mon-Fri)
16
Page 18
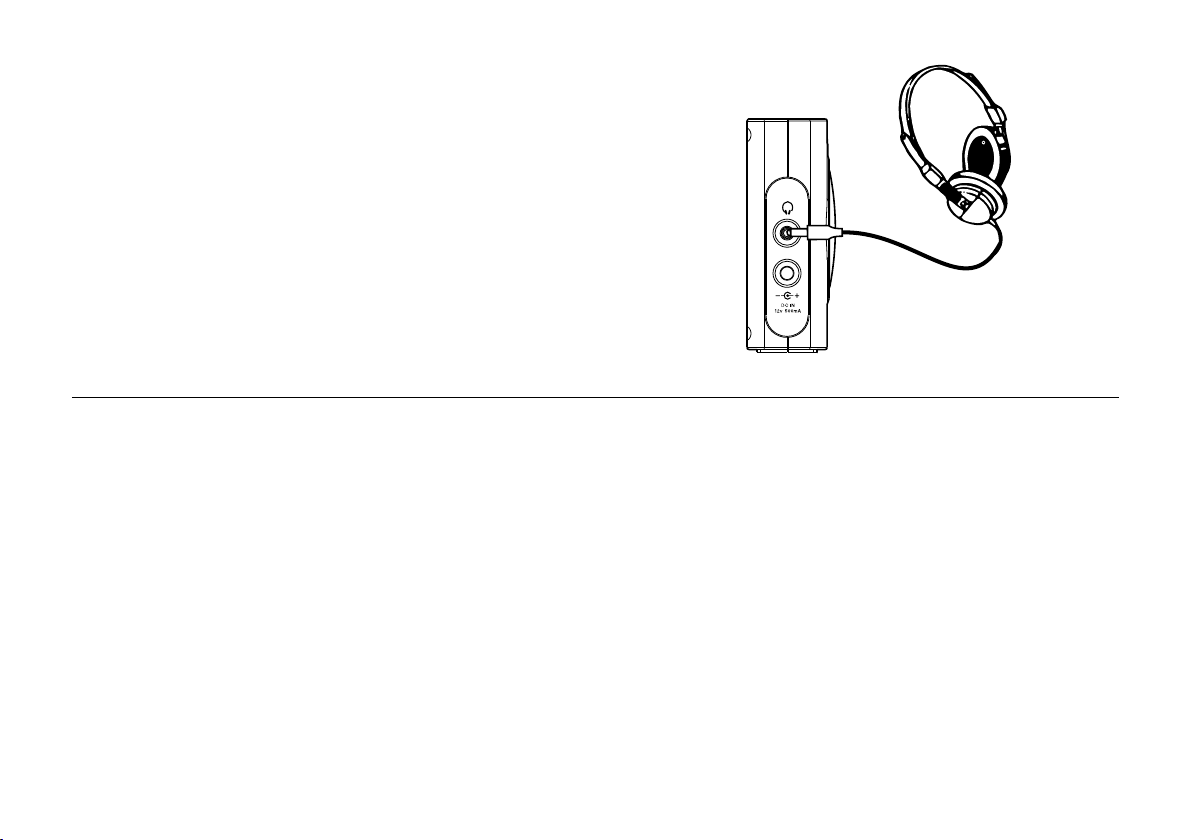
Headphone socket
A 3.5mm Headphone Socket located on the left hand side of your radio
is provided for use with either headphones or an earpiece. Inserting a plug
automatically mutes the internal loudspeaker.
Display backlight
1. When using on batteries, the display backlight will be switched on for
approximately 12 seconds when any button is pressed.
2. When your radio is powered by AC mains the display backlight will
always be switched on.
17
Page 19
General
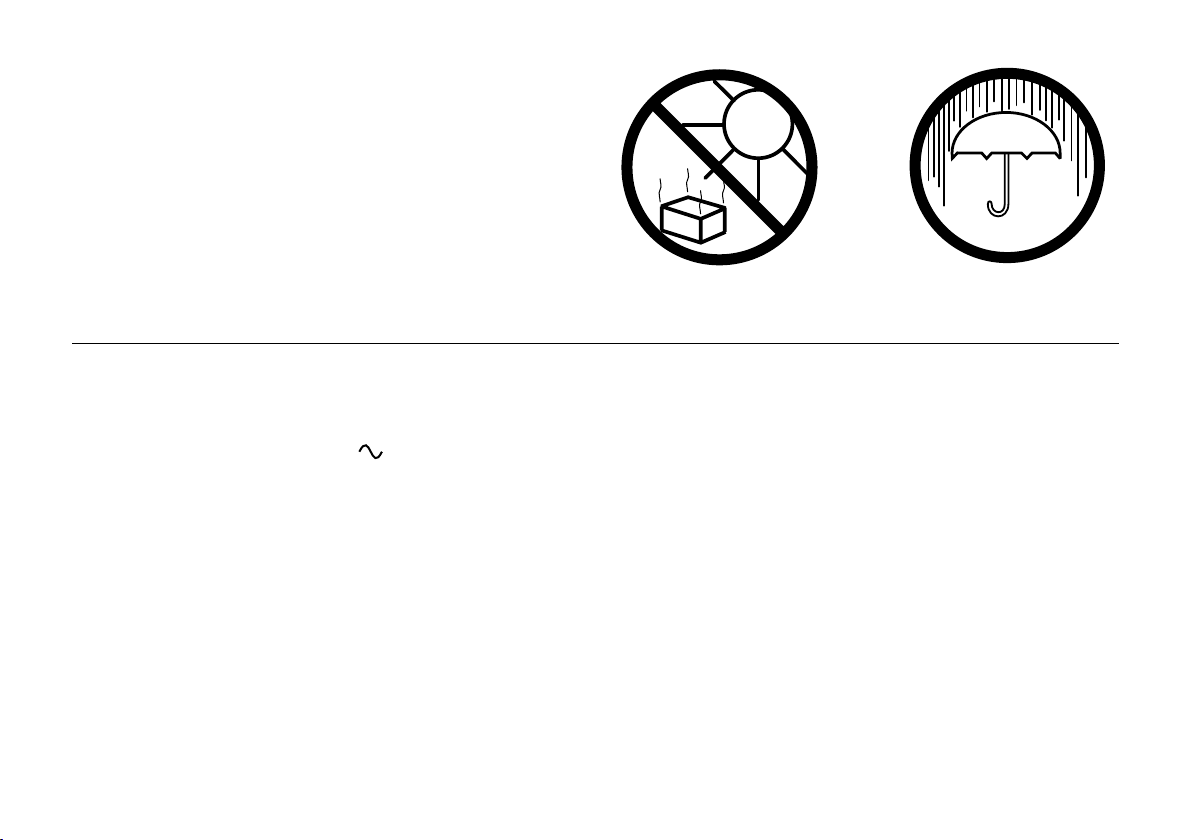
Do not allow this radio to be exposed to water, steam or sand. Do not leave
your radio where excessive heat could cause damage such as in a parked
car where the heat from the sun can build up even though the outside
temperature may not seem too high. It is recommended that the DAB band
be used wherever possible as better results in terms of quality and freedom
from interference will usually be obtained than on the FM band.
The name plate is located on the back of your radio.
Specications
Power Requirements
Mains AC 230 volts, 50Hz
Batteries 6 x LR6 (AA size)
Battery Life
Approx. 15 hours of listening for 4 hours a day
at normal volume using alkaline cells.
Frequency Coverage
FM 87.5-108MHz
DAB 174.928 - 239.200MHz
If you need any further advice, please call our Technical Helpline on :-
020 8758 0338 (Mon-Fri)
only (adaptor)
The Company reserves the right to amend the specication without notice
Circuit Features
Loudspeaker 75mm
Output Power 1 Watt
Headphone socket 3.5mm dia
Aerial System FM Telescopic aerial
DAB Telescopic aerial
18
Page 20

Guarantee
This instrument is guaranteed for twelve months from the date of delivery to the original owner against failure due to faulty workmanship or component
breakdown, subject to the procedure stated below. Should any component or part fail during this guarantee period it will be repaired or replaced free
of charge.
The guarantee does not cover:
1. Damage resulting from incorrect use.
2. Consequential damage.
3. Receivers with removed or defaced serial numbers.
N.B. Damaged or broken telescopic aerials will not be replaced under guarantee.
Procedure:
Any claim under this guarantee should be made through the dealer from whom the instrument was purchased. It is likely that your Roberts' dealer
will be able to attend to any defect quickly and efciently but should it be necessary the dealer will return the instrument to the Company’s service
department for attention. In the event that it is not possible to return the instrument to the Roberts' dealer from whom it was purchased, please contact
Roberts Radio Technical Services at the address shown on the rear of this manual.
These statements do not affect the statutory rights of a consumer.
Issue 1
ROBERTS RADIO TECHNICAL SERVICES
97-99 Worton Road
Isleworth Middlesex
TW7 6EG
Technical Helpline :- 020 8758 0338 (Mon-Fri during ofce hours)
Website: http://www.robertsradio.co.uk
 Loading...