

Page 1
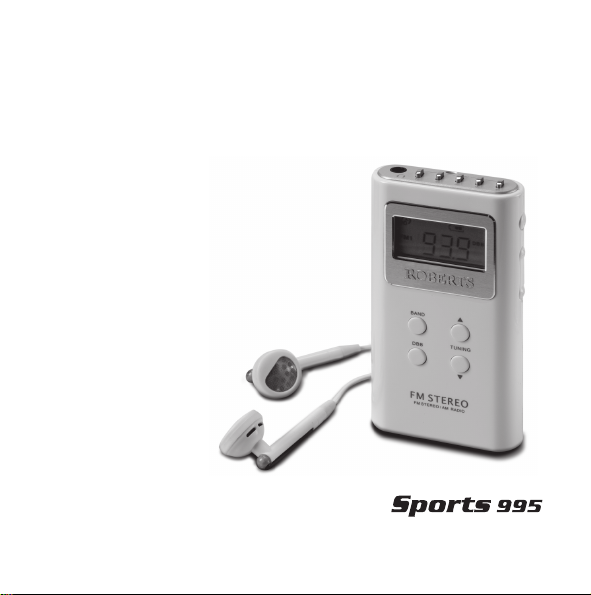
R9995
FM Stereo/AM PLL Digital Radio
ROBERTS
Please read this manual before use
Page 2

Contents
Contents ..........................................................................................1
Controls ......................................................................................... 2-4
Earphones ......................................................................................5
Display ............................................................................................6
Battery .............................................................................................7
Lock switch ....................................................................................9
Earphones ...................................................................................... 11
Aerial .............................................................................................. 11
Scan tuning ....................................................................................13
Manual tuning ................................................................................15
Presetting stations .........................................................................17
Recalling a preset station ...............................................................17
Mono/Stereo mode ........................................................................19
Deep bass boost button .................................................................19
Auto power off ................................................................................ 19
Tuning step size ............................................................................. 21
Troubleshooting .............................................................................23
General ..........................................................................................23
Specifi cation ................................................................................... 25
Guarantee ...................................................................................... 26
1
Page 3
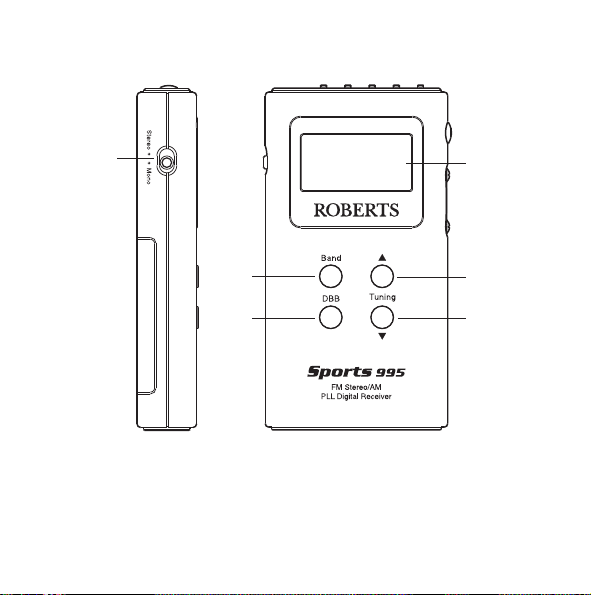
Controls
1
3
2
1. Stereo/Mono switch
2. Deep bass boost button
3. Band button
If you need any further advice, please call our Technical Helpline on :020 8758 0338 (Mon-Fri)
4. LCD display
5. Tuning Up button
6. Tuning Down button
4
5
6
2
Page 4
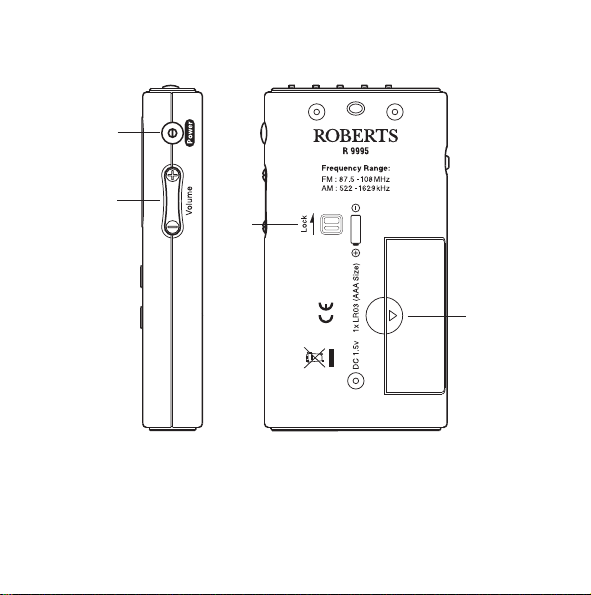
Controls
8
7
9
10
7. Volume control
8. Power button
3
9. Lock switch
10. Battery compartment
Page 5
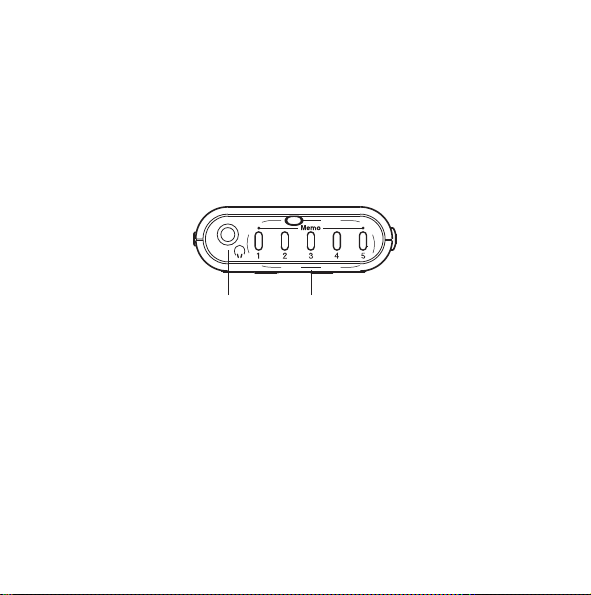
Controls
11 12
11. Earphone socket
12 . Memo preset buttons
If you need any further advice, please call our Technical Helpline on :020 8758 0338 (Mon-Fri)
4
Page 6

Earphones
13. Earphones
5
Page 7
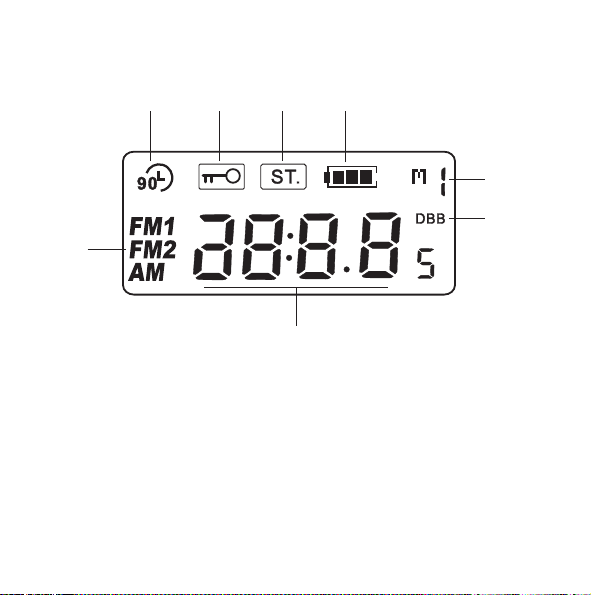
Display
CB
D
E
A
H
A. Waveband indicator
B. 90 minute auto shut off indicator
C. Lock indicator
D. Stereo indicator
If you need any further advice, please call our Technical Helpline on :020 8758 0338 (Mon-Fri)
E. Battery power indicator
F. Memory preset indicator
G. Deep bass boost indicator
H. Frequency indicator
F
G
6
Page 8

Battery
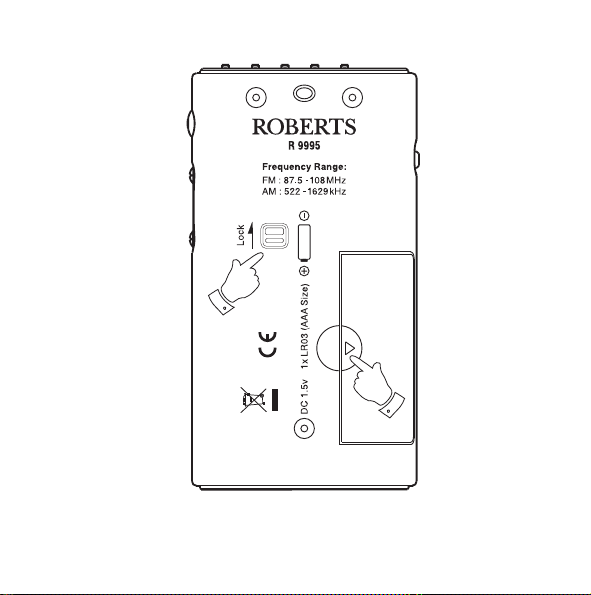
1. Open the battery cover located on the rear of your radio by sliding
it in the direction shown by the arrow.
2. Insert one LR03 (AAA) size battery into the compartment. Ensure
that battery is inserted in accordance with the diagram shown on
the rear of your radio and close the battery cover.
3. Battery should be replaced when the low battery indicator
fl ashes and “E” appears in the display .
4. During battery replacement ensure that the radio is turned off and
the Lock switch is in the “Lock” position. Battery replacement
should be completed within three minutes to prevent loss of
stations stored in memory presets.
5. If the radio is not to be used for a long period, set the Lock switch
to the “Lock” position, this will reduce power drain on the batteries
during storage .
6. Reduced power, distortion and a ‘stuttering’ sound are all signs that
the batteries may need replacing.
7. If the radio is not to be used for an extended period of time it is
recommended that the battery is removed from the radio.
IMPORTANT: The batteries should not be exposed to excessive heat
such as sunshine, fi re or the like. After use, disposable batteries should
if possible be taken to a suitable recycling centre. On no account
should batteries be disposed of by incineration.
7
Page 9
5
1
If you need any further advice, please call our Technical Helpline on :020 8758 0338 (Mon-Fri)
8
Page 10

Lock switch
The Lock switch is used to prevent unintentional operation of your
radio.
1. Set the Lock switch located on the back of your radio to the ‘Lock’
position. The power and all other buttons will be disabled, this will
prevent accidental operation when your radio is packed in a suitcase
or travel bag .
2. To prevent accidental operation of the controls when your radio is
switched on, set the Lock switch to the up ‘Lock’ position, the
symbol will appear in the display.
3. To release the Lock switch, move the lock switch to the down ‘Unlock’
position, the
9
symbol will be removed from the display.
Page 11

2,3
If you need any further advice, please call our Technical Helpline on :020 8758 0338 (Mon-Fri)
10
Page 12

Earphones
Plug the earphones into the Earphone socket located on the top of
your radio. Check that the volume control is not set too loud and place
the earpieces into your ears.
To save your battery the radio will shut off within 10 seconds when you
unplug the earphones from the earphone jack.
IMPORTANT: Excessive sound pressure from earphones and
headphones can cause hearing loss.
Aerials
The lead connecting earphones to your radio acts as an FM aerial when
plugged into the Earphone socket. The lead should be extended as
much as possible to increase reception.
For MW (AM) reception there is a built in ferrite aerial. Rotate your radio
to the position giving best reception.
11
Page 13

If you need any further advice, please call our Technical Helpline on :020 8758 0338 (Mon-Fri)
12
Page 14

Scan tuning
1. Switch on your radio by pressing the Power button.
2. To select the required waveband repeatedly press the Band button.
The earphone lead should be extended as much as possible to
increase reception. For MW (AM) reception there is a built in ferrite
aerial. Rotate your radio to the position giving best reception.
3. Press and hold down either the Tuning Up or Down buttons until
the frequency in the display begins to change rapidly. Release the
button. Your radio will scan the FM1, FM2 or MW (AM) band and
stop automatically when it fi nds a station of suffi cient strength.
4. Adjust the Volume control to the required setting.
5. Press and hold down either the Tuning Up or Down buttons for
more than half a second to resume scan tuning.
6. When the waveband end is reached your radio will continue tuning
from the opposite waveband end.
7. To switch off your radio press the Power button.
13
Page 15

2
1
3,5
3,5
4
7
4
If you need any further advice, please call our Technical Helpline on :020 8758 0338 (Mon-Fri)
14
Page 16

Manual tuning
1. Switch on your radio by pressing the Power button.
2. To select the required waveband repeatedly press the Band button.
The earphone lead should be extended as much as possible to
increase reception. For MW (AM) reception there is a built in ferrite
aerial. Rotate your radio to the position giving best reception.
3. A single press on either the Tuning Up or Down buttons will change
the frequency in the following increments.
FM 50kHz
MW (AM) 9kHz - 10kHz
4. Adjust the Volume control to the required setting.
5. When the waveband end is reached your radio will continue tuning
from the opposite waveband end.
6. To switch off your radio press the Power button.
15
Page 17

1
2
3
3
4
6
4
If you need any further advice, please call our Technical Helpline on :020 8758 0338 (Mon-Fri)
16
Page 18

Presetting stations
There are 5 memory presets for each waveband FM1, FM2 and MW.
1. Switch on your radio by pressing the Power button.
2. Tune to the required station using one of the methods previously
described.
3. Press and hold down the required Memory Preset button until a
beep is heard (via earphones) and the preset number appears in
the display and the station will be stored under the chosen preset
button.
4. Repeat this procedure for the remaining presets.
5. Stations stored in preset memories may be overwritten by following
the above procedure.
Recalling preset stations
There are 5 memory presets for each waveband.
1. Switch on your radio by pressing the Power button.
2. Select the required waveband by repeatedly pressing the Band
button.
3. Momentarily press the required Memory Preset button, the preset
number and station frequency will appear in the display.
17
Page 19

1
3
1
If you need any further advice, please call our Technical Helpline on :020 8758 0338 (Mon-Fri)
2
3
18
Page 20

Mono mode
1. If a station being received is weak some hiss may be audible.
To reduce the hiss slide the Stereo/Mono switch to the “Mono“
position. The stereo indicator will be removed from the display.
2. To return to “Stereo” mode slide the Stereo/Mono switch to the
“Stereo” position.
Deep Bass Boost button
1. Press the Deep bass boost button to enhance bass sounds. The
display will show “DBB”.
2. Press the Deep bass boost button again to return to normal
sound.
Auto power off
1. In order to save battery power, your radio is designed to automatically
switch off after 90 minutes of use.
2. For continuous listening switch off your radio and then press and
hold the Power button in until the auto shut off indicator disappears
from the display.
3. To use the auto shut off feature again, switch off the radio and press
and release the Power button.
19
Page 21

1,2
2,3
1,2
If you need any further advice, please call our Technical Helpline on :020 8758 0338 (Mon-Fri)
20
Page 22

Tuning step size
In Europe and other parts of the world MW tuning steps are 9kHz, in
America the MW tuning step size is 10kHz.
To change the MW (AM) tuning step to 10kHz.
1. Ensure that your radio is switched off.
2. Press and hold the Tuning up button and the Power button
simultaneously until the LCD display flashes “10” then “520”
indicating MW step has been changed to 10kHz.
To change the MW (AM) tuning step to 9kHz.
1. Ensure that your radio is switched off.
2. Press and hold the Tuning down button and the Power button
simultaneously until the LCD display fl ashes “9” then “522” indicating
MW step has been changed to 9kHz.
• Changing the MW tuning step willl erase any previously stored MW
preset stations.
21
Page 23

1,2
1,2
2
2
If you need any further advice, please call our Technical Helpline on :020 8758 0338 (Mon-Fri)
22
Page 24

Troubleshooting
In case of malfunction due to electrostatic discharge, just reset the
product (reconnection of power source may be required) to resume
normal operation.
General
Do not allow this unit to be exposed to moisture e.g. dripping or
splashing. Do not leave your radio where excessive heat could cause
damage such as in a parked car where the heat from the sun can build
up even though the outside temperature may not seem too high.
The name is located on the back of the radio.
23
Page 25

• Your radio should not be exposed to dripping or splashing and that
no objects fi lled with liquids, such as vases, shall be placed on the
radio.
• It is recommended to operate the product such that there is a
minimum distance (10cm recommended) to adjacent objects in order
to ensure good ventilation.
• The ventilation of the product should not be restricted by covering it or
its ventilation openings with items such as newspapers, tablecloths,
curtains etc.
• No naked fl ame sources such as lighted candles should be placed
on the product.
• It is recommended to avoid using or storing the product at extremes
of temperature. Avoid leaving the unit in cars, on window sills, in
direct sunlight etc.
If you need any further advice, please call our Technical Helpline on :020 8758 0338 (Mon-Fri)
24
Page 26

Specifi cations
Battery 1 x LR03 (AAA size)
Battery Life Approx. 30hrs using alkaline battery
Frequency coverage FM 87.5 - 108MHz
AM 522 - 1629kHz (9kHz)
AM 520 - 1710kHz (10kHz)
Output Power 2 x 1.0mW
Earphone Jack 3.5mm dia (Stereo)
The company reserves the right to amend the specifi cation without notice
25
Page 27

This radio is guaranteed for twelve months from the date of delivery to the
Guarantee
original owner against failure due to faulty workmanship or component
breakdown, subject to the procedure stated below. Should any component
or part fail during this guarantee period it will be repaired or replaced free
of charge.
The guarantee does not cover:
1. Damage resulting from incorrect use.
2. Consequential damage.
3. Product with removed or defaced serial numbers.
Procedure: Any claim under this guarantee should be made through the
dealer from whom the instrument was purchased. It is likely that your
Roberts’ dealer will be able to attend to any defect quickly and effi ciently but
should it be necessary the dealer will return the instrument to the Company’s
service department for attention. In the event that it is not possible to return
the instrument to the Roberts’ dealer from whom it was purchased, please
contact Roberts Radio Technical Services at the address shown below
before taking further action.
These statements do not affect the statutory rights of a consumer.
If you need any further advice, please call our Technical Helpline on :020 8758 0338 (Mon-Fri)
26
Page 28

ROBERTS RADIO TECHNICAL SERVICES
97-99 Worton Road
Isleworth Middlesex
Technical Helpline :- 020 8758 0338 (Mon-Fri during offi ce hours)
Website: http://www.robertsradio.co.uk
Issue 1
TW7 6EG
 Loading...