

Page 1
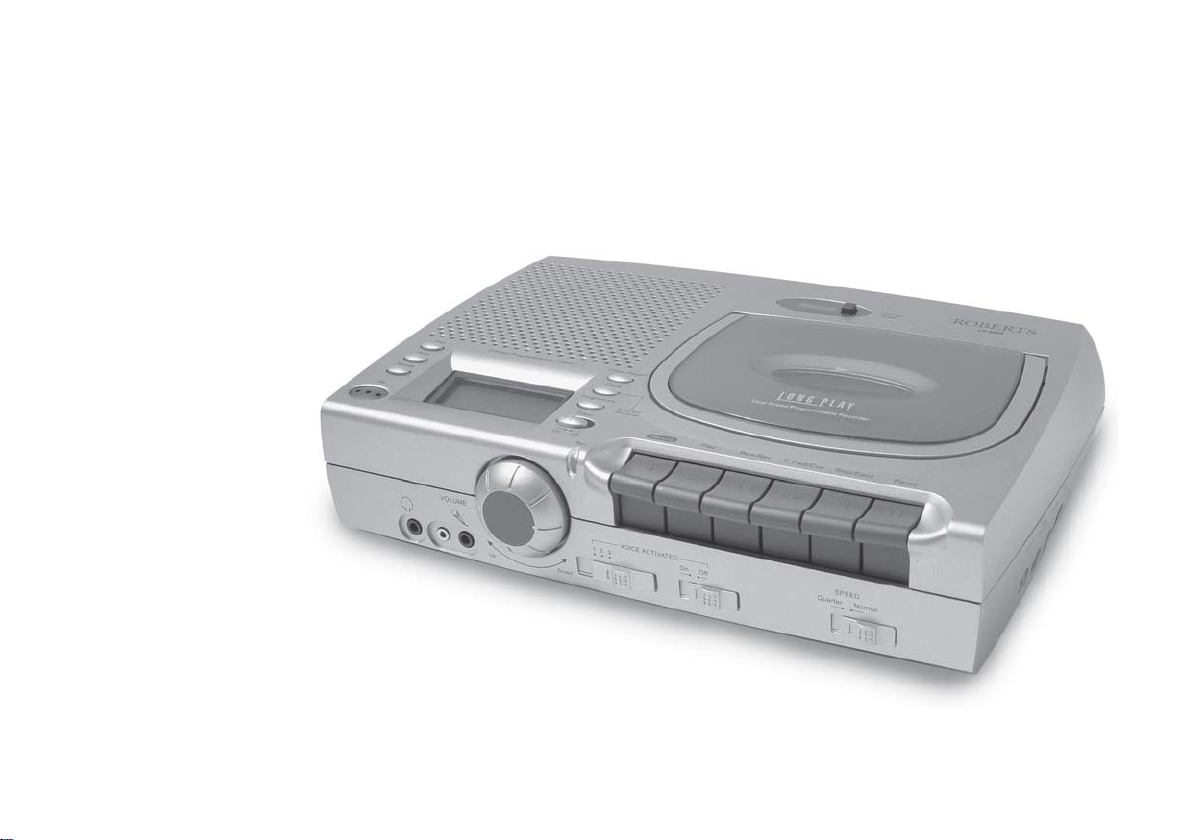
C9950
Dual Speed Programmable
Cassette Recorder
Sound for Generations
ROBERTS
Please read this manual before use
Page 2

Contents
Controls............................................................................ 2
Timer display.................................................................... 4
Battery operation & installation........................................ 5
Carrying handle ............................................................... 5
Cassette tapes................................................................. 6
Using the AC adaptor ...................................................... 6
Using headphones........................................................... 6
Setting the clock and day of the week............................. 7
Tape speed ...................................................................... 8
Listening to cassette tapes .............................................. 8
Recording from the radio ................................................. 9
Recording from the internal microphone ....................... 10
Recording from the line in socket .................................. 11
Recording from an external microphone ....................... 12
Timed recordings ........................................................... 13
Voice activated recordings ............................................ 15
Voice activated recording with timer.............................. 16
Remote switch operation ............................................... 17
Recording a telephone call ............................................ 18
Line out socket............................................................... 19
Cassette tapes............................................................... 20
Cleaning the heads........................................................ 20
Preventing accidental erasure ....................................... 20
General .......................................................................... 21
Specifications................................................................. 21
Guarantee ...................................................................... 22
1
Page 3
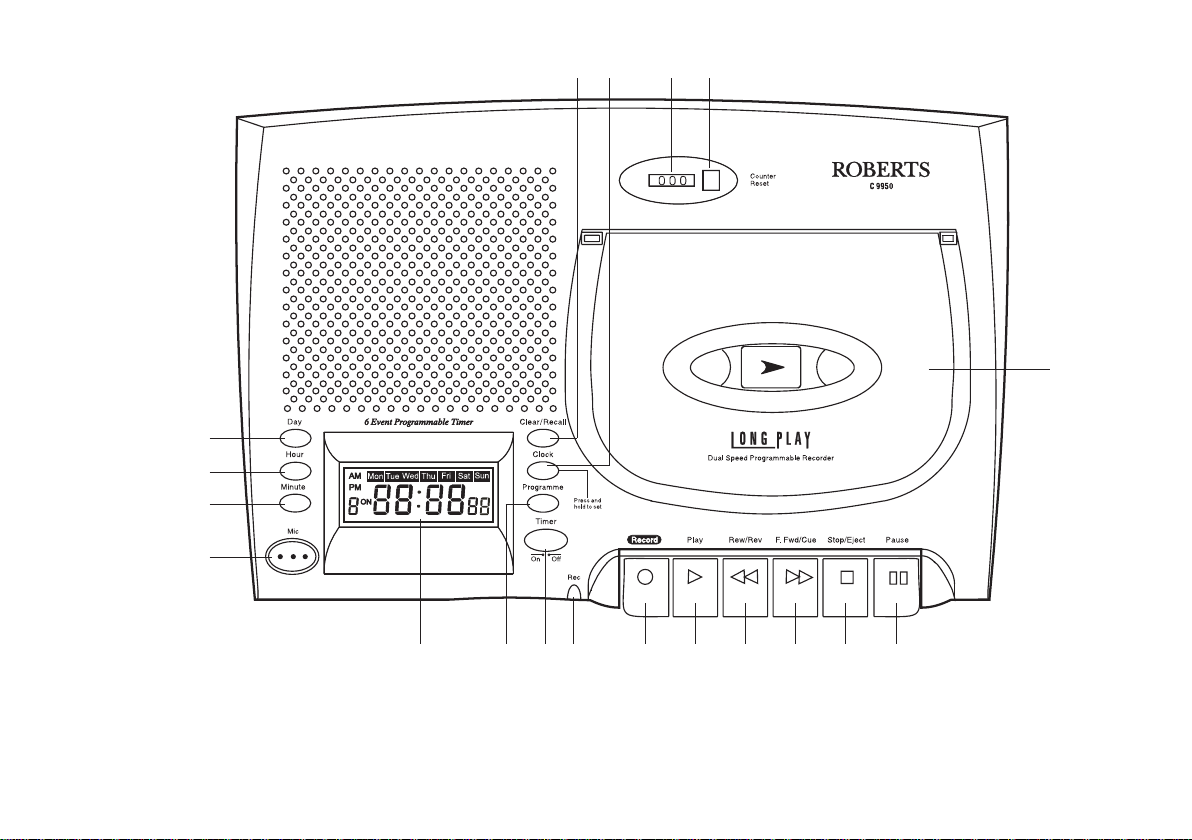
Controls
6
5
78
9
4
3
2
1
1. Built-in microphone
2. Minute button
3. Hour button
4. Day button
If you need any further advice, please call our Technical Helpline on
0208 758 0338 (Mon-Fri)
5. Clear/Recall button
6. Clock set button
7. Tape counter
8. Tape counter reset
9. Cassette door
10. Pause button
11. Stop/Eject button
12. F.Fwd/Cue button
13. Rew/Rev button
14. Play button
15. Record button
16. Record indicator
10111213141516171819
17. Timer ON/OFF switch
18. Program button
19. Timer display
2
Page 4
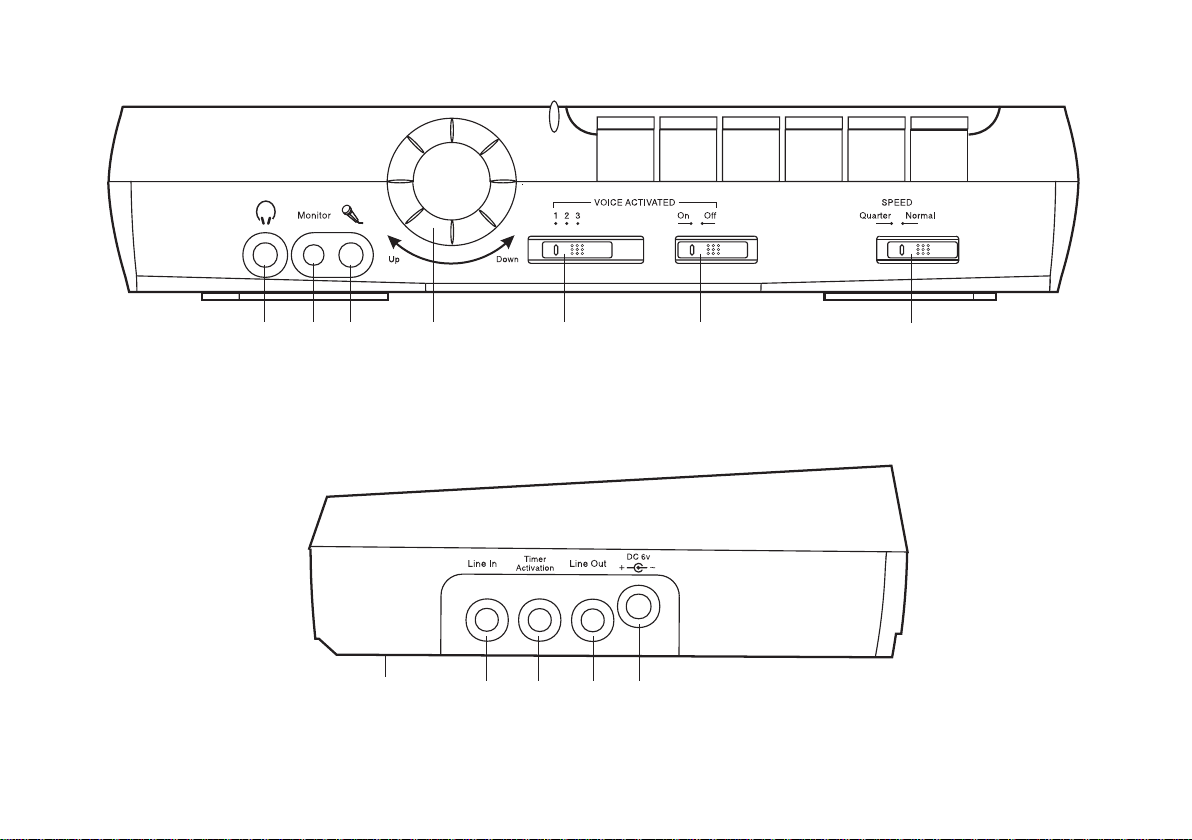
Controls (cont.)
21 22 2423
20. Headphone socket
21. Monitor socket
22. Microphone socket
23. Volume control
28
29 30
27. Beep switch (on underside)
28. Line in socket
29. Timer activator socket
3
24. Voice sensitivity level
25. Voice activated switch
26. Speed switch
3127
30. Line out socket
31. DC power input socket
262520
Page 5
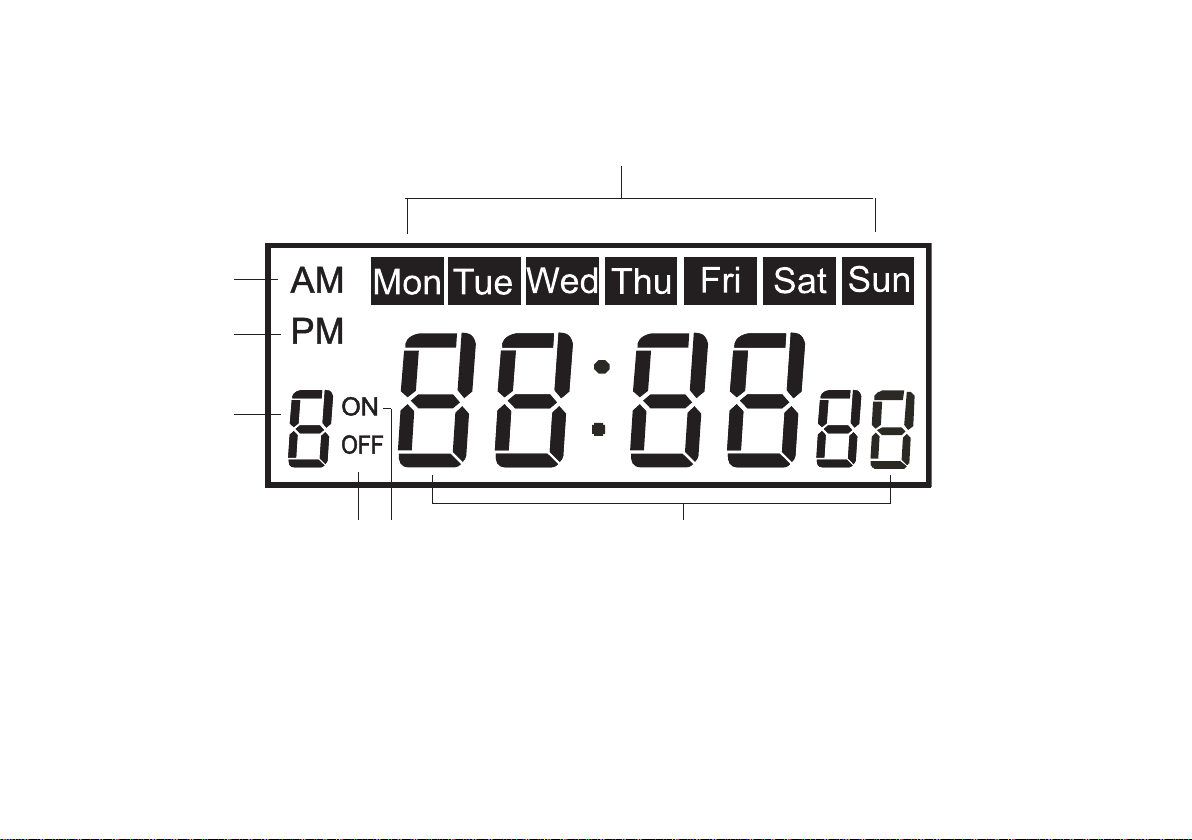
Timer Display
d
c
b
a
f
a. Timer number
b. PM indicator
c. AM indicator
If you need any further advice, please call our Technical Helpline on
0208 758 0338 (Mon-Fri)
eg
d. Day of week indicator
e. Hours minutes and seconds indicators
f. On time indicator
g. Off time indicator
4
Page 6
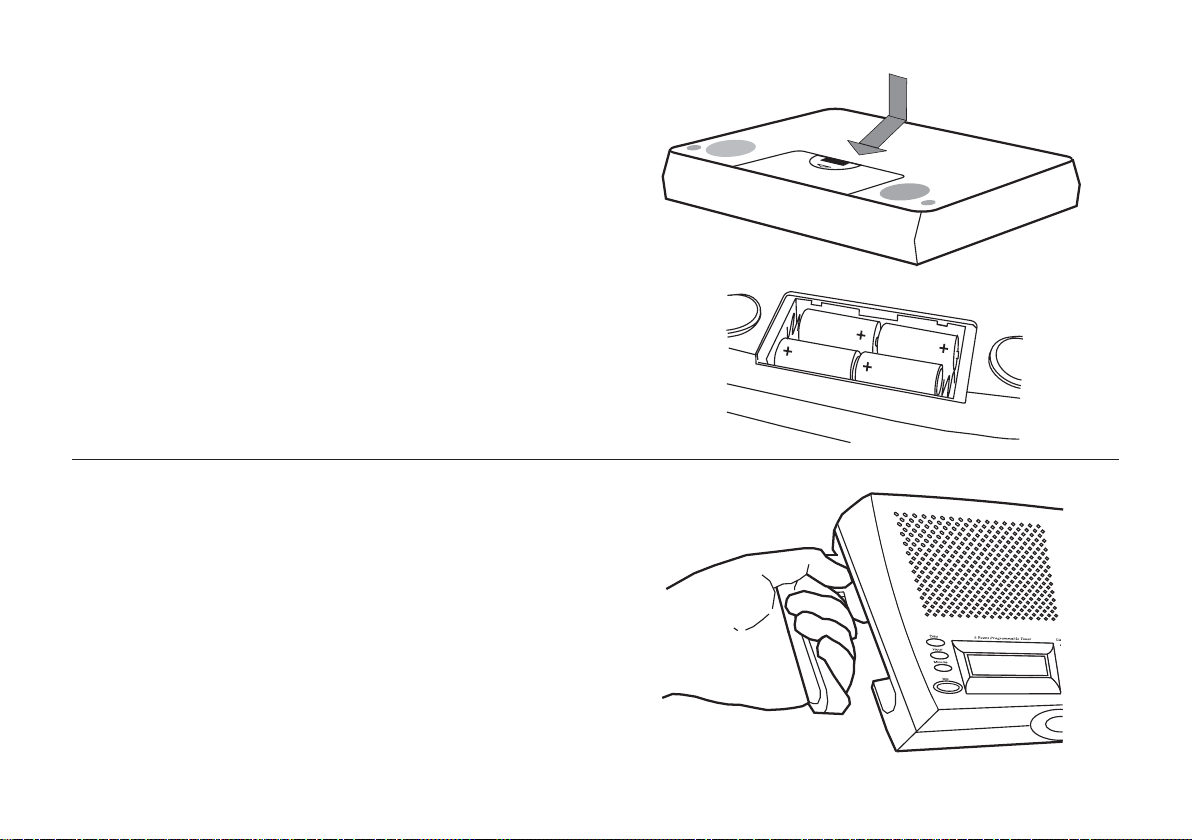
Battery operation & installation
1. Remove the Battery cover on the base of the unit by pushing the
ribbed tab in the direction of the arrow.
2. Insert 4 x LR14 (C size) batteries into the battery compartment. Take
care to ensure all batteries are inserted with the correct polarity as
shown inside the battery compartment.
3. Replace the Battery cover.
Batteries are necessary to maintain the clock and timer memories
in the event of a mains power failure.
Reduced power, distortion and a 'stuttering' sound are all signs that
the batteries may need replacing.
We would recommend for economy that the C9950 is used on the
mains whenever possible with battery operation for occasional or
stand-by use only.
Carrying handle
Your cassette recorder has a handle for travel purposes. To access the
handle place your fingers in the well underneath and to the right hand side
of the recorder and pull gently.
5
Page 7
Cassette Tapes
High quality 90 min (C90) tapes are recommended for use in your
cassette recorder. In tests these provide a balance between maximum
recording time and prolonged tape life. Audio cassette tapes are available
up to 120 minutes in length, however the tape material is thin and may
stretch or break during recording or playback and are not recommended
for use with your cassette recorder.
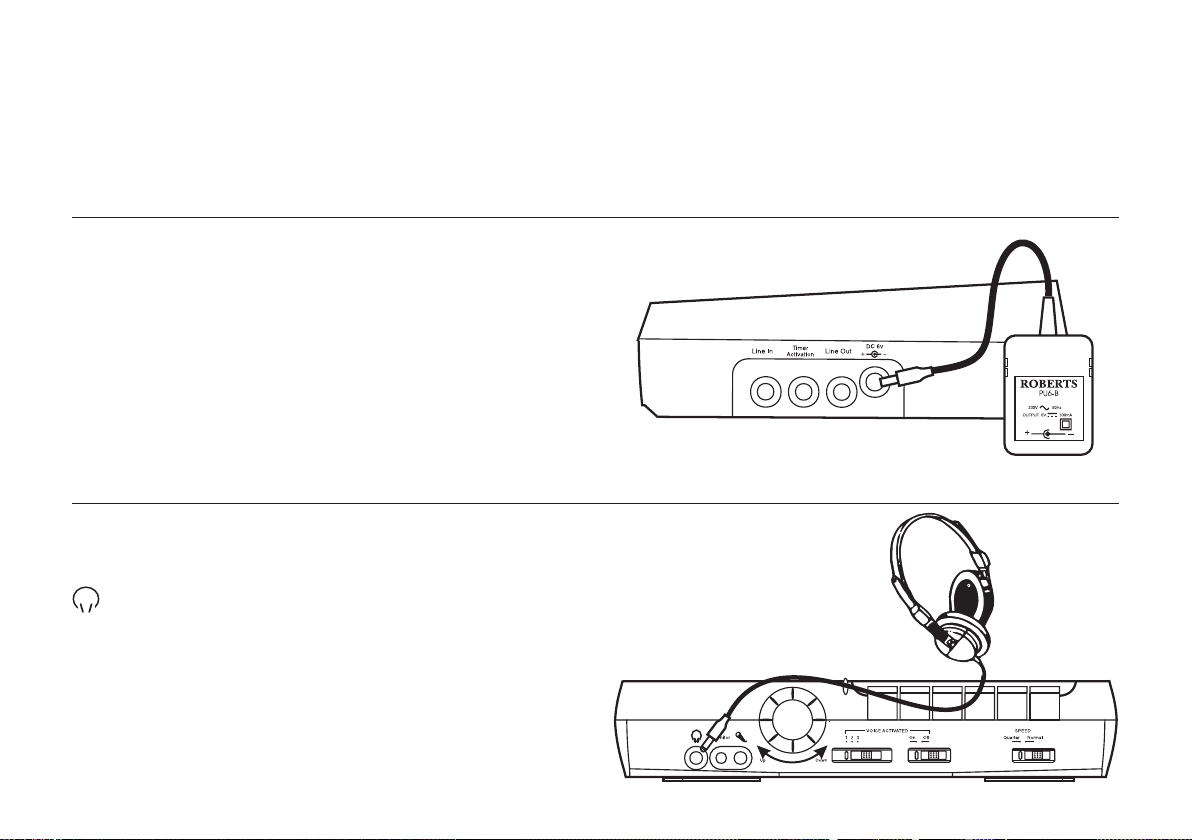
Using the AC adaptor
Insert the adaptor plug into the DC socket on the right side of your
cassette recorder. Plug the adaptor into a standard 13A mains socket
outlet. Whenever the adaptor is used the batteries are automatically
disconnected.
The AC adaptor should be disconnected from the mains supply and your
cassette recorder when not in use.
We would recommend for economy that the C9950 be used via an AC
adaptor whenever possible with battery operation for occasional or
stand-by use only.
Using headphones (not included)
Headphones or earphones for use with your C9950 should be stereo and
fitted with a 3.5mm stereo jack plug. Insert the headphone plug into the
socket located on the front left side of your cassette recorder. When
the headphones are plugged in the loudspeaker is automatically
disconnected.
If you need any further advice, please call our Technical Helpline on
0208 758 0338 (Mon-Fri)
6
Page 8
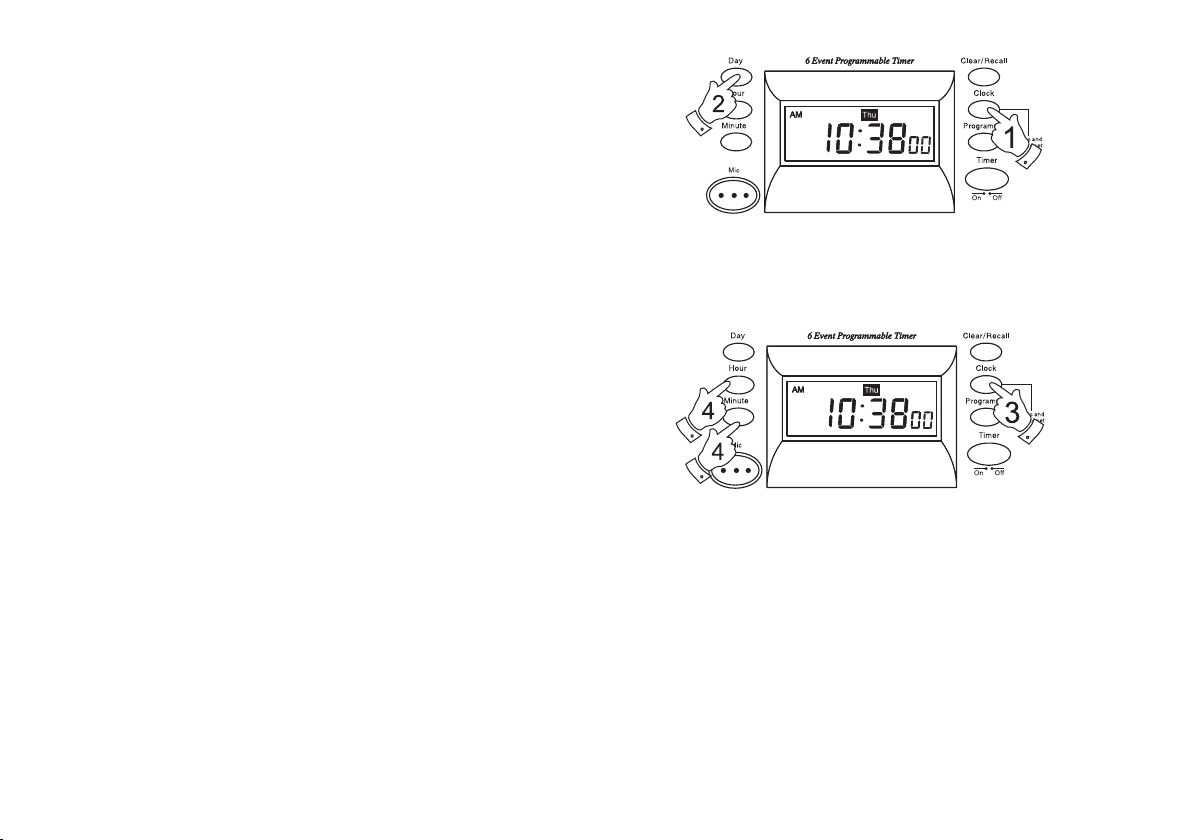
Setting the clock and day of the week
1. To set the day of the week press and hold down the Clock button.
2. Whilst holding down the Clock button press the Day button to select
the required day.
3. To set the time press and hold down the Clock button.
4. Whilst holding down the Clock button press the Hour, or Minute
buttons to set the time. Release the buttons when the correct time
is reached. The clock uses a 12 hour display with AM/PM indicators.
Ensure that the correct 12 hour cycle is selected.
Note: each time you press the Minute button the seconds reset to '00'.
7
Page 9

Tape speed
Your cassette recorder has the ability to record and playback at both
Normal and Quarter speed. Quarter speed gives 4 times longer recording
time than Normal speed. Normal speed should be used for music or
when higher quality is required. Quarter speed can be used for speech,
plays or talk shows where the highest quality is not important.
Listening to cassette tapes
1. Press the Stop/Eject button to open the cassette compartment.
2. Insert a cassette with the tape facing towards you and the side with
the desired recording uppermost. Close the cassette compartment.
3. For normal pre-recorded tapes set the Speed switch to the Normal
position.
4. Depress the Play button.
5. Adjust the Volume control to suit your personal taste.
6. Use the Fast forward or Rewind buttons to locate a specific
part of the tape.
7. If you wish to temporarily stop the playback press the Pause button.
When you are ready to resume playback press the Pause button a
second time.
Note: Your cassette recorder will playback tapes in stereo via the
Headphone socket or Line output socket.
If you need any further advice, please call our Technical Helpline on
0208 758 0338 (Mon-Fri)
8
Page 10

Recording from a radio
Your cassette recorder can record from any radio that has a 3.5mm
headphone or line out socket. Recording from other types of socket is
possible using adaptors available from your local dealer.
1. Press the Stop/Eject button to open the cassette compartment.
Insert a cassette with the tape facing towards you and the side on
which you wish to record uppermost. Close the cassette compartment.
2. Ensure that the Timer and Voice activated switches are set to the
'Off' position.
3. Set the Speed switch to the required position. Reset the Tape
counter if desired.
4. Switch on your radio and tune in to the station you wish to record.
Adjust the volume to normal listening level.
6. Plug one end of the supplied Red patch cord into your radio line out
or headphone socket and the other end into the Line In socket on
your cassette recorder.
7. Press the Record button to commence recording, the Recording
indicator will flash.
8. Adjust your cassette recorder's Volume control to suit your
requirements. The recording level is set automatically and is not
affected by the setting of the Volume control.
9. To stop the recording press the Stop/Eject button.
9
Page 11

Recording from the internal microphone
1. Press the Stop/Eject button to open the cassette compartment.
Insert a cassette with the tape facing towards you and the side on
which you wish to record uppermost. Close the cassette compartment.
2. Ensure that the Timer and Voice activated switches are set to the
'Off' position.
3. Set the Speed switch to the required position. Reset the Tape
counter if desired.
4. Ensure that no leads are connected to the Microphone or Line In
sockets.
5. Press the Record button to commence recording, the Recording
indicator will flash.
6. The recording level is set automatically and is not affected by the
setting of the Volume control.
7. To stop the recording press the Stop/Eject button.
Note : to reduce background noise it is important to speak as close as
possible to the Internal microphone .
If you need any further advice, please call our Technical Helpline on
0208 758 0338 (Mon-Fri)
10
Page 12

Recording from the line in socket
Your cassette recorder can record from any other product that has a
3.5mm headphone or line out socket. Recording from other types of
socket is possible using adaptors available from your local dealer.
1. Press the Stop/Eject button to open the cassette compartment.
Insert a cassette with the tape facing towards you and the side on
which you wish to record uppermost. Close the cassette compartment.
2. Ensure that the Timer and Voice activated switches are set to the
'Off' position.
3. Set the Speed switch to the required position. Reset the Tape
counter if desired.
4. Plug one end of the supplied Red patch cord into the line out or
headphone socket on the device you are recording from and the other
end into the Line In socket on your cassette recorder.
5. Press the Record button to commence recording, the Recording
indicator will flash.
6. The recording level is set automatically and is not affected by the
setting of the Volume control.
7. To stop the recording press the Stop/Eject button.
11
Page 13

Recording from an external microphone (not supplied)
Your cassette recorder can record from an external microphone. Most
types of microphone fitted with a 3.5mm plug will work with your cassette
recorder.
1. Press the Stop/Eject button to open the cassette compartment.
Insert a cassette with the tape facing towards you and the side on
which you wish to record uppermost. Close the cassette compartment.
2. Ensure that the Timer and Voice activated switches are set to the
'Off' position.
3. Set the Speed switch to the required position. Reset the Tape
counter if desired.
4. Connect a microphone to the Mic input socket located on the front
of your cassette recorder. Ensure that no connection has been made
to the Line In socket.
5. Press the Record button to commence recording, the Recording
indicator will flash.
6. The recording level is set automatically and is not affected by the
setting of the Volume control.
7. To stop the recording press the Stop/Eject button.
If you need any further advice, please call our Technical Helpline on
0208 758 0338 (Mon-Fri)
12
Page 14

Timed recordings
Your cassette recorder has a timer which allows six separate timed
recordings to be made. Each timer can be set to record a particular day
of the week, everyday of the week or Saturday/Sunday. If the timer is set
to record everyday of the week at the same time this only uses up one
of the six timed recordings. If another timer is set to record, say, on
Saturday/Sunday then four other timers remain unused.
1. Insert a cassette with the tape facing towards you and the side on
which you wish to record uppermost. Close the cassette compartment.
Reset the Tape counter if desired.
2. Set the Speed switch to the required setting and ensure that the
Voice Activated Switch is set to the "Off" position.
3. To set the start time, press the Program button once. The number '1'
and 'ON' will appear in the display.
4. Press the Day button until the desired day or days of week appear
in the display. Possible combinations are single day, everyday, every
week day or weekends.
5. Select the hour at which you wish to record by pressing the Hour
button until the desired hour appears in the display. The clock uses
a 12 hour display with AM/PM indicators. Ensure that the correct 12
hour cycle is selected.
6. Select the minute you would like the recording to begin by pressing
the Minute button until the desired minute appears in the display.
13
Page 15

Timed recordings (cont.)
7. To set the stop time, press the Program button once. The number
'1' and 'OFF' will appear in the display.
8. Select the day on which you wish to stop recording by pressing the
Day button until the desired day appears in the display.
9. Select the hour at which you wish to stop recording by pressing the
Hour button until the desired hour appears in the display.
10. Select the minute at which you wish to stop recording by pressing the
Minute button until the desired minute appears in the display.
11. After you have set the timer you can press the Clock button to return
to normal time display.
12. Set the Timer switch to the "On" position. Press the Record button.
Your cassette recorder will start and stop recording at the programmed
times.
13. If you wish to program your cassette recorder to record another event,
press the Program button until the number '2' and 'ON' appear in the
display. Repeat above steps to program ON/OFF times.
14. Whilst an ON or OFF time is showing in the display the Clear/Recall
button can be used to clear or recall a previously set ON/OFF time.
Note: Ensure correct day for Off time is set when recording across
midnight e.g. if recording starts at Monday 11:45PM and finishes at
12:15AM Tuesday, Off day should be set to Tuesday.
If you need any further advice, please call our Technical Helpline on
0208 758 0338 (Mon-Fri)
14
Page 16

Voice activated recordings
Your cassette recorder has the ability to make recordings which start and
stop depending on the sound level present at the Internal Microphone,
Microphone socket or Line in sockets. The sound level that will start
and stop recordings can be set with the Voice Sensitivity switch.
Position "1" is the most sensitive position, "3" is the least sensitive. It will
be necessary to experiment with the position of the Voice Sensitivity
switch to achieve the desired result.
1. For highest quality recordings set the Speed switch to the "Normal"
position. For maximum recording time set the Speed switch to the
"Quarter" position.
2. Insert a cassette with the tape facing towards you and the side on
which you wish to record uppermost. Close the cassette compartment.
Reset the Tape counter if desired.
3. Set the Voice Activated switch to the 'On' position.
4. Press down the Record button.
5. The recording will commence when the sound level present at the
Internal Microphone, Microphone socket or Line in sockets is of
a sufficient level.
15
Page 17

Voice activated recording with timer
Your cassette recorder can also be programmed for a timed voice
activated recording. This might be used to record sounds in a room at a
certain time of day or to record a conference that you are unable to attend.
1. For highest quality recordings set the Speed switch to the "Normal"
position. For maximum recording time set the Speed switch to the
"Quarter" position
2. Set the timer as instructed on page 13-15.
3. Insert a cassette with the tape facing towards you and the side on
which you wish to record uppermost. Close the cassette compartment.
Reset the Tape counter if desired.
4. Set the Voice Activated switch to the 'On' position.
5. Press down the Record button.
6. The timer will activate the recorder but recordings will only be made
when sound is present at the internal Microphone socket or Line in
sockets.
If you need any further advice, please call our Technical Helpline on
0208 758 0338 (Mon-Fri)
16
Page 18

Remote switch operation
Your cassette recorder can be switched on and off by another device
connected to the Timer Activation socket. Some radios such as the
Roberts R861 have a remote switch socket which enable the radio's timer
to switch your cassette recorder on and off.
1. For highest quality recordings set the Speed switch to the "Normal"
position. For maximum recording time set the Speed switch to the
"Quarter" position.
2. Insert a cassette with the tape facing towards you and the side on
which you wish to record uppermost. Close the cassette compartment.
Reset the Tape counter if desired.
3. Plug one end of the supplied Black patch cord into the Timer
Activation socket, plug the other end of the patch cord into your
radio or other device's remote switch socket.
4. Plug the one end of the supplied Red patch cord into the line out or
headphone socket on the device you are recording from and the other
end into the Line In socket on your cassette recorder.
5. Set the Voice Activated switch to the 'Off' position.
6. Set the Timer switch to the "Off" position.
7. Press down the Record button.
8. Set your radio's timer to the required start time. Tune to the desired
station. Your cassette recorder will commence recording when your
radio's timer switches on and switches off when your radio's timer
switches off.
17
Page 19

Recording a telephone call
It is possible to purchase a BT socket recording lead from your local
electronic component specialist (e.g. Maplin).
1. Connect the telephone recording lead to the Mic socket on the front
of your cassette recorder.
2. Connect your telephone to the telephone record adaptor. (Refer to
instructions included with the adaptor.)
3. Set the Speed switch to the required position.
4. Set the Voice Activated switch to the 'On' position.
5. Press the Record button.
6. Set Voice Sensitivity switch to position 2. Check recording starts
when telephone conversation begins.
7. On the bottom of your cassette recorder there is a switch to insert a
Beep into your recorded conversations at regular intervals to advise
both parties that they are being recorded. Set the Beep switch to the
'On' position to activate this function.
If you need any further advice, please call our Technical Helpline on
0208 758 0338 (Mon-Fri)
18
Page 20

Line out socket
Your cassette recorder can be used to playback through other equipment
e.g. amplifiers, mini disc, or another cassette recorder.
1. Connect one end of the supplied Green patch lead to the Line Out
socket. Connect the other end of the patch cord to the Line In socket
of your amplifier or other equipment.
2. Press the Stop/Eject button to open the cassette compartment.
Insert a cassette with the tape facing towards you and the side with
the desired recording uppermost. Close the cassette compartment.
3. For normal pre-recorded tapes set the Speed switch to the Normal
position.
4. Depress the Play button.
5. The output from the Line Out socket is not affected by the volume
control.
Note: Your cassette recorder will playback tapes in stereo via the Line
Out socket.
19
Page 21

Cassette tapes
High quality 90 min (C90) tapes are recommended for use in your
cassette recorder. In tests these provide a balance between maximum
recording time and prolonged tape life. Audio cassette tapes are available
up to 120 minutes in length, however the tape material is thin and may
stretch or break during recording or playback & are not recommended for
use with your cassette recorder.
Cleaning the heads
The binder and oxide from magnetic tapes can accumulate on the pinch
roller (A) the capstan shaft (B) and also the heads (C and D). This will
impair the sound quality.
To clean these parts proceed as follows:-
1. Turn off the power to the unit.
2. Press the Stop/Eject button.
3. Press the Play button and the heads will be clearly seen.
4. Clean the surfaces (A, B, C, D) with a lint free rag or cotton swab
soaked in industrial alcohol. Press the stop/eject button as soon as
cleaning is over.
Preventing accidental erasure
To safeguard your recordings against accidental erasure, break off the
appropriate rear tab on the cassette as shown . There is one tab for each
side of the cassette. This will prevent the Record button from being
pressed. To restore the cassette to normal, seal the tab openings with a
small piece of self-adhesive tape.
Safety tab side A
Safety tab side B
20
Page 22

General
Do not allow this unit to be exposed to water, steam or sand. Do not leave
the unit where excessive heat could damage such as in a parked car
where the heat from the sun can build up even though the outside
temperature may not seem too high
Specifications
Power Requirements
Mains : 230V AC via adaptor supplied
DC : 6.0V
Batteries : 4 x LR14 (C size) batteries
The Company reserves the right to amend the specification without notice.
21
Circuit Features
Semiconductors: 6 IC's , 28 Transistors , 27 diodes , 1 FET and 1
LED
Loudspeaker 75mm dia
Output Power 320mW
Headphone socket 3.5mm stereo
Microphone socket 3.5mm stereo input sensitivity 0.5mV
Line Input socket 3.5mm stereo input sensitivity 200mV
Timer activate socket 3.5mm
Page 23

Guarantee
This unit is guaranteed for twelve months from the date of delivery to the original owner against failure due to faulty workmanship or component breakdown,
subject to the procedure stated below. Should any component or part fail during this guarantee period it will be repaired or replaced free of charge.
The guarantee does not cover:
1. Damage resulting from incorrect use.
2. Consequential damage.
3. Product with removed or defaced serial numbers.
Procedure: Any claim under this guarantee should be made through the dealer from whom the instrument was purchased. It is likely that your Roberts' dealer
will be able to attend to any defect quickly and efficiently but should it be necessary the dealer will return the instrument to the company’s service department
for attention. In the event that it is not possible to return the instrument to the Roberts' dealer from whom it was purchased, please contact Roberts Radio
Technical Services at the address shown on the rear of this manual before taking further action.
These statements do not affect the statutory rights of a consumer.
22
Page 24

ROBERTS RADIO TECHNICAL SERVICES
97-99 Worton Road
Isleworth Middlesex
TW7 6EG
Issue 1
Technical Helpline:-0208 758 0338
 Loading...