


ROBERTS
DAB / DAB+ / FM RDS digital portable radio
Please read this manual before use
Contents |
|
Controls ........................................................................... |
2-3 |
Battery operation ................................................................. |
4 |
Using the AC adaptor .......................................................... |
5 |
Operating your radio - DAB ................................................. |
6 |
Selecting a station - DAB..................................................... |
7 |
Secondary services - DAB................................................... |
7 |
Display options - DAB...................................................... |
8-9 |
Finding new stations - DAB ................................................. |
9 |
Manual tuning - DAB ......................................................... |
10 |
Dynamic range control - DAB............................................ |
11 |
Prune stations - DAB......................................................... |
12 |
Operating your radio - FM ................................................. |
13 |
Manual tuning - FM............................................................ |
14 |
Display options - FM.......................................................... |
15 |
Scan sensitivity setting - FM.............................................. |
16 |
Presetting stations............................................................. |
17 |
Recalling a preset station .................................................. |
17 |
Software version................................................................ |
18 |
Language function............................................................. |
19 |
System reset...................................................................... |
20 |
Headphone socket............................................................. |
21 |
Dimmer function ................................................................ |
21 |
General.............................................................................. |
22 |
Specifications .................................................................... |
22 |
Circuit features .................................................................. |
22 |
Guarantee............................................................. |
Back page |
1

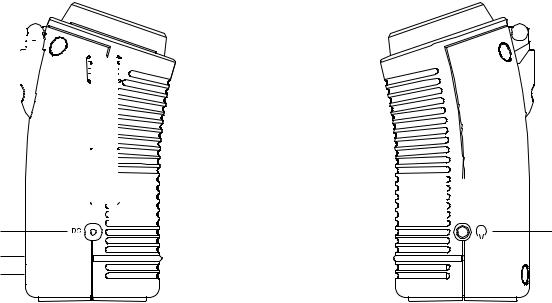
Controls
(Top)
3 |
4 |
5 |
6 |
7 |
8 |
|
|
|
|
|
9 |
2
1
|
|
12 |
11 |
10 |
1. |
Loudspeaker |
7. |
Preset 2 button |
|
2. |
Carry strap |
8. |
Preset 1 button |
|
3. |
LCD display |
9. |
Tuning / Select control |
|
4. |
Telescopic aerial |
10. |
Preset 3 button |
|
5. |
On / Off button |
11. |
Volume Down button |
|
6. |
Volume Up button |
12. |
Menu / Mode button |
|
2
Controls
(Left hand side) |
(Right hand side) |
|||||||||||||
|
|
|
|
|
|
|
|
|
|
|
|
|
|
|
|
|
|
|
|
|
|
|
|
|
|
|
|
|
|
|
|
|
|
|
|
|
|
|
|
|
|
|
|
|
|
|
|
|
|
|
|
|
|
|
|
|
|
|
|
|
|
|
|
|
|
|
|
|
|
|
|
|
|
|
|
|
|
|
|
|
|
|
|
|
|
|
|
|
|
|
|
|
|
|
|
|
|
|
|
|
|
|
|
|
|
|
|
|
|
|
|
|
|
|
|
|
|
|
|
|
|
|
|
|
|
|
|
|
|
|
|
|
|
|
|
|
|
|
|
|
|
|
|
|
|
|
|
|
|
|
|
|
|
|
|
|
|
|
|
|
|
|
|
|
|
|
|
|
|
|
|
|
|
|
|
|
|
|
|
|
|
|
|
|
|
|
|
|
|
|
|
|
|
|
|
|
|
|
|
|
|
|
|
|
|
|
|
|
|
|
|
|
|
|
|
|
|
|
|
|
|
|
|
|
15 |
16 |
14
13
13. Battery compartment |
16. Headphone socket |
14.USB upgrade socket (in battery compartment, for service use only)
15.DC input socket
3
Battery operation
1. Remove the battery cover on the back of the unit by sliding the cover downwards.
2. Insert four LR6 (AA size) batteries into the spaces in the compartment. Take care to ensure all batteries are inserted with the correct polarity as shown inside the battery compartment. Replace the battery cover.
3. Reduced power, distortion and a ‘stuttering’ sound are all signs that the batteries may need replacing.
1
4. If the radio is not to be used for any extended period of time it is recommended that the batteries are removed from the radio.
We would recommend for economy that the radio is used via the AC adaptor whenever possible with battery operation for occasional use only.
IMPORTANT: The batteries should not be exposed to excessive heat such as sunshine, fire or the like.After use, disposable batteries should if possible be taken to a suitable recycling centre. On no account should batteries be disposed of by incineration.
4
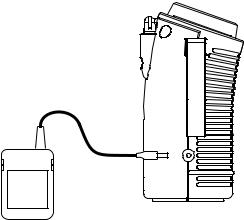
Using the AC adaptor
1.Place your radio on a flat surface.
2.Plug the mains adaptor into the DC input socket located on the left hand side of your radio (marked 'DC') ensuring that the plug is pushed fully into the socket.
3.Plug the other end of the mains adaptor into a standard mains socket outlet and switch on the wall socket. Whenever the adaptor is used the batteries are automatically disconnected.
The AC adaptor should be disconnected from the mains supply and from the radio when not in use.
IMPORTANT: The mains adaptor is used as the means of connecting the radio to the mains supply. The mains socket used for the radio must remain accessible during normal use. In order to disconnect the radio from the mains completely, the mains adaptor should be removed from the mains socket outlet completely.
DC |
5

Operating your radio - DAB
1. |
Carefully extend the telescopic aerial. The aerial should be fully |
|
|
extended and positioned vertically for optimum reception. |
|
2. |
Press and release the On/Off button to switch on your radio. The |
2 |
|
display will show 'WELCOME' for a few seconds. After each use the |
radio will remember the mode used and then switch on in that mode the next time that it is used.
3.If this is the first time the radio is used a scan of the Band III DAB channels will be carried out. This is known as 'Auto tune'. If the radio has been used before the last used station will be selected.
4.DuringAuto tune each group of stations will be detected and the station count will be updated.
5.When the Auto tune is completed the first station (in numeric-alpha order 0...9...A....Z) will be selected. The first station in the list of stations found will be played.
6.If no stations are found then 'OFF AIR' will be displayed and it may be necessary to relocate your radio to a position giving better reception. You should then carry out an auto tune to find stations as described on page 9 (see Finding new stations on page 9).
•Your radio has an indicator

 on the display to indicate the strength of the DAB radio signal being received.
Note: When first switched on, the radio will set the volume to a moderately high level, in case the broadcast is very quiet. After you have set the volume, the radio will remember the setting that you have applied for the next time that it is used.
6

Selecting a station - DAB
1. Press and release the On/Off button to switch on your radio.
2.If you are listening in FM mode, press and hold the Mode button.
'DAB' will show on the display.
2
3. |
Rotate the Tuning/Select control to step through the list of available |
|
|
stations. |
|
4. |
When the desired station name appears on the display the radio will |
|
|
automatically select the station after several seconds. Alternatively |
|
|
press and release the Tuning/Select control to select the station. |
|
|
The radio will select the new station. |
|
5. |
Adjust the Volume to the required setting. |
3,4 |
|
Note: If after selecting a station the display shows 'OFF AIR' it may be |
necessary to relocate your radio to a position giving better reception.
Secondary services - DAB
1.Certain radio stations have one or more secondary services associated with them. If a station has a secondary service associated with it the secondary service will then appear immediately after the primary service as you rotate the Tuning/Select control clockwise.
2.To tune to the secondary service, press and release the Tuning/Select
control. Most secondary services do not broadcaset continually and |
1,2 |
if the selected service is not available, the radio will re-tune to the associated primary service.
7
 Loading...