

Page 1
www.roadstar.com
DJ-880BT
User manual
Bedienungsanleitung
Manuel d’instructions
Manuale d’istruzioni
Manual de instrucciones
Gebruiksaanwijzing
Návod k použití
Návod na použitie
Page 2
INDEX
English Page 1
Deutsch Seite 3
Français Page 5
Italiano Pagina 7
Español Página 9
Nederlands Pagina 11
Čeština Strana 13
Slovenský Strana 15
Your new unit was manufactured and assem-
bled under strict ROADSTAR quality control.
Thank-you for purchasing our product for
your music enjoyment. Before operating the
unit, please read this instruction manual carefully. Keep it also handy for further future
references.
Votre nouvel appareil a été fabriqué et monté
en étant soumis aux nombreaux tests ROADSTAR. Nous espérons que cet appareil vous
donnera entière satisfaction. Avant de vous
adonner à ces activités, veuillez lire attentivement ce manuel d’instructions. Conservez-le
à portée de main à fin de référence ultérieure.
Vuestro nuevo sistema ha sido construido
según las normas estrictas de control de calidad ROADSTAR. Le felicitamos y le damos
las gracias por su elección de este aparado.
Por favor leer el manual antes de poner en
funcionamiento el equipo y guardar esta documentación en case de que se necesite
nuevamente.
Ihr neues Gerät wurde unter Beachtung der
strengen ROADSTAR Qualitätsvorschriften gefertigt. Wir danken Ihnen für den Kauf unseres
Produktes und wünschen Ihnen optimalen Hörgenuss. Bitte lesen Sie diese Bedienungsanleitung durch, und heben Sie sie auf, um jederzeit
darin nachschlagen zu können.
Il vostro nuovo apparecchio é stato prodotto ed
assemblato sotto lo stretto controllo di qualità
ROADSTAR. Vi ringraziamo di aver acquistato
un nostro prodotto per il vostro piacere d’ascolto. Prima di procedere all'utilizzo dell'apparec-
chio, leggete attentamente il manuale d’istru-
zioni e tenetelo sempre a portata di mano per
futuri riferimenti.
Seu novo aparelho foi construido e montado
sob o estrito controle de qualidade da ROADSTAR. Agradecemos por ter comprado nosso
produto para a sua diversão. Antes de usar
esta unidade é necessário ler com atençâo
este manual de instruções pare que possa ser
usada apropriadamente; mantenha o manual
ao seu alcance para outras informações.
Page 3
1 2 3 4 5 6 7 8 9 10
11 12 14 15
20
17 18 19 13 16
Page 4

1 English
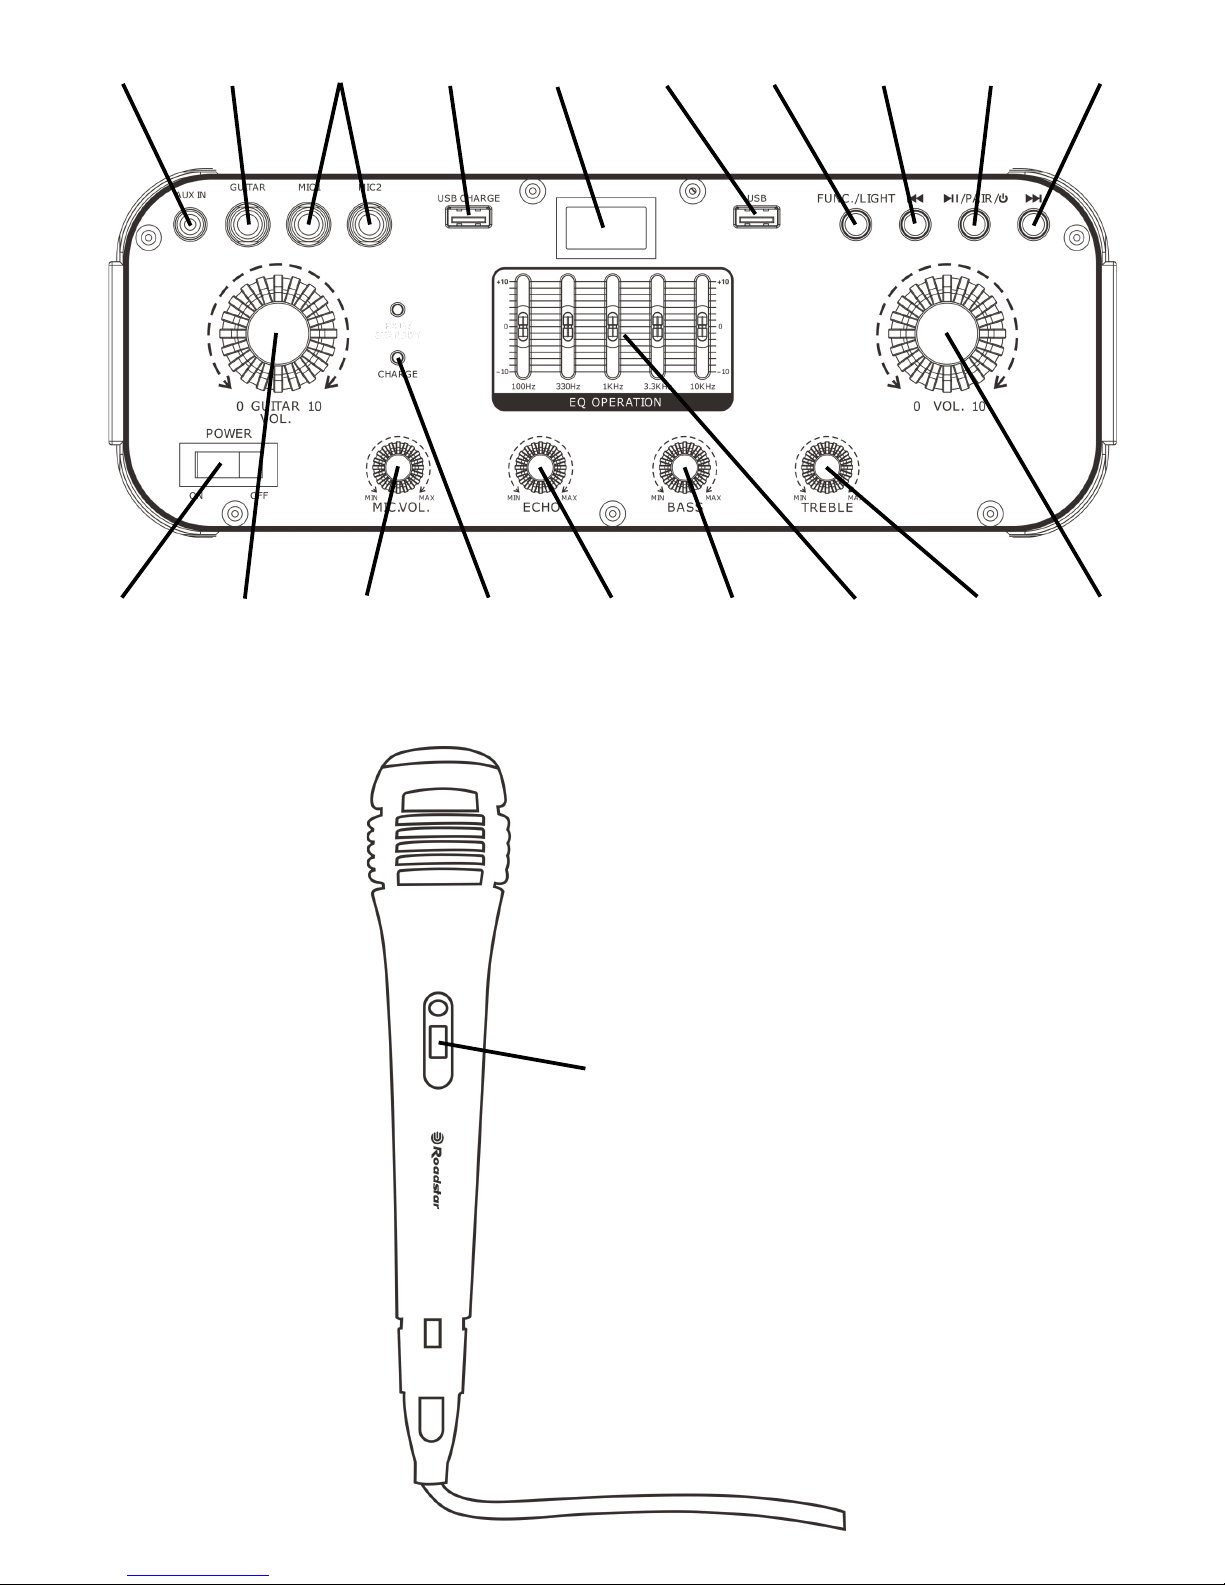
LOCATION OF CONTROLS
1. AUX-IN
2. GUITAR INPUT
3. MICROPHONE INPUT
4. USB CHARGER
5. LCD DISPLAY
6. USB SOCKET
7. FUNCTION BUTTON
8. SKIP-
9. PLAY/PAUSE
10. SKIP+
11. ON/OFF
12. GUITAR VOLUME
13. MICROPHONE VOLUME
14. CHARGE LED
15. ECHO REGULATOR
16. BASS REGULATOR
17. FREQUENCIES EQUALIZER
18. TREBLE REGULATOR
19. MAIN VOLUME
20. MICROPHONE ON/OFF
POWER SUPPLY
This unit operates from a main supply of 100-240V, 60/50Hz. Connect the AC power cord to the AC household main
outlet. Ensure that the voltage is as indicated on the rating plate on the rear of the unit.
Connect the unit to the power supply. Switch ON/OFF SWITCH (11) to ON position to turn the unit ON. Switch ON/OFF
SWITCH (11) to OFF position to switch the unit OFF.
When no sound is produced, the unit will switch OFF automatically after 15 minutes.
Press PLAY/PAUSE (9) again to resume the playback.
BATTERY OPERATION
This unit provide a Lead rechargable battery. Connect the product to the main current in order to recharge the battery.
Charge led explaination:
LED RED: battery is charging.
LED GREEN: battery completely charged.
LED Flashing RED: low battery, need to be charged.
VOLUME CONTROL
Turn MAIN VOLUME (19) to regulate the volume.
Adjust the equalizer using ECHO (15), BASS (16) and TREBLE (18).
If you want more precise equalizer use FREQUENCIES EQUALIZER (17) to regulate each frequence separately.
USB PLAYBACK
1. Insert the USB device's plug into the USB socket (6).
2. Press FUNCTION BUTTON (7) repeatedly to select USB mode. “USB” will be shown on the display.
3. The unit will start reading the device automatically after the connection.
Press SKIP -/+ (8/10) to select your favorite tunes. If you hold SKIP -/+ (8/10), the playing track will go fast backward
or forward until you release the button.
Press PLAY/PAUSE (9) to pause the playback. The track number will start blinking. Press PLAY/PAUSE (9) again to
resume the playback.
IMPORTANT: Note that USB (4) is for charging 5V/1A devices, not for playback.
AUX-IN
This unit provides an auxiliary audio input jack for connecting external audio device like MP3 players, CD players and
allow playback of your external source through the system speakers.
1. Use an audio cable (not included) with a 3,5mm stereo plugs on one end of the cable. Plug one end into the AUXIN jack on the main unit and plug the other end of the cable into the LINE OUT or HEADPHONE Jack of your external audio device.
2. Turn ON the unit and your external audio device. Press AUX (13) to select AUX function. “AUX” will be shown on
the display.
3. Start to play the external device (see the user manual of the external device).
Page 5
2 English
BLUETOOTH OPERATION
1. Press BT (9) to select BLUETOOTH function. “BT” will be shown on the display.
2. Select from your portable device (Smartphone, Tablet...) the ID Bluetooth tagged as DJ-880BT, then confirm connection.
3. When the pairing is successful the LED will stop blinking.
4. Now you can transfer the music to the DJ-880BT and all operations can only be operated from your mobile device.
MICROPHONE AND GUITAR
1. This unit provides 3x 6,35mm sockets for connecting microphones (3) and guitars (2).
2. Connect Microphone or guitar and regulate their volume using (12) or (13).
3. These inputs are always on and can be used to play guitars or microphons while using BT/AUX/USB.
DISCO-LIGHT
1. Press and hold FUNCTION BUTTON (7) to choose between 8 different light effects.
2. Press till you see OFF on the display to shut the light effect off.
SPECIFICATIONS
AC: 100-240V, 60/50Hz
Battery: 12V - 7,2A
Max Music Power: 800W
Specifications and the design are subject to possible modifications without notice due to improvement.
This marking shown on the product or its literature, indicates that it should not be disposed with
other household wastes at the end of its working life. To prevent possible harm to the environment or human health from uncontrolled waste disposal, please separate this from other types of
wastes and recycle it responsibly to promote the sustainable reuse of material resources. Household users should contact the retailer where they purchased this product, or their local government office, for details of where and how they can take this item for environmentally safe recycling. Business users should contact their supplier and check the terms and conditions of the purchase contract. This product should not be mixed with other commercial wastes for disposal.
CORRECT DISPOSAL OF THIS PRODUCT
(Waste Electrical & Electronic Equipment)
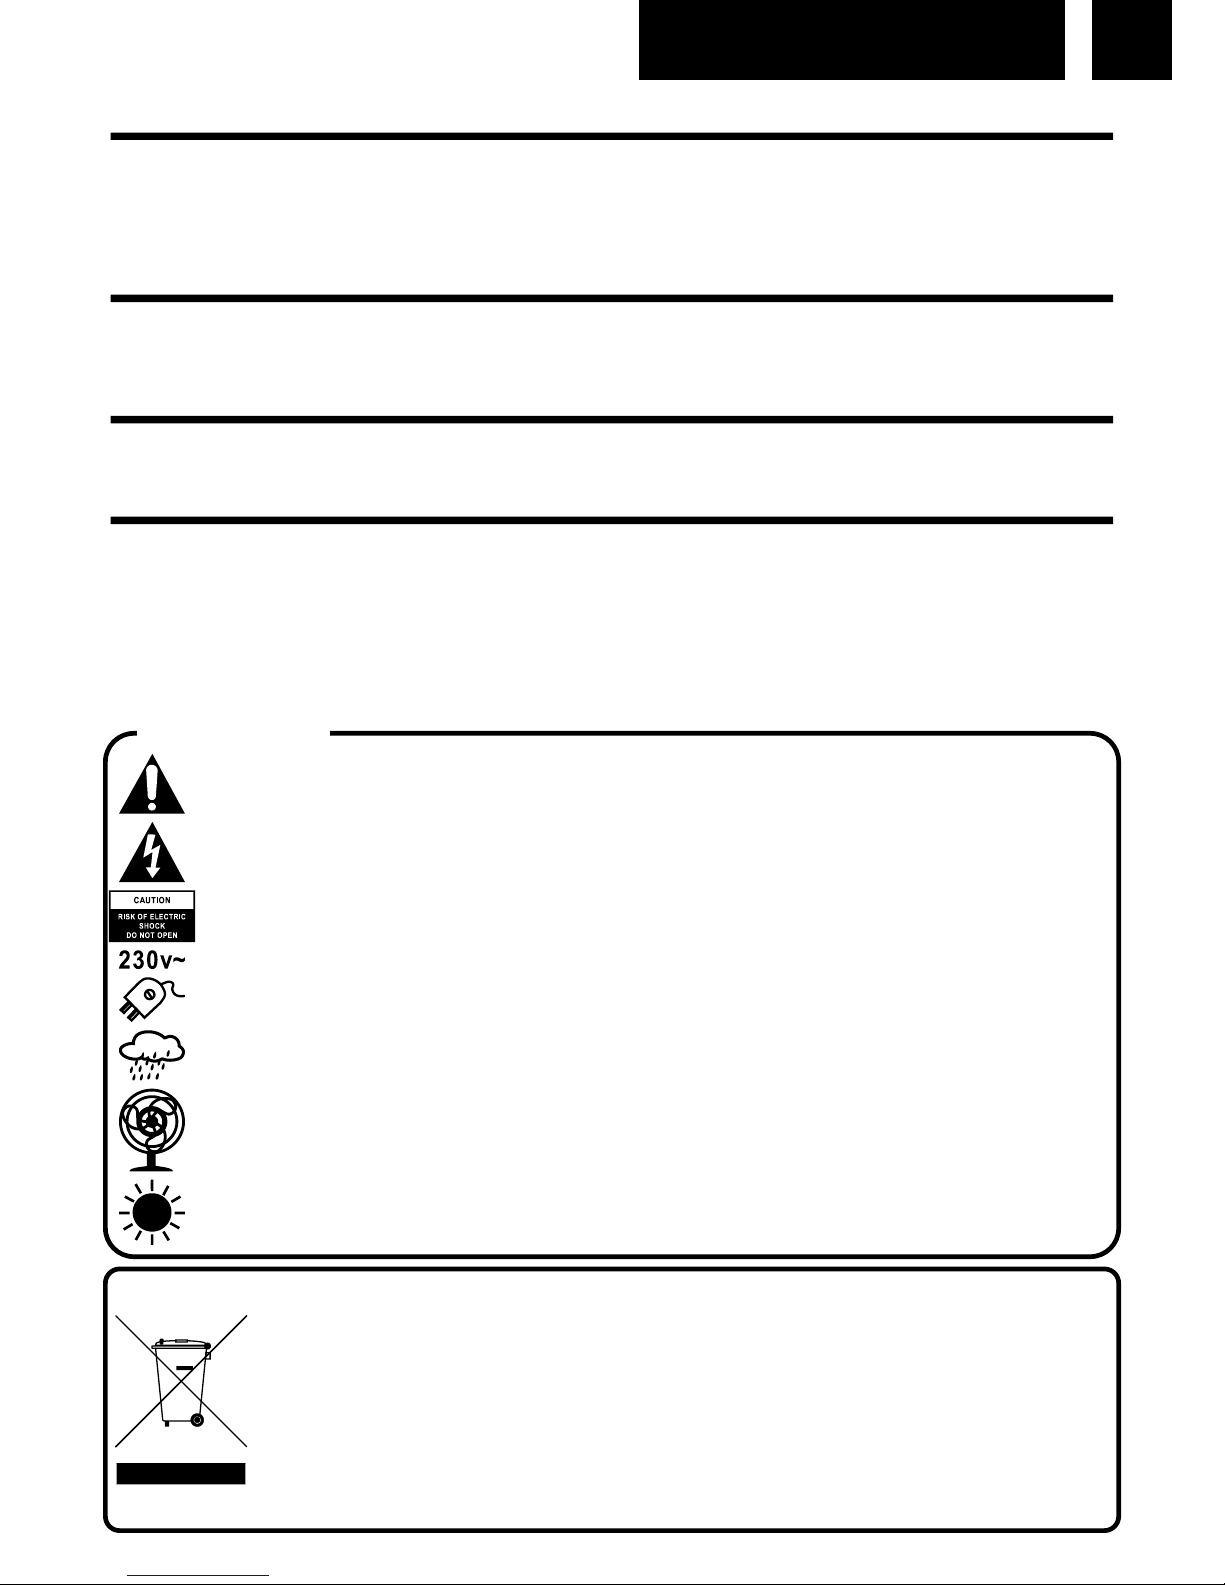
WARNINGS
The exclamation point within the triangle is a warning sign alerting the user of important instructions accompanying the product.
The lightening flash with arrowhead symbol within the triangle is a warning sign alerting the
user of “dangerous voltage” inside the unit.
To reduce the risk of electric shock, do not remove the cover. No user serviceable parts inside the unit. Refer all servicing to qualified personnel.
This unit operates on 100-240V, 60/50Hz. If the unit is not used for a long period of time, remove the plug from the AC mains.
Ensure all connections are properly made before operating the unit.
This unit must not be exposed to moisture or rain.
This unit should be positioned so that it is properly ventilated. Avoid placing it, for example,
close to curtains, on the carpet or in a built-in installation such as a bookcase.
Do not expose this unit to direct sunlight or heat radiating sources.
Page 6
3 Deutsch
LAGE DER BEDIENELEMENTE
1. AUX-IN
2. GITARRENEINGANG
3. MIKROFONEINGANG
4. USB-LADEPORT
5. LCD-DISPLAY
6. USB-EINGANG
7. FUNKTIONSTASTE
8. SKIP-
9. PLAY/PAUSE
10. SKIP+
11. ON/OFF
12. GITARRENLAUTSTÄRKE
13. MIKROFONLAUTSTÄRKE
14. LADE- LED (CHARGE LED)
15. ECHO-REGLER
16. BASS-REGLER
17. EQUALIZER
18. TREBLE- REGLER
19. HAUPTVOLUMEN
20. MIKROFON ON/OFF
ENERGIEVERSORGUNG
Dieses Gerät arbeitet mit einer Netzspannung von 100-240V, 60/50Hz. Schließen Sie das Netzkabel an die Netzsteckdose an.
Stellen Sie sicher, dass Ihre Haus Netzspannung dieselbe ist wie auf dem Typenschild auf der Rückseite des Gerätes.
Schließen Sie das Gerät an die Stromversorgung an. Schalten Sie den EIN / AUS - Schalter (11) auf ON (EIN), um das Gerät
einzuschalten. Schalten Sie den ON / OFF - Schalter (11) auf OFF (AUS) um das Gerät auszuschalten.
Wenn kein Audio Signal Wiedergegeben wird schaltet sich das Gerät nach 15 Minuten automatisch aus.
Drücken Sie erneut PLAY / PAUSE (9), um die Wiedergabe fortzusetzen.
BATTERIEBETRIEB
Dieses Gerät hat eine fest verbaute wiederaufladbare Batterie. Schließen Sie das Produkt an den Hauptstrom an, um die Batterie wieder aufzuladen.
Lade-LED Erklärung:
LED ROT: Batterie wird aufgeladen.
LED GRÜN: Batterie vollständig geladen.
LED blinkt ROT: schwache Batterie, muss aufgeladen werden.
LAUTSTÄRKEREGELUNG
Drehen Sie HAUPTVOLUMEN (19), um die Lautstärke zu verändern.
Passen Sie den Ton mit dem Regler ECHO (15), BASS (16) und TREBLE (18) Ihrem persönlichen Geschmack an.
Wenn Sie eine genauere Einstellung möchten, verwenden Sie den Equalizer (17), um die verschiedenen Frequenzen ein-
zeln zu regeln.
WIEDERGABE VON EINEM USB-GERÄT
1. Stecken Sie das USB-Gerät an den USB-Anschluss (6).
2. Drücken Sie die Funktion-Taste (7) so oft bis der USB-Modus ausgewählt ist. USB wird dann auf dem Display angezeigt.
3. Das Gerät beginnt automatisch, das USB-Gerät auszulesen, nachdem es verbunden ist.
Drücken Sie SKIP -/+ (8/10), um Ihre Lieblingstitel auszuwählen. Wenn Sie SKIP -/+ (8/10) halten, wird der momentan
abgespielte Titel schnell vorwärts oder rückwärts gespielt, bis Sie die Taste loslassen.
Drücken PLAY/PAUSE (9) um die Wiedergabe zu pausieren. Die Titelnummer beginnt zu blinken. Drücken die PLAY/
PAUSE (9) wiederholt um die Wiedergabe fortzusetzen.
WICHTIG: Beachten Sie, dass USB-LADEPORT (4) nur zum Laden (bis 5V/1A) geeignet ist und nicht zur Wiedergabe.
AUX-IN
Dieses Gerät bietet einen zusätzlichen Audioeingang zum Anschluss externer Audiogeräte wie Z.B. MP3-Player und CDPlayer und ermöglicht die Wiedergabe aus Ihrer externen Quelle über die Lautsprecher der Anlage.
1. Verwenden Sie ein Audiokabel (nicht im Lieferumfang enthalten) mit einem Stereo-Chinch-Stecker an einem Ende des
Kabels und dem entsprechenden Anschluss Ihres externe Audiogeräts am anderen Ende des Kabels um die Geräte zu
verbinden. Stecken Sie ein Ende in die AUX (1) IN-Buchse am Hauptgerät und das andere Ende des Kabels in den Ausgang oder die Kopfhörerbuchse Ihres externen Audiogeräts.
2. Schalten Sie das Gerät und Ihr externes Audiogerät EIN (11). Drücken Sie die FUNKTION- Taste (7) bis AUX im Display
(5) angezeigt wird. Der AUX Modus ist nun angewählt.
3. Beginnen Sie, die Wiedergabe des externen Gerätes (siehe Benutzerhandbuch des externen Gerätes).
Page 7

4 Deutsch
BLUETOOTH-BETRIEB
1. Drücken Sie die FUNCTION-Taste (7) so oft bis BT auf dem Display (5) angezeigt wird. Der BLUETOOTH-Modus ist nun
ausgewählt.
2. Wählen Sie auf einem Ihrer Bluetooth fähigen Geräten die Bluetooth Funktion und lassen dieses suchen. Das Gerät DJ880BT wird Ihnen in der Liste angezeigt. Gehen Sie auf das Gerät und bestätigen Sie die Eingabe.
3. Die Paarung wird durch ein Signalton bestätigt.
4. Jetzt kann der Ton von Ihrem externen Gerät über das DJ-880BT wiedergegeben werden. Die Bedienung erfolgt über
das externe Gerät.
MIKROFON UND GITARRE
1. Dieses Gerät bietet 3x 6,35-mm-Buchsen zum Anschluss von bis zu zwei Mikrofone (3) und einer Gitarre (2).
2. Verbinden Sie Mikrofon und / oder Gitarre mit dem Gerät und regeln Sie ihre Lautstärke mit (12) oder (13).
3. Diese Eingänge sind immer eingeschaltet und können verwendet werden, um Gitarren oder Mikrofone zu spielen,
während Sie BT / AUX / USB verwenden.
DISCO-LICHT
1. Halten Sie die FUNKTIONSTASTE (7) gedrückt, um zwischen 8 verschiedenen Lichteffekten zu wählen.
2. Halten Sie die FUNKTION-Taste (7) solange gedrückt, bis OFF auf dem Display erscheint, um den Lichteffekt
auszuschalten.
TECHNISCHE DATEN
AC: 100-240V, 60/50Hz
Battery: 12V - 7,2A
Max Music Power: 800W
Das Typenschild befindet sich an der Gehäuseunterseite des Gerätes.
Die Kennzeichnung auf dem Produkt bzw. auf der dazugehörigen Literatur gibt an, dass es nach seiner Lebensdauer nicht zusammen mit dem normalen HaushaltsmüIl entsorgt werden darf. Entsorgen Sie dieses
Gerat bitte getrennt von anderen Abfallen, um der Umwelt bzw. der menschl i chen Gesundhei t ni cht durch
unkontrol l i erte Mül l besei ti gung zu schaden. Recycel n Si e das Gerät, um di e nachhaltige Wiederverwertung von stofflichen Ressourcen zu fördern. Private Nutzer sollten den Händler, bei dem das Produkt
gekauft wurde, oder die zuständigen Behörden kontaktieren, um in Erfahrung zu bringen, wie sie das Gerät
auf umweltfreundliche Weise recyceln können. Gewerbliche Nutzer sollten sich an Ihren Lieferanten wenden
und die Bedingungen des Verkaufsvertrags konsultieren. Dieses Produkt darf nicht zusammen mit anderem
Gewerbemüll entsorgt werden.
KORREKTE ENTSORGUNG DIESES PRODUKTS
(Elektromüll)
SICHERHEITSHINWEISE
Das Ausrufszeichen im Dreieck weist den Benutzer auf wichtige Bedienungs- und Wartungsanweisungen (Service) in diesem Handbuch hin, die unbedingt zu befolgen sind.
Um die Gefahr elektrischer Schläge auszuschliessen, Gehäuse auf keinen Fall abnehmen.
Im Innem befinden sich keine vom Benutzer selbst instandsetz-baren Teile. Reparaturen dürfen nur von einer autorisierten Fachwerkstatt durchgeführt werden.
Dieses Gerät ist für 100-240V, 60/50Hz Netzspannung ausgelegt. Bei längerer Nichtbenutzung des Geräts ziehen Sie den Stecker aus der Steckdose.
Setzen Sie das Gerät weder Feuchtigkeit noch Regen aus.
Schalten Sie das System erst dann ein, wenn Sie alle Verbindungen genau geprüft haben.
Stellen Sie das Gerät so auf, dass immer eine ungestörte Frischluftzufuhr sichergestellt ist.
Es ist zum beispiel keinesfalls auf Teppiche und in der Nähe von Gardinen zu stellen oder in
Bücherregale einzubauen.
Setzen Sie das Gerät weder direkter Sonneneinstrahlung noch Wärmequellen aus.
Page 8

5 Français
CONTRÔLE DE POSITION
1. AUX-IN
2. ENTRÉE DE GUITARE
3. ENTRÉE MICRO
4. CHARGEUR USB
5. LCD-DISPLAY
6. ENTRÉE USB
7. BOUTON DE FONCTION
8. SKIP-
9. PLAY/PAUSE
10. SKIP+
11. ON/OFF
12. VOLUME DE GUITARE
13. VOLUME DU MICROPHONE
14. CHARGE LED
15. RÉGULATEUR D'ÉCHO
16. RÉGULATEUR BASSE
17. ÉGALISEUR DE FRÉQUENCES
18. RÉGULATEUR TRIPLE
19. VOLUME PRINCIPAL
20. MICROPHONE ON/OFF
PUISSANCE
1. Cet appareil utilise une alimentation de 100-240V, 60/50Hz. Branchez dans une prise électrique, en veillant à ce
que la tension est indiquée sur l'étiquette.
2. Branchez l'appareil au pouvoir. Place INTERRUPTEUR ON / OFF (11) en position ON pour allumer l'appareil. Place INTERRUPTEUR ON / OFF (11) en position OFF pour éteindre l'appareil.
3. Si aucun son pendant 15 minutes, l'appareil se met automatiquement hors tension.
4. Appuyez PLAY/PAUSE (9) à nouveau pour continuer à jouer
UTILISATION DE LA BATTERIE
Cet appareil fournit une batterie rechargeable au plomb. Connectez le produit au courant principal afin de recharger la
batterie.
Chargé explication led:
LED ROUGE: la batterie est en cours de charge.
LED VERTE: batterie complètement chargée.
LED clignotant ROUGE: batterie faible, doivent être chargés.
CONTRÔLE DU VOLUME
Tournez le bouton VOLUME PRINCIPAL (19) pour régler le volume.
Réglez l'égaliseur en utilisant ECHO (15), BASS (16) et TREBLE (18).
Si vous voulez un égaliseur plus précis, utilisez FREQUENCES EQUALIZER (17) pour régler séparément chaque
fréquence.
LECTURE USB
1. Insérez le périphérique USB dans la prise (6).
2. Appuyez sur BOUTON DE FONCTION (7) à plusieurs reprises pour sélectionner le mode USB. L'écran affiche
«USB».
3. Le dispositif de lecture démarre automatiquement après la connexion.
Appuyez sur SKIP -/+ (8/10) pour sélectionner les pistes souhaitées. Si vous maintenez SKIP -/+ (8/10) , la piste en
cours de lecture circule rapidement dans la direction choisie jusqu'à ce que le bouton est relâché.
Appuyez sur PLAY/PAUSE (9) pour interrompre la lecture. Le numéro de piste clignote. Appuyez PLAY/PAUSE (9) à
nouveau pour continuer à jouer
IMPORTANT: Notez que l'USB (4) sert à charger des appareils 5V / 1A, et non à les lire.
AUX-IN
Cette unité est équipée d'un 3,5 mm entrée AUX permet de connecter des périphériques audio externes et écouter de la
musique à travers les haut-parleurs de cet appareil.
1. Utilisez un câble audio aux prises 3,5mm sur au moins une extrémité du câble. Branchez une extrémité dans la
sortie audio de l'appareil externe et l'autre extrémité à l'entrée AUX de cet appareil.
2. Mettez cet appareil et le périphérique externe. Appuyez sur AUX (13) pour sélectionner la fonction AUX. L'écran
affiche "AUX".
Page 9

6 Français
3. A commencé à jouer de la musique à partir du périphérique externe (voir le mode d'emploi de l'appareil).
FONCTION BLUETOOTH
1. Appuyez sur BT (9) pour sélectionner la fonction BLUETOOTH. L'écran affiche "BT".
2. Sélectionnez à partir de votre appareil mobile (Smartphone, tablette ...) le Bluetooth nom du périphérique DJ880BT, puis confirmer la connexion.
3. Lorsque la connexion est terminée, le voyant cesse de clignoter.
4. Maintenant, vous pouvez transférer de la musique sur votre DJ-880BT et toutes les opérations peuvent être effectuées directement à partir de votre appareil.
MICROPHONE ET GUITARE
1. Cet appareil comprend 3 prises de 6,35 mm pour connecter des microphones (3) et des guitares (2).
2. Connectez le microphone ou la guitare et réglez leur volume en utilisant (12) ou (13).
3. Ces entrées sont toujours activées et peuvent être utilisées pour jouer des guitares ou des microphones tout en
utilisant BT / AUX / USB.
DISCO-LIGHT
1. Appuyez et maintenez enfoncé le bouton FUNCTION (7) pour choisir entre 8 effets de lumière différents.
2. Appuyez sur jusqu'à ce que vous voyiez OFF sur l'écran pour éteindre l'effet de lumière.
CARACTERISTIQUES TECHNIQUES
CA: 100-240V, 60/50Hz
Battery: 12V - 7,2A
Max Music Power: 800W
Les spécifications peuvent êtres modifiées sans avis préalable.
Ce symbole sur le produit ou sa documentation indique qu'il ne doit pas être éliminé en fin de vie avec
les autres déchets ménagers. L' élimination incontrôlée des déchetspouvant porter préjudice a l'environnement ou a la santé humaine, veuillez le séparer des autres types de déchets et le recycler defaçon
responsable. Vous favoriserez ainsi la réutilisation durable desressources matérielles. Les particuliers
sont invites a contacter le distributeur leur ayant vendu le produit ou a se renseigner auprès de leur mairie pour savoir ou et comment ils peuvent se débarrasser de ce produit afin qu'il soit recycle en respectant l'environnement. Les entreprises sont invitées a contacter leurs fournisseurs et aconsulter les conditions de leur contrat de vente. Ce produit ne doit pas être éliminé avec les autres déchets commerciaux.
COMMENT ÉLIMINER CE PRODUIT
(déchets d'équipements électriques et électroniques)
ATTENTION
Le symbole “point d’exclamation” à l’intérieur d’un triangle avertit l’utilisateur que d’importantes instructions d’utilisation et de maintenance sont contenues dans le mode d’emploi.
Le symbole “éclair” à l’intérieur d’un triangle sert à avertir l’utilisateur de la présence du courant à l’intérieur du l’appareil qui pourrait constituer un risque.
Afin de minimiser les risques, ne pas ouvrir le boîtier ni ôter le dos de l’appareil. En case de panne,
faites appel aux techniciens qualifiés pour les réparations. L’appareil ne renferme aucune pièce reparable par l’utilisateur.
Cet appareil a été conçu pour une tension d’alimentation de 100-240V, 60/50Hz. Débranchez la prise
de courant quand on prévoit de ne pas utiliser l’appareil pendant un certain temps.
Mettez l’appareil sous tension seulement après avoir vérifié que tous les raccordements soient corrects.
L’unité ne doit pas être exposée à l’humidité ou à la pluie.
L’appareil doit être gardé dans un endroit suffisamment ventilé. Ne le gardez jamais par exemple près
des rideaux, sur un tapis ou dans des meubles, tels qu’une bibliothèque.
L’unité ne doit pas être exposée à la lumière directe du soleil ou à des sources de chaleur.
Page 10

7 Italiano
POSIZIONE DEI COMANDI
1. AUX-IN
2. INGRESSO CHITARRA
3. INGRESSO MICROFONO
4. CARICABATTERIE USB
5. LCD-DISPLAY
6. INGRESSO USB
7. PULSANTE DI FUNZIONE
8. SKIP-
9. PLAY/PAUSE
10. SKIP+
11. ON/OFF
12. VOLUME DELLA CHITARRA
13. VOLUME DEL MICROFONO
14. LED CARICA
15. REGOLATORE DI ECO
16. REGOLATORE BASSO
17. FREQUENZE EQUALIZZATORE
18. REGOLATORE ALTI
19. VOLUME PRINCIPALE
20. MICROFONO ON/OFF
ALIMENTAZIONE
Questa unità utilizza un'alimentazione da 100-240V, 60/50Hz. Inserire la spina in una presa di corrente, assicurandosi
che il voltaggio sia lo stesso indicato sull'etichetta.
Connettere l'unità all'alimentazione. Posizionare INTERRUTTORE ON/OFF (11) in posizione ON per accendere l'unità.
Posizionare INTERRUTTORE ON/OFF (11) in posizione OFF per spegnere l'unità.
Se non viene riprodotto alcun suono per 15 minuti, l'unità si spegnerà automaticamente.
Premere nuovamente PLAY/PAUSE (9) per continuare la riproduzione
FUNZIONAMENTO BATTERIA
Questa unità è dotata di una batteria ricaricabile al piombo. Collegare il prodotto alla corrente principale al fine di ricaricare la batteria.
Spiegazione LED ricarica:
LED ROSSO: la batteria è in carica.
LED verde: la batteria è completamente carica.
LED rosso lampeggiante: batteria scarica, ha bisogno di essere ricaricata.
CONTROLLO DEL VOLUME
Ruotare VOLUME PRINCIPALE (19) per regolare il volume.
Regolare l'equalizzatore con ECHO (15), BASS (16) e TREBLE (18).
Se si desidera una regolazione più precisa utilizzare il regolatore di frequenze (17) per regolare ogni frequenza sepa-
ratamente.
RIPRODUZIONE DA USB
1. Inserire il dispositivo USB nell'apposita presa (6).
2. Premere il TASTO FUNZIONE (7) ripetutamente per scegliere la modalità USB. Sul display viene visualizzato
"USB".
3. La lettura del dispositivo inizierà automaticamente in seguito alla connessione.
Premere SKIP -/+ (8/10) per selezionare le tracce desiderate. Se si tiene premuto SKIP -/+ (8/10) , la traccia in ripro-
duzione scorrerà velocemente nella direzione selezionata fino a che non si rilascia il tasto.
Premere PLAY/PAUSE (9) per mettere in pausa la riproduzione. Il numero di traccia inizierà a lampeggiare. Premere
nuovamente PLAY/PAUSE (9) per continuare la riproduzione
IMPORTANTE: L’ingresso USB (4) è per la ricarica dispositivi 5V / 1A, non per la riproduzione USB.
AUX-IN
Questa unità è dotata di un ingresso AUX da 3,5 mm che consente di connettere dispositivi audio esterni e riprodurre la
musica tramite le casse di questa unità.
1. Utilizzare un cavo audio con degli spinotti 3,5mm su almeno un estremo del cavo. Connettere un'estremità nell'uscita audio del dispositivo esterno e l'altra estremità nell'ingresso AUX di questa unità.
2. Accendere questa unità e il dispositivo esterno. Premere AUX (13) per selezionare la funzione AUX. Sul display
viene visualizzato "AUX".
Page 11

8 Italiano
3. Iniziare a riprodurre musica dal dispositivo esterno (vedi manuale d'uso del dispositivo).
FUNZIONE BLUETOOTH
1. Premere BT (9) per selezionare la funzione BLUETOOTH. Sul display viene visualizzato "BT".
2. Selezionare dal vostro dispositivo portatile (Smartphone, Tablet…) il dispositivo Bluetooth con nome DJ-880BT,
quindi confermare la connessione.
3. Quando la connessione è completata il LED smetterà di lampeggiare.
4. Adesso potrete trasferire musica al vostro DJ-880BT e tutte le operazioni potranno essere realizzate direttamente
dal vostro dispositivo.
MICROFONO E CHITARRA
1. Questa unità offre 3 ingressi 6,35mm per i microfoni (3) e chitarre (2).
2. Collegare il microfono o una chitarra e regolare il volume usando (12) o (13).
3. Questi ingressi sono sempre accesi e possono essere utilizzati per utilizzare chitarre o microphons durante la riproduzione di BT / AUX / USB.
DISCO-LIGHT
1. Premere e tenere premuto il pulsante FUNZIONE (7) per scegliere tra 8 diversi effetti di luce.
2. Premere di nuovo fino a vedere OFF sul display per spegnere gli effetti di luce.
SPECIFICHE TECNICHE
AC: 100-240V, 60/50Hz
Battery: 12V - 7,2A
Max Music Power: 800W
Caratteristiche soggette a variazioni senza preavviso.
II marchio riportato sul prodotto e sulla sua documentazione indica che il prodotto non deve essere smaltito can altri rifiuti domestici al termine del ciclo di vita. Per evitare eventuali danni all'ambiente o alla salute causati dall'inopportuno smaltimento dei rifiuti, si invita l'utente a separare questo prodotto da altri tipi
di rifiuti e di riciclarlo in maniera responsabile per favorire il riutilizzo sostenibile delle risorse materiali. Gli
utenti domestici sono invitati a contattare il rivenditore presso il quale e stato acquistato il prodotto a l'ufficio locale preposto per tutte le informazioni relative alla raccolta differenziata e al riciclaggio per questo
tipo di prodotto. Gli utenti aziendali sono invitati a contattare il proprio fornitore e verificare i termini e le
condizioni del contratto di acquisto. Questo prodotto non deve essere smaltito unitamente ad altri rifiuti
commerciali.
CORRETTO SMALTIMENTO DEL PRODOTTO
(rifiuti elettrici ed elettronici)
ATTENZIONE
Il punto esclamativo all’interno di un triangolo avverte l’utente che il libretto d’istruzioni contiene delle importanti istruzioni per l’uso e la manutenzione.
Il simbolo del fulmine all’interno di un triangolo avverte l’utente della presenza di una pericolosa
tensione all’interno dell’apparecchio.
Per ridurre i rischi di scosse elettriche, non aprire l’apparecchio. L’apparecchio non contiene parti
riparabili dall’utente. In caso di guasto fare appello a tecnici qualificati per le riparazioni.
Questo apparecchio è stato progettato per funzionare a 100-240V, 60/50Hz. Se non si intende utilizzare l’apparecchio per un lungo periodo di tempo, rimuovere la spina dalla presa di corrente.
Utilizzare l’apparecchio solo dopo aver verificato che tutte le connessioni siano state eseguite correttamente.
Non esporre l’apparecchio alla pioggia o all’umidità.
Posizionare l’apparecchio in un luogo sufficientemente ventilato. Evitare di sistemarlo vicino a tende, sul tappeto o all’interno di un mobile quale, ad esempio, una libreria.
Non esporre l’apparecchio alla luce diretta del sole o a fonti di calore.
Page 12

9 Español
EL CONTROL DE POSICIÓN
1. AUX-IN
2. ENTRADA DE GUITARRA
3. ENTRADA DE MICRÓFONO
4. CARGADOR USB
5. LCD-DISPLAY
6. ENTRADA USB
7. BOTÓN DE FUNCIÓN
8. SKIP-
9. PLAY/PAUSE
10. SKIP+
11. ON/OFF
12. VOLUMEN DE LA GUITARRA
13. VOLUMEN DEL MICRÓFONO
14. CARGA LED
15. REGULADOR DE ECO
16. REGULADOR DE GRAVES
17. ECUALIZADOR DE FRECUENCIAS
18. REGULADOR TRIPLE
19. VOLUMEN PRINCIPAL
20. MICRÓFONO ON/OFF
POTENCIA
Esta unidad utiliza una fuente de alimentación de 100-240V, 60/50Hz. Enchufe en una toma de corriente, asegurándose
de que la tensión es tal como se indica en la etiqueta.
Conecte la unidad a la corriente. Lugar SWITCH ON / OFF (11) en la posición ON para encender la unidad. Colocar
SWITCH ON / OFF (11) en posición OFF para apagar la unidad.
Si no hay sonido durante 15 minutos, la unidad se apagará automáticamente.
Pulse PLAY/PAUSE (9) de nuevo para continuar jugando
FUNCIONAMIENTO DE LA BATERÍA
Esta unidad proporciona una batería recargable de plomo. Conecte el producto a la corriente principal para recargar la
batería.
Explicación dirigida de la carga:
LED ROJO: la batería se está cargando.
LED VERDE: batería completamente cargada.
LED parpadeante ROJO: batería baja, debe cargarse.
CONTROL DEL VOLUMEN
Gire VOLUMEN PRINCIPAL (19) para regular el volumen.
Ajuste el ecualizador utilizando ECHO (15), BASS (16) y TREBLE (18).
Si desea un uso de ecualizador más preciso, use FREQUENCIES EQUALIZER (17) para regular cada frecuencia por
separado.
REPRODUCCIÓN DEL DISPOSITIVO USB
1. Inserte el dispositivo USB en la toma (6).
2. Pulse BOTÓN DE FUNCIÓN (7) varias veces para seleccionar el modo USB. En la pantalla aparece "USB".
3. El dispositivo de lectura se iniciará automáticamente después de la conexión.
Presione SKIP -/+ (8/10) para seleccionar las pistas deseadas. Si mantiene pulsado SKIP -/+ (8/10) , la pista que se
está reproduciendo fluirá rápidamente en la dirección seleccionada hasta que se suelta el botón.
Presione PLAY/PAUSE (9) para pausar la reproducción. El número de pista parpadeará. Pulse de nuevo PLAY/
PAUSE (9) para continuar el juego
IMPORTANTE: Tenga en cuenta que USB (4) es para cargar dispositivos de 5V / 1A, no para la reproducción.
AUX-IN
Esta unidad está equipada con un 3,5 mm de entrada AUX permite conectar dispositivos externos de audio y reproducir
música a través de los altavoces de esta unidad.
1. Utilice un cable de audio a las tomas 3,5mm en al menos un extremo del cable. Conecte un extremo a la salida de
audio del dispositivo externo y el otro extremo a la toma AUX de esta unidad.
2. Encienda esta unidad y el dispositivo externo. AUX (13) pulse para seleccionar la función AUX. En la pantalla aparece "AUX".
3. Iniciado la reproducción de música desde el dispositivo externo (consulte el manual del usuario del dispositivo).
Page 13

10 Español
FUNCIÓN BLUETOOTH
1. Pulse BT (9) para seleccionar la función BLUETOOTH. En la pantalla aparece "BT".
2. Seleccionar desde su dispositivo móvil (smartphone, tablet ...) el nombre del dispositivo Bluetooth DJ-880BT, a
continuación, confirmar la conexión.
3. Cuando se complete la conexión, el LED deja de parpadear.
4. Ahora se puede transferir música al DJ-880BT y todas las operaciones se pueden realizar directamente desde el
dispositivo.
MICRÓFONO Y GUITARRA
1. Esta unidad dispone de 3 tomas de 6,35 mm para conectar micrófonos (3) y guitarras (2).
2. Conecte el micrófono o la guitarra y regular su volumen usando (12) o (13).
3. Estas entradas están siempre encendidas y se pueden utilizar para tocar guitarras o microfonos mientras se utiliza
BT / AUX / USB.
DISCO-LIGHT
1. Presione y mantenga presionado el botón FUNCTION (7) para elegir entre 8 diferentes efectos de luz.
2. Presione hasta que aparezca OFF en la pantalla para apagar el efecto de luz.
ESPECIFICACIONES TÉCNICAS
AC: 100-240V, 60/50Hz
Battery: 12V - 7,2A
Max Music Power: 800W
Las características tecnicas estan sujetas a cambios sin aviso previo.
La presencia de esta marca en el producto o en el materiál informativo que lo acompaña, indica que al
finalizar su vida útil no deberá eliminarse junto con otros residuos domésticos. Para evitar los posi bl es
daños al medi o ambi ente o a l a sal ud humane que representa la eliminación incontrolada de residuos,
separe este producto de otros tipos de residuos y reciclelo correctamente para promover la reutilización
sostenible de recursos materiales. Los usuarios particulares pueden contactar con el establecimiento
donde adqui ri eron el producto, o con l as autori dades l ocal es pertinentes, para informarse sobre
cómo y dónde pueden lIevario para que sea sometido a un reciclaje ecológico y seguro. Los usuarios
comerciales pueden contactar con su proveedor y consultar las condiciones del contrato de compra.
Este produco no debe eliminarse mezclado con otros residuos comerciales.
ELIMINACIÓN CORRECTA DE ESTE PRODUCTO
(material electrico y electrónico de descarte)
ATTENTIÓN
El símbolo de exclamación dentro un triángulo tiene el objeto de advertir al usuario de la presencia de
instrucciones importantes de funcionamiento y mantenimiento en la documentación adjunta con el
equipo.
El símbolo del rayo con punta de flecha dentro de un triángulo adverte al usuario de la presencia de
tensiones peligrosas en el equipo.
Para reducir los riesgos de descargas eléctricas, no retire la cubierta. La unidad no hay en su enterior
componentes que pueda manipular el usuario. Encargue su reparación a personal cualificado.
Esta unidad funciona con 100-240V, 60/50Hz. Cuando el equipo vaya a estar un tiempo prolongado
sin utilizarse, desenchufar el cable de alimentación.
No conecte la unidad hasta que no se hayan efectuado todas las otras conexiones.
La unidad no debería ser expuesta a lluvia o humedad.
La unidad se debe instalar de forma que su posición no le impida tener ventilación adecuada. Por
ejemplo, el equipo no se debe colocar cerca de cortinas o sobre el tapete, ni en una instalación como
puede ser un armario.
La unidad no debería ser expuesta a la luz solar directa ni a fuentes emisora de calor.
Page 14

11 Nederlands
PLAATS VAN DE CONTROLES
1. AUX-IN
2. GUITAR INGANG
3. MICROFOONINGANG
4. USB OPLADER
5. LCD-DISPLAY
6. USB-INGANG
7. FUNCTIETOETS
8. SKIP-
9. PLAY/PAUSE
10. SKIP+
11. ON/OFF
12. GITAARVOLUME
13. MICROFOONVOLUME
14. KOSTEN LEIDDEN
15. ECHO REGULATOR
16. BASS REGULATOR
17. FREQUENTIES EQUALIZER
18. TREBLE REGULATOR
19. HOOFDVOLUME
20. MICROFOON ON/OFF
STROOMVOORZIENING
Deze eenheid opereert vanuit een van de belangrijkste levering van 100-240V, 60/50Hz. Sluit het netsnoer aan op de
AC huishouden belangrijkste afzetmarkt. Zorg ervoor dat de spanning zoals aangegeven op het typeplaatje aan de achterzijde van het apparaat.
Sluit het apparaat aan op de voeding. Schakel ON / OFF KNOP (11) ON positie om het apparaat aan te zetten. Schakel
ON / OFF KNOP (11) op OFF om het toestel uit te schakelen.
Als er geen geluid wordt geproduceerd, wordt het apparaat automatisch na 15 minuten uitgeschakeld. Druk nogmaals
op PLAY/PAUSE (9) om de weergave te hervatten.
ACCUWERKING
Dit toestel voorzien van een Lead oplaadbare batterij. Sluit het product aan de hoofdstroom om de batterij op te laden.
Laad leidde uitleg:
LED ROOD: accu wordt opgeladen.
LED groen: accu volledig opgeladen.
LED Knippert rood: batterij bijna leeg is, moeten in rekening gebracht.
VOLUMEREGELING
Draai MAIN VOLUME (19) om het volume te regelen.
Pas de equalizer met behulp van ECHO (15), BASS (16) en TREBLE (18).
Wilt u meer precieze equalizer frequenties gebruiken equalizer (17) voor elke frequentie afzonderlijk te regelen.
AFSPELEN VANAF EEN USB-APPARAAT
1. Steek de stekker van het USB-apparaat in de USB aansluiting (6).
2. Druk herhaaldelijk op FUNCTIETOETS (7) om USB mode te kiezen. Zal het scherm het woord te geven USB.
3. Het apparaat start automatisch op het USB-apparaat te lezen nadat deze is aangesloten.
Druk op SKIP -/+ (8/10) om uw favoriete liedjes te selecteren. Als je SKIP -/+ (8/10) te houden, de huidige nummer
zal snel vooruit of achteruit totdat u de toets loslaat.
Druk PLAY/PAUSE (9) om het afspelen te onderbreken. Het nummer begint te knipperen. Druk nogmaals op PLAY/
PAUSE (9) om de weergave te hervatten.
BELANGRIJK: Let op dat USB (4) is voor het opladen van 5V / 1A apparaten, niet voor het afspelen.
AUX-IN
Dit apparaat biedt ook een aanvullende audio-jackingang om externe apparaten zoals MP3-spelers of CD-spelers te
kunnen aansluiten en door de systeemluidsprekers te kunnen afspelen.
1. Gebruik een audiokabel (niet meegeleverd) met een 3,5mm stereo-stekkers aan het ene uiteinde van de kabel.
Steek de ene kant van de kabel in de AUX-IN-ingang van het apparaat en de andere kant in de LINE OUT of
HEADPHONE-uitgang van uw externe audioapparaat.
2. Zet het apparaat en uw externe audioapparaat aan. Druk op de AUX (13) om de AUX-modus te selecteren. Zal het
scherm het woord te geven AUX.
Page 15

12 Nederlands
3. Start met afspelen vanaf het externe apparaat (zie de handleiding van het externe apparaat).
DE WERKING VAN BLUETOOTH
1. Druk op de BT (9) om de BLUETOOTH-modus te selecteren. Zal het scherm het woord te geven BT.
2. Kies een van uw draagbare apparaten (smartphone, tablet, ...), selecteert u het Bluetooth-ID, die wordt aangeduid
als DJ-880BT en bevestig de verbinding.
3. Als de koppeling slaagt de LED stopt met knipperen.
4. Nu kun je de muziek over te zetten in het DJ-880BT en het uitvoeren van alles gewoon vanaf uw mobiele apparaat.
MICROFOON EN GUITAR
1. Dit toestel biedt 3x 6,35mm voor het aansluiten van microfoons (3) en gitaren (2).
2. Sluit de microfoon of gitaar en reguleren van hun volume met (12) of (13).
3. Deze ingangen zijn altijd aan en kan worden gebruikt om gitaren of microphons spelen tijdens het gebruik van BT /
AUX / USB.
DISCO-LIGHT
1. Houd functietoets (7) te kiezen tussen 8 verschillende lichteffecten.
2. Druk op tot u OFF op het display om het lichteffect uitgeschakeld.
TECHNISCHE SPECIFICATIES
AC: 100-240V, 60/50Hz
Battery: 12V - 7,2A
Max Music Power: 800W
Kenmerken zijn zonder voorafgaande kennisgeving onderhevig aan veranderingen.
Dit symbool dat staat weergegeven op het product en in de documentatie ervan, duidt erop dat het product
niet kan worden weggegooid met het gewone huisvuil aan het einde van de levensduur. Om schade aan het
milieu of aan de gezondheid door ongepaste afvalverwijdering te voorkomen, dient de gebruiker dit product
te scheiden van andere soorten afval op verantwoorde wijze ter bevordering van duurzaam hergebruik van
de materiële hulpbronnen. De thuisgebruiker dient contact op te nemen met de verkoper van het apparaat of
met de lokale gemeente voor informatie met betrekking tot het scheiden en recyclen van dit type product.
Zakelijke gebruikers dienen contact op te nemen met hun leverancier en de algemene voorwaarden van de
verkoopovereenkomst te raadplegen. Dit product dient niet te worden gemengd met ander bedrijfsafval voor
de verwijdering.
CORRECTE AFVALVERWERKING VAN HET PRODUCT
(elektrisch en elektronisch afval)
WAARSCHUWING
Het uitroepteken in een gelijkzijdige driehoek is bedoeld om de gebruiker erop attent te maken dat de
gebruikershandleiding belangrijke instructies bevat voor het gebruik en het onderhoud.
De bliksemschicht in een gelijkzijdige driehoek is bedoeld om de gebruiker te waarschuwen voor de
aanwezigheid van gevaarlijke spanning binnen in het apparaat.
Om het risico op elektrische schokken te reduceren, dient het apparaat niet te worden geopend. Het
apparaat bevat geen onderdelen die gerepareerd kunnen worden door de gebruiker. In het geval van
een defect dient contact opgenomen te worden met een gekwalificeerde technicus voor de reparatie.
Dit apparaat is ontworpen om te werken op 100-240V, 60/50Hz. Als het apparaat voor een langere
tijd niet gebruikt gaat worden, dient de stekker uit het stopcontact te worden gehaald.
Stel het apparaat niet bloot aan regen of vocht.
Gebruik het apparaat uitsluitend nadat is gecontroleerd dat alle aansluitingen correct zijn uitgevoerd.
Plaats het apparaat op een voldoende geventileerde plek. Plaats het apparaat niet in de buurt van
gordijnen, op het tapijt of in in een stuk meubilair, zoals bijvoorbeeld een boekenkast.
Stel het apparaat niet bloot aan direct zonlicht of aan warmtebronnen.
Page 16

13 Čeština
ROZMÍSTĚNÍ OVLÁDÁNÍ
1. AUX-IN
2. VSTUP KYTARA
3. MIKROFONNÍ VSTUP
4. USB NABÍJEČKA
5. LCD-DISPLAY
6. USB VSTUP
7. TLAČÍTKO FUNKCE
8. SKIP-
9. PLAY/PAUSE
10. SKIP+
11. ON/OFF
12. OBJEM KYTARA
13. HLASITOST MIKROFONU
14. ÚČTOVAT VEDLO
15. ECHO REGULÁTOR
16. REGULÁTOR BASŮ
17. FREKVENCE EKVALIZÉR
18. VÝŠEK REGULÁTOR
19. HLAVNÍ OBJEM
20. MIKROFON ON/OFF
NAPÁJENÍ
Tento přístroj je určen pro síť 100-240V, 60/50Hz. Připojte napájecí kabel k elektrické zásuvce. Ensure that the voltage
is as indicated on the rating plate on the rear of the unit.Ujistěte se, že napětí je stejné, jak je uvedeno na typovém štítku
na zadní straně přístroje.
Pro zapnutí přístroje přepněte přepínač ON/OFF PŘEPÍNAČ (11) do pozice ON. Pro vypnutí přístroje přepněte přepínač
ON/OFF PŘEPÍNAČ (11) do pozice OFF.
Pokud není přehrávána žádná hudba, zařízení se automaticky po 15ti minutách vypne.
Pro opětovné přehrávání stiskněte opět PLAY/PAUSE (9).
PROVOZ Z BATERIÍ
Tato jednotka poskytuje Lead nabíjecí baterii. Připojte výrobek k hlavnímu proudu, aby se baterie dobila.
Účtovat vedl explaination:
LED červená: baterie se nabíjí.
LED Zelená: baterie zcela nabita.
LED bliká ČERVENÁ: nízký stav baterie, je třeba nabít.
OVLÁDÁNÍ HLASITOSTI
Otočte Hlavní objem (19) pro regulaci hlasitosti.
Ekvalizér nastavujete prostřednictvím ECHO (15), bass (16) a výšek (18).
Chcete-li přesnější ekvalizér využívání kmitočtů ekvalizéru (17) regulovat každou frekvenci samostatně.
PŘEHRÁVÁNÍ Z USB
1. Vložte konektor USB zařízení do portu USB (6).
2. Opakovaným stiskem tlačítka TLAČÍTKO FUNKCE (7) zvolte režim USB. Na displeji se zobrazí "USB".
3. Přístroj automaticky jednotku načte ihned po zapojení.
Pro výběr své oblíbené melodie stiskněte tlačítka SKIP -/+ (8/10). Pokud držíte tlačítko SKIP -/+ (8/10) , přehrávaná
skladba se rychle přetočí zpět či vpřed, dokud opět tlačítko nepustíte.
Pro pozastavení přehrávání stiskněte PLAY/PAUSE (9). Číslo stopy začne blikat. Pro obnovení přehrávání stiskněte
PLAY/PAUSE (9).
Důležité: Všimněte si, že USB (4) je určena pro nabíjení 5V / 1A zařízení, ne pro přehrávání.
AUX VSTUP
Do přístroje lze pomocí audio vstupu zapojit externí zařízení, jako jsouMP3 přehrávače, CD přehrávače.
1. Umožňuje přehrávání externího zdroje prostřednictvím systému reproduktorů. Použijte audio kabel (není součástí
dodávky) s 3,5mm stereo zástrčkou na jednom konci kabelu. Zapojte jeden konec do zdířky AUX-IN na hlavní
jednotce a druhý konec kabelu do LINE OUT nebo konektoru sluchátek externího audio zařízení.
2. Zapněte přístroj a externí audio zařízení. Stisknutím AUX (13) zvolte funkci AUX. Na displeji se zobrazí "AUX" .
3. Spusťte přehrávání externího zařízení (viz uživatelská příručka externího zařízení).
Page 17

14 Čeština
BLUETOOTH
1. Stisknutím BT (9) vyberte BLUETOOTH funkci. Na displeji se zobrazí “BT”.
2. Na vašem přenosném zařízení(chytrý telefon, tablet…) vyberte DJ-880BT, potvrďte připojení.
3. Je-li párování úspěšné, LED přestane blikat.
4. Nyní můžete přenést hudbu do DJ-880BT. Veškeré operace lze ovládat pouze z mobilního zařízení.
MIKROFON A KYTARA
1. Tato jednotka poskytuje 3x 6,35mm Patice pro spojovací mikrofony (3) a kytary (2).
2. Připojte mikrofon nebo kytaru a regulovat jejich hlasitost pomocí (12) nebo (13).
3. Tyto vstupy jsou vždy a mohou být použity pro přehrávání kytary nebo microphons při použití BT / AUX / USB.
DISCO-LIGHT
1. Stiskněte a podržte tlačítko FUNCTION tlačítko (7) volit mezi 8 různých světelných efektů.
2. Stiskněte, až uvidíte OFF na displeji, aby zavřel světelný efekt vypnout.
TECHNICKÉ ÚDAJE
AC: 100-240V, 60/50Hz
Battery: 12V - 7,2A
Max Music Power: 800W
Změny designu a technických údajů vyhrazeny bez předchozího oznámení.
Tento symbol na výrobku, jeho příslušenství nebo obalu označuje, že při pozdější likvidaci výrobku (z
jakýchkoliv důvodů) nesmí být s výrobkem zacházeno jako s domovním odpadem. Výrobek zlikvidujte
jeho předáním na sběrné místo pro likvidaci použitých elektrických a elektronických zařízení šetrnou
k životnímu prostředí. Zajištěním jejich správné likvidace zabráníte vzniku potenciálních rizik pro životní
prostředí a lidské zdraví, která by mohla vzniknout nesprávným zacházením s odpady. Kromě toho recyklace odpadových materiálů napomáhá udržení přírodních zdrojů surovin pro příští generace. Podrobné informace k likvidaci tohoto výrobku šetrné k životnímu prostředí získáte u pracovníka ochrany
životního prostředí místního (městského nebo obvodního) úřadu nebo v prodejně, ve které jste výrobek
zakoupili.
POKYNY PRO SPRÁVNOU LIKVIDACI VÝROBKU
(likvidaci použitých elektrických a elektronických zařízení)
UPOZORNĚNÍ
Vykřičník uvnitř trojúhelníka na zadní straně skříňky přístroje upozorňuje uživatele na důležité pokyny pro obsluhu a
ošetřování přístroje, uvedené v jeho doprovodné dokumentaci. čeština
Symbol blesku uvnitř trojúhelníka na zadní straně skříňky přístroje upozorňuje uživatele na existenci životu nebezpečného napětí na některých dílech uvnitř skříňky přístroje.
Nevyjímejte přístroj ze skříňky – riziko úrazu elektrickým proudem. Uvnitř skříňky nejsou díly, které by mohl opravit
nebo seřídit jeho uživatel bez odpovídajícího vybavení a kvalifikace. Bude-li přístroj vyžadovat seřízení nebo opravu kontaktujte odborný servis. Zásahem do přístroje v době platnosti záruky se vystavujete riziku ztráty event.
záručních plnění.
Přístroj je konstruován pro napájení střídavým napětím 100-240V, 60/50Hz z elektrické sítě. Pokud nebudete
přístroj delší dobu používat odpojte jej od elektrické sítě vyjmutím vidlice síťového kabelu přístroje ze síťové
zásuvky.
Chraňte přístroj před zmoknutím, postříkáním nebo politím jakoukoliv kapalinou.
Vypnutím přístroje není přístroj odpojen od elektrické sítě. Pro odpojení přístroje od elektrické sítě vyjměte vidlici
síťového kabelu přístroje ze síťové zásuvky. Před zapnutím přístroje překontrolujte všechna připojení k přístroji.
Okolo přístroje ponechejte na všech stranách dostatečný volný prostor, nutný pro cirkulaci vzduchu okolo přístroje.
Je tak odváděno teplo vznikající během jeho provozu.
Neumísťujte přístroj na přímém slunci nebo v blízkosti zdrojů tepla. Vysokými teplotami je významně zkracována
životnost elektronických dílů přístroje.
Page 18

15 Slovenský
ROZMIESTNENIE OVLÁDANIA
1. AUX-IN
2. VSTUP GITARA
3. MIKROFÓNNY VSTUP
4. USB NABÍJAČKA
5. LCD-DISPLAY
6. USB VSTUP
7. TLAČIDLO FUNKCIE
8. SKIP-
9. PLAY/PAUSE
10. SKIP+
11. ON/OFF
12. OBJEM GITARA
13. HLASITOSŤ MIKROFÓNU
14. ÚČTOVAŤ VIEDLO
15. ECHO REGULÁTOR
16. REGULÁTOR BASOV
17. FREKVENCIA EKVALIZÉR
18. VÝŠOK REGULÁTOR
19. HLAVNÝ OBJEM
20. MIKROFÓN
NAPÁJANIE
Tento prístroj je určený pre sieť 100-240V, 60/50Hz. Pripojte napájací kábel k elektrickej zásuvke. Ensure that the voltage
is as indicated on the rating plate on the rear of the unit.Ujistěte sa, že napätie je rovnaké, ako je uvedené na štítku na zadnej strane prístroja.
Pre zapnutie prístroja prepnite prepínač ON / OFF PREPÍNAČ (11) do pozície ON. Pre vypnutie prístroja prepnite prepínač
ON / OFF PREPÍNAČ (11) do pozície OFF.
Pokiaľ nie je prehrávaná žiadna hudba, zariadenie sa automaticky po 15tich minútach vypne.
Pre opätovné prehrávania stlačte opäť PLAY/PAUSE (9).
PREVÁDZKA Z BATÉRIÍ
Táto jednotka poskytuje Lead nabíjaciu batériu. Pripojte výrobok k hlavnému prúdu, aby sa batéria dobila.
Účtovať viedol explaination:
LED červená: batéria sa nabíja.
LED Zelená: batéria úplne nabitá.
LED bliká ČERVENÁ: nízky stav batérie, treba nabiť.
VOLUME CONTROL
Otočte Hlavný objem (19) pre reguláciu hlasitosti.
Ekvalizér nastavujete prostredníctvom ECHO (15), bass (16) a výšok (18).
Ak chcete presnejšie ekvalizér využívanie frekvencií ekvalizéra (17) regulovať každú frekvenciu samostatne.
PREHRÁVANIE Z USB
1. Vložte konektor USB zariadenia do portu USB (6).
2. Stláčaním TLAČIDLO FUNKCIE (7) zvoľte režim USB. Na displeji sa zobrazí "USB".
3. Prístroj automaticky jednotku načíta ihneď po zapojení.
Pre výber svoje obľúbené melódie stlačte tlačidlá SKIP -/+ (8/10). Ak držíte tlačidlo SKIP -/+ (8/10) , prehrávaná skladba
sa rýchlo pretočí späť či vpred, kým opäť tlačidlo nepustíte.
Pre pozastavenie prehrávania stlačte PLAY/PAUSE (9). Číslo stopy začne blikať. Pre obnovenie prehrávania stlačte
PLAY/PAUSE (9).
Dôležité: Všimnite si, že USB (4) je určená pre nabíjanie 5V / 1A zariadenie, nie pre prehrávanie.
AUX VSTUP
Do prístroja možno pomocou audio vstupu zapojiť externé zariadenia, ako jsouMP3 prehrávače, CD prehrávače.
1. Umožňuje prehrávanie externého zdroja prostredníctvom systému reproduktorov. Použite audio kábel (nie je
súčasťou dodávky) s 3,5mm stereo zástrčkou na jednom konci kábla. Zapojte jeden koniec do zásuvky AUX-IN na
hlavnej jednotke a druhý koniec kábla do LINE OUT alebo konektoru slúchadiel externého audio zariadenia.
2. Zapnite prístroj a externé audio zariadenia. Stlačením AUX (13) zvoľte funkciu AUX. Na displeji sa zobrazí "AUX".
3. Spustite prehrávanie externého zariadenia (pozrite si návod externého zariadenia).
Page 19

16 Slovenský
BLUETOOTH
1. Stlačením BT (9) vyberte BLUETOOTH funkciu. Na displeji sa zobrazí "BT".
2. Na vašom prenosnom zariadení (chytrý telefón, tablet ...) vyberte DJ-880BT, potvrďte pripojenie.
3. Ak je párovanie úspešné, LED prestane blikať.
4. Teraz môžete preniesť hudbu do DJ-880BT. Všetky operácie možno ovládať iba z mobilného zariadenia.
ZMAZANIE USB
1. Stlačte a držte počas prehrávania REC (18) (4 . "DEL" will be shown on the display.
2. Stlačte SKIP -/+ (8/10) opakovane pre výber ONE/FOLDER/ALL.
3. Pre potvrdenie stlačte REC (18) (4 znova.
MIKROFÓN A GITARA
1. Táto jednotka poskytuje 3x 6,35mm Pätica pre spojovacie mikrofóny (3) a gitary (2).
2. Pripojte mikrofón alebo gitaru a regulovať ich hlasitosť pomocou (12) alebo (13).
3. Tieto vstupy sú vždy a môžu byť použité pre prehrávanie gitary alebo microphons pri použití BT / AUX / USB.
DISCO-LIGHT
1. Stlačte a podržte tlačidlo FUNCTION tlačidlo (7) voliť medzi 8 rôznych svetelných efektov.
2. Stlačte, až uvidíte OFF na displeji, aby zavrel svetelný efekt vypnúť.
TECHNICKÉ ÚDAJE
AC: 100-240V, 60/50Hz
Battery: 12V - 7,2A
Zmeny dizajnu a technických údajov vyhradené bez predchádzajúceho oznámenia.
Tento symbol na výrobku, jeho príslušenstve alebo obale označuje, že pri naskoršej likvidácii výrobku (z
akýchkoľvek dôvodov) nesmie byť s výrobkom zachádzané ako s domácim odpadom. Výrobok zlikvidujte
jeho odovzdaním na zberné miesto pre likvidáciu použitých elektrických a elektronických zariadení šetrnú
k životnému prostrediu. Zaistením ich správnej likvidácie zabránite vzniku potenciálnych rizík pre životné
prostredie a ľudské zdravie, ktorá by mohla vzniknúť nesprávnym zachádzaním s odpadmi. Okrem toho
recyklácia odpadových materiálov napomáha udržaniu prírodných zdrojov surovín pre budúce generácie.
Podrobné informácie k likvidácii tohto výrobku šetrné k životnému prostrediu získate u pracovníka ochrany životného prostredia miestneho (mestského alebo obvodného) úradu alebo v predajni, v ktorej ste
výrobok zakúpili.
POKYNY PRE SPRÁVNU LIKVIDÁCIU VÝROBKU
(likvidácii použitých elektrických a elektronických zariadení)
OPOZORILO
Výkričník vo vnútri trojuholníka na skrinke prístroja upozorňuje užívateľa na existenciu dôležitých pokynov pre jeho obsluhu uvedených v návode.
Symbol blesku vo vnútri trojuholníka upozorňuje užívateľa na nebezpečné napätie na niektorých dieloch vo vnútri skrinky prístroja.
Nevyberajte prístroj zo skrinky - riziko úrazu elektrickým prúdom. Vo vnútri skrinky prístroja nie sú diely ktoré by mohol opraviť alebo nastaviť jeho užívateľ bez zodpovedajúceho vybavenia a kvalifikácie.
Ak bude prístroj vyžadovať nastavenie alebo opravu kontaktujte odborný servis. Zásahom do prístroja
v dobe platnosti záruky sa vystavujete riziku straty príp. záručných plnení.
Chráňte prístroj pred zmoknutím, postriekaním alebo poliatím akoukoľvek kvapalinou - riziko úrazu
lektrickým prúdom. Nepoužívajte prístroj mimo miestnosti.
Pre odpojenie prístroja od elektrickej siete vyberte vidlicu sieťového kábla prístroja zo sieťovej
zásuvky.
Prístroj umiestenie na dobre vetranom mieste. Nezakrývajte vetracie otvory skrinky prístroja - riziko
jeho prehriatia a poškodenia.
Chráňte prístroj pred priamym slnkom, neumiestňujte prístroj v blízkosti zdrojov tepla. Vysokými teplotami je výrazne skracovaná životnosť elektronických komponentov prístroja.
Page 20

is a registered Trademark of Roadstar S.A. - Switzerland. All rights reserved.
Roadstar Management SA, via Passeggiata 7 CH 6883 Novazzano (Switzerland)
VER.1
 Loading...