

Page 1
SERVICE INSTRUCTIONS
ice
shaver
FRRVSC500-B
®
1. Do NOT attempt to repair or adjust any electrical or mechanical functions on this unit. Doing so will void the
War rant y.
2. If you need to exchange the unit, please return it in its original carton, with a sales receipt, to the store where
you purchased it. I f you are retur ning the unit more th an 30 days af ter the date o f purchase, please see t he
enclo sed Warran ty.
3. If you have any questions or comments regarding this unit’s operation or believe any repair is necessary,
please cal l our Consumer S ervice Depar tment at 1-800-557-4825 or visit our websi te at
www.rivalproducts.com.
Sunbeam Products, Inc. doing business as Jarden Consumer Solutions or if in Canada, Sunbeam Corporation
(Canada) Limited doing business as Jarden Consumer Solutions (collectively “JCS”) warrants that for a period
of one year from the date of purchase, this product will be free from defects in material and workmanship. JCS,
at its option, will repair or replace this product or any component of the product found to be defective during the
warr anty peri od. Replacement w ill be made wi th a new or remanufactured product or c omponent. If the pr oduct
is no longer available, replacement may be made with a similar product of equal or greater value. This is your
exclusive warranty. Do NOT attempt to repair or adjust any electrical or mechanical functions on this product.
Doing s o will void thi s warrant y.
This warranty is valid for the original retail purchaser from the date of initial retail purchase and is not
transferable. Keep the original sales receipt. Proof of purchase is required to obtain warranty performance. JCS
dealers, service centers, or retail stores selling JCS products do not have the right to alter, modify or any way
change the terms an d conditions of thi s warrant y.
This warranty does not cover normal wear of par ts or damage resulting from any of the following: negligent
use or misuse of the product, use on improper voltage or current, use contrary to the operating instructions,
disassembly, repair or alteration by anyone other than JCS or an authorized JCS service center. Further, the
warr anty does n ot cover: Ac ts of God, such as fire, fl ood, hurricanes and tor nadoes.
What are the limits on JCS’s Liability?
JCS shall not be liable for any incidental or consequential damages caused by the breach of any express, implied
or sta tutory wa rranty or condi tion.
Except to the extent prohibited by applicable law, any implied warranty or condition of merchantability or fitness
for a par ticular purpos e is limited in durat ion to the duration o f the above warran ty.
JCS disclaims all other warrantie s, conditions or re presentations, exp ress, impli ed, statu tory or otherwi se.
JCS shall not be liable for any damages of any kind resulting from the purchase, use or misuse of, or inabilit y
to use the product including incidental, special, consequential or similar damages or loss of profits, or for any
breach of contract, fu ndamenta l or otherwise, or f or any claim br ought against pur chaser by an y other party.
Some provinces, states or jurisdictions do not allow the exclusion or limitation of incidental or consequential
damages or limita tions on how lo ng an implied w arranty last s, so the above limit ations or exclusion may no t
apply to you.
This warra nty gives you spec ific legal right s, and you may al so have other rights that var y from provin ce to
province, s tate to state or jurisdiction to jurisdiction.
How to Obtain Warranty Service
In the U.S .A.
f you have any que stion regarding this warranty or would like to ob tain warranty service, plea se call 1-800-557-482 5
I
and a convenient service cen ter address will be provided to you.
In Cana da
If you have any qu estion regarding this warrant y or would like to o btain warr anty ser vice, ple ase call 1-80 0-557-48 25
and a convenient service cen ter address will be provided to you.
In the U.S.A., this warranty is offered by Sunbeam Products, Inc. doing business as Jarden Consumer Solutions
located in Boca Raton, Florida 33431. In Canada, this warranty is offered by Sunbeam Corpor ation (Canada)
Limited doing busi ness as Jard en Consumer S olutions, located at 20 B Here ford Stree t, Brampton, Ont ario L6Y
0M1. If you have any other problem or claim in connection with this product, please write our Consumer Ser vice
Department.
PLEASE DO NOT RETURN THIS PRODUCT TO AN Y OF THESE ADDR ESSES OR TO TH E PLACE OF PURCHASE.
© 2009 Sunbeam Products, Inc. d oing business as Ja rden Consum er Solution s. All rights reserved. Dis tributed
by Sunbeam Products, Inc . doing business as J arden Consumer Solutions, Bo ca Raton, Fl orida 334 31.
1 YEAR LIMITED WARRANTY
Printed in China P.N. 137043
Page 2
IMPORTANT SAFEGUARDS
When using electrical appliances, basic safety precautions
should always be followed, including the following:
1. Read all instructions.
2. To protect against risk of electrical shock, do not immerse cord,
plug or motor unit in water or other liquid.
3. Close supervision is necessary when any appliance is used near
children.
4. Unplug from outlet when not in use, before putting on or taking
off parts and before cleaning.
5. Avoid contact with moving parts.
6. Do not operate any appliance with damaged cord or plug or after
the appliance malfunctions, or is dropped or damaged in any
manner. Contact Rival Customer Service (see warranty) to return
for examination, repair or electrical or mechanical adjustment.
7. The use of attachments not recommended by the manufacturer
may cause re, electric shock or injury.
8. Do not use outdoors.
9. Do not let cord hang over edge of table or counter, or contact
hot surface, including the stove.
10. Never place ngers or other utensils into feed or discharge areas.
11. Check ice chopper for presence of foreign objects before using.
12. Blades are sharp. Handle carefully.
13. Be certain COVER is securely locked in place before operating
appliance. Do not attempt to defeat the COVER interlock
mechanism.
14. Do not use extension cord.
POLARIZED PLUG
This appliance has a polarized plug (one blade is wider than the other). To
reduce the risk of electric shock, this plug is intended to t into a polarized
outlet only one way. If the plug does not t fully into the outlet, reverse the
plug. If it still does not t, contact a qualied electrician.
Do not attempt to modify the plug in any way. If the plug ts loosely into the
AC outlet or if the AC outlet feels warm do not use that outlet.
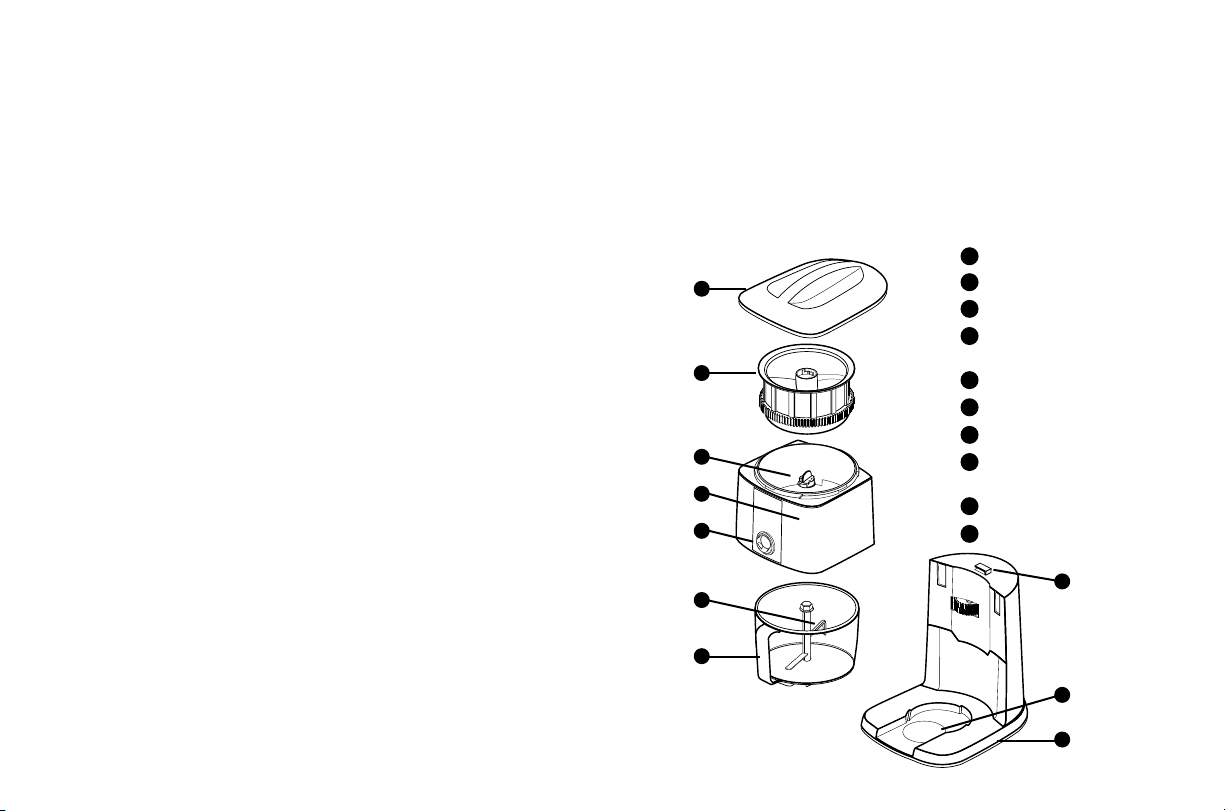
Know Your Ice Shaver
PRODUCT MAY VARY SLIGHTLY FROM ILLUSTRATIONS
a
Lid
b
a
b
c
d
e
f
Ice Shaving Chamber
c
Shaft
d
Front Housing with
Shaving Blade
e
Selector Knob
f
Mixing Paddle
g
Bowl
Interlock Switch
h
(Power Start/Stop)
i
Cup Guide
j
Base
h
SAVE THESE INSTRUCTIONS
This appliance is for HOUSEHOLD USE ONLY. No user-serviceable
parts inside. Power unit never needs lubrication. Do not attempt to
service this product. Do not immerse in water or other liquid. Any
servicing should be performed by an authorized service representative.
2 3
g
i
j
Page 3
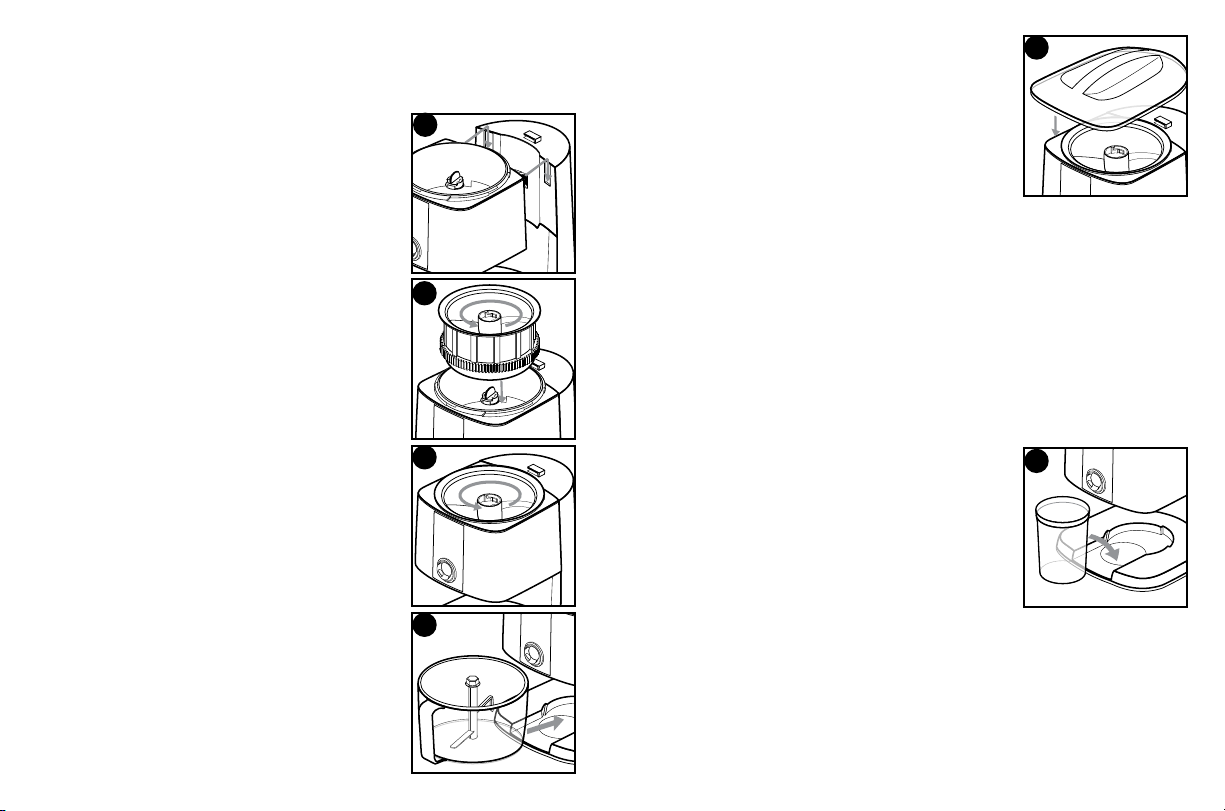
HOW TO OPERATE
1. Make sure the unit is unplugged. Place Base on clean, dry surface.
2. Hook Front Housing onto Base. (Figure 1)
3. Place Ice Shaving Chamber in Front Housing
and ensure it is seated on the shaft. (Figure 2)
4. Twist the shaft in direction of arrow to lock into
position. (Figure 3)
5. Place the Mixing Paddle in Bowl.
6. If mixing shaved ice with other ingredients,
place ingredients in bowl.
NOTE: Use serving size markings as a guide
for appropriate ice and liquid levels. For a large
or small serving, ll the ice and liquid to the level
indicated on the bowl.
7. Slide Bowl into groove on Base and turn
clockwise until it stops. This will allow the
Mixing Paddle to mix ice and ingredients
once operation begins. (Figure 4)
NOTE: The Cup Guide on base may be used to
shave ice into another bowl or cup other then the
bowl supplied.
8. Turn selector knob to desired setting. Slushie
setting produces ner ice. Snow Cone setting
produces coarser ice.
9. Place ice in Ice shaving Chamber. Do not ll
above top rim of Ice Shaving Chamber.
10. Plug cord into outlet.
1
2
3
4
11. Place Lid on Front Housing and turn clockwise
to engage the interlock switch (Power Start/
Stop). The unit will start and begin to shave
ice. (Figure 5)
NOTE: It may be necessary to open Lid
occasionally to redistribute ice.
WARNING
Cut Hazard
• AvoidcontactwithShavingBlade.
• DonotuseifShavingBladeisloose,cracked,bentordamaged.
12. Turn Lid counterclockwise to stop. Do not shave ice above top ice line.
13. To remove Bowl, turn counterclockwise, slide out and serve.
PREPARING ICY DRINKS OR SNOW CONES USING A SEPARATE
CONE OR CUP
NOTE: Make sure the unit is unplugged.
1. Select the desired ice setting. The Slushie setting produces ne ice
and Snow Cone setting produces coarse ice.
2. Add ice into the Ice Shaving Compartment.
3. Place cup or cone within the markings on the
Base. (Figure 6)
4. Plug cord into outlet
5. Place Lid on front housing and turn clockwise
to engage the interlock switch (power start/
stop) The unit will start and begin to shave ice.
NOTE: Open Lid and redistribute ice as needed.
6. Once the ice shaving has completed, turn lid
counter clockwise to stop. Slide out cone or cup and enjoy.
CAUTION: Do not allow children to operate this appliance. The Ice
Shaver is for household use only. Do not attempt to sharpen the Blade.
5
6
4 5
Page 4

HOW TO CLEAN YOUR ICE SHAVER
CAUTION: The Blade is very sharp. Never attempt
to touch the tip of the Blade when operating,
assembling, disassembling or cleaning.
1. Make sure the unit is unplugged.
2. Remove the Bowl and Mixing Paddle.
3. Remove the Lid and then the Front Housing from
the Base by simply sliding up. (Figure 1)
3. Remove the Ice Shaving Chamber. (Figure 2)
4. Wash all removable parts in hot, soapy
water or on the top rack of the dishwasher.
5. Once all parts are dry, reassemble by reversing
steps 1-3 above.
CAUTION: Do not immerse motor unit in water.
QUESTIONS? Please contact us at
www.rivalproducts.com or at 1-800-557-4825.
1
2
FUN AND EASY TREATS
Snow Cones
Rival™ Snow Cone Syrup
Ice
Shave ice on the Snow Cone setting into a snow cone cup and top with your
favorite Rival
Rainbow Slushie
4 oz of Rival™ Blue Raspberry Syrup 4 oz of Rival™ Cherry Syrup
Ice
Place Blue Raspberry Syrup in included Bowl with Mixing Paddles and slide
into Base. Shave ice on the Slushie setting and pour into glasses, leaving
approximately 3” empty. Rinse Bowl and Mixing Paddles.
Place Cherry Syrup in the included Bowl, repeat the steps above and serve.
™
Syrup.
6 7
Berry Slushie
1 cup of frozen strawberries 3 oz of Rival™ Blue
1 cup of frozen blueberries Raspberry Syrup (or fruit juice)
Ice
Place Blue Raspberry Syrup in included Bowl with Mixing Paddles and slide into
Base. Shave berries and ice on the Slushie setting and serve.
Soft Drink Slushie
8 ounces of your favorite soft drink Ice
Place soft drink in included Bowl with Mixing Paddles and slide into Base. Shave
ice on the Slushie setting and serve.
Cappuccino Slushie
1 cup cold coffee ½ cup milk
2 to 3 tablespoons sugar Ice
Place coffee, sugar and milk in Included Bowl with Mixing Paddles and slide into
Base. Shave ice on the Slushie setting and serve.
Morning Mocha Smoothie
½ cup milk 2 Tbsp. chocolate syrup
1 cup low-fat coffee yogurt Ice
Place milk, yogurt and chocolate syrup in Included Bowl with Mixing Paddles and
slide into Base. Shave ice on the Slushie setting and serve.
Pina Colada
1 cup pineapple juice ⅔ cup cream of coconut
6 ounces golden rum Ice
1 tsp. lemon juice
Garnish (optional): Pineapple slices, maraschino cherries.
Place pineapple juice, golden rum, cream of coconut and lemon juice in Included
Bowl with Mixing Paddles and slide into Base. Shave ice on the Slushie setting,
garnish if desired and serve.
Frozen Margarita
4 ounces gold tequila 2 Tbsp fresh lime juice
2 ounces orange and cognac liqueur ¼ cup sugar
Ice
Place tequila, orange and cognac liqueur, lime juice and sugar in Included
Bowl with Mixing Paddles and slide into Base. Shave ice on the Slushie setting
and serve.
Page 5

INDICACIONES DE SEGURIDAD
IMPORTANTES
Cuando use aparatos eléctricos, debe seguir una serie de
precauciones básicas de seguridad, entre ellas:
1. Lea todas las instrucciones.
2. Para evitar descargas eléctricas, no sumerja el cable, el enchufe o el
motor de la unidad en agua ni otros líquidos.
3. Mantenga una vigilancia estrecha de la unidad cuando se use cerca de
niños.
4. Desconéctela del tomacorriente cuando no esté en uso, antes de montar
o desmontar piezas y antes de limpiarla.
5. Evite el contacto con partes en movimiento.
6. No opere ningún aparato que tenga el cable o el enchufe dañados,
cuando funcione mal, se haya caído o recibido cualquier tipo de daño.
Contacte a Servicio al Cliente de Rival (consulte la garantía) para regresar
la unidad para su revisión, reparación o ajuste mecánico o eléctrico.
7. El uso de accesorios no recomendados por el fabricante puede ocasionar
incendios, descargas eléctricas o lesiones.
8. No lo use en exteriores.
9. No deje el cable colgando de la mesa o el mostrador, ni que toque
supercies calientes, incluyendo la estufa.
10. Nunca ponga los dedos ni utensilios en las áreas de carga o descarga.
11. Revise que el raspador de hielo no tenga objetos extraños antes de
usarlo.
12. Las hojas son losas. Manéjelas con cuidado.
13. Compruebe que la CUBIERTA esté bien asegurada en su sitio antes
de usar el aparato. No intente forzar el mecanismo de cierre de la
CUBIERTA.
14. No use un cable de extensión.
ENCHUFE POLARIZADO
Este aparato tiene un enchufe polarizado (una pata es más ancha que la otra).
Para reducir el riesgo de descarga eléctrica, este enchufe está diseñado para
ajustarse sólo de una forma en un tomacorriente polarizado. Si el enchufe no se
ajusta completamente en el tomacorriente, dé vuelta al enchufe. Si todavía no
se ajusta, contacte a un electricista calicado. No intente modicar el enchufe
de ninguna manera. Si el enchufe está ojo en el tomacorriente de CA o si el
tomacorriente se siente caliente, no utilice este tomacorriente.
CONOZCA SU RASPADOR DE HIELO
EL PRODUCTO PUEDE SER UN POCO DIFERENTE
A LAS ILUSTRACIONES
Tapa
a
b
c
d
e
f
h
a
Cámara de raspado de hielo
b
Eje
c
Cubierta protectora frontal
d
con hoja raspadora
e
Perilla de selección
Pala mezcladora
f
g
Tazón
Interruptor intermitente
h
(Encendido/Apagado)
Guía para el tazón
i
Base
j
GUARDE ESTE INSTRUCTIVO
Este aparato está diseñado SÓLO PARA USO DOMÉSTICO. En el interior
no hay piezas a las que el usuario les pueda dar mantenimiento. El motor
de la unidad no necesita lubricación. No intente dar mantenimiento ni
reparar este producto. No lo sumerja en agua ni en otros líquidos. Todo
trabajo de mantenimiento deberá realizarlo un representante autorizado.
8 9
g
i
j
Page 6

CÓMO OPERARLA
1. C o mpruebe que la unidad esté desconectada. Coloque la base en una
supercie limpia y seca.
2. Coloque la cubierta protectora frontal en la base
(Figura 1).
3. Ponga la cámara de raspado en la cubierta
protectora frontal y compruebe que se asiente en
el eje (Figura 2).
4. Gire el eje en la dirección que indica la echa
para jarlo en su posición (Figura 3).
5. Monte la pala mezcladora en el tazón.
6. Si mezcla el hielo picado con otros ingredientes,
coloque los ingredientes en el recipiente.
NOTA: Use las marcas de tamaño de porción como
referencia del nivel correcto de hielo y líquido. Llene
con hielo y líquido hasta el nivel correspondiente
(porción grande o pequeña) en el tazón.
7. Deslice el tazón en la ranura ubicada en la
base y gire en dirección de las manecillas del
reloj hasta que pare. Esto permitirá que la pala
mezcladora mezcle hielo y otros ingredientes
cuando se inicie la operación. (Figura 4)
NOTA: : La guía para el tazón en la base puede ser
usada para raspar hielo dentro de un tazón o bol
alterno al que se provee.
8. Gire la perilla de selección a la conguración
deseada. En la posición “Slushie" se produce
hielo más no. En la posición “Snow Cone” se
produce hielo más grueso.
9. Coloque el hielo en la cámara de raspado de
hielo. No llene con hielo por arriba del borde
superior de la cámara de raspado de hielo.
10. Enchufe el cable en el tomacorriente.
10 11
1
2
3
4
11. Coloque la tapa en la cubierta protectora frontal y
gire en dirección de las manecillas del reloj para
conectar el interruptor intermitente.(Encendido/
Apagado). La unidad empezará a raspar el hielo
(Figura 5).
NOTA:Puede ser necesario abrir la tapa de vez en
cuando para redistribuir el hielo.
ADVERTENCIA
Riesgo de cortaduras
• Notoquelahojaraspadora.
• Nouseelaparatosilahojaraspadoraestáoja,rota,dobladao
dañada.
12. Gire la tapa en sentido contrario a las manecillas del reloj para detenerla.
No raspe hielo por arriba de la línea superior de hielo.
13. Para quitar el tazón, gire en sentido contrario a las manecillas del reloj,
deslícelo y sirva.
PREPARACIÓN DE BEBIDAS CON HIELO O CONOS DE NIEVE CON UN
RECIPIENTE SEPARADO
NOTA: Compruebe que la unidad esté desconectada.
1. Seleccione la conguración deseada para el hielo. La posición “Slushie”
produce hielo no y “Snow Cone” produce hielo grueso.
2. Agregue hielo en la cámara de raspado de hielo.
3. Coloque la taza o el cono dentro de las marcas
en la base (Figura 6).
4. Enchufe el cable en el tomacorriente
5.
Coloque la tapa en la cubierta protectora frontal y
gire en dirección de las manecillas del reloj para
conectar el interruptor intermitente(Encendido/
Apagado). La unidad comenzará a raspar el hielo.
NOTA: Abra la tapa y redistribuya el hielo según sea
necesario.
6. Cuando haya nalizado el raspado de hielo, gire la tapa en sentido
contrario a las manecillas del reloj para detenerlo. Deslice el recipiente y
disfrute.
PRECAUCIÓN: No deje que los niños usen este aparato. El raspador de hielo
es sólo para uso doméstico. No intente alar la hoja.
5
6
Page 7

CÓMO LIMPIAR SU RASPADOR DE HIELO
PRECAUCIÓN: La hoja es muy losa. Nunca toque
la punta de la hoja mientras opere, ensamble,
desmonte o limpie el aparato.
1. Compruebe que la unidad esté desconectada.
2. Quite el tazón y la pala mezcladora.
3. Quite la tapa y luego la cubierta protectora frontal
de la base deslizándola (Figura 1).
4. Quite la cámara de raspado de hielo (Figura 2).
5. Limpie todas las partes desmontables con agua
jabonosa y caliente o en la parrilla superior del
lavavajillas.
6. Cuando las partes estén secas, vuelva a
montarlas repitiendo al revés los pasos 1 al 3.
PRECAUCIÓN: No sumerja el motor en agua.
¿PREGUNTAS? Contáctenos en
www.rivalproducts.com o al 1-800-557-4825.
1
2
RECETAS SENCILLAS Y DIVERTIDAS
Conos de nieve
Almíbar para cono de nieve Rival
Hielo
Raspe el hielo en la posición “Snow Cone” sobre un tazón para nieve y cúbralo
con su almíbar Rival
™
favorito.
“Slushie” arcoiris
4 oz de almíbar de frambuesa Rival
Hielo
Ponga el almíbar de frambuesa en el tazón con la pala mezcladora y
deslícelo sobre la base. Raspe el hielo en "Slushie" y sirva en vasos, dejando
aproximadamente 3 pulgadas sin llenar. Enjuague el tazón y la pala mezcladora.
Ponga el almíbar de cereza en el tazón, repita los pasos de arriba, y sirva.
™
™
4 oz de almíbar de cereza Rival
™
“Slushie” de fresas, frambuesas
1 taza de fresas congeladas 3 oz de azul Rival
1 taza de arándonos congelados
Almíbar de frambuesa (o jugo de fruta)
™
Hielo
Ponga el almíbar de frambuesa en el tazón con la pala mezcladora y deslícelo
sobre la base. Raspe las frutas y el hielo en la posición “Slushie” y sirva.
Bebida “slushie”
8 onzas de su refresco favorito Hielo
Ponga el refresco en el tazón con la pala mezcladora y deslícelo sobre la base.
Raspe el hielo en la posición “Slushie” y sirva.
“Slushie” capuchino
1 taza de café frío ½ taza de leche
2 a 3 cucharadas de azúcar Hielo
Ponga el café, el azúcar y la leche en el tazón con la pala mezcladora y deslícelo
sobre la base. Raspe el hielo en la posición “Slushie” y sirva.
“Smoothie” moka matinal
½ taza de leche 2 cucharadas de almíbar de chocolate
1 taza de yogurt de café bajo en grasa Hielo
Ponga la leche, el yogurt y el almíbar de chocolate en el tazón con la pala
mezcladora y deslícelo sobre la base. Raspe el hielo en la posición “Slushie” y sirva.
Piña colada
1 taza de jugo de piña ⅔ de taza de crema de coco
6 onzas de ron dorado Hielo
1 cucharada de jugo de limón
Decorado (opcional): Rebanadas de piña, cerezas al marrasquino.
Ponga el jugo de piña, el ron dorado, la crema de coco y el jugo de limón en el
tazón con la pala mezcladora y deslícelo en la base. Raspe el hielo en la posición
“Slushie”, decore y sirva.
Margarita congelada
4 onzas de tequila dorado 2 cucharadas de jugo de limón
2 onzas de coñac de naranja ¼ de taza de azúcar
Hielo
Ponga el tequila, el coñac y la naranja, el jugo de limón y el azúcar en el tazón
con la pala mezcladora y deslícelo en la base. Raspe el hielo en la posición
“Slushie” y sirva.
12
13
Page 8

INSTRUCCIONES DE SERVICIO
1. NO intente reparar o ajustar ninguna función eléctrica o mecánica de esta unidad. De hacerlo,
se invalidará la Garantía.
2. Si necesita cambiar la unidad, regrésela en su empaque original, con el recibo de compra, a la
tienda donde la adquirió. Si regresa la unidad más de 30 días después de la fecha de compra,
vea por favor la Garantía adjunta.
3. Si tiene alguna pregunta o comentario sobre la operación de esta unidad o cree que es
necesaria una reparación, llame por favor a nuestro Departamento de Servicio al Cliente al
1-800-557-4825 o visite nuestro website en www.rivalproducts.com.
GARANTÍA LIMITADA DE 1 AÑO
Sunbeam Products, Inc. operando bajo el nombre de Jarden Consumer Solutions, o en Canadá,
Sunbeam Corporation (Canada) Limited operando bajo el nombre de Jarden Consumer
Solutions, (en forma conjunta, “JCS”), garantiza que por un período de un año a partir de la
fecha de compra, este producto estará libre de defectos de materiales y mano de obra. JCS,
a su elección, reparará o reemplazará este producto o cualquier componente del mismo que
presente defectos durante el período de garantía. El reemplazo se realizará por un producto o
componente nuevo o reparado. Si el producto ya no estuviera disponible, se lo reemplazará por
un producto similar de valor igual o superior. Ésta es su garantía exclusiva. No intente reparar
o ajustar ninguna función eléctrica o mecánica de este producto. Al hacerlo elimínará ésta
garantía.
La garantía es válida para el comprador minorista original a partir de la fecha de compra inicial
y la misma no es transferible. Conserve el recibo de compra original. Para solicitar servicio en
garantía se requiere presentar un recibo de compra. Los agentes y centros de servicio de JCS
o las tiendas minoristas que venden productos de JCS no tienen derecho a alterar, modificar ni
cambiar de ningún otro modo los términos y las condiciones de esta garantía.
Esta garantía no cubre el desgaste normal de las piezas ni los daños que se produzcan como
resultado de uso negligente o mal uso del producto, uso de voltaje incorrecto o corriente
inapropiada, uso contrario a las instrucciones operativas, y desarme, reparación o alteración
por par te de un tercero ajeno a JCS o a un Centro de Servicio autorizado por JCS. Asimismo, la
garantía no cubre actos fortuitos tales como incendios, inundaciones, huracanes y tornados.
¿Cuál es el límite de responsabilidad de JCS?
JCS no será responsable de daños incidentales o emergentes causados por el incumplimiento
de alguna garantía o condición expresa, implícita o legal.
Excepto en la medida en que lo prohíba la ley aplicable, cualquier garantía o condición implícita
de comerciabilidad o aptitud para un fin determinado se limita, en cuanto a su duración, al plazo
de la garantía antes mencionada.
JCS queda exenta de toda otra garantías, condiciones o manifestaciones, expresa, implícita,
legal o de cualquier otra naturaleza.
JCS no será responsable de ningún tipo de daño que resulte de la compra, uso o mal uso
del producto, o por la imposibilidad de usar el producto, incluidos los daños incidentales,
especiales, emergentes o similares, o la pérdida de ganancias, ni de ningún incumplimiento
contractual, sea de una obligación esencial o de otra naturaleza, ni de ningún reclamo iniciado
contra el comprador por un tercero.
14
Algunas provincias, estados o jurisdicciones no permiten la exclusión o limitación de los daños
incidentales o emergentes ni las limitaciones a la duración de las garantías implícitas, de modo
que es posible que la exclusión o las limitaciones antes mencionadas no se apliquen en su caso.
Esta garantía le otorga derechos legales específicos y es posible que usted tenga otros derechos
que varían de un estado, provincia o jurisdicción a otro.
Cómo solicit ar el servicio en garantía
En los E st ados U nidos
Si tiene alguna pregunta sobre esta garantía o desea recibir servicio de garantía, llame al
1-800-334-0759 y podrá obtener la dirección del centro de servicio que le resulte más
conveniente.
En Can adá
Si tiene alguna pregunta sobre esta garantía o desea recibir servicio de garantía, llame al
1-800-667-8623 y podrá obtener la dirección del centro de servicio que le resulte más
conveniente.
En los Estados Unidos, esta garantía es ofrecida por Sunbeam Products, Inc. operando bajo el
nombre de Jarden Consumer Solutions, Boca Ratón, Florida 33431. En Canadá, esta garantía
es ofrecida por Sunbeam Corporation (Canada) Limited operando bajo el nombre de Jarden
Consumer Solutions, 20 B Hereford Street, Brampton, Ontario L6Y 0M1. Si usted tiene otro
problema o reclamo en conexión con este producto, por favor escriba al Departamento de
Servicio al Consumidor.
POR FAVOR NO DEVUELVA ESTE PRODUCTO A NINGUNA DE ESTAS DIRECCIONES NI AL LUGA R
DE COMPRA.
15
 Loading...