


GC8250-I/GC8250I04M1.qxd 6/16/04 11:28 Page 2
Holmes Products (Europe) Ltd
1 Francis Grove
London SW19 4DT
England
Fax: +44 (0)20 8947 8272
Email: info-europe@theholmesgroup.com Website address: www.theholmesgroup.com/europe
UK - Free phone Customer Service Helpline
– 0800 052 3615
Holmes Products France 1015, Rue du Maréchal Juin Z.I Vaux - Le - Pénil 77000 Melun – France Phone: +33 1 64 10 45 80 Fax: +33 1 64 10 02 32
FRANCE - SERVICE CONSOMMATEURS
 0 825 85 85 82
GC8250-I
SOFT SERVE
ICE CREAM
MAKER
Owner's Guide
GC8250-I/GC8250I04M1

GC8250-I/GC8250I04M1.qxd 6/16/04 11:28 Page 4
|
|
|
ENGLISH |
|
|
|
|
|
Please read this manual carefully before using this appliance, |
||
|
|
|
as correct use will give the best possible performance. |
||
|
|
|
Retain these instructions for future reference. |
||
|
|
|
|
|
|
|
|
|
IMPORTANT SAFEGUARDS |
|
|
English |
1 |
|
|
|
|
|
This appliance is for HOUSEHOLD USE ONLY. No user serviceable parts |
||||
|
|
|
inside. The motor never needs lubrication. Do not attempt to service this |
||
Deutsch/German |
14 |
|
product. |
||
|
|
|
Mains Connection |
||
Français/French |
26 |
|
• Read these instructions carefully, in conjunction with the illustrations, before |
||
|
|
|
using this appliance. |
||
|
|
|
• Before connecting this appliance, check that the voltage indicated on the |
||
|
|
|
rating plate (found on the underside of the appliance) corresponds to the |
||
|
|
|
mains voltage in your home. |
||
|
|
|
• Do not operate if the supply cord is damaged. It must be replaced by the |
||
|
|
|
manufacturer or its service agent. |
||
|
|
|
|
|
|
|
|
|
NOTE: During initial use of this appliance, some slight smoke and/or |
|
|
|
|
|
odour may be detected. This is normal with many appliances and |
|
|
|
|
|
will not recur after a few uses. |
|
|
|
|
|
Safe Positioning |
||
|
|
|
• DO NOT position where it can be touched by children, especially the very |
||
|
|
|
young. Close supervision is necessary when any appliance is used by or |
||
|
|
|
near children. |
||
|
|
|
• DO NOT position this appliance directly under an electrical socket. |
||
|
|
|
• DO NOT immerse the unit, cord or plug in water or other liquid. |
||
|
|
|
• DO NOT place the appliance on or near a hot gas or electric burner nor |
||
|
|
|
in a heated or microwave oven. |
||
|
|
|
• DO NOT allow the mains cord to overhang the edge of the counter or table. |
||
|
|
|
• DO NOT use harsh abrasives, caustic cleaners or oven cleaners when |
||
|
|
|
cleaning this appliance. |
||
|
|
|
• Always unplug the appliance from the electrical socket when not in use |
||
|
|
|
and before cleaning. |
||
|
|
|
• Do not use appliance for other than intended use. |
||
|
|
|
• Avoid contact with moving parts. Keep hands, hair, clothing, as well |
||
|
|
|
as spatulas and other utensils away during operation to reduce the |
||
1
GC8250-I/GC8250I04M1.qxd 6/16/04 11:28 Page 2
risk of injury to persons and or damage to the unit.
•Do not use sharp objects or utensils inside the Canister. Sharp objects will scratch and damage the inside of the Canister. A rubber spatula or wooden spoon may be used when the appliance is turned off.
Servicing
•Should the appliance stop working, first check the fuse in the plug (UK only) or fuse/circuit breaker at the distribution board to ensure it is operating, before contacting the manufacturer or service agent.
•If the supply cord or plug is damaged, it must be replaced by the manufacturer or its service agent or a similarly qualified person in order to
avoid hazard.
THIS APPLIANCE IS FOR HOUSEHOLD USE ONLY. DO NOT USE THE APPLIANCE FOR OTHER THAN THE INTENDED USE.
FITTING OF A PLUG - FOR U.K. AND IRELAND ONLY
If the plug is not suitable for the socket outlets in your home, it can be removed and replaced by a plug of the correct type. Please refer to "Installation of a plug" below.
Installation of a plug - Applicable to U.K. and Ireland
The wires in the mains lead are coloured as such:
BROWN |
- |
LIVE |
BLUE |
- |
NEUTRAL |
Please note that the colour of these mains wires may not correspond with the colour markings that identify the terminals in your plug. Please proceed as follows:
The BROWN coloured wire must be connected to the terminal, which is marked with the letter "L" or is coloured RED.
The BLUE coloured wire must be connected to the terminal, which is marked with the letter "N" or is coloured BLACK.
DO NOT CONNECT either of these wires to the earth terminal in the plug. The earth terminal plug is marked with the letter "E",
or with the earth symbol, or coloured GREEN, or GREEN and Yellow.
NOTE: If the terminals in the plug are not marked or if you are unsure or in doubt about the installation of the plug please contact a qualified electrician.
If a 13A 3-pin plug is fitted, it must be an ASTA approved plug, conforming to BS1363 standard. Replacement 3A fuses must be BSI or ASTA BS1362 approved.

 3 amp
3 amp
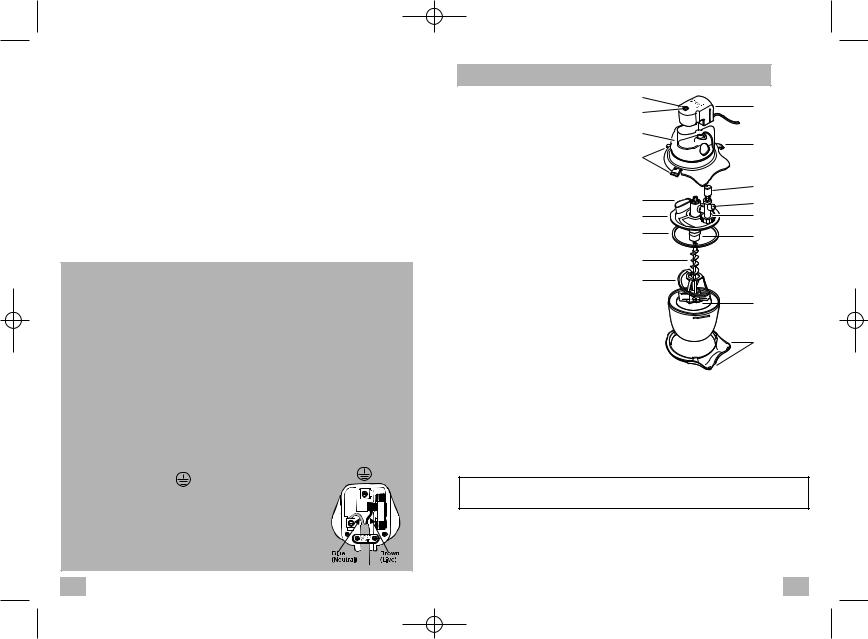
KNOW YOUR SOFT SERVE ICE CREAM MAKER
1. |
Locking Latch |
3 |
2 |
|
4 |
||||
2. |
Motor Housing |
|
||
|
|
|||
3. |
Indicator Light |
5 |
|
|
4. |
I (On)/0 (Off) Rocker Switch |
|
1 |
|
5. |
Top Cover |
6 |
|
|
6. |
Locking Latch |
|
||
|
|
|||
7. |
Mouth |
|
12 |
|
8. |
Canister Lid |
|
||
7 |
13 |
|||
9. |
Rubber Sealing Ring |
|||
8 |
14 |
|||
10. |
Dasher Assembly |
|||
11. |
Screw |
9 |
15 |
|
12. |
Dispensing Button |
|
|
|
13. |
Dispensing Opening |
11 |
|
|
14. |
Dispensing Valve |
10 |
|
|
15. |
Canister Lid Tube |
|
||
16. |
Canister |
|
16 |
|
17. |
Canister Collar |
|
||
|
|
|||
|
|
|
17 |
Before Use
1.Remove all packing materials and manual. Make sure to save manual.
2.Wash the Soft Serve Ice Cream Maker, except for the motor housing, in warm soapy water (see p. 7 - How to clean your soft serve ice-cream maker). Rinse and dry all parts thoroughly. The Rubber Sealing Ring will need to be thoroughly dried before assembling.
NOTE: Never immerse Motor Housing in water or any other liquids. Never wash the Canister in the dishwasher.
2 |
3 |
GC8250-I/GC8250I04M1.qxd 6/16/04 11:28 Page 4
HOW TO USE YOUR SOFT SERVE ICE CREAM MAKER
Freezing your Canister
NOTE:The Canister must be kept in the freezer for a minimum of 24 hours before each use.
1.Wash and dry Canister thoroughly prior to freezing.
2.For best results, wrap the Canister in a plastic bag and place upright in the back of your freezer.
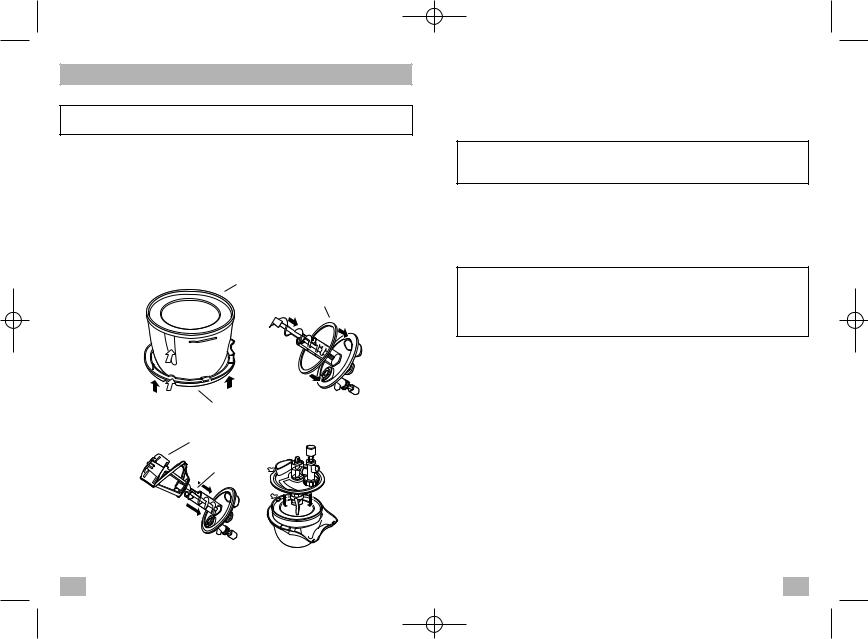
Assembling the Soft Server
1.Slide the Canister Collar upward onto the Canister until it locks. Make sure it is positioned correctly; follow the indentations on the
Canister. (Figure 1)
2.Fasten Rubber Sealing Ring securely on the underside of the Canister Lid. (Figure 2)
3.Insert the Screw into the Canister Lid Tube. (Figure 2)
Canister
Rubber
Sealing Ring
Figure 1 |
Canister |
Figure 2 |
|
Collar |
|
Dasher
Assembly
Screw
 Canister
Lid
Figure 3
Figure 4
4
4.Place the Dasher Assembly over the Canister Lid Tube. Turn it clock-wise to make sure it locks in place. (Figure 3)
5.Place the Canister Lid with Dasher Assembly attached, inside the Canister. Make sure the top of the Canister Lid aligns with the half circle. It should fit in place when the half circle is aligned on the top. (Figure 4)
NOTE: Make sure the Rubber Sealing Ring is assembled securely inside the Canister Lid. The Rubber Sealing Ring must be thoroughly dried to properly seal.
6.Place the transparent Top Cover over the Canister.
7.Gently lock the Motor Housing in place by pushing the Motor downward onto the transparent Top Cover.
8.Securely lock down the 3 Locking Latches.
9.Select your designer Dispensing Tip (4 different designs) and attach it over the Dispensing Opening.
To operate, the assembled unit must be placed in the horizontal position when unit is first turned on and kept in this position at all times for churning, pouring in recipe and dispensing (as shown on the front cover of the manual).
5
GC8250-I/GC8250I04M1.qxd 6/16/04 11:28 Page 6
Using the Soft Server
NOTE: During operation it is normal for condensation to form on the outside of the canister. Therefore, do not use your Soft Serve Ice Cream Maker on a surface that could be damaged.
1.Plug in unit.
2.Press the Rocker Switch to the I (On) position.
NOTE: The unit must be running when the chilled recipe is added. (See p. 10 for recipe ideas)
CAUTION: Do not place hands or utensils into the Mouth of unit.
3.Pour chilled recipe slowly into the Mouth of unit.
NOTE: The volume of soft serve ice cream will increase during the freezing process. Do not fill the Soft Serve Ice Cream Maker all the way to the top.
4.Churn the ice cream according to the recipe.
Off
On
Off
On
6
NOTE: Variation in ingredients and environmental conditions will affect the freezing time of the mixture. The ice cream may be ready before or after the churning time stated in the recipe. When you see that the ice cream is starting to solidify, you can test it. Simply press the Dispensing Button and dispense some ice cream to test. Continue to run if you would like a firmer consistency.
Personal preference for consistency will determine actual freezing time.
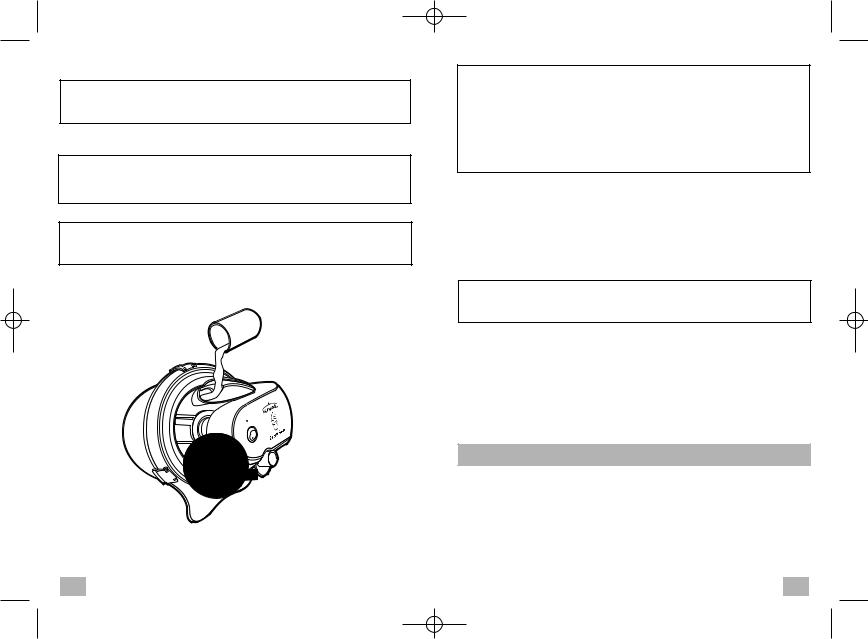
5.Press and hold the Dispensing Button inward to dispense.
6.Place towel underneath the Dispensing Button to catch any melting ice cream.
Soft Serve or Hard Ice Cream?
Making Soft Serve
Simply follow the instructions above and recipes provided. See page 10.
Making Hard Ice Cream
NOTE: Do not use typical hard ice cream recipes. The specially formulated recipes provided in the manual can be used for both soft serve and hard ice cream.
1.Using these recipes, follow steps 1 through 5 in the section titled -
How To Use Your Soft Serve Ice Cream Maker.
2.Remove the Top Cover, including Motor, Dasher Assembly, and Screw.
3.Remove excess ice cream from dasher with spoon and place into airtight container.
4.Place remaining ice cream from Canister in airtight container. Put closed container in freezer for 2-4 hours.
HOW TO CLEAN YOUR SOFT SERVE ICE CREAM MAKER
1.Use a damp cloth to clean the Motor Housing. Never immerse the Motor Housing Unit, Plug or Cord in water or in any other liquids.
2.Wash the Top Cover, Dasher, Screw, Canister Lid, and Collar in hot soapy water. These parts are also dishwasher safe.
3.Wash the Canister with hot soapy water. NEVER place the Canister, or Rubber Sealing Ring in the dishwasher. These parts are NOT dishwasher safe.
4.Make sure all parts are thoroughly dried.
7

GC8250-I/GC8250I04M1.qxd 6/16/04 11:28 Page 8
NOTE: Please use the provided Cleaning Brush for hard to reach areas, like the Canister Lid Tube.
HELPFUL HINTS - Cleaning:
•The cleaning brush included provides an excellent way to clean the hard to reach places in your ice cream maker.
•Use a damp cloth to carefully wipe the outside of the Motor Housing after each usage.
•To ensure a thorough cleaning, the Soft Serve Ice Cream Maker should be completely disassembled prior to cleaning.
TROUBLESHOOTING
Ice cream did not hold shape:
•Was the Recipe made correctly?
•Were the proper ingredients used?
•Was the mixture chilled long enough?
•Was the Canister left in the freezer for a full 24 hours?
•Not all freezers are the same; some may require a longer freezing time for the canister.
The Dasher is not turning / Unit stopped while dispensing:
•The mixture became too thick. Try dispensing sooner when using that particular recipe.
•Check that no frozen lumps are jamming the rotating plastic blade.
•The motor over-heated – unplug the unit and let the unit cool down for approximately 4 hours.
•Make sure the unit is attached to a power supply.
•Make sure the unit is properly assembled.
Ice Cream is leaking from unit:
•Make sure Rubber Sealing Ring is securely attached.
•Make sure there is no ice on the edge of the Canister underneath Rubber Sealing Ring.
•Make sure all three Locking Latches on the Top Cover are secure.
8
RECIPES
Plan Ahead
•The Canister must be kept in the freezer for a minimum of 24 hours before each use.
•The prepared recipe mixture must be cooled in a refrigerator or chilled in a freezer (as detailed in the recipe) before it is poured before each use. Plan this time into your preparation.
•Each recipe makes about 6-8 servings.
HELPFUL HINTS - Recipes:
•Specially formulated recipes are provided in the manual. Please follow these recipes.
•Before pouring the mixture into the Canister, please ensure there are no lumps.
•Do not use cream labelled "extra thick" or UHT creams or milk, as the heat process alters their proteins and affects churning.
•Do not use typical hard ice cream recipes as it may damage the unit. This includes any recipes that contain nuts, chocolate chips, fruit pieces, or any other solid chunks.
•Most recipes require the mixture to be pre-cooked. For best results, make the recipe at least one day ahead. This will allow the mixture time to cool completely and provide the best results.
•Eggs may be substituted with egg substitutes.
•When using eggs in any recipes, heating or cooking the recipe mixture is necessary.
•Ice cream should be stored in an air-tight container.
•The volume of soft serve ice cream will increase during the freezing process. Do not fill the Soft Serve Ice Cream Maker all the way to the top.
•The Soft Serve Ice Cream Maker has a 60 minute auto shut off device and will automatically stop churning after this time.
•After each use you must wash and refreeze the Canister. If you have purchased a second Canister allow a 4 hour period for the motor to cool before using the Soft Serve Ice Cream Maker again.
•If the Soft Serve Ice Ceam Maker stops while churning, check that no frozen lumps are jamming the rotating plastic blade - See Troubleshooting on page 8.
9
 Loading...