

Page 1
Instruction Manual
BLENDER
MODEL:DC-TB170
READ ALL INSTRUCTIONS
BEFORE USING THIS APPLIANCE
Page 2

Page 3

To prevent personal injury or property damage read and follow
the instructions and warnings in this use and care instructional
manual.
IMPORTANT SAFEGUARDS
When using electrical appliances, basic safety precautions
should always be followed including the following:
1. READ ALL INSTRUCTIONS CAREFULLY BEFORE USING
THE 6 SPEED BLENDER.
2. Before connecting the appliance, make sure the voltage in
your outlet is the same as the voltage indicated on the
appliance’s rating label.
3. To protect against risk of electric shock, do not immerse
cord, plug, Base or motor in water or any other liquid.
4. Close adult supervision is necessary when this appliance is
used near children. Children should not use this appliance.
5. Unplug cord from wall outlet when not in use, before putting
on or taking off parts and before cleaning.
6. Avoid contact with moving parts.
7. Do not operate the appliance with a damaged cord or after
the unit malfunctions or is dropped or damaged in any
manner. To avoid the risk of electric shock, do not
disassemble the appliance. Return appliance to the nearest
authorized service facility for examination, repair or
adjustment. Incorrect re-assembly can cause a risk of electric
shock when the appliance is used.
8. The use of attachments, including canning jars not
recommended by the manufacturer may cause a risk of injury
to persons.
9. Do not use outdoors or for commercial purposes.
10. Do not let the electrical cord hang over the edge of table
or counter-top, or touch hot surfaces.
11. Keep hands and utensils out of container while blending to
reduce the risk of severe personal injury and/or damage to
Blender. A rubber spatula may be used but must be used
1
Page 4

only when Blender is not running.
12. Do not use a broke, chipped or cracked Blender Jar.
13. Do not use broken, cracked or loose Cutting Blades.
14. To reduce the risk of injury, never place cutting unit blades
on Base without Jar properly attached.
15. Always operate Blender with cover in place.
16. When blending hot liquids, remove the Filler Cap from
cover. Do not fill Blender container beyond 3-cup level.
Always begin processing at the lowest speed setting. Keep
hands and other exposed skin away from the cover opening
to prevent possible burns.
17. Blade are sharp. Handle carefully.
18. Screw on Blade Assembly firmly. Injury can result if moving
blades become exposed.
19. If the Jar should turn when the motor is switched ON,
switch OFF immediately and tighten Blade Assembly.
20. Do not leave Blender unattended while it is operating.
21. To disconnect cord, turn the control to OFF, then remove
the plug from wall outlet.
22. Never yank the cord to disconnect the appliance from the
ou
tlet. To unplug, grasp plug and pull straight out from the
tlet
ou
23. Use this electric appliance only for its intended use.
SAVE THESE INSTRUCTIONS
SPECIAL INSTRUCTIONS
SHORT POWER SUPPLY CORD INFORMATION
A short power supply cord is provided to reduce the risk of
becoming entangled in or tripping over a long cord. Extension
cords may be used if care is exercised in their use.
If an extension cord is used, the marked electrical rating of the
ex
tension cord should be at least as great as the electrical rating
of the appliance. The cord should be arranged so that it will not
2
Page 5
drape over the countertop or tabletop where it can be pulled on
by children or tripped over unintentionally.
POLARIZED PLUG
This appliance has a polarized plug (one blade is wider than the
other). To reduce the risk of electric shock, this plug is intended
to fit into a polarized outlet only one way. If the plug does not
fit fully into the outlet, reverse the plug. If it still does not fit,
contact a qualified electrician. Do not attempt to modify the plug
in any way.
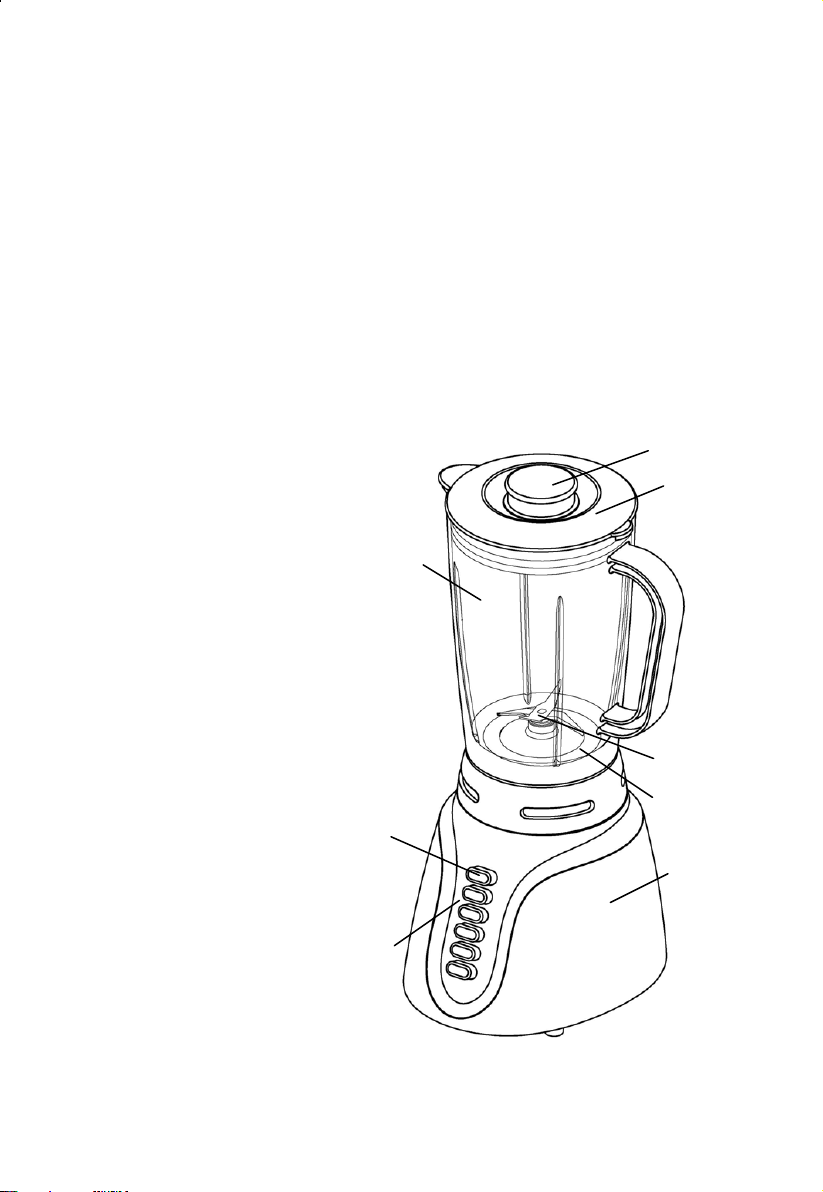
LEARNING ABOUT YOUR BLENDR
A
A. Filler-Cap
B. Lid
C. Jar (48 ounce)
D. Gaskets
E. Blade Assembly
F. Base
G. Control panel
H. Off / pulse button-For instant
control the pulse operates
only as long as the button
is held down. The blender
motor stops when the
button is released.
C
H
G
B
E
D
F
3
Page 6
HOW TO USE YOUR BLENDER
After unpacking the Blender, wash everything except the
Blender Base in hot, soapy water. Dry thoroughly. Do not place
in dishwasher. Wipe the Blender Base with a damp cloth or
sponge. Do not immerse the Base in water. Care should be
taken when handling the Blades, as they are very sharp.
HOW TO ASSEMBLE AND USE
Important: Your Blender Jar and cutting blades are subject to
wear during normal use. Always inspect cutting blades for
broken, cracked or loose Blades. If Jar or Cutting Blades are
damaged, do not use.
1.
Make sure Blender is unplugged. Place Blender Base on
clean, dry surface to keep foreign particles from being pulled
into motor during operation.
up
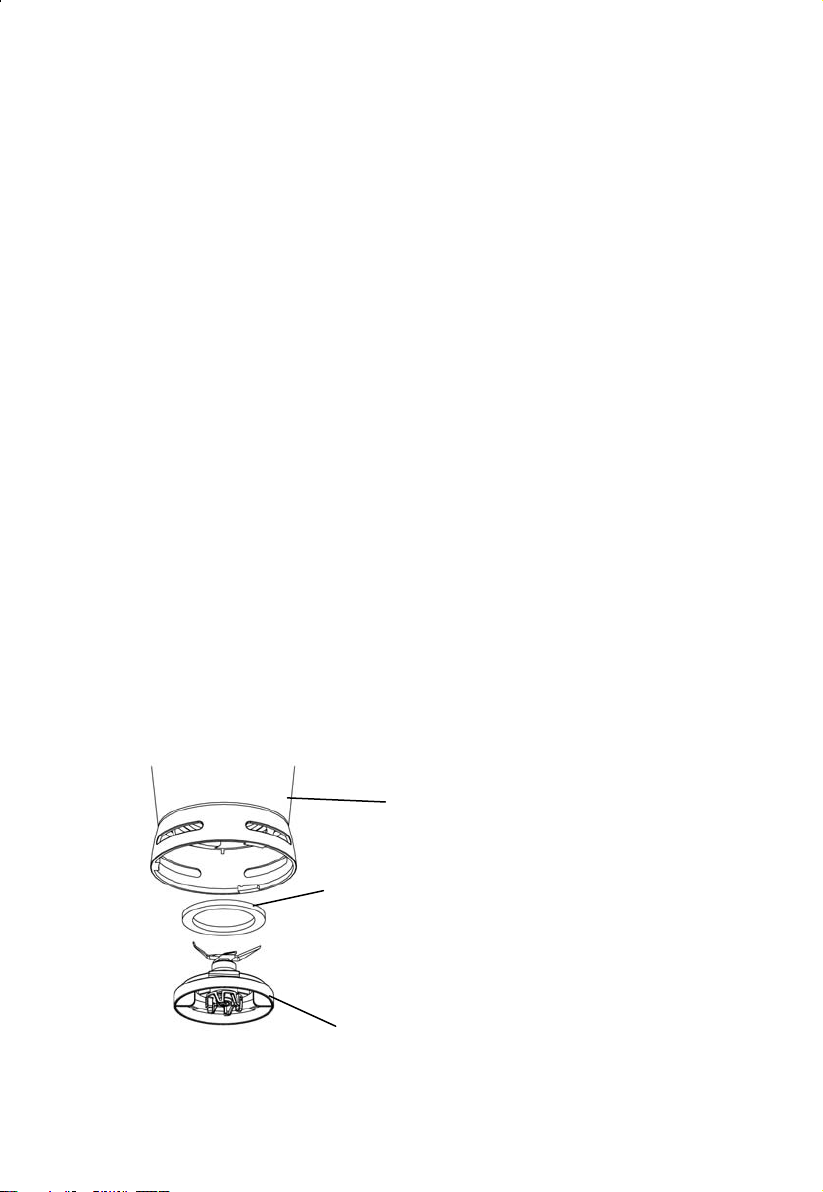
2.
Make sure Gasket is in place on outer rim of blade assembly.
The Gasket must lie flat. Screw the Blade Assembly
counterclockwise into the Jar base firmly using the finger
tabs
on the bottom of assembly.
3. The Blade Assembly must be screwed into the Jar firmly. If
not, it may loosen when the motor is turned on.
Container
Gasket
Cutting Blade Assembly
4
Page 7

4. Set Jar into place on Blender Base, making sure it is securely
seated by twisting jar clockwise until it snaps into the locked
posit
ion.
Plug cord into outlet.
5.
6. Put ingredients in Jar, place Lid on Jar.
7. Process food or beverages. Place hand on Lid when blending
liquids. Push button on Control Panel to start Blender.
8. Always turn blender OFF and wait until blades have stopped
rotating before removing Jar.
9. To remove Jar after blending is complete, hold blender base
with one hand and grasp jar handle with the other hand and
twist jar counter clockwise approximately a quarter turn to
un
lock, then lift jar straight up from base.
10. Never place Jar onto unit while motor is running.
6-SPEED
Speeds are Chop, Mix, Grate, Blend, Liquefy, and Pulse/Off.
Pulse is a controlled cycle operation. This means it operates only
while the button is held down. All other speeds are continuous
cycle operation. They operate continuously at whatever speed is
selected until the "Off" button is pressed.
Select the appropriate speed setting for your task: Press the
“OFF” button when finished.
Chop
x Prepare pancake or waffle batter
Mi
Grate Finely chop cabbage, carrots or other vegetables (add
Cho
p garlic, herbs, onions—pulse to chop evenly
Reconstitute frozen juice
Milk
shakes
Co
cktails
½ to 1 cup water and pulse to chop, then drain.)
Grate chunks of cheese (Cut cold cheese into ½ to
1-inch chunks, place ½ cup cheese chunks into blender
and pulse to chop. Very hard cheese, such as Parmesan
shou
ld be at room temperature for chopping.)
5
Page 8

Blend Puree fruits or cooked vegetables
Blend salad dressings or mayonnaise
Liquefy Liquefy cooked vegetables for soups
Make very smooth sauces
Icy drinks & smoothies
Chop nuts
Baby food
Caution: Do not exceed recommended maximum volumes (70g
or less cubed cooked beef) for baby food.Do not
process baby food for longer than recommended
time( 60seconds or less).
FOR CONTINUOUS OPERATION
Rest one hand on top of the Blender Jar with Lid securely in
place. Press desired speed button to turn Blender on. Press
"Off" button to turn Blender off. The Blender must not run
continuously for more than 2 minutes at a time.
FOR CONTROLLED CYCLE OPERATION
Rest one hand on top of Blender Jar with Lid securely in place.
Press "Pulse" button and hold down for about 2 seconds.
Release button and allow Blades to coast to a stop.
Repeat cycles until contents reach a desired consistency.
Release of the "Pulse" button turns blender off.
NOTE: "Pulse" button can be held longer than 2 seconds
as needed.
HINTS FOR BEST USE
1. Processing hot foods or liquids in the Blender may cause hot
liquid to spurt out when the cover is removed. Always remove
the Filler-Cap from the cover before blending hot foods or
liquid
s. (Please review Important Safeguards).
To add foods when Blender is operating remove Filler-Cap
2.
6
Page 9

from container cover and add ingredients through the
opening.
3. If using your Blender to make salsa or other recipes using
tomatoes, onions and/or other vegetables, you may have
better results using a slower speed function.
4. If blending action stops during blending or ingredients stick
to the sides of the Jar, turn Blender OFF. Remove the cover
and use a rubber spatula to push mixture towards blades.
5. Do not try to mash potatoes, mix stiff dough, whip egg
whites, grind corn or raw meat, or extract juices from fruits
and vegetables. The Blender is not made to perform these
tasks.
6. Do not store food or liquids in the Blender Jar.
7. Avoid bumping or dropping the Blender.
HOW TO CLEAN THE BLENDER
1. Unplug the Blender from electrical outlet.
2. Wipe Blender Base, Control Panel, and cord with a damp cloth
or sponge. To remove stubborn spots, use a mild, nonabrasive cleanser.
3. To clean Jar, unscrew Blade Assembly and tilt slightly to
remove from Jar.
4. Carefully remove Gasket from outer rim of Blade Assembly.
5. Carefully wash Blade Assembly, Gasket, Jar and cover in hot,
soapy water. Rinse and dry thoroughly. Do not soak. Do not
wash Blade Assembly, Gasket, plastic Jar, or cover in a
dishwasher.
6. Replace Gasket on Blade Assembly, screw into Jar and
replace onto Blender Base.
7
Page 10

WARRANTY SERVICE
If any parts are missing or defective, return this
product to the place of purchase or contact the
Customer Service Department of your nearest
Wal-Mart Store for replacement.
Wal-Mart Stores, Inc.
Bentonville, AR 72716
Call Center number is: 1-866-321-9509
8
Page 11

SERVICIO DE GARANTIA
Si alguna parte se encuentra defectuosa o
ausen
te, regresar este producto al lugar donde
fue adquirido o contactar
de Serv
más cer
Wal-Ma
icio al Cliente del local de Wal-Mart Store
cano para su reemplazo.
rt Stores, Inc.
Bentonville, AR 72716
Call Center
nú
mero es: 1-866-321-9509
se con el Depa
rtamento
8
Page 12

COMO LIMPIAR LA LICUADORA
1. Desenchufe la licuadora del tomacorrientes.
2. Pásele un paño o una esponja húmeda a la base, el panel de
control
limp
3. Para limpiar la jarra, desatornille el conjunto de cuchillas e
in
4. Cuidadosamente retire la junta de sellado del borde exterior
de
5. Cuidadosamente lave el conjunto de cuchillas, el sellado, la
jarr
completamente.
cuchillas, la junta de sellado, la jarra plástica o la tapa en una
máquin
6.
Vuelva a colocar la junta de sellado en el conjunto de
cuchillas, atorníllelo en la jarra y vuelva a montarlo sobre la
bas
y al cable. Para quitar las manchas rebeldes, utilice un
iador suave no abrasivo.
cline ligeramente para retirarlo de la jarra.
l
conjunto de cuchillas.
a y la tapa en agua jobonosa caliente. Enjuagar y secar
No empapar. No lave el conjunto de
a lavaplatos.
de la licuadora.
e
7
Page 13

PARA OPERACION CONTINUO
Apoye una mano sobre la parte superior de la jarra de la
li
cuadora con su tapa adecuadamente colocada. Presione el
tón de velocidad deseada para prender la licuadora. Presionar
bo
botón "Off" para apagar la licuadora. La licuadora no debe
el
funcionar en forma contínua por más de 2 minutos cada vez.
PARA OPERACION DE CICLO CONTROLADO
Apoye una mano sobre la parte superior de la jarra de la
li
cuadora con su tapa adecuadamente colocada. Presione el
bo
tón "Pulse" y manténgalo presionado por alrededor de 2
undos. Libere el botón y deje que las cuchillas se detenga
seg
completamente.
deseada del contenido. Liberando el botón "Pulse" podrá apagar
la licuadora.
OBSERVACION:
botón "Pulse" presionado por más de 2 segundos.
CONSEJOS PARA UNA MEJOR UTILIZACION
1. Al procesar comidas o líquidos calientes en la licuadora puede
provocar que el líquido se derrame al retirar la tapa. Retire
siempre el tapón de llenado de la tapa antes de mezclar
alime
ntos o líquidos calientes. (Por favor vuelva a leer Notas
ort
Imp
2. Para agregar alimentos mientras la licuadora está en
funcionamiento retire el tapón de llenado de la tapa y
agregue los ingredientes a través del orificio.
Si utiliza la licuadora para preparar salsa u otro tipo de
3.
recetas
obtendría mejores resultados usando una menor velocidad.
4.
Si el mezclado se detiene durante el funcionamiento o si los
ingredientes
licuado
empujar
No intente machacar patatas, amasar, batir claras de huevo,
5.
moler
ver
6. No almacene alimentos o líquidos en la jarra.
7. Evite
antes sobre Seguridad)
que contenga tomates, cebollas y/u otros vegetales,
a. Retire la tapa y use una espátula de goma para
r
la mezcla hacia las cuchillas.
maíz o carne cruda, o extraer jugos de frutas o
duras
golpear o dejar caer a la licuadora.
Repita el ciclo hasta que logre la consistencia
Según su necesidad, Ud. puede mantener el
se adhieren a los costados de la jarra, apague la
. La licuadora no está construído para tales fines.
6
Page 14

toma la base de la licuadora con una mano y tome la manija
de la jarra con la otra mano y luego gire la jarra en sentido
antihorario un cuarto de giro para destrabar, luego levante la
jarra directamente de la base.
10
.
Nunca coloque la jarra en la unidad cuando el motor está
andan
do
.
6-VELOCIDAD
Las velocidades disponibles son Triturado, Mezcla, Granizado,
lado, licuado y Pulso/Apagado.
Mezc
es una operación de ciclo controlado. Lo cual significa que
Pulso
únicamente cuando se lo mantiene presionado al botón.
opera
las otras velocidades son operaciones de ciclo continuo.
Todas
Opera
a que el botón de apagado “Off” es presionado.
hast
Seleccionar la velocidad adecuada para tarea:
Presione
Pique uniformemente ajo, hiervas, especias, cebollas.
Mezclas
Prepare la mezcla para hacer panecillos como hot cakes o waffles
jugos congelados.
Licue
Licuados
Cócteles
Pique finamente lechugas, zanahorias y otros vegetales (solo vierta
½ taza de agua y oprima el
Rallar trozos de queso (Cortar el queso frío en trozos de media a
una pulgada, ponga media
la licuadora y presione el botón para licuar. El queso muy
el Parmesano, debe estar a temperatura ambiente para cortar.)
Licue la pulpa de frutas o vegetales cocidos
nuamente en la velocidad según lo seleccionado
n cotí
el botón “OFF o Apagar” cuando haya terminado.
de leche y malteadas
bo
tón para licuar, después escurra)
taza con los trozos de queso dentro d
duro, co
e
mo
Licuar
Licúa vegetales cocidos para sopas
Para prepara salsas
Bebidas
frías y malteadas
Pique semillas como nueces, almendras o avellanas.
Co
m
ida para bebé
Precaución:
de 70 gramos o menos de
No
l
icuar comida para bebé por mas del tiempo recomendado (60
segundos o menos)
No exceder la cantidad máxima recomendada (porciones
ne de res cocida) para bebé.
car
5
Page 15

COMO UTILIZAR SU LICUADORA
Luego de desempacar la licuadora , limpie todo en agua caliente
jabonosa con la excepción de la base de la licuadora.
completamente. No lo coloque en la máquina lavaplatos.
Secar
Pasarle
cuadora en agua. Se debe tomar extremo cuidado al manipular
li
las
a la base con un paño húmedo o esponja. No sumerja la
cuchillas ya que son muy filosas.
COMO ENSAMBLAR Y USAR
Importante: La jarra y las cuchillas están sujetas a desgastes
durante el uso normal. Revise siempre las cuchillas para verificar
de que no estén rotos, rajados o sueltos. Si la jara o las
cuchill
1.
2.
as
están dañadas, no los use.
Asegúrese de que la licuadora está desenchufada. Coloque
la base de la licuadora en una superficie limpia y seca para
evitar
que las partículas extrañas sean jalados dentro del
mo
tor durante el funcionamiento.
Asegúrese de que la junta de sellado está bien puesto sobre
el borde exterior del conjunto de cuchillas. La junta de
r plano y liso. Atornillar firmemente el
sellado debe qued
juego de cuchillas en sentido antihorario dentro de la base de
la jarra utilizando las tablillas en la base del conjunto.
El grupo de cuchillas debe ser atorillado en la jara de manera
3.
segura.
funcionando.
Si no, el mismo puede aflojarse cuando el motor está
a
Contenedor
Junta de sellado
Conjunto de cuchillas
4. Acomode la jarra en la base de la licuadora, asegure la
correcta
qu
5.
Enchufar el cable al tomacorrientes.
6.
Coloque los ingredientes en la jarra, coloque la tapa sobre la
jarra.
7.
Procesar los alimentos o las bebidas. Ponga la mano sobre la
ta
pa al mezclar líquidos. Presionar el botón en el Panel de
Co
8.
Siempre apague la licuadora y espere que las cuchillas
dete
9.
Para retirar la jarra una vez que la mezcla mezclado esté lista,
colocación girando la jarra en sentido horario hasta
e encaje en la posición de traba.
ntrol
para iniciar la licuadora.
ngan su rotación antes de retirar la jarra.
4
Page 16

H
A
B
C
E
D
F
G
3
Page 17

14. Para reducir los peligros de daños, nunca coloque las
cuchillas de la unidad de corte en la base sin que la jarra
correctamente montada.
es
té
Haga funcionar la licuadora siempre con la tapa puesta.
15
.
Al mezclar líquidos calientes, retire el tapón de llenado de la
16.
pa. No llene la jarra más allá de 3 copas de capacidad.
ta
Siempre
velocid
cuerpo alejados de la abertura en la tapa para evitar
posibles
Las cuchillas son filosas, manéjelas con cuidado.
17.
. Atornillar firmemente el conjunto de cuchillas. Puede
18
resultar
Si la jarra se vuelca cuando el motor está prendido en “ON”,
19
.
apág
el juego de cuchillas.
No deja la licuadora desatendida mientras esté en
20
.
fun
. Para desconectar el cable, ponga la llave de control en OFF,
21
luego
Nunca jale del cable al desenchufar. Para desenchufar, tome
22.
firmemente
23
.
Use este aparato sólo para su finalidad prevista.
comience procesando con el selector en la menor
ad. Mantenga las manos y otras partes expuestas del
quemaduras.
en daños si las hojas en movimiento son expuestas.
elo poniendo en “OFF” imediatamente y ajustar bien
u
ionamiento.
c
retire la ficha del tomacorrientes.
de la ficha y retírela del tomacorrientes.
GUARDE ESTAS INSTRUCCIONES
INSTRUCCIONES ESPECIALES
INFORMACION SOBRE EL CABLE DE
ALIMENTAC
El aparato está provisto de un cable de alimentación corto para
nimizar el riesgo de tropiezos o enredos que un cable largo
mi
ocasionaría.
siempre y cuando se tome los cuidados debidos.
utilizar un cable de alargue, las especificaciones eléctricas
Al
nomin
debe disponerse de manera que no cuelgue del borde de
mesas
causar
ales deben igualar o superar las del aparato.El cable
o mostradores donde pueden ser jalados por niños o
tropiezos por enredos involuntarios.
ION CORTO
Los cables de alargue pueden ser utilizados
2
Page 18

Para evitar daños a las personas o a la propiedad, lea y siga las
instrucciones
instrucciones
y advertencias provistas en este manual de
sobre uso y cuidado.
NOTAS IMPORTANTES SOBRE
SEGURIDAD
Al utilizar aparatos electrodomésticos se debe seguir siempre las
precauc
1.
Lea todas las instrucciones.
Antes de conectar el aparato, asegúrese de que el voltage de
2.
3.
Para protegerse contra los peligros de electrocuciones, no
Este aparato no debe ser utilizado por niños y se requiere
4.
5.
Desconecte el aparato del tomacorrientes cuando no está en
Evitar tocar las partes en movimiento.
6.
7.
Nunca utilice el aparato si su cable o ficha se encuentra
8.
El uso de complementos, incluyendo jarras no recomendados
9.
No lo use en el exterior ni para fines comerciales.
10.
11.
12.
13.
iones básicas de seguridad, como las siguientes:
toma coincida con el del aparato indicado en su rótulo.
la
sumerja el cable, la ficha, el base o el motor en agua u otro
ido.
líqu
estrecha supervisión cuando se lo utiliza cerca de niños.
una
uso y antes de realizar la limpieza.
dañado/a,
haya
electrocución, no desarme el aparto. Regrese el producto
de
centro de servicios autorizado más cercano para su
al
examinac
puede pro
po
r el fabricante puede provocar daños a las personas.
No deje que el cable cuelgue sobre el borde de mesas o
mostradores, o que toque superficies calientes.
Mantenga las manos y los utensilios fuera de la jarra
duran
severos
goma puede ser utilizado, pero únicamente cuando la
li
cuadora no está en funcionamiento.
No use una jarra rota, rajada o salpicada.
No use cuchillas rotas, rajadas o sueltas.
o cuando no funcione adecuadamente, o si se
caído o dañado de manera alguna. Para evitar peligros
ión, reparación o ajuste. Un reensamblado incorrecto
vocar peligros de electrocución al funcionar.
te el funcionamiento de la licuadora para evitar daños
a las personas y/o a la licuadora. Una espátula de
1
Page 19

Page 20

Manual de Instrucciones
LICUADORA
MODEL: DC-TB170
LEA TODAS LAS INSTRUCCIONES
ANTES DE USAR ESTE APARATO
 Loading...