

Rinnai RHFE-559FDT, RHFE-1005FDT Operation & Installation Manual
This appliance shall be installed in accordance with:
• Manufacturer’s Installation Instructions
• Current AS/NZS 5601 AS/NZS 3000
• Local Regulations and Municipal Building Codes including local OH&S requirements
This appliance must be installed, maintained and removed by an Authorised Person.
For continued safety of this appliance it must be installed and maintained in
accordance with the manufacturers instructions.
All Rinnai gas products
are A.G.A. certified.
RHFE-1005FDTRHFE-559FDT
Operation & Installation Manual
RHFE-559FDT RHFE-1005FDT
The flue system installation instructions are enclosed with the flue terminal, packaged separately.
NOTE

Rinnai 2 ES_FDT_OIM
Congratulations on the purchase of your Rinnai Energysaver space heater.
We trust you will have many years of comfort and enjoyment from your appliance.
BEFORE PROCEEDING WITH THE OPERATION OR INSTALLATION OF YOUR NEW HEATER
PLEASE READ THIS MANUAL THOROUGHLY AND GAIN A FULL UNDERSTANDING OF THE
REQUIREMENTS, FEATURES AND OPERATION OF YOUR NEW APPLIANCE.

Rinnai 3 ES_FDT_OIM
BEFORE YOU START ..................................................... .... ..... ..........................................................4
INSTALLATION REQUIREMENTS .................................................................................................................. 4
CERTIFICATION .............................................................................................................................................. 4
FLUE INSTALLATION MANUAL ...................................................................................................................... 4
UNPACKING THE APPLIANCE ....................................................................................................................... 4
CARTON CONTENTS / ITEM CHECKLIST ............................... ... ... ... .... ... ... ... ... .... ... ...................................... 4
SAFETY...............................................................................................................................................5
ABOUT YOUR ENERGY SAVER SPACE HEATER ..........................................................................8
FEATURES....................................................................................................................................................... 8
CONTROL PANEL GENERAL LAYOUT ...................................................................... ................................... 9
BASIC HEATER OPERATION..........................................................................................................10
TO TURN THE UNIT ‘ON’ .............................................................................................................................. 10
TO TURN THE UNIT ‘OFF’............................................................................................................................. 10
ROOM TEMPERATURE ADJUSTMENT ....................................................................................................... 10
ECONOMY MODE.......................................................................................................................................... 11
CHILD / FUNCTION LOCK............................................................................................................................. 11
FAN OPERATION........................................................................................................................................... 11
ADDITIONAL HEATER OPERATION INFORMATION ....................................................................12
HUMIDIFIER TRAY ........................................................................................................................................ 12
VERTICAL LOUVRE ADJUSTMENT .. ... ... .... ... ... ... .......................................... ... .... ... ... ................................. 12
OUTSIDE FLUE TERMINAL................ ... .......................................... ... .... ... ... ... ... .... ... ... ................................. 12
CARE AND MAINTENANCE.............................................................................................................13
CLEANING...................................................................................................................................................... 13
HUMIDIFIER TRAY ........................................................................................................................................ 13
FAN FILTER(S)............................................................................................................................................... 13
CLEANING THE FAN FILTER(S)............................................................................ ... ... ... .... .......................... 13
FLUE TERMINAL............................................................................................................................................ 13
SAVE A SERVICE CALL................................................................................................................................ 14
SERVICE........................................................................................................................................................ 14
TROUBLE SHOOTING CHECKLIST.............................................................................................................. 15
ERROR CODES ........................................ .... ... .......................................... ... ................................................. 15
INSTALLATION MANUAL ................................................................................................................17
CONTACT INFORMATION ...............................................................................................................28
OPERATION MANUAL

Rinnai 4 ES_FDT_OIM
BEFORE YOU START
INSTALLATION REQUIREMENTS
This heater must be installed by an authorised person. The installation must conform to local regulations. The
installation must also comply with the instructions supplied by Rinnai.
Service and removal must be carried out by an authorised person.
CERTIFICATION
The Rinnai Energysaver® Range has been certified by the Australian Gas Association.
The AGA Certification Number is shown on the appliance dataplate.
No parts or functions should be modified or permanently removed from the heater.
Please keep these instructions in a safe place for future reference.
FLUE INSTALLATION MANUAL
These instructions are to be used in conjunction with the Rinnai “Energysaver Space Heater Co -Axial Flue System
Installation Manual” These components Installation Manual” supplied with flue kits ESDFK or ESKIT03.
UNPACKING THE APPLIANCE
Check for damage and missing parts. If the heater is damaged or missing any parts, contact your supplier for
advice.
Before installing the appliance, check it is labelled for the correct gas type (see label on the rear of heater).
Refer to local gas authority for confirmation of gas type if you are in doubt.
CARTON CONTENTS / ITEM CHECKLIST
Ensure that the components listed are present before proceeding with the installation.
* For direct flue kit `ESDFK´ installations ONLY refer to page 22 for installation details.
Check you have the following:
1 x One of the following Rinnai Space Heaters
RHFE-559FDT
RHFE-1005FDT
2 x Keys for lockable control panel door.
1 x Rear Cover set, comprising of left, right and top cover panels
1 x Bolt pack containing;
Part RHFE-559FDT RHFE-1005FDT
Plastic inlet hose clamps 2 0
Air intake baffle ring* 1 0
Flue adapter 0 1
Stainless steal sheath clamp Large 0 1
Stainless steal sheath clamp 1 0
Securing brackets 2 2
8g x 32mm screws 2 2
150mm long cable tie 1 1
Flue lock clamp L 0 1
Flue lock clamp S 1 1
6g x 10mm button head screws 2 0
6g x 8mm pan head screws 4 7
Rinnai 5 ES_FDT_OIM
SAFETY
DO NOT MODIFY THIS APPLIANCE.
You MUST read and understand these instructions fully before operating the heater.
Failure to comply with these instructions could result in a fire or explosion, which could cause
serious injury, death or property damage.
Improper installation, adjustments, service or maintenance can cause serious injury, death or
property damage. Such work must be performed by an authorised person.
• Improper installation, adjustments, service or maintenance can cause serious injury, death or
property damage. Such work must be performed by an authorised person.
• The appliance must be installed in accordance with the local gas and electrical authority
regulations.
• Flue terminal must always vent directly to outdoors.
• DO NOT extend the flue vertically or horizontally in ways other tha n prescribed in the a ppliance
manufacturers’ flue installation instructions.
• For information on gas consumption, see data plate on the appliance.
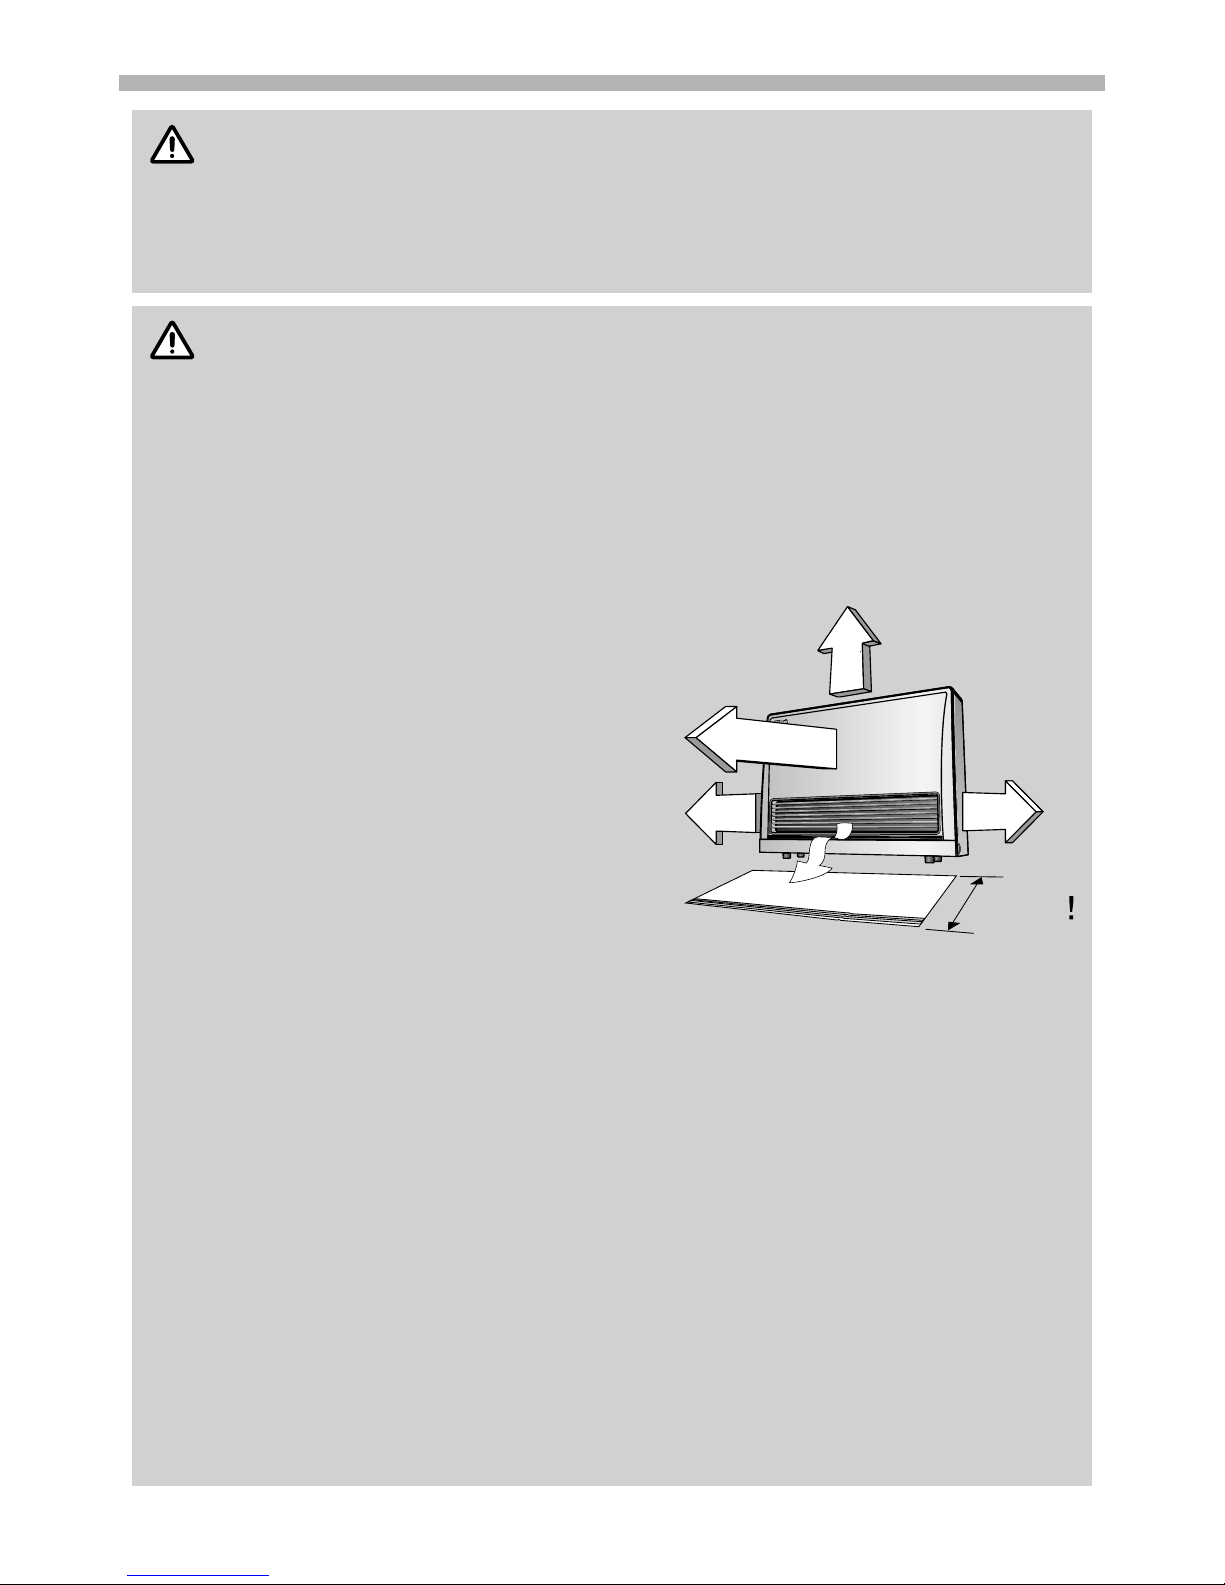
• This appliance must not be installed where curtains or other combustible materials could come
into contact with it. In some cases curtains may need restraining.
• Not intended for a fireplace insert, DO NOT
build into bookcases or walls etc.
• The clearances shown must be maintained.
• Heat radiating from the front of this heater may
over time affect the appearance of some
materials used for flooring such as carpet,
vinyl, cork or timber.
This effect may be amplified if the air in the
room contains cooking vapours or cigarette
smoke.
To avoid this possibility, it is recommended
that a mat or similar protective sheet be placed
in front of the appliance, extending for at least
750 mm.
• This appliance is not intended for use by persons (including children) with reduced physical,
sensory or mental capabilities or lack of experience and knowledge, unless they have been
given supervision or instruction concerning use of the appliance by a person responsible for
their safety.
• The appliance is not intended for use by young children or infirm persons without super vision.
• Young Children must be supervised when in the vicinity of this heater while it is in operation.
• If the supply cord is damaged or requires replacing, it must be replaced by the ma nufacture r or
the manufacturer's agent or similarly qualified person in order to avoid a hazard.
• The heater MUST NOT BE located immediately below a power point.
• DO NOT connect to an LPG Gas cylinder indoors.
• A dedicated 230V / 240V 50Hz earthed 10 Amp power point must be used with this appliance.
• DO NOT modify this appliance. Modifying from original specifications may create a dangerous
situation and will void your warranty.
• Only the flue components specified by Rinnai must be used.
• Unpack the heater and check for damage. DO NOT INSTALL A DAMAGED HEATER. If the heater
is damaged, contact your supplier for advice.
• Before installing the heater, check the label for the correct gas type (refer to the data label at the
rear of the heater). Refer to local gas authority for confirmation of the gas type if you are in
doubt.
WARNING
IMPORTANT
50 mm
50 mm
TOP
LEFT SIDE RIGHT SIDE
AT LEAST
750mm
1
0
0
0
m
m
250 mm
FRONT
Rinnai 6 ES_FDT_OIM
SAFETY
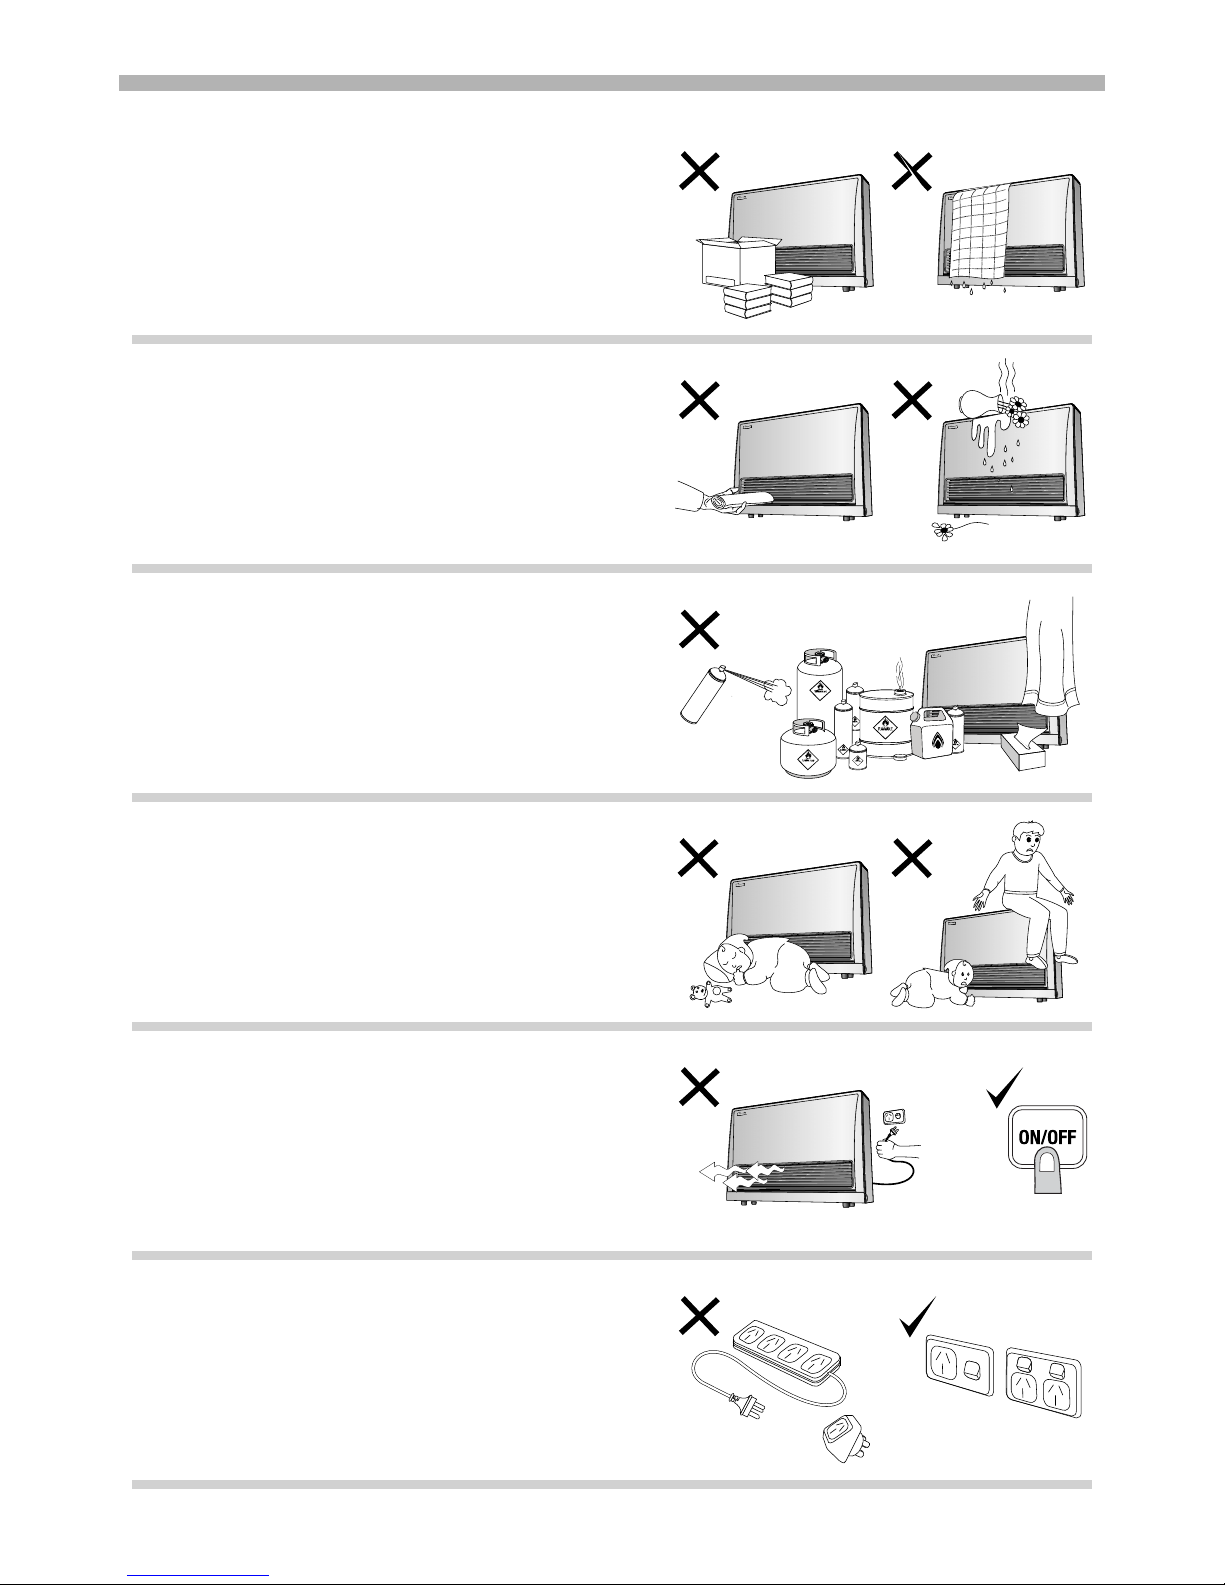
DO NOT restrict the warm air discharge b y placing articles in
front of the heater.
This appliance MUST NOT be used for any purpose other than
heating.
DO NOT allow anyone to post articles through the louvres or
let flammable and combustible materials to come into contact
with the heater.
DO NOT place articles on or against this heater.
DO NOT place containers of liquid on top of the heater. Water
spillage can cause extensive damage to the appliance and
create an electrocution hazard.
DO NOT spray aerosols in the vicinity of this appliance whilst
the heater is operating. Most aerosols contain flammable gas,
which can be a fire hazard if used near the heater when it is in
use.
DO NOT use or store flammable materials near this appliance.
Combustible materials must not be placed where the heater
could ignite them.
Young children should be supervised at all times. Hand or
body contact with the warm air discharge louvres must be
avoided.
DO NOT allow young children or the infirm to sleep directly in
front of the heater while in operation.
DO NOT allow anyone to sit on or lean against the appliance.
DO NOT unplug the heater while it is in operation or while the
fans are still cycling.
DO Turn ‘OFF’ the heater when not in use.
A dedicated 230V / 240V 50Hz earthed 10 Amp power point
must be used with this appliance. DO NOT use power boards
or double adaptors to operate this appliance.
The appliance MUST NOT BE located below a power point.

Rinnai 7 ES_FDT_OIM
SAFETY
Heat emanating from the front of this appliance may over time
affect the appearance of some materials used fo r flooring such
as carpet, vinyl, cork or timber. This effect may be amplified if
the air in the room contains cooking vapours or cigarette
smoke. To avoid this possibility, it is recommended that a mat
be placed in front of the appliance, extending at least 750 m m
in front of it.
Keep flammable materials; trees, shrubs, et c. away from the
flue terminal.
Snow Areas - in areas subject to heavy snowfall, keep snow
clear of flue terminal at all times.
When the heater is operated for the first time or after long
periods of non use a slight odour may be emitted, this is
normal.
However if odours persist switch ‘OFF’ the appliance and
contact Rinnai.
During peak operating periods the filters should be cleaned
weekly, however if the “FILTER” warning indicator flashes in
the control panel display, turn off the appliance immediately
and clean filters before any further use.
This appliance is fitted with an integral humidifier tray that can
be filled with water as required to raise the humidity level in the
room for extra comfort.
The integral humidifier tray should not be filled to more than
3/4 full, or more than the MAX Fill line when this is indicated.
Access panel / door and humidifier tray have to be fitted /
closed while the heater is in use.
DO NOT modify this appliance.
This appliance MUST NOT BE built-in, all clearances that are
shown on page 5 MUST BE maintained.
At Least 750mm
Humidifier Tray
Access
Panel
Access
Door
Max.
Fill Line
Humidifier Tray
Filler Spout

Rinnai 8 ES_FDT_OIM
ABOUT YOUR ENERGY SAVER SPACE HEATER
FEATURES
Room Sealed:
Air for combustion is taken from the outside and the combustion products are exhausted to the outside. This
means heater operation has no effect on the composition and quality o f air in the room.
Push Button Ignition:
Only one touch of the ‘ON’/’OFF’ button is required to operate the heater.
Child / Function Lock:
Prevents children from altering heater settings whilst running, or from activa ting the heater when turned ‘OFF’.
7 Step Automatic Heat Control:
Selected temperature is controlled via thermostat. The optimum correspon ding fan speeds are controlled by
the Central Processing Unit.
Economy Mode:
The economy mode function is an energy saving feature designed to control the room temperature and
prevent discomfort from over heatin g.
Filter Indicator:
When the fan filters become covered with dust, the filter indicator will flash.
The filters should be vacuumed at regular intervals to avoid unnecessary strain on the app liance.
Humidifier Tray:
The integral humidifier tray can be filled with water as required to raise the humidity level in the room for extra
comfort.
The integral humidifier tray should not be filled to more than 3/4 full, or more than the MAX Fill line when this is
indicated.
Lockable Control Panel Door:
A lockable Control Panel Door which is ideal for commercial use.
This feature is great for applications where safety is p aramount o r when the unit is requir ed to b e set once and
left alone.
Two keys for the panel door are supplied with the unit.
Fixed Time Period Operation:
The option to operate the appliance so that it automatically stops af ter a fixed time pe riod is also available, this
can be set between 1 to 12 hours in 1 hour increments. This option can only be activated by a qualified person
or trained Rinnai service person.
Fixed time period operation is ideally suited to classroom situations, clubs, meeting halls, and other areas
where a limit is required on the length of time the appliance operates.
The feature can provide substantial energy savings in cases where users are likely to forget to turn the
appliance off when they leave the room after meetings or lessons.
If a power failure occurs at any time during operation, the appliance will remain OFF once the power is reinstated and the ON/OFF button must be pressed to re-ignite the appliance.
Questions?
Contact Rinnai using the contact numbers listed on the back cover of this booklet for further advice.
Rinnai 9 ES_FDT_OIM
ABOUT YOUR ENERGY SAVER SPACE HEATER
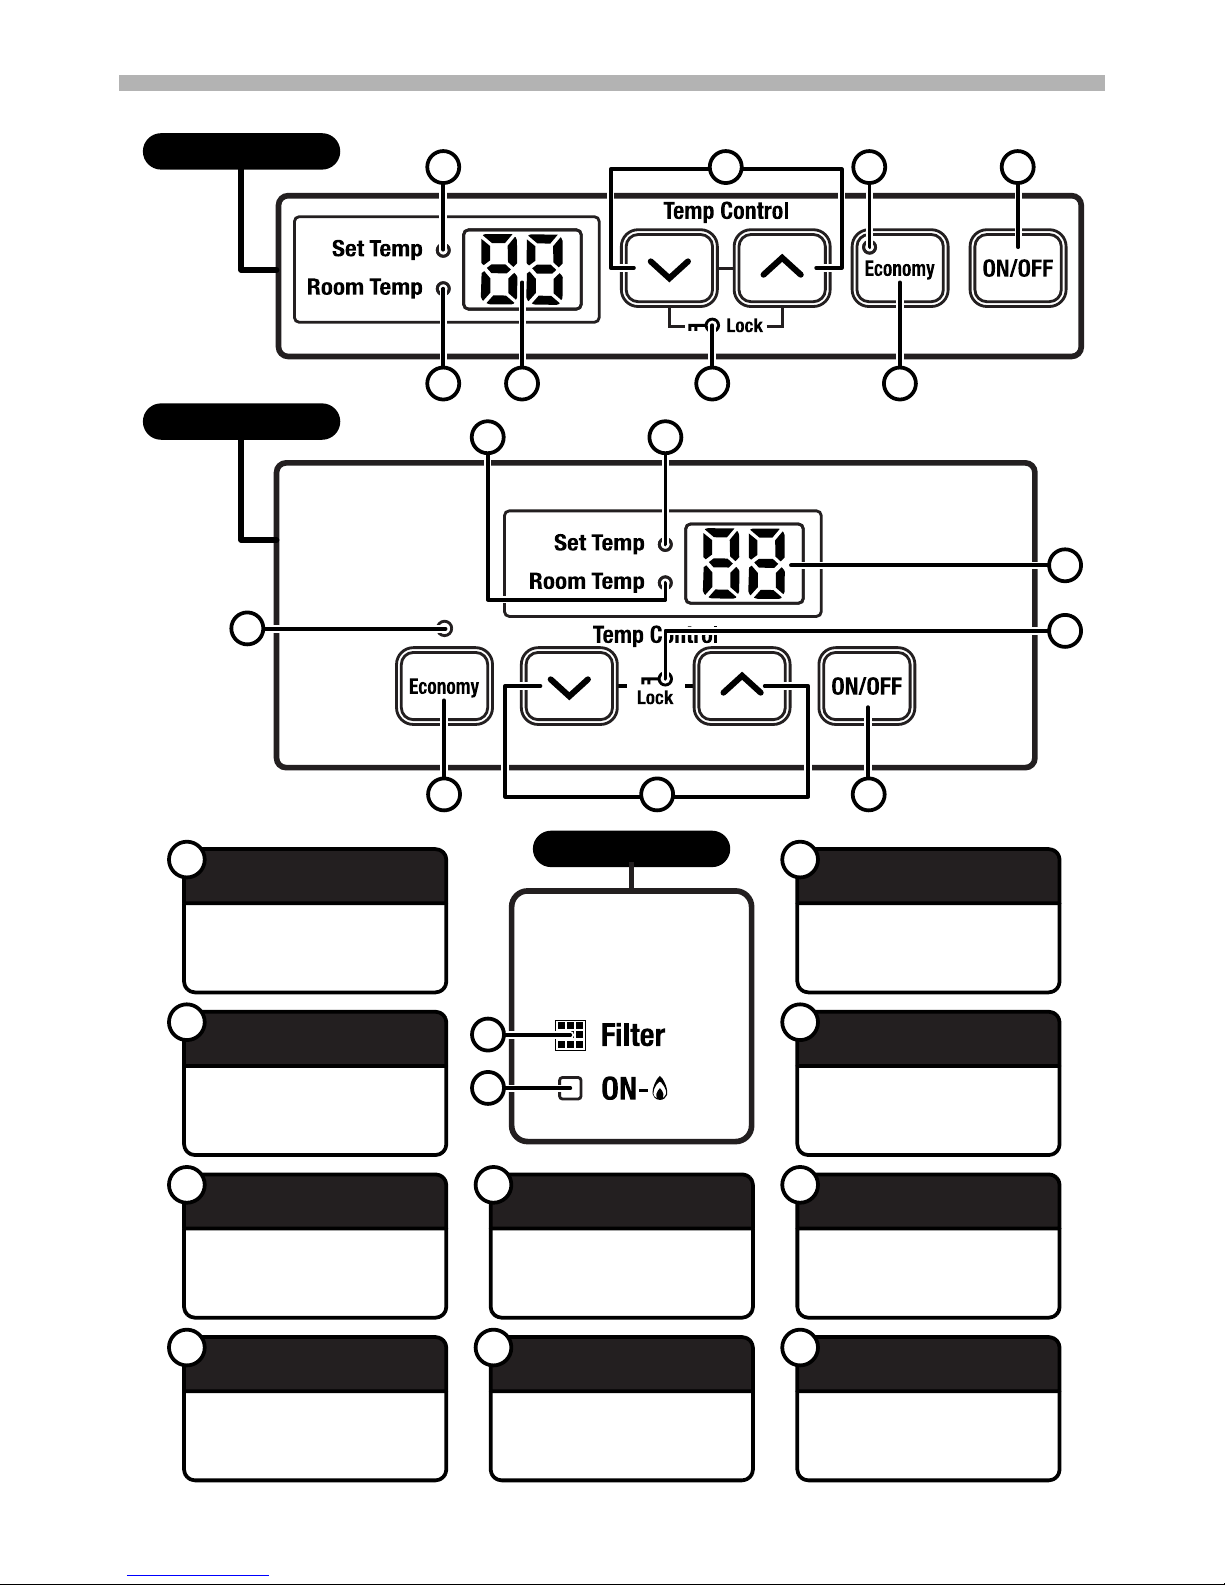
CONTROL PANEL GENERAL LAYOUT
8
9
2
1
4
3
6
10
Shows temperature (Set / Room),
or coded error message.
TEMPERATURE DISPLAY
2
Indicated that the Temperature
Display is displaying the Set
temperature.
SET TEMPERATURE
INDICATOR
3
Indicated that the Temperature
Display is displaying the Room
temperature.
ROOM TEMPERATURE
INDICATOR
4
Main switch for turning 'ON / OFF'.
'ON' / 'OFF' BUTTON
1
Indicates that the Child / Function
Lock is actived (see page 11).
CHILD / FUNCTION
LOCK INDICATOR
7
Indicates that the filter needs
cleaning
(see page 13).
FILTER INDICATOR
8
Indicates that the appliance
is turned ON and whether
the burner is alight.
POWER ON/
COMBUSTION INDICATOR
9
Indicates that the Economy mode is
in operation (see page 11).
ECONOMY INDICATOR
5
Selects energy saving function.
ECONOMY BUTTON
6
Increases or decreases the
temperature setting. Also used
to set Child /Functiom Lock.
TEMPERATURE
ADJUSTMENT BUTTONS
10
1
624 7
10
5
RHFE-559FDT
RHFE-1005FDT
3 5
7
Both Models
 Loading...