

Rinnai RHFE-1004FTR How To Use Manual
This appliance shall be installed in accordance with:
・Manufacturer's Instructions
・Local Authority Building Codes
・NZS 5261 Installation Code for Gas Burning Equipment
・Any other relevant Statutory Regulation
This appliance must be installed, serviced and removed by an authorised
person.
Energysaver
Ñ
Heater
RHFE-1004FTR
Customer
page 2
Installer
page 18

CONTENTS
– 1 –
Features of your 1004 FTR
……………………………………………………………………………
2
Getting to know your New 1004 FTR
…………………………………………………………………
3
Control Panel Layout
……………………………………………………………………………………
4
Important Points
…………………………………………………………………………………………
5
Customers Operating Information
How to Operate the Heater
……………………………………………………………………………
7
Adjusting Temperature
…………………………………………………………………………………
8
Economy Mode
…………………………………………………………………………………………
9
Function Lock
…………………………………………………………………………………………
10
Override Function
………………………………………………………………………………………
11
Setting Clock
……………………………………………………………………………………………
12
Programming the ON/OFF Timer(s)
…………………………………………………………………
13
Operating the Heater Timer(s)
………………………………………………………………………
14
Pre-Heat Function
………………………………………………………………………………………
15
Other Operating Information
…………………………………………………………………………
16
Remote Control
…………………………………………………………………………………………
17
Installation
Location
…………………………………………………………………………………………………
18
Installation Instructions
………………………………………………………………………………
21
Sleeve and Manifold Installation
………………………………………………………………………
22
Fitting Unit
………………………………………………………………………………………………
24
Testing
…………………………………………………………………………………………………
25
Installation Check
………………………………………………………………………………………
26
Care of your 1004 FTR
………………………………………………………………………………
27
Pre-Service Check
……………………………………………………………………………………
28
Error Messages
…………………………………………………………………………………………
29
Safety Devices
…………………………………………………………………………………………
30
Product Specifications
Dimensions
……………………………………………………………………………………………
31
Wiring Diagram
…………………………………………………………………………………………
32
Block Diagram
…………………………………………………………………………………………
32
Guarantee
………………………………………………………………………………………………
34
Specifications
…………………………………………………………………………………………
35
Service Contact Points
…………………………………………………………………………………
35

– 2 –
Push button ignition : Only one touch of the ON / OFF button is required to operate the heater.
Dual Timer : The dual timer allows you to program the heater to come on for two separate periods
each day, usually one period in the morning and one period in the evening. The dual timer feature
means that you can set and forget your heater. It will turn itself ON and OFF at the times you
have programmed until you cancel the timer program.
7 step automatic heat control with electronic thermostat. The fan is also controlled by the
thermostat.
Pre-Heat : This function will automatically operate the heater within one-hour prior to the
programmed time of the timer in order to heat a room to the pre-set temperature by the
programmed time.
Economy mode : An energy saving feature that reduces the room temperature by 3℃over a 90
minute interval.
Memory : The micro-computer records selected pre-set temperatures, the times programmed into
Timers as well as operating the Economy and Pre-heat modes to maintain comfort levels. Even if
the power cord is pulled out of the power point, the next time the unit is operated, there will be no
need to re-program the Timer times (only the clock will need to be re-programmed).
Override Function : This temporarily changes the heater operation from ON to OFF, or vice
versa, until the next programmed setting is reached.
Remote Control : A remote control is supplied to enable you to turn your 1004 FTR ON and OFF,
and to adjust its temperature at your convenience. The remote control also comes with its own
handy bracket for easy storage.
Lockable Control Panel Lid : The 1004 FTR has a lockable Control Panel Lid which is ideal for
commercial use. This feature is great for applications where safety is paramount or when the unit
is required to be set once and left alone. Two keys are also supplied with the unit.
Function Lock : Prevents children from altering heater settings whilst running, or from activating
the heater when turned off. This feature is utilised if the Control Panel Lid is unlocked.
Heater Filter Indicator : When the heater filter becomes covered with dust and the temperature
inside the appliance rises, the heater filter indicator will flash indicating that cleaning is necessary.
The integral humidifier tray can be filled with water as required to raise the humidity level in the
room.
Room Sealed : Air for combustion is taken from the outside and the flue product is exhausted
outside, keeping the room air clean.
FEATURES OF YOUR 1004 FTR
– 3 –
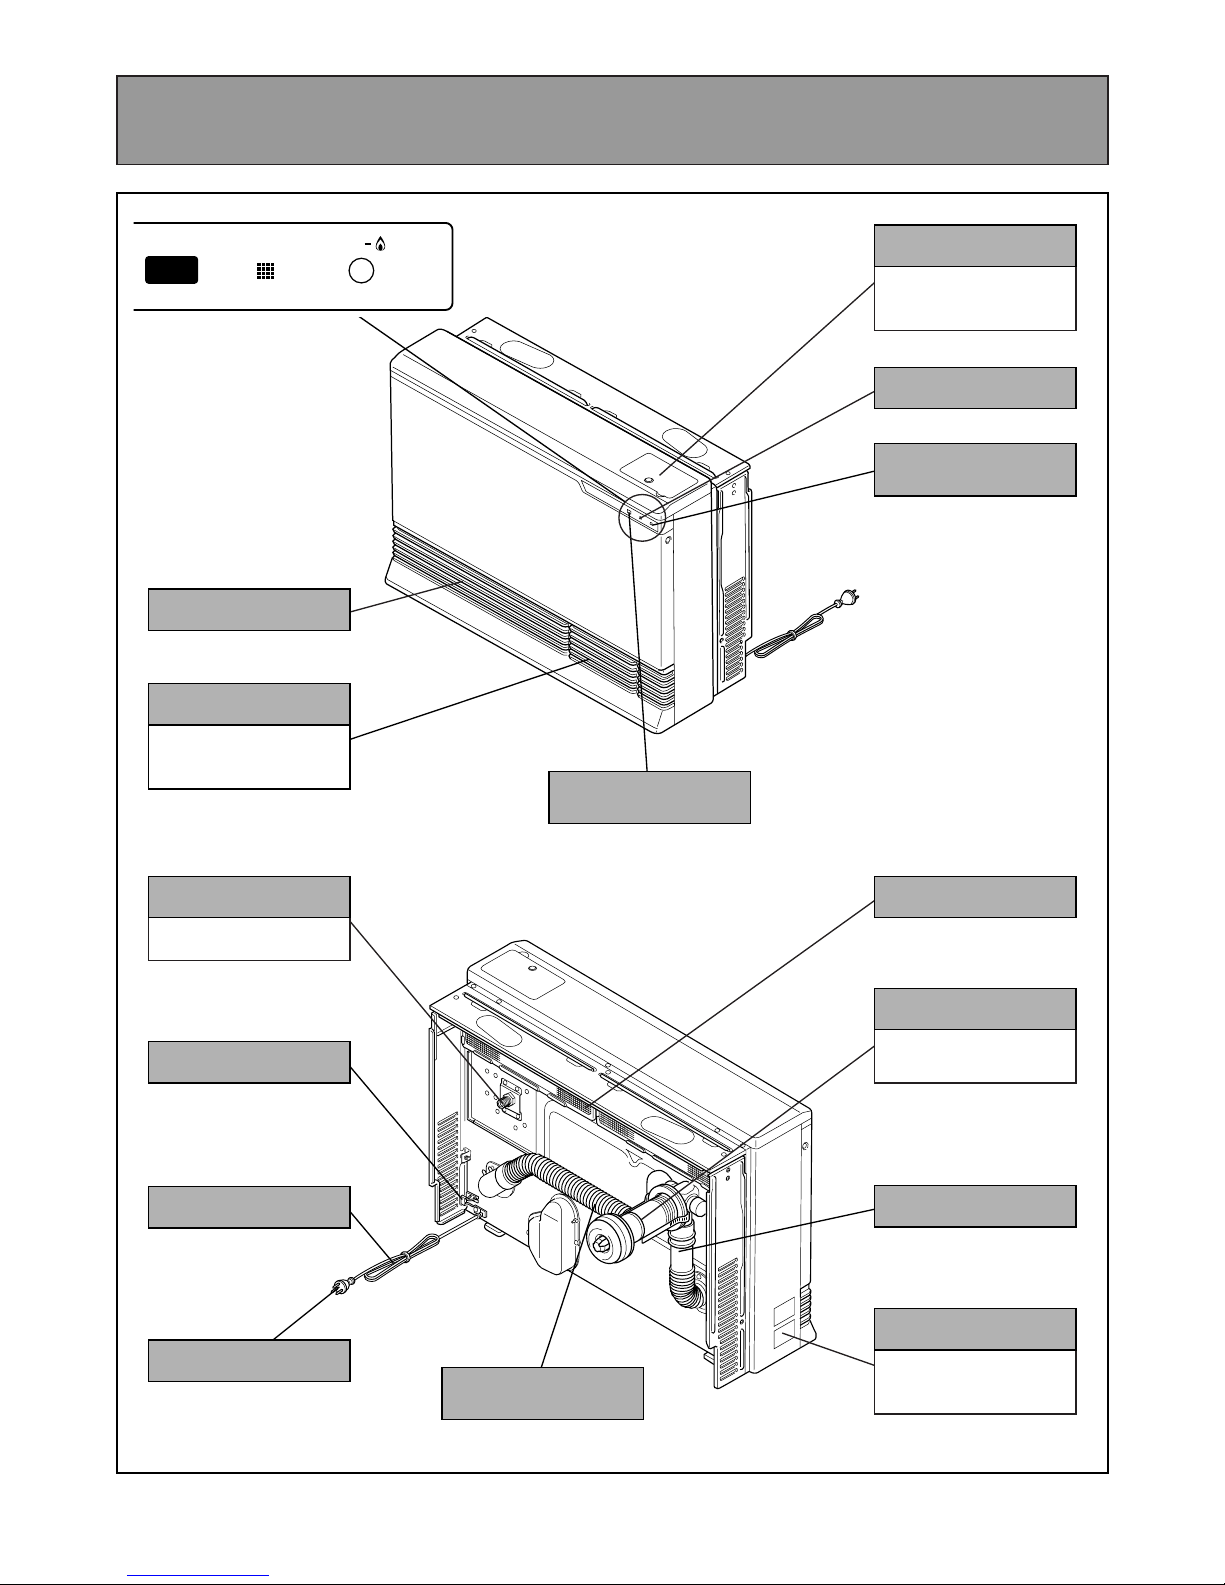
GETTING TO KNOW YOUR NEW 1004FTR
WARM AIR OUTLET
THERMISTOR
POWER CORD
PLUG 230VAC
iltr
e
F
o
N
FILTER INDICATOR
AIR FILTER
EXHAUST PIPE
COMBUSTION AIR
INTAKE HOSE
OPERATION
INDICATOR
REMOTE CONTROL
SENSOR
HUMIDIFIER
OPEN THE DOOR
AND POUR WATER
INTO THE TRAY.
GAS CONNECTION
1/2" BSP(15mm)
CONTROL PANEL
OPERATION/TEMPERATURE
CONTROL DISPLAY
RATING PLATE
MODEL NUMBER,
SERIAL NUMBER,
GAS TYPE, ETC.
FLUE TERMINAL
(“A” Flue supplied as
standard)
– 4 –
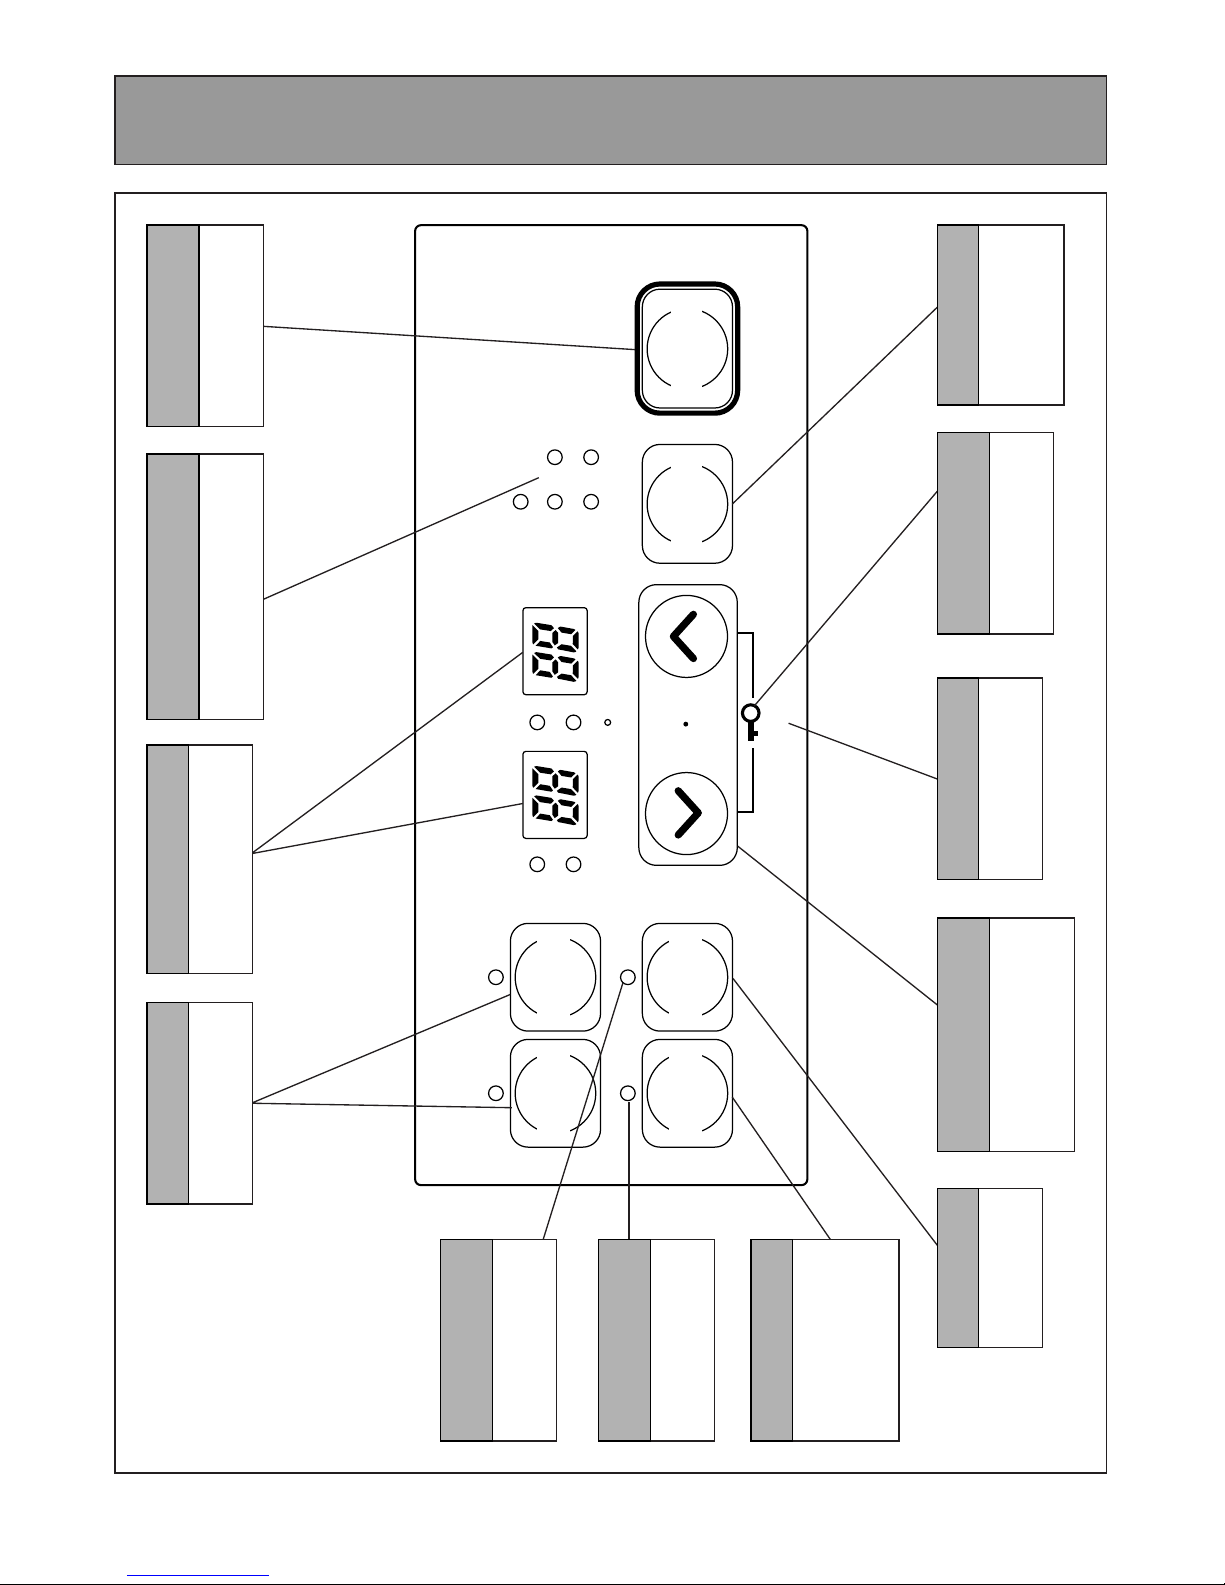
CONTROL PANEL LAYOUT
Timer2 Timer1
AM
PM
Override
Economy
Set
SetTimes
ON/OFF
Room
Temp
Time
Timer1
Timer2
Clock
on
off
FunctionLock
ECONOMY
Selects Economy
Mode.
FUNCTION LOCK
Locks all controls when
pressed.
SET TIMES
Selects clock and /
or timers for
adjusting or
programming.
TIME / TEMP
ADJUSTMENT
Increases or decreases the
temperature setting as well
as changing hours or
minutes.
FUNCTION LOCK
INDICATOR
Indicates Function lock
is activated.
OVERRIDE
Temporarily changes
operation from ON to
OFF or OFF to ON,
until next programmed
setting is reached.
ECONOMY
INDICATOR
Indicates that the
Economy mode is in
operation.
OVERRIDE
INDICATOR
Indicates that the
override function is
activated.
ON TIMERS
Selects operating mode
for Timer 1 or 2.
HEATER ON/OFF
BUTTON
Main switch for turning
heater on and off.
TIME / TEMP DISPLAY
Shows either the time of
day, temperatures, or error
code messages.
CLOCK ADJUSTMENT
AND TIMER INDICATORS
Indicates that clock or dual timer
programme is being set.
– 5 –
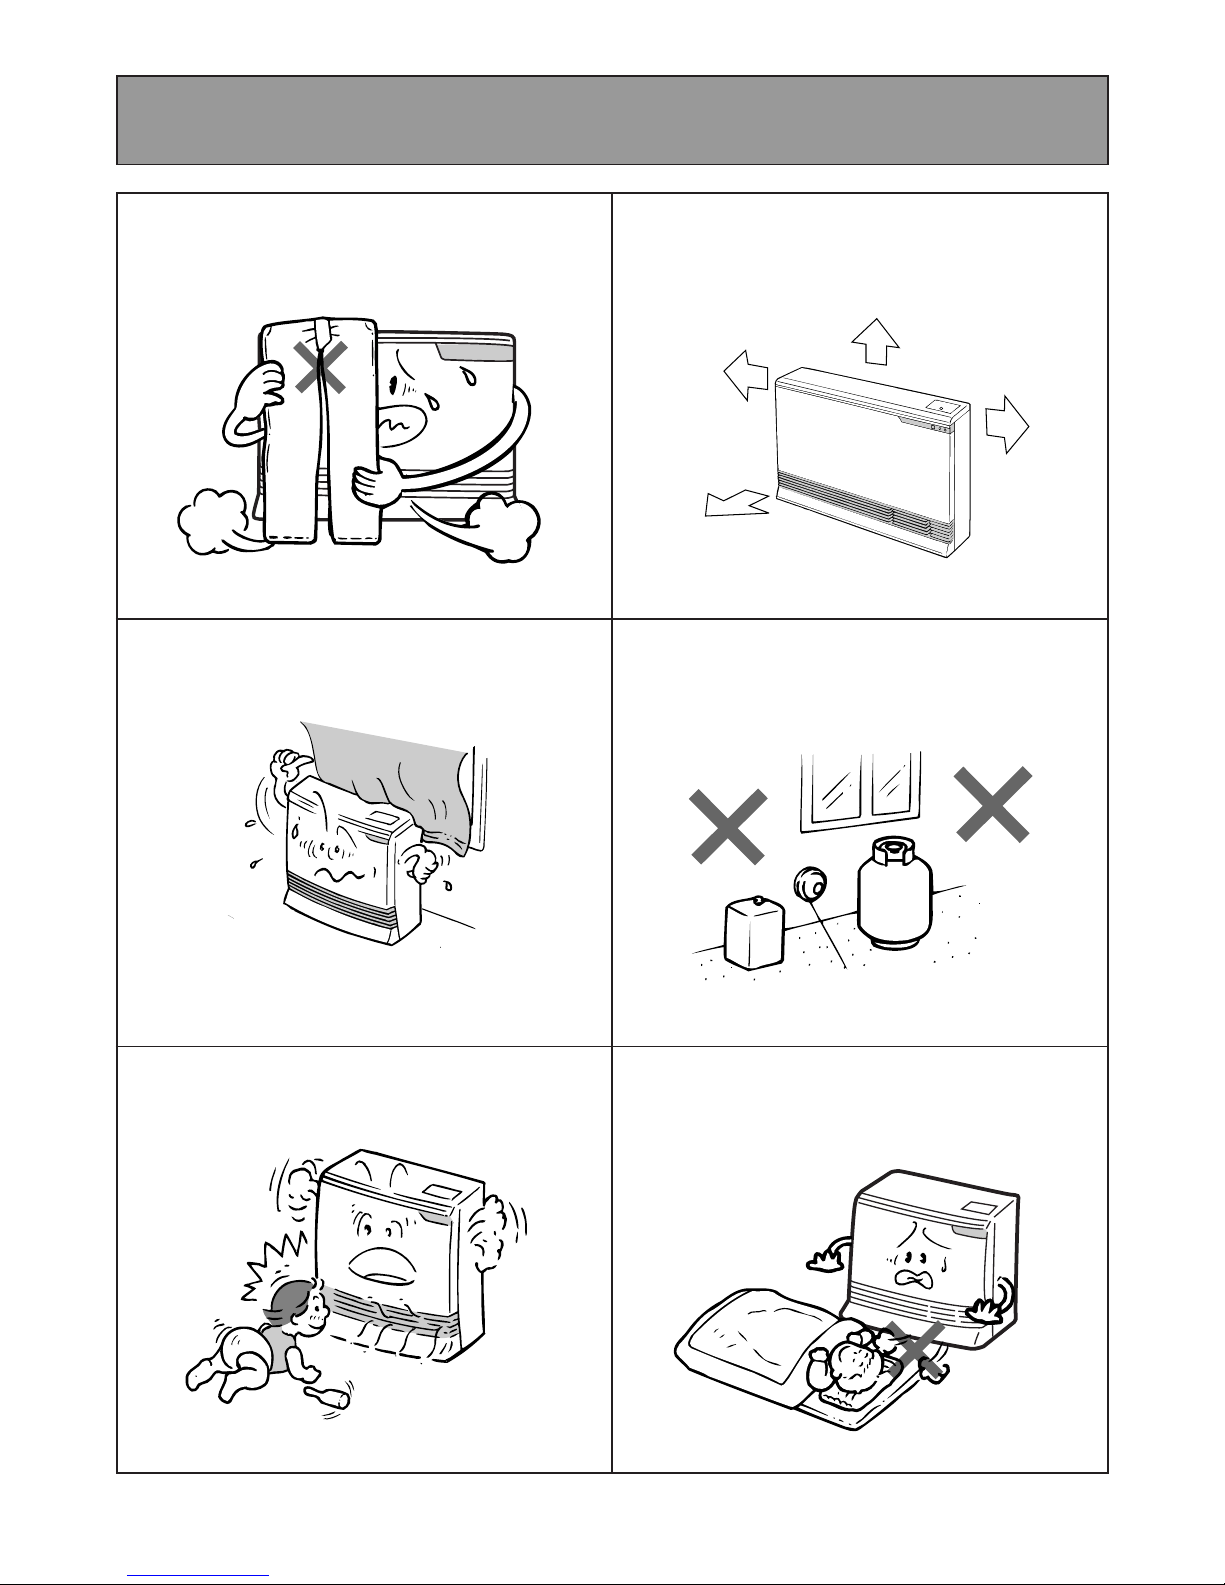
IMPORTANT POINTS
250mm
50mm
50mm
1000mm
Flue Terminal
LP GAS
Do not use for any other purpose except
heating.
Do not allow curtains or other flammable
materials to come into contact with the
heater.
Supervise children near heater.
Keep flammable materials, trees shrubs etc.
away from flue terminal.
Do not allow young children or the infirm to
sleep directly in front of the heater.
Do not store flammable products near the
unit.
These clearances should be maintained at all
times.

– 6 –
IMPORTANT POINTS
Don’t allow children to ‘post’ articles in the
louvres.
Don’t spray aerosols on the heater whilst it is
in operation.
Most aerosols contain butane gas and can be
a fire hazard if used near this heater when in
use.
Do not sit on this heater.
Do not place articles on or against the heater.
Don’t place any articles containing liquids on
top of the heater.
– 7 –
HOW TO OPERATE THE HEATER
■
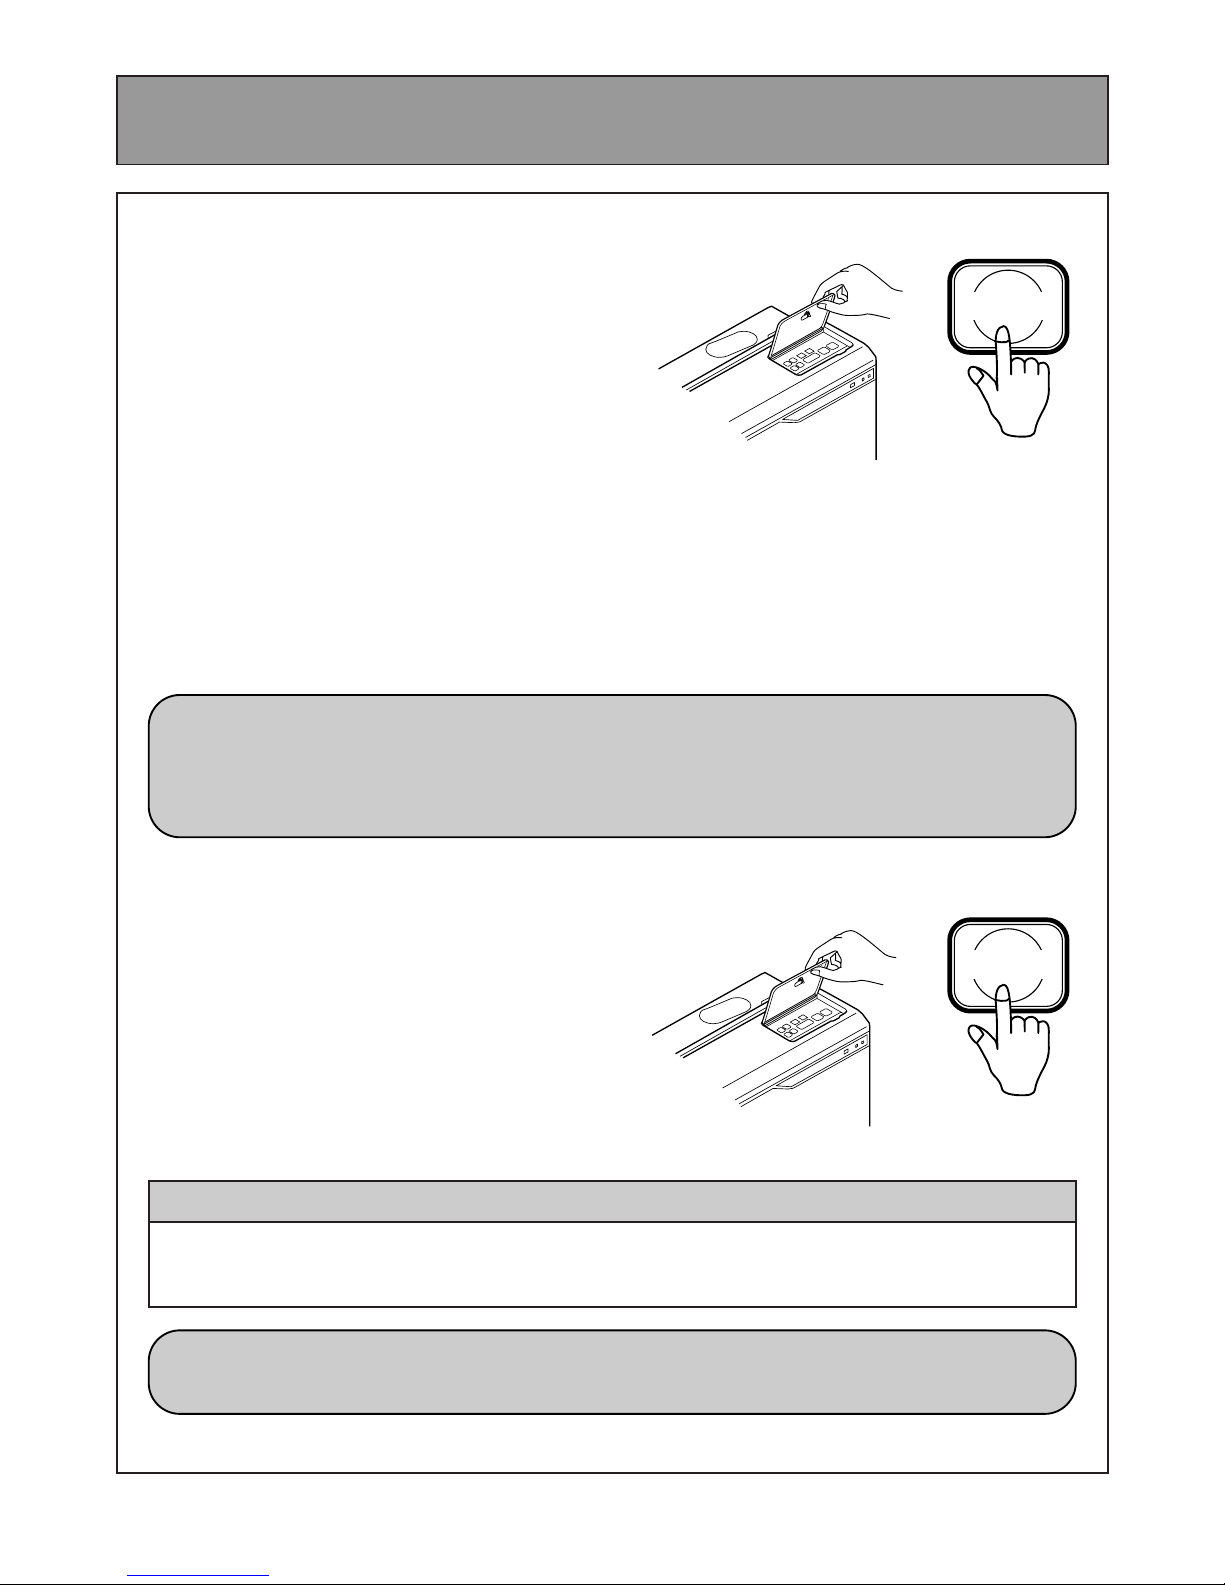
Turning ON
●
Press the ON/OFF button
・
The ON indicator will illuminate green.
・The convection fan will rotate.
・Ignition will take 5〜10 seconds and the
ON / Combustion indicator will change from
green to red to let you know that the burner
has ignited.
Note :
・
When using the unit for the first time or after long periods of disuse, ignition may not occur
the first time it is operated as there may be air in the gas pipes. If ignition does not occur
after approximately 30 seconds the unit will cease operation automatically.
Try operating the unit again if this occurs.
・The unit may make noises after ignition / extinction. This is the inside of the unit expanding
and contracting and is normal.
・The heater will not ignite if the “ON / OFF” button is pressed straight after extinction. After
approximately 20 seconds has passed. the unit will automatically go into ignition mode.
■
Turning OFF
●
Press the ON/OFF button
・
The ON / Combustion indicator will go out.
・ After the indicator has gone out, the
convection fan will continue to rotate for
several minutes, then stop. This is to lower
the temperature within the unit. Do not pull
out the power cord during this time.
・When the Function Lock is set, the Function Lock indicator will continue to illuminate even
when the unit is OFF and the Function Lock will not be cancelled.
・Do not pull out the power cord or disconnect the power during combustion to cause
extinction, or straight after extinction, as this may cause damage to the unit.
CAUTION !
ON/OFF
ON/OFF
Displaying, setting and adjusting the room
temperature can only be done when the heater is
operating.
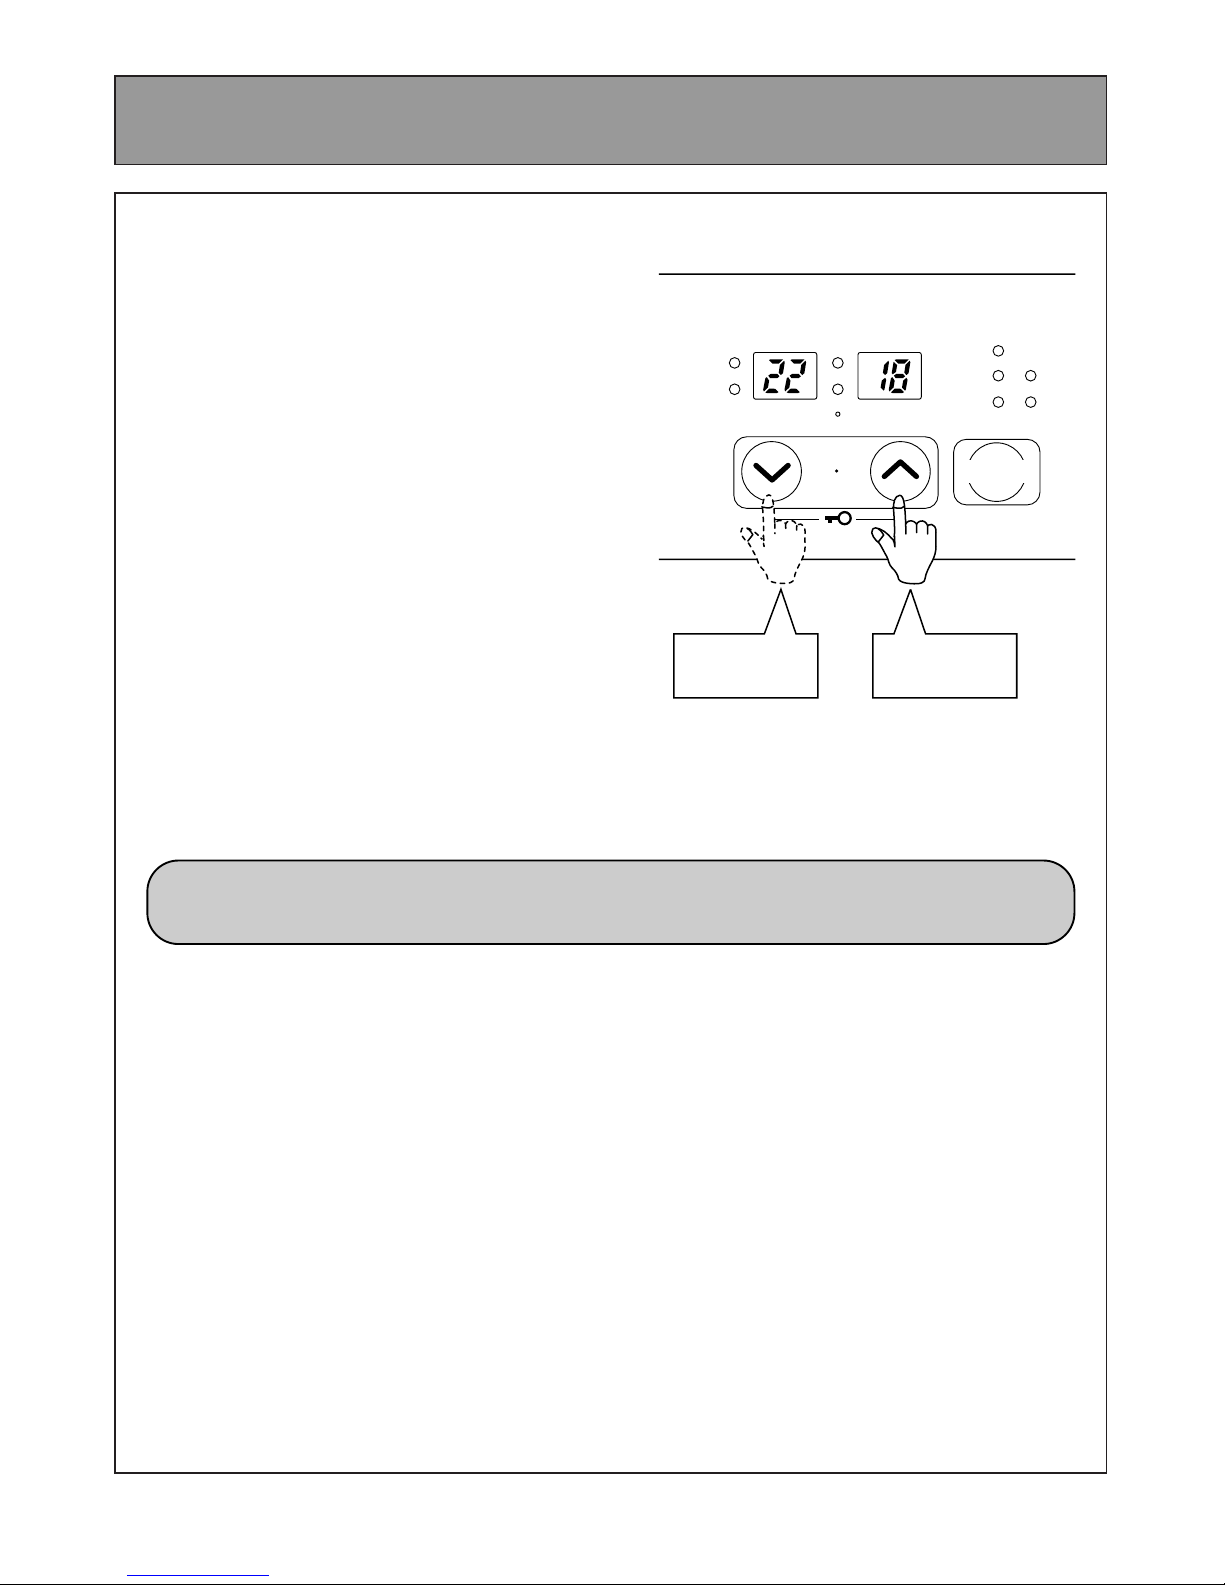
・
When the unit is first operated, the room
temperature is set at 22
℃
.
・
Set the desired room temperature with the
up and down buttons while looking at the
display section.
・The “Set Temp” can be set to “L ” or
between “16” 〜“26” , or “H” (continuous
combustion on High)
.
・The “Room Temp” will display “L” (when
lower than 1℃), “1” 〜“30” (at intervals of
1℃), or “H” (when higher than 30℃)
.
・Once a temperature is set, it will be stored in
the microcomputer's memory.
Note :
・Rooms may not arrive at the set temperature
due to the construction of the room, the
location of the unit, or external temperatures.
– 8 –
ADJUSTING TEMPERATURE
If the heater does not ignite then the pre-set temperature may not be set to a setting which is
higher than the actual room temperature.
AM
PM
Set
SetTimes
O
Room
Temp
Time
Timer1
Timer2
Clock
on
off
FunctionLock
Press to lower
the temperature
Press to raise
the temperature
– 9 –
ECONOMY MODE
The Economy Mode, when selected, has the ability to reduce gas consumption and ultimately
save energy. Once a room has reached the desired temperature, the unit will automatically begin
reducing the set temperature gradually. This reduction is normally not noticeable, however, it is
purely your choice whether to select this mode.
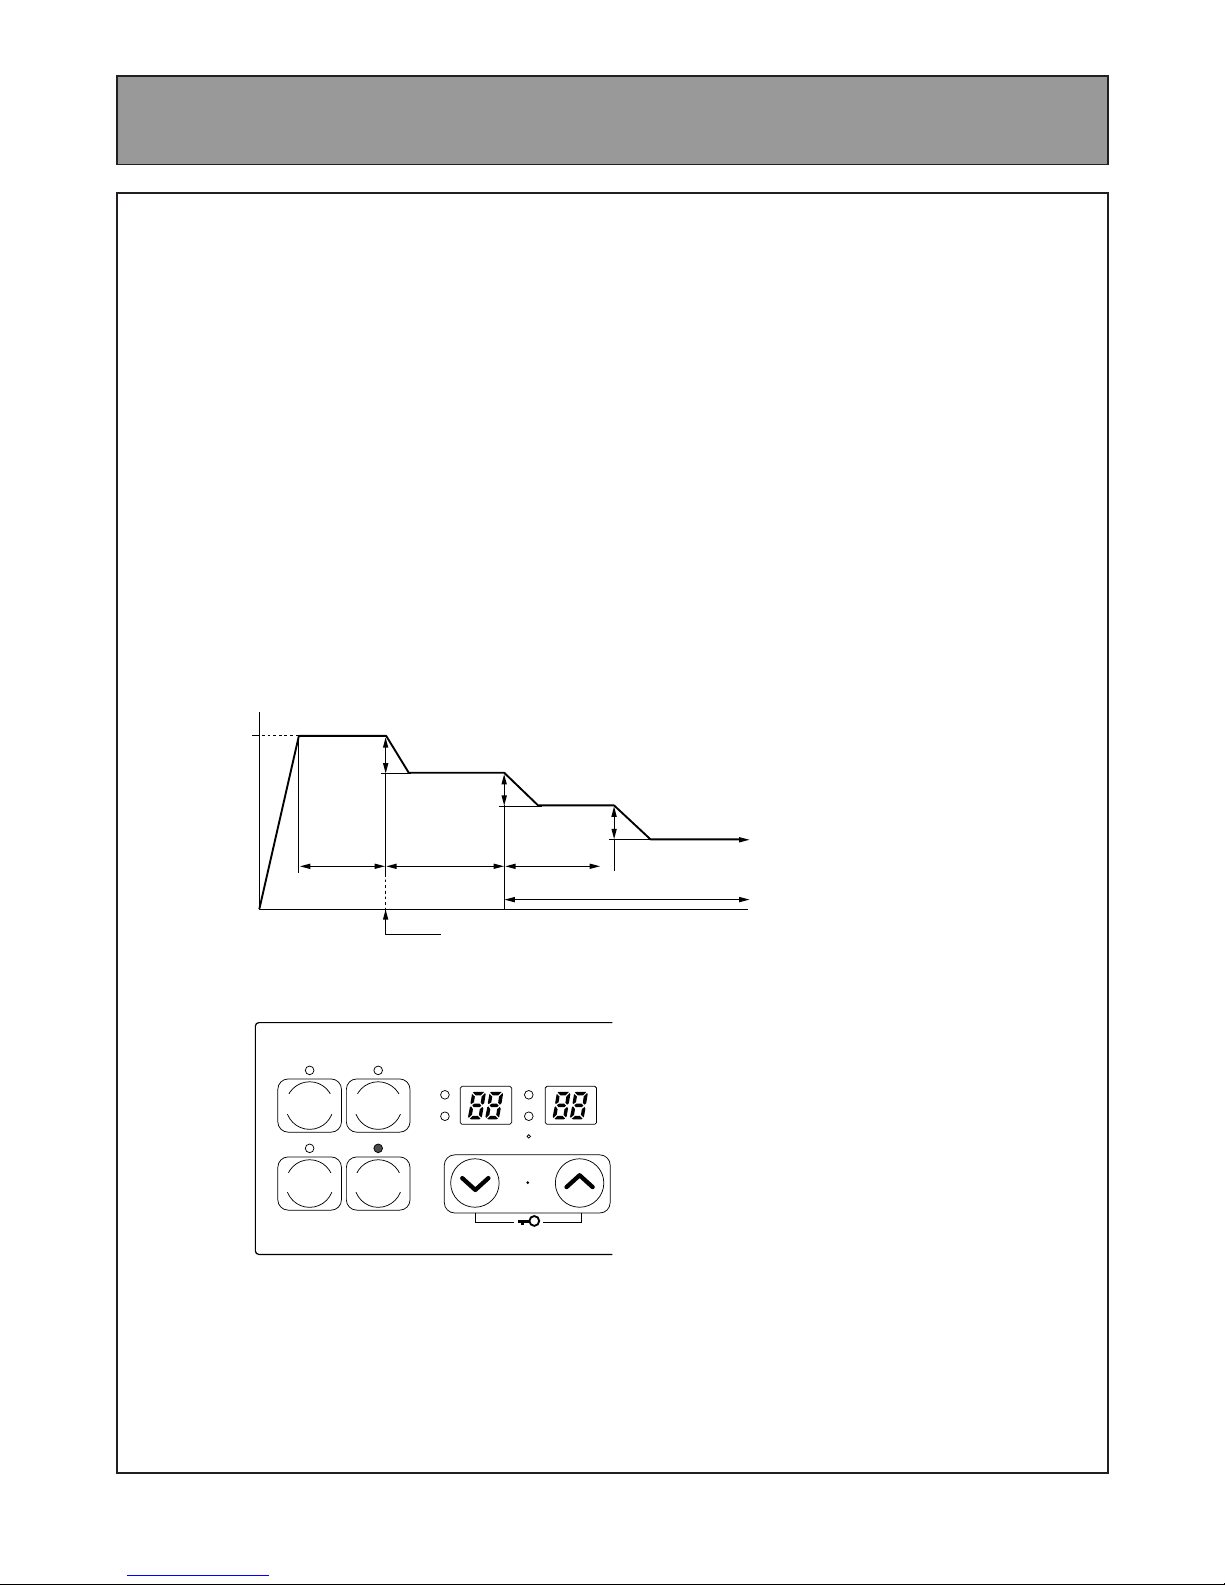
How it works :
・After a room reaches the set temperature, the set room temperature will decrease 3 times
automatically, each time, dropping by a maximum of 1℃in 30 minute blocks. From the
second time onwards, the comfort control will automatically operate. (The comfort control
alters combustion and fan speed more frequently to counteract the feeling of cold air. )
・The Economy indicator will illuminate to let you know that the Economy Function is selected.
・
The Economy function will not operate when the set room temperature is less than 16℃or
above 26℃.
・When the Economy function is operating, the current room temperature may be shown as
being lower than the set room temperature, however, this is normal.
Set
Room
Temp Max. 1℃
Max. 1℃
Max. 1℃
30min 30min 30min
Comfort Control
"Economy" indicator illuminates
Timer2 Timer1
AM
PM
Override
Economy
Set
Room
Temp
Time
T
T
FunctionLock
– 10 –
FUNCTION LOCK
The Function Lock will help to prevent accidental operation as well as small children from
altering the heater settings.
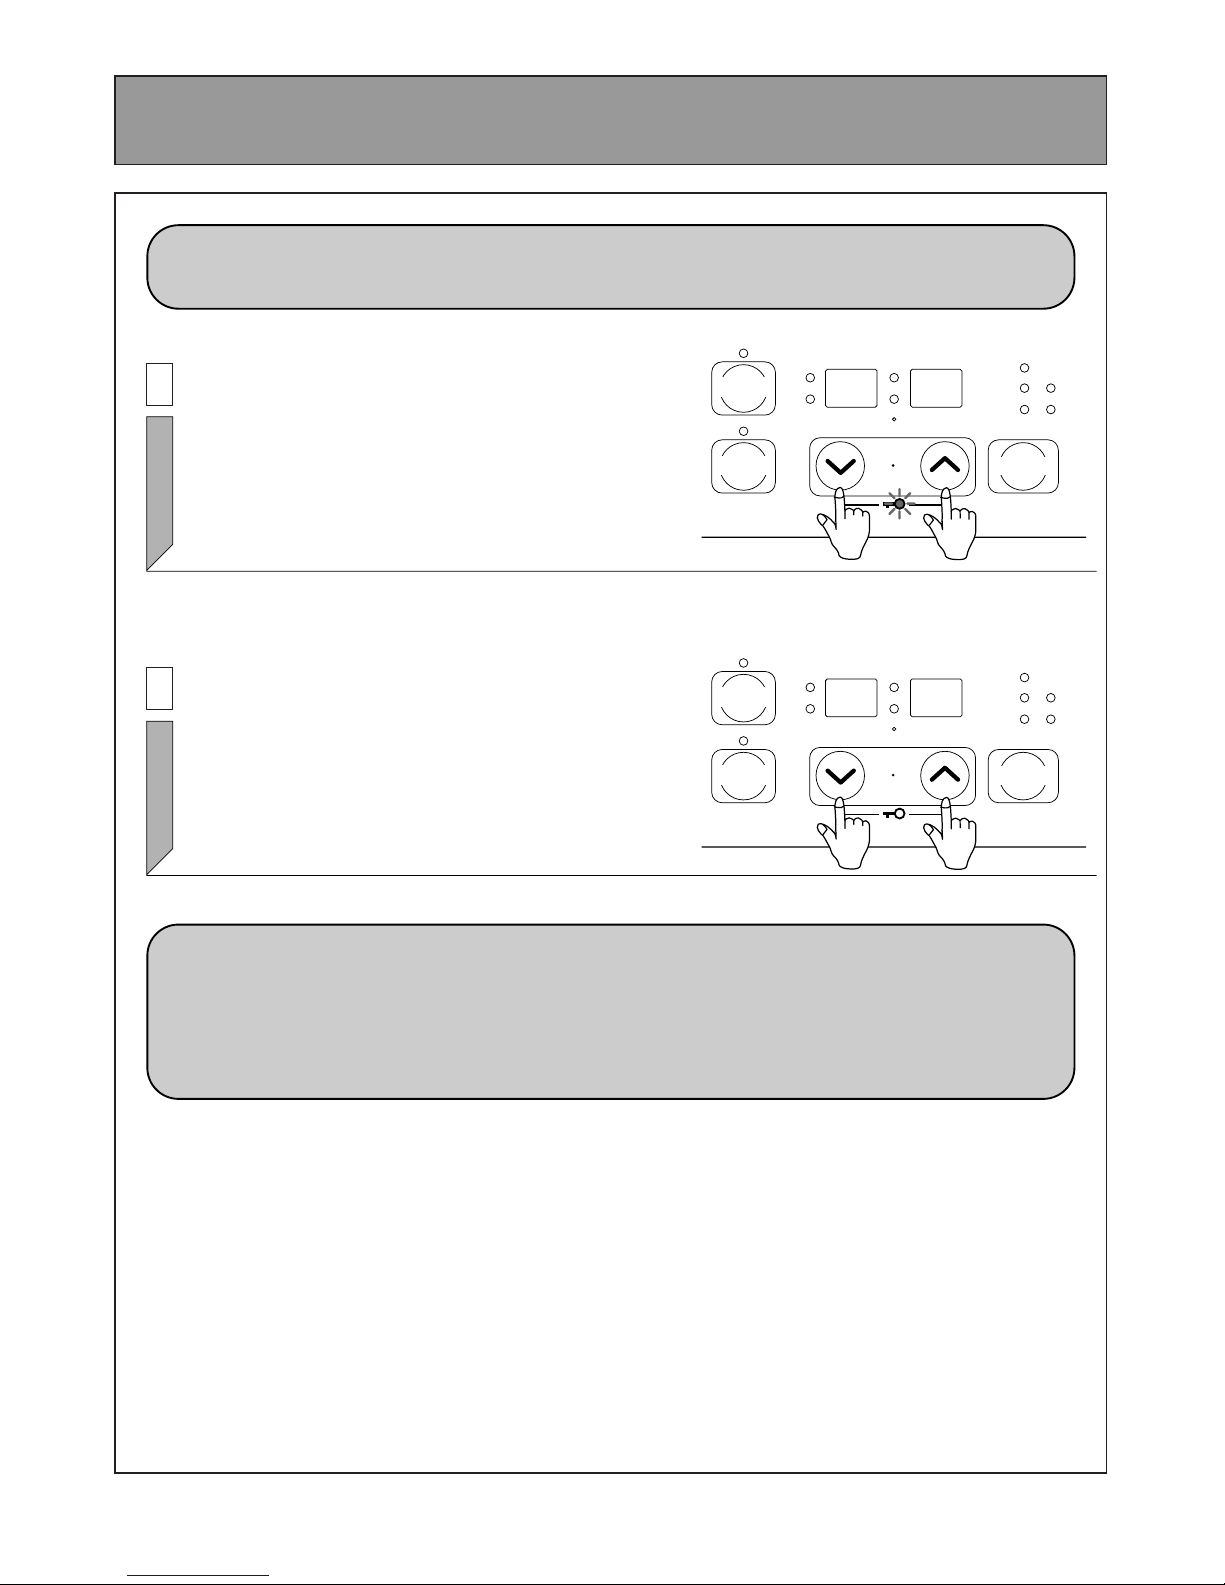
1
The Function Lock can be operated either when the
heater is running, or in the “stand by” mode, by
pressing the up and down buttons simultaneously.
The Function is activated and the Function Lock
indicator will glow.
Timer1
AM
PM
Economy
Set
SetTimes
O
Room
Temp
Time
Timer1
Timer2
Clock
on
off
FunctionLock
2
To de-activate the Function Lock, simply press
both arrow buttons simultaneously for 2 seconds
and the Function Lock indicator will go out. The
lock can be de-activated at any time in this way.
Timer1
AM
PM
Economy
Set
SetTimes
O
Room
Temp
Time
Timer1
Timer2
Clock
on
off
FunctionLock
When the Function lock is activated during normal operation all heater controls other than the
OFF switch will be locked. Deactivating the lock releases the controls. If the lock is activated
whilst the heater is turned OFF, then all heater functions will be locked. If the heater is
turned OFF whilst the Function lock is activated, it cannot be turned ON again until the lock is
deactivated.
 Loading...